CipherLab 9200C Mobile Computer User Manual 9200 Mobile Computer
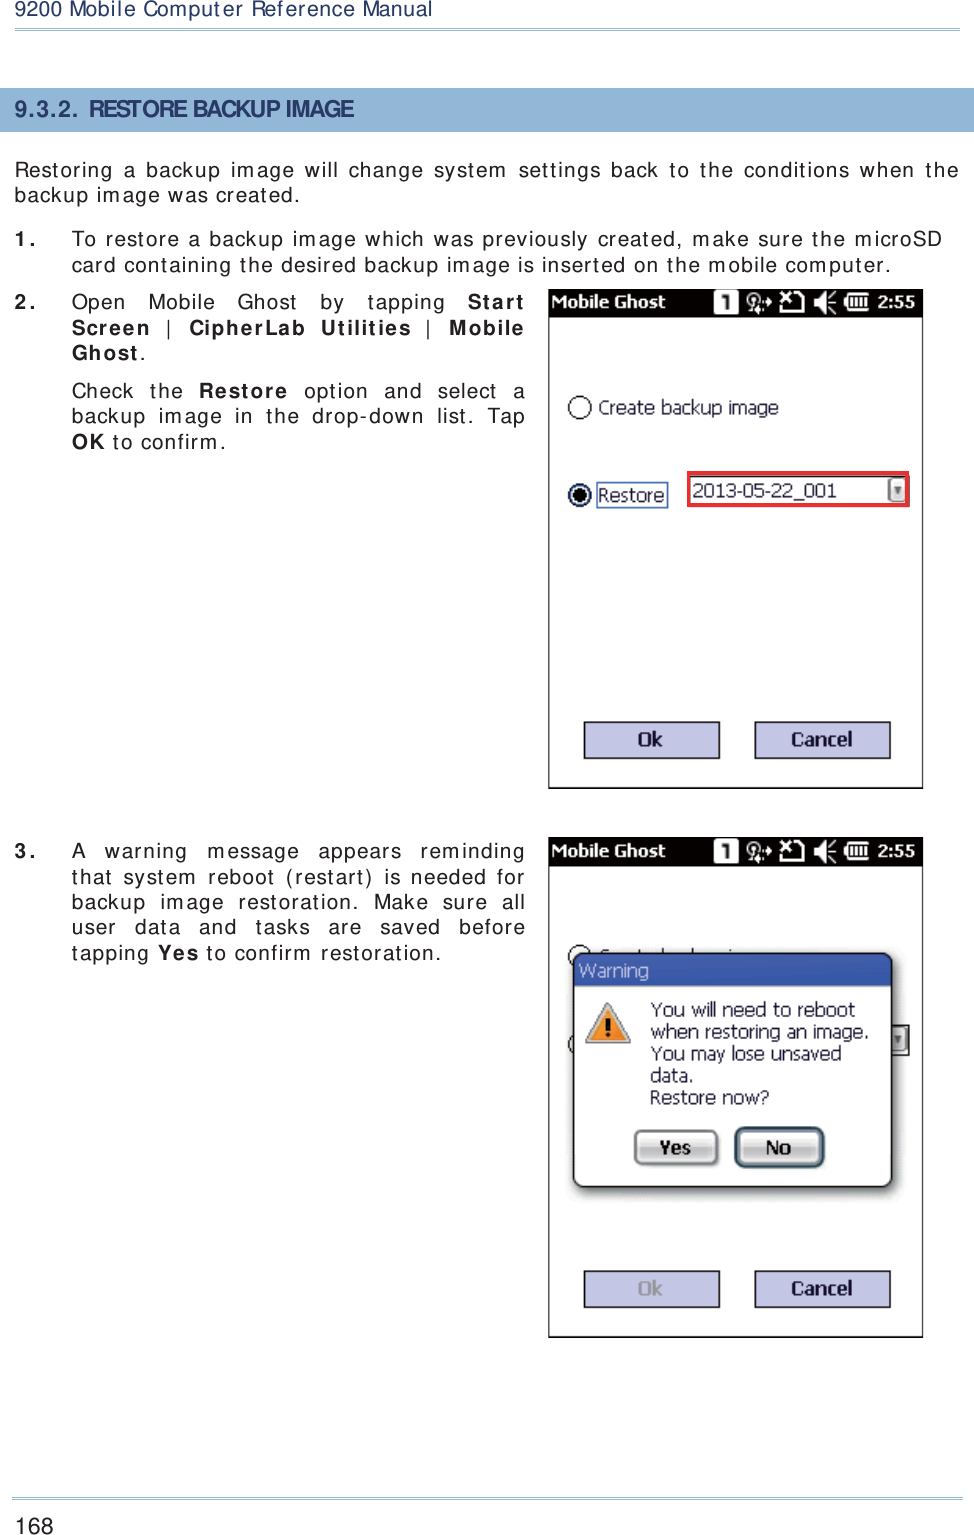
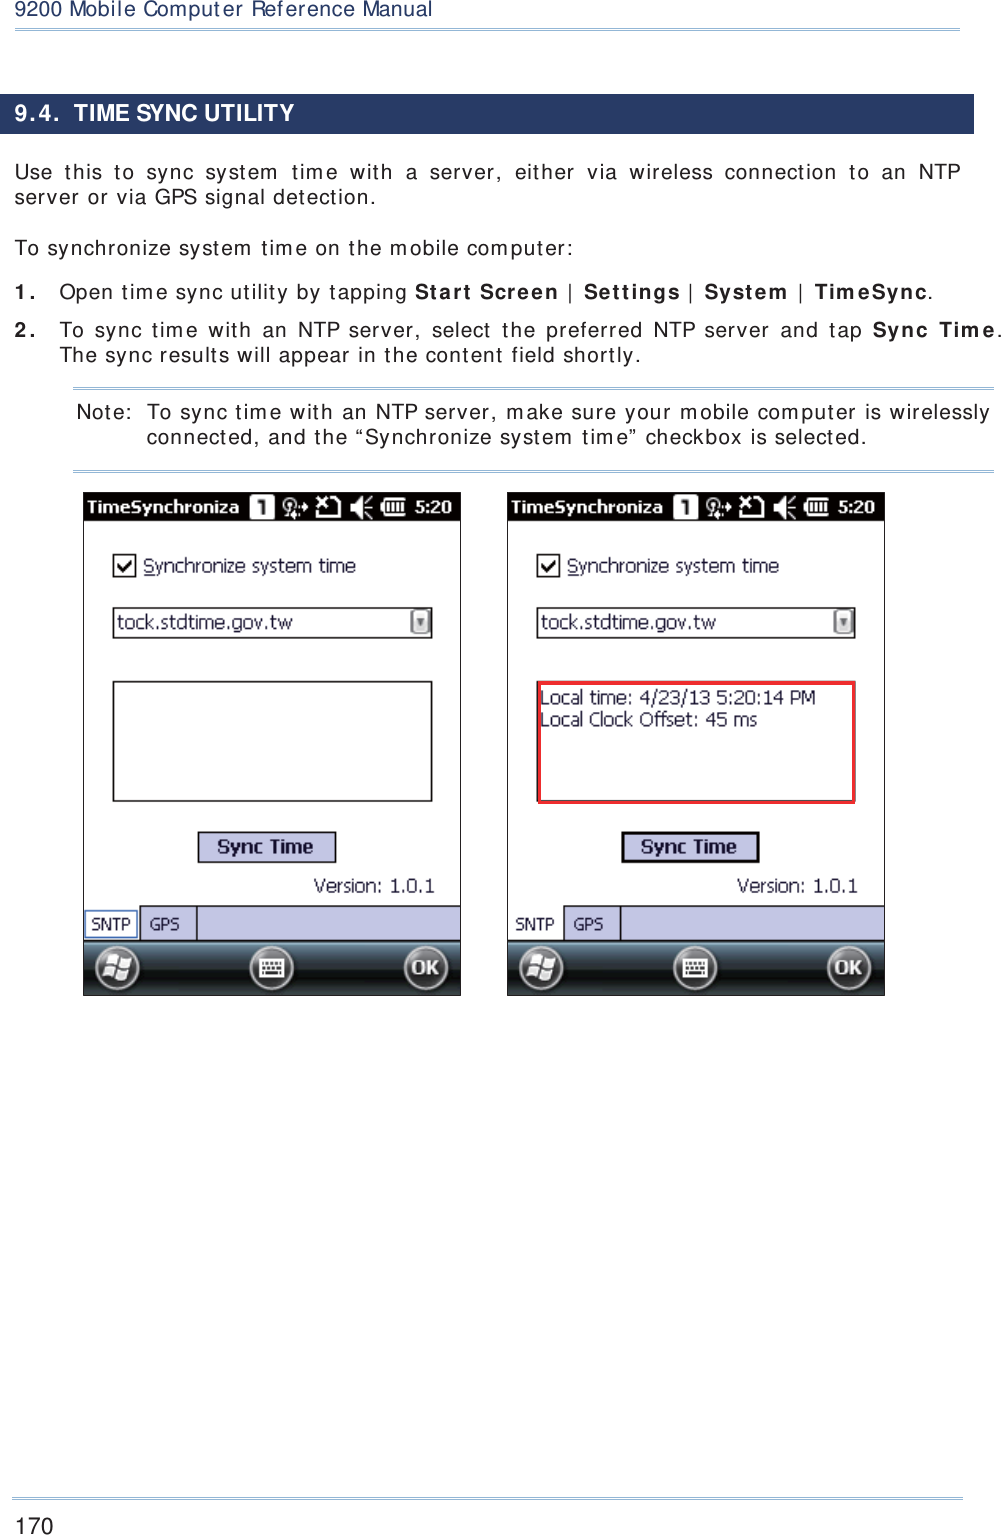
CipherLab Co., Ltd. Mobile Computer 9200 Mobile Computer
UserManual.wiki
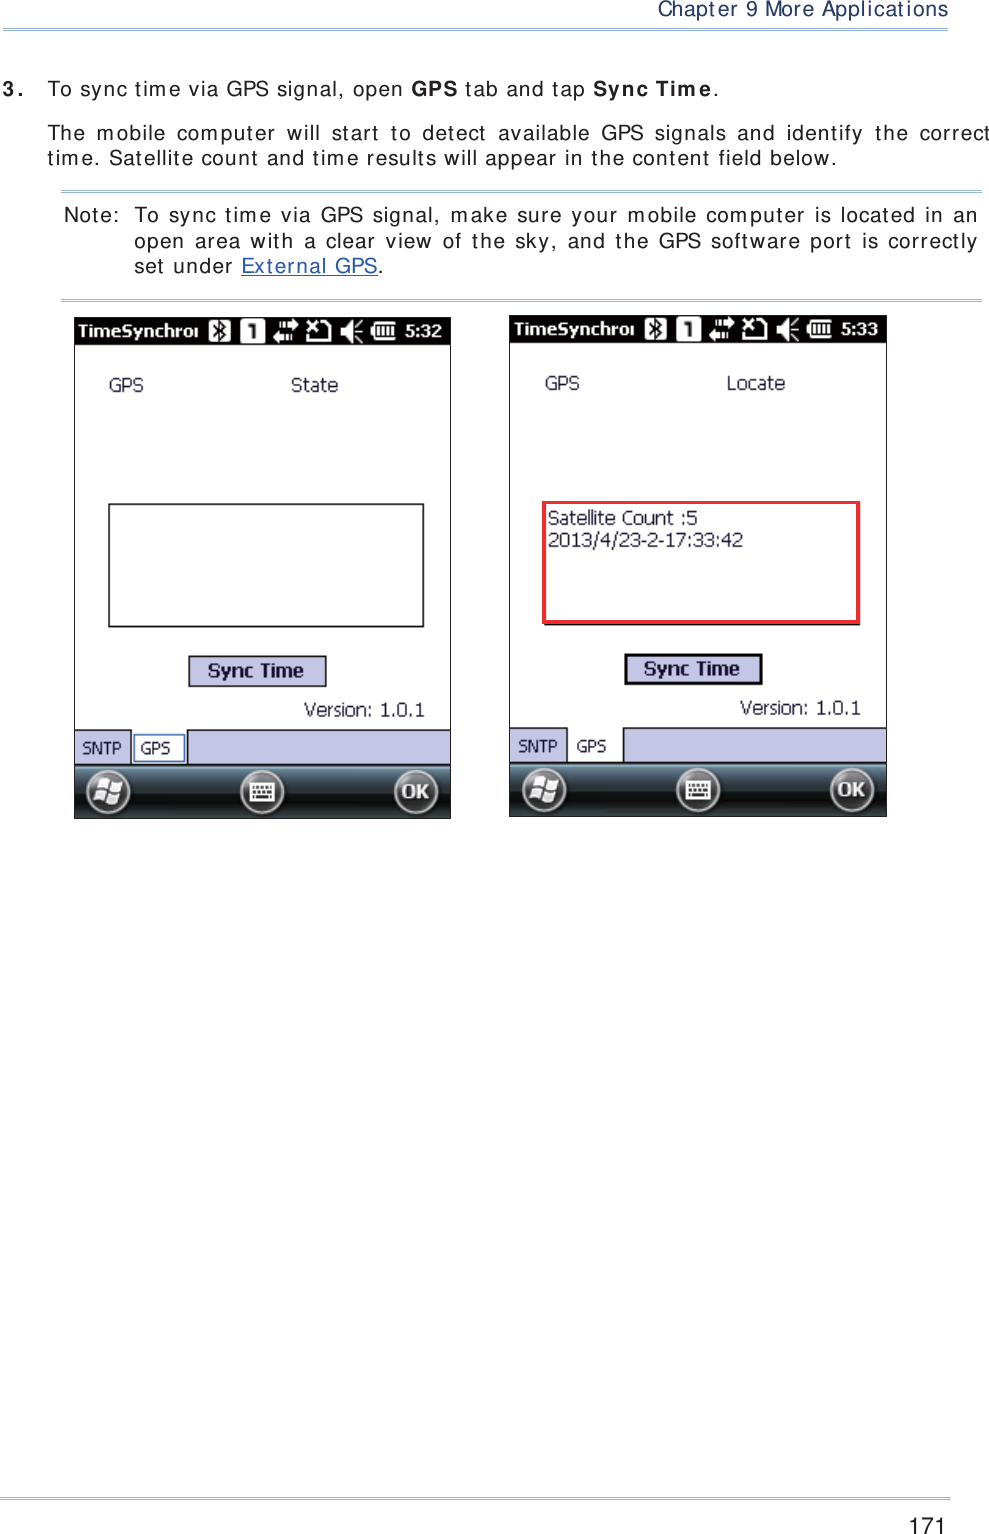
>
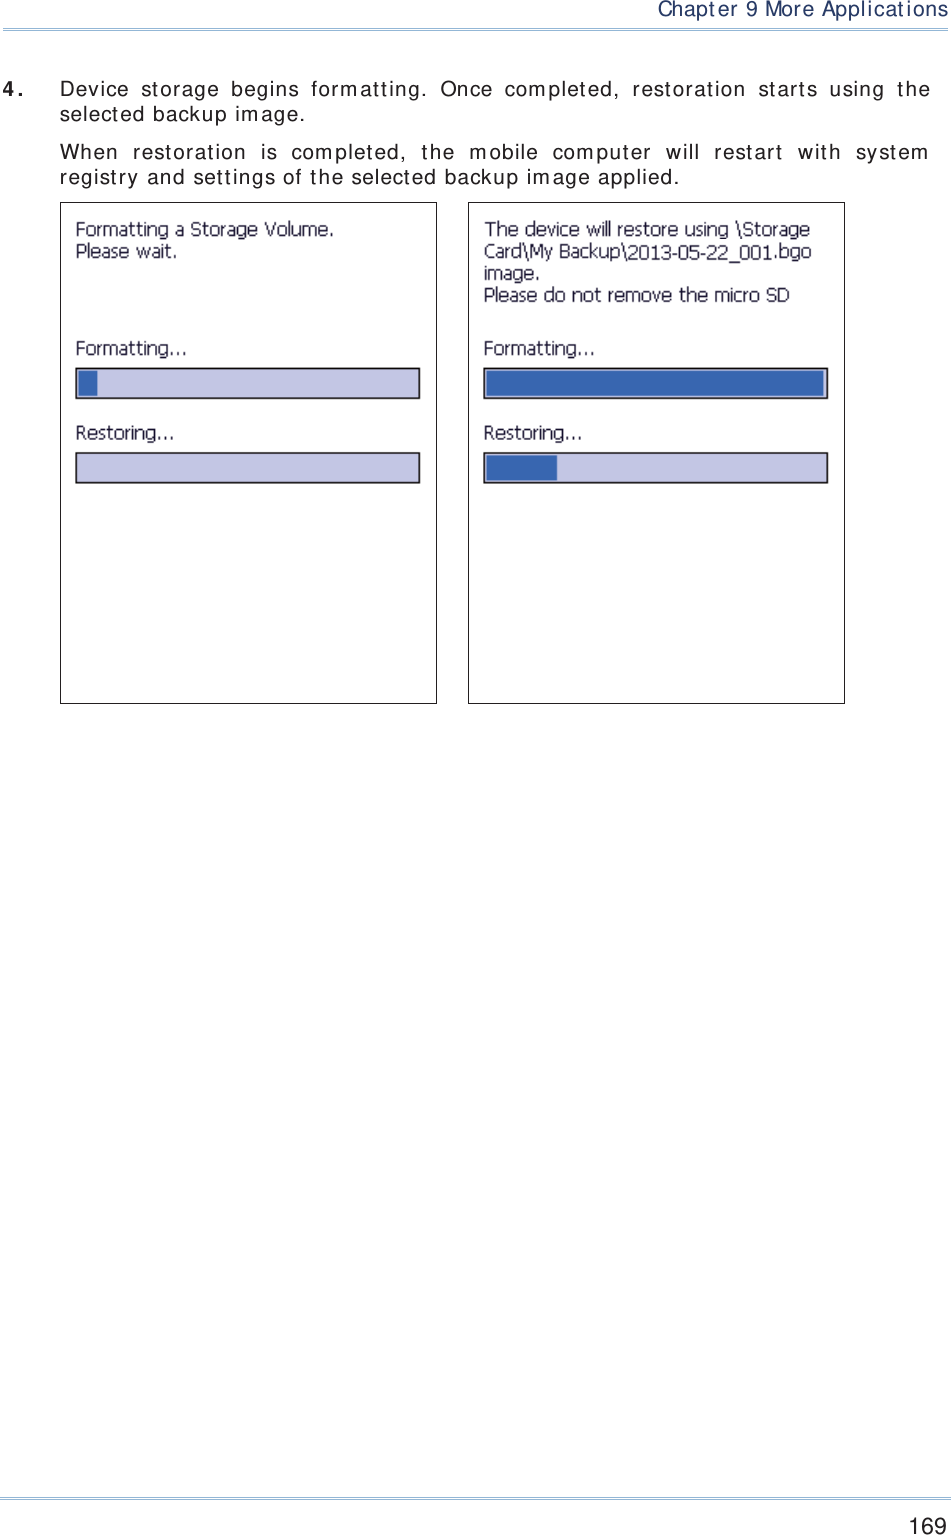
CipherLab
>
9200C User Manual
User Manual.pdf
Navigation menu
Upload a User Manual
Namespaces
Wiki Guide
HTML
PDF
Info
Views
User Manual
Discussion / Help
Navigation
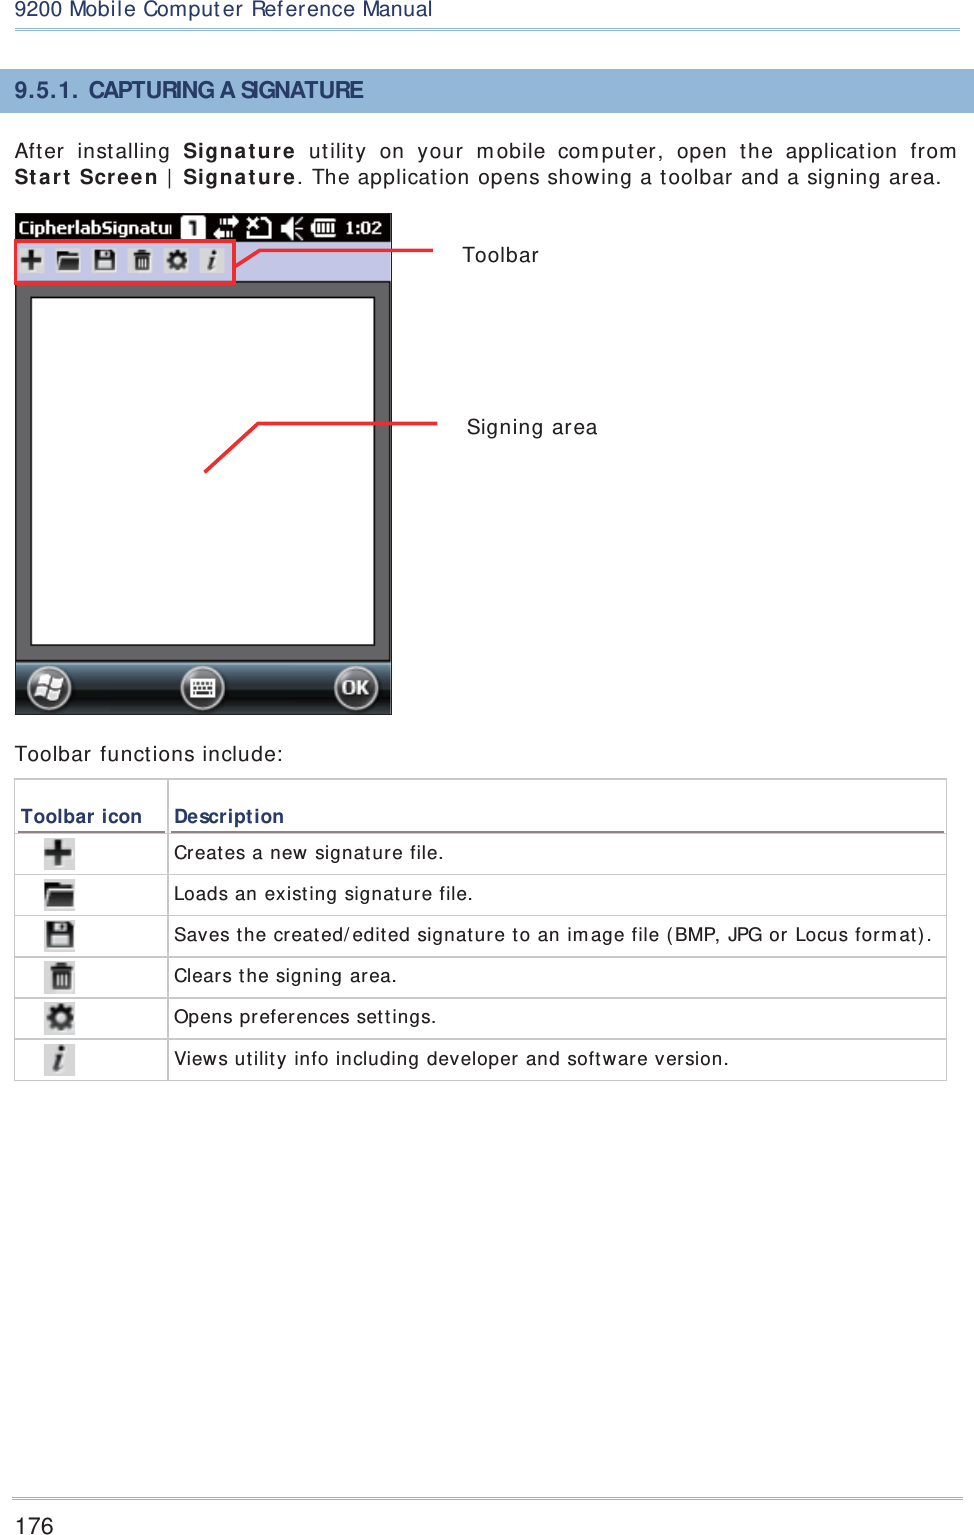
![0560 ÿe sky [Cze c h] [Jmé no výro bc e ] tímto pro hla šuje , že te nto [typ za Ģíze ní] je ve sho dď se zá kla dními po žada vky a da lšími p Ģíslušnými usta no ve ními smďrnic e 1999/ 5/ ES. Da nsk [Da nish] Und e rte g ne de [fab rika nte ns navn] e rklæ re r he rve d , a t fø lg e nd e udstyr [udstyre ts typ e b e te g ne lse ] o ve rho lde r de væ se ntlig e kra v o g ø vrig e re le va nte krav i dire ktiv 1999/ 5/ EF. De utsc h [Ge rma n] Hie rmit e rklä rt [Name de s He rste lle rs], d a ss sic h d a s G e rä t [Ge räte typ] in Übe re instimmung mit de n g rundle g e nde n Anfo rde rung e n und de n üb rig e n e insc hlä g ig e n Be stimmung e n de r Ric htlinie 1999/ 5/ EG b e find e t. Ee sti [Esto nia n] Kä e so le va g a kinnitab [to o tja nimi = na me o f ma nufa c ture r] se a d me [se a dme tüüp = type o f e q uipme nt] va stavust dire ktiivi 1999/ 5/ EÜ p õ hinõ ue te le ja nime ta tud d ire ktiivist tule ne va te le te iste le a sja ko ha ste le sä te te le . Eng lish He re b y, [na me o f ma nufa c ture r], d e c la re s tha t this [typ e o f e q uip me nt] is in c o mp lianc e with the e sse ntial re quire me nts a nd o the r re le va nt pro visio ns o f Dire c tive 1999/ 5/ EC. Esp a ño l [Sp a nish] Po r me d io d e la pre se nte [no mb re de l fab ric ante ] d e c la ra q ue e l [c la se de e q uipo ] c ump le c o n lo s re q uisito s e se nc ia le s y c ua le sq uie ra o tra s disp o sic io ne s a p lic a b le s o e xig ib le s de la Dire c tiva 1999/ 5/ CE. ƧnjnjLjǎNJNjƿ [Gre e k] ƮƧ ƵƩƯ ƲƣƳƱƶƴƣ [name o f ma nufac ture r] ƦƩƭƺƯƧƫ ƱƵƫ [type o f e q uip me nt] ƴƶƮƮƱƳƷƺƯƧƵƣƫ ƲƳƱƴ Ƶƫƴ ƱƶƴƫƺƦƧƫƴ ƣƲƣƫƵƩƴƧƫƴ Ƭƣƫ Ƶƫƴ ƭƱƫƲƧƴ ƴƸƧƵƫƬƧƴ ƦƫƣƵƣưƧƫƴ ƵƩƴ ƱƦƩƥƫƣƴ 1999/ 5/ ƧƬ. Fra nç a is [Fre nc h] Pa r la pré se nte [no m du fab ric a nt] dé c lare q ue l'a ppa re il [type d'a p pa re il] e st c o nfo rme a ux e xig e nc e s e sse ntie lle s e t a ux a utre s d isp o sitio ns p e rtine nte s d e la d ire c tive 1999/ 5/ CE. Ita lia no [Ita lia n] Co n la p re se nte [no me de l c o strutto re ] d ic hia ra c he q ue sto [tipo di ap pa re c c hio ] è c o nfo rme a i re q uisiti e sse nzia li e d a lle a ltre d isp o sizio ni p e rtine nti sta b ilite d a lla d ire ttiva 1999/ 5/ C E. Latviski [La tvia n] Ar šo [name o f manufac ture r / izg a tavo tœja no saukums] de kla rř, ka [typ e o f e q uip me nt / ie kœrta s tips] a tb ilst Dire ktūva s 1999/ 5/ EK b ƈtiska jœm p rasūbœm un c itie m a r to sa istūta jie m no te ikumie m. Lie tuviƌ [Lithua nian] Šiuo [manufa c ture r na me ] d e kla ruo ja , ka d šis [e q uipme nt type ] a titinka e sminius re ika lavimus ir kita s 1999/ 5/ EB Dire ktyvo s nuo stata s. Ne d e rla nd s [Dutc h] Hie rb ij ve rkla a rt [na am van de fab rikant] d a t he t to e ste l [type van to e ste l] in o ve re e nste mming is me t de e sse ntië le e ise n e n de a nd e re re le vante b e pa ling e n va n ric htlijn 1999/ 5/ EG . Ma lti [Ma lte se ] Hawnhe kk, [ise m tal-manifattur], jid d ikja ra li d a n [il-mude l tal-pro do tt] jikko nfo rma mal-ŧtišijie t e sse nzja li u ma pro vve d ime nti o ŧra jn re le va nti li he mm fid-Dirre ttiva 1999/ 5/ EC . Ma g ya r [Hung a ria n] Alulíro tt, [g yártó ne ve ] nyila tko zo m, ho g y a [... típus] me g fe le l a vo na tko zó ala pve tõ kö ve te lmé nye kne k é s a z 1999/ 5/ EC iránye lv e g yé b e lõ írá sa ina k. Po lski [Po lish] Ninie jszym [nazwa p ro duc e nta] o Ĥwia d c za , İe [nazwa wyro b u] je st zg o dny z za sa d nic zymi wymo g a mi o ra z po zo sta ãymi sto so wnymi p o sta no wie nia mi Dyre ktywy 1999/ 5/ EC . Po rtug uê s [Po rtug ue se ] [No me do fabric a nte ] d e c la ra q ue e ste [tipo de e q uip ame nto ] e stá c o nfo rme c o m o s re q uisito s e sse nc iais e o utra s disp o siç õ e s da Dire c tiva 1999/ 5/ CE. Slo ve nsko [Slo ve nia n] [Ime p ro izva ja lc a] izja vlja , d a je ta [tip o p re me ] v skla du z b istve nimi za hte vami in o sta limi re le va ntnimi do lo Āili dire ktive 1999/ 5/ ES. Slo ve nsky [Slo va k] [Me no výro b c u] týmto vyhla suje , že [typ zariade nia] sp ēěa zá kla d né p o žia da vky a vše tky p ríslušné usta no ve nia Sme rnic e 1999/ 5/ ES. Suo mi [Finnish] [Va lmistaja = manufac ture r] va kuutta a tä te n e ttä [type o f e q uip me nt = laitte e n tyypp ime rkintä] tyyp pine n laite o n d ire ktiivin 1999/ 5/ EY o le e lliste n va a timuste n ja sitä ko ske vie n d ire ktiivin muide n e hto je n muka ine n. Sve nska [Swe dish] Härme d intyg a r [fö re ta g ] a tt d e nna [utrustning styp] står I ö ve re nsstämme lse me d de vä se ntlig a e g e nska p skrav o c h ö vrig a re le va nta b e stämme lse r so m fra mg å r a v dire ktiv 1999/ 5/ EG.](https://usermanual.wiki/CipherLab/9200C/User-Guide-2081897-Page-8.png)


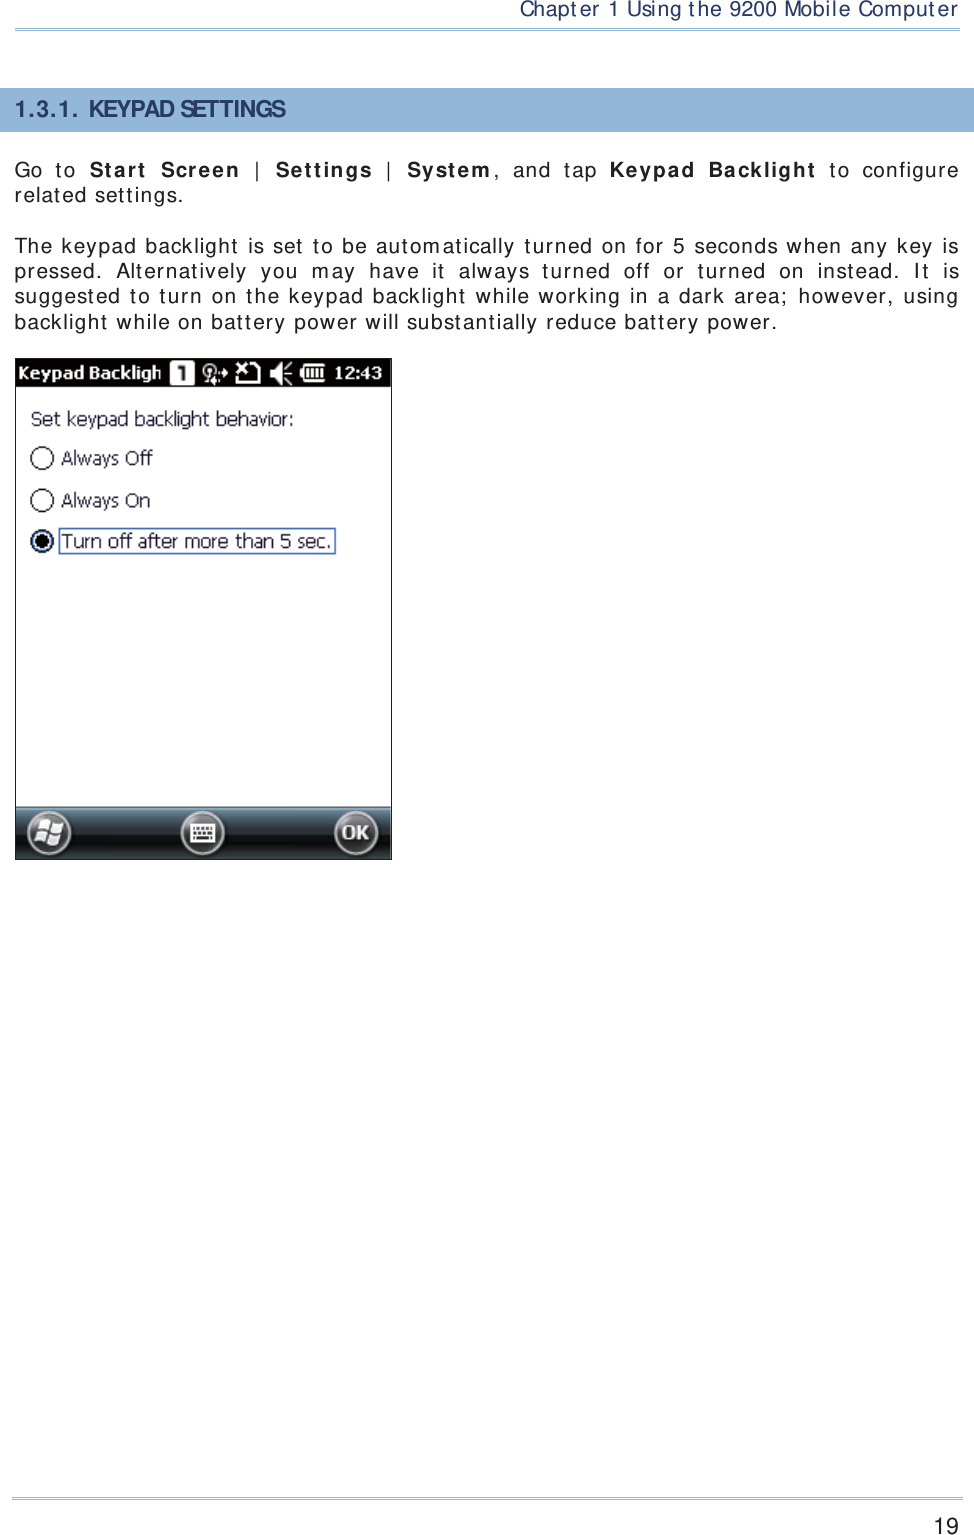
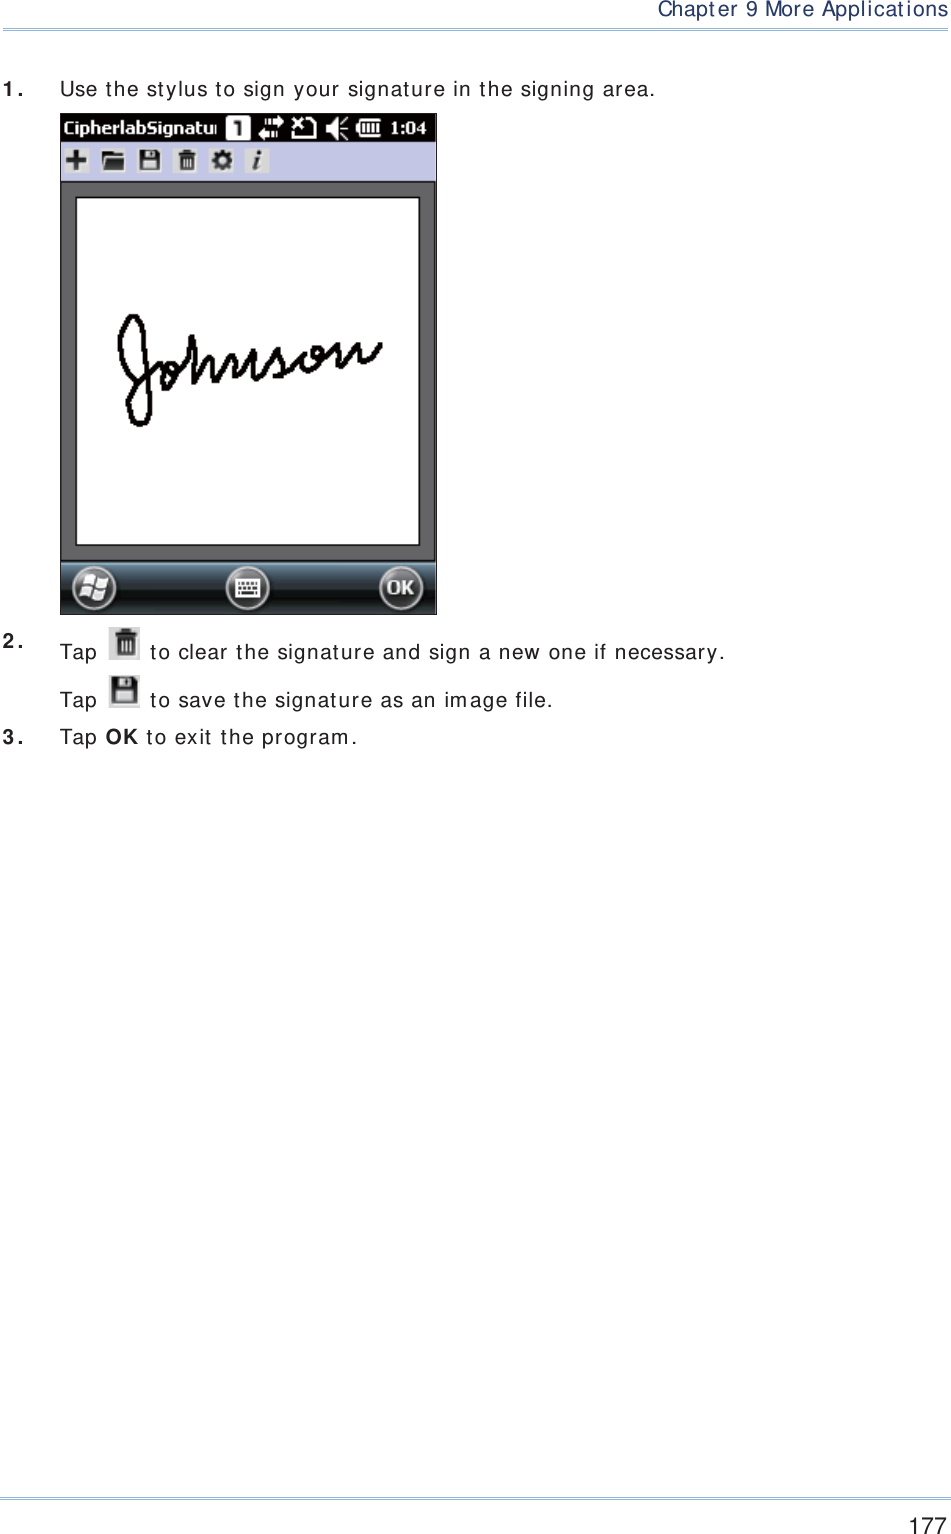
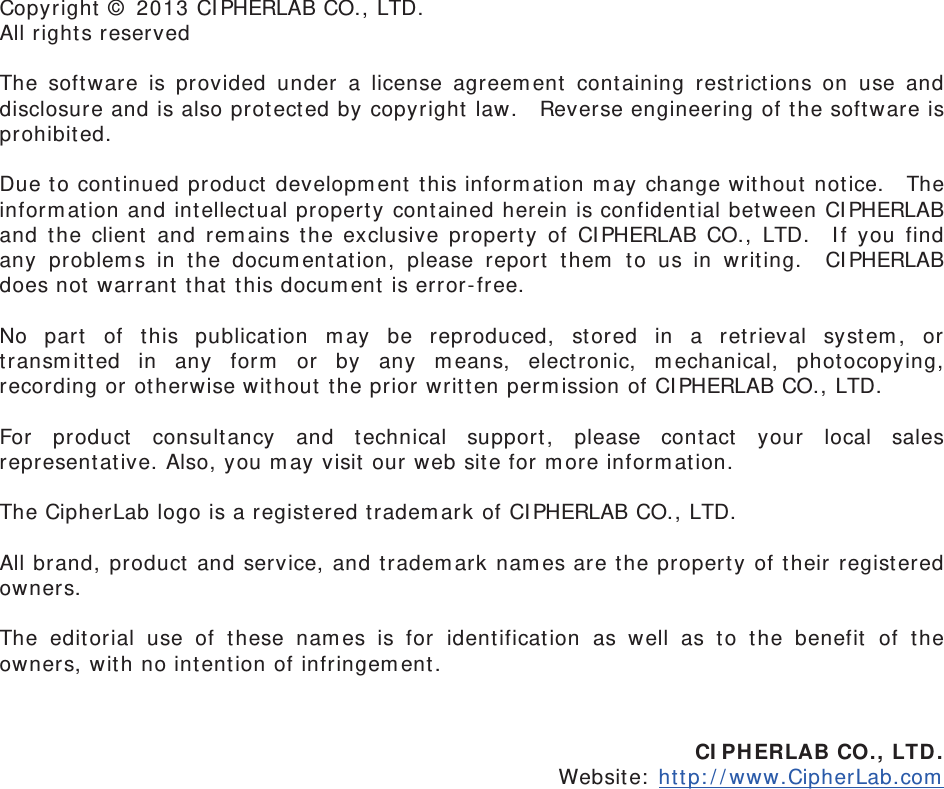
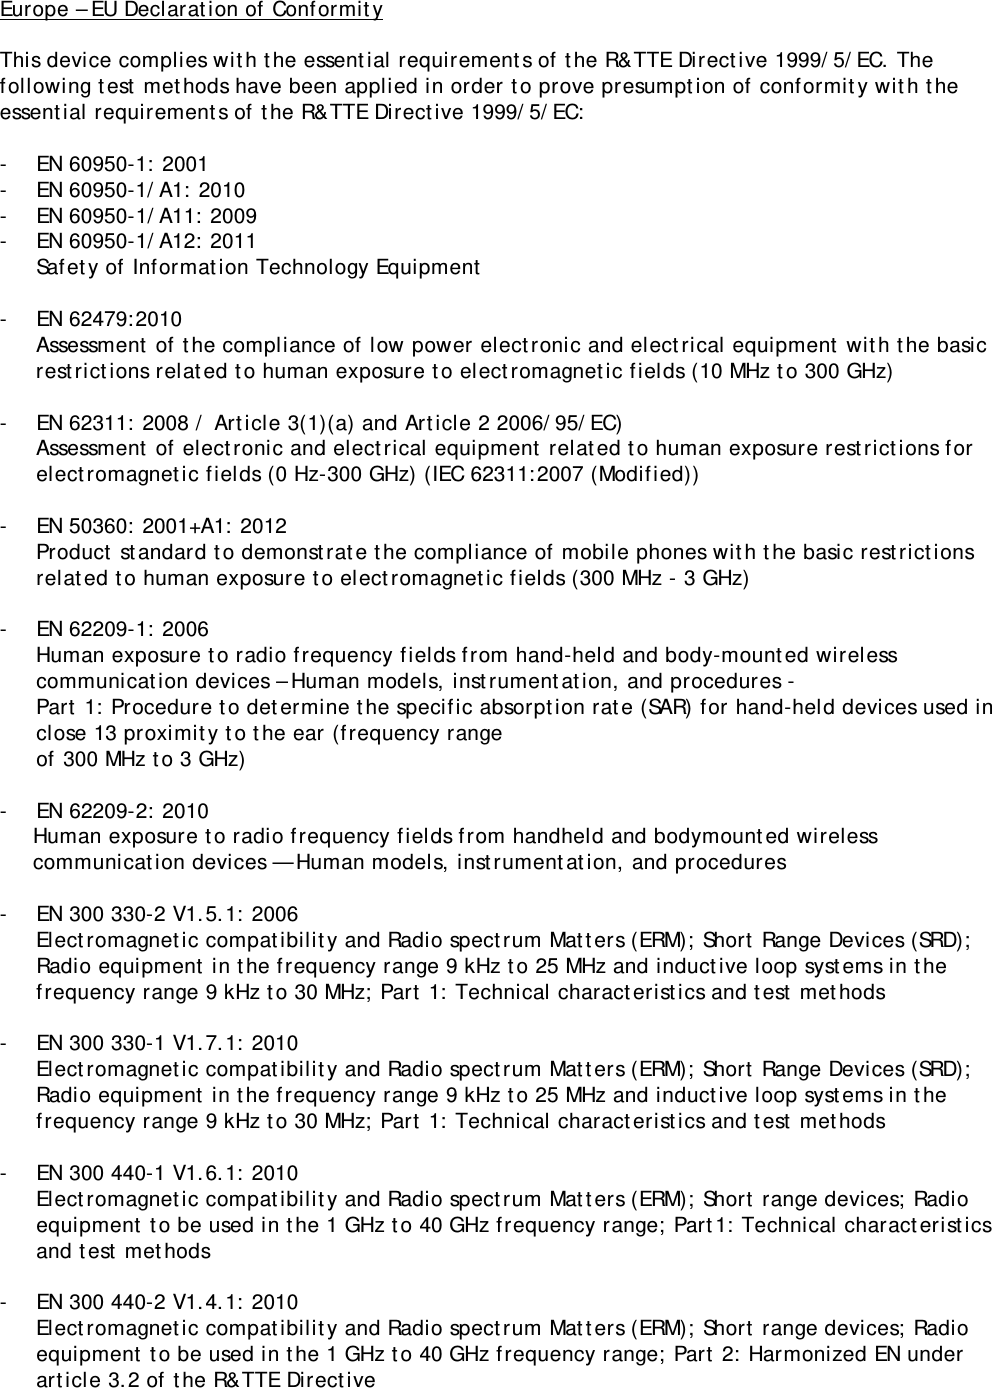
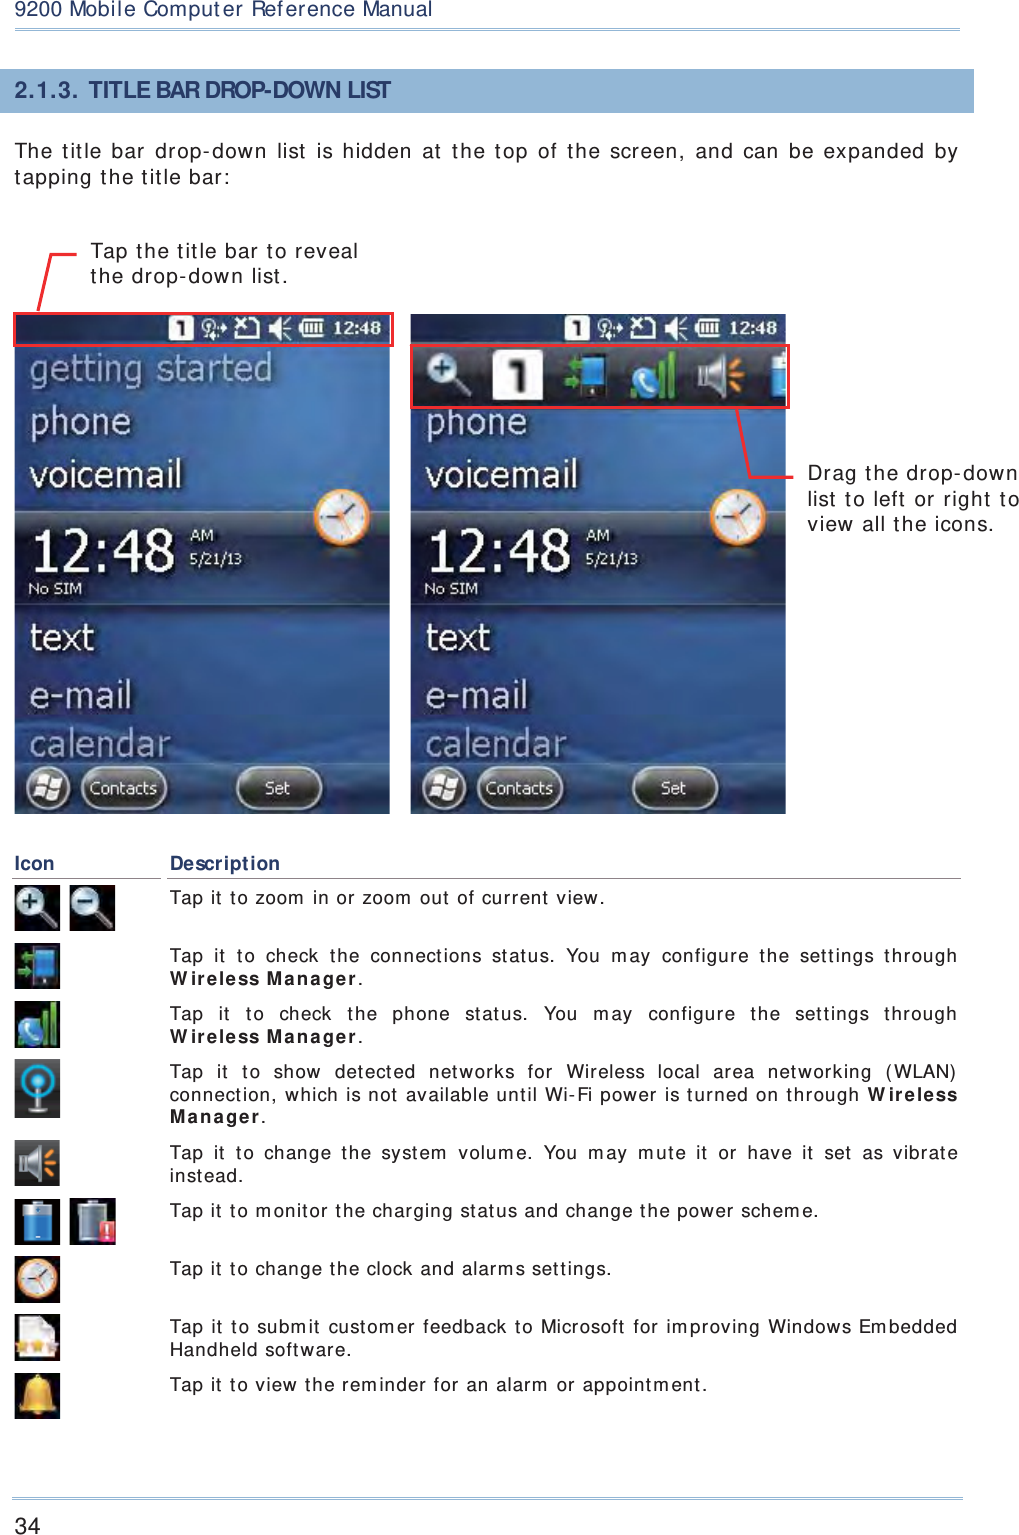
![209200 Mobile Comput erRef erence Manual1.3. 2. ALPHA KEY This alphanum eric keypad is set to num eric m ode by default . The Alpha key [ Į] serves as a swit ch key bet ween num eric and alpha (lower-case alphabetic) input m odes. Note: Press [ Į] key to switch bet ween num eric and lower-case alphabetic m odes. The alpha icon will appear on the stat us bar with a sequence as shown below. Status Icon Alpha Key Input Mode - - - Num bers Press [ Į] one tim e Lower-case alphabetic charact ers Note: ( 1) Under m ode, use the Shift key [ ×] t o ent er ALPHA ( upper-case alphabetic) character ( or ) m ode. ( 2) I f you are using the on- screen keyboard, t ap CAP (Caps Lock) to switch upper-case and lower-case alphabetic m odes. 1.3. 3. SHIFT KEY Status Icon Shift Key Input Mode Ш Ш Press [ ×] one tim e The Shift key [ ×] m odifies the next key pressed depending on the input m ode. ( 1) I n num eric m ode ( ) , it will m odify t he next key pressed. ( 2) I n alpha (lower- case alphabetic) m ode ( ), it will show a single upper- case charact er aft er pressing Shift key [ ×] one tim e. For exam ple, input “ ABC”, it w ill show “ Abc. Ш Ш Press [ ×] two tim es ( ent er Shift Lock Mode) Pressing Shift key [ ×] t wo tim es will lock the present input m ode. ( 1) I n num eric m ode ( ), it will lock num eric m ode. ( 2) I n alpha (lower- case alphabetic) m ode ( ), it will lock upper-case alphabetic m ode ( = Caps Lock) . For exam ple, input “ ABC”, it will show “ ABC”. Note: I t is not necessary t o long press the Shift key [ ×] .](https://usermanual.wiki/CipherLab/9200C/User-Guide-2081897-Page-35.png)
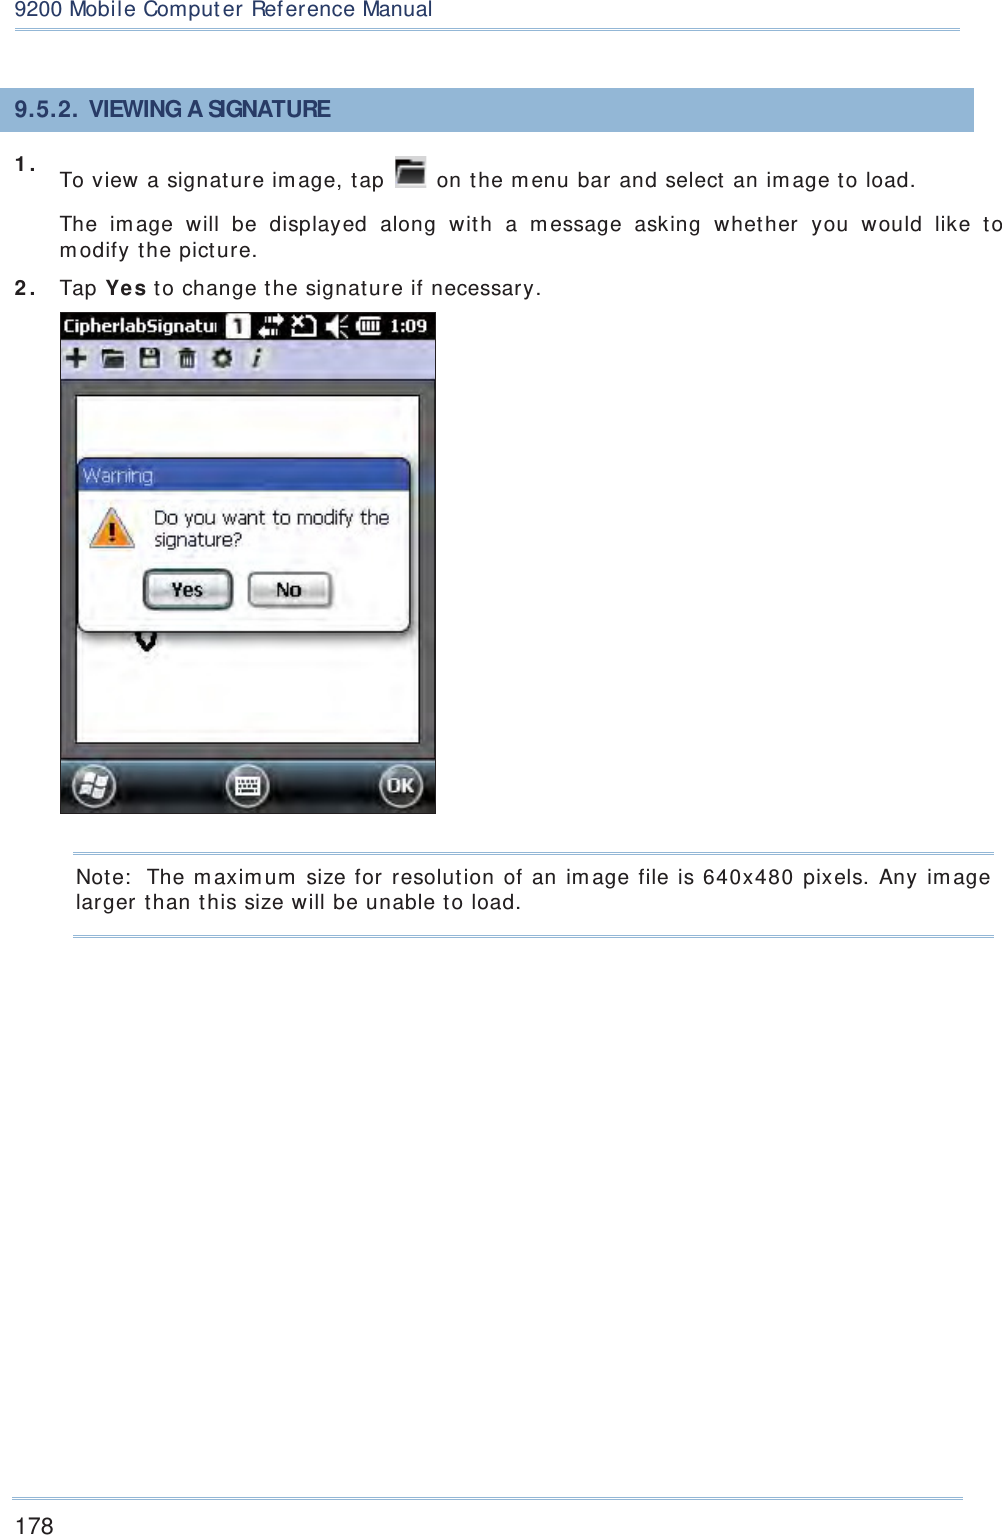
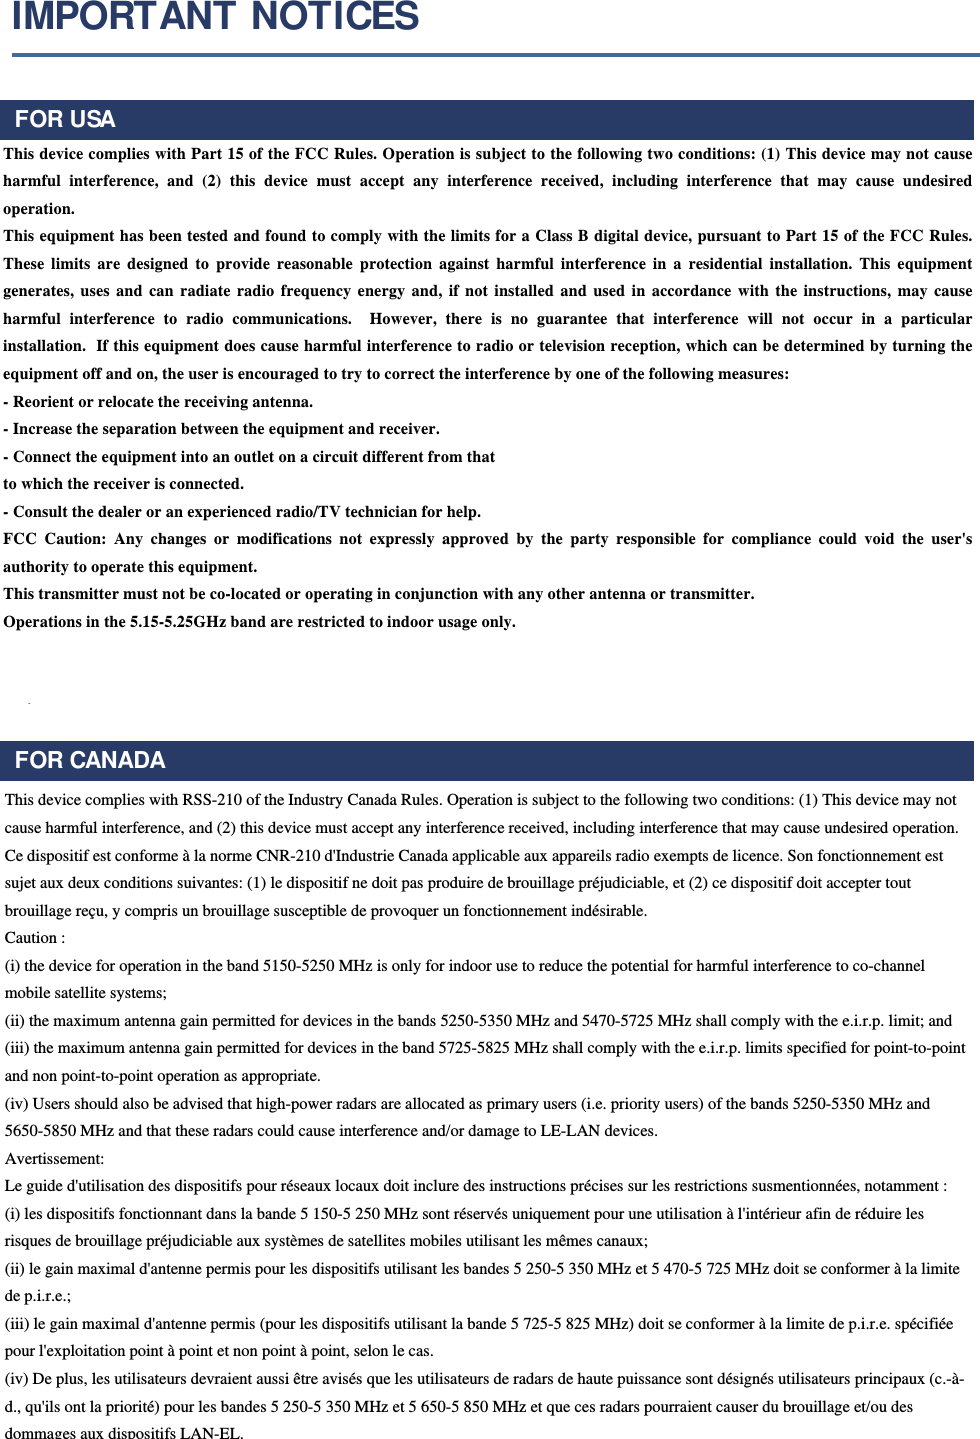
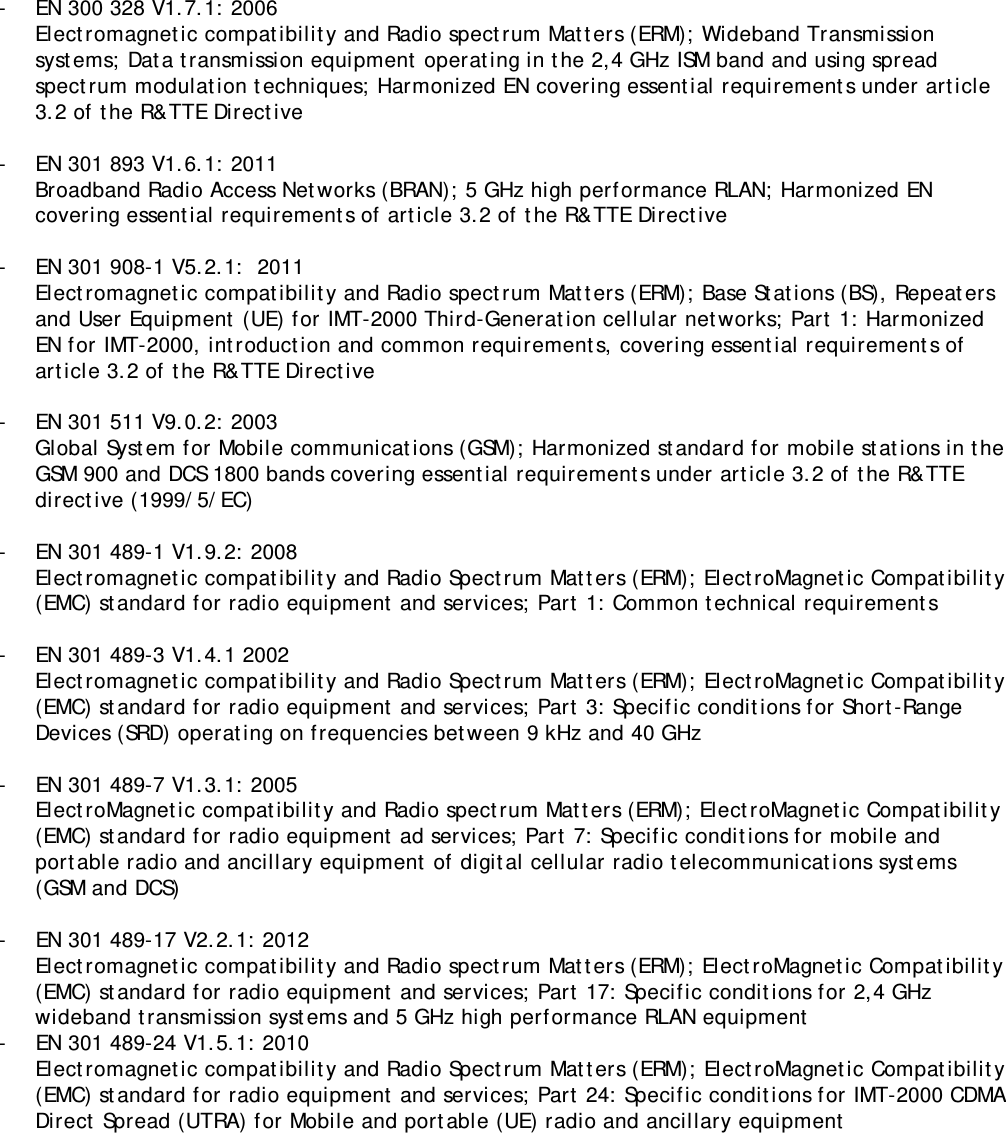
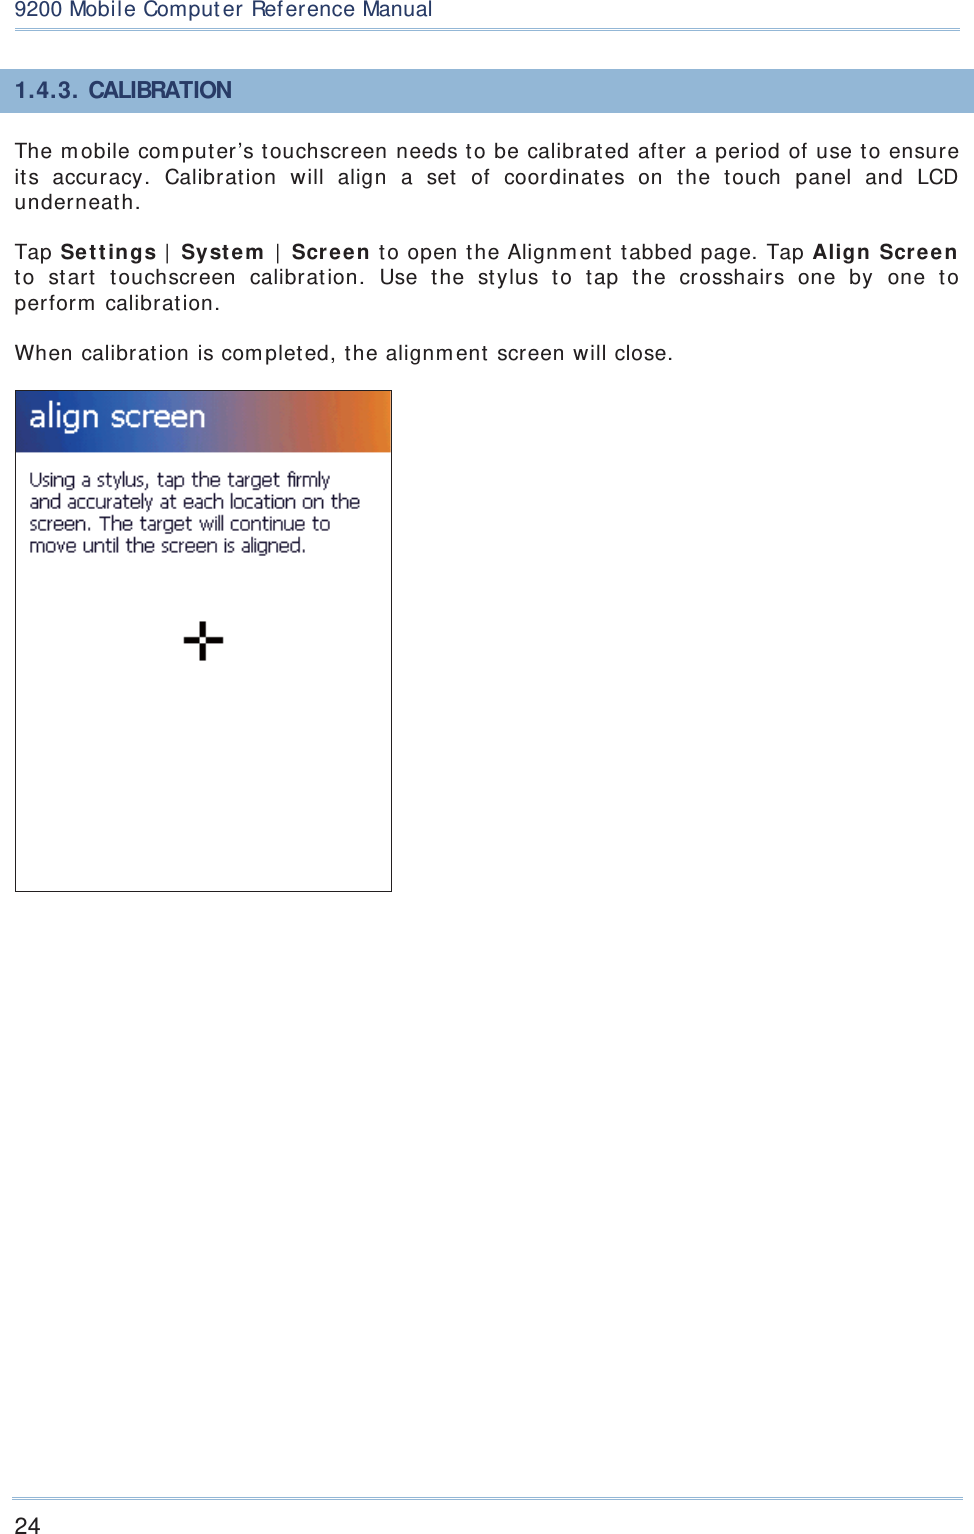
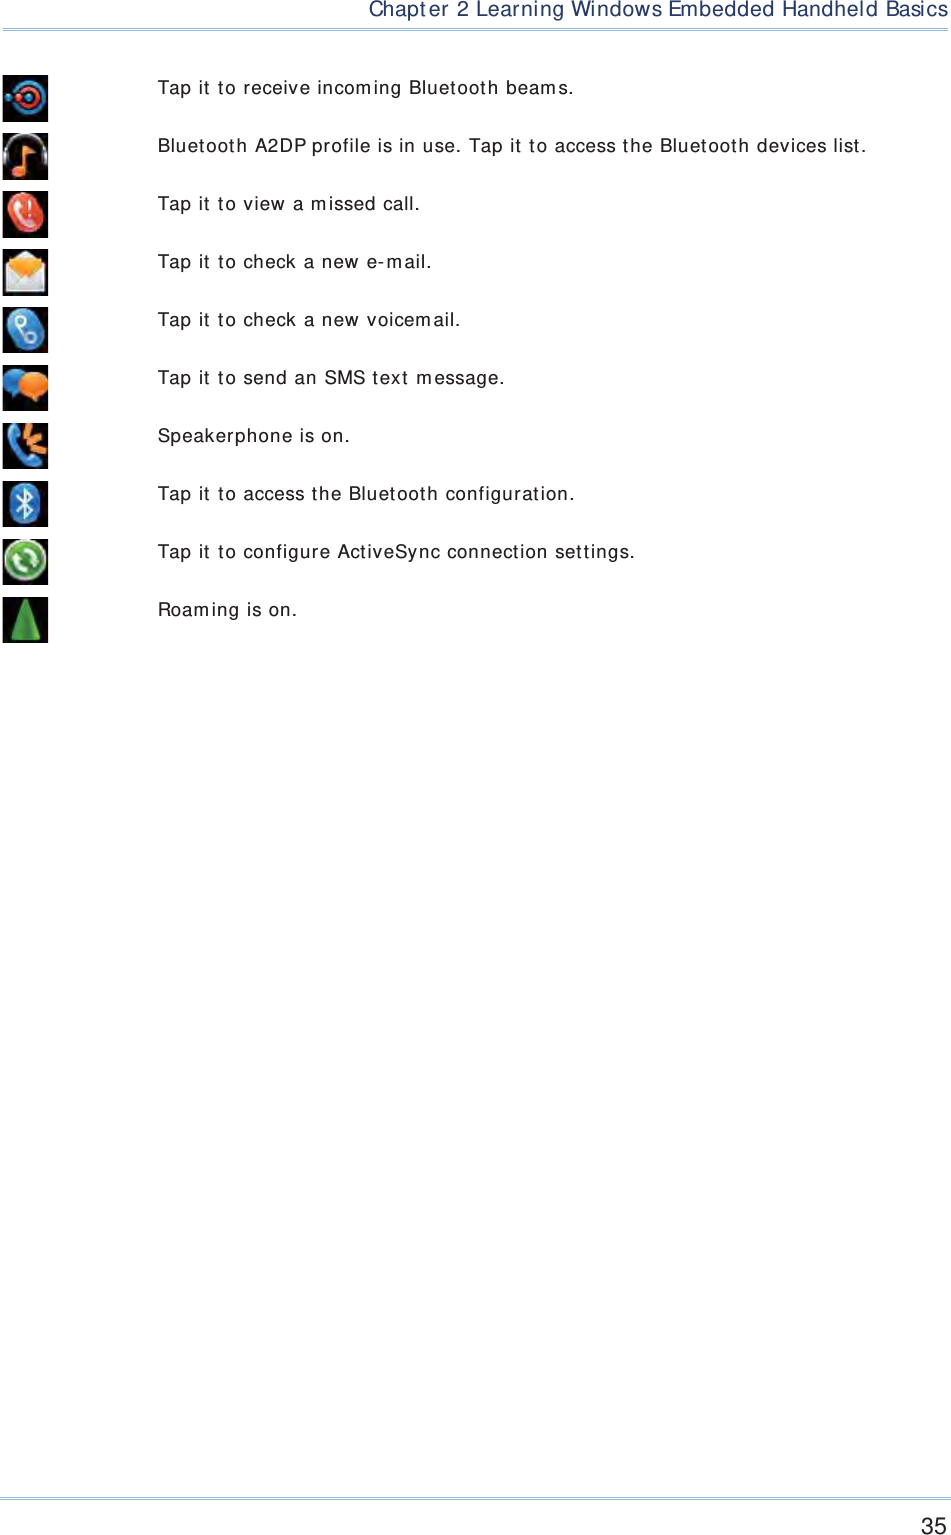
![21 Chapt er 1 Using t he 9200 Mobile Comput er1.3. 4. FUNCTION KEY The Funct ion key [ Fn] serves as a specified key, and the functionality of each key com binat ion is applicat ion- dependent . 1) To enable this special key, press [ Fn] on the keypad. I t s icon will appear on t he st at us bar. 2) Now press anot her key to get t he value of key com binat ion ( say, press [ 1] to get the value of F1) . 3) To get the value of anot her key com binat ion specified by t he funct ion key, repeat st ep 2. 4) To disable the special key funct ion, press [ Fn] again, and the icon will go off. Note: I t is not necessary t o long press the [ Fn] key. The default [ Fn] key com binations are defined as below: Key Combination Action[ Fn] , [ 1] = F1 Soft key 1 [ Fn] , [ 2] = F2 Soft key 2 [ Fn] , [ 3] = F3 Talk [ Fn] , [ 4] = F4 Minim ize current active window [ Fn] , [ 5] = F5 n/ a [ Fn] , [ 6] = F6 Volum e Up [ Fn] , [ 7] = F7 Volum e Dow n [ Fn] , [ 8] = F8 * [ Fn] , [ 9] = F9 # [ Fn] , [ 0] = F10 Record Note: Press the [ Fn] key first , and t hen press the second key for a specific funct ion. 1.3. 5. PROGRAMMABLE KEYS The following keys are user- definable. They can be defined t o serve as anot her key or to serve as a shortcut to launch a specific program . See Button Assignm ent ut ilit y for m ore details. Two side triggers Application key [ -] ( Hyphen key) [ .] ( Period key)](https://usermanual.wiki/CipherLab/9200C/User-Guide-2081897-Page-36.png)


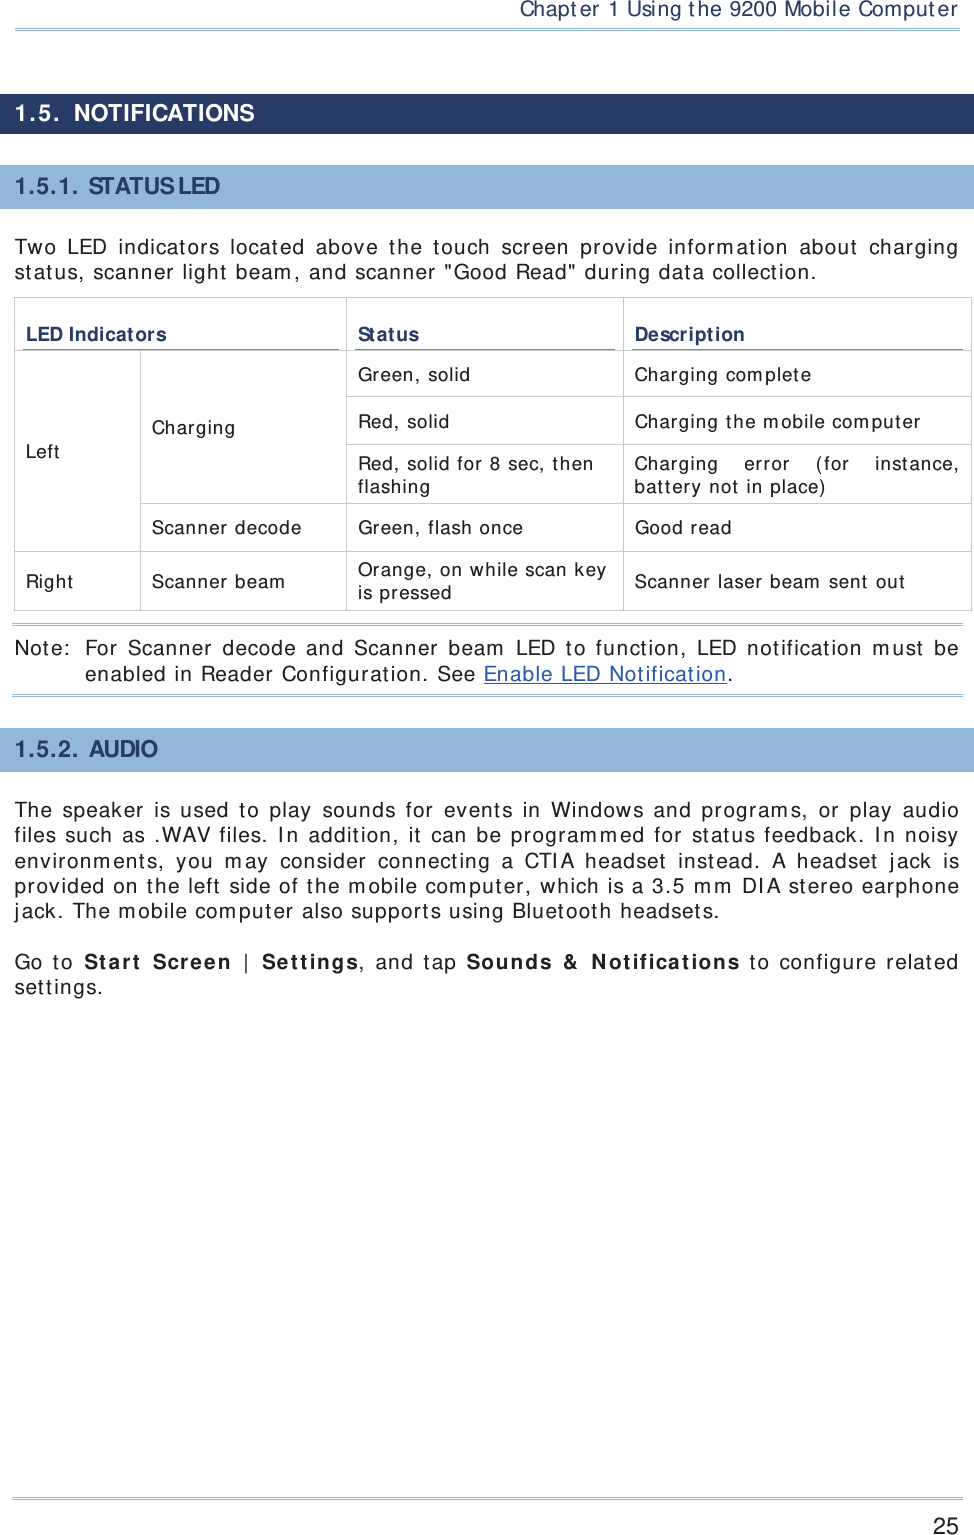

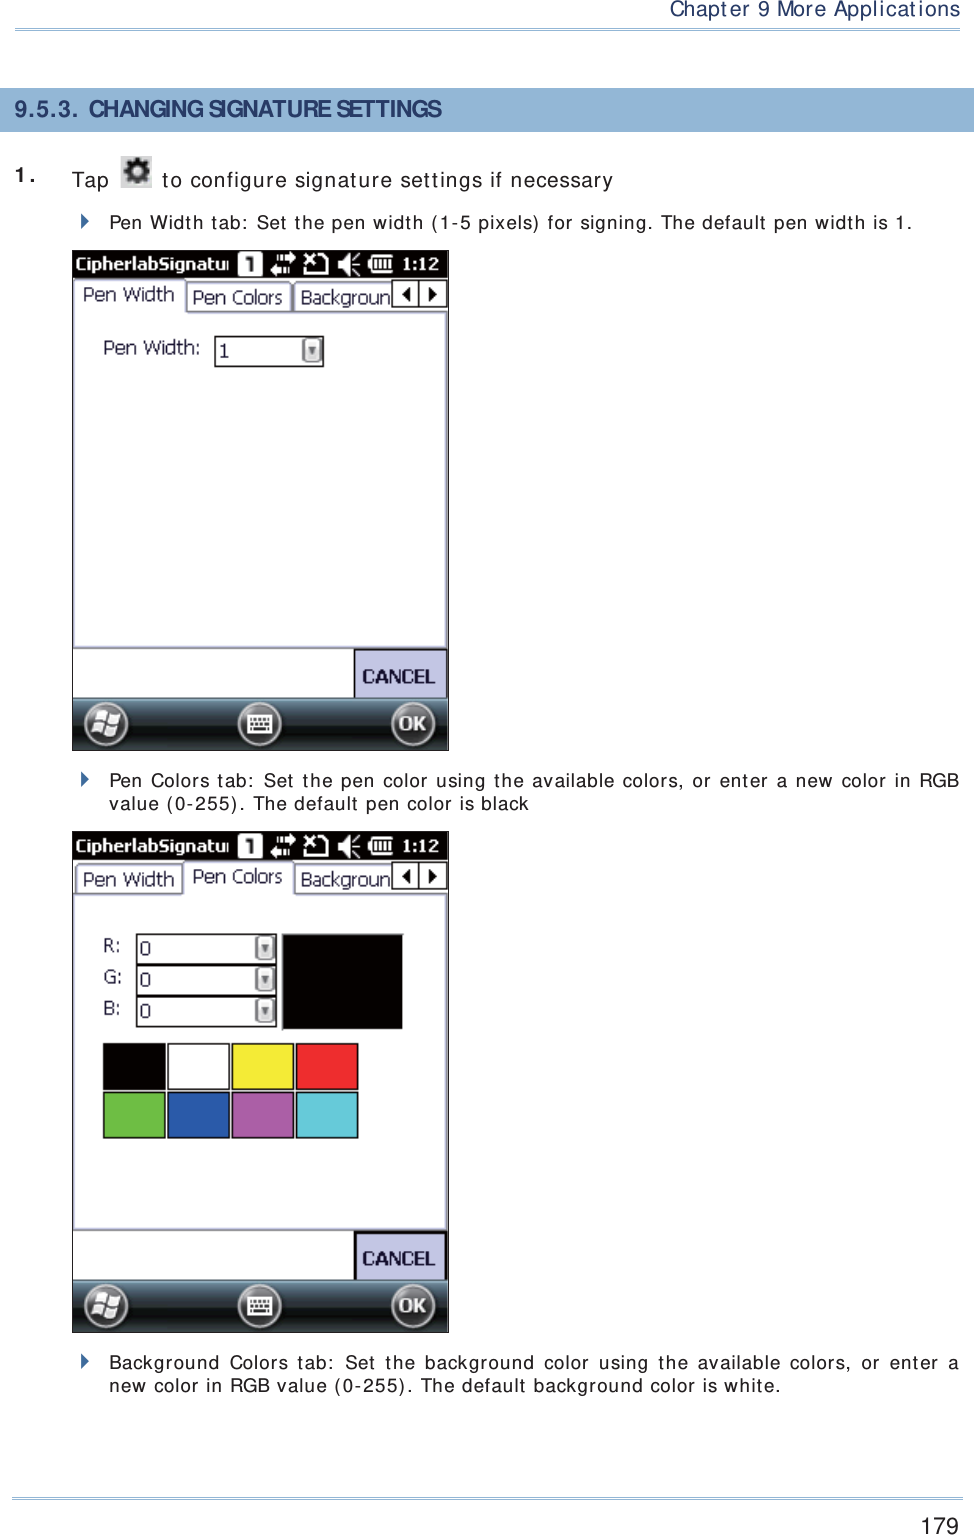
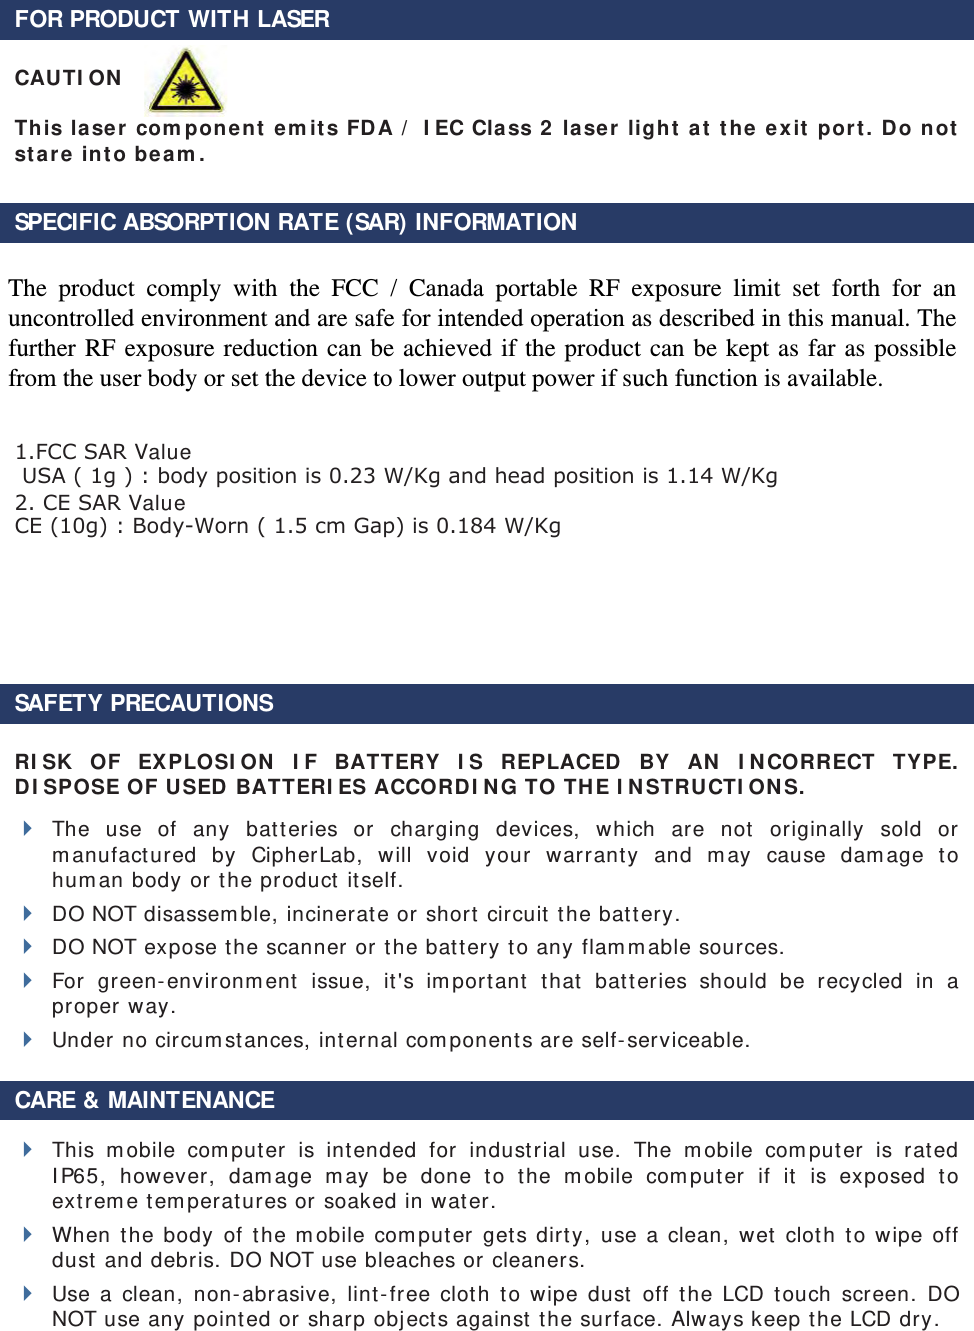
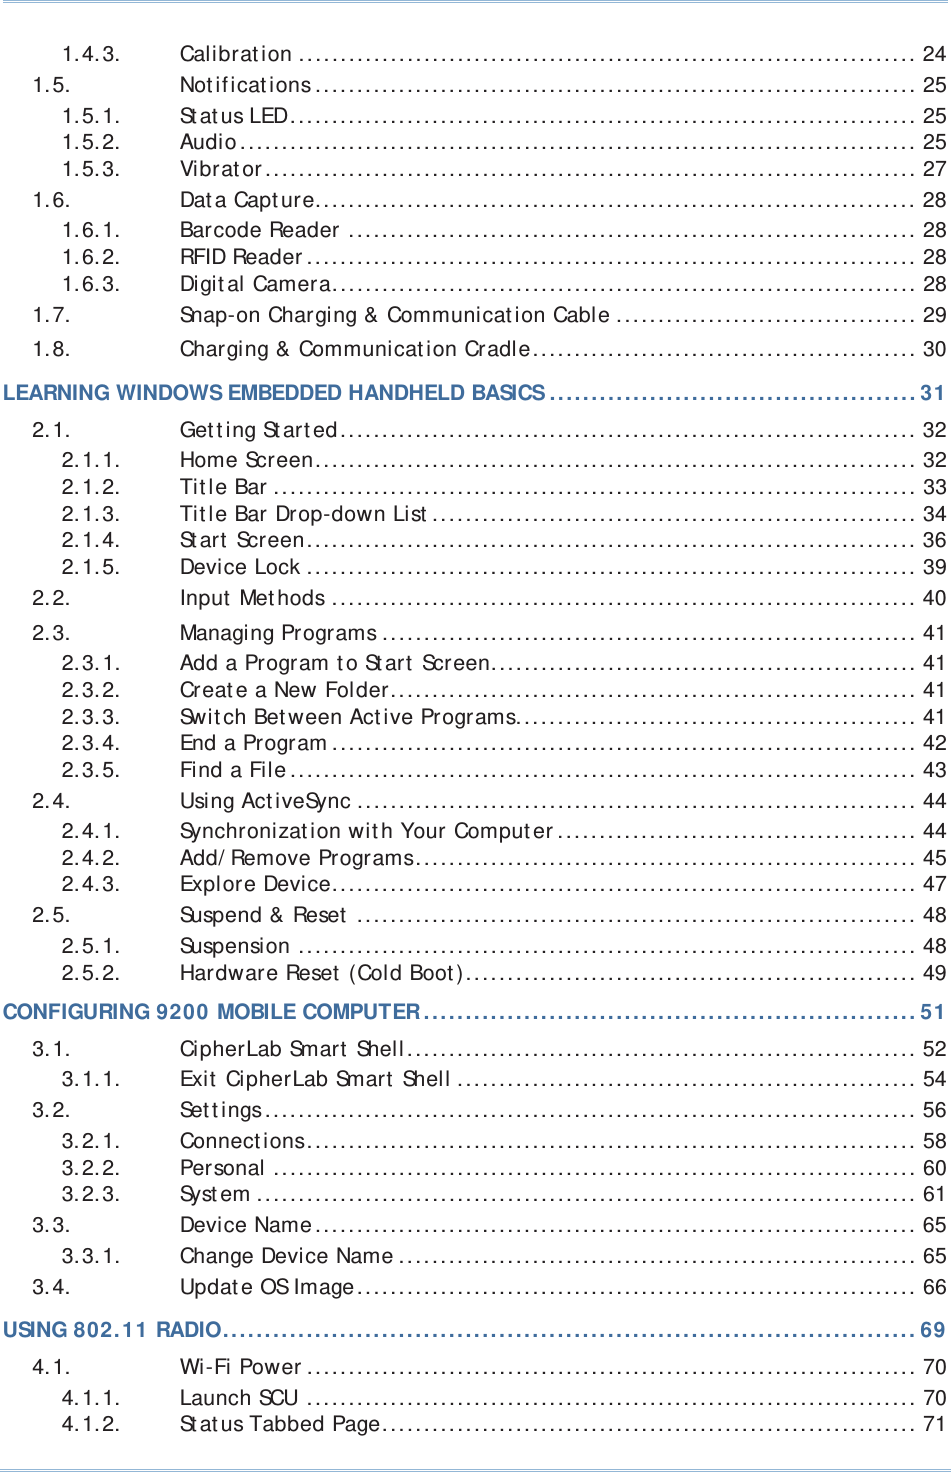
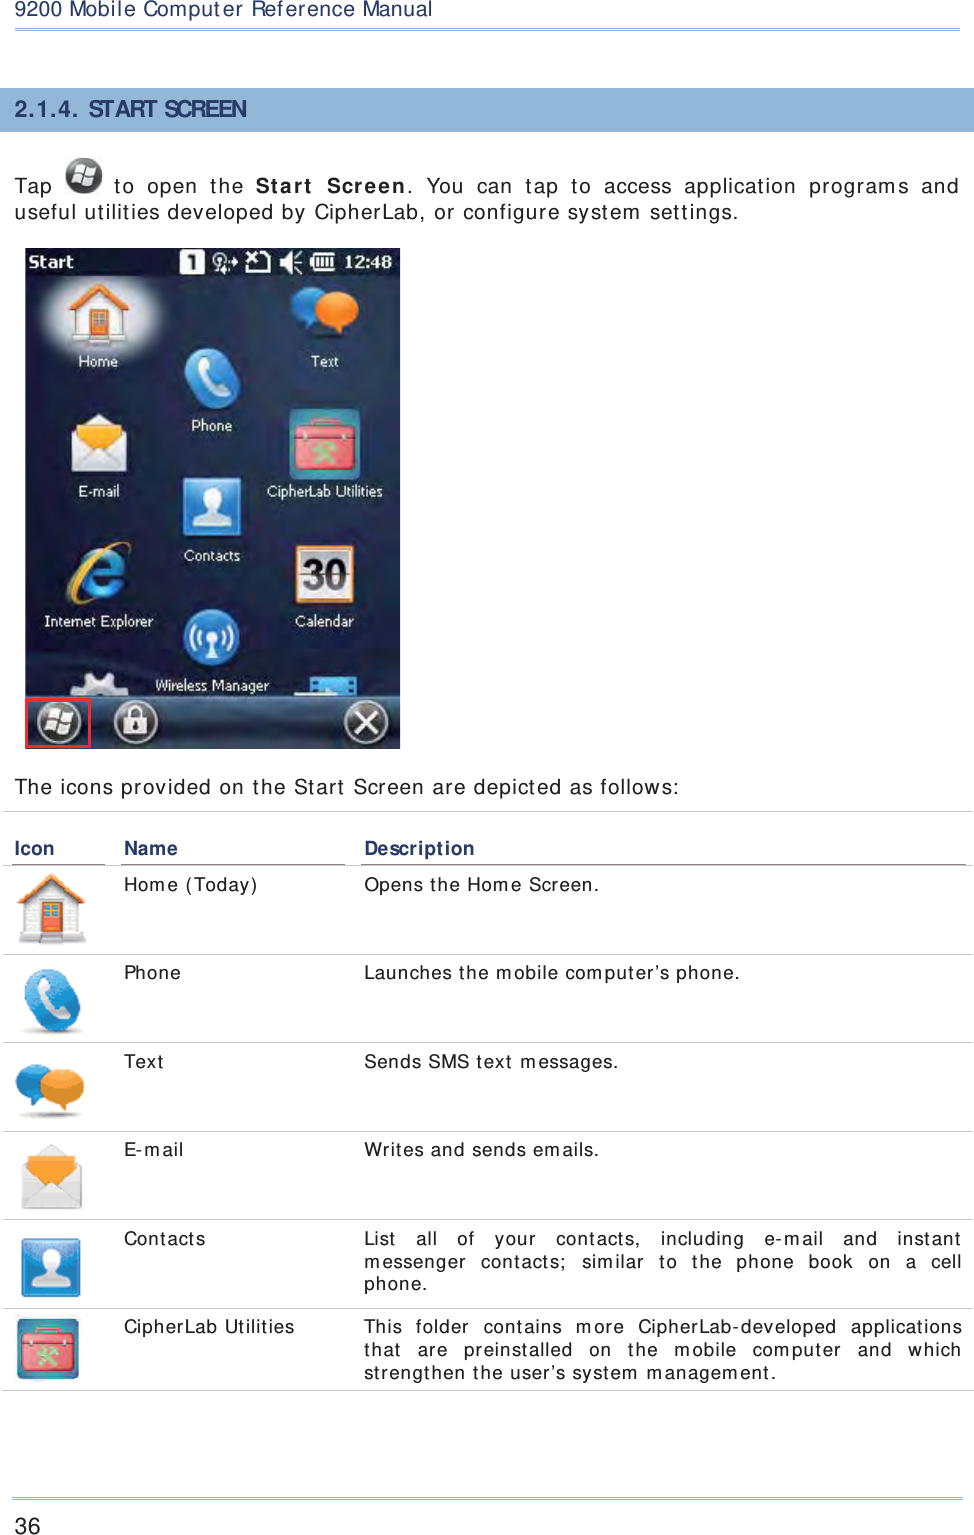
![33 Chapt er 2 Learning Windows Embedded Handheld Basics2.1. 2. TITLE BAR The icons at t he top of t he screen are explained below. Icon Description Ext ernal power source is connected. Batt ery pow er rem aining: more bars indicate m ore power in t he batt ery. Keypad is in default num eric m ode or alphabet ic m ode. Shift [ ×] is enabled in num eric m ode/ num eric lock m ode. Shift [ ×] is enabled in alpha m ode/ alpha lock m ode. Funct ion m ode is enabled. Volum e status: On, off, or vibrat e. SI M card is m issing. You can still m ake em ergency calls if your service provider supports it. GPRS service available. GPRS connect ion is established. EDGE service available. EDGE connect ion is est ablished. UMTS (3G) service available. UMTS (3G) connect ion is established. HSPA service available. HSPA connect ion is established. I ncom ing call. Missed call. Antenna signal st atus: Phone power off. Ant enna signal st atus: PI N Code required for power ing on the Phone. Antenna signal st atus: phone power on; the m ore bars, the st ronger the signal. Connect ion is active. Wi- Fi Net work is det ect ed ( but not connect ed) . Wi- Fi Network is connect ed. Rem inder for an alarm or appoint m ent is active. Receiving Bluetooth beam s. System not ification icon. E- m ail/ text m essage is received. Roam ing. .](https://usermanual.wiki/CipherLab/9200C/User-Guide-2081897-Page-48.png)


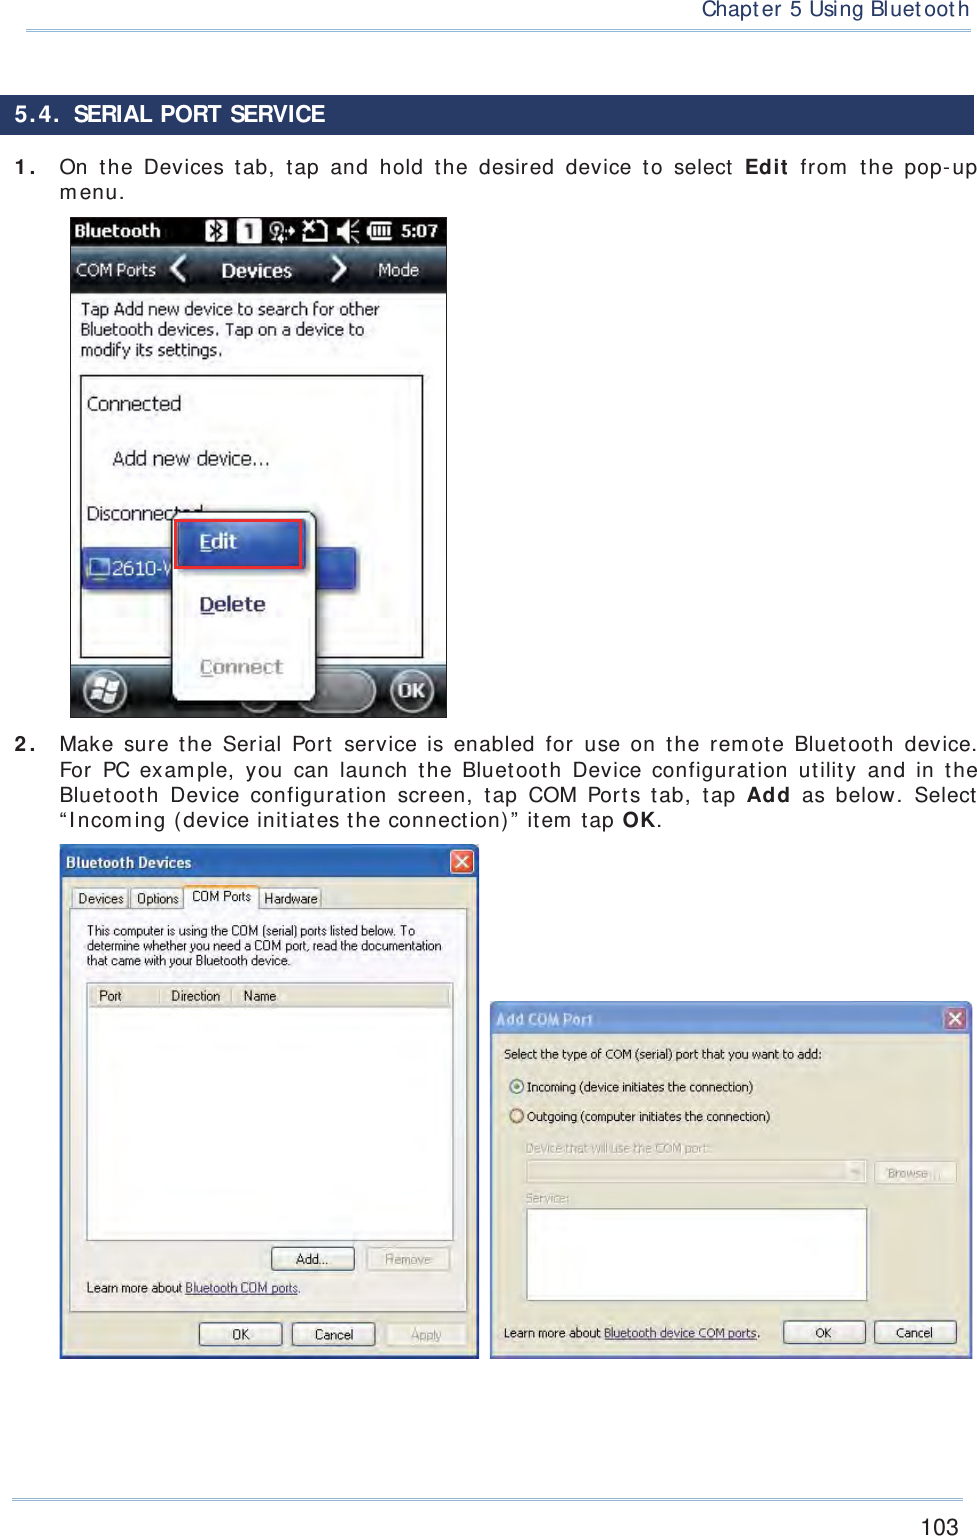
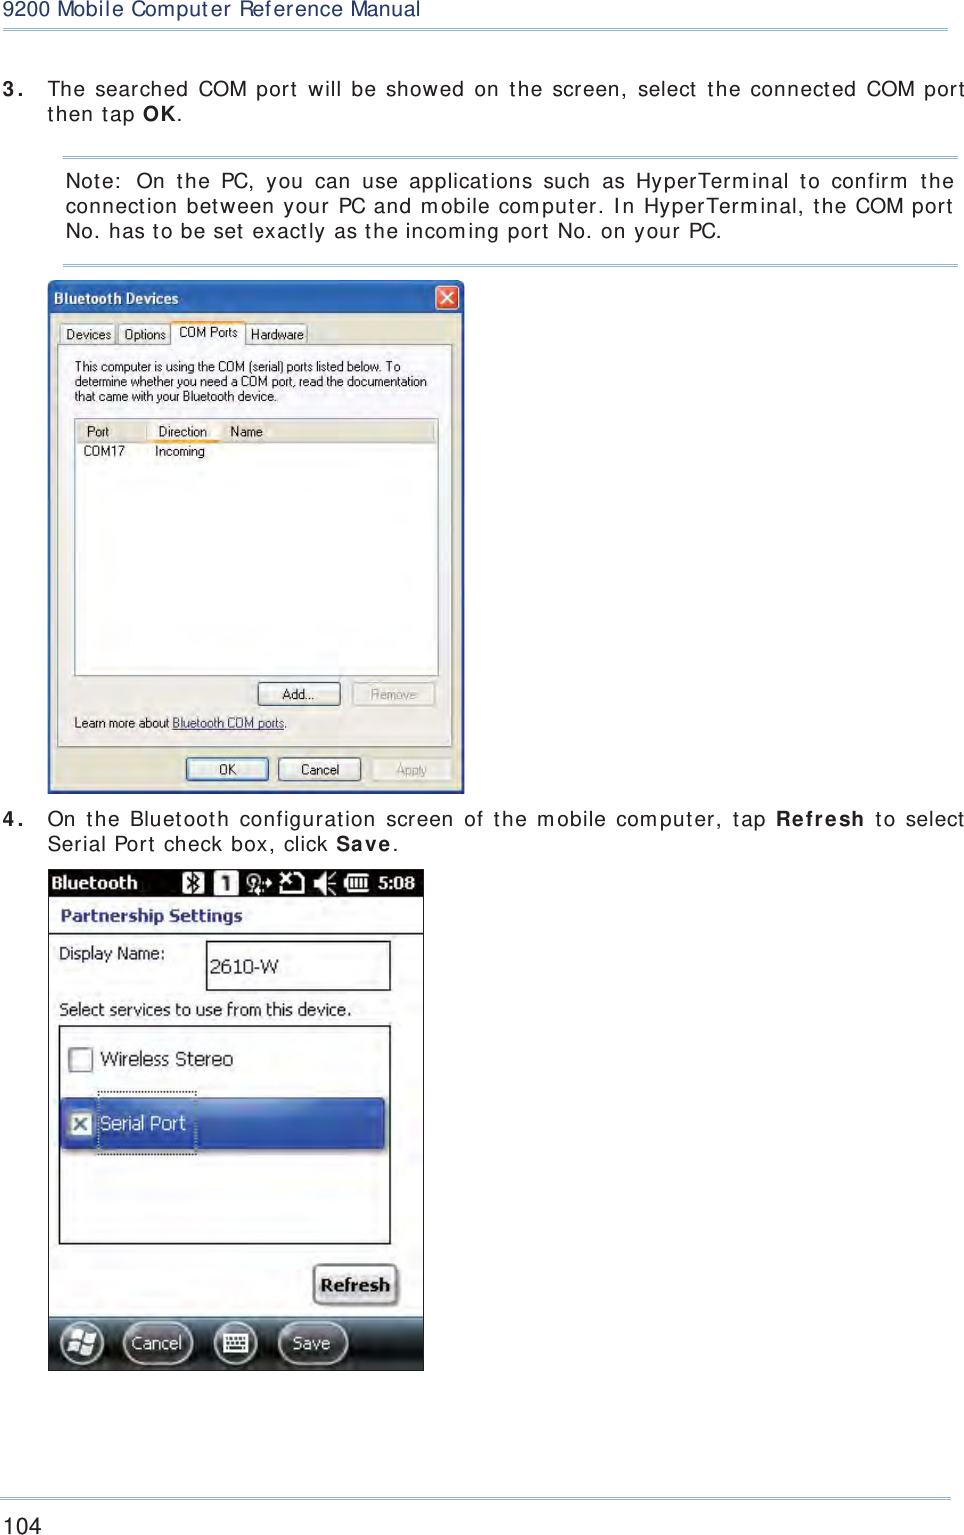
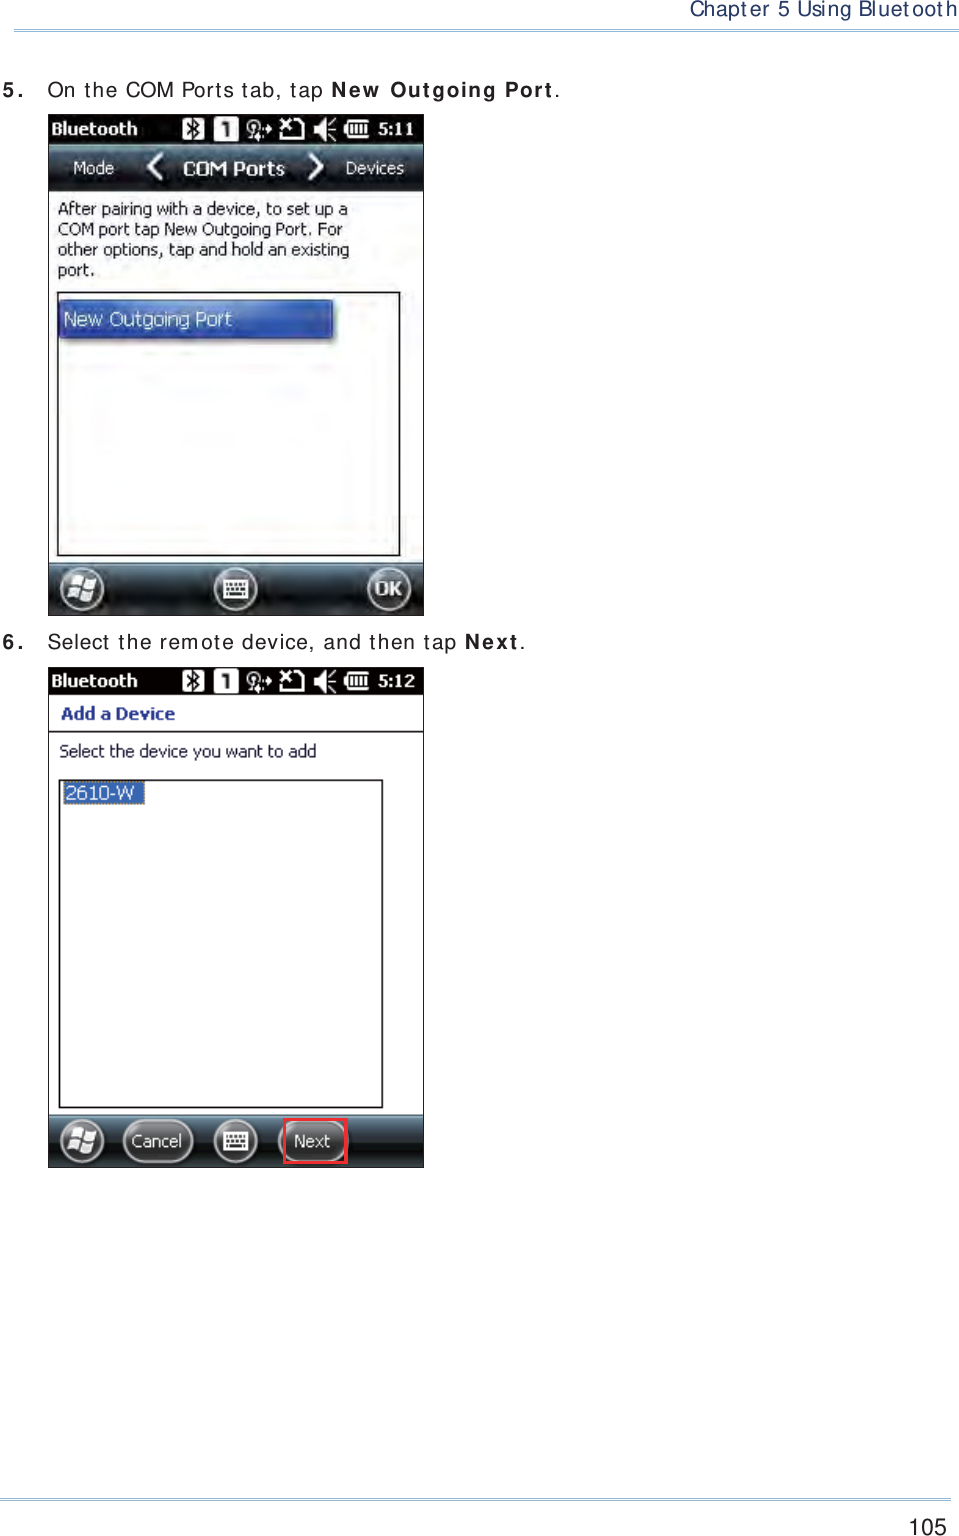
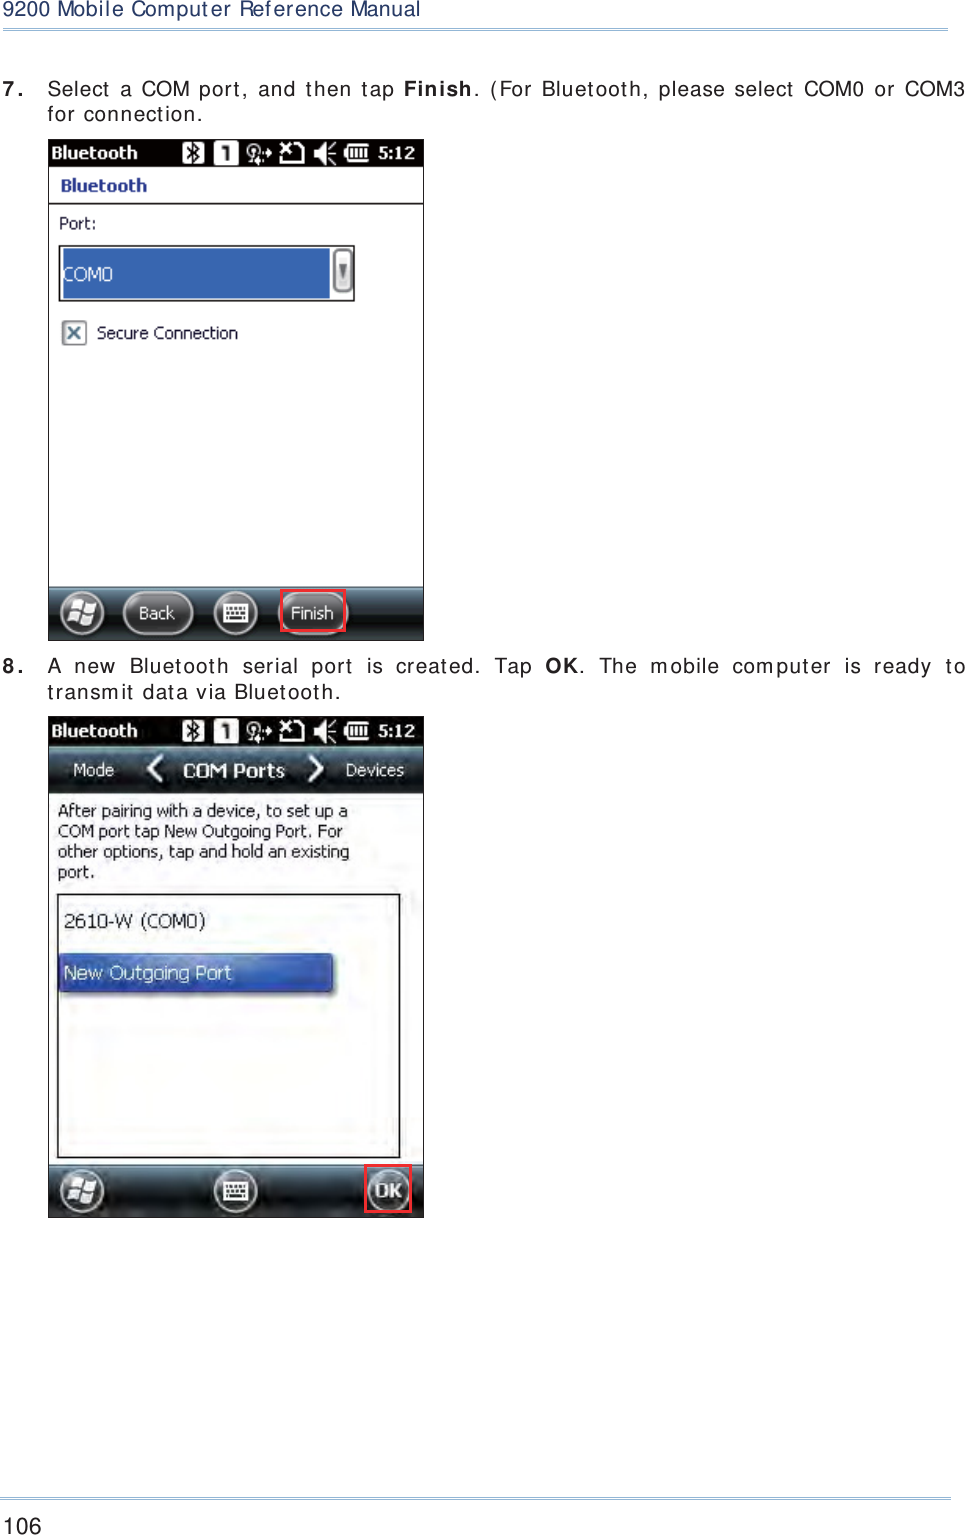
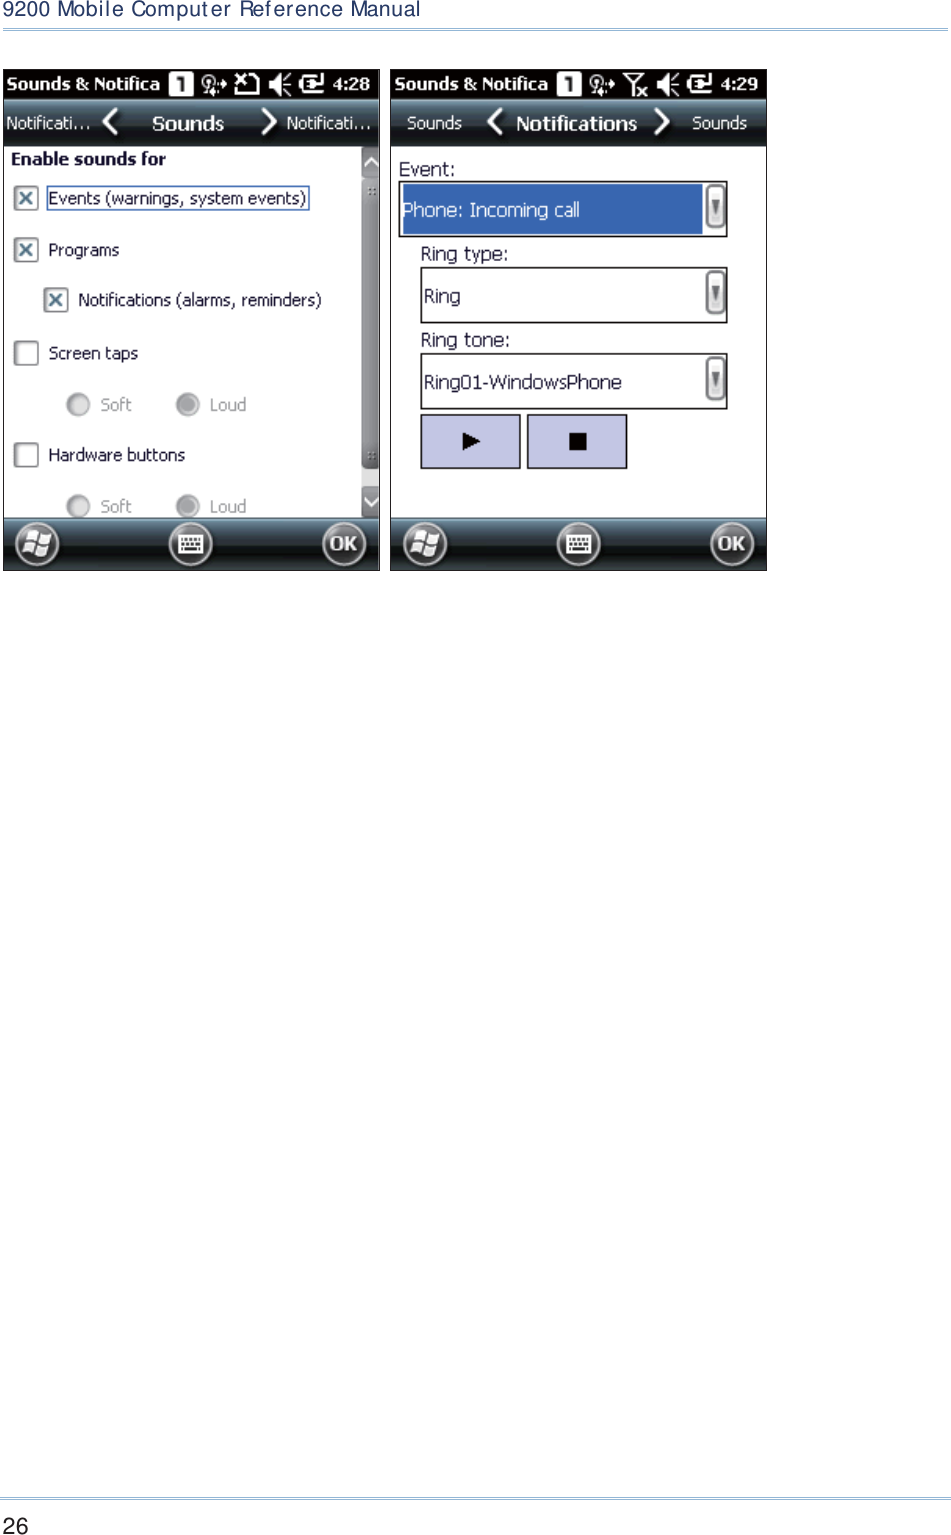
![1149200 Mobile Comput erRef erence Manual6.1. 2. SIM CARD MISSING 1 . On the Hom e Scree n, t he not ification icon on the t it le bar shows that t he SI M card is m issing. 2 . Tap Phone or press the [ SEND] but t on on t he physical keypad t o access t he phone applicat ion. I f support ed by your service provider, only em ergency calls are allowed when a SI M card is absent. Note: I f your wired headset ( CTI A st andard) has an integrat ed hook swit ch, press the hook switch to open the dialer screen.](https://usermanual.wiki/CipherLab/9200C/User-Guide-2081897-Page-129.png)
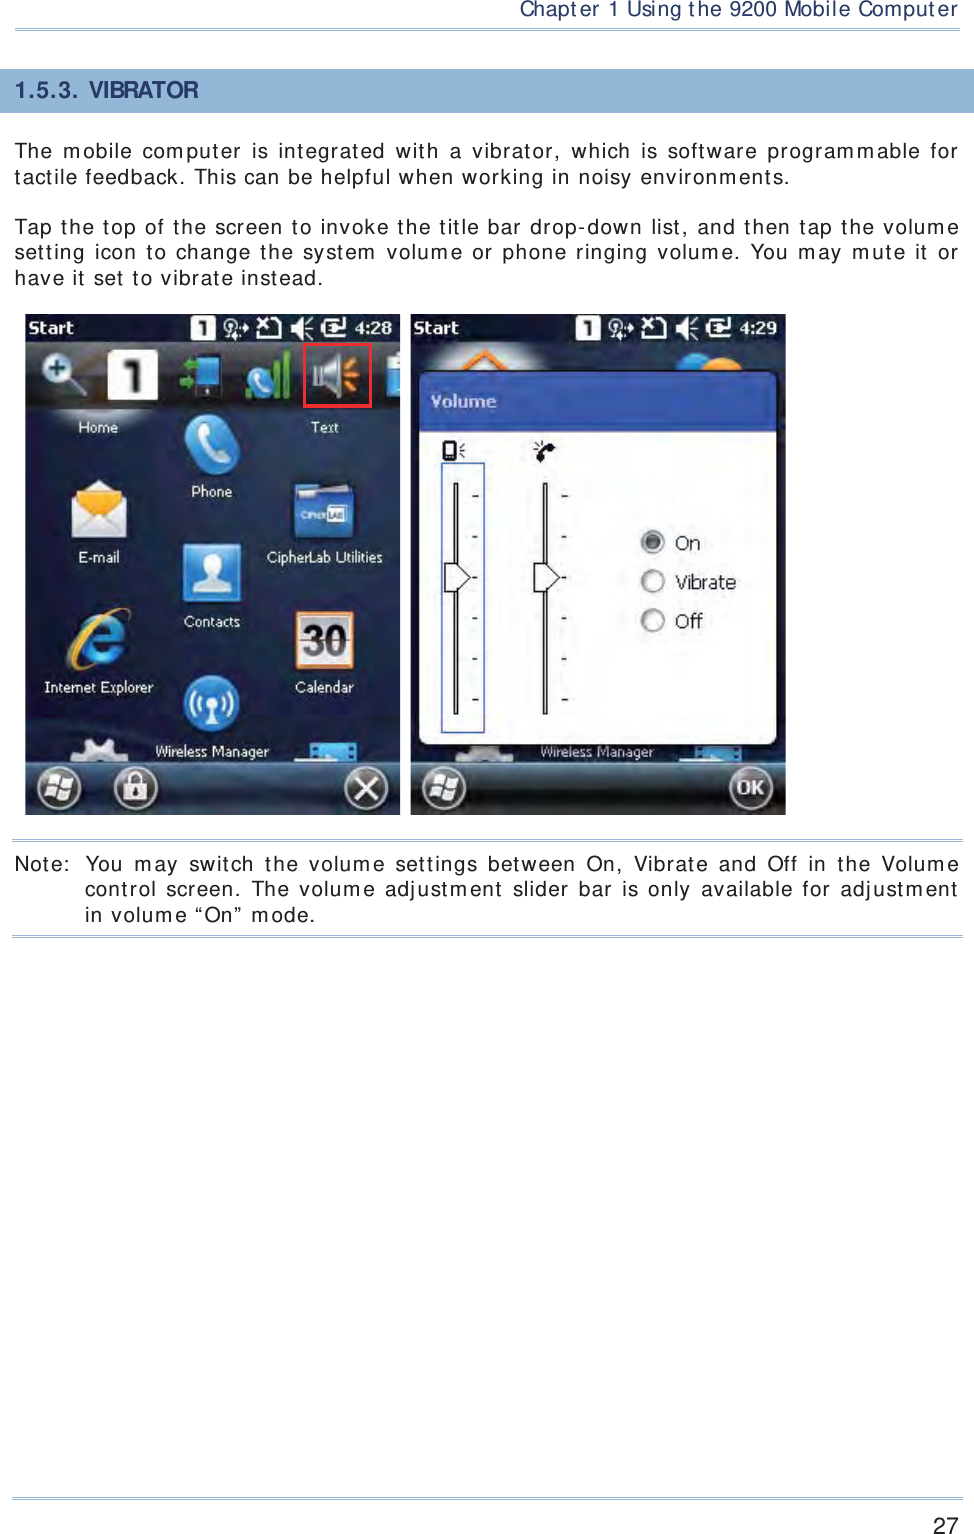
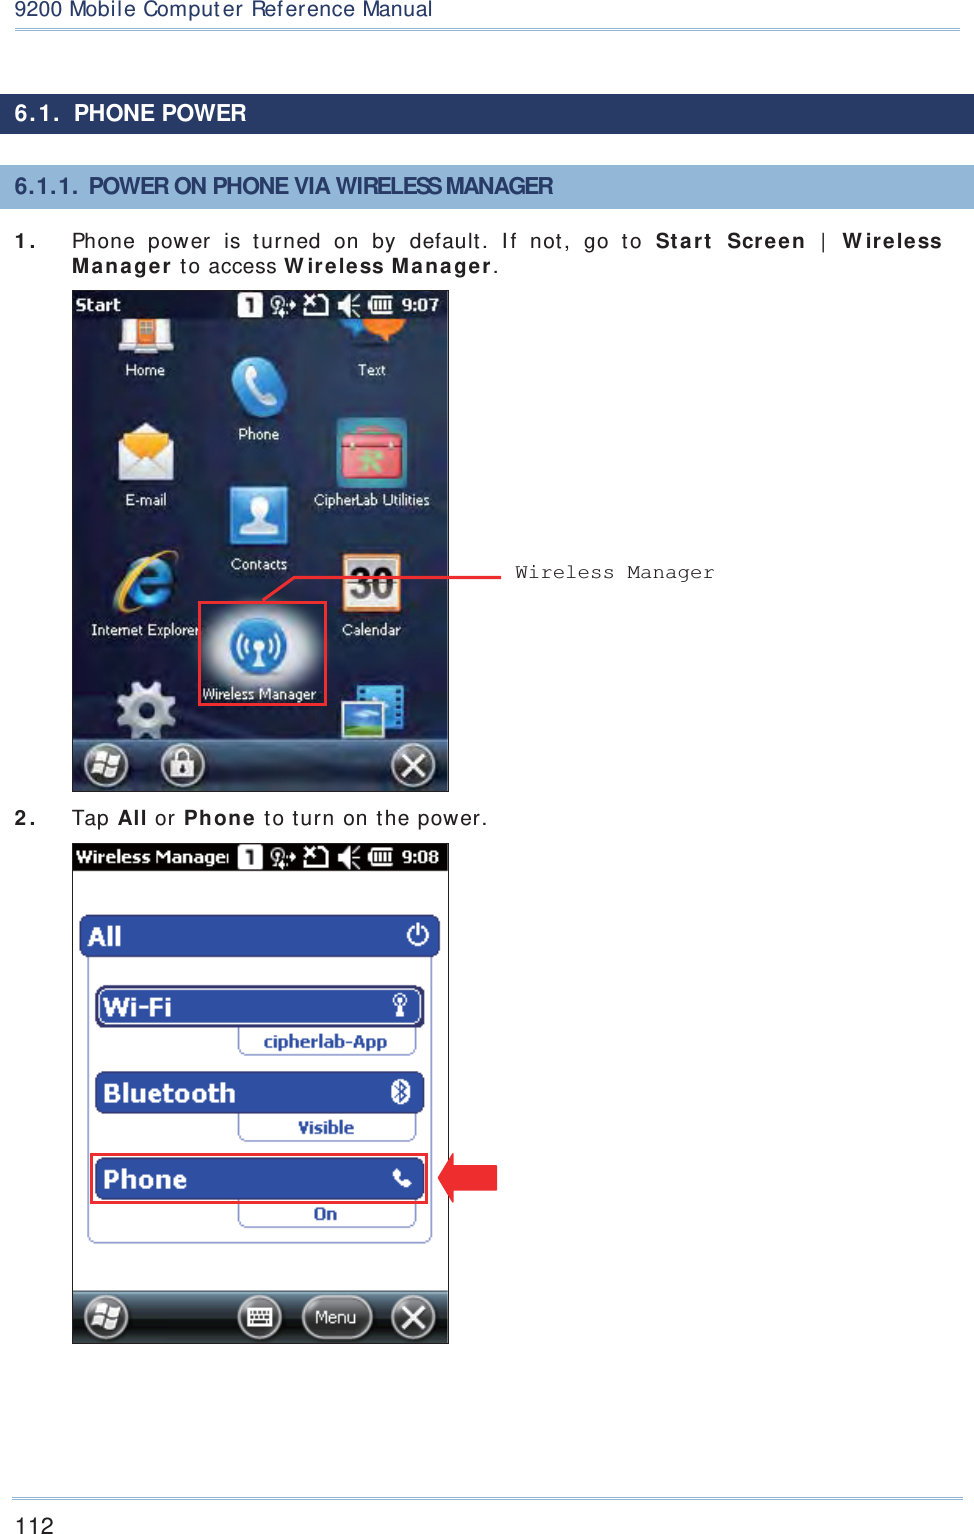
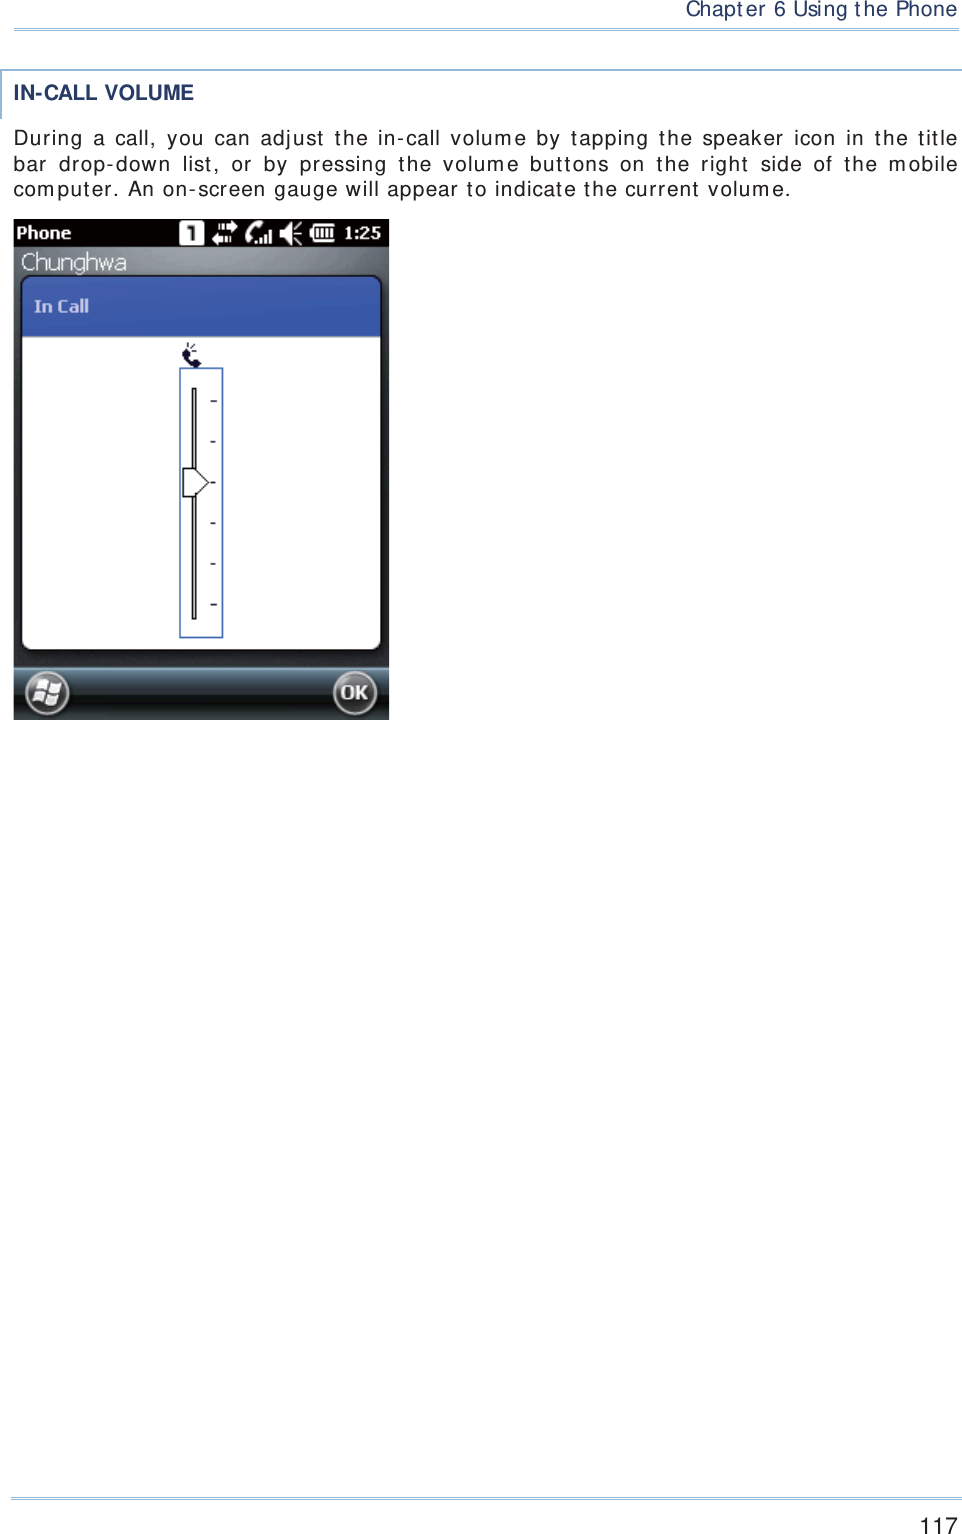
![1169200 Mobile Comput erRef erence Manual6.2. 2. BUTTONS The phone keypad feat ures t he following but t ons: Button Description [ Backspace] but t on allows you to delete t he last input. [ Speed Dial] but t on allows you t o view, edit the speed dial list and pick the num ber you want t o call. [ Call Hist ory] but t on allows you to browse, edit call hist ory and pick the num ber you want to call. [ Talk] butt on allows you to m ake or receive a call. Alt ernatively, you m ay press [ SEND] on the physical keypad. [ End] butt on allows you to hang up a call. Alt ernatively, you m ay press [ END] on the physical keypad. 6.2. 3. VOLUMESYSTEM AND RINGER VOLUME Tap the speaker icon in t he tit le bar drop- down list to change syst em volum e or phone ringer volum e. You m ay also m ut e it or have it set as vibrate inst ead. An on-screen gauge will appear to indicat e t he current set t ings. Volum e adj ust m ent can also be done by pressing the volum e up/ down buttons on the right side of t he m obile com puter.](https://usermanual.wiki/CipherLab/9200C/User-Guide-2081897-Page-131.png)
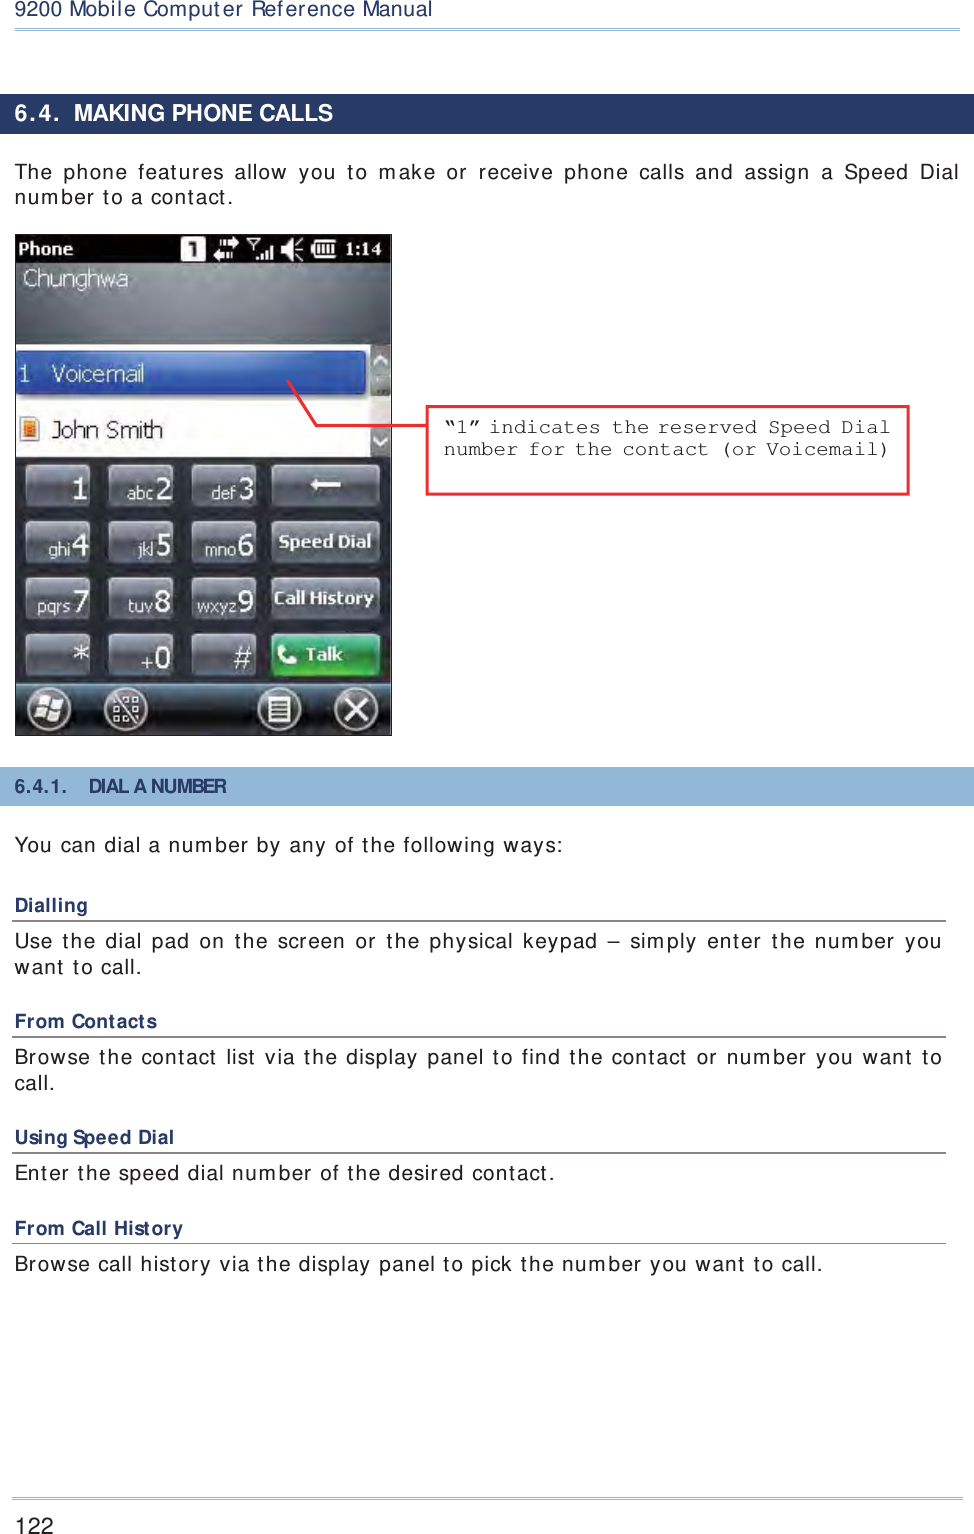
![123 Chapt er 6 Using t he Phone6.4. 2. MAKE A CALL Dialling Out Tap the green [ Talk] butt on on t he phone keypad, or press [ SEND] from the physical keypad. Hanging up Tap the red [ End] but t on on t he phone keypad, or press [ END] from the physical keypad.](https://usermanual.wiki/CipherLab/9200C/User-Guide-2081897-Page-138.png)
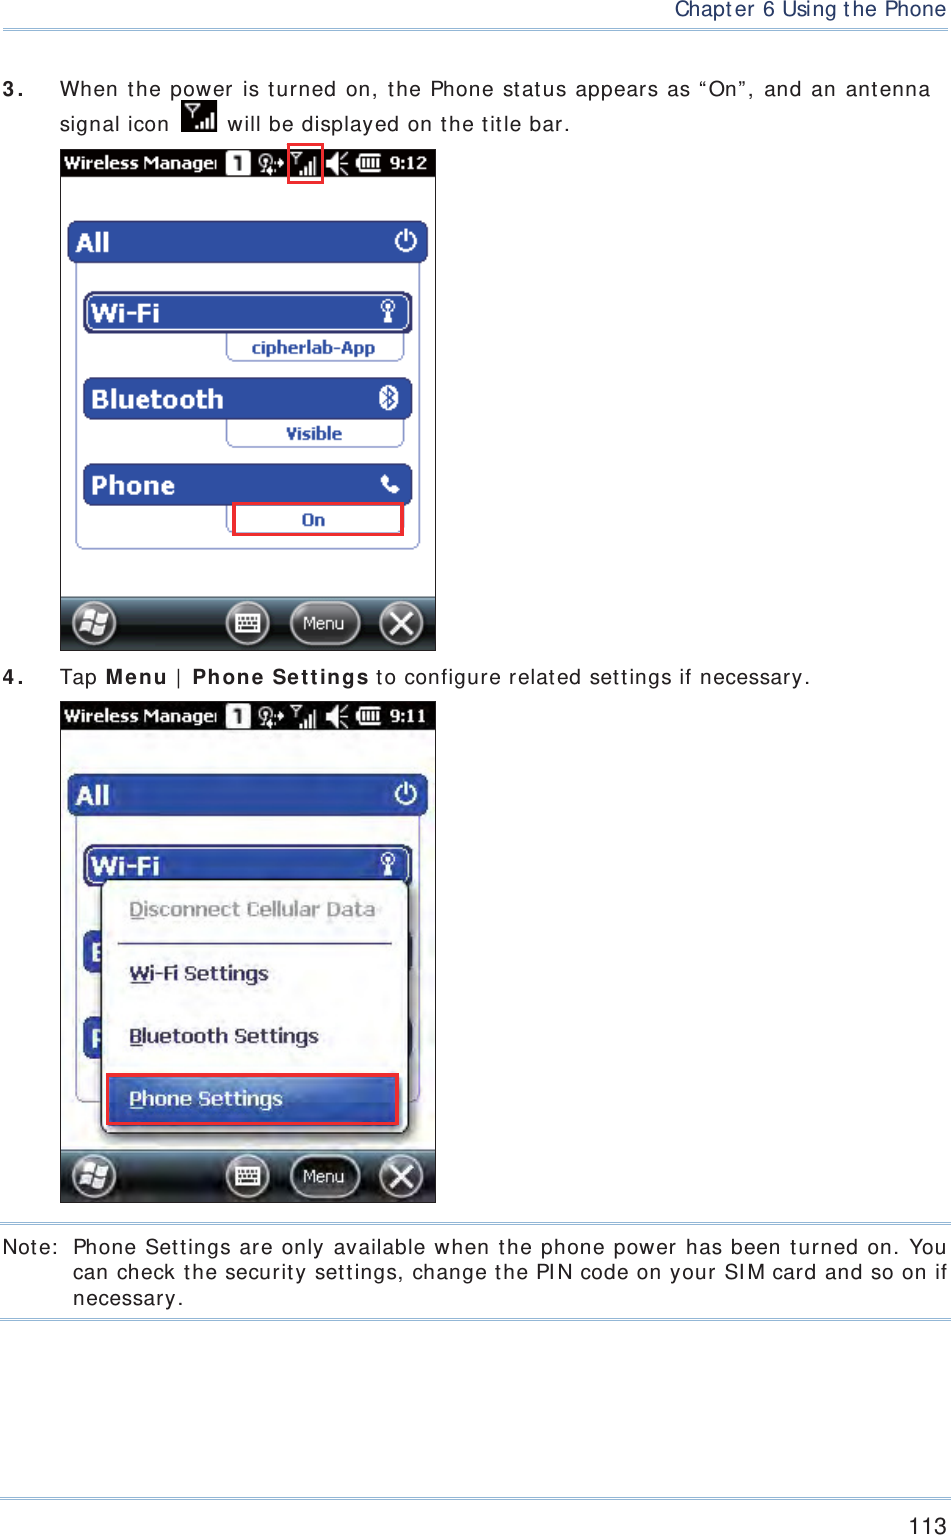
![1249200 Mobile Comput erRef erence ManualDuring a Call During a call, you m ay select to turn on t he speaker, m ute the receiver, or hold t he line by tapping the respect ive on- screen buttons. Alternatively you m ay place another call by the Add Ca ll button, or open t he Co nt a ct s application. 6.4. 3. ANSWER A CALL Answering a Call Tap the Answ er button or press [ SEND] from the physical keypad. Note: I f your wired headset (CTI A standard) has an int egrat ed hook switch, press the hook swit ch during an incom ing call t o answer it . When finished with the phone conversation, press the hook swit ch again to end t he call.](https://usermanual.wiki/CipherLab/9200C/User-Guide-2081897-Page-139.png)
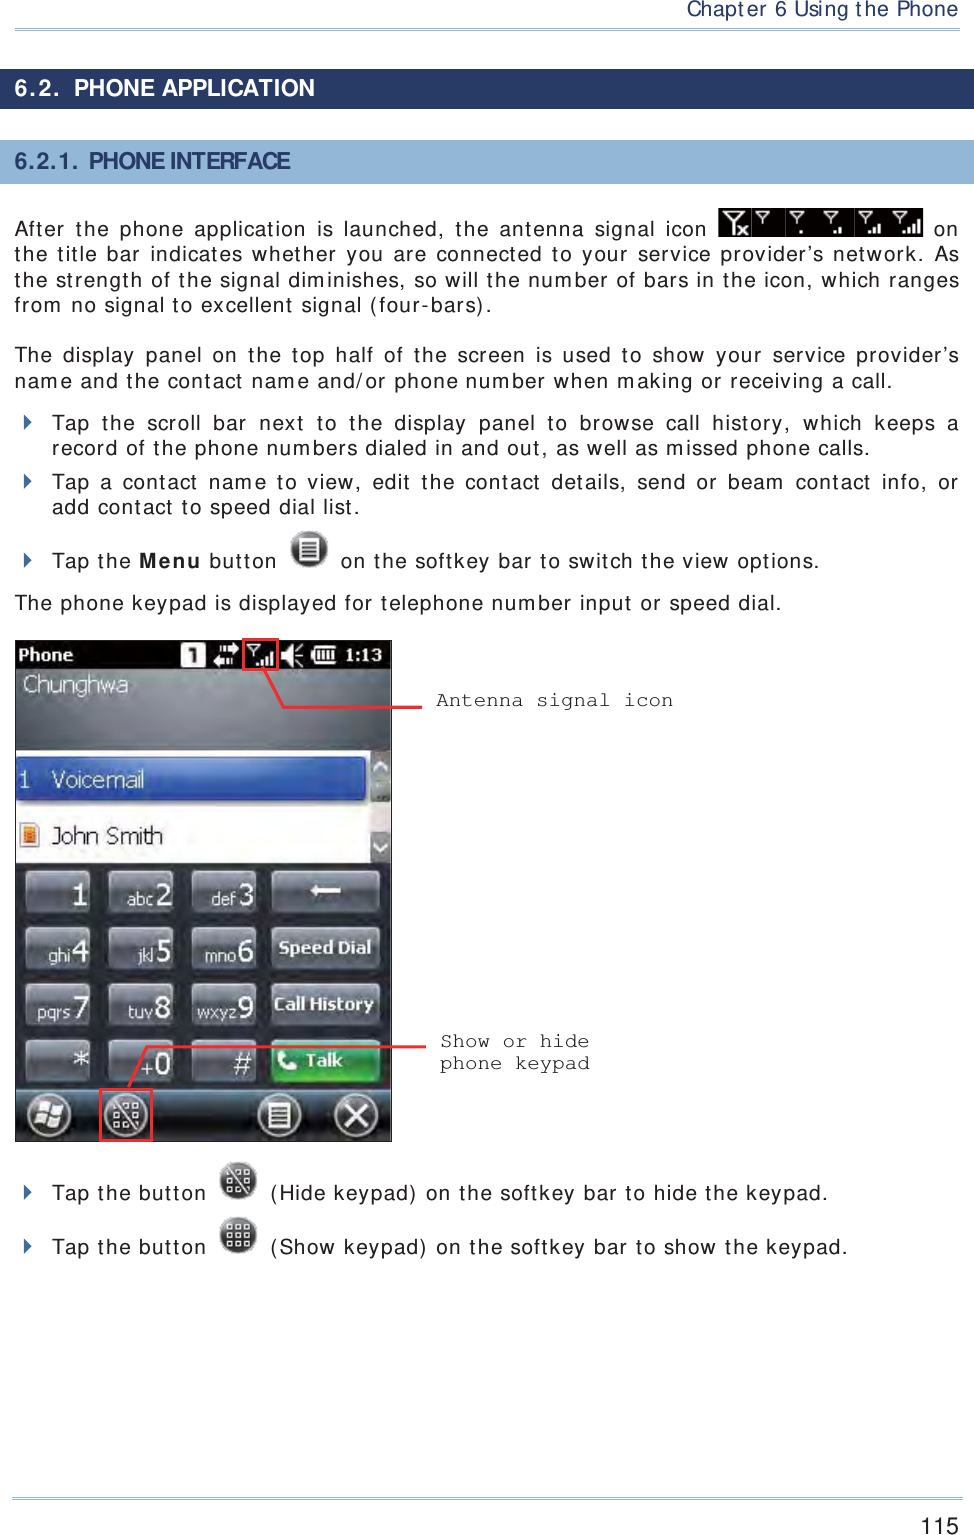
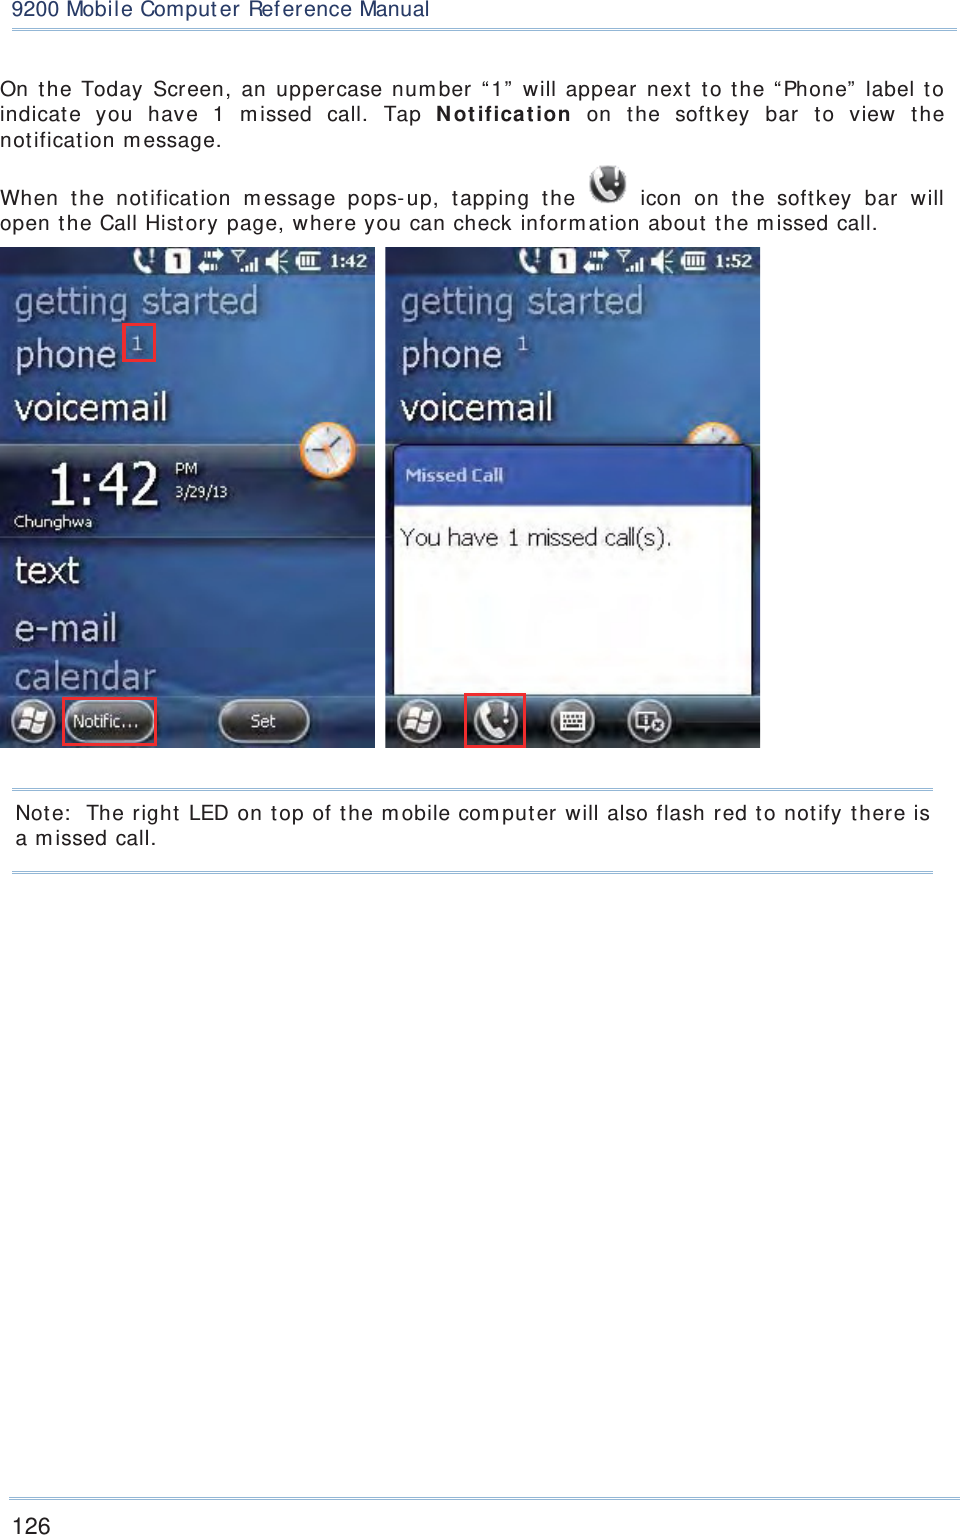
![125 Chapt er 6 Using t he PhoneIgnoring a Call Tap I gnore button or press [ END] from the physical keypad. Viewing a Missing Call When you have a m issed call, will be displayed on t he t it le bar. Tapping it will reveal a m issed call icon . Tap it t o open the Call History page t o identify the m issed call. OR](https://usermanual.wiki/CipherLab/9200C/User-Guide-2081897-Page-140.png)


![1429200 Mobile Comput erRef erence ManualWindows Event When select ed, a Windows event will be broadcast ed after decoding. I ntercept the decode event in your applicat ion. Call Windows API (ReadMsgQueue) in your application t o retrieve the decoded data. Disable Note: ( 1) Refer to 9200 .NET or C/ C+ + Program m ing Guide for det ails on Windows Message and Windows Event. Sam ple program s are provided by request . ( 2) For the use with a barcode decoding program ot her t han ReaderConfig.exe, a dynam ic- link library ( DLL) file is provided. HOW TO OUTPUT Aut o Ent er Adds an Ent er character before or after each scanning act . This funct ion spares you the trouble of pressing [ Ent er] key to confirm each scan. Options are: None Scan + Ent er Char Ent er Char+ Scan Scan + Ent er Char Aut o Ent er Char Adds a key code before or after the decoded data. This set t ing is available only when “ Aut o Ent er” is enabled. Opt ions ar e: None Carriage ret urn Tab Space Com m a Sem icolon Carriage Ret urn Prefix String Affixes 0~ 10 characters t o t he left of the out put dat a. NULL Suffix String Affixed 0~ 10 charact ers t o the right of t he out put data. NULL Display Code Type Prefixes code type t o the decoded data. Disabled Display Code Lengt h Suffixes code lengt h t o the decoded dat a. Disabled Display RFI D UI D Outputs t he UI D of t he RFI D tag t o read. This set ting is available only when an RFI D reader is integrated on the m obile com put er and is enabled. Enabled Display RFI D user dat a Outputs t he user dat a of t he RFI D tag to read. This set ting is available only when an RFI D reader is integrated on the m obile com put er and is enabled. Disabled Field delim it er Adds a field delim it er in t he decoded data to separate t he dat a to segm ents. For printed barcodes: This delim iter separat es code type , decoded dat a, and code lengt h ( if applicable) For RFI D tags: This delim iter separat es UI D and user data ( if both are applicable) “ ,” ( com m a)](https://usermanual.wiki/CipherLab/9200C/User-Guide-2081897-Page-157.png)
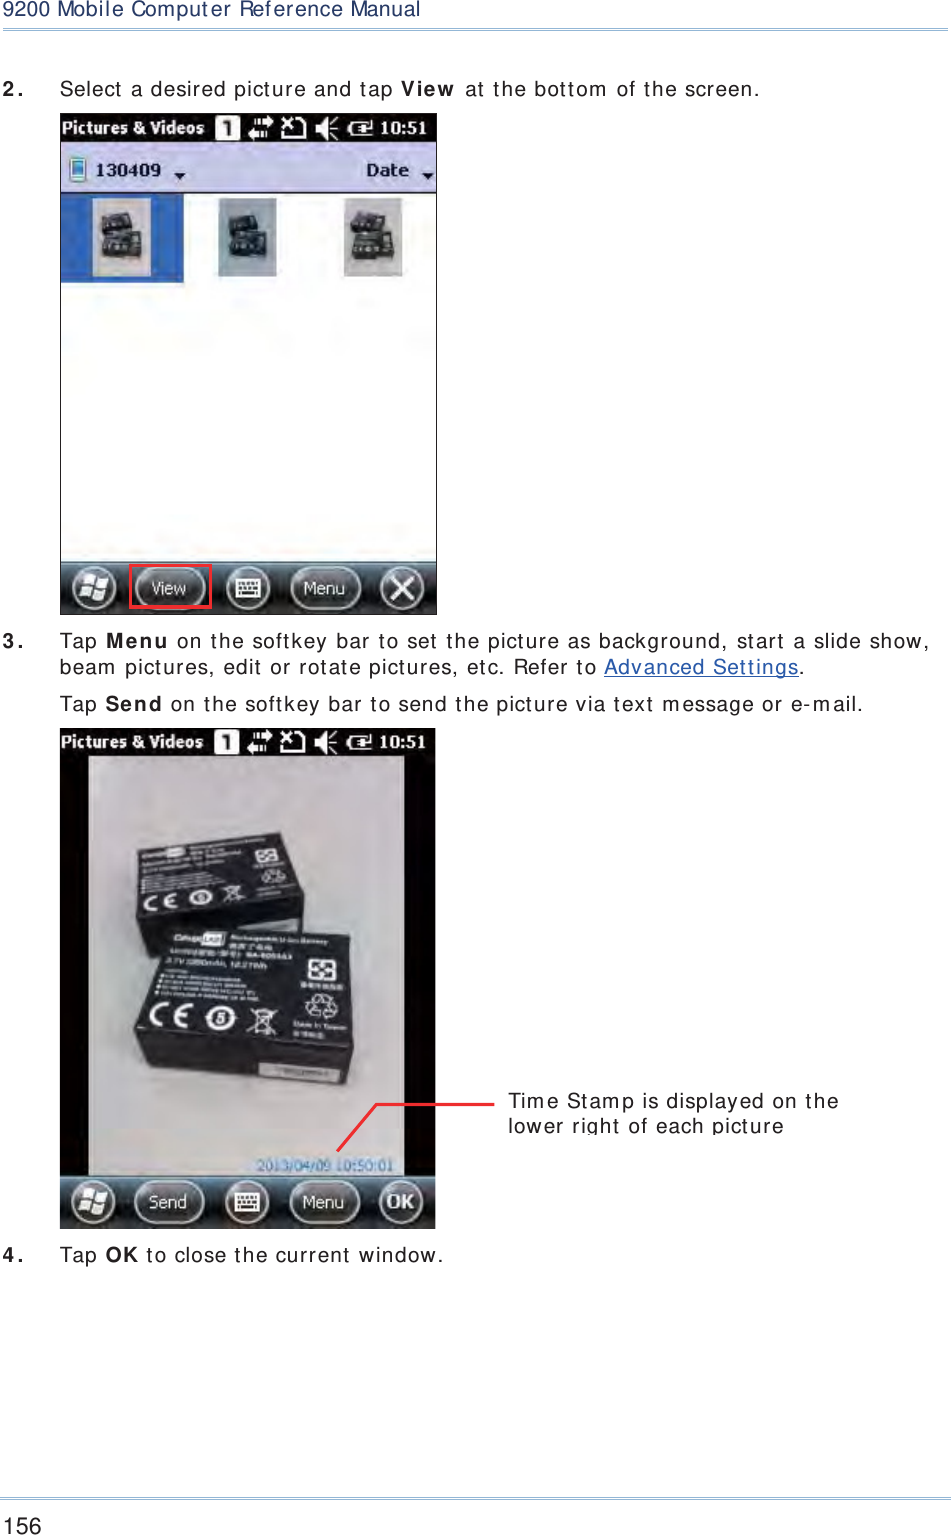
![149 Chapt er 8 Using Camera8.2. TAKING A PICTURE When launched, t he cam era is set to St ill m ode by default for pict ure taking, and a preview screen is displayed. 1 . Aim at the obj ect you want to shoot. Drag the slider t o zoom in ( + ) or zoom out ( - ) an im age. 2 . Press [ Scan] key or [ Ent er] on t he physical keypad t o t ake a picture. Each pict ure will be aut om at ically saved under the designated storage locat ion. Drag t he slider to adjust the focus](https://usermanual.wiki/CipherLab/9200C/User-Guide-2081897-Page-164.png)
![151 Chapt er 8 Using Camera8.3. SHOOTING A VIDEO When sw it ching to Video m ode, a preview screen will be displayed. 1 . Hold st ill and take aim at the obj ect you want to shoot 2 . Press [ Scan] or [ Ent er] on the physical keypad to start recording a video. Available recording timeRemaining recording time](https://usermanual.wiki/CipherLab/9200C/User-Guide-2081897-Page-166.png)
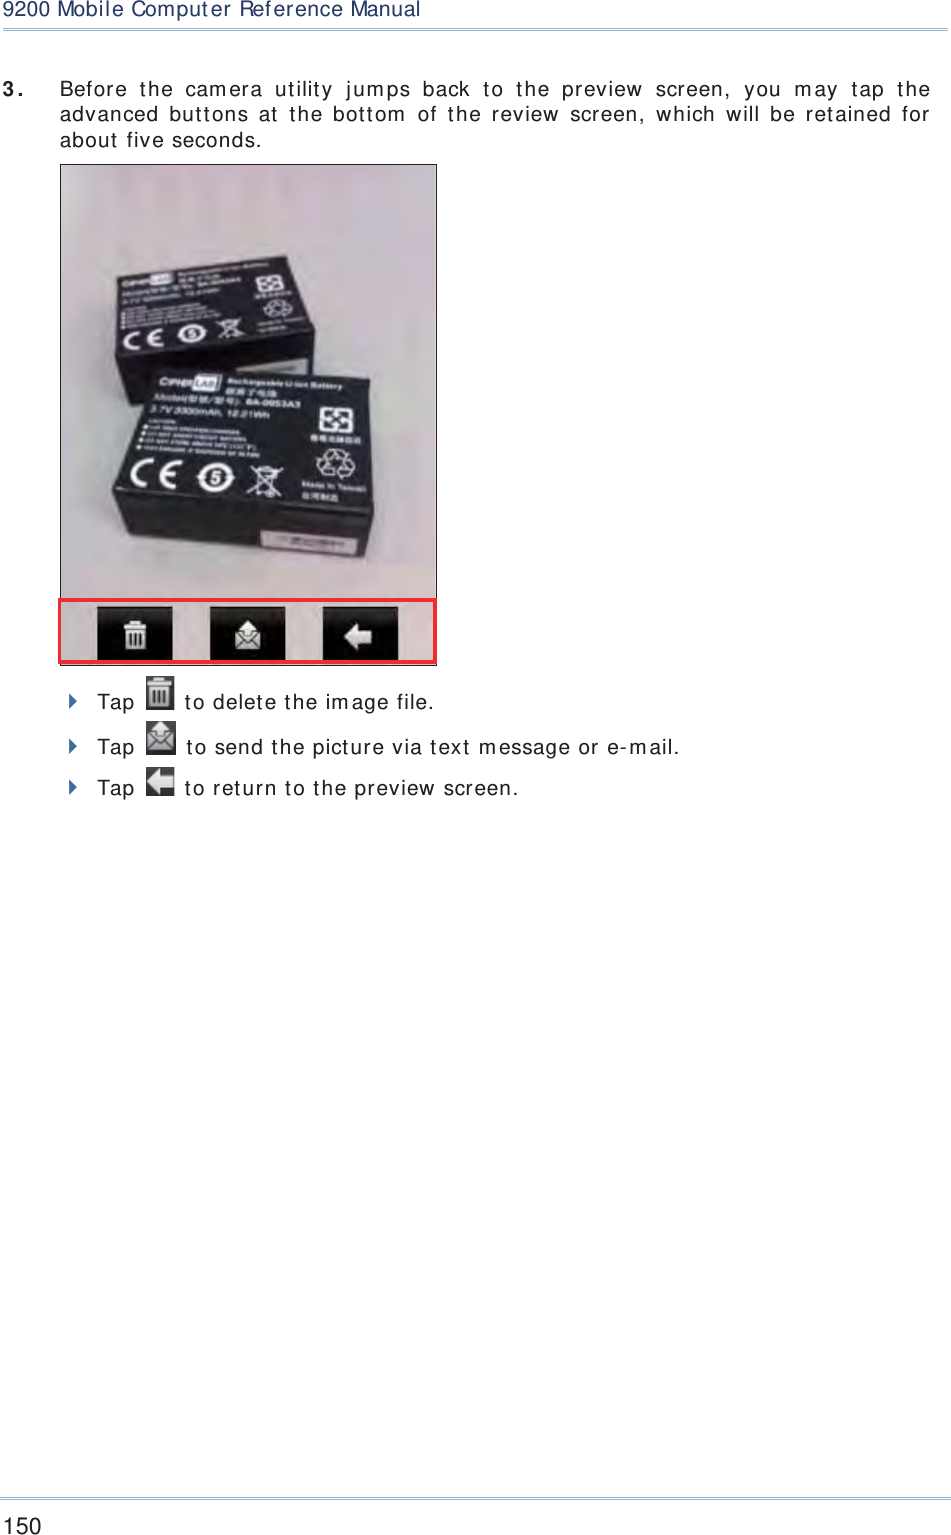
![1529200 Mobile Comput erRef erence Manual3 . Press [ Scan] or [ Ent er] on t he physical keypad t o end recording. Ot herwise, it will st op aut om at ically after reaching the t im e lim it. Refer to Advanced Settings. Tap t o delet e t he im age file. Tap to send the picture via t ext m essage or e- m ail. Tap t o return to the preview screen.](https://usermanual.wiki/CipherLab/9200C/User-Guide-2081897-Page-167.png)
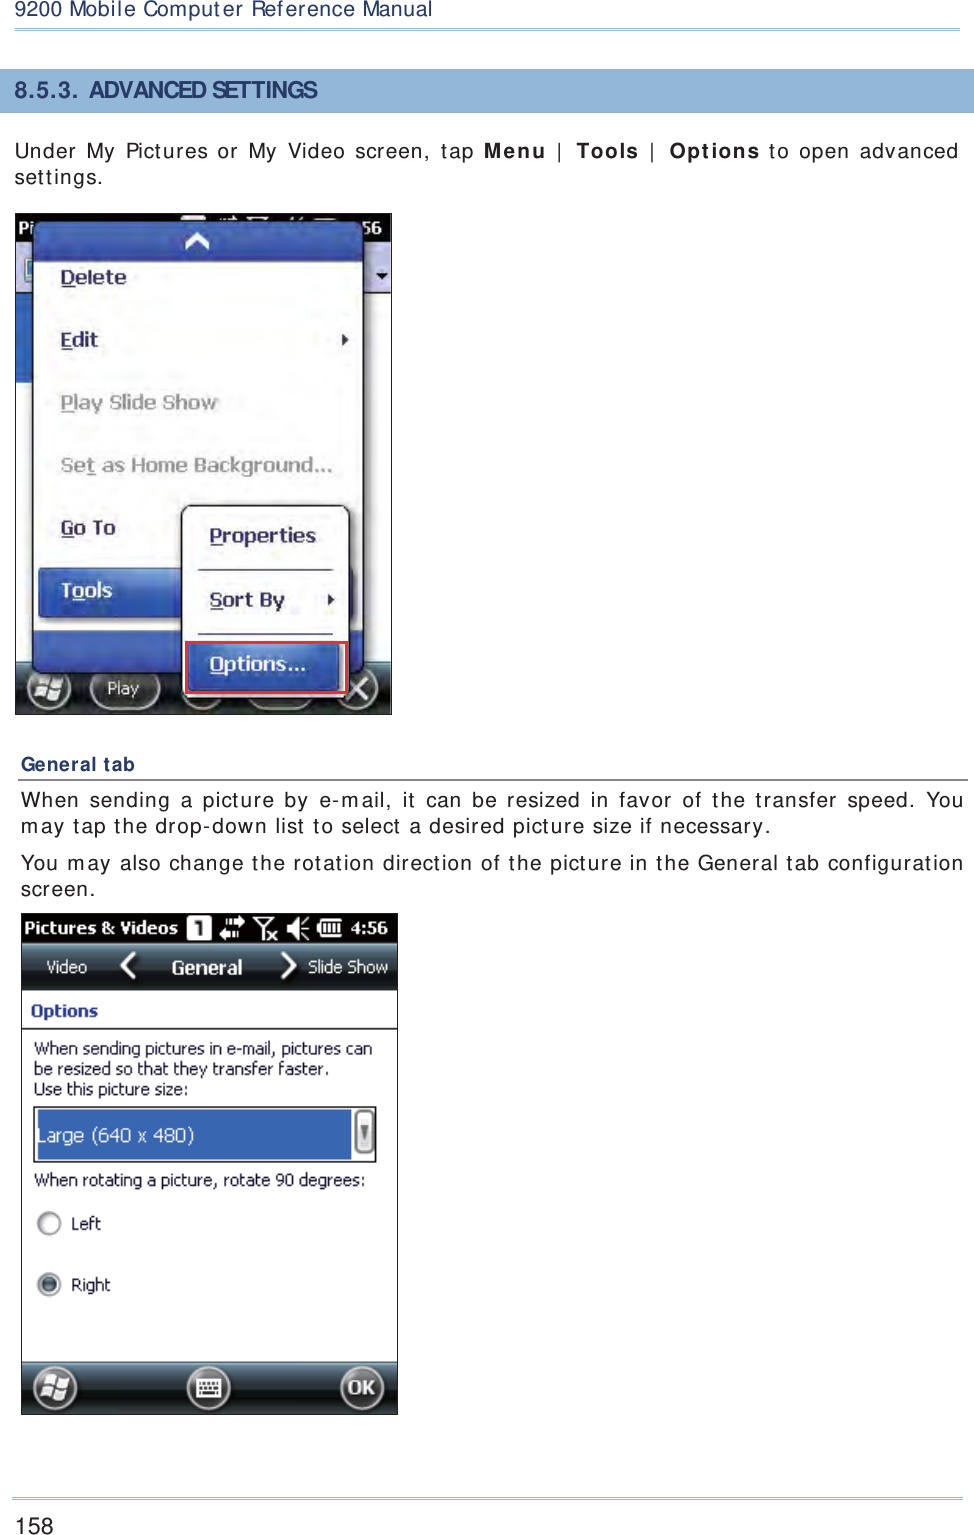
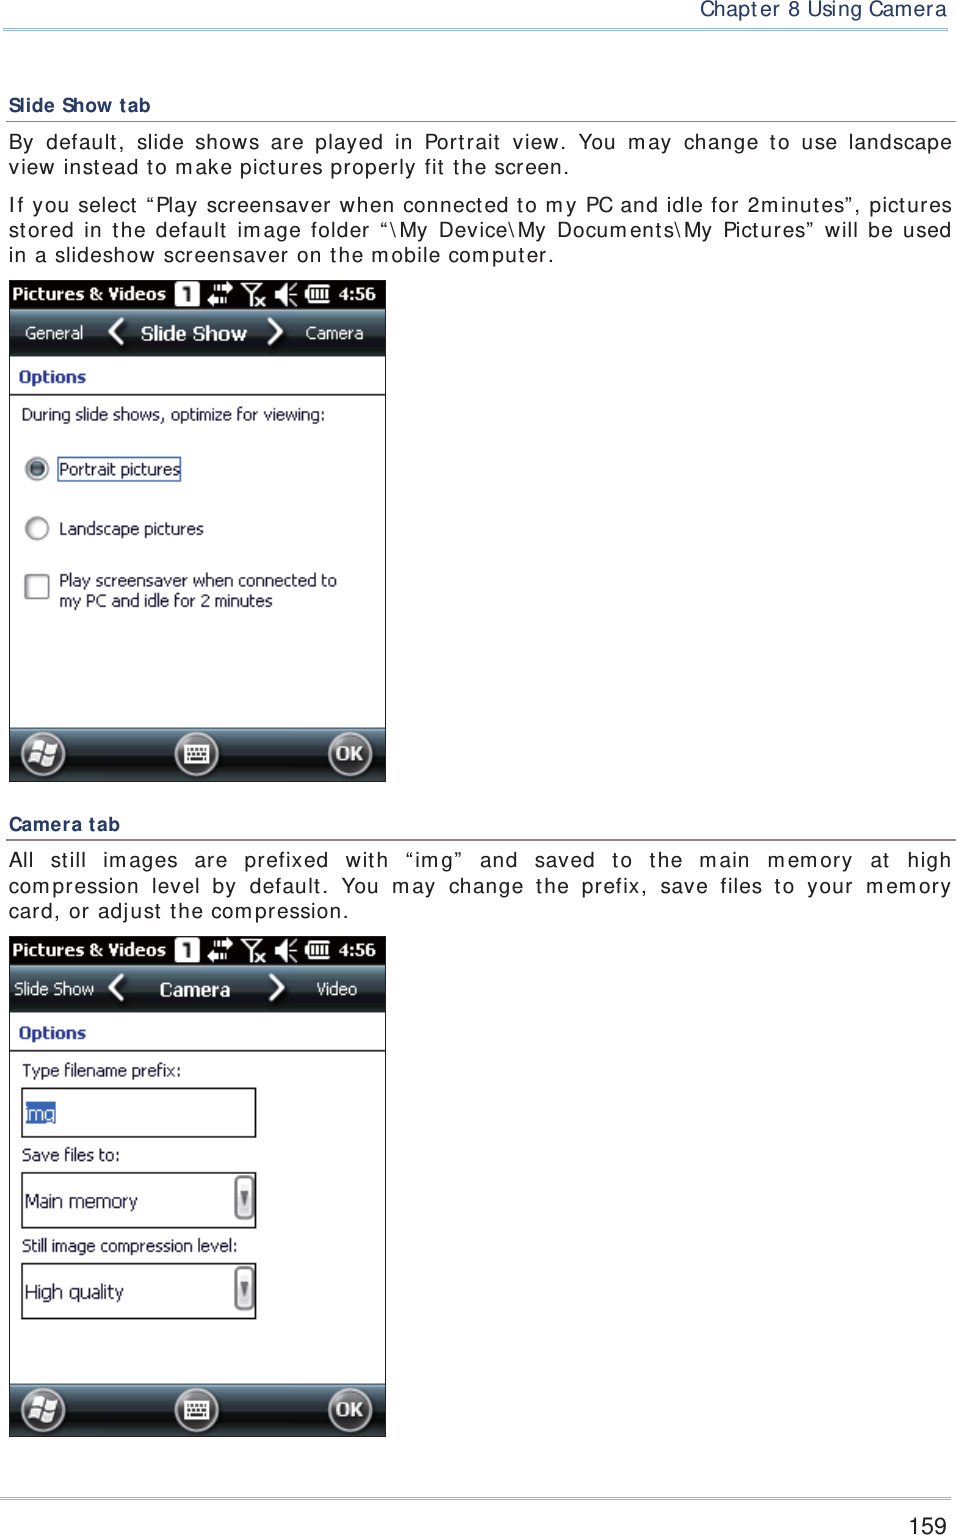
![153 Chapt er 8 Using Camera8.4. CAMERA SETTINGS On the soft key bar, tap t he but t on t o configure cam era set t ings if necessary. Brightness, Contrast, Sharpness Adj ust s brightness, contrast, and sharpness for t he pict ure t o t ake. Mode Set s a scene m ode for t he pict ure t o t ake. By default , no special m ode is applied. Options are: Icon Description Backlight Night m ode St abilize Out door Low light White Balance Tap to select a specific scenario for setting white balance. By default , t he cam era is set t o adj ust aut om at ically. Options are: Icon Description Bright light I ndoor light Sunny light Cloudy light Effect Applies a special effect t o t he picture to take. By default , no special effect is applied. Options are: Monochrom e, Negative, and Sepia Timer Enables the t im er which allows t aking t he pict ure a period of t im e aft er t he [ Scan] key or [ Ent er] is pressed. By default , t im er is disabled. Options are: 3 seconds, 5 seconds, and 10 seconds This is only applicable in Still m ode.](https://usermanual.wiki/CipherLab/9200C/User-Guide-2081897-Page-168.png)

![157 Chapt er 8 Using Camera8.5. 2. PLAYBACK A VIDEO 1 . Locat e the t arget folder and the desired videos. The subfolders are nam ed wit h the dat e YYMMDD (2-digit year, 2-digit m ont h and 2- digit date) when videos were recorded. 2 . Select a desired video and tap Play on the softkey bar.. Tap Men u on t he softkey bar to edit, send or beam videos, et c. Refer t o Advanced Set t ings. 3 . The video will be played in Windows Media player. Tap [²] to end t he application. Subfolders in date form at](https://usermanual.wiki/CipherLab/9200C/User-Guide-2081897-Page-172.png)
![1609200 Mobile Comput erRef erence ManualVideo tab While recording a video, audio sound will be included. You m ay disable the check box or set a t im e lim it for videos so t hat the file size can be reduced. Tap [ OK] to save the current set t ings and ret urn to the previous window.](https://usermanual.wiki/CipherLab/9200C/User-Guide-2081897-Page-175.png)
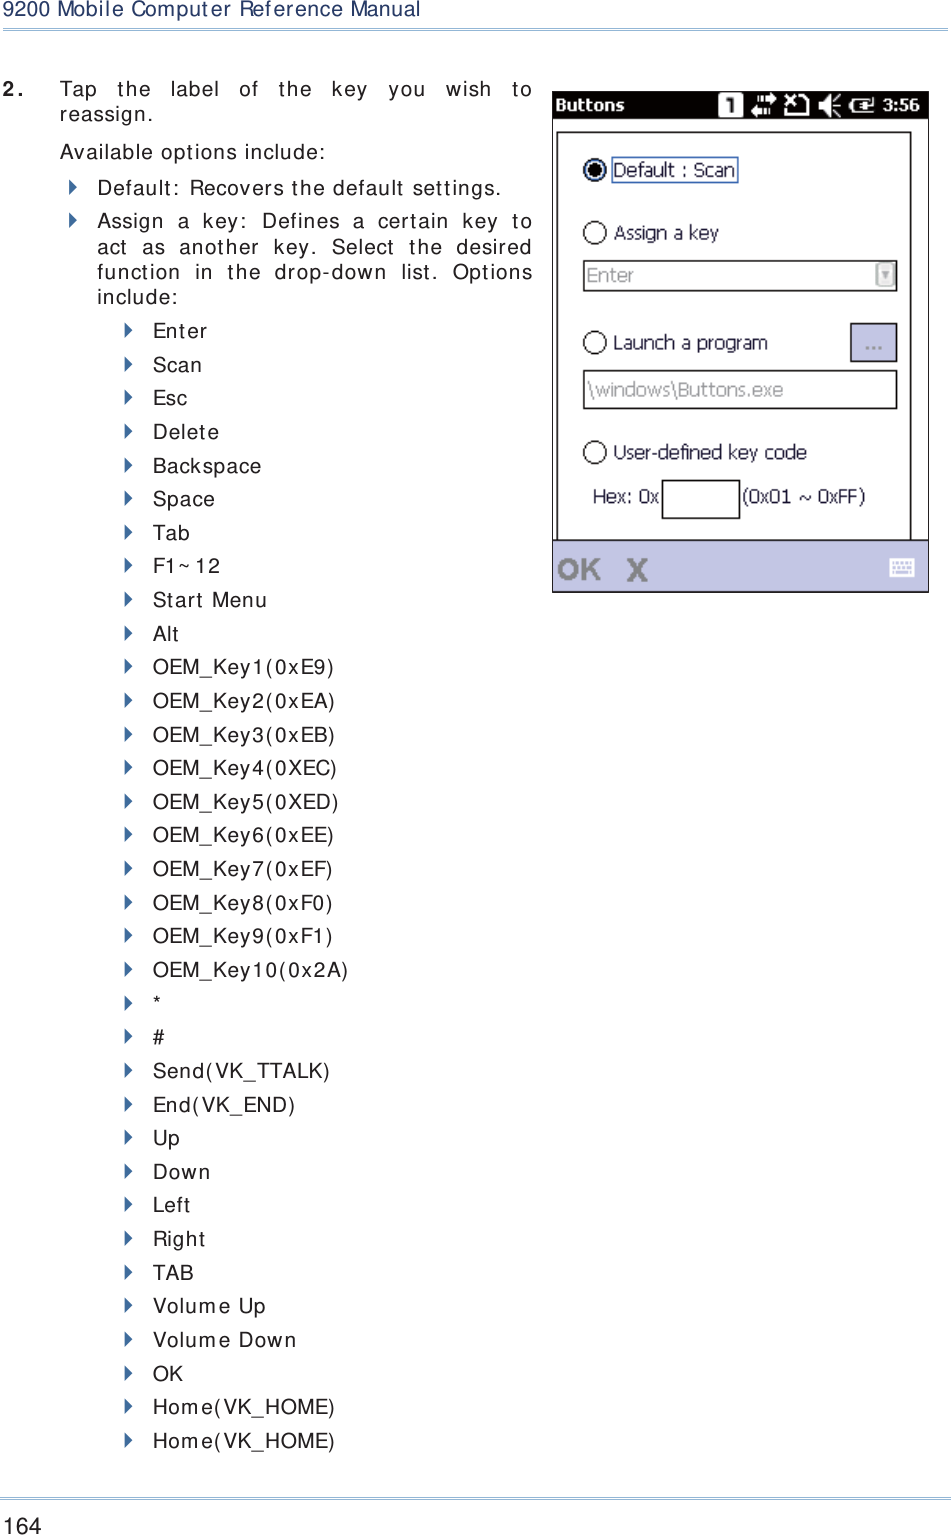
![163 Chapt er 9 More Applicat ions9.2. BUTTON ASSIGNMENT Use Button Assignm ent to re- define the functions of physical keys to have t hem t rigger different functions. For inst ance, you can assign a key to sim ulate another key’s behaviour, to launch a specific program , or t o deliver effect s of a specific key code. Reassignable keys include: Side t riggers ( Left and right scan keys) Application key (App Key) [ -] ( Hyphen) key [ .] ( Period) key. 9.2. 1. REASSIGN PHYSICAL KEYS 1 . Tap Sta r t Scr een | Se tt in gs | Syst em | But ton Assignm en t . A screen shows with a pict ure of t he m obile com put er and its reassignable physical keys.](https://usermanual.wiki/CipherLab/9200C/User-Guide-2081897-Page-178.png)
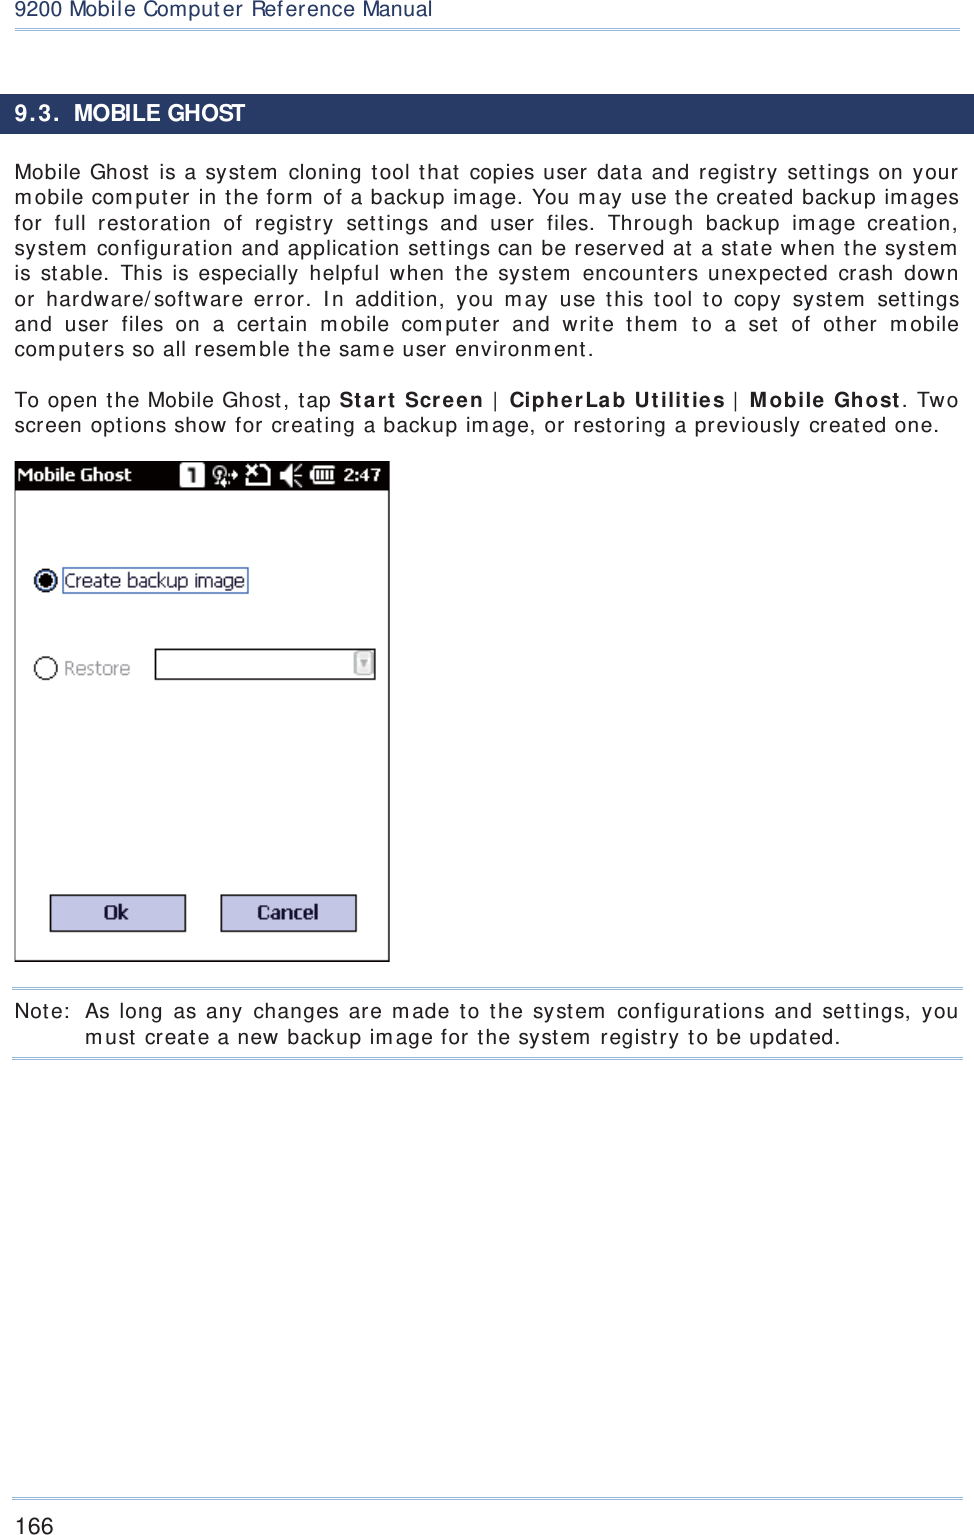
![167 Chapt er 9 More Applicat ionsNote: ( 1) To prevent data loss during backup, m ake sure syst em battery level is sufficient , preferably over 50% , or m ake sure the m obile com puter is connect ed t o external power. ( 2) Do not rem ove the m icroSD card during backup im age creation. [ St ar t bac kup] ( Bac kup i n pr ogr ess) Pl eas e wai t f or a f ew mi nut es…………………………9.3. 1. CREATE BACKUP IMAGE 1 . To creat e a backup im age for syst em registry and set t ings, a m em ory card is required. I nsert a m icroSD card into the SD card slot as described in Using Mem ory Card. 2 . Open Mobile Ghost by tapping Star t Scre en | CipherLa b Ut ilit ies | M obileGhost . 3 . Check Crea t e back up im a ge and t ap OK. A warning m essage shows not ifying that syst em reboot ( restart ) is needed for backup im age creation. Tap Ye s to continue and N o t o abort . 4 . The m obile com puter restart s, and t he backup procedure begins short ly. An on- screen m essage appears stating that backup is currently under progress. When backup is com plet ed, a .bgo file nam ed in date form at (YYYY- MM-DD_001) will be created on t he m icroSD card. The m obile com puter will rest art once m ore.](https://usermanual.wiki/CipherLab/9200C/User-Guide-2081897-Page-182.png)