Cisco Linksys WRT55AG Dual-Band Wireless A+G Broadband Router User Manual WRT55AG ug Rev NC
Cisco-Linksys, LLC Dual-Band Wireless A+G Broadband Router WRT55AG ug Rev NC
Contents
User manual part 3
Dual-Band Wireless A+G Broadband Router
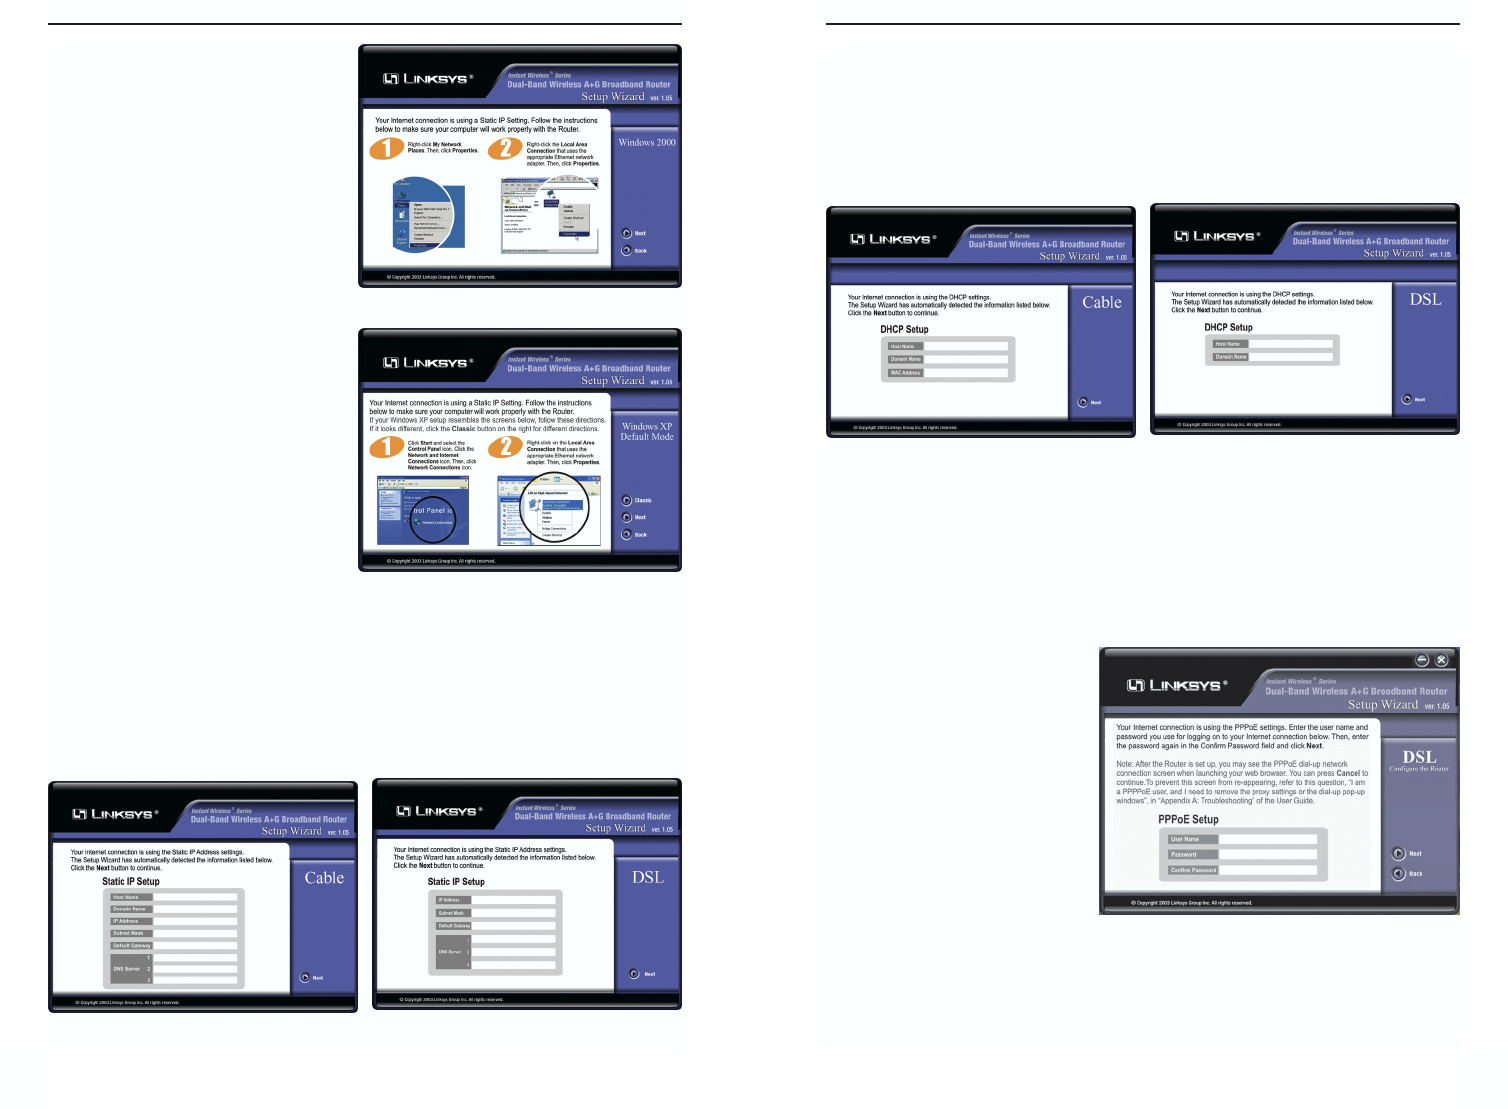
7b. When connecting to the Internet through a DHCP connection:
If you have a cable connection, you will see a screen similar to that shown
in Figure 5-14. If you have a DSL connection, you will see a screen similar
to that shown in Figure 5-15. Enter the information just as you do when
logging onto your Internet connection, and click the Next button. Then,
continue to step 6.
7c. When connecting to the Internet through a PPPoE connection:
PPPoE connections are only available with DSL Internet connections. If
this is how you connect to the Interent, you will see a screen similar to that
shown in Figure 5-16. Enter the information just as you do when logging
onto your Internet connection, and click the Next button. Then, continue to
step 6.
25
Instant Wireless®Series
If you are using Windows 2000,
the instructions will start as
shown in Figure 5-10.
If you are using Windows XP, the
instructions will start as shown in
Figure 5-11. If you are using
Windows XP in “Classic” mode,
you can see these instructions in
this mode by clicking the Classic
button.
After configuring your PC, as shown in the first part of 5a, you will see a
Static IP Setup screen. If you have a cable connection, you will see a screen
similar to that shown in Figure 5-12. If you have a DSL connection, you
will see a screen similar to that shown in Figure 5-13. Enter the informa-
tion just as you do when logging onto your Internet connection, and click
the Next button. Then, continue to step 6.
24
Figure 5-12 Figure 5-13
Figure 5-14 Figure 5-15
Figure 5-16
Figure 5-10
Figure 5-11
Dual-Band Wireless A+G Broadband Router
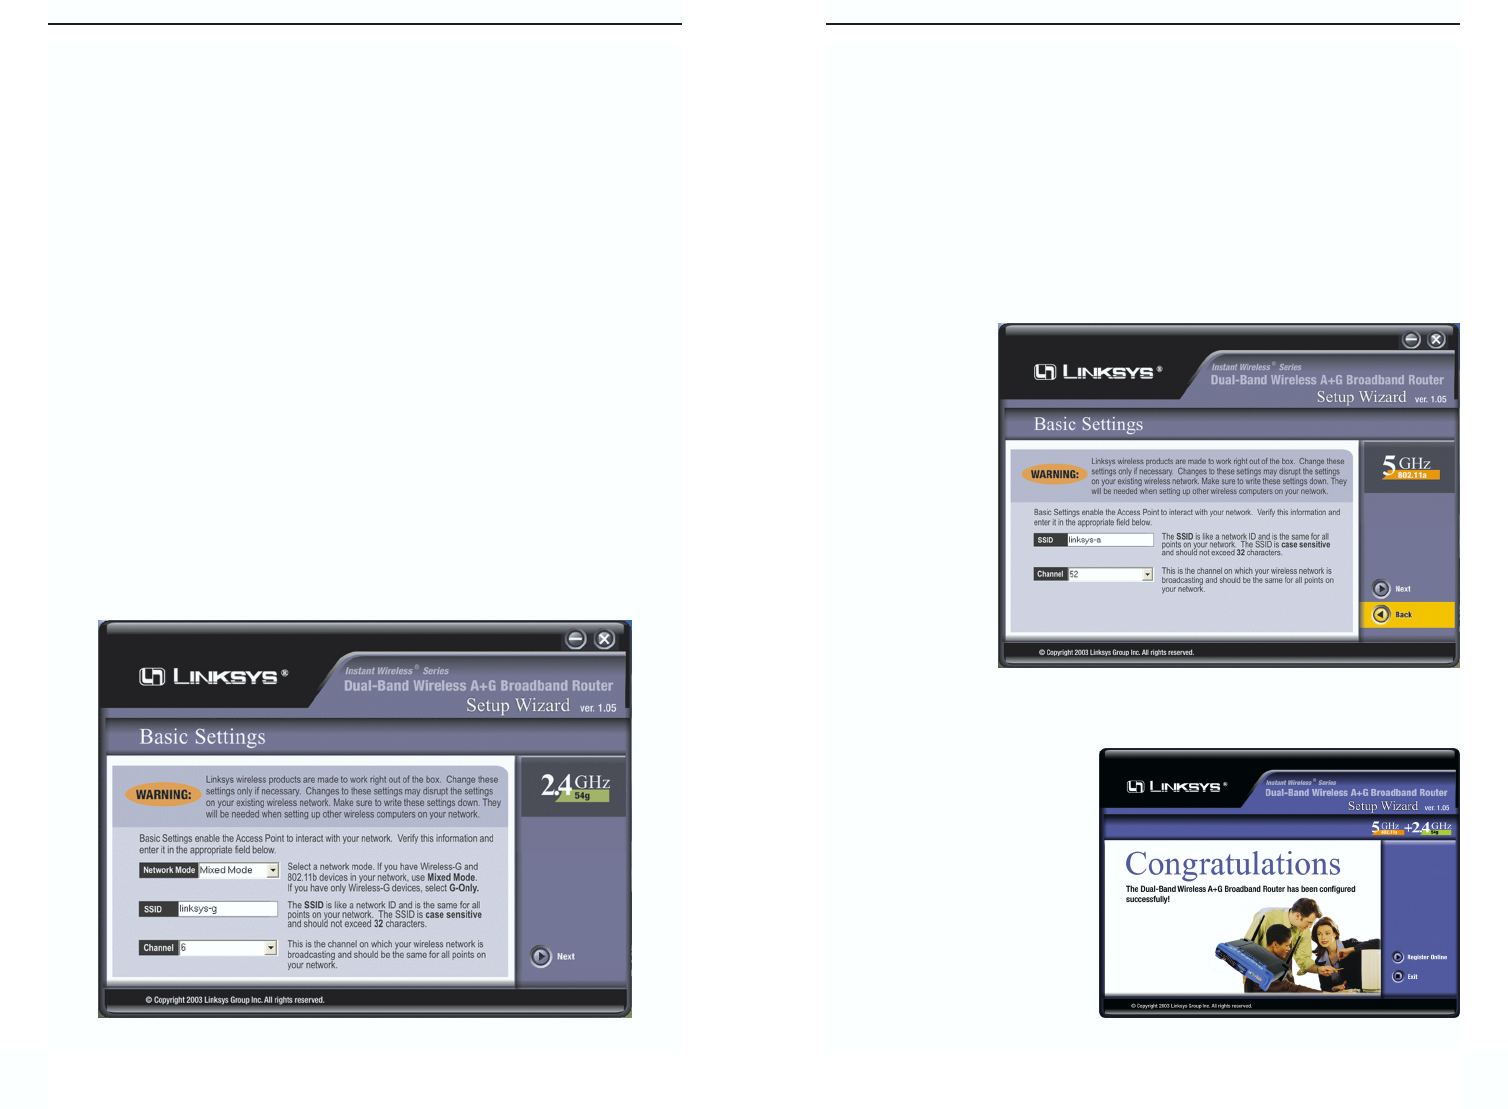
9. As shown in Figure 5-18, the Basic Settings screen for your 5 GHz/802.11a
wireless products will appear. Enter your wireless network’s SSID and
select the channel at which the network broadcasts its wireless signal. Then,
click the Next button to continue.
SSID. The SSID is the unique name shared among all points in a wireless
network. The SSID must be identical for all points in the wireless network.
It is case sensitive and must not exceed 32 characters, which may be any
keyboard character. The default SSID, linksys-a, should be changed for
greater security. Make sure this setting is the same for all points in your
wireless network.
Channel. Select
the appropriate
channel from
the list provided
to correspond
with your net-
work settings,
between 36 and
64. All points in
your wireless
network must
use the same
channel in order
to function cor-
rectly.
10. At this point, the configura-
tion performed with the
Setup Wizard is complete, as
shown in Figure 5-19. You
can register the Router
online by clicking the
Register Online button. To
configure any other Access
Points in your network, you
can run this Setup Wizard
again. Click the Exit button
to exit the Setup Wizard.
27
Instant Wireless®Series
8. As shown in Figure 5-17, the Basic Settings screen for your 2.4GHz/54g
(802.11g-draft) wireless products will appear. Enter the Network Mode,
SSID, and the channel at which the network broadcasts its wireless signal.
Then, click the Next button to continue.
Network Mode. Since Wireless-G products are backwards compatible with
802.11b products, this mode is provided in the event you wish to incorpo-
rate 802.11b products into you Wireless-G wireless network. If you are
using both Wireless-G and 802.11b products in your network, select Mixed
mode. You may experience reduced networking speeds in Mixed mode, as
the speed must compensate for both types. If you are only using Wireless-
G products in your network, select G-Only mode.
SSID. The SSID is the unique name shared among all points in a wireless
network. The SSID must be identical for all points in the wireless network.
It is case sensitive and must not exceed 32 characters, which may be any
keyboard character. The default SSID, linksys-g, should be changed for
greater security. Make sure this setting is the same for all points in your
wireless network.
Channel. Select the appropriate channel from the list provided to corre-
spond with your network settings, between 1 and 11 (in North America). All
points in your wireless network must use the same channel in order to func-
tion correctly.
26
Figure 5-18
Figure 5-17 Figure 5-19
29
Instant Wireless®Series
28
Dual-Band Wireless A+G Broadband Router
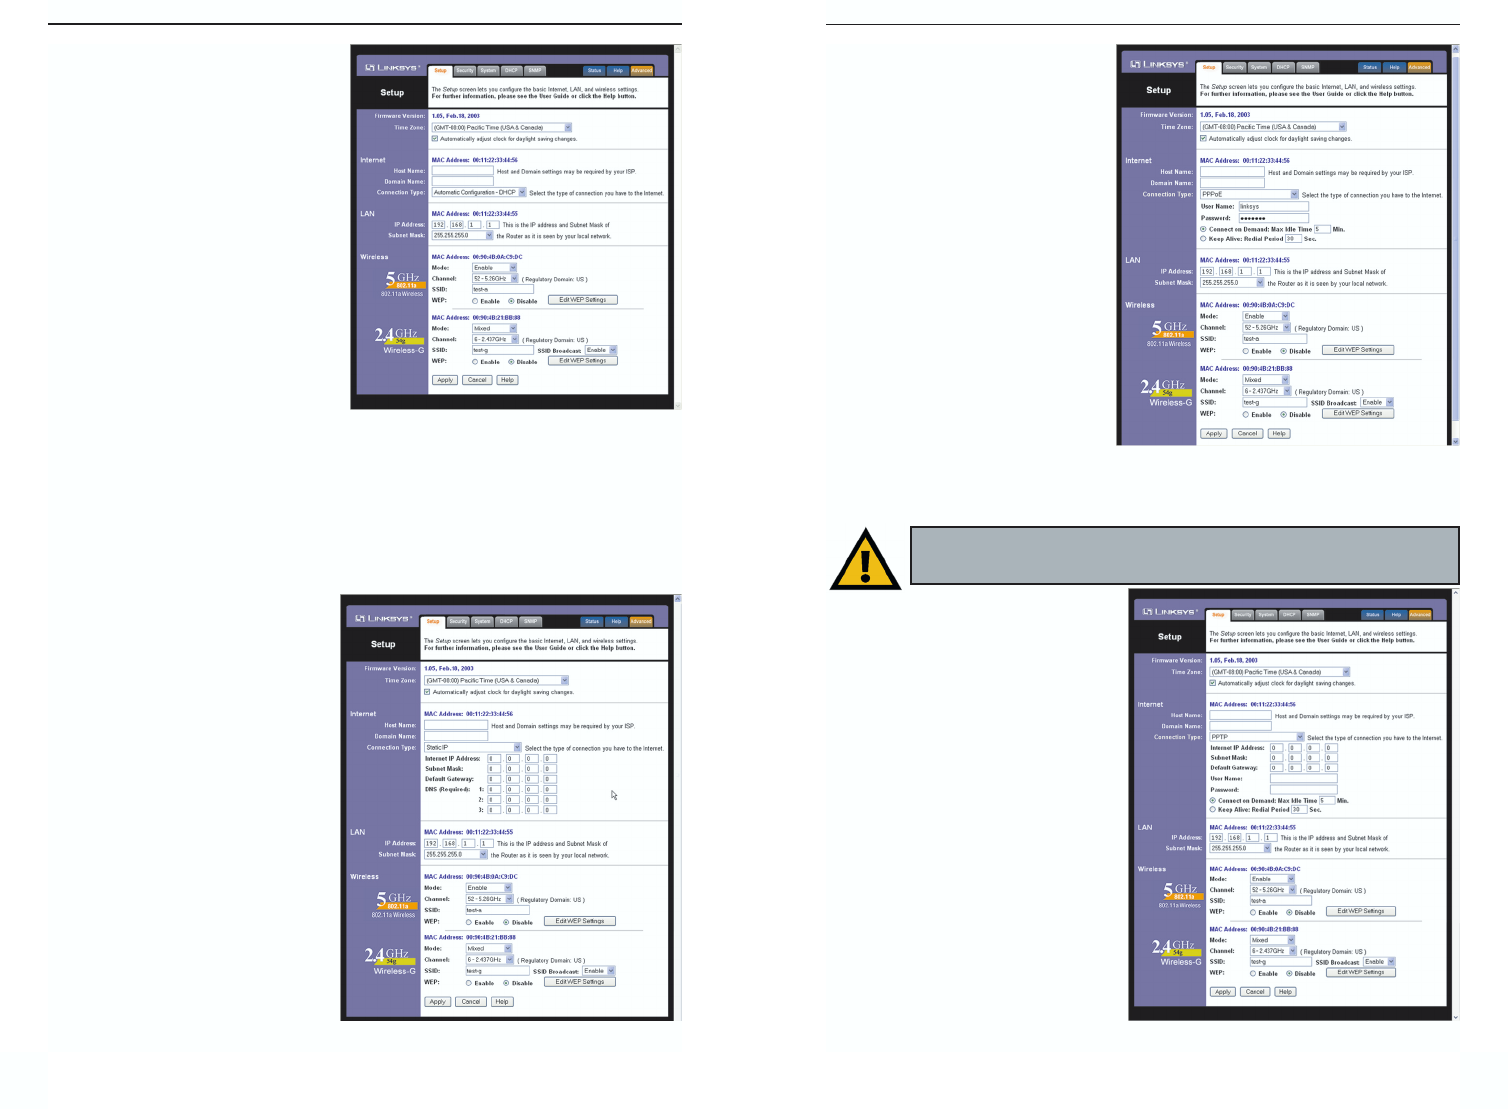
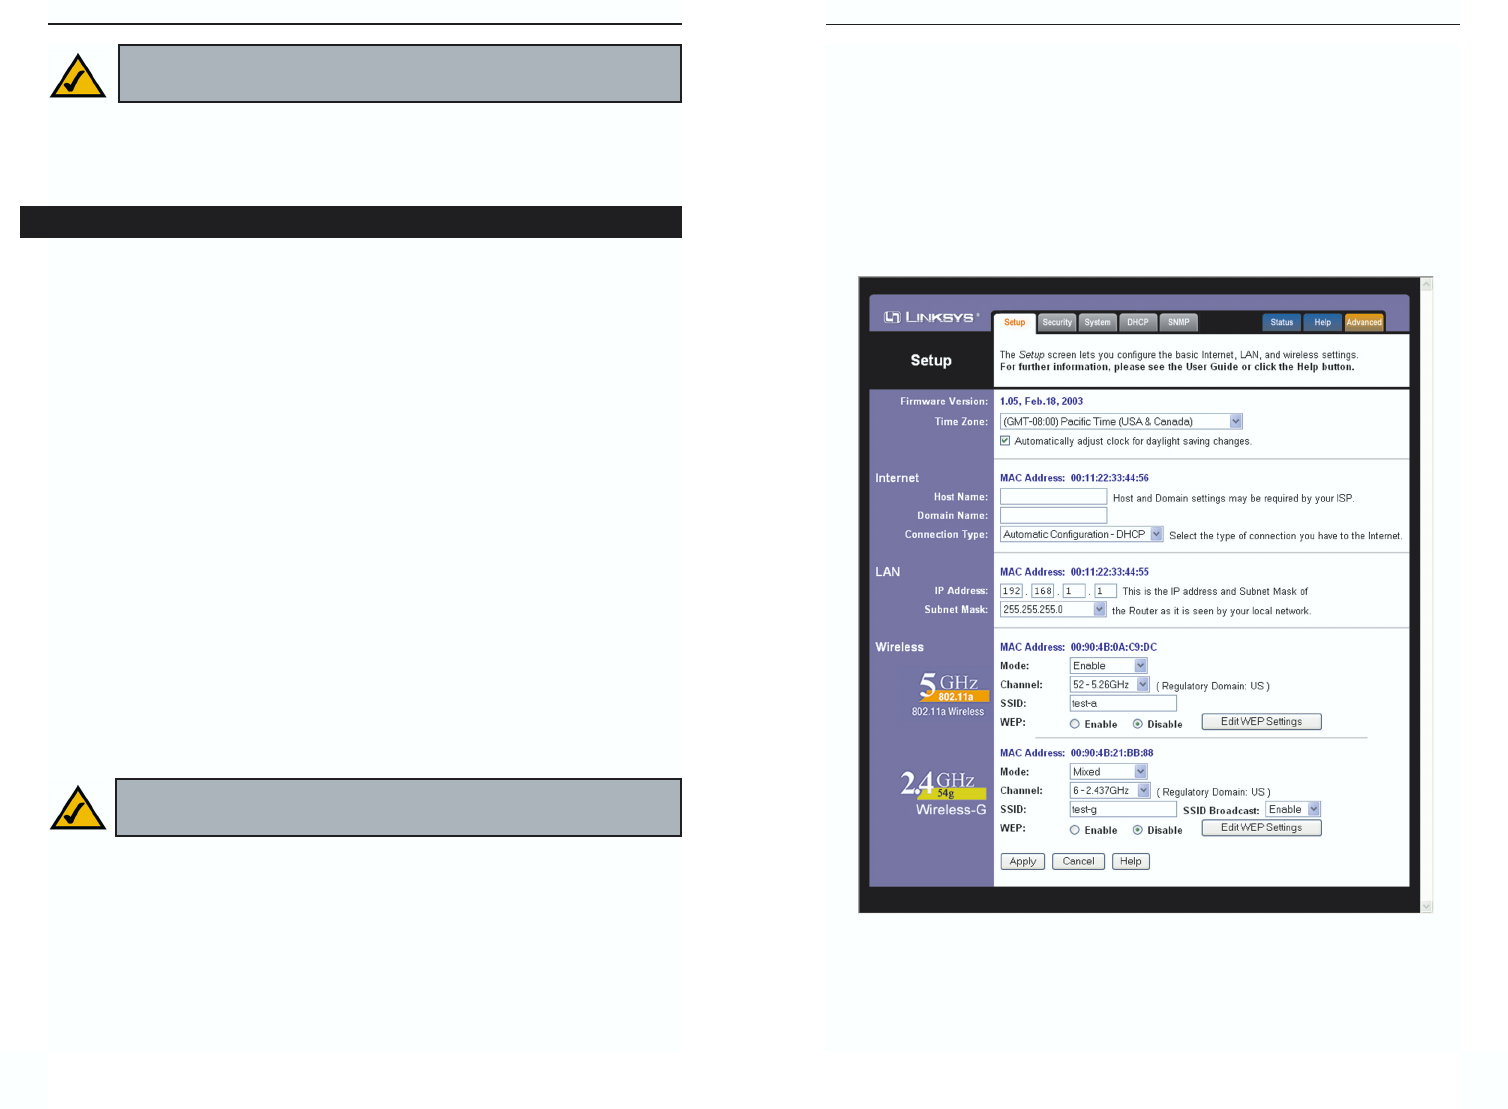
3. The web-based utility will appear with the Setup tab selected. Based on the
setup instructions from your ISP, you may need to provide the Host Name
and Domain Name (usually cable ISPs require them). These fields allow
you to provide a host name and domain name for the Router and are usual-
ly left blank.
The values for the Router’s LAN IP Address and Subnet Mask are shown
on the Setup screen. The default values are 192.168.1.1 for the IP Address
and 255.255.255.0 for the Subnet Mask.
4. The Router supports four connection types: Automatic Configuration -
DHCP (obtain an IP automatically), Static IP, PPPoE, and PPTP. These
types are listed in the drop-down menu for the Configuration Type setting.
Each Setup screen and available features will differ depending on what kind
of connection type you select. Proceed to the instructions for the connec-
tion type you are using, and then continue to step 5.
IMPORTANT: If you have previously enabled any Internet-sharing
proxy server software on any of your PCs, you must disable it now.
Some examples of Internet-sharing software are Internet LanBridge,
Wingate, ICS, and Sygate. To disable your Internet-sharing software:
• If you are running Netscape Navigator, click Edit, Preferences,
Advanced, and Proxies. Click Direct Connection to the Internet.
• If you are running Internet Explorer 5.x or higher, click Tools,
Settings, Control Panel, Internet Options, Connections, and
LAN Settings. Remove checkmarks from all three boxes. Click the
OK button to continue.
You must also disable any Internet log-on software (such as Ivasion
Winpoet or Enternet 300) and any firewall software (such as
ZoneAlarm and Watchdog) on all of your PCs.
Chapter 6: Configuring the
Router’s Basic Settings with the
Web-Based Utility
This chapter will show you how to configure the Router to function in your
network and gain access to the Internet through your Internet Service Provider
(ISP). Detailed description of the Router’s web-based utility can be found in
“Chapter 7: The Router’s Web-based Utility.”
The instructions from your ISP tell you how to set up your PC for Internet
access. Because you are now using the Router to share Internet access among
several computers, you will use the setup information to configure the Router
instead of your PC. You only need to configure the Router once using the first
computer you set up.
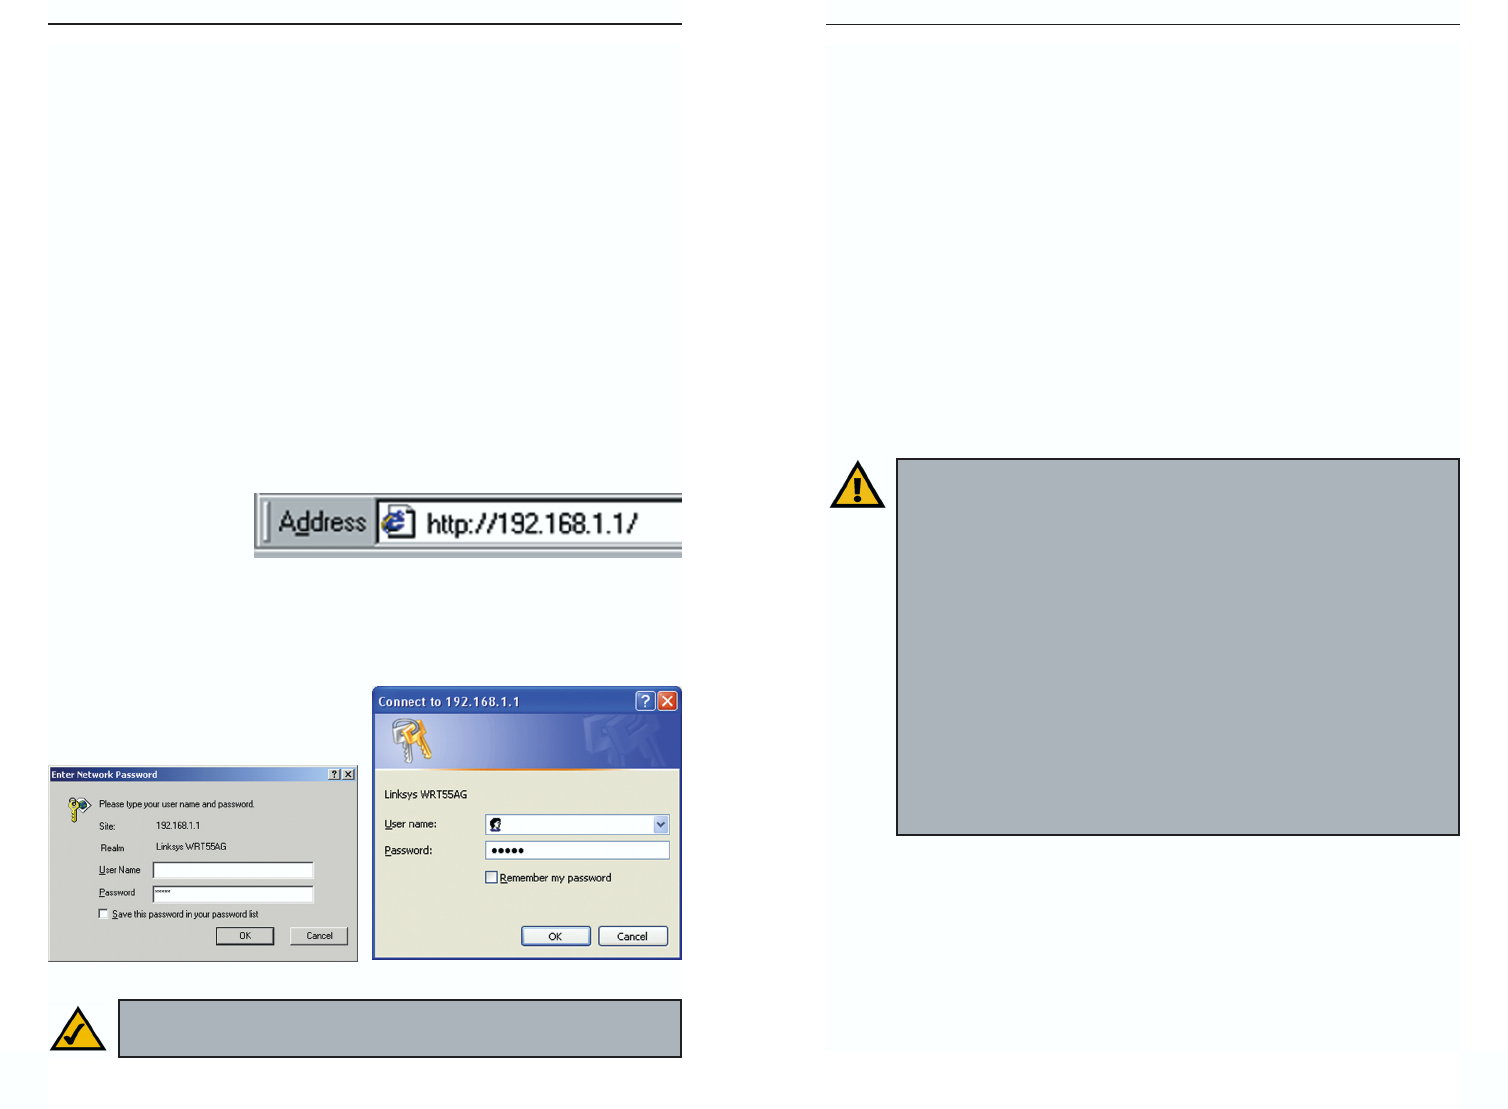
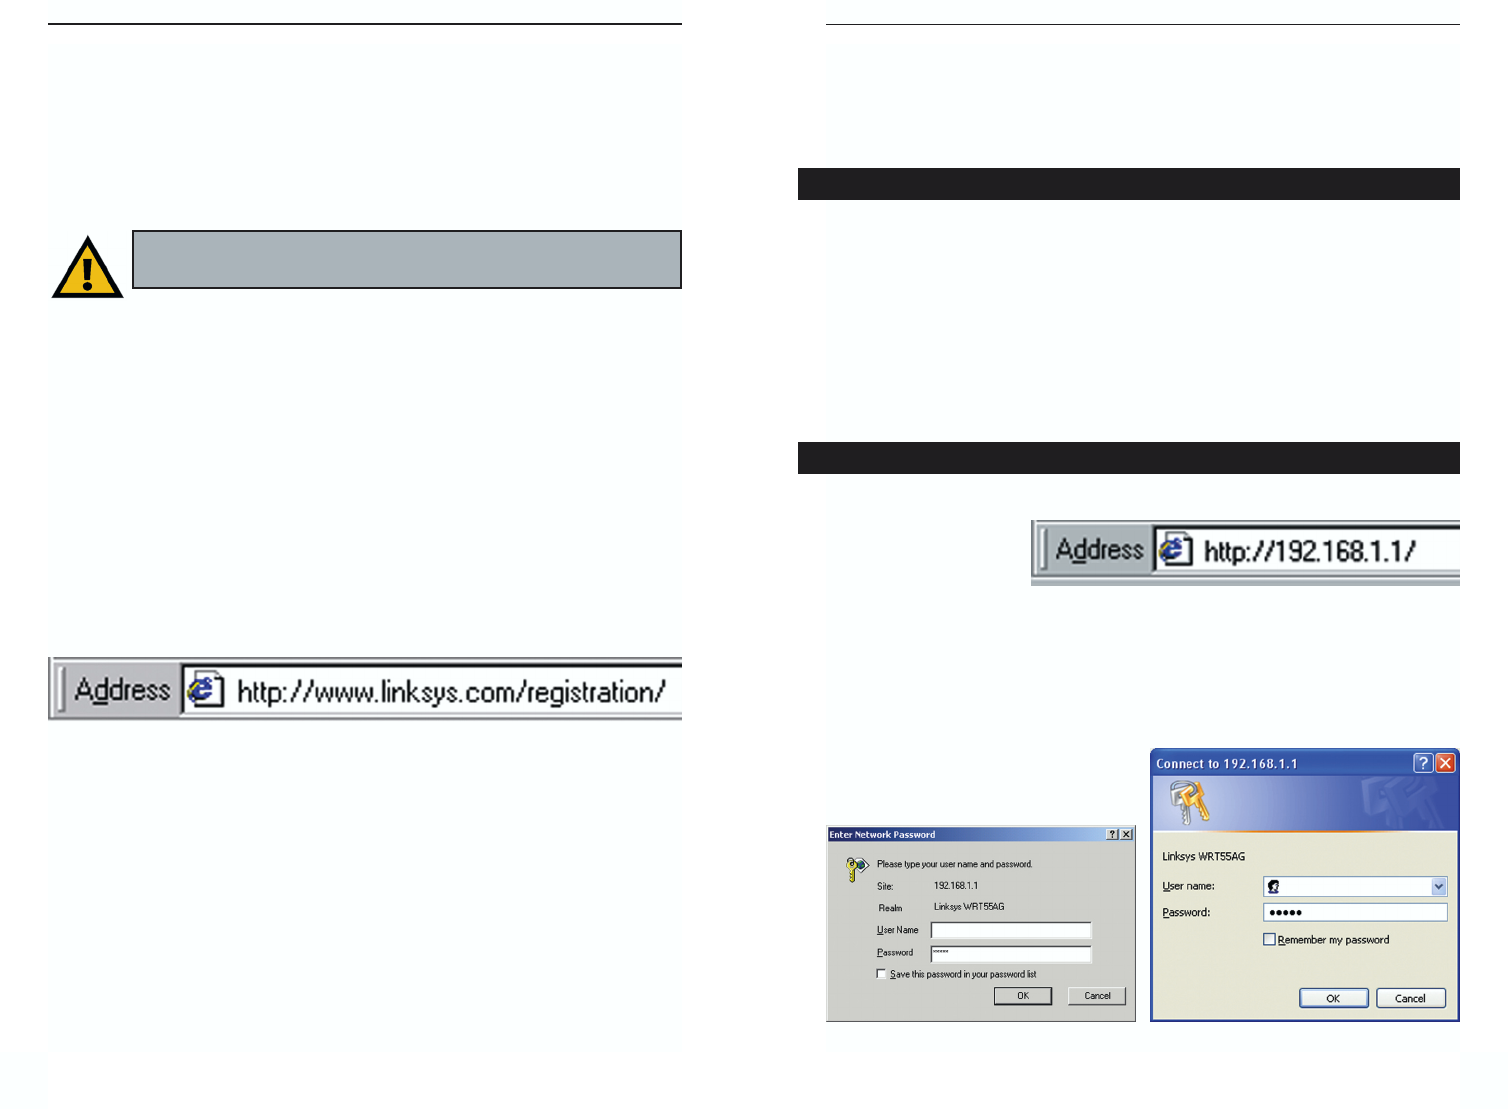
1. Open your web browser. Enter http://192.168.1.1 (the Router’s default IP
address) in the web
browser’s Address
field, as shown in
Figure 6-1, and
press the Enter key.
2. An Enter Network Password window, shown in Figure 6-2, will appear.
Windows XP users will see a Connect to 192.168.1.1 window, shown in
Figure 6-3. Leave the User Name field empty, and enter admin in lower-
case letters in the Password field
(admin is the default password).
Then, click the OK button.
Figure 6-1
Figure 6-2 Figure 6-3
Note: For added security, you should change the password through
the Password screen of the web-based utility.
31
Instant Wireless®Series
Automatic Configuration - DHCP
If you are connecting through
DHCP or a dynamic IP address
from your ISP, perform these steps:
A. Keep the default setting,
Automatic Configuration -
DHCP, as the Configuration
Type, shown in Figure 6-4.
B. Click the Apply button to save the
setting, or click the Cancel button
to clear the setting and start over.
When you are finished, proceed to
step 5.
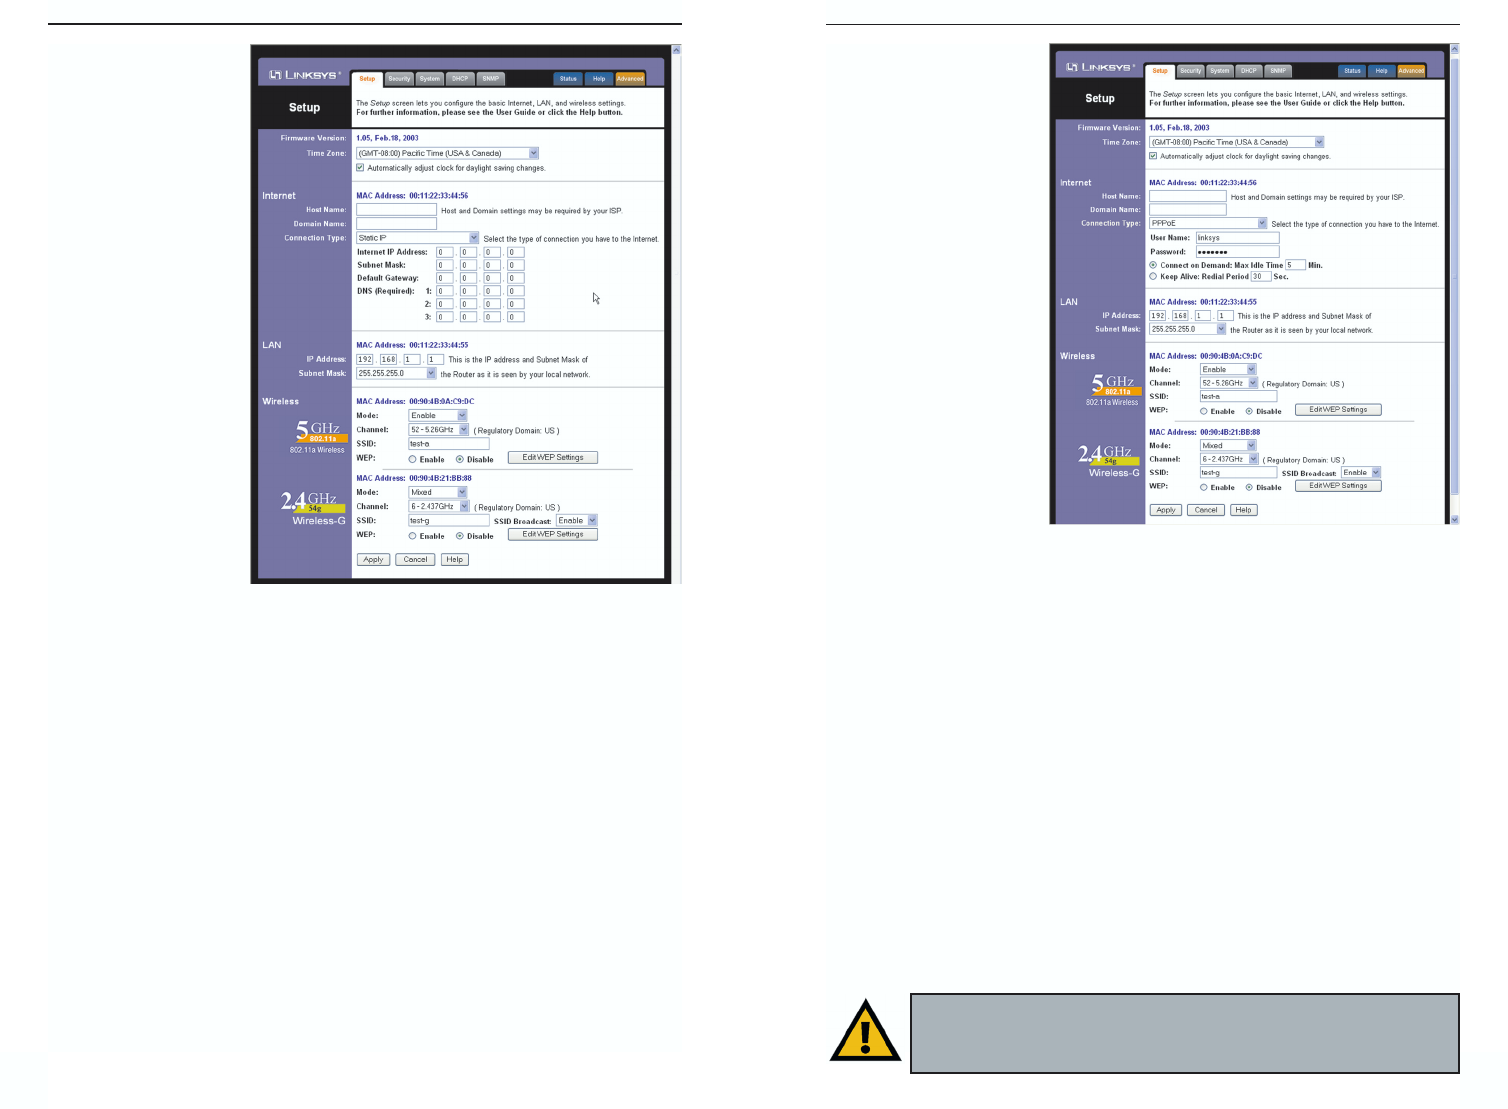
Static (or Fixed) IP Address
If you are connecting through a static or fixed IP address from your ISP, per-
form these steps:
A. Select Static IP as the
Configuration Type, shown in
Figure 6-5.
B. Enter the Internet IP Address.
C. Enter the Subnet Mask.
D. Enter the Default Gateway.
E. Enter the DNS in the 1, 2,
and/or 3 fields. You need to
enter at least one DNS address.
F. Click the Apply button to save
the settings, or click the Cancel
button to clear the settings and
start over. When you are fin-
ished, proceed to step 5.
30
Dual-Band Wireless A+G Broadband Router
PPPoE
If your DSL provider says that you
are connecting through PPPoE
(you use a user name and password
to access the Internet), perform
these steps:
A. Select PPPoE as the
Configuration Type, shown in
Figure 6-6.
B. Enter the User Name.
C. Enter the Password.
D. Click the Apply button to save
the settings, or click the Cancel
button to clear the settings and start over. When you are finished, proceed to
step 5.
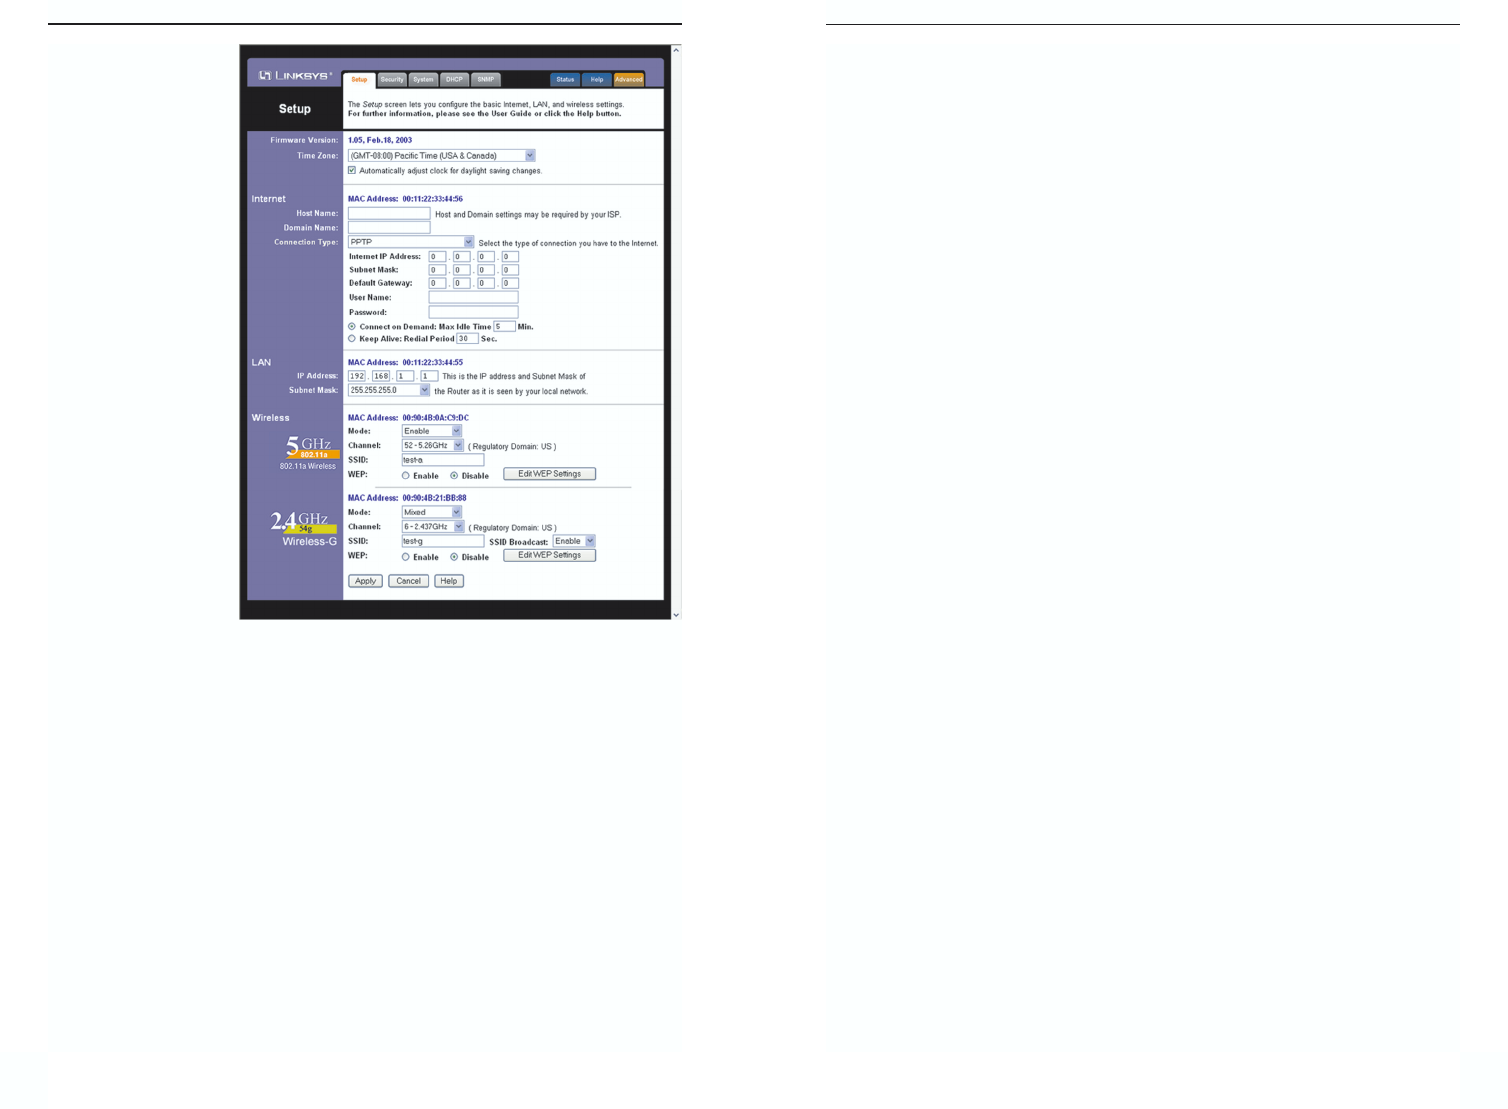
PPTP
PPTP is a service used in Europe
only. If you are using a PPTP con-
nection, check with your ISP for the
necessary setup information.
After you have entered your setup
information, click the Apply button to
save the settings, or click the Cancel
button to clear the settings and start
over. When you are finished, proceed
to step 5.
Figure 6-6
Figure 6-7
Important: If you enable PPPoE, remember to remove any PPPoE
applications already installed on any of your PCs.
Figure 6-4
Figure 6-5
Chapter 7: The Router’s
Web-based Utility
Use the Router’s web-based utility to administer it. This chapter will describe
each web page in the Utility and each page’s key functions. The utility can be
accessed via your web browser through use of a computer connected to the
Router.
The Setup, Security, System, DHCP, SNMP, Status, and Help screens are avail-
able for basic setup. For advanced setup, click the Advanced tab to access these
screens: Advanced Wireless, Internet Filter, Port Forwarding, Routing, and
DDNS.
To access the web-based utility, launch Internet Explorer or Netscape
Navigator, and enter the
Router’s default IP
address, 192.168.1.1, in
the Address field, as
shown in Figure 7-1.
Then press Enter.
A password request page, shown in Figure 7-2 will pop up. (Windows XP users
will see a Connect to 192.168.1.1 window, shown in Figure 7-3). Leave the
User Name field blank, and enter admin (the default password) in the
Password field. Then click the OK
button.
33
Instant Wireless®Series
5. To configure the Router for your wireless network(s), perform these steps:
A. To enable 5GHz, 802.11a wireless networking, make sure the 5GHz,
802.11a Enable radio button is selected. Then click the Change 5GHz
Settings button, and customize the SSID, Channel, and WEP encryption
settings as needed. Then click the Apply button to save your changes. For
more information, refer to “Chapter 7: The Router’s Web-based Utility.”
B. To enable 2.4GHz, Wireless-G wireless networking, make sure the 2.4GHz,
802.11g Enable radio button is selected. Then click the Change 2.4GHz
Settings button, and customize the SSID, Channel, and WEP encryption
settings as needed. Then click the Apply button to save your changes. For
more information, refer to “Chapter 7: The Router’s Web-based Utility.”
6. If you haven’t already done so, click the Apply button to save your Setup
settings. Close the web browser.
7. Restart your computers so that they can obtain the Router’s new settings.
If you need more details or advanced setting information, please refer to
“Chapter 7: The Router’s Web-based Utility” or the Linksys support web-
site at support.linksys.com.
Test the setup by opening your web browser from any computer and enter-
ing http://www.linksys.com/registration, as shown in Figure 6-8.
Congratulations! You’ve successfully configured the Router.
If you are unable to reach our website, you may want to review what you
did in this section or refer to “Appendix A: Troubleshooting.”
Proceed to “Chapter 7: The Router’s Web-based Utility” for more details
and advanced settings information.
32
Dual-Band Wireless A+G Broadband Router
Overview
How to Access the Web-based Utility
Figure 6-8
Important: Operation within the 5150 to 5250GHz band is
restricted to indoor use only.
Figure 7-1
Figure 7-2 Figure 7-3
Automatic Configuration - DHCP
By default, the Router’s Configuration Type is set to Automatic Configuration
- DHCP, as shown in Figure 7-4, and it should be kept only if your ISP supports
DHCP or you are connecting through a dynamic IP address.
To apply any of the settings you change on this page, click the Apply button.
To cancel any changes you’ve entered on this page, click the Cancel button. To
get more information about the features, click the Help button.
35
Instant Wireless®Series
34
Dual-Band Wireless A+G Broadband Router
Figure 7-4
To apply any of the settings you change on a page, click the Apply button. To
cancel any changes you’ve entered on any page, click the Cancel button. To get
additional information about any screen’s features, click the Help button.
The Setup screen is the first screen you see when you access the web-based
utility. If you have already installed and set up the Router, you have already
seen this screen and properly configured all of the screen’s values.
Firmware Version This shows the version and date of the firmware you are
using. Future versions of the Router’s firmware will be posted and available
for download on the Linksys website at www.linksys.com.
Time Zone Select your local time zone from this pull-down menu. The Router
will show the correct time for your area.
Host Name and Domain Name These fields allow you to supply a host and
domain name for the Router. Some ISPs, usually cable ISPs, require these
names as identification. You may have to check with your ISP to see if your
broadband Internet service has been configured with a host and domain name.
In most cases, leaving these fields blank will work.
Configuration Type The Router supports four connection types: Automatic
Configuration - DHCP, Static IP, PPPoE, and PPTP. Each Setup screen and
available features will differ depending on what kind of connection type you
select.
Setup
Note: You can verify that the Internet configuration settings are cor-
rect by successfully connecting to the Internet.
Note: For added security, you should always change the password
through the Password screen of the web-based utility.
37
Instant Wireless®Series
36
Dual-Band Wireless A+G Broadband Router
PPPoE
Some DSL-based ISPs
use PPPoE (Point-to-Point
Protocol over Ethernet) to
establish Internet connec-
tions. If you are connected
to the Internet through a
DSL line, check with your
ISP to see if they use
PPPoE. If they do, you
will have to enable
PPPoE, as shown in
Figure 7-6.
User Name and Password
Enter the User Name and
Password provided by
your ISP.
Connect on Demand: Max Idle Time You can configure the Router to cut the
Internet connection after it has been inactive for a specified period of time
(Max Idle Time). If your Internet connection has been terminated due to inac-
tivity, Connect on Demand enables the Router to automatically re-establish
your connection as soon as you attempt to access the Internet again. If you wish
to activate Connect on Demand, click the radio button. In the Max Idle Time
field, enter the number of minutes you want to have elapsed before your
Internet connection terminates.
Keep Alive Option: Redial Period If you select this option, the Router will peri-
odically check your Internet connection. If you are disconnected, then the
Router will automatically re-establish your connection. To use this option, click
the radio button next to Keep Alive. In the Redial Period field, you specify how
often you want the Router to check the Internet connection. The default Redial
Period is 30 seconds.
To apply any of the settings you change on this page, click the Apply button.
To cancel any changes you’ve entered on this page, click the Cancel button. To
get more information about the features, click the Help button.
Figure 7-6
Static IP
If you are required to
use a permanent IP
address to connect to
the Internet, then select
Static IP, as shown in
Figure 7-5.
Internet IP Address This is the Router’s IP address, when seen from the WAN,
or the Internet. Your ISP will provide you with the IP Address you need to spec-
ify here.
Subnet Mask This is the Router’s Subnet Mask, as seen by external users on
the Internet (including your ISP). Your ISP will provide you with the Subnet
Mask.
Default Gateway Your ISP will provide you with the Default Gateway Address,
which is the ISP server’s IP address.
DNS Your ISP will provide you with at least one DNS (Domain Name System)
Server IP Address.
To apply any of the settings you change on this page, click the Apply button.
To cancel any changes you’ve entered on this page, click the Cancel button. To
get more information about the features, click the Help button.
Figure 7-5
Important: For ADSL users, if you enable PPPoE, remember to
remove any PPPoE applications that are already installed on any of
your PCs.
39
Instant Wireless®Series
38
Dual-Band Wireless A+G Broadband Router
Connect on Demand: Max Idle Time You can configure the Router to cut the
Internet connection after it has been inactive for a specified period of time
(Max Idle Time). If your Internet connection has been terminated due to inac-
tivity, Connect on Demand enables the Router to automatically re-establish
your connection as soon as you attempt to access the Internet again. If you wish
to activate Connect on Demand, click the radio button. In the Max Idle Time
field, enter the number of minutes you want to have elapsed before your
Internet connection terminates.
Keep Alive Option: Redial Period If you select this option, the Router will peri-
odically check your Internet connection. If you are disconnected, then the
Router will automatically re-establish your connection. To use this option, click
the radio button next to Keep Alive. To use this option, click the radio button
next to Keep Alive. In the Redial Period field, you specify how often you want
the Router to check the Internet connection. The default Redial Period is 30
seconds.
To apply any of the settings you change on this page, click the Apply button.
To cancel any changes you’ve entered on this page, click the Cancel button. To
get more information about the features, click the Help button.
LAN
IP Address and LAN Subnet Mask The values for the Router’s IP Address
and Subnet Mask are shown here. The default values are 192.168.1.1 for the
LAN IP Address and 255.255.255.0 for the Subnet Mask.
WIRELESS
5GHz, 802.11a Wireless To enable 5GHz, 802.11a wireless networking, make
sure the Enable radio button is selected. Click the Change 5GHz Settings but-
ton to customize the 802.11a configuration (see Figure 7-8).
2.4GHz Wireless-G To enable 2.4GHz, Wireless-G wireless networking, make
sure the Enable radio button is selected. Click the Change 2.4GHz Settings
button to customize the 802.11b configuration (see Figure 7-10).
PPTP
Point to Point
Tunneling Protocol
(PPTP), selected in
the screen shown in
Figure 7-7, is a serv-
ice that applies to con-
nections in Europe
only.
Specify Internet IP Address This is the Router’s IP address, when seen from
the Internet. Your ISP will provide you with the IP Address you need to speci-
fy here.
Subnet Mask This is the Router’s Subnet Mask, as seen by external users on
the Internet (including your ISP). Your ISP will provide you with the Subnet
Mask.
Default Gateway Your ISP will provide you with the Default Gateway Address.
User Name and Password Enter the User Name and Password provided by
your ISP.
Figure 7-7