Cisco Systems RTPRO0350 Wireless IP Phone User Manual 9971 rt901
Cisco Systems Inc Wireless IP Phone 9971 rt901
UserManual.wiki
>
Cisco Systems
>
RTPRO0350 User Manual
>
User Manual 4
Contents
1.
User Manual 1
2.
User Manual 2
3.
User Manual 3
4.
User Manual 4
5.
User Manual 5
User Manual 4
Navigation menu
Upload a User Manual
Namespaces
Wiki Guide
HTML
PDF
Info
Views
User Manual
Discussion / Help
Navigation


![102 OL-19963-01EFT DRAFT - CISCO CONFIDENTIAL6. In the Message Waiting Lamp area, choose from various settings. Typically, the default message waiting setting prompts your phone to display a steady red light from the handset light strip to indicate a new voice message.7. Select Save.Change the Audible Voice Message Indicator Setting Per Line1. Sign in to your User Options web page.2. Select User Options > Device.3. Select a phone from the Name drop-down menu.4. Select Line Settings.5. If you have more than one directory number (line) assigned to your phone, select a line from the Line drop-down menu.6. In the Audible Message Waiting Lamp area, choose from various settings.7. Select Save.Change the Ring Settings Per Line1. Sign in to your User Options web page.2. Select User Options > Device.3. Select a phone from the Name drop-down menu.4. Select Line Settings.5. If you have more than one directory number (line) assigned to your phone, select a line from the Line drop-down menu.6. In the Ring Settings area, set the option for Ring Setting (Phone Idle) and Ring Setting (Phone Active) from the drop-down menus. The options are: –Use System Default –Disable –Flash Only –Ring Once –Ring –Beep Only [this option is only available for Ring Setting (Phone Active)]7. Select Save.Change or Create a Line Text Label for Your Phone Display1. Sign in to your User Options web page.2. Select User Options > Device.](https://usermanual.wiki/Cisco-Systems/RTPRO0350.User-Manual-4/User-Guide-1172590-Page-34.png)


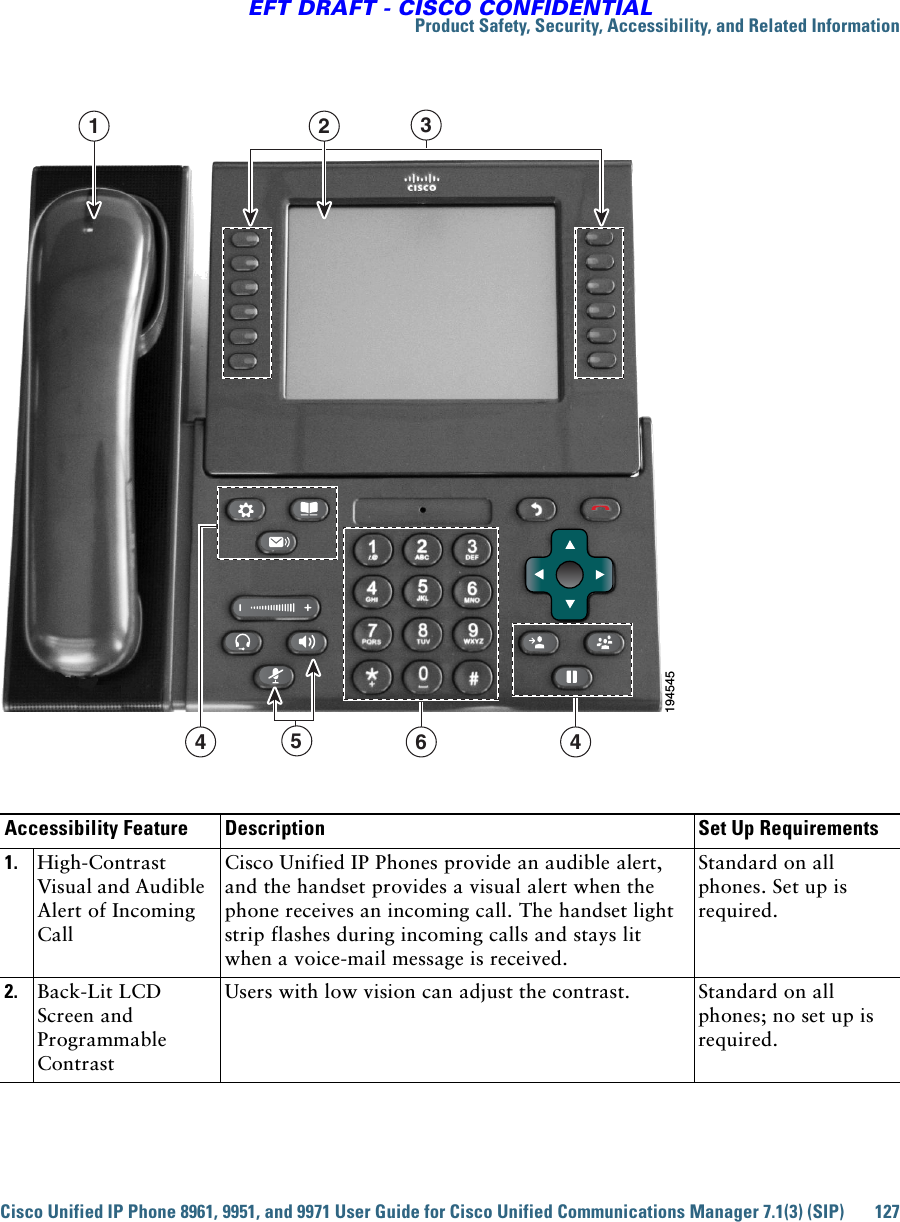
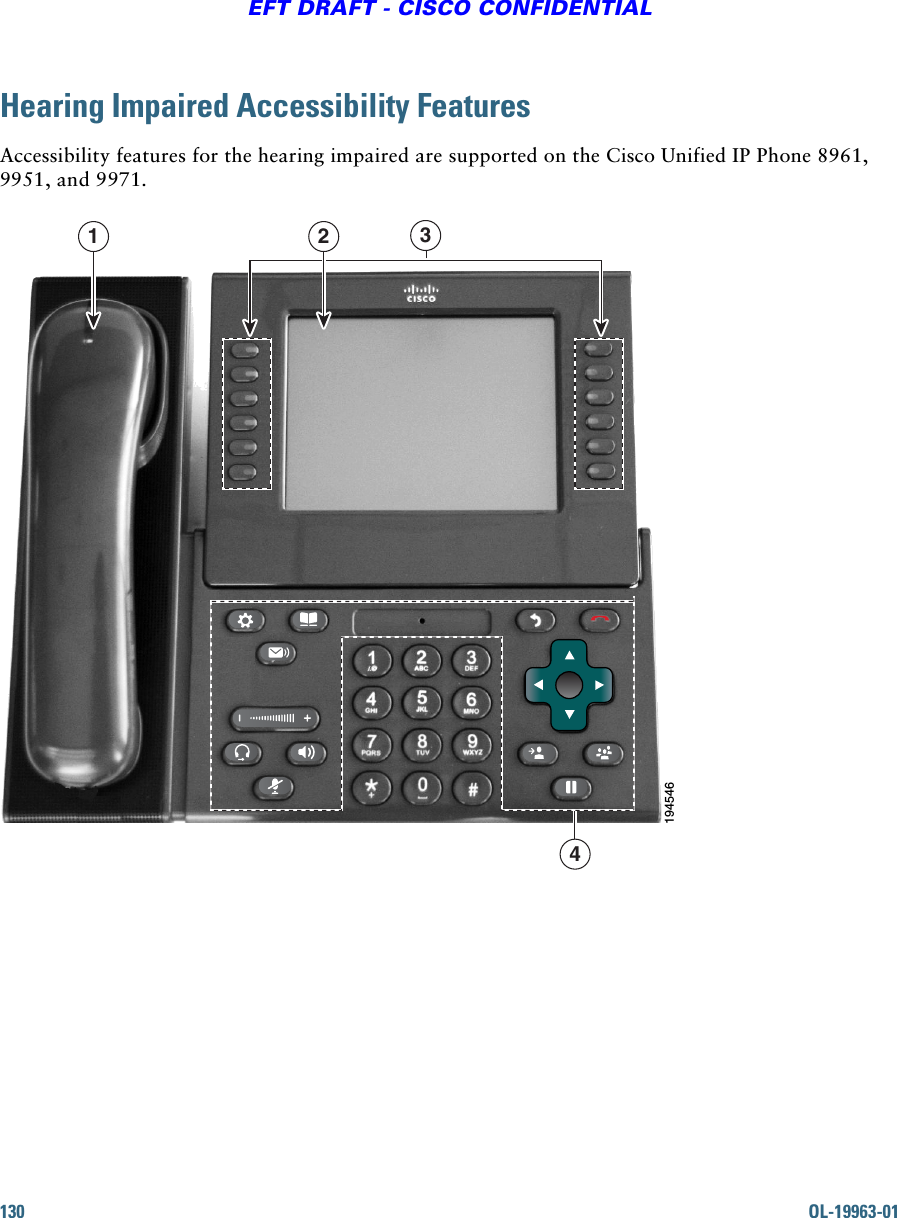
![126 OL-19963-01EFT DRAFT - CISCO CONFIDENTIALCaution In European Union countries, use only external speakers, microphones, and headsets that are fully compliant with the EMC Directive [89/336/EC]. Cisco Product SecurityThis product contains cryptographic features and is subject to United States and local country laws governing import, export, transfer and use. Delivery of Cisco cryptographic products does not imply third-party authority to import, export, distribute or use encryption. Importers, exporters, distributors and users are responsible for compliance with U.S. and local country laws. By using this product you agree to comply with applicable laws and regulations. If you are unable to comply with U.S. and local laws, return this product immediately. Further information regarding U.S. export regulations may be found at:http://www.access.gpo.gov/bis/ear/ear_data.html.Accessibility FeaturesThe Cisco Unified IP Phone 8961, 9951, and 9971 provides accessibility features for the blind, and the visually, hearing and mobility impaired.Vision Impaired and Blind Accessibility Features Accessibility features for the vision impaired and blind are supported on the Cisco Unified IP Phone 8961, 9951, and 9971.](https://usermanual.wiki/Cisco-Systems/RTPRO0350.User-Manual-4/User-Guide-1172590-Page-58.png)