ClearCount Medical Solutions CCMS003 Detects and counts surgical items with RFID tags. User Manual Quick Start Guide
ClearCount Medical Solutions Inc. Detects and counts surgical items with RFID tags. Quick Start Guide
Contents
- 1. Users Manual
- 2. Quick Start Guide
Quick Start Guide

100417 Rev. D
For use with SmartSponge®
Surgical Sponges
In Scan Tray
Count Out
Bucket
SmartWand
Serial Number
Power Entry
Lift
®
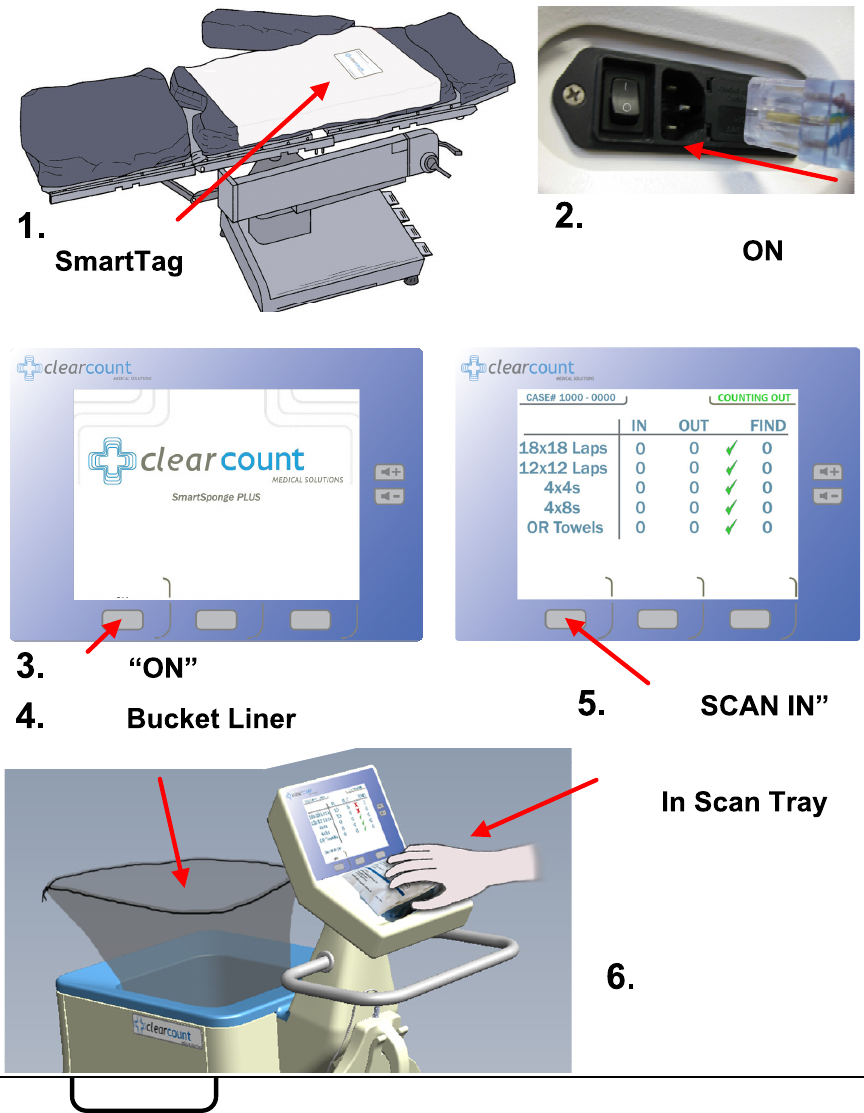
Apply
between
sheets, directly below surgical site.
Pre-Surgery
(May be left in ON
position when not in use)
Press to enter COUNT MODE.
Place into
Count Out Bucket.
Press “
to scan packs in by
holding them on
the .
Open and use
sponges.
Plug in power cord,
flip switch to .
ON SCAN IN END WAND
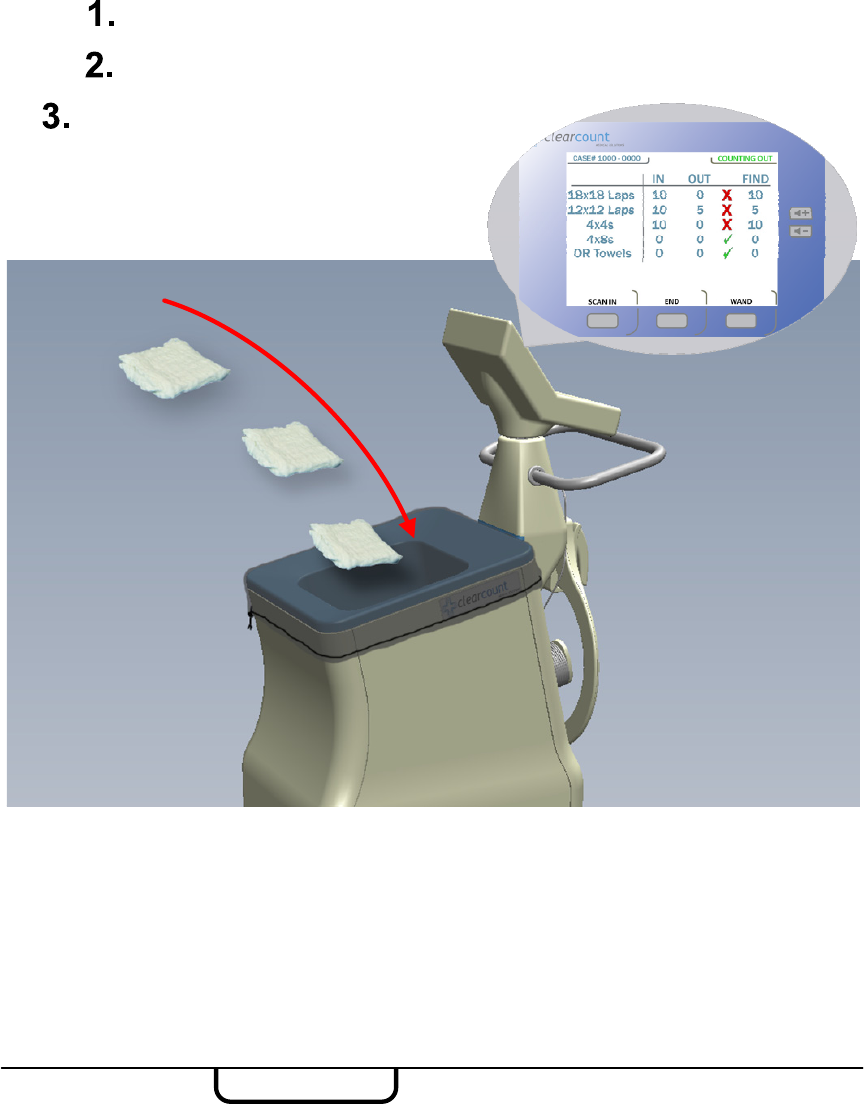
Ensure System is in “COUNTING OUT”Mode; verified by display.
If the ”Change Bag”System Alert appears, remove the sponges or discard
the full bag and replace with a new liner. Sponge counts will not change. Do
not fill the Count Out Bucket with more than 50 sponges at a time.
During Surgery
If a sponge that has not been scanned in is detected by the Count Out
Bucket, the system will prompt the user on what action to take. Accept
infers the sponge was intentionally discarded into the bucket. Decline infers
the sponge was accidentally held too close to the Count Out Bucket prior to
being scanned in.
●
●
Discard all sponges directly into the Count Out Bucket.
Ensure that all sponges have been
accounted for by placing them into
the Count Out Bucket before
ending the case.

Press the button
to view the final sponge
counts. Make sure all
columns have a green
check mark.
Press the
button to save the case
data and power down the
device.
If the is
requested and the sponge
counts are not reconciled,
an will be
needed to end the case.
Ending Surgery
Press the “STANDBY”
button to retain case data and
temporarily power down the
device.
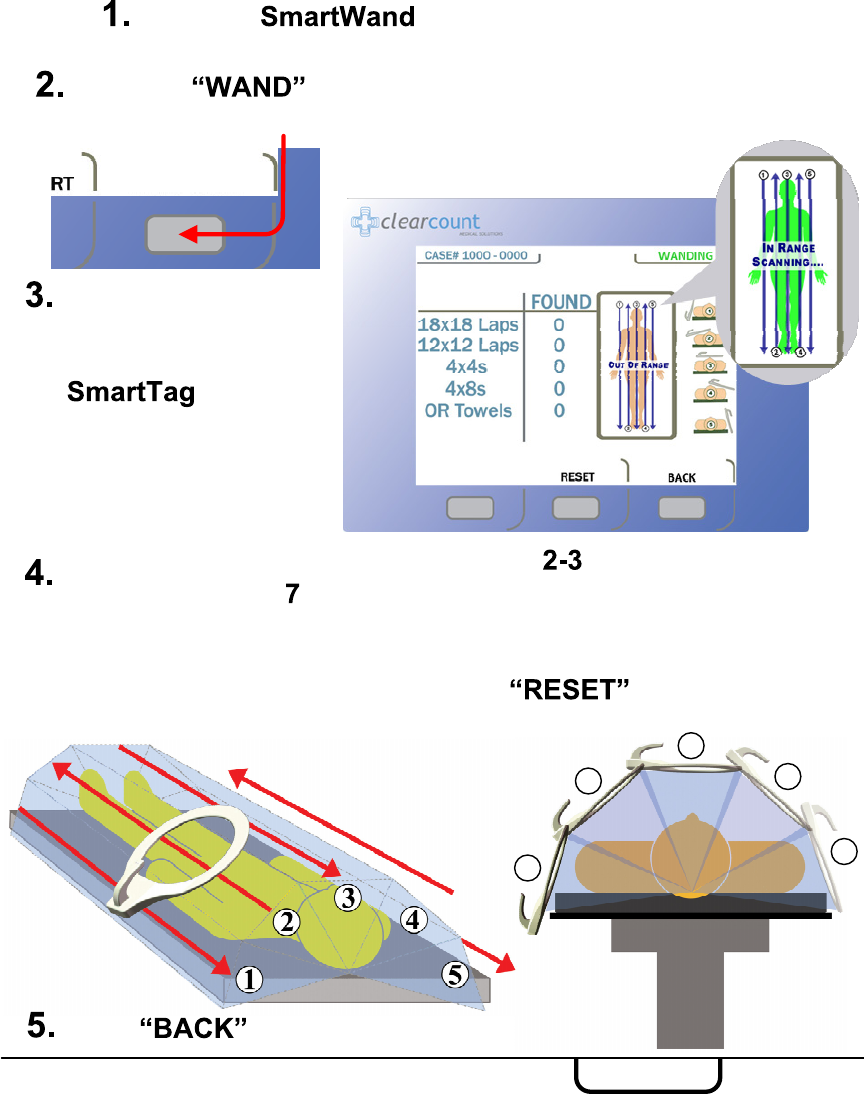
Hold the wand over the
surgical site above the
location of the
. When the
SmartTag is detected,
the on-screen figure
will change to green as
shown.
SmartWand
Slowly scan the patient holding the wand inches above, at a
rate no faster than inches a second while following the onscreen
directions. When a sponge is detected, the Amber LED on the wand
will illuminate followed by an audible tone and the type and quantity
will be displayed on the screen. Press to clear the
“FOUND” column to rescan.
Cover the with a sterile cover while passing it
into the sterile field.
Press the button to activate the wand. The green LED
on the wand will illuminate when activated.
Press to return to count mode.
1
2
3
4
5
WAND

SYSTEM MESSAGE CAUSE ACTION
Pack Not Verified – Retry
Pack System unable to scan pack.
Flip or Rotate pack and
Rescan. If rescanning does
not work, discard pack.
Discard Pack System has detected a
problem with pack.
Discard pack and resume
scanning with a new pack.
Multiple Packs Detected –
Remove and Scan One Pack
at a Time
System unable to scan more
than one pack at a time.
Ensure one pack is placed on
the In-Scan Tray at a time.
Pack Already Scanned Pack already counted. Pack ready for use – open
and use / continue.
Change Bag – Bucket Limit
Has Been Exceeded –
Remove Sponges to
Continue
Over 50 sponges in Count Out
Bucket.
Remove sponges or discard
bag and replace. (Counts will
not change)
Bag Overflow Warning –
Bucket Limit Has Been
Exceeded – Remove
Sponges to Continue
Over 70 sponges in Count Out
Bucket.
Remove sponges or discard
bag and replace. (Counts will
not change)
System Reset – Bucket
Limit Has Been Exceeded –
Remove Sponges and
Power Cycle the System
Over 80 sponges in Count Out
Bucket.
Remove sponges and power
cycle system. Rescan
sponges in groups of no more
than 50 to assure each has
been counted.
System Failure
A system failure will prevent the system from
functioning properly.
In this event.
Contact ClearCount for Service,
Provide Numeric Error Code from screen,
Power down the system.
ClearCount Medical Solutions
101 Bellevue Road. Suite 300
Pittsburgh, PA 15229
(888) 931-0787
service@clearcount.com
Service Contact
Messages
System Messages are displayed on-screen as System Alerts, Warnings, or
Failures.