Cobra Electronics 0K29BT2K12 BLUETOOTH ACCESSORY FOR CB User Manual 29LXBT MANL indd
Cobra Electronics Corporation BLUETOOTH ACCESSORY FOR CB 29LXBT MANL indd
Contents
- 1. Users Manual 1
- 2. Users Manual 2
- 3. Users Manual 3
- 4. Users Manual 4
Users Manual 2
Operation
Operation
17
16
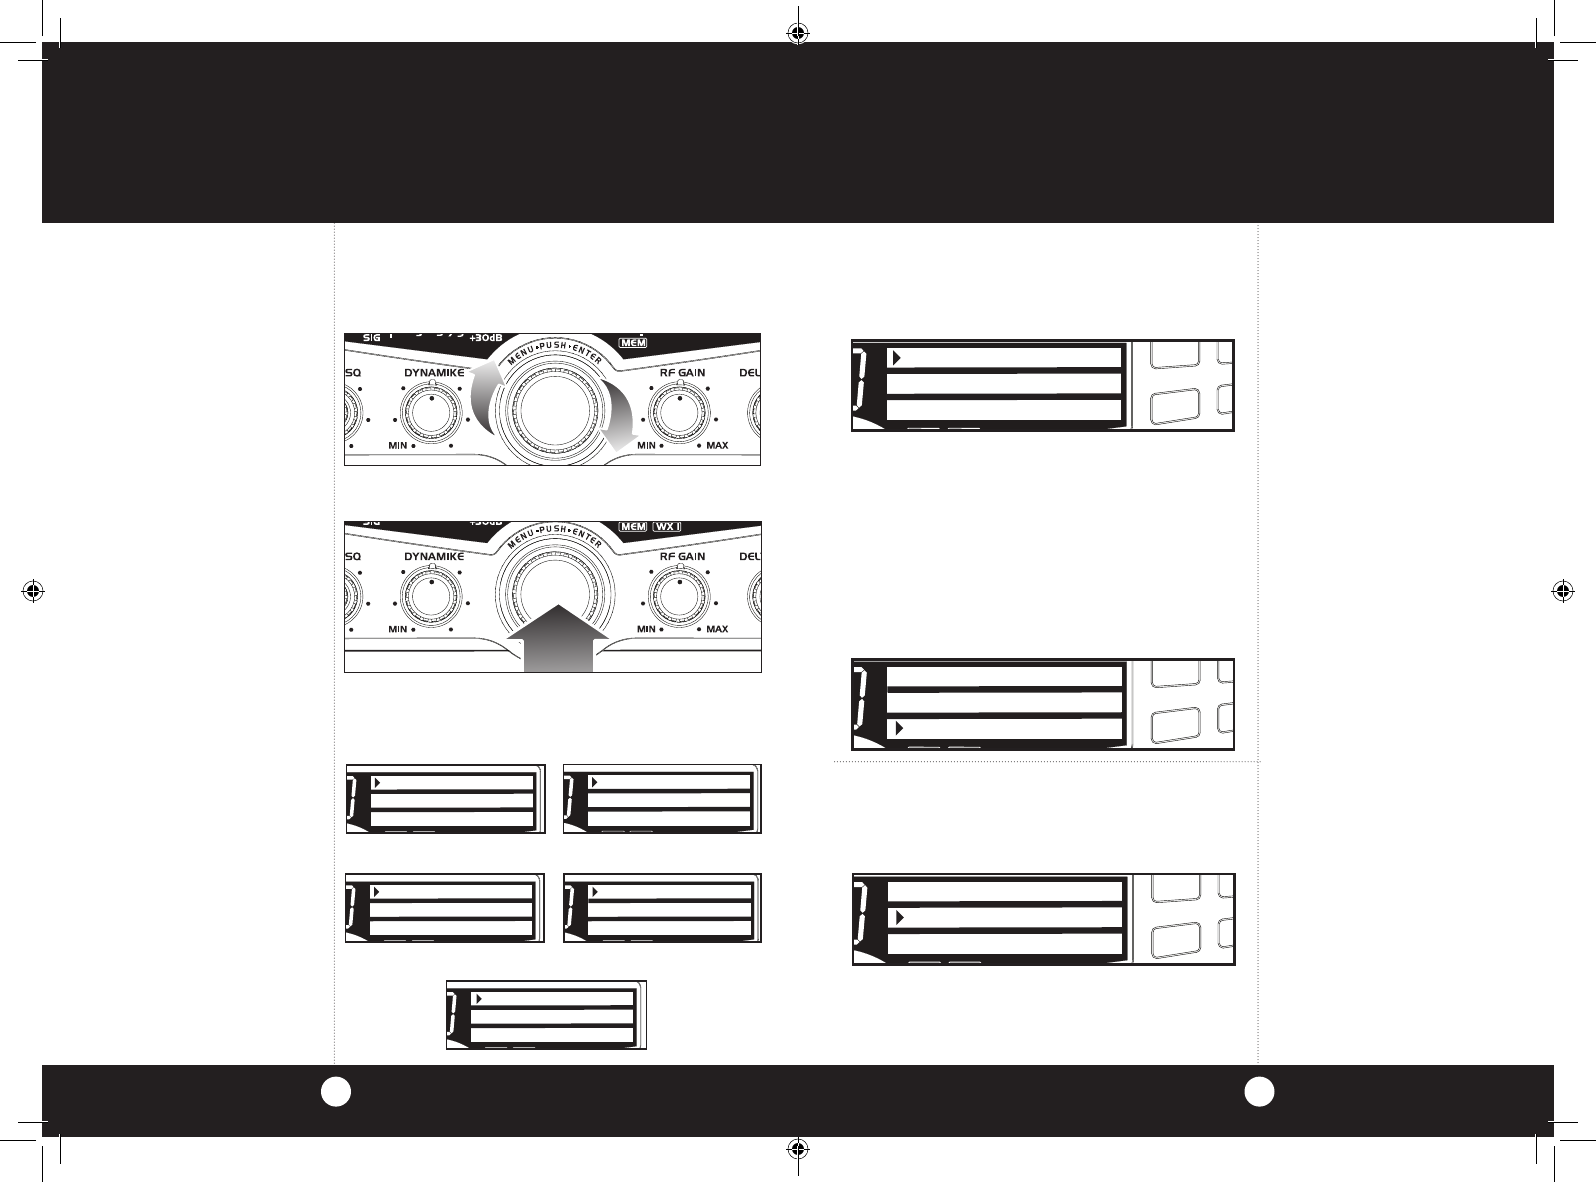
Menu Mode Menu Mode
Used to program special features. Menu/Enter
knob is used to move cursor to desired feature
to program.
Rotate Menu/Enter knob clockwise to navigate
menu levels.
Press Menu/Enter knob to select feature to be
programmed.
Note
Use Dim/Escape button to exit
from any routine back to CB
standby mode.
Setting the
Clock
Setting the Clock
Using the clock, alarm and countdown functions.
To set the clock, press Menu/Enter knob and
select Set Clock.
12:00 PM will appear in the display and the hours
will flash. Rotate Menu/Enter knob clockwise to
select desired hour and press to set.
The minutes will then flash. Rotate Menu/Enter knob
again to select desired minutes and press to set.
Once the minutes are set, AM or PM will then
flash. Rotate Menu/Enter knob again to select AM
or PM and press to set or scroll down to EXIT and
press to return to main menu.
SWR/CAL
NB/ANL
VOL SQ DYNAMIKERF GAIN DELTA TUNE T BACK SWR
CAL
OFF MIN MINOFF
MAX
ESC
MEM SCAN
S/RF
M
E
N
U
P
U
S
H
E
N
T
E
R
SIG
RF
+30dB
1
1.5 23CAL
3579
SWR TX
RX
NB/ANL
MEMWX !
ANL
S/RF
SWR
CAL
CH 9/
19
CB/WX
DIM
SCAN
SETTING
BLUETOOTH
EXIT
SWR/CAL
NB/ANL
VOL SQ DYNAMIKERF GAIN DELTA TUNE T BACK SWR
CAL
OFF MIN MINOFF
MAX
ESC
MEM SCAN
S/RF
M
E
N
U
P
U
S
H
E
N
T
E
R
SIG
RF
+30dB
1
1.5 23CAL
3579
SWR TX
RX
NB/ANL
MEMWX !
ANL
S/RF
SWR
CAL
CH 9/
19
CB/WX/
DIM
SCAN
PA
SET CLOCK
ALARM CLOCK
SET COUNT DOWN
SWR/CAL
NB/ANL
VOL SQ DYNAMIKERF GAIN DELTA TUNE T BACK SWR
CAL
OFF MIN MINOFF
MAX
ESC
MEM SCAN
S/RF
M
E
N
U
P
U
S
H
E
N
T
E
R
SIG
RF
+30dB
1
1.5 23CAL
3579
SWR TX
RX
NB/ANL
MEMWX !
ANL
S/RF
SWR
CAL
CH 9/
19
CB/WX/
DIM
SCAN
PA
KEY TONES
WX ALERT
WX ALERT SCAN
Level 1: Level 2:
SWR/CAL
NB/ANL
VOL SQ DYNAMIKERF GAIN DELTA TUNE T BACK SWR
CAL
OFF MIN MINOFF
MAX
ESC
MEM SCAN
S/RF
M
E
N
U
P
U
S
H
E
N
T
E
R
SIG
RF
+30dB
1
1.5 23CAL
3579
SWR TX
RX
NB/ANL
MEMWX !
ANL
S/RF
SWR
CAL
CH 9/
19
CB/WX/
DIM
SCAN
PA
WX AUTO SCAN
DISPLAY COLOR
BRIGHTNESS
SWR/CAL
NB/ANL
VOL SQ DYNAMIKERF GAIN DELTA TUNE T BACK SWR
CAL
OFF MIN MINOFF
MAX
ESC
MEM SCAN
S/RF
M
E
N
U
P
U
S
H
E
N
T
E
R
SIG
RF
+30dB
1
1.5 23CAL
3579
SWR TX
RX
NB/ANL
MEMWX !
ANL
S/RF
SWR
CAL
CH 9/
19
CB/WX/
DIM
SCAN
PA
NW LIGHTING
CONTRAST
RADIO CHECK
Level 3: Level 4:
Level 5:
Note
Normal display will appear if
clock has not yet been set.
SWR/CAL
NB/ANL
VOL SQ DYNAMIKERF GAIN DELTA TUNE T BACK SWR
CAL
OFF MIN MINOFF
MAX
ESC
MEM SCAN
S/RF
M
E
N
U
P
U
S
H
E
N
T
E
R
SIG
RF
+30dB
1
1.5 23CAL
3579
SWR TX
RX
NB/ANL
MEMWX !
ANL
S/RF
SWR
CAL
CH 9/
19
CB/ WX
DIM
SCAN
SET CLOCK
ALARM CLOCK
SET COUNT DOWN
SWR/CAL
NB/ANL
VOL SQ DYNAMIKERF GAIN DELTA TUNE T BACK SWR
CAL
OFF MIN MINOFF
MAX
ESC
MEM SCAN
S/RF
M
E
N
U
P
U
S
H
E
N
T
E
R
SIG
RF
+30dB
1
1.5 23CAL
3579
SWR TX
RX
NB/ANL
MEMWX !
ANL
S/RF
SWR
CAL
CH 9/
19
CB/ WX
DIM
SCAN
SET AM-PM
11:30 PM
EXIT
Note
Use Dim/Escape button to exit
from any routine back to CB
standby mode.
Setting the
Alarm
Setting the Alarm
Your 29 LX can be utilized as an alarm clock.
To set the alarm, press Menu/Enter knob and
select Set Alarm.
Rotate Menu/Enter knob clockwise to select Set
Alarm Time. Follow instructions above for setting
the alarm time and AM or PM.
SWR/CAL
NB/ANL
VOL SQ DYNAMIKERF GAIN DELTA TUNE T BACK SWR
CAL
OFF MIN MINOFF
MAX
ESC
MEM SCAN
S/RF
M
E
N
U
P
U
S
H
E
N
T
E
R
SIG
RF
+30dB
1
1.5 23CAL
3579
SWR TX
RX
NB/ANL
MEMWX !
ANL
S/RF
SWR
CAL
CH 9/
19
CB/ WX
DIM
SCAN
SET CLOCK
ALARM CLOCK
SET COUNT DOWN
Note
The radio should be connected
to a constant 12V source to
maintain the time when the
radio is turned off.
29LXBT_MANL.indd 16-17 2/27/12 11:14 AM

Setting the Count Down Timer
To set the count down timer, press Menu/Enter
knob and select Set Count Down.
Follow instructions in Setting the Clock section
(page 17) to set count down hour and
minutes. Once desired count down time is
selected, press Menu/Enter knob again to set
and return to the standby menu.
Radio Check
Mode
Radio Check Mode
Allows testing of important radio functions.
Test 1- Battery Level: Confirms that battery
voltage level is between 10.8 V to 15.8 V. If in that
range, it is “PASS”. Outside of that range, either
FAIL LOW” or “FAIL HIGH” will be displayed. Press
Menu/Enter knob to advance to next test.
Note
Press Dim/Escape button to
return to CB standby mode.
If 10 seconds pass or if Enter
button pressed, unit goes to
2nd test.
Test 2- RF Power Output: Confirms 3.3 to 4 Watt
output level. Once Push-to-Talk button is pressed,
Pass or Fail will be displayed if level is outside limits. Note
Press Dim/Escape button to
return to CB standby mode. If
10 seconds pass or if Enter button
pressed, go to 3rd test.
Note
Press Push-To-Talk within 10
seconds or unit will go to the
next test.
SWR/CAL
NB/ANL
VOL SQ DYNAMIKERF GAIN DELTA TUNE T BACK SWR
CAL
OFF MIN MINOFF
MAX
ESC
MEM SCAN
S/RF
M
E
N
U
P
U
S
H
E
N
T
E
R
SIG
RF
+30dB
1
1.5 23CAL
3579
SWR TX
RX
NB/ANL
MEMWX !
ANL
S/RF
SWR
CAL
CH 9/
19
CB/WX/
DIM
SCAN
PA
RF POWER OUTPUT
PASS
SWR/CAL
NB/ANL
VOL SQ DYNAMIKERF GAIN DELTA TUNE T BACK SWR
CAL
OFF MIN MINOFF
MAX
ESC
MEM SCAN
S/RF
M
E
N
U
P
U
S
H
E
N
T
E
R
SIG
RF
+30dB
1
1.5 23CAL
3579
SWR TX
RX
NB/ANL
MEMWX !
ANL
S/RF
SWR
CAL
CH 9/
19
CB/WX/
DIM
SCAN
PA
RF POWER OUTPUT
FAIL
Note
Press Dim/Escape button to
return to CB standby mode.
If 10 seconds pass or if Enter
button pressed, testing is
complete. Unit will return to
CB Standby mode.
Test 3- Antenna Mismatch Warning: Press
Push-to-Talk button to check antenna/radio for
proper matching.
SWR/CAL
NB/ANL
VOL SQ DYNAMIKERF GAIN DELTA TUNE T BACK SWR
CAL
OFF MIN MINOFF
MAX
ESC
MEM SCAN
S/RF
M
E
N
U
P
U
S
H
E
N
T
E
R
SIG
RF
+30dB
1
1.5 23CAL
3579
SWR TX
RX
NB/ANL
MEMWX !
ANL
S/RF
SWR
CAL
CH 9/
19
CB/WX/
DIM
SCAN
PA
ANTENNA
PASS
SWR/CAL
NB/ANL
VOL SQ DYNAMIKERF GAIN DELTA TUNE T BACK SWR
CAL
OFF MIN MINOFF
MAX
ESC
MEM SCAN
S/RF
M
E
N
U
P
U
S
H
E
N
T
E
R
SIG
RF
+30dB
1
1.5 23CAL
3579
SWR TX
RX
NB/ANL
MEMWX !
ANL
S/RF
SWR
CAL
CH 9/
19
CB/WX/
DIM
SCAN
PA
ANTENNA
FAIL
1
23
1
23
1
23
Operation
19
18
Operation
Key Tones
Mode
Key Tones Mode On and Off
Press Menu/Enter knob and rotate clockwise
to Set Key Tones. Press Menu/Enter to set Key
Tones On/Off.
Press Menu/Enter knob to select On/Off and
exit to main menu.
SWR/CAL
NB/ANL
VOL SQ DYNAMIKERF GAIN DELTA TUNE T BACK SWR
CAL
OFF MIN MINOFF
MAX
ESC
MEM SCAN
S/RF
M
E
N
U
P
U
S
H
E
N
T
E
R
SIG
RF
+30dB
1
1.5 23CAL
3579
SWR
TX
RX
NB/ANL
MEMWX !
ANL
S/RF
SWR
CAL
CH 9/
19
CB/WX
D
IM
SCAN
SET KEY TONES
ON
OFF
Note
Press Dim/Escape
button to return to CB mode.
Setting the
Alarm continued
Once alarm settings are complete, rotate Menu/Enter
knob clockwise to Set Snooze and press to select.
Enter desired snooze time (from 1 to 60 minutes).
Select Enter to exit, return to Set Snooze or Alarm
Length. Select Alarm Length to set alarm duration
(from 10 to 300 seconds). Pressing Menu/Enter
knob returns unit to exit, Set Snooze or Alarm
Length.
SWR/CAL
NB/ANL
VOL SQ DYNAMIKERF GAIN DELTA TUNE T BACK SWR
CAL
OFF MIN MINOFF
MAX
ESC
MEM SCAN
S/RF
M
E
N
U
P
U
S
H
E
N
T
E
R
SIG
RF
+30dB
1
1.5 23CAL
3579
SWR TX
RX
NB/ANL
MEMWX !
ANL
S/RF
SWR
CAL
CH 9/
19
CB/ WX
DIM
SCAN
EXIT
SET SNOOZE
ALARM LENGTH
Note
Default snooze time length
is 10 minutes.
Note
Press Dim/Escape button to
return to CB standby mode.
Note
Default alarm length
is 60 seconds and is set in
10 second increments.
Setting the
Count Down
Timer
SWR/CAL
NB/ANL
VOL SQ DYNAMIKERF GAIN DELTA TUNE T BACK SWR
CAL
OFF MIN MINOFF
MAX
ESC
MEM SCAN
S/RF
M
E
N
U
P
U
S
H
E
N
T
E
R
SIG
RF
+30dB
1
1.5 23CAL
3579
SWR TX
RX
NB/ANL
MEMWX !
ANL
S/RF
SWR
CAL
CH 9/
19
CB/ WX
DIM
SCAN
SET CLOCK
SET ALARM
SET COUNT DOWN
Note
Press Dim/Escape button to
return to CB standby mode.
29LXBT_MANL.indd 18-19 2/27/12 11:14 AM
Operation
Operation
21
20
Setting
Brightness
Mode
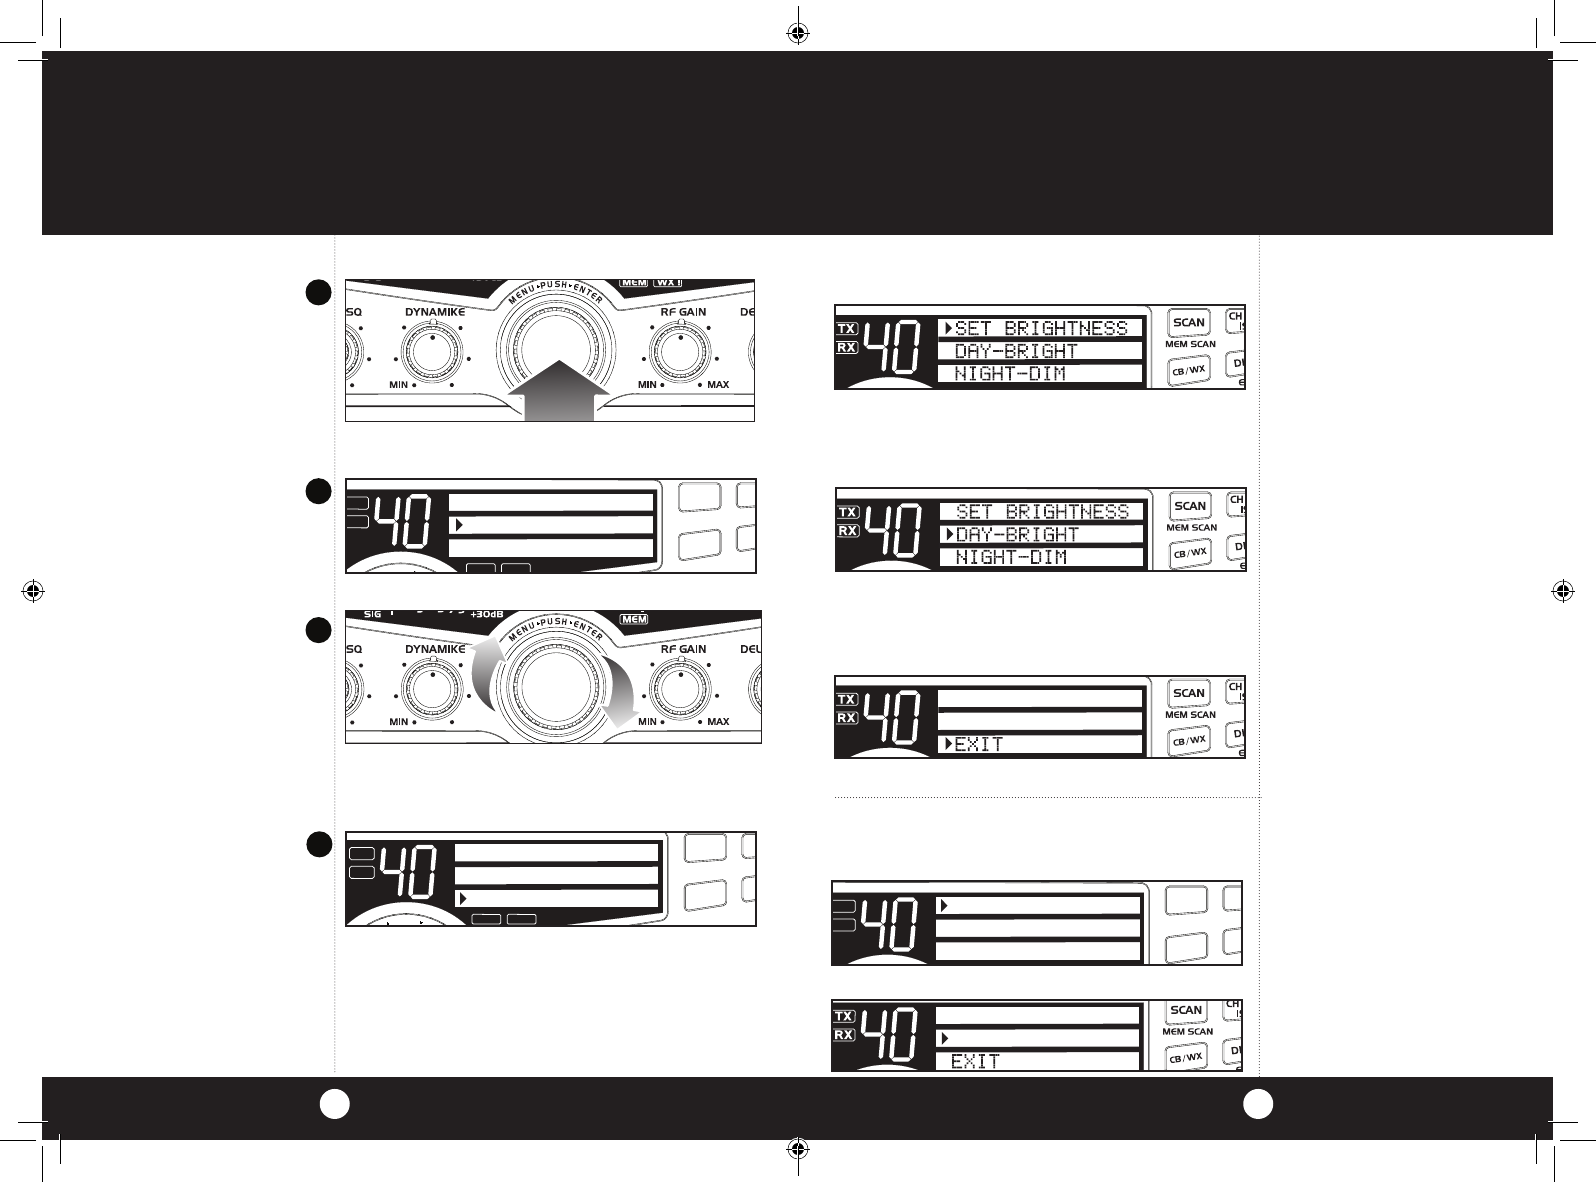
Setting Brightness Mode
Press Menu/Enter knob to select Set Brightness
Rotate Menu/Enter knob clockwise to Select
Brightness. Press Menu/Enter knob to select Day-
Bright. Turn Menu/Enter clockwise to increase bright-
ness and turn counter-clockwise to decrease brightness.
To set the day bright level, turn the Menu/Enter
knob clockwise to a desired setting and then press
Menu/Enter. To set the Night-Dim level, repeat
instructions above then select Night-Dim.
Press Menu/Enter knob again to exit routine.
Note
If an attempt is made to
exceed the highest or lowest
brightness levels, 1 error beep
will be heard.
TURN CH KNOB TO
SET LEVEL
Note
Exit will return to menu mode.
ESC will exit and return to CB
Standby.
Setting Display
Color Mode
Note
Select EXIT to return to
main menu. Press Dim/Escape
button to return to CB mode.
Setting Display Color Mode
Press Menu/Enter knob and scroll down to select
Display Color.
Press and release Menu/Enter to set the color.
Rotating Menu/Enter knob clockwise changes the
display color from green to blue to amber to red
then back to green.
Press Menu/Enter knob or escape button again
to exit routine.
SWR/CAL
NB/ANL
VOL SQ DYNAMIKERF GAIN DELTA TUNE T BACK SWR
CAL
OFF MIN MINOFF
MAX
ESC
MEM SCAN
S/RF
M
E
N
U
P
U
S
H
E
N
T
E
R
SIG
RF
+30dB
1
1.5 23CAL
3579
SWR
TX
RX
NB/ANL
MEMWX !
ANL
S/RF
SWR
CAL
CH 9/
19
CB/WX
D
IM
SCAN
WX AUTO SCAN
DISPLAY COLOR
BRIGHTNESS
SWR/CAL
NB/ANL
VOL SQ DYNAMIKERF GAIN DELTA TUNE T BACK SWR
CAL
OFF MIN MINOFF
MAX
ESC
MEM SCAN
S/RF
M
E
N
U
P
U
S
H
E
N
T
E
R
SIG
RF
+30dB
1
1.5 23CAL
3579
SWR
TX
RX
NB/ANL
MEMWX !
ANL
S/RF
SWR
CAL
CH 9/
19
CB/WX
DIM
SCAN
SET COLOR
EXIT
TURN CH KNOB TO
1
2
3
4
Note
To select day or night levels,
press and release Dim/Escape
button once levels are set.
Turn
NightWatch
Illumination
On/Off
Turn NightWatch Illumination On-Off-Hi-Lo
Press Menu/Enter knob and scroll down to select
NW Lighting.
Press Menu/Enter knob again to exit routine.
NW IS SET HI
HI-LO-OFF
SWR/CAL
NB/ANL
VOL SQ DYNAMIKERF GAIN DELTA TUNE T BACK SWR
CAL
OFF MIN MINOFF
MAX
ESC
MEM SCAN
S/RF
M
E
N
U
P
U
S
H
E
N
T
E
R
SIG
RF
+30dB
1
1.5 23CAL
3579
SWR
TX
RX
NB/ANL
MEMWX !
ANL
S/RF
SWR
CAL
CH 9/
19
CB/WX /
D
IM
SCAN
PA
NW LIGHTING
CONTRAST
RADIO CHECK
Note
To select HI-LO-OFF, turn
menu knob to select and press
and release Enter knob.
29LXBT_MANL.indd 20-21 2/27/12 11:14 AM
Bluetooth®
Note
When cell phone calls are in
progress using the Bluetooth
features, the CB functions of the
unit are disabled.
Note
Dual Point Bluetooth:
Two cell phones can be paired
and and used for team drivers.
Bluetooth®
Calls on a Bluetooth enabled cell phone can be
routed through the 29 LX BT speaker or external
speaker accessory.
2322
Operation Operation
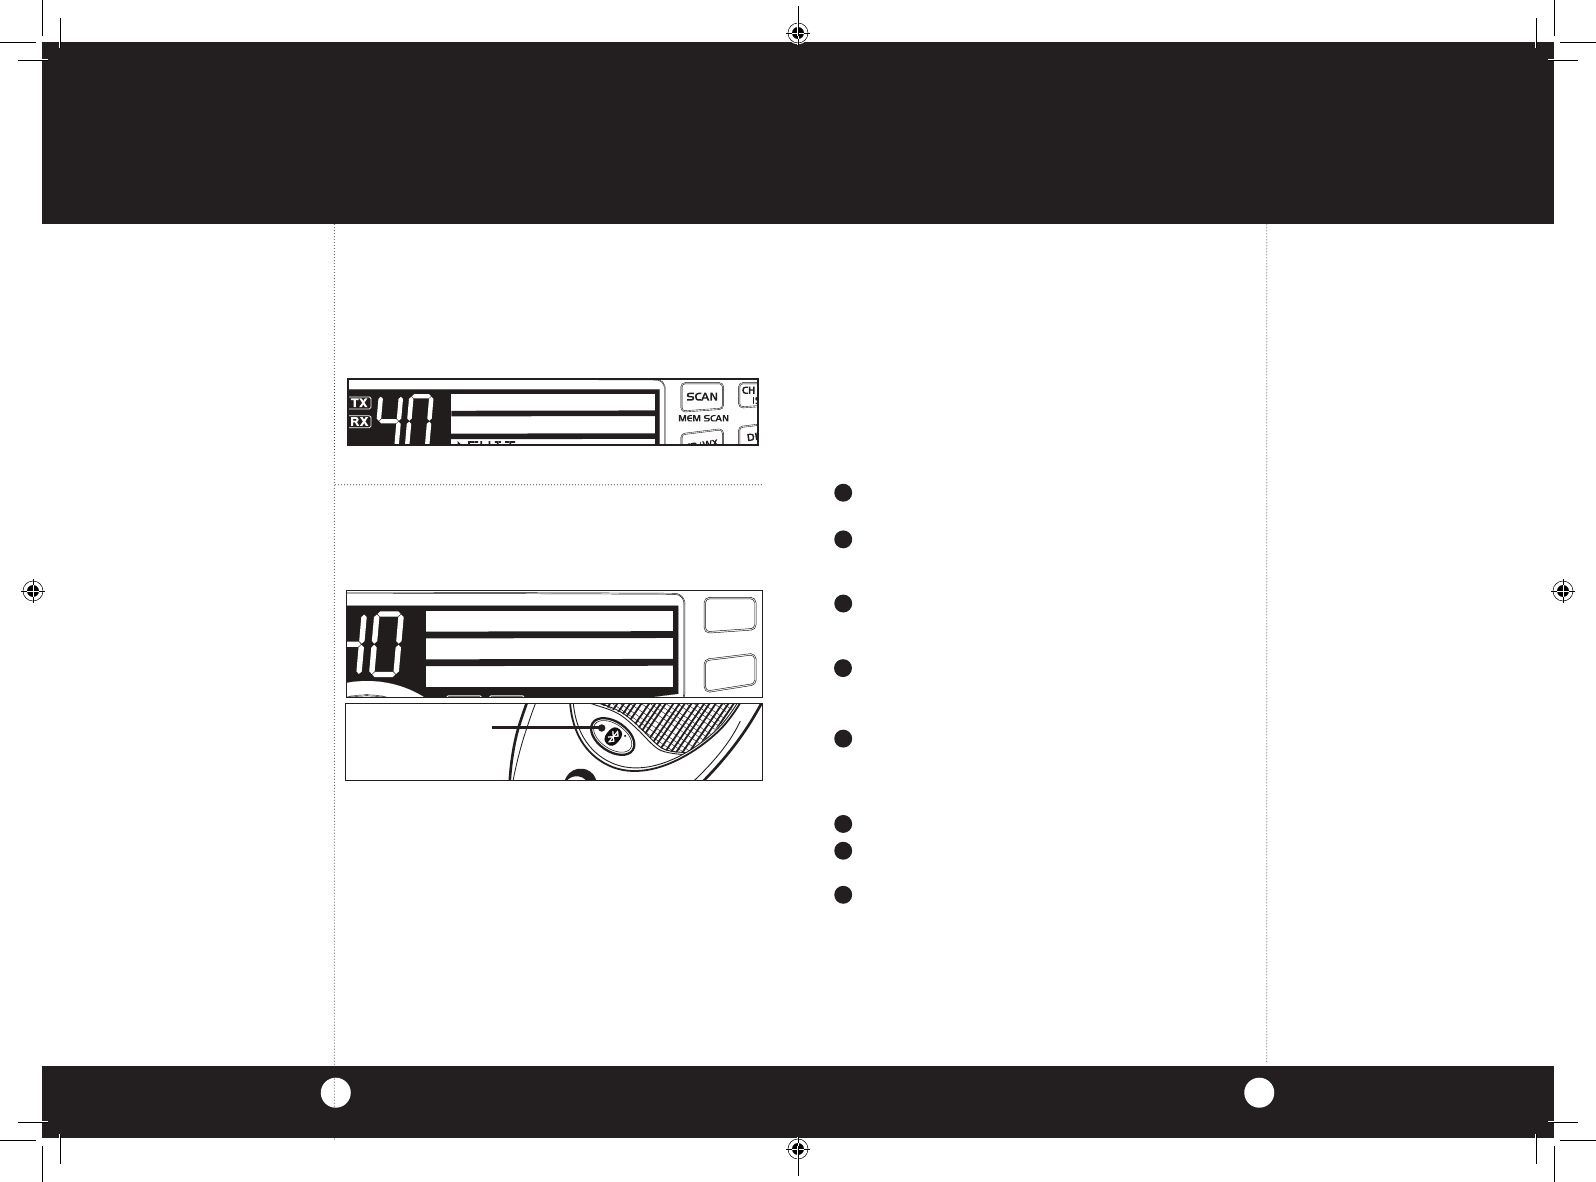
To Pair with a Cell Phone
With 29 LX BT power On, press and hold the BT
Button for six seconds to enter Standby mode. A
tone will sound to confirm entry to Standby.
A. First time pairing with a cell phone:
I. A tone will sound to confirm Pairing mode.
II.
Follow the cell phone manufacturer’s
instruction to enable its Bluetooth
function and enter the PIN (Personal
Identification Number) 0000.
BT Button
To Answer Calls
Press and release the BT Button when the cell
phone ring is heard through the 29 LX BT speaker.
Speak into the 29 LX BT microphone. The CB
function of the unit and PTT Button will be
disabled while a call is in progress.
Press and release of the BT Button to end the
call. A tone will sound.
To Initiate Calls
Dial a number according to the cell phone manu-
facturer’s instructions. The key press and other
tones will be heard through the 29 LX BT speaker.
Press Send on the cell phone send key a few
seconds, you will hear the ring tone for the
number you dialed on the CB speaker.
Once connected, speak into the microphone.
Press and release of the BT Button to end the
call. A tone will sound.
Press and hold the BT Button for two seconds to
redial a number. A tone will sound; and after a
few seconds, you will hear the ring tone for the
number you dialed.
1
2
3
1
2
3
4
5
To Enable or Disable Voice Dialing
If the paired cell phone supports voice dialing,
press and release the BT Button twice to toggle
between enabling and disabling this feature.
Note
The external microphone (see
accessories on page 35) can be
plugged into the rear of the
unit and clipped to a pocket or
lapel for hands-free speech dur-
ing calls.
When the microphone is
plugged in, the main micro-
phone will not pick up speech
during calls but will be fully
functional for CB operation.
Note
If no further pairing steps are
taken, the unit will time-out
and return to Standby after
five minutes. During the pair-
ing process, press and
release the BT Button to can-
cel the pairing process.
Note
For Text-to-Speech conversion,
an app should be downloaded
to your cell phone.
Note
When cell phone calls are in
progress using the Bluetooth
features, the CB functions of
the unit are disabled until the
phone call is put on hold (see
page 24).
SWR/CAL
NB/ANL
VOL SQ DYNAMIKERF GAIN DELTA TUNE T BACK SWR
CAL
OFF MIN MINOFF
MAX
ESC
MEM SCA
N
S/RF
M
E
N
U
P
U
S
H
E
N
T
E
R
SIG
RF
+30dB
1
1.5 23CAL
3579
SWR TX
RX
NB/ANL
MEMWX !
ANL
S/RF
SWR
CAL
CH 9/
19
CB/ WX
DIM
SCAN
READY FOR
PAIRING
PW 0000
Setting
Contrast Mode
Setting Contrast Mode
Press Menu/Enter knob and rotate clockwise to
select Set Contrast. Press Menu/Enter knob
again and rotate clockwise to increase contrast,
counter-clockwise to decrease contrast.
Press Menu/Enter knob to set contrast.
Press Menu/Enter knob again to exit routine.
Note
If an attempt is made to
exceed the highest or lowest
contrast levels, 1 error beep
will be heard. TURN CH KNOB TO
SET CONTRAST
III. Successful pairing will be indicated by
a tone to confirm entry to Connected
mode. A pair record will also be established
for subsequent connections.
B. Subsequent pairings with a cell phone:
I. Follow any cell phone manufacturer
instructions if needed, to enable the
Bluetooth function.
II.
Successful pairing will be indicated by a
tone to confirm entry to Connected mode.
29LXBT_MANL.indd 22-23 2/27/12 11:14 AM