Compal Communications EB-X100U GPRS User Manual X100 OI English AAA
Compal Communications, Inc. GPRS X100 OI English AAA
Contents
- 1. UserMan1
- 2. UserMan2
- 3. UserMan3
UserMan2

My Phone 37
Shortcut key
You can assign two selected functions to the Right soft key and activate them
by a Short press (press once) or a Long press (press and hold).
From My Phone menu
1. 4 move to Shortcut key
2. Press <(Select)
3. 4 move to Short press or Long press
4. Press <(Select)
5. 4 move to the required function
6. Press <(Select)
The following functions are available:
Camera Start Browser Calendar
Games My Media Calculator
Contacts Alarms Sound recorder
X100_OI_English_AAA.book Page 37 Friday, August 6, 2004 3:11 PM
38 My Phone
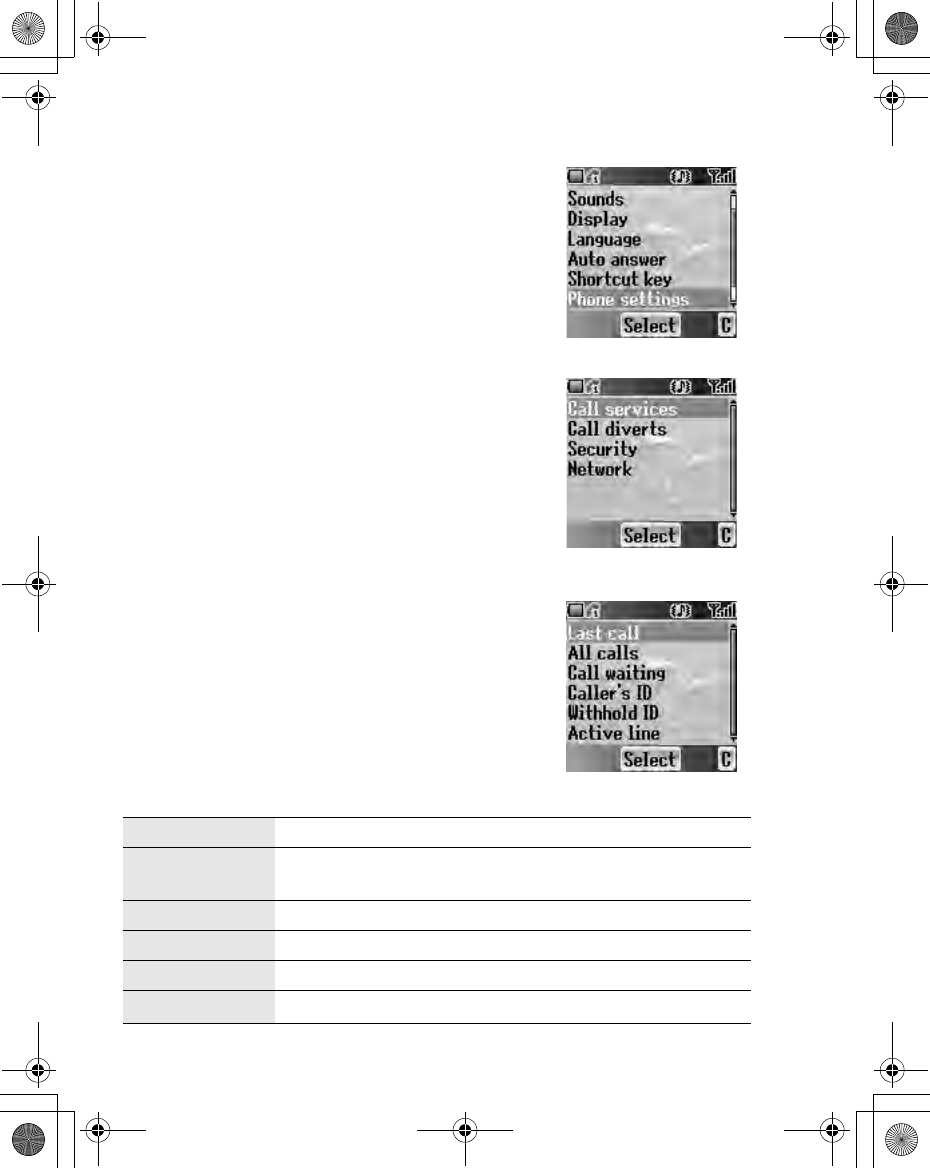
Phone settings
You can customise each phone setting.
From My Phone menu
1. 4 move to Phone settings
2. Press <(Select)
3. 4 move to the required settings
4. Press <(Select)
Call services
From Phone settings menu
1. 4 move to Call services
2. Press <(Select)
3. 4 move to the required setting
4. Press<(Select)
Calls F
You can check the call status.
From Call services menu
1. 4 move to Calls
2. Press <(Select)
3. 4 move to the required status
4. Press <(Select)
Last call See the duration of the last call.
All calls See the total duration of all calls.
Reset the total by pressing <(Reset).
Call waiting Activate Call waiting and see the status.
Caller’s ID Check how Caller’s ID is received.
Withhold ID Check how your call ID is sent.
Active line Select a line to activate ( E ).
X100_OI_English_AAA.book Page 38 Friday, August 6, 2004 3:11 PM
My Phone 39
Service charges E
You can control the cost of calls by setting the limit on the cost of calls and
charge units of call time.
From Call services menu
1. 4 move to Service charges
2. Press <(Select)
3. 4 move to the required item to set
4. The current setting is displayed.
You need to enter the PIN2 code to edit the Max cost and Price unit.
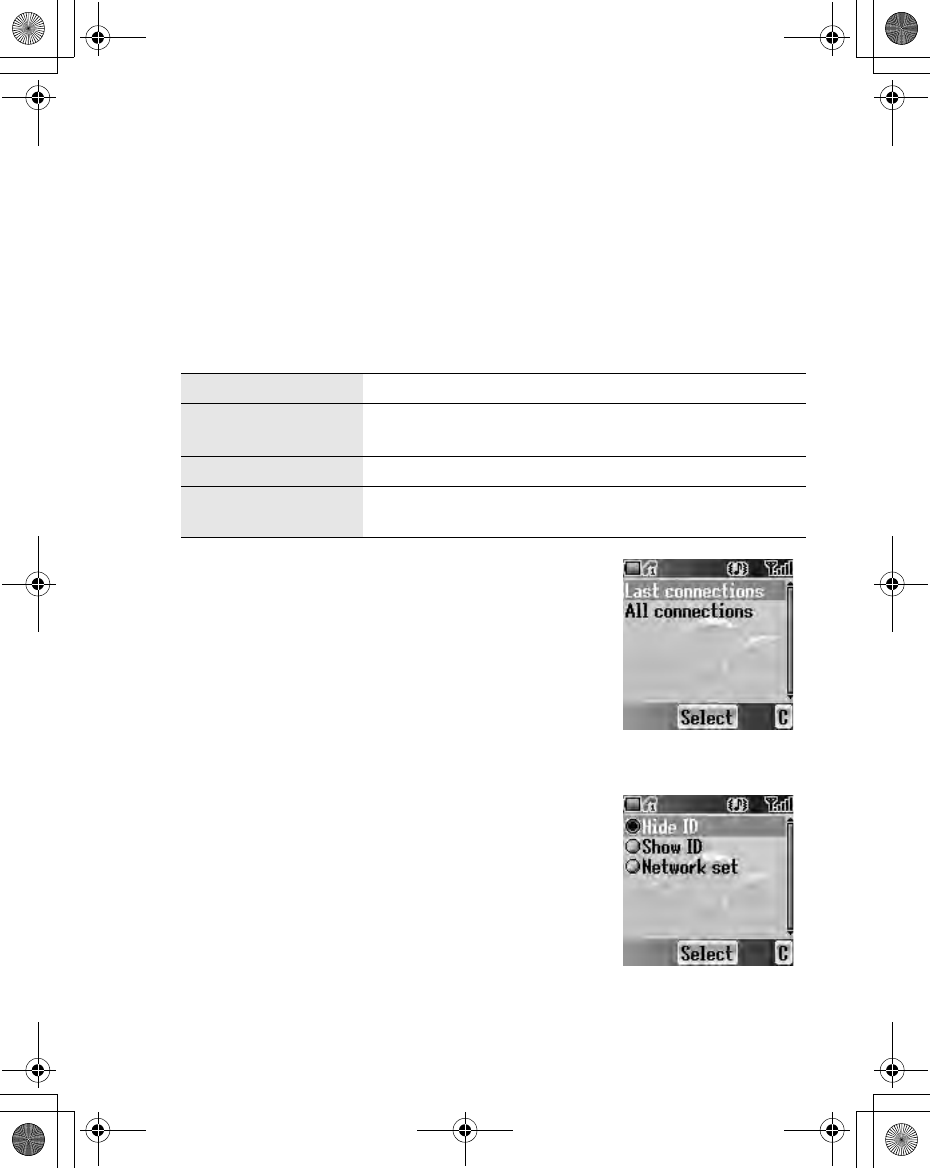
Connections
You can see the amount of transferred data. You also
can reset the total amount of transferred data shown
in All connections menu.
From Call services menu
1. 4 move to Connections
2. Press <(Select)
3. 4 move to Last connections or All
connections
4. Press<(Select)
Show my number
You can select whether your ID will be displayed or
not.
From Call services menu
1. 4 move to Show my number
2. Press <(Select)
3. 4 move to the required method
4. Press <(Select)
Cost left Check the cost left.
Price unit You can set the price per unit to add up the total by
pressing <(Edit).
Max cost You can edit the Max cost by pressing <(Edit).
Call meters Check the total cost.
You can reset the total cost by pressing <(Reset).
X100_OI_English_AAA.book Page 39 Friday, August 6, 2004 3:11 PM
40 My Phone
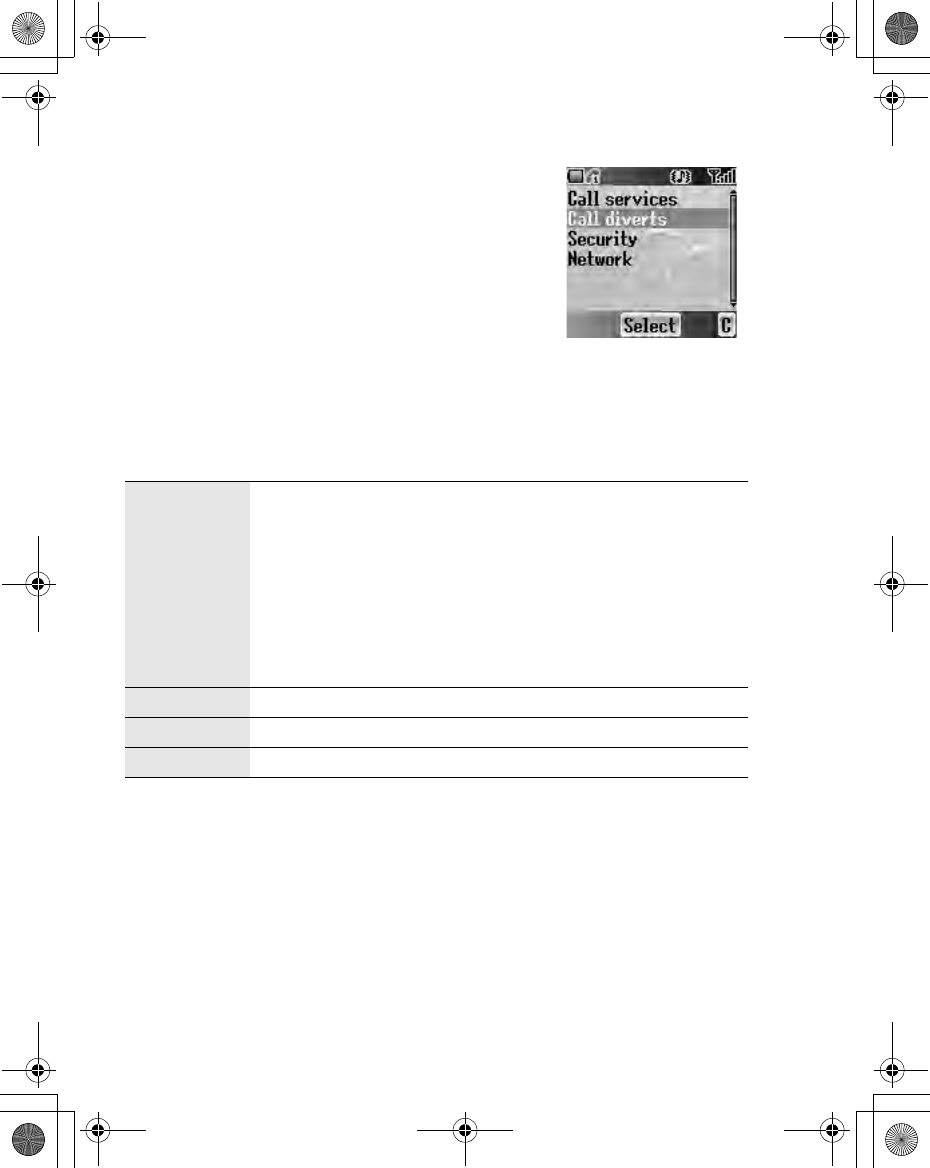
Call diverts
You can divert calls by setting the condition according
to the type of calls.
From Phone settings menu
1. 4 move to Call diverts
2. Press <(Select)
3. 4 move to the required type of calls or Cancel
all
4. Press <(Select)
When you select Voice calls,
4 move to the required type and press <(Select)
5. 4 move to Status, On or Off
6. Press <(Select)
When you select On, enter the phone number to divert. Then press <(OK)
Voice calls
Voice calls will be diverted under the following conditions:
Not reachable: When the phone is not in the network
coverage area, all incoming voice calls will be diverted.
No reply: Unanswered incoming voice calls will be diverted.
Busy: When the lines are busy, all incoming voice calls will
be diverted.
All conditional: With above 3 conditions, all incoming voice
calls will be diverted ( E ).
All voice calls: All incoming voice calls will be diverted.
Fax calls Fax calls will be diverted.
Data calls Data calls will be diverted.
Cancel all No calls will be diverted.
X100_OI_English_AAA.book Page 40 Friday, August 6, 2004 3:11 PM
My Phone 41
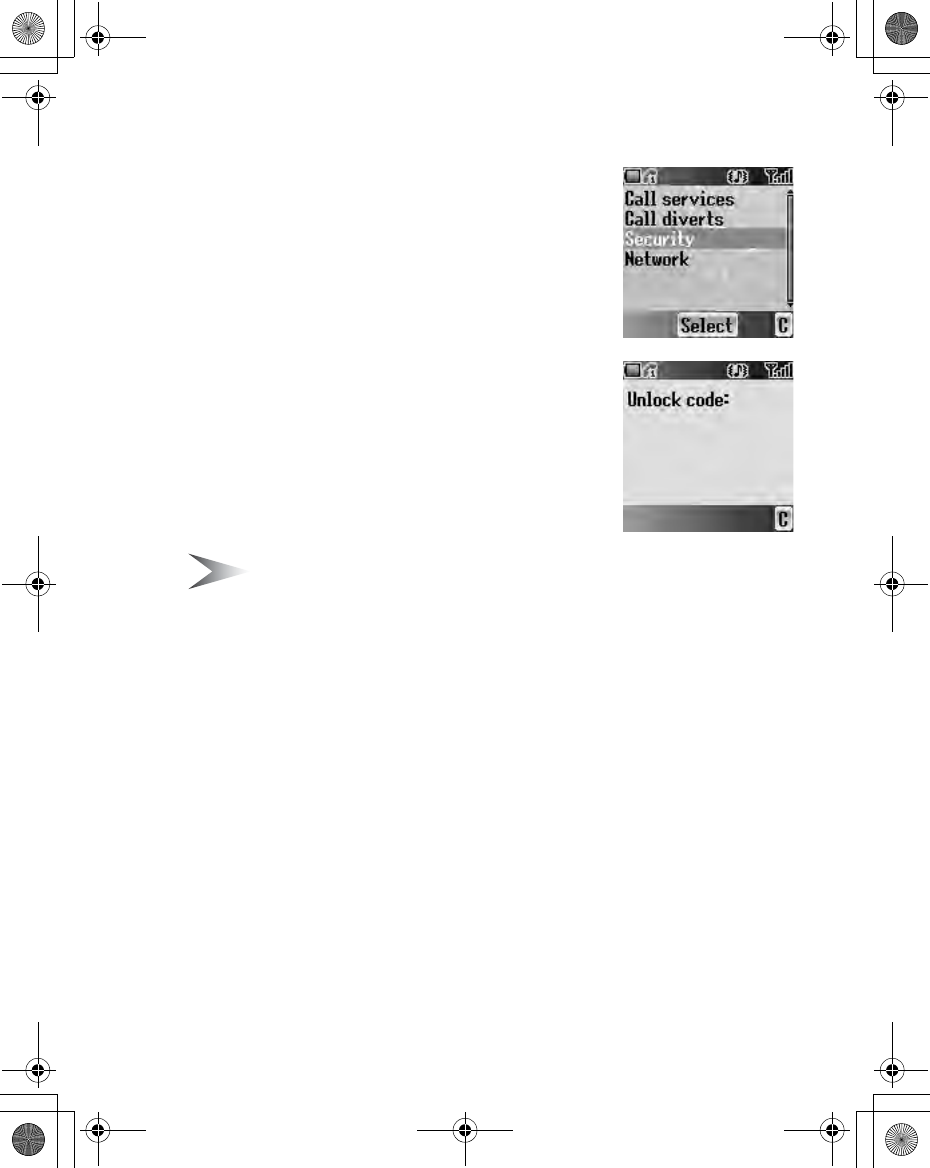
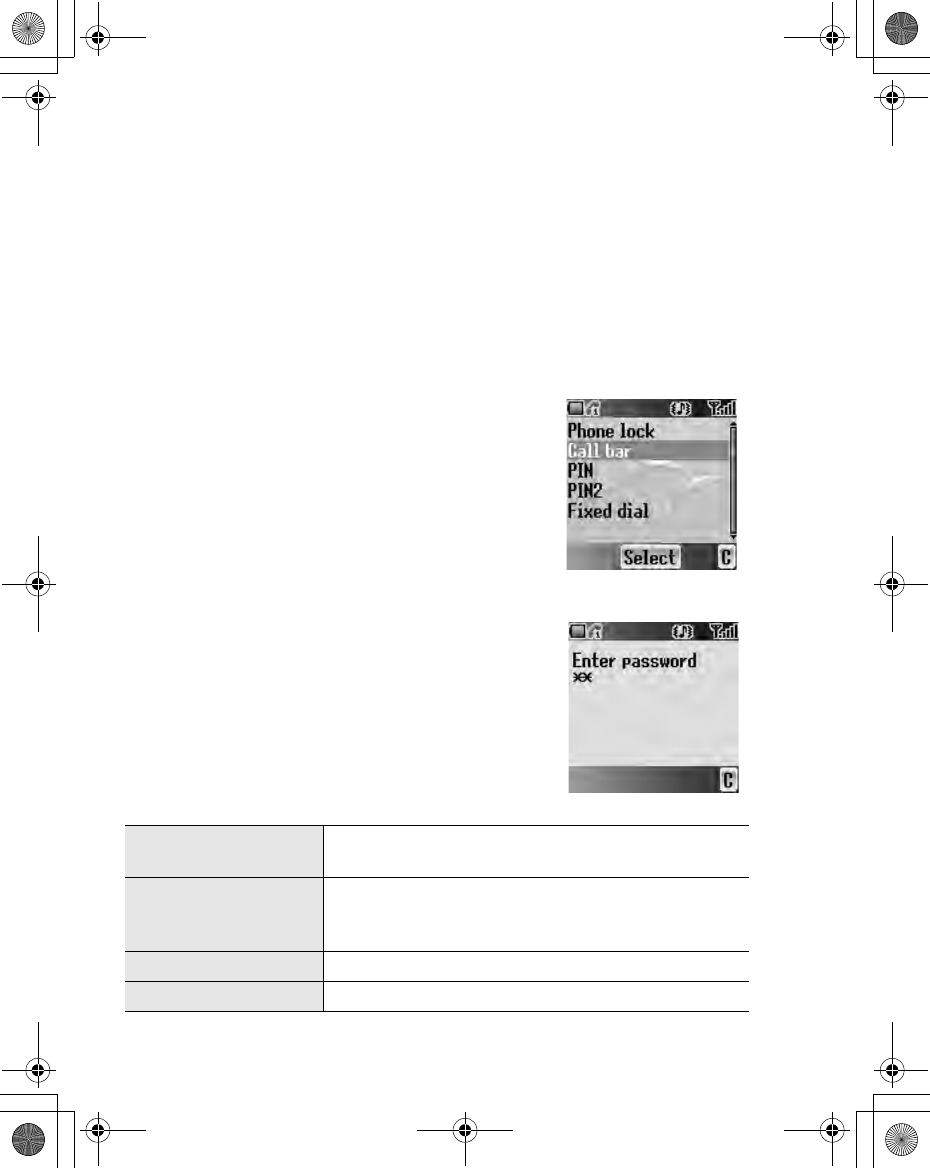
Security
You can limit access to protect your phone, SIM,
calls, information and data. You must enable the PIN
before changing the code.
Phone lock
You can lock your phone, and you will be prompted to
enter your unlock code when you switch on the phone
with a different SIM inserted.
From Security menu
1. Press <(Select)
2. 4 move to Status or Change code
Note: You are advised to write down your unlock code for yourself. If you
forget your unlock code, you will need to contact your service provider to
unlock the phone.
Changing the Status
From Phone lock menu
1. Press <(Select)
2. 4 move to On or Off
3. Press <(Select)
4. Enter the correct 4-digit unlock code
5. Press <(OK)
OR
In idle screen
1. Press and hold <(Menu)
2. 4 move to Phone lock
3. Press <(On)
4. Enter the correct 4-digit unlock code
5. Press <(OK)
X100_OI_English_AAA.book Page 41 Friday, August 6, 2004 3:11 PM
42 My Phone
Changing the Unlock code
From Phone lock menu
1. 4 move to Change code
2. Press <(Select)
3. Enter old unlock code
4. Press <(OK)
5. Enter new unlock code
6. Press <(OK)
7. Enter new unlock code to verify
8. Press <(OK)
Call bar
You can bar certain outgoing and/or incoming calls
using a password supplied by your service provider.
When updating/checking the Call bar status, the
phone must be registered to a network.
From Security menu
1. 4 move to Call bar
2. Press <(Select)
3. 4 move to the required function
4. Press <(Select)
Bar voice You can bar Voice calls and select the type from
Incoming calls and/or Outgoing calls.
Bar data
You can bar Data calls and select the type from
Off, International calls except home,
International calls or All calls.
Cancel all You can cancel all Call bar settings.
Change password You can change the password.
X100_OI_English_AAA.book Page 42 Friday, August 6, 2004 3:11 PM

My Phone 43
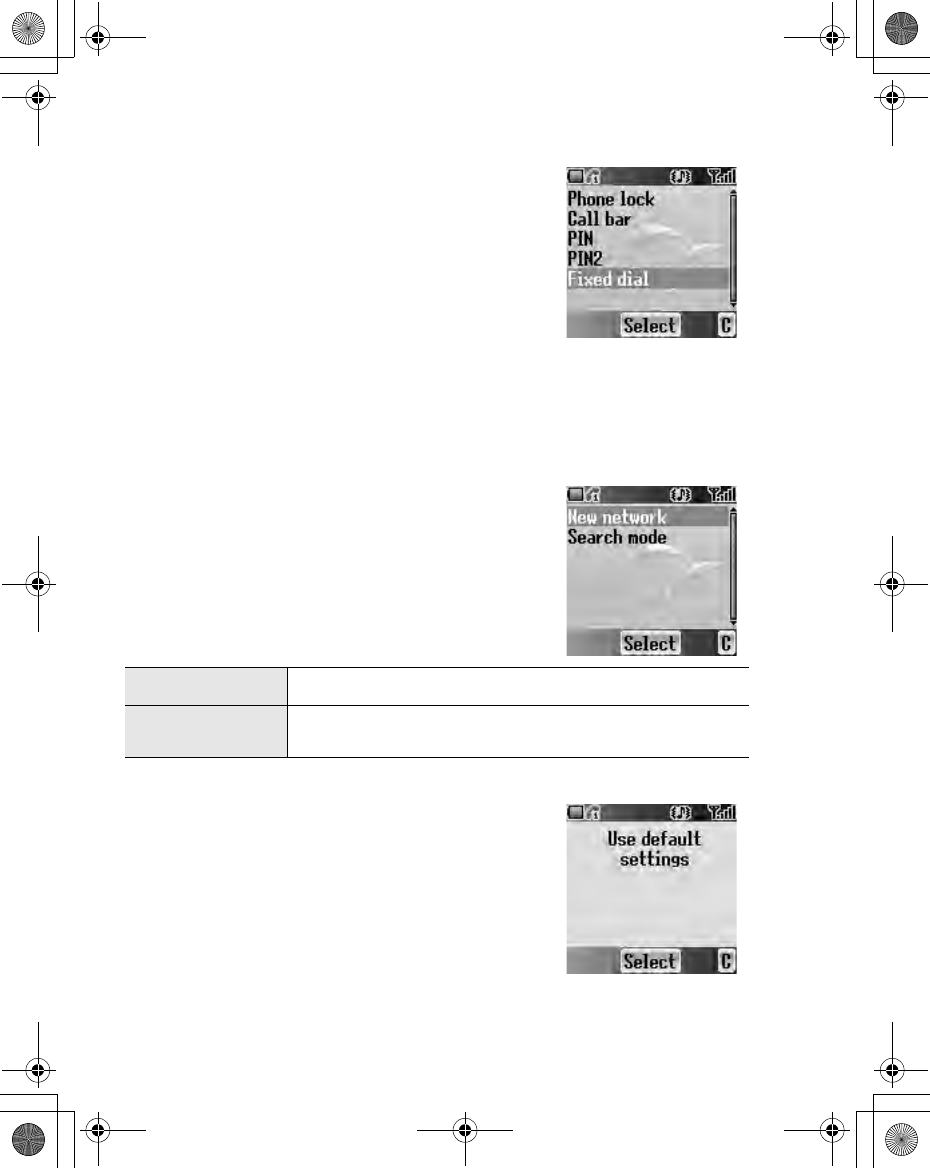
PIN
You can protect your SIM against unauthorised use.
Once you enable the PIN, you will be prompted to
enter the PIN code each time you switch on the
phone. You must enable the PIN before changing the
PIN code, and you must enter the PIN code to unable
the PIN.
From Security menu
1. 4 move to PIN
2. Press <(Select)
3. 4 move to Status or Change
4. Press <(Select)
Changing the PIN code
Ensure the PIN Status is On before changing the PIN code.
1. Enter old PIN code with # - ,
2. Press <(OK)
3. Enter new PIN code with # - ,
4. Press <(OK)
5. Enter new PIN code to verify
6. Press <(OK)
Changing the Status
1. 4 move to On or Off
2. Press <(Select)
3. Enter the PIN code with # - ,
4. Press <(OK)
PIN2
You cannot change the PIN2 code without the current
PIN2 code.
From Security menu
1. 4 move to PIN2
2. Press <(Select)
3. Enter old PIN2 code with # - ,
4. Press <(OK)
5. Enter new PIN2 code with # - ,
6. Press <(OK)
7. Enter new PIN2 code to verify
8. Press <(OK)
X100_OI_English_AAA.book Page 43 Friday, August 6, 2004 3:11 PM
44 My Phone
Fixed dial E
The Fixed dial feature allows you to limit your
outgoing calls to a certain set of numbers saved in
FDN (Fixed Dial Numbers), which is located in your
SIM. When this function is on, only FDN can be
dialled, and any attempt to call other numbers will fail.
From Security menu
1. 4 move to Fixed dial
2. Press <(Select)
3. Enter SIM PIN2 code with # - ,
4. Press <(OK)
5. 4 move to On or Off
6. Press <(Select)
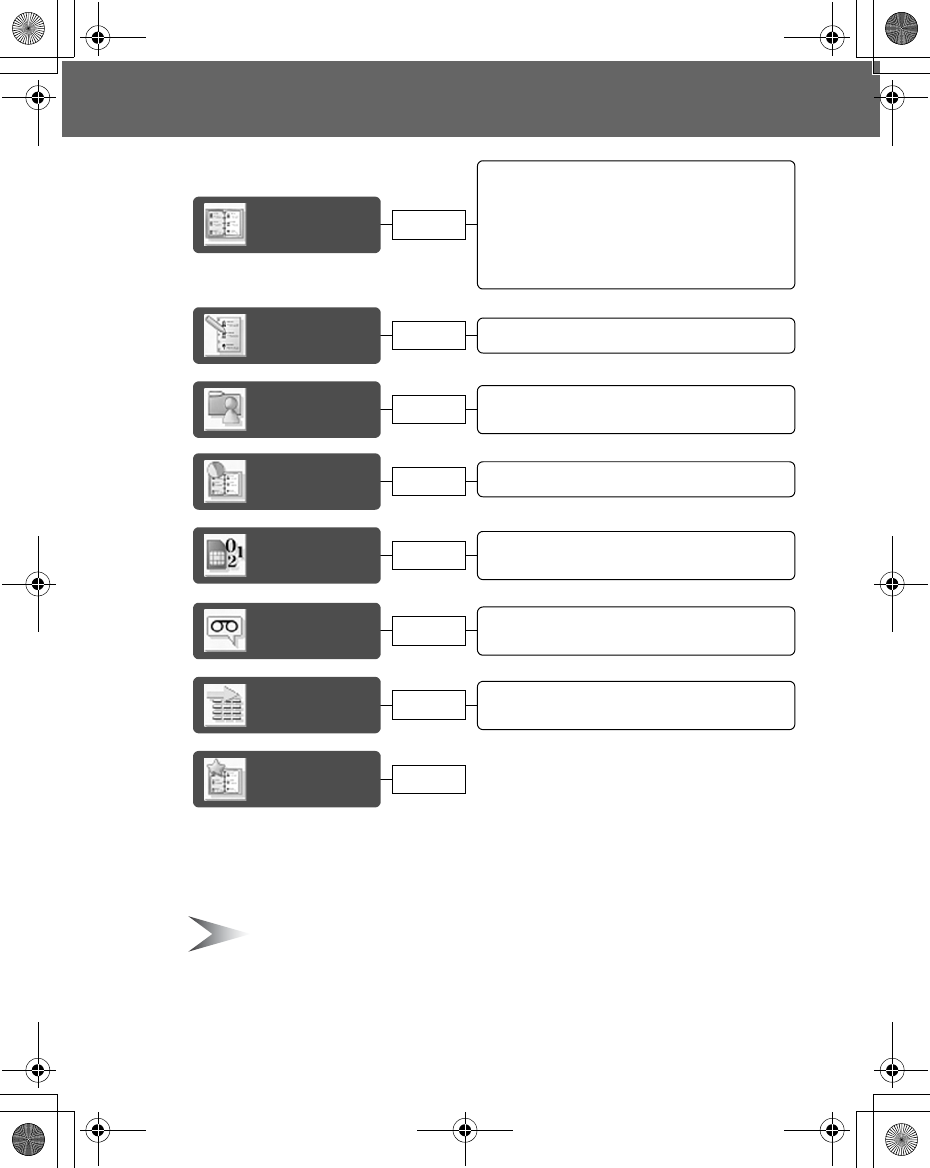
Network
You can select a Network that is available in your
current location.
From Phone settings menu
1. 4 move to Network
2. Press <(Select)
3. 4 move to New network or Search mode
4. Press <(Select)
Defaults
You can return all personal settings in My Phone
menu to the factory default settings.
From My Phone menu
1. 4 move to Defaults
2. Press <(Select)
3. Press <(Select)
New network You can find a New network from the list.
Search mode You can select an available network by Manual or
Automatic.
X100_OI_English_AAA.book Page 44 Friday, August 6, 2004 3:11 PM
Contacts 45
Contacts
You can store phone numbers in two locations: the SIM Contacts list and the
Phone Contacts list.
Note: See “Text Entry” on page 26 for information on entering text.
Viewing the Contacts list ................................. 46
Viewing the entries in the Contacts list............46
Editing the Contacts list................................... 47
Making a call using the Contacts list ............... 47
Sending messages from the Contacts list .......48
Deleting an entry from the Contacts list ..........48
Copying an entry to the other Contacts list .....48
Memory
status
My
Contacts
My
numbers
Voicemail
Groups Viewing the Group........................................... 51
Editing the Group ............................................ 51
Hot key
dial
Assigning Hot keys.......................................... 55
Viewing Hot key dial list................................... 55
Contacts
list
Create
Viewing My numbers ....................................... 53
Editing My numbers.........................................53
Viewing Voicemail ........................................... 54
Editing Voicemail............................................. 54
Copying all entries to the other Contacts list ...52
Creating a new entry ....................................... 49
page 49
page 46
page 51
page 52
page 53
page 54
page 55
page 55
X100_OI_English_AAA.book Page 45 Friday, August 6, 2004 3:11 PM
46 Contacts
Contacts list
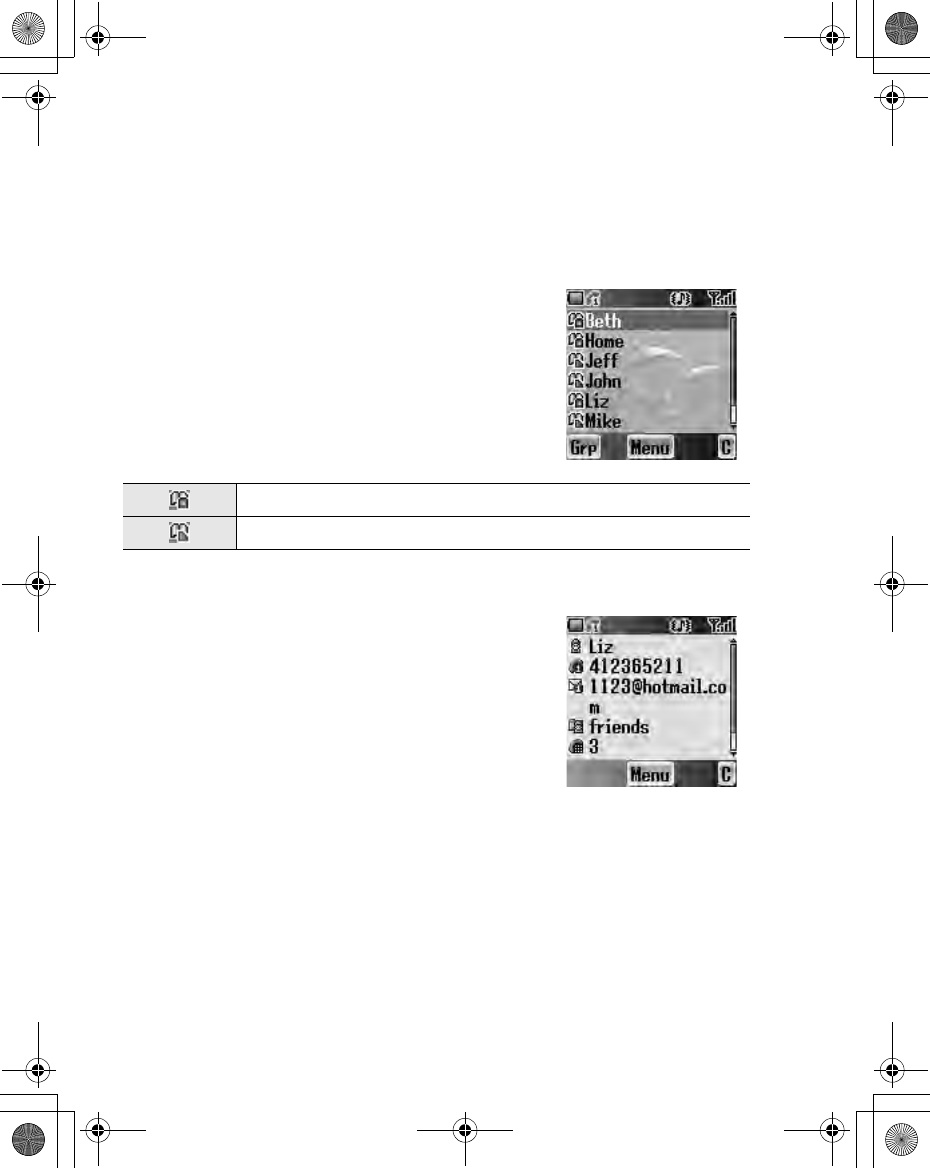
You can browse the SIM Contacts list and the Phone Contacts list
individually, or both Contacts list together.
Viewing the Contacts list
From Contacts menu
1. Press <(Select)
2. 4 move to the required entry
OR
Press the numeric key which contains the first
letter of the required name
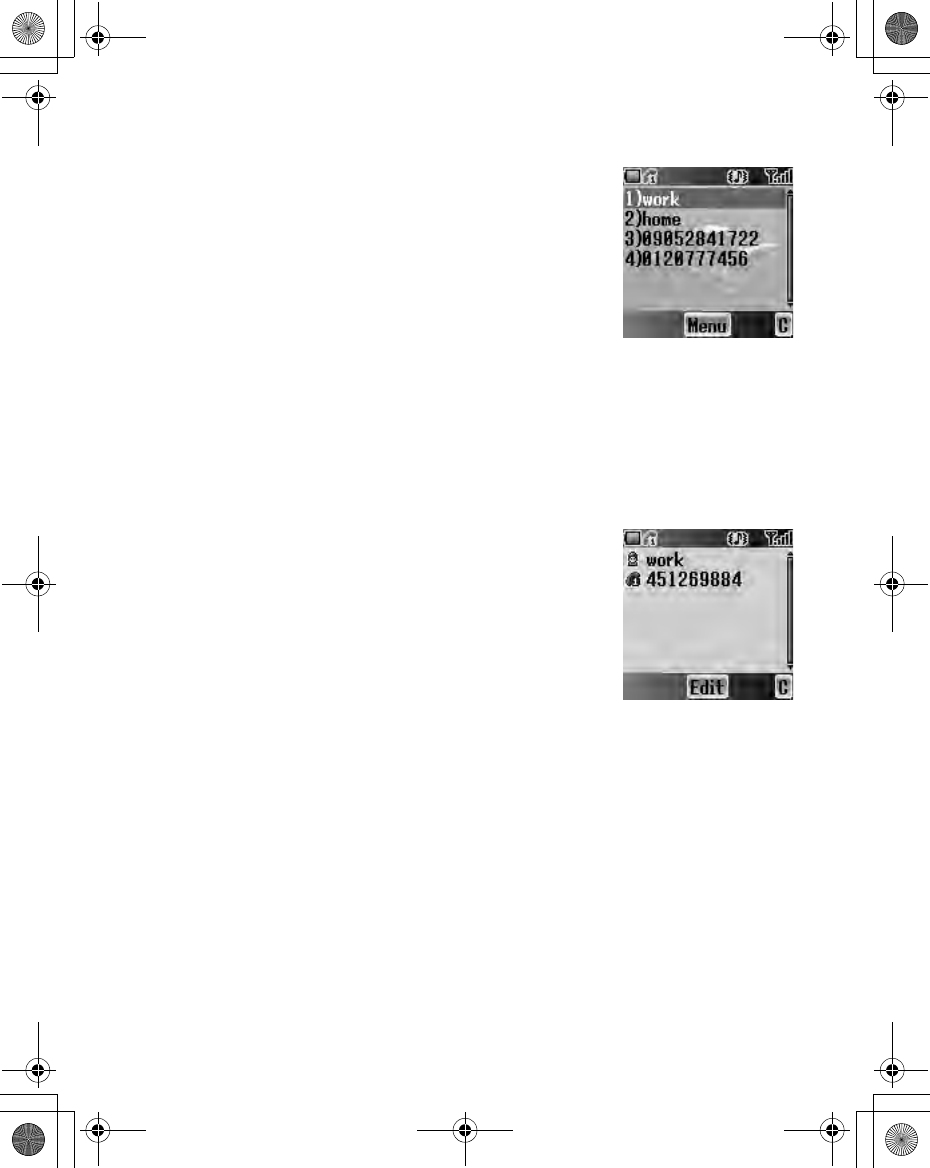
Viewing the entries in the Contacts list
From Contacts list menu
1. 4 move to the required entry
OR
Press the numeric key which contains the first
letter of the required name
2. Press <(Menu)
3. Press <(Select)
Located in Phone Contacts list
Located in SIM Contacts list
X100_OI_English_AAA.book Page 46 Friday, August 6, 2004 3:11 PM
Contacts 47
Editing the Contacts list
From Contacts list menu
1. 4 move to the required entry
OR
Press the numeric key which contains the first
letter of the required name
2. Press <(Menu)
3. 4 move to Edit
4. Press <(Select)
5. 4 move to the required item
6. Press <(Edit)
7. Edit an entry item
8. Press <(OK)
9. Press A(Save)
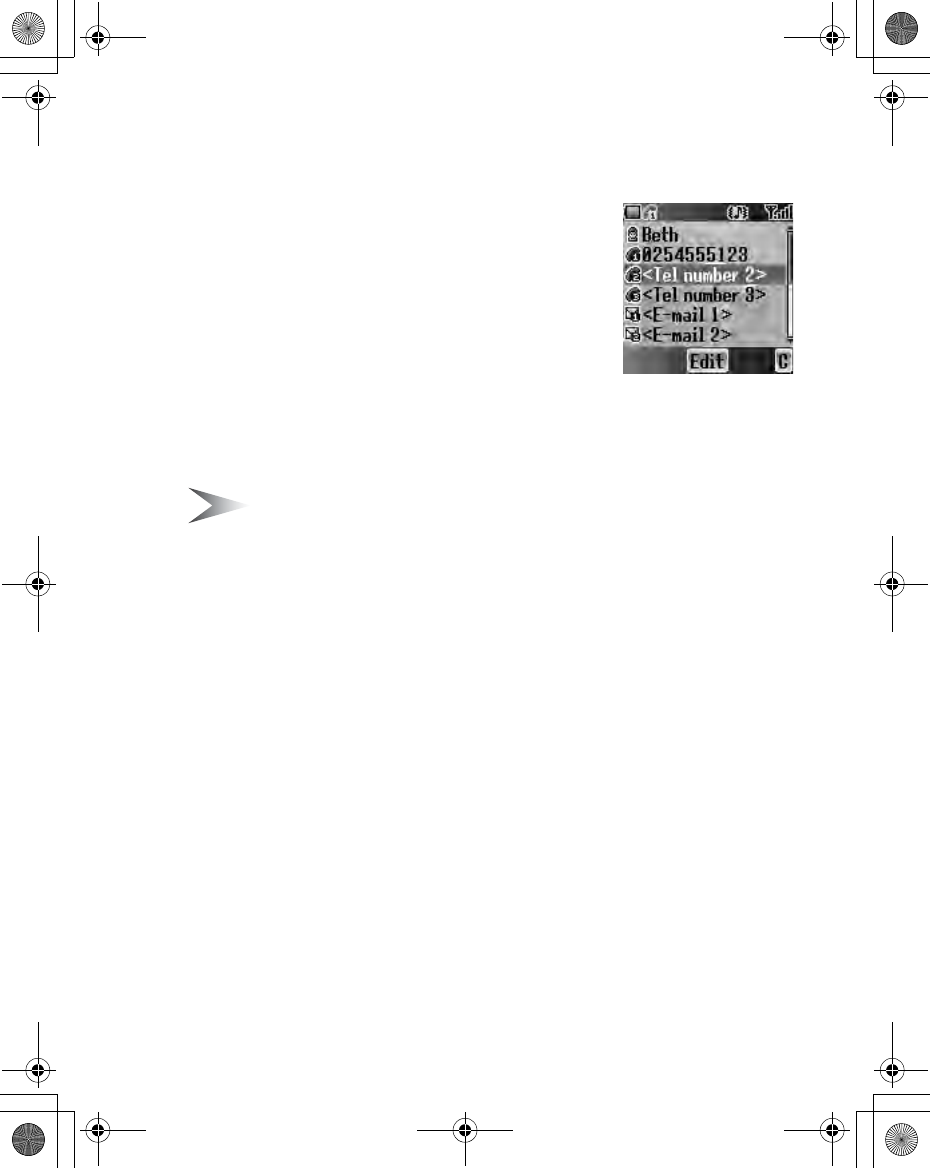
Note: SIM Contacts list can contain only Name, Tel number 1 and
Location No.
Making a call using the Contacts list
From Contacts list menu
1. 4 move to the required entry
OR
Press the numeric key which contains the first letter of the required name
2. Press C(Send)
From Contacts list menu
1. 4 move to the required entry
OR
Press the numeric key which contains the first letter of the required name
2. Press <(Menu)
3. 4 move to Call
4. Press <(Select)
X100_OI_English_AAA.book Page 47 Friday, August 6, 2004 3:11 PM

48 Contacts
Sending messages from the Contacts
list
You can send messages via the Contacts list (see “Messages” on page 73).
From Contacts list menu
1. 4 move to the required entry
OR
Press the numeric key which contains the first letter of the required name
2. Press <(Menu)
3. 4 move to Create MMS or Create SMS/EMS
4. Press <(Select)
5. 4 move to the required item
6. Press <(Select)
7. Press A(Done)
Follow the steps in Messages (see “Messages” on page 73).
Deleting an entry from the Contacts list
From Contacts list menu
1. 4 move to the required entry
OR
Press the numeric key which contains the first letter of the required name
2. Press <(Menu)
3. 4 move to Delete
4. Press <(Select)
5. Press <(Yes)
Copying an entry to the other Contacts
list
From Contacts list menu
1. 4 move to the required entry
OR
Press the numeric key which contains the first letter of the required name
2. Press <(Menu)
3. 4 move to Copy
4. “Copy (entry name) to (SIM or Phone)?” is displayed.
5. Press <(Yes)
X100_OI_English_AAA.book Page 48 Friday, August 6, 2004 3:11 PM
Contacts 49
Create
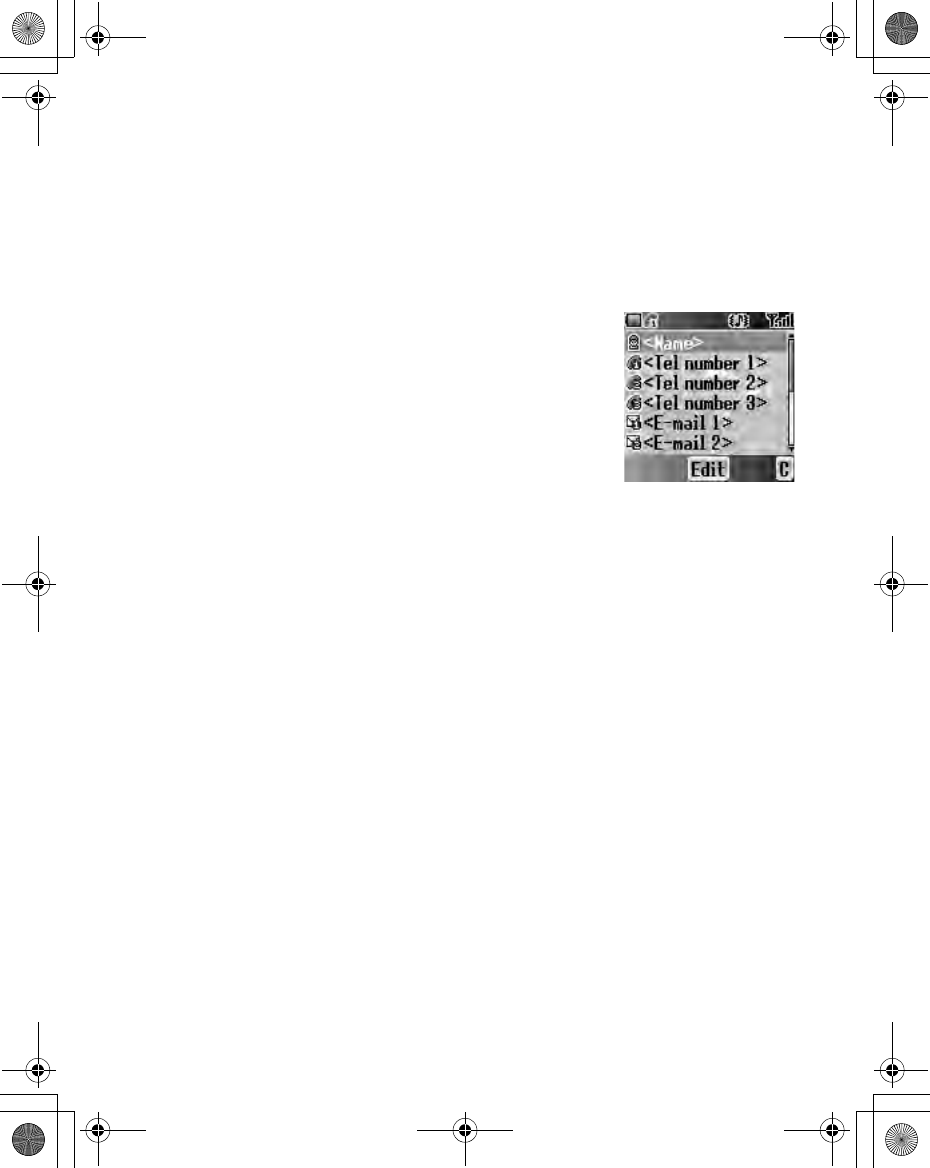
SIM Contacts list: You can store Name, Tel number and Location No.
Phone Contacts list: You can store Name, 3 Tel numbers, 2 E-mail addresses,
Ringtone type, Group, Hot key dial, Photo, Note and Location No.
Creating a new entry
From Contacts menu
1. 4 move to Create
2. Press <(Select)
3. 4 move to SIM or Phone
4. Press <(Select)
5. 4 move to the required item
6. Press <(Edit)
7. Edit the entry item
8. Press <(OK)
9. Press A(Save)
From Contacts list menu
1. Press <(Menu)
2. 4 move to Create
3. Press <(Select)
4. 4 move to SIM or Phone
5. Press <(Select)
6. 4 move to the required item
7. Press <(Edit)
8. Edit the entry item
9. Press <(OK)
10. Press A(Save)
X100_OI_English_AAA.book Page 49 Friday, August 6, 2004 3:11 PM
50 Contacts
From Contacts list menu
1. 4 move to [New entry]
2. Press <(Select)
3. 4 move to SIM or Phone
4. Press <(Select)
5. 4 move to the required item
6. Press <(Edit)
7. Edit the entry item
8. Press <(OK)
9. Press A(Save)
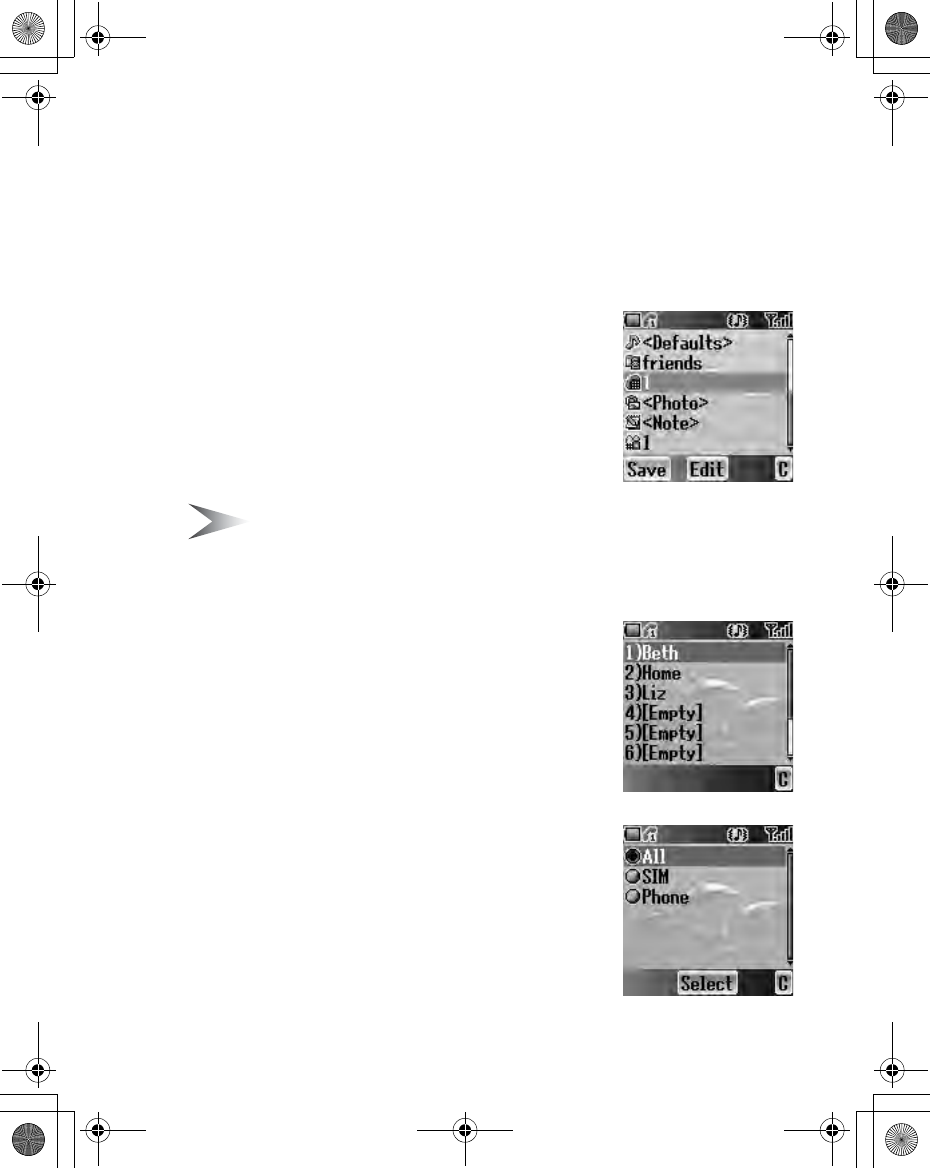
The following entry items are available:
Icon Item Icon Item
Name Hot key dial
Tel number 1 - 3 Photo
E-mail address1, 2 Note
Ringtone Location in Phone
Contacts list
Groups Location in SIM
Contacts list
X100_OI_English_AAA.book Page 50 Friday, August 6, 2004 3:11 PM
Contacts 51
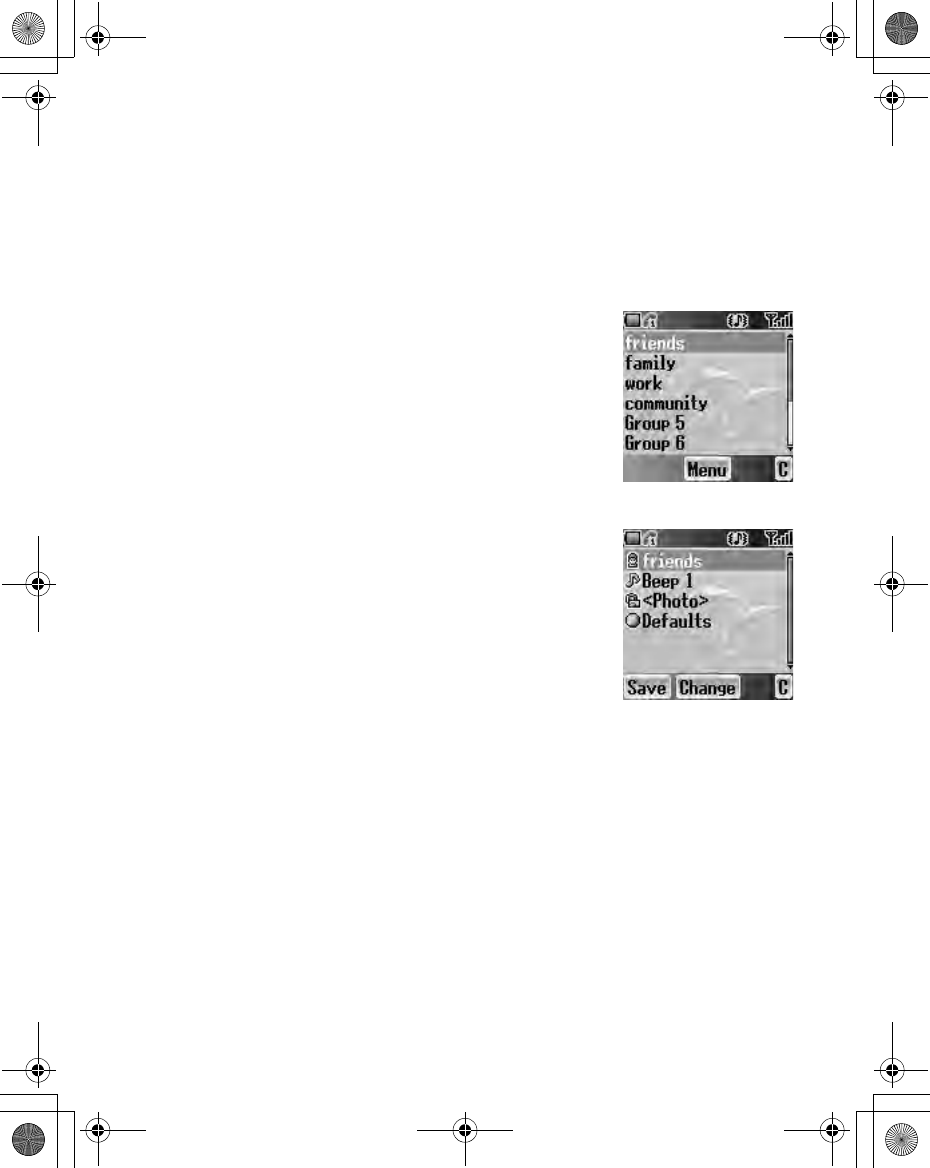
Groups
You can categorise the phone Contacts entries into 10 groups. You can name,
select a particular ringtone, and insert a photo as an icon for each group to
identify incoming calls. This function is available with Phone Contacts list only.
Viewing the Group
From Contacts menu
1. 4 move to Groups
2. Press <(Select)
3. 4 move to the required group
4. Press <(Menu)
5. 4 move to View
6. Press <(Select)
Editing the Group
You can change the name, ringtone and photo
assigned to a group. You also can reset a group
setting to the default.
From Groups menu
1. 4 move to the required group
2. Press <(Menu)
3. 4 move to Edit
4. Press <(Select)
5. 4 move to the required item
To reset the group setting, select Defaults.
6. Press <(Change)
7. Edit a group setting
8. Press A(Save)
X100_OI_English_AAA.book Page 51 Friday, August 6, 2004 3:11 PM
52 Contacts
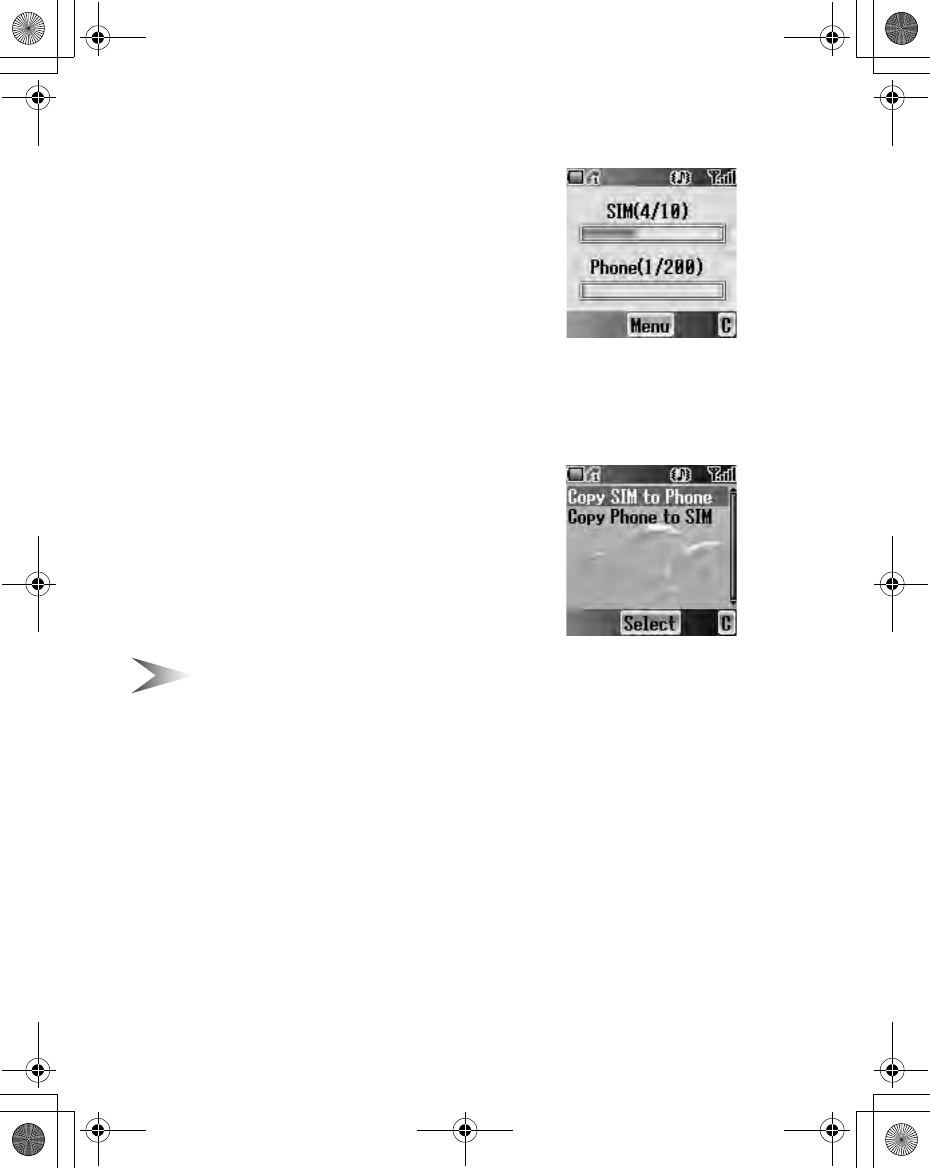
Memory status
Memory status shows how many locations are
available in each Contacts list. You can copy entries
of the SIM Contacts list to the Phone Contacts list
and vice versa.
From Contacts menu
1. 4 move to Memory status
2. Press <(Select)
3. 2 bars indicating Contacts list memory status
are displayed
(in use location(s) / maximum locations)
Copying all entries to the
other Contacts list
While displaying the Memory status
1. Press <(Menu)
2. 4 move to the required action
3. Press <(Select)
4. Press <(Yes)
Note: Original entries will not be deleted from the Contacts list.
X100_OI_English_AAA.book Page 52 Friday, August 6, 2004 3:11 PM
Contacts 53
My numbers
You can store and view your information such as your
names and phone numbers in your SIM.
Viewing My numbers
From Contacts menu
1. 4 move to My numbers
2. Press <(Select)
3. 4 move to Line 1 or Line 2
4. Press <(Menu)
5. 4 move to View
6. Press <(Select)
To edit the entry press <(Edit)
Editing My numbers
From My numbers menu
1. 4 move to Line 1 or Line 2
2. Press <(Menu)
3. 4 move to Edit
4. Press <(Select)
5. 4 move to Name or Tel number 1
6. Press <(Edit)
7. Enter the required name or number
8. Press <(OK)
9. Press A(Save)
Service dial E
See “Service dial E” on page 18.
X100_OI_English_AAA.book Page 53 Friday, August 6, 2004 3:11 PM
54 Contacts
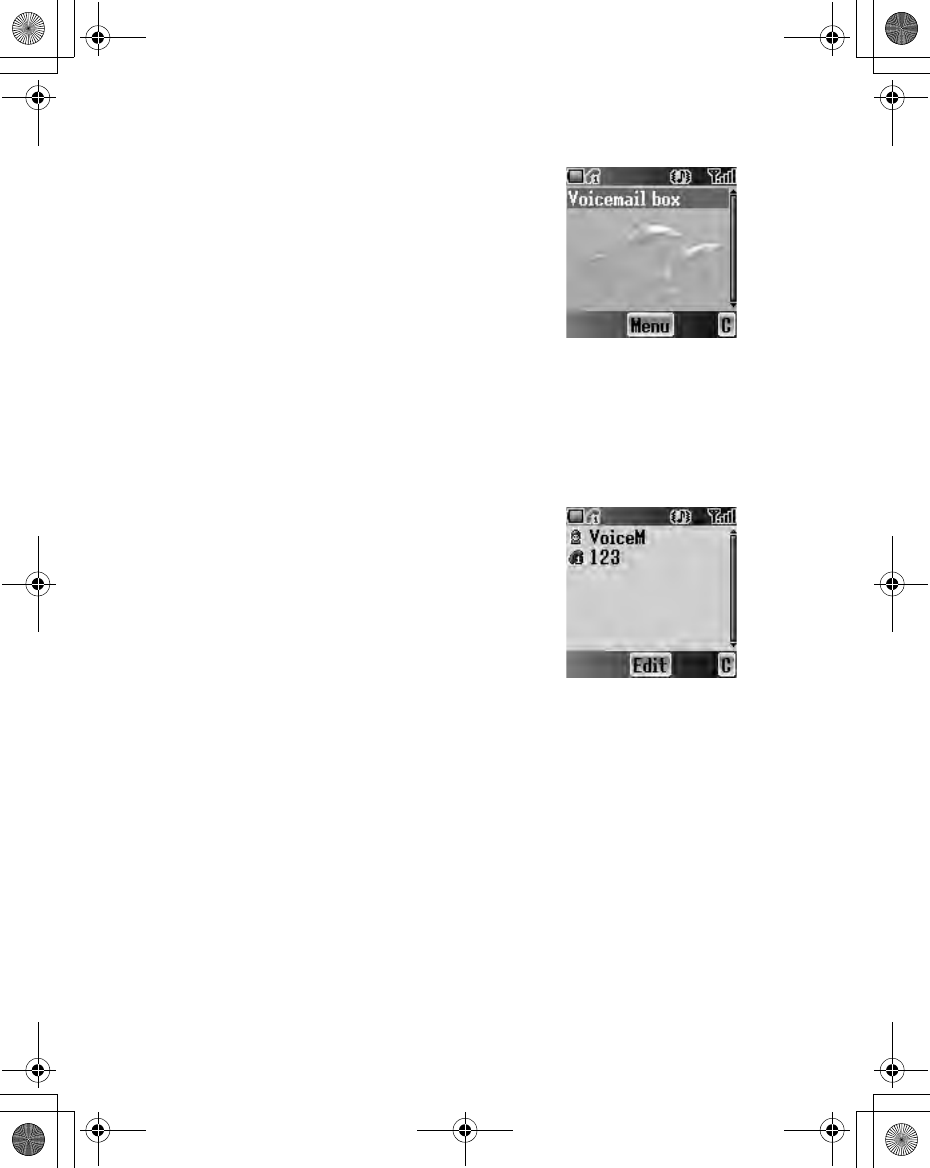
Voicemail
You can store the phone number to your Voicemail
and make a call to check if you have Voicemail.
Viewing Voicemail
From Contacts menu
1. 4 move to Voicemail
2. Press <(Select)
3. Press <(Menu)
4. 4 move to View
5. Press <(Select)
To edit the entry press <(Edit)
Editing Voicemail
From Voicemail menu
1. Press <(Menu)
2. 4 move to Edit
3. Press <(Select)
4. 4 move to Name or Tel number 1
5. Press <(Edit)
6. Enter the required name or number
7. Press <(OK)
8. Press A(Save)
X100_OI_English_AAA.book Page 54 Friday, August 6, 2004 3:11 PM
Contacts 55
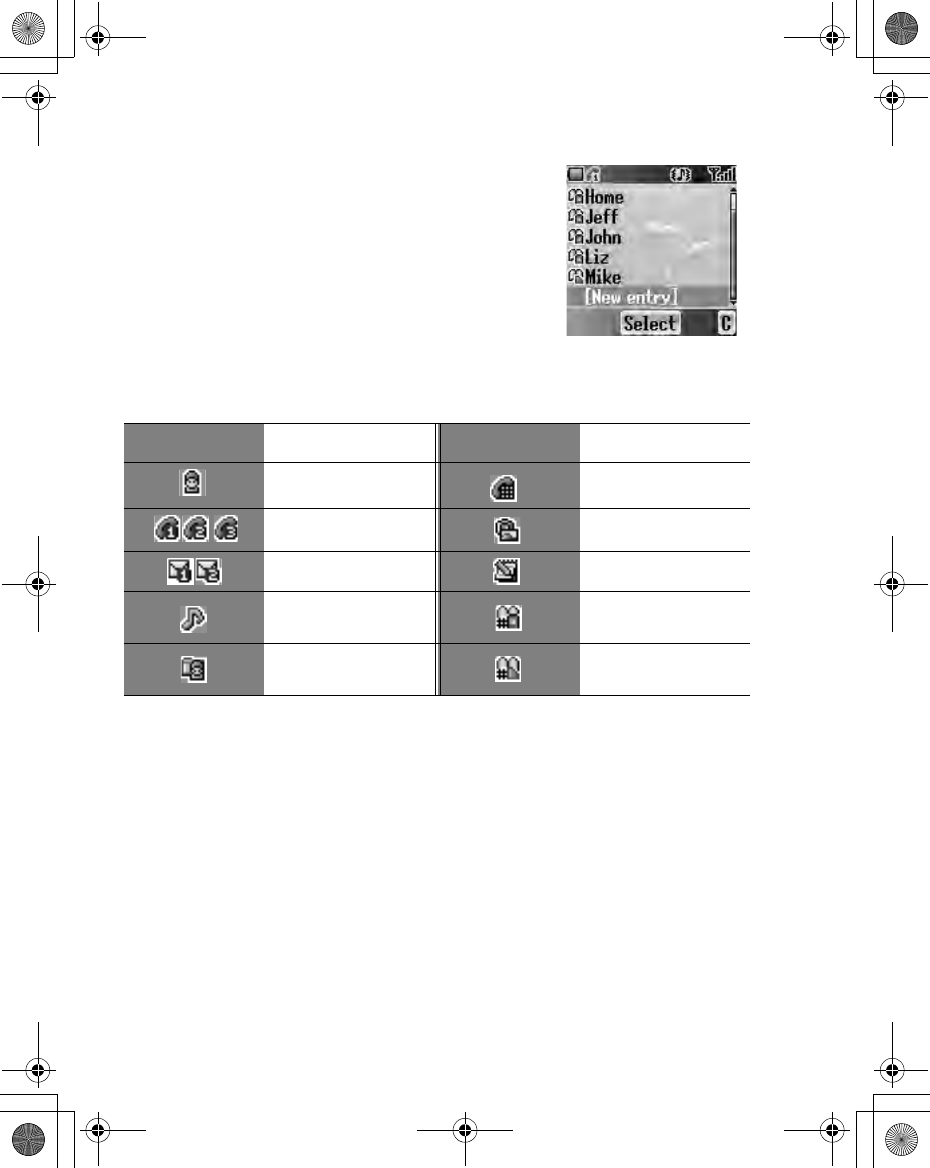
Hot key dial
You can quickly dial the numbers which are assigned to each numeric key $
- , (see “Hot key dial” on page 17). This function is available with Phone
Contacts list only.
Assigning Hot keys
While editing the Contacts list entry
1. 4 move to <Hot key dial>
2. Press <(Edit)
3. Enter the required number $ - ,
4. Press <(OK)
Note: To clear the Hot key dial assignment
of an entry, enter # instead of the entry’s original Hot key dial
number. Then press <(OK)
Viewing Hot key dial list
From Contacts menu
1. 4 move to Hot key dial
2. Press <(Select)
3. The Hot key dial list is displayed
My Contacts
You can select from All, SIM or Phone to display the
entries in the Contacts list entries.
From Contacts menu
1. 4 move to My Contacts
2. Press <(Select)
3. 4 move to All, SIM or Phone
4. Press <(Select)
X100_OI_English_AAA.book Page 55 Friday, August 6, 2004 3:11 PM
56 Games
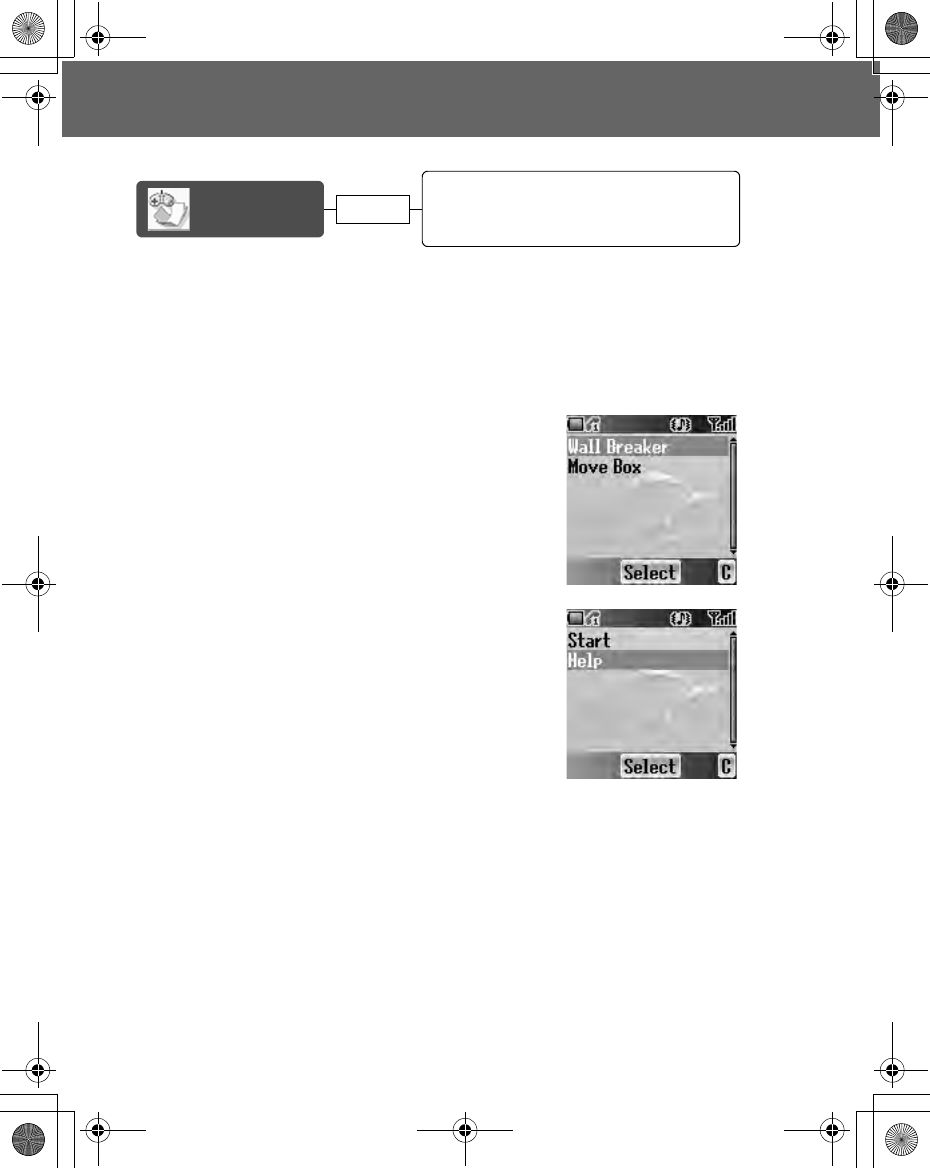
Games
Games
There are two preinstalled games in you phone.
Playing a game
From Games menu
1. 4 move to the required game
2. Press <(Select)
3. Press <(Select)
Viewing Help for a game
From Games menu
1. 4 move to the required game
2. Press <(Select)
3. 4 move to Help
4. Press <(Select)
Games page 56
Playing a game ............................................... 56
Viewing Help for a game................................. 56
Wall Breaker.................................................... 57
Move Box ........................................................ 58
X100_OI_English_AAA.book Page 56 Friday, August 6, 2004 3:11 PM
Games 57
Wall Breaker
Move a board to deflect a ball towards rows of various
coloured bricks. Some of the bricks release power up
items, such as board extension, ball reduce, gun and
more. But be careful: there are some items that works
in the opposite way. The next level is achieved by
removing all the bricks.
Key operation
Note: You can Resume your game from the
moment you pressed @(exit) or D(quit).
Resume is available as long as the phone is switched on.
Key Function
< / (Release a ball
Shoot (if your board has gun)
7 / 'Move left
3 / )Move right
5 / #Pause / Continue
1 / %Suicide a ball
@Exit and back to the Wall Breaker game menu
DQuit and back to the idle screen
X100_OI_English_AAA.book Page 57 Friday, August 6, 2004 3:11 PM
58 Games
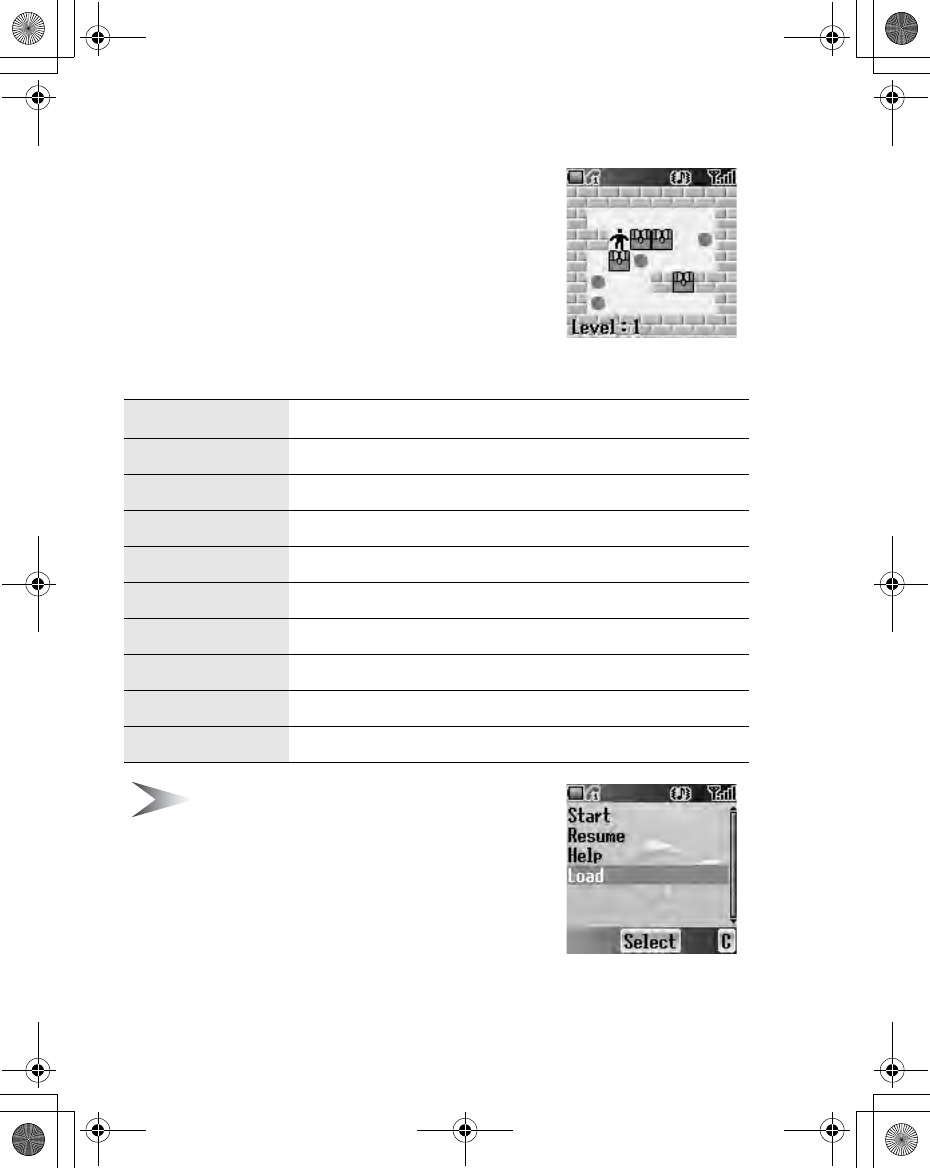
Move Box
Arrange all the boxes into designated places. You
can only push the boxes and only one at a time. So
be careful not to push them into corners.
Key operation
Note: You can Resume your game from the
point you pressed @(exit) or D(quit).
Resume is available as long as the phone is switched on.
Meanwhile, if you have saved your game by pressing *,
you can Load your saved data to continue from the stage
you left off. The saved data is available even after the
phone is switched off.
Key Function
1 / %Move up
5 / +Move down
7 / 'Move left
3 / )Move right
$Restart the current stage from the beginning
(Return to the last step
*Save the current game
@Exit and back to the Move Box game menu
DQuit and back to the idle screen
X100_OI_English_AAA.book Page 58 Friday, August 6, 2004 3:11 PM
Browser 59
Browser
You can access Internet services supported by the network, such as news,
weather reports and sport.
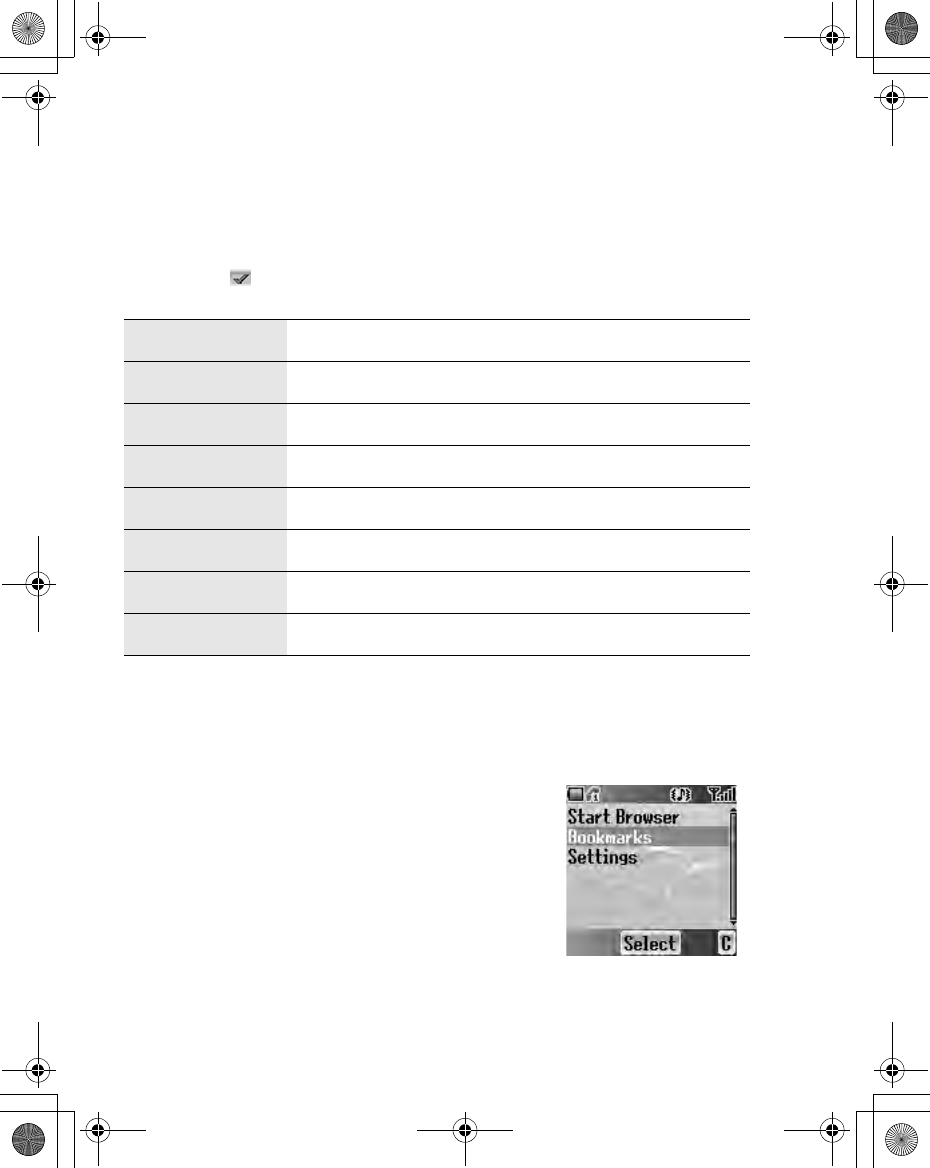
Starting the Browser
From Browser menu
1. Press <(Select)
2. The WAP browser will start to connect to the
network.
To exit the browser, press .
D
Note: If the server is not responding, press <(Retry) or try again later.
Navigating contents
Use 0 to scroll through the contents on the screen. When linked text is
highlighted, press <( ) to load the page.
1Scroll up
Page up with Long press
5Scroll down
Page down with Long press
7Scroll up
Return to the previous object
3Scroll down
Return to the next object
Starting the
Browser
Navigating contents......................................... 59
Using the Browser........................................... 60
Bookmarks Managing Bookmarks in Browser ................... 61
Managing off-line Bookmarks.......................... 62
Settings
page 61
page 59
Editing GPRS Connection............................... 65
Editing CSD Connection ................................. 65
page 64
X100_OI_English_AAA.book Page 59 Friday, August 6, 2004 3:11 PM
60 Browser
Using the Browser
While browsing the homepage
1. Press A(Menu) or C(Send)
2. 4 move to Browser Menu
To exit the browser, select Done
OR
Press D(Power/End) or @( ).
3. Press <( )
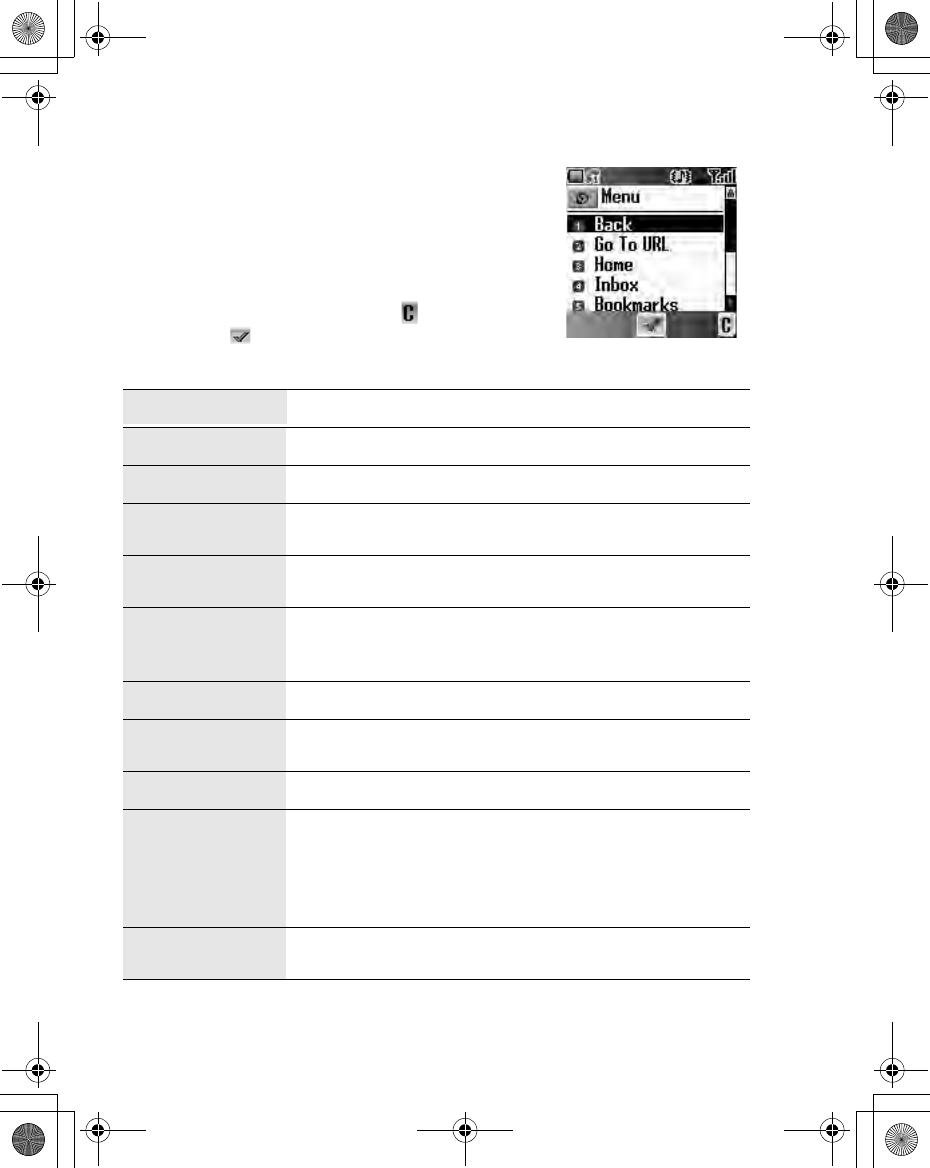
Menu Description
Back Return to the previous page.
Go To URL Enter URL and jump to the homepage.
Home Jump to the homepage which is pre-defined in the
browser settings.
Inbox Store, view or delete WAP push messages from the
network. Jump to the home page.
Bookmarks
Jump to a page by setting a bookmark. Add the current
page to bookmarks. (see “Managing Bookmarks in
Browser” on page 61)
Save Items Save images or other items from the current page.
Snapshots Capture the screen image of the current page and view
or delete it.
Reload Reload and update the current page.
Settings
Select and set the following:
Homepage
Downloads
Restart Browser
Security
About... Information about the browser type and security
options.
X100_OI_English_AAA.book Page 60 Friday, August 6, 2004 3:11 PM

Browser 61
Bookmarks
Once you store your favourite page or a frequently accessed page as a
bookmark, you can jump to the page quickly. This eliminates the need to enter
the URL every time. You also can assign hot keys to jump to particular pages.
There are 2 types of bookmarks, one is in Browser and the other is off-line
Bookmarks.
Managing Bookmarks in
Browser
You can add a bookmark by entering the URL.
From Browser Menu in Browser
1. 4 move to Bookmarks
2. Press <( )
3. Press A(Menu)
4. Press <( )
5. Enter the Title and URL with # - ,
6. Select a folder
7. Press <(Save)
Adding a current page as a bookmark
From Browser Menu in Browser
1. 4 move to Bookmarks
2. Press <( )
3. Press <( ) to Mark Site
Using Bookmarks
From Browser Menu in Browser
1. 4 move to Bookmarks
2. Press <( )
3. 4 move to the required bookmark
4. Press <(Go)
X100_OI_English_AAA.book Page 61 Friday, August 6, 2004 3:11 PM
62 Browser
Managing Bookmarks in Browser
While viewing Bookmarks
1. 4 move to the required bookmark
2. Press A(Menu)
3. 4 move to the required function
4. Press <( )
The following functions are available:
Managing off-line Bookmarks
You can store bookmarks in off-line Bookmarks. When you jump to the URL,
the Browser will start up automatically.
Adding a new bookmark
From Browser menu
1. 4 move to Bookmarks
2. Press <(Select)
3. 4 move to [New entry]
4. Press <(Select)
5. 4 move to Title: or URL:
6. Press <(Select)
7. Enter the required Title: or URL:
8. Press <(OK)
9. Press A(Save)
Details Display and edit the bookmark information
Delete Delete the bookmark
New Bookmark Add a new bookmark
New Folder Add a new folder in which to save the bookmarks
Move Move a bookmark in a folder
Move to folder Move a bookmark into another folder
Delete all Delete all bookmarks
Hotkeys Assign bookmarks to keys
X100_OI_English_AAA.book Page 62 Friday, August 6, 2004 3:11 PM
Browser 63
Managing Bookmarks in off-line
Bookmarks
From Browser menu
1. 4 move to Bookmarks
2. Press <(Select)
3. 4 move to the required bookmark
4. Press <(Menu)
5. 4 move to the required function
6. Press <(Select)
The following functions are available:
Select Jump to the selected bookmark site.
Edit Edit the Title and URL.
Delete Delete the bookmark.
Delete all Delete all bookmarks.
X100_OI_English_AAA.book Page 63 Friday, August 6, 2004 3:11 PM
64 Browser
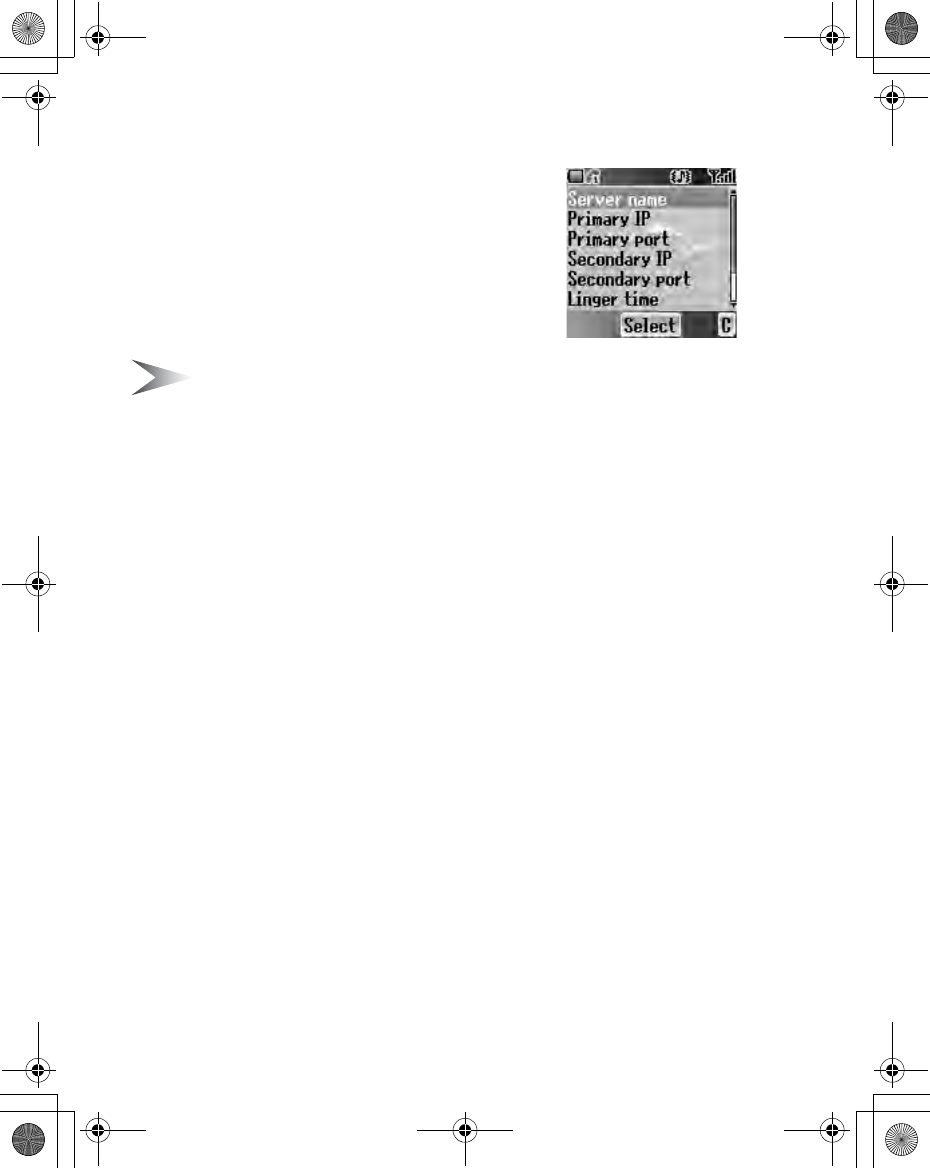
Settings
Before accessing the Internet services, you need to
set up a subscription with your network operator or
Internet Service Provider (ISP) to enable the relevant
configuration information. If you have any trouble with
your network settings, please contact your network
service provider.
Note: Modifying default settings may cause failure of the Browser. See
“Personal Settings” on page 106, for your details.
From Browser menu
1. 4 move to Settings
2. Press <(Select)
3. 4 move to the required network
4. Press <(Select)
5. 4 move to Activate or Edit
To activate the selected network, select Activate.
To edit the network settings, select Edit.
6. Press <(Select)
7. 4 move to the required setting
8. Press <(Select)
You can edit the following settings:
•Server name
•Primary IP
•Primary port
•Secondary IP
•Secondary port
•Linger time
•Homepage
•Connection
In the Connection menu, you can edit GPRS and CSD connections. See
the following section for details.
X100_OI_English_AAA.book Page 64 Friday, August 6, 2004 3:11 PM
Browser 65
Editing GPRS Connection
From Connection menu
1. 4 move to GPRS
2. Press <(Select)
3. Press <(Select) to Edit
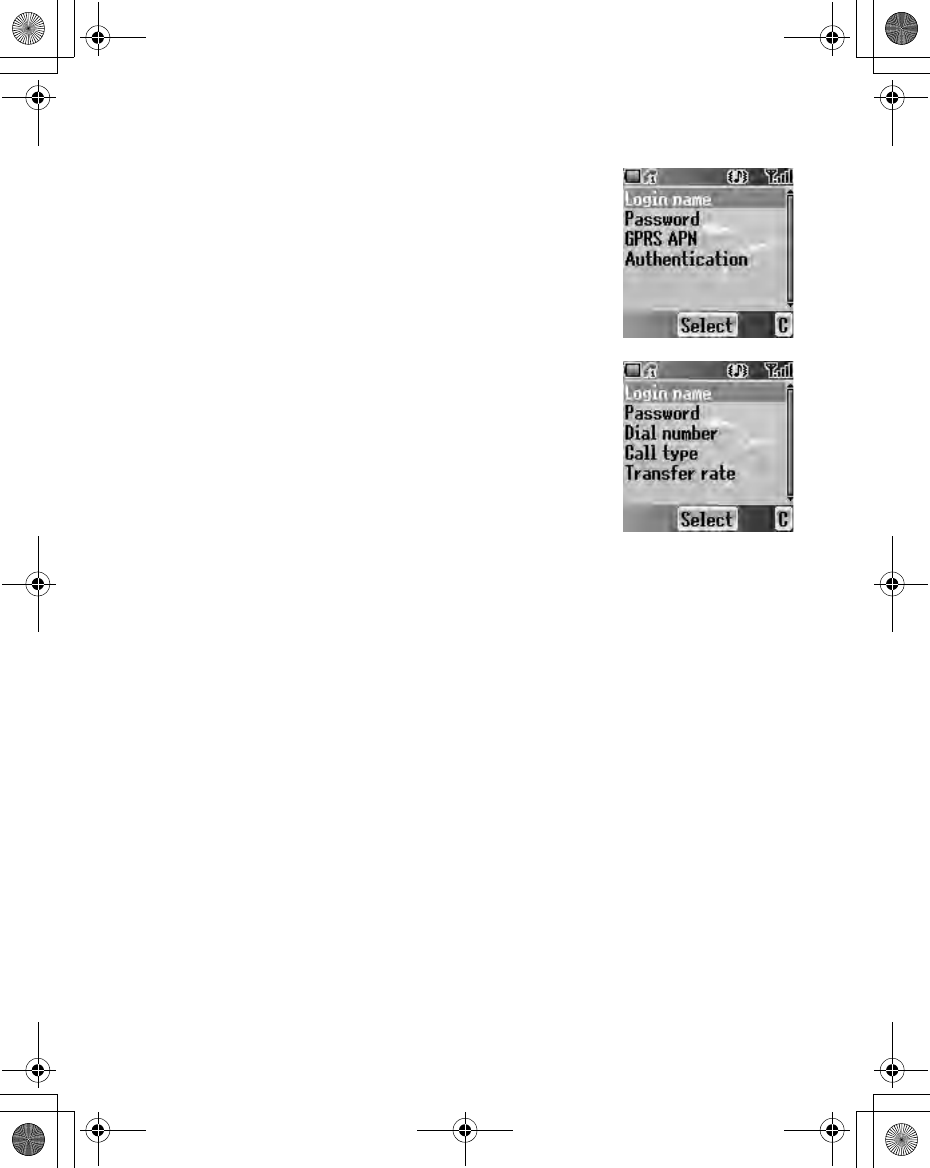
•Login name, Password, GPRS APN, Authentication
Editing CSD Connection
From Connection menu
1. 4 move to CSD
2. Press <(Select)
3. Press <(Select) to Edit
•Login name, Password, Dial number, Call type,
Transfer rate
X100_OI_English_AAA.book Page 65 Friday, August 6, 2004 3:11 PM
66 Camera
Camera
Camera Appearance
Launching the Camera Preview mode ............ 68
Operating the Camera..................................... 69
Options ............................................................ 69
Preview
mode
Capture
mode
Camera
Appearance
Key functions...................................................67
Status icons ..................................................... 68
page 72
page 68
page 66
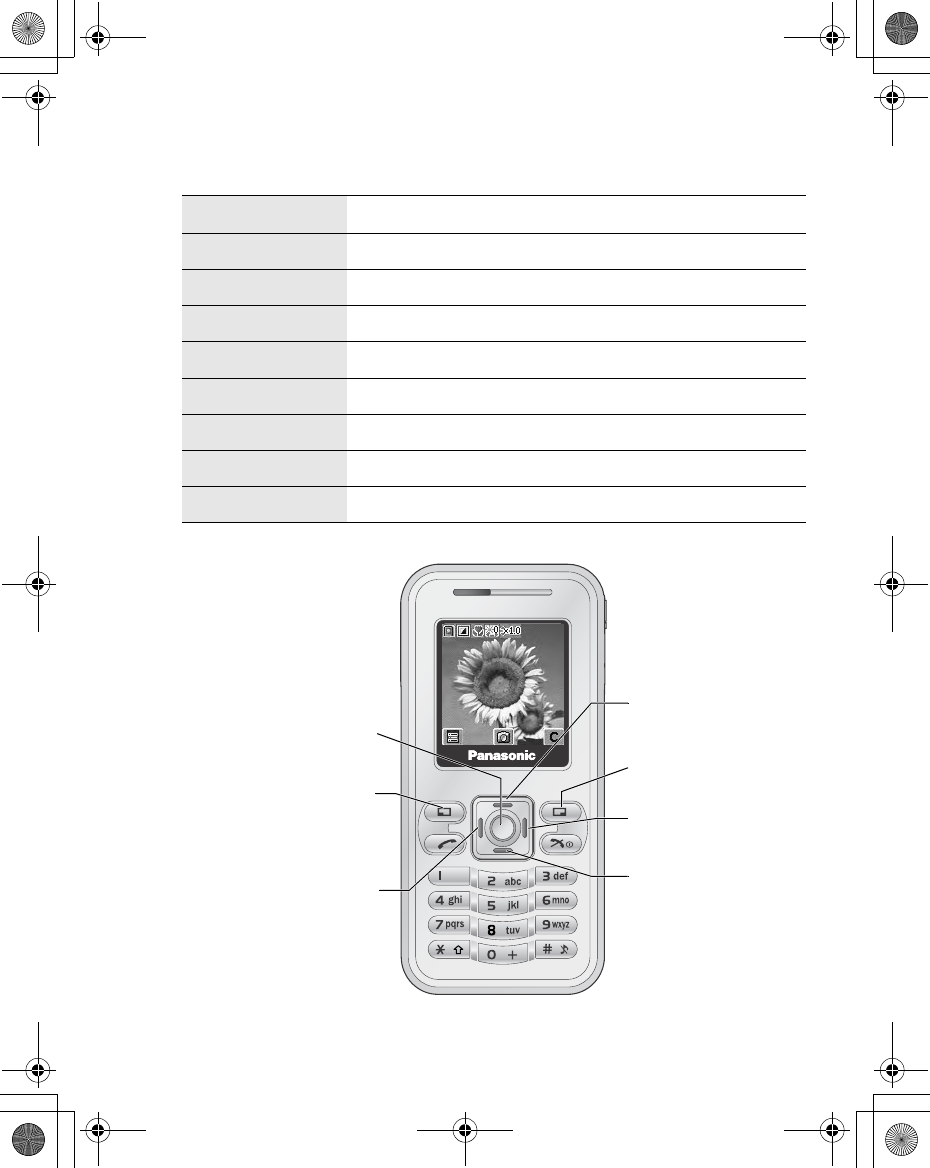
Camera lens
Self-portrait mirror
X100_OI_English_AAA.book Page 66 Friday, August 6, 2004 3:11 PM
Camera 67
Key functions
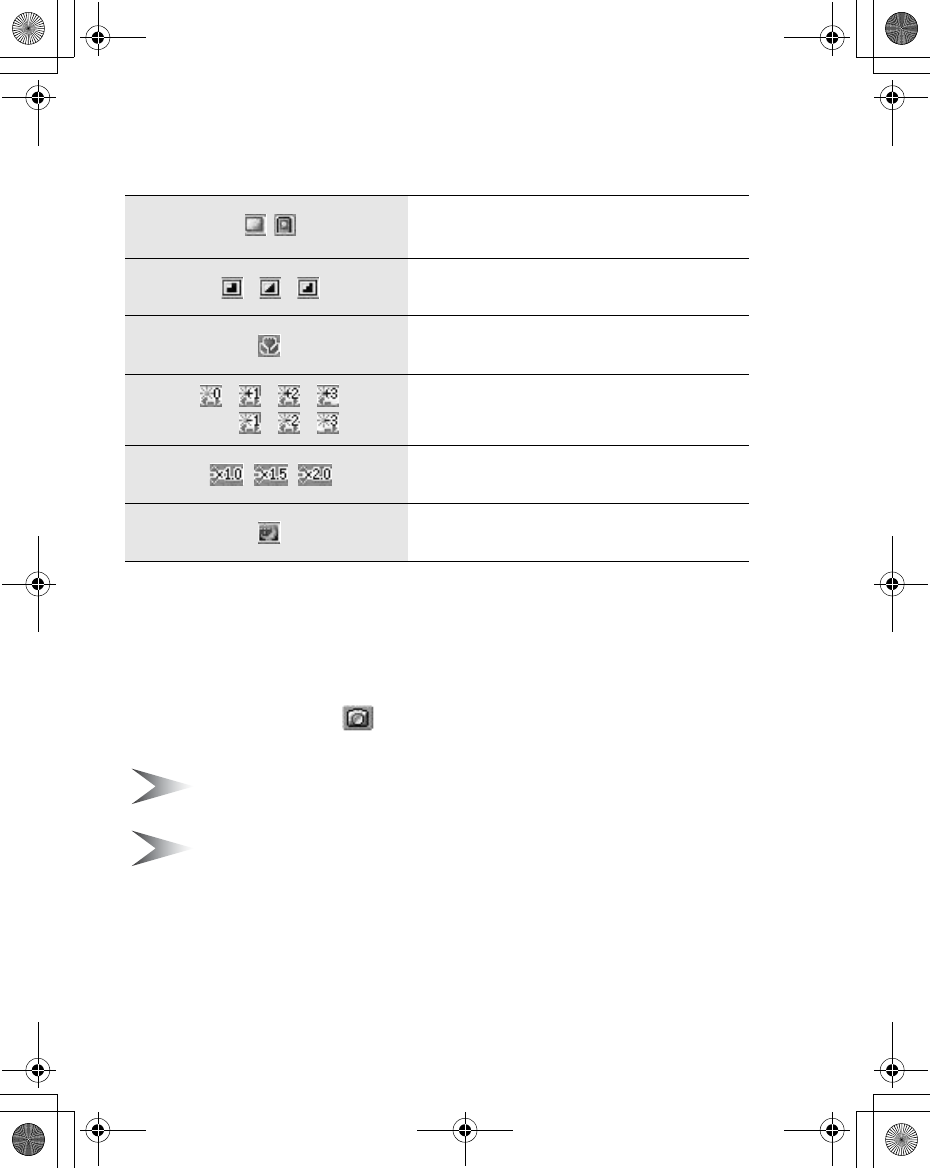
Key Function
1Zoom in
5Zoom out
3Brightness up
7Brightness down
<Shutter / Options (Capture mode)
AOptions / Save a captured image
@Exit the camera mode / Delete a captured image
DExit to the idle screen
Cancel
Shutter
Options
Zoom out
Zoom in
Brightness down
Brightness up
X100_OI_English_AAA.book Page 67 Friday, August 6, 2004 3:11 PM
68 Camera
Status icons
Preview mode
Launching the Camera Preview mode
• In idle screen, press @( ) (if Camera is selected as Shortcut key)
• From main menu, press < Camera
Note: The quality of display images may vary depending on the object or
environment.
Note: Displayed images may distort when shooting moving objects
especially in a fast moving environment.
Image size
Quality
Close up mode
Brightness
Zoom (only Wallpaper size)
Twilight mode
X100_OI_English_AAA.book Page 68 Friday, August 6, 2004 3:11 PM
Camera 69
Operating the Camera
Brightness
In Preview mode
3 brightness up
7 brightness down
Zoom
In Preview mode
1 zoom in
5 zoom out
Taking a picture
In Preview mode
Press <(Shutter) to take a picture
Note: See “Image size” below for changing the size of images
Options
In Preview mode
1. Press A( )
The option menu is displayed
2. 4 move to the required function
3. Press <(Select)
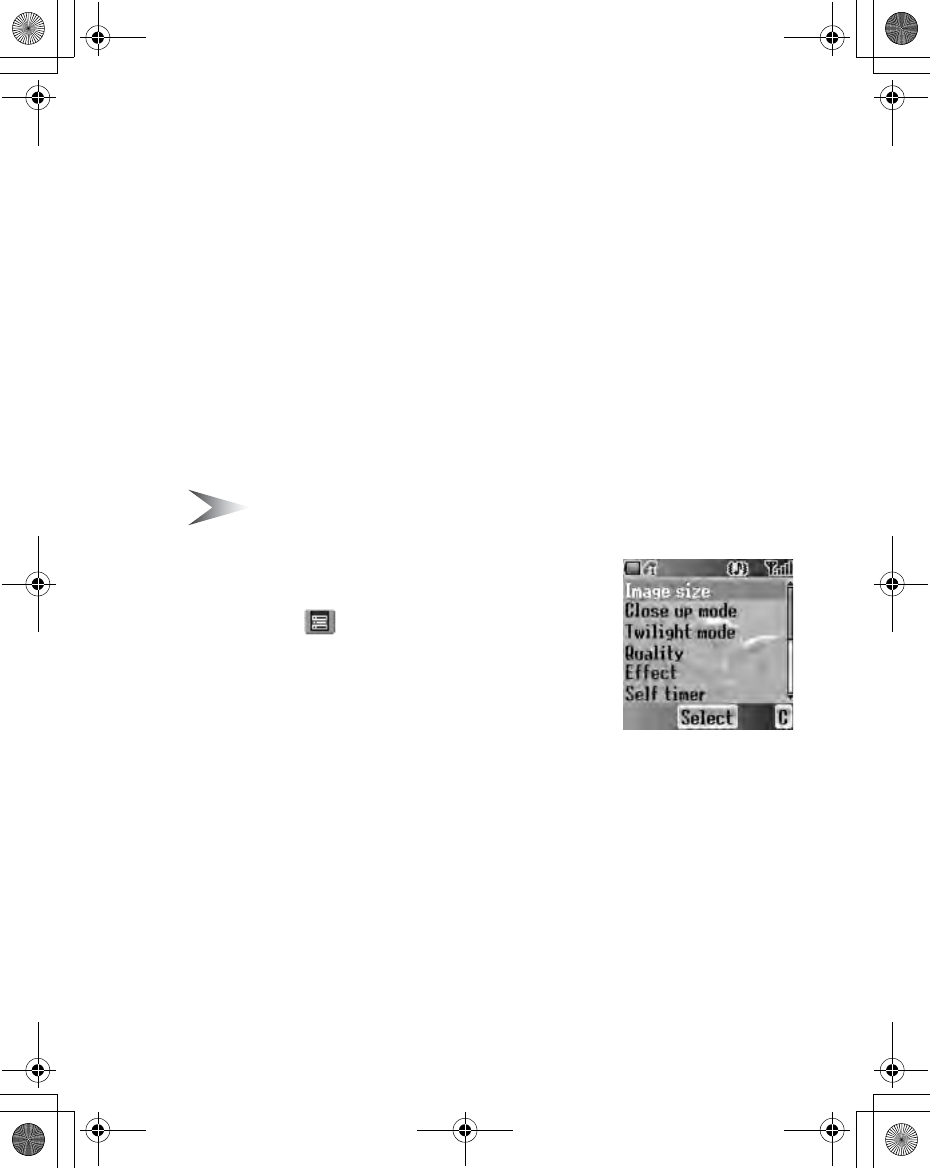
Image size
From options menu
1. Press <(Select)
2. 4 move to the required size
3. Press <(Select)
The following image sizes are available:
• Wallpaper size (128 x 128 pixels)
• CIF (352 x 288 pixels)
X100_OI_English_AAA.book Page 69 Friday, August 6, 2004 3:11 PM

70 Camera
Close up mode
Close up mode can be used to take pictures at a close range.
From options menu
1. 4 move to Close up mode
2. Press <(Select)
3. 4 move to On or Off
4. Press <(Select)
Twilight mode
Twilight mode can be used to take pictures in low light conditions.
From options menu
1. 4 move to Twilight mode
2. Press <(Select)
3. 4 move to On or Off
4. Press <(Select)
Quality
You can choose the image quality of your picture.
From options menu
1. 4 move to Quality
2. Press <(Select)
3. 4 move to Fine, Normal or Economy
4. Press <(Select)
Effect
You can enjoy various effects on your picture.
From options menu
1. 4 move to Effect
2. Press <(Select)
3. 4 move to the required effect
4. Press <(Select)
The following effects are available:
•Normal
•Sunset
•Monochrome
•Inverse
•Emboss
•Cold
X100_OI_English_AAA.book Page 70 Friday, August 6, 2004 3:11 PM

Camera 71
Self timer
Self timer automatically takes a picture after a 10 second delay. After pressing
the shutter, a series of ringtone will begin. The picture will be taken when you
hear the shutter sound.
From options menu
1. 4 move to Self timer
2. Press <(Select)
3. 4 move to On or Off
4. Press <(Select)
Shutter sound
You can change the sound of the shutter.
From options menu
1. 4 move to Shutter sound
2. Press <(Select)
3. 4 move to the required sound
4. Press <(Select)
Anti flicker
If the display flickers, you can change Anti flicker to 50Hz or 60Hz. Choosing
50Hz or 60Hz is country dependent.
From options menu
1. 4 move to Anti flicker
2. Press <(Select)
3. 4 move to 50Hz or 60Hz
4. Press <(Select)
Note: When taking a picture, flicker may appear in certain environments.
Exit
Use to Exit the camera mode. You can also Exit by pressing D(Power/End)
anytime.
X100_OI_English_AAA.book Page 71 Friday, August 6, 2004 3:11 PM

72 Camera
Capture mode
When you press the shutter, all images are saved in My Pictures (see “My
Media” on page 85). You can confirm and control the image before you save it.
In Capture mode
1. Press <( )
2. 4 move to the required function
3. Press <(Select)
The following functions are available for a picture:
•Create MMS
•Set as wallpaper
•Set as caller ID
•Set as group ID
•Effect (available only in Wallpaper size)
•Rename
•Properties
•Delete
X100_OI_English_AAA.book Page 72 Friday, August 6, 2004 3:11 PM

Messages 73
Messages
Your phone has various messaging features, including SMS/EMS and MMS.
You need to customise the settings of Messages and Network before you start.
SMS/EMS – You can send short text messages with media attached to phone
numbers whose network support SMS/EMS.
MMS – You can send media attached messages to phone numbers whose
network support MMS or E-mail address.
Settings
From Messages menu
1. 4 move to Settings
2. Press <(Select)
3. 4 move to MMS or SMS/EMS
4. Press <(Select)
Settings MMS settings...................................................74
SMS/EMS settings...........................................75
Receiving messages........................................76
User
messages
Cell
Broadcast
Receiving Cell Broadcast messages ...............80
Reading Cell Broadcast messages..................80
Topic list ...........................................................80
Languages.......................................................81
Create
Inbox and
Outbox
Chat
SMS
page 77
page 73
page 78
page 79
page 79
page 80
X100_OI_English_AAA.book Page 73 Friday, August 6, 2004 3:11 PM
74 Messages
MMS settings
Server list
You can configure up to 5 server profiles.
From Settings menu
1. Press <(Select)
2. Press <(Select)
3. 4 move to the required network
4. Press <(Select)
5. 4 move to Activate or Edit
6. Press <(Select)
To activate the selected network, select Activate.
To edit the network settings, select Edit.
7. 4 move to the required setting
8. Press <(Select)
You can edit the following settings:
•Server name
•Primary IP
•Primary port
•Secondary IP
•Secondary port
•Linger time
•MMS centre
•Connection
X100_OI_English_AAA.book Page 74 Friday, August 6, 2004 3:11 PM
Messages 75
Other settings for MMS
SMS/EMS settings
You can change the following settings:
Signature You can set a signature to add to your message.
Reply text You can select On or Off to add the reply text to the
messages.
Receive setting You can select, accept or reject anonymous messages.
Auto reception You can select On, Off or Interactive.
Mail settings
Validity period: Set the duration that your message is
stored at the message centre. Select Maximum or
Manual.
Delivery report: Request a report on the delivery
status of your message. Select On or Off.
Sender visibility: Select Show or Hide your address to
the recipient.
Restore settings Reset the MMS settings to the factory default settings.
Validity period You can select from Defaults, 1 hour, 12 hours, 1 day,
1 week or Maximum.
Message centre You can change the server’s service number.
Protocol You can select the type of protocol from SMS, Fax,
Email, Paging, X.400, ERMES or Voice.
Delivery report You can select from On, Off or Ask.
X100_OI_English_AAA.book Page 75 Friday, August 6, 2004 3:11 PM
76 Messages
Receiving messages
When one or more messages arrive, New Message(s)! dialogue and the
message indicator ( ) will appear in the screen together with a message tone
(see “Message tone” on page 32).
Note: Please be sure to keep enough free memory for new messages.
When the phone memory is full, ( ) will be displayed in the upper left of
the display. Delete unnecessary messages from the Inbox or Outbox.
Reading received messages
When New Message(s)! is displayed, press <(Read). If you have more than
one message, use 4 to move to the required message.
If you press other keys without reading new messages, the idle screen will be
displayed. To read new received messages, press A ( ) and check the
Inbox.
The following functions are available for received messages:
Reply Create a reply message to the sender.
Call Call back to the sender.
Forward Forward the selected message.
Chat Send a chat message to the sender. (SMS only)
Extract number Save the sender’s phone number in Contacts list.
Delete Delete the message.
Delete all Delete all messages in Inbox.
Extract media Save the attached image in My Media.
Move to SIM Move the message to the SIM memory. A (SMS only)
Message info View information about the message.
X100_OI_English_AAA.book Page 76 Friday, August 6, 2004 3:11 PM