Continental Automotive Systems 137830 Tachograph User Manual Manual part1
Continental Automotive Systems, Inc. Tachograph Manual part1
Contents
Manual part1
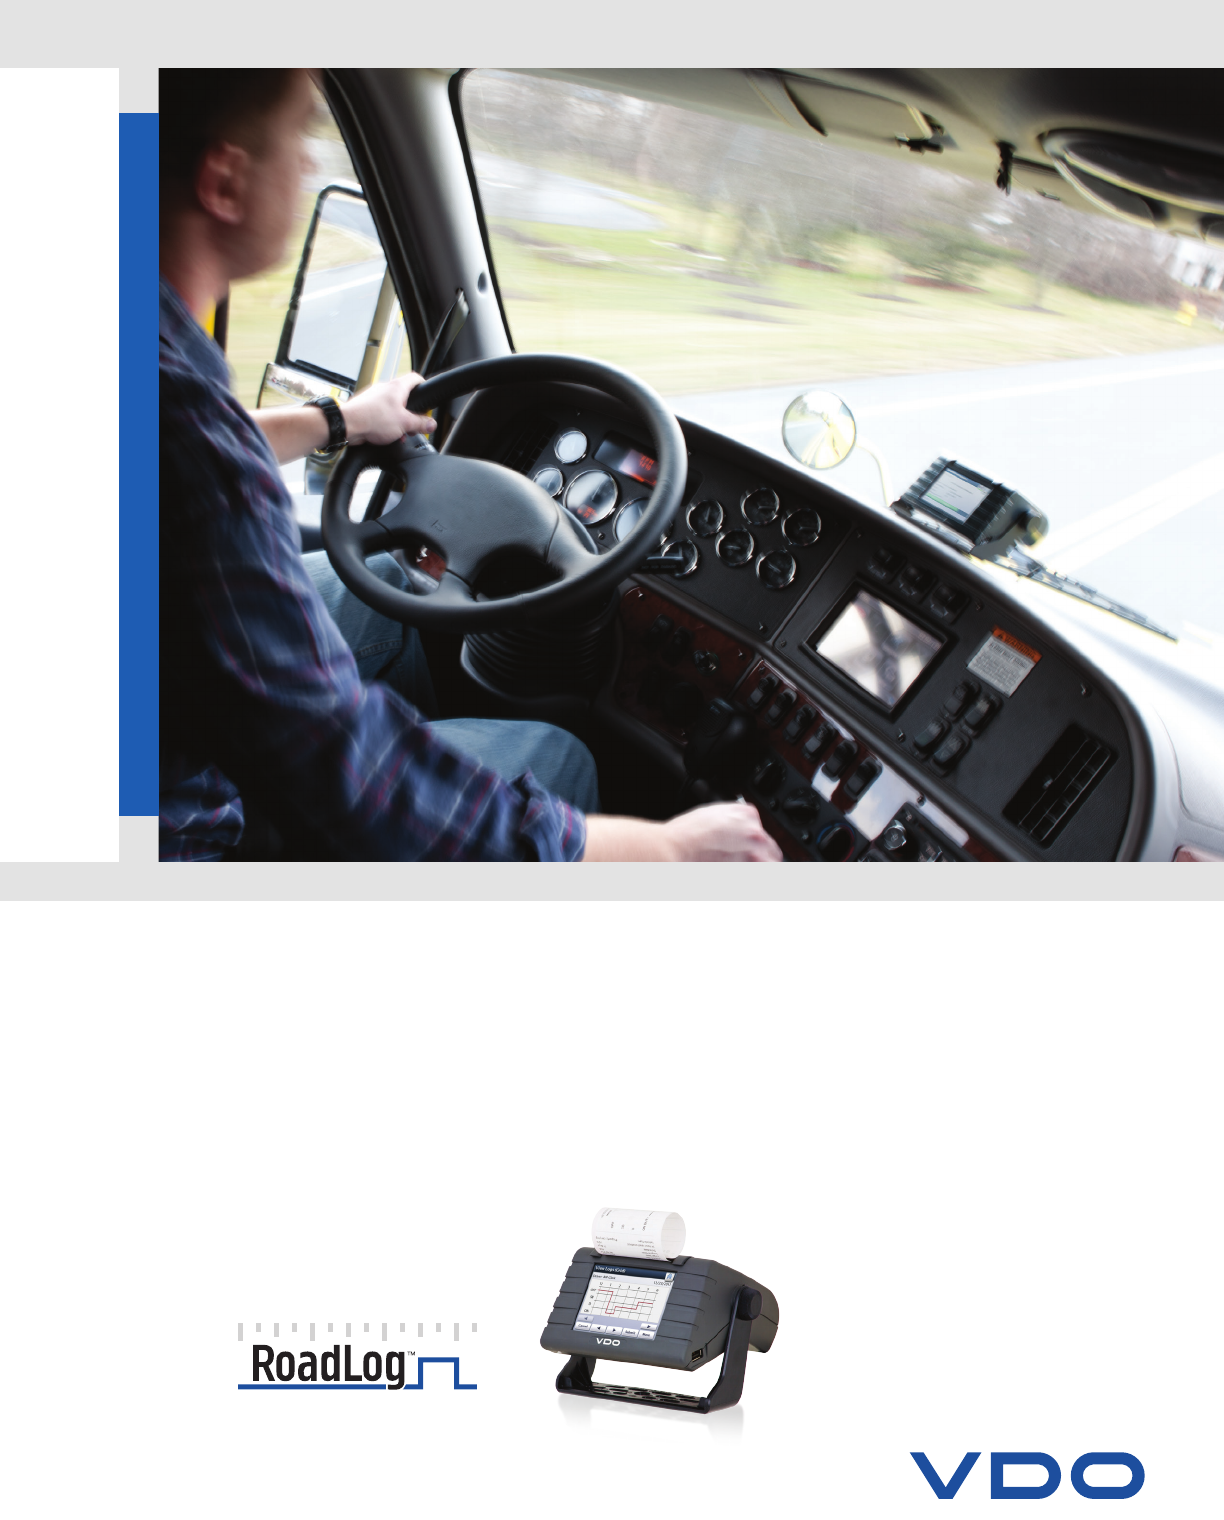
RoadLog™ EOBR Owner’s Manual
Version 1.1
Includes Instructions on:
• Fleet Management Software
• EOBR Installation
• EOBR Operation
www.vdoroadlog.com

2
Table of Contents
Table of Contents
Introduction ................................................................................. 5
The RoadLog EOBR is used in conjunction with: ....................... 5
Getting Started ......................................................................... 5
Chapter 1: VDO RoadLog™ Fleet Management
Software ..........................................................6
1. Managing your Fleet with the VDO RoadLog™ System....... 7
2. Getting Started ...................................................................... 8
System Requirements ............................................................... 8
Activating the RoadLog Fleet Management Software ................. 9
Software Installation .................................................................. 9
3. Navigating RoadLog Fleet Management Software:
First Look .............................................................................. 13
The Quick Start Screen: ......................................................... 13
The Navigation Buttons: ......................................................... 13
The Action Palettes: ................................................................ 14
4. Navigating work area Screens and Tabs............................ 15
Viewer Screen ......................................................................... 15
HOS Tab: ............................................................................... 15
IFTA/IRP Tab: .......................................................................... 15
DVIR Tab: ................................................................................ 15
Supporting Documents Tab: .................................................... 15
Speed Graph Tab: ................................................................... 16
Events Tab: ............................................................................. 16
Report Screen ......................................................................... 16
Supporting Documents Screen ............................................... 16
Drivers / Vehicles ..................................................................... 17
Driver Profile Tab: .................................................................... 17
Trailer Assignments Tab: .......................................................... 17
Shipping Assignments Tab: ..................................................... 17
Company Configuration Screen............................................... 18
Company Tab: ........................................................................ 18
Shipping Documents Tab: ....................................................... 18
Supporting Documents Tab: .................................................... 18
Annotations Tab: ..................................................................... 19
Fuel Vendor List Tab: ............................................................... 19
Fuel Types Tab: ....................................................................... 19
Asset Part List Tab: ................................................................. 20
Application Tab: ...................................................................... 20
Support .................................................................................. 20
5. Creating and working
with Driver Keys ................................................................... 21
Creating Drivers ...................................................................... 21
Creating a Driver Profile ........................................................... 21
6. Transferring data .................................................................. 23
Uploading Driver data to the Fleet Management Software ....... 23
Exporting to RoadLog ............................................................. 23
7. Screens & Tabs: Features & Functions .............................. 24
Viewer Screen – HOS Tab ....................................................... 24
Events Grid ............................................................................ 25
Map View and IFTA / IRP Tabs ................................................. 27
DVIR Tab ................................................................................. 27
Exporting DVIRs to RoadLog................................................... 29
Importing DVIRs from RoadLog ............................................... 29
Supporting Documents Tab ..................................................... 29
Speed Graph Tab ................................................................... 30
This functionality will be introduced in 2013. ............................ 30
Events Tab .............................................................................. 30
Report Screen ......................................................................... 31
DVIR Status Report ................................................................. 31
HOS Download Reminder Report ............................................ 32
IRP Driven Miles and IRP Vehicle List Reports ......................... 32
Vehicle Trip Report .................................................................. 32
Supporting Documents Screen ............................................... 33
Drivers / Vehicles Screen ......................................................... 33
Driver Tab ............................................................................... 34
Vehicle Screen ........................................................................ 35
Creating Trailers ...................................................................... 37
Trailer Screen .......................................................................... 38
Trailer Assignments Tab ........................................................... 38
Shipping Assignments Tab ...................................................... 39
Company Configuration Screen............................................... 40
Company Tab ......................................................................... 40
Creating Shipping Documents ................................................. 42
Supporting Documents Tab .................................................... 42
Annotations Tab ...................................................................... 43
Fuel Vendor List Tab ................................................................ 43
Fuel Types Tab ........................................................................ 43
Asset Part List Tab .................................................................. 44
Application Tab ....................................................................... 45
Support Screen ....................................................................... 46
Update RoadLog EOBR Software ........................................... 46
Update RoadLog Fleet Management Software ........................ 46
Start Remote Control (FastViewer) ........................................... 46
Technical Support ................................................................... 46
Collect Software Diagnostics ................................................... 47
Adding Vehicle Licenses .......................................................... 47
Purging old data ..................................................................... 48
Replacing Lost or Damaged RoadLog Keys ............................ 48
8. Resolving Conflict Files ....................................................... 49
9. Backing up your RoadLog Data .......................................... 50
Chapter 2: VDO RoadLog™
EOBR Installation .......................................... 51
1. VDO RoadLog™ EOBR Installation .................................... 51
1. Make sure you have the correct Installation Kit! ................... 52
2. Choose your Mounting Option. ........................................... 52
3. Choose your Mounting Location. ........................................ 53
4. Attach your Bracket or Mount. ............................................ 53
5. Prepare the RoadLog. ......................................................... 53
6. Connect Cable. ................................................................... 54
7. Install RoadLog into Mount. ................................................ 54
8. Load Paper Roll. ................................................................. 54
9. Compliance Sticker. ............................................................ 54
Instructions for Open End “Basic” Cable ................................. 55
6-pin and 9-pin Wiring Configurations ..................................... 56
OBDII Vehicle Connector ......................................................... 56

3
Table of Contents
Chapter 3: VDO RoadLog™ EOBR Operation ...57
1. VDO RoadLog EOBR Fundamentals .................................. 57
Operating RoadLog: ............................................................... 58
On/Off Button and Operation Modes ....................................... 60
USB Connector....................................................................... 60
Printer .................................................................................... 61
GPS Antenna / Connector ..................................................... 61
Connector Cables ................................................................... 61
Battery .................................................................................... 62
Touch Screen Display ............................................................. 62
System Icons .......................................................................... 62
2. First Device Start Up After Installation Into Vehicle .......... 63
3. Company Log In ................................................................... 64
4. Configuration Parameters ................................................... 65
Setting Configuration Parameters ............................................ 65
Setting the Vehicle Synchronization Parameter ........................ 66
Setting the Vehicle Synchronization Parameter Automatically ... 67
Setting the Vehicle Synchronization Parameter Manually .......... 67
Setting the Vehicle Odometer Parameter ................................. 68
Setting the Vehicle Identification Number (VIN)......................... 69
Setting the Wake up condition ................................................ 69
Setting the Vehicle Type .......................................................... 70
Setting the Printing Speed....................................................... 71
Setting the W Factor ............................................................... 72
Saving new Configuration Parameters to the Fleet Key ............ 74
5. The User Settings Menu ...................................................... 75
Adjusting Illumination .............................................................. 75
Change Language .................................................................. 75
Diagnostic Functions ............................................................... 76
About – RoadLog Device Information ...................................... 76
6. Daily Operations ................................................................... 77
Driver Log In ........................................................................... 77
Enter your Status .................................................................... 78
If you are not the first Driver to Log In: ..................................... 79
Manual Log In ......................................................................... 80
Manual Location Entry ............................................................ 81
Performing DVIRs at Log In and Log Out ................................. 81
The Driver Overview Options Screen: ..................................... 82
Company Data Transfer .......................................................... 83
Update the Company Assets File ........................................... 84
Upload the Company Support Data Lists ................................ 84
Data Download to a normal USB Flash Drive ......................... 84
Change Status ........................................................................ 85
Status Lock ............................................................................ 85
View Logs (Grid) ...................................................................... 86
View Logs (Details) .................................................................. 86
Event Details ........................................................................... 87
Driver Log Out ........................................................................ 88
Data Download at Driver Log Out ............................................ 89
7. Trailer management ............................................................. 90
Adding a Trailer ....................................................................... 90
Removing a Trailer ................................................................... 91
8. Shipment Documents management ................................... 92
9. Supporting Documents ....................................................... 93
Generating a Supporting Document Automatically ................... 93
Generating a Supporting Document Manually.......................... 94
10. Vehicle Inspection Reports: Creating DVIRs ..................... 96
Performing DVIRs.................................................................... 96
Pre-trip Inspection ................................................................... 96
Creating a Pre-trip DVIR .......................................................... 96
Creating a Post-trip DVIR ........................................................ 97
Assigning Defects to a Part in the DVIR ................................... 98
DVIR Summary ..................................................................... 100
Printing a DVIR ..................................................................... 100
Viewing Driver Vehicle Inspection Reports (DVIR) ................... 101
11. Enabling/Disabling Exemptions ....................................... 102
Automatic deactivation of Exemptions ................................... 102
Disabling the 100 or 150 Air-miles Radius Exemptions .......... 103
12. Adding a Pre-Trip or Post-Trip Activity ............................ 104
13. Performing a Roadside Inspection .................................. 105
Retrieving and Printing DVIR Reports .................................... 105
Retrieving, Printing and Transferring HOS logs....................... 106
14. Company Log Out from RoadLog ................................... 107
15. Software Updates .............................................................. 108
16. Diagnostic Warning Screens ............................................ 109
17. RoadLog Files .................................................................... 129
Company-Related Files (Fleet Management Software Files) ... 129
Company Identification File ................................................... 129
Company Tractor List File ...................................................... 130
Company Support Data File .................................................. 130
Company Vehicle Activities Data File ..................................... 130
Company Vehicle DVIR Data File ........................................... 130
Company Configuration Session File ..................................... 131
Company Assets Parts List File ............................................. 131
Device Related Files .............................................................. 131
Device Configuration Parameters Data .................................. 131
Device Diagnostic Events Data .............................................. 132
Vehicle Data .......................................................................... 132
Device Software Update History File ...................................... 133
Driver Related Files ............................................................... 133
Driver Identification Data File ................................................. 133
Driver Support Data File ........................................................ 133
Driver RODS Binary Data File ................................................ 134
Driver RODS Text Data File .................................................... 134
Printouts ............................................................................... 135
Daily Log ............................................................................... 136
DVIR Report .......................................................................... 137
Supporting Document ........................................................... 138
18. Support / Warranty ............................................................ 142
19. Glossary ............................................................................. 143
20. Legal Notices ..................................................................... 145
4
DOT Certificate of Compliance
ContinentalAutomotiveSystemsUS,Inc.
CERTIFICATEOFCOMPLIANCE
DEPARTMENTOFTRANSPORTATIONREGULATIONS
The VDO RoadLog electronic logging system has been sufficiently tested, under the conditions in which it will be used, to meet
or exceed the requirements of section 49 CFR 395.15 of the United States Federal Motor Carrier Safety Regulations in effect at
the time of its manufacture. This VDO RoadLog electronic logging system can be used to record, transfer and archive all hours
of service data as required by the United States Department of Transportation Federal Motor Carrier Safety Administration as of
the date of its manufacture.
Authorized by
Ekkehard Kraemer
Head of Finance and Quality
Tachographs, Telematics and Services
Commercial Vehicles & Aftermarket
5
Introduction
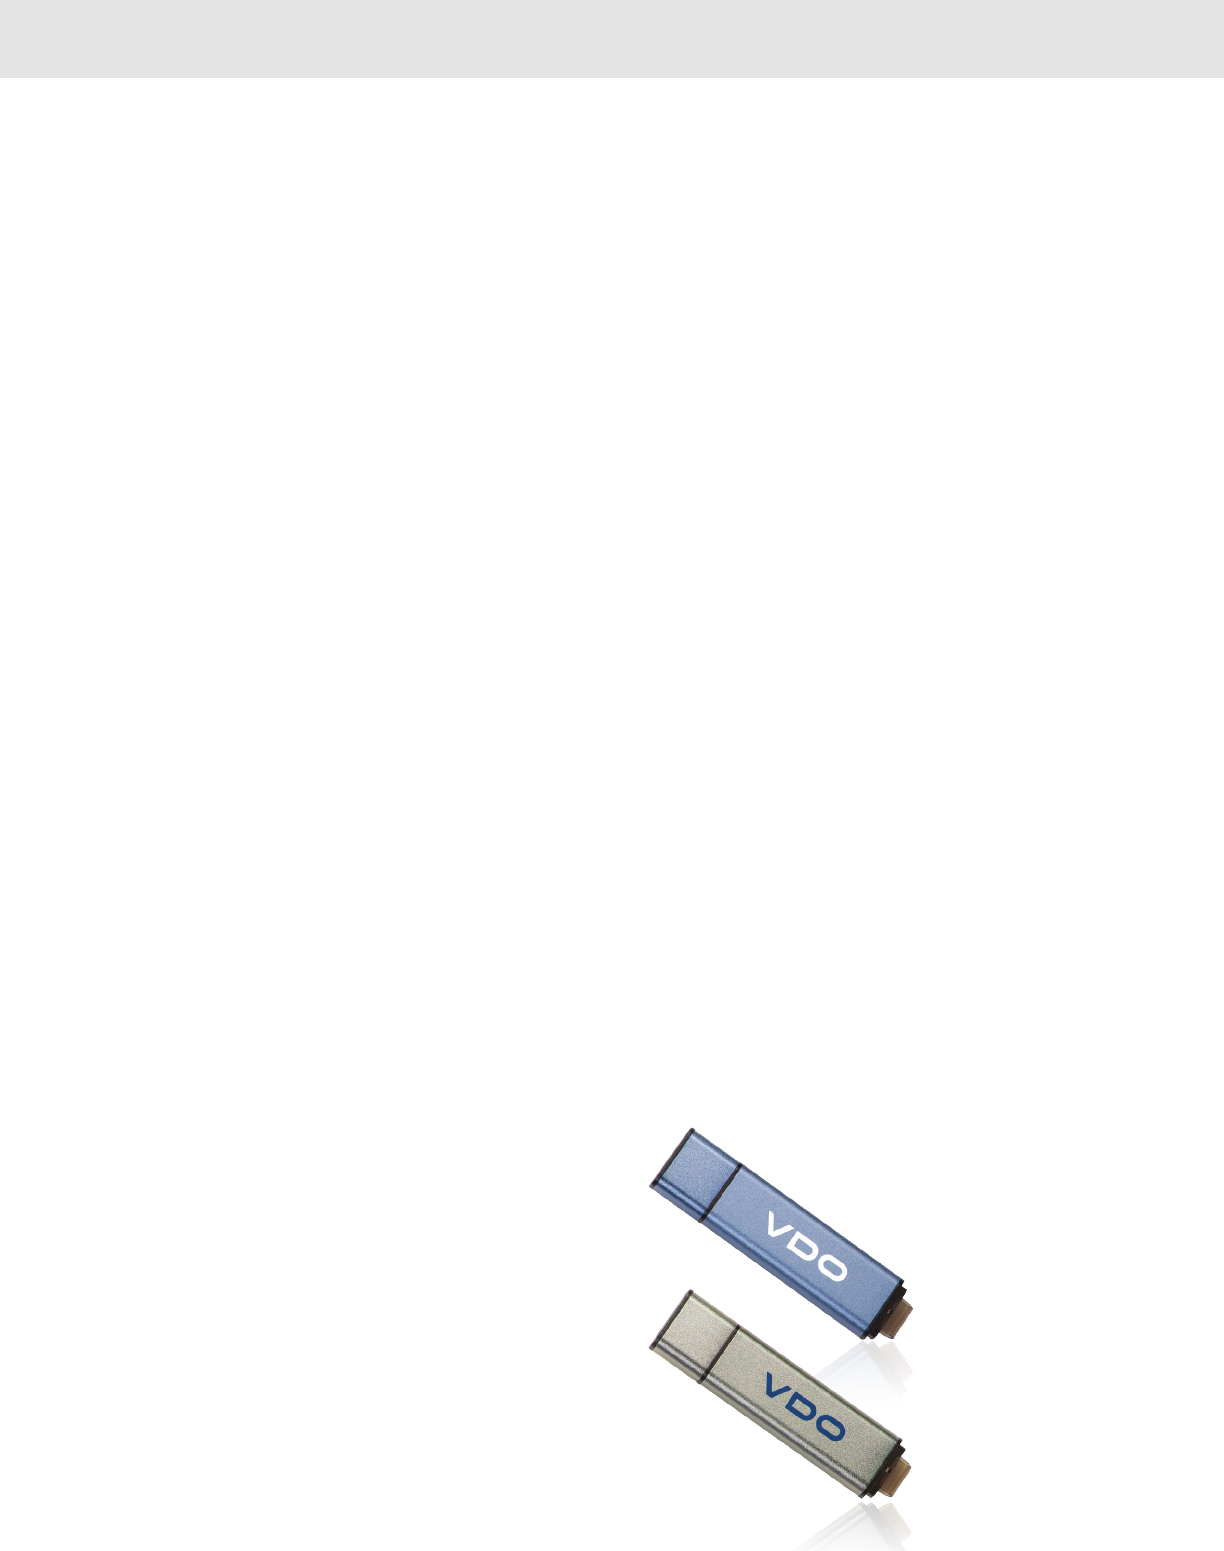
Fleet Key
Driver Key
Introduction
Introduction
The VDO RoadLog Electronic On Board Recorder (EOBR) is the simple,
affordable, all-in-one solution for automated daily log book and compliance
reporting. It provides cost-effective HOS monitoring that you can have up and
running in minutes.
RoadLog was designed to keep Drivers in compliance with all FMSCA regulations
by recording data for:
• Hours-of-Service (HOS)
• Driver Vehicle Inspection Reports (DVIR)
• International Fuel Tax Agreement (IFTA)
(This feature will be implemented in an upcoming release)
• International Registration Plan (IRP)
(This feature will be implemented in an upcoming release)
RoadLog Fleet Software is designed to enable Fleet Managers and Owner /
Operators to collect and archive driver data to maintain compliance with FMSCA
regulations and to help manage trucking operations more efficiently.
The RoadLog EOBR is used in conjunction with:
RoadLog Fleet Management Software
The Fleet Management Software allows the Fleet Manager or Owner / Operator to
collect and archive Driver data, make notes in the Driver data and prepare reports
on Driver history.
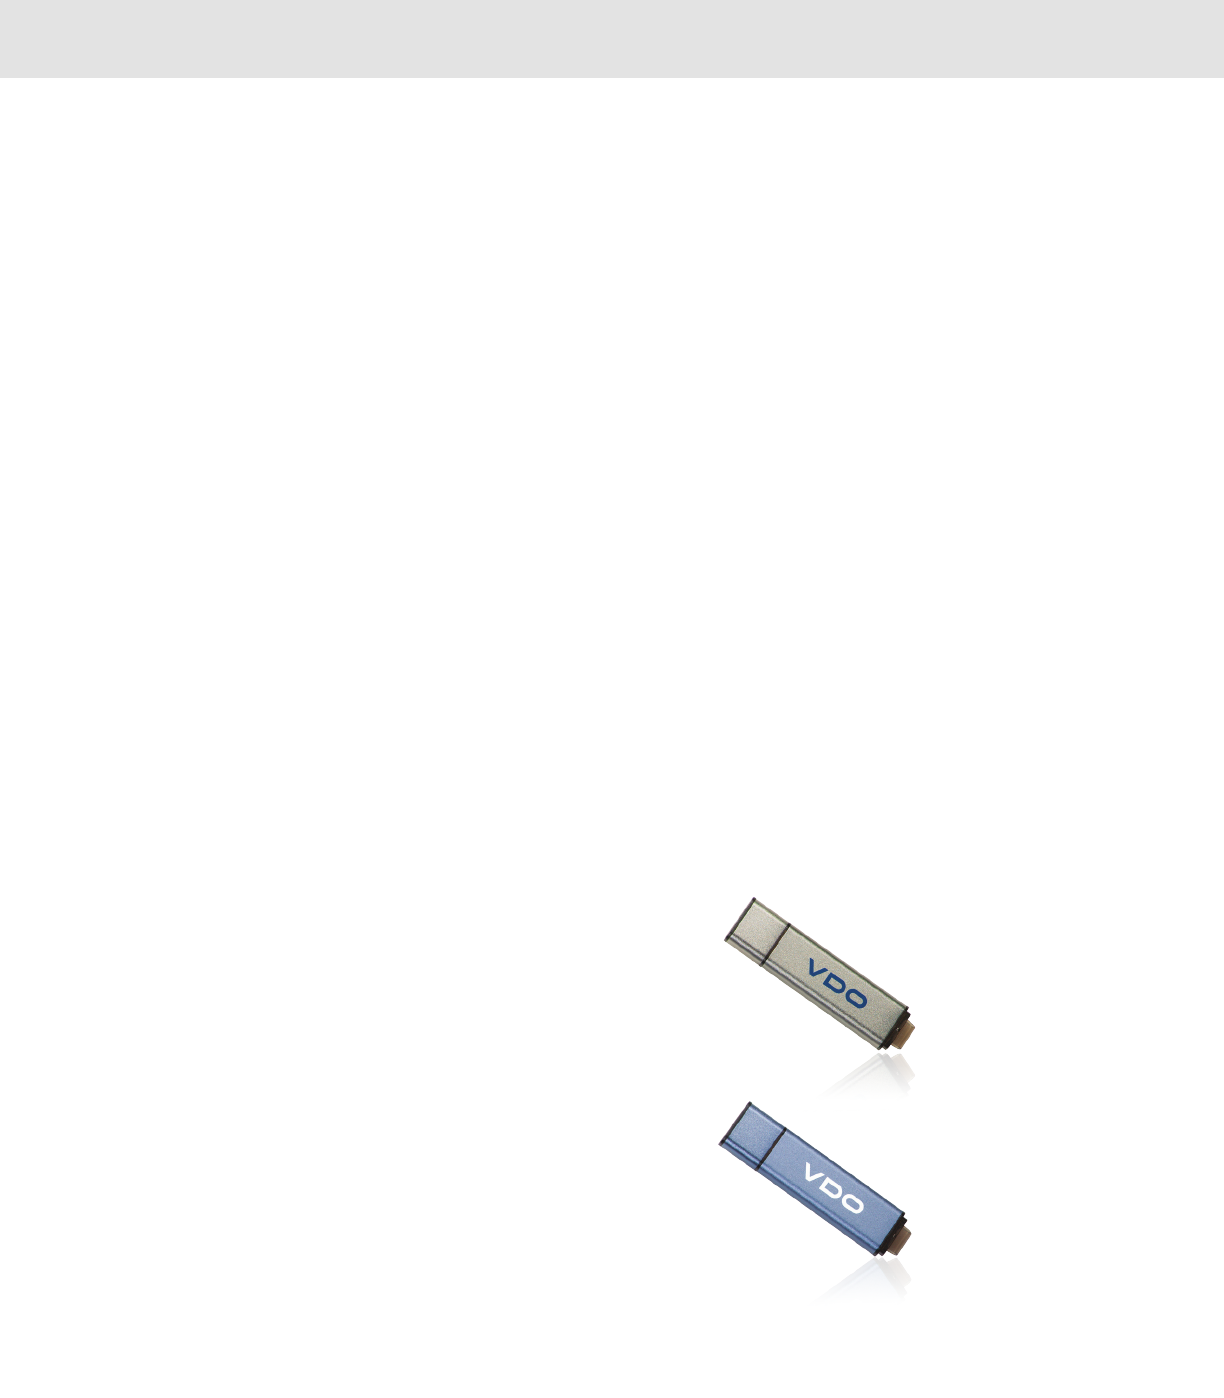
RoadLog Fleet Key
The RoadLog Fleet Key USB flash drive is used to log in to the RoadLog Fleet
Software. The Fleet Key can also be used to download and upload data to and
from RoadLog. Each company must have at least one Fleet Key and the RoadLog
Fleet Management Software.
RoadLog Driver Key
The RoadLog Driver Key USB flash drive is used by the Driver to log in and out of
RoadLog and to transfer data.
Getting Started
To set up your VDO RoadLog EOBR, you’ll follow these steps:
1. Install the RoadLog Fleet Software.
2. Activate the RoadLog Fleet Key.
3. Set up your Company and Drivers in the RoadLog Fleet Software.
4. Install RoadLog in your Vehicle.
5. Download and upload Driver data.
6
Chapter 1:
VDO RoadLog™ Fleet Management Software
7
Managing your Fleet with the VDO RoadLog™ System
1. Managing your Fleet with the
VDO RoadLog™ System
The VDO RoadLog Electronic On Board Recorder (EOBR)
was designed to allow Drivers, Fleets and Owner Operators
to record and report Hours of Service (HOS), Driver Vehicle
Inspection Reports (DVIR), Fuel Tax Reporting and other
data quickly and easily, and without monthly fees.
VDO RoadLog Fleet Management Software lets you collect
and manage that data to ensure that your fleet complies
with regulations. By having accurate data on hand, Fleet
Managers and Owner Operators can see if they are
operating within regulations, and where changes need to be
made to improve efficiency and increase profits.
RoadLog eliminates the chance of manual logbook entry
errors that can result in big fines. RoadLog printouts provide
all the information that a manual log provides and more, but
RoadLog is faster, easier and more accurate, for both the
Driver and the Compliance Officer.
The VDO RoadLog Fleet Management Software generates
accurate, up-to-date reports far quicker than paper-based
methods, saving time and money. RoadLog Fleet
Management Software can manage an unlimited number
of Drivers and trucks. And, since the RoadLog Fleet
Management Software is a one-time purchase, it
represents an excellent value compared to subscription-
based solutions.
RoadLog records a range of data that helps make trucking
operations safer and more efficient:
• Hours-of-Service (HOS) according to US rules
• Driver Vehicle Inspection Reports (DVIR) according to
US rules
• International Fuel Tax Agreement (IFTA)
• International Registration Plan (IRP)
RoadLog’s software is flexible and up-dateable to meet
anticipated DOT compliance requirements. Free upcoming
software updates will include:
• Hours-of-Service (HOS) according to Canadian rules
• Vehicle Inspection and Repair Maintenance (DVIR)
according to Canadian rules
• International Fuel Tax Agreement (IFTA)
• International Registration Plan (IRP)
• Compliance with Alaska and oilfield filed rules
Entry errors in traditional paper logbooks interfere with your
asset tracking and operations planning. They can also lead
to big fines! The RoadLog system is faster, easier and more
accurate, for both the Driver and the fleet manager or
compliance officer.
Permission to access data from the RoadLog EOBR and the
Fleet Management Software is possible only with the Driver
Key or Fleet Key USBs, so that data is fully protected and
tamper resistant, to ensure data integrity and data privacy.
VDO RoadLog Fleet Management Software is used in
conjunction with:
• VDO RoadLog Electronic On Board Recorder (EOBR) –
the in-vehicle device that records vehicle and Driver
activities.
• VDO RoadLog Driver Key – a proprietary USB drive that
allows Drivers to log in to RoadLog and that is used to
transfer data between RoadLog and the PC that is
running the Fleet Management Software. The Driver
Key can also transfer Driver data between vehicles, if
the Driver uses different vehicles through out the
workday/workweek. The Driver Key can also enable
use of a limited feature set of the Fleet Management
Software.
• VDO RoadLog Fleet Key – a proprietary USB drive that
is required to log in to the Fleet Management Software,
assuring the integrity and authenticity of your RoadLog
data files.
• The Fleet Key and Driver Keys are also used to transfer
data between the PC that is running the Fleet
Management Software and the RoadLog EOBR.
Driver Key
Fleet Key
8
Getting Started
2. Getting Started
System Requirements
VDO RoadLog Fleet Management Software requires:
• A PC with Windows® 8, Windows® 7, Windows Vista with Service Pack 2,
or Windows XP with Service Pack 3.
• Adobe® PDF Reader (or any software that allows reading of PDFs).
• An Internet connection.
• Two open USB ports.
• A CD drive.
• 400 MB of free hard drive space.
PC OPERATING SYSTEM REQUIREMENTS -
32 BIT Versions
Windows XP (SP3)
Windows VistaSP2 Enterprise
Windows VistaSP2 Ultimate
Windows VistaSP2 Home Basic
Windows VistaSP2 Home Premium
Windows VistaSP2 Business
Windows 7 Ultimate
Windows 7 Home Premium
Windows 7 Home Basic
Windows 7 Enterprise
Windows 7 Professional
Windows 8 Consumer
Windows 8 Professional
Windows 8 Enterprise
PC OPERATING SYSTEM REQUIREMENTS -
64 BIT Versions
Windows XP (SP3)
Windows 7 Ultimate
Windows 7 x64 Home Premium
Windows 7 x64 Home Basic
Windows 7 x64 Enterprise
Windows 7 x64 Professional
Windows 8 Consumer
Windows 8 Professional
Windows 8 Enterprise
NOTE: PostgreSQL 9.0 Database supported for all Operating Systems.
The installer will check to see if the PostgreSQL database is installed on the
machine. If it is not installed, setup will automatically install it.
9
Getting Started
Activating the RoadLog Fleet
Management Software
In order to use the RoadLog Fleet Management
Software, you will need to install the Software and
activate the VDO RoadLog Fleet Key. Whenever you use
the Fleet Management Software, an activated VDO Fleet
Key or VDO Driver Key must be inserted in the PC.
If the Fleet Key is not already activated, it can be
activated by filling the data in the Company window that
appears after installation of the RoadLog Fleet Software
application.
The application connects to the VDO Internet portal. The
company will be registered, and the PC will receive a
download of the CID file for the activation of the Fleet key.
Note: The activation described here requires an Internet
connection. If you do not have an Internet connection, see
Activating Your Fleet Key through the RoadLog Portal for how to
activate the Fleet Key using Internet access from another PC.
Software Installation
1. Insert the Fleet Key into a USB port on your PC.
2. Insert the Fleet Management Software CD into the PC. When the
CD appears, double click the setup.exe file. The Fleet Management
Software installation will start.
3. Follow the InstallShield Wizard prompts, and make all the required
user choices.
While running the InstallShield Wizard, there is an option to choose
a Client/Server installation.
> If you select “Complete installation,” all parts of the application
(database, client application, etc.) will be installed on one
computer. This option is selected by default.
> If you select “Client installation,” only the client portions
(application, JRE, etc.) will be installed.
> If the user selects “Server installation,” only the server parts will
be installed.
> If “Client installation” is selected, you will be prompted for a
database server name / address. You will also have to enter the
US DOT Number for the company.
> If there is a PostgreSQL database already installed, you will have
to enter the admin password.
10
Getting Started
Note: The installer will check to see if PostgreSQL database is
installed on the machine. If it is not installed, the setup will
automatically install it. You may see a message(s) indicating that
there are software updates available. Click Yes to allow installation
of the updates.
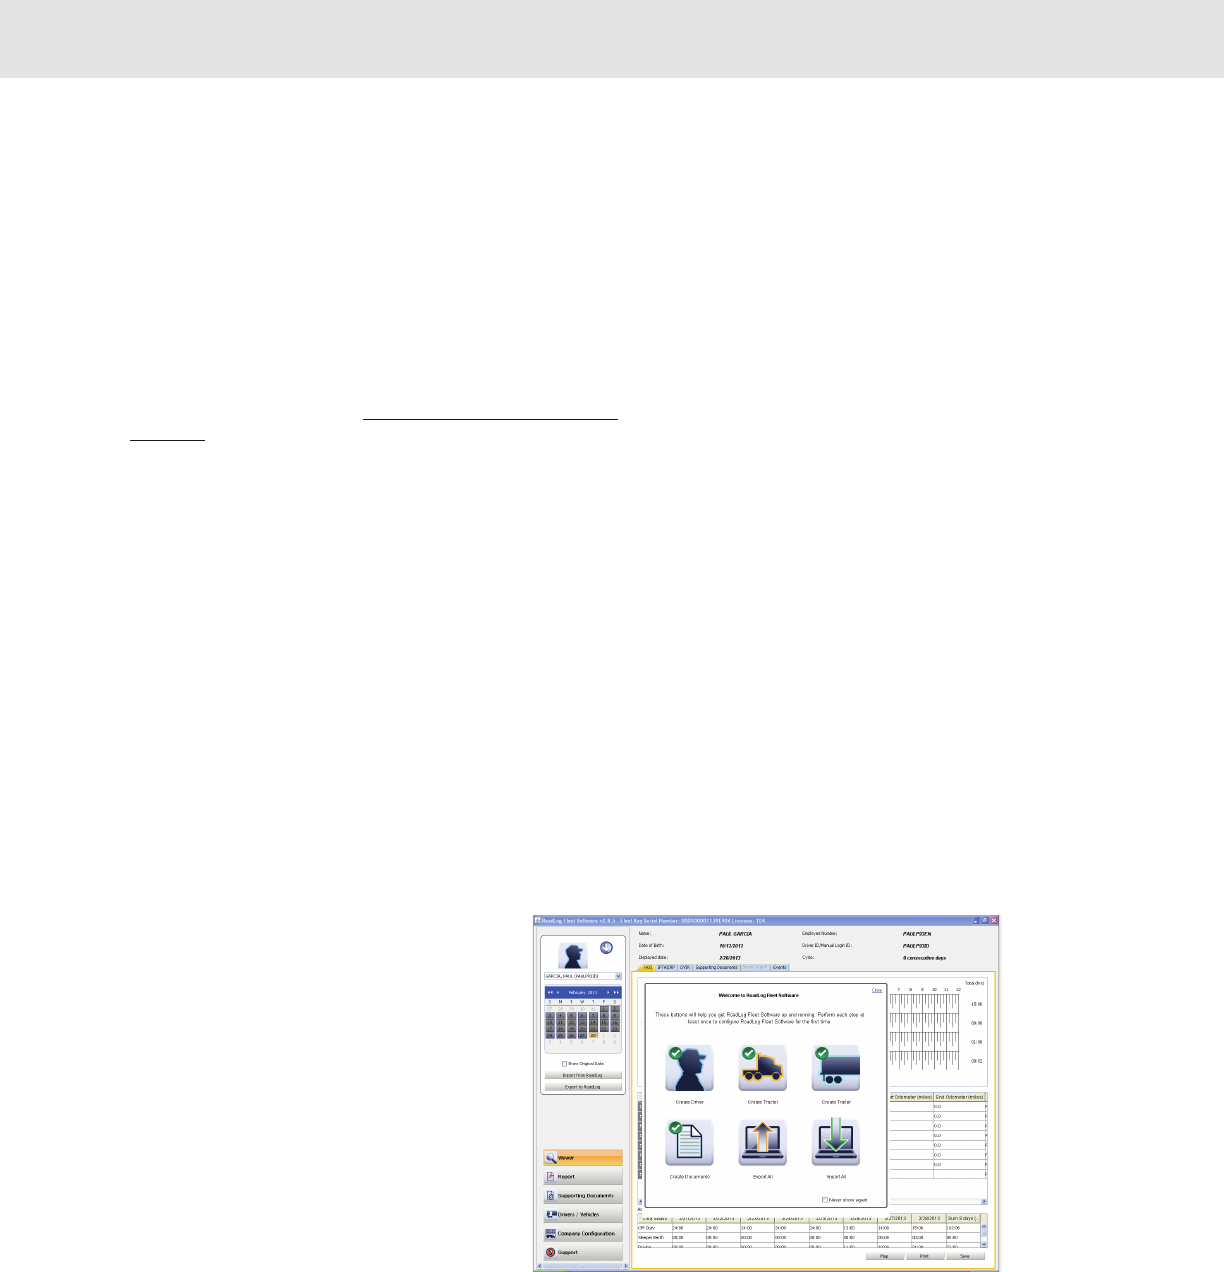
When you see the Fleet Key Activation screen, enter your company
information in the fields shown. Be careful to enter the information
accurately – once saved, the US DOT number cannot be changed.
We recommend using an email address that all users will have
access to, for example: manager@your_company.com.
You’ll need to know your company data, including your US DOT
Number. The serial number of the Fleet Key will be read from the
Key and entered into the field automatically.
When the information entry is completed, click Save. The software
will automatically activate your Fleet Key (this may take several
minutes - again, Internet access is required). When the activation is
complete, your Fleet Key will be activated. The Fleet Manager
Software will start up automatically, and a “RoadLog Fleet
Management Software” shortcut icon will appear on your desktop.
To start the RoadLog Fleet Management Software, double click on
this shortcut icon.
Activating your Key will create a Company account for you on the
RoadLog User Portal (www.vdoroadlog.com/user). You will be able
to use this account to purchase additional RoadLog Fleet Keys and
Vehicle licenses when you need them.
4. At first start up, no Driver data will be present. You’ll
need to complete your Company and Driver profiles,
create Trailers and Tractors and export the data to
the Fleet Key and Driver Key(s). Then, you’ll be ready
to log your Company in on your RoadLog(s) with the
Fleet Key and then have your Driver(s) begin using
the system. When the Driver(s) return from driving
with data from RoadLog, you will be able to
download the data from the Driver Key(s), view
Driver activities and manage Driver records.
Note: You will be notified by e-mail when software
updates are available. If you do not have Internet
access from the PC where you’ll use the Fleet
Management Software, you must make
arrangements to get the software updates. Software
updates may be necessary to maintain compliance
with changes to the FMCSA regulations. Updates
will be available on the VDO RoadLog web portal:
www.vdoroadlog.com/user
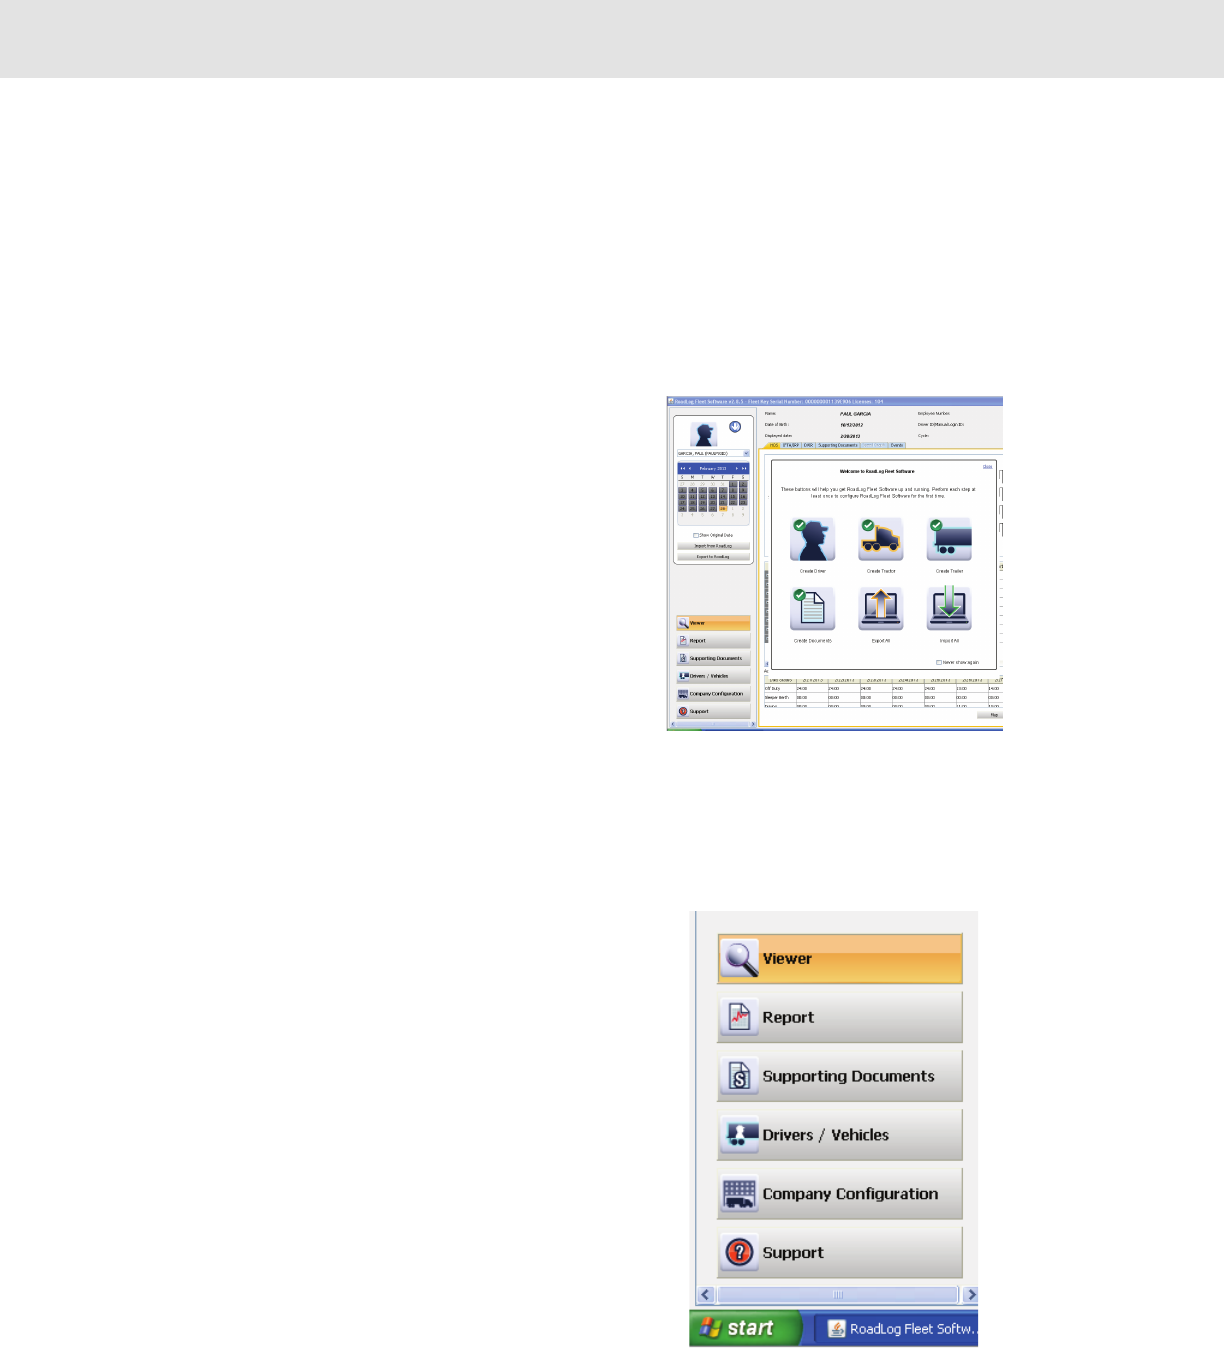
When the Fleet Management Software starts up and the Fleet Key is
authenticated, you’ll see the Quick Start Screen. The Quick Start Screen
provides shortcuts to create Drivers, Tractors, Trailers and Supporting
Documents, as well as import and export data.

11
Getting Started
Instructions on how to perform each of these steps are
featured below.
Create Driver
Create Tractor
Create Trailer
Create Documents
Import to RoadLog
Export to RoadLog
Important note: It is recommended to read the instructions prior
to using this software. However, some users may choose to create
these entries before reading this manual completely. If you are
going to immediately create entries, please read “Backing Up Your
RoadLog Data” and follow the guidance there to ensure that the
results of your work are secure.
Activating your Fleet Key
through the RoadLog Portal
If your computer is not able to connect to the Internet and the RoadLog
Portal, the Fleet Management Software will not be able to download the
.CID file needed to activate your Fleet Key.
If this is the case, you must use a computer that can connect to the
RoadLog Portal and use the Portal to manually register your company
and activate your Fleet Key. You will also need an email account that you
can access from the Internet-connected computer.
To perform a manual registration and .CID file download:
• Insert the Fleet Key into a USB port on the Internet-connected PC.
• Using the PC’s Internet browser, go to the RoadLog User Portal at
www.vdoroadlog.com/user and click on “Register.”
• Enter your company information in the fields shown. You’ll need to
know your company data, including your US Department of
Transportation (DOT) number and the serial number of the Fleet Key.
This serial number is available on the package of the Fleet Key and
in the file KEY_DATA.txt on the root directory of the Fleet Key.
Once you enter your registration information, an email with a
download link will be sent to the email address that you registered
with. Click on the link to begin the download. Save the download
as a file in your Documents folder. The downloaded file, with the
extension .CID, is your Company ID registration file.
• Copy this file to your Fleet Key’s “Company” folder. You can now
use your Fleet Key to launch the Fleet Management Software as
described above in Software Installation.

12
Getting Started
Note: The .CID file is unique to your Fleet Key. It will not work with other Fleet
Keys or with generic USB flash drives. The activated Fleet Key must be
plugged into a USB port on the computer for the Fleet Management Software
to run.
Adding additional Fleet Keys
You may wish to have more than one Fleet Key for your company. Additional Fleet
Keys can be purchased from VDO RoadLog retailers or by contacting RoadLog
Customer Support:
Customer Support
Email: roadlog-support@vdo.com
Tel.: (855) ROADLOG, or (855) 762-3564
Fax: (800) 752-7224 or (610) 366-9837
Customer service is available 8:00 am – 5:00 pm EST
IMPORTANT: All additional Fleet Keys purchased for your company must be
activated using the same US DOT number and company address as the
original Fleet Key, or the new Fleet Key cannot be used with your original
company file.
13
Navigating RoadLog Fleet Management Software: First Look
3. Navigating RoadLog Fleet
Management Software:
First Look
The RoadLog Fleet Management Software four main elements:
The Quick Start Screen:
This floating layer is seen at the first start up and it is designed to help
you through your initial software configuration and to enable easy access
to common tasks at start up. The Quick Start Screen includes buttons
that allow you to quickly create Drivers, Tractors, Trailers, and Supporting
Documents, as well as to import data from your RoadLog EOBR and
export data to RoadLog.
Note: If you don’t want the Quick Start Screen to appear at start
up, check the box “Don’t show again” in the Screen.
The Navigation Buttons:
Seen at the lower left, the Navigation Buttons select among the various
screens designed for different activities. The Navigation Buttons include:
Viewer: For viewing tabs that show Driver logs and records
associated with their activities.
Report: For viewing various reports reflecting the status of Drivers,
Vehicles and IRP information.
Supporting Documents: For viewing Supporting Documents,
which are records created by the Driver to document activities
during trips such as meals, fueling and vehicle maintenance.
Drivers / Vehicles: For creating and viewing Driver profiles and
assignments of tractors and shipments made to each Driver.
Company Configuration: For creating and viewing the company
profile as well as creating Shipping Documents, Supporting
Document Categories, frequently used Annotations, pre-
established Fuel Vendors and Fuel Types, and Asset Part Names.
In addition, the Company Configuration screen includes the
Application tab for configuring the VDO Fleet Management
Software user preferences.
14
Navigating RoadLog Fleet Management Software: First Look
The Action Palettes:
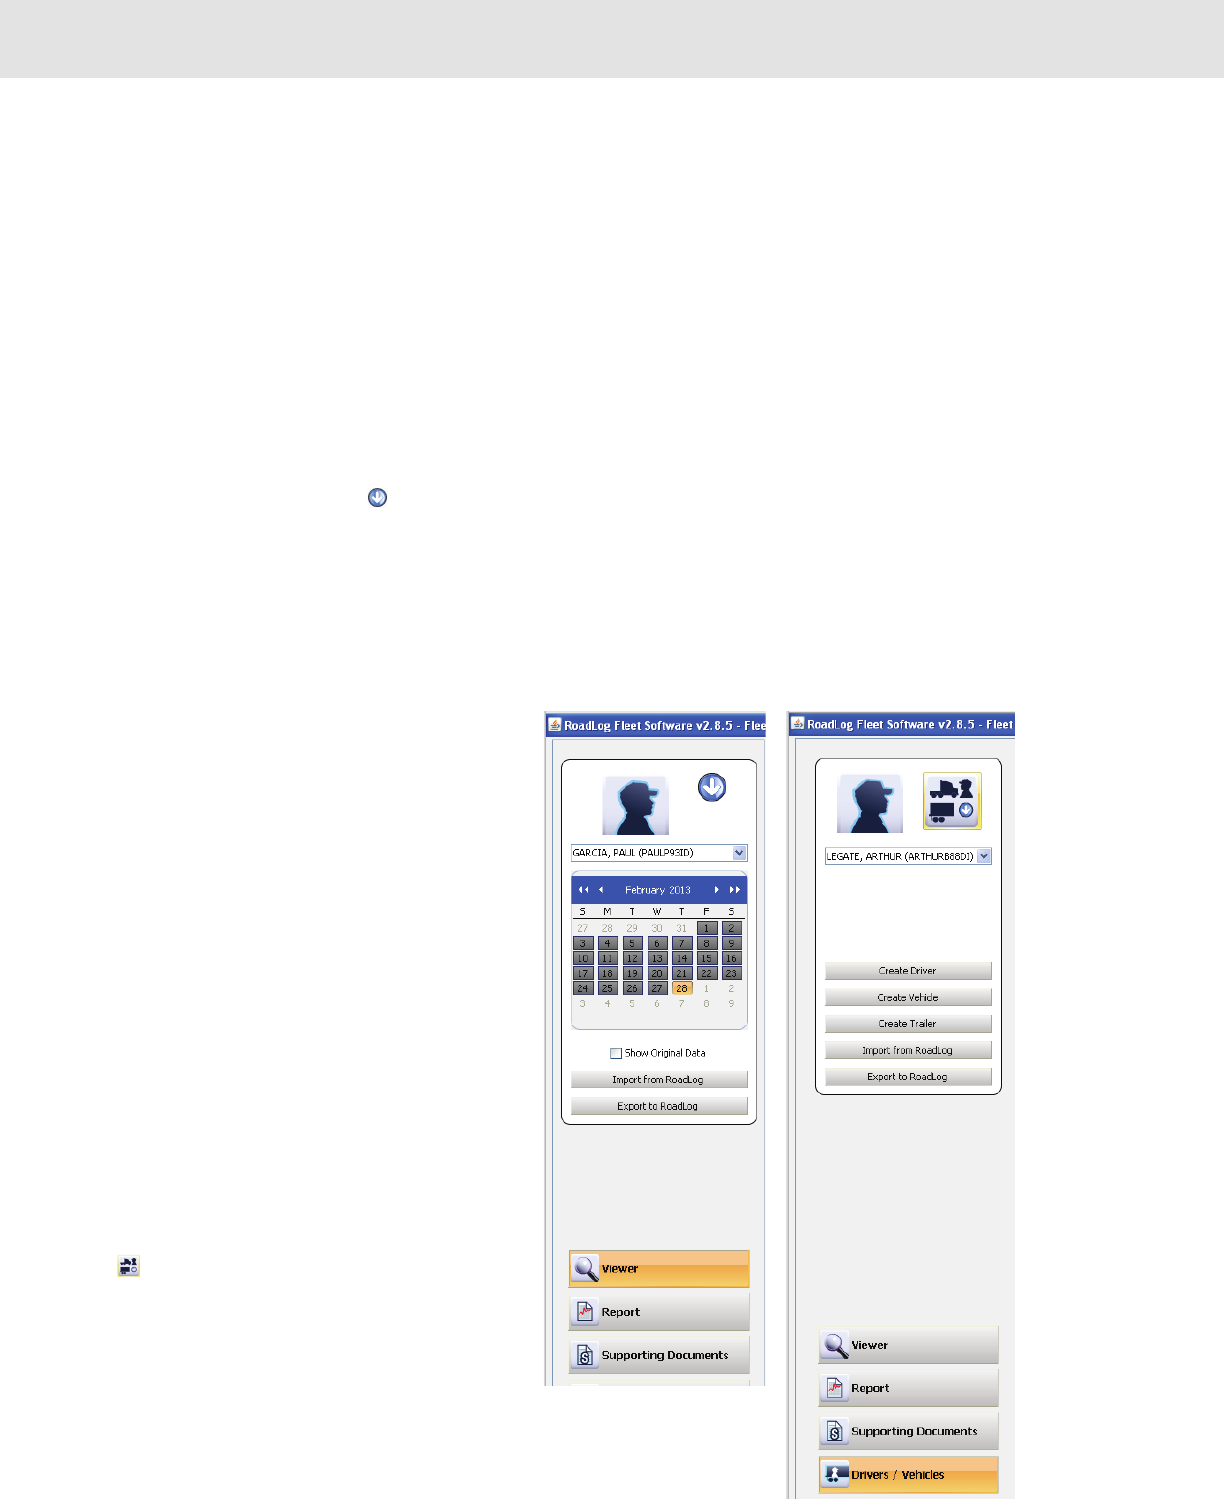
Seen at the upper left, the Action Palette provides access to
the frequently used actions. The options shown in the Action
Palette change, depending on which Navigation button is
active.
Viewer Action Palette:
When the Viewer Navigation Button is active, the Action
Palette shows the interactive calendar used to select dates
you’ll view and buttons to import or export data from or to a
RoadLog Fleet Key or Driver Key. The icon at the top of
the Action Palette toggles to reveal the list of all Drivers that
have been created for the company. You may also select the
Driver or vehicle from the drop-down menu. The “Show
Original Data” check box will cause the HOS tab screen to
show original data automatically recorded by the RoadLog
EOBR rather than data that was manually edited by a
RoadLog Fleet Management Software user.
Report Action Palette:
When the Report Navigation Button is active, the Action
Palette is inactive and shows only the Company icon. You
may use the default Company Icon, or if you wish, you can
change the Company icon to an image of your choosing,
such as your logo, by clicking on it.
Supporting Documents Action Palette:
When the Supporting Documents Navigation Button is
active, the Action Palette shows timeline selectors that
define the time period from which you will see recorded
Supporting Documents. The “Display only new entries”
checkbox will cause the software to display only newly
recorded entries.
Drivers / Vehicles Action Palette:
When the Drivers / Vehicles Navigation Button is active, the
Action Palette shows buttons to create Drivers, vehicles
and trailers as well as buttons to import or export data from
or to a RoadLog Fleet Key or Driver Key.
The icon at the top of the Action Palette toggles to
reveal the list of all Drivers that have been created for the
company.
Company Configuration Action Palette:
When the Company Configuration Navigation Button is
active, the Action palette shows buttons to import or export
data from or to a RoadLog Fleet Key or Driver Key.
Support Action Palette:
When the Support Navigation Button is active, the Action
Palette is inactive, and shows only the Company icon.
The Work Area:
The Work Area displays the tabbed screens and fields you’ll
work in. The screens seen here change according to which
of the Navigation Buttons is active and which tab you’ve
clicked on.
Note: As with the Company icon mentioned above,
you can change the icons for Driver, Trailer or Vehicle,
to images of your choosing. Create your icon at 75 x
75 pixels. Click on the icon you wish to replace and
choose your icon from the dialog box that appears.
15
Navigating work area Screens and Tabs
4. Navigating work area
Screens and Tabs
The easiest way to understand the Fleet Software’s capabilities
is to review the screens and their tabs’ functions. An overview
of the functions of each section is described below; a detailed
explanation of how to work in the screen and tabs is provided
in Screens & Tabs: Features & Functions.
Viewer Screen
HOS Tab:
• View, edit and print Driver HOS data in logbook, tabular
and map form.
• View start/end times for Events, Violations, Exemptions
and Supporting Documents.
• View and edit accumulated times for each Duty Status
recorded; Off Duty, Sleeper Berth, Driving and On Duty
IFTA/IRP Tab:
• [This feature will be implemented in a free
upcoming release]
DVIR Tab:
• View and annotate DVIR records created by the Driver.
Supporting Documents Tab:
• View Supporting Documents records such as fuel and
meal receipts.
• Manually create new Supporting Documents.
• Add scanned documents to the Supporting Documents
records.
16
Navigating work area Screens and Tabs
Speed Graph Tab:
• [This feature will be implemented in a free
upcoming release]
Events Tab:
• View a complete list of all events recorded
automatically by RoadLog, including vehicle status
changes and Driver actions.
Report Screen
Create, view, save and print reports for:
• DVIR status.
• HOS download reminders.
• IRP driven miles [This feature will be implemented in
a free upcoming release].
• IRP vehicles list. [This feature will be implemented in
a free upcoming release].
• Vehicle trips.
Supporting Documents Screen
• View Supporting Documents records such as fuel
and meal receipts.
• Add scanned documents to the Supporting
Documents records.
17
Navigating work area Screens and Tabs
Drivers / Vehicles
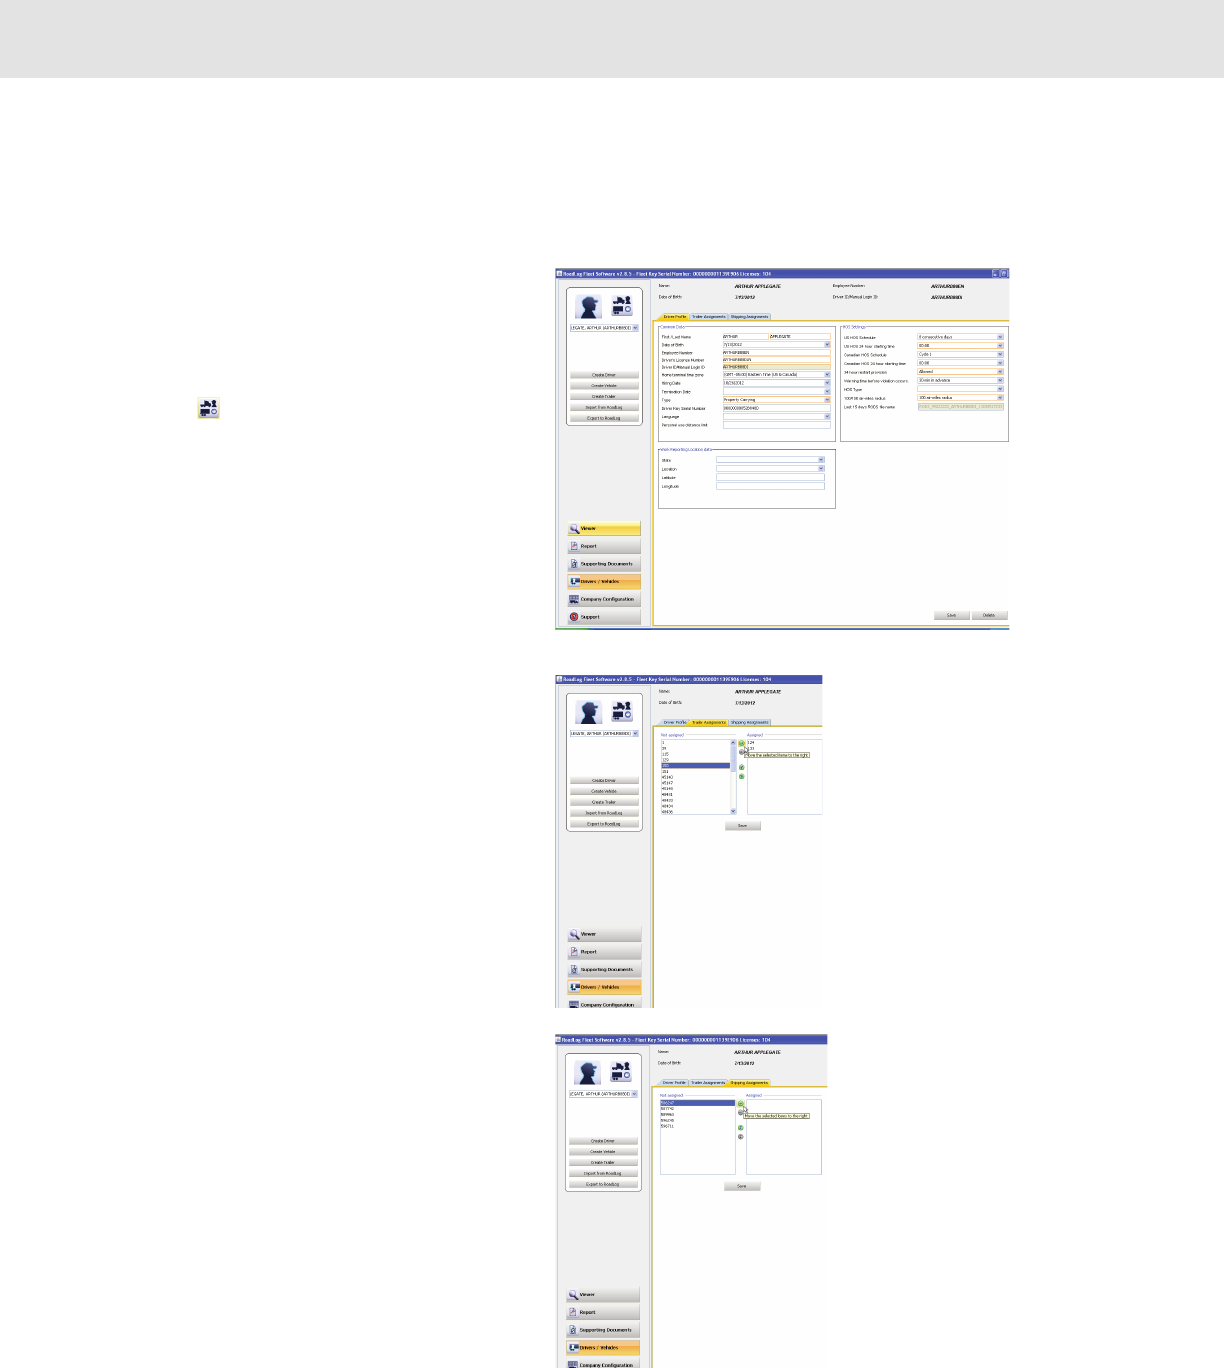
Driver Profile Tab:
• Create RoadLog identities for Drivers.
• Choose from existing profiles for Drivers and vehicles
(using the icon in the actions palette).
Trailer Assignments Tab:
• Assign trailers to the currently selected Driver.
• Un-assign trailers from the currently selected Driver.
Shipping Assignments Tab:
• Assign Shipping Documents to the currently selected
Driver.
• Un-assign Shipping Documents from the currently
selected Driver.
18
Navigating work area Screens and Tabs
Company Configuration Screen
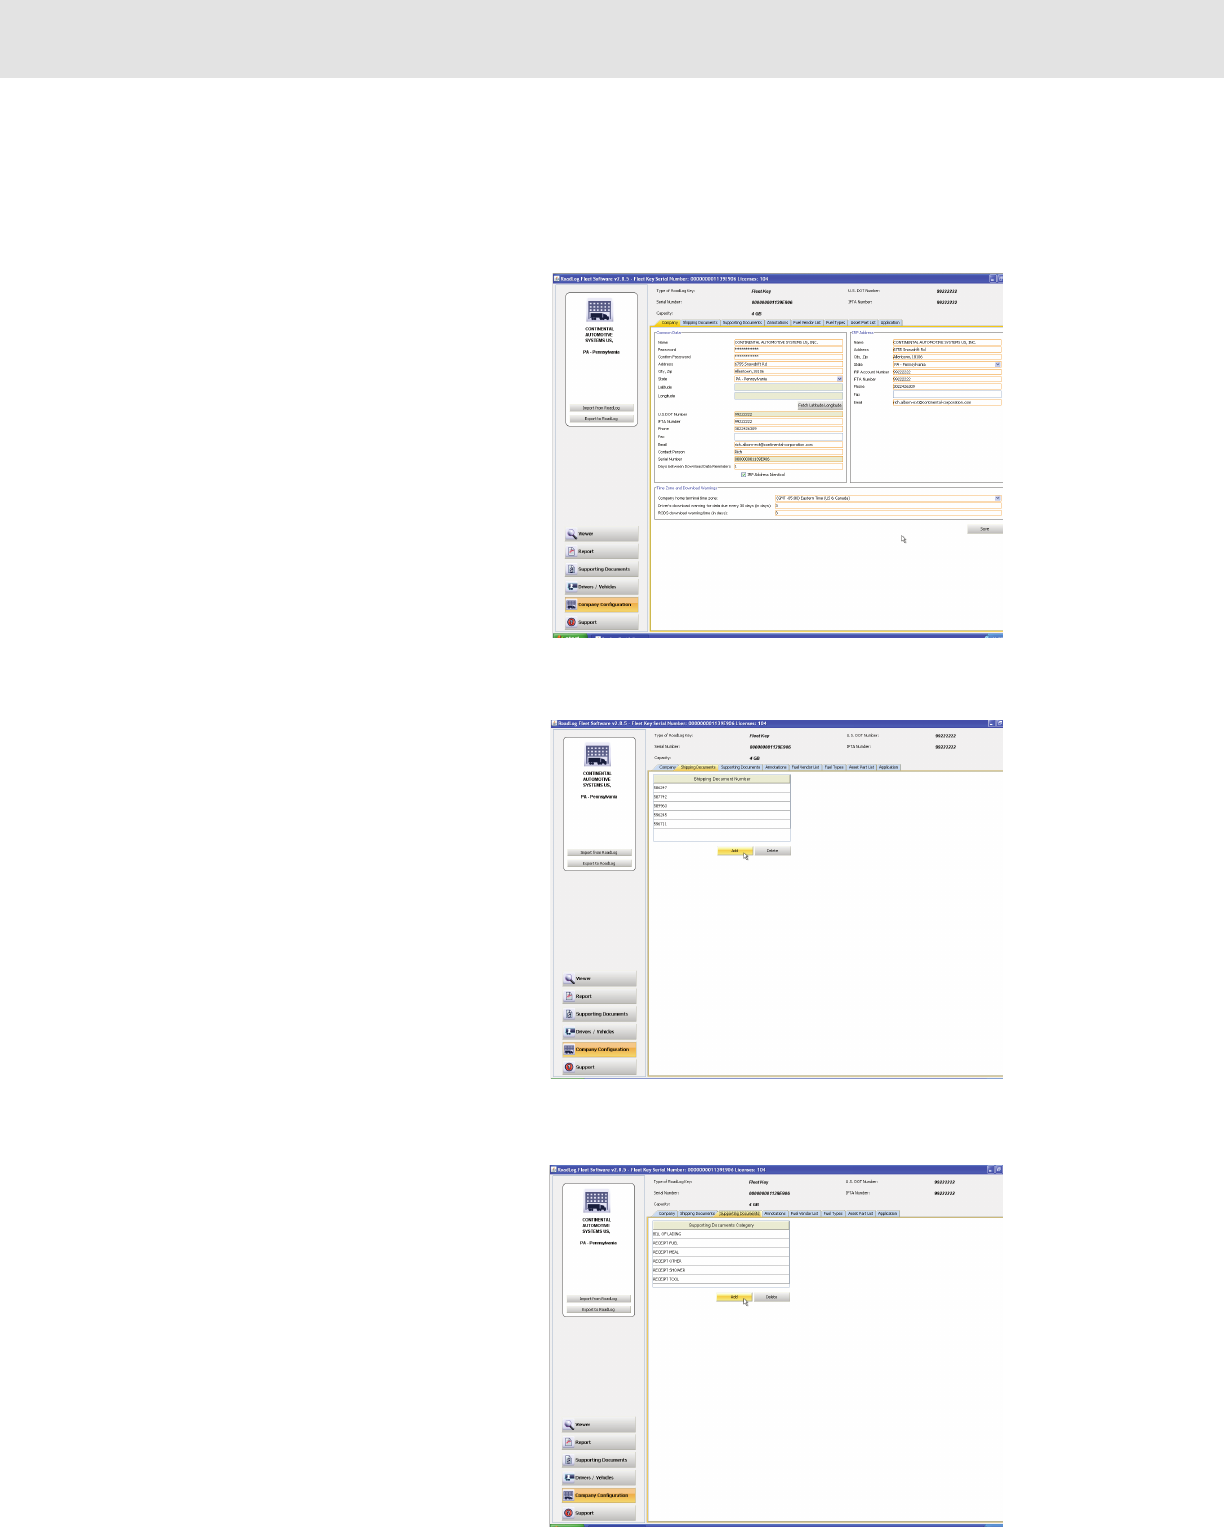
Company Tab:
• Enter and maintain Company and IRP data as well as
time zone settings and download warnings.
Shipping Documents Tab:
• Create new Shipping Document numbers for use in
making Shipping Assignments to Drivers.
Supporting Documents Tab:
• Create a list of predefined Supporting Document types,
such as “Receipt Fuel” and “Receipt Meal,” to allow
Drivers easy and consistent creation of Supporting
Documents.
19
Navigating work area Screens and Tabs
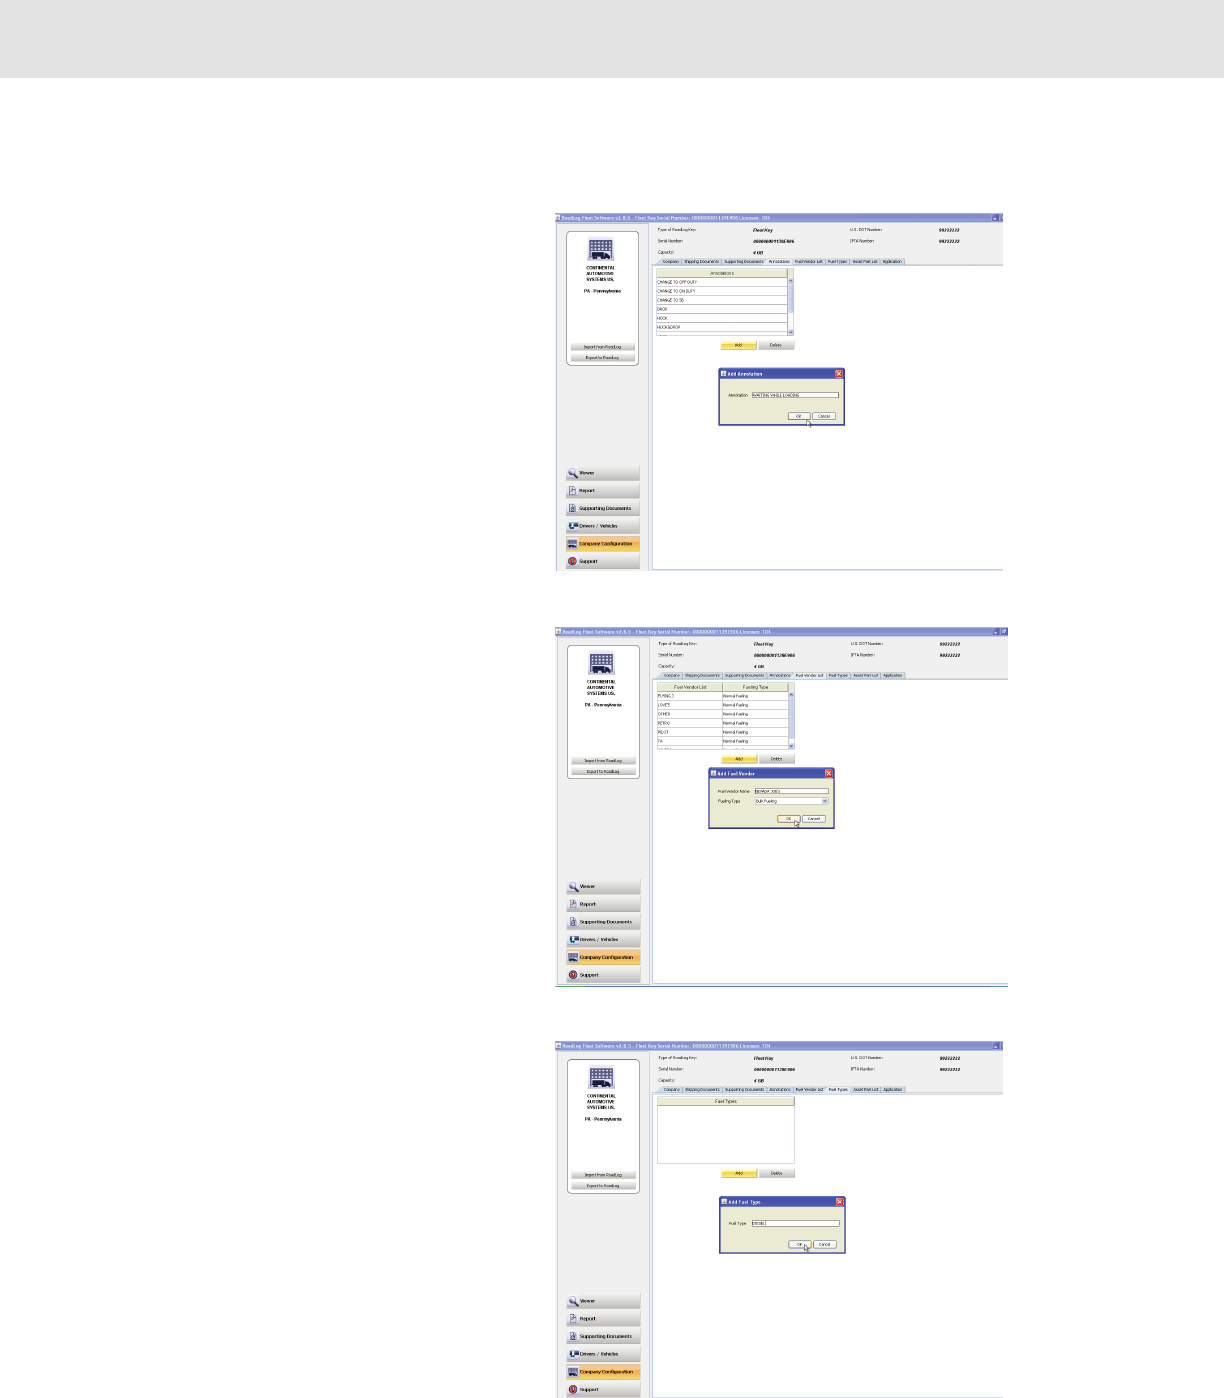
Annotations Tab:
• Create a list of predefined annotations such as
“Waiting while loading.”
Fuel Vendor List Tab:
• Create a predefined list of fuel vendors and fueling
types such as “Normal refueling” or “Bulk refueling.”
Fuel Types Tab:
• Create a predefined list of fuel types such as “Gasoline”
or “Diesel” for use in creating reports on fueling events.
20
Navigating work area Screens and Tabs
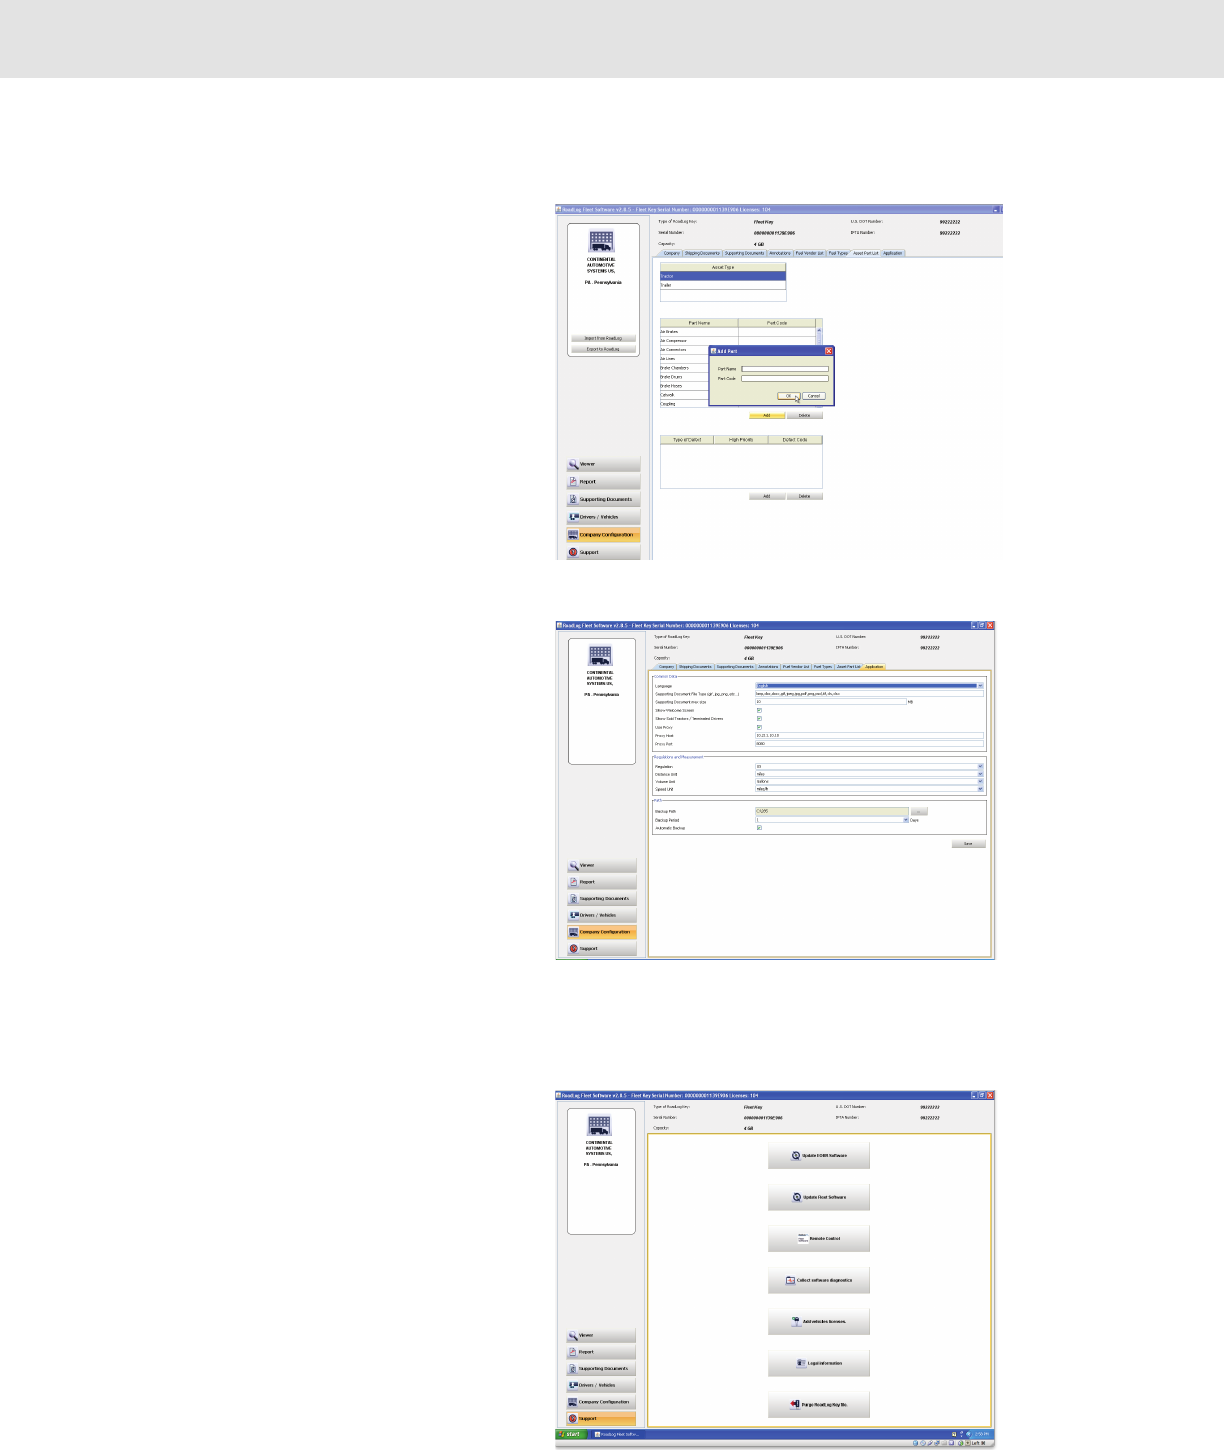
Asset Part List Tab:
• Create a predefined list of Part Names and associated
Part Codes to be used in creating DVIRs for tractors and
trailers.
• Create a predefined list of Types of Defects associated
with each Part Name and assign each Type of Defect
with a priority level and Defect Code, both for use in
creating DVIRs.
Application Tab:
• Set the language to be used.
• Set the file types that can be used for Supporting
Document scans.
• Set the maximum file size for Supporting Document
scans.
• Set whether or not the Quick Start Screen will appear at
start up.
• Set the region whose regulations will be used to
calculate HOS compliance.
• Check box to show Sold Tractors / Terminated Drivers.
• Set the distance, volume and speed units that will be
used.
• Set the location where backup files will be stored and
the number of days before a backup warning is given to
the user.
• Check box to select whether Automatic Backup will be
performed or not.
Support
• Check for updates to the RoadLog EOBR software.
• Check for updates to the RoadLog Fleet Management
Software.
• Start Remote Control (FastViewer), allowing RoadLog
support personnel to diagnose problems and answer
questions.
• Collect and open software diagnostic data for evaluation
by RoadLog support personnel.
• Enter license extension activations to enable
management of additional vehicles.
• View RoadLog legal notices.
• Purge operational data that is older than the required
time period.
21
Creating and working with Driver Keys
5. Creating and working
with Driver Keys
Creating Drivers
To use RoadLog, each Driver must have a profile in the Fleet
Management Software and must have a personal Driver Key activated
with that profile.
The RoadLog Driver Key is a proprietary USB drive that allows Drivers to
log in to the RoadLog EOBR and download and transfer their records to
the Fleet Management Software or transfer their data between multiple
vehicles equipped with RoadLog EOBRs.
The Driver Key can also be used to transfer software updates to the
RoadLog EOBR.
Creating a Driver Profile
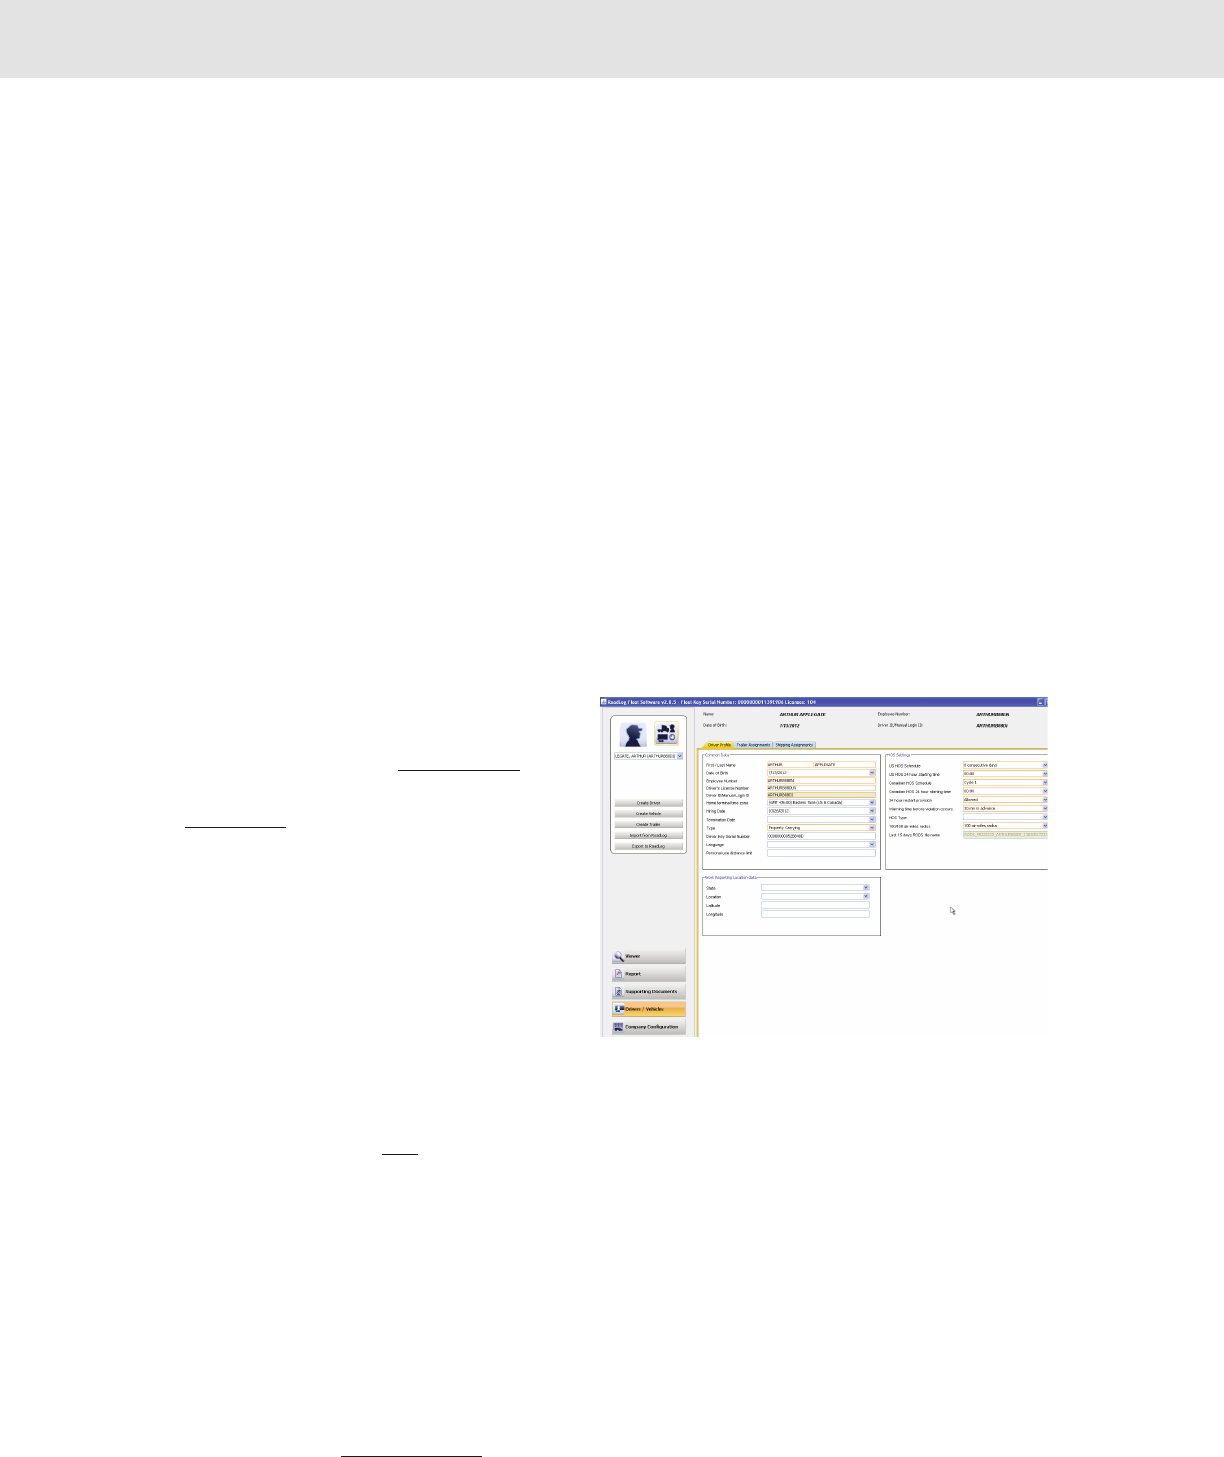
• To create a Driver profile, click on the Drivers/Vehicles
button in the main navigation.
• Click on Create Driver from the Action Palette.
• Enter the data for the Driver – fields outlined in orange are
mandatory and must be completed.
• The Driver Key serial number (S/N) can be found on the
Driver Key package, or it can be read from the key_data.txt
file on the Driver Key. Enter the serial number exactly as it
appears, including all zeros.
• If you wish to enter the optional Latitude and Longitude
information for the “Work Reporting Location” can be found
using free websites such as http://itouchmap.com
• The Last 15 days RODS file name is set automatically for the file that
contains the most recent RODS data for the selected Driver.
• When data has been entered, click Save. The Driver’s profile is now
part of the Fleet Management Software data.
After the Driver’s profile has been created in the Fleet Management
Software, the profile must be transferred to a Driver Key to activate the
Key.
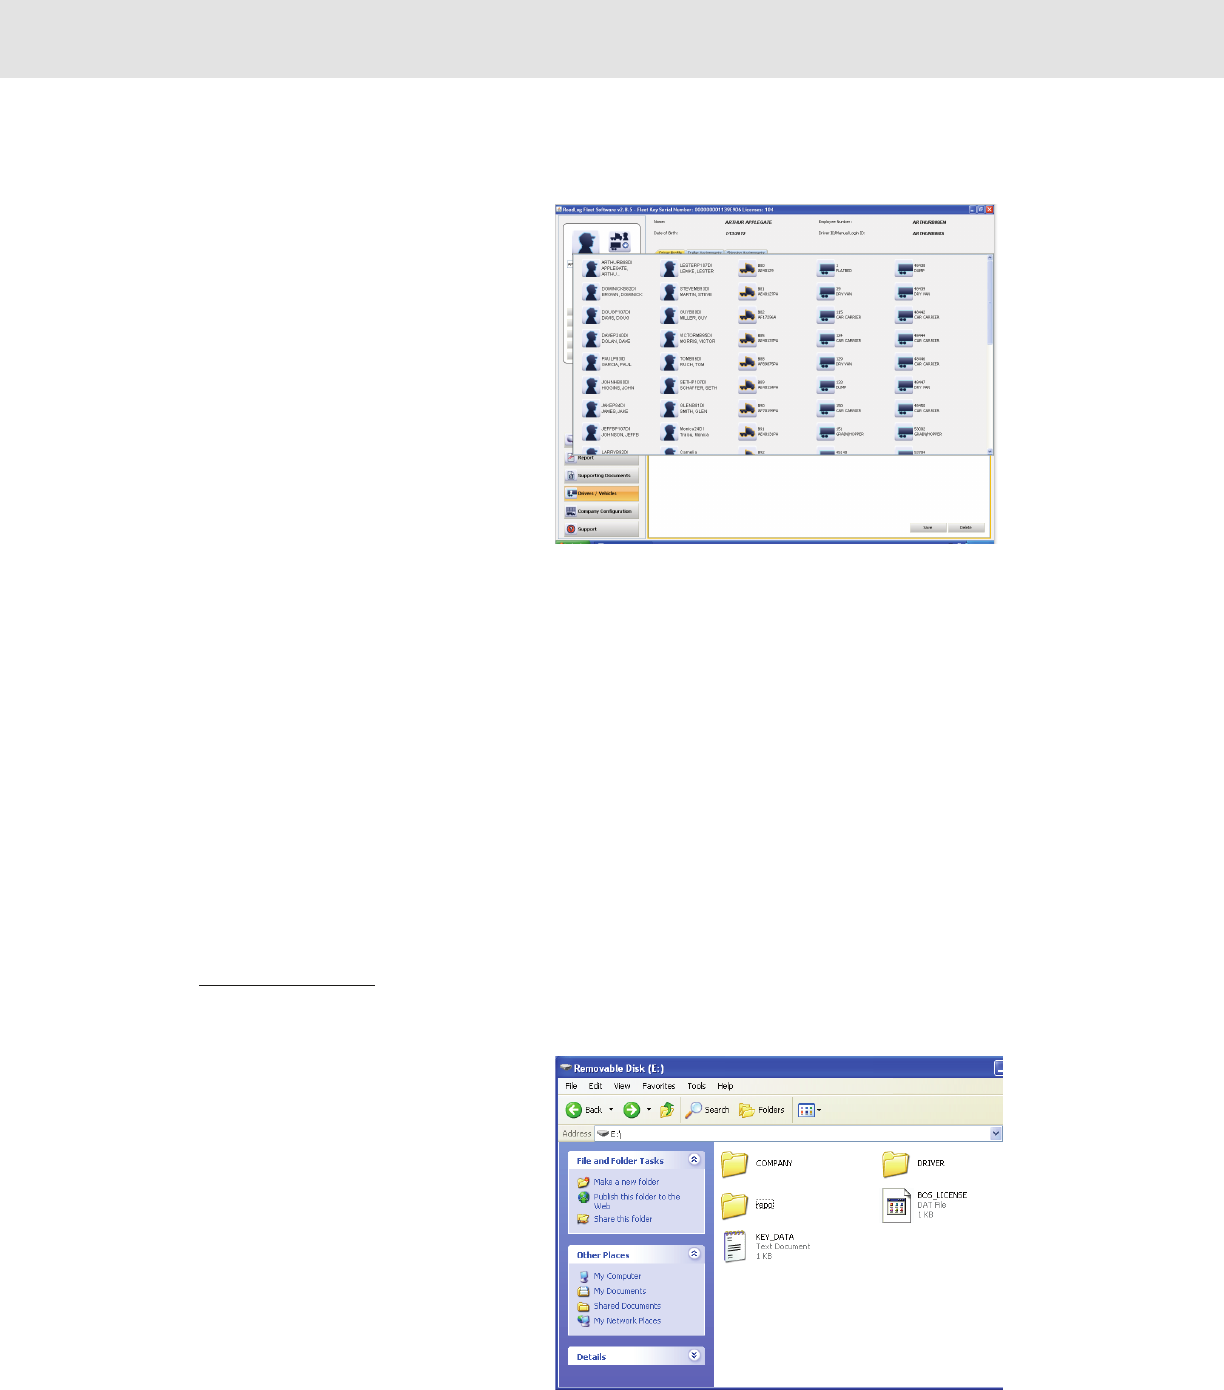
Activating a Driver Key
• Insert the Driver Key you want to activate into an open USB port.
• Click the Drivers/Vehicles button in the main naviagtion.
• From the Action Palette click Export to RoadLog.
• A popup for selecting the Key appears. Select the drive icon for the
Driver Key you wish to activate.
22
Creating and working with Driver Keys
• Click the Driver icon in the Action palette, and select
the Driver you wish to assign to the Key from the drop
down box that appears.
Note: Only Drivers for whom a serial number is not
already assigned will appear on the drop-down list of
Drivers.
Once the Driver’s profile data and relevant company
information has been downloaded to the Driver Key, that
Driver can now automatically log in to the RoadLog EOBR
by inserting the Key. When the Driver changes vehicles
within a working day or within a working week, the data is
transferred from one vehicle to another and it is recognized
by each RoadLog EOBR installed in those vehicles at log in
and log out. When the Driver’s workday is complete,
updated records can be downloaded to the Driver Key for
transfer to the Fleet Management Software.
Note: The Fleet Key can also double as a Driver Key
for one Driver. To use the Fleet Key as a Driver Key,
insert the Fleet Key and follow the steps listed above
for activating a Driver Key.
Note: If there are two usable Keys available to the
computer when you chose Export to RoadLog, you
will be asked to choose which Key is the one you
wish to activate.
For complete instructions on downloading data from the
EOBR, see the RoadLog User Manual.
Reassigning a Driver Key
A Driver Key can be reassigned to a new Driver by deleting
the Driver’s data from they key, deleting the Key’s Serial
Number from the profile of the old Driver and assigning the
Key’s Serial Number to the new Driver.
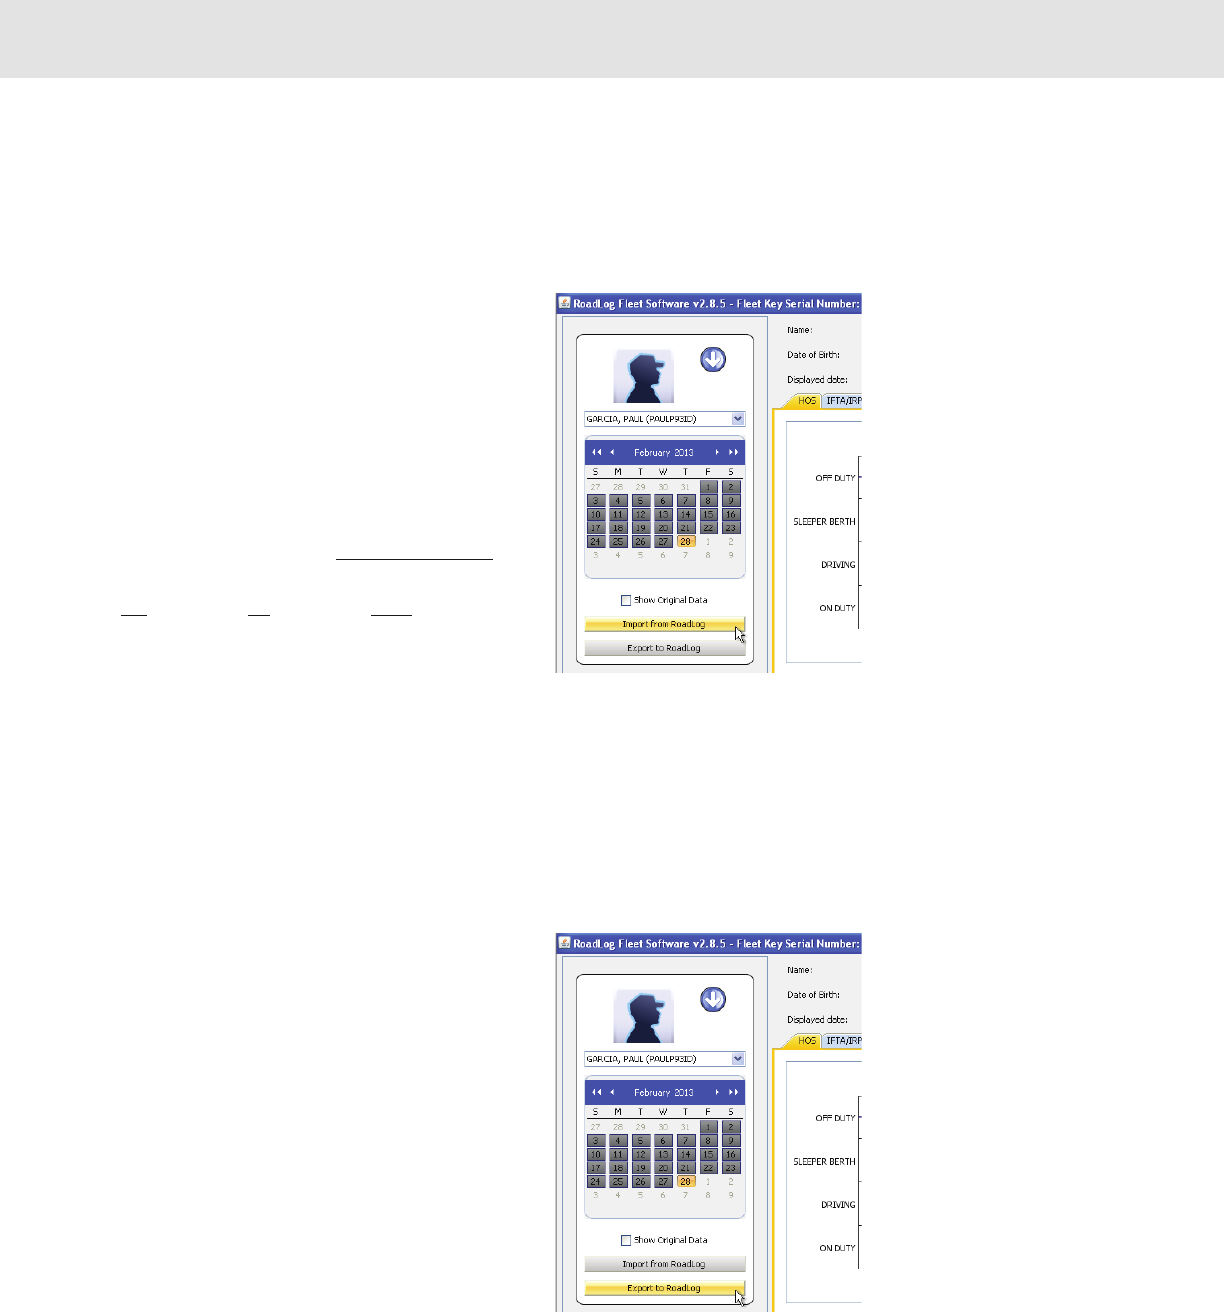
WARNING!!! DO NOT DELETE the BOS_
LICENSE.dat file or the driver folder as this will
turn RoadLog Driver Key into a plain USB flash
drive, and you will not be able to use it as a
RoadLog Driver Key.
23
Transferring data
6. Transferring data
Uploading Driver data to the
Fleet Management Software
At the end of the workday, Drivers will download their data
from RoadLog to their Driver Key. Once Drivers download
their data from RoadLog to the Driver Key, the data can be
entered into the Fleet Management Software:
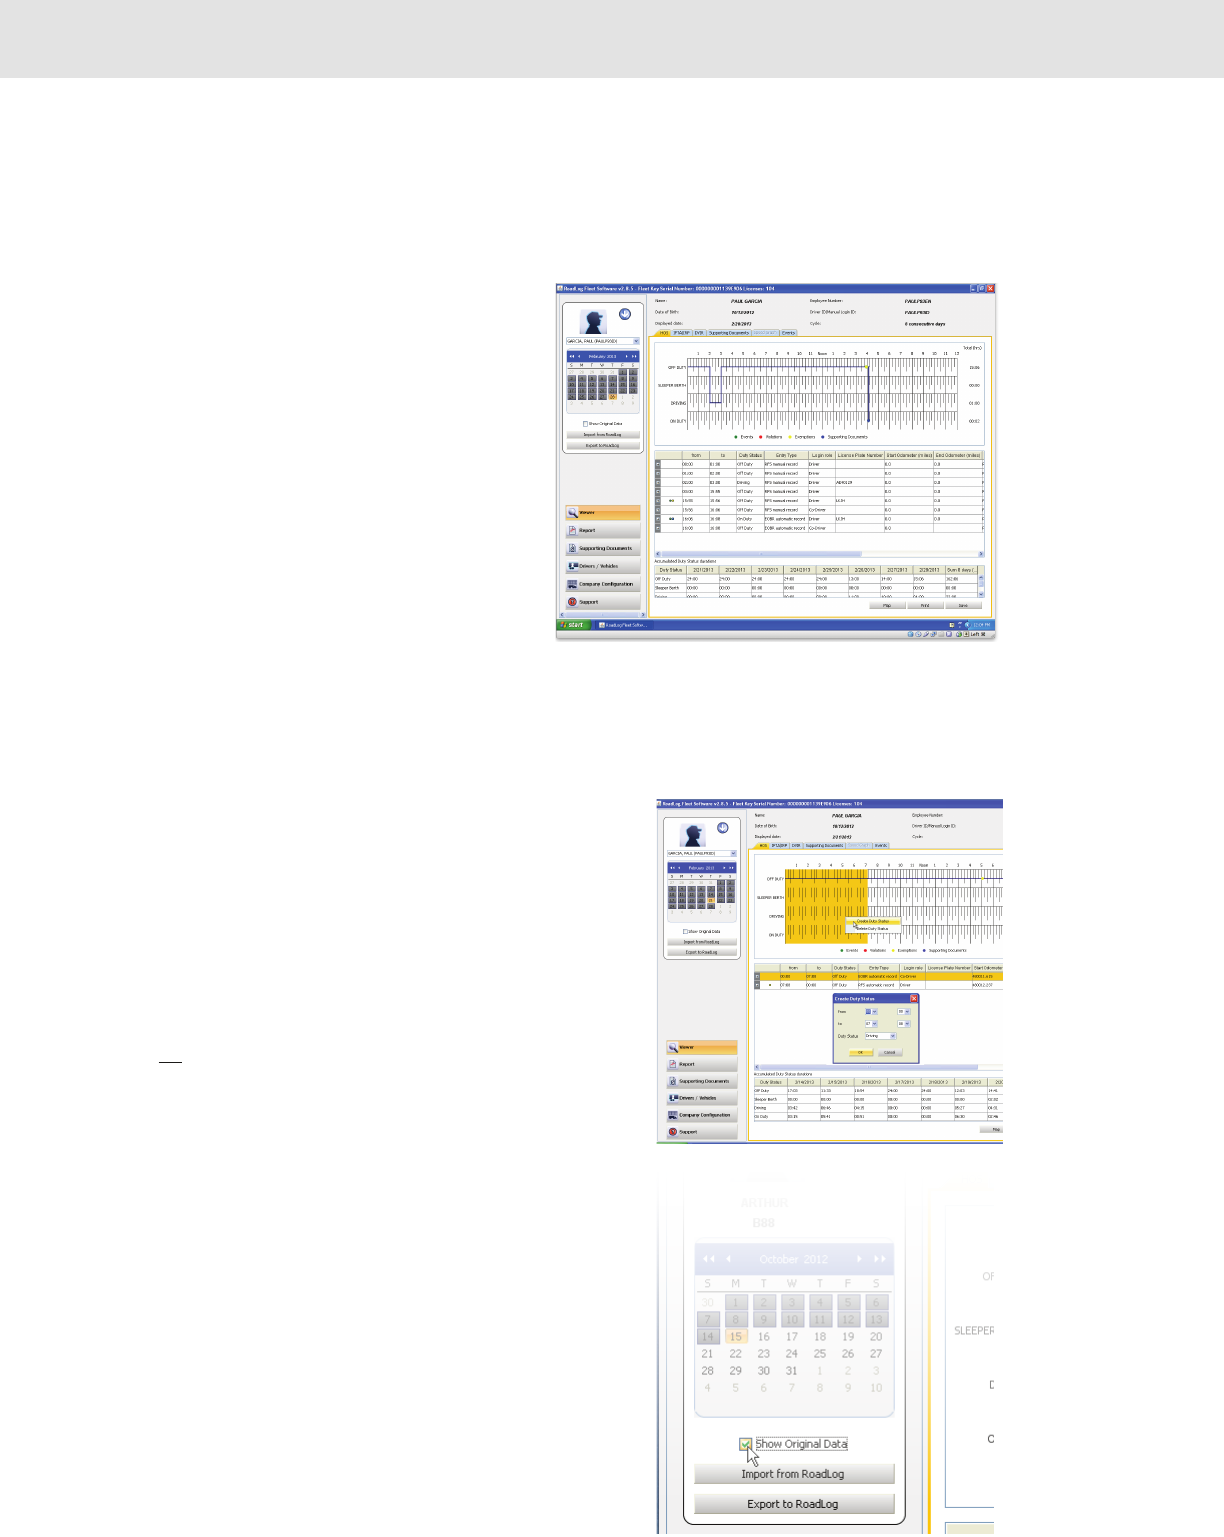
• Insert the Driver Key into the PC’s USB port.
• Select Drivers / Vehicles from the main navigation.
• From the Action palette click Import From Roadlog.
• Select the key from which you wish to import. Click
Yes to import all, No to cancel, or Details to choose
specific files to import.
The RoadLog Fleet Software will detect when a new trailer,
not currently in the company data, is included in the data
being imported from the Driver Key. If a new trailer is
detected, a “Create Trailer” pop-up window will appear. Data
for the trailer must be entered and it will be saved along with
the data imported from the Driver Key.
When importing the files from the Fleet Key or
Driver Key the data are archived in the installation folder
(e.g. C:\Program Files\VDO\BOS\dist\Archive).
Exporting to RoadLog
In addition to downloading data from RoadLog to the Fleet
Management Software, there will also be data that must be
uploaded from the Fleet Management Software to RoadLog.
Examples include:
• When a Driver has been assigned a new trailer or
shipping document.
• When company configuration data has been updated.
• When a Driver’s records have been annotated in the
Fleet Manager Software.
To export data from the RoadLog
Fleet Management Software to RoadLog:
• Insert the Driver Key into the PC’s USB port.
• Select Drivers / Vehicles from the main navigation.
• From the Action Palette click on Export to RoadLog.
Company and Driver files are automatically downloaded
to the Driver Key.
Note: If there is more than one Key inserted, you will
be asked to choose the one you want to download to.
24
Screens & Tabs: Features & Functions
7. Screens & Tabs: Features & Functions
Viewer Screen – HOS Tab
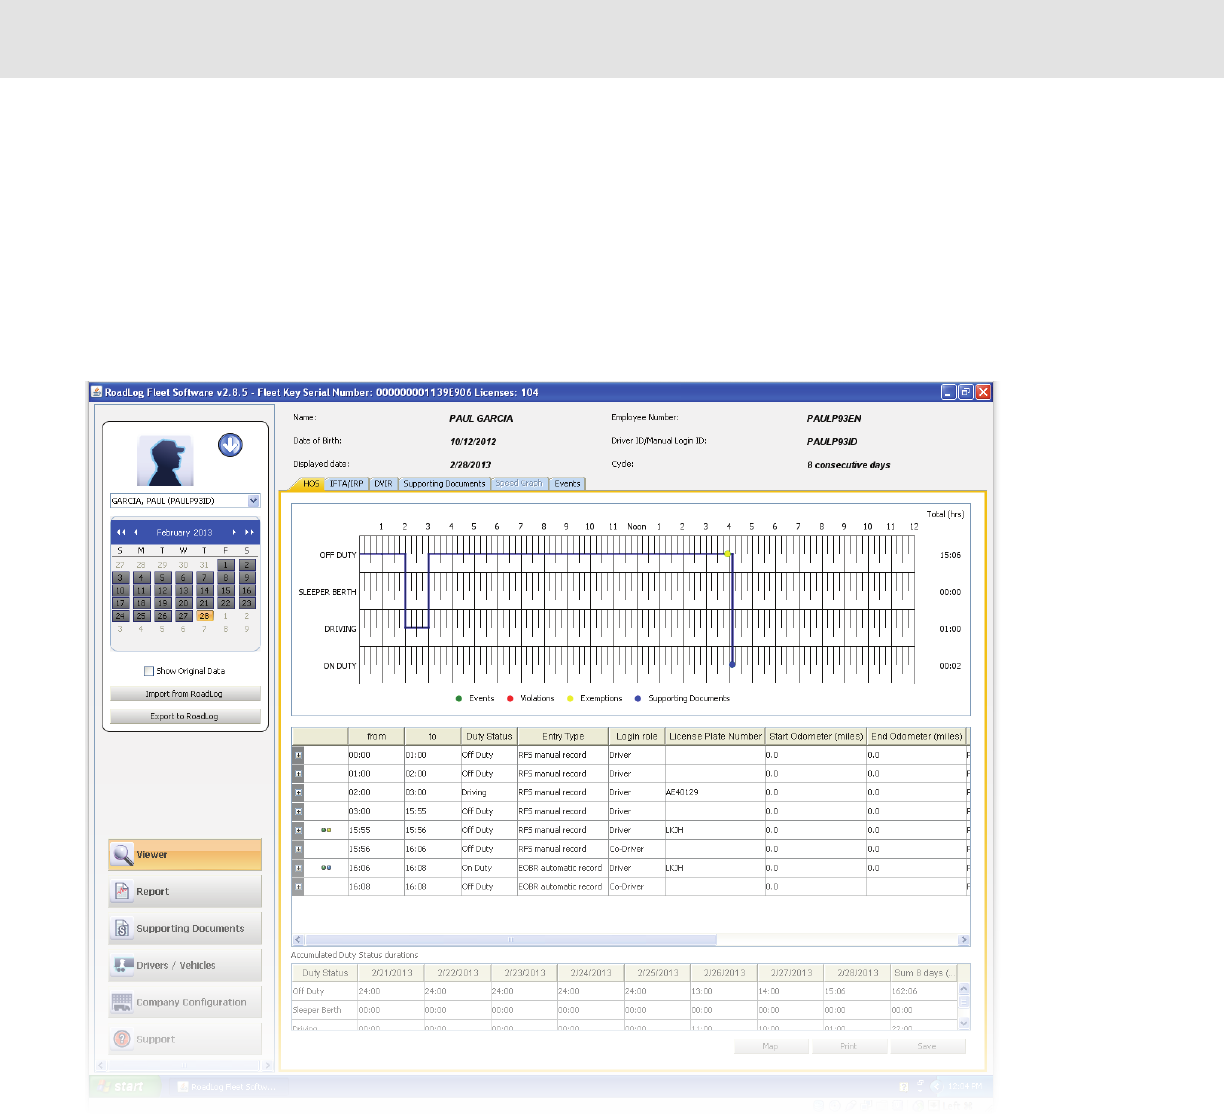
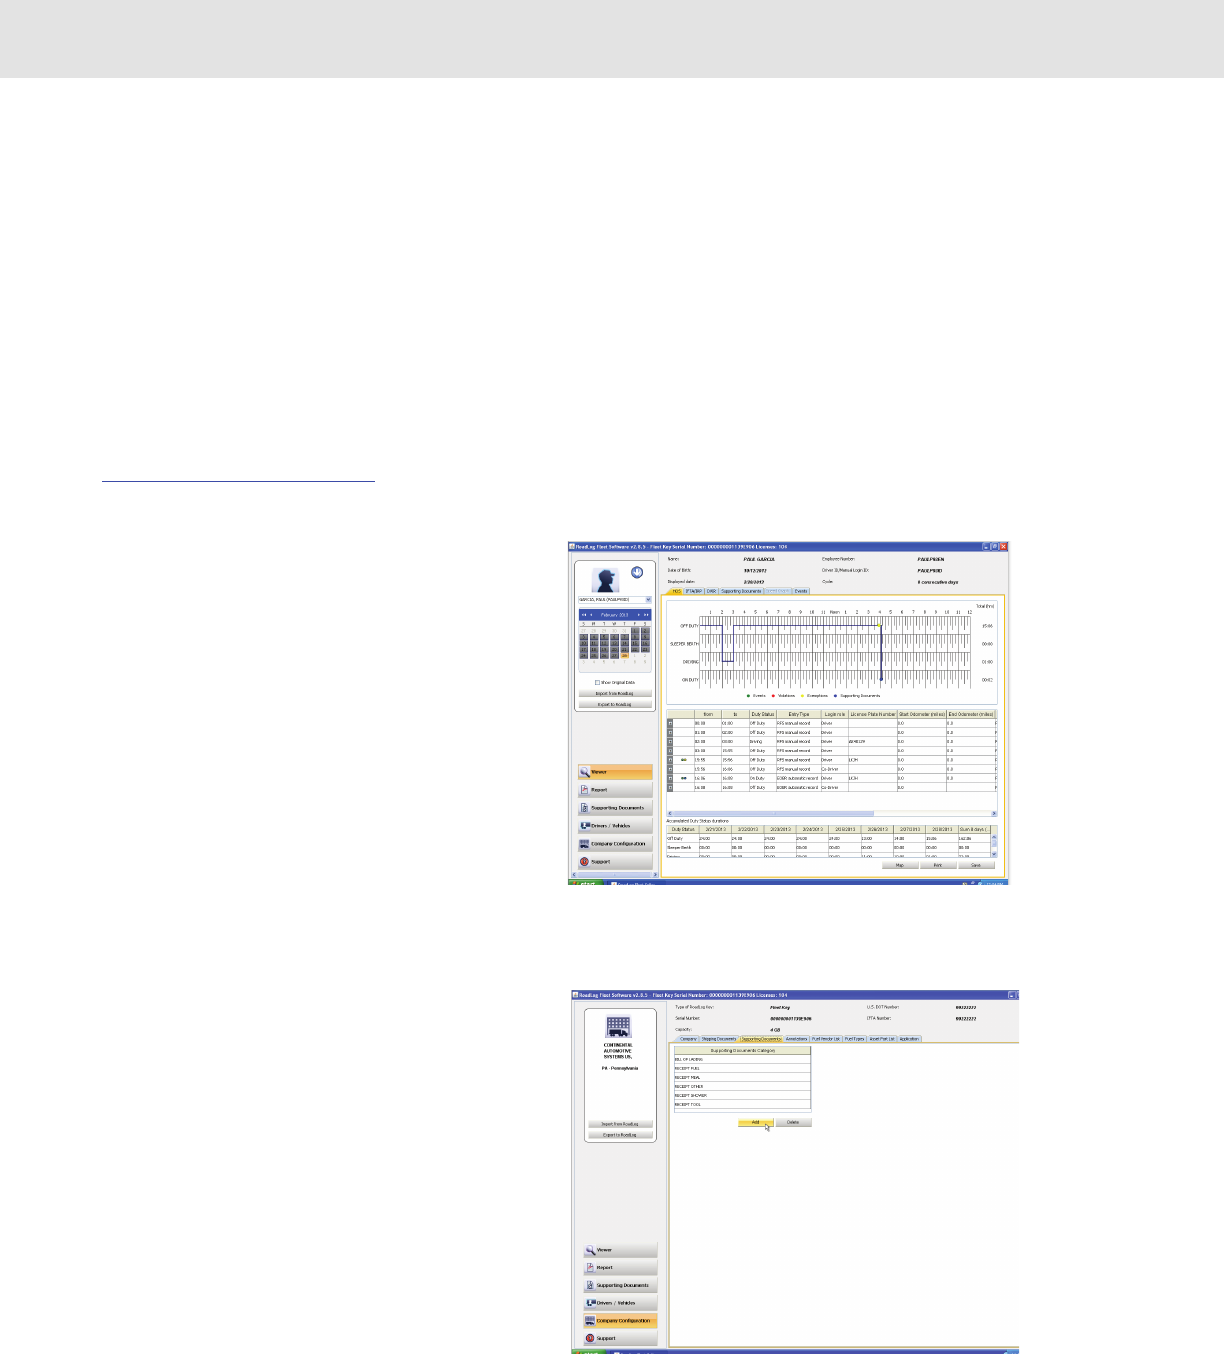
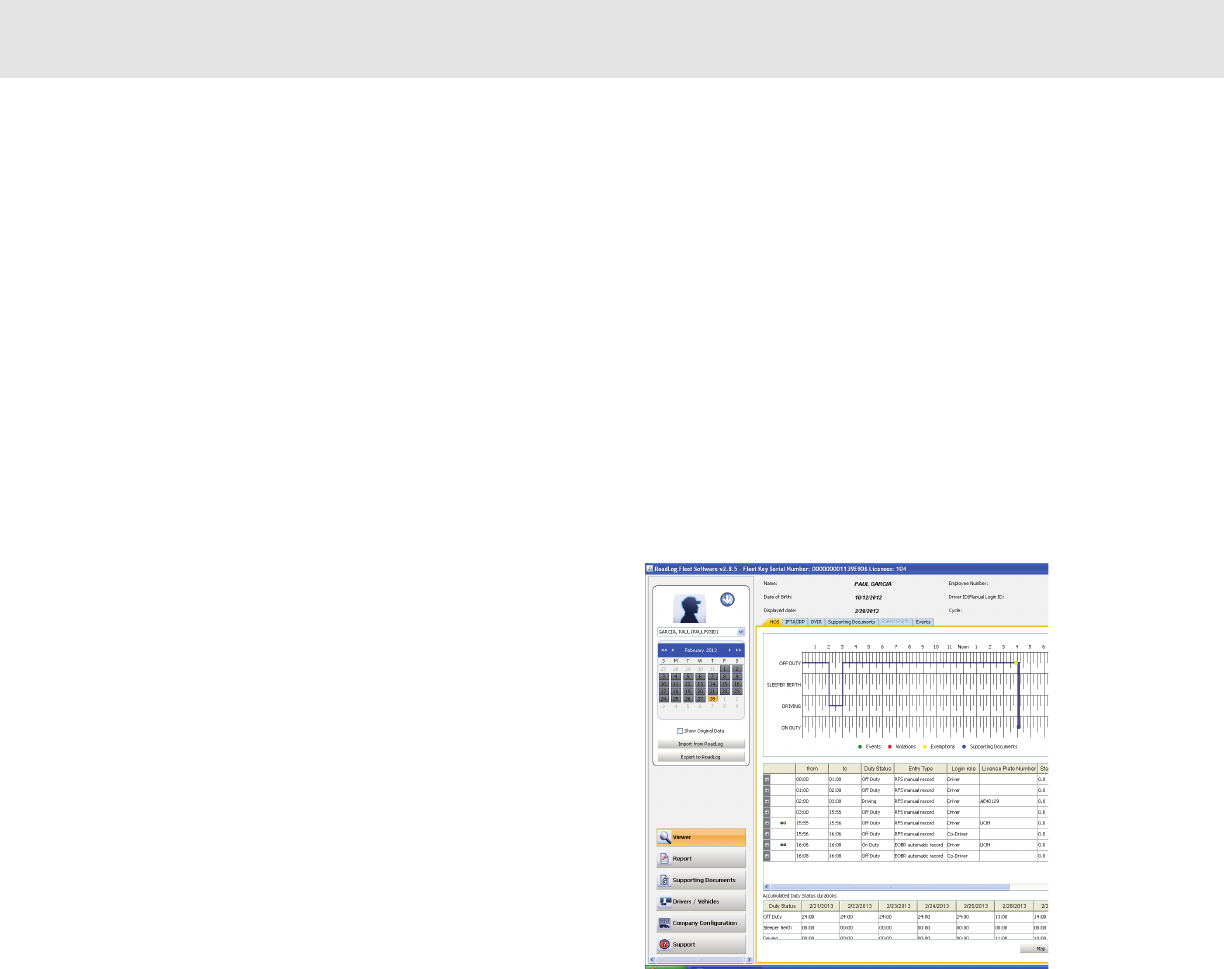
The HOS tab displays Driver information across the top of
the work area: name, employee number, date of birth,
Driver ID, the currently displayed date as selected in the
action palette calendar and the cycle chosen for the HOS
schedule.
Note: The Driver information seen here is entered and
maintained on the Driver Data Tab of the Master Data
screens.
In the work area, the Driver’s hours of service are shown in
several formats:
Logbook Timeline
The logbook timeline displays a running line of a Driver’s
Duty Status (On Duty, Driving, Sleeper Berth, Off Duty) and also shows
color-coded indicators for Events, Violations, Exemptions and Supporting
Documents associated with times recorded in the Driver’s log.
Annotating the logbook
The recorded record shown in the logbook timeline can be changed if
necessary. An example would be a period of time when the Driver
neglected to switch from On Duty to Off Duty.
• Click and drag on a segment of the timeline, to select it.
• Right-click on the selection to change (annotate) the status
recorded. A “Create Duty Status” pop-up appears.
• Enter the revised time span and status you wish to record and
click OK.
Note: Segments can only be selected for editing as they were
recorded. Therefore some edits will require you to individually
select and edit multiple adjacent segments to create one
continuous new segment. Segments can also be edited in the
events grid below the logbook view.
While the logbook record displayed will reflect the changes made, the
Fleet Management Software will annotate the data as having been
changed and will retain the original data as well as the revised data. To
view the original, unchanged data, click the “Show Original Data”
checkbox in the Action Palette.
Data can also been added manually when clicking on a calendar day. If
no data is available this message appears: “No HOS data for the Driver
available. To create HOS data please click here.” Clicking brings up a
pop-up where data can be entered. This can also be used to enter
activities recorded for the previous 15 days for a new Driver or when
starting up a new company record.
25
Screens & Tabs: Features & Functions
Events Grid
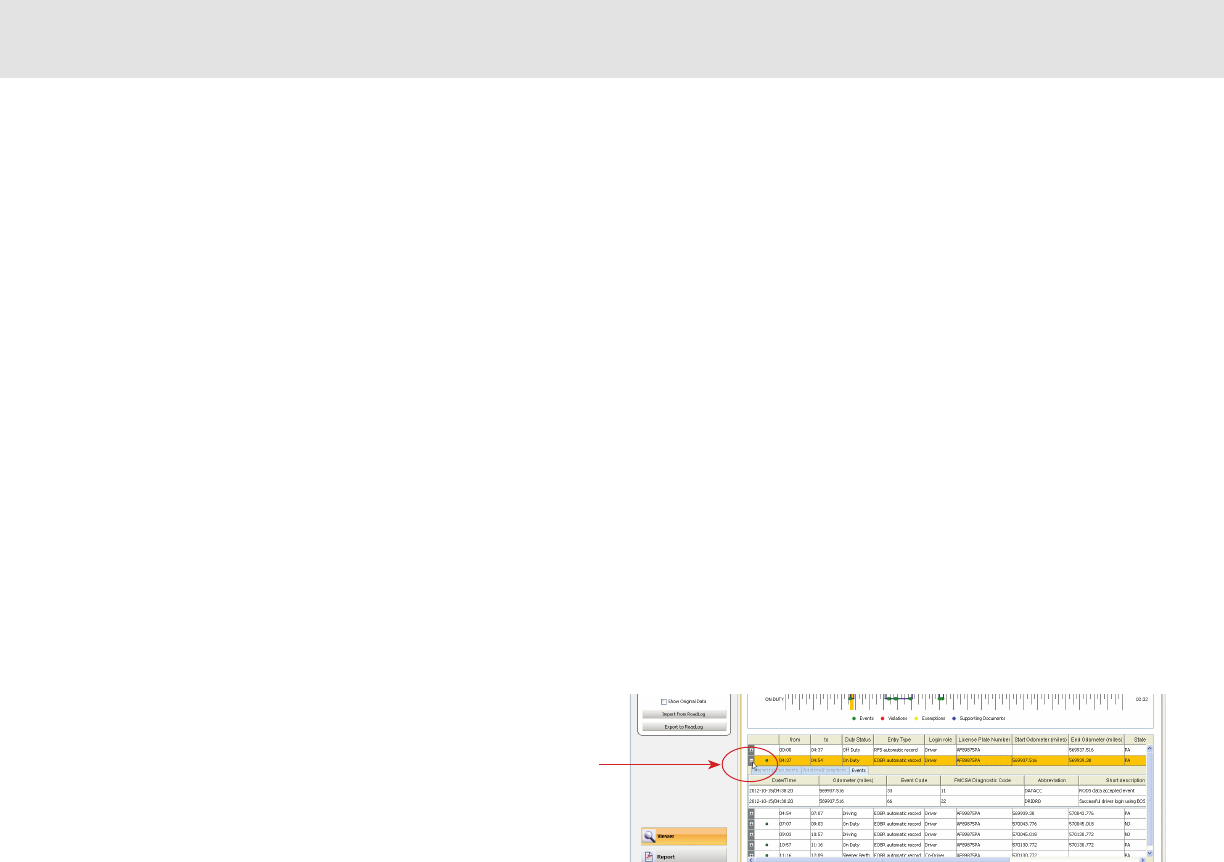
Below the logbook view, the events grid shows a record of the same
data seen in the logbook.
Annotating the Events Grid
Clicking on some cells in a segment row allow you to edit the value in the
cell, either by directly typing in a new value or by selecting a new value
from a drop-down menu. While the grid and logbook record displayed
will reflect the changes made, the Fleet Management Software will
annotate the data as having been changed and will retain the original
data as well as the revised data. To view the original, unchanged data,
click the “Show Original Data” checkbox in the Action Palette.
The data points in the Events Grid include (from left to right):
• Events: Colored dots that coincide with the dots seen on the
events timeline indicating Events (Green), Violations (Red),
Exemptions (Yellow), and Supporting Documents (Blue).
• From: Start time for the trip segment.
• To: End time for the trip segment.
• Duty Status: Duty Status indicated by the Driver during the
segment (Duty Status can be edited by clicking on the cell and
selecting another status from the pull-down menu).
• Entry Type: Indication of whether the recorded segment was
entered manually in the Fleet Management Software (RFS manual
record) or recorded automatically by the RoadLog EOBR (EOBR
automatic record).
• Login Role: Indication of whether the record was made under a
Driver or Co-Driver log in (Login Role can be edited by clicking on
the cell and selecting another status from the pull-down menu).
• VLPN: The Vehicle License Plate Number of the vehicle recorded for
the segment (the VLPN can be edited by clicking in the cell
choosing another VLPN from the pull-down menu).
• Start Odometer: The odometer reading at the beginning of the
segment.
• End Odometer: The odometer reading at the end of the segment.
Note: The odometer reading can be edited by clicking in the cell
and entering another value. However, the End Odometer reading
entered cannot be lower than the Start Odometer reading from the
previous cell.
26
Screens & Tabs: Features & Functions
Note about Odometer readings: The RoadLog EOBR is typically calibrated
to observe the odometer reading from the engine’s computer. The engine
computer’s odometer reading can vary significantly from the odometer reading
displayed on the dashboard. These conflicting odometer readings both come
from different message sources within the vehicle. Therefore, odometer
readings from this device may not match the odometer reading displayed on
the dashboard.
• State: The state traveled during the segment (the State can be edited by
clicking in the cell and choosing another state from the drop-down menu).
• Location: The nearest populated area to the area traveled during the segment.
• Distance to nearest populated location: Distance to the nearest populated
area as recorded by the US census.
• Bearing Data: Your current location relative to the closest most populated
place – for example, “7 miles West of Allentown, PA.”
• Description: Remarks recorded by the Driver regarding changes of duty status.
Additional Events Grid data
Clicking on some of the other cells in a segment row in the events
grid opens an additional grid view showing additional details for the
segment including:
Events
• Date/Time: Exact recording time for an Event.
• Odometer: ECM Odometer reading at the time of the event (may not match the
instrument cluster odometer).
• Event Code: Predefined codes for diagnostic events recorded by the RoadLog
EOBR, including FMCSA type events and events related specifically to the
RoadLog EOBR.
• FMSCA Diagnostic Code: FMCSA codes for events that are detected and
recorded in order to maintain compliance with US HOS regulation.
• Abbreviation: FMCSA abbreviations for events that are detected and recorded
in order to maintain compliance with US HOS regulation. Examples include
“ENG_ON” (Engine On) and “BATLOW” (Battery Low).
• Short Description: Predefined descriptions for predefined events. An example
would be “Successful Driver log in using Driver Key.”
• Description: A longer text version of the activity described in the “Short
Description.”
27
Screens & Tabs: Features & Functions
Violations / Exemptions
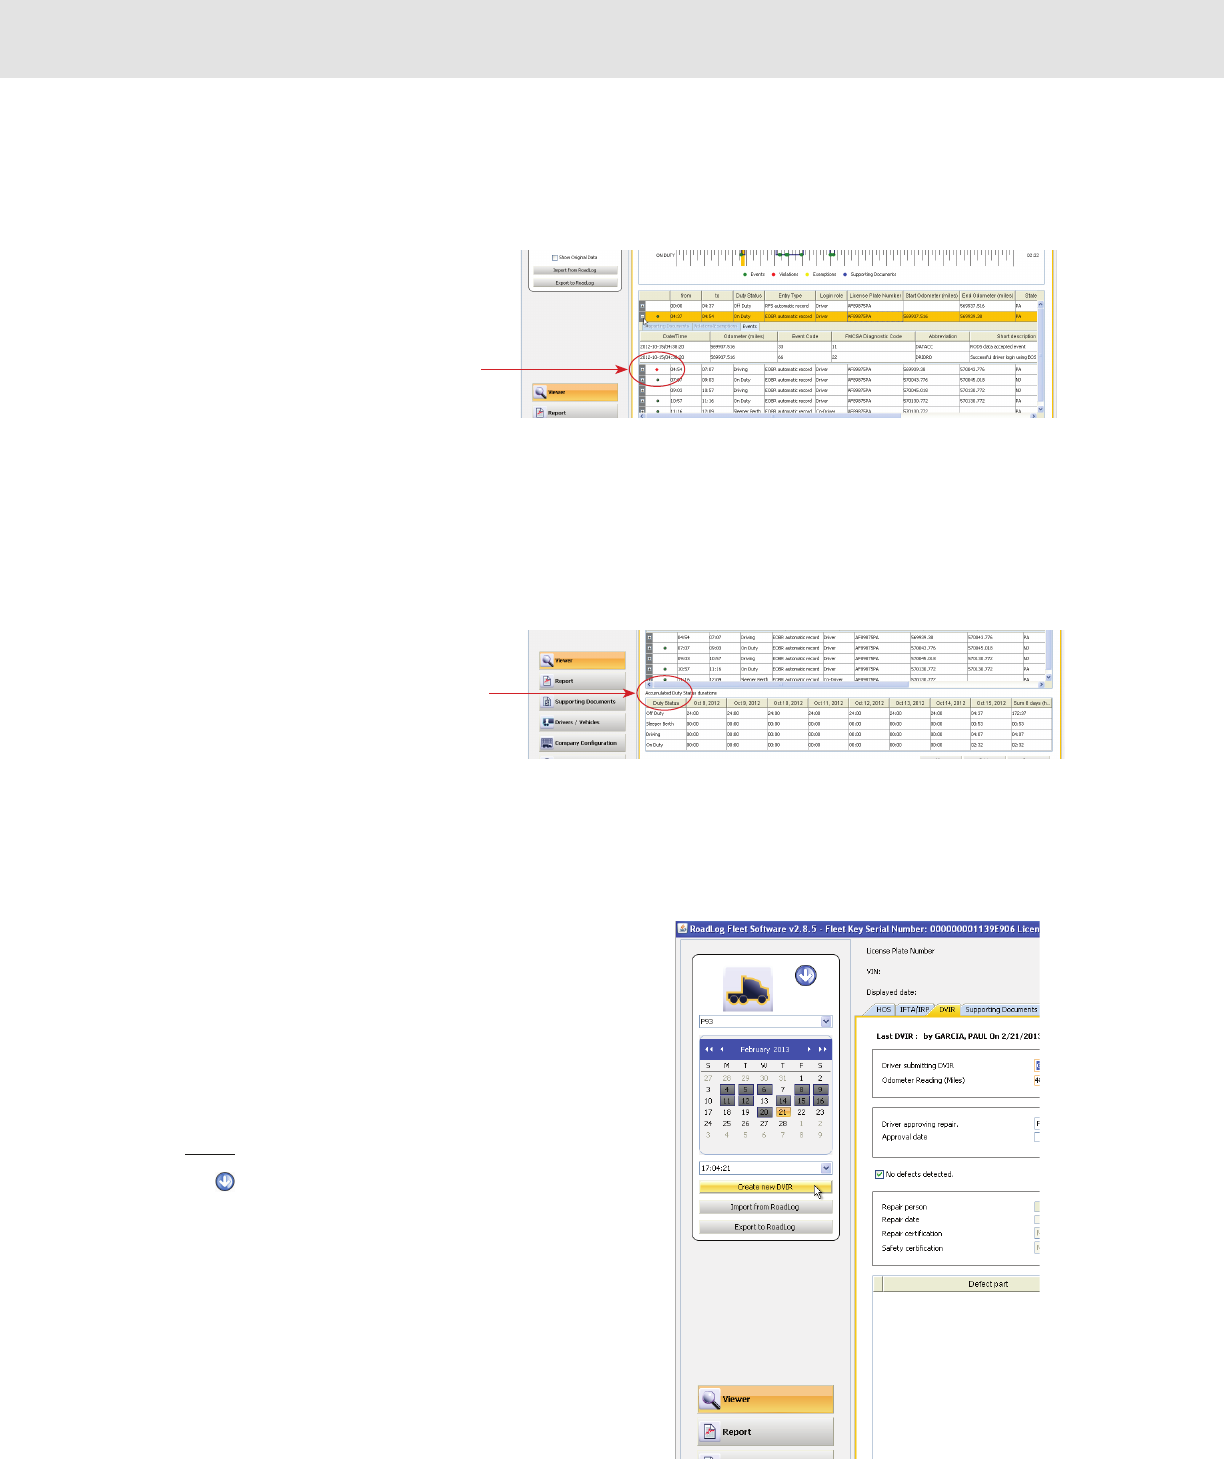
Violations are instances where the Driver’s record of
duty status has violated FMCSA regulations.
Violations are highlighted by red dots on the Logbook
Timeline and by red dots in the Events Grid.
Clicking on the red dot in the Events Grid reveals a
second grid showing details of the Violation including
Date / Time, Odometer, Event Code, Type, Short
Description and Description.
Exemptions are instances where the Driver has encountered
circumstances that affected HOS compliance. Exemptions are predefined
in the RoadLog EOBR and include Emergency Conditions, Adverse
driving conditions, 16 hours extension, 100- or 150-mile radius Driver,
and Personal Use.
Accumulated Duty Status Durations Grid
Below the events grid view, the accumulated Duty
Status view shows daily and weekly cumulative totals
of each Duty Status, based on the values seen in the
logbook and events grid displays.
Map View and IFTA / IRP Tabs
[These features will be implemented in a free upcoming release]
DVIR Tab
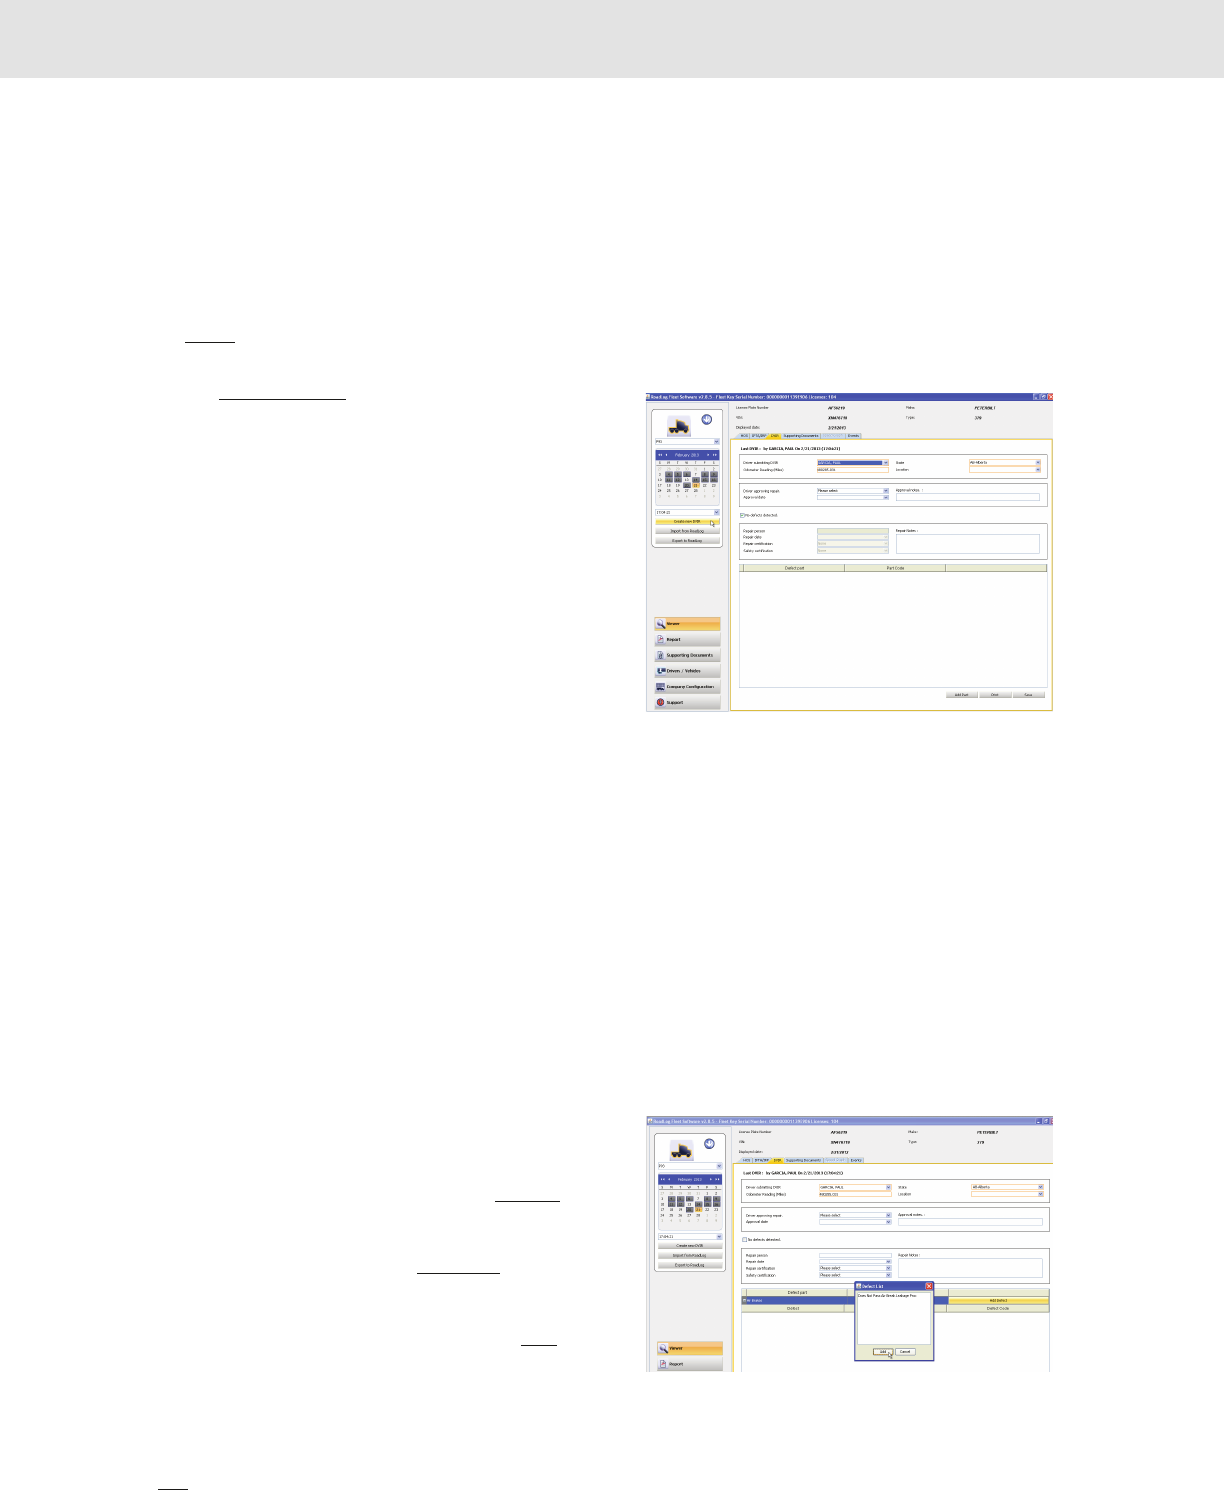
The DVIR Tab displays Driver Vehicle Inspection Reports recorded by the
Driver in the RoadLog EOBR and imported into the Fleet Management
Software as well as DVIRs created in the Fleet Management Software.
To select the vehicle that you wish to view o r create a DVIR for:
• Click on Viewer form the main navigation.
• Click on the icon at the top of the Action Palette. Select the
vehicle from those shown.
• Select the date that you wish to view or create a DVIR for from the
interactive calendar in the Action Palette.
The drop down menu field below the calendar is self-populated with the
times for all the DVIRs created on the selected date. If there is more than
one DVIR for a selected date, choose the time from the drop down menu
for the DVIR you want to view.
At the top of the screen, the work area data displayed reflects the vehicle
and the date selected including License Plate Number, VIN, Displayed
date, and Make and Model of the vehicle.
28
Screens & Tabs: Features & Functions
Creating a DVIR in the Fleet Management Software
The Driver in the RoadLog can create DVIRs, or they can be created in the Fleet
Management Software. To create a DVIR in the Fleet Management Software:
• Click on Viewer in tha main navigation.
• Select the date you want to record the DVIR for in the calendar, and
then click on Create new DVIR in the Action Palette.
• Complete the fields in the tab. Fields outlined in orange are
mandatory.
The DVIR fields include:
• Driver submitting DVIR: The Driver who has reported the vehicle
inspection details.
• Odometer Reading (miles): Odometer at the time the report is
made.
• State: The state from which the DVIR was filed.
• Location: The location from which the DVIR was filed.
• Driver approving repair: Driver who has viewed the repairs made
to defects reported in the DVIR and has judged them to be
complete.
• Approval Date: Date that the Driver approving the repair reported that the
repairs had been made satisfactorily.
• Approval notes: Comments made by the Driver or user on the repairs and
approval.
• No defects detected: A check box to indicate that the Driver detected no
defects.
• Repair person: The person making repairs to the reported defects.
• Repair date: The date the defects were repaired.
• Repair certification: Predefined list of repairs for annotations to the repair
person’s report; None, Repairs made, Repairs not necessary.
• Safety certification: Predefined list of safety conditions for annotations to the
repair person’s report; None, Safe to operate, Unsafe to operate.
• Repair notes: Comments made by the repair person or user on the
repairs and approval.
You can add defective parts to the DVIR by clicking the Add Part button at
the lower right of the screen and selecting from the list of predefined parts.
Once you have entered the defective part, you may add the defect(s) you
want to record for the part by clicking on the Add Defect bar, and selecting
the defect(s) from the list of predefined defects.
When all fields and defect part listings are completed, click Save to record
the DVIR. To print the DVIR, click on the Print button at the lower right of
the screen.
Note: There is a list of predefined defective parts that comes with the Fleet
Management Software. You can add additional parts to the list by clicking on
the Add button below the Part Name / Part code grid on the Asset Part List tab.
Once uploaded to RoadLog, these parts and defects will appear in the
RoadLog menus for easy creation of DVIRs.
29
Screens & Tabs: Features & Functions
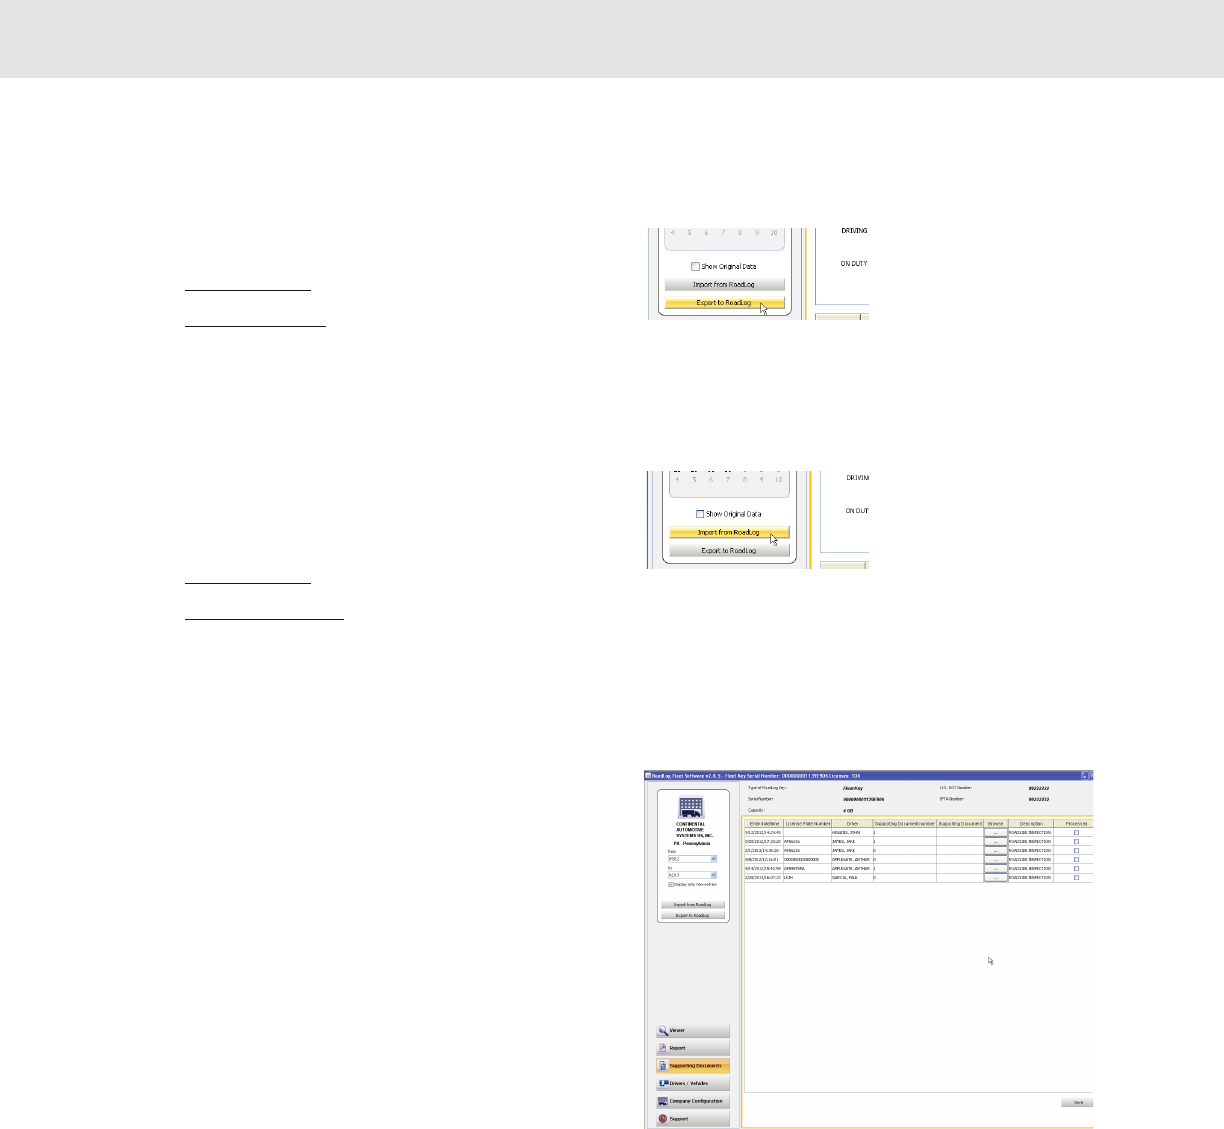
Exporting DVIRs to RoadLog
To export DVIRs to RoadLog, insert a Driver Key in the USB port.
• Click on Drivers / Vehicles in the main navigation.
• Click on Export to RoadLog in the Action Palette.
• Click on the Key you wish to export to. If more than one Key is
inserted, select the correct drive. All Driver files are automatically
transferred to the Driver Key.
Importing DVIRs from RoadLog
To import DVIRs from RoadLog, insert a Driver Key in the USB port.
• Click on Drivers / Vehicles in the main navigation.
• Click on Import from RoadLog in the Action Palette.
• Click on the Key you wish to export to. If more than one Key is
inserted, select the correct drive. All Driver files are automatically
transferred from the Driver Key to the Fleet Management Software.
Supporting Documents Tab
Supporting Documents are electronic records of costs incurred by the
Driver during the trip. Examples include “Fuel Receipt” and “Meal
Receipt.” The Supporting Document records are created by the Driver on
the RoadLog EOBR and transferred to the Fleet Management Software
when data is exported from RoadLog and imported into the RoadLog
Fleet Management Software.
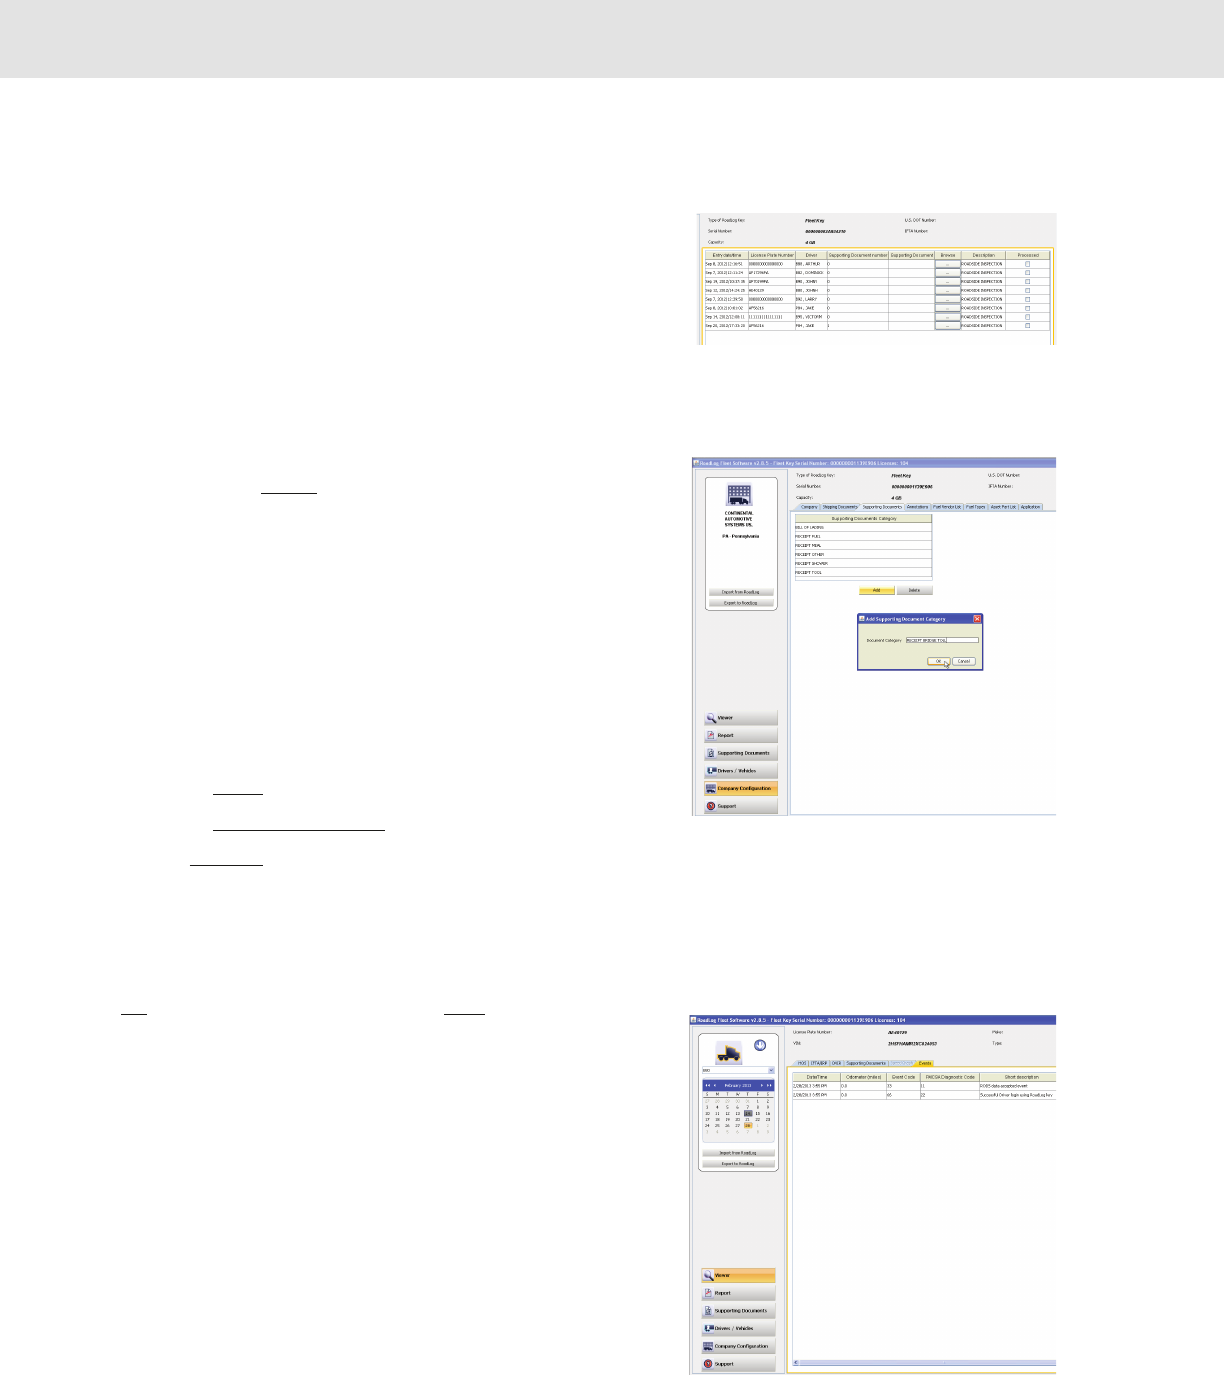
To allow Drivers easy and consistent creation of Supporting Documents,
predefined Supporting Document Categories can be created in the Fleet
Management Software, in the Company Configuration screen’s
Supporting Documents tab (not to be confused with the Supporting
Documents tab in the Viewer screen). Supporting Document Categories
that are created here will appear as choices for the Driver in the RoadLog
EOBR, once data has been exported from the Fleet Management
Software to the RoadLog EOBR.
A paper receipt for each Supporting Document can be printed from the
RoadLog EOBR, using the RoadLog’s built-in thermal printer. In addition,
physical documents such as paper receipts can be scanned, and the
scanned file can be “attached” to the Supporting Document’s electronic
record.
The Supporting Documents tab displays vehicle information across the
top of screen in the work area: Vehicle License Plate Number, VIN, Make
and Model, and the currently displayed date period as selected in the
action palette.
The work area shows a table of Supporting Documents associated with
the currently selected vehicle, listed in order by entry date and time.
30
Screens & Tabs: Features & Functions
Each Supporting Document record shows:
• Entry date/time: Entered automatically when the record is created.
• Supporting Document Number: The number assigned automatically by
the software when the supporting Document is created.
• Description: The description is selected from the list of predefined
Supporting Document types established in the Company Configuration /
Supporting Documents tab.
• Link: A scan of a physical document that is added to the Supporting Document
record.
• Browse: Click the Browse button to navigate to and select the scan file
you wish to make a Link.
Note: File types accepted and the maximum file size that can be used as
a link is set in the Company Configuration / Application tab.
• Driver: The Driver who created or is associated with the Supporting
Document.
• Processed: A check box that indicates that the user has finished working
with this record. Once clicked, the record is processed and the Supporting
Document will no longer be displayed in the list.
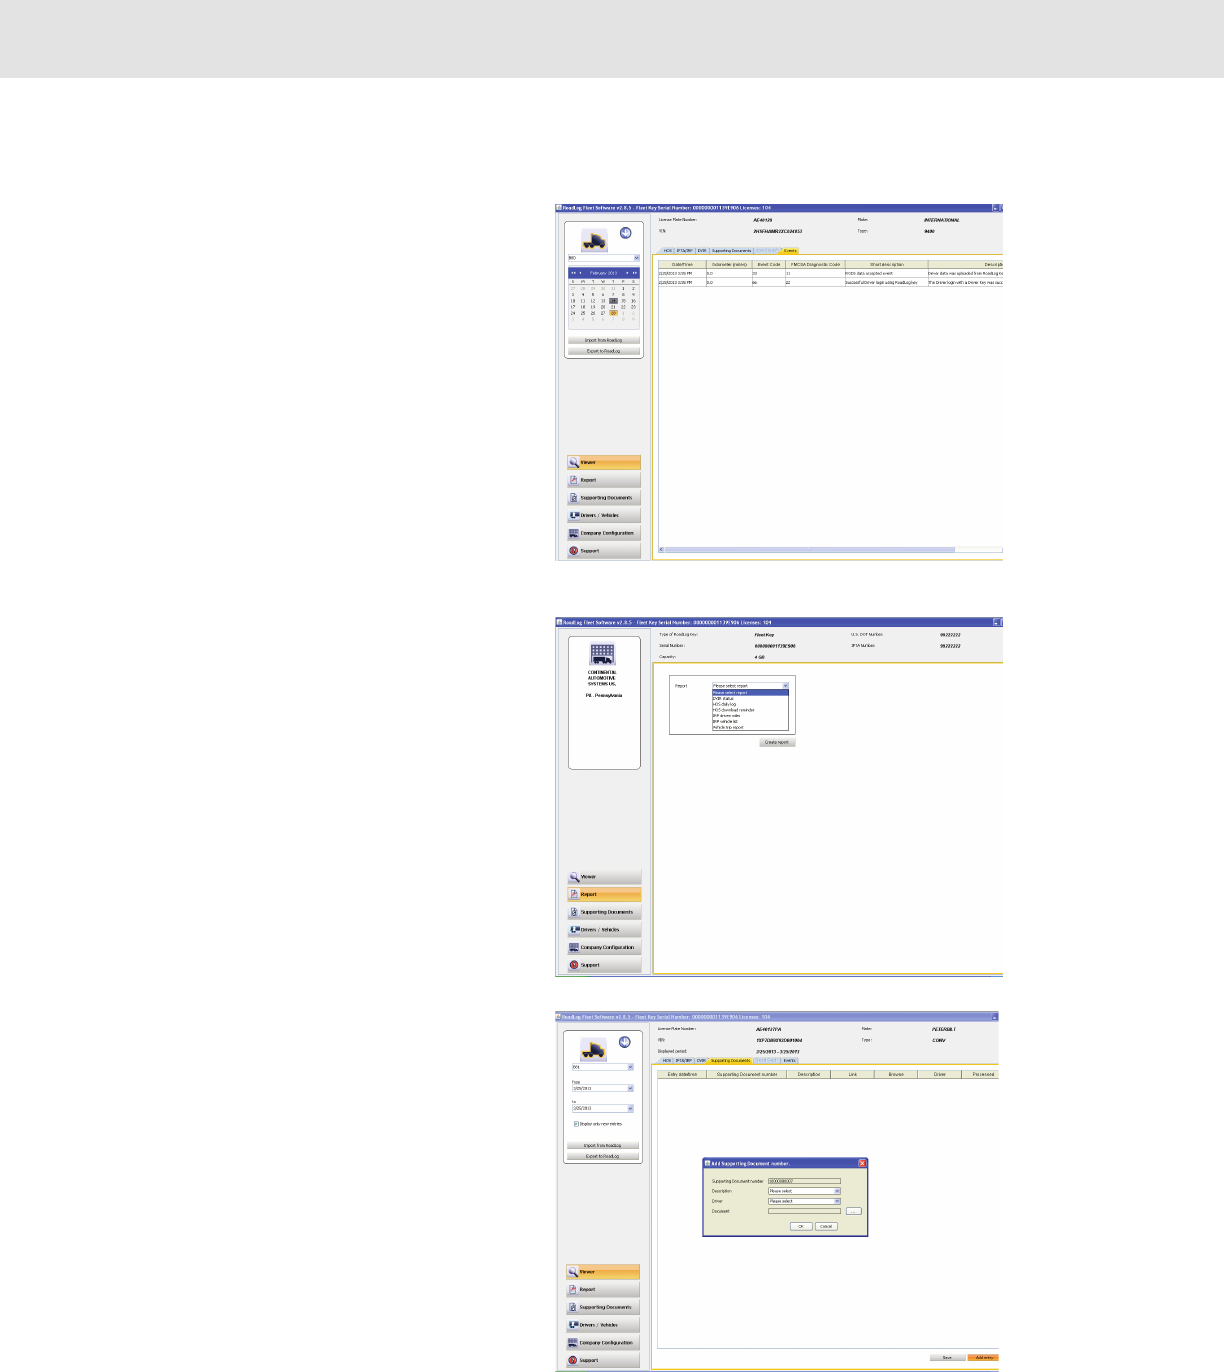
To create a new Supporting Document in the Viewer / Supporting
Documents tab:
• Click on the Viewer in the main navigation.
• Click on the Supporting Documents tab.
• Click the Add Entry button. The Add Supporting Document Number dialog is
displayed.
• Select a description from the drop-down menu.
• Select a Driver from the drop-down menu.
• If appropriate, select a scanned document to add to the record by clicking the
••• button. Navigate to the file and click on Open to select the file and add
it to the record.
Speed Graph Tab
This functionality will be introduced in 2013.
Events Tab
The events tab displays vehicle information across the top of the work area and
a table of events automatically logged by the EOBR, listed in order by date and
time.
Select the date to be displayed from the interactive calendar in the Action
Palette.
For each event, the table shows the odometer reading, the event code, Federal
Motor Carrier Safety Administration (FMCSA) diagnostic code (if applicable), a short
description and a longer description.
• Clicking and dragging on the column divider allows you to view the full contents
of any cell.