D Link AP1350A1 Wireless N Pocket Router/Access Point User Manual Manual 2
D Link Corporation Wireless N Pocket Router/Access Point Manual 2
D Link >
Contents
- 1. Manual 1
- 2. Manual 2
- 3. Manual 3
- 4. Manual 4
Manual 2
30D-Link DAP-1350 User Manual
Section 3 - Configuration
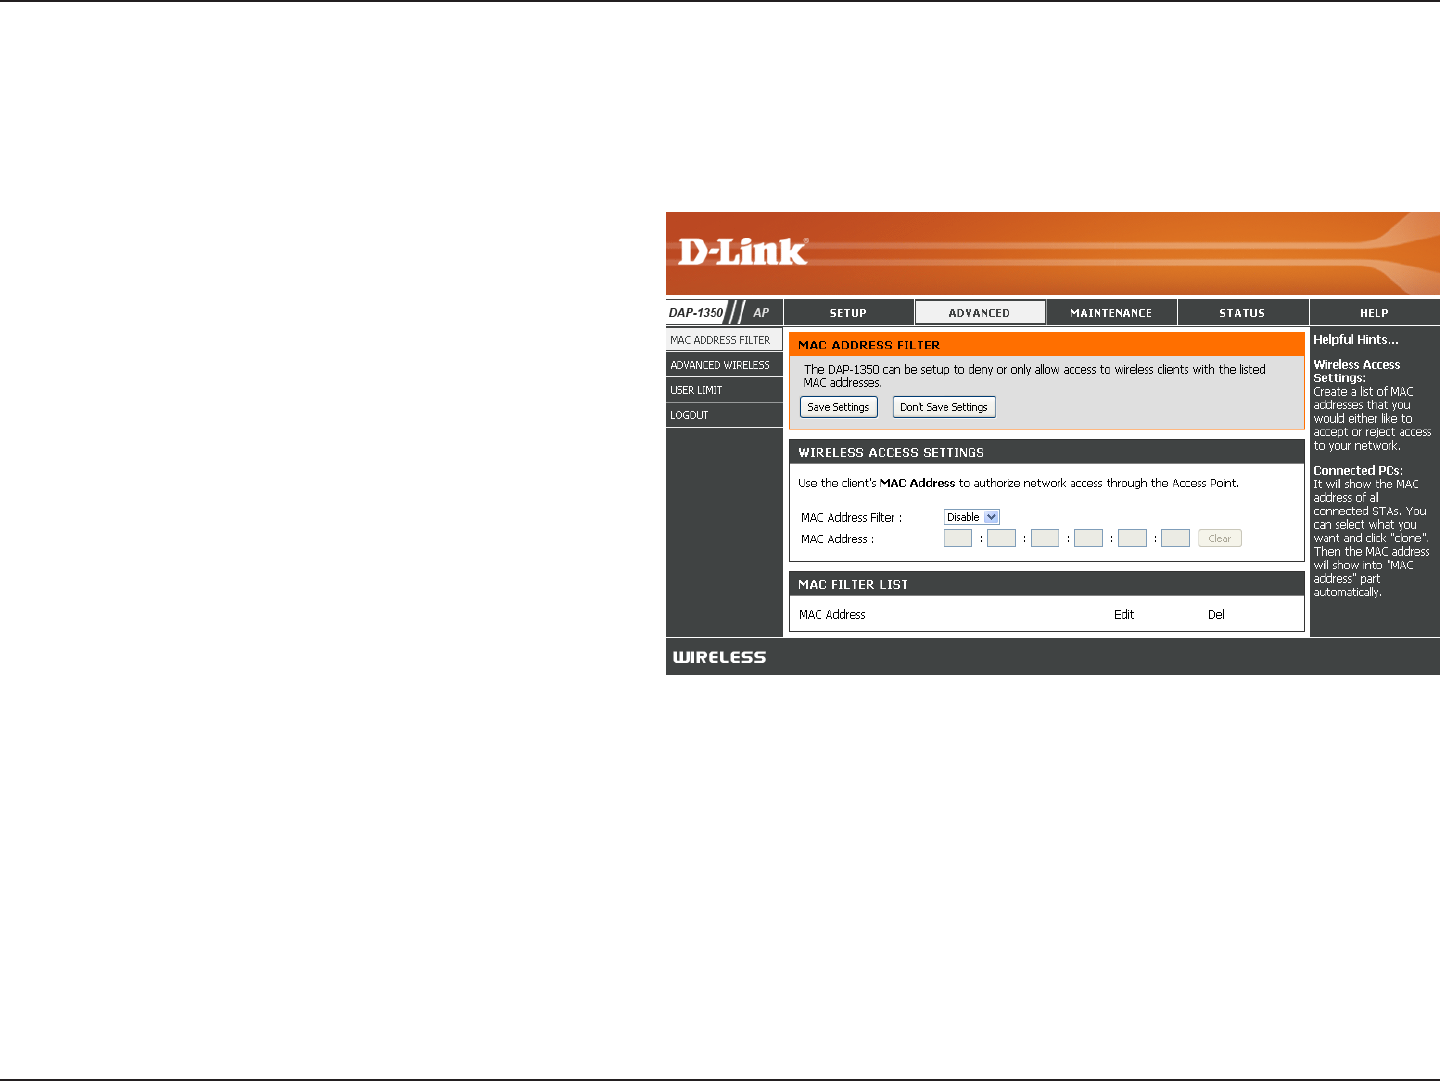
MAC Address Filter
Select Enable or Disable from the drop-down
menu.
Enter the MAC address you would like to filter.
To find the MAC address on a computer, please
refer to the Networking Basics section in this
manual. Click Save Settings to activate and
save.
Note: Make sure you enter the computer you
are currently using to configure the access
point first or you will not be able to access
the configuration utility once you click Save
Settings.
Displays the list of clients in the filter list.
MAC Address
Filter:
MAC Address:
MAC Filter List:
Use MAC (Media Access Control) Filters to authorize wireless clients by their MAC addresses to access your network.
When enabled, any client not on the MAC filter list will not be able to access your network.
31D-Link DAP-1350 User Manual
Section 3 - Configuration
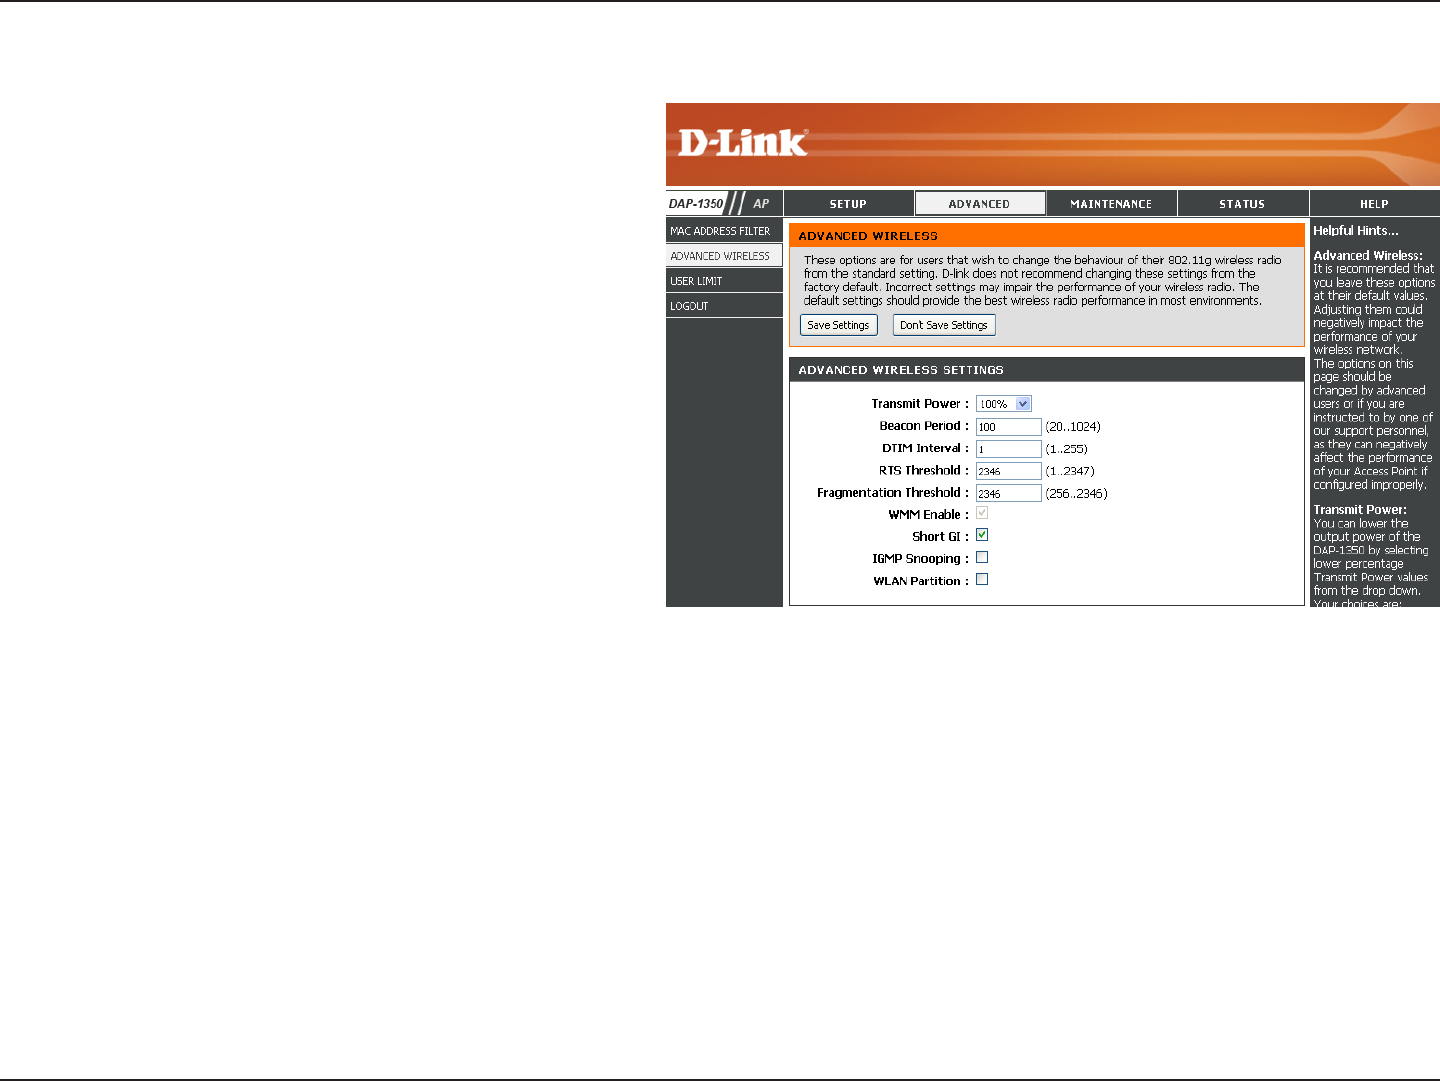
Advanced Wireless
Transmit Power:
Beacon Period:
DTIM Interval:
RTS Threshold:
Fragmentation
Threshold:
WMM Enable:
Short GI:
Sets the transmit power of the antennas.
Note: Transmit power is regulated by international
standard. Users are forbidden to change its
maximum limit.
Beacons are packets sent by an access point
to synchronize a wireless network. Specify
a value. 100 is the default setting and is
recommended.
(Delivery Traffic Indication Message) 1 is the
default setting. A DTIM is a countdown informing
clients of the next window for listening to
broadcast and multicast messages.
This value should remain at its default setting of
2346. If inconsistent data flow is a problem, only
a minor modification should be made.
The fragmentation threshold, which is specified in bytes, determines whether packets will be fragmented. Packets exceeding
the 2346 byte setting will be fragmented before transmission. 2346 is the default setting.
WMM is QoS for your wireless network. This will improve the quality of video and voice applications for your wireless
clients.
Check this box to reduce the guard interval time therefore increasing the data capacity. However, it’s less reliable and may
create higher data loss.
32D-Link DAP-1350 User Manual
Section 3 - Configuration
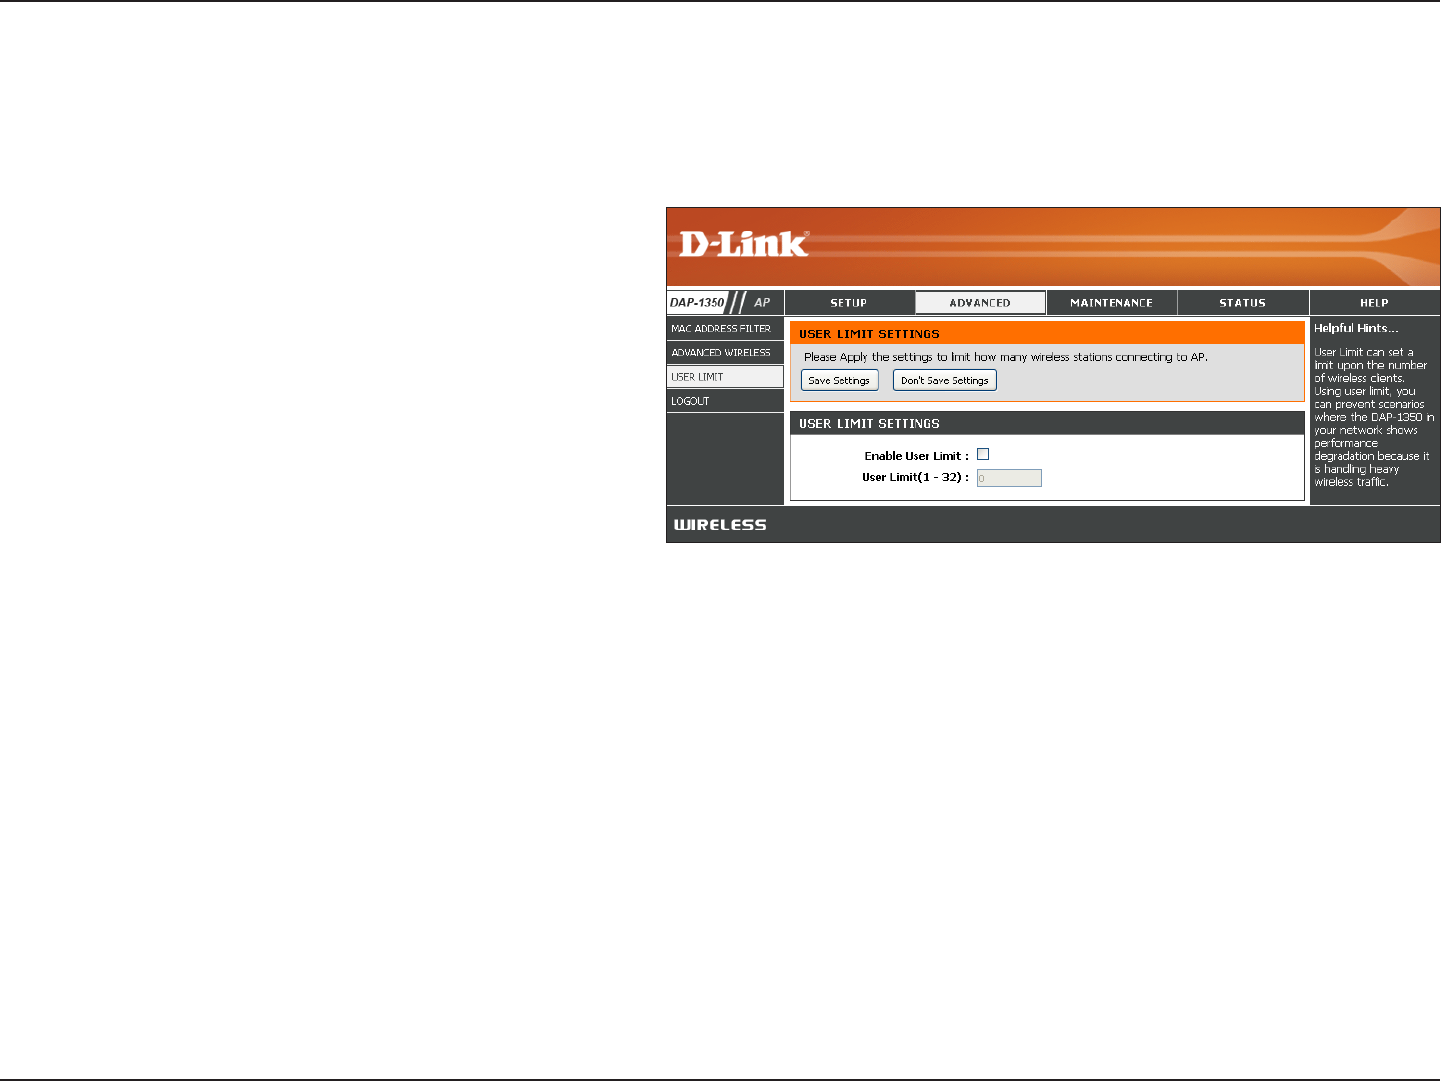
User Limit
Check the Enable User Limit box to enable
this feature.
Enter the maximum number of clients, between
1 and 32.
Click Save Settings to save and activate the
new changes.
Enable User
Limit:
User Limit:
Save
Settings:
Enter the maximum number of wireless clients that can connect at one time to your access point.
33D-Link DAP-1350 User Manual
Section 3 - Configuration
Password:
Verify
Password:
Enable
Graphical
Authentication:
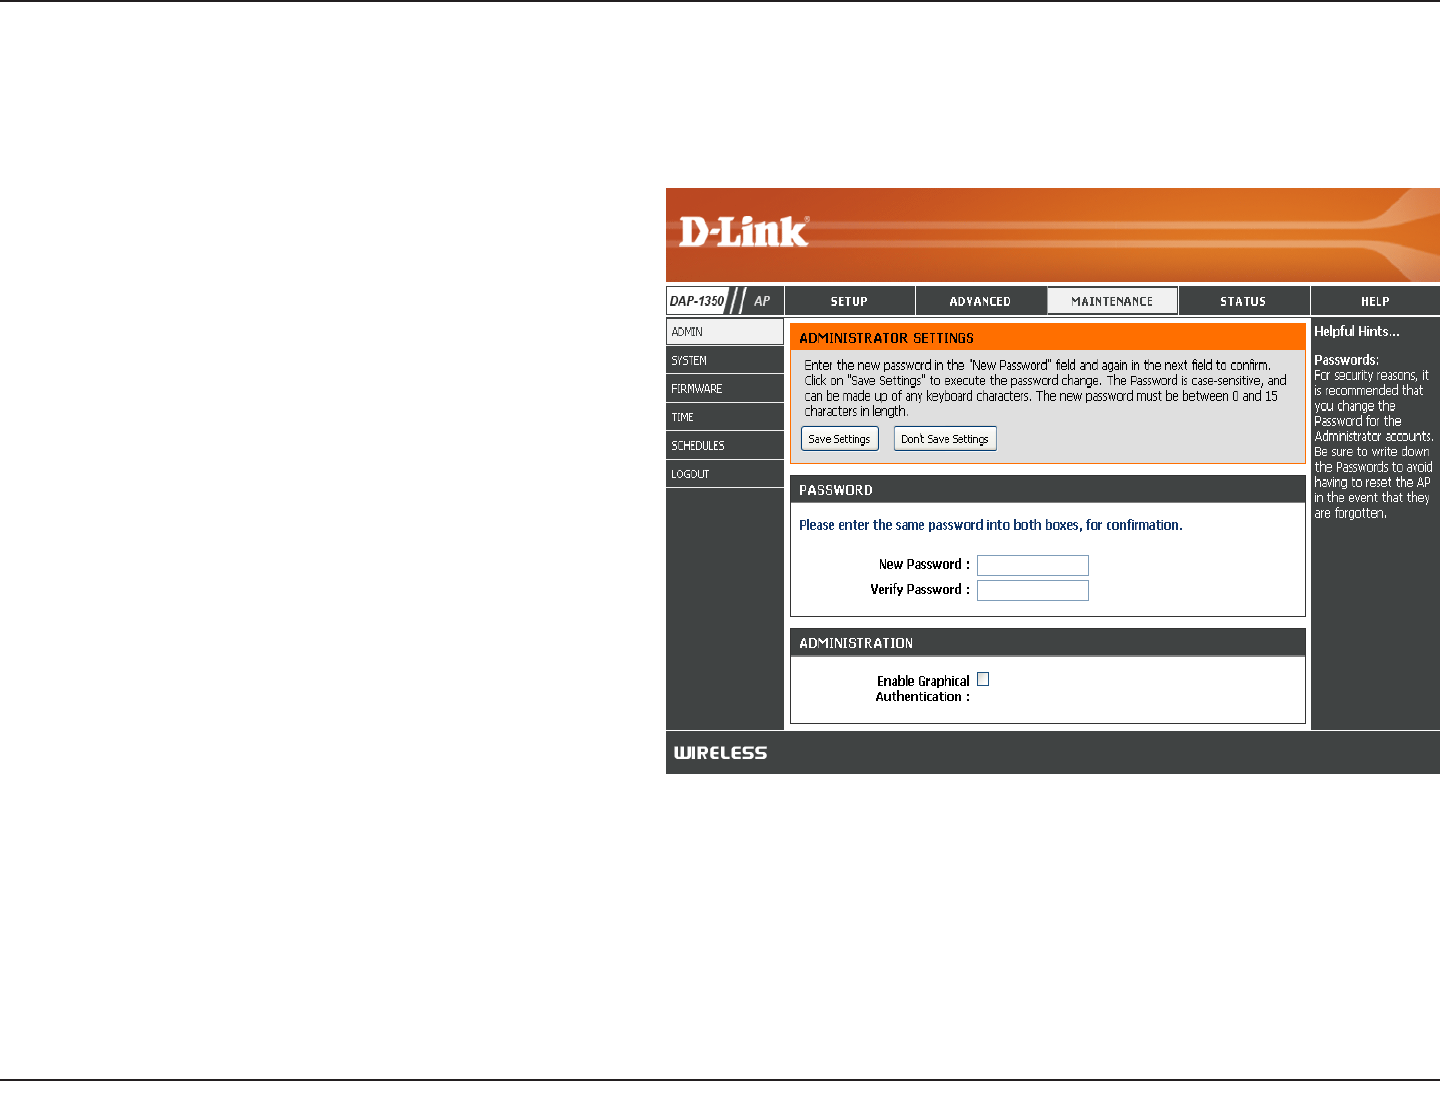
Enter a new password for the Administrator
Login Name. The administrator can make
changes to the settings.
Enter the same password that you entered
in the previous textbox in order to confirm its
accuracy.
Enables a challenge-response test to require
users to type letters or numbers from a distorted
image displayed on the screen to prevent online
hackers and unauthorized users from gaining
access to your router’s network settings. This
feature is disabled by default.
Admin
This page will allow you to change the Administrator password. The administrator password has read/write access.
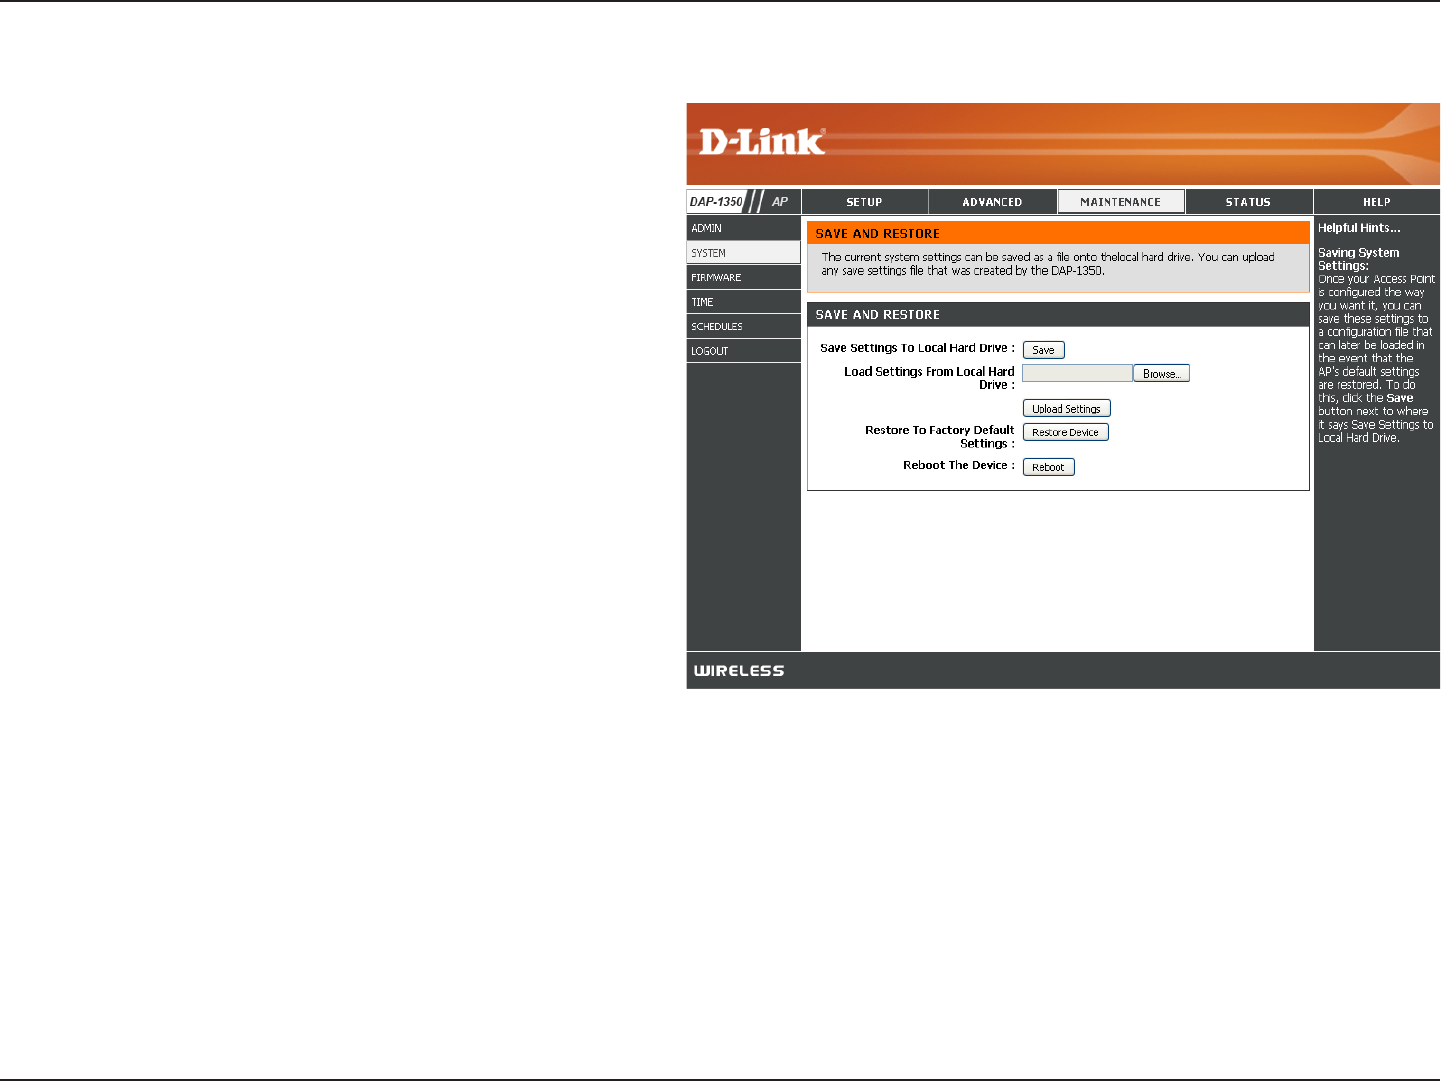
34D-Link DAP-1350 User Manual
Section 3 - Configuration
Save to Local
Hard Drive:
Upload from
Local Hard Drive:
Restore to
Factory Default:
Reboot the
Device:
Use this option to save the current access point
configuration settings to a file on the hard disk of
the computer you are using. Click the Save button.
You will then see a file dialog where you can select
a location and file name for the settings.
Use this option to load previously saved access
point configuration settings. Click Browse to find a
previously saved configuration file. Then, click the
Upload Settings button to transfer those settings
to the access point.
This option will restore all configuration settings
back to the settings that were in effect at the time
the access point was shipped from the factory.
Any settings that have not been saved will be lost,
including any rules that you have created. If you
want to save the current access point configuration
settings, use the Save button above.
Note: Restoring the factory default settings will not
reset the Wi-Fi Protected Status to Not Configured.
Click to reboot the access point.
System
35D-Link DAP-1350 User Manual
Section 3 - Configuration
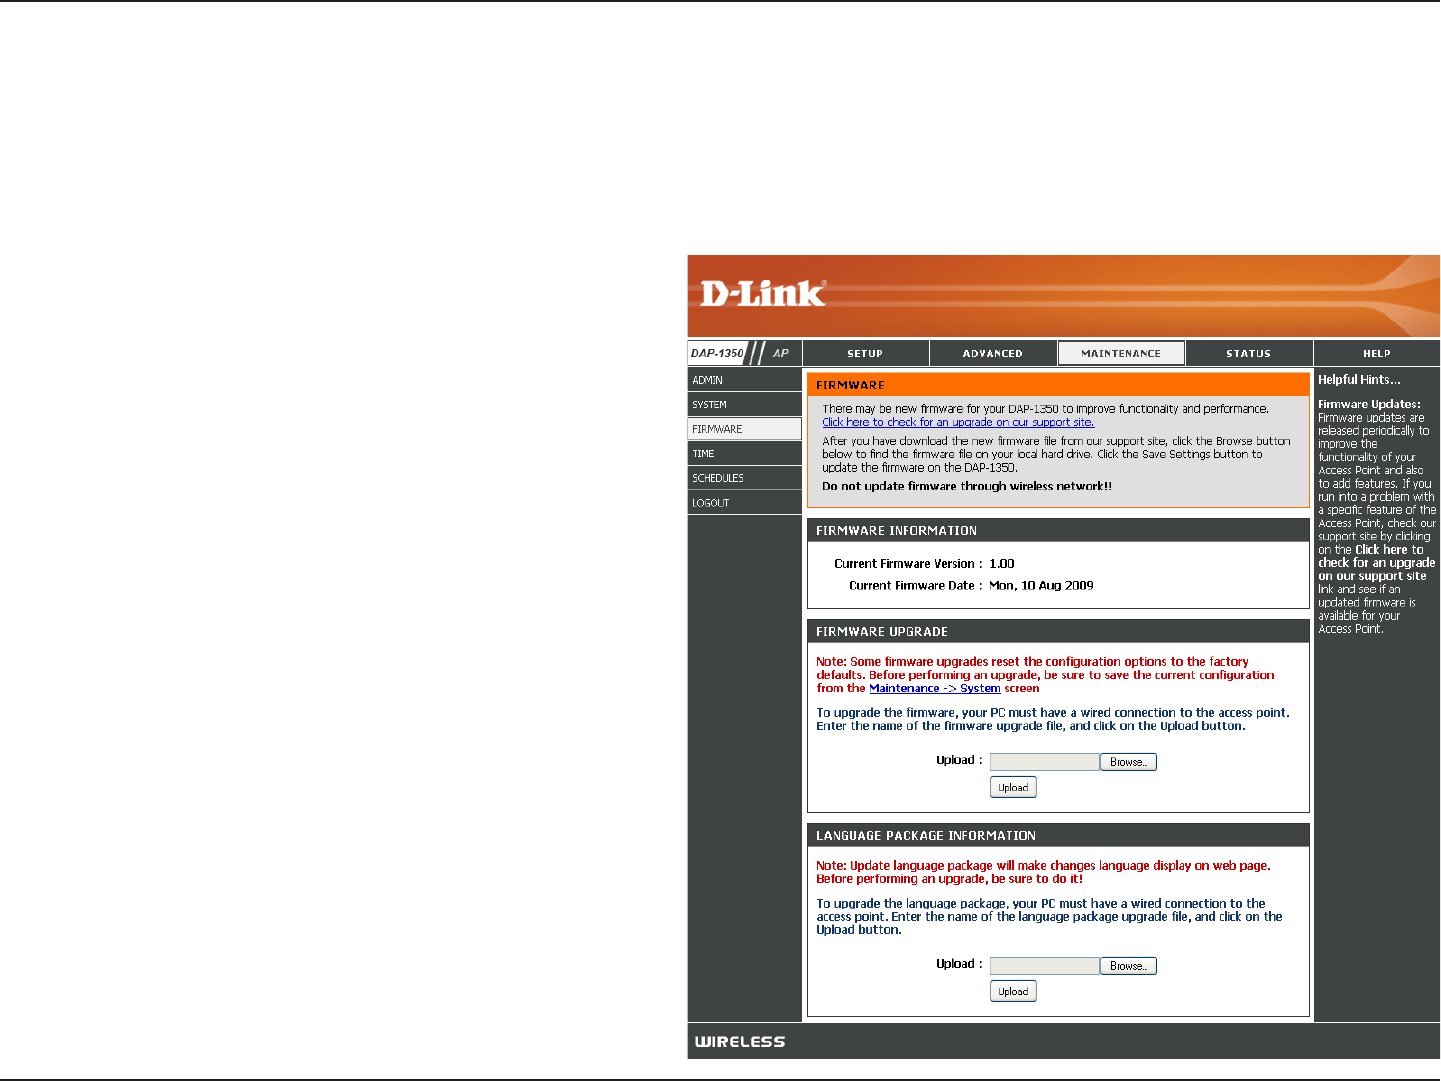
Browse:
Upload:
After you have downloaded the new firmware, click
Browse to locate the firmware update on your
hard drive. Click Upload to complete the firmware
upgrade.
Once you have a firmware update on your computer,
use this option to browse for the file and then upload
the information into the access point.
Firmware
You can upgrade the firmware of the access point here. Make sure the firmware you want to use is on the local hard
drive of the computer. Click on Browse to locate the firmware file to be used for the update. Please check the D-Link
support website for firmware updates at http://support.dlink.com. You can download firmware upgrades to your hard
drive from this site.
After you have downloaded the new language
pack, click Browse to locate the language pack file
on your hard drive. Click Upload to complete the
language pack upgrade.
Note: In most cases you must unzip the file first
before uploading.
Language Pack
You can change the language of the web UI by uploading
available language packs.
Browse:
36D-Link DAP-1350 User Manual
Section 3 - Configuration
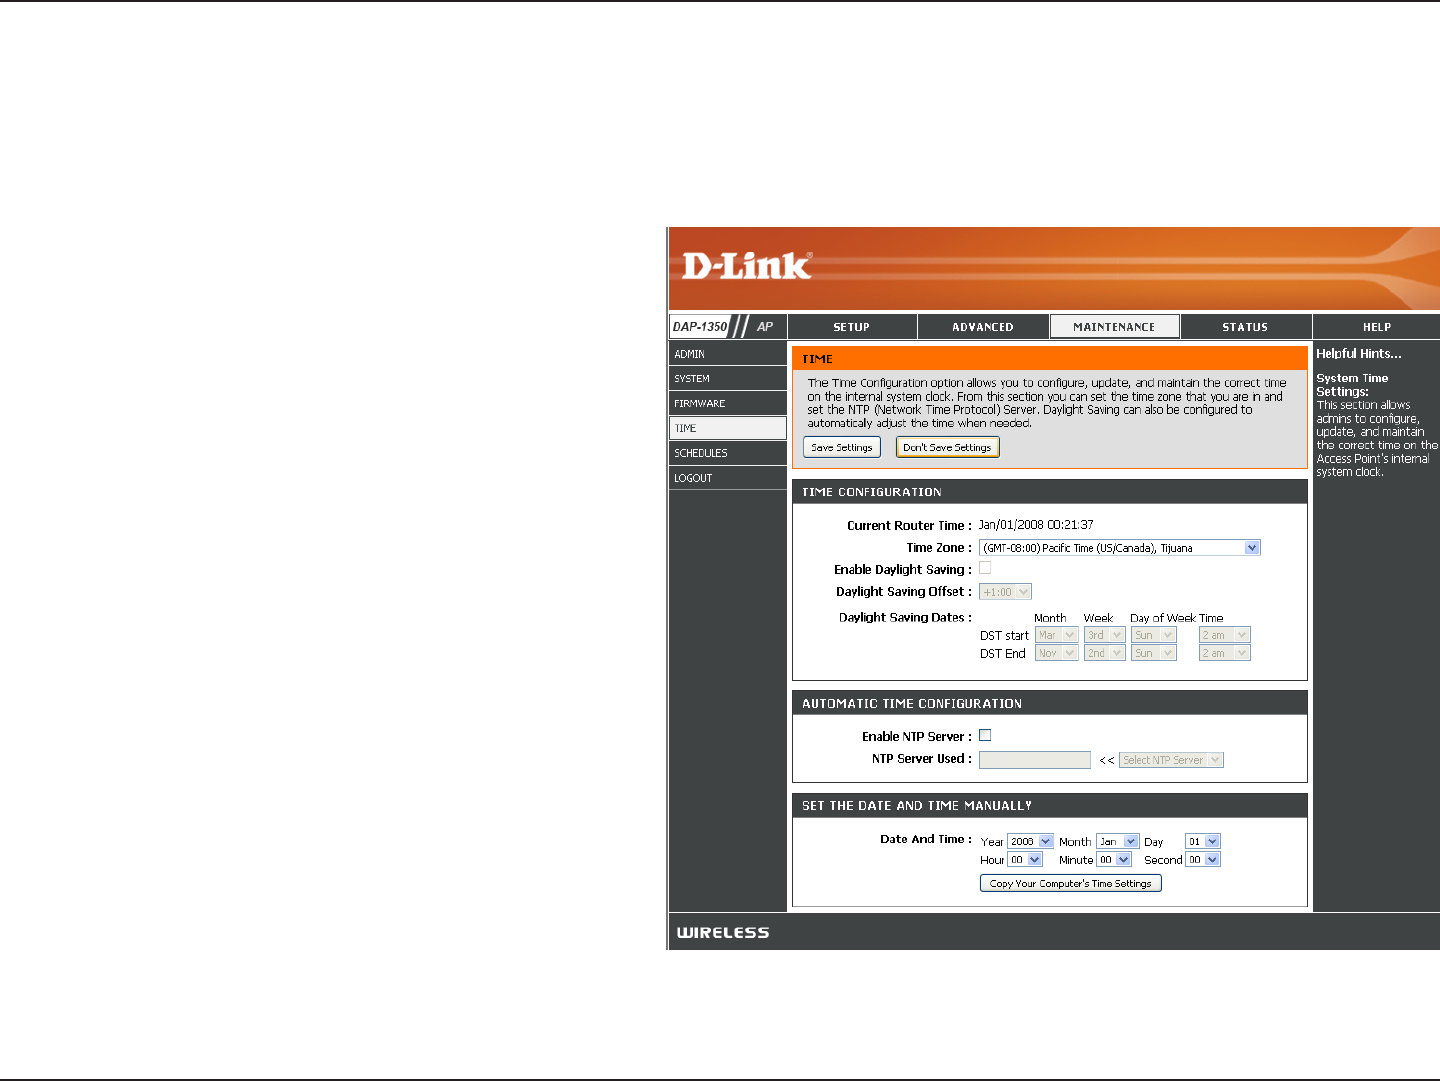
Time Zone:
Daylight Saving:
Enable NTP Server:
NTP Server Used:
Date and Time:
Select the Time Zone from the drop-down
menu.
To select Daylight Saving time manually, click
the Enable Daylight Saving check box. Next
use the drop-down menu to select a Daylight
Saving Offset and then enter a start date and
an end date for daylight saving time.
NTP is short for Network Time Protocol. NTP
synchronizes computer clock times in a network
of computers. Check this box to use a NTP
server. This will only connect to a server on the
Internet, not a local server.
Enter the NTP server or select one from the
drop-down menu.
To manually input the time, enter the values
in these fields for the Year, Month, Day, Hour,
Minute, and Second and then click Save
Settings. You can also click the Copy Your
Computer’s Time Settings button at the bottom
of the screen.
Time
The Time Configuration option allows you to configure, update, and maintain the correct time on the internal system
clock. From this section you can set the time zone that you are in. Daylight Saving can also be configured to automatically
adjust the time when needed.
37D-Link DAP-1350 User Manual
Section 3 - Configuration
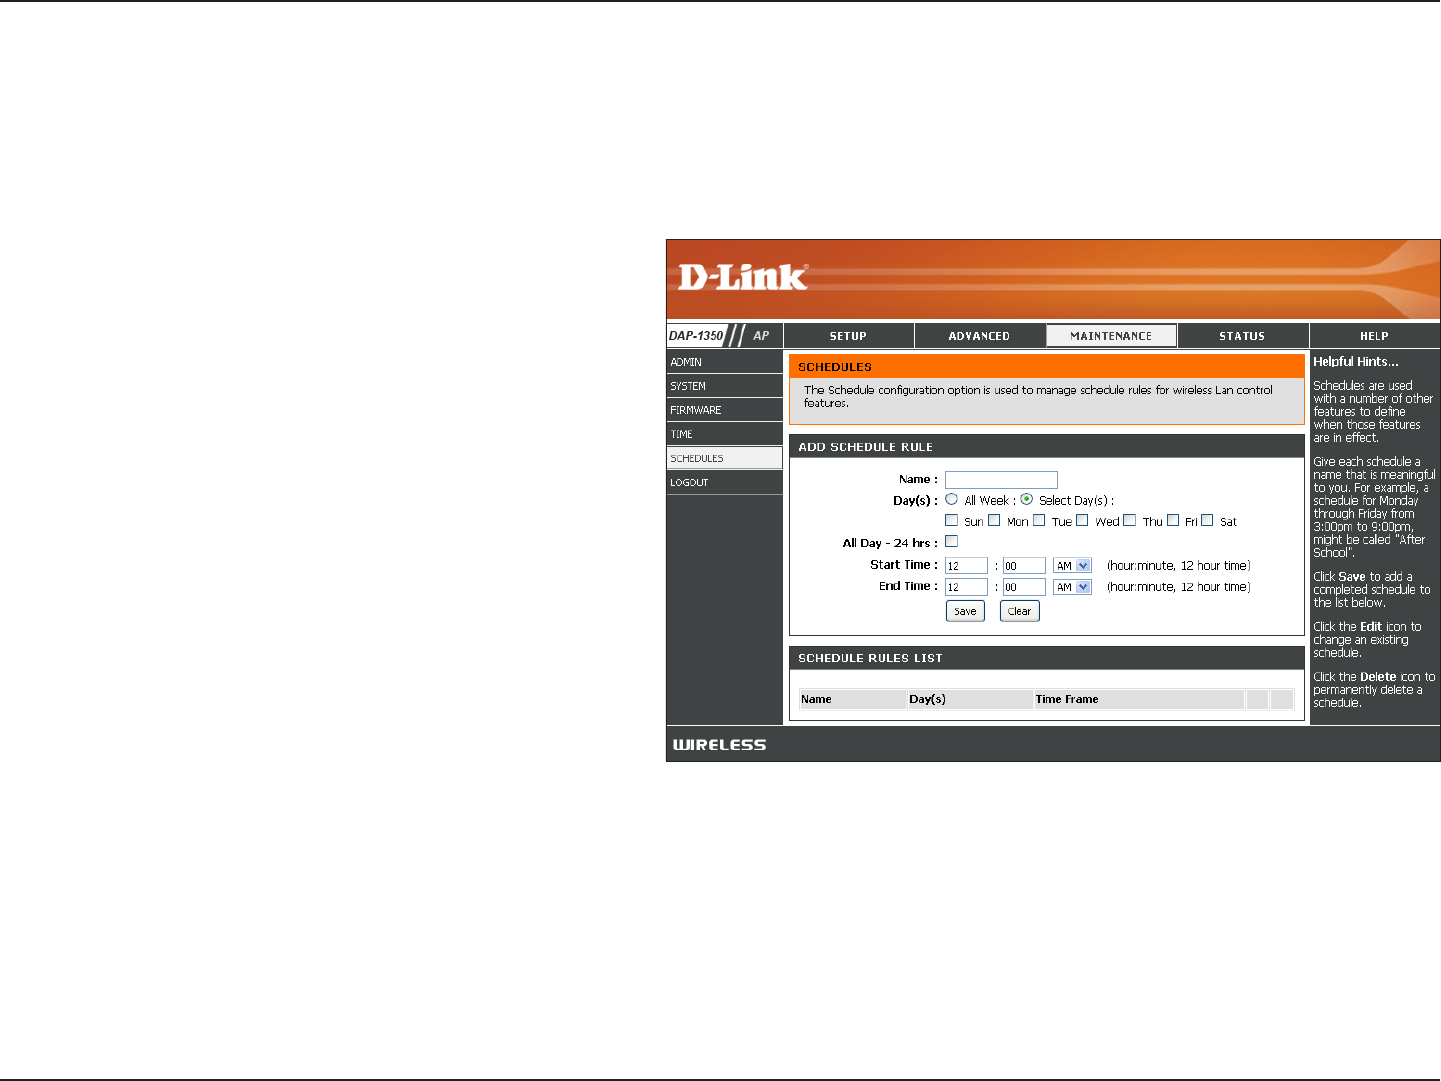
Enter a name for your new schedule.
Select a day, a range of days, or All Week to
include every day.
Check All Days or enter a start and end time
for your schedule.
Select On or Off from the drop-down menu.
Click Add to save your schedule. You must click
Save Settings at the top for your schedules
to go into effect.
The list of schedules will be listed here. Click
the Edit icon to make changes or click the
Delete icon to remove the schedule.
Name:
Days:
Time:
Wireless:
Add:
Schedule Rules
List:
Schedules
Schedules can be created for use with enforcing rules. For example, if you want to restrict web access to Mon-Fri from
3pm to 8pm, you could create a schedule selecting Mon, Tue, Wed, Thu, and Fri and enter a Start Time of 3pm and
End Time of 8pm.
38D-Link DAP-1350 User Manual
Section 3 - Configuration
General:
LAN:
Wireless LAN:
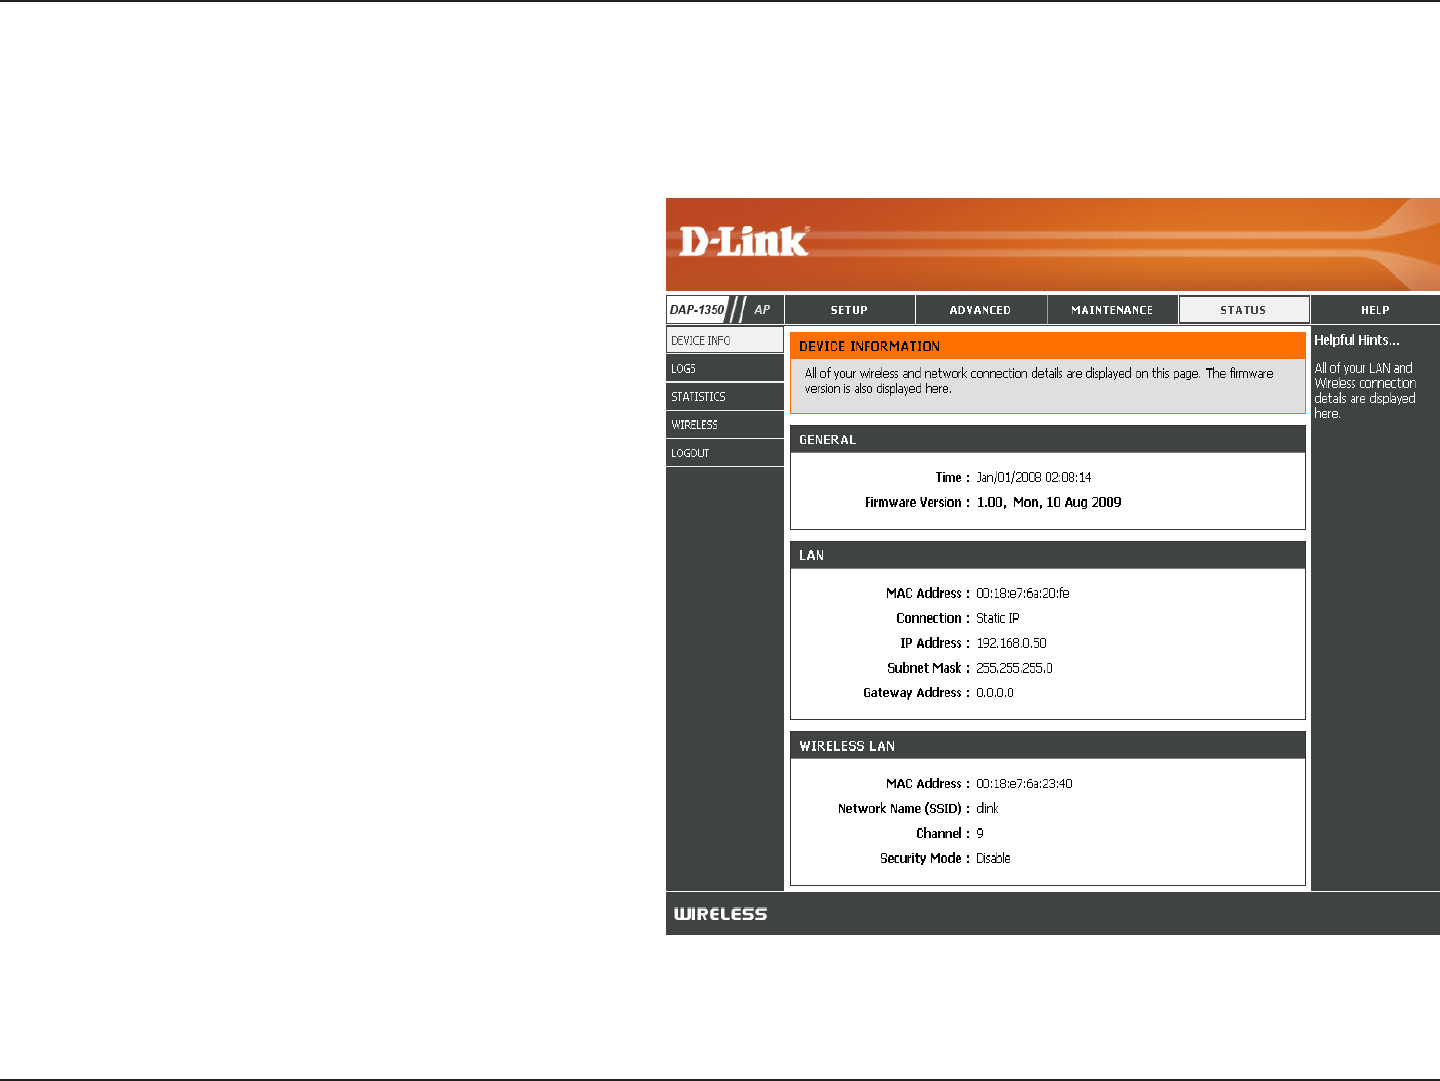
Displays the access point’s time and firmware
version.
Displays the MAC address and the private
(local) IP settings for the access point.
Displays the wireless MAC address and your
wireless settings such as SSID and Channel.
Device Info
This page displays the current information for the DAP-1350. It will display the LAN and wireless LAN information.
39D-Link DAP-1350 User Manual
Section 3 - Configuration
First Page:
Last Page:
Previous Page:
Next Page:
Clear Log:
Log Settings:
Refresh:
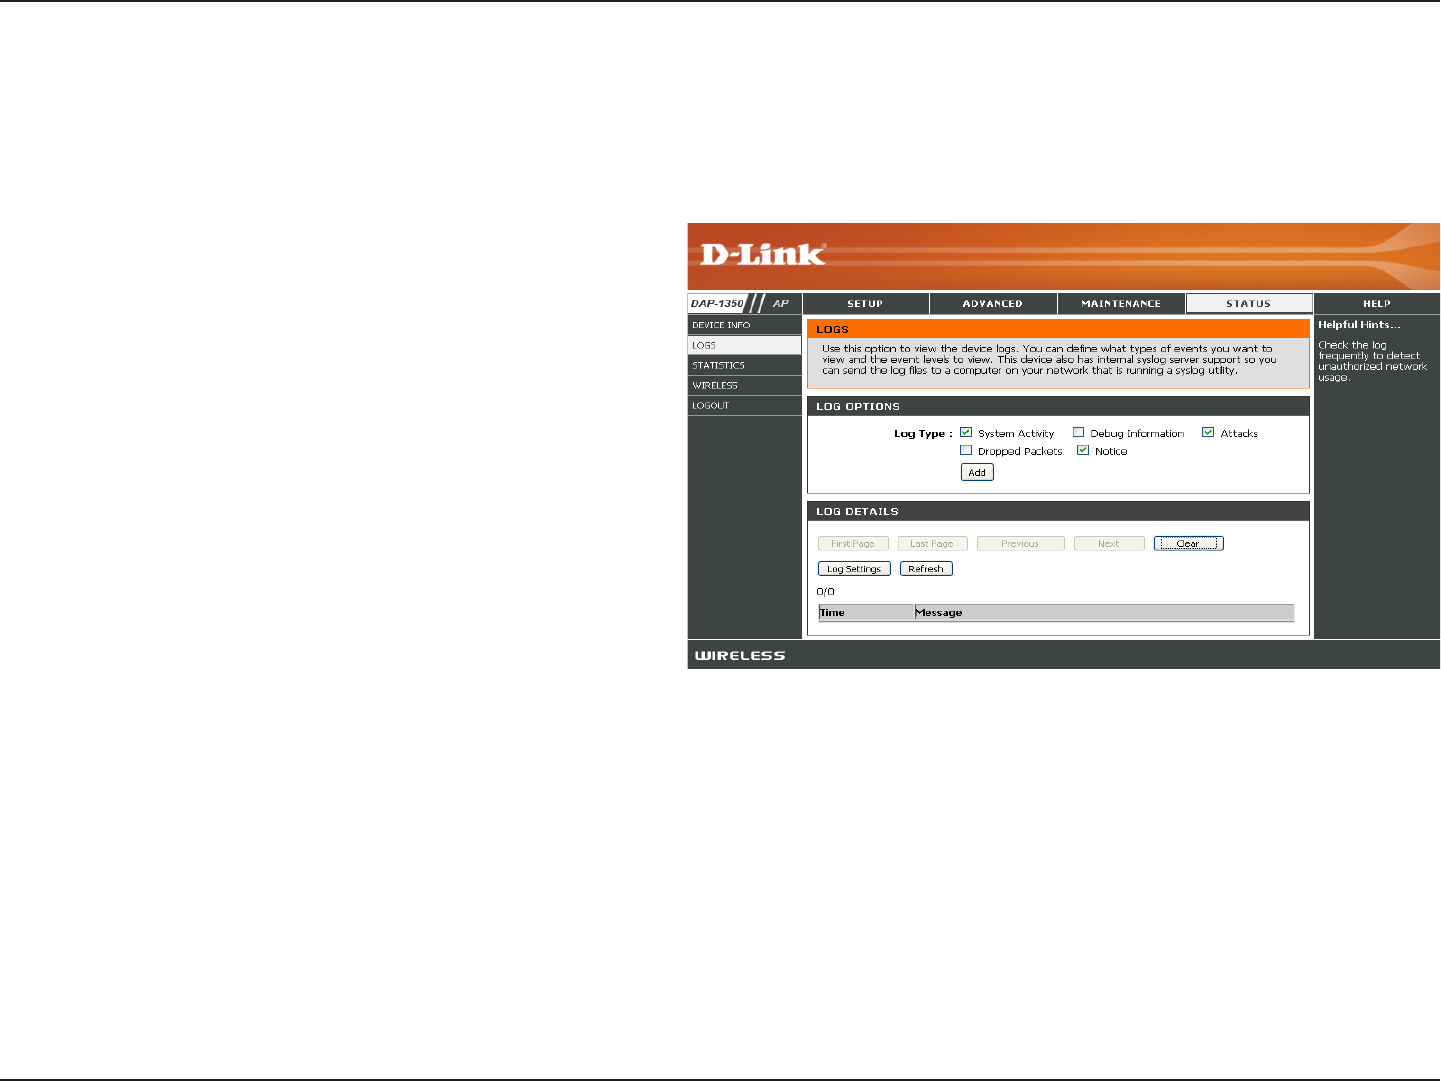
This button directs you to the first page of the log.
This button directs you to the last page of the log.
This button directs you to the previous page of the
log.
This button directs you to the next page of the
log.
This button clears all current log content.
This button opens a new menu where you can
configure the log settings.
This button refreshes the log.
Logs
The DAP-1350 keeps a running log of events and activities occurring on the AP. If the AP is rebooted, the logs are
automatically cleared. You can save the log files under Log Setting.
40D-Link DAP-1350 User Manual
Section 3 - Configuration
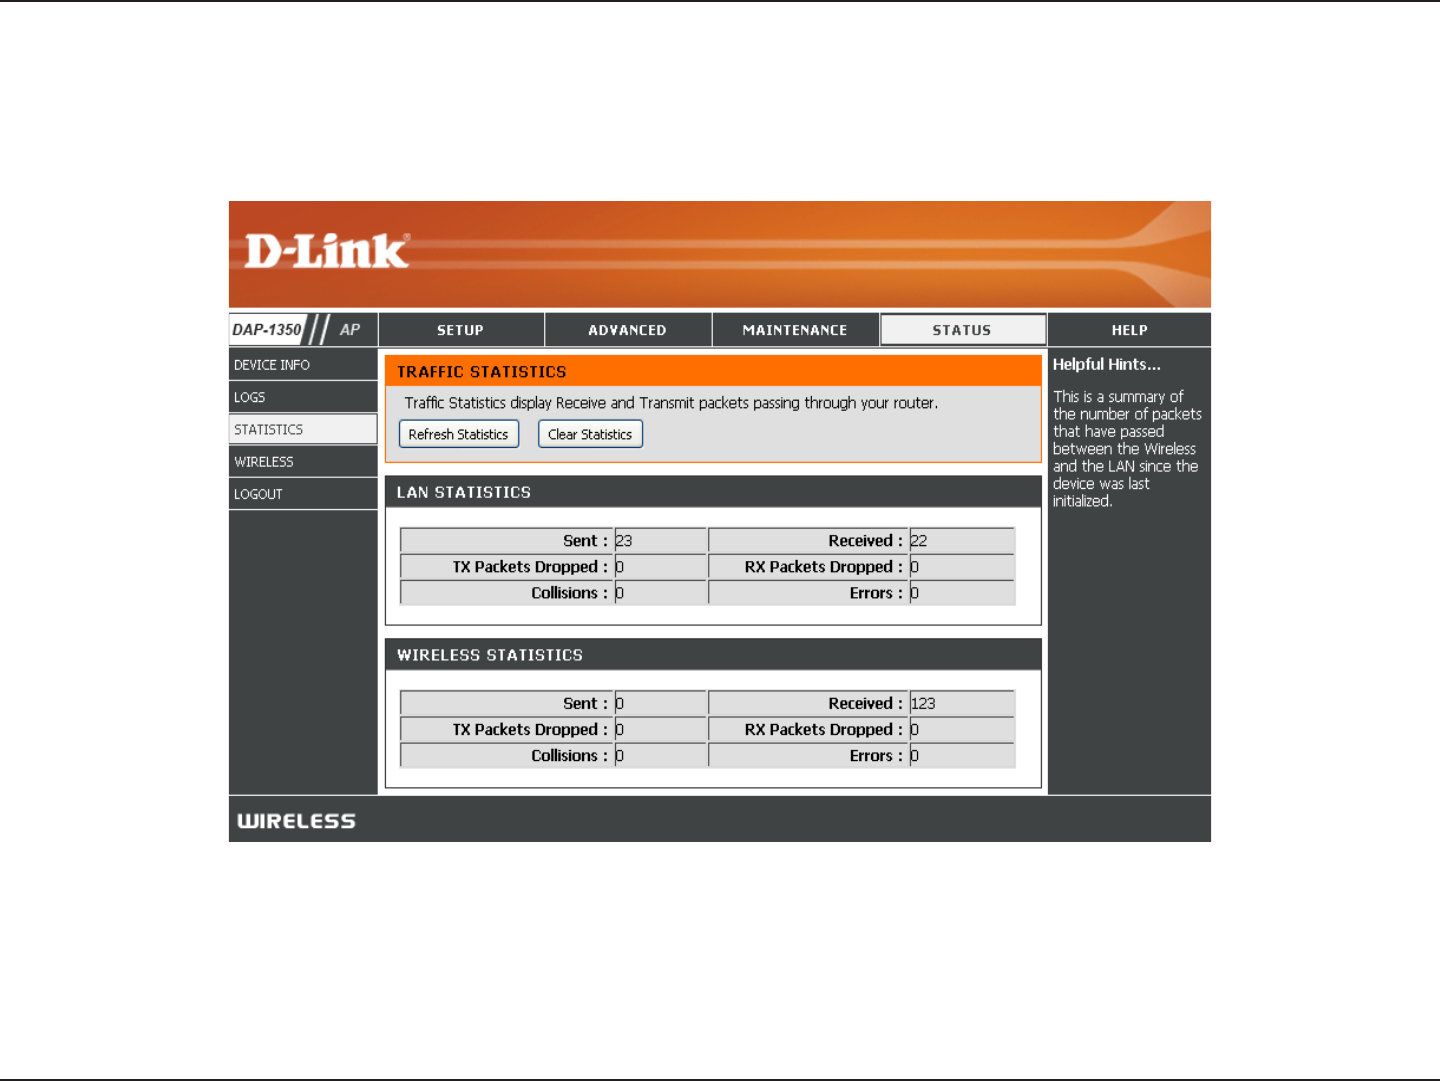
Statistics
The DAP-1350 keeps statistics of the traffic that passes through it. You can view the amount of packets that pass through
the LAN and wireless portions of the network. The traffic counter will reset if the access point is rebooted.
41D-Link DAP-1350 User Manual
Section 3 - Configuration
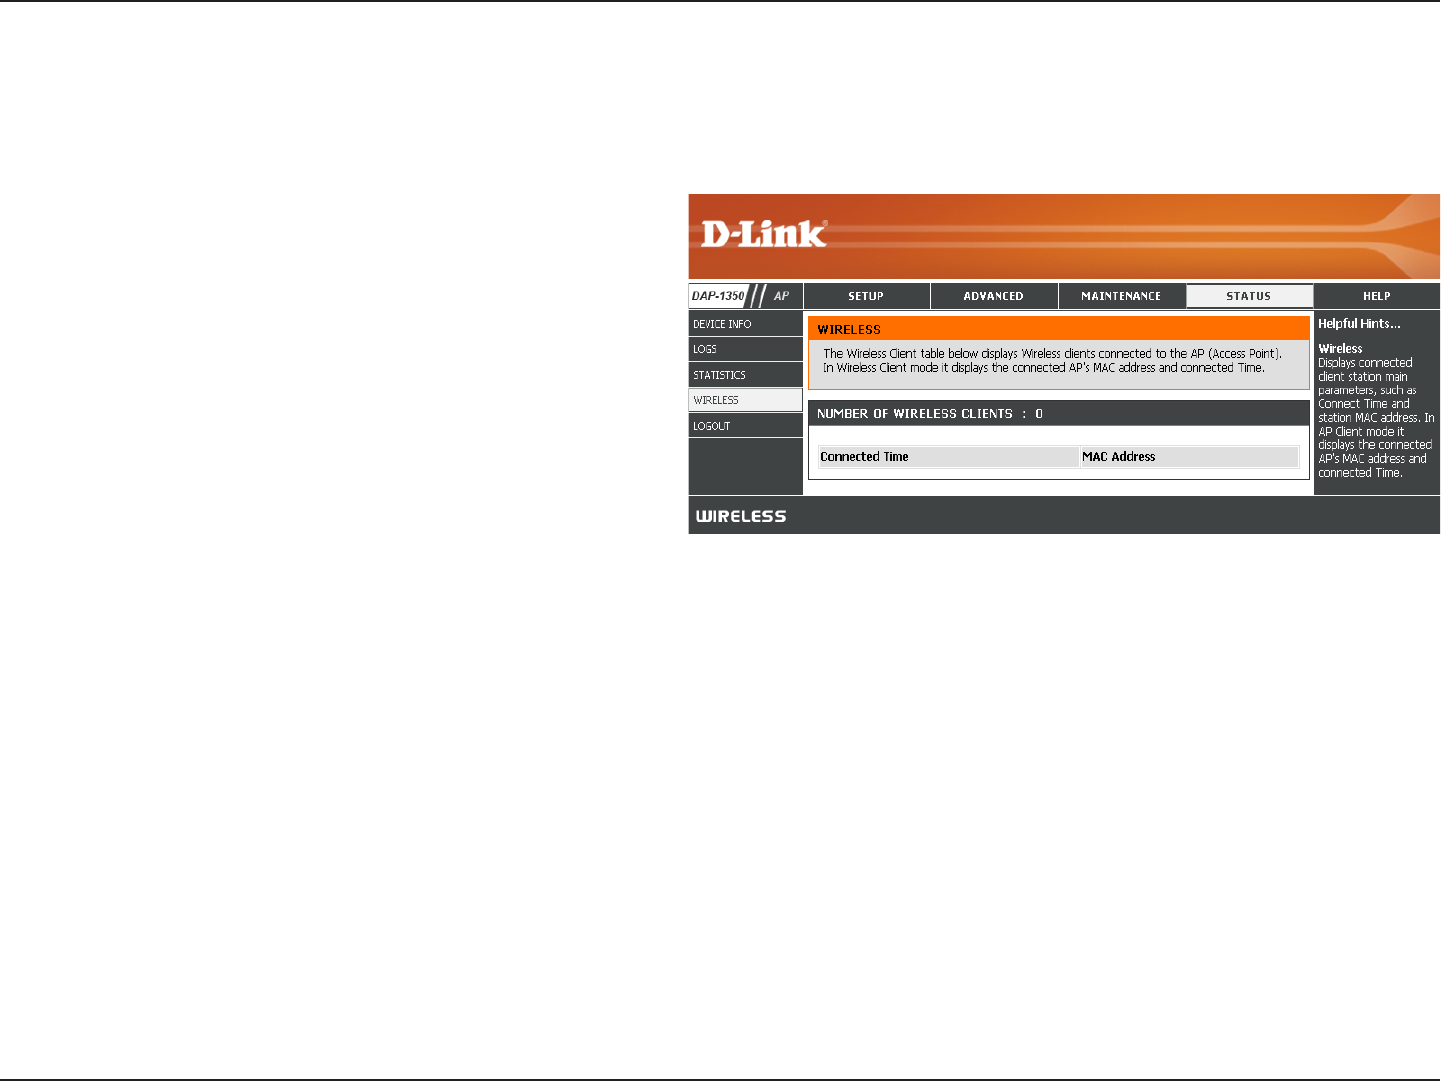
Wireless
The wireless section allows you to view the wireless clients that are connected to your wireless access point.
Connection Time:
MAC Address:
Displays the amount of time the wireless client has
been connected to the access point.
The Ethernet ID (MAC address) of the wireless
client.
42D-Link DAP-1350 User Manual
Section 3 - Configuration
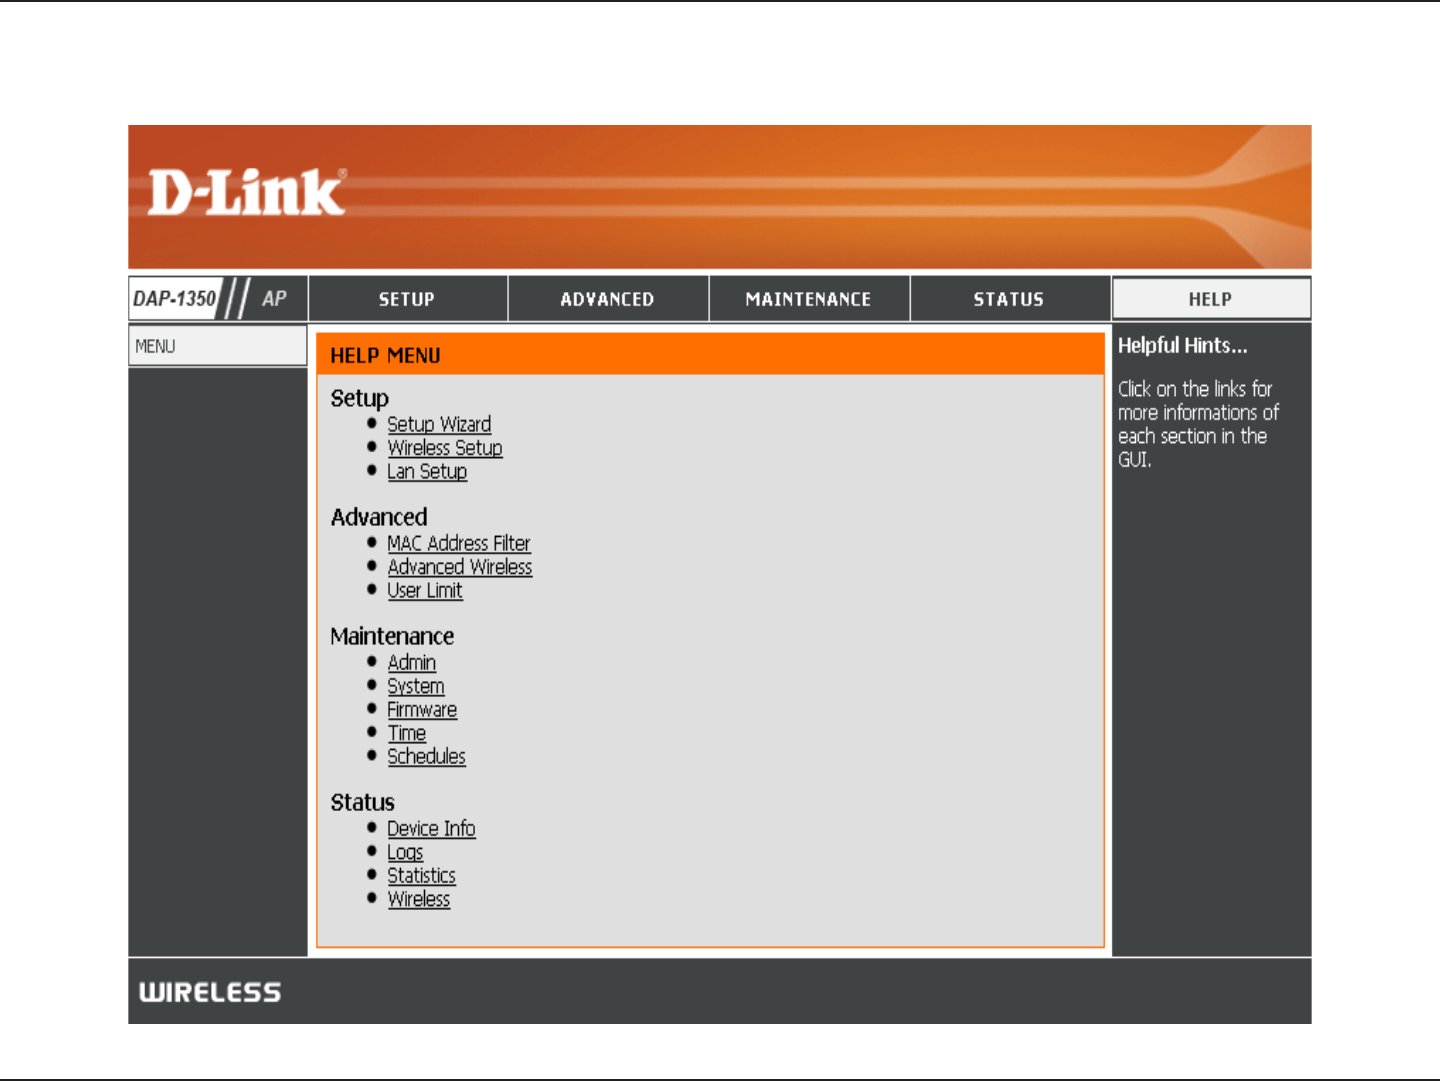
Help
43D-Link DAP-1350 User Manual
Section 3 - Configuration
Wireless Client Mode
If you wish to change the default settings or optimize
the performance of the DAP-1350, you may use the
web-based configuration utility.
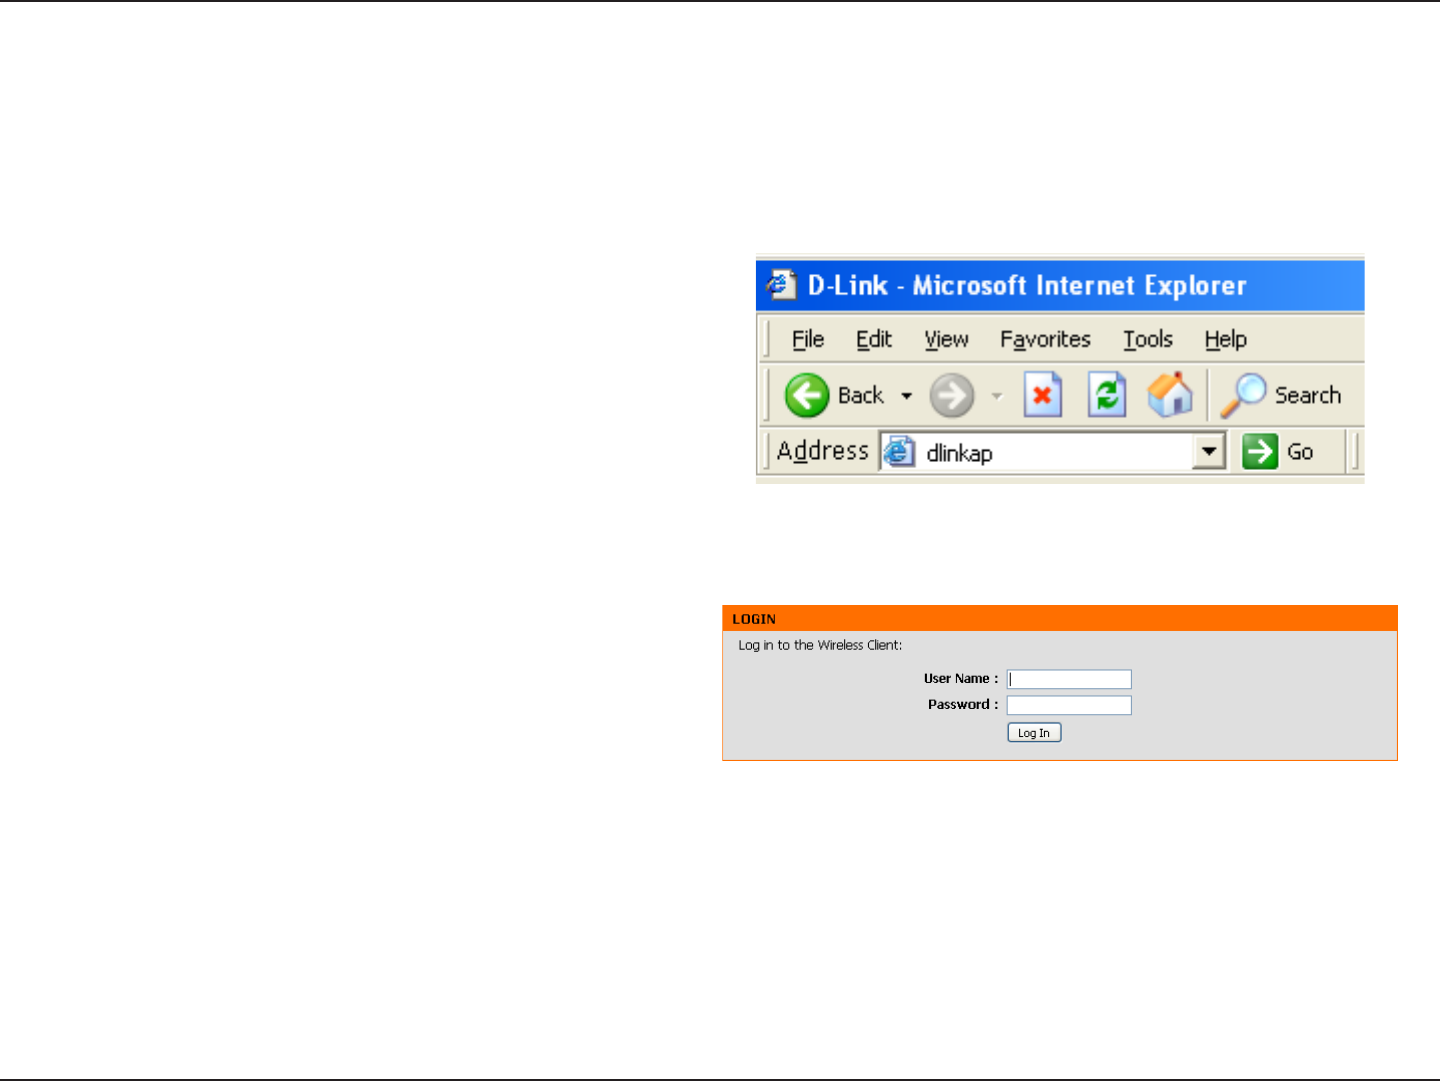
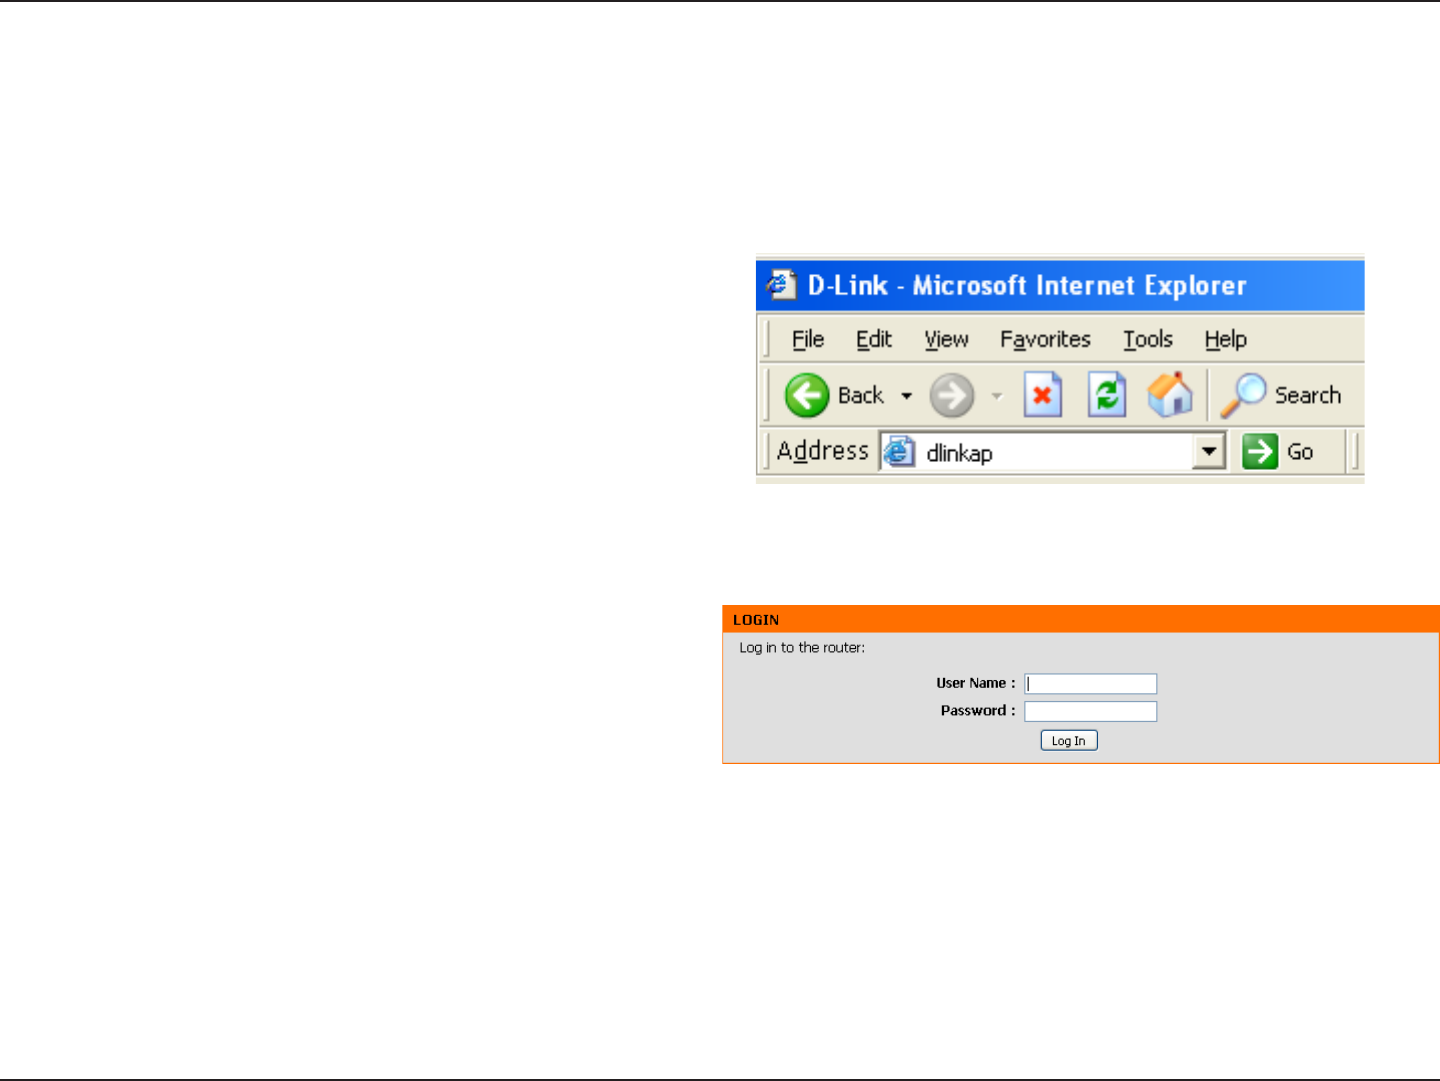
To access the configuration utility, open a web browser
such as Internet Explorer and enter dlinkap or
192.168.0.50 in the address field.
Type Admin and then enter your password. Leave the
password blank by default..
If you get a Page Cannot be Displayed error, please
refer to the Troubleshooting section for assistance.
Change the mode selector to Client on the device. Connect an Ethernet cable from the Ethernet port on the DAP-1350
to a computer for configuration.
44D-Link DAP-1350 User Manual
Section 3 - Configuration
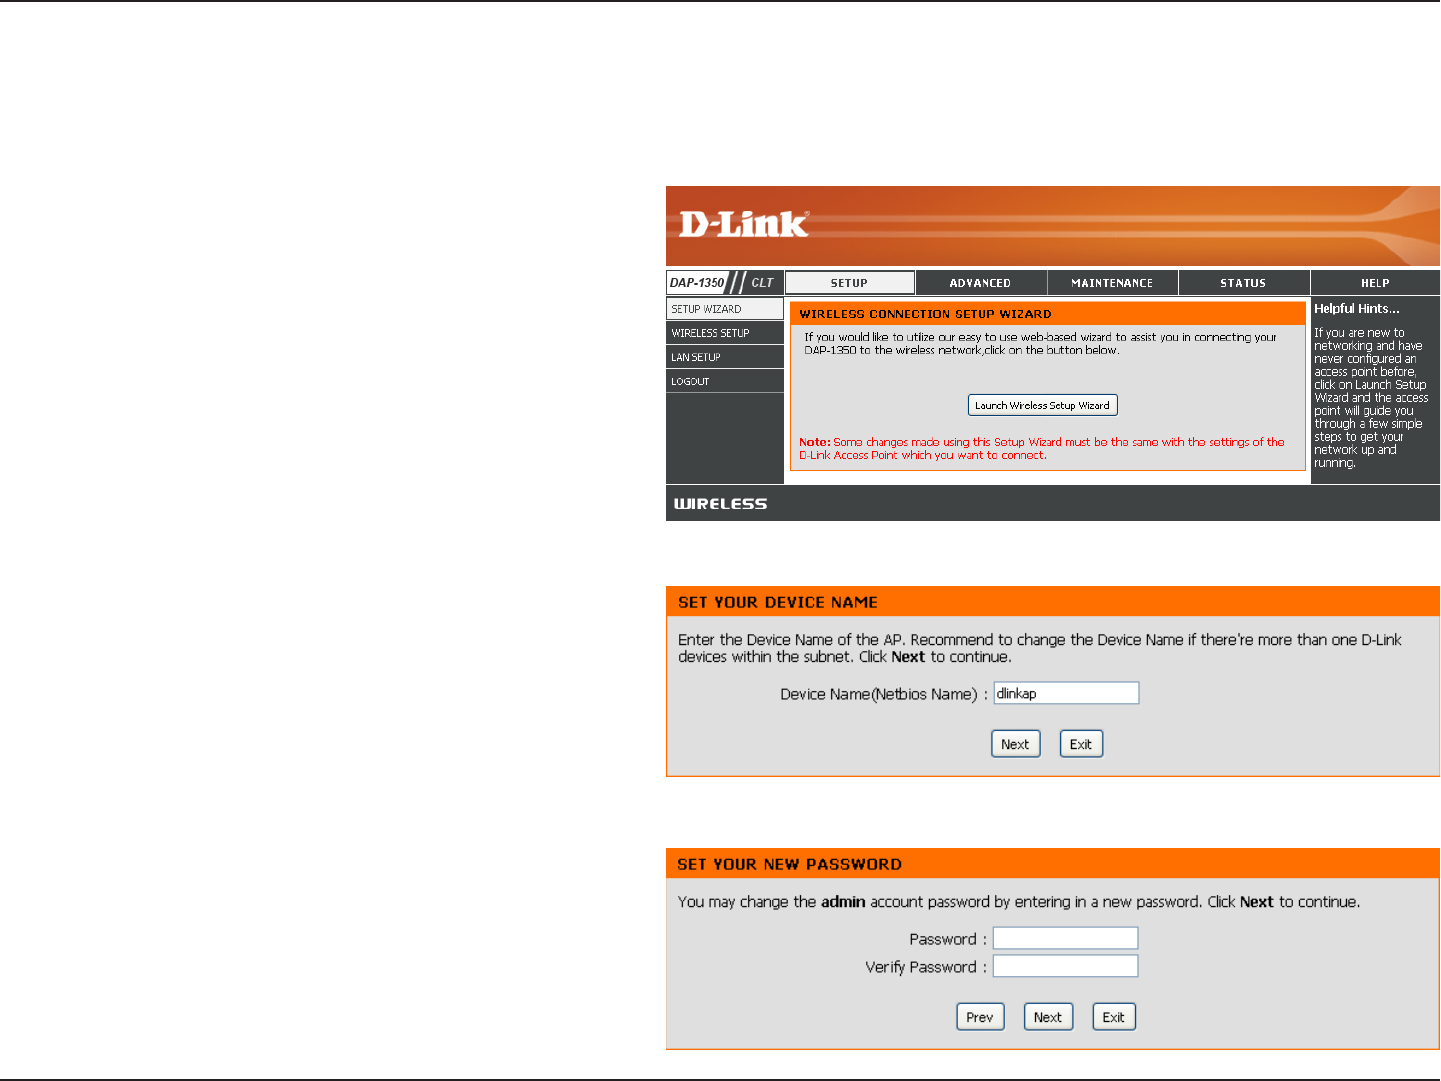
This Wizard is designed to assist you in configuring your DAP-1350 as a wireless client.
If you want to change the admin account password,
enter a new password and click Next. It is strongly
recommended to change your password.
Wireless Setup Wizard
Enter the Device Name of the AP and click Next to
continue. It is recommended to change the Device
Name if there is more than one D-Link device within
the same wireless network.
Click the Launch Wireless Setup Wizard button to
use the wizard to setup your network.
45D-Link DAP-1350 User Manual
Section 3 - Configuration
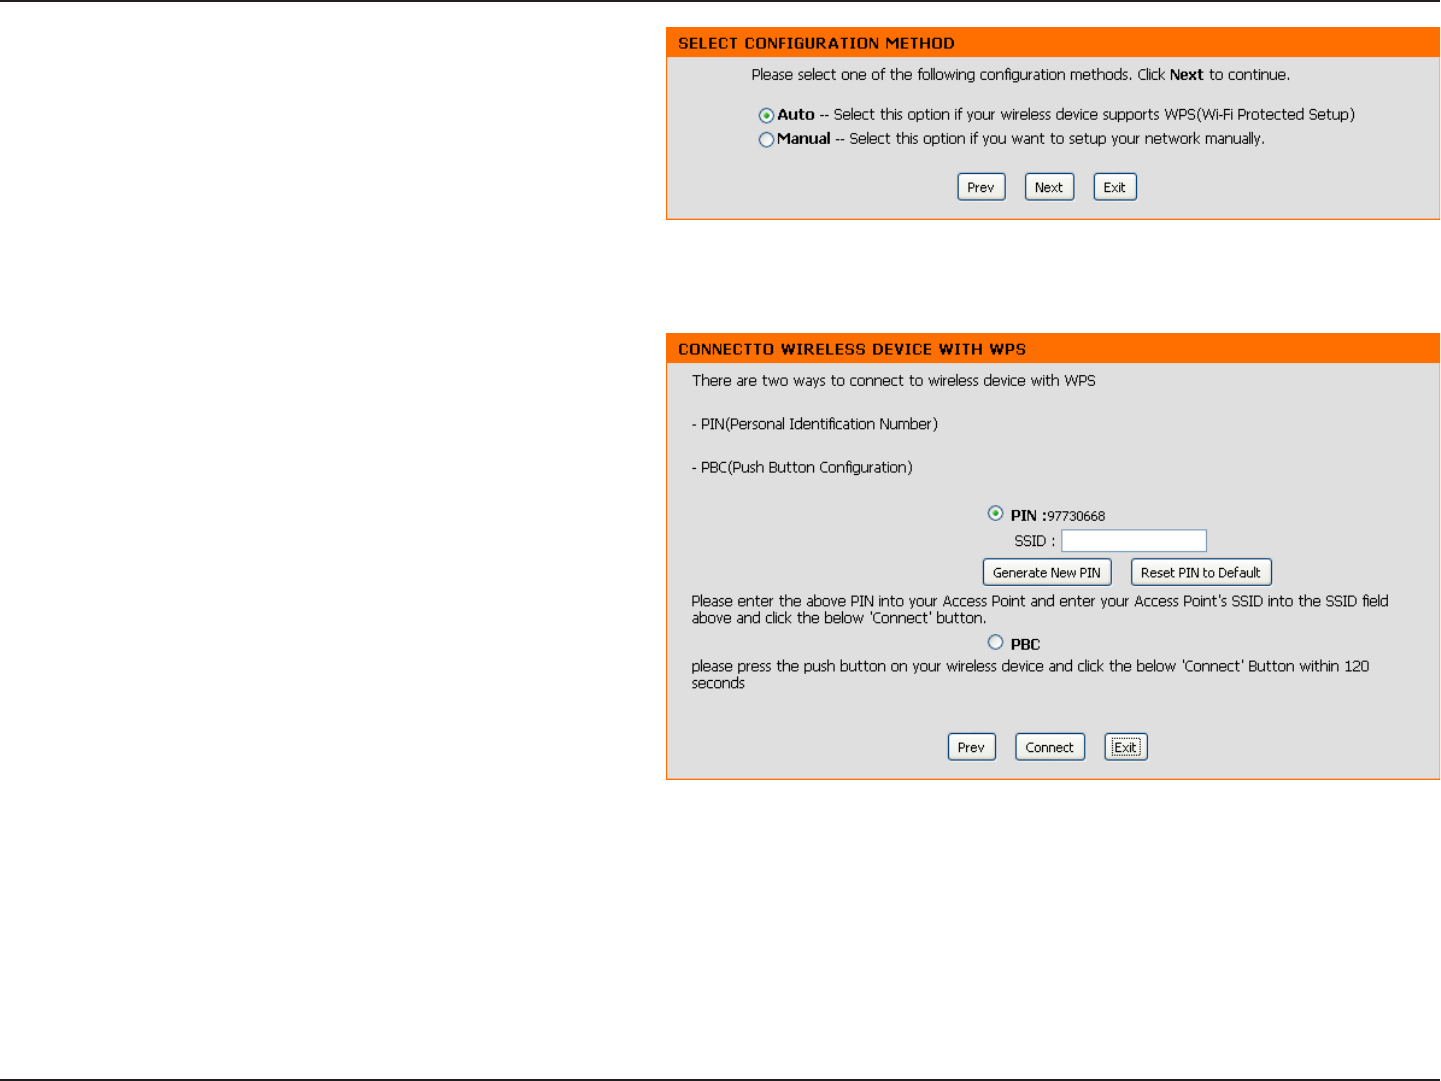
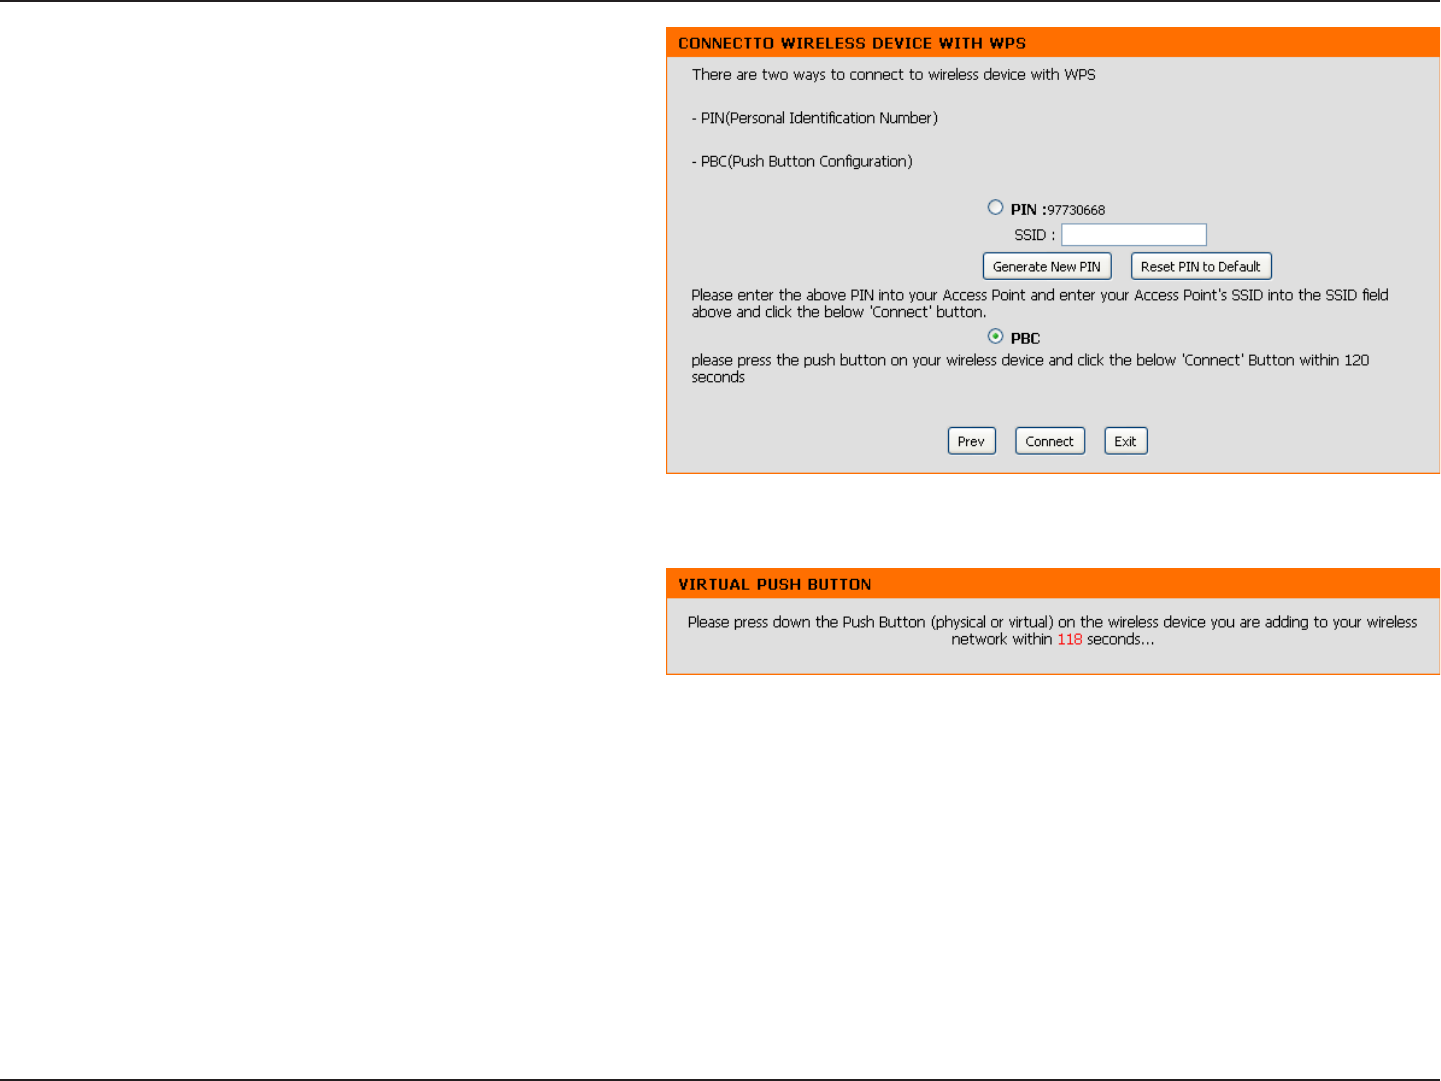
For PBC (Push Button Configuration), skip to the
next page.
Select PIN to connect your wireless device with WPS.
You may click Generate New PIN to use a different
PIN number. Click Connect to start the WPS scan.
Within 2 minutes, enter the PIN number into the other
device you want to connect to.
Select Auto as the configuration method only if your
wireless device supports Wi-Fi Protected Setup
(WPS). For Manual setup, skip to the next page.
Click Next to continue.
46D-Link DAP-1350 User Manual
Section 3 - Configuration
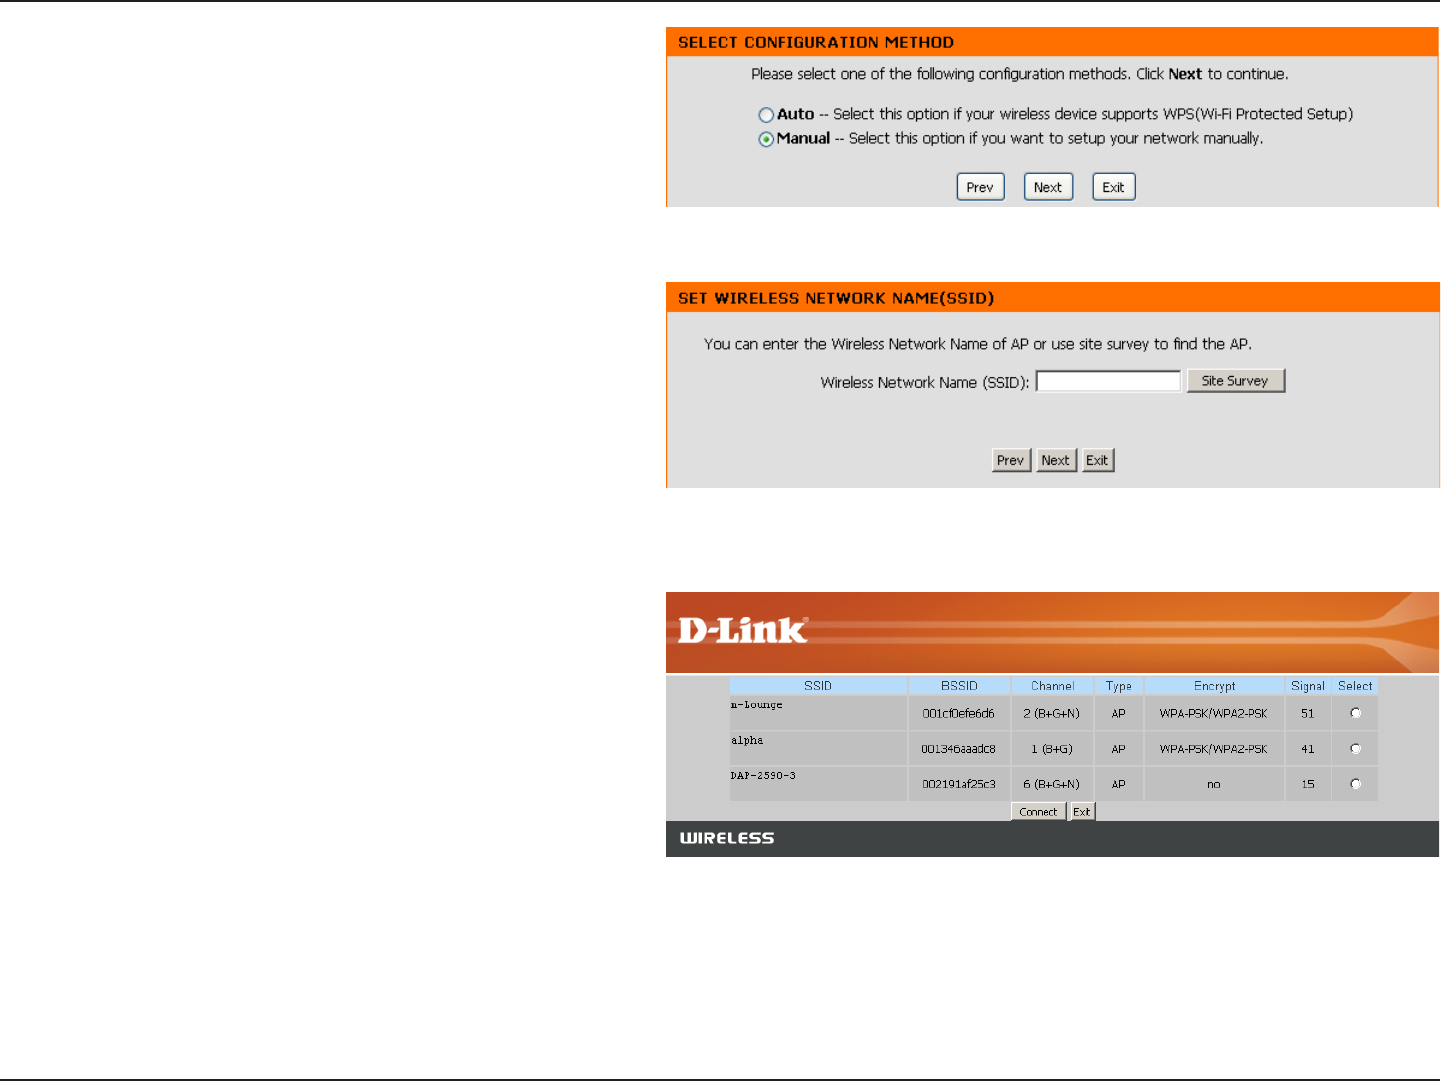
Select PBC to use the Push Button Configuration to
connect to your network.
Click Connect to continue.
Note: You may also press the WPS button located
on the side of the DAP-1350 instead of running this
wizard.
On the device you want to connect to, start the PBC
process on the device. You will have 2 minutes to
start the PBC process on both devices.
47D-Link DAP-1350 User Manual
Section 3 - Configuration
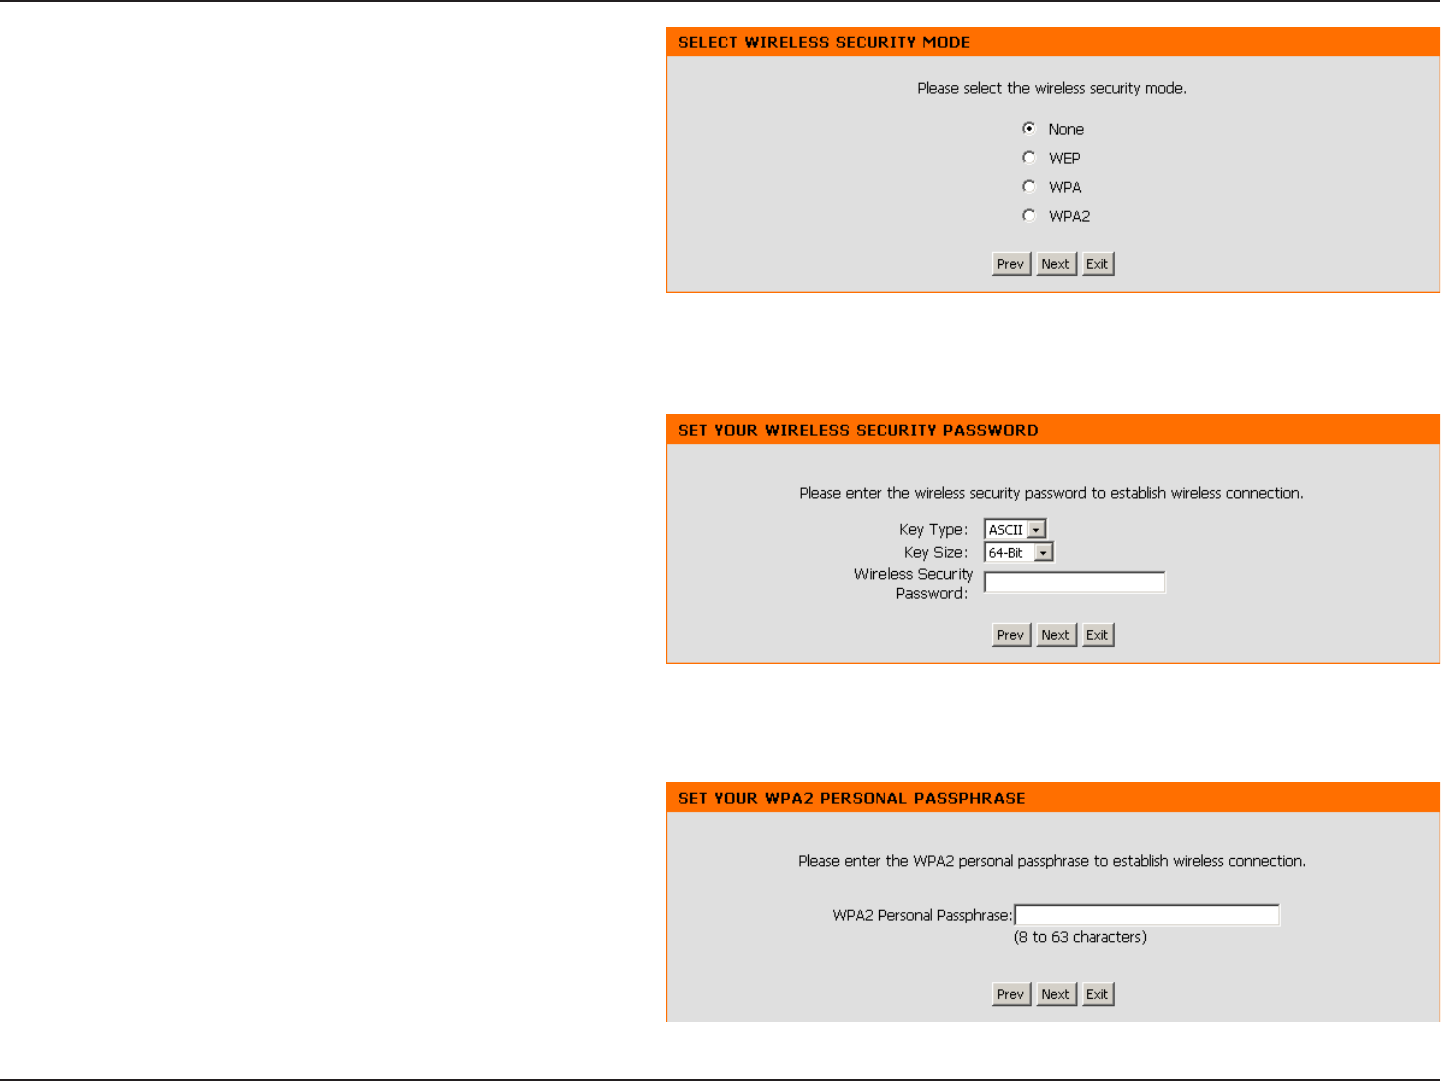
Select Manual configuration to setup your network
manually.
Click Next to continue.
Enter the network name (SSID) of the network you
want to connect to. If you do not know the exact name
or would like to search for the wireless network, click
Site Survey.
Find your access point from the list, click the radio
button in the right column, and click Connect.
48D-Link DAP-1350 User Manual
Section 3 - Configuration
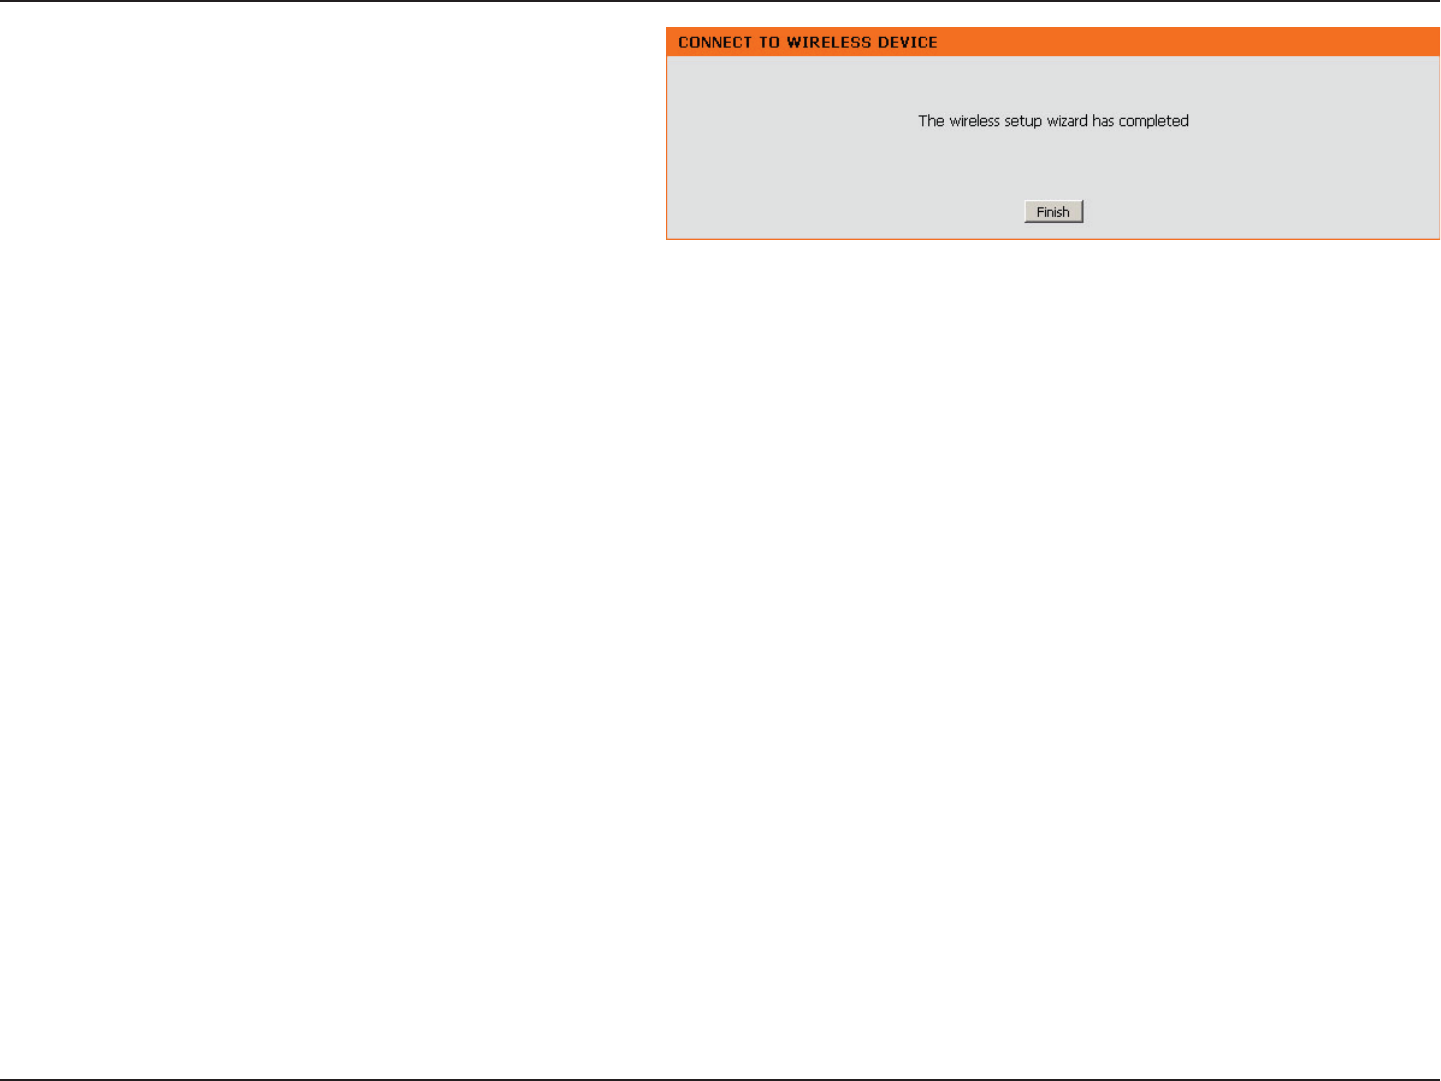
Choose which Security Mode you want to use and
click Next to continue.
If you select WEP, choose the key type (ASCII or
HEX), the key size (64 or 128-bit), and enter the
wireless security password. Click Next to complete
the Setup Wizard.
If you select WPA or WPA2, enter the wireless
security password. Click Next to complete the Setup
Wizard.
49D-Link DAP-1350 User Manual
Section 3 - Configuration
The Wireless Setup Wizard is complete. Click Finish
to reboot the device.
50D-Link DAP-1350 User Manual
Section 3 - Configuration
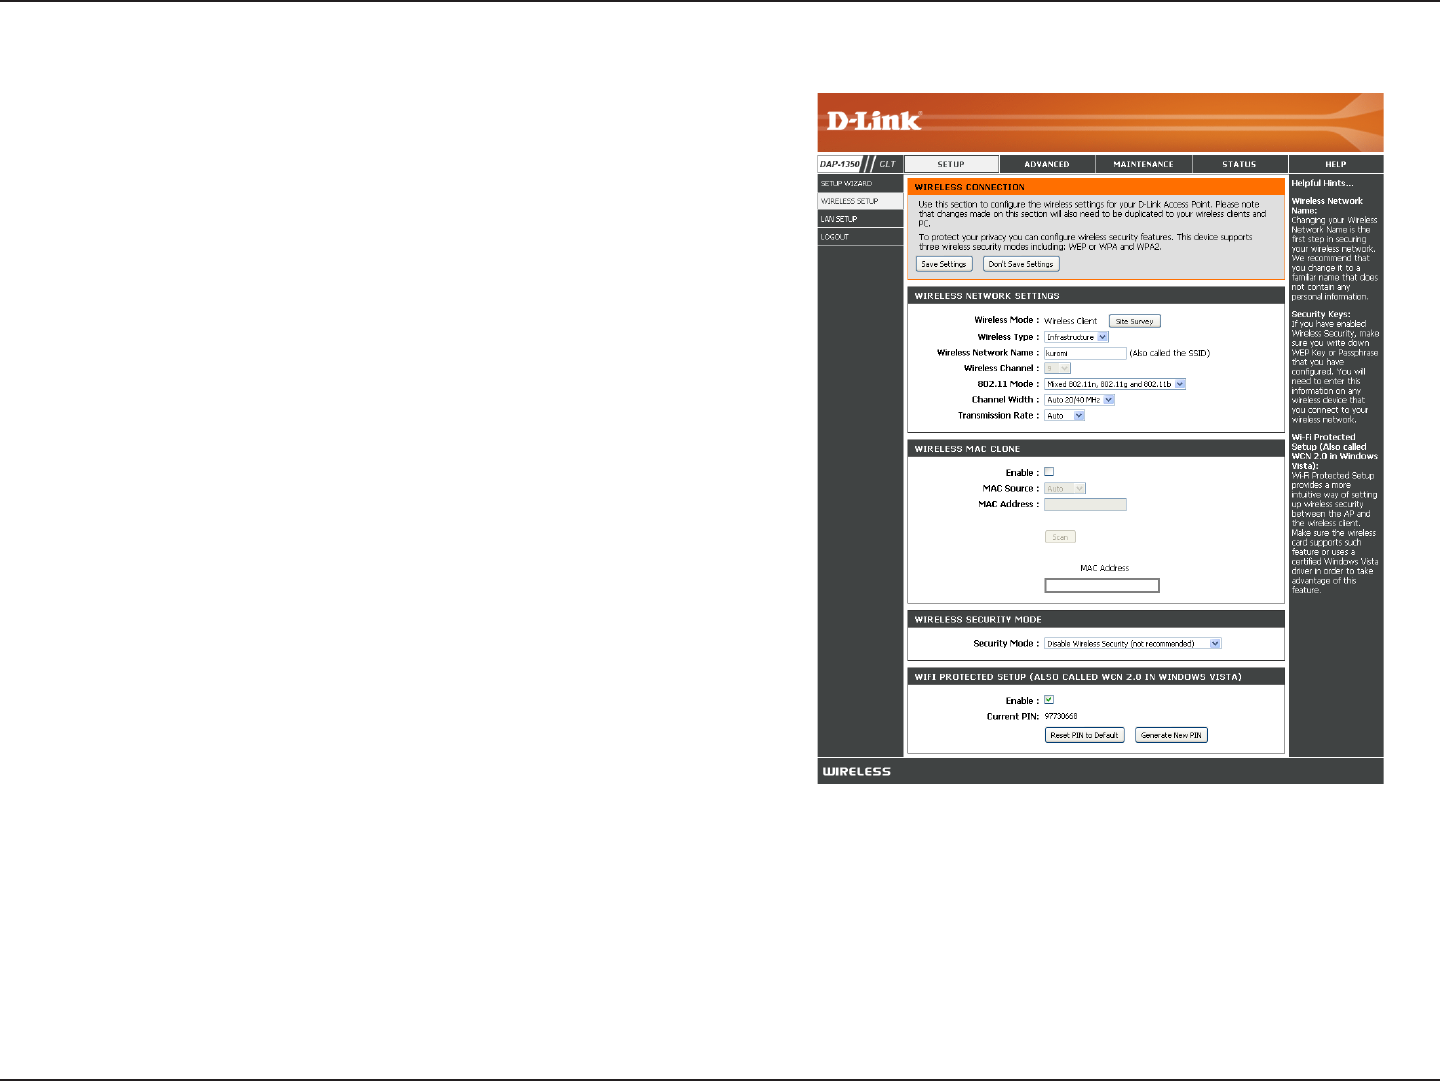
Manual Wireless Setup
Wireless Mode:
Site Survey:
Wireless Type:
Wireless Network
Name:
Wireless Channel:
802.11 Mode:
Channel Width:
Transmission Rate:
Wireless MAC
Clone:
Wireless Security
Mode:
WPS:
Wireless Client Mode is selected.
Click Site Survey to display a list of wireless networks in your
area. You may select the wireless access point to connect to.
Select Infrastructure if connecting to an access point or
wireless router, or select Ad-Hoc if connecting to another
wireless client.
Enter the SSID of the wireless network you want to connect
to. If you do not know for sure, click Site Survey and select it
from the list, if available.
The channel will automatically change to the channel of the AP
you are connected to.
Select the appropriate 802.11 mode based on the wireless
clients in your network. Select Mixed 802.11b/g, 802.11n Only,
or Mixed 802.11b/g/n from the drop-down menu.
Select the Channel Width:
Auto 20/40 - Select if you are using both 802.11n and non-
802.11n wireless devices.
20MHz - Select if you are not using any 802.11n wireless
clients.
Select the transmission rate. It is strongly suggested to use the Auto setting for optimal performance.
You can clone the MAC address of the device connected via Ethernet to the DAP-1350.
Select a wireless security setting. Options are None, WEP, WPA, or WPA2. See the Wireless Security section in this manual
for a detailed explanation of the wireless security options.
Select enable if you want to configure the DAP-1350 with Wi-Fi Protection setup.
51D-Link DAP-1350 User Manual
Section 3 - Configuration
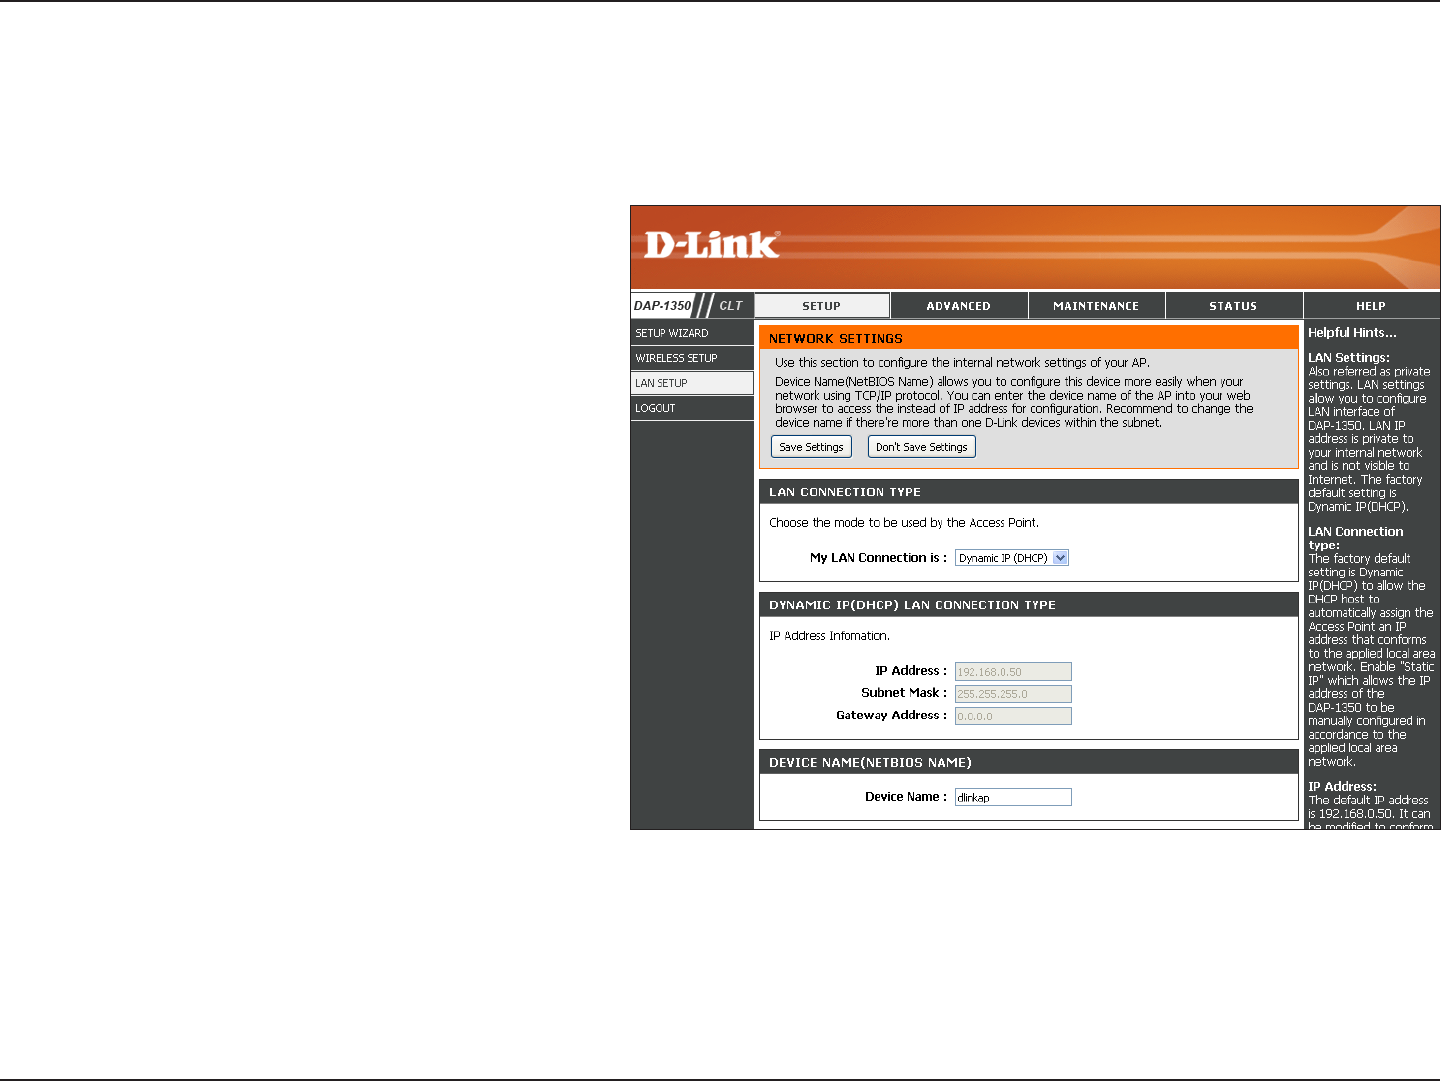
LAN Settings
This section will allow you to change the local network settings of the access point and to configure the DHCP
settings.
LAN Connection
Type:
IP Address:
Subnet Mask:
Default Gateway:
Device Name:
Use the drop-down menu to select Dynamic
IP (DHCP) to automatically obtain an IP
address on the LAN/private network or select
Static IP to manually enter the IP settings.
192.168.0.50 is the default IP Address of the
DAP-1350.
255.255.255.0 is the default subnet mask.
All devices on the network must have the
same subnet mask to communicate on the
network.
Enter the IP Address of the gateway in your
network.
Enter the Device Name of the AP. It is
recommended to change the Device Name if
there is more than one D-Link device within
the subnet.
52D-Link DAP-1350 User Manual
Section 3 - Configuration
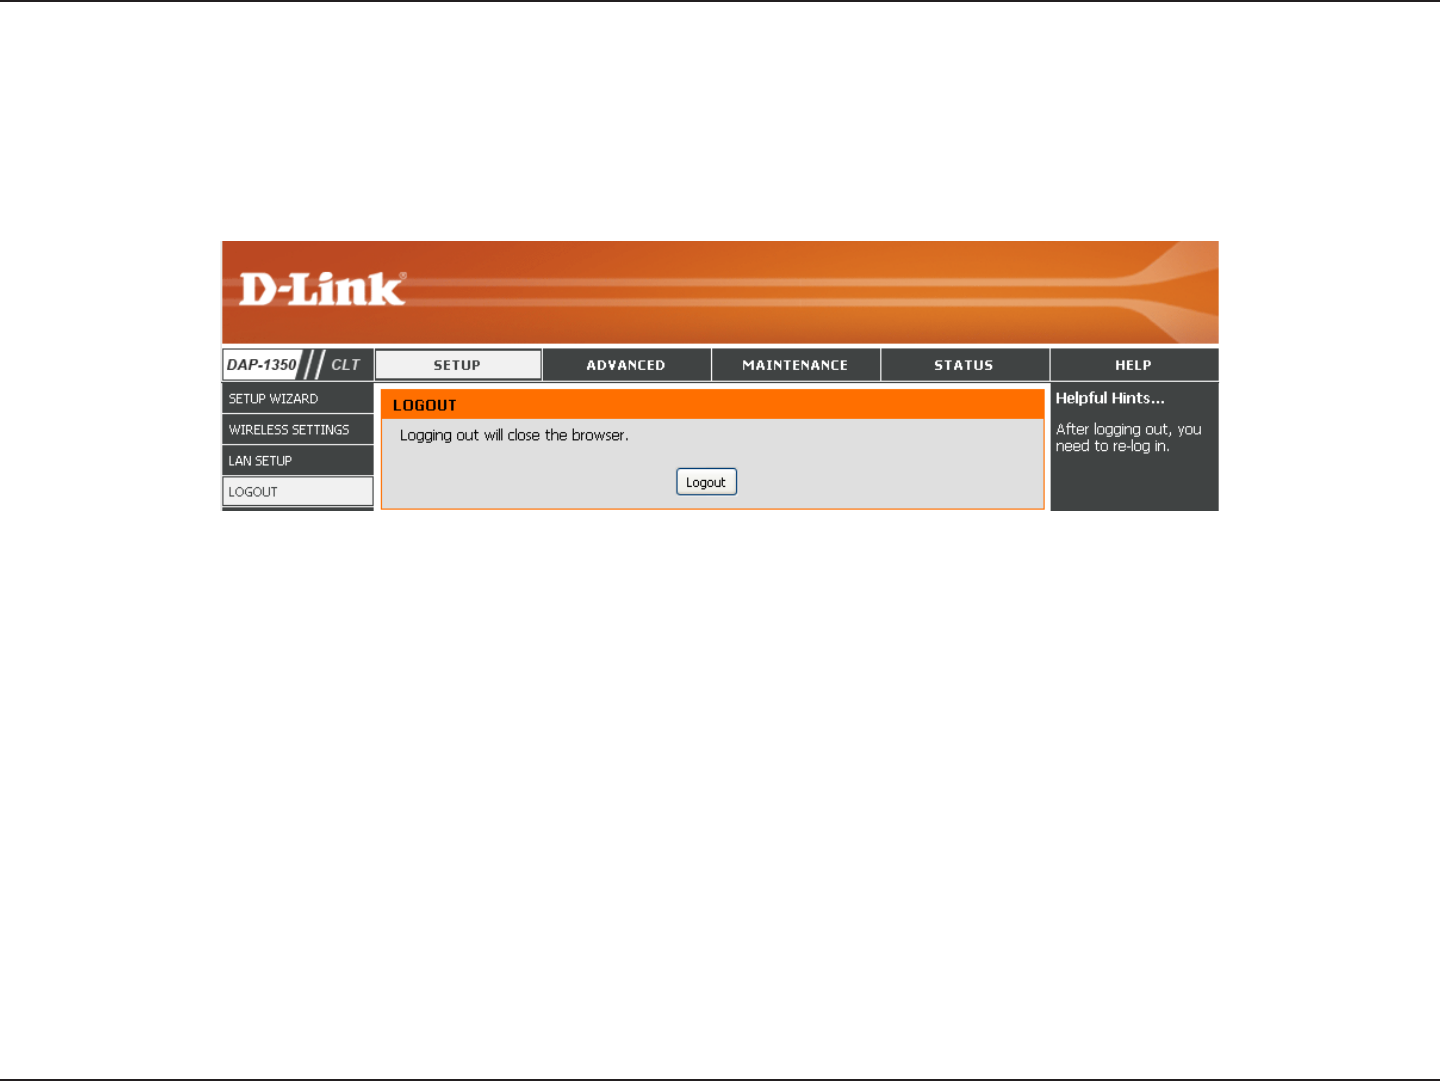
Logout
This section will allow you to change the local network settings of the access point and to configure the DHCP
settings.
53D-Link DAP-1350 User Manual
Section 3 - Configuration
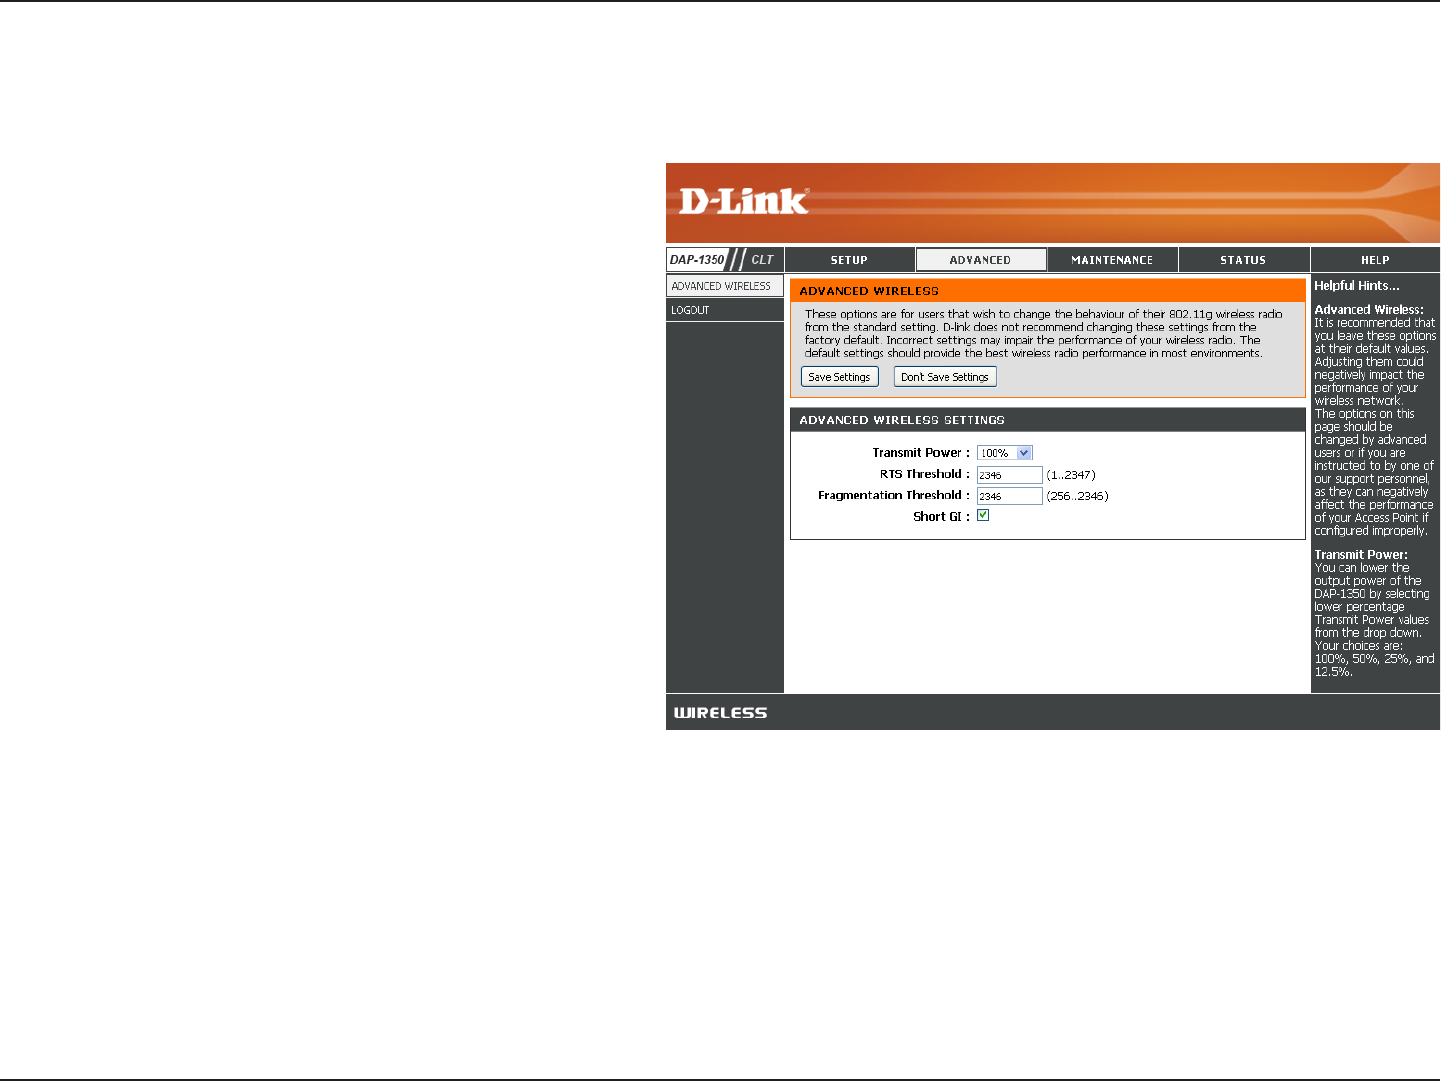
Advanced Wireless
Transmit Power:
RTS Threshold:
Fragmentation
Threshold:
Short GI:
Sets the transmit power of the antennas.
Note: Transmit power is regulated by international
standard. Users are forbidden to change its
maximum limit.
This value should remain at its default setting of
2346. If inconsistent data flow is a problem, only
a minor modification should be made.
The fragmentation threshold, which is specified
in bytes, determines whether packets will be
fragmented. Packets exceeding the 2346 byte
setting will be fragmented before transmission.
2346 is the default setting.
Check this box to reduce the guard interval time
therefore increasing the data capacity. However,
it’s less reliable and may create higher data
loss.
54D-Link DAP-1350 User Manual
Section 3 - Configuration
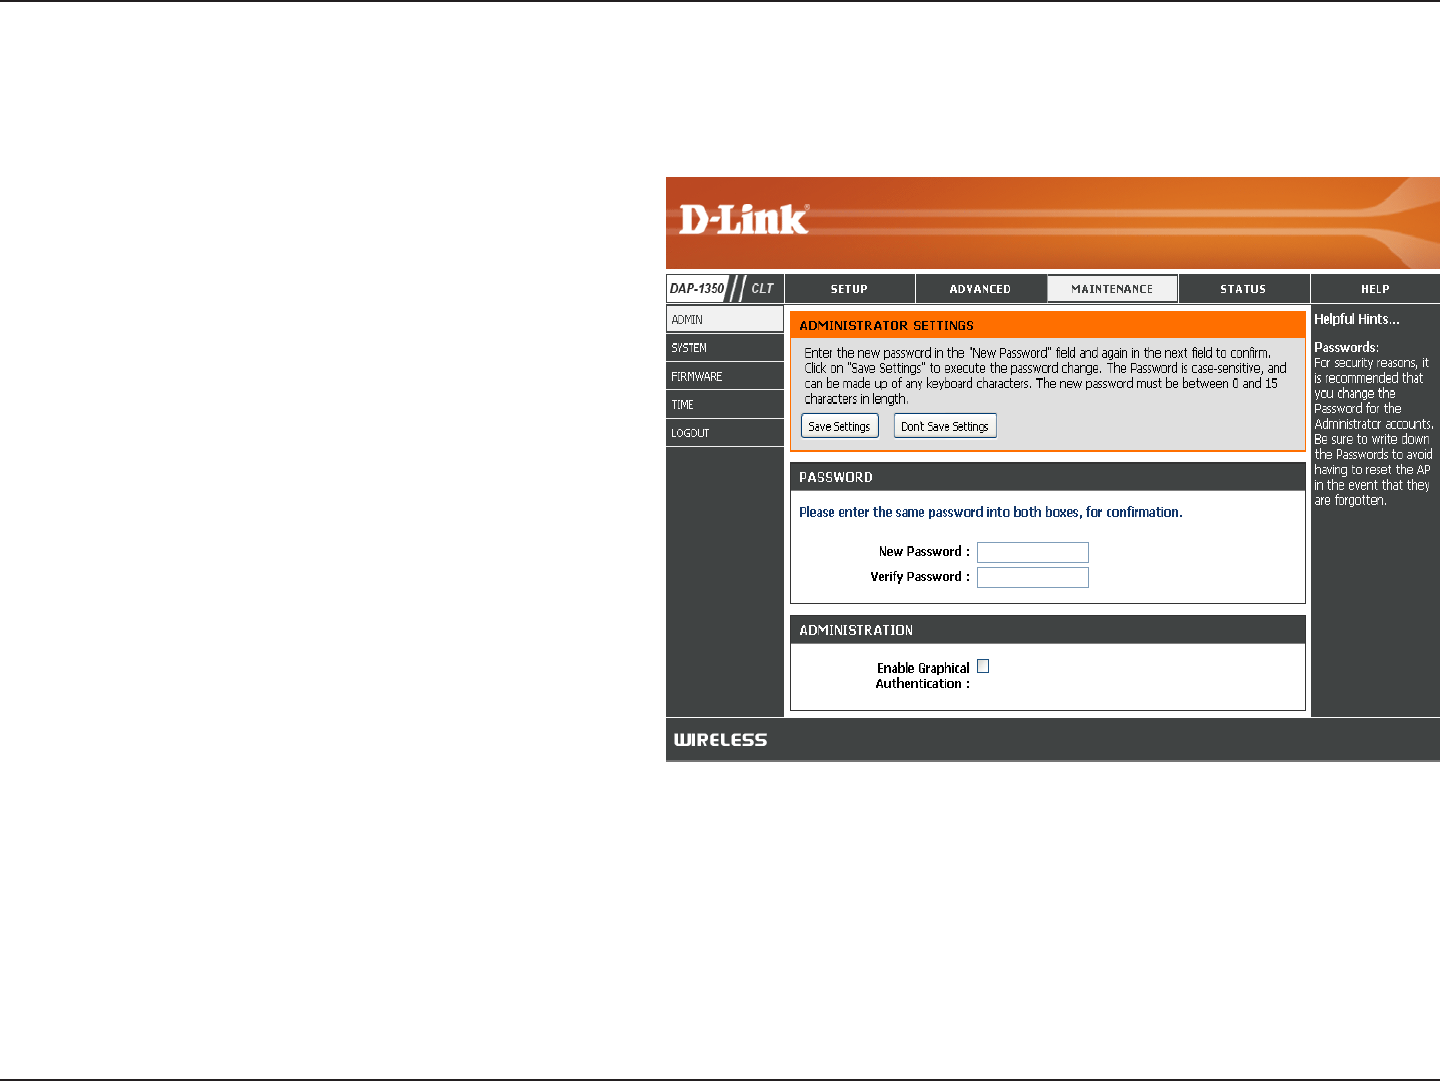
Enter a new password for the Administrator Login
Name. The administrator can make changes to
the settings.
Enter the same password that you entered
in the previous textbox in order to confirm its
accuracy.
Enables a challenge-response test to require
users to type letters or numbers from a distorted
image displayed on the screen to prevent online
hackers and unauthorized users from gaining
access to your router’s network settings.
Admin
This page will allow you to change the Administrator password. The administrator password has read/write access.
Password:
Verify
Password:
Enable
Graphical
Authentication:
55D-Link DAP-1350 User Manual
Section 3 - Configuration
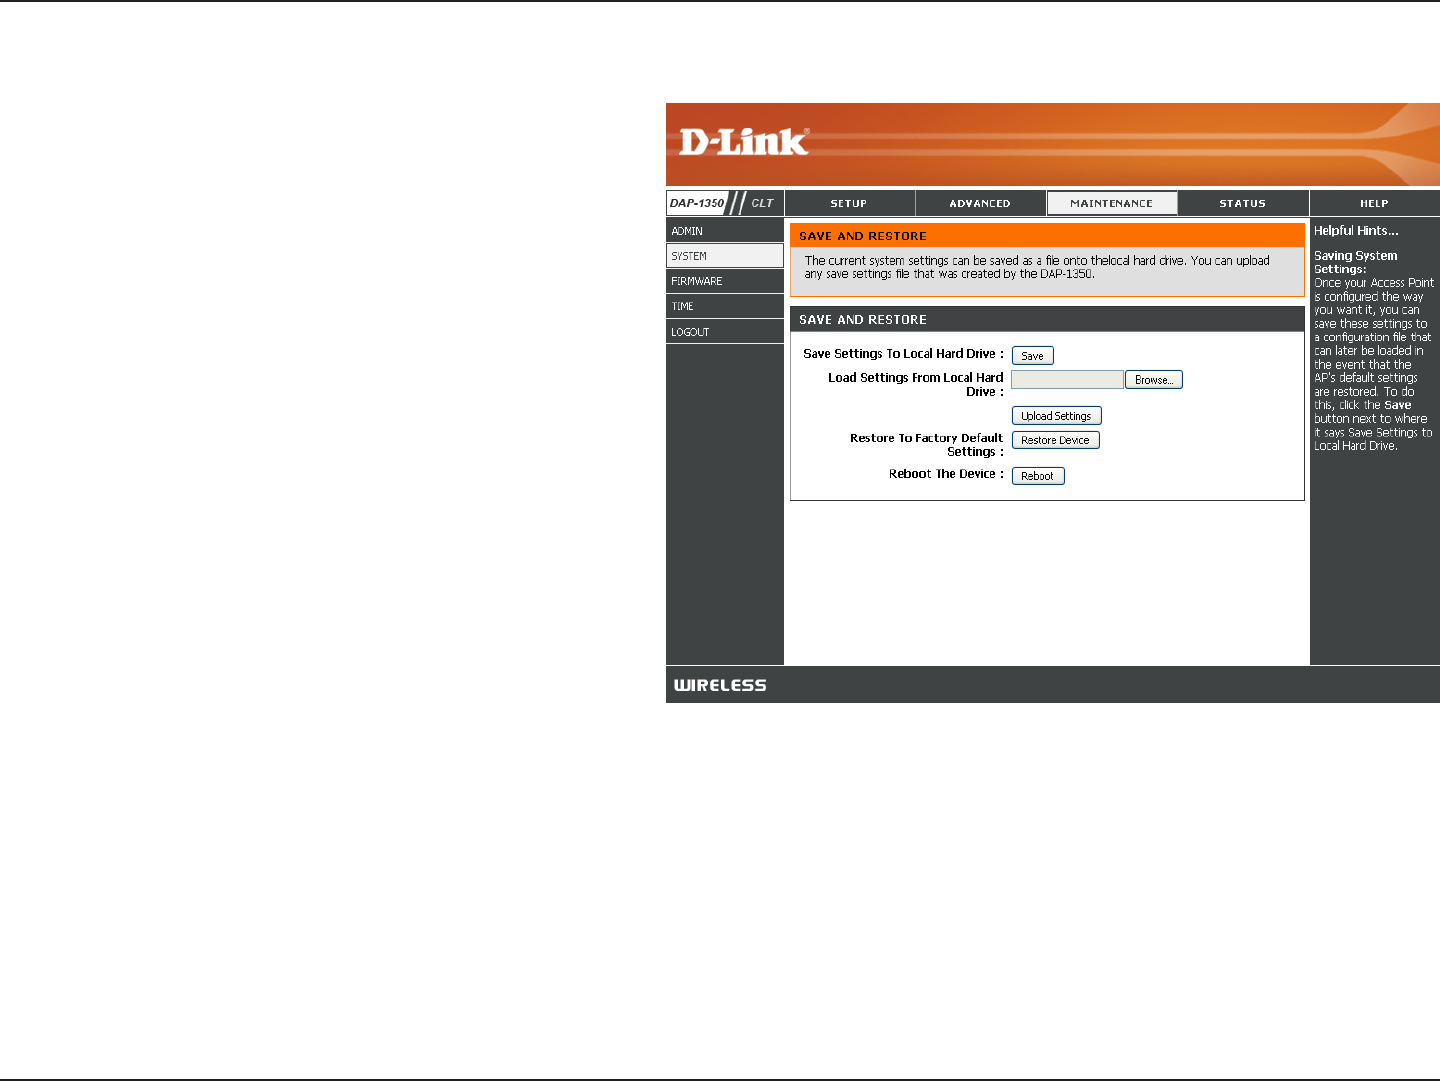
Save to Local
Hard Drive:
Load from Local
Hard Drive:
Restore to Factory
Default:
Reboot the Device:
Use this option to save the current access point
configuration settings to a file on the hard disk
of the computer you are using. Click the Save
button. You will then see a file dialog where
you can select a location and file name for the
settings.
Use this option to load previously saved access
point configuration settings. Click Browse to find
a previously saved configuration file. Then, click
the Upload Settings button to transfer those
settings to the access point.
This option will restore all configuration settings
back to the settings that were in effect at the
time the access point was shipped from the
factory. Any settings that have not been saved
will be lost, including any rules that you have
created. If you want to save the current access
point configuration settings, use the Save button
above.
Note: Restoring the factory default settings
will not reset the Wi-Fi Protected Status to Not
Configured.
Click to reboot the access point.
System
56D-Link DAP-1350 User Manual
Section 3 - Configuration
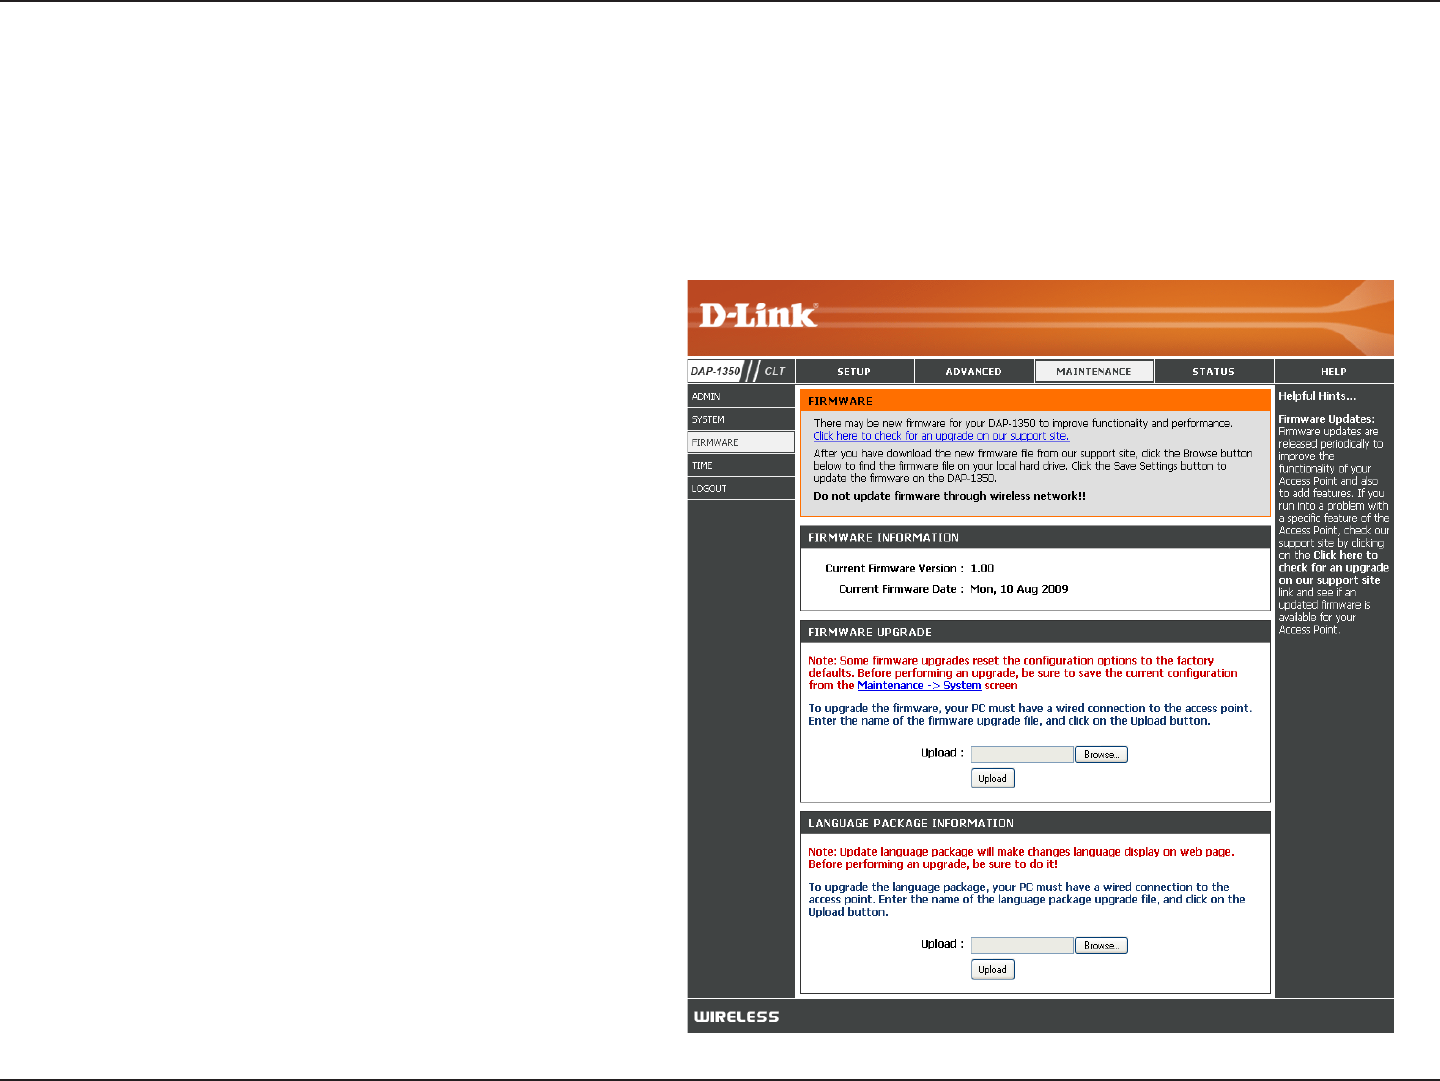
Browse:
Upload:
After you have downloaded the new firmware, click
Browse to locate the firmware update on your
hard drive. Click Upload to complete the firmware
upgrade.
Once you have a firmware update on your computer,
use this option to browse for the file and then upload
the information into the access point.
Firmware
You can upgrade the firmware of the access point here. Make sure the firmware you want to use is on the local hard
drive of the computer. Click on Browse to locate the firmware file to be used for the update. Please check the D-Link
support website for firmware updates at http://support.dlink.com. You can download firmware upgrades to your hard
drive from this site.
After you have downloaded the new language
pack, click Browse to locate the language pack file
on your hard drive. Click Upload to complete the
language pack upgrade.
Note: In most cases you must unzip the file first
before uploading.
Language Pack
You can change the language of the web UI by uploading
available language packs.
Browse:
57D-Link DAP-1350 User Manual
Section 3 - Configuration
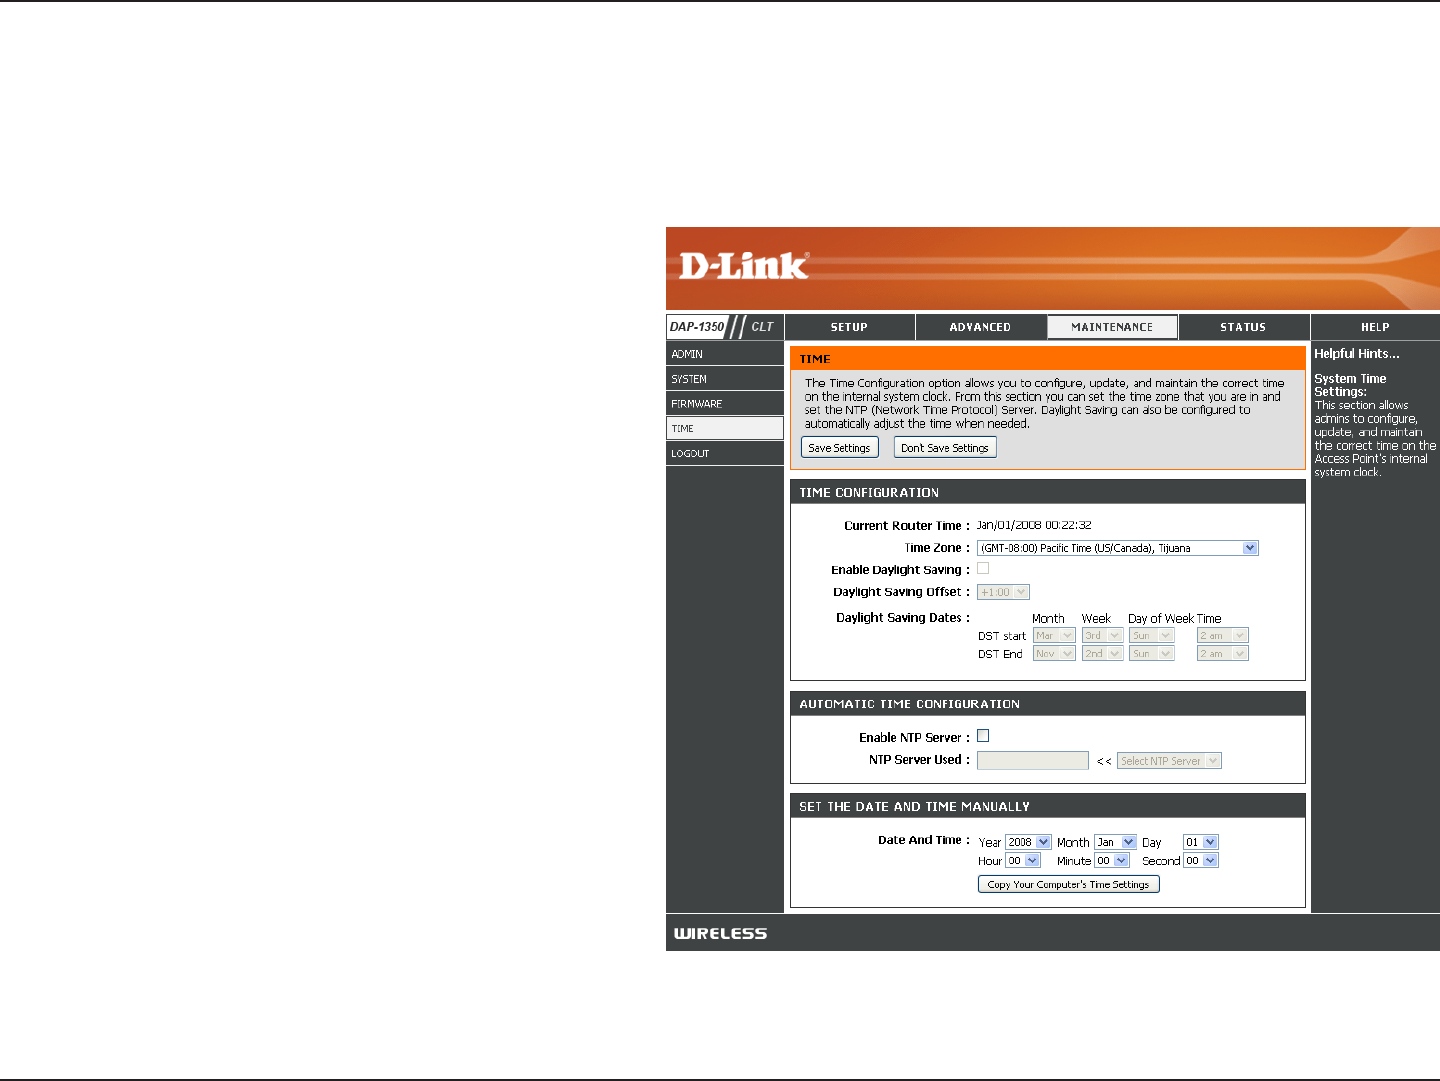
Time Zone:
Daylight Saving:
Enable NTP Server:
NTP Server Used:
Date and Time:
Select the Time Zone from the drop-down
menu.
To select Daylight Saving time manually, click
the Enable Daylight Saving check box. Next
use the drop-down menu to select a Daylight
Saving Offset and then enter a start date and
an end date for daylight saving time.
NTP is short for Network Time Protocol. NTP
synchronizes computer clock times in a network
of computers. Check this box to use a NTP
server. This will only connect to a server on the
Internet, not a local server.
Enter the NTP server or select one from the
drop-down menu.
To manually input the time, enter the values
in these fields for the Year, Month, Day, Hour,
Minute, and Second and then click Save
Settings. You can also click the Copy Your
Computer’s Time Settings button at the bottom
of the screen.
Time
The Time Configuration option allows you to configure, update, and maintain the correct time on the internal system
clock. From this section you can set the time zone that you are in. Daylight Saving can also be configured to automatically
adjust the time when needed.
58D-Link DAP-1350 User Manual
Section 3 - Configuration
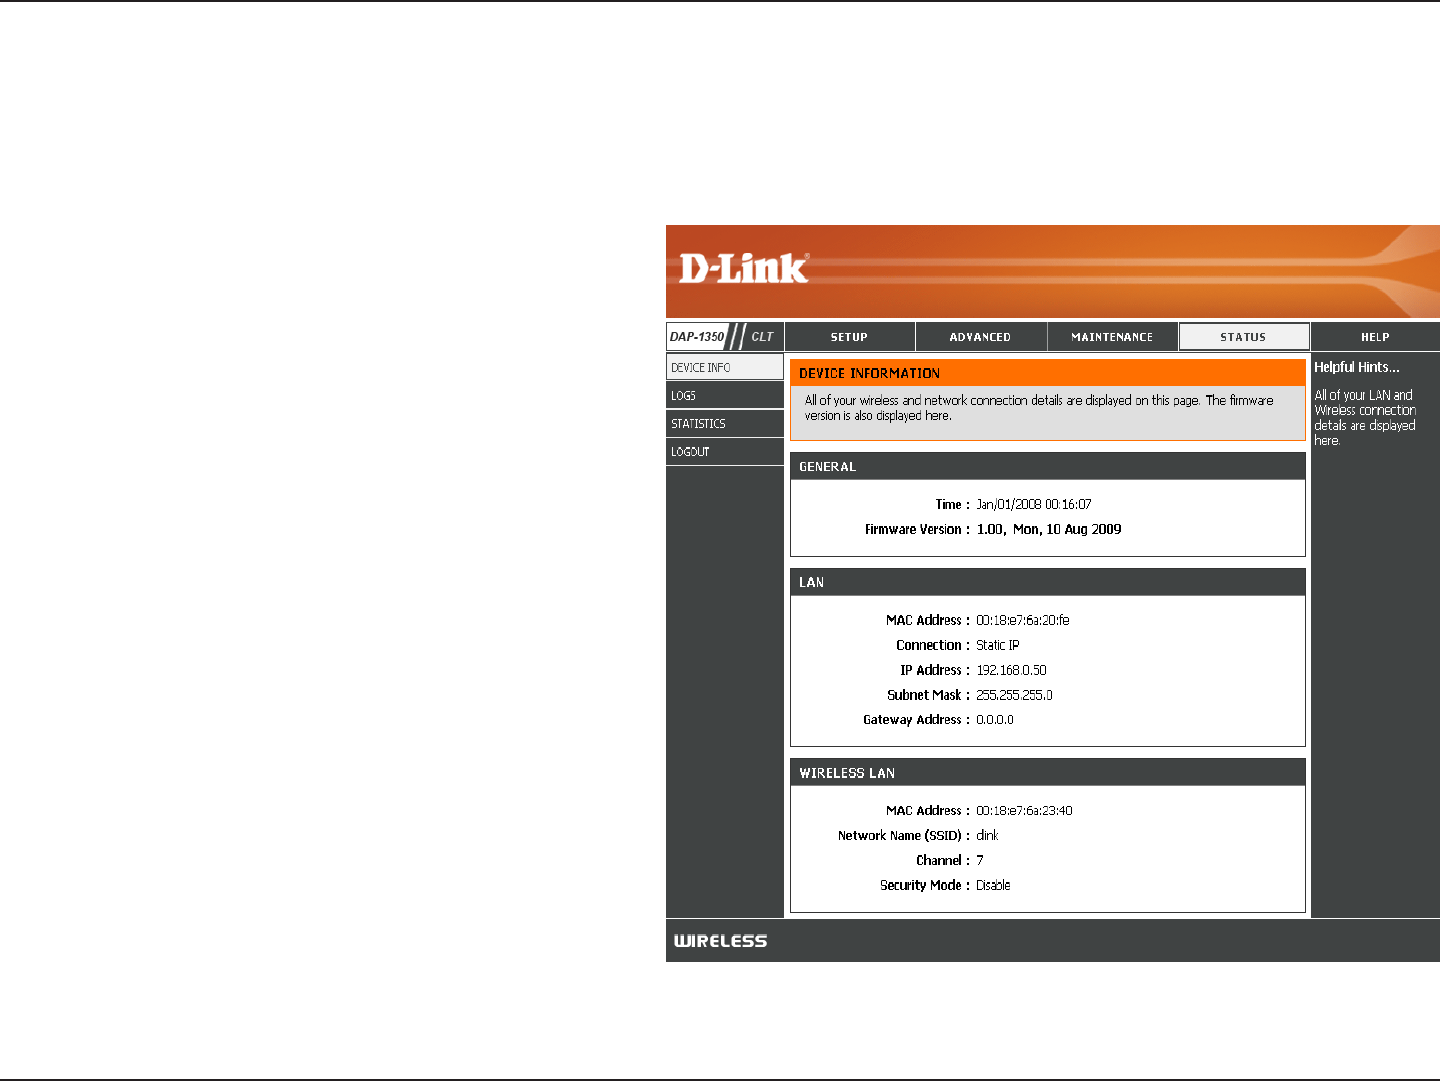
General:
LAN:
Wireless LAN:
Displays the access point’s time and firmware
version.
Displays the MAC address and the private
(local) IP settings for the access point.
Displays the wireless MAC address and your
wireless settings such as SSID and Channel.
Device Info
This page displays the current information for the DAP-1350. It will display the LAN and wireless LAN information.
59D-Link DAP-1350 User Manual
Section 3 - Configuration
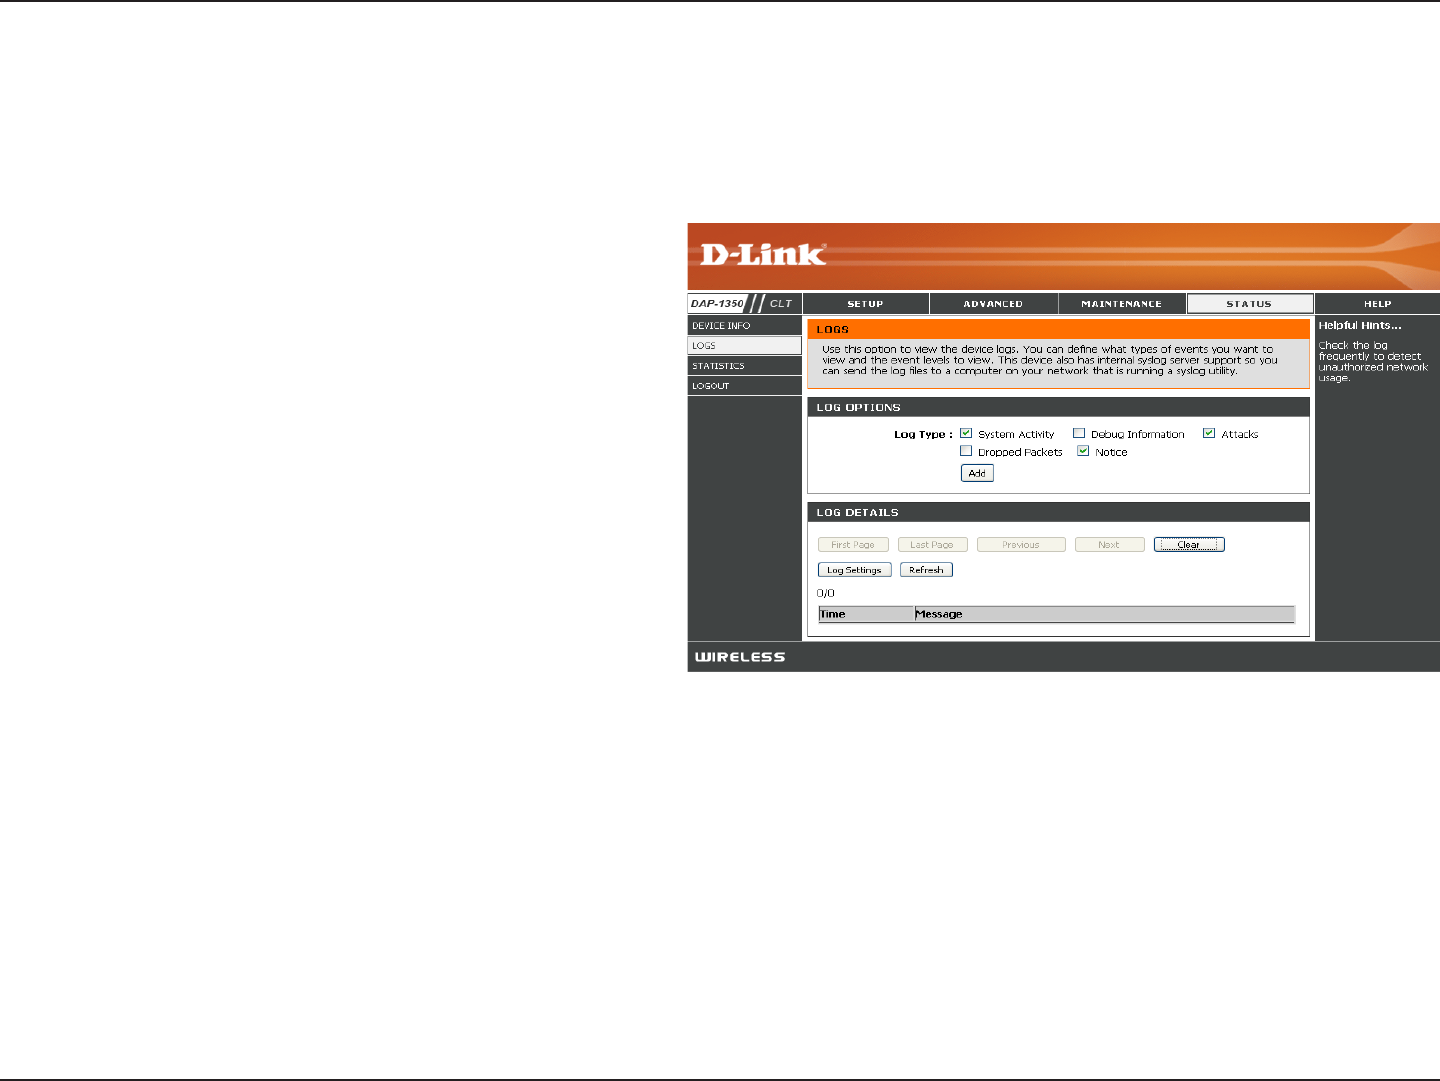
First Page:
Last Page:
Previous Page:
Next Page:
Clear Log:
Log Settings:
Refresh:
This button directs you to the first page of the log.
This button directs you to the last page of the log.
This button directs you to the previous page of the
log.
This button directs you to the next page of the
log.
This button clears all current log content.
This button opens a new menu where you can
configure the log settings.
This button refreshes the log.
Logs
The DAP-1350 keeps a running log of events and activities occurring on the AP. If the AP is rebooted, the logs are
automatically cleared. You can save the log files under Log Setting.
60D-Link DAP-1350 User Manual
Section 3 - Configuration
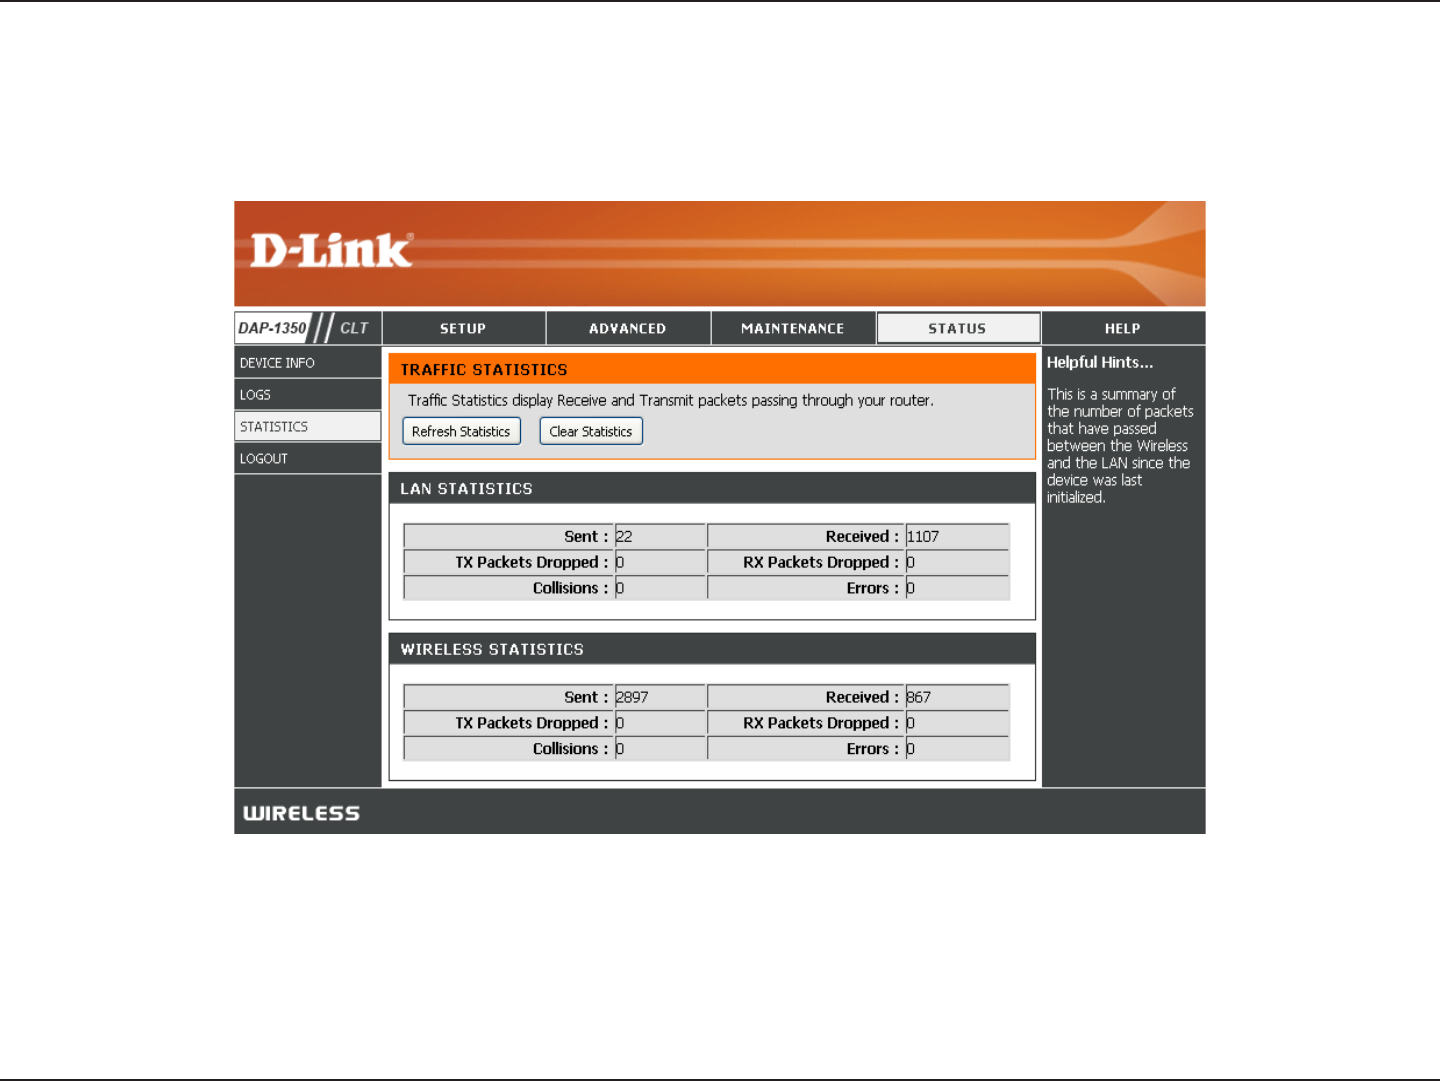
Statistics
The DAP-1350 keeps statistics of the traffic that passes through it. You can view the amount of packets that pass through
the LAN and wireless portions of the network. The traffic counter will reset if the access point is rebooted.
61D-Link DAP-1350 User Manual
Section 3 - Configuration
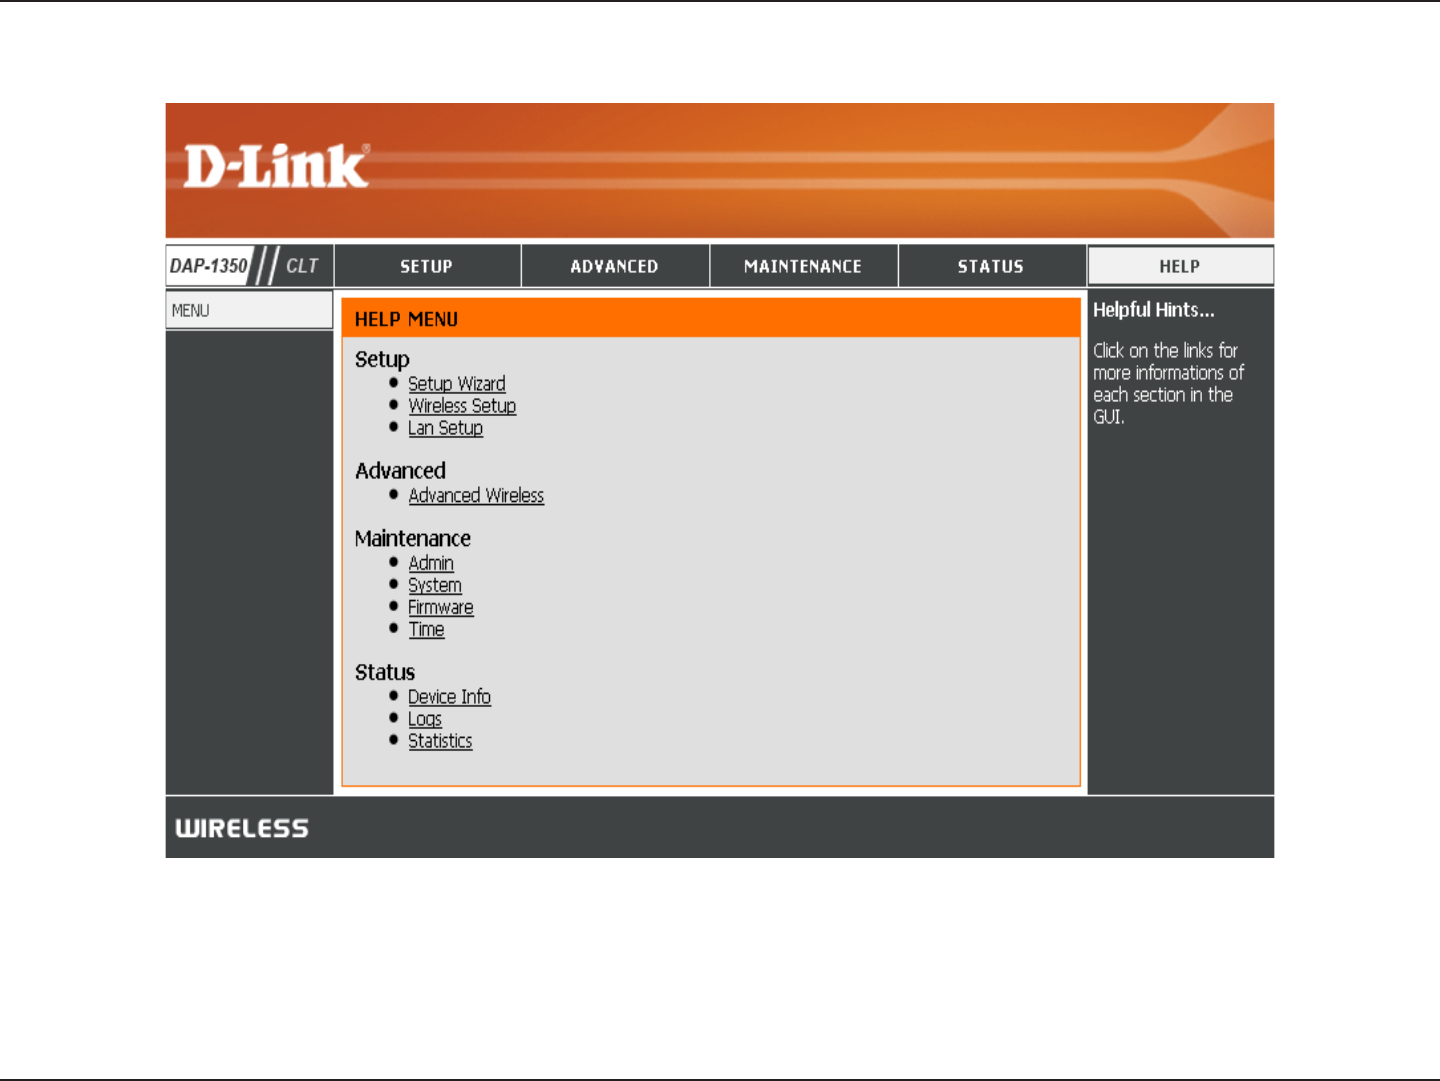
Help
62D-Link DAP-1350 User Manual
Section 3 - Configuration
Router Mode
If you wish to change the default settings or optimize
the performance of the DAP-1350, you may use the
web-based configuration utility.
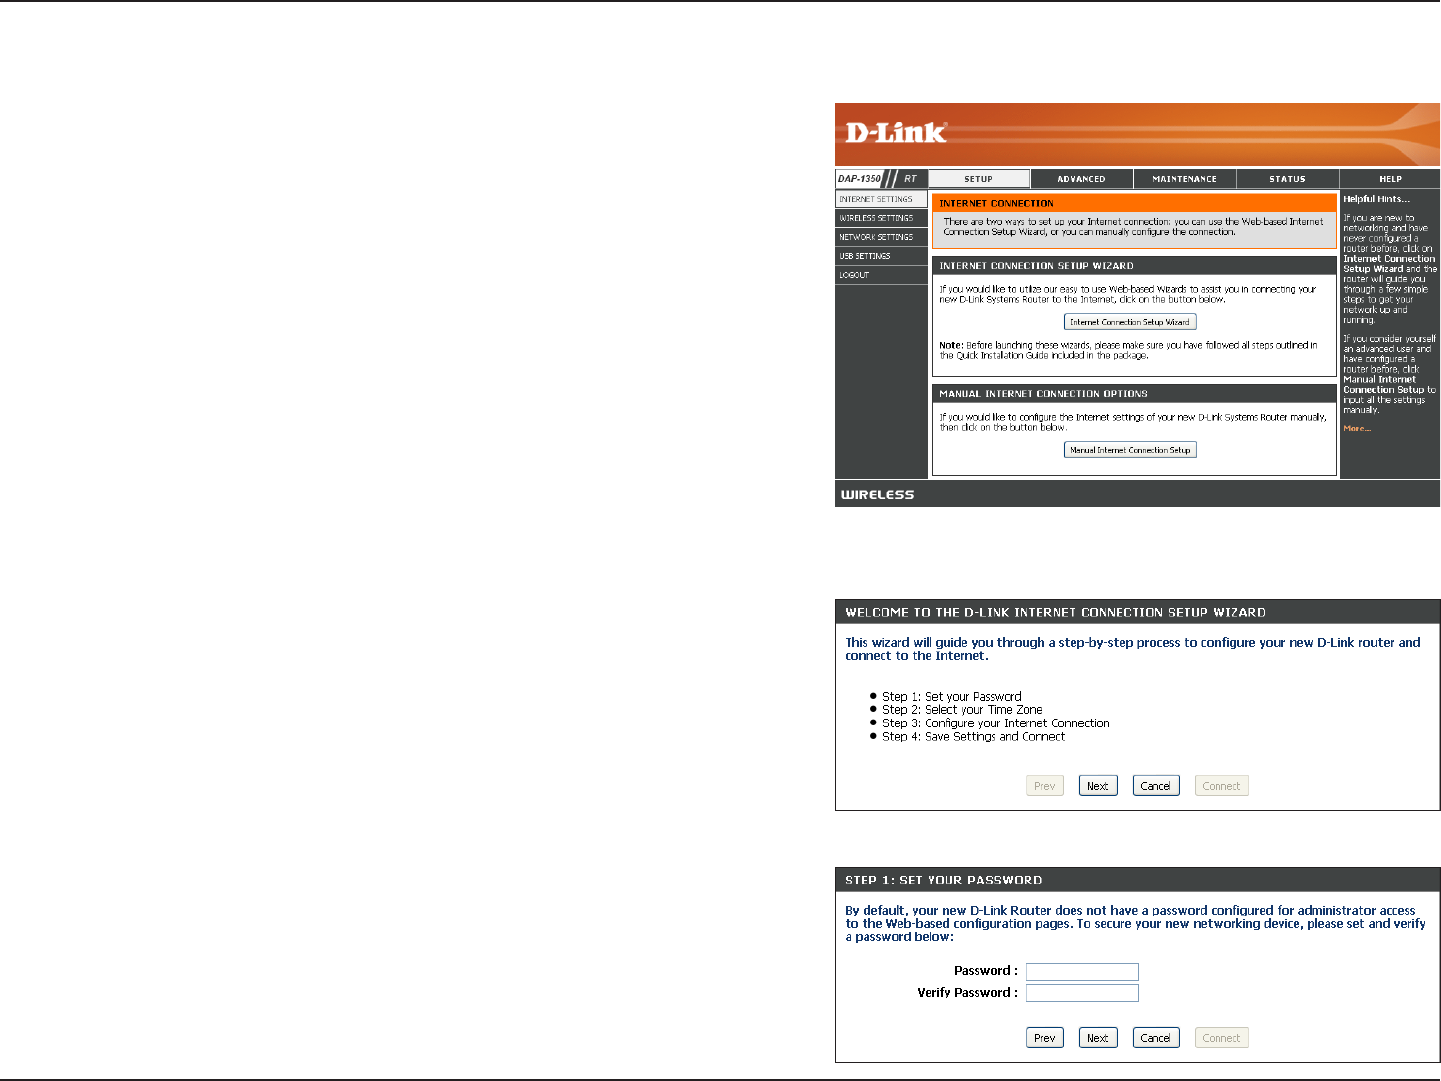
To access the configuration utility, open a web browser
such as Internet Explorer and enter dlinkap or
192.168.0.50 in the address field.
Type Admin and then enter your password. Leave the
password blank by default..
If you get a Page Cannot be Displayed error, please
refer to the Troubleshooting section for assistance.
Change the mode selector to Router on the device. Connect an Ethernet cable from the Ethernet port on the DAP-1350
to your broadband modem. You will need to connect wirelessly to the DAP-1350 to configure it.
63D-Link DAP-1350 User Manual
Section 3 - Configuration
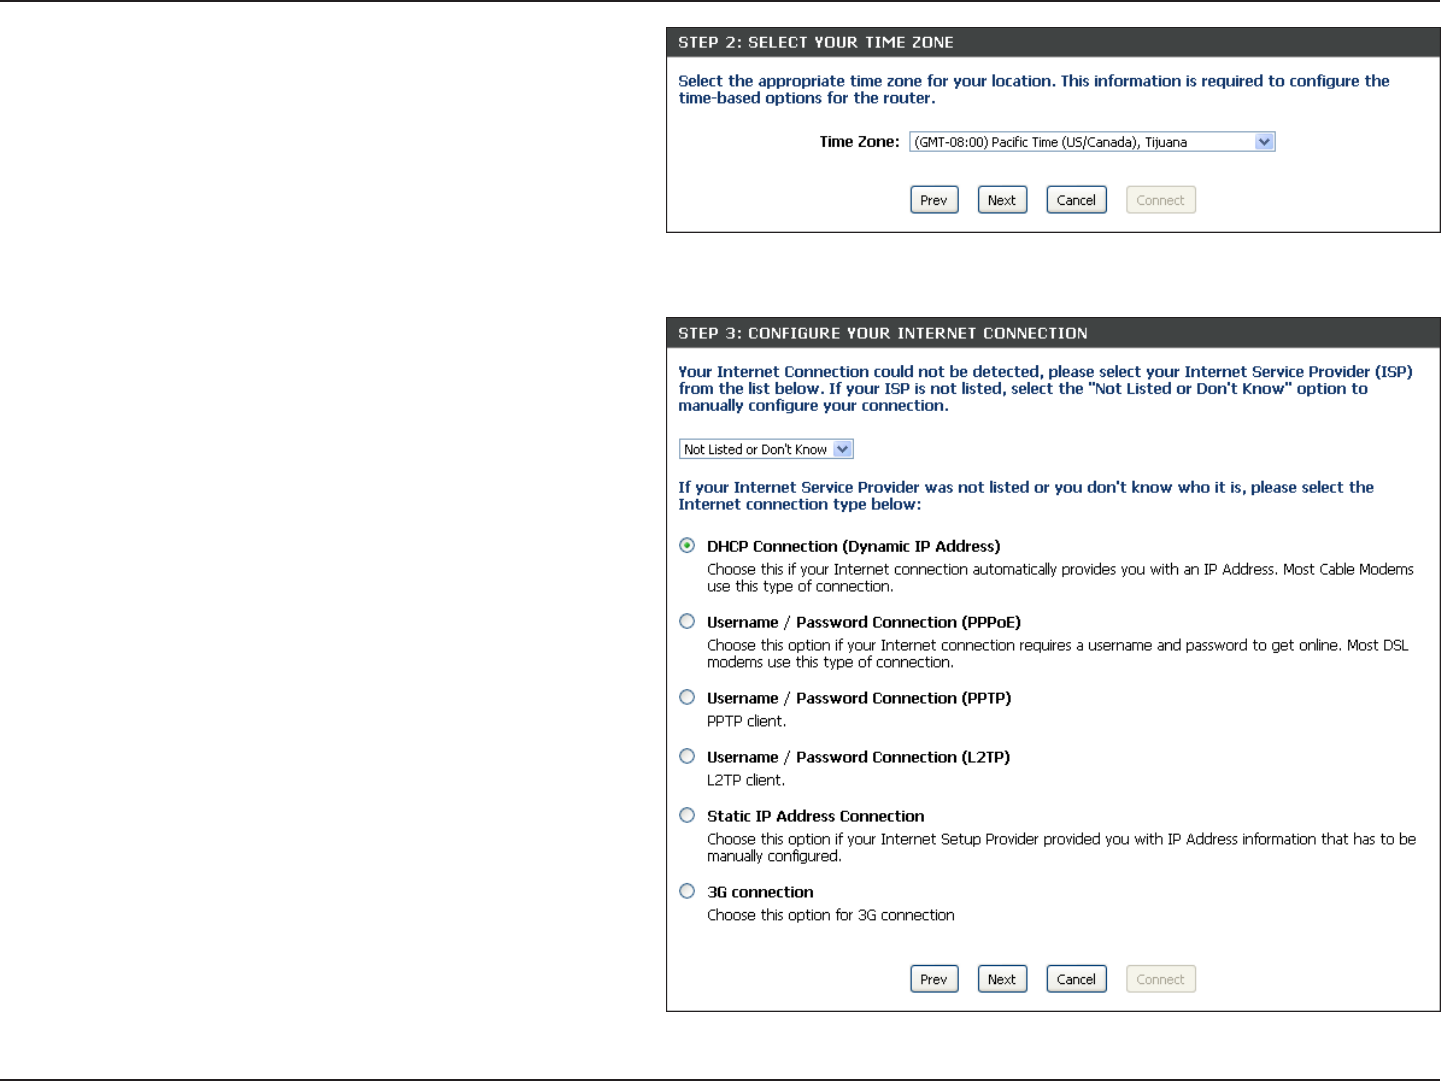
Click Launch Internet Connection Setup Wizard to begin.
If you want to enter your settings without running the wizard,
click Manual Internet Configuration Setup and skip to page
65.
Setup Wizard
Click Next to continue.
Create a new password and then click Next to continue.
64D-Link DAP-1350 User Manual
Section 3 - Configuration
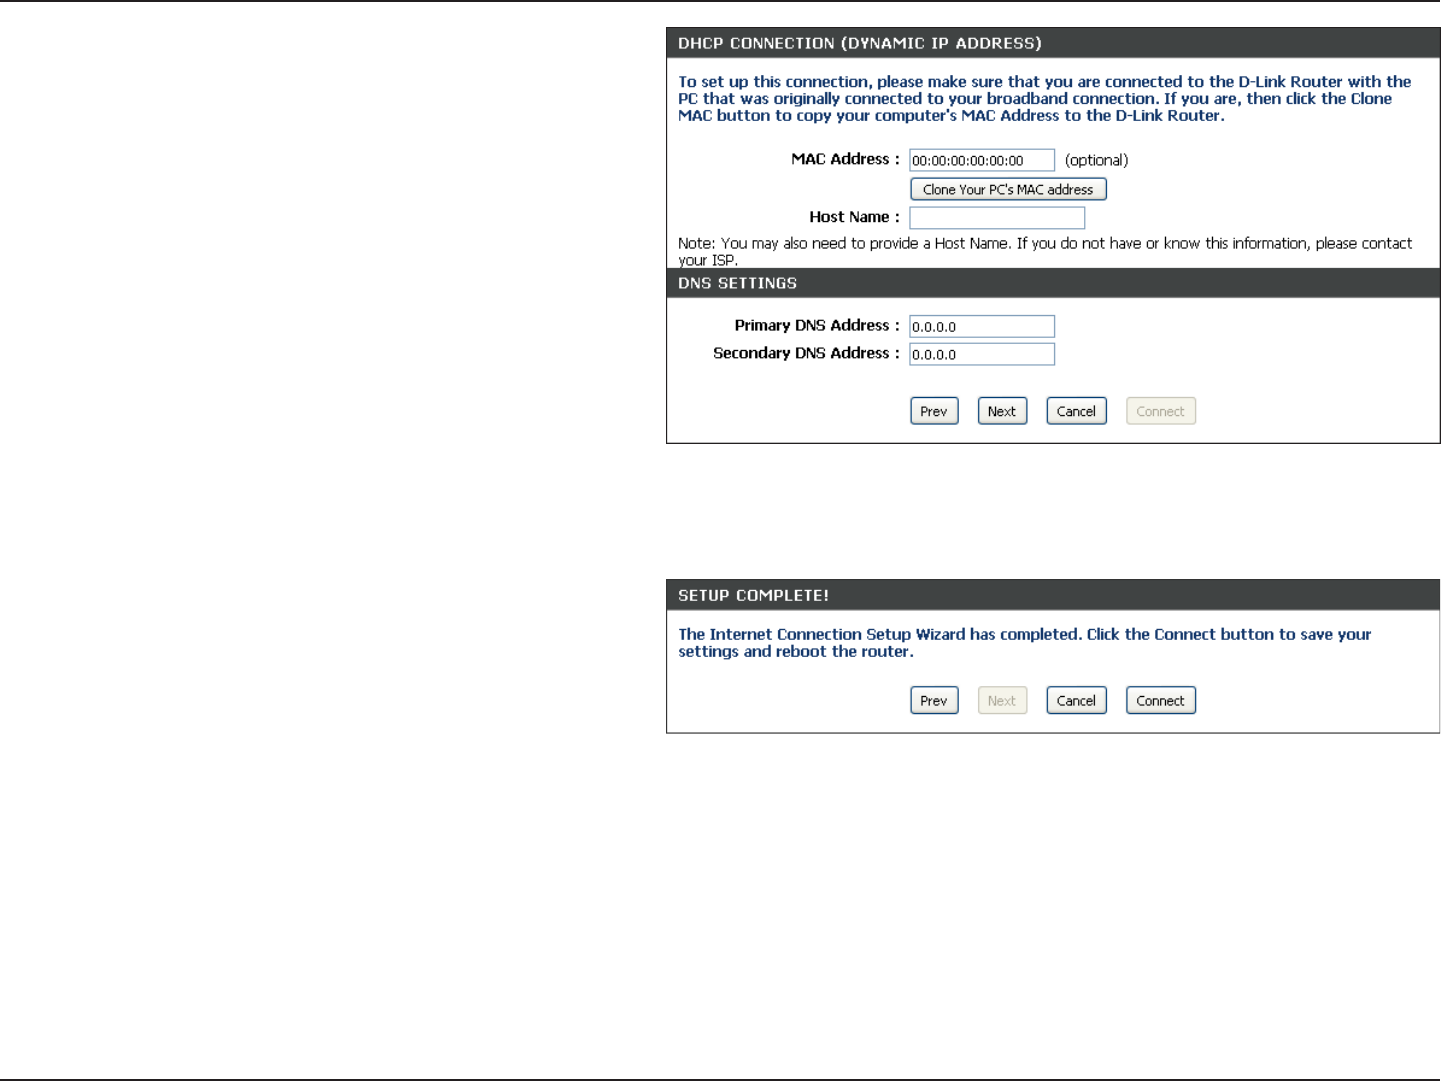
Select your time zone from the drop-down menu and
then click Next to continue.
Select the type of Internet connection you use and
then click Next to continue.
65D-Link DAP-1350 User Manual
Section 3 - Configuration
If you selected Dynamic, you may need to enter
the MAC address of the computer that was last
connected directly to your modem. If you are currently
using that computer, click Clone Your PC’s MAC
Address and then click Next to continue.
The Host Name is optional but may be required by
some ISPs. The default host name is the device name
of the Router and may be changed.
Click Connect to save your settings. Once the router
is finished rebooting, click Continue. Please allow
1-2 minutes to connect.
Close your browser window and reopen it to test your
Internet connection. It may take a few tries to initially
connect to the Internet.
66D-Link DAP-1350 User Manual
Section 3 - Configuration
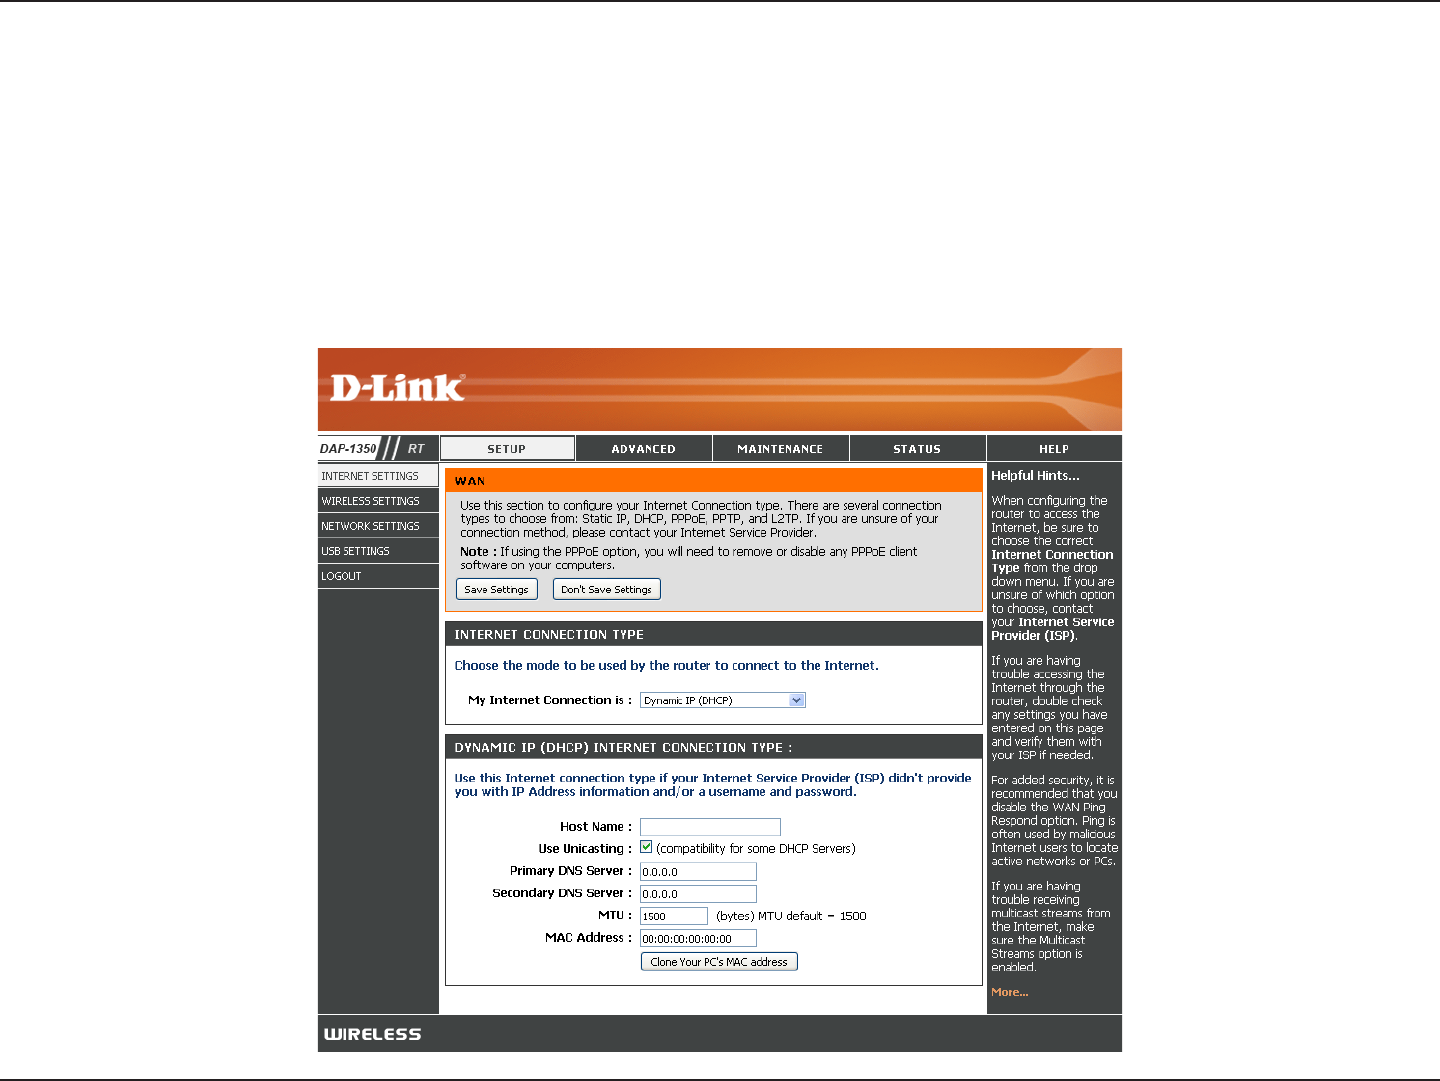
Internet Setup
If you opt to set up your Internet connection manually, you will be redirected to a WAN page that allows you to select
your Internet type and enter the correct configuration parameters.
Select your Internet connection type using the “My Internet Connection is” drop-down menu.
Click the Save Settings button when you have configured the connection.
67D-Link DAP-1350 User Manual
Section 3 - Configuration
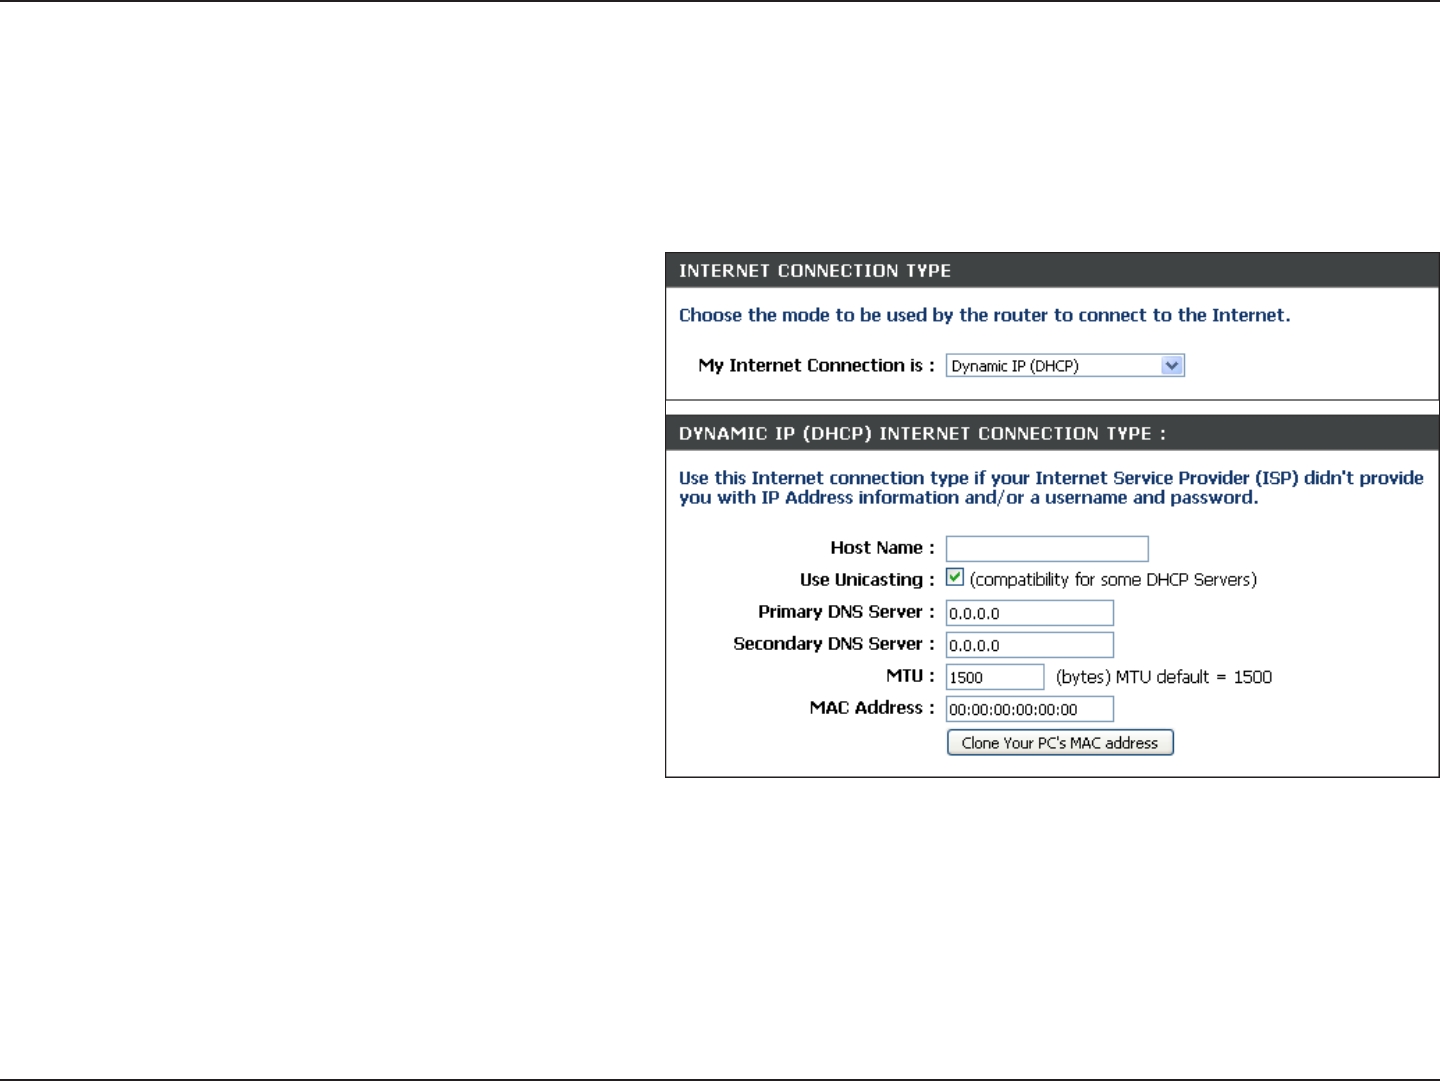
Dynamic IP (DHCP)
Select Dynamic IP(DHCP) to obtain IP Address information automatically from your ISP. Select this option if your ISP
does not give you any IP number to use. This option is commonly used for Cable modem services.
Host Name:
Use Unicasting:
DNS Server:
MTU:
MAC Address:
The Host Name is optional but may be
required by some ISPs.
Select if you are having problems obtaining
an IP address from your DHCP server.
Enter the Primary and Secondary DNS
server IP address assigned by your ISP.
You may need to change the MTU (Maximum
Transmission Unit) for optimal performance
with your specific ISP. The default MTU size
is 1500.
The default MAC address is set to the
Ethernet MAC address your DAP-1350.
You can click the Clone Your PC’s MAC
Address button to replace the AP’s MAC
address with the MAC address of the PC that
you used to register with your ISP. It is not
recommended that you change the default
MAC address unless required by your ISP.
68D-Link DAP-1350 User Manual
Section 3 - Configuration
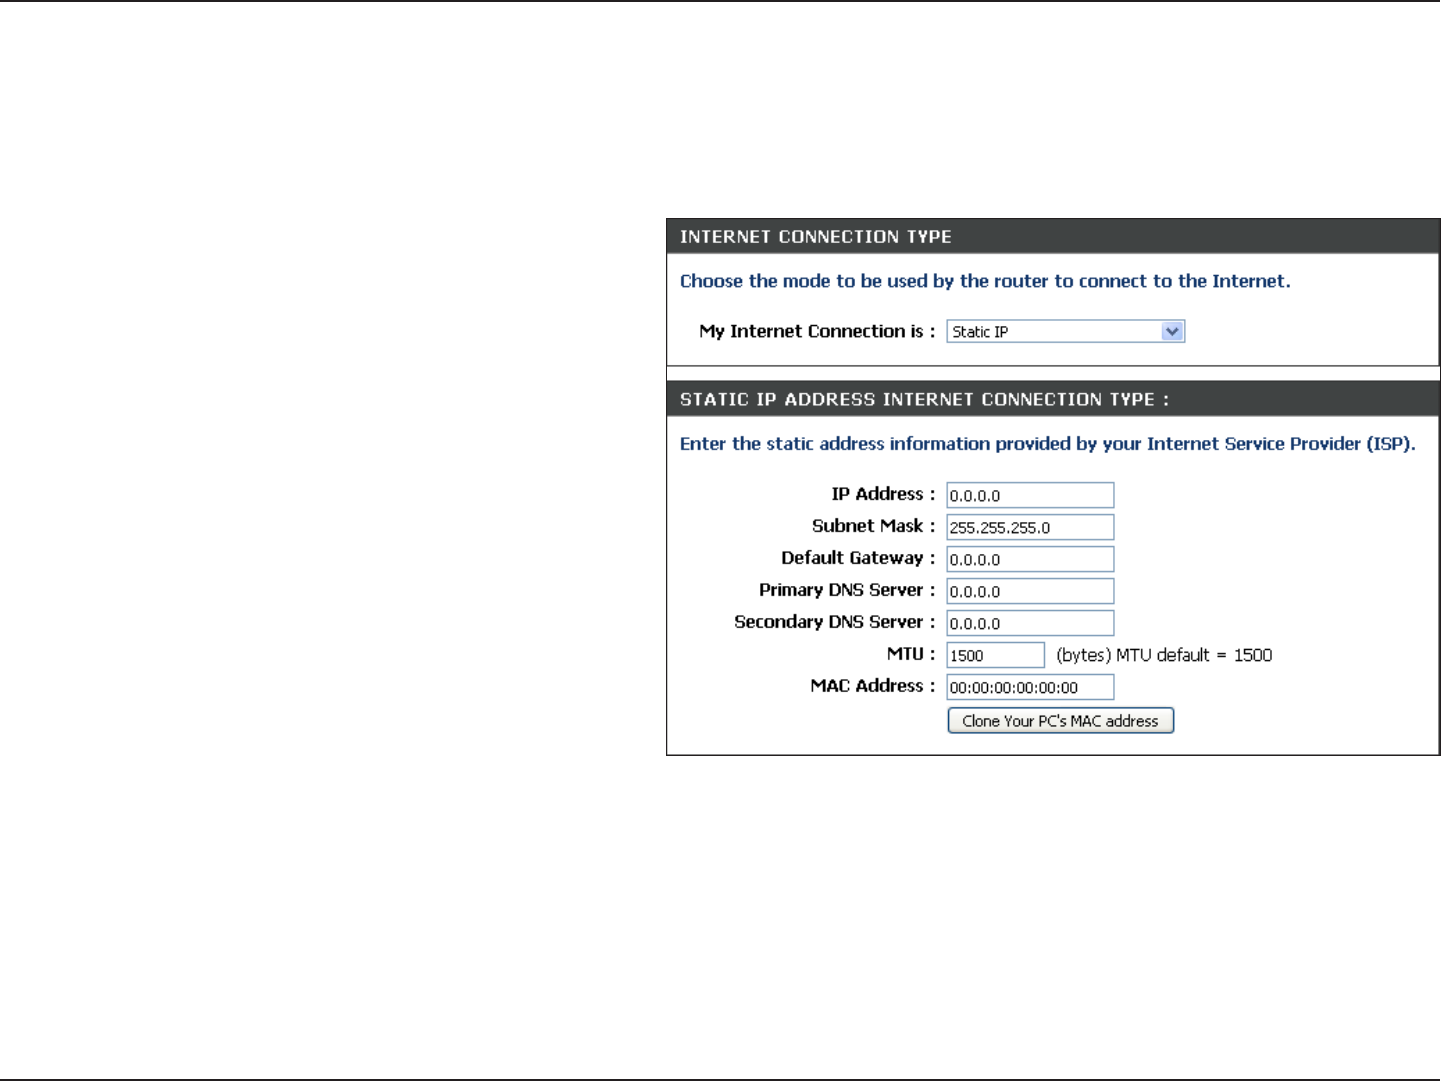
Static IP
Select Static IP if all WAN IP information is provided to you by your ISP. You will need to enter in the IP address, subnet
mask, gateway address, and DNS address(es) provided to you by your ISP.
IP Address:
Subnet Mask:
Default Gateway:
Primary DNS Server:
Secondary DNS Server:
MTU:
Clone MAC Address:
Enter the IP Address provided by your ISP
(Internet Service Provider).
255.255.255.0 is the default subnet mask.
All devices on the network must have the
same subnet mask to communicate on
the network.
Enter the IP Address of the gateway in
your network.
Enter the Primary DNS (Domain Name
System) server IP address assigned by
your ISP.
Enter the Secondary DNS (optional) server
IP address assigned by your ISP.
You may need to change the MTU
(Maximum Transmission Unit) for optimal
performance with your specific ISP. The default MTU size is 1500.
The default MAC address is set to the MAC address on the AP (Access Point). You can click the Clone Your PC’s MAC
Address button to replace the AP’s MAC address with the MAC address of your Ethernet card. It is not recommended
that you change the default MAC address unless required by your ISP.
69D-Link DAP-1350 User Manual
Section 3 - Configuration
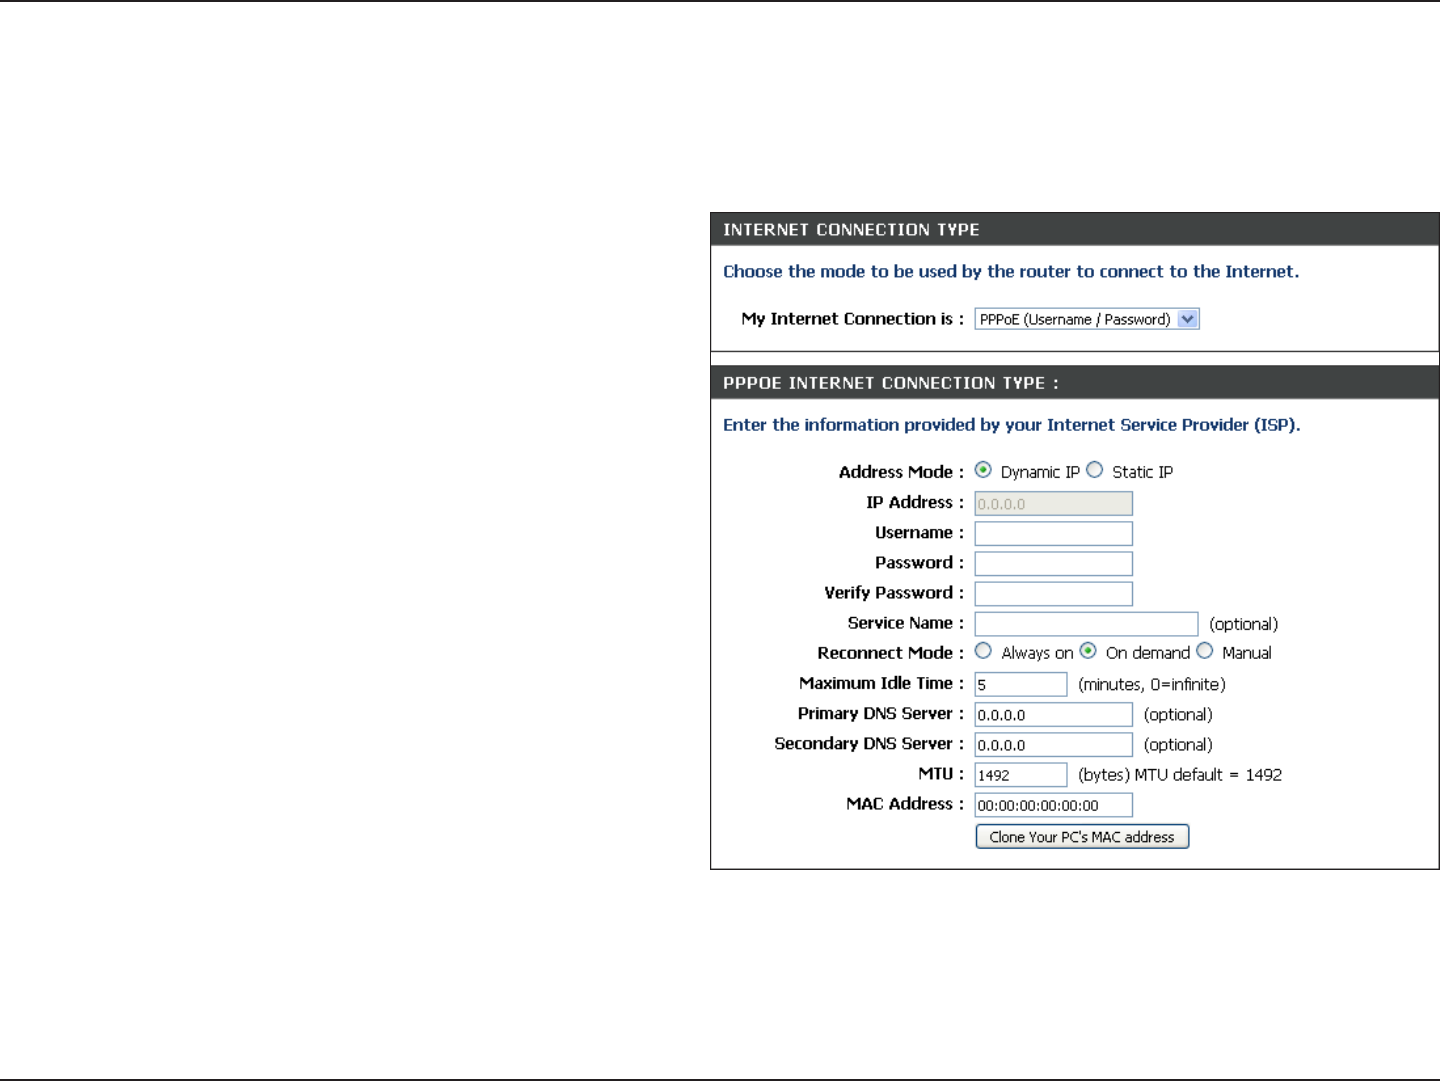
PPPoE
Select PPPoE (Point-to-Point Protocol over Ethernet) if your ISP uses a PPPoE connection. Your ISP will provide you with
a username and password. This option is typically used for DSL services. Make sure to remove your PPPoE software
from your computer. The software is no longer needed and will not work through the DAP-1350.
Username:
Password:
Service Name:
Reconnect Mode:
Maximum Idle Time:
DNS Servers:
MTU:
Clone MAC Address:
Enter your PPPoE user name.
Enter your PPPoE password and then retype
the password in the next box.
Enter the ISP Service Name (optional).
Select Always on, On Demand or Manual.
Enter the time (in minutes) where the router will
disconnect if idle for the time specified.
Enter the Primary and Secondary DNS (Domain
Name System) server IP address assigned by
your ISP.
You may need to change the MTU (Maximum
Transmission Unit) for optimal performance
with your specific ISP. The default MTU size is
1400.
The default MAC address is set to the MAC
address on the AP (Access Point). You can click
the Clone Your PC’s MAC Address button to
replace the AP’s MAC address with the MAC address of your Ethernet card. It is not recommended that you change the
default MAC address unless required by your ISP.
70D-Link DAP-1350 User Manual
Section 3 - Configuration
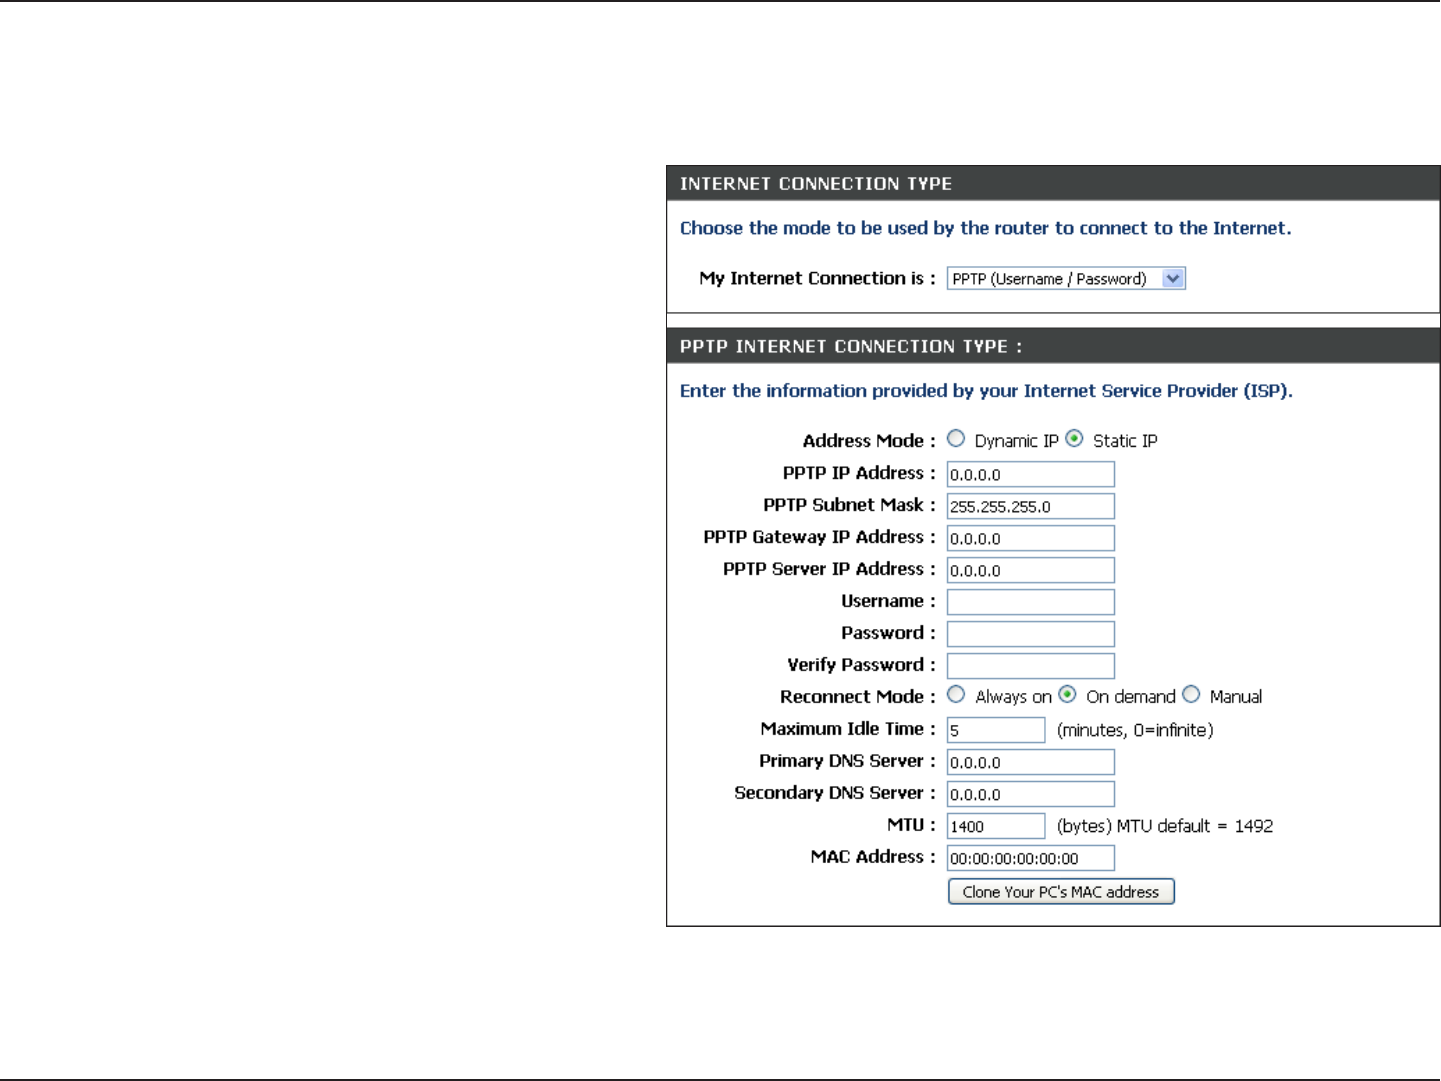
PPTP
Choose PPTP (Point-to-Point Tunneling Protocol) if your ISP uses a PPTP connection. Your ISP will provide you with
a username and password. This option is typically used for DSL services.
PPTP IP Address:
PPTP Subnet Mask:
PPTP Server IP Address:
Username:
Password:
Reconnect Mode:
Maximum Idle Time:
DNS Servers:
MTU:
Clone MAC Address:
Enter the IP address (Static PPTP only).
Enter the subnet mask.
Enter the Server IP Address provided by
your ISP.
Enter your PPTP username.
Enter your PPTP password and then retype
the password in the next box.
Select Always on, On Demand or
Manual.
Enter the time (in minutes) where the
router will disconnect if idle for the time
specified.
Enter the Primary and Secondary DNS
(Domain Name System) server IP address
assigned by your ISP.
You may need to change the MTU (Maximum
Transmission Unit) for optimal performance
with your specific ISP. The default MTU size
is 1400.
The default MAC address is set to the MAC address on the AP (Access Point). You can click the Clone Your PC’s MAC
Address button to replace the AP’s MAC address with the MAC address of your Ethernet card. It is not recommended
that you change the default MAC address unless required by your ISP.
71D-Link DAP-1350 User Manual
Section 3 - Configuration
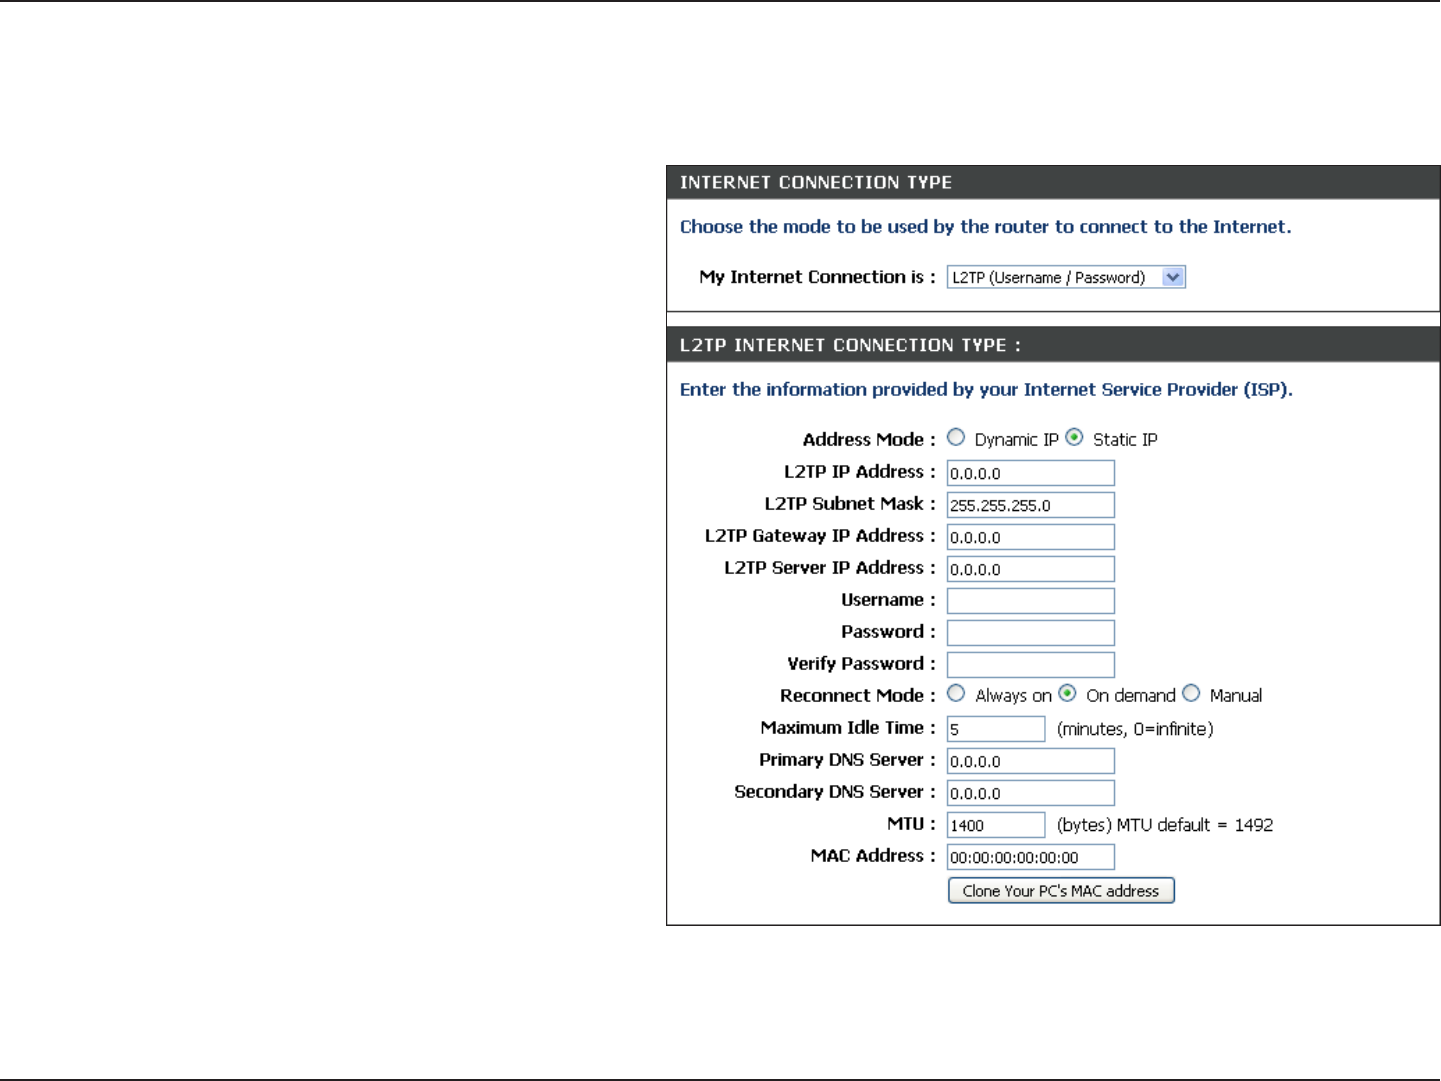
L2TP
Choose L2TP (Point-to-Point Tunneling Protocol) if your ISP uses a L2TP connection. Your ISP will provide you with a
username and password. This option is typically used for DSL services.
PPTP IP Address:
PPTP Subnet Mask:
PPTP Server IP Address:
Username:
Password:
Reconnect Mode:
Maximum Idle Time:
DNS Servers:
MTU:
Clone MAC Address:
Enter the IP address (Static PPTP only).
Enter the subnet mask.
Enter the Server IP Address provided by
your ISP.
Enter your PPTP username.
Enter your PPTP password and then retype
the password in the next box.
Select Always on, On Demand or
Manual.
Enter the time (in minutes) where the
router will disconnect if idle for the time
specified.
Enter the Primary and Secondary DNS
(Domain Name System) server IP address
assigned by your ISP.
You may need to change the MTU (Maximum
Transmission Unit) for optimal performance
with your specific ISP. The default MTU size
is 1400.
The default MAC address is set to the MAC address on the AP (Access Point). You can click the Clone Your PC’s MAC
Address button to replace the AP’s MAC address with the MAC address of your Ethernet card. It is not recommended
that you change the default MAC address unless required by your ISP.
72D-Link DAP-1350 User Manual
Section 3 - Configuration
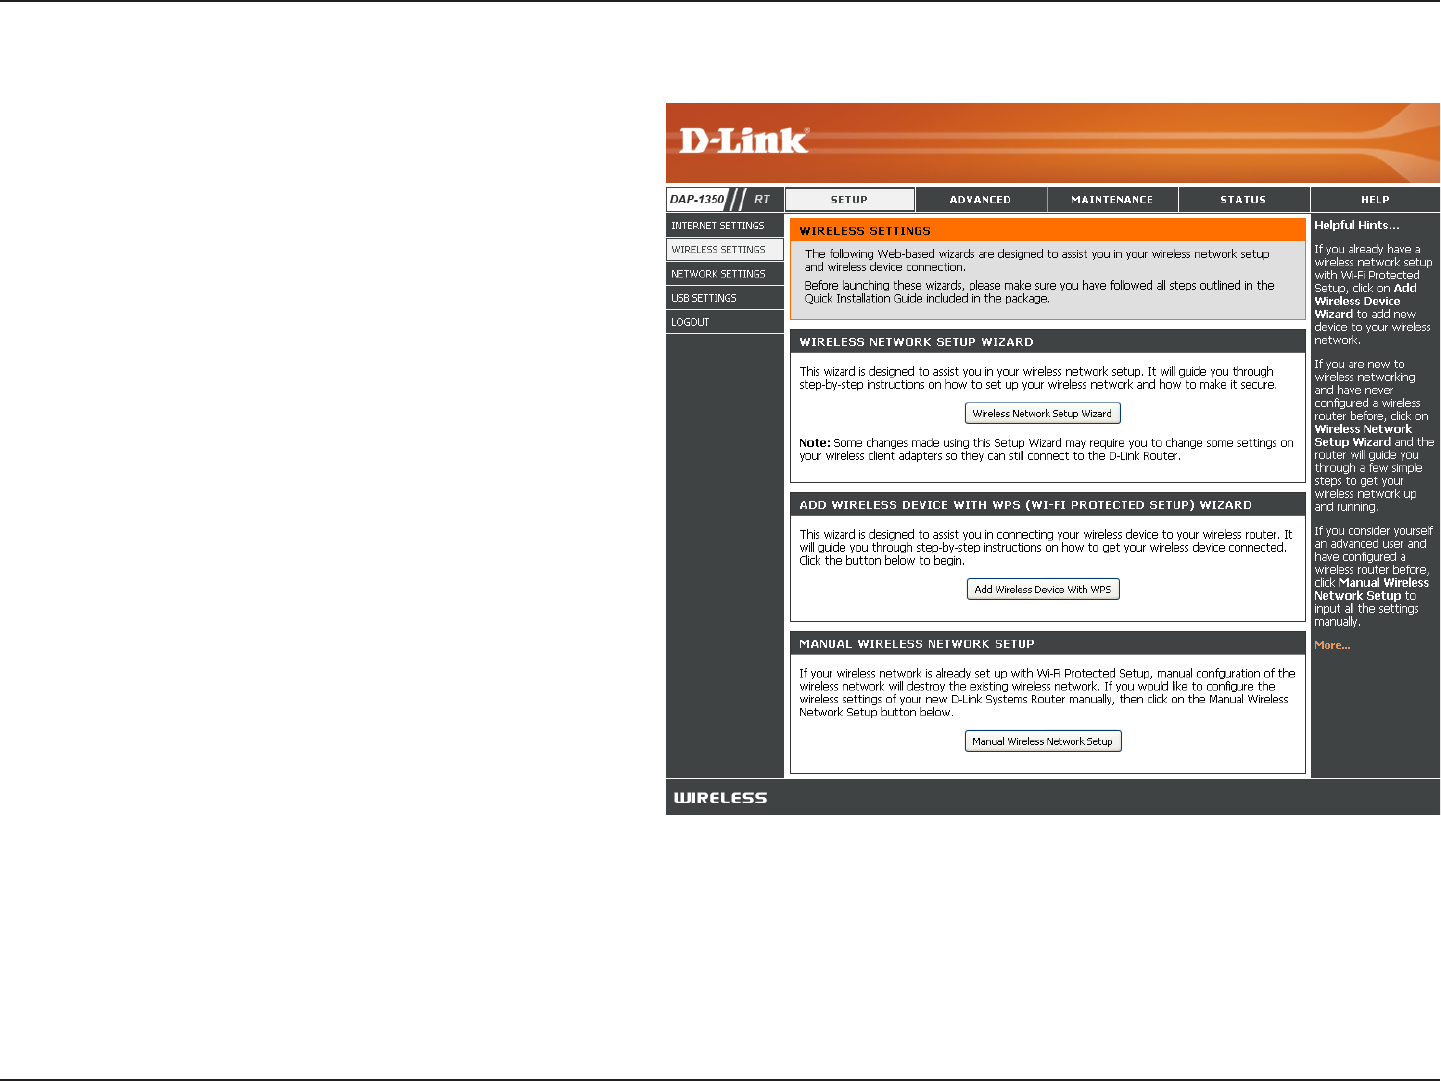
Wireless Setup Wizard
You may click Wireless Network Setup Wizard
to quickly configure your router. Refer to the next
page.
To set up your wireless network, click Add Wireless
Device With WPS and skip to page 76.
If you want to enter your settings without running the
wizard, click Manual Wireless Network Setup and
skip to page 77.
73D-Link DAP-1350 User Manual
Section 3 - Configuration
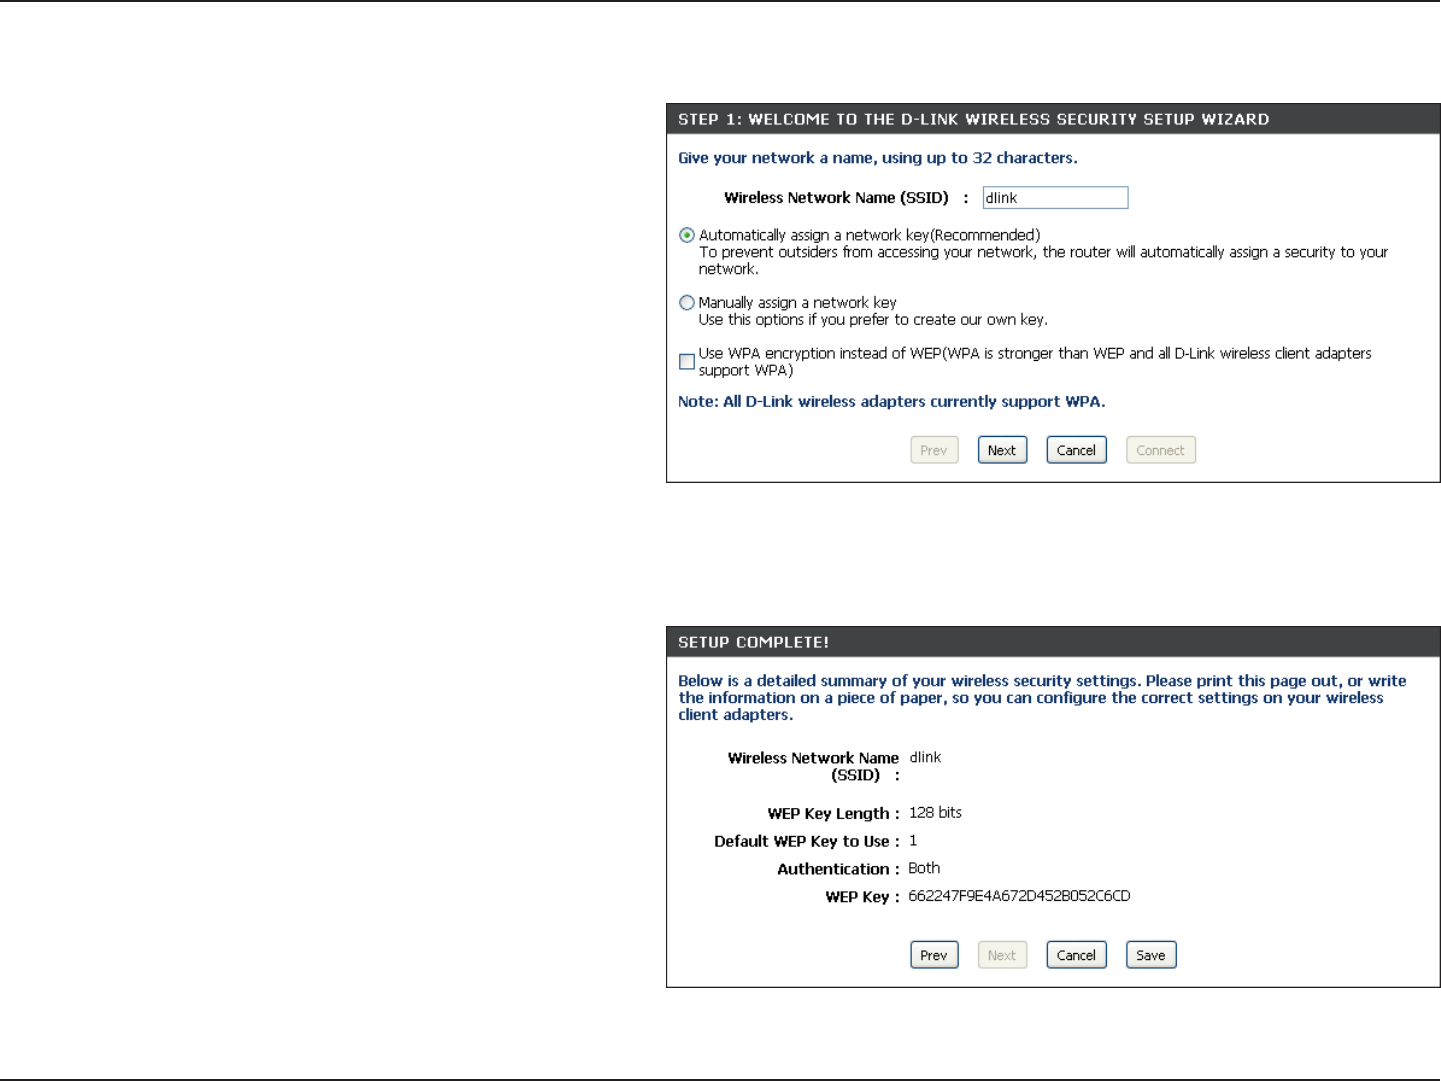
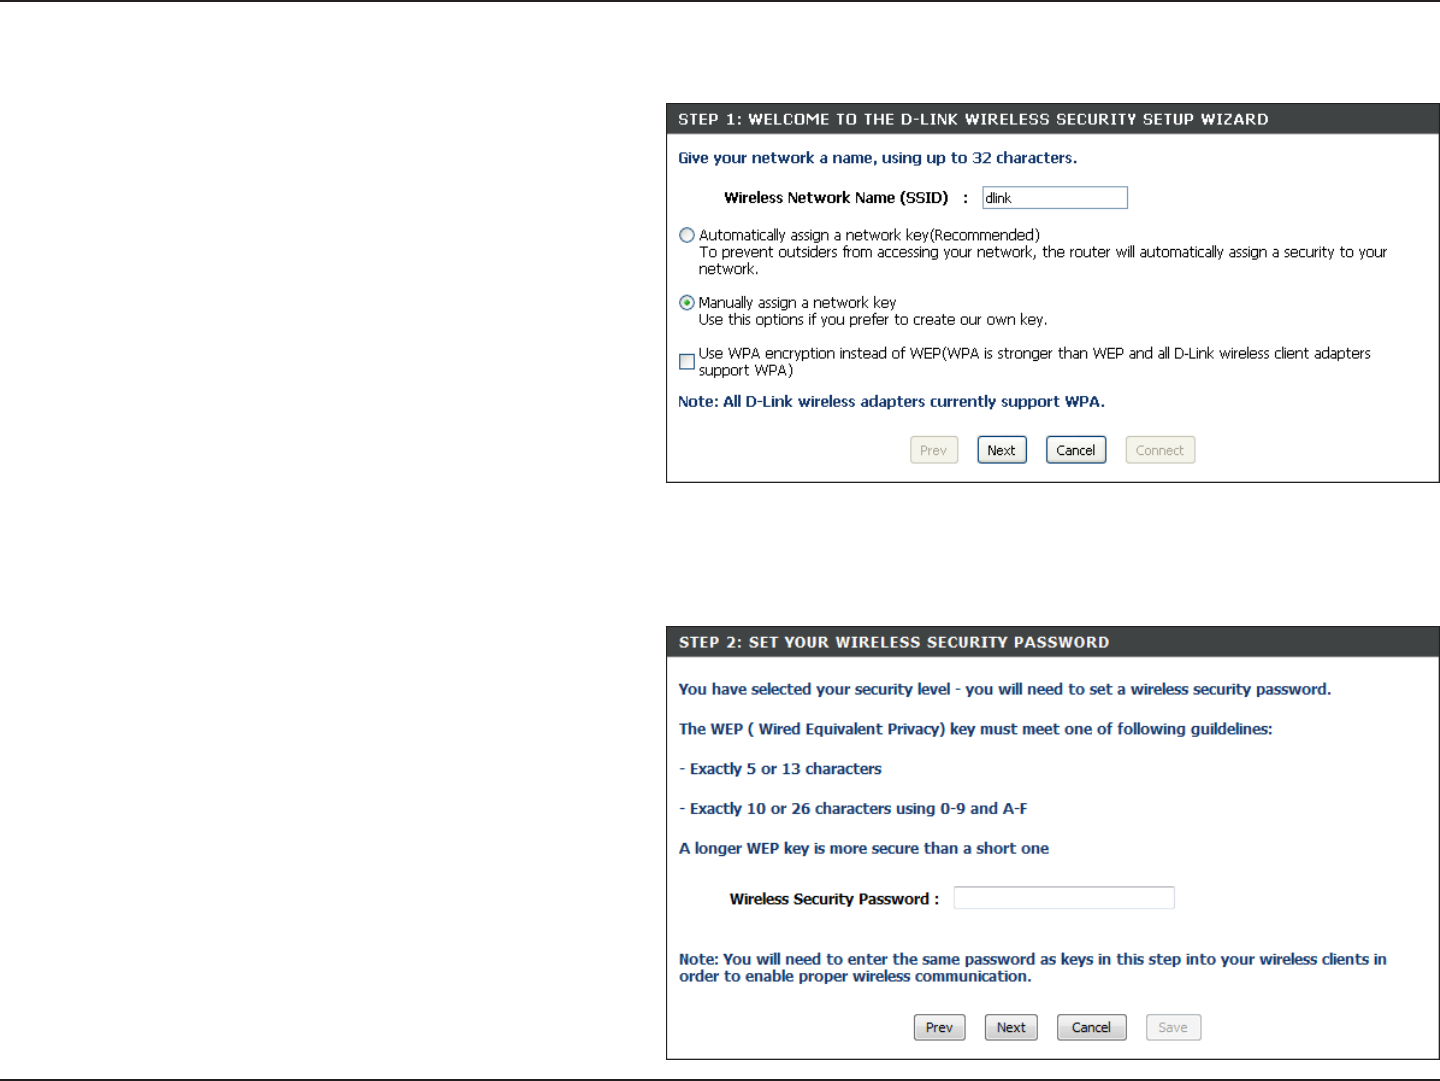
Type your desired wireless network name (SSID).
Automatically: Select this option to automatically
generate the router’s network key and click
Next.
Manually: Select this option to manually enter
your network key and click Next.
If you selected Automatically, the summary window
will display your settings. Write down the security key
and enter this on your wireless clients. Click Save to
save your settings.
74D-Link DAP-1350 User Manual
Section 3 - Configuration
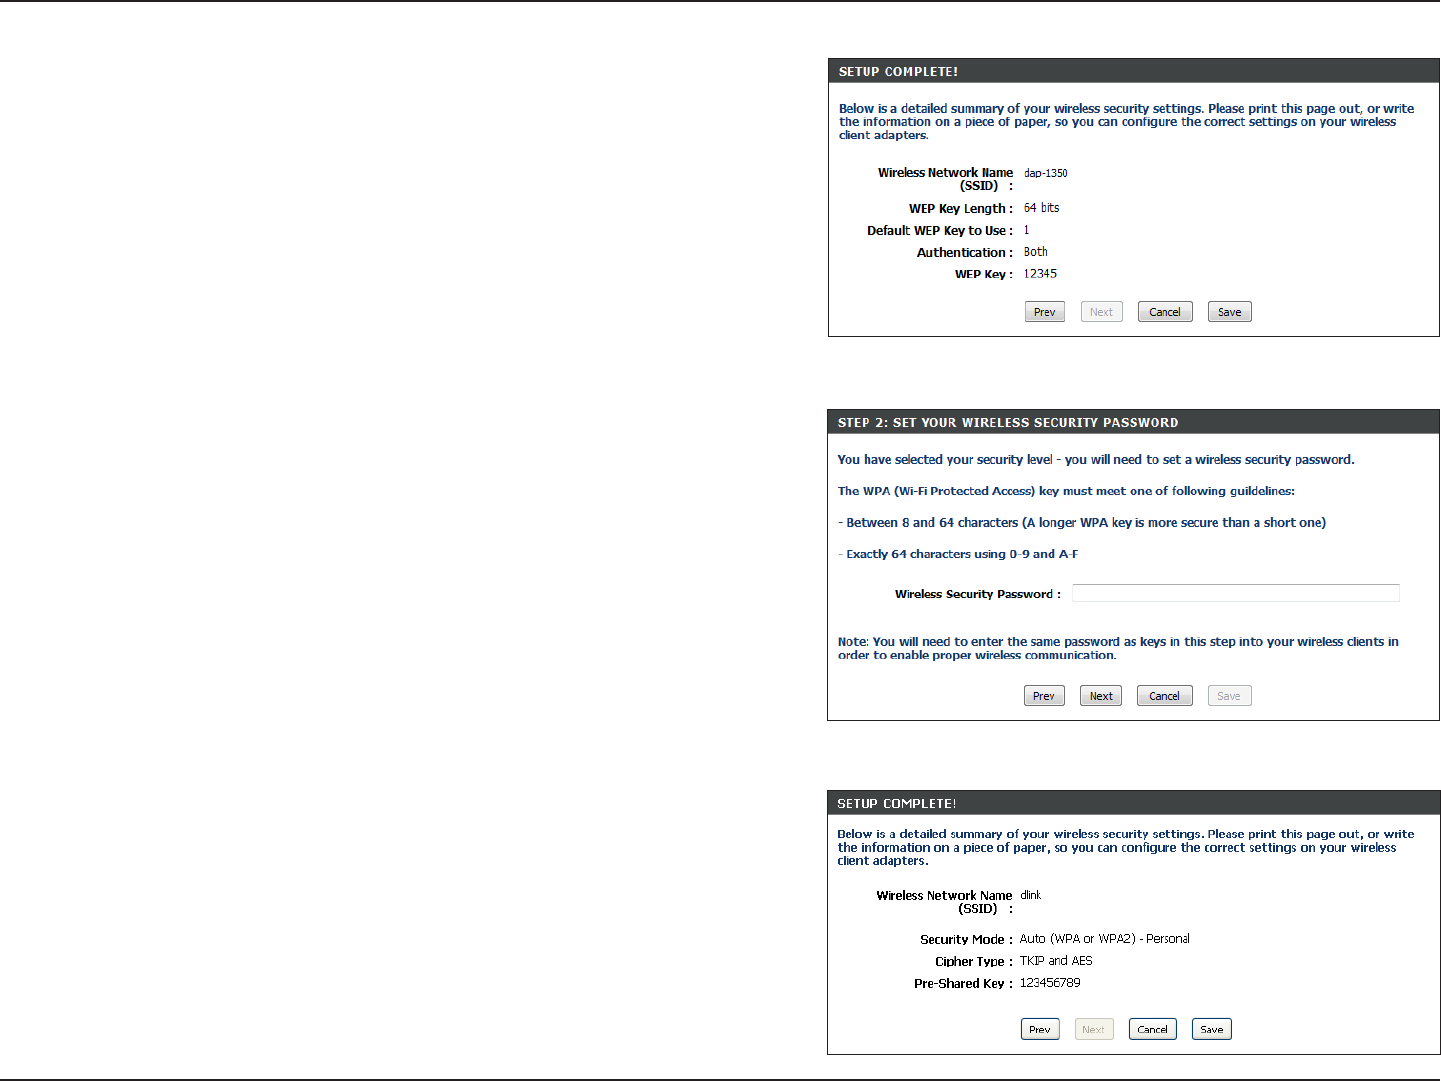
If you selected Manually assign a network key as
the configuration method, enter your network key.
This key must be entered on your wireless clients.
Check the Use WPA encryption instead of WEP
box to use WPA Encryption instead of WEP.
Click Next to continue.
For WEP encryption, enter a Network Key exactly 5
or 13 characters long or exactly 10 or 26 characters
using 0-9 and A-F.
Click Next to continue.
75D-Link DAP-1350 User Manual
Section 3 - Configuration
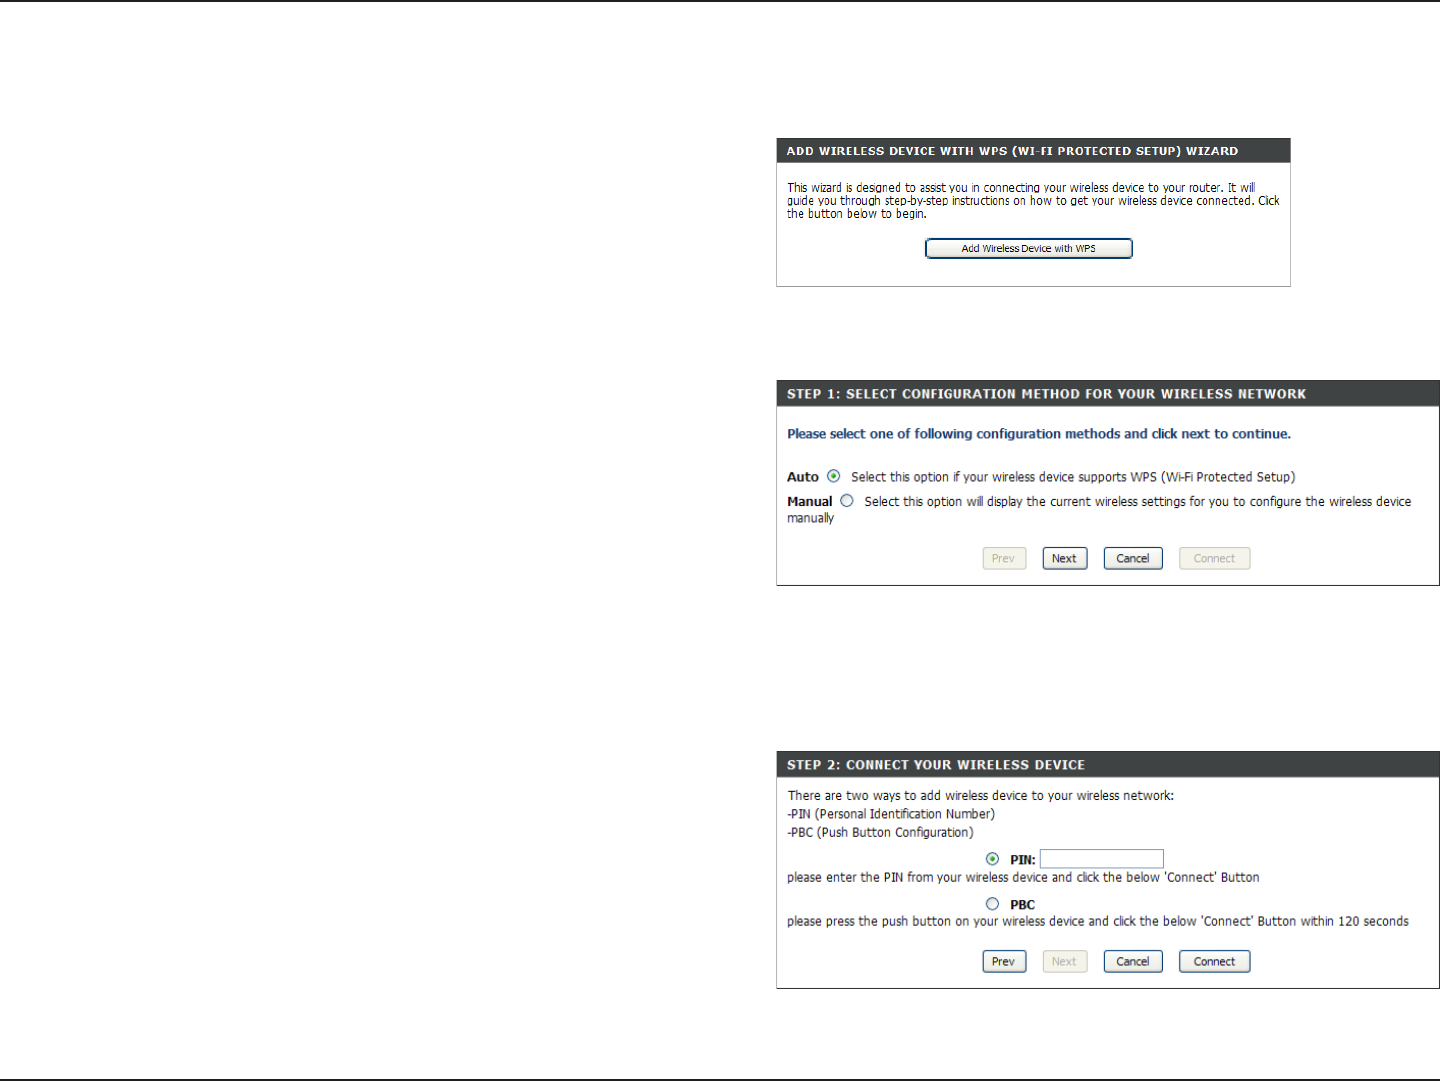
If you select WPA, enter the wireless security password (8-32
characters). Click Next to complete the Setup Wizard.
Click Next to continue.
The summary screen will appear.
Click Save to continue.
The summary screen will appear.
Click Save to continue.
76D-Link DAP-1350 User Manual
Section 3 - Configuration
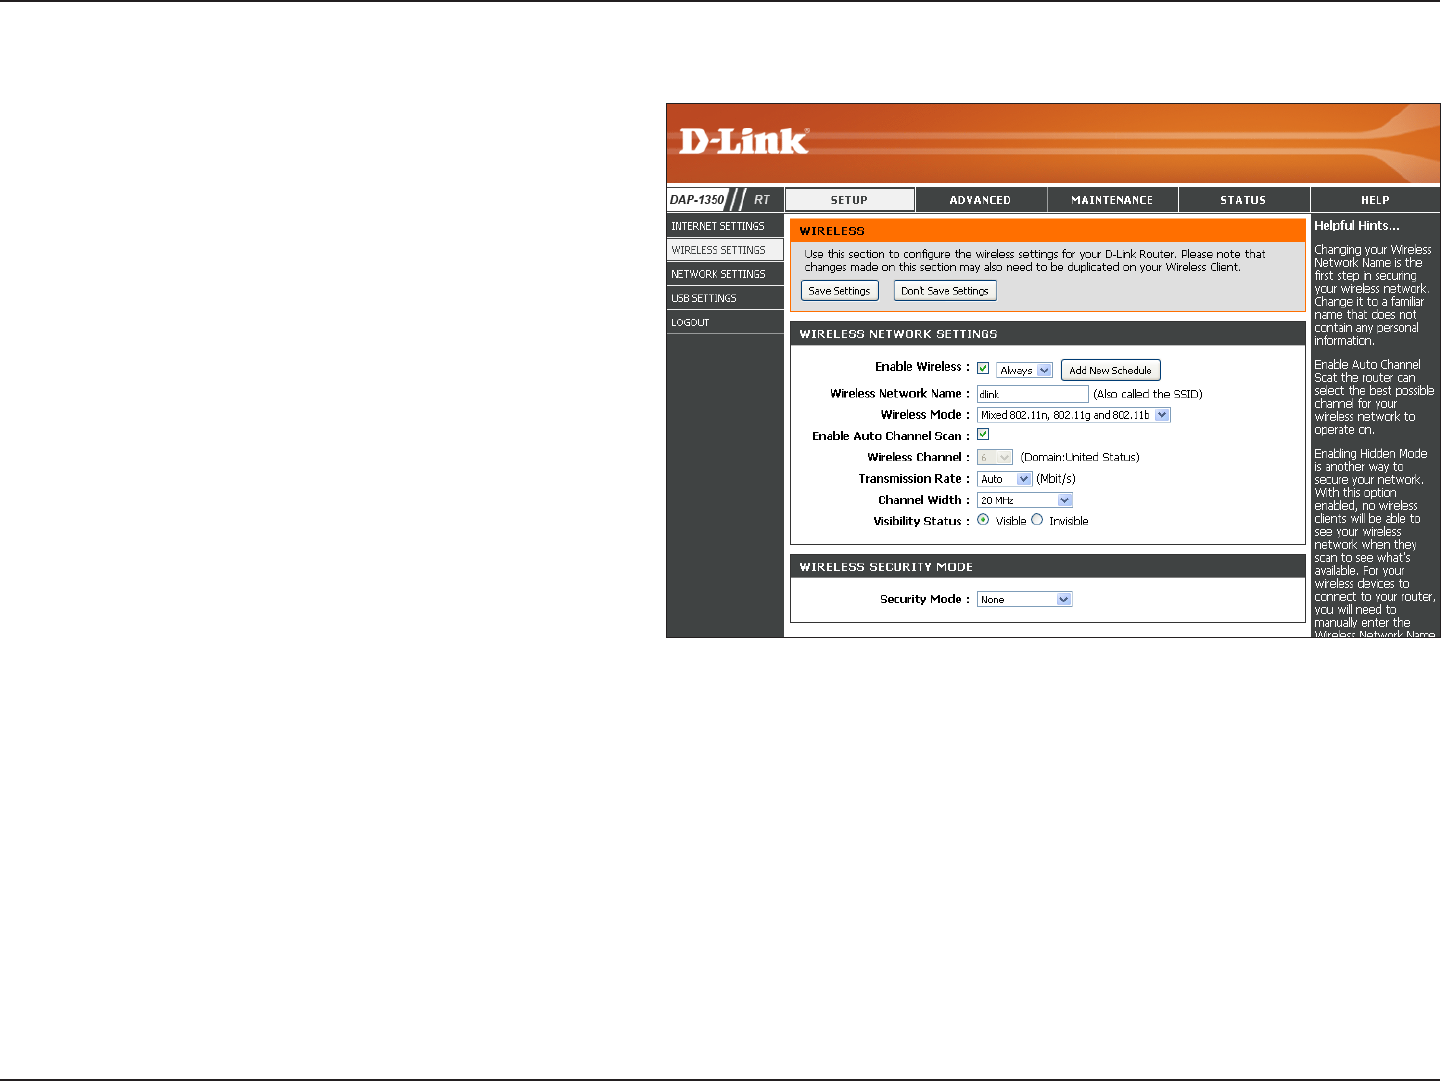
From the Setup > Wireless Settings screen, click Add
Wireless Device with WPS.
Add Wireless Device with WPS Wizard
PIN: Select this option to use PIN method. In order to use this
method you must know the wireless client’s 8 digit PIN and
click Connect.
PBC: Select this option to use PBC (Push Button) method to
add a wireless client. Click Connect.
Select Auto to add a wireless client using WPS (Wi-Fi Protected
Setup). Once you select Auto and click Connect, you will have
a 120 second time limit to apply the settings to your wireless
client(s) and successfully establish a connection.
If you select Manual, a settings summary screen will appear.
Write down the security key and enter this on your wireless
clients.
77D-Link DAP-1350 User Manual
Section 3 - Configuration
Wireless Settings
Enable Wireless:
Wireless Network
Name:
Wireless Mode:
Enable Auto
Channel Scan:
Wireless Channel:
Transmission Rate:
Channel Width:
Visibility Status:
Wireless Security
Mode:
Select this to turn the Wi-Fi module on and off.
Use the drop-down box to select if you want to
use a schedule. Click Add New Schedule to
add or change a schedule.
Enter a wireless network name (SSID) for your
network (up to 32 characters).
Select the appropriate 802.11 mode based
on the wireless clients in your network. The
drop-down menu options are 802.11g Only,
Mixed 802.11b/g, 802.11b Only, 802.11n Only,
or Mixed 802.11b/g/n.
Check this box to have the device automatically
scan for the best available channel.
Select a wireless channel. It is recommended
to use channels 1,6, or 11. This option will
be disabled if the Auto Channel Scan box is
checked.
Select the transmission rate. It is strongly suggested to use the Auto setting for optimal performance.
Select the appropriate channel width between 20MHz or Auto 20/40MHz from the drop-down menu.
Select Invisible if you do not want the SSID of your wireless network to be broadcast by the DAP-1350. If Invisible is selected,
the SSID of the DAP-1350 will not be seen by Site Survey utilities so your wireless clients will have to know the SSID of your
DAP-1350 in order to connect to it.
Select a wireless security setting. Options are None, WEP, WPA, or WPA2. Refer to the Wireless Security section of this
manual for a detailed explanation of the wireless security options.
78D-Link DAP-1350 User Manual
Section 3 - Configuration
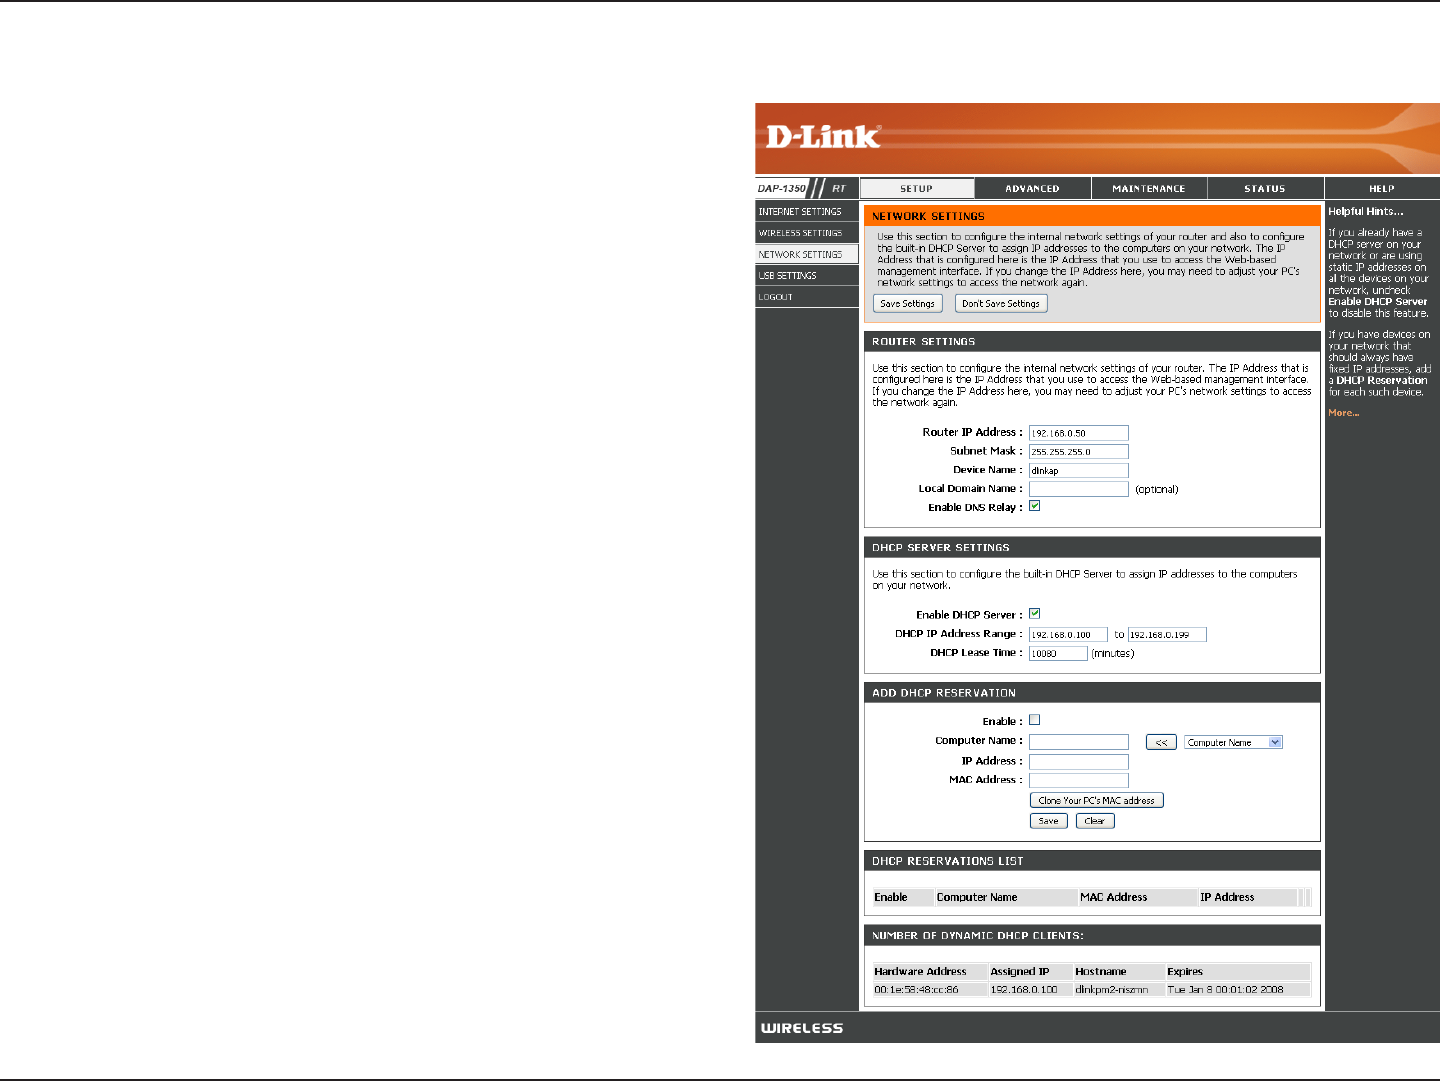
Network Settings
Enter the IP address of the router. The default IP
address is 192.168.0.1.
If you change the IP address, once you click Apply,
you will need to enter the new IP address in your
browser to get back into the configuration utility.
Enter the Subnet Mask. The default subnet mask is
255.255.255.0.
Enter the Domain name (Optional).
Uncheck the box to transfer the DNS server
information from your ISP to your computers. If
checked, your computers will use the router for a
DNS server.
IP Address:
Subnet Mask:
Local Domain:
Enable DNS Relay:
79D-Link DAP-1350 User Manual
Section 3 - Configuration
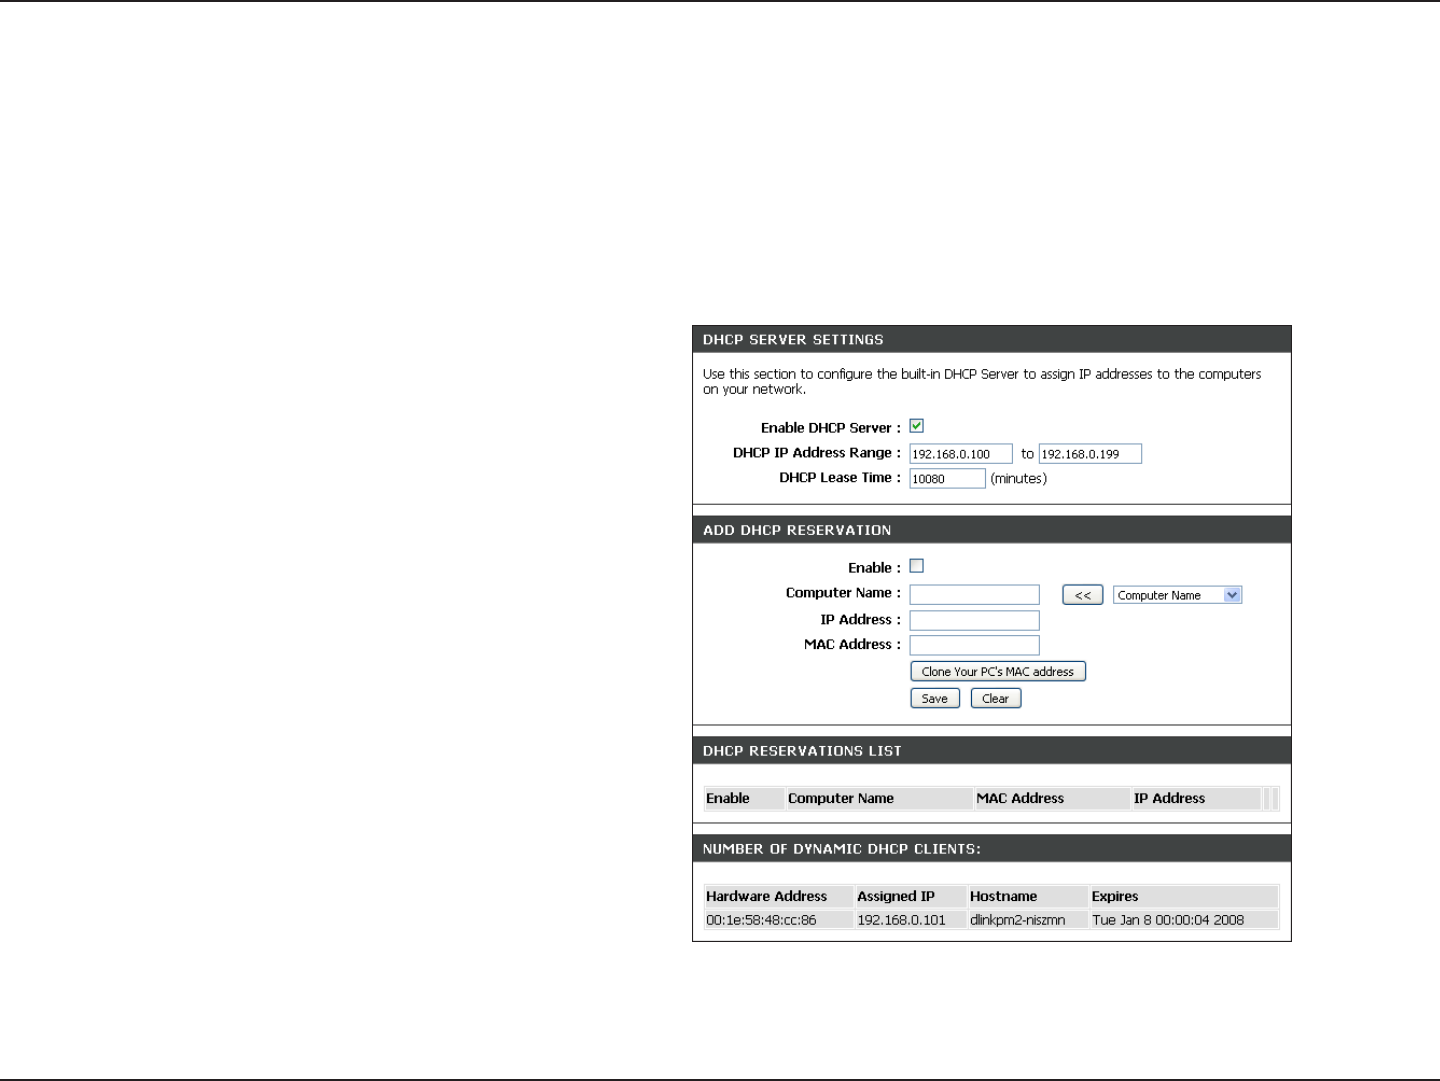
Check this box to enable the DHCP server on
your router. Uncheck to disable this function.
Enter the starting and ending IP addresses for
the DHCP server’s IP assignment.
Note: If you statically (manually) assign IP
addresses to your computers or devices, make
sure the IP addresses are outside of this range
or you may have an IP conflict.
The length of time for the IP address lease.
Enter the Lease time in minutes.
Refer to the next page for the DHCP Reservation
function.
Enable DHCP
Server:
DHCP IP Address
Range:
Lease Time:
Add DHCP
Reservation:
DHCP Server Settings
DHCP stands for Dynamic Host Control Protocol. The DAP-1350 has a built-in DHCP server. The DHCP Server will
automatically assign an IP address to the computers on the LAN/private network. Be sure to set your computers to be
DHCP clients by setting their TCP/IP settings to “Obtain an IP Address Automatically.” When you turn your computers on,
they will automatically load the proper TCP/IP settings provided by the DAP-1350. The DHCP Server will automatically
allocate an unused IP address from the IP address pool to the requesting computer. You must specify the starting and
ending address of the IP address pool.