D Link DI774VB1 Tri-Mode Dualband Wireless Router User Manual di764 manual 104
D Link Corporation Tri-Mode Dualband Wireless Router di764 manual 104
D Link >
Contents
- 1. Users Manual 1
- 2. Users Manual 2
- 3. Users Manual 3
Users Manual 2
31
Using the Configuration Menu (continued)
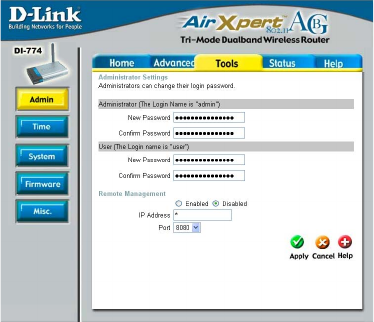
Administrator
Login Name-
admin (lower case) is
the default login name
for the admin account.
The admin account
has read/write access
to the router.
User
Login Name-
user (lower case) is
the default login
name for the user ac-
Admin Password- The default setting is blank - no password. To change the pass-
word, enter and confirm the new password.
User Password- The default setting is blank - no password. To change the pass-
word, enter and confirm the new password.
CTS Mode- CTS (Clear To Send) is a function used to minimize collisions
among wireless devices on a wireless local area network (LAN).
CTS will make sure the wireless network is clear before a wire-
less client attempts to send wireless data. Enabling CTS will
add overhead and may lower wireless throughput.
Auto- CTS will monitor the wireless network and automati-
cally decide whether to implement CTS based on
the amount of traffic and collisions that occurs on
the wireless network.
Always- CTS will always be used to make sure the wireless
LAN is clear before sending data.
None- CTS is typically used in a pure 802.11g environment.
If CTS is set to “None” in a mixed mode environment
populated by 802.11b clients, wireless collisions may
occur frequently.
Advanced > Performance > 802.11g (continued)
Tools> Admin
802.11g only mode- Select this mode to restrict your network to only those devices
that employ the 802.11g standard. Enabling this mode will en-
sure that you maintain the highest connectivity rate, unhampered
by any connection to an 802.11b device.
32
Using the Configuration Menu (continued)
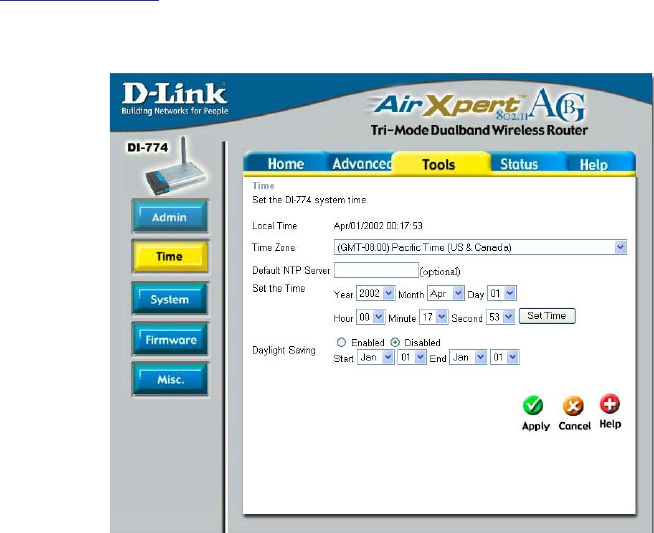
Tools > Time
Remote Management
Remote Management allows the DI-774 to be configured from the Internet by a web
browser. A username and password is still required to access the Web-Management
interface. In general, only a member of your network can browse the built-in web pages
to perform “Administrator” tasks. This feature enables you to perform “Administrator”
tasks from the remote (Internet) host.
IP Address: Internet IP Address of the computer that has access to the Router. It is not
recommended that you set the IP Address to * (star), because this allows any Internet
IP Address to access the Router, which could result in a loss of security for your network.
If you elect to enable Remote Management, make sure to enter the IP Address of the
remote computer allowed to configure the DI-774.
Port: For security purposes, select a separate port number used to access the Router.
(The following is an example only; you may use a different port number.)
Example: http://x.x.x.x:8080 where x.x.x.x is the WAN IP Address of the Router and
8080 is the port used for the Web-Management interface.
Default
NTP Server- NTP is short for Network Time Protocol. NTP synchronizes com-
puter clock times in a network of computers.
This field is optional.
Time settings- In this window you can choose the time zone; set the time;
and enable or disable Daylight Savings Time.
Tools> Admin (continued)
33
Using the Configuration Menu (continued)
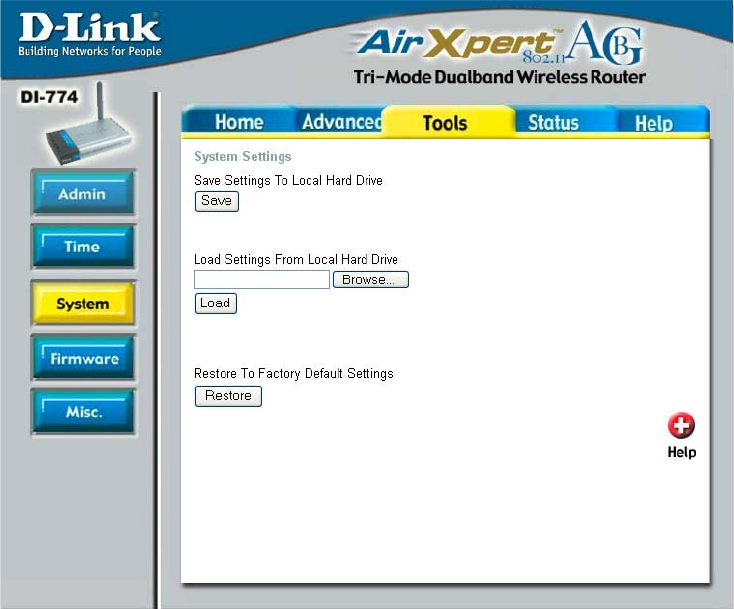
Tools > System
System Settings
Click Save to save the current settings to the local Hard Drive
Click Browse to find the settings, then click Load
Save Settings to
Local Hard Drive-
Load Settings from
Local Hard Drive-
Restore to Factory
Default Settings- Click Restore to restore the factory default settings
34
Using the Configuration Menu (continued)
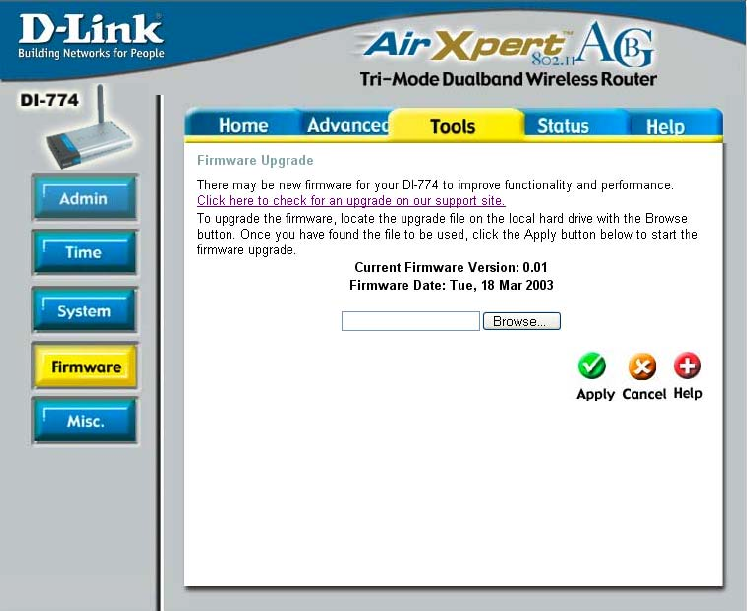
Tools > Firmware
Firmware
Upgrade-
Browse-
Click on the link in this screen to find out if there is an updated
firmware; if so, download the new firmware to your hard drive.
After you have downloaded the new firmware, click Browse in
this window to locate the firmware update on your hard drive.
Click Apply to complete the firmware upgrade.

35
Using the Configuration Menu (continued)
Tools > Misc
Ping Test- The Ping Test is used to send Ping packets to test if a computer
is on the Internet. Enter the IP Address that you wish to Ping,
and click Ping
Restart Device- Click Reboot to restart the DI-774
Block WAN Ping- If you choose to block WAN Ping, the WAN IP Address of the DI-
774 will not respond to pings. Blocking the Ping may provide
some extra security from hackers.
Discard Ping
from WAN side- Click Enabled to block the WAN ping
VPN
Pass Through-
PPTP- select Enabled or Disabled
IPSec- select Enabled or Disabled
The DI-774 supports VPN (Virtual Private Network) pass-through
for both PPTP (Point-to-Point Tunneling Protocol) and IPSec
(IP Security). Once VPN pass-through is enabled, there is no
need to open up virtual services. Multiple VPN connections can
be made through the DI-774. This is useful when you have many
VPN clients on the LAN network.
DDNS- Fill in the required fields to use the Dynamic Domain Name Ser-
vice (DDNS) feature.
DDNS-
Dynamic
Domain Name
System is a
method to
keep domain
names linked
to changing IP
Addresses. In
this way,
changing IP
Addresses
(e.g., via
DHCP) will not
interfere with
network
connectivity.
36
Using the Configuration Menu (continued)
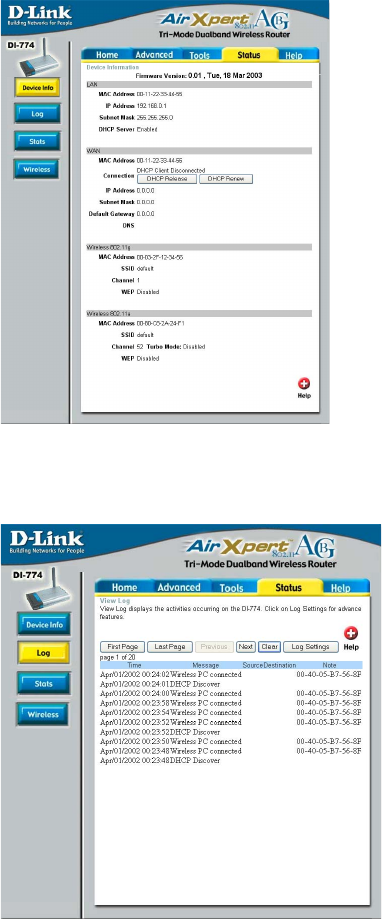
Status > Device Info
Device Information- This screen displays information about the DI-774
Status > Log
For advanced features, click on Log Settings
Log Settings-
View Log- This screen displays the activity on the DI-774
37
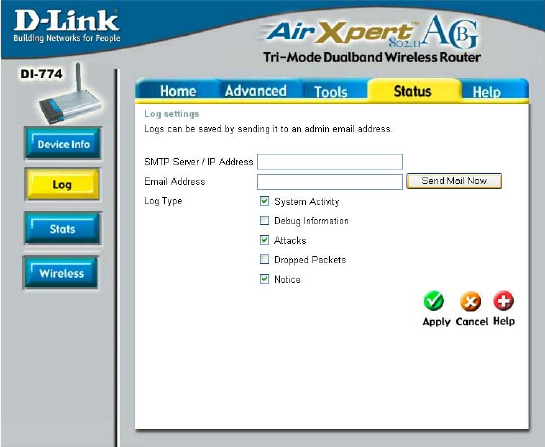
Using the Configuration Menu (continued)
Status > Log > Log Settings
Enter the email address of the recipient who will receive the
email logs.
SMTP Server/
IP Address- Enter the proper SMTP Server information or the IP Address
Email Address-
The administrator can specify which surveillance they want to
log. Check mark the box for specific activities.
Log Type-
38
Status > Wireless
Connected
Wireless
Client List-
Using the Configuration Menu (continued)
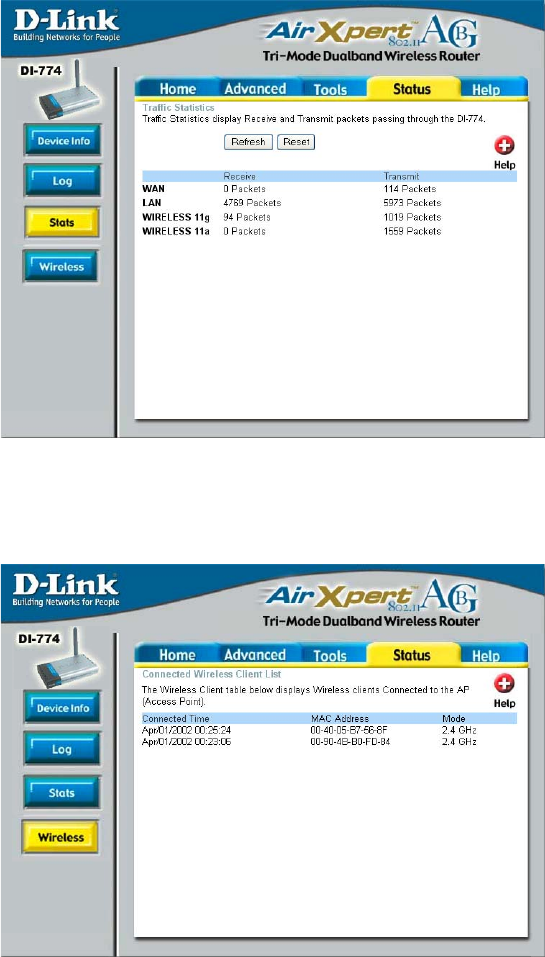
Status > Stats
Traffic Statistics- Displays the receive and transmit packets that are passing through
the DI-774. Click on Refresh, for the most recent information.
Click Reset to reset the counters back to zero.
Displays the wireless clients that are connected to the Access
Point function of the DI-774.
39
Using the Configuration Menu (continued)
Help
Help- Displays the complete Help menu. For help at anytime, click
the Help tab in the Configuration menu.
40
Using the Network Setup Wizard in Windows XP
In this section you will learn how to establish a network at home or work, using
Microsoft Windows XP.
Note: Please refer to websites such as http://www.homenethelp.com
and http://www.microsoft.com/windows2000 for information about networking
computers using Windows 2000, ME or 98.
Go to Start>Control Panel>Network Connections
Select Set up a home or small office network
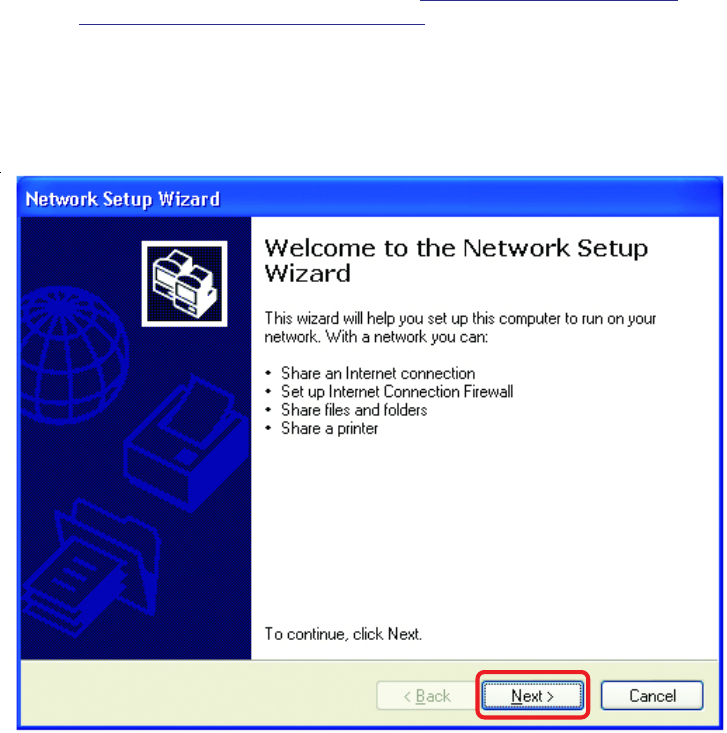
Networking Basics
When this screen appears, Click Next.
41
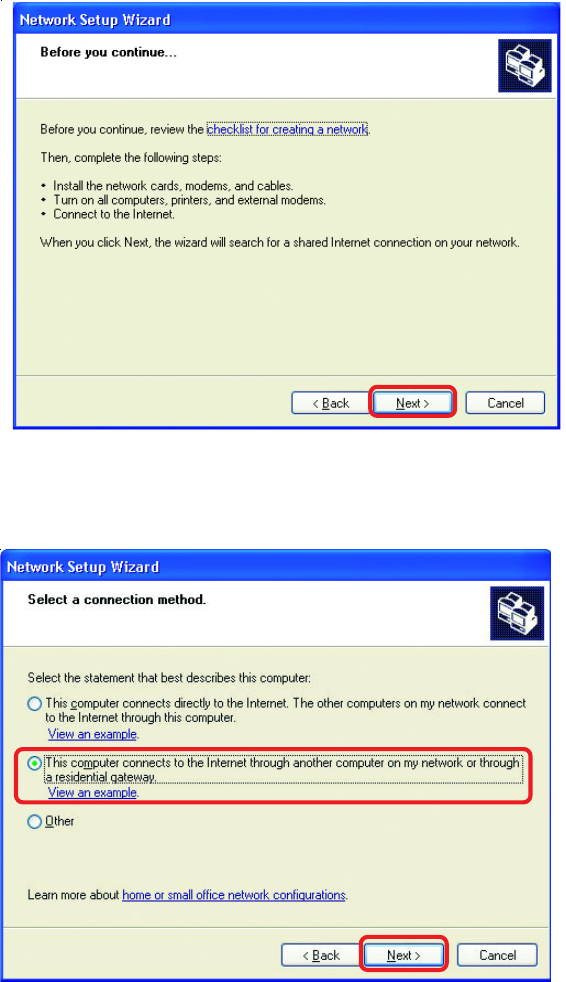
Please follow all the instructions in this window:
Networking Basics
Click Next
In the following window, select the best description of your computer. If your
computer connects to the internet through a gateway/router, select the second option
as shown.
Click Next
42
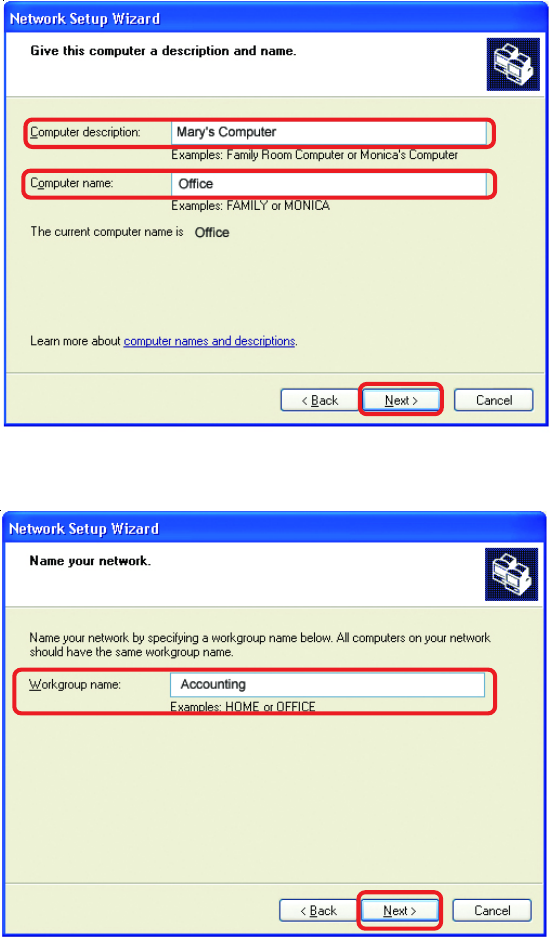
Enter a Computer description and a Computer name (optional.)
Networking Basics
Click Next
Enter a Workgroup name. All computers on your network should have the same
Workgroup name.
Click Next
43
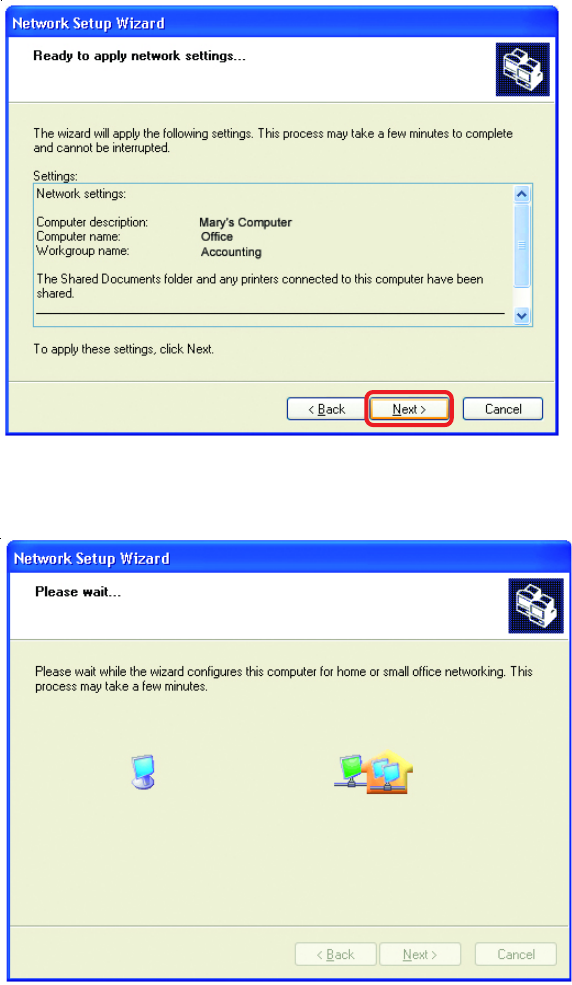
Please wait while the Network Setup Wizard applies the changes.
Networking Basics
When the changes are complete, click Next.
Please wait while the Network Setup Wizard configures the computer.
This may take a few minutes.
44
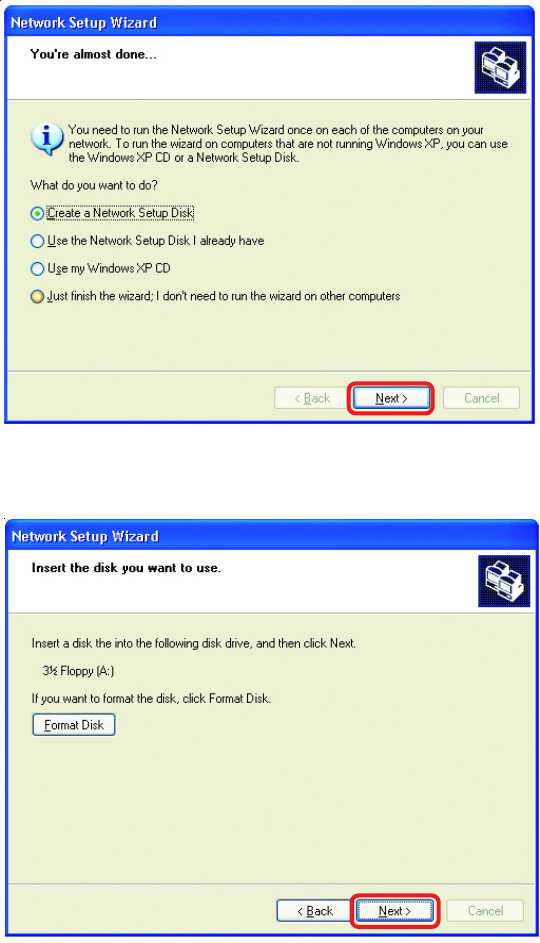
Networking Basics
In the window below, select the option that fits your needs. In this example, Create a
Network Setup Disk has been selected. You will run this disk on each of the
computers on your network. Click Next.
Insert a disk into the Floppy Disk drive, in this case drive A.
45
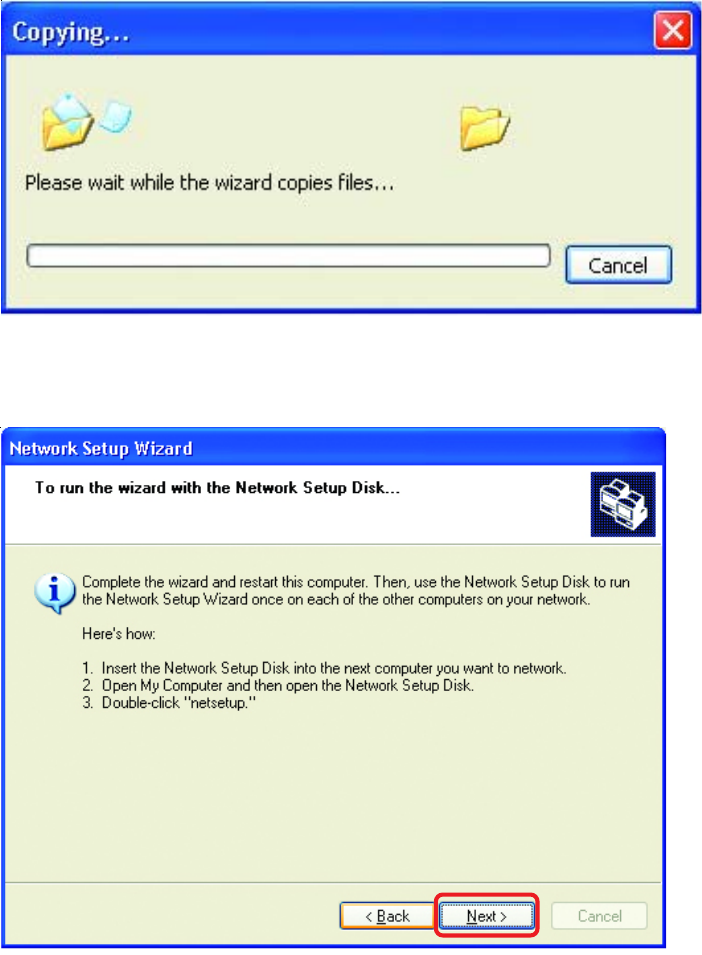
Networking Basics
Please read the information under Here’s how in the screen below. After you com-
plete the Network Setup Wizard you will use the Network Setup Disk to run the
Network Setup Wizard once on each of the computers on your network. To continue
click Next.
46
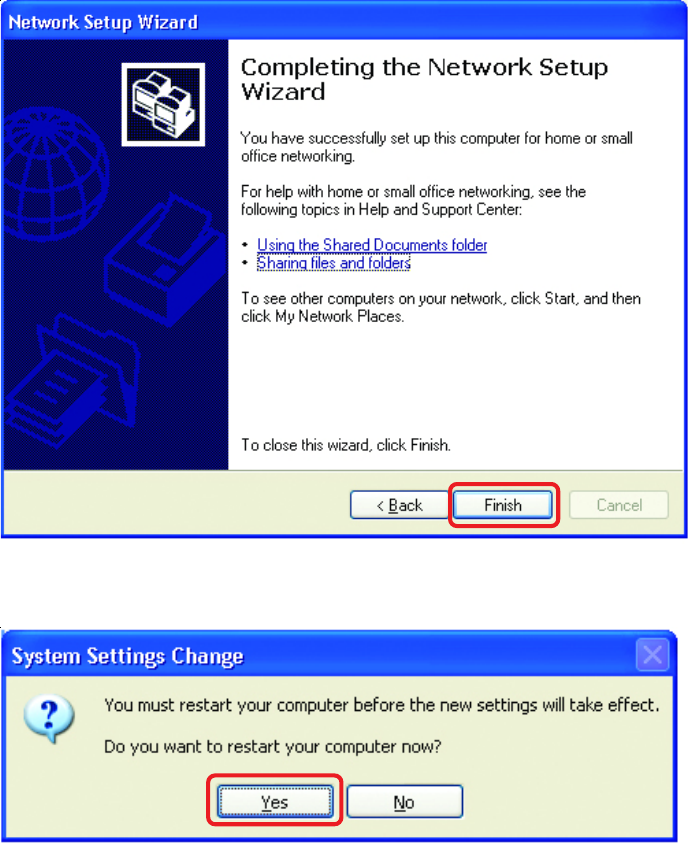
Networking Basics
Please read the information on this screen, then click Finish to complete the
Network Setup Wizard.
The new settings will take effect when you restart the computer. Click Yes to restart
the computer.
You have completed configuring this computer. Next, you will need to run the Network
Setup Disk on all the other computers on your network. After running the Network
Setup Disk on all your computers, your new wireless network will be ready to use.
47
!
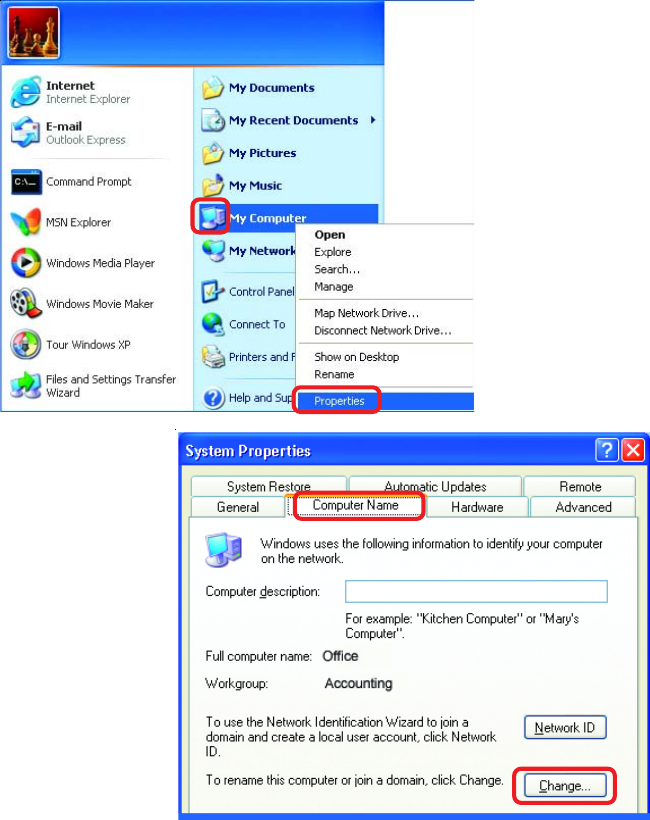
Networking Basics
Naming your Computer
To name your computer, please follow these directions:In Windows XP:
Click Start (in the lower left corner of the screen)
Right-click on My Computer
Select Properties and click
!
!
!
!
!
Select the Computer
Name Tab in the System
Properties window.
You may enter a Com-
puter Description if you
wish; this field is optional.
To rename the computer
and join a domain, Click
Change.
48
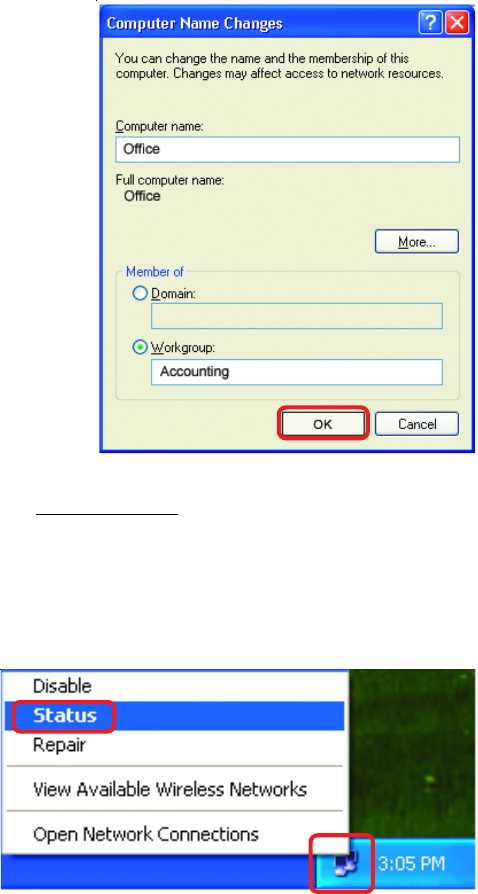
Networking Basics
Naming your Computer
!In this window, enter the
Computer name
Select Workgroup and enter
the name of the Workgroup
All computers on your network
must have the same
Workgroup name.
Click OK
!
!
!
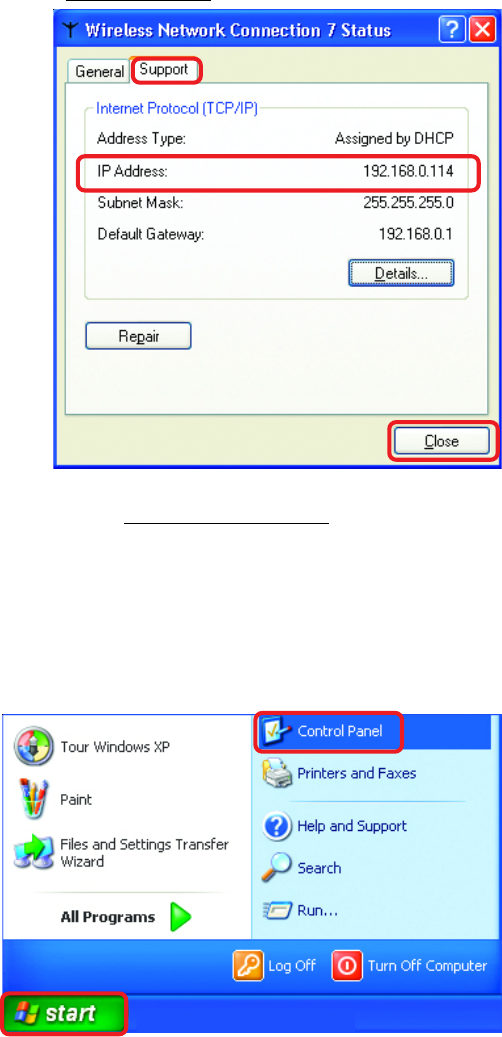
Checking the IP Address in Windows XP
The wireless adapter-equipped computers in your network must be in the same IP Ad-
dress range (see Getting Started in this manual for a definition of IP Address Range.) To
check on the IP Address of the adapter, please do the following:
Right-click on the
Local Area
Connection icon
in the task bar
Click on Status
!
!
49
Networking Basics
Checking the IP Address in Windows XP
This window will appear.
Click the
Support tab
Click Close
!
!
Assigning a Static IP Address in Windows XP/2000
Note: Residential Gateways/Broadband Routers will automatically assign IP Ad-
dresses to the computers on the network, using DHCP (Dynamic Host Configura-
tion Protocol) technology. If you are using a DHCP-capable Gateway/Router you
will not need to assign Static IP Addresses.
If you are not using a DHCP capable Gateway/Router, or you need to assign a Static IP
Address, please follow these instructions:
!
!
Go to Start
Double-click on
Control Panel

50
Networking Basics
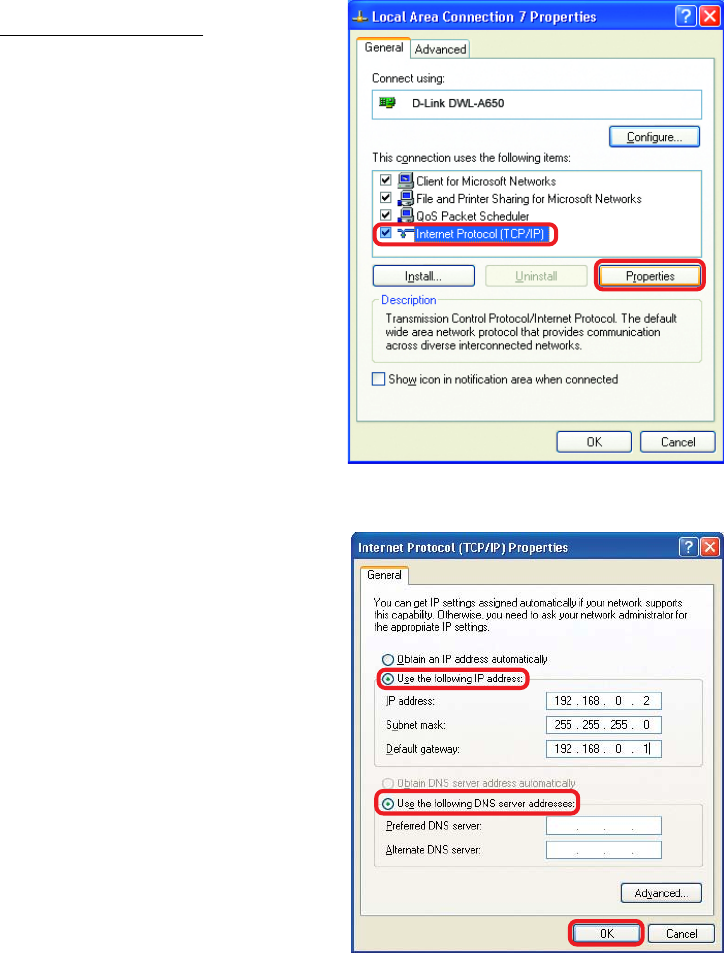
Assigning a Static IP Address in Windows XP/2000
!Double-click on
Network
Connections
!
!Double-click on
Properties
Right-click on Local Area
Connections
51
Networking Basics
Assigning a Static IP Address
in Windows XP/2000
Input your IP address and
subnet mask. (The IP
Addresses on your network
must be within the same
range. For example, if one
computer has an IP Address
of 192.168.0.2, the other
computers should have IP
Addresses that are
sequential, like 192.168.0.3
and 192.168.0.4. The
subnet mask must be the
same for all the computers
on the network.
!
The DNS server address will be supplied by your ISP (Internet Service Provider).
If the DNS Server address is not available from your ISP, you may input 192.168.0.1
in this field.
Click on Internet Protocol
(TCP/IP)
Click Properties
!
!
!
!Click OK
! Enter the IP Address
of the Default
Gateway (in this case
it is 192.168.0.1 for
the DI-774)
Input your DNS server
address.
52
Networking Basics
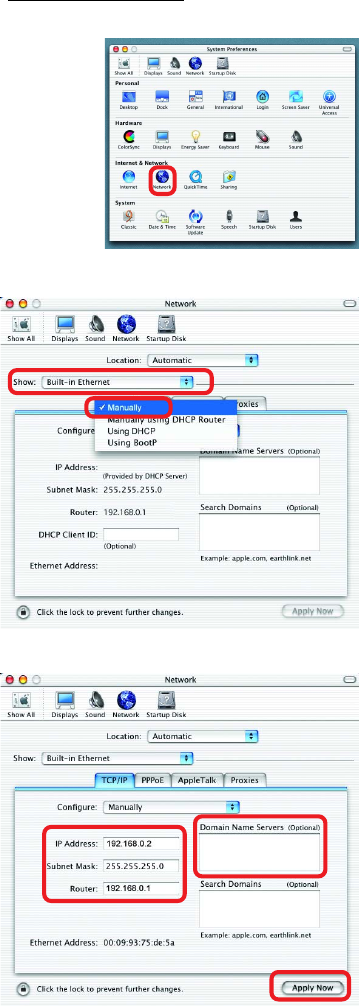
Assigning a Static IP Address with Macintosh OSX
!
!
!
!
Go to the Apple Menu and se-
lect System Preferences
cClick on Network
Select Built-in Ethernet in the
Show pull-down menu
Select Manually in the
Configure pull-down menu
!Input the Static IP Address,
the Subnet Mask and the
Router IP Address in the
appropriate fields
Input the Domain Name
Server address. Your ISP
(Internet Service Provider)
will provide the IP address of
the DNS Server. If the DNS
Server address is not avail-
able from your ISP, you may
input 192.168.0.1 in this field.
!
!Click Apply Now
53
Networking Basics
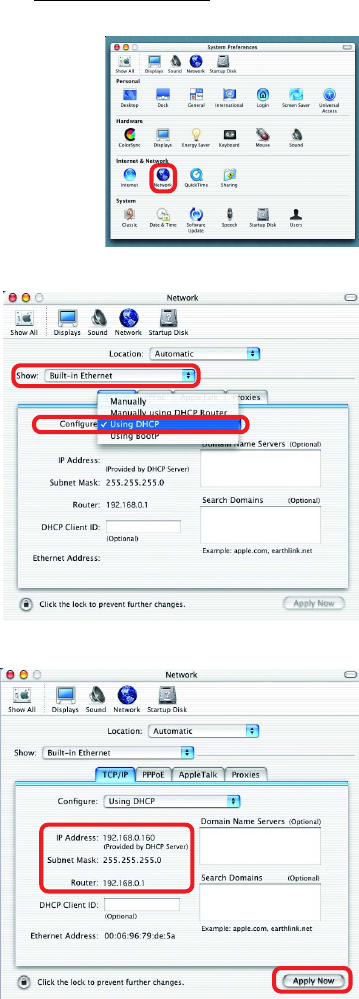
Selecting a Dynamic IP Address with Macintosh OSX
Go to the Apple Menu and select
System Preferences
Click on Network
Select Built-in Ethernet in the
Show pull-down menu
Select Using DHCP in the
Configure pull-down menu
Click Apply Now
The IP Address, Subnet
mask, and the Router’s IP
Address will appear in a few
seconds
!
!
!
!
!
!
54
Networking Basics
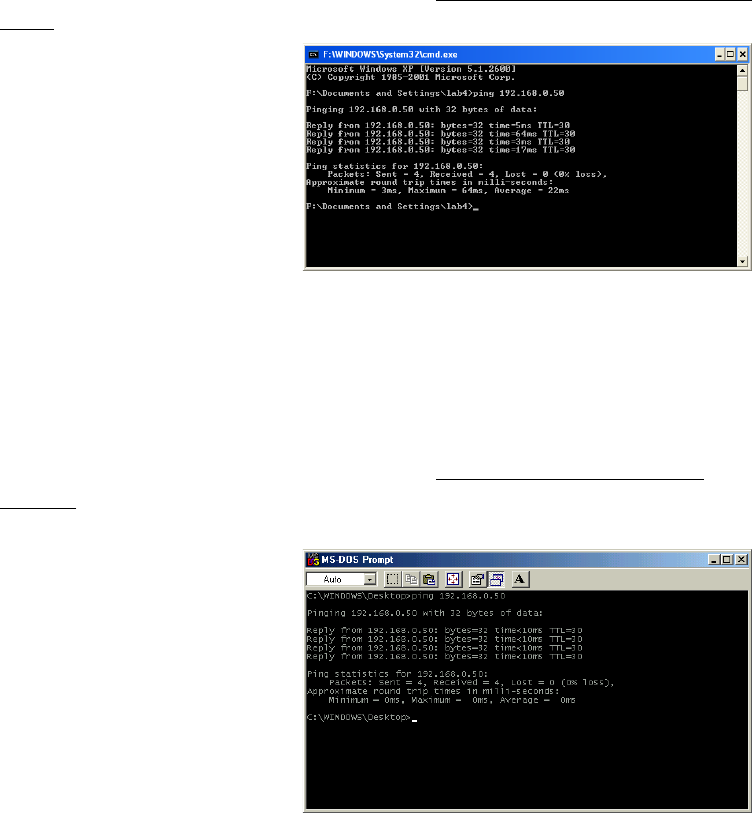
Checking the Wireless Connection by Pinging in Windows XP and
2000
Checking the Wireless Connection by Pinging in Windows Me
and 98
Go to Start > Run >
type cmd. A window
similar to this one
will appear. Type
ping
xxx.xxx.xxx.xxx,
where xxx is the IP
Address of the
Wireless Router or
Access Point. A
good wireless
connection will show
four replies from the
Wireless Router or
Acess Point, as
shown.
Go to Start > Run
> type command.
A window similar to
this will appear.
Type ping
xxx.xxx.xxx.xxx
where xxx is the IP
Address of the
Wireless Router or
Access Point. A
good wireless
connection will
show four replies
from the wireless
router or access
point, as shown.
!
!
55
Troubleshooting
Note: If you have changed
the default IP Address,
make sure to ping the cor-
rect IP Address assigned
to the DI-774.
1.The computer used to configure the DI-774 cannot access the
Configuration menu.
Check that the Ethernet LED on the DI-774 is ON. If the LED is not
ON, check that the cable for the Ethernet connection is securely
inserted.
Check that the Ethernet Adapter is working properly. Please see
item 3 (Check that the drivers for the network adapters are
installed properly) in this Troubleshooting section to check that
the drivers are loaded properly.
Check that the IP Address is in the same range and subnet as the
DI-774. Please see Checking the IP Address in Windows XP in
the Networking Basics section of this manual.
Note: The IP Address of the DI-774 is 192.168.0.1. All the computers on the
network must have a unique IP Address in the same range, e.g., 192.168.0.x.
Any computers that have identical IP Addresses will not be visible on the
network. They must all have the same subnet mask, e.g., 255.255.255.0
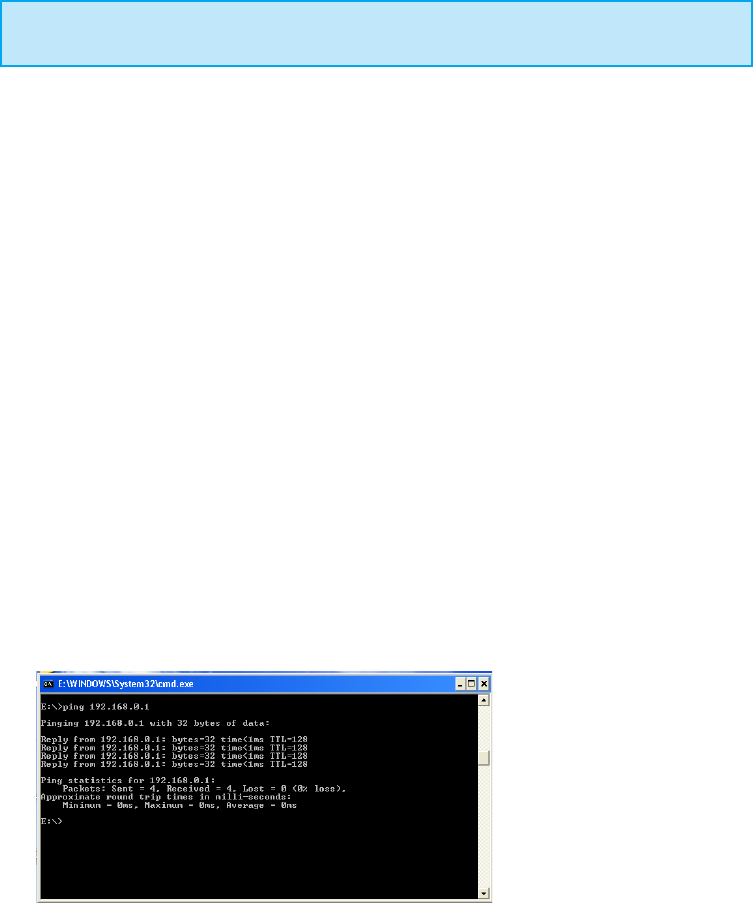
Do a Ping test to make sure that the DI-774 is responding. Go to
Start>Run>Type Command>Type ping 192.168.0.1. A successful
ping will show four replies.
This Chapter provides solutions to problems that can occur during the installation and
operation of the DI-774 Wireless Broadband Router. We cover various aspects of the
network setup, including the network adapters. Please read the following if you are
having problems.
Note: It is recommended that you use an Ethernet connection to
configure the DI-774 Wireless Broadband Router.
!
!
!
!
56
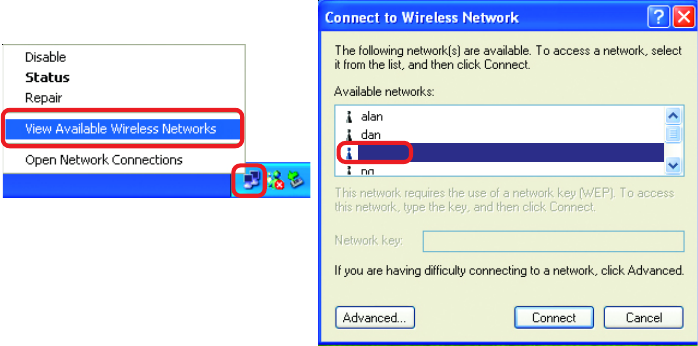
2. The wireless client cannot access the Internet in the
Infrastructure mode.
Make sure the wireless client is associated and joined with the correct Access
Point. To check this connection: Right-click on the Local Area Connection icon
in the taskbar> select View Available Wireless Networks. The Connect to
Wireless Network screen will appear. Please make sure you have selected the
correct available network, as shown in the illustrations below.
Troubleshooting
Check that the IP Address assigned to the wireless adapter is within the
same IP Address range as the access point and gateway. (Since the
DI-774 has an IP Address of 192.168.0.1, wireless adapters must have
an IP Address in the same range, e.g., 192.168.0.x. Each device must
have a unique IP Address; no two devices may have the same IP
Address. The subnet mask must be the same for all the computers on
the network.) To check the IP Address assigned to the wireless adapter,
double-click on the Local Area Connection icon in the taskbar >
select the Support tab and the IP Address will be displayed. (Please
refer to Checking the IP Address in the Networking Basics section of
this manual.)
If it is necessary to assign a Static IP Address to the wireless adapter,
please refer to the appropriate section in Networking Basics. If you are
entering a DNS Server address you must also enter the Default
Gateway Address. (Remember that if you have a DHCP-capable
router, you will not need to assign a Static IP Address. See
Networking Basics: Assigning a Static IP Address.)
default
!
!
57
Troubleshooting
3. Check that the drivers for the network adapters are
installed properly.
You may be using different network adapters than those illustrated here, but this
procedure will remain the same, regardless of the type of network adapters you are
using.
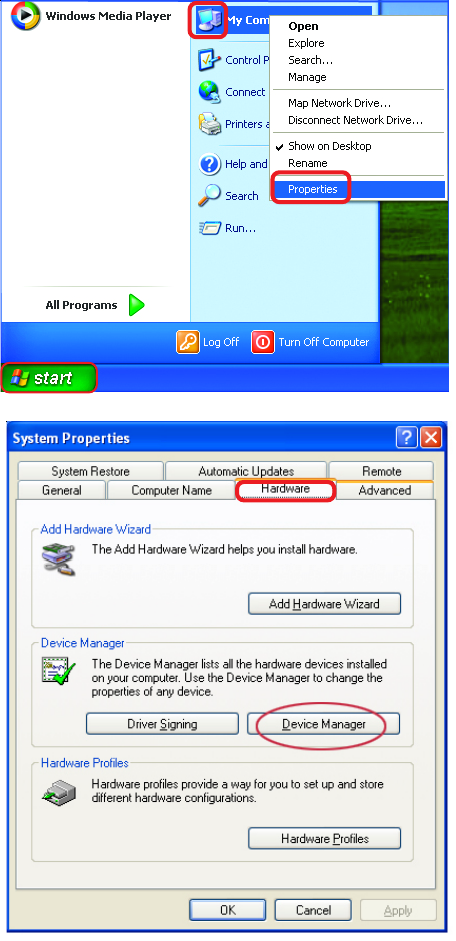
Click Device
Manager
!Select the
Hardware
Tab
!
58
Troubleshooting
!
!
!
!
!
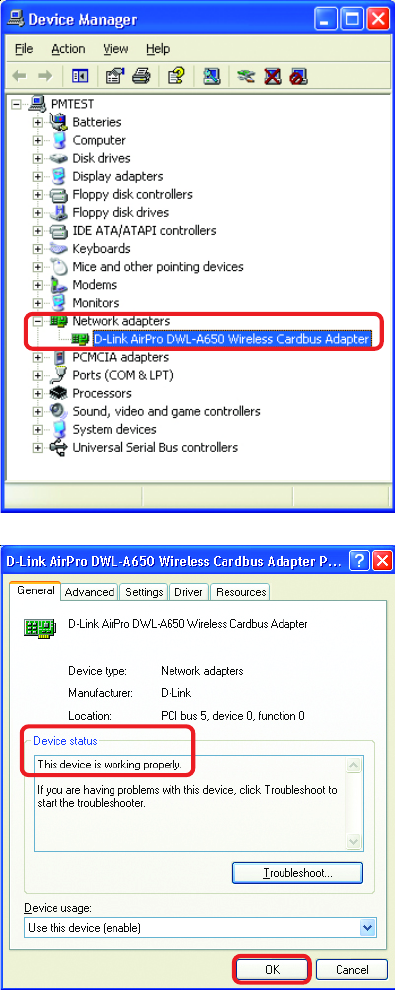
Double-click
on Network
Adapters
Right-click on D-Link
AirPro DWL-A650
Wireless Cardbus
Adapter (In this example,
the DWL-A650 is used;
you may be using another
network adapter, but the
procedure will remain the
same.)
Select Properties
to check that the
drivers are
installed properly
Look under Device
Status to check that the
device is working
properly
Click OK
59
Troubleshooting
4. What variables may cause my wireless products to lose reception?
D-Link products let you access your network from virtually anywhere you want. However,
the positioning of the products within your environment will affect the wireless range.
Please refer to Installation Considerations in the Wireless Basics section of this manual
for further information about the most advantageous placement of your D-Link wireless
products.
5. Why does my wireless connection keep dropping?
Antenna Orientation- Try different antenna orientations for the DI-774. Try to
keep the antenna at least 6 inches away from the wall or other objects.
If you are using 2.4GHz cordless phones, X-10 equipment or other home secu-
rity systems, ceiling fans, and lights, your wireless connection will degrade dra-
matically or drop altogether. Try changing the Channel on your Router, Access
Point and Wireless adapter to a different Channel to avoid interference.
Keep your product away (at least 3-6 feet) from electrical devices that generate
RF noise, like microwaves, Monitors, electric motors, etc.
Make sure that the SSID on the Router and the Wireless Client are exactly the same. If
they are not, wireless connection will not be established. Please note that there are two
separate SSIDs for 802.11a and 802.11g. The default SSID for both 802.11a and 802.11g
is default.
!
!
!
6. Why can’t I get a wireless connection?
To establish a wireless connection, while enabling Encryption on the DI-774, you must
also enable encryption on the wireless client.
For 802.11a, the Encryption settings are: 64, 128 or 152 bit. Make sure that the
encryption bit level is the same on the Router and the Wireless Client.
For 802.11g, the Encryption settings are: 64, 128, or 152 bit. Make sure that the
encryption bit level is the same on the Router and the Wireless Client.
!
!
60
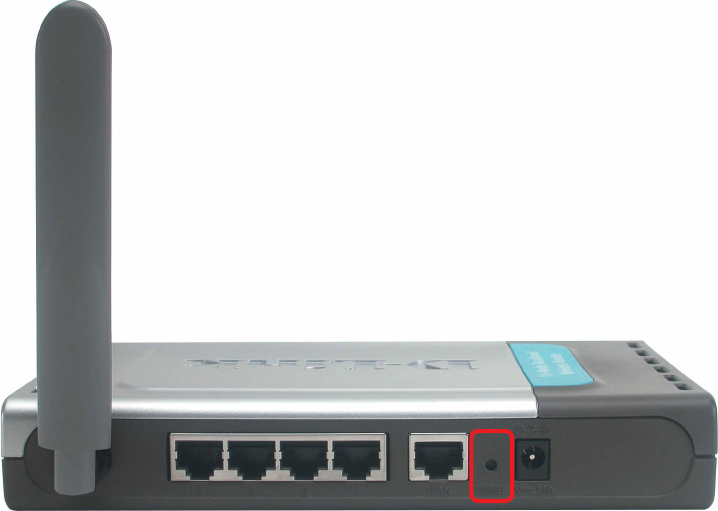
7. Resetting the DI-774 to Factory Default Settings
After you have tried other methods for troubleshooting your network, you may
choose to Reset the DI-774 to the factory default settings. Remember that D-
Link Air Xpert products network together, out of the box, at the factory default
settings.
Troubleshooting
To hard-reset the D-Link Air Xpert DI-774 to Factory Default Settings, please do the
following:
!
!
!
!After the DI-774 reboots (this may take a few minutes) it will
be reset to the factory Default settings
Use a paper clip to press the Reset button
Hold for about 10 seconds and then release
Locate the Reset button on the back of the DI-774