D Link DWL700AP-A1 D-Link Air 2.4 GHz Wireless Access Point User Manual dwl900AP manual 224
D Link Corporation D-Link Air 2.4 GHz Wireless Access Point dwl900AP manual 224
D Link >
Contents
User Manual Part 9
Networking Basics (continued)
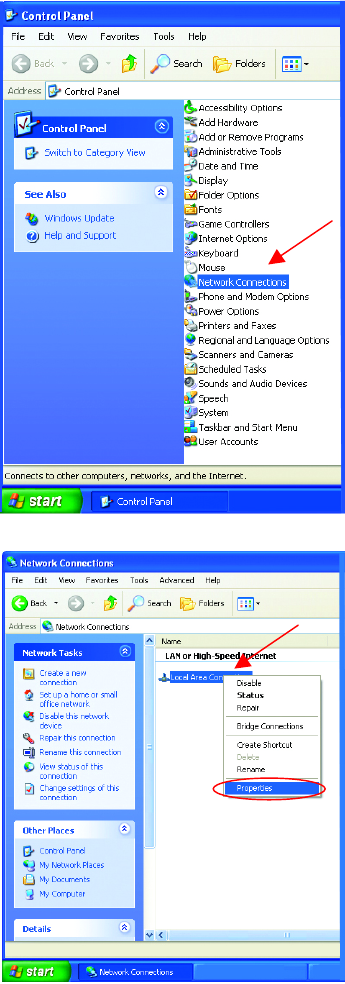
Assigning a Static IP Address
• Double-click on
Network Connections
• Right-click on Local
Area Connections.
• Double-click
Properties
46
Networking Basics (continued)
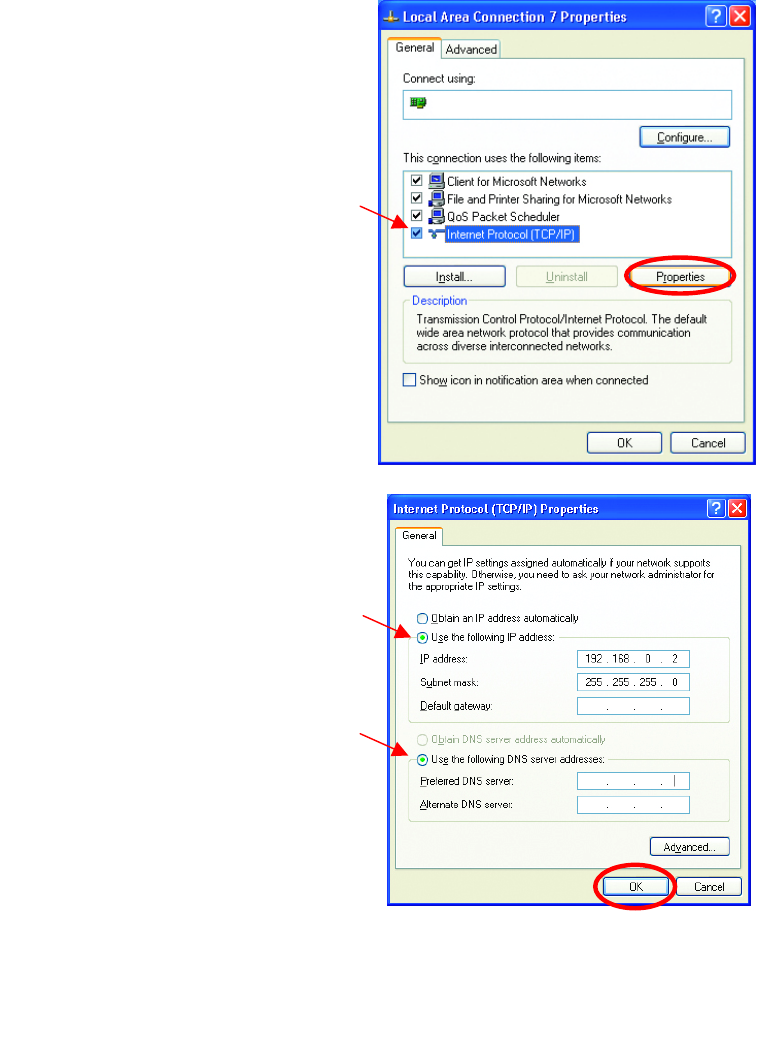
Assigning a Static IP Address
• Click OK
You have completed the assignment of a Static
IP Address. (You do not need to assign a Static
IP Address if you have a DHCP-capable
Gateway/Router.)
• Click on Internet Protocol
(TCP/IP)
• Click Properties
• Select Use the following
IP address
in the Internet Protocol
(TCP/IP) Properties
window,
• Input your IP address and
subnet mask. (The IP
A
ddresses on your network
must be within the same
range. For example, if one
computer has an IP
Address of 192.168.0.2,
the other computers should
have IP Addresses that are
sequential, like
192.168.0.3 and
192.168.0.4. The subnet
mask must be the same for
all the computers on the
network.)
• Input your DNS server
addresses. (Note: If you
are entering a DNS
server, you must enter
the IP Address of the
Default Gateway.)
The DNS server information
will be provided by your ISP
(Internet Service Provider.)
DWL-650+ Wireless Cardbus Adapter
192 168 0 1
192 168 0 1
47
Networking Basics (continued)
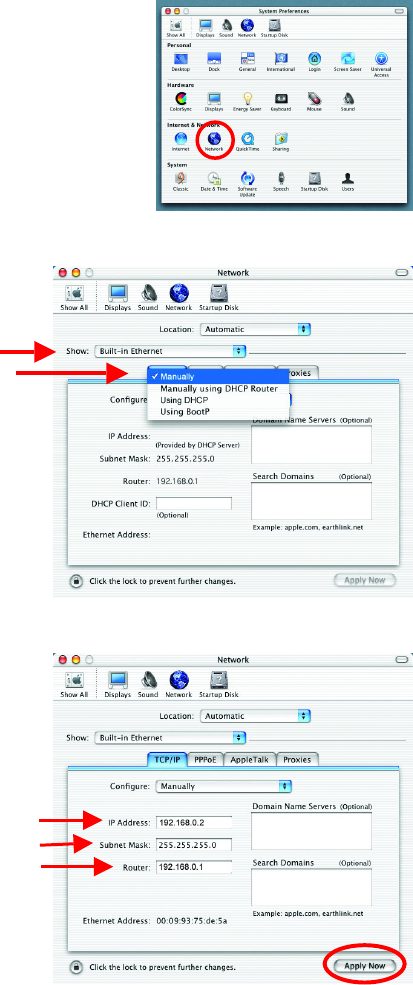
Assigning a Static IP Address with Macintosh OS X
Go to the Apple Menu and select System
Preferences.
Click on Network
Select Built-in Ethernet in the
Show pull-down menu.
Select Manually in the
Configure pull-down menu.
Input the Static IP Address, the
Subnet Mask and the Router IP
Address in the appropriate fields.
Click Apply Now
48
Networking Basics (continued)
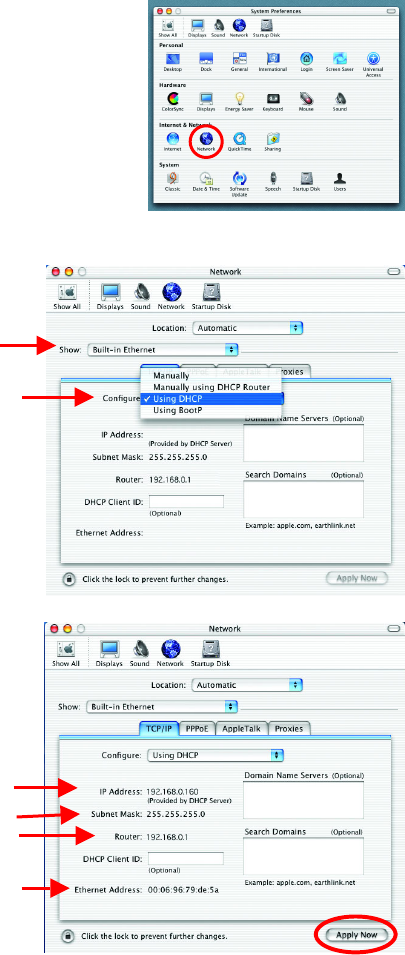
Selecting a Dynamic IP Address with Macintosh OS X
Go to the Apple Menu and select
System Preferences.
Click on Network
Select Built-in Ethernet in
the Show pull-down menu.
Select Using DHCP in the
Configure pull-down menu.
Click Apply Now
The IP Address, Subnet
mask, and the Router’s IP
Address will appear in a few
seconds.
49
Networking Basics (continued)
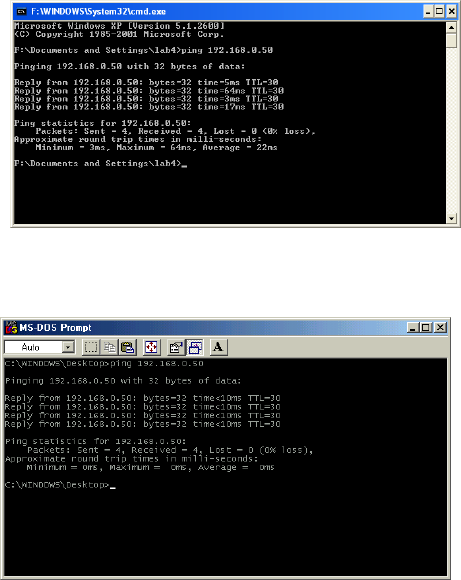
Checking the Wireless Connection by Pinging
For Windows XP and 2000:
Go to Start > Run > type
cmd. A window similar to
Fig. 9.25 will appear. Type
ping xxx.xxx.xxx.xxx,
where xxx is the IP address
of the Wireless Router or
Access Point.
A good wireless connection
will show four replies from
the wireless router or access
point, as shown.
For Windows Me and 98:
Go to Start > Run > type
command. A window
similar to Fig. 9.26 will
appear. Type ping
xxx.xxx.xxx.xxx, where
xxx is the IP address of the
Wireless Router or Access
Point. A good wireless
connection will show four
replies from the wireless
router or access point, as
shown.
Adding and Sharing Printers in Windows XP
After you have run the Network Setup Wizard on all the computers in your
network (please see the Network Setup Wizard section at the beginning of
Networking Basics,) you can use the Add Printer Wizard to add or share a
printer on your network.
Whether you want to add a local printer (a printer connected directly to one
computer,) share an LPR printer (a printer connected to a print server) or
share a network printer (a printer connected to your network through a
Gateway/Router,) use the Add Printer Wizard. Please follow the directions
below:
Fig. 8.35
Fig. 8.36
50
Networking Basics (continued)
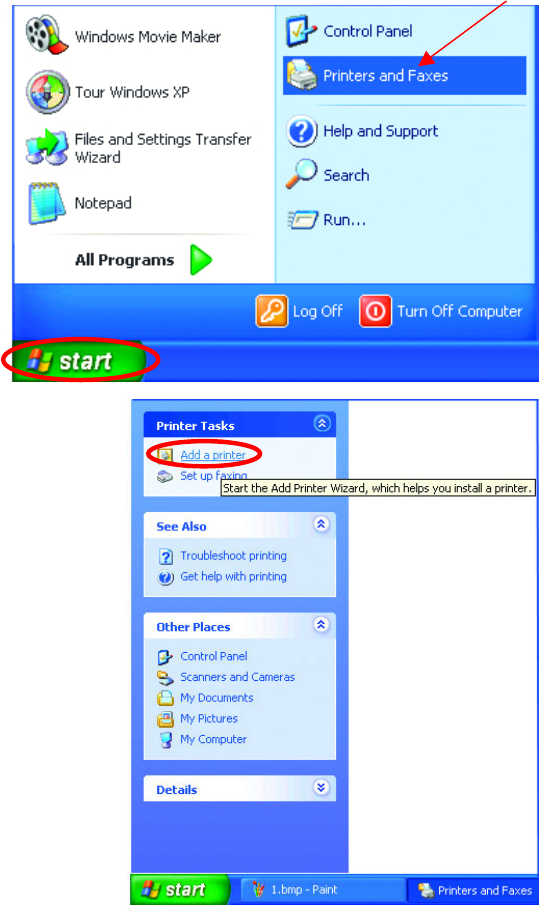
Adding a local printer
(A printer connected directly to a computer)
A printer that is not shared on the network and is connected directly to one
computer is called a local printer. If you do not need to share your printer
on a network, follow these directions to add the printer to one computer.
• Go to Start>
Printers and
Faxes
• Click on Add a printer
51

Networking Basics (continued)
Adding a local printer
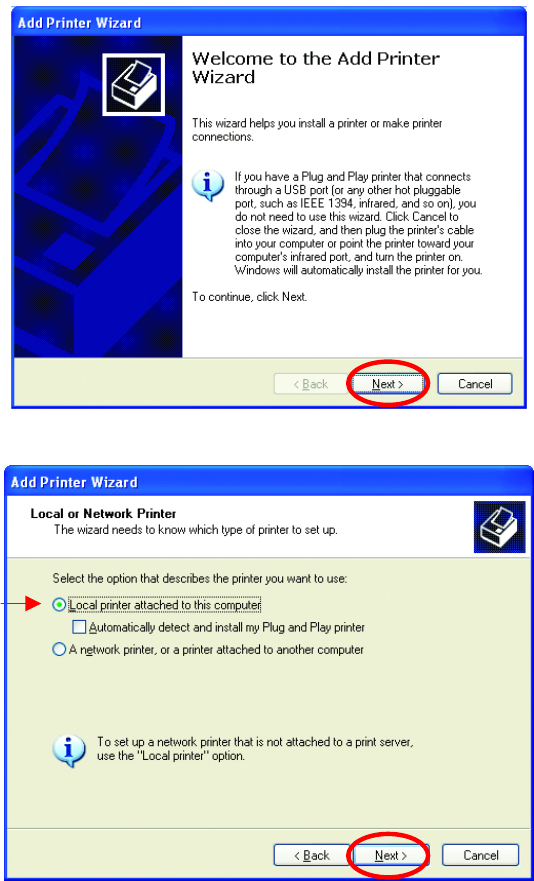
• Click Next
• Select Local printer
attached to this computer
• (Deselect Automaticall
y
detect
and install my Plug and Play
printer if it has been selected.)
• Click Next
• Select Use the
following port:
• From the pull-down
menu select the
correct port for your
printer
(Most computers use the
LPT1: port, as shown in
the illustration.)
• Click Next
52
Networking Basics (continued)
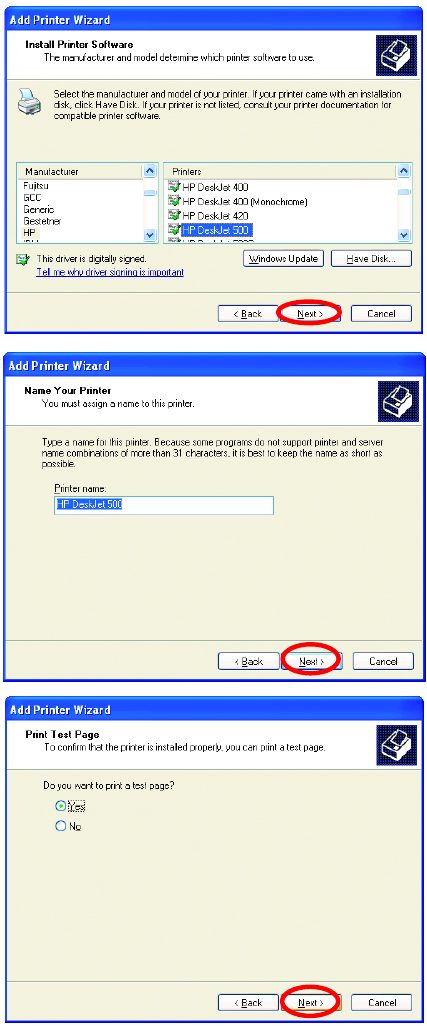
Adding a local printer
• Select and highlight the
correct driver for your
printer.
• Click Next
(If the correct driver is not
displayed, insert the CD or
floppy disk that came with your
p
rinter and click Have Disk.)
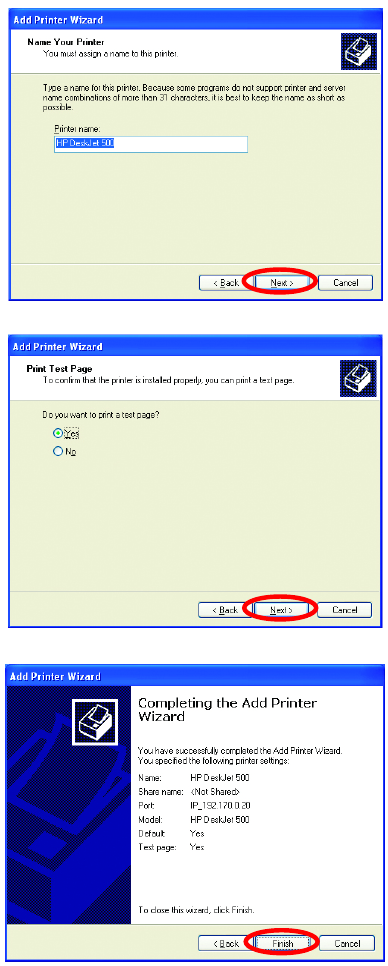
• At this screen, you can
change the name of the
printer (optional.)
• Click Next
• Select Yes, to print a
test page. A
successful printing will
confirm that you have
chosen the correct
driver.
• Click Next
53
Networking Basics (continued)
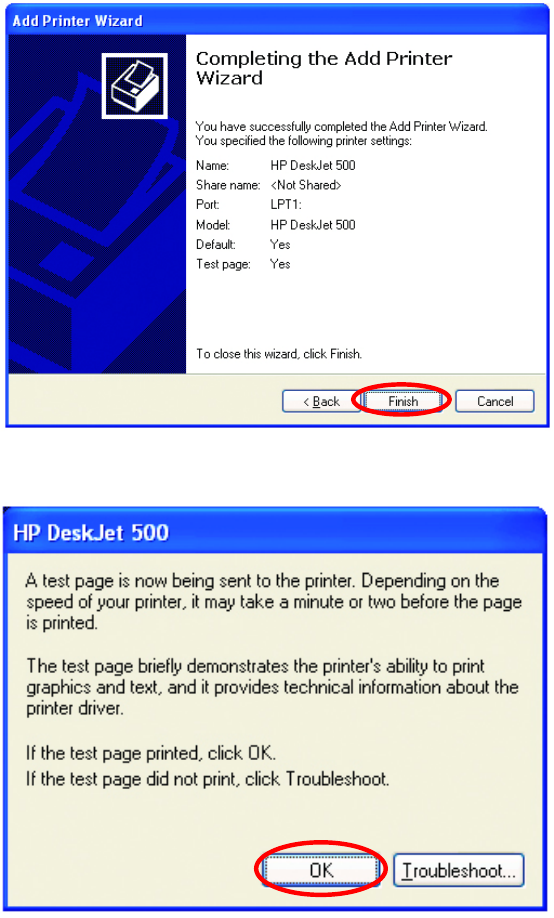
Adding a local printer
Click Finish
Click OK
This screen
g
ives
y
ou information about
y
our
p
rinter.
When the test page has printed,
54
Networking Basics (continued)
Adding a local printer
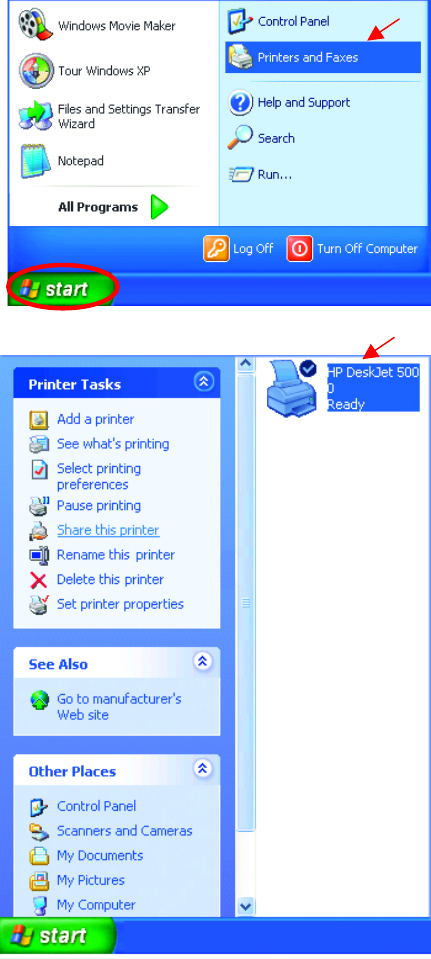
Sharing a network printer
After you have run the Network Setup Wizard on all the computers on your
network, you can run the Add Printer Wizard on all the computers on your
network. Please follow these directions to use the Add Printer Wizard to
share a printer on your network:
• Go to Start> Printers and
Faxes
A
successful installation will
display the printer icon as shown
at right.
You have successfully added a
local printer.
• Go to Start>
Printers and Faxes
55
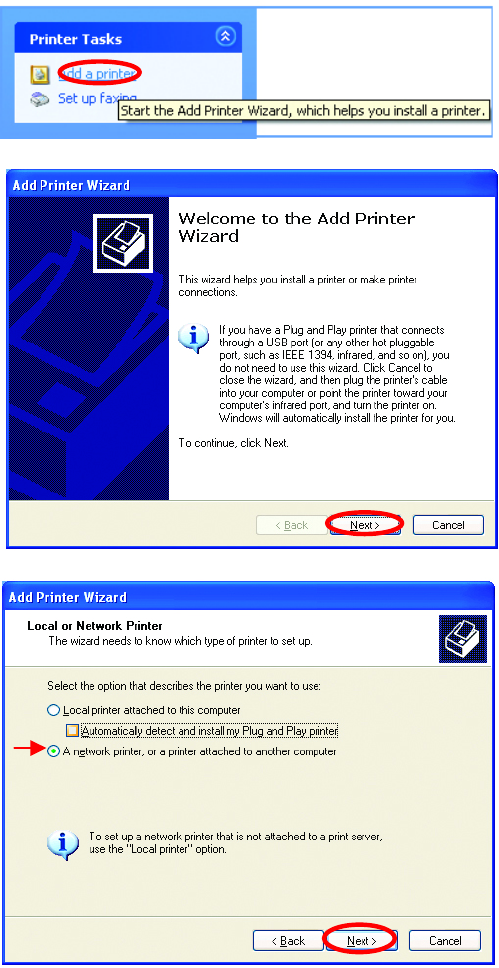
Networking Basics (continued)
Sharing a network printer
• Click on
Add a Printer
• Click Next
• Select Network
Printer
• Click Next
56
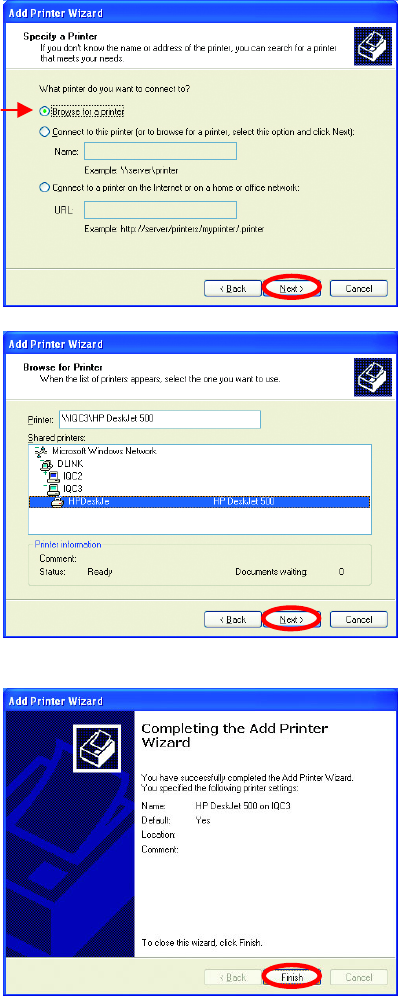
Networking Basics (continued)
Sharing a network printer
• Select Browse for a printer
• Click Next
• Select the printer you
would like to share.
• Click Next
• Click Finish
57
Networking Basics (continued)
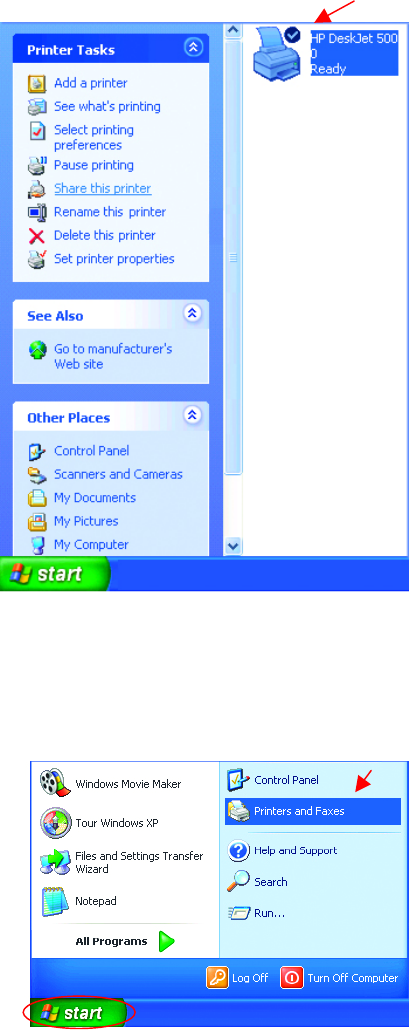
Sharing a network printer
To check for proper installation:
• Go to Start>
Printers and Faxes
The printer icon will appear
at right, indicating proper
installation.
You have completed
adding the printer.
To share this printer on
your network:
• Remember the
printer name
• Run the Add Printer
Wizard on all the
computers on your
network.
• Make sure you have
already run the
Network Setup
Wizard on all the
network computers.
After you run the Add
Printer Wizard on all the
computers in the
network, you can share
the printer.
58
Networking Basics (continued)
Sharing an LPR printer
To share an LPR printer (using a print server,) you will need a Print Server such as
the DP-101P+. Please make sure that you have run the Network Setup Wizard on
all the computers on your network. To share an LPR printer, please follow these
directions:
• Go to Start>
Printers
and Faxes
• Click on
Add a Printer
The screen to the
right will display.
• Click Next
• Select
Local printer…
• Click Next
59
Networking Basics (continued)
Sharing an LPR printer
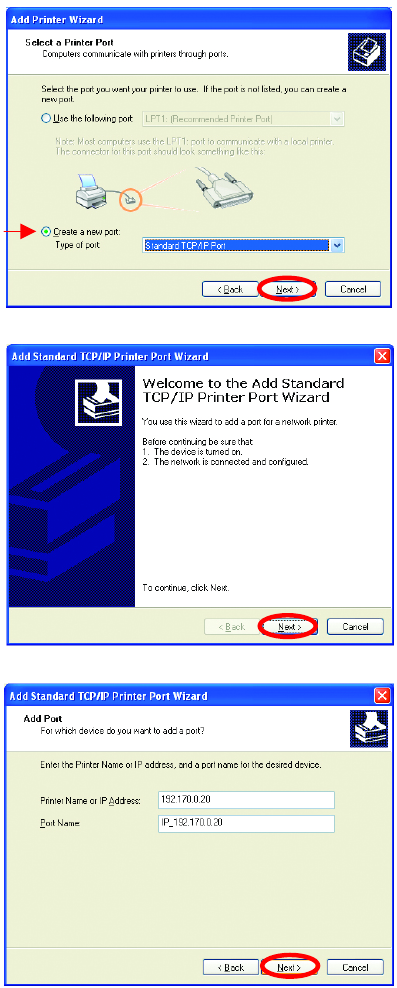
• Select Create a new port
• From the pull-down menu,
select Standard TCP/IP
Port, as shown.
• Click Next
• Please read the instructions
on this screen.
• Click Next
• Enter the Printer IP
Address and the Port
Name, as shown.
• Click Next
60
Networking Basics (continued)
Sharing an LPR printer
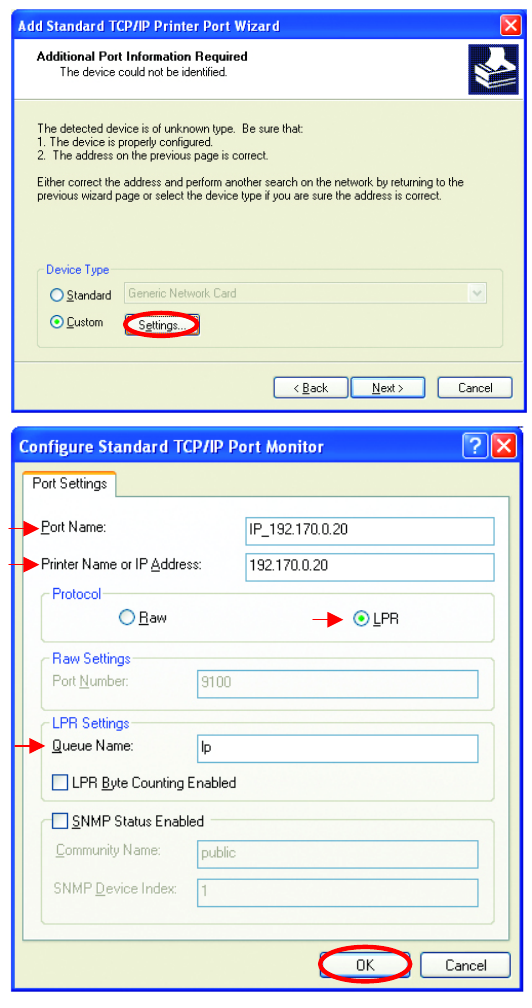
• In this screen,
select Custom.
• Click Settings
• Enter the Port
Name and the
Printer Name or
IP Address.
• Select LPR
• Enter a Queue
Name (if your
Print-Server/
Gateway has
more than one
port, you will
need a Queue
name.)
• Click OK
61
Networking Basics (continued)
Sharing an LPR printer
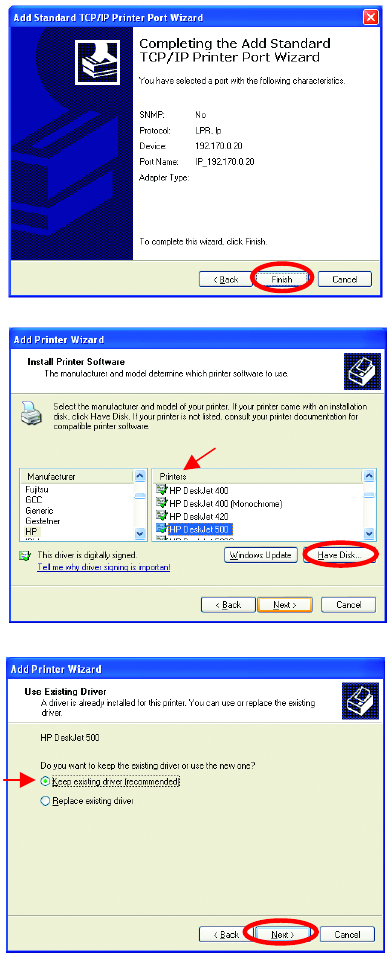
• This screen will show
you information
about your printer.
• Click Finish
• Select the printer you
are adding from the
list of Printers.
• Insert the printer
driver disk that came
with your printer.
• Click Have Disk
If the printer driver is already
installed,
• Select Keep existing
driver
• Click Next
62
Networking Basics (continued)
Sharing an LPR printer
• You can rename your
printer if you choose. It
is optional.
Please remember the name of
your printer. You will need this
information when you use the
A
dd Printer Wizard on the
other computers on your
network.
• Click Next
• Select Yes, to print a
test page.
• Click Next
This screen will display
information about your
printer.
• Click Finish to
complete the
addition of the
printer.
• Please run the
Add Printer
Wizard on all the
computers on your
network in order to
share the printer.
Note: You must run the Network Setup Wizard
on all the computers on your network before you
run the Add Printer Wizard.
63

Networking Basics (continued)
Other Tasks
For help with other tasks in home or small office networking, see Using the
Shared Documents folder and Sharing files and folders in the Help and
Support Center in Microsoft Windows XP.
9. Technical Specifications
Standards
IEEE 802.11b
IEEE 802.3
IEEE 802.3u
IEEE 802.1x
)
64
Ports
(1) 10/100Base-T Ethernet, RJ-45 (UTP)
(1) Power – 5V DC, 2.0A
Network Management
Web-Based browser with JavaScript
Frequency Range
2.4 – 2.4835 GHz, Dir
ect Sequence Spread Spectrum (DSSS
Data Rates (Mbps : Channel)
11 : CCK
5.5: CCK
2: Barker
1: Barker
Data Security
64, 128-bit WEP (Wired Equivalent Privacy) Encryption
Access Control List
Diagnostic LED
Power
Link
TX/RX
Antenna Type
• Detachable Reverse SMA
Range
• Indoors – up to 328 feet (100 meters)
• Outdoors – up to 1,312 feet (400 meters)
Temperature
• Operating: -10ºC to 55ºC (14ºF to 131ºF)
• Storing: -20ºC to 65ºC (-4ºF to 149ºF)
Humidity:
• 5%-95%, non-condensing
Emissions:
• FCC part 15b
• UL1950-3
65