D Link IR652A1 XTreme N Gigabit Home Router User Manual User s manual
D Link Corporation XTreme N Gigabit Home Router User s manual
D Link >
Contents
- 1. User Manual Part 1
- 2. User Manual Part 2
User Manual Part 2
70D-Link DIR-652 User Manual
5GEVKQP%QPſIWTCVKQP
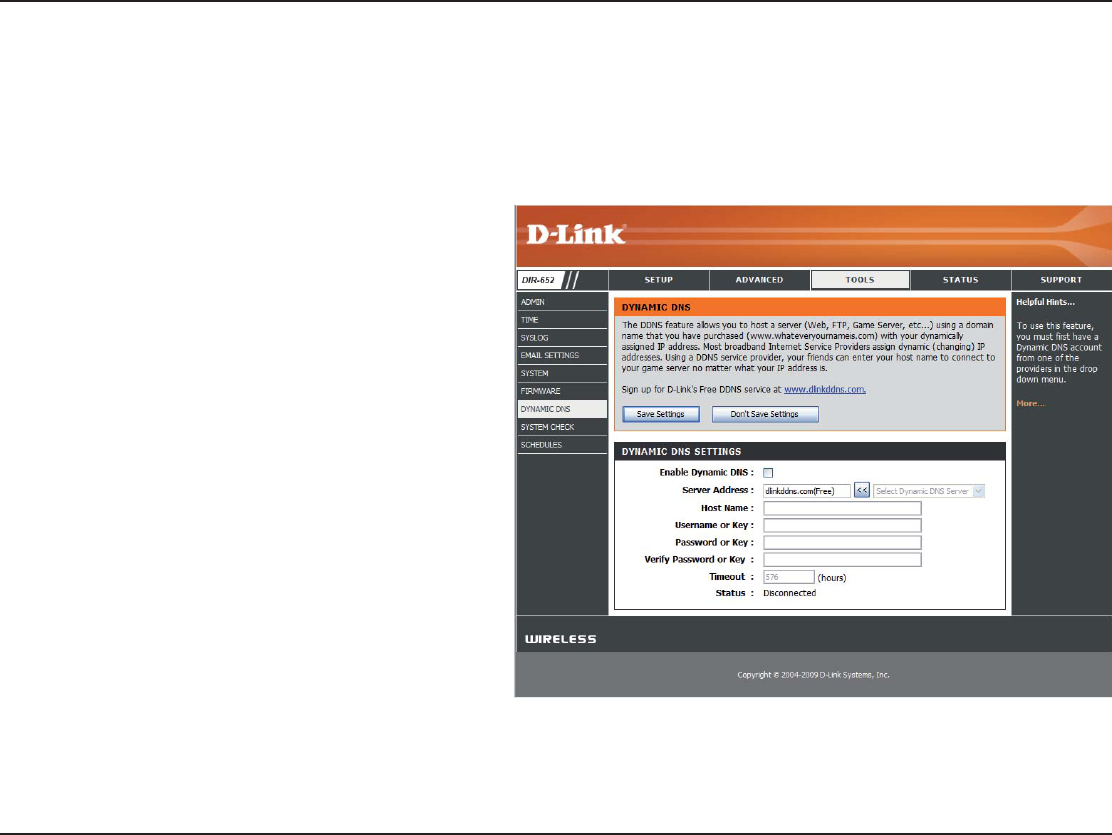
Check this box to enable DDNS updates.
Choose your DDNS provider from the drop
down menu.
Enter the Host Name that you registered with
your DDNS service provider.
Enter the Username for your DDNS account.
Enter the Password for your DDNS account.
Enter a time (in hours).
Enable Dynamic
$.3
3ERVER!DDRESS
(OST.AME
5SERNAMEOR+EY
0ASSWORDOR+EY
4IMEOUT
DDNS
The DDNS feature allows you to host a server (Web, FTP, Game Server, etc…) using a domain name that you have purchased (www.
whateveryournameis.com) with your dynamically assigned IP address. Most broadband Internet Service Providers assign dynamic
(changing) IP addresses. Using a DDNS service provider, your friends can enter in your domain name to connect to your server no matter
what your IP address is.
71D-Link DIR-652 User Manual
5GEVKQP%QPſIWTCVKQP
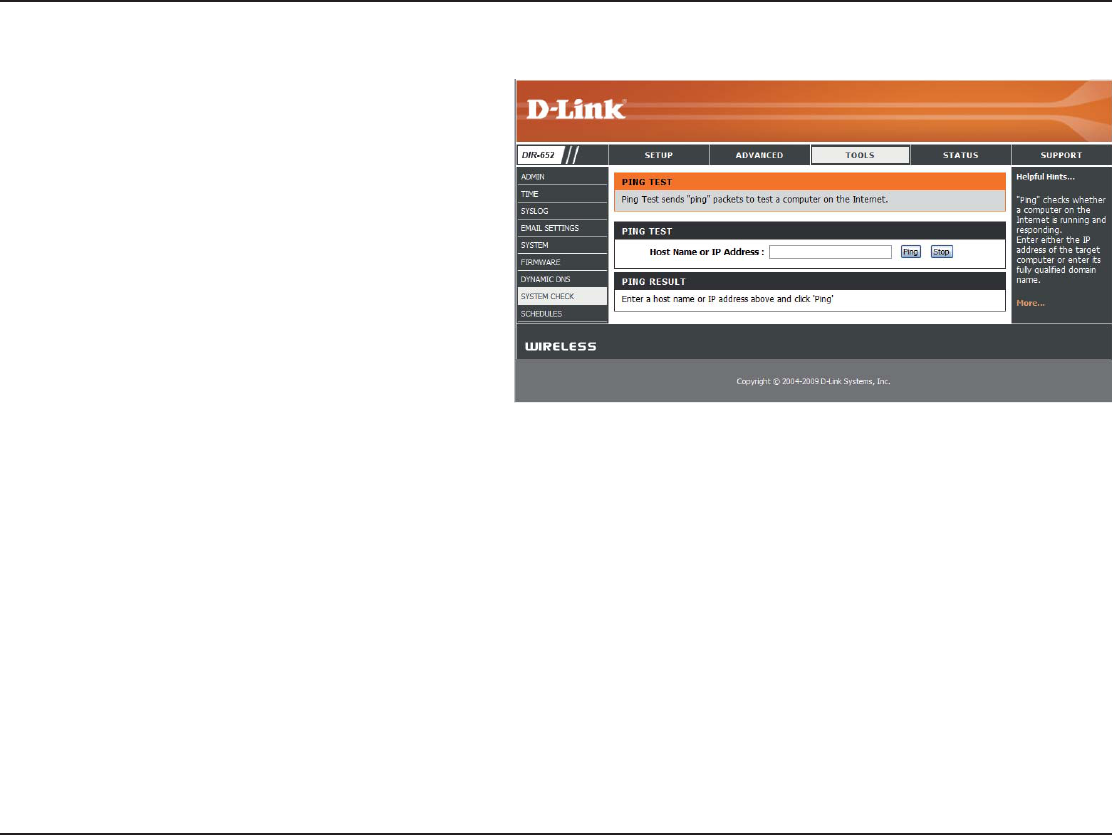
The Ping Test is used to send Ping packets
to test if a computer is on the Internet. Enter
the IP Address that you wish to Ping, and
click 2KPI.
The results of your ping attempts will be
displayed here.
3YSTEM#HECK
0ING4EST
0ING2ESULTS
72D-Link DIR-652 User Manual
5GEVKQP%QPſIWTCVKQP
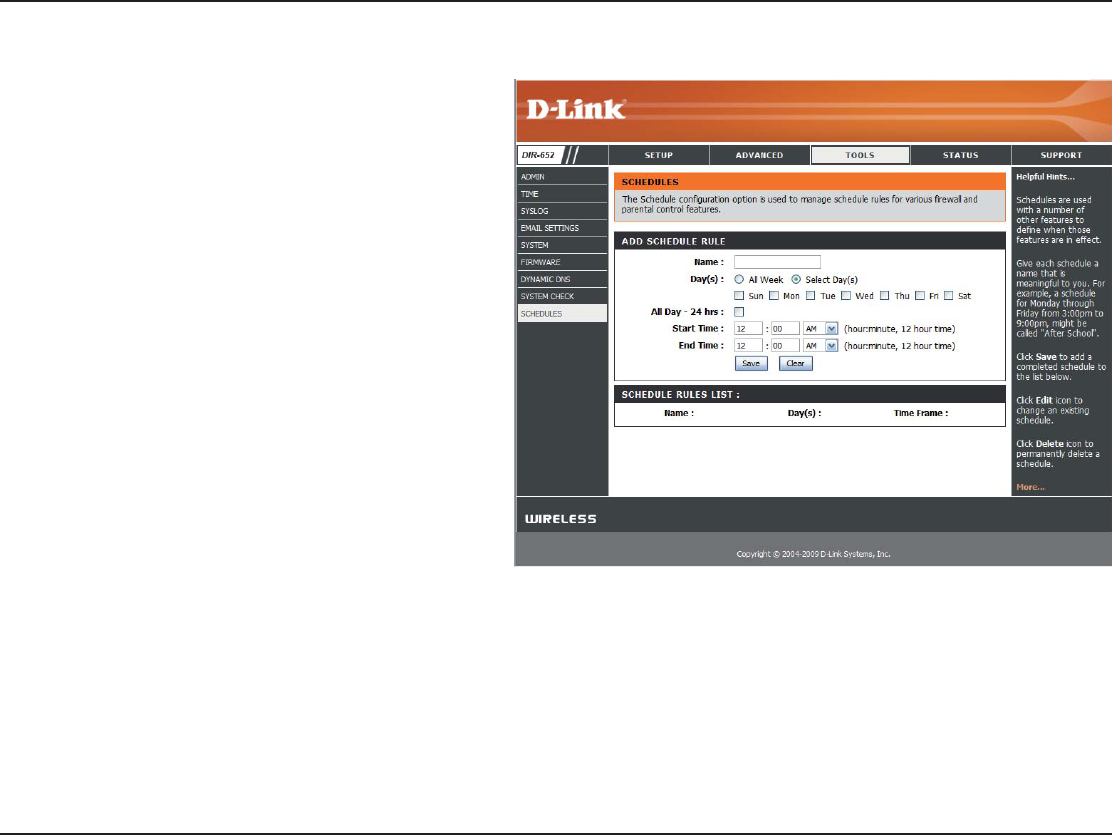
Enter a name for your new schedule.
Select a day, a range of days, or All Week to
include every day.
Enter a start and end time for your schedule,
or check !LL$AYHRS to set the schedule to
run all day (for the selected days).
Click Save to save your schedule. You must
click at the top for your schedules to go into
effect.
The list of schedules will be listed here. Click
the Edit icon to make changes or click the
Delete icon to remove the schedule.
.AME
$AYS
4IME
3AVE
3CHEDULE
2ULES,IST
3CHEDULES
73D-Link DIR-652 User Manual
5GEVKQP%QPſIWTCVKQP
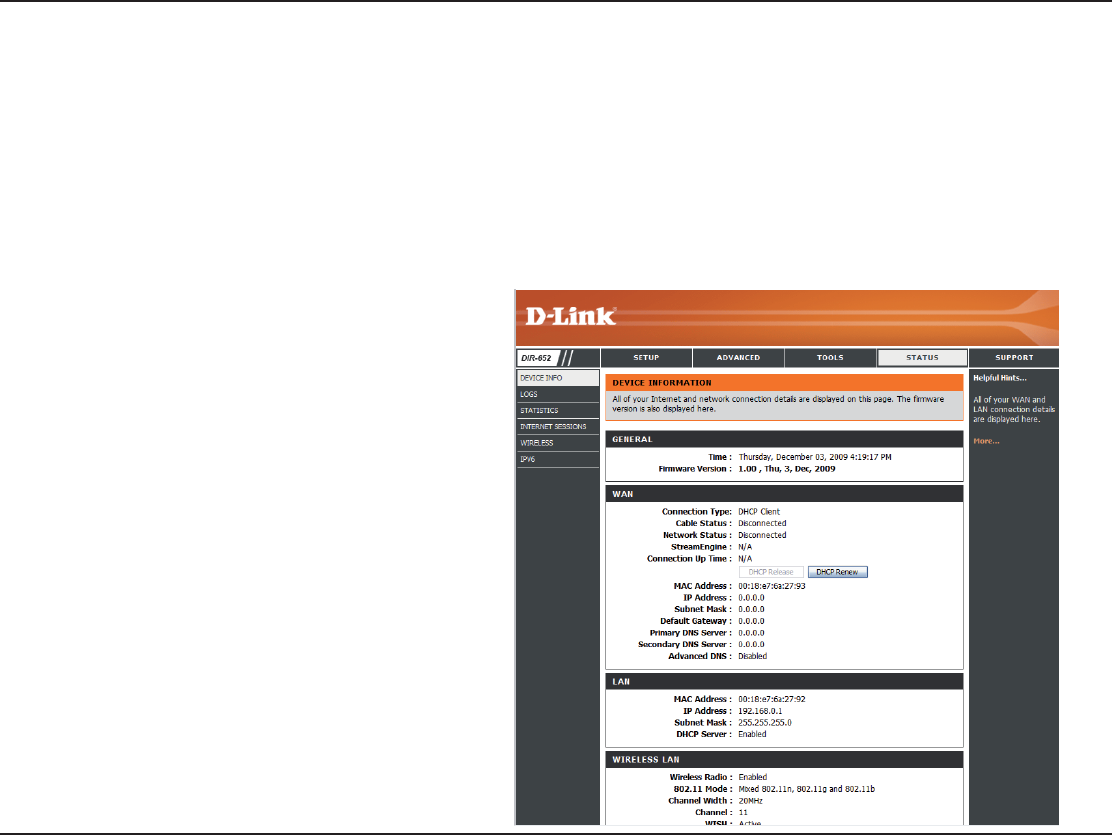
This page displays the current information for the DIR-652. It will display the LAN, WAN (Internet), and Wireless information.
If your Internet connection is set up for a Dynamic IP address then a Release button and a Renew button will be displayed. Use Release to
disconnect from your ISP and use Renew to connect to your ISP.
If your Internet connection is set up for PPPoE, a Connect button and a Disconnect button will be displayed. Use Disconnect to drop the
PPPoE connection and use Connect to establish the PPPoE connection.
Displays the router’s time and firmware
version.
Displays the MAC address and the public IP
settings for the router.
Displays the MAC address and the private
(local) IP settings for the router.
Displays the wireless MAC address and your
wireless settings such as SSID and Channel.
Displays computers and devices that are
connected to the router via Ethernet and that
are receiving an IP address assigned by the
router (DHCP).
Displays the Multicast Group IP Address.
'ENERAL
7!.
,!.
7IRELESS,!.
,!.#OMPUTERS
IGMP Multicast
-EMBERSHIPS
Device Information
74D-Link DIR-652 User Manual
5GEVKQP%QPſIWTCVKQP
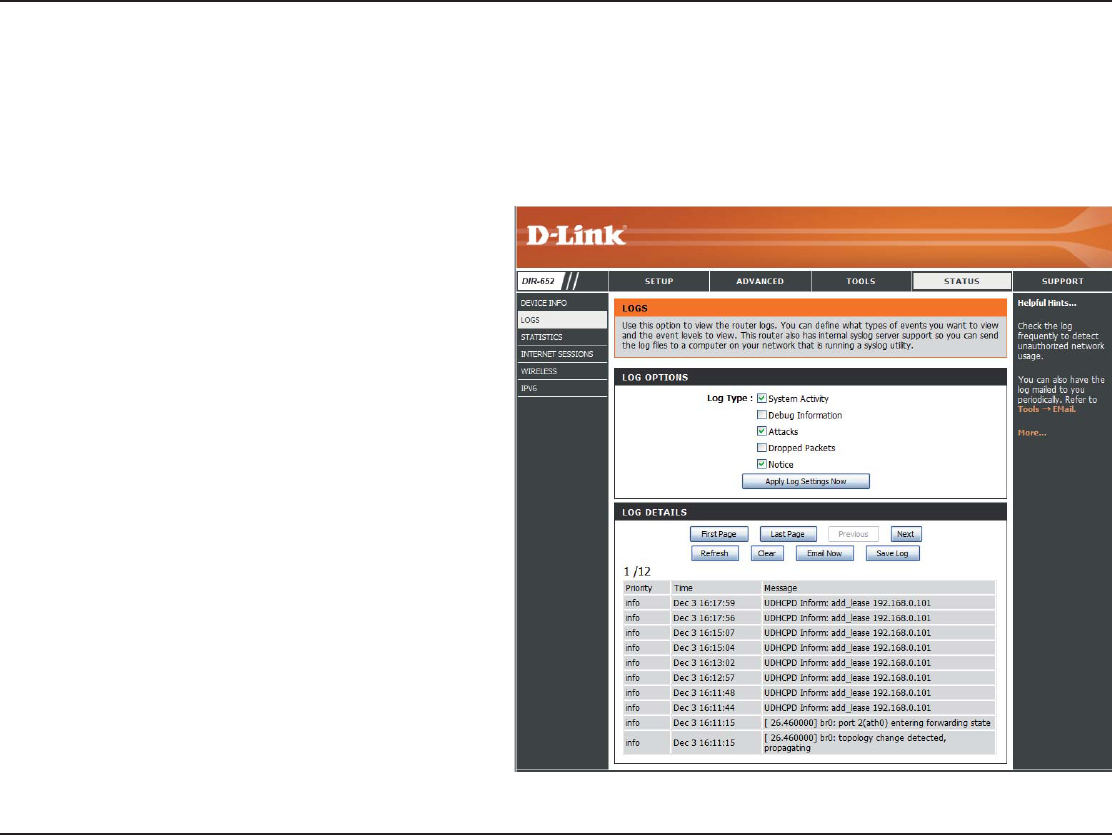
Logs
,OG4YPE
!PPLY,OG3ETTINGS
.OW
2EFRESH
#LEAR
%MAIL.OW
3AVE,OG
You can select the types of messages that you
want to display from the log. System Activity,
Debug Information, Attacks, Dropped Packets,
and Notice messages can be selected.
9KNNſNVGTVJGNQITGUWNVUUQVJCVQPN[VJGUGNGEVGF
message types appear.
Updates the log details on the screen so it
displays any recent activity.
Clears all of the log contents.
This option will send a copy of the router log to
VJGGOCKNCFFTGUUEQPſIWTGFKPVJGTools >
E-mail screen.
6JKUQRVKQPYKNNUCXGVJGTQWVGTVQCNQIſNGQP
your computer.
The router automatically logs (records) events of interest in its internal memory. If there isn’t enough internal memory for all events, logs
of older events are deleted, but logs of the most recent events are retained. The Logs option allows you to view the router logs. You can
FGſPGYJCVV[RGUQHGXGPVU[QWYCPVVQXKGYCPFVJGNGXGNQHVJGGXGPVUVQXKGY6JKUTQWVGTCNUQJCUGZVGTPCN5[UNQI5GTXGTUWRRQTVUQ
[QWECPUGPFVJGNQIſNGUVQCEQORWVGTQP[QWTPGVYQTMVJCVKUTWPPKPIC5[UNQIWVKNKV[

75D-Link DIR-652 User Manual
5GEVKQP%QPſIWTCVKQP
Statistics
6JGUETGGPDGNQYFKURNC[UVJG6TCHſE5VCVKUVKEU*GTG[QWECPXKGYVJGCOQWPVQHRCEMGVUVJCVRCUUVJTQWIJVJG&+4QPDQVJVJG+PVGTPGV
CPFVJG.#0RQTVU6JGVTCHſEEQWPVGTYKNNTGUGVKHVJGFGXKEGKUTGDQQVGF
Internet Sessions
76D-Link DIR-652 User Manual
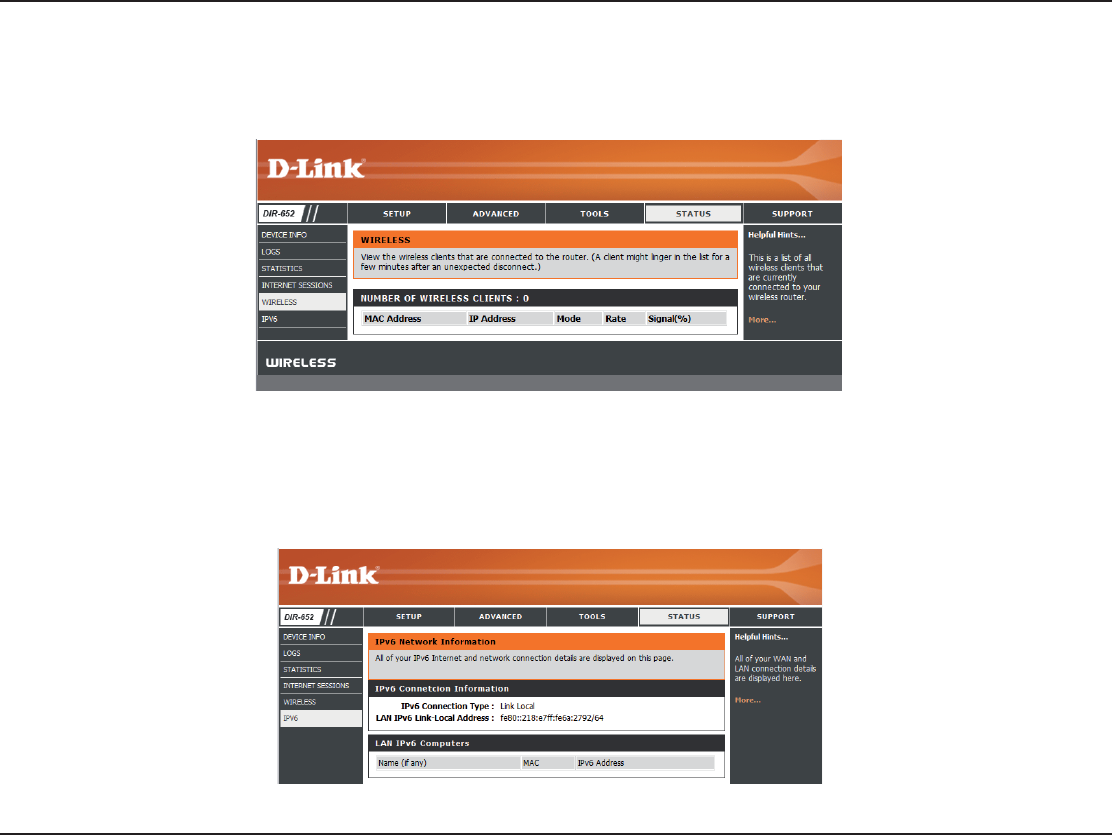
5GEVKQP%QPſIWTCVKQP
The wireless client table displays a list of current connected wireless clients. This table also displays the connection time and MAC address
of the connected wireless clients.
Wireless
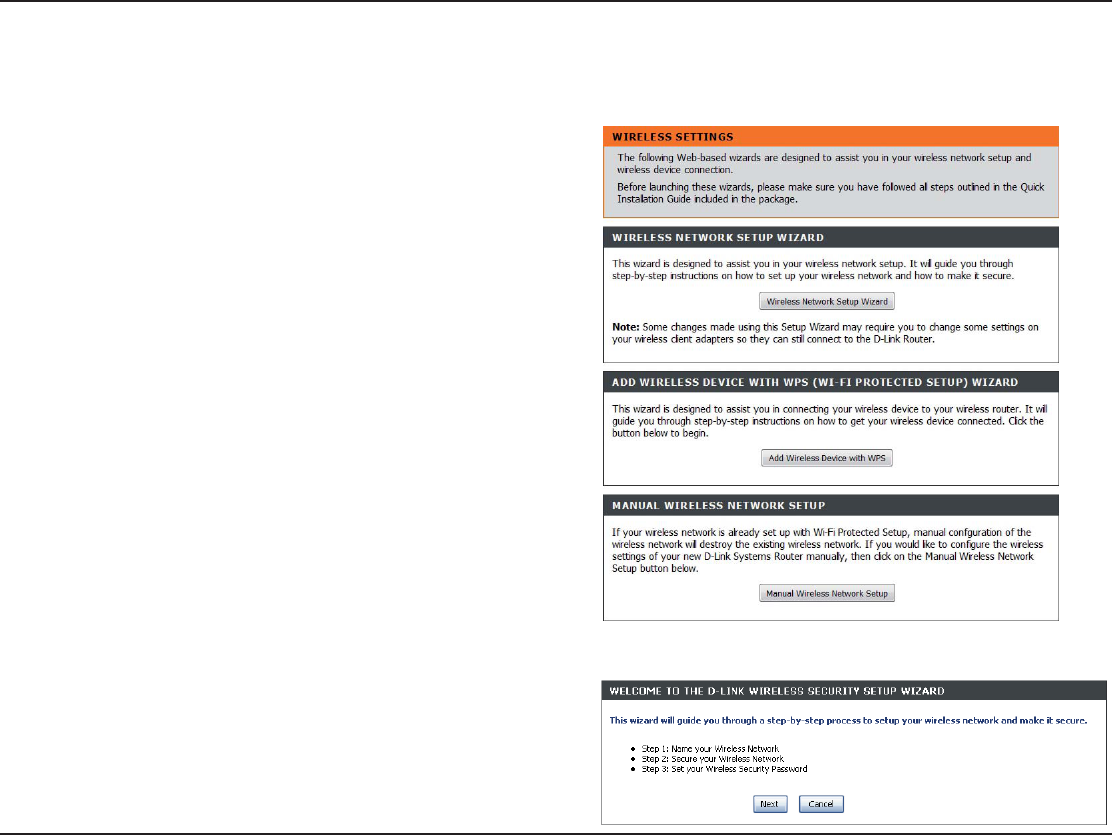
The IPv6 details page displays full details of IPv6 clients that are connected when IPv6 is enabled.
IPv6

77D-Link DIR-652 User Manual
5GEVKQP%QPſIWTCVKQP
3UPPORT

78D-Link DIR-652 User Manual
Section 4 - Security
Wireless Security
This section will show you the different levels of security you can use to protect your data from intruders. The
DIR-652 offers the following types of security:
Ŗ92#9K(K2TQVGEVGF#EEGUU Ŗ92#25-2TG5JCTGF-G[
Ŗ92#9K(K2TQVGEVGF#EEGUU Ŗ92#25-2TG5JCTGF-G[
7HATIS70!
WPA, or Wi-Fi Protected Access, is a Wi-Fi standard that was designed to improve the security features of WEP (Wired
Equivalent Privacy).
The 2 major improvements over WEP:
Ŗ+ORTQXGFFCVCGPET[RVKQPVJTQWIJVJG6GORQTCN-G[+PVGITKV[2TQVQEQN6-+26-+2UETCODNGUVJGMG[U
using a hashing algorithm and, by adding an integrity-checking feature, ensures that the keys haven’t
been tampered with. WPA2 is based on 802.11i and uses Advanced Encryption Standard (AES) instead
QH6-+2
Ŗ7UGTCWVJGPVKECVKQPYJKEJKUIGPGTCNN[OKUUKPIKP9'2VJTQWIJVJGGZVGPUKDNGCWVJGPVKECVKQPRTQVQEQN
'#29'2TGIWNCVGUCEEGUUVQCYKTGNGUUPGVYQTMDCUGFQPCEQORWVGTŏUJCTFYCTGURGEKſE/#%
address, which is relatively simple to be sniffed out and stolen. EAP is built on a more secure public-key
encryption system to ensure that only authorized network users can access the network.
92#25-92#25-WUGUCRCUURJTCUGQTMG[VQCWVJGPVKECVG[QWTYKTGNGUUEQPPGEVKQP6JGMG[KUCPCNRJCPWOGTKE
password between 8 and 63 characters long. The password can include symbols (!?*&_) and spaces. This key must
be the exact same key entered on your wireless router or access point.
92#92#KPEQTRQTCVGUWUGTCWVJGPVKECVKQPVJTQWIJVJG'ZVGPUKDNG#WVJGPVKECVKQP2TQVQEQN'#2'#2KUDWKNVQPC
more secure public key encryption system to ensure that only authorized network users can access the network.
79D-Link DIR-652 User Manual
Section 4 - Security
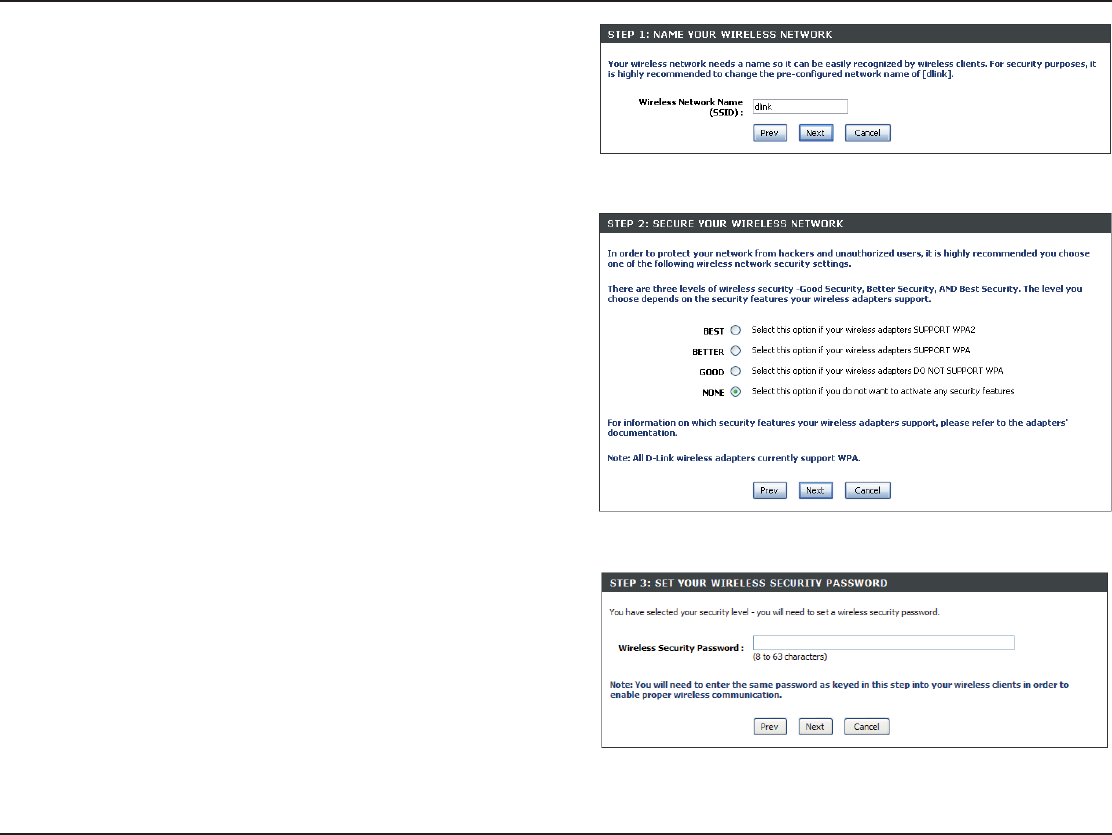
7IRELESS3ECURITY3ETUP7IZARD
To run the security wizard, click on Setup at the top and then click ,AUNCH
7IRELESS3ECURITY3ETUP7IZARD.
Click Next to continue.
80D-Link DIR-652 User Manual
Section 4 - Security
'PVGTVJG55+&5GTXKEG5GV+FGPVKſGT6JG55+&KUVJGPCOGQH[QWT
wireless network. Create a name using up to 32 characters. The SSID
is case-sensitive.
Select the level of security for your wireless network:
Ŗ$GUV92##WVJGPVKECVKQP
Ŗ$GVVGT92##WVJGPVKECVKQP
Ŗ0QPG0QUGEWTKV[
Click Next to continue.
If you selected Best or Better, enter a password between
8-63 characters.
If you selected Good, enter 13 characters or 26 Hex digits.
Click Next to continue.
81D-Link DIR-652 User Manual
Section 4 - Security
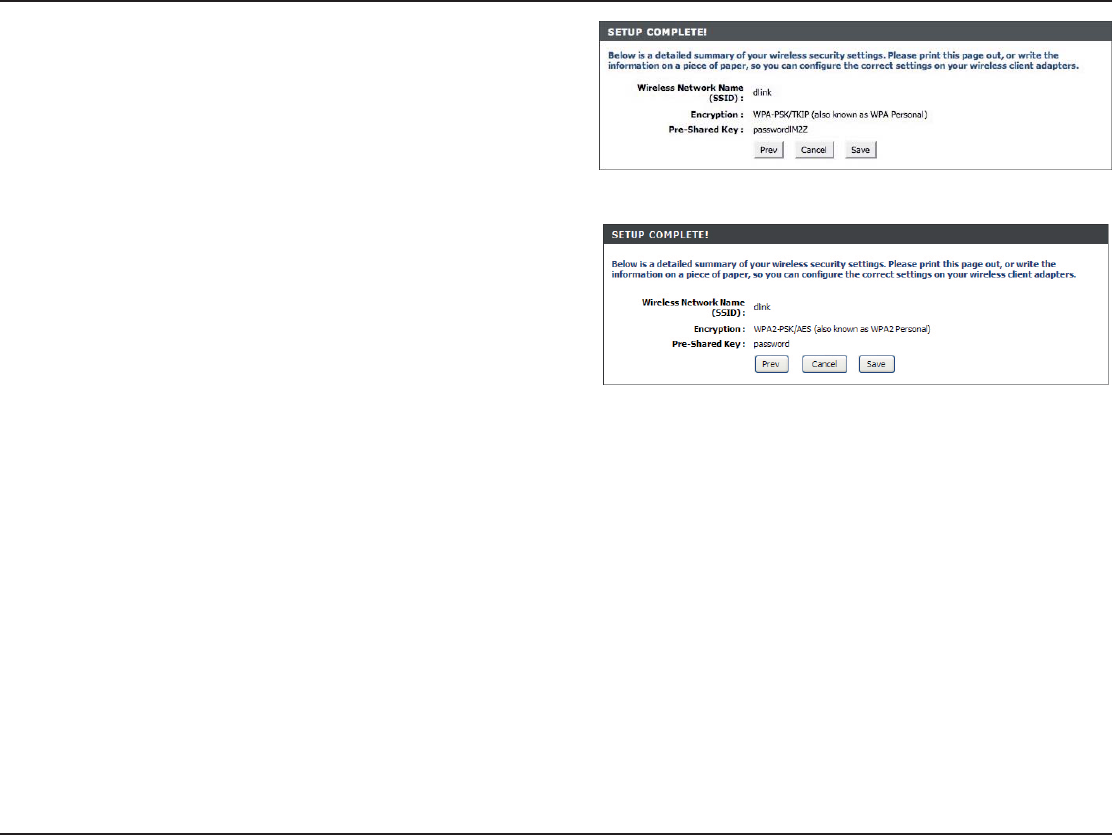
If you selected Better, the following screen will show you your Pre-Shared
-G[VQGPVGTQP[QWTYKTGNGUUENKGPVU
Click SaveVQſPKUJVJG5GEWTKV[9K\CTF
If you selected Best, the following screen will show you your Pre-Shared
-G[VQGPVGTQP[QWTYKTGNGUUENKGPVU
Click SaveVQſPKUJVJG5GEWTKV[9K\CTF
If you selected WPA-Enterprise, the RADIUS information will be displayed. Click SaveVQſPKUJVJG5GEWTKV[9K\CTF
82D-Link DIR-652 User Manual
Section 4 - Security
#ONlGURE70!0ERSONAL03+
It is recommended to enable encryption on your wireless router before your wireless network adapters. Please establish
wireless connectivity before enabling encryption. Your wireless signal may degrade when enabling encryption due to
the added overhead.
Log into the web-based configuration by opening a web browser and entering the IP address of the router
(192.168.0.1).
Log into the web-based configuration by opening a
web browser and entering the IP address of the router
(192.168.0.1). Click on3ETUPand then click Wireless Settings
on the left side.
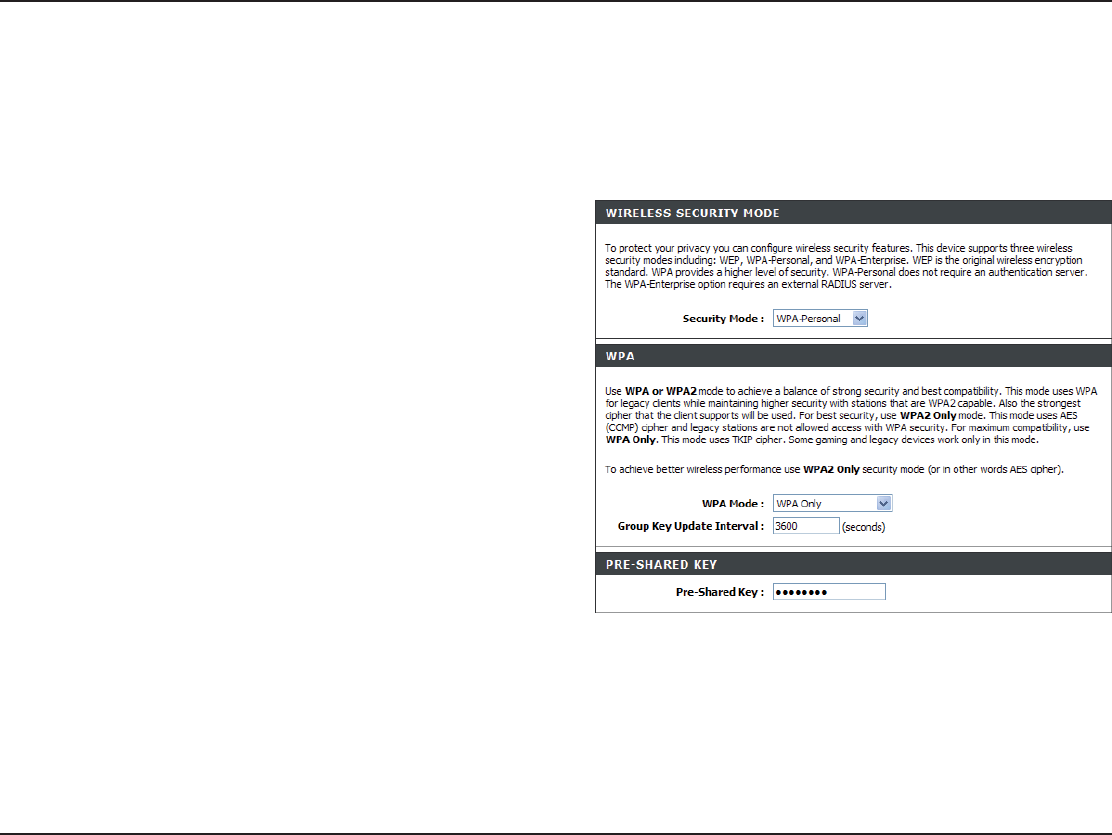
2. Next to Security Mode, select 70!0ERSONAL.
3. Next to WPA Mode, select Auto,70! /NLY, or WPA Only.
Use Auto if you have wireless clients using both WPA and
WPA2.
4. Next to Group Key Update Interval, enter the amount of time
before the group key used for broadcast and multicast data
is changed (3600 is default).
5. Next to Pre-Shared Key, enter a key (passphrase). The key
is entered as a pass-phrase in ASCII format at both ends of
the wireless connection. The pass-phrase must be between
8-63 characters.
6. Click Save SettingsVQUCXG[QWTUGVVKPIU+H[QWCTGEQPſIWTKPIVJGTQWVGTYKVJCYKTGNGUUCFCRVGT[QWYKNNNQUG
EQPPGEVKXKV[WPVKN[QWGPCDNG92#25-QP[QWTCFCRVGTCPFGPVGTVJGUCOGRCUURJTCUGCU[QWFKFQPVJGTQWVGT
83D-Link DIR-652 User Manual
Section 4 - Security
It is recommended to enable encryption on your wireless router before your wireless network adapters. Please establish
wireless connectivity before enabling encryption. Your wireless signal may degrade when enabling encryption due to
the added overhead.
.QIKPVQVJGYGDDCUGFEQPſIWTCVKQPD[QRGPKPICYGDDTQYUGTCPFGPVGTKPIVJG+2CFFTGUUQHVJGTQWVGT
Click on3ETUPand then click Wireless Settings on the left side.
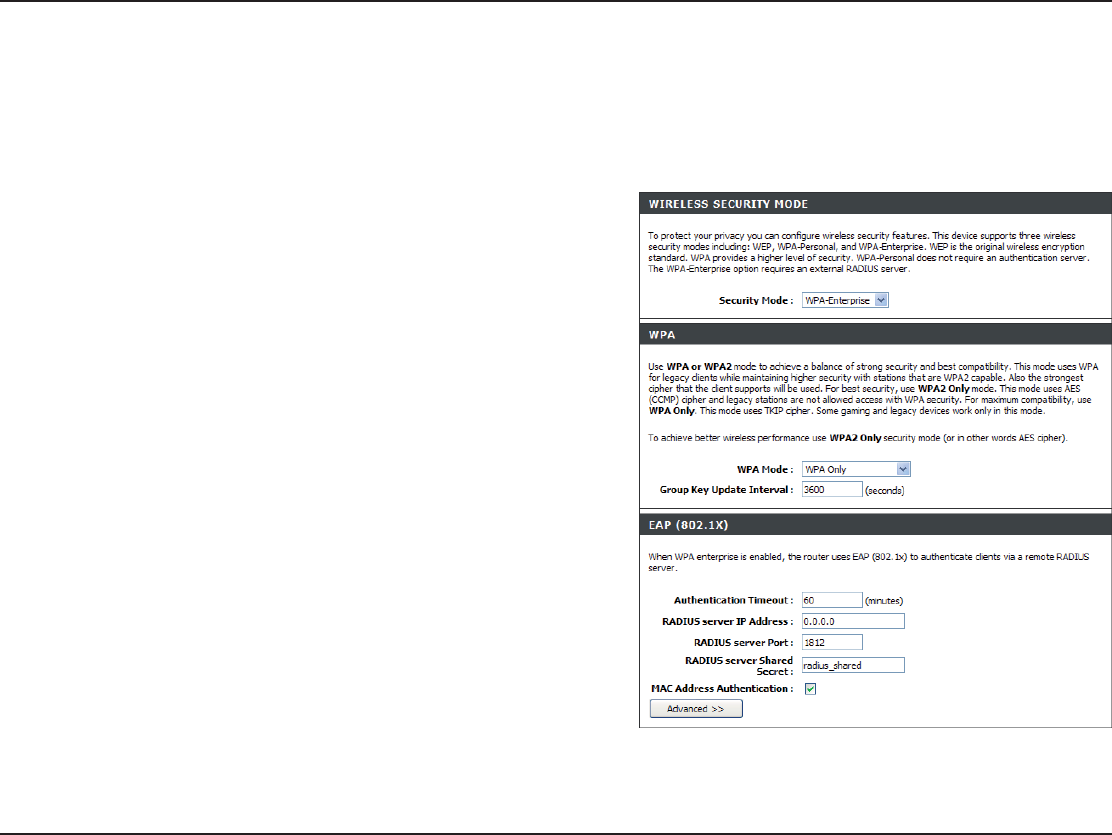
2. Next to Security Mode, select 70!%NTERPRISE.
3. Next to WPA Mode, select Auto,70!/NLY, or WPA Only. Use Auto
if you have wireless clients using both WPA and WPA2.
4. Next to Group Key Update Interval, enter the amount of time before
the group key used for broadcast and multicast data is changed
(3600 is default).
5. Next to Authentication Timeout, enter the amount of time before a
client is required to re-authenticate (60 minutes is default).
6. Next to RADIUS Server IP Address enter the IP Address of your
RADIUS server.
7. Next to RADIUS Server Port, enter the port you are using with your
RADIUS server. 1812 is the default port.
8. Next to RADIUS Server Shared Secret, enter the security key.
9. If the MAC Address Authentication box is selected then the user
will need to connect from the same computer whenever logging
into the wireless network.
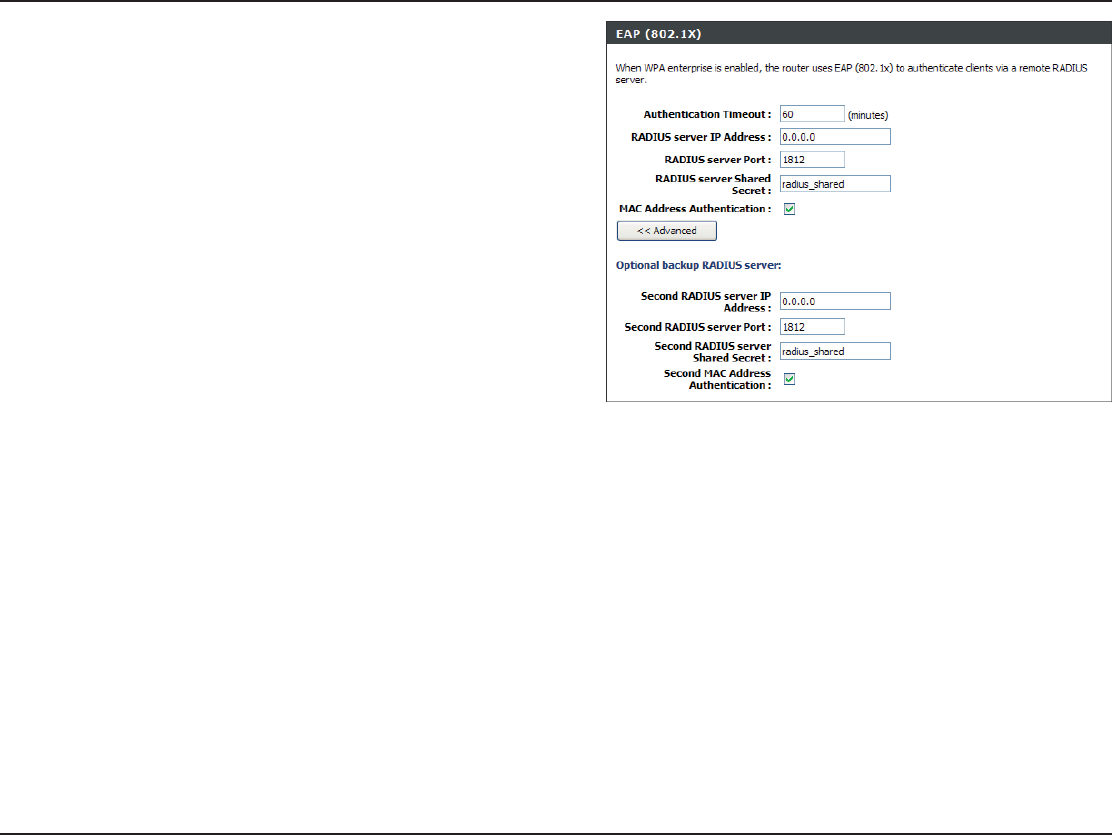
10. Click Advanced to enter settings for a secondary RADIUS
Server.
11. Click !PPLY3ETTINGS to save your settings.
#ONlGURE70!%NTERPRISE2!$)53
84D-Link DIR-652 User Manual
Section 4 - Security
85D-Link DIR-652 User Manual
Section 5 - Connecting to a Wireless Network
Using Windows® 7 and WPS for Wireless Configuration
6JGHQNNQYKPIUVGRUCNNQY[QWVQEQPſIWTG[QWT&+4YKTGNGUUPGVYQTMUGVVKPIUWUKPI9KPFQYU® 7 through WPS.
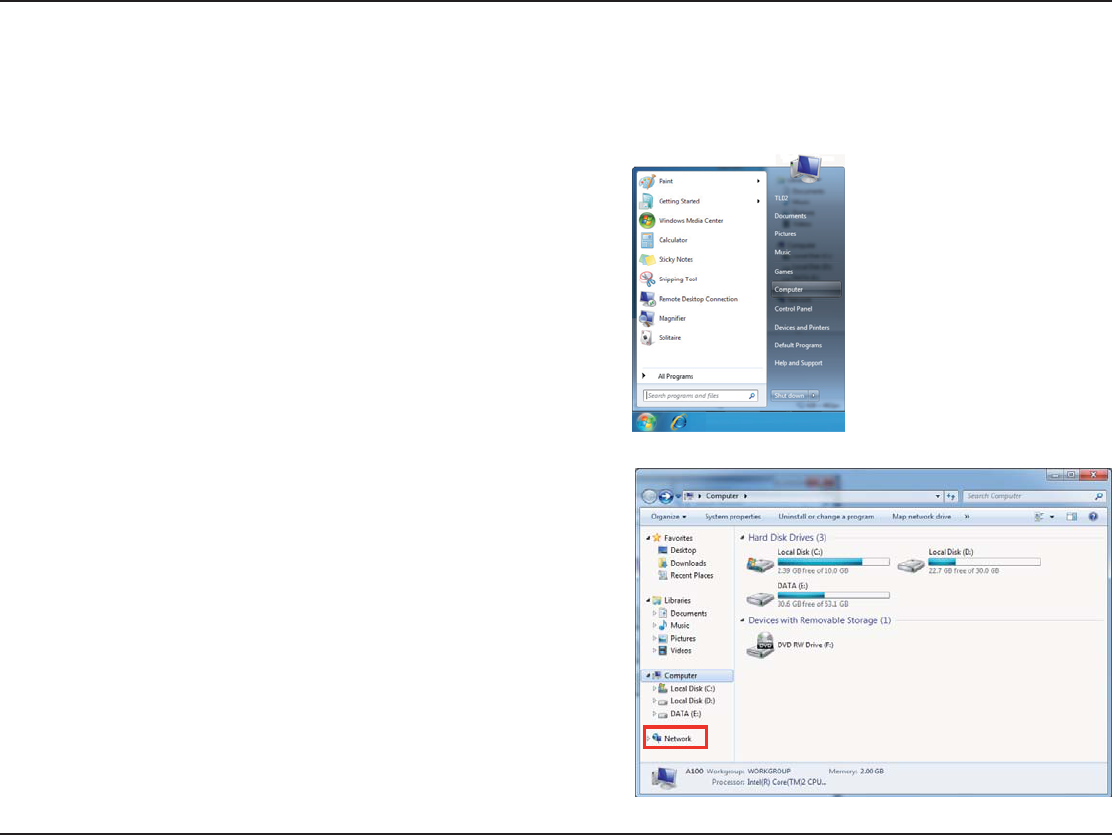
1. Click the Start button and select Computer from the Start
menu.
2. Click the Network option.
86D-Link DIR-652 User Manual
Section 5 - Connecting to a Wireless Network
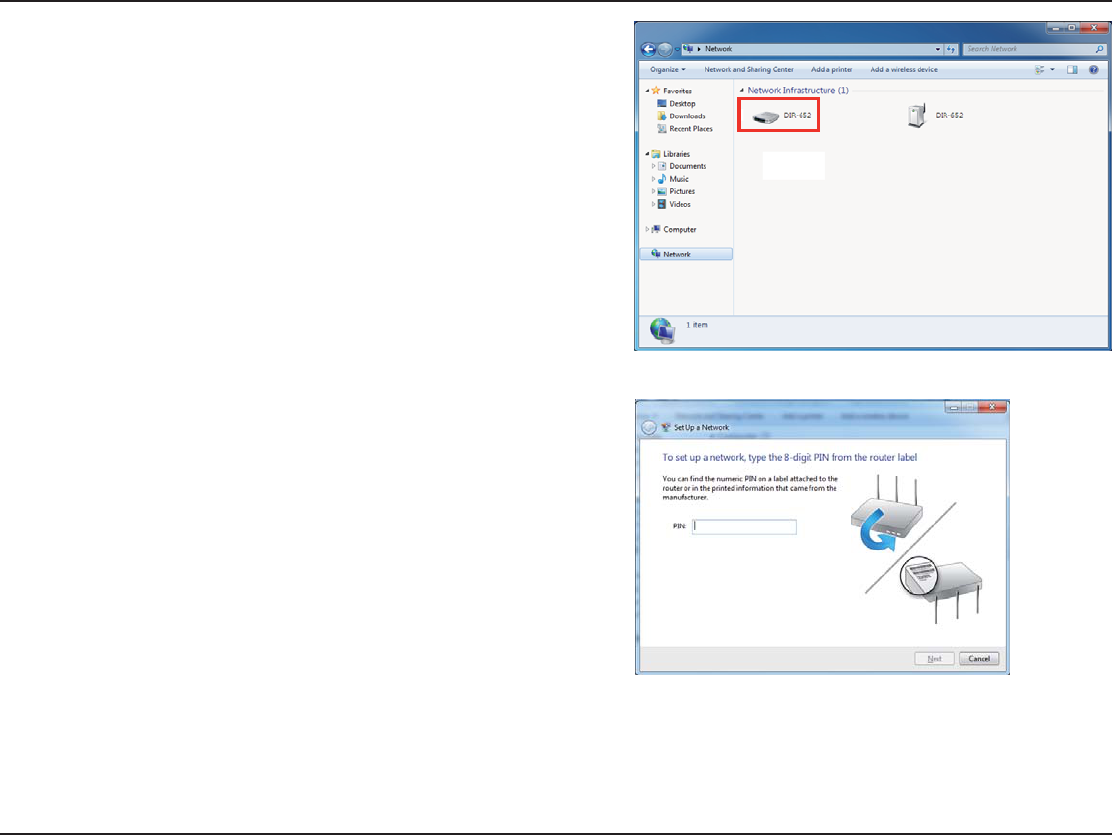
3. Double-click the DIR-652 router.
4. Input the WPS PIN number (displayed in the Advanced >
Wi-Fi Protected Setup section in the Router’s Web UI) and
click Next.
87D-Link DIR-652 User Manual
Section 5 - Connecting to a Wireless Network
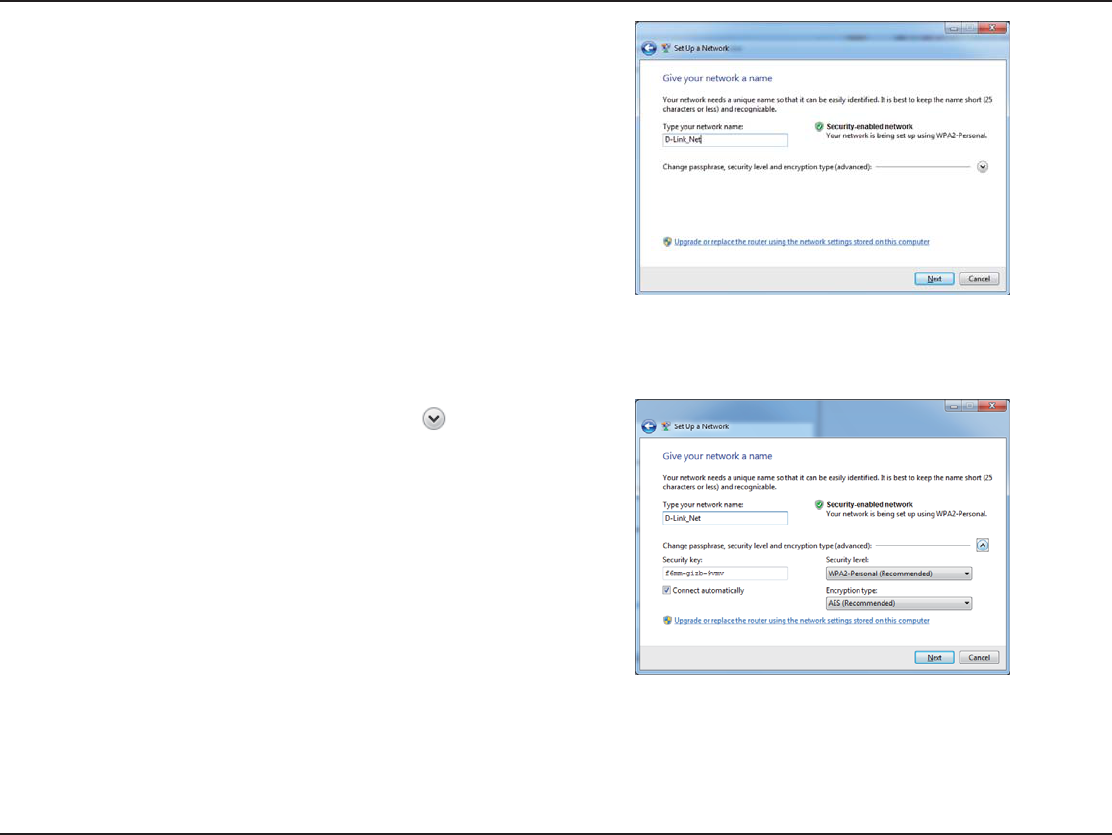
5. Type a name for your wireless network.
6QEQPſIWTGCFXCPEGFUGVVKPIUENKEMVJG icon.
Click Next to continue.
88D-Link DIR-652 User Manual
Section 5 - Connecting to a Wireless Network
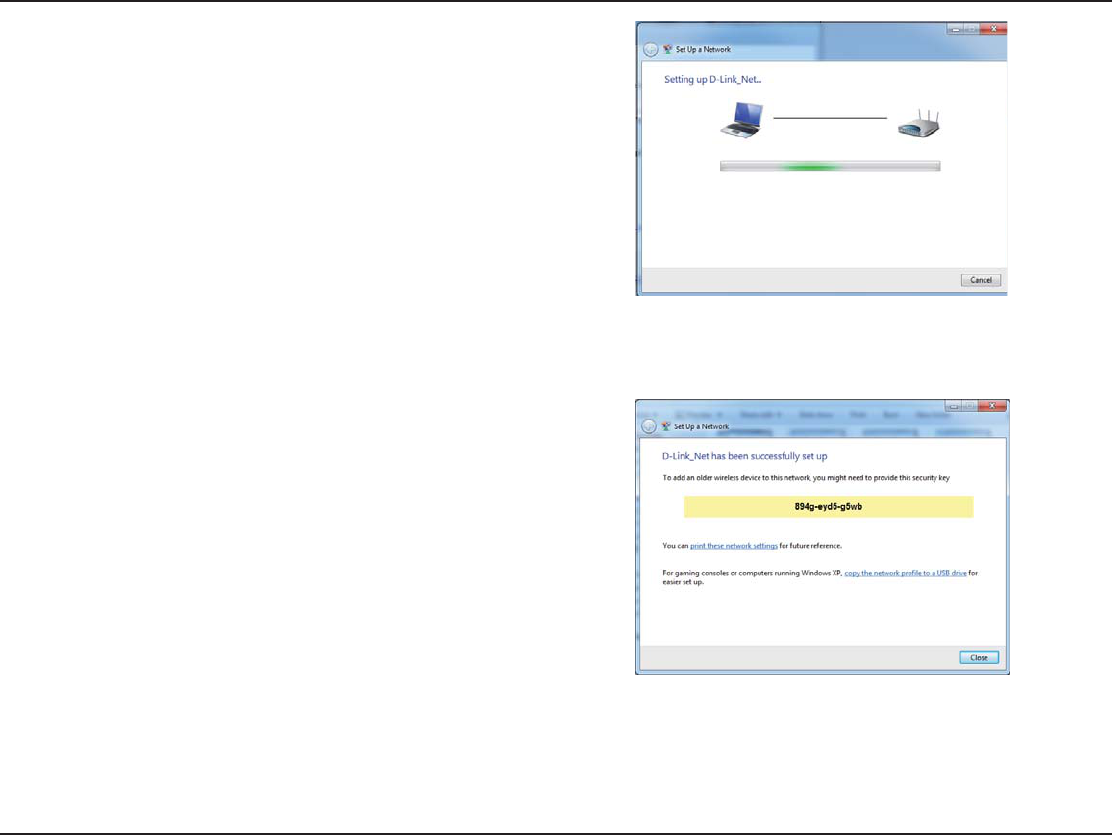
7. The following window will appear while the Router is being
EQPſIWTGF
9CKVHQTVJGEQPſIWTCVKQPVQEQORNGVG
#HVGTEQPſIWTCVKQPKUEQORNGVGCYKPFQYYKNNCRRGCTVJCV[QWT
wireless network has been set up successfully.
Make a note of the security key as you may need to provide
this security key when adding an older wireless device to the
network in the future.
Click Close to complete WPS setup.
89D-Link DIR-652 User Manual
Section 5 - Connecting to a Wireless Network
Connecting to a Wireless Network
Using Windows® 7
+VKUTGEQOOGPFGF VJCV[QWGPCDNGYKTGNGUUUGEWTKV[ 92#92#QP[QWTYKTGNGUUTQWVGTQTCEEGUURQKPVDGHQTG
EQPſIWTKPI[QWTYKTGNGUUCFCRVGT+H[QWCTGLQKPKPICPGZKUVKPIPGVYQTM[QWYKNNPGGFVQMPQYVJGUGEWTKV[MG[QT
passphrase being used.
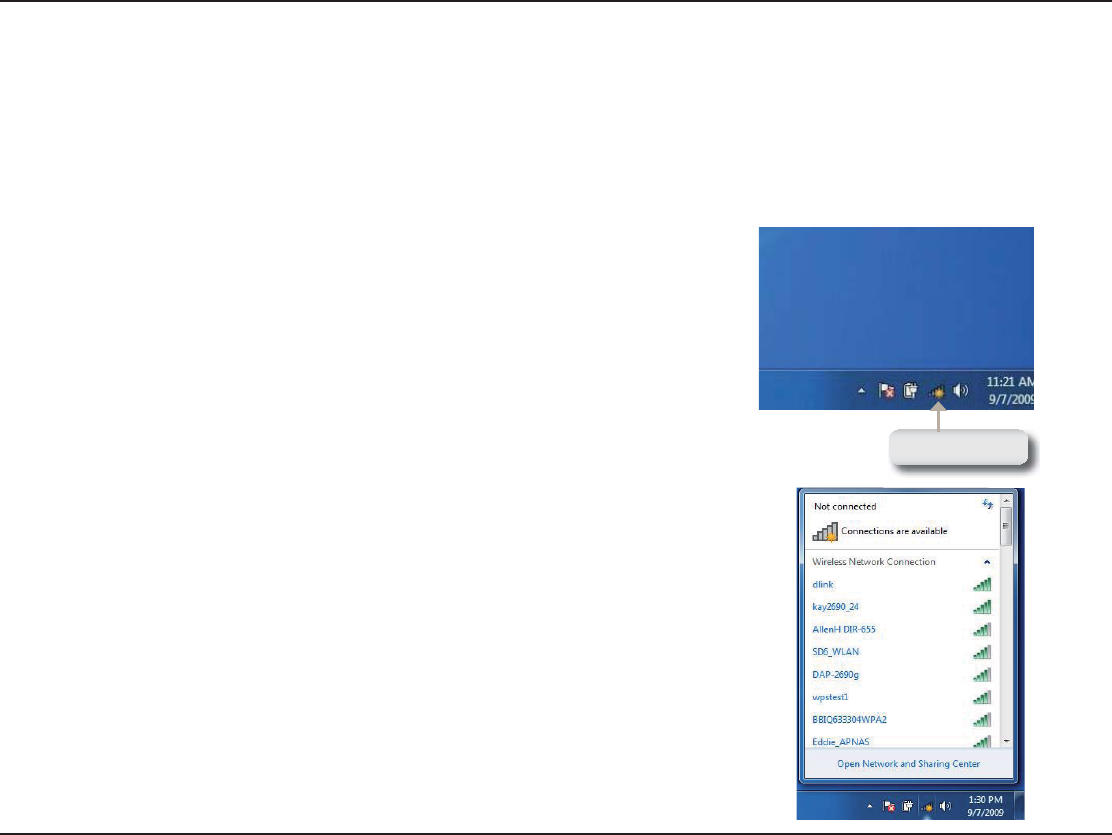
2. The utility will display any available wireless networks in
your area.
1. Click on the wireless icon in the system tray in the lower-
right corner of your screen.
Wireless Icon
90D-Link DIR-652 User Manual
Section 5 - Connecting to a Wireless Network
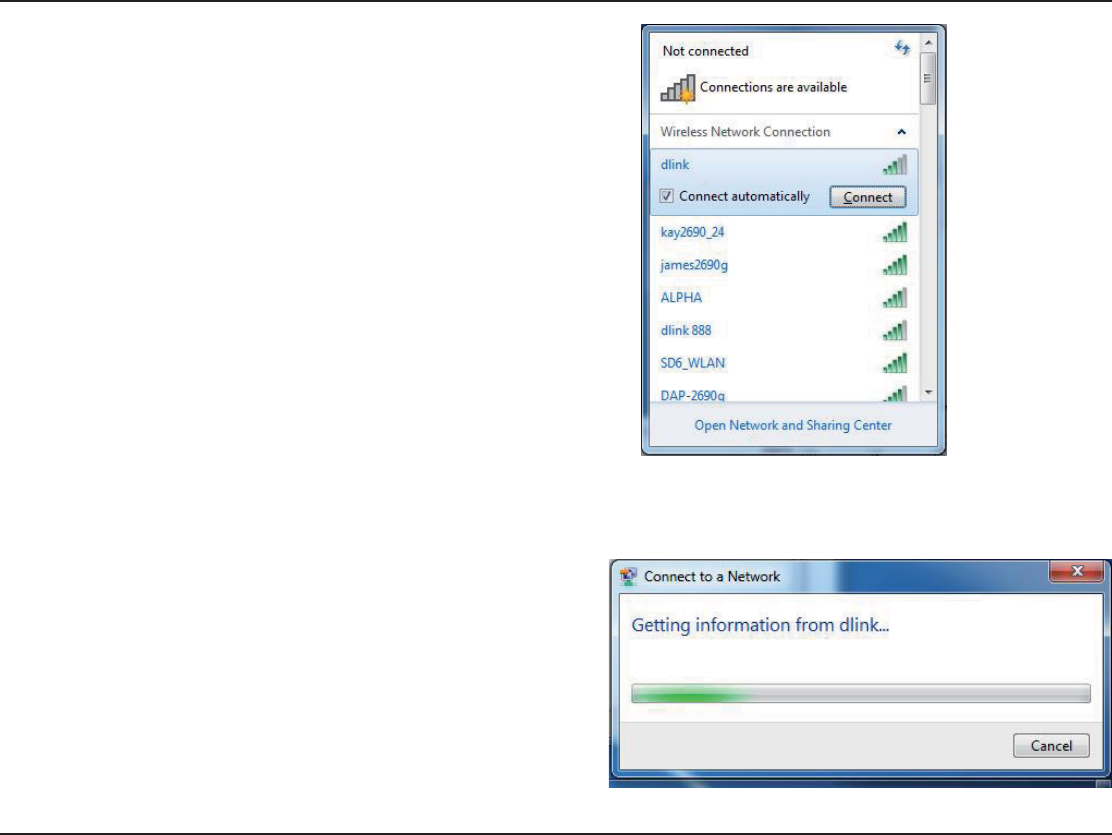
3. Highlight the wireless network (SSID) you would like to
connect to and click the Connect button.
4. The following window appears while your computer tries
to connect to the router.
91D-Link DIR-652 User Manual
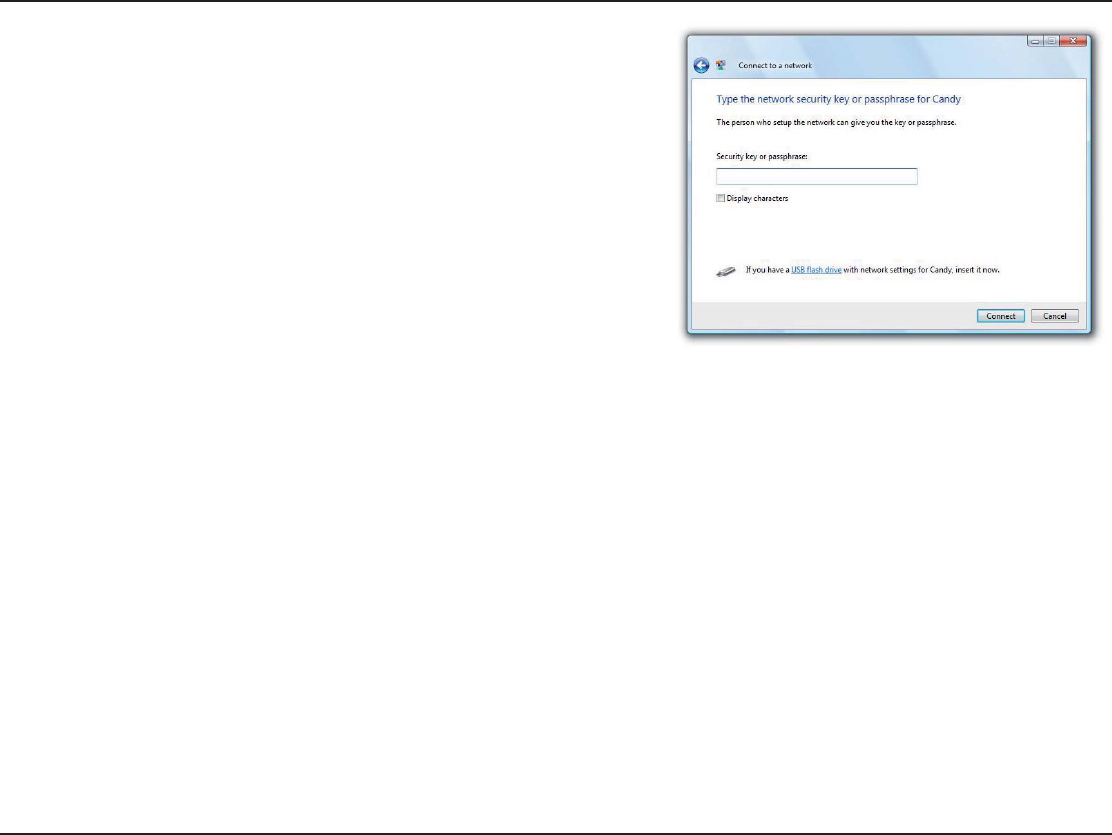
Section 5 - Connecting to a Wireless Network
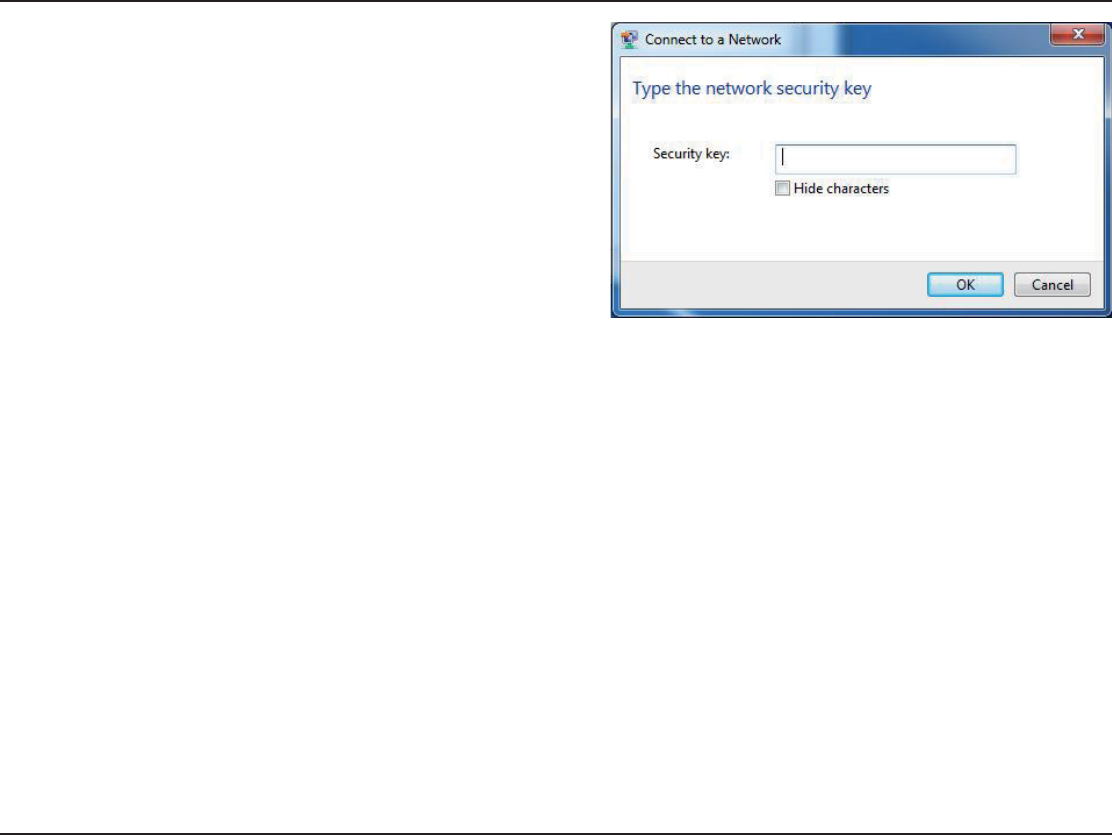
5. If your wireless network uses encryption such as WEP or
92#92#GPVGTVJGGPET[RVKQPRCUUYQTFRCUURJTCUG
for your wireless network and click Connect.
It may take 20-30 seconds to connect to the wireless
network. If the connection fails, please verify that the key
or passphrase is exactly the same as on the wireless
router.
92D-Link DIR-652 User Manual
Section 5 - Connecting to a Wireless Network
Connecting to a Wireless Network Using Windows Vista®
+VKUTGEQOOGPFGF VJCV[QWGPCDNGYKTGNGUUUGEWTKV[ 92#92#QP[QWTYKTGNGUUTQWVGTQTCEEGUURQKPVDGHQTG
EQPſIWTKPI[QWTYKTGNGUUCFCRVGT+H[QWCTGLQKPKPICPGZKUVKPIPGVYQTM[QWYKNNPGGFVQMPQYVJGUGEWTKV[MG[QT
passphrase being used.
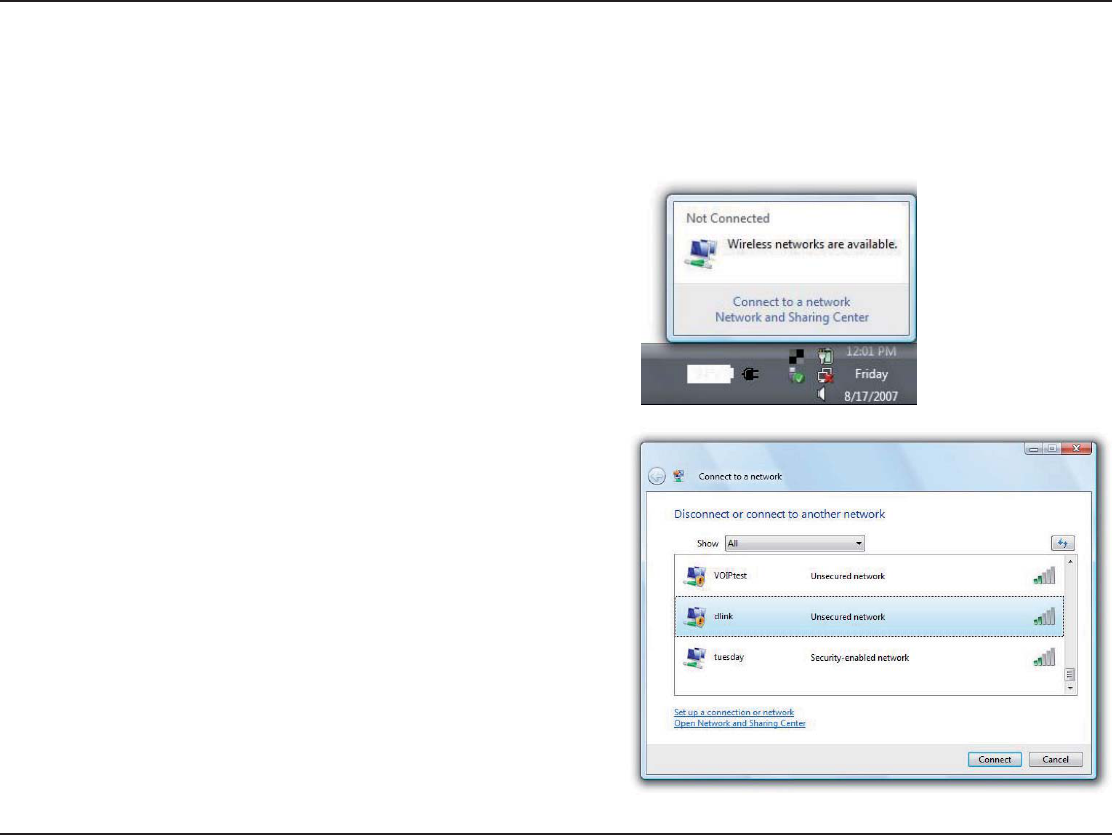
2. The utility will display any available wireless networks
in your area.
Highlight the wireless network (SSID) you would like to
connect to and click Connect.
If you get a good signal but cannot access the Internet,
EJGEM[QWT6%2+2UGVVKPIUHQT[QWTYKTGNGUUCFCRVGT
4GHGTVQVJG0GVYQTMKPI$CUKEU section in this manual
for more information.
1. Open the Windows Vista® Wireless Utility by right-clicking
on the wireless computer icon in the system tray in the
lower right corner of the screen. Select Connect to a
network.
93D-Link DIR-652 User Manual
Section 5 - Connecting to a Wireless Network
3.+H[QWT YKTGNGUUPGVYQTMWUGUGPET[RVKQP UWEJCU9'2QT 92#
92#GPVGTVJGGPET[RVKQPRCUUYQTFRCUURJTCUGHQT[QWTYKTGNGUU
network and click Connect.
It may take 20-30 seconds to connect to the wireless network. If the
connection fails, please verify that the key or passphrase is exactly
the same as on the wireless router.
94D-Link DIR-652 User Manual
Section 5 - Connecting to a Wireless Network
Connecting to a Wireless Network
Using Windows® XP
Windows®:2WUGTUOC[WUGVJGDWKNVKPYKTGNGUUWVKNKV[<GTQ%QPſIWTCVKQP7VKNKV[6JGHQNNQYKPIKPUVTWEVKQPUCTGHQT
Service Pack 2 users. If you are using another company’s utility or Windows® 2000, please refer to the user manual
of your wireless adapter for help with connecting to a wireless network. Most utilities will have a “site survey” option
similar to the Windows® XP utility as seen below.
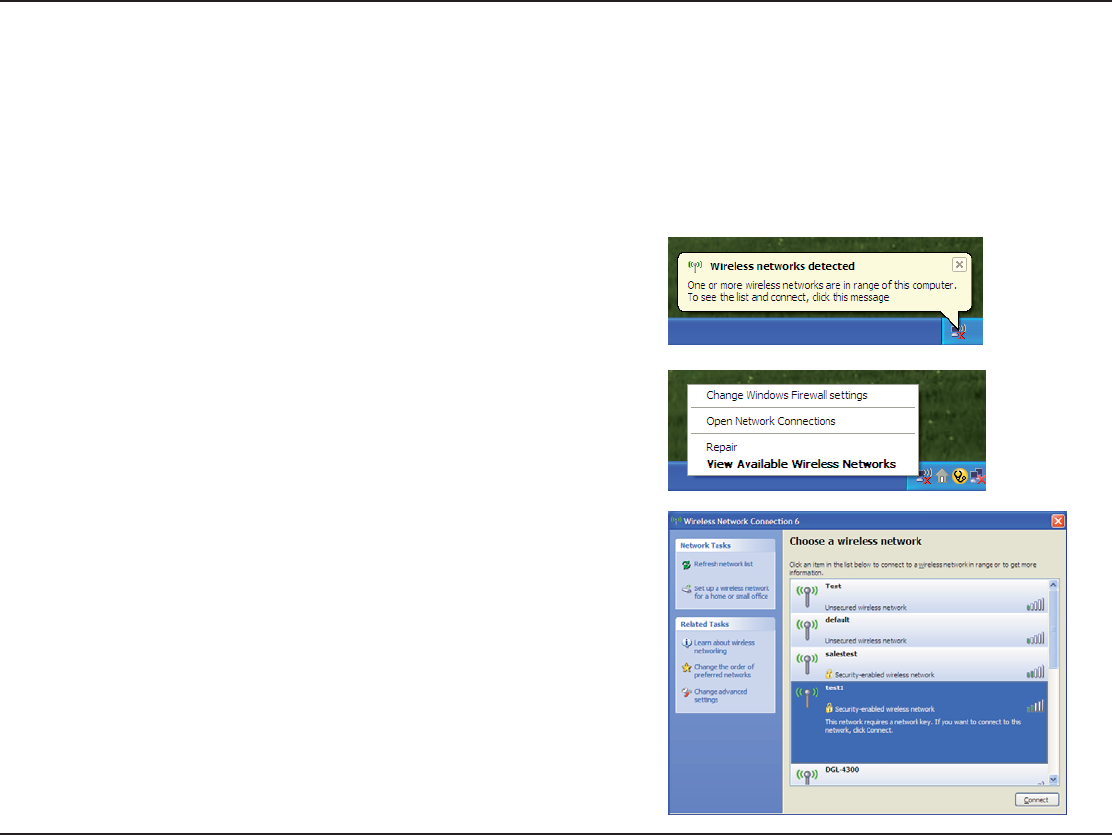
1. If you receive the Wireless Networks Detected bubble, click
on the center of the bubble to access the utility.
or
Right-click on the wireless computer icon in the system tray
in the lower-right corner of the screen. Select View Available
Wireless Networks.
2. The utility will display any available wireless networks in your
area. Click on a network (displayed using the SSID) and click
the Connect button.
If you get a good signal but cannot access the Internet,
EJGEM[QW6%2+2UGVVKPIUHQT[QWTYKTGNGUUCFCRVGT4GHGT
to the 0GVYQTMKPI$CUKEU section in this manual for more
information.

95D-Link DIR-652 User Manual
Section 5 - Connecting to a Wireless Network
3.+H[QWTYKTGNGUUPGVYQTMWUGUGPET[RVKQPUWEJCU9'2QT92#
92#GPVGTVJGGPET[RVKQPRCUUYQTFRCUURJTCUGHQT[QWTYKTGNGUU
network and click Connect.
It may take 20-30 seconds to connect to the wireless network. If the
connection fails, please verify that the key or passphrase is exactly
the same as on the wireless router.

96D-Link DIR-652 User Manual
Section 6 - Troubleshooting
4ROUBLESHOOTING
7HYCANT)ACCESSTHEWEBBASEDCONlGURATIONUTILITY
When entering the IP address of the D-Link router (192.168.0.1 for example), you are not connecting to a website on
the Internet or have to be connected to the Internet. The device has the utility built-in to a ROM chip in the device itself.
Your computer must be on the same IP subnet to connect to the web-based utility.
Ŗ/CMGUWTG[QWJCXGCPWRFCVGF,CXCGPCDNGFYGDDTQYUGT9GTGEQOOGPFVJGHQNNQYKPI
Ŗ+PVGTPGV'ZRNQTGTQTJKIJGT
Ŗ0GVUECRGQTJKIJGT
Ŗ/Q\KNNCQTJKIJGT
Ŗ1RGTCQTJKIJGT
Ŗ5CHCTKQTJKIJGTYKVJ,CXCQTJKIJGT
Ŗ%COKPQQTJKIJGT
Ŗ(KTGHQZQTJKIJGT
Ŗ8GTKH[RJ[UKECNEQPPGEVKXKV[D[EJGEMKPIHQTUQNKFNKPMNKIJVUQPVJGFGXKEG+H[QWFQPQVIGVCUQNKFNKPMNKIJVVT[WUKPI
a different cable or connect to a different port on the device if possible. If the computer is turned off, the link light may
not be on.
Ŗ&KUCDNGCP[KPVGTPGVUGEWTKV[UQHVYCTGTWPPKPIQPVJGEQORWVGT5QHVYCTGſTGYCNNUUWEJCU<QPG#NCTO$NCEM+EG
Sygate, Norton Personal Firewall, and Windows®:2ſTGYCNNOC[DNQEMCEEGUUVQVJGEQPſIWTCVKQPRCIGU%JGEMVJG
JGNRſNGUKPENWFGFYKVJ[QWTſTGYCNNUQHVYCTGHQTOQTGKPHQTOCVKQPQPFKUCDNKPIQTEQPſIWTKPIKV

97D-Link DIR-652 User Manual
Section 6 - Troubleshooting
Ŗ%QPſIWTG[QWT+PVGTPGVUGVVKPIU
Ŗ)QVQStart > Settings > Control Panel. Double-click the )NTERNET/PTIONS Icon. From the Security tab, click
the button to restore the settings to their defaults.
Ŗ%NKEMVJGConnection tab and set the dial-up option to Never Dial a Connection. Click the LAN Settings
button. Make sure nothing is checked. Click OK.
Ŗ)QVQVJGAdvanced tab and click the button to restore these settings to their defaults. Click OK three
times.
Ŗ%NQUG[QWTYGDDTQYUGTKHQRGPCPFQRGPKV
Ŗ#EEGUUVJGYGDOCPCIGOGPV1RGP[QWTYGDDTQYUGTCPFGPVGTVJG+2CFFTGUUQH[QWT&.KPMTQWVGTKPVJGCFFTGUU
bar. This should open the login page for your the web management.
Ŗ+H[QWUVKNNECPPQVCEEGUUVJGEQPſIWTCVKQPWPRNWIVJGRQYGTVQVJGTQWVGTHQTUGEQPFUCPFRNWIDCEMKP9CKV
CDQWVUGEQPFUCPFVT[CEEGUUKPIVJGEQPſIWTCVKQP+H[QWJCXGOWNVKRNGEQORWVGTUVT[EQPPGEVKPIWUKPICFKHHGTGPV
computer.
7HATCAN)DOIF)FORGOTMYPASSWORD
If you forgot your password, you must reset your router. Unfortunately this process will change all your settings back
to the factory defaults.
To reset the router, locate the reset button (hole) on the rear panel of the unit. With the router powered on, use a
paperclip to hold the button down for 10 seconds. Release the button and the router will go through its reboot process.
Wait about 30 seconds to access the router. The default IP address is 192.168.0.1. When logging in, the username is
admin and leave the password box empty.
98D-Link DIR-652 User Manual
Section 6 - Troubleshooting
7HYCANT)CONNECTTOCERTAINSITESORSENDANDRECEIVEEMAILSWHENCONNECTINGTHROUGHMYROUTER
If you are having a problem sending or receiving email, or connecting to secure sites such as eBay, banking sites, and
Hotmail, we suggest lowering the MTU in increments of ten (Ex. 1492, 1482, 1472, etc).
Note: AOL DSL+ users must use MTU of 1400.
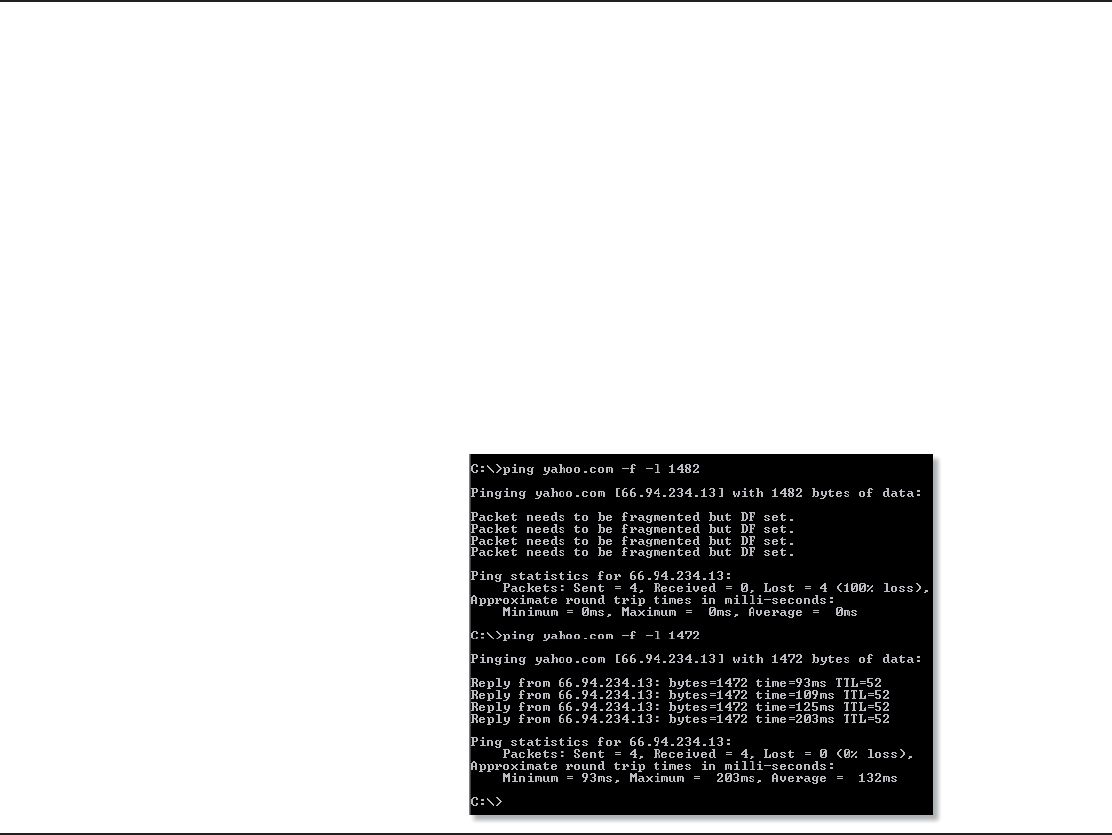
6QſPFVJGRTQRGT/675K\G[QWŏNNJCXGVQFQCURGEKCNRKPIQHVJGFGUVKPCVKQP[QWŏTGVT[KPIVQIQVQ#FGUVKPCVKQP
could be another computer, or a URL.
Ŗ%NKEMQPStart and then click Run.
Ŗ9KPFQYU® 95, 98, and Me users type in command (Windows® NT, 2000, XP and Vista® users type in cmd)
and press Enter (or click OK).
Ŗ1PEGVJGYKPFQYQRGPU[QWŏNNPGGFVQFQCURGEKCNRKPI7UGVJGHQNNQYKPIU[PVCZ
PING;URL=;F=;L=;-45VALUE=
Example: PINGYAHOOCOMFL

99D-Link DIR-652 User Manual
Section 6 - Troubleshooting
You should start at 1472 and work your way down by 10 each time. Once you get a reply, go up by 2 until you get a
HTCIOGPVGFRCEMGV6CMGVJCVXCNWGCPFCFFVQVJGXCNWGVQCEEQWPVHQTVJGXCTKQWU6%2+2JGCFGTU(QTGZCORNG
lets say that 1452 was the proper value, the actual MTU size would be 1480, which is the optimum for the network
we’re working with (1452+28=1480).
1PEG[QWſPF[QWT/67[QWECPPQYEQPſIWTG[QWTTQWVGTYKVJVJGRTQRGT/67UK\G
To change the MTU rate on your router follow the steps below:
Ŗ1RGP[QWTDTQYUGTGPVGTVJG+2CFFTGUUQH[QWTTQWVGTCPFENKEMOK.
Ŗ'PVGT[QWTWUGTPCOGCFOKPCPFRCUUYQTFDNCPMD[FGHCWNV%NKEMOKVQGPVGTVJGYGDEQPſIWTCVKQP
page for the device.
Ŗ%NKEMQP3ETUP and then click Manual Configure.
Ŗ6QEJCPIGVJG/67GPVGTVJGPWODGTKPVJG/67ſGNFCPFENKEMSave Settings to save your settings.
Ŗ6GUV[QWTGOCKN+HEJCPIKPI VJG/67FQGUPQV TGUQNXGVJGRTQDNGOEQPVKPWG EJCPIKPIVJG/67KP
increments of ten.

100D-Link DIR-652 User Manual
Appendix A - Wireless Basics
D-Link wireless products are based on industry standards to provide easy-to-use and compatible high-speed wireless
connectivity within your home, business or public access wireless networks. Strictly adhering to the IEEE standard,
the D-Link wireless family of products will allow you to securely access the data you want, when and where you want
it. You will be able to enjoy the freedom that wireless networking delivers.
A wireless local area network (WLAN) is a cellular computer network that transmits and receives data with radio signals
KPUVGCFQHYKTGU9KTGNGUU.#0UCTGWUGFKPETGCUKPIN[KPDQVJJQOGCPFQHſEGGPXKTQPOGPVUCPFRWDNKECTGCUUWEJ
as airports, coffee shops and universities. Innovative ways to utilize WLAN technology are helping people to work and
EQOOWPKECVGOQTGGHſEKGPVN[+PETGCUGFOQDKNKV[CPFVJGCDUGPEGQHECDNKPICPFQVJGTſZGFKPHTCUVTWEVWTGJCXGRTQXGP
VQDGDGPGſEKCNHQTOCP[WUGTU
Wireless users can use the same applications they use on a wired network. Wireless adapter cards used on laptop
and desktop systems support the same protocols as Ethernet adapter cards.
Under many circumstances, it may be desirable for mobile network devices to link to a conventional Ethernet LAN in
order to use servers, printers or an Internet connection supplied through the wired LAN. A Wireless Router is a device
used to provide this link.
Wireless Basics

101D-Link DIR-652 User Manual
Appendix A - Wireless Basics
7HATIS7IRELESS
Wireless or Wi-Fi technology is another way of connecting your computer to the network without using wires. Wi-Fi
uses radio frequency to connect wirelessly, so you have the freedom to connect computers anywhere in your home
QTQHſEGPGVYQTM
7HY$,INK7IRELESS?
D-Link is the worldwide leader and award winning designer, developer, and manufacturer of networking products.
D-Link delivers the performance you need at a price you can afford. D-Link has all the products you need to build your
network.
(OWDOESWIRELESSWORK
Wireless works similar to how cordless phone work, through radio signals to transmit data from one point A to point
B. But wireless technology has restrictions as to how you can access the network. You must be within the wireless
network range area to be able to connect your computer. There are two different types of wireless networks Wireless
Local Area Network (WLAN), and Wireless Personal Area Network (WPAN).
7IRELESS,OCAL!REA.ETWORK7,!.
In a wireless local area network, a device called an Access Point (AP) connects computers to the network. The access
point has a small antenna attached to it, which allows it to transmit data back and forth over radio signals. With an
indoor access point as seen in the picture, the signal can travel up to 300 feet. With an outdoor access point the signal
can reach out up to 30 miles to serve places like manufacturing plants, industrial locations, college and high school
campuses, airports, golf courses, and many other outdoor venues.
7IRELESS0ERSONAL!REA.ETWORK70!.
Bluetooth is the industry standard wireless technology used for WPAN. Bluetooth devices in WPAN operate in a range
up to 30 feet away.

102D-Link DIR-652 User Manual
Appendix A - Wireless Basics
Compared to WLAN the speed and wireless operation range are both less than WLAN, but in return it doesn’t use
nearly as much power which makes it ideal for personal devices, such as mobile phones, PDAs, headphones, laptops,
speakers, and other devices that operate on batteries.
7HOUSESWIRELESS
Wireless technology as become so popular in recent years that almost everyone is using it, whether it’s for home,
QHſEGDWUKPGUU&.KPMJCUCYKTGNGUUUQNWVKQPHQTKV
Home
Ŗ)KXGUGXGT[QPGCVJQOGDTQCFDCPFCEEGUU
Ŗ5WTHVJGYGDEJGEMGOCKNKPUVCPVOGUUCIGCPFGVE
Ŗ)GVUTKFQHVJGECDNGUCTQWPFVJGJQWUG
Ŗ5KORNGCPFGCU[VQWUG
Small Office and Home Office
Ŗ5VC[QPVQRQHGXGT[VJKPICVJQOGCU[QWYQWNFCVQHſEG
Ŗ4GOQVGN[CEEGUU[QWTQHſEGPGVYQTMHTQOJQOG
Ŗ5JCTG+PVGTPGVEQPPGEVKQPCPFRTKPVGTYKVJOWNVKRNGEQORWVGTU
Ŗ0QPGGFVQFGFKECVGQHſEGURCEG

103D-Link DIR-652 User Manual
Appendix A - Wireless Basics
7HEREISWIRELESSUSED
9KTGNGUUVGEJPQNQI[KUGZRCPFKPIGXGT[YJGTGPQVLWUVCVJQOGQTQHſEG2GQRNGNKMGVJGHTGGFQOQHOQDKNKV[CPFKVŏU
becoming so popular that more and more public facilities now provide wireless access to attract people. The wireless
connection in public places is usually called “hotspots”.
Using a D-Link Cardbus Adapter with your laptop, you can access the hotspot to connect to Internet from remote
locations like: Airports, Hotels, Coffee Shops, Libraries, Restaurants, and Convention Centers.
9KTGNGUUPGVYQTMKUGCU[VQUGVWRDWVKH[QWŏTGKPUVCNNKPIKVHQTVJGſTUVVKOGKVEQWNFDGSWKVGCVCUMPQVMPQYKPIYJGTGVQ
start. That’s why we’ve put together a few setup steps and tips to help you through the process of setting up a wireless
network.
4IPS
Here are a few things to keep in mind, when you install a wireless network.
#ENTRALIZEYOURROUTEROR!CCESS0OINT
/CMGUWTG[QWRNCEGVJGTQWVGTCEEGUURQKPVKPCEGPVTCNK\GFNQECVKQPYKVJKP[QWTPGVYQTMHQTVJGDGUVRGTHQTOCPEG6T[
VQRNCEGVJGTQWVGTCEEGUURQKPVCUJKIJCURQUUKDNGKPVJGTQQOUQVJGUKIPCNIGVUFKURGTUGFVJTQWIJQWV[QWTJQOG
If you have a two-story home, you may need a repeater to boost the signal to extend the range.
Eliminate Interference
Place home appliances such as cordless telephones, microwaves, and televisions as far away as possible from the
TQWVGTCEEGUURQKPV6JKUYQWNFUKIPKſECPVN[TGFWEGCP[KPVGTHGTGPEGVJCVVJGCRRNKCPEGUOKIJVECWUGUKPEGVJG[QRGTCVG
on same frequency.
Security
Don’t let you next-door neighbors or intruders connect to your wireless network. Secure your wireless network by turning
on the WPA or WEP security feature on the router. Refer to product manual for detail information on how to set it up.

104D-Link DIR-652 User Manual
Appendix A - Wireless Basics
Wireless Modes
There are basically two modes of networking:
ŖInfrastructure – All wireless clients will connect to an access point or wireless router.
Ŗ!D(OC – Directly connecting to another computer, for peer-to-peer communication, using wireless network
adapters on each computer, such as two or more DIR-652 wireless network Cardbus adapters.
An Infrastructure network contains an Access Point or wireless router. All the wireless devices, or clients, will connect
to the wireless router or access point.
An Ad-Hoc network contains only clients, such as laptops with wireless CardBus adapters. All the adapters must be
in Ad-Hoc mode to communicate.
105D-Link DIR-652 User Manual
Appendix B - Networking Basics
Networking Basics
#HECKYOUR)0ADDRESS
#HVGT[QWKPUVCNN[QWTPGY&.KPMCFCRVGTD[FGHCWNVVJG6%2+2UGVVKPIUUJQWNFDGUGVVQQDVCKPCP+2CFFTGUUHTQO
a DHCP server (i.e. wireless router) automatically. To verify your IP address, please follow the steps below.
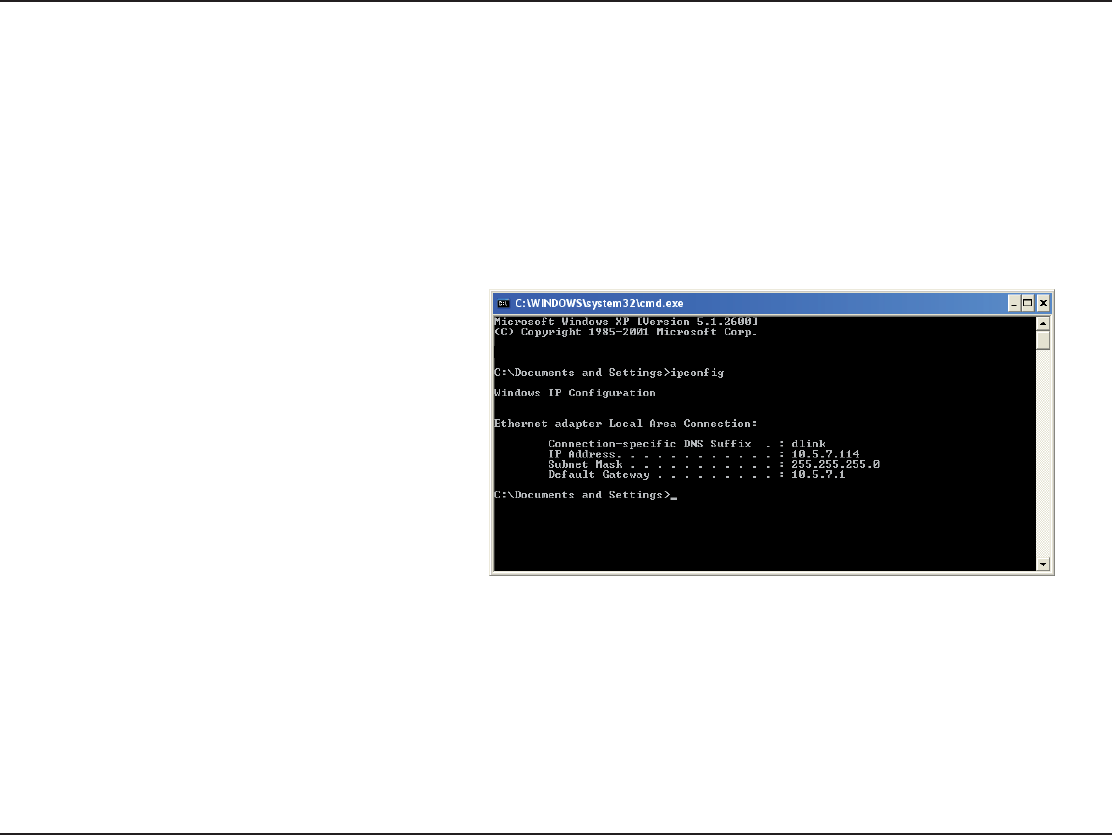
Click on Start > Run. In the run box type cmd and click /+ (Windows Vista® users type cmd in the 3TART3EARCH box.)
At the prompt, type ipconfig and press Enter.
This will display the IP address, subnet mask, and the default gateway of your adapter.
If the address is 0.0.0.0, check your adapter
installation, security settings, and the settings
QP[QWTTQWVGT5QOGſTGYCNNUQHVYCTGRTQITCOU
may block a DHCP request on newly installed
adapters.
If you are connecting to a wireless network at a
hotspot (e.g. hotel, coffee shop, airport), please
contact an employee or administrator to verify their
wireless network settings.
106D-Link DIR-652 User Manual
Appendix B - Networking Basics
Statically Assign an IP address
+H[QWCTGPQVWUKPIC&*%2ECRCDNGICVGYC[TQWVGTQT[QWPGGFVQCUUKIPCUVCVKE+2CFFTGUURNGCUGHQNNQYVJGUVGRU
below:
3TEP
Windows Vista®: Click on Start > Control Panel > Network and Internet > .ETWORKAND3HARING#ENTER > Manage Network
#ONNECTIONS
Windows® XP: Click on Start > Control Panel > Network Connections.
Windows® 2000: From the desktop, right-click My Network Places > 0ROPERTIES.
3TEP
Right-click on the Local Area Connection which represents your D-Link network adapter and select 0ROPERTIES.
3TEP
Highlight )NTERNET0ROTOCOL4#0)0 and click 0ROPERTIES.
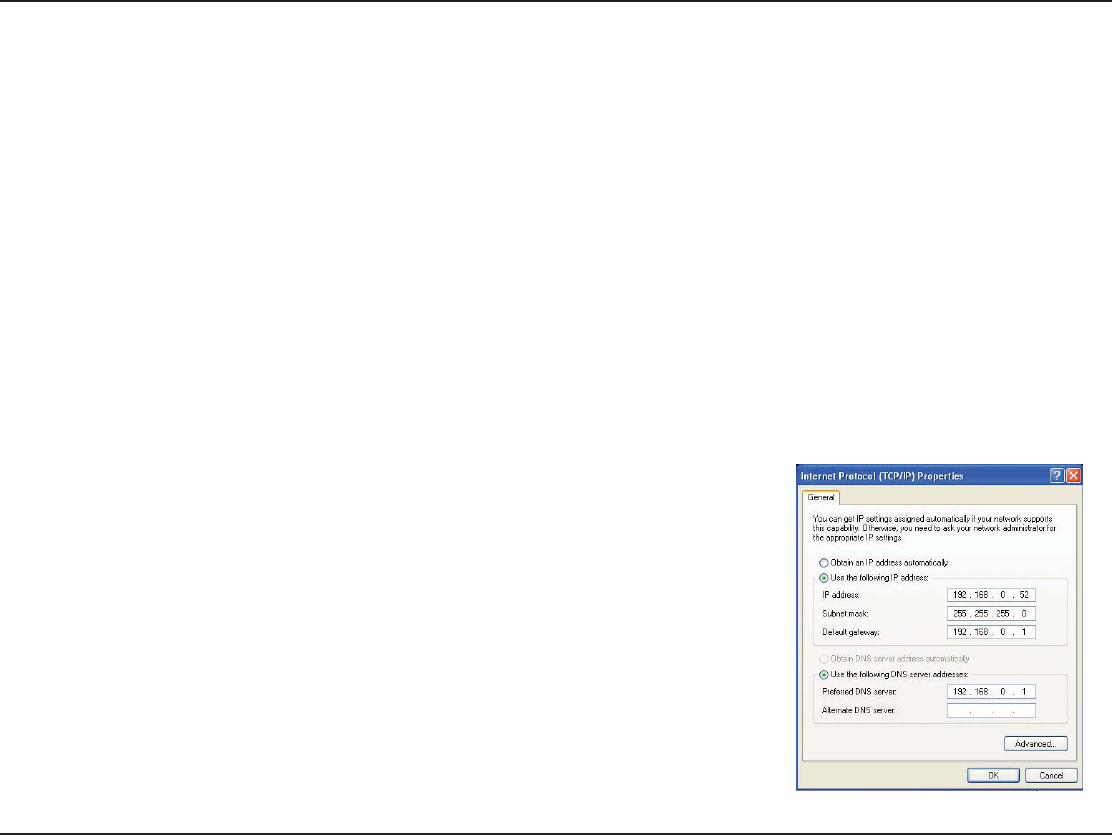
3TEP
Click 5SETHEFOLLOWING)0ADDRESS and enter an IP address that is on the same subnet as your network or the LAN IP
address on your router.
%XAMPLE If the router´s LAN IP address is 192.168.0.1, make your IP address
192.168.0.X where X is a number between 2 and 99. Make sure that the number
you choose is not in use on the network. Set Default Gateway the same as the LAN
IP address of your router (192.168.0.1).
Set Primary DNS the same as the LAN IP address of your router (192.168.0.1). The
Secondary DNS is not needed or you may enter a DNS server from your ISP.
3TEP
Click OK twice to save your settings.

107D-Link DIR-652 User Manual
#RRGPFKZ%6GEJPKECN5RGEKſECVKQPU
4ECHNICAL3PECIlCATIONS
Standards
Ŗ+'''P
Ŗ+'''I
Ŗ+'''
Ŗ+'''W
Security
Ŗ92#2GTUQPCN
Ŗ92#2GTUQPCN
Ŗ92#'PVGTRTKUG
Ŗ92#'PVGTRTKUG
Wireless Signal Rates*
)%%%N(4
Ŗ/DRU Ŗ/DRU
Ŗ/DRU Ŗ/DRU
Ŗ/DRU Ŗ/DRU
Ŗ/DRU Ŗ/DRU
Ŗ/DRU Ŗ/DRU
Ŗ/DRU Ŗ/DRU
Ŗ/DRU
)%%%G
Ŗ/DRU Ŗ/DRU
Ŗ/DRU Ŗ/DRU
Ŗ/DRU Ŗ/DRU
Ŗ/DRU Ŗ/DRU
Ŗ/DRU Ŗ/DRU
Ŗ/DRU
Frequency Range
Ŗ)*\VQ)*\
4RANSMITTER/UTPUT0OWER7l[hW][
ŖF$O
%XTERNAL!NTENNA4YPE
Ŗ6YQFGVCEJCDNGTGXGTUG5/##PVGPPCU
LEDs
Ŗ2QYGT5VCVWU Ŗ+PVGTPGV
Ŗ9.#0 Ŗ.#0
/PERATING4EMPERATURE
Ŗu(VQu(u%VQu%
Humidity
ŖOCZKOWOPQPEQPFGPUKPI
Safety & Emissions
Ŗ(%%
Ŗ%'
Dimensions
Ŗ.KPEJGU
Ŗ9KPEJGU
Ŗ*KPEJGU
/CZKOWOYKTGNGUUUKIPCNTCVGFGTKXGFHTQO+'''5VCPFCTFICPFPURGEKſECVKQPU#EVWCNFCVCVJTQWIJRWVYKNNXCT[0GVYQTMEQPFKVKQPUCPFGPXKTQPOGPVCN
HCEVQTUKPENWFKPIXQNWOGQHPGVYQTMVTCHſEDWKNFKPIOCVGTKCNUCPFEQPUVTWEVKQPCPFPGVYQTMQXGTJGCFNQYGTCEVWCNFCVCVJTQWIJRWVTCVG'PXKTQPOGPVCNHCEVQTUYKNN
adversely affect wireless signal range.

108D-Link DIR-652 User Manual
#RRGPFKZ&%GTVKſECVKQPU
#%-ARK7ARNING
This is a Class B product. In a domestic environment, this product may cause radio interference, in which case the user may be required
to take adequate measures.
&##3TATEMENT
This equipment has been tested and found to comply with the limits for a Class B digital device, pursuant to part 15 of the FCC Rules.
These limits are designed to provide reasonable protection against harmful interference in a residential installation. This equipment
generates, uses, and can radiate radio frequency energy and, if not installed and used in accordance with the instructions, may cause
harmful interference to radio communication. However, there is no guarantee that interference will not occur in a particular installation.
If this equipment does cause harmful interference to radio or television reception, which can be determined by turning the equipment off
and on, the user is encouraged to try to correct the interference by one or more of the
following measures:
Ŗ4GQTKGPVQTTGNQECVGVJGTGEGKXKPICPVGPPC
Ŗ+PETGCUGVJGUGRCTCVKQPDGVYGGPVJGGSWKROGPVCPFTGEGKXGT
Ŗ%QPPGEVVJGGSWKROGPVKPVQCPQWVNGVQPCEKTEWKVFKHHGTGPVHTQOVJCVVQYJKEJVJGTGEGKXGTKUEQPPGEVGF
Ŗ%QPUWNVVJGFGCNGTQTCPGZRGTKGPEGFTCFKQ68VGEJPKEKCPHQTJGNR
&###AUTION
#P[EJCPIGUQTOQFKſECVKQPUPQVGZRTGUUN[CRRTQXGFD[VJGRCTV[TGURQPUKDNGHQTEQORNKCPEGEQWNFXQKFVJGWUGTŏUCWVJQTKV[VQQRGTCVG
this equipment.
This device complies with Part 15 of the FCC Rules. Operation is subject to the following two conditions:
(1) This device may not cause harmful interference, and (2) this device must accept any interference received, including interference that
may cause undesired operation.
)-0/24!.4./4)#%
&##2ADIATION%XPOSURE3TATEMENT
This equipment complies with FCC radiation exposure limits set forth for an uncontrolled environment. This equipment should be installed
and operated with minimum distance 20cm between the radiator & your body. This transmitter must not be co-located or operating in
conjunction with any other antenna or transmitter.
6JGCXCKNCDKNKV[QHUQOGURGEKſEEJCPPGNUCPFQTQRGTCVKQPCNHTGSWGPE[DCPFUCTGEQWPVT[FGRGPFGPVCPFCTGſTOYCTGRTQITCOOGFCV
VJGHCEVQT[VQOCVEJVJGKPVGPFGFFGUVKPCVKQP6JGſTOYCTGUGVVKPIKUPQVCEEGUUKDNGD[VJGGPFWUGT
Certifications