D Link WR755A1 HSPA+ 3G VPN Router User Manual Manual P A 60
D Link Corporation HSPA+ 3G VPN Router Manual P A 60
D Link >
Contents
- 1. Manual_P.A-60
- 2. Users Manual -2
Manual_P.A-60
Version 1.0 | 02/21/2014
DWR-755
User Manual
HSPA+ 3G VPN Router

iD-Link DWR-755 User Manual
D-Link reserves the right to revise this publication and to make changes in the content hereof without obligation to notify any
person or organization of such revisions or changes.
Manual Revisions
Trademarks
D-Link and the D-Link logo are trademarks or registered trademarks of D-Link Corporation or its subsidiaries in the United States or other countries.
All other company or product names mentioned herein are trademarks or registered trademarks of their respective companies.
Apple®, Apple logo®, Safari®, iPhone®, iPad®, iPod touch® and Macintosh® are trademarks of Apple Inc., registered in the U.S. and other countries.
App StoreSM is a service mark of Apple Inc.
Chrome™ browser, Google Play™ and Android™ are trademarks of Google Inc.
Internet Explorer®, Windows® and the Windows logo are trademarks of the Microsoft group of companies.
Copyright © 2014 by D-Link Corporation, Inc.
All rights reserved. This publication may not be reproduced, in whole or in part, without prior expressed written permission from D-Link Corporation,
Inc.
The purpose of this product is to create a constant network connection for your devices. As such, it does not have a standby mode or use a power
management mode. If you wish to power down this product, please simply unplug it from the power outlet.
Revision Date Description
1.0 February 21, 2014 • Initial release
Preface

iiD-Link DWR-755 User Manual
Table of Contents
Preface ................................................................................. i
Manual Revisions ........................................................................... i
Trademarks ...................................................................................... i
Product Overview .............................................................. 1
Package Contents ......................................................................... 1
System Requirements ................................................................. 2
Introduction ................................................................................... 3
Features ............................................................................................ 4
Hardware Overview ..................................................................... 5
Rear Panel ................................................................................ 5
Front Panel .............................................................................. 6
LEDs ........................................................................................... 7
Installation ......................................................................... 8
Before you Begin ........................................................................... 8
Wireless Installation Considerations ......................................9
Conguration ...................................................................10
Web-based Conguration Utility ..........................................10
Setup ...............................................................................................11
Internet Connection Setup Wizard ............................... 12
Manual Internet Connection Setup .............................14
Static (assigned by ISP) ................................................14
Dynamic IP (DHCP) ........................................................15
PPPoE .................................................................................16
PPTP ....................................................................................17
L2TP ....................................................................................18
3G ........................................................................................19
GRE Settings .........................................................................21
Wireless Settings .................................................................22
Wireless Connection Setup Wizard..........................22
Manual Wireless Connection Setup ........................25
Network Settings ................................................................30
DHCP Server Settings ...................................................31
IPv6 ..........................................................................................32
Static IPv6 .........................................................................33
LAN IPv6 Address Settings .........................................34
PPPoE .................................................................................35
LAN IPv6 Link-Local Address ......................................36
6 to 4 ...................................................................................37
6rd .......................................................................................38
Autoconguration .........................................................39
Message Service .................................................................. 40
SMS Inbox .........................................................................40
Create Message ..............................................................41
USSD ........................................................................................42
VPN Settings .........................................................................43
VPN Setup Wizard ..........................................................43
Manual VPN Setup .............................................................. 45
VPN Dynamic IP ..............................................................46
Tunnel - IKE .......................................................................48
Tunnel - Manual .............................................................. 51
Table of Contents

iiiD-Link DWR-755 User Manual
Table of Contents
Advanced ......................................................................................53
Virtual Server ........................................................................53
Application Rules ................................................................54
QoS Engine............................................................................55
MAC Address Filter .............................................................56
URL Filter ................................................................................57
Outbound Filter ................................................................... 58
Inbound Filter ......................................................................59
SNMP .......................................................................................60
Routing ...................................................................................61
Advanced Wireless .............................................................62
Advanced Network ............................................................64
Network Scan .......................................................................65
DMZ .........................................................................................66
Tools ................................................................................................67
Admin .....................................................................................67
Time .........................................................................................68
Syslog ......................................................................................69
Email Settings ......................................................................70
System ....................................................................................71
Firmware ................................................................................72
Dynamic DNS .......................................................................73
System Check .......................................................................74
Schedules ..............................................................................75
PIN Control ............................................................................76
Status ..............................................................................................77
Device Info ............................................................................77
Log ...........................................................................................78
Statistics .................................................................................79
Wireless ..................................................................................80
IPv6 Status .............................................................................81
Support ..........................................................................................82
Connecting a Wireless Client ..........................................83
WPS Button ...................................................................................83
Windows® 8 ................................................................................... 84
WPA/WPA2 ............................................................................84
Windows® 7 ................................................................................... 86
WPA/WPA2 ............................................................................86
WPS ..........................................................................................89
Windows Vista® ............................................................................ 93
WPA/WPA2 ............................................................................94
Windows® XP ................................................................................ 96
WPA/WPA2 ............................................................................97
Troubleshooting ..............................................................99
Wireless Basics ...............................................................103
What is Wireless? ...................................................................... 104
Tips ................................................................................................ 106
Wireless Modes ......................................................................... 107
Networking Basics .........................................................108
Check your IP address ............................................................ 108
Statically Assign an IP address ............................................ 109
Technical Specications ................................................110

1D-Link DWR-755 User Manual
Section 1 - Product Overview
Product Overview
Package Contents
Note: Using a power supply with a dierent voltage rating than the one included with the DWR-755 will cause damage and void the warranty
for this product.
If any of the above items are missing, please contact your reseller.
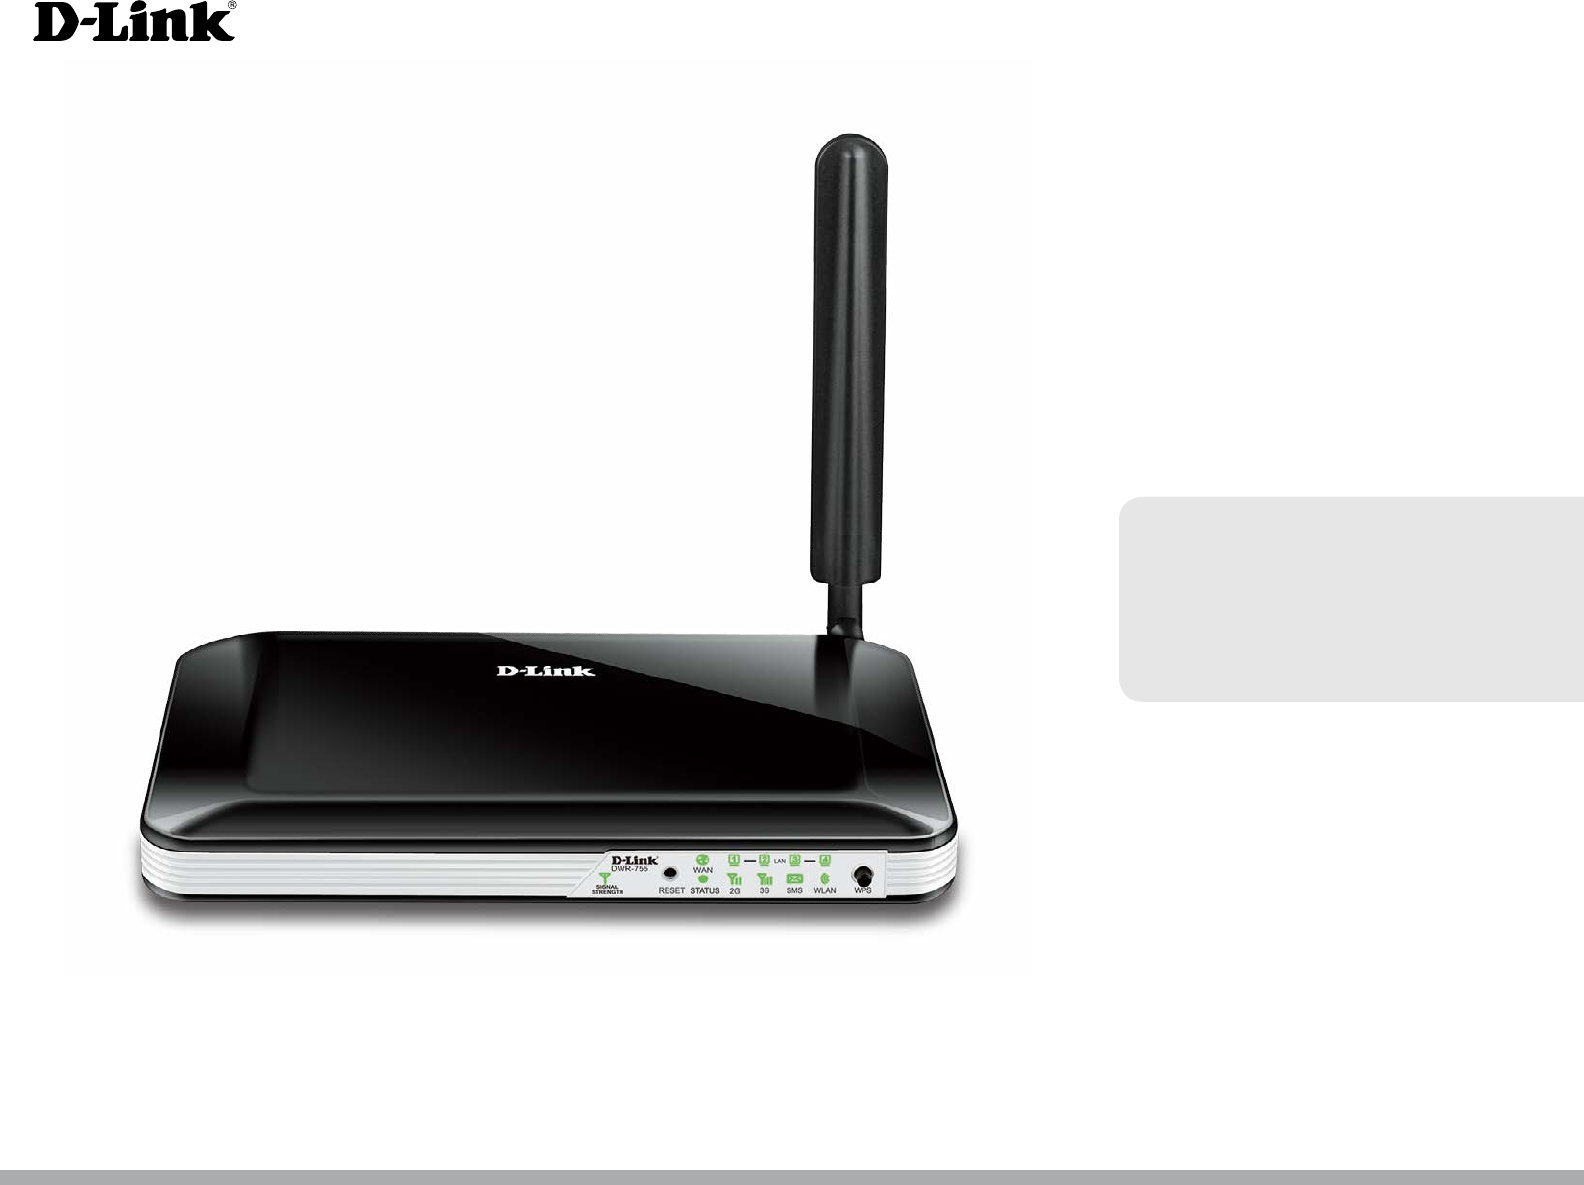
DWR-755 HSPA+ 3G VPN Router
Ethernet Cable
Detachable Antenna
Power Adapter

2D-Link DWR-755 User Manual
Section 1 - Product Overview
Network Requirements
• An Ethernet-based cable or DSL modem
• IEEE 802.11n, 802.11g, or 802.11b wireless clients
• 10/100 Ethernet
• A compatible (U)SIM card with service.*
*Subject to services and service terms available from your carrier.
Web-based Conguration
Utility Requirements
Computer with the following:
• Windows®, Macintosh, or Linux-based operating system
• An installed Ethernet adapter
Browser Requirements:
• Internet Explorer 6 or higher
• Firefox 3.0 or higher
• Safari 3.0 or higher
• Chrome 2.0 or higher
Windows® Users: Make sure you have the latest version of Java
installed. Visit www.java.com to download the latest version.
System Requirements

3D-Link DWR-755 User Manual
Section 1 - Product Overview
Introduction
The D-Link DWR-755 is a 802.11n/g/b compliant device that delivers real world performance of up to 14x faster than an 802.11g wireless
connection (also faster than a 100 Mbps wired Ethernet connection). Create a secure wireless network to share photos, les, music, video,
printers, and network storage throughout your home. Connect the DWR-755 router to a cable or DSL modem and share your high-speed
Internet access with everyone on the network. In addition, this router includes a Quality of Service (QoS) engine that keeps digital phone
calls (VoIP) and online gaming smooth and responsive, providing a better Internet experience.

4D-Link DWR-755 User Manual
Section 1 - Product Overview
• Ultimate Performance - The D-Link DWR-755 delivers real world performance of up to 14x faster than an 802.11g
wireless connection so you can stream photos, music, and videos smoothly throughout your home.
• Extended Whole Home Coverage - Powered by Wireless N technology, this high performance router provides superior
Whole Home Coverage while reducing dead spots. The router is designed for use in bigger homes and for users who
demand higher performance networking. Add a Wireless N notebook or desktop adapter and stay connected to your
network from virtually anywhere in your home.
• Total Network Security - The Wireless N router supports all of the latest wireless security features to prevent
unauthorized access, be it from over the wireless network or from the Internet. Support for WPA/WPA2 standards ensures
that you’ll be able to use the best possible encryption method, regardless of your client devices. In addition, this router
utilizes dual active rewalls (SPI and NAT) to prevent potential attacks from across the Internet.
• Quality of Service (QoS) - For smooth, uninterrupted streaming, this router includes a Quality of Service (QoS) engine
that prioritizes according to data type so your digital phone calls (VoIP) and online gaming stay smooth and responsive.
* Maximum wireless signal rate derived from IEEE Standard 802.11b, 802.11g and 802.11n specications. Actual data throughput will vary. Network conditions and environmental
factors, including volume of network trac, building materials and construction, and network overhead, lower actual data throughput rate. Environmental conditions will
adversely aect wireless signal range.
Features
5D-Link DWR-755 User Manual
Section 1 - Product Overview
Hardware Overview
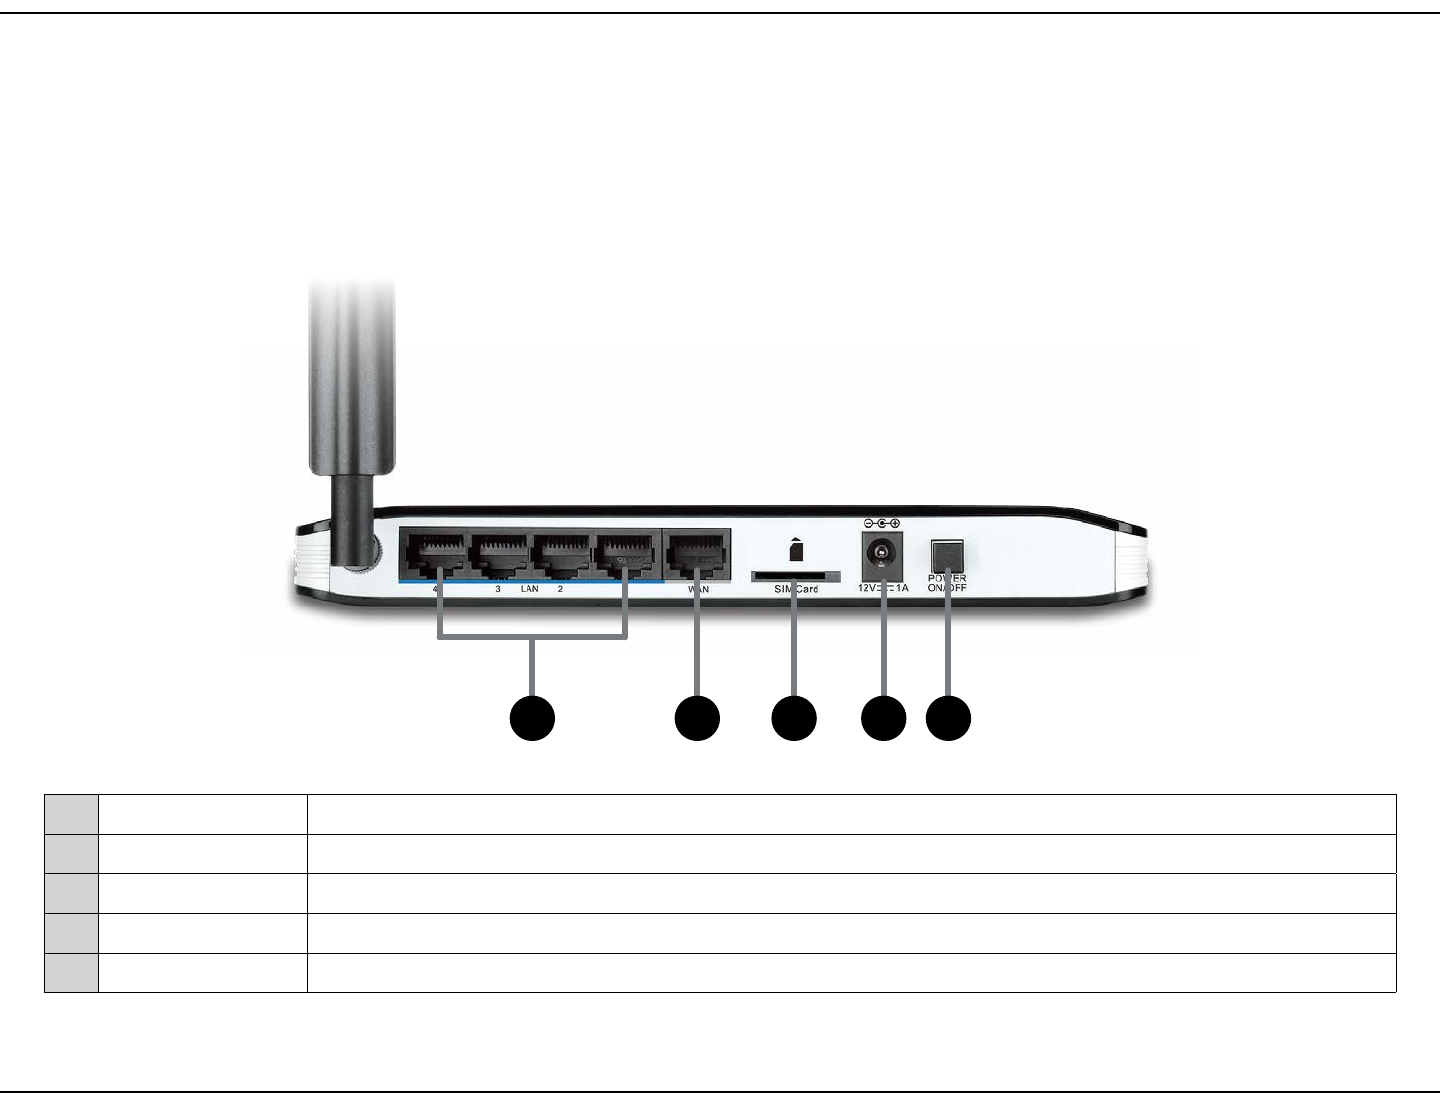
Rear Panel
1LAN Ports (1-4) Connect Ethernet devices such as computers, switches, and NAS.
2WAN Port The auto MDI/MDIX Internet port connects to your cable or DSL modem via an Ethernet cable.
3SIM Accepts a standard (U)SIM card for 2G/3G connectivity.
4Power Receptor Connects to the included power adapter.
5Power Switch Turns the device on or o.
21 43 5
6D-Link DWR-755 User Manual
Section 1 - Product Overview
Hardware Overview
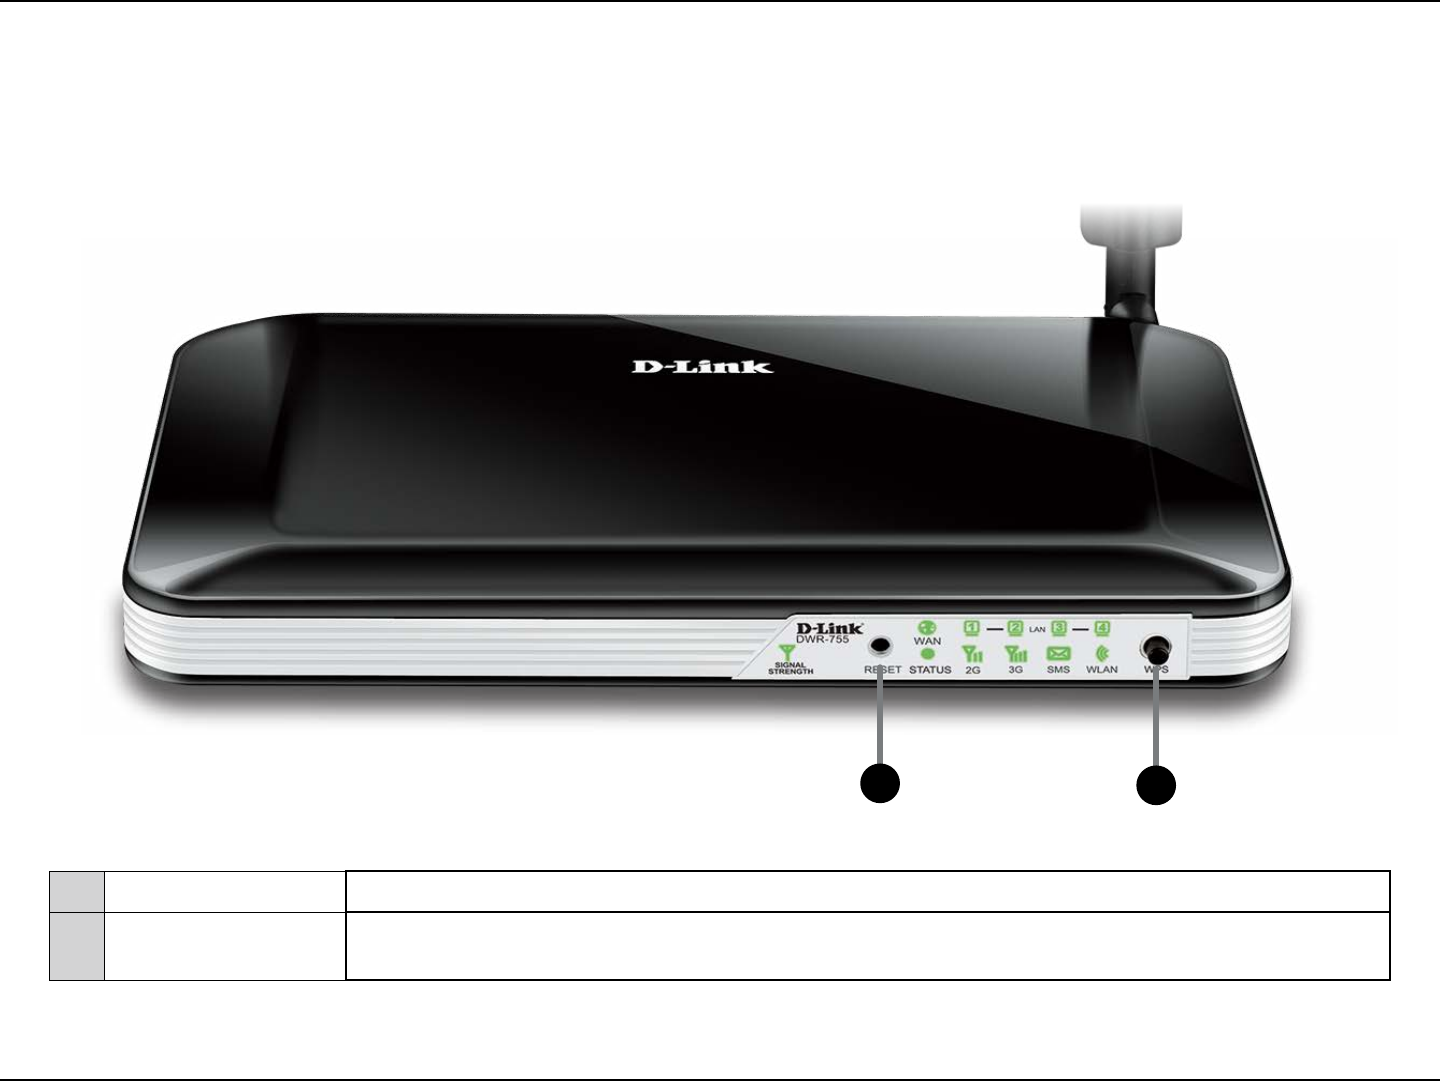
Front Panel
12
1Reset Press this button for 10 seconds with an unfolded paperclip to reset the device.
2WPS Press this button to initiate a new WPS connection. Refer to “Add Wireless Device with WPS” on page 24
for more details.

7D-Link DWR-755 User Manual
Section 1 - Product Overview
Hardware Overview
LEDs
1Signal Strength
Blinking Red: No SIM card / signal or unveried PIN code
Solid Red: Signal strength is at level one (weak)
Solid Amber: Signal strength is at level two or three (medium)
Solid Green: Signal strength is at level four or ve (strong)
2WAN Solid Green: Ethernet connection has been established
Blinking Green: Data is being transferred
3LAN (1-4) Solid Green: Ethernet connection has been established
Blinking Green: Data is being transferred
4Status Blinking Green: Device is working
52G Solid Green: EDGE or GPRS connection has been established
Blinking Green: Data is being transferred via 2G
63G Solid Green: UMTS/HSDPA/HSUPA/HSPA+ connection is established
Blinking: Data is being transferred via 3G
7SMS Solid Green: SMS storage is full
Blinking Green: There is an unread SMS
8WLAN Solid Green: WLAN is active and available
Blinking Green: Data is being transferred via WLAN
1
2 3
4 5 6 7 8

8D-Link DWR-755 User Manual
Section 2 - Installation
Installation
This section will guide you through the installation process. Placement of the router is very important. Do not place the router in an enclosed area
such as a closet, cabinet, or in an attic or garage.
Before you Begin
1. Ensure that your DWR-755 is disconnected and powered o.
2. Insert a standard (U)SIM card into the SIM card slot on the back of the router as indicated by the SIM card logo next to the slot. The gold
contacts should face downwards.
Caution: Always unplug/power down the router before installing or removing the SIM card. Never insert or remove the SIM card while
the router is in use.
3. Connect the power adapter to the socket on the back panel of your DWR-755. Plug the other end of the power adapter into a wall
outlet or power strip and turn the device on.
a. The Status LED will light up to indicate that power has been supplied to the router.
b. The LEDs on the front panel will ash on and o as the DWR-755 performs initialization and Internet connection processes.

9D-Link DWR-755 User Manual
Section 2 - Installation
Wireless Installation Considerations
The D-Link wireless router lets you access your network using a wireless connection from virtually anywhere within the
operating range of your wireless network. Keep in mind, however, that the number, thickness and location of walls, ceilings,
or other objects that the wireless signals must pass through, may limit the range. Typical ranges vary depending on the types
of materials and background RF (radio frequency) noise in your home or business. The key to maximizing wireless range is to
follow these basic guidelines:
1. Keep the number of walls and ceilings between the D-Link router and other network devices to a minimum -
each wall or ceiling can reduce your adapter’s range from 3-90 feet (1-30 meters.) Position your devices so that
the number of walls or ceilings is minimized.
2. Be aware of the direct line between network devices. A wall that is 1.5 feet thick (.5 meters), at a 45-degree angle
appears to be almost 3 feet (1 meter) thick. At a 2-degree angle it looks over 42 feet (14 meters) thick! Position
devices so that the signal will travel straight through a wall or ceiling (instead of at an angle) for better reception.
3. Building materials make a dierence. A solid metal door or aluminum studs may have a negative eect on range.
Try to position access points, wireless routers, and computers so that the signal passes through drywall or open
doorways. Materials and objects such as glass, steel, metal, walls with insulation, water (sh tanks), mirrors, le
cabinets, brick, and concrete will degrade your wireless signal.
4. Keep your product away (at least 3-6 feet or 1-2 meters) from electrical devices or appliances that generate RF
noise.
5. If you are using 2.4 GHz cordless phones or X-10 (wireless products such as ceiling fans, lights, and home security
systems), your wireless connection may degrade dramatically or drop completely. Make sure your 2.4 GHz phone
base is as far away from your wireless devices as possible. The base transmits a signal even if the phone in not
in use.
10D-Link DWR-755 User Manual
Section 3 - Conguration
Conguration
This section will show you how to congure your new D-Link mobile router using the web-based conguration utility.
Web-based Conguration Utility
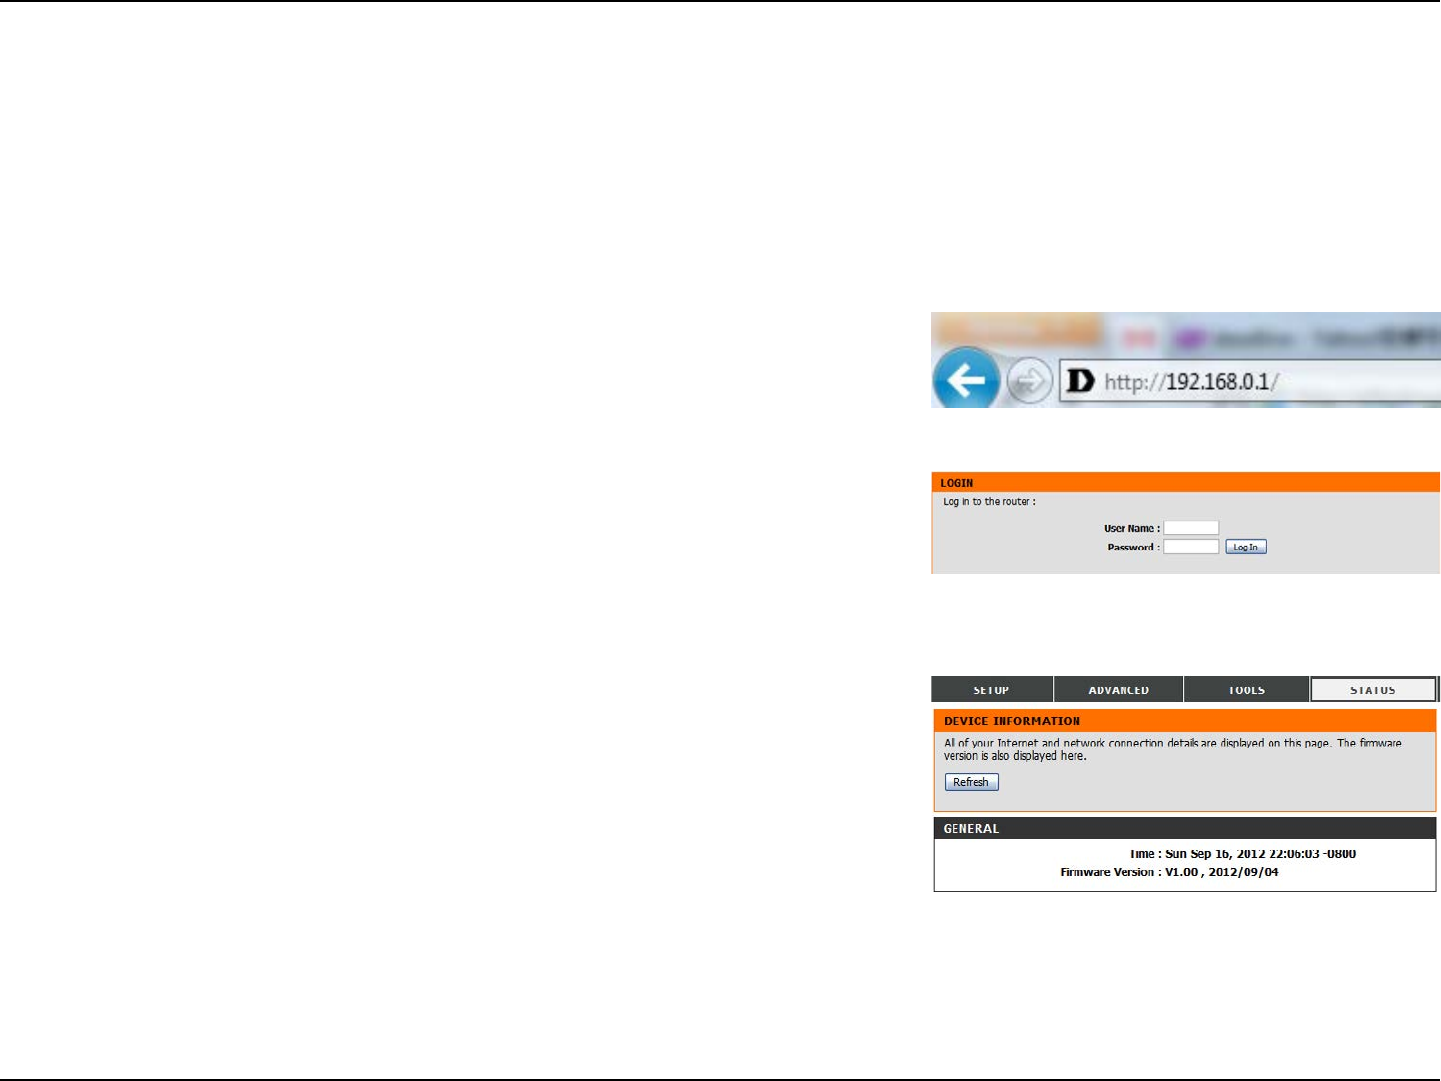
To access the conguration utility, open a web-browser such as Internet Explorer and enter
the IP address of the router (http://192.168.0.1).
Type Admin and then enter the password. By default, the password is blank.
If you get a Page Cannot be Displayed error, please refer to “Troubleshooting” on page 56
for assistance.
The conguration utility will open to the STATUS > DEVICE INFO page. You can view dierent
conguration pages by clicking on the categories at the top of the screen (SETUP/ADVANCED/
TOOLS/STATUS/SUPPORT), and then selecting a conguration page from the bar on the left side.
The following pages will describe each section in detail, starting with the SETUP pages.
11D-Link DWR-755 User Manual
Section 3 - Conguration
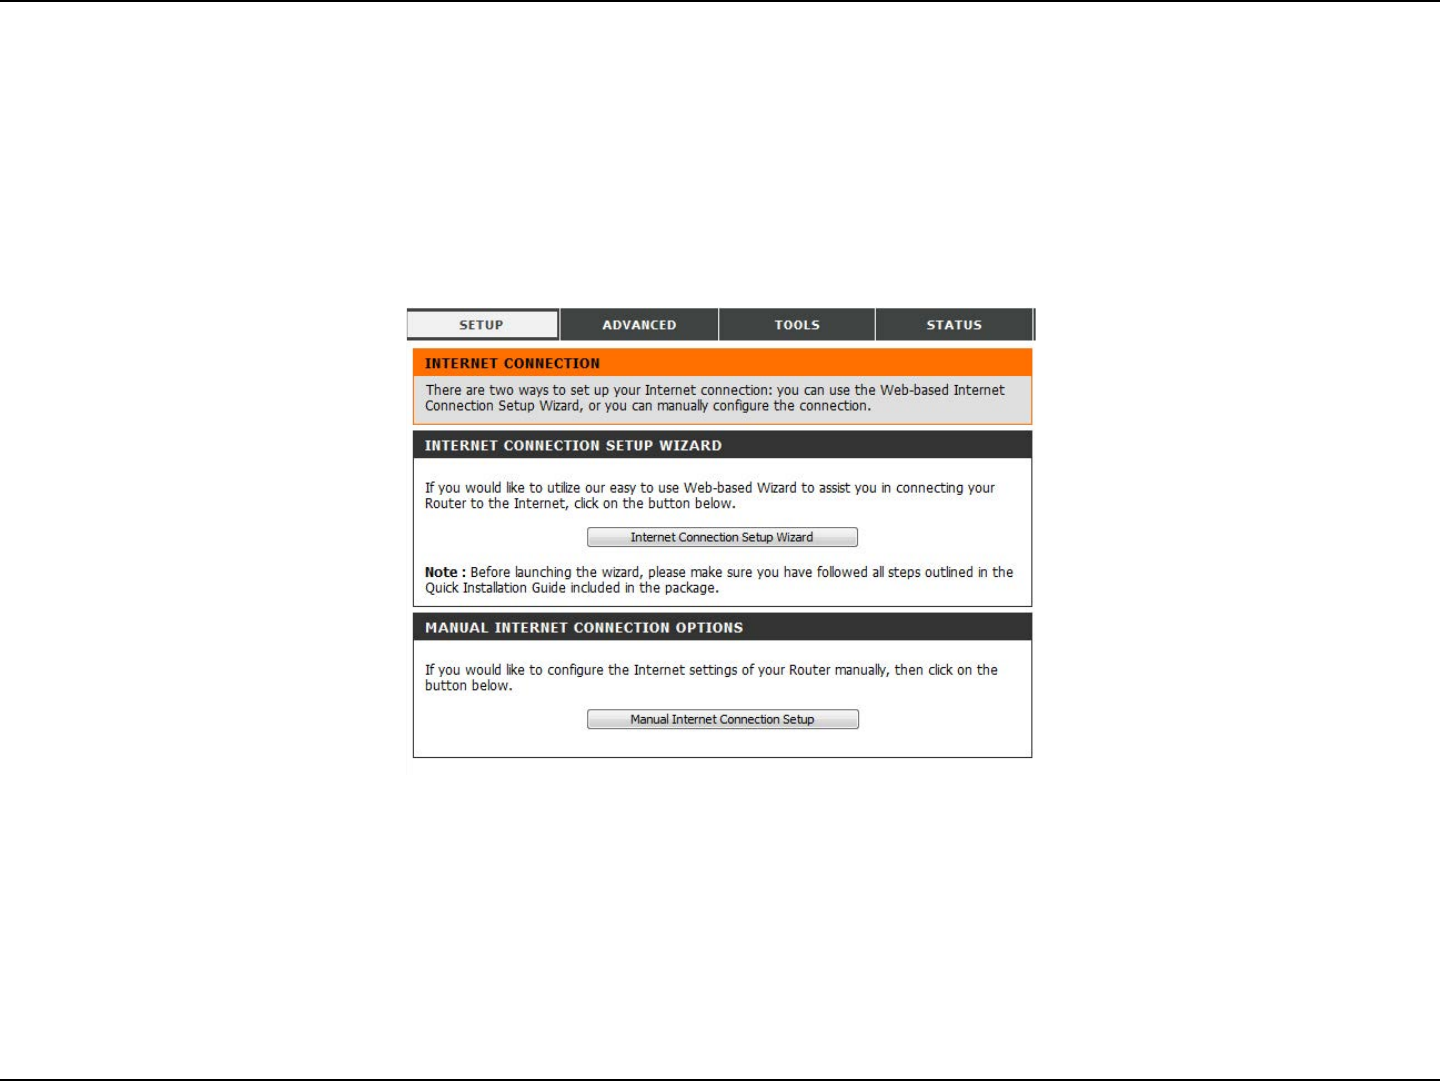
The setup wizard guides you through the initial setup of your router. There are two ways to setup your Internet connection. You can use the
web-based Internet Connection Setup Wizard or you can manually congure using the Manual Internet Connection Setup wizard.
Click Internet Connection Setup Wizard to begin.
If you want to enter your settings without running the wizard, click Manual Internet Connection Setup and refer to “Manual Internet Connection
Setup” on page 14.
Setup
12D-Link DWR-755 User Manual
Section 3 - Conguration
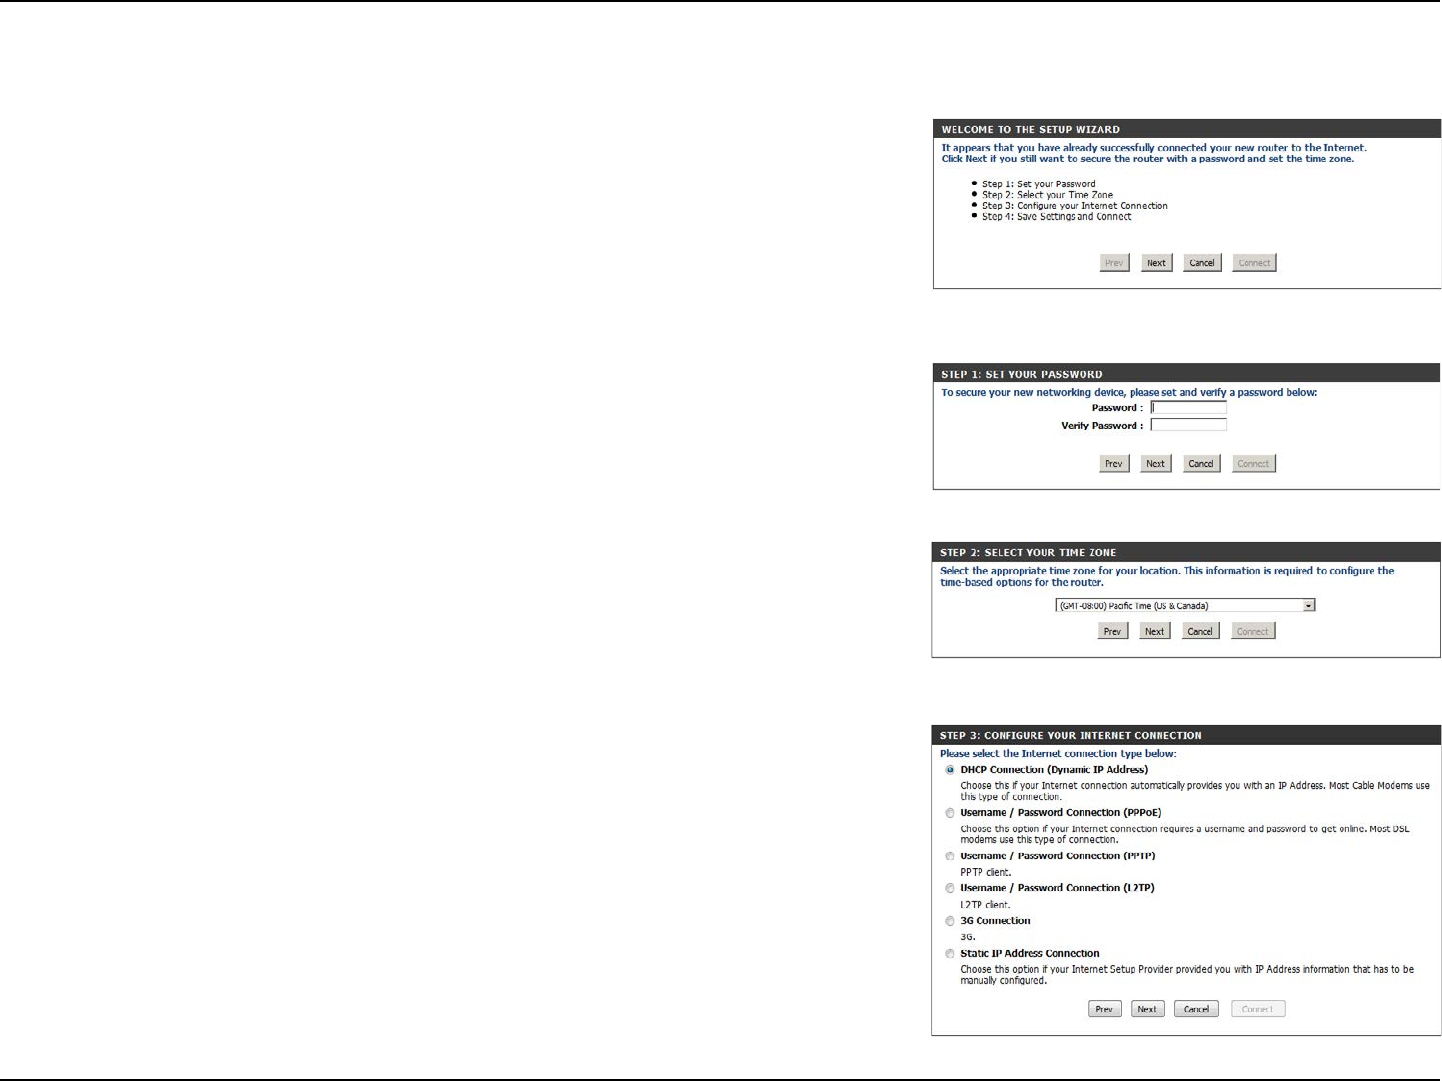
Create a new password and then click Next to continue.
Select the Internet connection type you use. The connection types are explained on the
following page. If you are unsure which connection type you should use, contact your Internet
Service Provider (ISP).
Click Prev to go back to the previous page or click Cancel to close the wizard.
Note: The DWR-755 has a WAN failover feature that allows the router to switch to a 2G/3G
connection if the WAN connection is down or unavailable.
Select your time zone from the drop-down box and then click Next to continue.
This wizard will guide you through a step-by-step process to congure your router to connect
to the Internet.
Click Next to continue.
Note: While using the wizard, you can click Prev to go back to the previous step, or you can
click Cancel to close the wizard.
Internet Connection Setup Wizard

13D-Link DWR-755 User Manual
Section 3 - Conguration
Choose this if your Internet connection automatically provides you with an IP address. Most cable modems use
this type of connection. See “Dynamic IP (DHCP)” on page 15 for information about how to congure this type of
connection.
Choose this option if your Internet connection requires a username and password to connect. Most DSL modems
use this style of connection. See “PPPoE” on page 16 for information about how to congure this type of
connection.
Choose this option if your Internet connection requires Point-to-Point Tunneling Protocol (PPTP). See “PPTP” on
page 17 for information about how to congure this type of connection.
Choose this option if your Internet connection requires Layer 2 Tunneling Protocol (L2TP). See “L2TP” on page 18
for information about how to congure this type of connection.
Choose this connection if you have installed a SIM card into the DWR-755. See “3G” on page 19 for information
about how to congure this type of connection.
Choose this option if your Internet Service Provider provided you with IP address information that has to be
manually congured. See “Static (assigned by ISP)” on page 14 for information about how to congure this type
of connection.
DHCP Connection
(Dynamic IP Address):
Username / Password
Connection (PPPoE):
Username / Password
Connection (PPTP):
Username / Password
Connection (L2TP):
3G Connection:
Static IP Address
Connection:
The subsequent conguration pages will dier depending on the selection you make on this page.
After entering the requested information,click Next to continue.
Note: If you are not sure what connection type to use or what settings to enter, check with your Internet Service Provider.
This completes the Internet Connection Setup Wizard. Click Connect to save your changes
and reboot the router.
14D-Link DWR-755 User Manual
Section 3 - Conguration
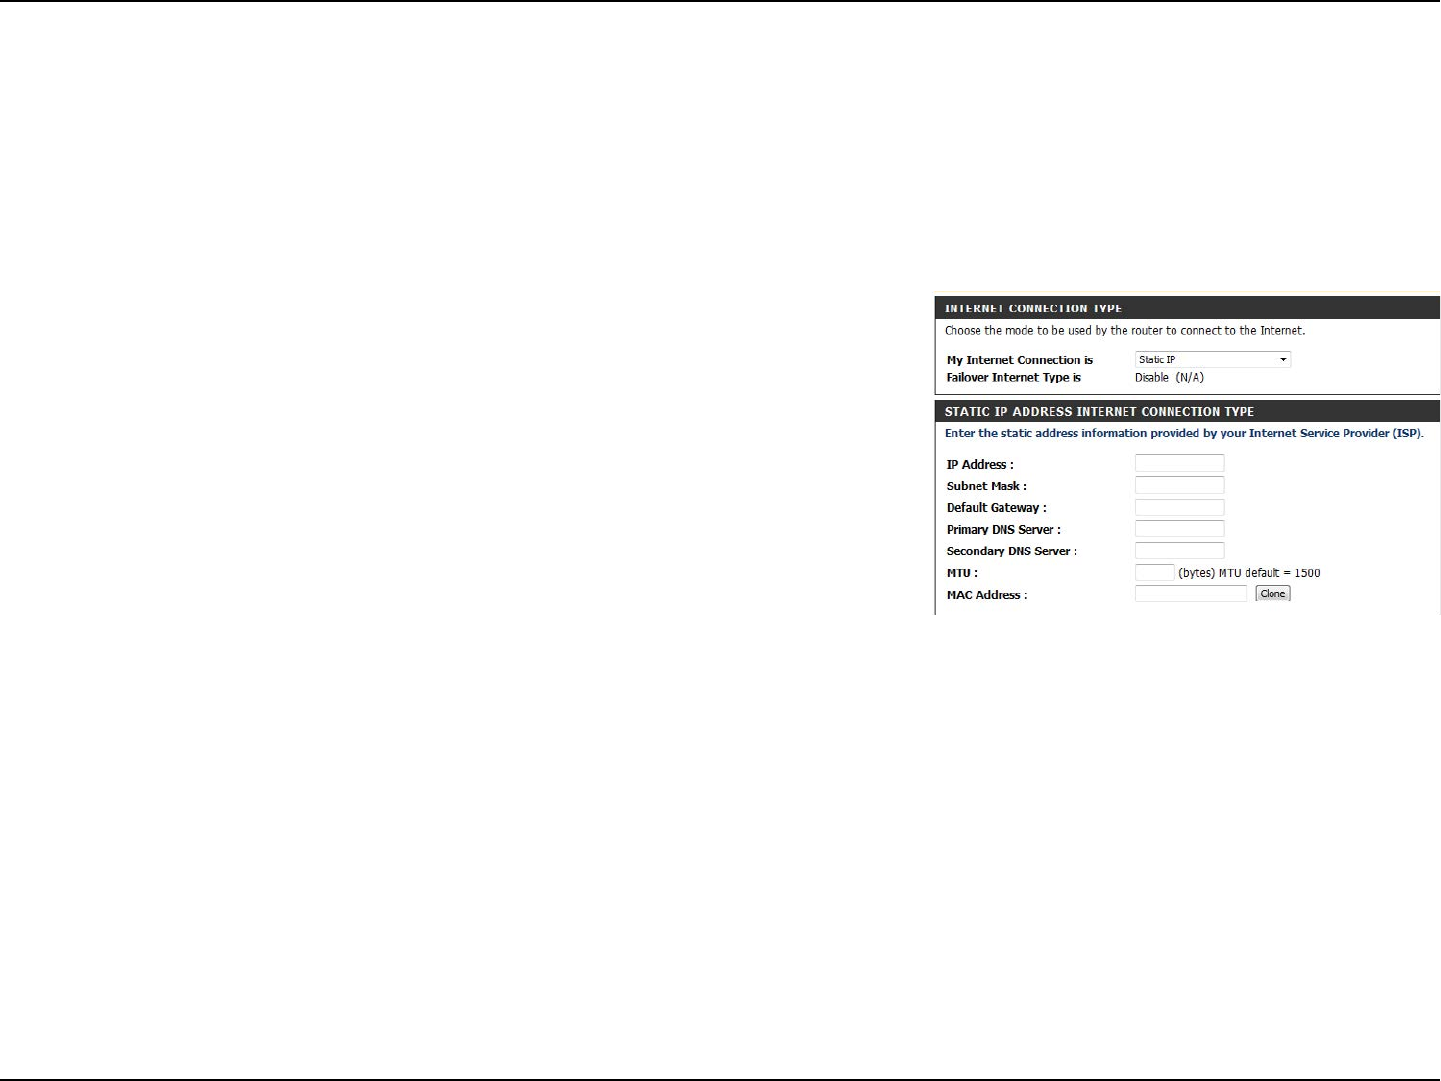
This will display the failover Internet type, if available.
Enter the IP address assigned by your ISP.
Enter the Subnet Mask assigned by your ISP.
Enter the Gateway assigned by your ISP.
The DNS server information will be supplied by your ISP (Internet
Service Provider.)
Maximum Transmission Unit - you may need to change the
MTU for optimal performance with your specic ISP. 1500 is the
default MTU.
The default MAC address is set to the Internet port’s physical
interface MAC address on the broadband router. It is not
recommended that you change the default MAC address unless
required by your ISP. You can use the Clone button to replace
the Internet port’s MAC address with the MAC address of your
Ethernet card.
Failover Internet Type Is:
IP Address:
Subnet Mask:
Default Gateway:
DNS Servers:
MTU:
MAC Address:
Manual Internet Connection Setup
Static (assigned by ISP)
Select Static IP Address if all the Internet port’s IP information is provided to you by your ISP. You will need to enter in the IP address, subnet mask,
gateway address, and DNS address(es) provided to you by your ISP. Each IP address entered in the elds must be in the appropriate IP form, which
are four octets separated by a dot (x.x.x.x). The router will not accept the IP address if it is not in this format. After modifying any settings, click Save
Settings to save your changes.
15D-Link DWR-755 User Manual
Section 3 - Conguration
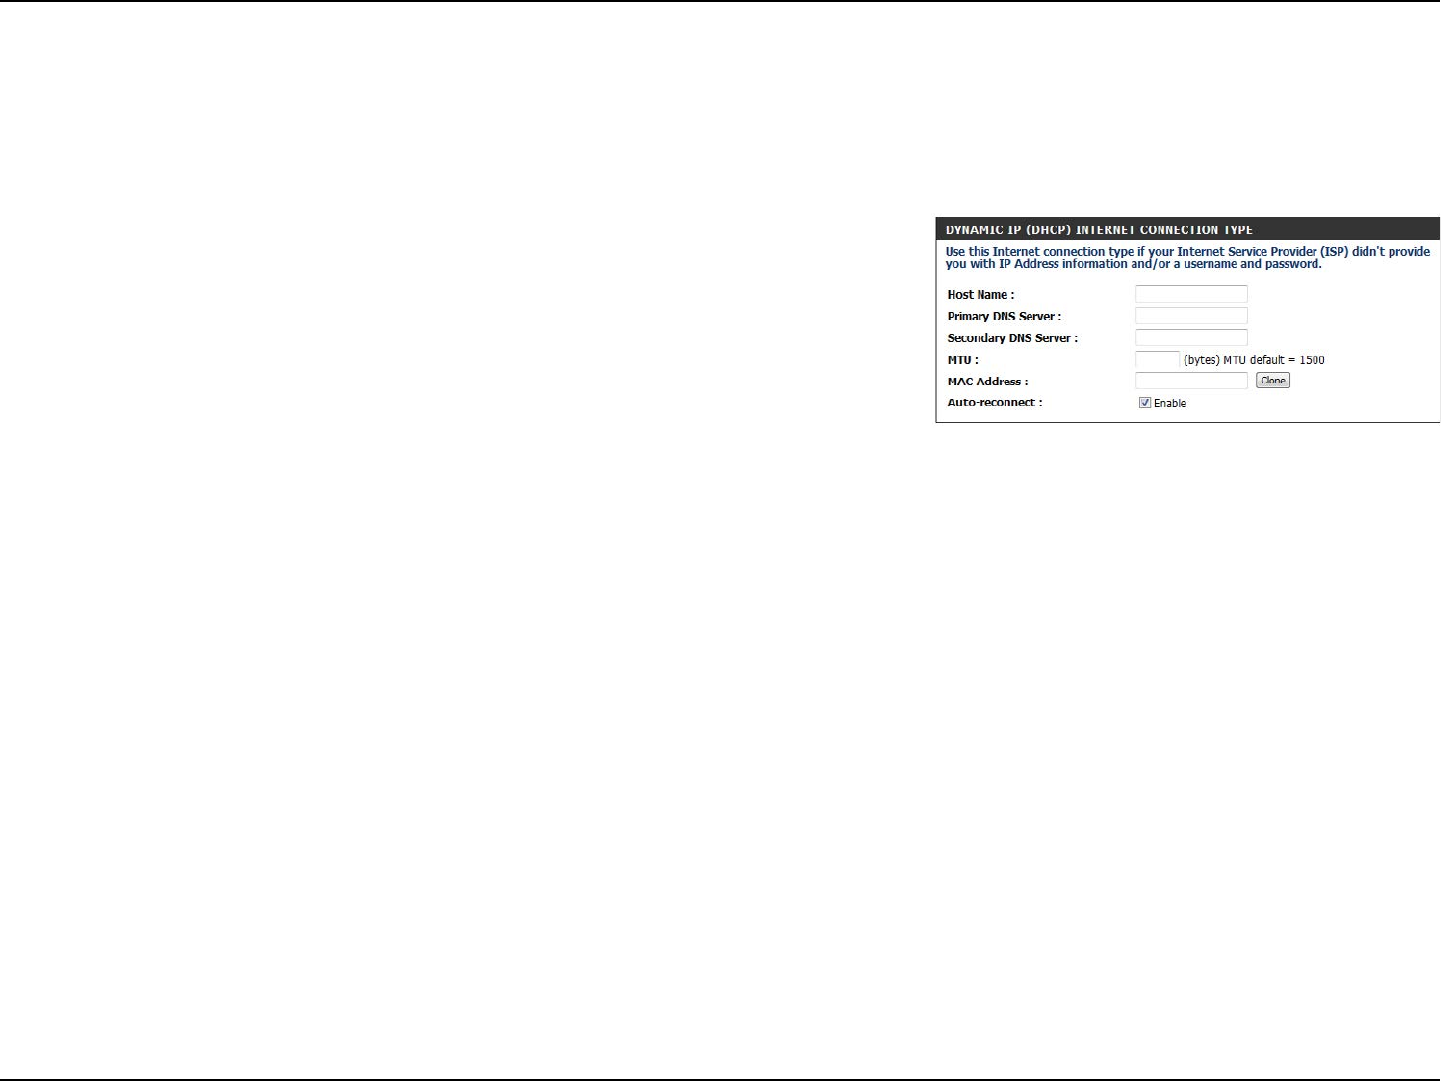
Dynamic IP (DHCP)
This section will help you to obtain IP address information automatically from your ISP. Use this option if your ISP didn’t provide you with IP address
information and/or a username and password. After modifying any settings, click Save Settings to save your changes.
(Optional) Fill in the host name of your DNS server.
(Optional) Fill in with IP address of the primary DNS server.
(Optional) Fill in with IP address of the secondary DNS server.
You may need to change the Maximum Transmission Unit
(MTU) for optimal performance. The default value is 1500.
The default MAC address is set to the Internet port’s physical
interface MAC address on the broadband router. It is not
recommended that you change the default MAC address
unless required by your ISP. You can use the Clone button to
replace the Internet port’s MAC address with the MAC address
of your PC.
This feature enables this product to renew the WAN IP address
automatically when the lease time has expired.
Host Name:
Primary DNS Server:
Secondary DNS Server:
MTU (Maximum
Transmission Unit):
MAC Address:
Auto-reconnect:
16D-Link DWR-755 User Manual
Section 3 - Conguration
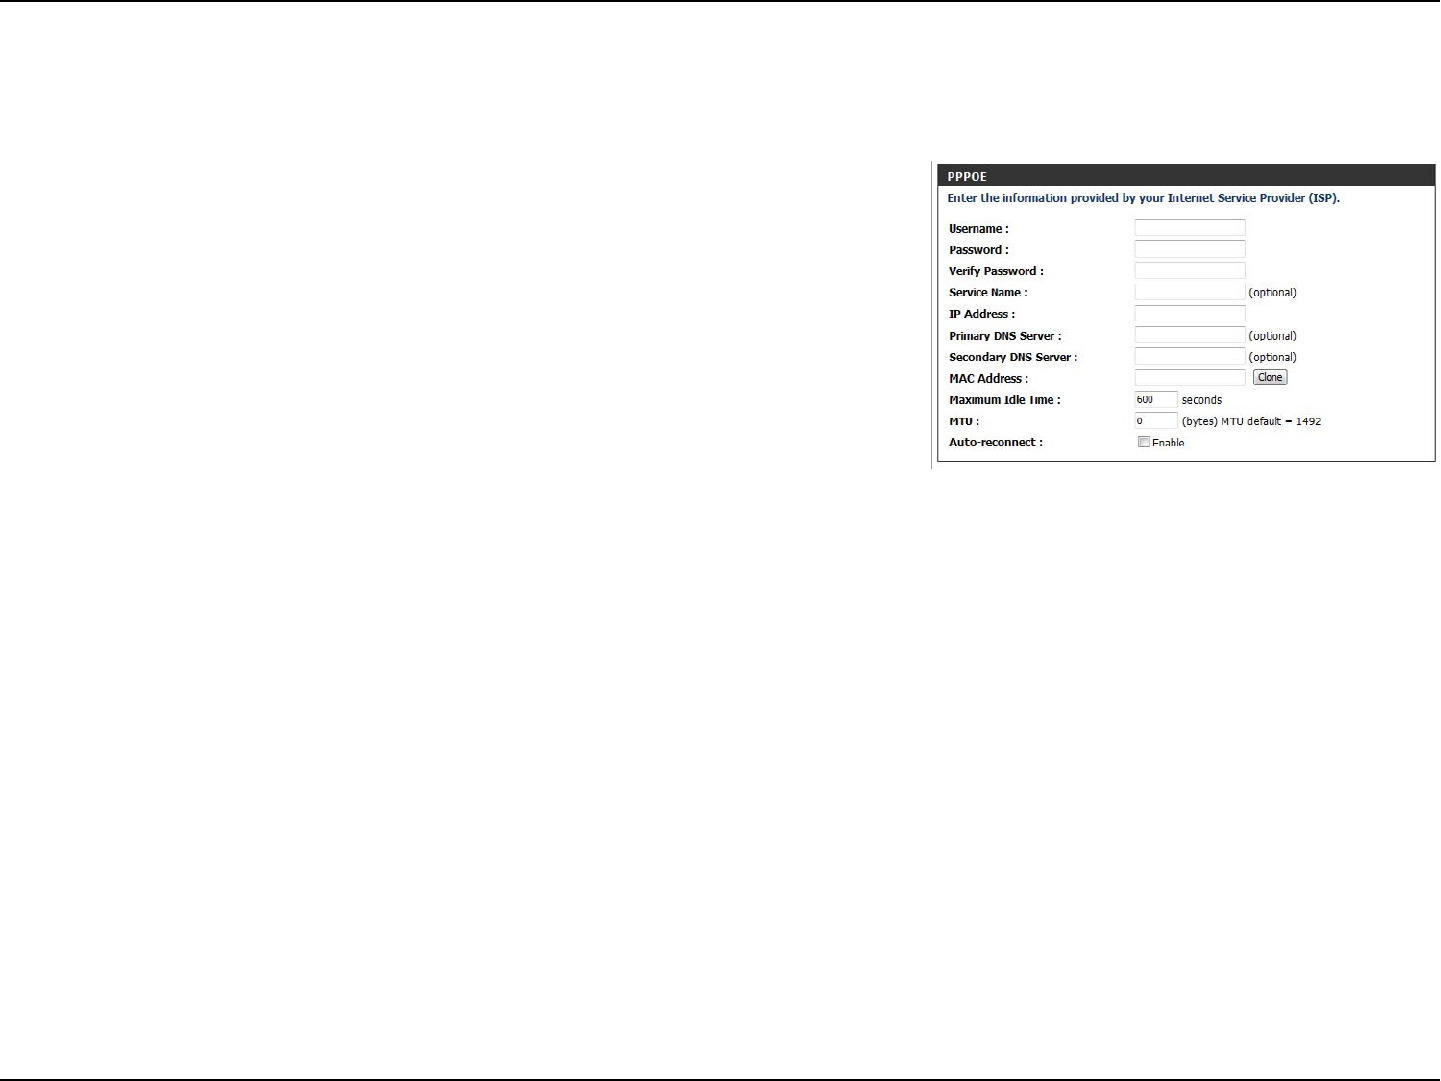
PPPoE
Choose this Internet connection if your ISP provides you with a PPPoE account. After modifying any settings, click Save Settings to save your changes.
The username/account name that your ISP provides to you for
PPPoE dial-up.
Password that your ISP provides to you for PPPoE dial-up.
Re-type your password in this eld.
Fill in if provided by your ISP. (Optional)
Fill in if provided by your ISP. If not, keep the default value.
Fill in if provided by your ISP. If not, keep the default value
(optional).
Fill in if provided by your ISP. If not, keep the default value
(optional).
MAC address of WAN interface. You can also copy MAC address
of your PC to its WAN interface by clicking the Clone button.
The amount of time of inactivity before disconnecting an
established PPPoE session. Set it to zero or enable auto-
reconnect to disable this feature.
Maximum Transmission Unit - you may need to change the
MTU for optimal performance with your specic ISP. 1492 is the
default MTU.
The device will automatically reconnect to your PPPoE
connection automatically.
Username:
Password:
Verify Password:
Service Name:
IP Address:
Primary DNS Server:
Secondary DNS Server:
MAC Address:
Maximum Idle Time:
MTU:
Auto-reconnect:
17D-Link DWR-755 User Manual
Section 3 - Conguration
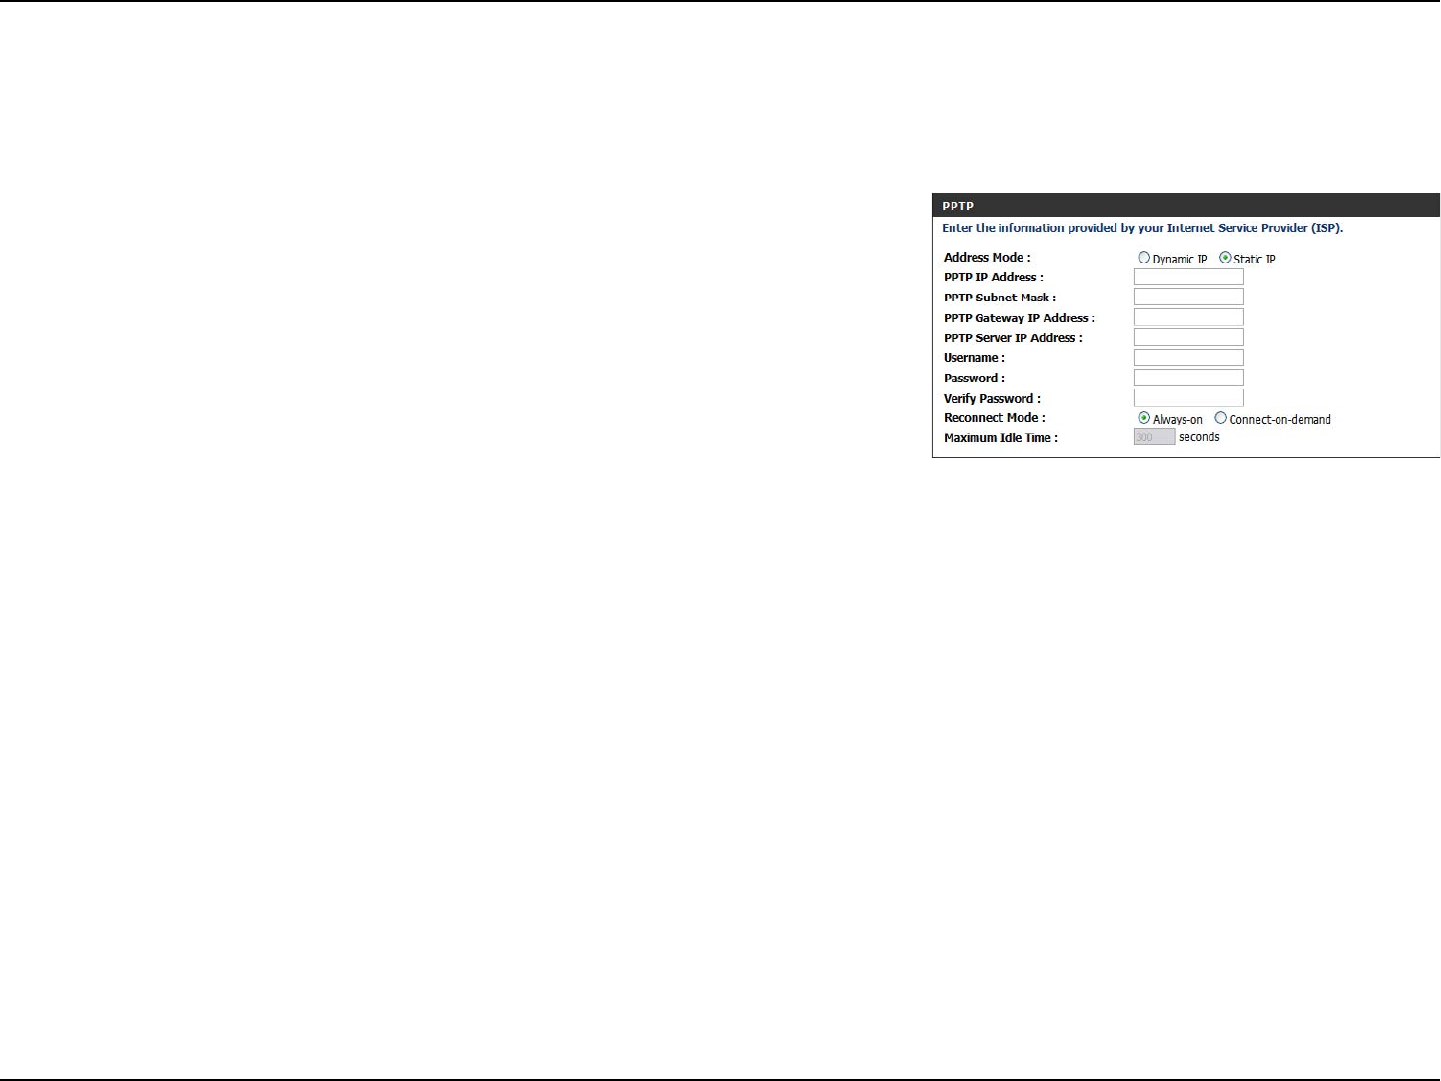
PPTP
Choose Static IP only if your ISP assigns you an IP address.
Otherwise, please choose Dynamic IP.
Enter the information provided by your ISP
(Only applicable for Static IP PPTP).
Enter the information provided by your ISP
(Only applicable for Static IP PPTP).
Enter the information provided by your ISP
(Only applicable for Static IP PPTP).
IP address of PPTP server.
User/account name that your ISP provides to you for PPTP dial-
up.
Password that your ISP provides to you for PPTP dial-up.
Re-enter your password for verication.
Choose Always-on when you want to establish PPTP
connection all the time. If you choose Connect-on-demand,
the device will establish a PPTP connection when local users
want to connect to the Internet, and disconnect if there is no
trac after the time period dened by the Maximum Idle
Time setting.
The time of no activity to disconnect your PPTP session. Set it
to zero or choose Always-on to disable this feature.
Address Mode:
PPTP IP Address:
PPTP Subnet Mask:
PPTP Gateway IP
Address:
PPTP Server IP Address:
Username:
Password:
Verify Password:
Reconnect Mode:
Maximum Idle Time:
Choose PPTP (Point-to-Point-Tunneling Protocol ) if your ISP uses a PPTP connection. Your ISP will provide you with a username and password. This
option is typically used for DSL services. Click Save Settings to save your changes.
18D-Link DWR-755 User Manual
Section 3 - Conguration
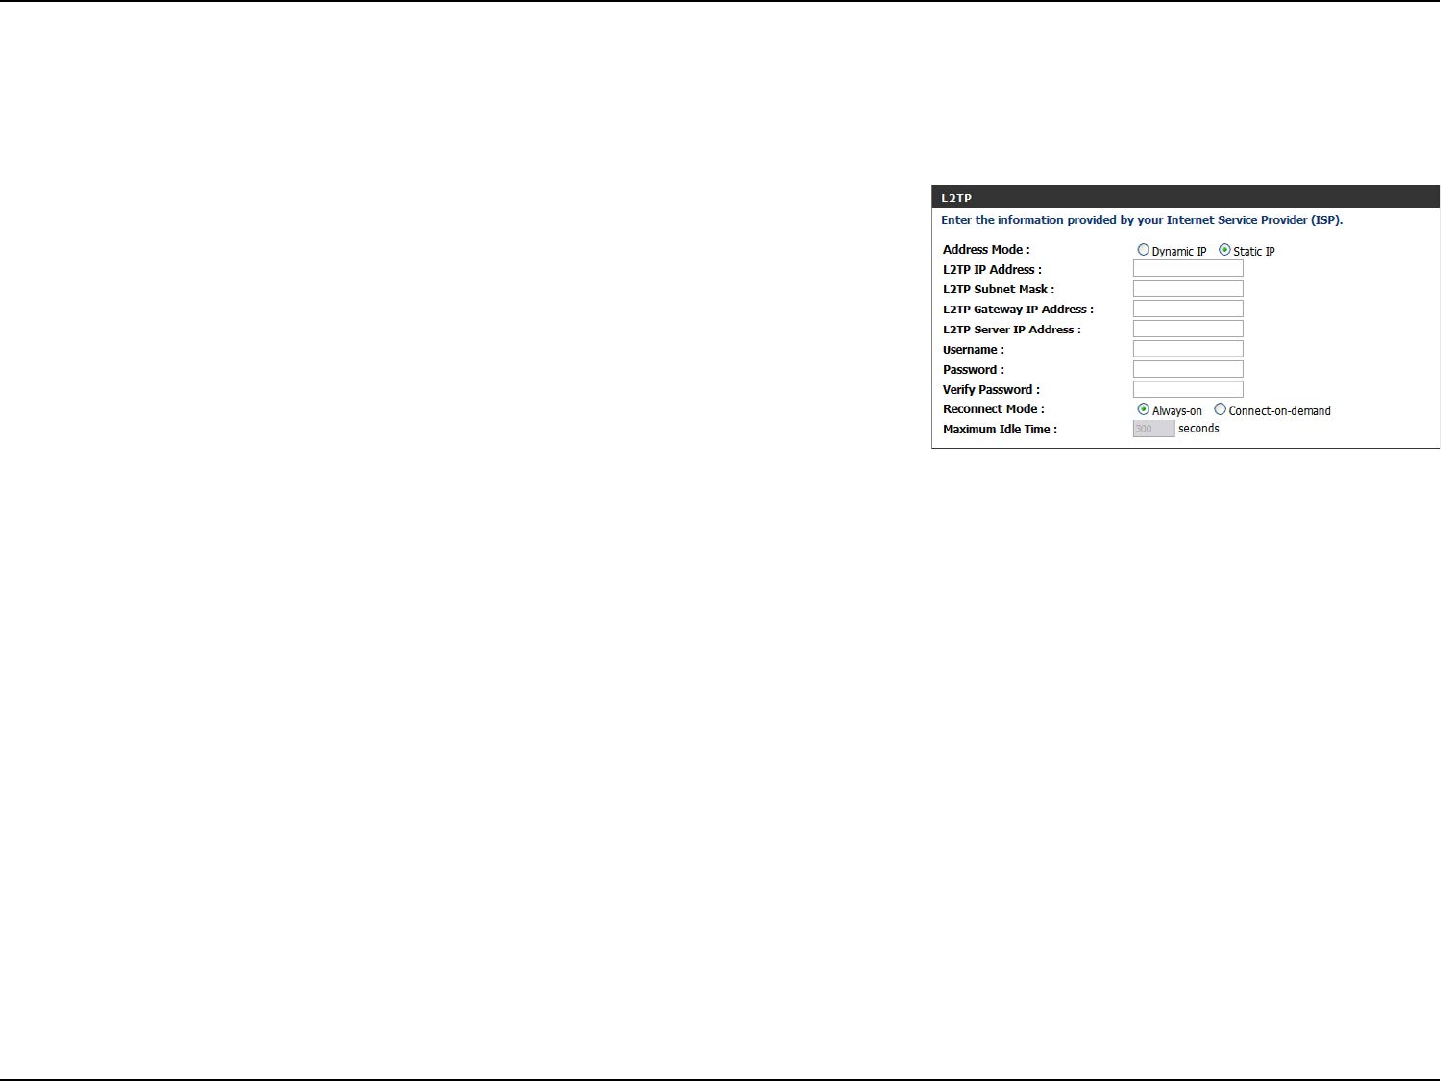
L2TP
Choose this Internet connection if your ISP provides you with an L2TP account. After modifying any settings, click Save Settings to save your changes.
Choose Static IP only if your ISP assigns you an IP address.
Otherwise, please choose Dynamic IP.
Enter the information provided by your ISP
(Only applicable for Static IP L2TP).
Enter the information provided by your ISP
(Only applicable for Static IP L2TP).
Enter the information provided by your ISP
(Only applicable for Static IP L2TP).
IP address of L2TP server.
User/account name that your ISP provides to you for L2TP dial-
up.
Password that your ISP provides to you for L2TP dial-up.
Re-type your password in this eld.
Choose Always-on when you want to establish L2TP
connection all the time. If you choose Connect-on-demand
the device will establish L2TP connection when local users
want to use Internet, and disconnect if no trac after time
period of Maximum Idle Time.
The time of no activity to disconnect your L2TP session. Set it
to 0 or choose Always-on to disable this feature.
Address Mode:
L2TP IP Address:
L2TP Subnet Mask:
L2TP Gateway IP
Address:
L2TP Server IP Address:
Username:
Password:
Verify Password:
Reconnect Mode:
Maximum Idle Time:
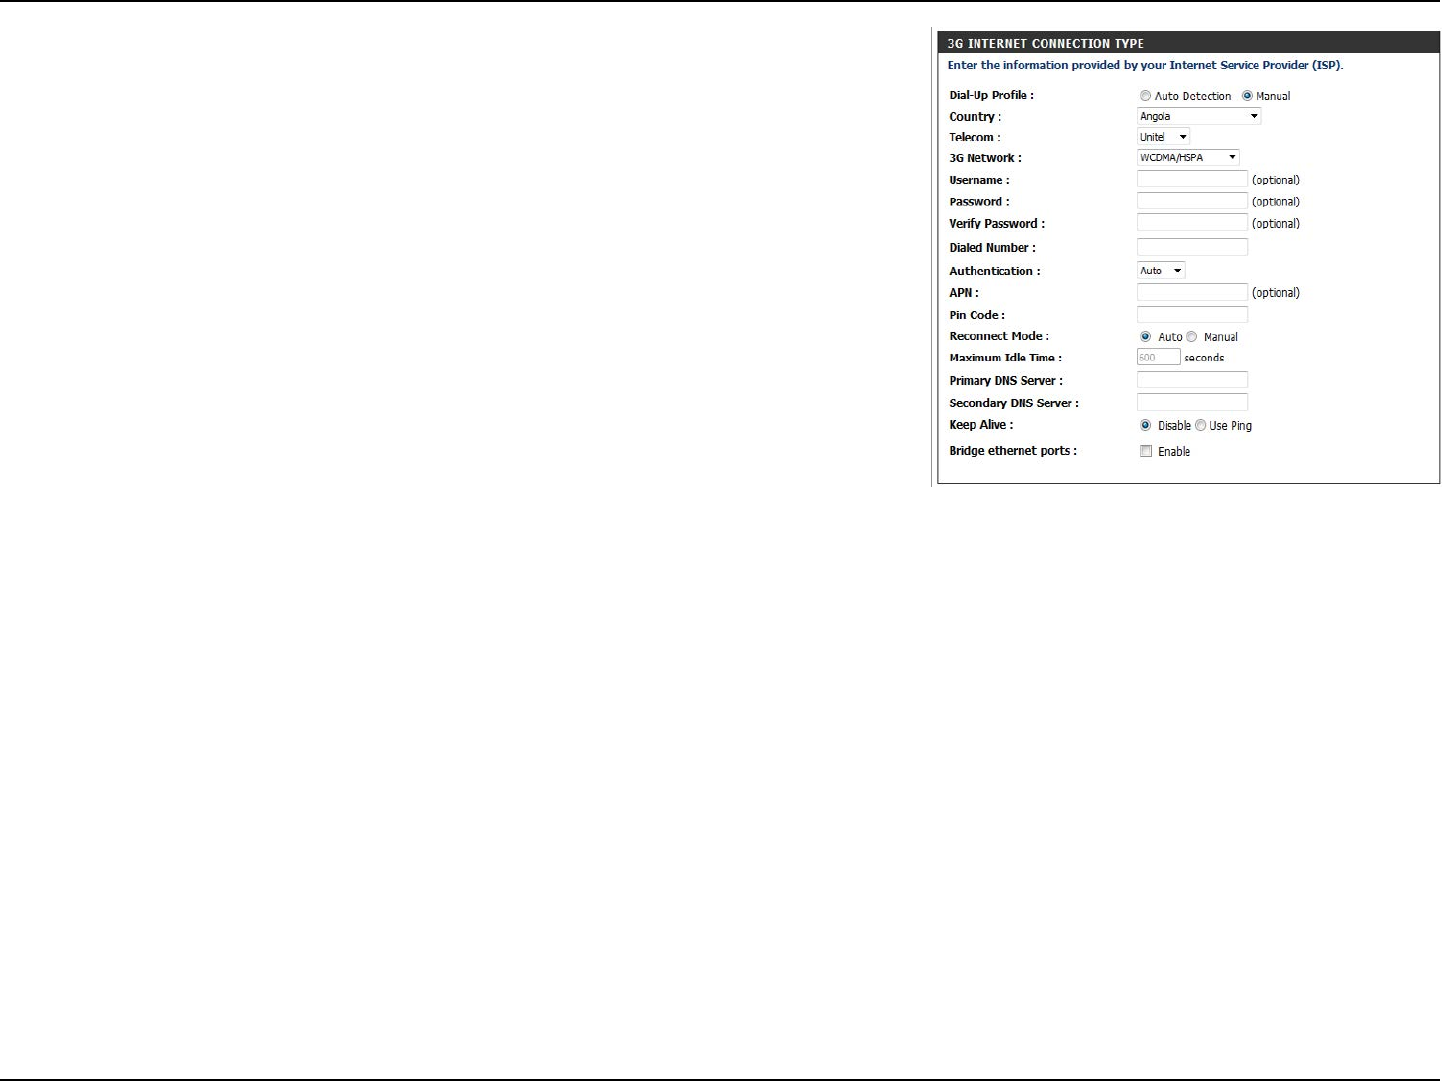
19D-Link DWR-755 User Manual
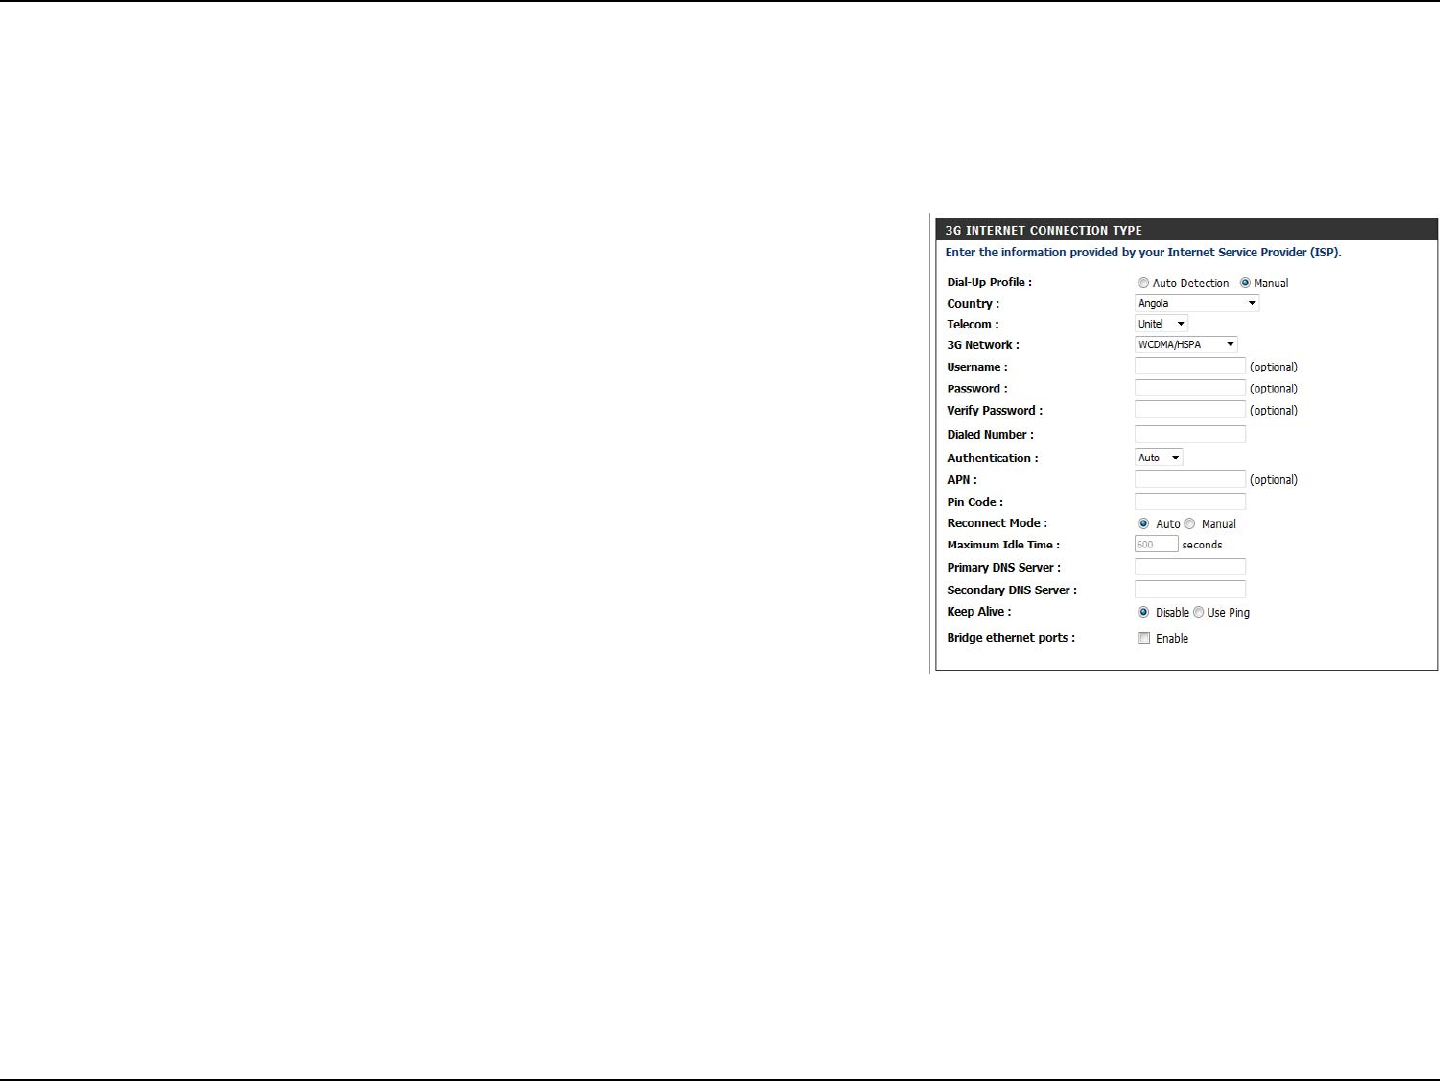
Section 3 - Conguration
Select Auto-Detection to have the router automatically detect
the settings for your connection. Select Manual to enter the
details of your connection manually.
Select your country and service provider to automatically ll in
some of the required settings.
Choose between WCDMA/HSPA or CDMA2000/EV-DO.
Fill in only if requested by ISP (optional).
Fill in only if requested by ISP (optional).
Re-type your password.
Enter the number to be dialed.
Select PAP, CHAP, or Auto detection. The default
authentication method is Auto.
Enter the APN information (optional).
Enter the PIN associated with your SIM card.
Select Auto or Manual to determine whether the router
should reconnect to your 3G/4G network automatically or
manually.
Dial Up Prole:
Country/Telecom:
3G Network
Username:
Password:
Verify Password:
Dialed Number:
Authentication:
APN:
Pin Code:
Reconnect Mode:
3G
Choose this Internet connection if you already use a SIM card for 2G/3G Internet service from your mobile Internet service provider. The elds here
may not be necessary for your connection. The information on this page should only be used if required by your service provider. After modifying
any settings, click Save Settings to save your changes.
20D-Link DWR-755 User Manual
Section 3 - Conguration
Set the maximum time your connection can be idle before
disconnecting. Set it to 0 or choose Auto in Reconnect Mode
to disable this feature.
Fill in if provided by your ISP. If not, keep the default value
(optional).
Fill in if provided by your ISP. If not, keep the default value
(optional).
Select Disable or Use Ping depending on the settings
required by your ISP. If you select Use Ping, set the ping
interval and the IP address to ping.
Activate this feature to use the Ethernet WAN port as an
additional LAN port.
Maximum Idle Time:
Primary DNS Server:
Secondary DNS Server:
Keep Alive:
Bridge Ethernet Ports:
21D-Link DWR-755 User Manual
Section 3 - Conguration
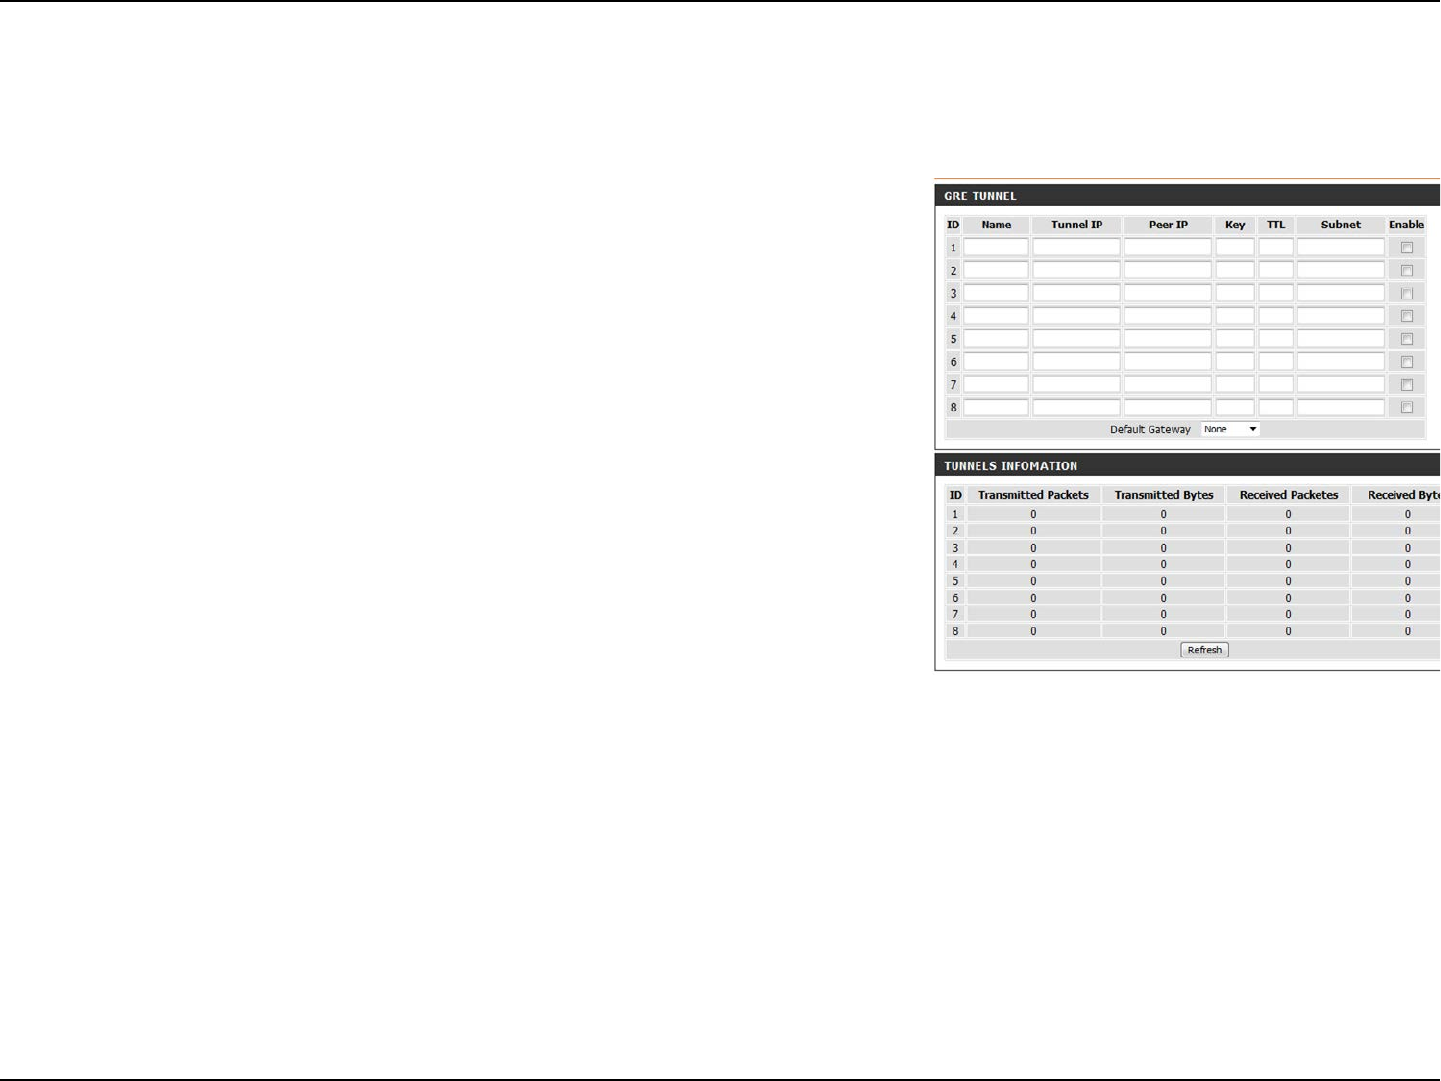
GRE Settings
This page allows you to set up GRE Tunnels and view information about the amount of data transmitted and received. Generic Routing Encapsulation
(GRE) is an IP packet encapsulation protocol used when IP packets must be sent from one network to another. Click Save Settings to apply changes.
Choose a name for the GRE tunnel.
Enter the IP address for the tunnel.
Enter a Peer IP for the tunnel.
Dene a key.
Set the time to live for the GRE tunnel.
Enter the subnet address.
Check this box to enable the individual GRE tunneling rule.
Choose a gateway from the drop-down menu (if any).
Update the information on current GRE tunnels.
Name:
Tunnel IP:
Peer IP:
Key:
TTL:
Subnet:
Enable:
Default Gateway:
Refresh:
22D-Link DWR-755 User Manual
Section 3 - Conguration
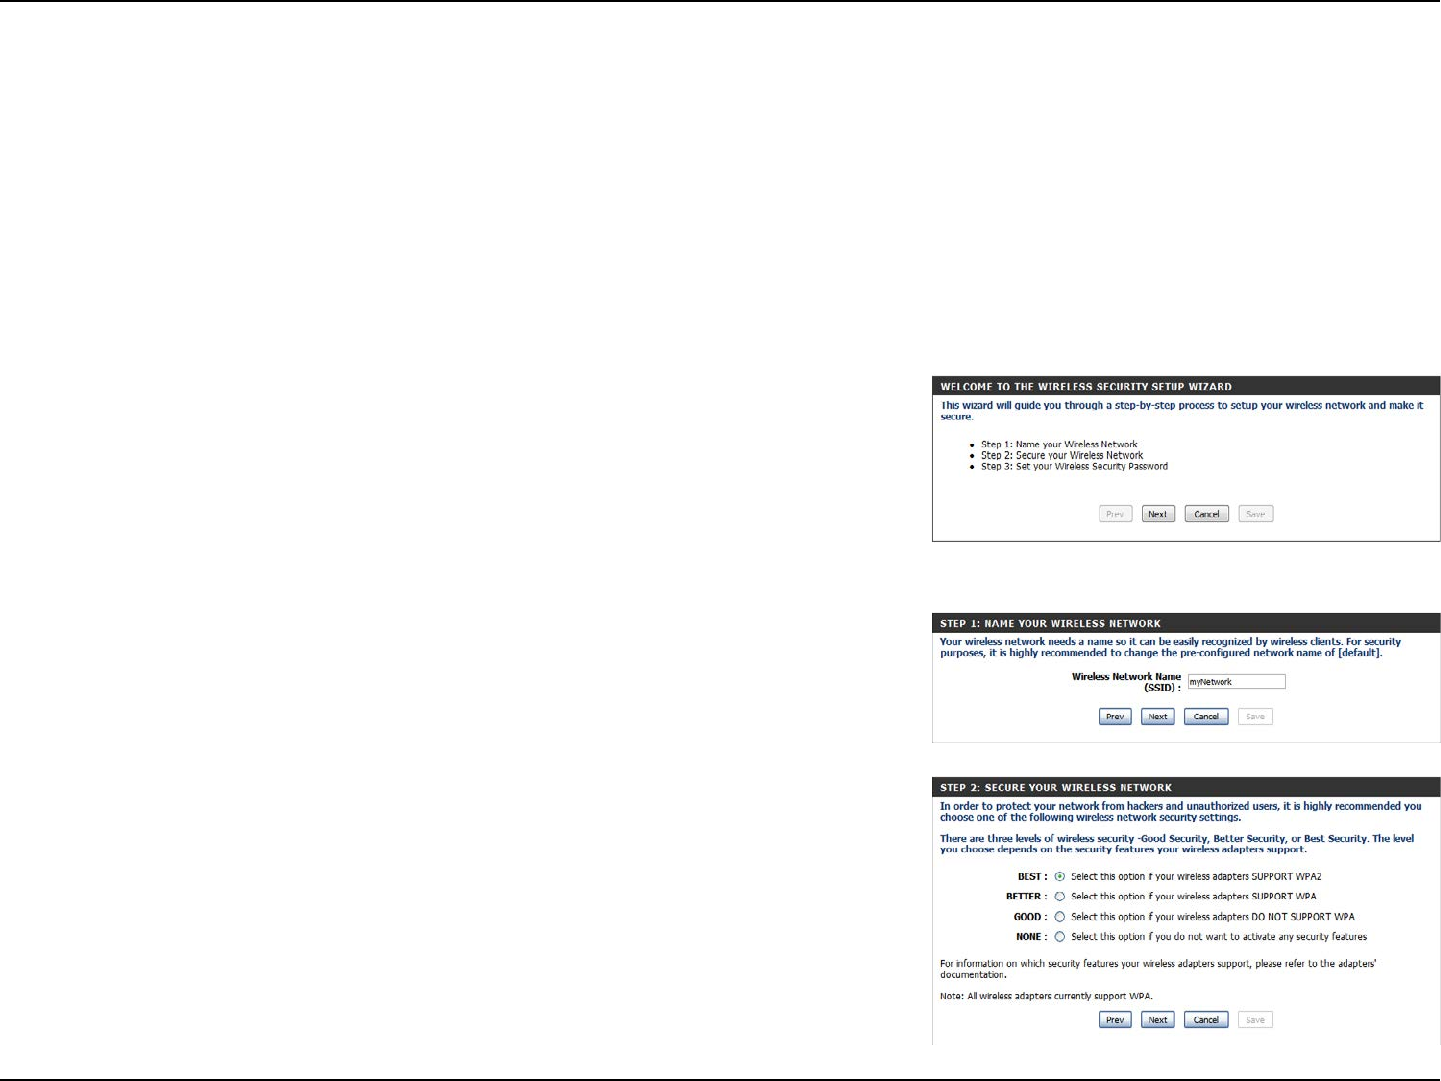
Wireless Settings
Wireless Connection Setup Wizard
This section will help you to manually congure the wireless settings of your router. Please note that changes made in this section may also need
to be duplicated on your wireless devices and clients. The Wireless Settings page allows you to congure how your router connects to the Internet.
There are several ways to set up your wireless connection. You can click on the Wireless Connection Setup Wizard button to start a wizard that
will guide you through setting up your wireless settings. If you want to manually congure your settings, click the Manual Wireless Connection
Setup button and skip to “Manual Wireless Connection Setup” on page 25. You can also set up a wireless connection to a device automatically,
or congure your router automatically through Windows by clicking the Wi-Fi Protected Setup button. This is described in “Add Wireless Device
with WPS” on page 24.
This wizard will guide you through a step-by-step process to congure your router’s wireless
settings.
Click Next to continue.
Note: While using the wizard, you can click Prev to go back to the previous page or you can
click Cancel to close the wizard.
Enter a name (SSID) for your wireless network, then click Next to continue.
Select a level of wireless security to use, then click Next to continue.
23D-Link DWR-755 User Manual
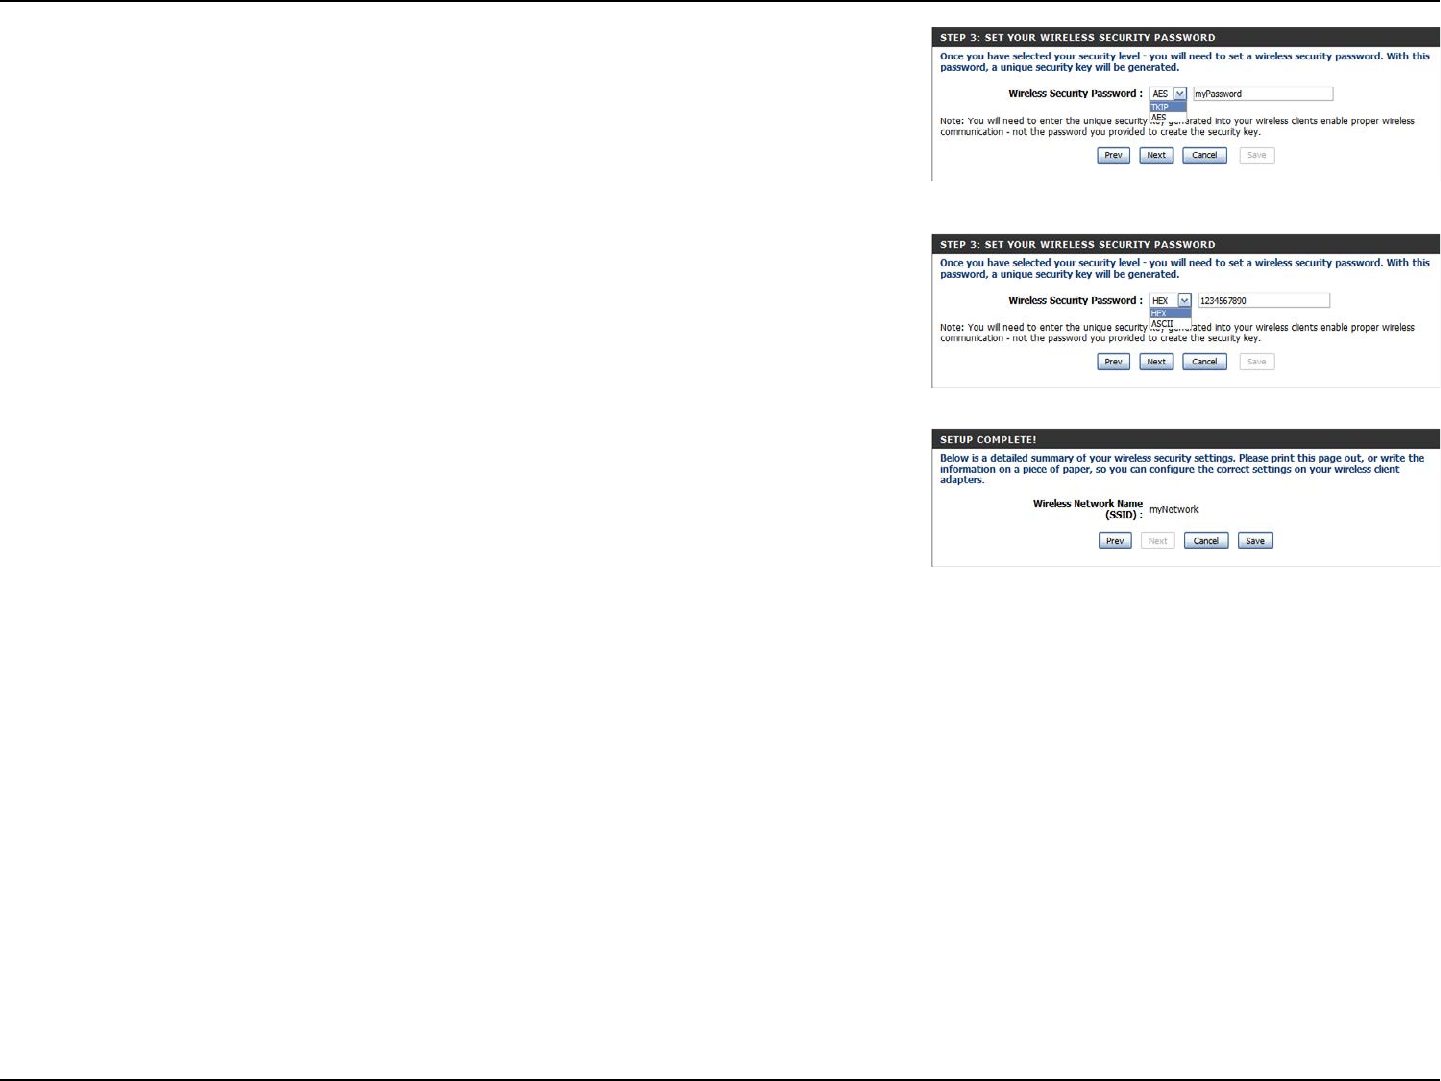
Section 3 - Conguration
If you chose BEST or BETTER, select whether to use TKIP or AES encryption, then enter a
password to use for your wireless network. It is recommended that you use AES if your wireless
computers and devices support it, as it is more secure. Click Next to continue.
If you chose GOOD, select whether to use a HEX or ASCII password, then enter a password
to use for your wireless network. If you choose HEX, you will need to enter a 10 or 26 digit
password using only hex characters (0-9, A-F). If you choose ASCII, the password must be 5 or
13 alphanumeric characters. Click Next to continue.
This completes the Wireless Connection Setup Wizard. Click Save to save your changes and
reboot the router.
24D-Link DWR-755 User Manual
Section 3 - Conguration
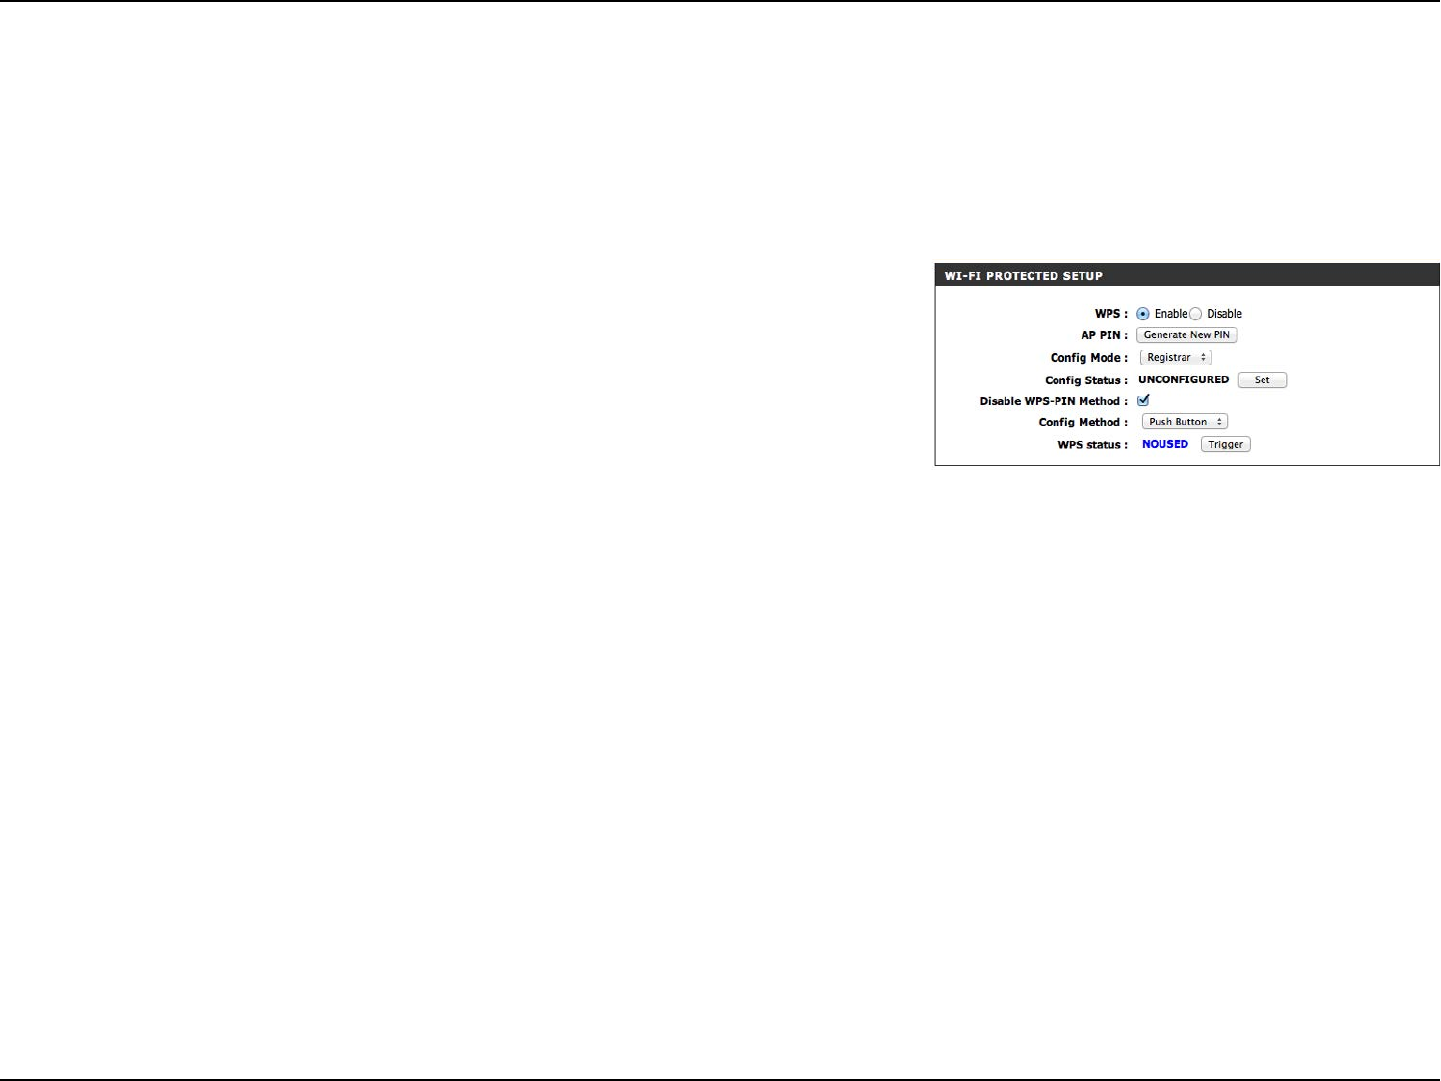
Add Wireless Device with WPS
Enable the Wi-Fi Protected Setup feature.
A PIN is a unique number that can be used to add the router to
an existing network or to create a new network. Pushing this
button will generate a new, random PIN.
Choose either Enrollee or Registrar from the drop-down menu.
Press Set to switch between Congured and Uncongured
states.
Check this button to use the Push Button method only.
Select Push Button or PIN method from the drop-down menu.
For the Push Button method, to add a wireless client simply push
the WPS button on the device and click Trigger. In order to use
the PIN method you must know the wireless client’s 8 digit PIN
and click Trigger.
Note: Once you click Trigger, you will have a 120 second
time limit to apply the settings to your wireless client(s) and
successfully establish a connection.
Indicates whether WPS is In Use or Not In Use. The Trigger button
will activate WPS for up to 120 seconds.
WPS:
AP PIN:
Cong Mode:
Cong Status:
Disable WPS-PIN
Method:
Cong Method:
WPS Status:
Wi-Fi Protected Setup (WPS) System is a simplied method for securing your wireless network during the initial setup as well as the “Add New
Device” processes. The Wi-Fi Alliance (WFA) has certied it across dierent products as well as manufacturers. The process is just as easy as pressing
a button for the Push-Button method or correctly entering the 8-digit code for the Pin Code method. The time reduction in setup and ease of use
are quite benecial, while the highest wireless Security setting of WPA2 is automatically used.
25D-Link DWR-755 User Manual
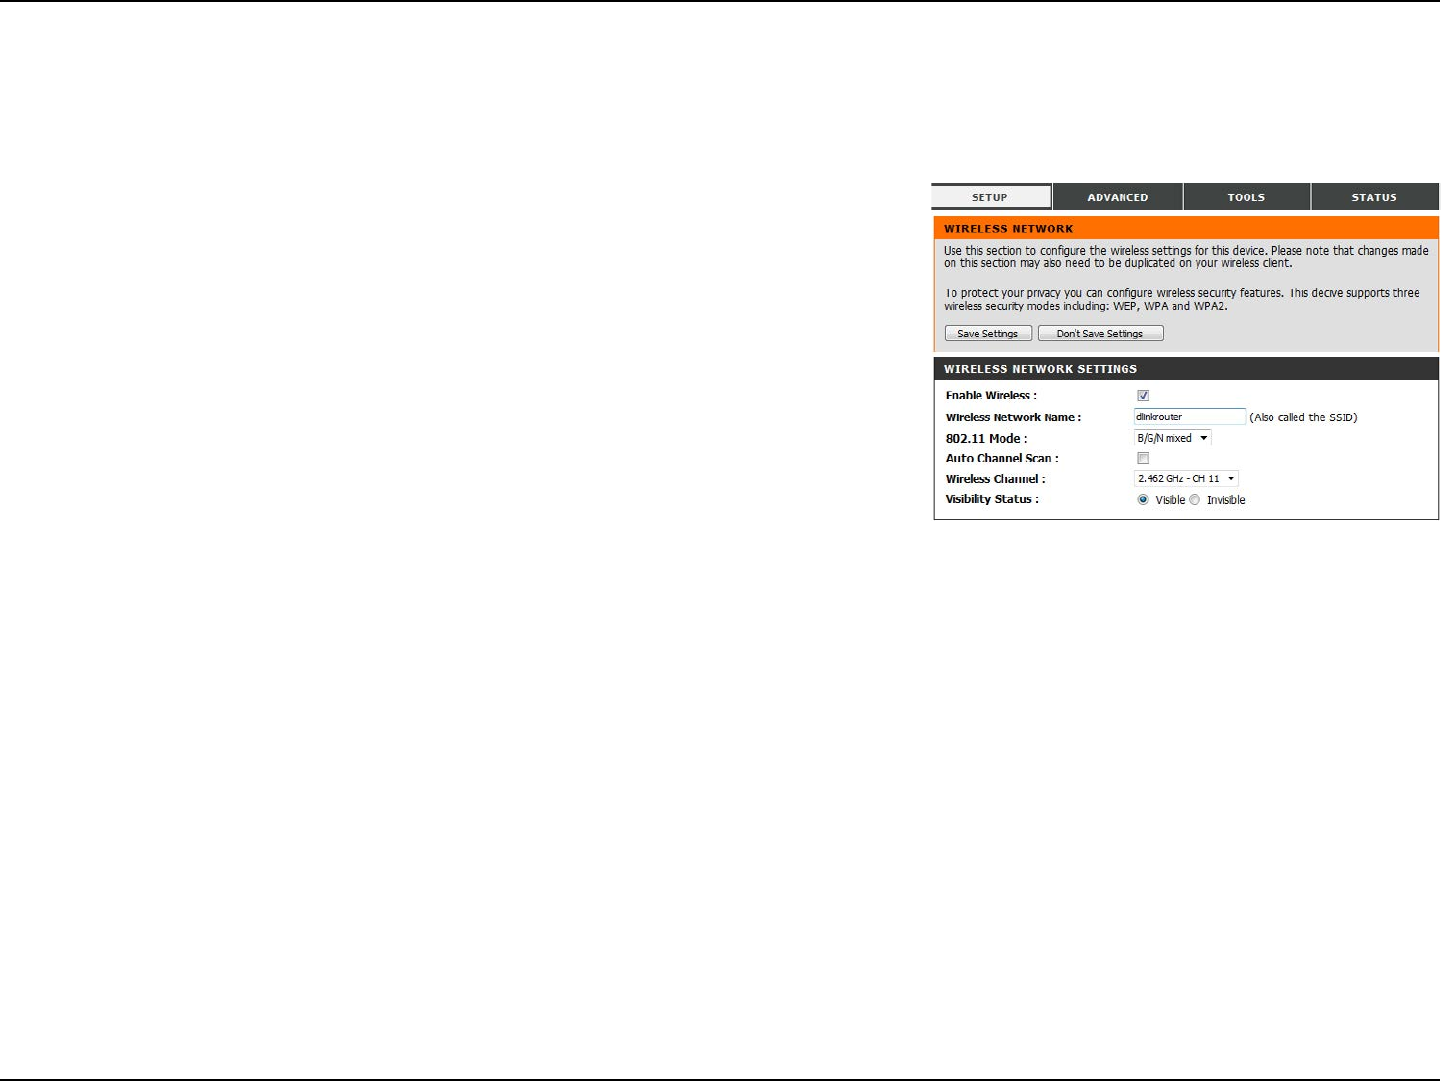
Section 3 - Conguration
Check this box to enable wireless access. When you enable this
option, the following parameters take eect.
Also known as the SSID (Service Set Identier), this is the name
of your Wireless Local Area Network (WLAN). Enter a name
using up to 32 alphanumeric characters. The SSID is case-
sensitive.
B/G mixed: Enable this mode if your network contains a mix of
802.11b and 802.11g devices.
N only: Enable this mode if your network only has 802.11n
devices.
B/G/N mixed: Enable this mode if you have a mix of 802.11n,
802.11g, and 802.11b clients.
Enabling this feature will allow the router to automatically
scan for the best wireless channel to use.
A wireless network uses specic channels in the wireless
spectrum to handle communication between clients. Some
channels in your area may experience interference from
other electronic devices. Choose the clearest channel to help
optimize the performance and coverage of your wireless
network, or enable Auto Channel Scan for the router to
automatically select the best channel.
This setting determines whether the SSID will be Visible or
Invisible to wireless clients looking for wireless networks.
Setting this to Invisible can increase the security of your
network by making it undetectable, but clients will need to
manually enter the SSID of your network to connect.
Enable Wireless:
Wireless Network Name:
802.11 Mode:
Auto Channel Scan:
Wireless Channel:
Visibility Status:
Manual Wireless Connection Setup
This page lets you set up your wireless network and choose a wireless security mode. After modifying any settings, click Save Settings to save your
changes.

26D-Link DWR-755 User Manual
Section 3 - Conguration
You can choose from 4 dierent security modes.
• None: No security will be used. This setting is not
recommended.
• WEP: WEP encryption will be used. This setting is
only recommended if your wireless devices do not
support WPA or WPA2.
• WPA-Personal: WPA-PSK encryption will be used.
This setting is recommended for most users.
• WPA-Enterprise: WPA-EAP encryption will be
used. This setting is only recommended if you
have a RADIUS authentication server. Otherwise,
WPA-Personal should be used.
Security Mode:
27D-Link DWR-755 User Manual
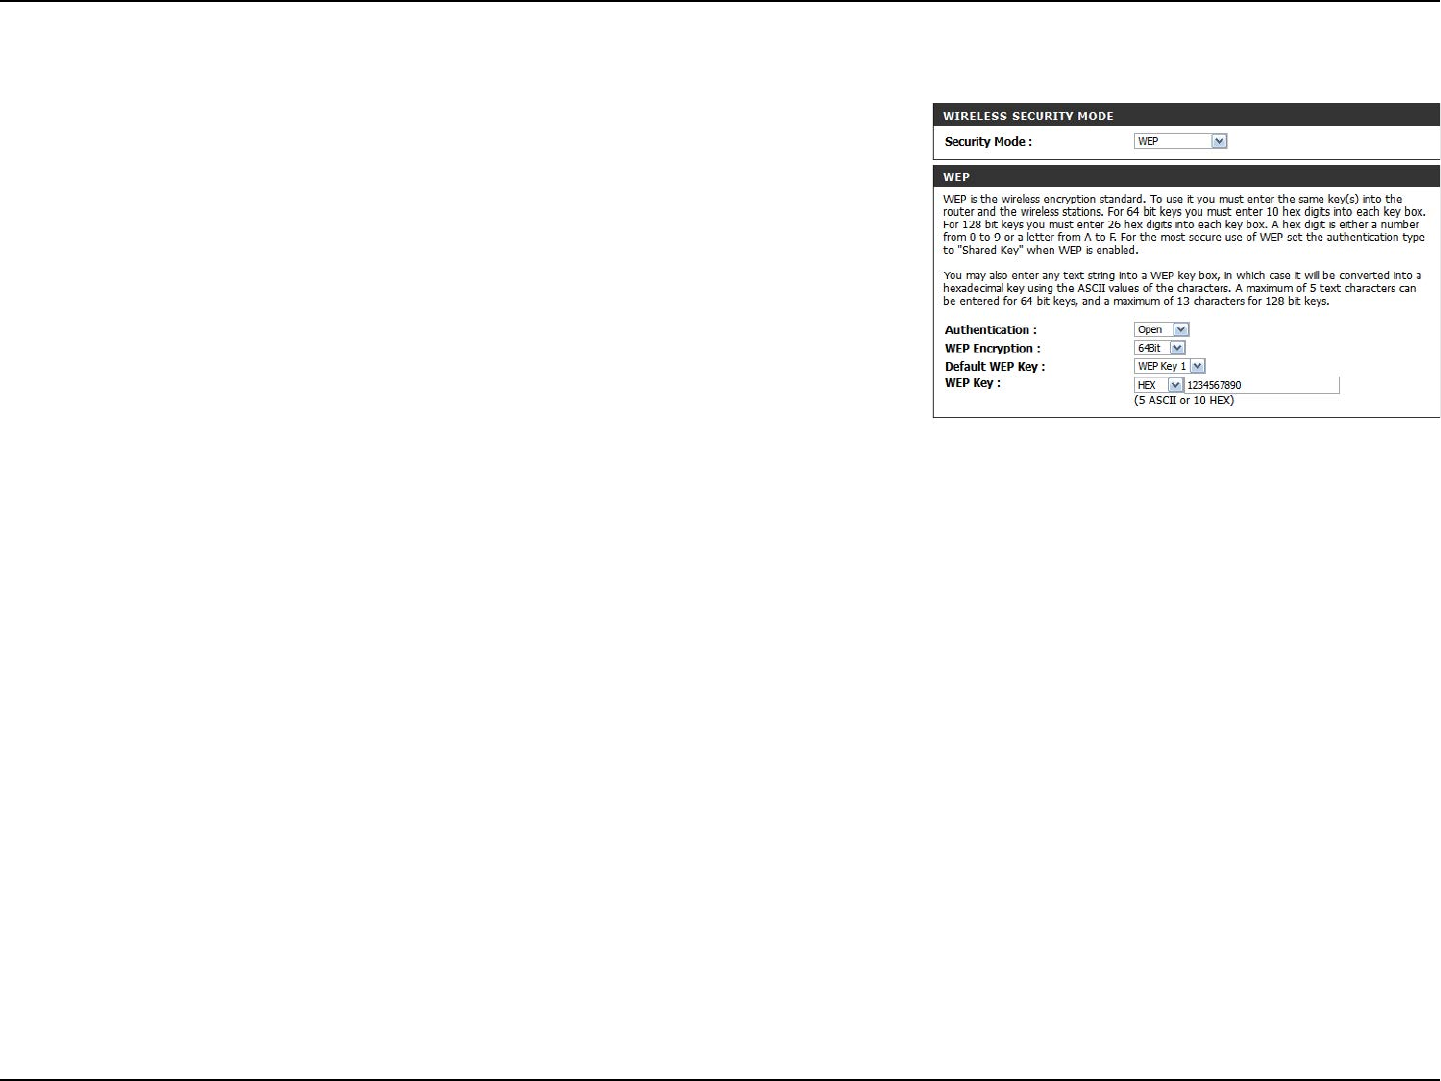
Section 3 - Conguration
Select whether to use Open or Shared authentication.
Select whether to use 64-bit or 128-bit encryption.
Select which WEP key (1-4) to use as the default key. This will
also change the WEP Key text box to that WEP key for you to
congure(1-4).
Set the WEP key/password for your wireless network. Based
on whether you are using 64 or 128-bit encryption, and
whether you are using a HEX or ASCII key, you will need to
enter dierent numbers of characters for your key, as indicated
below the WEP Key text box. ASCII keys may use letters and
numbers only, and HEX keys may use numbers 0-9 and letters
A-F only.
Authentication:
WEP Encryption:
Default WEP Key:
WEP Key:
WEP
28D-Link DWR-755 User Manual
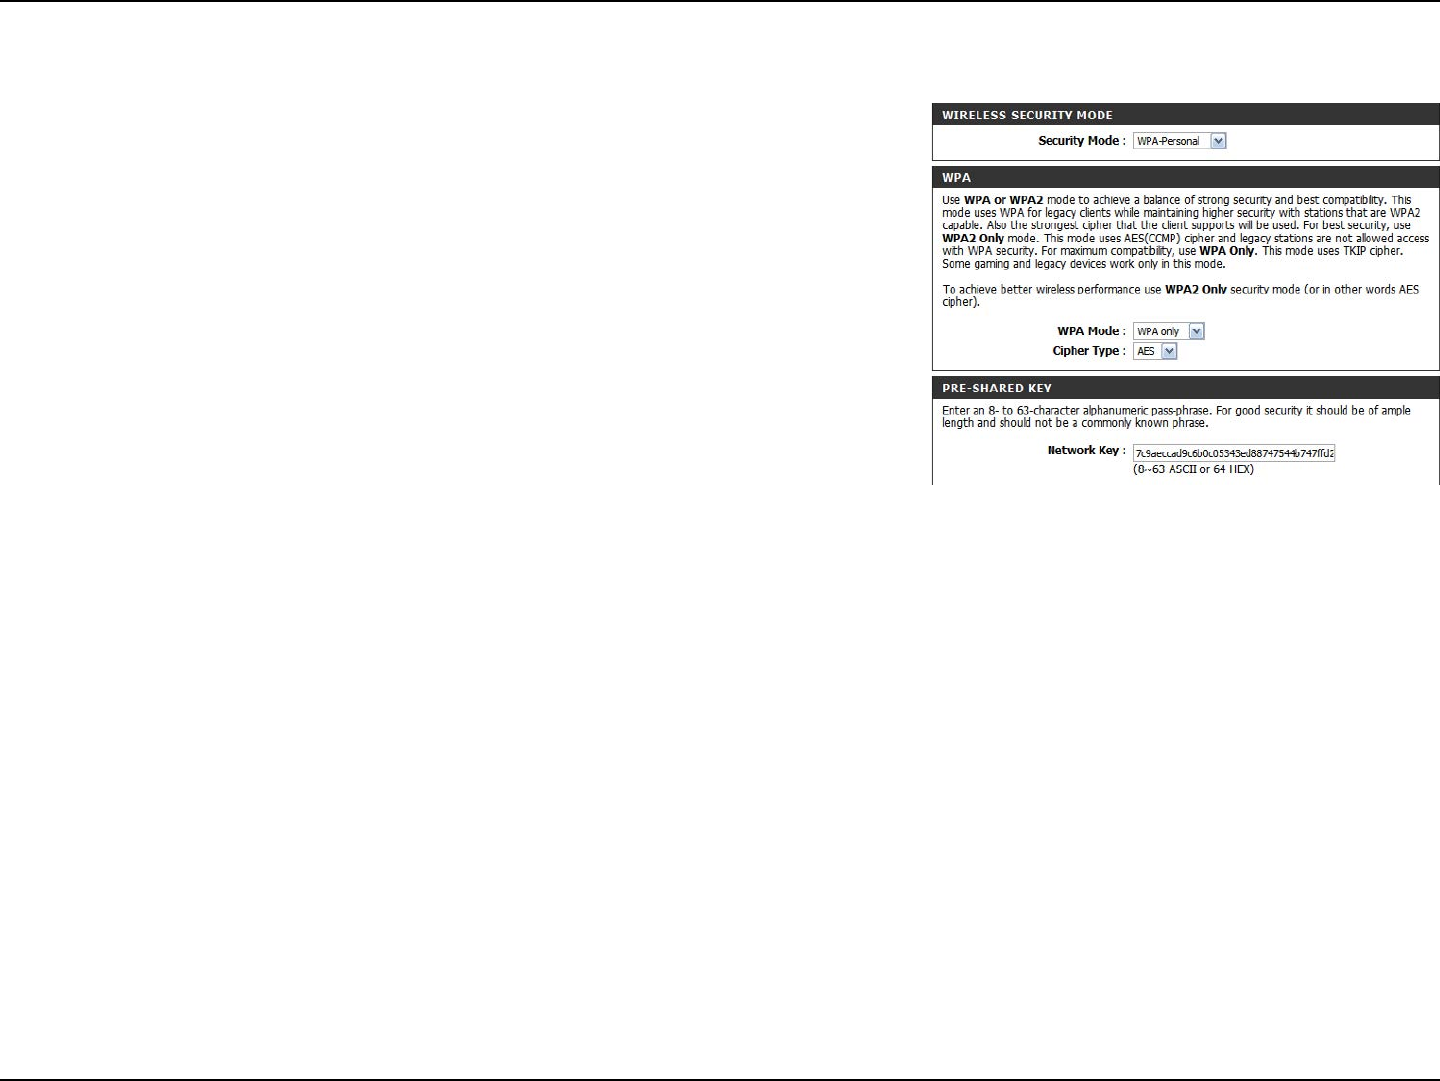
Section 3 - Conguration
Select whether to use WPA2 only or WPA only. WPA2 only is
the most secure, provided that all of your clients can support
it.
Select whether to use the TKIP or AES cipher. The AES cipher
is the most secure, provided that all of your clients can support
it.
Enter the key/password you want to use for your wireless
network. The key must be between 8 and 63 characters long,
and may only contain letters and numbers.
WPA Mode:
Cipher Type:
Network Key:
WPA-Personal
29D-Link DWR-755 User Manual
Section 3 - Conguration
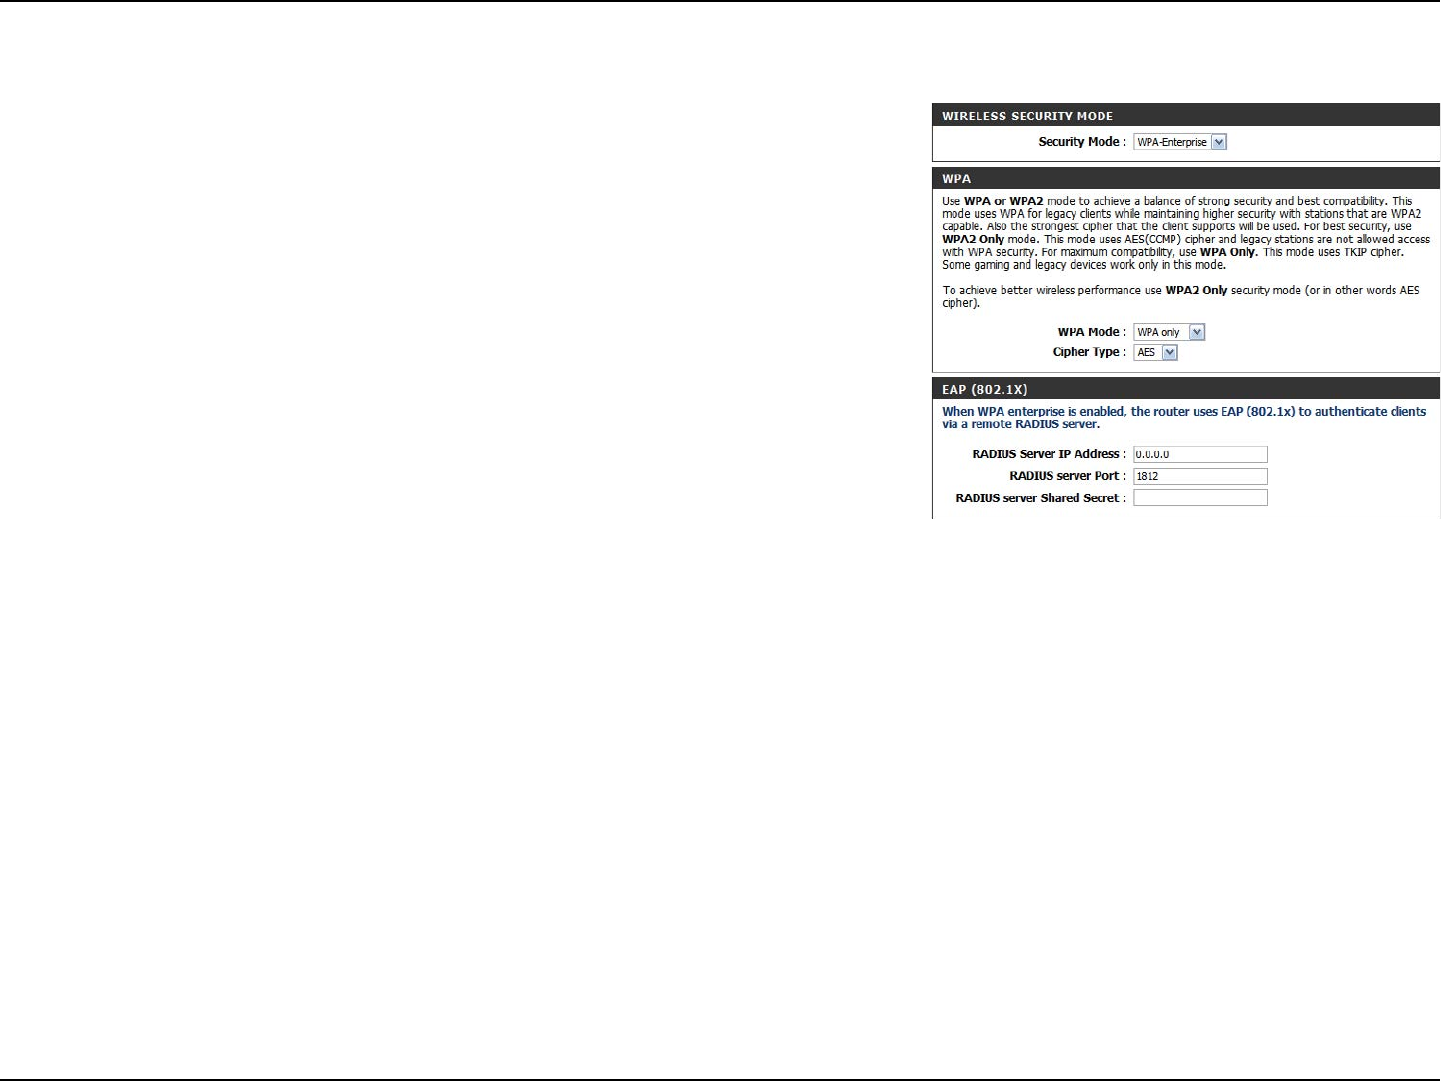
Select whether to use WPA2 only or WPA only. WPA2 only is
the most secure, provided that all of your clients can support
this security method.
Select whether to use the TKIP or AES cipher. The AES cipher
is the most secure, provided that all of your clients can support
it.
Enter the IP address of your RADIUS server.
Enter the port used for your RADIUS server.
Enter the shared secret/password for your RADIUS server.
WPA Mode:
Cipher Type:
RADIUS Server IP
Address:
RADIUS Server Port:
RADIUS Server Shared
Secret:
WPA-Enterprise
30D-Link DWR-755 User Manual
Section 3 - Conguration
This section will help you to change the internal network settings of your router and to congure the DHCP Server settings. After modifying any
settings, click Save Settings to save your changes.
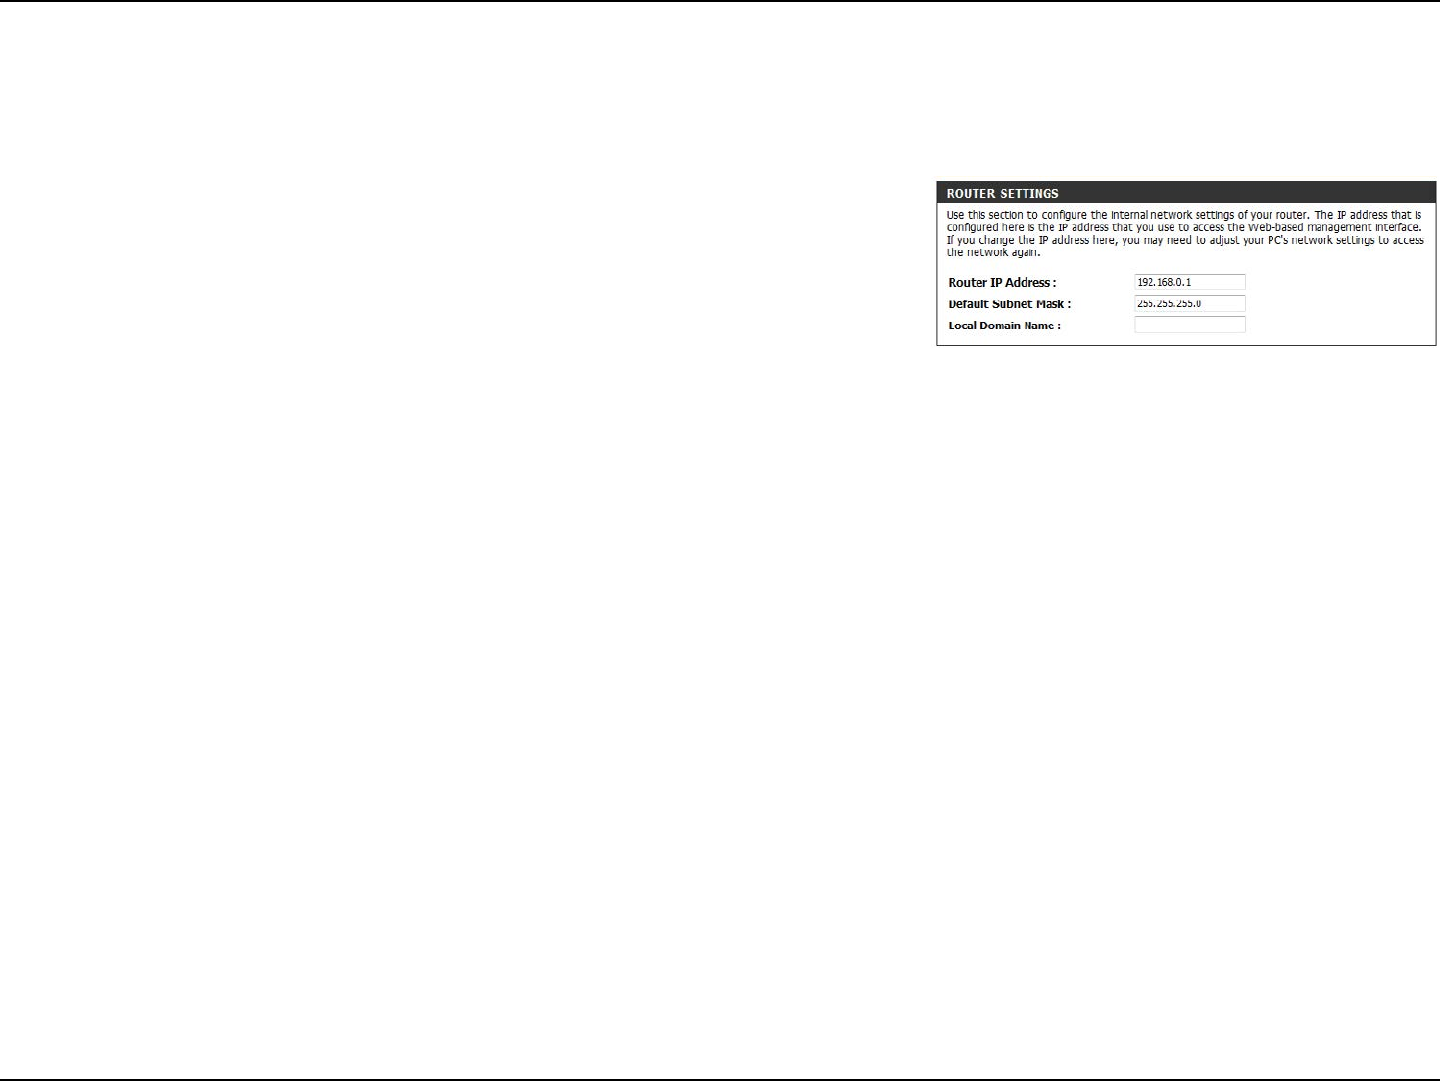
Network Settings
ROUTER SETTINGS
Enter the IP address of the router. The default IP address is
192.168.0.1.
If you change the IP address, once you click Save Settings, you
will need to enter the new IP address in your browser to get back
into the conguration utility.
Enter the subnet mask. The default subnet mask is 255.255.255.0.
Enter the local domain name for your network.
Router IP Address:
Subnet Mask:
Local Domain
Name:
31D-Link DWR-755 User Manual
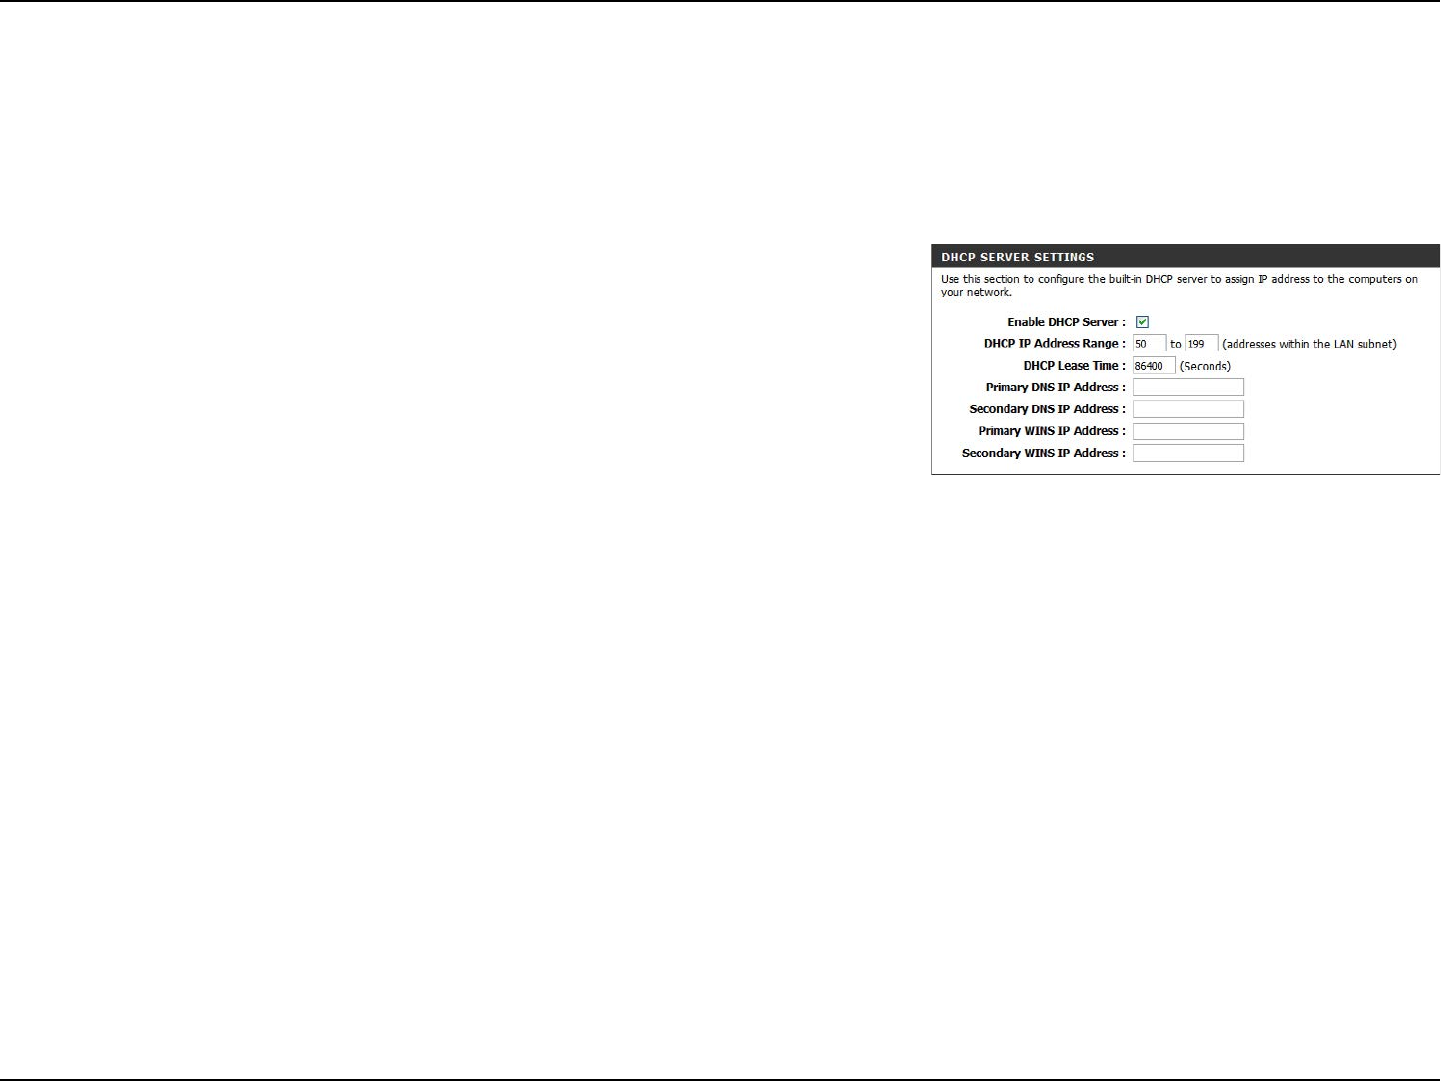
Section 3 - Conguration
Select this box to enable the DHCP server on your router.
Enter the range of IPs for the DHCP server to use to assign
IP addresses to devices on your network. These values will
represent the last octet of the IP addresses in the pool.
Enter the lease time for IP address assignments.
Enter the primary DNS IP address that will be assigned to
DHCP clients.
Enter the secondary DNS IP address that will be assigned to
DHCP clients.
Enter the primary WINS IP address that will be assigned to
DHCP clients.
Enter the secondary WINS IP address that will be assigned to
DHCP clients.
Enable DHCP Server:
DHCP IP Address Range:
DHCP Lease Time:
Primary DNS IP Address:
Secondary DNS IP
Address:
Primary WINS IP
Address:
Secondary WINS IP
Address:
DHCP Server Settings
The DWR-755 has a built-in DHCP (Dynamic Host Control Protocol) server. The DHCP server assigns IP addresses to devices on the network that
request them. By default, the DHCP Server is enabled on the device. The DHCP address pool contains a range of IP addresses, which are automatically
assigned to the clients on the network. After modifying any settings, click Save Settings to save your changes.
32D-Link DWR-755 User Manual
Section 3 - Conguration
IPv6
There are several connection types to choose from: Static IPv6, LAN IPv6 Address, PPPoE, LAN IPv6 Link-Local, 6 to 4, 6rd, and Autoconguration. If
you are unsure of your connection method, please contact your IPv6 Internet Service Provider (ISP).
Note: If using the PPPoE option, you will need to ensure that any PPPoE client software on your computers has been removed or disabled.
33D-Link DWR-755 User Manual
Section 3 - Conguration
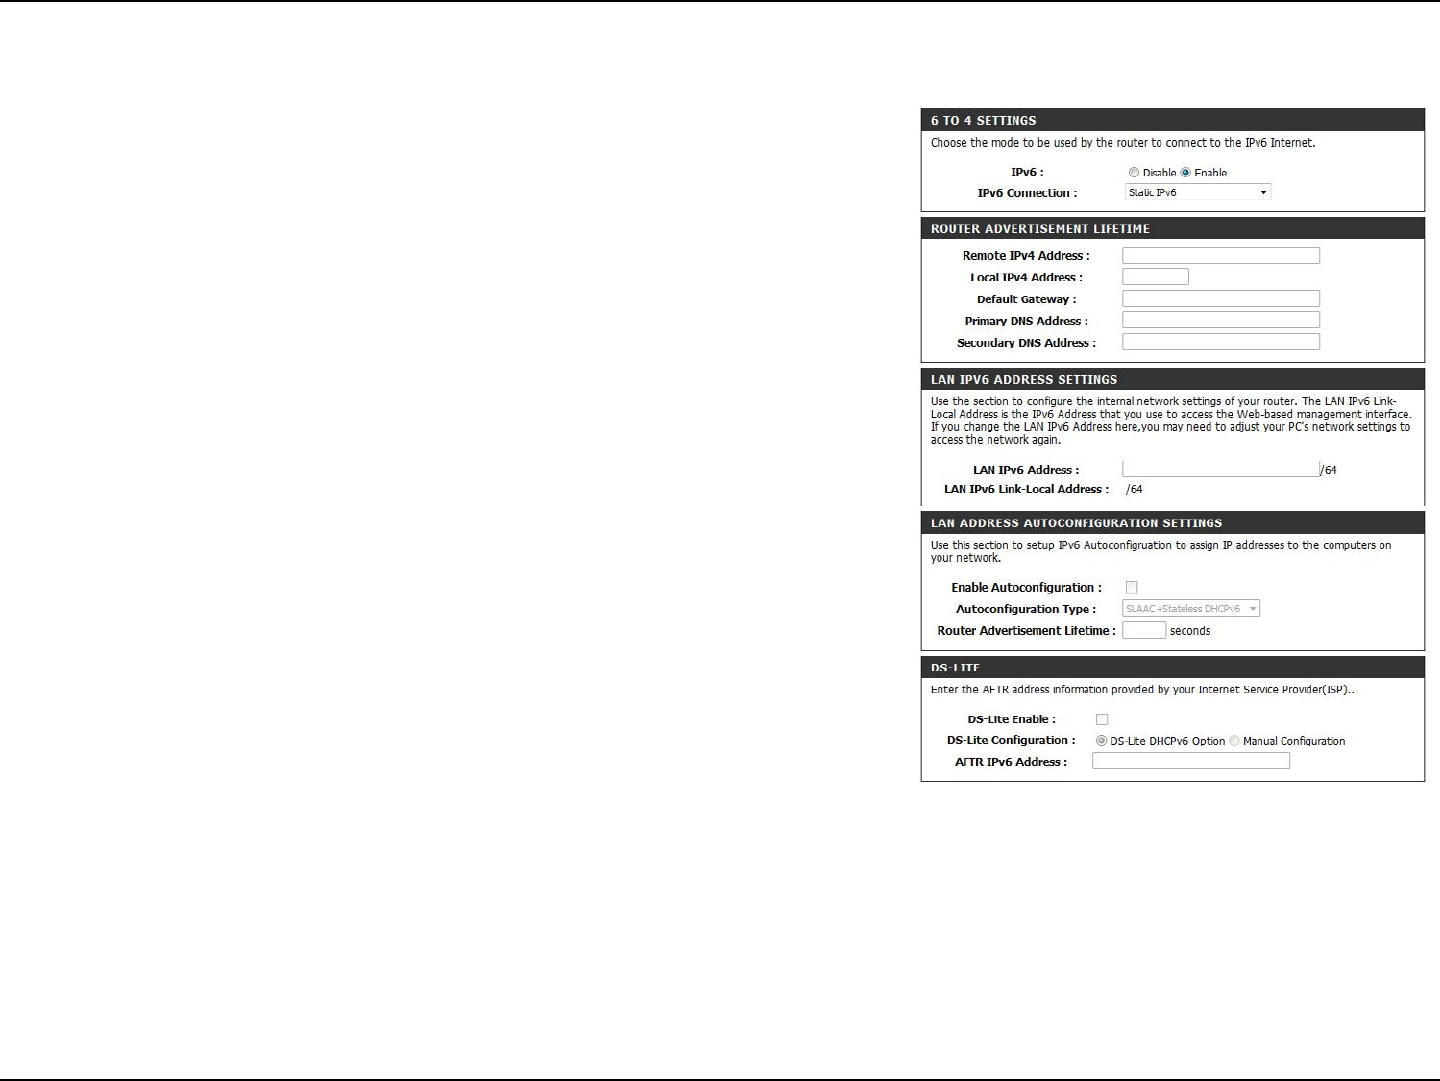
Static IPv6
Tick to Enable IPv6 tunneling.
Select Static IPv6 from the drop-down menu.
Enter the remote IPv4 address.
Enter the local IPv4 address.
Enter the default gateway.
Enter the primary and secondary DNS addresses here.
Enter the LAN IPv6 address.
Displays the LAN IPv6 link-local address.
Check to enable the autoconguration feature.
Select SLAAC + Stateless DHCPv6 or Stateful (DHCPv6).
Enter the IPv6 Address Lifetime (in seconds).
Tick to enable DS-Lite.
Tick Manual Conguration.
Enter the AFTR IPv6 address supplied by your service provider.
IPv6:
IPv6 Connection:
Remote IPv4 Address:
Local IPv4 Address:
Default Gateway:
DNS Addresses:
LAN IPv6 Address:
LAN IPv6 Link-Local
Address:
Enable
Autoconguration:
Autoconguration
Type:
Router Advertisement
Lifetime:
DS-Lite Enable:
DS-Lite Conguration:
AFTR IPv6 Address:
34D-Link DWR-755 User Manual
Section 3 - Conguration
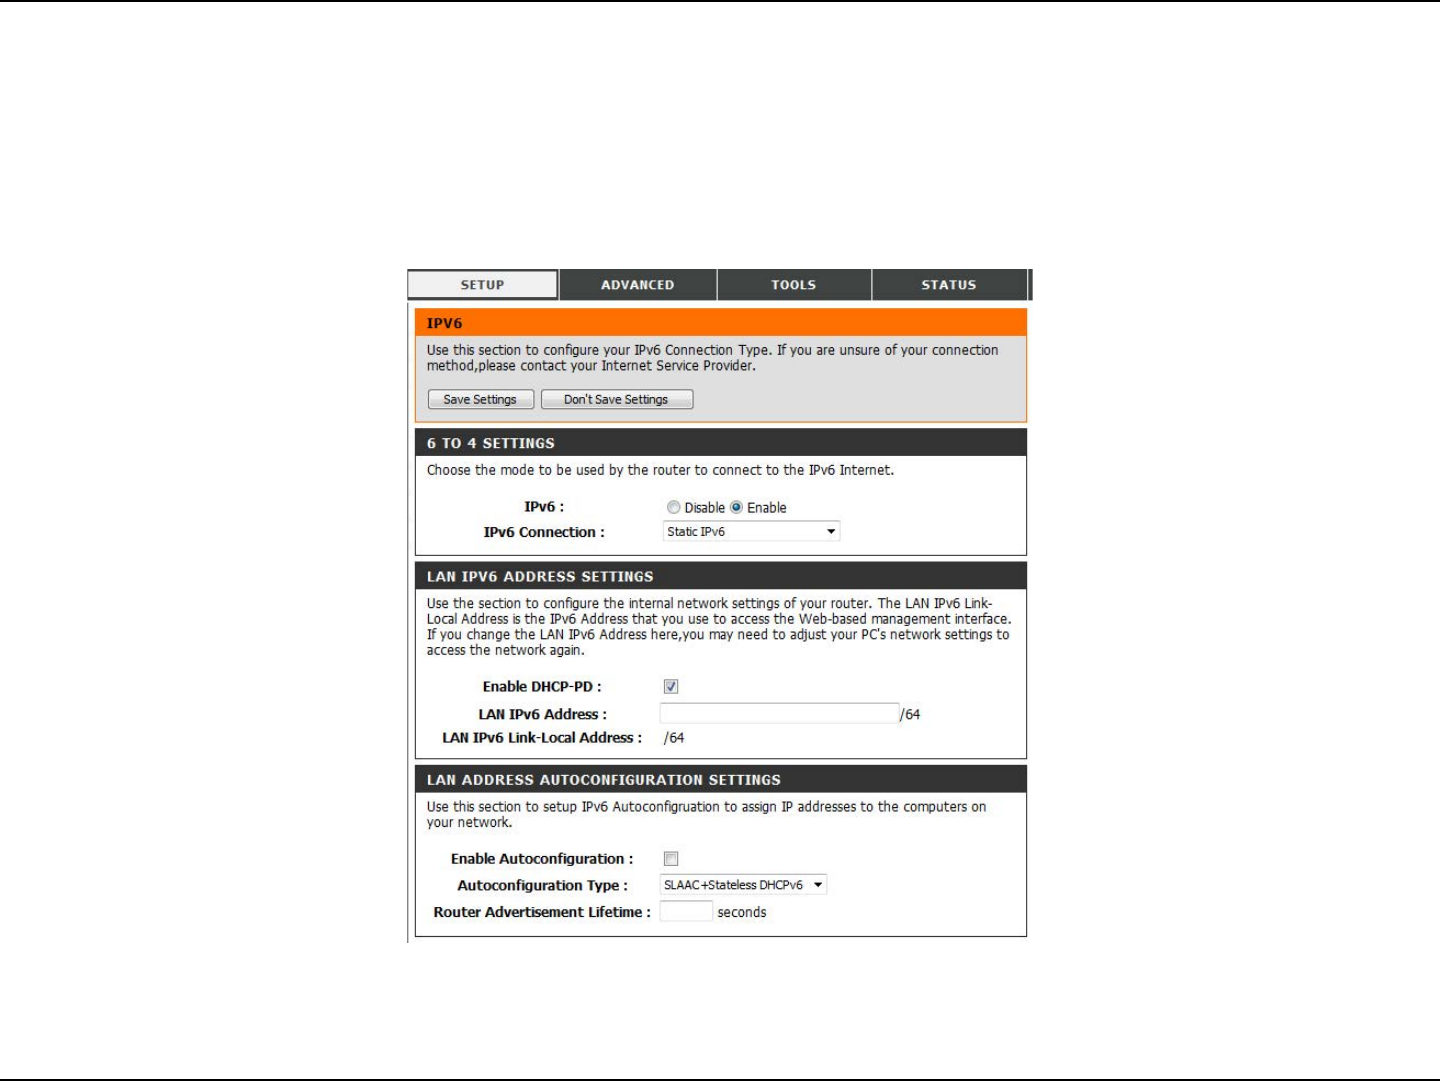
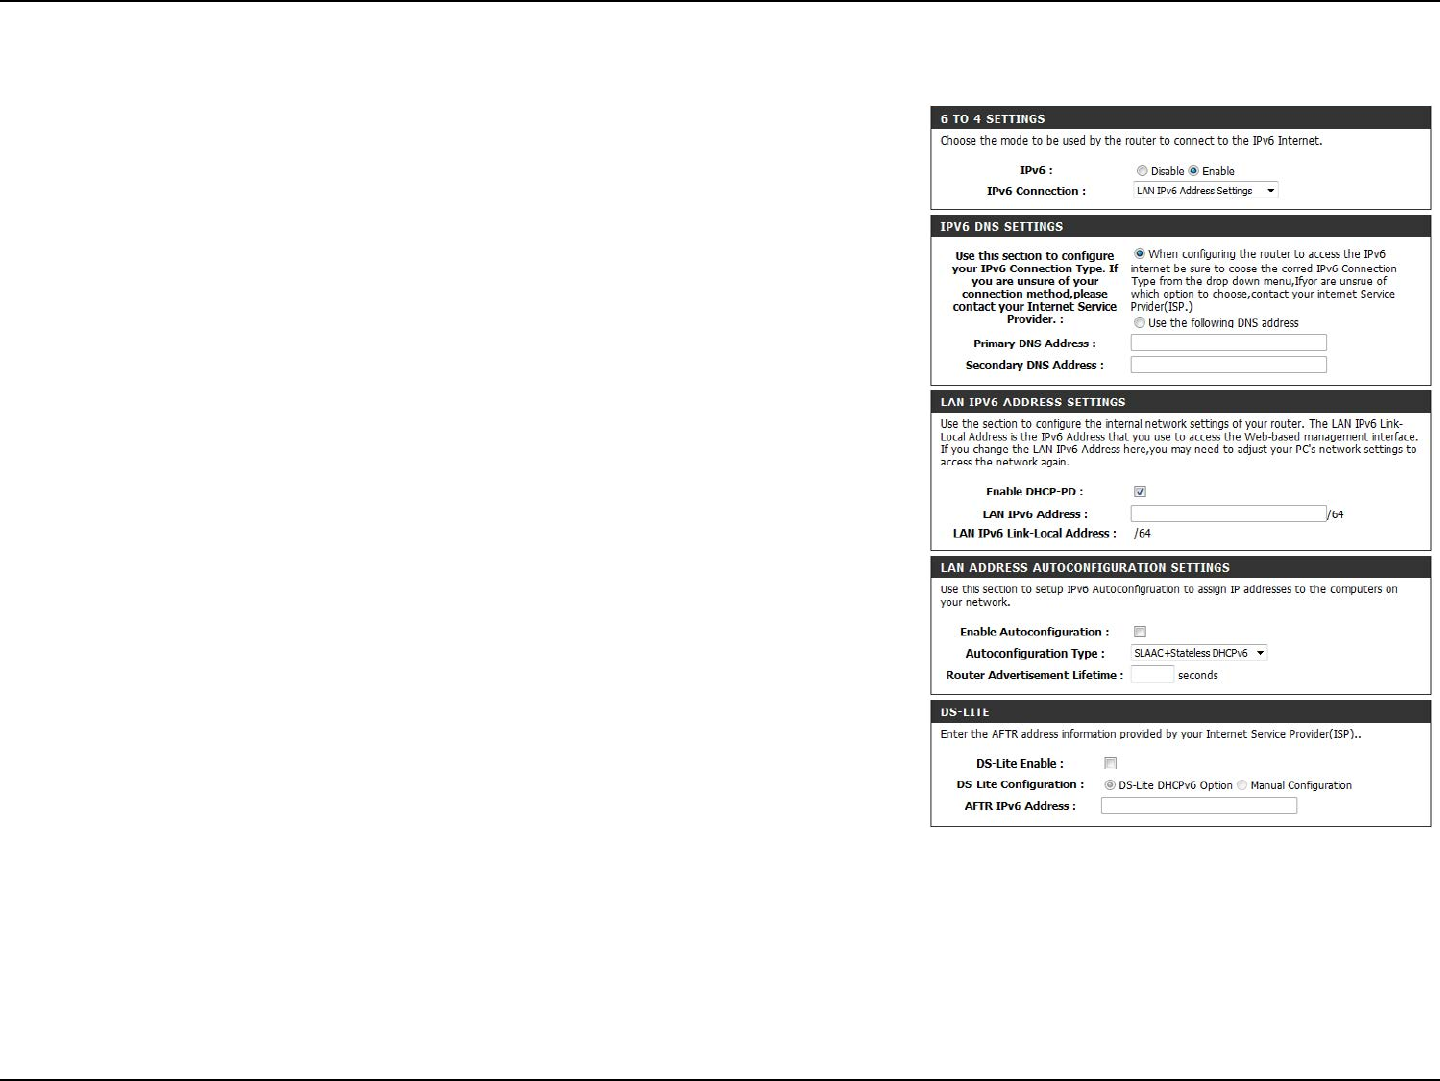
LAN IPv6 Address Settings
Tick to Enable IPv6 tunneling.
Select LAN IPv6 Address Settings from the drop-down menu.
Enter the primary and secondary DNS addresses here.
Tick to enable DHCP-PD.
Enter the LAN IPv6 address.
Displays the LAN IPv6 link-local address.
Check to enable the autoconguration feature.
Select SLAAC + Stateless DHCPv6 or Stateful (DHCPv6).
Enter the IPv6 address lifetime (in seconds).
Tick to enable DS-Lite.
Tick DS-Lite DHCPv6 Option or Manual Conguration.
Enter the AFTR IPv6 address supplied by your service provider.
IPv6:
IPv6 Connection:
DNS Addresses:
Enable DHCP-PD:
LAN IPv6 Address:
LAN IPv6 Link-Local
Address:
Enable
Autoconguration:
Autoconguration
Type:
Router Advertisement
Lifetime:
DS-Lite Enable:
DS-Lite Conguration:
AFTR IPv6 Address:

35D-Link DWR-755 User Manual
Section 3 - Conguration
PPPoE
Tick to Enable IPv6 tunneling.
Select LAN IPv6 Address Settings from the drop-down menu.
Enter the LAN IPv6 address.
You may need to change the Maximum Transmission Unit
(MTU) for optimal performance.
Enter the primary and secondary DNS addresses here.
Tick to enable DHCP-PD.
Enter the LAN IPv6 address.
Displays the LAN IPv6 Link-local address.
Check to enable the autoconguration feature.
Select SLAAC + Stateless DHCPv6 or Stateful (DHCPv6).
Enter the IPv6 address lifetime (in seconds).
IPv6:
IPv6 Connection:
LAN IPv6 Address:
MTU:
DNS Addresses:
Enable DHCP-PD:
LAN IPv6 Address:
LAN IPv6 Link-Local
Address:
Enable
Autoconguration:
Autoconguration
Type:
Router Advertisement
Lifetime:
36D-Link DWR-755 User Manual
Section 3 - Conguration
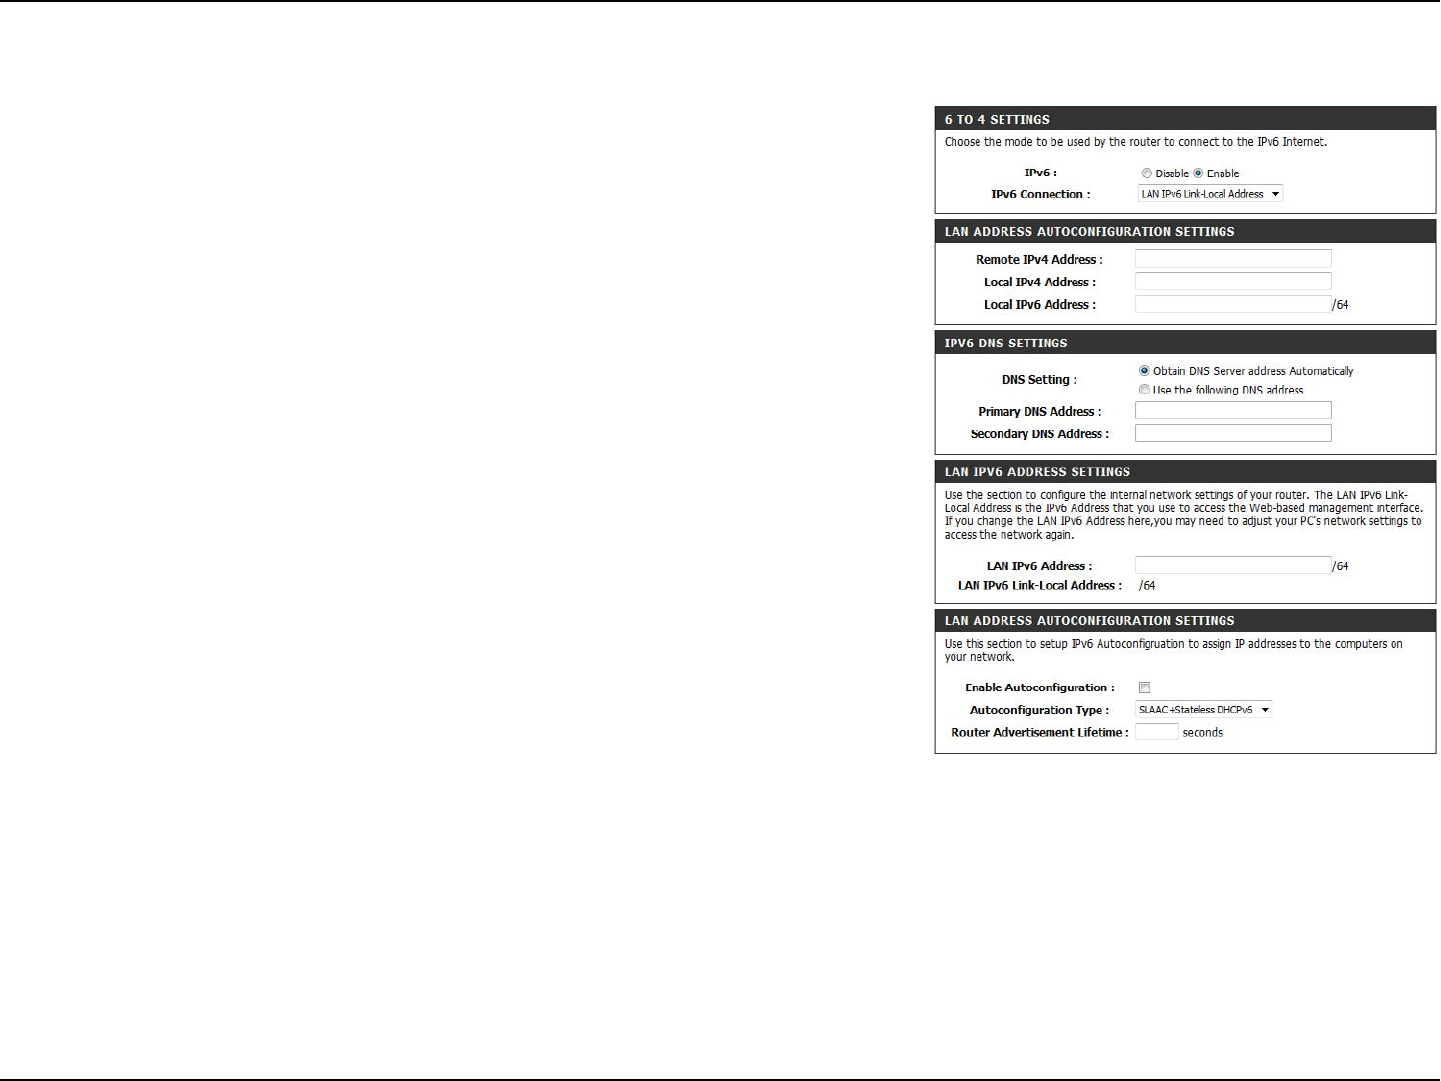
LAN IPv6 Link-Local Address
Tick to Enable IPv6 tunneling.
Select LAN IPv6 Link-Local Address from the drop-down menu.
Enter the remote IPv4 address.
Enter the local IPv4 address.
Enter the local IPv6 address.
Choose to automatically obtain the DNS server address or to set
manually.
Enter the primary and secondary DNS addresses here.
Enter the LAN IPv6 address.
Displays the LAN IPv6 link-local address.
Check to enable the autoconguration feature.
Select SLAAC + Stateless DHCPv6 or Stateful (DHCPv6).
Enter the IPv6 address lifetime (in seconds).
IPv6:
IPv6 Connection:
Remote IPv4 Address:
Local IPv4 Address:
Local IPv6 Address:
DNS Setting:
DNS Addresses:
LAN IPv6 Address:
LAN IPv6 Link-Local
Address:
Enable
Autoconguration:
Autoconguration
Type:
Router Advertisement
Lifetime:
37D-Link DWR-755 User Manual
Section 3 - Conguration
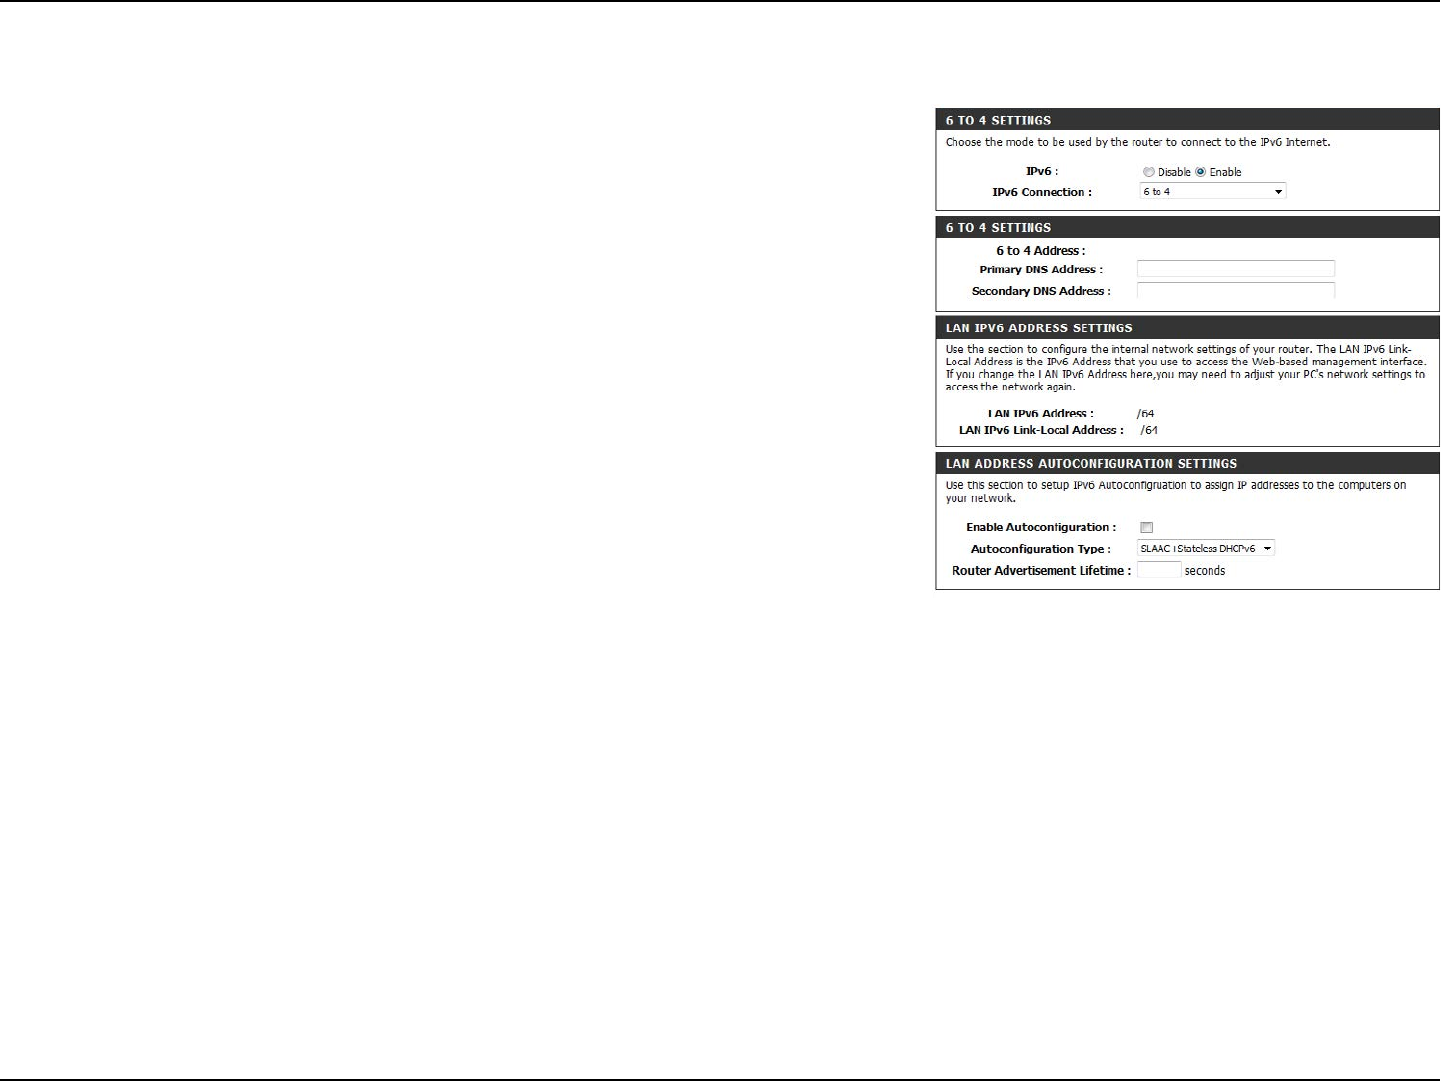
6 to 4
Tick Enable to activate IPv6 tunneling.
Select 6 to 4 from the drop-down menu.
Displays the IPv6 settings supplied by your Internet
Service Provider (ISP).
Enter the primary and secondary DNS server addresses.
Displays the LAN (local) IPv6 address for the router.
Displays the router’s LAN link-local address.
Check to enable the autoconguration feature.
Select Stateful (DHCPv6) or SLAAC+Stateless
DHCPv6 autoconguration.
Enter the IPv6 address lifetime (in seconds).
IPv6:
IPv6 Connection:
6 to 4 Address:
Primary/Secondary
DNS Address:
LAN IPv6 Address:
LAN Link-Local
Address:
Enable
Autoconguration:
Autoconguration
Type:
Router Advertisement
Lifetime:
38D-Link DWR-755 User Manual
Section 3 - Conguration
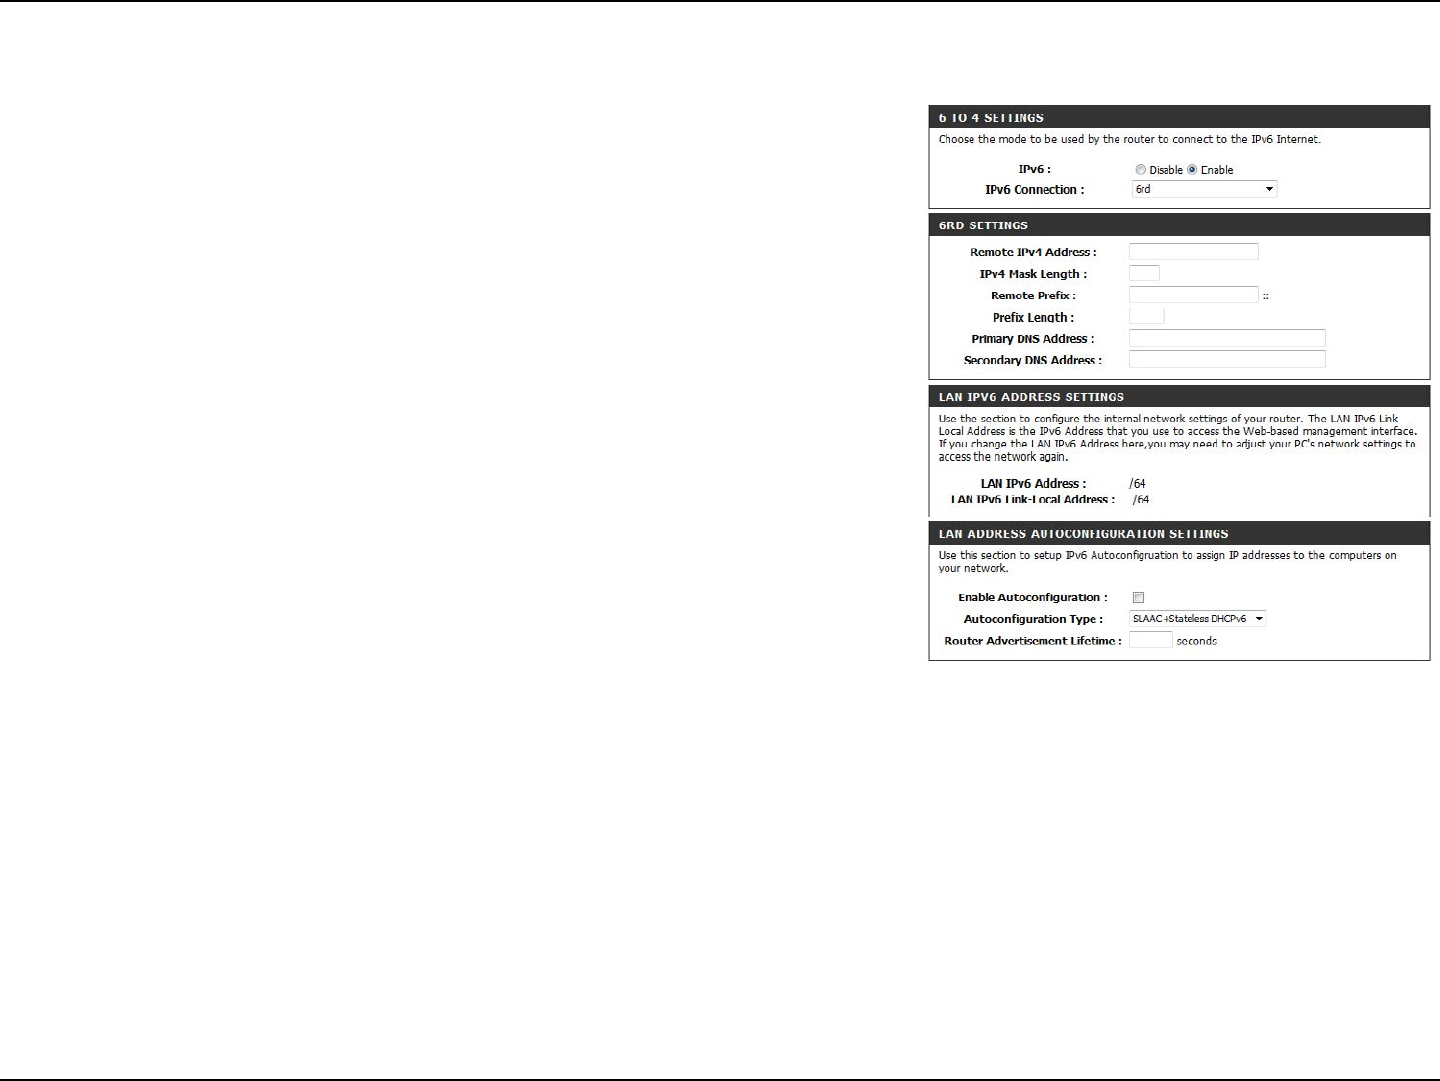
6rd
Tick to Enable IPv6 tunneling.
Select 6rd from the drop-down menu.
Enter the IPv4 (remote) address here.
Enter the mask length of the IPv4 address.
Enter the remote prex of the IPv4 address.
Enter the length of the remote prex.
Enter the DNS server addresses.
Displays the LAN (local) IPv6 address for the router.
Displays the router’s LAN link-local address.
Check to enable the autoconguration feature.
Select Stateful (DHCPv6) or SLAAC+Stateless
DHCPv6 autoconguration.
Enter the IPv6 address lifetime (in seconds).
IPv6:
IPv6 Connection:
Remote IPv4 Address:
IPv4 Mask Length:
Remote Prex:
Prex Length:
Primary/Secondary DNS
Addresses:
LAN IPv6 Address:
LAN Link-Local Address:
Enable
Autoconguration:
Autoconguration Type:
Router Advertisement
Lifetime:
39D-Link DWR-755 User Manual
Section 3 - Conguration
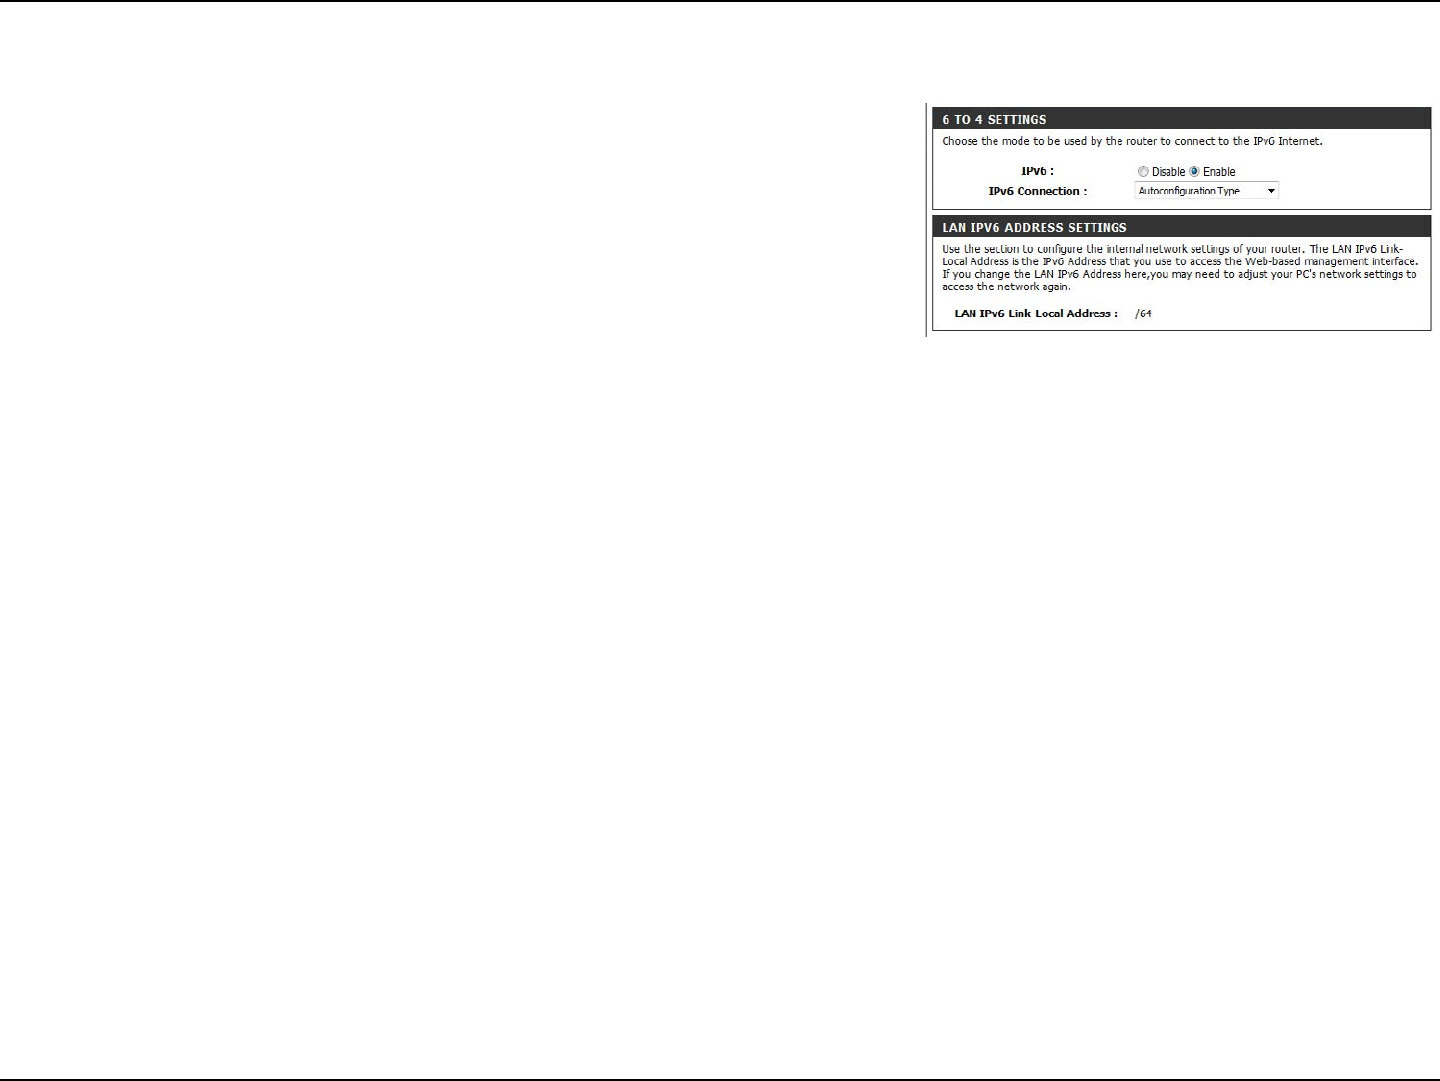
Autoconguration
Tick to Enable IPv6 tunneling.
Select Autoconguration Type from the drop-down menu.
Displays the router’s LAN link-local address.
IPv6:
IPv6 Connection:
LAN Link-Local Address:
40D-Link DWR-755 User Manual
Section 3 - Conguration
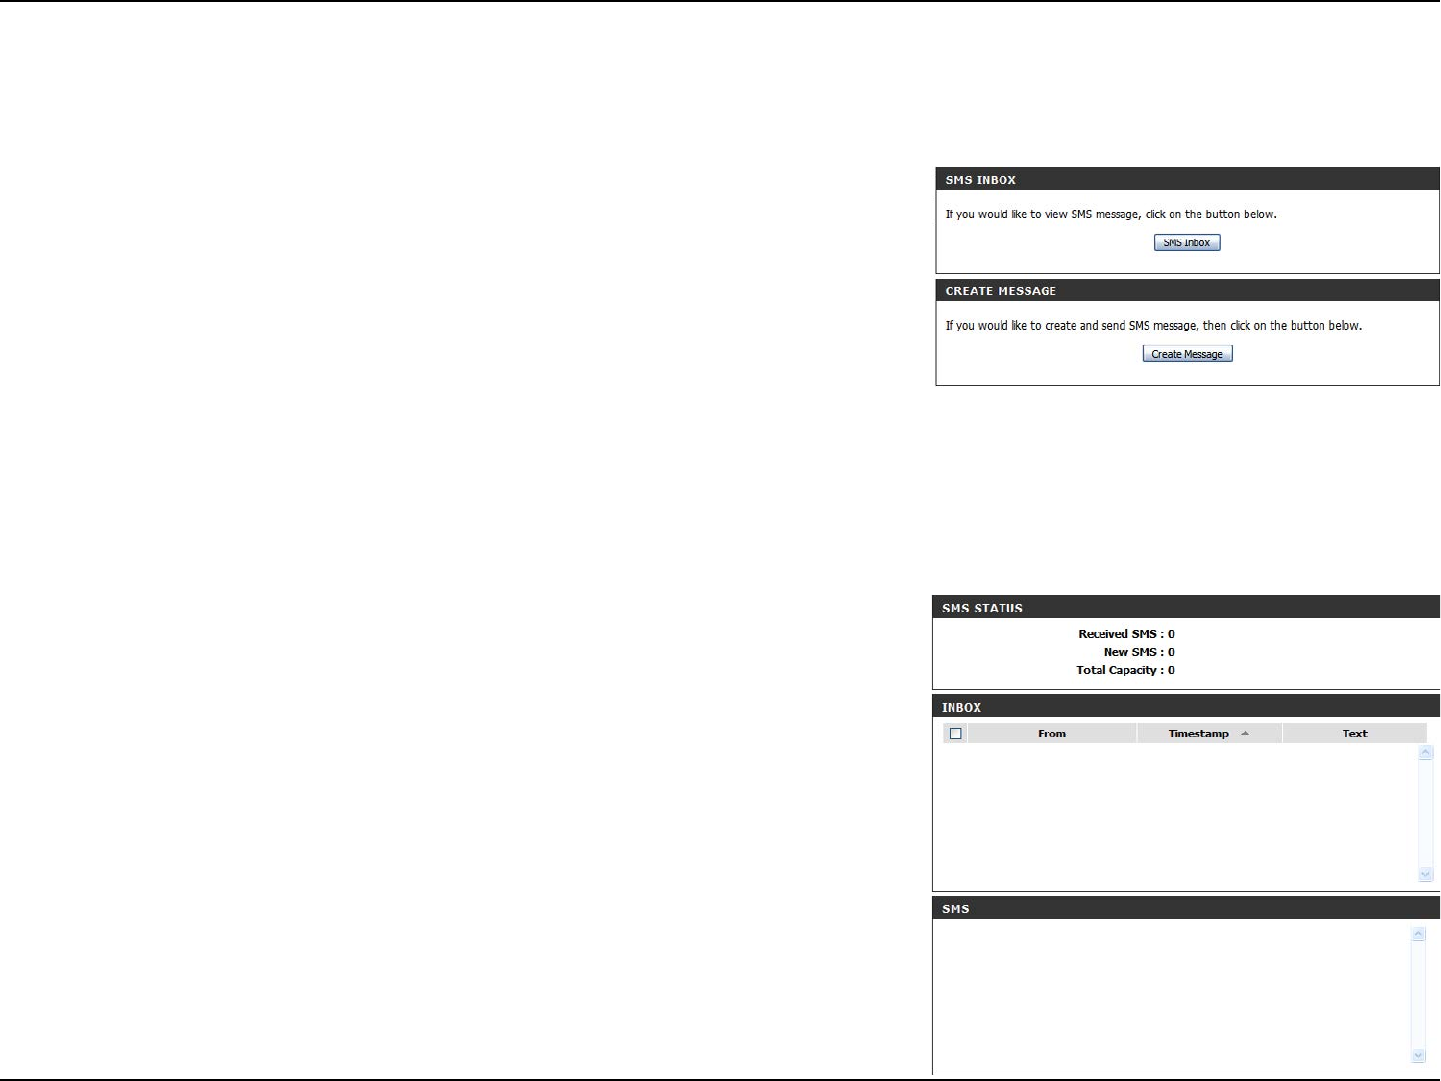
Message Service
If your ISP provides SMS service, you can check and send messages from this page.
Click this button to view SMS messages that you have
received.
Click this button to create a new message to send.
SMS Inbox:
Create Message:
Deletes the selected SMS message.
Opens a Create Message window to reply to the selected SMS
message.
Opens a Create Message windows to forward the selected SMS
message to another recipient.
Click this button to check for new messages.
Delete:
Reply:
Forward:
Refresh:
SMS Inbox
This page shows all messages that are stored on the SIM card. Select a message to display its contents in the SMS window. After you have read a
message, you can delete it, or reply to the sender. Click the Refresh button to update the list.
41D-Link DWR-755 User Manual
Section 3 - Conguration
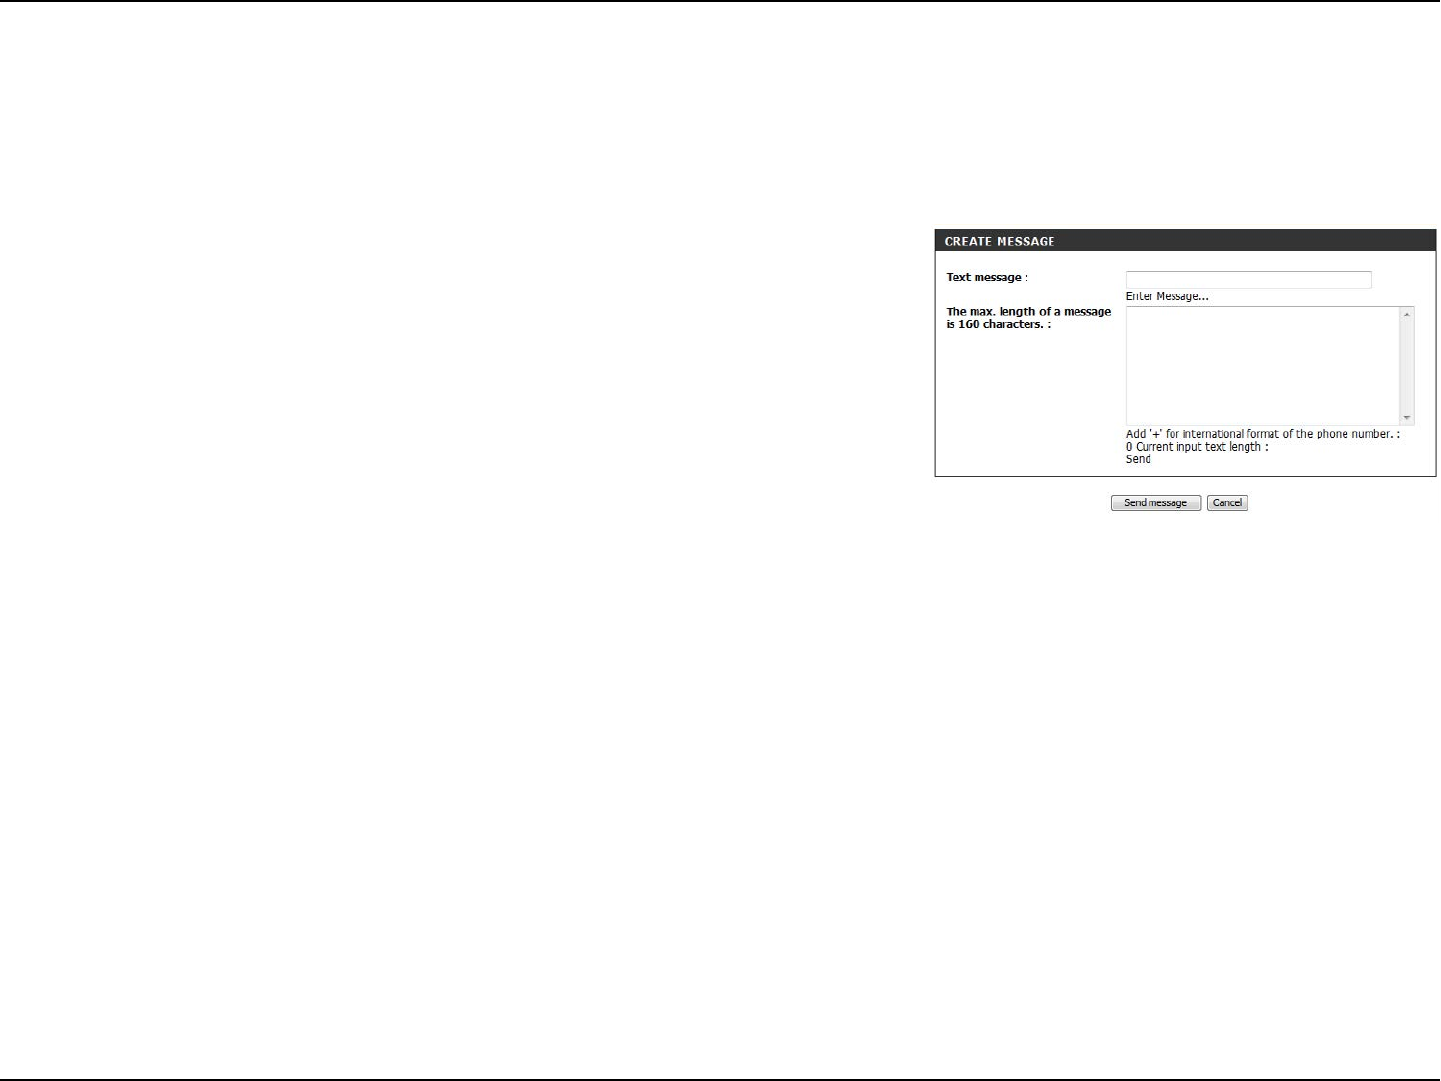
Create Message
Type the phone number of the recipient.
Type the message that you would like to send.
Click this button to send the message.
Click this button to clear the message.
Receiver:
Text Message:
Send Message:
Cancel:
This page allows you to send an SMS to your contacts. Just ll in the phone number of the recipient, and type the content of the message. Then
click the Send Message button to send out the message. If you would like to add more than one recipient, you must put a semicolon (;) between
each of the phone numbers.
42D-Link DWR-755 User Manual
Section 3 - Conguration
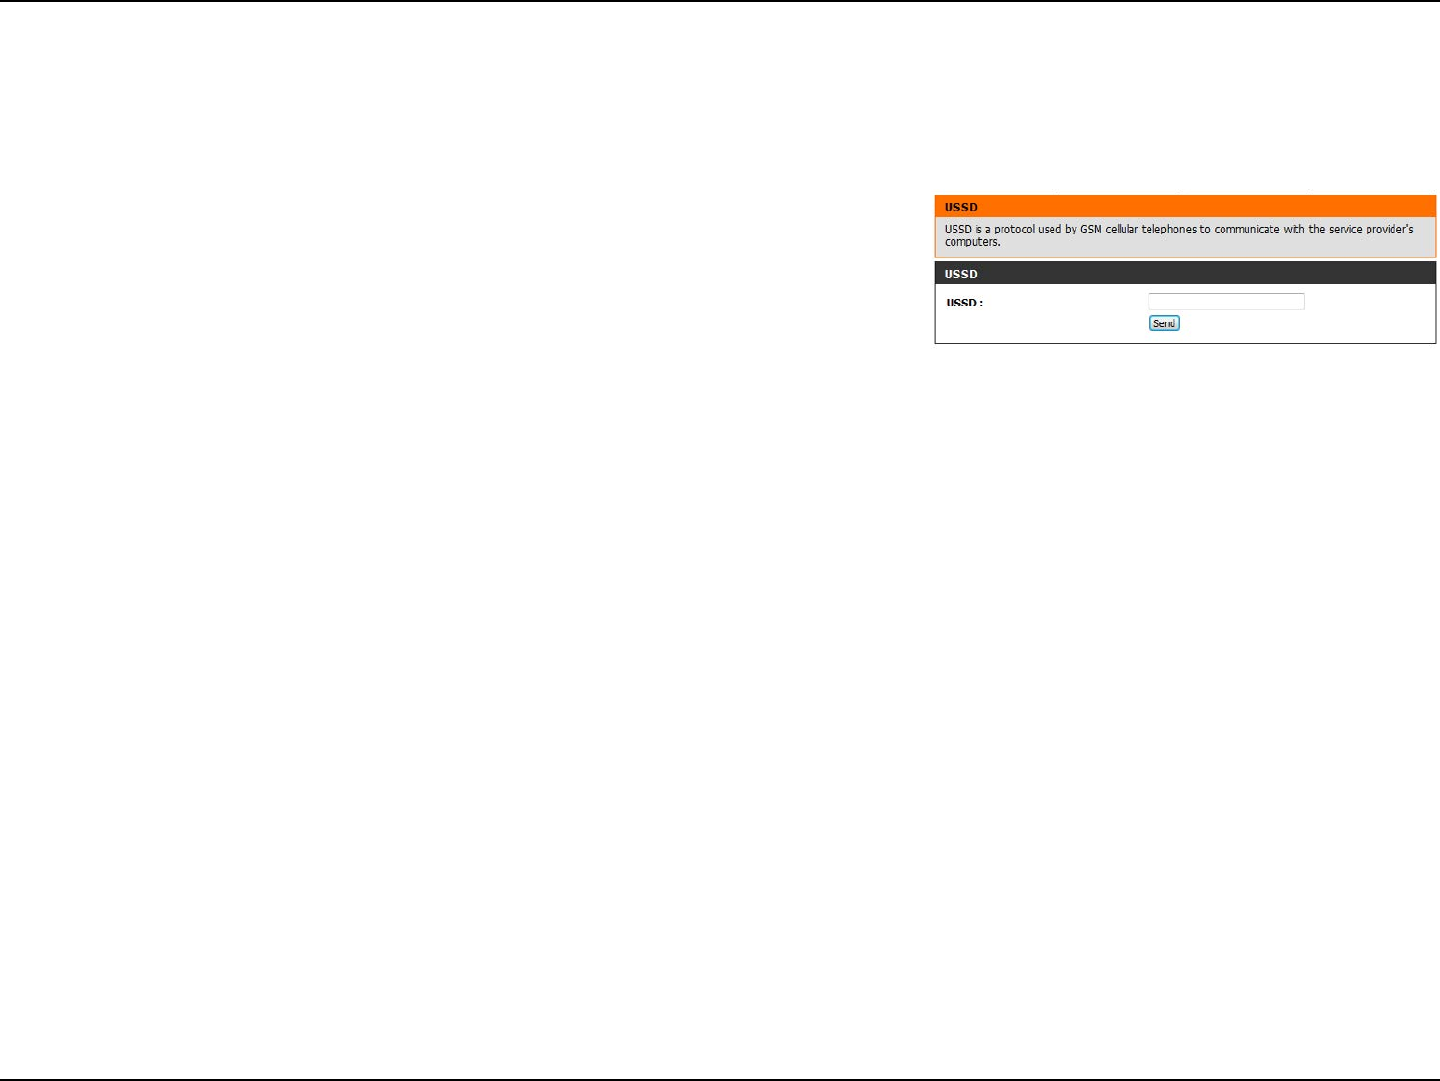
USSD
You can use this page to send Unstructured Supplementary Service Data (USSD) codes used by your service provider to activate specic applications
with an SMS message.
Enter an application activation code and click the Send
button. This will allow you to activate applications by sending
an SMS to your ISP.
USSD:
43D-Link DWR-755 User Manual
Section 3 - Conguration
VPN Settings
VPN Setup Wizard
The DWR-755 allows you to set up VPN using the automated VPN Setup Wizard or using Manual VPN Setup. VPN settings are used to create
virtual private tunnels to remote VPN gateways. The tunnel technology supports data condentiality, data origin authentication, and data integrity
of network information by utilizing encapsulation protocols, encryption algorithms, and hashing algorithms.
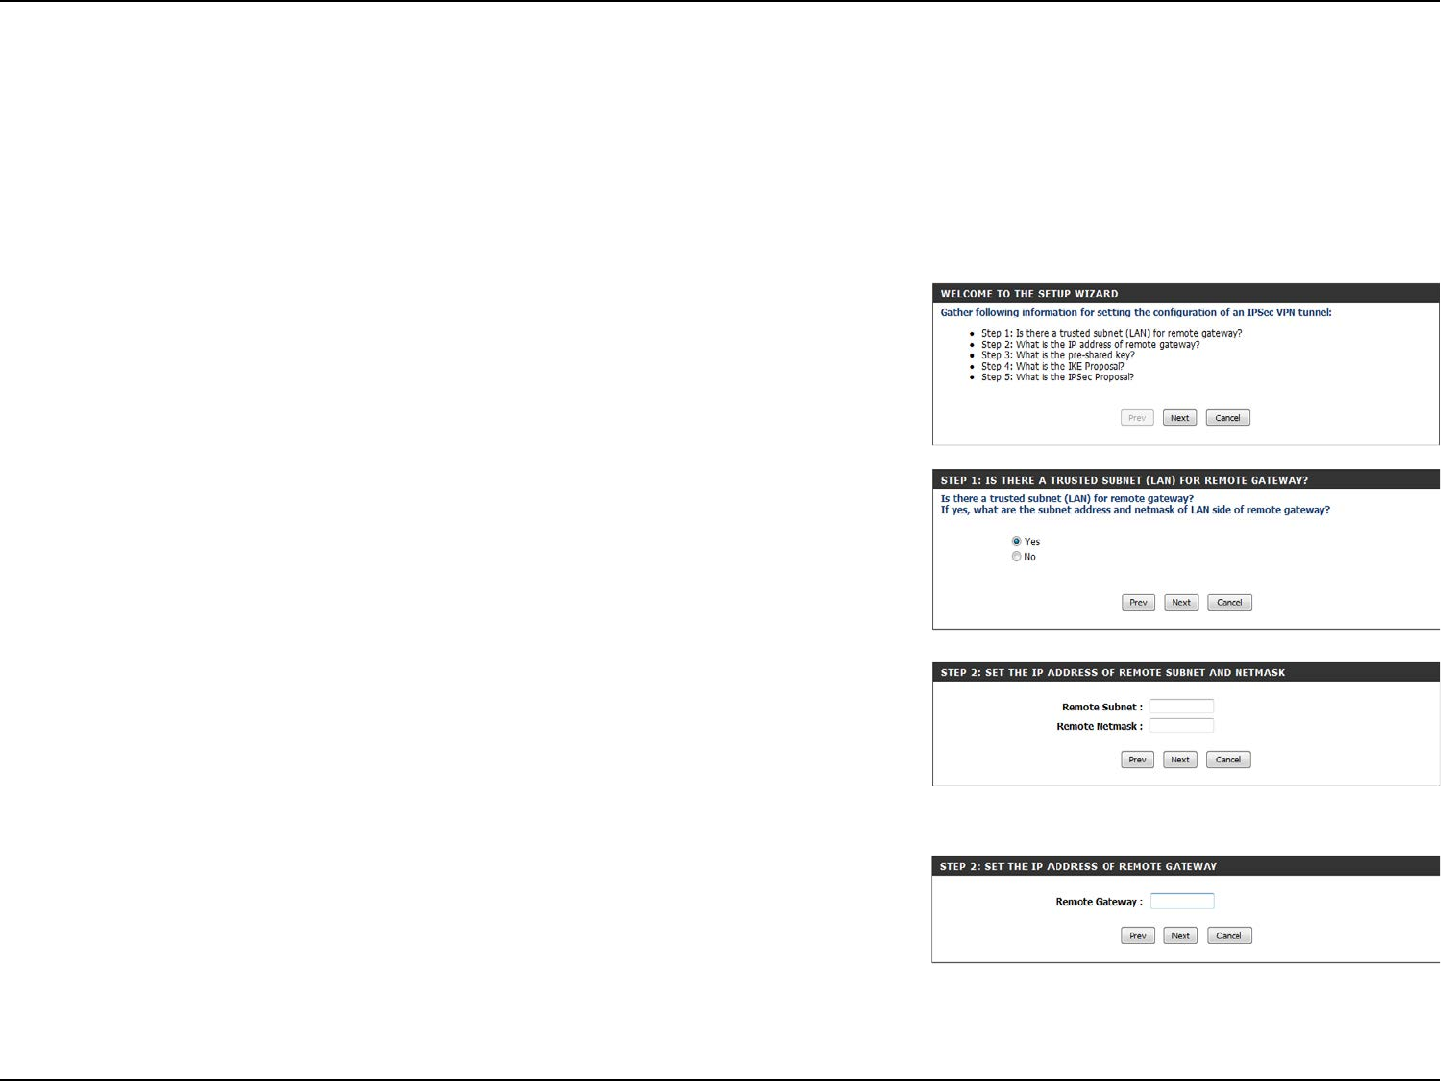
This window explains the steps you will be guided through to set up an IPSec VPN tunnel.
Click Next to continue.
If there is a trusted subnet for remote gateway, select Ye s, otherwise choose No.
Click Next to continue.
If you chose “yes” you will now need to enter the Remote Subnet and Remote Netmask.
Click Next to continue.
Enter the Remote Gateway address.
Click Next to continue.
44D-Link DWR-755 User Manual
Section 3 - Conguration
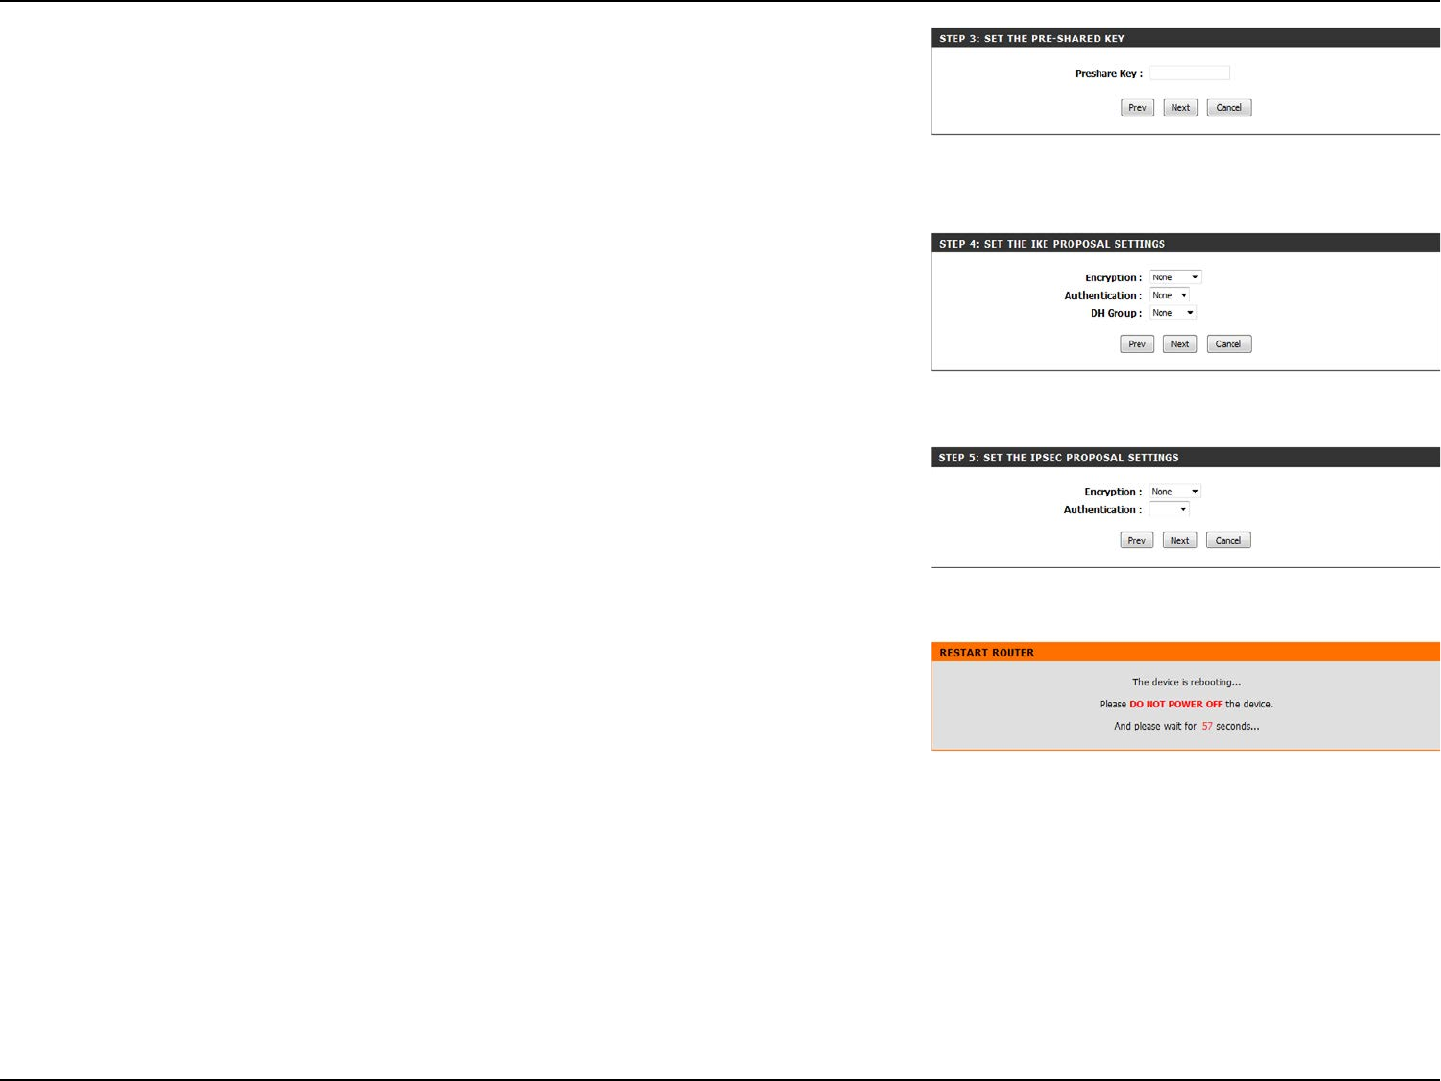
Set the type of encryption and authentication of your IPsec proposal settings and click Next.
Set your Preshared Key.
Click Next to continue.
Set your IKE Proposal Settings by choosing your Encryption, Authentication, and DH Group
settings from the drop-down menus.
Click Next to continue.
When setup is completed the name and security details will be displayed and the router will
reboot.
Click Save to nish.
45D-Link DWR-755 User Manual
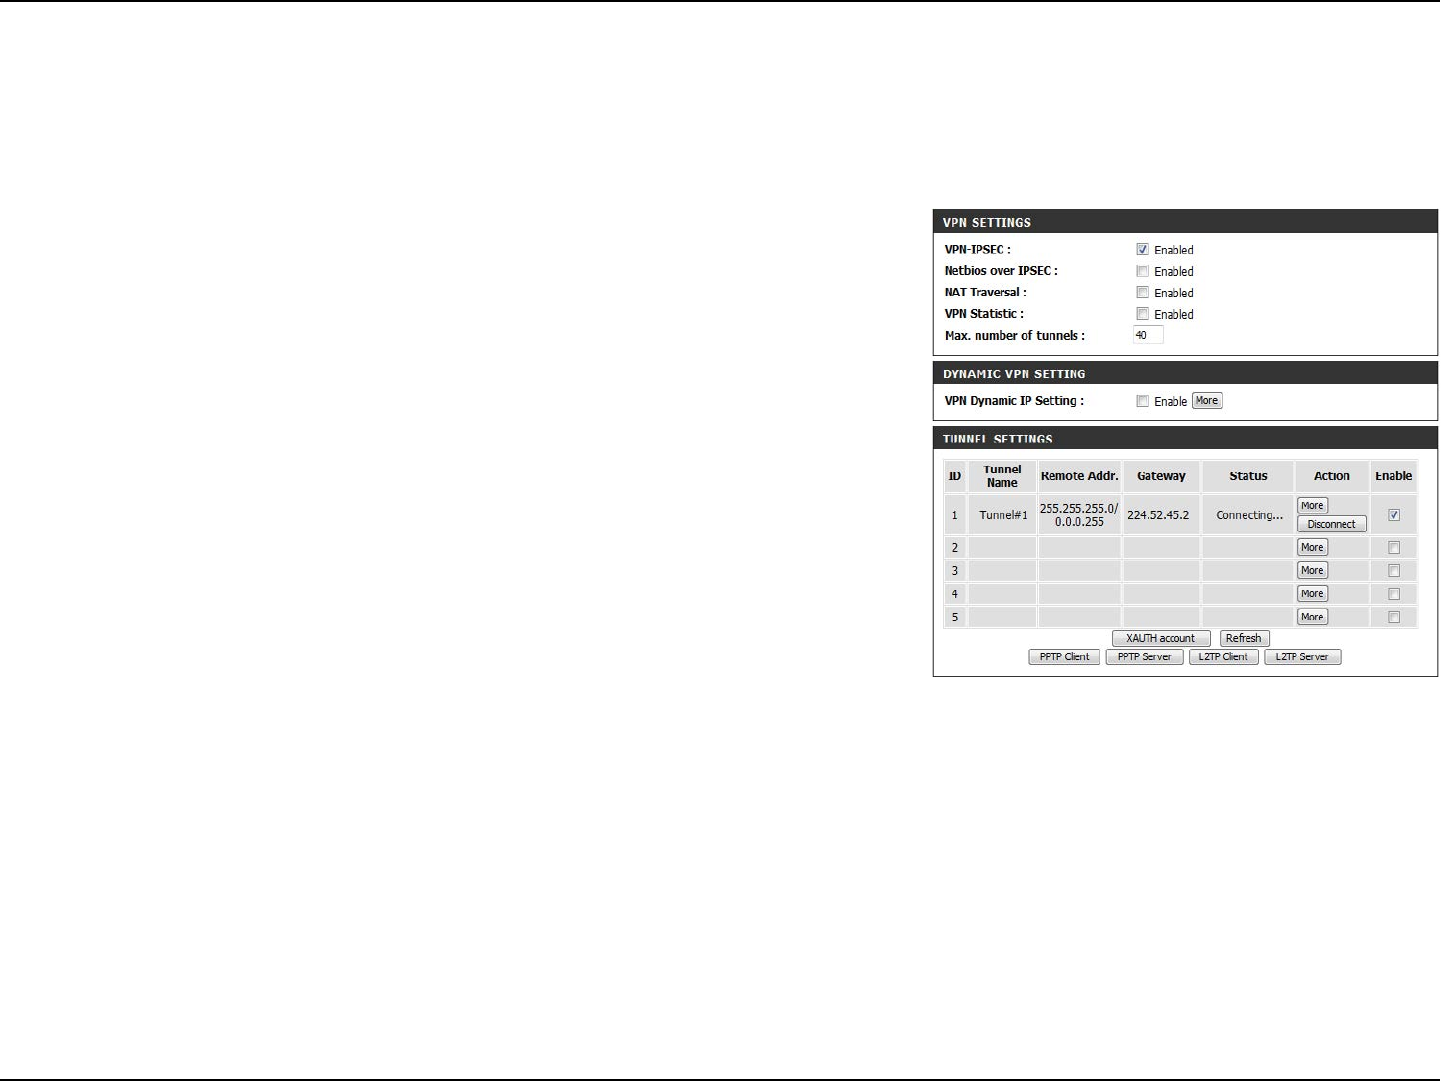
Section 3 - Conguration
Check this box to enable IPSec VPN function.
Check this box to receive Netbios from Network Neighborhood.
Some NAT routers will block IPSec packets if it doesn’t support
IPSec passthrough. If you connect to another NAT router which
doesn’t support IPSec passthrough on the WAN side, you need
to activate this option.
Check this box to enable VPN Statistic options.
The device supports 1~10 tunnels.
Check this box to enable this features and click More to congure
VPN Dynamic IP on a separate page. Please see the next page
for more details.
Tunnel details are displayed here. Click More to congure a new
tunnel or click Disconnect to disconnect from an existing tunnel.
Select the Enable checkbox to activate this rule.
In tunnel settings page, you can click More under Action for
detail tunnel setting.
XAUTH account: select it to store XAUTH account information
such as user name and password.
PPTP client / PPTP Server: DWR-755 can act as either
client or server under PPTP, click it to congure this setting.
L2TP client / L2TP Server: DWR-755 can act as either
client or server under L2TP, click it to congure this setting.
VPN-IPSEC:
Netbios over IPSEC:
NAT Traversal:
VPN Statistic:
Max Number of Tunnels:
VPN Dynamic IP Setting:
Tunnel Settings:
Manual VPN Setup
This section will help you create and congure your VPN settings. The router supports IPSec as the Server Endpoint. IPSec (Internet Protocol Security)
is a set of protocols dened by the IETF (Internet Engineering Task Force) to provide IP security at the network layer.
46D-Link DWR-755 User Manual
Section 3 - Conguration
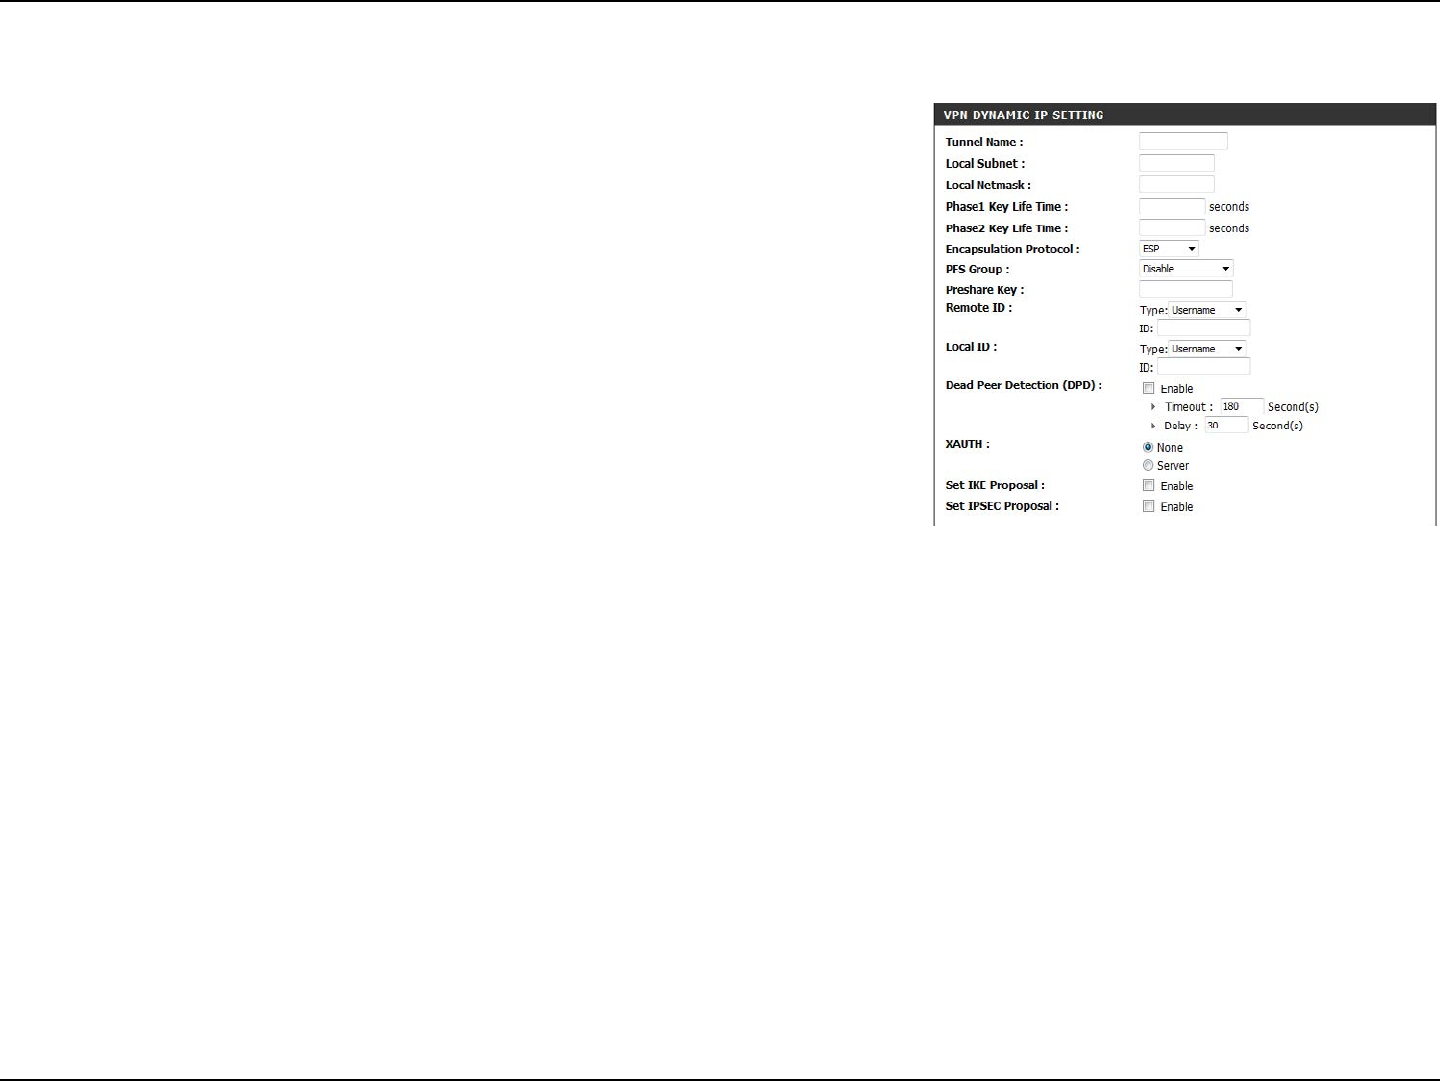
VPN Dynamic IP
Enter a name for your VPN.
Enter the local (LAN) subnet and mask.
(ex. 192.168.0.0/24)
Enter the amount of time in seconds that the Phase 1 and Phase
2 keys should last.
Choose either ESP, AH or ESP + AH from the drop-down menu.
Enable or Disable the PFS Group option using the drop-down
menu. PFS is an additional security protocol.
Manually enter an ASCII passphrase in box.
Choose from Username, FQDN, User@FQDN, or Key ID using
the drop-down menu and then the ID in the box.
Choose from Username, FQDN, User@FQDN, or Key ID using
the drop-down menu and then the ID in the box.
Check this box to enable Dead Peer Detection, then enter the
time in seconds in which a peer is determined to be no longer
active. You may also enter a delay period in seconds.
Check this box to include additional username and password
authentication requirements for the VPN. Select Server Mode or
None. Then enter the user name and password if required by the
remote VPN server endpoint congured in xAuth Server Mode.
Check this box to enable IKE Proposal.
Check this box to enable IPSec Proposal.
Tunnel Name:
Local Subnet/Netmask:
Phase1/2 Key Life Time:
Encapsulation Protocol:
PFS Group:
Preshare Key:
Remote ID:
Local ID:
Dead Peer Detection
(DPD):
XAUTH:
Set IKE Proposal:
Set IPSEC Proposal:

47D-Link DWR-755 User Manual
Section 3 - Conguration
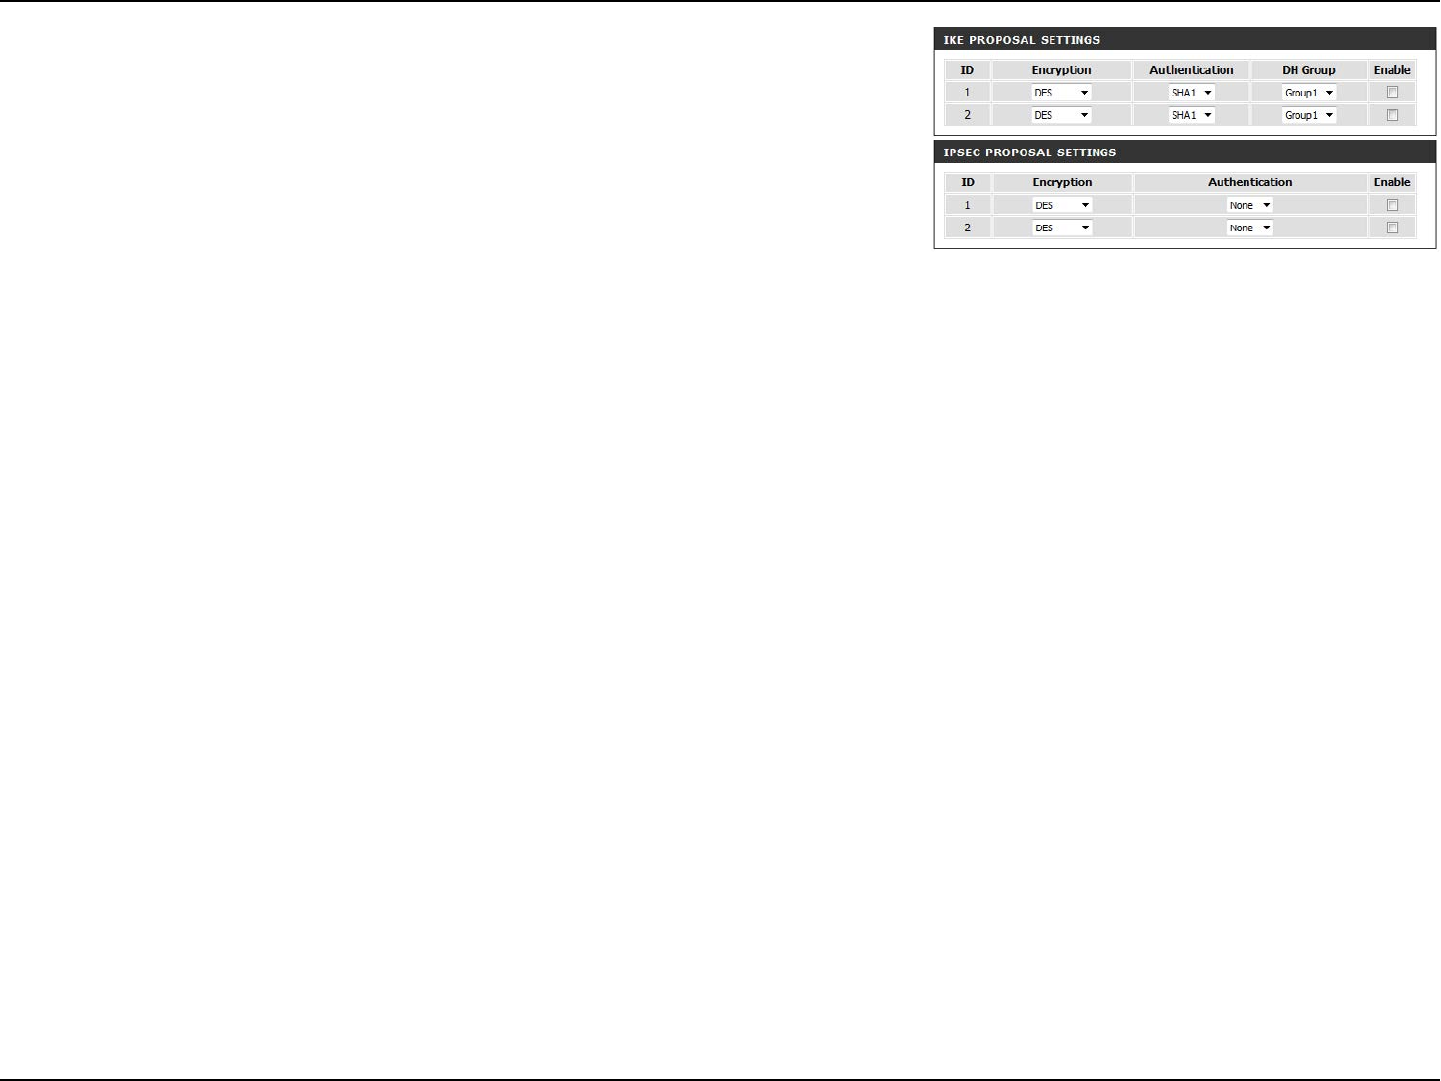
Use this area to Enable IKE Proposals. Then determine the
Encryption and Authentication types, as well as the DH Group
from the drop-down menus.
Use this area to Enable IPSec Proposals. Then determine the
Encryption and Authentication types from the drop-down
menus.
IKE Proposal Settings:
IPSEC Proposal Settings:
48D-Link DWR-755 User Manual
Section 3 - Conguration
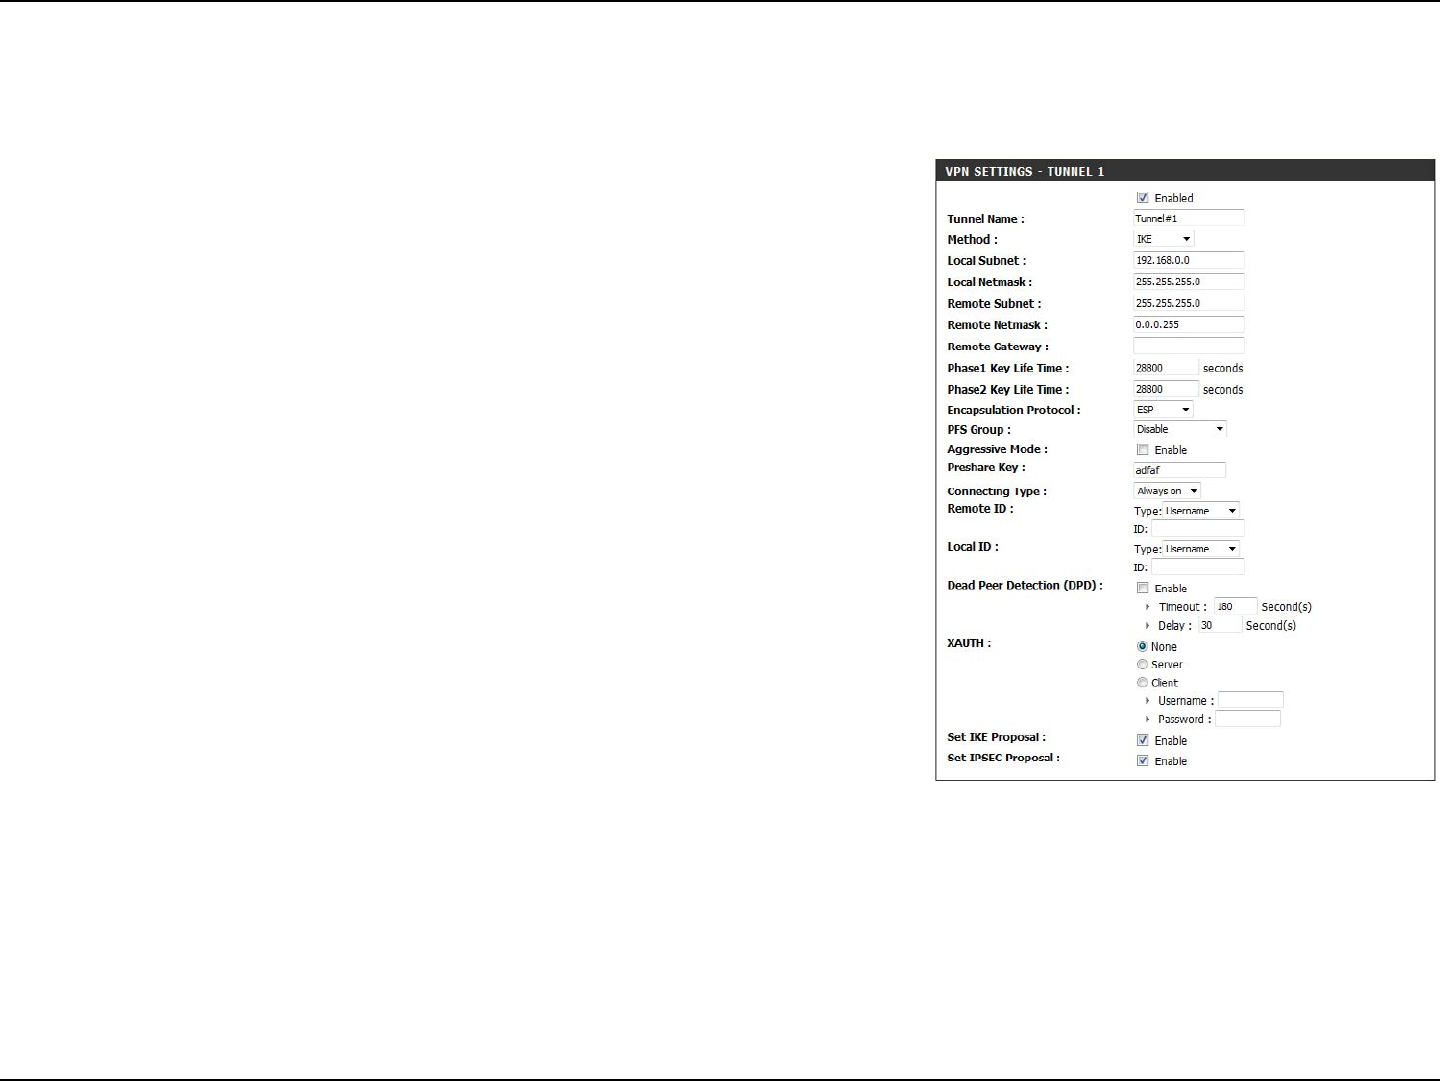
Indicate a tunnel name for this VPN conguration.
Choose either IKE from the drop-down menu.
The subnet of the VPN gateway’s local network. It can be a host,
a partial subnet or a whole subnet.
Local netmask combined with local subnet to form a subnet
domain.
The subnet of the remote VPN gateway’s local network. It can be
a host, a partial subnet, or a whole subnet.
The netmask of the remote VPN gateway’s local network.
The WAN IP address of remote VPN gateway.
The phase 1 key life time of the dedicated VPN tunnel between
both end gateways (in seconds). Its value can range from 300
seconds to 172,800 seconds.
The phase 2 key life time of the dedicated VPN tunnel between
both end gateways (in seconds). Its value can range from 300
seconds to 172,800 seconds.
ESP, AH, or ESP+AH.
Three groups can be selected: None, Group 1, Group 2, Group 5.
None: No PFS group
Group 1: 768-bit Die-Hellman prime modulus
Group 2: 1024-bit Die-Hellman prime modulus
Group 5: 1536-bit Die-Hellman prime modulus
Tunnel Name:
Method:
Local Subnet:
Local Netmask:
Remote Subnet:
Remote Netmask:
Remote Gateway:
Phase 1 Key Life Time:
Phase 2 Key Life Time:
Encapsulation Protocol:
PFS Group:
Tunnel - IKE
Tick Enabled, choose IKE in the Method eld, and congure your settings. When you are done, click Save Settings to apply changes.
49D-Link DWR-755 User Manual
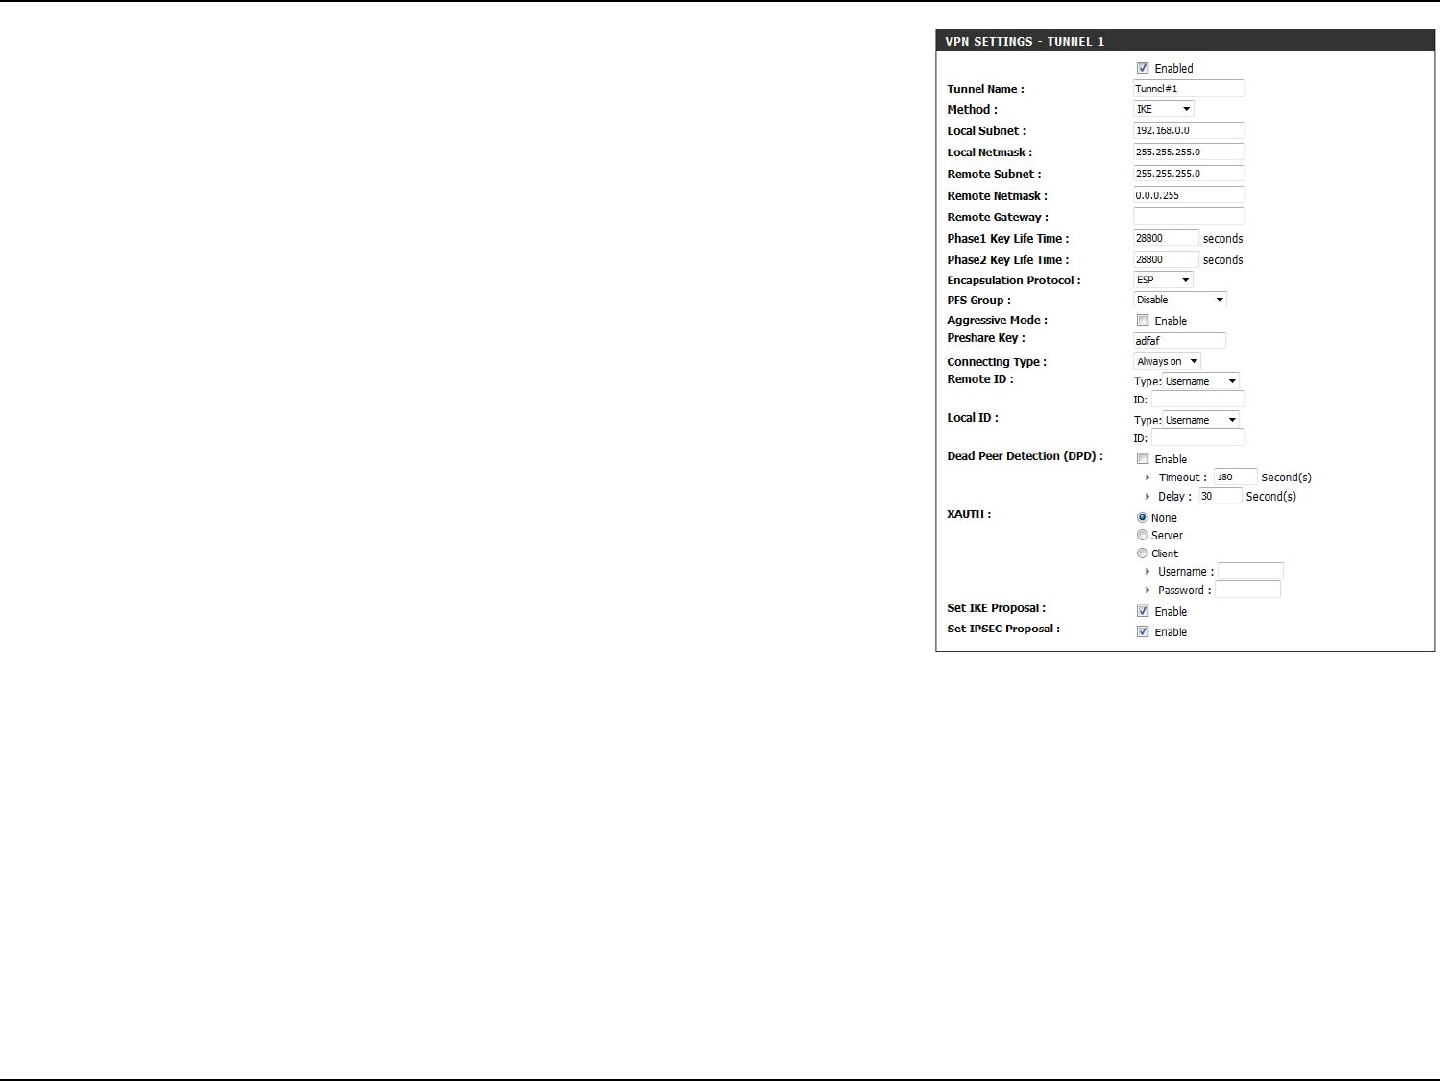
Section 3 - Conguration
Enabling this mode will accelerate the initial tunnel setup, but
the device will suer from less security in the meantime. Hosts at
both ends of the tunnel must support this mode so as to establish
the tunnel properly.
The rst key that supports IKE mechanism of both VPN gateway
and VPN client host for negotiating further security keys. The
pre-shared key must be same on both VPN gateways and clients.
Choose Always on or Manual from the drop-down menu.
The Type and the Value must be the same as the Type and the
Value of the Local ID of the remote VPN gateway.
The Type and the Value must be the same as the Type and the
Value of the Remote ID of the remote VPN gateway.
Input the IP address of remote host that exist in the remote side
of the VPN tunnel (Ex. You can input the LAN IP address of remote
VPN gateway). The device will start to Ping the remote host when
there is no trac within the VPN tunnel. If the device is no longer
receiving an ICMP response from remote host, it will terminate
the VPN tunnel automatically.
Check this box to enable Dead Peer Detection, then enter the
time in seconds in which a peer is determined to be no longer
active. You may also enter a delay period in seconds.
Check this box to include additional username and password
authentication requirements for the VPN. Select Server Mode or
None. Then enter the user name and password if required by the
remote VPN server endpoint congured in xAuth Server Mode.
Check this box to enable IKE Proposal.
Check this box to enable IPSec Proposal.
Aggressive Mode:
Preshared Key:
Connecting Type:
Remote ID:
Local ID:
Dead Peer Detection
(DPD):
XAUTH:
Set IKE Proposal:
Set IPSEC Proposal:
50D-Link DWR-755 User Manual
Section 3 - Conguration
Five algorithms can be selected: DES, 3DES, AES-128, AES-192,
and AES-256.
Two algorithms can be selected: SHA1 and MD5.
Three groups can be selected: group 1 (MODP768), group 2
(MODP1024), and group 5 (MODP1536).
Select this checkbox to enable the IKE Proposal with this rule.
Five algorithms can be selected: DES, 3DES, AES-128, AES-192,
and AES-256. However, when the encapsulation protocol is set
to AH, the encryption algorithm is unnecessary.
Two algorithms can be selected: SHA1 and MD5.
Select this checkbox to enable the IKE Proposal with this rule.
Encryption:
Authentication:
DH Group:
Enable:
Encryption:
Authentication:
Enable:
51D-Link DWR-755 User Manual
Section 3 - Conguration
Indicate a tunnel name for this VPN conguration.
Choose Manual from the drop-down menu.
The subnet of the VPN gateway’s local network. It can be a host,
a partial subnet or a whole subnet.
Local netmask combined with local subnet to form a subnet
domain.
The subnet of the remote VPN gateway’s local network. It can be
a host, a partial subnet, or a whole subnet.
The netmask of the remote VPN gateway’s local network.
The WAN IP address of remote VPN gateway.
Select ESP or AH.
SPI is an important parameter during hashing. Outbound SPI
will be included in the outbound packet transmitted from
local gateway. The value of outbound SPI should be set in hex
formatted.
Inbound SPI will be included in the inbound packet transmitted
from WAN site of remote gateway. It will be used to de-hash the
coming packet and check its integrity. The value of outbound
SPI should be set in hex formatted.
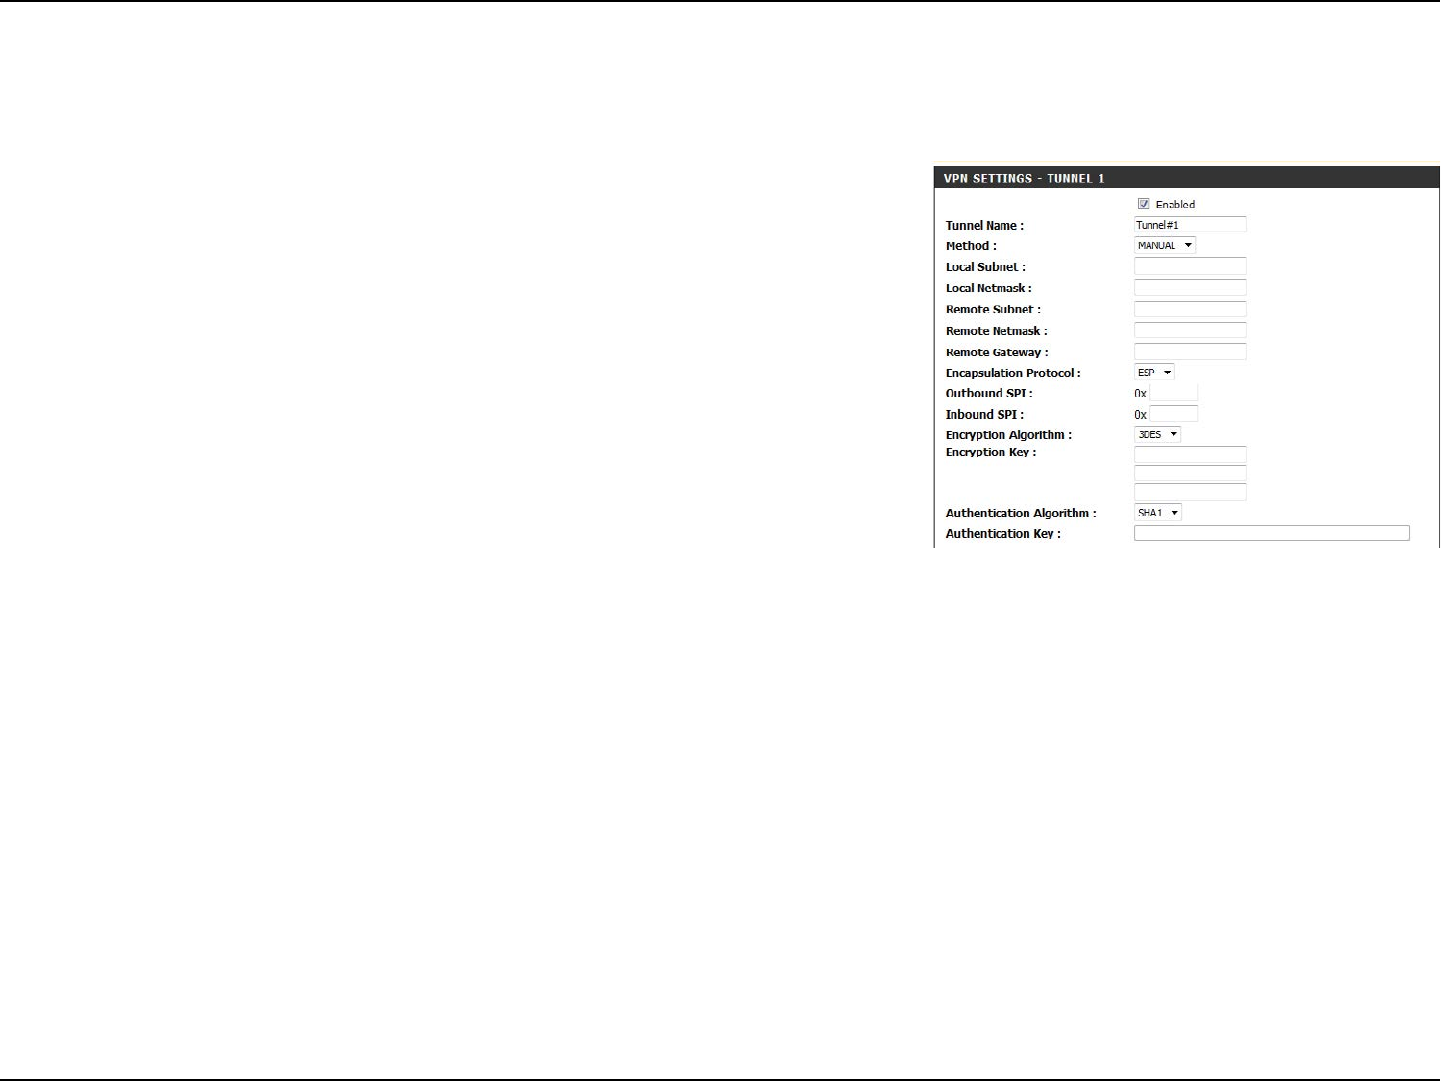
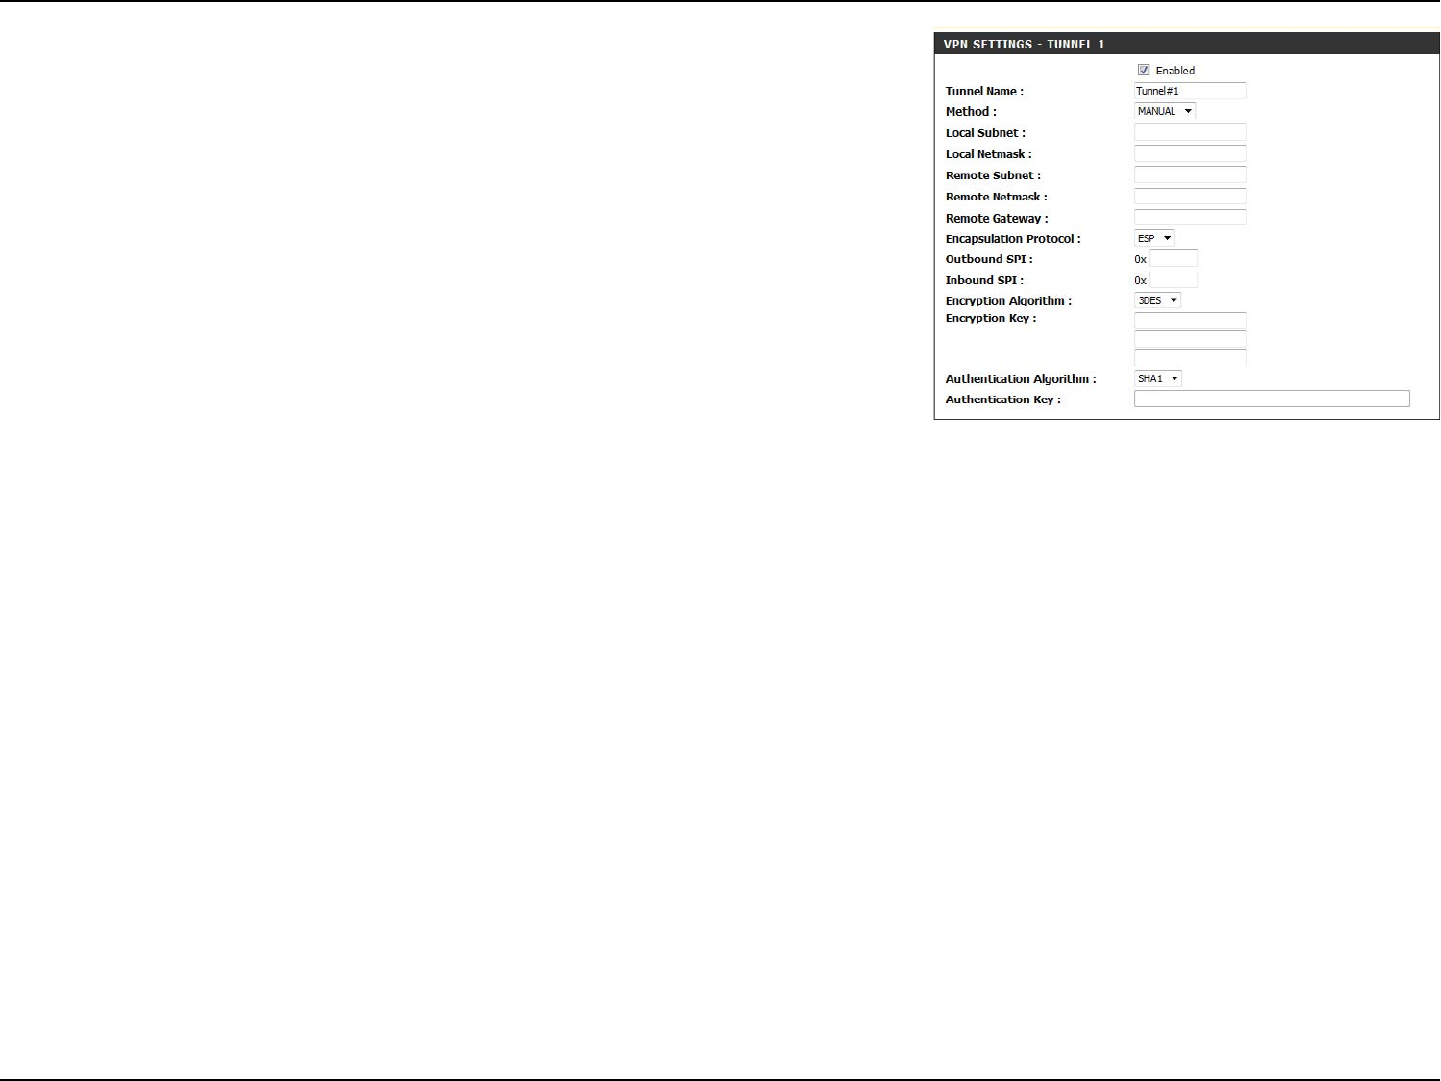
Tick Enabled, choose MANUAL in the Method eld, and congure your settings. When you are done, click Save Settings to apply changes.
Tunnel - Manual
Tunnel Name:
Method:
Local Subnet:
Local Netmask:
Remote Subnet:
Remote Netmask:
Remote Gateway:
Encapsulation Protocol:
Outbound SPI:
Inbound SPI:
52D-Link DWR-755 User Manual
Section 3 - Conguration
Two algorithms can be selected: 3DES and DES. When the
encapsulation protocol is set to AH, the encryption algorithm
is unnecessary.
The encryption key is used by the encryption algorithm. Its length
is 8 bytes if encryption algorithm is DES or 24 bytes if 3DES. The
key value should be set in hex format.
Two algorithms can be selected: SHA1 and MD5.
This authentication key is used by the authentication algorithm.
Its length is 16 bytes if authentication algorithm is MD5 or 20
bytes if SHA1. Its length will be 0 if no authentication algorithm
is chosen. The key value should be set in hex format.
Encryption Algorithm:
Encryption Key:
Authentication
Algorithm:
Authentication Key:
53D-Link DWR-755 User Manual
Section 3 - Conguration
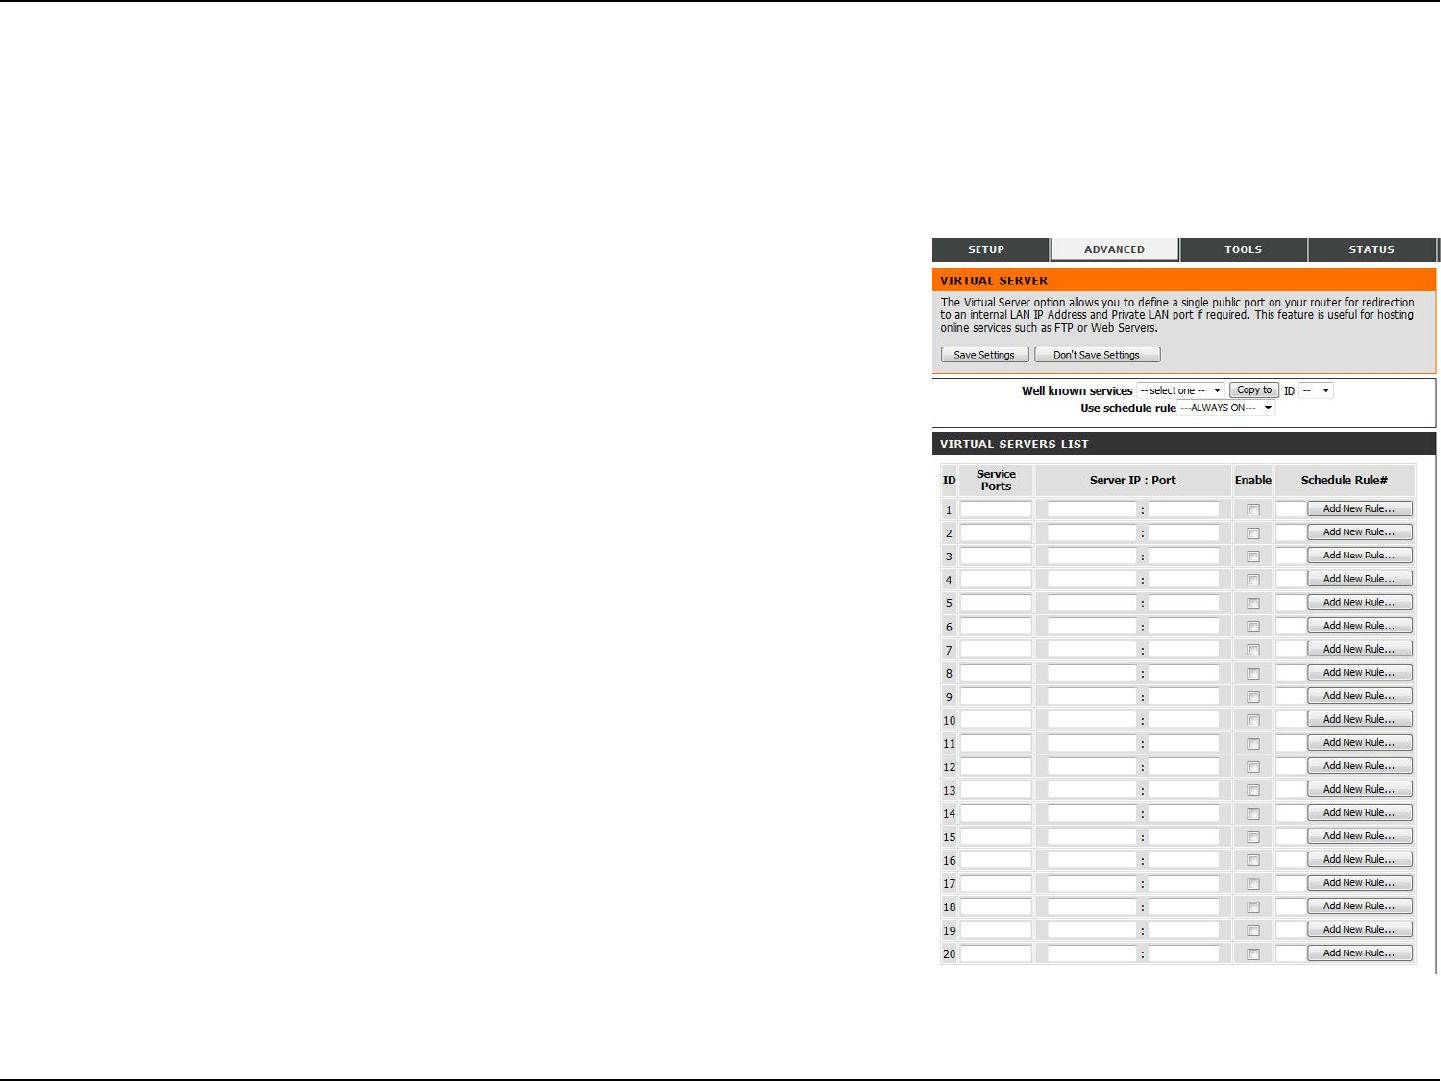
Virtual Server
The device can be congured as a virtual server so that users can access services such as Web or FTP via the public (WAN) IP address of the router.
Click Save Settings to save your changes, or click Don’t Save Settings to discard your changes.
This contains a list of pre-dened services.
Copies the rule to the line of the specied ID.
You may select Always On or choose the number of a schedule
rule that you have dened.
VIRTUAL SERVERS LIST
This identies the rule.
Enter the public port(s) you want to open.
Enter the IP address and port of the computer on your local
network that you want to forward the Service Ports to.
Check the box to enable the specied rule.
Specify the schedule rule number. To create schedules, click
on the Add New Rule button. For further information on
schedules, please refer to “Schedules” on page 75.
Well-known Services:
Copy to:
Use schedule rule:
ID:
Service Ports:
Server IP: Port:
Enable:
Schedule Rule #:
Advanced
54D-Link DWR-755 User Manual
Section 3 - Conguration
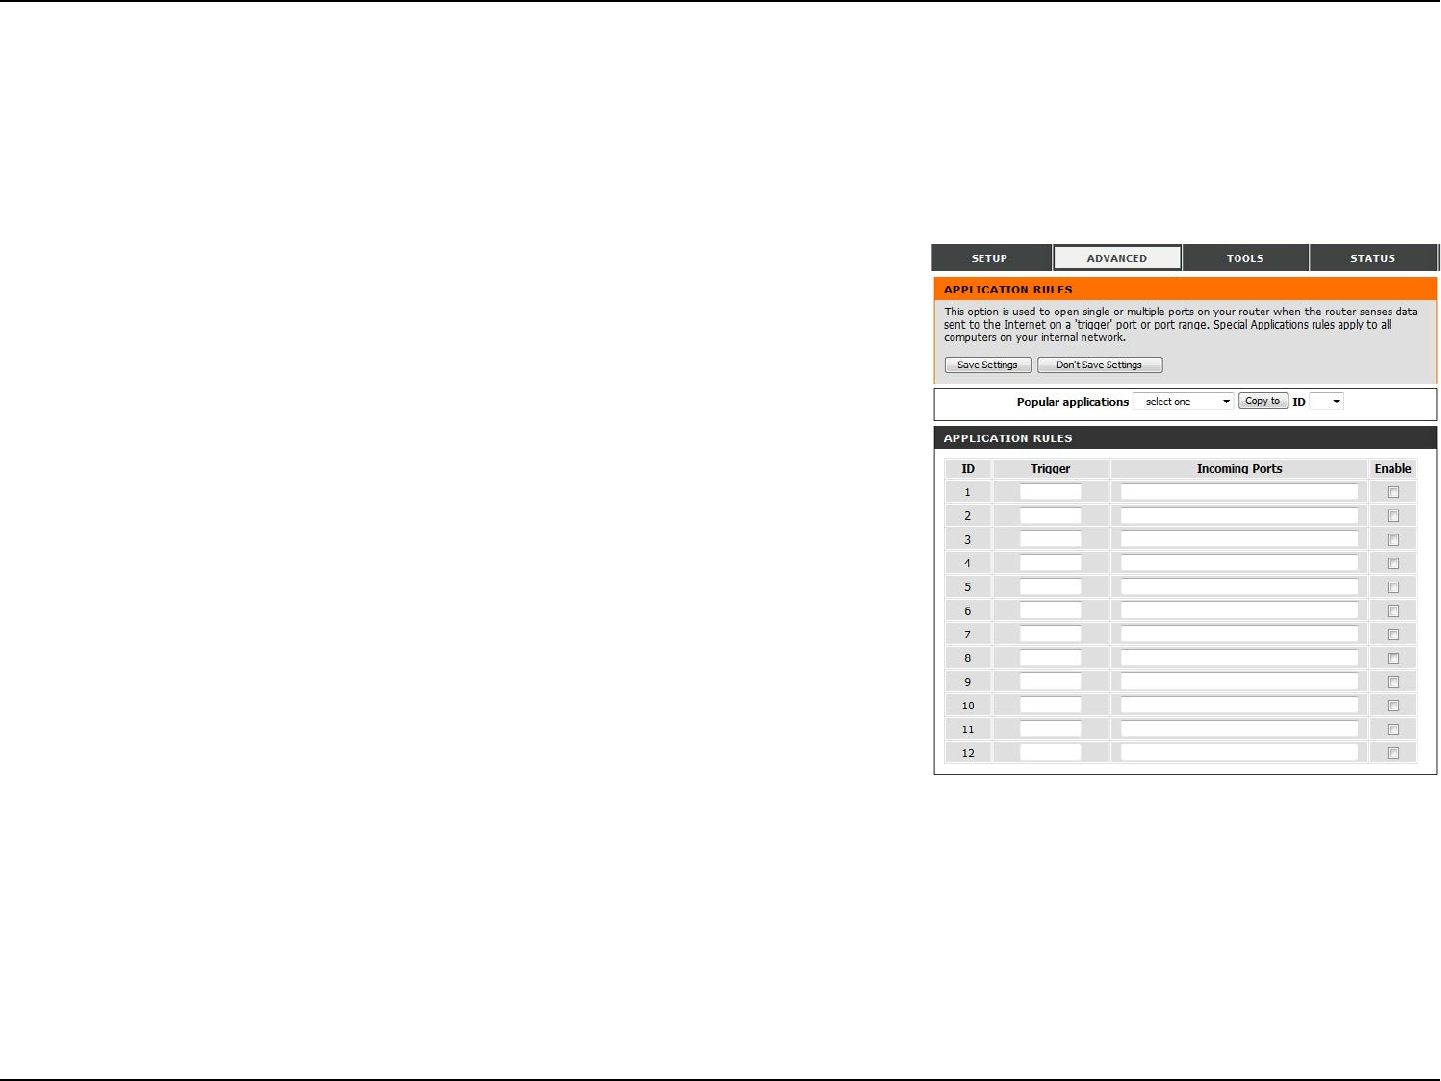
Application Rules
Some applications require multiple connections, such as Internet gaming, video conferencing, and Internet telephony. These applications may
have diculty working through NAT (Network Address Translation). Application Rules allow some of these applications to work with the DWR-755
by opening ports after detecting trac being sent through a trigger port. After modifying any settings, click Save Settings to save your changes.
Select from a list of popular applications. You can select a
service, select a rule ID, then click the Copy to button to copy
the default settings for that service to the specied rule ID.
Species which rule to copy the selected Popular application
settings to when you click the Copy to button.
APPLICATION RULES
This identies the rule.
Enter the port to listen to in order to trigger the rule.
Specify the incoming port(s) to open when trac comes over
the Trigger port.
Check the box to enable the specied rule.
Popular Applications:
ID:
ID:
Trigger:
Incoming Ports:
Enable:
55D-Link DWR-755 User Manual
Section 3 - Conguration
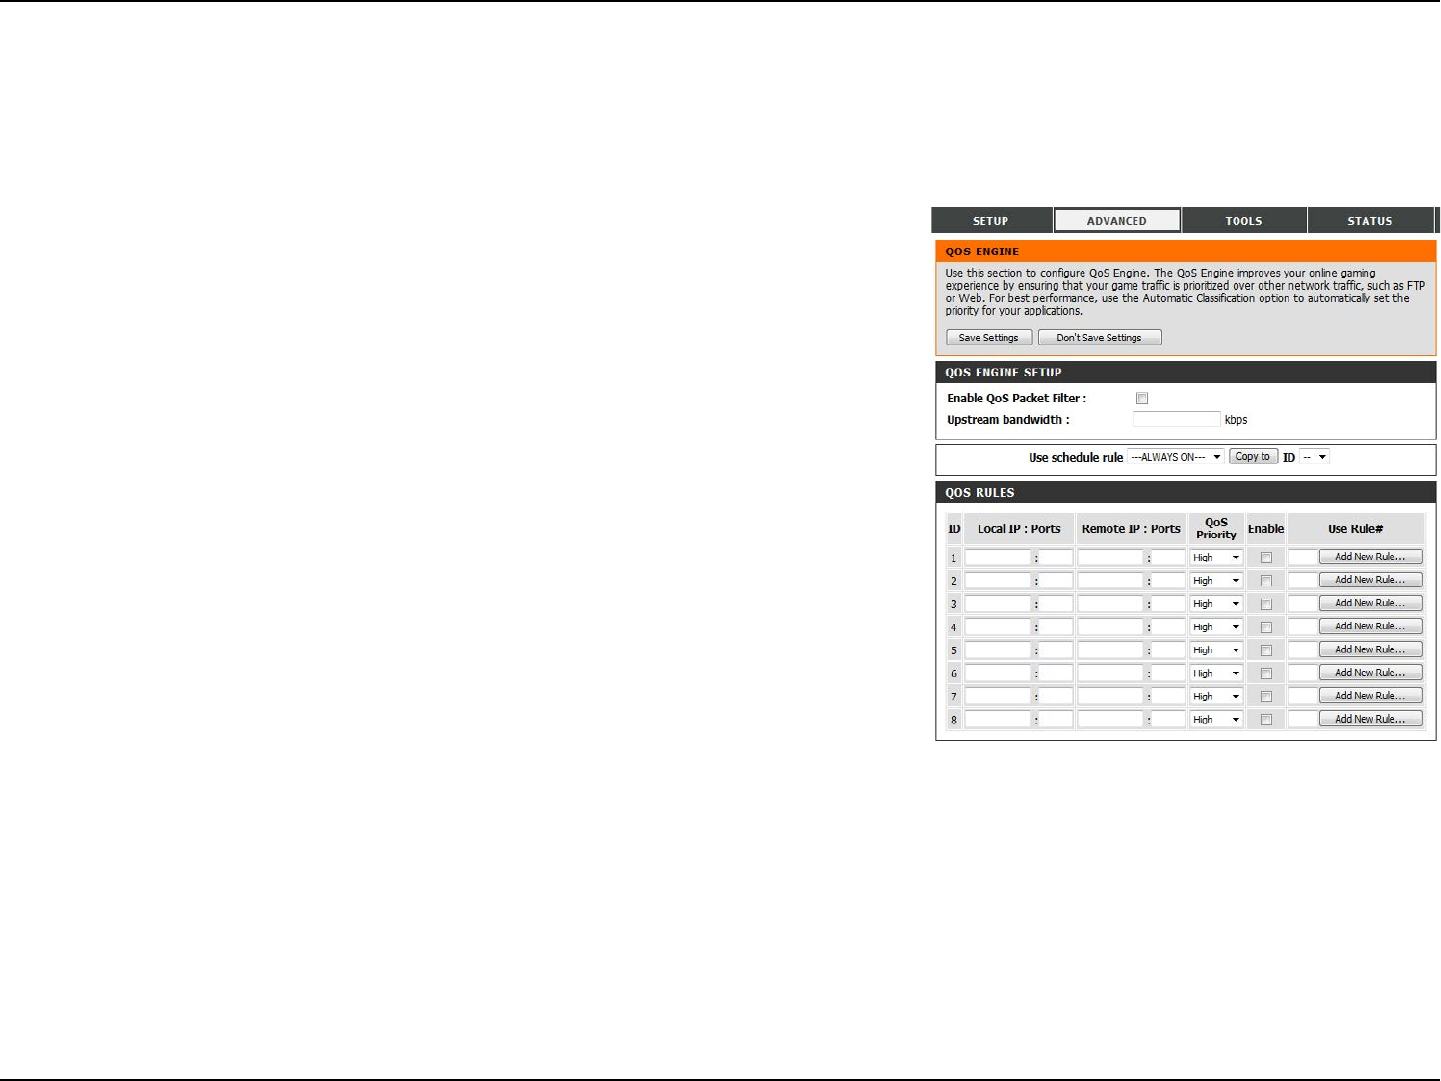
QoS Engine
QOS ENGINE SETUP
Select this box to enable the QoS feature.
Specify the maximum upstream bandwidth here (e.g. 400
Kbps).
Select a schedule to use and copy to the specied rule ID
when you click the Copy to button. You may select Always On
or use a specic schedule that you have dened. To create and
edit schedules, please refer to “Schedules” on page 75.
QOS RULES
This identies the rule.
Specify the local IP address(es) and port(s) for the rule to
aect.
Specify the remote IP address(es) and port(s) for the rule to
aect.
Select what priority level to use for trac aected by the rule:
Low, Normal, or High.
Check the box to enable the specied rule.
Specify the schedule rule number. To create a new schedule,
click on the Add New Rule button. For more information
about schedules, please refer to “Schedules” on page 75.
Enable QOS Packet
Filter:
Upstream Bandwidth:
Use Schedule Rule:
ID:
Local IP : Ports:
Remote IP : Ports:
QoS Priority:
Enable:
Use Rule #:
The QoS engine improves your online gaming or streaming media experience by ensuring that your game or media trac is prioritized over
other network trac, such as FTP or web. For best performance, use the Automatic Classication option to automatically set the priority for your
applications. After modifying any settings, click Save Settings to save your changes.
56D-Link DWR-755 User Manual
Section 3 - Conguration
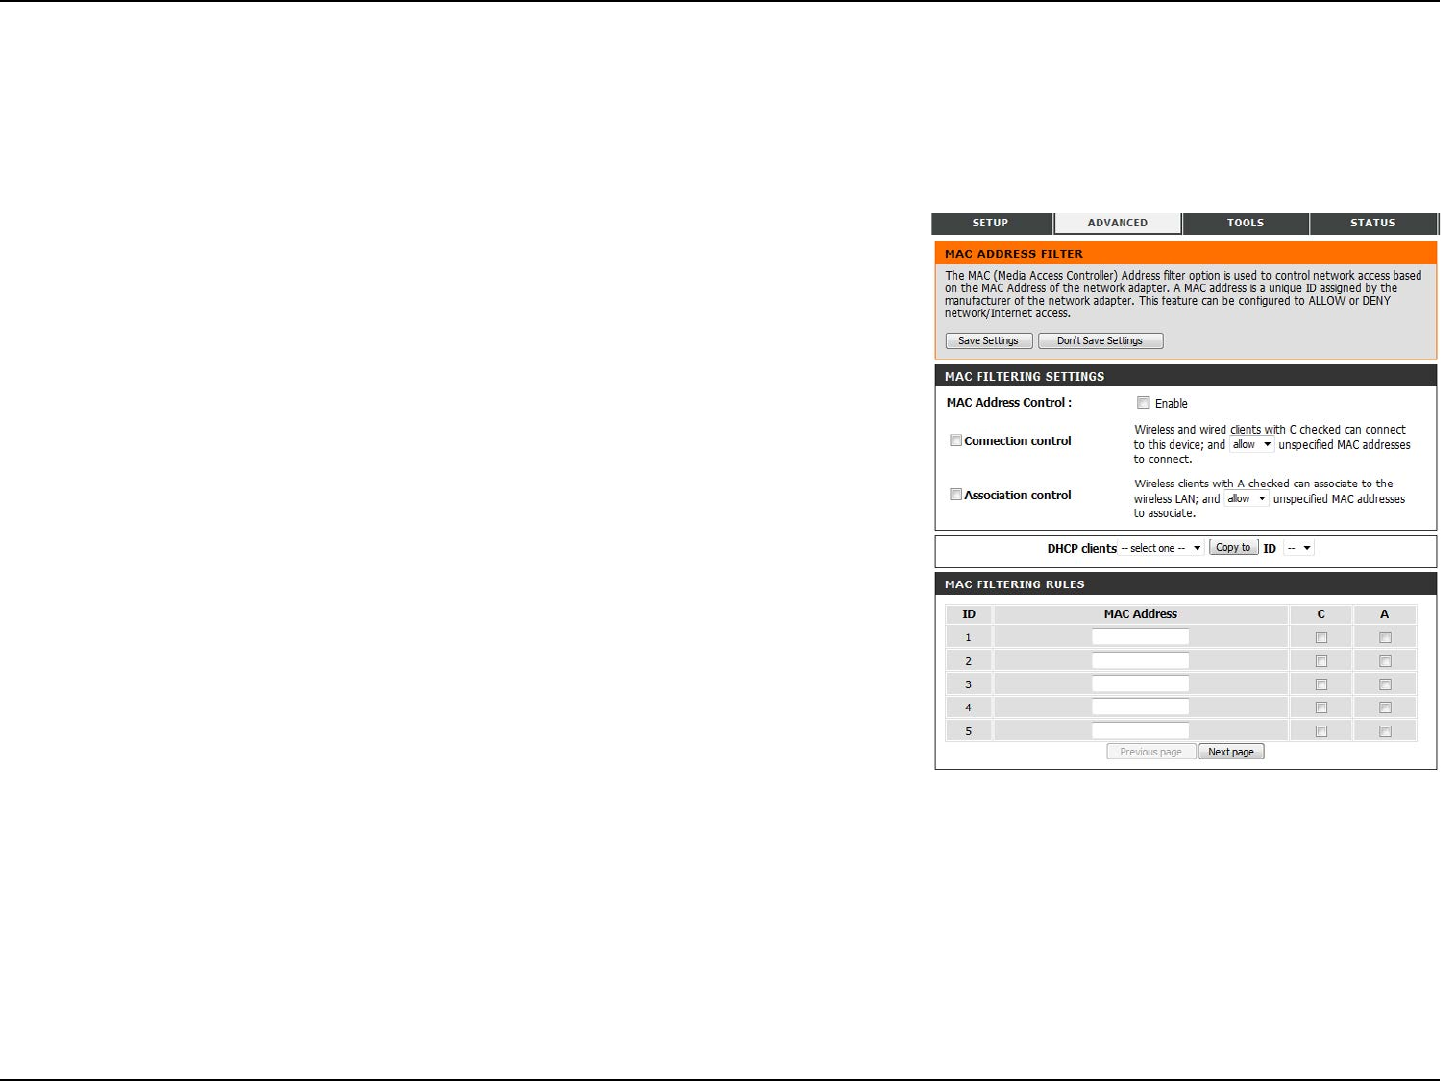
MAC Address Filter
MAC FILTERING SETTINGS
Tick this box to enable MAC ltering.
Check the box to allow wireless and wired clients with C
selected to connect to this device. You can also select to allow
or deny connections from unspecied MAC addresses.
Check the box to allow wireless clients with A selected can
associate to the wireless LAN. You can also select to allow or
deny connections from unspecied MAC addresses.
MAC FILTERING RULES
This identies the rule.
Specify the MAC address of the computer to be ltered.
Specify the last section of the IP address.
If this box is ticked, the rule will follow the connection control
setting specied in MAC ltering settings specied above.
If this box is ticked, the rule will follow the association control
setting specied in MAC ltering settings specied above.
MAC Address Control:
Connection Control:
Association Control:
ID:
MAC Address:
IP Address:
C:
A:
The MAC (Media Access Controller) address lter option is used to control network access based on the MAC address of the network adapter. A MAC
address is a unique ID assigned by the manufacturer of the network adapter. This feature can be congured to ALLOW or DENY network/Internet
access. After modifying any settings, click Save Settings to save your changes.
57D-Link DWR-755 User Manual
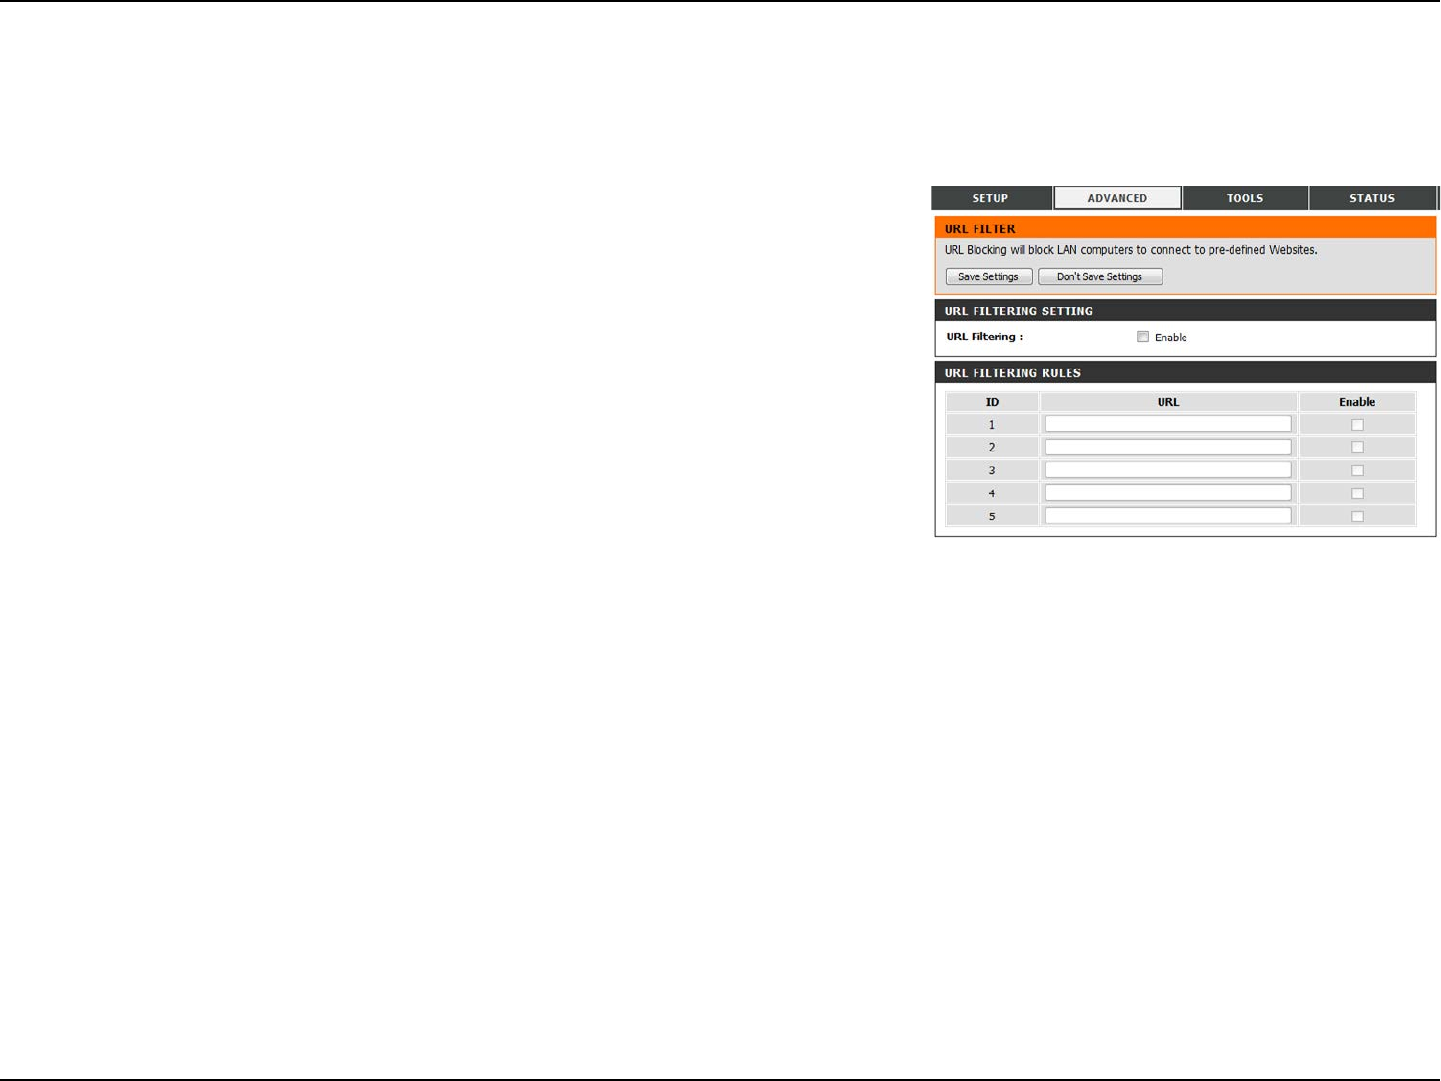
Section 3 - Conguration
Check the box to enable URL ltering.
URL FILTERING RULES
This identies the rule.
Enter URL that you would like to block. All URLs that begin
with this URL will be blocked.
Check the box to enable the specied rule.
The URL lter allows you to set up a list of websites that will be blocked from users on your network. After modifying any settings, click Save
Settings to save your changes.
URL Filter
URL Filtering:
ID:
URL:
Enable:
58D-Link DWR-755 User Manual
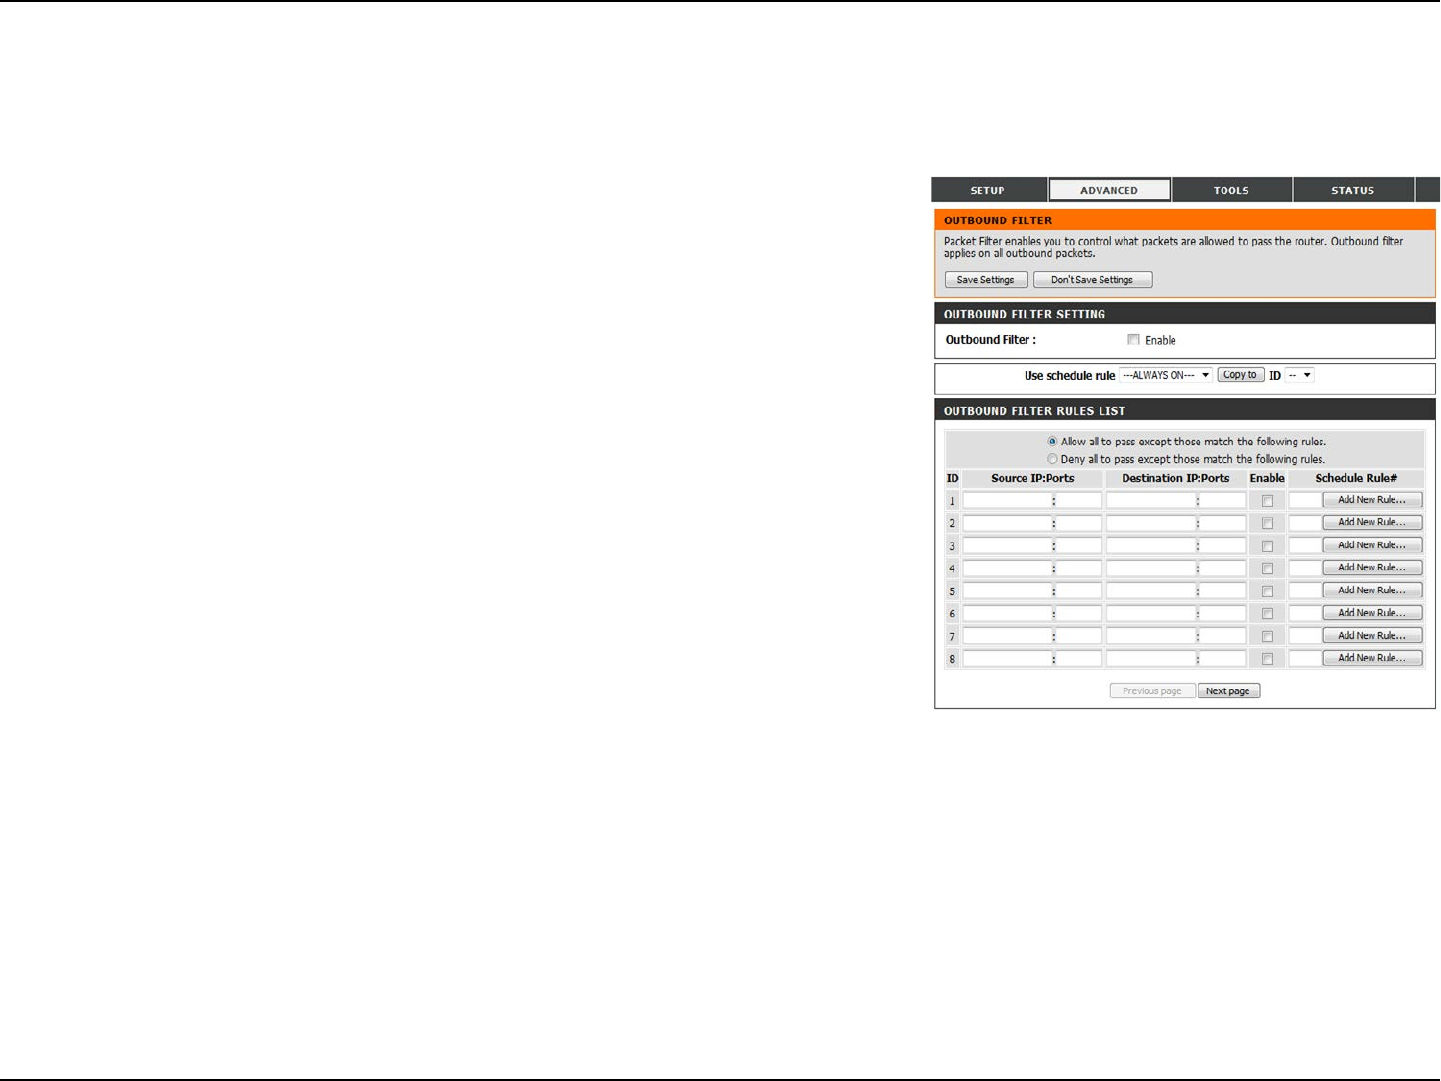
Section 3 - Conguration
OUTBOUND FILTER SETTING
Select this box to Enable outbound ltering.
Select a schedule to use and copy to the specied rule ID
when you click the Copy to button. You may select Always On
or use a specic schedule that you have dened. To create and
edit schedules, please refer to “Schedules” on page 75.
OUTBOUND FILTER RULES LIST
Here, you can select whether to Allow or Deny all outgoing
trac except for trac that matches the listed rules.
This identies the rule.
Specify the local IP address and then specify the port after the
colon.
Specify the remote IP address and then the port after the
colon.
Check the box to enable the specied rule.
Specify the schedule rule number. Click on the Add New Rule
button to create a new schedule rule.
Go back to the previous lter page.
Advance to the next lter page.
Outbound Filter
Outbound Filter:
Use Schedule Rule:
ID:
Source IP : Ports:
Destination IP : Ports:
Enable:
Schedule Rule #:
Previous Page:
Next Page:
The outbound lter enables you to control what packets are allowed to be sent out to the Internet. The outbound lter applies to all outbound
packets. After modifying any settings, click Save Settings to save your changes.
59D-Link DWR-755 User Manual
Section 3 - Conguration
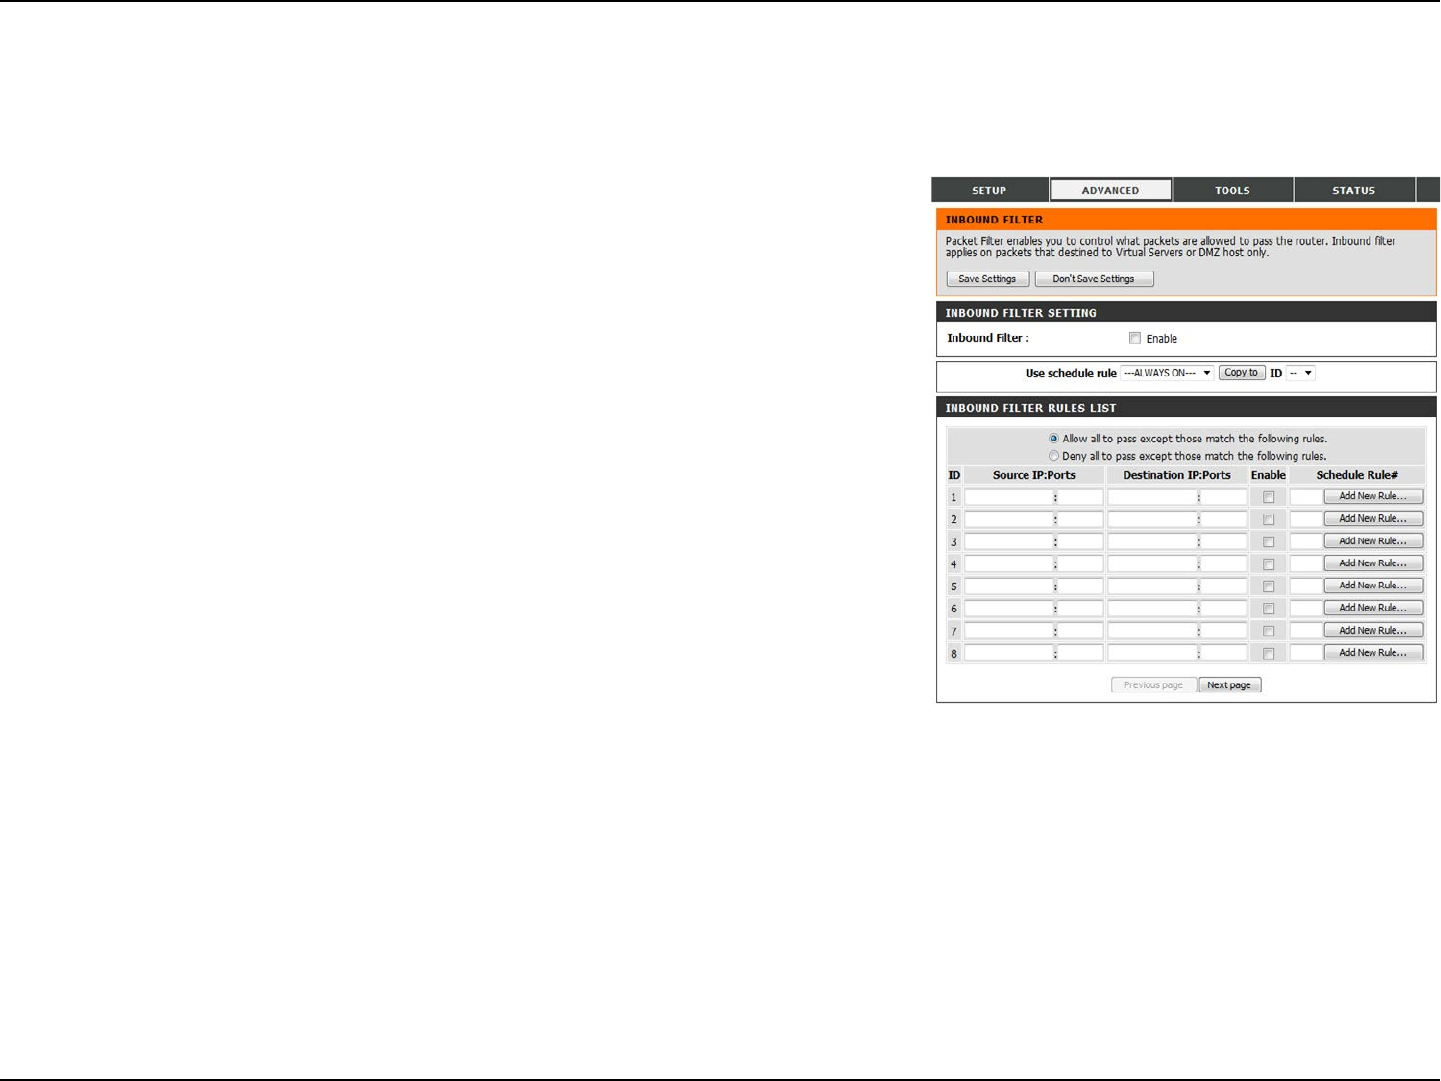
INBOUND FILTER SETTING
Select this box to Enable the lter.
Select a schedule to use and copy to the specied rule ID
when you click the Copy to button. You may select Always On
or use a specic schedule that you have dened. To create and
edit schedules, please refer to “Schedules” on page 75.
INBOUND FILTER RULES LIST
Here, you can select whether to Allow or Deny all incoming
trac except for trac that matches the listed rules.
This identies the rule.
Specify the local IP address and then specify the port after the
colon.
Specify the remote IP address and then the port after the
colon.
Check the box to enable the specied rule.
Specify the schedule rule number. Click on the Add New Rule
button to create a new schedule rule.
Go back to the previous lter page.
Advance to the next lter page.
Inbound Filter
Inbound Filter:
Use Schedule Rule:
ID:
Source IP : Ports:
Destination IP : Ports:
Enable:
Schedule Rule #:
Previous Page:
Next Page:
The inbound lter enables you to control what packets are allowed to come in to your network from the Internet. The inbound lter only applies
to packets that are destined for Virtual Servers or DMZ hosts. After modifying any settings, click Save Settings to save your changes.
60D-Link DWR-755 User Manual
Section 3 - Conguration
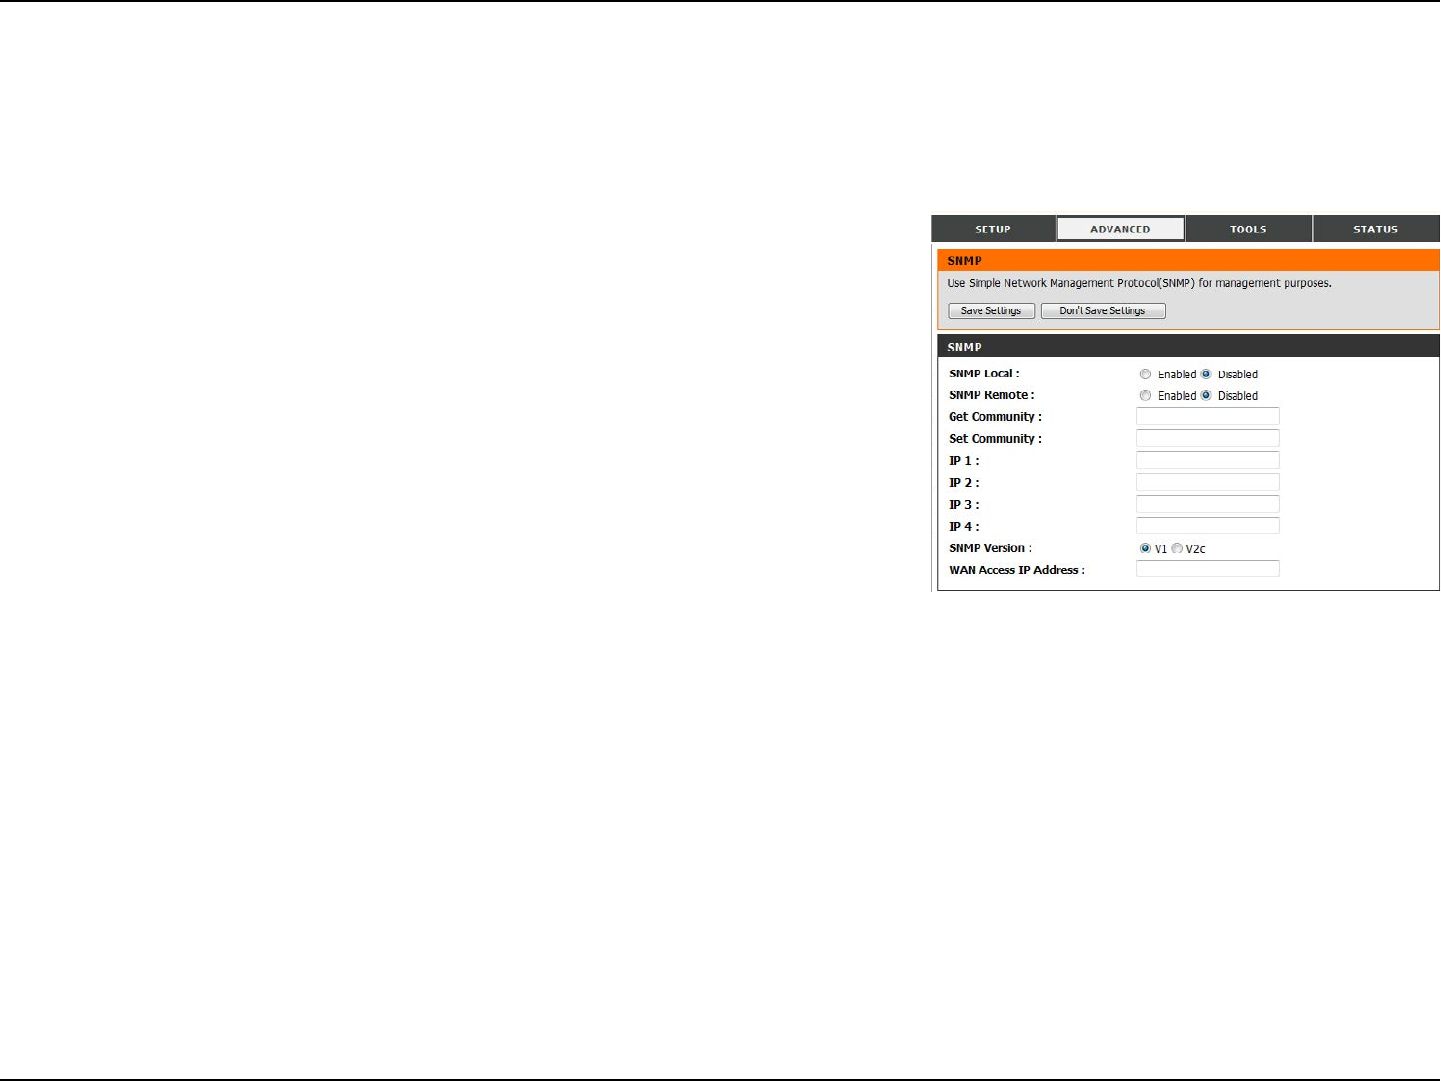
SNMP
Select whether to Enable or Disable local SNMP
administration.
Select whether to Enable or Disable remote SNMP
administration.
Enter the password public in this eld to allow read-only
access to network administration using SNMP. You can view
the network, but no conguration is possible with this setting.
Enter the password private in this eld to enable
read/write access to the network using SNMP.
Enter up to 4 IP addresses to use as trap targets for your
network.
Select the SNMP version of your system.
If you want to limit remote access SNMP access, enter the IP
address of the remote computer you will use to access this
device; all other IP addresses will be denied remote SNMP
access.
SNMP
SNMP Local:
SNMP Remote:
Get Community:
Set Community:
IP 1/2/3/4:
SNMP Version:
WAN Access IP Address:
SNMP (Simple Network Management Protocol) is a widely used network monitoring and control protocol that reports activity on each network
device to the administrator of the network. SNMP can be used to monitor trac and statistics of the DWR-755. The DWR-755 supports SNMP v1
and v2c. After modifying any settings, click Save Settings to save your changes.