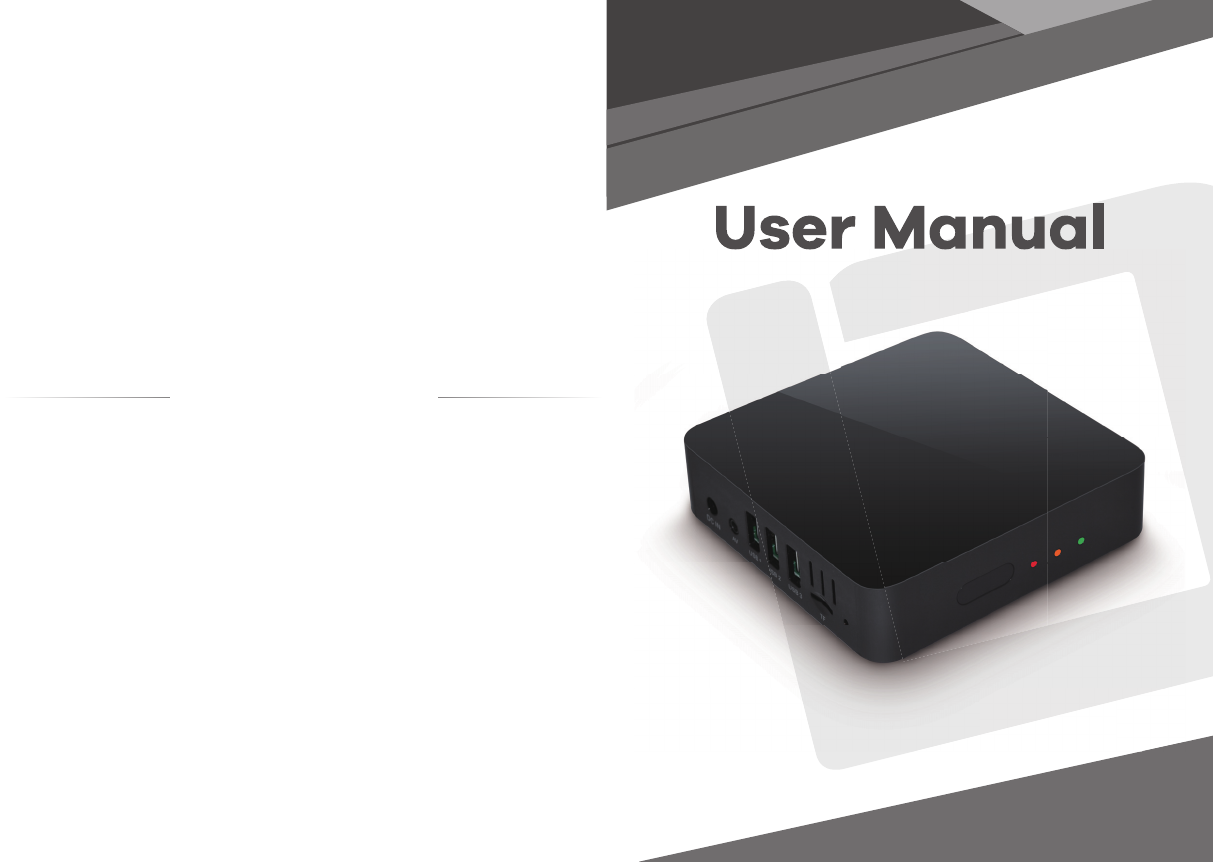
DATAMAX TECHNOLOGY S905D-DM14S5 Telegenic User Manual DM14
SZ datamax Electronic technology Co.,LTD Telegenic DM14
User Manual
Model No.
Data change life
S905D-DM14S5
Telegenic

Catalogue
Chapter 1 Overview
Chapter 2 Connection
Chapter 3 Remote Control
Chapter 4 Initial Configuration
Chapter 5 Man Menu
Chapter 6 Local media play
Chapter 7 About APP
Chapter 8 Setting
Chapter 9 DTV
Chapter 10 Update
Chapter 11 Factory data reset
Chapter 12 Troubleshootings
Chapter 13 Specification
Page 1
Page 2
Page 3
Page 4~5
Page 6
Page 7
Page 8~10
Page 11~14
Page 15~21
Page 22
Page 23
Page 24
Page 25
FCC Warning:
This equipment has been tested and found to comply with the limits for a Class B
digital device, pursuant to part 15 of the FCC Rules. These limits are designed
to provide reasonable protection against harmful interference in a residential
installation. This equipment generates, uses and can radiate radio frequency
energy and, if not installed and used in accordance with the instructions, may
cause harmful interference to radio communications. However, there is no guarantee
that interference will not occur in a particular installation. If this equipment
does cause harmful interference to radio or television reception, which can be
determined by turning the equipment off and on, the user is encouraged to try
to correct the interference by one or more of the following measures:
o Reorient or relocate the receiving antenna.
o Increase the separation between the equipment and receiver.
o Connect the equipment into an outlet on a circuit different from that to
which the receiver is connected.
o Consult the dealer or an experienced radio/TV technician for help.
Caution: Any changes or modifications to this device not explicitly approved
by manufacturer could void your authority to operate this equipment.
This device complies with part 15 of the FCC Rules. Operation is subject to
the following two conditions: (1) This device may not cause harmful interference,
and (2) this device must accept any interference received, including
interference that may cause undesired operation.
This equipment complies with FCC radiation exposure limits set forth for an
uncontrolled environment. This equipment should be installed and operated
with minimum distance 20cm between the radiator and your body.
This transmitter must not be co-located or operating in conjunction with any
other antenna or transmitter.
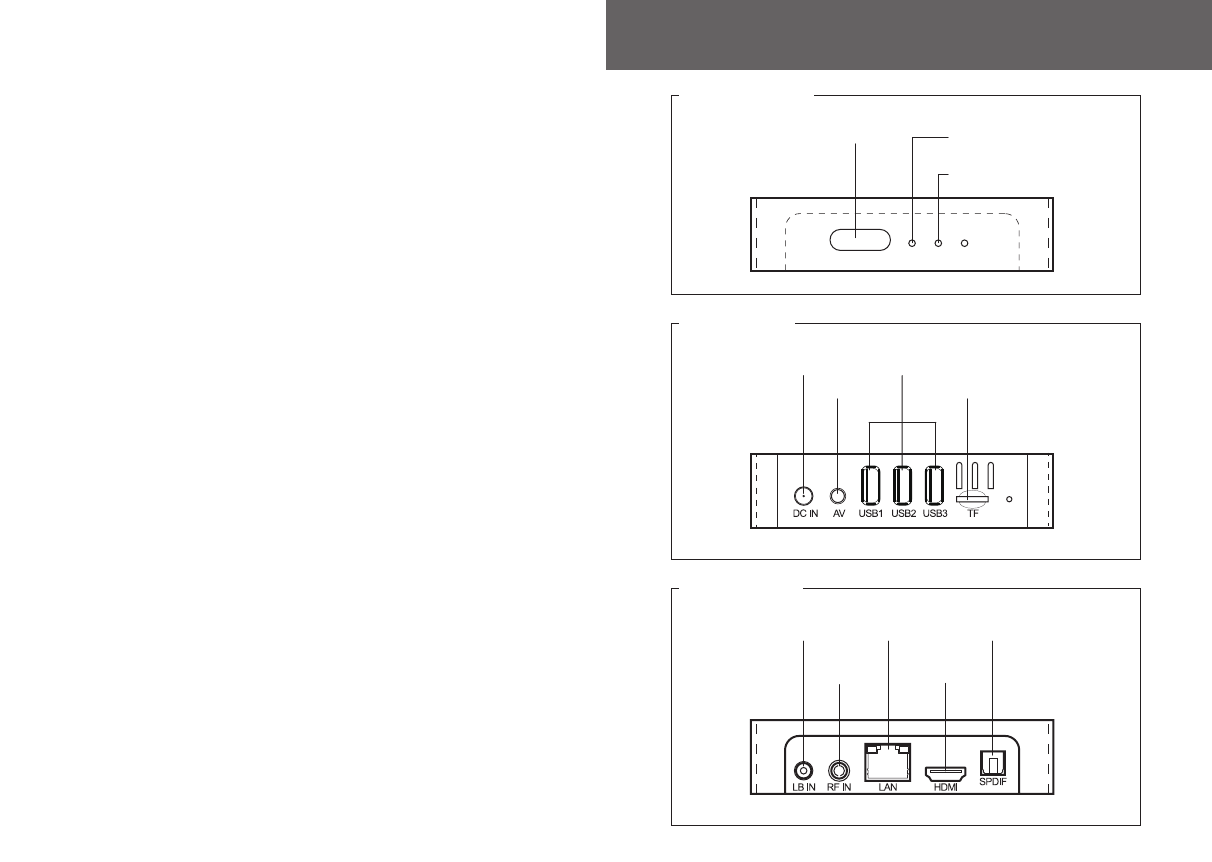
Chapter1. Overview
Appearance and interface
Power indicator
Standby indicator RC receiver
FRONT PANEL
Power
AV output
USB slot
TF card slot
SIDE PANEL
REAR PANEL
LNB input
RF input
ETHERNET
HDMI output
OPTICAL output
1
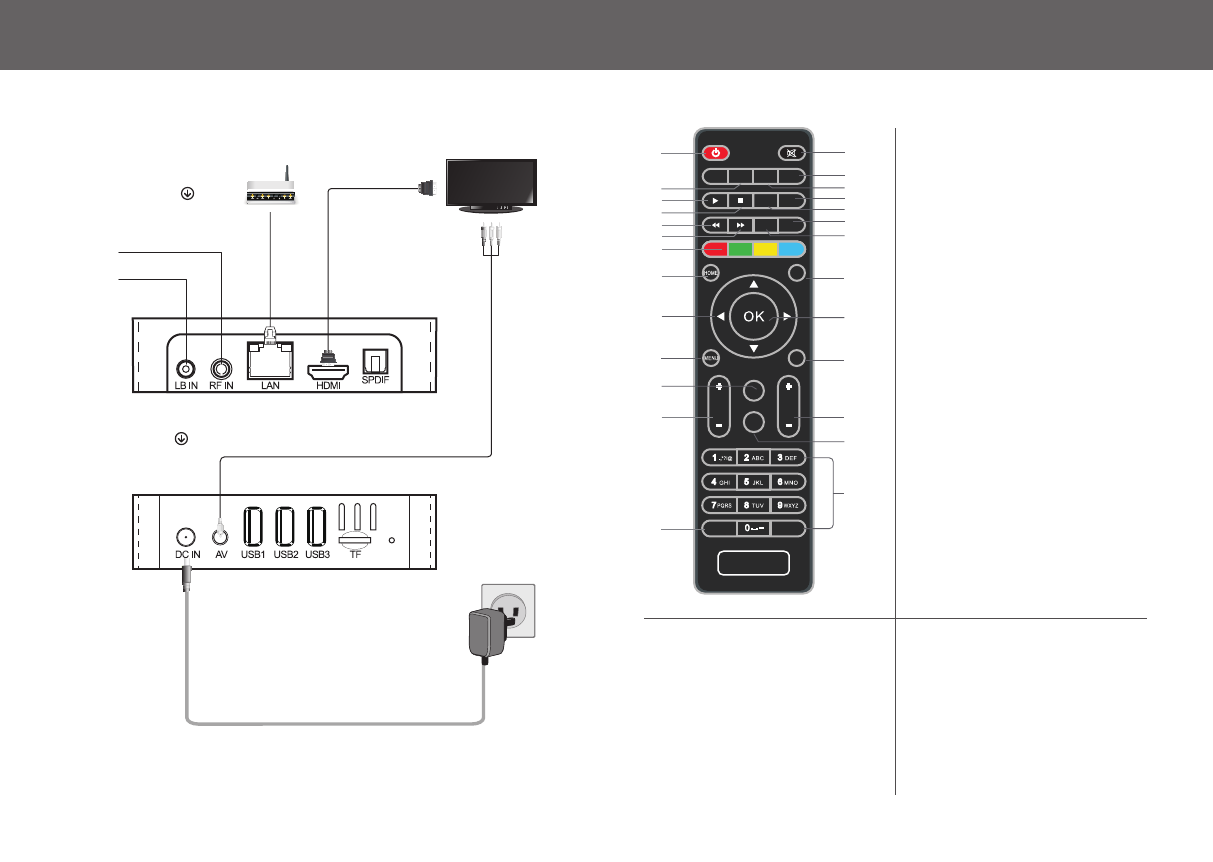
Chapter2. Connection
SIDE PANEL
REAR PANEL
RF cable
RF cable Lan
Power adaptor
Chapter3. Remote control
SHIFT INFO
BACK
MOUSE
CHANNEL
VOL
DVBPLAY DELETE
PAGE+
PAGE-
SUBTITLE
L/REPG TEXT
REC
SWITCH
MUTEPOWER
PLAY STOP
12
3
7
8
9
10
11
12
13
14
15
16 17
18 19
20 21
23
26
25
27
22
24
46
5
1.POWER
2.MUTE
3.
EPG HOTKEY
4.TEXT
5.L/R AUDIO SWITCH
6.SUBTITLE
7. PLAY
8.STOP
9.SERVICE INFO FOR CHANNEL
10.TIMESHIFT
11.FBW Button
12.FFW Button
13.DISPLAY CHANNEL INFO
14.RECORD
15.DTV FUNCTION Buttons
(RED,GREEN YELLOW,BLUE)
16.HOME
17.BACK
18.CURSOR
19.OK
20.MENU
21.MOUSE/REMOTE SWITCH
22.VOL+/-
23.PAGE UP
24.PAGE DOWN
25.Channel +/-
26.NUNERIC ENTRY
27.DTV PLAY HOTKEY
32

STEP
1
At the “Welcome” page,click “Next”
STEP
3
Select output mode
STEP
2
Select your favorite language
STEP
4
Adjust the display position on the watch with
your TV set
STEP 5
Set up the wired network if you are using
a wired home network
STEP 7
Press “Finish” to complete the initial
configuration
STEP 6
Set up the WiFi if you are using a wireless
home network
Chapter4. Initial Configuration Chapter4. Initial Configuration
54
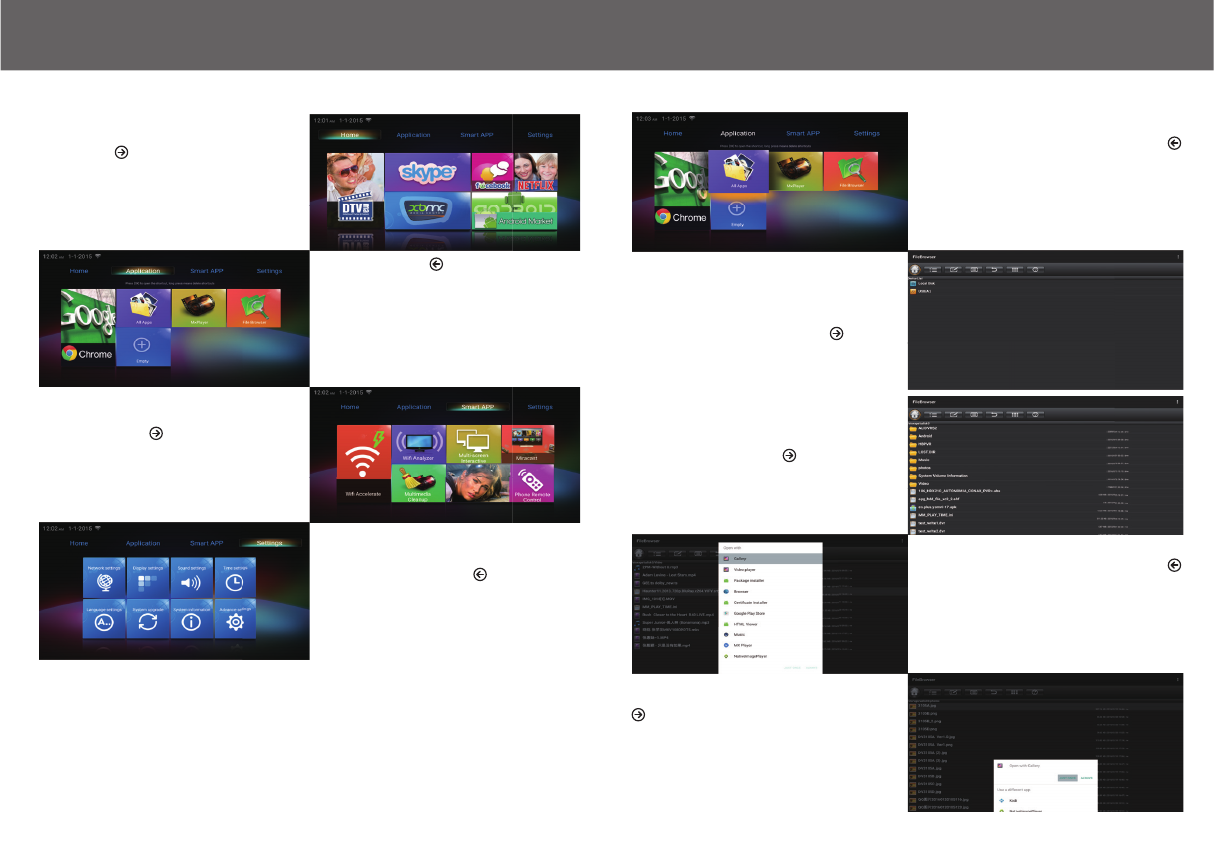
5.1 Home
Press Left/Right/Up/Down Keys on your
remote to select items and Press “ok”
button to enter
5.3 Smart App
Press Left/Right/Up/Down Keys on your remote
to select items and Press “ok” button to enter
5.2 APPLICATION
Press Left/Right/Up/Down Keys on
your remote to select items and Press
“ok” button to enter
Press Empty to add your favorite app
as a new shortcut, long press shortcut
can delete yourfavorite app
Press “Application” in main menu to select
“file browser”, Press “ok” button to enter
Click the video(or music), there would pop up a
option menu, Select your favorite video
(or music) player to start
playing video(or music)
Select “Local Disk” or “USB” driver
Press “ok” button to enter
Click the photos, there would pop up a option
menu, Select your favorite photo player to
start playing photos
5.4 Settings
Press Left/Right/Up/Down Keys on your remote
to select items and Press “ok” button to enter
Chapter6. Local Media Play
Chapter5. Man Menu Chapter6. Local media play
76
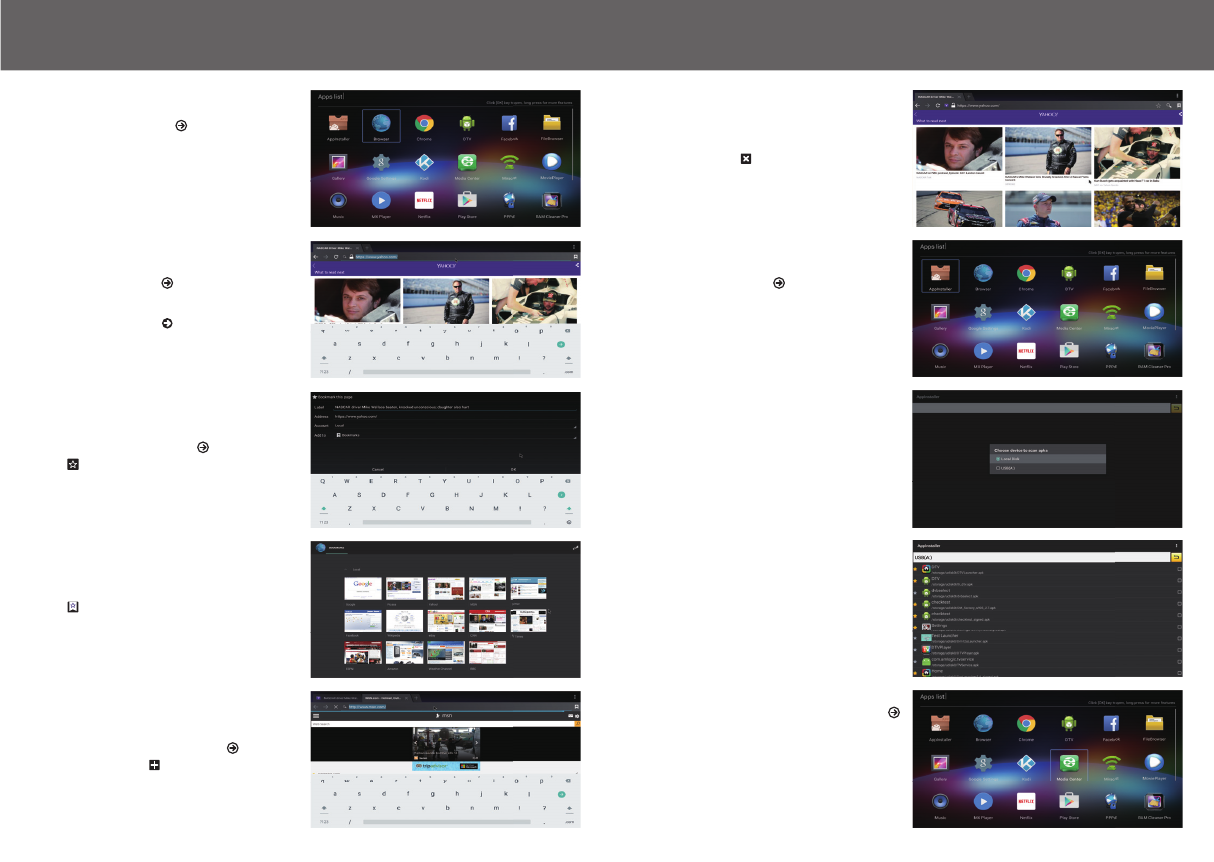
7.1 About browser
- Press “Application” in main menu select browser.
- Use Brower to browse the web and visit your favorite
websites.
- Open multiple webpages, use the Windows menu
to switch.
- Create a bookmark in the Brower for quick visit.
7.3 About multi screen communication
7.3.1 DLNA
- Click “Media center” in Apps list.
- Turn on “ DLNA DMP ” and “ DLNA DMR ”.
- Turn on DLNA in your android mobile device.
- Start playing the video,music,photo in your adroid
mobile device
7.1.1 Open Webpage
- Click the address bar to bring up the on screen
virtual key-board.
- Type a URL and then click
7.1.4 About App installer
- Click “AppInstaller” in Apps list
- Select the driver which APK allocated
- Select the driver which APK allocated
7.1.2 Book mark a webpage
- Click on the webpage to make a bookmark.
- Click on the webpage to open a bookmark.
7.1.3 Open multipage at one time
- Open a new page: click
- Open a new page: click
Chapter6. Local Media Play
Chapter7. About APP Chapter7. About APP
98
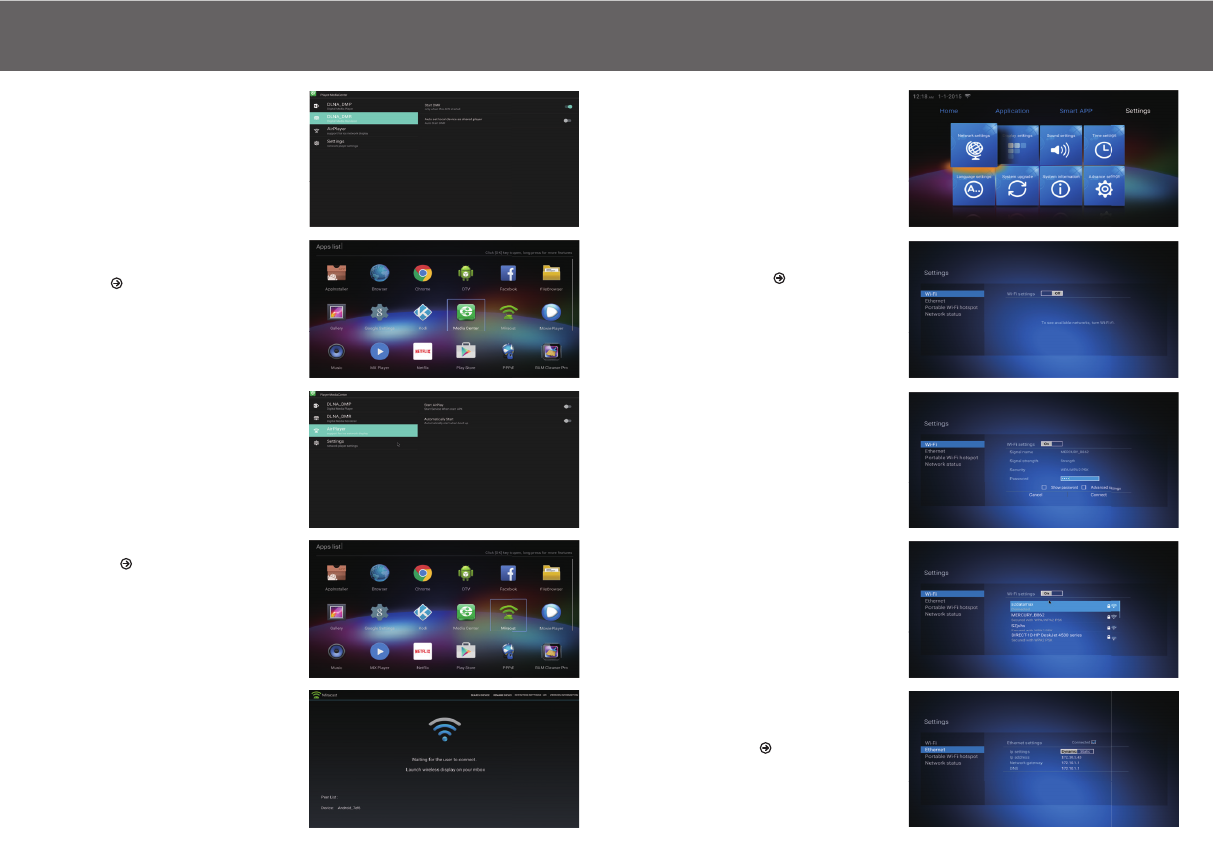
7.3.2 Airplay
- Click “Media center” in Apps list.
- Turn on “ DLNA DMP ” and “ DLNA DMR ”.
- Turn on DLNA in your android mobile device.
- Start playing the video,music,photo in your adroid
mobile device
7.3.3 Miracast
- Click “Miracast ” in Apps list
- Start searching other android device
- Turn on the Mirocast option in your android mobile device
- Select STB device name and connect it in your andorid
mobile device
- Start playing video,music,photos in your andorid mobile
device
8.1 Network setting
8.1.1 Wi-Fi setting
- Click ”Network settings”, select Wi-Fi, click Wi-Fi settings
button to on or off to open Wi-Fi or close Wi-Fi.
8.1.2 Ethernet setting
- Click ”Network settings”, select Ethernet, if Dynamic IP, when
plug Ethernet cable, Ethernetsettings will display “Connected”
- Open Wi-Fi, waiting till Wi-Fi scanning finished, select Wi-Fi
network name from the list, inputpassword, click “connect”
- You can use setting to re-config your network, display,
language…etc.
Chapter6. Local Media Play
Chapter7. About APP Chapter8. Setting
11
10
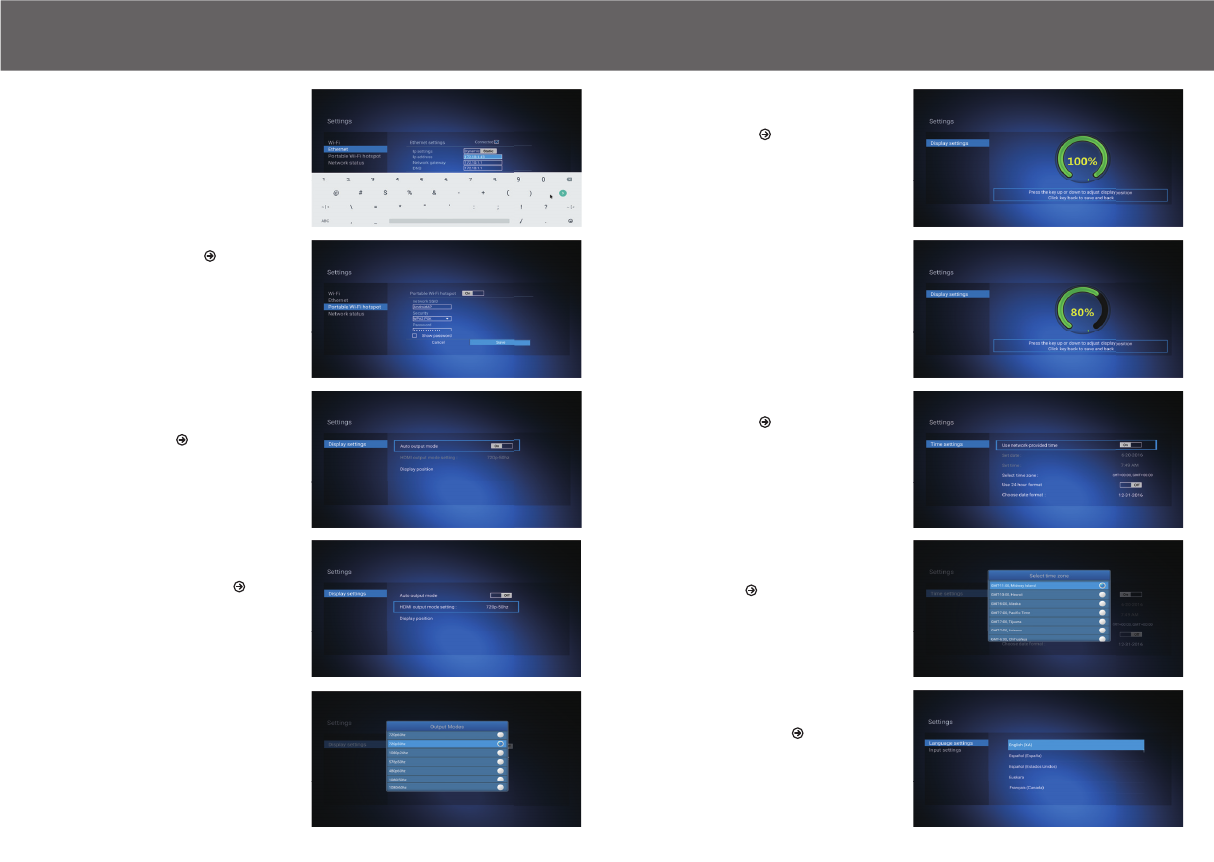
8.2 Display setting
8.2.1 Auto output mode
- Click Auto output mode button to “on”
8.3 Time settings
8.3.1 Date and time
- keep “use network-provided time” on can keep TV display
correct date and time as local date and time.
- Close “Use network-provided time” can input new date and
new time in “ set date ” and “set time ”.
8.4 Language settings
8.4.1 OSD language settings
- Click language setting,select the language as OSD language
from language list,click “ok” to save and back.
8.1.3 Portable Wi-Fi hotspot
- This device can provide Wi-Fi hotspot for other network
devices including PC,mobile,Pad…etc.They can get Free
Wi-Fi sevice from this.
Click Wi-Fi hotpot button to on, you can set network SSID
name,Securtiy,Password as following,Password must be 8
digits at least. Click save.Then you can search SSID name
in other network devices with inputting the same password
to receive Wi-Fi signal.
8.2.3 Display position
- Click display position,press “up” or ”down” key on the remote
to adjust display position,Click “back” key to save and back
- If select Static IP, click “static” in IP settings, revise address
in IP address bar,Network gateway barand DNS bar,
click save.
8.2.2 Select output mode by hand
- Click output mode to “off’’ ,Click HDMI output mode setting
- Select the mode in the pop-up list
- Presss ok to confirm and back
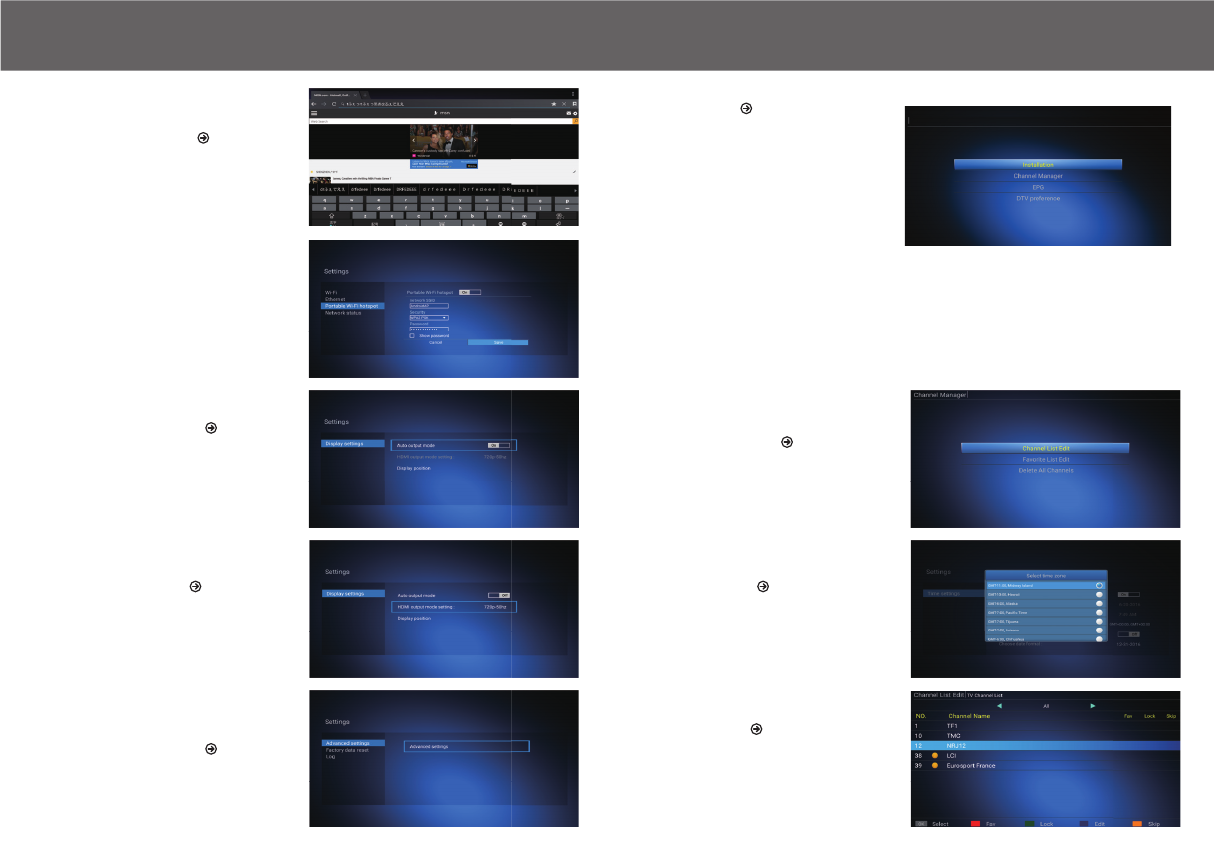
8.3.2 Set time zone
- Click the select time zone bar,select time zone from the pop
-up list,click ok to save and back.
Chapter6. Local Media Play
Chapter8. Setting Chapter8. Setting
1312
8.5 System information
8.5.1 System information
- Click system information to see model No., Android
Version, Software Version, Hardware version, Apk version,
IP address,Mac Address, Serial number.
8.6 More other settings
- Click Advanced settings for more other settings.
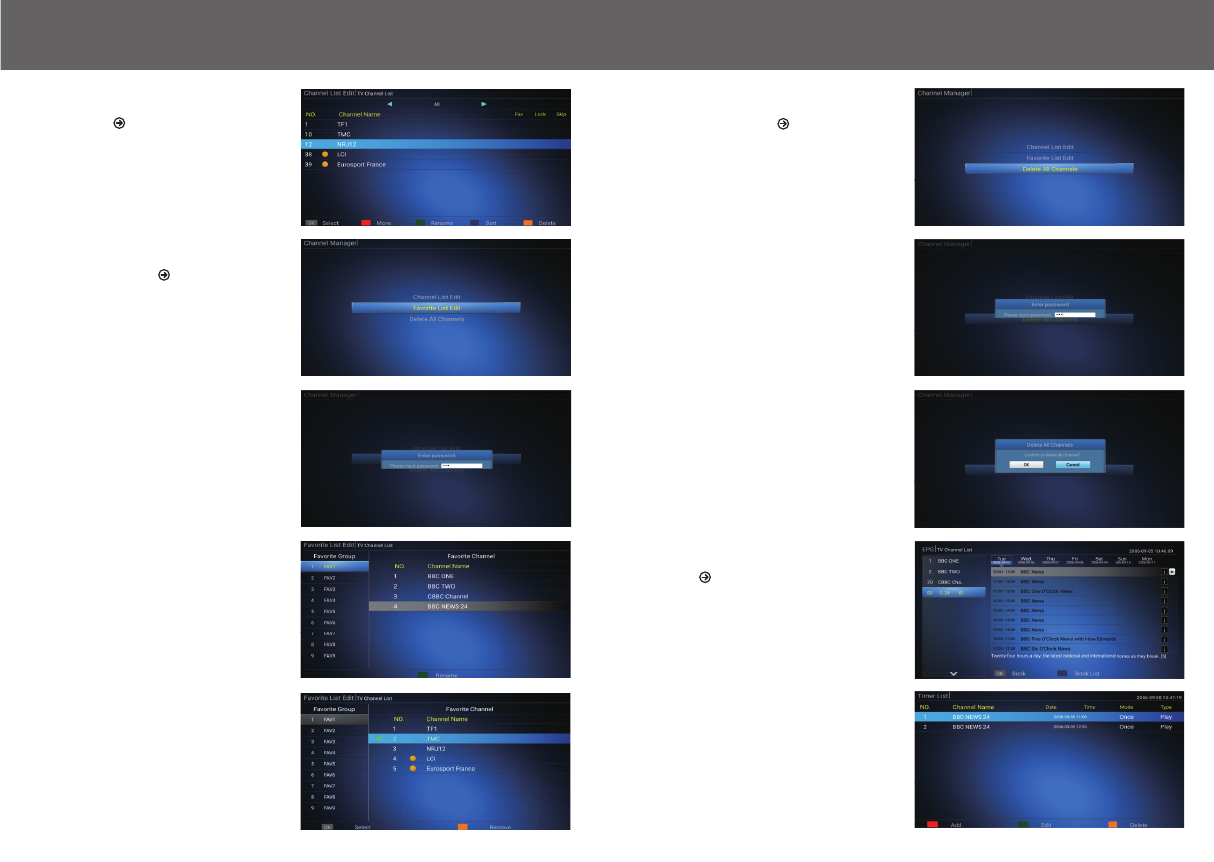
9.2 Channel Manager
- Click “Channel Manger”, Manage your Channel list.
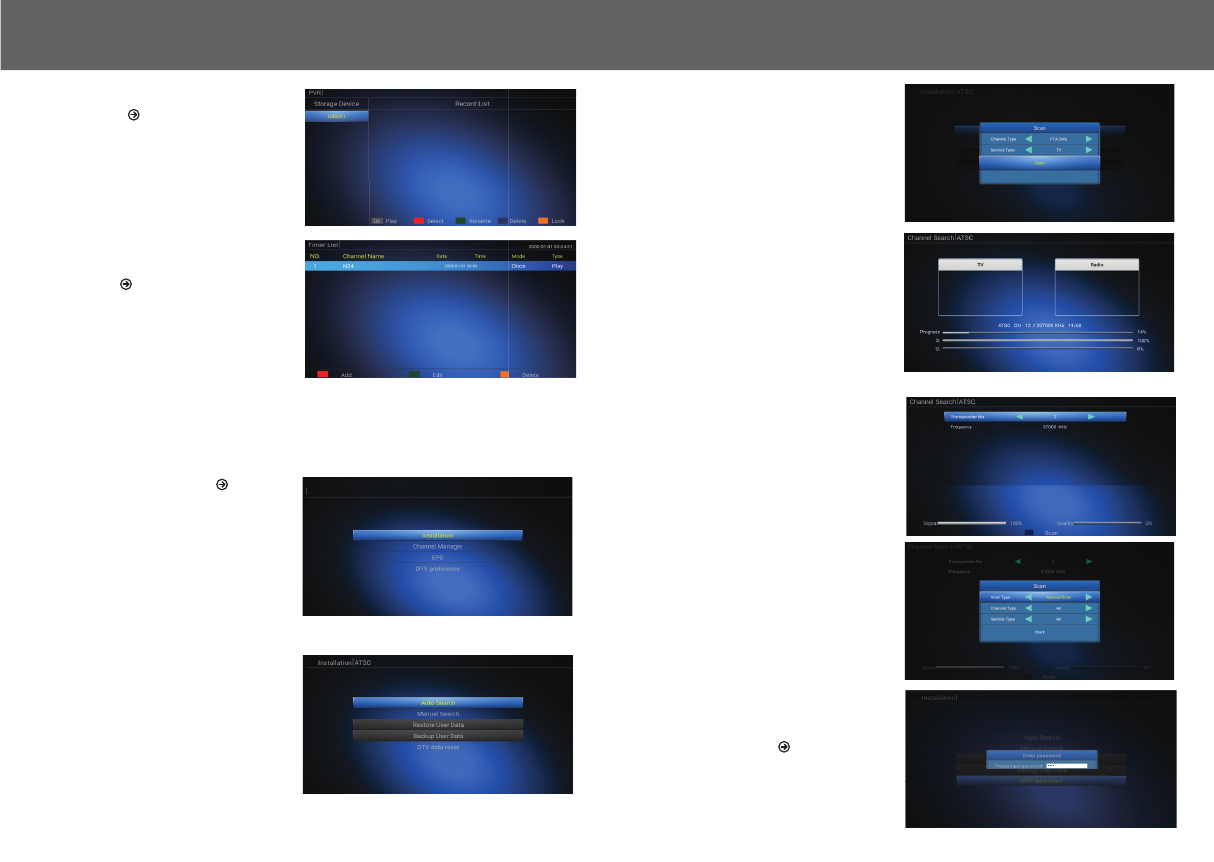
9.1 DTV model
- This device provides ATSC digital singal receiving
- Select DTV logo in Home page,
Manage Channel List
- OK: select a channel
- FAV : select a channel as your favorite Channel
- Lock: Parents Lock
- Edit: move, rename,sort ,delete a channel
- Skip: Skip the Channel when switch channels
8.4.2 Input method settings
- Click input settings,click input method from the list,click
“ok” to save and back then you use new input method.
8.5.2 Memory information
- Click Memory information to see the memory space and
internal storage space.
9.2.1 Channel List Edit
- Click “Channel List Edit”, input default password“0000”
Chapter6. Local Media Play
Chapter8. Setting Chapter9. DTV
1514
Press "Menu" key on remote to enter into the DTV interface,
9.3 EPG
9.2.3 Delete All Channels
- Click “Delete All Channels”.
- Input password “0000”.
- Press “OK” to confirm.
Edit Channel
- OK: select a channel
- Move: change the sequence of a channel
- Rename: change the name of a channel
- Sort: Sort of the channel list
- Delete: Delete a channel
9.3.1 Click “EPG” to watch your EPG list
- Press “ok” to book a TV program.
- Press blue button on remote to check the book list.
9.3.2 Book EPG
- Press blue button on remote to check the book list.
9.2.2 Favorite List Edit
- Click “Favorite List Edit”.
- input default password“0000”.
- Rename: Press right/left key on remote, select a Favorite
group, change Favorite Group Name as you like.
- Remove: Press right/left key on remote, select a Favorite
Channel, remove the channel from the list.
Chapter6. Local Media Play
Chapter9. DTV Chapter9. DTV
1716
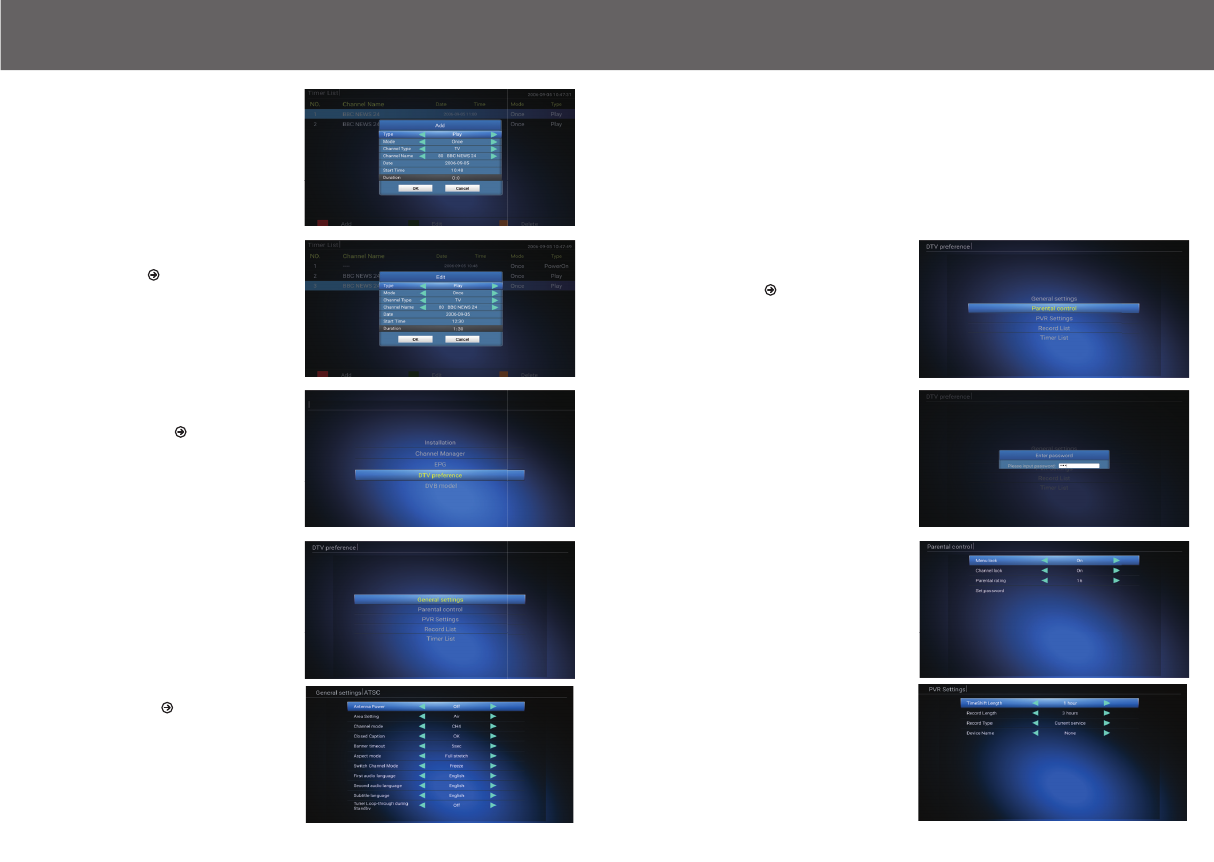
9.4 DTV preference
9.4.1 General settings
- Antenna Power: Press right/left button on remote to set
Antenna Power to “on” or “off ”.
- Area Setting:Press right/left button on remote to
- Chanenel mode: CH3/CH4/LOOP THROUGH
- Closed caption:Press "ok" to enter
Then set closed caption setting
9.4.2 Parental control
- Click “Parental control”.
- Click “DTV preference”.
- Press red button on remote,you can add a new channel
into the timer list.
- Menu Lock: Press right/left button on remote to select “on” or”
off” to lock or unlock the menu.
- Channel Lock: Press right/left button on remote to select “on”
or “ off ” to lock or unlock the channel.
- Parental rating: Press right/left button on remote to select the
children old from 4-18years.
- Set password: set new password.
9.4.3 PVR setting
- TimeShift Length:
1minute/5minute/30minutes/1hour/user-defined
- Record Length:
Auto/1minute/10minutes/30minutes/1hours/user-defined
- Device Name:
Press “ok” to select device name from the list
Select one channel
- Press green button on remote,you edit channel EPG
infomation.
- Set your preferred DTV playing setting.
Chapter6. Local Media Play
Chapter9. DTV Chapter9. DTV
- Switch Channel mode: Freeze /Blank
- First audio language: Press right/left button on remote,
select language.
- Subtitle language: Press right/left button on remote,
select language.
- input password “ 0000 ”.
1918
- Banner timeout:Press right/left button on remote to set
banner timeout from 3seconds,5seconds,7seconds,10
seconds options.
- Aspect mode: 16:9/4:3/Full stretch/Auto
- Tuner Loop-through during Standby: On/Off
set area to "air" or "cable"
- Second audio language: Press right/left button on remote,
select language.
9.5 ATSC TV receiving
9.4.4 Record list
- Press “ok” to play the record.
- Press red button on remote to select the record.
- Press green button on remote to rename the record.
- Press blue button on remote to delete the record.
- Press yellow button on remote to lock the record.
9.4.5 Timer list
- Press red button to add a new channel.
- Press green button to edit the channel.
- Press Yellow button to delete the chanel.
- Press " "ok button on remote to start searching.
9.7 DTV data reset
- Click DTV data reset, input password “ 0000 ”.
- Click “OK” to confirm.
Chapter6. Local Media Play
Chapter9. DTV Chapter9. DTV
- Click “Auto search” to set scanning type,
- Click “Manual Search”.
- Press blue button on remote to edit scanning setting.
- Click "IInstallation" enter into the ATSC
receiving interface.
2120
- press start to start searching automaticly
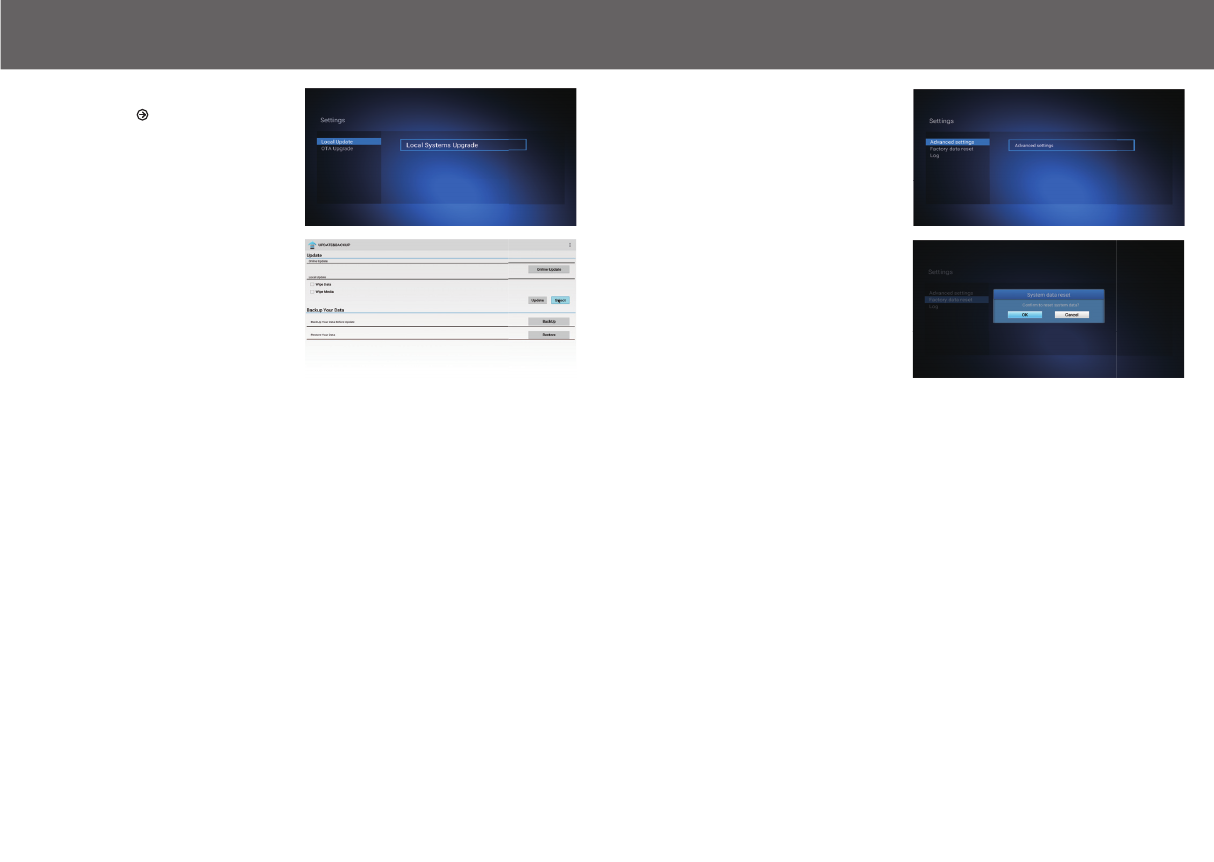
Local update
- Select setting in main menu,click “system upgrade”.
- Select “Local Update”,click “ok” to Enter.
- Click “select” button, select the new software, press “ok”
to back.
- Click “Update” button to start update.
Chapter6. Local Media Play
Chapter10. Update Chapter11. Factory data reset
- Click “system data reset” ,press “ok” to confirm.
- Select settings in main menu, select “System Advance”.
2322
- Click “Factory data reset”.
In some region, the digital terrestrial signal may be weak. So you'd better use the antenna
inwhich the booster was built, for watching the weak signal channels.
Chapter6. Local Media Play
Chapter12. Troubleshootings Chapter13.Specification
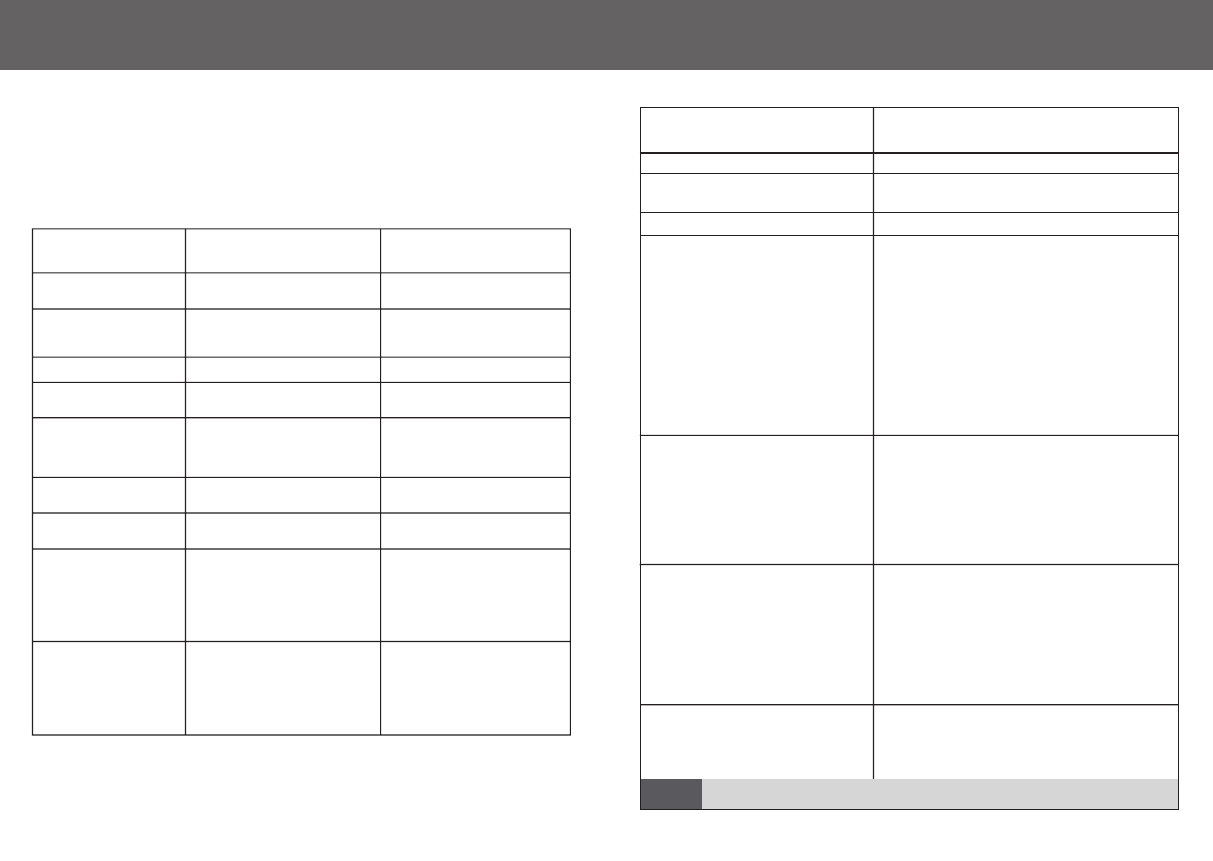
Problem
Standby light not lit
No signal found
No picture or sound
Scrambled channel
message
No response to remote
control
Forgotten channel lock
code
Forgotten menu lock
code
The remote control will
not operate your STB
After moving the STB to
another room you find you
are no longer ableto
receive digital reception
Mains lead unplugged
Mains fuse blown
Aerial is disconnected
Aerial is damaged/misaligned
Out of digital signal area
HDMI/AV is not selected on your TV
Channel is scrambled
Receiver off
Handset not aimed correctly
Front panel obstructed
Hand set batteries exhausted
(1) The batteries inyour remote
control need replacing
(2) There is an obstruction
blocking the signal path
between the remote control
and the box.
The aerial feed formernew point
may come through a distribution
system which may reduce the
digital signal now received bythe
box.
Check mains lead
Check fuse
Check aerial lead
Check aerial
Check with dealer
Reduce to another channel
Select alternative channel
Plug in and turn onplug
Aim handset at front panel
Check for obstructions
Replace handset batteries
Re-install channels to cancel
channel lock
Contact help line
(1) Replace the batteries
(2) Check that thereis nothing in
the way of the pathbetween
the remote control and the
receiver
Try a direct feed from the antenna
Possible cause What to do
Design and Specifications are subject to change without notice.NOTE:
CPU
GPU
MEMORY
OS
TUNER&CHANNEL
DECODER
VIDEO DECODER
PHOTO DECODER
VIDEO OUTPUT
MODULATION
CONNETION
MAIN POWER CABLE
TUNER
DATA PORT
HDMI
OPTICAL
AV
ETHERNET
POWER SUPPLY
INPUT VOLTAGE
POWER CONSUMPTION
AMLOGIC S905D QUAD-CORE 64-BIT CORTEX-A53
UP TO 2.0GHz
PENTA-CORE MALI450
1G DDRIII
8G EMMC FLASH
ANDROID 6.0
RF INPUT CONNECTOR x1
RF OUTPUT CONNECTOR x1
(F-TYPE,FEMALE)
UHD 4K 60FPS,FHD 1080P 60FPS
H.265 10-BIT, H.264, VC-1, MPEG1/2/4
MP3,AAC,WMA,RM,FLAC,OGG
4:3/,16:9 SWITCHABLE
HDMI, AV
QPSK,16QAM,64QAM, 256QAM
FIXED TYPE
RF INPUTx1,RF OUTPUT x1
USB X3 TFX1
HDMI OUTPUT x1
SPDIF x1
AV OUTPUTx1
R 45x1
12V/1A
MAX. 6W
2524
(F-TYPE,FEMALE)