DOMISI TECHNOLOGY WTS2000 Programmable Wireless Thermostat User Manual 15 WTS2000 UserMan
DOMISI TECHNOLOGY CO.,LIMITED Programmable Wireless Thermostat 15 WTS2000 UserMan
15_WTS2000 UserMan
Power button( )
Pairing button( )
CD
CLOCKSET HEAT
TARGET
CURRENT
COOL
SET OK
This new innovation Programmable Wireless Thermostat is
intended for automatic control elctrical heating in winter/cold area
or control electrical cooling devices in summer/hot area.
It consisted of 2 componets: a Remote Control unit with integrated
tempreature sensor and a Plug in Socket unit.
(One remote thermostat control can be with multiple plug in sockets)
It will automatically turn on/off heating devices as your preset target
temperature or preset time range,to maintain a stable room
temperature in order to provide confort and save energy.
Temperature range.................. 0~60 °C/32~140 °F
Temperature accuracy......................± 1 °C/±1.8 °F
Current Temp. Resolution........................0.1 °C/°F
TARGET Temp. Resolution.........................1 °C/°F
Power supply.............................3V(2pcs* AA 1.5V)
Max.Range..........................20 meters in open land
Transmission Frequency.......................433.92Mhz
Remote unit demension...................124x82x42mm
Remote unit Net weight...................................121g
New design........Wall mount holder & Table stand
Max.current/Load...............230V/16A/3680W (EU)
.................230V/13A/3250W (UK)
.................120V/15A/1800W (US)
Plug in socket dimension................132x62x76mm
Plug in socket Net weight................................127g
LED indicator
Remote thermostat control
Plug in Socket
4. Specification
ON/OFF
Remark:
* After pairing successfully, don’t need to do this pairing when you connect
power next time or even the mains is cut off. The plug in socket will
memorize the pairing code.
* If you want to change new remote thermostat control, repeat the above
steps using other remote thermostat control.
* If need to add more plug in sockets in this system,repeat the above steps,
one remote thermostat control can control unlimited plug in sockets.
2. Pairing code
WTS2000 User Manual
Programmable Wireless Thermostat
LCD: Indicate working status
LCD: CURRENT temperature
LCD: TARGET temperature
LCD: Display CLOCK/HEAT/
COOL programs
Down button( )
UP button( )
OK button( )
OK
SET button( )
SET
ON/OFF button
Socket/Plug
Rating label
SET OK
CLOCK
CURRENT
TARGET
HEAT
ON/OFF
1
1Connect the plug in socket into home socket,
and press ON/OFF button for 3 seconds.
the LED indicator will be flashing, it is in pairing mode now.
6
2
Press Power button to turn on this device,
enter into standard heating mode.
3
Remove the battery cover, and load into 2pcs*AA batteries
observing the battery polarity, replace cover.
3
Press Pairing button to send the pairing code at once.
The LED indicator will be stop flash and firm lighting.
It means the pairing is successful.
4
5
2
Plug in your heating devices or cooling devices.
SET OK
CLOCK
CURRENT
4
Now, the remote thermostat control is in standby mode.
Only dispaly current temperature and CLOCK.
5
6
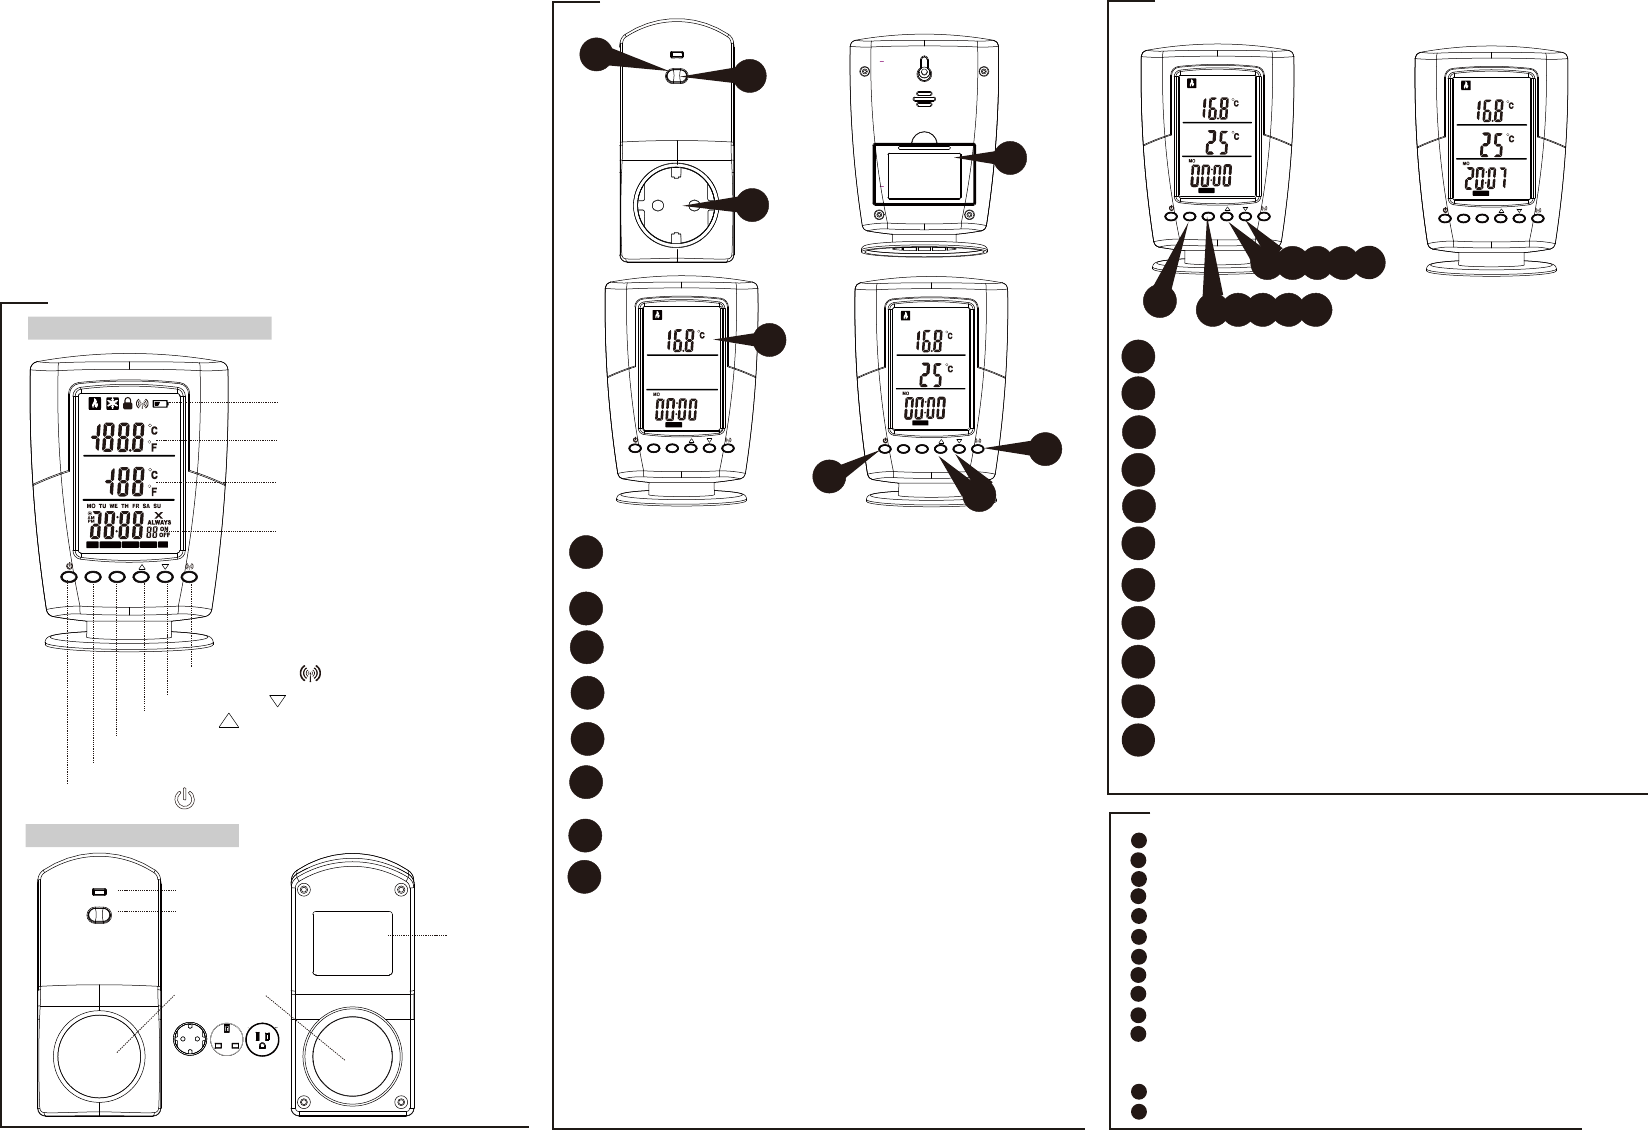
1.Product description
3. CLOCK Setting
For example, we set CLOCK as 20:07 at Monday(see Pic.1).
SET OK
CLOCK
CURRENT
TARGET
HEAT
SET OK
CLOCK
CURRENT
TARGET
HEAT
1
3
57 9 10
Press SET for 3 seconds,enter into setting mode
Press UP/DOWN,set weekday (MO-SU)
Press OK
Press UP/DOWN,choose 12/24HR
Press OK
Press UP/DOWN,set the hour
Press OK
Press UP/DOWN,set the minute
Press OK,second set to 0
Press UP/DOWN,set temperature unit °C/°F
Press OK
2
46 8 10
1
2
3
4
5
6
7
8
9
10
11
Pic.1
Press ON/OFF button to turn off plug in socket,then the remote
thermosat control can’t control it, you have to manually turn on
plug in socket once again when you want to use it next time,
then remote thermostat can control it.
8
8
EU UK US
Standby mode
7
Press UP/DOWN button to adjust the TARGET temperature
7

SET
TARGET
CURRENT
Press OK for 3 seconds,enter into P1~P8 program setting
Press SET,switch between P1~P8, for example we choose P2
Press OK ,TARGET is flashing
Press UP/DOWN,set the TARGET value
Press OK
Press UP/DOWN,choose(MO,TU,WE,TH,FR,SA,SU,MO-FR,
MO-SA, SA-SU, MO-SU)
Press OK
Press UP/DOWN,set hour of P2 ON
Press OK
Press UP/DOWN,set minute of P2 ON
Press OK
Press UP/DOWN,set hour of P2 OFF
Press OK
Press UP/DOWN,set minute of P2 ON
Press OK, back to program switching interface, at this time, you
can press SET button switch to P1, P3,P4,P5,P6,P7,P8,
repeat above steps to set other programs.
1. When CURRENT< TARGET, it will be in ON status,the flame symbol
( )will display in LCD,turn on connected heaters,start to warm the
room, so the room temperature is rising.
2. As current temp. rising, CURRENT=TARGET, it will be in OFF status,
the flame symbol( )will disappear,remote thermostat will send OFF
commands to turn off all connected heaters.
3. The current temperature will be decreasing, when current temp.
decreased 1°C/1.8°F, it will turn on all connected heaters once again,
then infinite loop.
8. Working principle
So in the HEATING mode, remote thermostat control will automatically
keep the room temp. in below range:
Target Temp.-1°C/1.8°F ≥ Room Temp. ≥Target Temp.
Heating Mode:
9. Other functions
Children Lock
In any mode(except standby mode),
child lock will be activated if no activity
for 10 minutes, the child lock symbol( )
will appear in the top of LCD display.
Press DOWN button for 3 seconds to
disengaged child lock.
1. When CURRENT> TARGET, it will be in ON status,the snow symbol
( )will display in LCD display,turn on connected cooling devices,
start to cool down the room, so the room temperature is decreasing.
2. As current temp. rising, CURRENT=TARGET, it will be in OFF status,
snow symbol( )will disappear from LCD display,remote thermostat
will send OFF commands to turn off all connected cooling devices
3. The current temperature will be rising, when current temp. increased
1°C/1.8°F, it will turn on all connected cooling devices once again,
then infinite loop.
So in the COOLING mode, remote thermostat control will automatically
keep the room temp. in below range:
Target Temp. ≤ Room Temp. ≤ Target Temp.+1°C/1.8°F
Cooling Mode:
5. Program setting
Pic.2
Pic.3
For example, we set as 30°C,MO-FR,18:00~23:00,show in Pic.2 and Pic.3
It means, from Monday to Friday, 18:00 to 23:00, TARGET temperature
change to 32°C,in other time, keep in 25°C(Standard heating mode,see Pic.1)
SET
TARGET
CURRENT
6. Turn on/Turn off P1~P8 programs
7. How to switch Heating/Cooling mode
TARGET
CURRENT
CLOCK
Pic.4
Reset
During heating/cooling mode,
Press UP&DOWN button at the
same time for 3 seconds.
The green backlight will flash 3 times,
all setting will be deleted, and back to
factory setting.
SET OK
CLOCK
CURRENT
TARGET
HEAT
1
2
3
4
5
6
7
8
9
10
11
12
13
14
15
Remark:
* P1~P4, it is period for HEATING, P5~P8, it is period for COOLING
* During setting, if you don’t want to set, press POWER button to exit.
* During setting, if no operation for 10 seconds,automatically save and exit.
1
35 7 9 1113 15
2
4
68 10 1214
SET OK
TARGET
CURRENT
CLOCK
3
1
2
Press SET, enter programming ON/OFF selection,
ON or OFF(default) symbol is flashing.
Press UP/DOWN to select the ON,or OFF.
ON: turn on all programming at once,P display next to
the time,the P1~P8 program is working(see Pic.4).
OFF: turn off all programming at once,P disappear,
only standard heating or cooling is working.
Press OK
1
2
3
SET OK
CLOCK
CURRENT
TARGET
HEAT
3
2
Press UP for 3 seconds,enter selection between
heating (default) and cooling mode
Press UP/DOWN,select Flame( ) or Snow symbol( )
Flame represents HEATING mode
Snow represents COOLING mode
Press OK
1
1
2
3
1
SET OK
CLOCK
CURRENT
TARGET
HEAT
2
6
1
1
2
SET OK
CLOCK
TARGET
CURRENT
Cooling mode
FCC Warning:
FCC ID: 2AQQ7-WTS2000
Changes or modifications not expressly approved by the party responsible for compliance could void the user’s authority to operate
the equipment.
This device complies with Part 15 of the FCC Rules. Operation is subject to the following two conditions: (1) this device may not
cause harmful interference, and (2) this device must accept any interference received, including interference that may cause
undesired operation.
This equipment has been tested and found to comply with the limits for a Class B digital device, pursuant to Part 15 of the FCC
Rules. These limits are designed to provide reasonable protection against harmful interference in a residential installation. This
equipment generates, uses and can radiate radio frequency energy and, if not installed and used in accordance with the instructions,
may cause harmful interference to radio communications. However, there is no guarantee that interference will not occur in a
particular installation.
If this equipment does cause harmful interference to radio or television reception, which can be determined by turning the equipment
off and on, the user is encouraged to try to correct the interference by one or more of the following measures:
-- Reorient or relocate the receiving antenna.
-- Increase the separation between the equipment and receiver.
-- Connect the equipment into an outlet on a circuit different from that to which the receiver is connected.
-- Consult the dealer or an experienced radio/TV technician for help.
This device complies with FCC RF radiation exposure limits set forth for an uncontrolled environment. This transmitter must not be
co-located or operating in conjunction with any other antenna or transmitter