Dayton SPEEDSEN Bike computer transmitter User Manual 2
Dayton Industrial Co., Ltd. Bike computer transmitter 2
Dayton >
Contents
- 1. User manual1
- 2. User manual2
User manual2
Installation & Quick StartDURATA
M M M
M
M M
X 2
5mm
1
2
1 2 3
3
or
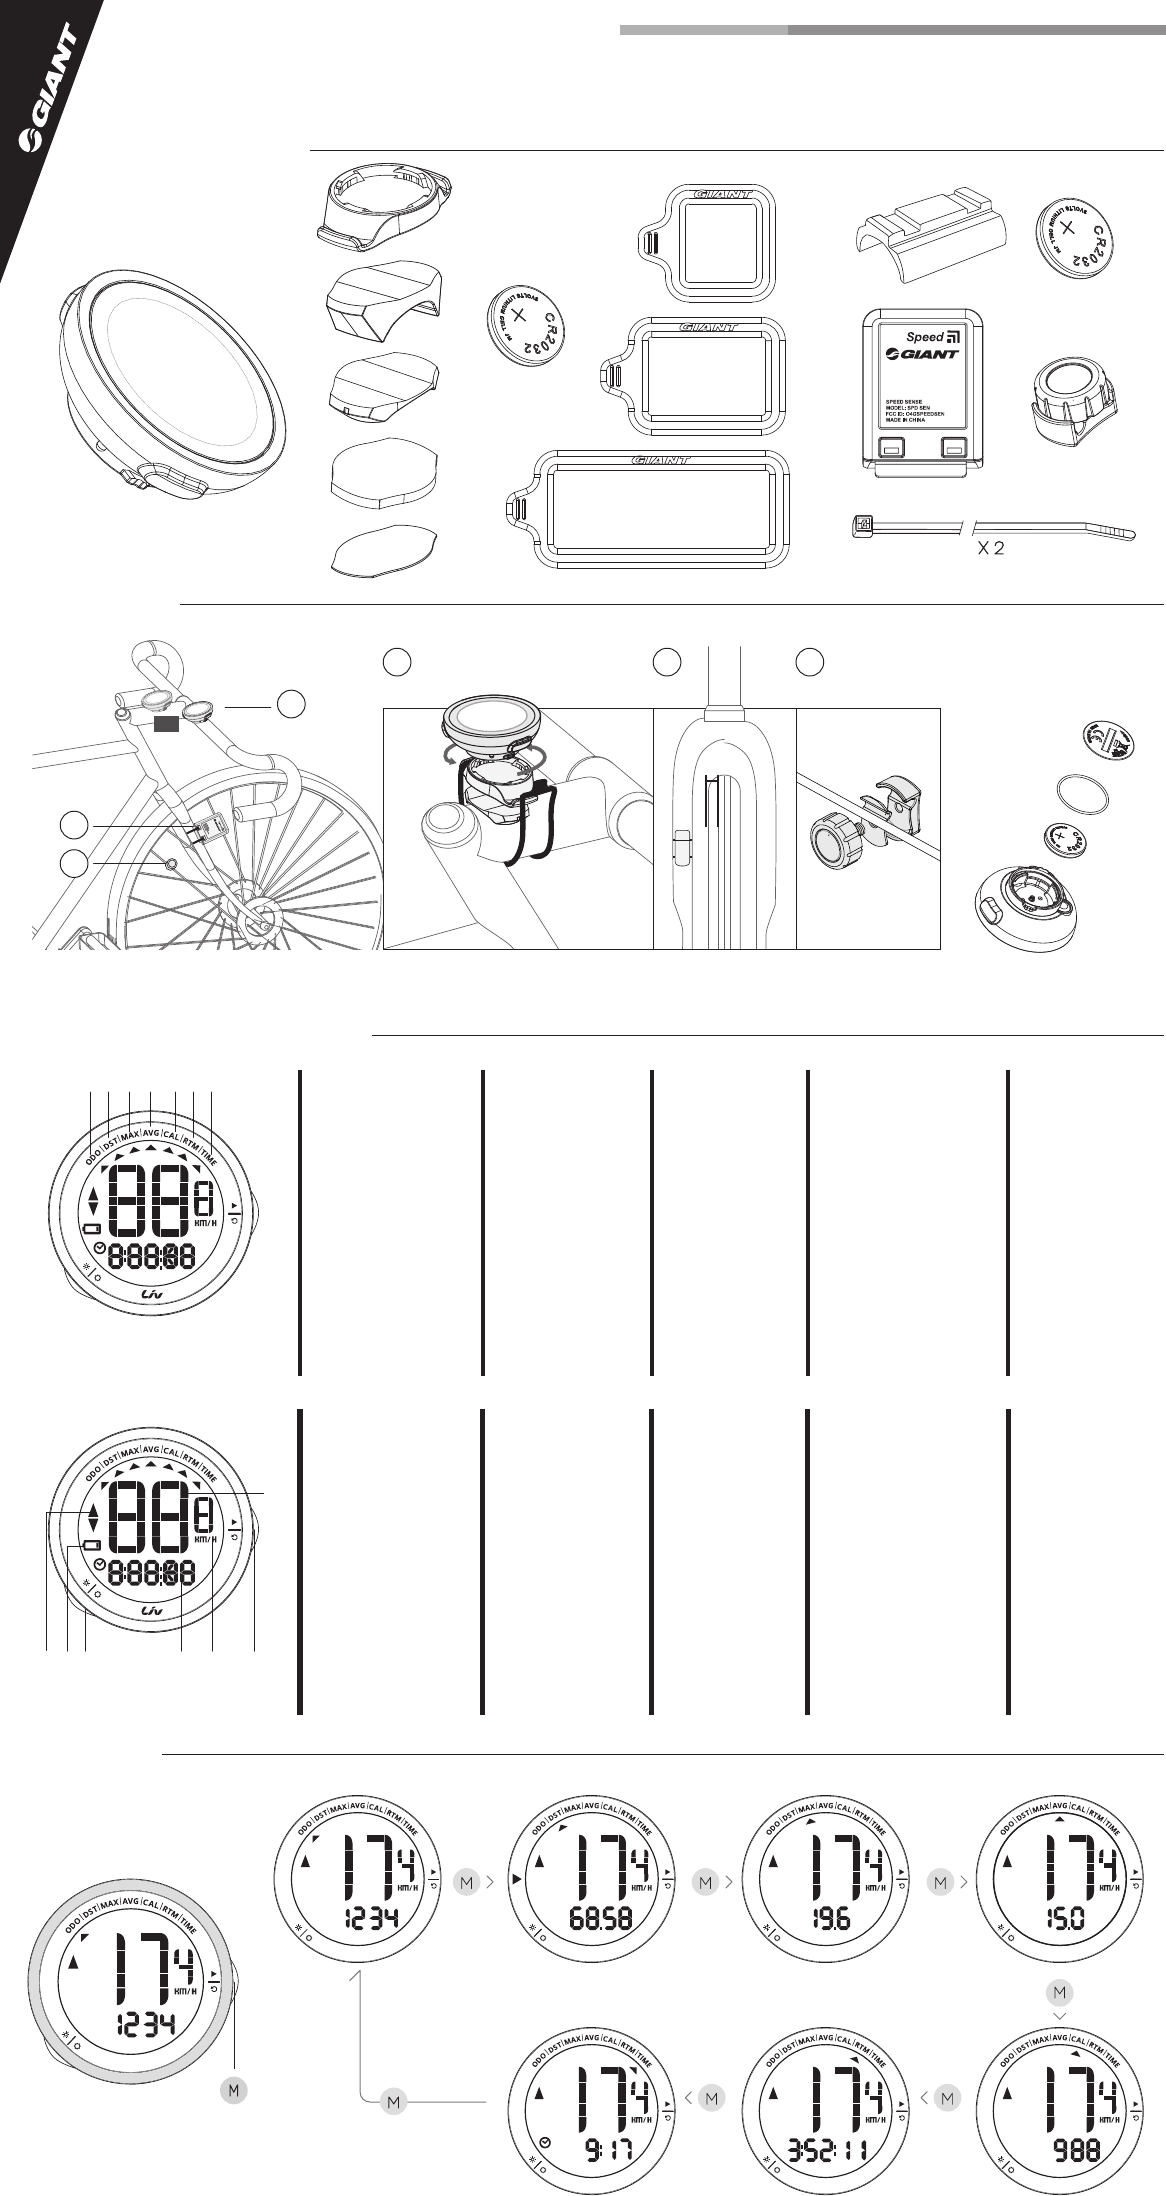
Installation
General Operation & Display
M
1. 总里程
2. 距离
3. 最大速度
4. 平均速度
5. 卡路里
6. 骑乘时间
7. 时钟
8. 速度
9. 功能键 (M)
清除键 (M2)
10. 单位
11. 功能数值
12. 背光键 (S)
设定键 (S2)
13. 低电显示功能
14. 速度比较
SC 1. 總里程
2. 距離
3. 最大速度
4. 平均速度
5. 卡路里
6. 騎乘時間
7. 時鐘
8. 速度
9. 功能鍵 (M)
清除鍵 (M2)
10. 單位
11. 功能數值
12. 背光鍵 (S)
設定鍵 (S2)
13. 低電顯示功能
14. 速度比較
TC 1. 総走行距離
2. 走行距離
3. 最高走行速度
4. 平均走行速度
5. カロリー
6. 走行時間
7. 時刻
8. 走行速度
9. モードキー (M)
リセットキー (M2)
10. 単位
11. 機能の値
12. バックライトキー (S)
設定キー (S2)
13. 低電顯示功能
14. ペース表示
JP 1. Cuentakilómetros
2. Distancia
3. Velocidad máx
4. Velocidad media
5. Calorías
6. Tiempo de marcha
7. Tiempo
8. Velocidad
9. Tecla de modo (M)
Tecla de reinicio (M2)
10. Unidad
11. Valor de funciones
12. Tecla de luz de fondo (S)
Tecla de configuración (S2)
13. Indicador de carga
baja de la batería
14. Pulsómetro
ES
1. Compteur kilométrique
2. Distance
3. Vitesse maxi
4. Vitesse moyenne
5. Calories
6. Durée du trajet
7. Heure
8. Vitesse
9. Touche Mode (M)
Touche Réinitialisation (M2)
10. Unité
11. Valeurs fonctions
12. Touche Rétroéclairage (S)
Touche Configuration (S2)
13. Indicateur batterie faible
14. Régulateur
FR 1. 적산거리계
2. 거리
3. 최대 속도
4. 평균 속도
5. 칼로리
6. 주행 시간
7. 시간
8. 속도
9. 모드 키 (M)
초기화 키 (M2)
10. 단위
11. 기능 값
12. 백라이트 키 (S)
설정 키 (S2)
13. 배터리 부족 경고
14. 페이스
KR 1. Odometer
2. Afstand
3. Max snelheid
4. Gemiddelde snelheid
5. Calorie
6. Rijtijd
7. Tijd
8. snelheid
9. Modustoets (M)
Resettoets (M2)
10. Eenheid
11. Functiewaarde
12. Toets achtergrondverlichting (S)
Instellingstoets (S2)
13. Indicator batterij bijna leeg
14. Gangmaker
NL 1. Licznik kilometrów
2. Dystans
3. Prędkość maks
4. Prędkość średnia
5. Kalorie
6. Czas jazdy
7. Czas
8. Prędkość
9. Przycisk trybu (M)
Przycisk zerowania (M2)
10. Jednostka
11. Wartość
12. Przycisk podświetlania (S)
Przycisk ustawień (S2)
13. Wskaźnik słabego
naładowania baterii
14. Tempo
PL
1 2 3 4 5 6 7
8
13 910
1112
14
Press and
release M key
1. Odometer
2. Trip Distance
3. Max Speed
4. Average Speed
5. Calories
6. Ride Time
7. Time
8. Speed
9. Mode Key (M)
Reset Key (M2)
10. Units
11. Current Function Value
12. Backlight Key (S)
Setup Key (S2)
13. Low Battery Indicator
14. Pace Arrow
EN
1. Tageskilometer
2. Entfernung
3. Max. Geschwindigkeit
4. Durchschnitts-
geschwindigkeit
5. Kalorien
6. Fahrzeit
7. Zeit
8. Geschwindigkeit
9. Modustaste (M)
Reset-Taste (M2)
10. Einheit
11. Funktionswert
12. Hintergrundbeleuchtungs-
taste (S)
Einrichtungstaste (S2)
13. Akkustand-Anzeige
14. Schrittzähler
DE
Head Unit & Parts
Functions
s
S
s
S
m
M
s s
s
m s
s
s2
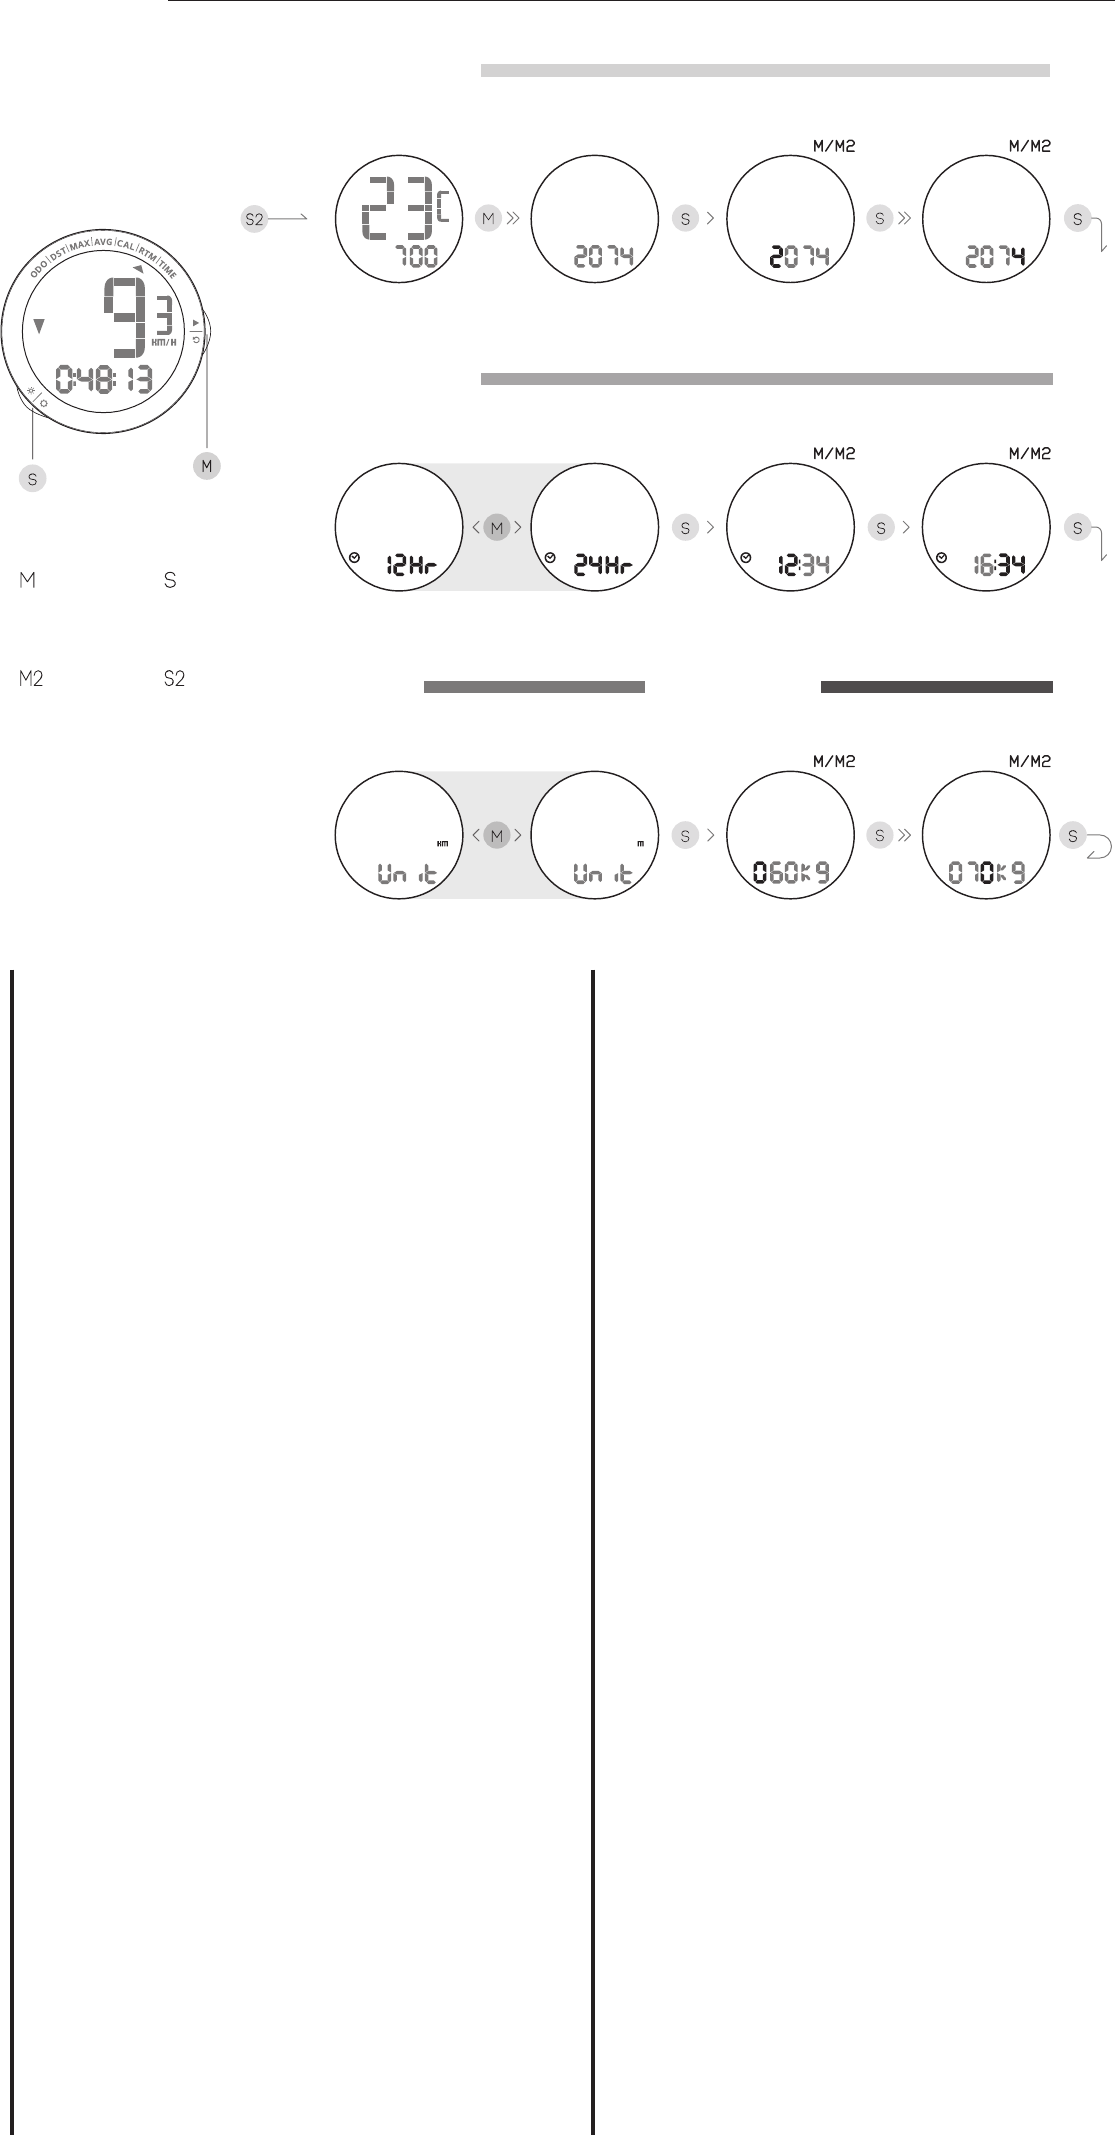
1. Set Wheel Size
4. Set Weight
2. Set Hour Format
Set Hour
Format
Set Unit
ES
TC
DE
SC
EN
FR
ストップウォッチを初めてご利用になる場合:
設定するには S2 キーを押してください。オプションを選択するには M キーを押して
ください。設定を保存し、次のユニットまたはアイテムに移動するには S キーを押し
てください。
1. ホイール外径の設定: M キーを押し、事前に定義されている 10 のホイールサイ
ズから選択するか、カスタムのホイール直径を入力します。
2. 時計の設定: M キーを押し、24/12 時間表示を切り替えます。S キーを押し、選
択内容を保存し、時間と分の設定に進みます。
3. 単位系の設定: M キーを押し、メートル (KM) またはヤード・ポンド (M) を選択
します。S キーを押し、選択内容を保存します。
4. 体重の設定: M キーを押し、体重を選択します。S キーを押し、選択内容を保存
します。
* 操作マニュアルは Web サイト (http://www.giant-bicycles.com/en-in/) でダウ
ンロードしてください。
Pour utiliser votre chronomètre pour la première fois :
Appuyez sur la touche S2 pour le configurer ; appuyez sur la touche M pour sélectionner des
options ; appuyez sur la touche S pour enregistrer vos paramètres et poursuivre avec l'unité ou
l'élément de configuration suivant :
1. Configuration du diamètre de la roue : Appuyez sur la touche M pour faire défiler les 10 tailles
de roue prédéfinies ou saisissez le diamètre personnalisé de votre roue.
2. Configuration de l'horloge : Appuyez sur la touche M pour sélectionner le système temps 24 ou
12 heures, appuyez sur la touche S pour enregistrer votre sélection et poursuivre le réglage de
l'heure et des minutes.
3. Configuration du système d'unité : Appuyez sur la touche M pour sélectionner les unités de
mesure métriques (KM) ou impériales (M), appuyez sur la touche S pour enregistrer votre
sélection.
4. Configuration du poids : Appuyez sur la touche M pour sélectionner le poids, appuyez sur la
touche S pour enregistrer votre sélection.
* Veuillez télécharger le mode d'emploi sur le site Web: http://www.giant-bicycles.com/en-in/
首次使用码表时,按压S2键進行设定,按M键:调整选项,按S键:确认并进入下
一个设定单位或项目:
1.设定轮径:按M键选择内建10种常用轮径或自行输入轮径总长。
2.设定时钟:按M键选择24时/12时制,按S键确认并依序完成 小时:分钟 设定。
3.设定单位:按M键选择公制(KM)或英制(M),按S键确认。
4.设定体重:按M键选择体重,按S键确认。
*详细说明书下载:http://www.giant-bicycles.com/en-in/
JP
So nutzen Sie Ihre Stoppuhr das erste Mal:
Drücken Sie zur Einrichtung die S2-Taste; wählen Sie mit der M-Taste zwischen den Optionen;
drücken Sie zum Speichern Ihrer Einstellungen und zum Fortfahren mit der nächsten Einstellung oder
Option die S-Taste:
1. Reifendurchmesser festlegen: Drücken Sie zum Blättern durch 10 vordefinierte Reifendurchmesser
die M-Taste oder geben Sie Ihren angepassten Reifendurchmesser ein.
2. Uhr stellen: Drücken Sie zum Wählen des 24- oder 12-Stunden-Systems die M-Taste; mit der
S-Taste können Sie Ihre Auswahl speichern und die Einstellungen von Stunde und Minute
fortsetzen.
3. Einheitensystem einrichten: Wählen Sie mit der M-Taste das metrische (KM) oder imperiale (M)
Einheitensystem; drücken Sie zum Speichern Ihrer Auswahl die S-Taste.
4. Gewicht einstellen: Drücken Sie zur Auswahl des Gewichts die M-Taste; drücken Sie zum
Speichern Ihrer Auswahl die S-Taste.
* Bitte laden Sie die Bedienungsanleitung von der Webseite herunter:
http://www.giant-bicycles.com/en-in/
Para utilizar el cronómetro por primera vez:
Pulse la tecla S2 para configurarlo; pulse la tecla M para seleccionar opciones; pulse la tecla S
para guardar la configuración y proceder a la siguiente unidad de configuración o elemento:
1. Configurar el diámetro de la rueda: Pulse la tecla M para desplazarse por los 10 tamaños de
ruedas predefinidas o introduzca el diámetro personalizado de sus ruedas.
2. Configurar el reloj: Pulse la tecla M para seleccionar el sistema de tiempo como 24 o 12
horas, pulse la tecla S para guardar su selección y continúe con la configuración de la hora y
los minutos.
3. Establecer un sistema de unidades: Pulse la tecla M para seleccionar la unidad de medida
métrica (KM) o el sistema anglosajón (M) y pulse la tecla S para guardar su selección.
4. Configurar el peso: Pulse la tecla M para seleccionar el peso, pulse la tecla S para guardar su
selección.
* Descargue el manual de funcionamiento en el sitio Web: http://www.giant-bicycles.com/en-in/
EL Uw stopwatch voor de eerste keer gebruiken:
Druk op de S2-toets om deze in te stellen. Druk op de M-toets om opties te selecteren. Druk op
de S-toets om uw instellingen op te slaan en ga verder naar de volgende instellingseenheid of het
instellingsitem:
1. Wieldiameter instellen: druk op de M-toets om te bladeren door de vooraf gedefinieerde 10
wielmaten of voer de aangepaste wieldiameter in.
2. Klok instellen: druk op de M-toets om de tijdsysteem op 24 of 12 uur in te stellen. Druk op de
S-toets om uw selectie op te slaan en ga verder met de instellingen van uren en minuten.
3. Het eenheidssysteem instellen: Druk op de M-toets om de metrische (KM) of Engelse
maateenheid (M) te kiezen. Druk op de S-toets om uw selectie op te slaan.
4. Gewicht instellen: Druk op de M-toets om het gewicht te selecteren. Druk op de S-toets om uw
selectie op te slaan.
* Download de bedieningshandleiding op de website: http://www.giant-bicycles.com/en-in/
PL Pierwsze użycie stopera:
Naciśnij przycisk S2, aby go skonfigurować; naciśnij przycisk M, aby wybrać opcje; naciśnij
przycisk S, aby zapisać ustawienia i przejść do konfiguracji kolejnego urządzenia lub pozycji:
1. Ustawienie średnicy koła: Naciśnij przycisk M, aby przewinąć przez 10 predefiniowanych
średnic koła lub ustawić własną niestandardową średnicę koła.
2. Ustawienie zegara: Naciśnij przycisk M, aby wybrać tryb 24 lub 12 godzinny czasu, naciśnij
przycisk S, aby zapisać wybór i przejść do ustawienia godzin i minut.
3. Ustawienie układu jednostek miar: Naciśnij przycisk M w celu wyboru metrycznego (km) lub
anglosaskiego (M) układu jednostek miar, naciśnij przycisk S w celu potwierdzenia wyboru.
4. Ustawienie masy: Naciśnij przycisk M w celu wyboru masy, naciśnij przycisk S w celu zapisania
wyboru.
* Pobierz instrukcję obsługi na stronie internetowej: http://www.giant-bicycles.com
KR 스톱워치를 처음 사용하는 경우:
S2 키를 눌러 스톱워치를 설정하십시오. M 키를 눌러 옵션을 선택하십시오. S
키를 눌러 설정을 저장하고 계속해서 다음과 같이 단위 또는 항목을 설정하십시오.
1. 휠 직경 설정: M 키를 눌러 10개의 사전 설정된 휠 크기를 스크롤하여
선택하거나 사용자 지정 휠 직경을 입력합니다.
2. 시계 설정: M 키를 눌러 24 또는 12시간 형식을 선택하고, S 키를 눌러 선택
항목을 저장하고 시간 및 분 설정을 계속합니다.
3. 단위 체계 설정: M 키를 눌러 미터법(KM) 또는 야드법(M) 측정 단위를
선택하고, S 키를 눌러 선택 항목을 저장합니다.
4. 몸무게 설정: M 키를 눌러 몸무게를 선택하고, S 키를 눌러 선택 항목을
저장합니다. * 다음 웹 사이트에서 사용 설명서를 다운로드하십시오.
http://www.giant-bicycles.com/en-in/
首次使用碼表時,按壓S2鍵進行設定,按M鍵:調整選項,按S鍵:確認並進入下
一個設定單位或項目:
1.設定輪徑:按M鍵選擇內建10種常用輪徑或自行輸入輪徑總長。
2.設定時鐘:按M鍵選擇24時/12時制,按S鍵確認並依序完成 小時:分鐘 設定。
3.設定單位:按M鍵選擇公制(KM)或英制(M),按S鍵確認。
4.設定體重:按M鍵選擇體重,按S鍵確認。
*詳細說明書下載:http://www.giant-bicycles.com/en-in/
Press and
release S key
s
Press and
release M key
M
Press & hold
M key for 2s
M2
Press & hold
S key for 2s
S2
s
To use your computer for the first time:
Press S2 key to enter setup; press M key to select options; press S key to save your settings and
proceed to the next setup step:
1. Set up wheel diameter: Press M key to scroll through 10 predefined wheel sizes or enter your
custom wheel circumference in millimeters.
2. Set up clock: Press M key to select 24 or 12 hour time format, press S key to save your
selection and proceed with hour and minute setup.
3. Set up units of measure: Press M key to select Metric (KM) or Imperial (M) units, press S key to
save your selection.
4. Set up weight: Press M key to select weight, press S key to save your selection.
*Please download the operation manual at web site: http://www.giant-bicycles.com/en-in/
Start Setup
3. Set Units
FCC ID: O4GSPEEDSEN
FCC STATEMENT
This device complies with Part 15 of the FCC Rules.
Operation is subject to the following two conditions: (1) This device may not cause harmful
interference, and (2) This device must accept any interference received, including interference
that may cause undesired operation.
The grantee is not responsible for any changes or modifications not expressly approved by the
party responsible for compliance. Such modifications could void the user’s authority to operate
the equipment.
NOTE: This equipment has been tested and found to comply with the limits for a Class B digital
device, pursuant to part 15 of the FCC Rules. These limits are designed to provide reasonable
protection against harmful interference in a residential installation. This equipment generates,
uses and can radiate radio frequency energy and, if not installed and used in accordance with
the instructions, may cause harmful interference to radio communications. However, there is no
guarantee that interference will not occur in a particular installation. If this equipment does
cause harmful interference to radio or television reception, which can be determined by turning
the equipment off and on, the user is encouraged to try to correct the interference by one or
more of the following measures:
—Reorient or relocate the receiving antenna.
—Increase the separation between the equipment and receiver.
—Connect the equipment into an outlet on a circuit different from that to which the receiver is connected.
—Consult the dealer or an experienced radio/TV technician for help.
IC: 7666A-SPEEDSEN
IC Statement
This device complies with Industry Canada licence-exempt RSS standard(s). Operation is
subject to the following two conditions: (1) this device may not cause interference, and (2) this
device must accept any interference, including interference that may cause undesired operation
of the device. CAN ICES-3(B)/NMB-3(B)
Le présent appareil est conforme aux CNR d'Industrie Canada applicables aux appareils radio
exempts de licence. L'exploitation est autorisée aux deux conditions suivantes:
(1) il ne doit pas produire de brouillage et
(2) l’ utilisateur du dispositif doit étre prêt à accepter tout brouillage radioélectrique reçu, même
si ce brouillage est susceptible de compromettre le fomctionnement du dispositif. CAN ICES-3(B)/NMB-3(B)
The device meets the exemption from the routine evaluation limits in section 2.5 of RSS 102
and compliance with RSS-102 RF exposure, users can obtain Canadian information on RF
exposure and compliance.
Le dispositif rencontre l'exemption des limites courantes d'évaluation dans la section 2.5 de
RSS 102 et la conformité à l'exposition de RSS-102 rf, utilisateurs peut obtenir l'information
canadienne sur l'exposition et la conformité de rf.
This transmitter must not be co-located or operating in conjunction with any other antenna or
transmitter. This equipment should be installed and operated with a minimum distance of 20
millimeters between the radiator and your body.
Cet émetteur ne doit pas être Co-placé ou ne fonctionnant en même temps qu'aucune autre
antenne ou émetteur. Cet équipement devrait être installé et actionné avec une distance
minimum de 20 milliimètres entre le radiateur et votre corps.