Dell 24CLNS Laptop with Wireless 2100 LAN 3A Mini PCI Adapter User Manual
Dell Inc. Laptop with Wireless 2100 LAN 3A Mini PCI Adapter Users Manual
Dell >
Contents
Manual part 1

Dell™ Latitude™ D505L User's Guide
Notes, Notices, and Cautions
Abbreviations and Acronyms
For a complete list of abbreviations and acronyms, see the Glossary.
If you purchased a Dell™ n Series computer, any references in this document to Microsoft® Windows®
operating systems are not applicable.
Information in this document is subject to change without notice.
© 2003 Dell Inc. All rights reserved.
Reproduction in any manner whatsoever without the written permission of Dell Inc. is strictly forbidden.
Trademarks used in this text: Dell, the DELL logo, Latitude, Dell Precision, OptiPlex, Inspiron, Dimension, Dell TravelLite, and
DellNet are trademarks of Dell Inc.; Intel and Pentium are registered trademarks and Intel SpeedStep and Centrino are trademarks
of Intel Corporation; Microsoft, Windows, Windows NT, and MS-DOS are registered trademarks of Microsoft Corporation; Bluetooth is
a trademark owned by Bluetooth SIG, Inc. and is used by Dell Inc. under license; ENERGY STAR is a registered trademark of the
U.S. Environmental Protection Agency. As an ENERGY STAR Partner, Dell Inc. has determined that this product meets the ENERGY
STAR guidelines for energy efficiency.
Other trademarks and trade names may be used in this document to refer to either the entities claiming the marks and names or
their products. Dell Inc. disclaims any proprietary interest in trademarks and trade names other than its own.
Model PP10L
September 2003 P/N M1794 Rev. A00
NOTE: A NOTE indicates important information that helps you make better use of your computer.
NOTICE: A NOTICE indicates either potential damage to hardware or loss of data and tells you how to
avoid the problem.
CAUTION: A CAUTION indicates a potential for property damage, personal injury, or death.
Pa
g
e 1 of 1t
p
.htm
9/19/2003file://C:\Documents%20and%20Settin
g
s\r
p
axman\Local%20Settin
g
s\Tem
p
\~hh1E1F.htm
Finding Information for Your Computer
What are you looking
for?
Find It Here
zA diagnostic
program for my
computer
zDrivers for my
computer
zMy computer
documentation
zMy device
documentation
Drivers and Utilities CD (also known as the ResourceCD)
Documentation and drivers are already installed on your computer. You can
use the CD to reinstall drivers, run the Dell Diagnostics, or access your
documentation.
Readme files may be included on your CD to provide last-minute updates about
technical changes to your computer or advanced technical-reference material
for technicians or experienced users.
zHow to set up my
computer
zWarranty
information
zSafety instructions
Dell™ System Information Guide
NOTE: This document is available as a PDF at support.dell.com.
zHow to remove and
replace parts
zTechnical
specifications
zHow to configure
system settings
zHow to troubleshoot
and solve problems
User's Guide
Windows XP Help and Support Center
1. Click the Start button and click Help and Support.
2. Click User's and system guides and click User's guides.
Microsoft Windows 2000
Double-click the User's Guides icon on your desktop.
zService Tag and
Express Service
Service Tag and Microsoft Windows License
Pa
g
e 1 of 3Findin
g
Information for Your Com
p
ute
r
9/10/2003file://C:\Documents%20and%20Settin
g
s\r
p
axman\Local%20Settin
g
s\Tem
p
\~hh4C4.htm

Code
zMicrosoft Windows
License Label
These labels are located on your computer.
zUse the Service Tag to identify your computer when you use
support.dell.com or contact technical support.
zEnter the Express Service Code to direct your call when contacting
technical support. The Express Service Code is not available in all
countries.
zUse the number on the Microsoft Windows License Label if you reinstall
your operating system.
zLatest drivers for my
computer
zAnswers to technical
service and support
questions
zOnline discussions
with other users and
technical support
zDocumentation for
my computer
Dell Support Website — support.dell.com
The Dell Support website provides several online tools, including:
zSolutions — Troubleshooting hints and tips, articles from technicians,
and online courses
zCommunity — Online discussion with other Dell customers
zUpgrades — Upgrade information for components, such as memory, the
hard drive, and the operating system
zCustomer Care — Contact information, order status, warranty, and
repair information
zDownloads — Drivers, patches, and software updates
zReference — Computer documentation, product specifications, and white
papers
zService call status
and support history
zTop technical issues
for my computer
zFrequently asked
questions
zFile downloads
zDetails on my
computer
configuration
zService contract for
my computer
Dell Premier Support Website — premiersupport.dell.com
The Dell Premier Support website is customized for corporate, government,
and education customers. This website may not be available in all regions.
zHow to use Windows
XP
zDocumentation for
my computer
zDocumentation for
devices (such as a
modem)
Windows Help and Support Center
1. Click the Start button and click Help and Support.
2. Type a word or phrase that describes your problem and click the arrow
icon.
3. Click the topic that describes your problem.
4. Follow the instructions on the screen.
zHow to reinstall my
operating system
Operating System CD
The operating system is already installed on your computer. To resintall your
operating system, use the Operating System CD. See your User's Guide for
operating system reinstallation instructions.
After you reinstall your operating system, use the Drivers and Utilities CD to
Pa
g
e 2 of 3Findin
g
Information for Your Com
p
ute
r
9/10/2003file://C:\Documents%20and%20Settin
g
s\r
p
axman\Local%20Settin
g
s\Tem
p
\~hh4C4.htm

reinstall drivers for the devices that came with your computer.
Your operating system product key label is located on your computer.
Pa
g
e 3 of 3Findin
g
Information for Your Com
p
ute
r
9/10/2003file://C:\Documents%20and%20Settin
g
s\r
p
axman\Local%20Settin
g
s\Tem
p
\~hh4C4.htm
About Your Computer
Front View
Left View
Right View
Back View
Bottom View
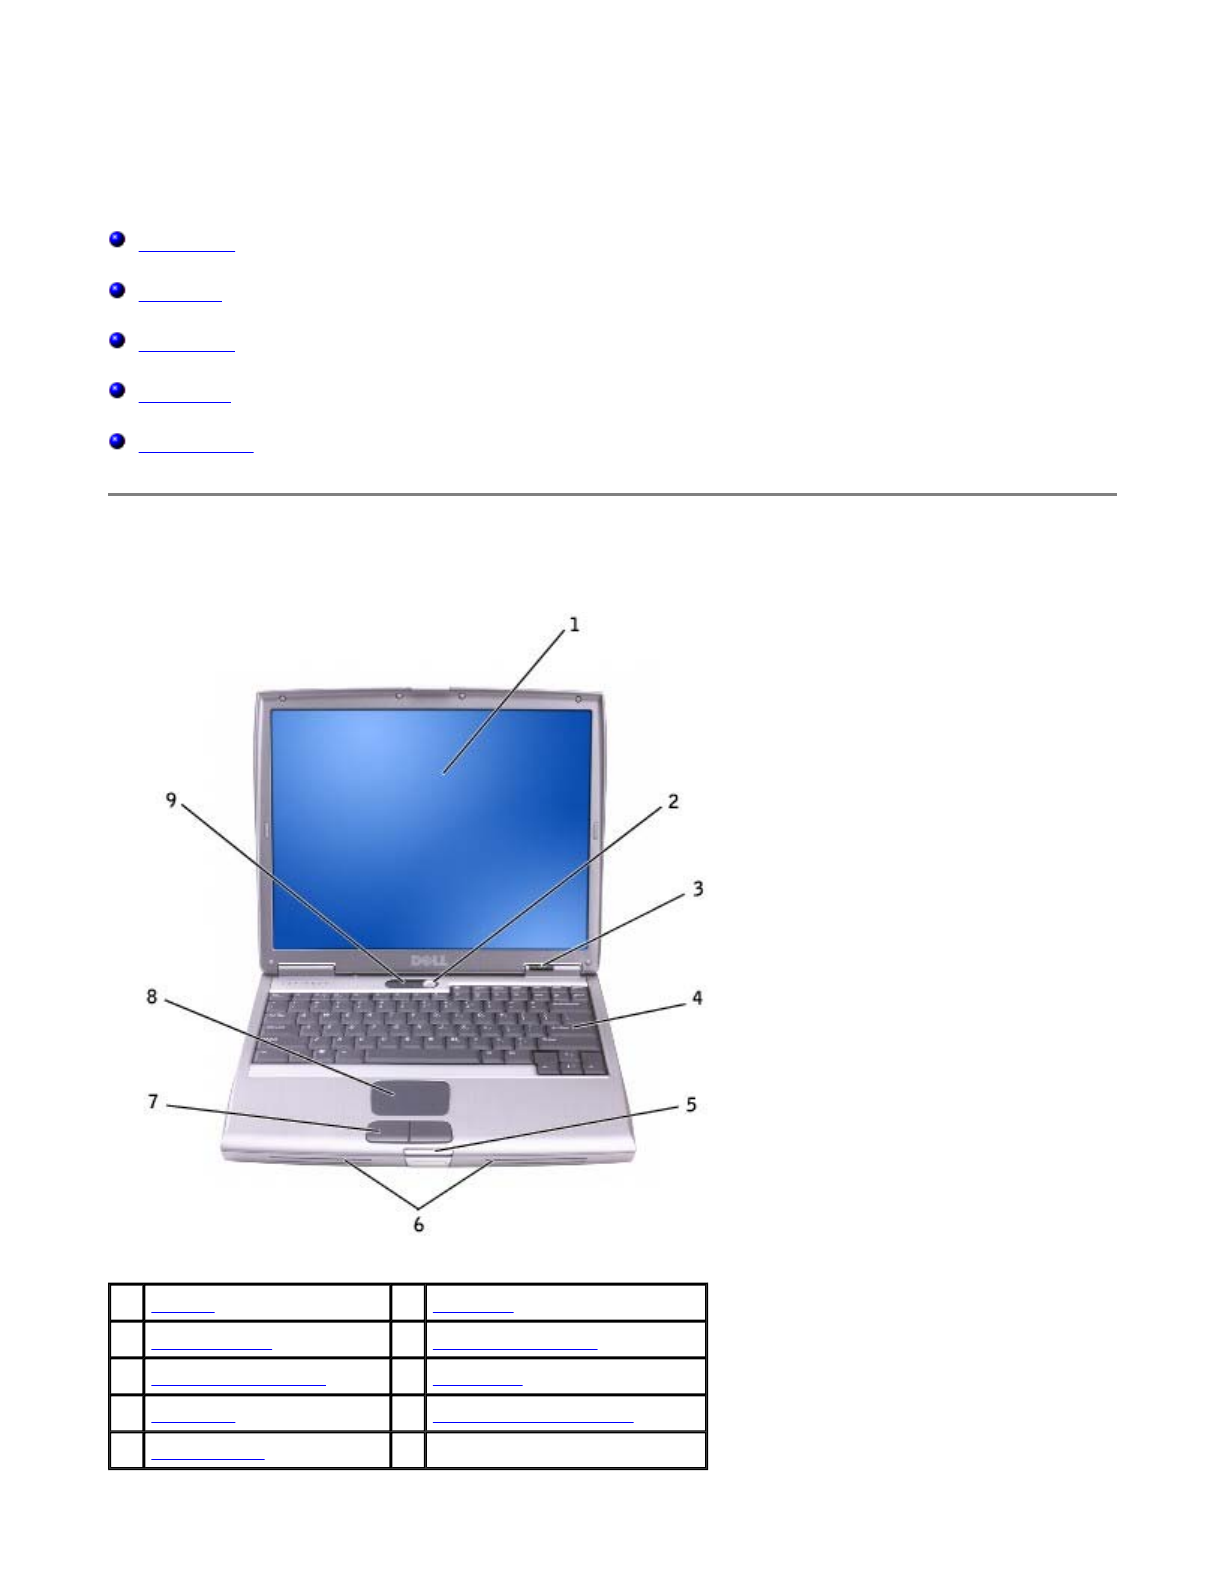
Front View
1 display 6 speakers
2 power button 7 touch pad buttons
3 device status lights 8 touch pad
4 keyboard 9 keyboard status lights
5 display latch
Pa
g
e 1 of 11About Your Com
p
ute
r
9/10/2003file://C:\Documents%20and%20Settin
g
s\r
p
axman\Local%20Settin
g
s\Tem
p
\~hh5A79.htm
display — For more information about your display, see "Using the Display."
power button — Press the power button to turn on the computer or exit a power management mode.
If the computer stops responding, press and hold the power button until the computer turns off completely
(which may take several seconds).
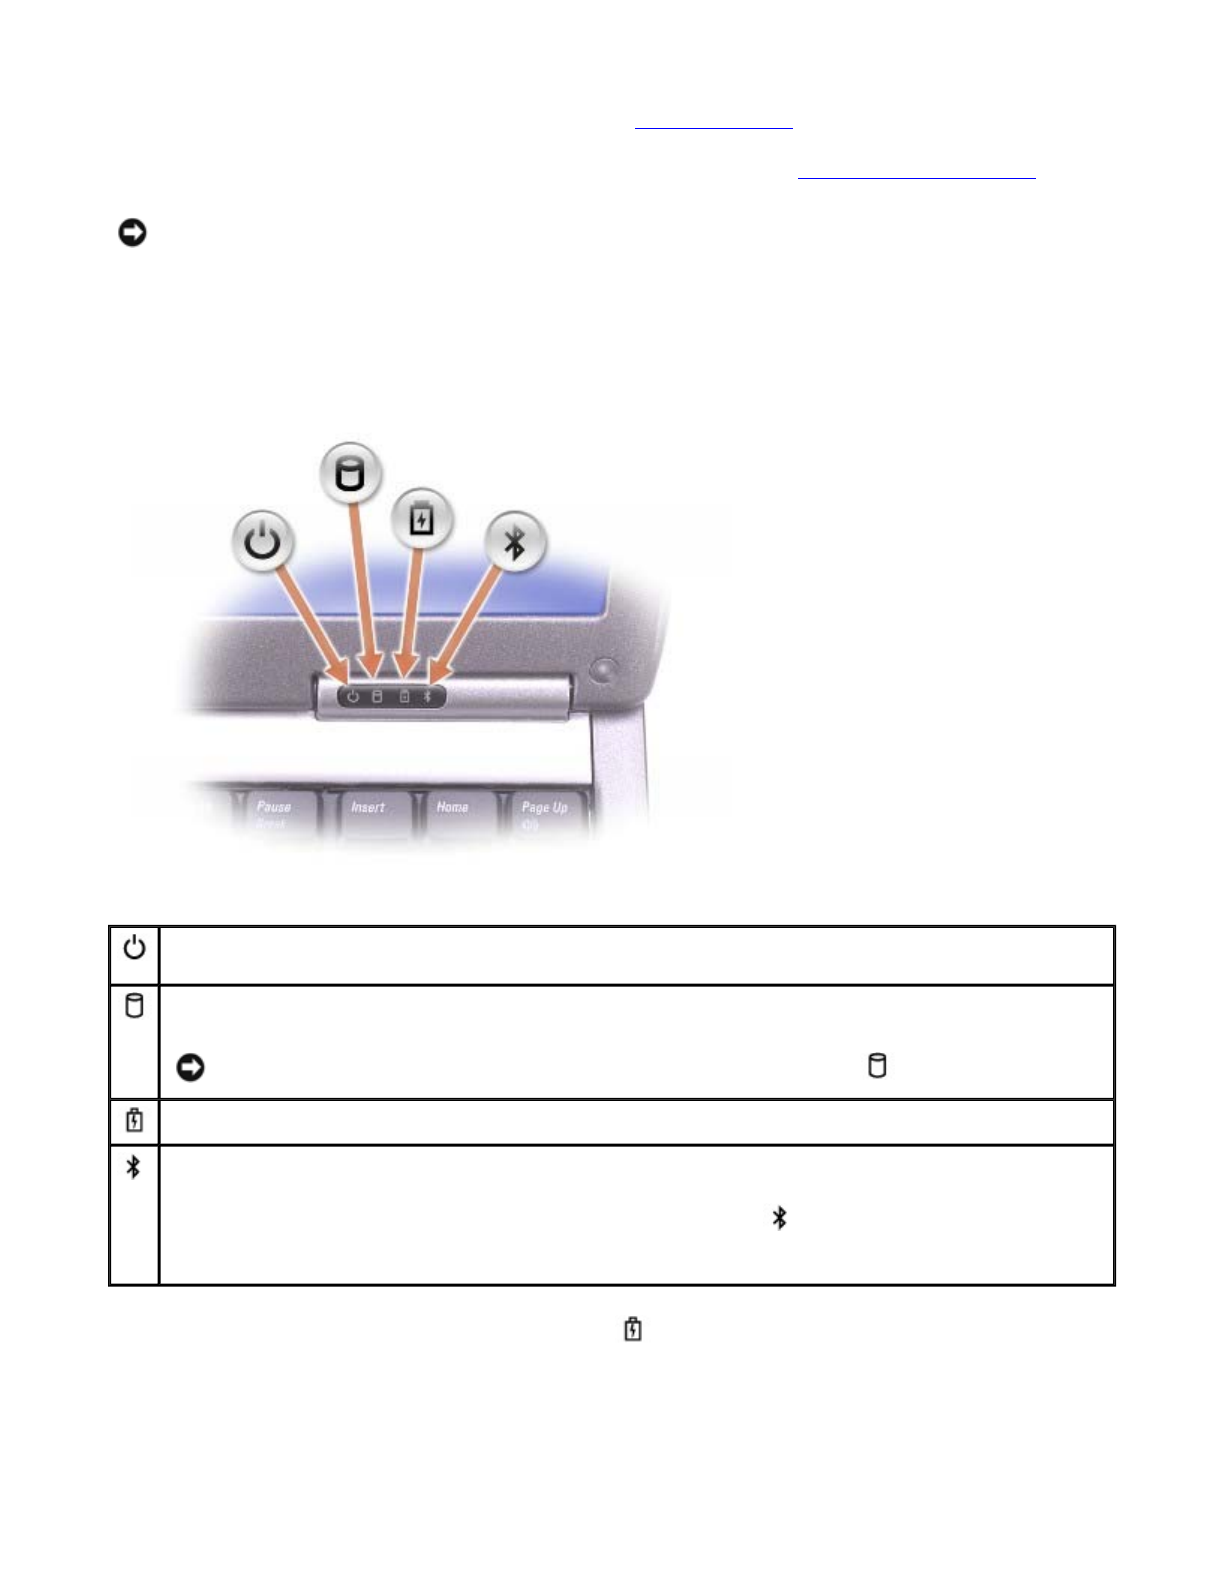
device status lights
If the computer is connected to an electrical outlet, the light operates as follows:
{Solid green: The battery is charging.
{Flashing green: The battery is almost fully charged.
NOTICE: To avoid losing data, turn off your computer by performing a Microsoft® Windows®
operating system shutdown rather than by pressing the power button.
Turns on when you turn on the computer and blinks when the computer is in a power management
mode.
Turns on when the computer reads or writes data.
NOTICE: To avoid loss of data, never turn off the computer while the light is flashing.
Turns on steadily or blinks to indicate battery charge status.
Turns on when Bluetooth™ is enabled. To enable or disable Bluetooth, press <Fn><F2>.
NOTE: Bluetooth is an optional feature on your computer, so the icon turns on only if you ordered
Bluetooth with your computer. For more information, see the documentation that came with your
Bluetooth wireless technology.
Pa
g
e 2 of 11About Your Com
p
ute
r
9/10/2003file://C:\Documents%20and%20Settin
g
s\r
p
axman\Local%20Settin
g
s\Tem
p
\~hh5A79.htm
If the computer is running on a battery, the light operates as follows:
{Off: The battery is adequately charged (or the computer is turned off).
{Flashing orange: The battery charge is low.
Solid orange: The battery charge is critically low.
keyboard — The keyboard includes a numeric keypad as well as the Windows logo key . For
information on supported keyboard shortcuts, see "Using the Keyboard and Touch Pad."
display latch — Keeps the display closed.
speakers — To adjust the volume of the integrated speakers, press the volume control buttons, mute button,
or volume-control keyboard shortcuts. For more information, see "Using the Keyboard and Touch Pad."
touch pad buttons — Provide the functionality of a mouse. See "Using the Keyboard and Touch Pad" for
more information.
touch pad — Provides the functionality of a mouse. See "Using the Keyboard and Touch Pad" for more
information.
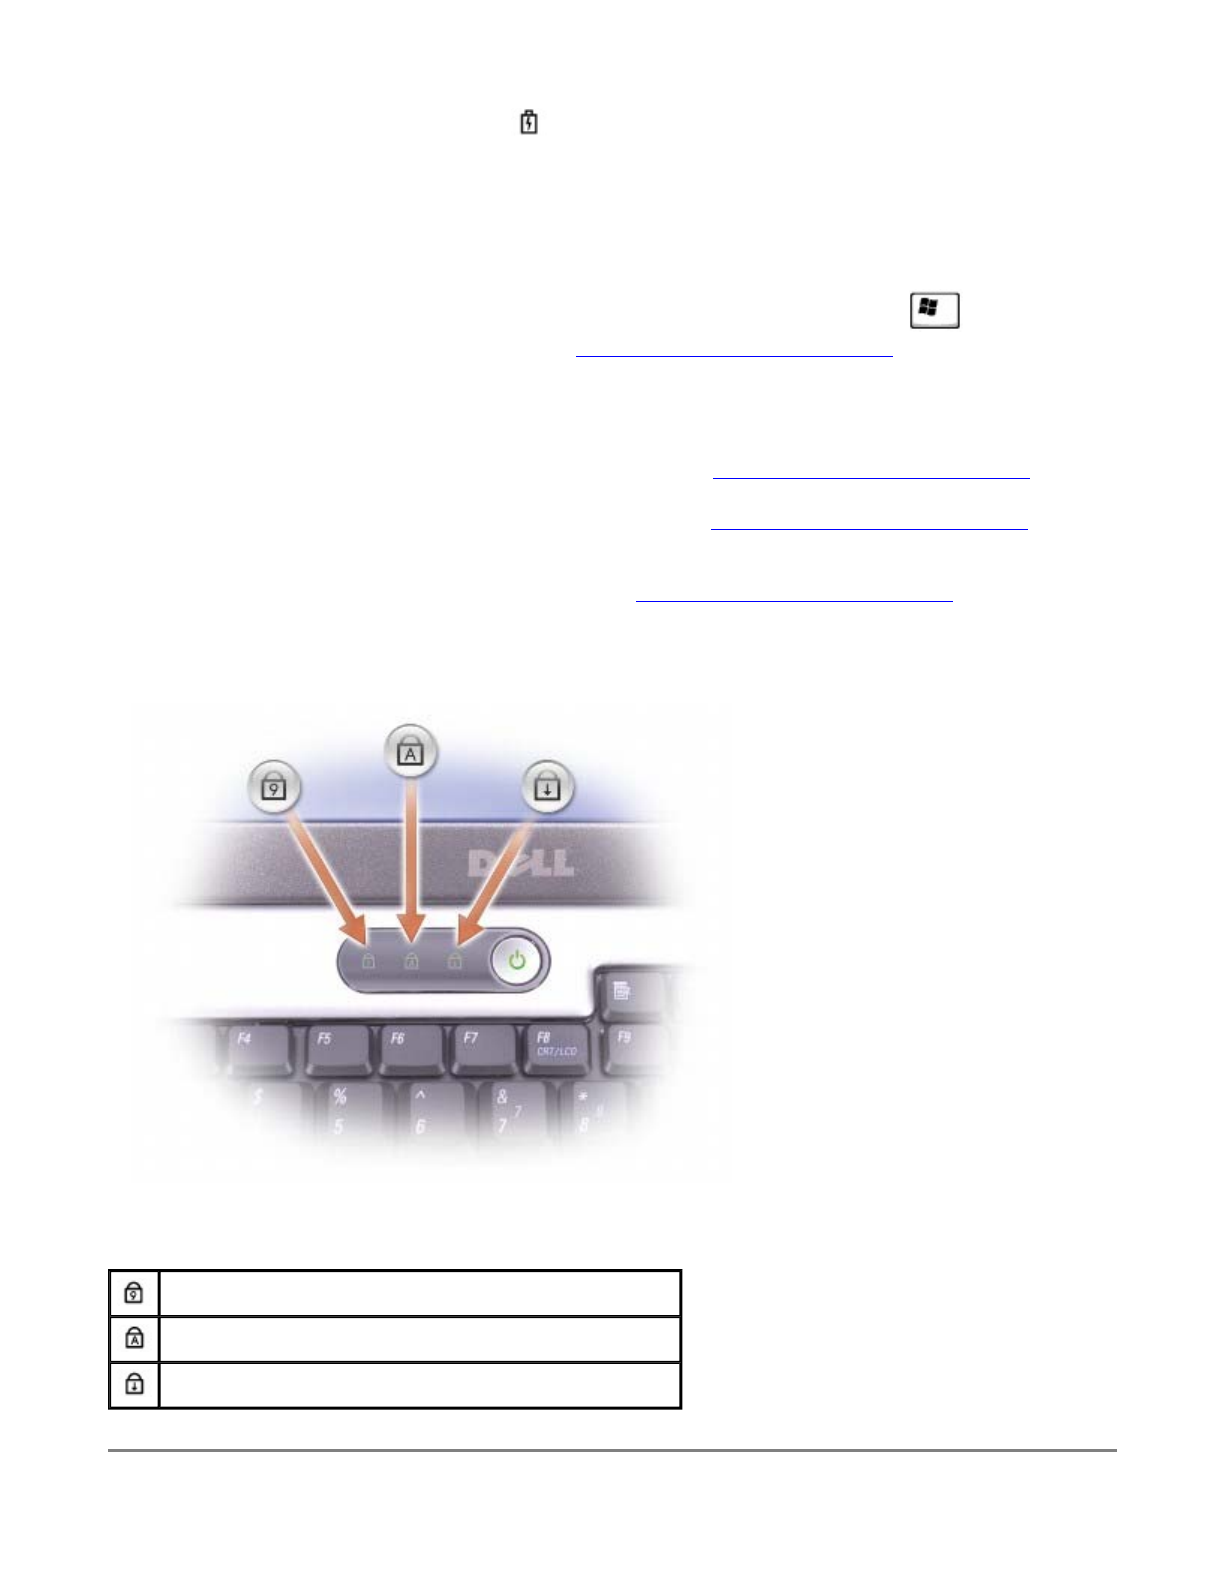
keyboard status lights
The green lights located above the keyboard indicate the following:
Turns on when the numeric keypad is enabled.
Turns on when the uppercase letter function is enabled.
Turns on when the scroll lock function is enabled.
Pa
g
e 3 of 11About Your Com
p
ute
r
9/10/2003file://C:\Documents%20and%20Settin
g
s\r
p
axman\Local%20Settin
g
s\Tem
p
\~hh5A79.htm
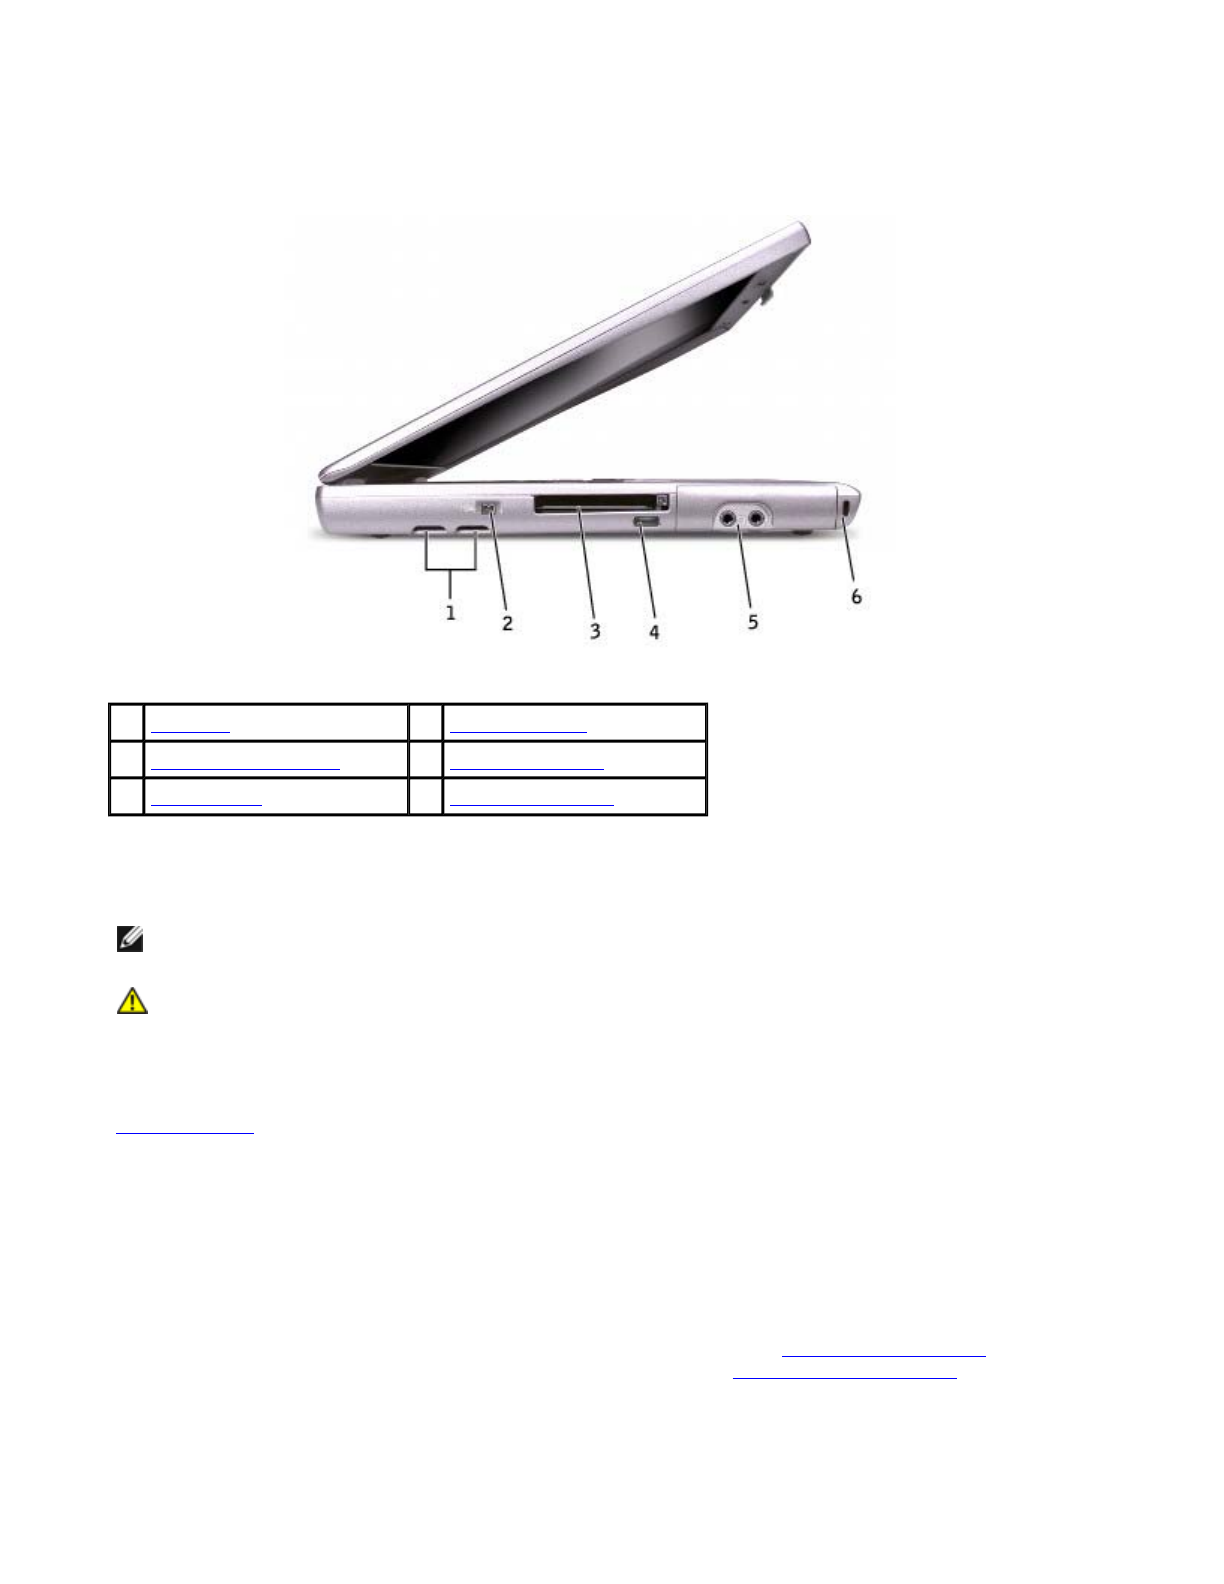
Left View
air vents — The computer uses an internal fan to create airflow through the vents, which prevents the
computer from overheating.
PC Card slot — Supports one PC Card, such as a modem or network adapter. For more information, see
"Using PC Cards."
infrared sensor — Lets you transfer files from your computer to another infrared-compatible device without
using cable connections.
IEEE 1394 connector —
Use to attach devices supporting IEEE 1394 high-speed transfer rates, such as some digital video cameras.
When you receive your computer, the sensor is disabled. You can use the system setup program to enable the
sensor. For information on transferring data, see Windows Help, the Help and Support Center, or the
documentation that came with your infrared-compatible device.
audio connectors
1 air vents (2) 4 infrared sensor
2 IEEE 1394 connector 5 audio connectors (2)
3 PC Card slot 6 security cable slot
NOTE: The computer turns on the fan when the computer gets hot. Fan noise is normal and does not
indicate a problem with the fans or the computer.
CAUTION: Do not block, push objects into, or allow dust to accumulate in the air vents. Do
not store your Dell™ computer in a low-airflow environment, such as a closed briefcase,
while it is running. Restricting the airflow can damage the computer or cause a fire.
Pa
g
e 4 of 11About Your Com
p
ute
r
9/10/2003file://C:\Documents%20and%20Settin
g
s\r
p
axman\Local%20Settin
g
s\Tem
p
\~hh5A79.htm
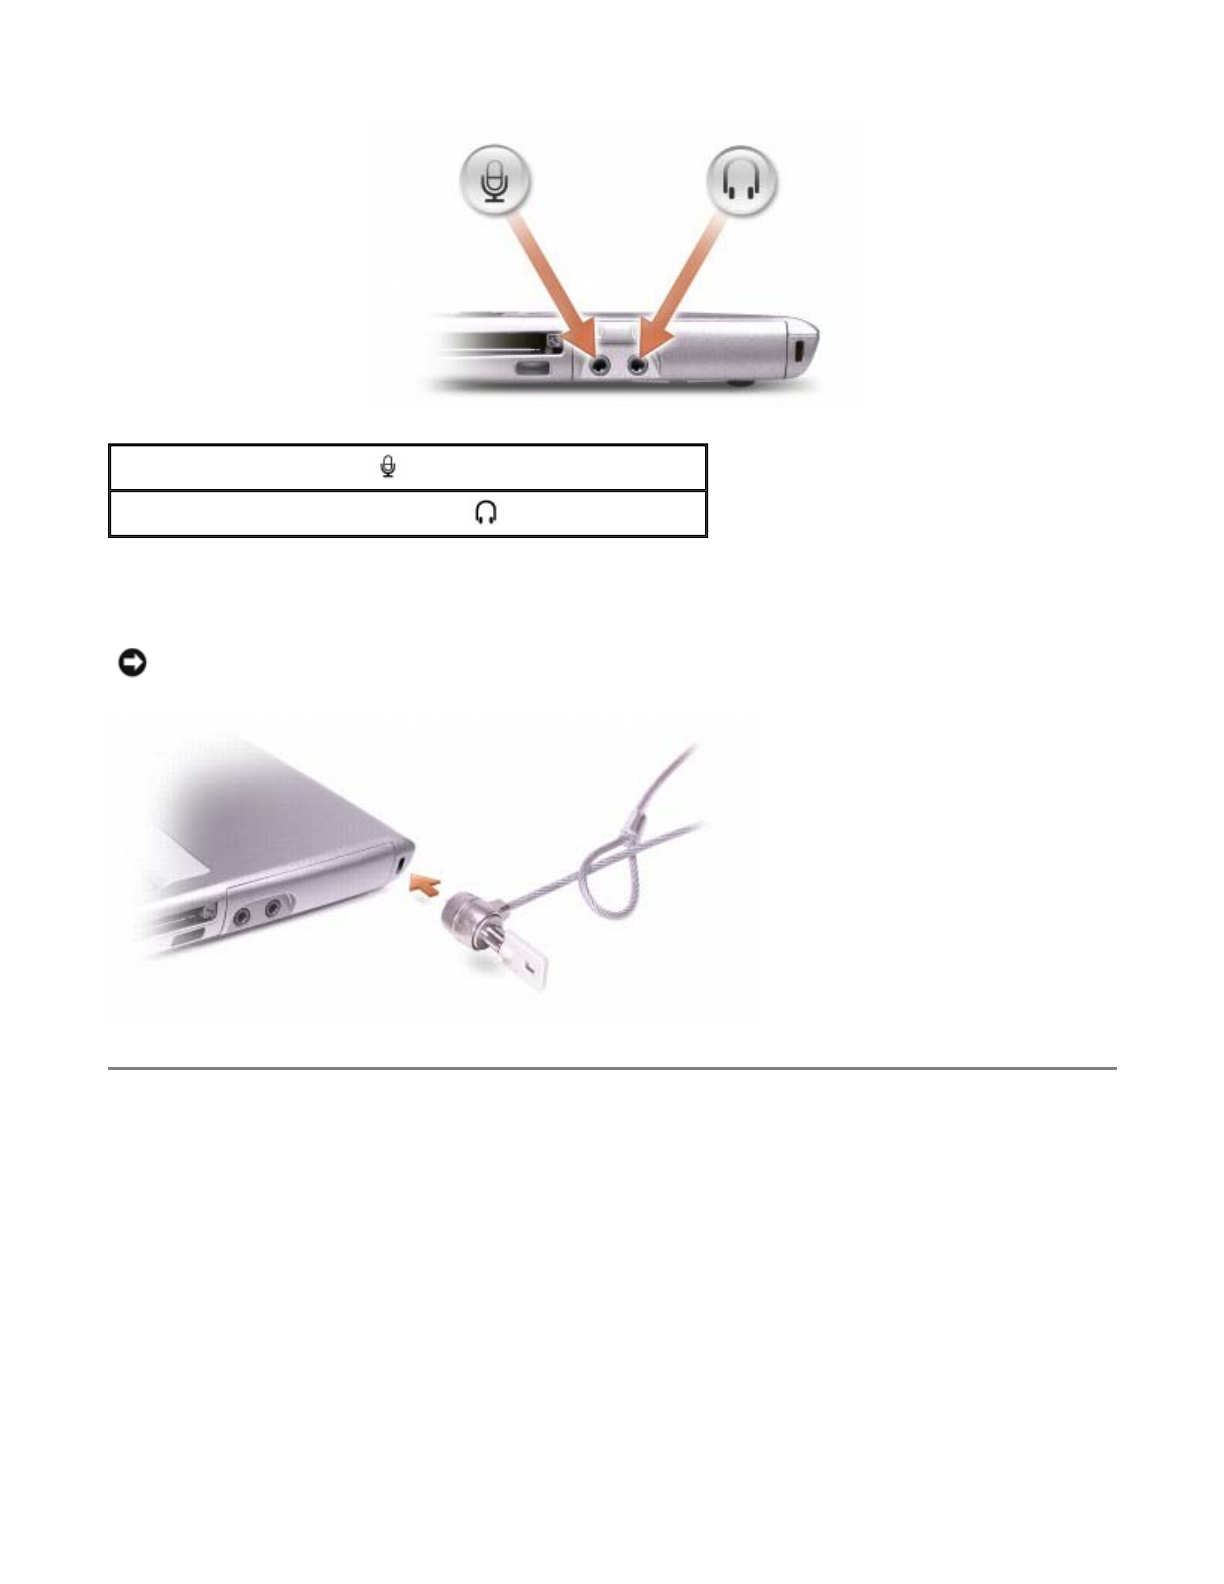
security cable slot — Lets you attach a commercially available antitheft device to the computer. For more
information, see the instructions included with the device.
Right View
Attach a microphone to the connector.
Attach headphones or speakers to the connector.
NOTICE: Before you buy an antitheft device, ensure that it will work with the security cable slot.
Pa
g
e 5 of 11About Your Com
p
ute
r
9/10/2003file://C:\Documents%20and%20Settin
g
s\r
p
axman\Local%20Settin
g
s\Tem
p
\~hh5A79.htm
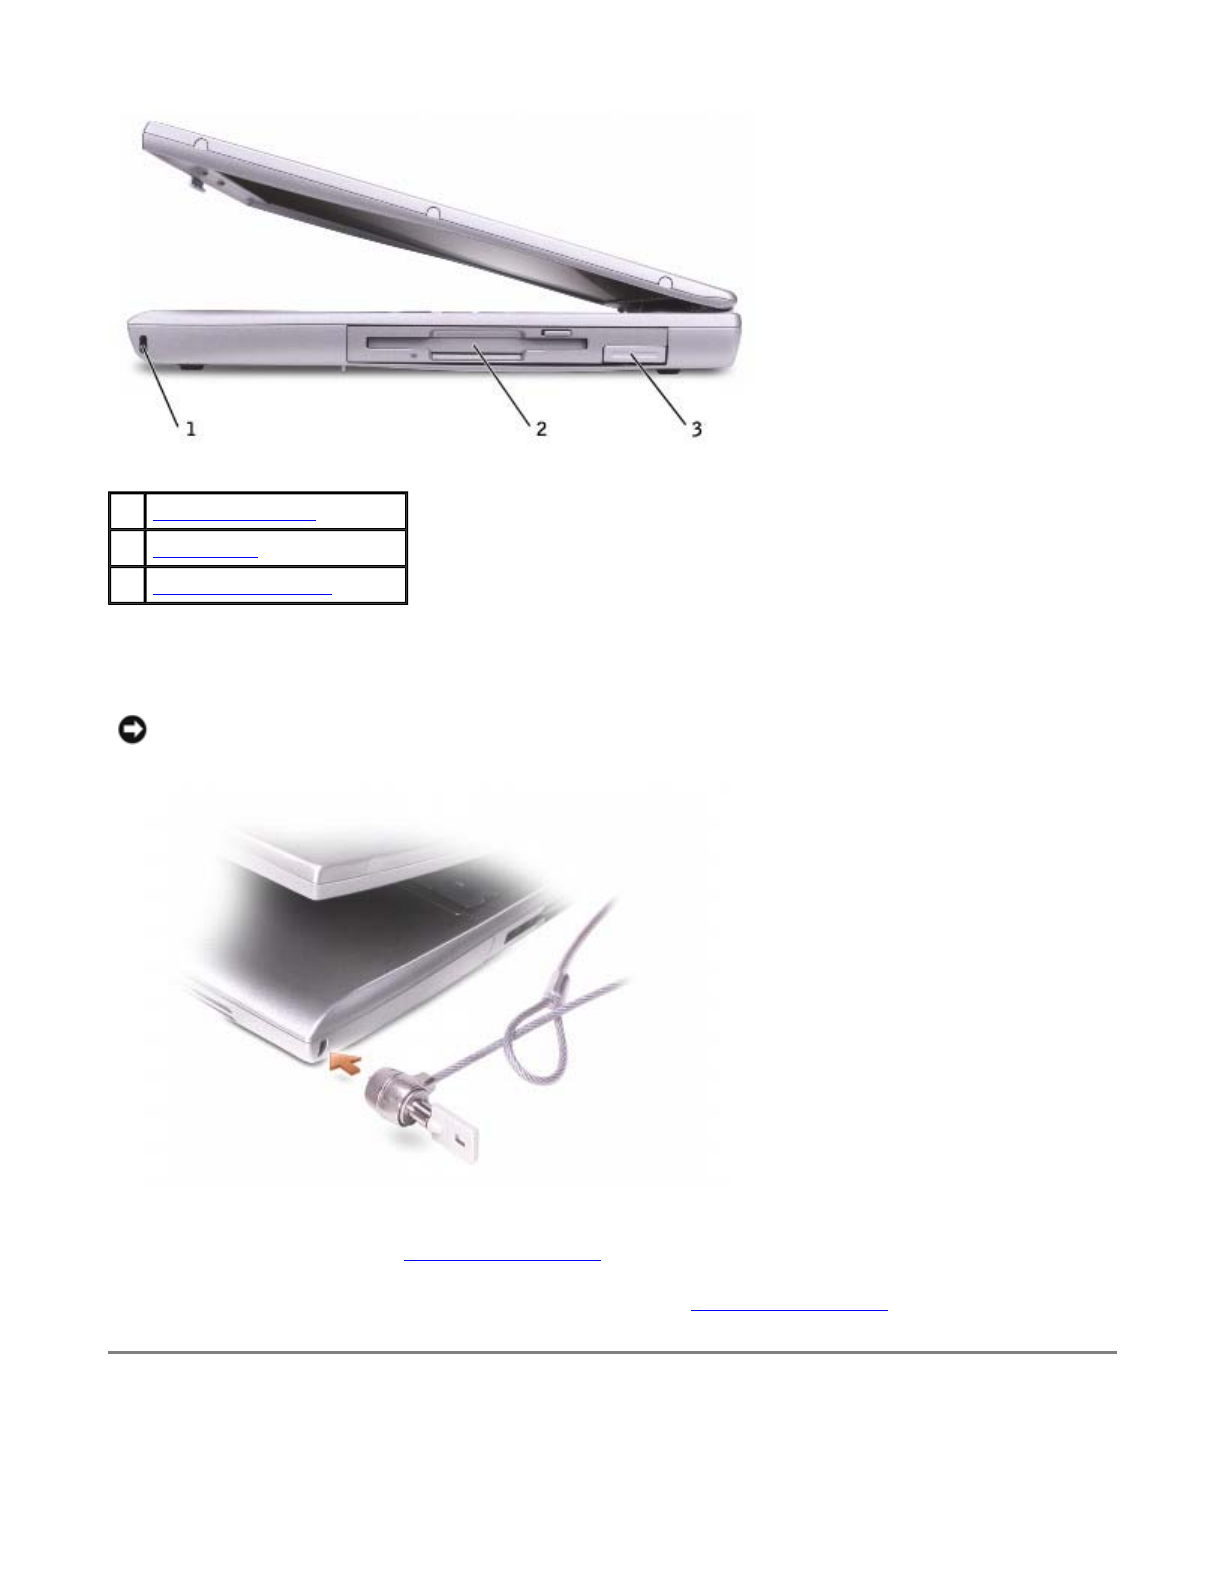
security cable slot — Lets you attach a commercially available antitheft device to the computer. For more
information, see the instructions included with the device.
module bay — You can install devices such as an optical drive or a Dell TravelLite™ module in the module
bay. For more information, see "Using the Module Bay."
device latch release — Releases the module bay device. See "Using the Module Bay" for instructions.
Back View
1 security cable slot
2 module bay
3 device latch release
NOTICE: Before you buy an antitheft device, ensure that it will work with the security cable slot.
Pa
g
e 6 of 11About Your Com
p
ute
r
9/10/2003file://C:\Documents%20and%20Settin
g
s\r
p
axman\Local%20Settin
g
s\Tem
p
\~hh5A79.htm
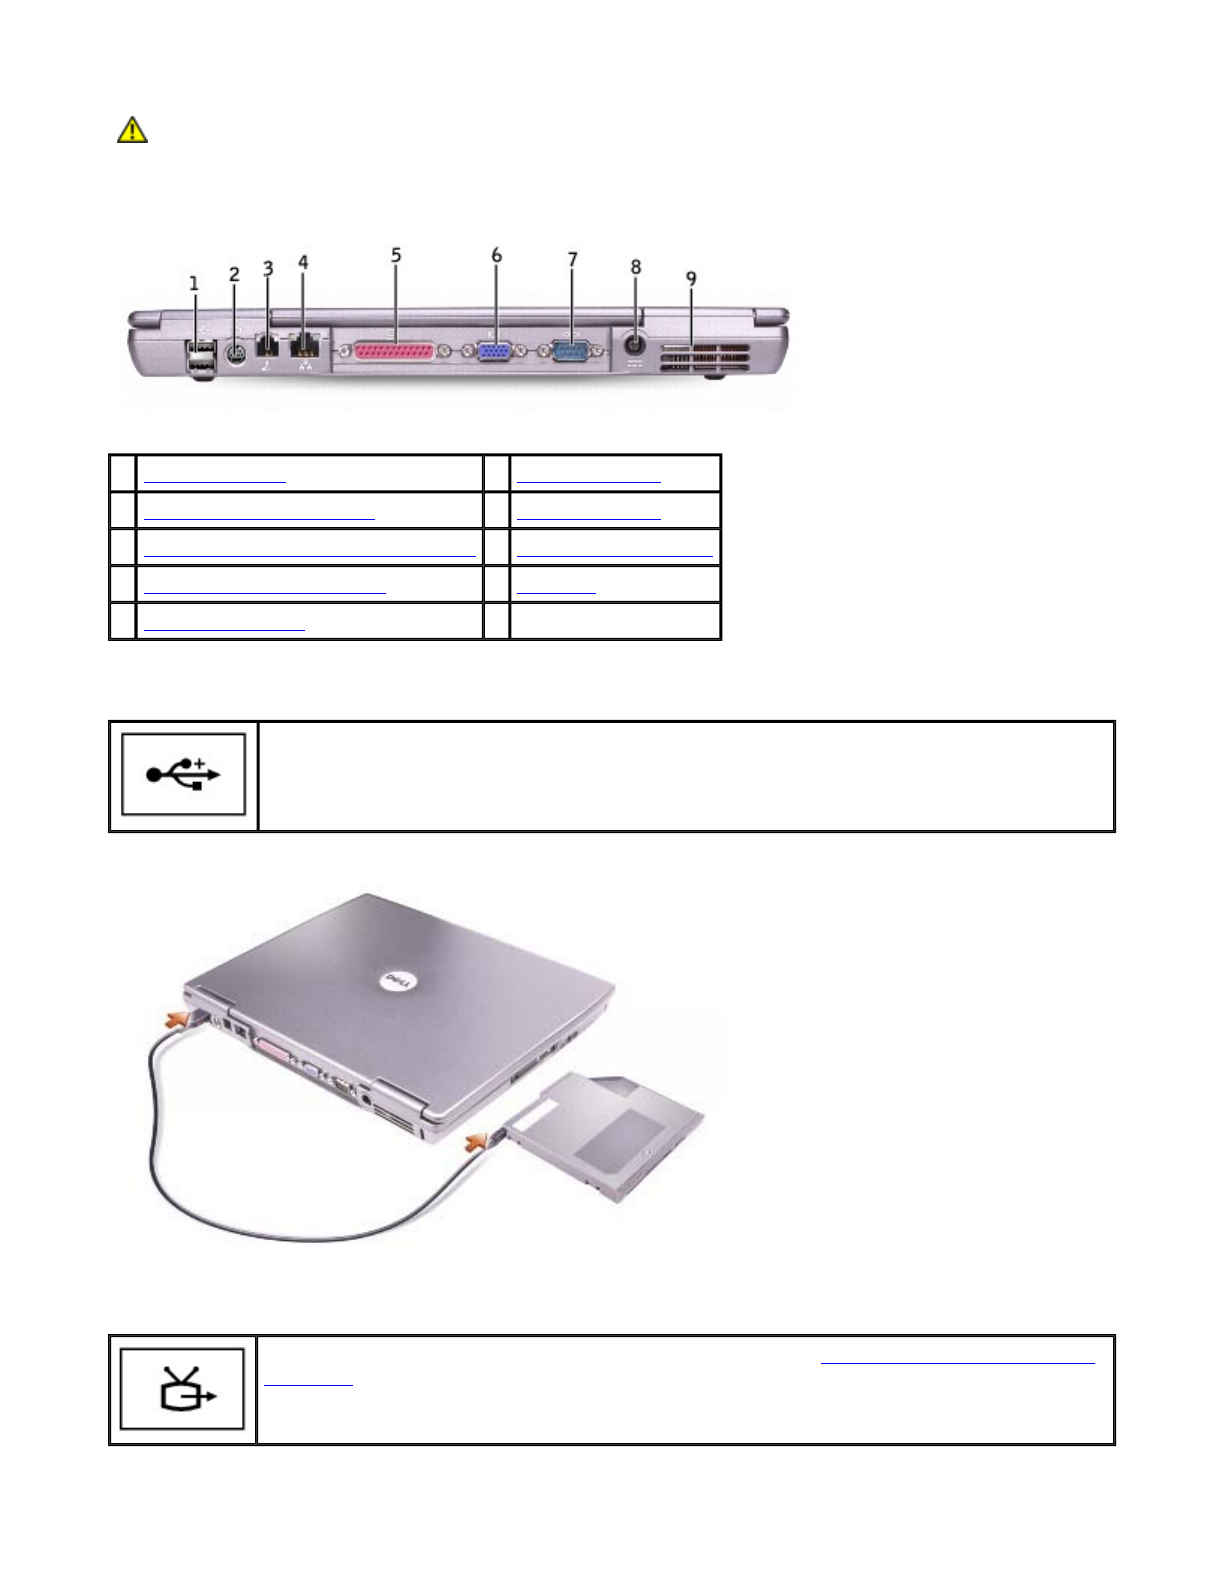
USB connectors
S-video TV-out connector
CAUTION: Do not block, push objects into, or allow dust to accumulate in the air vents. Do
not store your computer in a low- airflow environment, such as a closed briefcase, while it is
running. Restricting the airflow can damage the computer or cause a fire.
1 USB connectors (2) 6 video connector
2 S-video TV-out connector 7 serial connector
3 modem connector (RJ-11) (optional) 8 AC adapter connector
4 network connector (RJ-45) 9 air vents
5 parallel connector
Connect USB devices, such as a mouse, keyboard, or printer. You can also connect the
optional floppy drive directly to a USB connector using the optional floppy-drive cable.
Connects your computer to a TV. For more information, see "Connecting a Television to the
Computer."
Pa
g
e 7 of 11About Your Com
p
ute
r
9/10/2003file://C:\Documents%20and%20Settin
g
s\r
p
axman\Local%20Settin
g
s\Tem
p
\~hh5A79.htm
modem connector (RJ-11) (optional)
network connector (RJ-45)
parallel connector
video connector
serial connector
AC adapter connector — Attach an AC adapter to the computer.
If you ordered the optional internal modem, connect the telephone line to the modem
connector.
For information on using the modem, see the online modem documentation supplied with
your computer. See "Finding Information for Your Computer."
NOTICE: The network connector is slightly larger than the modem connector. To avoid damaging the
computer, do not plug a telephone line in to the network connector.
Connects the computer to a network. The green and yellow lights next to the connector
indicate activity for both wired and wireless network communications.
For information on using the network adapter, see the device user's guide supplied with
your computer. See "Finding Information for Your Computer."
Connects a parallel device, such as a printer.
Connects an external monitor. For more information, see "Using the Display."
Connects serial devices, such as a mouse or handheld device.
Pa
g
e 8 of 11About Your Com
p
ute
r
9/10/2003file://C:\Documents%20and%20Settin
g
s\r
p
axman\Local%20Settin
g
s\Tem
p
\~hh5A79.htm
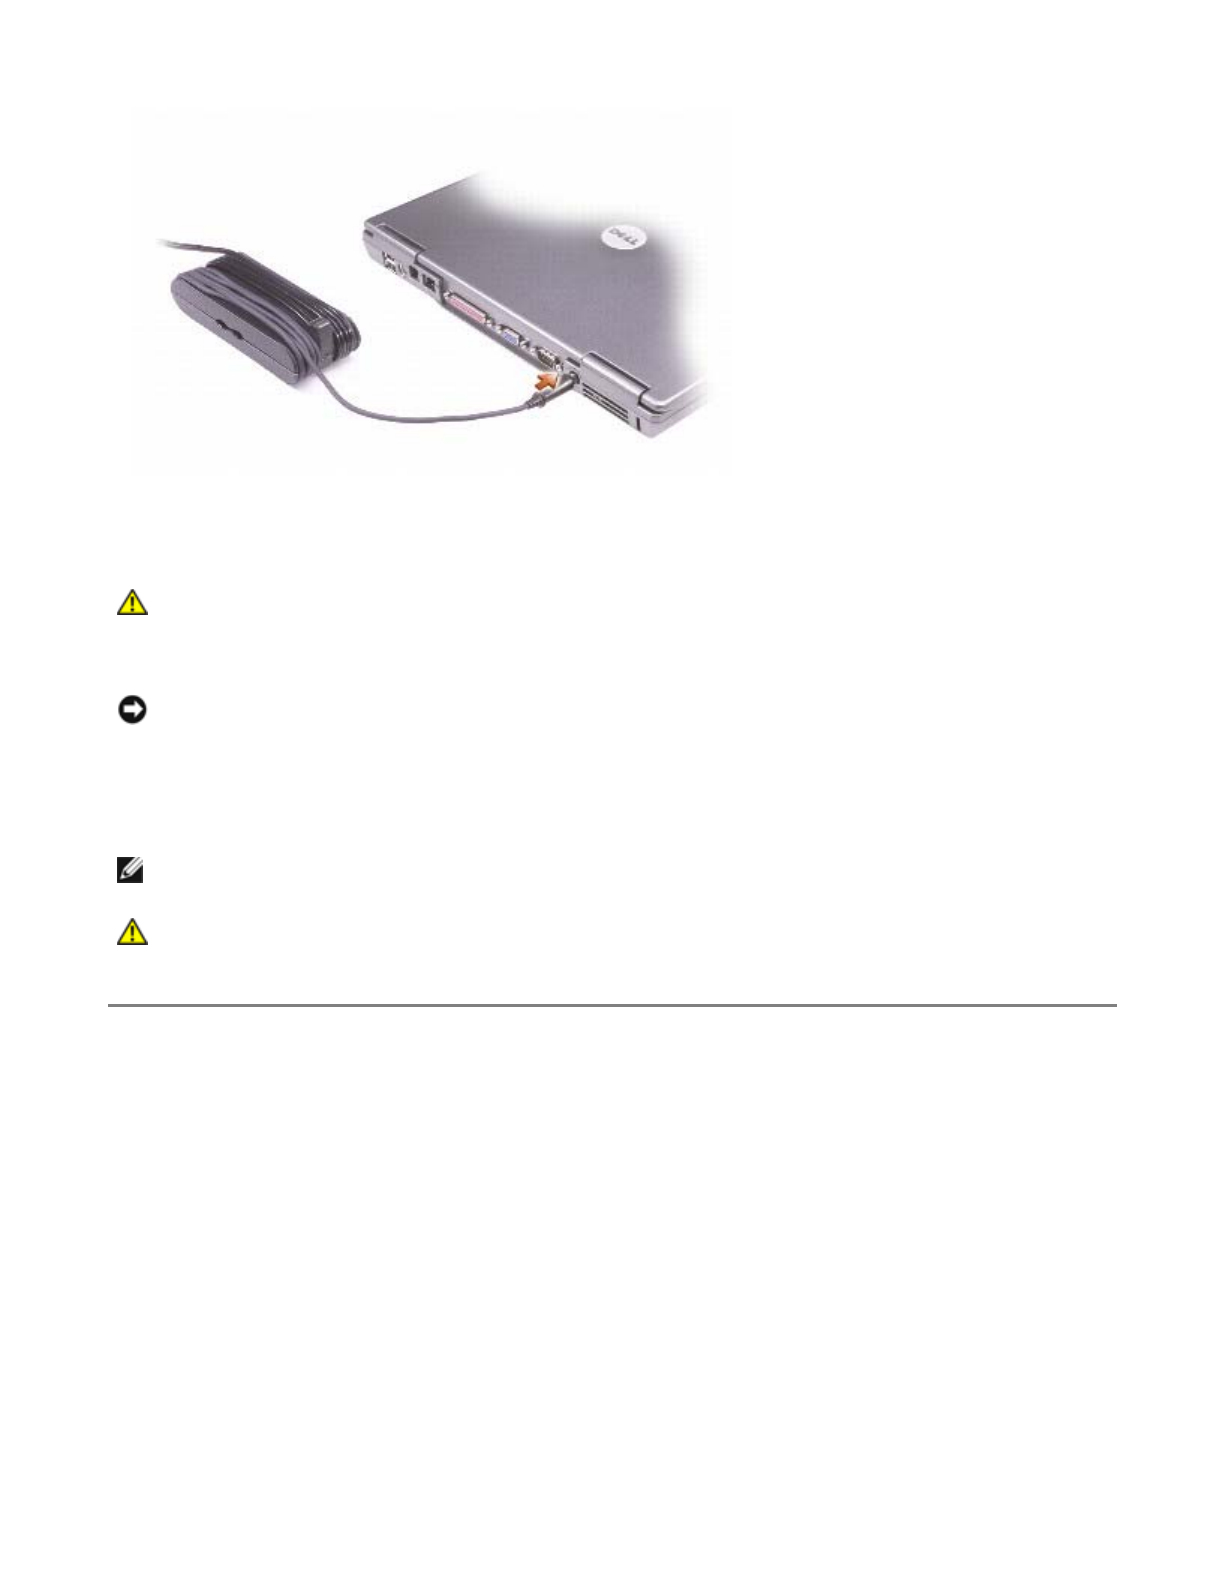
The AC adapter converts AC power to the DC power required by the computer. You can connect the AC
adapter with your computer turned either on or off.
air vents — The computer uses an internal fan to create airflow through the vents, which prevents the
computer from overheating.
Bottom View
CAUTION: The AC adapter works with electrical outlets worldwide. However, power
connectors and power strips vary among countries. Using an incompatible cable or
improperly connecting the cable to the power strip or electrical outlet may cause fire or
equipment damage.
NOTICE: When you disconnect the AC adapter cable from the computer, grasp the connector, not the
cable itself, and pull firmly but gently to avoid damaging the cable.
NOTE: The computer turns on the fan when the computer gets hot. Fan noise is normal and does not
indicate a problem with the fan or the computer.
CAUTION: Do not block, push objects into, or allow dust to accumulate in the air vents. Do
not store your computer in a low- airflow environment, such as a closed briefcase, while it is
running. Restricting the airflow can damage the computer or cause a fire.
Pa
g
e 9 of 11About Your Com
p
ute
r
9/10/2003file://C:\Documents%20and%20Settin
g
s\r
p
axman\Local%20Settin
g
s\Tem
p
\~hh5A79.htm
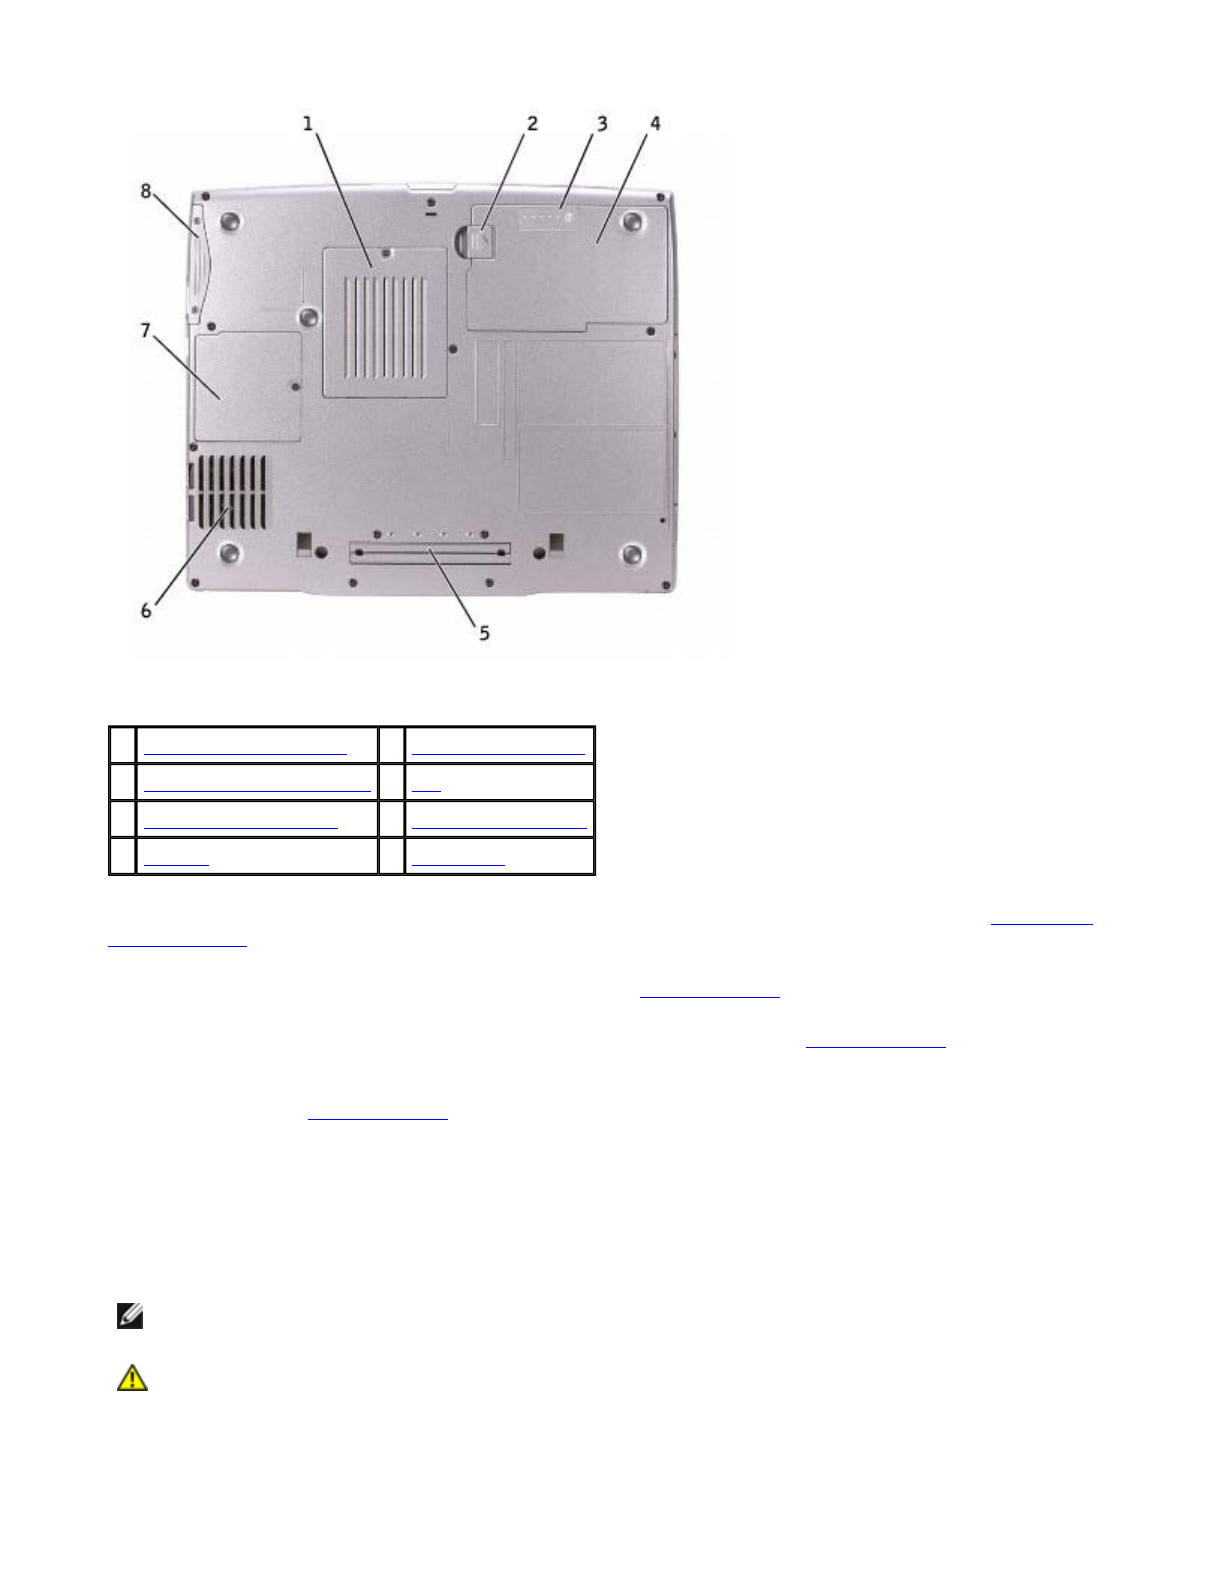
memory module cover — Covers the compartment that contains the memory module(s). See "Adding and
Replacing Parts."
battery-bay latch release — Releases the battery. See "Using a Battery" for instructions.
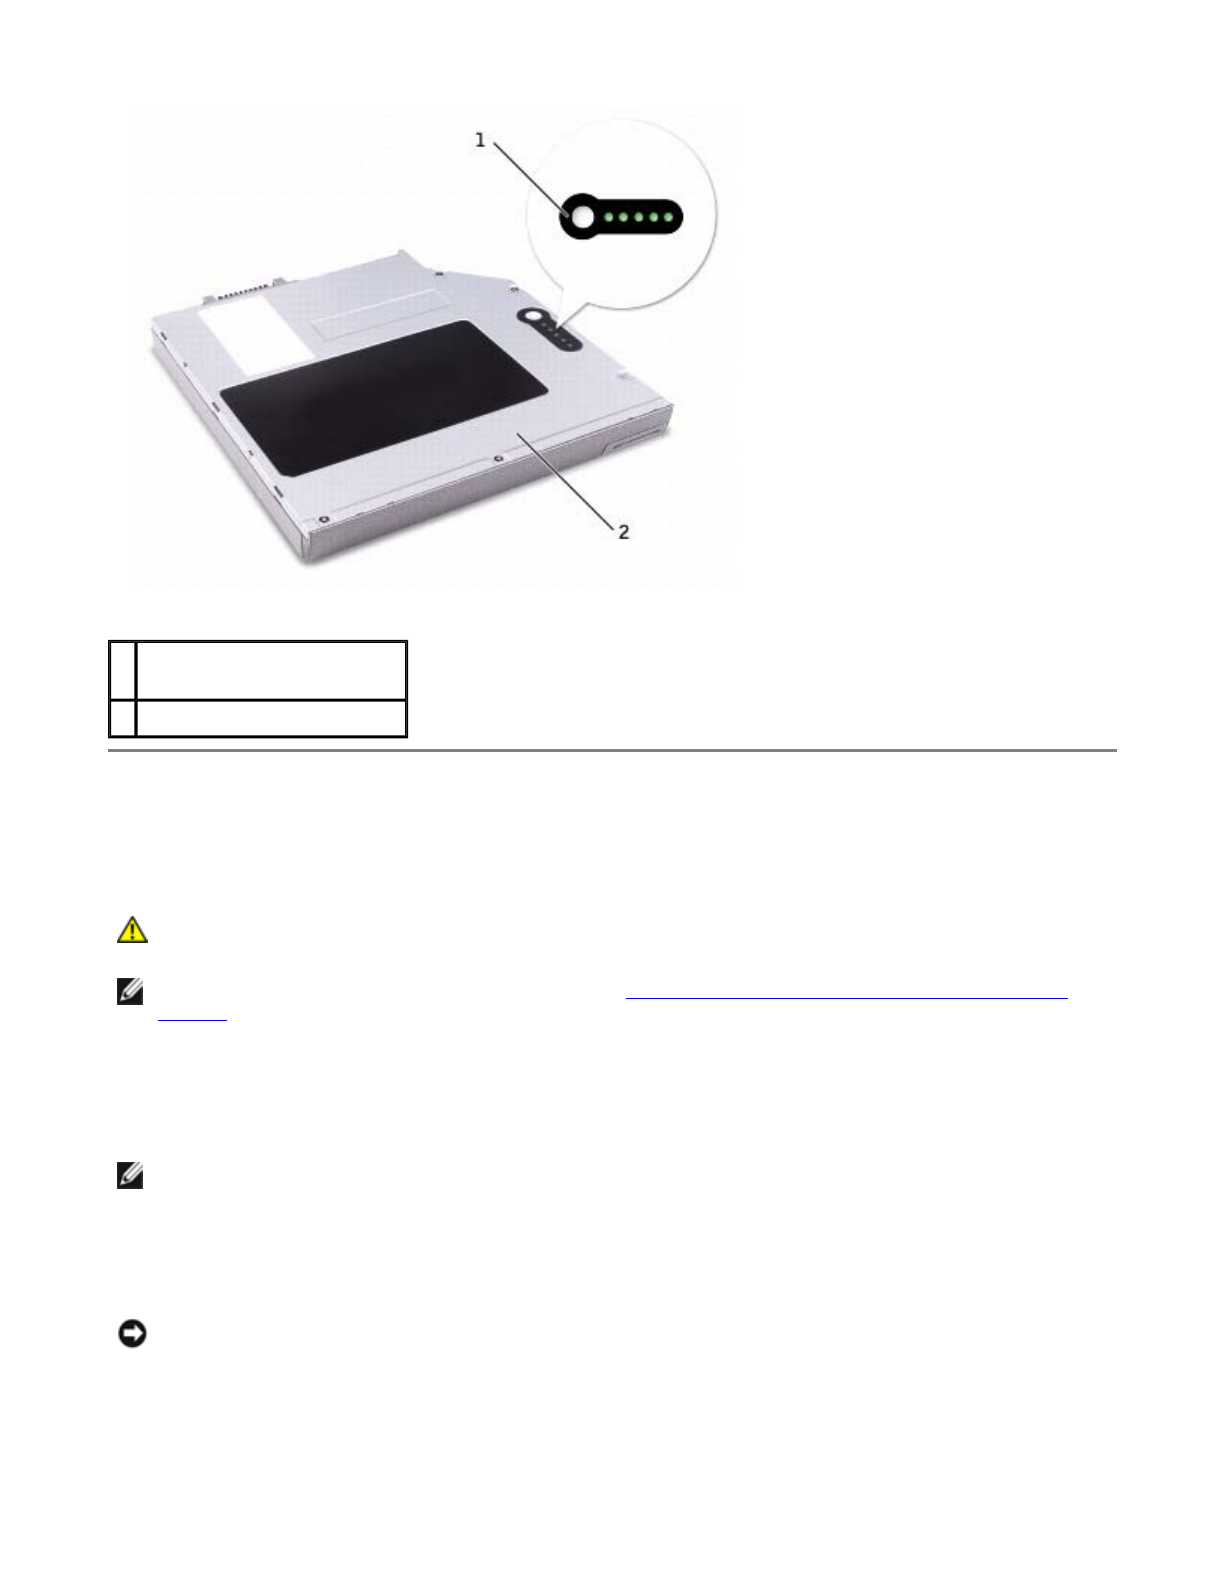
battery charge gauge — Provides information on the battery charge. See "Using a Battery."
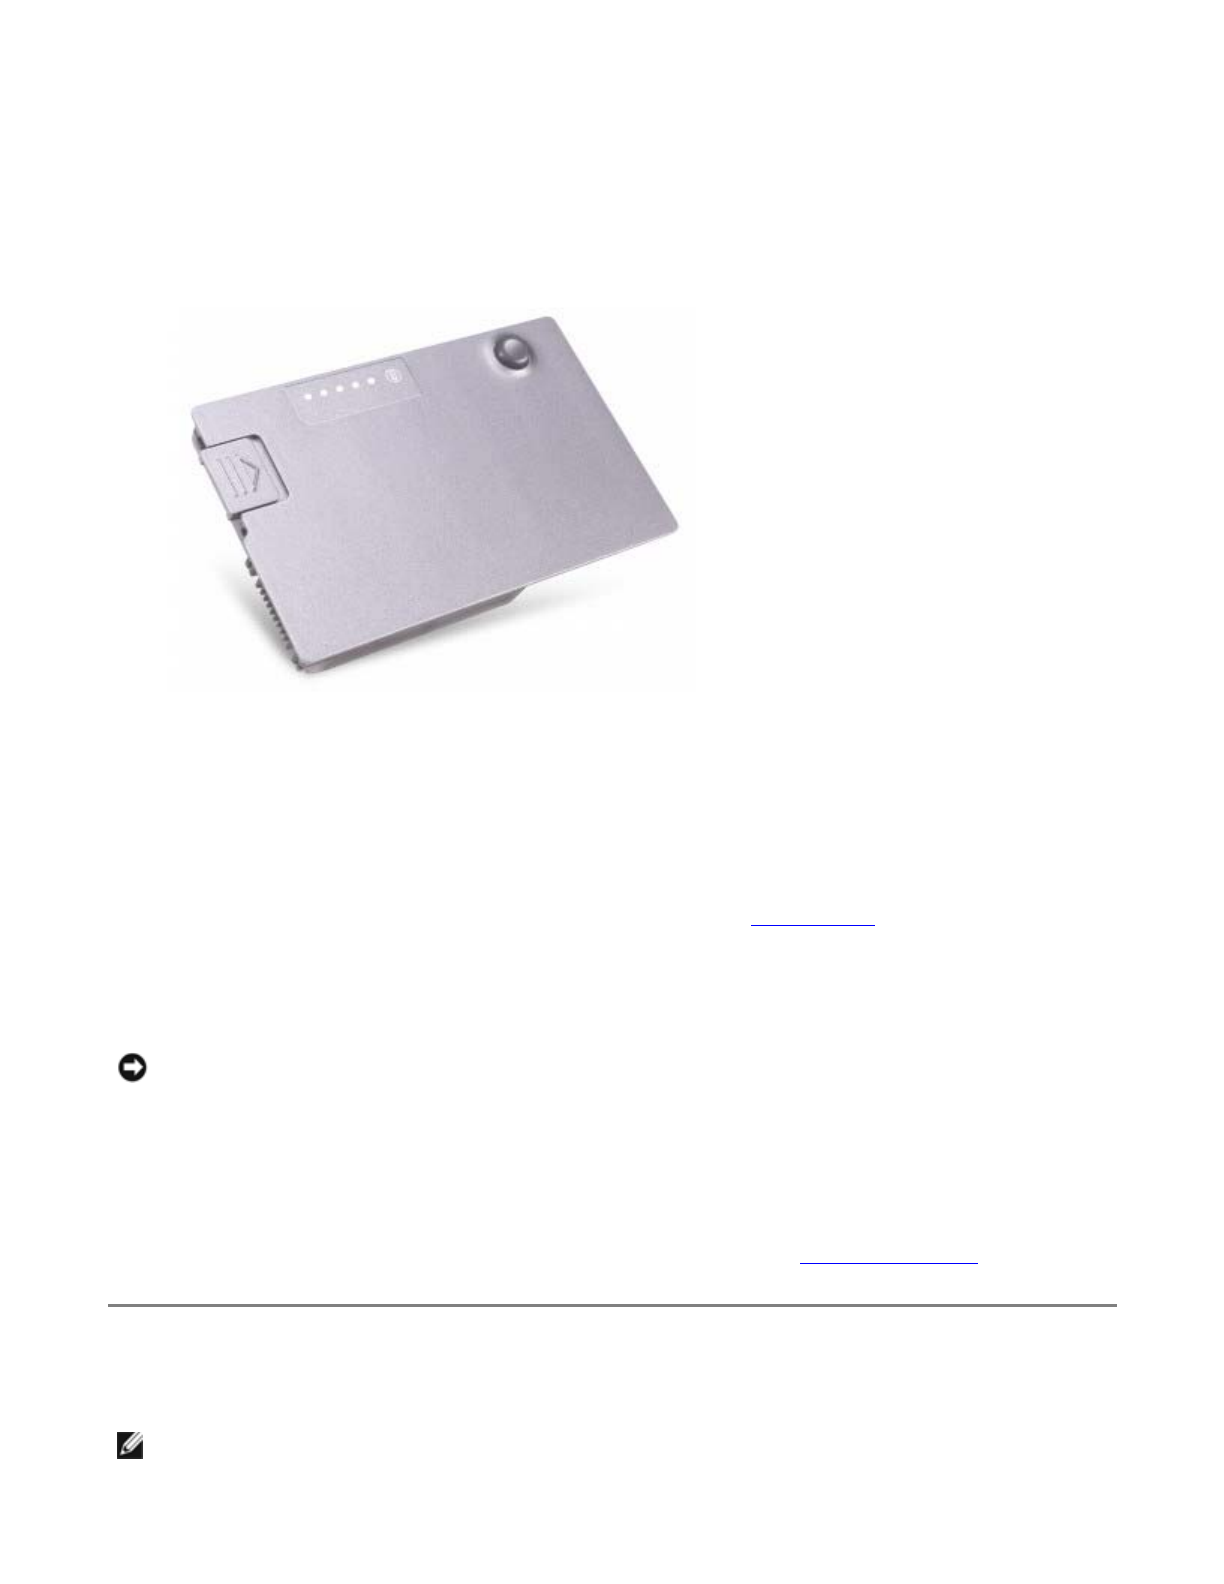
battery — When a battery is installed, you can use the computer without connecting the computer to an
electrical outlet. See "Using a Battery."
docking device slot — Lets you attach your computer to a docking device. See the documentation that came
with your docking device for additional information.
fan — The computer uses an internal fan to create airflow through the vents, which prevents the computer
from overheating.
1 memory module cover 5 docking device slot
2 battery-bay latch release 6 fan
3 battery charge gauge 7 Mini PCI card cover
4 battery 8 hard drive
NOTE: The computer turns on the fan when the computer gets hot. Fan noise is normal and does not
indicate a problem with the fans or the computer.
CAUTION: Do not block, push objects into, or allow dust to accumulate in the air vents. Do
not store your computer in a low- airflow environment, such as a closed briefcase, while it is
running. Restricting the airflow can damage the computer or cause a fire.
Pa
g
e 10 of 11About Your Com
p
ute
r
9/10/2003file://C:\Documents%20and%20Settin
g
s\r
p
axman\Local%20Settin
g
s\Tem
p
\~hh5A79.htm

Mini PCI card cover — Covers the compartment that contains the Mini PCI card. See "Adding and Replacing
Parts."
hard drive — Stores software and data.
Pa
g
e 11 of 11About Your Com
p
ute
r
9/10/2003file://C:\Documents%20and%20Settin
g
s\r
p
axman\Local%20Settin
g
s\Tem
p
\~hh5A79.htm

About Microsoft® Windows® XP
Help and Support Center
Switching to Classic View
Desktop Cleanup Wizard
Files and Settings Transfer Wizard
Program Compatibility Wizard
User Accounts and Fast User Switching
Home and Small Office Networking
Internet Connection Firewall
Help and Support Center
The Help and Support Center provides help with the Windows XP operating system and other support and
educational tools. To access the Help and Support Center, click the Start button and click Help and Support.
Switching to Classic View
You may change the appearance of the Control Panel, the Start menu, and the Windows desktop to the
classic view of earlier Windows operating systems.
Control Panel
The Control Panel presents information as task-oriented categories. If you are accustomed to performing a
particular task with the icon-oriented classic Control Panel, you can switch to the classic icon view:
1. Click the Start button and click Control Panel.
2. Click Switch to Classic View or Switch to Category View in the upper-left area of the Control
Panel window.
Start Menu
1. Right-click the empty area on the taskbar.
2. Click Properties.
3. Click the Start Menu tab.
Pa
g
e 1 of 4About Microsoft® Windows® XP
9/19/2003file://C:\Documents%20and%20Settin
g
s\r
p
axman\Local%20Settin
g
s\Tem
p
\~hh7409.htm

4. Select Classic Start Menu and click OK.
Window and Button Appearance
1. Right-click anywhere on the main desktop screen and click Properties.
2. Click the Appearance tab.
3. From the Windows and buttons drop-down menu, select Windows Classic style.
4. To customize color, font, and other classic desktop options, click Advanced.
5. When you have completed your appearance selections, click OK.
Desktop Cleanup Wizard
By default, the Desktop Cleanup Wizard moves programs that are not frequently used to a designated folder
7 days after you first start your computer and every 60 days after that. The appearance of the Start menu
changes as programs are moved.
To turn off the Desktop Cleanup Wizard:
1. Right-click an empty spot on the desktop, and click Properties.
2. Click the Desktop tab and click Customize Desktop.
3. Click Run Desktop Cleanup Wizard every 60 days to remove the check mark.
4. Click OK.
To run the Desktop Cleanup Wizard at any time:
1. Right-click an empty spot on the desktop, and click Properties.
2. Click the Desktop tab and click Customize Desktop.
3. Click Clean Desktop Now.
4. When the Desktop Cleanup Wizard appears, click Next.
5. In the list of shortcuts, deselect any shortcuts you want to leave on the desktop, and then click Next.
6. Click Finish to remove the shortcuts and close the wizard.
Files and Settings Transfer Wizard
The Files and Settings Transfer Wizard allows you to transfer files and settings from one computer to another
(for instance, when upgrading to a new computer), even if the old computer is running an earlier operating
system. The time required to collect and transfer data depends on the amount of data collected. Times can
vary from just a few minutes to several hours.
Pa
g
e 2 of 4About Microsoft® Windows® XP
9/19/2003file://C:\Documents%20and%20Settin
g
s\r
p
axman\Local%20Settin
g
s\Tem
p
\~hh7409.htm

You can transfer the data to the new computer over a network or direct serial connection, or you can store it
on a removable medium such as a floppy disk or writable CD. If a CD drive is not available, the wizard allows
you to create a wizard disk to run on your old computer.
For more information, see the Help and Support Center.
Program Compatibility Wizard
If you encounter problems running a program designed for an earlier Windows operating system, you can use
the Program Compatibility Wizard to help resolve the problem. The Program Compatibility Wizard allows you
to configure a program to run in an environment closer to that of Windows 95, Windows 98, Windows
Millennium Edition (Me), Windows NT® 4.0 with Service Pack 5, or Windows 2000.
If you experience problems with your operating system or other programs after performing an installation,
you can use the system restore feature to return your computer to a previous stable condition.
For more information, see the Help and Support Center.
User Accounts and Fast User Switching
Fast User Switching allows multiple users to access the computer. After you log on to the computer with your
specific settings, including the desktop and various programs, other users can log on to the computer without
requiring you to first log off. New users log on and switch from your session to their own. New users can run
their desktop and programs without interfering with yours. You can switch back to your desktop and programs
with the original settings. For more information, see the Help and Support Center.
Special Considerations With Fast User Switching
zComputers with low memory configurations can experience problems. The computer uses memory to
keep your programs running in the background while a second user is logged on, which can cause the
computer to run slowly. Fast User Switching is off by default on computers with less than 128 MB of
RAM.
zFast User Switching is disabled in Windows XP Professional when the computer is a member of a
computer domain.
Home and Small Office Networking
The Network Setup Wizard provides online documentation and support for setting up a home or small office
network. The new wizard automatically enables the personal firewall (see "Internet Connection Firewall").
The Network Setup Wizard includes a checklist and steps to guide you through the process of sharing
resources, such as files, printers, or an Internet connection, between computers in a home or small office. For
more information, see the Help and Support Center.
Pa
g
e 3 of 4About Microsoft® Windows® XP
9/19/2003file://C:\Documents%20and%20Settin
g
s\r
p
axman\Local%20Settin
g
s\Tem
p
\~hh7409.htm

Internet Connection Firewall
The Internet Connection Firewall provides basic protection from unauthorized access to the computer while
the computer is connected to the Internet. The firewall is automatically enabled when you run the Network
Setup Wizard. When the firewall is enabled for a network connection, the firewall icon appears with a red
background in the Network Connections portion of the Control Panel.
Note that enabling the Internet Connection Firewall does not reduce the need for virus-checking software.
For more information, see the Help and Support Center.
Pa
g
e 4 of 4About Microsoft® Windows® XP
9/19/2003file://C:\Documents%20and%20Settin
g
s\r
p
axman\Local%20Settin
g
s\Tem
p
\~hh7409.htm

Dell™ QuickSet Features
Clicking the QuickSet Icon
Double-Clicking the QuickSet Icon
Right-Clicking the QuickSet Icon
Dell™ QuickSet runs from the icon located in the taskbar and functions differently when you click, double-
click, or right-click the icon.
Clicking the QuickSet Icon
Click the icon to perform the following tasks:
zAdjust power management settings using the Power Management Wizard.
zAdjust the size of icons and toolbars.
zSelect a power scheme that you set in the Power Management Wizard.
zTurn presentation mode on or off.
Double-Clicking the QuickSet Icon
Double-click the icon to adjust power management settings using the Power Management Wizard.
Right-Clicking the QuickSet Icon
Right-click the icon to perform the following tasks:
zEnable or disable the Brightness Meter on the screen.
zEnable or disable the Volume Meter on the screen.
zTurn wireless activity on or off.
zView Dell QuickSet Help.
zView the version and copyright date of the QuickSet program installed on your computer.
Pa
g
e 1 of 2Dell™ QuickSet Features
9/19/2003file://C:\Documents%20and%20Settin
g
s\r
p
axman\Local%20Settin
g
s\Tem
p
\~hhEBEF.htm

For more information about QuickSet, right-click the icon in the taskbar and click Help.
Pa
g
e 2 of 2Dell™ QuickSet Features
9/19/2003file://C:\Documents%20and%20Settin
g
s\r
p
axman\Local%20Settin
g
s\Tem
p
\~hhEBEF.htm
Using the Keyboard and Touch Pad
Numeric Keypad
Keyboard Shortcuts
Touch Pad
Customizing the Touch Pad
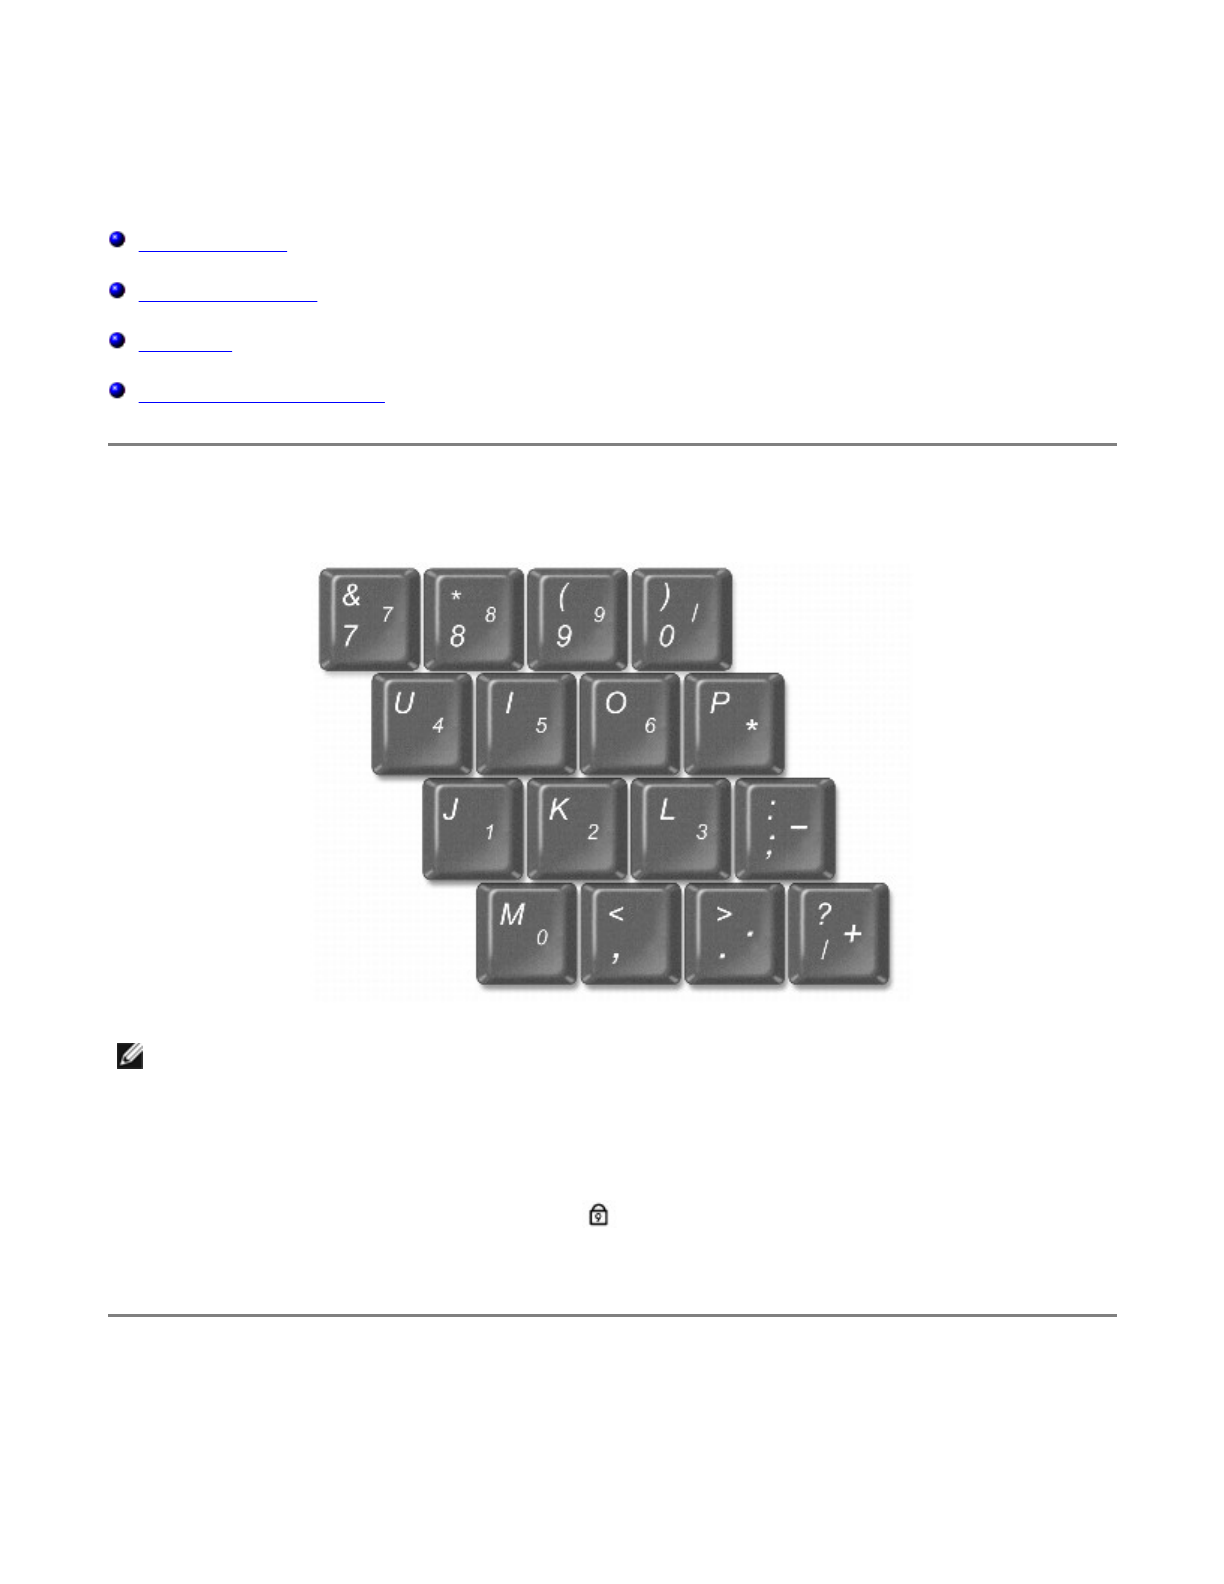
Numeric Keypad
The numeric keypad functions like the numeric keypad on an external keyboard. Each key on the keypad has
multiple functions. The keypad numbers and symbols are marked in blue on the right of the keypad keys. To
type a number or symbol, enable the keypad, hold down <Fn> and press the desired key.
zTo enable the keypad, press <Num Lk>. The light indicates that the keypad is active.
zTo disable the keypad, press <Num Lk> again.
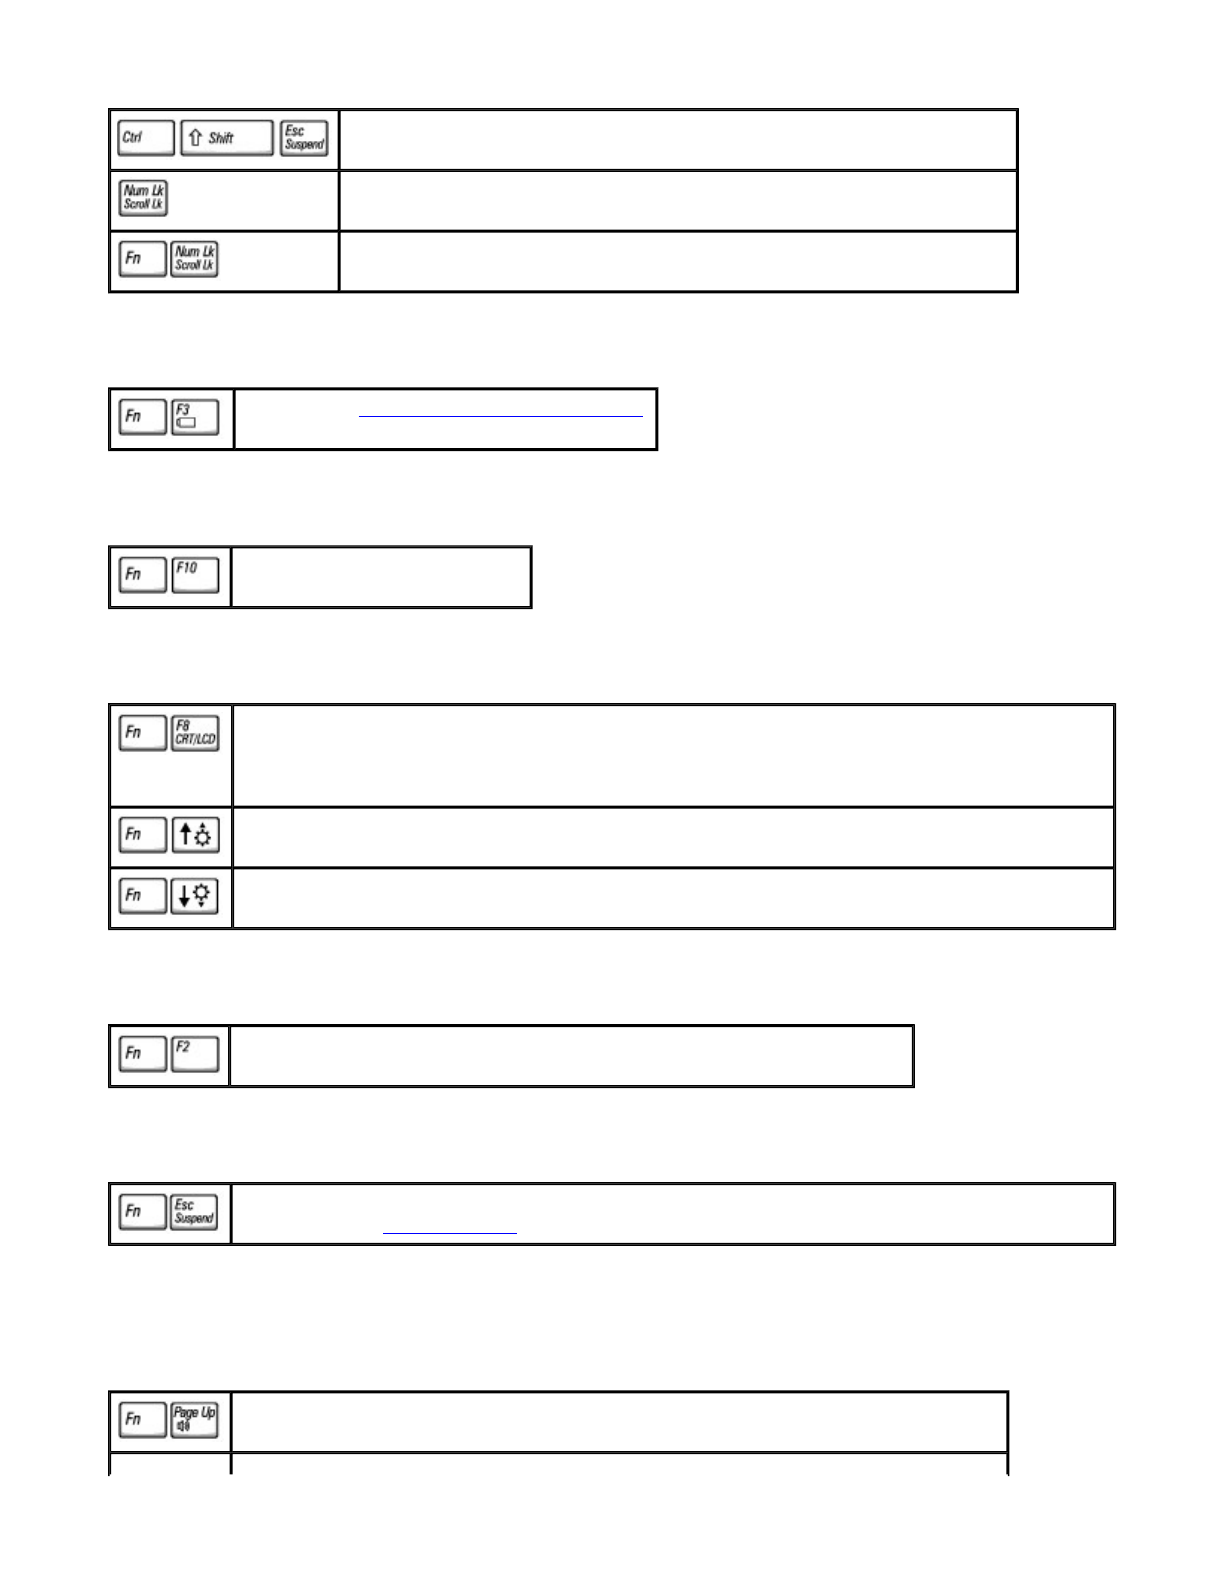
Keyboard Shortcuts
System Functions
NOTE: When you connect an external keyboard or keypad to the computer, the keypad is disabled.
Pa
g
e 1 of 5Usin
g
the Ke
y
board and Touch Pa
d
9/19/2003file://C:\Documents%20and%20Settin
g
s\r
p
axman\Local%20Settin
g
s\Tem
p
\~hh4213.htm
Battery
CD or DVD Tray
Display Functions
Radios (Including Wireless Networking and Bluetooth™)
Power Management
Speaker Functions
If no sound comes from the speakers, press <Fn><End> and adjust the volume.
Opens the Windows Task Manager window
Enables and disables the numeric keypad (on an external keyboard only)
Enables and disables the scroll lock
Displays the Dell™ QuickSet Battery Meter.
Ejects the tray out of the drive.
Switches the video image to the next display in the following sequence: the integrated display
only, the integrated display and an external CRT monitor simultaneously, an external CRT
monitor only, the integrated display and an external DVI monitor simultaneously, and an
external DVI monitor only.
Increases brightness on the integrated display only (not on an external monitor)
Decreases brightness on the integrated display only (not on an external monitor)
Enables and disables radios, including wireless networking and Bluetooth.
Activates the power management mode of your choice. You can program this keyboard
shortcut on the Advanced tab in the Power Options Properties window.
Increases the volume of the integrated speakers and external speakers, if attached
Pa
g
e 2 of 5Usin
g
the Ke
y
board and Touch Pa
d
9/19/2003file://C:\Documents%20and%20Settin
g
s\r
p
axman\Local%20Settin
g
s\Tem
p
\~hh4213.htm
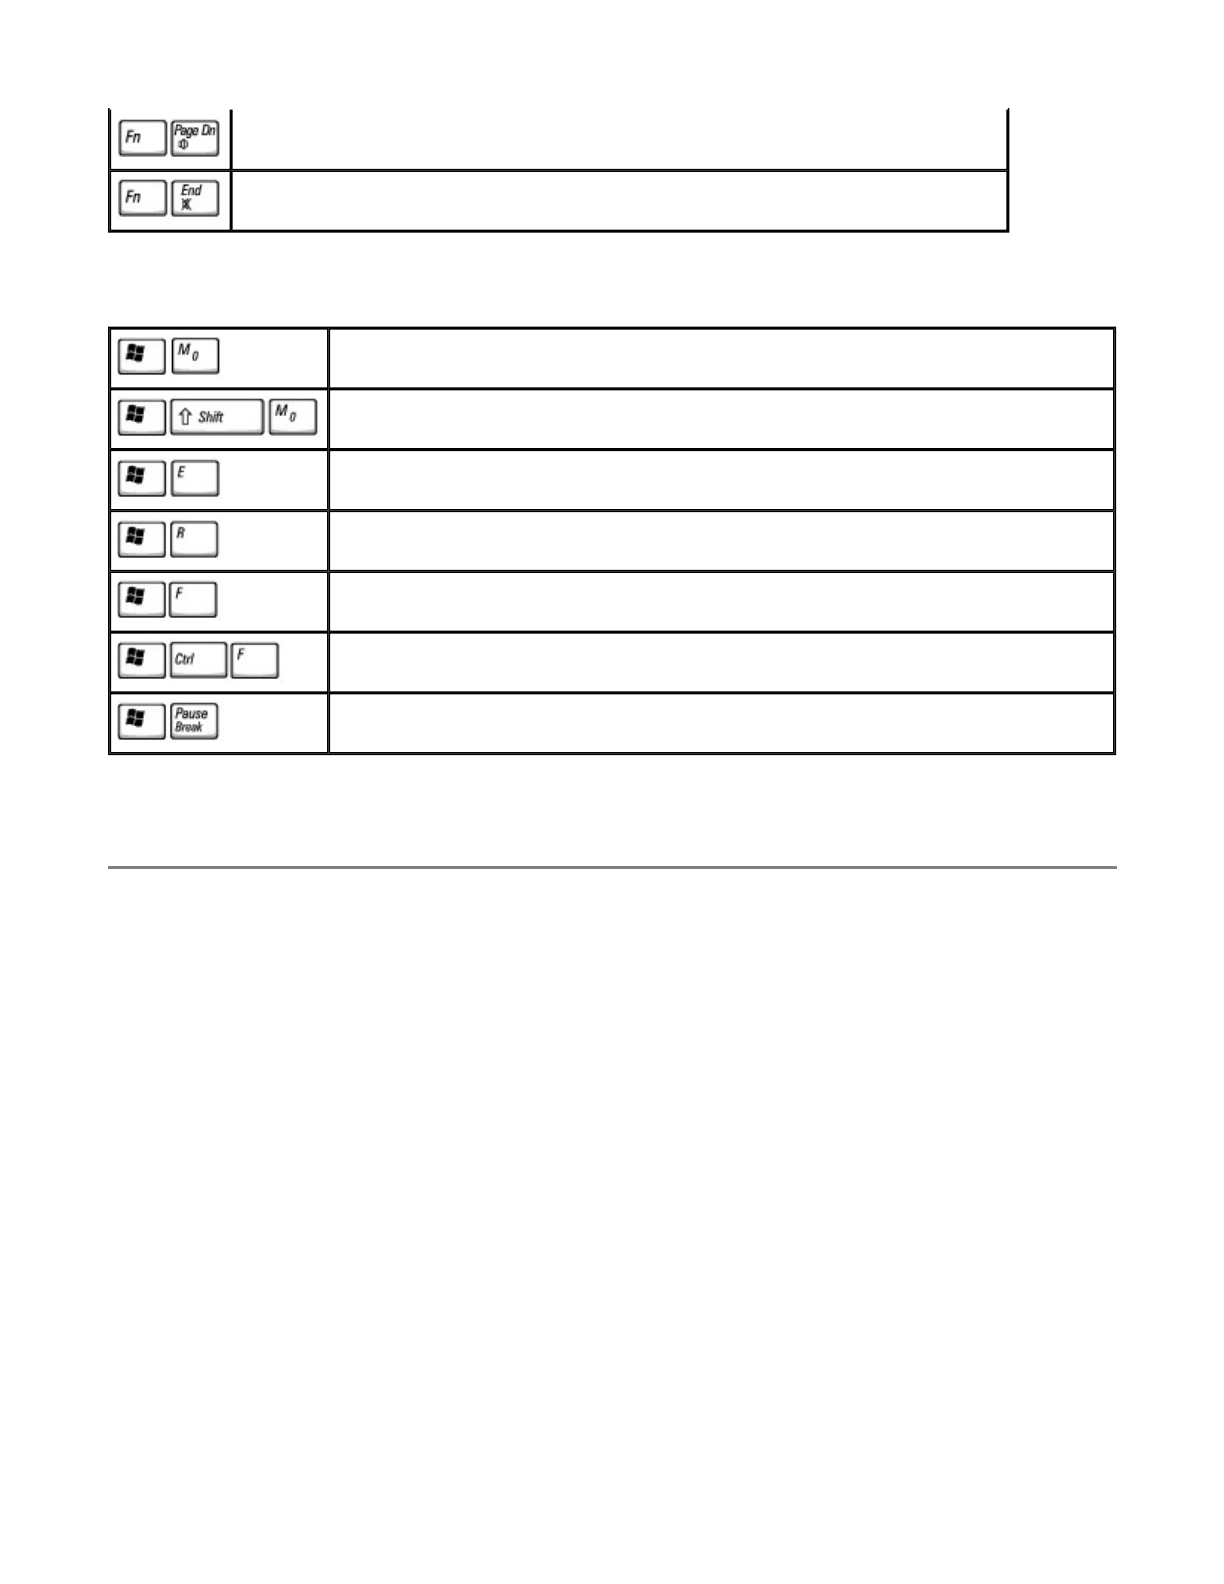
Microsoft® Windows® Logo Key Functions
To adjust keyboard operation, such as the character repeat rate, open the Control Panel, and click Printers
and Other Hardware (for Windows XP) or double-click the Keyboard icon (for Windows 2000).
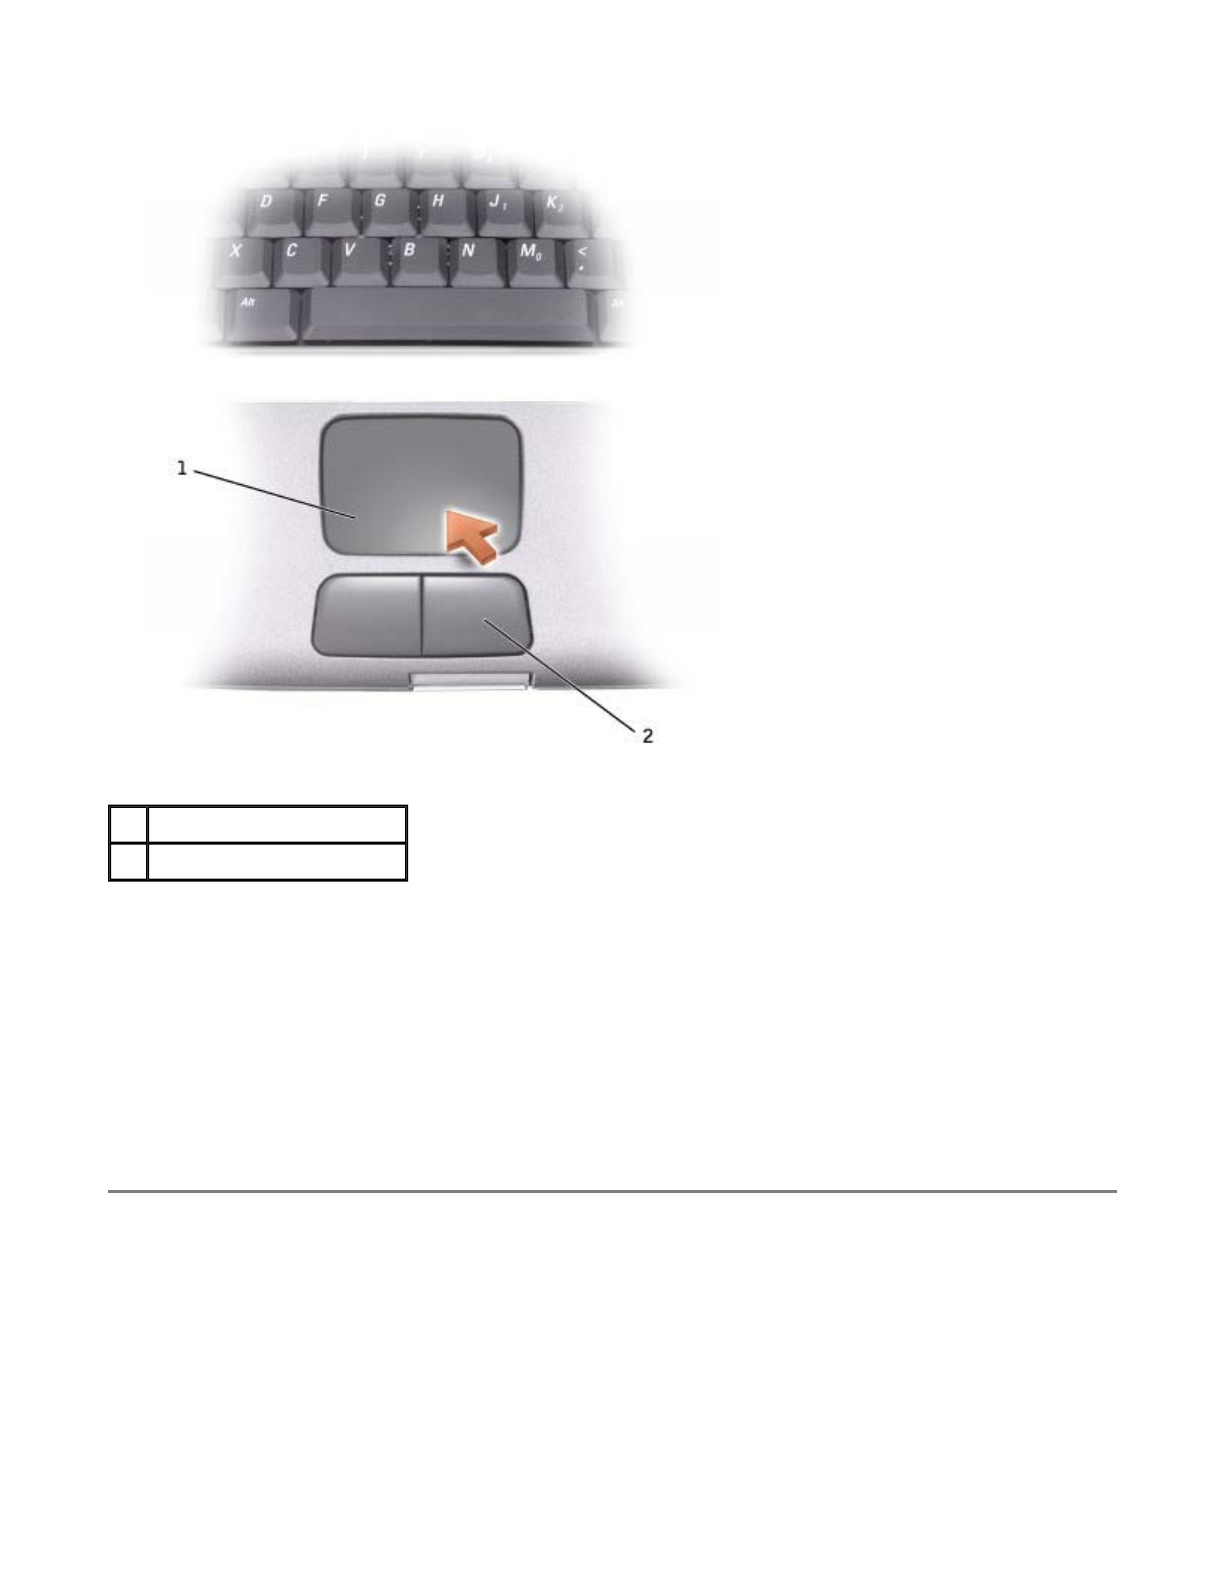
Touch Pad
The touch pad detects the pressure and movement of your finger to allow you to move the cursor on the
display. Use the touch pad and touch pad buttons as you would use a mouse.
Decreases the volume of the integrated speakers and external speakers, if attached
Enables and disables the integrated speakers and external speakers, if attached
Minimizes all open windows
Maximizes all windows
Runs Windows Explorer
Opens the Run dialog box
Opens the Search Results dialog box
Opens the Search Results-Computer dialog box (if the computer is connected to a
network)
Opens the System Properties dialog box
Pa
g
e 3 of 5Usin
g
the Ke
y
board and Touch Pa
d
9/19/2003file://C:\Documents%20and%20Settin
g
s\r
p
axman\Local%20Settin
g
s\Tem
p
\~hh4213.htm
zTo move the cursor, lightly slide your finger over the touch pad.
zTo select an object, lightly tap once on the surface of the touch pad or use your thumb to press the left
touch-pad button.
zTo select and move (or drag) an object, position the cursor on the object and tap down-up-down on the
touch pad. On the second down motion, leave your finger on the touch pad and move the selected
object by sliding your finger across the surface.
zTo double-click an object, position the cursor on the object and then tap twice on the touch pad, or use
your thumb to press the left touch-pad button twice.
Customizing the Touch Pad
You can disable the touch pad or adjust its settings by using the Mouse Properties window.
1. In Windows XP, open the Control Panel, click Printers and Other Hardware, and then click Mouse.
In Windows 2000, open the Control Panel and double-click the Mouse icon.
1 touch pad
2 touch pad buttons
Pa
g
e 4 of 5Usin
g
the Ke
y
board and Touch Pa
d
9/19/2003file://C:\Documents%20and%20Settin
g
s\r
p
axman\Local%20Settin
g
s\Tem
p
\~hh4213.htm

2. On the Mouse Properties window:
zClick the Device Select tab to disable the touch pad.
zClick the Pointer tab to adjust touch pad settings.
3. Select the desired settings and click Apply.
4. Click OK to save the settings and close the window.
Pa
g
e 5 of 5Usin
g
the Ke
y
board and Touch Pa
d
9/19/2003file://C:\Documents%20and%20Settin
g
s\r
p
axman\Local%20Settin
g
s\Tem
p
\~hh4213.htm
Using the Display
Adjusting Brightness
Switching the Video Image
Setting Display Resolution
Adjusting Brightness
When the Dell™ computer is running on battery power, you can conserve power by setting the brightness to
the lowest comfortable setting using the appropriate keyboard shortcuts for the display.
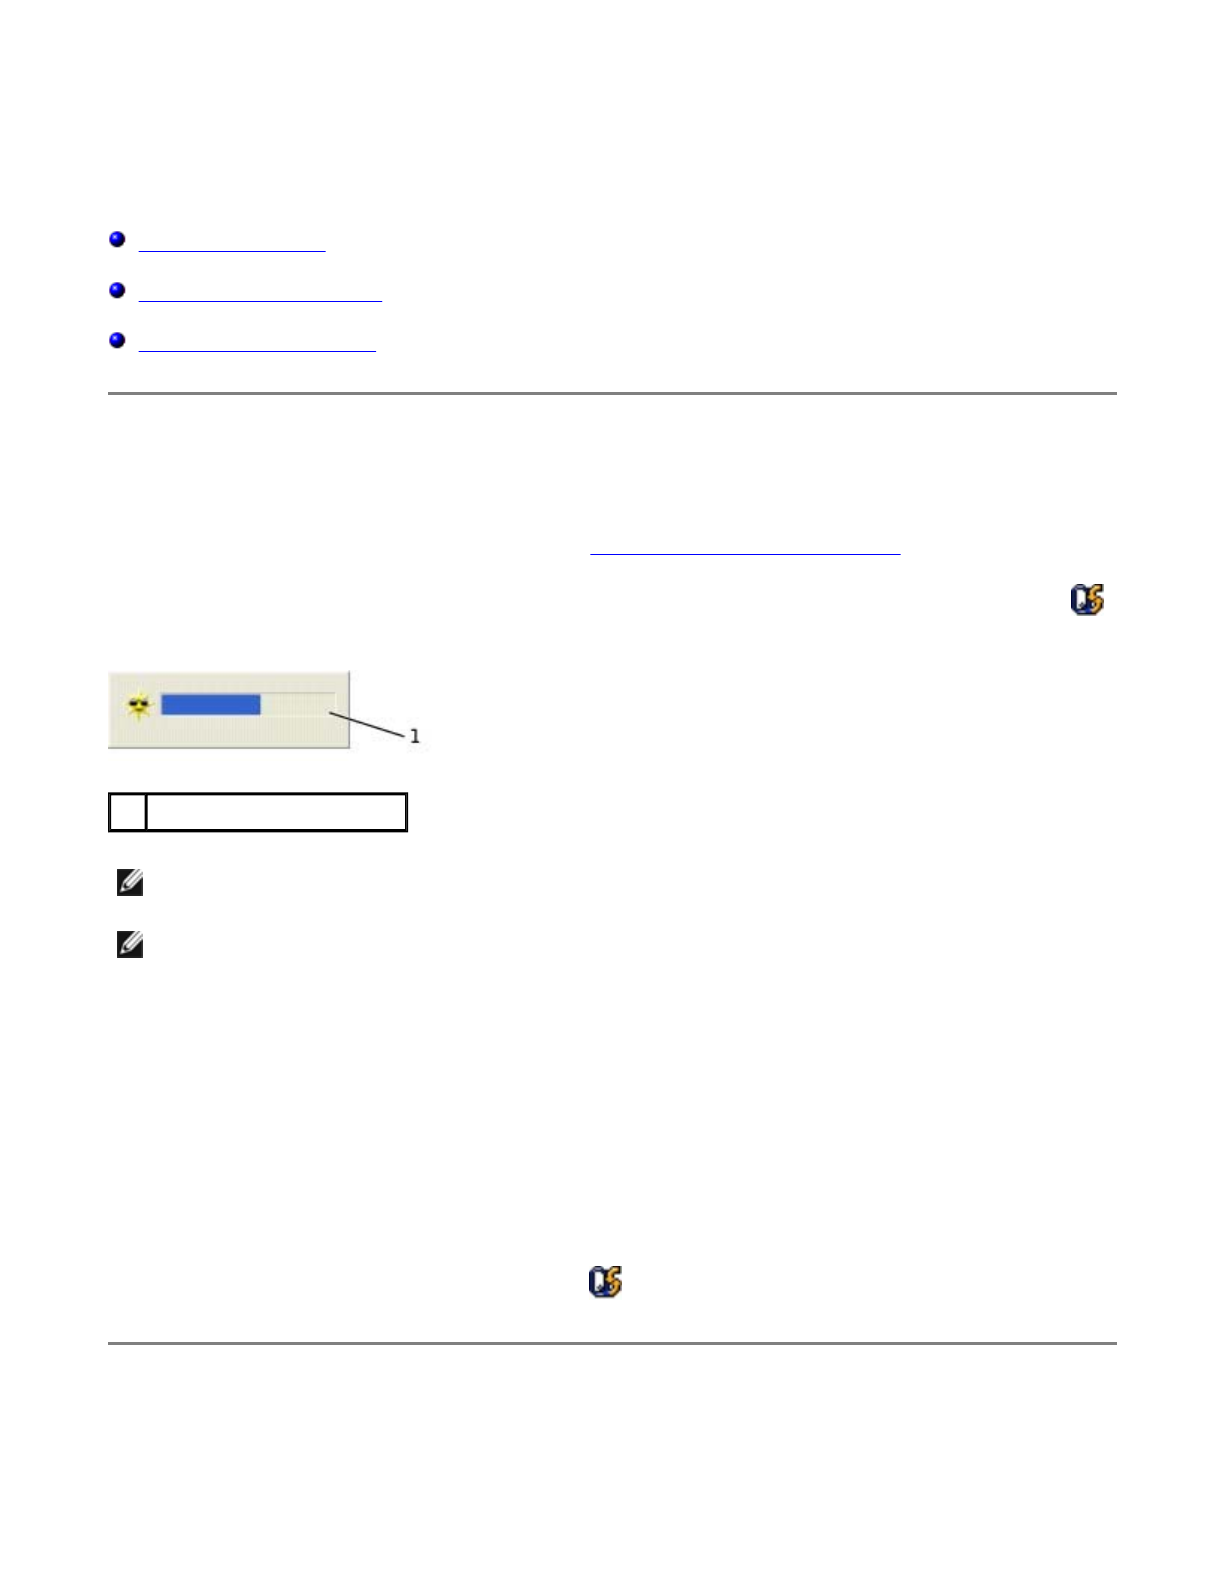
The Dell QuickSet Brightness Meter shows the current brightness setting for the display. Right-click the
icon in the taskbar to enable or disable the Brightness Meter on the screen.
You can enable or disable the Brightness Meter from the QuickSet taskbar menu. When the meter is
enabled, press the following keys to adjust brightness:
zPress <Fn> up-arrow key to increase brightness on the integrated display only (not on an external
monitor).
zPress <Fn> down-arrow key to decrease brightness on the integrated display only (not on an external
monitor).
For more information about QuickSet, right-click the icon in the taskbar and click Help.
Switching the Video Image
1 Brightness Meter
NOTE: By default, the Brightness Meter appears in the lower-right corner of the display. You can click
and drag the meter to a new location, and the meter subsequently always appears at the new location.
NOTE: Brightness keyboard shortcuts only affect the display on your portable computer, not monitors
that you attach to your portable computer or docking device. If your computer is in CRT only mode and
you try to change the brightness level, the Brightness Meter appears, but the brightness level on the
monitor does not change.
Pa
g
e 1 of 3Usin
g
the Dis
p
la
y
9/19/2003file://C:\Documents%20and%20Settin
g
s\r
p
axman\Local%20Settin
g
s\Tem
p
\~hh9AA3.htm

When you start the computer with an external device (such as an external monitor or projector) attached and
turned on, the image may appear on either the display or the external device.
Press <Fn><F8> to switch the video image to the integrated display only, the integrated display and an
external CRT monitor simultaneously, an external CRT monitor only, the integrated display and external DVI
monitor simultaneously, and external DVI monitor only.
Setting Display Resolution
To display a program at a specific resolution, both the video controller and the display must support the
program, and the necessary video drivers must be installed.
Before you change any of the default display settings, make a note of the default settings for future reference.
If you choose a resolution or color palette that is higher than the display supports, the settings adjust
automatically to the closest possible setting.
If the video resolution setting is higher than that supported by the display, the computer enters pan mode. In
pan mode, the screen cannot be completely displayed. For example, the taskbar that usually appears at the
bottom of the desktop may no longer be visible. To view the rest of the screen, use the touch pad to pan up,
down, left, and right.
Microsoft® Windows® XP
1. Click the Start button and click Control Panel.
2. Under Pick a category, click Appearance and Themes.
3. Under Pick a task..., click the area you want to change, or under or pick a Control Panel icon, click
Display.
4. Try different settings for Color quality and Screen resolution.
Windows 2000
1. Click the Start button, point to Settings, and then click Control Panel.
2. Double-click the Display icon and click the Settings tab.
3. Try different settings for Colors and Screen area.
NOTE: : You cannot use <Fn><F8> to switch the video image between the integrated display and an
external S-Video device.
NOTE: Use only the Dell-installed video drivers, which are designed to offer the best performance with
your Dell-installed operating system.
NOTE: As the resolution increases, icons and text appear smaller on the screen.
NOTICE: You can damage an external monitor by using an unsupported refresh rate. Before adjusting
the refresh rate on an external monitor, see the monitor user's guide.
Pa
g
e 2 of 3Usin
g
the Dis
p
la
y
9/19/2003file://C:\Documents%20and%20Settin
g
s\r
p
axman\Local%20Settin
g
s\Tem
p
\~hh9AA3.htm

Pa
g
e 3 of 3Usin
g
the Dis
p
la
y
9/19/2003file://C:\Documents%20and%20Settin
g
s\r
p
axman\Local%20Settin
g
s\Tem
p
\~hh9AA3.htm

Using a Battery
Battery Performance
Checking the Battery Charge
Charging the Battery
Removing a Battery
Removing and Installing a Reserve Battery
Installing a Battery
Storing a Battery
Battery Performance
For optimal computer performance and to help preserve BIOS settings, operate your Dell™ portable computer
with the main battery installed at all times. Use a battery to run the computer when the computer is not
connected to an electrical outlet. One battery is supplied as standard equipment in the battery bay.
Battery operating time varies depending on operating conditions. With average usage, you may expect from 3
to 4 hours from a single, fully charged battery. You can install an optional second battery in the module bay to
significantly increase operating time. For more information about the second battery, see "Using the Module
Bay."
Operating time is significantly reduced when you perform operations including, but not limited to, the
following:
zUsing optical drives, especially DVD and CD-RW drives
zUsing wireless communications devices, PC Cards, or USB devices
zUsing high-brightness display settings, 3D screen savers, or other power-intensive programs, such as
3D games
zRunning the computer in maximum performance mode
NOTE: Batteries for portable computers are covered under warranty only during the initial 1-year
period of the limited warranty for the computer. For more information about the Dell warranty for the
computer, see the System Information Guide or separate paper warranty document that shipped with
your computer.
NOTE: For more information on maximizing battery operating time, see "Power Management."
NOTE: It is recommended that you connect your computer to an electrical outlet when writing to a CD.
Pa
g
e 1 of 7Usin
g
a Batter
y
9/19/2003file://C:\Documents%20and%20Settin
g
s\r
p
axman\Local%20Settin
g
s\Tem
p
\~hhEA52.htm
You can check the battery charge on the bottom of the computer. You can also set power management
options to alert you when the battery charge is low.
Checking the Battery Charge
The Dell QuickSet battery meter, Microsoft® Windows® power meter window and icon, the battery
charge gauge and health gauge, and the low-battery warning provide information on the battery charge.
For more information about checking the charge on the second battery, see "Using the Module Bay."
Dell QuickSet Battery Meter
Press <Fn><F3> to display the QuickSet Battery Meter.
The Battery Meter screen displays status, charge level, and charge completion time for the primary and
second batteries in your computer.
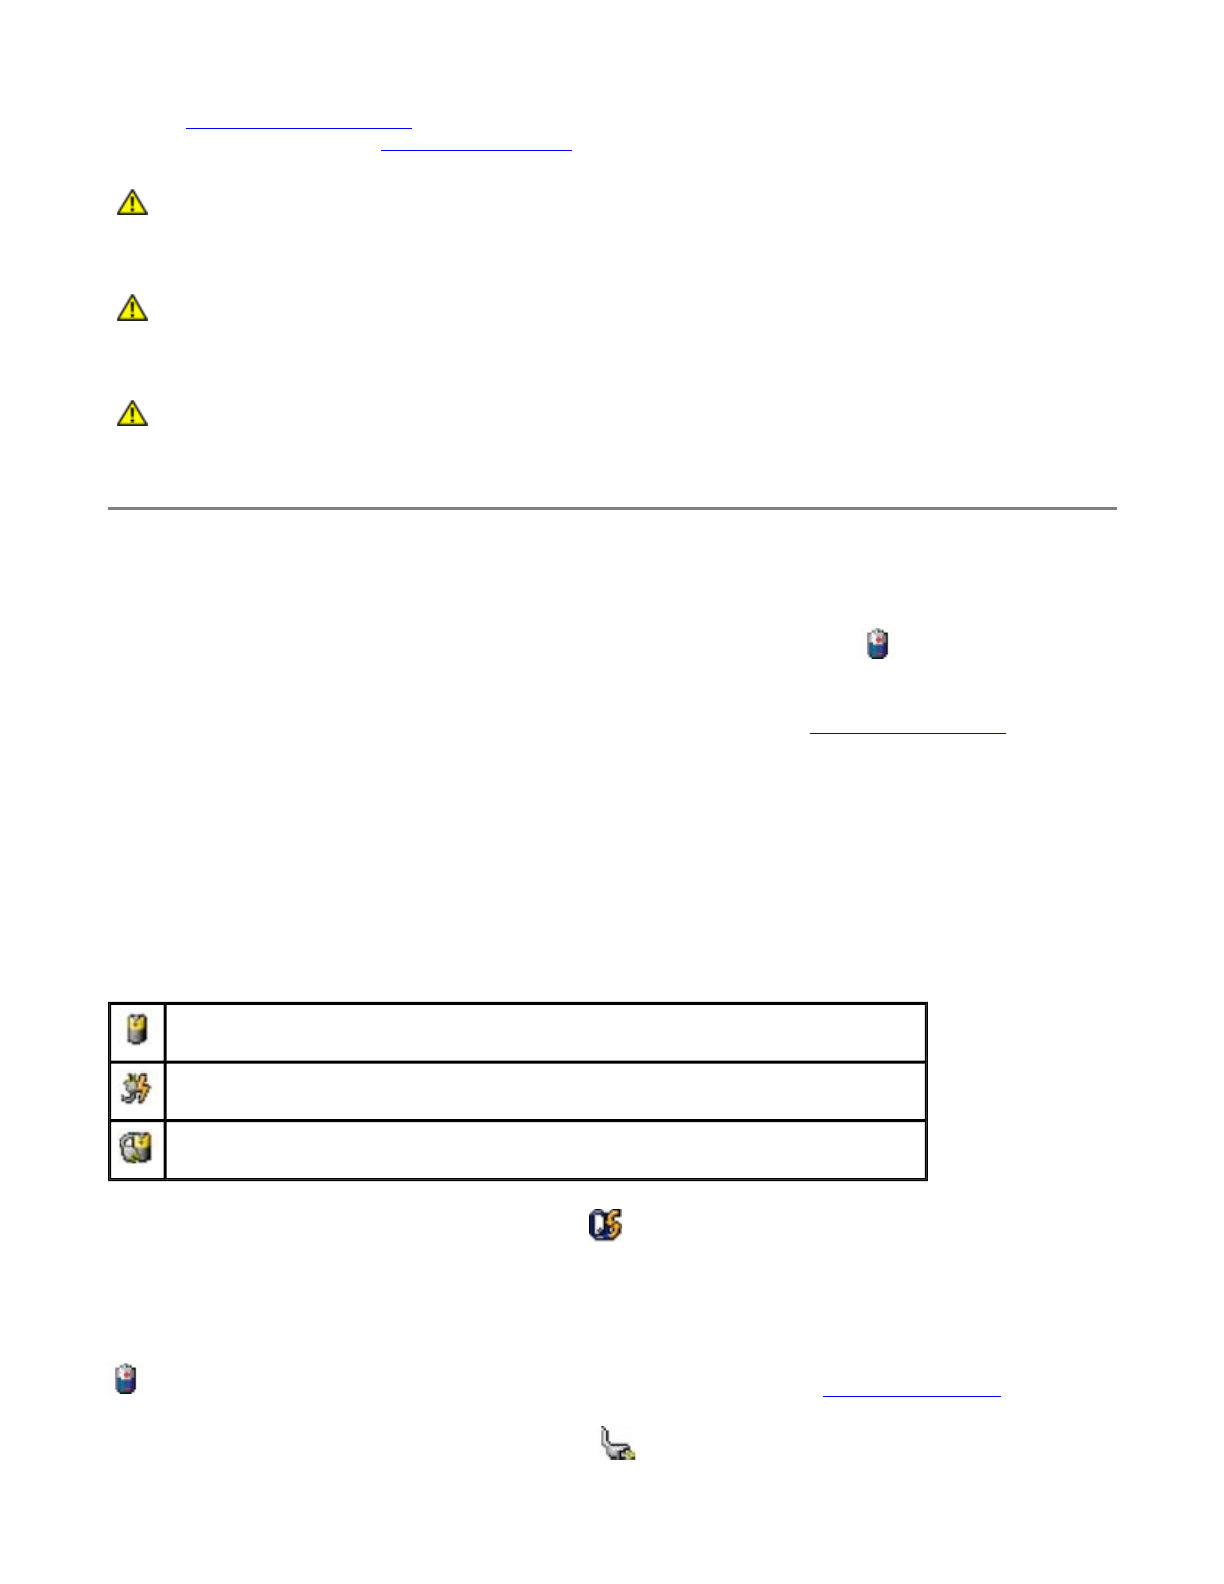
The following icons appear in the Battery Meter screen:
For more information about QuickSet, right-click the icon in the taskbar, and click Help.
Microsoft Windows Power Meter
The Windows power meter indicates the remaining battery charge. To check the power meter, double-click the
icon on the taskbar. For more information on the Power Meter tab, see "Power Management."
If the computer is connected to an electrical outlet, a icon appears.
CAUTION: Using an incompatible battery may increase the risk of fire or explosion. Replace
the battery only with a compatible battery purchased from Dell. The lithium-ion battery is
designed to work with your Dell™ computer. Do not use a battery from other computers with
your computer.
CAUTION: Do not dispose of batteries with household waste. When your battery no longer
holds a charge, call your local waste disposal or environmental agency for advice on
disposing of a lithium-ion battery. See the battery disposal instructions in your System
Information Guide.
CAUTION: Misuse of the battery may increase the risk of fire or chemical burn. Do not
puncture, incinerate, disassemble, or expose the battery to temperatures above 65°C (149°
F). Keep the battery away from children. Handle damaged or leaking batteries with extreme
care. Damaged batteries may leak and cause personal injury or equipment damage.
zThe computer is running on battery power.
zThe battery is discharging or idle.
zThe computer is connected to an electrical outlet and running on AC power.
zThe battery is charging.
zThe computer is connected to an electrical outlet and running on AC power.
zThe battery is discharging, idle, or charging.
Pa
g
e 2 of 7Usin
g
a Batter
y
9/19/2003file://C:\Documents%20and%20Settin
g
s\r
p
axman\Local%20Settin
g
s\Tem
p
\~hhEA52.htm
Charge Gauge
Press the status button on the battery charge gauge to illuminate the charge-level lights. Each light represents
approximately 20 percent of the total battery charge. For example, if the battery has 80 percent of its charge
remaining, four of the lights are on. If no lights appear, the battery has no charge.
Health Gauge
The battery operating time is largely determined by the number of times it is charged. After hundreds of
charge and discharge cycles, batteries lose some charge capacity, or battery health. To check the battery
health, press and hold the status button on the battery charge gauge for at least 3 seconds. If no lights
appear, the battery is in good condition, and more than 80 percent of its original charge capacity remains.
Each light represents incremental degradation. If five lights appear, less than 60 percent of the charge
capacity remains, and you should consider replacing the battery. See "Specifications" for more information
about the battery operating time.
Low-Battery Warning
A low-battery warning occurs when the battery charge is approximately 90 percent depleted. The computer
beeps once, indicating that minimal battery operating time remains. During that time, the speaker beeps
periodically. If two batteries are installed, the low-battery warning means that the combined charge of both
batteries is approximately 90 percent depleted. The computer enters hibernate mode when the battery charge
is at a critically low level. For more information on low-battery alarms, see "Power Management."
Charging the Battery
NOTICE: To avoid losing or corrupting data, save your work immediately after a low-battery warning.
Then connect the computer to an electrical outlet, or install a second battery in the module bay. If the
battery runs completely out of power, hibernate mode begins automatically.
NOTE: The AC adapter charges a completely discharged battery in approximately 1 hour with the
Pa
g
e 3 of 7Usin
g
a Batter
y
9/19/2003file://C:\Documents%20and%20Settin
g
s\r
p
axman\Local%20Settin
g
s\Tem
p
\~hhEA52.htm

When you connect the computer to an electrical outlet or install a battery while the computer is connected to
an electrical outlet, the computer checks the battery charge and temperature. If necessary, the AC adapter
then charges the battery and maintains the battery charge.
If the battery is hot from being used in your computer or being in a hot environment, the battery may not
charge when you connect the computer to an electrical outlet.
Disconnect the computer from the electrical outlet and allow the computer and the battery to cool to room
temperature. Then connect the computer to an electrical outlet to continue charging the battery.
For more information on resolving problems with a battery, see "Power Problems."
Removing a Battery
For more information about removing the second battery, see "Using the Module Bay."
1. Ensure that the computer is turned off, disconnected from an electrical outlet, and disconnected from
the telephone wall jack.
2. If the computer is connected to a docking device (docked), undock it. See the documentation that came
with your docking device for instructions.
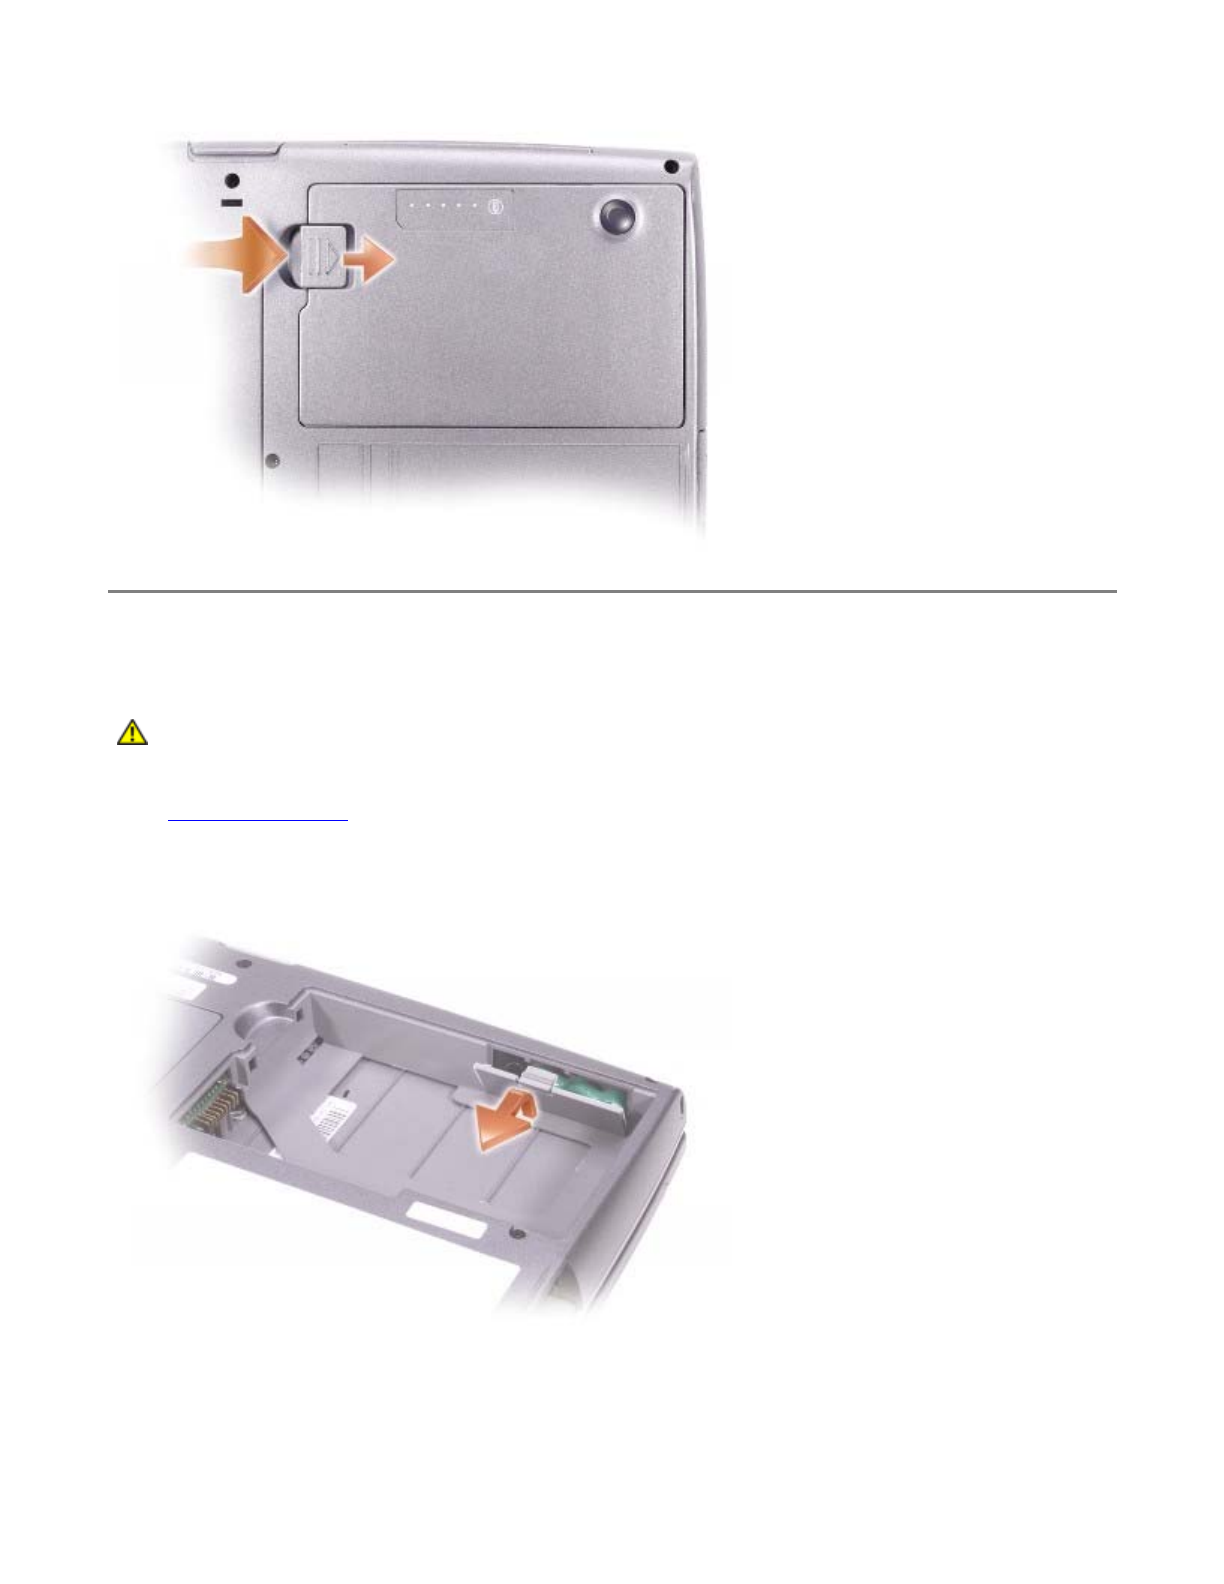
3. Slide and hold the battery-bay latch release on the bottom of the computer, and then remove the
battery from the bay.
computer turned off. Charge time is longer with the computer turned on. You can leave the battery in
the computer as long as you like. The battery internal circuitry prevents the battery from overcharging.
CAUTION: Before performing the following procedures, read and follow the safety
instructions in the System Information Guide.
CAUTION: Before performing these procedures, turn off the computer, disconnect it from the
electrical outlet, and disconnect the modem from the telephone wall jack.
NOTICE: If you choose to replace the battery with the computer in standby mode, you have up to 90
seconds to complete the battery replacement before the computer shuts down and loses any unsaved
data.
Pa
g
e 4 of 7Usin
g
a Batter
y
9/19/2003file://C:\Documents%20and%20Settin
g
s\r
p
axman\Local%20Settin
g
s\Tem
p
\~hhEA52.htm
Removing and Installing a Reserve Battery
1. Remove the battery.
2. Remove the reserve battery cover.
3. Pull the reserve battery out of its compartment, and disconnect the reserve battery cable from the
connector.
CAUTION: Before performing the following procedures, read and follow the safety
instructions in the System Information Guide.
Pa
g
e 5 of 7Usin
g
a Batter
y
9/19/2003file://C:\Documents%20and%20Settin
g
s\r
p
axman\Local%20Settin
g
s\Tem
p
\~hhEA52.htm
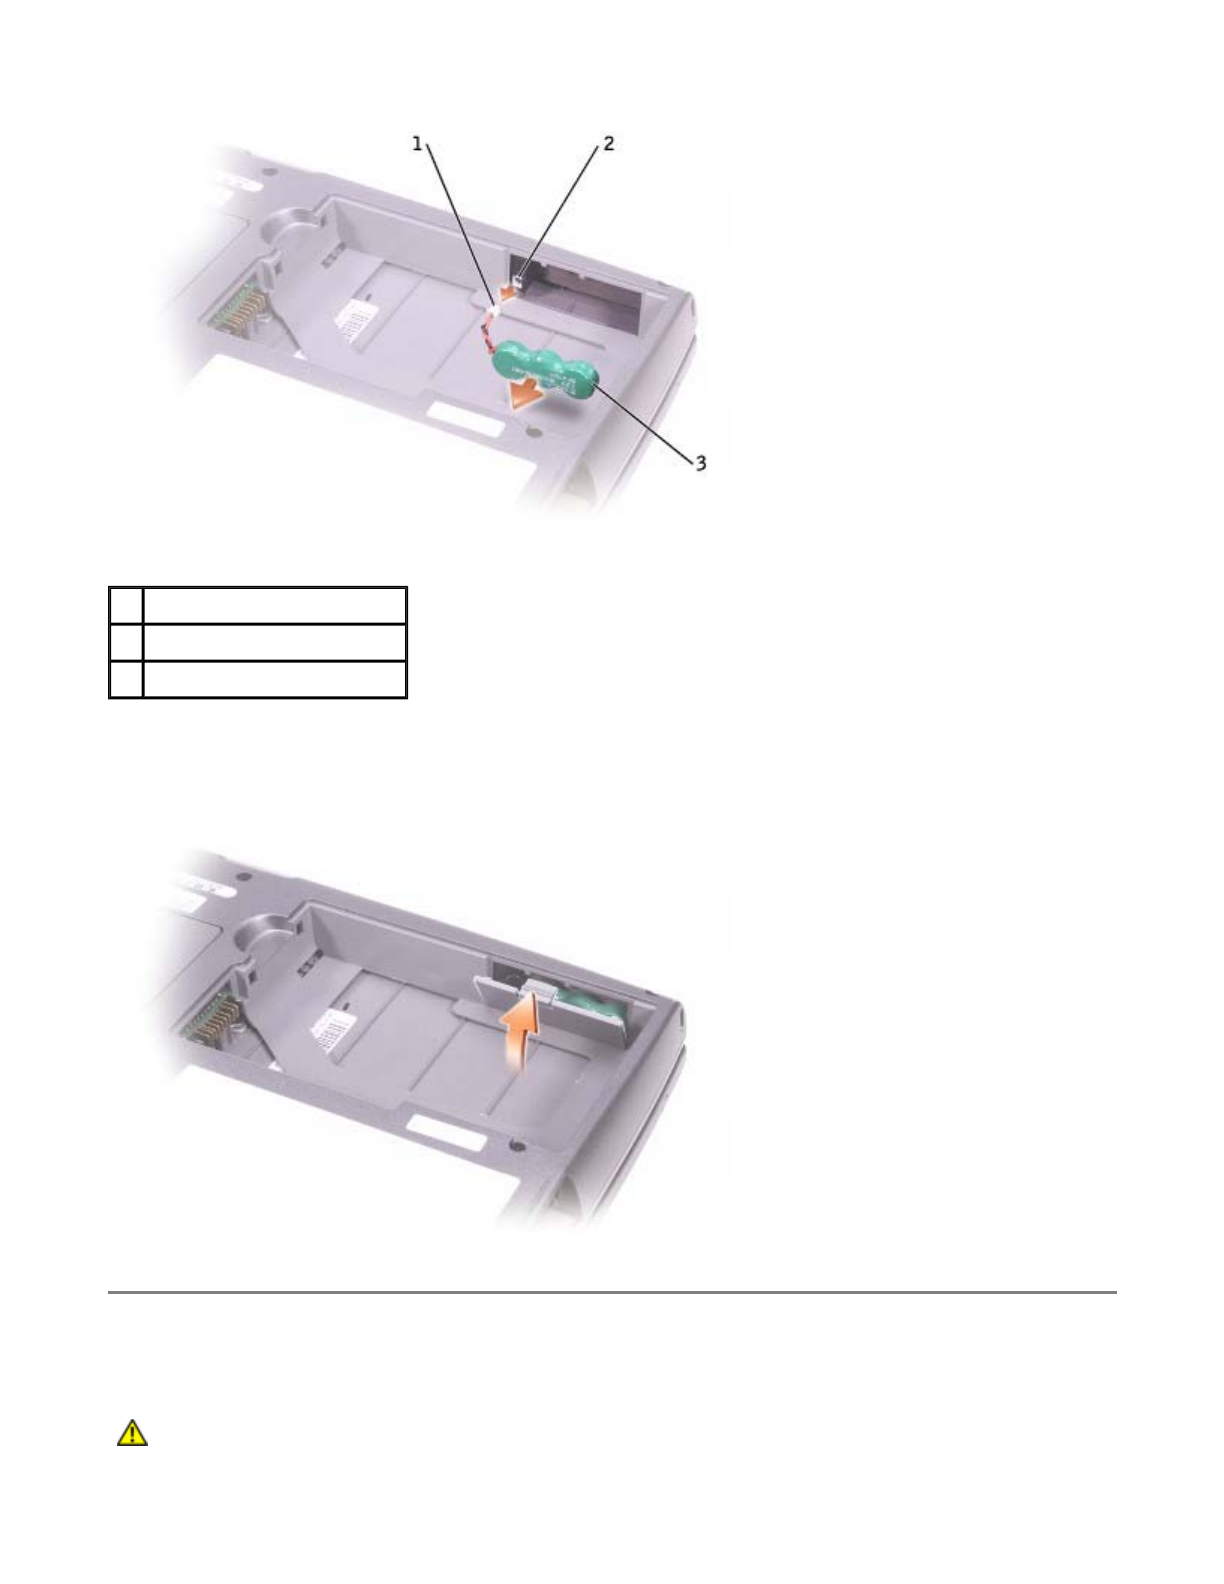
4. Connect the reserve battery cable to the connector in the reserve battery compartment.
5. Place the reserve battery in the compartment, and replace the reserve battery cover.
Installing a Battery
1 reserve battery cable
2 connector
3 reserve battery
CAUTION: Before performing the following procedures, read and follow the safety
instructions in the System Information Guide.
Pa
g
e 6 of 7Usin
g
a Batter
y
9/19/2003file://C:\Documents%20and%20Settin
g
s\r
p
axman\Local%20Settin
g
s\Tem
p
\~hhEA52.htm

Slide the battery into the bay until the latch release clicks.
For more information about installing the second battery, see "Using the Module Bay."
Storing a Battery
Remove the battery when you store your computer for an extended period of time. A battery discharges
during prolonged storage. After a long storage period, recharge the battery fully before you use it.
Pa
g
e 7 of 7Usin
g
a Batter
y
9/19/2003file://C:\Documents%20and%20Settin
g
s\r
p
axman\Local%20Settin
g
s\Tem
p
\~hhEA52.htm

Using the Module Bay
About the Module Bay
Checking the Charge on the Second Battery
Removing and Installing Devices While the Computer Is Turned Off
Removing and Installing Devices While the Computer Is Running
Using CDs or DVDs
About the Module Bay
You can install devices such as a floppy drive, CD drive, CD-RW drive, DVD drive, CD-RW/DVD drive,
DVD+RW, second battery, or second hard drive in the module bay.
Your Dell™ computer ships with an optical drive installed in the module bay. However, the device screw is not
installed in the optical drive but packaged separately. When you install your device in the module bay, you can
install the device screw.
Checking the Charge on the Second Battery
Before you install a second battery, press the status button on the battery charge gauge to illuminate the
charge level lights. Each light represents approximately 20 percent of the total battery charge. For example, if
the battery has 80 percent of its charge remaining, four of the lights are on. If no lights appear, the battery
has no charge.
CAUTION: Before performing any of the following procedures, read and follow the safety
instructions in the System Information Guide.
NOTE: You do not need to install the device screw unless you want to secure the module inside the
computer for security purposes.
Pa
g
e 1 of 12Usin
g
the Module Ba
y
9/19/2003file://C:\Documents%20and%20Settin
g
s\r
p
axman\Local%20Settin
g
s\Tem
p
\~hh433D.htm
Removing and Installing Devices While the Computer Is
Turned Off
Your computer ships with an optical drive installed in the module bay. However, the device screw is not
installed in the optical drive but packaged separately. When you install your device in the module bay, you can
install the device screw.
If the Device Screw Is Not Installed
1. Press the device latch release so that the latch release pops out.
1 status button on the
battery charge gauge
2 second battery (bottom)
CAUTION: Before performing any of the following procedures, read and follow the safety
instructions in the System Information Guide.
NOTE: If the device screw is not installed, you can remove and install devices while the computer is
running and connected to a docking device (docked).
NOTE: You do not need to install the device screw unless you want to secure the module inside the
computer for security purposes.
NOTICE: To prevent damage to devices, place them in a safe, dry place when they are not installed in
the computer. Avoid pressing down on them or placing heavy objects on top of them.
Pa
g
e 2 of 12Usin
g
the Module Ba
y
9/19/2003file://C:\Documents%20and%20Settin
g
s\r
p
axman\Local%20Settin
g
s\Tem
p
\~hh433D.htm
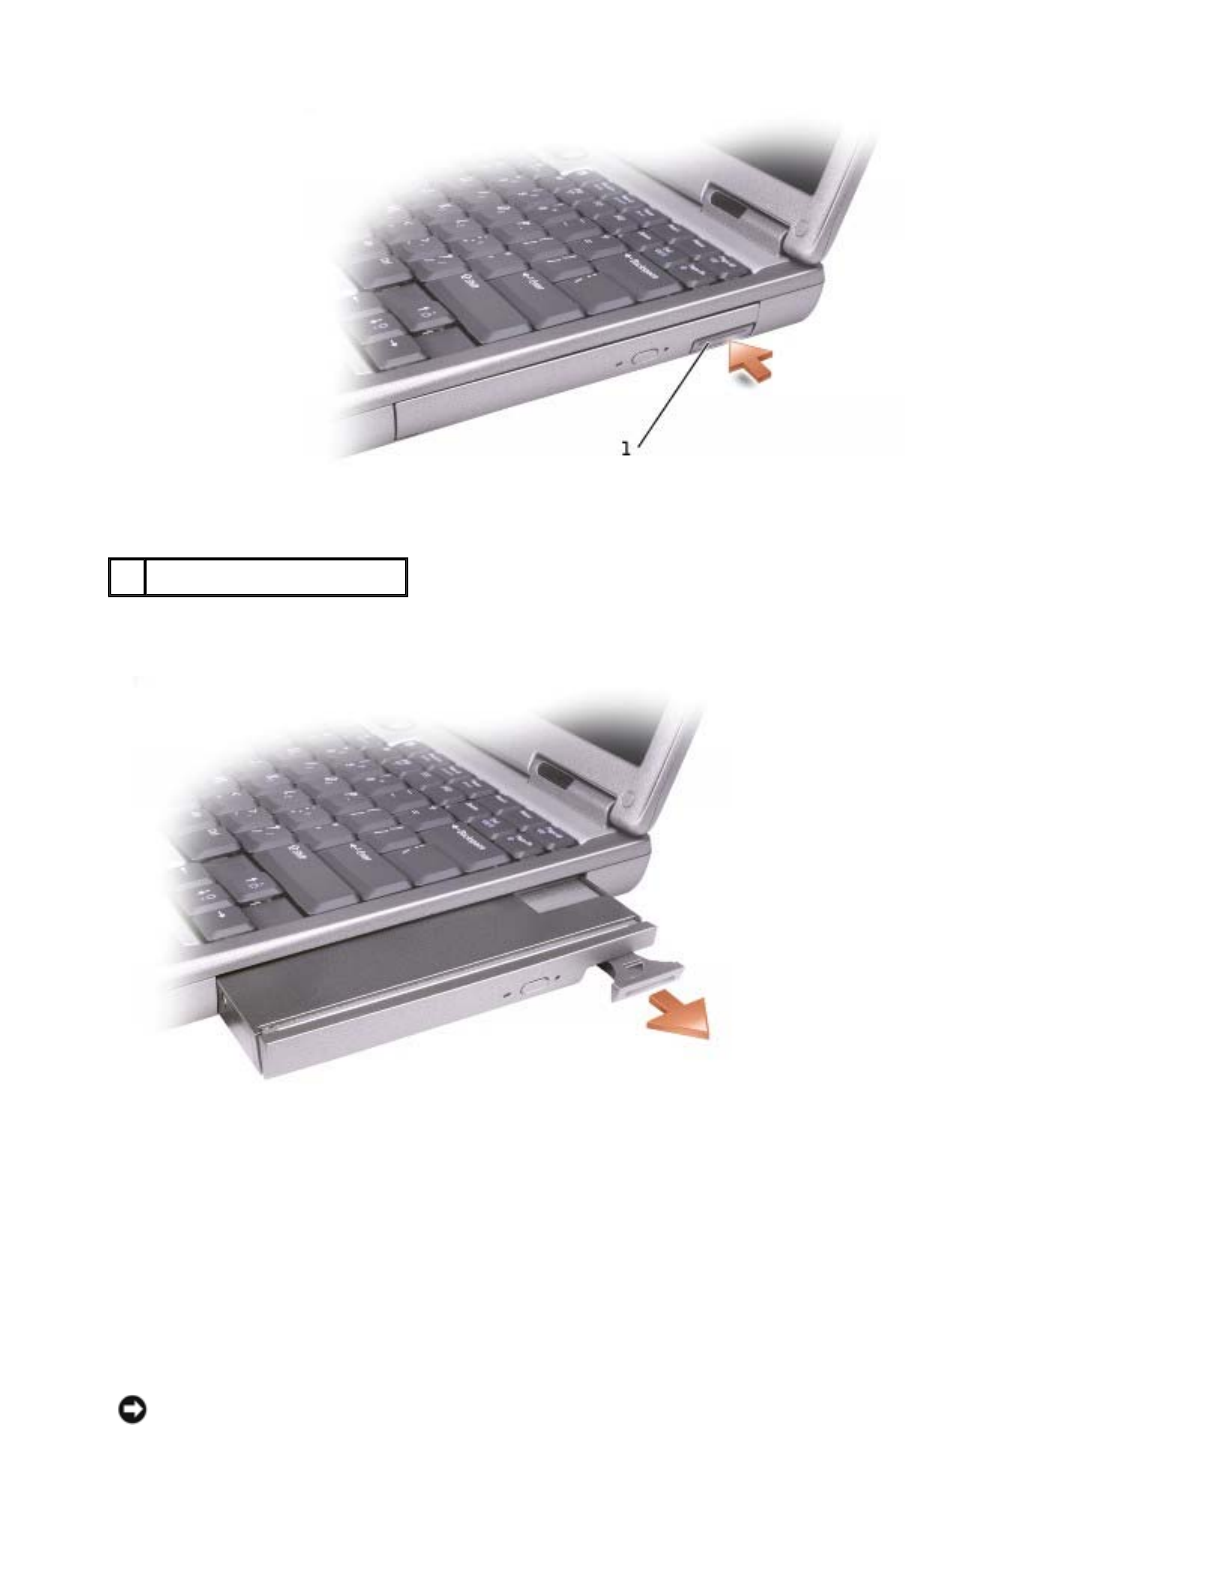
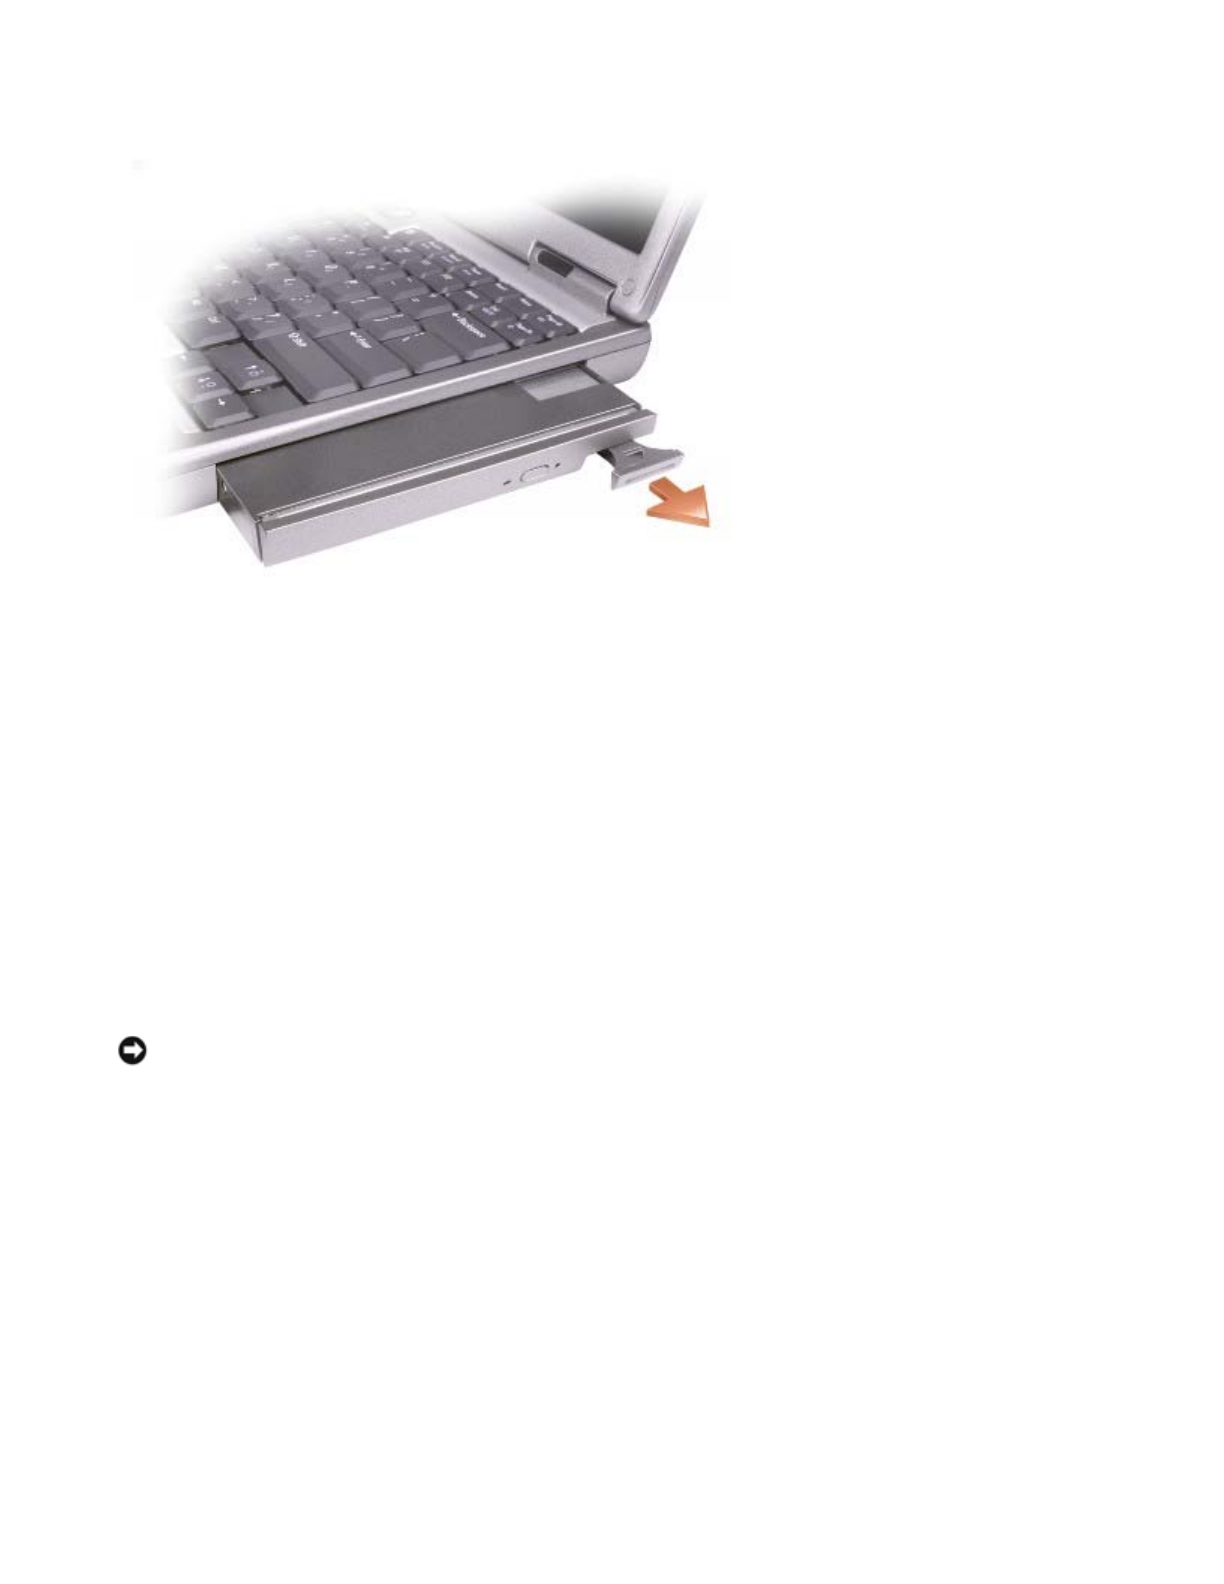
2. Pull the device by the latch release to remove the device from the module bay.
3. Insert the new device into the bay, push the device until you feel a click, and push the device latch
release in so that it is flush with the computer.
If the Device Screw Is Installed
1. Save and close any open files, exit any open programs, and then shut down the computer.
2. If the computer is connected to a docking device (docked), undock it. See the documentation that came
with your docking device for instructions.
1 device latch release
NOTICE: To prevent damage to devices, place them in a safe, dry place when they are not installed in
the computer. Avoid pressing down on them or placing heavy objects on top of them.
Pa
g
e 3 of 12Usin
g
the Module Ba
y
9/19/2003file://C:\Documents%20and%20Settin
g
s\r
p
axman\Local%20Settin
g
s\Tem
p
\~hh433D.htm
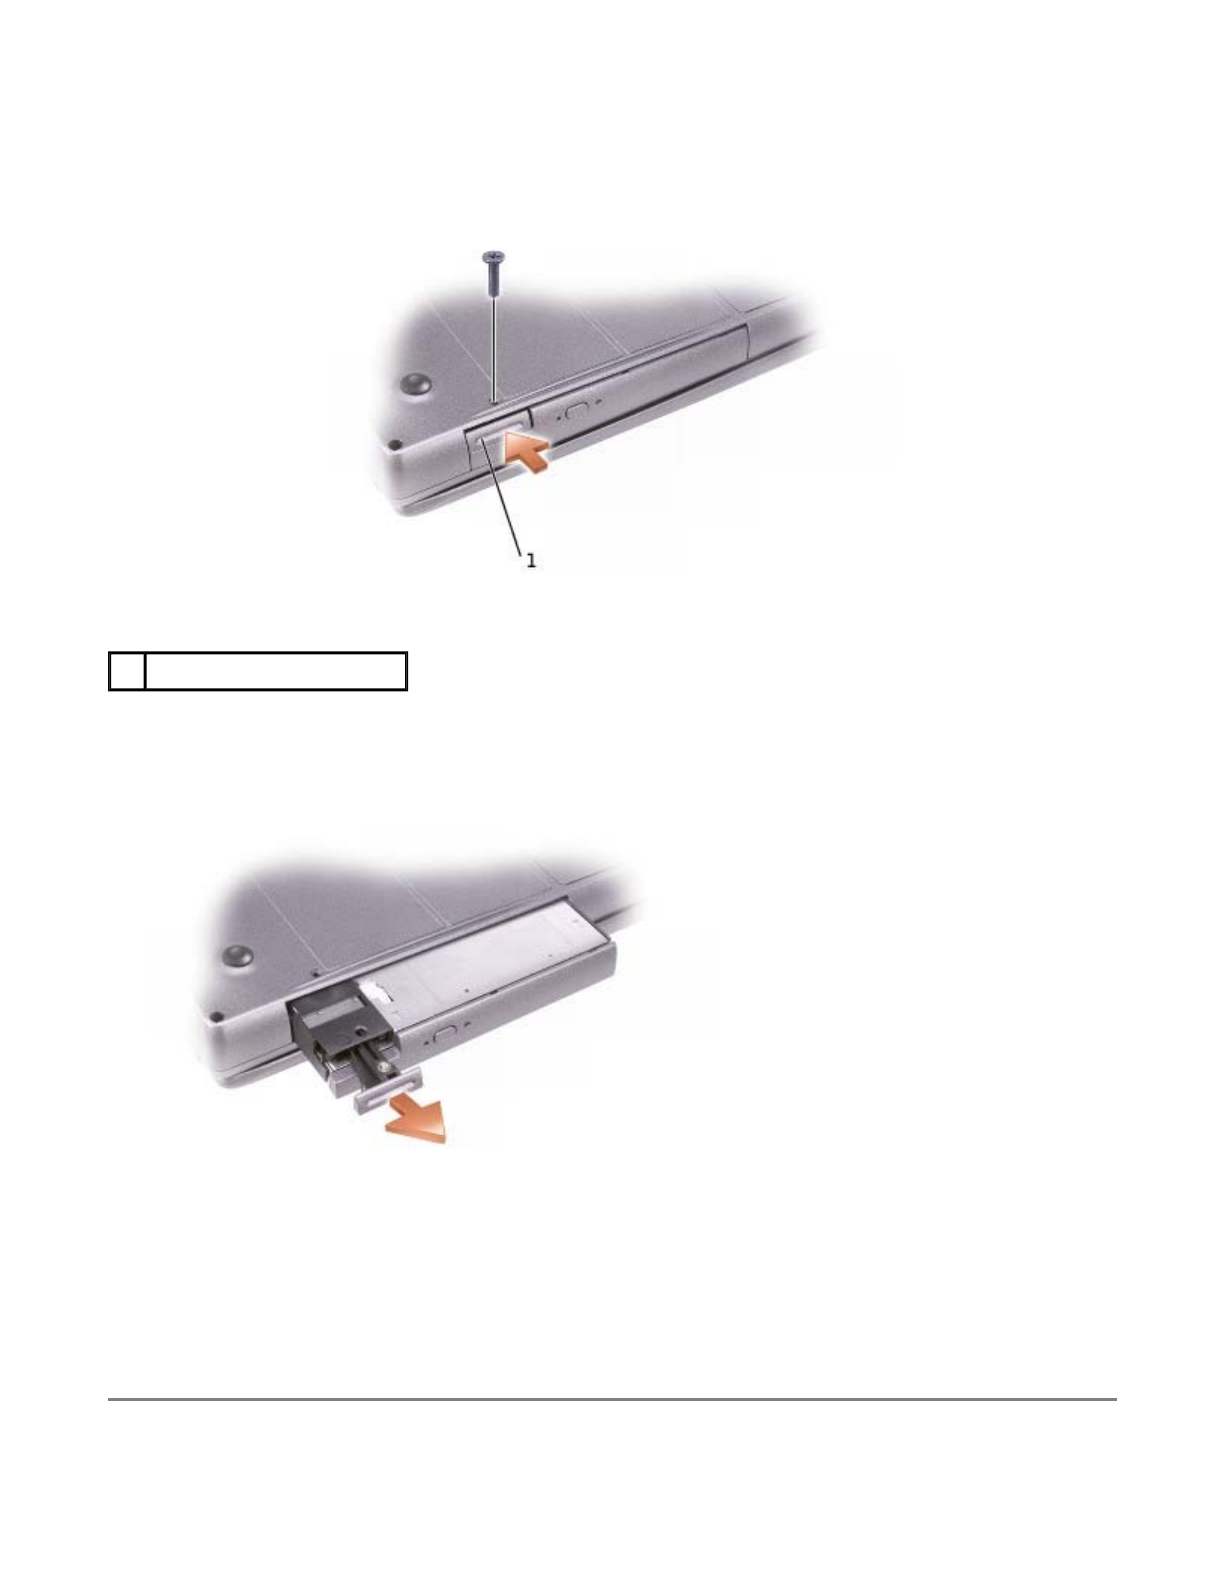
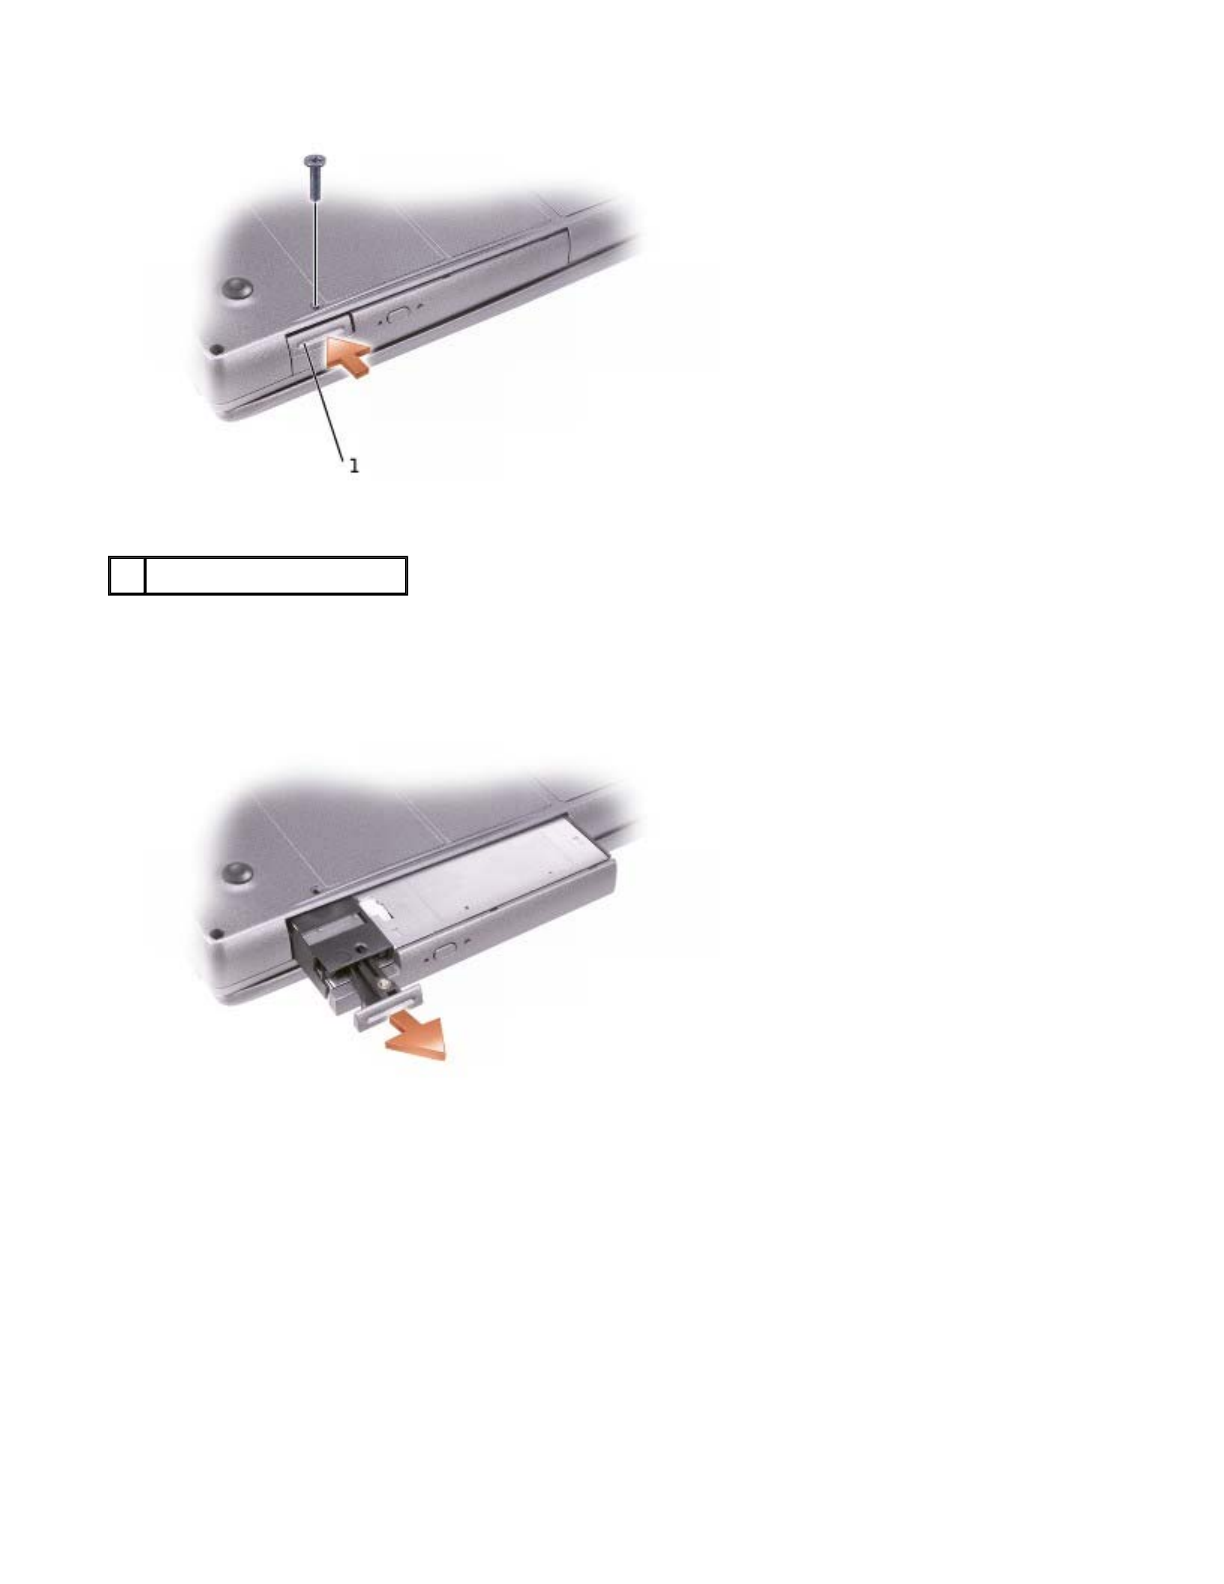
3. Close the display and turn the computer over.
4. Use a #1 Phillips screwdriver to remove the device screw from the bottom of the computer.
5. Press the device latch release so that the latch release pops out.
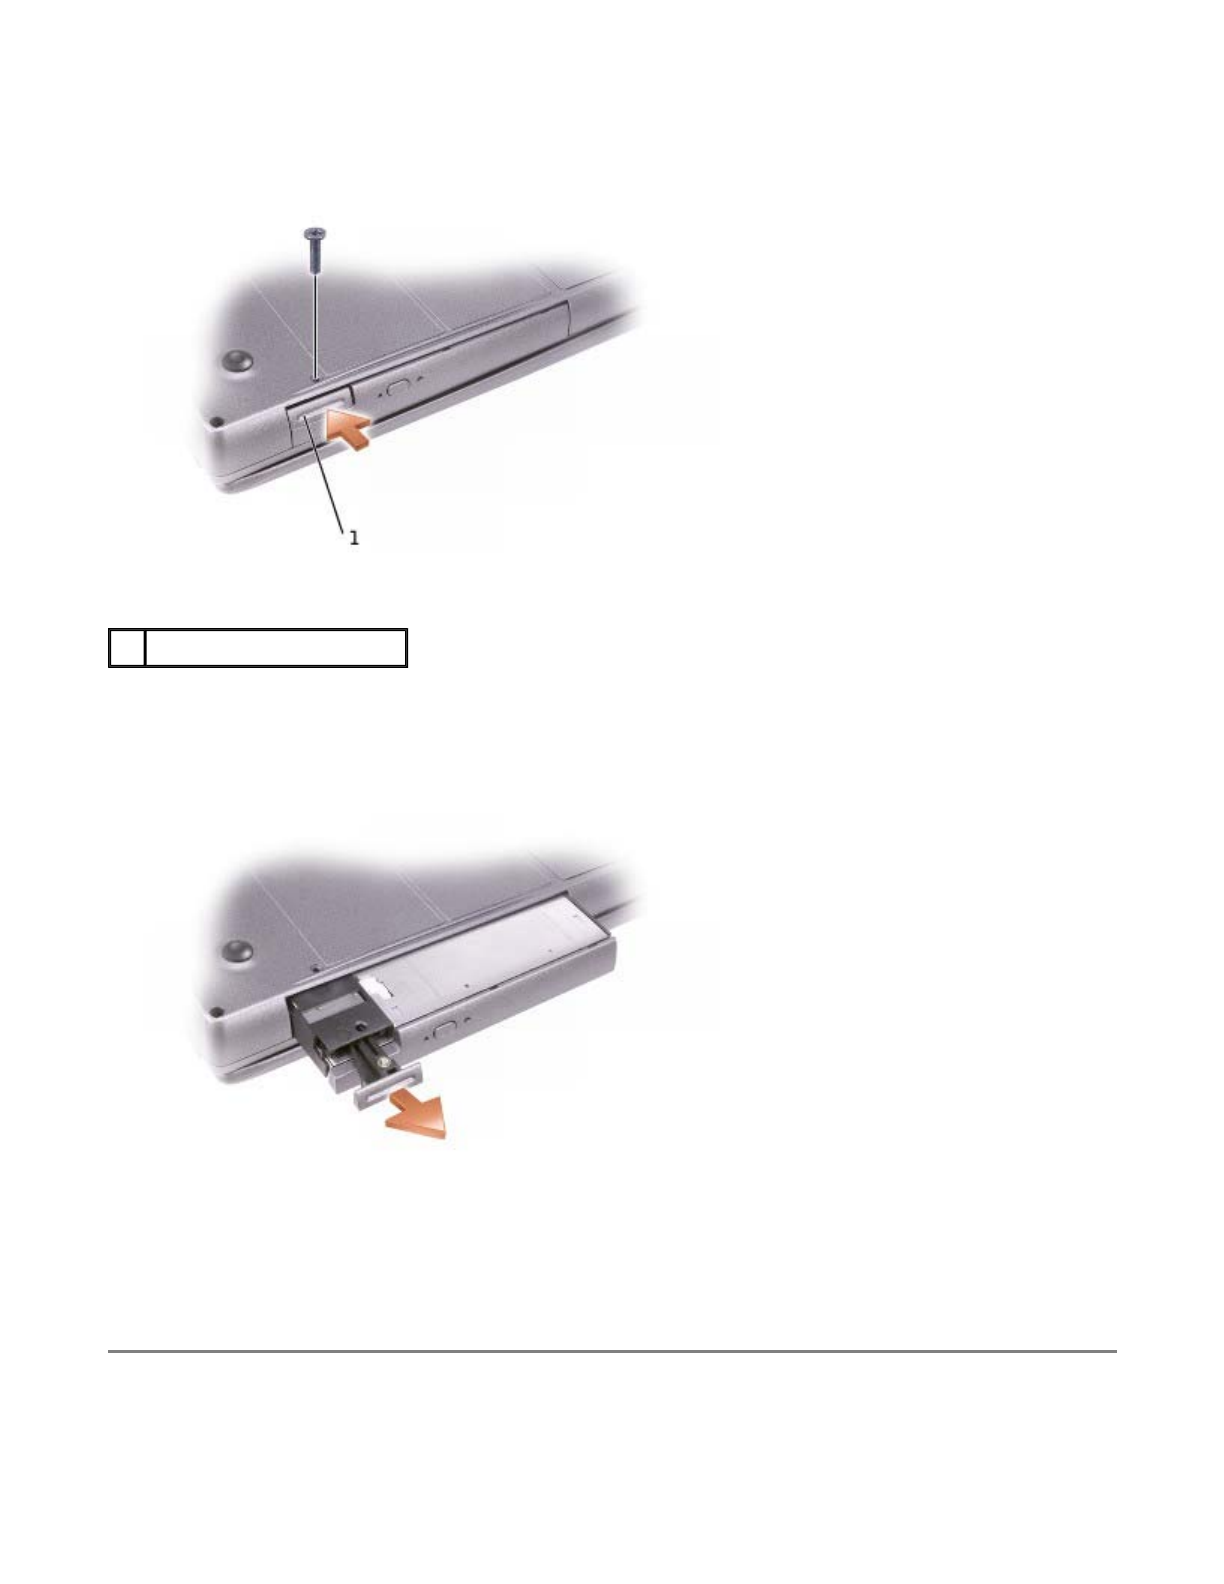
6. Pull the device by the latch release to remove the device from the module bay.
7. Insert the new device into the bay, push the device until you feel a click, and push the device latch
release in so that it is flush with the computer.
8. Replace the device screw.
9. Turn on the computer.
1 device latch release
Pa
g
e 4 of 12Usin
g
the Module Ba
y
9/19/2003file://C:\Documents%20and%20Settin
g
s\r
p
axman\Local%20Settin
g
s\Tem
p
\~hh433D.htm

Removing and Installing Devices While the Computer Is
Running
Your computer ships with an optical drive installed in the module bay. However, the device screw is not
installed in the optical drive but packaged separately. When you install your device in the module bay, you can
install the device screw.
If the Device Screw Is Not Installed
Microsoft® Windows® XP
1. Double-click the Safely Remove Hardware icon on the taskbar.
2. Click Stop and wait for the operating system to confirm that the device has stopped.
3. Click the device you want to eject.
4. Press the device latch release so that the latch release pops out.
CAUTION: Before performing any of the following procedures, read and follow the safety
instructions in the System Information Guide.
NOTE: You do not need to install the device screw unless you want to secure the module inside the
computer for security purposes.
NOTICE: To prevent damage to devices, place them in a safe, dry place when they are not installed in
the computer. Avoid pressing down on them or placing heavy objects on top of them.
1 device latch release
Pa
g
e 5 of 12Usin
g
the Module Ba
y
9/19/2003file://C:\Documents%20and%20Settin
g
s\r
p
axman\Local%20Settin
g
s\Tem
p
\~hh433D.htm
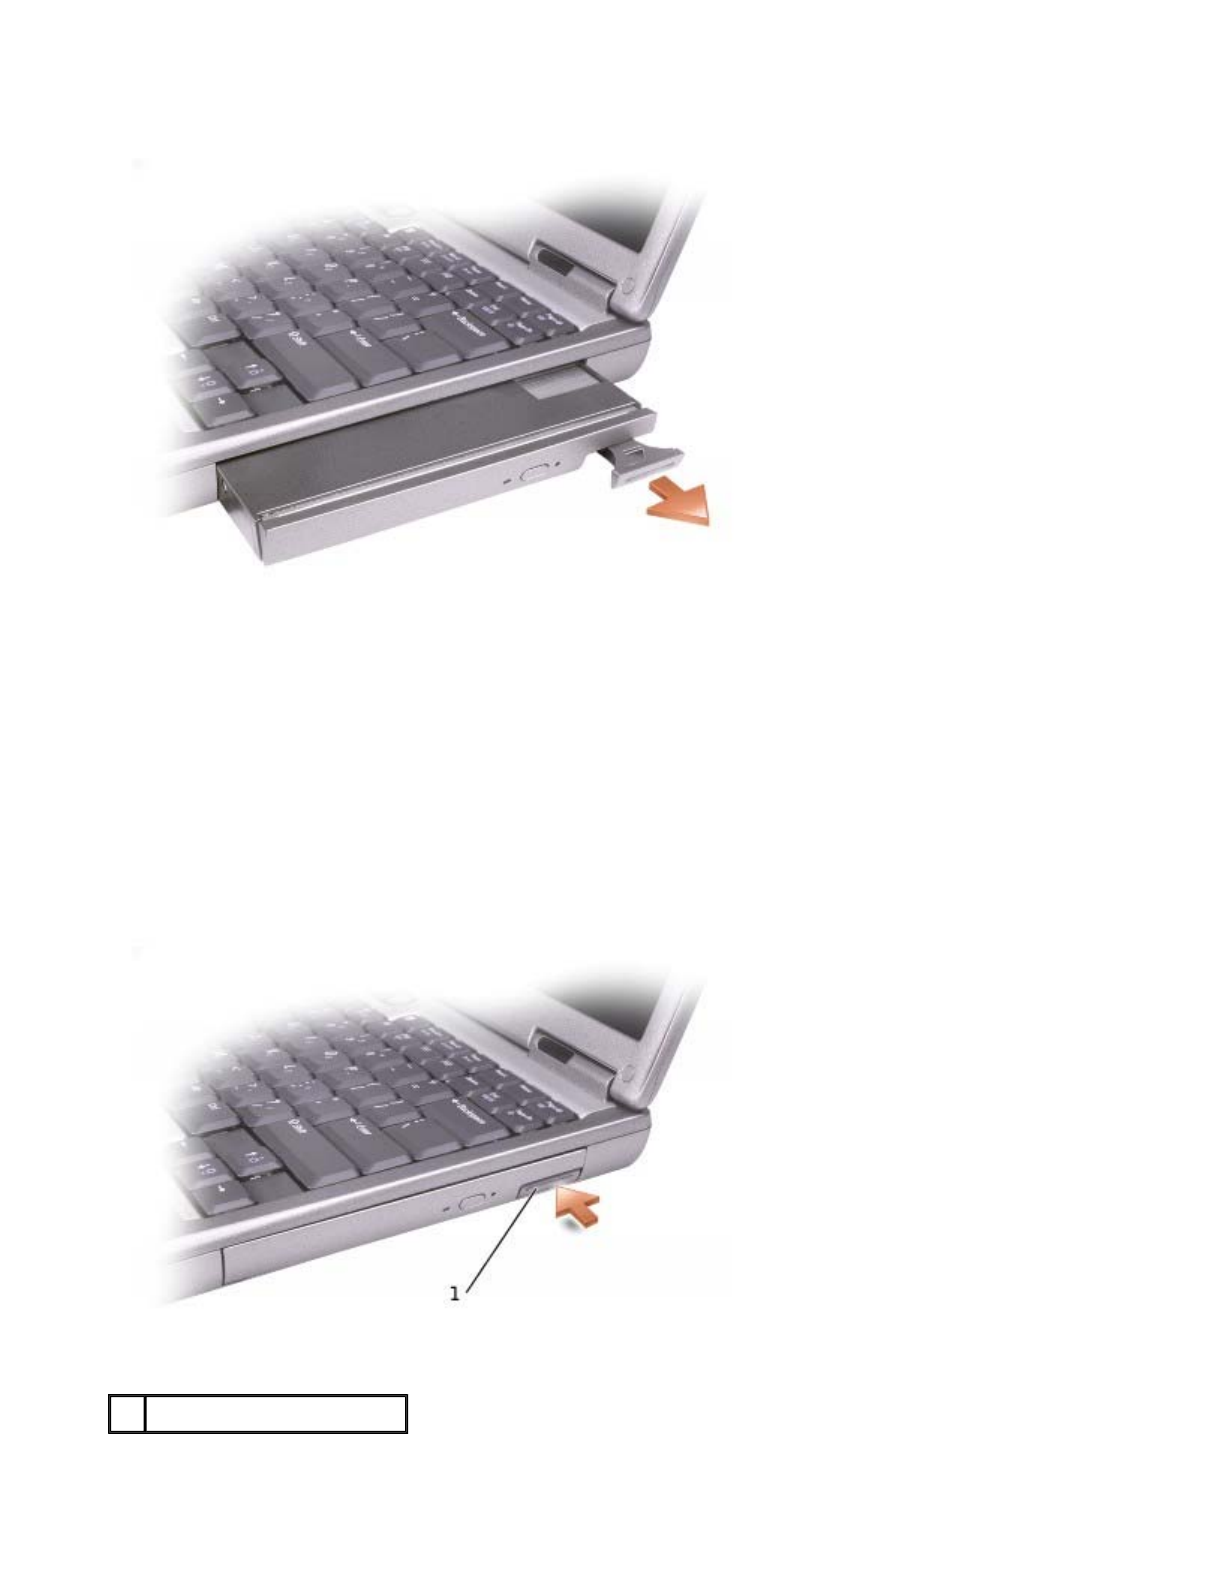
5. Pull the device by the latch release to remove the device from the module bay.
6. Insert the new device into the bay, push the device until you feel a click, and push the device latch
release in so that it is flush with the computer. Windows XP automatically recognizes the new device.
7. If necessary, enter your password to unlock your computer.
Windows 2000
1. Click the Unplug or Eject Hardware icon on the taskbar.
2. Click the device you want to eject and click Stop.
3. Press the device latch release so that the latch release pops out.
1 device latch release
Pa
g
e 6 of 12Usin
g
the Module Ba
y
9/19/2003file://C:\Documents%20and%20Settin
g
s\r
p
axman\Local%20Settin
g
s\Tem
p
\~hh433D.htm
4. Pull the device by the latch release to remove the device from the module bay.
5. Insert the new device into the bay, push the device until you feel a click, and push the device latch
release in so that it is flush with the computer.
6. When the operating system recognizes the new device, click Close.
If the Device Screw Is Installed
Windows XP
1. Double-click the Safely Remove Hardware icon on the taskbar.
2. Click the device you want to eject.
3. If the computer is connected to a docking device (docked), undock it. See the documentation that came
with your docking device for instructions.
4. Use a #1 Phillips screwdriver to remove the device screw from the bottom of the computer.
NOTICE: To prevent damage to devices, place them in a safe, dry place when they are not installed in
the computer. Avoid pressing down on them or placing heavy objects on top of them.
Pa
g
e 7 of 12Usin
g
the Module Ba
y
9/19/2003file://C:\Documents%20and%20Settin
g
s\r
p
axman\Local%20Settin
g
s\Tem
p
\~hh433D.htm
5. Press the device latch release so that the latch release pops out.
6. Pull the device by the latch release to remove the device from the module bay.
7. Insert the new device into the bay, push the device until you feel a click, and push the device latch
release in so that it is flush with the computer. Windows XP automatically recognizes the new device.
8. If necessary, enter your password to unlock your computer.
Windows 2000
1. Click the Unplug or Eject Hardware icon on the taskbar.
2. Click the device you want to eject and click Stop.
3. If the computer is connected to a docking device (docked), undock it. See the documentation that came
with your docking device for instructions.
1 device latch release
Pa
g
e 8 of 12Usin
g
the Module Ba
y
9/19/2003file://C:\Documents%20and%20Settin
g
s\r
p
axman\Local%20Settin
g
s\Tem
p
\~hh433D.htm
4. Use a #1 Phillips screwdriver to remove the device screw from the bottom of the computer.
5. Press the device latch release so that the latch release pops out.
6. Pull the device by the latch release to remove the device from the module bay.
7. Insert the new device into the bay, push the device until you feel a click, and push the device latch
release in so that it is flush with the computer.
8. When the operating system recognizes the new device, click Close.
Using CDs or DVDs
1 device latch release
Pa
g
e 9 of 12Usin
g
the Module Ba
y
9/19/2003file://C:\Documents%20and%20Settin
g
s\r
p
axman\Local%20Settin
g
s\Tem
p
\~hh433D.htm
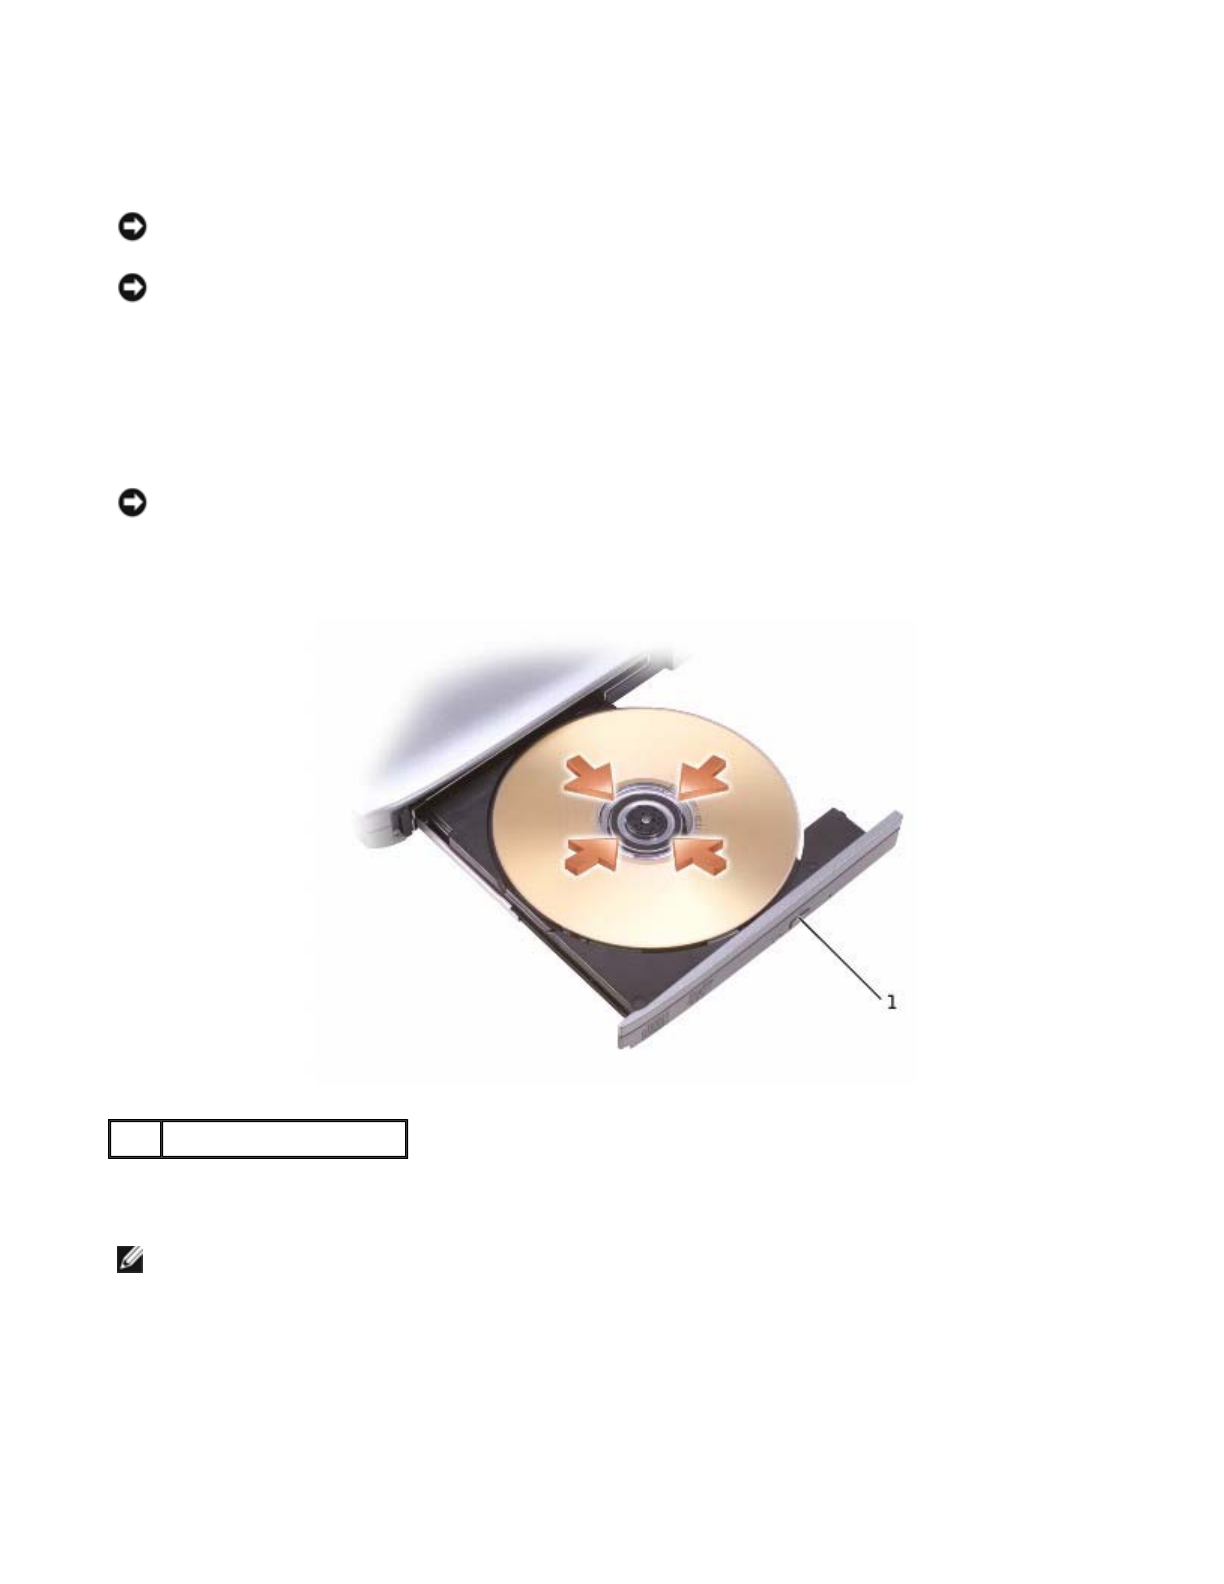
Using the CD or DVD Tray
1. Press the eject button on the front of the drive.
2. Pull the tray out.
3. Place the disc, label side up, in the center of the tray.
4. Snap the disc onto the spindle.
5. Push the tray back into the drive.
You can play a DVD on your computer if the computer shipped with a DVD drive or a CD-RW/DVD combo
drive. You can write data to a CD-R/CD-RW on your computer if the computer shipped with a CD-RW or CD-
RW/DVD combo drive.
For more information on playing CDs or DVDs, click Help on the CD player or DVD player (if available).
NOTICE: Do not press down on the drive tray when opening or closing it. Keep the tray closed when
you are not using the drive.
NOTICE: Do not move the computer while playing CDs or DVDs.
NOTICE: Ensure that you snap the disc onto the spindle. Otherwise you may damage the drive tray, or
your CD or DVD will not work properly.
1 eject button
NOTE: If you use a module that shipped with another computer, you need to install the drivers and
software necessary to play DVDs or write data. For more information, see the Drivers and Utilities CD.
Pa
g
e 10 of 12Usin
g
the Module Ba
y
9/19/2003file://C:\Documents%20and%20Settin
g
s\r
p
axman\Local%20Settin
g
s\Tem
p
\~hh433D.htm
Adjusting the Volume
1. Click the Start button, point to All Programs→ Accessories→ Entertainment (or Multimedia), and
then click Volume Control.
2. In the Volume Control window, click and drag the bar in the Volume Control column and slide the
bar up or down to increase or decrease the volume.
For more information on volume control options, click Help in the Volume Control window.
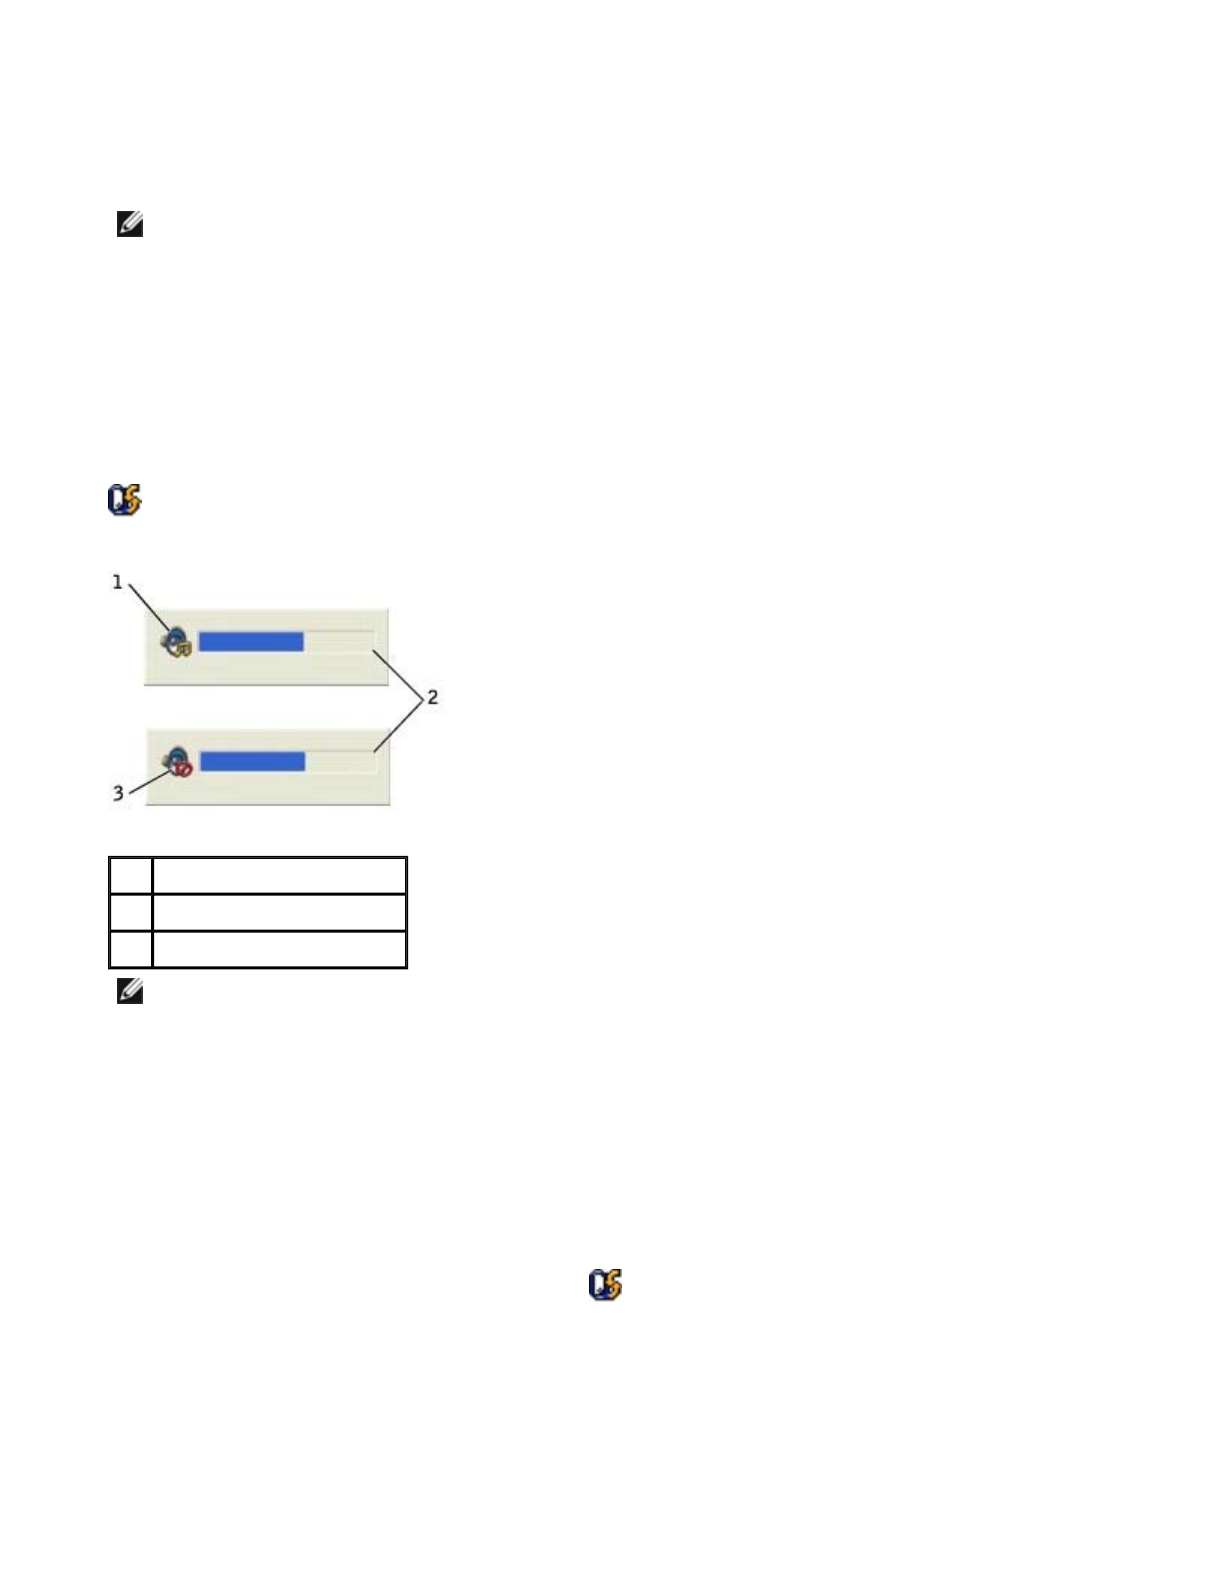
The Volume Meter displays the current volume level, including mute, on your computer. Either right-click the
icon in the taskbar or press the volume control buttons to enable or disable the Volume Meter on the
screen.
When the meter is enabled, adjust the volume using the volume control buttons or by pressing the following
keys:
zPress <Fn><Page Up> to increase volume.
zPress <Fn><Page Down> to decrease volume.
zPress <Fn><End> to mute volume.
For more information about QuickSet, right-click the icon in the taskbar, and click Help.
Adjusting the Picture
If an error message notifies you that the current resolution and color depth are using too much memory and
preventing DVD playback, adjust the display properties.
NOTE: If the speakers are muted, you do not hear the CD or DVD playing.
1 volume icon
2 Volume Meter
3 mute icon
NOTE: By default, the Volume Meter appears in the lower-right corner of the display. You can click
and drag the meter to a new location, and the meter subsequently always appears at the new location.
Pa
g
e 11 of 12Usin
g
the Module Ba
y
9/19/2003file://C:\Documents%20and%20Settin
g
s\r
p
axman\Local%20Settin
g
s\Tem
p
\~hh433D.htm

Windows XP
1. Click the Start button and click Control Panel.
2. Under Pick a category, click Appearance and Themes.
3. Under Pick a task..., click Change the screen resolution.
4. In the Display Properties window, click and drag the bar in Screen resolution to change the setting
to 1024 by 768 pixels.
5. Under Color quality, click the drop-down menu and click Medium (16 bit).
6. Click OK.
Windows 2000
1. Click the Start button, point to Settings, and then click Control Panel.
2. Double-click the Display icon and click the Settings tab.
3. Click and drag the bar in Screen area to change the setting to 1024 by 768 pixels.
4. Under Color quality, click the drop-down menu and click High Color (16 bit).
5. Click Apply.
6. Click OK to save the settings and close the window.
Pa
g
e 12 of 12Usin
g
the Module Ba
y
9/19/2003file://C:\Documents%20and%20Settin
g
s\r
p
axman\Local%20Settin
g
s\Tem
p
\~hh433D.htm

Power Management
Power Management Tips
Power Management Wizard
Power Management Modes
Power Options Properties
Power Management Tips
zConnect the computer to an electrical outlet when possible because battery life is largely determined by
the number of times the battery is charged.
zPlace the computer in standby mode or hibernate mode when you leave the computer unattended for
long periods of time.
zTo enter a power management mode, close the display or press <Fn><Esc>.
zTo exit a power management mode, press the power button.
Power Management Wizard
Click or double-click the icon to open the Power Management Wizard.
The first two screens of the wizard—Welcome and What is Power Management?—describe and define
various power management options.
Use the following screens of the Power Management Wizard to set various power management options,
including sleep modes, power schemes, and low battery-charge alarms.
Setting Sleep Modes
The screen defines standby and hibernate modes. From the screen you can:
NOTE: See "Using a Battery" for more information on conserving battery power.
NOTE: The Power Management Wizard is not available if you have restricted access rights.
NOTE: On the What is Power Management? screen, you can select Do not show this page again.
When you select this option, the Welcome screen also does not appear again.
Pa
g
e 1 of 6Power Mana
g
ement
9/19/2003file://C:\Documents%20and%20Settin
g
s\r
p
axman\Local%20Settin
g
s\Tem
p
\~hhAA15.htm

zSet standby-mode password options.
zEnable or disable hibernate mode.
zSelect how the computer will respond when you close the display:
{Choose no action.
{Enter standby mode.
{Enter hibernate mode.
zSelect how the computer will respond when you press the power button:
{Choose no action.
{Enter standby mode.
{Enter hibernate mode.
{Shut down the Microsoft® Windows® operating system and turn off the computer.
{Prompt a user for an action (Ask me what to do).
zSelect how the computer will respond when you press <Fn><Esc>.
{Choose no action.
{Enter standby mode.
{Enter hibernate mode.
{Shut down Microsoft Windows and turn off the computer.
{Prompt a user for an action (Ask me what to do).
Selecting a Power Scheme
The screen allows you to select, create, and edit power scheme settings. In addition, you can delete power
schemes that you create, but you cannot delete Dell™ QuickSet predefined power schemes (Maximum
Battery, Maximum Performance, Presentation, and Network Disabled).
All QuickSet power schemes are displayed in a drop-down menu near the center of the screen. The power
settings for each scheme in the menu are listed below the menu. The power settings are listed separately for
when the computer is running on battery or connected to an electrical outlet.
The Power Management Wizard also allows you to associate the display brightness level with a power
scheme. You must enable brightness-level power schemes through QuickSet in order to set the brightness
level.
NOTE: When your computer is running on battery power, the Network Disabled power scheme
disables your internal network and wireless activity. When your computer is connected to an electrical
outlet, the Network Disabled power scheme disables only your wireless activity. You must set the
power scheme through QuickSet (not Microsoft® Windows®) for Network Disabled to work.
NOTE: QuickSet automatically adds the word (QuickSet) after the names of power schemes created
using QuickSet.
Pa
g
e 2 of 6Power Mana
g
ement
9/19/2003file://C:\Documents%20and%20Settin
g
s\r
p
axman\Local%20Settin
g
s\Tem
p
\~hhAA15.htm

The display brightness, internal network-card activity, and wireless activity features are not available through
the Microsoft® Windows® Control Panel power schemes. In order to make use of these value-added
features, you must set them through QuickSet power schemes.
Setting Battery Alarms and Actions
The screen allows you to enable the low-battery and critical-battery alarms and to change settings for the
alarms. For example, you can set the low-battery alarm to 20 percent to remind you to save work and switch
to AC power, and you can set the critical-battery alarm to 10 percent to enter hibernate mode. From the
screen, you can:
zSelect whether the alarm will notify you by sound or text.
zAdjust the power level at which you want the alarm to notify you.
zSelect how the computer will respond when the alarm notifies you:
{Choose no action.
{Enter standby mode.
{Enter hibernate mode.
{Shut down Windows and turn off the computer.
Completing the Power Management Wizard
The screen summarizes the QuickSet power scheme, sleep mode, and battery alarm settings for your
computer. Review the settings you have selected and click Finish.
For more information about QuickSet, right-click the icon in the taskbar and click Help.
Power Management Modes
Standby Mode
Standby mode conserves power by turning off the display and the hard drive after a predetermined period of
inactivity (a time-out). When the computer exits standby mode, it returns to the same operating state it was
in before entering standby mode.
To enter standby mode:
zIn the Microsoft® Windows® XP operating system, click the Start button, click Turn off computer,
NOTE: Brightness shortcut keys only affect the display on your portable computer, not monitors that
you attach to your portable computer or docking device. If your computer is in CRT only mode and you
try to change the brightness level, the Brightness Meter appears, but the brightness level on the
monitor does not change.
NOTICE: If your computer loses AC and battery power while in standby mode, it may lose data.
Pa
g
e 3 of 6Power Mana
g
ement
9/19/2003file://C:\Documents%20and%20Settin
g
s\r
p
axman\Local%20Settin
g
s\Tem
p
\~hhAA15.htm

and then click Stand by.
In Windows 2000, click the Start button, click Shutdown, click Standby, and then click OK.
or
zDepending on how you set the power management options on the Advanced tab in the Power
Options Properties window, use one of the following methods:
{Close the display.
{Press <Fn><Esc>.
To exit standby mode, press the power button or open the display depending on how you set the options on
the Advanced tab. You cannot make the computer exit standby mode by pressing a key or touching the
touch pad.
Hibernate Mode
Hibernate mode conserves power by copying system data to a reserved area on the hard drive and then
completely turning off the computer. When the computer exits hibernate mode, it returns to the same
operating state it was in before entering hibernate mode.
Your computer enters hibernate mode if the battery charge level becomes critically low.
To manually enter hibernate mode:
zIn Windows XP, click the Start button, click Turn off computer, press and hold <Shift> key, and then
click Hibernate.
In Windows 2000, if hibernate support is enabled, click the Start button, click Shutdown, click
Hibernate, and then click OK.
or
zDepending on how you set the power management options on the Advanced tab in the Power
Options Properties window, use one of the following methods to enter hibernate mode:
{Close the display.
{Press <Fn><Esc>.
To exit hibernate mode, press the power button. The computer may take a short time to exit hibernate mode.
You cannot make the computer exit hibernate mode by pressing a key or touching the touch pad. For more
information on hibernate mode, see the documentation that came with your operating system.
NOTICE: You cannot remove devices or disconnect your computer from a docking device while your
computer is in hibernate mode.
NOTE: Some PC Cards may not operate correctly after the computer exits hibernate mode. Remove
and reinsert the card, or simply restart (reboot) your computer.
Pa
g
e 4 of 6Power Mana
g
ement
9/19/2003file://C:\Documents%20and%20Settin
g
s\r
p
axman\Local%20Settin
g
s\Tem
p
\~hhAA15.htm

Power Options Properties
The Power Options Properties window helps you to manage power consumption and monitor battery
charge status. To access the Microsoft Windows Power Options Properties window:
zIn Windows XP, click the Start button, click Control Panel, click Performance and Maintenance,
and then click Power Options.
zIn Windows 2000, open the Control Panel and double-click the Power Options icon.
Power Schemes Tab
Windows XP controls the performance level of the processor depending on the power scheme you select. You
do not need to make any further adjustments to set the performance level. For information on setting
processor performance for other operating systems, see "Intel SpeedStep™ Technology Tab (for Windows
2000)."
Each preset power scheme has different time-out settings for entering standby mode, turning off the display,
and turning off the hard drive. For more information on power management options, see the Help and Support
Center (Windows Help in Windows 2000).
Alarms Tab
The Low battery alarm and Critical battery alarm settings alert you with a message when the battery
charge falls below a certain percentage. When you receive your computer, the Low battery alarm and
Critical battery alarm check boxes are selected. It is recommended that you continue to use these settings.
See "Using a Battery" for more information on low-battery warnings.
Power Meter Tab
The Power Meter tab displays the current power source and amount of battery charge remaining.
Advanced Tab
The Advanced tab allows you to:
zSet power icon and standby mode password options.
zProgram the following functions (depending on your operating system):
{Prompt a user for an action (Ask me what to do).
{Enter standby mode.
{Enter hibernate mode.
{Shut down Windows and turn off the computer.
{Choose no action (None or Do nothing).
NOTE: To enable audible alarms, click each Alarm Action button and select Sound alarm.
Pa
g
e 5 of 6Power Mana
g
ement
9/19/2003file://C:\Documents%20and%20Settin
g
s\r
p
axman\Local%20Settin
g
s\Tem
p
\~hhAA15.htm

To program these functions, click an option from the corresponding drop-down menu and then click OK.
Hibernate Tab
The Hibernate tab lets you enable hibernate mode by clicking the Enable hibernate support check box.
Intel SpeedStep™ Technology Tab (for Windows 2000)
Depending on your operating system and microprocessor, the Power Options Properties window includes
the Intel SpeedStep™ technology tab. Intel SpeedStep technology allows you to set the performance level
of the processor according to whether the computer is running on battery or AC power. Depending on your
operating system, typical options are:
zAutomatic — The processor runs at its highest possible speed (Maximum Performance mode) when the
computer is running on AC power. When the computer is running on battery power, the processor runs
in Battery Optimized mode.
zMaximum Performance — The processor runs at its highest possible speed even if the computer is
running on battery power.
zBattery Optimized Performance — Processor speed is optimized for battery power even if the
computer is connected to an electrical outlet.
zMaximum Battery — The processor runs at a slower speed to extend battery life.
To change additional Intel SpeedStep options:
1. Click Advanced and click one of the following options:
zDisable Intel SpeedStep technology control
zRemove flag icon (from the notification area)
zDisable audio notification when performance changes
2. Click OK to accept any changes and click OK to close the Intel SpeedStep™ technology window.
You can also change the Intel SpeedStep settings by right-clicking the flag icon in the notification area.
NOTE: Windows XP controls the performance level of the processor depending on the power scheme
that you select. See "Power Schemes Tab."
NOTE: To use Intel SpeedStep technology, a Windows operating system must be running.
Pa
g
e 6 of 6Power Mana
g
ement
9/19/2003file://C:\Documents%20and%20Settin
g
s\r
p
axman\Local%20Settin
g
s\Tem
p
\~hhAA15.htm
Connecting to a Wireless Local Area Network
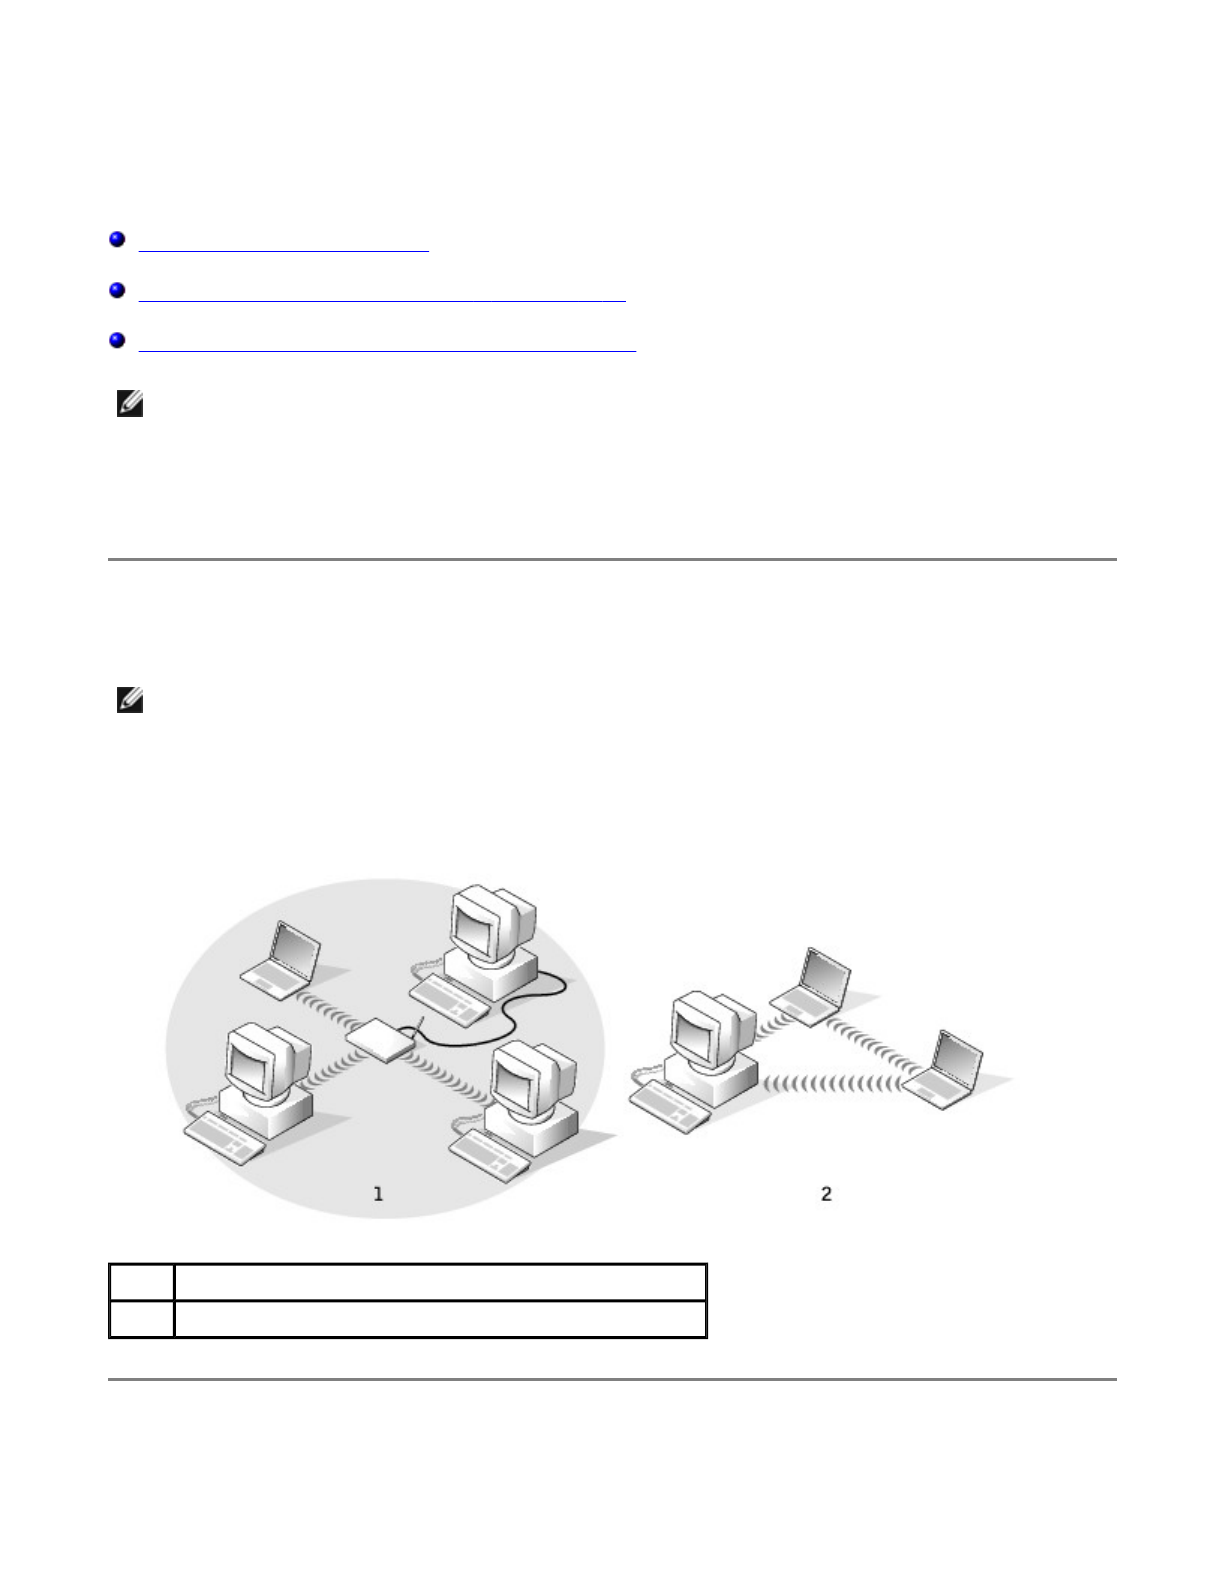
Determining Your Network Type
Connecting to a Network in Microsoft® Windows® XP
Finalizing Your Network Connection (Security Settings)
Before you can connect to a wireless Local Area Network (LAN), you must have specific information about
your network. Be sure to get the name of your wireless network along with any special security settings from
your network administrator. The settings are unique to your network and cannot be provided by Dell.
Determining Your Network Type
Wireless networks fall into two categories—infrastructure networks and ad-hoc networks. An infrastructure
network uses routers or access points to connect several computers. An ad-hoc network does not use routers
or access points and consists of computers that broadcast to one another.
Connecting to a Network in Microsoft® Windows® XP
NOTE: These networking instructions do not apply to Bluetooth™ or cellular products.
NOTE: Most wireless networks are of the infrastructure type. Consult your network administrator if you
are unsure of the type of network you are connecting to.
1 infrastructure network
2 Ad-Hoc network
Pa
g
e 1 of 4Connectin
g
to a Wireless Local Area Networ
k
9/19/2003file://C:\Documents%20and%20Settin
g
s\r
p
axman\Local%20Settin
g
s\Tem
p
\~hhCB5E.htm

Your wireless network card requires proper software and drivers in order to connect to a network. The
software is pre-installed in the factory. If the software is removed or corrupted, follow the instructions listed in
the User's Guide for your wireless card. The User's Guide is located on your Drivers and Utilities CD (that
came with your computer) in the "User's Guides-Network User's Guides" category. The User's Guide is also
available on the Dell Support website at support.dell.com.
1. Click the Start button, click Control Panel, and then click Switch to Classic View.
2. Double-click Network Connections.
3. Click Wireless Network Connection.
The Wireless Network Connection icon is highlighted.
4. Under Network Tasks in the left-hand pane, click Change settings of this connection.
The Wireless Network Connection Properties window appears.
5. Select the Wireless Networks tab.
6. Click Add.
The Wireless network properties window appears.
7. Enter the name of your network in the Network name (SSID) field.
8. If you are connecting to an ad-hoc network, which does not use any routers or access points, click the
check box labeled This is a computer-to-computer (ad hoc) network; wireless access points are
not used.
9. Click OK.
Your new network name appears in the Preferred networks area.
Finalizing Your Network Connection (Security Settings)
To finalize your connection, you must change your wireless security settings to match the wireless network
you are trying to connect to. Choose one of the following connection options based on the security settings for
your network:
zConnecting to a Network without Security-Related Requirements (common for home and small office
networks)
zConnecting to a Network with Wi-Fi Protected Access (WPA) Security Requirements
zConnecting to a Network with Wired Equivalent Protocol (WEP) Security Requirements
NOTE: The names of wireless networks that your computer can detect are listed under Available
Networks.
NOTE: Network security settings are only provided by your network administrator and are unique to
Pa
g
e 2 of 4Connectin
g
to a Wireless Local Area Networ
k
9/19/2003file://C:\Documents%20and%20Settin
g
s\r
p
axman\Local%20Settin
g
s\Tem
p
\~hhCB5E.htm

Connecting to a Network Without Security-Related
Requirements
1. In the Preferred networks area, click the name of your wireless network.
2. Click Properties.
3. From the Network Authentication drop-down menu, select Open.
Earlier versions of the Dell™ wireless software may not contain the
drop-down menu. If you are using an earlier version, click to uncheck the Data encryption (WEP
enabled) check box and go to step 5.
4. From the Data encryption drop-down menu, select Disabled.
5. Click OK.
Your network setup is complete.
Connecting to a Network With Wi-Fi Protected Access (WPA)
Security Requirements
The following instructions are basic steps for connecting to a WPA network. If your network requires a user
name, password, or domain settings, consult the setup instructions in the User's Guide for your wireless
network card.
1. In the Preferred networks section, click the name of your wireless network.
2. Click Properties.
3. From the Network Authentication drop-down menu, select your network authentication type (as
provided by the network administrator).
If you do not see the drop-down menu, you must update your wireless software before continuing.
Download and install the latest version of your wireless driver software from the Dell Support website at
support.dell.com.
4. From the Data encryption drop-down menu, select your data encryption type (as provided by the
network administrator).
5. If your wireless network requires a key, enter it in the Network key field.
your network. Dell cannot provide this information.
NOTE: Your computer can take up to 1 minute to connect to the network.
NOTE: WPA protocols require that you know the Network Authentication and Data Encryption settings
for your wireless network. In addition, your WPA-protected network may require special settings such
as a network key, user name, password, and domain name. Be sure to get all necessary WPA settings
from your network administrator before continuing.
Pa
g
e 3 of 4Connectin
g
to a Wireless Local Area Networ
k
9/19/2003file://C:\Documents%20and%20Settin
g
s\r
p
axman\Local%20Settin
g
s\Tem
p
\~hhCB5E.htm

6. Click OK.
Your network setup is complete.
Connecting to a Network With Wired Equivalent Protocol (WEP)
Security Requirements
1. In the Preferred networks section, click the name of your wireless network.
2. Click Properties.
3. From the Network Authentication drop-down menu, select Open.
Earlier versions of Dell wireless software may not contain the drop-down menus. If you are using an
earlier version, click to check the check box labeled Data encryption (WEP enabled) and go to
step 5.
4. From the Data encryption drop-down menu, select WEP.
5. If the wireless network does not require a network key (for example, a password), go to step 8.
6. Click to uncheck the check box labeled The key is provided for me automatically.
7. Enter the WEP network key, provided by your network administrator, in the Network key field.
8. Enter the WEP network key again in the Confirm network key field.
9. Click OK.
Your network setup is complete.
NOTE: Your computer can take up to 1 minute to connect to the network.
NOTE: Your computer can take up to 1 minute to connect to the network.
Pa
g
e 4 of 4Connectin
g
to a Wireless Local Area Networ
k
9/19/2003file://C:\Documents%20and%20Settin
g
s\r
p
axman\Local%20Settin
g
s\Tem
p
\~hhCB5E.htm

Using PC Cards
PC Card Types
Extended PC Cards
Installing a PC Card
Removing a PC Card
PC Card Types
See "Specifications" for information on supported PC Cards.
The PC Card slot has one connector that supports a single Type I or Type II card. The PC Card slot supports
CardBus technology and extended PC Cards. "Type" of card refers to its thickness, not its functionality.
Extended PC Cards
An extended PC Card (for example, a wireless network adapter) is longer than a standard PC Card and
extends outside the computer. Follow these precautions when using extended PC Cards:
zProtect the exposed end of an installed card. Striking the end of the card can damage the system
board.
zAlways remove an extended PC Card before you pack the computer in its carrying case.
zInstall an extended card in the upper PC Card connector to allow room for a second PC Card.
Installing a PC Card
You can install a PC Card in the computer while the computer is running. The computer automatically detects
the card.
PC Cards are generally marked with a symbol (such as a triangle or an arrow) to indicate which end to insert
into the slot. The cards are keyed to prevent incorrect insertion. If card orientation is not clear, see the
documentation that came with the card.
CAUTION: Before performing any of the procedures listed below, read and follow the safety
instructions in the System Information Guide.
NOTE: A PC Card is not a bootable device.
Pa
g
e 1 of 3Usin
g
PC Cards
9/19/2003file://C:\Documents%20and%20Settin
g
s\r
p
axman\Local%20Settin
g
s\Tem
p
\~hh5972.htm
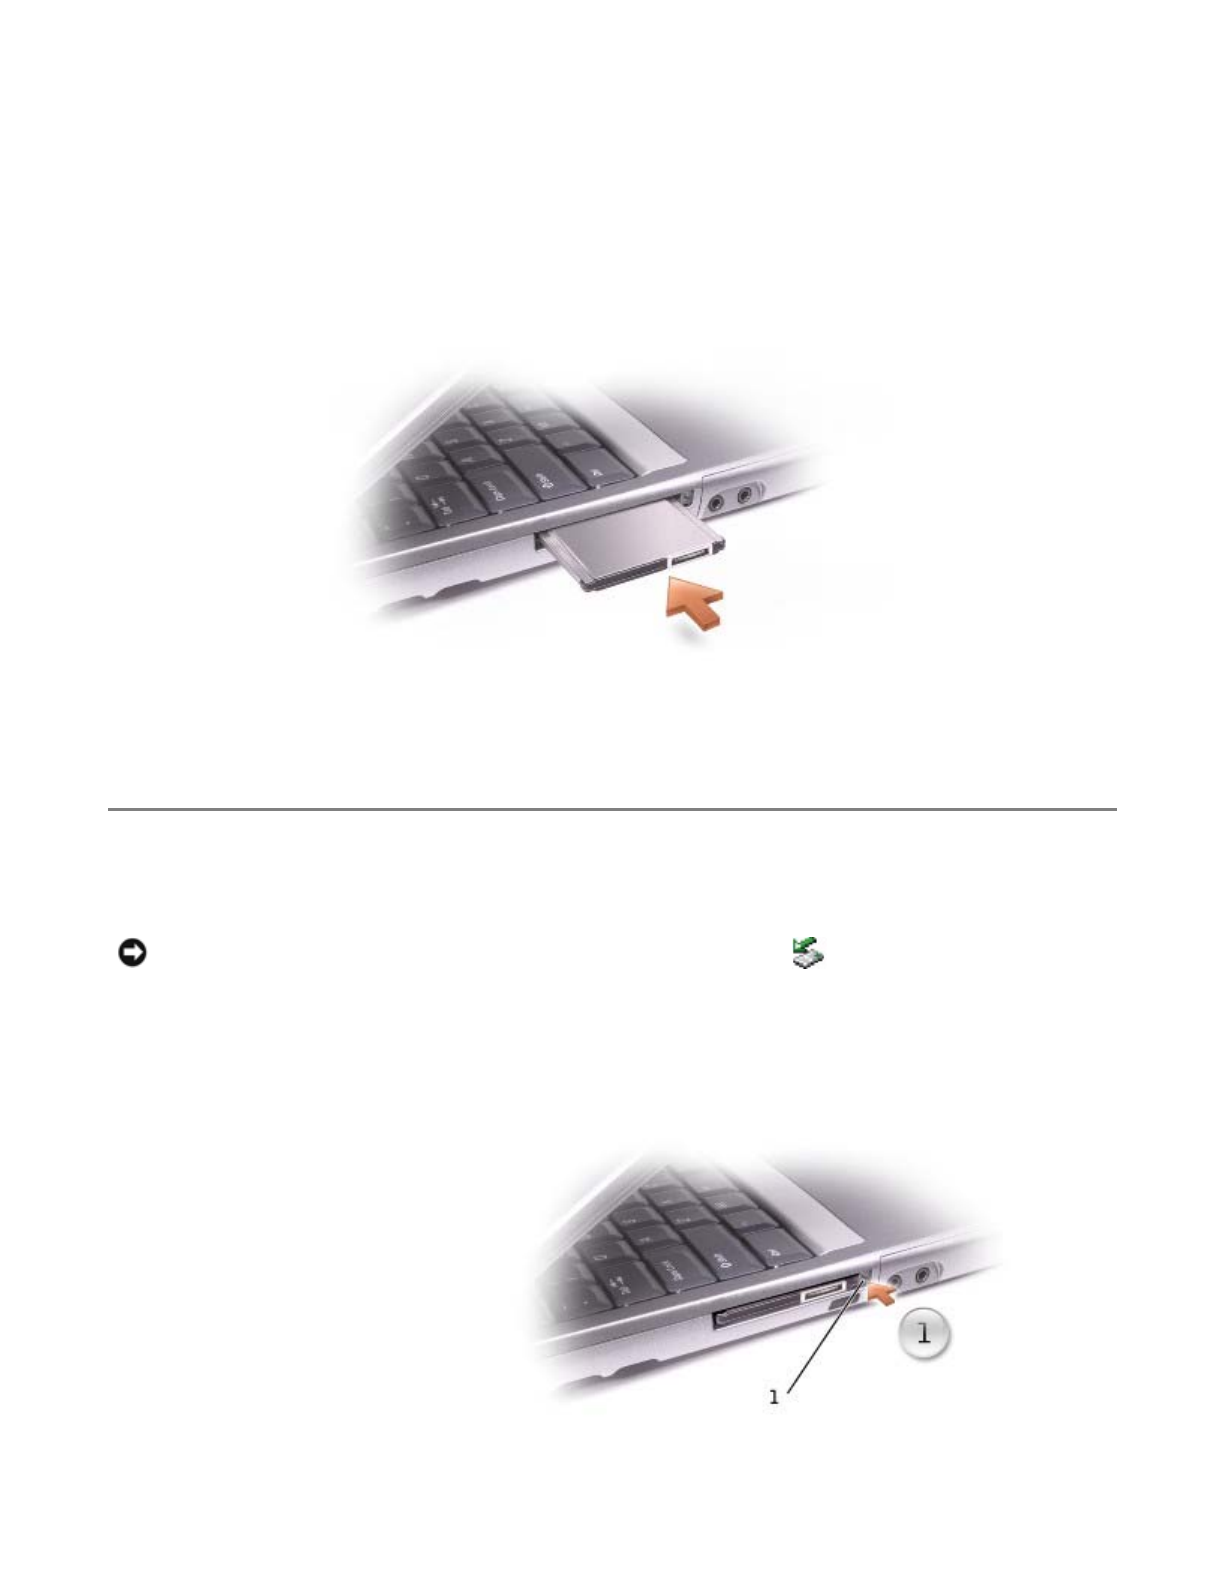
To install a PC Card:
1. Hold the card with its orientation symbol pointing into the slot and the top side of the card facing up.
The latch needs to be in the "in" position before you insert the card.
2. Slide the card into the slot until the card is completely seated in its connector.
If you encounter too much resistance, do not force the card. Check the card orientation and try again.
The computer recognizes most PC Cards and automatically loads the appropriate device driver. If the
configuration program tells you to load the manufacturer's drivers, use the floppy disk or CD that came with
the PC Card.
Removing a PC Card
1. Press the eject button.
NOTICE: Before you remove a PC Card from the computer, click the icon on the taskbar to select
a card and stop it from functioning. If you do not stop the card in the configuration utility, you could
lose data. Do not attempt to eject a card by pulling its cable, if one is attached.
Pa
g
e 2 of 3Usin
g
PC Cards
9/19/2003file://C:\Documents%20and%20Settin
g
s\r
p
axman\Local%20Settin
g
s\Tem
p
\~hh5972.htm
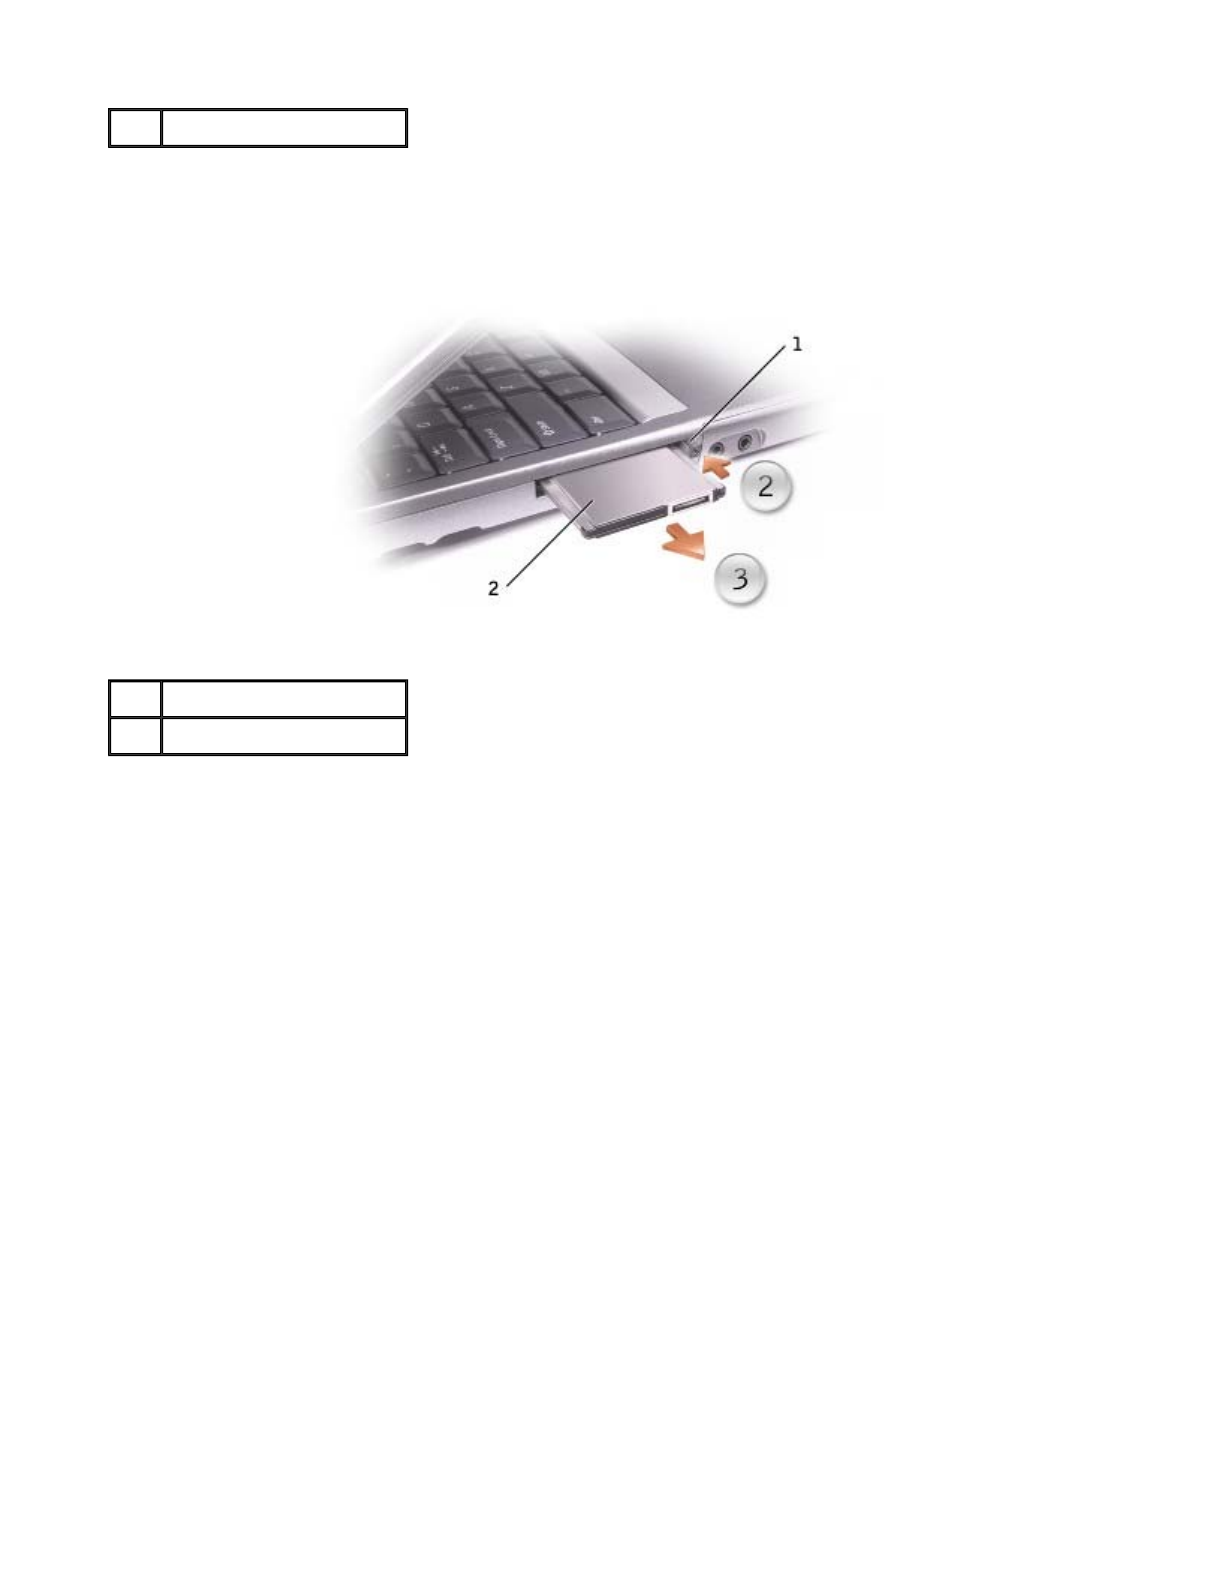
2. Push the eject button a second time.
3. Gently remove the card.
1 eject button
1 eject button
2 PC Card
Pa
g
e 3 of 3Usin
g
PC Cards
9/19/2003file://C:\Documents%20and%20Settin
g
s\r
p
axman\Local%20Settin
g
s\Tem
p
\~hh5972.htm

Traveling With Your Computer
Identifying Your Computer
Packing the Computer
Travel Tips
Identifying Your Computer
zAttach a name tag or business card to the computer, or use a permanent marker or stencil to write a
unique identifying mark (such as your driver's license number) on the computer.
zWrite down your Service Tag and store it in a safe place away from the computer or carrying case. Use
the Service Tag if you need to report a loss or theft to law enforcement officials and to Dell.
zCreate a file on the Microsoft® Windows® desktop called if_found. Place information such as your
name, address, and telephone number in this file.
zContact your credit card company and ask if it offers coded identification tags.
Packing the Computer
zRemove any external devices attached to the computer and store them in a safe place. Remove any
cables attached to installed PC Cards, and remove any extended PC Cards.
zTo make the computer as light as possible, replace any devices installed in the module bay with the Dell
TravelLite™ module.
zFully charge the main battery and any spare batteries you plan to carry with you.
zShut down the computer.
zDisconnect the AC adapter.
zRemove any extraneous items, such as paper clips, pens, and paper, from the keyboard and palm rest
and close the display.
zUse the optional Dell™ carrying case to pack the computer and its accessories together safely.
zAvoid packing the computer with items such as shaving cream, colognes, perfumes, or food.
zProtect the computer, the batteries, and the hard drive from hazards such as extreme temperatures
and overexposure to sunlight, dirt, dust, or liquids.
NOTICE: When the display is closed, extraneous items on the keyboard or palm rest could damage the
display.
Pa
g
e 1 of 3Travelin
g
With Your Com
p
ute
r
9/19/2003file://C:\Documents%20and%20Settin
g
s\r
p
axman\Local%20Settin
g
s\Tem
p
\~hhB45B.htm

zPack the computer so that it does not slide around in the trunk of your car or in an overhead storage
compartment.
Travel Tips
zConsider disabling wireless activity on your computer to maximize battery operating time. To disable
wireless activity, press <Fn><F2>.
zConsider changing your power management options to maximize battery operating time.
zIf you are traveling internationally, carry proof of ownership—or of your right to use the computer if it is
company-owned—to speed your passage through customs. Investigate the customs regulations of the
countries you plan to visit, and consider acquiring an international carnet (also known as a merchandise
passport) from your government.
zEnsure that you know which electrical outlets are used in the countries you will visit, and have
appropriate power adapters.
zCheck with your credit card company for information about the kinds of emergency travel assistance it
offers to users of portable computers.
Traveling by Air
zEnsure that you have a charged battery available in case you are asked to turn on the computer.
zBefore you use the computer on an airplane, verify that such usage is permitted. Some airlines forbid
the use of electronic devices during the flight. All airlines forbid the use of electronic devices during
takeoff and landing.
If Your Computer Is Lost or Stolen
zCall a law enforcement agency to report the lost or stolen computer. Include the Service Tag in your
description of the computer. Ask that a case number be assigned and write down the number, along
with the name, address, and telephone number of the law enforcement agency. If possible, obtain the
name of the investigating officer.
NOTICE: If the computer has been exposed to extreme temperatures, allow it to acclimate to room
temperature for 1 hour before turning it on.
NOTICE: Do not check the computer as baggage.
NOTICE: Do not move the computer while using the optical drive. Doing so can result in loss of data.
NOTICE: Do not walk the computer through a metal detector. Send the computer through an X-ray
machine or have it hand inspected.
NOTE: If you know where the computer was lost or stolen, call a law enforcement agency in that area.
If you do not know, call a law enforcement agency where you live.
Pa
g
e 2 of 3Travelin
g
With Your Com
p
ute
r
9/19/2003file://C:\Documents%20and%20Settin
g
s\r
p
axman\Local%20Settin
g
s\Tem
p
\~hhB45B.htm

zIf the computer belongs to a company, notify the security office of the company.
zContact Dell customer service to report the missing computer. Provide the computer Service Tag, the
case number, and the name, address, and telephone number of the law enforcement agency to which
you reported the missing computer. If possible, give the name of the investigating officer.
The Dell customer service representative will log your report under the computer Service Tag and flag the
computer as missing or stolen. If someone calls Dell for technical assistance and gives your Service Tag, the
computer is identified automatically as missing or stolen. The representative will attempt to get the phone
number and address of the caller. Dell will then contact the law enforcement agency to which you made the
report of the missing computer.
Pa
g
e 3 of 3Travelin
g
With Your Com
p
ute
r
9/19/2003file://C:\Documents%20and%20Settin
g
s\r
p
axman\Local%20Settin
g
s\Tem
p
\~hhB45B.htm
Passwords
About Passwords
Using a Primary Password
Using an Administrator Password
Using a Hard Drive Password
Assigning an Asset Tag
About Passwords
A primary password prevents unauthorized access to the computer at start-up. You can use an administrator
password instead of the primary password. A hard drive password helps prevent unauthorized access to data
on the drive, even when the drive is installed in another computer.
If you forget any of your passwords, contact your system administrator or call Dell. For your protection, Dell
technical support staff will ask you for proof of your identity to ensure that only an authorized person can use
the computer.
The following table identifies types and features of passwords available on your computer.
NOTE: Passwords are disabled when you receive your computer.
NOTE: Only hard drives purchased from Dell for use with the Dell™ Latitude™ D-Family computers
support hard drive passwords.
NOTICE: Passwords provide a high level of security for data in your computer or hard drive. However,
they are not foolproof. If you require more security, obtain and use additional forms of protection, such
as data encryption programs or PC Cards with encryption features.
Type of
Password
Features
Primary zProtects the computer from unauthorized access
Administrator zGives system administrators or service technicians access to computers for repair
or reconfiguration
zAllows you to restrict access to the system setup program in the same way a
system password restricts access to the computer
zCan be used in place of the primary password
Hard drive zHelps protect the data on your hard drive or external hard drive (if one is being
used) from unauthorized access
Pa
g
e 1 of 5Passwords
9/19/2003file://C:\Documents%20and%20Settin
g
s\r
p
axman\Local%20Settin
g
s\Tem
p
\~hh5EB8.htm

Using a Primary Password
The primary password allows you to protect the computer from unauthorized access.
After assigning a primary password, you must enter it each time you turn on your computer. The following
message appears each time you turn on the computer:
Please type in the primary or administrator password and press <Enter>.
To continue, enter your password (maximum of eight characters).
If you do not enter a password within 2 minutes, the computer returns to its previous operating state.
If you have assigned an administrator password, you can use it instead of the primary password. The
computer does not specifically prompt you for the administrator password.
Using an Administrator Password
The administrator password is designed to give system administrators or service technicians access to
computers for repair or reconfiguration. The administrators or technicians can assign identical administrator
passwords to groups of computers, allowing you to assign the primary password.
When you set an administrator password, the Configure Setup option becomes available in the system setup
program. The Configure Setup option allows you to restrict access to the system setup program in the same
way a primary password restricts access to the computer.
The administrator password can be used in place of the primary password. Whenever you are prompted to
enter the primary password, you can enter the administrator password instead.
If you forget the primary password and do not have an administrator password assigned, or if you have both a
primary and an administrator password assigned but forget them both, contact your system administrator or
contact Dell.
Using a Hard Drive Password
The hard drive password helps protect the data on your hard drive from unauthorized access. You can also
assign a password for an external hard drive (if one is being used) that can be the same as or different from
the password for the primary hard drive.
NOTICE: If you disable the administrator password, the primary password is also disabled.
NOTE: The administrator password provides access to the computer, but it does not provide access to
the hard drive when a hard drive password is assigned.
NOTICE: If you disable the administrator password, the primary password is also disabled.
Pa
g
e 2 of 5Passwords
9/19/2003file://C:\Documents%20and%20Settin
g
s\r
p
axman\Local%20Settin
g
s\Tem
p
\~hh5EB8.htm

After assigning a hard drive password, you must enter it each time you turn on the computer and each time
you resume normal operation from standby mode.
If the hard drive password is enabled, the following message appears each time you turn on the computer:
Please type in the hard-disk drive password and press <Enter>.
To continue, enter your password (maximum of eight characters). Press <Esc> to return the computer to its
previous operating state.
If you do not enter a password within 2 minutes, the computer returns to its previous operating state.
If you enter the wrong password, the following message appears:
Invalid password
[Press Enter to retry]
If the correct password is not entered in three attempts, the computer tries to boot from another bootable
device if the Boot First Device option in the system setup program is set to allow it. If the Boot First
Device option is not set to allow booting from another device, the computer returns to the state it was in
when you turned it on.
If the hard drive password, the external hard drive password, and the primary password are the same, you
are prompted only for the primary password. If the hard drive password is different from the primary
password, you are prompted for both. Two different passwords provide greater security.
Assigning an Asset Tag
The Asset Tag utility allows you to enter an asset tag that you or your company assigns to the computer. After
you enter an asset tag, the tag appears in the system setup screens.
You can also use the Asset Tag utility to enter an owner tag that appears in the system log-on screen with the
primary password prompt.
Viewing Existing Asset Tag and Service Tag
1. Boot the computer using a bootable floppy disk or CD.
2. Type cd c:\Dell\Util and press <Enter>.
3. Type asset and press <Enter>.
Assigning an Asset Tag
An asset tag can have up to ten characters; any combination of characters excluding spaces is valid.
NOTE: The administrator password provides access to the computer, but it does not provide access to a
hard drive that is protected by a hard drive password.
NOTE: The Drivers and Utilities CD for your computer is a bootable CD.
Pa
g
e 3 of 5Passwords
9/19/2003file://C:\Documents%20and%20Settin
g
s\r
p
axman\Local%20Settin
g
s\Tem
p
\~hh5EB8.htm

1. Boot the computer using a bootable floppy disk or CD.
2. Type cd c:\dell\util and press <Enter>.
3. Type asset and a space followed by the new asset tag, and press <Enter>.
For example, type the following command line and press <Enter>:
asset 1234$ABCD&
4. When the computer prompts you to verify the asset tag, type y and press <Enter>.
The computer displays the new or modified asset tag and the Service Tag.
Deleting an Asset Tag
1. Boot the computer using a bootable floppy disk or CD.
2. Type cd c:\dell\util and press <Enter>.
3. Type asset /d and press <Enter>.
Assigning an Owner Tag
An owner tag can have up to 48 characters; any combination of letters, numbers, and spaces is valid.
1. Boot the computer using a bootable floppy disk or CD.
2. Type cd c:\dell\util and press <Enter>.
3. Type asset /o and a space followed by the new owner tag, and press <Enter>.
For example, type the following command line and press <Enter>:
asset /o ABC Company
4. When the computer prompts you to verify the owner tag, type y and press <Enter>.
The computer displays the new owner tag.
Deleting an Owner Tag
1. Boot the computer using a bootable floppy disk or CD.
2. Type cd c:\dell\util and press <Enter>.
3. Type asset /o /d and press <Enter>.
Asset Tag Options
NOTE: For security, you cannot set, change, or delete the owner tag if the primary or administrator
passwords are set.
Pa
g
e 4 of 5Passwords
9/19/2003file://C:\Documents%20and%20Settin
g
s\r
p
axman\Local%20Settin
g
s\Tem
p
\~hh5EB8.htm

To use one of the asset tag options (see the following table):
1. Boot the computer using a bootable floppy disk or CD.
2. Type cd c:\dell\util and press <Enter>.
3. Type asset and a space followed by the option, and then press <Enter>.
Asset Tag Option Description
/d Deletes the asset tag
/o owner tag Specifies a new owner tag
/o /d Deletes the owner tag
/? Displays the Asset Tag utility help screen
Pa
g
e 5 of 5Passwords
9/19/2003file://C:\Documents%20and%20Settin
g
s\r
p
axman\Local%20Settin
g
s\Tem
p
\~hh5EB8.htm

Solving Problems
Power Problems
Error Messages
Video and Display Problems
Sound and Speaker Problems
Printer Problems
Modem and Internet Connection Problems
Touch Pad or Mouse Problems
External Keyboard Problems
Unexpected Characters
Drive Problems
PC Card Problems
Network Problems
General Program Problems
If Your Dell™ Computer Gets Wet
If You Drop or Damage Your Computer
Resolving Other Technical Problems
Power Problems
Fill out the Diagnostics Checklist as you complete these checks.
Check the power light — When the power light is lit or blinking, the computer has power. If the
power light is blinking, the computer is in standby mode—press the power button to exit standby
mode. If the light is off, press the power button to turn on the computer.
Charge the battery — The battery charge may be depleted.
1. Reinstall the battery.
2. Use the AC adapter to connect the computer to an electrical outlet.
3. Turn on the computer.
Check the battery status light — If the battery status light flashes orange or is a steady
Pa
g
e 1 of 17Solvin
g
Problems
9/19/2003file://C:\Documents%20and%20Settin
g
s\r
p
axman\Local%20Settin
g
s\Tem
p
\~hhB694.htm

Error Messages
If the message is not listed, see the documentation for the operating system or the program that was running
at the time the message appeared.
orange the battery charge is low or depleted. Connect the computer to an electrical outlet.
If the battery status light flashes green and orange, the battery is too hot to charge. Shut down
the computer, disconnect the computer from the electrical outlet, and then let the battery and
computer cool to room temperature.
If the battery status light rapidly flashes orange, the battery may be defective. Contact Dell.
Test the electrical outlet — Ensure that the electrical outlet is working by testing it with
another device, such as a lamp.
Check the AC adapter — Check the AC adapter cable connections. If the AC adapter has a light,
ensure that the light is on.
Connect the computer directly to an electrical outlet — Bypass power protection devices,
power strips, and the extension cable to verify that the computer turns on.
Eliminate possible interference — Turn off nearby fans, fluorescent lights, halogen lamps, or
other appliances.
Adjust the power properties — See "Power Management."
Reseat the memory modules — If the computer power light turns on but the display remains
blank, reseat the memory modules.
Auxiliary device failure — The touch pad or external mouse may be faulty. For an
external mouse, check the cable connection. Enable the Pointing Device option in the
system setup program. If the problem persists, contact Dell.
Bad command or file name — Ensure that you have spelled the command correctly, put
spaces in the proper place, and used the correct pathname.
Cache disabled due to failure — The primary cache internal to the microprocessor has
failed. Contact Dell.
CD drive controller failure — The CD drive does not respond to commands from the
computer. See "Drive Problems."
Data error — The floppy or hard drive cannot read the data. See "Drive Problems."
Decreasing available memory — One or more memory modules may be faulty or
improperly seated. Reseat the memory modules and, if necessary, replace them. See
"Memory."
Disk C: failed initialization — The hard drive failed initialization. Run the Hard-Disk
Drive tests as described in "Using the Dell Diagnostics."
Floppy drive 0 seek failure — The system configuration information may not match the
hardware configuration. Run the Diskette tests as described in "Using the Dell
Diagnostics."
Diskette read failure — The floppy disk may be defective. If the drive access light turns
on, try a different disk. See "Drive Problems."
Diskette subsystem reset failed — The floppy drive controller may be faulty. Run the
Pa
g
e 2 of 17Solvin
g
Problems
9/19/2003file://C:\Documents%20and%20Settin
g
s\r
p
axman\Local%20Settin
g
s\Tem
p
\~hhB694.htm

Diskette tests as described in "Using the Dell Diagnostics."
Diskette write-protected — Because the floppy disk is write-protected, the operation
cannot be completed. Slide the write-protect notch.
Drive not ready — The operation requires a floppy disk in the drive or a hard drive in
the bay before it can continue. Insert a floppy disk, or push the floppy disk all the way
into the drive until the eject button pops out. Or, install a hard drive in the hard drive
bay.
Error reading PCMCIA card — The computer cannot identify the PC Card. Reinsert the
card or try another PC Card.
Extended memory size has changed — The amount of memory recorded in NVRAM does
not match the memory installed in the computer. Restart the computer. If the error
appears again, contact Dell.
Gate A20 failure — A memory module may be loose. Reinstall the memory modules
and, if necessary, replace them.
General failure — The operating system is unable to carry out the command. The
message is usually followed by specific information—for example, Printer out of
paper. Take the appropriate action.
Hard-disk drive configuration error — The computer cannot identify the drive type.
Turn off the computer, remove the hard drive, and boot the computer from a bootable
floppy disk or CD. Then turn off the computer, reinstall the hard drive, and restart the
computer. Run the Hard-Disk Drive tests as described in "Using the Dell Diagnostics."
Hard-disk drive controller failure 0 — The hard drive does not respond to commands
from the computer. Turn off the computer, remove the hard drive, and boot the
computer from a bootable floppy disk or CD. Then turn off the computer, reinstall the
hard drive, and restart the computer. If the problem persists, try another drive. Run
the Hard-Disk Drive tests as described in "Using the Dell Diagnostics."
Hard-disk drive failure — The hard drive does not respond to commands from the
computer. Turn off the computer, remove the hard drive, and boot the computer from a
bootable floppy disk or CD. Then turn off the computer, reinstall the hard drive, and
restart the computer. If the problem persists, try another drive. Run the Hard-Disk
Drive tests as described in "Using the Dell Diagnostics."
Hard-disk drive read failure — The hard drive may be defective. Turn off the computer,
remove the hard drive, and boot the computer from a bootable floppy disk or CD. Then
turn off the computer, reinstall the hard drive, and restart the computer. If the problem
persists, try another drive. Run the Hard-Disk Drive tests as described in "Using the
Dell Diagnostics."
Insert bootable media — The operating system is trying to boot to a nonbootable floppy
disk or CD. Insert a bootable floppy disk or CD.
Invalid configuration information-please run System Setup Program — The system
configuration information does not match the hardware configuration. The message is
most likely to occur after a memory module is installed. Correct the appropriate
options in the system setup program. See "Using the System Setup Program."
Keyboard clock line failure — For external keyboards, check the cable connection. Run
the Keyboard Controller test as described in "Using the Dell Diagnostics."
Keyboard controller failure — For external keyboards, check the cable connection.
Restart the computer, and avoid touching the keyboard or the mouse during the boot
routine. Run the Keyboard Controller test as described in "Using the Dell Diagnostics."
Keyboard data line failure — For external keyboards, check the cable connection. Run
the Keyboard Controller test as described in "Using the Dell Diagnostics."
Keyboard stuck key failure — For external keyboards or keypads, check the cable
Pa
g
e 3 of 17Solvin
g
Problems
9/19/2003file://C:\Documents%20and%20Settin
g
s\r
p
axman\Local%20Settin
g
s\Tem
p
\~hhB694.htm

connection. Restart the computer, and avoid touching the keyboard or keys during the
boot routine. Run the Stuck Key test as described in "Using the Dell Diagnostics."
Memory address line failure at address, read value expecting value — A memory
module may be faulty or improperly seated. Reinstall the memory modules and, if
necessary, replace them.
Memory allocation error — The software you are attempting to run is conflicting with
the operating system, another program, or a utility. Turn off the computer, wait 30
seconds, and then restart it. Try to run the program again. If the error message still
appears, see the software documentation.
Memory data line failure at address, read value expecting value — A memory module
may be faulty or improperly seated. Reinstall the memory modules and, if necessary,
replace them.
Memory double word logic failure at address, read value expecting value — A memory
module may be faulty or improperly seated. Reinstall the memory modules and, if
necessary, replace them.
Memory odd/even logic failure at address, read value expecting value — A memory
module may be faulty or improperly seated. Reinstall the memory modules and, if
necessary, replace them.
Memory write/read failure at address, read value expecting value — A memory module
may be faulty or improperly seated. Reinstall the memory modules and, if necessary,
replace them.
No boot device available — The computer cannot find the floppy disk or hard drive. If
the floppy drive is your boot device, ensure that a bootable floppy disk is in the drive.
If the hard drive is your boot device, ensure that the drive is installed, properly seated,
and partitioned as a boot device.
No boot sector on hard drive — The operating system may be corrupted. Contact Dell.
No timer tick interrupt — A chip on the system board may be malfunctioning. Run the
System Set tests as described in "Using the Dell Diagnostics."
Non-system disk or disk error — A floppy disk is in the floppy drive. Remove the floppy
disk and restart the computer.
Not a boot diskette — The operating system is trying to boot to a nonbootable floppy
disk. Insert a bootable floppy disk.
Operating system not found — Contact Dell.
Optional ROM bad checksum — The optional ROM apparently failed. Contact Dell.
A required .DLL file was not found — The program that you are trying to open is
missing an essential file. Remove and then reinstall the program.
Microsoft® Windows® XP
1. Click the Start button and click Control Panel.
2. Click Add or Remove Programs.
3. Select the program you want to remove.
4. Click Remove or Change/Remove and follow the prompts on the screen.
5. See the program documentation for installation instructions.
Windows 2000
1. Click the Start button, point to Settings, and then click Control Panel.
2. Double-click the Add/Remove Programs icon.
3. Select the program that you want to remove.
Pa
g
e 4 of 17Solvin
g
Problems
9/19/2003file://C:\Documents%20and%20Settin
g
s\r
p
axman\Local%20Settin
g
s\Tem
p
\~hhB694.htm

Video and Display Problems
Fill out the Diagnostics Checklist as you complete these checks.
If the display is blank
4. Click Change or Remove Programs.
5. See the program documentation for installation instructions.
Sector not found — The operating system cannot locate a sector on the floppy or hard
drive. You may have a defective sector or corrupted FAT on the floppy disk or hard
drive. Run the Windows error-checking utility to check the file structure on the floppy
disk or hard drive. See Windows Help for instructions. If a large number of sectors are
defective, back up the data (if possible), and then reformat the floppy disk or hard
drive.
Seek error — The operating system cannot find a specific track on the floppy disk or
hard drive. If the error is on the floppy disk, try another floppy disk.
Shutdown failure — A chip on the system board may be malfunctioning. Run the
System Set tests as described in "Using the Dell Diagnostics."
Time-of-day clock lost power — System configuration settings are corrupted. Connect
your computer to an electrical outlet to charge the battery. If the problem persists, try
to restore the data by entering the system setup program. Then immediately exit the
program. See "Using the System Setup Program." If the message reappears, contact
Dell.
Time-of-day clock stopped — The reserve battery that supports the system
configuration settings may require recharging. Connect your computer to an electrical
outlet to charge the battery. If the problem persists, contact Dell.
Time-of-day not set-please run the System Setup program — The time or date stored in
the system setup program does not match the system clock. Correct the settings for
the Date and Time options. See "Using the System Setup Program."
Timer chip counter 2 failed — A chip on the system board may be malfunctioning. Run
the System Set tests as described in "Using the Dell Diagnostics."
Unexpected interrupt in protected mode — The keyboard controller may be
malfunctioning, or a memory module may be loose. Run the System Memory tests and
the Keyboard Controller test as described in "Using the Dell Diagnostics."
x:\ is not accessible. The device is not ready — Insert a disk into the drive and try
again.
Warning: Battery is critically low — The battery is running out of charge. Replace the
battery, or connect the computer to an electrical outlet. Otherwise, activate hibernate
mode or turn off the computer.
NOTE: If you are using a program that requires a higher resolution than your computer supports, it is
recommended that you attach an external monitor to your computer.
Check the battery — If you are using a battery to power your computer, the battery charge
may be depleted. Connect the computer to an electrical outlet using the AC adapter, and turn on
the computer.
Pa
g
e 5 of 17Solvin
g
Problems
9/19/2003file://C:\Documents%20and%20Settin
g
s\r
p
axman\Local%20Settin
g
s\Tem
p
\~hhB694.htm

If the display is difficult to read
If only part of the display is readable
Test the electrical outlet — Ensure that the electrical outlet is working by testing it with
another device, such as a lamp.
Check the AC adapter — Check the AC adapter cable connections. If the AC adapter has a light,
ensure that the light is on.
Connect the computer directly to an electrical outlet — Bypass power protection devices,
power strips, and the extension cable to verify that the computer turns on.
Adjust the power properties — Search for the keyword standby in Windows Help or the
Windows Help and Support Center.
Switch the video image — If your computer is attached to an external monitor, press
<Fn><F8> to switch the video image to the display.
Adjust the brightness — See "Adjusting Brightness" for instructions on adjusting the
brightness.
Move the subwoofer away from the computer or monitor — If your external speaker
system includes a subwoofer, ensure that the subwoofer is at least 60 cm (2 ft) away from the
computer or external monitor.
Eliminate possible interference — Turn off nearby fans, fluorescent lights, halogen lamps, or
other appliances.
Rotate the computer to face a different direction — Eliminate sunlight glare, which can
cause poor picture quality.
Adjust the Windows display settings —
Windows XP
1. Click the Start button and then click Control Panel.
2. Click Appearance and Themes.
3. Click the area you want to change or click the Display icon.
4. Try different settings for Color quality and Screen resolution.
Windows 2000
1. Click the Start button, point to Settings, and then click Control Panel.
2. Double-click the Display icon and click the Settings tab.
3. Try different settings for Colors, Screen area, and Advanced Settings.
Run the Video diagnostics tests — If no error message appears and you still have a display
problem, but the display is not completely blank, run the Video device group in the Dell
Diagnostics. Then contact Dell.
See "Error Messages" — If an error message appears, see "Error Messages."
Connect an external monitor —
1. Shut down your computer and connect an external monitor to the computer.
2. Turn on the computer and the monitor and adjust the monitor brightness and contrast
controls.
Pa
g
e 6 of 17Solvin
g
Problems
9/19/2003file://C:\Documents%20and%20Settin
g
s\r
p
axman\Local%20Settin
g
s\Tem
p
\~hhB694.htm
Sound and Speaker Problems
Fill out the Diagnostics Checklist as you complete these checks.
If you have a problem with integrated speakers
If you have a problem with external speakers
If the external monitor works, the computer display or video controller may be defective. Contact
Dell.
Adjust the Windows volume control — Double-click the speaker icon in the lower-right corner
of your screen. Ensure that the volume is turned up and that the sound is not muted. Adjust the
volume, bass, or treble controls to eliminate distortion.
Adjust the volume using keyboard shortcuts — See "Using the Keyboard and Touch Pad."
Press <Fn><End> to disable (mute) or reenable the integrated speakers.
Reinstall the sound (audio) driver — See "Reinstalling Software."
For Windows 2000 only, ensure that digital audio for the CD drive is enabled —
1. Click the Start button, point to Settings, and then click Control Panel.
2. Double-click the System icon.
3. Click the Hardware tab.
4. Click Device Manager.
5. Double-click DVD/CD-ROM drives.
6. Double-click the name of the drive.
7. On the drive Properties screen, click the Properties tab.
8. Click the box near the bottom of the screen to enable digital audio for your CD or DVD
drive.
NOTE: The volume control in some MP3 players overrides the Windows volume setting. If you have
been listening to MP3 songs, make sure that you did not turn the player volume down or off.
Check the speaker cable connections — See the setup diagram supplied with the speakers.
Test the electrical outlet — Ensure that the electrical outlet is working by testing it with
another device, such as a lamp.
Ensure that the speakers are turned on — See the setup diagram supplied with the speakers.
Adjust the Windows volume control — Double-click the speaker icon in the lower-right corner
of your screen. Ensure that the volume is turned up and that the sound is not muted. Adjust the
volume, bass, or treble controls to eliminate distortion.
Test the speakers — Plug the speaker audio cable in to the connector on the computer.
Ensure that the headphone volume control is turned up. Play a music CD.
Run the speaker self-test — Some speaker systems have a self-test button on the subwoofer.
See the speaker documentation for self-test instructions.
Eliminate possible interference — Turn off nearby fans, fluorescent lights, or halogen lamps
to check for interference.
Pa
g
e 7 of 17Solvin
g
Problems
9/19/2003file://C:\Documents%20and%20Settin
g
s\r
p
axman\Local%20Settin
g
s\Tem
p
\~hhB694.htm

Printer Problems
Fill out the Diagnostics Checklist as you perform the various checks.
Reinstall the sound (audio) driver — See "Reinstalling Software."
Run the Misc. PCI Devices diagnostic test — See "Using the Dell Diagnostics." If the tests
complete successfully, the controller is functioning properly.
If the problem persists, or if the tests do not complete successfully, contact Dell.
For Windows 2000 only, ensure that digital audio for the CD drive is enabled —
1. Click the Start button, point to Settings, and then click Control Panel.
2. Double-click the System icon.
3. Click the Hardware tab.
4. Click Device Manager.
5. Double-click DVD/CD-ROM drives.
6. Double-click the name of the drive.
7. On the drive Properties screen, click the Properties tab.
8. Click the box near the bottom of the screen to enable digital audio for your CD or DVD
drive.
Check the printer cable connections — Ensure that the printer cable is properly connected to
the computer.
Check the printer cable —
1. Shut down the computer and turn off the printer.
2. Swap the printer cable with a cable that you know is working.
3. Turn on the printer and computer, and try again to print.
4. If you print successfully, contact Dell for assistance in obtaining a new printer cable.
Test the electrical outlet — Ensure that the electrical outlet is working by testing it with
another device, such as a lamp.
Ensure that the printer is turned on — See the documentation supplied with the printer.
Verify that Windows recognizes the printer —
Windows XP
1. Click the Start button and click Control Panel.
2. Click Printers and Other Hardware.
3. Click View installed printers or fax printers. If the printer model is listed, right-click
the printer icon.
4. Click Properties and click the Ports tab. Ensure that the Print to the following port
(s): setting is LPT1 (Printer Port).
Windows 2000
1. Click the Start button, point to Settings, and then click Printers.
If the printer model is listed, right-click the printer icon.
Pa
g
e 8 of 17Solvin
g
Problems
9/19/2003file://C:\Documents%20and%20Settin
g
s\r
p
axman\Local%20Settin
g
s\Tem
p
\~hhB694.htm

Modem and Internet Connection Problems
Fill out the Diagnostics Checklist as you complete these checks.
2. Click Properties and click the Ports tab.
3. Ensure that the Print to the following port: option is set for your printer type:
zFor a parallel printer: LPT1 (Printer Port)
zFor a USB printer: USB
Reinstall the printer driver — See "Reinstalling Software."
Check the printer — Run the printer self-test. If the test does not complete successfully, the
printer is probably defective. Contact the printer manufacturer.
NOTICE: Connect the modem to an analog telephone wall jack only. Connecting the modem to a
digital telephone network may damage the modem.
NOTICE: Modem and network connectors look similar. Do not plug a telephone line in to the network
connector.
NOTE: If you can connect to your Internet service provider (ISP), your modem is functioning properly.
If you are sure that your modem is working properly and you still experience problems, contact your
ISP.
Check the telephone wall jack — Disconnect the telephone line from the modem and connect
it to a telephone. Listen for a dial tone. Ensure that you have touchtone telephone service. Try
connecting the modem to a different telephone wall jack.
Slow connection speeds can be caused by telephone noise as well as by telephone line or
network conditions. Contact your telephone company or network administrator for more
information.
Connect the modem directly to the telephone wall jack — If you have other telephone
devices sharing the line, such as an answering machine, fax machine, surge protector, or line
splitter, then bypass them and use the telephone line to connect the modem directly to the
telephone wall jack.
Check the connection — Verify that the telephone line is connected to the modem.
Check the telephone line — Try using a different telephone line. If you are using a line that is
3 m (10 ft) or more in length, try a shorter one.
Irregular dial tone — If you have voice mail service, you might hear an irregular dial tone
when you have messages. Contact your telephone company for instructions on restoring a dial
tone.
Turn off call waiting (catch-phone) — See your telephone directory for instructions on
deactivating this feature. Then adjust the dial-up networking connection properties.
Windows XP
1. Click the Start button and click Control Panel.
2. Click Printers and Other Hardware, click Phone and Modem Options, click the
Dialing Rules tab, and then click Edit....
3. In the Edit Location window, ensure that To disable call waiting, dial: is checked, and
Pa
g
e 9 of 17Solvin
g
Problems
9/19/2003file://C:\Documents%20and%20Settin
g
s\r
p
axman\Local%20Settin
g
s\Tem
p
\~hhB694.htm

Touch Pad or Mouse Problems
Fill out the Diagnostics Checklist as you perform the various checks.
then select the proper code as listed in your telephone directory.
4. Click Apply and click OK.
5. Close the Phone and Modems Options window.
6. Close the Control Panel window.
Windows 2000
1. Click the Start button, point to Settings, and then click Control Panel.
2. Click Phone and Modem Options.
3. Click the Dialing Rules tab and click Edit.
4. Ensure that To disable call waiting, dial: is checked, and then select the proper code as
listed in your telephone directory.
5. Click Apply and click OK.
6. Close the Phone and Modem Options window.
Verify that the modem is communicating with Windows —
Windows XP
1. Click the Start button and click Control Panel.
2. Click Printers and Other Hardware and click Phone and Modem Options.
3. Click the Modems tab.
4. Click the COM port for your modem.
5. Click Properties, click the Diagnostics tab, and then click Query Modem to verify that
the modem is communicating with Windows.
If all commands receive responses, the modem is operating properly.
Windows 2000
1. Click the Start button, point to Settings, and then click Control Panel.
2. Double-click Phone and Modem Options.
If multiple entries for the same modem or modems are listed but not installed, delete the
entries, restart the computer, and repeat steps 1 and 2.
3. Click the Diagnostics tab.
4. Click the COM port for your modem.
5. Click Query Modem to verify that the modem is communicating with Windows.
If all commands receive responses, the modem is operating properly.
Check the touch pad settings —
Windows XP
1. Click the Start button, click Control Panel, and then click Printers and Other
Hardware.
Pa
g
e 10 of 17Solvin
g
Problems
9/19/2003file://C:\Documents%20and%20Settin
g
s\r
p
axman\Local%20Settin
g
s\Tem
p
\~hhB694.htm

External Keyboard Problems
Fill out the Diagnostics Checklist as you perform the various checks.
2. Click Mouse.
3. Try adjusting the settings.
Windows 2000
1. Click the Start button, point to Settings, and then click Control Panel.
2. Double-click the Mouse icon.
3. Try adjusting the settings.
Check the mouse cable — Shut down the computer. Disconnect the mouse cable, check it for
damage, and firmly reconnect the cable.
If you are using a mouse extension cable, disconnect it and connect the mouse directly to the
computer.
To verify that the problem is with the mouse, check the touch pad —
1. Shut down the computer.
2. Disconnect the mouse.
3. Turn on the computer.
4. At the Windows desktop, use the touch pad to move the cursor around, select an icon, and
open it.
If the touch pad operates correctly, the mouse may be defective.
Check the system setup program settings — Verify that the system setup program lists the
correct device for the pointing device option. (The computer automatically recognizes a USB
mouse without making any setting adjustments.)
Test the mouse controller — To test the mouse controller (which affects pointer movement)
and the operation of the touch pad or mouse buttons, run the Mouse test in the Pointing
Devices test group in the Dell Diagnostics.
Reinstall the touch pad driver — See "Reinstalling Software."
NOTE: Use the integrated keyboard when working in MS-DOS® mode or when running the Dell
Diagnostics or the system setup program. When you attach an external keyboard, the integrated
keyboard remains fully functional.
Check the keyboard cable — Shut down the computer. Disconnect the keyboard cable and
check it for damage, and firmly reconnect the cable.
If you are using a keyboard extension cable, disconnect it and connect the keyboard directly to
the computer.
Check the external keyboard —
1. Shut down the computer, wait 1 minute, and turn it on again.
2. Verify that the numbers, capitals, and scroll lock lights on the keyboard blink during the
boot routine.
Pa
g
e 11 of 17Solvin
g
Problems
9/19/2003file://C:\Documents%20and%20Settin
g
s\r
p
axman\Local%20Settin
g
s\Tem
p
\~hhB694.htm

Unexpected Characters
Drive Problems
Fill out the Diagnostics Checklist as you complete these checks.
If you cannot save a file to a floppy disk drive
3. From the Windows desktop, click the Start button, point to Programs, point to
Accessories, and click Notepad.
4. Type some characters on the external keyboard and verify that they appear on the display.
If you cannot verify these steps, you may have a defective external keyboard.
To verify that the problem is with the external keyboard, check the integrated
keyboard —
1. Shut down the computer.
2. Disconnect the external keyboard.
3. Turn on the computer.
4. From the Windows desktop, click the Start button, point to Programs, point to
Accessories, and click Notepad.
5. Type some characters on the external keyboard and verify that they appear on the display.
If the characters appear now but did not with the external keyboard, you may have a defective
external keyboard.
Run the keyboard diagnostics tests — Run the PC-AT Compatible Keyboards tests in the Dell
Diagnostics. If the tests indicate a defective external keyboard, contact Dell.
Disable the numeric keypad — Press <Num Lk> to disable the numeric keypad if numbers are
displayed instead of letters. Verify that the numbers lock light is not lit.
Ensure that Windows recognizes the drive — In Windows XP, click the Start button and click
My Computer. In other operating systems, double-click My Computer. If the drive is not listed,
perform a full scan with your antivirus software to check for and remove viruses. Viruses can
sometimes prevent Windows from recognizing the drive. Insert a bootable disk and restart the
computer.
Ensure that the disk is not write-protected — You cannot save data to a write-protected
disk.
Try another floppy disk — Insert another disk to eliminate the possibility that the original disk
is defective.
Reinstall the drive —
1. Save and close any open files, exit any open programs, and shut down the computer.
2. Remove the drive from the module bay. See "Using the Module Bay" for instructions.
3. Reinstall the drive.
Pa
g
e 12 of 17Solvin
g
Problems
9/19/2003file://C:\Documents%20and%20Settin
g
s\r
p
axman\Local%20Settin
g
s\Tem
p
\~hhB694.htm
If you cannot play a CD, CD-RW, DVD, or DVD+RW
High-speed CD drive vibration is normal and may cause noise. The noise does not indicate a defect with the
drive or the CD.
If you cannot eject the CD, CD-RW, DVD, or DVD+RW drive tray
If you hear an unfamiliar scraping or grinding sound
4. Turn on the computer.
Clean the drive — See "Cleaning Your Computer" for instructions.
Check the drive for errors —
zIf a drive error message appears, see "Error Messages" for an explanation.
zRun the Diskette tests as described in "Using the Dell Diagnostics."
NOTE: Because of different worldwide file types, not all DVD titles work in all DVD drives.
Ensure that Windows recognizes the drive — In Windows XP, click the Start button and click
My Computer. In other operating systems, double-click My Computer. If the drive is not listed,
perform a full scan with your antivirus software to check for and remove viruses. Viruses can
sometimes prevent Windows from recognizing the drive. Insert a bootable disk and restart the
computer.
Try another disc — Insert another disc to eliminate the possibility that the original disc is
defective.
Adjust the Windows volume control — Double-click the speaker icon in the lower-right corner
of your screen. Ensure that the volume is turned up and that the sound is not muted.
Reinstall the drive
1. Save and close any open files, exit any open programs, and shut down the computer.
2. Remove the drive. See "Using the Module Bay" for instructions.
3. Reinstall the drive.
4. Turn on the computer.
Clean the drive or disc — See "Cleaning Your Computer" for instructions.
Check the drive for errors
If a drive error message appears, see "Error Messages" for an explanation.
Run the IDE Drives tests as described in the Dell Diagnostics.
1. Ensure that the computer is turned off.
2. Straighten a paper clip and insert one end into the eject hole at the front of the drive;
push firmly until the tray is partially ejected.
3. Gently pull out the tray until it stops.
zEnsure that the sound is not caused by the program that is running.
zEnsure that the disk or disc is inserted properly.
Pa
g
e 13 of 17Solvin
g
Problems
9/19/2003file://C:\Documents%20and%20Settin
g
s\r
p
axman\Local%20Settin
g
s\Tem
p
\~hhB694.htm

If the CD-RW or DVD+RW drive stops writing
If you have problems with a hard drive
PC Card Problems
Network Problems
Disable standby or hibernate mode in Windows before writing to a CD-RW — Search for
the keyword standby or hibernate in Windows Help or the Windows Help and Support Center.
Change the write speed to a slower rate — See the help files for your CD or DVD creation
software.
Exit all other open programs — Exiting all other open programs before writing to the CD-RW
or DVD+RW may alleviate the problem.
Allow the computer to cool before turning it on — A hot hard drive may prevent the
operating system from starting. Try allowing the computer to return to room temperature before
turning it on.
Check the drive for errors —
zRun the Windows error-checking tool:
1. In Windows XP, click the Start button and click My Computer. In Windows 2000, double-
click My Computer.
2. Right-click the drive letter (local disk) that you want to scan for errors, and then click
Properties.
3. Click the Tools tab.
4. Under Error-checking, click Check Now.
5. Click Start.
zRun the IDE Drives tests as described in the Dell Diagnostics.
Check the PC Card — Ensure that the PC Card is properly inserted into the connector.
Ensure that the card is recognized by Windows — Double-click the Safely Remove
Hardware (Unplug or Eject Hardware in Windows 2000) icon in the Windows taskbar. Ensure
that the card is listed.
Run the PC Card diagnostics test — See the documentation that came with the PC Card for
instructions if a diagnostics test was provided with the card.
If you have problems with a Dell-provided PC Card — Contact Dell.
If you have problems with a PC Card not provided by Dell — Contact the PC Card
manufacturer.
Pa
g
e 14 of 17Solvin
g
Problems
9/19/2003file://C:\Documents%20and%20Settin
g
s\r
p
axman\Local%20Settin
g
s\Tem
p
\~hhB694.htm
Fill out the Diagnostics Checklist as you complete these checks.
General Program Problems
Fill out the Diagnostics Checklist as you complete these checks.
A program crashes
A program stops responding
A solid blue screen appears
Check the network cable connector — Ensure that the network cable connector is firmly
connected to the connector on the computer and the network wall jack.
Check the network lights on the network connector — Green indicates that the network
connection is active. If the status light is not green, try replacing the network cable. Amber
indicates that the network adapter driver is loaded and the adapter is detecting activity.
Restart the computer — Try to log on to the network again.
Contact your network administrator — Verify that your network settings are correct and that
the network is functioning.
NOTE: Software usually includes installation instructions in its documentation or on a floppy disk or CD.
See the software documentation — Many software manufacturers maintain websites with
information that may help you solve the problem. Ensure that you properly installed and
configured the program. Reinstall the program if necessary.
End the program
1. Simultaneously press <Ctrl><Shift><Esc>.
2. Click the Applications tab, and then select the program that is no longer responding.
3. Click End Task.
Turn the computer off — If the computer does not respond to a keystroke or a proper
shutdown, press the power button until the computer turns off. Press the power button again to
restart the computer.
Windows XP
The computer restarts.
Windows 2000
The solid blue screen appears because you were not able to perform a proper Windows
shutdown. ScanDisk automatically runs during the start-up process. Follow the instructions on
Pa
g
e 15 of 17Solvin
g
Problems
9/19/2003file://C:\Documents%20and%20Settin
g
s\r
p
axman\Local%20Settin
g
s\Tem
p
\~hhB694.htm
Error messages appear
If Your Dell™ Computer Gets Wet
1. Shut down the computer, disconnect the AC adapter from the computer, and then disconnect the AC
adapter from the electrical outlet.
2. Turn off any attached external devices, and disconnect them from their power sources and then from
the computer.
3. Ground yourself by touching one of the metal connectors on the back of the computer.
4. Remove the module bay device and any installed PC Cards, and put them in a safe place to dry.
5. Remove the battery.
6. Wipe off the battery and put it in a safe place to dry.
7. Remove the hard drive.
8. Remove the memory module(s).
9. Open the display and place the computer right-side up across two books or similar props to let air
circulate all around it. Let the computer dry for at least 24 hours in a dry area at room temperature.
10. Ground yourself by touching one of the metal connectors on the back of the computer.
11. Replace the memory module(s), the memory module cover, and the screw(s).
12. Replace the hard drive.
13. Replace the module bay device and any PC Cards you removed.
the screen.
Review "Error Messages" — Look up the message and take the appropriate action. See the
software documentation.
Confirm that the problem is software-related — Run the System Board Devices tests in the
Dell Diagnostics. If all tests in the device group run successfully, the problem may be software-
related. See the software documentation.
CAUTION: Perform this procedure only after you are certain that it is safe to do so. If the
computer is connected to an electrical outlet, it is recommended that you turn off AC power
at the circuit breaker before attempting to remove the power cables from the electrical
outlet. Use the utmost caution when removing wet cables from a live power source.
NOTICE: Do not use artificial means, such as a hair dryer or a fan, to speed the drying process.
CAUTION: To help prevent electrical shock, verify that the computer is thoroughly dry before
continuing with the rest of this procedure.
Pa
g
e 16 of 17Solvin
g
Problems
9/19/2003file://C:\Documents%20and%20Settin
g
s\r
p
axman\Local%20Settin
g
s\Tem
p
\~hhB694.htm
14. Replace the battery.
15. Turn on the computer and verify that it is working properly.
If the computer does not start, or if you cannot identify the damaged components, contact Dell.
If You Drop or Damage Your Computer
1. Save and close any open files, exit any open programs, and shut down the computer.
2. Disconnect the AC adapter from the computer and from the electrical outlet.
3. Turn off any attached external devices, and disconnect them from their power sources and then from
the computer.
4. Remove and reinstall the battery.
5. Turn on the computer.
If the computer does not start, or if you cannot identify the damaged components, contact Dell.
Resolving Other Technical Problems
NOTE: See your System Information Guide or separate paper warranty document that shipped with
your computer for information on your warranty coverage.
NOTE: See your System Information Guide for information on your warranty coverage.
Go to the Dell Support website — Go to support.dell.com for help with general usage,
installation, and troubleshooting questions. See "Getting Help" for a description of the hardware
and software support provided by Dell.
E-mail Dell — Go to support.dell.com and then click E-Mail Dell in the Communicate list.
Send an e-mail message to Dell about your problem; you can expect to receive an e-mail
message from Dell within hours. See "Getting Help" for a description of the hardware and
software support provided by Dell.
Contact Dell — If you cannot solve your problem using the Dell Support website
(support.dell.com) or e-mail service, call Dell for technical assistance. See "Getting Help" for a
description of the hardware and software support provided by Dell.
Pa
g
e 17 of 17Solvin
g
Problems
9/19/2003file://C:\Documents%20and%20Settin
g
s\r
p
axman\Local%20Settin
g
s\Tem
p
\~hhB694.htm