Diasonic Technology Co RVM-704I REARVIEW MONITOR User Manual 1
Diasonic Technology Co Ltd REARVIEW MONITOR 1
USERS MANUAL

http://www.emc2000.co.kr
FCC TEST REPORT
Report No.: EMC-FCC-R0077
EMC compliance Ltd.
480-5 Shin-dong, Yeongtong-gu, Suwon-city, Gyunggi-do, 443-390, Korea
82 31 336 9919 (Main) 82 31 336 4767 (Fax)
This test report shall not be reproduced except in full, Without the written approval.
Appendix 6.
User manual
OWNER'S MANUAL
R
2-DIN, 7"Touch screen vehicle
monitor for allround vision
Model : MXN-7DDT
Design and Specifications are subject to change without notice.
2-DIN, 7"Touch screen Monitor
Model : MXN-7DDT
Instruction Manual (Ver 1.0)
Index
1. Caution
2. Components of the product
3. How to use the product
4. How to install the product
5. Specification
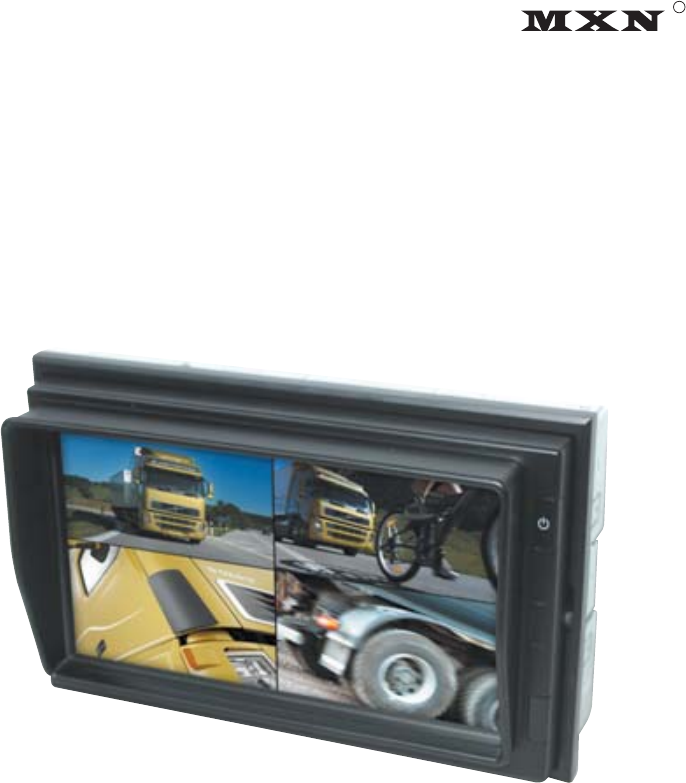
Thank you for purchasing our touchscreen vehicle monitor.
Please read this manual before you use the product.
The product may be different than described in the manual;
depending on renewal and/or upgrade of S/W version and
performance it can be altered without notice.

Caution
3
For your safe operation, please read this manual before you start to use
the product. We inform you that our company shall not be responsible for
failures and troubles that are occurred due to misuse or neglection of the
cautions written on this manual.
Operating this equipment when driving a vehicle might cause an accident.
Use the equipment after parking or stopping the vehicle in a safe area.
When wiping off the dust, use a soft fabric instead of liquid solvents (thinner,
benzene etc.) solution or a wet rag.
Do not press the liquid crystal screen hard. It might be damaged by hard
pressure.
Do not drop or give shock. It might cause breakdown or damage.
Do not dismantle the product arbitrarily. We do not supply free after service
for an arbitrarily dismantled product.
Touching the power with a wet hand causes electric shock. Caution
required.
For accessories or cables to connect with the product, it is recommended
to use proper goods from our company. We are not responsible for any
problems caused by wrong articles.
Do not disconnect the power cable during using the product. It might
cause damage to the product.
Amplified explanation is as follows.
-Caution: This part informs what to keep in mind or understand and what
caution is required to use the product.
-Ref (reference): Reference is about functional explanation.
Caution : Any changes or modifications in construction of this device
which are not expressly approved by the party responsible for
compliance could void the user's authority to operate the equipment.
Components of the product
4
2
3
6
5
7
4
1
1
2
3
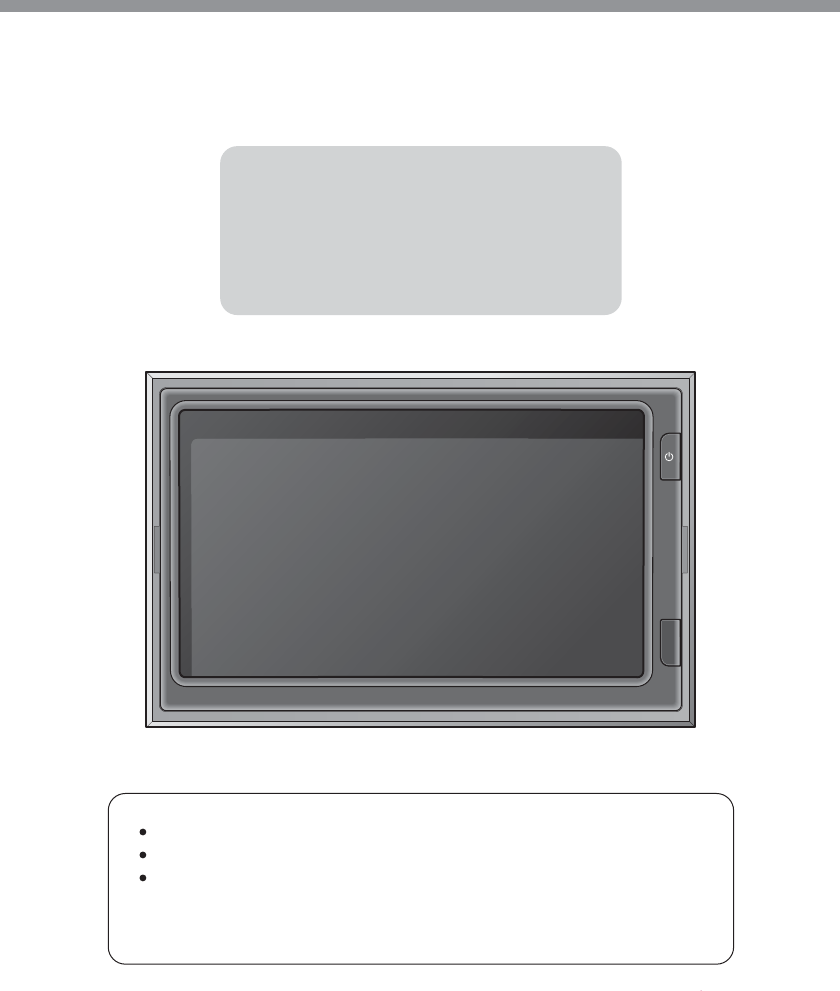
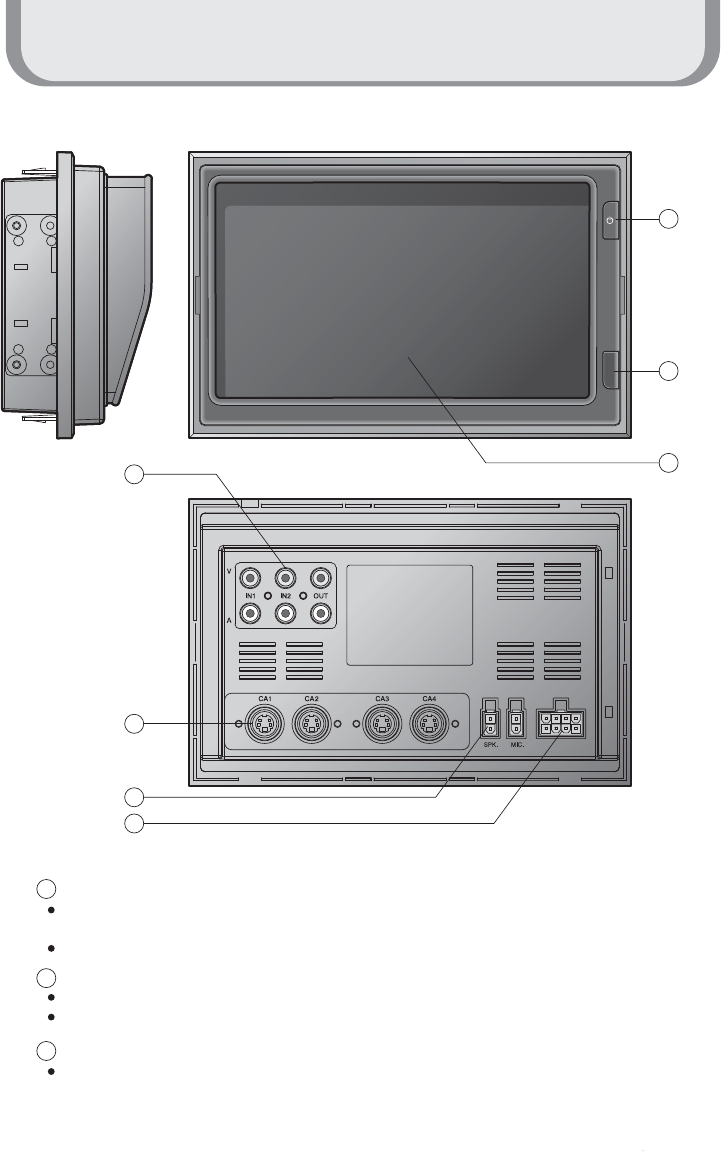
Touch Screen
By touching one of the small pictures during multi screen mode, the concerning small picture
will be enlarged into Full Screen mode.
By touching the screen it is possible to control the equipment or to change the settings.
Power On/Off
Press the Power button for 0.5 seconds to turn on the screen.
Press the Power button for 0.5 seconds to turn off the screen when it is tuned on.
illuminance Sensor
Behind this window a sensor detects the actual light conditions in the area around the screen.
When activated via the menu settings, this sensor automatically controls the brightness of the
screen.(Day/Night control)
Components of the product
5
4
5
6
7
Power Input
Connect the Power Cable ( VCC/GND/TRIGGER1~TRIGGER5/Speed Switch )
Camera Input
Connect the Camera Cable ( Cam1 ~ Cam4 )
AV In/Out
AV IN: AUX1 & AUX2 (RCA), AV Out (RCA)
Ext.Speaker output / Mic. input
Connect the external speaker (left side terminal)
Connect the optional microphone (right side terminal)
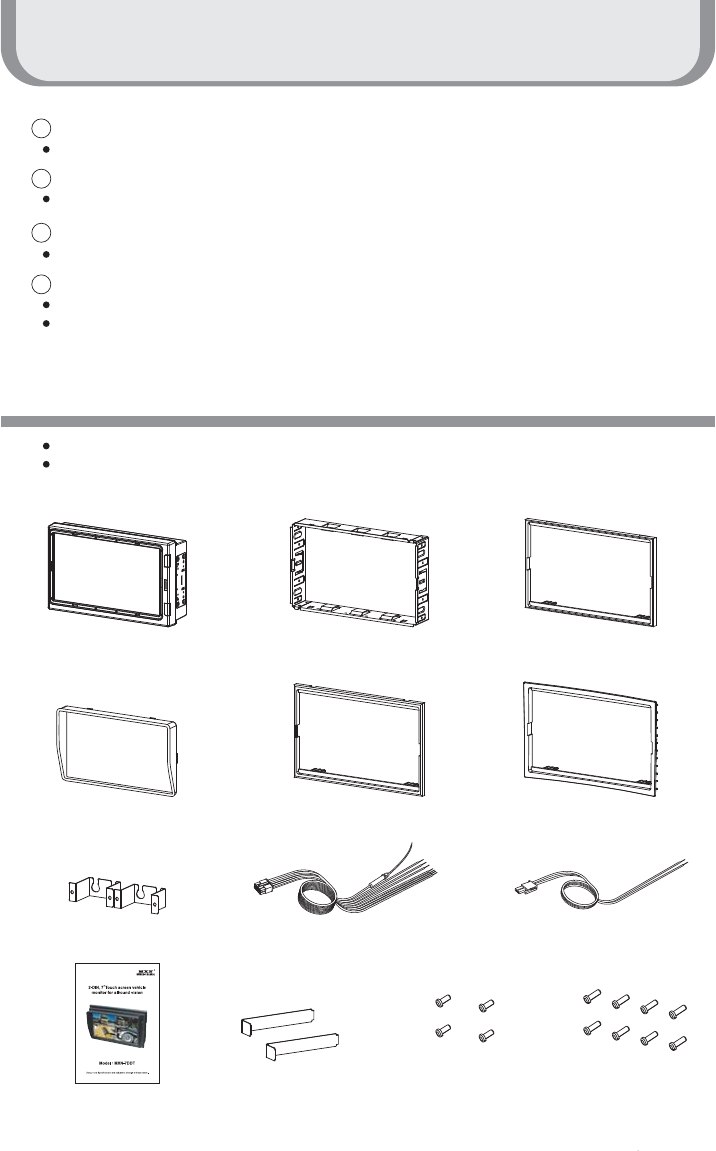
Please check that you have the correct contents before using this product.
If any items are missing, please contact your dealer.
Package Contents
Monitor Trim Bracket Deco Plate A
(Dimensions:187.6 x 121.4mm)
Sunvisor Deco Plate B
(Dimensions:187.6 x 115.4mm)
Deco Plate C(Optional)
(Dimensions:190.4x 124mm)
Cable Bracket(2EA) Power Cable Speaker Cable
Ejection Key(2EA)
Instruction Manual
Tapping Screw
T2 3X6L (4EA)
Tapping Screw
T2 2.3X8L (8EA)
How to use the product
6
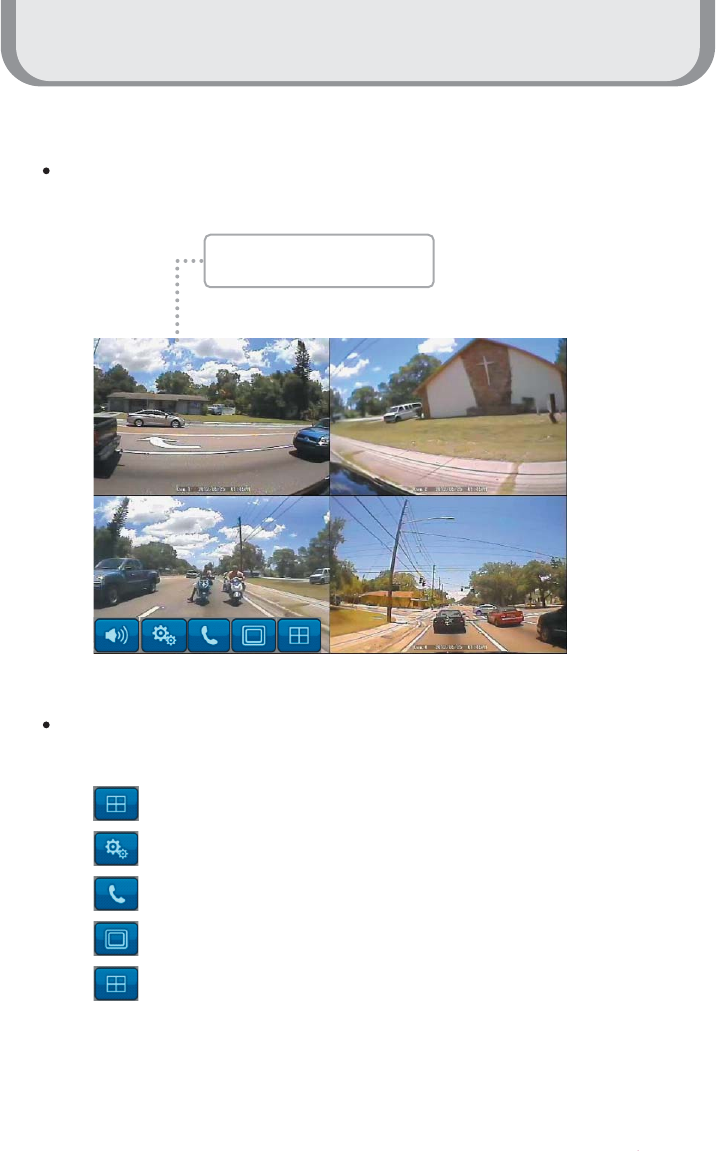
Start Screen
When the booting is ready, the multi screen as below will be displayed
When the small windows on the multi screen are touched, the channel is enlarged into full
screen mode. One more touch returns it back to the multi screen mode.
: Controls volume of the speaker
: Settings menu
: Run the Bluetooth Phone (Optional function)
: Change Input signal
: Multi screen mode
When the small window is
touched, it is enlarged.
How to use the product
7
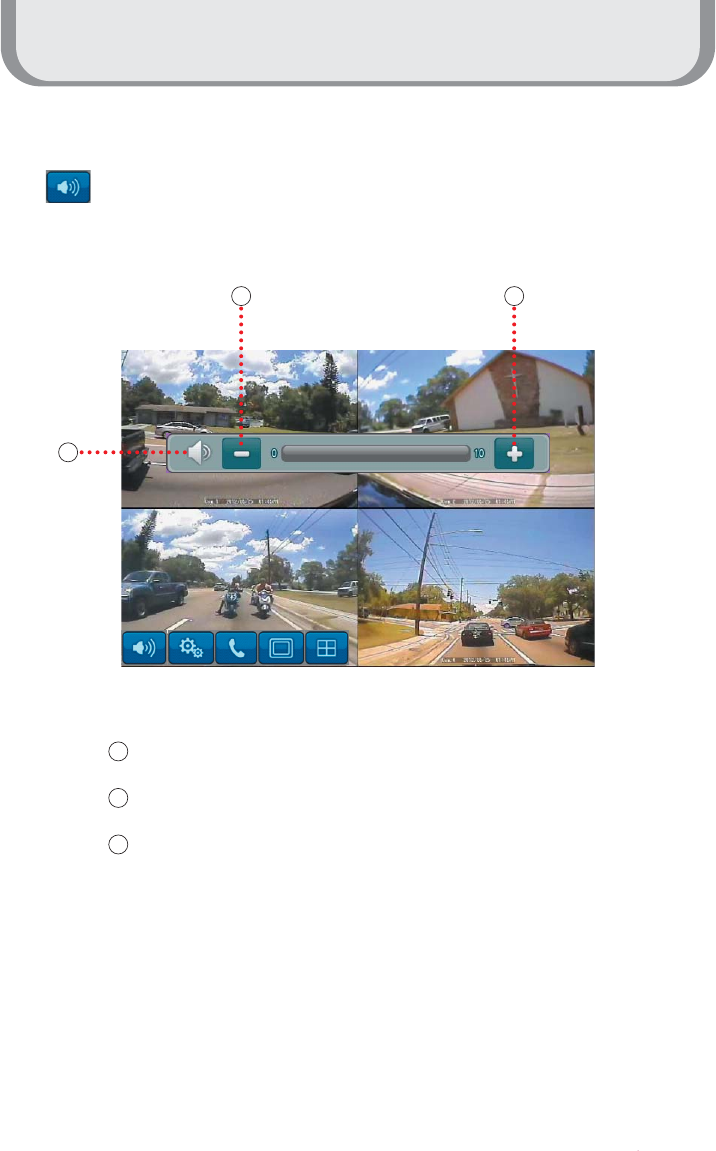
Volume Control
Press the button to display Volume Pop-up.
1
1
2
3
2 3
Press the button to mute
Press the button to increase the volume
Press the button to decrease the volume
How to use the product
8
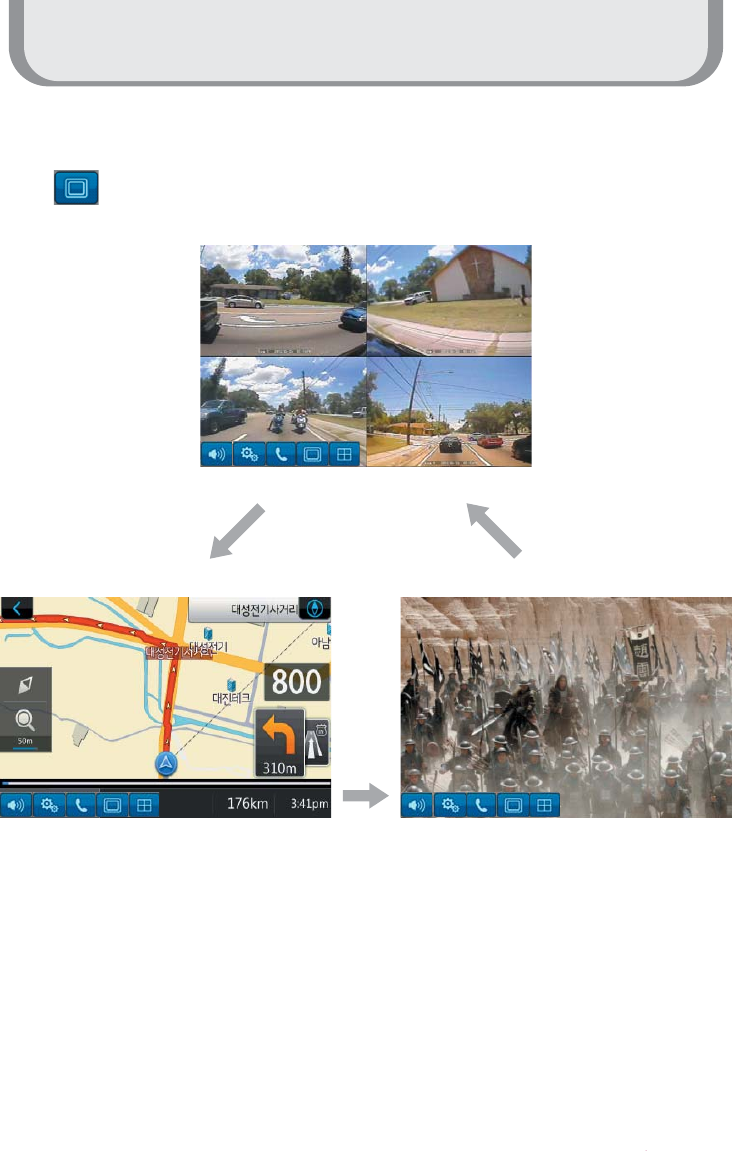
Input selection
Press the Input button to change Input
Press input button
once: AUX1
Press input button twice: AUX2
Press input button
3 times: Cam
How to use the product
9
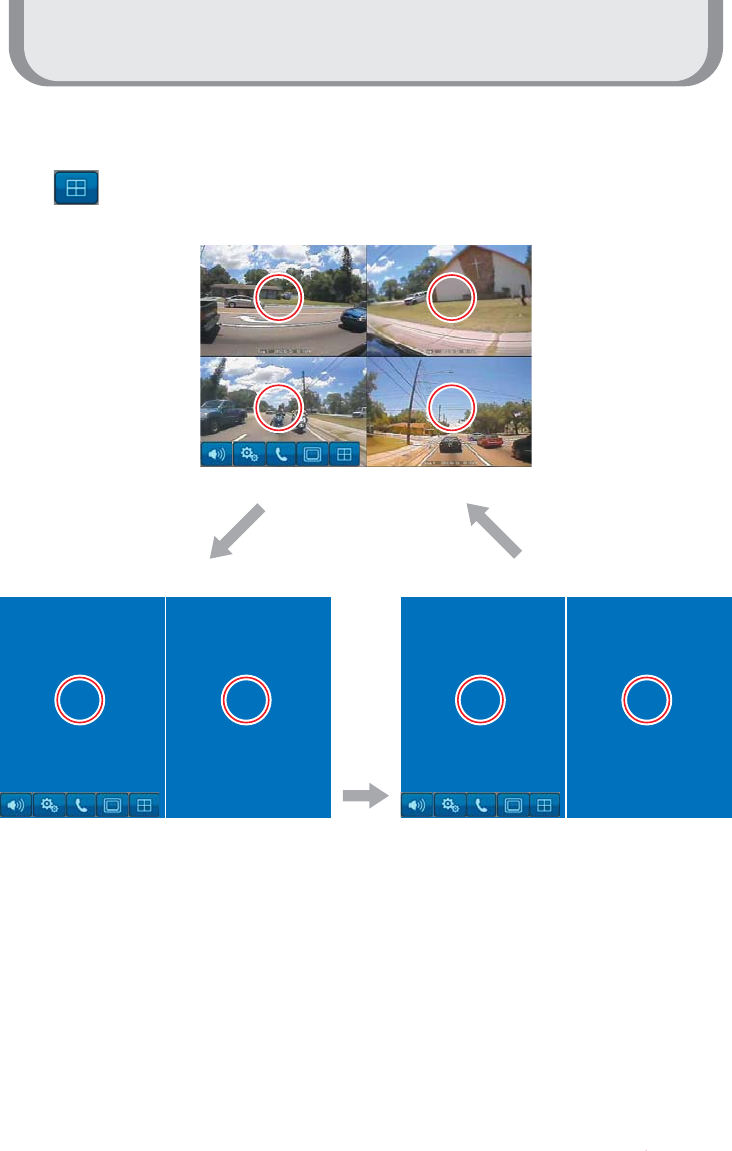
Multi screen
Press multi screen
button once:
Cam1,Cam2
Press multi screen button twice: Cam3,Cam4
Press multi screen
button 3 times:
Cam1,2,3,4
1
1
2
2
3
3
4
4
1
1
2
2
3
3
4
4
Press the multi screen button to divide the screen.
How to use the product
10
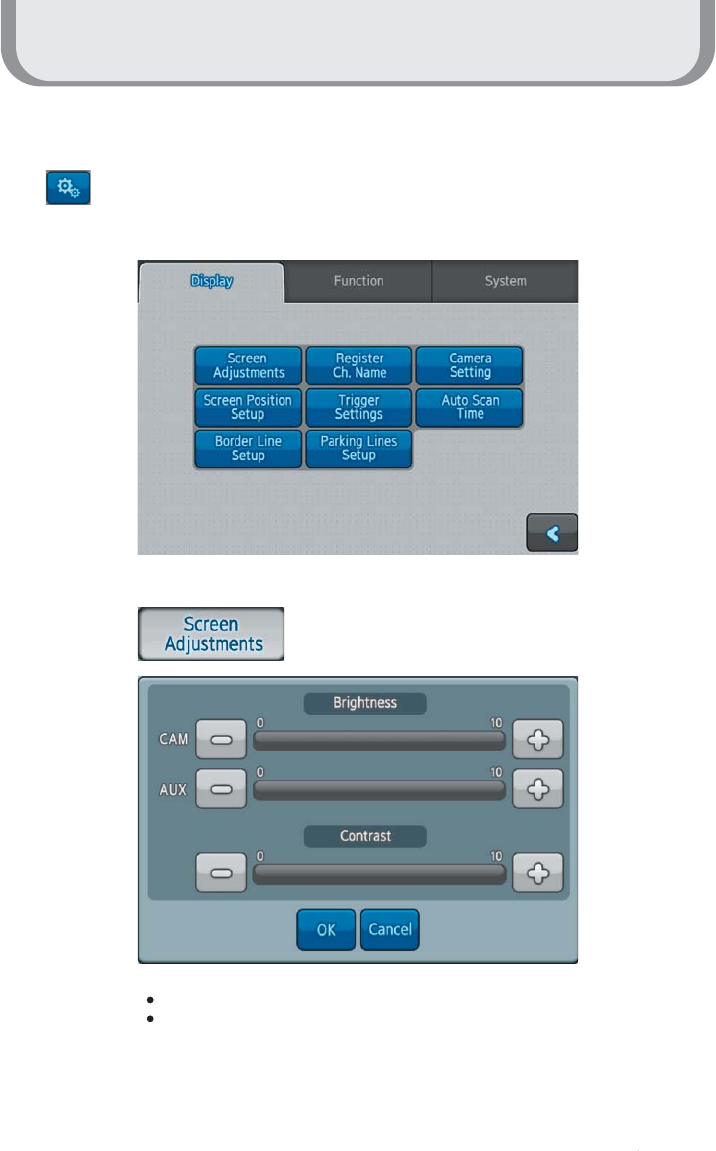
Setting Mode
Press the setting menu button to open the Setting screen.
CAM : Adjust brightness of Camera input screen
AUX : Adjust brightness of AUX screen
How to use the product
11
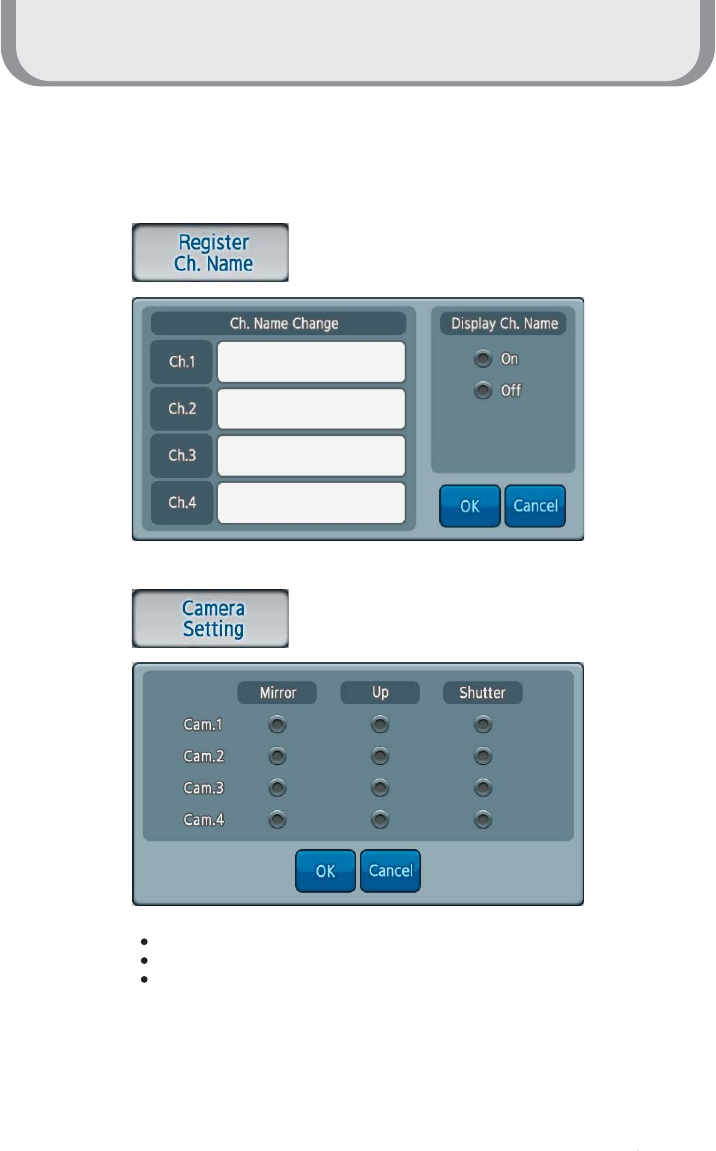
Display
Input the name into each channel.
Mirror : Mirror image or normal image
Up : Change up and down of the screen
Shutter : Enable to operate Shutter/Heater Camera
How to use the product
12
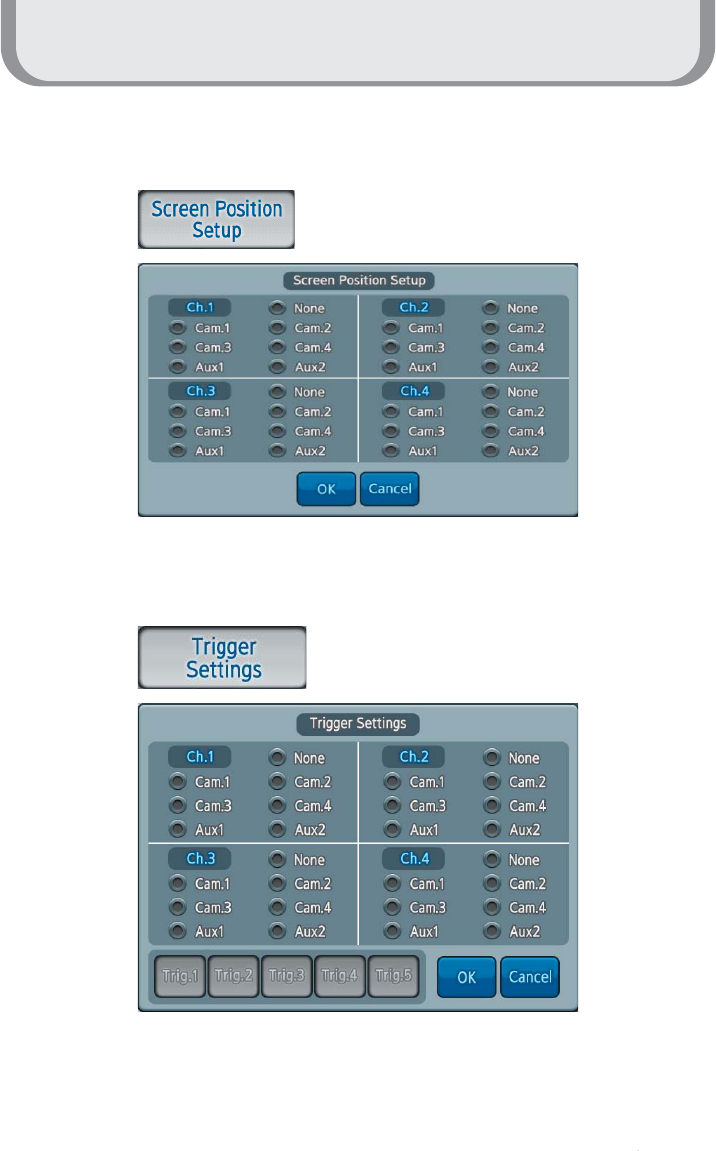
Display
Setup screen position of each channel
Setup the screen on each Trigger
Mirror : Mirror image or normal image
Up : Change up and down of the screen
Shutter : Enable to operate Shutter/Heater Camera
Caution: Cam1and AUX1 cannot be setup at the same time.
Cam2 and AUX2 cannot be setup at the same time.
The screen will be showed screen by each Trigger set if input
Trigger.
How to use the product
13
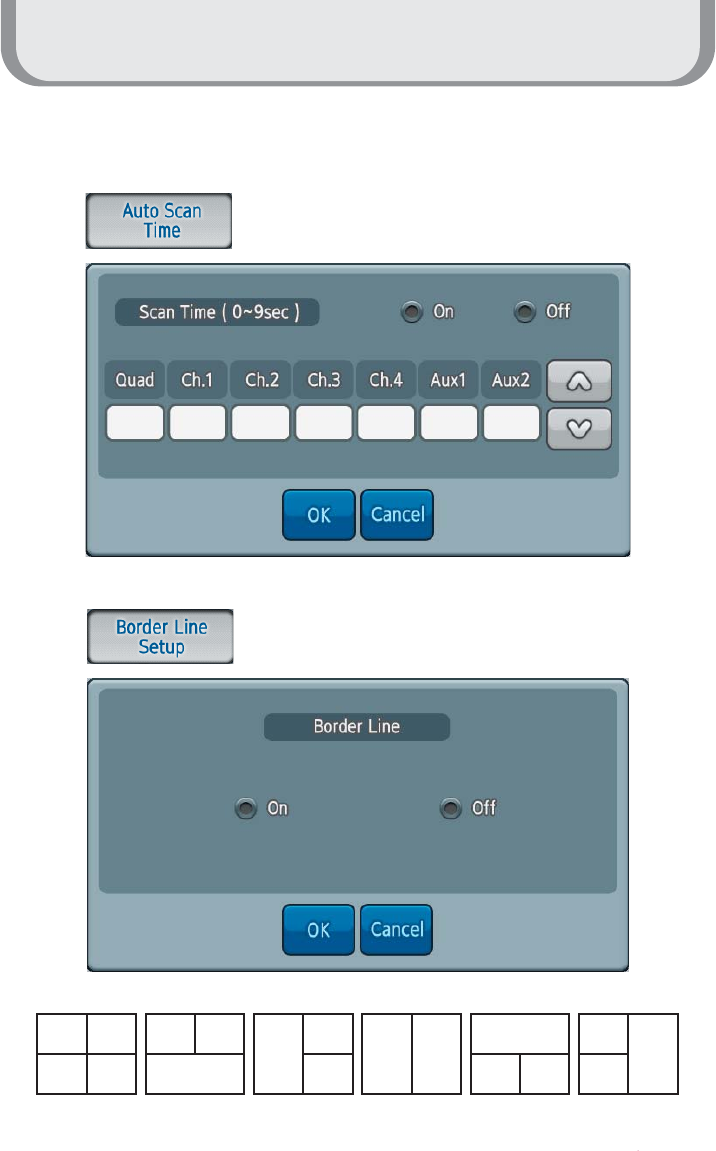
Display
Display the full screen according to each channel
setup when setting up On
Display the dividing lines of the screen
How to use the product
14
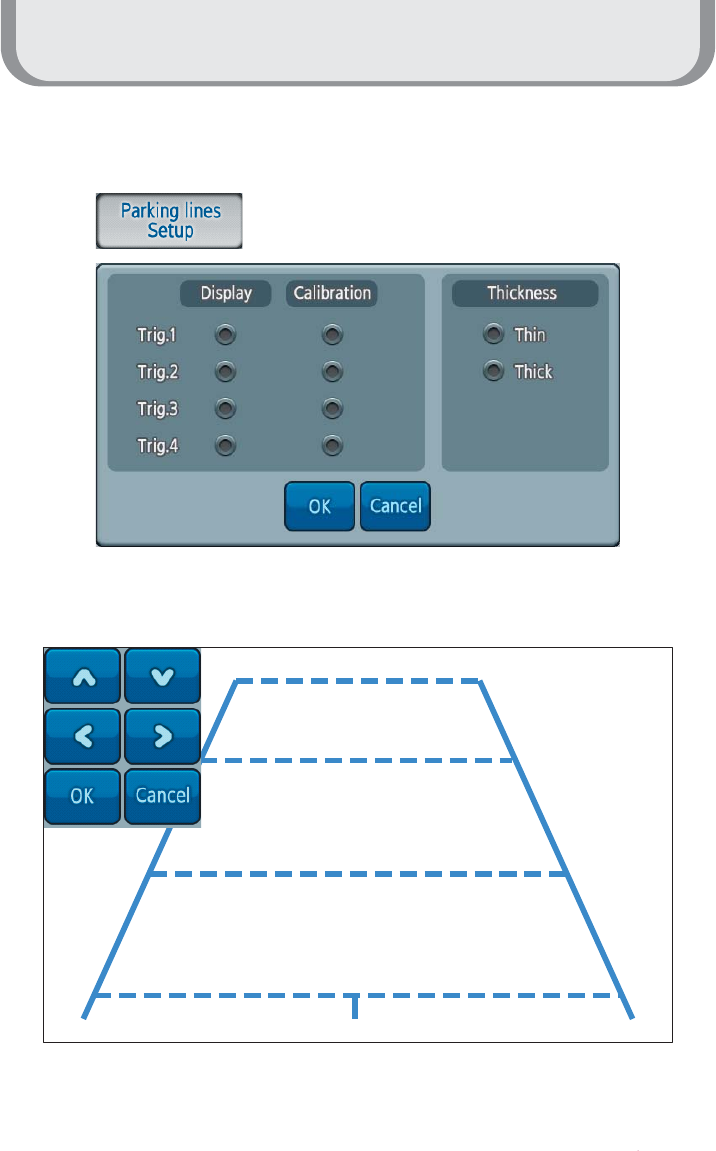
Display
Adjust Parking line of each Trigger
Trig.1
Calibration Front & Rear
How to use the product
15
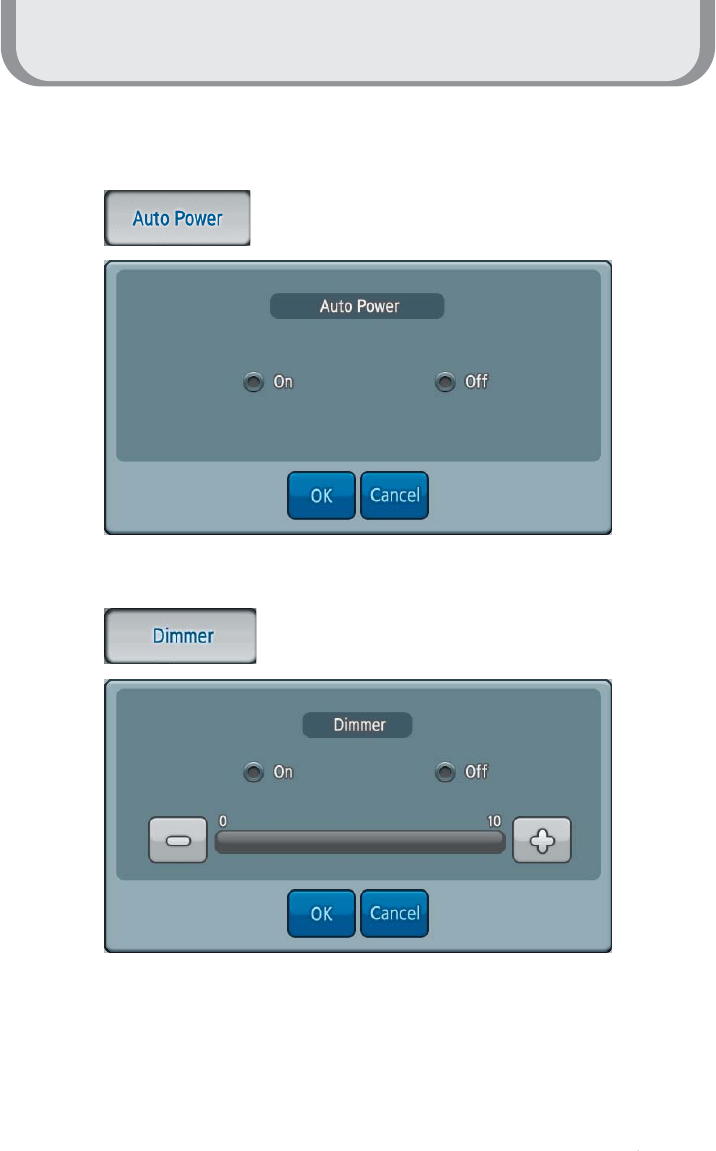
Function
The screen is turned ON automatically
when starting the vehicle
Sensitivity of automatic brightness adjustment, level 0 to 10 controlled
by actual light conditions (Day/Night)
Automatic brightness adjustment by sensor
in the front housing
How to use the product
16
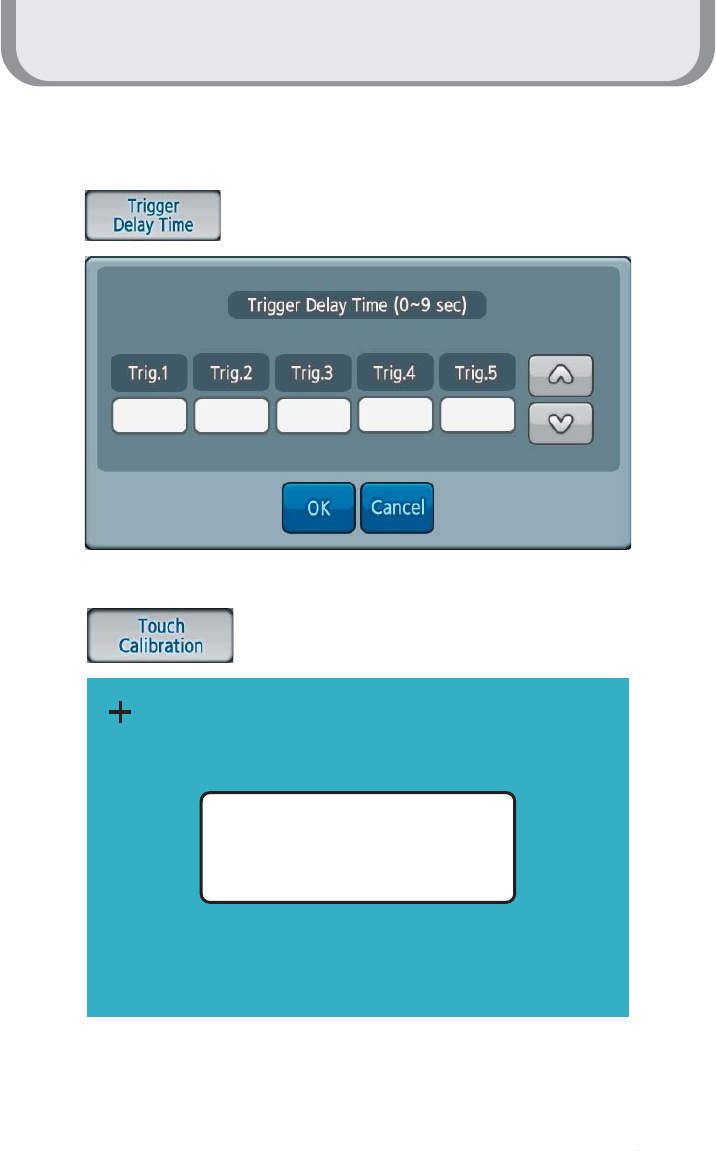
Function
Keep Trigger activated during setup time after Trigger off
in order to bridge temporary powerloss, e.g. from vehicle's
turnlight signal
Re-adjust center Point of Touch panel
STEP 1 of 3
Click on center of '+' icon
for Touch screen calibration.
How to use the product
17
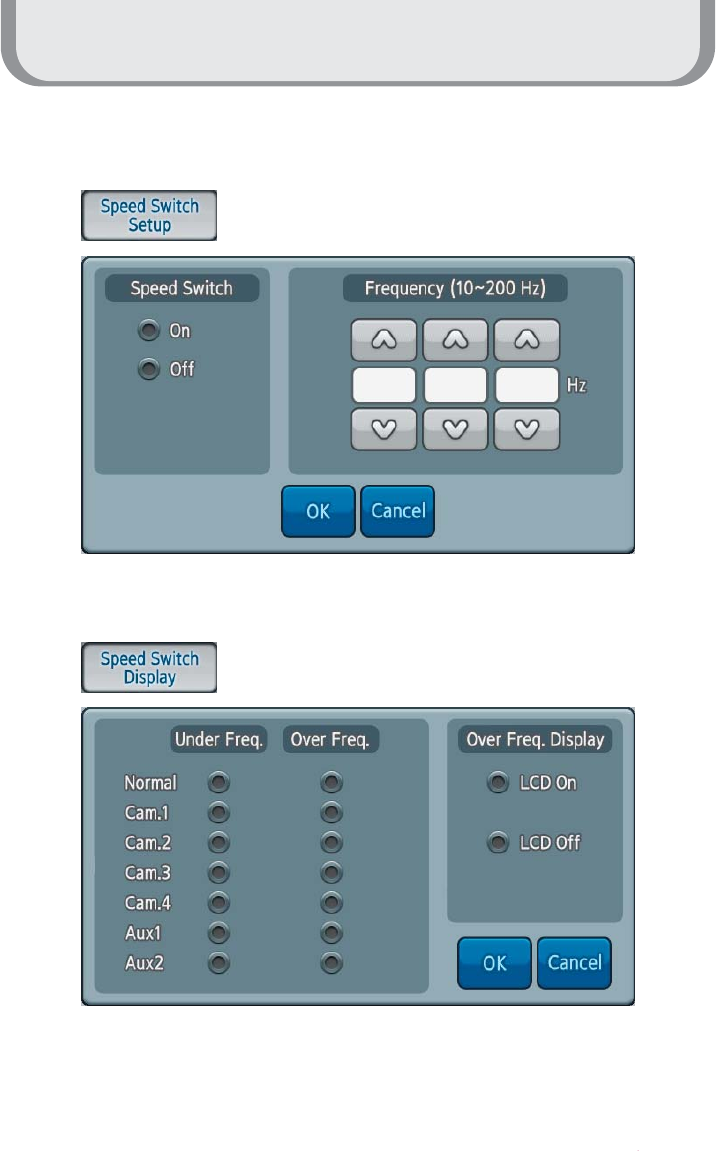
Function
Detect speed of a vehicle from 10 to 200 Hz
To switch automatically into the screen ON mode,
by detecting a speed signal (tacho signal)
How to use the product
18
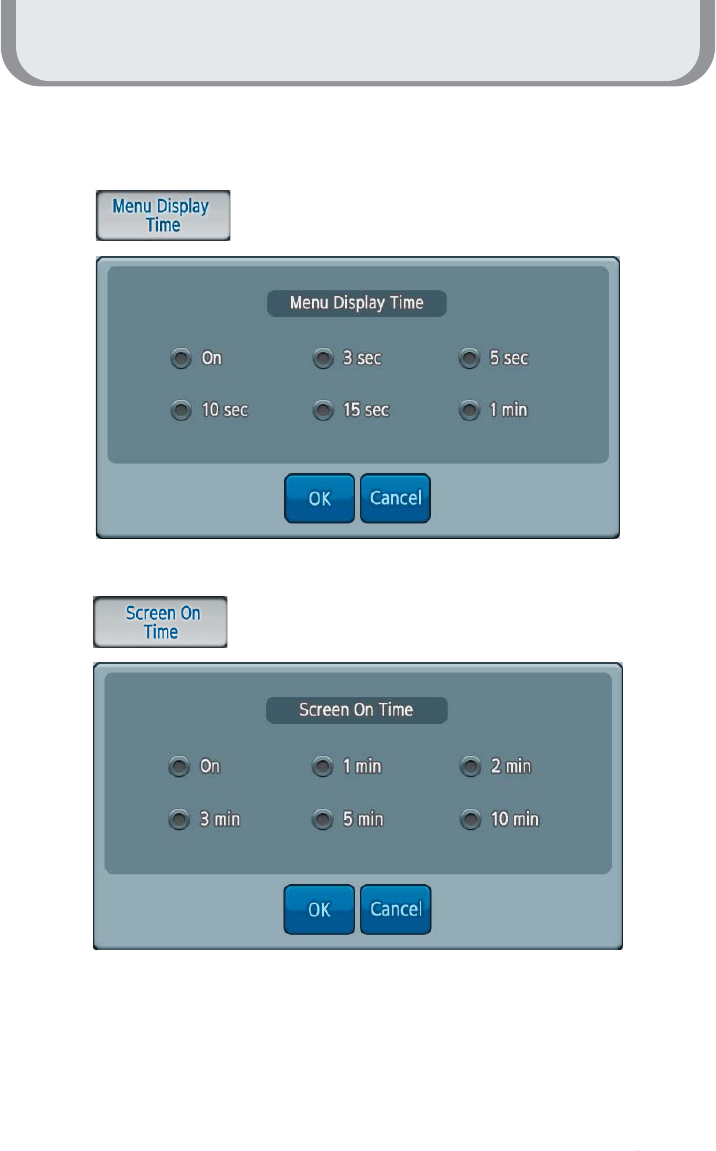
System
Set time displaying the Menu screen
Set time displayed on the screen
The screen is turned off when there is no input like touching it or so during
setting up time
How to use the product
19
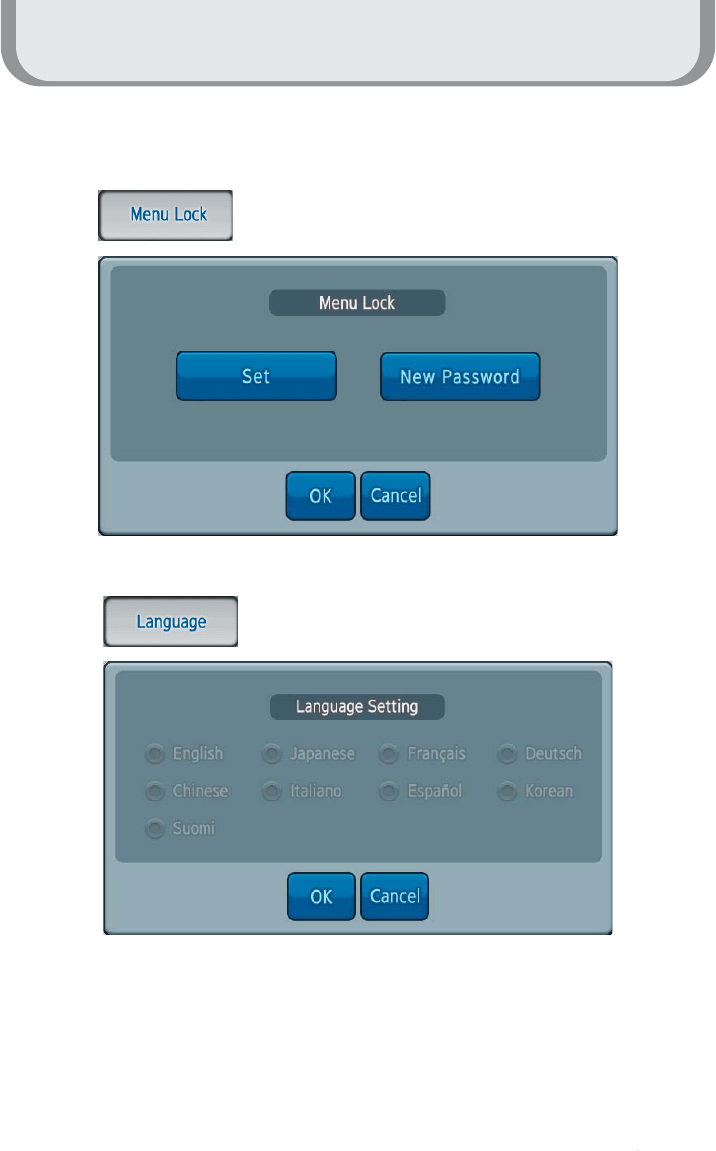
System
Set a password to lock the Menu button
Support languages for each country ( Option )
How to use the product
20
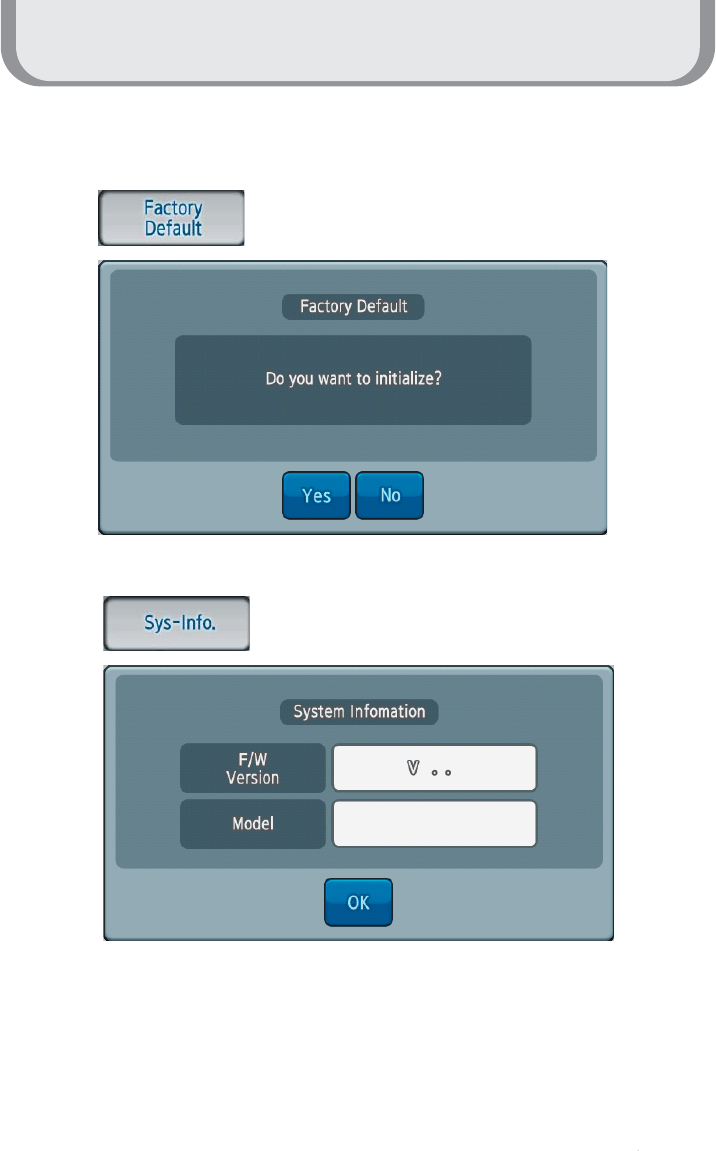
System
Initializing set points of Menu
Display Firmware Version and Model name

How to use the product
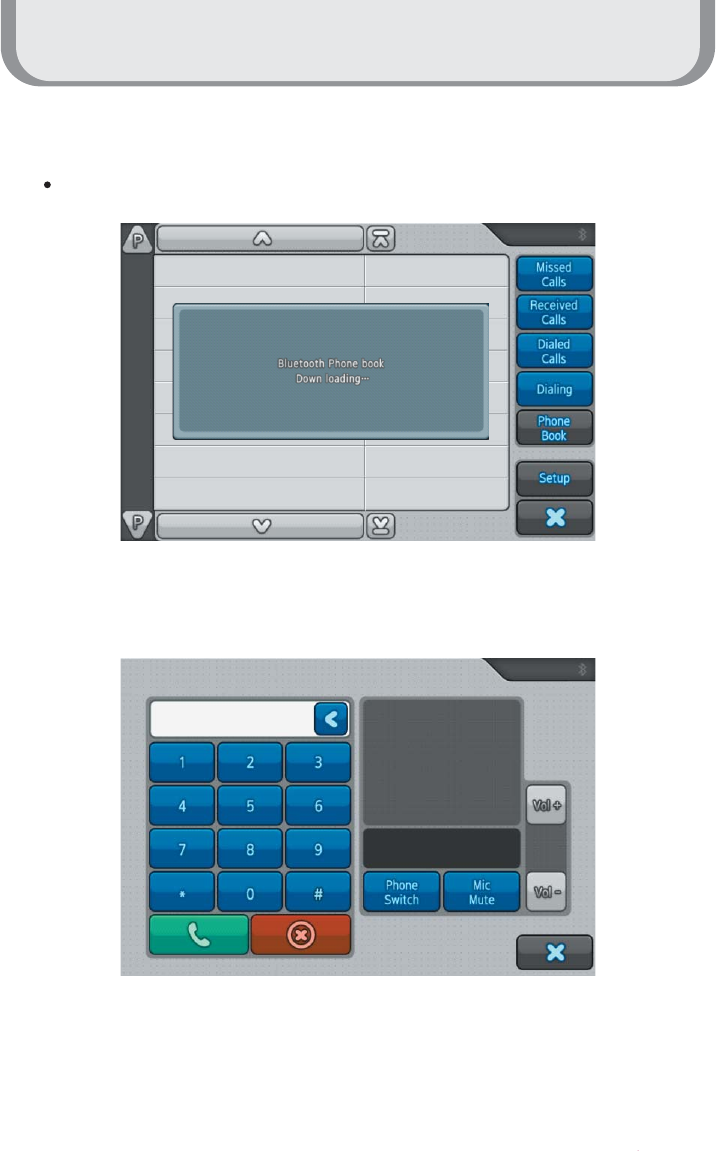
21
Start-up screen displays the Phone Book list of the phone paired
: Displays call lists during absence
: Displays phone call lists received
: Displays phone call lists sent
: Use for making a call dialing numbers
: Displays a Phonebook list
: Setup of Bluetooth
: Finishes Bluetooth
Bluetooth Phone (Optional)
Press the button to start Bluetooth
Screen of Bluetooth start
How to use the product
22
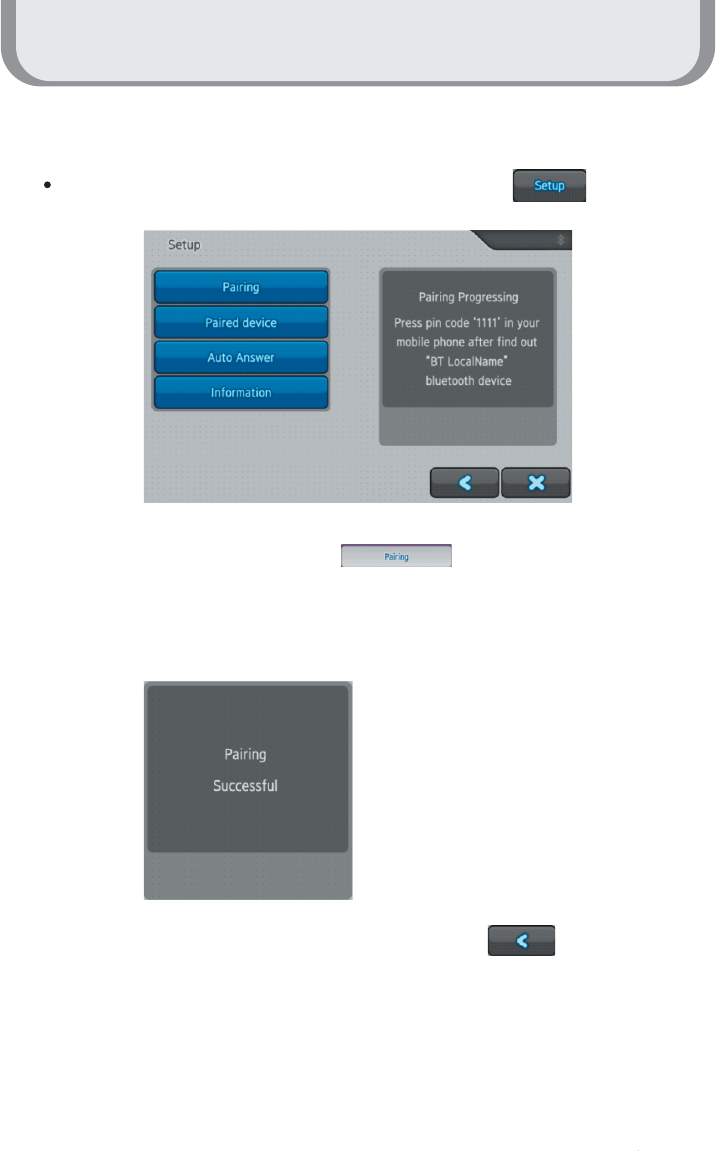
Bluetooth Phone (Optional)
Enter the Paring Mode for Paring with Bluetooth by pressing the button
1. Pairing mode is set by pressing the button.
2. Connect Bluetooth to a cell phone you want searching Bluetooth device.
(Enter the Pin code depending on type of cell phones)
3. Message is displayed when it is connected as below.
4. Return to the start-up screen of Bluetooth by pressing the button.
How to use the product
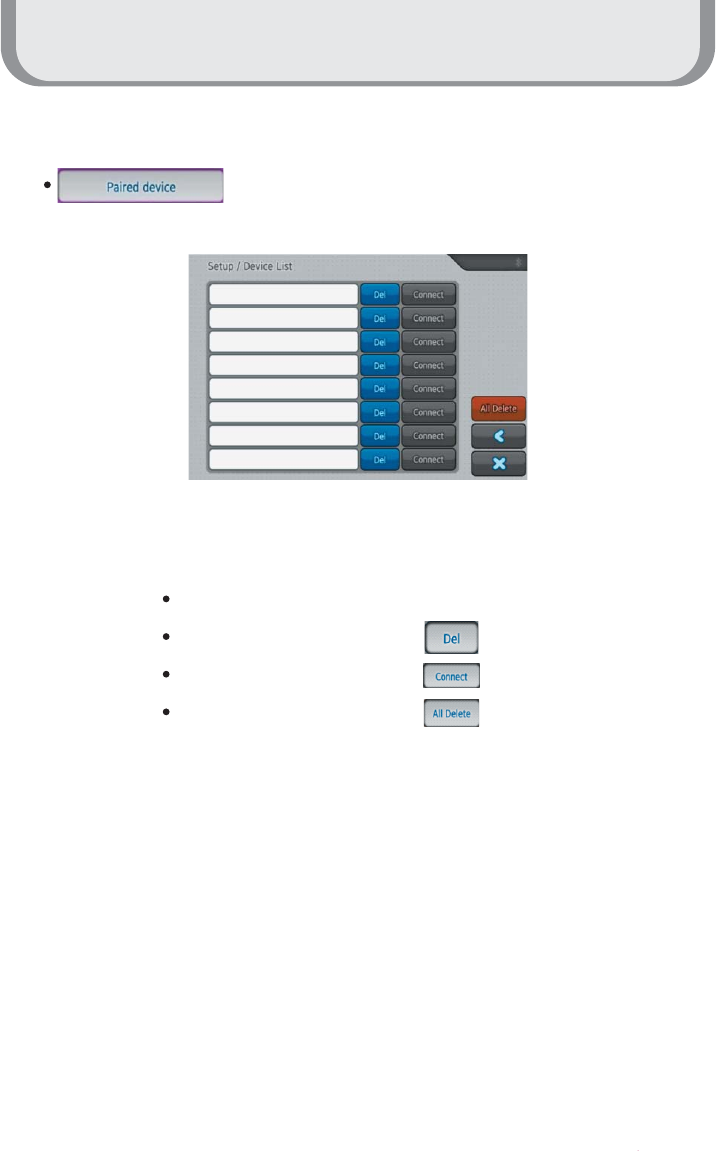
23
Bluetooth Phone (Optional)
: Displays devices Paired.
Displays devices paired up to 8 devices
Displays devices paired
Deletes devices connected by the button
Connects devices by pressing the button
Deletes all devices by pressing the button
( Devices paired are connected automatically in order )
How to use the product
24
Bluetooth Phone (Optional)
Down load phonebook list after pairing succeed.
Call after press the number in the list.
Installation
25
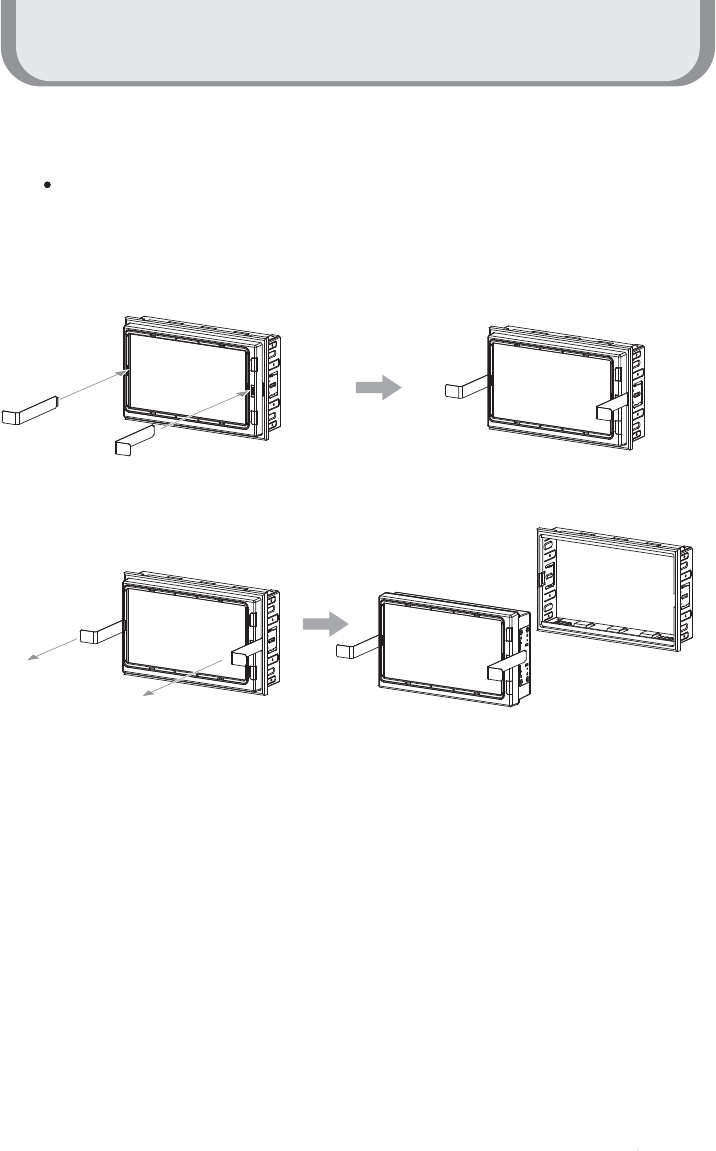
Pre-Installation
Please make sure to disassemble the monitor and trim bracket before installation.
1. Insert the ejection keys into the monitor along the guides on either sides.
2. Pull the monitor out from the trim bracket.
Installation
26
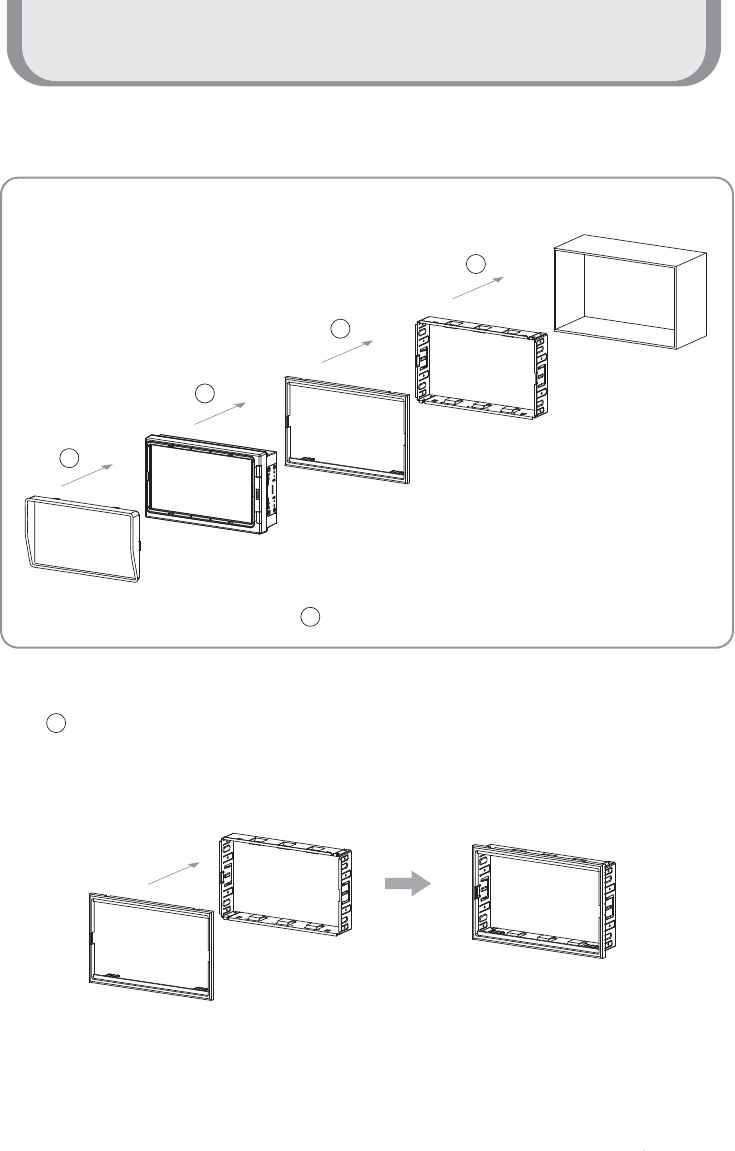
Installation
Installation Overview
1
3
5
1
2
Deco Plate + Trim Bracket
Sunvisor
4Power Cable, Cable Bracket, Cameras
Monitor
Deco Plate
Trim Bracket
Dash Board

Installation
27
Installation
2Trim Bracket Dash Board
a. Insert trim bracket into dash board.
b. Fix trim bracket firmly with the supplied screw. ( top and bottom )
c. Bend the taps. ( right and left )
3Sunvisor + Monitor
Trim Bracket + Dash Board
Trim Bracket + Screw
a
b
c
Installation
28
Installation
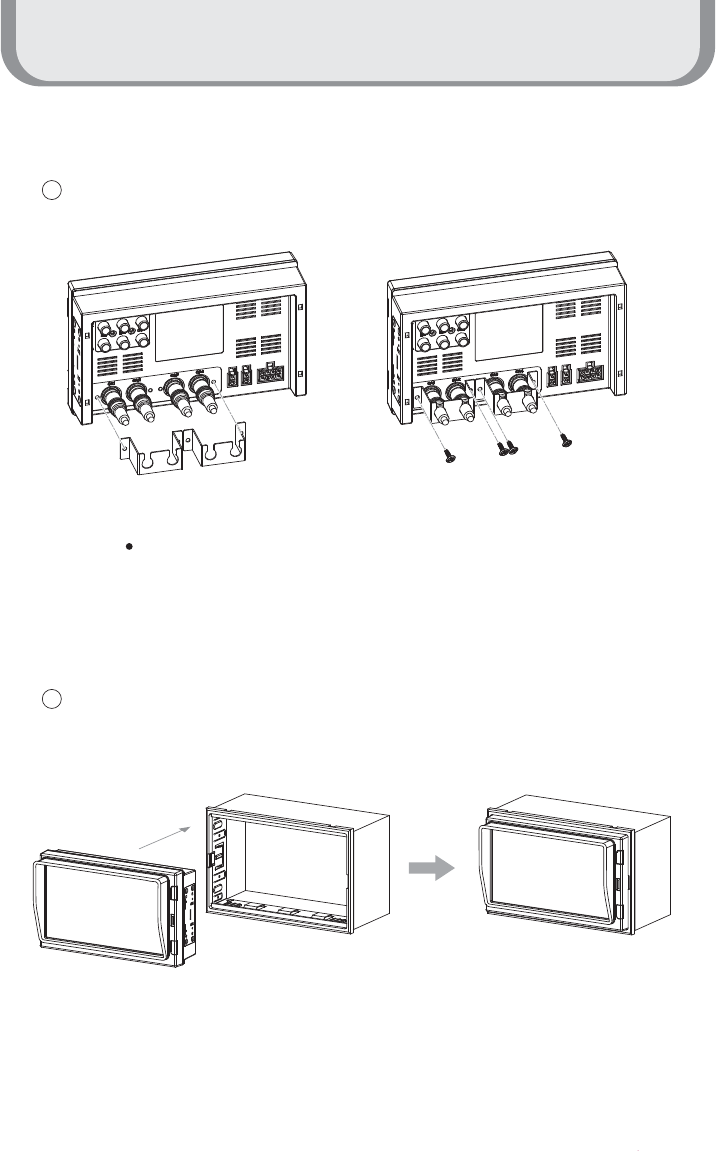
4Power Cable, Cable Bracket, Cameras
5Monitor + Trim Bracket
Monitor + Cable Bracket Monitor + Screw
Please make a connection for power cable, camera cables,
cable bracket before installation of monitor and trim bracket.
Installation
29
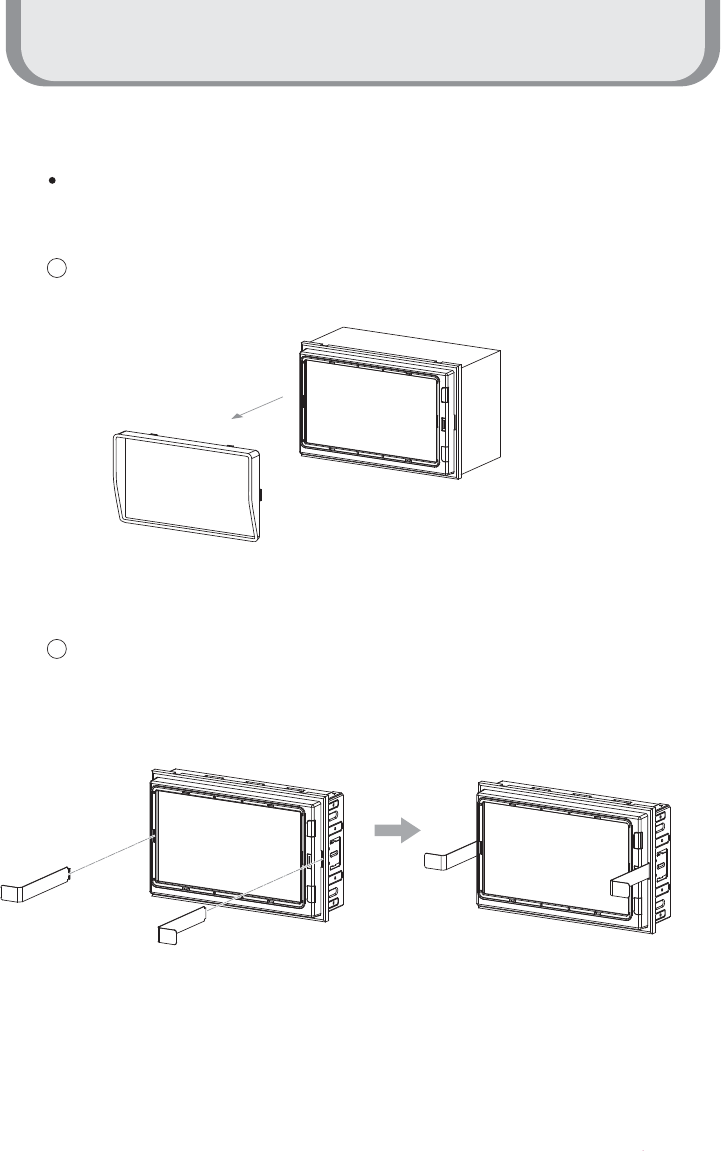
Disassemble
1Total Ass'y - Sunvisor
2Total Ass'y - Ejection Key
Please disassemble the unit in reverse of installation.
Installation
30
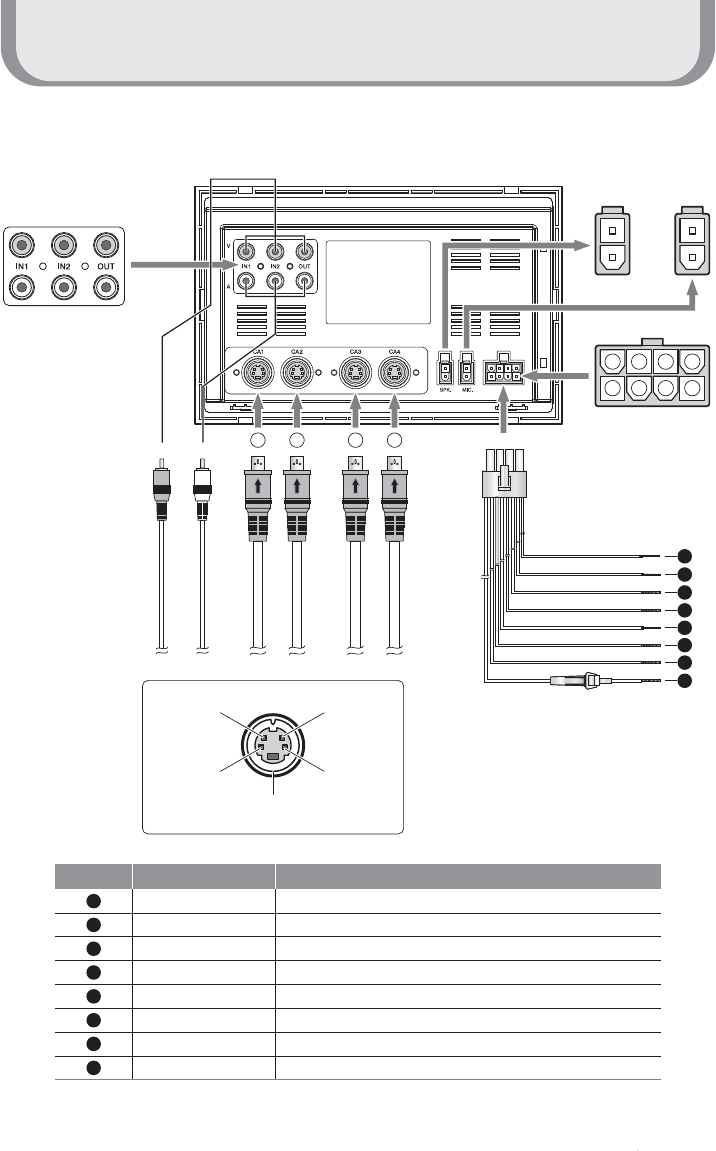
System Connection
1 2 3 4
1234
5678
VIDEO
VIDEO IN/OUT
RED
GREEN
BLUE
BROWN
BLACK
WHITE
YELLOW
ORANGE
Power ( 12~30V DC, via ignition )
Trigger1 ( 9~30V DC, via direction light, etc. )
Trigger3 ( 9~30V DC, via direction light, etc. )
Trigger5 ( 9~30V DC, via direction light, etc. )
Ground
Trigger2 ( 9~30V DC, via direction light, etc. )
Trigger4 ( 9~30V DC, via direction light, etc. )
Speed Pulse ( via tachograph, 10 ~ 200 Hz )
AUDIO IN/OUT
CAMERA1
EXT.Speaker
Power Cable ( 2M·100mm )
EXT.MIC
CAMERA2
CAMERA3
CAMERA4
AUDIO
1
5
2
3
4
6
7
8
1
B3 RED
(CAM AUDIO)
B2 BLUE
(CAM+9V)
B4 YEL
(CAM VCC)
B1 WHT
(CAM VIDEO)
B5 GND
(SHX2)
No Wire Color Label
2
3
4
5
6
7
8

Specification
31
LCD : Built in 7˟ TFT LCD (WVGA 800x480, with Touch Panel)
Camera : 4Ch input (1 Vp-p, 75˟) /NTSC, PAL ( Video & Audio )
Video Output : CVBS 1 Ch. (1 Vp-p, 75˟) /NTSC, PAL
Audio Output 1Ch (RCA)
External speaker Output ( +,- 2pin / Max 3.1V @ 8 Ohm Speaker )
Video input : AUX1, AUX2 ( RCA )
5 Trigger inputs (Cable Input : 12 ~ 24V)
ALS Sensor (Night & Daytime Brightness detection)
Power : 12~30Vdc (12Vdc 1.3A)
Operating Temp. : -20 ~ 60
Storage Temp. : -30 ~ 85
Dimensions (W x H x D) : 178mm x 110mm x 44.6mm
Weight : appx. 640g