Displaydata 120-0039-05 Networking Device User Manual 601 0009 01
ZBD Displays Ltd Networking Device 601 0009 01
Contents
- 1. Manual 1
- 2. Manual 2 Installation
Manual 2 Installation
Eng. No: 601-0009-01
ZBD Displays Limited
Work Instructions
Tesco Basestation Setup
Instruction
Strictly Private & Confidential
© 2006 ZBD Displays Ltd Page i
Work Instructions
Tesco Basestation Setup
Instruction
Abstract
This document defines the setup to be used for the Tesco Basestation.
Prepared by:
Shiv Sidar
Signed:
Date:
11/09/2006
Authorised by:
D.Dix
Signed:
Date:
11/09/2006
Amendment Record
Amendment
Number Date Amended by Sections / Pages affected
1 11/09/06 S.Sidar Initial Release
Document Control
The distribution of this document is controlled in accordance with the ZBD Quality management
system. The ZBD DCC is the responsible Control Centre.
The information disclosed herein is the exclusive property of ZBD Displays Ltd. and is not to be
disclosed without the written consent of ZBD Displays Ltd. No part of this publication may be
reproduced or transmitted in any form or by any means including electronic storage, reproduction,
execution or transmission without the prior written consent of ZBD Displays Ltd.
This document is intended for limited circulation.
The information contained in this document is subject to change without written notice and should not
be construed as a commitment by ZBD Displays Ltd. unless such commitment is expressly given in a
covering document.
© Copyright ZBD Displays Ltd. (2006)

Eng. No: 601-0009-01
ZBD Displays Limited
Work Instructions
Tesco Basestation Setup
Instruction
Strictly Private & Confidential
© 2006 ZBD Displays Ltd Page ii
TABLE OF CONTENTS
1 INTRODUCTION.....................................................................................................................1
2 APPLICABLE DOCUMENTS...............................................................................................1
3 TESCO BASESTATION SETUP INSTRUCTION........................................................1

Eng. No: 601-0009-01
ZBD Displays Limited
Work Instructions
Tesco Basestation Setup
Instruction
Strictly Private & Confidential
© 2006 ZBD Displays Ltd Page 1
1 INTRODUCTION
Below are some notes on how to install the Tesco Basestation.
2 APPLICABLE DOCUMENTS
A. BOM – 120-0003-01.
3 TESCO BASESTATION SETUP INSTRUCTION
Firstly the following programs below need to be download and installed.
MSDE (Rel A)
.Net Framework 1.0 – dotnetredist.exe
Hot Fix .Net Framework 1.0 SPK 3
EMS – SQL Manager – SQL Manager 2005 for SQL Server Lite
Installing .Net Framework 1.0
Double click the executeable file and following the on screen instructions,
once completed restart machine.
Installing Hot Fix .Net Framework
Run the executeable file and follow the on screen instructions and once
completed restart machine.
Installing MSDE
Creating and installing an Instance for both databases – Counters \
ZBDCounters
Command:
C:\[Location of extracted MSDE]\[ Setup InstanceName=[Name of
Instance] SecurityMode=SQL BLANKSAPWD=1
eg. c:\MSDEReIA\Setup InstanceName=Counters
SecurityMode=SQL BLANKSAPWD=1
Counters Instance Setup
Setup InstanceName=Counters SecurityMode=SQL BLANKSAPWD=1
ZBDCounters Instance Setup
Setup InstanceName=ZBDCounters SecurityMode=SQL BLANKSAPWD=1
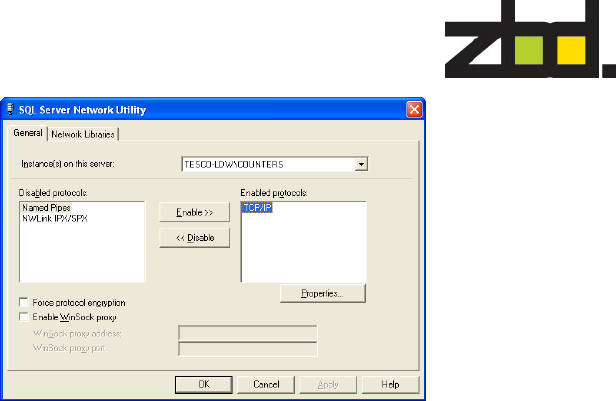
Configuring Network Access to the database (MSDE)
After installing and creating SQL Instances, it is necessary to configure the
'Instance' of the basestation which runs the database.
eg. [Basestation name]\[Database name].
This is done with svrnetcn:
C:\Program Files\Microsoft SQL Server\80\Tools\Binn\svrnetcn
Eng. No: 601-0009-01
ZBD Displays Limited
Work Instructions
Tesco Basestation Setup
Instruction
Strictly Private & Confidential
© 2006 ZBD Displays Ltd Page 2
Select the correct instance and enable TCP, as above. This need to be
configured on both Instances. Once configured reboot machine.
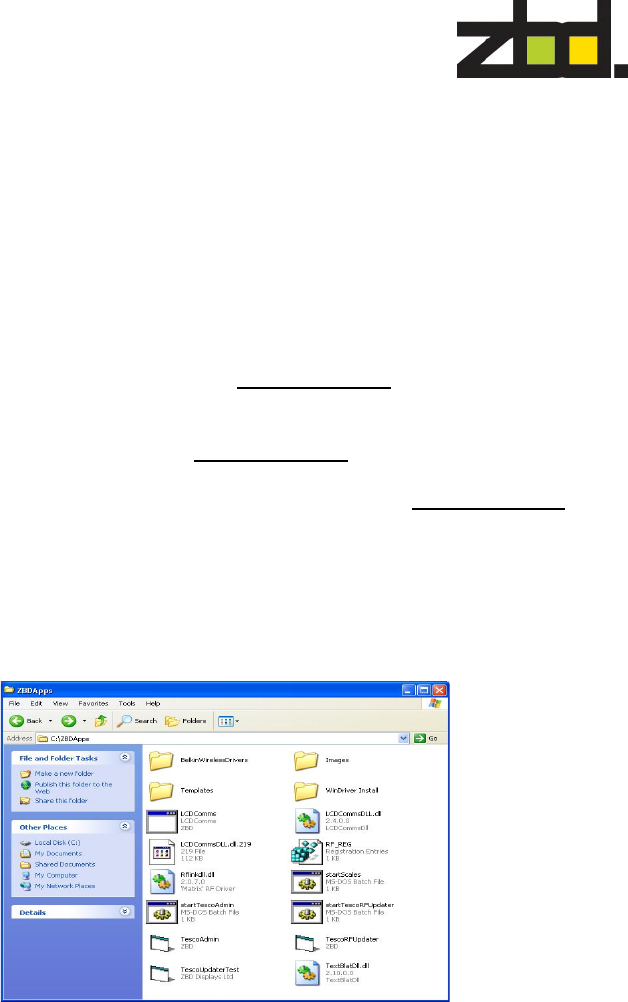
Copy Folders
From P:\Customer\Tesco\TescoBasestationInstall
Folder Name: ScalesClientInstall
Folder Name: ZBDApps
To: Local Hard Disk C:\
Using OSQL - Location - c:\Program Files\Microsoft SQL
Server\80\tools\binn>
From the local machine: type
osql -Usa -S(local)\Counters -P
or
Remotely: type
osql -Usa -S([basestation name])\Counters -P
Installing database –Tesco Counters
From osql, run the following command:
>osql
>1
Command:
restore database dxCountersClient
from disk='c:\ScalesClientInstall\TescoCountersDB\dxCountersClient'
with move 'dxCountersClient_data' to
'c:\ScalesClientInstall\dxCountersClient_data.mdf',
move 'dxCountersClient_log' to
'c:\ScalesClientInstall\dxCountersClient_log.ldf'
go
Installing database – ZBD Counters
From osql run the following command:
>osql
>1
Command:
Restore database TescoCountersDB
from disk=’c:\ScalesClientInstall\ZBDCountersDB\TecountersDB.dat
go

Eng. No: 601-0009-01
ZBD Displays Limited
Work Instructions
Tesco Basestation Setup
Instruction
Strictly Private & Confidential
© 2006 ZBD Displays Ltd Page 3
Example test command:
use dxCountersClient
go
select count(*) from txProduct
go
Installing Weighscale S/W
Add the 'Message Queueing' component from the Add/Remove
components control panel section.
Copy TescoCounters folder from c:\ScalesClientInstall directory to
c:\Program Files.
The following config options may need to be changed:
In file "CountersClient.exe.config":
<appSettings>
<add key="ConfigurationFile" value="CounterConfiguration.xml" />
<add key="scaleattached" value="V" />
<add key="printerenabled" value="N" />
<add key="comport" value="3" />
<add key="baudrate" value="38400" />
<add key="databits" value="8" />
<add key="stopbits" value="0" />
<add key="parity" value="2" />
<add key="flowcontrol" value="0" />
<add key="readtimeout" value="500" />
<add key="printerip" value="192.168.0.1" />
<add key="printerport" value="2001" />
<add key="shutdowncmd" value="shutdown.exe" />
<add key="shutdownprms" value="-s -t 0 -f" />
<add key="restartprms" value="-r -t 0 -f" />
<add key="logfilename" value="c:\CountersLog" />
Check that the following settings have been configured – example as
above
scale attached = v
printer Enabled = N
V = Virtual
N = None
logfilename – change drive letter depending only local drive – eg.
d:\Counterlog to c:\Counterlog
In file "CounterConfiguration.xml":
<appSettings>
<add key="SqlXmlConnectionString"
value="Provider=SQLOLEDB;data source=(local)\counters;initial
catalog=dxCountersClient;uid=sa;pwd=" />
Eng. No: 601-0009-01
ZBD Displays Limited
Work Instructions
Tesco Basestation Setup
Instruction
Strictly Private & Confidential
© 2006 ZBD Displays Ltd Page 4
<add key="SqlConnectionString" value="data
source=(local)\counters;initial
catalog=dxCountersClient;uid=sa;pwd=" />
Check that both passwords have been set to null.
To run the weighscale s/w, run CountersClient.exe
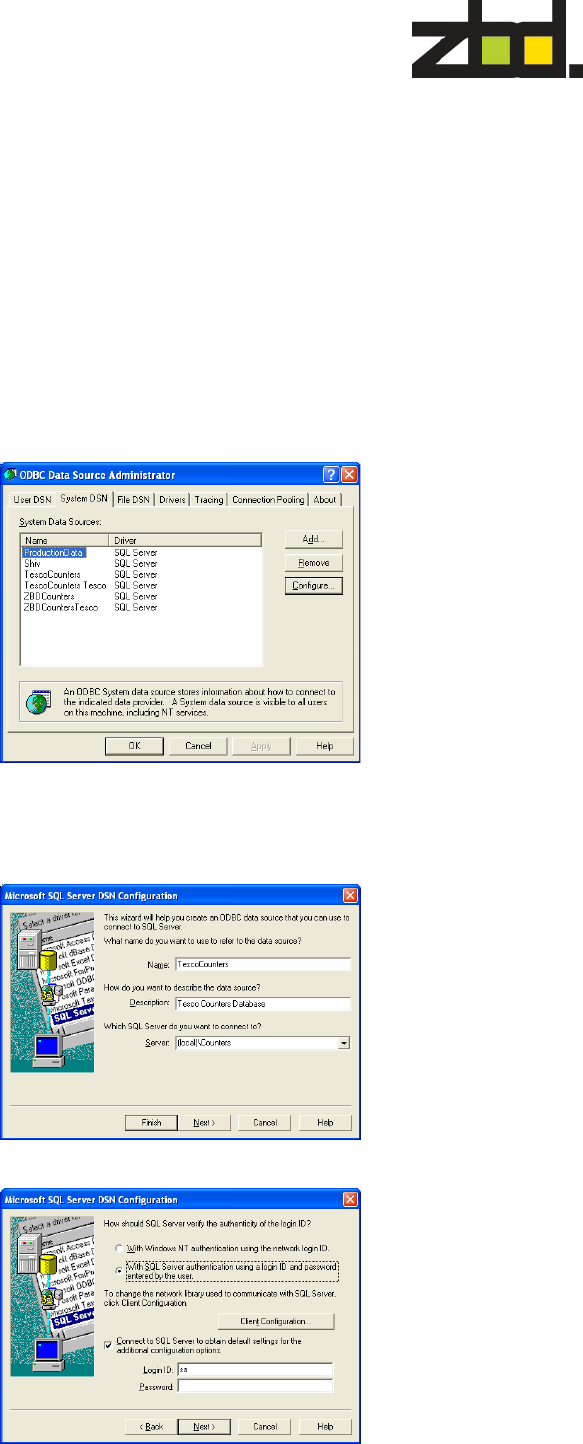
ODBC Setup – Tesco Basestation Databases
Configure ODBC Data Source – System DSN
Click Add – Create New Data Source – Use SQL Server
TescoCounters Database Setup – Settings
Enter the following details as below
Click next >
Eng. No: 601-0009-01
ZBD Displays Limited
Work Instructions
Tesco Basestation Setup
Instruction
Strictly Private & Confidential
© 2006 ZBD Displays Ltd Page 5
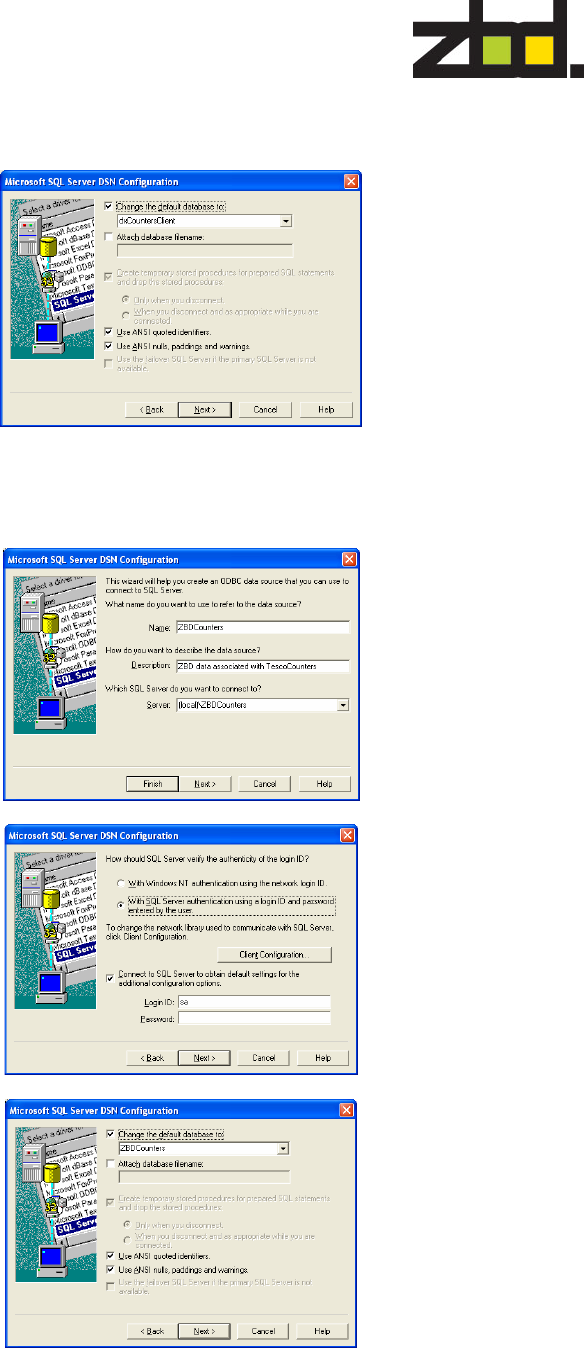
Configure the SQL authentication with Login ID – sa and select next >
Select the default database and click Next>
ZBDCounters Database Setup - Settings
Eng. No: 601-0009-01
ZBD Displays Limited
Work Instructions
Tesco Basestation Setup
Instruction
Strictly Private & Confidential
© 2006 ZBD Displays Ltd Page 6
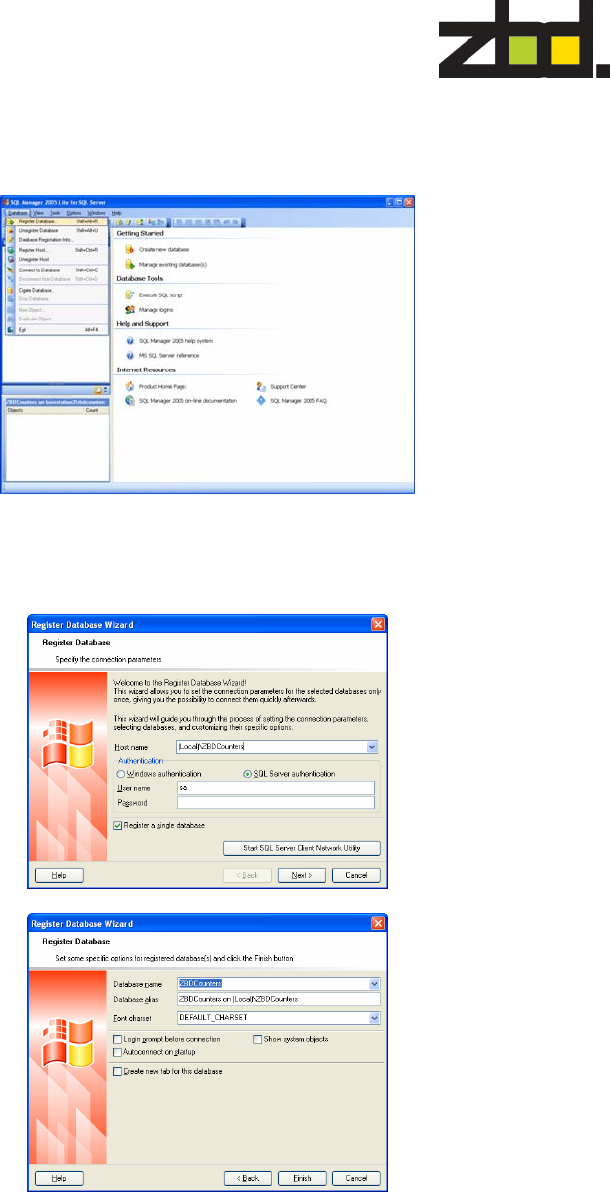
Install and configure SQL Manager 2005
Once installed, you need to register the two databases – ZBDCounters / Counters
Register Database – ZBDCounters- Settings
Use the current screen shots configuration below for each database registration
Eng. No: 601-0009-01
ZBD Displays Limited
Work Instructions
Tesco Basestation Setup
Instruction
Strictly Private & Confidential
© 2006 ZBD Displays Ltd Page 7
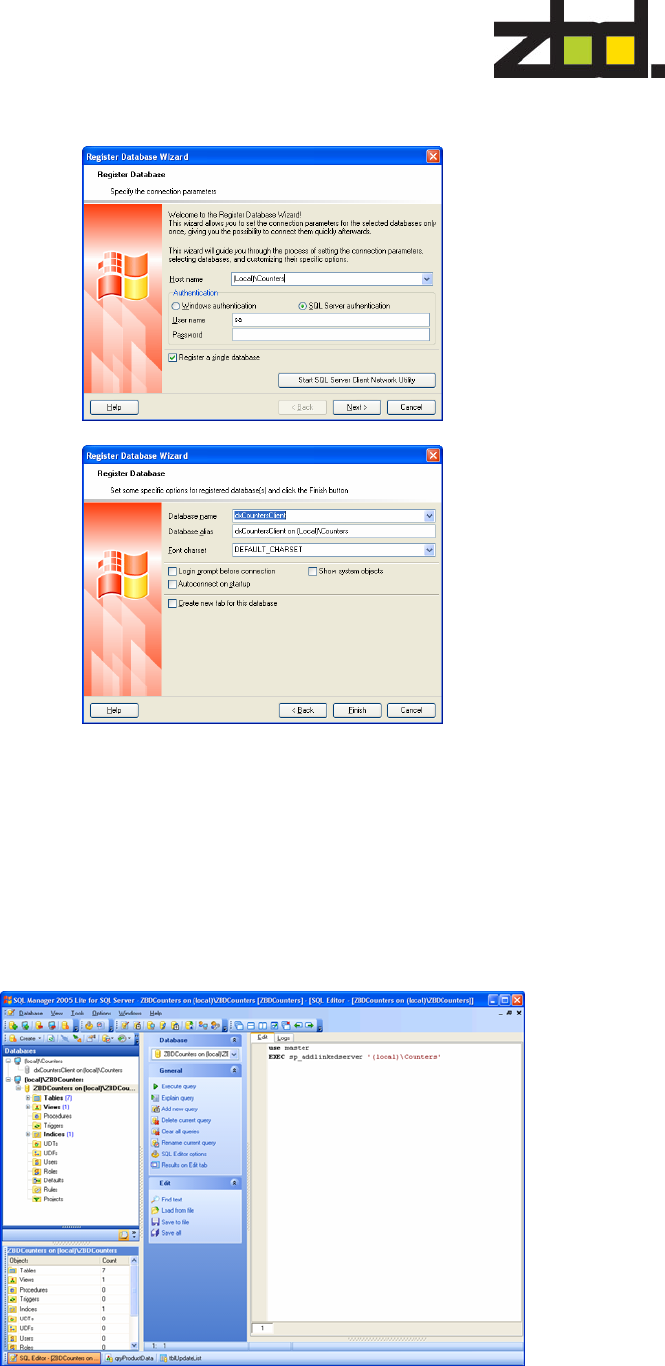
Register Database – Counters- Settings
Link – Tesco Counters Database to ZBD Counters Database
In SQL Manager – connect the ZBDCounters instance and run the following
command to link Counters to ZBDCounters databases
Command: -Using SQL Editor – ZBDCounters Instance
use master
Exec sp_addlinkedserver ‘(local)\Counters’

Eng. No: 601-0009-01
ZBD Displays Limited
Work Instructions
Tesco Basestation Setup
Instruction
Strictly Private & Confidential
© 2006 ZBD Displays Ltd Page 8
Registry Configuration
Import the following Reg Key – RF_REG.reg from location c:\ZBDApps\
Check reg key location in regedit
HKEY_CURRENT_USER\Software\VB and VBA Program
Settings\TescoLabel Updater
Batch Files
Create shortcuts to the following batch file to location
c:\Documents and Settings\ESEL\Start Menu\Programs\Startup
from c:\ZBDApps
Shortcut to startScales
Shortcut to startTescoAdmin
Shortcut to startTescoRFUpdater
BIOS – Settings
Power Management Setup
- AC Loss Auto Restart – On
Standard CMOS
- Halt on [All, but Keyboard]
Important .dll & .ocx
Check that the following DLL & OCX files are available in
c:\windows\system32 folder
MSCOMCTL.ocx
MSRDO20.dll
COMDLG32.ocx
MSCOMM32.ocx
You may be required to register MSRDO20.dll
Register .dll
Eng. No: 601-0009-01
ZBD Displays Limited
Work Instructions
Tesco Basestation Setup
Instruction
Strictly Private & Confidential
© 2006 ZBD Displays Ltd Page 9
Command:
regsvr32 c:\windows\system32\[.dll name]
eg. regsvr32 c:\windows\system32\MSRDO20.dll
Windows Firewall Settings
Exceptions – Add Program
Add all three sqlserver program executables to the exceptions list
c:\Program Files\Microsoft SQL
Server\MSSQL$ZBDCounters\Binn\Sqlserver.exe
c:\Program Files\Microsoft SQL
Server\MSSQL$Counters\Binn\Sqlserver.exe
c:\Program Files\Microsoft SQL Server\MSSQL\Binn\Sqlserver.exe
Attaching RF Dongle – (Matrix Dongle)
Go to the following folder location as below
c:\ZBDApps\WinDriver Install
Double click on the Install batch file (install.bat) to install drivers for
dongle.
Next install the RF Dongle to any available USB port
On the “Welcome to the found new Hardware wizard” box
- Can windows connect to windows update to search for software
Select – No, not at this time and click Next >
Leave default – Install the software automatically (Recommended)
and click Next > This will now install the appropriate drivers required.
Once completed on the “Completing the found Hardware wizard” click
Finish >