Edgecore Networks WAP5110 IEEE 802.11a/b/g/n Enterprise Access Point User Manual Quick Start Guide

Edgecore Networks Corporation IEEE 802.11a/b/g/n Enterprise Access Point Quick Start Guide

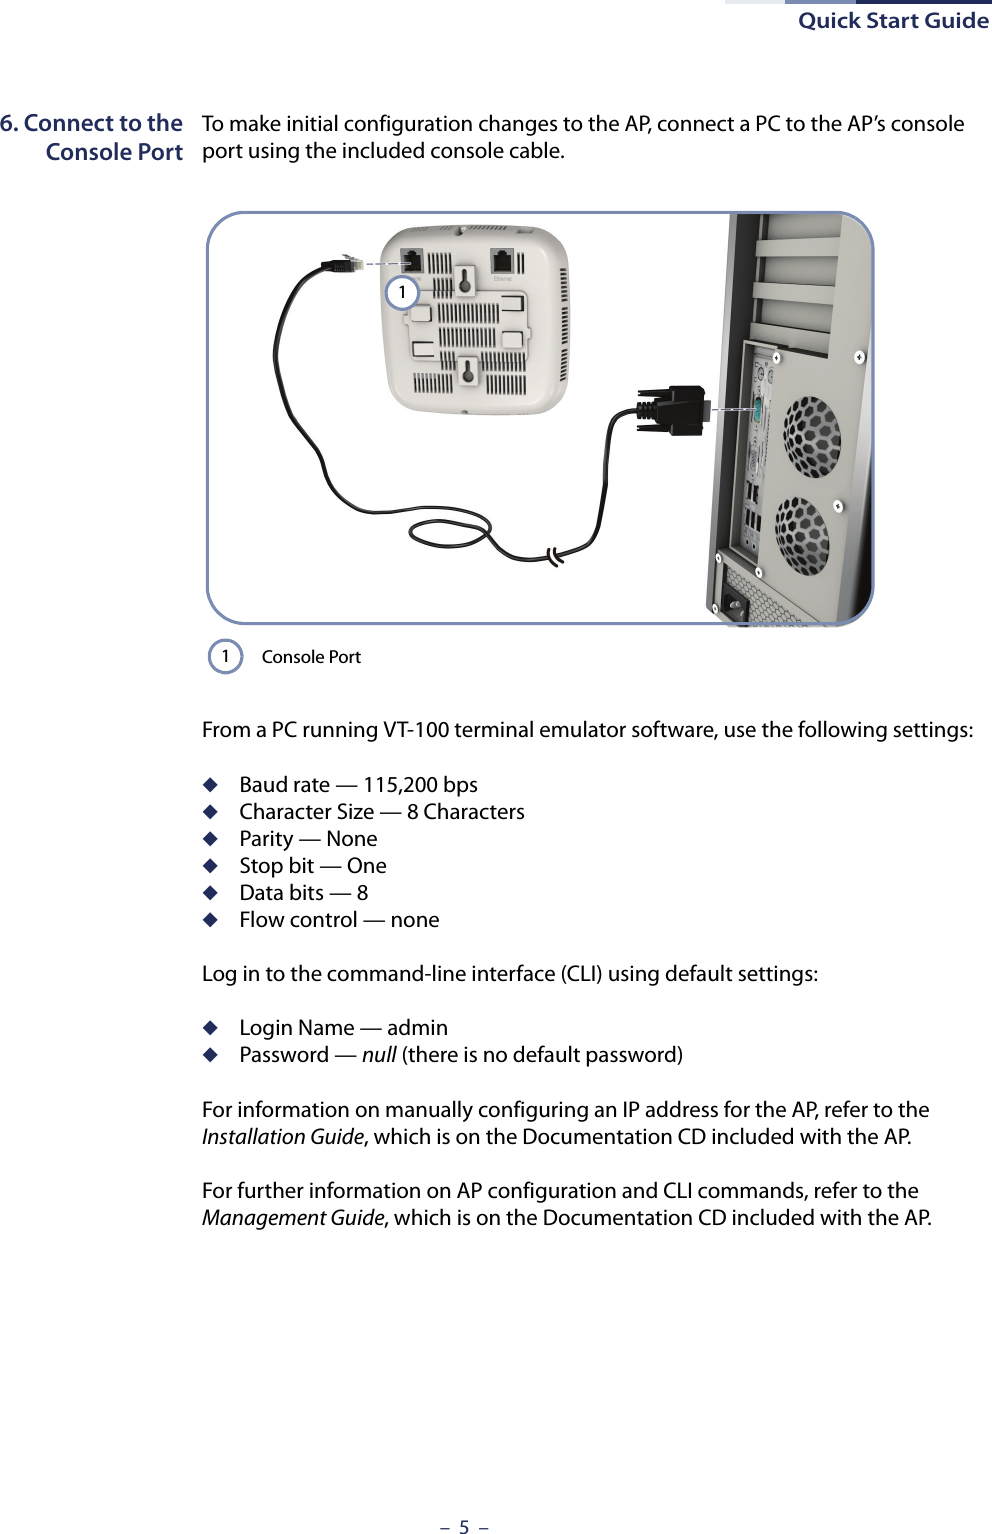
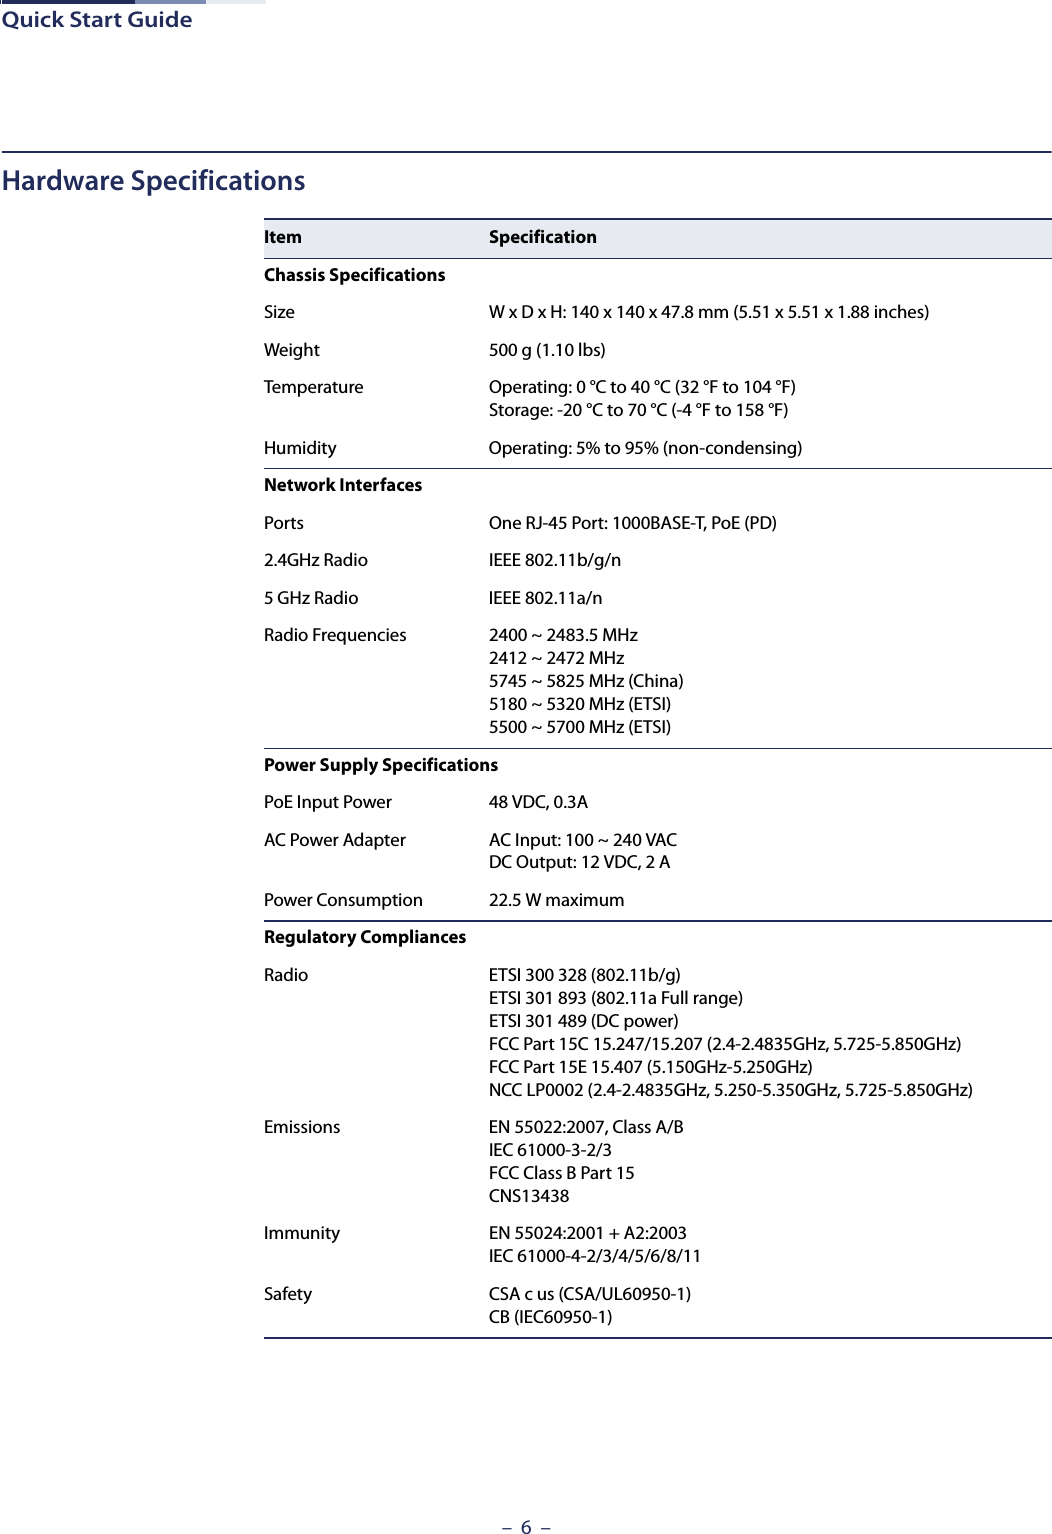
User Manual (WAP5110-L).pdf

–  1  –Quick Start GuideIEEE 802.11a/b/g/n Enterprise Access PointWAP5110-LThe WAP5110-L is a dual-band IEEE 802.11a/b/g/n access point (AP) that is designed to deliver high-performance wireless services for clients in an enterprise environment. Housed in a compact enclosure, the unit includes its own built-in options for mounting on a wall, or suspended ceiling T-rail. The unit can be powered through a PoE cable connection from a PoE network switch, or from its AC power adapter.In addition, the AP supports network management from an SMC WAC4502 wireless access controller throught the Control and Provisioning of Wireless Access Points (CAPWAP) protocol.NOTE: For detailed access point (AP) installation information, refer to the Installation Guide,  which is on the Documentation CD included with the AP.NOTE: For Safety and Regulatory information, refer to the Safety and Regulatory Information document included with the AP.E042013-CS-R01150200000660Awww.smc.com
Quick Start Guide–  2  –The AP includes its own built-in features for mounting the unit to a wall or suspended ceiling T-rail. Caution: The planning and installation of the AP requires professional personnel that are trained in the installation of radio transmitting equipment. The user is responsible for compliance with local regulations concerning items such as antenna power, use of lightning arrestors, grounding, and radio mast or tower construction. Therefore, it is recommended to consult a professional contractor knowledgeable in local radio regulations prior to equipment installation.Follow these steps to install the AP:1. Unpack the AP Unpack the AP and check the package contents.◆WAP5110-L Enterprise Access Point◆AC Power adapter◆Console cable (RJ-45 to DB-9)◆Quick Start Guide (this guide)◆Regulatory and Safety Information◆Documentation CD — includes Installation Guide 2. Mount the AP After planning your installation, mount the unit on a wall or suspended ceiling T-rail. .Mounting on a WallSet two screws in the wall 6.2 mm (2.4 in.) apart.Slide the AP’s wall mounting slots down onto the screws so that the unit is secure.1212
Quick Start Guide–  3  –3. Connect Cables Connect network cable to the RJ-45 port for your network connection. The RJ-45 port connection can also provide PoE power to the unit.12.Mounting on a Ceiling T-railPosition the AP’s ceiling-mount clip holders on either side of the T-rail.Turn the AP until the two clips lock the AP to the T-rail.12Connect Category 5e or better cable to the RJ-45 port.11
Quick Start Guide–  4  –4. Connect Power If you do not power the unit using PoE, connect the AC power adapter to the AP and to an AC power source.5. Verify AP Operation Verify basic AP operation by checking the system LEDs. The Power LED should be on green and the Network LED on or flashing amber. Connect the power adapter to the power socket. Connect the power adapter to a nearby AC power source.1212Network Link/ActivityPower/Diagnostic2112
Quick Start Guide–  5  –6. Connect to theConsole PortTo make initial configuration changes to the AP, connect a PC to the AP’s console port using the included console cable. From a PC running VT-100 terminal emulator software, use the following settings:◆Baud rate — 115,200 bps◆Character Size — 8 Characters◆Parity — None◆Stop bit — One◆Data bits — 8◆Flow control — noneLog in to the command-line interface (CLI) using default settings:◆Login Name — admin◆Password — null (there is no default password)For information on manually configuring an IP address for the AP, refer to the Installation Guide, which is on the Documentation CD included with the AP.For further information on AP configuration and CLI commands, refer to the Management Guide, which is on the Documentation CD included with the AP.Console Port11
Quick Start Guide–  6  –Hardware SpecificationsItem SpecificationChassis SpecificationsSize W x D x H: 140 x 140 x 47.8 mm (5.51 x 5.51 x 1.88 inches)Weight 500 g (1.10 lbs)Temperature Operating: 0 °C to 40 °C (32 °F to 104 °F)Storage: -20 °C to 70 °C (-4 °F to 158 °F)Humidity Operating: 5% to 95% (non-condensing)Network InterfacesPorts One RJ-45 Port: 1000BASE-T, PoE (PD)2.4GHz Radio IEEE 802.11b/g/n5 GHz Radio IEEE 802.11a/nRadio Frequencies 2400 ~ 2483.5 MHz2412 ~ 2472 MHz5745 ~ 5825 MHz (China)5180 ~ 5320 MHz (ETSI)5500 ~ 5700 MHz (ETSI)Power Supply SpecificationsPoE Input Power 48 VDC, 0.3AAC Power Adapter AC Input: 100 ~ 240 VACDC Output: 12 VDC, 2 APower Consumption 22.5 W maximumRegulatory CompliancesRadio ETSI 300 328 (802.11b/g)ETSI 301 893 (802.11a Full range)ETSI 301 489 (DC power)FCC Part 15C 15.247/15.207 (2.4-2.4835GHz, 5.725-5.850GHz)FCC Part 15E 15.407 (5.150GHz-5.250GHz)NCC LP0002 (2.4-2.4835GHz, 5.250-5.350GHz, 5.725-5.850GHz)Emissions EN 55022:2007, Class A/BIEC 61000-3-2/3FCC Class B Part 15CNS13438Immunity EN 55024:2001 + A2:2003IEC 61000-4-2/3/4/5/6/8/11Safety CSA c us (CSA/UL60950-1)CB (IEC60950-1)

Navigation menu