Ensemble Communications ODU-2800-001 Fiberless 2800 Series Outdoor Unit transceiver User Manual Users manual 1 of 3 Site Setup
Ensemble Communications Inc. Fiberless 2800 Series Outdoor Unit transceiver Users manual 1 of 3 Site Setup
Users manual 1 of 3 Site Setup
6Ensemble Communications Inc.CPE Site Setup 6This chapter details how to install and commission the CPE site. Before beginning the process, review the information in “Preinstallation”, page 3-1. Chapter Topics Antenna Alignment 6-12Antenna Alignment Completion 6-14Antenna Mounting 6-4Cable Terminations 6-8CPE Indoor Access Requirement 6-9CPE Indoor Grounding 6-10CPE Indoor Installation 6-9CPE Indoor Power 6-10CPE Indoor Procedure 6-11CPE Indoor Temperature 6-10CPE LEDs 6-14CPE Software Configuration 6-14CPE Subscriber Interface Cards (SICs) 6-14DC Voltage Measurement 6-12Ground Mast 6-4Horizontal Antenna Polarization 6-7IF Cable Installation 6-8Indoor Equipment Components 6-2Indoor Equipment Placement 6-9Installation Materials 6-2Lightning Suppressor Installation 6-5Main Lobe Location 6-14ODU Components 6-2ODU Installation 6-4Receive Signal Levels for Various Voltages 6-13Sighting Tools 6-3Test Equipment 6-3Unpacking and Inventory 6-2Vertical Antenna Polarization 6-7Voltage Readings 6-13
Ensemble Communications Inc.6-2Operator’s Guide to the Fiberless SystemUnpacking and Inventory •Unpack the Fiberless 320 CPE and CPE ODU on a flat, clean surface at the installation site. •Check the items received against the packing list and a copy of the purchase order to ensure that you have received your com-plete order. •Check that the CPE ODU has the frequency band that was ordered. This information is on the manufacturer label and should match the network plan.•Inspect all components to be sure they are not damaged. If a component appears to be damaged or is missing, contact your shipper and Ensemble Customer Service immediately. •Save all packing materials.Note Ensemble Customer Support is available at 888-710-8910.Indoor EquipmentComponents •Fiberless 320 indoor unit with pre-installed subscriber interface cards (SICs). Cards may be of the following types:•4-port T1•6-port 10/100BaseTNote Subscriber interface cards are specified at the time of ordering and are factory-installed.Note Release 1.0 does not support V.35 SICs.•Power cord for AC-powered modelODU Components •Fiberless CPE ODU with frequency band as specified at time of ordering. See page A-1 for specifications.Note CPE ODU frequency is specified at the time of ordering and is factory-configured.•ODU wall mount or pole mount kitNote Mount type is specified at the time of ordering.•Ground strapInstallation Materials •3M type 33 electrical tape•3M electrical coating (PN 054007-1483)•RG-6 Belden 9248 75 Ohm coaxial cable for outdoor use
Ensemble Communications Inc.CPE Site Setup6-3•RG-6 Belden 82248 for indoor plenum use•Ratchet wrench•7/16-inch socket•1/2-inch socket•TNC crimp connectors•Black nylon wire ties for outdoor useNote For a complete list of recommended ancillary equipment, see Table 3-3, “Ancillary Equipment Requirements,” on page 10.Sighting Tools The following equipment is recommended to assist in antenna alignment:•Binoculars to locate the base station ODU•Reflection mirrorTest Equipment •Digital voltmeter (DVM)•BNC (cable-male connector) test cable for meter•Banana plug with female BNC connector•Laptop computer
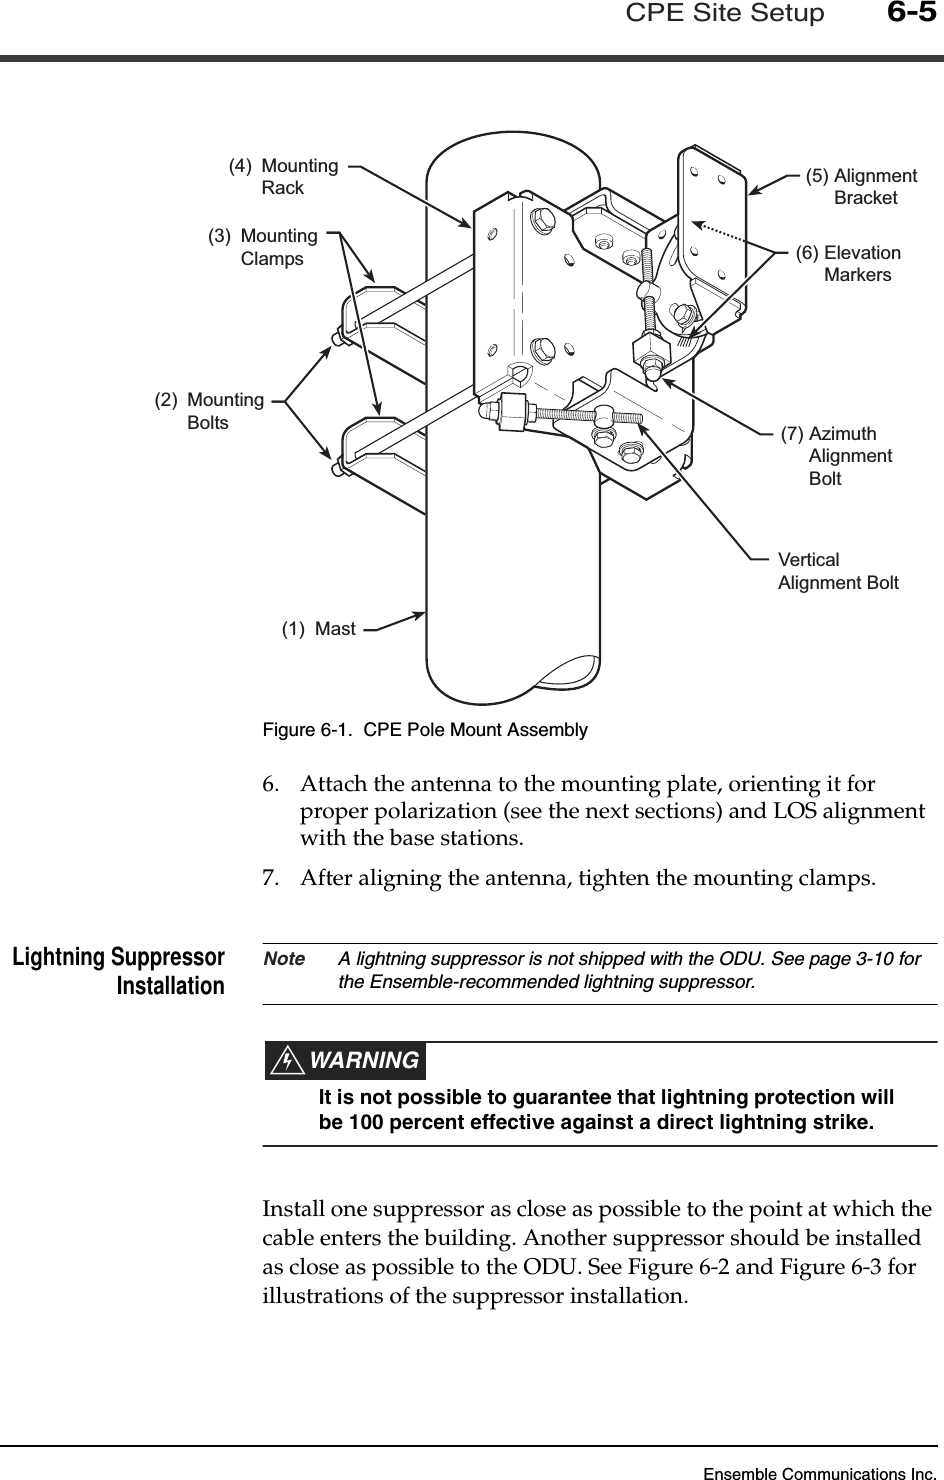
Ensemble Communications Inc.6-4Operator’s Guide to the Fiberless SystemODU InstallationNote Installers are responsible for supplying mounting bolts.Ground Mast All steel mounting structures attached to the building and the antenna mast must be connected to the building grounding system. If no grounding system or ring is available, ground the antenna mounting structures to the nearest structural beam. The grounding conductor should be set at least a # 2 (AWG) solid tinned copper wire. Use exothermic welds (Cad Welds) when possible to connect to the mounting structure and the building grounding system.Antenna Mounting 1. Attach the ODU mounting bracket to a mast between 2- and 4-inches in diameter (1 in Figure 6-1). 2. Remove the nuts and washers (2 in Figure 6-1) from one side of each of the two mounting clamps (3) and slide the mounting clamps off the bolts. Set them aside in a safe place.3. Slip the mounting rack (4 in Figure 6-1) around the mast.4. Reattach each of the two mounting clamps with the flat washer, lock washer, and nut. 5. Tighten with a 1/2-inch socket wrench until secure.
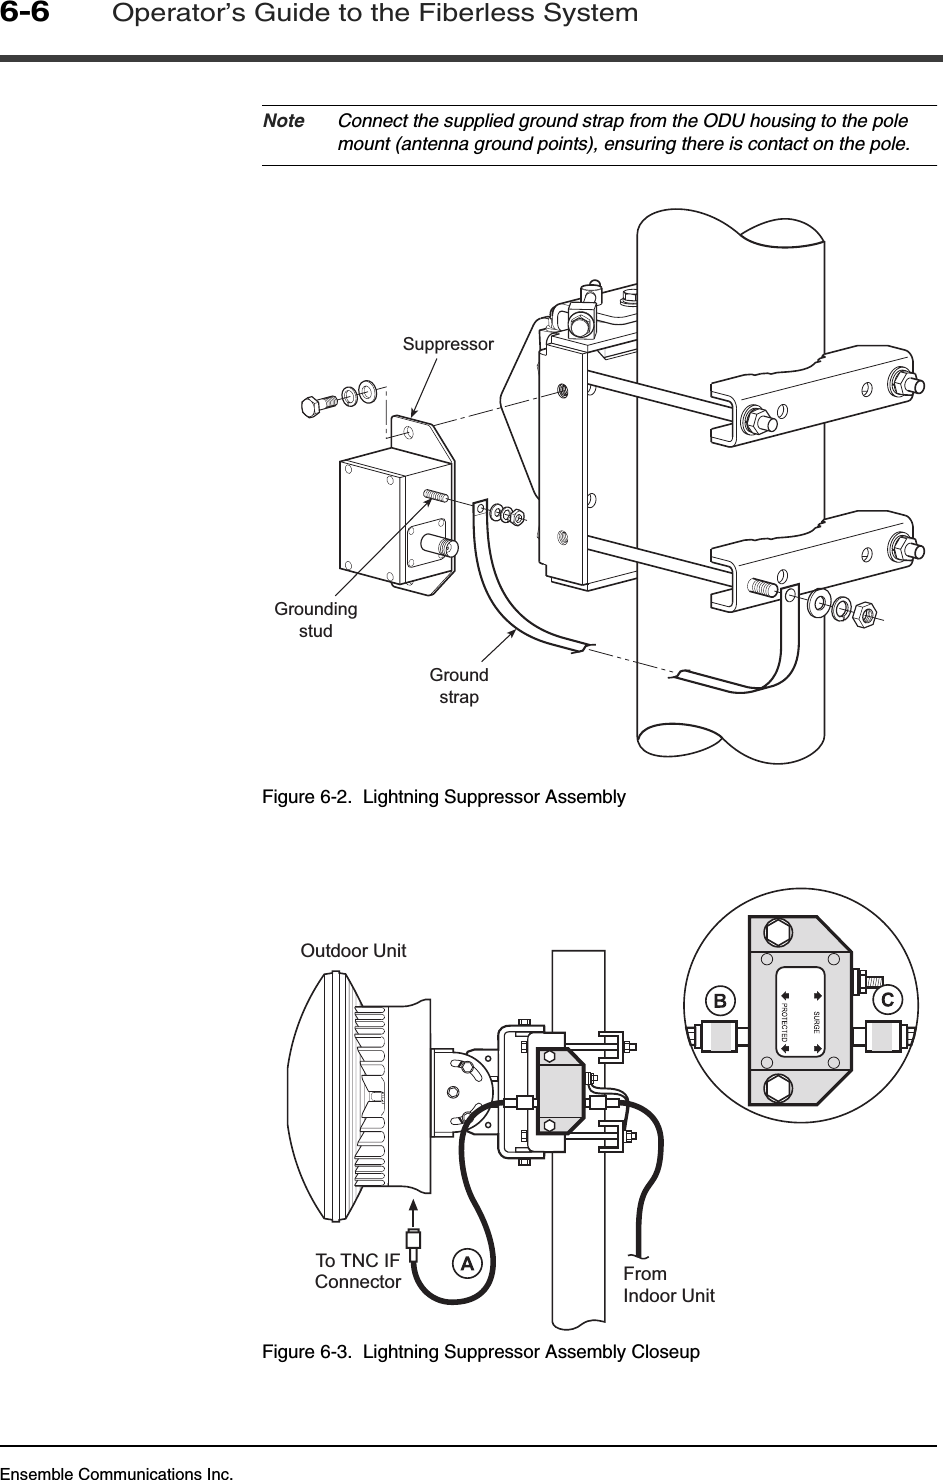
Ensemble Communications Inc.CPE Site Setup6-5Figure 6-1.  CPE Pole Mount Assembly6. Attach the antenna to the mounting plate, orienting it for proper polarization (see the next sections) and LOS alignment with the base stations.7. After aligning the antenna, tighten the mounting clamps.Lightning SuppressorInstallation Note A lightning suppressor is not shipped with the ODU. See page 3-10 for the Ensemble-recommended lightning suppressor.WARNINGIt is not possible to guarantee that lightning protection will be 100 percent effective against a direct lightning strike.Install one suppressor as close as possible to the point at which the cable enters the building. Another suppressor should be installed as close as possible to the ODU. See Figure 6-2 and Figure 6-3 for illustrations of the suppressor installation.(6) ElevationMarkers(5) AlignmentBracket(7) AzimuthAlignmentBoltVerticalAlignment Bolt(1) Mast(3) MountingClamps(4) MountingRack(2) MountingBolts
Ensemble Communications Inc.6-6Operator’s Guide to the Fiberless SystemNote Connect the supplied ground strap from the ODU housing to the pole mount (antenna ground points), ensuring there is contact on the pole.Figure 6-2.  Lightning Suppressor AssemblyFigure 6-3.  Lightning Suppressor Assembly CloseupGroundingstudGroundstrapSuppressorFromIndoor UnitOutdoor UnitTo TNC IFConnector
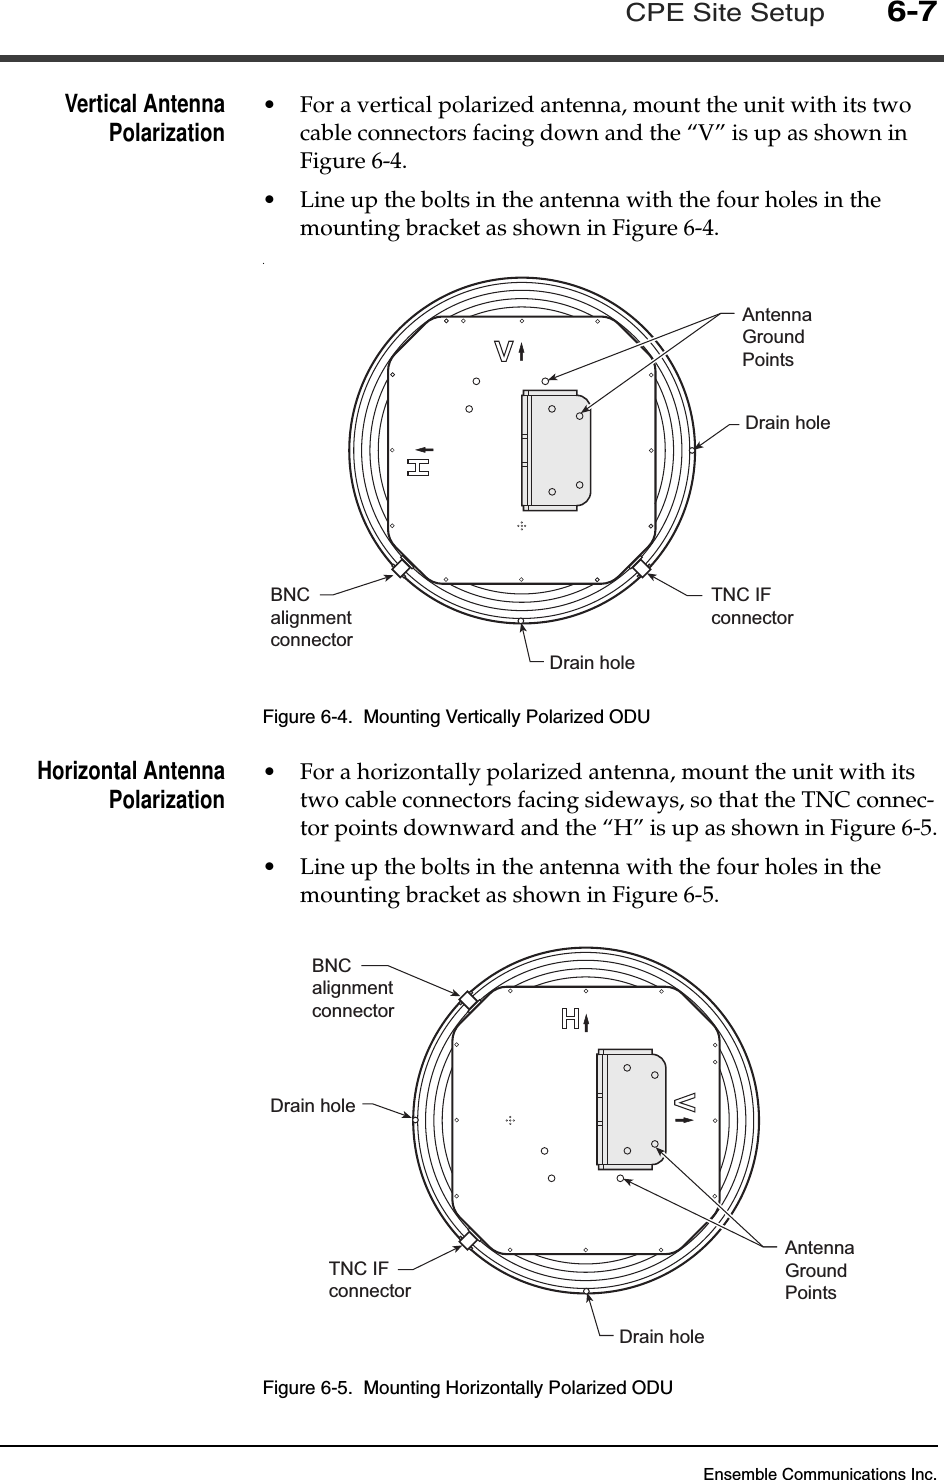
Ensemble Communications Inc.CPE Site Setup6-7Vertical AntennaPolarization •For a vertical polarized antenna, mount the unit with its two cable connectors facing down and the “V” is up as shown in Figure 6-4.•Line up the bolts in the antenna with the four holes in the mounting bracket as shown in Figure 6-4..Figure 6-4.  Mounting Vertically Polarized ODUHorizontal AntennaPolarization •For a horizontally polarized antenna, mount the unit with its two cable connectors facing sideways, so that the TNC connec-tor points downward and the “H” is up as shown in Figure 6-5.•Line up the bolts in the antenna with the four holes in the mounting bracket as shown in Figure 6-5.Figure 6-5.  Mounting Horizontally Polarized ODUBNCalignmentconnectorDrain holeTNC IFconnectorDrain holeAntennaGroundPointsBNCalignmentconnectorDrain holeTNC IFconnectorDrain holeAntennaGroundPoints
Ensemble Communications Inc.6-8Operator’s Guide to the Fiberless SystemIF Cable InstallationWARNINGThe RG-6 cable may have -48 VDC across the connector when it is connected to the CPE. So if for some reason the CPE has been powered up, power it off before connecting or disconnecting the RG-6 cable at either end. Note Belden 9248 (for outdoor) or Belden 82248 (for plenum indoor) are the only approved RG-6 cable types.1. Run RG-6 coaxial cable between the CPE and the CPE ODU. The maximum permissible individual cable run length is 1,000 feet (300 meters). Ensure there is an 18-inch (45 cm) service loop at each end of the cable.When required, encase cables in plastic or metal conduit or cable duct, maintaining a minimum bend radius of two inches (5 cm).Note Depending on local codes and the HVAC design of a particular building, plenum-rated cable may be required.Normally, cables between the ODU and the CPE indoor equip-ment should not be spliced. However, if a cable splice cannot be avoided, use only approved connectors. 2. Label each end of the cable individually with numbers or col-ors using cable labeling tape. 3M makes a product that is ide-ally suited for this application.Cable Terminations The RG-6-type coaxial cable uses a male TNC connector to connect to the ODU. Follow the instructions from the connector manufacturer to prepare the cable. Install the connector only with the recommended crimping tool. (See page 3-10 for recommended tool.)1. Install TNC connector on the IF cable.2. Connect the cable to the lightning suppressor.3. Make an 18-inch (45 cm) IF jumper cable with a TNC connector on each end.4. Install the 18-inch IF jumper cable between the ODU and the lightning suppressor.
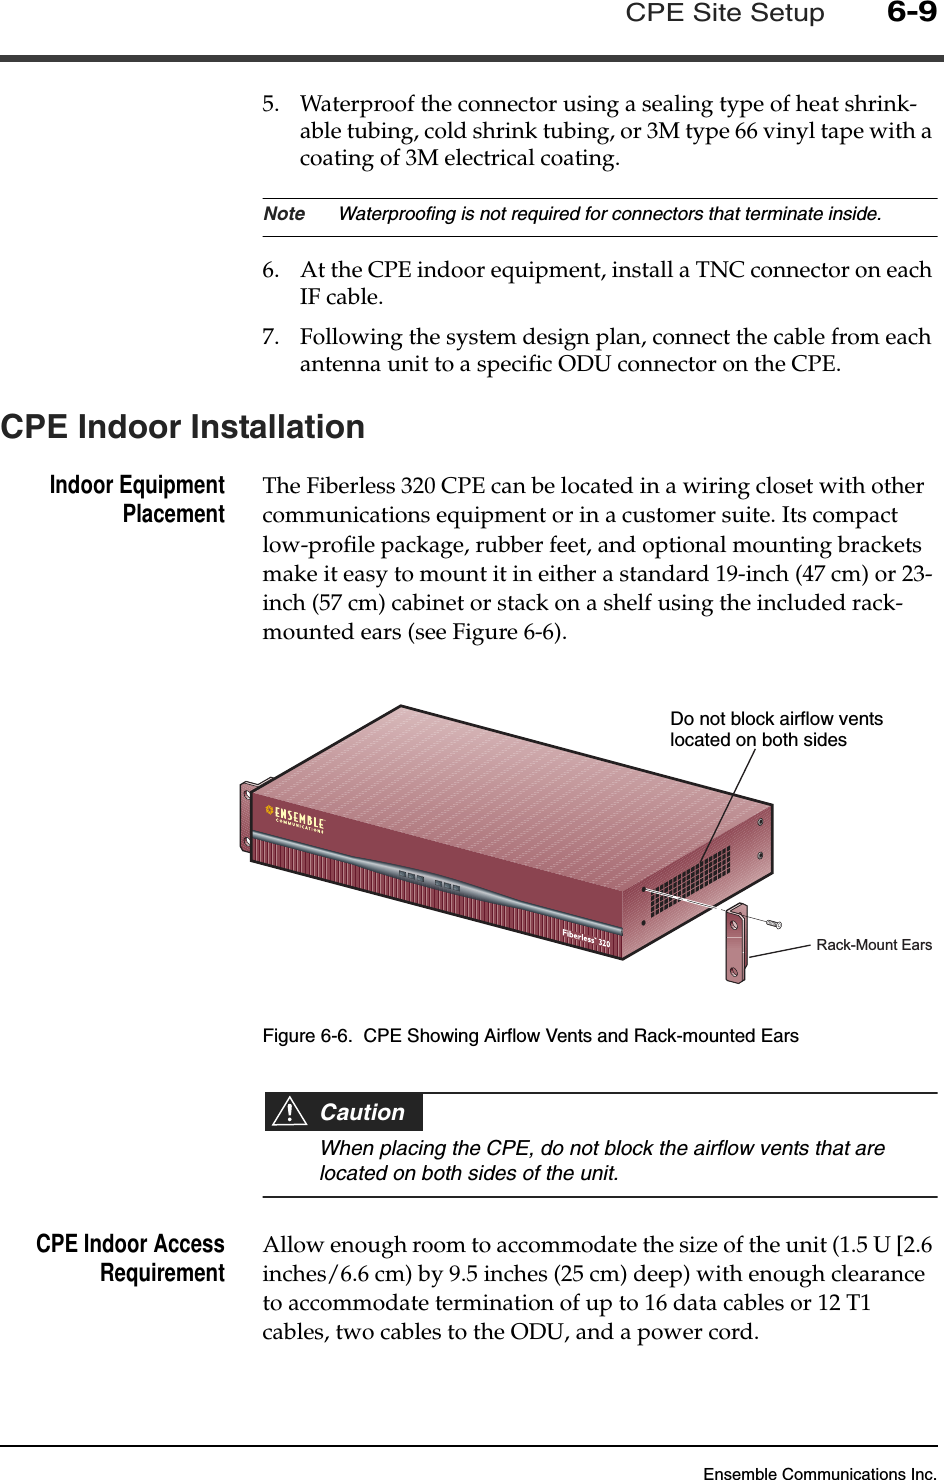
Ensemble Communications Inc.CPE Site Setup6-95. Waterproof the connector using a sealing type of heat shrink-able tubing, cold shrink tubing, or 3M type 66 vinyl tape with a coating of 3M electrical coating.Note Waterproofing is not required for connectors that terminate inside.6. At the CPE indoor equipment, install a TNC connector on each IF cable.7. Following the system design plan, connect the cable from each antenna unit to a specific ODU connector on the CPE.CPE Indoor InstallationIndoor EquipmentPlacement The Fiberless 320 CPE can be located in a wiring closet with other communications equipment or in a customer suite. Its compact low-profile package, rubber feet, and optional mounting brackets make it easy to mount it in either a standard 19-inch (47 cm) or 23-inch (57 cm) cabinet or stack on a shelf using the included rack-mounted ears (see Figure 6-6).Figure 6-6.  CPE Showing Airflow Vents and Rack-mounted EarsCautionWhen placing the CPE, do not block the airflow vents that are located on both sides of the unit. CPE Indoor AccessRequirement Allow enough room to accommodate the size of the unit (1.5 U [2.6 inches/6.6 cm) by 9.5 inches (25 cm) deep) with enough clearance to accommodate termination of up to 16 data cables or 12 T1 cables, two cables to the ODU, and a power cord. DO NOT BLOCKAIRFLOW VENTSRack-Mount EarsDo not block airflow ventslocated on both sides
Ensemble Communications Inc.6-10Operator’s Guide to the Fiberless SystemCPE IndoorTemperature The location should meet these temperature allowances, including enough ventilation to dissipate heat loads of 150 Watts:50° to 86° F (10° to 40° C)CPE Indoor Power The CPE indoor unit is normally shipped for use with 120/220 VAC power. When possible, it should be plugged into a dedicated 15 Amp circuit. You may install a small PC-style UPS if desired.CPE Indoor Grounding For AC systems, ground the indoor unit by connecting its conductor to a grounded power outlet. The ground conductor on the power plug must be connected to the building’s electrical ground. WARNINGDo not power up the indoor unit until you are instructed to do so during the initial procedure.
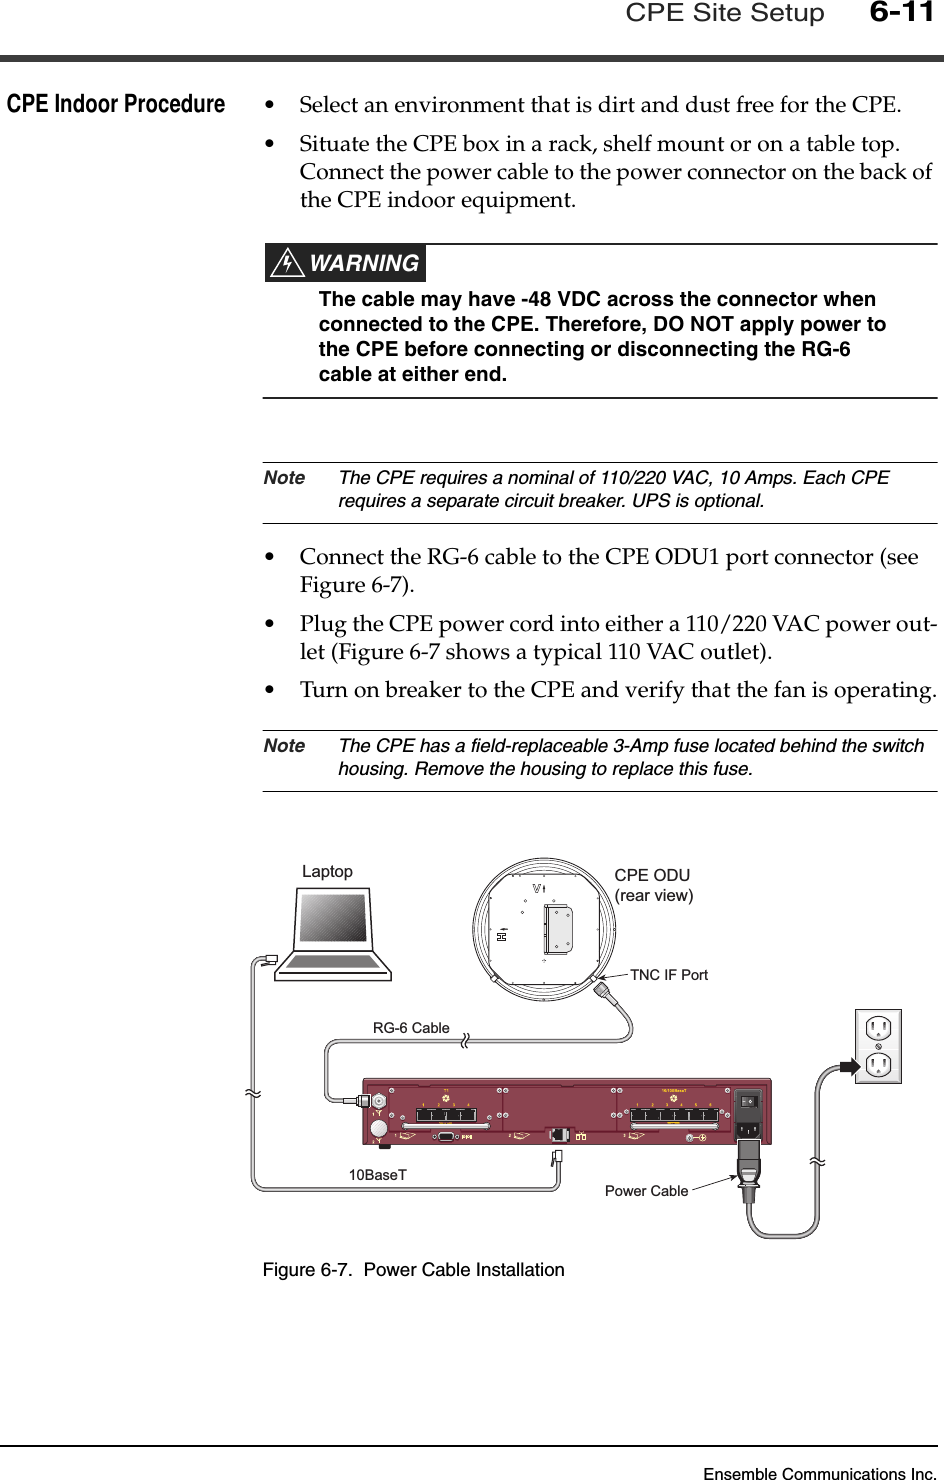
Ensemble Communications Inc.CPE Site Setup6-11CPE Indoor Procedure •Select an environment that is dirt and dust free for the CPE. •Situate the CPE box in a rack, shelf mount or on a table top. Connect the power cable to the power connector on the back of the CPE indoor equipment.WARNINGThe cable may have -48 VDC across the connector when connected to the CPE. Therefore, DO NOT apply power to the CPE before connecting or disconnecting the RG-6 cable at either end. Note The CPE requires a nominal of 110/220 VAC, 10 Amps. Each CPE requires a separate circuit breaker. UPS is optional.•Connect the RG-6 cable to the CPE ODU1 port connector (see Figure 6-7).•Plug the CPE power cord into either a 110/220 VAC power out-let (Figure 6-7 shows a typical 110 VAC outlet).•Turn on breaker to the CPE and verify that the fan is operating.Note The CPE has a field-replaceable 3-Amp fuse located behind the switch housing. Remove the housing to replace this fuse.Figure 6-7.  Power Cable InstallationSICRG-6 CablePower CableCPE ODU(rear view)TNC IF PortLaptop10BaseT
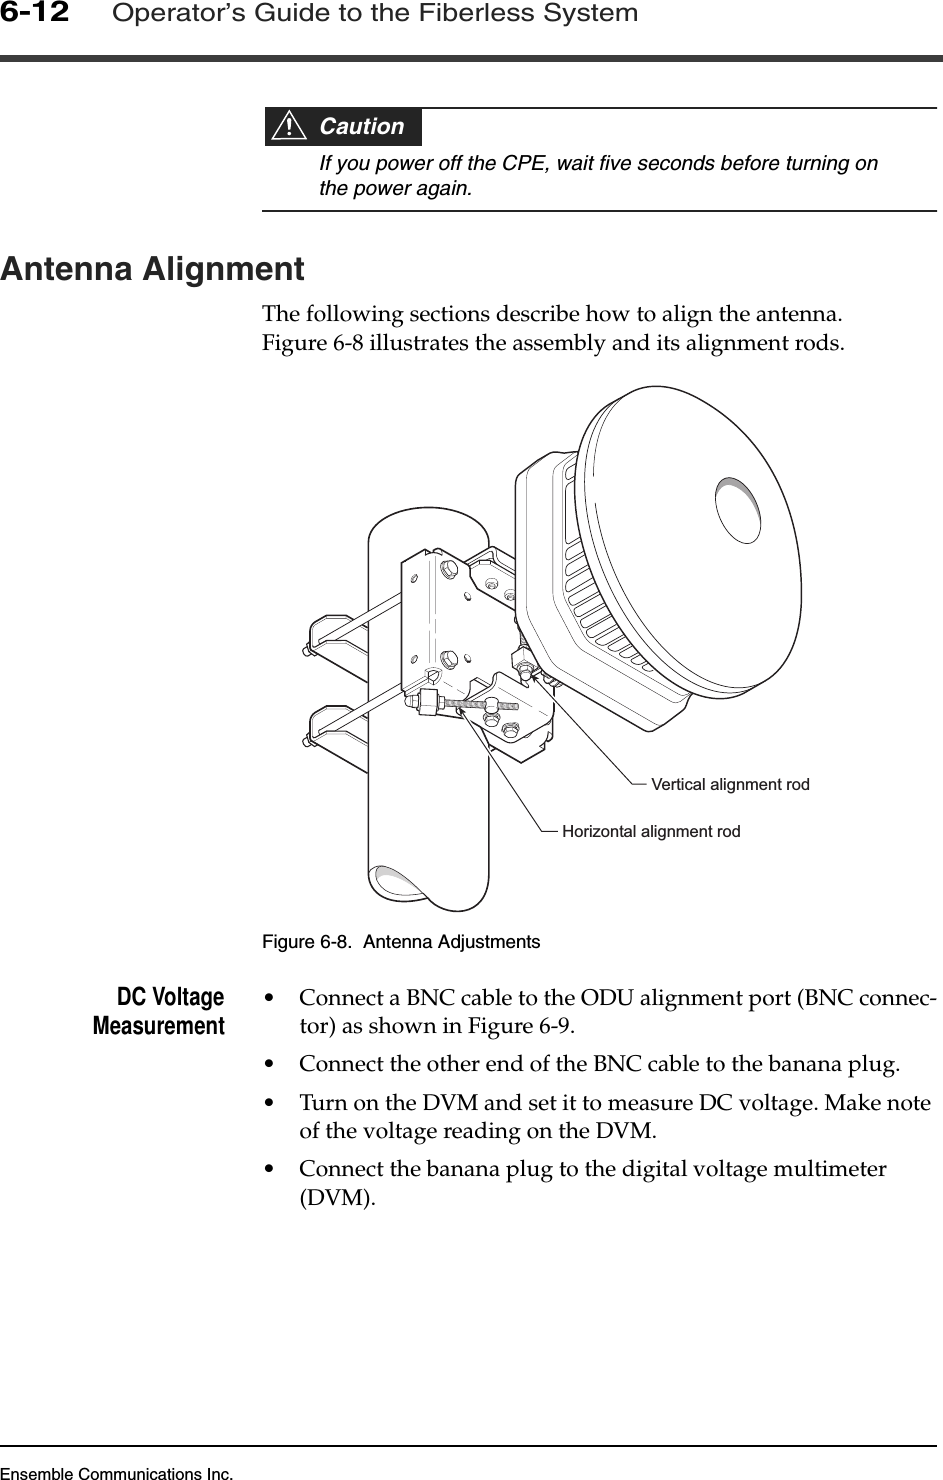
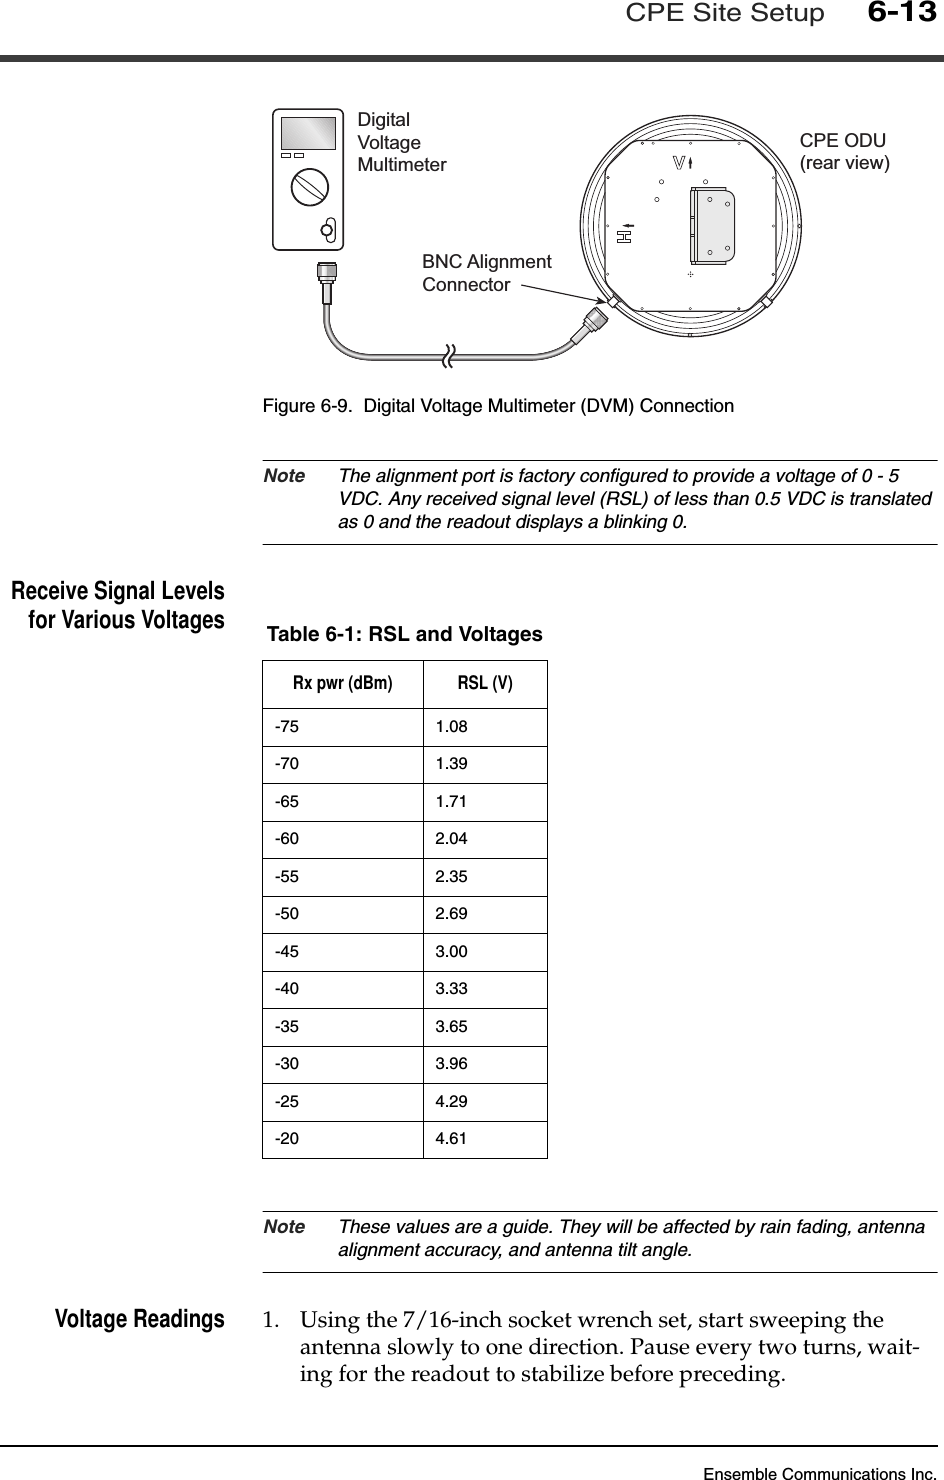
Ensemble Communications Inc.6-12Operator’s Guide to the Fiberless SystemCautionIf you power off the CPE, wait five seconds before turning on the power again.Antenna AlignmentThe following sections describe how to align the antenna. Figure 6-8 illustrates the assembly and its alignment rods.Figure 6-8.  Antenna AdjustmentsDC VoltageMeasurement •Connect a BNC cable to the ODU alignment port (BNC connec-tor) as shown in Figure 6-9.•Connect the other end of the BNC cable to the banana plug.•Turn on the DVM and set it to measure DC voltage. Make note of the voltage reading on the DVM.•Connect the banana plug to the digital voltage multimeter (DVM).Vertical alignment rodHorizontal alignment rod
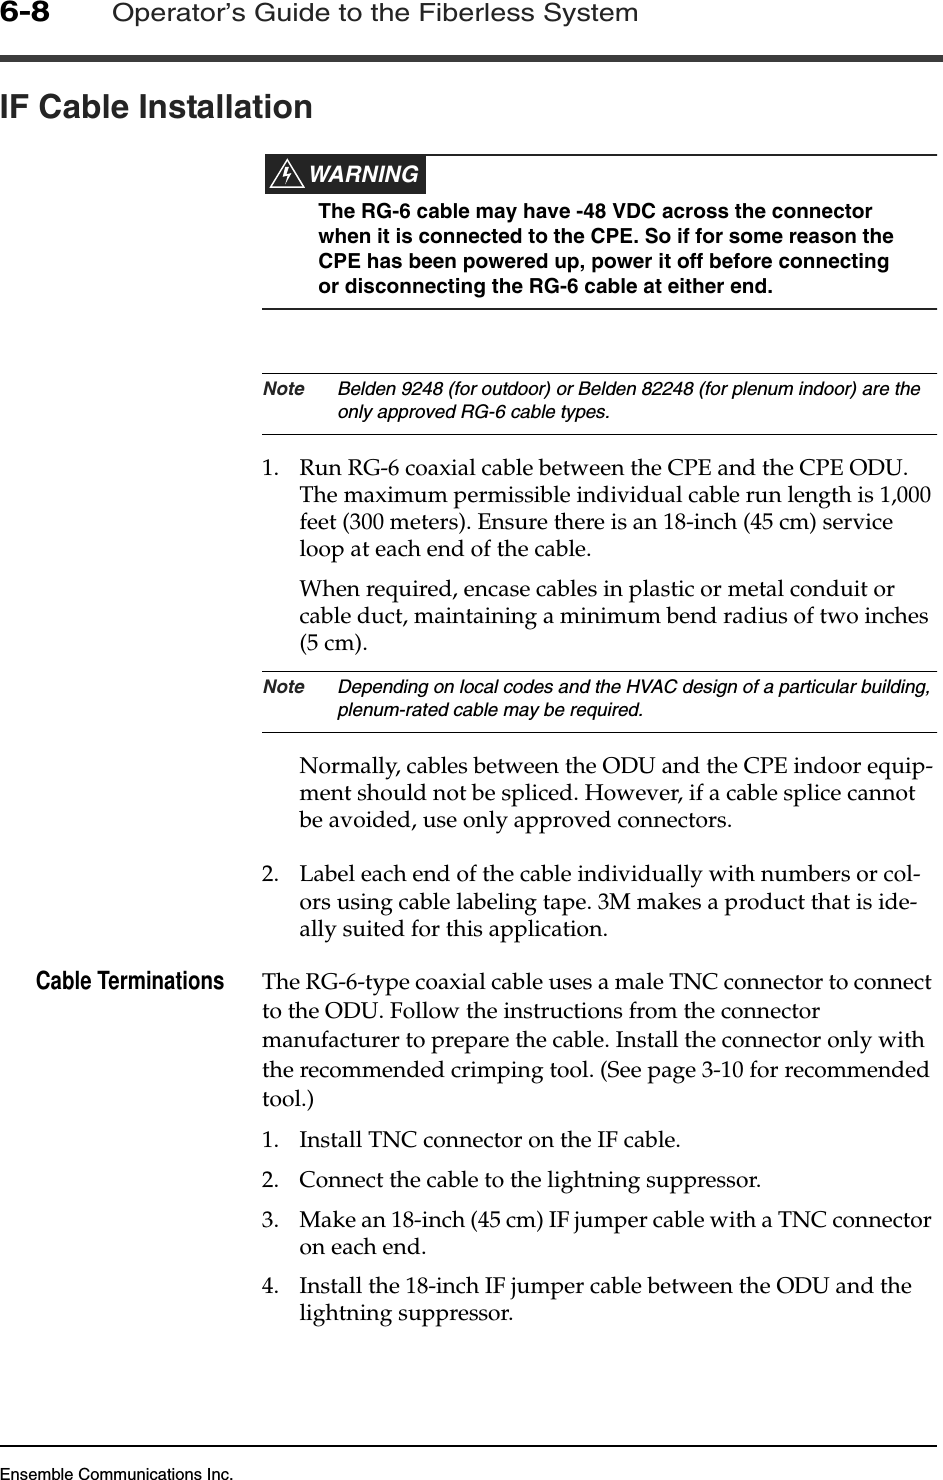
Ensemble Communications Inc.CPE Site Setup6-13Figure 6-9.  Digital Voltage Multimeter (DVM) ConnectionNote The alignment port is factory configured to provide a voltage of 0 - 5 VDC. Any received signal level (RSL) of less than 0.5 VDC is translated as 0 and the readout displays a blinking 0. Receive Signal Levelsfor Various VoltagesNote These values are a guide. They will be affected by rain fading, antenna alignment accuracy, and antenna tilt angle.Voltage Readings 1. Using the 7/16-inch socket wrench set, start sweeping the antenna slowly to one direction. Pause every two turns, wait-ing for the readout to stabilize before preceding.CPE ODU(rear view)DigitalVoltageMultimeterBNC AlignmentConnectorTable 6-1: RSL and VoltagesRx pwr (dBm) RSL (V)-75 1.08-70 1.39-65 1.71-60 2.04-55 2.35-50 2.69-45 3.00-40 3.33-35 3.65-30 3.96-25 4.29-20 4.61
Ensemble Communications Inc.6-14Operator’s Guide to the Fiberless System2. Note the peak voltage variances, and sweep the antenna in the other direction.Main Lobe Location 3. Move the antenna to the strongest signal reference of the two.4. Repeat steps 1-3 for the vertical alignment.Antenna AlignmentCompletion 5. When alignment is completed, disconnect the BNC cable at both the ODU BNC connector and the DVM.6. Recap the ODU BNC connector and stow all tools.CPE Software ConfigurationSee page 7-65.CPE Subscriber Interface Cards (SICs)Customer equipment is connected to the SIC ports at the rear of the CPE. Slot 1 may be the four-port T1, and slot 3 may be the six-port 10/100BaseT.Note Release 1.0 does not support slot 2.Connect CPE SIC ports to the customer equipment.CPE LEDsWithin 45 seconds of successful registration, the CPE establishes an active data connection.The CPE Status, ODU, and Sync LEDs, as shown in Figure 9-1, will display solid green if the CPE is functioning properly.Note At power up, Status, ODU, and Sync LEDs are red.See “Troubleshooting” on page 9-1 for the LED descriptions.

Navigation menu