Entrust Datacard Q10035 SP35 Printer User Manual SP Production e guide
Entrust Datacard Corporation SP35 Printer SP Production e guide
Contents
manual 2
Card production and system maintenance 1
SP35 Info Central
Card production and system maintenance
After the printer, driver, card creation application, and capture system are set up, you are ready to produce
cards. To assure that you produce cards that meet requirements, be familiar with how to make cards. In
addition, invest small amount of time to care for the equipment you use to print cards.
2Card production and system maintenance
SP35 Info Central
3
SP35 Info Central
Card Production
To use a card creation application, such as Datacard’s ID Works™ or Preface™:
1 Follow instructions for the card creation application to capture, format, and save the card data.
2 In the card creation application, send cards to the printer (usually, use the Print button).
The printer driver receives and processes card data, places cards in a queue, and sends the next card
to the printer.
To use a PC application such as Microsoft Word:
1 In the application, select the SmartDriver as the current printer. (Your printer might have a different
name.)
2 Select the printer settings that correspond to the cards. See Setting up for the card design for details.
3 In the application's page setup feature, set the paper size to CR80 Card 2.13" x 3.38" and set the
margins to match the driver.
4 Format the text to print using TrueType fonts. Text formatted as Black will print using the K (solid black)
ribbon panel. All other colors are printed using the color panels (if you use a color print ribbon).
5 To encode magnetic stripe data, do one of the following:
a Type the magnetic stripe data on the front of the card and format the text using one of the following
fonts:
• Track 1—Magnetic Stripe
• Track 2—Magnetic Stripe
• Track 3—Magnetic Stripe
• Track NTT—Magnetic Stripe (PC must run a Japanese language Windows operating system)
b If your application does not allow you to select fonts, use magnetic stripe escapes to identify data.
See Magnetic stripe setup for details.
6 When the card data is ready, select Print to send the card to print. The printer driver receives and
processes card data, places cards in a queue, and sends the next card to the printer.
Tips for success
•Developers can write applications using the SmartDriver™ Software Developer’s Kit. This kit can be
downloaded from www.datacard.com.
•If you use magnetic stripe fonts or escapes, keep data for one track in one line of text, and only
have magnetic stripe data on the line. (Use a small font size if needed.)
•Do not use character formatting (such as kerning) or formatting characters (such as tabs) with
data intended for magnetic stripe encoding.
•Whenever you encode magnetic stripe data or program smart cards, the card can include confidential
data that you cannot see. In addition, used print ribbon contains negative images of data printed on cards.
Handle used print ribbon and incomplete cards according to your policy for handling the confidential data
that might be on the card.
•For the most current information about messages, see the online help for each message.
4
SP35 Info Central
5
SP35 Info Central
Responding to messages
The printer and driver generate a message on the PC when a card cannot be processed. Usually, the
message is displayed on the PC.
1 When a message is displayed on the PC, follow the suggested action. Click the Help button to see
likely causes and possible solutions.
2 When the printer status light blinks amber, it is safe to open the printer to fix any problems.
3 Fix the problem, then close the printer cover and press to latch it.
4 The message box might disappear on its own or you might need to click a button.
Buttons on the message box can be:
Retry: Clears the card. The driver sends the card or cards to the printer again. If the problem is fixed,
normal operation resumes.
Cancel: Clears the card. The driver does not send the card again. If the problem is fixed, normal
operation resumes.
OK: Used for a message that occurs when no card was being printed, a status message, or an
equipment failure message. If the problem is corrected, normal operation resumes. (Power cycle the
printer if operation does not resume.)
5 The printer might eject any cards in the printer.
Message Tips
•If the message box disappears automatically, you might need to return to the card creation
application to send the card to print again.
•If the printer beeps and the status light blinks amber but no message appears on the PC, try:
•If you printed a test card and the printer beeps but no message appears on the PC, use a card
with a magnetic stripe and make sure the stripe is oriented correctly.
•Restart Windows to fix the problem.
•If a message appears repeatedly and you cannot reliably fix it, the printer might need service.
Record the message and message number, the printer serial number, and the driver and
firmware versions (see the Printer Toolbox). Call your service provider.
6
SP35 Info Central
7
SP35 Info Central
Cleaning the Printer
See “Common-sense site requirements” in Before you install for guidelines for a good printer environment,
which can reduce the amount of cleaning required to produce high-quality cards.
Cleaning tips
•Run a cleaning card as the first step when cleaning the printer. The cleaning card can remove
most contaminants from the printer. See Cleaning the printer for steps to follow.
•If you use StickICards™, clean the card tracks after every 100 cards. Run a cleaning card to
clean the card track.
•Some card features can require more frequent cleaning of the printer, especially if the cards are
not high quality. Signature panels and magnetic stripes can deposit particles on rollers. You can
run a cleaning card, replace the cleaning roller, or clean the printer rollers to remove particles.
Cleaning the printer rollers
The printer rollers move the card during printing or cleaning operations. Clean the rollers when problems
occur such as:
•Repeated card jams
•Cards are not being picked, repeatedly
•Colors are not aligned on the printed card
Use the cleaning pen to clean printer rollers.
Make sure that printing of cards is complete before cleaning the rollers.
1 Open the Printer Toolbox if needed by double-clicking the printer icon.
2 Clean the pick roller:
a Open the card tray.
b Remove all cards from the card tray.
c Remove the cap from the cleaning pen. Hold the end of the cleaning pen against the pick roller.
8
SP35 Info Central
d Click the Clean Printer button in the Printer Toolbox. Click OK on the prompt that appears. Do not
insert a cleaning card! The driver sends a command to the printer to run the printer cleaning card.
The printer moves rollers when it attempts to pick the card.
e Slowly move the pen on the pick roller.
f Lightly wipe any dirt from the end of the cleaning pen onto a clean cloth or paper. Move the
cleaning pen to another area of the roller. (Click Cancel on the “Card not picked” message if it
appears.)
g Repeat steps d through f until no more dirt appears on the pen.
3 Clean the permanent cleaning rollers if needed:
a Open the printer cover and remove the print ribbon cartridge.
b Remove the cleaning roller.
c Observe the permanent cleaning rollers, especially the lower roller (location 1 in the following
illustration). If you observe ribbon or other debris on the rollers, clean the rollers using the cleaning
pen. (If not, continue with step 4.)
d Do one of the following to turn the rollers in the printer.
• Click the Clean Printer button in the Printer Toolbox. Click OK on the prompt that appears. Do not
insert a cleaning card! The driver sends a command to the printer to run the printer cleaning
card. The printer moves rollers when it attempts to pick the card.
• Turn the card advance knob to move rollers by hand.
e Move the pen on the roller.
f Lightly wipe any dirt from the end of the cleaning pen onto a clean cloth or paper. Move the
cleaning pen to another area of the roller. (Click Cancel on the “Card not picked” message if it
appears.)
g Repeat steps d through f for the rollers at location 1 until no more dirt appears on the pen or cloth.
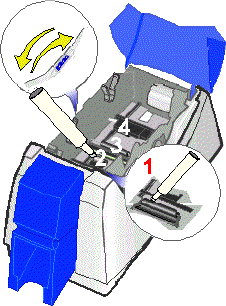
4 Clean the transport area rollers:
a Make sure the print ribbon cartridge and cleaning rollers have been removed.
9
SP35 Info Central
b Place the cleaning pen on top of the first transport roller (location 2 in the illustration). Do not place
the pen next to the black transport base. The pen can get pinched between the roller and the
transport base.
c Do one of the following to turn the rollers in the printer.
• Click the Clean Printer button in the Printer Toolbox. Click OK on the prompt that appears. Do not
insert a cleaning card! The driver sends a command to the printer to run the printer cleaning
card. The printer moves rollers when it attempts to pick the card.
• Turn the card advance knob to move rollers by hand.
d Move the pen on the roller.
e Lightly wipe any dirt from the end of the cleaning pen onto a clean cloth or paper. Move the
cleaning pen to another area of the roller. (Click Cancel on the “Card not picked” message if it
appears.)
f Repeat steps c through e for the roller at location 1 until no more dirt appears on the pen or cloth.
g Move the cleaning pen to location 3. Repeat steps c through f.
h Move the cleaning pen to location 4. Repeat steps c through f.
• If the printer has a magnetic stripe module, the roller is just visible below the black cover of the
magnetic stripe module, on the left side of the printer.
• If the printer does not have a magnetic stripe module, clean the upper roller and the partly hidden
lower roller.
5 Replace the print ribbon cartridge, cleaning roller, and close the printer cover.
6 Replace cards in the card tray.
7 Print a card to verify the quality of printing. You can print a printer test card, a sample card, or a card
using your card creation application.
10
SP35 Info Central

11
SP35 Info Central
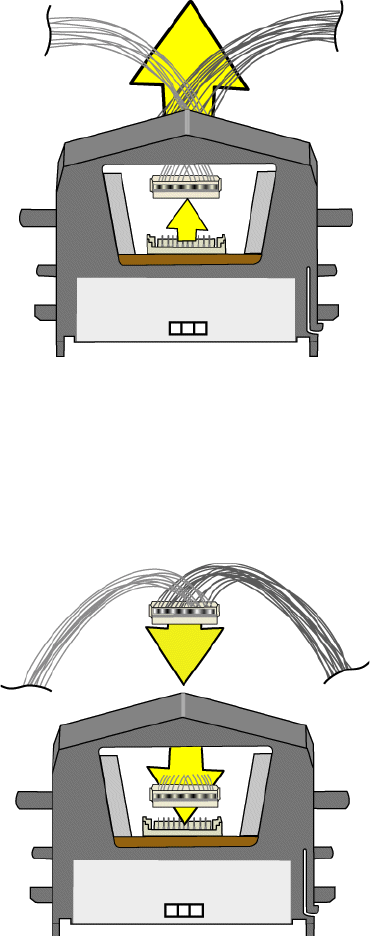
Cleaning the printhead
The printhead can have contamination stuck to it. You might notice it as unprinted lines on printed cards.
Clean the printhead only when needed, such as:
•The printhead has been accidently touched, such as when changing supplies or clearing a card jam.
•You have replaced the printhead cartridge.
•Your observe problems with card appearance, as described in Troubleshooting card appearance.
Tips for success
•Do not touch the printing edge of the printhead cartridge with your fingers. The oils on your
fingers can damage the printhead.
•Do not bump the printing edge of the printhead cartridge with any sharp objects. Sharp objects
can permanently damage the printhead.
•Use the cleaning pen to clean the printhead. Do not use a cotton swab. The fibers from the
cotton can stick to the printhead.
1 Power off the printer by disconnecting it from the power source.
2 Open the printer cover.
3 Open the cleaning pen.
4 Using gentle pressure, move the cleaning pen back and forth along the full length of the printhead
edge (see the following illustration). Be sure to clean the rounded edge of the printhead completely.
If the cleaning pen does not remove all contamination from the printhead, contact your service provider
for additional assistance.
12
SP35 Info Central
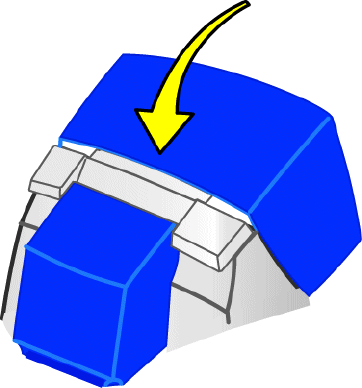
5 Close the printer cover. Push firmly on the blue edge to latch the cover.
6 Connect the power cable to the power receptacle to power on the printer.
Print a card to verify the quality of printing. You can print a Windows test page or a sample card.
13
SP35 Info Central
Replacing the printhead cartridge
The printer uses an operator-replaceable printhead cartridge. For more information about printhead
cartridges, see the Supplies e-Guide.
Remove the printhead cartridge
Do not touch the printing edge of the printhead cartridge. If you do, clean it using the cleaning pen, as
described in Cleaning the printhead.
Do not bump the printing edge of the printhead cartridge with any sharp objects. Sharp objects can
permanently damage the printhead.
1 Power off the printer.
2 Open the printer cover.
3 Place your hand under the printhead cartridge because it will move down when released.
4 Press the printhead latch away from you to release the printhead cartridge.
5Pull on plug and cables to remove the printhead cable.
14
SP35 Info Central
Replace the printhead cartridge
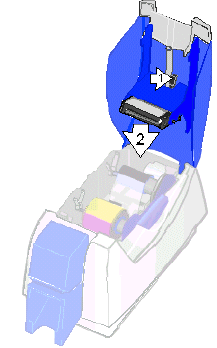
1 Position the printhead cartridge with the silver label toward you and on top. Place the printhead cable
behind the cartridge so the plug is visible through the opening in the printhead cartridge.
2 Carefully align the plug with the receptacle on the printhead. Push the plug all the way onto the
receptacle (see the following illustration).
3 Align the printhead cartridge pins with the printhead cartridge slots on the cover arm (see the following
illustration).
15
SP35 Info Central
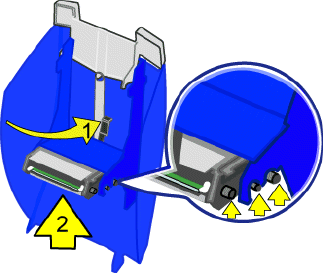
4 Press in the printhead latch (step 1 in the illustration above) and push up on the printhead cartridge to
seat it in the cradle. (step 2 in the illustration above). Release the printhead latch when the printhead
cartridge is in place.
5 Clean the printhead. Move the cleaning pen back and forth along the length of the printhead edge. Be
sure to completely clean the rounded edge of the printhead.
6 Close the printer cover, pressing down on the blue edge to latch it.
7 Plug in the printer to power on the printer.
8 Print a card to verify the quality of printing. You can print a sample card or a card using your card
creation application.
9 If needed, change the position of printing settings to center the printed image with the new printhead
cartridge. See Advanced Setup for steps to follow.
16
SP35 Info Central
17
SP35 Info Central
Maintain the PC
Good PC operation contributes to good operation of the printer and driver. Problems on the PC can
prevent efficient operation of the system that includes the PC and printer.
Perform PC hard disk maintenance on a regular basis or when the following occurs:
•The printer driver displays messages for which PC maintenance is a solution
•Applications display “Out of memory” messages
•The hard disk has less than 50 MB of space free
•Windows has shut down unexpectedly (crashed) (which can result in temp files remaining on the PC)
•The PC is used often to access the Internet
Tips for Success
•On the Windows 2000 and Windows XP operating systems, the Administrator must perform
maintenance tasks.
•Perform maintenance tasks on each PC that prints cards.
•Follow the steps in Windows help or use the steps in this section.
•To access Windows help, select Help from the Start menu. In the Windows Help contents,
select Troubleshooting.
1 Save all data in your open applications.
2 Close all applications, including resource monitors.
3 Exit from the Printer Toolbox. (Using the Minimize button on the Printer Toolbox does not have the
same effect.)
a Locate the System Tray in the right corner of the Windows taskbar.
b Right-click on the icon for the Printer Toolbox.
c From the popup menu that appears, select Exit.
4 Log off any network connections.
5 For Windows Me, 98, 2000, and XP, run the Disk Cleanup program:
a From the Windows task bar, select Start, Programs, Accessories, System Tools and then Disk
Cleanup.
b Select the drive to clean up, usually C:\.
c Select the types of files to delete.
d Select OK and then Yes on the message box. Disk Cleanup can require a minute or more to delete
files.
6 For Windows Me and 98, run the ScanDisk program:
a From the Windows task bar, select Start, Programs, Accessories, System Tools and then
ScanDisk.
b Select the drive to scan, usually C:\.
c Select Standard test and Automatically fix errors.
18
SP35 Info Central
d Select OK. ScanDisk can require 5 minutes or more for a standard scan.
e When ScanDisk is complete, follow any instructions and close the program.
7 Free up additional disk space:
a From the Windows task bar, select Start, Programs and then Windows Explorer.
b Open the C:\Temp, C:\Windows\Temp, C:\Winnt\Temp, or C:\Win2K\Temp folder. Delete any files
not being used.
c Open the C:\Windows\Temporary Internet Files, C:\Winnt\Temporary Internet Files folder. Delete
any files not being used.
d Open the Recycle Bin in Explorer. Delete all files from the Recycle Bin.
e Click the icon for drive C:\. The status line shows the available disk space, such as:
48.2MB (Disk free space: 302MB)
f Make sure the Disk free space is 40MB or greater.
g Remove additional files if needed.
8 Run the Disk Defragment program if one is installed on the PC:
a From the Windows task bar, select Start, Programs, Accessories, System Tools and then Disk
Defragmenter.
b Select the drive to scan, usually C:\.
c Select OK to run the program.
d When the program completes, a message appears.
e Select OK to close the program.
9 With all applications closed, from the Windows task bar, select Start and then Shutdown.
10 From the Shut Down Windows box, select Restart the Computer and then Yes.
11 If you were printing cards, restart the card creation program (such as Preface or ID Works) and send
the card to print again.
Other PC problems
•On Windows 2000 and XP, the PC can appear to have maintenance problems when the user
does not have the necessary permissions. See “Setting Printer Permissions” in Installing the
Driver to set permissions.
•If a Datacard printer driver was installed on this PC and then removed, you can run the
Cleanup Utility to remove any files that Windows does not remove. See the “Running the
Cleanup Utility” in Reinstall the Printer Driver.
•If the print processor is not the correct one, the PC can appear to have problems. Make sure
that the “Print Processor” or the “Print using the following driver” selection in Properties is
SmartDriver.