Entrust Datacard Q10035 SP35 Printer User Manual SP Setup e guide
Entrust Datacard Corporation SP35 Printer SP Setup e guide
Contents
manual3
Setting up for your card design 1
SP35 Info Central
Setting up for your card design
The driver provides settings that you can use to make sure that your cards print as you intend. These
settings provide users of the printer with great flexibility in printing, encoding a magnetic stripe, or
personalizing a smart card. This flexibility makes it very difficult to provide you with a step-by-step process
for getting your cards to print as you intend. Instead, Datacard recommends that you do one of the
following:
•Work with your value-added reseller or dealer to design cards and set up the printer to produce them
•Understand the features of your card design, read information in this section to match features to
printer settings, and change the settings to produce the cards.
How do I create a card design?
•Datacard’s ID Works and Preface applications are designed to capture, format, and manage
the data the often appears on cards. (Other applications can use the SmartDriver API or other
driver features to handle card-specific data.)
•A PC application that can be used for many purposes, such as Word, Excel, or PaintShopPro,
can be used to create a card design and format the data for the cards.
•This section focuses on the settings, not the application you use. When the application has an
affect on the driver settings, this section will include that information.
What is a card design?
•Card design is the name given to the combined features of the cards you produce. Cards are
useful only when all cards contain the same information: Name, photo, and so on.
•The card design includes the different types of data (name, ID number, and so on), images
(logo, photo, and so on), and special features such as barcode, magnetic stripe, or smart card
on the card.
•Card design also includes the way those components are arranged.
•Finally, card design frequently includes quality guidelines. For example, an organization might
print their logo in red, however another organization might require a specific shade of red for
the logo.
•An organization might have more than one card design. For example, a health club is likely to
produce member cards and employee cards.
When should I perform setup tasks?
• Initial setup: When you obtain the printer and have the card design complete, perform setup
tasks to get the printer to produce the cards you want.
• Production changes: If you make substantial changes to the way you produce cards, review
setup tasks to make sure cards continue to have the quality you require. For example, if you
purchase a new brand of (unprinted) cards, you might notice changes in the color of some
images.
• New card design: If you change the design of your cards, or if you start producing an
additional card design, review setup tasks to make sure each design prints as required. You
might identify changes to your process to support printing of two different designs.
2Setting up for your card design
SP35 Info Central
What do I use to set up the printer?
• Properties dialog box:
On Windows 98 and Me, the Properties dialog box includes typical printer settings, such as
landscape or portrait orientation, and settings for card printers, such magnetic stripe settings. It
also includes port and communication settings.
On Window 2000 and XP, the Properties dialog box includes port and communication settings
and permissions.
• Printing Preferences:
The Printing Preferences dialog box is displayed on Windows 2000 and XP to provide typical
printer settings, such as landscape or portrait orientation.
• Printer Toolbox:
The Printer Toolbox provides information about printer-driver communication, buttons for
performing tasks such as running a cleaning card, and access to color settings and advanced
setup.
• Advanced Setup:
Advanced Setup is a special mode that allows you to view or change some settings in the
printer. For the SP35 printer, you can change where printing occurs on a card and the intensity
for topcoat or monochrome (single-color) printing.
• Printer Diagnostics:
Printer Diagnostics is a separate application that you can install to perform tests on the printer
with the guidance of your service provider. It also includes settings that might need to be
changed for special-purpose cards.
Why are there several interfaces to set up the printer?
•Microsoft Windows provides a set of tools that other products (such as the SP35 printer) can
use for viewing and changing device settings (Properties or Printing Preferences dialog box).
The functions available meet some but not all needs for setting up card printers. In addition the
organization and functions available are different for Windows 98/ME and Windows 2000/XP.
Because our printers can be used on several operating systems and include functions that
cannot be managed through standard Windows tools, more than one interface is needed.
•As Datacard’s printers have changed over time, the features needed in the driver have
changed. In addition, some tasks are mutually exclusive. For example, you cannot change
printhead settings at the same time as you are printing cards. The current interfaces are the
result of Datacard’s efforts to meet the needs of customers and dealers who use the printer.
(The driver for the SP35 printer can be used with other Datacard printers.)
•Some tasks are advanced, requiring a higher level of knowledge about the printer. These tasks
are usually performed infrequently, and only by service providers or with the guidance of
service providers, and so should not be easily available.
3
SP35 Info Central
Card design checklist
Use this checklist to guide your selection of set up tasks to perform.
Before you print the design:
•Does the card include a smartcard or magnetic stripe on the printed side of the card? If yes, set topcoat
blocking to prevent application of topcoat over that feature.
•Does the card include a magnetic stripe? If yes, see Magnetic Stripe Setup for more information.
•Does the card include a smart card? If yes, see Smart card setup for more information.
Make several cards using your card design and evaluate the quality of the card.
•Are you printing barcodes? If yes, check the cards in your barcode reader to make sure they are easy
to read. If needed, change the printing intensity for K if needed to improve bar code readability.
•Are you printing both photos and a logo in color? Use the following sequence to obtain the best color
quality:
– Check the color quality of the photos first.
– Change the image capture system (If used) to get the best quality photos. For example, work with
distance, lighting, and camera settings to obtain consistent high quality photos.
– After you optimize the image capture system, evaluate the quality of printed photos. If needed,
change the Color Settings for optimal printing of photos. Color settings affect all colored areas of the
card, but you can change other components to return them to optimal color.
– Next, evaluate the other colored areas of the card, such as text or logos.
– You might want to use settings in the application to improve the printed color of text.
– You might also want to use an image editing application (such as PhotoShop or PaintShopPro) to
change the color of a logo file (bitmap) for optimal printing.
•If you print without a margin (the setting is edge-to-edge), observe whether the both long edges of the
card appear evenly printed. If not, change the position of printing on the card. See Change the position
of printing for steps to follow.
If you print with only one color (monochrome or K ribbon), decide whether to perform the
following setup tasks:
•If you print photos:
– Select a dithering method (for Windows 98 or Me) to manage how color photos are printed using
one color.
– Use the Brightness, Contrast, and Sharpness controls on the Color Settings page to obtain the best
quality printed photos.
•Adapt your card design to use the ribbon saver feature. See Using Ribbon Saver for details.
•Change the print intensify to optimize printing of features such as barcodes or small text. See Changing
the print intensity for details.
4
SP35 Info Central
5
SP35 Info Central
Working with Properties and Printing Preferences
Printer driver settings and data are organized in a set of dialog boxes or pages where settings for the
printer are displayed and can be changed. The dialog boxes are organized differently for Windows Me and
98, Windows 2000, Windows XP, and Windows NT. Use the section that applies to the operating system
you use.
The default printer name when the driver is installed is SmartDriver. References in this guide to the printer
driver refer to the SmartDriver. The driver detects the type of printer attached and displays a status icon
that matches the printer type.
Tips for Properties and Printing Preferences
•When it is installed, the SmartDriver printer driver uses default settings for the printer. Make
sure that driver settings match printer features and supplies used.
•For settings that affect the printer, such as magnetic stripe settings, make sure that the printer
and PC are connected so the value you select is sent to the printer and saved. (For settings
that affect only the card format, such as landscape or portrait orientation, the printer does not
need to be connected and powered on.)
•The Print Ribbon Type setting depends on the printer and cannot be changed.
•The card creation application might include settings that override driver settings. Also, you can
access printer settings through the application’s print feature. (Depending on the application
and operating system, settings might apply only to the current document or session.)
•When the printer is installed, the default spool setting is “Spool printing so program finishes
printing faster.” Use this setting, not “Print directly to printer.”
•When the printer is installed, “Enable bi-directional support” is selected. This setting is required
to display messages, print test cards, and perform other functions.
Properties for Windows Me & 98
The Properties dialog box includes the following settings or data:
•Card design settings, such as landscape or portrait orientation and print blocking pattern
•Print ribbon type
•Magnetic stripe encoding formats and coercivity
•Data about the printer, including the printer type
•Port to which the printer is attached
•Port settings for a directly networked printer
Use the Properties dialog box
Make sure the printer power is on and the printer is connected to the PC.
1 Select Start from the Windows task bar.
2 From the Windows Start menu, select Settings and then Printers. The Printers window appears.
3 Click once on the SmartDriver icon.
4 Select File from the Printers menu bar, and then select Properties. The SmartDriver Properties dialog
box appears.
6
SP35 Info Central
– If you have the Printer Toolbox open, you can click the Properties button on the Status page to open
the Properties dialog box. The General, Details, Color Management, and Sharing tabs are not
displayed when you open Properties from the Printer Toolbox.
5 Select the tab with the information to view or change.
–General: Shows the printer name and contains the Print Test Page button (sends a Windows test
page)
–Details: Shows the port to which the printer is connected, and includes the Port Settings button for
setting up a directly networked printer
–Color Management: Allows you to load a color profile (the printer does not include a color profile)
–Sharing: Allows you set up the printer for sharing over a network
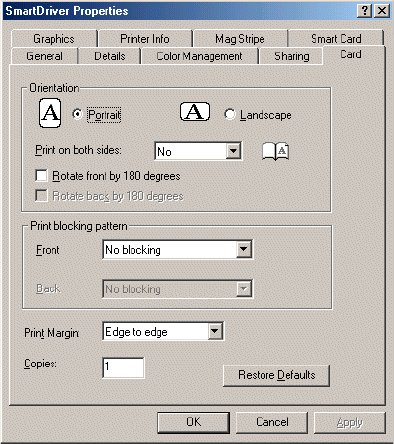
–Card: Allows you to set the orientation, rotation, print blocking, print margin, and number of copies
–Graphics: Shows the print ribbon type and allows you to set ribbon initialization (For K ribbons, you
can choose the type of dithering to use. See Set up for monochrome (K) printing for details.)
–Printer Info: Shows the printer type and the resettable card count. Includes the Open Printer
Toolbox button and the About Driver button.
–Mag Stripe: Shows whether a magnetic stripe option is included in the printer. If the printer includes
a magnetic stripe module, you can set the Coercivity and Encoding Format. You can also enable
Magnetic Stripe Escape Compatibility. (See Magnetic Stripe Setup for details.)
–Smart Card: Shows whether a smart card option is included in the printer. There are no settings.
(See Smart card setup for details.)
– To view help for settings, click on the What's This help button and then click the setting.
6 If you make changes, click Apply to save the settings. When you are done, click OK to close the dialog
box. If you do not want to make changes, click Cancel to close the Properties dialog box.
Properties & Printing Preferences for Windows 2000 & XP
The Properties dialog box includes the following:

7
SP35 Info Central
•Printer type
•Port to which the printer is attached
•Permissions for other users of the PC
The Printing Preferences dialog box includes the following settings or data:
•Card design settings, such as landscape or portrait orientation and print blocking pattern
•Print ribbon type
•Magnetic stripe encoding formats and coercivity
•Data about the printer, including the printer type
Use the Properties dialog box
Make sure the printer power is on and the printer is connected to the PC.
1 Select Start from the Windows 2000 or XP task bar.
2 From the Windows Start menu, select Settings and then Printers (2000) or Printers and Faxes (XP).
The Printers (and Faxes) window appears.
3 Click once on the SmartDriver icon.
4 Select File from the Printers menu bar, and then select Properties. The SmartDriver Properties dialog
box appears.
– To view help for the Properties dialog box, click on the help icon and then click the setting. Microsoft
provides help for Properties dialog box.
5 Select the tab that contains the information you want to view or change.
–General: Shows the printer name and contains the Print Test Page button (sends a Windows test
page)
–Sharing: Allows you set up the printer for sharing over a network

8
SP35 Info Central
–Ports: Shows the port to which the printer is connected, and includes the Port Settings button for
setting up a directly networked printer
– Advanced: Contains the “Update Driver” button which you can use to install a more recent printer
driver
–Color Management: Allows you to load a color profile (the printer does not include a color profile)
–Security: Contains setting you use to grant or deny permissions to the printer for users of the PC.
6 If you make changes, click OK to save the settings and close the dialog box. If you do not want to
make changes, click Cancel to close the Properties dialog box.
7 If you change the port or change the printer name, reboot the PC before printing.
Use the Printing Preferences dialog box
Make sure the printer power is on and the printer is connected to the PC.
1 Select Start from the Windows 2000 or XP task bar.
2 From the Windows Start menu, select Settings and then Printers (2000) or Printers and Faxes (XP).
The Printers (and Faxes) window appears.
3 Click once on the SmartDriver icon.
4 Select File from the Printers menu bar, and then select Printing Preferences. The SmartDriver Printing
Preferences dialog box appears.
– If you have the Printer Toolbox open, you can click the Printing Preferences button on the Status
page to open the Printing Preferences dialog box.
5 View or change settings.
– If the setting you want to change appears, select the setting.
– If the setting you want to change does not appear, click the Advanced button to display the
Advanced Options dialog box.
– Click the plus sign (+) to see all selections available.
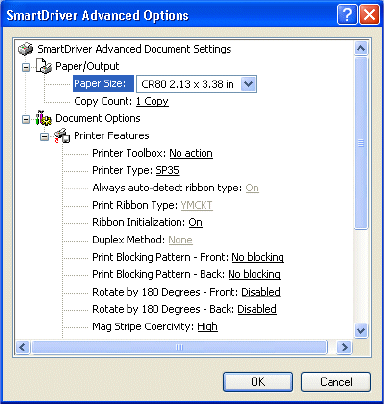
9
SP35 Info Central
– When you click a selection, a list of choices appears next to the selection. Click the arrow on the box
to see the selections available.
– If the selections you want to use are not available (are grayed out), make sure the feature is
available in the printer. Also make sure that the printer is powered on and connected to the PC, and
then resume communication using the Printer Toolbox.
– To view help for settings, click on the What's This help button and then click any setting in the Printer
Features list. A list of settings is displayed. Select the setting for which you want help.
6 If you make changes, click OK on each dialog box to save the settings and close the dialog box. If you
do not want to make changes, click Cancel to close the Advanced and Printing Preferences dialog
boxes.

10
SP35 Info Central
Set up for monochrome (K) printing
If you print with only one color, decide whether to perform the following setup tasks:
•Adapt your card design to use the ribbon saver feature
•Change the print intensity to optimize printing of features such as barcodes or small text.
Using Ribbon Saver
If you use a Datacard Black (K) monochrome ribbon, or a Datacard monochrome ribbon of another color,
such as red, you can use the Ribbon Save feature. Without Ribbon Saver, the printer uses a length of
ribbon that is about the same length as the card. With Ribbon Saver, the printer can use less ribbon if the
card design does not occupy the complete length of the card.
The printer begins using ribbon at a location that corresponds to the leading edge of the card. WIth Ribbon
Saver, the printer continues to spool ribbon for the length of the image but no farther. (The printer leaves a
small margin between each card to avoid image overlap.)
Without Ribbon Saver, the printer spools ribbon for the length of the card.
You can adapt your card design to take advantage of the Ribbon Saver feature. For example, the following
card does not make best use of the ribbon saver feature while the card shown above saves more ribbon.
Changing the print intensity
When you use Datacard monochrome ribbons, the printer identifies the ribbon and changes internal values
for optimal printing of a range of card features. (For example, the printer uses slightly different values to
print with black ribbon than with red ribbon.) However, your card requirements might be different. For
11
SP35 Info Central
example, your card might include a barcode and you might want to change print intensity to produce the
most readable barcodes.
Consider changing the print intensity in the following situations:
•You use infrared barcode readers. Barcodes often are most readable when printed with lower intensity.
•You print using a small font size. Small characters often print better when printed with higher intensity.
•The settings were changed previously and you want to return settings to the default.
See Changing settings in the printer for steps to follow.
12
SP35 Info Central
13
SP35 Info Central
Color settings
Use the Color Settings page to fine-tune the printed appearance of your cards. Color settings affect how
the printer driver prepares card data to send to the printer, so the changes to color settings affect only the
cards sent from the PC on which you make the changes.
Changing the color settings
Settings that you can change include brightness, contrast, sharpness, and the balance of red, green and
blue. When you change color settings, all the colored features (such as photos, logos, and text) on the
card change.
For some settings and operating systems, the brightness, contrast, and sharpness will affect dithered
images. The following table indicates the operating systems and settings for which dithering can be
affected:
You must change color settings at the PC sending the card. If a PC is connected to the printer through
a network, changing color settings at the administrative or host PC will not change color settings at any
client or user PCs.
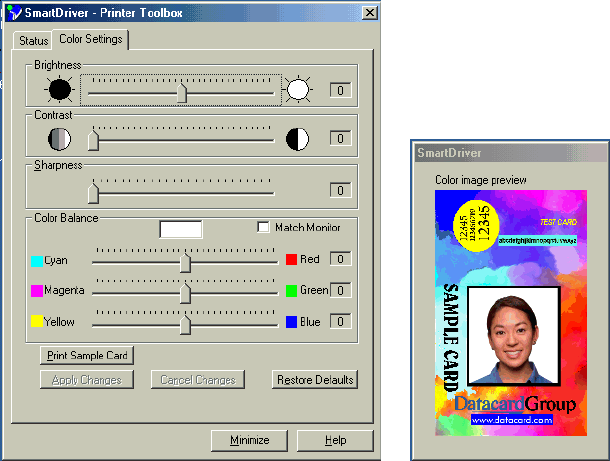
Open the Color Settings page
1 Double-click on the printer Printer Toolbox icon. The Printer Toolbox appears.
2 Click the Color Settings tab to display the Color Settings page.
Operating system Dithering setting Dithering affected?
Windows 98 or Me Course No
Windows 98 or Me Error diffusion Yes
Windows 2000 or XP (not available) Yes
14
SP35 Info Central
The page displays the current settings. For all settings, a value of 0 (zero) is equal to no change. The
Color image preview pop-up also appears.
What should I do before changing color settings?
1 Set up your card design, using your card creation application. Make sure that you use all the data you
plan to print in the design, such as a logo, a photo, text, and a barcode. You can use one sample card
or a set (batch) of sample cards.
2 If you use photos, choose one or more photos that are similar to all the photos you plan to use.
3 Determine the priority and requirements for changing color settings. Color settings affect the complete
card and cannot be used to change just one part of the card.
4 Consider the use of a graphics application to change one part of a card if needed. For example, if the
color of the logo is not acceptable when the appearance of photos is best, consider changing the color
of the logo using a graphics application.
5 Load the cards you plan to use in the card cartridge. Card stock can have a big impact on the
appearance of printed cards.
6 Make one or more sample cards with the current settings. The card provides a way to record current
settings and to evaluate the effect of changed settings. Do one of the following:
– In the card creation application, send the sample card(s) to print.
– Click the Print Sample Card button.
7 Use a permanent marker to mark the back of the card(s) with a 1 and the date. If you printed the
sample card from the Color Settings tab, the current settings are printed on the card. If you printed the
sample card from the card creation application, record all settings on the Color Settings page.
15
SP35 Info Central
How do I choose the correct order for changing color settings?
1 First, decide whether you want to use the printer’s color profile. The printer’s color profile assumes
colors on the cards are adjusted from the input device to the Windows default profile, and adjusts from
the Windows profile to the printer’s color profile.
To use the printer’s color profile, check Match Monitor. (Most monitors do not use a color profile.)
2 Change the Brightness setting, if needed.
3 Change the Contrast setting, if needed.
4 Change the Sharpness setting, if needed.
5 Change the Color Balance settings, if needed.
How do I make photos brighter?
1 After making a sample card, click on the pointer in the Brightness box.
2 Drag the slider to the new position.
3 Wait a moment while the Color Image Preview changes to show the effect of the new setting.
4 If preview shows the change you want, click the Apply Changes button. If not, return to step 2.
5 Print a sample card, using the same method as you used in What should I do before changing color
settings?
– In the card creation application, print one or more sample cards.
– Click the Print Sample Card button to print a card.
6 Use a permanent marker to mark the back of the card with a 2 (or the next number if repeating these
steps).
– If you printed the sample card from the Color Settings tab, the current settings are printed on the
card.
– If you printed the sample card from the card creation application, record the new Brightness setting
on the card.
7 Evaluate the appearance of the sample card(s).
– If the brightness is decreased all the way, the white color in a card might become slightly darker.
8 Repeat these steps until the sample cards meet your requirements.
How do I change the contrast?
1 After making a sample card, click on the pointer in the Contrast box.
2 Drag the pointer to the new position. Move to the right to increase the contrast.
3 Wait a moment while the Color Image Preview changes to show the effect of the new setting.
4 If preview shows the change you want, click the Apply Changes button. If not, return to step 2.
5 Print a sample card. (Use the same method as you used in What should I do before changing color
settings?.)
– In the card creation application, print one or more sample cards.
– Click the Print Sample Card button to print a card.
16
SP35 Info Central
6 Use a permanent marker to mark the back of the card with a 2 (or the next number if repeating these
steps).
– If you printed the sample card from the Color Settings tab, the current settings are printed on the
card.
– If you printed the sample card from the card creation application, record the new Contrast setting on
the card.
7 Evaluate the appearance of the sample card(s).
8 Repeat these steps until the sample cards meet your requirements.
How do I make the dark colors darker and the light colors lighter?
1 After making a sample card, click on the pointer in the Contrast box.
2 Drag the slider to the new position. Move it to the right to increase the difference between light and
dark colors.
3 Wait a moment while the Color Image Preview changes to show the effect of the new setting.
4 If preview shows the change you want, click the Apply Changes button. If not, return to step 2.
5 Print a sample card, using the same method as you used previously.
– In the card creation application, print one or more sample cards.
– Click the Print Sample Card button to print a card.
6 Use a permanent marker to mark the back of the card with a 2 (or the next number if repeating these
steps).
– If you printed the sample card from the Color Settings tab, the current settings are printed on the
card.
– If you printed the sample card from the card creation application, record the new Contrast setting on
the card.
7 Evaluate the appearance of the sample card(s).
8 Repeat these steps until the sample cards meet your requirements.
How do I make the printed cards less fuzzy?
1 After making a sample card, click on the pointer in the Sharpness box.
2 Drag the slider to the new position. Drag the slider to the right to increase sharpness.
3 Wait a moment while the Color Image Preview changes to show the effect of the new setting.
4 If preview shows the change you want, click the Apply Changes button. If not, return to step 2.
5 Print a sample card, using the same method as you used previously.
– In the card creation application, print one or more sample cards.
– Click the Print Sample Card button to print a card.
6 Use a permanent marker to mark the back of the card with a 2 (or the next number if repeating these
steps).
– If you printed the sample card from the Color Settings tab, the current settings are printed on the
card.
17
SP35 Info Central
– If you printed the sample card from the card creation application, record the new Sharpness setting
on the card.
7 Evaluate the appearance of the sample card(s).
8 Repeat these steps until the sample cards meet your requirements.
How do I improve the color of my logo?
1 Evaluate the problem, such as “The logo has a yellow cast” or “The logo is reddish.”
If most of the card prints with the correct colors, consider using a graphics application to change the
logo or other part of the card that needs color improvement.
2 After making a sample card, click on the pointer for the color that is a problem.
3 Drag the pointer to the new position.
4 If changing the color that appears to be a problem does not fix the situation, try changing the other two
colors. For example, if the logo is too red, try changing green and blue to bring red into balance.
5 Wait a moment while the Color Image Preview changes to show the effect of the new setting.
6 If preview shows the change you want, click the Apply Changes button. If not, return to step 2.
7 Print a sample card, using the same method as you used previously.
– In the card creation application, print one or more sample cards.
– Click the Print Sample Card button to print a card.
8 Use a permanent marker to mark the back of the card with a 2 (or the next number if repeating these
steps).
– If you printed the sample card from the Color Settings tab, the current settings are printed on the
card.
– If you printed the sample card from the card creation application, record the new Color Balance
settings on the card.
9 Evaluate the appearance of the sample card(s).
– If the color balance is increased all the way, the white color in a card might become slightly darker.
10 Repeat these steps until the sample cards meet your requirements.
How do I make my photo colors more lifelike?
1 After making a sample card, click on the pointer in the Contrast box.
2 Drag the slider to the new position.
3 Wait a moment while the Color Image Preview changes to show the effect of the new setting.
4 If preview shows the change you want, click the Apply Changes button. If not, return to step 2.
5 Print a sample card, using the same method as you used previously.
– In the card creation application, print one or more sample cards.
– Click the Print Sample Card button to print a card.
6 Use a permanent marker to mark the back of the card with a 2 (or the next number if repeating these
steps).
18
SP35 Info Central
– If you printed the sample card from the Color Settings tab, the current settings are printed on the
card.
– If you printed the sample card from the card creation application, record the new Sharpness setting
on the card.
7 Evaluate the appearance of the sample card(s).
8 Repeat these steps until the sample cards meet your requirements.
How do I undo color changes?
1 If you want to remove all color changes and set all controls to 0, click the Restore Defaults button.
2 Click the Apply changes button.
3 You will use the default color settings.
How do I use a different color profile?
You must have another color profile to use.
1 Make a sample card. The card provides a way to record current settings and to evaluate the effect of
changed settings. Do one of the following:
– In the card creation application, send the sample card(s) to print.
– Click the Print Sample Card button.
2 Open the Printer Toolbox.
3 Click the Color Settings tab and make sure the Match Monitor setting is clear.
4 Click the Apply Changes button.
5 Print a sample card. (Use the same method as you used in step 1.)
– In the card creation application, print one or more sample cards.
– Click the Print Sample Card button to print a card.
6 Use a permanent marker to mark the back of the card with a 2 (or the next number if repeating these
steps) and “Uncheck Match Monitor.”
7 Use the Color Management Tab of the Printer Properties dialog box to load a color profile. See
Windows Help for more information.
8 Continue with changing any other color settings.
19
SP35 Info Central
Changing settings in the printer
This section describes the settings in the printer that you might want to change. These settings can be
used to customize the performance of the printer to meet the demands of your card design.
Tips for success
•You must use a PC to which the printer is directly connected to change operational settings
(locally attached or directly networked). You cannot change operational settings from a client
PC using shared printing.
•Your service representative can guide you in making settings that will meet your specific needs.
•Printer settings should be changed only by someone familiar with the operation of the printer
and with Windows. Allow enough time to perform all steps of the procedures to achieve the
card quality desired.
•If this information does not result in the print quality that you want, contact your service
representative for assistance.
You can work with the following settings:
•Printer values: Before changing many operational settings, record or save the current values in the
printer using the Printer Values tab. This record will allow you to return to current settings if the changes
you make do not address your concerns. The saved record can be sent to your service provider at their
request.
•Printing intensity: You can fine-tune the appearance and function of cards you print by changing the
intensity used to print black (K) and topcoat (T) panels. Intensity affects the thickness of letters and
barcodes–higher intensity prints thicker letter or barcodes. Use the Printhead tab of the Printer Toolbox
to change the printing intensity.
•Position of printing on the card: You can change where the printing is positioned on the card. When
you select “Edge to edge” as the Print Margin value, you should set the position of printing on the card
for best appearance and smooth operation. (Print Margin is set in the Properties, Document Default
Properties, or Printing Preferences dialog box.) You can also change the position of printing to address
card quality concerns. Use the Printhead tab of the Printer Toolbox to change the position of printing on
the card.
Process for changing settings
This section contains several procedures which help you make specific changes to settings. All of the
procedures use the following basic steps. This overview can help you prepare for the specific processes
that follow.
Materials to use
•Blank cards, for making “test cards” before and after changing settings. If you will be making
printer test cards and the printer includes a magnetic stripe module, make sure the magnetic
stripe test cards and the printer have the same coercivity.
•Permanent marker (for recording data on cards) or a pen (if you record data on paper).
•Paper and tape, if you want to create log pages. A log page has “test cards” taped to it with
corresponding data (such as setting values) written on the page. Only one side of the card is
visible when it is taped to the log page, but you can write more information on a log page than
on a test card or sample card.
20
SP35 Info Central
Suggested process
1 Make sure the printer is powered on and is directly connected to the PC.
2 Save or record printer values.
3 Identify the setting to change and the result you want. (Stating the desired result in a measurable way
can help you identify when you have met your goal.)
4 Make a test card (or sample card) and record the current values for the setting to change. Also record
the date and sequence number (beginning with 1). Use the same card at each step.
5 Change the setting and apply the change.
6 Make another test card. Record the new setting and sequence number.
7 Evaluate the result on the test card.
– If the result meets the goal, you have completed the process.
– If the result does not meet the goal, return to step 5. Repeat steps 5, 6, and 7 until you meet the
stated goal.
– If you have repeated the steps several times but are not making progress toward the stated goal,
consider whether the goal is possible and whether changing this setting will lead to the goal. Return
to the settings recorded in step 1.
Record printer values
Make sure the printer is connected to the PC and powered on.
1 Make sure the Printer Toolbox is open. Double-click on the icon in the system tray.
2 Select the Advanced Setup button on the Printer Toolbox.
– The printer driver changes from printing mode to Advanced Setup mode, and additional tabs appear
on the Printer Toolbox.
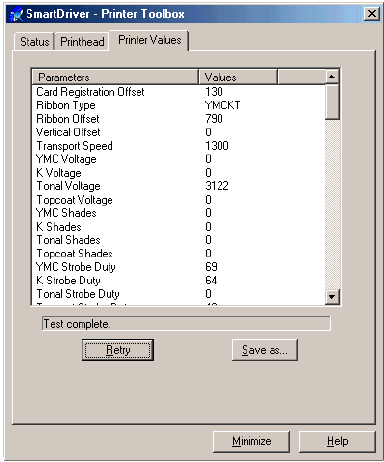
3 Click the Printer Values tab to display the Printer Values page.
21
SP35 Info Central
– The driver obtains the values from the printer when the window opens. If the values were not
available and the “Printer not responding” message appears, click the Retry button. The printer
values must be available to continue.
– Some entries in the Values column might be blank if the Parameter is not used.
4 Click the Save as button.
5 Select a file location for saving the file.
6 Type in a file name that includes the printer name and today’s date, for example “SP35_011003.”
Windows adds the .txt extension.
7 Click OK. The values are saved to the file.
You can use Microsoft Notepad to print or view these values. You can also e-mail the file if the service
representative requests it.
Change printing intensity
1 Make sure the Printer Toolbox is open. Double-click on the icon in the system tray.
2 Select the Advanced Setup button on the Printer Toolbox.
– The printer driver changes from printing mode to Advanced Setup mode, and additional tabs appear
on the Printer Toolbox.
3 Click the Printhead tab to display the Printhead page.
– The driver obtains the values from the printer when the window opens. If the values were not
available and the “Printer not responding” message appears, click the Retry button. The printhead
values must be available to continue.
4 Click the Printer Test Card button to print a test card that serves as a baseline for the changes you
make.
22
SP35 Info Central
5 Mark the back of the test card with “1” and the intensity setting that you plan to change. For example,
mark it “1-K 0” if you plan to change the intensity for black (K) and the current value is 0.
6 To change the printhead intensity:
a Select the panel type: K for monochrome ribbon or panels; T for the topcoat panel.
The slider moves to the location that matches the current value and the current value appears.
b Move the slider:
• You can use the mouse or the arrow keys (← →) to move the slider.
• Move to the right to increase the intensity. Printing on the card will appear darker. If you selected
the topcoat panel type, the degree of coverage increases. If intensity is too high, the print ribbon
will wrinkle or break (or both), especially at the end of a panel.
• Move to the left to decrease the intensity. Colors on the card will appear lighter and ribbon is less
likely to break.
• Decrease the intensity for the topcoat only if the ribbon is melting when applying the topcoat.
Decreasing the intensity reduces the degree of coverage of the topcoat. Topcoat can affect the
durability of the image, and the degree of coverage can be difficult to detect.
c Select the Apply Changes button to make the values take effect in the printer, OR select the
Cancel Changes button to return to the values displayed before you used the slider.
• The “Changes saved to printer” message appears when the values have been saved to the
printer.
7 Select the Printer Test Card button.
8 Mark the card on the back with a 2 (or the next number if repeating these steps) and the new settings
(such as K -20 for K intensity).
9 Evaluate the result as shown on the printed card.
– If the new setting has solved the problem, you can select another value to change or quit Advanced
Setup.
– If the new setting has not solved the problem, return to step 5 and repeat the process.
– If the new setting has made the problem worse, return to step 6 and move the slider to the intensity
value for the selected panel type written on card 1.
10 When you are done running Advanced Setup, select the Status tab and then the Quit Diagnostics
button to enable printing.
If you have entered Advanced Setup and selected the Close button in any tab of the Status dialog box,
the driver quits Advanced Setup for you.
Change the position of printing
Tips for success
•Make small changes in settings to avoid breaking the print ribbon.
•You can use the mouse or the arrow keys (< >) to move the slider.
•If you have selected “Edge to edge” as the Print Margin value and you are changing the print
position toward the leading edge of the card, watch for print ribbon break messages. If you
change the print position too much, the print ribbon might break as a result. If so, return to the
original print position as marked on card 1.
23
SP35 Info Central
1 Make sure the Printer Toolbox is open. Double-click on the icon in the system tray if needed.
2 Select the Advanced Setup button on the Printer Toolbox.
– The printer driver changes from printing mode to Advanced Setup mode, and additional tabs appear
on the Printer Toolbox.
3 Click the Printhead tab to display the Printhead page.
– The driver obtains the values from the printer when the window opens. If the values were not
available and the “Printer not responding” message appears, click the Retry button. The printhead
values must be available to continue.
4 Click the Printer Test Card button to print a test card that serves as a baseline for the changes you
make.
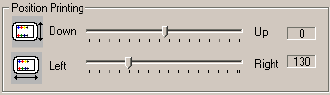
5 Mark the back of the test card with “1.” Also mark the position change you plan to make. Finally, mark
the current print position values, such as -5/190 for the Up/Down and Left/Right positions.
6 Select the slider for the position you want to change, and then move it in the selected direction. The
right edge of the card, as shown by the icons in the position printing box, is printed first.
7 Select the Apply Changes button to make the values take effect in the printer, OR select the Cancel
Changes button to return to the values displayed before you used the slider.
– The “Changes saved to printer” message appears when the values have been saved to the printer.
8 Select the Printer Test Card button.
9 Mark the card on the back with a 2 (or the next number if repeating these steps) and the new settings
(such as -5 for 5 steps up).
10 Evaluate the result as shown on the printed card.
– If the new setting has solved the problem, you can select another value to change or quit Advanced
Setup.
– If the new setting has not solved the problem, return to step 6 and repeat the process.
– If the new setting has made the problem worse, return to step 6 and move the slider to the value for
the print position written on card 1.
11 When you are done running Advanced Setup, select the Status tab and then the Quit Advanced Setup
button to enable printing.
24
SP35 Info Central
25
SP35 Info Central
Magnetic Stripe Setup
Do the following to set up the printer and driver to encode magnetic stripes on cards:
•Use cards with magnetic stripes when making a printer test card.
•Identify the encoding format and how it will be formatted.
•Determine whether to send coercivity and encoding format data with each card or whether to set values
in the printer. Choose the "Use printer settings" in the Properties or Printing Preferences dialog box if
you set values in the printer (using Diagnostics).
•Determine the coercivity to use. Usually, the coercivity is a system-wide decision: The magnetic stripe
readers which will read the cards encoded by the printer are likely to require a specific coercivity value.
Card stock is purchased to match that coercivity value. Set the coercivity in the Properties or Printing
Preferences dialog box.
•The following table lists formatting choices available and provides information about setup:
Format Printer
Module Data formatted by Data verified by Driver format
setting Use
Diagnostics?
IAT IAT ID Works Driver IAT No
Magnetic Stripe Fonts
(includes Preface) Printer IAT No
Escape Codes Printer IAT No
NTT J ID Works Driver NTT Coercivity
Magnetic Stripe Fonts
(includes Preface) Printer NTT Coercivity
Triple IATA IAT (three-track)
J (single track) ID Works Driver Use printer
settings Yes
Magnetic Stripe Fonts
(includes Preface) Printer Use printer
settings Yes
Proprietary IAT (three track) ID Works Printer Use printer
settings Yes
Magnetic Stripe Fonts Driver Use printer
settings Yes
Custom Application Application Use printer
settings Yes
Custom IAT (three track)
J (single track) Custom Application Application Binary or
Use printer
settings
Optional
Magnetic Stripe Fonts
(includes Preface) -- Binary or
Use printer
settings
Optional

26
SP35 Info Central
Tips for success
•Your service provider or value-added reseller (VAR) must participate in setting up a custom
magnetic stripe format. Obtain the guidance of your service provider or (VAR) when using
Diagnostics to set up magnetic stripe encoding.
•Proprietary formats, used for applications such as driver’s licenses or hotels, can be used with
the SP35 printer. Obtain the guidance of your service provider or (VAR) when using proprietary
formats.
•See the Release Notes file for the operating system you use to identify any limitations that
might apply to magnetic stripe encoding.
•On Windows 98 and Me, data formatted with magnetic stipe fonts or escape codes cannot be
located in rotated fields.
Using magnetic stripe escape codes
To support existing custom applications, Datacard allows use of escape codes for magnetic stripe data that
uses the IAT format. Escape codes are used by several other card printers and applications written to use
those printers can use escape codes with printers that use the SmartDriver. In addition, if you use an
application that does not allow you to select fonts, you can use escape codes to encode magnetic stripe
data. The Eltron format is the simplest format to use.
Binary IAT (three track)
J (single track) ID Works ID Works Binary No
Custom Application Application Binary No
Printer
Manufacturer Encoding
Format Syntax Example
Eltron IAT (ISO) ~<track#><data> ~1ENCODING WITH ESCAPES
~21234567890
~31234567890
Atlantek IAT (ISO) ~<track#>=<data> ~1=ENCODING WITH ESCAPES
~2=1234567890
~3=1234567890
Fargo IAT (ISO) ~<track#>(Start Sentinel><Data>
<End Sentinel> ~1%ENCODING WITH ESCAPES?
~2;1234567890?
~3;1234567890?
Datacard HiFX IAT (ISO) ~<track#>(Start Sentinel><Data>
<End Sentinel> ~1%ENCODING WITH ESCAPES?
~2;1234567890? #
~3;1234567890? #
#. Only the default start sentinel, a semicolon (;), is permitted.
Victor Data
Systems IAT (ISO) ~<track#>(Start Sentinel><Data>
<End Sentinel> ~1%ENCODING WITH ESCAPES?
~2;1234567890? #
~3;1234567890? #
Format Printer
Module Data formatted by Data verified by Driver format
setting Use
Diagnostics?

27
SP35 Info Central
For information about the characters allowed for each track format, see the following section. For more
information about requirements for using escapes, see the documentation for the original printer.
IATA, ABA, and TTS character sets
The IAT encoding format selection for the SP35 printer encodes IATA data on track 1, ABA data on track 2,
and TTS data on track 3. This meets the requirements of the ISO standard.
IATA (International Air Transport Association)
The maximum field length for IATA format is 76 characters. IATA allows spaces, upper case alphabetic
characters, numeric characters, and the following special characters:
! # $ % ' ( ) * + , - . / ; : < @ > = ^ ] \ [ " & _
ABA (American Bankers Association)
The maximum field length for ABA format is 37 characters. ABA allows numeric characters and the
following special characters:
: ; < = >
TTS (Thrift Third Standard)
The maximum field length for TTS format is 104 characters. TTS allows numeric characters and the
following special characters:
: ; < = >
NTT character set
The maximum field length for NTT (Nippon Telephone & Telegraph) format is 69 characters. NTT allows
spaces, numeric characters, upper case alphabetic characters, lower case alphabetic characters, and
special characters. From a PC running a Japanese edition of a supported Windows operating system, NTT
also supports 55 Katakana characters.
The special characters include:
! " # $ % & ' ( ) * + , - . / : ; < = > ? @ [ ] ^ _ ` { | } ~
and the following Japanese-language special characters: (a Japanese edition of a supported Windows
operating system is required.)
The 55 Katakana characters include the following 45 Katakana characters:
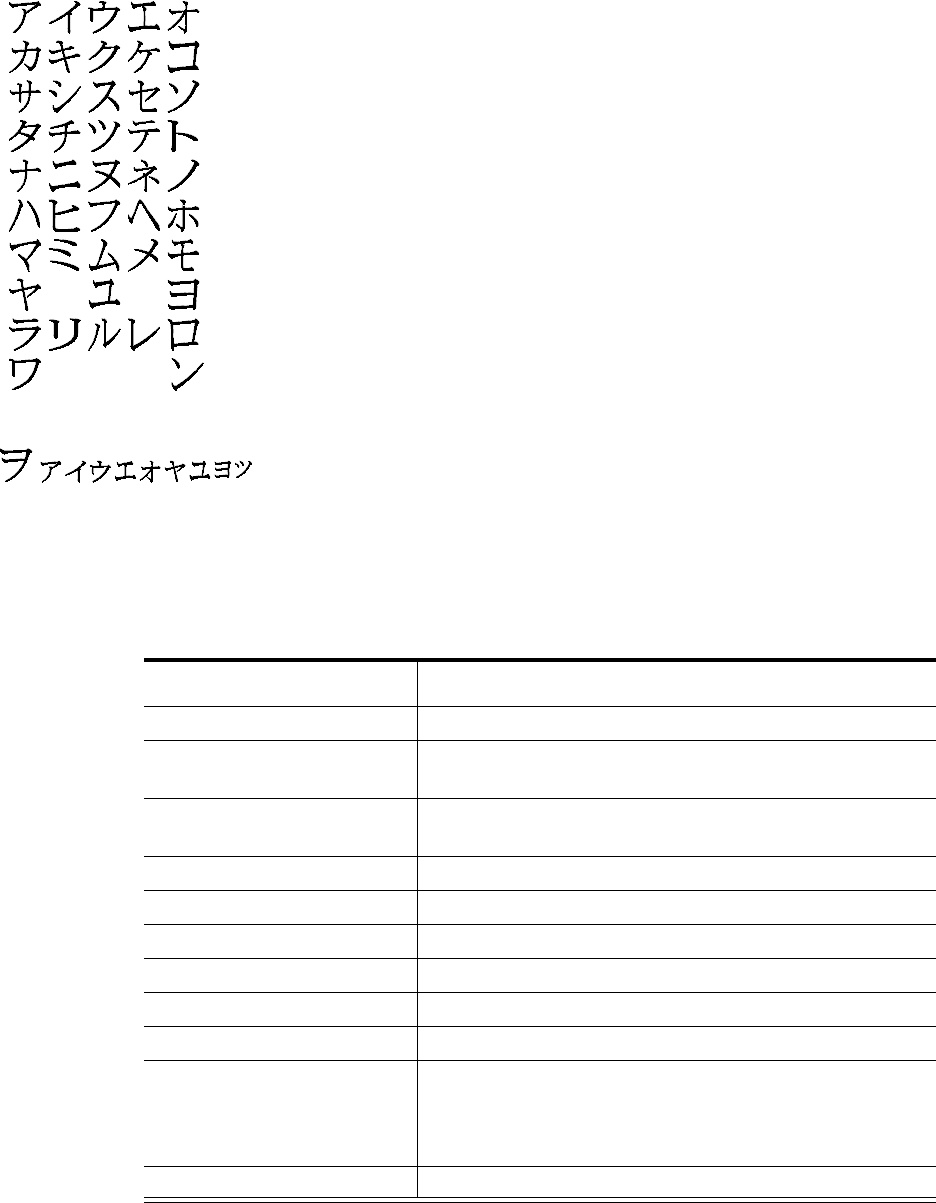
28
SP35 Info Central
and the following 10 Katakana characters:
Each time you start using Japanese-language characters, or stop using them, the driver adds a hidden
character. Each hidden character reduces by one the number of characters you can encode.
Magnetic Stripe settings used by the printer
The following table presents technical details that apply to encoding magnetic stripe data.
IATA ABA TTS NTT Binary
Character Differential 32 48 48 0 0
Start Sentinel (SS)
(ASCII character) % (37) ; (59) ; (59) 127 None
End Sentinel (ES)
(ASCII character) ? (63) ? (63) ? (63) 127 None
Lowest ASCII Character space (32) 0 (48) 0 (48) (1) 0
Highest ASCII Character _ (95) ? (63) ? (63) (126) 255
Character-level parity (VRC) Odd Odd Odd Even None
Cumulative parity (LRC) Even Even Even Even None
Density in bits per inch 210 75 210 210 210
Data bits per character6 4478
Maximum number of
encodable characters (not
including start and end
sentinel or LRC)
76 37 104 69 33
Encoding direction SS first SS first SS first SS last SS first
29
SP35 Info Central
30
SP35 Info Central
31
SP35 Info Central
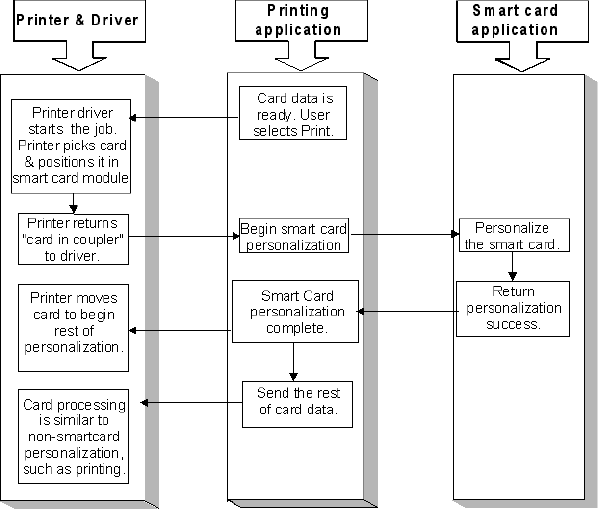
Smart card setup
This section presents information about how to set up a system if you are personalizing smart cards. Smart
card processing is different from other types of personalization, because the “smart card” step of
personalization is controlled by an application (or application module) that is different from the rest of card
personalization.
The data for smart card personalization is sent from the smart card application using a separate smart card
cable.
Requirements
To personalize a smart card, you need to obtain or create the following:
•A direct local connection between the printer and the PC (parallel or USB)
•Smart card module in the printer OR a contact station in the printer plus an external coupler
•A smart card cable for each coupler used
•Card application that is customized to work with the SP35 printer and the smart card application (using
the SmartDriver SDK)
•Smart card application (which uses the SDK for the smart card and coupler type)
•Smart cards that work with the coupler in the printer
Tips for success
•Cards-per-hour ratings do not apply. The smart card personalization process requires dwell
time that is controlled by the personalizing application, not the printer and driver.
•The Retry button on message boxes is not available. The personalizing application can control
messages, and so some printer messages might not be displayed.
32
SP35 Info Central
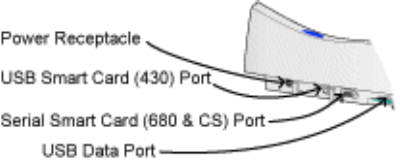
Hardware set up
Make sure the printer driver has been installed and that the printer produces a sample card before setting
up the smart card module. A printer with smart card module has one or two additional ports.
•If the printer has a USB smart card port, obtain the files needed to install smart card support before
connecting the hardware. See Obtaining USB smart card support files fo steps to follow.
•If the printer has only a serial smart card port, you can connect the hardware before installing files to
support the smart card. Files to support a contactless reader are available from the Products area of the
Gemplus Web site at www.gemplus.com. Select the GemEasyLink680 product, and then go to
Development Downloads to obtain files.
Obtaining USB smart card support files
The most current support files are available from the manufacturer of the coupler, GemPlus. Datacard
recommends that you obtain the GemPlus installation utility from their web site to obtain and install files.
1 Navigate to the support area of the GemPlus Web site at support.gemplus.com.
2 Select the downloads area for PC-Link readers.
3 Select the GemPC430 reader.
4 Select the operating system used by the PC.
5 From the list of downloadable files, select the “Readers Installer” choice: it contains drivers and files to
install the smart card support. At the time of publication, the file was named Gemplus-PC/SC Readers
Installer_V2.6.1.zip. This file includes support for all allowed SP35 operating systems.
6 After downloading the file, extract the contents of the ZIP file.
7 Start the RDRInstaller.exe file.
8 Select the 430 reader and the Install command. Use the installation utility to install the smart card
module support. Plug in the USB cable when the utility prompts.
9 If you want to verify smart card installation, you can use the Gemplus SmartDiag utility, which is also
available from the GemPlus web site.
Tips for success
•If you plug in the smart card USB port instead of the printer data port, the Add/Detected New
Hardware wizard appears, naming the GemPC430 as the hardware it found. Cancel the wizard
and connect the USB data cable to the USB port closest to the card tray to install the printer on
the PC.
•The Windows XP operating system includes support for the SC430 smart card module.
However, the most recent files are available on the Gemplus Web site.
33
SP35 Info Central
•Typically, the developer of the smart card application will download USB smart card support
files and provide them as part of smart card installation and setup.
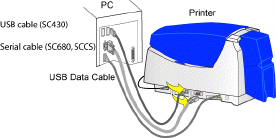
Connecting an optional smart card cable
Tips for success
•If the printer has a smart card module, the ports to use correspond to the module installed. If no
smart card ports are installed in the printer, no cable is needed.
•If the smart card module uses a USB cable, wait until the driver is installed and a sample card
has been printed before setting up the smart card module.
•The smart card serial cable must be a shielded DB9 serial cable, up to a maximum of 9.8 feet
or 3 meters long.
•The USB cable must be a type CM 30V cable, up to a maximum of 6.5 feet or 2 meters long. A
longer cable might result in electrical interference.
•Some printers include a proximity card coupler connected using a USB cable. Attach this USB
cable to the port at the top of the back panel (not the data port).
•USB allows devices to be connected to the PC through another USB device (daisy-chained).
USB also uses hubs to which multiple USB devices (including other hubs) can be connected
(cascaded). Up to five hubs can be used between the printer and the PC. (In a daisy chain, at
least every other hub needs to be powered.) Datacard printers do not have ports to support
daisy chaining. If you need to connect two Datacard printers to a PC with one USB port, obtain
a USB hub to which both printers can be connected.
1 Connect a serial cable to the printer port if a contactless (680) smart card module or a contact station
(CS) is installed in the printer.
2 Connect a USB cable to the printer port if a contact (430) module is installed in the printer.
3 Use two smart card cables if both ports are installed on the printer (the smart card module contains
both contactless (680) and contact (430) couplers).
4 Connect the other end of the smart card cable(s) to the appropriate port on the PC. For the USB cable,
the installer utility will tell you when to connect the cable.