Escort Data Logging Systems REDI PORTABLE DATA LOGGING DEVICE User Manual REDi 13 02 06
Escort Data Logging Systems Ltd PORTABLE DATA LOGGING DEVICE REDi 13 02 06
UserManual.wiki
>
Escort Data Logging Systems
>
REDI User Manual
>
USERS MANUAL
Contents
1.
TECHNICAL MANUAL
2.
USERS MANUAL
USERS MANUAL
Navigation menu
Upload a User Manual
Namespaces
Wiki Guide
HTML
PDF
Info
Views
User Manual
Discussion / Help
Navigation
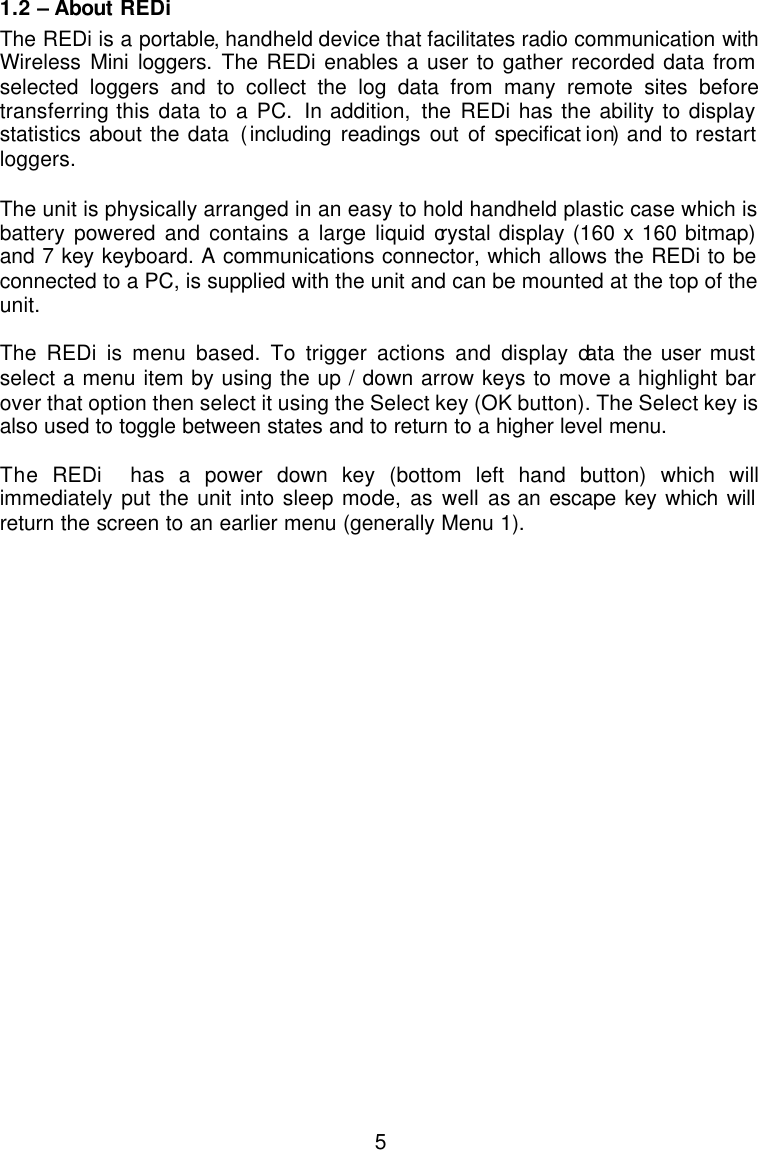
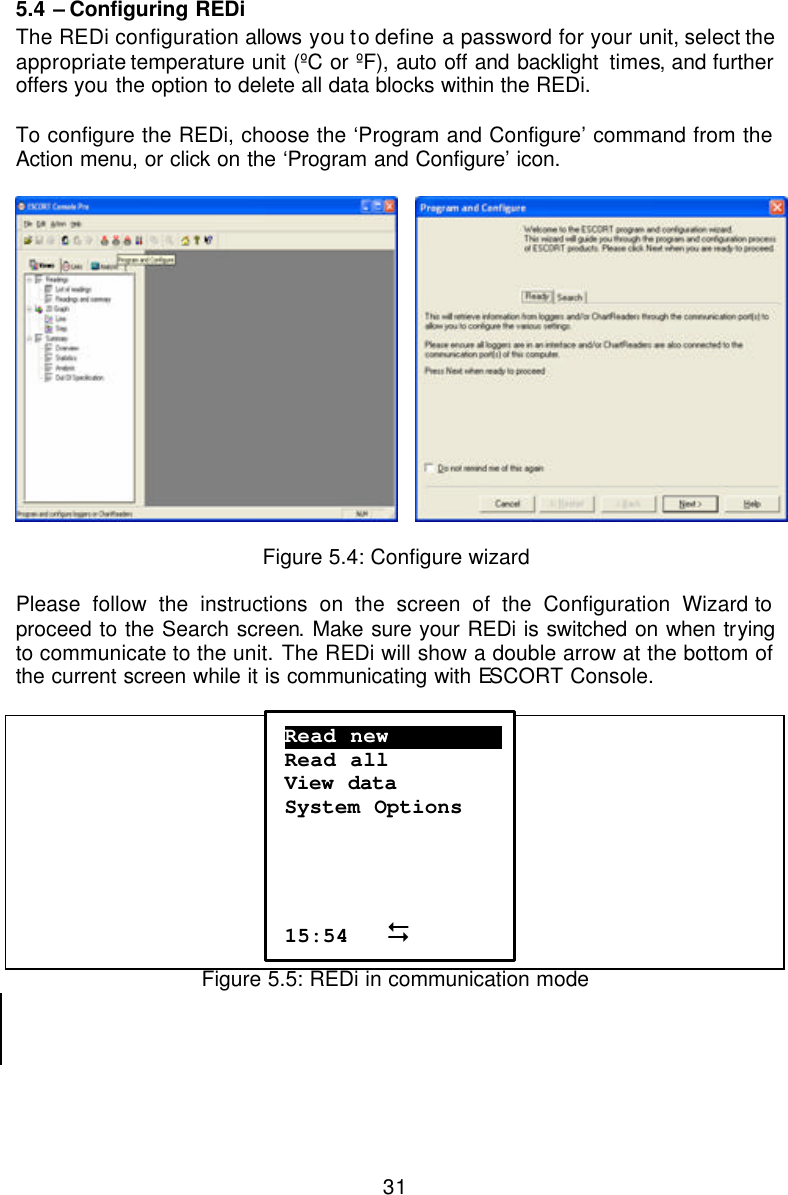
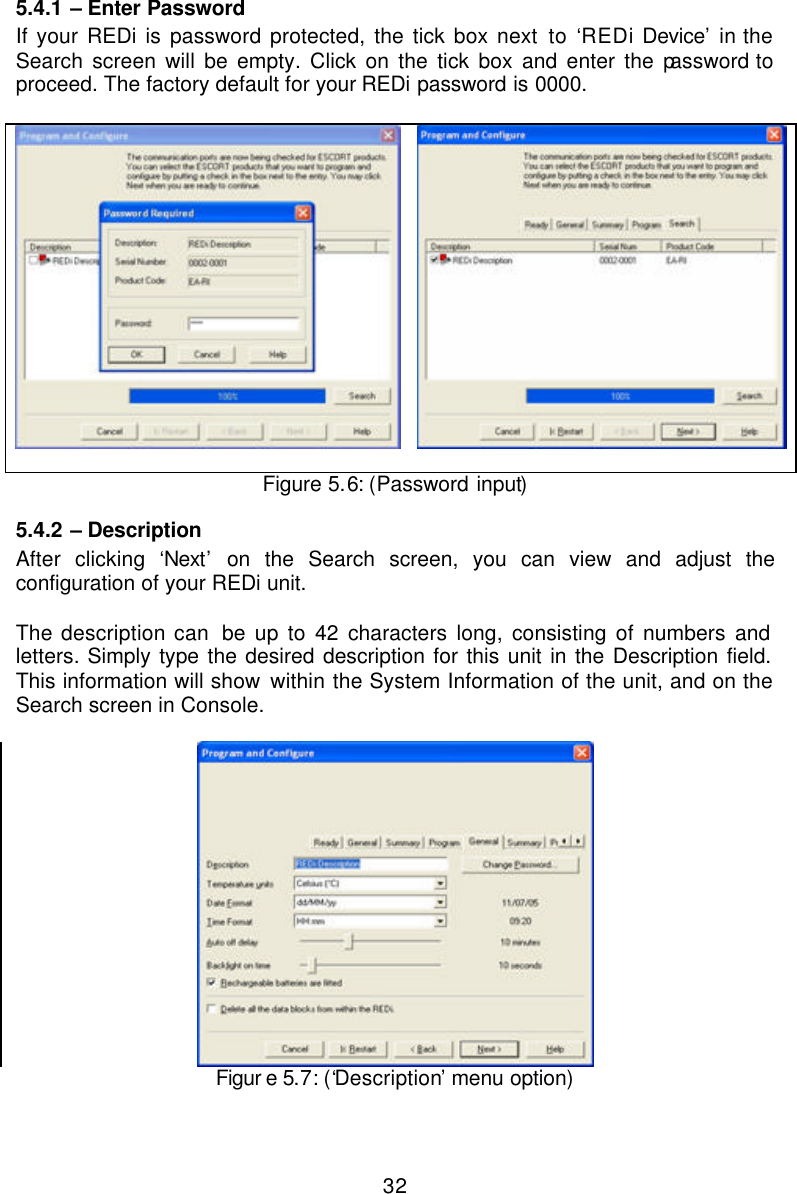
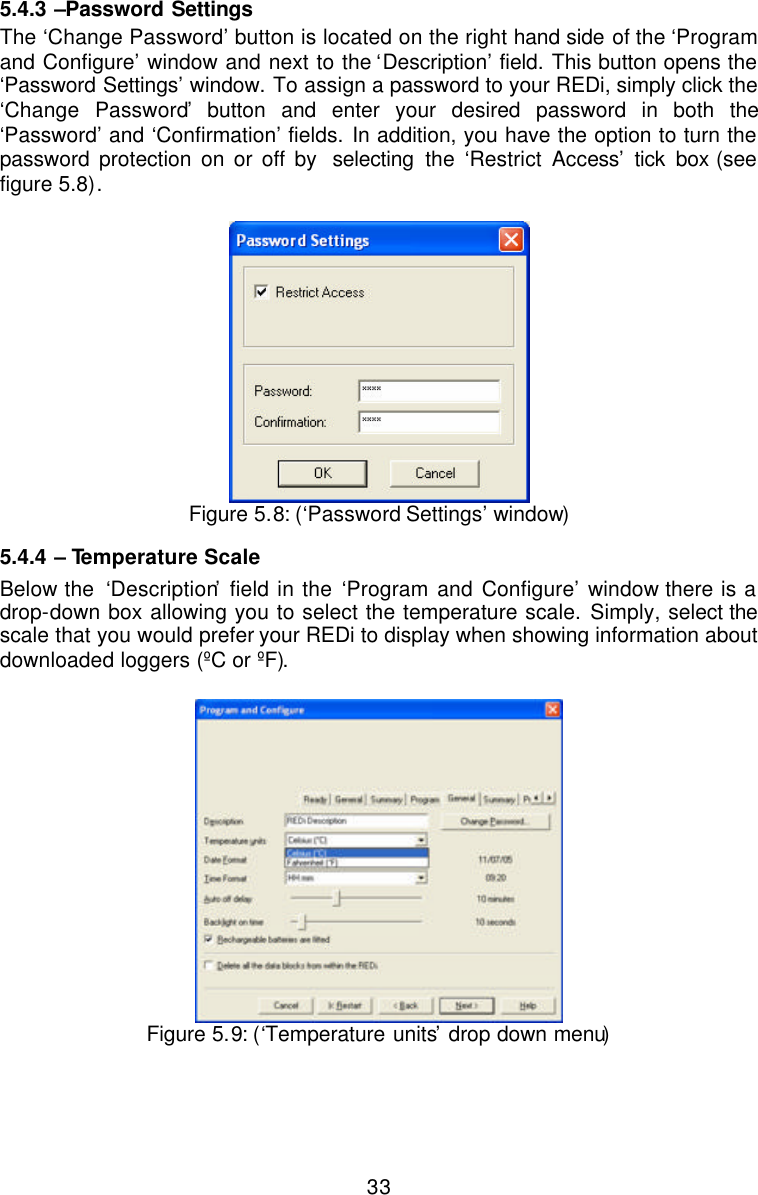
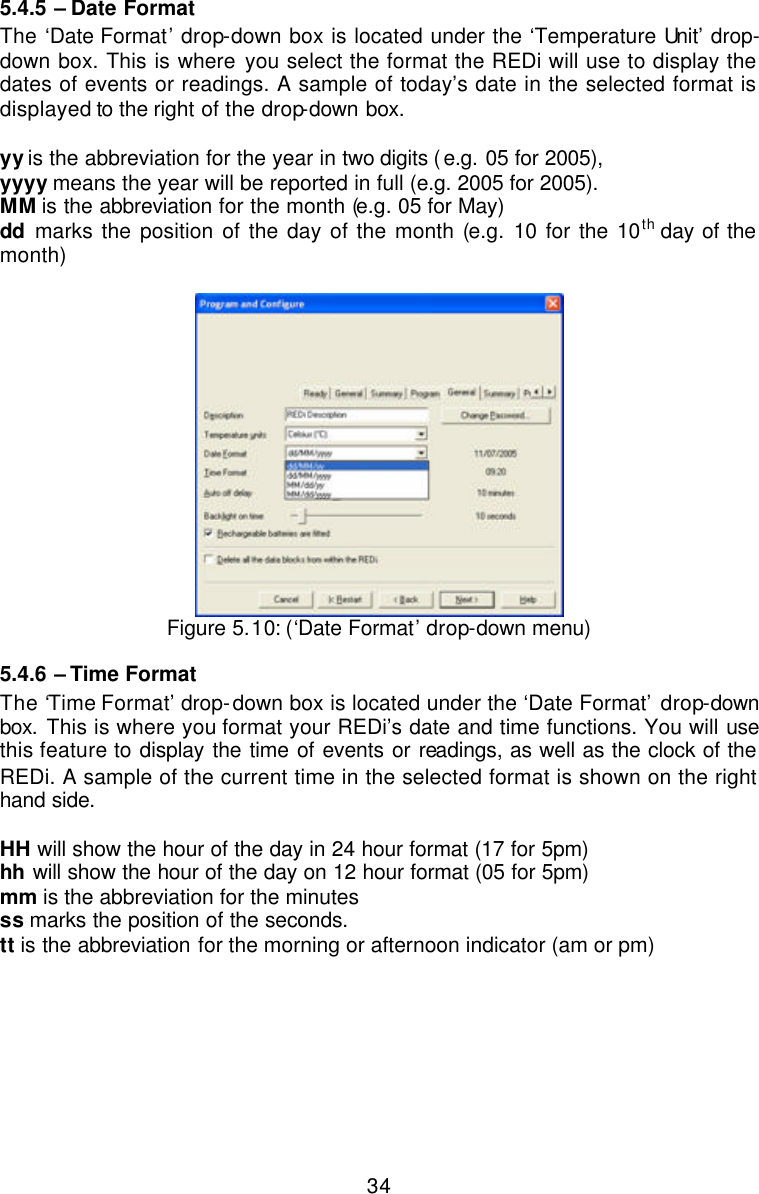
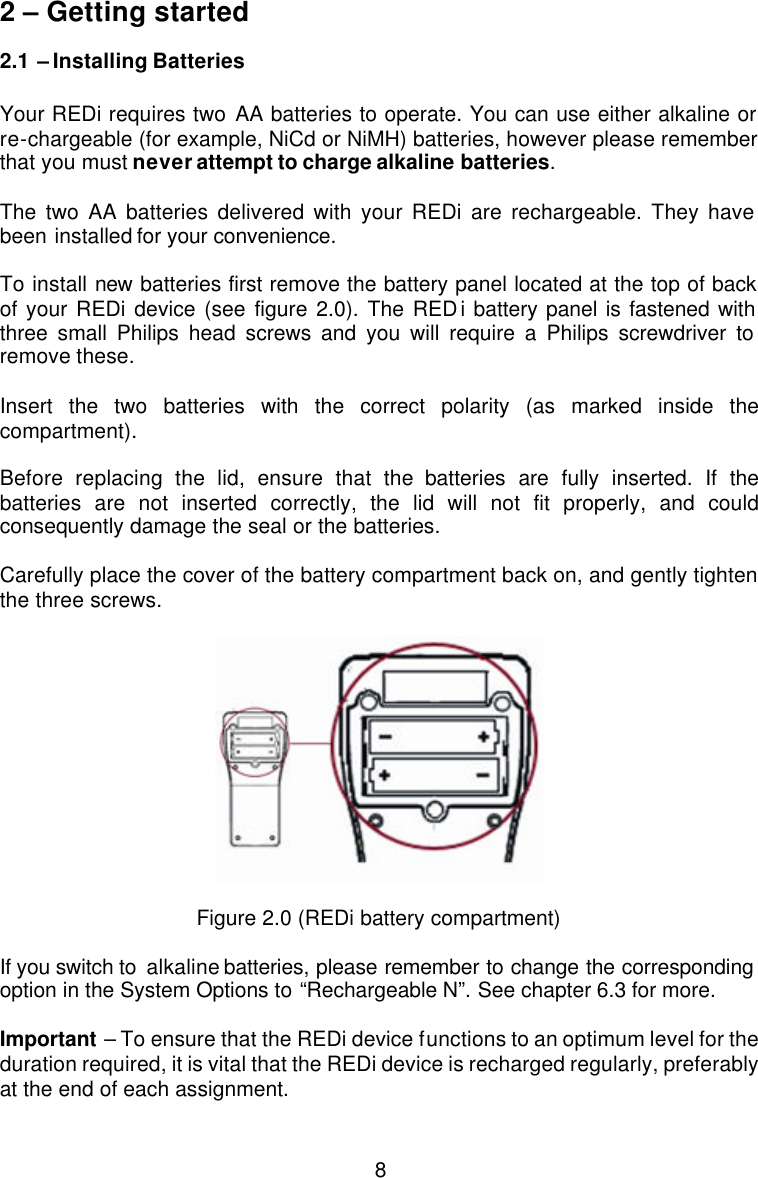
![71.4 – Part Descriptions 1 2 3 4 5 6 7 8 1. Liquid-Crystal-Display 5. Antenna (top view) 2. Keypad and OK button 6. Interface Connector 3. Escape button (Esc) 7. Antenna (side view) 4. Power button 8. Battery compartment Message text Loggers connected to Status bar Loggers downloaded with scrolling OK button Option Selected Option Time Connected to 10 loggers [9/10] read Read new Read all View data System Options 15:54](https://usermanual.wiki/Escort-Data-Logging-Systems/REDI.USERS-MANUAL/User-Guide-640558-Page-7.png)

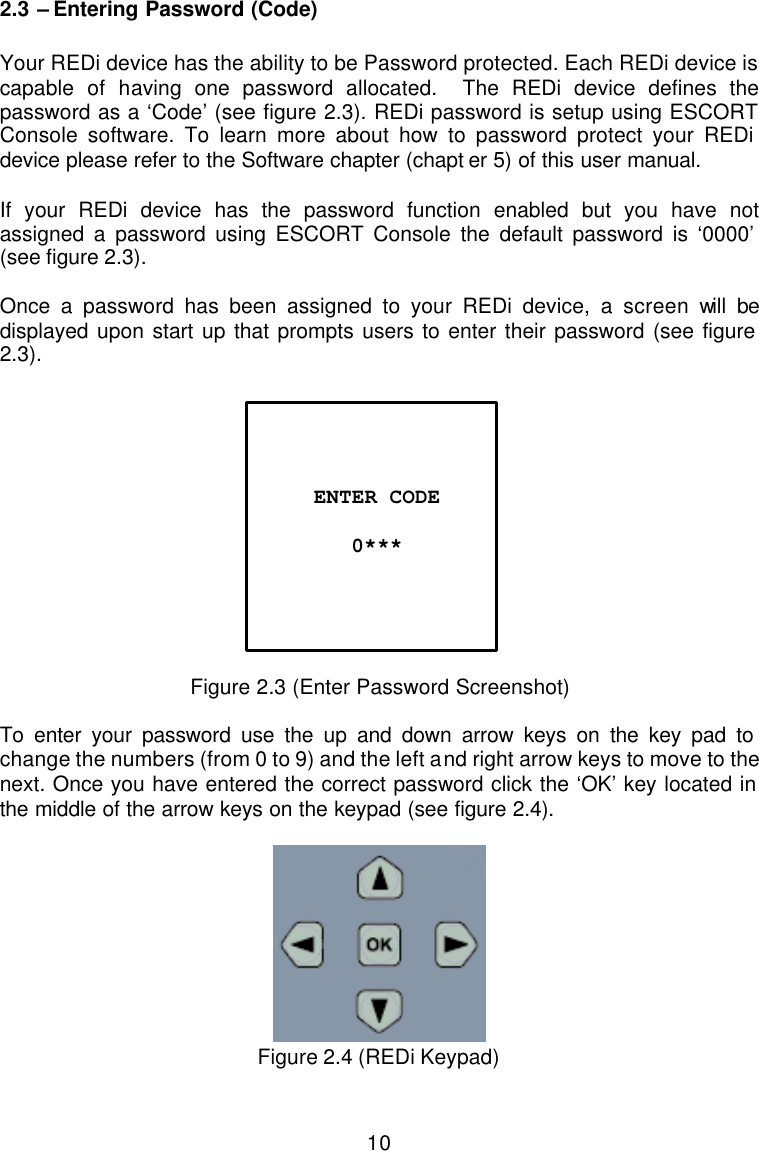
![14 Screen 1 Screen 2 Screen 3 Screen 4 Figure 3.1 (Steps to download new logger data) You will typically use the ‘Read New’ function when you have already downloaded some of the loggers you are searching for and want to find any loggers that the REDi could not connect to during your previous try. 3.1.2 - Read All The ‘Read All’ option allows you to locate and download data from all of the loggers (both new and downloaded previously) that are within communicating distance. The ‘Read All’ option is located on the ‘Main Menu’ screen and is option number two. To download all of the available logger data select ‘Read All’ and press ‘OK’, the next screen displayed is the ‘search’ screen followed by the ‘connected to loggers screen (see figure 3.2). Once the REDi has downloaded all of the found logger information you’re given the option to either view the recently downloaded data or view all of the data stored in the REDi memory (see 3.2.1 View Recent and 3.2.2 View All for more information). Read new……………………. Read all View data System Options 15:54 Searching… Connected to 10 loggers [9/15] read View recent………. View all Exit 15:54](https://usermanual.wiki/Escort-Data-Logging-Systems/REDI.USERS-MANUAL/User-Guide-640558-Page-14.png)
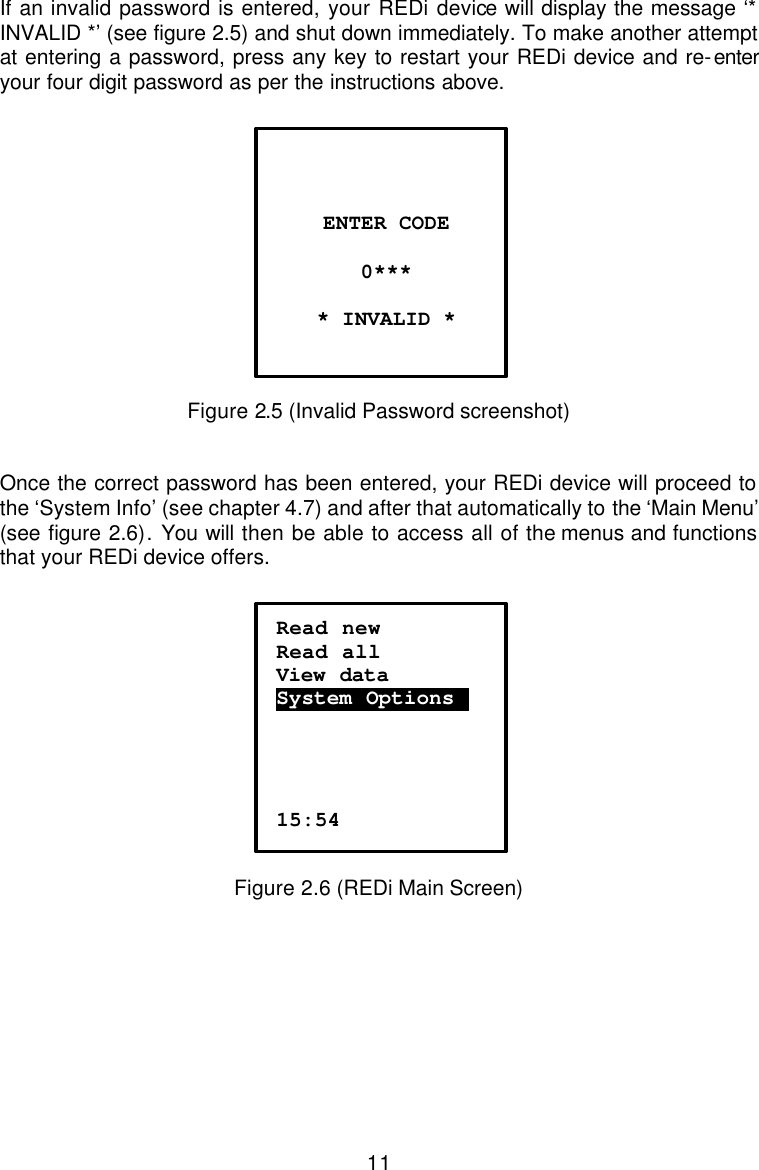
![15 Screen 1 Screen 2 Screen 3 Screen 4 Figure 3.2 (Steps to download all logger data) This function will typically be used if you need to repeat the download of some loggers because additional readings have been taken. The existing data will not be overwritten, but a new logger data block for the same logger will be added in the REDi. The REDi can only connect to a maximum of 32 loggers at the same time. If you did not connect to all loggers you were expecting, try to get closer to those you are missing and repeat ‘Read all’. If those missing loggers have not been downloaded before, use the ‘Read new’ function. 3.2 – Viewing and Interpreting Data Your REDi device is designed to provide several different ways in which to view the logger data that has been downloaded into its memory. There are two ways in which you can access logger data from the REDi’s memory. Firstly, you can access data saved from previous download sessions by choosing the ‘View Data’ option from the main menu (see figure 3.3). Secondly, you are given the option to view logger data immediately after downloading has finished (see figure 3.4). Read new Read all……………………. View data System Options 15:54 Searching… Connected to 27 loggers [22/27] read View recent………. View all Exit 15:54](https://usermanual.wiki/Escort-Data-Logging-Systems/REDI.USERS-MANUAL/User-Guide-640558-Page-15.png)
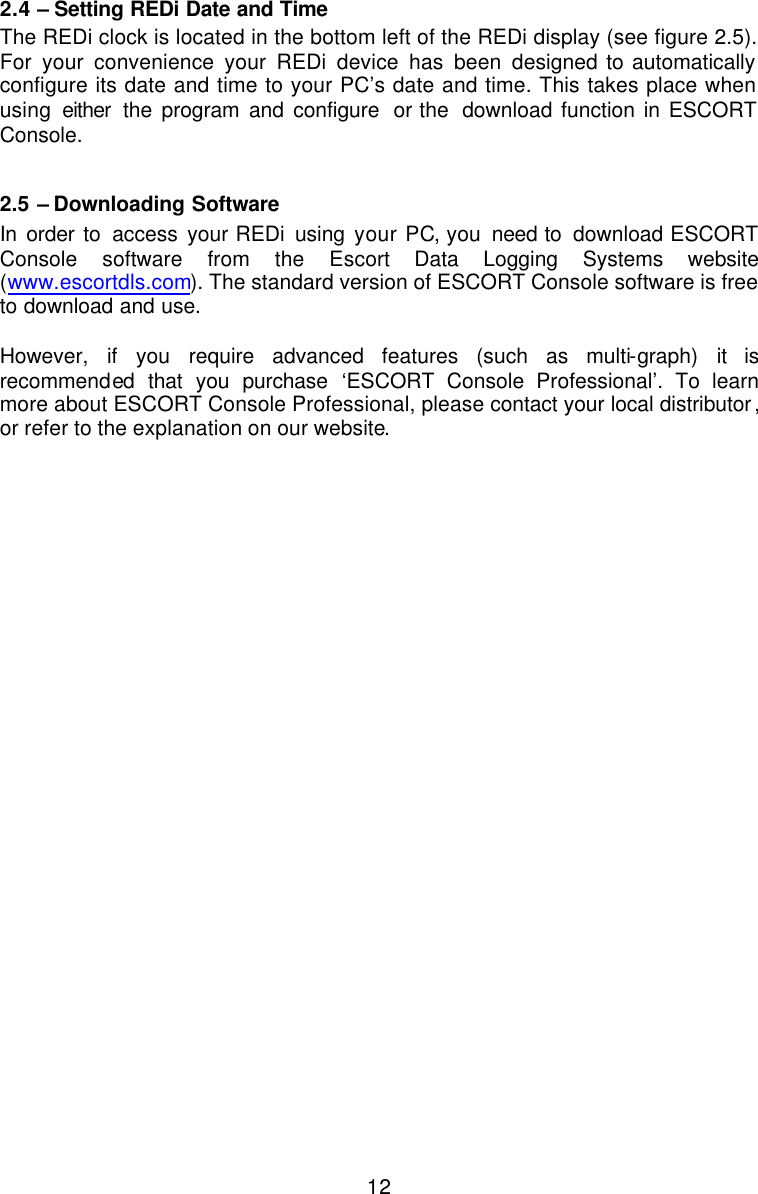
![16 Figure 3.3 (Main Screen – View Data) 3.4 (Download Screen – Read Loggers) Both the main screen and the download screen direct you to the ‘View Screen’, where you have two viewing options, “View recent’ and ‘View all’ (see figure 3.5). For more information on the ‘View Recent’ and ‘View All’ options please read sections 3.2.1 and 3.2.2. Figure 3.5 (View Screen) For Wireless Mini loggers which have the downloaded data password protected, you can only view the Overview, not summary or out of specification information. 3.2.1 – View Recent The ‘View Recent’ option will only display data which has been collected during the REDi’s most recent scan (see figure 3.6). To scroll through the different loggers, first the ‘Number of Loggers in Memory’ window (see figure 3.8) must be highlighted. By pressing the left and right arrow keys on the key pad you can move through the logger list. For information regarding the viewing of detailed logger information please refer to 3.2.3 ‘View Summary’ and 3.2.4 ‘View out of Specification’. Read new Read all View data…………………. System Options 15:54 Connected to 10 loggers [9/10] read View recent………. View all Exit 15:54](https://usermanual.wiki/Escort-Data-Logging-Systems/REDI.USERS-MANUAL/User-Guide-640558-Page-16.png)
![17 Figure 3.6 (‘View recent’ to ‘Overview’ Screenshots) If there have been no recent downloads of data the REDi with display a screen with the message ‘No Loggers’ (see figure 3.7). To return to the ‘View Screen’ select the ‘Exit’ option (near the bottom of the screen) or press the ‘Esc’ button. Figure 3.7 (No Loggers screen) If your REDi registers recently downloaded data within its memory, your REDi screen will display the basic information relating to that logger data (‘Overview’), Items such as; product code, serial number, battery status and whether the logger has logged readings out of specification (see figure 3.8). No loggers ..…………[0/0]………….. Exit 15:54 View recent………. View all Exit 15:54 MR-IN-D-2-LR8 MR-BF-053-001 CONTAINER 4 Battery LOW Stopped. PASS [5/10] View Summary View Out Spec Restart Logger 15:54](https://usermanual.wiki/Escort-Data-Logging-Systems/REDI.USERS-MANUAL/User-Guide-640558-Page-17.png)
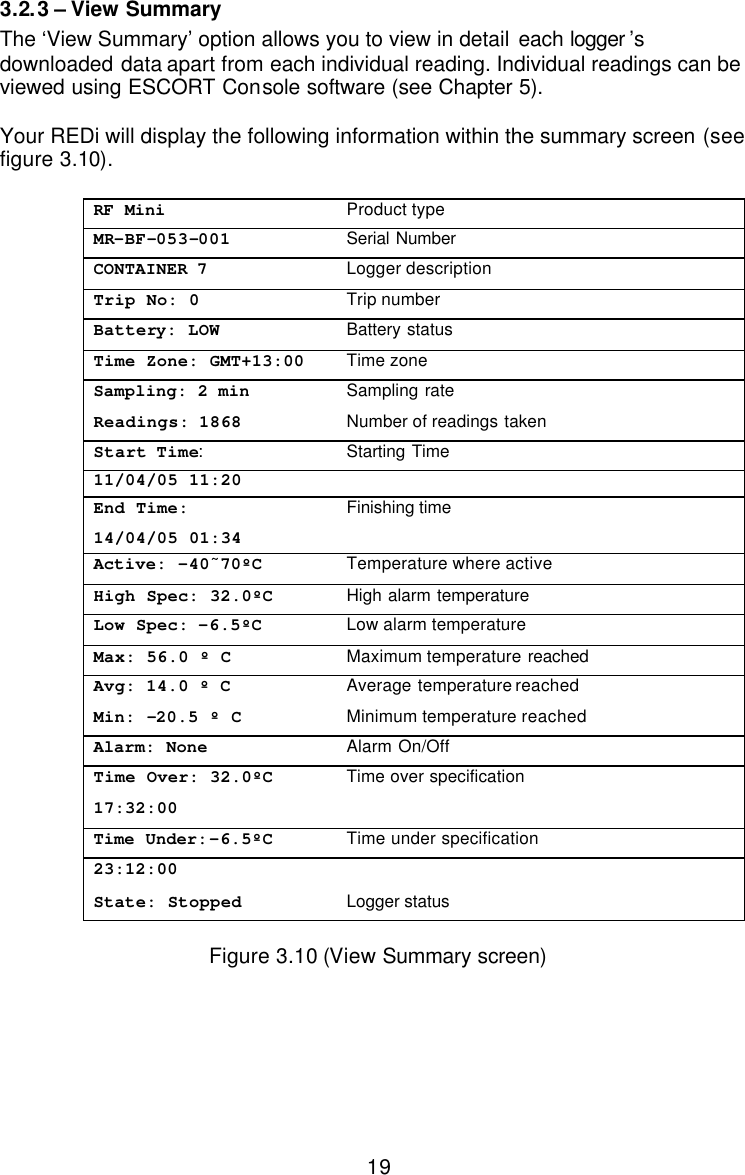
![18 Figure 3.8 (Downloaded screen) 3.2.2 – View All The ‘View All’ screen allows you to access and view all logger data currently in the REDi’s memory. This includes data that has been downloaded before the REDi’s most recent scan. Once you have selected the ‘View All’ function the REDi will precede to the ‘Overview’ menu (see figure 3.9). To scroll through the different loggers, first highlight the ‘Number of Loggers in Memory’ window. By pressing the left and right arrow keys on the key pad you will be able to move through the logger list. For explanations regarding the viewing of detailed logger information please refer to 3.2.3 ‘View Summary’ and 3.2.4 View out of Specification. Figure 3.9 (View All and Overview) View recent View all……………………. Exit 15:54 MR-IN-D-2-LR8 MR-BF-053 -001 CONTAINER 4 Battery LOW Stopped. PASS [5/10] View Summary View Out Spec Exit 15:54 and Position of displayed logger in memory](https://usermanual.wiki/Escort-Data-Logging-Systems/REDI.USERS-MANUAL/User-Guide-640558-Page-18.png)
![20Once you have reviewed the summary information of the logger that you have chosen you are given two options, which are ‘View new logger’ and ‘Exit’. These are the last two fields of the ‘View Summary’ screen (see figure 3.11). Figure 3.11 (View Summary Screen) The ‘View new logger’ option allows you to return to the ‘Overview’ where you can choose to look at another logger’s data file that is saved in your REDi memory (see figure 3.12). You also get there by pressing the ‘Esc’ button. Figure 3.12 (Return to ‘Overview’) Min: -20.5ºC Alarm: None Time over: 32.0ºC 17:32:00 Time under:-6.5ºC 23:12:00 State: Stopped View new logger…. Exit 15:54 MR-IN-D-2-LR8 MR-BF-053 -001 CONTAINER 4 Battery LOW Stopped. FAIL [5/10] View Summary View Out Spec Restart Logger Exit 15:54 Min: -20.5ºC Alarm: None Time over: 32.0ºC 17:32:00 Time under:-6.5ºC 23:12:00 State: Stopped View new logger…. Exit 15:54](https://usermanual.wiki/Escort-Data-Logging-Systems/REDI.USERS-MANUAL/User-Guide-640558-Page-20.png)
![21The ‘Exit’ option allows you to return to the ‘Main Menu’ (see figure 3.13). Figure 3.13 (Return to ‘Main Menu’) If you accidentally exit the ‘View Summary’ screen you can return to the ‘View Summary’ screen by selecting the ‘View data’ option. From this screen you can return to the ‘View’ menu where you have the option to either choose ‘View recent’; or ‘View all’ (see 3.2.1 and 3.2.2). 3.2.4 – View out of Specification Your REDi device allows you to view specific readings when an ‘Out of Specification’ event has occurred. You can access these readings by selecting the ‘View Out Spec’ option from the ‘Overview’ screen (see figure 3.14). Figure 3.14 (Viewing ‘out of specification’ readings) Once you have chosen the ‘View Out Spec’ option a list of readings does appear on your REDi screen. You can view all of the readings by selecting the ‘Next’ option located at the top and bottom of the ‘Out of Specification’ screen. If you would like to exit this screen simply press the escape key (‘Esc’) located at the bottom right of your REDi keypad, after which, you will be returned to the ‘Overview’ screen (see figure 3.15). Min: -20.5ºC Alarm: None Time over: 32.0ºC 17:32:00 Time under:-6.5ºC 23:12:00 State: Stopped View new logger Exit……………………….. 15:54 Read new Read all View data …………………. System Options 15:54 MR-IN-D-2-LR8 MR-BF-053 -001 CONTAINER 4 Battery LOW Stopped. FAIL [5/10] View Summary View Out Spec…… Exit 15:54 Next………………………………. 13/01/13 16:43 Reading: 41.5ºC 13/01/13 16:44 Reading: 41.5ºC 13/01/13 16:45 Reading: 42.0ºC 13/01/13 16:46 Reading: 40.5ºC 11:23](https://usermanual.wiki/Escort-Data-Logging-Systems/REDI.USERS-MANUAL/User-Guide-640558-Page-21.png)
![22 Figure 3.15 (Returning to “Overview’ screen) 3.2.5 Restart the logger Through the ‘Overview’ menu you have the ability to restart loggers (3.16). Figure 3.16 (Restart Function) When you have successfully started the logger, it will run exactly the same programme again that it had been running for the last trip. This includes any start delays, as well as the specification limits and recording frequency. Please note that you do not need to push the button to start your Wireless Mini; the ‘Restart’ function starts the programme immediately (The logger will show ‘d’ for start delay or the latest reading if no delay was specified). This function is not available if the program of the logger has been password protected, or the available trips of the logger have been used up. In case the logger program had been password protected, you need to connect the logger to ESCORT Console for re-arming and supply the correct password. If the password has been lost, the logger has to be returned to your ESCORT distributor for password reset. Next 13/01/13 16:43 Reading: 41.5ºC 13/01/13 16:44 Reading: 41.5ºC 13/01/13 16:45…. Reading: 42.0ºC 13/01/13 16:46 Reading: 40.5ºC 11:23 MR-IN-D-2-LR8 MR-BF-053-001 CONTAINER 4 Battery LOW Stopped. FAIL [5/10] View Summary View Out Spec Restart Logger Exit 15:54 MR-IN-D-2-LR8 MR-BF-053 -001 CONTAINER 4 Battery LOW Stopped. FAIL [5/10] View Summary View Out Spec Restart Logger Exit 15:54 MR-BF-158-006 Started! OK](https://usermanual.wiki/Escort-Data-Logging-Systems/REDI.USERS-MANUAL/User-Guide-640558-Page-22.png)