FUJIFILM Business Innovation C2665DNF Dell C2665dnf Color Laser Multifunction Printer User Manual 05 Short Term Confidential 4
Fuji Xerox Co., Ltd. Dell C2665dnf Color Laser Multifunction Printer 05 Short Term Confidential 4
Contents
User manual-4
Removing Options 509
33
Removing Options
If the printer location needs to change or the printer and print media handling options need to be shipped to a new
location, all print media handling options must be removed from the printer. For shipping, pack the printer and print
media handling options securely to avoid damage.
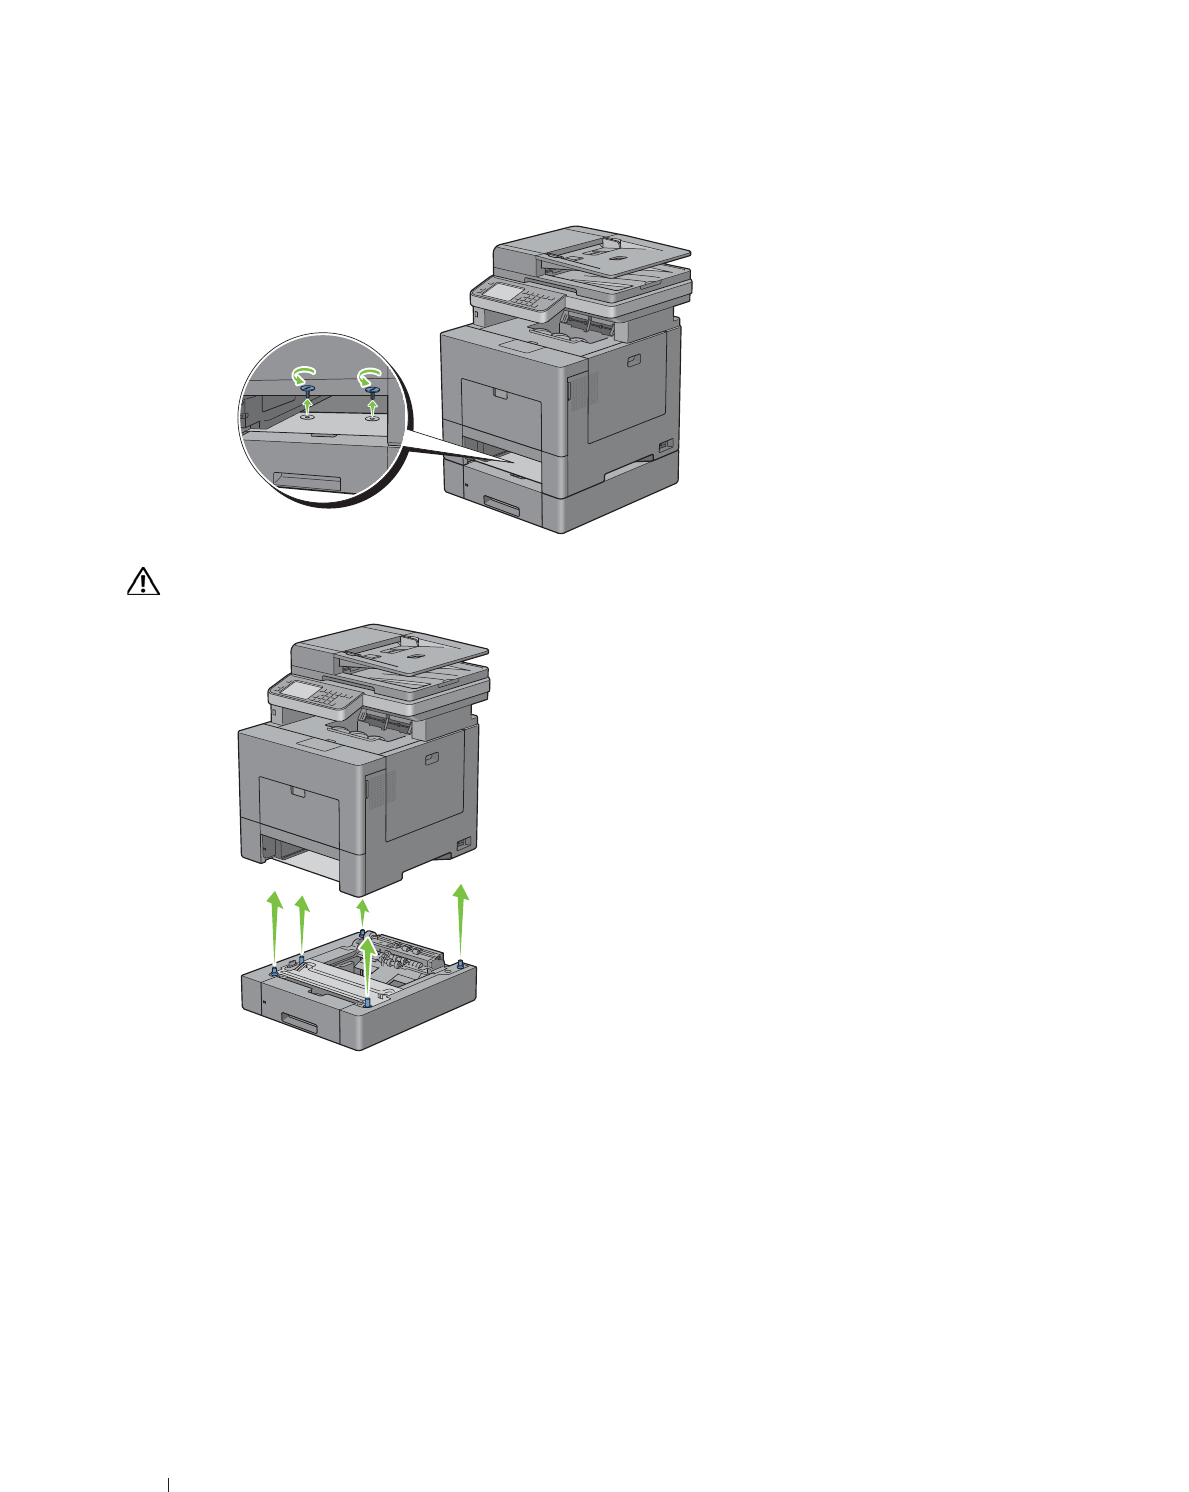
Removing the Optional 550-Sheet Feeder
WARNING: When you remove the optional 550-sheet feeder (Tray2), be sure to turn off the printer, unplug the power cable, and
disconnect all cables from the back of the printer before starting these tasks.
1
Ensure that the printer is turned off, and then disconnect all cables from the back of the printer.
2
Pull the tray1 out of the printer about 200 mm.
3
Hold tray1 with both hands, and remove it from the printer.
510 Removing Options
4
Remove the two screws joining the printer and the optional 550-sheet feeder by unscrewing them with a coin or
similar object.
5
Gently lift the printer off the optional 550-sheet feeder, and place it on a level surface.
WARNING: Two people are required to lift the printer.
Removing Options 511
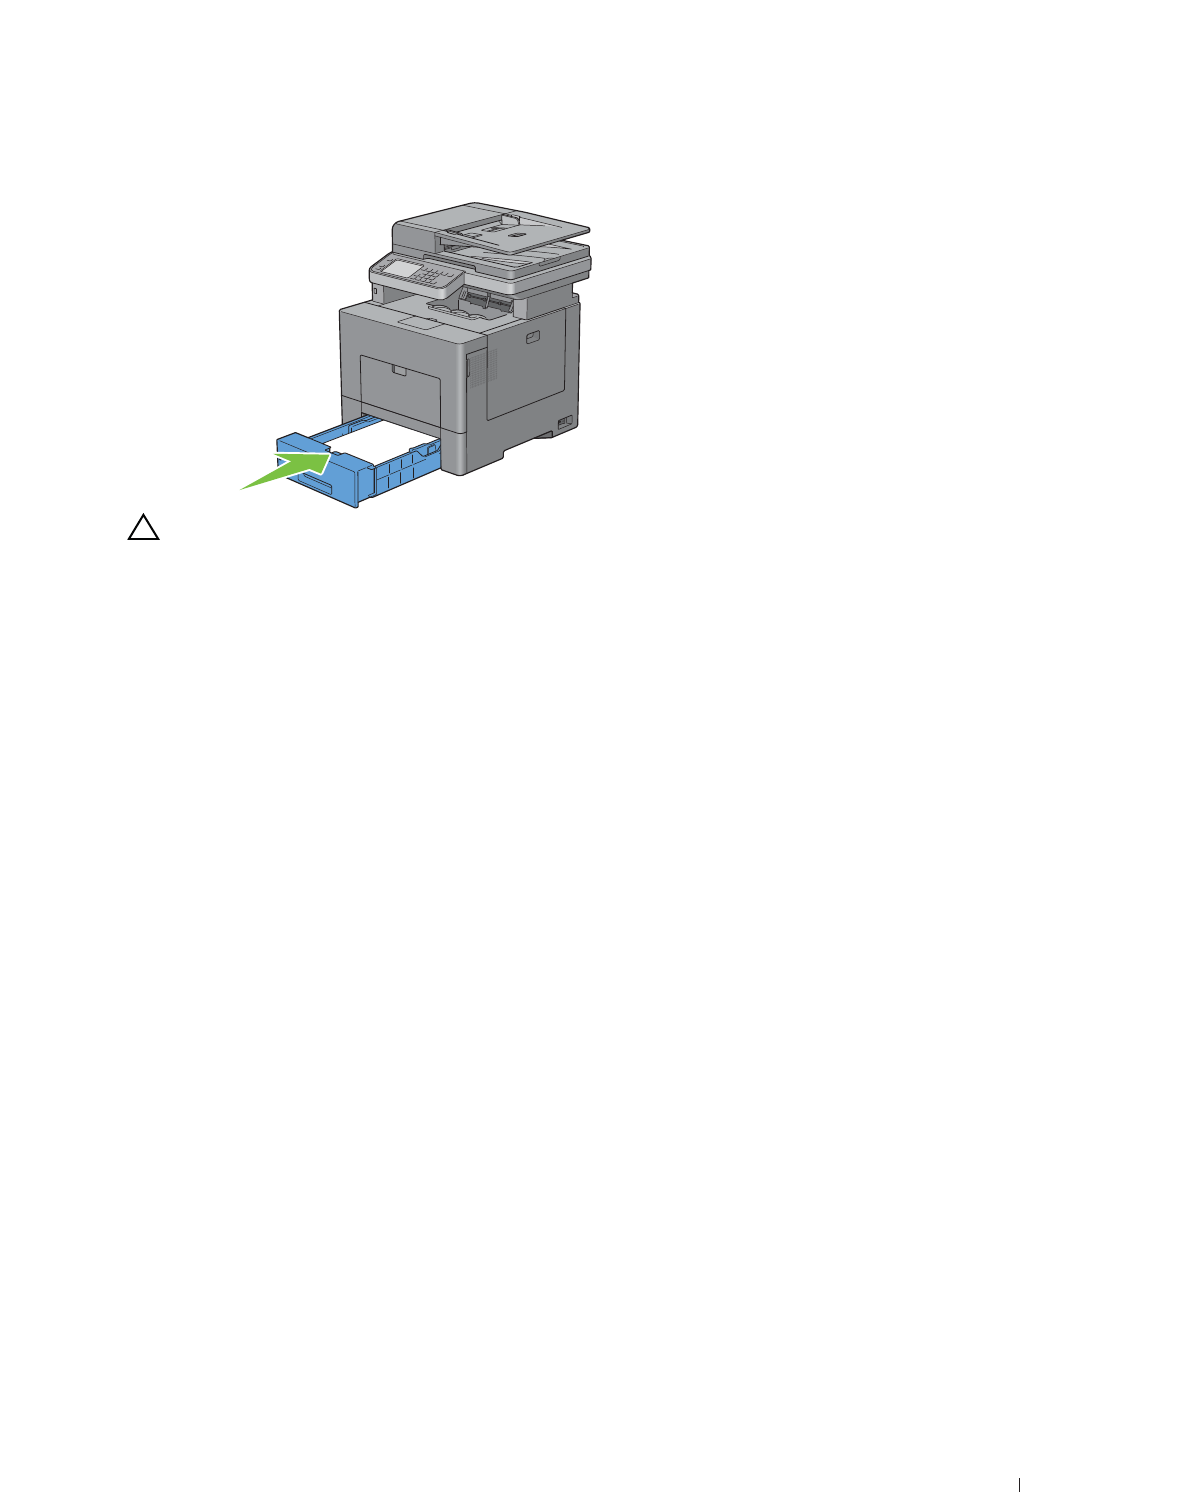
6
Insert the tray1 into the printer, and push until it stops.
CAUTION: Do not use excessive force on the tray. Doing so could damage the tray or the inside of the printer.
7
Re-connect all cables into the back of the printer and turn on the printer.

512 Removing Options
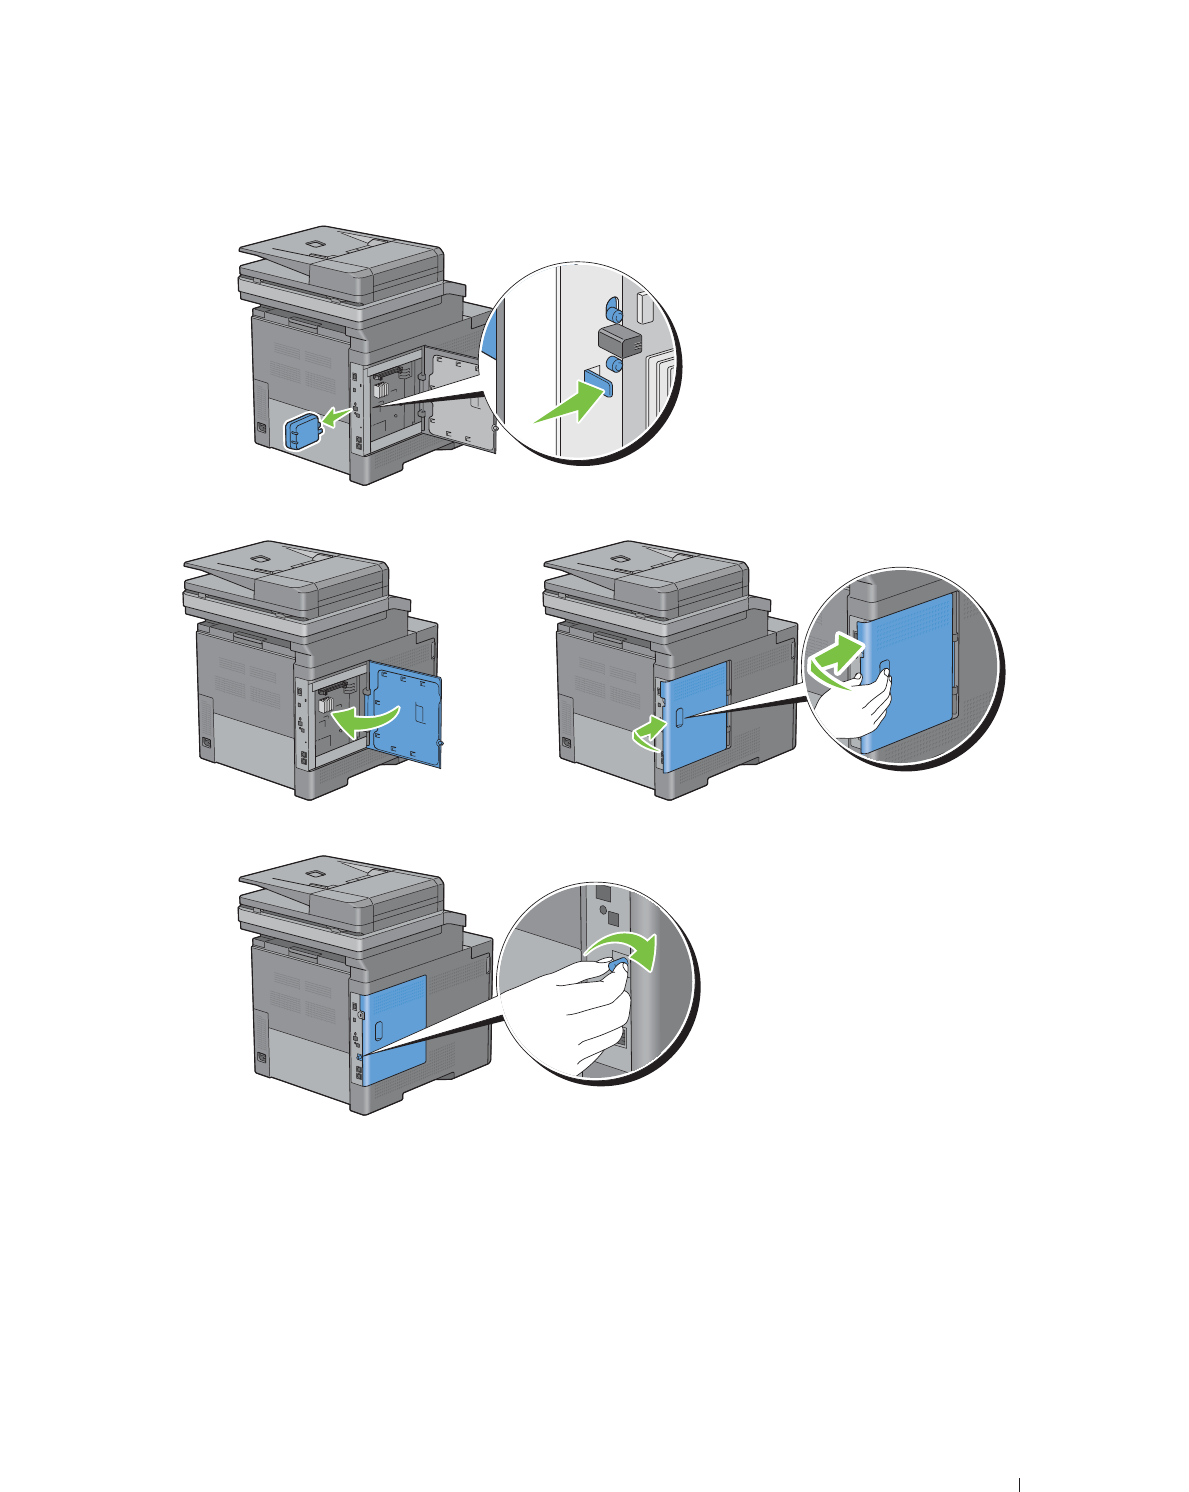
Removing the Optional Wireless Adapter
WARNING: When you remove the optional wireless adapter, be sure to turn off the printer, unplug the power cable, and
disconnect all cables from the back of the printer before starting these tasks.
1
Ensure that the printer is turned off.
2
Turn the screw on the left side cover counterclockwise to remove it.
3
Slide the left side cover towards the back of the printer.
4
Open the left side cover completely.
Removing Options 513
5
Remove the wireless adapter from the printer by releasing the adapter's hook while pushing the wireless adapter
towards the front of the printer.
6
Close the left side cover, and then slide it towards the front of the printer.
7
Turn the screw clockwise.
8
Turn on the printer.

514 Removing Options

Clearing Jams 515
34
Clearing Jams
Careful selection of appropriate print media and proper loading allow you to avoid paper jams. See
"
Print Media
Guidelines
"
for more information.
NOTE: Before buying large quantities of any print media, it is recommended to try a sample first.
Avoiding Jams
• Use only recommended print media. See "
Print Media Guidelines
" for more information.
• See "Loading Print Media in Tray1 and the Optional 550-Sheet Feeder" and "Loading Print Media in the MPF" to
load print media properly.
• Do not overload the print media sources. Ensure that the print media stack height does not exceed the maximum
height indicated by the load-line labels in the tray.
• Do not load wrinkled, creased, damp, or curled print media.
• Flex, fan, and straighten print media before you load it. If a jam occurs with print media, try feeding one sheet at a
time through the multipurpose feeder (MPF).
• Do not use print media that you have cut or trimmed yourself.
• Do not mix print media sizes, weights, or types in the same print media source.
• Ensure that the recommended print side is face up when you insert the print media.
• Keep print media stored in an acceptable environment. For more information, see
"
Storing Print Media.
"
• Do not remove the feeding tray during a print job.
• Push tray1 or the optional 550-sheet feeder (tray2) in firmly after loading.
• Ensure that all cables that connect to the printer are correctly attached.
• Overtightening the guides may cause jams.
• Wipe the retard rollers in the tray or MPF with a cloth that is slightly dampened with water if jams caused by
misfeeding paper occur frequently.
516 Clearing Jams
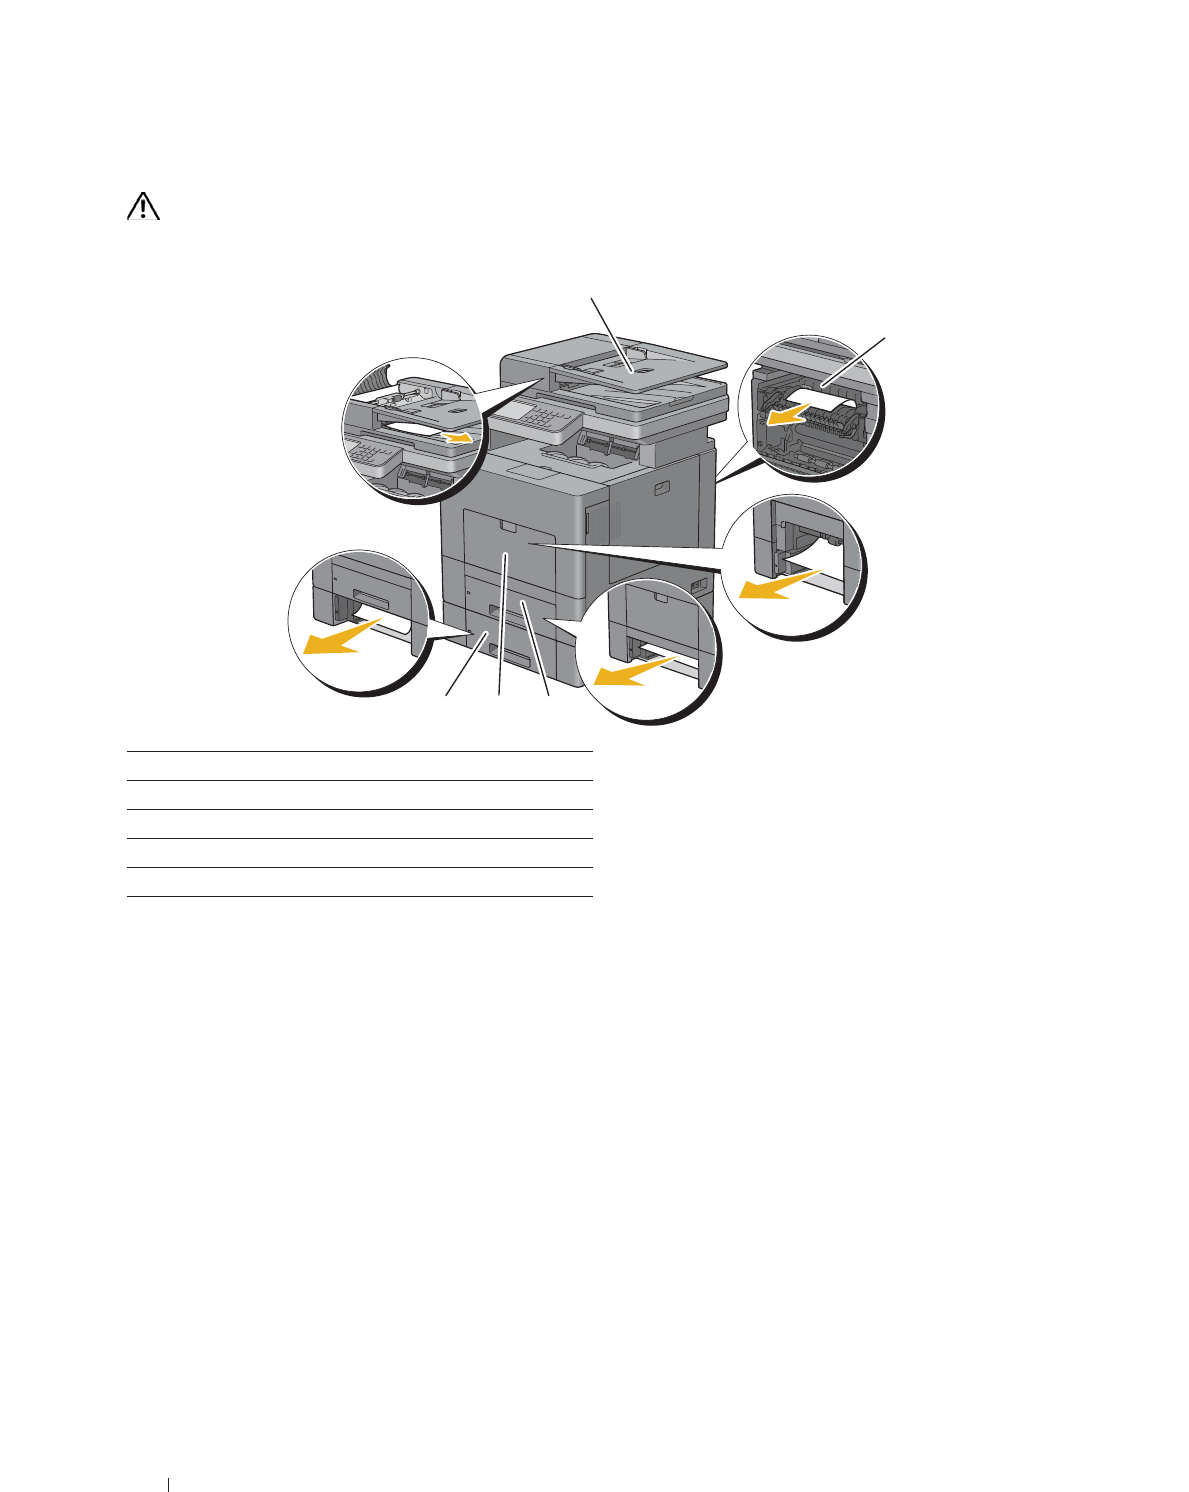
Identifying the Location of Paper Jams
WARNING: Do not attempt to clear any jams using tools or instruments. This may permanently damage the printer.
The following illustration shows where paper jams may occur along the print media path.
1Duplex Automatic Document Feeder (DADF)
2Fusing Unit
3Tray1
4MPF
5Optional 550-Sheet Feeder
1
2
345
Clearing Jams 517
Clearing Paper Jams From the DADF
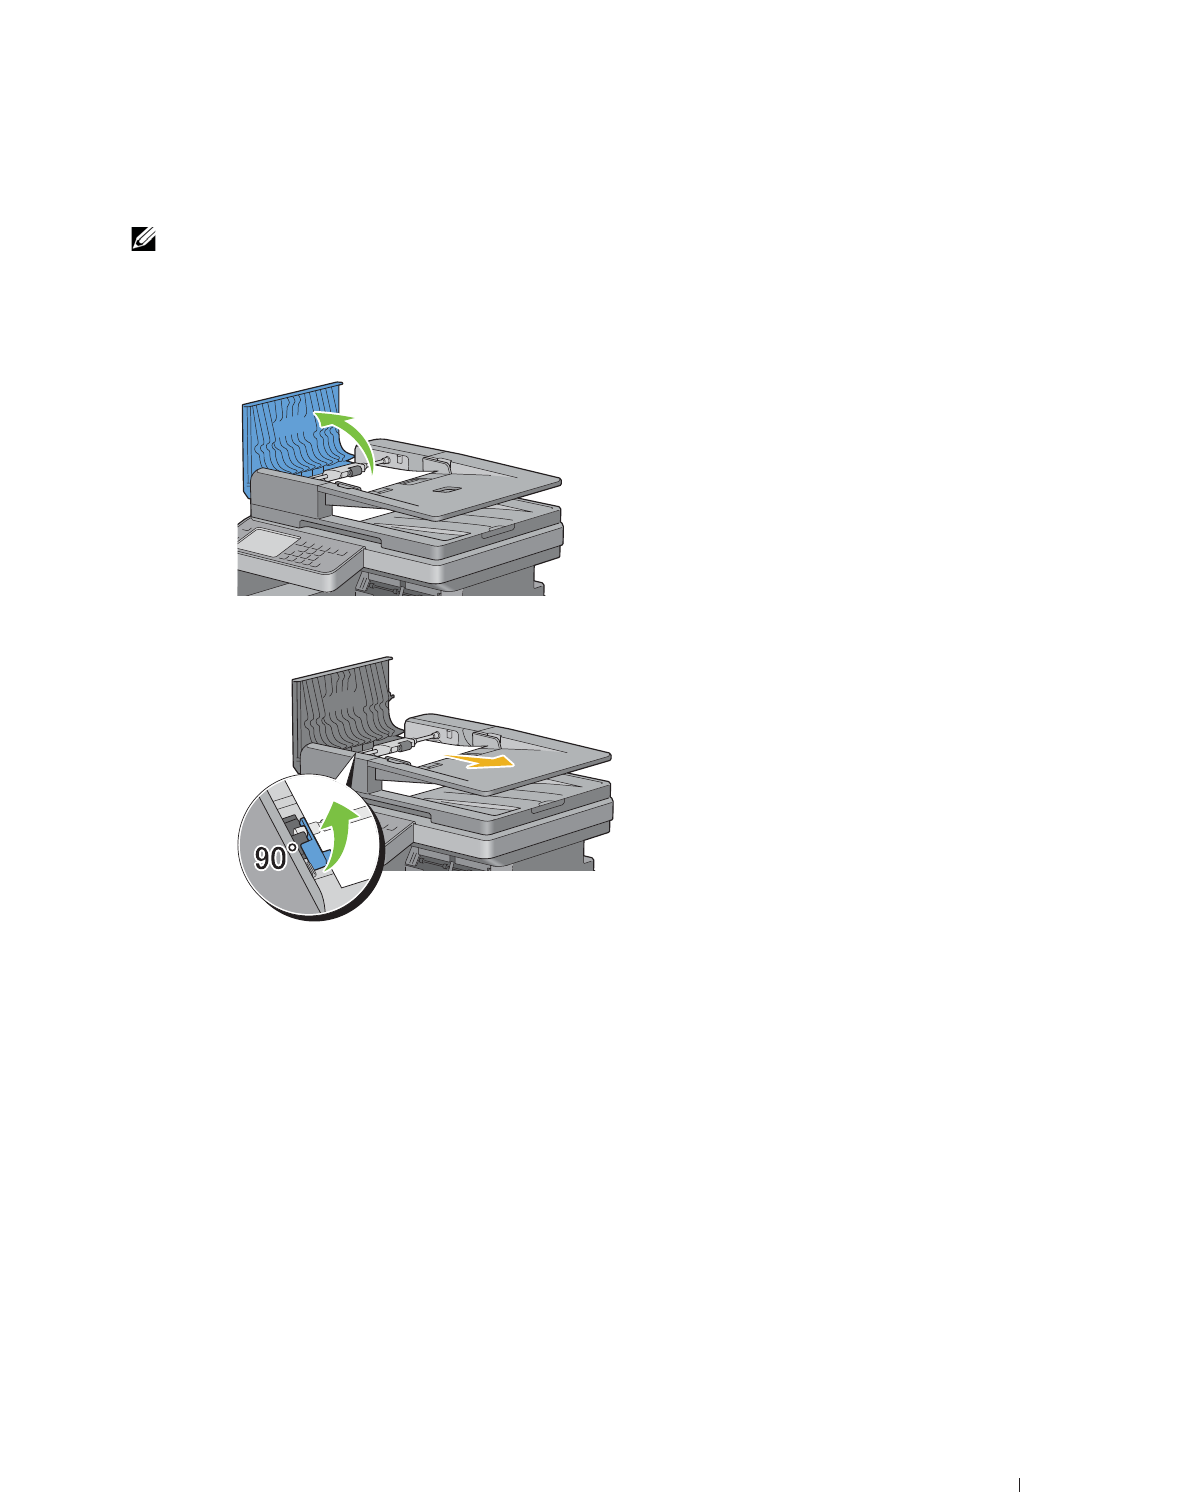
When a document jams while it passes through the DADF, remove the jam according to the following procedure.
NOTE: To prevent document jams, use the document glass for thick, thin, or mixed documents.
1
Remove the remaining documents from the DADF.
If the document is jammed in the paper feed area:
a
Open the DADF cover.
b
Lift the release lever 90 degrees and remove the jammed document by carefully pulling it to the right.
If you find it difficult to pull the document:
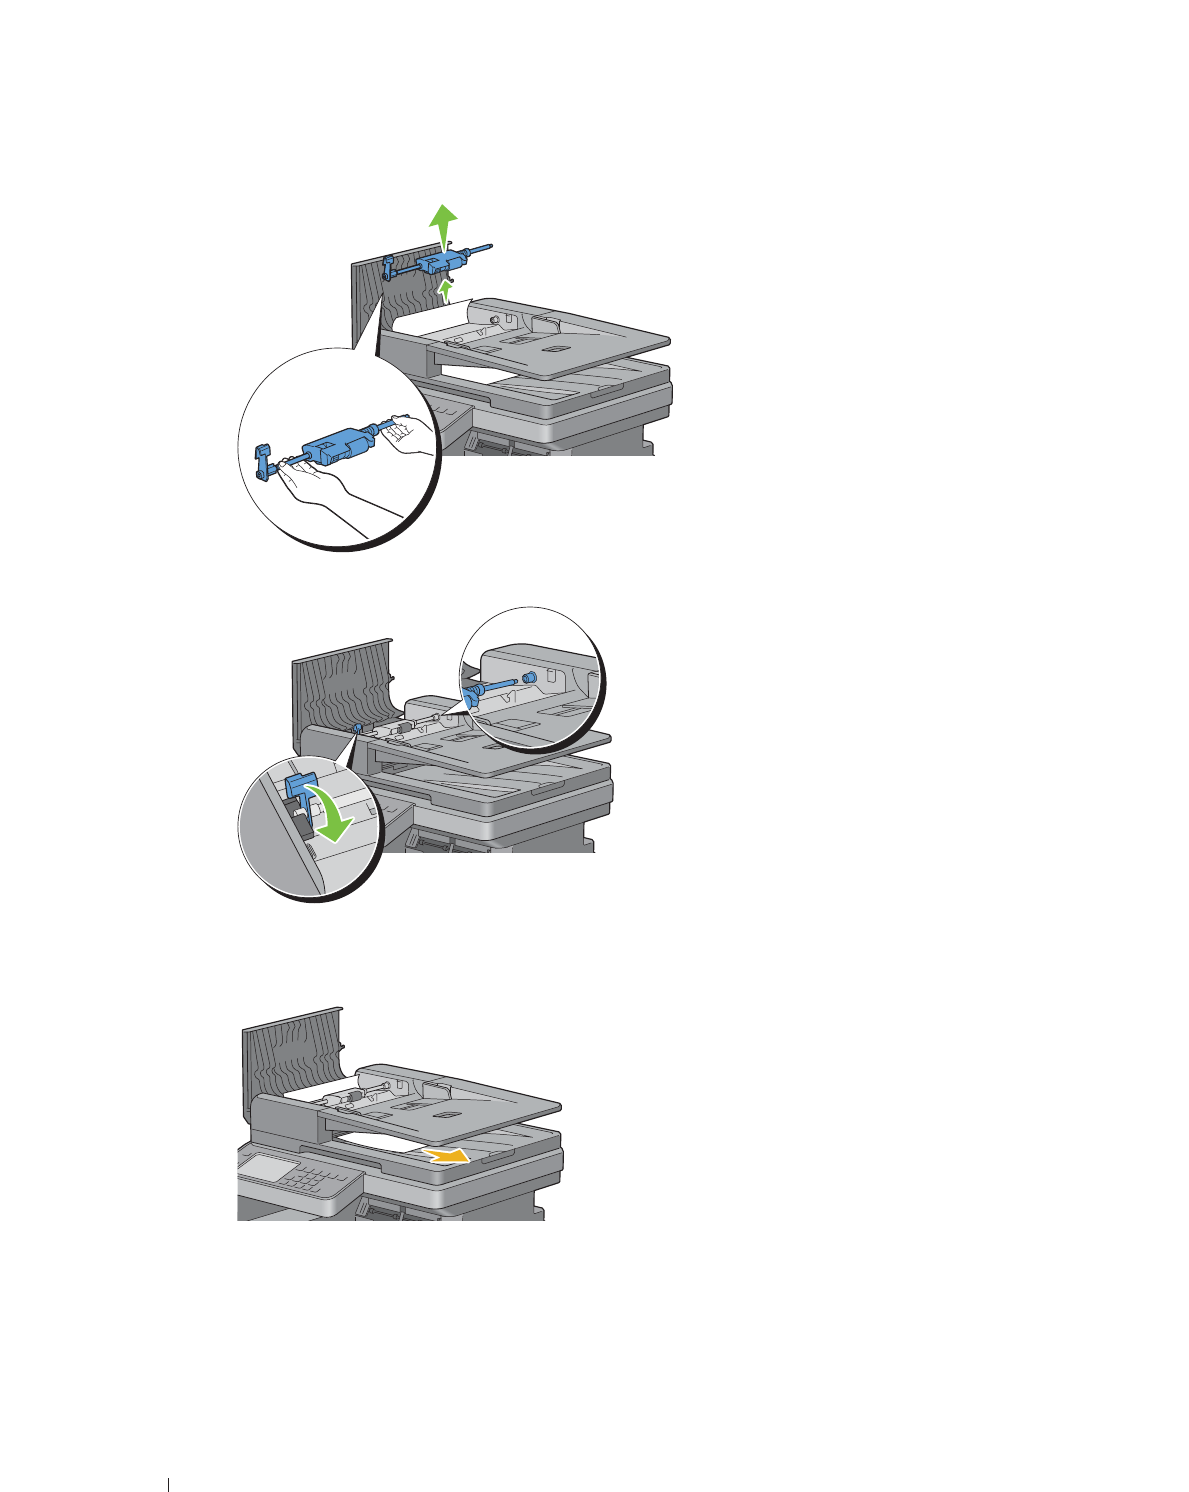
518 Clearing Jams
c
Remove the DADF feed roller assembly and remove the document by gently pulling it straight up.
d
Insert the DADF feed roller assembly and press down the release lever.
If the document is jammed in the paper exit area:
e
Remove the jammed document from the document output tray.
Clearing Jams 519
f
Close the DADF cover, and then load the documents back into the DADF.
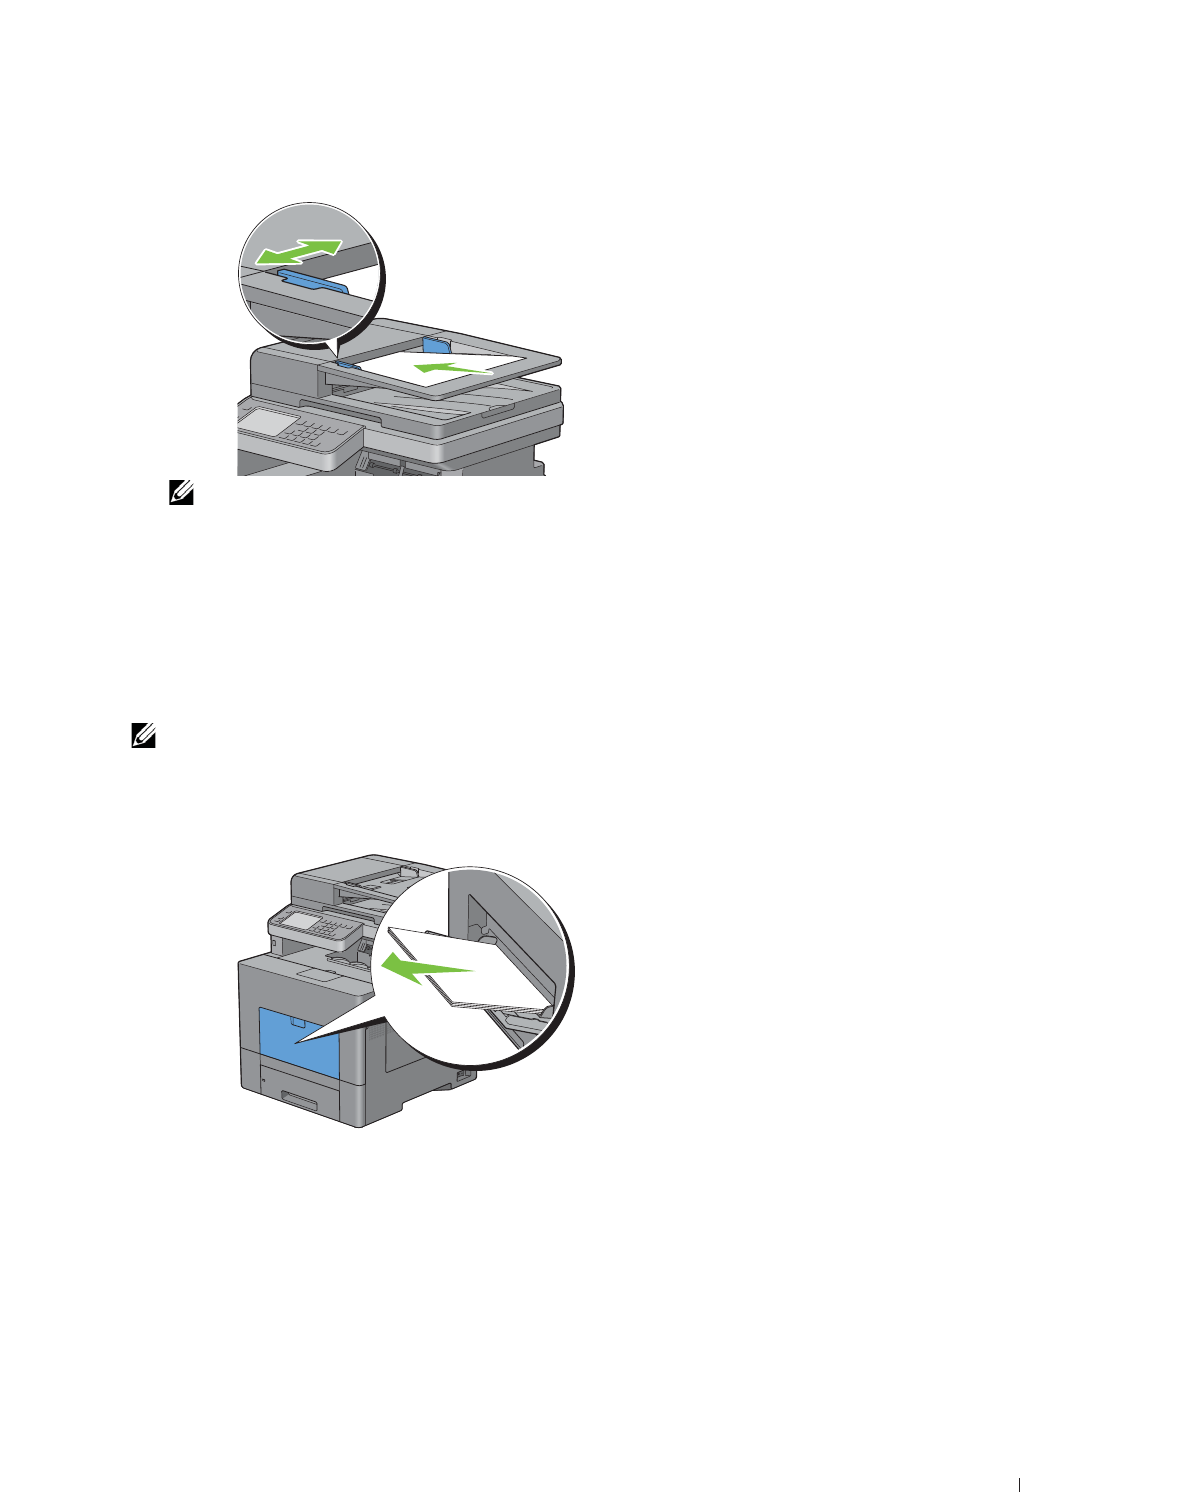
NOTE: Ensure that you adjust the document guides before printing a Legal-size document.
2
If you cannot see the jammed document or the jammed document do not move when you pulled, open the
document cover.
3
Remove the document from the white sheet by carefully pulling it to the right.
4
Close the document cover, and then load the documents back into the DADF.
5
Ta p
Start
.
Clearing Paper Jams From the MPF
NOTE: To resolve the error displayed on the touch panel, you must clear all print media from the print media path.
If error code: 050-112 appears:
1
Remove any paper loaded on the MPF
520 Clearing Jams
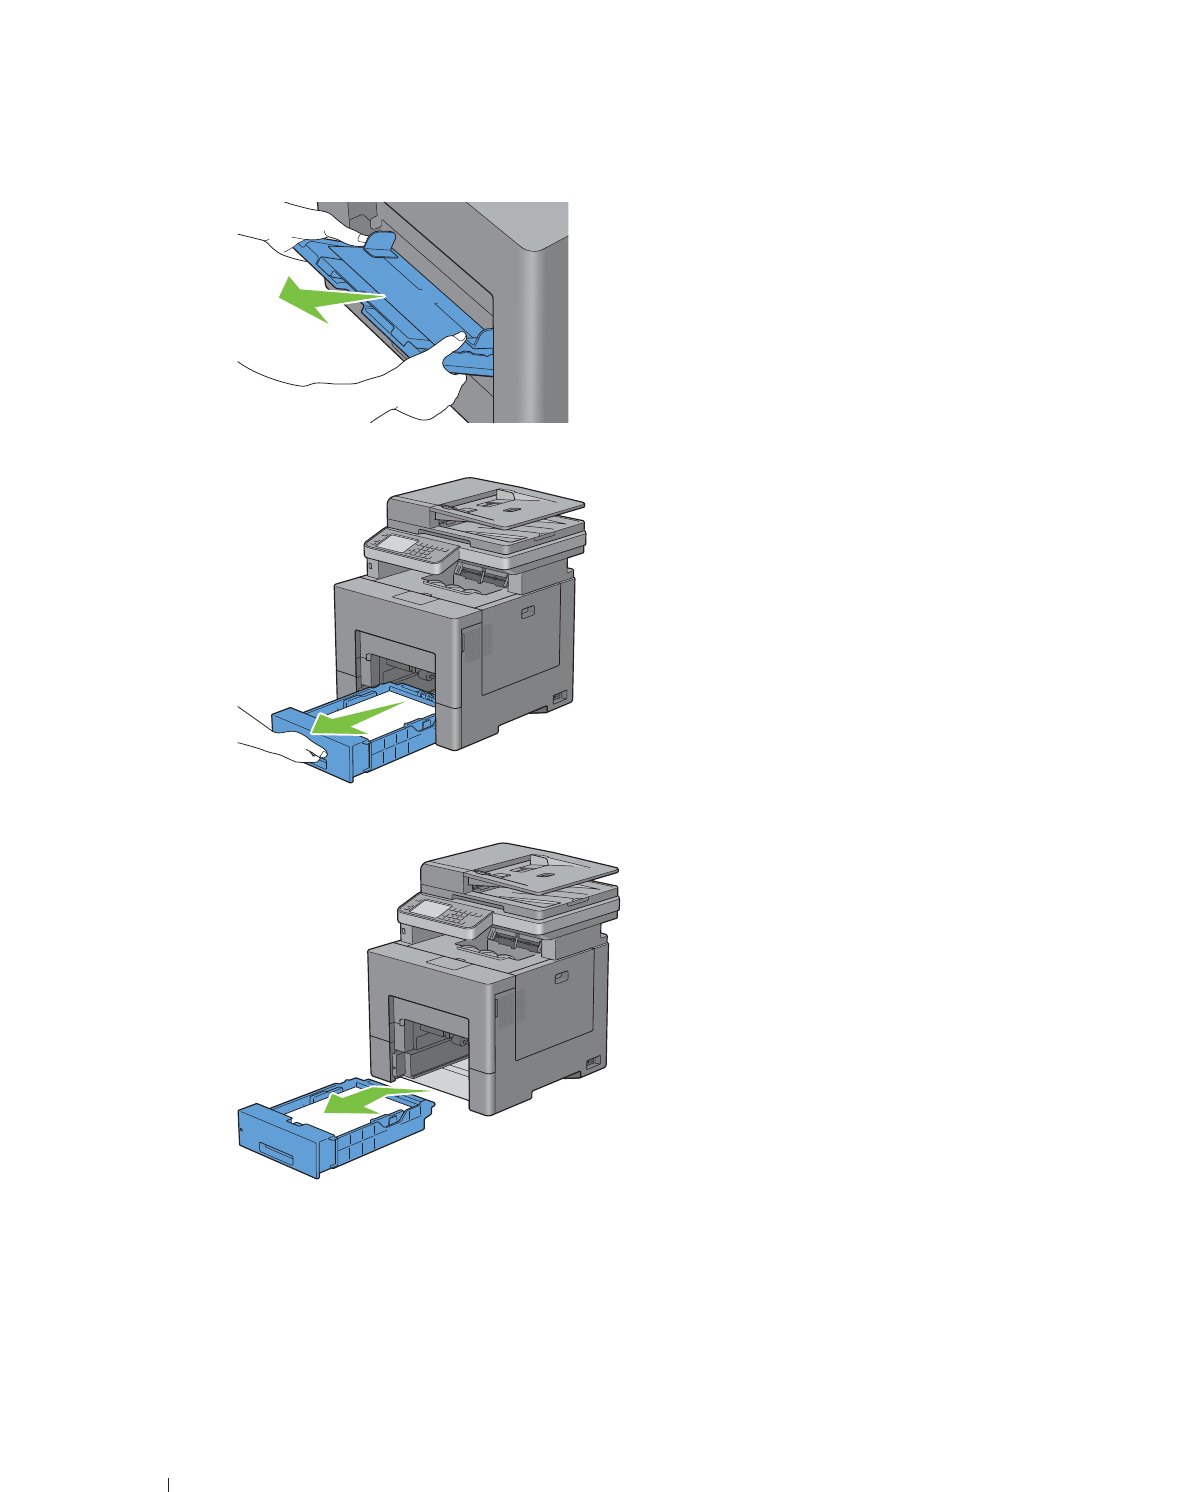
2
Grasp both sides of the MPF, and then pull it out of the printer.
3
Pull tray1 out of the printer about 200 mm.
4
Hold tray1 with both hands, and remove it from the printer.
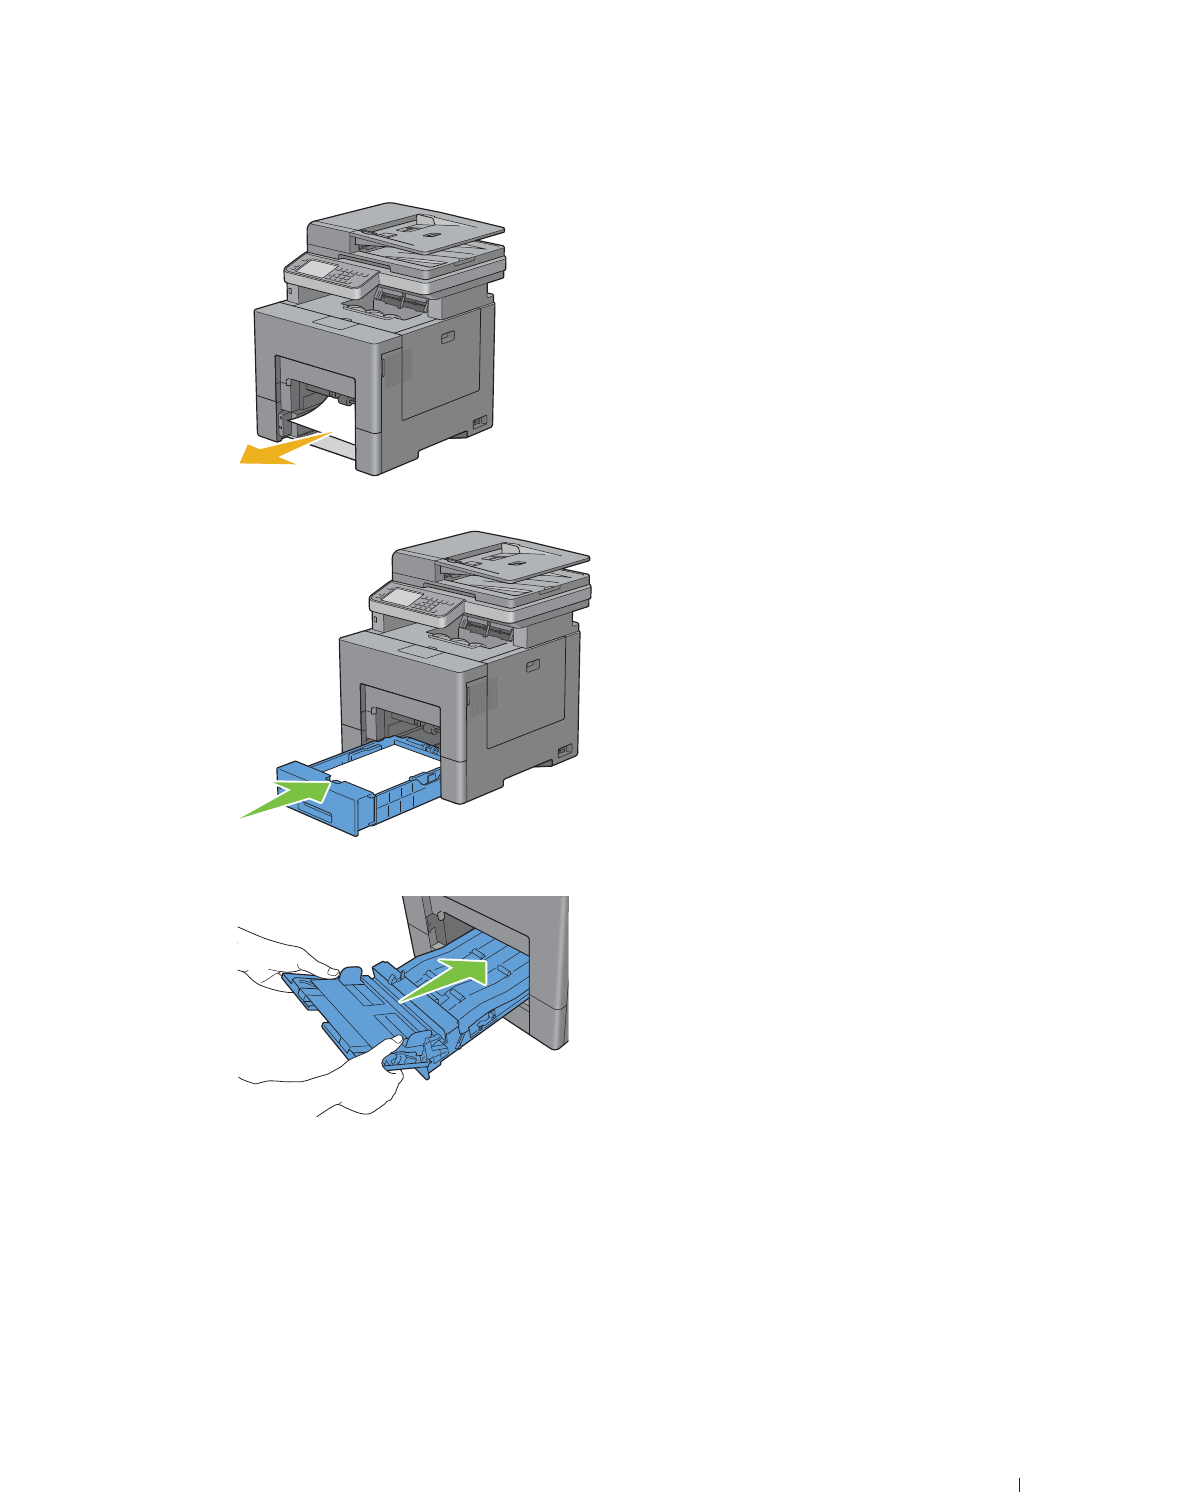
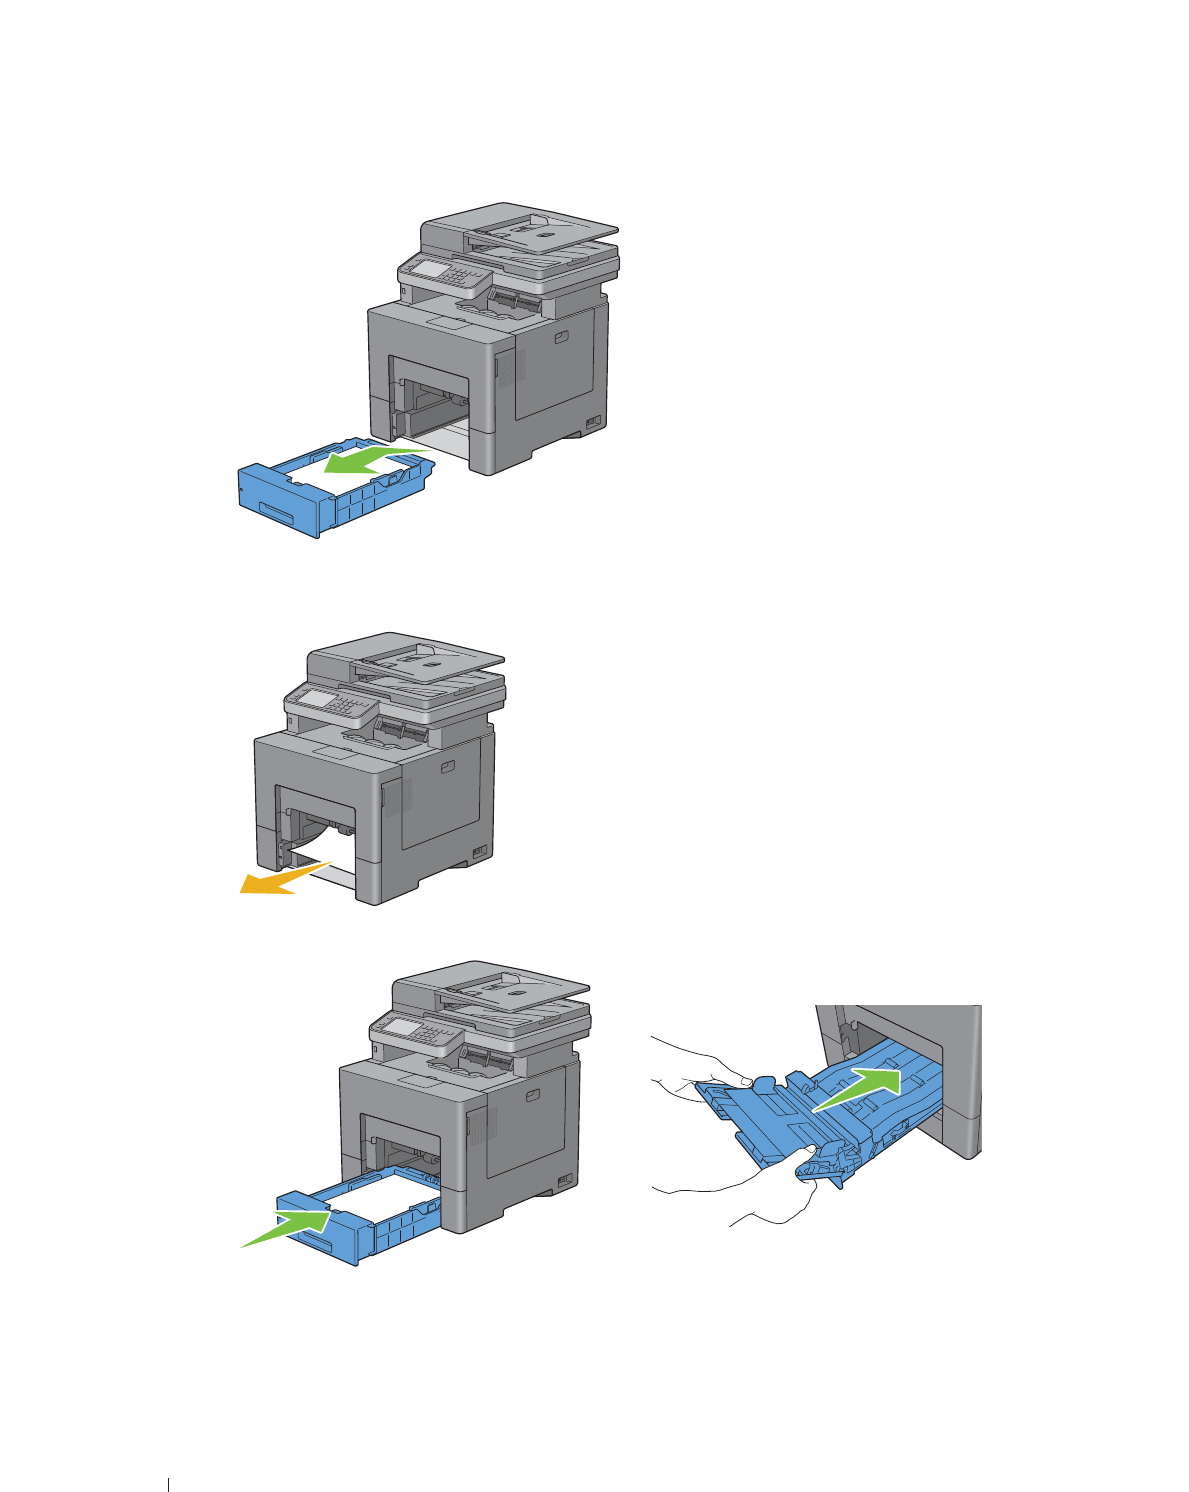
Clearing Jams 521
5
Remove the jammed paper.
6
Insert tray1 into the printer, and push until it stops.
7
Insert the MPF into the printer.
If error code: 050-129 appears:
Follow the instructions in "If error code: 050-129 appears:" to clear paper jams.
522 Clearing Jams
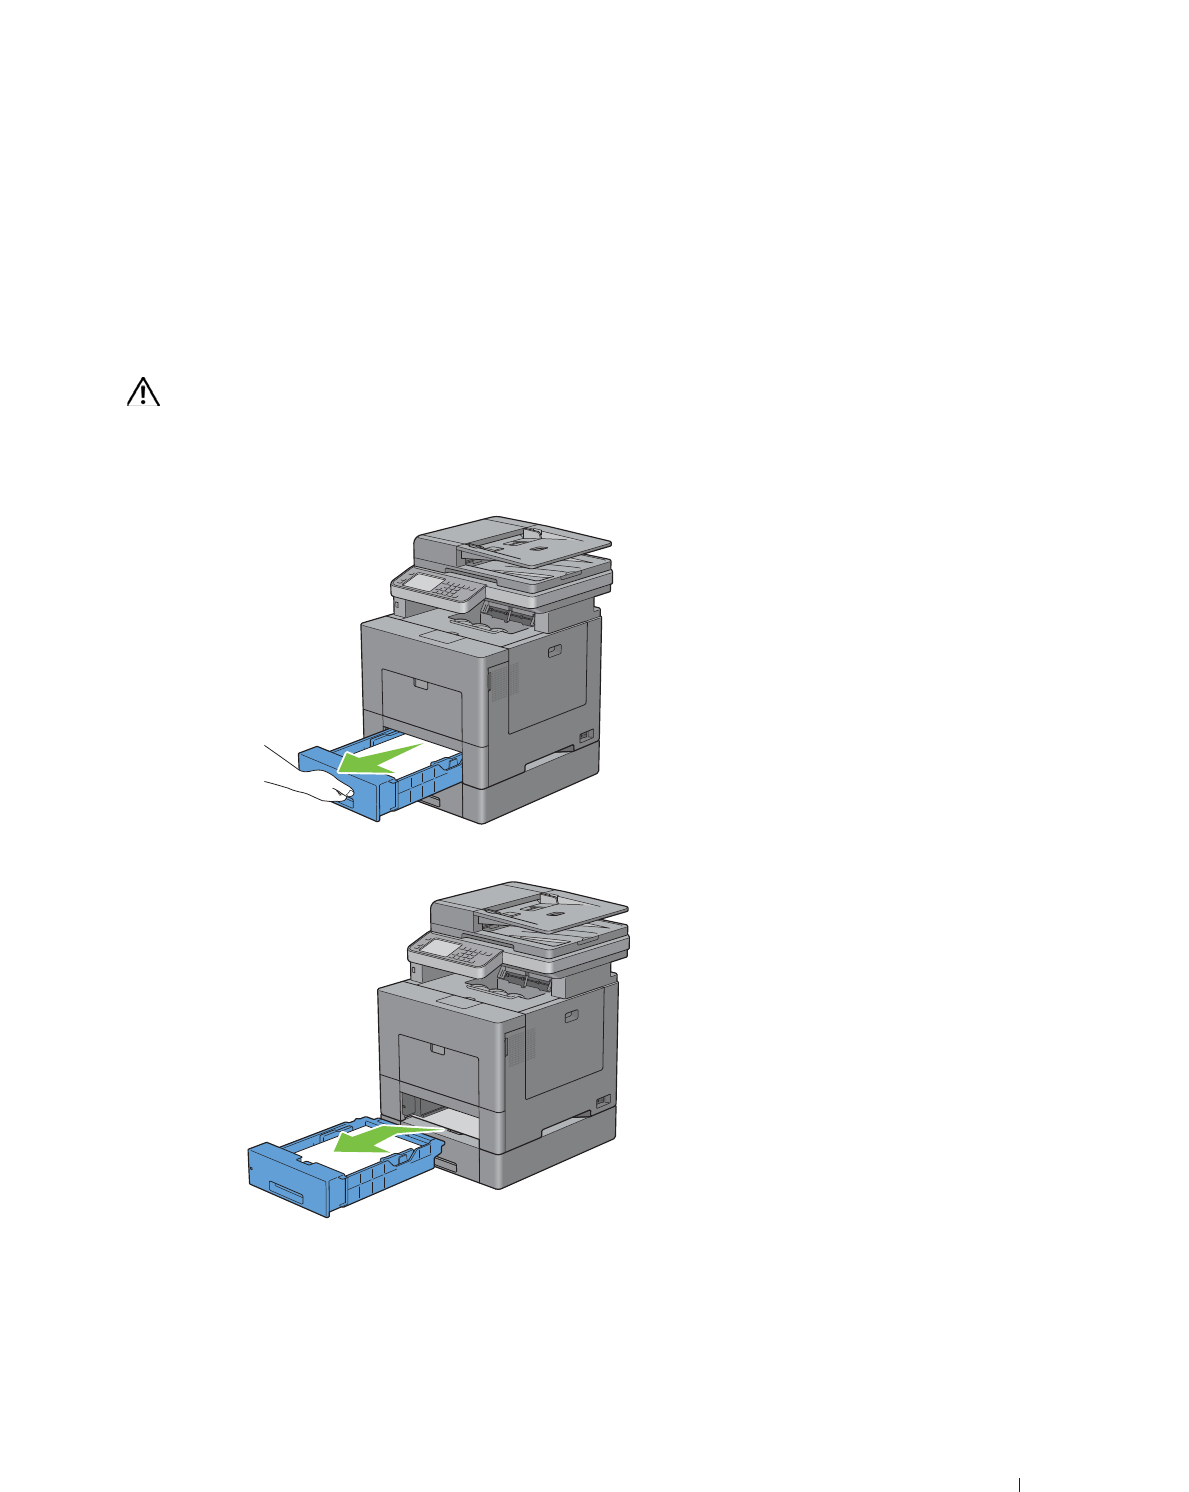
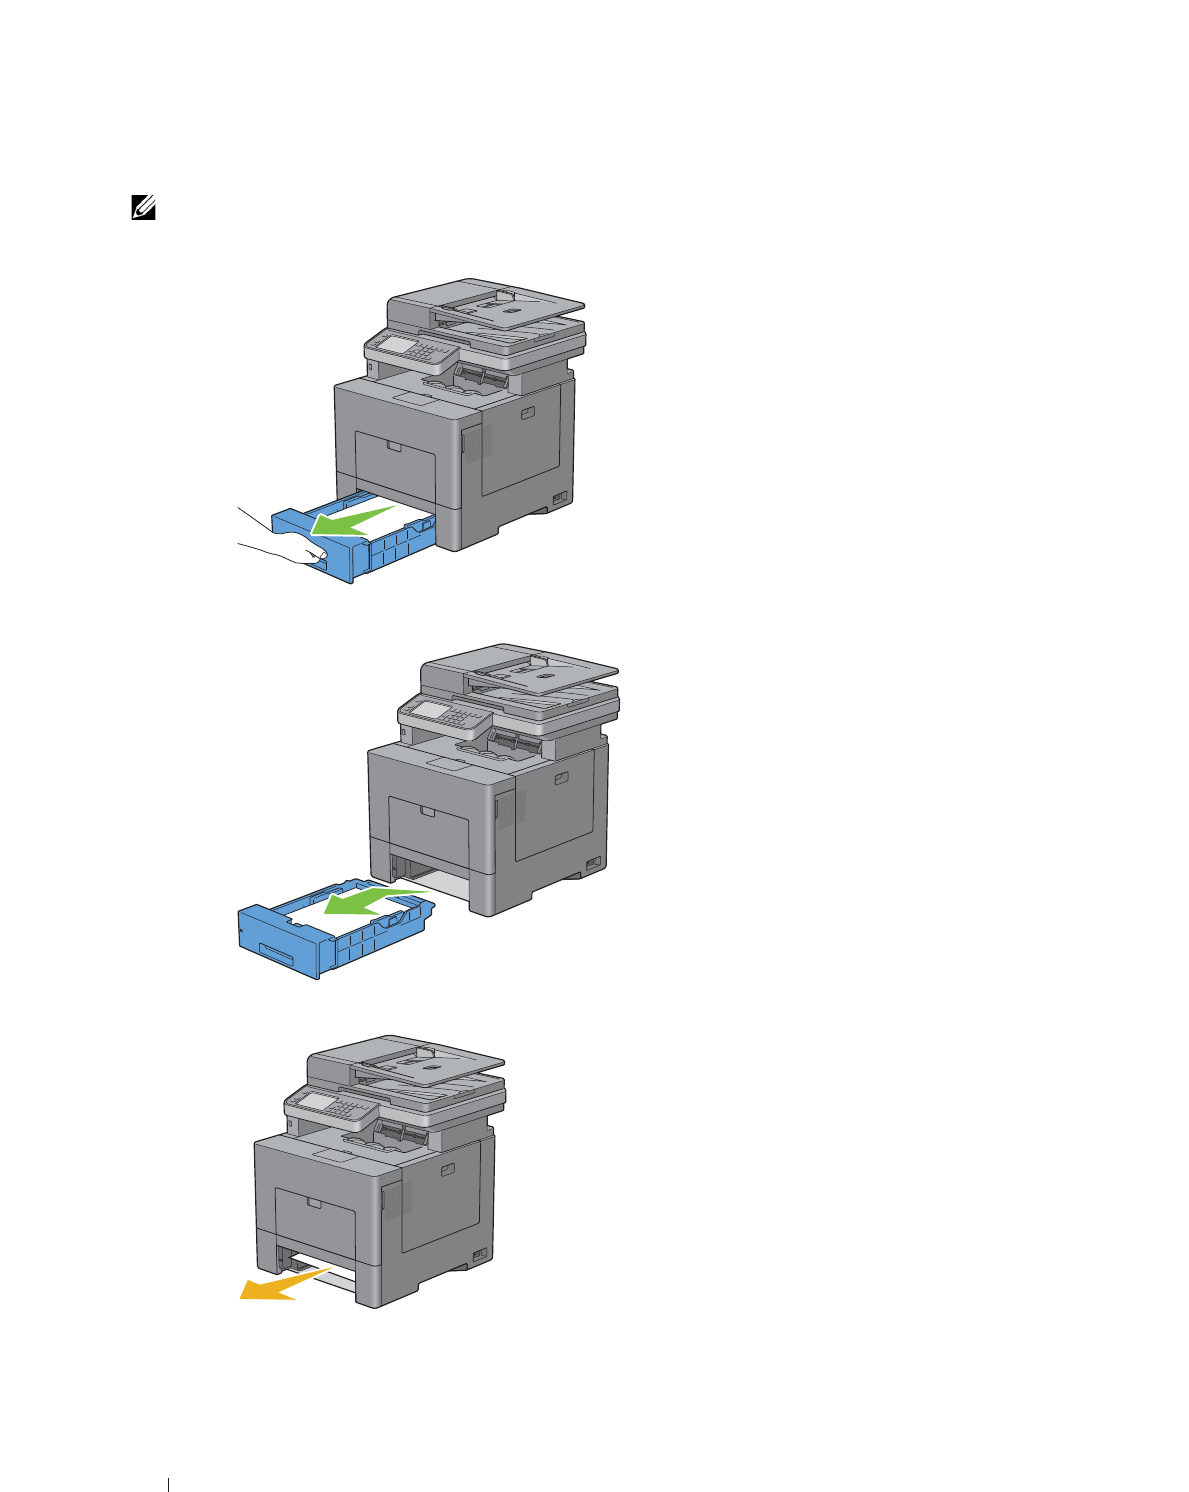
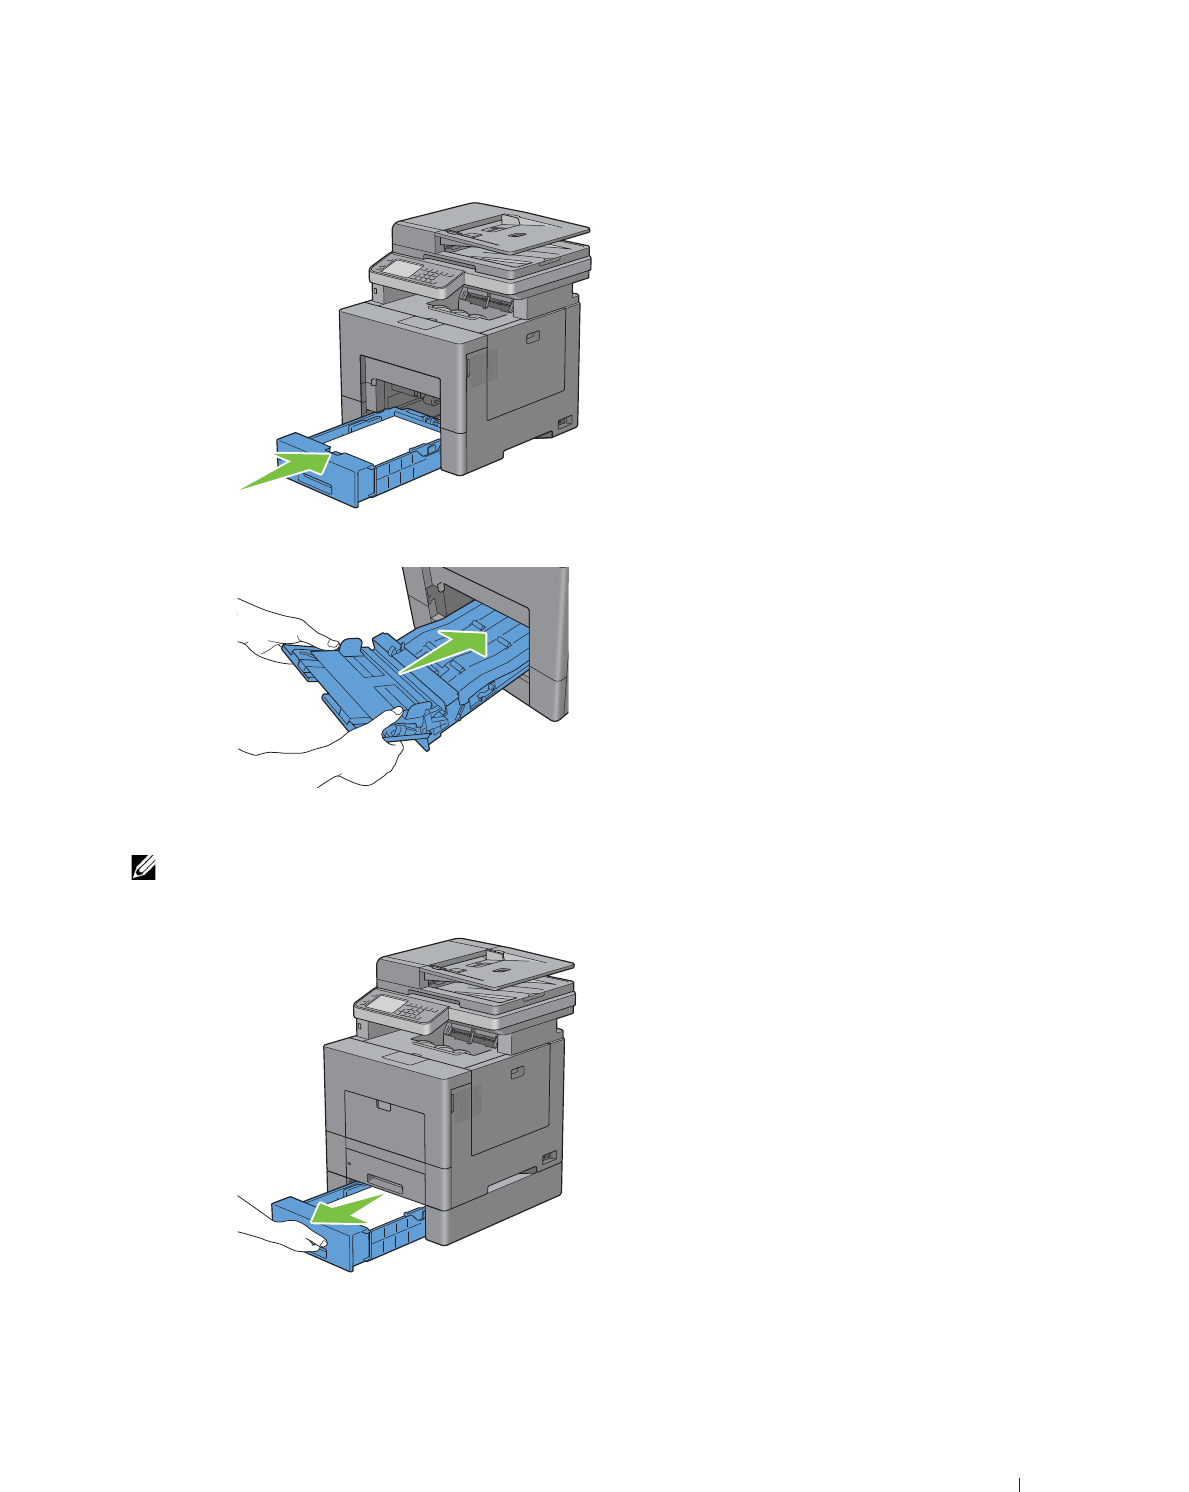
Clearing Paper Jams From Tray1
NOTE: To resolve the error displayed on the touch panel, you must clear all print media from the print media path.
1
Pull tray1 out of the printer about 200 mm.
2
Hold tray1 with both hands, and remove it from the printer.
3
Remove the jammed paper.
Clearing Jams 523
4
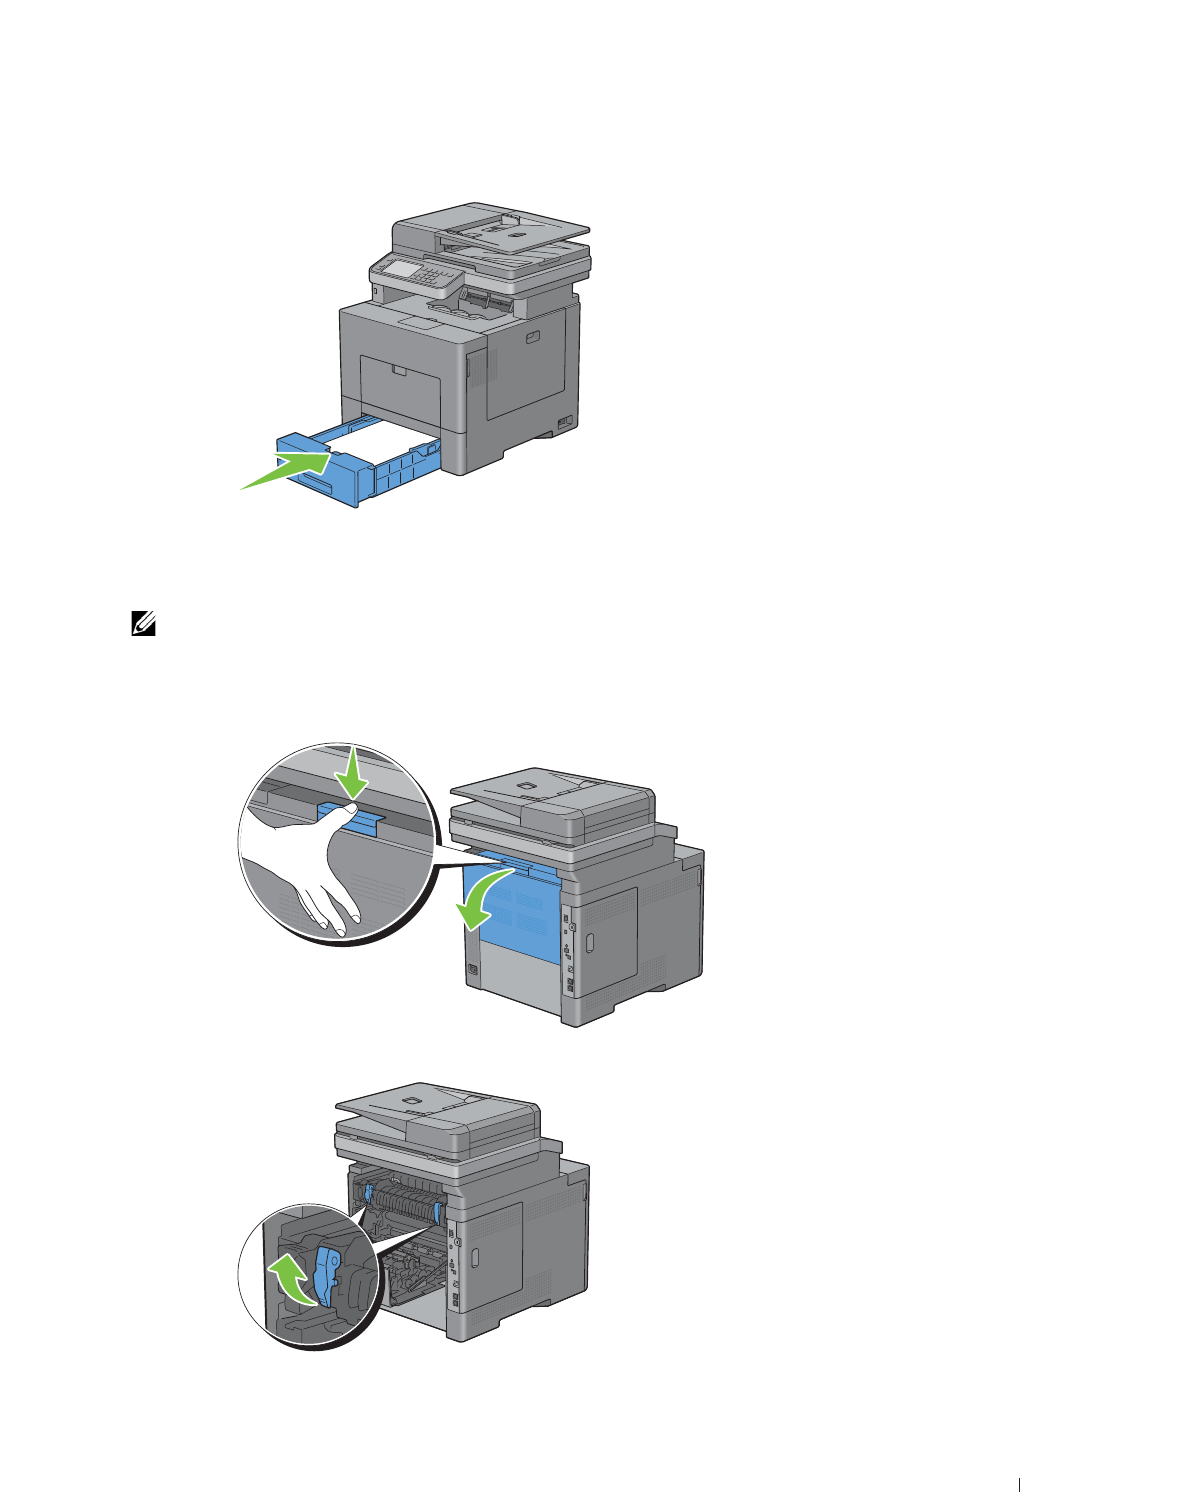
Insert tray1 into the printer, and push until it stops.
5
Ta p
Start
.
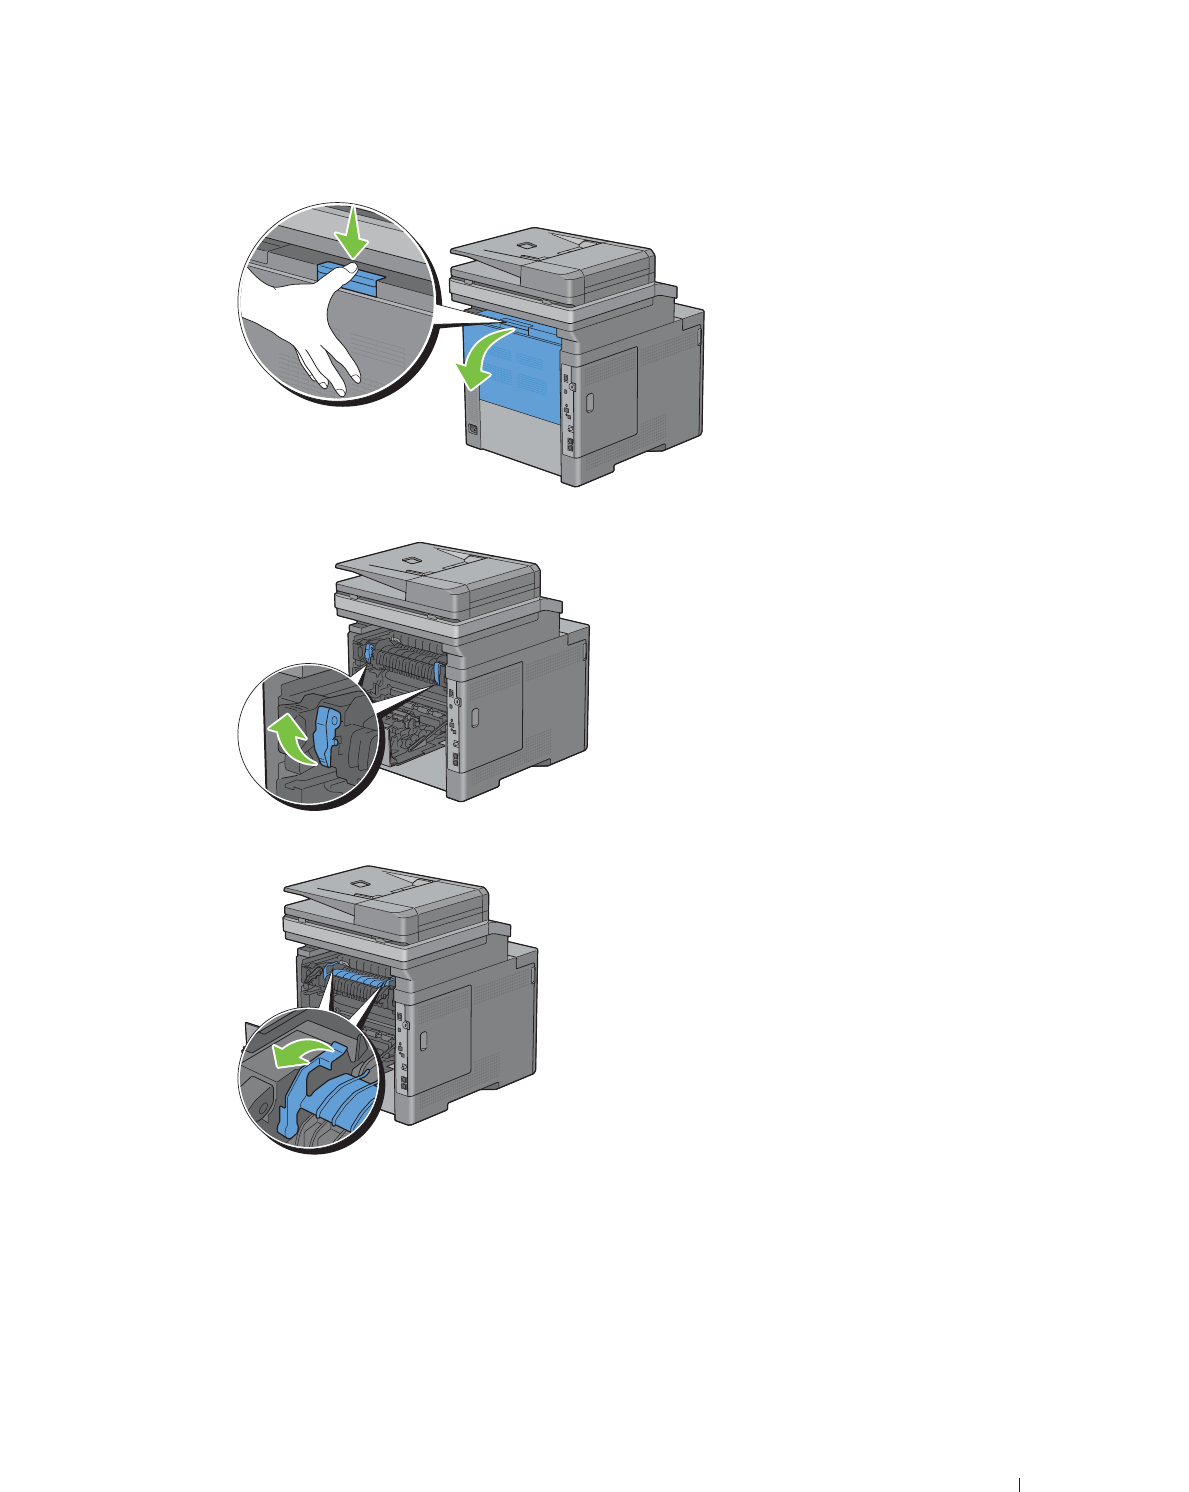
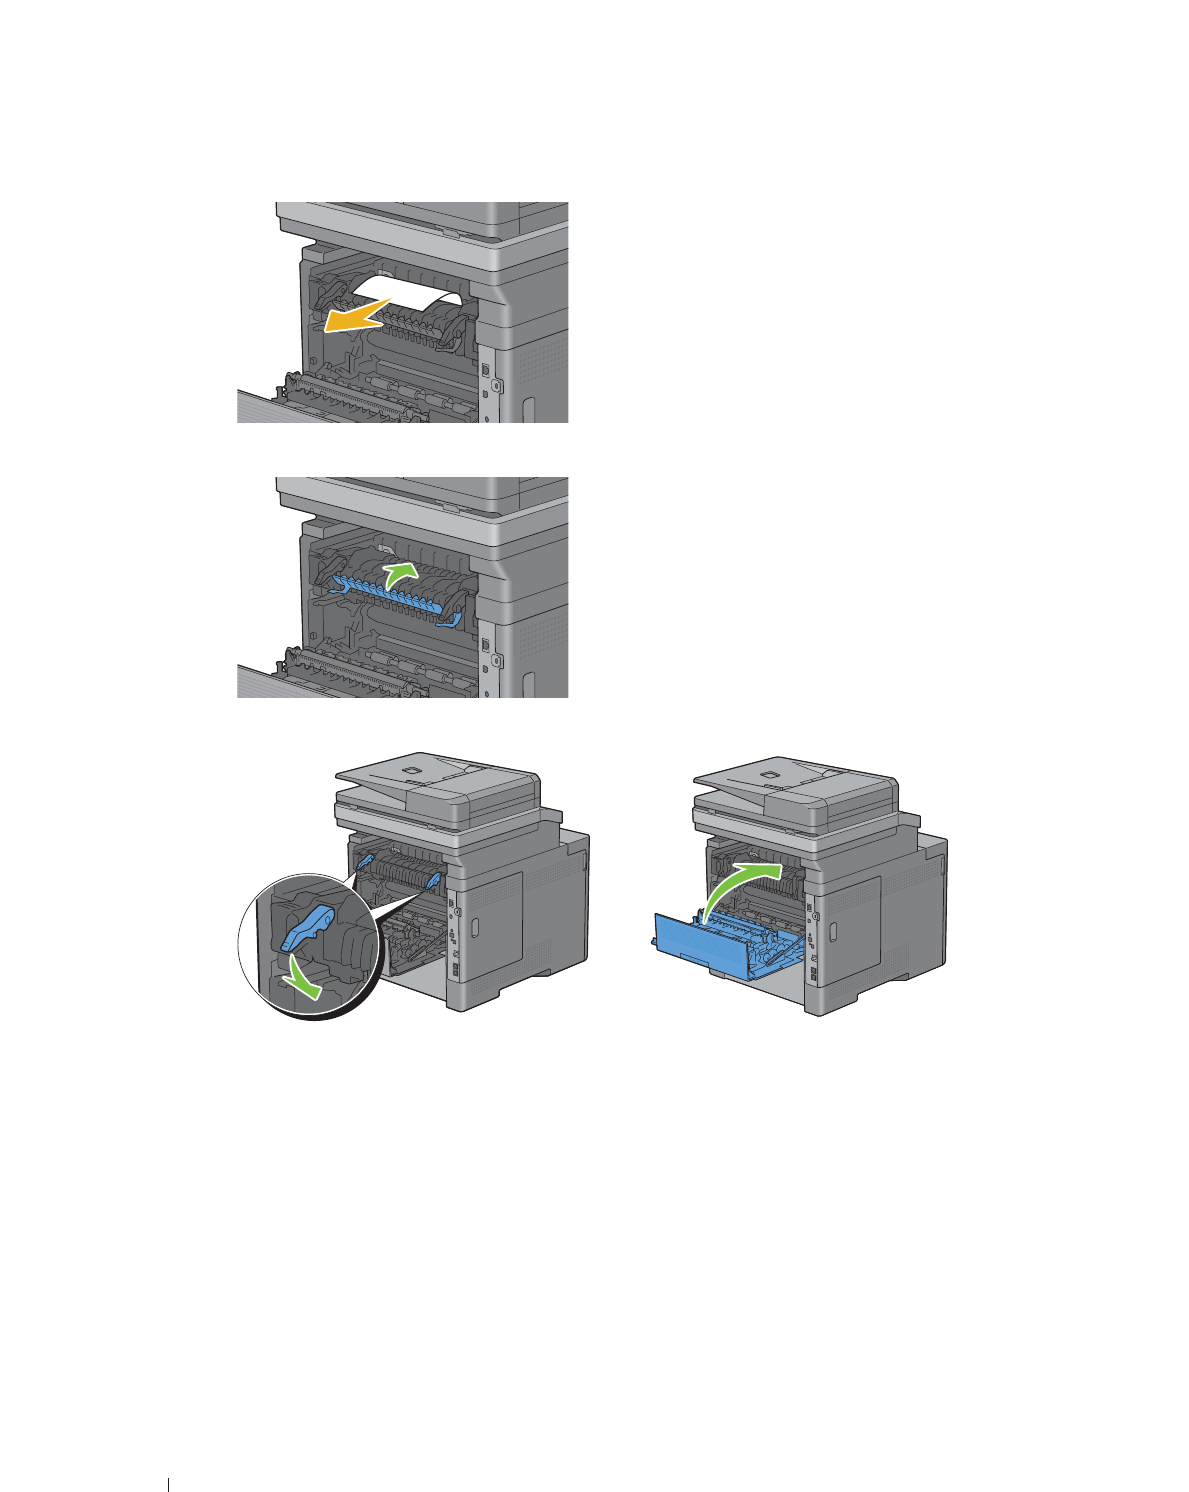
Clearing Paper Jams From the Fusing Unit
NOTE: To resolve the error displayed on the touch panel, you must clear all print media from the print media path.
If error code: 050-111 appears:
1
Push down the latch to open the rear cover.
2
Lift the levers on both sides of the fusing unit.
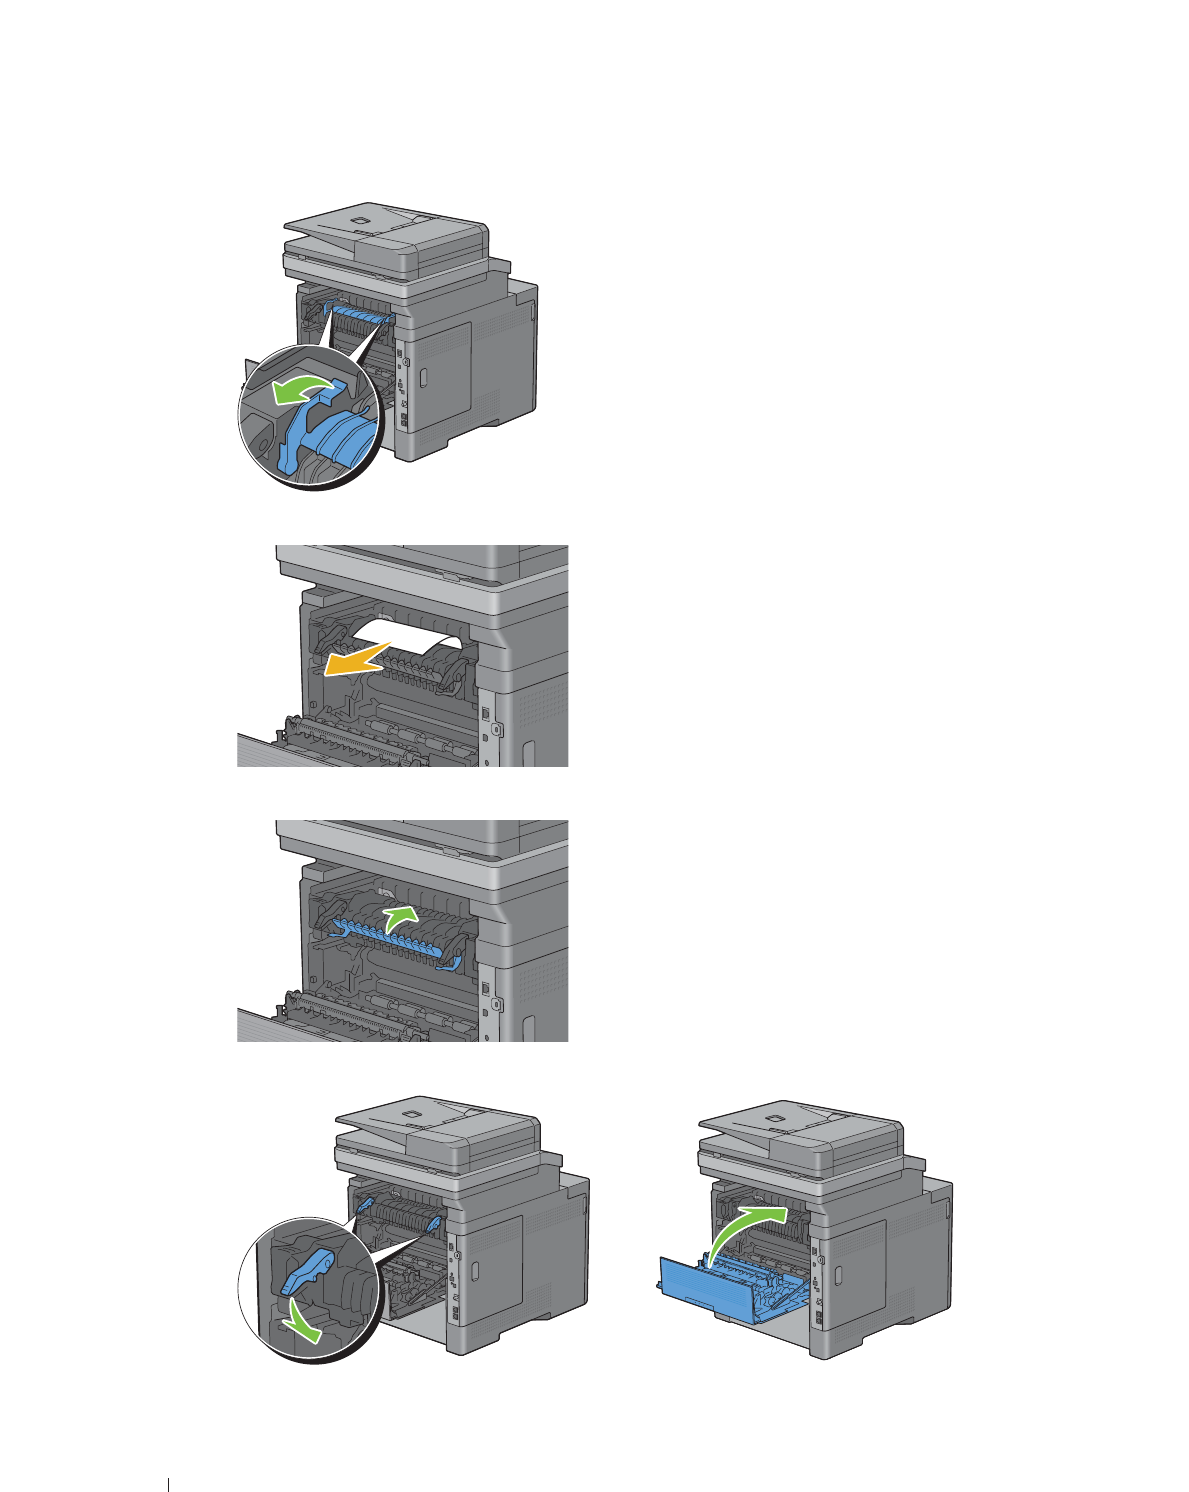
524 Clearing Jams
3
Hold and lower the tab to open the inner part.
4
Remove the jammed paper.
5
Replace the inner part.
6
Press down the levers on both sides of the fusing unit, and then close the rear cover.
Clearing Jams 525
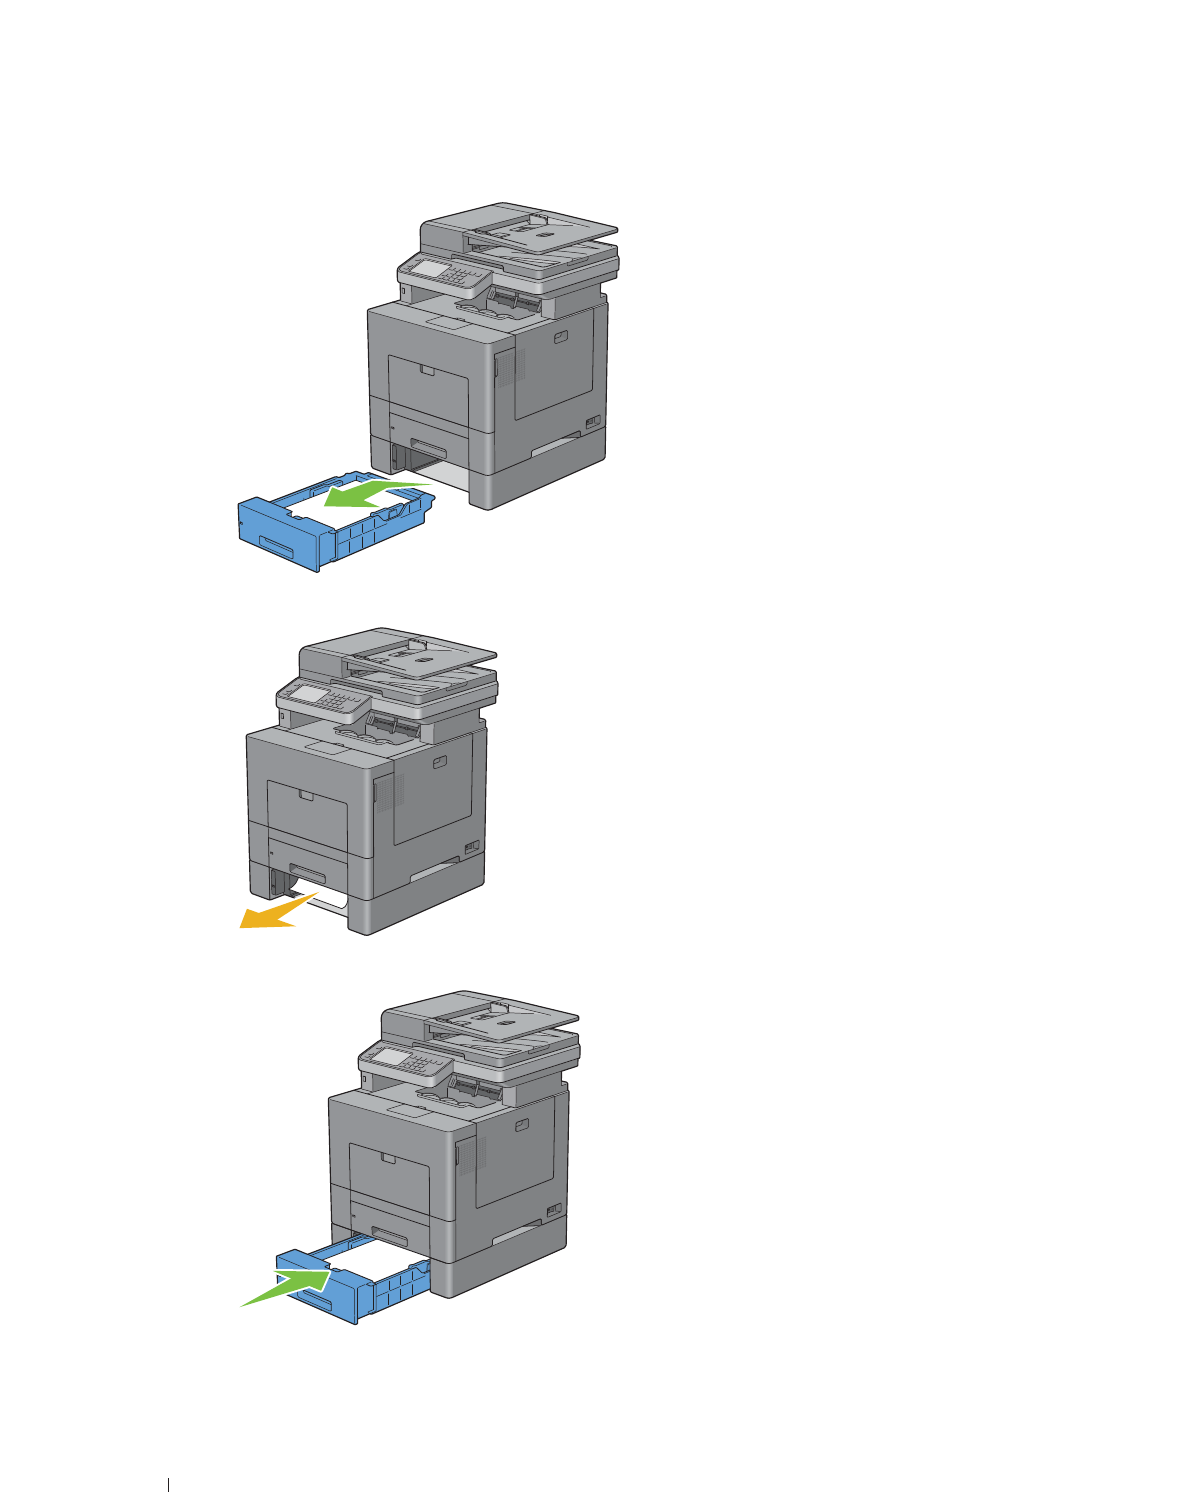
If error code: 050-129 appears:
1
Remove any paper loaded on the MPF
2
Grasp both sides of the MPF and then pull it out of the printer.
3
Pull tray1 out of the printer about 200 mm.
526 Clearing Jams
4
Hold tray1 with both hands, and remove it from the printer.
If you can see the jammed paper:
a
Remove the jammed paper.
b
Reinsert tray1 and the MPF into the printer.
If you cannot see the jammed paper:
a
Go to the next step.
Clearing Jams 527
5
Push down the latch to open the rear cover.
6
Lift the levers on both sides of the fusing unit.
7
Hold and lower the tab to open the inner part.
528 Clearing Jams
8
Remove the jammed paper.
9
Replace the inner part.
10
Press down the levers on both sides of the fusing unit, and then close the rear cover.
Clearing Jams 529
11
Insert tray1 into the printer, and push until it stops.
12
Insert the MPF into the printer.
Clearing Paper Jams From the Optional 550-Sheet Feeder
NOTE: To resolve the error displayed on the touch panel, you must clear all print media from the print media path.
1
Pull the optional 550-sheet feeder out of the printer about 200 mm.
530 Clearing Jams
2
Hold the optional 550-sheet feeder with both hands, and remove it from the printer.
3
Remove the jammed paper.
4
Insert the optional 550-sheet feeder into the printer, and push until it stops.