FUJIFILM Business Innovation C2665DNF Dell C2665dnf Color Laser Multifunction Printer User Manual 05 Short Term Confidential 1
Fuji Xerox Co., Ltd. Dell C2665dnf Color Laser Multifunction Printer 05 Short Term Confidential 1
Contents
User manual-1

C2665dnf | Dell Document Hub
Color Laser Multifunction Printer
User's Guide
Regulatory Model: C2665dnf

Template Last Updated - 2/7/2007 Contents 1
Contents
Before Beginning . . . . . . . . . . . . . . . . . . . . . . . . . . . . . . 23
Notes, Cautions, and Warnings . . . . . . . . . . . . . . . . . . . . . . . . 25
As for RSA BSAFE . . . . . . . . . . . . . . . . . . . . . . . . . . . . . . . . . . . . . . . . . . . . . . . . . . . . . . . . . . 25
1 Dell™ C2665dnf Color Laser Multifunction Printer User's
Guide . . . . . . . . . . . . . . . . . . . . . . . . . . . . . . . . . . . . . . . . . 27
Conventions. . . . . . . . . . . . . . . . . . . . . . . . . . . . . . . . . . . . . . 27
2 Finding Information . . . . . . . . . . . . . . . . . . . . . . . . . . . . . . 29
3 Product Features . . . . . . . . . . . . . . . . . . . . . . . . . . . . . . . . 33
4 About the Printer . . . . . . . . . . . . . . . . . . . . . . . . . . . . . . . . 35
Front and Rear View . . . . . . . . . . . . . . . . . . . . . . . . . . . . . . . . . 35
Front View . . . . . . . . . . . . . . . . . . . . . . . . . . . . . . . . . . . . 35
Rear View . . . . . . . . . . . . . . . . . . . . . . . . . . . . . . . . . . . . 36
Duplex Automatic Document Feeder (DADF) . . . . . . . . . . . . . . . . . . . . 37
Space Requirements . . . . . . . . . . . . . . . . . . . . . . . . . . . . . . . . . 37
Operator Panel . . . . . . . . . . . . . . . . . . . . . . . . . . . . . . . . . . . . 38
Additional Components. . . . . . . . . . . . . . . . . . . . . . . . . . . . . . . . 38
Optional Accessories . . . . . . . . . . . . . . . . . . . . . . . . . . . . . . 38
Non-bundled Items . . . . . . . . . . . . . . . . . . . . . . . . . . . . . . . 38
Securing the Printer . . . . . . . . . . . . . . . . . . . . . . . . . . . . . . . . . 39
Ordering Supplies . . . . . . . . . . . . . . . . . . . . . . . . . . . . . . . . . . 39

2Contents Template Last Updated - 2/7/2007
Setting up the Printer (Printer Setup) . . . . . . . . . . . . . . 41
5 Preparing Printer Hardware . . . . . . . . . . . . . . . . . . . . . . . . 43
Removing Tape . . . . . . . . . . . . . . . . . . . . . . . . . . . . . . . . . . . . 43
6 Installing Optional Accessories . . . . . . . . . . . . . . . . . . . . . 45
Installing the Optional 550-Sheet Feeder. . . . . . . . . . . . . . . . . . . . . . . 45
Updating Your Driver to Detect 550-Sheet Feeder. . . . . . . . . . . . . . . . 47
Installing the Optional Wireless Adapter . . . . . . . . . . . . . . . . . . . . . . 50
Verifying the Contents of the Box . . . . . . . . . . . . . . . . . . . . . . . . 51
Installing the Optional Wireless Adapter . . . . . . . . . . . . . . . . . . . . 51
Determining the Wireless Network Settings . . . . . . . . . . . . . . . . . . 52
Configuring the Optional Wireless Adapter . . . . . . . . . . . . . . . . . . . . . 53
Configuring the Wireless Adapter Using Dell Printer Setup . . . . . . . . . . 53
Configuring the Wireless Adapter Without Using Dell Printer Setup . . . . . . 54
Reconfiguring the Wireless Setting . . . . . . . . . . . . . . . . . . . . . . . . . 57
Reconfiguring the Wireless Setting Using Dell Printer Configuration
Web Tool . . . . . . . . . . . . . . . . . . . . . . . . . . . . . . . . . . . . . 57
Reconfiguring the Wireless Setting Using Dell Printer Setup. . . . . . . . . . 58
7 Connecting Your Printer . . . . . . . . . . . . . . . . . . . . . . . . . . . 59
Connecting Printer to Computer or Network . . . . . . . . . . . . . . . . . . . . . 60
Direct Connection . . . . . . . . . . . . . . . . . . . . . . . . . . . . . . . . 60
Network Connection . . . . . . . . . . . . . . . . . . . . . . . . . . . . . . . 61
Connecting the Telephone Line. . . . . . . . . . . . . . . . . . . . . . . . . . . . 61
Turning on the Printer . . . . . . . . . . . . . . . . . . . . . . . . . . . . . . . . . 63
Setting Initial Settings on the Operator Panel . . . . . . . . . . . . . . . . . . . . 63
8 Setting the IP Address . . . . . . . . . . . . . . . . . . . . . . . . . . . . 71
Assigning an IP Address . . . . . . . . . . . . . . . . . . . . . . . . . . . . . . . 71
When Using the Dell Printer Setup . . . . . . . . . . . . . . . . . . . . . . . 71
When Using the Operator Panel. . . . . . . . . . . . . . . . . . . . . . . . . 71
When Using the Tool Box . . . . . . . . . . . . . . . . . . . . . . . . . . . . 72
Verifying the IP Settings . . . . . . . . . . . . . . . . . . . . . . . . . . . . . . . 73
Verifying the Settings Using Operator Panel . . . . . . . . . . . . . . . . . . 73

Template Last Updated - 2/7/2007 Contents 3
Verifying the Settings Using System Settings Report. . . . . . . . . . . . . . 73
Verifying the Settings Using Ping Command . . . . . . . . . . . . . . . . . . 73
9 Loading Paper . . . . . . . . . . . . . . . . . . . . . . . . . . . . . . . . . . 75
10 Installing Printer Drivers on Windows® Computers . . . . . 79
Identifying Printer Driver Pre-install Status . . . . . . . . . . . . . . . . . . . . . 79
Changing the firewall settings before installing your printer . . . . . . . . . . 79
Inserting the Software and Documentation Disc . . . . . . . . . . . . . . . . . . 79
Direct Connection Setup . . . . . . . . . . . . . . . . . . . . . . . . . . . . . . . 80
Network Connection Setup . . . . . . . . . . . . . . . . . . . . . . . . . . . . . 83
Network Printer Setup on a Local Network. . . . . . . . . . . . . . . . . . . 83
Setting Up for Shared Printing . . . . . . . . . . . . . . . . . . . . . . . . . . . . 88
Specifying the Shared Settings of the Printer . . . . . . . . . . . . . . . . . 88
Point and Print. . . . . . . . . . . . . . . . . . . . . . . . . . . . . . . . . . 89
Peer-to-Peer. . . . . . . . . . . . . . . . . . . . . . . . . . . . . . . . . . . 92
11 Installing Printer Drivers on Macintosh Computers . . . . . 95
Installing the Drivers and Software . . . . . . . . . . . . . . . . . . . . . . . . . 95
Adding a Printer on Mac OS X 10.5, 10.6, 10.7, or 10.8 . . . . . . . . . . . . . 95
Configuring Settings. . . . . . . . . . . . . . . . . . . . . . . . . . . . . . . 96
12 Installing Printer Drivers on Linux Computers (CUPS) . . . 97
Operation on Red Hat Enterprise Linux 5/6 Desktop. . . . . . . . . . . . . . . . . 97
Setup Overview . . . . . . . . . . . . . . . . . . . . . . . . . . . . . . . . . 97
Installing the Printer Driver . . . . . . . . . . . . . . . . . . . . . . . . . . . 97
Setting Up the Queue . . . . . . . . . . . . . . . . . . . . . . . . . . . . . . 97
Setting the Default Queue. . . . . . . . . . . . . . . . . . . . . . . . . . . . 98
Specifying the Printing Options . . . . . . . . . . . . . . . . . . . . . . . . . 99
Uninstalling the Printer Driver. . . . . . . . . . . . . . . . . . . . . . . . . . 99
Operation on SUSE Linux Enterprise Desktop 10 . . . . . . . . . . . . . . . . . 100
Setup Overview . . . . . . . . . . . . . . . . . . . . . . . . . . . . . . . . 100
Installing the Printer Driver . . . . . . . . . . . . . . . . . . . . . . . . . . 100
Setting Up the Queue . . . . . . . . . . . . . . . . . . . . . . . . . . . . . 100
Setting the Default Queue. . . . . . . . . . . . . . . . . . . . . . . . . . . 101
Specifying the Printing Options . . . . . . . . . . . . . . . . . . . . . . . . 101
Setting the Password for Authority as the Printer Administrator. . . . . . . 102

4Contents Template Last Updated - 2/7/2007
Uninstalling the Printer Driver . . . . . . . . . . . . . . . . . . . . . . . . . 102
Operation on SUSE Linux Enterprise Desktop 11. . . . . . . . . . . . . . . . . . 102
Setup Overview . . . . . . . . . . . . . . . . . . . . . . . . . . . . . . . . 102
Installing the Printer Driver . . . . . . . . . . . . . . . . . . . . . . . . . . 103
Setting Up the Queue . . . . . . . . . . . . . . . . . . . . . . . . . . . . . 103
Setting the Default Queue . . . . . . . . . . . . . . . . . . . . . . . . . . . 104
Specifying the Printing Options . . . . . . . . . . . . . . . . . . . . . . . . 104
Setting the Password for Authority as the Printer Administrator . . . . . . . 105
Uninstalling the Printer Driver . . . . . . . . . . . . . . . . . . . . . . . . . 105
Using Your Printer . . . . . . . . . . . . . . . . . . . . . . . . . . . . 107
13 Operator Panel . . . . . . . . . . . . . . . . . . . . . . . . . . . . . . . . . 109
About the Operator Panel . . . . . . . . . . . . . . . . . . . . . . . . . . . . . . 109
Basic Operations on the Touch Panel . . . . . . . . . . . . . . . . . . . . . . . 110
To Select the Item on the Screen . . . . . . . . . . . . . . . . . . . . . . . 110
To Scroll the Screen or the Listed Items. . . . . . . . . . . . . . . . . . . . 110
About the Home Screen. . . . . . . . . . . . . . . . . . . . . . . . . . . . . . . 111
Notification Bar . . . . . . . . . . . . . . . . . . . . . . . . . . . . . . . . 111
Lock Icon. . . . . . . . . . . . . . . . . . . . . . . . . . . . . . . . . . . . 112
Wi-Fi Direct Connection Status Icon . . . . . . . . . . . . . . . . . . . . . 112
Wireless LAN Connection Status Icon . . . . . . . . . . . . . . . . . . . . 112
Time/Network Information . . . . . . . . . . . . . . . . . . . . . . . . . . . 112
Account Name . . . . . . . . . . . . . . . . . . . . . . . . . . . . . . . . . 112
Tiles . . . . . . . . . . . . . . . . . . . . . . . . . . . . . . . . . . . . . . 112
Moving, Adding or Deleting the Tiles . . . . . . . . . . . . . . . . . . . . . . . 112
To Move the Tiles . . . . . . . . . . . . . . . . . . . . . . . . . . . . . . . 112
To Add the Tiles . . . . . . . . . . . . . . . . . . . . . . . . . . . . . . . . 113
To Delete the Tiles . . . . . . . . . . . . . . . . . . . . . . . . . . . . . . . 113
Using the Keyboard Displayed on the Touch Panel . . . . . . . . . . . . . . . . 113
To Change the Keyboard Layout . . . . . . . . . . . . . . . . . . . . . . . . 114
Using the Number Pad . . . . . . . . . . . . . . . . . . . . . . . . . . . . . . . 114
Number Pad Numbers . . . . . . . . . . . . . . . . . . . . . . . . . . . . . 114
Changing Numbers or Names . . . . . . . . . . . . . . . . . . . . . . . . . 114
Inserting a Pause . . . . . . . . . . . . . . . . . . . . . . . . . . . . . . . 114
Printing a Panel Settings Report . . . . . . . . . . . . . . . . . . . . . . . . . . 115
Changing the Language. . . . . . . . . . . . . . . . . . . . . . . . . . . . . . . 115

Template Last Updated - 2/7/2007 Contents 5
When Using the Operator Panel . . . . . . . . . . . . . . . . . . . . . . . 115
When Using the Tool Box . . . . . . . . . . . . . . . . . . . . . . . . . . . 115
Setting the Power Saver Timer Option . . . . . . . . . . . . . . . . . . . . . . . 115
About the Concurrent Jobs Feature . . . . . . . . . . . . . . . . . . . . . . . . 116
14 Dell™ Printer Configuration Web Tool . . . . . . . . . . . . . . . 117
Overview . . . . . . . . . . . . . . . . . . . . . . . . . . . . . . . . . . . . . . 117
Setting Up the Dell Printer Configuration Web Tool . . . . . . . . . . . . . . . . 118
Setting Up From Web Browser . . . . . . . . . . . . . . . . . . . . . . . . 118
Setting Up From Operator Panel . . . . . . . . . . . . . . . . . . . . . . . 119
Starting the Dell Printer Configuration Web Tool . . . . . . . . . . . . . . . . . 120
Overview of the Menu Items . . . . . . . . . . . . . . . . . . . . . . . . . . . . 120
Printer Status . . . . . . . . . . . . . . . . . . . . . . . . . . . . . . . . . 120
Printer Jobs . . . . . . . . . . . . . . . . . . . . . . . . . . . . . . . . . . 120
Printer Settings . . . . . . . . . . . . . . . . . . . . . . . . . . . . . . . . 120
Print Server Settings . . . . . . . . . . . . . . . . . . . . . . . . . . . . . 120
Copy Printer Settings . . . . . . . . . . . . . . . . . . . . . . . . . . . . . 121
Print Volume . . . . . . . . . . . . . . . . . . . . . . . . . . . . . . . . . . 121
Address Book . . . . . . . . . . . . . . . . . . . . . . . . . . . . . . . . . 121
Printer Information . . . . . . . . . . . . . . . . . . . . . . . . . . . . . . 121
Tray Management . . . . . . . . . . . . . . . . . . . . . . . . . . . . . . . 121
E-Mail Alert . . . . . . . . . . . . . . . . . . . . . . . . . . . . . . . . . . 121
Set Password . . . . . . . . . . . . . . . . . . . . . . . . . . . . . . . . . 121
Online Help . . . . . . . . . . . . . . . . . . . . . . . . . . . . . . . . . . 121
Order Supplies at: . . . . . . . . . . . . . . . . . . . . . . . . . . . . . . . 121
Contact Dell Support at: . . . . . . . . . . . . . . . . . . . . . . . . . . . . 121
Page Display Format . . . . . . . . . . . . . . . . . . . . . . . . . . . . . . . . 122
Top Frame . . . . . . . . . . . . . . . . . . . . . . . . . . . . . . . . . . . 122
Left Frame . . . . . . . . . . . . . . . . . . . . . . . . . . . . . . . . . . . 123
Right Frame . . . . . . . . . . . . . . . . . . . . . . . . . . . . . . . . . . 123
Changing the Settings of the Menu Items . . . . . . . . . . . . . . . . . . . . . 124
Details of the Menu Items . . . . . . . . . . . . . . . . . . . . . . . . . . . 124
Printer Status . . . . . . . . . . . . . . . . . . . . . . . . . . . . . . . . . 127
Printer Jobs . . . . . . . . . . . . . . . . . . . . . . . . . . . . . . . . . . 128
Printer Settings . . . . . . . . . . . . . . . . . . . . . . . . . . . . . . . . 129
Print Server Settings . . . . . . . . . . . . . . . . . . . . . . . . . . . . . 152
Copy Printer Settings . . . . . . . . . . . . . . . . . . . . . . . . . . . . . 175
Print Volume . . . . . . . . . . . . . . . . . . . . . . . . . . . . . . . . . . 176
Address Book . . . . . . . . . . . . . . . . . . . . . . . . . . . . . . . . . 177

6Contents Template Last Updated - 2/7/2007
Tray Management . . . . . . . . . . . . . . . . . . . . . . . . . . . . . . . 183
15 Understanding the Tool Box Menus . . . . . . . . . . . . . . . . . 185
Starting the Tool Box . . . . . . . . . . . . . . . . . . . . . . . . . . . . . . . . 185
Printer Setting Reports . . . . . . . . . . . . . . . . . . . . . . . . . . . . . . . 185
Printer Information. . . . . . . . . . . . . . . . . . . . . . . . . . . . . . . 185
Menu Settings . . . . . . . . . . . . . . . . . . . . . . . . . . . . . . . . . 186
Reports. . . . . . . . . . . . . . . . . . . . . . . . . . . . . . . . . . . . . 188
TCP/IP Settings . . . . . . . . . . . . . . . . . . . . . . . . . . . . . . . . 188
Tray Settings . . . . . . . . . . . . . . . . . . . . . . . . . . . . . . . . . . 189
Default Settings . . . . . . . . . . . . . . . . . . . . . . . . . . . . . . . . 189
Fax Settings . . . . . . . . . . . . . . . . . . . . . . . . . . . . . . . . . . 191
Panel Language . . . . . . . . . . . . . . . . . . . . . . . . . . . . . . . . 192
Printer Maintenance . . . . . . . . . . . . . . . . . . . . . . . . . . . . . . . . 193
System Settings - General . . . . . . . . . . . . . . . . . . . . . . . . . . . 193
System Settings - Timers . . . . . . . . . . . . . . . . . . . . . . . . . . . 195
System Settings - Output Settings. . . . . . . . . . . . . . . . . . . . . . . 196
Service Tools. . . . . . . . . . . . . . . . . . . . . . . . . . . . . . . . . . 197
Tray Management . . . . . . . . . . . . . . . . . . . . . . . . . . . . . . . 198
Panel Language . . . . . . . . . . . . . . . . . . . . . . . . . . . . . . . . 201
TCP/IP Settings . . . . . . . . . . . . . . . . . . . . . . . . . . . . . . . . 201
Network Settings . . . . . . . . . . . . . . . . . . . . . . . . . . . . . . . 202
Copy Defaults . . . . . . . . . . . . . . . . . . . . . . . . . . . . . . . . . 202
Scan Defaults . . . . . . . . . . . . . . . . . . . . . . . . . . . . . . . . . 205
Fax Defaults . . . . . . . . . . . . . . . . . . . . . . . . . . . . . . . . . . 206
USB Direct Print Defaults . . . . . . . . . . . . . . . . . . . . . . . . . . . 207
Fax Settings . . . . . . . . . . . . . . . . . . . . . . . . . . . . . . . . . . 208
Diagnosis . . . . . . . . . . . . . . . . . . . . . . . . . . . . . . . . . . . . . . 210
Chart Print . . . . . . . . . . . . . . . . . . . . . . . . . . . . . . . . . . . 210
Environment Sensor Info . . . . . . . . . . . . . . . . . . . . . . . . . . . 211
Resetting Defaults . . . . . . . . . . . . . . . . . . . . . . . . . . . . . . . . . 211
When Using the Tool Box . . . . . . . . . . . . . . . . . . . . . . . . . . . 211
16 Understanding the Printer Menus . . . . . . . . . . . . . . . . . . 213
Report / List . . . . . . . . . . . . . . . . . . . . . . . . . . . . . . . . . . . . . 213
System Settings . . . . . . . . . . . . . . . . . . . . . . . . . . . . . . . . 213
Panel Settings . . . . . . . . . . . . . . . . . . . . . . . . . . . . . . . . . 213
PCL Fonts List . . . . . . . . . . . . . . . . . . . . . . . . . . . . . . . . . 213
PCL Macros List . . . . . . . . . . . . . . . . . . . . . . . . . . . . . . . . 213
PS Fonts List . . . . . . . . . . . . . . . . . . . . . . . . . . . . . . . . . . 213

Template Last Updated - 2/7/2007 Contents 7
PDF Fonts List . . . . . . . . . . . . . . . . . . . . . . . . . . . . . . . . . 213
Job History . . . . . . . . . . . . . . . . . . . . . . . . . . . . . . . . . . 213
Error History . . . . . . . . . . . . . . . . . . . . . . . . . . . . . . . . . . 214
Print Meter . . . . . . . . . . . . . . . . . . . . . . . . . . . . . . . . . . 214
Color Test Page . . . . . . . . . . . . . . . . . . . . . . . . . . . . . . . . 214
Protocol Monitor . . . . . . . . . . . . . . . . . . . . . . . . . . . . . . . 214
Speed Dial . . . . . . . . . . . . . . . . . . . . . . . . . . . . . . . . . . . 214
Address Book . . . . . . . . . . . . . . . . . . . . . . . . . . . . . . . . . 214
Server Address . . . . . . . . . . . . . . . . . . . . . . . . . . . . . . . . 214
Fax Activity . . . . . . . . . . . . . . . . . . . . . . . . . . . . . . . . . . 214
Fax Pending . . . . . . . . . . . . . . . . . . . . . . . . . . . . . . . . . . 214
Stored Documents. . . . . . . . . . . . . . . . . . . . . . . . . . . . . . . 214
Printing a Report/List Using the Operator Panel . . . . . . . . . . . . . . . 215
Printing a Report/List Using the Tool Box . . . . . . . . . . . . . . . . . . . 215
Connection Status . . . . . . . . . . . . . . . . . . . . . . . . . . . . . . . . . 215
Disconnecting the device connected via Wi-Fi Direct . . . . . . . . . . . . 215
Admin Settings . . . . . . . . . . . . . . . . . . . . . . . . . . . . . . . . . . . 215
Phone Book . . . . . . . . . . . . . . . . . . . . . . . . . . . . . . . . . . 215
PCL. . . . . . . . . . . . . . . . . . . . . . . . . . . . . . . . . . . . . . . 216
PS . . . . . . . . . . . . . . . . . . . . . . . . . . . . . . . . . . . . . . . 222
PDF . . . . . . . . . . . . . . . . . . . . . . . . . . . . . . . . . . . . . . 223
Network . . . . . . . . . . . . . . . . . . . . . . . . . . . . . . . . . . . . 225
Fax Settings . . . . . . . . . . . . . . . . . . . . . . . . . . . . . . . . . . 232
System Settings . . . . . . . . . . . . . . . . . . . . . . . . . . . . . . . . 240
Maintenance . . . . . . . . . . . . . . . . . . . . . . . . . . . . . . . . . 250
Secure Settings . . . . . . . . . . . . . . . . . . . . . . . . . . . . . . . . 255
USB Settings . . . . . . . . . . . . . . . . . . . . . . . . . . . . . . . . . 258
Default Settings. . . . . . . . . . . . . . . . . . . . . . . . . . . . . . . . . . . 259
Copy Defaults . . . . . . . . . . . . . . . . . . . . . . . . . . . . . . . . . 259
Fax Defaults . . . . . . . . . . . . . . . . . . . . . . . . . . . . . . . . . . 260
Scan Defaults . . . . . . . . . . . . . . . . . . . . . . . . . . . . . . . . . 260
USB Direct Print Defaults . . . . . . . . . . . . . . . . . . . . . . . . . . . 261
Tray Management. . . . . . . . . . . . . . . . . . . . . . . . . . . . . . . . . . 261
Tray Settings. . . . . . . . . . . . . . . . . . . . . . . . . . . . . . . . . . 261
Tray Priority . . . . . . . . . . . . . . . . . . . . . . . . . . . . . . . . . . 265
Language Settings . . . . . . . . . . . . . . . . . . . . . . . . . . . . . . . . . 266
Panel Language . . . . . . . . . . . . . . . . . . . . . . . . . . . . . . . . 266
Keyboard Layout. . . . . . . . . . . . . . . . . . . . . . . . . . . . . . . . 266
Print . . . . . . . . . . . . . . . . . . . . . . . . . . . . . . . . . . . . . . . . 266
Private Mailbox . . . . . . . . . . . . . . . . . . . . . . . . . . . . . . . . 267
Public Mailbox. . . . . . . . . . . . . . . . . . . . . . . . . . . . . . . . . 267

8Contents Template Last Updated - 2/7/2007
Proof Print . . . . . . . . . . . . . . . . . . . . . . . . . . . . . . . . . . . 267
Secure Print . . . . . . . . . . . . . . . . . . . . . . . . . . . . . . . . . . 268
Secure Fax Receive . . . . . . . . . . . . . . . . . . . . . . . . . . . . . . 268
Tile Settings . . . . . . . . . . . . . . . . . . . . . . . . . . . . . . . . . . 268
Copy . . . . . . . . . . . . . . . . . . . . . . . . . . . . . . . . . . . . . . . . . 268
Quantity . . . . . . . . . . . . . . . . . . . . . . . . . . . . . . . . . . . . 268
Darken / Lighten . . . . . . . . . . . . . . . . . . . . . . . . . . . . . . . . 269
Output Color . . . . . . . . . . . . . . . . . . . . . . . . . . . . . . . . . . 269
Select Tray . . . . . . . . . . . . . . . . . . . . . . . . . . . . . . . . . . . 269
2 Sided Copying . . . . . . . . . . . . . . . . . . . . . . . . . . . . . . . . 271
Sharpness . . . . . . . . . . . . . . . . . . . . . . . . . . . . . . . . . . . 271
Reduce/Enlarge . . . . . . . . . . . . . . . . . . . . . . . . . . . . . . . . 272
Original Size . . . . . . . . . . . . . . . . . . . . . . . . . . . . . . . . . . 272
Original Type . . . . . . . . . . . . . . . . . . . . . . . . . . . . . . . . . . 273
Collation . . . . . . . . . . . . . . . . . . . . . . . . . . . . . . . . . . . . 273
2-Up . . . . . . . . . . . . . . . . . . . . . . . . . . . . . . . . . . . . . . 274
Color Saturation . . . . . . . . . . . . . . . . . . . . . . . . . . . . . . . . 274
Margin . . . . . . . . . . . . . . . . . . . . . . . . . . . . . . . . . . . . . 274
Auto Exposure . . . . . . . . . . . . . . . . . . . . . . . . . . . . . . . . . 274
Save Settings . . . . . . . . . . . . . . . . . . . . . . . . . . . . . . . . . 274
ID Copy . . . . . . . . . . . . . . . . . . . . . . . . . . . . . . . . . . . . . . . 275
Save Settings . . . . . . . . . . . . . . . . . . . . . . . . . . . . . . . . . 275
Scan . . . . . . . . . . . . . . . . . . . . . . . . . . . . . . . . . . . . . . . . 275
Scan to E-mail . . . . . . . . . . . . . . . . . . . . . . . . . . . . . . . . . 275
Scan to Network . . . . . . . . . . . . . . . . . . . . . . . . . . . . . . . . 275
Scan to PC . . . . . . . . . . . . . . . . . . . . . . . . . . . . . . . . . . . 276
Scan to USB . . . . . . . . . . . . . . . . . . . . . . . . . . . . . . . . . . 276
Scan Settings . . . . . . . . . . . . . . . . . . . . . . . . . . . . . . . . . 276
Save Settings . . . . . . . . . . . . . . . . . . . . . . . . . . . . . . . . . 279
Scan to WSD. . . . . . . . . . . . . . . . . . . . . . . . . . . . . . . . . . 279
Tile Settings . . . . . . . . . . . . . . . . . . . . . . . . . . . . . . . . . . 280
Fax . . . . . . . . . . . . . . . . . . . . . . . . . . . . . . . . . . . . . . . . . 280
Fax Settings . . . . . . . . . . . . . . . . . . . . . . . . . . . . . . . . . . 280
Save Settings . . . . . . . . . . . . . . . . . . . . . . . . . . . . . . . . . 281
Print PDF/TIFF . . . . . . . . . . . . . . . . . . . . . . . . . . . . . . . . . . . . 282
Print JPEG . . . . . . . . . . . . . . . . . . . . . . . . . . . . . . . . . . . . . . 282
Print Settings. . . . . . . . . . . . . . . . . . . . . . . . . . . . . . . . . . 282
Save Settings . . . . . . . . . . . . . . . . . . . . . . . . . . . . . . . . . 285
Dell Document Hub . . . . . . . . . . . . . . . . . . . . . . . . . . . . . . . . . 285
Search for Files . . . . . . . . . . . . . . . . . . . . . . . . . . . . . . . . 285

Template Last Updated - 2/7/2007 Contents 9
Browse for Files . . . . . . . . . . . . . . . . . . . . . . . . . . . . . . . . 285
Scan . . . . . . . . . . . . . . . . . . . . . . . . . . . . . . . . . . . . . . 286
Smart OCR Scan. . . . . . . . . . . . . . . . . . . . . . . . . . . . . . . . 287
E-mail Me . . . . . . . . . . . . . . . . . . . . . . . . . . . . . . . . . . . 288
Business Card Reader. . . . . . . . . . . . . . . . . . . . . . . . . . . . . 290
Add Apps . . . . . . . . . . . . . . . . . . . . . . . . . . . . . . . . . . . . . . 290
Panel Lock . . . . . . . . . . . . . . . . . . . . . . . . . . . . . . . . . . . . . 290
Enabling the Panel Lock. . . . . . . . . . . . . . . . . . . . . . . . . . . . 290
Disabling the Panel Lock . . . . . . . . . . . . . . . . . . . . . . . . . . . 291
Resetting Defaults . . . . . . . . . . . . . . . . . . . . . . . . . . . . . . . . . 291
When Using the Operator Panel . . . . . . . . . . . . . . . . . . . . . . . 291
17 Print Media Guidelines . . . . . . . . . . . . . . . . . . . . . . . . . . 293
Paper . . . . . . . . . . . . . . . . . . . . . . . . . . . . . . . . . . . . . . . . 293
Paper Characteristics . . . . . . . . . . . . . . . . . . . . . . . . . . . . . 293
Recommended Paper . . . . . . . . . . . . . . . . . . . . . . . . . . . . . 294
Unacceptable Paper . . . . . . . . . . . . . . . . . . . . . . . . . . . . . 294
Selecting Paper . . . . . . . . . . . . . . . . . . . . . . . . . . . . . . . . 294
Selecting Pre-Printed Media and Letterheads . . . . . . . . . . . . . . . . 295
Selecting Pre-Punched Paper . . . . . . . . . . . . . . . . . . . . . . . . 295
Envelopes . . . . . . . . . . . . . . . . . . . . . . . . . . . . . . . . . . . . . . 295
Labels . . . . . . . . . . . . . . . . . . . . . . . . . . . . . . . . . . . . . . . . 296
Storing Print Media. . . . . . . . . . . . . . . . . . . . . . . . . . . . . . . . . 297
Identifying Print Media and Specifications . . . . . . . . . . . . . . . . . . . . 297
Supported Paper Sizes . . . . . . . . . . . . . . . . . . . . . . . . . . . . 297
Supported Paper Types . . . . . . . . . . . . . . . . . . . . . . . . . . . . 298
Paper Type Specifications . . . . . . . . . . . . . . . . . . . . . . . . . . 298
18 Loading Print Media . . . . . . . . . . . . . . . . . . . . . . . . . . . . . 299
Capacity. . . . . . . . . . . . . . . . . . . . . . . . . . . . . . . . . . . . . . . 299
Print Media Dimensions . . . . . . . . . . . . . . . . . . . . . . . . . . . . . . 299
Loading Print Media in Tray1 and the Optional 550-Sheet Feeder . . . . . . . . 299
Loading Letterhead (Pre-Printed and Pre-Punched Paper) . . . . . . . . . 299
Loading Print Media in the MPF . . . . . . . . . . . . . . . . . . . . . . . . . . 300
Loading an Envelope in the MPF . . . . . . . . . . . . . . . . . . . . . . . 302
Envelope #10, Monarch, or DL . . . . . . . . . . . . . . . . . . . . . . . . 303

10 Contents Template Last Updated - 2/7/2007
C5. . . . . . . . . . . . . . . . . . . . . . . . . . . . . . . . . . . . . . . . 303
Using the MPF. . . . . . . . . . . . . . . . . . . . . . . . . . . . . . . . . . . . 304
Linking Trays . . . . . . . . . . . . . . . . . . . . . . . . . . . . . . . . . . . . 304
Printing, Copying, Scanning, Faxing, and Dell Document
Hub . . . . . . . . . . . . . . . . . . . . . . . . . . . . . . . . . . . . . . . . 305
19 Printing . . . . . . . . . . . . . . . . . . . . . . . . . . . . . . . . . . . . . . . 307
Tips for Successful Printing . . . . . . . . . . . . . . . . . . . . . . . . . . . . 307
Tips on Storing Print Media . . . . . . . . . . . . . . . . . . . . . . . . . . 307
Avoiding Paper Jams . . . . . . . . . . . . . . . . . . . . . . . . . . . . . 307
Sending a Job to Print . . . . . . . . . . . . . . . . . . . . . . . . . . . . . . . 307
Canceling a Print Job . . . . . . . . . . . . . . . . . . . . . . . . . . . . . . . . 308
Canceling a Job From the Operator Panel . . . . . . . . . . . . . . . . . . 308
Canceling a Job From a Computer Running Windows . . . . . . . . . . . . 308
Duplex Printing . . . . . . . . . . . . . . . . . . . . . . . . . . . . . . . . . . . 309
Duplex Printing With Duplex Unit . . . . . . . . . . . . . . . . . . . . . . . 309
Using Booklet Print . . . . . . . . . . . . . . . . . . . . . . . . . . . . . . 309
Using the Stored Print Feature . . . . . . . . . . . . . . . . . . . . . . . . . . . 310
Overview . . . . . . . . . . . . . . . . . . . . . . . . . . . . . . . . . . . . 310
Procedures for Printing Stored Print . . . . . . . . . . . . . . . . . . . . . 312
Printing from USB Memory . . . . . . . . . . . . . . . . . . . . . . . . . . . . . 313
Supported File Formats . . . . . . . . . . . . . . . . . . . . . . . . . . . . 314
Inserting and Removing a USB Memory . . . . . . . . . . . . . . . . . . . 314
Printing a PDF/TIFF File in a USB Memory . . . . . . . . . . . . . . . . . . 314
Printing a JPEG File in a USB Memory . . . . . . . . . . . . . . . . . . . . 315
Printing With Web Services on Devices (WSD) . . . . . . . . . . . . . . . . . . 315
Adding Roles of Printer Services . . . . . . . . . . . . . . . . . . . . . . . 315
Printer Setup . . . . . . . . . . . . . . . . . . . . . . . . . . . . . . . . . . 316
Installing a Printer Driver Using the Add Printer Wizard . . . . . . . . . . . 316
Printing With Wi-Fi Direct™ . . . . . . . . . . . . . . . . . . . . . . . . . . . . 317
Setting Up Wi-Fi Direct . . . . . . . . . . . . . . . . . . . . . . . . . . . . 317
Printing via Wi-Fi Direct . . . . . . . . . . . . . . . . . . . . . . . . . . . . 320
Disconnecting Wi-Fi Direct Network . . . . . . . . . . . . . . . . . . . . . 320
Resetting the Passphrase . . . . . . . . . . . . . . . . . . . . . . . . . . . 320
Resetting the PIN . . . . . . . . . . . . . . . . . . . . . . . . . . . . . . . 321

Template Last Updated - 2/7/2007 Contents 11
Mobile Printing . . . . . . . . . . . . . . . . . . . . . . . . . . . . . . . . . . . 321
Android OS . . . . . . . . . . . . . . . . . . . . . . . . . . . . . . . . . . 321
Apple® iOS . . . . . . . . . . . . . . . . . . . . . . . . . . . . . . . . . . 321
Printing With AirPrint . . . . . . . . . . . . . . . . . . . . . . . . . . . . . . . 322
Setting Up AirPrint on Your Printer . . . . . . . . . . . . . . . . . . . . . . 322
Printing via AirPrint . . . . . . . . . . . . . . . . . . . . . . . . . . . . . . 322
Printing With Google Cloud Print™ . . . . . . . . . . . . . . . . . . . . . . . . 322
Preparing to Use the Printer with Google Cloud Print . . . . . . . . . . . . 322
Registering the Printer to Your Google Account . . . . . . . . . . . . . . . 323
Printing via Google Cloud Print . . . . . . . . . . . . . . . . . . . . . . . . 323
Printing a Report Page . . . . . . . . . . . . . . . . . . . . . . . . . . . . . . . 324
Printer Settings . . . . . . . . . . . . . . . . . . . . . . . . . . . . . . . . . . . 324
Using the Operator Panel to Change the Printer Settings . . . . . . . . . . 324
Using the Dell Printer Configuration Web Tool to Change the Printer
Settings . . . . . . . . . . . . . . . . . . . . . . . . . . . . . . . . . . . . 325
20 Copying. . . . . . . . . . . . . . . . . . . . . . . . . . . . . . . . . . . . . . . 327
Loading Paper for Copying . . . . . . . . . . . . . . . . . . . . . . . . . . . . . 327
Selecting Paper Tray . . . . . . . . . . . . . . . . . . . . . . . . . . . . . . . . 327
Preparing a Document . . . . . . . . . . . . . . . . . . . . . . . . . . . . . . . 327
Making Copies From the Document Glass . . . . . . . . . . . . . . . . . . . . . 328
Making Copies From the DADF. . . . . . . . . . . . . . . . . . . . . . . . . . . 329
Setting Copy Options . . . . . . . . . . . . . . . . . . . . . . . . . . . . . . . . 330
Quantity . . . . . . . . . . . . . . . . . . . . . . . . . . . . . . . . . . . . 330
Darken / Lighten . . . . . . . . . . . . . . . . . . . . . . . . . . . . . . . . 330
Output Color . . . . . . . . . . . . . . . . . . . . . . . . . . . . . . . . . . 331
Select Tray. . . . . . . . . . . . . . . . . . . . . . . . . . . . . . . . . . . 331
2 Sided Copying . . . . . . . . . . . . . . . . . . . . . . . . . . . . . . . . 331
Sharpness . . . . . . . . . . . . . . . . . . . . . . . . . . . . . . . . . . . 332
Reduce / Enlarge . . . . . . . . . . . . . . . . . . . . . . . . . . . . . . . 332
Original Size . . . . . . . . . . . . . . . . . . . . . . . . . . . . . . . . . . 333
Original Type. . . . . . . . . . . . . . . . . . . . . . . . . . . . . . . . . . 333
Collation . . . . . . . . . . . . . . . . . . . . . . . . . . . . . . . . . . . . 334
2-Up . . . . . . . . . . . . . . . . . . . . . . . . . . . . . . . . . . . . . . 335
Color Saturation . . . . . . . . . . . . . . . . . . . . . . . . . . . . . . . . 336
Margin . . . . . . . . . . . . . . . . . . . . . . . . . . . . . . . . . . . . . 336
Auto Exposure . . . . . . . . . . . . . . . . . . . . . . . . . . . . . . . . . 336
Using the ID Copy. . . . . . . . . . . . . . . . . . . . . . . . . . . . . . . . . . 336

12 Contents Template Last Updated - 2/7/2007
Changing the Default Settings . . . . . . . . . . . . . . . . . . . . . . . . . . . 337
21 Scanning . . . . . . . . . . . . . . . . . . . . . . . . . . . . . . . . . . . . . . 339
Scanning Overview . . . . . . . . . . . . . . . . . . . . . . . . . . . . . . . . . 339
Scanning - With scanner driver . . . . . . . . . . . . . . . . . . . . . . . . 339
Scanning - Without scanner driver . . . . . . . . . . . . . . . . . . . . . . 339
Scanning From the Operator Panel - Scan to PC . . . . . . . . . . . . . . . . . . 340
Scanning from the Operator Panel - Scan to WSD. . . . . . . . . . . . . . . . . 342
Printer Setup for Scan to WSD . . . . . . . . . . . . . . . . . . . . . . . . 342
Procedures for Scan to WSD . . . . . . . . . . . . . . . . . . . . . . . . . 342
Scanning Using the TWAIN Driver . . . . . . . . . . . . . . . . . . . . . . . . . 343
Scan Settings Tool . . . . . . . . . . . . . . . . . . . . . . . . . . . . . . . . . 345
IP Address Settings . . . . . . . . . . . . . . . . . . . . . . . . . . . . . . 345
Password Setting . . . . . . . . . . . . . . . . . . . . . . . . . . . . . . . 346
Scanning Using the Windows Image Acquisition (WIA) Driver . . . . . . . . . . 347
Scanning to a PC or Server via SMB/FTP . . . . . . . . . . . . . . . . . . . . . 349
Overview . . . . . . . . . . . . . . . . . . . . . . . . . . . . . . . . . . . . 349
Procedures. . . . . . . . . . . . . . . . . . . . . . . . . . . . . . . . . . . 350
Setting a Login Name and a Password (SMB Only). . . . . . . . . . . . . . 351
Creating a Shared Folder (SMB Only) . . . . . . . . . . . . . . . . . . . . . 352
Setting a Destination Using an Address Book. . . . . . . . . . . . . . . . . 357
Sending the Scanned File on the Network . . . . . . . . . . . . . . . . . . 362
Scanning to a USB Memory . . . . . . . . . . . . . . . . . . . . . . . . . . . . 362
Types of a USB Memory . . . . . . . . . . . . . . . . . . . . . . . . . . . . 362
Procedures. . . . . . . . . . . . . . . . . . . . . . . . . . . . . . . . . . . 363
Specifying a Folder to Save the Scanned Image . . . . . . . . . . . . . . . 363
Sending an E-Mail With the Scanned Image. . . . . . . . . . . . . . . . . . . . 364
Preparing the Printer to Send the E-Mail . . . . . . . . . . . . . . . . . . . 364
Setting the DNS Server Address . . . . . . . . . . . . . . . . . . . . . . . 364
Setting the Administrator's E-mail Address . . . . . . . . . . . . . . . . . . 364
Setting the Information Necessary to Access the Mail Server . . . . . . . . 365
Registering a New E-Mail Address to Address Book . . . . . . . . . . . . . 367
Sending an E-mail With the Scanned File . . . . . . . . . . . . . . . . . . . 367
22 Faxing . . . . . . . . . . . . . . . . . . . . . . . . . . . . . . . . . . . . . . . . 369
Specifying the Fax Initial Settings Using the Dell Printer Setup . . . . . . . . . 369
Setting Your Country . . . . . . . . . . . . . . . . . . . . . . . . . . . . . . . . 370

Template Last Updated - 2/7/2007 Contents 13
Setting the Printer ID . . . . . . . . . . . . . . . . . . . . . . . . . . . . . . . . 370
Setting the Time and Date . . . . . . . . . . . . . . . . . . . . . . . . . . . . . 370
Changing the Clock Mode . . . . . . . . . . . . . . . . . . . . . . . . . . . . . 371
Setting Sounds . . . . . . . . . . . . . . . . . . . . . . . . . . . . . . . . . . . 371
Speaker Volume . . . . . . . . . . . . . . . . . . . . . . . . . . . . . . . . 371
Ringer Volume . . . . . . . . . . . . . . . . . . . . . . . . . . . . . . . . . 371
Specifying the Fax Settings Options . . . . . . . . . . . . . . . . . . . . . . . . 371
Changing the Fax Settings Options . . . . . . . . . . . . . . . . . . . . . . 371
Available Fax Settings Options . . . . . . . . . . . . . . . . . . . . . . . . 372
Advanced Fax Settings . . . . . . . . . . . . . . . . . . . . . . . . . . . . 376
Sending a Fax. . . . . . . . . . . . . . . . . . . . . . . . . . . . . . . . . . . . 377
Loading an Original Document . . . . . . . . . . . . . . . . . . . . . . . . 377
Adjusting the Document Resolution. . . . . . . . . . . . . . . . . . . . . . 378
Adjusting the Document Contrast. . . . . . . . . . . . . . . . . . . . . . . 379
Sending a Fax From Memory . . . . . . . . . . . . . . . . . . . . . . . . . 379
Sending a Fax Manually. . . . . . . . . . . . . . . . . . . . . . . . . . . . 380
Confirming Transmissions . . . . . . . . . . . . . . . . . . . . . . . . . . . 381
Automatic Redialing . . . . . . . . . . . . . . . . . . . . . . . . . . . . . . 381
Sending a Delayed Fax . . . . . . . . . . . . . . . . . . . . . . . . . . . . . . . 381
Sending a Fax from the Driver (Direct Fax) . . . . . . . . . . . . . . . . . . . . 382
Example . . . . . . . . . . . . . . . . . . . . . . . . . . . . . . . . . . . . 382
Receiving a Fax. . . . . . . . . . . . . . . . . . . . . . . . . . . . . . . . . . . 386
About Receiving Modes. . . . . . . . . . . . . . . . . . . . . . . . . . . . 386
Loading Paper for Receiving Faxes . . . . . . . . . . . . . . . . . . . . . . 386
Receiving a Fax Automatically in the Fax Mode . . . . . . . . . . . . . . . 387
Receiving a Fax Manually in the Telephone Mode . . . . . . . . . . . . . . 387
Receiving a Fax Automatically in the Telephone / Fax or Ans
Machine/Fax. . . . . . . . . . . . . . . . . . . . . . . . . . . . . . . . . . 387
Receiving a Fax Manually Using an External Telephone
(Remote Receive) . . . . . . . . . . . . . . . . . . . . . . . . . . . . . . . 387
Receiving Faxes Using the DRPD . . . . . . . . . . . . . . . . . . . . . . . 388
Receiving Faxes in the Memory. . . . . . . . . . . . . . . . . . . . . . . . 388
Polling Receive . . . . . . . . . . . . . . . . . . . . . . . . . . . . . . . . 388
Automatic Dialing . . . . . . . . . . . . . . . . . . . . . . . . . . . . . . . . . 388
Speed Dialing . . . . . . . . . . . . . . . . . . . . . . . . . . . . . . . . . 388
Setting Speed Dial. . . . . . . . . . . . . . . . . . . . . . . . . . . . . . . 389
Sending a Fax Using Speed Dial . . . . . . . . . . . . . . . . . . . . . . . 389
Group Dialing . . . . . . . . . . . . . . . . . . . . . . . . . . . . . . . . . 390
Setting Group Dial . . . . . . . . . . . . . . . . . . . . . . . . . . . . . . . 390
Editing Group Dial . . . . . . . . . . . . . . . . . . . . . . . . . . . . . . . 390

14 Contents Template Last Updated - 2/7/2007
Sending a Fax Using Group Dial (Multi-address Transmission). . . . . . . . 391
Printing a Speed Dial List . . . . . . . . . . . . . . . . . . . . . . . . . . . 391
Phone Book . . . . . . . . . . . . . . . . . . . . . . . . . . . . . . . . . . . . . 391
Other Ways to Fax. . . . . . . . . . . . . . . . . . . . . . . . . . . . . . . . . . 392
Using the Secure Receiving Mode . . . . . . . . . . . . . . . . . . . . . . 392
Using an Answering Machine . . . . . . . . . . . . . . . . . . . . . . . . . 393
Using a Computer Modem . . . . . . . . . . . . . . . . . . . . . . . . . . . 393
Printing a Report . . . . . . . . . . . . . . . . . . . . . . . . . . . . . . . . . . 394
Changing Setting Options. . . . . . . . . . . . . . . . . . . . . . . . . . . . . . 394
23 Dell™ Document Hub . . . . . . . . . . . . . . . . . . . . . . . . . . . . 395
Registering the User and Signing In to the Dell Document Hub . . . . . . . . . . 395
Registering a New User to the Dell Document Hub . . . . . . . . . . . . . . 395
Signing In to the Dell Document Hub . . . . . . . . . . . . . . . . . . . . . 396
When the Favorites Screen is Displayed When You Tap the Tile on the Dell
Document Hub Screen. . . . . . . . . . . . . . . . . . . . . . . . . . . . . 396
Returning to the Home Screen . . . . . . . . . . . . . . . . . . . . . . . . 396
Logging Out From the Printer . . . . . . . . . . . . . . . . . . . . . . . . . 396
Searching for and Printing Files . . . . . . . . . . . . . . . . . . . . . . . . . . 397
Browsing and Printing Files . . . . . . . . . . . . . . . . . . . . . . . . . . . . 398
Searching for the Files in the Selected Cloud Service . . . . . . . . . . . . 399
Scanning . . . . . . . . . . . . . . . . . . . . . . . . . . . . . . . . . . . . . . 400
Searching for the Location Across the Cloud Services . . . . . . . . . . . . 401
Searching for the Location in the Selected Cloud Service . . . . . . . . . . 401
Scanning the Document Using Optical Character Recognition (OCR). . . . . . . 401
Receiving the Scanned File as an E-Mail . . . . . . . . . . . . . . . . . . . . . 402
Receiving the Scanned Image of the Business Card as an E-Mail . . . . . . . . 403
Know Your Printer. . . . . . . . . . . . . . . . . . . . . . . . . . . . . 405
24 Understanding Your Printer Software . . . . . . . . . . . . . . . 407
Printer Utility Software . . . . . . . . . . . . . . . . . . . . . . . . . . . . . . . 408
Status Window. . . . . . . . . . . . . . . . . . . . . . . . . . . . . . . . . 409
Tool Box . . . . . . . . . . . . . . . . . . . . . . . . . . . . . . . . . . . . 409
Updater . . . . . . . . . . . . . . . . . . . . . . . . . . . . . . . . . . . . 409

Template Last Updated - 2/7/2007 Contents 15
Troubleshooting . . . . . . . . . . . . . . . . . . . . . . . . . . . . . . . . 409
Address Book Editor. . . . . . . . . . . . . . . . . . . . . . . . . . . . . . 409
ScanButton Manager . . . . . . . . . . . . . . . . . . . . . . . . . . . . . 409
Address Books . . . . . . . . . . . . . . . . . . . . . . . . . . . . . . . . . . . 409
Types of Address Books. . . . . . . . . . . . . . . . . . . . . . . . . . . . 409
Adding and Editing Entries to the Address Books . . . . . . . . . . . . . . 410
App Manager . . . . . . . . . . . . . . . . . . . . . . . . . . . . . . . . . . . . 413
Preparing to use the App Manager - Dell C2665dnf . . . . . . . . . . . . . 413
Using the App Manager - Dell C2665dnf . . . . . . . . . . . . . . . . . . . 413
Status Monitor Widget for Macintosh . . . . . . . . . . . . . . . . . . . . . . . 414
Status Monitor Widget Feature . . . . . . . . . . . . . . . . . . . . . . . . 414
Before Installing the Status Monitor Widget . . . . . . . . . . . . . . . . . 414
Installing the Status Monitor Widget . . . . . . . . . . . . . . . . . . . . . 414
Opening and Closing the Status Monitor Widget . . . . . . . . . . . . . . . 414
Printer Status Window . . . . . . . . . . . . . . . . . . . . . . . . . . . . 415
Order Window . . . . . . . . . . . . . . . . . . . . . . . . . . . . . . . . . 416
Preferences . . . . . . . . . . . . . . . . . . . . . . . . . . . . . . . . . . 417
Status Monitor Console for Linux . . . . . . . . . . . . . . . . . . . . . . . . . 418
Status Monitor Console Feature . . . . . . . . . . . . . . . . . . . . . . . 418
Before Installing the Status Monitor Console. . . . . . . . . . . . . . . . . 418
Installing the Status Monitor Console. . . . . . . . . . . . . . . . . . . . . 418
Starting the Status Monitor Console . . . . . . . . . . . . . . . . . . . . . 419
Printer Selection Window. . . . . . . . . . . . . . . . . . . . . . . . . . . 419
Printer Status Window . . . . . . . . . . . . . . . . . . . . . . . . . . . . 420
Dell Supplies Management System Window . . . . . . . . . . . . . . . . . 421
Service Tag Window . . . . . . . . . . . . . . . . . . . . . . . . . . . . . 422
Settings Window . . . . . . . . . . . . . . . . . . . . . . . . . . . . . . . 422
25 User Authentication . . . . . . . . . . . . . . . . . . . . . . . . . . . . . 425
Creating and Editing the User Accounts . . . . . . . . . . . . . . . . . . . . . . 425
Creating a New User Account . . . . . . . . . . . . . . . . . . . . . . . . 425
Editing the User Account . . . . . . . . . . . . . . . . . . . . . . . . . . . 426
Deleting the User Account . . . . . . . . . . . . . . . . . . . . . . . . . . 426
Logging In to the User Account . . . . . . . . . . . . . . . . . . . . . . . . . . 426
Logging In Using the Touch Panel. . . . . . . . . . . . . . . . . . . . . . . 426
Logging In Using the NFC Authentication Card . . . . . . . . . . . . . . . . 427
Logging Out . . . . . . . . . . . . . . . . . . . . . . . . . . . . . . . . . . 427

16 Contents Template Last Updated - 2/7/2007
26 Multiple Desktop
- Tile Customization . . . . . . . . . . . . . . . . . . . . . . . . . . . . . 429
Adding a New Tile . . . . . . . . . . . . . . . . . . . . . . . . . . . . . . . . . 429
Selecting From the Pre-defined Tiles . . . . . . . . . . . . . . . . . . . . . 429
Creating a New Tile Including the Job Settings . . . . . . . . . . . . . . . . 429
27 Using the Server Address Book and Server Phone
Book . . . . . . . . . . . . . . . . . . . . . . . . . . . . . . . . . . . . . . . . . 431
Preparing the Printer to Access the External LDAP Server . . . . . . . . . . . . 431
Starting the Dell Printer Configuration Web Tool . . . . . . . . . . . . . . . 431
Setting Authentication Type . . . . . . . . . . . . . . . . . . . . . . . . . . 431
Setting LDAP Server . . . . . . . . . . . . . . . . . . . . . . . . . . . . . . 432
Setting LDAP User Mapping. . . . . . . . . . . . . . . . . . . . . . . . . . 433
Sending an E-mail With the Scanned File Using the E-mail Server Address
Book . . . . . . . . . . . . . . . . . . . . . . . . . . . . . . . . . . . . . . . . . 434
Sending a Fax Using the Fax Server Phone Book . . . . . . . . . . . . . . . . . 434
28 Using Digital Certificates . . . . . . . . . . . . . . . . . . . . . . . . . 435
Managing Certificates . . . . . . . . . . . . . . . . . . . . . . . . . . . . . . . 435
Preparing to Manage Certificates . . . . . . . . . . . . . . . . . . . . . . . 435
Importing a Digital Certificate . . . . . . . . . . . . . . . . . . . . . . . . . 436
Setting a Digital Certificate . . . . . . . . . . . . . . . . . . . . . . . . . . 436
Confirming the Settings of a Digital Certificate . . . . . . . . . . . . . . . . 437
Deleting a Digital Certificate. . . . . . . . . . . . . . . . . . . . . . . . . . 437
Exporting a Digital Certificate . . . . . . . . . . . . . . . . . . . . . . . . . 438
Setting the Features. . . . . . . . . . . . . . . . . . . . . . . . . . . . . . . . . 439
Setting the Certificate in the IPsec Digital Signature Mode . . . . . . . . . 439
Setting the SSL-use Server Certificate (HTTP/IPP) . . . . . . . . . . . . . . 439
Setting LDAP-SSL/TLS Communication . . . . . . . . . . . . . . . . . . . . 440
Setting Server Certificate Verification for LDAP-SSL/
TLS Communication . . . . . . . . . . . . . . . . . . . . . . . . . . . . . . 440
Setting Client Certificate for LDAP-SSL/TLS Communication . . . . . . . . . 440
Setting for Wireless LAN WPA-Enterprise (EAP-TLS). . . . . . . . . . . . . 441
Setting for Wireless LAN WPA-Enterprise (PEAPV0-MS-CHAPV2,
EAP-TTLS PAP, EAP-TTLS CHAP) . . . . . . . . . . . . . . . . . . . . . . . 442
Setting Client Certificate for IEEE 802.1x (EAP-TLS). . . . . . . . . . . . . . 443
29 Understanding Fonts . . . . . . . . . . . . . . . . . . . . . . . . . . . . 445
Typefaces and Fonts . . . . . . . . . . . . . . . . . . . . . . . . . . . . . . . . 445

Template Last Updated - 2/7/2007 Contents 17
Weight and Style . . . . . . . . . . . . . . . . . . . . . . . . . . . . . . . 445
Pitch and Point Size . . . . . . . . . . . . . . . . . . . . . . . . . . . . . . 445
Bitmapped and Scalable Fonts. . . . . . . . . . . . . . . . . . . . . . . . . . . 446
Resident Fonts . . . . . . . . . . . . . . . . . . . . . . . . . . . . . . . . . . . 447
Symbol Sets. . . . . . . . . . . . . . . . . . . . . . . . . . . . . . . . . . . . . 450
Symbol Sets for PCL 5/PCL 6 . . . . . . . . . . . . . . . . . . . . . . . . . 450
30 Understanding Printer Messages . . . . . . . . . . . . . . . . . . 451
Error Codes . . . . . . . . . . . . . . . . . . . . . . . . . . . . . . . . . . . . . 451
Error Messages . . . . . . . . . . . . . . . . . . . . . . . . . . . . . . . . . . . 459
31 Specifications . . . . . . . . . . . . . . . . . . . . . . . . . . . . . . . . . 461
Operating System Compatibility . . . . . . . . . . . . . . . . . . . . . . . . . . 461
Power Supply. . . . . . . . . . . . . . . . . . . . . . . . . . . . . . . . . . . . 461
Dimensions . . . . . . . . . . . . . . . . . . . . . . . . . . . . . . . . . . . . . 461
Memory . . . . . . . . . . . . . . . . . . . . . . . . . . . . . . . . . . . . . . . 461
Page Description Language (PDL)/Emulation, Operating System,
and Interface . . . . . . . . . . . . . . . . . . . . . . . . . . . . . . . . . . . . 461
MIB Compatibility . . . . . . . . . . . . . . . . . . . . . . . . . . . . . . . 462
Environment. . . . . . . . . . . . . . . . . . . . . . . . . . . . . . . . . . . . . 462
Operation . . . . . . . . . . . . . . . . . . . . . . . . . . . . . . . . . . . 462
Print Quality Guarantee . . . . . . . . . . . . . . . . . . . . . . . . . . . . 462
Storage . . . . . . . . . . . . . . . . . . . . . . . . . . . . . . . . . . . . 462
Altitude . . . . . . . . . . . . . . . . . . . . . . . . . . . . . . . . . . . . 462
Cables. . . . . . . . . . . . . . . . . . . . . . . . . . . . . . . . . . . . . . . . 462
Copier Specifications . . . . . . . . . . . . . . . . . . . . . . . . . . . . . . . 463
Scanner Specifications . . . . . . . . . . . . . . . . . . . . . . . . . . . . . . 463
Facsimile Specifications . . . . . . . . . . . . . . . . . . . . . . . . . . . . . . 464
Optional Wireless Adapter . . . . . . . . . . . . . . . . . . . . . . . . . . . . . 464

18 Contents Template Last Updated - 2/7/2007
Maintaining Your Printer . . . . . . . . . . . . . . . . . . . . . . . 467
32 Maintaining Your Printer . . . . . . . . . . . . . . . . . . . . . . . . . 469
Determining the Status of Supplies . . . . . . . . . . . . . . . . . . . . . . . . 469
Conserving Supplies . . . . . . . . . . . . . . . . . . . . . . . . . . . . . . . . 469
Ordering Supplies. . . . . . . . . . . . . . . . . . . . . . . . . . . . . . . . . . 469
Storing Print Media . . . . . . . . . . . . . . . . . . . . . . . . . . . . . . . . . 470
Storing Consumables . . . . . . . . . . . . . . . . . . . . . . . . . . . . . . . . 470
Replacing the Toner Cartridges. . . . . . . . . . . . . . . . . . . . . . . . . . . 471
Removing the Toner Cartridge . . . . . . . . . . . . . . . . . . . . . . . . . 471
Installing a Toner Cartridge . . . . . . . . . . . . . . . . . . . . . . . . . . 472
Replacing the Drum Cartridges. . . . . . . . . . . . . . . . . . . . . . . . . . . 473
Removing the Drum Cartridge . . . . . . . . . . . . . . . . . . . . . . . . . 473
Installing a Drum Cartridge . . . . . . . . . . . . . . . . . . . . . . . . . . 475
Replacing the Fusing Unit . . . . . . . . . . . . . . . . . . . . . . . . . . . . . 479
Removing the Fusing Unit . . . . . . . . . . . . . . . . . . . . . . . . . . . 479
Installing a Fusing Unit. . . . . . . . . . . . . . . . . . . . . . . . . . . . . 480
Replacing the Transfer Belt Unit, the 2nd Belt Transfer Roller (2nd BTR),
and the Retard Roller . . . . . . . . . . . . . . . . . . . . . . . . . . . . . . . . 481
Removing the Transfer Belt Unit. . . . . . . . . . . . . . . . . . . . . . . . 481
Installing a Transfer Belt Unit . . . . . . . . . . . . . . . . . . . . . . . . . 484
Removing the 2nd BTR. . . . . . . . . . . . . . . . . . . . . . . . . . . . . 487
Installing a 2nd BTR . . . . . . . . . . . . . . . . . . . . . . . . . . . . . . 487
Removing the Retard Roller in Tray1. . . . . . . . . . . . . . . . . . . . . . 488
Installing a Retard Roller in Tray1 . . . . . . . . . . . . . . . . . . . . . . . 489
Replacing the Waste Toner Box . . . . . . . . . . . . . . . . . . . . . . . . . . 490
Removing the Waste Toner Box . . . . . . . . . . . . . . . . . . . . . . . . 490
Installing a Waste Toner Box . . . . . . . . . . . . . . . . . . . . . . . . . 491
Cleaning Inside the Printer . . . . . . . . . . . . . . . . . . . . . . . . . . . . . 493
Cleaning the CTD Sensor . . . . . . . . . . . . . . . . . . . . . . . . . . . 493
Cleaning the Raster Optical Scanner (ROS) Window . . . . . . . . . . . . . 498
Cleaning the Scanner . . . . . . . . . . . . . . . . . . . . . . . . . . . . . . . . 502
Cleaning the DADF Feed Roller. . . . . . . . . . . . . . . . . . . . . . . . . . . 504
Adjusting Color Registration . . . . . . . . . . . . . . . . . . . . . . . . . . . . 504
Printing the Color Registration Chart . . . . . . . . . . . . . . . . . . . . . 504

Template Last Updated - 2/7/2007 Contents 19
Determining Values . . . . . . . . . . . . . . . . . . . . . . . . . . . . . . 505
Entering Values . . . . . . . . . . . . . . . . . . . . . . . . . . . . . . . . 507
33 Removing Options . . . . . . . . . . . . . . . . . . . . . . . . . . . . . . 509
Removing the Optional 550-Sheet Feeder . . . . . . . . . . . . . . . . . . . . . 509
Removing the Optional Wireless Adapter . . . . . . . . . . . . . . . . . . . . . 512
34 Clearing Jams . . . . . . . . . . . . . . . . . . . . . . . . . . . . . . . . . 515
Avoiding Jams . . . . . . . . . . . . . . . . . . . . . . . . . . . . . . . . . . . 515
Identifying the Location of Paper Jams . . . . . . . . . . . . . . . . . . . . . . 516
Clearing Paper Jams From the DADF . . . . . . . . . . . . . . . . . . . . . . . 517
Clearing Paper Jams From the MPF . . . . . . . . . . . . . . . . . . . . . . . . 519
If error code: 050-112 appears: . . . . . . . . . . . . . . . . . . . . . . . . 519
If error code: 050-129 appears: . . . . . . . . . . . . . . . . . . . . . . . . 521
Clearing Paper Jams From Tray1 . . . . . . . . . . . . . . . . . . . . . . . . . . 522
Clearing Paper Jams From the Fusing Unit . . . . . . . . . . . . . . . . . . . . 523
If error code: 050-111 appears: . . . . . . . . . . . . . . . . . . . . . . . . 523
If error code: 050-129 appears: . . . . . . . . . . . . . . . . . . . . . . . . 525
Clearing Paper Jams From the Optional 550-Sheet Feeder . . . . . . . . . . . . 529
Troubleshooting . . . . . . . . . . . . . . . . . . . . . . . . . . . . . . 531
35 Troubleshooting Guide . . . . . . . . . . . . . . . . . . . . . . . . . . . 533
Basic Printer Problems. . . . . . . . . . . . . . . . . . . . . . . . . . . . . . . 533
Display Problems . . . . . . . . . . . . . . . . . . . . . . . . . . . . . . . . . . 533
Printing Problems . . . . . . . . . . . . . . . . . . . . . . . . . . . . . . . . . 533
Print Quality Problems . . . . . . . . . . . . . . . . . . . . . . . . . . . . . . . 534
The output is too light . . . . . . . . . . . . . . . . . . . . . . . . . . . . . 535
Toner smears or print comes off . . . . . . . . . . . . . . . . . . . . . . . 536
Random spots/Blurred images . . . . . . . . . . . . . . . . . . . . . . . . 537
The entire output is blank . . . . . . . . . . . . . . . . . . . . . . . . . . . 538
Streaks appear on the output . . . . . . . . . . . . . . . . . . . . . . . . . 539
Part or the entire output is black . . . . . . . . . . . . . . . . . . . . . . . 540

20 Contents Template Last Updated - 2/7/2007
Pitched color dots . . . . . . . . . . . . . . . . . . . . . . . . . . . . . . . 540
Vertical blanks . . . . . . . . . . . . . . . . . . . . . . . . . . . . . . . . . 541
Ghosting . . . . . . . . . . . . . . . . . . . . . . . . . . . . . . . . . . . . 542
Light-induced fatigue . . . . . . . . . . . . . . . . . . . . . . . . . . . . . 543
Fog . . . . . . . . . . . . . . . . . . . . . . . . . . . . . . . . . . . . . . . 544
Bead-Carry-Out (BCO) . . . . . . . . . . . . . . . . . . . . . . . . . . . . . 544
Jagged characters. . . . . . . . . . . . . . . . . . . . . . . . . . . . . . . 545
Banding . . . . . . . . . . . . . . . . . . . . . . . . . . . . . . . . . . . . 545
Auger mark. . . . . . . . . . . . . . . . . . . . . . . . . . . . . . . . . . . 546
Wrinkled/Stained paper . . . . . . . . . . . . . . . . . . . . . . . . . . . . 547
Damage on the leading edge of paper . . . . . . . . . . . . . . . . . . . . 547
Jam/Alignment Problems . . . . . . . . . . . . . . . . . . . . . . . . . . . . . . 548
The top and side margins are incorrect . . . . . . . . . . . . . . . . . . . . 548
Color registration is out of alignment . . . . . . . . . . . . . . . . . . . . . 548
Images are skewed . . . . . . . . . . . . . . . . . . . . . . . . . . . . . . 549
Tray1/Optional 550-Sheet Feeder Misfeed Jam . . . . . . . . . . . . . . . . 550
MPF Misfeed Jam . . . . . . . . . . . . . . . . . . . . . . . . . . . . . . . 551
Regi Jam (Exit Sensor On JAM) . . . . . . . . . . . . . . . . . . . . . . . . 551
Exit Jam (Exit Sensor Off JAM) . . . . . . . . . . . . . . . . . . . . . . . . 552
Tray1/Optional 550-Sheet Feeder Multi-feed Jam. . . . . . . . . . . . . . . 552
MPF Multi-feed Jam . . . . . . . . . . . . . . . . . . . . . . . . . . . . . . 553
Noise . . . . . . . . . . . . . . . . . . . . . . . . . . . . . . . . . . . . . . . . 553
Copy Problems . . . . . . . . . . . . . . . . . . . . . . . . . . . . . . . . . . . 554
Fax Problems . . . . . . . . . . . . . . . . . . . . . . . . . . . . . . . . . . . . 555
Scanning Problems . . . . . . . . . . . . . . . . . . . . . . . . . . . . . . . . . 556
Digital Certificate Problems . . . . . . . . . . . . . . . . . . . . . . . . . . . . 559
Problems With Installed Optional Accessories . . . . . . . . . . . . . . . . . . 560
Wi-Fi Direct Problems . . . . . . . . . . . . . . . . . . . . . . . . . . . . . . . 560
Scanner Driver/Printer Utility Problems . . . . . . . . . . . . . . . . . . . . . . 560
Other Problems . . . . . . . . . . . . . . . . . . . . . . . . . . . . . . . . . . . 561
Contacting Service . . . . . . . . . . . . . . . . . . . . . . . . . . . . . . . . . 561
Appendix . . . . . . . . . . . . . . . . . . . . . . . . . . . . . . . . . . . . 563
Appendix . . . . . . . . . . . . . . . . . . . . . . . . . . . . . . . . . . . . . . . . . .565
Dell™ Technical Support Policy . . . . . . . . . . . . . . . . . . . . . . . . . . 565

Template Last Updated - 2/7/2007 Contents 21
Online Services . . . . . . . . . . . . . . . . . . . . . . . . . . . . . . . . 565
Warranty and Return Policy . . . . . . . . . . . . . . . . . . . . . . . . . . . . 566
Recycling Information . . . . . . . . . . . . . . . . . . . . . . . . . . . . . 566
Contacting Dell . . . . . . . . . . . . . . . . . . . . . . . . . . . . . . . . . . . 566
Index . . . . . . . . . . . . . . . . . . . . . . . . . . . . . . . . . . . . . . . . . . . . 567

22 Contents Template Last Updated - 2/7/2007

23
Before Beginning
Notes, Cautions, and Warnings ..................................................... 25
1 Dell™ C2665dnf Color Laser Multifunction Printer User's Guide....27
2 Finding Information..................................................................... 29
3 Product Features......................................................................... 33
4 About the Printer......................................................................... 35

24

Notes, Cautions, and Warnings 25
Notes, Cautions, and Warnings
NOTE: A N
NOTE
indicates important information that helps you make better use of your printer.
CAUTION: A CAUTION indicates potential damage to hardware or loss of data if instructions are not followed.
WARNING: A WARNING indicates a potential for property damage, personal injury, or death.
Information in this document is subject to change without notice.
© 2013 Dell Inc. All rights reserved.
Reproduction of these materials in any manner whatsoever without the written permission of Dell Inc. is strictly forbidden.
Trademarks used in this text:
Dell
and the
DELL
logo
are trademarks of Dell Inc.;
Microsoft
,
Windows
,
Windows Server
,
Windows Vista, and
Active Directory
are either trademarks or registered trademarks of Microsoft Corporation in the United States and/or other countries; Apple,
Bonjour, iPad, iPhone, iPod touch, Macintosh, Mac OS, and TrueType are trademarks of Apple Inc., registered in the U.S. and other countries.
AirPrint and the AirPrint logo are trademarks of Apple Inc.; Android, Google Chrome, Gmail, Google, Google Cloud Print, Google Drive, and
Google Play are either registered trademarks or trademarks of Google Inc.;
Adobe
and
Photoshop
are either registered trademarks or trademarks of
Adobe Systems Incorporated in the United States and/or other countries;
Wi-Fi
is a registered trademark of the Wi-Fi Alliance; Wi-Fi Protected
Setup, WPA, WPA2 and Wi-Fi Direct are trademarks of the Wi-Fi Alliance;
Red Hat
and
Red Hat Enterprise Linux
are registered trademarks of
Red Hat. Inc. in the U.S. and other countries;
SUSE
is a registered trademark of Novell, Inc., in the United States and other countries; MIFARE is
a trademark of NXP Semiconductors; Thinxtream is a trademark of Thinxtream Technologies Pte. Ltd.; QR Code is a registered trademark of
Denso Wave Incorporated; Evernote is a trademark of Evernote Corporation and used under a license; Dropbox is a trademark or registered
trademark of Dropbox Inc.
XML Paper Specification (XPS)
: This product may incorporate intellectual property owned by Microsoft Corporation. The terms and conditions
upon which Microsoft is licensing such intellectual property may be found at http://go.microsoft.com/fwlink/?LinkId=52369;
DES
: This product
includes software developed by Eric Young (eay@mincom.oz.au);
AES
: Copyright (c) 2003, Dr Brian Gladman, Worcester, UK. All rights
reserved. This product uses published AES software provided by Dr Brian Gladman under BSD licensing terms;
TIFF (libtiff)
: Copyright (c)
1988-1997 Sam Leffler and Copyright (c) 1991-1997 Silicon Graphics, Inc.;
ICC Profile (Little cms)
: Copyright (c) 1998-2004 Marti Maria.
Other trademarks and trade names may be used in this document to refer to either the entities claiming the marks and names or their products.
Dell Inc. disclaims any proprietary interest in trademarks and trade names other than its own.
The printer software uses some of the codes defined by the Independent JPEG Group.
WSD stands for Web Services on Devices.
As for RSA BSAFE
This printer includes RSA BSAFE® Cryptographic software from EMC Corporation.
____________________
UNITED STATES GOVERNMENT RESTRICTED RIGHTS
This software and documentation are provided with RESTRICTED RIGHTS. Use, duplication or disclosure by the Government is subject to
restrictions as set forth in subparagraph (c)(1)(ii) of the Rights in Technical Data and Computer Software clause at DFARS 252.227-7013 and in
applicable FAR provisions: Dell Inc., One Dell Way, Round Rock, Texas, 78682, USA.
October 2013 Rev. A00

26 Notes, Cautions, and Warnings

Dell™ C2665dnf Color Laser Multifunction Printer User's Guide 27
1
Dell™ C2665dnf Color Laser Multifunction Printer
User's Guide
Click the links to the left for information on the features, options, and operation of your Dell C2665dnf Color Laser
Multifunction Printer. For information on other documentation included with your Dell C2665dnf Color Laser
Multifunction Printer, see "Finding Information."
NOTE: In this manual, Dell C2665dnf Color Laser Multifunction Printer is referred to as the "printer."
Conventions
The following describe the meaning of the symbols and fonts used in this manual:
Bold texts :
• Names of hardware button on the operator panel.
• Screen name on the touch panel.
• Menus, commands, windows, or dialog boxes displayed on the computer screen.
Texts in Courier New font :
• Menus and messages displayed on the touch panel.
• Characters entered from the computer.
• Directory paths.
<> :
• Key on the keyboard of the computer.
o:
• Indicates a path to a certain item within a procedure on a computer.
" " :
• Cross references in this manual.
• Characters entered from the operator panel.
• Messages displayed on the computer screen.

28 Dell™ C2665dnf Color Laser Multifunction Printer User's Guide
Finding Information 29
2
Finding Information
What are you looking for? Find it here
• Drivers for my printer
•My
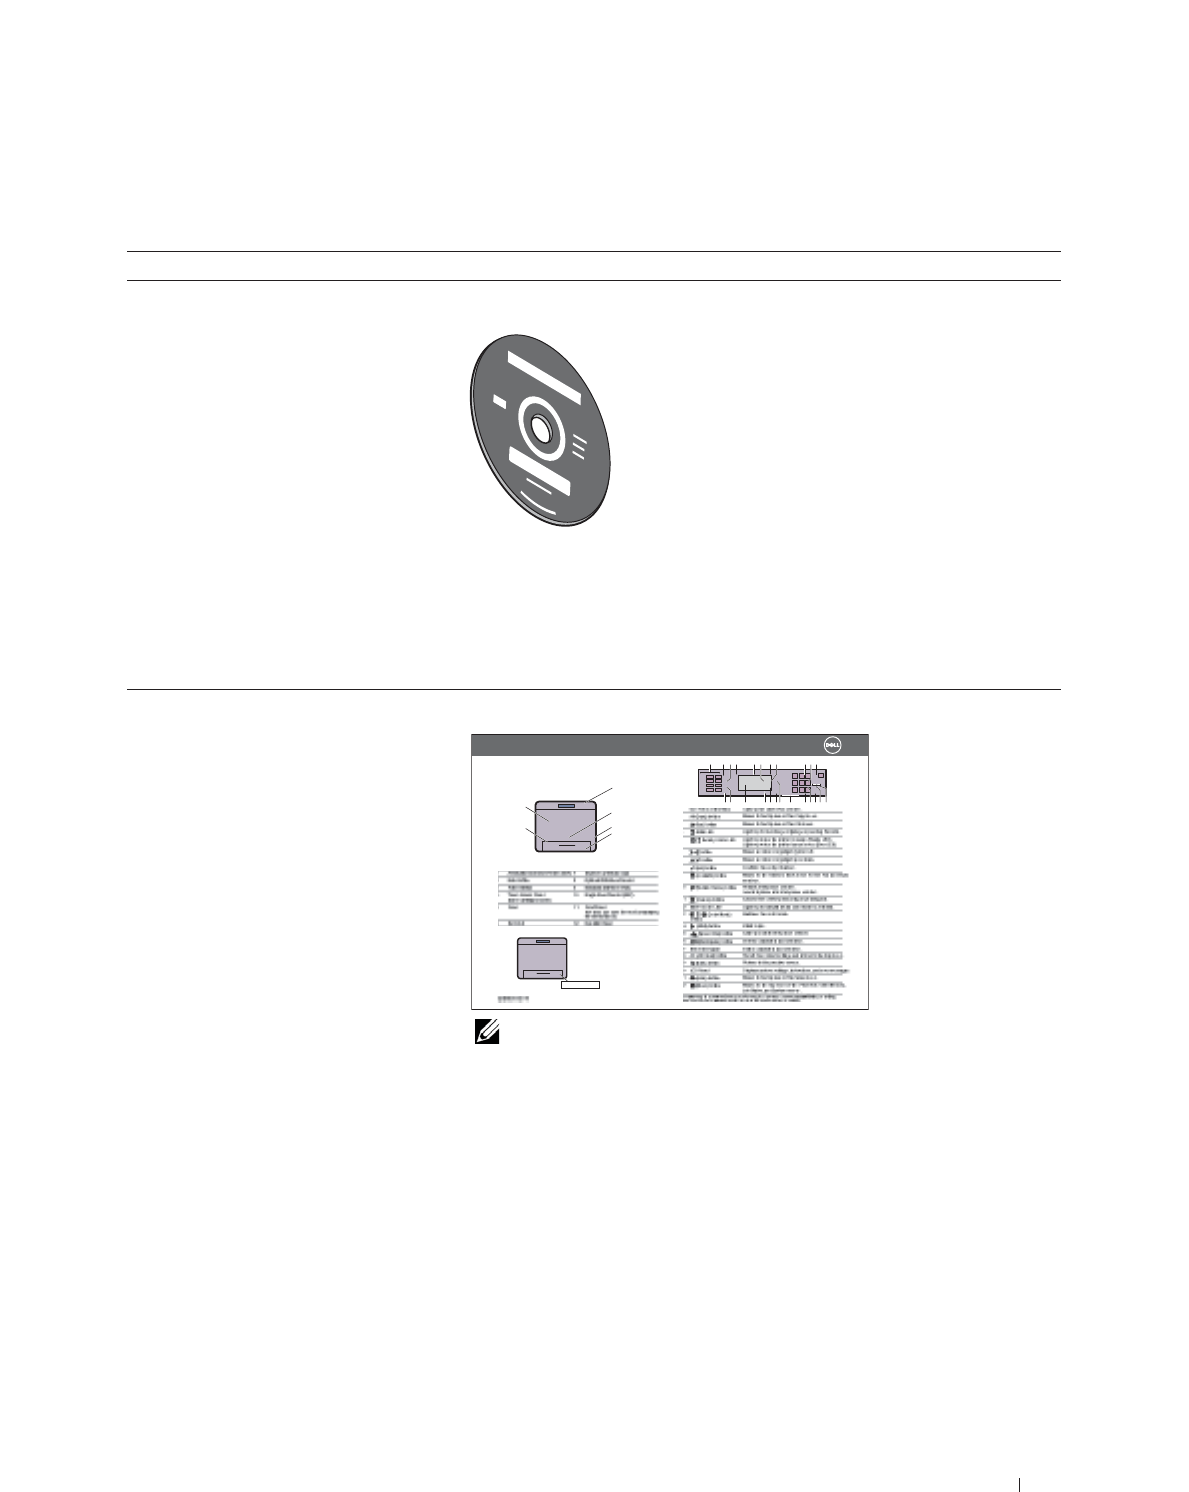
User's Guide
Software and Documentation
disc
The
Software and Documentation
disc contains setup video, documentation,
and drivers for your printer. You can use the
Software and Documentation
disc to
install drivers or access your setup video and documentation.
Readme files may be included on your
Software and Documentation
disc to
provide last-minute updates about technical changes to your printer or advanced
technical reference material for experienced users or technicians.
• How to use my printer
Quick Reference Guide
NOTE: Quick Reference Guide may not be included in the package for some
regions.
Quick Reference Guide
About Your Printer
1
2
4
3
11
12
Service Tag Express Service Code
xxxxxxx 000 000 000 00
111234 5678 910
6151412131917816 71202212
Service Tag
30 Finding Information
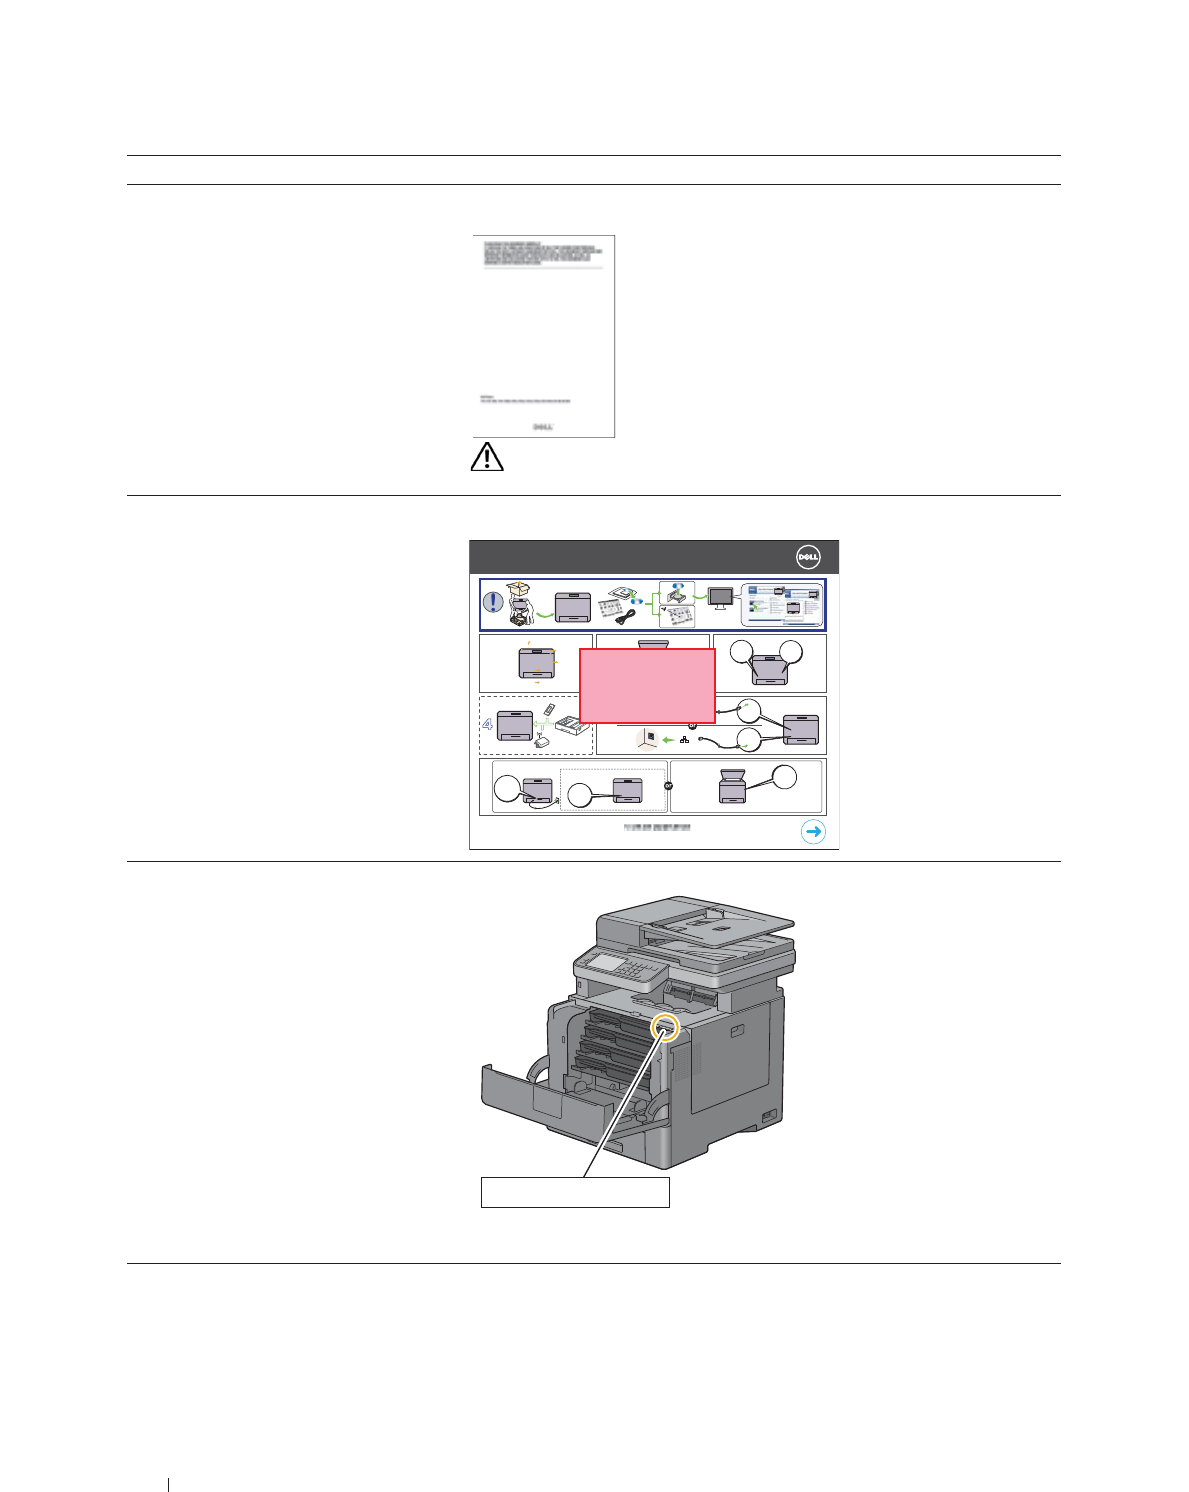
• Safety information
• Warranty information
Important Information
WARNING: Read and follow all safety instructions in the
Important
Information
prior to setting up and operating your printer.
• How to set up my printer
Setup diagram
• Express Service Code and Service Tag
The Express Service Code and Service Tag are located inside the front cover of
your printer.
• Latest drivers for my printer
• Documentation for my printer
Go to dell.com/support.
What are you looking for? Find it here
TBD
Setting Up Your Printer
54
a1
a2
b
123
Service Tag Express Service Code
xxxxxxx 000 000 000 00
TBD

Finding Information 31
• Answers to technical service and support
questions
dell.com/support provides several online tools, including:
• Solutions — Troubleshooting hints and tips, articles from technicians, and
online courses
• Upgrades — Upgrade information for components, such as the printer drivers
• Customer Care — Contact information, order status, warranty, and repair
information
•Downloads — Drivers
• Manuals— Printer documentation and product specifications
Go to dell.com/support. Select your region, and fill in the requested details to
access help tools and information.
What are you looking for? Find it here

32 Finding Information

Product Features 33
3
Product Features
This chapter describes the product features and indicates their links.
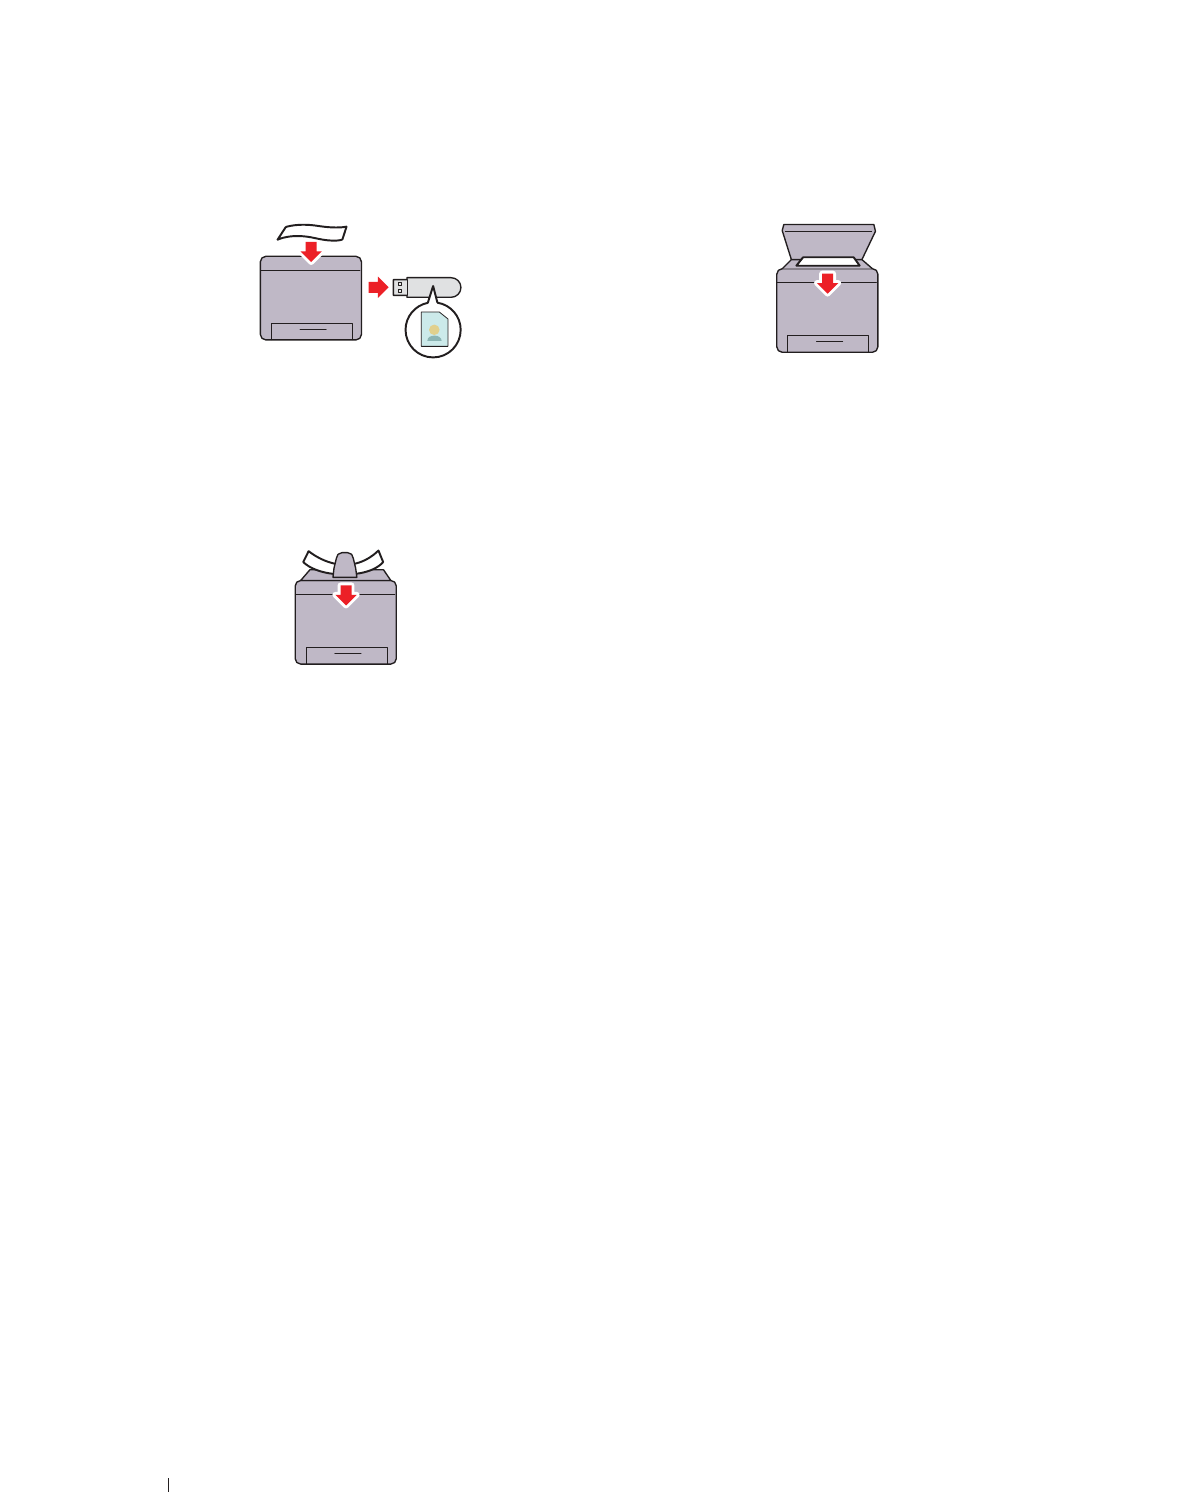
Converting and storing with Dell Document Hub
With the Dell Document Hub, you can scan hard copy
documents and store them directly in your preferred cloud
storage service. You can also convert hard copy documents
into editable digital content before sending them to the
cloud storage.
Printing with Dell Document Hub
With the Dell Document Hub, you can easily locate and
print documents stored in cloud storage. You can also
search for files across multiple clouds storage services
simultaneously.
Printing from USB Memory (USB Direct Print)
The USB Direct Print feature enables you to print files
directly from a USB memory without requiring you to start
your computer and an application.
Using the ID Copy (ID Copy)
You can copy both sides of an ID card on one side of a
single sheet of paper in its original size by tapping ID
Copy on the touch panel. This feature helps to show both
sides of an ID card in one page in its original size.
Sending an E-Mail With the Scanned Image (Scan to E-mail)
When you want to send scanned data by e-mail, use the
Scan to E-mail feature. You can directly send the data
scanned as an e-mail attachment. You can choose
destination e-mail addresses from the address book on the
printer or server. Or, you can enter the address from the
touch panel on the printer's operator panel.
Scanning to a PC or Server via SMB/FTP (Scan to Network)
You can transfer data scanned to a PC or a server via SMB
or FTP without service software. Although prior
registration of the destination FTP server or PC on the
address book is required, it helps save your time.
34 Product Features
Scanning to a USB Memory (Scan to USB)
With the Scan to USB feature, you don't need a PC to
connect a USB memory. You can specify the USB memory
inserted into the printer's port as a data saving location
when you scan data.
Making Copies From the Document Glass (Scan From
Document Glass)
You can scan the pages of a book or a brochure from the
document glass. When you scan documents using the
document glass, place them facing down.
Making Copies From the DADF (Scan From DADF)
You can scan pieces of unbound paper using the duplex
automatic document feeder (DADF). When you scan
documents using the DADF, load them facing up.
About the Printer 35
4
About the Printer
This chapter provides an overview of your Dell™ C2665dnf Color Laser Multifunction Printer.
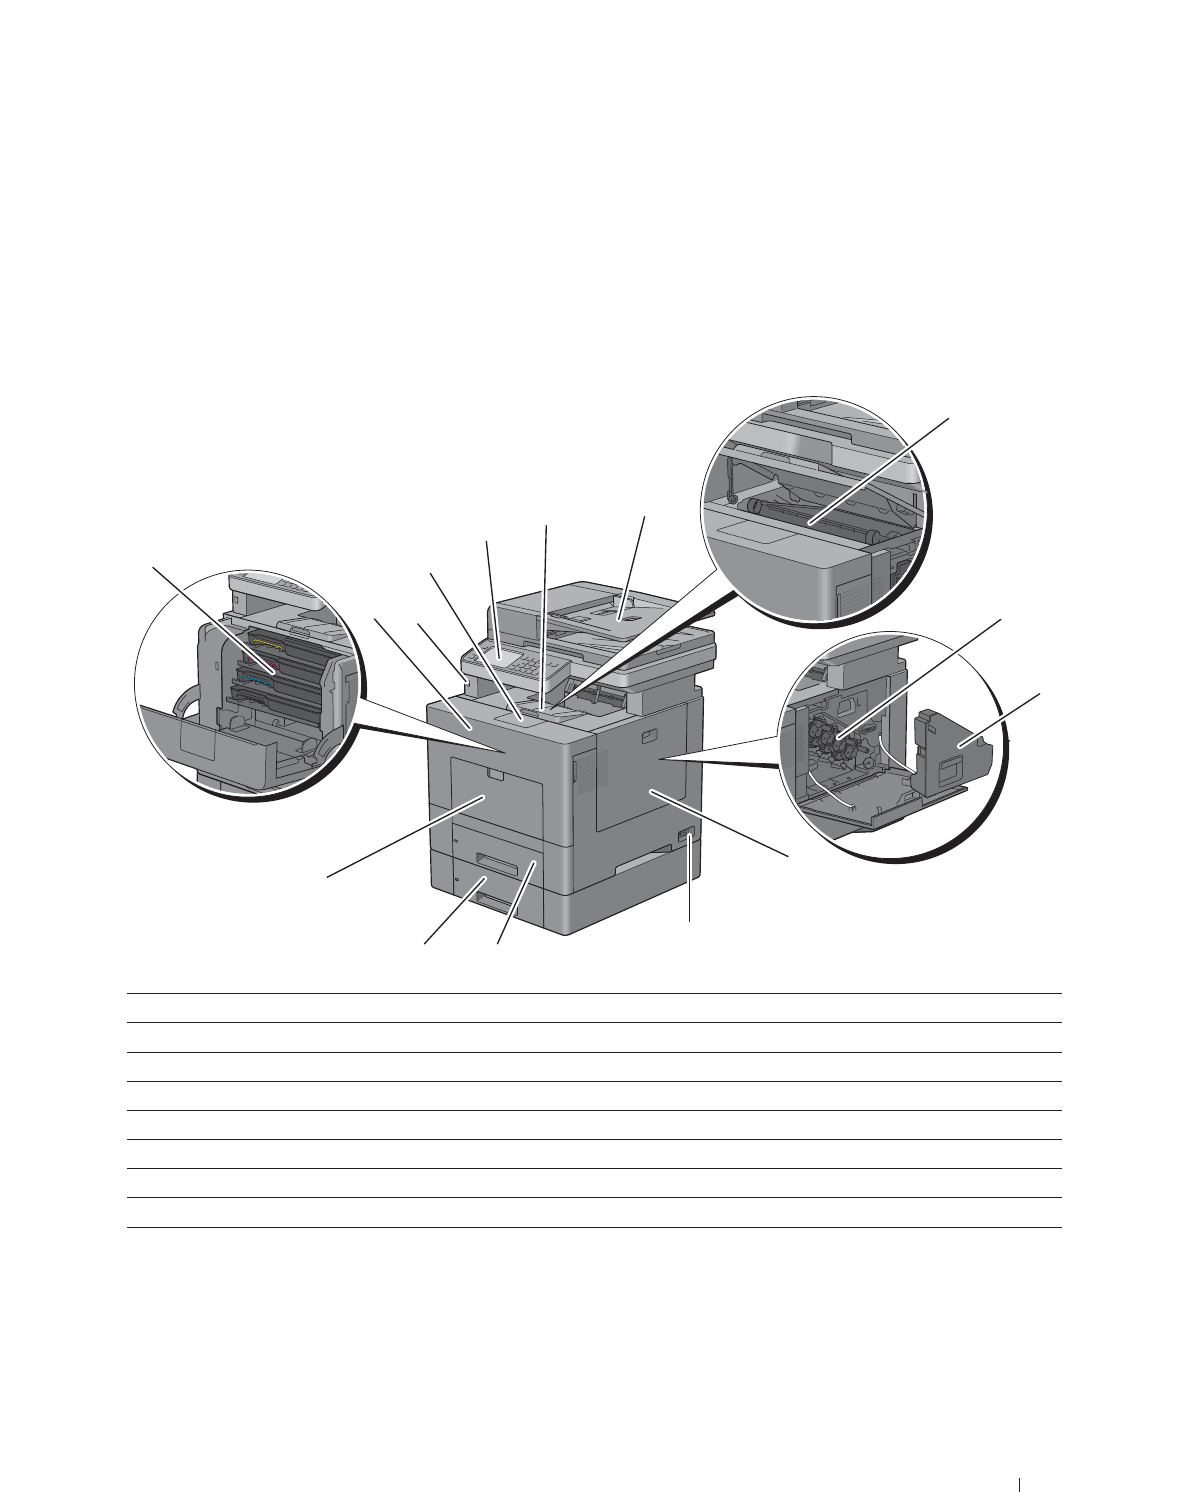
Front and Rear View
Front View
1Duplex Automatic Document Feeder (DADF) 9Multipurpose Feeder (MPF)
2Transfer Belt Un i t 10 Toner Cartridges
3Drum Cartridges 11 Front Cover
4Was te Toner Box 12 Front USB Port
5Right Side Cover 13 Output Tray Extension
6Power Switch 14 Operator Panel
7Tray1 15 Top Cover
8Optional 550-Sheet Feeder (Tray2)
1
15
2
3
4
5
6
7
8
9
10
11 12
14
13
36 About the Printer
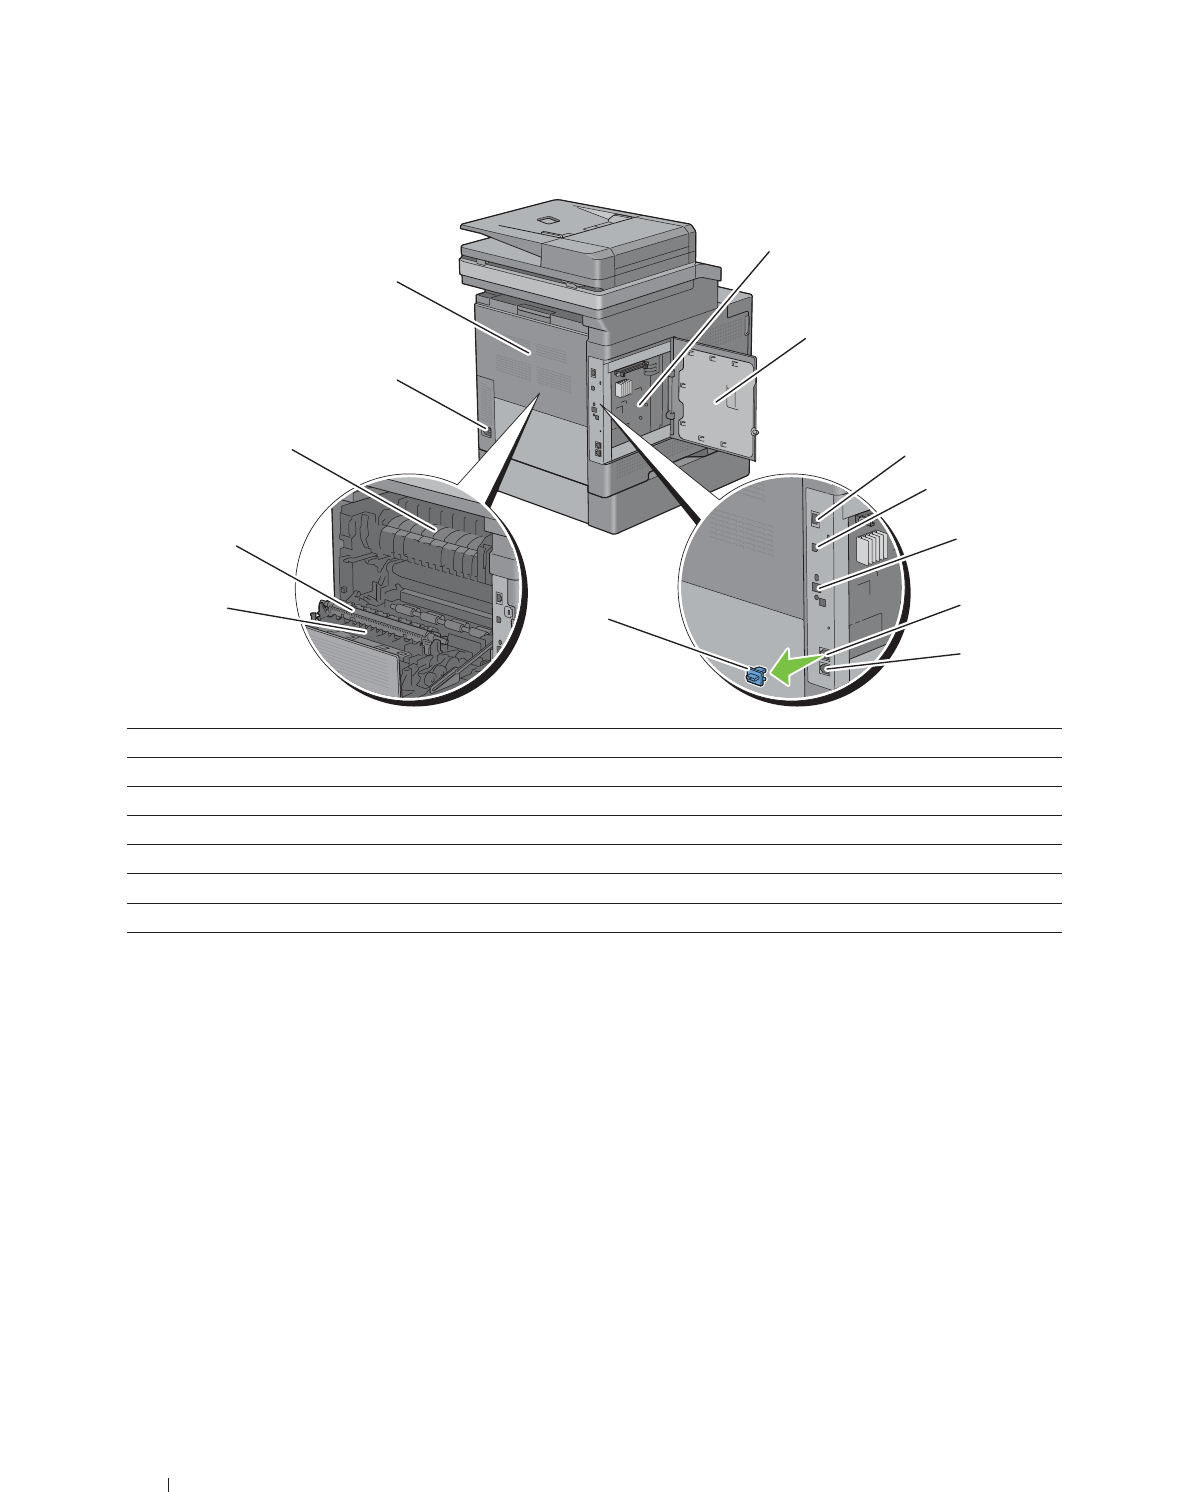
Rear View
1Control Board 8"Blue" Plug
2Left Side Cover 9Duplex Unit
3Ethernet Port 10 2nd Belt Transfer Roller (2nd BTR)
4USB Port 11 Fusing Unit
5Wireless Adapter Socket 12 Power Connector
6Phone Connector 13 Rear Cover
7Wall Jack Connector
1
2
3
4
5
6
7
8
9
10
11
12
13
About the Printer 37
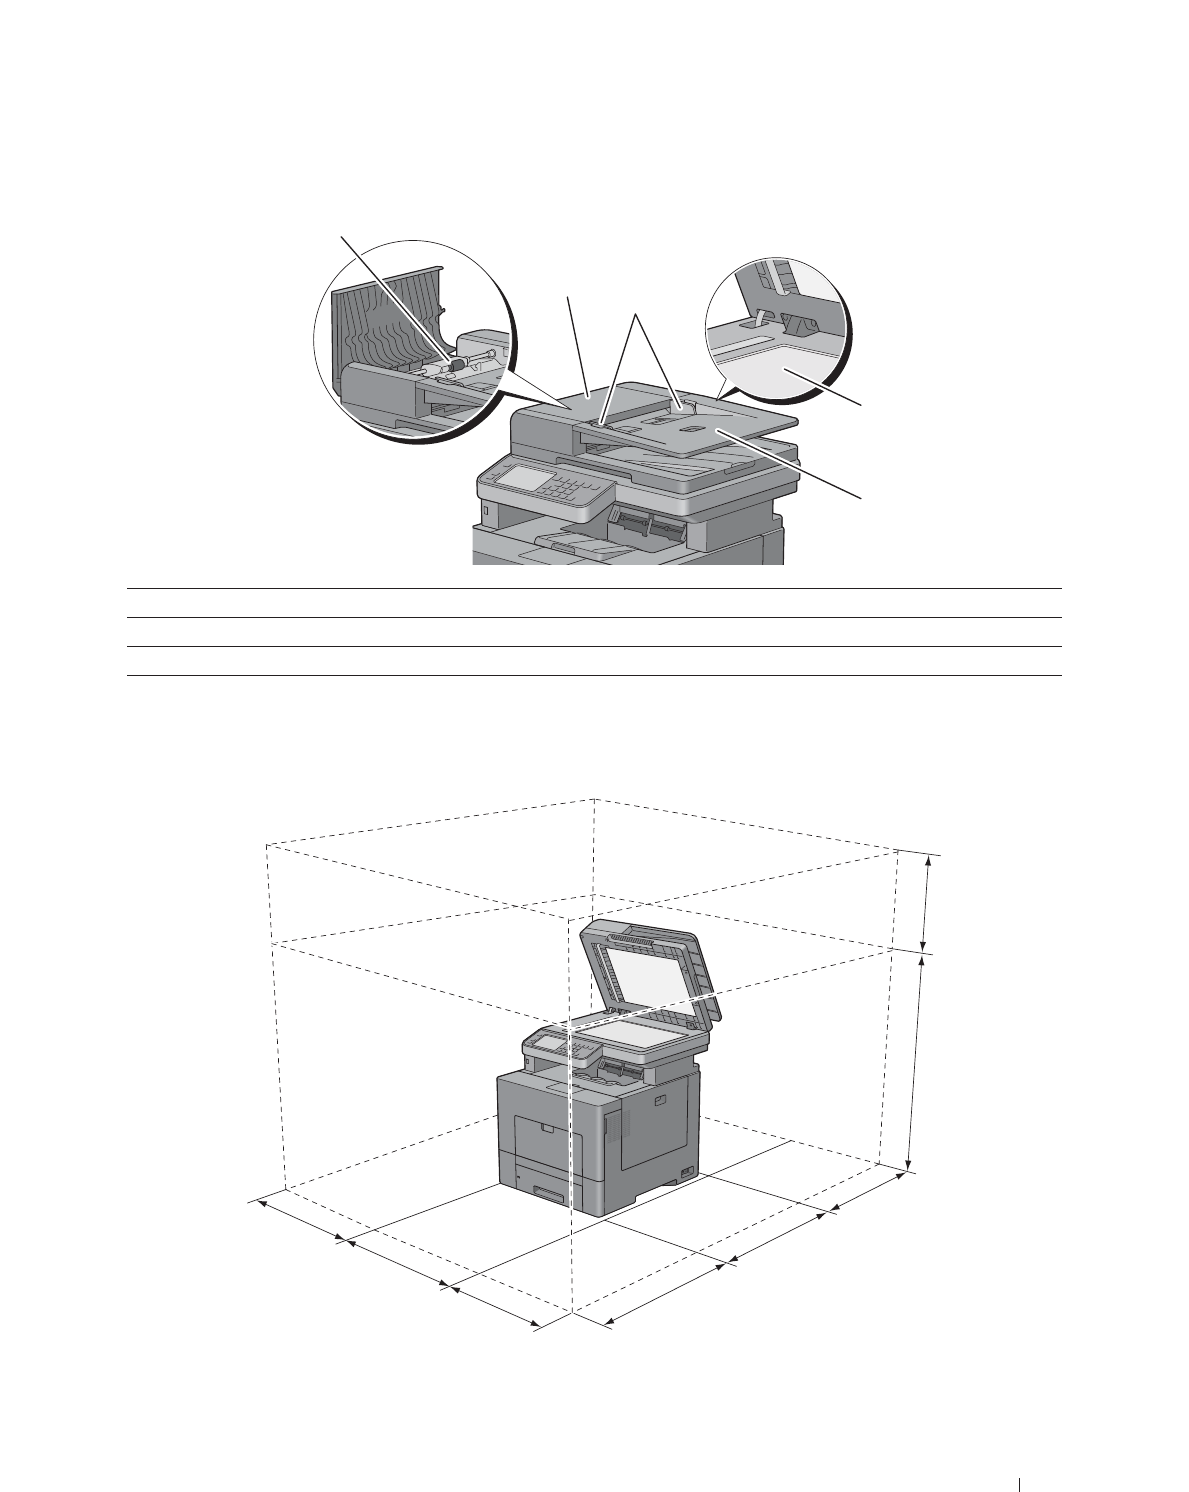
Duplex Automatic Document Feeder (DADF)
Space Requirements
Provide enough room to open the printer trays, covers, and optional accessories, and for proper ventilation.
1DADF Cover 4Document Feeder Tray
2Document Guides 5DADF Feed Roller
3Document Glass
12
3
4
5
320 mm/
12.60 inches
558 mm/
21.97 inches
400 mm/15.75 inches
530 mm/20.87 inches
600 mm/23.62 inches
400 mm/15.75 inches
530 mm/20.87 inches
400 mm/15.75 inches
38 About the Printer
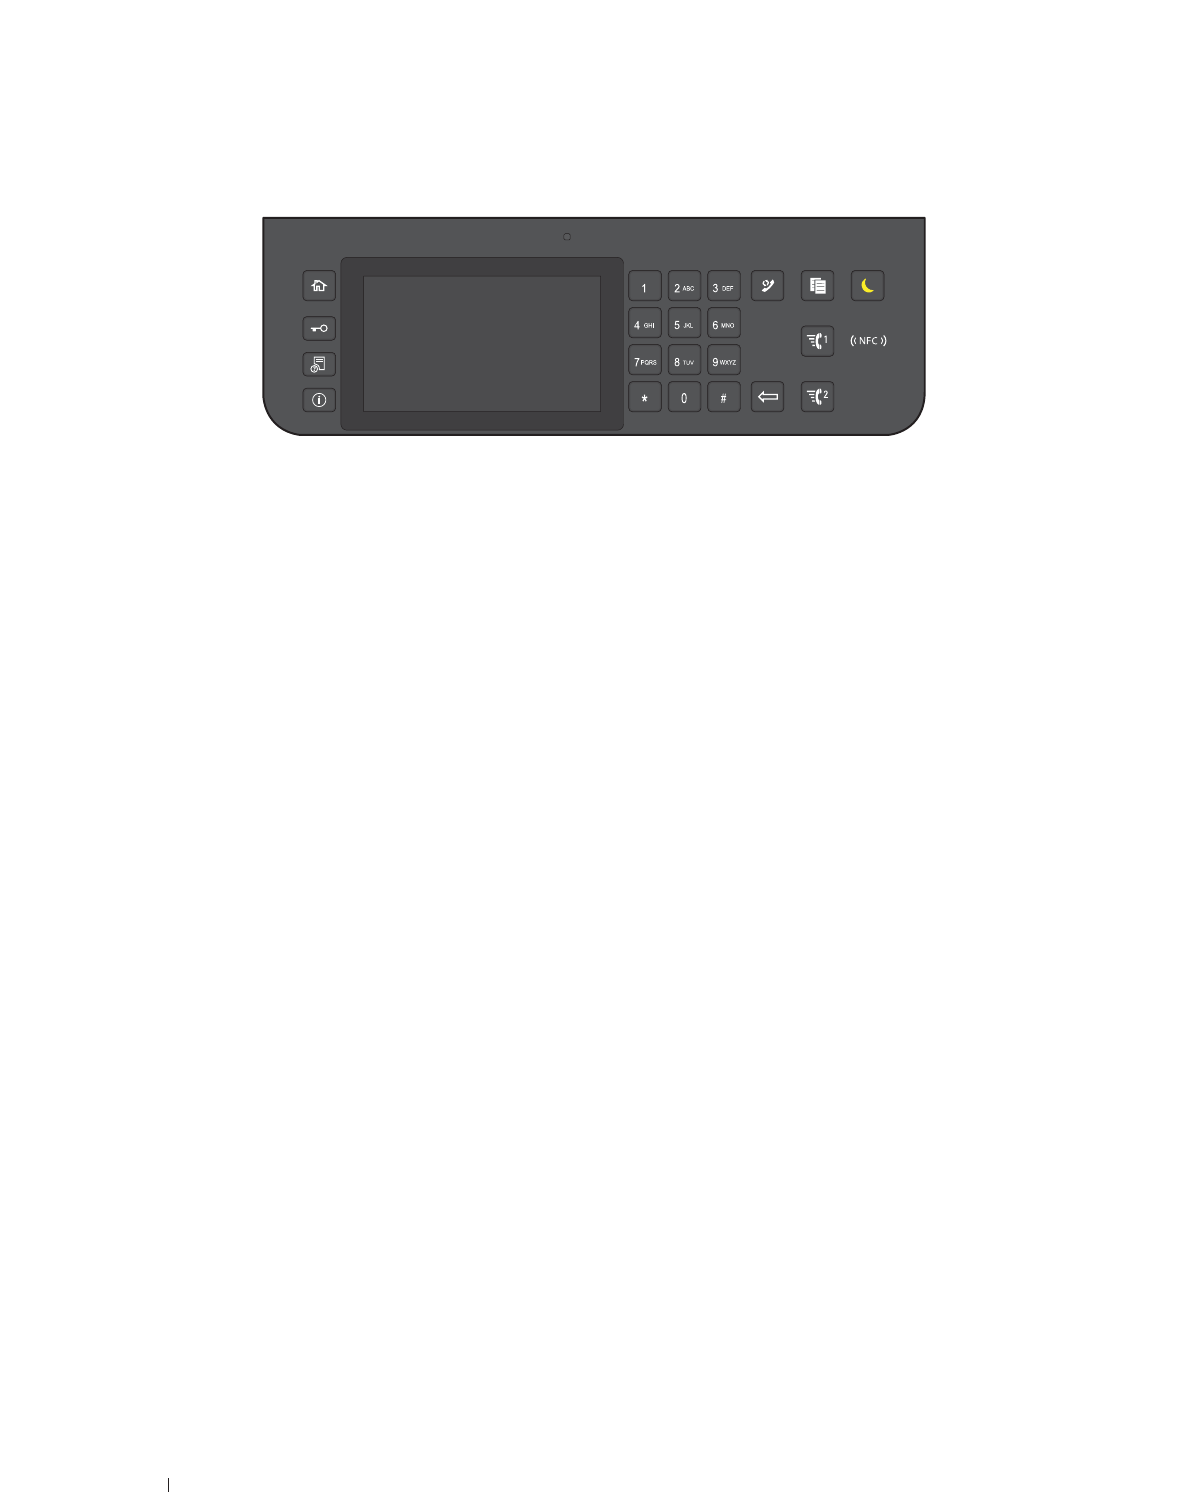
Operator Panel
For more information on the operator panel, see "About the Operator Panel."
Additional Components
Optional Accessories
The following optional accessories are available for the printer.
• Wireless adapter
• Optional 550-sheet feeder
Non-bundled Items
The following items are required for connecting the printer to a computer or a network. Please purchase them as
needed.
•USB cable
• Ethernet cable
About the Printer 39
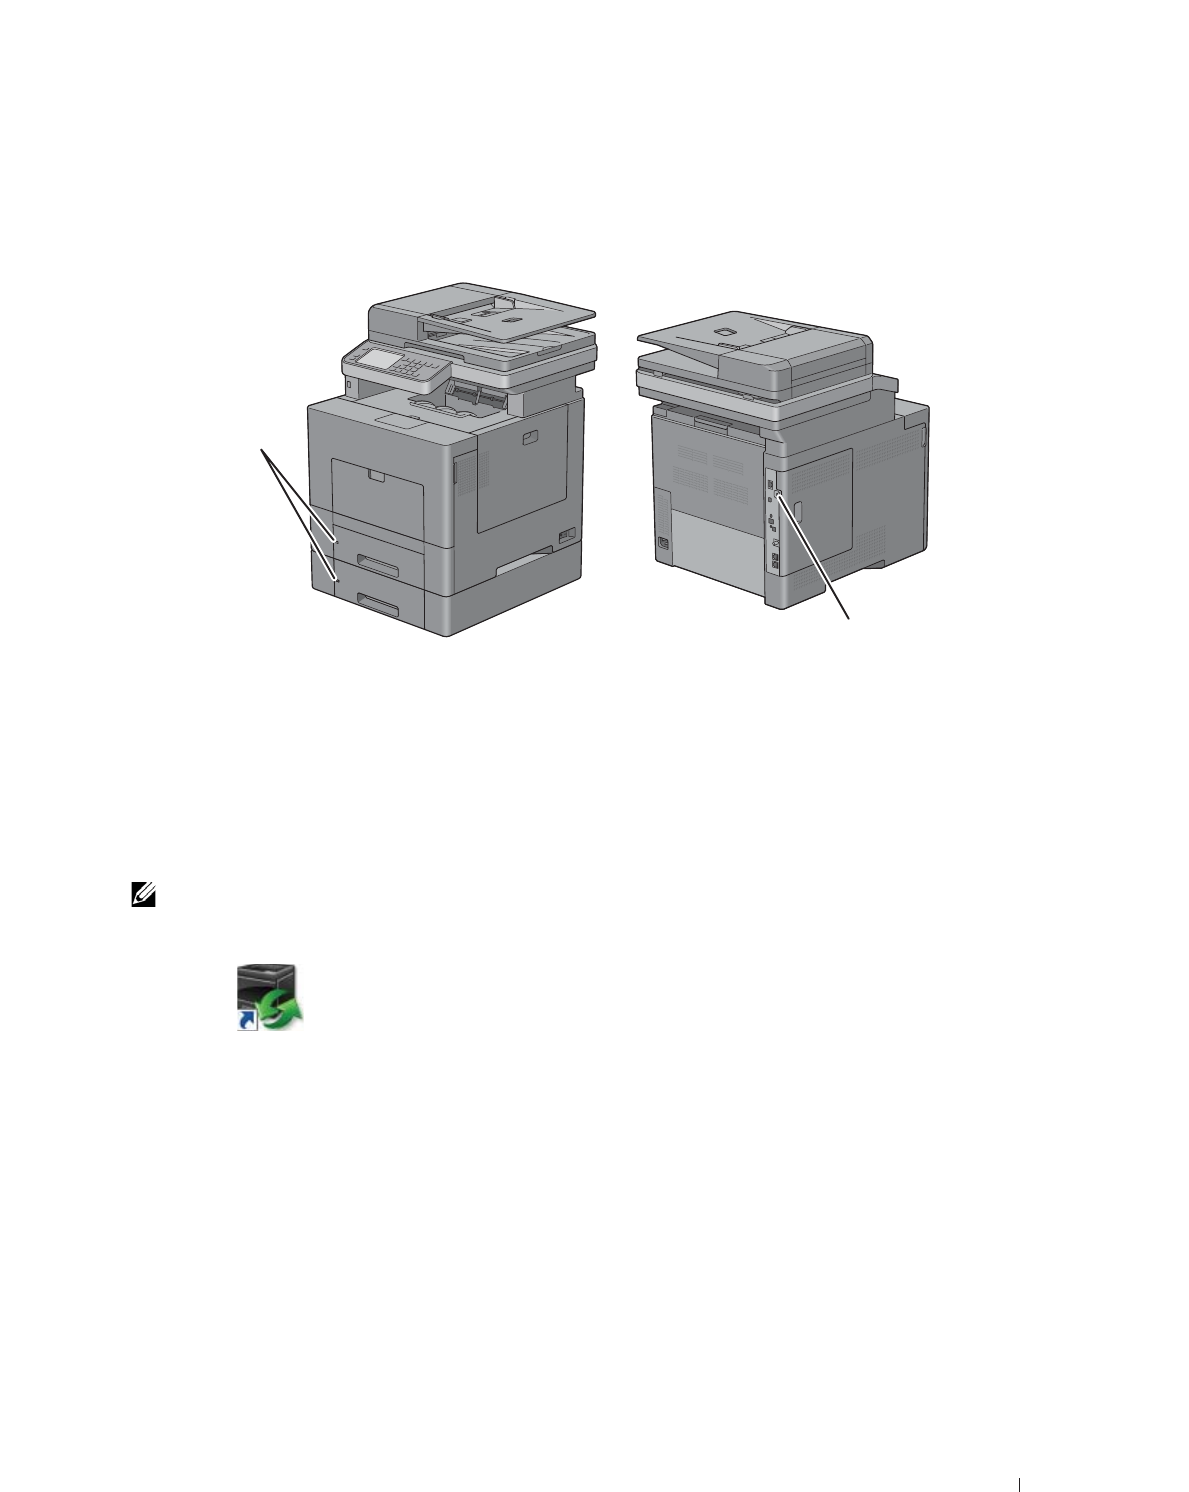
Securing the Printer
To protect your printer from theft, you can use the optional Kensington lock.
Attach the Kensington lock to the security slot on your printer.
For details, see the operating instructions supplied with the Kensington lock.
Ordering Supplies
You can order consumables from Dell online when using a networked printer. Enter the IP address of your printer in
your web browser, launch the Dell Printer Configuration Web Tool, and click the web address under Order Supplies
at: to order toner or supplies for your printer.
You can also order replacement toner cartridges or supplies from Dell by using the Dell Supplies Management
System:
NOTE: For Macintosh, start the Status Monitor Widget, and then select O
Order Supplies
button to open O
Order
window.
1
Double-click the icon on your desktop.
If you cannot find the icon on your desktop:
a
Right-click
DLRMM.EXE
under
x:\abc\Dell Printers\Additional Color Laser
Software\Reorder
, where
x:\abc
is the location where the printer software is installed.
b
Choose
Send To
from the drop-down menu, and then click
Desktop (create shortcut)
on the submenu.
The
Dell Supplies Management System
window appears.
You can also launch the Dell Supplies Management System by clicking
Start
o
All Programs
o
Dell Printers
o
Additional Color Laser Software
o
Dell Supplies Management System
.
2
Click the
Visit Dell printer supplies ordering web site
link (
www.dell.com/supplies
), or order Dell printer supplies
by phone.
To ensure that you get the best service, have your Dell printer’s Service Tag ready.
For information regarding locating your Service Tag, see
"
Express Service Code and Service Tag.
"
Security Slot
Security Slot

40 About the Printer

41
Setting up the Printer (Printer
Setup)
5 Preparing Printer Hardware...................................................... 43
6 Installing Optional Accessories................................................ 45
7 Connecting Your Printer............................................................. 59
8 Setting the IP Address ............................................................... 71
9 Loading Paper.............................................................................. 75
10 Installing Printer Drivers on Windows® Computers............. 79
11 Installing Printer Drivers on Macintosh Computers.............. 95
12 Installing Printer Drivers on Linux Computers (CUPS) .............97

42
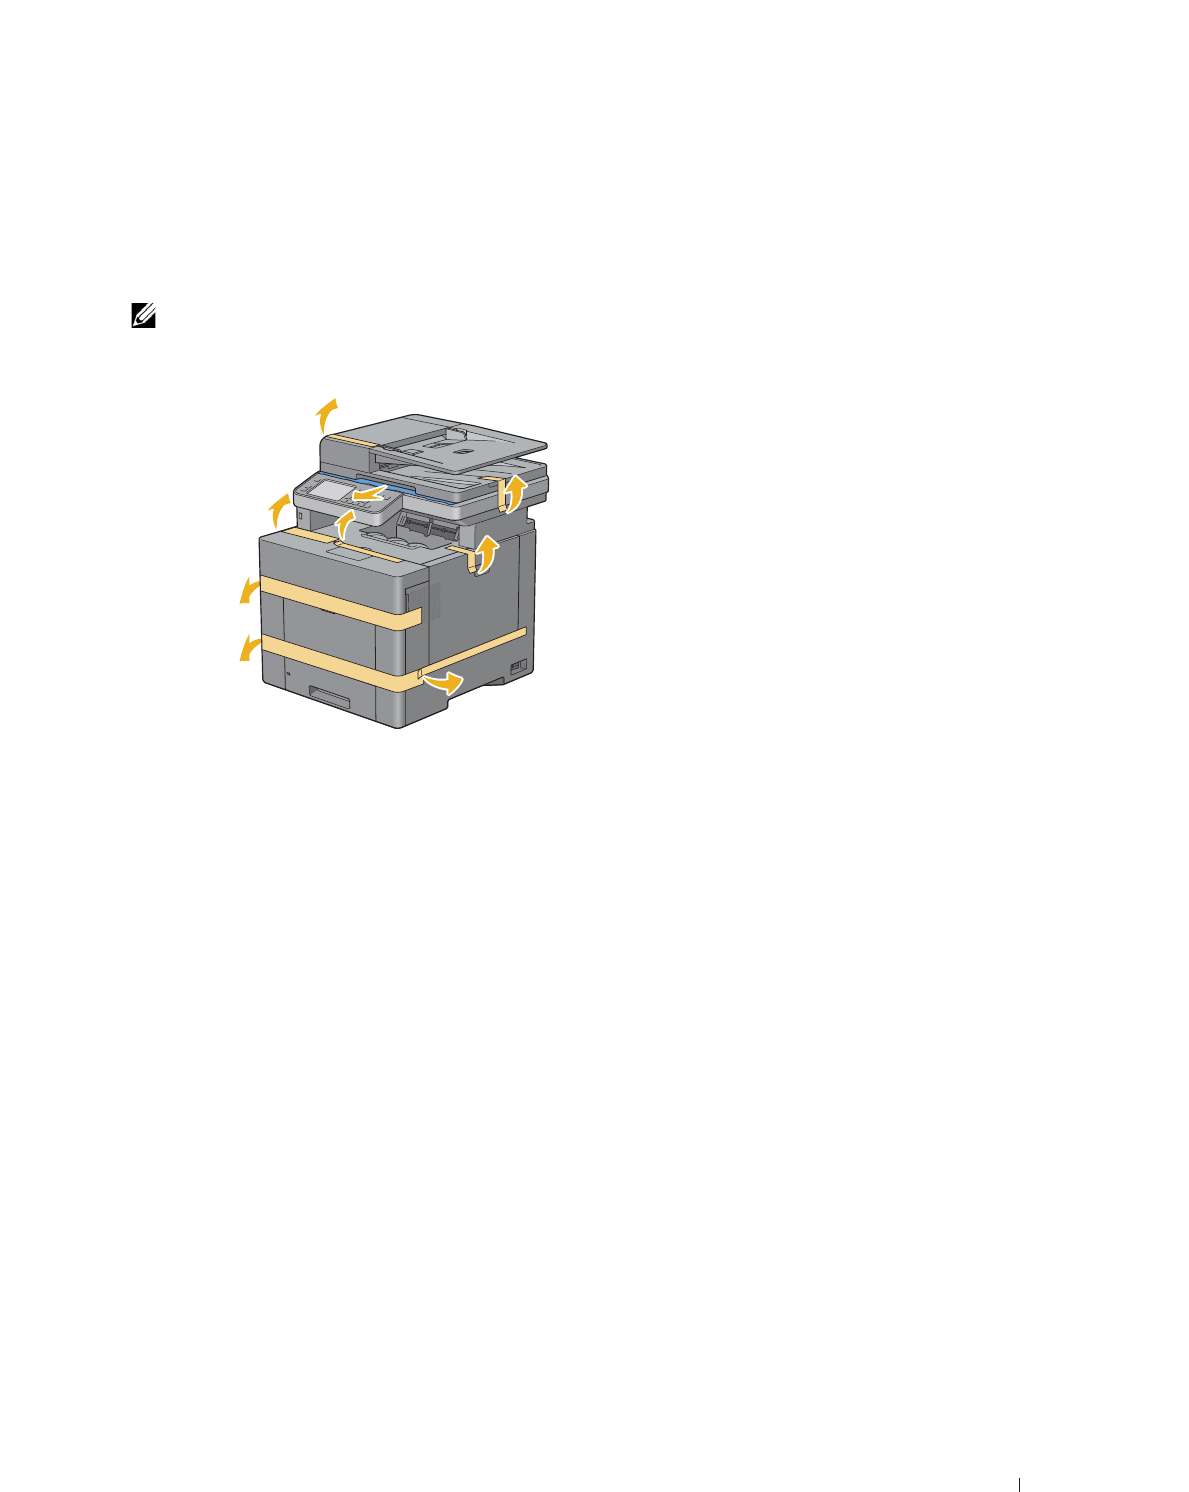
Preparing Printer Hardware 43
5
Preparing Printer Hardware
Removing Tape
NOTE: The Software and Documentation disc also contains video instructions. On D
Dell Printer Setup
, click I
Installation Video
.
1
Remove tapes and the protective sheet from the printer.

44 Preparing Printer Hardware
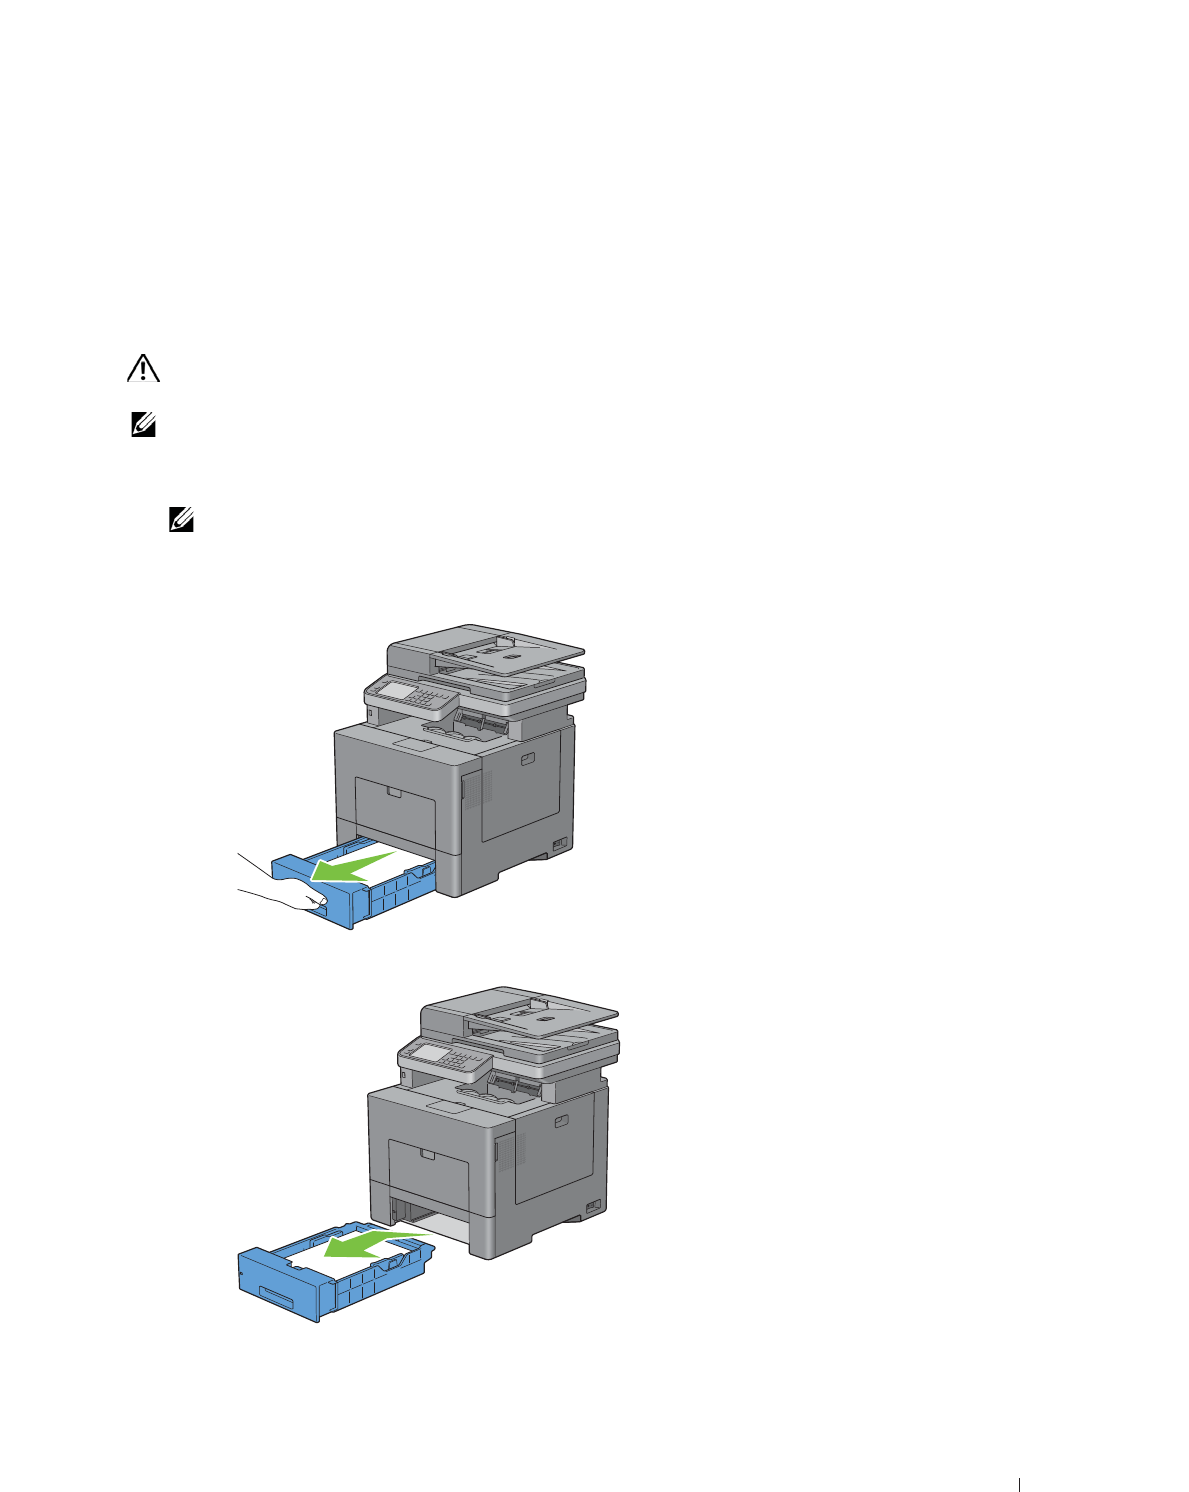
Installing Optional Accessories 45
6
Installing Optional Accessories
You can make the printer more functional by installing the optional accessories. This chapter describes how to install
the printer's options such as the optional 550-sheet feeder (tray2) and wireless adapter.
Installing the Optional 550-Sheet Feeder
WARNING: If you install the optional 550-sheet feeder after setting up the printer, be sure to turn off the printer, unplug the
power cable, and disconnect all cables from the back of the printer before starting this task.
NOTE: The Software and Documentation disc also contains video instructions. On D
Dell Printer Setup
, click I
Installation Video
.
1
Ensure that the printer is turned off, and then disconnect all cables from the back of the printer.
2
Remove the tape and the bag holding the screws.
NOTE: Save the screws as you will need them later.
3
Place the optional 550-sheet feeder in the same location that the printer is located.
4
Pull tray1 out of the printer about 200 mm.
5
Hold tray1 with both hands, and remove it from the printer.
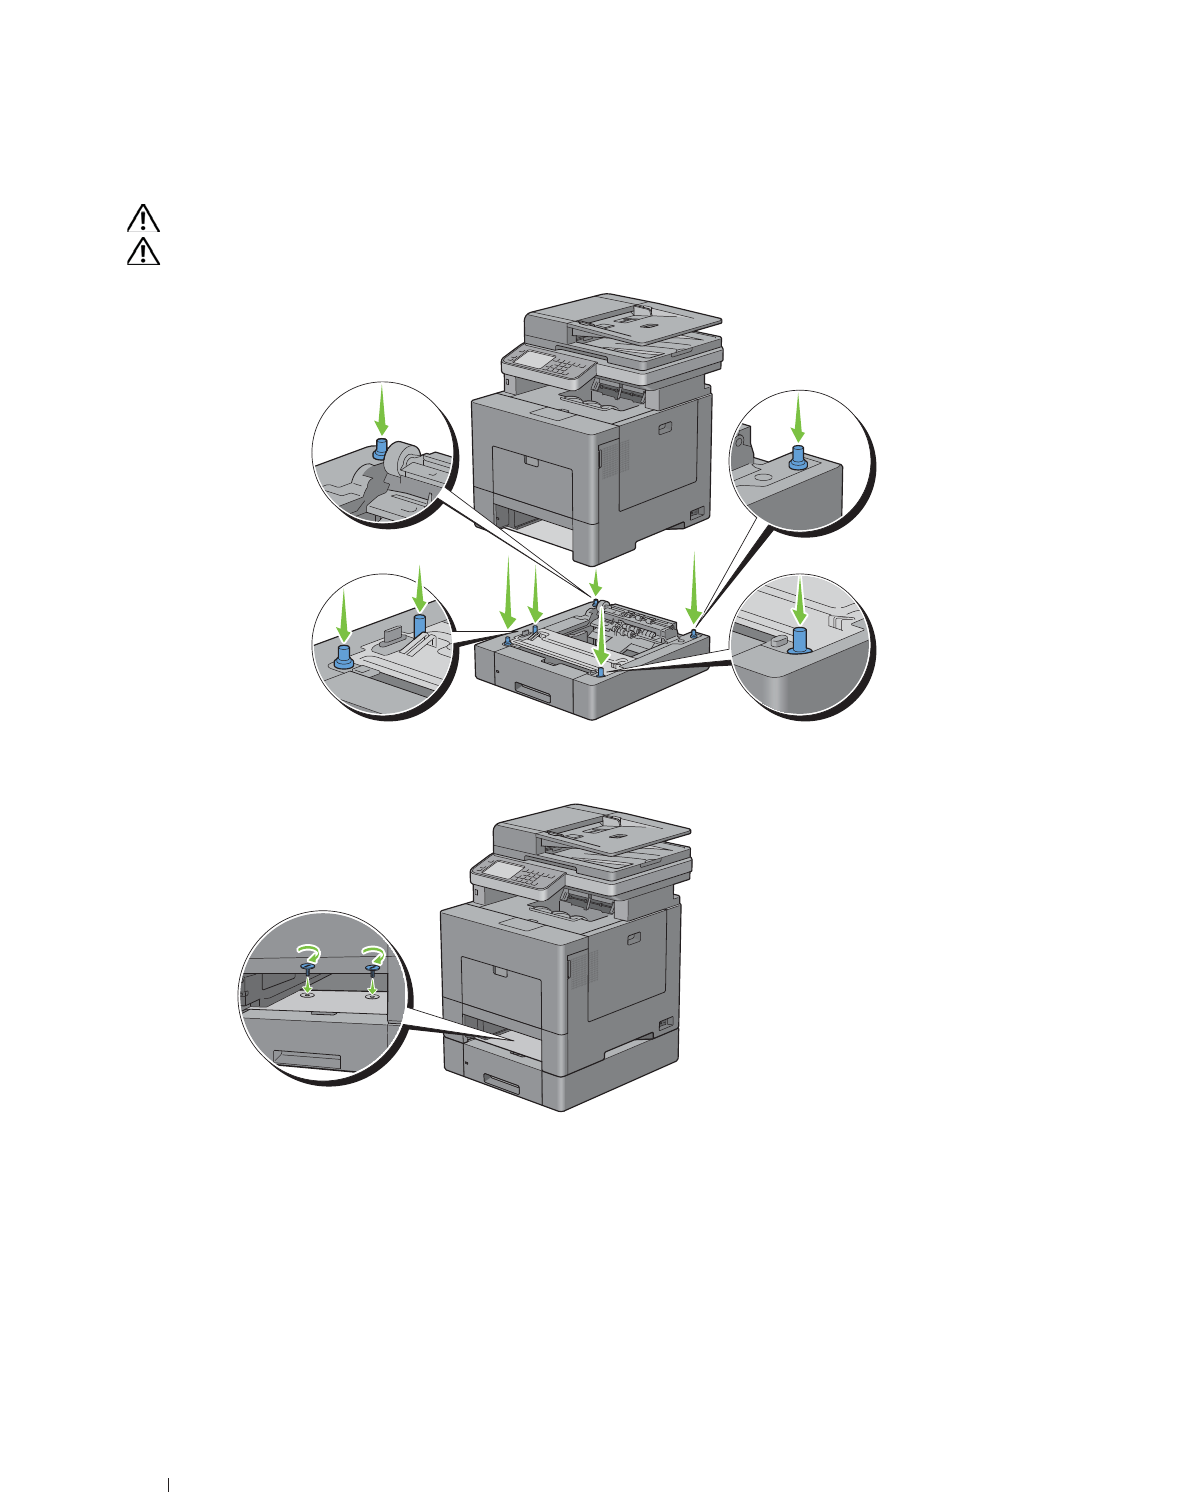
46 Installing Optional Accessories
6
Lift the printer and align the five guide pins of the optional 550-sheet feeder with the holes at the bottom of the
printer. Gently lower the printer onto the optional 550-sheet feeder.
WARNING: Two people are required to lift the printer.
WARNING: Be careful not to pinch your fingers when lowering the printer onto the optional 550-sheet feeder.
7
Secure the optional 550-sheet feeder to the printer by tightening the two screws provided with the feeder, using a
coin or similar object.
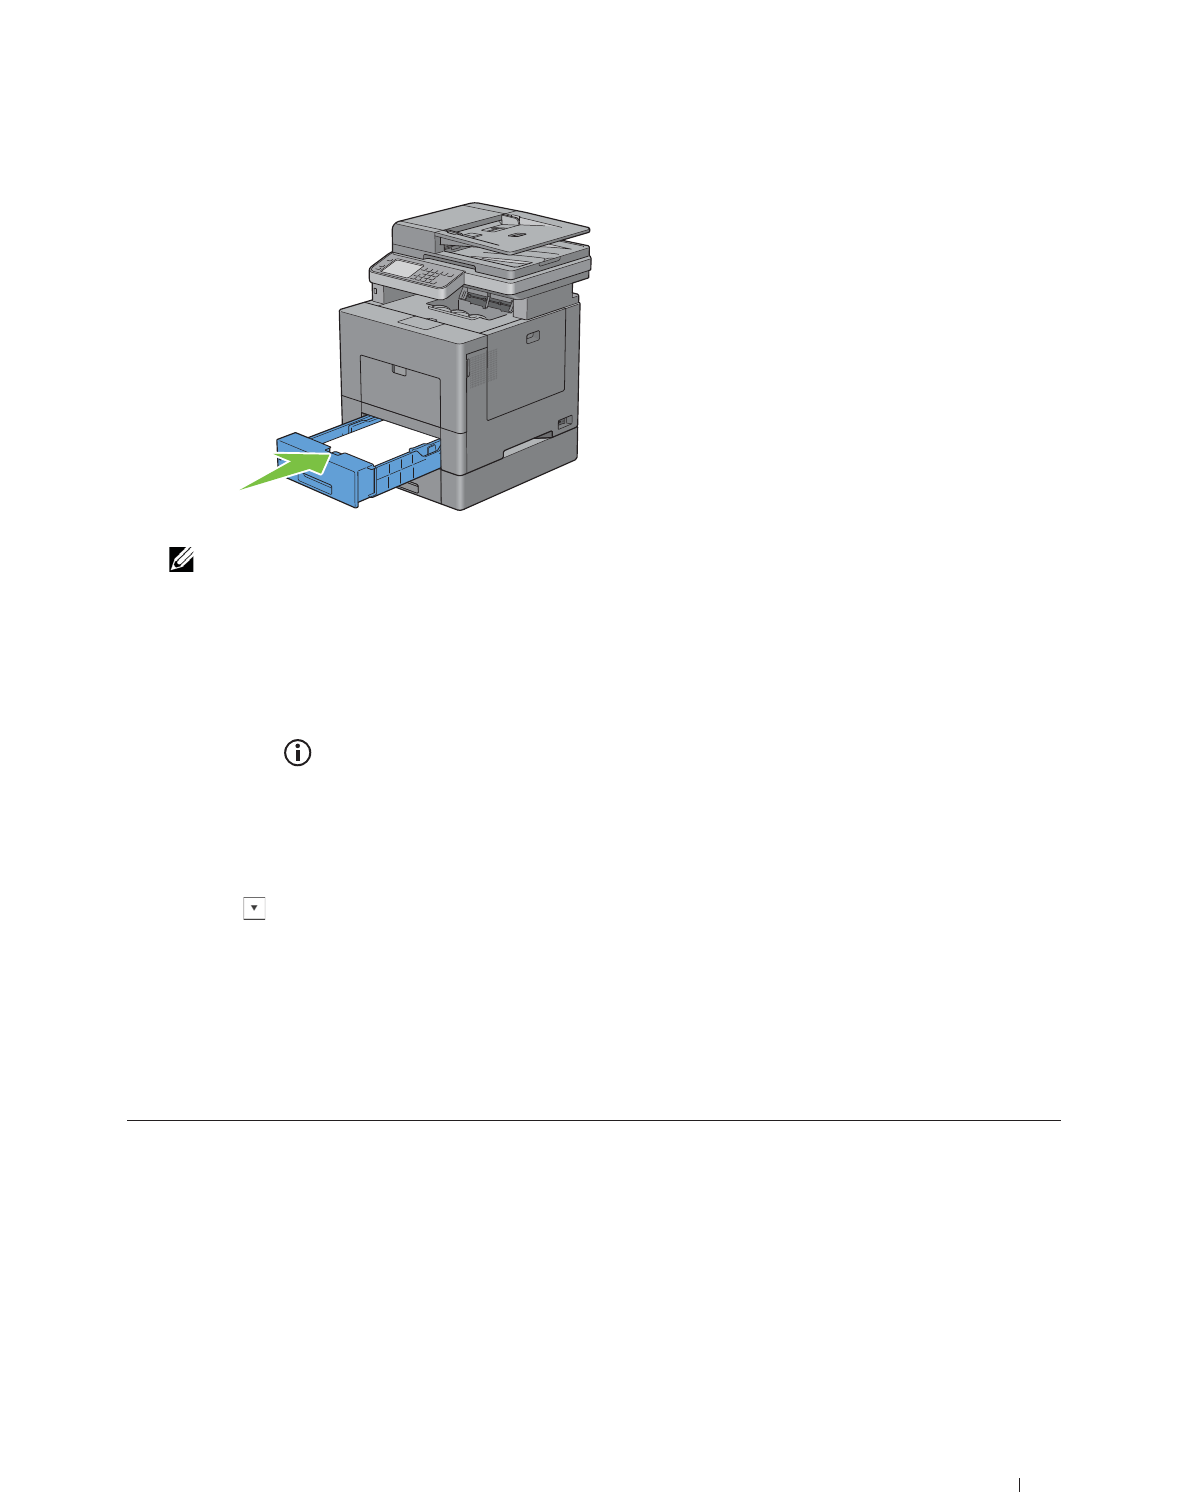
Installing Optional Accessories 47
8
Insert tray1 into the printer, and push until it stops.
9
Re-connect all cables into the back of the printer, and turn on the printer.
NOTE: The printer will automatically detect the attached tray but will not detect the paper type.
10
Print the system settings report to confirm that the optional 550-sheet feeder is installed correctly.
For details about how to print a system settings report, see "Report / List."
11
Confirm
Tray2 (550 Sheet Feeder)
is listed in the system settings report under
Printer Options
.
If the feeder is not listed, turn off the printer, unplug the power cable, and re-install the optional 550-sheet feeder.
12
After loading paper in the optional 550-sheet feeder, specify the paper type from the printer touch panel.
a
Press the
(Information)
button.
b
Tap t h e
Tools
tab, and then tap
Tray Management
.
c
Ta p
Tray Settings
.
d
Ta p
Tray2
.
e
Ta p
Type
.
f
Tap until the desired paper type appears, and then tap the desired paper type.
g
Ta p
OK
.
13
If you installed the optional 550-sheet feeder after installing the printer driver, update your driver by following the
instructions for each operating system. If the printer is on a network, update the driver for each client.
Updating Your Driver to Detect 550-Sheet Feeder
When Using PCL Driver
Windows 8/
Windows 8 x64/
Windows Server 2012
1
Under Desktop mode, right-click the bottom left corner of the screen, and then click
Control Panel
o
Hardware and Sound
(
Hardware
for Windows Server 2012)
o
Devices
and Printers
.
2
Right-click the printer icon of the Dell C2665dnf Color Laser Multifunction Printer, and
then select
Printer properties
.
3
Click the
Options
tab, and then select
Get Information from Printer
.
4
Click
Apply
, and then click
OK
.
5
Close the
Devices and Printers
dialog box.

48 Installing Optional Accessories
If the printer information is not updated automatically after clicking Get Information from Printer, follow these
steps:
1
Click the
Options
tab, and then select
Paper Tray Configuration
in the
Items
list box.
2
Select
Tray2
in the
Paper Tray Configuration
drop-down menu in
Change Setting for
.
3
Click
Apply
, and then click
OK
.
4
Close the
Printers and Faxes
(
Printers
, or
Devices and Printers
) dialog box.
When Using PS Driver
Windows 7/
7 x64/
Server 2008 R2 x64
1
Click
Start
o
Devices and Printers
.
2
Right-click the printer icon of the Dell C2665dnf Color Laser Multifunction Printer, and
then select
Printer properties
.
3
Click the
Options
tab, and then select
Get Information from Printer
.
4
Click
Apply
, and then click
OK
.
5
Close the
Devices and Printers
dialog box.
Windows Vista/Vista x64 1
Click
Start
o
Control Panel
o
Hardware and Sound
o
Printers
.
2
Right-click the printer icon of the Dell C2665dnf Color Laser Multifunction Printer, and
then select
Properties
.
3
Click the
Options
tab, and then select
Get Information from Printer
.
4
Click
Apply
, and then click
OK
.
5
Close the
Printers
dialog box.
Windows Server 2008/
Server 2008 x64
1
Click
Start
o
Control Panel
o
Printers
.
2
Right-click the printer icon of the Dell C2665dnf Color Laser Multifunction Printer, and
then select
Properties
.
3
Click the
Options
tab, and then select
Get Information from Printer
.
4
Click
Apply
, and then click
OK
.
5
Close the
Printers
dialog box.
Windows XP/XP x64/
Server 2003/
Server 2003 x64
1
Click
start
o
Printers and Faxes
.
2
Right-click the printer icon of the Dell C2665dnf Color Laser Multifunction Printer, and
then select
Properties
.
3
Click the
Options
tab, and then select
Get Information from Printer
.
4
Click
Apply
, and then click
OK
.
5
Close the
Printers and Faxes
dialog box.
Windows 8/
Windows 8 x64/
Windows Server 2012
1
Under Desktop mode, right-click the bottom left corner of the screen, and then click
Control Panel
o
Hardware and Sound
(
Hardware
for Windows Server 2012)
o
Devices
and Printers
.
2
Right-click the printer icon of the Dell C2665dnf Color Laser Multifunction Printer, and
then select
Printer properties
.
3
Click the
Configuration
tab, and then select
Bi-Directional Setup
.
4
Select
Get Information from Printer
and then click
OK
.
5
Click
Apply
, and then click
OK
.
6
Close the
Devices and Printers
dialog box.

Installing Optional Accessories 49
If the printer information is not updated automatically after clicking Get Information from Printer, follow these
steps:
1
Click the
Configuration
tab, and then select
Installable Options
.
2
Select
Paper Tray Configuration
in the
Items
list box.
3
Select
Tray2
in the
Paper Tray Configuration
drop-down menu in
Setting for
.
4
Click
OK
.
5
Click
Apply
, and then click
OK
.
6
Close the
Printers and Faxes
(
Printers
, or
Devices and Printers
) dialog box.
Windows 7/
7 x64/
Server 2008 R2 x64
1
Click
Start
o
Devices and Printers
.
2
Right-click the printer icon of the Dell C2665dnf Color Laser Multifunction Printer, and
then select
Printer properties
.
3
Click the
Configuration
tab, and then select
Bi-Directional Setup
.
4
Select
Get Information from Printer
and then click
OK
.
5
Click
Apply
, and then click
OK
.
6
Close the
Devices and Printers
dialog box.
Windows Vista/Vista x64 1
Click
Start
o
Control Panel
o
Hardware and Sound
o
Printers
.
2
Right-click the printer icon of the Dell C2665dnf Color Laser Multifunction Printer, and
then select
Properties
.
3
Click the
Configuration
tab, and then select
Bi-Directional Setup
.
4
Select
Get Information from Printer
and then click
OK
.
5
Click
Apply
, and then click
OK
.
6
Close the
Printers
dialog box.
Windows Server 2008/
Server 2008 x64
1
Click
Start
o
Control Panel
o
Printers
.
2
Right-click the printer icon of the Dell C2665dnf Color Laser Multifunction Printer, and
then select
Properties
.
3
Click the
Configuration
tab, and then select
Bi-Directional Setup
.
4
Select
Get Information from Printer
and then click
OK
.
5
Click
Apply
, and then click
OK
.
6
Close the
Printers
dialog box.
Windows XP/XP x64/
Server 2003/
Server 2003 x64
1
Click
Start
o
Printers and Faxes
.
2
Right-click the printer icon of the Dell C2665dnf Color Laser Multifunction Printer, and
then select
Properties
.
3
Click the
Configuration
tab, and then select
Bi-Directional Setup
.
4
Select
Get Information from Printer
and then click
OK
.
5
Click
Apply
, and then click
OK
.
6
Close the
Printers and Faxes
dialog box.
Mac OS X 10.7.x/10.8.x 1
Select the
Print & Scan
in
System Preferences
.
2
Select the printer in
Printers
list, and click
Options & Supplies
.
3
Select
Driver
, select the options that have been installed on the printers, and then click
OK
.
Mac OS X 10.5.x/10.6.x 1
Select the
Print & Fax
in
System Preferences
.
2
Select the printer in
Printers
list, and click
Options & Supplies
.
3
Select
Driver
, select the options that have been installed on the printers, and then click
OK
.
50 Installing Optional Accessories
When Using XML Paper Specification (XPS) Driver
NOTE: The XPS driver does not support Windows XP, XP x64, and Windows Server 2003.
Installing the Optional Wireless Adapter
The wireless adapter allows you to use the printer with wireless network connection.
The specifications of the wireless adapter are described below.
Windows 8/
Windows 8 x64/
Windows Server 2012
1
Under Desktop mode, right-click the bottom left corner of the screen, and then click
Control Panel
o
Hardware and Sound
(
Hardware
for Windows Server 2012)
o
Devices
and Printers
.
2
Right-click the printer icon of the Dell C2665dnf Color Laser Multifunction Printer, and
then select
Printer properties
.
3
Click the
Device Setting
tab, and then select
Available
in
Tray2
drop-down menu.
4
Click
Apply
, and then click
OK
.
5
Close the
Devices and Printers
dialog box.
Windows 7/
7 x64/
Server 2008 R2 x64
1
Click
Start
o
Devices and Printers
.
2
Right-click the printer icon of the Dell C2665dnf Color Laser Multifunction Printer, and
then select
Printer properties
.
3
Click the
Device Setting
tab, and then select
Available
in
Tray2
drop-down menu.
4
Click
Apply
, and then click
OK
.
5
Close the
Devices and Printers
dialog box.
Windows Vista/Vista x64 1
Click
Start
o
Control Panel
o
Hardware and Sound
o
Printers
.
2
Right-click the printer icon of the Dell C2665dnf Color Laser Multifunction Printer, and
then select
Properties
.
3
Click the
Device Setting
tab, and then select
Available
in
Tray2
drop-down menu.
4
Click
Apply
, and then click
OK
.
5
Close the
Printers
dialog box.
Windows Server 2008/
Server 2008 x64
1
Click
Start
o
Control Panel
o
Printers
.
2
Right-click the printer icon of the Dell C2665dnf Color Laser Multifunction Printer, and
then select
Properties
.
3
Click the
Device Setting
tab, and then select
Available
in
Tray2
drop-down menu.
4
Click
Apply
, and then click
OK
.
5
Close the
Printers
dialog box.
Item Specification
Connectivity Technology Wireless
Compliant Standards IEEE 802.11b, 802.11g, and 802.11n
Bandwidth 2.4 GHz
Data Transfer Rate IEEE 802.11n: 65 Mbps
IEEE 802.11g: 54, 48, 36, 24, 18, 12, 9, and 6 Mbps
IEEE 802.11b: 11, 5.5, 2, and 1 Mbps
Security 64 (40-bit key)/128 (104-bit key) WEP,
WPA- PSK (TKIP, AES), WPA2-PSK (AES), WPA-Enterprise (TKIP, AES)*1,
WPA2-Enterprise (AES)*1
Wi-Fi Protected Setup® (WPS)*2 Push-Button Configuration (PBC),
Personal Identification Number (PIN)

Installing Optional Accessories 51
*1 EAP method supports PEAPv0, EAP-TLS, EAP-TTLS PAP, and EAP-TTLS CHAP.
*2 WPS 2.0 compliant. WPS 2.0 works on access points with the following encryption types: Mixed mode PSK,
WPA-PSK AES, WPA2-PSK AES, WPA-PSK TKIP, Open (No Security)
NOTE: When the wireless adapter is installed, you cannot use IEEE 802.1x authentication and/or the Ethernet port for a wired
connection.
Verifying the Contents of the Box
NOTE: To complete wireless installation, you require the corresponding Software and Documentation disc that comes with your
printer, which can also be downloaded from d
dell.com/support
.
Installing the Optional Wireless Adapter
NOTE: The Software and Documentation disc also contains video instructions. On D
Dell Printer Setup
, click I
Installation Video
.
1
Ensure that the printer is turned off.
2
Align the connector and the three protrusions of the wireless adapter with the four holes and insert the adapter.
NOTE: Ensure that the adapter is fully inserted and secured.
3
Turn on the printer.
NOTE: If a message displays telling you to make initial setup on the touch panel, always do as instructed.
4
Print the system settings report to confirm that the wireless adapter is installed correctly.
For details about how to print a system settings report, see "Report / List."
5
Confirm that the
Network (Wireless)
section exists.
Installing the Optional
Wireless Adapter
Wireless Adapter TBD
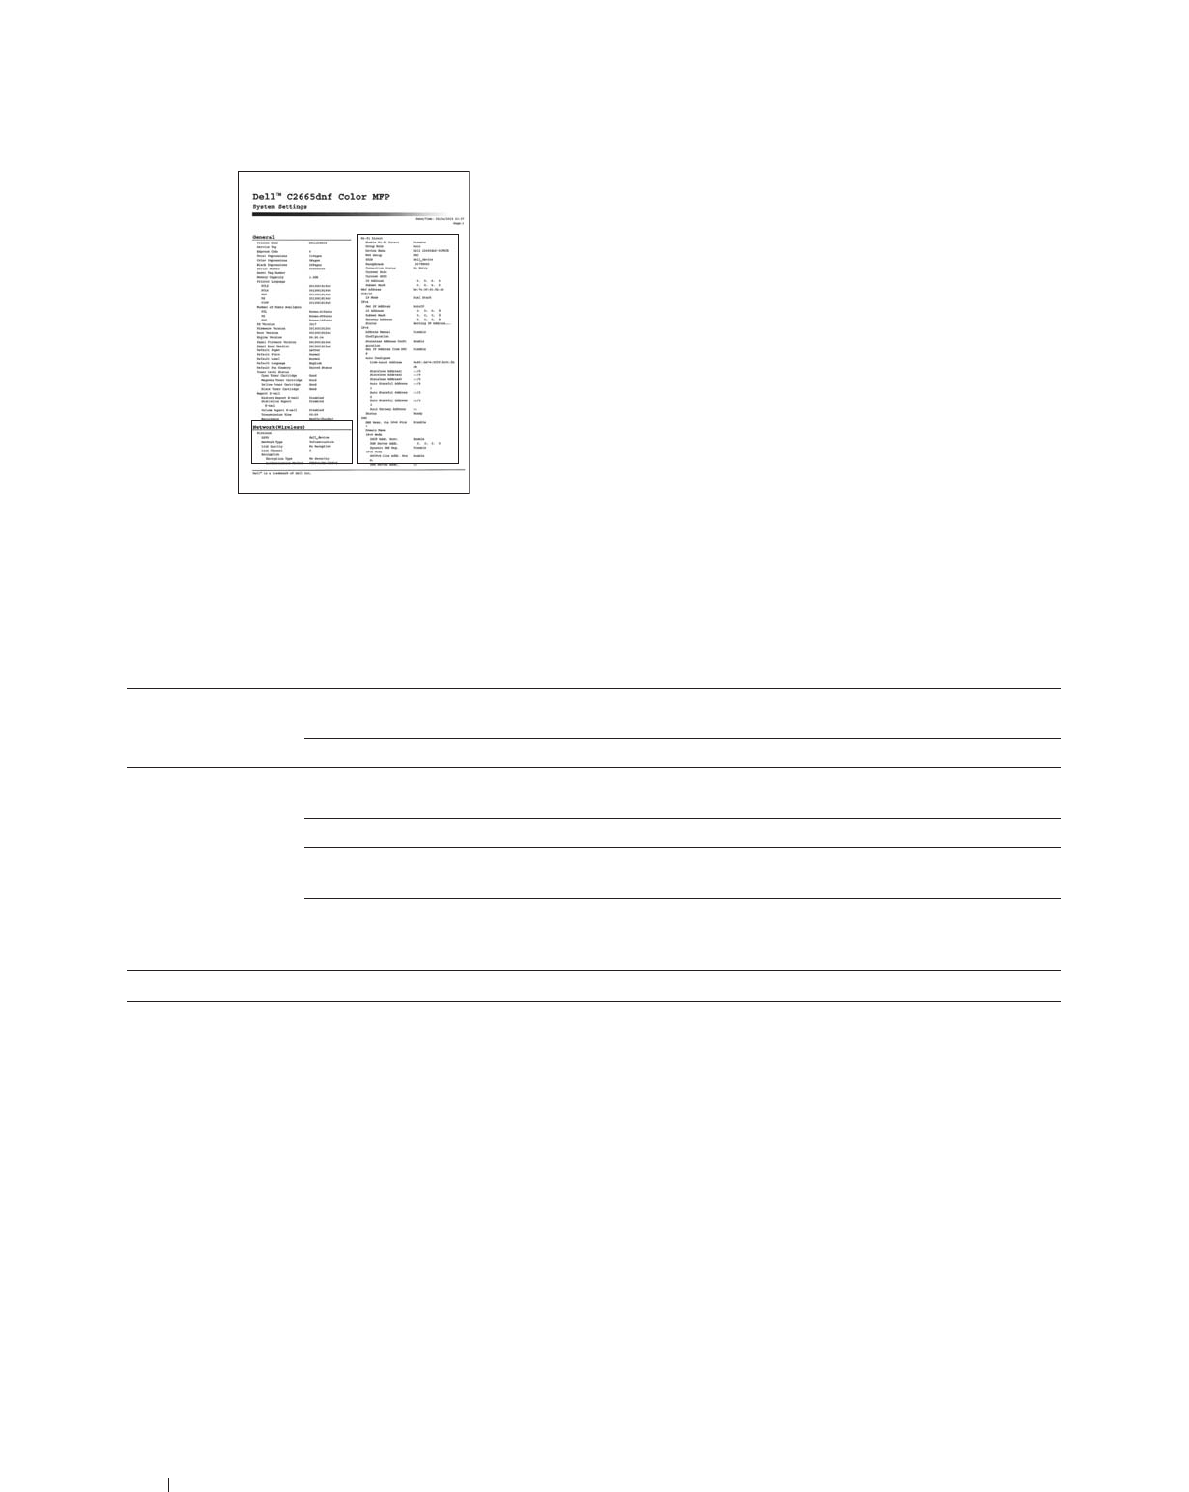
52 Installing Optional Accessories
6
Configure the wireless adapter to connect to a wireless network. For details, see "Configuring the Optional
Wireless Adapter."
Determining the Wireless Network Settings
You need to know the settings for the wireless network to set up the wireless printer. For details of the settings,
contact your network administrator.
Wireless Settings SSID Specifies the name that identifies the wireless network with up to 32
alphanumeric characters.
Network Mode Specifies the network mode from Ad-hoc or Infrastructure.
Security Settings Security Selects the encryption type from No Security, Mixed mode PSK*, WPA-PSK-
TKIP, WPA2-PSK-AES, and WEP.
Transmit Key Specifies the transmit key from the list.
WEP Key Specifies the WEP key used through the wireless network only when WEP is
selected as the encryption type.
Pass Phrase Specifies the pass phrase of alphanumeric characters from 8 to 63 bytes long
only when Mixed mode PSK*, WPA-PSK-TKIP, or WPA2-PSK-AES is
selected as the encryption type.
*Mixed mode PSK automatically selects an available encryption type from WPA-PSK-TKIP, WPA-PSK-AES, or WPA2-PSK-AES.
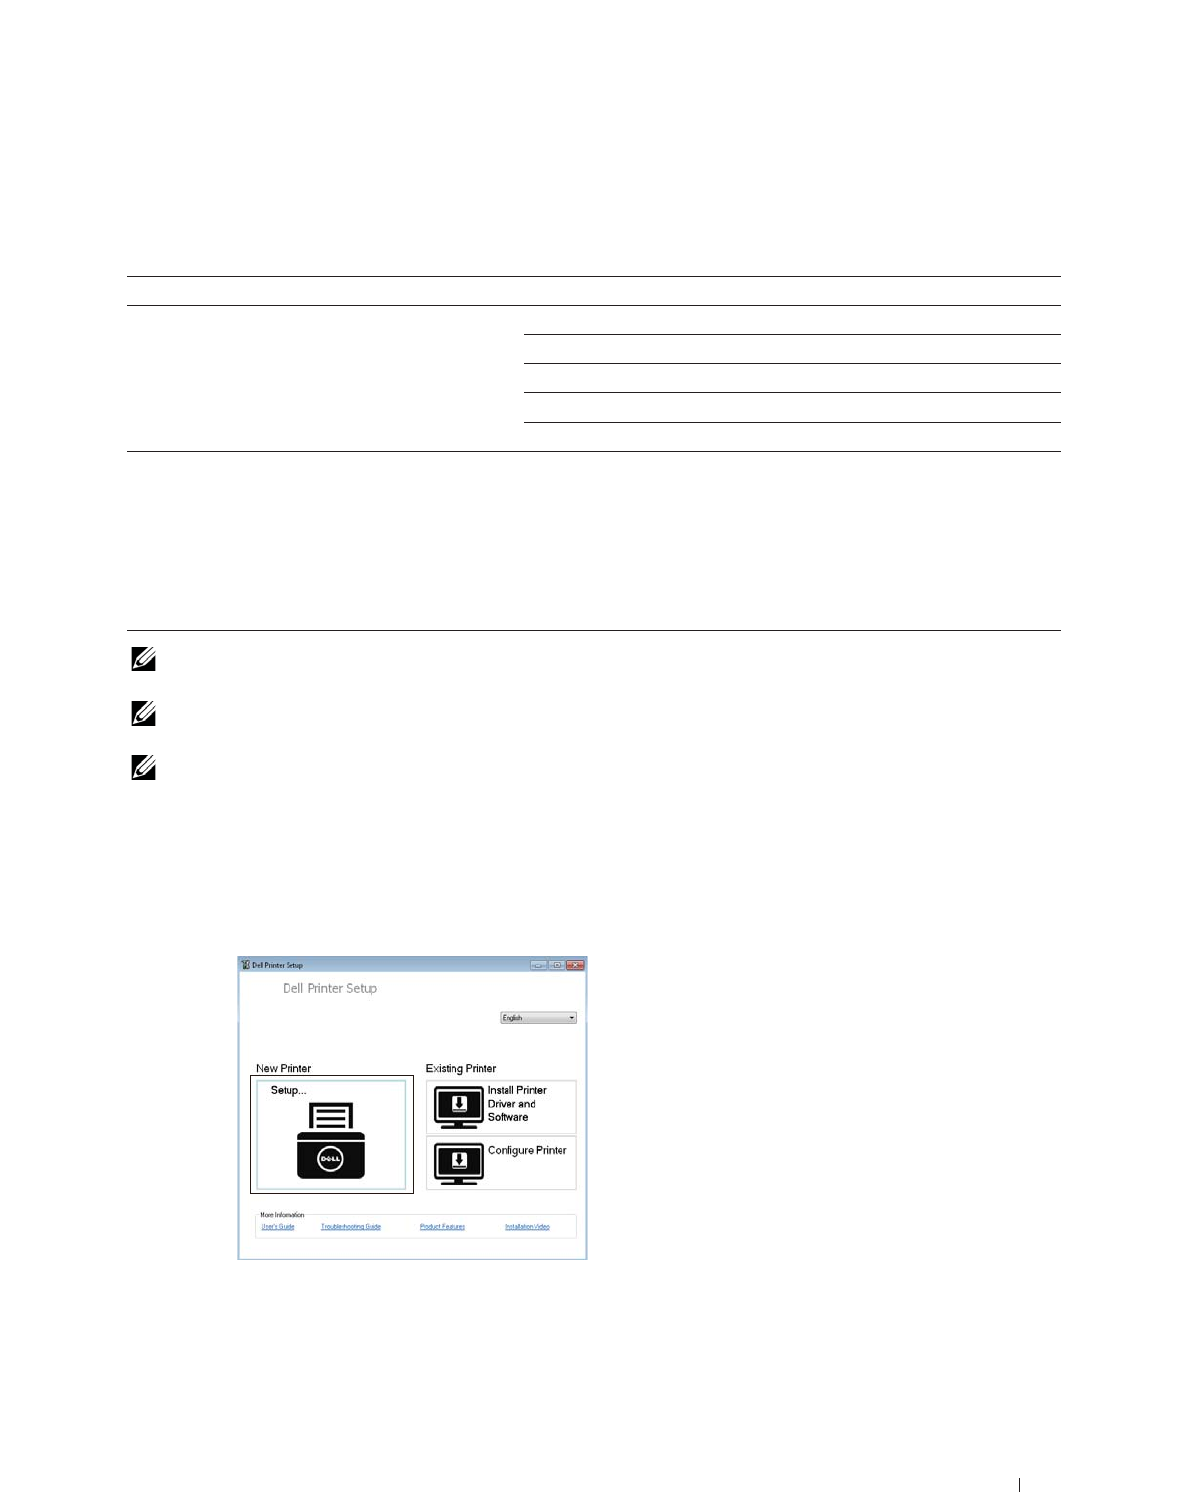
Installing Optional Accessories 53
Configuring the Optional Wireless Adapter
This section describes how to configure a wireless adapter.
You can select a method to configure a wireless adapter from the following:
NOTE: The optional wireless adapter must be installed on the printer. For information on how to install a wireless adapter, see
"Installing the Optional Wireless Adapter."
NOTE: If the Panel Lock Control is set to Enable, you need to enter the four digit password to enter the Admin
Settings menu.
NOTE: For details about using WPA-Enterprise-AES, WPA2-Enterprise-AES, or WPA-Enterprise-TKIP, see "Using Digital
Certificates."
Configuring the Wireless Adapter Using Dell Printer Setup
1
Insert the
Software and Documentation
disc provided with the printer on your computer. The
Dell Printer Setup
file launches automatically.
2
Click
Setup
.
3
Click
Wireless
.
Follow the on-screen instructions, and configure the wireless setting of the printer.
For WPS-PIN, WPS-PBC, Operator Panel, and Dell Printer Configuration Web Tool, see the following
instructions.
Wizard Setup through USB Cable(recommended)
Advanced Setup through
WPS-PBC*1*3
WPS-PIN*2*3
Operator Panel
Ethernet Cable
Dell Printer Configuration Web Tool
*1 WPS-PBC (Wi-Fi Protected Setup-Push Button Configuration) is a method to authenticate and register devices required for wireless
configuration, by pressing the button provided on the access point via wireless routers, and then performing WPS-PBC setting on the
operator panel. This setting is available only when the access point supports WPS.
*2 WPS-PIN (Wi-Fi Protected Setup-Personal Identification Number) is a method to authenticate and register devices required for wire-
less configuration, by entering PIN assignments in the printer and computer. This setting, performed through access point, is available
only when the access points of your wireless router supports WPS.
*3 WPS 2.0 compliant. WPS 2.0 works on access points with the following encryption types: Mixed mode PSK, WPA-PSK AES, WPA2-
PSK AES, WPA-PSK TKIP, Open (No Security)

54 Installing Optional Accessories
Configuring the Wireless Adapter Without Using Dell Printer Setup
WPS-PIN
The PIN code of WPS-PIN can only be configured from the operator panel.
NOTE: WPS-PIN (Wi-Fi Protected Setup-Personal Identification Number) is a method to authenticate and register devices
required for wireless configuration by entering PIN assignments to a printer and computer. This setting, performed through an
access point, is available only when the access points of your wireless router support WPS.
1
Press the
(Information)
button.
2
Tap t h e
Tools
tab, and then tap
Admin Settings
.
3
Ta p
Network
.
4
Ta p
Wireless
.
5
Ta p
WPS Setup
.
6
Ta p
PIN Code
.
7
Write down the displayed 8-digit PIN code or tap
Print PIN Code
. The PIN code is printed.
8
Ta p
Start Configuration
.
9
Ensure that the message
Operate Wireless Router
is displayed, and enter the PIN code displayed on step
7 into the wireless LAN access point (Registrar).
NOTE: For WPS operation on the wireless LAN access point, refer to the manual supplied with the wireless LAN access
point.
10
When the WPS operation is successful and the printer is rebooted, wireless LAN connection setting is completed.
WPS-PBC
You can start Push Button Control only from the operator panel.
NOTE: WPS-PBC (Wi-Fi Protected Setup-Push Button Configuration) is a method to authenticate and register devices required
for wireless configuration by pressing the button provided on the access point via wireless routers, and then performing WPS-
PBC setting on the operator panel. This setting is available only when the access point supports WPS.
NOTE: Before starting WPS-PBC, confirm the position of the WPS button (button name may vary) on the wireless LAN access
point. For information about WPS operation on the wireless LAN access point, refer to the manual supplied with the wireless
LAN access point.
1
Press the
(Information)
button.
2
Tap t h e
Tools
tab, and then tap
Admin Settings
.
3
Ta p
Network
.
4
Ta p
Wireless
.
5
Ta p
WPS Setup
.
6
Ta p
Push Button Control
.
7
Ta p
Start Configuration
.
Ensure that the message
Push WPS Button on router
is displayed, and start the WPS-PBC on the wireless
LAN access point (Registrar) within two minutes.
8
When the WPS operation is successful and the printer is rebooted, wireless LAN connection setting is completed.

Installing Optional Accessories 55
Operator Panel
Auto SSID Setup
1
Press the
(Information)
button.
2
Tap t h e
Tools
tab, and then tap
Admin Settings
.
3
Ta p
Network
.
4
Ta p
Wireless
.
5
Ta p
Wireless Setup Wizard
.
The printer automatically searches the access points on wireless network.
6
Tap until the desired access point appears, and then select the access point.
If the desired access point does not appear, go to "Manual SSID Setup."
NOTE: Some hidden SSID may not be displayed. If the SSID is not detected turn on SSID broadcast from the router.
7
Ta p
Next
.
8
Enter the WEP key or pass phrase.
When the encryption type of the selected access point is WEP in step 6:
a
Tap t h e
WEP Key
text box, and then enter the WEP key.
b
Ta p
OK
.
When the encryption type of the selected access point is WPA, WPA2 or Mixed in step 6:
a
Tap t h e
Pass Phrase
text box, and then enter the pass phrase.
b
Ta p
OK
.
9
The
Restart System
screen appears.
10
Turn off the printer, and turn it on again to apply the settings.
Wireless LAN connection setting is complete.
Manual SSID Setup
1
Press the
(Information)
button.
2
Tap t h e
Tools
tab, and then tap
Admin Settings
.
3
Ta p
Network
.
4
Ta p
Wireless
.
5
Ta p
Wireless Setup Wizard
.
6
Tap t h e
Manual SSID Setup
check box, and then tap
Next
.
7
Enter the SSID, and then tap
Next
.
8
Select the network mode from
Infrastructure
and
Ad-hoc
depending on your environment, and then tap
Next
.
If you select
Infrastructure
, proceed to step 9.
If you select
Ad-hoc
, proceed to step 10.

56 Installing Optional Accessories
9
Select the encryption type from
No Security
,
Mixed mode PSK
,
WPA-PSK-TKIP
,
WPA2-PSK-AES
, or
WEP
.
If you do not set security for your wireless network:
a
Tap until
No Security
appears, and then tap
No Security
.
b
Ta p
OK
.
To use Mixed mode PSK, WPA-PSK-TKIP, or WPA2-PSK-AES encryption:
a
Tap until
Mixed mode PSK
,
WPA-PSK-TKIP
, or
WPA2-PSK-AES
appears, and then tap the desired
encryption type.
b
Tap t h e
Pass Phrase
text box, and then enter the pass phrase.
c
Ta p
OK
.
To use WEP encryption:
a
Tap until
WEP
appears, and then tap
WEP
.
b
Tap t h e
WEP Key
text box, and then enter the WEP key.
c
Ta p
Transmit Key
, and then select the desired transmit key from
Auto
or
WEP Key 1
to
WEP Key 4
.
d
Ta p
OK
.
Proceed to step 11.
10
Select the encryption type from
No Security
or
WEP
.
If you do not set security for your wireless network:
a
Tap until
No Security
appears, and then tap
No Security
.
b
Ta p
OK
.
To use WEP encryption:
a
Tap until
WEP
appears, and then tap
WEP
.
b
Tap t h e
WEP Key
text box, and then enter the WEP key.
c
Ta p
Transmit Key
, and then select the desired transmit key from
Auto
or
WEP Key 1
to
WEP Key 4
.
d
Ta p
OK
.
11
The
Restart System
screen appears.
12
Turn off the printer, and turn it on again to apply the settings.
Wireless LAN connection setting is complete.
Dell Printer Configuration Web Tool
NOTE: For details about using WPA-Enterprise-AES, WPA2-Enterprise-AES, or WPA-Enterprise-TKIP, see "Using Digital
Certificates."
1
Ensure that the printer is turned off and the wireless adapter is connected to the printer.
2
Connect the printer to the network with an Ethernet cable.
For details about how to connect the Ethernet cable, see "Connecting Printer to Computer or Network."
3
Turn on the printer.
4
Launch the
Dell Printer Configuration Web Tool
by entering the IP address of the printer in your web browser.
5
Click
Print Server Settings
.
6
Click
Print Server Settings
tab.
7
Click
Wireless LAN
.
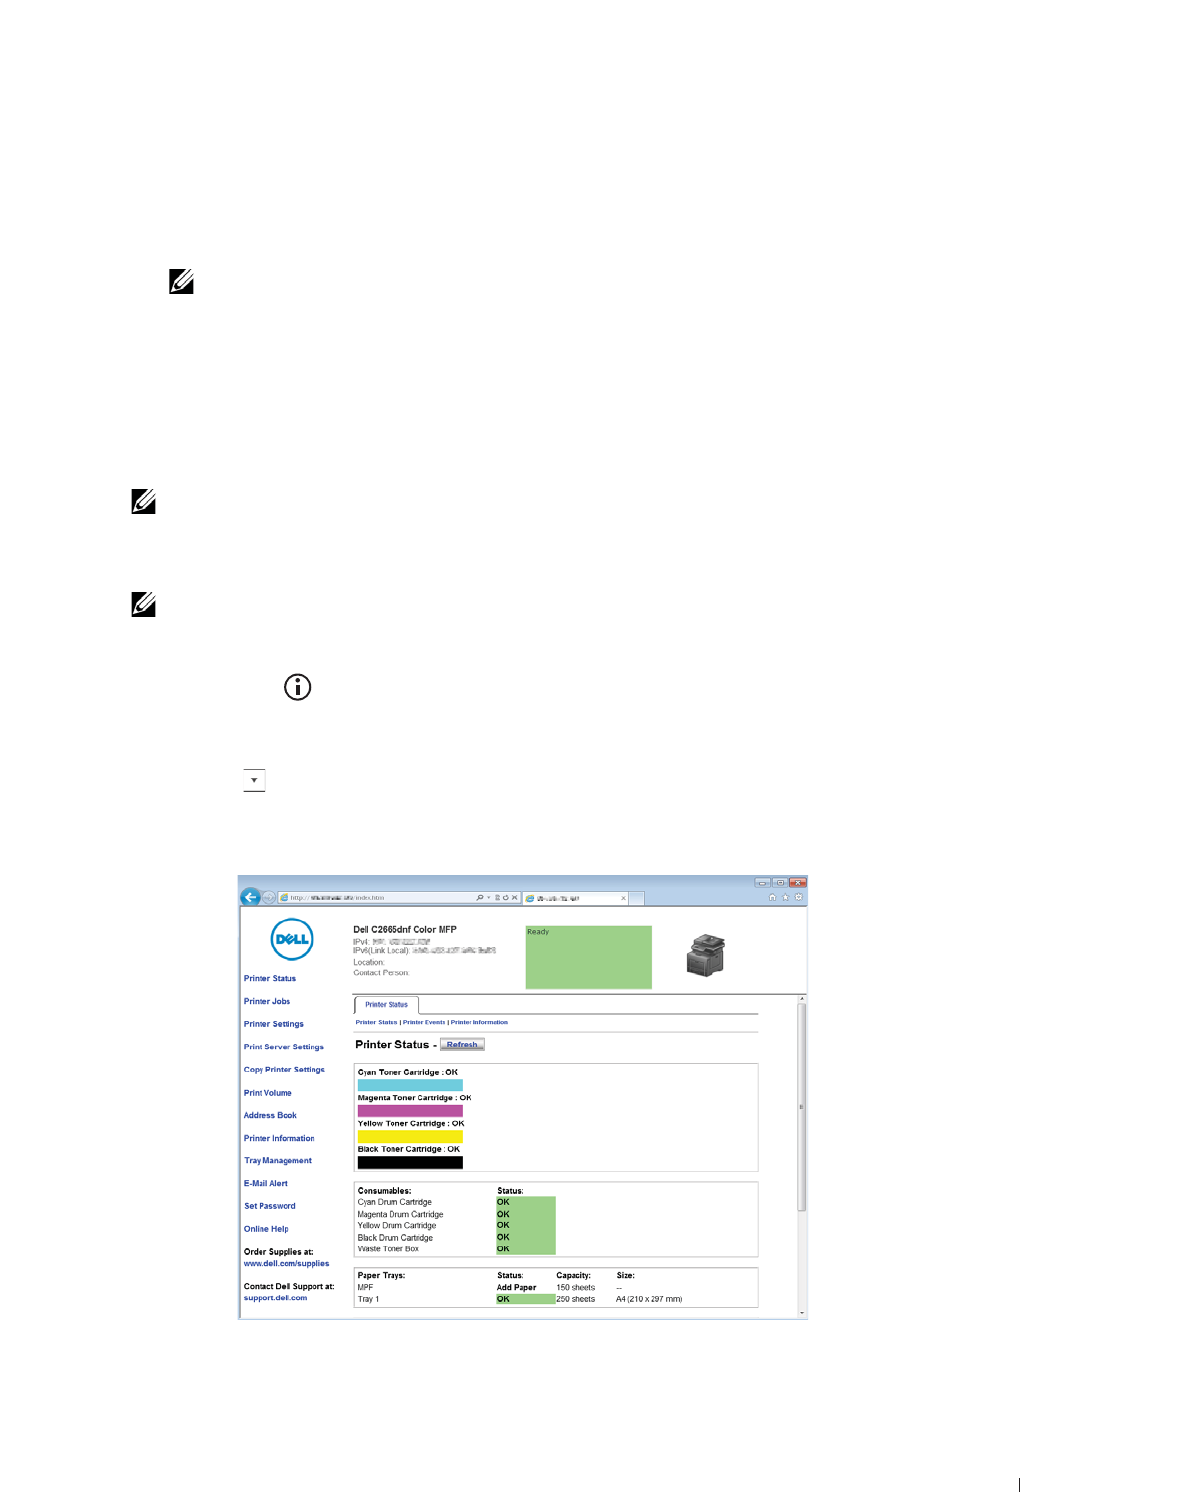
Installing Optional Accessories 57
8
Enter the SSID in the
SSID
text box.
9
Select
Ad-Hoc
or
Infrastructure
in the
Network Type
drop-down list box.
10
Select the encryption type from
No Security
,
WEP, WPA-PSK-TKIP
,
WPA-PSK-AES/WEP2-PSK AES
, and
Mixed
Mode PSK
in the
Encryption
drop-down list box, and then set each item for the encryption type selected.
NOTE: For details on each item, see "Dell™ Printer Configuration Web Tool."
11
Click
Apply New Settings
to apply the settings.
12
Turn off the printer, disconnect the Ethernet cable and turn it on again.
Wireless LAN connection setting is complete.
Reconfiguring the Wireless Setting
To change the wireless setting from your computer, perform the following.
NOTE: To change the wireless setting through wireless connection, ensure that the wireless connection setting is completed in
"Configuring the Optional Wireless Adapter."
Reconfiguring the Wireless Setting Using Dell Printer Configuration Web Tool
NOTE: The following settings are available when the network mode is set to infrastructure in "Configuring the Optional Wireless
Adapter."
1
Check the IP address of the printer.
a
Press the
(Information)
button.
b
Ta p
About This MFP
.
c
Tap t h e
Network
tab.
d
Tap button until
IP(v4) Address
appears, and then check the IP address displayed in the
IP(v4)
Address
.
2
Launch the
Dell Printer Configuration Web Tool
by entering the IP address of the printer in your web browser.
3
Click
Print Server Settings
.

58 Installing Optional Accessories
4
Click
Print Server Settings
tab.
5
Click
Wireless LAN
.
6
Change the wireless setting of the printer.
7
Reboot the printer.
8
Change the wireless settings on your computer or access point accordingly.
NOTE: To change the wireless settings on your computer, refer to the manuals provided with the wireless adapter or if
your computer provides a wireless adapter tool, change the wireless settings using that tool.
Reconfiguring the Wireless Setting Using Dell Printer Setup
1
Insert the
Software and Documentation
disc provided with the printer in your computer. The
Dell Printer Setup
file launches automatically.
2
Click
Configure Printer
.
3
Click
Wireless Configuration
.
4
Follow the on-screen instructions, and change the wireless setting of the printer.
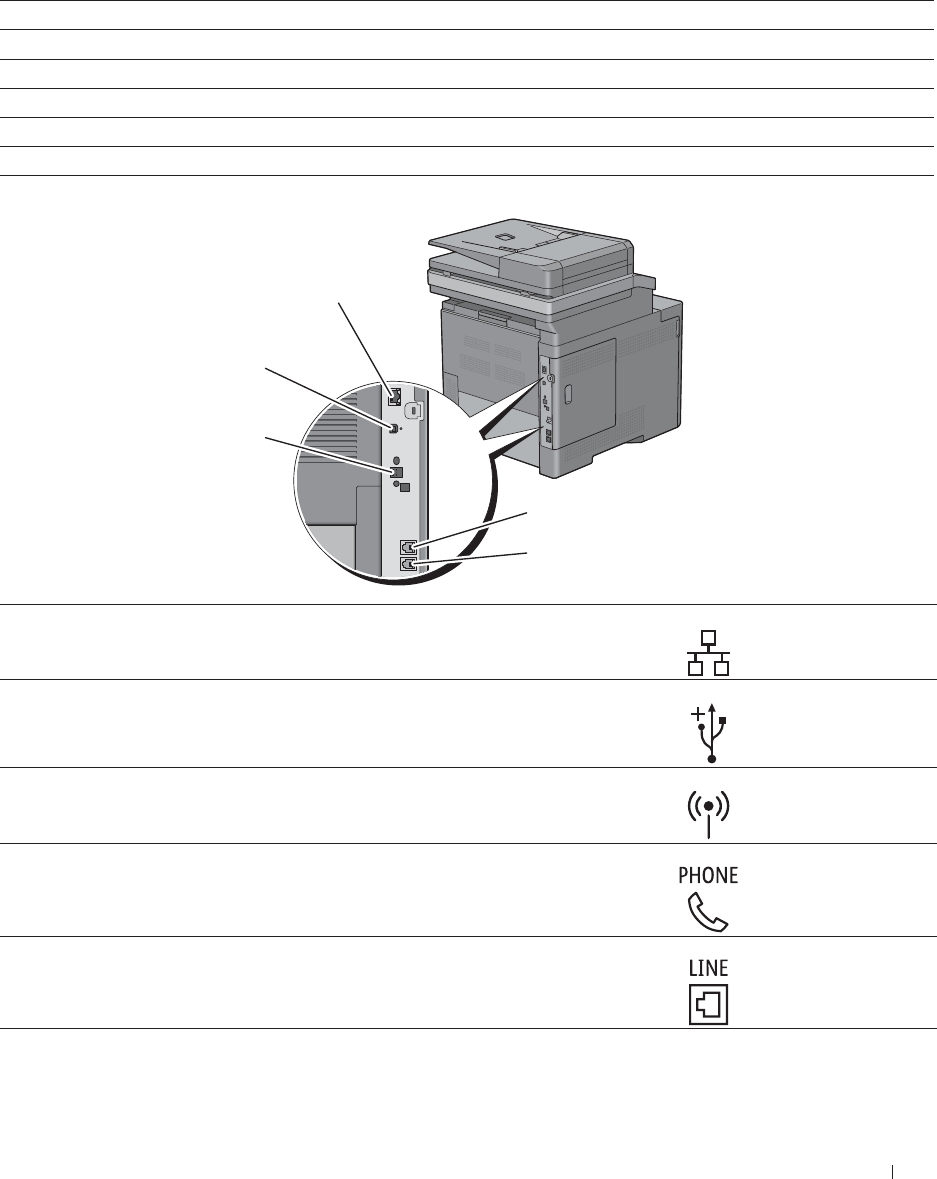
Connecting Your Printer 59
7
Connecting Your Printer
To connect your Dell™ C2665dnf Color Laser Multifunction Printer to a computer or device, the following
specification must be met for each of the connection type:
Connection type Connection specifications
Ethernet 10 Base-T/100 Base-TX/1000 Base-T
USB USB 2.0
Wireless (optional) IEEE 802.11b/802.11g/802.11n
Phone connector RJ11
Wall jack connector RJ11
1Ethernet port
2USB port
3Wireless adapter socket
4Phone connector
5Wall jack connector
1
2
3
4
5
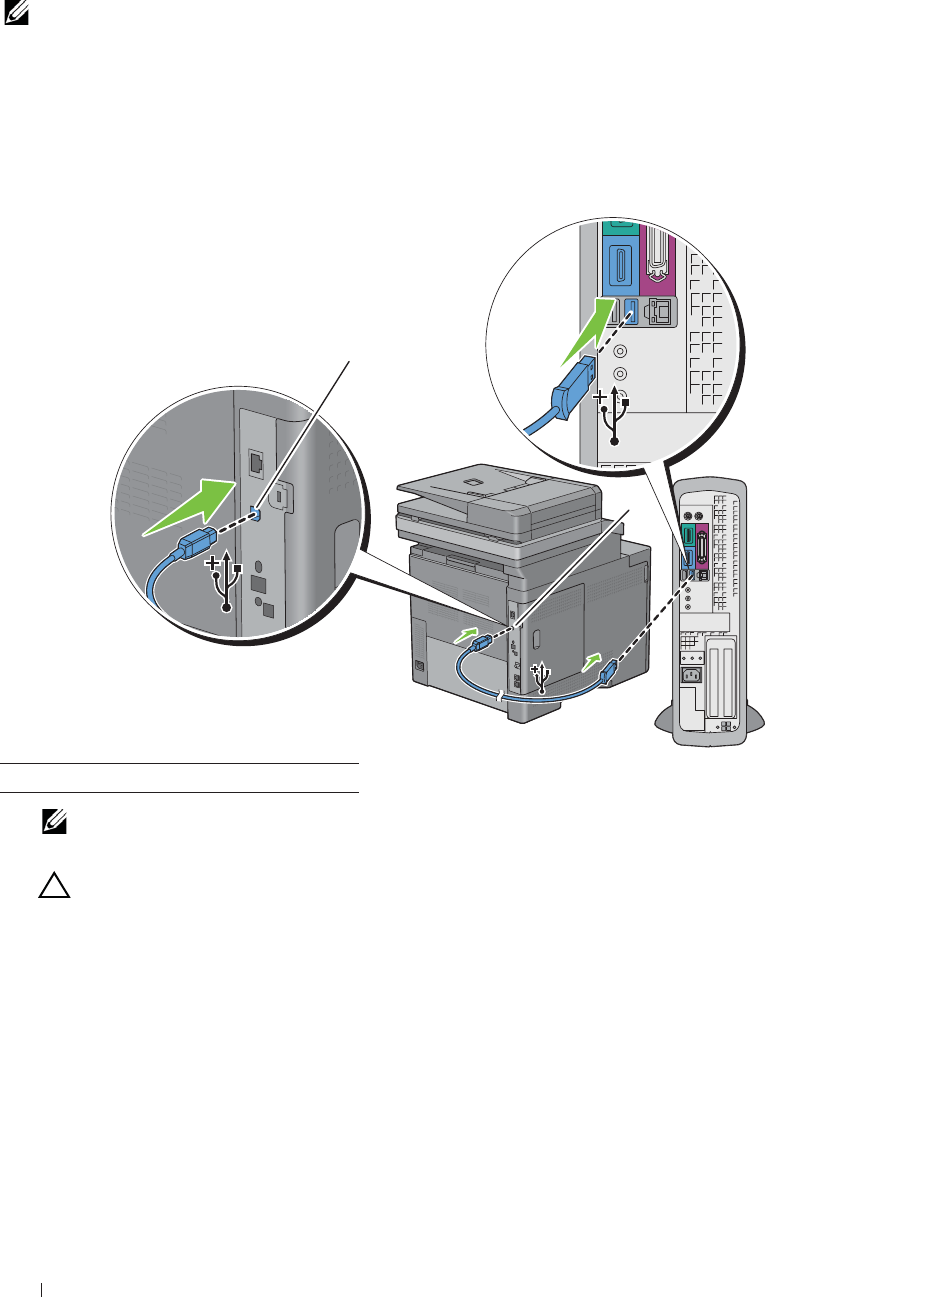
60 Connecting Your Printer
Connecting Printer to Computer or Network
NOTE: The Software and Documentation disc also contains video instructions. On D
Dell Printer Setup
, click I
Installation Video
.
Direct Connection
A local printer is a printer which is directly connected to your computer using the USB cable. If your printer is
connected to a network instead of your computer, skip this section and go to "Network Connection."
To connect the printer to a computer:
1
Connect the smaller USB connector into the USB port at the back of the printer.
NOTE: Ensure that you match the USB symbol on the cable to the USB symbol on the printer.
2
Connect the other end of the cable into a USB port of the computer.
CAUTION: Do not connect the printer USB cable to the USB port available on the keyboard.
1USB port
1
1
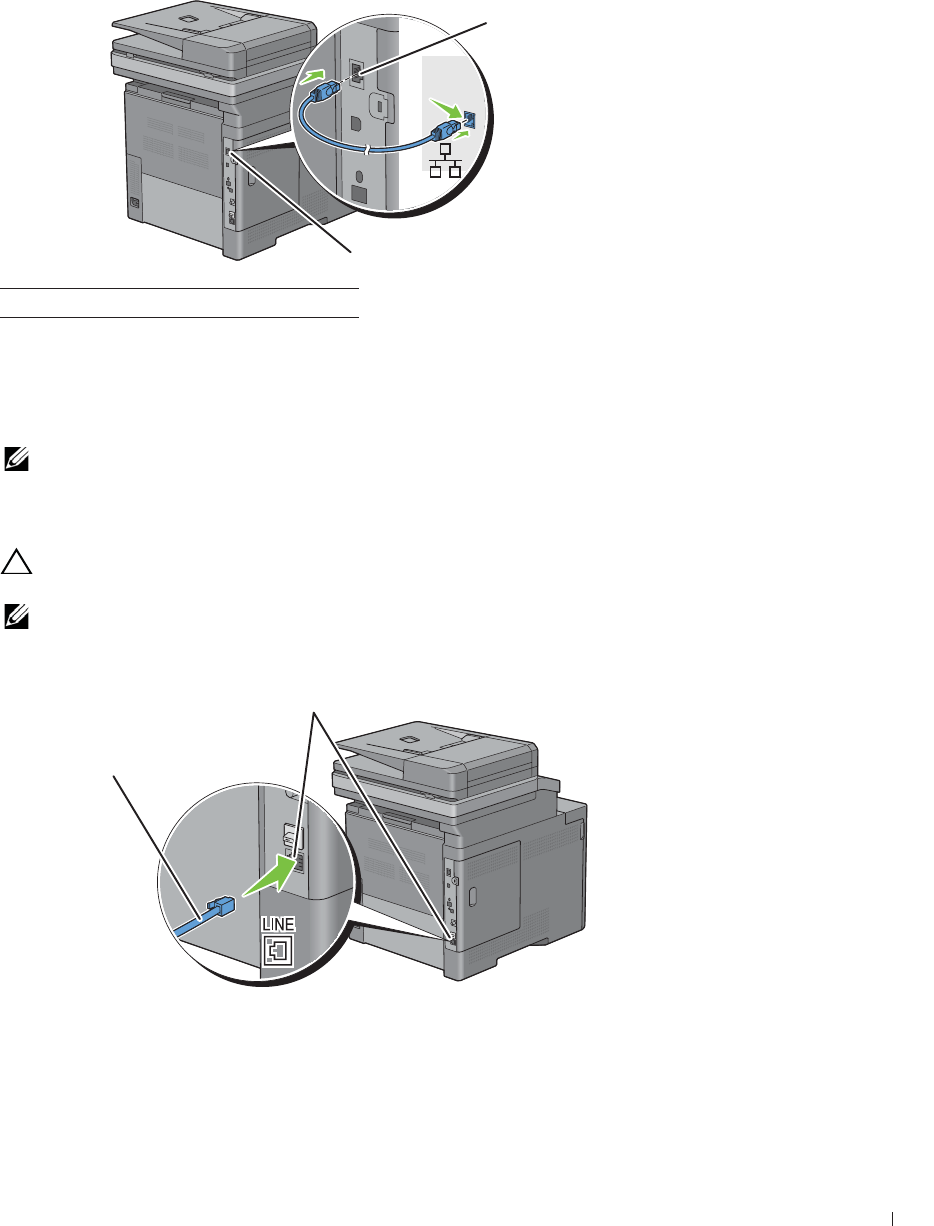
Connecting Your Printer 61
Network Connection
To connect the printer to a network:
1
Connect the Ethernet cable.
To connect the printer to the network, connect one end of an Ethernet cable into the Ethernet port on the rear of
the printer, and the other end to a LAN drop or hub. To setup a wireless connection, insert the wireless adapter into
the wireless adapter socket on the back of the printer.
For a wireless connection, see "Installing the Optional Wireless Adapter."
NOTE: To use the wireless adapter, be sure to disconnect the Ethernet cable.
Connecting the Telephone Line
CAUTION: Do not connect your printer directly to a Digital Subscriber Line (DSL). This may damage the printer. To use a DSL,
you will need to use an appropriate DSL filter. Contact your service provider for the DSL filter.
NOTE: The Software and Documentation disc also contains video instructions. On D
Dell Printer Setup
, click I
Installation Video
.
1
Connect one end of a telephone line cord into the wall jack connector and the other end into an active wall jack.
1Ethernet port
1
1
Wall jack connector
To the wall jack
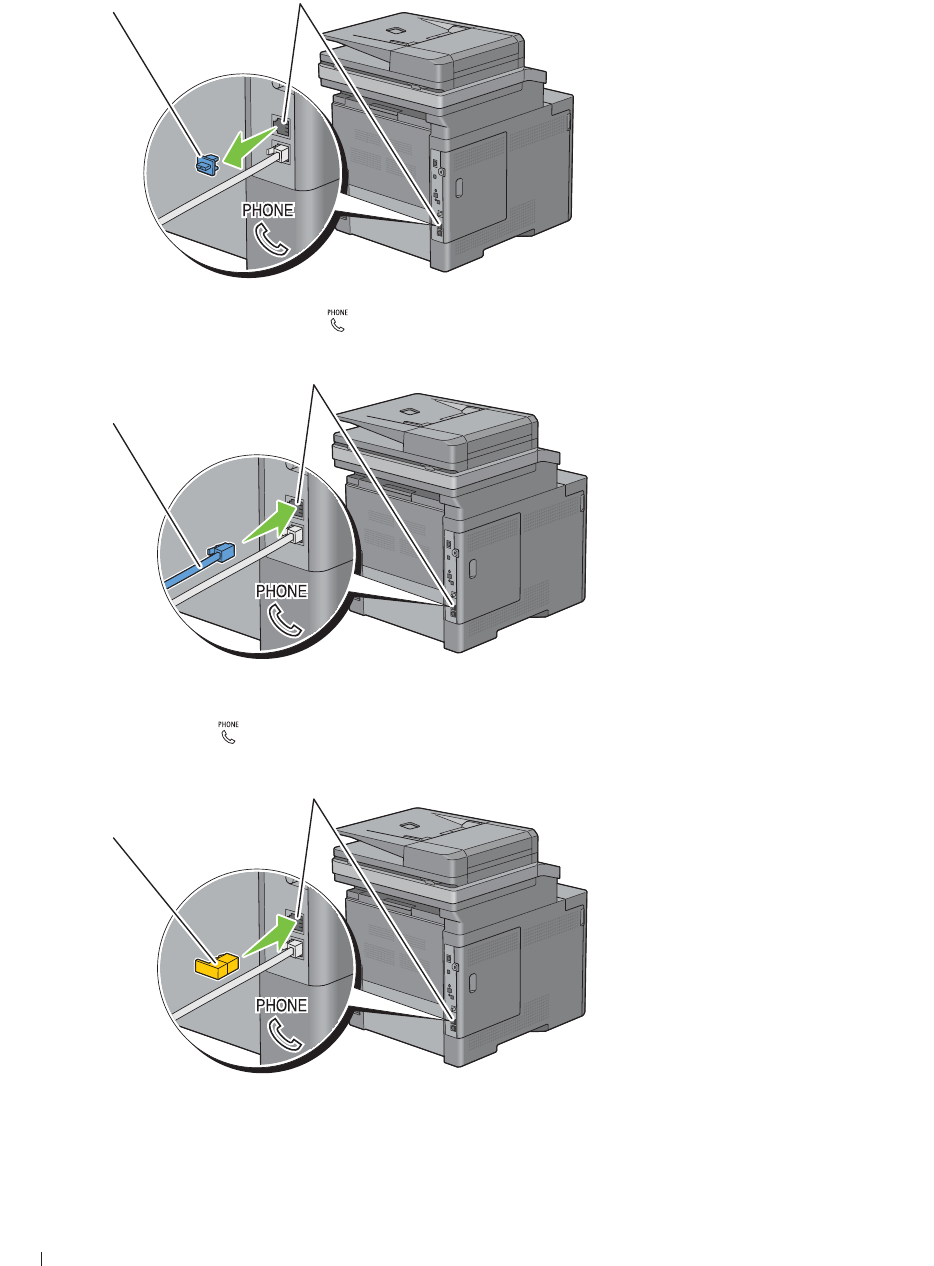
62 Connecting Your Printer
2
Remove the "Blue" plug from the phone connector.
3
To connect a telephone and/or answering machine to your printer, connect the telephone or answering machine
line cord into the phone connector ( ).
If the phone communication is serial in your country (such as Germany, Sweden, Denmark, Austria, Belgium, Italy,
France and Switzerland), and that you are supplied with a "Yellow" terminator, insert the "Yellow" terminator into
the phone connector ( ).
Phone connector
"Blue" plug
Phone connector
To an external telephone or
answering machine
Phone connector
"Yellow" terminator
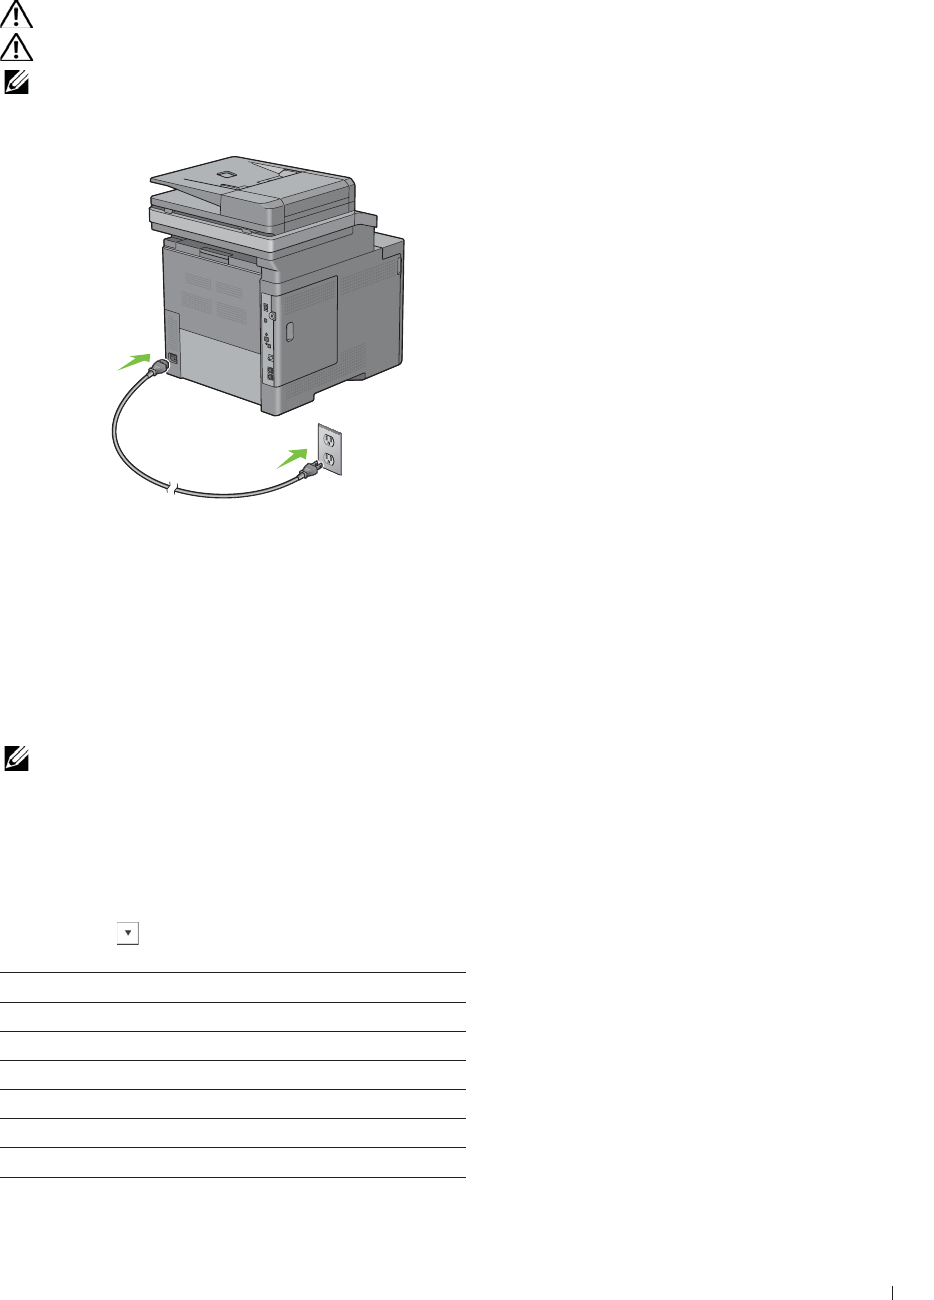
Connecting Your Printer 63
Turning on the Printer
WARNING: Do not use extension cords or power strips.
WARNING: The printer should not be connected to an Uninterruptible Power Supply (UPS) system.
NOTE: The Software and Documentation disc also contains video instructions. On D
Dell Printer Setup
, click I
Installation Video
.
1
Connect the power cable to the power connector on the rear of the printer, and then to a power source.
2
Turn on the printer. When the printer is connected via a USB cable, the USB driver is automatically installed.
Setting Initial Settings on the Operator Panel
You need to set the printer language, country, clock date, time, and fax settings when you turn on printer for the first
time.
When you turn the printer on, the wizard screen to perform the initial setup appears on the touch panel. Follow the
steps below to set the initial settings.
NOTE: If you do not start configuring the initial settings, the printer automatically restarts in three minutes, and the H
Home
screen
appears on the touch panel. After that, you can set the following initial setup by enabling Power on Wizard on the touch
panel or D
Dell Printer Configuration Web Tool
if needed.
For more information on operator panel, see
"Operator Panel."
For more information on
Dell Printer Configuration Web Tool
, see
"
Dell™ Printer Configuration Web Tool.
"
1
The
Select Your Language
screen appears.
a
Tap until desired language appears, and then tap the desired language.
English
Français
Italiano
Deutsch
Español
Dansk
Nederlands
64 Connecting Your Printer
b
Ta p
Next
.
2
The
Date & Time
screen appears.
a
Ta p
Time Zone
.
b
Tap until the desired geographic region appears, and then tap the desired geographic region.
c
Tap until the desired time zone appears, and then tap the desired time zone.
Norsk
Svenska
Geographic Region Time Zone
Africa (UTC) Accra, Bamako, Dakar, Nouakchott
(UTC) Casablanca
(UTC +01:00) Algiers, Douala, Libreville, Luanda
(UTC +01:00) Tunis
(UTC +01:00) Windhoek
(UTC +02:00) Cairo
(UTC +02:00) Harare, Johannesburg, Kinshasa, Tripoli
(UTC +03:00) Addis Ababa, Khartoum, Mogadishu, Nairobi
Americas (UTC -10:00) Adak
(UTC -09:00) Alaska
(UTC -08:00) Pacific Time (US & Canada)
(UTC -08:00) Tijuana
(UTC -07:00) Arizona, Dawson Creek, Sonora
(UTC -07:00) Chihuahua, Mazatlan
(UTC -07:00) Mountain Time (US & Canada)
(UTC -06:00) Cancun, Mexico City, Monterrey
(UTC -06:00) Central America
(UTC -06:00) Central Time (US & Canada)
(UTC -06:00) Saskatchewan
(UTC -05:00) Atikokan, Resolute
(UTC -05:00) Bogota, Lima, Panama, Quito
(UTC -05:00) Cayman Islands, Jamaica, Port-au-Prince
(UTC -05:00) Eastern Time (US & Canada)
(UTC -05:00) Grand Turk
(UTC -05:00) Havana
(UTC -04:30) Caracas
(UTC -04:00) Asuncion
(UTC -04:00) Atlantic Time (Canada)
(UTC -04:00) Blanc-Sablon
(UTC -04:00) Caribbean Islands
(UTC -04:00) Cuiaba

Connecting Your Printer 65
Americas (UTC -04:00) Georgetown, La Paz, Manaus
(UTC -04:00) Thule
(UTC -03:30) St. John's
(UTC -03:00) Brasilia, Cayenne, Paramaribo
(UTC -03:00) Buenos Aires
(UTC -03:00) Greenland
(UTC -03:00) Miquelon
(UTC -03:00) Montevideo
(UTC -02:00) Noronha
Antarctica (UTC -04:00) Palmer Archipelago, Santiago
(UTC -03:00) Rothera
(UTC +03:00) Syowa
(UTC +06:00) Mawson, Vostok
(UTC +07:00) Davis
(UTC +08:00) Casey
(UTC +10:00) Dumont d'Urville
(UTC +12:00) McMurdo
Asia (UTC +02:00) Amman
(UTC +02:00) Beirut
(UTC +02:00) Damascus
(UTC +02:00) Jerusalem
(UTC +02:00) Nicosia
(UTC +02:00) Palestine
(UTC +03:00) Aden, Baghdad, Qatar, Riyadh
(UTC +03:30) Tehran
(UTC +04:00) Baku
(UTC +04:00) Dubai, Muscat, Tbilisi
(UTC +04:00) Yerevan
(UTC +04:30) Kabul
(UTC +05:00) Aqtau, Aqtobe, Ashgabat, Samarkand
(UTC +05:00) Ekaterinburg
(UTC +05:00) Karachi
(UTC +05:30) Colombo, Kolkata
(UTC +05:45) Kathmandu
(UTC +06:00) Almaty, Bishkek, Dhaka, Thimphu
(UTC +06:00) Novosibirsk, Omsk
(UTC +06:30) Yangon (Rangoon)
(UTC +07:00) Bangkok, Ho Chi Minh, Hovd, Jakarta
(UTC +07:00) Krasnoyarsk
(UTC +08:00) Chongqing, Hong Kong, Shanghai
(UTC +08:00) Irkutsk
Geographic Region Time Zone

66 Connecting Your Printer
Asia (UTC +08:00) Kuala Lumpur, Makassar, Manila, Singapore
(UTC +08:00) Taipei
(UTC +08:00) Ulaan Baatar
(UTC +09:00) Dili, Jayapura
(UTC +09:00) Pyongyang
(UTC +09:00) Seoul
(UTC +09:00) Tokyo
(UTC +09:00) Yakutsk
(UTC +10:00) Sakhalin, Vladivostok
(UTC +11:00) Magadan
(UTC +12:00) Anadyr, Kamchatka
Atlantic Ocean (UTC -04:00) Bermuda
(UTC -04:00) Stanley
(UTC -02:00) South Georgia Island
(UTC -01:00) Azores, Scoresbysund
(UTC -01:00) Cape Verde
(UTC) Reykjavik
Australia (UTC +08:00) Perth
(UTC +08:45) Eucla
(UTC +09:30) Adelaide
(UTC +09:30) Darwin
(UTC +10:00) Brisbane, Lindeman
(UTC +10:00) Hobart, Melbourne, Sydney
(UTC +10:30) Lord Howe Island
Europe (UTC) Dublin, Edinburgh, Lisbon, London
(UTC +01:00) Amsterdam, Berlin, Rome, Stockholm, Vienna
(UTC +01:00) Belgrade, Bratislava, Budapest, Prague
(UTC +01:00) Brussels, Copenhagen, Madrid, Paris
(UTC +01:00) Sarajevo, Skopje, Warsaw, Zagreb
(UTC +02:00) Athens, Bucharest, Istanbul
(UTC +02:00) Helsinki, Kiev, Riga, Sofia
(UTC +02:00) Kaliningrad, Minsk
(UTC +03:00) Moscow
(UTC +04:00) Samara
Indian Ocean (UTC +03:00) Antananarivo, Comoro Islands, Mayotte
(UTC +04:00) Mahe, Reunion
(UTC +04:00) Mauritius
(UTC +05:00) Kerguelen, Maldives
(UTC +06:00) Chagos
(UTC +06:30) Cocos Islands
(UTC +07:00) Christmas Island
Geographic Region Time Zone
Connecting Your Printer 67
d
Ta p
OK
.
e
Ta p
Date
.
f
Select a date format from the menu displayed by selecting
Format
.
g
After tapping the box under
Year
, tap - or +, or use the number pad to enter the desired value. Repeat this
step to enter the desired value for
Month
and
Day
.
h
Ta p
OK
.
i
Ta p
Time
.
j
Select the time format from
12 Hour
or
24 Hour
. If you select
12 Hour
, select
AM
or
PM
.
k
After tapping the box under
Hour
, use the number pad to enter the desired value. Repeat this step to enter
the desired value for
Minute
.
l
Ta p
OK
.
m
Ta p
Next
.
3
The
Fax (Do you want to setup Fax Now?)
screen appears.
To set Fax settings, select
Yes, Setup FAX
and follow the procedure below. To end the settings, select
No,
I'll Do It Later
and proceed to Step 4.
a
Enter the fax number of the printer using the number pad.
b
Ta p
Country
.
c
Tap until the desired country appears, and then tap the desired country.
The default paper size is automatically set when you select a country.
Pacific Ocean (UTC -11:00) Midway Island, Niue, Samoa
(UTC -10:00) Cook Islands, Hawaii, Tahiti
(UTC -09:30) Marquesas Islands
(UTC -09:00) Gambier Islands
(UTC -08:00) Pitcairn Islands
(UTC -06:00) Easter Island
(UTC -06:00) Galapagos Islands
(UTC +09:00) Palau
(UTC +10:00) Guam, Port Moresby, Saipan
(UTC +11:00) Efate, Guadalcanal, Kosrae
(UTC +11:30) Norfolk Island
(UTC +12:00) Auckland
(UTC +12:00) Fiji, Marshall Islands
(UTC +12:45) Chatham
(UTC +13:00) Tongatapu
(UTC +14:00) Kiritimati
YYYY/MM/DD
DD/MM/YYYY
MM/DD/YYYY
Geographic Region Time Zone

68 Connecting Your Printer
Algeria A4
Australia A4
Austria A4
Belgium A4
Bulgaria A4
Canada Letter
Colombia Letter
Costa Rica Letter
Cyprus A4
Czech Republic A4
Denmark A4
Dominican Republic Letter
Egypt A4
Estonia A4
Finland A4
France A4
Germany A4
Greece A4
Guatemala Letter
Hungary A4
Iceland A4
Ireland A4
Italy A4
Jamaica Letter
Jordan A4
Latvia A4
Liechtenstein A4
Lithuania A4
Luxembourg A4
Malaysia A4
Malta A4
Mexico Letter
Netherlands A4
New Zealand A4
Nicaragua Letter
Norway A4
Panama Letter
Poland A4
Portugal A4
Puerto Rico Letter
Romania A4

Connecting Your Printer 69
d
Ta p
Next
.
4
The
Setup Complete (Congratulations, setup is complete.)
screen appears.
5
Ta p
OK
.
The printer automatically restarts after tapping
OK
.
Russia A4
Saudi Arabia A4
Singapore A4
Slovakia A4
Slovenia A4
South Africa A4
Spain A4
Sweden A4
Switzerland A4
Thailand A4
Tunisia A4
Turkey A4
U.A.E. A4
United Kingdom A4
United States Letter
Unknown Letter

70 Connecting Your Printer
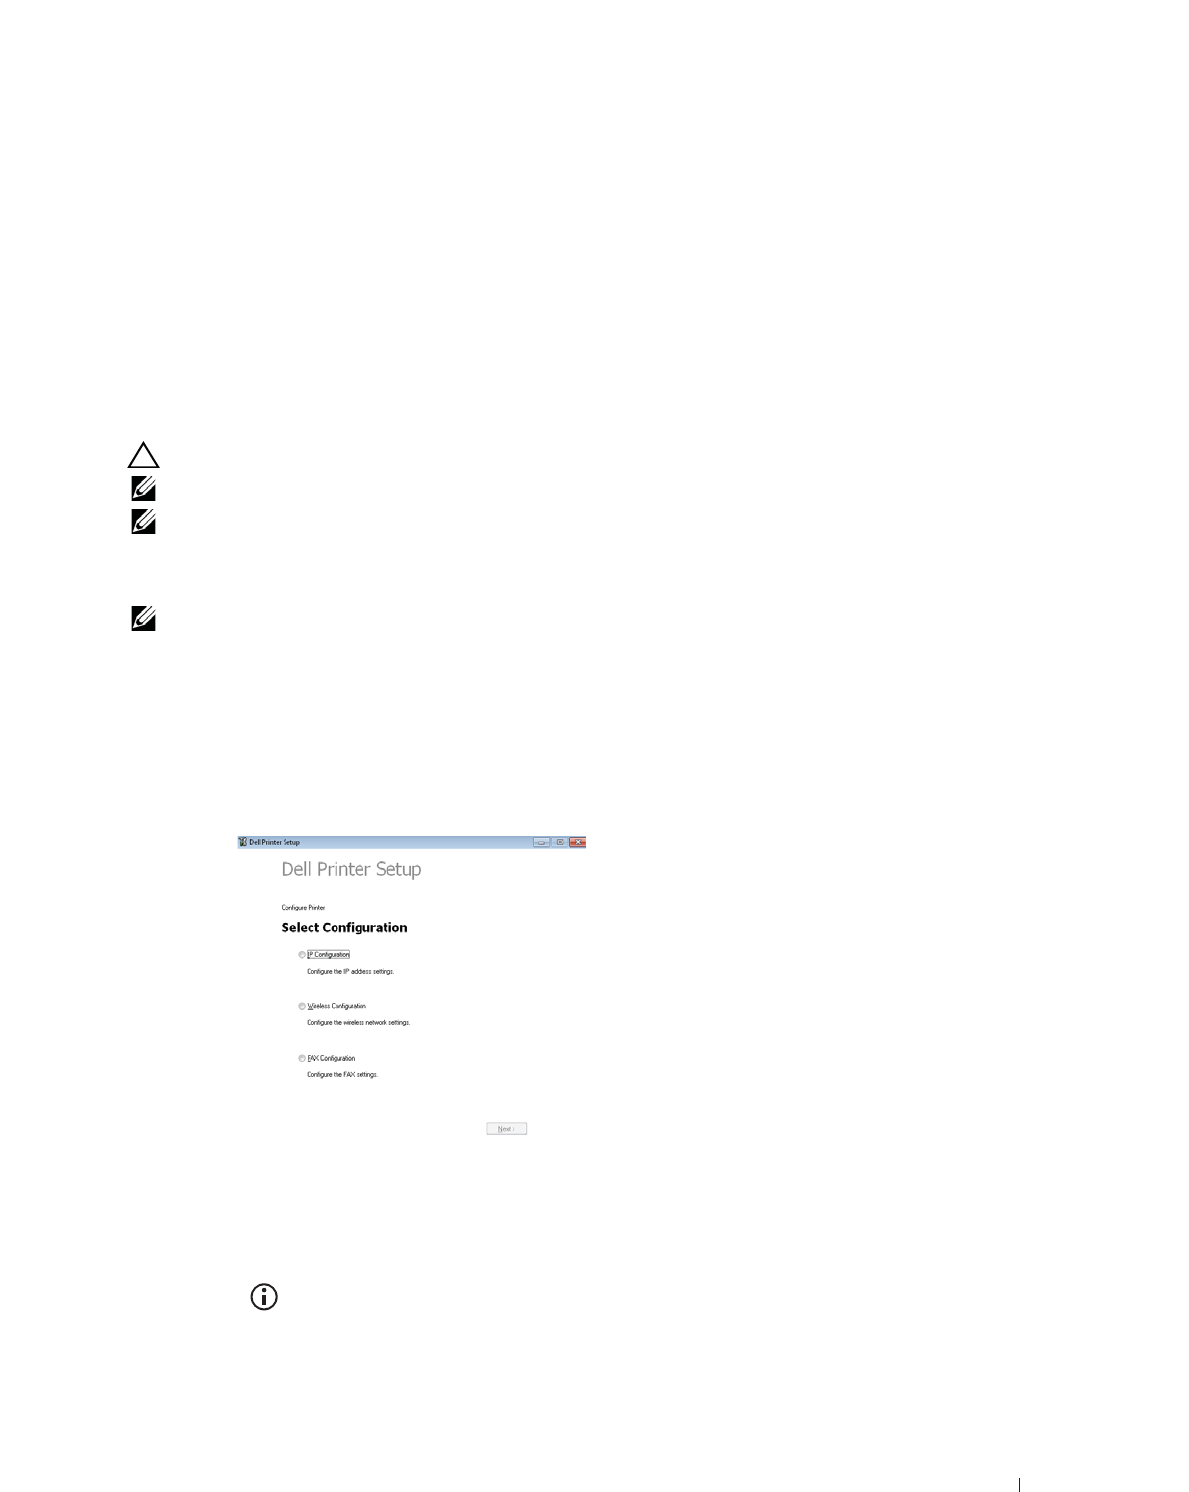
Setting the IP Address 71
8
Setting the IP Address
Assigning an IP Address
An IP address is a unique number that consists of four sections that are delimited by a period and can include up to
three digits in each section, for example, 111.222.33.44.
You can select the IP mode from Dual Stack, IPv4, and IPv6. If your network supports both IPv4 and IPv6, select
Dual Stack.
Select the IP mode of your environment, and then set IP address, subnet mask (for IPv4 only), and gateway address.
CAUTION: Assigning an IP address that is already in use can cause network performance issues.
NOTE: Assigning an IP address is considered as an advanced function and is normally done by a system administrator.
NOTE: When you assign an IP address manually in IPv6 mode, use the D
Dell™ Printer Configuration Web Tool
. To display the D
Dell
Printer Configuration Web Tool
, use the link-local address. To confirm the link-local address, print a system settings report and
check the L
Link-Local Address
under N
Network (Wired)
or N
Network (Wireless)
.
For details about how to print a system settings report, see "Report / List."
NOTE: If the Panel Lock Control is set to Enable, you need to enter the four digit password to enter the Admin
Settings menu.
When Using the Dell Printer Setup
1
Insert the
Software and Documentation
disc provided with the printer in your computer. The
Dell Printer Setup
file launches automatically.
2
Click
Configure Printer
on the
Dell Printer Setup
window.
The
Configure Printer
window opens.
3
Click
IP Configuration
.
4
Follow the instructions displayed on the screen.
When Using the Operator Panel
For more information on using the operator panel, see
"
Operator Panel.
"
1
Press the
(Information)
button.
2
Tap t h e
Tools
tab, and then tap
Admin Settings
.
3
Ta p
Network
.

72 Setting the IP Address
4
Do either of the following:
When connecting to network with the Ethernet cable:
Ta p
Ethernet
.
When connecting to network with the wireless adapter:
Ta p
Wireless
.
5
Ta p
IP Mode
.
6
Ta p
IPv4 Mode
, and then tap
OK
.
7
Tap until
TCP / IP
appears, and then tap
TCP / IP
.
8
Ta p
Get IP Address
.
9
Ta p
Panel
, and then tap
OK
.
10
Ta p
IP Address
.
The cursor is located at the first octet of the IP address.
11
Use the number pad to enter the first octet of the IP address, and then tap .
The cursor moves to the next digit.
NOTE: You can only enter one octet at a time and must tap after entering each octet.
12
Enter the rest of the octets, and then tap
OK
.
13
Ta p
Subnet Mask
.
14
Repeat steps 11 and 12 to set Subnet Mask.
15
Ta p
Gateway Address
.
16
Repeat steps 11 and 12 to set Gateway Address.
17
Turn off the printer, and then turn it on again.
When Using the Tool Box
1
Click
Start
o
All Programs
o
Dell Printers
o
Dell C2665dnf Color Laser Multifunction Printer
o
Tool Box
.
NOTE: For details about starting the T
Tool Box
, see "Starting the Tool Box."
The
Tool Box
opens.
2
Click the
Printer Maintenance
tab.
3
Select
TCP/IP Settings
from the list at the left side of the page.
The
TCP/IP Settings
page appears.
4
Select the mode from
IP Address Mode
, and then enter the values in IP Address, Subnet Mask, and Gateway
Address.
5
Click
Apply New Settings
to take effect.
You can also assign the IP address to the printer when installing the printer drivers with the installer. When you use the
Network Installation
feature, and the
Get IP Address
is set to
AutoIP or DHCP
on the printer, you can set the IP
address from 0.0.0.0 to the desired IP address on the printer selection window.

Setting the IP Address 73
Verifying the IP Settings
You can confirm the settings by using the operator panel, printing the system settings report, or using the ping
command.
Verifying the Settings Using Operator Panel
1
Press the
(Information)
button.
2
Ta p
About This MFP
.
3
Tap t h e
Network
tab.
4
Verify the IP address displayed in
IP(v4) Address
.
Verifying the Settings Using System Settings Report
1
Print the system settings report.
For details about how to print a system settings report, see "Report / List."
2
Verify the correct IP address, subnet mask, and gateway address are listed in the system settings report under
Network (Wired)
or
Network (Wireless)
.
If the IP address shows
0.0.0.0
(the factory default), an IP address has not been assigned. To assign one for your
printer, see "Assigning an IP Address."
Verifying the Settings Using Ping Command
Ping the printer and verify that it responds. For example, at a command prompt on a network computer, type ping
followed by the new IP address (for example, 192.168.0.11):
ping 192.168.0.11
If the printer is active on the network, you will receive a reply.

74 Setting the IP Address
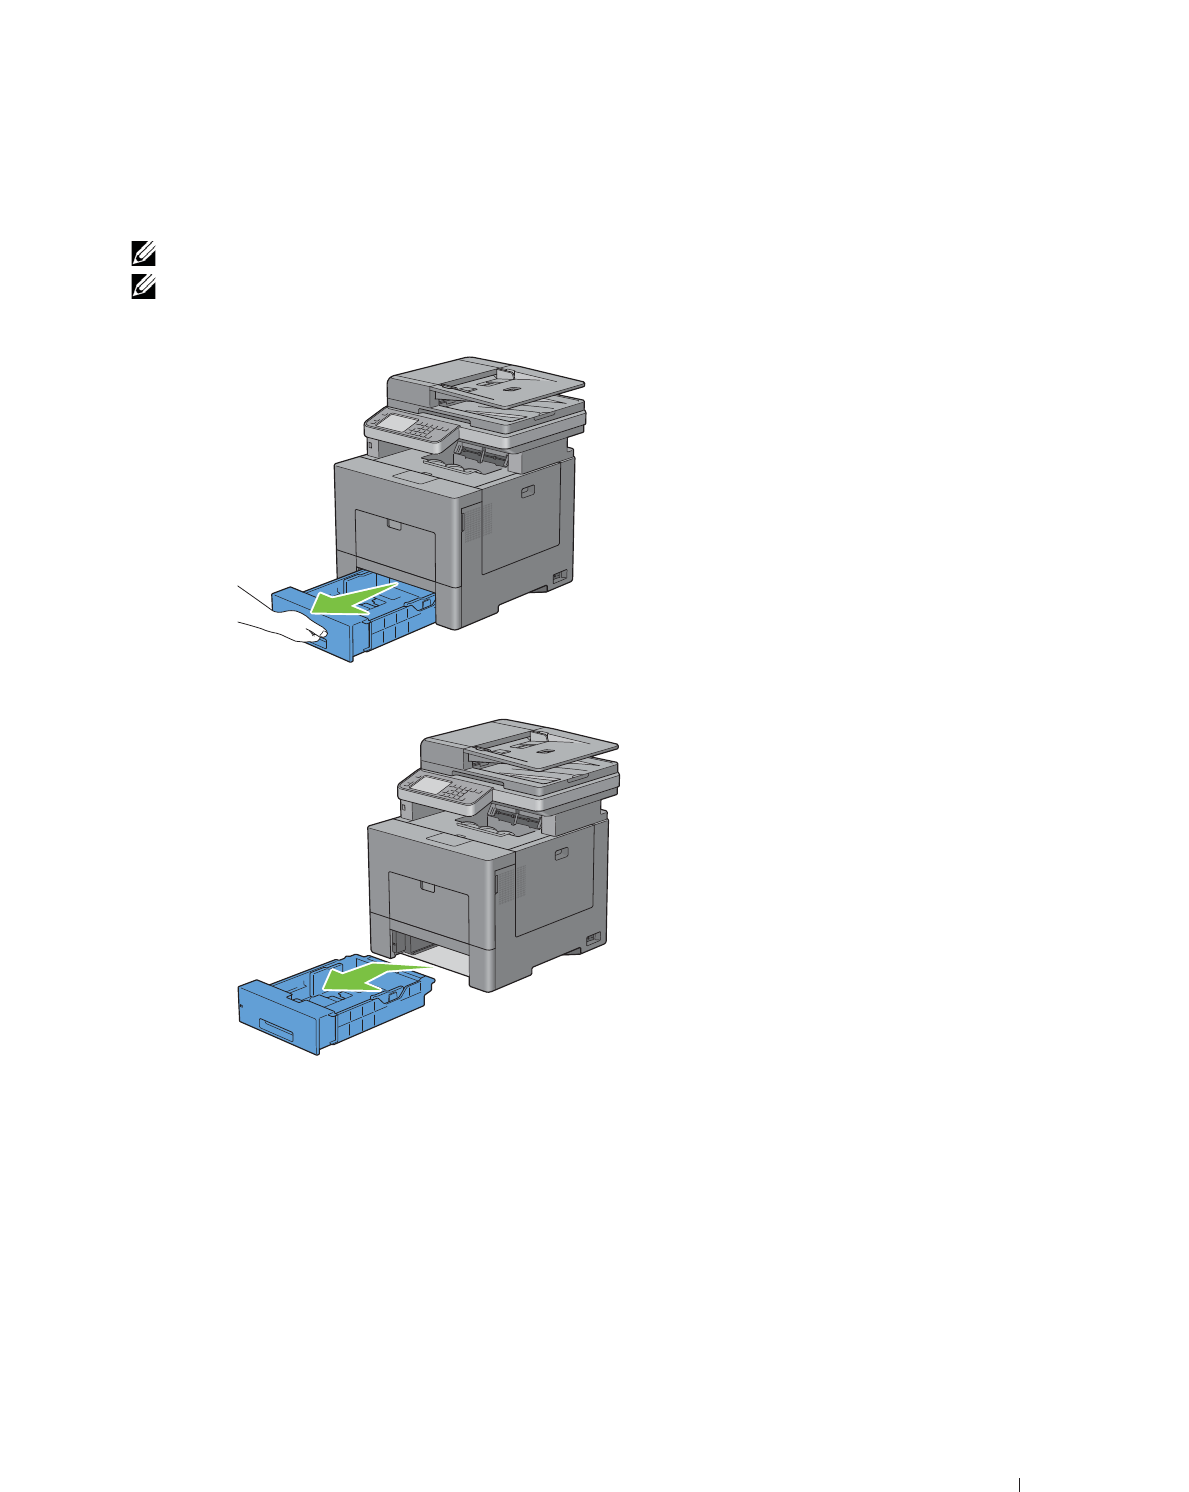
Loading Paper 75
9
Loading Paper
NOTE: To avoid paper jams, do not remove the tray while printing is in progress.
NOTE: The Software and Documentation disc also contains video instructions. On D
Dell Printer Setup
, click I
Installation Video
.
1
Pull the tray out of the printer about 200 mm.
2
Hold the tray with both hands, and remove it from the printer.
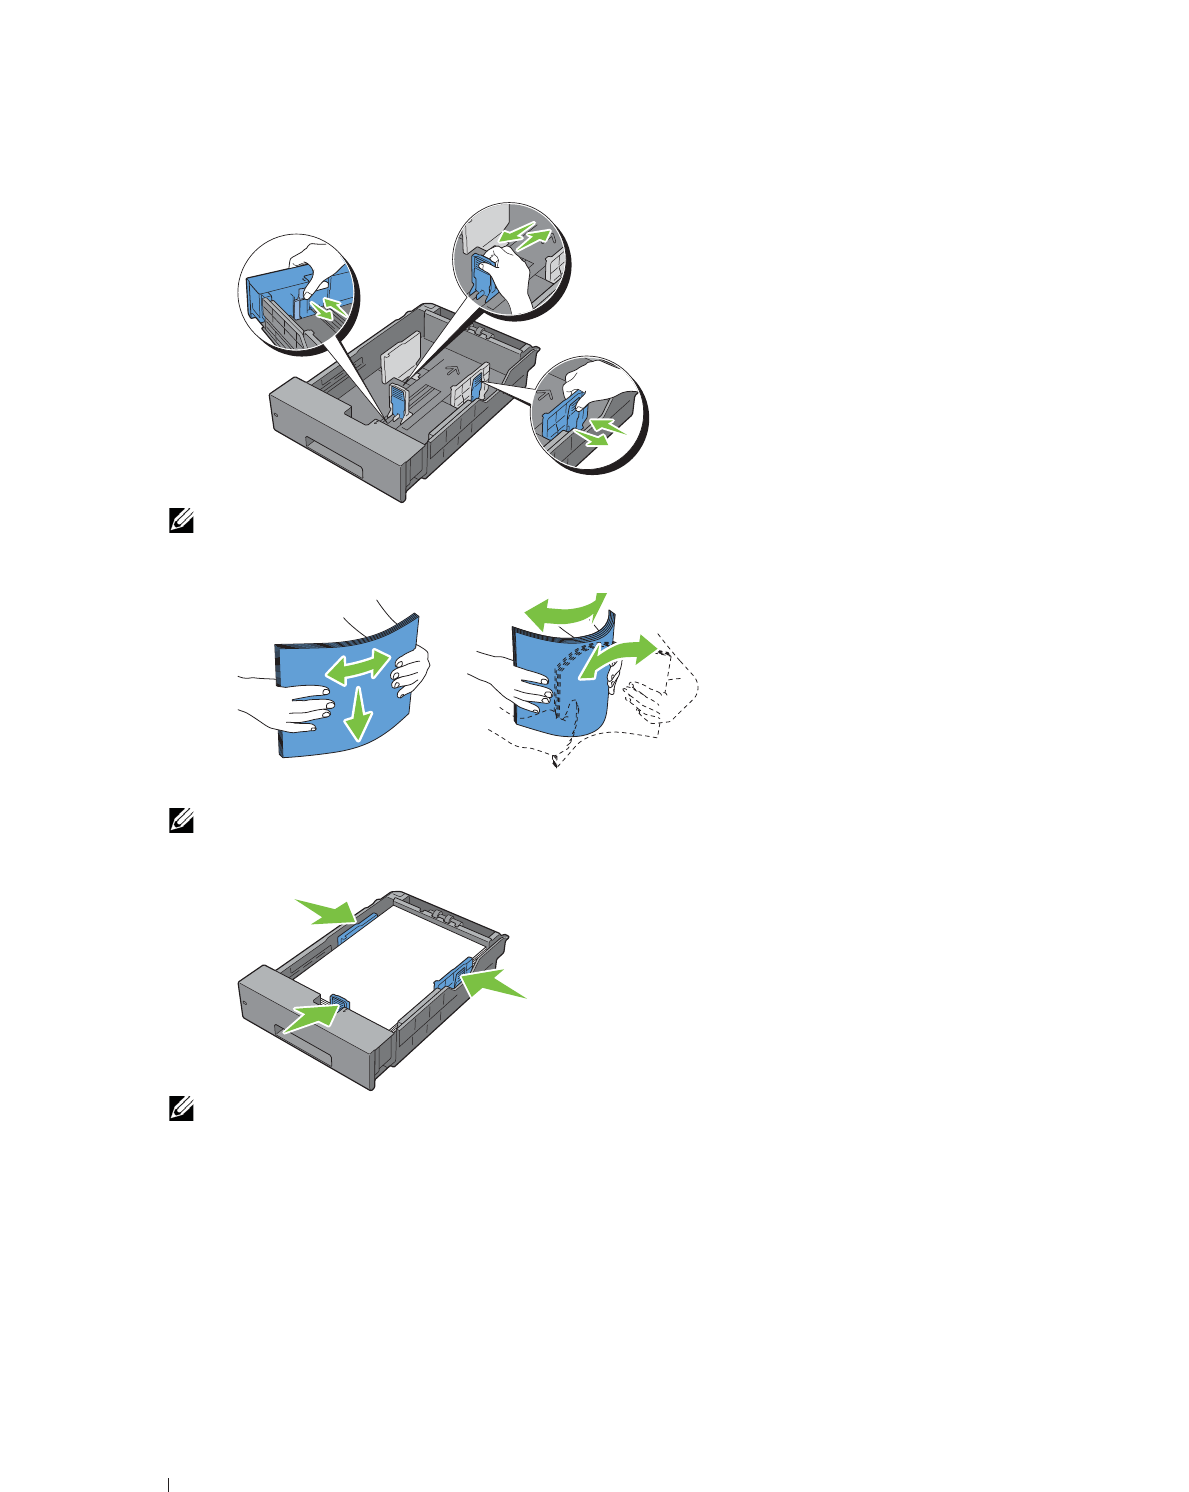
76 Loading Paper
3
Adjust the paper guides.
NOTE: Extend the front side of the tray when you load Legal-size paper.
4
Before loading the print media, flex the sheets and fan them. Straighten the edges of the stack on a level surface.
5
Load the print media into the tray with the recommended print side facing up.
NOTE: Do not exceed the maximum fill line in the tray. Overfilling the tray may cause paper jams.
6
Align the width guides against the edges of the paper.
NOTE: When loading user-specified print media, adjust the width guides and slide the extendable part of the tray by
pinching the length guide and sliding it until it rests lightly against the edge of the paper.
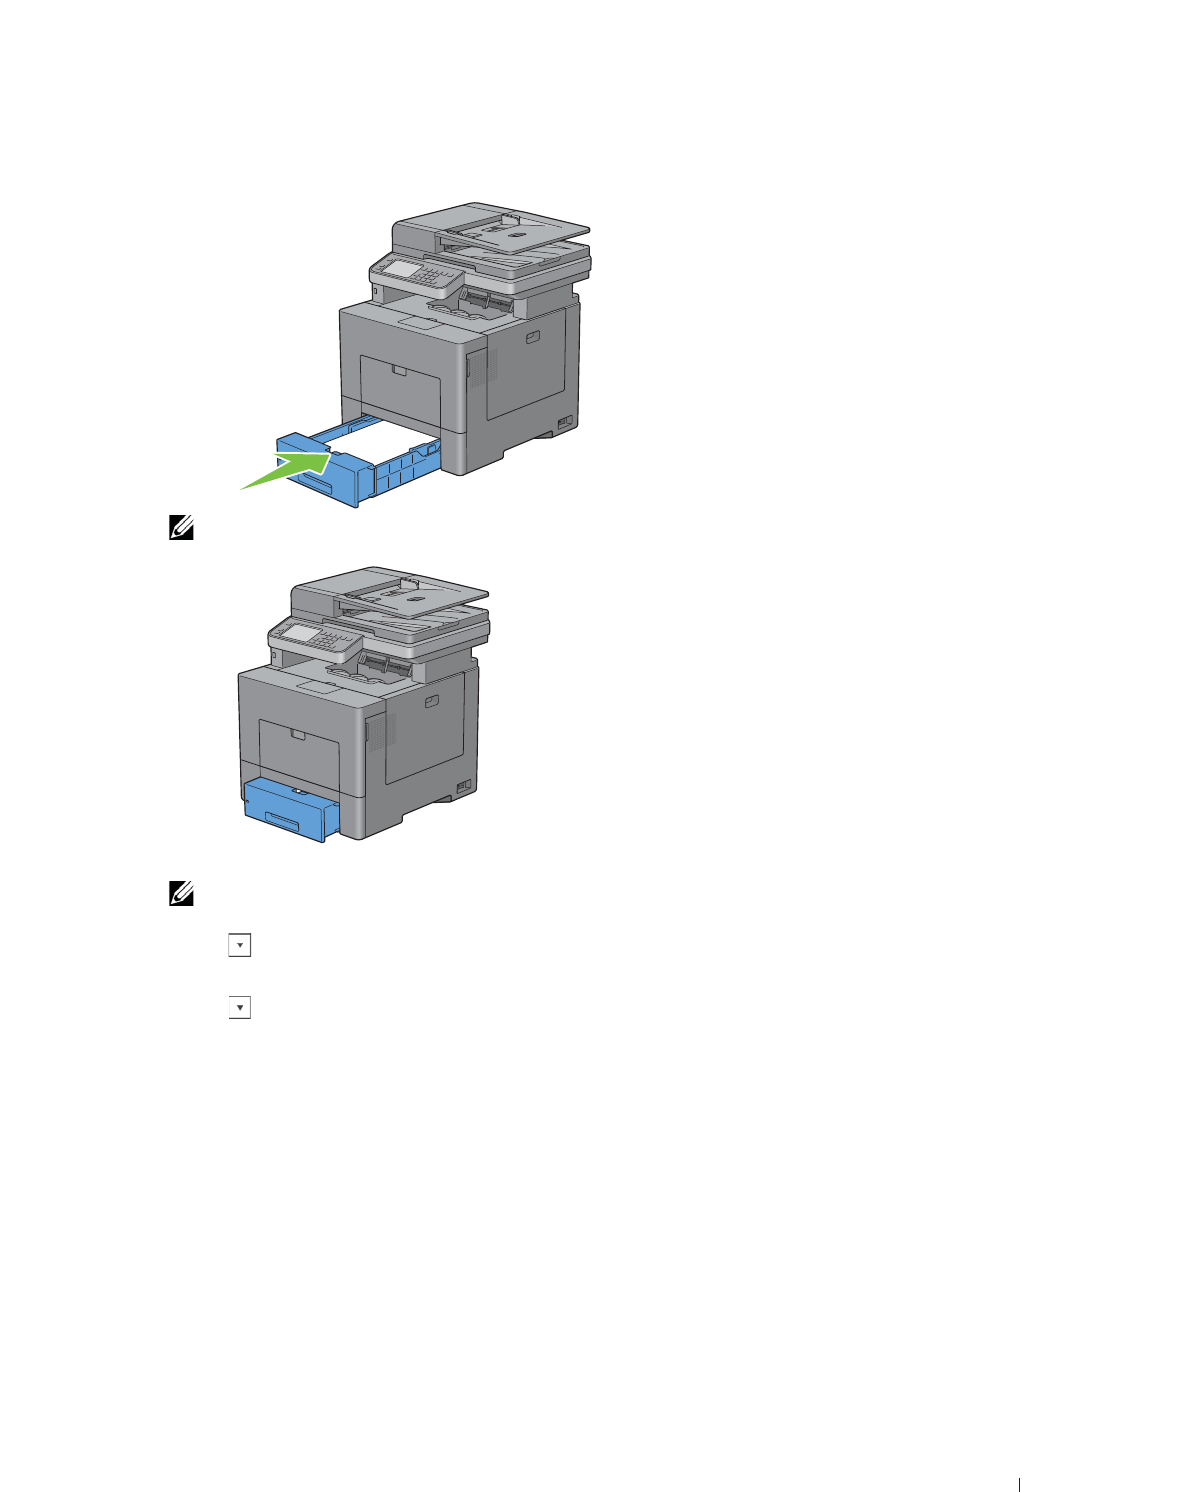
Loading Paper 77
7
After confirming that the guides are securely adjusted, insert the tray into the printer.
NOTE: If the front side of the tray is extended, the tray protrudes when it is inserted into the printer.
8
On the touch panel, tap
Size
.
NOTE: Set the same paper size and type as the actual paper being loaded. An error may occur if the paper size or type
setting is different from the loaded paper.
9
Select until the desired paper size appears, and then select the desired paper size.
10
Ta p
Type
.
11
Select until the desired paper type appears, and then select the desired paper size.
12
Select
OK.

78 Loading Paper

Installing Printer Drivers on Windows® Computers 79
10
Installing Printer Drivers on Windows® Computers
Identifying Printer Driver Pre-install Status
Before installing the printer driver on your computer, check the IP address of your printer by performing one of the
procedures in "Verifying the IP Settings."
Changing the firewall settings before installing your printer
If you are running one of the following operating systems, you must change the firewall settings before installing the
Dell printer software:
• Microsoft
®
Windows XP
• Windows Vista
®
• Windows 7
• Windows 8
• Windows Server
®
2008
• Windows Server 2008 R2
• Windows Server 2012
NOTE: For Windows XP, Service Pack 2 or 3 must be installed.
The following procedure uses Windows 7 as an example.
1
Insert the
Software and Documentation
disc into your computer.
2
Click
Start
o
Control Panel
.
3
Select
System and Security
.
4
Click
Allow a program through Windows Firewall
.
5
Click
Change settings
o
Allow another program
.
6
Check
Browse
.
7D:\setup_assist.exe
(where D is the drive letter of the optical drive) in the
File name
text box, and then
click
Open
.
8
Click
Add
, and then click
OK
.
Inserting the Software and Documentation Disc
1
Insert the
Software and Documentation
disc into your computer and click
setup_assist.exe
to start
Dell Printer
Setup
.
NOTE: If the Software and Documentation disc does not launch automatically, follow the procedure below.
For Windows XP, Windows Server 2008, and Windows Server 2008 R2
Click
start
o
Run
, enter
D:\setup_assist.exe
(where D is the drive letter of the optical drive) in the Run dialog
box, and then click
OK
.
For Windows Vista and Windows 7
Click
Start
o
All Programs
o
Accessories
o
Run
, enter
D:\setup_assist.exe
(where D is the drive letter of
the optical drive) in the Run dialog box, and then click
OK
.

80 Installing Printer Drivers on Windows® Computers
For Windows 8 and Windows Server 2012
Point to the top or bottom right corner of the screen, and then click
Search
o
Ty pe
Run
in the search box, click
Apps
, and
then click
Run
o
Ty p e
D:\setup_assist.exe
(where D is the drive letter of the optical drive), and then click
OK
.
Direct Connection Setup
For installing PCL, PS and Fax printer driver
1
In the
Dell Printer Setup
window, click
Install Printer Driver and Software
to launch the installation software.
2
Select
Personal Installation
, and then click
Next
.
3
Follow the on-screen instructions to connect the computer and the printer with a USB cable, and then turn the
printer on.
The Plug and Play installation starts and the installation software proceeds to the next page automatically.
NOTE: If the installation software does not automatically proceed to the next page, click I
Install
.
4
Select either
Typical Installation (recommended)
or
Custom Installation
from the installation wizard, and then
click
Install
. If you select
Custom Installation
, you can select the specific software you want to install.
5
If you agree to the terms of the
Environmental Information Notice
, select
Use duplex printing
check box, and
click
Install
to continue the installation.
6
Click
Finish
to exit the wizard when the
Ready to Print!
screen appears.
If you want to verify installation, click
Print Test Page
before clicking
Finish
.
Personal Installation
A personal printer is a printer connected to your computer or a print server using a USB. If your printer is connected
to a network and not your computer, see "Network Connection Setup."

Installing Printer Drivers on Windows® Computers 81
For installing XML Paper Specification (XPS) printer driver
NOTE: XPS driver is supported on the following operating systems: Windows Vista, Windows Vista 64-bit Edition, Windows
Server 2008, Windows Server 2008 64-bit Edition, Windows Server 2008 R2, Windows 7, Windows 7 64-bit Edition, Windows 8,
Windows 8 64-bit Edition, and Windows Server 2012.
NOTE: If you are using Windows Vista or Windows Server 2008, you need to install Service Pack 2 or later, and then the
Windows Platform Update (KB971644). The update (KB971644) is available for download from Windows Update.
Windows Vista or Windows Vista 64-bit Edition
1
Extract the following zip file to your desired location.
D:\Drivers\XPS\Win_7Vista\XPS-V3_C2665.zip
(where D is the drive letter of the optical drive)
2
Click
Start
o
Control Panel
o
Hardware and Sound
o
Printers
.
3
Click
Add a printer
.
4
Click
Add a local printer
.
5
Select the port connected to this product, and then click
Next
.
6
Click
Have Disk
to display the
Install From Disk
dialog box.
7
Click
Browse
, and then select the extracted folder in step 1.
8
Click
OK
.
9
Select your printer name and click
Next
.
10
To change the printer name, enter the printer name in the
Printer name
box, and then click
Next
. To use this
printer as the default printer, select the check box displayed under the
Printer name
, and then click
Next
.
Installation starts.
If the
User Account Control
dialog box appears, click
Continue
.
NOTE: If you are an administrator on the computer, click C
Continue
; otherwise, contact your administrator to continue the
desired action.
11
As the driver installation is completed, click
Print a test page
to print a test page.
12
Click
Finish
.
Windows Server 2008 or Windows Server 2008 64-bit Edition
NOTE: You must log in as an administrator.
1
Extract the following zip file to your desired location.
D:\Drivers\XPS\Win_7Vista\XPS-V3_C2665.zip
(where D is the drive letter of the optical drive)
2
Click
Start
o
Control Panel
o
Hardware and Sound
o
Printers
.
3
Click
Add a printer
.
4
Click
Add a local printer
.
5
Select the port connected to this product, and then click
Next
.
6
Click
Have Disk
to display the
Install From Disk
dialog box.
7
Click
Browse
, and then select the extracted folder in step 1.
8
Click
OK
.
9
Select your printer name and click
Next
.
10
To change the printer name, enter the printer name in the
Printer name
box, and then click
Next
.
To use this printer as the default printer, select the
Set as the default printer
check box, and then click
Next
.

82 Installing Printer Drivers on Windows® Computers
11
If you do not share your printer, select
Do not share this printer
.
If you share your printer, select
Share this printer
so that others on your network can find and use it
.
12
Click
Next
.
Installation starts.
13
As the driver installation is completed, click
Print a test page
to print a test page.
14
Click
Finish
.
Windows 7, Windows 7 64-bit Edition, or Windows Server 2008 R2
1
Extract the following zip file to your desired location.
D:\Drivers\XPS\Win_7Vista\XPS-V3_C2665.zip
(where D is the drive letter of the optical drive)
2
Click
Start
o
Devices and Printers
.
3
Click
Add a printer
.
When you use Windows Server 2008 R2, click
Add a local or network printer as an administrator
.
If the
User Account Control
dialog box appears, click
Yes
.
NOTE: If you are an administrator on the computer, click Y
Yes
; otherwise, contact your administrator to continue the
desired action.
4
Click
Add a local printer
.
5
Select the port connected to this product, and then click
Next
.
6
Click
Have Disk
to display the
Install From Disk
dialog box.
7
Click
Browse
, and then select the extracted folder in step 1.
8
Click
OK
.
9
Select your printer name and click
Next
.
10
To change the printer name, enter the printer name in the
Printer name
box, and then click
Next
.
To use this printer as the default printer, select the
Set as the default printer
check box, and then click
Next
.
11
If you do not share your printer, select
Do not share this printer
.
If you share your printer, select
Share this printer
so that others on your network can find and use it
.
12
Click
Next
.
Installation starts.
13
As the driver installation is completed, click
Print a test page
to print a test page.
14
Click
Finish
.
Windows 8, Windows 8 64-bit Edition, or Windows Server 2012
1
Extract the zip file you downloaded to your desired location.
D:\Drivers\XPS\Win_8\XPS-V4_C2665.zip
(where D is the drive letter of the optical drive)
2
Under Desktop mode, right-click the bottom left corner of the screen, and then click
Control Panel
.
3
Click
Hardware and Sound
(
Hardware
for Windows Server 2012)
o
Devices and Printers
o
Add a printer
.
4
Click
Have Disk
to display the
Install From Disk
dialog box.
5
Click
Browse
, and then select the extracted folder in step 1.
6
Click
OK
.
7
Select your printer name and click
Next
.
8
To change the printer name, enter the printer name in the
Printer name
box, and then click
Next
. Installation
starts.

Installing Printer Drivers on Windows® Computers 83
9
If you do not share your printer, select
Do not share this printer
. If you share your printer, select
Share this printer
so that others on your network can find and use it
. Click
Next
.
10
As the driver installation is completed, click
Print a test page
to print a test page. To use this printer as the default
printer, select the
Set as the default printer
check box.
11
Click
Finish
.
Network Connection Setup
NOTE: To use this printer in a Linux environment, you need to install a Linux driver. For more information on how to install and
use these, see "Installing Printer Drivers on Linux Computers (CUPS)."
Network Printer Setup on a Local Network
For installing PCL, PS and Fax printer driver
1
In the
Dell Printer Setup
window, click
Install Printer Driver and Software
to launch the installation software.
2
Select
Network Installation
, and then click
Next
.
3
Select
Local Installation
, and then click
Next
.
4
Select the printer you want to install from the printer list, and then click
Next
. If the target printer is not displayed
on the list, click
Refresh
to refresh the list or click
Add Printer
to add a printer to the list manually. You may specify
the IP address and port name at this point.
If you have installed this printer on the server computer, select the
I am setting up this printer on a server
check
box.
NOTE: When using AutoIP, 0.0.0.0 is displayed in the installer. Before you can continue, you must enter a valid IP
address.
NOTE: In some cases,
Windows Security Alert
is displayed in this step when you use Windows Vista, Windows Vista
64-bit Edition, Windows Server 2008, Windows Server 2008 64-bit Edition, Windows Server 2008 R2, Windows 7, Windows 7
64-bit Edition, Windows 8, Windows 8 64-bit Edition, Windows Server 2012. In this case, select
Unblock
(Allow access
for
Windows Server 2008 R2 and Windows 7), and then continue the procedure.
5
Specify the printer settings, and then click
Next
.
a
Enter the printer name.
b
If you want to set the printer as the default printer, select the
Set this printer as default
check box.
c
If you want to install the Fax Driver, select the
FAX Driver
check box.
If you want to install the PostScript printer driver, select the
PostScript Driver
check box.
d
If you want other users on the network to access the printer, click
Advanced
check box and select
Share this
printer with other computers on the network
, and then enter a share name that users can identify.
e
If you want to restrict color printing, select the appropriate
Dell™ ColorTrack
option. Enter the password
when
Color-Password Enabled
is selected for
Dell ColorTrack
.
6
Select the software and documentation you want to install, and then click
Install
. If you want to change the
installation destination, click
Browse
and specify a new location.
7
If you agree to the terms of the
Environmental Information Notice
, select
Use duplex printing
check box, and
click
Install
to continue the installation.
8
Click
Finish
to exit the wizard when the
Ready to Print!
screen appears.
If you want to verify installation, click
Print Test Page
before clicking
Finish
.

84 Installing Printer Drivers on Windows® Computers
For installing XML Paper Specification (XPS) printer driver
NOTE: XPS driver is supported on the following operating systems: Windows Vista, Windows Vista 64-bit Edition, Windows
Server 2008, Windows Server 2008 64-bit Edition, Windows Server 2008 R2, Windows 7, Windows 7 64-bit Edition, Windows 8,
Windows 8 64-bit Edition, and Windows Server 2012.
Windows Vista or Windows Vista 64-bit Edition
1
Extract the following zip file to your desired location.
D:\Drivers\XPS\Win_7Vista\XPS-V3_C2665.zip
(where D is the drive letter of the optical drive)
2
Click
Start
o
Control Panel
o
Hardware and Sound
o
Printers
.
3
Click
Add a printer
.
4
Click
Add a network
,
wireless or Bluetooth printer
.
5
Select printer or click
The printer that I want isn't listed
.
6
Select
Add a printer using a TCP/IP address or host name
, and then click
Next
.
7
Select
TCP/IP Device
from
Device type
, and enter the IP address for
Hostname or IP address
, and then click
Next
.
If the
User Account Control
dialog box appears, click
Continue
.
NOTE: If you are an administrator on the computer, click C
Continue
; otherwise, contact your administrator to continue the
desired action.
8
Click
Have Disk
to display the
Install From Disk
dialog box.
9
Click
Browse
, and then select the extracted folder in step 1.
10
Click
OK
.
11
Select your printer name and click
Next
.
12
To change the printer name, enter the printer name in the
Printer name
box, and then click
Next
.
To use this printer as the default printer, select the
Set as the default printer
check box, and then click
Next
.
Installation starts.
13
As the driver installation is completed, click
Print a test page
to print a test page.
14
Click
Finish
.
Windows Server 2008 or Windows Server 2008 64-bit Edition
NOTE: You must log in as an administrator.
1
Extract the following zip file to your desired location.
D:\Drivers\XPS\Win_7Vista\XPS-V3_C2665.zip
(where D is the drive letter of the optical drive)
2
Click
Start
o
Control Panel
o
Hardware and Sound
o
Printers
.
3
Click
Add a printer
.
4
Click
Add a network
,
wireless or Bluetooth printer
.
5
Select printer or click
The printer that I want isn't listed
.
When you select your printer, go to step 8.
When you click
The printer that I want isn't listed
, go to step 6.
6
Select
Add a printer using a TCP/IP address or host name
, and then click
Next
.
7
Select
TCP/IP Device
from
Device
type
, and enter the IP address for
Hostname or IP address
, and then click
Next
.
If the
User Account Control
dialog box appears, click
Continue
.

Installing Printer Drivers on Windows® Computers 85
NOTE: If you are an administrator on the computer, click C
Continue
; otherwise, contact your administrator to continue the
desired action.
8
Click
Have Disk
to display the
Install From Disk
dialog box.
9
Click
Browse
, and then select the extracted folder in step 1.
10
Click
OK
.
11
Select your printer name and click
Next
.
12
To change the printer name, enter the printer name in the
Printer name
box, and then click
Next
.
To use this printer as the default printer, select the
Set as the default printer
check box, and then click
Next
.
13
If you do not share your printer, select
Do not share this printer
.
If you share your printer, select
Share this printer
so that others on your network can find and use it
.
14
Click
Next
.
Installation starts.
15
As the driver installation is completed, click
Print a test page
to print a test page.
16
Click
Finish
.
Windows Server 2008 R2
1
Extract the following zip file to your desired location.
D:\Drivers\XPS\Win_7Vista\XPS-V3_C2665.zip
(where D is the drive letter of the optical drive)
2
Click
Start
o
Devices and Printers
.
3
Click
Add a printer
.
4
Click
Add a network
,
wireless or Bluetooth printer
.
5
Select printer or click
The printer that I want isn't listed
.
NOTE: When you click T
The printer that I want isn't listed, Find a printer by name or TCP/IP address
screen appears. Find
your printer on the screen.
If the
User Account Control
dialog box appears, click
Continue
.
NOTE: If you are an administrator on the computer, click C
Continue
; otherwise, contact your administrator to continue the
desired action.
6
Click
Have Disk
to display the
Install From Disk
dialog box.
7
Click
Browse
, and then select the extracted folder in step 1.
8
Click
OK
.
9
Select your printer name and click
Next
.
10
To change the printer name, enter the printer name in the
Printer name
box, and then click
Next
.
To use this printer as the default printer, select the
Set as the default printer
check box, and then click
Next
.
11
If you do not share your printer, select
Do not share this printer
.
If you share your printer, select
Share this printer
so that others on your network can find and use it
.
12
Click
Next
.
Installation starts.
13
As the driver installation is completed, click
Print a test page
to print a test page.
14
Click
Finish
.

86 Installing Printer Drivers on Windows® Computers
Windows 7 or Windows 7 64-bit Edition
1
Extract the following zip file to your desired location.
D:\Drivers\XPS\Win_7Vista\XPS-V3_C2665.zip
(where D is the drive letter of the optical drive)
2
Click
Start
o
Devices and Printers
.
3
Click
Add a printer
.
4
Click
Add a network
,
wireless or Bluetooth printer
.
5
Select printer or click
The printer that I want isn't listed
.
When you select your printer, go to step 8.
When you click
The printer that I want isn't listed
, go to step 6.
6
Select
Add a printer using a TCP/IP address or host name
, and then click
Next
.
7
Select
TCP/IP Device
from
Device type
, and enter the IP address for
Hostname or IP address
, and then click
Next
.
If the
User Account Control
dialog box appears, click
Yes
.
NOTE: If you are an administrator on the computer, click Y
Yes
; otherwise, contact your administrator to continue the
desired action.
8
Click
Have Disk
to display the
Install From Disk
dialog box.
9
Click
Browse
, and then select the extracted folder in step 1.
10
Click
OK
.
11
Select your printer name and click
Next
.
12
To change the printer name, enter the printer name in the
Printer name
box, and then click
Next
.
To use this printer as the default printer, select the
Set as the default printer
check box, and then click
Next
.
13
If you do not share your printer, select
Do not share this printer
.
If you share your printer, select
Share this printer
so that others on your network can find and use it
.
14
Click
Next
.
Installation starts.
15
As the driver installation is completed, click
Print a test page
to print a test page.
16
Click
Finish
.
Windows 8, Windows 8 64-bit Edition, or Windows Server 2012
1
Extract the zip file you downloaded to your desired location.
D:\Drivers\XPS\Win_8\XPS-V4_C2665.zip
(where D is the drive letter of the optical drive)
2
Under Desktop mode, right-click the bottom left corner of the screen, and then click
Control Panel
.
3
Click
Hardware and Sound
(
Hardware
for Windows Server 2012)
o
Devices and Printers
o
Add a printer
.
4
Click
Have Disk
to display the
Install From Disk
dialog box.
5
Click
Browse
, and then select the extracted folder in step 1.
6
Click
OK
.
7
Select your printer name and click
Next
.
8
To change the printer name, enter the printer name in the
Printer name
box, and then click
Next
. Installation
starts.
9
If you do not share your printer, select
Do not share this printer
. If you share your printer, select
Share this printer
so that others on your network can find and use it
. Click
Next
.

Installing Printer Drivers on Windows® Computers 87
10
As the driver installation is completed, click
Print a test page
to print a test page. To use this printer as the default
printer, select the
Set as the default printer
check box.
11
Click
Finish
.
Use the Dell Printer Configuration Web Tool to monitor the status of your network printer without leaving your
desk. You can view and/or change the printer settings, monitor toner level, and acknowledge the timing of ordering
replacement consumables. You can click the Dell supplies link for ordering supplies.
NOTE: The
Dell Printer Configuration Web Tool
is not available when the printer is directly connected to a computer or a
print server.
To launch the Dell Printer Configuration Web Tool, type the printer's IP address in your web browser. The printer
configuration appears on the screen.
You can set up the Dell Printer Configuration Web Tool
to send you an e-mail when the printer needs supplies or
intervention.
To set up e-mail alerts:
1
Launch the
Dell Printer Configuration Web Tool
.
2
Click
E-Mail Alert
link.
3
Under
E-Mail Server Settings
, enter the
Primary SMTP Gateway
,
Reply Address
, and your or key operator's e-mail
address in the e-mail list box.
4
Click
Apply New Settings
.
NOTE:
Connection pending until printer sends an alert
is displayed on the SMTP server until an error occurs.

88 Installing Printer Drivers on Windows® Computers
Setting Up for Shared Printing
You can share your new printer on the network using the
Software and Documentation
disc that comes with your
printer, or using Microsoft® point-and-print or peer-to-peer method. However, if you use one of the Microsoft
methods, some features, such as the status monitor and other printer utilities, installed with the
Software and
Documentation
disc, may not be available.
If you want to use the printer on a network, share the printer and install its drivers on all the computers on the
network.
NOTE: You need to purchase an Ethernet cable for shared printing.
Specifying the Shared Settings of the Printer
Windows XP, Windows XP 64-bit Edition, Windows Server 2003, or Windows Server 2003 x64 Edition
1
Click
start
o
Printers and Faxes
.
2
Right-click the printer icon and select
Properties
.
3
On the
Sharing
tab, select the
Share this printer
check box, and then type a name in the
Share name
text box.
4
Click
Additional Drivers
and select the operating systems of all network clients that print to the printer.
5
Click
OK
.
If you are missing files, you are prompted to insert the server operating system CD.
Windows Vista or Windows Vista 64-bit Edition
1
Click
Start
o
Control Panel
o
Hardware and Sound
o
Printers
.
2
Right-click the printer icon and select
Sharing
.
3
Click
Change sharing options
.
The message
Windows needs your permission to continue
appears.
4
Click
Continue
.
5
Select the
Share this printer
check box, and then type a name in the
Share name
text box.
6
Click
Additional Drivers
and select the operating systems of all network clients that print to the printer.
7
Click
OK
.
Windows Server 2008 or Windows Server 2008 64-bit Edition
1
Click
Start
o
Control Panel
o
Printers
.
2
Right-click the printer icon and select
Sharing
.
3
Click
Change Sharing Options
if exists.
4
Select the
Share this printer
check box, and then type a name in the
Share name
text box.
5
Click
Additional Drivers
and select the operating systems of all network clients that print to the printer.
6
Click
OK
.
Windows 7, Windows 7 64-bit Edition, or Windows Server 2008 R2
1
Click
Start
o
Devices and Printers
.
2
Right-click the printer icon and select
Printer properties
.
3
On the
Sharing
tab, click
Change Sharing Options
if exists.
Select the
Share this printer
check box, and then type a name in the
Share name
text box.

Installing Printer Drivers on Windows® Computers 89
4
Click
Additional Drivers
and select the operating systems of all network clients that print to the printer.
5
Click
Apply
, and then click
OK
.
Windows 8, Windows 8 64-bit Edition, or Windows Server 2012
1
Under Desktop mode, right-click the bottom left corner of the screen, and then click
Control Panel
o
Hardware
and Sound
(
Hardware
for Windows Server 2012)
o
Devices and Printers
.
2
Right-click the printer icon and select
Printer properties
.
3
On the
Sharing
tab, click
Change Sharing Options
if exists.
4
Select the
Share this printer
check box, and then type a name in the
Share name
text box.
5
Click
Additional Drivers
and select the operating systems of all network clients using this printer.
6
Click
Apply
, and then click
OK
.
To confirm that the printer is properly shared:
• Ensure that the printer object in the
Printers
,
Printers and Faxes
, or
Devices and Printers
folder is shared. The
shared icon is shown under the printer icon.
• Browse
Network
or
My Network Places
. Find the host name of the server and the shared name you assigned to the
printer.
Now that the printer is shared, you can install the printer on network clients using the point and print method or the
peer-to-peer method.
NOTE: If the OS bit editions (32/64 bit edition) differ between a print server and a client computer, you need to manually add the
printer driver for the client computer edition on the server. Otherwise, the printer driver cannot be installed on the client
computer using the point and print or peer-to-peer method. For example, if the print server runs on Windows XP 32-bit edition,
while the client computer runs on Windows 7 64-bit edition, follow the procedures below to additionally install the printer driver
for 64-bit client on the 32-bit server.
a
Click
Additional Drivers
on the screen for sharing printers.
For details about how to display this screen, see "Specifying the Shared Settings of the Printer."
b
Select the
x64
check box, and then click
OK
.
c
Insert the
Software and Documentation
disc into your computer.
d
Click
Browse
to specify the folder that contains the 64-bit OS driver, and then click
OK
.
Installation starts.
Point and Print
Point and Print is a Microsoft Windows technology that allows you to connect to a remote printer. This feature
automatically downloads and installs the printer driver.
Windows XP, Windows XP 64-bit Edition, Windows Server 2003, or Windows Server 2003 x64 Edition
1
On the Windows desktop of the client computer, double-click
My Network Places
.
2
Locate the host name of the server computer, and then double-click the host name.
3
Right-click the shared printer name, and then click
Connect
.
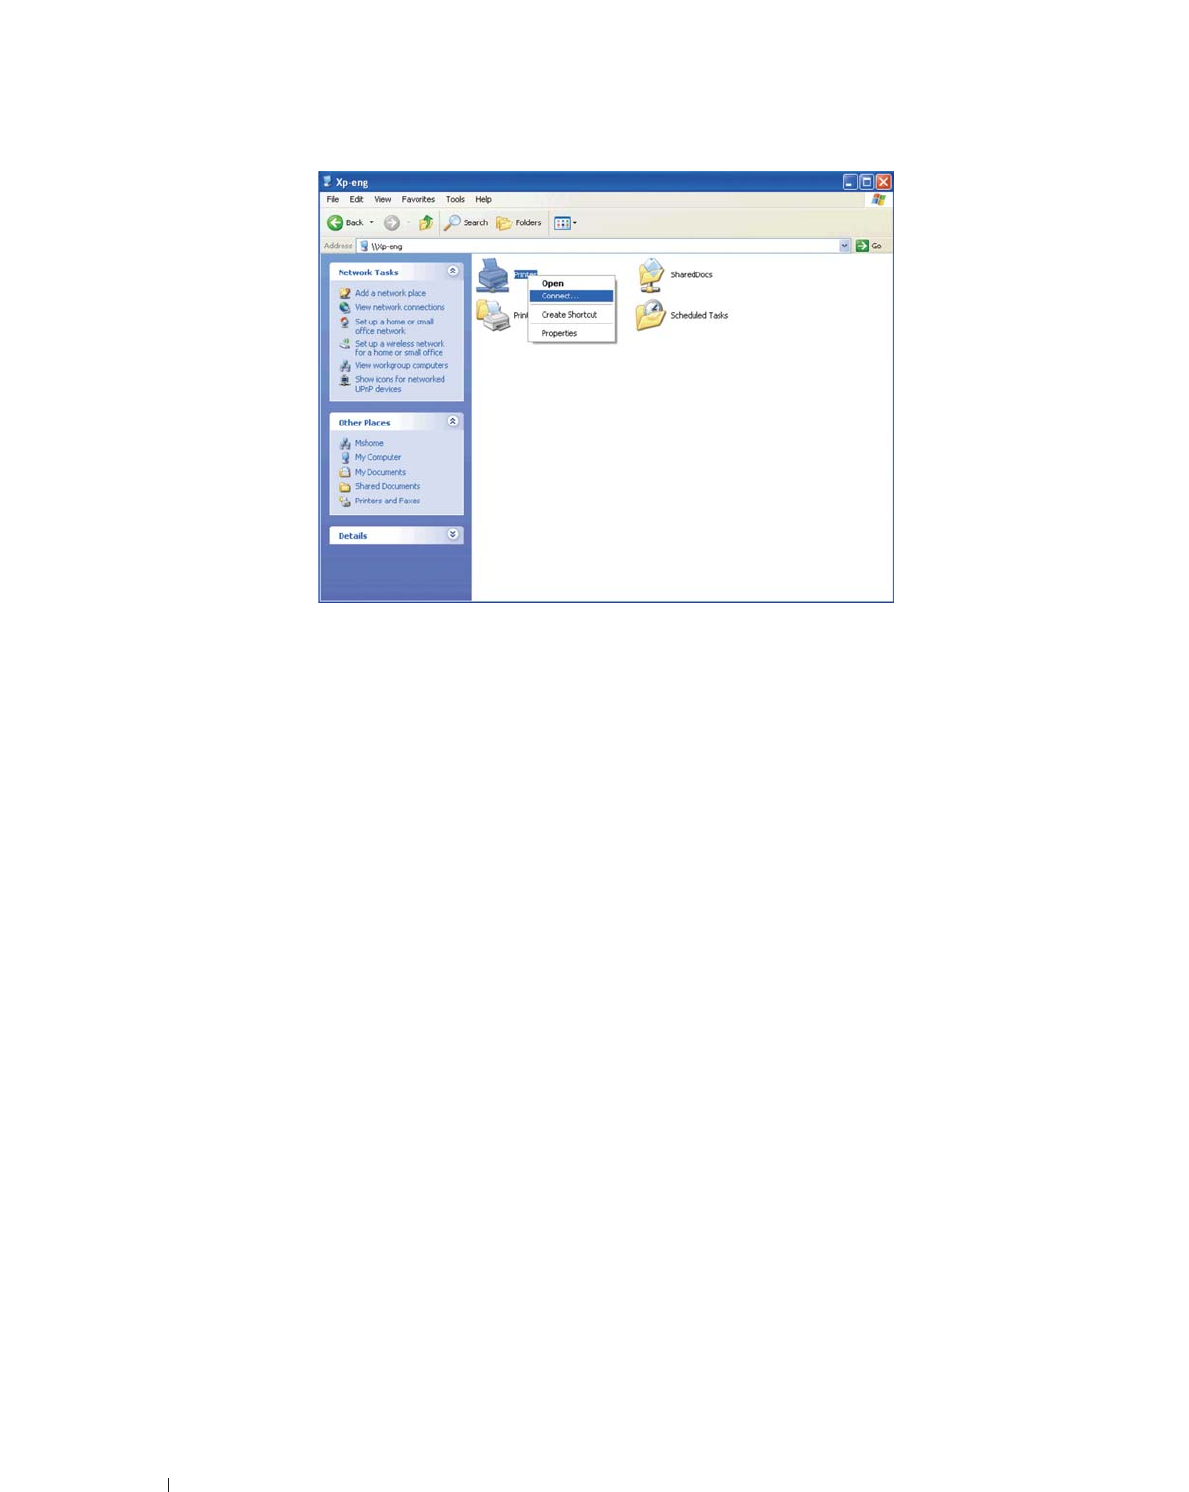
90 Installing Printer Drivers on Windows® Computers
Wait for the driver information to be copied from the server computer to the client computer, and for a new printer
object to be added to the
Printers and Faxes
folder. The copy time varies, based on network traffic and other
factors.
4
Close
My Network Places
.
5
Print a test page to verify installation.
a
Click
start
o
Printers and Faxes
.
b
Select the printer you just created.
c
Click
File
o
Properties
.
d
On the
General
tab, click
Print Test Page
.
When a test page prints successfully, installation is complete.
Windows Vista or Windows Vista 64-bit Edition
1
On the Windows desktop of the client computer, click
Start
o
Network
.
2
Locate the host name of the server computer, and then double-click the host name.
3
Right-click the shared printer name, and then click
Connect
.
4
Click
Install driver
.
5
Click
Continue
in the
User Account Control
dialog box.
6
Wait for the driver information to be copied from the server computer to the client computer, and for a new printer
object to be added to the Printers folder. The time this takes varies, based on network traffic and other factors.
7
Print a test page to verify installation.
a
Click
Start
o
Control Panel
o
Hardware and Sound
.
b
Select
Printers
.
c
Right-click the printer you just created and click
Properties
.
d
On the
General
tab, click
Print Test Page
.
When a test page prints successfully, installation is complete.

Installing Printer Drivers on Windows® Computers 91
Windows Server 2008 or Windows Server 2008 64-bit Edition
1
On the Windows desktop of the client computer, click
Start
o
Network
.
2
Locate the host name of the server computer, and then double-click the host name.
3
Right-click the shared printer name, and then click
Connect
.
4
Click
Install driver
.
5
Wait for the driver information to be copied from the server computer to the client computer, and for a new printer
object to be added to the
Printers
folder. The time this takes varies, based on network traffic and other factors.
6
Print a test page to verify installation.
a
Click
Start
o
Control Panel
.
b
Select
Printers
.
c
Right-click the printer you just created and select
Properties
.
d
On the
General
tab, click
Print Test Page
.
When a test page prints successfully, installation is complete.
Windows 7, Windows 7 64-bit Edition, or Windows Server 2008 R2
1
On the Windows desktop of the client computer, click
Start
o
your user name
o
Network
(
Start
o
Network
for
Windows Server 2008 R2).
2
Locate the host name of the server computer, and then double-click the host name.
3
Right-click the shared printer name, and then click
Connect
.
4
Click
Install driver
.
5
Wait for the driver information to be copied from the server computer to the client computer, and for a new printer
object to be added to the
Devices and Printers
folder. The time this takes varies, based on network traffic and other
factors.
6
Print a test page to verify installation.
a
Click
Start
o
Devices and Printers
.
b
Right-click the printer you just created and select
Printer properties
.
c
On the
General
tab, click
Print Test Page
.
When a test page prints successfully, installation is complete.
Windows 8, Windows 8 64-bit Edition, or Windows Server 2012
1
Point to the top or bottom right corner of the screen, and then click
Search
o
Ty p e
Network
in the search box,
click
Apps
, and then click
Network
.
2
Locate the host name of the server computer, and then double-click the host name.
3
Right-click the shared printer name, and then click
Connect
.
4
Click
Install driver
.
5
Wait for the driver information to be copied from the server computer to the client computer, and for a new printer
object to be added to the
Devices and Printers
folder. The time this takes varies, based on network traffic and other
factors.
6
Print a test page to verify installation.
a
Under Desktop mode, right-click the bottom left corner of the screen, and then click
Control Panel
o
Hardware and Sound
(
Hardware
for Windows Server 2012)
o
Devices and Printers
.
b
Right-click the printer you just created and select
Printer properties
.
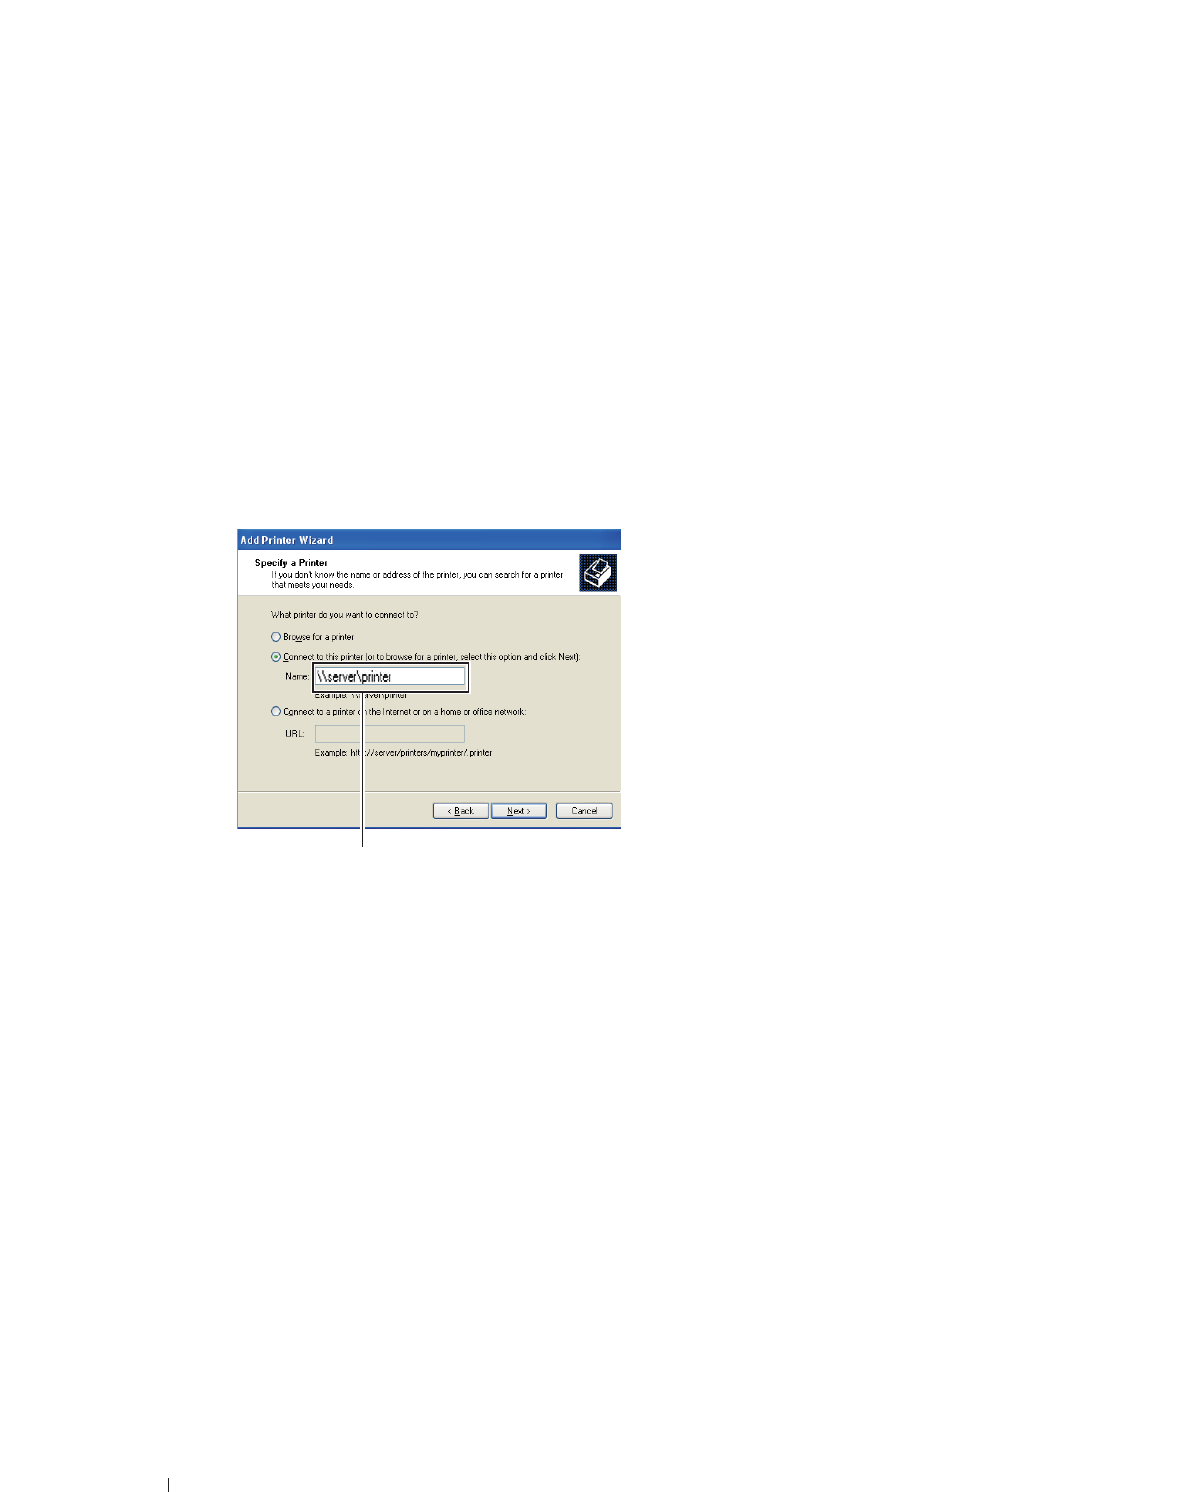
92 Installing Printer Drivers on Windows® Computers
c
On the
General
tab, click
Print Test Page
.
When a test page is printed successfully, installation is complete.
Peer-to-Peer
If you use the peer-to-peer method, the printer driver is fully installed on each client computer. Network clients
retain control of driver modifications. The client computer handles the print job processing.
Windows XP, Windows XP 64-bit Edition, Windows Server 2003, or Windows Server 2003 x64 Edition
1
Click
start
o
Printers and Faxes
.
2
Click
Add a Printer
.
3
Click
Next
.
4
Select
A network printer, or a printer attached to another computer
, and then click
Next
. If the printer is not
listed, type the path to the printer in the text box.
The server host name is the name of the server computer that identifies it on the network. The shared printer
name is the name assigned during the server installation process.
5
Click
Browse for a printer
, and then click
Next
.
If this is a new printer, you may be prompted to install a printer driver. If no system driver is available, you need to
specify the path to available drivers.
6
Select
Yes
if you want this printer to be set as the default printer, and then click
Next
.
If you want to verify installation, click
Yes
to print a test page.
7
Click
Finish
.
When a test page prints successfully, installation is complete.
For example:\\<server host name>\<shared printer name>
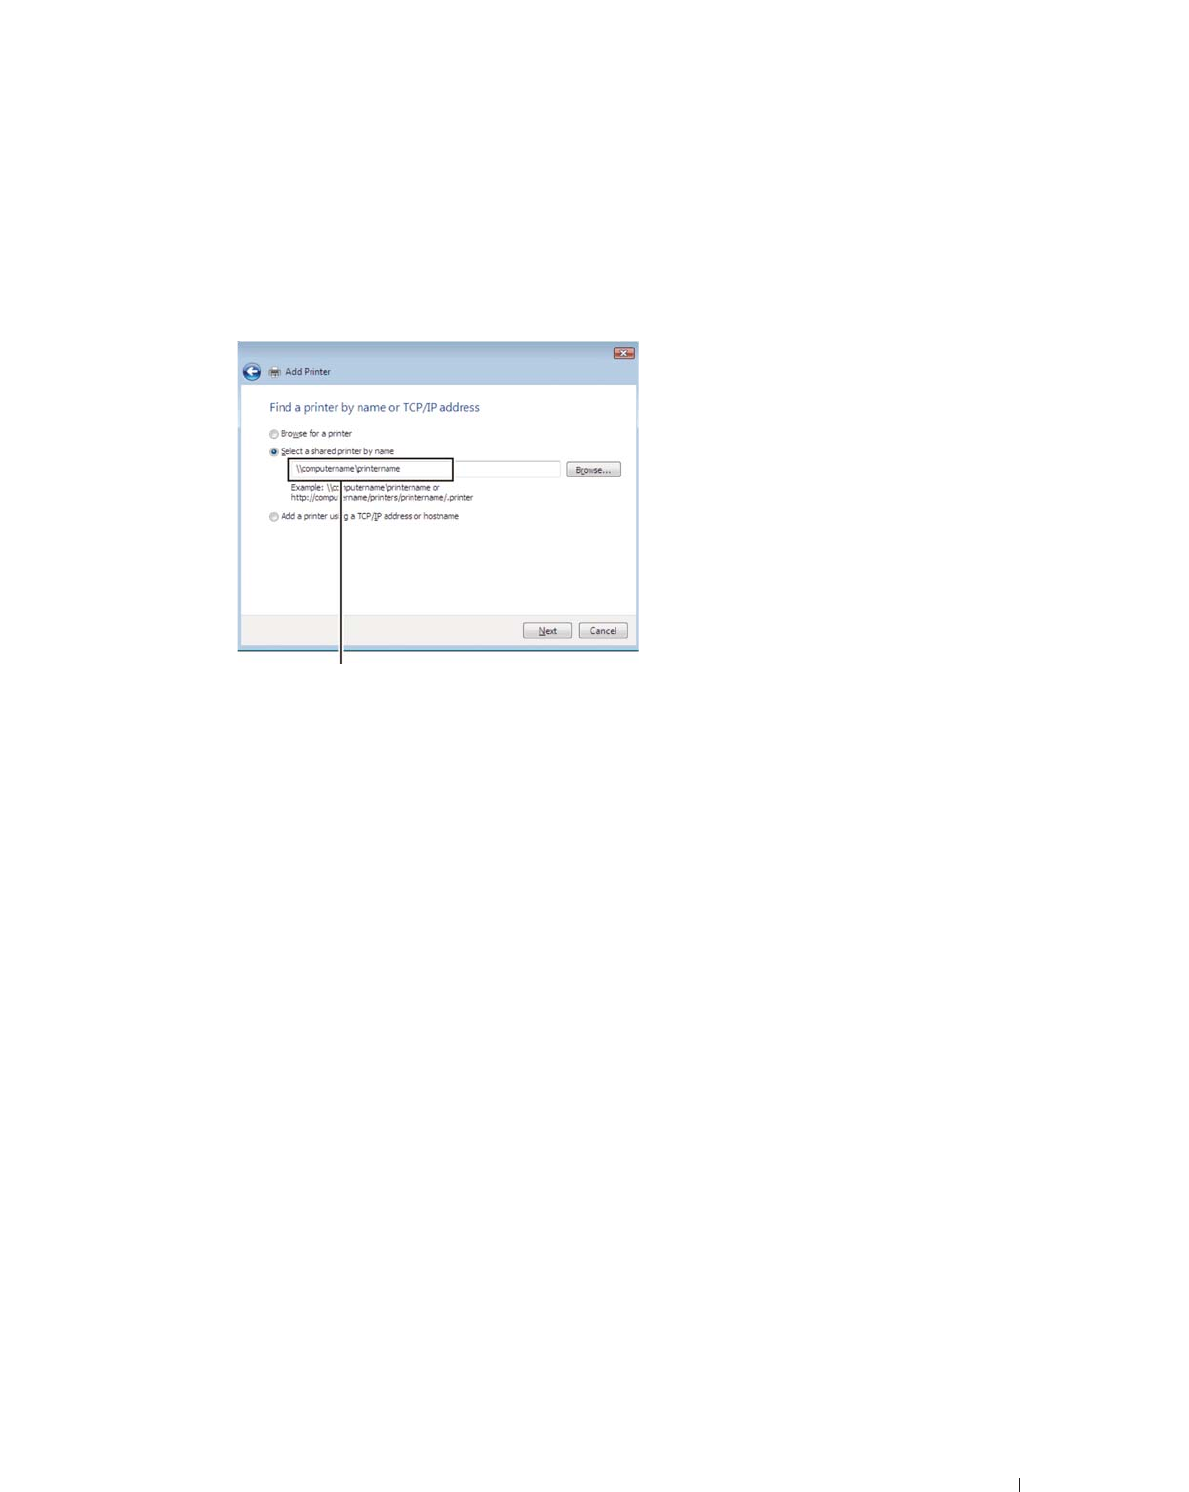
Installing Printer Drivers on Windows® Computers 93
Windows Vista or Windows Vista 64-bit Edition
1
Click
Start
o
Control Panel
o
Hardware and Sound
o
Printers
.
2
Click
Add a Printer
to launch the
Add Printer
wizard.
3
Select
Add a network
,
wireless or Bluetooth printer
, and then click
Next
. If the printer is listed, select the printer
and click
Next
, or select
The printer that I want isn't listed
and type in the path of the printer in the
Select a
shared printer by name
text box and click
Next
.
The server host name is the name of the server computer that identifies it on the network. The shared printer
name is the name assigned during the server installation process.
If this is a new printer, you may be prompted to install a printer driver. If no system driver is available, you need to
specify the path to available drivers.
4
Select
Yes
if you want this printer to be set as the default printer, and then click
Next
.
5
If you want to verify installation, click
Print a test page
.
6
Click
Finish
.
When a test page prints successfully, installation is complete.
Windows Server 2008 or Windows Server 2008 64-bit Edition
1
Click
Start
o
Control Panel
o
Printers
.
2
Click
Add a Printer
.
3
Select
Add a network
,
wireless or Bluetooth printer
, and then click
Next
. If the printer is listed, select the printer
and click
Next
, or select
The printer that I want isn't listed
and type the path to the printer in the
Select a shared
printer by name
text box and click
Next
.
For example:
\\<server host name>\<shared printer name>
The server host name is the name of the server computer that identifies it on the network. The shared printer
name is the name assigned during the server installation process.
If this is a new printer, you may be prompted to install a printer driver. If no system driver is available, then you will
need to provide a path to available drivers.
4
Select
Yes
if you want this printer to be set as the default printer, and then click
Next
.
5
Click
Print a test page
if you want to verify installation.
6
Click
Finish
.
When a test page prints successfully, installation is complete.
For example:\\<server host name>\<shared printer name>

94 Installing Printer Drivers on Windows® Computers
Windows 7, Windows 7 64-bit Edition, or Windows Server 2008 R2
1
Click
Start
o
Devices and Printers
.
2
Click
Add a Printer
.
3
Select
Add a network, wireless or Bluetooth printer
. If the printer is listed, select the printer and click
Next
, or
select
The printer that I want isn't listed
. Click
Select a shared printer by name
and type in the path of the printer
in the text box, and then click
Next
.
For example:
\\<server host name>\<shared printer name>
The server host name is the name of the server computer that identifies it to the network. The shared printer name
is the name assigned during the server installation process.
If this is a new printer, you may be prompted to install a printer driver. If no system driver is available, then you will
need to provide the path to the available driver.
4
Confirm the printer name, and then click
Next
.
5
Select
Yes
if you want this printer to be set as the default printer, and then click
Next
.
6
Click
Print a test page
if you want to verify installation.
7
Click
Finish
.
When a test page prints successfully, installation is complete.
Windows 8, Windows 8 64-bit Edition, or Windows Server 2012
1
Under Desktop mode, right-click the bottom left corner of the screen, and then click
Control Panel
o
Hardware
and Sound
(
Hardware
for Windows Server 2012)
o
Devices and Printers
.
2
Click
Add a Printer
to launch the
Add Printer
wizard.
3
If the printer is listed, select the printer and click
Next
, or select
The printer that I want isn't listed
. Click
Select a
shared printer by name
and type in the path of the printer in the text box, and then click
Next
.
For example:
\\<server host name>\<shared printer name>
The server host name is the name of the server computer that identifies it to the network. The shared printer name
is the name assigned during the server installation process.
If this is a new printer, you may be prompted to install a printer driver. If no system driver is available, then you will
need to provide the path to the available driver.
4
Confirm the printer name, and then click
Next
.
5
Select
Yes
if you want this printer to be set as the default printer, and then click
Next
.
6
Click
Print a test page
if you want to verify installation.
7
Click
Finish
.
When a test page is printed successfully, installation is complete.

Installing Printer Drivers on Macintosh Computers 95
11
Installing Printer Drivers on Macintosh Computers
Installing the Drivers and Software
1
Run the
Software and Documentation
disc on the Macintosh computer.
2
Double-click the
Dell C2665 Installer
icon, and then click
Continue
.
3
When the popup dialog box prompts you for confirming the program included in the installation package, click
Continue
.
4
Click
Continue
on the
Important Information
screen.
5
Select a language for the Software License Agreement.
6
After reading the Software License Agreement,
click
Continue
.
7
If you agree to the terms of the Software License Agreement, click
Agree
to continue the installation process.
8
Confirm the installation location.
9
Click
Install
to perform the standard installation.
If you want to select a custom installation, click
Customize
to select items that you want to install.
• Dell C2665dnf Printer Driver
• Dell C2665dnf Fax Driver
• Dell C2665dnf Scan Driver
• Dell Printer Status Monitor
10
Type the administrator's name and password, and then click
Install Software
.
11
Click
Continue Installation
to continue the installation.
12
When the message
The installation was successful.
appears, click
Log Out
to complete installation.
Adding a Printer on Mac OS X 10.5, 10.6, 10.7, or 10.8
When Using a USB connection
1
Turn on the printer.
2
Connect the USB cable between the printer and the Macintosh computer.
The printer is automatically added to your Macintosh computer.
When Using IP Printing
1
Turn on the printer.
2
Ensure that Macintosh computer and the printer are connected.
If you use wired connection, connect the LAN cable between the printer and the network.
If you use wireless connection, ensure that wireless connection is configured properly on your Macintosh computer
and the printer.
3
Open the
System Preferences,
and click
Print & Fax
(
Print & Scan
for Mac OS X 10.7 and Mac OS X 10.8).
4
Click the Plus (+) sign, and click
IP
.
5
Select
Line Printer Daemon - LPD
for
Protocol
.
6
Type the IP address for the printer in the
Address
area.

96 Installing Printer Drivers on Macintosh Computers
7
Select
Dell C2665dnf Color MFP
for
Print Using
(
Use
for Mac OS X 10.8).
NOTE: When printing is set up using IP printing, the queue name is displayed as blank. You do not need to specify it.
8
Click
Add
.
9
Specify the options that have been installed on the printer, and then click
Continue
.
10
Confirm that the printer is displayed in the
Print & Fax
(
Print & Scan
for Mac OS X 10.7 and Mac OS X 10.8)
dialog box.
When Using Bonjour
1
Turn on the printer.
2
Ensure that Macintosh computer and the printer are connected.
If you use wired connection, connect the LAN cable between the printer and the network.
If you use wireless connection, ensure that wireless connection is configured properly on your Macintosh computer
and the printer.
3
Open the
System Preferences,
and click
Print & Fax
(
Print & Scan
for Mac OS X 10.7 and Mac OS X 10.8).
4
Click the Plus (+) sign, and click
Default
.
5
Select the printer connected via Bonjour from the
Printer Name
list.
6
Name
and
Print Using
(
Use
for Mac OS X 10.8) are automatically entered.
NOTE: If "AirPrint Printer" is automatically selected for P
Print Using
, select "Dell C2665dnf Color MFP" manually.
7
Click
Add
.
8
Specify the options that have been installed on the printer, and then click
Continue
.
9
Confirm that the printer is displayed in the
Print & Fax
(
Print & Scan
for Mac OS X 10.7 and Mac OS X 10.8)
dialog box.
Configuring Settings
All the optional accessories are verified as installed
.
1
Open the
System Preferences,
and click
Print & Fax
(
Print & Scan
for Mac OS X 10.7 and Mac OS X 10.8).
2
Select the printer in the printers list, and click
Options & Supplies
.
3
Select
Driver,
and select the options that have been installed in the printer, and then click
OK
.

Installing Printer Drivers on Linux Computers (CUPS) 97
12
Installing Printer Drivers on Linux Computers (CUPS)
This section provides information for installing or setting up the printer driver with CUPS (Common UNIX Printing
System) on Red Hat®Enterprise Linux® 5/6 Desktop or SUSE® Linux Enterprise Desktop 10/11.
Operation on Red Hat Enterprise Linux 5/6 Desktop
Setup Overview
Red Hat Enterprise Linux 5/6 Desktop:
1
Install the printer driver.
2
Set up the print queue.
3
Specify the default queue.
4
Specify the printing options.
Installing the Printer Driver
CAUTION: Before you install the printer driver on Red Hat Enterprise Linux 5, confirm that Update 6 or higher is applied to your
operating system. Consult your Linux distributor for the upgrade of your system.
1
Select
Applications
o
System Tools
(
Accessories
for Red Hat Enterprise Linux 5 Desktop)
o
Terminal
.
2
Type the following command in the terminal window.
The printer driver is installed.
Setting Up the Queue
To execute printing, you must set up the print queue on your workstation.
For Red Hat Enterprise Linux 5 Desktop:
1
Open the URL "
http://localhost:631
" using a web browser.
2
Click
Administration
.
3
Click
Add Printer.
Type the name of the printer in the
Name
box in the
Add New Printer
window, and click
Continue
.
You can optionally specify the location and description of the printer for further information.
For network connections:
a
Select
LPD/LPR Host or Printer
from the
Device
menu, and click
Continue
.
b
Type the IP address of the printer in
Device URI
, and click
Continue
.
Format:
lpd://xxx.xxx.xxx.xxx
(the IP address of the printer)
su
(Type the administrator password)
rpm -ivh (Type the file path)/Dell-C2665-Color-
MFP-x.x-x.noarch.rpm

98 Installing Printer Drivers on Linux Computers (CUPS)
For USB connections
:
a
Select
Dell C2665dnf Color MFP USB #1
or
Dell C2665dnf Color MFP
from the
Device
menu, and click
Continue
.
4
Select
Dell C2665dnf Color MFP PS vx.x (en)
from the
Model
menu, and click
Add Printer
.
5
Ty p e
root
as the user name, type the administrator password, and click
OK
.
The message
Printer xxx has been added successfully.
appears.
The setup is complete.
For Red Hat Enterprise Linux 6 Desktop:
1
Open the URL
"http://localhost:631"
using a web browser.
2
Click
Administration
.
3
Click
Add Printer
.
4
Ty p e
root
as the user name, type the administrator password, and click
OK
.
For network connections:
a
Select
LPD/LPR Host or Printer
from the
Other Network Printers
menu, and click
Continue
.
b
Type the IP address of the printer in
Connection
, and click
Continue
.
Format:
lpd://xxx.xxx.xxx.xxx
(the IP address of the printer)
For USB connections:
a
Select
Dell C2665dnf Color MFP
from the
Local Printers
menu, and click
Continue
.
5
Type the name of the printer in the
Name
box in the
Add Printer
window, and click
Continue
.
You can optionally specify the location and description of the printer for further information.
6
Select
Dell C2665dnf Color MFP PS vx.x (en)
from the
Model
menu, and click
Add Printer
.
The setup is complete.
Printing From the Applications
When you have finished setting up the queue, you can print jobs from the applications. Start the print job from the
application, and specify the queue in the print dialog box.
However, sometimes you can print only from the default queue depending on the application (for example Mozilla).
In these cases, before you start printing, set queue you want to print to as the default queue. For information on
specifying the default queue, see "Setting the Default Queue."
Setting the Default Queue
1
Select
Applications
o
System Tools
(
Accessories
for Red Hat Enterprise Linux 5 Desktop)
o
Terminal
.
2
Type the following command in the terminal window.
su
(Type the administrator password)
lpadmin -d (Type the queue name)

Installing Printer Drivers on Linux Computers (CUPS) 99
Specifying the Printing Options
You can specify the printing options such as color mode.
For Red Hat Enterprise Linux 5 Desktop:
1
Open the URL "
http://localhost:631
" using a web browser.
2
Click
Administration
.
3
Click
Manage Printers
.
4
Click
Set Printer Options
of the printer for which you want to specify the printing options.
5
Specify the required settings, and click
Set Printer Options
.
6
Ty p e
root
as the user name, and type the administrator password.
The message
Printer xxx has been configured successfully.
appears.
The setting is complete.
For Red Hat Enterprise Linux 6 Desktop:
1
Open the URL
"http://localhost:631"
using a web browser.
2
Click
Administration
.
3
Click
Manage Printers
.
4
Click the queue name for which you want to specify the printing options.
5
Select
Set Default Options
from the
Administration
menu.
6
Click the desired setting item, specify the required settings, and click
Set Default Options
.
The message
Printer xxx default options have been set successfully.
appears.
The setting is complete.
Uninstalling the Printer Driver
1
Select
Applications
o
System Tools
(
Accessories
for Red Hat Enterprise Linux 5 Desktop)
o
Terminal
.
2
Type the following command in the terminal window to delete the print queue.
3
Repeat the command above for all queues for the same model.
4
Type the following command in the terminal window.
The printer driver is uninstalled.
su
(Type the administrator password)
/usr/sbin/lpadmin -x (Type the print queue name)
su
(Type the administrator password)
rpm -e Dell-C2665-Color-MFP

100 Installing Printer Drivers on Linux Computers (CUPS)
Operation on SUSE Linux Enterprise Desktop 10
Setup Overview
SUSE Linux Enterprise Desktop 10:
1
Install the printer driver.
2
Set up the print queue.
3
Specify the default queue.
4
Specify the printing options.
Installing the Printer Driver
1
Select
Computer
o
More Applications...
and select
Gnome Terminal
on the Application Browser.
2
Type the following command in the terminal window.
The printer driver is installed.
Setting Up the Queue
To execute printing, you must set up the print queue on your workstation.
1
Select
Computer
o
More Applications...
and select
YaST
on the Application Browser.
2
Type the administrator password, and click
Continue
.
YaST Control Center
is activated.
3
Select
Hardware
on
YaST Control Center
, and select
Printer
.
The
Printer Configuration
dialog box appears.
For network connections:
a
Click
Add
.
b
Select
Network Printers
as
Printer Type
, and click
Next
.
c
Select
Print via LPD-Style Network Server
as
Network Printers
, and click
Next
.
d
Type the IP address of the printer in
Hostname of the Print Server
.
e
Type the name of the printer queue in
Print Queue Name
, and click
Next
.
f
Type the printer name in
Name for Printing
.
NOTE:
Printer Description
and P
Printer Location
do not have to be specified.
g
Select the
Do Local Filtering
check box, and click
Next
.
h
Select DELL as
Manufacturer
. Select
C2665dnf Color MFP
as
Model
, and click
Next
.
i
Confirm the settings in
Configuration
, and click
OK
.
su
(Type the administrator password)
rpm -ivh (Type the file path)/Dell-C2665-Color-
MFP-x.x-x.noarch.rpm

Installing Printer Drivers on Linux Computers (CUPS) 101
For USB connections:
a
Select
Dell C2665dnf Color MFP on USB
(//Dell/C2665dnf%20Color%20MFP or /dev/usblp*)
as
Available
are
, and click
Configure…
.
b
Confirm the settings in
Edit configuration
, and click
OK
.
4
Click
Finish
.
Printing From the Applications
When you have finished setting up the queue you can print jobs from the applications. Start the print job from the
application, and specify the queue in the print dialog box.
However, sometimes you can print only from the default queue depending on the application (for example Mozilla).
In these cases, before you start printing, set queue you want to print to as the default queue. For information on
specifying the default queue, see "Setting the Default Queue."
Setting the Default Queue
1
To activate the
Printer setup: Autodetected printers
, do the following.
a
Select
Computer
o
More Applications...
and select
YaST
on the Application Browser.
b
Type the administrator password, and click
Continue
.
YaST Control Center
is activated.
c
Select
Hardware
on
YaST Control Center
, and select
Printer
.
2
Select the printer you want to set to default on the
Printer Configuration
, and select
Set Default
in the
Other
button menu.
3
Click
Finish
.
Specifying the Printing Options
You can specify the printing options such as color mode.
1
Open a web browser.
2
Ty p e
http://localhost:631/admin
in
Location
, and press <Enter>.
3
Ty p e
root
as the user name, and type the administrator password.
The
CUPS
window appears.
NOTE:
Set the password for authority as the printer administrator before setting the printer queue. If you have not set it, go to
"Setting the Password for Authority as the Printer Administrator."
4
Click
Manage Printers
.
5
Specify the required settings, and click
Continue
.
The message
Printer xxx has been configured successfully.
appears.
The setting is complete. Execute printing from the application.

102 Installing Printer Drivers on Linux Computers (CUPS)
Setting the Password for Authority as the Printer Administrator
You must set the password for authority as the printer administrator to do operations as the printer administrator.
1
Select
Computer
o
More Applications...
and select
Gnome Terminal
on the Application Browser.
2
Type the following command in the terminal window.
Uninstalling the Printer Driver
1
Select
Computer
o
More Applications...
and select
Gnome Terminal
on the Application Browser.
2
Type the following command in the terminal window to delete the print queue.
3
Repeat the command above for all queues for the same model.
4
Type the following command in the terminal window.
The printer driver is uninstalled.
Operation on SUSE Linux Enterprise Desktop 11
Setup Overview
SUSE Linux Enterprise Desktop 11:
1
Install the printer driver.
2
Set up the print queue.
3
Specify the default queue.
4
Specify the printing options.
su
(Type the administrator password)
lppasswd -g sys -a root
(Type the password for authority as the printer administrator after
the Enter password prompt.)
(Retype the password for authority as the printer administrator after
the Enter password again prompt.)
su
(Type the administrator password)
/usr/sbin/lpadmin -x (Type the printer queue name)
su
(Type the administrator password)
rpm -e Dell-C2665-Color-MFP

Installing Printer Drivers on Linux Computers (CUPS) 103
Installing the Printer Driver
1
Select
Computer
o
More Applications...
and select
GNOME Terminal
on the Application Browser.
2
Type the following command in the terminal window.
The printer driver is installed.
Setting Up the Queue
To execute printing, you must set up the print queue on your workstation.
1
Select
Computer
o
More Applications...
,
and
select
YaST
on the Application Browser.
2
Type the administrator password, and click
Continue
.
YaST Control Center
is activated.
3
Select
Hardware
on
YaST Control Center
, and select
Printer
.
The
Printer Configurations
dialog box opens.
For network connections:
a
Click
Add
.
The
Add New Printer Configuration
dialog box opens.
b
Click
Connection Wizard
.
The
Connection Wizard
dialog box opens.
c
Select
Line Printer Daemon (LPD) Protocol
from
Access Network Printer or Printserver Box via
.
d
Type the IP address of the printer in
IP Address or Host Name:
.
e
Select
Dell
in the
Select the printer manufacturer:
drop-down menu.
f
Click
OK
.
The
Add New Printer Configuration
dialog box appears.
g
Select
Dell C2665dnf Color MFP PS vx.x [Dell/Dell_C2665dnf_Color_MFP.ppd.gz]
from the
Assign
Driver
list.
NOTE: You can specify the printer name in S
Set Name:
.
h
Confirm the settings, and click
OK
.
For USB connections:
a
Click
Add
.
The
Add New Printer Configuration
dialog box opens.
The printer name is displayed in the
Determine Connection
list.
b
Select
Dell C2665dnf Color MFP PS vx.x. [Dell/Dell_C2665dnf_Color_MFP.ppd.gz]
from the
Assign
Driver
list.
NOTE: You can specify the printer name in S
Set Name:
.
c
Confirm the settings, and click
OK
.
su
(Type the administrator password)
rpm -ivh (Type the file path)/Dell-C2665-Color-
MFP-x.x-x.noarch.rpm

104 Installing Printer Drivers on Linux Computers (CUPS)
Printing From the Applications
When you have finished setting up the queue you can print jobs from the applications. Start the print job from the
application, and specify the queue in the print dialog box.
However, sometimes you can print only from the default queue depending on the application (for example Mozilla).
In these cases, before you start printing, set queue you want to print to as the default queue. For information on
specifying the default queue, see "Setting the Default Queue."
Setting the Default Queue
You can set the default queue when you add the printer.
1
Select
Computer
o
More Applications...
,
and select
YaST
on the Application Browser.
2
Type the administrator password, and click
Continue
.
YaST Control Center
is activated.
3
Select
Hardware
on
YaST Control Cente
r, and select
Printer
.
The
Printer Configurations
dialog box opens.
4
Click
Edit
.
A
dialog box to modify the specified queue opens.
5
Confirm that the printer you want to set is selected in the
Connection
list.
6
Select the
Default Printer
check box.
7
Confirm the settings, and click
OK
.
Specifying the Printing Options
You can specify the printing options such as color mode.
1
Open a web browser.
2
Ty p e
http://localhost:631/admin
in
Location
, and press <Enter>.
3
Click
Manage Printers
.
4
Click
Set Printer Options
of the printer for which you want to specify the printing options.
5
Specify the required settings, and click
Set Printer Options
.
6
Ty p e
root
as the user name, type the administrator password, and click
OK
.
NOTE:
Set the password for authority as the printer administrator before setting the printer queue. If you have not set it, go to
"Setting the Password for Authority as the Printer Administrator."
The message
Printer xxx has been configured successfully.
appears.
The setting is complete. Execute printing from the application.

Installing Printer Drivers on Linux Computers (CUPS) 105
Setting the Password for Authority as the Printer Administrator
You must set the password for authority as the printer administrator to do operations as the printer administrator.
1
Select
Computer
o
More Applications...
and select
GNOME Terminal
on the Application Browser.
2
Type the following command in the terminal window.
Uninstalling the Printer Driver
1
Select
Computer
o
More Applications...
and select
GNOME Terminal
on the Application Browser.
2
Type the following command in the terminal window to delete the print queue.
3
Repeat the command above for all queues for the same model.
4
Type the following command in the terminal window.
The printer driver is uninstalled.
su
(Type the administrator password)
lppasswd -g sys -a root
(Type the password for authority as the printer administrator after
the Enter password prompt.)
(Retype the password for authority as the printer administrator after
the Enter password again prompt.)
su
(Type the administrator password)
/usr/sbin/lpadmin -x (Type the printer queue name)
su
(Type the administrator password)
rpm -e Dell-C2665-Color-MFP

106 Installing Printer Drivers on Linux Computers (CUPS)