FUJIFILM Business Innovation C2665DNF Dell C2665dnf Color Laser Multifunction Printer User Manual 05 Short Term Confidential 3
Fuji Xerox Co., Ltd. Dell C2665dnf Color Laser Multifunction Printer 05 Short Term Confidential 3
Contents
User manual-3

467
Maintaining Your Printer
32 Maintaining Your Printer.......................................................... 469
33 Removing Options ..................................................................... 509
34 Clearing Jams............................................................................ 515

468

Maintaining Your Printer 469
32
Maintaining Your Printer
You need to complete certain tasks to maintain optimum print quality.
Determining the Status of Supplies
If your printer is connected to the network, the Dell™ Printer Configuration Web Tool can provide instant feedback
on remaining toner levels. Type the printer's IP address in your web browser to view this information. To use the E-
Mail Alert Setup feature that notifies you when the printer requires new supplies, type the desired e-mail address in
the e-mail list box.
On the touch panel screen, you can also confirm the following:
• Any supply or maintenance items that require attention replacing (However, the printer can only display
information about one item at a time).
• Amount of toner remaining in each toner cartridge.
Conserving Supplies
You can change several settings in your printer driver to conserve toner cartridge and paper.
Ordering Supplies
You can order consumables (toner cartridges, drum cartridges, and waste toner box) from Dell on the Internet when
using a networked printer. Type the IP address of your printer in your web browser, launch the Dell Printer
Configuration Web Tool, and click the Order Supplies at: to order consumables for your printer.
You can also order consumables by the following method.
1
Click
Start
o
All Programs
o
Dell Printers
o
Additional Color Laser Software
o
Dell Supplies Management
System
.
The
Dell Supplies Management System
window appears.
2
Select your printer from the
Select Printer Model
list.
3
If ordering from the web:
a
Select a URL from the
Select Reorder URL
list.
b
Click
Visit Dell printer supplies ordering web site
.
NOTE: When you cannot get information from the printer automatically by two-way communication, a window that
prompts you to type the Service Tag appears. Type your Dell printer Service Tag in the field provided.
Your Service Tag number is located inside the front cover of your printer.
4
If ordering by phone, call the number that appears under the
Order by Phone
heading.
Supply Setting Function
Toner cartridge Toner Saver in the Others tab This check box allows the users to select a print mode that uses less
toner. The image quality will be lower when this feature is used.
Print media Multiple Up in the Layout tab The printer prints two or more pages on one side of a sheet.
Print media Duplex in the General tab The printer prints on both sides of a sheet of paper.

470 Maintaining Your Printer
Storing Print Media
To avoid potential paper feeding problems and uneven print quality, there are several things you can do:
• To achieve the best possible print quality, store print media in an environment where the temperature is
approximately 21 °C (70 °F) and the relative humidity is 40 %.
• Store cartons of print media on a pallet or shelf, rather than directly on the floor.
• If you store individual packages of print media out of the original carton, ensure that they rest on a flat surface so
the edges do not buckle or curl.
• Do not place anything on top of the print media packages.
Storing Consumables
Store consumables in their original packaging until you need to use them. Do not store consumables in:
• Temperatures greater than 40 °C (104 °F).
• An environment with extreme changes in humidity or temperature.
• Direct sunlight.
• Dusty places.
• A car for a long period of time.
• An environment where corrosive gases are present.
• A humid environment.
Maintaining Your Printer 471
Replacing the Toner Cartridges
WARNING: Before performing any of the following procedures, read and follow the safety instructions in the
Important
Information
.
Dell toner cartridges are available only through Dell. You can order cartridges online at http://www.dell.com/supplies
or by phone. To order by phone, see "Contacting Dell."
It is recommended to use Dell toner cartridges for your printer. Dell does not provide warranty coverage for problems
caused by using accessories, parts, or components not supplied by Dell.
WARNING: Never throw used toner cartridges into fire. The residual toner could explode resulting in burns and injuries.
WARNING: Do not shake the used toner cartridge. This may cause toner spills.
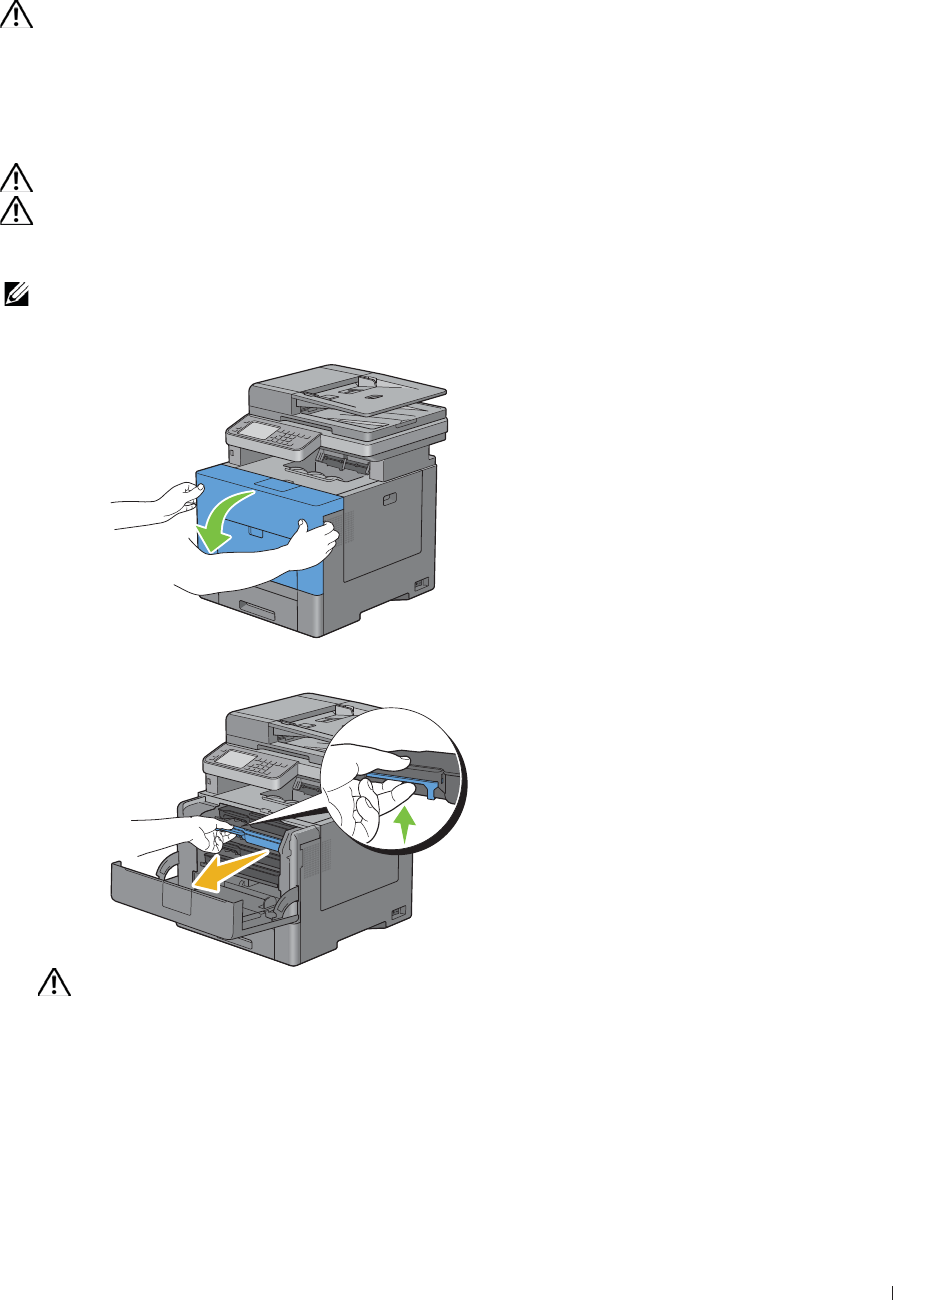
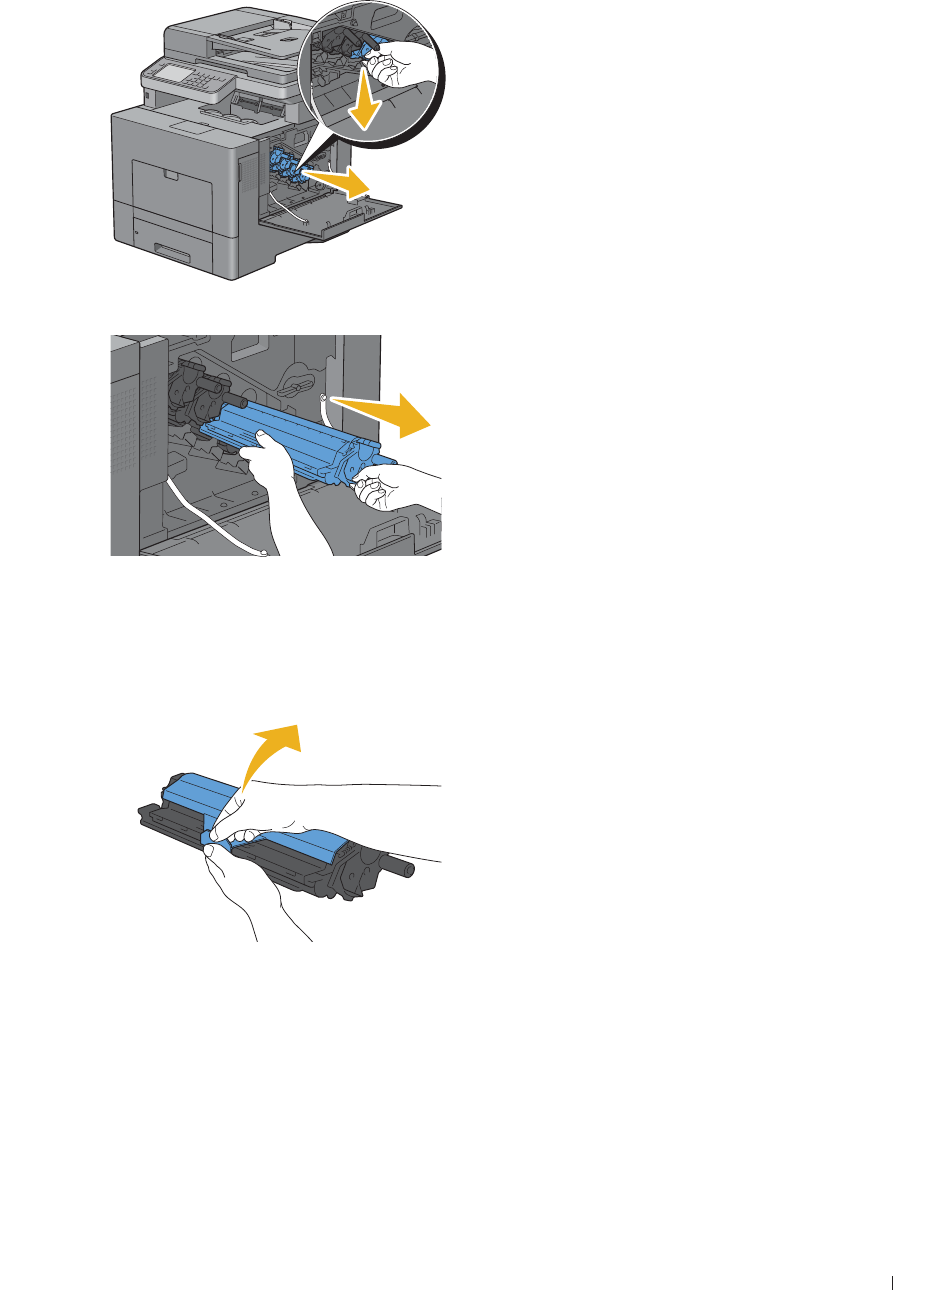
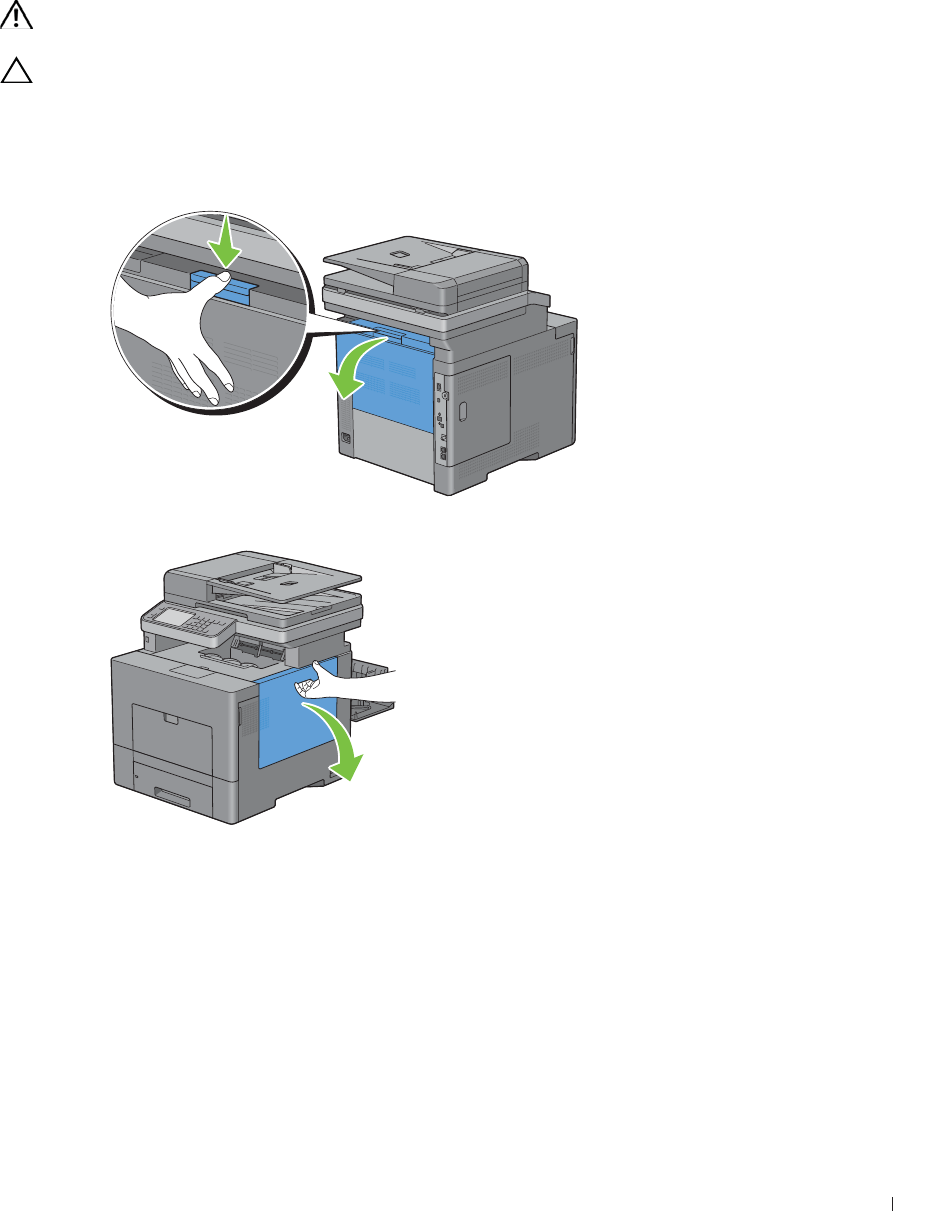
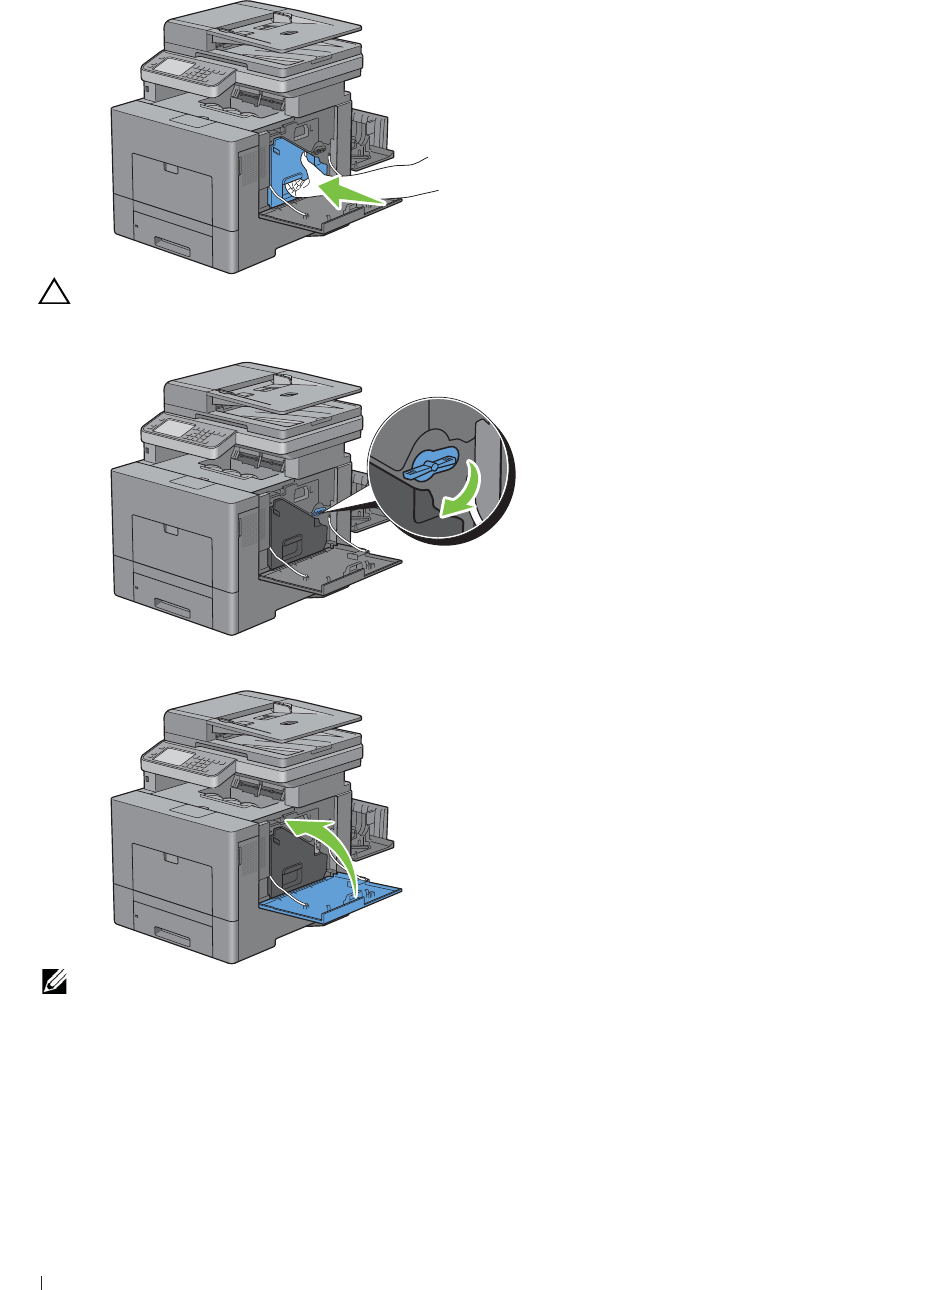
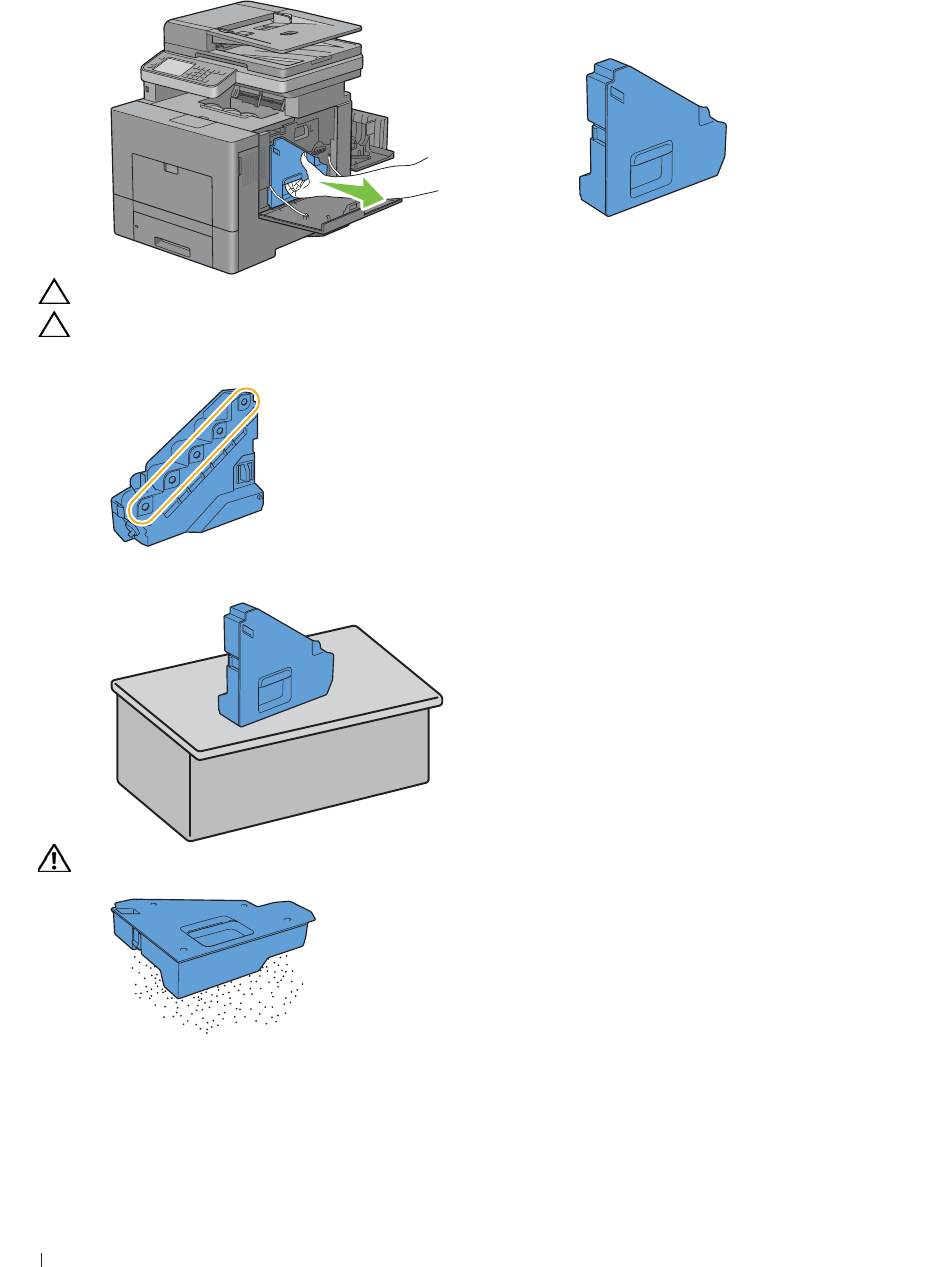
Removing the Toner Cartridge
NOTE: Ensure that you remove all the paper from the MPF and close the MPF cover before removing the toner cartridge.
1
Grasp the grips on both sides of the front cover, and then pull it down to open.
2
Grasp the handle on the toner cartridge that you want to replace, and then pull it out.
WARNING: Do not shake the toner cartridge as it may cause toner spills.
472 Maintaining Your Printer
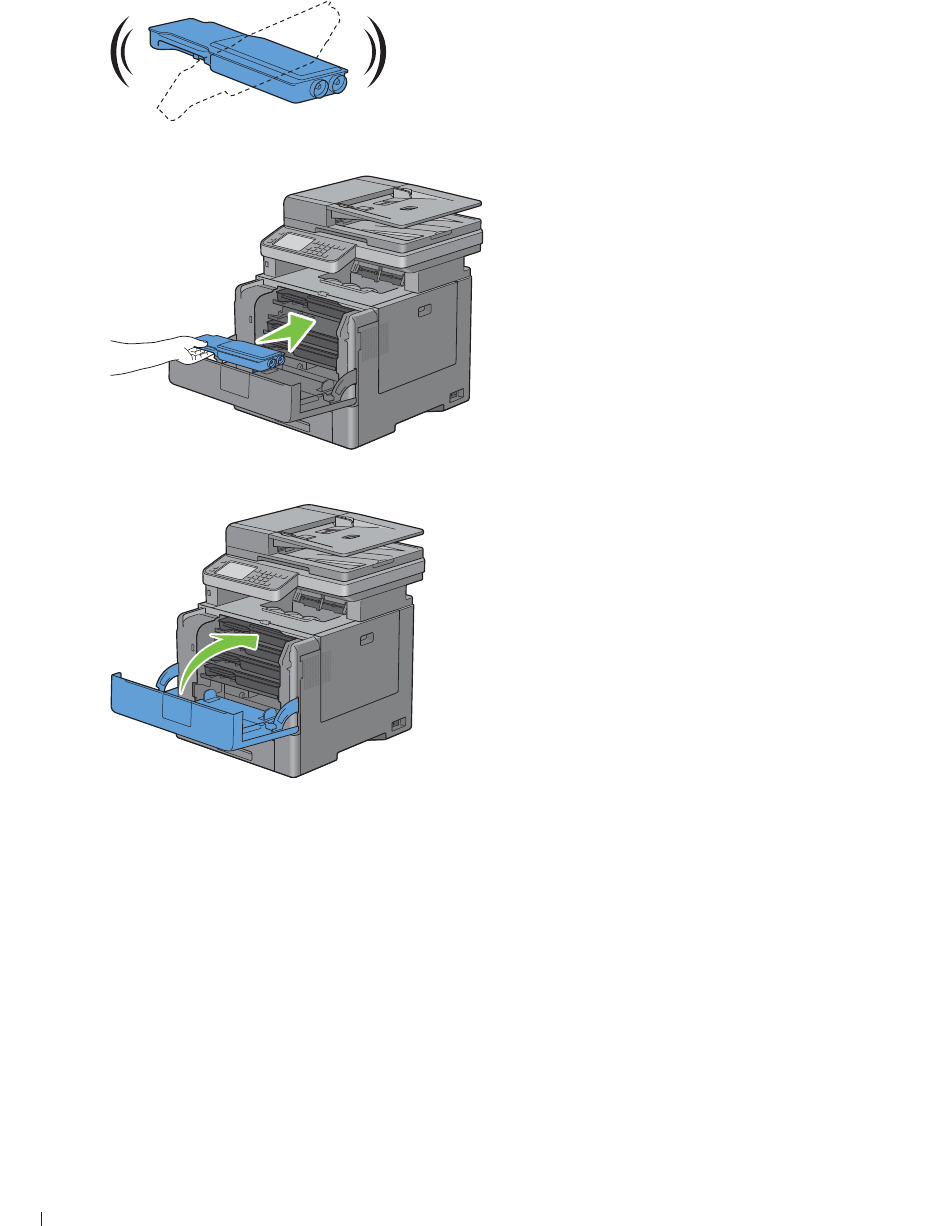
Installing a Toner Cartridge
1
Unpack a new toner cartridge of the desired color.
2
Shake the new toner cartridge five or six times to distribute the toner evenly.
3
Insert the toner cartridge into the associated cartridge slot, and then push until it stops.
4
Close the front cover.
Maintaining Your Printer 473
Replacing the Drum Cartridges
You need to replace all drum cartridges (yellow, magenta, cyan, and black) at a time.
WARNING: Before performing any of the following procedures, read and follow the safety instructions in the
Important
Information
.
CAUTION: Protect the drum cartridges against bright light. If the right side cover remains open for more than three minutes,
print quality may deteriorate.
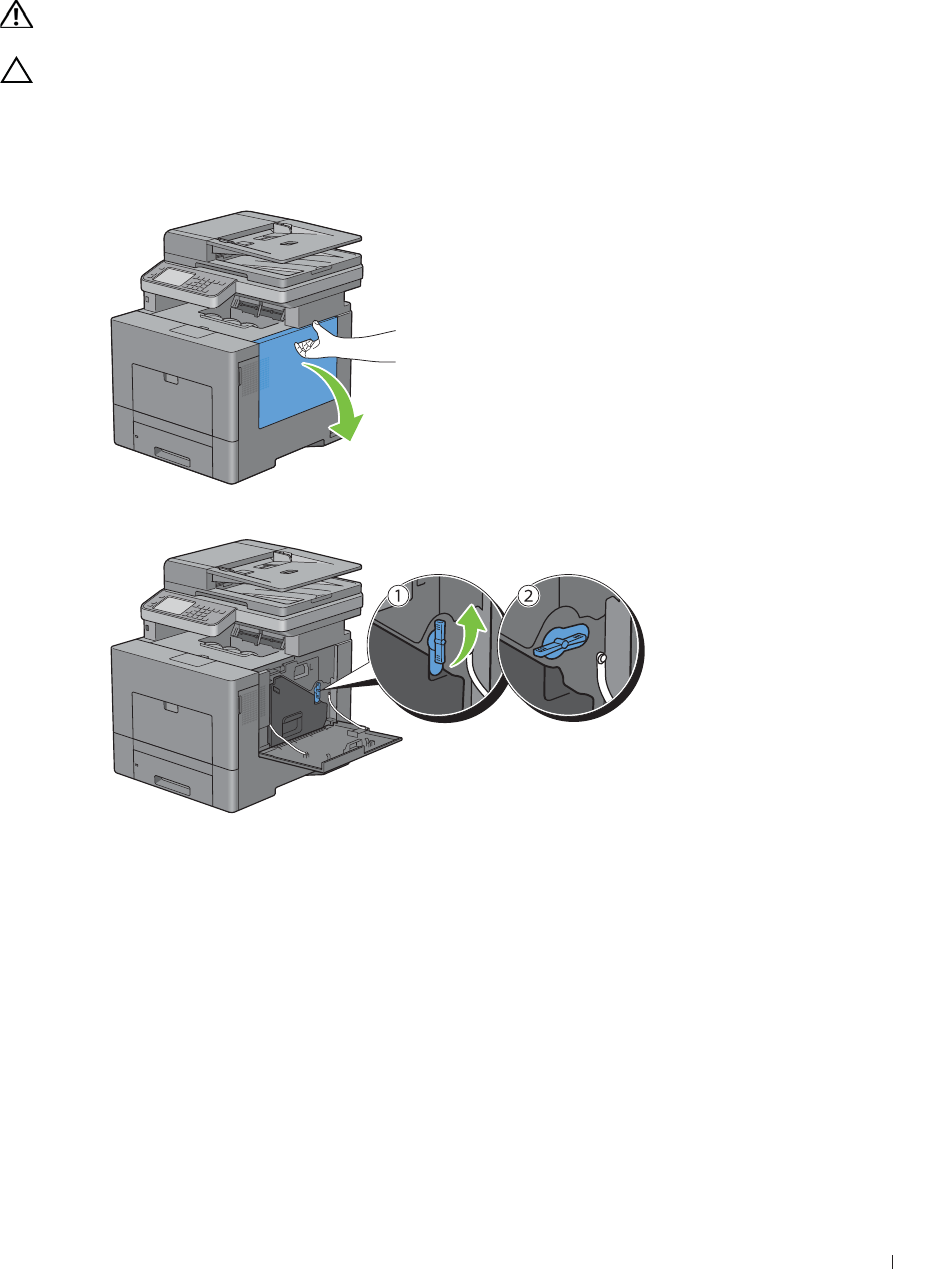
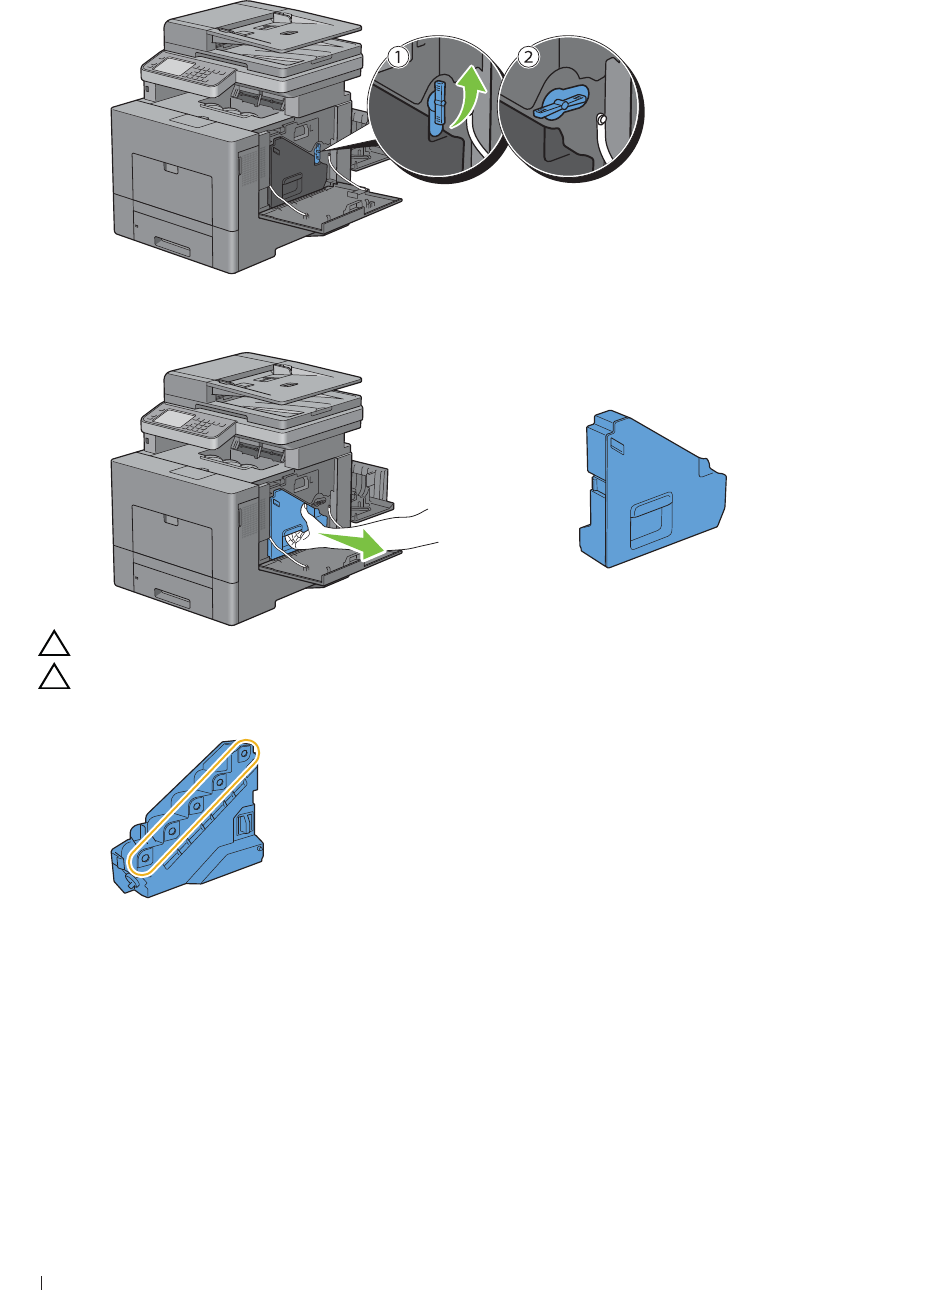
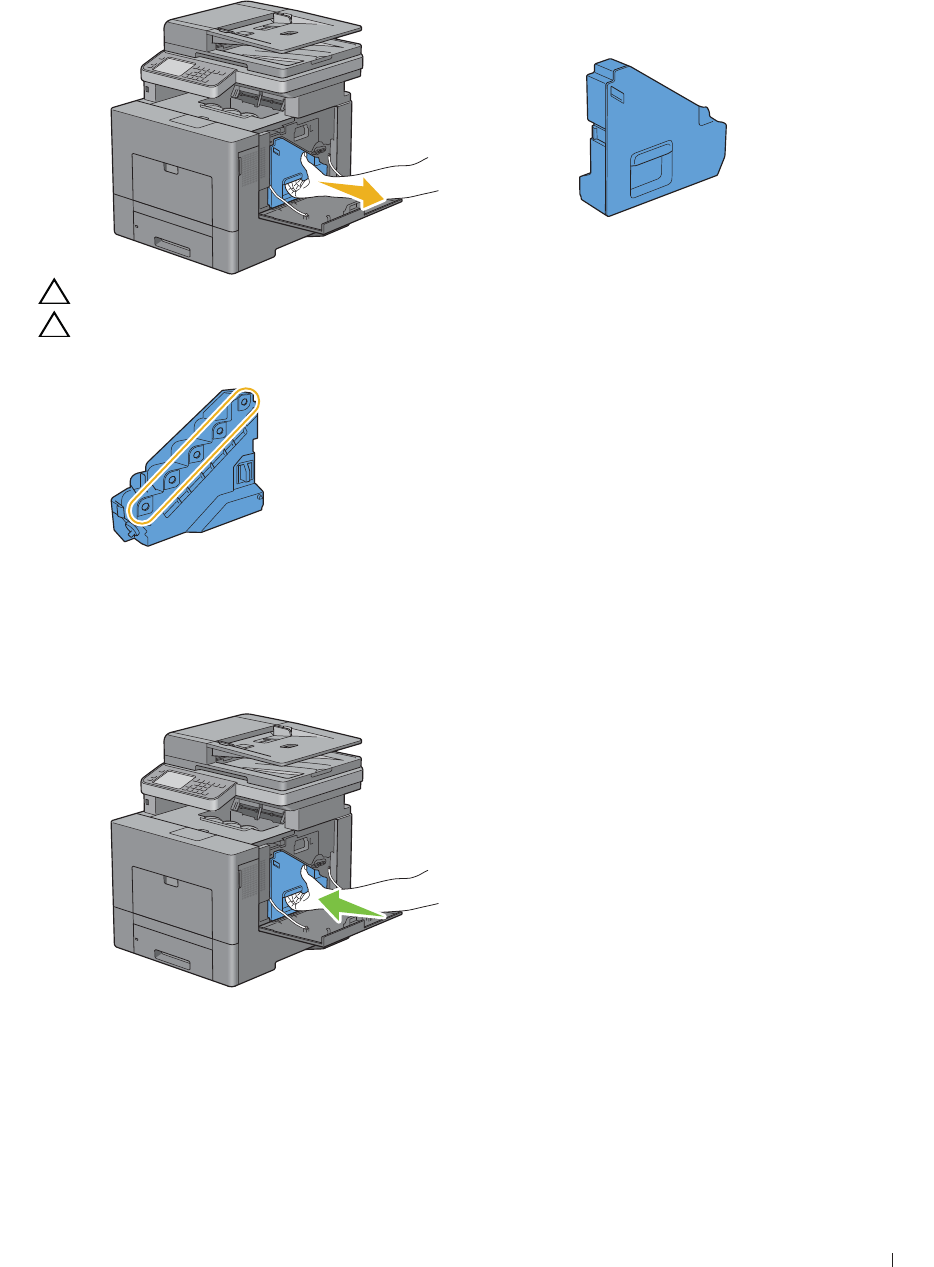
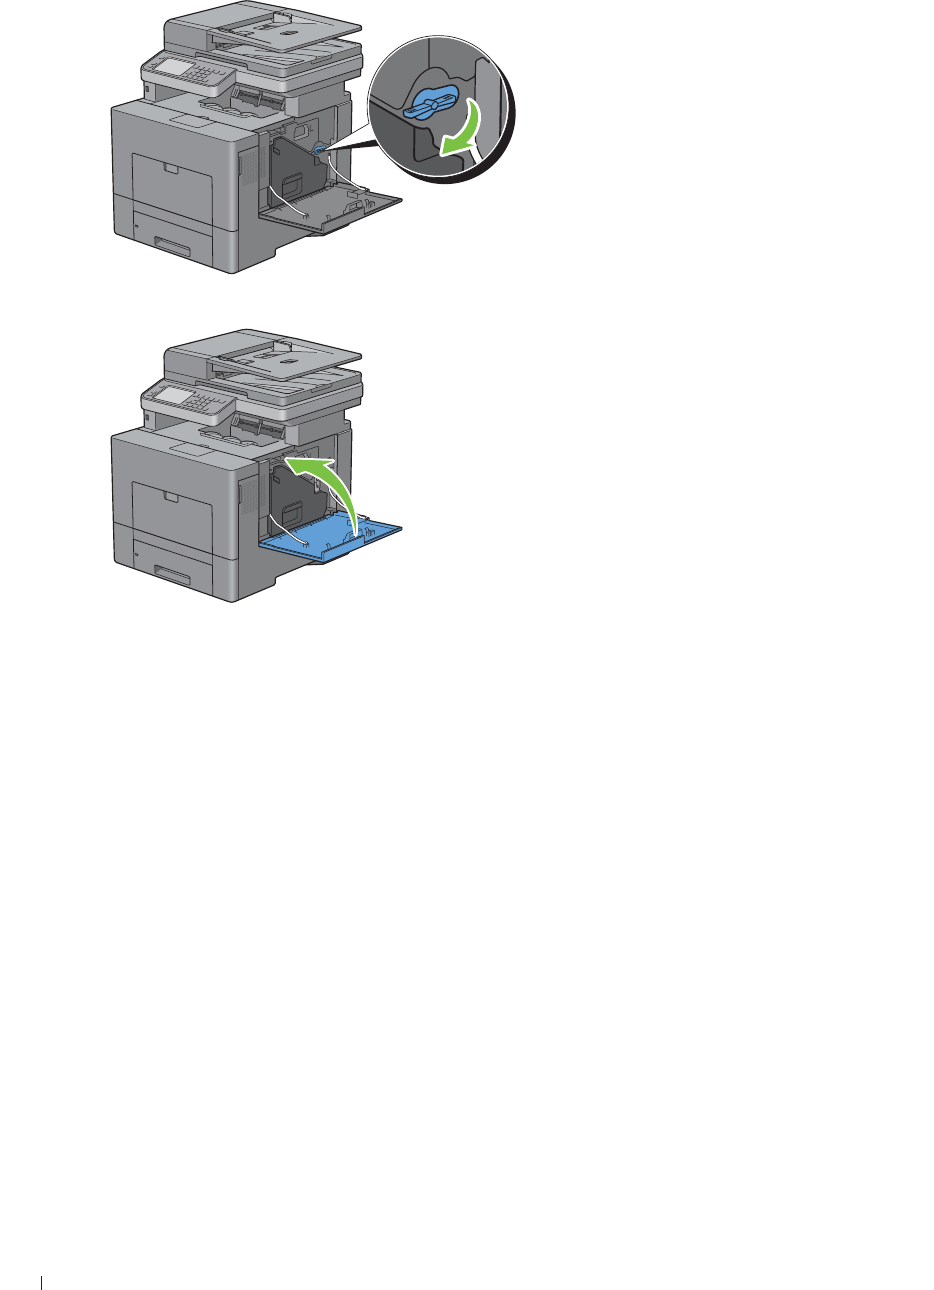
Removing the Drum Cartridge
1
Open the right side cover.
2
Turn the waste toner box lock lever 90-degrees counterclockwise to unlock the waste toner box.
474 Maintaining Your Printer
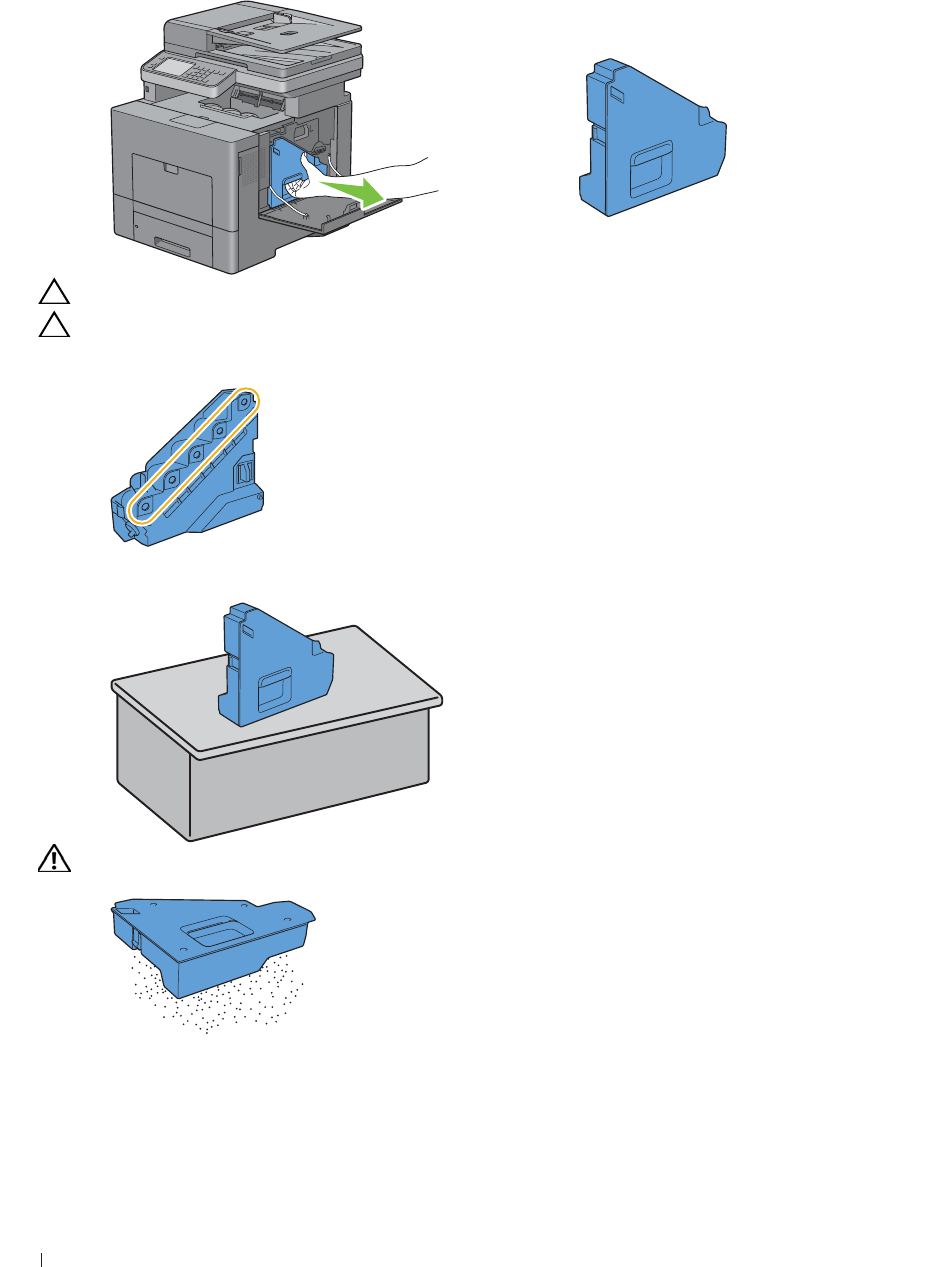
3
Grasp the handle on the waste toner box and pull it out making sure to hold it upright so that the waste toner does
not spill out.
CAUTION: Take care not to drop the waste toner box while you are removing it.
CAUTION: After removing the waste toner box, do not touch the parts shown in the illustration. Toner can dirty or stain
your hands.
4
Stand the removed waste toner box upright on a level surface.
WARNING: Never lay the waste toner box on its side as this may cause its malfunction or toner spills.
Maintaining Your Printer 475
5
Slightly pressing down the tab on the drum cartridge that you want to replace, pull it out halfway with one hand.
6
Support the drum cartridge with the other hand from underneath, and then pull it out completely.
7
Repeat the steps 5 and 6 to remove the other three cartridges.
Installing a Drum Cartridge
1
Unpack a new drum cartridge of the desired color.
2
Remove the orange protective cover from the drum cartridge.

476 Maintaining Your Printer
3
Insert the drum cartridge into the associated cartridge slot, and then push until it stops.
4
Repeat the steps 1 to 3 to insert the other three cartridges.
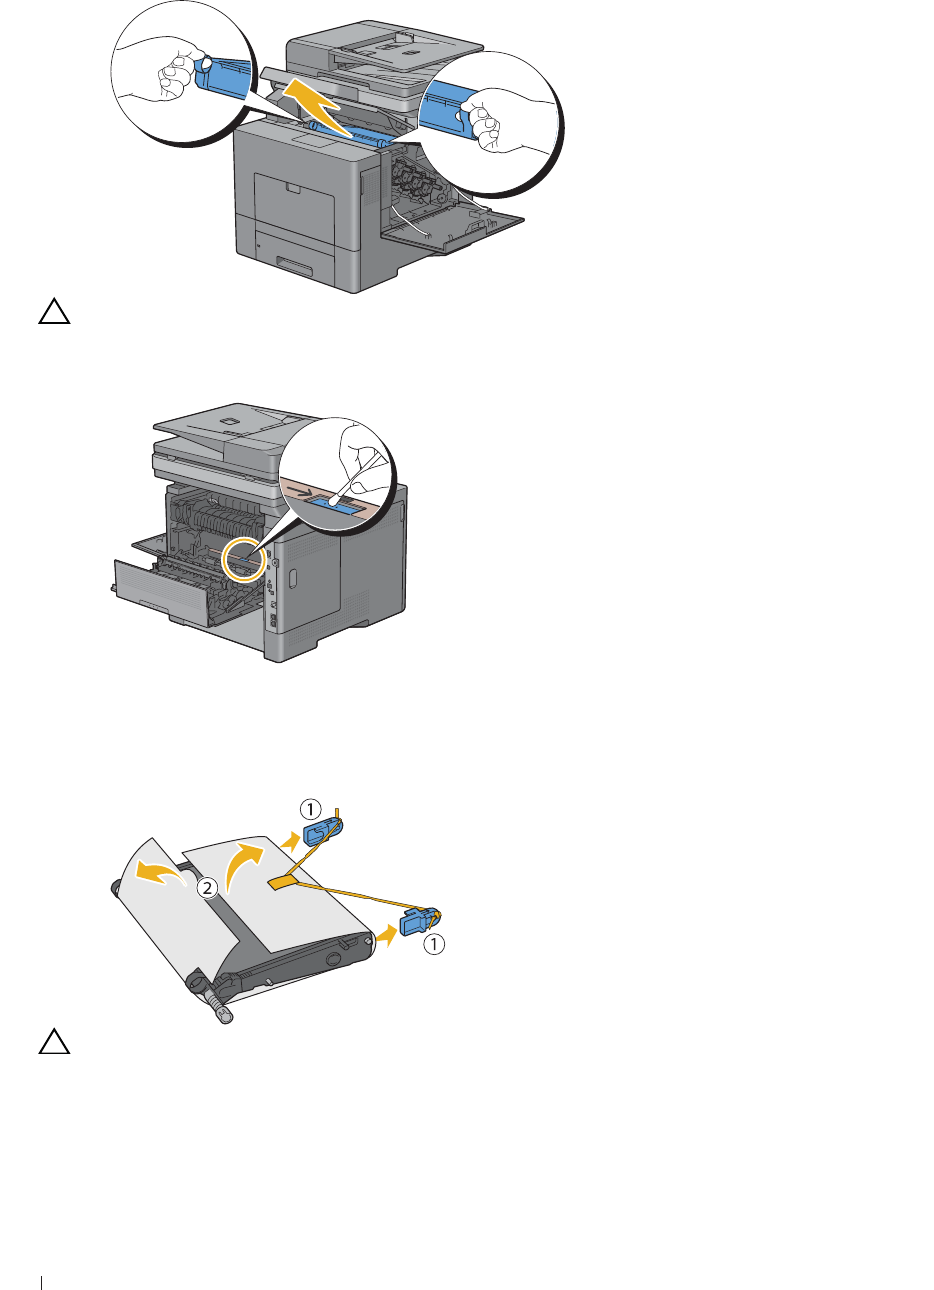
5
Remove the cleaning rod from inside the printer.
6
Remove the cleaning pad by pressing the white tabs between your thumb and index finger.
7
Unpack a new cleaning pad.
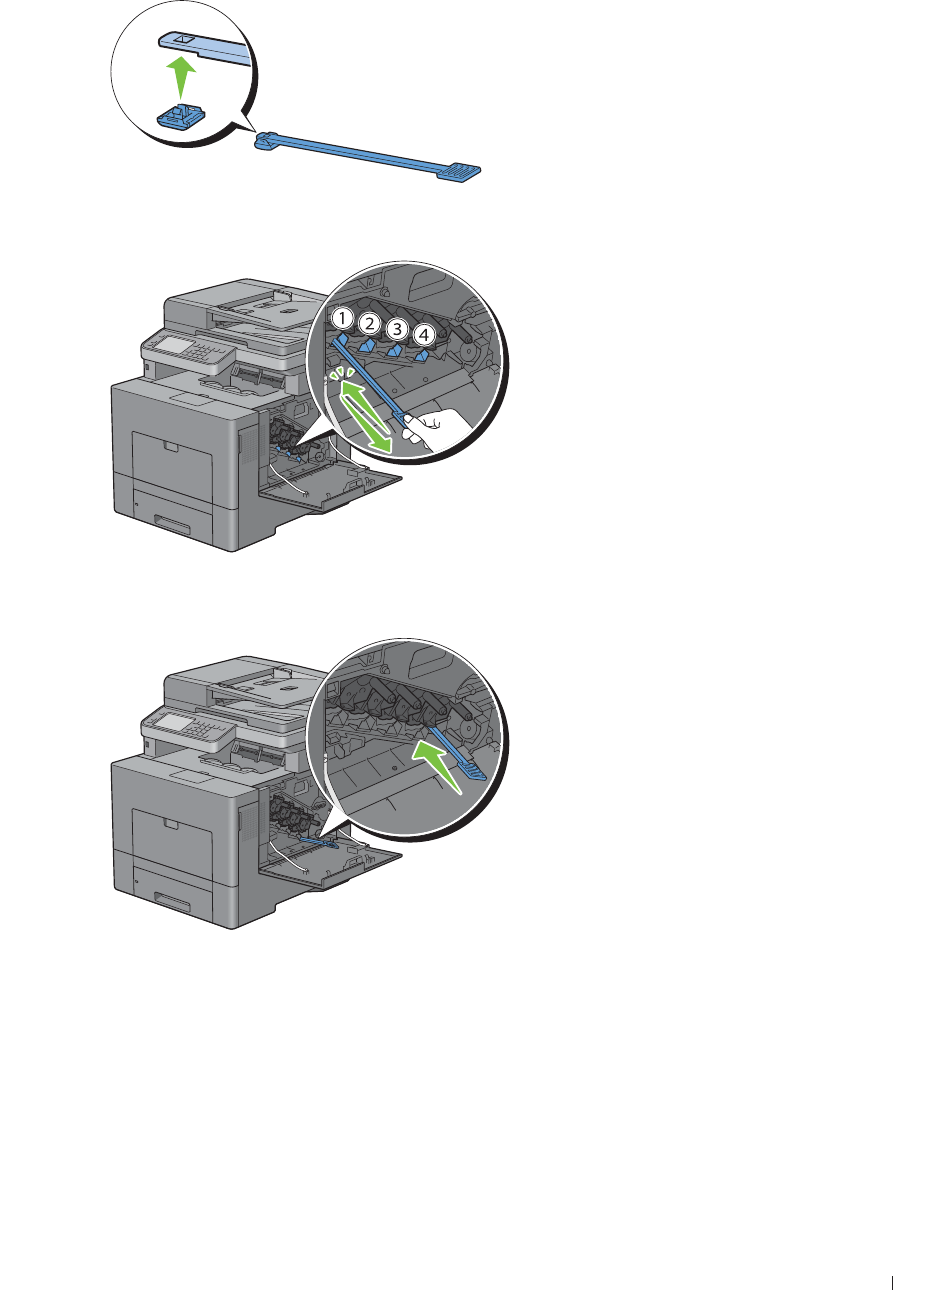
Maintaining Your Printer 477
8
Attach the new cleaning pad to the cleaning rod.
9
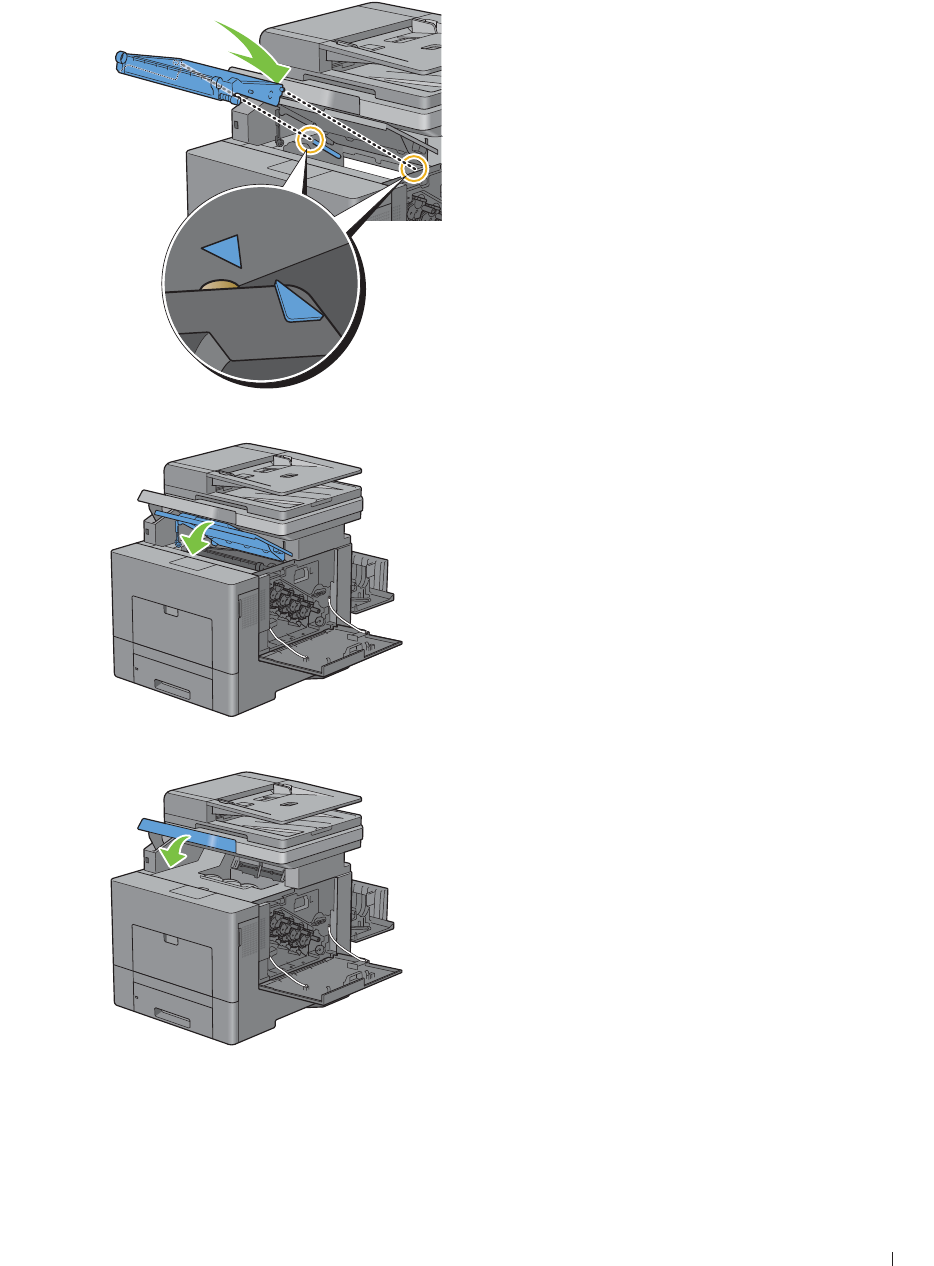
Insert the cleaning rod fully into one of the four holes until it clicks into the interior of the printer as illustrated
below, and then pull it out.
10
Repeat step 9 also on the other three holes. One time insertion is enough for each hole.
11
Return the cleaning rod to its original location.
478 Maintaining Your Printer
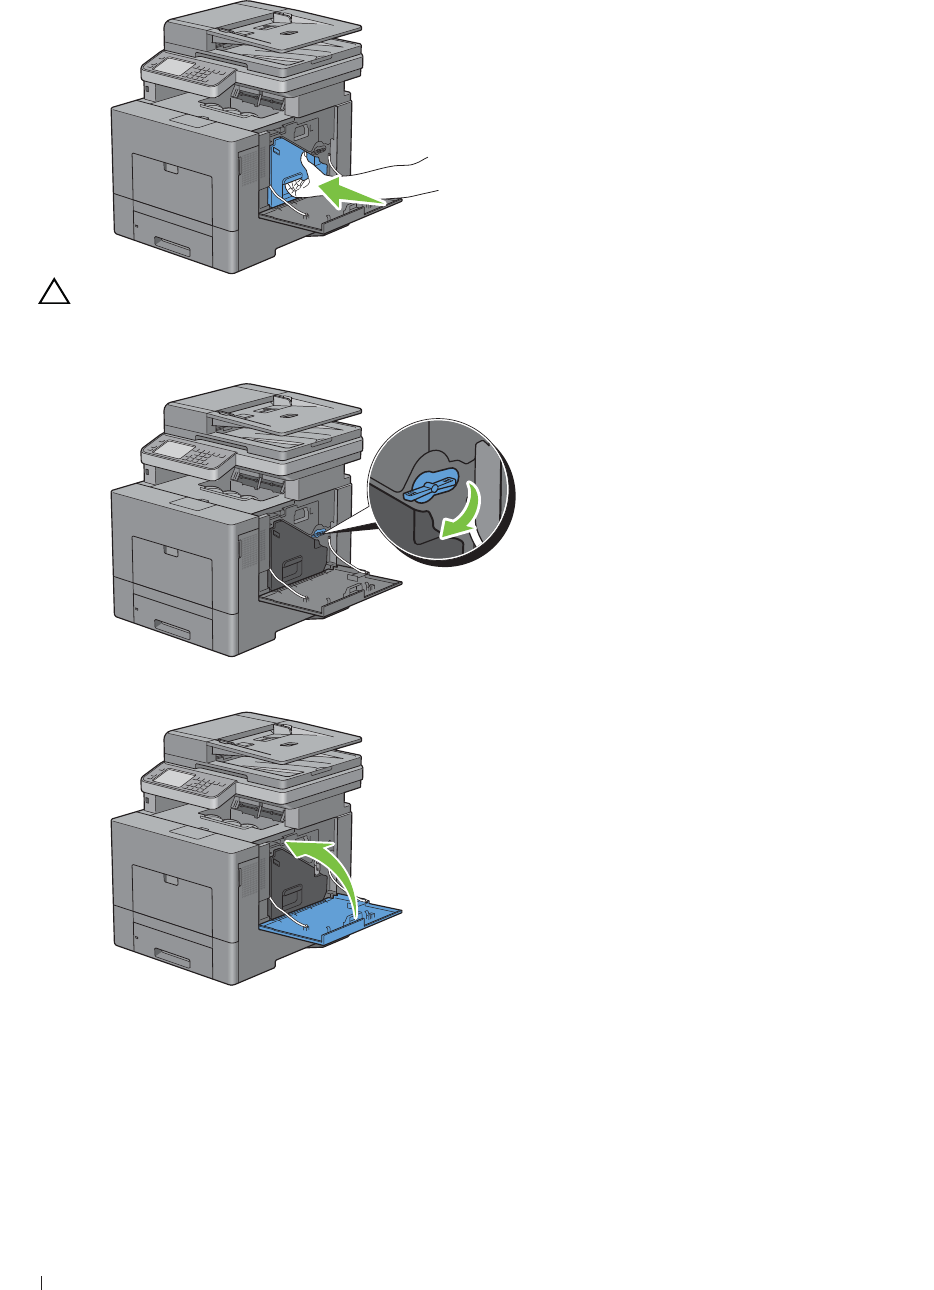
12
Reinsert the removed waste toner box.
CAUTION: If the waste toner box does not fit into place properly, make sure that the drum cartridge is fully inserted in
the previous step.
13
Turn the waste toner box lock lever 90-degrees clockwise to lock the waste toner box.
14
Close the right side cover.
Maintaining Your Printer 479
Replacing the Fusing Unit
WARNING: Before performing any of the following procedures, read and follow the safety instructions in the
Important
Information
.
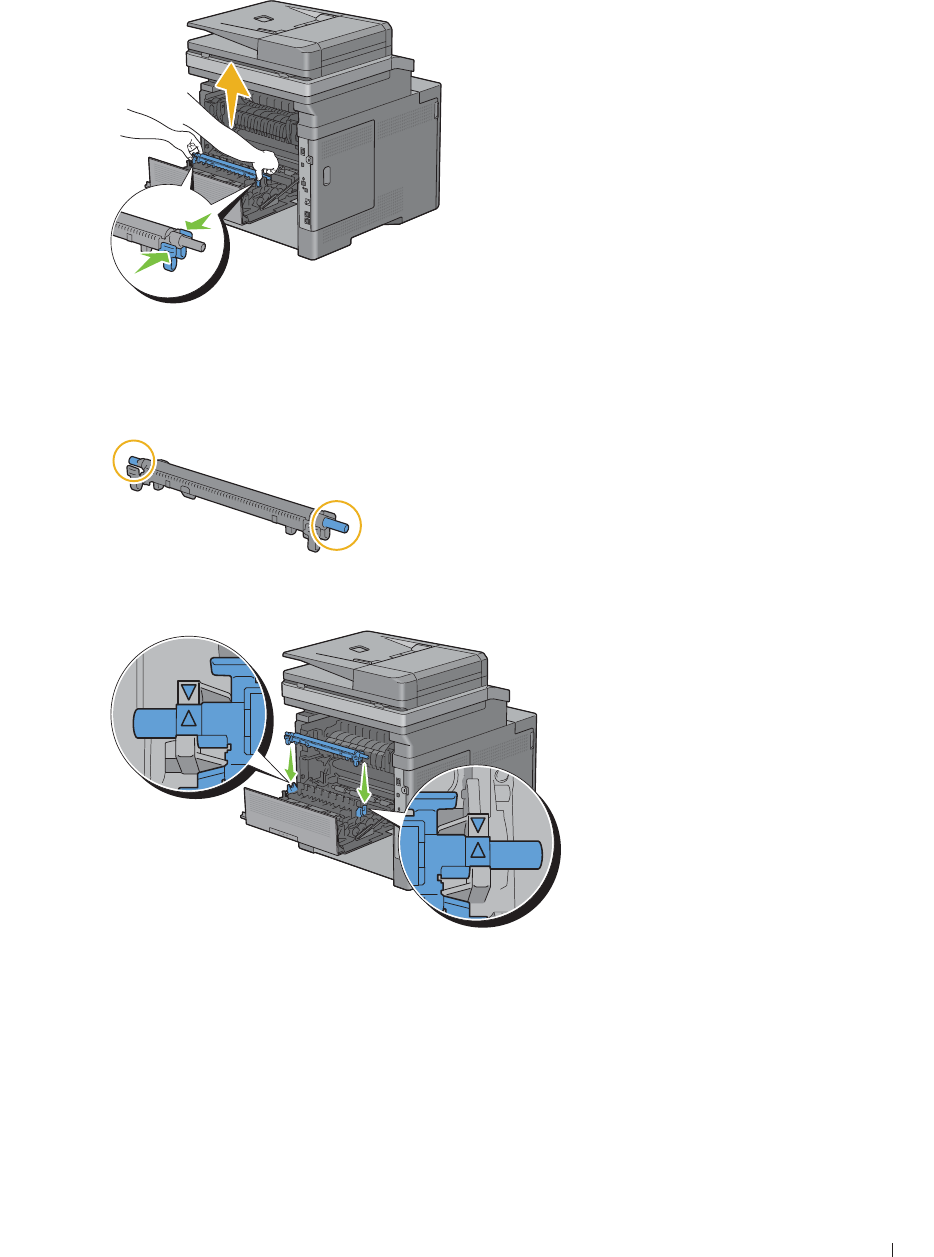
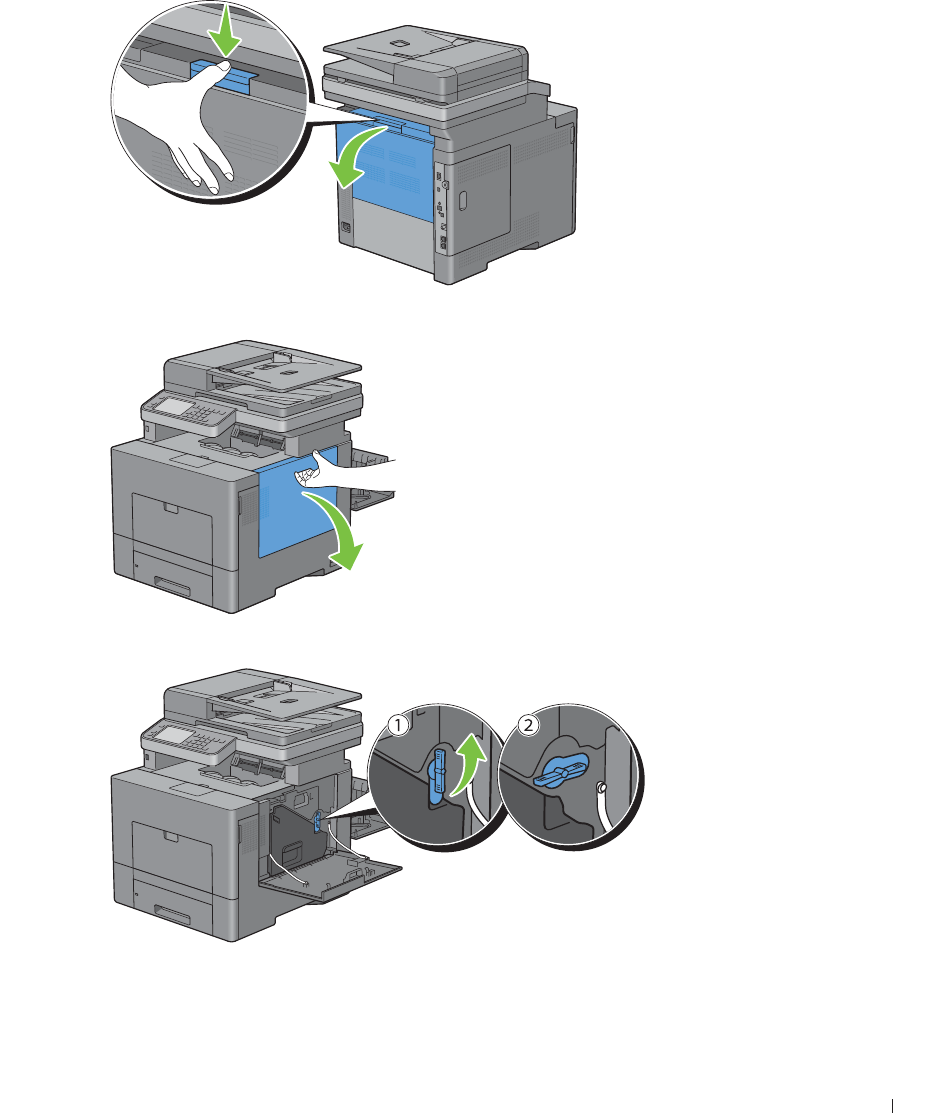
Removing the Fusing Unit
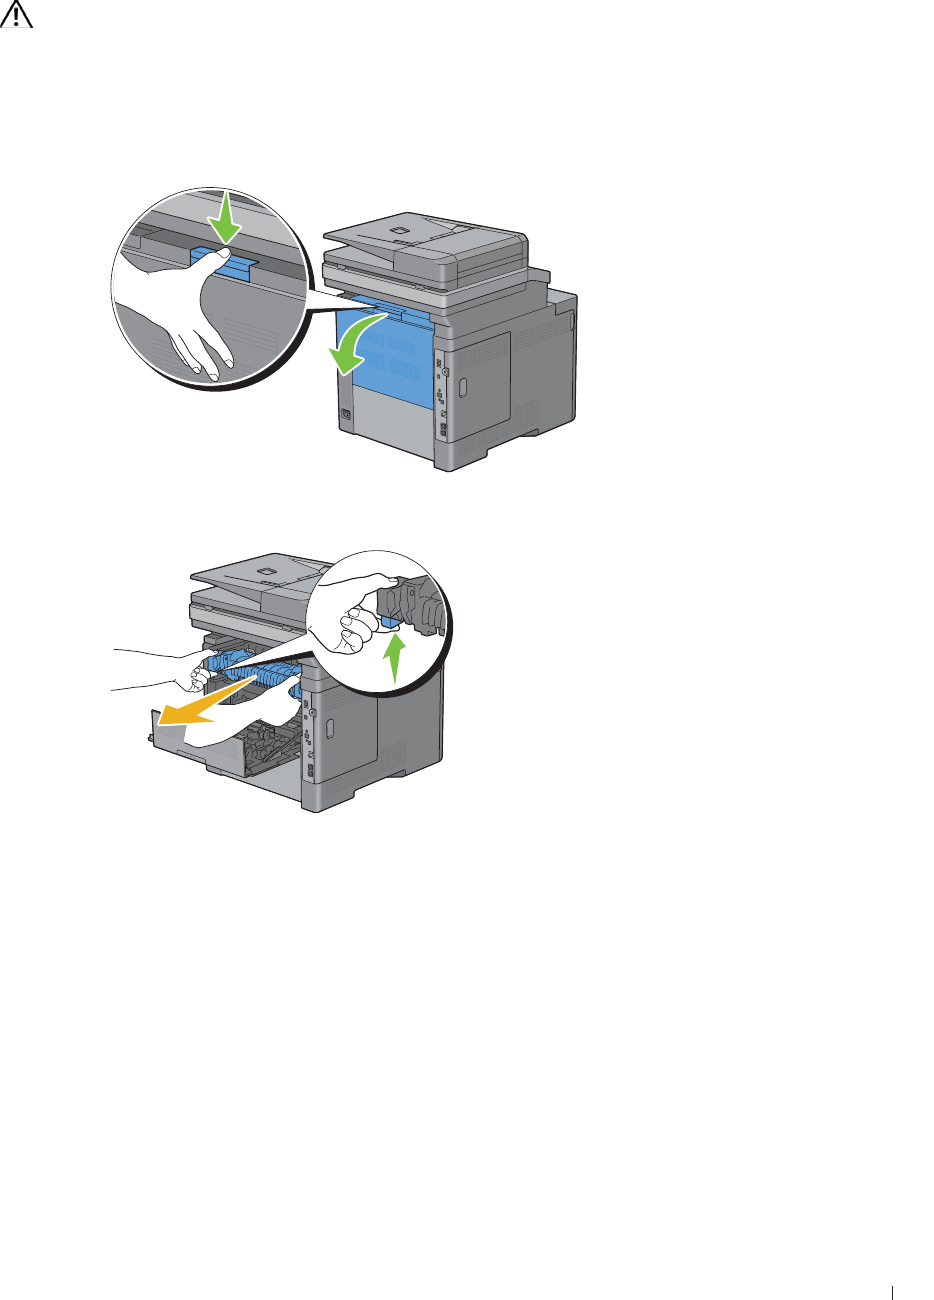
1
Turn off the printer and wait for 30 minutes.
2
Push down the latch to open the rear cover.
3
Grasp the grips on both sides of the fusing unit squeezing the lever under the left side grip, and then pull out the
unit.

480 Maintaining Your Printer
Installing a Fusing Unit
1
Unpack a new fusing unit.
2
Make sure that the two tabs of the fusing unit align with the grooves on the printer, and then insert it into the
printer until it clicks.
3
Close the rear cover.
NOTE: After replacing the fusing unit, be sure to initialize its life counter by following the instructions in the accompanying
manual.
Maintaining Your Printer 481
Replacing the Transfer Belt Unit, the 2nd Belt Transfer Roller (2nd BTR),
and the Retard Roller
You need to replace all three parts (transfer belt unit, 2nd BTR, and retard roller) at a time. Both the 2nd BTR and
the retard roller for replacement come with a new transfer belt unit.
WARNING: Before performing any of the following procedures, read and follow the safety instructions in the
Important
Information
.
CAUTION: Ensure nothing touches or scratches the surface (black-colored film) of the transfer belt unit. Scratches, dirt, or oil
from your hands on the film of the transfer belt unit may reduce print quality.
Removing the Transfer Belt Unit
1
Push down the latch to open the rear cover.
2
Open the right side cover.
482 Maintaining Your Printer
3
Turn the waste toner box lock lever 90-degrees counterclockwise to unlock the waste toner box.
4
Grasp the handle on the waste toner box and pull it out making sure to hold it upright so that the waste toner does
not spill out.
CAUTION: Take care not to drop the waste toner box while you are removing it.
CAUTION: After removing the waste toner box, do not touch the parts shown in the illustration. Toner can dirty or stain
your hands.

Maintaining Your Printer 483
5
Stand the removed waste toner box upright on a level surface.
WARNING: Never lay the waste toner box on its side as this may cause its malfunction or toner spills.
6
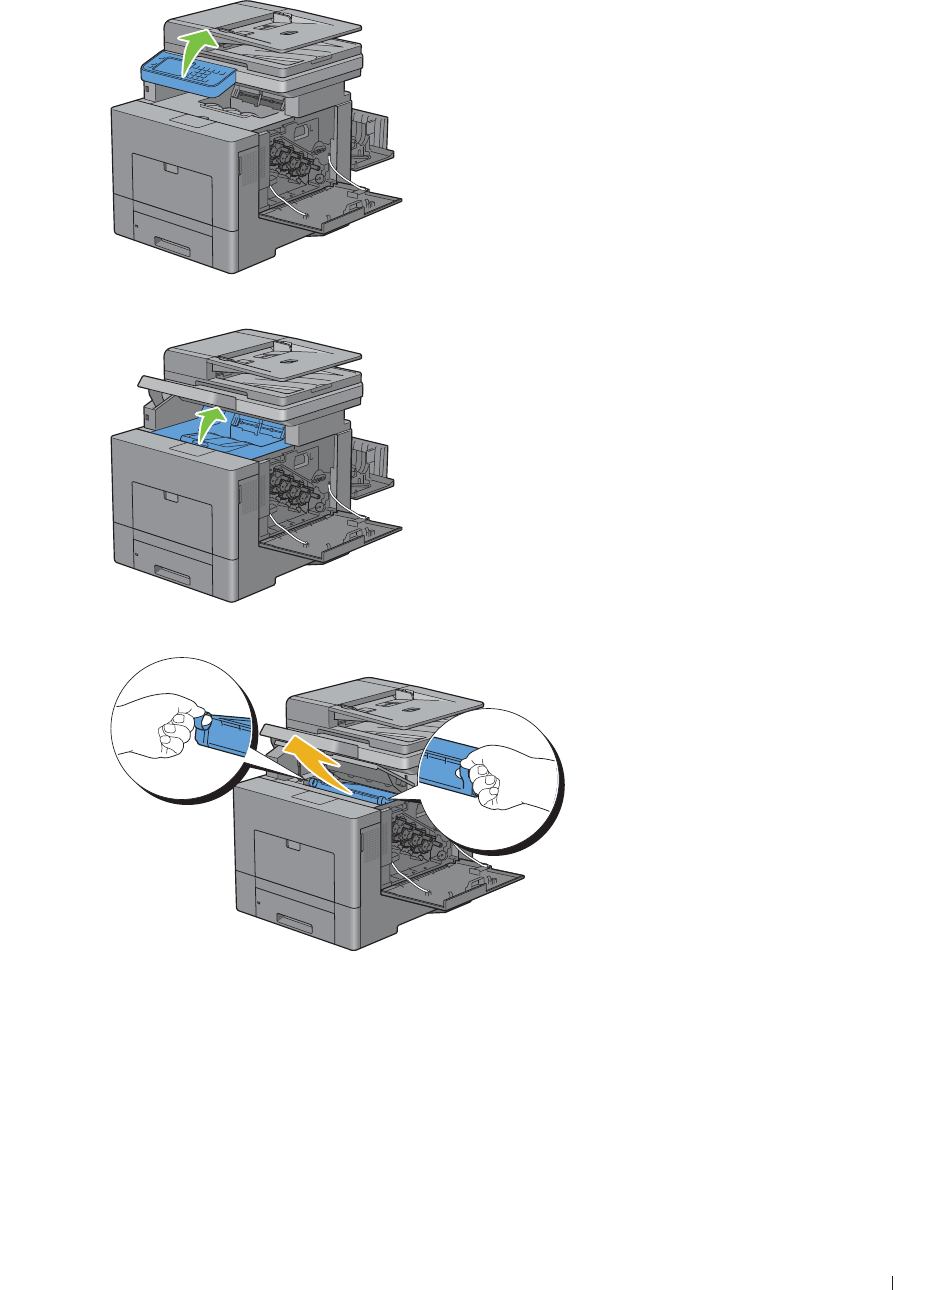
Lift the operator panel.
7
Open the top cover.
484 Maintaining Your Printer
8
Put your fingers through the loops on both sides of the transfer belt unit, and then pull it out.
CAUTION: If you cannot pull out the unit from the printer, make sure that all of the above procedures are performed
properly.
9
Clean the CTD sensor (as shown) with a clean, dry cotton swab.
Installing a Transfer Belt Unit
1
Unpack a new transfer belt unit.
2
Remove the two orange packing materials first, and then the protective sheet from the transfer belt unit.
CAUTION: Ensure nothing touches or scratches the surface (black-colored film) of the transfer belt unit. Scratches, dirt,
or oil from your hands on the film of the transfer belt unit may reduce print quality.
Maintaining Your Printer 485
3
Make sure that the arrow marks on the transfer belt unit and the printer face each other, and then insert the unit
into the printer until it clicks.
4
Close the top cover.
5
Lower the operator panel back in place.
486 Maintaining Your Printer
6
Reinsert the removed waste toner box.
CAUTION: If the waste toner box does not fit into place properly, make sure that the transfer belt unit is fully inserted.
7
Turn the waste toner box lock lever 90-degrees clockwise to lock the waste toner box.
8
Close the right side cover.
NOTE: After replacing the transfer belt unit, be sure to initialize its life counter by following the instructions in the
accompanying manual.
Maintaining Your Printer 487
Removing the 2nd BTR
1
Pinching the tabs on both sides of the 2nd BTR, lift it out of the printer.
Installing a 2nd BTR
1
Unpack a new 2nd BTR.
2
Hold the 2nd BTR by both its ends.
3
Make sure that the arrow marks on the 2nd BTR and the printer face each other, and then press down the 2nd BTR
until it clicks.
488 Maintaining Your Printer
4
Close the rear cover.
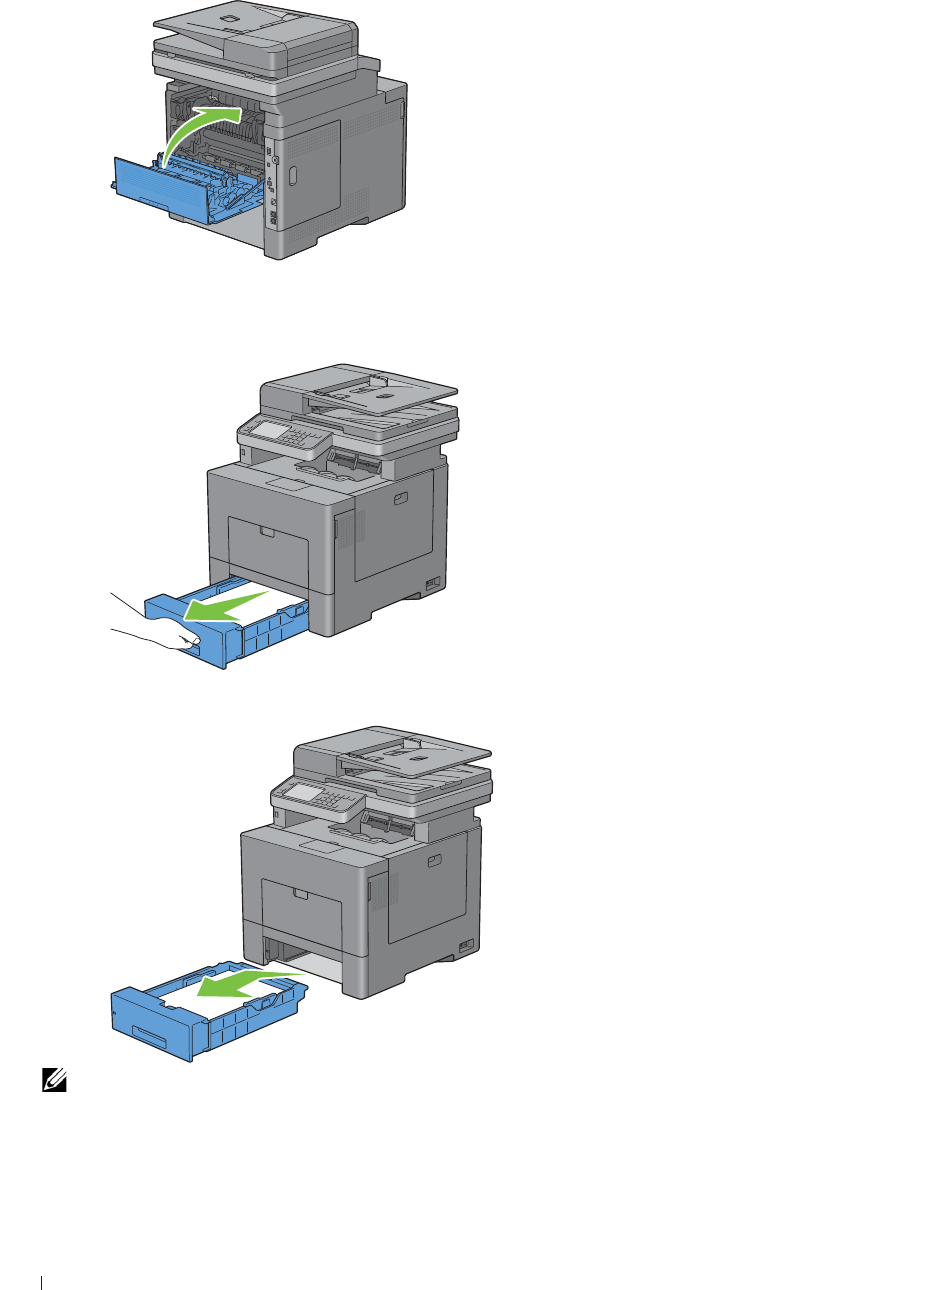
Removing the Retard Roller in Tray1
1
Pull tray1 out of the printer about 200 mm.
2
Hold tray1 with both hands, and remove it from the printer.
NOTE: Ensure that you remove all the paper from tray1 before removing the retard roller.
Maintaining Your Printer 489
3
Slightly pressing down the lock lever on tray1 to the right with one hand, raise the retard roller with the other hand.
4
Slide the retard roller to the left to remove it from tray1.
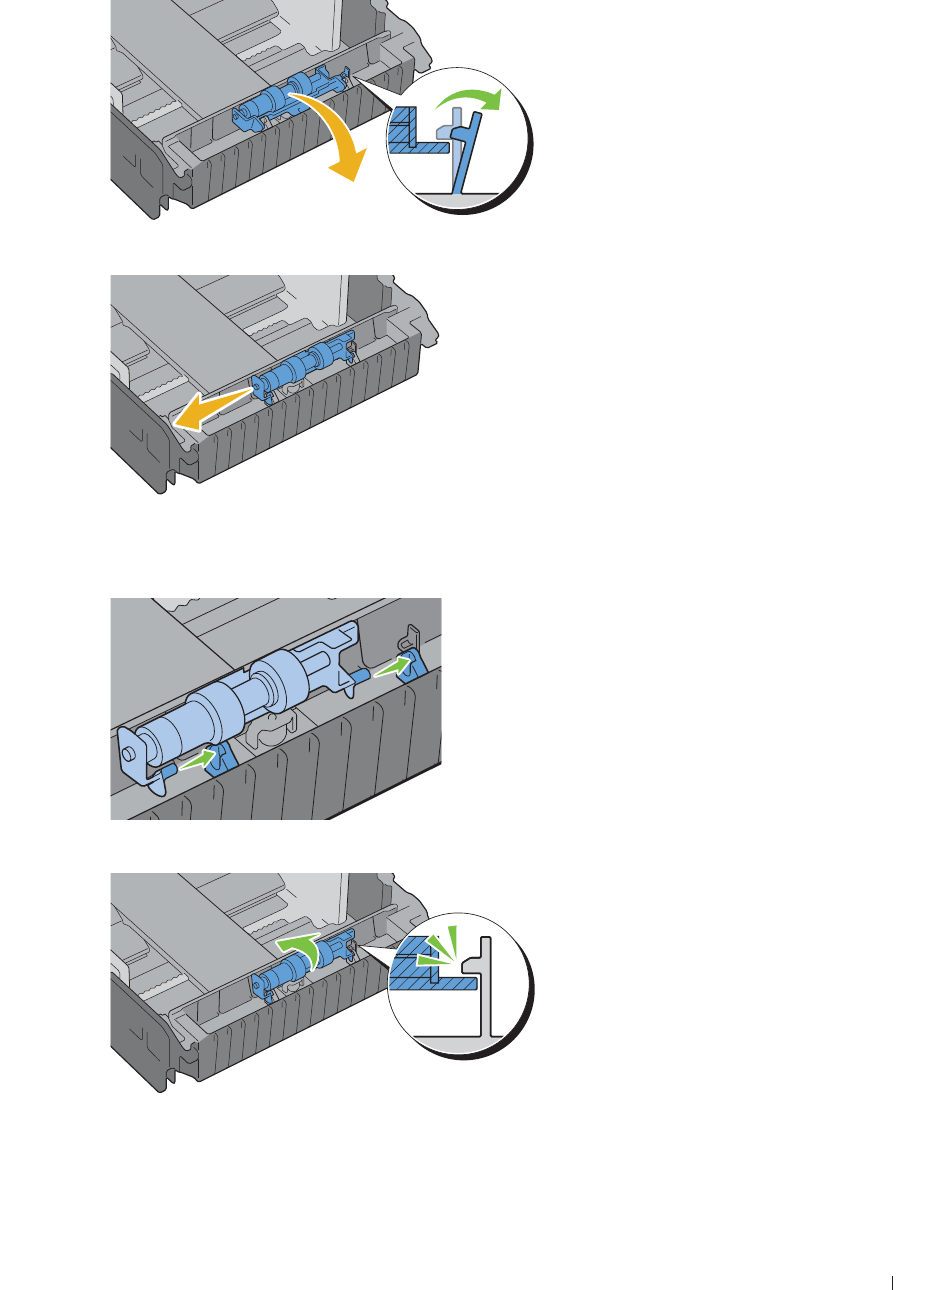
Installing a Retard Roller in Tray1
1
Slide the two axles of the retard roller into the holes on tray1.
2
Press down the retard roller until it snaps.
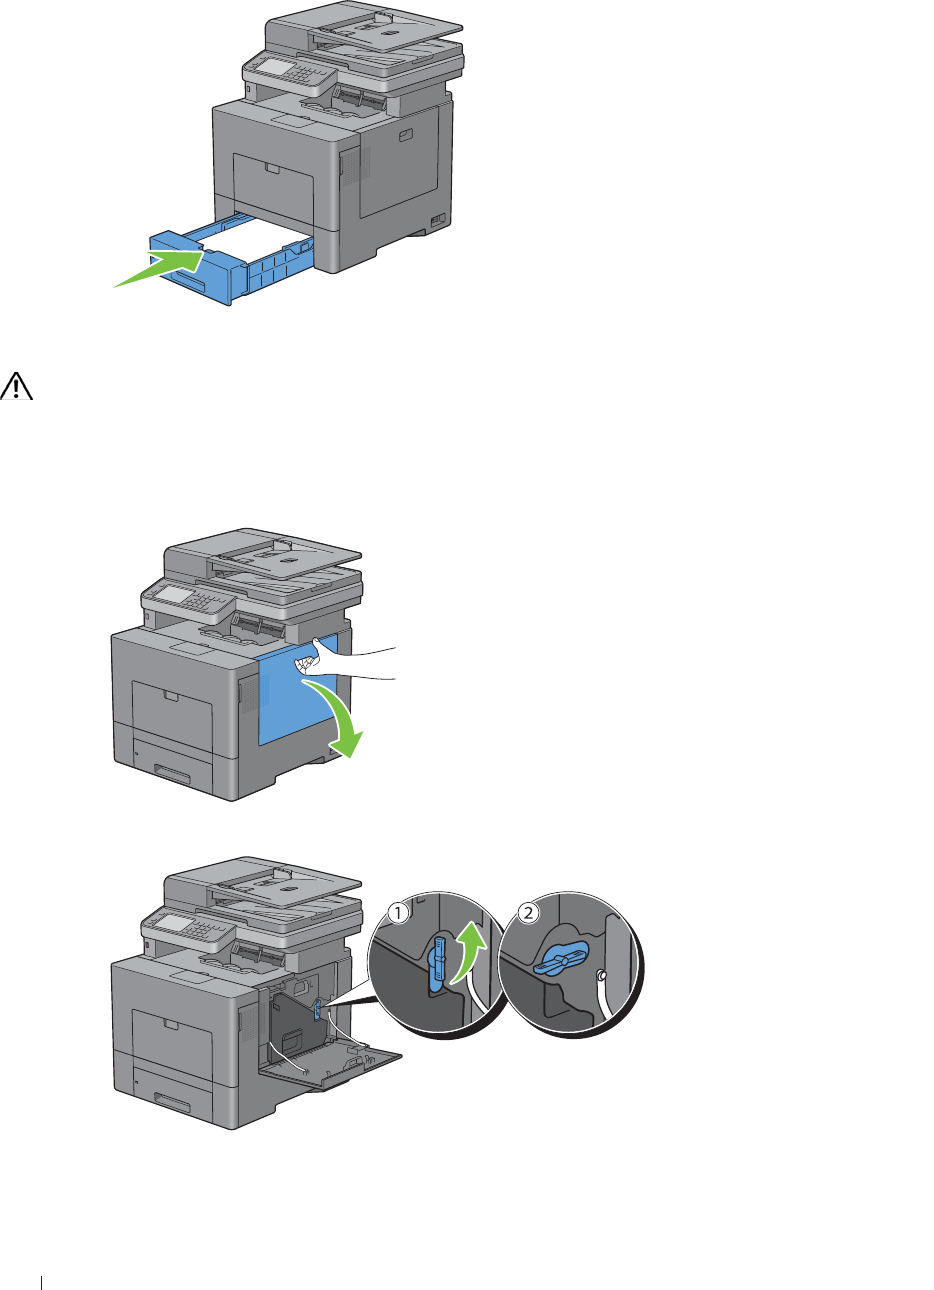
490 Maintaining Your Printer
3
Load paper in tray1, and then insert the tray into the printer and push until it stops.
Replacing the Waste Toner Box
WARNING: Before performing any of the following procedures, read and follow the safety instructions in the
Important
Information
.
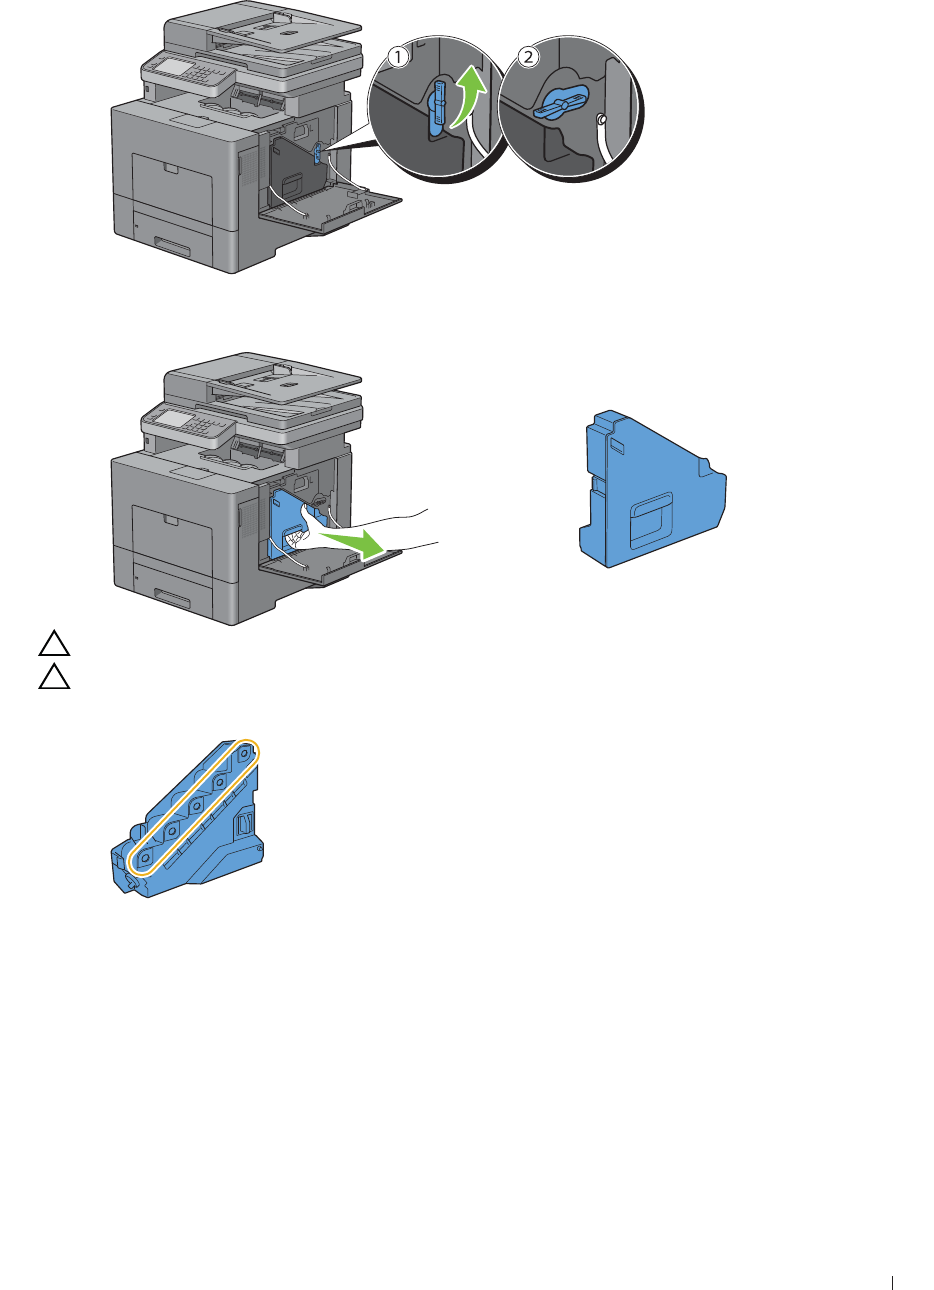
Removing the Waste Toner Box
1
Open the right side cover.
2
Turn the waste toner box lock lever 90-degrees counterclockwise to unlock the waste toner box.
Maintaining Your Printer 491
3
Grasp the handle on the waste toner box and pull it out making sure to hold it upright so that the waste toner does
not spill out.
CAUTION: Take care not to drop the waste toner box while you are removing it.
CAUTION: After removing the waste toner box, do not touch the parts shown in the illustration. Toner can dirty or stain
your hands.
4
Insert the used waste toner box into the plastic bag that came with the new waste toner box and seal the bag.
Installing a Waste Toner Box
1
Unpack a new waste toner box.
2
Insert the waste toner box.
492 Maintaining Your Printer
3
Turn the waste toner box lock lever 90-degrees clockwise to lock the waste toner box.
4
Close the right side cover.
Maintaining Your Printer 493
Cleaning Inside the Printer
Cleaning the CTD Sensor
Clean the Color Toner Density (CTD) sensor only when an alert for the CTD sensor is shown on the Status Monitor
or touch panel screen.
1
Ensure that the printer is turned off.
2
Push down the latch to open the rear cover.
3
Open the right side cover.
4
Turn the waste toner box lock lever 90-degrees counterclockwise to unlock the waste toner box.
494 Maintaining Your Printer
5
Grasp the handle on the waste toner box and pull it out making sure to hold it upright so that the waste toner does
not spill out.
CAUTION: Take care not to drop the waste toner box while you are removing it.
CAUTION: After removing the waste toner box, do not touch the parts shown in the illustration. Toner can dirty or stain
your hands.
6
Stand the removed waste toner box upright on a level surface.
WARNING: Never lay the waste toner box on its side as this may cause its malfunction or toner spills.
Maintaining Your Printer 495
7
Lift the operator panel.
8
Open the top cover.
9
Put your fingers through the loops on both sides of the transfer belt unit, and then pull it out.
496 Maintaining Your Printer
10
Clean the CTD sensor (as shown) with a clean, dry cotton swab.
11
Make sure that the arrow marks on the transfer belt unit and the printer face each other, and then insert the unit
into the printer until it clicks.
12
Close the top cover.

Maintaining Your Printer 497
13
Lower the operator panel back in place.
14
Reinsert the removed waste toner box.
CAUTION: If the waste toner box does not fit into place properly, make sure that the transfer belt unit is fully inserted.
15
Turn the waste toner box lock lever 90-degrees clockwise to lock the waste toner box.
498 Maintaining Your Printer
16
Close the right side cover.
17
Close the rear cover.
Cleaning the Raster Optical Scanner (ROS) Window
To prevent deterioration of printing quality due to stains inside the printer, clean inside the printer regularly by using
the cleaning rod whenever you replace drum cartridges.
1
Open the right side cover.
Maintaining Your Printer 499
2
Turn the waste toner box lock lever 90-degrees counterclockwise to unlock the waste toner box.
3
Grasp the handle on the waste toner box and pull it out making sure to hold it upright so that the waste toner does
not spill out.
CAUTION: Take care not to drop the waste toner box while you are removing it.
CAUTION: After removing the waste toner box, do not touch the parts shown in the illustration. Toner can dirty or stain
your hands.
500 Maintaining Your Printer
4
Stand the removed waste toner box upright on a level surface.
WARNING: Never lay the waste toner box on its side as this may cause its malfunction or toner spills.
5
Remove the cleaning rod from inside the printer.
6
Insert the cleaning rod fully into one of the four holes until it clicks into the interior of the printer as illustrated
below, and then pull it out.
7
Repeat step 6 also on the other three holes. One time insertion is enough for each hole.
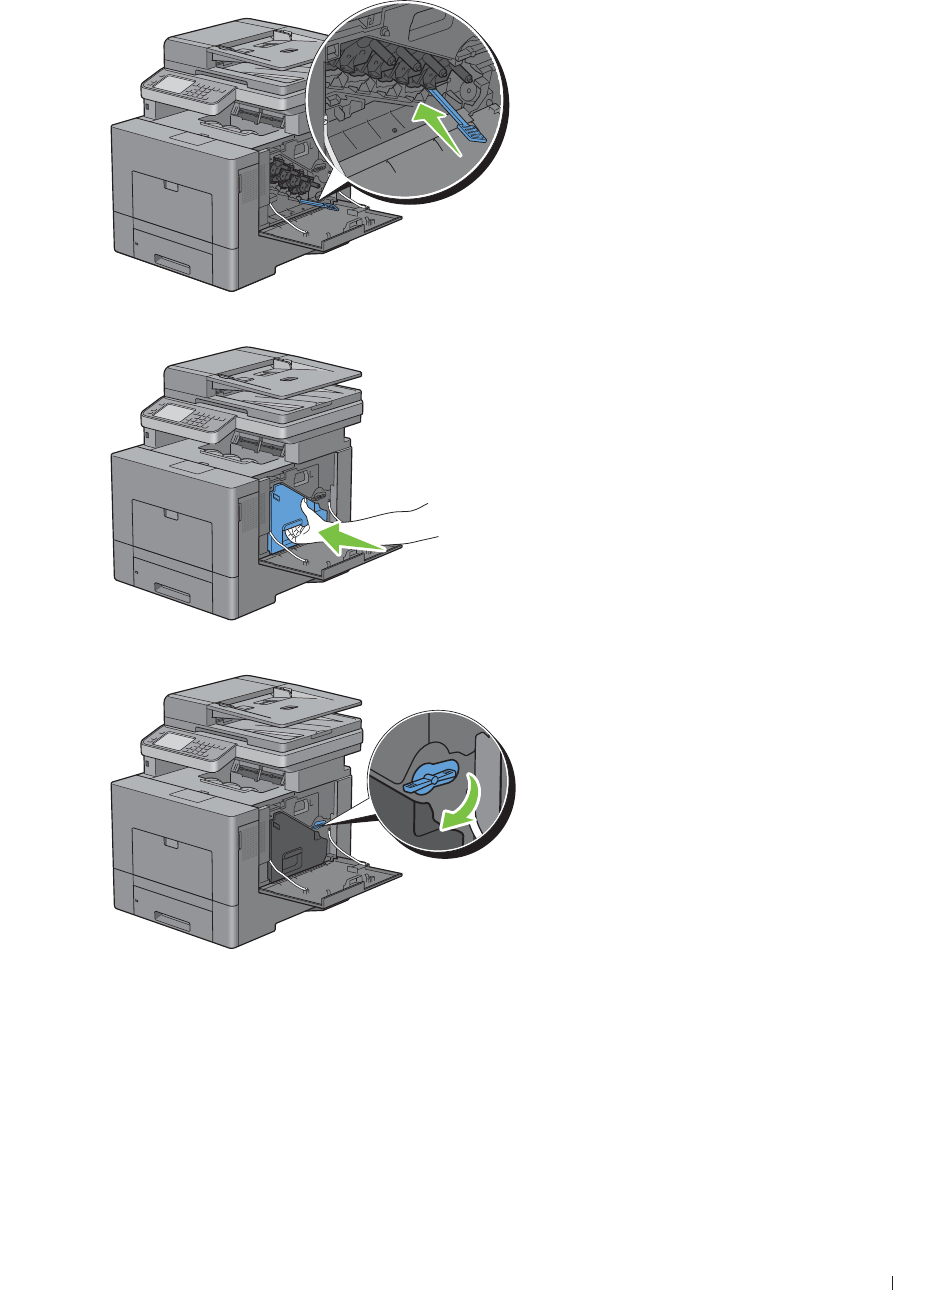
Maintaining Your Printer 501
8
Return the cleaning rod to its original location.
9
Reinsert the removed waste toner box.
10
Turn the waste toner box lock lever 90-degrees clockwise to lock the waste toner box.
502 Maintaining Your Printer
11
Close the right side cover.
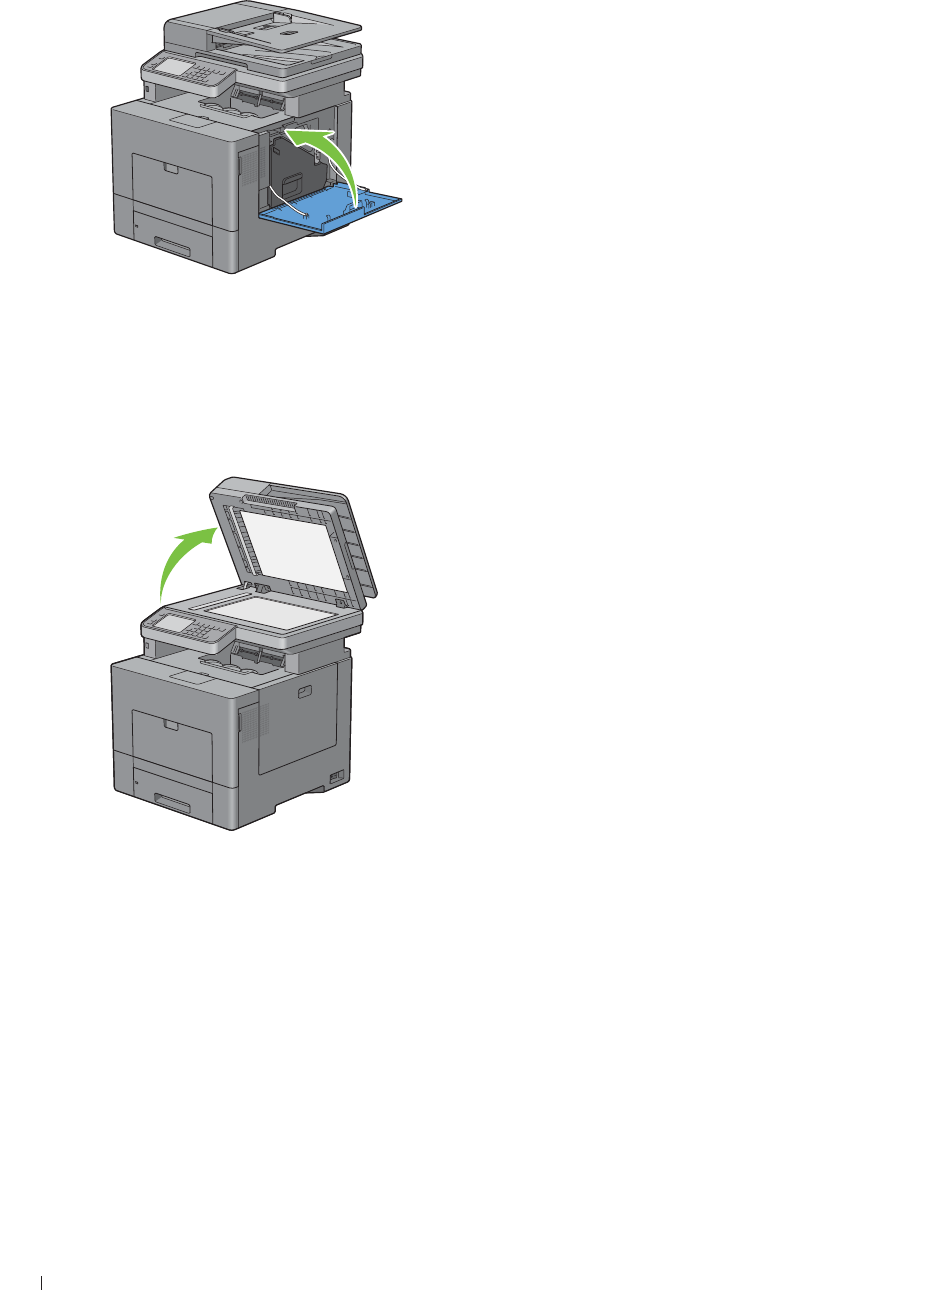
Cleaning the Scanner
Keeping the scanner clean helps ensure the best possible copies. It is recommended to clean the scanner at the start
of each day and during the day, as needed.
1
Slightly dampen a soft lint-free cloth or paper towel with water.
2
Open the document cover.
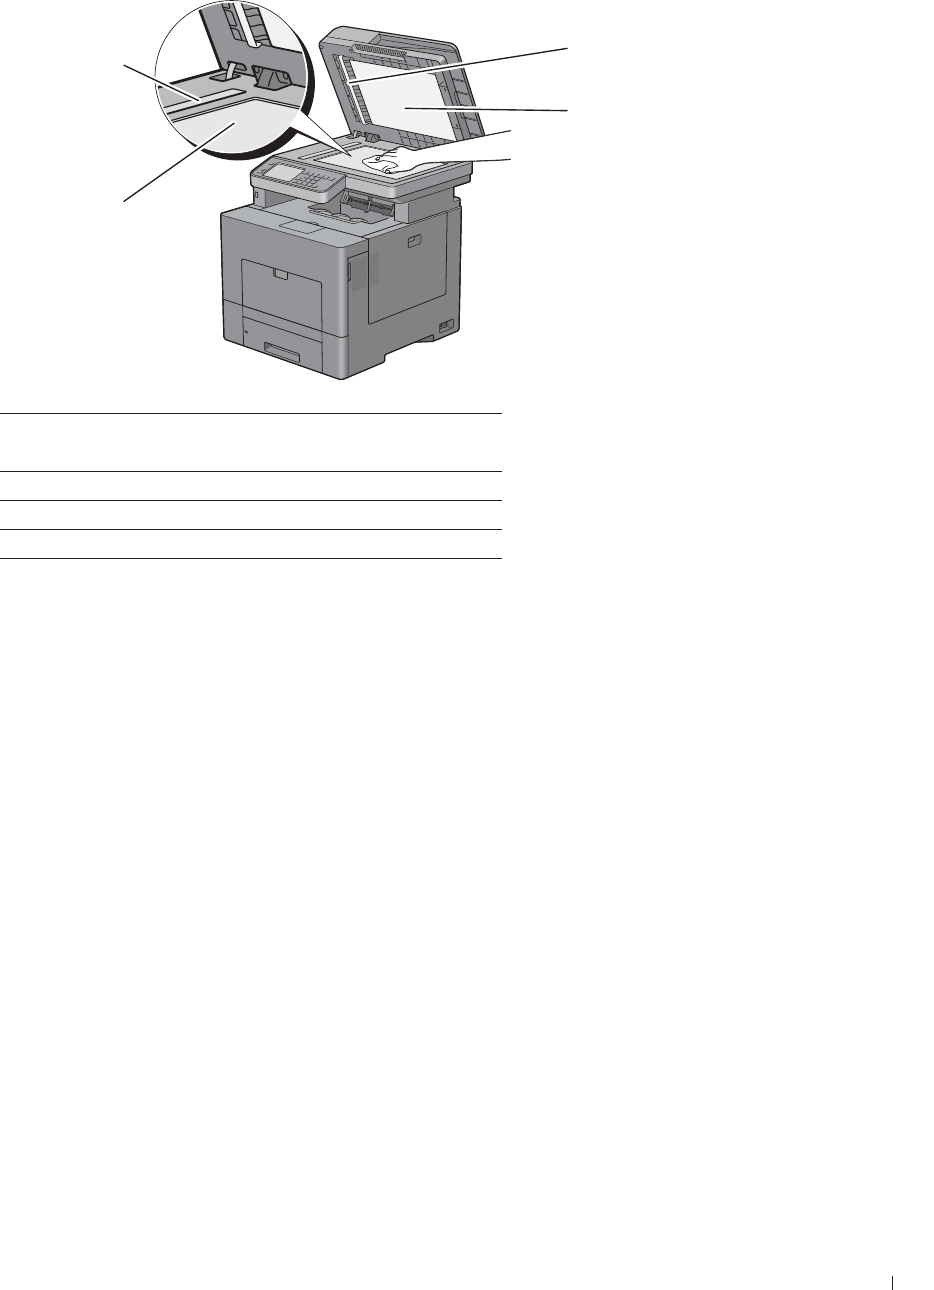
Maintaining Your Printer 503
3
Wipe the surface of the document glass and DADF glass until it is clean and dry.
4
Wipe the underside of the white document cover and white sheet until it is clean and dry.
5
Close the document cover.
1White Sheet
NOTE: Handle with care.
2White Document Cover
3Document Glass
4DADF Glass
1
2
3
4
504 Maintaining Your Printer
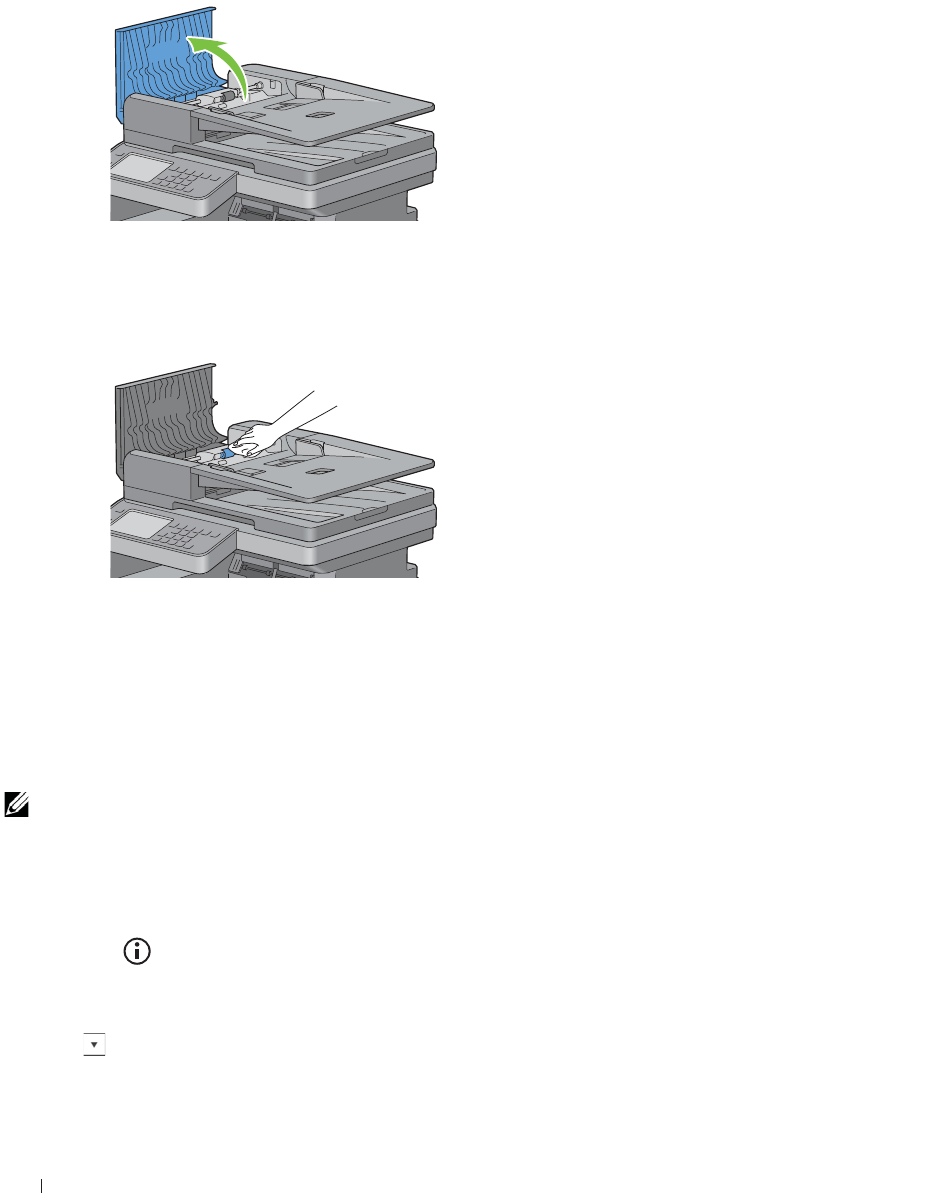
Cleaning the DADF Feed Roller
Keeping the DADF feed roller clean helps ensure the best possible copies. It is recommended to clean the DADF feed
roller at regular intervals.
1
Open the DADF cover.
2
Wipe the DADF feed roller with a dry soft lint-free cloth or paper towel until it is clean.
If the DADF feed roller gets soiled with ink stains, paper from the DADF may also be soiled. In this case, slightly
dampen a soft lint-free cloth or paper towel with a neutral detergent or water, and then remove the contamination
from the DADF feed roller until it is clean and dry.
Adjusting Color Registration
To adjust the color registration when you first install the printer or after moving it to a new location, follow the
procedure below.
• Printing the Color Registration Chart
• Determining Values
• Entering Values
NOTE: If the Panel Lock Control is set to Enable, you need to enter the four digit password to enter the Admin
Settings menu.
Printing the Color Registration Chart
When Using the Operator Panel
1
Press the
(Information)
button.
2
Tap the
Tools
tab, and then tap
Admin Settings
.
3
Ta p
Maintenance
.
4
Tap until
Color Reg Adjust
appears, and then tap
Color Reg Adjust
.
Maintaining Your Printer 505
5
Ta p
Color Regi Chart
.
6
Ta p
Print
.
The color registration chart is printed.
When Using the Tool Box
1
Click
Start
o
All Programs
o
Dell Printers
o
Dell C2665dnf Color Laser Multifunction Printer
o
Tool Box
.
NOTE: For details about starting the T
Tool Box
, see "Starting the Tool Box."
The
Tool Box
opens.
2
Click the
Printer Maintenance
tab.
3
Select
Service Tools
from the list at the left side of the page.
The
Service Tools
page is displayed.
4
Click
Start
next to
Color Regi Chart
under
Color Registration Adjustments
.
The color registration chart is printed.
Determining Values
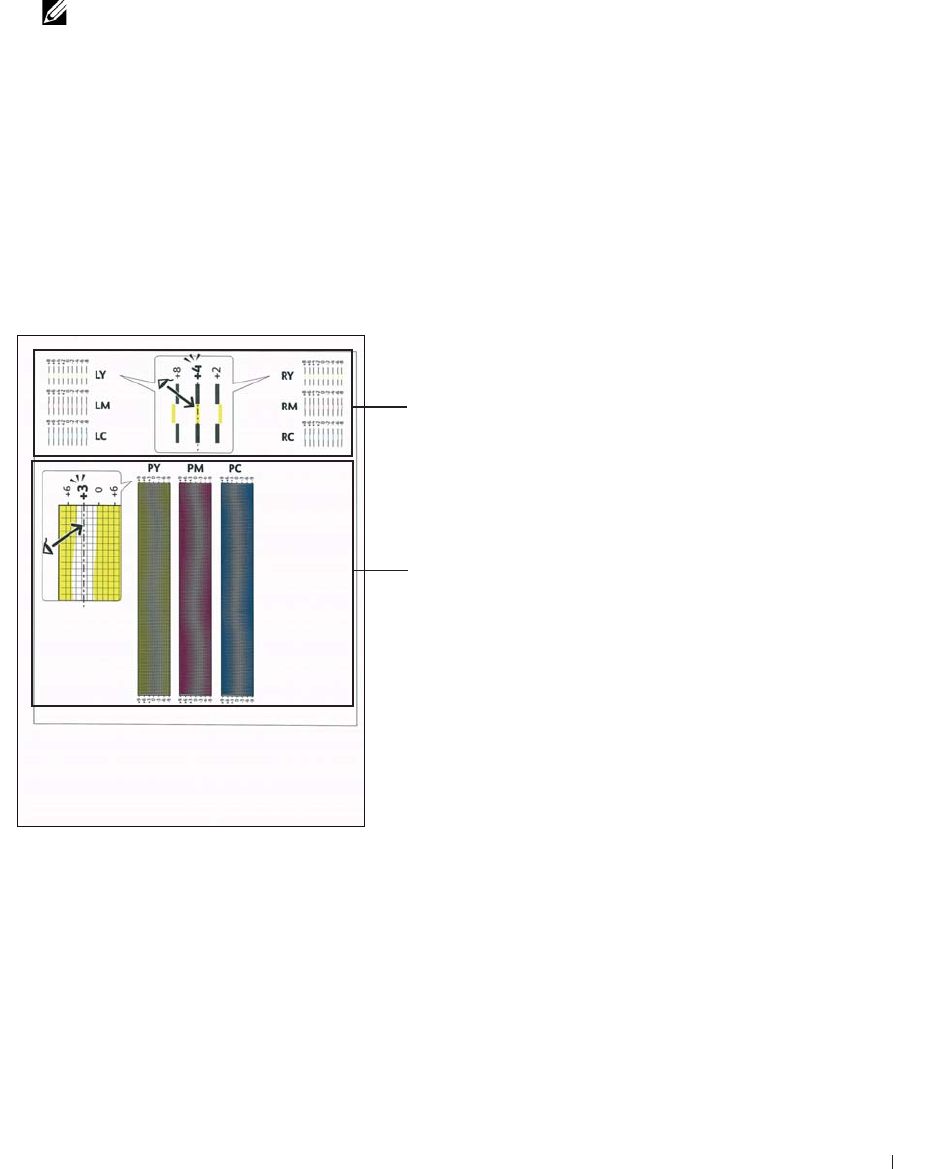
On the color registration chart, there are two types of charts: Chart 1 (fast scan) and Chart 2 (slow scan).
The Chart 1 is used to adjust the color registration for the fast scan direction, which is vertical to paper feed
direction. The Chart 2 is used to adjust the color registration for the slow scan direction, which is horizontal to paper
feed direction.
The following sections explain how to determine the adjustment values for the fast scan and the slow scan using
Chart 1 and Chart 2.
Chart 1 (fast scan)
Chart 2 (slow scan)
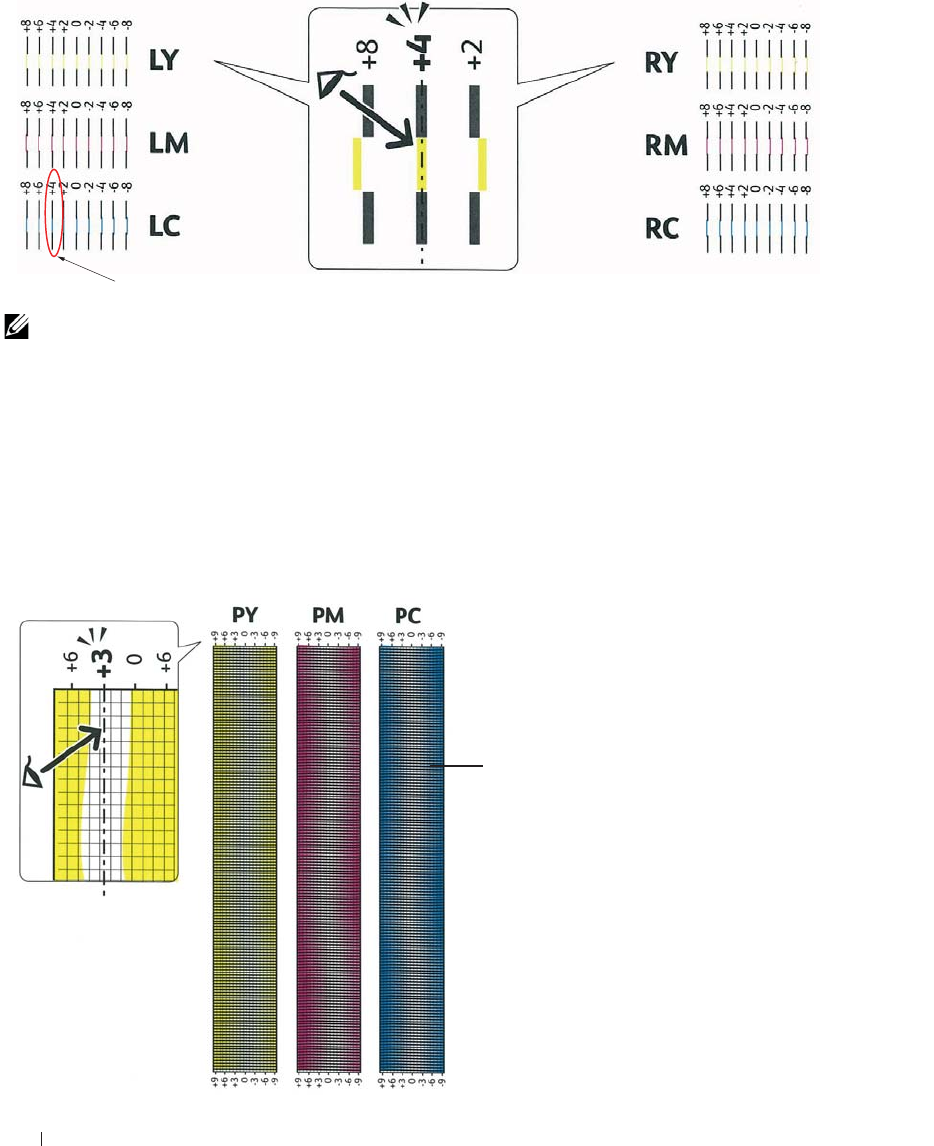
506 Maintaining Your Printer
Fast Scan
On the Chart 1 of the color registration chart, find the straightest lines where the two black lines and the colored line
are most closely aligned for each color (LY, LM, LC, RY, RM, and RC). If you find the straightest line, make a note
of the value (-8 to +8) indicated by the straightest line for each color.
When the value is 0 for each color, you do not need to adjust the color registration for the fast scan.
When the value is not 0, enter the value using the procedure in "Entering Values."
NOTE: If it is difficult to choose only one value, as in the case that there seem to be two values closest to a straight line, take the
value between the two. For example, in the figure above, -6 and -8 are the values closest to a straight line, so you would enter the
value -7.
Slow Scan
On the Chart 2 of the color registration chart, find the medium line within the range of white area for each color
pattern (PY, PM, and PC). If you find the medium line, make a note of the value (-9 to +9) indicated by the
medium line for each color.
When the value is 0 for each color, you do not need to adjust the color registration for the slow scan.
When the value is not 0, enter the value using the procedure in "Entering Values."
Straightest line
Lattice pattern

Maintaining Your Printer 507
Entering Values
When Using the Operator Panel
Using the operator panel, enter the values found in the color registration chart to make adjustments.
1
Press the
(Information)
button.
2
Tap the
Tools
tab, and then tap
Admin Settings
.
3
Ta p
Maintenance
.
4
Tap until
Color Reg Adjust
appears, and then tap
Color Reg Adjust
.
5
Ta p
Enter Number
.
6
Ta p
-
or
+
to specify the values for left colors (
LY
,
LM
, and
LC
), and then tap
Next
.
7
Ta p
-
or
+
to specify the values for right colors (
RY
,
RM
, and
RC
), and then tap
Next
.
8
Ta p
-
or
+
to specify the values for process colors (
PY
,
PM
, and
PC
), and then tap
OK
.
NOTE: The registration values are always shown as 0 the next time you enter the menu.
9
Ta p
Color Regi Chart
.
10
Ta p
Print
.
The color registration chart with the new values is printed.
If the straightest line is not at the value of 0, adjust the values again. Checking the charts before and after the
adjustments will help you to determine the values to enter.
When Using the Tool Box
Using the Tool Box, enter the values that you found in the color registration chart to make adjustments.
1
Click
Start
o
All Programs
o
Dell Printers
o
Dell C2665dnf Color Laser Multifunction Printer
o
Tool Box
.
NOTE: For details about starting the T
Tool Box
, see "Starting the Tool Box."
The
Tool Box
opens.
2
Click the
Printer Maintenance
tab.
3
Select
Service Tools
from the list at the left side of the page.
The
Service Tools
page is displayed.
4
Specify each value for process, left, and right colors in
Enter Number
under
Color Registration Adjustments
, and
then click
Apply New Settings
.
5
Click
Start
next to
Color Regi Chart
under
Color Registration Adjustments
.
The color registration chart is printed with the new values.
6
Adjust till all straight lines are at the value of 0. Show image of before and after adjustment will help.
After printing the color registration chart, do not turn off the printer until the printer motor has stopped running.
NOTE: If 0 is not next to the straightest lines, determine the values and adjust the printer again.

508 Maintaining Your Printer