First Computer A430 Notebook PC User Manual Chap1
First International Computer Inc Notebook PC Chap1
Contents
Chap 1
Introduction 1
1-1
1Introduction
Your Notebook PC is a fully IBM compatible
portable personal computer. With the latest features
in mobile computing and multimedia technology, this
notebook makes a natural traveling companion.
Lightweight and compact, your Notebook PC runs
on a whole wide range of general business, personal
productivity, entertainment, and professional
applications. It is ideal for use in the office, at home,
and on the road.
With its all-in-one design, full functionality is built-in
with no need to change external devices. Your
Notebook PC makes an ideal choice for use in the
office, the schoolroom, at home, on the road and all
other occasions.

Notebook User Guide
1-2
1.1 Feature Highlight
Before we go to identify each part of your Notebook PC, we will first
introduce you to other notable features of your computer.
Processing Unit
• Your notebook runs on Intel Mobile Pentium !!! microprocessor, with
integrated 256KB L2 Cache; or Intel Mobile Celeron microprocessor,
with integrated 128 KB L2 Cache. Check with your dealer on the CPU
type and speed.
• Fully compatible with an entire library of PC software based on operating
systems such as MS-DOS, Windows 95/98, and Windows NT/2000. It
also runs on future versions of Windows.
Memory
This notebook provides two memory slots for installing 144-pin SODIMM
modules up to 256MB using 32MB, 64MB, and 128MB SDRAM modules.
PCMCIA
Provides two PCMCIA slots that allows you to insert either two Type II or
one Type III cards.
AGP Local Bus Architecture
• AGP 2X video local bus and 2D/3D Graphic Engine with 4/8MB
VRAM. Supports Zoomed Video (ZV) Port technology for smooth full-
screen motion picture playback capabilities.

Introduction 1
1-3
PCI Local Bus Architecture
• 32-bit PCI Enhanced IDE optimizes the data transfer between the CPU
and hard disk drives. Support ultra DMA33/66 PIO Mode up to PIO
Mode 4, bus mastering for LBA Scheme.
• 32-bit PCMCIA CardBus PCI technology that is also backward
compatible with 16-bit PC cards.
Audio System
Full-duplex 16-bit stereo audio system with wavetable function and Plug-and-
Play features. Sound Blaster and Sound Blaster Pro compatible.
Flash BIOS
Flash EPROM BIOS allows you to easily upgrade the System BIOS using the
Phoenix Flash utility program.
Power and System Management
• Integrated SMM on system chipset that shuts down components not in
use to reduce power consumption. Power Management user control on
System BIOS SETUP allows you to activate and deactivate power saving
features.
• Auto Suspend hot-key allows you to suspend the system operation
instantly and resume at the press of the power button.
• System Password for User and Supervisor included on the BIOS SETUP
Program to protect unauthorized use or your computer.

Notebook User Guide
1-4
1.2 Unpacking the Computer
Your computer comes securely packaged in a sturdy cardboard shipping
carton. Upon receiving your computer, open the carton and carefully remove
the contents. In addition to this User Guide, the shipping carton should also
contain the following items:
þ The Notebook Computer
þ An AC Adapter and AC Power Cord
þ Li-Ion or NiMH Battery Pack(s)
þ Utility Diskettes/CD
þ Hardcopy User Guide
þ Quick Setup Manual
Carefully inspect each component to make sure that nothing is missing and/or
damaged. If any of these items are missing or damaged, notify your dealer
immediately. Be sure to save the shipping materials and the carton in case you
need to ship the computer or if you plan to store the computer away
sometime in the future.
Introduction 1
1-5
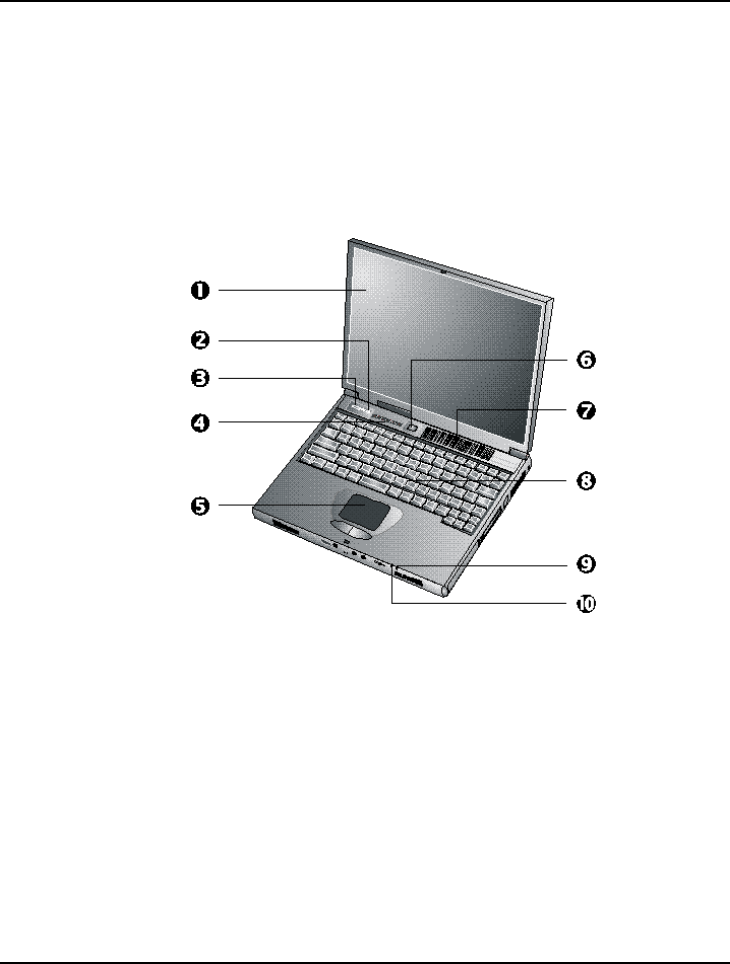
1.3 The Inside of the Notebook
The notebook computer is compact with features on every side. First, look at
the inside of the system. The following sections describe inside features.
¶. Color LCD Display ·. Internet Button
¸. E-Mail Button ¹. Status LED Indicator Panel
º. Touchpad Pointing Device ». Power On/Resume Button
¼. Cooling Fan Vent ½. Keyboard
”. Power Indicator •. Battery Charging LED
• Color LCD Display
The notebook computer comes with a color LCD that you can adjust for
a comfortable viewing position. The LCD can be a 12.1” TFT (Thin Film
Transistor) color LVDS with 800x600 SVGA (Super Video Graphics

Notebook User Guide
1-6
Array) resolution panels, or 13.3” or 14.1” TFT color LVDS with
1024x768 XGA (Extended Graphics Array) resolution panels. The
features of the Color LCD Display are summarized as follows:
−TFT color LVDS with 800x600 SVGA or 1024x768 XGA
resolution panels.
−Capable of displaying 64K colors (32-bit high color) on either
SVGA or XGA LVDS panels.
−LVDS display control hot-keys allows you to adjust the contrast
of the LCD.
−Simultaneous display capability for LCD and external desktop
computer monitor.
−LCD display can be upgraded from 12.1” TFT to 13.3” or 14.1”
TFT.
• Internet button
This latest technology is designed specifically for providing a very
convenient way in connecting Internet only by pressing Internet button as
shown in the graphics. For more understanding and interesting, you can
refer Section 2.5 to recognize the driver installation procedures in
activating Internet button.
• E-mail button
This is the most convenient way to access the outlook utility just by
pressing this button, you can omit several procedures in entering into
Outlook environment.
• Status LED Indicator Panel
keep you informed of your notebook computer’s current operating status.
Descriptions of the status icons appear in the following section.

Introduction 1
1-7
• Touchpad Pointing Device
Microsoft and IBM PS/2 mouse compatible with two select buttons.
Supports tapping selection and dragging function. It works like a standard
computer mouse. Simply move your fingertip over the Glide Pad to
control the position of the cursor. Use the selection buttons below the
Glide Pad to select menu items.
• Power On/Resume Button
Switches the computer power on and off, or resumes whenever it is in
Suspend mode.
• Cooling Fan Vent
Emits the heat out of your computer and keeps it within operating
temperature.
+
Do not block the fan while the notebook is in use.
• Keyboard
−Standard QWERTY-key layout and full-sized 86/87 keys
keyboard with Windows 98 hot-keys, embedded numeric keypad,
12 function keys, inverted “T” cursor arrow keys, and separate
page screen control keys.
−Wide extra space below the keyboard panel for your wrist or palm
to sit-on comfortably during typing.
• Power Indicator
Lets you know that power to the system is turned on. This LED is
positioned so that you can see the power state whether the LVDS panel is
opened or closed.
ß Lights green when the system is powered on using the AC adapter
or battery.
ß Lights amber when battery is warning in low battery power.

Notebook User Guide
1-8
ß Lights green blinking when in Suspend to RAM (or Suspend to Disk
if you already created Save to Disk partition in HDD by using
PHDISK utility in the MS-DOS) mode and critically low battery
power. We strongly recommend that users create Save to Disk
partition as this will prevent your data from loss when power is
critically low.
• Battery Charging LED
Lights to indicate battery charging status.
ß Lights amber to indicate the battery is charging.
ß Lights off to indicate the battery is fully charged or no battery
installed.
STATUS ICONS
The notebook computer uses status lights marked with icons to communicate
system status. See the following figure and list for each icon’s meaning.
¶. Drive Access ·. Diskette Drive Access
¸. Caps Lock ¹. Scroll Lock
º. Num Lock Status LED Icons

Introduction 1
1-9
• Drive Access
When LED in green light indicates that the system is accessing either the
CD-ROM or DVD-ROM.
• Diskette Drive Access
When LED in green light indicates that the system is accessing data from
or is retrieving data to the floppy diskette drive.
• Caps Lock
When LED in green light indicates that the Caps Lock key on the
keyboard is activated. When activated, all alphabet keys typed in will be in
upper-case or capital letters.
• Scroll Lock
When LED in green light indicates that the Scroll Lock key on the
keyboard is activated. The Scroll Lock key has different functions
depending on the software you are using.
• Num Lock
When LED in green light indicates that the Num Lock key on the
keyboard is activated. When activated, the embedded numeric keypad will
be enabled.
Notebook User Guide
1-10
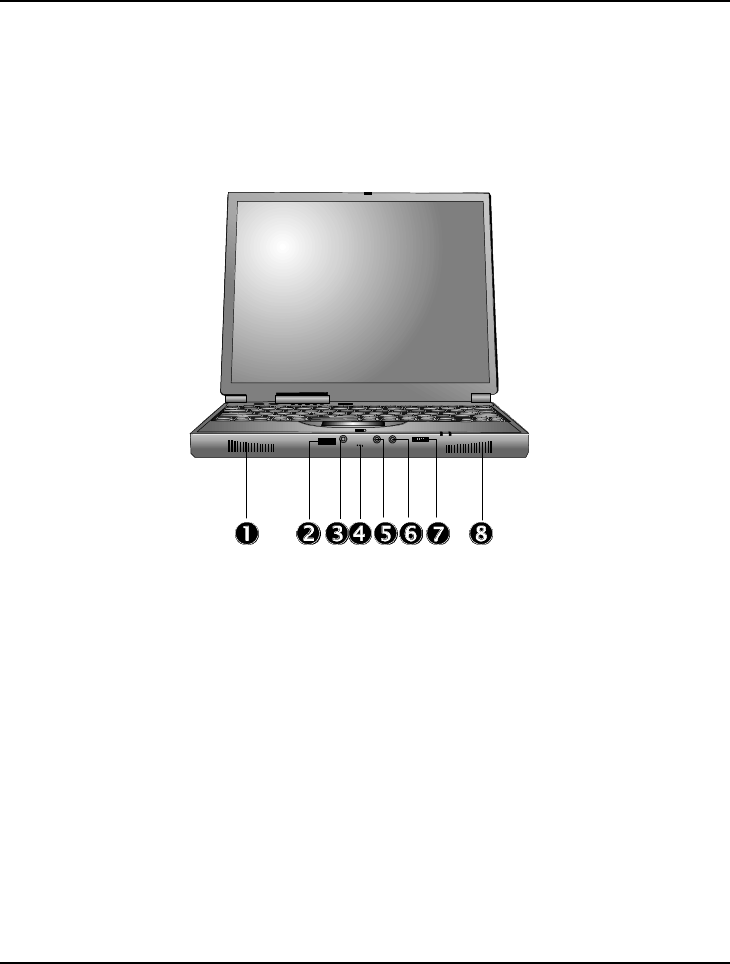
1.4 The Front Side of the Notebook
¶. Built-in Stereo Speakers ·. IR Port ¸. Microphone Jack
¹. Integrated Microphone º. Stereo Line-In Jack ». Headphone Jack
¼. Volume Control ½. Built-in Stereo Speakers
• Built-in Stereo Speakers
Integrated left and right mini stereo speakers for sound and audio output
for your multimedia presentations or listening pleasure.
• IR Port
Wireless data transfer of files between your notebook computer and an
IR-equipped device or notebook computer. You can also print to an IR-

Introduction 1
1-11
equipped printer without using cables. The SIR mode provides up to
115.2Kbps of data transfer rate.
• Audio Ports
From left to right, the jacks are Microphone, Line In & Headphones
described as follows:
ß Microphone Jack
Allows you to connect an external microphone for monophonic
recording or amplification through the unit. Plugging in an external
microphone disables the built-in microphone. Lets you connect an
external microphone to record monophonic sound directly into your
notebook computer.
ß Integrated Microphone
Integrated mono microphone for instant voice recording and
simultaneous voice conversation.
ß Stereo Line-In Jack
Lets you connect an external audio device such as CD player, a tape
deck, or a synthesizer as an input source. Use a cable to connect to
the Line-Out port on the other audio system to record or play.
ß Headphone Jack
Lets you plug in a stereo headphone, powered speakers, or earphone
set with 1/8 inch phono plug for personal listening.
• Thumb Wheel Volume Control
Allows you to control the speaker volume.

Notebook User Guide
1-12
1.5 The Rear Side of the Notebook
You’ll find system ports for connecting optional devices (like a printer or
external monitor) to the back of your notebook computer. The ports are
described after the figure.
¶”. PortBar Notches ·. AC Power Port ¸. PS/2 Port
¹. Serial Port º. Expansion Port ». Parallel Port
¼. Monitor (Video) Port ½ TV Port
• PortBar Notches
Use these notches to secure the PortBar to the back of the system. There
are two PortBar notches located at the both ends of the rear side of the
system.
• AC Power Port
Lets you connect the AC power adapter in supplying continuous power
to your notebook and recharging the battery.
• PS/2 Port
Lets you connect an external PS/2-style mouse, PS/2-style keyboard, or
PS/2-style numeric keypad to the system. With an optional Y-cable

Introduction 1
1-13
adapter, you also can connect any combination on two of these devices
simultaneously.
• Serial Port
Lets you connect a 9-pin external pointing device such as a high-speed
modem, mouse, or other serial devices.
• 80-Pin Expansion Port
Lets you connect to the notebook PortBar.
• Parallel Port
Use this port to connect a parallel printer or other parallel device. The
parallel port supports Enhanced Capabilities Port (ECP) standard. The
standard provides you with a greater processing speed than the
conventional parallel port. The port also supports bi-directional and uni-
directional protocols.
+
The default setting for the parallel port on your notebook computer is set
to Enhanced Capabilities Port (ECP). Some older parallel devices may not
function with the ECP default setting. You may need to adjust the setting
to accommodate your parallel device by changing the BIOS setting.
• Monitor (Video) Port
Lets you attach an external CRT monitor for wider display. You can run
the LCD display and the external CRT monitor simultaneously or switch
it to CRT only using the display hot-key.
• TV Port
Lets you connect to a S-Video TV connector for presentation or VCD,
DVD watching.
Notebook User Guide
1-14
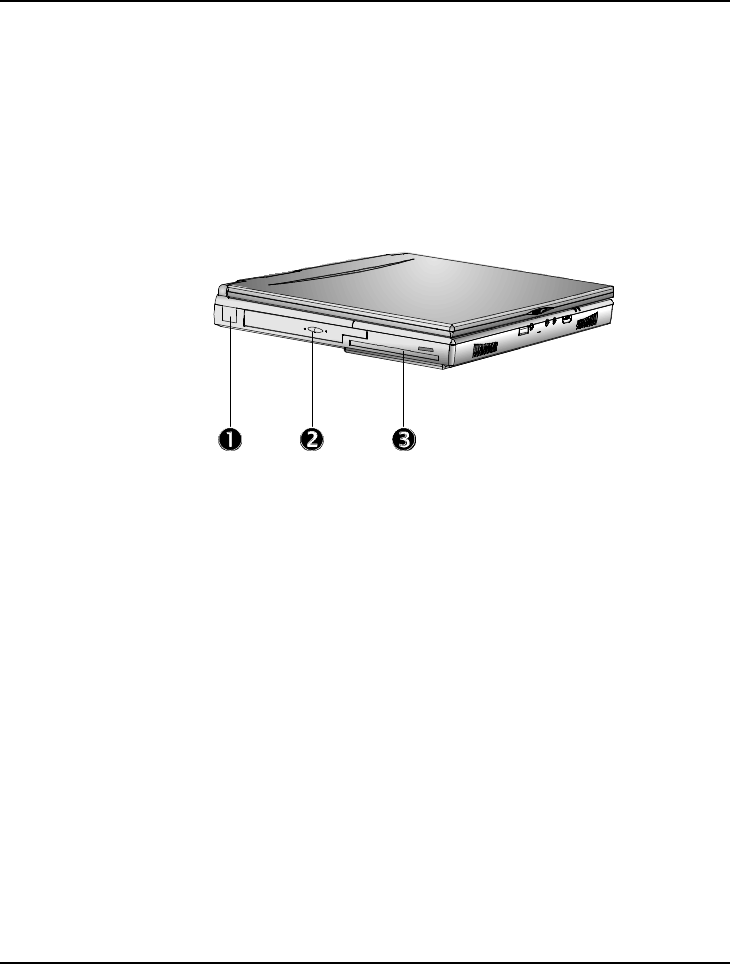
1.6 The Left Side of the Notebook
The left side of your notebook computer provides the features shown in the
following figure.
¶. USB ·. CD-ROM/DVD-ROM
¸. Diskette Drive
Left Side Features
• USB Port
The Universal Serial Bus (USB) port allows you to connect up to 127
USB-equipped peripheral devices (for example, printers, monitors,
scanners and so on) to your notebook computer.
• CD-ROM/DVD-ROM
Allows you to load and start programs from a compact disc (CD) or a
digital video disc (DVD) and play conventional audio CDs.
• Diskette Drive
A 3.5-inch floppy diskette drive comes installed in the notebook
computer. The drive accepts 1.44 MB/1.2MB floppy diskettes.
Introduction 1
1-15
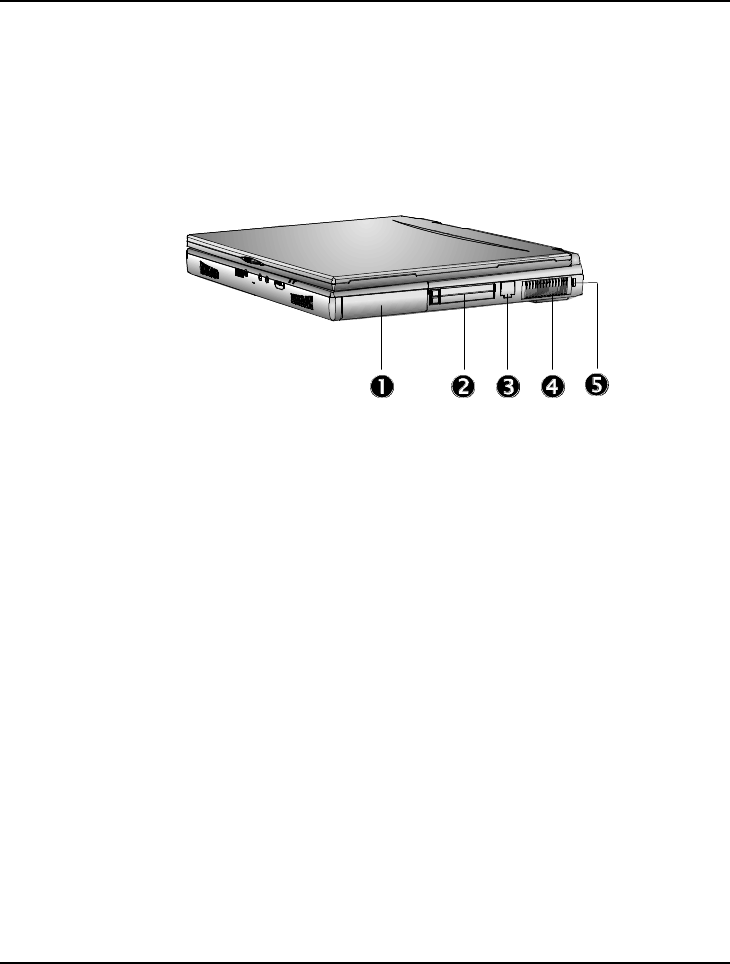
1.7 The Right Side of the Notebook
The right side of the notebook computer offers the features shown in the
following figure.
¶. Battery Bay ·. PC Card Slots
¸. Modem / LAN Port ¹. Cooling Fan Vent
º. Kensington Lock
Right Side Features
• Battery Bay
Stores the Nickel Metal-Hydride (NiMH) or Lithium-Ion (Li-Ion) battery
pack for off-the-cord operation or battery recharging.
• PCMCIA Slot
−Lets you connect various PC cards such as Modem cards, Ethernet
LAN cards, and SCSI cards.
−Double-deck PCMCIA slots that support two Type II PC cards at
the same time, or one Type III PC card in the bottom slot.
−Supports both 5V and 3V 32-bit CardBus and 16-bit PC cards
including PC cards with ZV function. The Zoom Video (ZV) port
is supported in the bottom slot only.

Notebook User Guide
1-16
• Modem/LAN Port
If you purchase an internal fax modem, a 56K internal voice/fax/data
modem is installed. It keeps you connected to the outside world through
networks.
If you purchase an internal 10Base-T/100Base-TX LAN module, it
connects your computer to other computers/networks through a local
area network (LAN).
Build-in Modem and LAN modules are available as option. You can
install only one module in the notebook PC and cannot use them
simultaneously. If you need to use them simultaneously, you need to use
other PC card in PCMCIA socket instead.
• Cooling Fan Vent
Emits the heat out of your computer and keeps it within operating
temperature.
+
Do not block the fan while the notebook is in use.
• Locking Device Keyhole
Lets you attach a Kensington security system or a compatible lock to
secure your notebook computer.
Introduction 1
1-17
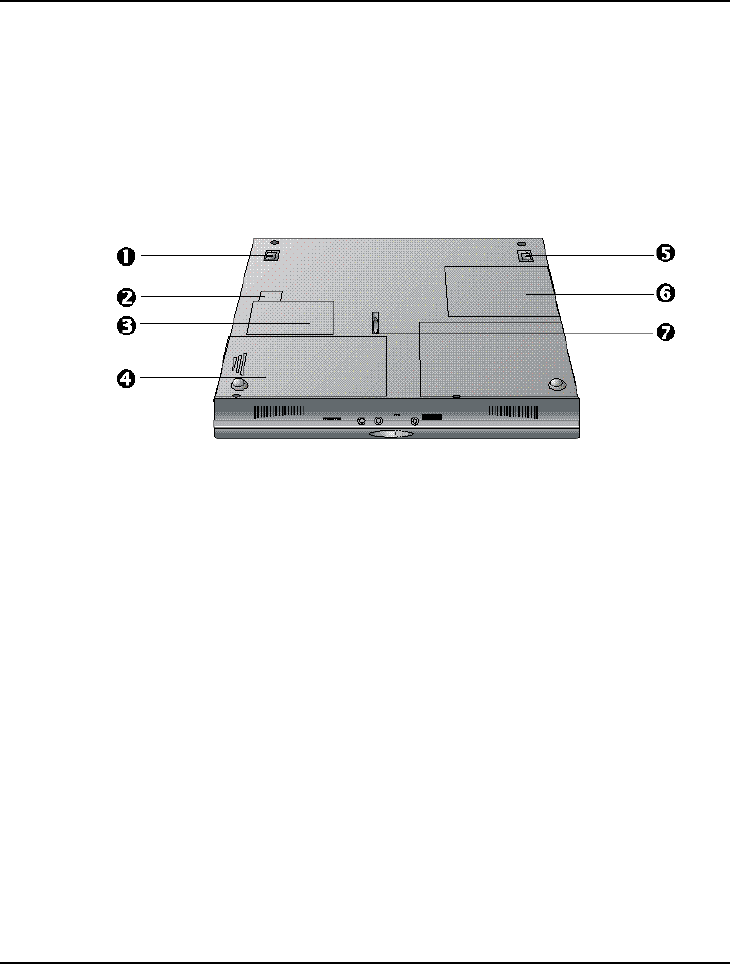
1.8 The Underside of the Notebook
The bottom of the notebook computer offers the following features.
¶. Tilt Foot ·. Modem or LAN Door
¸. Modem or LAN Card Compartment ¹. Battery Bay
º. Tilt Foot ». Memory Compartment .
’ Battery Release Latch
Bottom of the System
• Tilt Foot
Provides flexible keyboard angle.
• Modem or LAN Door
Provides Modem or LAN cable inserted into optional Modem or LAN card for
data transmitting.

Notebook User Guide
1-18
• Modem or LAN Card Compartment
Provides optional Modem card or LAN card inserted into this compartment for
executing relative functions.
• Battery Bay
Equipped with a rechargeable Nickel-Metal-Hydride (NiMH) or Lithium-
Ion (Li-Ion) battery.
• Memory Compartment
Remove the screw to find two DIMM slots. One is inserted with SDRAM
memory board configured by the factory. The other is empty for upgrade
use.
• Battery Release Latch
Slide the latch to the other end and hold it. While holding the latch, slide
the battery bay outwards to remove the battery.
1.9 Notebook Accessories
AC Adapter
The AC Adapter supplies external power to your notebook computer and
charges the internal battery pack simultaneously. The AC adapter has an auto-
switching design that can connect to any 100VAC ~ 240VAC power outlets.
You just change the power cord if you are going to use your notebook in
other countries with different connector outlets.
When you connect the AC adapter, it charges the battery whether or not the
notebook computer is powered on.

Introduction 1
1-19
Battery Pack
Aside from the AC adapter, your computer can also be powered through the
internal battery pack. The battery pack uses rechargeable Nickel-Metal
Hydride (NiMH) or Lithium-Ion (Li-Ion) battery cells that provide long
computing hours when fully charged and power management enabled. You
should always leave the battery inside your computer even when using the AC
adapter as it also acts as a back-up power supply in case power from the AC
adapter is cut off. It is also very important to have the battery pack always
charged to prevent battery cell degradation.
1.10 Notebook Options
DVD-ROM Device Pack
This device pack option plugs into the Device Bay and used for reading DVD
or playing DVD titles. DVD-ROM drives are also backward compatible with
CD-ROM, so you can also use any audio CDs, video CDs, photo CDs, and
recorded CD (CD-R).
Internal Ethernet LAN module
This notebook comes with an optional 10Base-T/100Base-TX LAN module
that supports data transfer rates at 10Mbps and can be up to 100Mbps.
Internal Modem Module
This notebook comes equipped with a 56K capable internal voice/fax/ data
modem that allows you to communicate with others via fax, email, or connect
to an online service or bulletin board.

Notebook User Guide
1-20
1INTRODUCTION ................................................................................................ 1
1.1 FEATURE HIGHLIGHT................................................................................ 2
1.2 UNPACKING THE COMPUTER ..................................................................... 4
1.3 THE INSIDE OF THE NOTEBOOK ................................................................. 5
Status Icons............................................................................................................ 8
1.4 THE FRONT SIDE OF THE NOTEBOOK ....................................................... 10
1.5 THE REAR SIDE OF THE NOTEBOOK ......................................................... 12
1.6 THE LEFT SIDE OF THE NOTEBOOK.......................................................... 14
1.7 THE RIGHT SIDE OF THE NOTEBOOK........................................................ 15
1.8 THE UNDERSIDE OF THE NOTEBOOK........................................................ 17
1.9 NOTEBOOK ACCESSORIES ....................................................................... 18
1.10 NOTEBOOK OPTIONS .............................................................................. 19