First Computer T700 Tablet PC User Manual Manual 2
First International Computer Inc Tablet PC Manual 2
Contents
- 1. Manual 1
- 2. Manual 2
Manual 2
SlateVision System User Guide
26
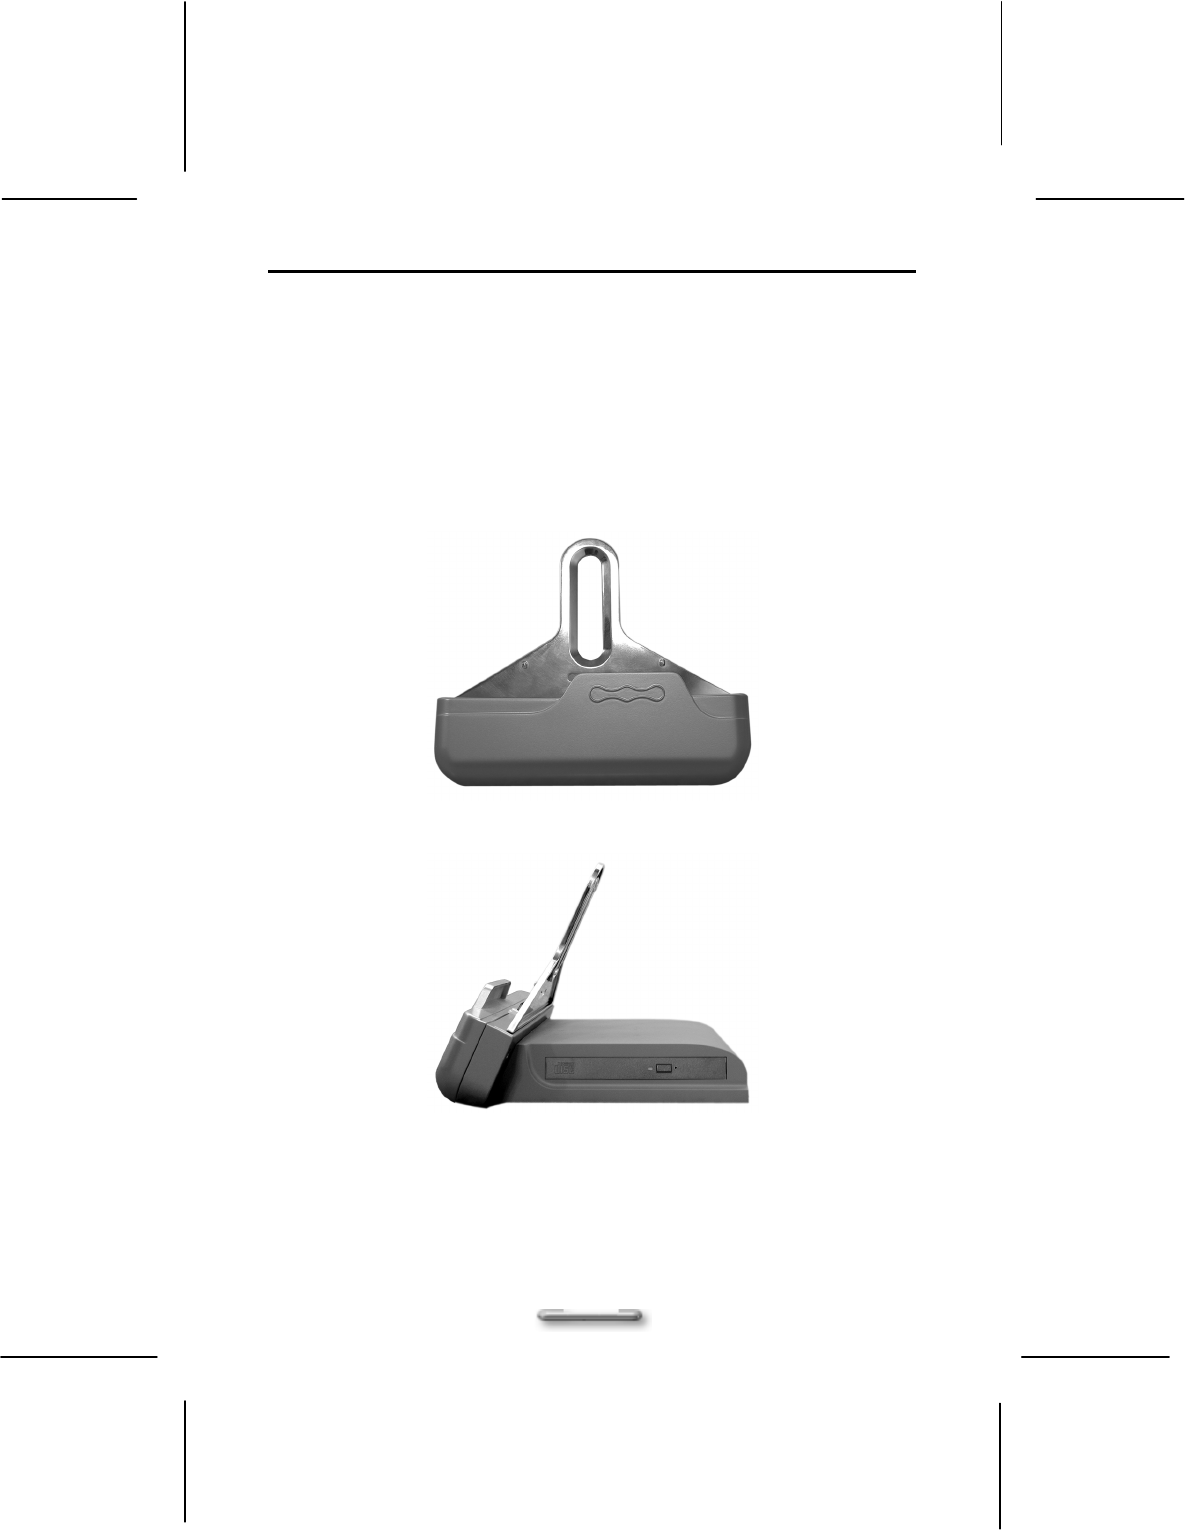
Docking Station (Optional)
Except for the power charging function, you can also take the advantage of the
standard or optional components on the docking station to reach higher performance
in data transmission. The component includes,
Two USB 1.1 ports
One Ethernet jack (RJ45)
One slim-type CD-ROM (optional)
One VGA connector
One stereo line-out jack
Figure 3.6.1 The front view of the docking station
Figure 3.6.2 The side view of the docking station
Getting to Know Your SlateVision
27
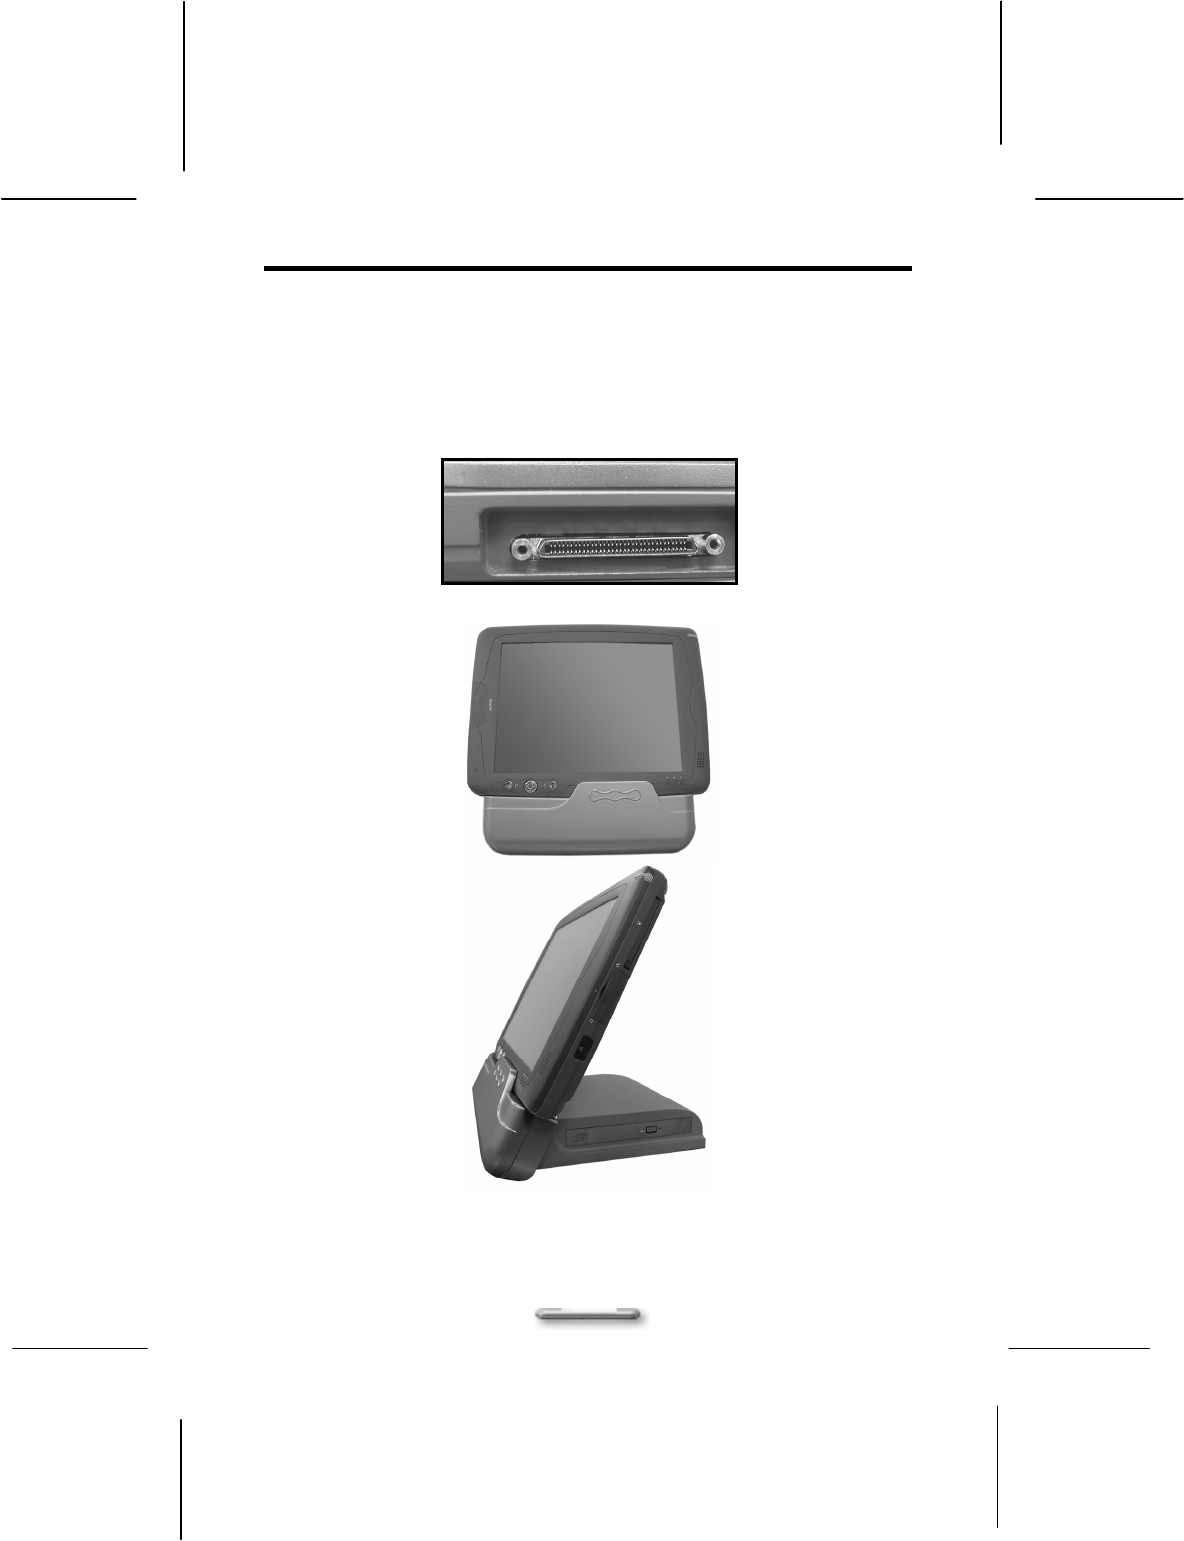
Set Up the Docking Station
To attach SlateVision to the docking station, place SlateVision over the docking station.
Please follow these steps:
Find the female connector on the bottom of SlateVision as shown in [Figure. 3.7.1]
below.
Place the female connector of SlateVision to the male connector on the docking station.
Figure 3.7.1 The female connector
Figure 3.7.2 SlateVision with the docking station
SlateVision System User Guide
28
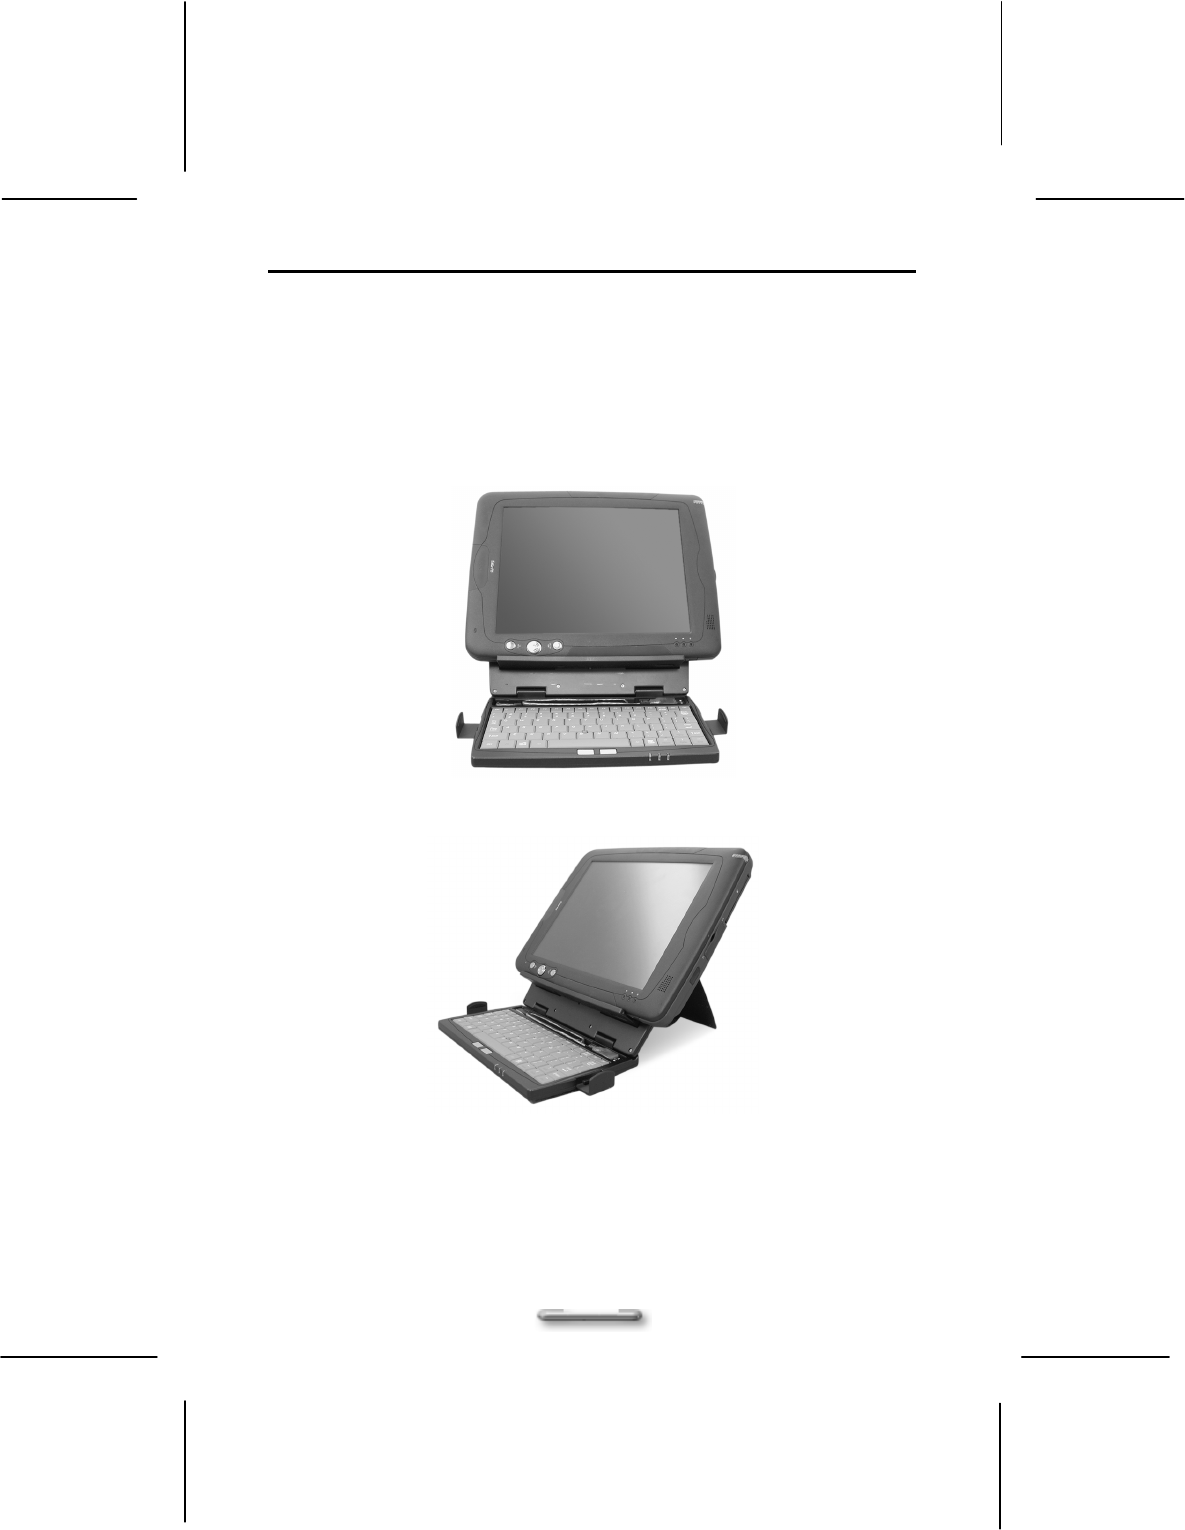
Keyboard Cradle (Optional)
In addition to the standard docking station that provides power charging function, there
is also an optional cradle equipped with USB keyboard. With sophisticated design, the
lighter and slimmer SlateVision is a reliable partner that extends your exquisite taste.
Instead of using the stylus to input data in the Tablet PC Input Panel, you can place
SlateVision on its keyboard cradle and input data with a standard USB keyboard. And
the better part is that with the USB mouse connected, your SlateVision will function
just like a desktop PC!
Figure 3.8.1 Keyboard cradle
Figure 3.8.2 Keyboard cradle
Getting to Know Your SlateVision
29
Figure 3.8.3 Keyboard cradle
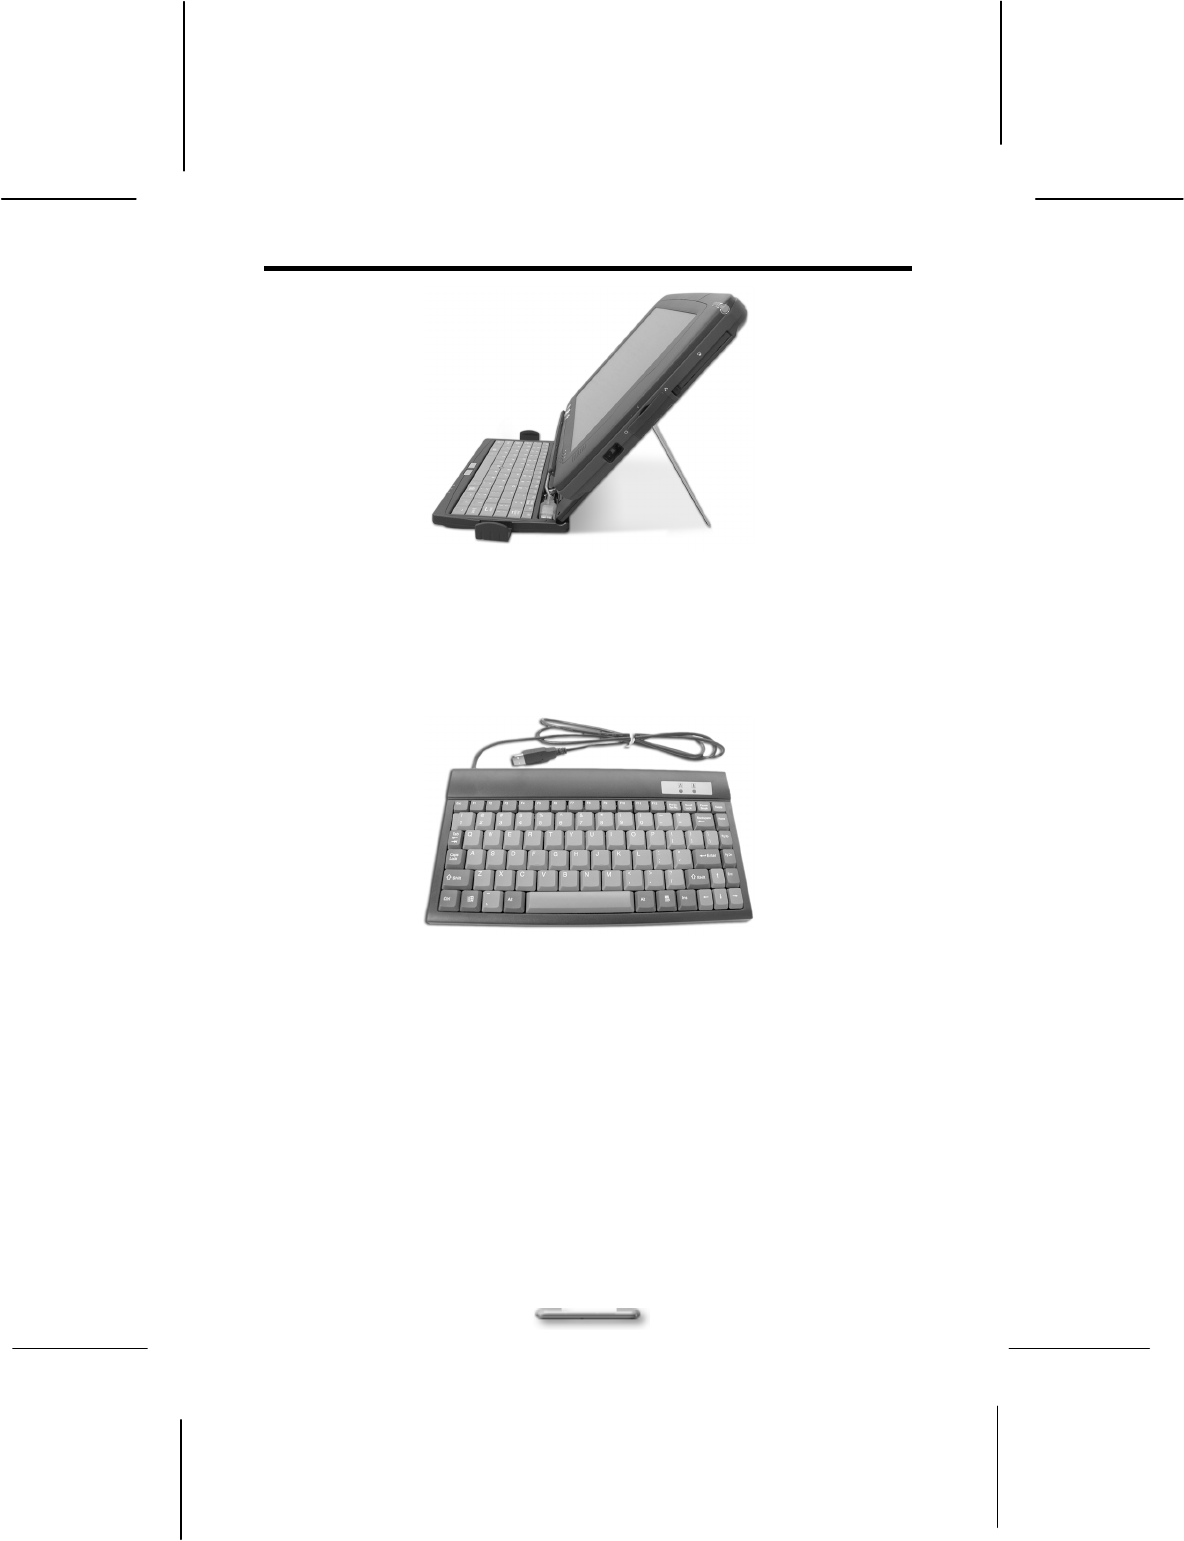
USB Keyboard (Optional)
An optional standard USB keyboard you may purchase as shown below:
Figure 3.9 Optional standard USB keyboard

SlateVision System User Guide
30
31
C
Ch
ha
ap
pt
te
er
r
4
4
U
Us
si
in
ng
g
S
St
ty
yl
lu
us
s
a
an
nd
d
T
Ta
ab
bl
le
et
t
B
Bu
ut
tt
to
on
ns
s
Using Your Stylus Correctly
To interact with your tablet computer, SlateVision offers a unique input tool, EMD
compatible stylus, that you can use it in place of a mouse or a standard keyboard.
Instead of using a mouse, you can use your stylus to interact with items on your
screen. You can move items, open them, change them, delete them, and more. Also,
instead of using a standard keyboard, you can use your stylus with Microsoft® Tablet
PC Input Panel or Microsoft® Windows® Journal to enter text with your own
handwriting.
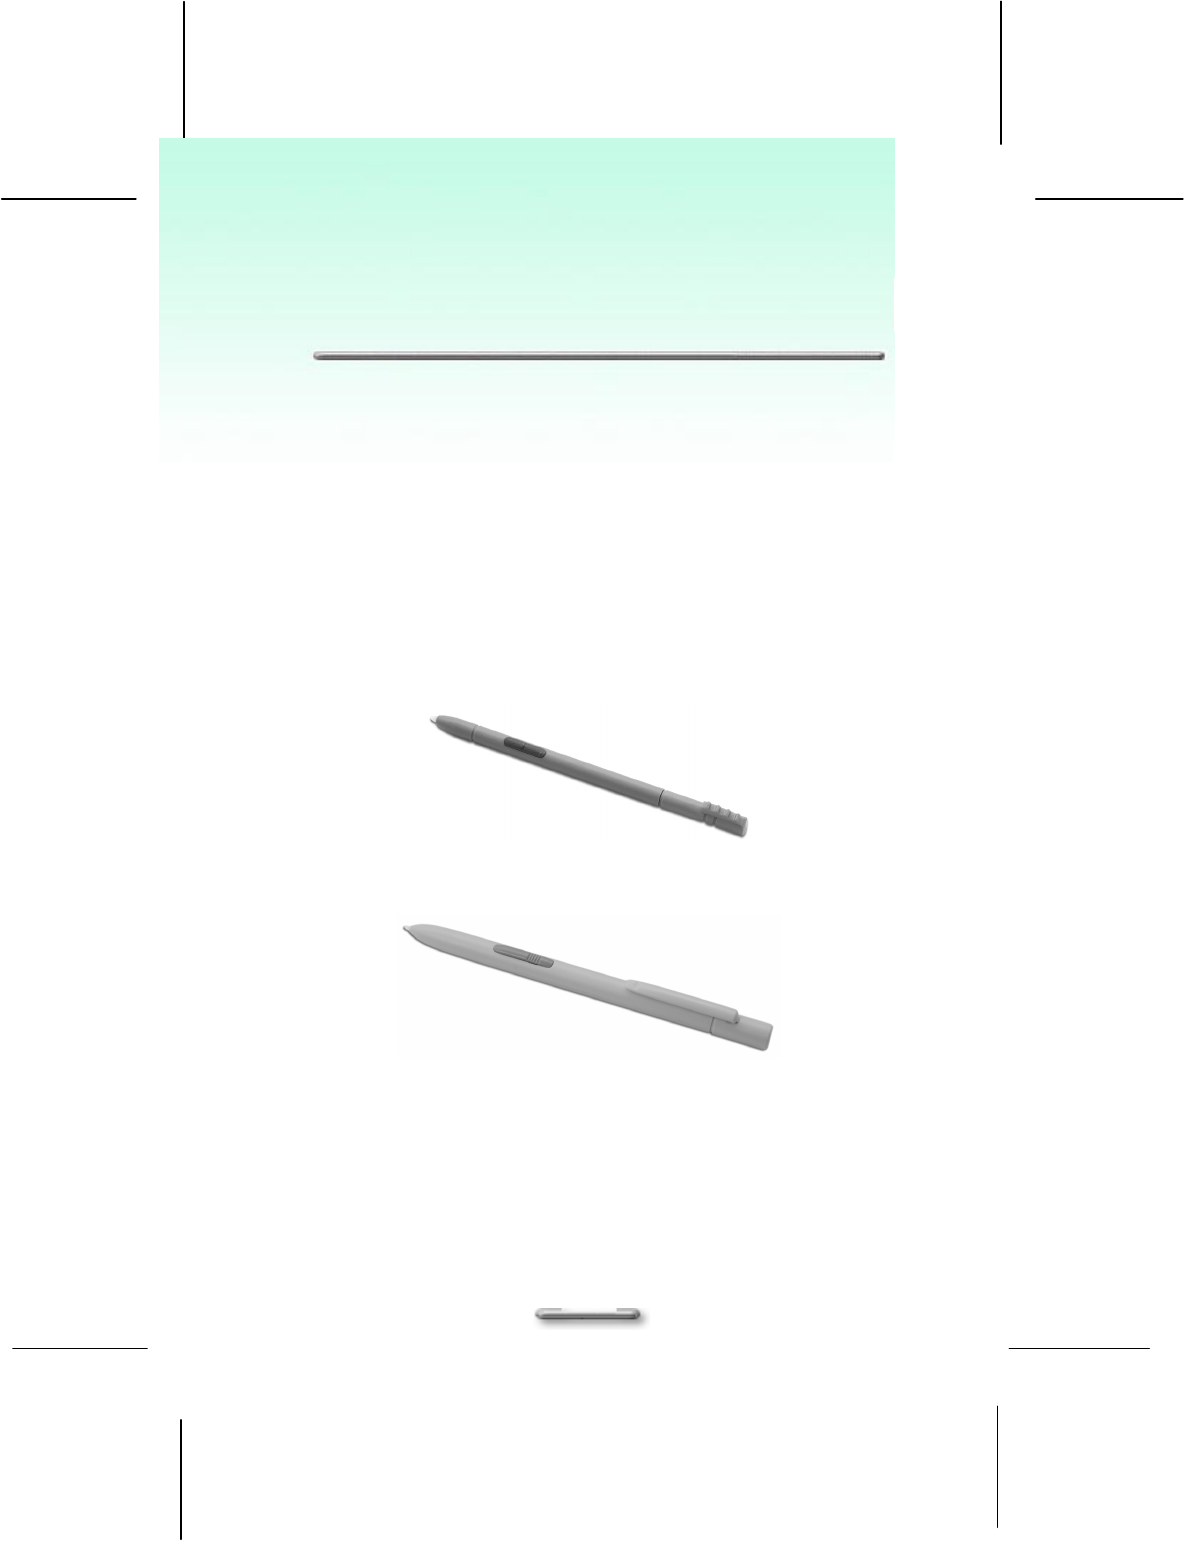
SlateVision provides two forms of EMD compatible stylus, including ones that can be
stored above the LCD screen, or ones come in actual pen size, and an advanced
version that comes with an "eraser" that can be activated with certain software.
Figure 4.1.1 The slim stylus can be stored directly
above the LCD screen.
Figure 4.1.2 The multipurpose stylus in actual pen size
SlateVision System User Guide
32
Use the pen instead of a mouse
You can use your stylus to do many things you're used to do with mouse. That
includes the pointer on the screen, clicking the left mouse, and clicking the right mouse.
Use single-tap anywhere you would normally single-click with the mouse. Where you
would double-click using the mouse, you now double-tap with the stylus.
There are four basic actions that you can perform with your stylus. Pen actions
correspond to mouse actions as follows:
Stylus Action Mouse Action
Point Point
Tap Click
Double-tap Double-click
Press and hold Right-click
Drag Drag
Right-click equivalents
You can use your stylus to use features that you would normally access with a right
mouse button, such as shortcut menus. There is a button on your stylus as a right-click
equivalent. Or, you can use another one stylus action called "press and hold".
1. Using stylus button as a right-click equivalent
You can use the stylus button to display shortcut menus or access other
program-specific right-click features. You can turn on or turn off the tablet pen
button for right-click in Control Panel > Tablet and Pen Settings.
To use the stylus button for right-click, press the stylus button and hold it
as you tap the screen of your SlateVision, and then release the stylus
button.
To right-drag an item, press the stylus button, hold it as you drag the item
to the location of your choice, and then release the choice.
2. Using press and hold for right-click
You can also use a tablet pen action called "press and hold" to perform right-click
equivalents. You can turn on or turn off press and hold for right-click in Control
Panel > Tablet and Pen Settings.
To use press and hold as a right-click equivalent, press the tip of the tablet pen
into the screen, hold it down until the mouse icon appears, and then lift the tablet
pen. The pop-up menu appears and then you may tap your choice now.

Using Stylus and Tablet Buttons
33
Tips for using stylus
Hold the stylus in the same way that you hold a pen or pencil when writing
on paper.
Rest the palm of your hand on the screen and hold the stylus near the tip
when you tap or perform other actions.
To tap successfully, tap and lift your pen quickly off the screen. Avoid
pushing items with your pen.
When tapping, watch the pointer as it moves on the screen, not the tip of
the stylus. This will help you more accurately tap what you're aiming at on
the screen.
SlateVision System User Guide
34
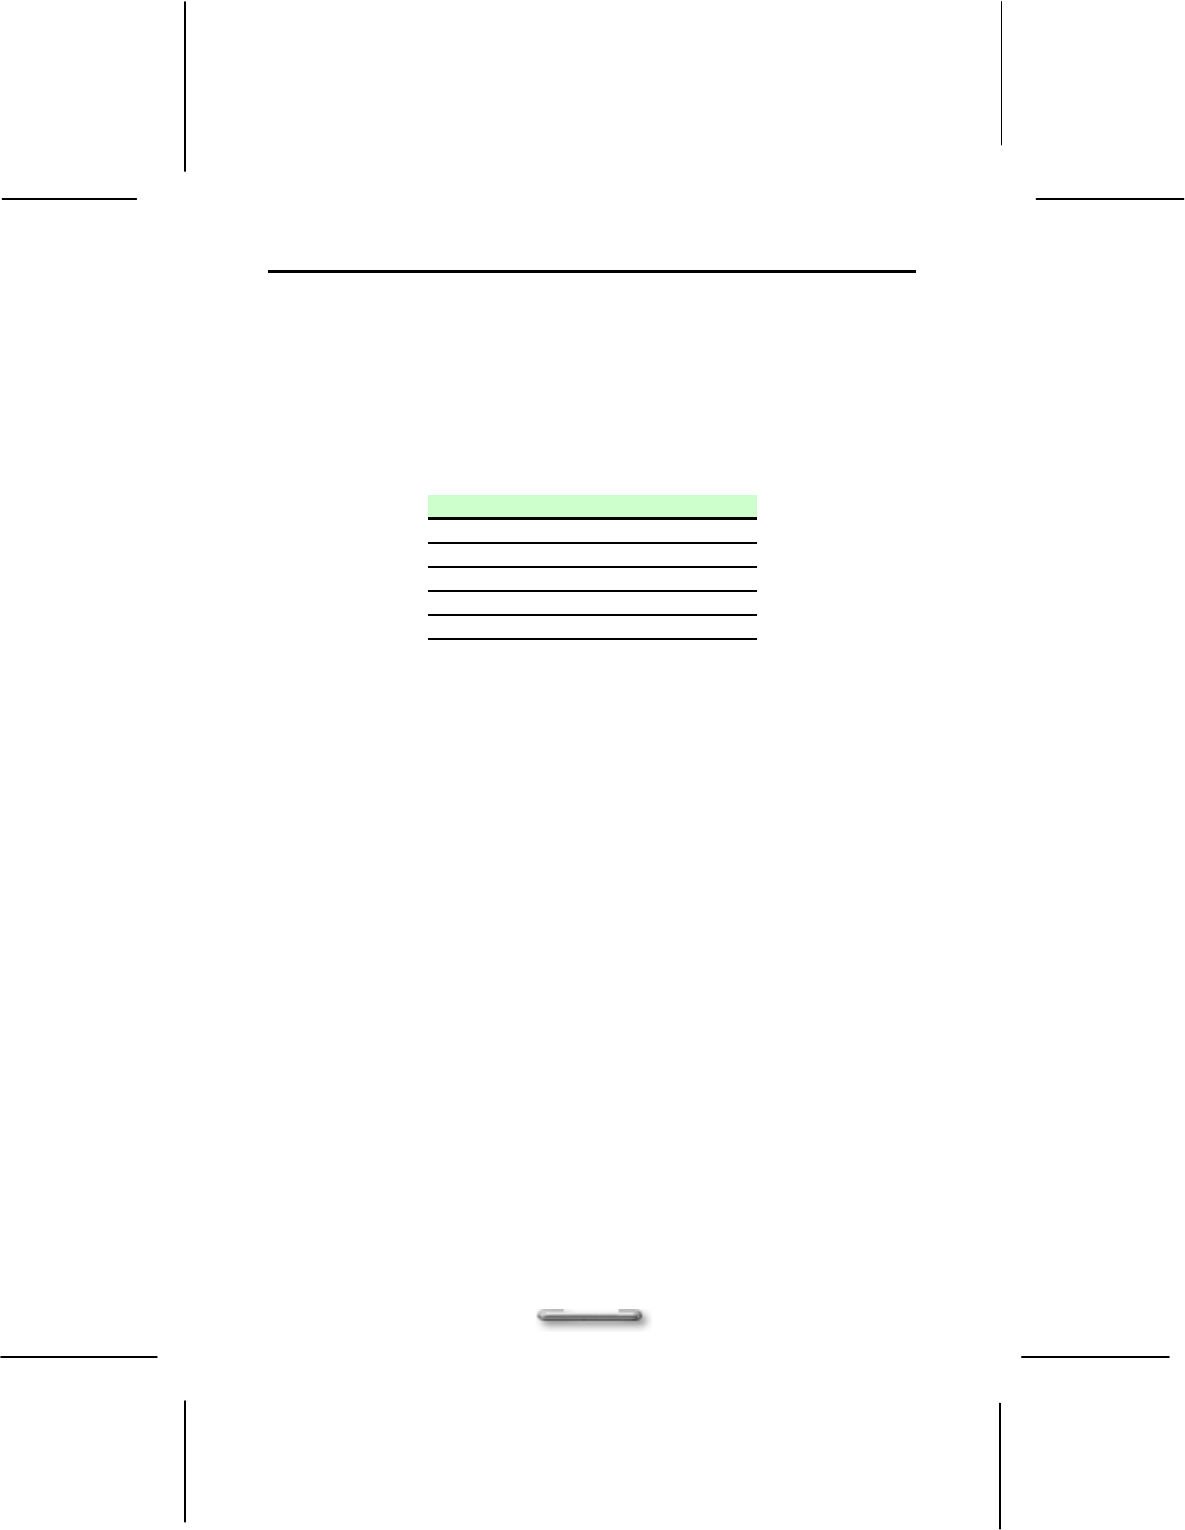
Tablet and Pen Settings
The Tablet and Pen Settings is a very important and useful tool when you start using
the SlateVision Tablet PC. At times, you may want to adjust your stylus or change the
orientation of the display screen, e.g., from landscape to portrait. You might also want
to customize your tablet buttons or stylus button. You can adjust these in Control
Panel > Tablet and Pen Settings, just like you adjust computer mouse settings.
Settings Tab
Figure 4.2.1 Tablet and Pen Settings dialog box
1. Change handedness settings
Adjusting the handedness settings will improve handwriting recognition and also
changes the location of menus so that your hand does not cover them.
To set the right-handed or left-handed settings:
Under Handedness, select the Right-handed or Left-handed.
Under Menu Location, select the Right-handed (menu appears on left)
or Left-handed (menu appears on right).
Using Stylus and Tablet Buttons
35
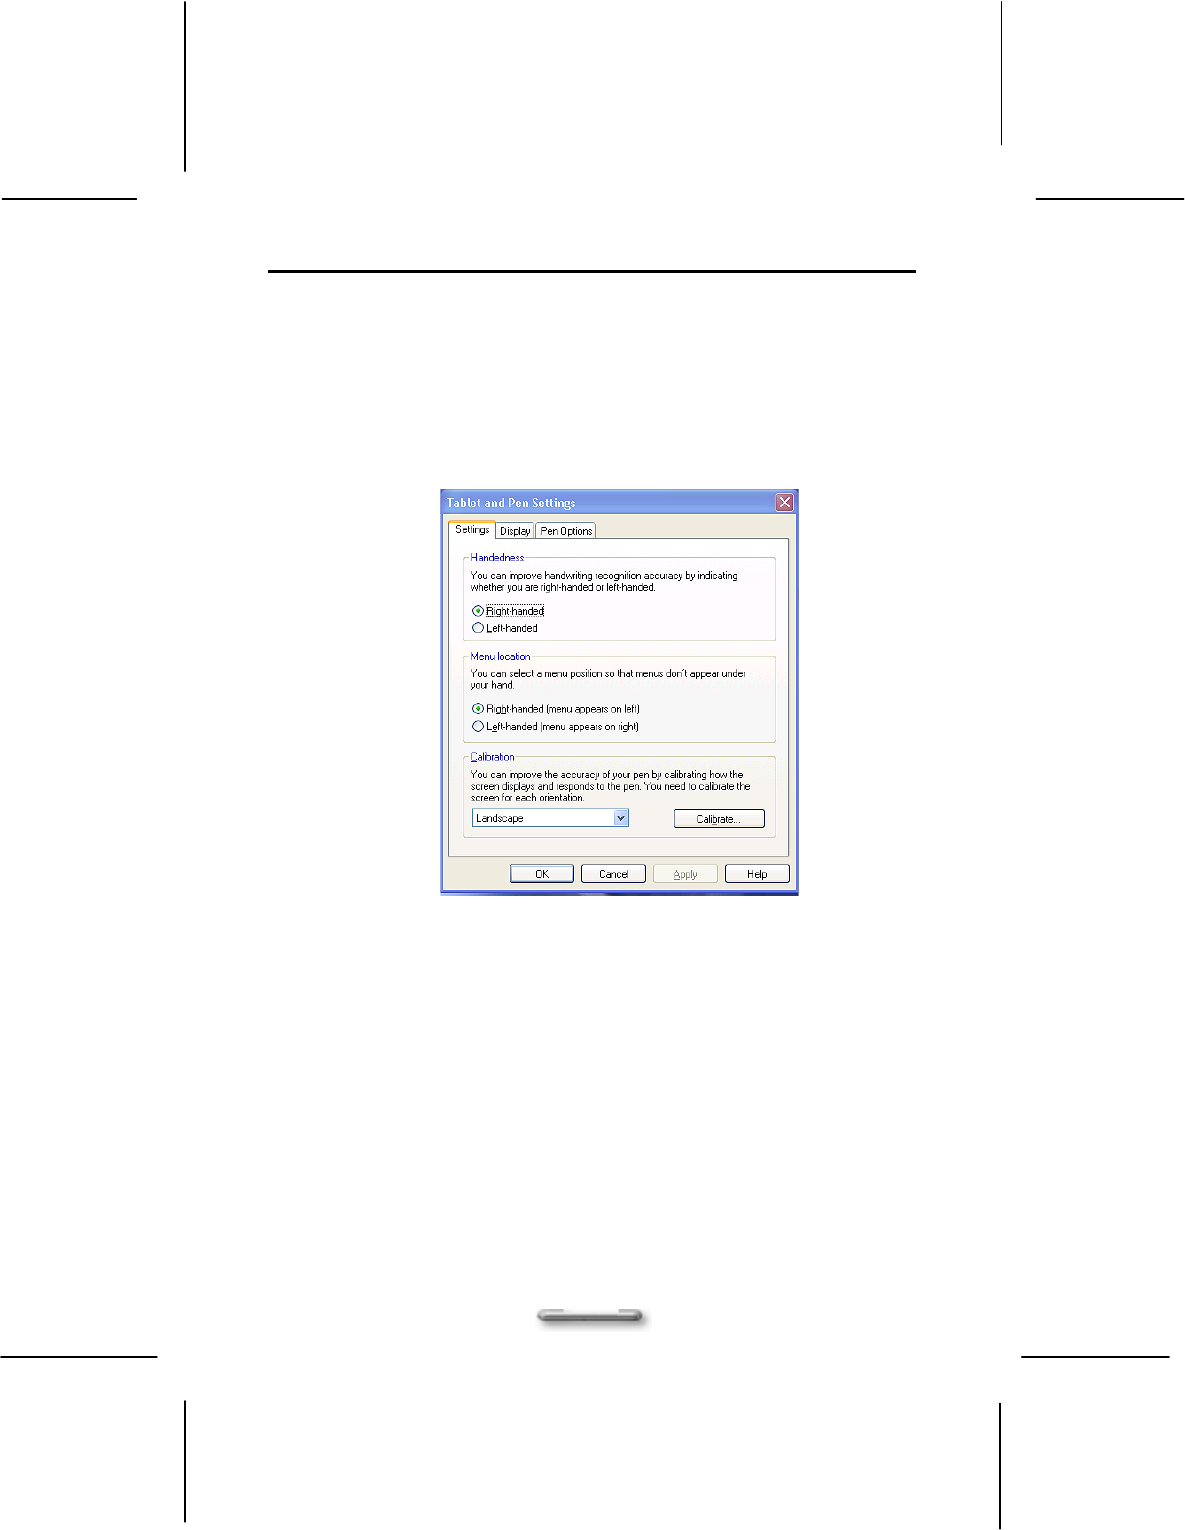
2. Setting up stylus and calibration
If you find that the tip of the stylus does not accurately point at items on the
screen, then you can calibrate how the screen responds to the pen.
Under Calibration, tap the Calibrate, as shown in [Figure 4.2.1].
There will be crosshair appearing at the four corners of the screen. Tap on
the center of the each crosshair accordingly.
After finished the calibration, tap OK to exit.
Figure 4.2.2 Screen calibration
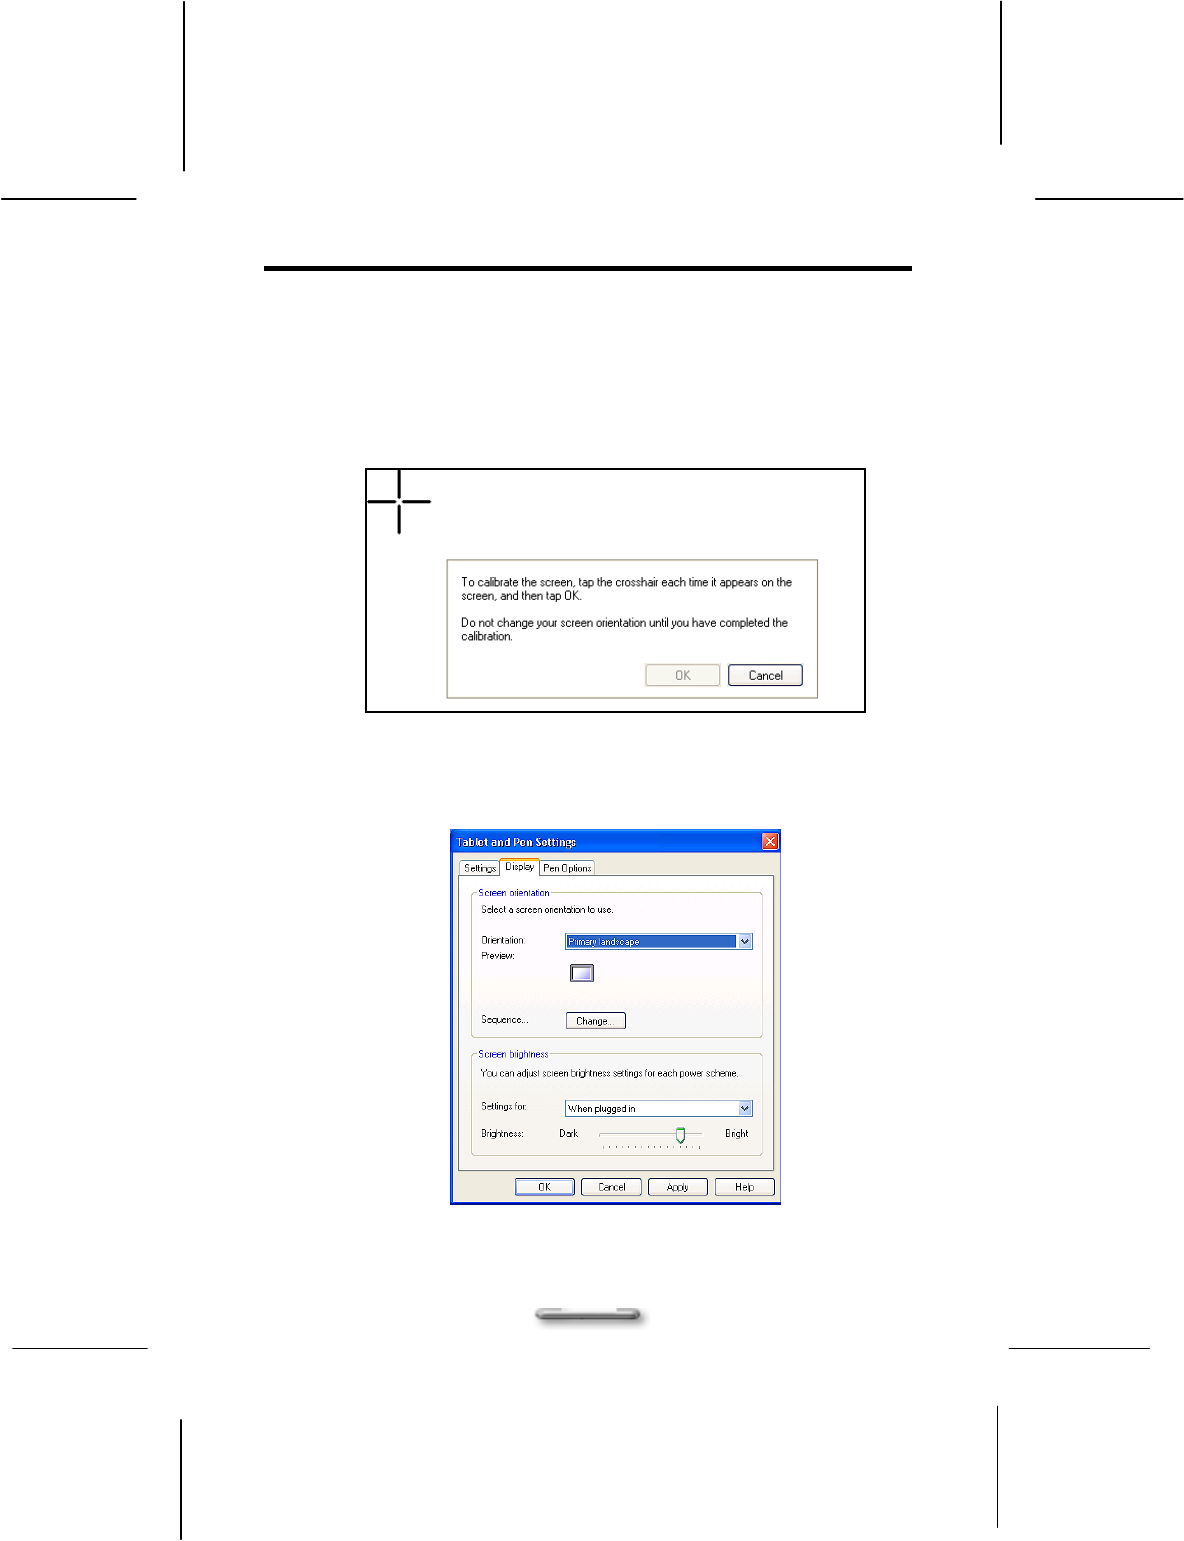
Display Tab
Figure 4.3.1 Display tab
SlateVision System User Guide
36
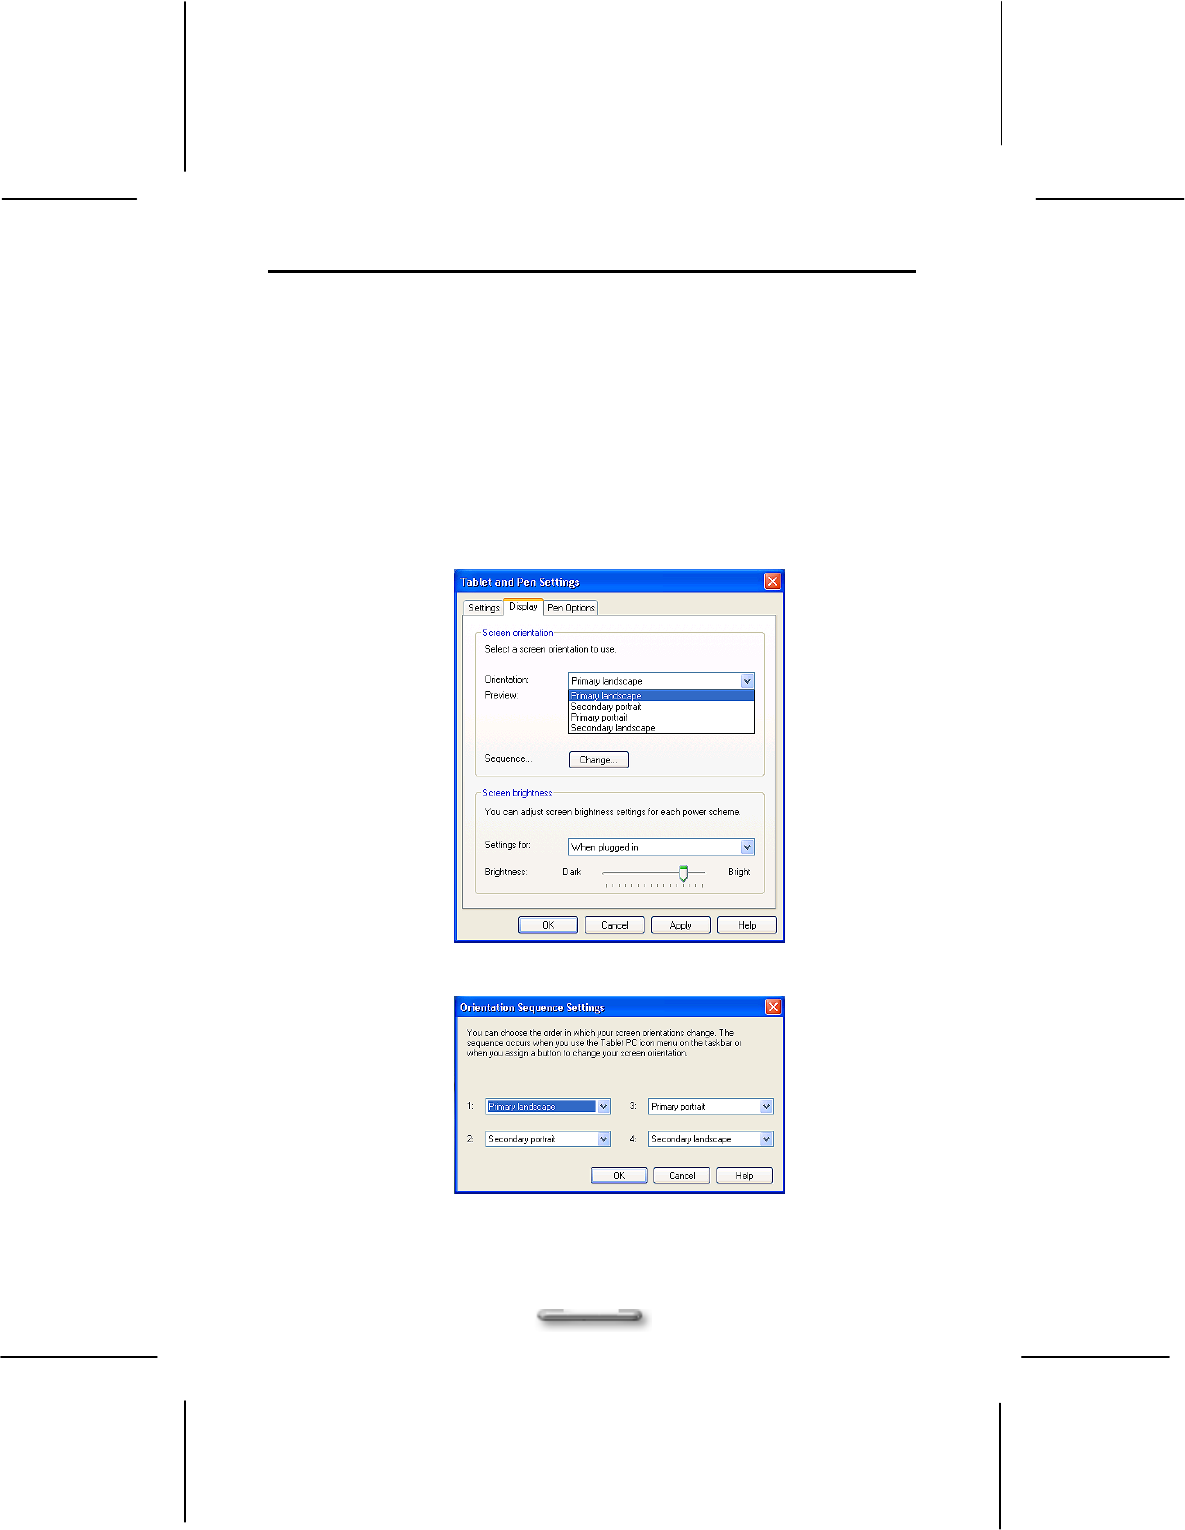
1. Change screen orientation
Your SlateVision screen is more versatile than a desktop or laptop. You can
easily change from the landscape to portrait view.
To set the screen orientation:
Under Screen orientation, select the screen orientation you want to use
from the Orientation drop-down list.
Tap on Change to setup the orientation sequence.
There are four preferential settings for the screen orientations. Select
None, Primary landscape, Primary portrait, Secondary landscape or
Secondary portrait in the order of 1,2,3 and 4 at your will.
Figure 4.3.2 Change screen orientation
Figure 4.3.3 Change orientation sequence
Using Stylus and Tablet Buttons
37
NOTE
You can also change the screen orientation according to the instructions in
“Using the 1st Menu Button - Rotation” in this chapter.
2. Adjust screen brightness
Select the power scheme to adjust screen brightness. Select either When
plugged in or Powered by batteries from the drop-down list.
Move the slider to the left to decrease or to the right to increase the screen
brightness.
NOTE
You can also change the screen brightness according to the instructions in
“Using the 1st Menu Button - Brightness Control” in this chapter.
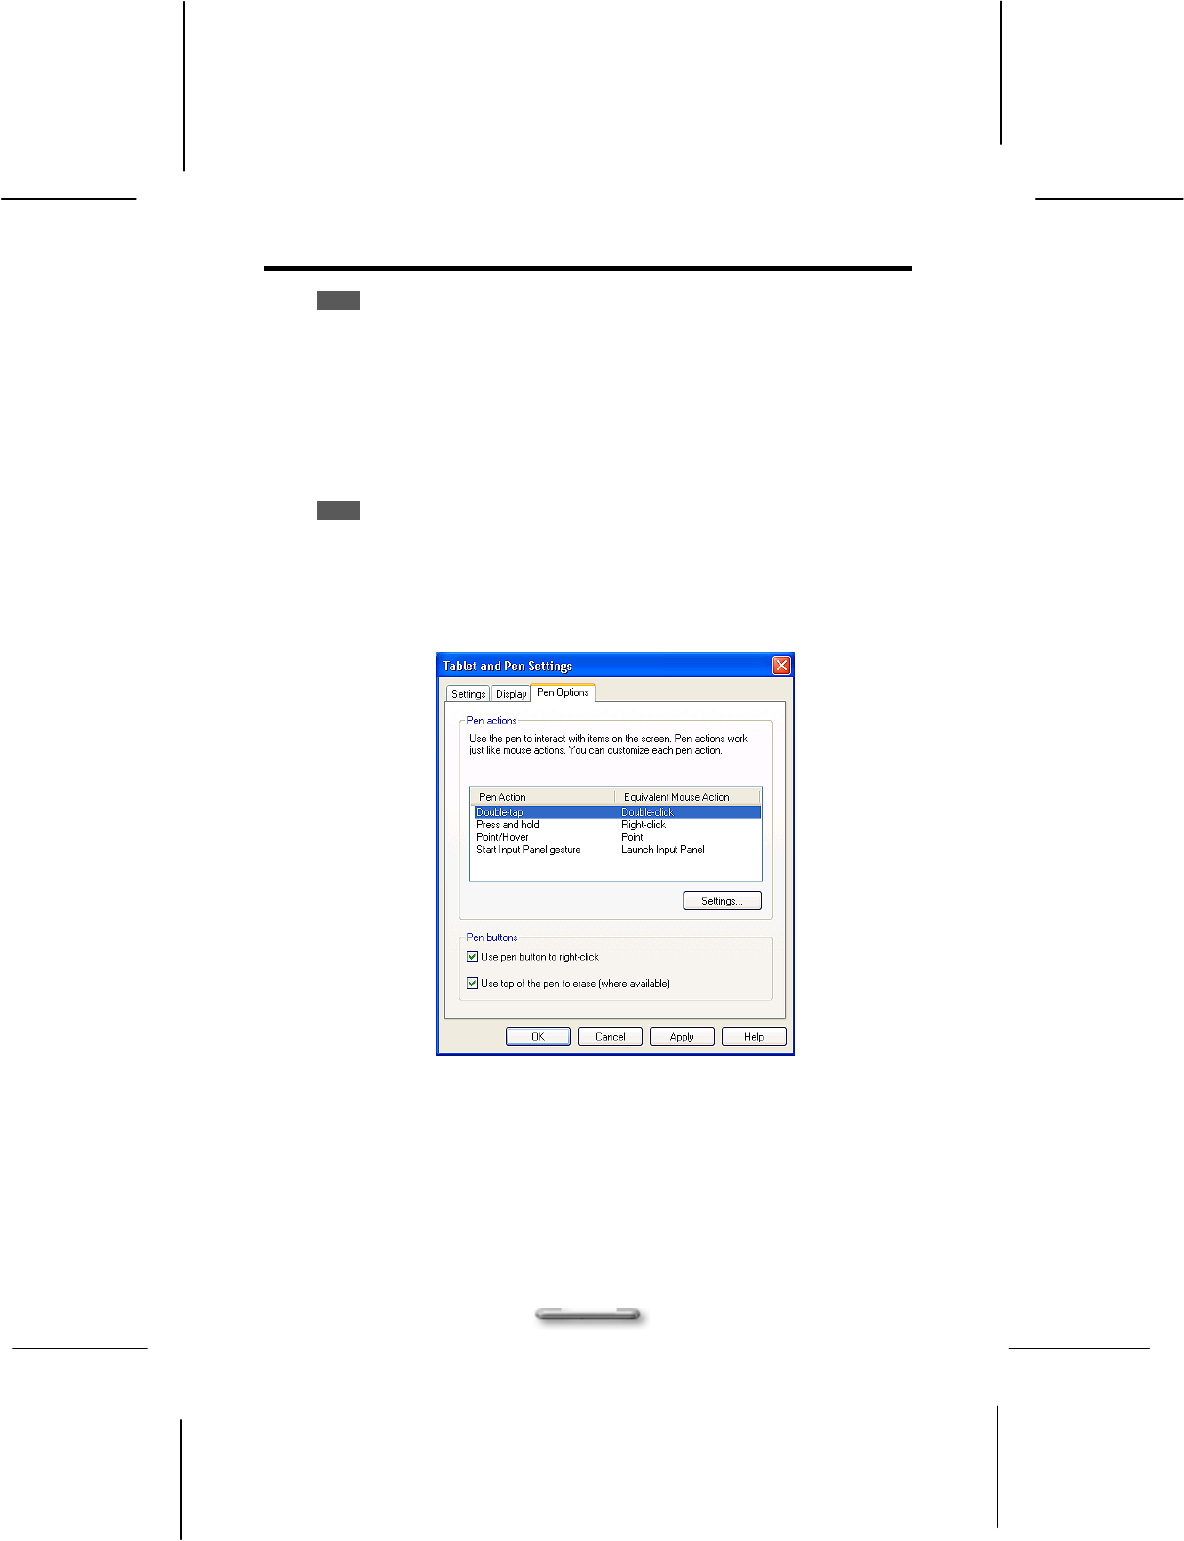
Pen Options Tab
Figure 4.3.4 Pen Options tab
1. Adjust the stylus buttons
To have your stylus button do a right-click equivalent, select the Use pen
button to right-click check box.
To enable/disable a pen eraser, select or clear the Use top of the pen to
erase (where available) check box.
SlateVision System User Guide
38
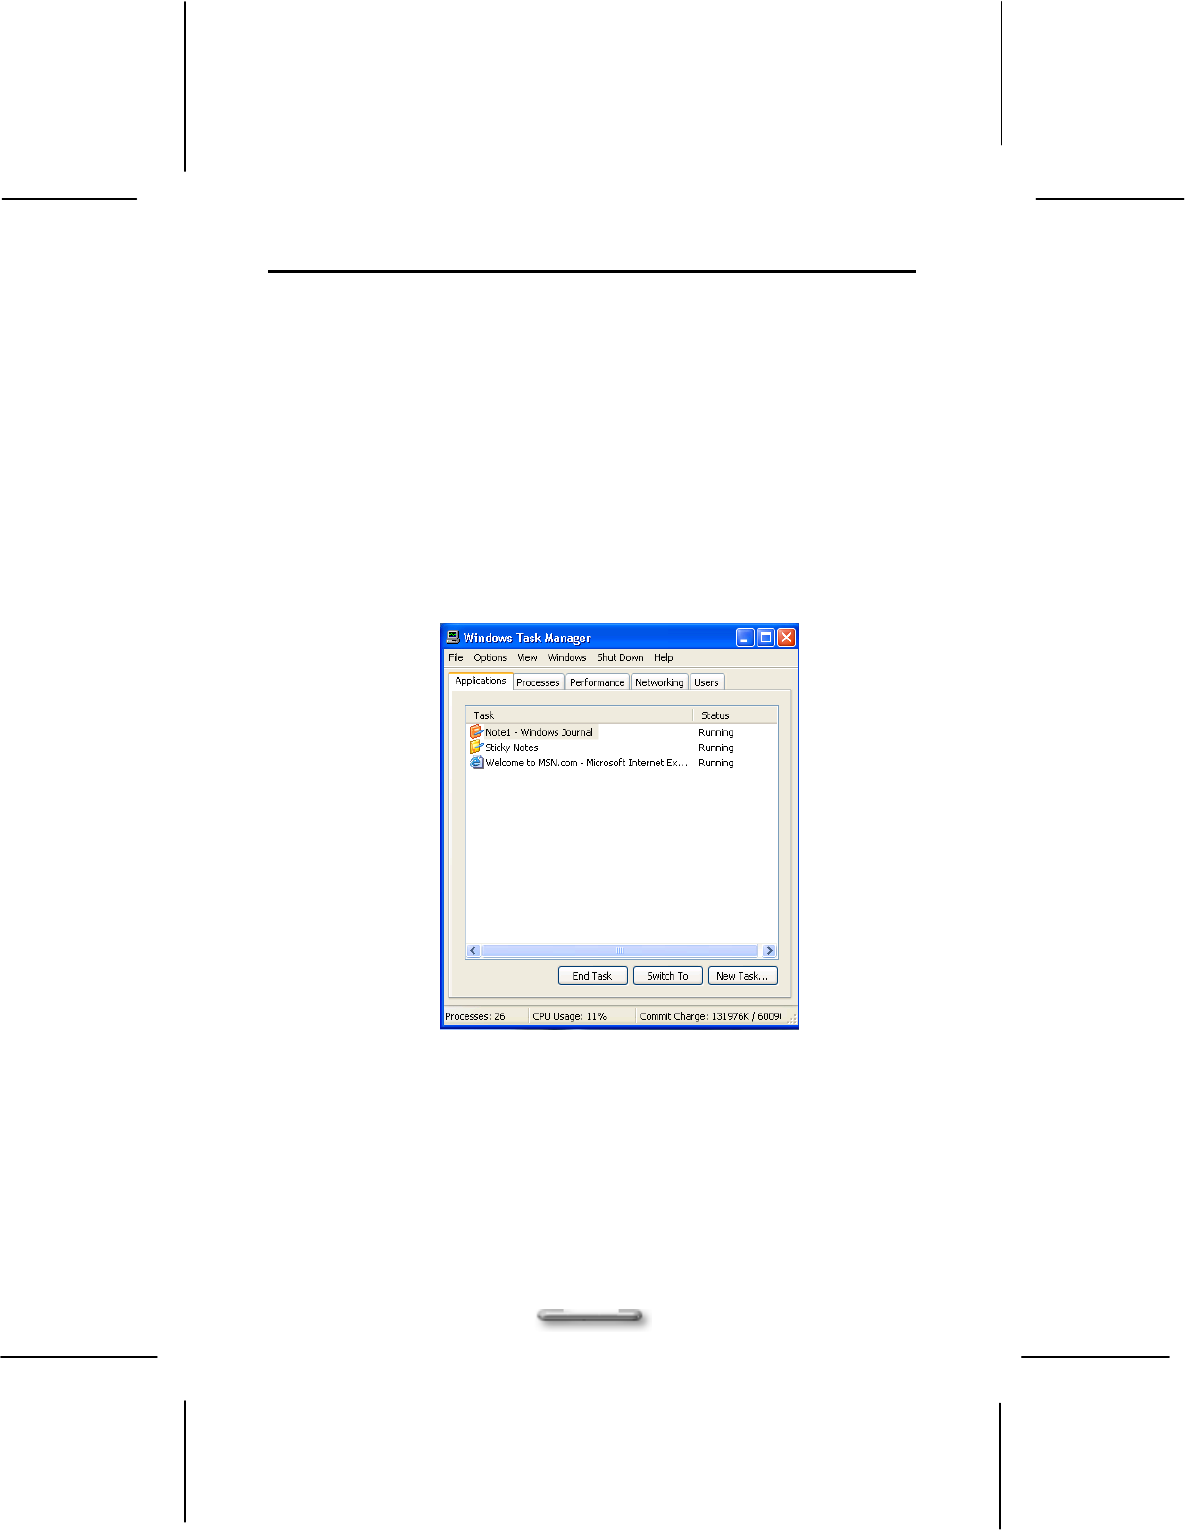
Using the CTRL-ALT-DEL Button
This button is used to emulate the CTRL+ALT+DEL combination key, which brings the
Windows Task Manager dialog box, as shown in [Figure 4.4].
Task Manager provides information about programs and processes running on your
computer. It also displays the most commonly used performance measures for
processes.
You can use Task Manager to monitor key indicators of your computer's performance.
You can see the status of the programs that are running and end programs that have
stopped responding. You can also assess the activity of running processes using as
many as fifteen parameters, and see graphs and data on CPU and memory usage. In
addition, if you are connected to a network, you can view network status and see how
your network is functioning. If you have more than one user connected to your
computer, you can see who is connected, what they are working on, and you can send
them a message.
Figure 4.4 Windows Task Manager
Using Stylus and Tablet Buttons
39
Using the Direction / Enter Button
The up/down/left/right arrow buttons let you to choose the menu items
you want to execute. The round button represents the ENTER command and use to
confirm selection.
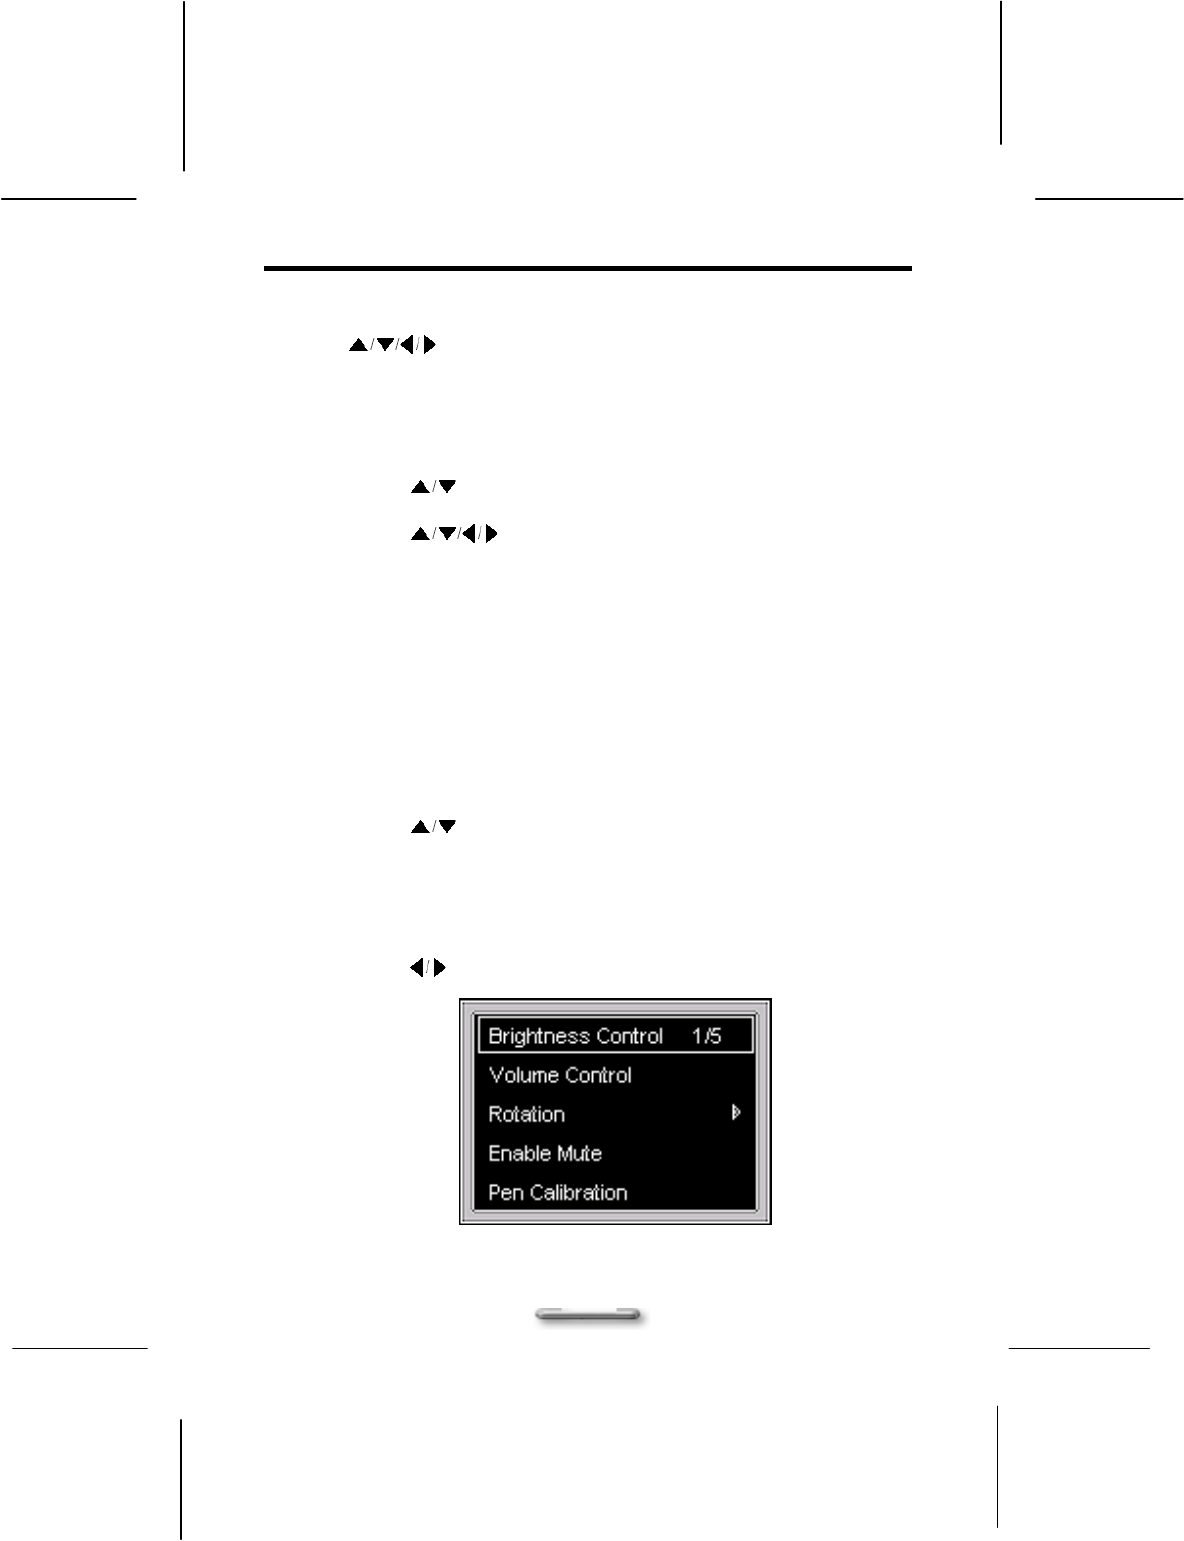
To enter a menu and set settings, please follow these steps:
1. First press the 1st Menu button to invoke the first main menu and you will see four
menus: Brightness, Volume, Screen Rotation, and Pen Calibration.
2. Use the up/down arrow buttons to select the menu you want and then
press the Enter button to enter the sub-menu.
3. Use the arrow buttons to set the values for each field and then press
the Enter button to confirm changes.
4. Press the 1st Menu button to exit the first main menu.
Using the 1st Menu Button
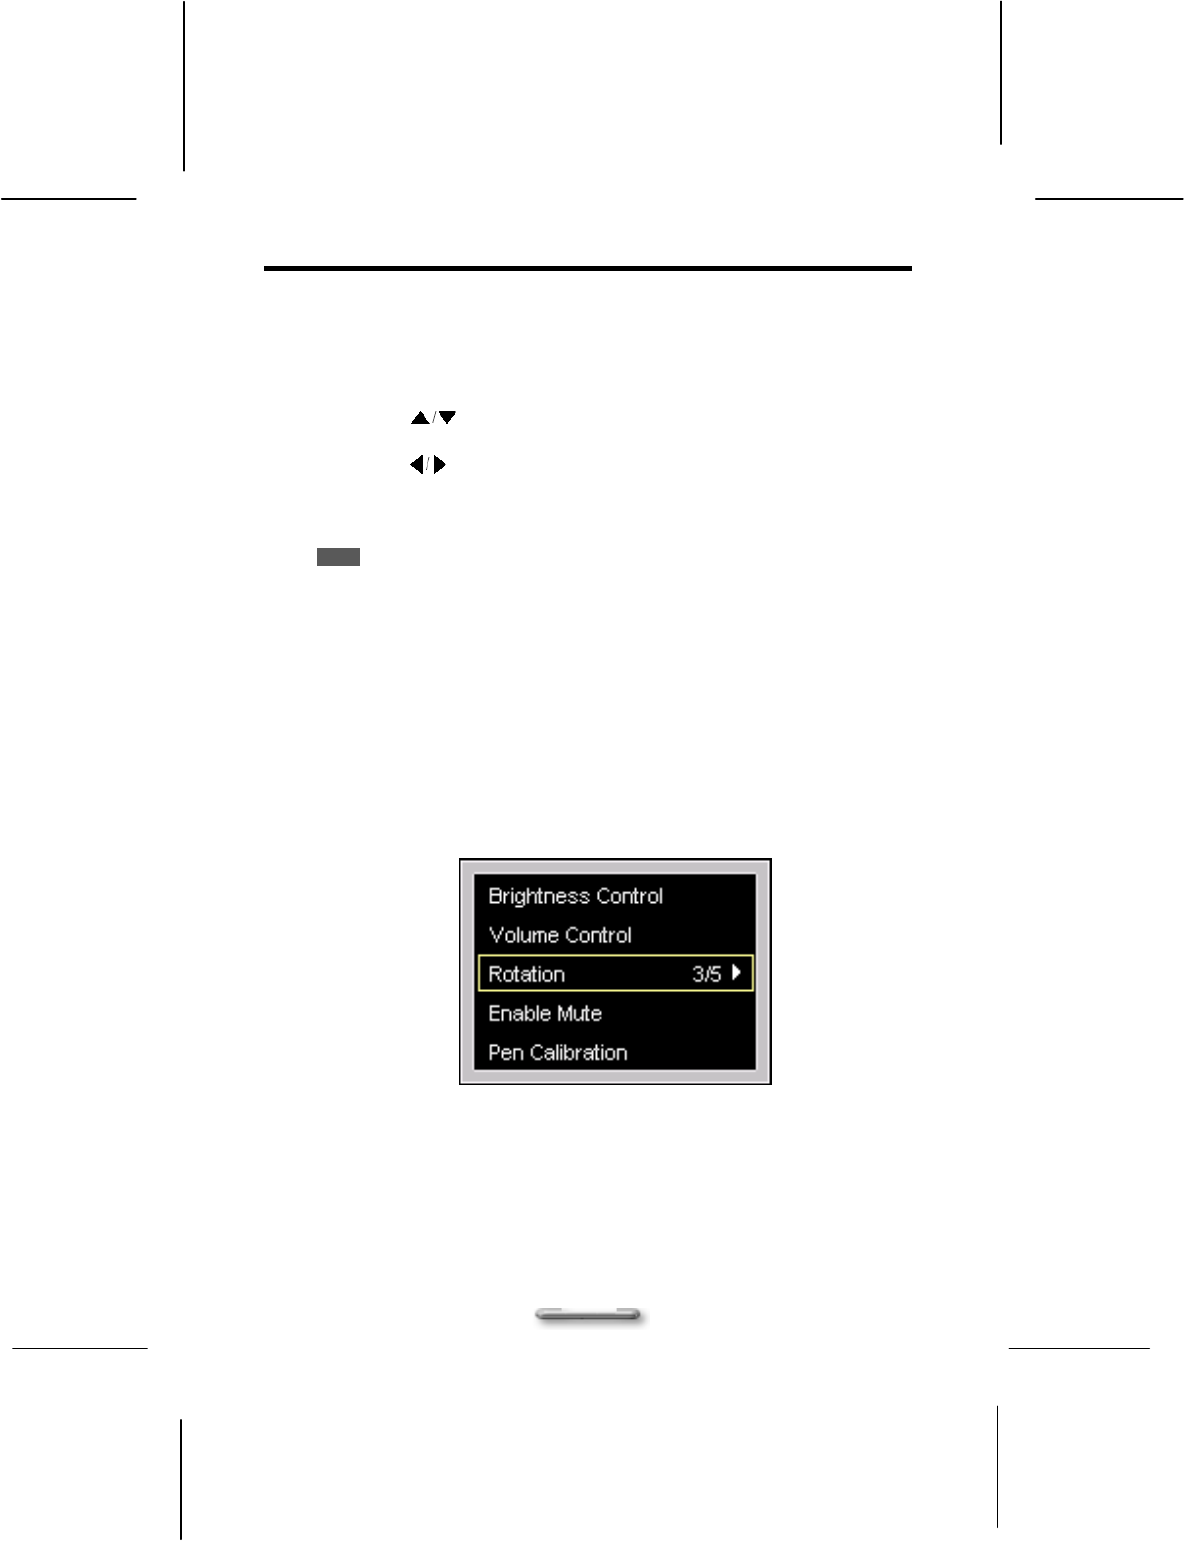
SlateVision comes with 1st Menu button for you to access an array of controls such as:
Brightness, Volume, Screen Rotation, and Pen Calibration. You can change the
values you need without configuring them in Control Panel or other programs anytime.
Menu options are described as following:
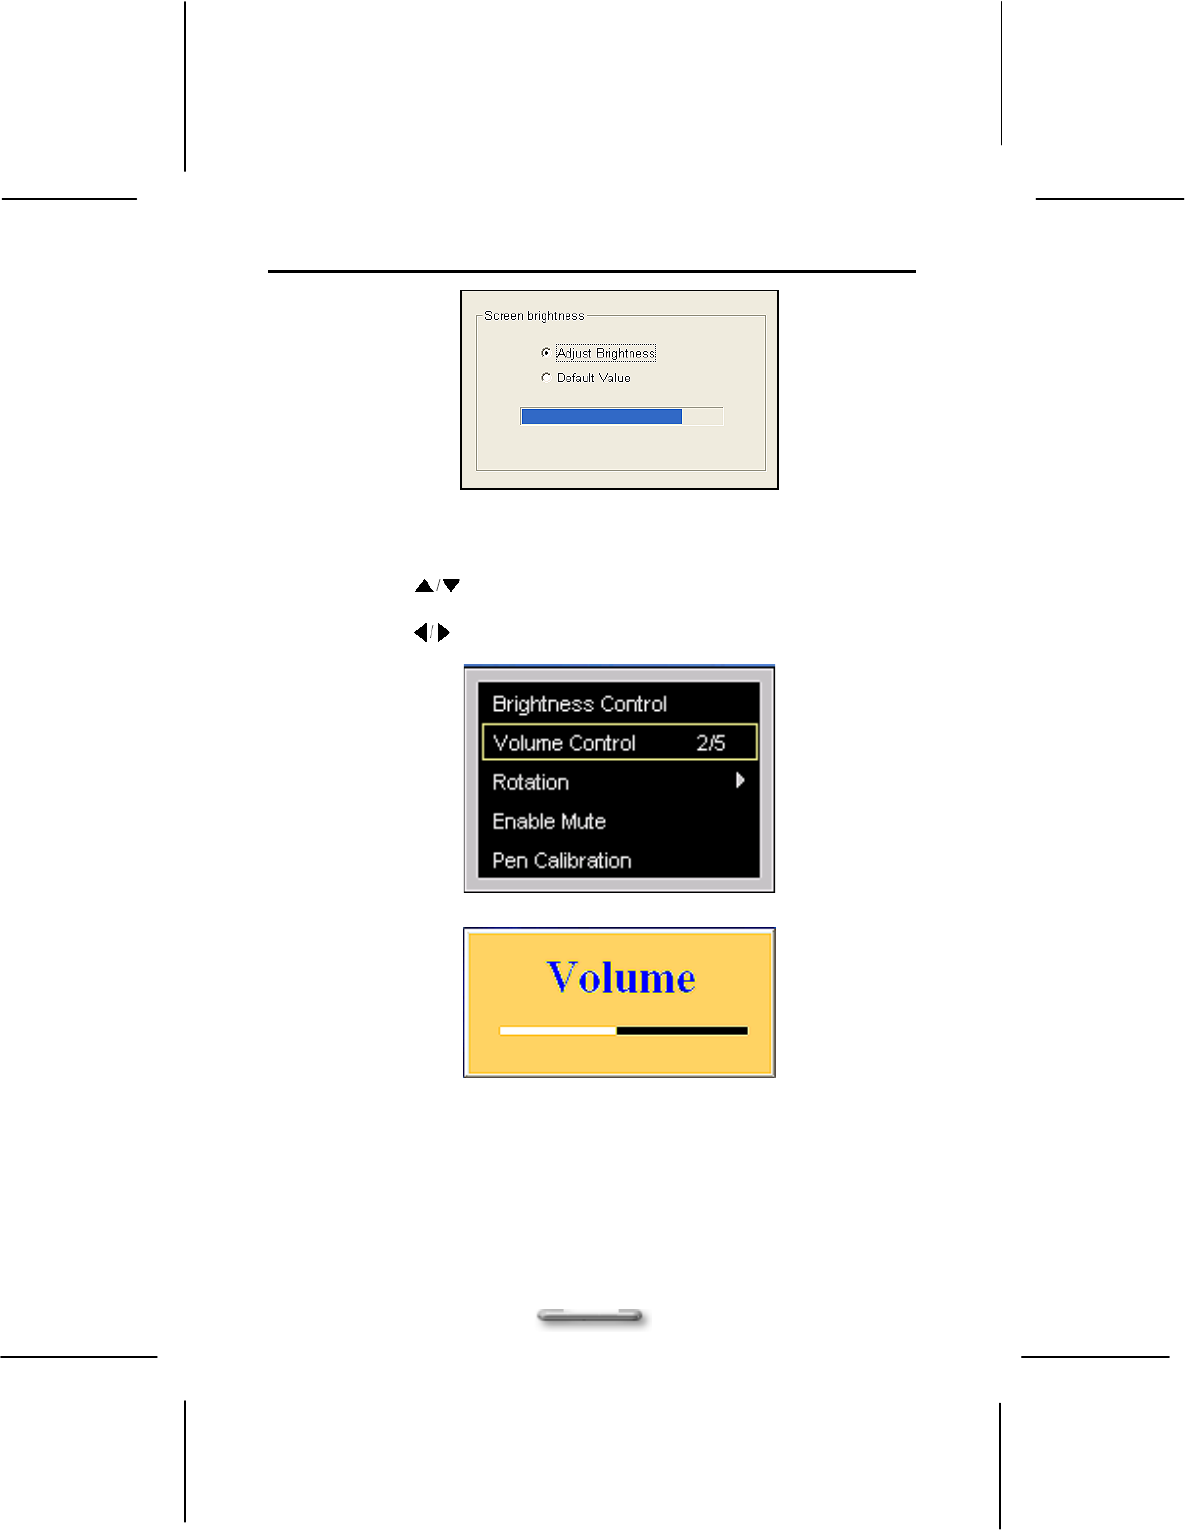
Brightness Control
This option adjusts the brightness of the display. To adjust the LCD screen brightness:
1. Press the 1st Menu button to invoke the first main menu.
2. Use the up/down arrow buttons to select Brightness Control.
3. Press the Enter button, and the Screen brightness dialog box appears.
4. If you want to restore the default brightness value, select Default Value and
press Enter button to confirm.
5. If you want to adjust the brightness value manually, select Adjust Brightness
and press Enter button.
6. Use the to decrease or increase the screen brightness.
SlateVision System User Guide
40
Volume Control
This option adjusts the volume of the speaker. To adjust the volume:
1. Press the 1st Menu button to invoke the first main menu.
2. Use the up/down arrow buttons to select Volume Control.
3. Press the Enter button, and the Volume dialog box appears.
4. Use the to decrease or increase the volume.
Using Stylus and Tablet Buttons
41
Rotation
This option adjusts changes your SlateVision screen orientation. This flexibility of an
adjustable screen layout that permits shifting between landscape and portrait viewing
modes. To adjust the screen orientation:
1. Press the 1st Menu button to invoke the first main menu.
2. Use the up/down arrow buttons to select Rotation.
3. Press the Enter button to enter the sub-menu.
4. Use the to select the orientation you want, and you can preview the result
on the upper small frame.
5. Press the Enter button to confirm changes.
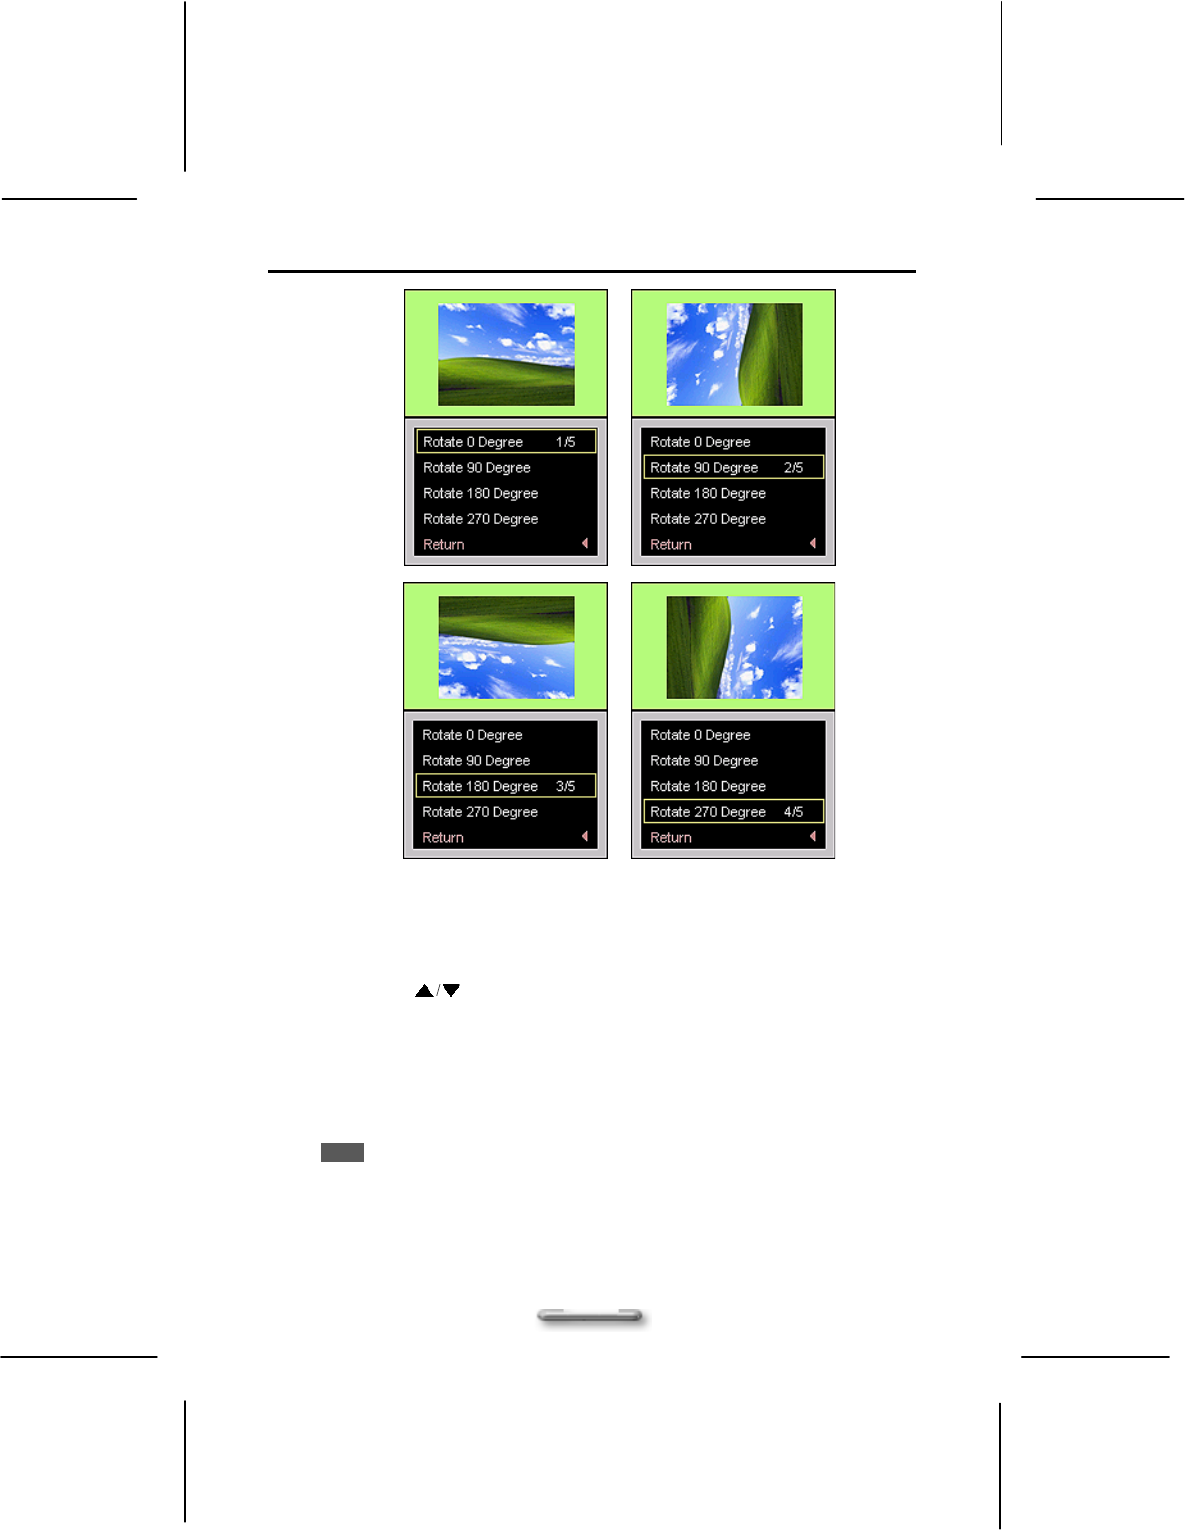
NOTE
The LCD integrates touch panel will only provides 16-bit high color resolution
while you are using rotation function.
Five options in the Rotation menu
Rotate 0 Degree - keep the screen in landscape viewing.
Rotate 90 Degree - rotate the screen 90 degree anticlockwise, in portrait
viewing.
Rotate 180 Degree - rotate the screen 180 degree anticlockwise, in
landscape viewing.
Rotate 270 Degree - rotate the screen 270 degree anticlockwise, in
portrait viewing.
Return - exit the Rotation menu to return to main menu.
SlateVision System User Guide
42
Pen Calibration
If you find that the tip of the stylus does not accurately point at items on the screen,
then you can calibrate how the screen responds to the pen. This option allows you can
calibrate your stylus. To do the pen calibration:
1. Press the 1st Menu button to invoke the first main menu.
2. Use the up/down arrow buttons to select Pen Calibration.
3. Press the Enter button to brings up Tablet and Pen Settings dialog box.
4. In the
Settings tab, tap the Calibrate.
5. There will be crosshair appearing at the four corners of the screen. Tap on the
center of the each crosshair accordingly.
6. After finished the calibration, tap OK to exit.
NOTE
You can also tap the Tablet and Pen Settings icon in the Control Panel to do
the pen calibration. For more the information, please refer to “Tablet and Pen
Settings - Settings Tab - Setting up stylus and calibration” in this chapter.
43
C
Ch
ha
ap
pt
te
er
r
5
5
U
Us
si
in
ng
g
T
Ta
ab
bl
le
et
t
I
In
np
pu
ut
t
P
Pa
an
ne
el
l
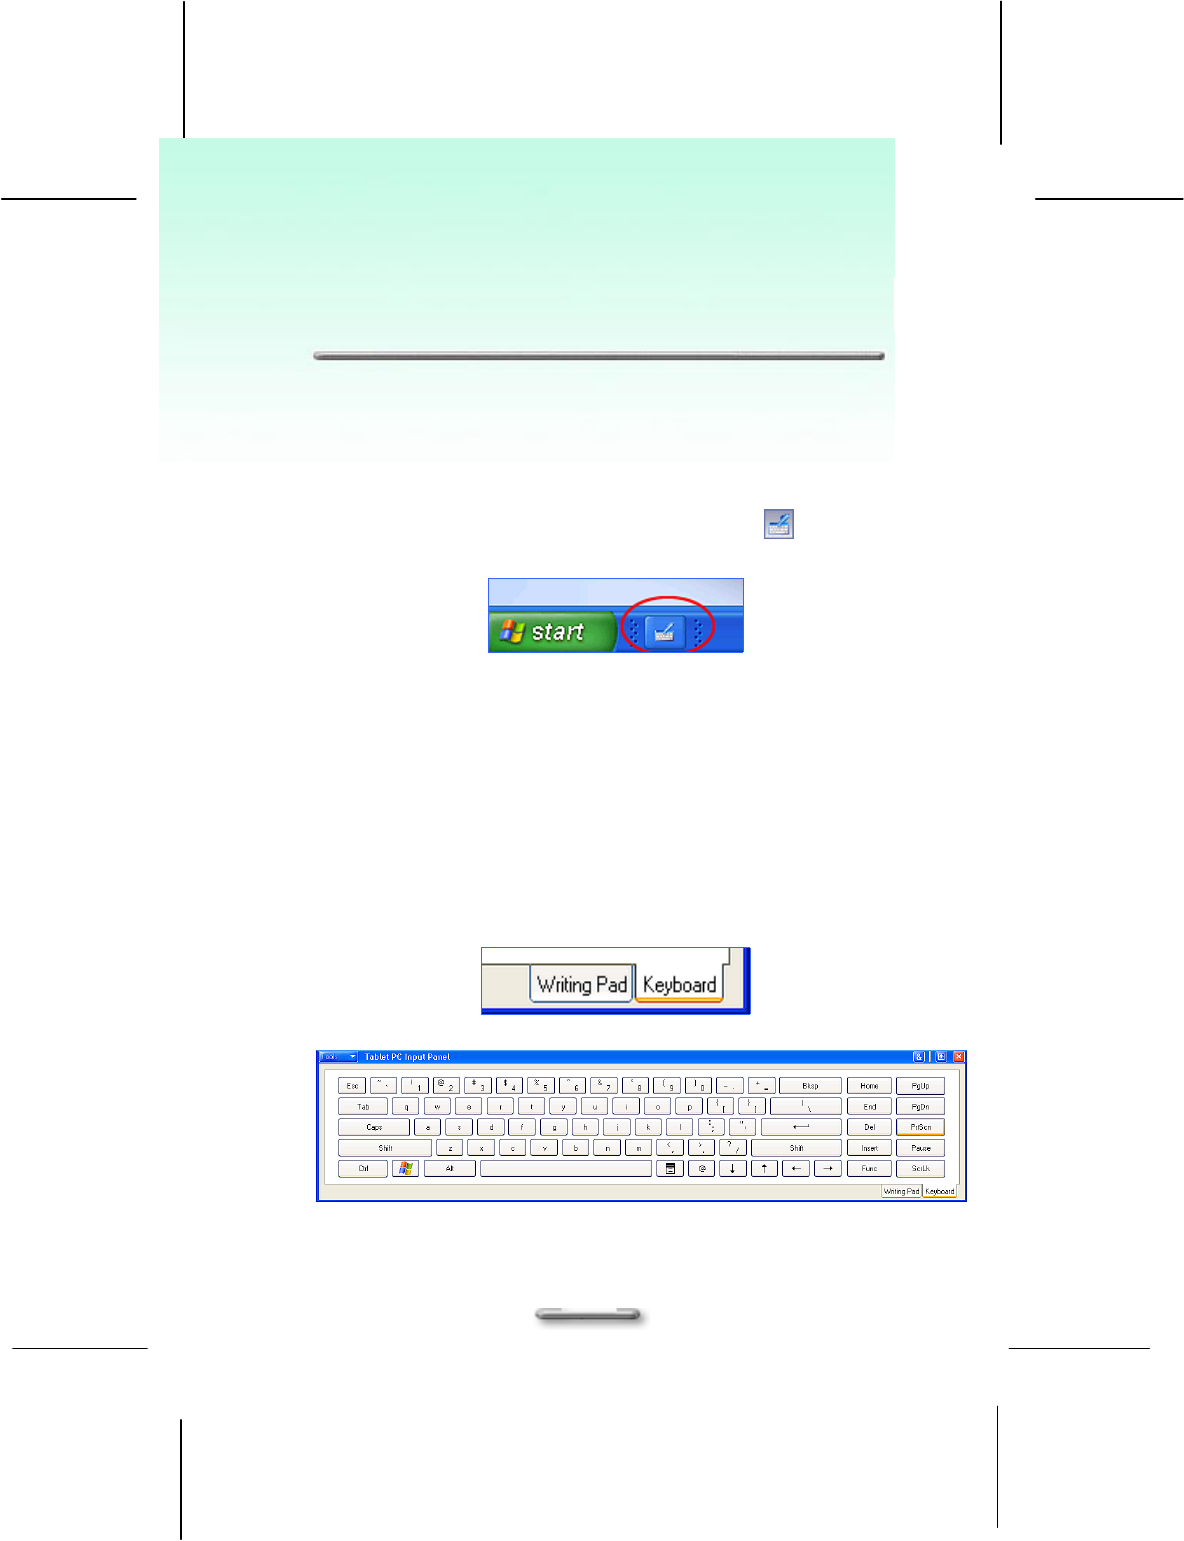
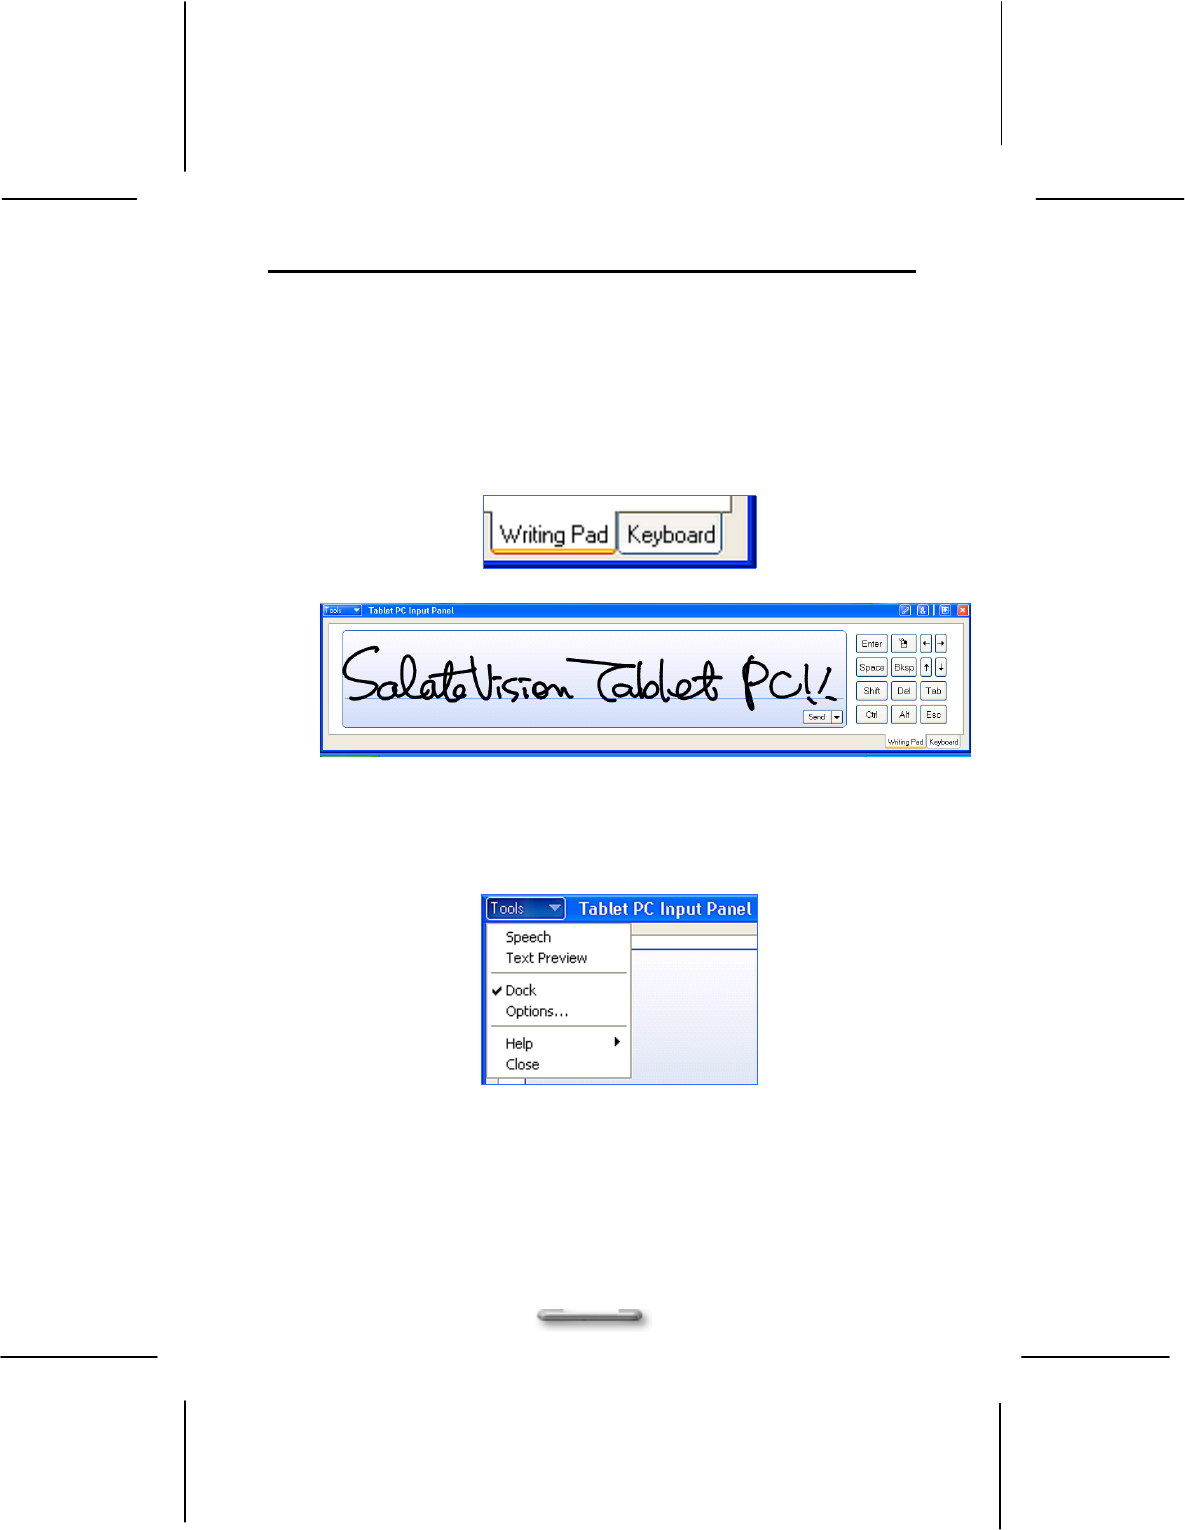
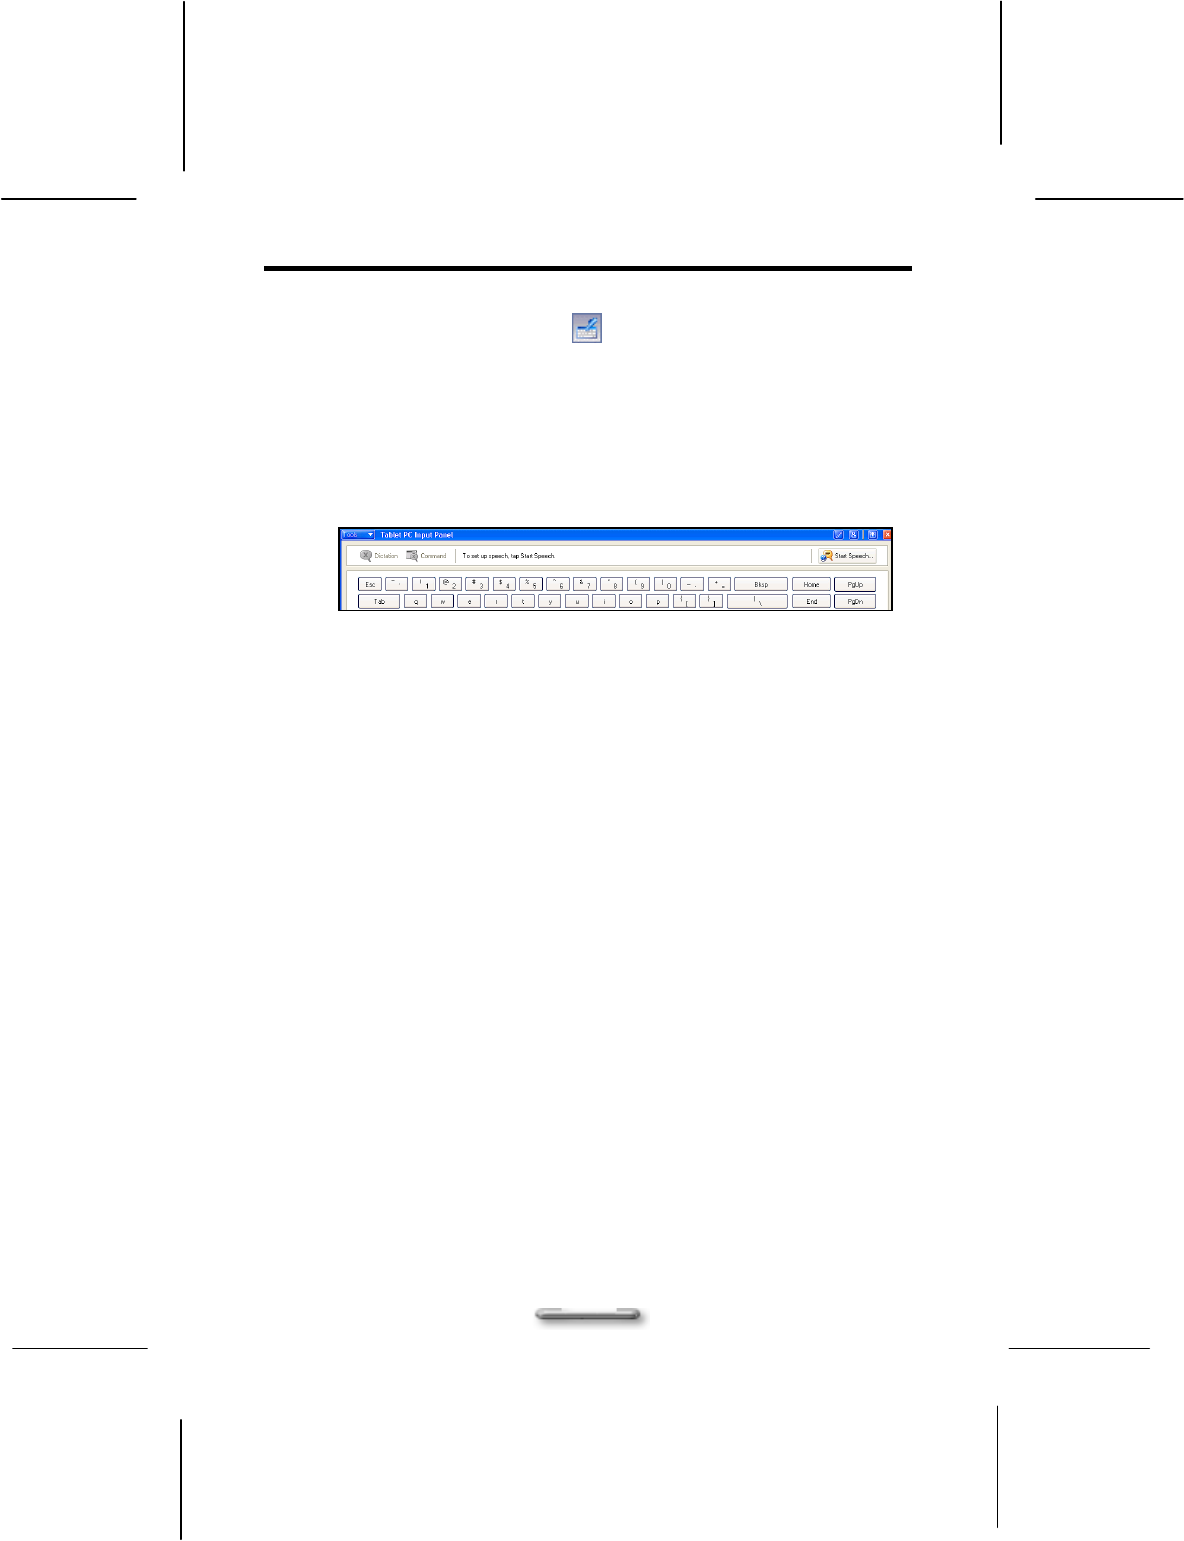
Invoking the Tablet Input Panel
Data can be entered from the touch screen using the stylus and Tablet PC Input Panel.
To invoke the Tablet Input Panel, tap the Tablet PC Input Panel icon next to the
Start button on the lower left corner of desktop.
You can either enter data with handwriting panel or soft keyboard of the Tablet PC
Input Panel. To switch the handwriting box or soft keyboard, please tap the Keyboard
or Writing Pad.
Inputting with Keyboard
The software keyboard looks and acts like a standard keyboard. Use your stylus to tap
the keys. You can use the software keyboard to enter text anywhere that you can use
a standard keyboard to enter text. The software keyboard is especially useful for
entering small amounts of text that require a high degree of accuracy, such as
passwords and file names. Also, the software keyboard is often the easiest tool for
correcting spelling or punctuation.
Tap Keyboard and a soft keyboard will display.
SlateVision System User Guide
44
Inputting with Writing Pad
The writing pad converts your handwriting into typed text and inserts it in a location
that you specify, such as a DOC document. In some programs, you can choose to
enter your handwriting instead of typed text. You can use the writing pad to enter text
anywhere that you can use a standard keyboard to enter text. The writing pad is
especially useful for brief writing tasks like writing e-mail messages, recording phone
messages, and taking meeting notes.
Tap Writing Pad and a handwriting panel will display.
Tablet Input Panel Settings
You can define your custom settings by tapping the Tools on the up-left corner. There
are six options: Speech, Text Preview, Dock, Options, Help, and Close.
1. Speech - to enable the two different speech modes: Dictation and Voice
command to speak to your tablet computer either to dictate or give commands.
The Dictation mode, your computer listens to everything you say and changes
your words to text. The Voice command mode, your computer listens for specific
words that correspond to an existing list of available voice commands.

Using Tablet Input Panel
45
2. Text Preview - you can use the text preview pane to review and edit your text
before you insert it.
3. Dock - dock or float Tablet PC Input Panel.
4. Options - to bring up the Options dialog box for advanced settings. It contains
five tabs:
Writing Pad
Writing Tools
Write Anywhere
Speech
Advanced
5. Help - display help topics, tutorial, program information, version number, and
copyright.
6. Close - close the Tablet PC Input Panel.

SlateVision System User Guide
46
47
C
Ch
ha
ap
pt
te
er
r
6
6
U
Us
si
in
ng
g
W
Wi
in
nd
do
ow
ws
s
J
Jo
ou
ur
rn
na
al
l
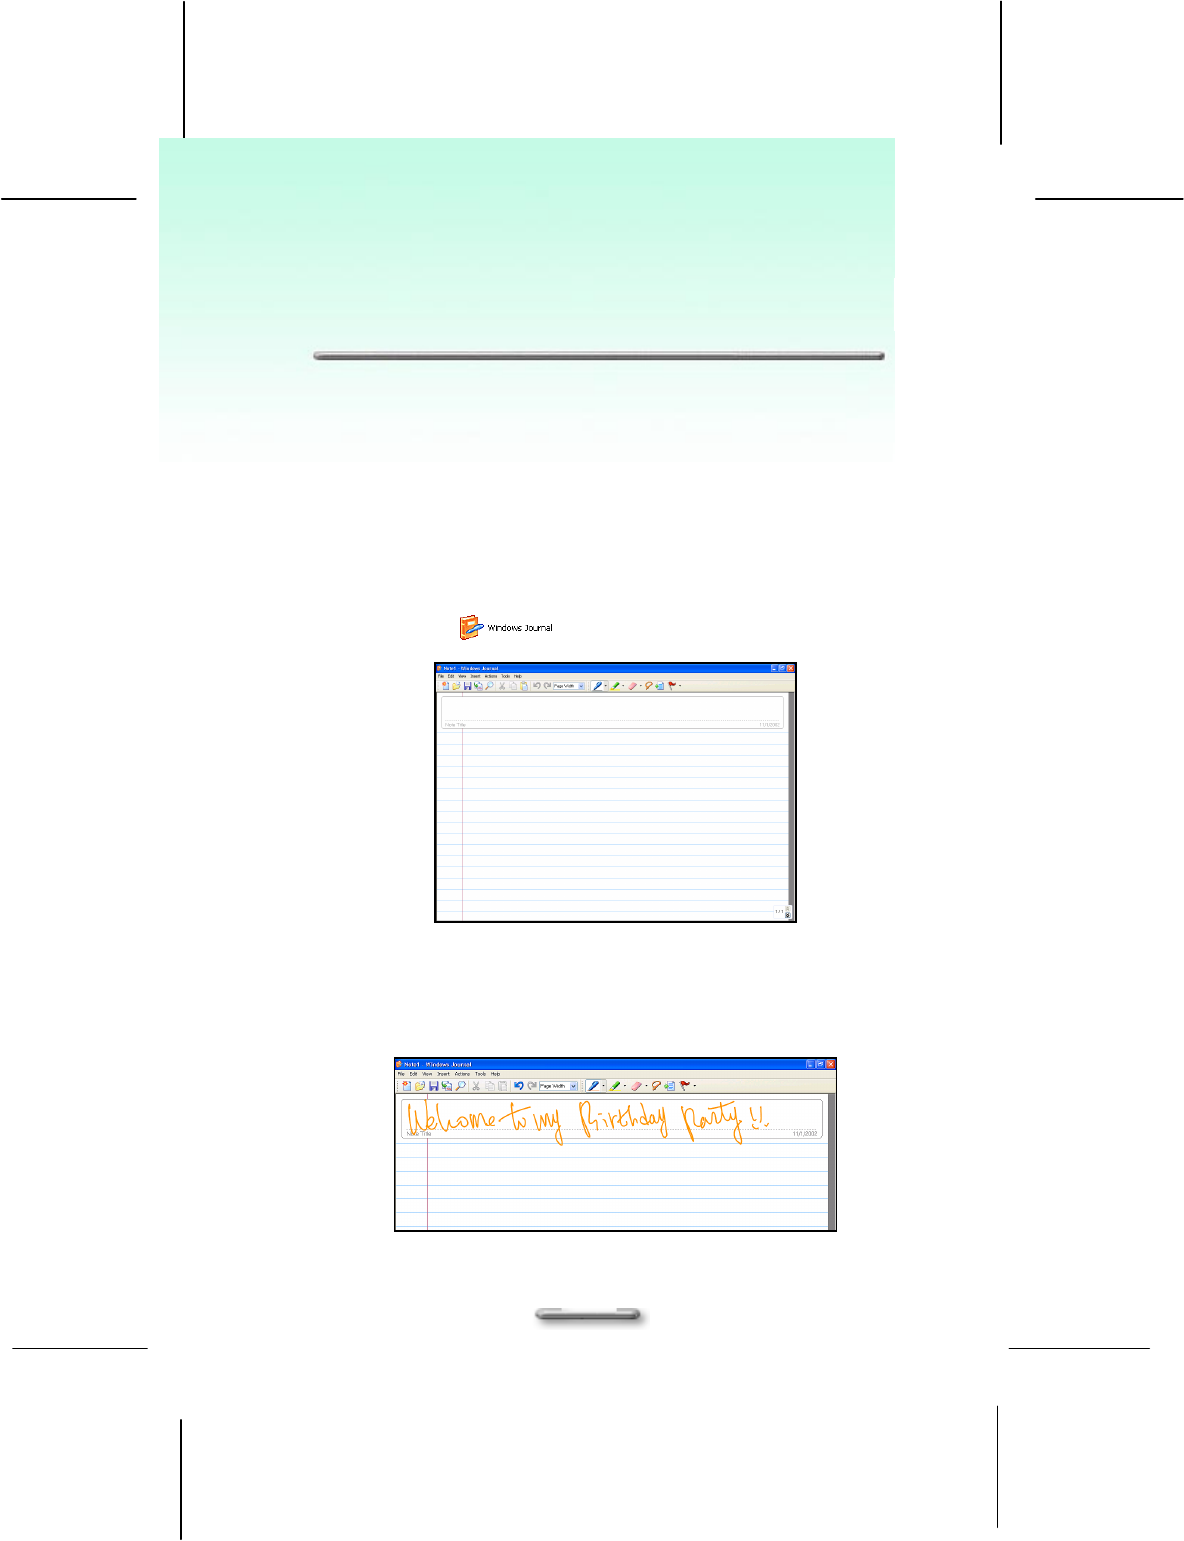
What is Windows Journal?
In Microsoft® Windows® Journal, you can use the tablet pen to write information and
save it in a note. You can convert your writing to typed text, and you can enter typed
text into your notes. You can create drawings in your notes and insert pictures.
Launch Windows Journal
Tab on the Start button, point to All Programs, and then tab Window
Journal to launch the program.
Figure 6.1.1 Full screen view of Windows Journal
Entering the Note Title
Write directly in the Journal document with the stylus, such as the title “Insert Text Box
to key in” in the “Note Title” area.
SlateVision System User Guide
48
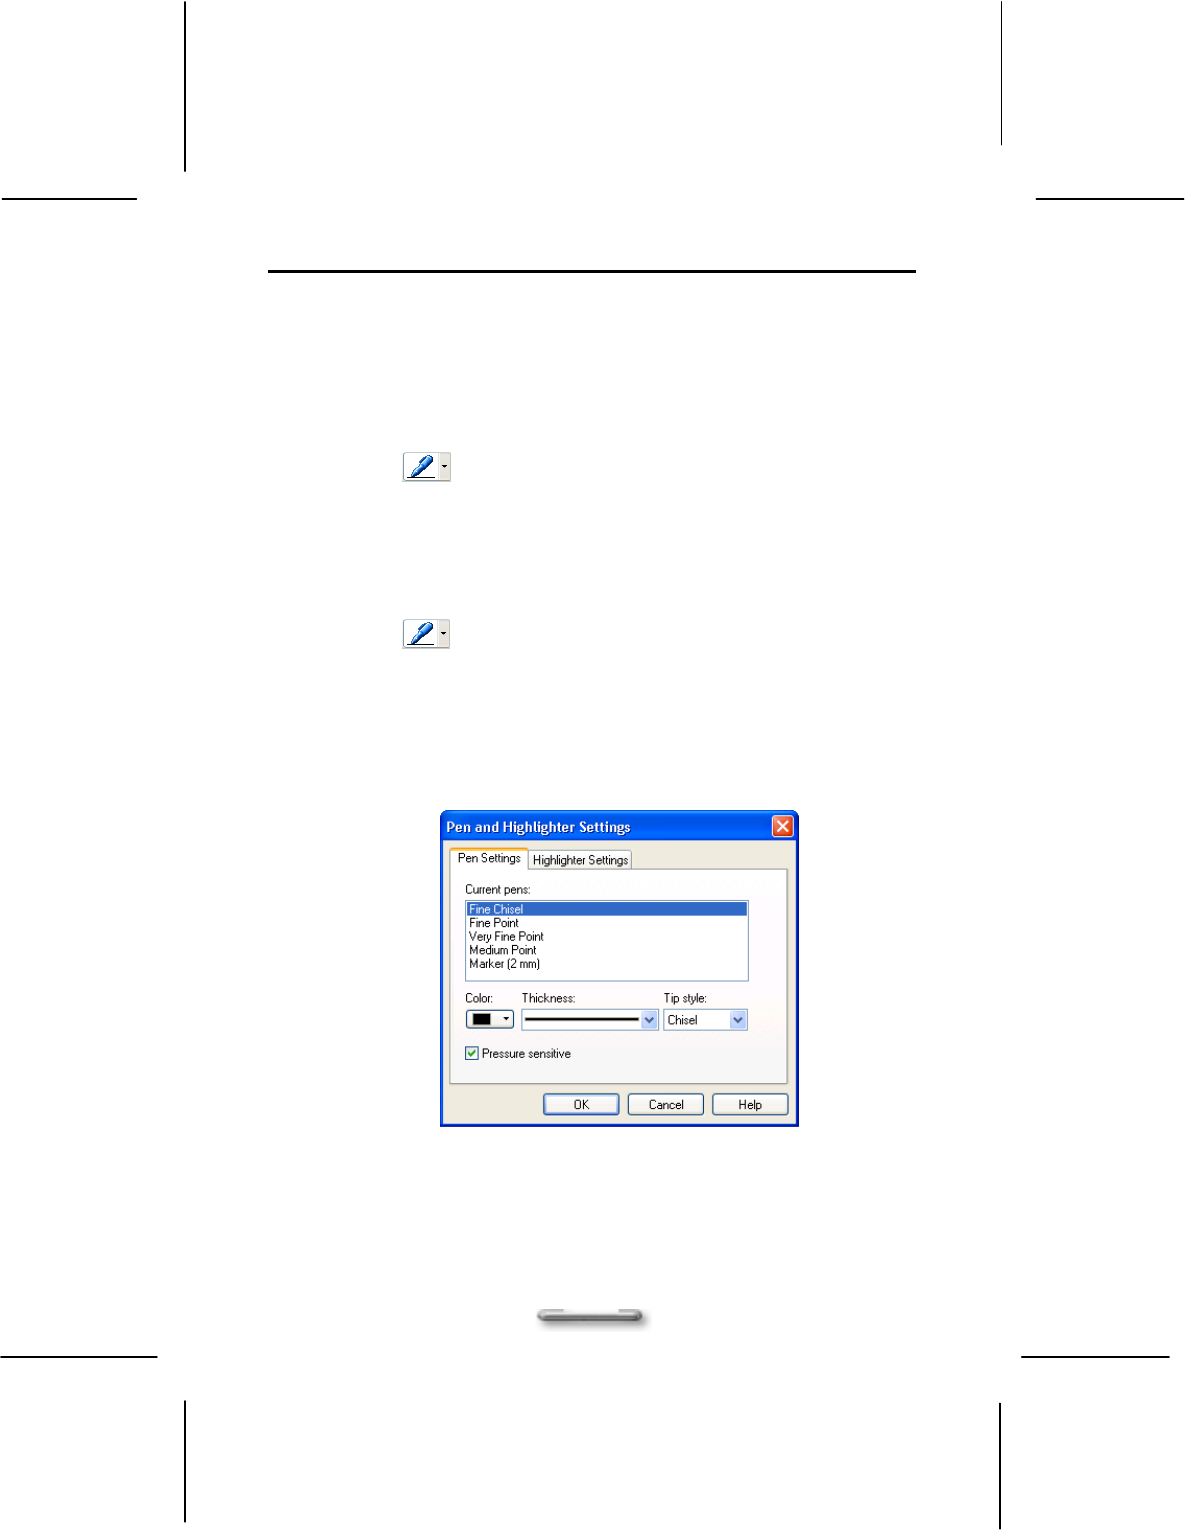
Using a Pen
On the Pen toolbar, you can select one of several pens that have different settings for
ink color, ink thickness, and tip style. You can customize these pen settings to suit
your preferences.
1. Select a pen
On the Pen toolbar, tap the small arrow to the right of the Pen button
.
A list of pens appears.
Tap the pen that you want to use.
2. Change pen settings
You can change the settings for any pen.
On the Pen toolbar, tap the small arrow to the right of the Pen button
, and then tap Pen Settings.
In the Current pens list, tap the pen for which you want to change the
settings.
Select the appropriate color, thickness, and tip style.
Select the Pressure sensitive check box. It is enabled if checked. This
means that as you press harder with the tablet pen, the ink that you create
in your note becomes thicker.
Figure 6.1.1 Pen Settings
Using Windows Journal
49
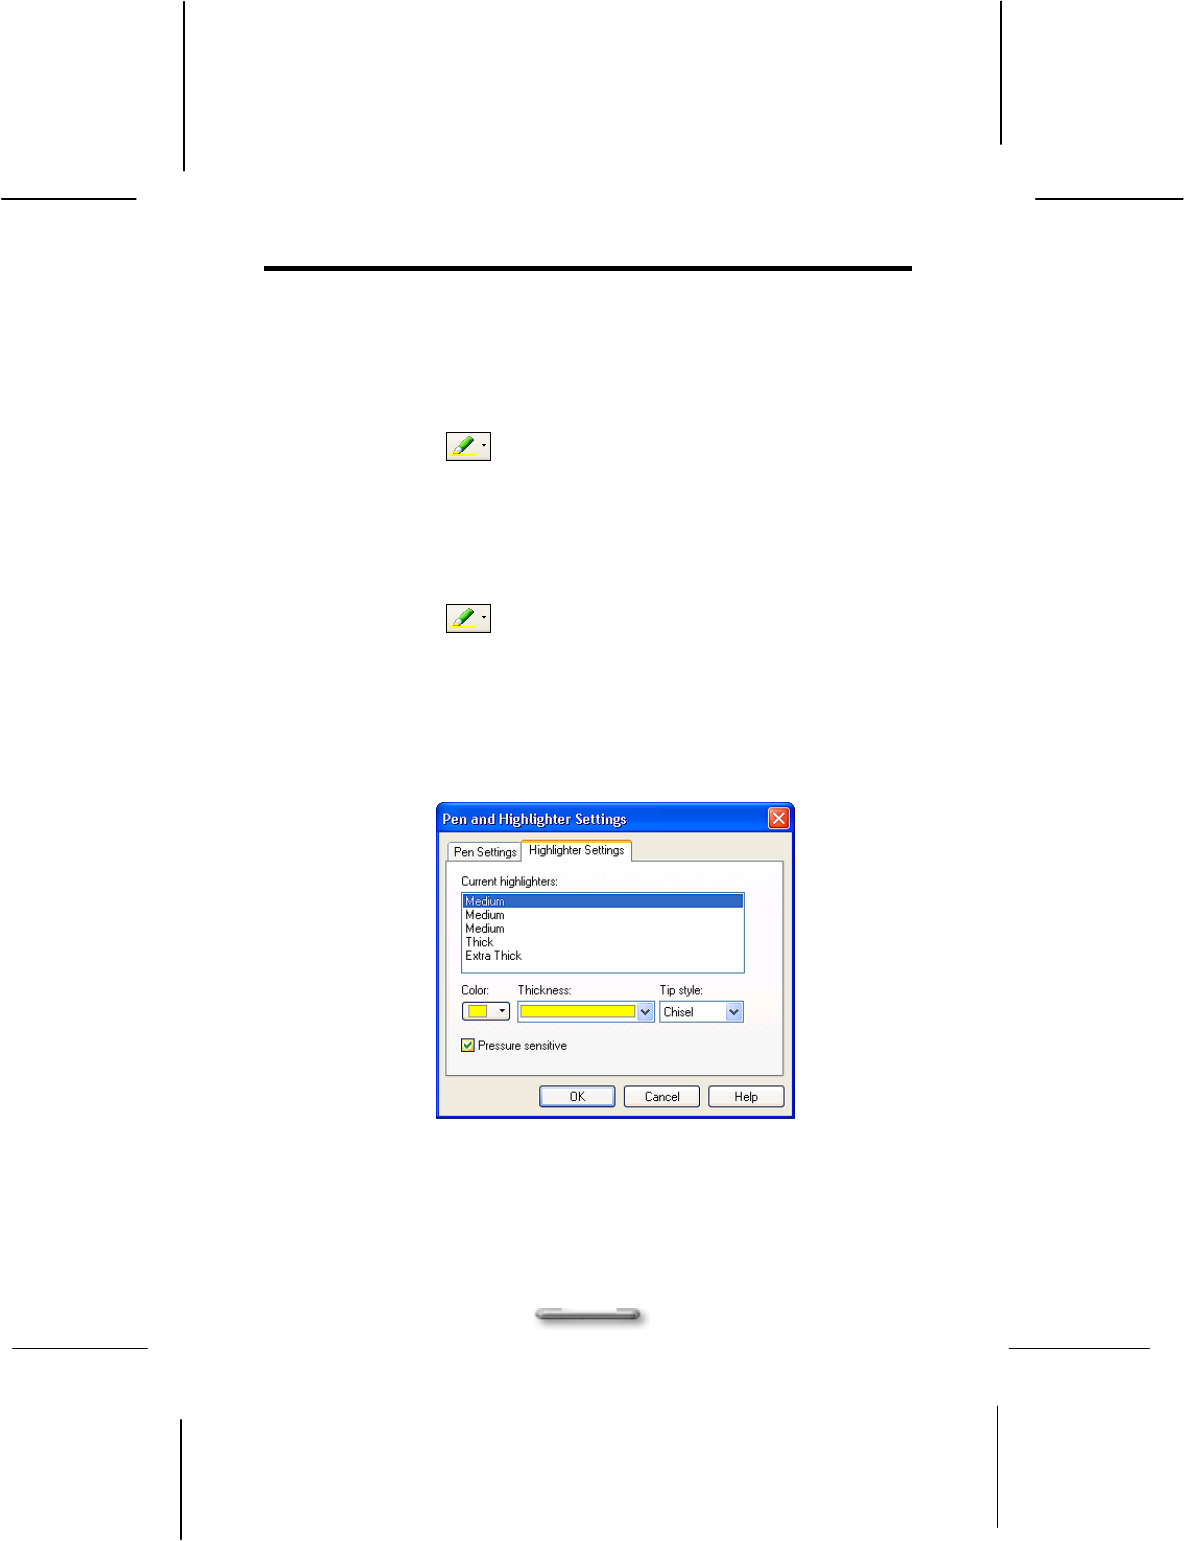
Using a Highlighter
On the Pen toolbar, you can choose one of several highlighters that have different
settings for ink color, ink thickness, and tip style. You can customize these highlighter
settings to suit your preferences.
1. Select a highlighter
On the Pen toolbar, tap the small arrow to the right of the Highlighter
button .
A list of pens appears.
Tap the highlighter that you want to use.
2. Change highlighter settings
You can change the settings for any pen.
On the Pen toolbar, tap the small arrow to the right of the Highlighter
button , and then tap Highlighter Settings.
In the Current highlighters list, tap the highlighter for which you want to
change the settings.
Select the appropriate color, thickness, and tip style.
Select the Pressure sensitive check box. It is enabled if checked. This
means that as you press harder with the tablet pen, the ink that you create
in your note becomes thicker.
Figure 6.1.2 Highlighter Settings
SlateVision System User Guide
50
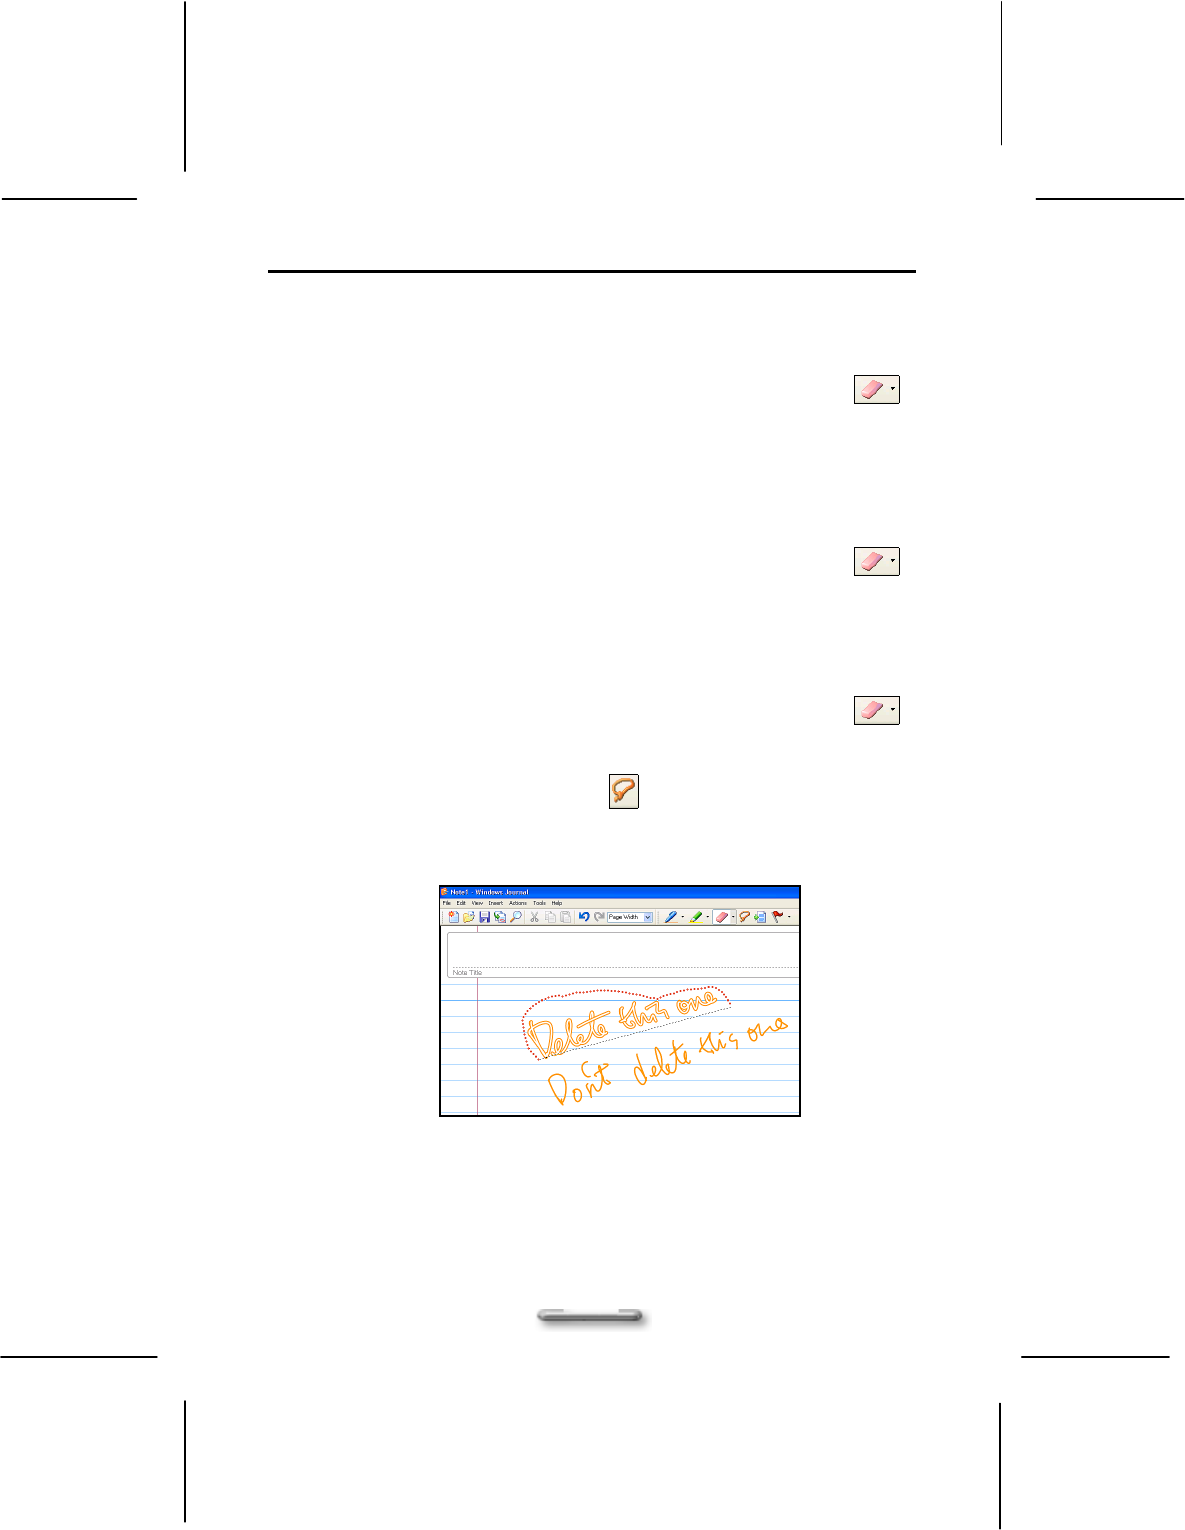
Using the Eraser Tool
You can use to remove writing and drawing from your notes.
1. Select the eraser size
On the Pen toolbar, tap the arrow to the right of the Eraser button ,
and tap the size of the eraser, Small, Medium, or Large, that you want to
use.
The eraser removes all of the ink that it touches.
The eraser does not affect pictures or text boxes.
2. Erase an entire ink stroke
On the Pen toolbar, tap the arrow to the right of the Eraser button ,
and tap Stroke.
Tap any part of the ink stroke that you want to erase.
The entire stroke is erased.
3. Erase portions of an ink stroke
On the Pen toolbar, tap the arrow to the right of the Eraser button ,
and tap the size of the eraser, Small, Medium, or Large, that you want to
use.
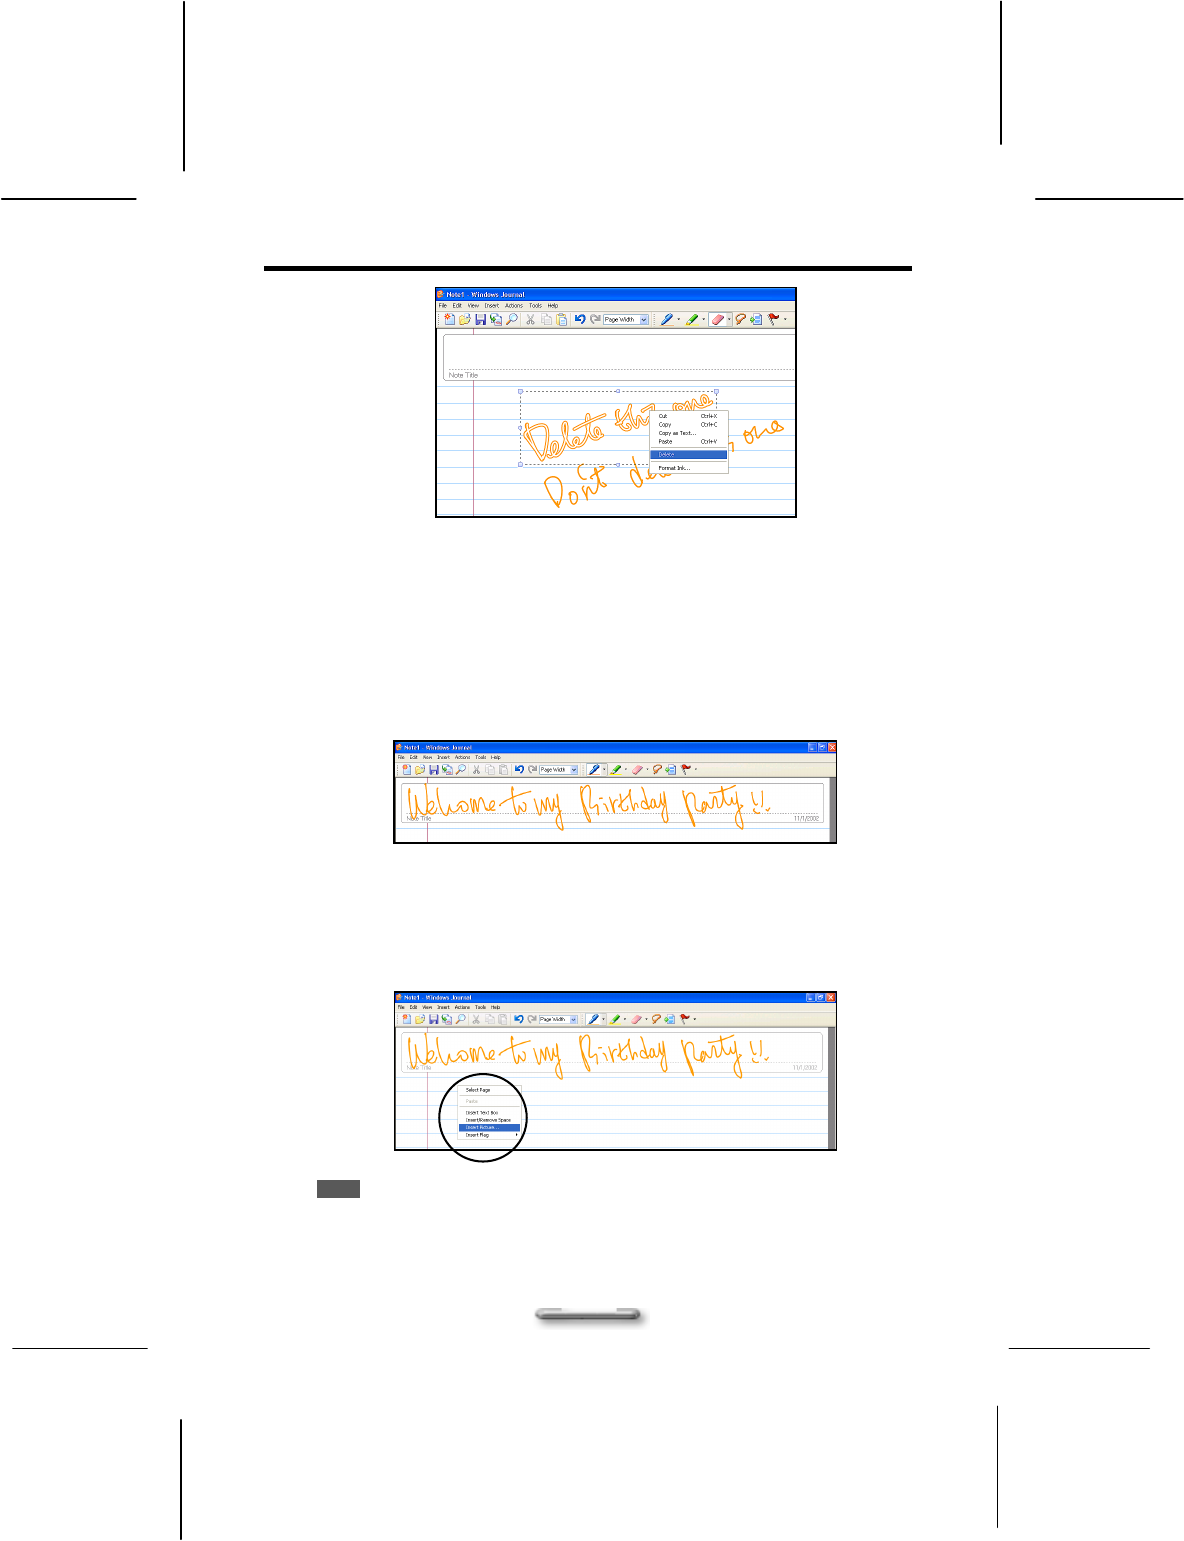
Tap the Selection Tool button , and the drag the stylus over the ink
that you want to erase.
Select Delete from the pop-up menu.
Figure 6.2.1 Select the potion you want to delete
Using Windows Journal
51
Figure 6.2.2 Select Delete command
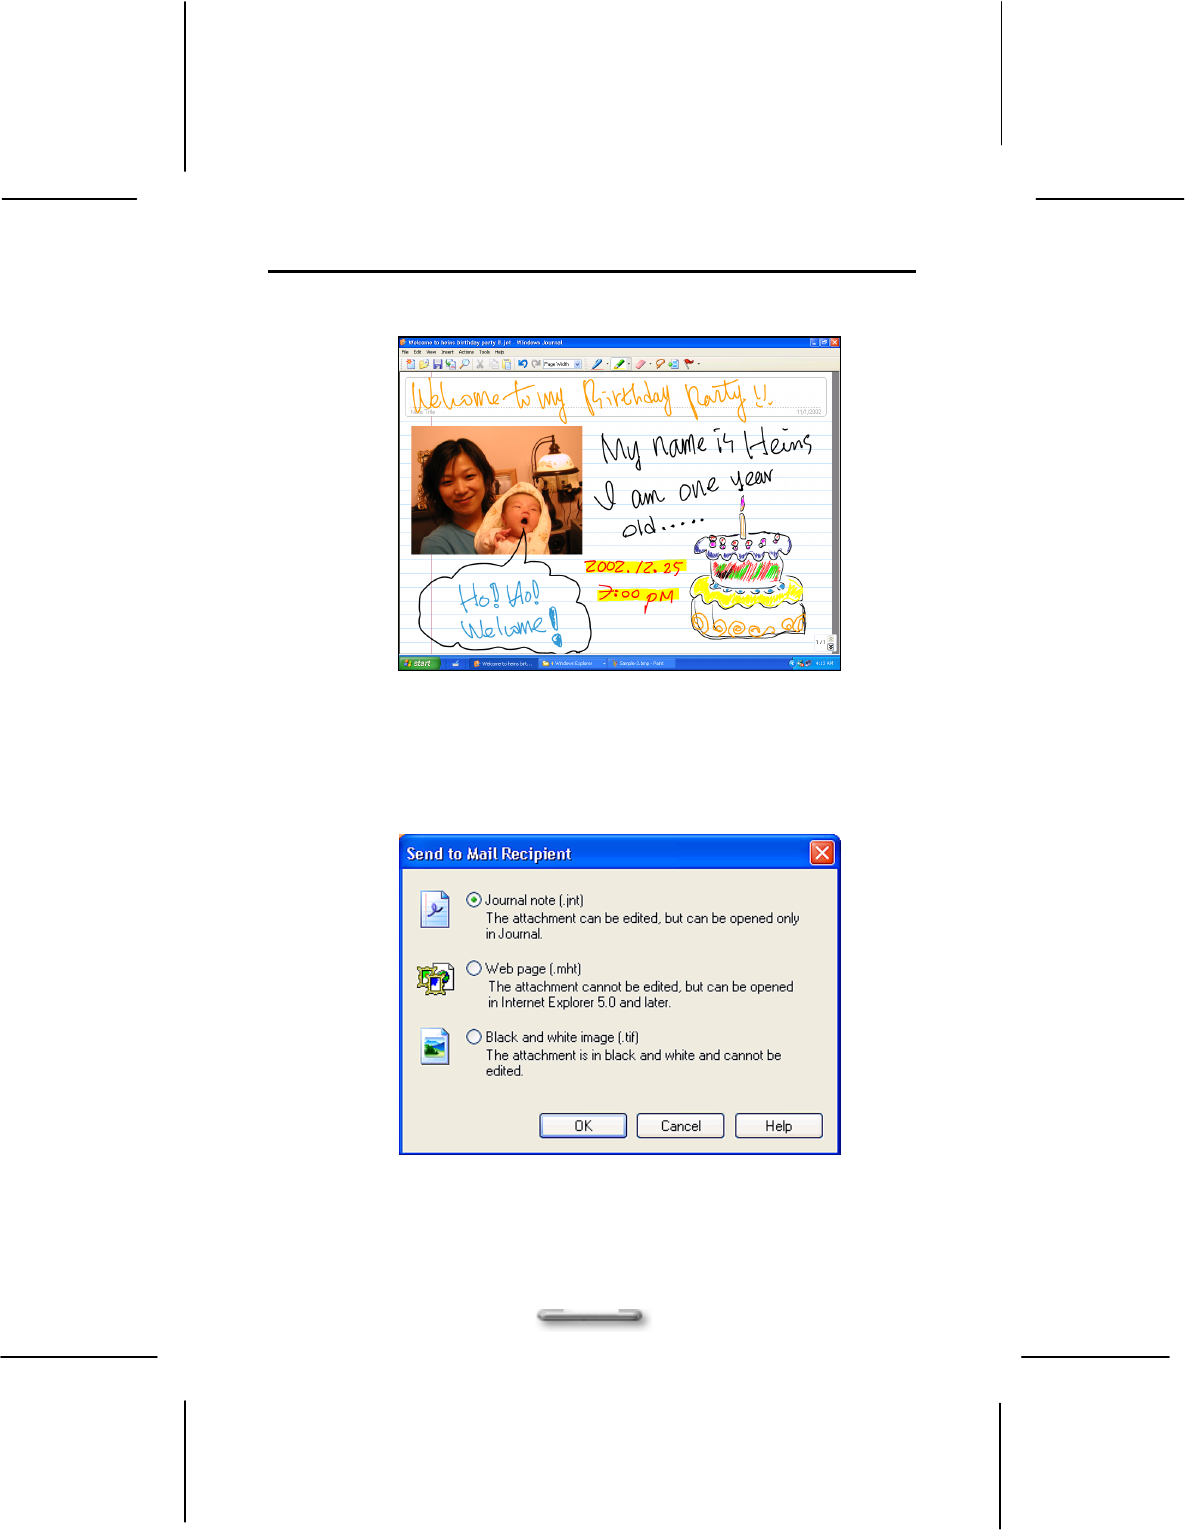
Let's Practice!
The best way to practice to use your tablet screen is the way you would use a piece of
paper or writing tablet.
1. Create a new note and enter the Note Title
Enter such as the title “Welcome to my birthday party!!” in the Note Title
area.
2. Insert a picture
Press and hold your stylus and then select Insert Picture from the pop-up
menu. Or you can also select Picture… from the Insert menu on the
toolbar.
NOTE
Microsoft® Windows® Journal supports the following picture file
types: .jpg , .jpeg, .gif, .bmp, .png, .wmf, and .emf.
SlateVision System User Guide
52
3. Apply the appropriate pen/highlighter color, thickness, and tip style.
4. Send your Note via E-mail
Select Send to Mail Recipient…from the File menu on the toolbar.
The Send to Mail Recipient dialog box appears.
Select the attachment file format you want to use: Journal note (.jnt),
Web page (.mht) or Black and white image (.tif).
53
C
Ch
ha
ap
pt
te
er
r
7
7
U
Us
si
in
ng
g
S
St
ti
ic
ck
ky
y
N
No
ot
te
es
s
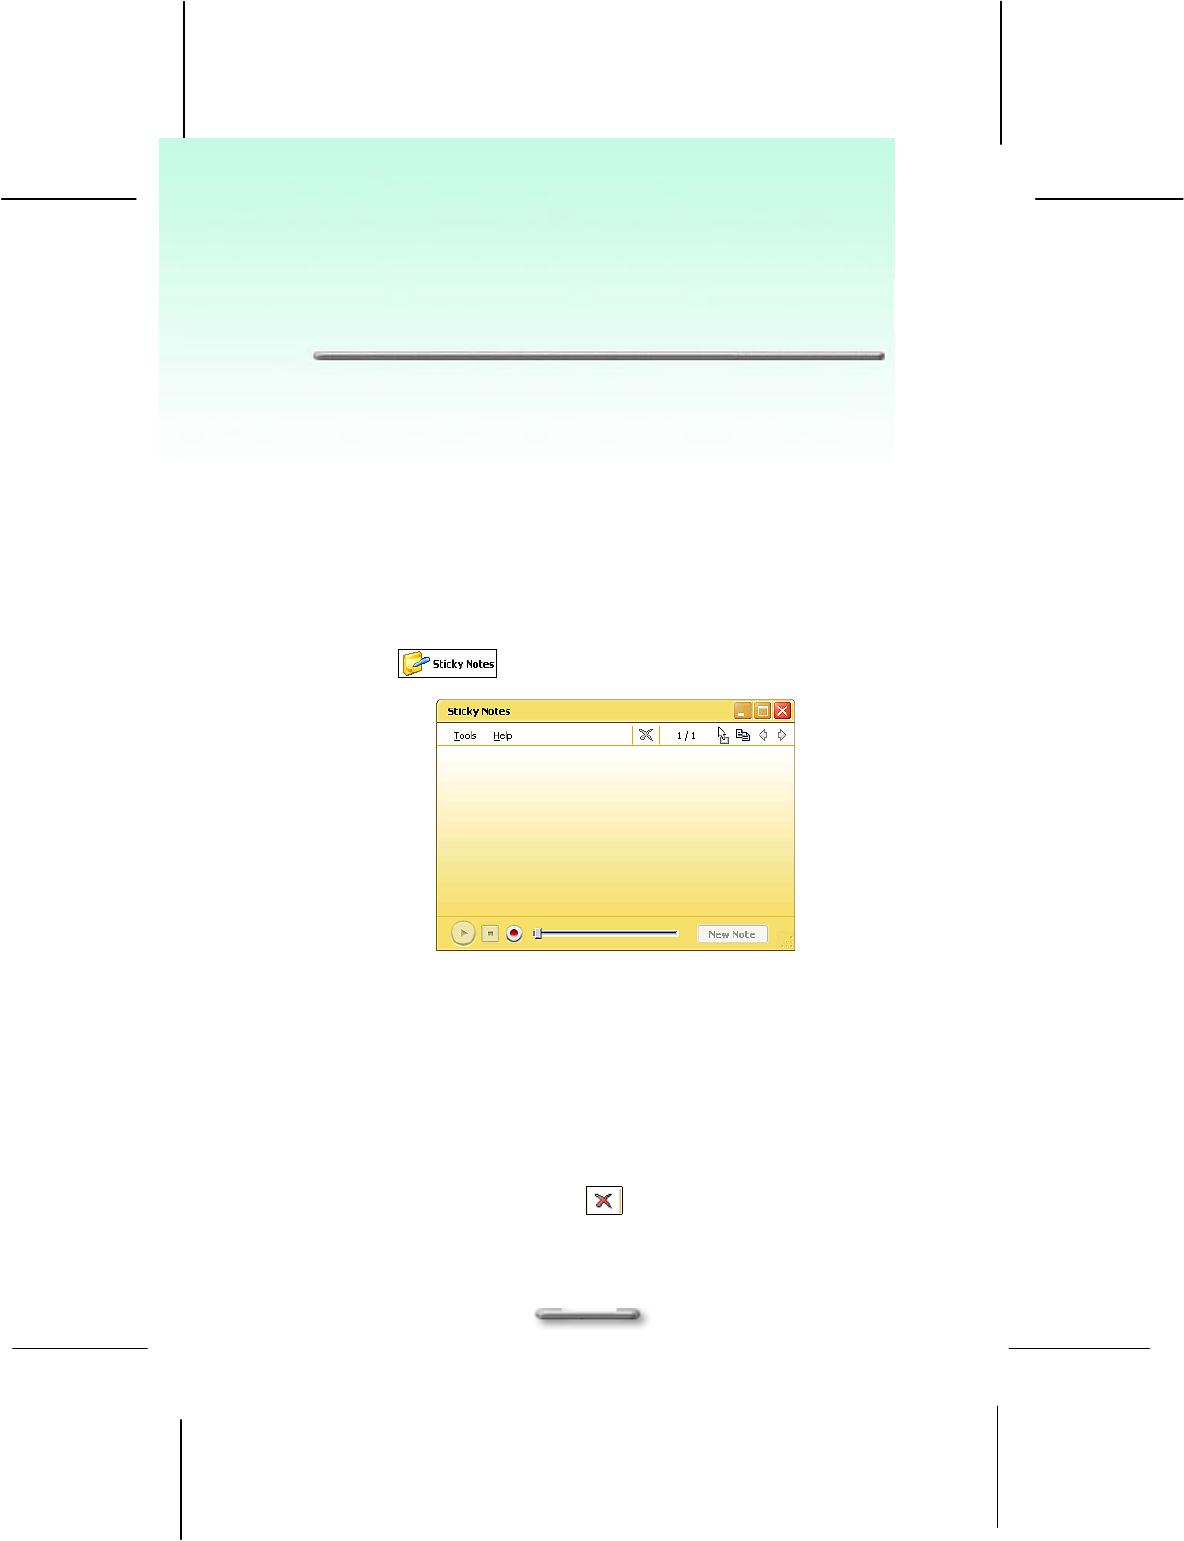
What is Sticky Notes?
In Microsoft® Sticky Notes, you can use it the same way that you use a paper sticky
note - to retain names, phone numbers, simple maps with directions, and other
information that you need to write quickly and keep easily available. You can also use
a microphone to record information. A sticky note can contain both writing and
recording.
Launch Sticky Notes
Tab on the Start button, point to All Programs, and then tab Sticky Notes
to launch the program.
Figure7.1 Full screen view of Sticky Notes
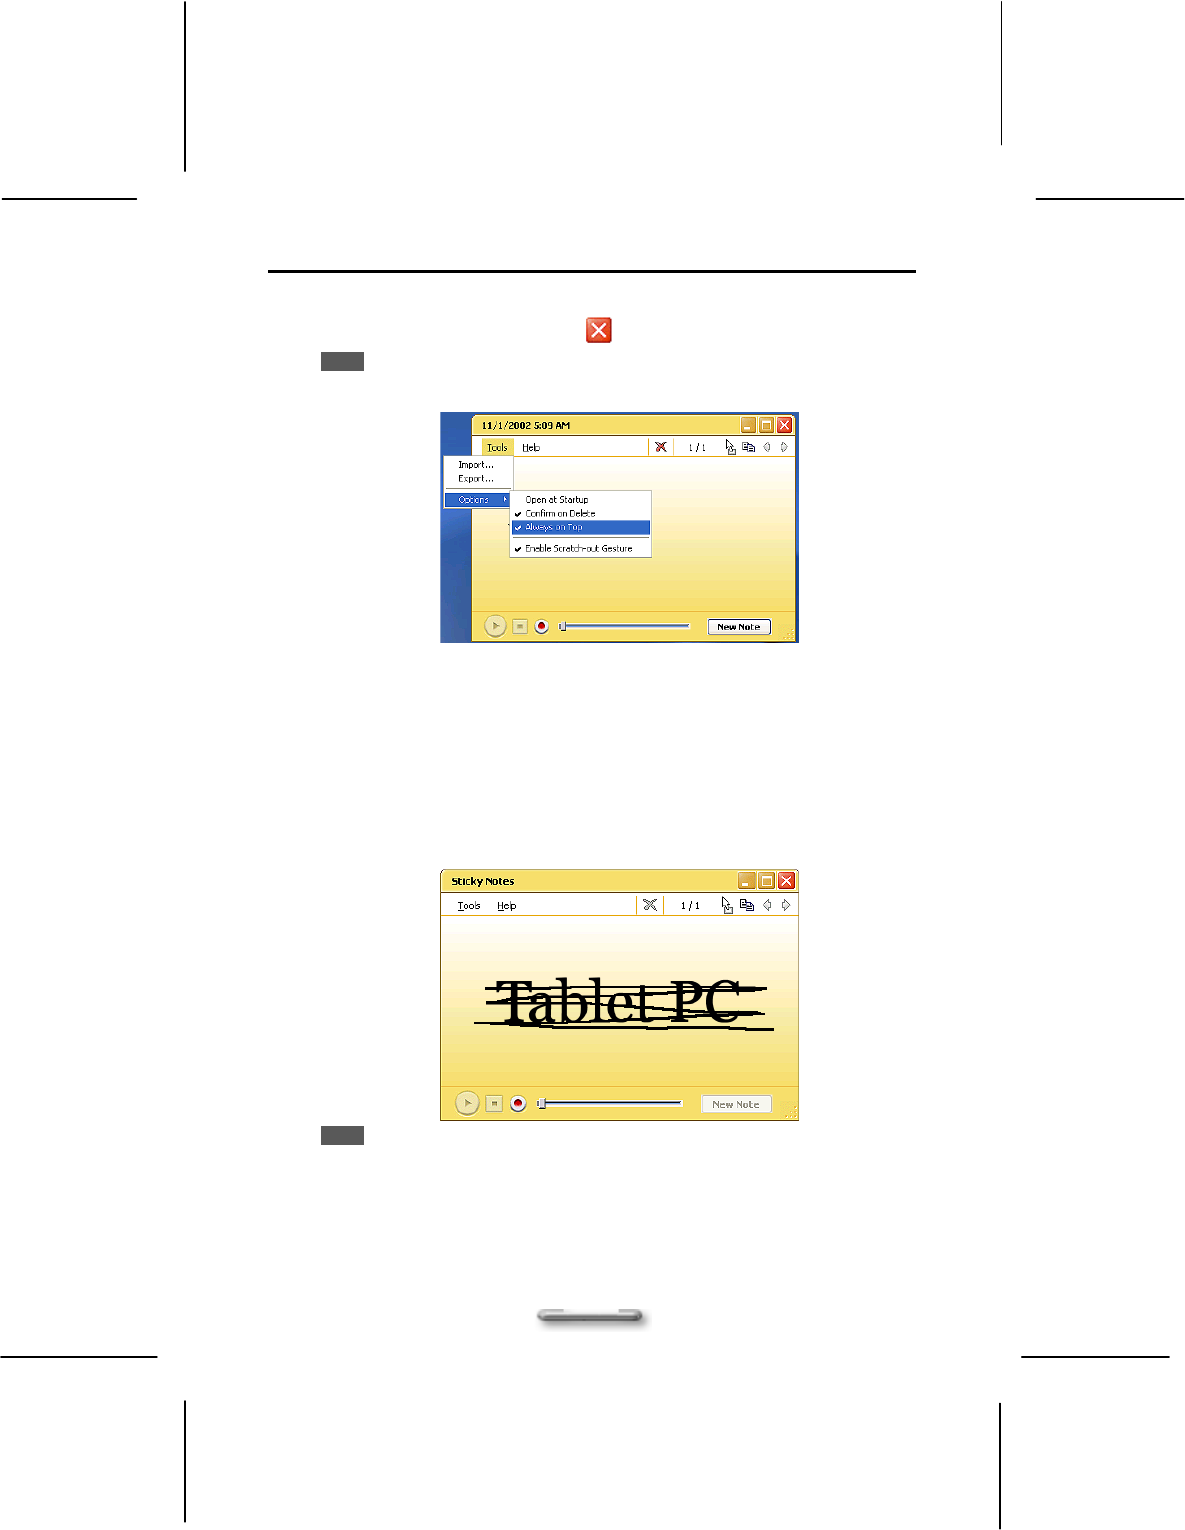
Make Sticky Notes open automatically at startup
On the Tools menu, point to Options, and then tap Open at Startup.
Keep Sticky Notes always visible on the desktop
On the Tools menu, point to Options, and then tap Always on Top.
Delete Sticky Notes
On the title bar, tap Delete button.
SlateVision System User Guide
54
Close Sticky Notes
On the title bar, tap Close button.
NOTE
Your notes are automatically saved when you close Sticky Notes.
Remove an ink stroke
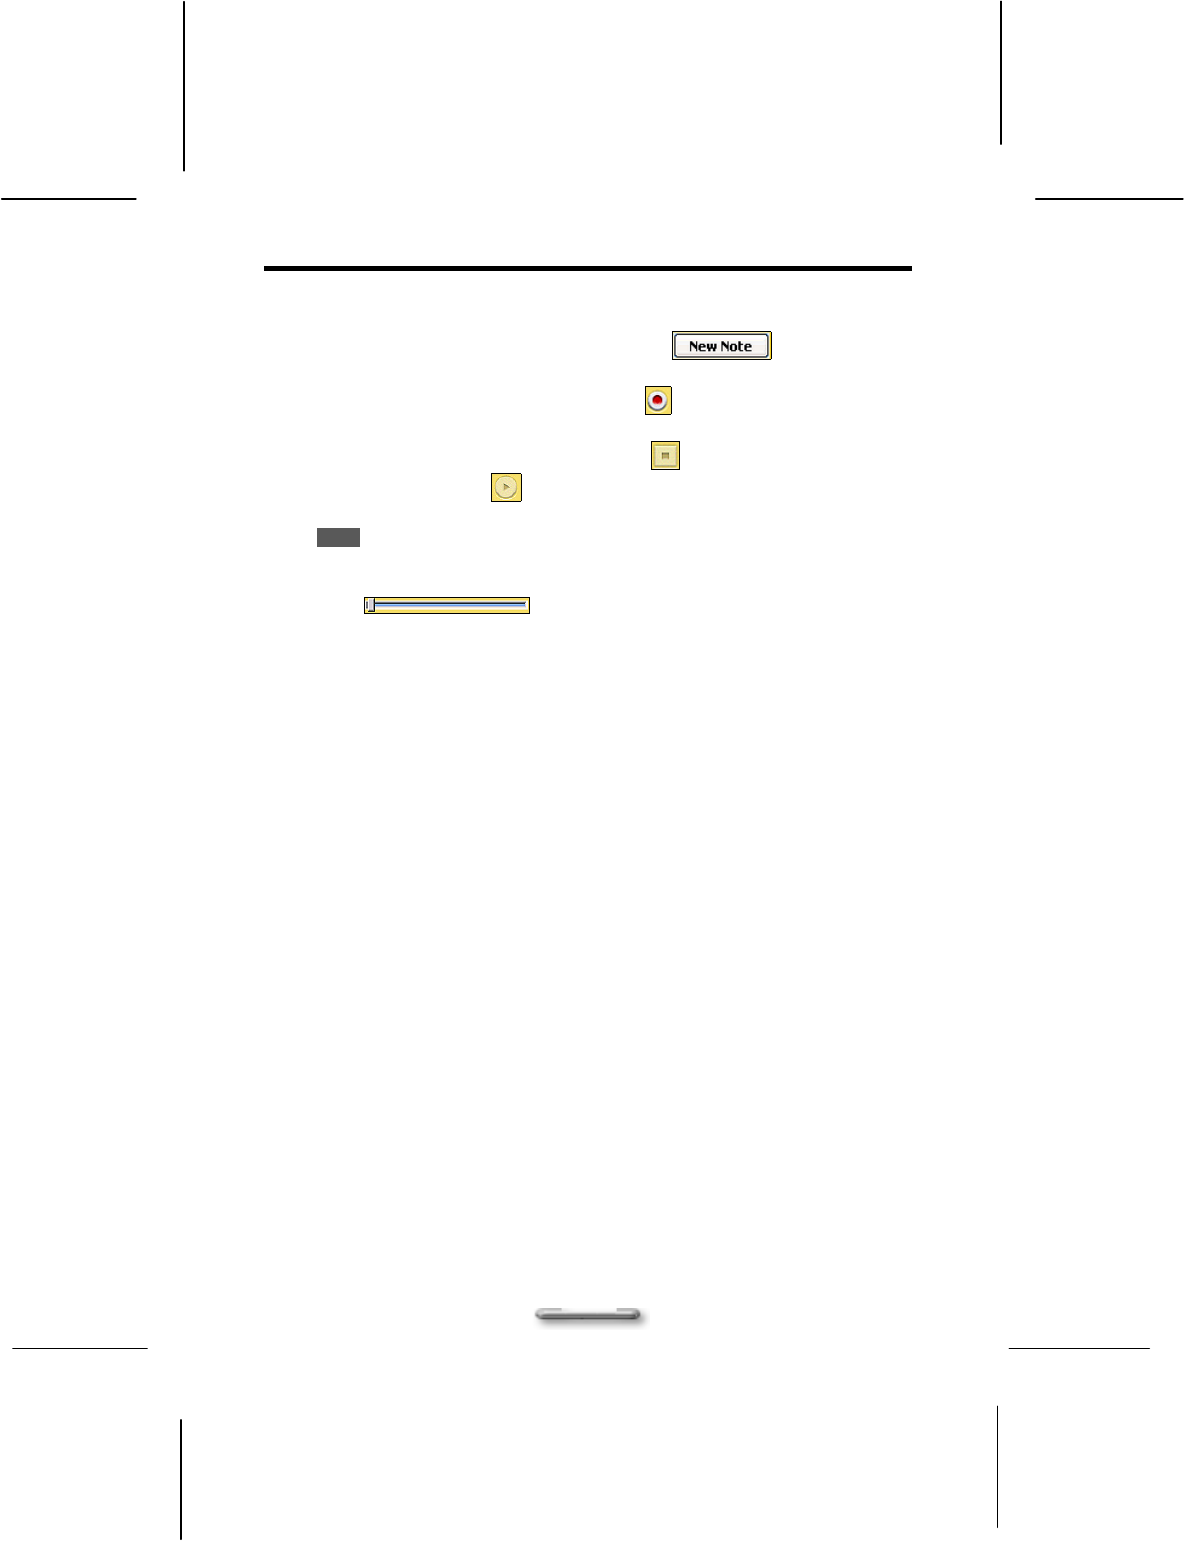
An ink stroke is a continuous movement of the stylus that starts when the stylus
touches the screen and ends when the stylus is lifted. You can easily remove an ink
stroke from a written note by using the scratch-out gesture.
On the Tools menu, point to Options, and then tap Enable Scratch-out
Gesture.
Using the stylus, make the scratch-out gesture OVER the ink stroke that
you want to erase.
NOTE
If your scratch-out gesture does not OVER the ink stroke that you want to erase.
There will be only some portion of the ink stroke deleted.
Using Sticky Notes
55
Create and play a voice note
You can record a new voice note or add your voice to a written note.
In the lower-right corner, tap New Note button. Use the
current note if the button is unavailable.
In the lower-left corner, tap Record button. Speak into your computer
microphone.
When you finish recording, tap Stop button.
Tap the Play button to play the voice note with voice.
NOTE
When you tap Record, the date and time appear in the title bar.
You can record a maximum of 30 seconds. The position of the slider
indicates how much recording time remains.

SlateVision System User Guide
56
57
C
Ch
ha
ap
pt
te
er
r
8
8
U
Us
si
in
ng
g
S
Sp
pe
ee
ec
ch
h
What is Speech?
Speech capabilities for a computer system refers to the ability to play back text in a
spoken voice (referred to as text-to-speech or TTS), or to convert a spoken voice into
electronic text (referred to as speech recognition or SR). The two capabilities are
independent of each other. Many systems will have only TTS. SR may be installed
later either by loading a speech package, or more commonly, through an application
which has incorporated speech into it. For example, a new word processor or office
tool suite may include speech and it will be loaded at that time.
Launch Speech
For speech systems to work properly or for optimal results, the components need to be
set up correctly.
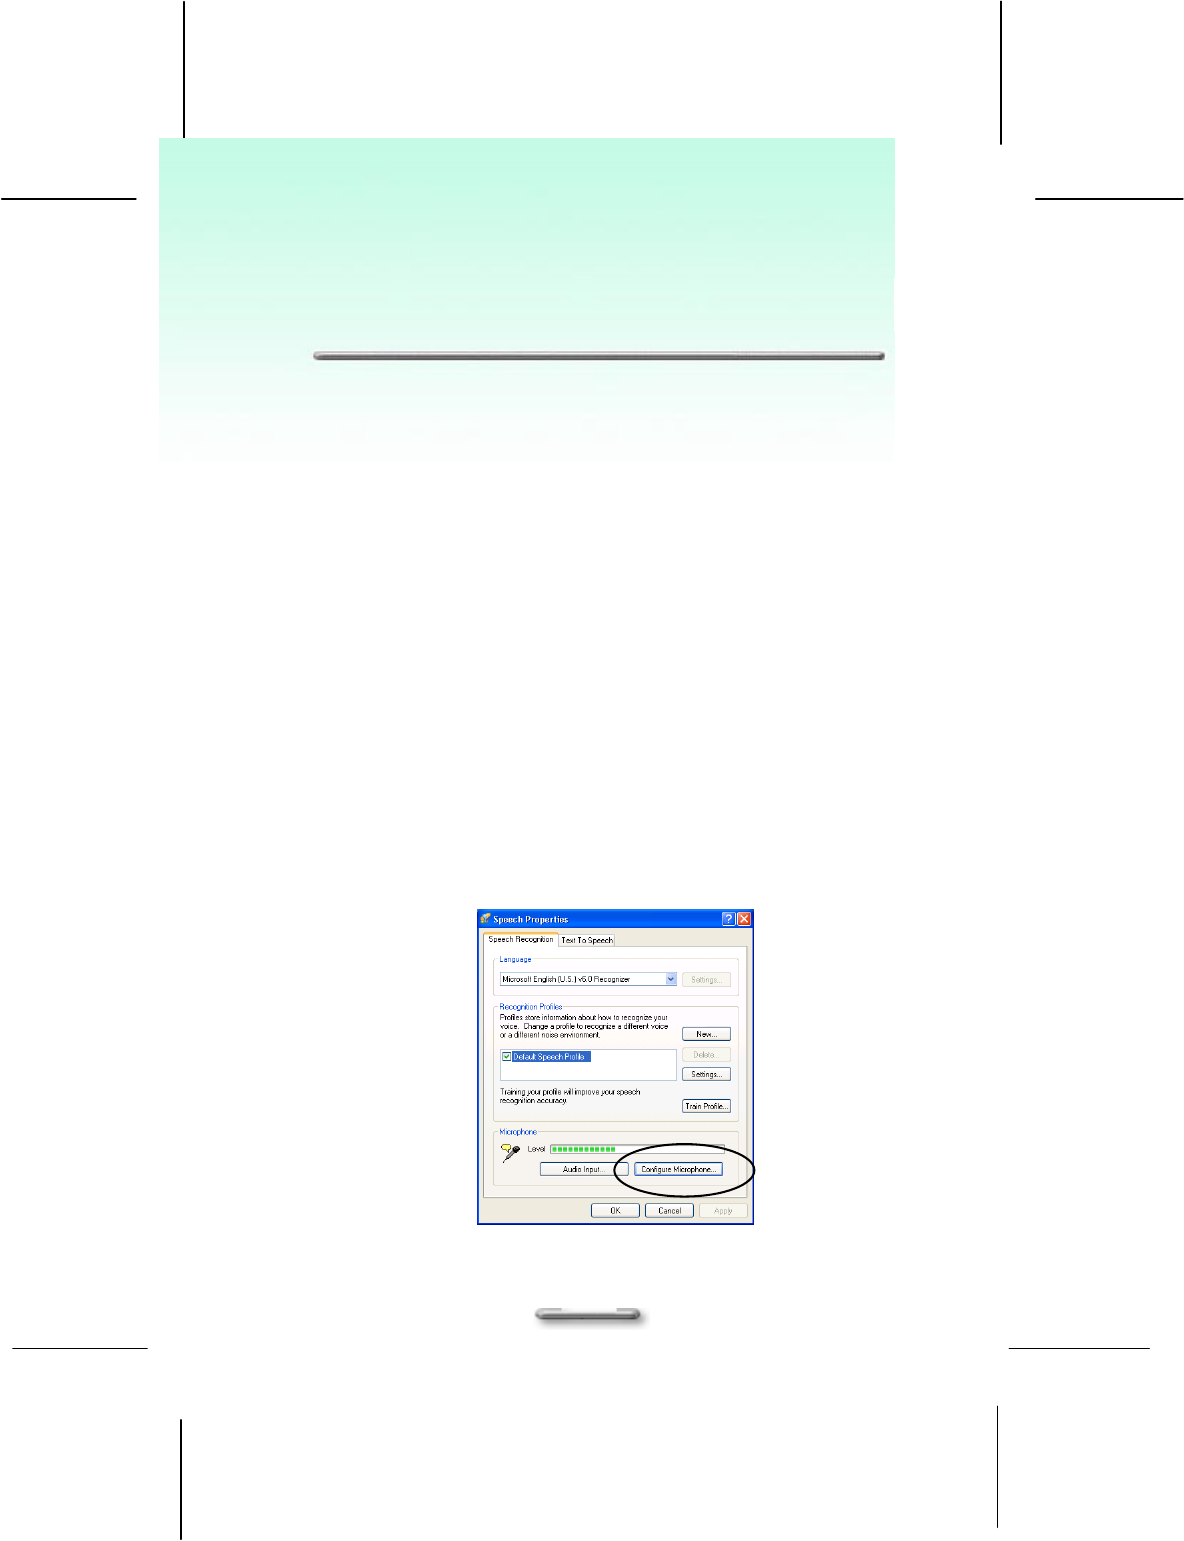
1. Set up a microphone
Plug a microphone into the microphone jack on the bottom of SlateVision.
Open Speech in Control Panel.
Select the Speech Recognition tab.
Speak directly into the microphone. The sound level should register in the
Microphone Level indicator.
You can also tap Configure Microphone… to invoke Microphone
Wizard for you to adjust your microphone volume for use with speech
recognition.
SlateVision System User Guide
58
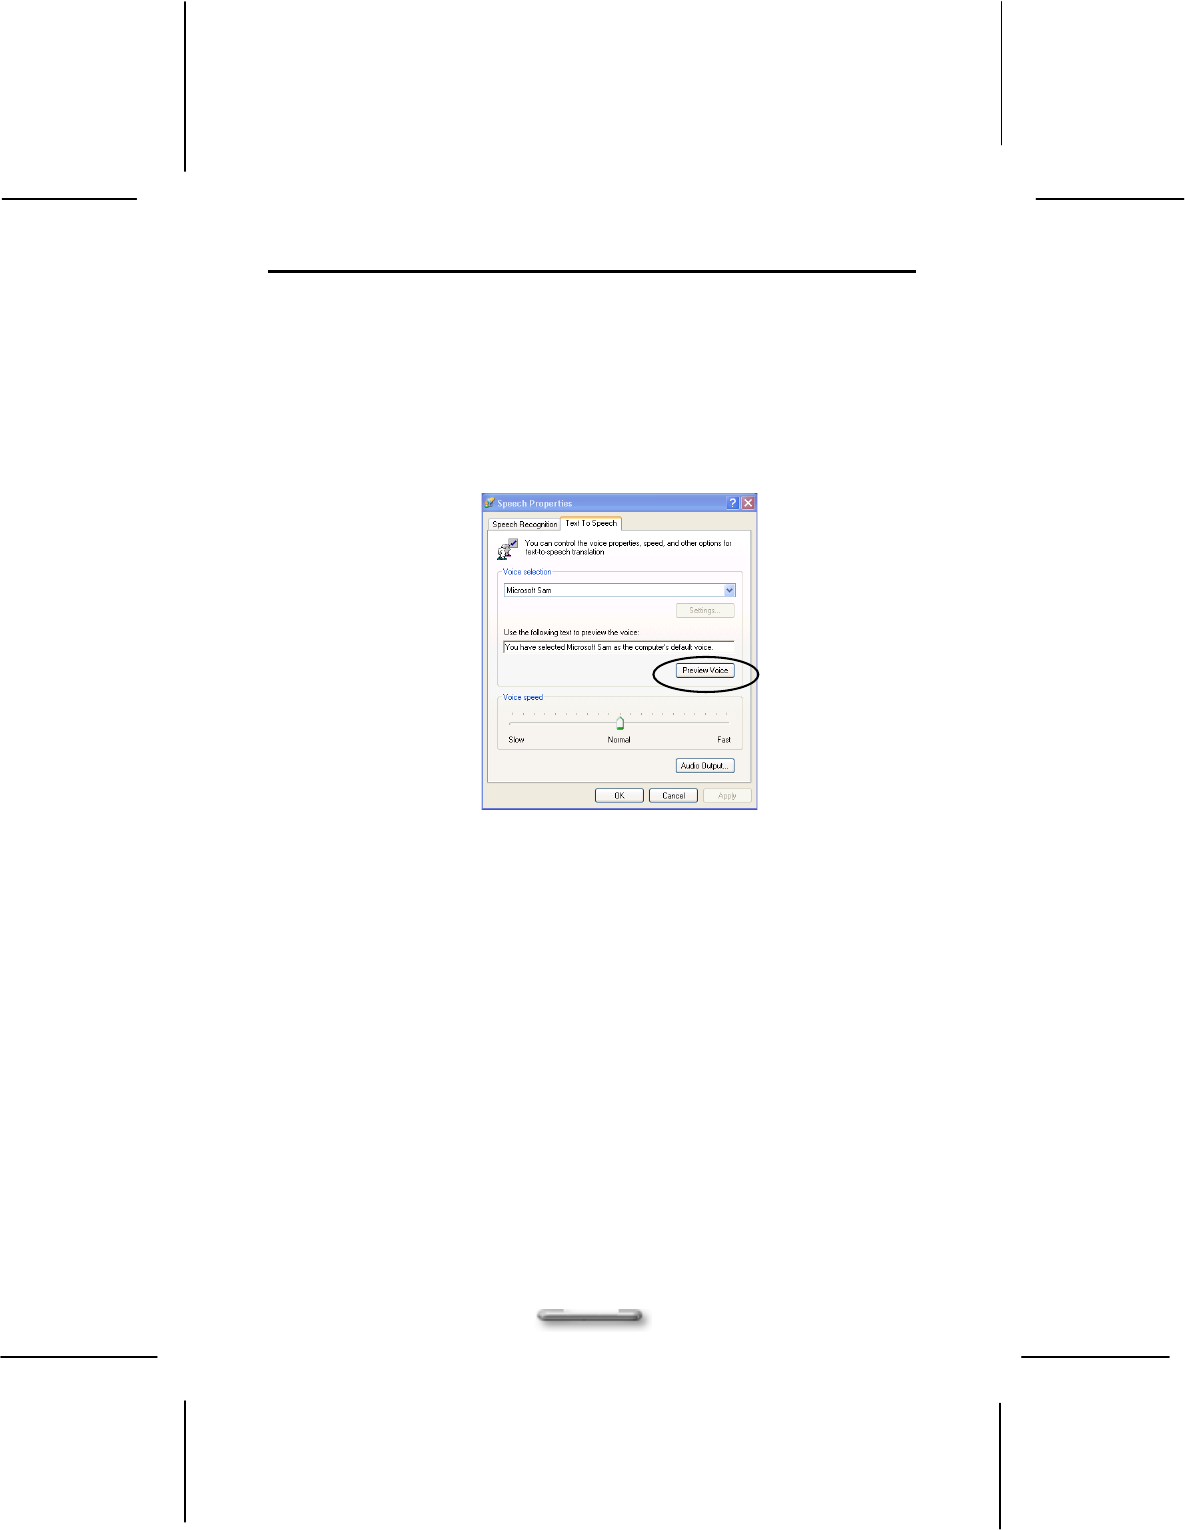
2. Set up speakers
You can plug an external speaker into the Line-out jack or using the
external speaker.
Open Speech in Control Panel.
On the Text-to-Speech tab, click Preview Voice to hear the currently
selected voice; the text will be spoken, highlighting the words as they are
spoken. If the speakers are working properly, you will hear the spoken
words.
3. Change languages
The language used by either speech recognition (SR) or text-to-speech (TTS) is
dependent on the respective engine. Only one engine of each type (SR and TTS)
can be active at a given time. You may decide a particular engine better meets
your requirements and use that engine more often. Once an engine is set, it is not
usually necessary to change it.
To change an SR language:
Open Speech in Control Panel.
On the Speech Recognition tab, change the SR language by changing
the SR engine.
To change a TTS language:
Open Speech in Control Panel.
On the Text-to-Speech tab, change the TTS language by changing the
TTS engine.
Using Speech
59
Launch Speech in Tablet Input Panel
1. Tap the Tablet PC Input Panel icon next to the Start button on the lower left
corner of desktop.
2. Tap the Tools on the up-left corner and select Speech.
3. Speech contains the two speech modes: Dictation and Voice command. Let you
to speak to your tablet computer either to dictate or give commands. The
Dictation mode, your computer listens to everything you say and changes your
words to text. The Voice command mode, your computer listens for specific
words that correspond to an existing list of available voice commands.
4. Tap Start Speech… to start the speech program.

SlateVision System User Guide
60
61
A
Ap
pp
pe
en
nd
di
ix
x
I
I
S
Sy
ys
st
te
em
m
S
Sp
pe
ec
ci
if
fi
ic
ca
at
ti
io
on
n
Item Features
Dimension 286mm(L) X 216mm(W) X 25mm(H)
11.3"(L) X 8.2" (W) X 0.95"(H)
Weight 1.35 Kg
Processor
Transmeta Crusoe TM5800 / 800-1000MHz
Transmeta Long-Run / Cool-Run function
Cache L1/L2: 64KB(I), 64KB(D) / 512KB
Northbridge Integrated
Memory Default 128MB DDR down on M/B
Extend SDRAM SO-DIMM slot up to 512MB
Storage 2.5" HDD ATA66/100 20GB or above
Display
TFT-LCD LTPS 10.4", 1024X768 XGA, 16-bit color, 124 dpi
Portrait and Landscape Mode Support
One Protection Sheet
Digitizer
EMD (Active Digitizer, Electro-Magnetic Digitizer)
Report Rate: 133 dpi
Resolution: 1000 dpi
Coordinate Accuracy ±0.4mm
Hover Support
Battery/Life
6-cell 3600 mAH Lithium-Ion Battery
Battery Lift: Battery Mark 4.5 hours (approximately)
Battery Charge Time: 2.5 - 3 hours
Power
Adapter
Auto-sensing
60W Max, 100 ~ 240V
Output Voltage: 19V, 3.16A
Expansions One Type II PC-Card Slot (CardBus Support)

SlateVision System User Guide
62
Input/Output &
Connectors
One DC-in Power Jack
Two USB 1.1 Ports
One IEEE 1394 Port
One RJ11 (Modem) Jack
One RJ45 (Ethernet) Jack
One Stereo Headphone
Jack
One Built-in Mono Speaker
One Built-in Microphone
One Mini-VGA Port
One IrDA 1.1 (FIR)
One Docking Station
Connector
One Mini PCI Slot
Communication
Built-in IrDA On Board
V.90 Modem
10/100 BaseT Ethernet
802.11b WLAN (Optional)
Buttons
One Direction Button
One Ctrl-Del-Alt Button
One Menu Button (for Brightness, Volume, Screen Rotation,
Pen Calibration)
Enclosure Magnesium Alloy & Plastic with Rugged Design
O/S Microsoft® Windows® XP Tablet PC Edition
Standard
Accessories
User Guide
One EMD Standard Pen & One Stylus Pen
Recovery CD
AC-DC Power Adapter with power cord
VGA Cable
Carry Bag
Gift Box
Optional
Accessories
USB Keyboard
USB Mouse
Docking Station
Keyboard Cradle
Extra 6-cell 3600 mAH Battery Pack
Cradle
Specification
Two USB 1.1 Ports
One RJ45 (Ethernet) Jack
One Slim-Type CD-ROM (Optional)
One Stereo Line-out Jack
One VGA Connector
The specification and appearance are subject to change without notice.

63
A
Ap
pp
pe
en
nd
di
ix
x
I
II
I
A
AC
C-
-D
DC
C
A
Ad
da
ap
pt
te
er
r
G
Gu
ui
id
de
el
li
in
ne
e
This AC adaptor is a dedicated accessory to be used exclusively with SlateVision,
please make sure to read this guideline before use.
WARNING
Do not use the product at a voltage other than the specified voltage, otherwise
can cause fire or electrical shock.
Continuing to use the product after an abnormality such as generation of smoke
or a strange odor has occurred can cause a fire or electrical shock.
Do not attempt to disassemble or modify the product. This can cause a fire or
electrical shock.
If water should happen to get inside the product, immediately unplug the power
cord. Continuing to use the product can cause a fire or electrical shock.
Wipe off the plug of the power cord if it should become covered with dust.
Failure to do so can cause a fire or electrical shock.
The total ampere ratings of the equipment plugged in should not exceed the
ampere rating of the cord if you are using an extension cord. Also, the total
current rating of all equipment plugged into a single wall outlet should not
exceed the fuse rating.
CAUTION
Do not place heavy objects on power cord, allow heavy objects to drop onto it
or allow the power cord to become damaged due to excessive bending.
Do not short or touch the output terminals of the product while it is still plugged
in.
Do not plug in the power cord with wet hands. This can cause an electrical
shock.
Do not subject the product to strong impacts or allow it to drop onto a hard
surface. This can cause a malfunction.
For countries with a different shaped outlet, you are recommended to purchase
a suitable AC Adapter.

SlateVision System User Guide
64

65
A
Ap
pp
pe
en
nd
di
ix
x
I
II
II
I
L
LE
ED
D
I
In
nd
di
ic
ca
at
to
or
rs
s
All LED indicators messages are described in following table. Please refer to this table
while you have question with the LED indicators status.
Indicator Status Remarks Description/Activity
IDE/HDD LED Blinking Red IDE hard disk is accessing
Off HDD is shut down
Off Enter standby mode
Off Enter hibernate mode
Off Turn off the system
PWR LED Solid Green Power on the system
Solid Green Turn off Monitor
Solid Orange Enter standby mode
Off Enter hibernate mode
Off Turn off the system
Battery LED Off Enter standby mode
Off Enter hibernate mode
Off Turn off system
Off AC In No Battery Power
Solid Red AC In (Charging)
Blinking Red AC Out
Low Battery Power
(0% ~ 6%)
Solid Red AC In (Charging)
Off AC Out
Medium Battery Power
(7% ~ 95%)
Green AC In
Off AC Out
Full Battery Power
(95 - 100%)

SlateVision System User Guide
66

67
A
Ap
pp
pe
en
nd
di
ix
x
I
IV
V
T
Tr
ro
ou
ub
bl
le
es
sh
ho
oo
ot
ti
in
ng
g
General Problems
Question: SlateVision does not turn on when not connected to AC power.
Solution: The power may be too low to run your SlateVision, the Power LED Indicator starts
blinking. Turn off SlateVision to replace a fresh battery or connect to AC power.
Question: Battery runs out of power quickly.
Solution: It possible you use SlateVision in ways that drain power quickly. The Power LED
Indicator starts blinking in low power mode. Please plug the AC-DC adapter in and
start charging until the power is full.
Question: Auto power off
Solution: Power is too low or run out. Use the Stylus to tap on the screen to see if the display
activates. You can replace a fresh battery or plug the AC-DC adapter in to charge
SlateVision.
Question: SlateVision locks up when running applications, or runs slowly.
Solution: SlateVision is locked up. Close some applications those are not in use, if this doesn’t
work, you can use a noodle; such as paper clip to press the Reset Button on the top
of the SlateVision to restart your system. Be sure to save your data before you
restart the system.
Question: SlateVision does not turn on or the TFT LCD display appears to be off, even
though the power is on.
Solution: The display brightness and contrast are too low. Use the Brightness Control
menu to adjust the brightness level of screen image.
SlateVision is in Suspend mode. Use the Stylus to tap on the screen to see if the
display activates.
SlateVision has run out of power. Plug the AC-DC adapter in to charge
SlateVision.

SlateVision System User Guide
68
Question: Screen is blank
Solution: Adjust the LCD display brightness and contrast by using the Brightness Control
menu. The screen can be darkened or lightened until SlateVision appears to be
powered off.
Restart SlateVision.
Charge the device by connecting to AC power.
Question: Screen is dark
Solution: Prolonged exposure to direct sunlight can cause your SlateVision’s LCD screen to
temporarily darken. This is normal for LCD SCREENS AND IS NOT PERMANENT.
Question: Display is difficult to see in sunlight or in dark rooms
Solution: Use the Brightness Control menu to adjust contrast and brightness level for optimal
viewing.
Possible TTS Problems
Question: If no speech is heard after testing the system, consider the following:
Solution: The speaker volume is not turned up or is muted. Some speakers have external
controls for volume and muting. Make sure the volume is turned up sufficiently or
that muting is off.
The speakers may not be selected as the current output device. On the Text-to-
Speech tab, click Audio Output to make sure that the speakers are selected.
The speakers might not be connected properly. Consult the speaker hardware
documentation for additional information.
The text-to-speech engine may be corrupted. To test for corruption, switch to
another engine. See Changing the text-to-speech engine. If another engine is
working properly, reinstall the specific engine from the original source. If no engine
is working properly, reinstall the SAPI component from the original source or CD.
Possible SR Problems
Question: If no sound is detected after testing the system, consider the following:
Solution: The microphone is muted. Some microphones have an external control for muting.
Make sure the mute is turned off.
The microphone input level is set too low. On the Speech Recognition tab, select
Configure Microphone. Follow the directions in the subsequent Microphone
Wizard to set the input level.
The microphone may not be selected as the current input device. On the Speech
Recognition tab, click Audio Input to make sure that the microphone is selected.

Troubleshooting
69
It is possible that the microphone connections are not properly secured. Make sure
the microphone wires are intact and unbroken.
Check the documentation for the microphone's hardware for information specific to
the manufacturer.
The SR engine may be corrupted. To test for corruption, switch to another engine if
you have one. See Changing the SR engine. If the other engine is working
properly, reinstall the specific engine from the original source. If no engine is
working properly, reinstall the SAPI component from the original source or CD.