Flairency SL-1550-T90 Liscensed Non-Braodcast Station A/V Transmitter User Manual SL 1550 T90 Manual pub
Flair Agency Liscensed Non-Braodcast Station A/V Transmitter SL 1550 T90 Manual pub
Users Manual
FEATURES:
►FCC Part 90 Compliant
►32 Preset Channels Available
to Select From
►Each Channel can be Preset
to any Frequency Between 2.460GHz
and 2.472GHz with 1 MHz Resolution
►10 Power Levels Selectable
from between 1mW and 1Watt
►Wide 10VDC to 40VDC Input Power
Range
►4 Digit LED Display of Selected
Channel
►4 Digit LED Display of Power Level
►Easy to Use Channel Selection
Buttons
►Compact and Lightweight
ELITE–SERIES
Model: SL-1550-T90
Contact:
NextLink Video Communications
Tel: 1-520-889-1340
Introducing the most full featured Wireless Audio/Visual Transmitter
available on the market today for mobile broadcast applications
Wireless 2.4 GHz A/V Transmitter
►NTSC Video Input
►Line Level Audio Input
►Locking Power Connector
►Built In Camera Mount
FCC ID: XXXYYYYYYYYYYY

Elite Series Wireless A/V Transmitter
Model SL-1550-T90
Specifications Summary
► Channels: 32 Programmable Preset Channels
► Frequency Range: 2.460GHz—2.472GHz
► Programmable Resolution: 1 MHz
► RF Power: Compliant with FCC Part 90
► Antenna Connector: SMA
► Antenna Type: Tilt Swivel Base 0db Gain
► Input Power: 10VDC-40VDC @ < 1A
► Warranty: 1 Year
(Specifications subject to change without notice)
► Size: 4.12” x 3.67” x 1.25”
► Weight: 300 Grams
► Case Type: Extruded Aluminum
► Video Connector: BNC
► Audio Connector: RCA
► Power Connector: 3 Pin Locking DIN
► Operating Temperature: -20° to 120° F
(-30o to +50o C)
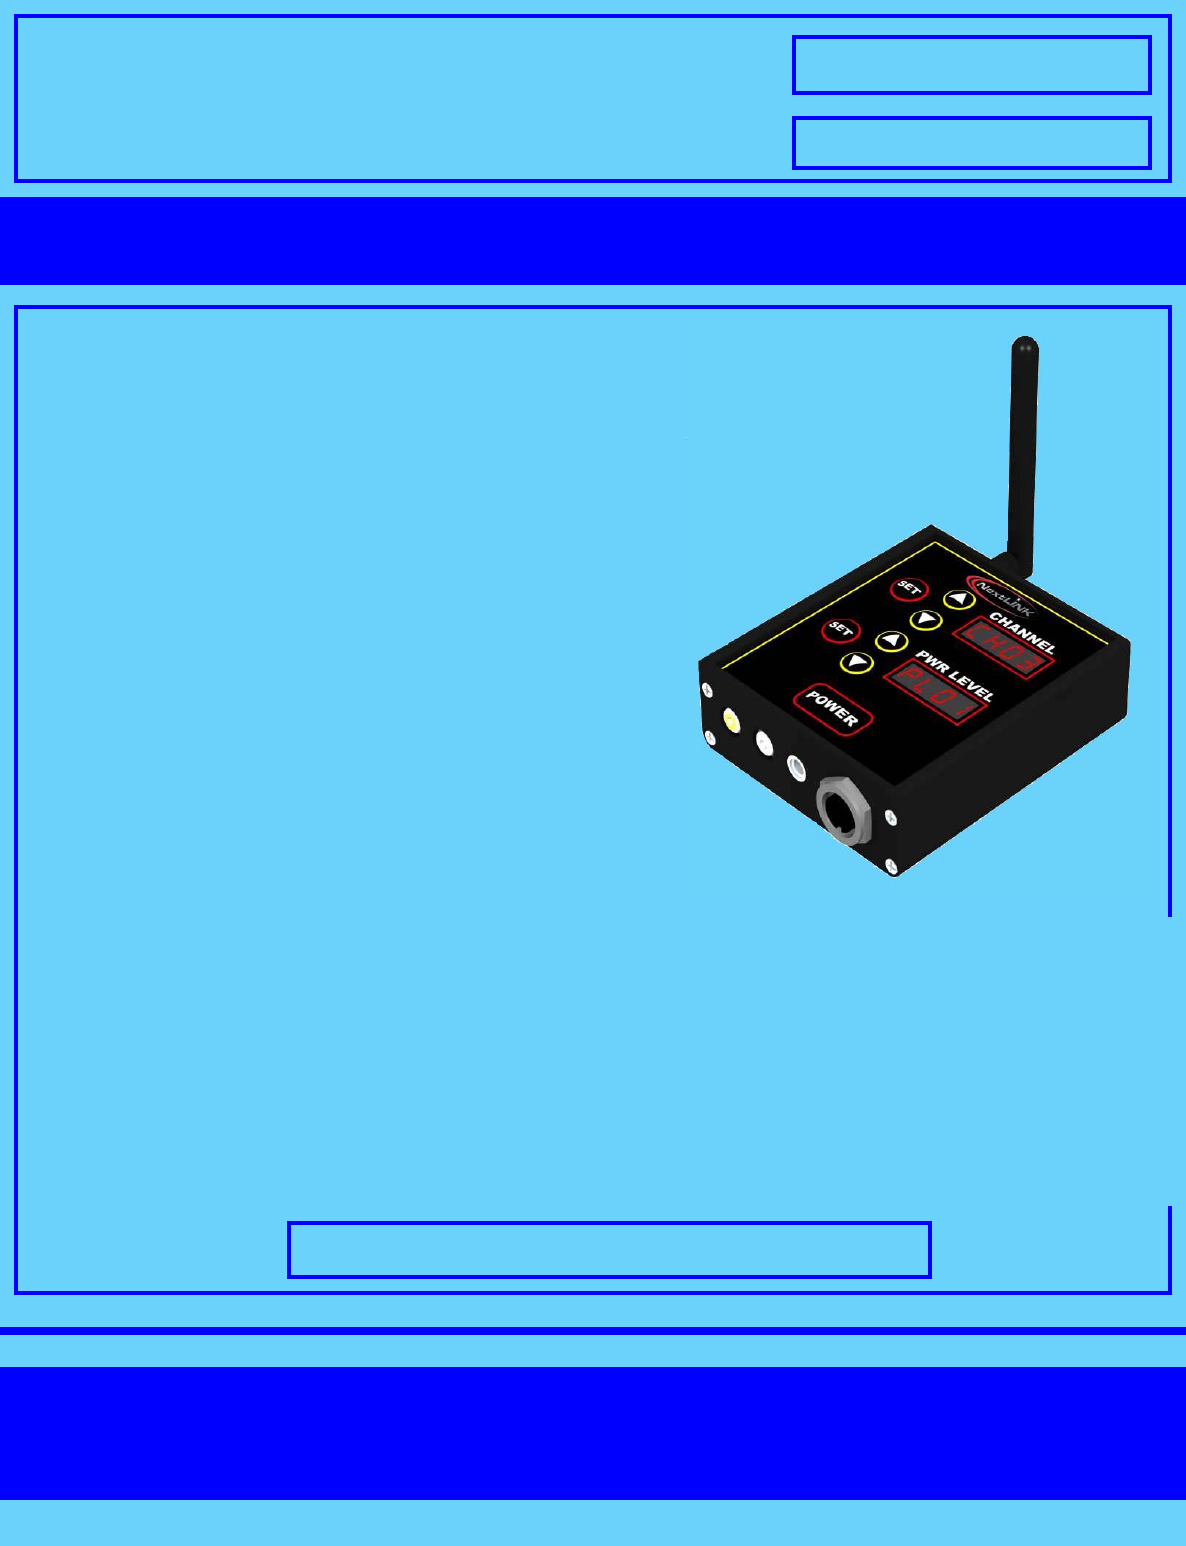
To set the transmission Channel:
1) Press the Channel Set button for 1 second and
release. The Channel LED display will begin to
flash.
2) Press the ▲ or ▼ buttons until the desired
Channel is displayed.
3) Press the Channel Set button to store and the
Channel LED display will stop flashing.
To set the transmission Power Level:
1) Press the Power Level Set button for 1 second
and release. The Power Level LED display will
begin to flash.
2) Press the ▲ or ▼ buttons until the desired
Power Level is displayed
3) Press the Power Level Set button to store and
the Power Level LED display will stop flashing
Operating Instructions
Power ON/OFF Operation:
1) Press the POWER button to turn the unit ON, press again to turn OFF.
Notes:
•Only the programmed Channels are displayed
for selection
•Holding the ▲ or ▼ buttons down continu-
ously will fast scroll through the Channel and
Power Level selections
•Selected Channels are stored in non-volatile
memory and remain set during power OFF

Elite Series Wireless A/V Transmitter
Model SL-1550-T90
1) Press the Channel Set button for > 5 seconds.
2) Release the Set button once both the Channel
LED display and Power Level LED display go
blank.
3) The Channel LED display and Power Level LED
display will begin to flash. The Power Level LED
display will now indicate the frequency that is
currently programmed for the displayed Channel
number.
4) Press the Channel ▲ or ▼ buttons until the
desired Channel to be programmed is dis-
played.
5) Press the Power Level ▲ or ▼ buttons until the
desired Frequency for the selected Channel to
be programmed is displayed. Note: Holding the
Power Level ▲ or ▼ buttons down continu-
ously will fast scroll through the Frequency
range.
Channel Frequency Programming Instructions
6) To delete a Channel from the active list press
the Power Level ▼ button until all dashes are
displayed.
7) Press the Channel Set button and release to
store the Preset Frequency value. Note: The
Channel LED display and the Power Level LED
display will stop flashing for an instant indicating
Channel frequency has been stored.
8) Repeat Steps 4) and 7) for all the desired Chan-
nels have been programmed.
9) To exit the program operation, Press the Chan-
nel Set button for > 5 seconds until both the
Channel LED display and Power Level LED dis-
play go blank. Then release the button.
Factory Channel Default Presets
The factory default Channel programming is as follows:
Channel Frequency(MHz)
CH01 2460
CH02 2472
To restore the unit to factory default Channel programming:
1) Turn the unit OFF
2) Hold down the Channel Set button and then turn the unit
3) Release the Channel Set button after the LED displays
active
Note: Changes or modifications not expressly approved NextLink Video Communications could
void the user’s authority to operate the equipment.
NextLink Video Communications
Tel: 1-520-889-1340