Flir BelgiumBA WFBT10 Marine Multifunctional Display with 802.11b/g & Bluetooth User Manual 88038 1 EN GA150 installation instructions
Raymarine UK Ltd. Marine Multifunctional Display with 802.11b/g & Bluetooth 88038 1 EN GA150 installation instructions
Contents
- 1. 82314-1-EN a9x and a12x Supplementary information
- 2. 82327-1 RF Exposure - Addendum notice - DRAFT1
- 3. 88032-1-EN a9x a12x Mounting and getting started
- 4. 88038-1-EN GA150 installation instructions
- 5. a-c-e Series Installation and operation instructions 81337-10-EN_WEB - part 1
- 6. a-c-e Series Installation and operation instructions 81337-10-EN_WEB - part 2
- 7. a-c-e Series Installation and operation instructions 81337-10-EN_WEB - part 3
- 8. a-c-e Series Installation and operation instructions 81337-10-EN_WEB - part 4
- 9. a-c-e Series Installation and operation instructions 81337-10-EN_WEB - part 5
88038-1-EN GA150 installation instructions

GA150installationinstructions
GA150productoverview
TheGA150isanexternalantennacapableofimprovingthe
receptionofaMultifunctiondisplay’s(MFD’s)internalGlobal
NavigationSatelliteSystem(GNSS)receiver.
D13078-1
TheGA150hasthefollowingfeatures:
•10m(33ft.)ttedcable.
•Lowpowerconsumption.
•Surfaceorpolemountable.
Note:WhentheBeidouGNSSbecomesavailableaGA150
MUSTbeusedinordertoobtainreception.YourMFDwillalso
requireasoftwareupdatetoenablesupportoftheBeidou
system.
GA150MFDcompatibility
TheGA150antennaiscompatiblewiththefollowingRaymarine
variantMFDs:
•a95/a97/a98
•a125/a127/a128
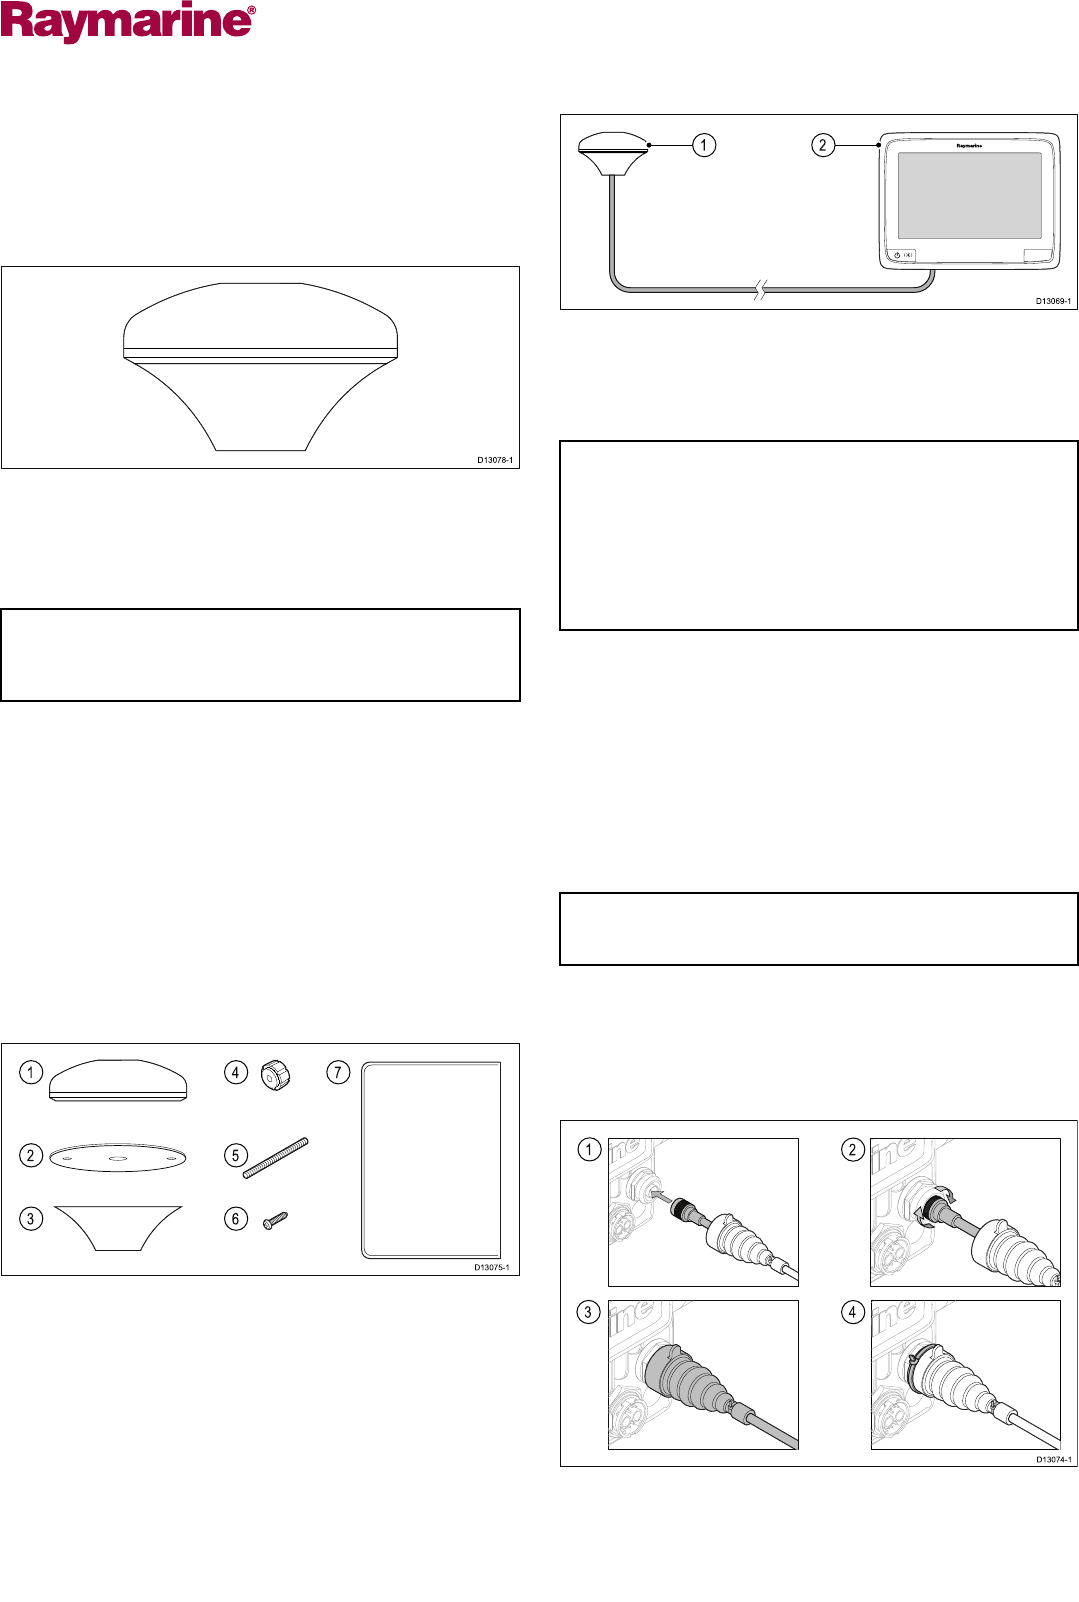
GA150Partssupplied
ThepartssuppliedwithyourGA150GNSS(GPS/GLONASS)
antennaareshownbelow.
D13075-1
1
2
3
47
5
6
1.GA150antenna(Theantennaissuppliedwithatted10m
(33ft.)cableforconnectiontoyourMFD.)
2.GA150mountinggasket
3.Polemountadaptor
4.2xThumbsnuts
5.2xStuds
6.2xscrews
7.Documentpack
GA150connection
a9xanda12xMFDsincludeaninternalGNSS(GPS/GLONASS)
receiver.TheGA150antennacanbeusedtoimprovetheGNSS
(GPS/GLONASS)receiver’sreception.
D13069-1
21
1.GA150antenna
2.a9xora12xvariantMFD
Forinstallationdetailsforyourexternalantenna,refertothe
documentationthataccompaniedtheantenna.
Note:
•TheBeidouGNSSissupportedbutnotcurrentlyavailable.
•AGA150mustbeconnectedinordertoreceivetheBeidou
systemwhenitbecomesavailable.
•AsoftwareupdatewillberequiredtoaddsupportforBeidou
oncethesystemisavailable.Pleasecheckwithyour
Raymarinedealerforfurtherdetails.
Antennacablelength
TheGA150issuppliedwithatted10m(33ft.)cable.The
lengthoftheantennacablecanbeextendedifrequired.
Theantennacablelengthcanbeextendedbyupto10m(33ft.)
givingatotalmaximumcablelengthof20m(66ft.)
50ohmcoaxialcableandreliableconnectors(offeringprotection
againstwateringress)mustbeusedwhenextendingtheantenna
cable.
Note:Extendingthecablelengthbymorethanthe
recommendedmaximumlengthwillresultinsignal
degradation.
Connectinganexternalantenna
FollowthestepsbelowtoconnecttheGA150externalantennato
youra9xora12xvariantMFD.
1
3
2
4
D13074-1
1.Fullyinserttheantenna’scableconnectorintotheGA150
connectorontherearofyourdisplay.
2.Turnthelockingcollarclockwiseuntiltight.
Documentnumber:88038-1Date:05-2014

3.Pushtoprotectivebootovertheconnectiononthebackof
thedisplay.
4.Usethesuppliedcabletietosecuretheprotectivebootover
theconnection.
Antennalocationrequirements
TheantennacanbeusedtoimprovethereceptionofyourMFD’s
built-inGNSS(GPS/GLONASS)receiver.DoNOTconnectany
otherantennatotheMFD’sGA150connector.
Theantennacanbemountedeitheronaathorizontalsurfaceor
onasuitablepole.
•Ifyouintendtosurfacemounttheantenna,ensureyouhave
accesstotheundersideofthemountingsurface.
•Ifyouintendtopole-mounttheantenna,thepoleneedstohave
a1inch14TPIthread.
Important:Theantennamustbemountedinalocationthat
providesagooddirectlineofsitetotheentiresky,aroundthe
horizon.
Ensurethattheselectedmountinglocationis:
•Openandclearofanyobstructions(suchasmasts,search
lights,orotherstructures)thatcouldblockline-of-sighttothe
sky.
•Aslowaspossible,tokeeptheantennaasstableaspossible.
Themorestabletheantenna,themoreeffectivelyitwilltrack
satellitesandprovidestabledata.
•Asfaraspossible(atleast1m(3ft)fromotherantennaeand
electronicequipment.
DoNOTmounttheantenna:
•Inanyareawhereitcouldbesteppedonortrippedover.
•Upamast.Thiswillcausetheantennatoswingandgive
signicanterrorsinpositiondata.
•Inthedirectpathofaradarbeam.
Fittingtheantenna
Tottheantenna:
1.Selectasuitablelocationfortheantennaasdescribedunder
Antennalocationrequirements.
2.FityourantennausingeithertheSurfacemountingorPole
mountingprocedure,asappropriate.
3.Ensuringthatcableroutingandconnectionrequirementsas
detailedintheinstallationinstructionsfortheproductthatthe
antennawillbeconnectedtoarefollowed.
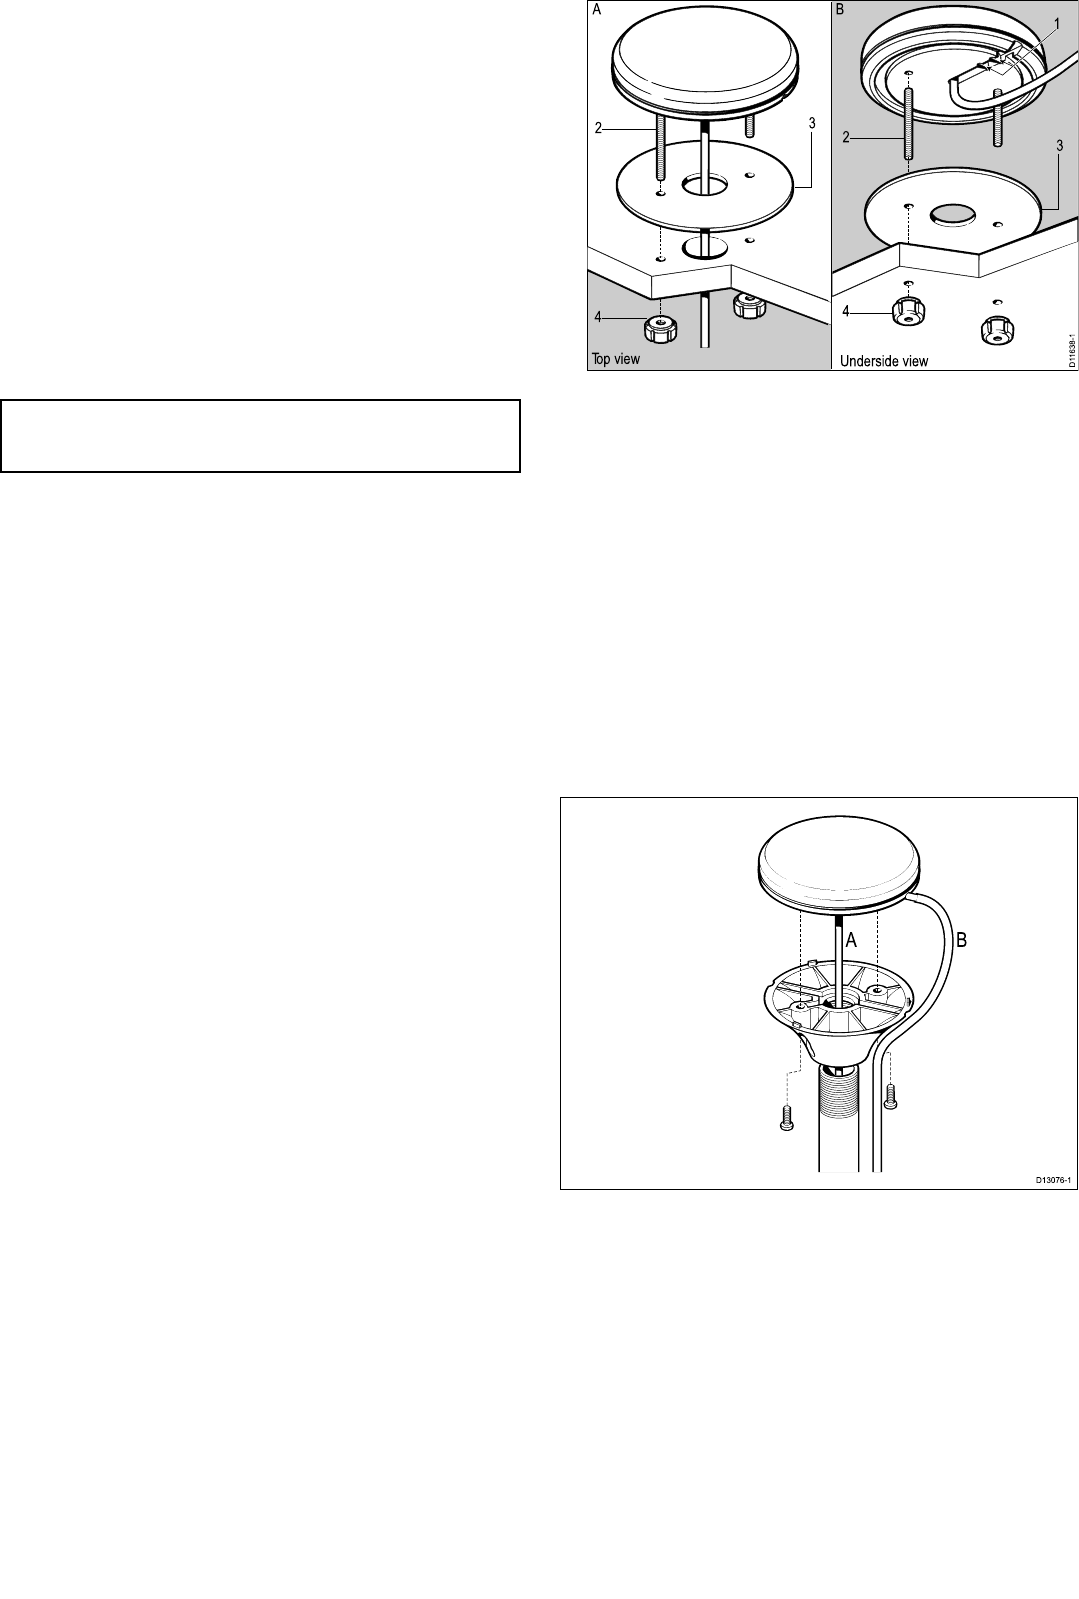
Surfacemounting
Whensurfacemountingtheantenna,youcanroutethecable
eithercentrally(OptionA)orfromthesideoftheantenna
(OptionB).
1.Usethetemplatesuppliedtomarkthetwo6mm(0.25in)
mountingholes.
•OPTIONA:Ifthecableisgoingtopassthroughthe
mountingsurfacedrilla19mm(0.75in)centerhole.
•OPTIONB:Ifthecableistoberoutedfromthesideofthe
antenna(i.e.abovethemountingsurface),removethe
twoplastictabs(1)obstructingthecablechannel.Ifyou
donotremovethesetabsbeforeusingthecablechannel,
youcoulddamagethecable.
D11638-1
1
23
4
23
4
Top view Underside view
A B
2.Screwthetwomountingstuds(2)intotheundersideofthe
antenna.
3.Stickthesuppliedgasket(3)tothemountingsurface,ensuring
thattheholesonthegasketcorrespondwiththedrilledholes.
4.Routethecableasfollows:
•ForOptionA,feedthecabledownthroughthecenterhole.
•ForOptionB,routethecablealongthecableexitchannel.
5.Carefullyplacetheantennasothemountingstudspass
throughtheholesinthemountingsurface.
6.Securetheantennatothesurfaceusingthesuppliedthumb
nuts(4).
Polemounting
Ifyouwanttopole-mounttheantenna,obtainapoleofsuitable
lengthwitha1inch14TPIthread.
D13076-1
A B
1.EnsuringthattheAntennalocationrequirementsaremet,
securelyattachthepoletoasuitable,stablepoint.
2.Screwthepolemountadaptorfullyontothepoleandensureit
issecureonthepole.
3.Routetheantennacableasfollows:
i.Ifyouwanttoroutetheantennacabledirectlydownfrom
theantenna(optionA),feeditthroughthecenterofthe
polemountadaptorandthendownthroughthepole.
ii.Ifyouwanttoroutetheantennacableoutofthesideofthe
antenna(optionB),removethetwoplastictabsfromthe
cablechannel,thenfeedthecablealongthechannel.
4.Ensuringyoudonottrapthecable,placetheantennaonthe
polemountadaptorsothescrewholesalign,thensecurethe
antennawiththescrewsprovided.
2GA150installationinstructions