Food Automation Service Techniques XWIRE-REPEATER Food quality & supply chain monitor equipment User Manual Letter Size
Food Automation - Service Techniques, Inc. Food quality & supply chain monitor equipment Letter Size
User Manual

Installation Guide
SmartRepeaterTM Device
Direct, Inc.
"...because you can't improve
what you don't measure"
www.MySCK.com
( These instructions should be saved for future reference. )
2© 2008 SCK Direct, Inc. 229-51379 Rev A www.MySCK.com
SmartRepeaterTM Direct, Inc.
NOTICES
SCK Direct, Inc. is not liable for any use of product not in accor-
dance with SCK Direct, Inc.’s installation and operation
instructions.
CLEANING
Using a clean damp cloth, wipe down the SmartRepeater when
necessary using a commercial quality foodservice-approved
detergent. DO NOT IMMERSE.
NEVER use chemical or abrasive cleaners on the SmartRepeater.
TOOLS REQUIRED FOR INSTALLATION
Drill Bit: 3/16” if using wall anchor, or #50 if installing into
metal
Phillips Screwdrivers
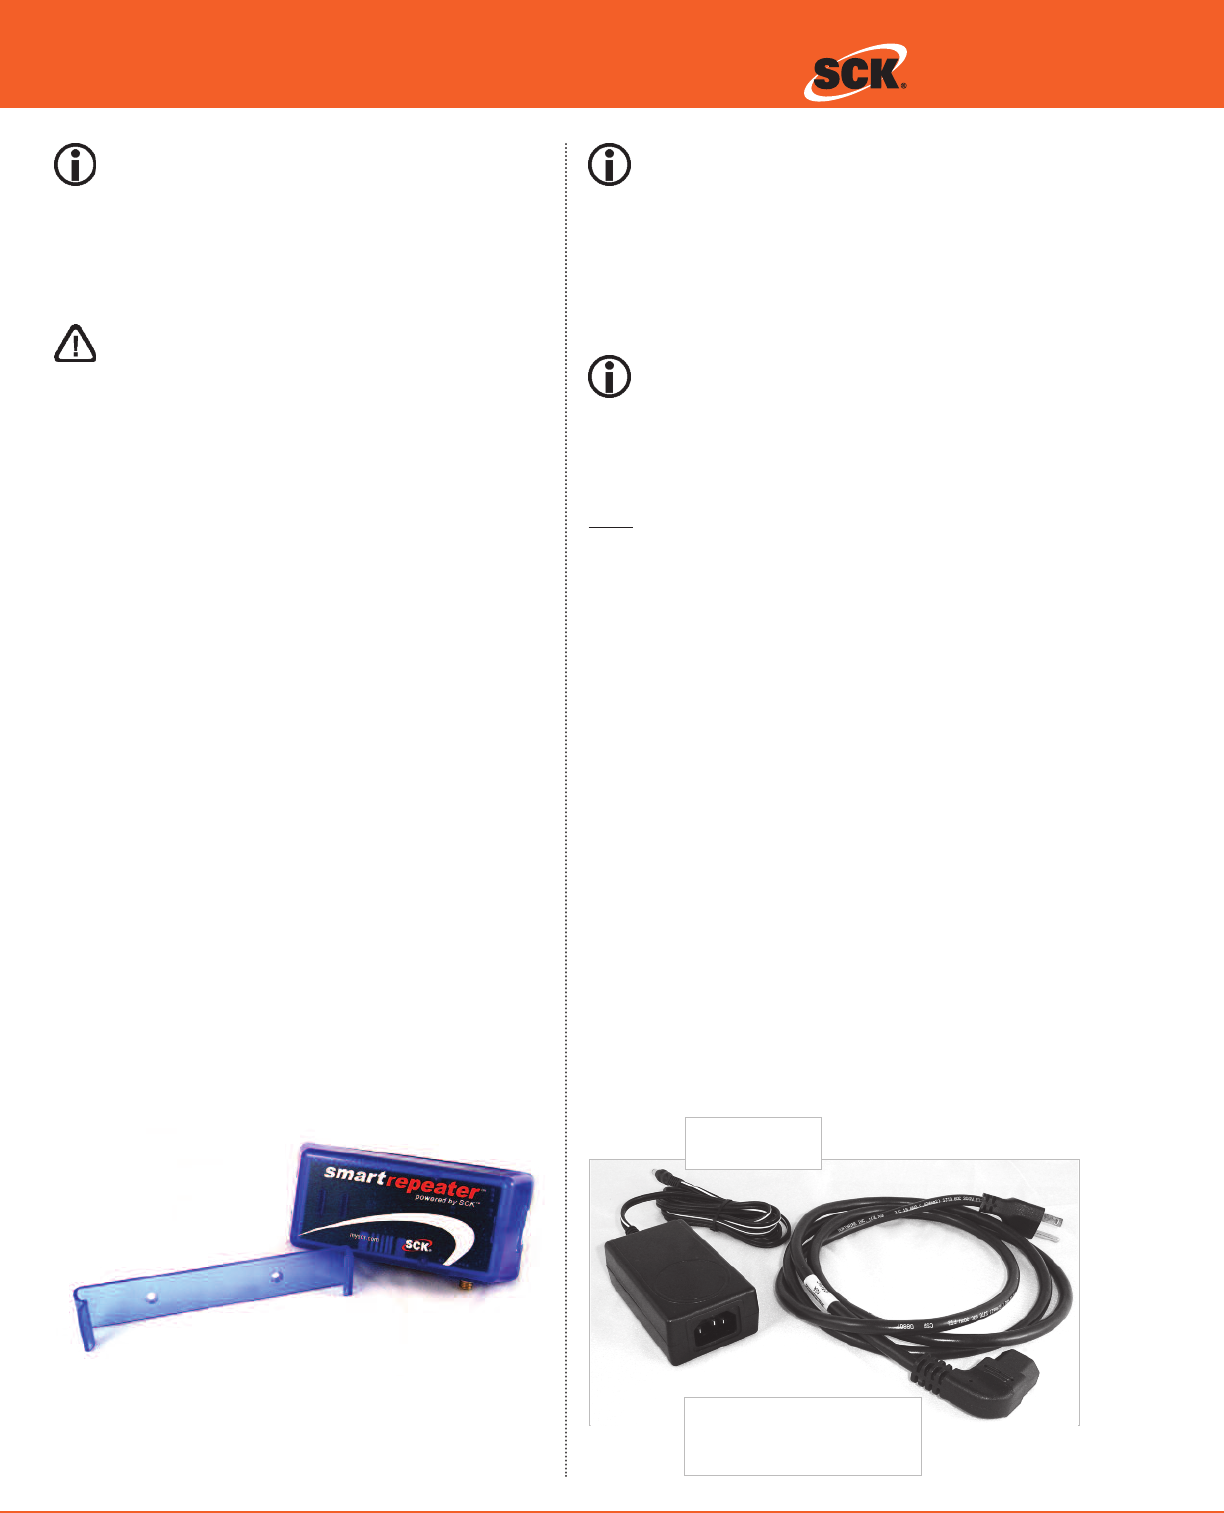
INCLUDED PARTS
Please confirm that these parts have shipped with your order:
SmartRepeater: 231-60233-01
Mounting Kit: 213-50641
Power Supply Mounting Kit: 213-50759-01
Strain Relief Kit: 213-50760-01
If something is missing, please call 1-866-840-4271 (8:00 a.m. -
5:00 p.m. EST).
BEFORE YOU INSTALL
SmartRepeaters should be installed after the installation of your
SCK Smart Direct 2TM, SCK Kitchen AdvisorTM, or (FAST.) XwireTM
Wireless Gateway.
Changes or modifications not expressly
approved by SCK Direct, Inc. could void the
user's authority to operate the equipment.
NOTE: This equipment has been tested and found to comply
with the limits for a Class B digital device, pursuant to Part 15 of
the FCC Rules. These limits are designed to provide reasonable
protection against harmful interference in a residential installa-
tion. This equipment generates, uses and can radiate radio
frequency energy and, if not installed and used in accordance
with the instructions, may cause harmful interference to radio
communications. However, there is no guarantee that interfer-
ence will not occur in a particular installation. If this equipment
does cause harmful interference to radio or television reception,
which can be determined by turning the equipment off and on,
the user is encouraged to try to correct the interference by one
or more of the following measures:
Reorient or relocate the receiving antenna.
Increase the separation between the equipment and
receiver.
Connect the equipment into an outlet on a circuit different
from that to which the receiver is connected.
Consult the dealer for help.
This document contains confidential information. The dissemination, publication, copying, or duplication of this document or the software described herein without prior written authorization is strictly prohibited.
POWER SUPPLY
126-10033
POWER CORD OPTIONS
126-10028: Power Cord U.S.
126-10029: Power Cord Euro, Round
126-10030: Power Cord UK, Flat
3
© 2008 SCK Direct, Inc. 229-51379 Rev A www.MySCK.com
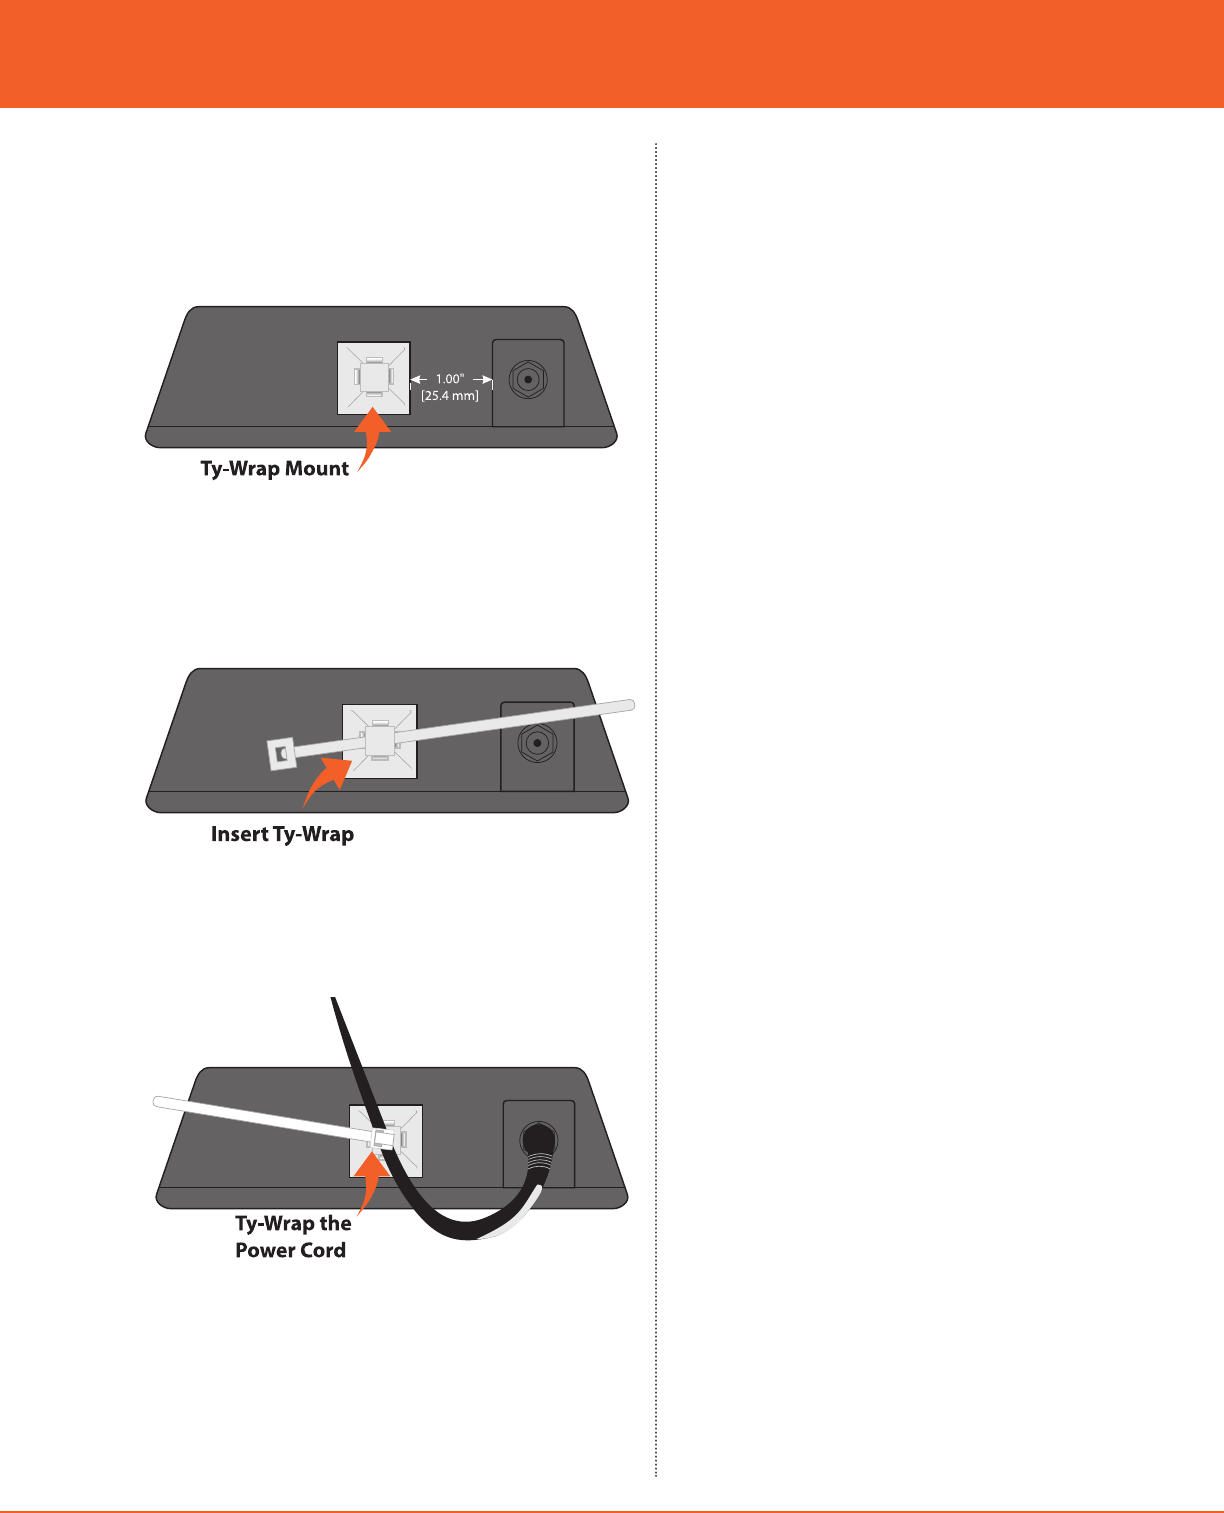
STRAIN RELIEF SETUP
1. Apply the supplied Ty-wrap adhesive-backed mount (150-
15028) on the bottom side of the SmartRepeater (1) one
inch from the power supply plug.
2. Run the supplied Ty-wrap (150-15005R) through one of the
holes on the adhesive backed mount.
3. Plug the power supply into the SmartRepeater. Take the
power cord and Ty-wrap it so the power cord does not
become unplugged when mounted on a surface.
installation guide
This document contains confidential information. The dissemination, publication, copying, or duplication of this document or the software described herein without prior written authorization is strictly prohibited.
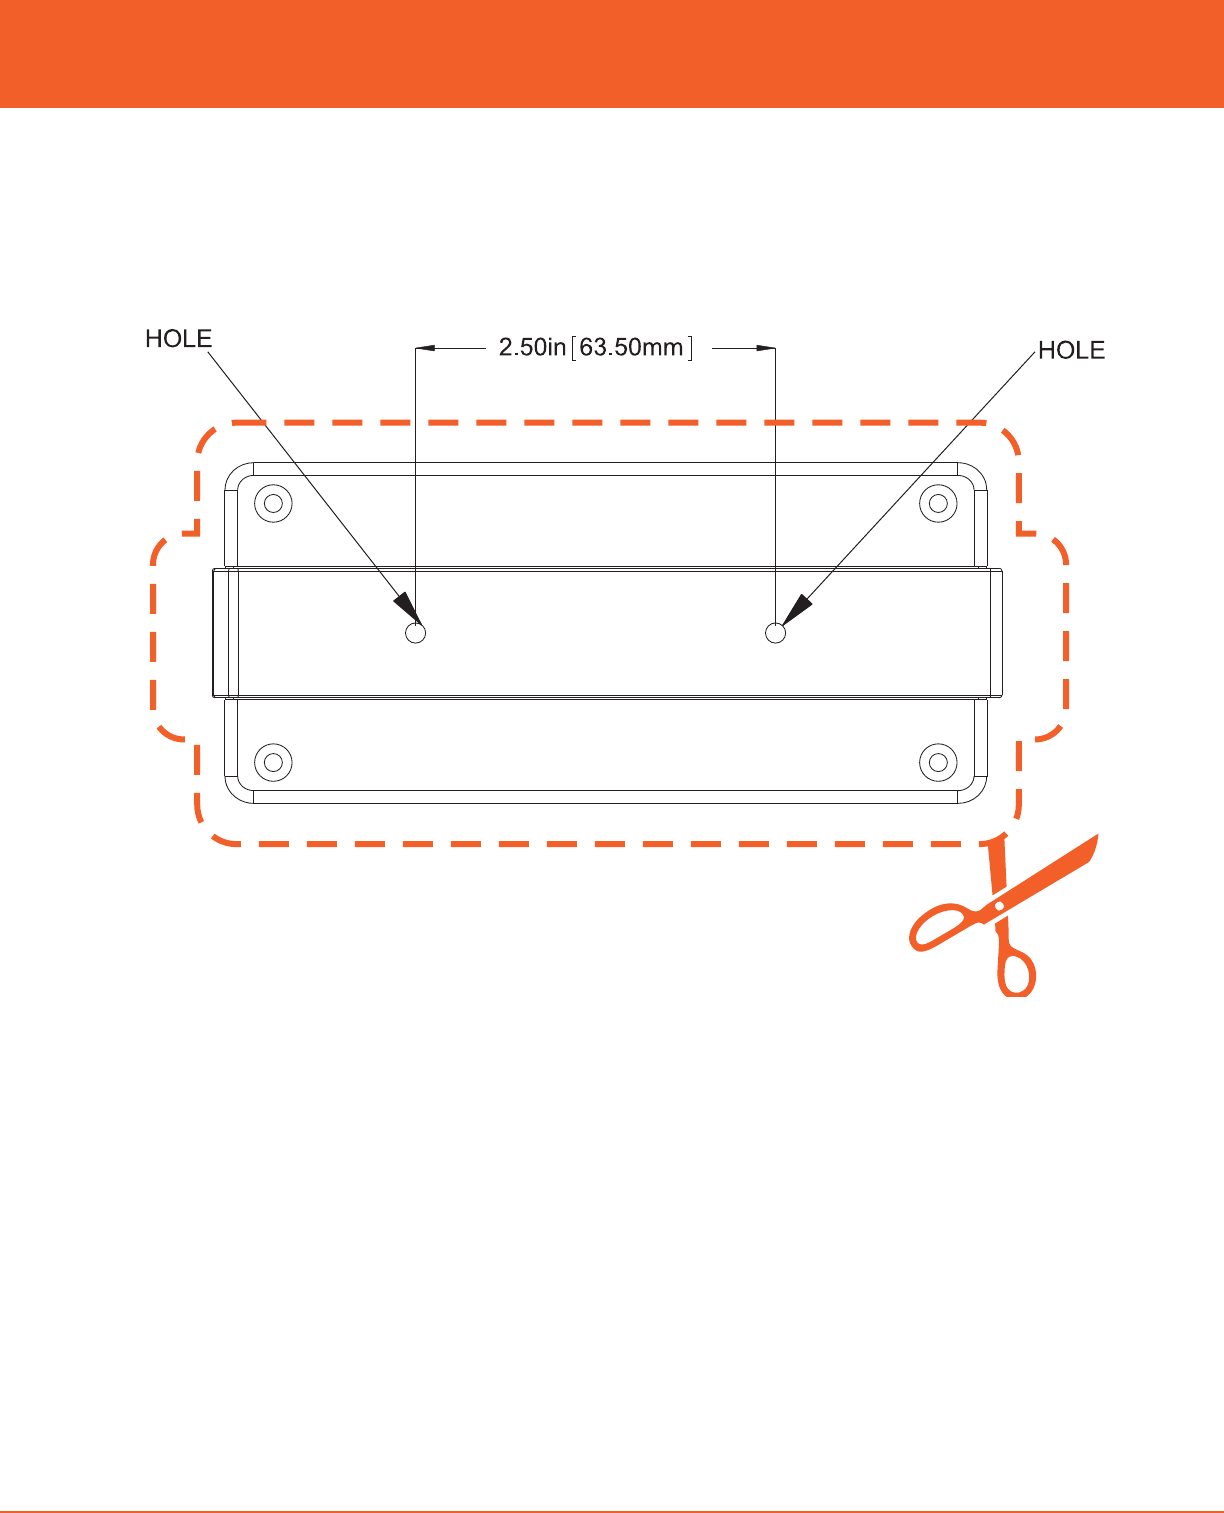
MOUNTING INSTRUCTIONS
1. Choose a location for the SmartRepeater to be installed
(within 8 feet of an outlet). Use the SmartRepeater mount-
ing bracket template found in this guide to mark the
locations of the 2 mounting holes.
View the tentative positioning and ensure there are no loca-
tion problems. Drill the 2 pilot holes. (If you are using the
supplied wall anchors, use a 3/16 bit. For mounting into
sheet metal, use a #50 bit.) Insert screws into the mounting
bracket holes and tighten.
2. Clip the Smart Repeater into its bracket.
3. Plug the SmartRepeater into outlet.
ALTERNATIVE MOUNTING OPTION USING
SUPPLIED VELCRO
1. Choose a location to install the SmartRepeater (within 8
feet of an outlet).
2. Clean the mounting surface and back of the SmartRepeater
with the supplied alcohol wipe.
3. Adhere one piece of the supplied Velcro to the surface
where you want to mount the SmartRepeater.
Make sure there will be no obstructions once the
SmartRepeater is mounted.
4. Adhere the second piece of supplied Velcro to the back side
of the SmartRepeater. Then adhere the SmartRepeater onto
the mounting location.
5. Plug the SmartRepeater into outlet.
4© 2008 SCK Direct, Inc. 229-51379 Rev A www.MySCK.com
Direct, Inc.
This document contains confidential information. The dissemination, publication, copying, or duplication of this document or the software described herein without prior written authorization is strictly prohibited.
SmartRepeaterTM
Status LED Chart
Signal LEDs
Troubleshooting / LED Codes
Signal Strength Indicator
INDICATOR CHARTS
LED Color LED Blink Rate Description
RED Solid On Device is connected as
a router
RED Slow
Device is waiting for
data from its parent
node
RED Very Fast
Device is communicat-
ing with another device
as a router. Signal bars
should exist.
GREEN Solid On Device is connected as
a coordinator
GREEN Very Fast
Device is communicat-
ing with another device
as a coordinator. Signal
bars should exist.
LED Action Description
Strobe effect
using all LEDs
Device is scanning the channels for
available networks.
LEDs alternate
being lit in
sequence for a
period of time.
A diagnostic command was issued to
this device to blink the LEDs in a recog-
nizable pattern for a set amount of time.
Bars Link Quality
NONE(0) No signal or No messages received
ONE(1) Moderate signal
TWO(2) Good signal
THREE(3) Excellent signal
5
© 2008 SCK Direct, Inc. 229-51379 Rev A www.MySCK.com
This document contains confidential information. The dissemination, publication, copying, or duplication of this document or the software described herein without prior written authorization is strictly prohibited.
MOUNTING TEMPLATE
Use this template as a guide to install your SmartRepeater mounting bracket. Drawing is to scale.
214-53639A
installation guide

6© 2008 SCK Direct, Inc. 229-51379 Rev A www.MySCK.com
SmartRepeaterTM Direct, Inc.
This document contains confidential information. The dissemination, publication, copying, or duplication of this document or the software described herein without prior written authorization is strictly prohibited.
This page left intentionally blank.

7
© 2008 SCK Direct, Inc. 229-51379 Rev A www.MySCK.com
installation guide
This document contains confidential information. The dissemination, publication, copying, or duplication of this document or the software described herein without prior written authorization is strictly prohibited.
This page left intentionally blank.

Direct, Inc.
Thank You for Choosing
SCK Direct, Inc!
SCK Direct, Inc.
905 Honeyspot Road
Stratford, CT 06615
+1 203.377.4174 voice
+1 203.377.8187 fax
1.866.840.4271 toll-free sales & helpdesk
www.MySCK.com; info@mysck.com
229-51379 Rev. A
© 2008 SCK Direct, Inc.
Printed in the USA
05MAR2008
This document contains confidential information. The dissemi-
nation, publication, copying, or duplication of this document or
the software described herein without prior written authoriza-
tion is strictly prohibited.
Troubleshooting
Should you experience problems installing your SCK
SmartRepeater, or any aspect of your SCK Direct, Inc. services,
please contact the SCK HelpDesk toll-free at 1.866.840.4271
(Monday-Friday, 8:00 a.m.-5:00 p.m. EST).
Optional SCK System Components
SCK has a variety of optional accessories to help you complete
your kitchen automation:
SCK Kitchen Advisor Information Server
SCK Remote Input Device
SCK KMS Kitchen Status Monitor
SCK-Enabled Appliance Controllers
SCK Wireless (XwireTM) Appliance Interface
SCK Wireless (XwireTM) Temperature/Door SmartSensorTM
SCK Wireless (XwireTM) Wireless.Gateway
SCK Wired Backbone
For additional information on any of these accessories, or to
request Technical Specification Sheets, please contact your SCK
Representative or contact SCK Customer Support toll-free at
1-866-840-4271 (Monday-Friday, 8:00 a.m. to 5:00 p.m. EST).