Fujitsu Client Computing WL0026 62205ANHMW WLAN IN PORTABLE LIFEBOOK T SERIES User Manual Claw T731 UG
Fujitsu Limited 62205ANHMW WLAN IN PORTABLE LIFEBOOK T SERIES Claw T731 UG
Contents
- 1. User Manual 1
- 2. User Manual 2
- 3. User Manual 3
User Manual 2

135
- Care and Maintenance
Increasing Battery Life
•Power your Tablet PC through the AC or optional auto/airline adapter whenever possible.
•If your tablet runs on battery power all day, connect it to an AC adapter overnight to recharge it.
•Keep brightness to the lowest level comfortable.
•Set the power management for maximum battery life.
•Put your Tablet PC in Sleep mode when it is turned on and you are not actually using it.
•Limit your media drive access.
•Disable the Media Player auto insert notification function.
•Eject ExpressCards when not in use.
Media Care
Caring for your Media (DVD/CD/CD-R/BD)
Media discs are precision devices and will function reliably if given reasonable care.
•Always store your media disc in its case when it is not in use.
•Always handle discs by the edges and avoid touching the surface.
•Avoid storing any media discs in extreme temperatures.
•Do not bend or scratch media discs or set heavy objects on them.
•Do not spill liquids on media discs.
•Do not get dust on media discs.
•Never write on the label surface with a ballpoint pen or pencil. Always use a felt pen.
•If a disc is subjected to a sudden change in temperature, condensation may form on the surface.
Wipe moisture off with a soft, lint free cloth and let it dry at room temperature. DO NOT use a hair
dryer or heater to dry media discs.
•If a disc is dirty, use only a DVD/CD cleaner or wipe it with a clean, soft, lint free cloth starting
from the inner edge and wiping to the outer edge.
Claw T731 UG.book Page 135 Wednesday, May 25, 2011 3:50 PM

136
- Care and Maintenance
Caring for your Optical Drive
Your optical drive is durable but you must treat it with care. Please pay attention to the following points:
•The drive rotates the compact disc at a very high speed. Do not carry it around or subject it to shock
or vibration with the power on.
•Avoid using or storing the drive where it will be exposed to extreme temperatures.
•Avoid using or storing the drive where it is damp or dusty.
•Avoid using or storing the drive near magnets or devices that generate strong magnetic fields.
•Avoid using or storing the drive where it will be subjected to shock or vibration.
•Do not disassemble or dismantle the optical drive.
•Use of a commercially available lens cleaner is recommended for maintenance of your drive.
Express Cards
Caring for your Cards
Express Cards are durable, but you must treat them with care. The documentation supplied with your card
will provide specific information, but you should pay attention to the following points:
•To keep out dust and dirt, store cards in their protective sleeves when they are not installed in your
LIFEBOOK Tablet PC.
•Avoid prolonged exposure to direct sunlight or excessive heat.
•Keep the cards dry.
•Do not flex or bend the cards, and do not place heavy objects on top of them.
•Do not force cards into the slot.
•Avoid dropping cards, or subjecting them to excessive vibration.
Claw T731 UG.book Page 136 Wednesday, May 25, 2011 3:50 PM
137
Chapter 6
System Specifications
Specifications
This section provides the hardware and environmental specifications for your Fujitsu LIFEBOOK Tablet
PC. Specifications of particular configurations will vary.
Configuration Label
The configuration label located on the bottom of your Tablet PC contains specific information regarding the
options you’ve chosen for your Tablet PC. Following is an example configuration label.
T731, i5-2520M, 12.1 WXGA, W7Pro, 320G, 4GB
Configuration P/N: A4XXXXXXXXXXXXX
FPC P/N: FPCXXXXXX
Hard Drive
Part Number
Processor
Model # Memory
Operating System
Screen Size/Type
Configuration ID
Claw T731 UG.book Page 137 Wednesday, May 25, 2011 3:50 PM

138
- Specifications
Microprocessor
New 2nd Generation Intel® Core™ Processor (Refer to the system label to determine the speed of your
processor).
Chipset
•Mobile Intel® QM67 Express
•Platform Control Hub (PCH)
Memory
System Memory
•DDR3-1333 MHz SDRAM dual-channel memory module.
•Two DIMM slots; upgradeable to 8 GB of total memory (4 GB x 2).
Cache Memory
Up to 4MB L3 cache on-die (depending upon CPU)
Video
Built-in color flat-panel TFT active matrix LED backlit display with simultaneous display capability.
Video Color and Resolution
12.1" Wide XGA display
•Internal: 1280 x 800 pixel resolution, 16M colors
•External: 1920 x 1200 pixel resolution, 16M colors
•Simultaneous: 1280 x 800, 16M colors
Video RAM
Intel(R) HD 3000 Graphics with dynamic frequency. Automatically distributes performance to CPU and
graphics applications that need an extra boost up to approximately 20%.
Claw T731 UG.book Page 138 Wednesday, May 25, 2011 3:50 PM

139
- Specifications
Digitizer
Depending upon the configuration of your system, one of two digitizer options is included:
•Active digitizer (uses active stylus input), or,
•Dual Digitizer, consisting of active digitizer and capacitive touch panel (uses active stylus input and
two finger touch input).
Audio
•Realtek codec ALC269 with High Definition (HD) audio.
•Headphones: Stereo headphone jack, 3.5 mm, 1 Vrms or less, minimum impedance 32 Ohms
•Microphone: Stereo microphone jack, 3.5 mm, 100 mVp-p or less, minimum impedance 10K
Ohms
•Two built-in speakers, 25 mm x 16 mm, 0.6 W
•Two built-in digital microphones
Mass Storage Device Options
Hard Drive
Serial ATA, 2.5”, 9.5 mm, shock-mounted with Shock Sensor utility. Capacity and speed of the hard drive
are determined by system configuration.
Modular Bay Devices
One of the following devices is pre-installed:
•Dual-Layer Multi-Format DVD Writer
•Blu-ray Triple Writer
•Modular Bay Battery
•Weight Saver
Claw T731 UG.book Page 139 Wednesday, May 25, 2011 3:50 PM

140
- Specifications
Features
Integrated Pointing Device
Touchpad cursor control buttons, with scroll strip built-in
Communications
•Gigabit LAN: Intel 82579LM 10/100/1000 Gigabit Ethernet LAN
•WLAN: Optional integrated Intel Centrino Advanced-N 6205 (a/b/g/n) or Atheros XSPAN
802.11a/b/g/n
•Bluetooth: Optional Bluetooth V3.0 device for wireless personal area network communication
Web Camera
Optional built-in 2.0 megapixel web camera.
Security
Trusted Platform Module: The LIFEBOOK T731 may have an optional Trusted Platform Module
(TPM) installed for added system security.
Theft Prevention Lock: Lock slot for use with security restraint systems.
Fingerprint Reader: The fingerprint sensor uses biometric readings to ensure that only a person with a
registered fingerprint can access the system.
iAMT Support (using Intel ®vPro™ technology): Intel vPro technology is a set of features that work
together to allow for remote wired or wireless access of a computer. This technology can be used whether
or not the computer is running, and enhances the administrator's ability to maintain the system, enhance
security, and increase the cost benefits by allowing off-site service
Claw T731 UG.book Page 140 Wednesday, May 25, 2011 3:50 PM

141
- Specifications
Device Ports
On the LIFEBOOK Tablet PC:
•Express Card slot for one Express Card
•Memory Stick/SD Card slot
•One 15-pin D-SUB connector for VGA external monitor (see Display specifications)
•Two USB 2.0 (Universal Serial Bus) connectors
•One USB 3.0 (Universal Serial Bus) connector (the USB 3.0 port also supports the Anytime USB
Charge feature)
•One DC In connector
•One IEEE 1394 (4-pin type) jack
•One LAN (RJ-45) connector
•One HDMI port
•Docking port (100-pin, to dock with port replicator)
•One stereo headphone jack
•One stereo microphone/line-in jack
On the Optional Port Replicator:
•One 15-pin D-SUB connector for VGA external monitor
•Four USB 2.0 connectors for input/output devices
•One LAN (RJ-45) connector
•One DC-in connector
•One DVI-D connector
•One Headphone-Out connector
Claw T731 UG.book Page 141 Wednesday, May 25, 2011 3:50 PM

142
- Specifications
Keyboard
Built-in keyboard with all functions of 101 key keyboard.
•Total number of keys: 84
•Function keys: F1 through F12, plus Fn extension key
•Two Windows keys: one Start key, one application key
•Key pitch: 19 mm; key stroke: 3.0 mm
•Built-in Touchpad pointing device with two left and two right buttons and scroll strip.
•Built-in Palm Rest
•Spill-resistant
•Anti-microbial
•External USB keyboard/mouse support
Power
Battery
•Standard Lithium ion battery, rechargeable, 6-cell, 63 Wh (10.8V, 5800 mAh) or 6-cell, 67 Wh
(10.8V, 6200 mAh)
•Optional Lithium ion bay battery, rechargeable, 6-cell 10.8V, 3800 mAh
AC Adapter
Autosensing 100-240V AC, supplying 19V DC, 4.22A, 80W to the LIFEBOOK; includes an AC cable
Power Management
Conforms to ACPI (Advanced Configuration and Power Interface).
Claw T731 UG.book Page 142 Wednesday, May 25, 2011 3:50 PM

143
- Specifications
Dimensions and Weight
Overall Dimensions
11.69"(w) x 9.17"(d) x 1.54”(h) (297 mm x 233 mm x 39.0 mm). The height dimensions include the rubber
feet.
Weight
Wide-view display, active digitizer with weight saver: 3.9 lbs.
Wide-view display, active digitizer with optical drive: 4.3 lbs.
Standard display, dual-digitizer with optical drive: 4.6 lbs.
Environmental Requirements
Temperature
Operating: 41° to 95° F (5° to 35° C). Non-operating: 5° to 140° F (–15° to 60° C)
Humidity
Operating: 20% to 85%, relative, non-condensing. Non-operating: 8% to 85%, relative, non-condensing
Altitude
Operating: 10,000 feet (3,048 m) maximum
Popular Accessories
For ordering or additional information on Fujitsu accessories please visit our Web site at
www.shopfujitsu.com or call 1-800-FUJITSU.
Claw T731 UG.book Page 143 Wednesday, May 25, 2011 3:50 PM

144
- Specifications
Pre-Installed Software
Depending on your pre-installed operating system, your Tablet PC comes with pre-installed software for
playing audio and video files of various formats. In addition there is file transfer software and virus
protection software.
•Adobe Reader
•Norton Internet Security™ (60-day free trial)
•CyberLink PowerDirector
•CyberLink PowerDVD
•CyberLink MakeDisc (Windows 7 models only)
•CyberLink YouCam
•Google Toolbar
•Roxio Creator
•OmniPass Fingerprint application
•Fujitsu Driver Update utility
•Microsoft Windows Live Essentials
•Microsoft Office 2010 Starter
THE FOLLOWING LIST CONSTITUTES THE SOFTWARE THAT MAY BE INSTALLED ON YOUR COMPUTER. THE
PRE-INSTALLED SOFTWARE MAY VARY, AND IS DETERMINED BY YOUR OPERATING SYSTEM AND
CONFIGURATION.
Claw T731 UG.book Page 144 Wednesday, May 25, 2011 3:50 PM

145
- Specifications
Learning About Your Software
Tutorials
All operating systems and most application software have tutorials built into them upon installation. We
highly recommend that you step through the tutorial before you use an application.
Manuals
Included with your Tablet PC you will find manuals for your installed operating system and other pre-
installed software. Any manuals that are not included are available online through the software’s “Help”
menu. We recommend that you review these manuals for information on the use of these applications.
Adobe Reader
Adobe Reader allows you to view, navigate, and print PDF files across all major computing platforms.
Norton Internet Security
Your system is preinstalled with a free 60-day trial version of Symantec’s Norton Internet Security™.
Internet Security is a suite of tools designed to protect your LIFEBOOK from viruses, hackers, spam, and
spyware. It helps you protect data currently on your hard disk from destruction or contamination. The trial
version is activated upon your acceptance of software license agreement. After 60 days, you will need to
purchase a subscription from Symantec to download latest virus, spyware, and spam definitions.
CyberLink MakeDisc
(Windows 7 systems only) CyberLink MakeDisc allows you to burn data, videos and photographs to CDs
or DVDs.
CyberLink PowerDVD
CyberLink PowerDVD allows you to produce and edit home movies and slideshows on discs.
CyberLink YouCam
CyberLink YouCam allows you to capture photos or movies on the embedded webcam, add special effects
to them, and share them in a variety of formats or via social networks.
Claw T731 UG.book Page 145 Wednesday, May 25, 2011 3:50 PM

146
- Specifications
CyberLink PowerDirector
CyberLink PowerDirector allows you to edit and enhance your videos, and add special effects to them.
Roxio Creator
Roxio Creator lets you burn CDs and organize, edit and share digital photos, music, data, or videos.
OmniPass Fingerprint application
The fingerprint sensor uses Softex OmniPass which provides password management capabilities to
Microsoft Windows operating systems. OmniPass lets you use a "master password" for all Windows,
applications, and on-line passwords, and presents a convenient user interface through which you can
securely manage passwords, users, and multiple identities for each user.
Google Toolbar
Google Toolbar lets you to search the Internet quickly, block pop-ups, and perform a variety of other tasks
to make your Internet experience easier and more pleasant.
Fujitsu Driver Update Utility
The Fujitsu Driver Update (FDU) utility is pre-installed on your system. With FDU, you can choose to
automatically or manually go to the Fujitsu site to check for new updates for your system. See
“Automatically Downloading Driver Updates” on page 128.
Microsoft Windows Live Essentials
Windows Live Essentials is a suite of programs that make it easier and more enjoyable to use your LIFE-
BOOK. Live Essentials consists of six Live applications: Messenger, Photo Gallery, Writer, Mail, Movie
Maker, and Silverlight. Messenger lets you quickly communicate and interact with individuals and
groups. Photo Gallery is a flexible application that lets you organize, edit, and share your photos. Writer
can be used to generate blog entries, upload videos and photos to your blogs, and publish your entries
online. Mail makes it easy for you to manage your email accounts. Movie Maker makes great-looking
movies and slideshows from your videos and photos. It’s simple to import standard or high definition
Claw T731 UG.book Page 146 Wednesday, May 25, 2011 3:50 PM

147
- Specifications
video and photos, and then have AutoMovie add animations, music, and a title in minutes. Silverlight
powers rich application experiences and delivers high quality, interactive video across the Web and
mobile devices.
Microsoft Office Starter 2010
Microsoft® Office Starter 2010 includes reduced-functionality versions of Word 2010 and Excel 2010
with advertising. PowerPoint, Outlook and Publisher are NOT included. Purchase an Office 2010 Product
Key Card to activate full-featured Office software on this PC.
Operating System Options
Microsoft Windows 7 Professional
Claw T731 UG.book Page 147 Wednesday, May 25, 2011 3:50 PM

148
Glossary
AC Adapter
A device which converts the AC voltage from a wall outlet to the DC voltage needed to power your
LIFEBOOK Tablet PC.
Access point
Wireless network device used to bridge wireless and wired network traffic.
ACPI
Advanced Configuration and Power Interface
Active-Matrix Display
A type of technology for making flat-panel displays which has a transistor or similar device for every
pixel on the screen.
Ad Hoc Mode
Ad Hoc Mode refers to a wireless network architecture where wireless network connectivity between
multiple computers is established without a central wireless network device, typically known as Access
Points. Connectivity is accomplished using only client devices in a peer-to-peer fashion.
Claw T731 UG.book Page 148 Wednesday, May 25, 2011 3:50 PM

149
- Glossary
ADSL
Asymmetric Digital Subscriber Line. Technology for transporting high bit-rate services over ordinary
phone lines.
AGP
Accelerated Graphics Port. Graphics port specifically designed for graphics-intensive devices, such as
video cards and 3D accelerators.
Auto/Airline Adapter
A device which converts the DC voltage from an automobile cigarette lighter or aircraft DC power
outlet to the DC voltage needed to power your LIFEBOOK Tablet PC.
BIOS
Basic Input-Output System. A program and set of default parameters stored in ROM which tests and
operates your LIFEBOOK Tablet PC when you turn it on until it loads your installed operating system
from disk. Information from the BIOS is transferred to the installed operating system to provide it with
information on the configuration and status of the hardware.
Bit
An abbreviation for binary digit. A single piece of information which is either a one (1) or a zero (0).
bps
An abbreviation for bits per second. Used to describe data transfer rates.
Boot
To start-up a computer and load its operating system from disk, ROM or other storage media into
RAM.
Claw T731 UG.book Page 149 Wednesday, May 25, 2011 3:50 PM

150
- Glossary
Bus
An electrical circuit which passes data between the CPU and the sub-assemblies inside your
LIFEBOOK Tablet PC.
Byte
8 bits of parallel binary information.
Cache Memory
A block of memory built into the micro-processor which is much faster to access than your system
RAM and used in specially structured ways to make your overall data handling time faster.
CD-ROM
Compact disk read only memory. This is a form of digital data storage which is read optically with a
laser rather than a magnetic head. A typical CD-ROM can contain about 600MB of data and is not
subject to heads crashing into the surface and destroying the data when there is a failure nor to wear
from reading.
Channel
Range of narrow-band frequencies used by the WLAN device to transmit data. IEEE802.11b/g - 11
channels, 22 MHz wide channels.
CMOS RAM
Complementary metal oxide semiconductor random access memory. This is a technology for
manufacturing random access memory which requires very low levels of power to operate.
Command
An instruction which you give your operating system. Example: run a particular application or format
a floppy disk.
Claw T731 UG.book Page 150 Wednesday, May 25, 2011 3:50 PM

151
- Glossary
Configuration
The combination of hardware and software that makes up your system and how it is allocated for use.
CRT
Cathode Ray Tube. A display device which uses a beam of electronic particles striking a luminescent
screen. It produces a visual image by varying the position and intensity of the beam.
Data
The information a system stores and processes.
DC
Direct current. A voltage or current that does not fluctuate periodically with time.
Default Value
A pre-programmed value to be used if you fail to set your own.
DHCP
Dynamic Host Configuration Protocol. A protocol used to automatically acquire parameters required
for the communication, such as IP address. The sender of IP address is called a DHCP server, and the
receiver is called a DHCP client.
DIMM
Dual-in-line memory module.
Disk
A spinning platter of magnetic data storage media. If the platter is very stiff it is a hard drive, if it is
highly flexible it is a floppy disk, if it is a floppy disk in a hard housing with a shutter it is commonly
called a diskette.
Claw T731 UG.book Page 151 Wednesday, May 25, 2011 3:50 PM

152
- Glossary
Disk Drive
The hardware which spins the disk and has the heads and control circuitry for reading and writing the
data on the disk.
Diskette
A floppy disk in a hard housing with a shutter.
DMA
Direct Memory Access. Special circuitry for memory to memory transfers of data which do not require
CPU action.
DMI
Desktop Management Interface. A standard that provides PC management applications with a
common method of locally or remotely querying and configuring PC computer systems, hardware and
software components, and peripherals.
DNS
Domain Name System. A function to control the association between the IP address and the name
assigned to the computer. If you do not know the IP address but if you know the computer name, you
can still communicate to that computer.
DOS
Disk Operating System (MS-DOS is a Microsoft Disk Operating System).
Driver
A computer program which converts application and operating system commands to external devices
into the exact form required by a specific brand and model of device in order to produce the desired
results from that particular equipment.
Claw T731 UG.book Page 152 Wednesday, May 25, 2011 3:50 PM

153
- Glossary
DVMT
Dynamic Video Memory Technology. A video memory architecture that increases the efficiency of the
motherboard by using innovative memory utilization and direct AGP.
ECP
Extended Capability Port. A set of standards for high speed data communication and interconnection
between electronic devices.
Encryption Key (Network Key)
Data encryption key used to encrypt message text and for computing message integrity checks. Data
encryption protects data from unauthorized viewing.
This device uses the same encryption key to encode and decode the data, and the identical encryption
key is required between the sender and receiver.
ESD
Electro-Static Discharge. The sudden discharge of electricity from a static charge which has built-up
slowly. Example: the shock you get from a doorknob on a dry day or the sparks you get from brushing
hair on a dry day.
FCC
Federal Communications Commission.
Floppy Disk
A spinning platter of magnetic data storage media which is highly flexible.
GB
Gigabyte. One billion bytes.
Claw T731 UG.book Page 153 Wednesday, May 25, 2011 3:50 PM

154
- Glossary
Hard drive
A spinning platter of magnetic data storage media where the platter is very stiff.
I/O
Input/Output. Data entering and leaving your Tablet PC in electronic form.
I/O Port
The connector and associated control circuits for data entering and leaving your Tablet PC in
electronic form.
IDE
Intelligent Drive Electronics. A type of control interface for a hard drive which is inside the hard drive
unit.
IEEE802.11a
Wireless LAN standard that supports a maximum data rate of 54 Mbps. 802.11a devices operate in the
5 GHz lower and middle UNII bands.
IEEE802.11b
Wireless LAN standard that supports a maximum data rate of 11 Mbps. 802.11b devices operate in the
2.4 GHz ISM band.
IEEE802.11g
Wireless LAN standard that supports a maximum data rate of 54 Mbps. 802.11g devices operate in the
2.4 GHz ISM band.
Infrared
Light just beyond the red portion of the visible light spectrum which is invisible to humans.
Claw T731 UG.book Page 154 Wednesday, May 25, 2011 3:50 PM

155
- Glossary
Infrastructure
A name of a wireless LAN configuration. This type of communication uses an access point. Another
type of communication is called Ad Hoc.
IP Address
An identifier for a computer or device on a TCP/IP network. Networks using the TCP/IP protocol
route messages based on the IP address of the destination. The format of an IP address is a 32-bit
numeric address written as four numbers separated by periods. Each number can be zero to 255. For
example, 1.160.10.240 could be an IP address.
Within an isolated network, you can assign IP addresses at random as long as each one is unique.
However, connecting a private network to the Internet requires using registered IP addresses (called
Internet addresses) to avoid duplicates.
The four numbers in an IP address are used in different ways to identify a particular network and a
host on that network. Three regional Internet registries -- ARIN, RIPE NCC and APNIC -- assign
Internet addresses from the following three classes.
Class A - supports 16 million hosts on each of 126 networks
Class B - supports 65,000 hosts on each of 16,000 networks
Class C - supports 254 hosts on each of 2 million networks
The number of unassigned Internet addresses is running out, so a new classless scheme called CIDR
is gradually replacing the system based on classes A, B, and C and is tied to adoption of IPv6.
IR
An abbreviation for infrared.
IrDA
Infrared Data Association. An organization which produces standards for communication using
infrared as the carrier.
Claw T731 UG.book Page 155 Wednesday, May 25, 2011 3:50 PM

156
- Glossary
IRQ
Interrupt Request. An acronym for the hardware signal to the CPU that an external event has occurred
which needs to be processed.
KB
Kilobyte. One thousand bytes.
LAN
Local Area Network. An interconnection of computers and peripherals within a single limited
geographic location which can pass programs and data amongst themselves.
LCD
Liquid Crystal Display. A type of display which makes images by controlling the orientation of
crystals in a crystalline liquid.
Lithium ion Battery
A type of rechargeable battery which has a high power-time life for its size and is not subject to the
memory effect as Nickel Cadmium batteries.
LPT Port
Line Printer Port. A way of referring to parallel interface ports because historically line printers were
the first and latter the most common device connected to parallel ports.
MAC Address
Media Access Control Address. A unique physical address of a network card. For Ethernet, the first
three bytes are used as the vendor code, controlled and assigned by IEEE. The remaining three bytes
are controlled by each vendor (preventing overlap), therefore, every Ethernet card is given a unique
physical address in the world, being assigned with a different address from other cards. For Ethernet,
frames are sent and received based on this address.
Claw T731 UG.book Page 156 Wednesday, May 25, 2011 3:50 PM

157
- Glossary
MB
Megabyte. One million bytes.
Megahertz
1,000,000 cycles per second.
Memory
A repository for data and applications which is readily accessible to your LIFEBOOK Tablet PC’s
CPU.
MHz
Megahertz.
MIDI
Musical Instrument Digital Interface. A standard communication protocol for exchange of
information between computers and sound producers such as synthesizers.
Modem
A contraction for MOdulator-DEModulator. The equipment which connects a computer or other data
terminal to a communication line.
Monaural
A system using one channel to process sound from all sources.
MTU
Maximum Transmission Unit
The maximum data size that can be transferred at a time through the Internet or other networks. You
can set a smaller MTU size to obtain successful communication, if you have difficulty transferring
data due to the fact that the maximum size is too large.
Claw T731 UG.book Page 157 Wednesday, May 25, 2011 3:50 PM

158
- Glossary
Network key
Data that is used for encrypting data in data communication. The personal computer uses the same
network key both for data encryption and decryption, therefore, it is necessary to set the same network
key as the other side of communication.
Network name (SSID: Service Set Identifier )
When a wireless LAN network is configured, grouping is performed to avoid interference or data theft.
This grouping is performed with “Network name (SSID)”. In order to improve security, the network
key is set allowing no communication unless “Network name (SSID)” coincides with the network key.
NTSC
National TV Standards Commission. The standard for TV broadcast and reception for the USA.
Open system authentication
Null authentication method specified in the 802.11 standard that performs no authentication checks on
a wireless client before allowing it to associate.
Operating System
A group of control programs that convert application commands, including driver programs, into the
exact form required by a specific brand and model of microprocessor in order to produce the desired
results from that particular equipment.
Partition
A block of space on a hard drive which is set aside and made to appear to the operating system as if it
were a separate disk, and addressed by the operating system accordingly.
PCMCIA
PCMCIA is a trademark of the Personal Computer Memory Card International Association. The
Personal Computer Memory Card International Association is an organization that sets standards for
add-in cards for personal computers.
Claw T731 UG.book Page 158 Wednesday, May 25, 2011 3:50 PM

159
- Glossary
Peripheral Device
A piece of equipment which performs a specific function associated with but not integral to a
computer. Examples: a printer, a modem, a CD-ROM.
Pitch (keyboard)
The distance between the centers of the letter keys of a keyboard.
Pixel
The smallest element of a display, a dot of color on your display screen. The more pixels per area the
clearer your image will appear.
POST
Power On Self Test. A program which is part of the BIOS which checks the configuration and
operating condition of your hardware whenever power is applied to your Tablet PC. Status and error
messages may be displayed before the operating system is loaded. If the self test detects failures that
are so serious that operation cannot continue, the operating system will not be loaded.
PPPoE
Point to Point Protocol over Ethernet. A protocol for Ethernet, using a Point-to-Point Protocol (PPP),
which is used for connection on the phone line.
Program
An integrated set of coded commands to your computers telling your hardware what to do and how
and when to do it.
Claw T731 UG.book Page 159 Wednesday, May 25, 2011 3:50 PM

160
- Glossary
Protocol
Procedures and rules use to send and receive data between computers.
- Method of sending and receiving data
- Process used to handle communication errors
Conditions required for communication are organized in procedures for correct transfer of
information.
RAM
Random Access Memory. A hardware component of your LIFEBOOK Tablet PC that holds binary
information (both program and data) as long as it has the proper power applied to it.
RAM Module
A printed circuit card with memory and associated circuitry which allows the user to add additional
memory to the computer without special tools.
Reset
The act of reloading the operating system. A reset erases all information stored in RAM.
Restart
See Reset.
Resume
To proceed after interruption. In your Tablet PC this refers to returning to active operation after having
been in one of the suspension states.
ROM
Read Only Memory. A form of memory in which information is stored by physically altering the
material. Data stored in this way cannot be changed by your Tablet PC and does not require power to
maintain it.
Claw T731 UG.book Page 160 Wednesday, May 25, 2011 3:50 PM

161
- Glossary
SDRAM
Synchronous Dynamic Random Access Memory.
Serial Port
A connection to another device through which data is transferred one bit at a time on a single wire with
any other wires only for control of the device not for transfer of data.
Shared key authentication
802.11 network authentication method in which the AP sends the client device a challenge text packet
that the client must then encrypt with the correct WEP key and return to the AP. If the client has the
wrong key or no key, authentication will fail and the client will not be allowed to associate with the
AP. Shared key authentication is not considered secure, because a hacker who detects both the clear-
text challenge and the same challenge encrypted with a WEP key can decipher the key.
Sleep
To make inoperative for a period of time. Your LIFEBOOK Tablet PC uses various suspension states
to reduce power consumption and prolong the charge of your battery.
SSID
Service Set Identifier, a 32-character unique identifier attached to the header of packets sent over a
WLAN that acts as a password when a mobile device tries to connect to the BSS. The SSID
differentiates one WLAN from another, so all access points and all devices attempting to connect to a
specific WLAN must use the same SSID. A device will not be permitted to join the BSS unless it can
provide the unique SSID. Because the SSID is broadcast in plain text, it does not supply any security
to the network.
Status Indicator
A display which reports the condition of some portion of your hardware. On your LIFEBOOK Tablet
PC this is an LCD screen just above the keyboard.
Claw T731 UG.book Page 161 Wednesday, May 25, 2011 3:50 PM

162
- Glossary
Stereo (audio)
A system using two channels to process sound from two different sources.
Subnet mask
TCP-IP network is controlled by being divided into multiple smaller networks (subnets). IP address
consists of the subnet address and the address of each computer. Subnet mask defines how many bits
of IP address comprise the subnet address. The same value shall be set among computers
communicating with each other.
SVGA
Super VGA.
S-Video
Super Video. A component video system for driving a TV or computer monitor.
System Clock
An oscillator of fixed precise frequency which synchronizes the operation of the system and is counted
to provide time of day and date.
TCP/IP
Transmission Control Protocol/Internet Protocol. A standard Internet protocol that is most widely
used.
TFT
Thin Film Transistor – A technology for flat display panels which uses a thin film matrix of transistors
to control each pixel of the display screen individually.
UL
Underwriters Laboratories – An independent organization that tests and certifies the electrical safety
of devices.
Claw T731 UG.book Page 162 Wednesday, May 25, 2011 3:50 PM

163
- Glossary
USB
Universal Serial Bus. Standard that allows you to simultaneously connect up to 127 USB devices such
as game pads, pointing devices, printers, and keyboards to your computer.
VRAM
Video Random Access Memory. A memory dedicated to video display data and control.
WFM
Wired for Management is Intel’s broad-based initiative to reduce the total cost of ownership (TCO) of
business computing without sacrificing power and flexibility.
Wi-Fi Compatible
Wi-Fi (Wireless Fidelity) Identifies that the product has passed the interoperability test, supplied by
the WECA (Wireless Ethernet Compatibility Alliance), which guarantees the interoperability of
wireless IEEE 802.11 LAN products. For more information on the Wi-Fi standard, go to the WECA
Web site at: www.wirelessethernet.com.
WLAN
Wireless Local Area Network. A wireless interconnection of computers and peripherals within a
single limited geographic location which can pass programs and data amongst themselves.
Claw T731 UG.book Page 163 Wednesday, May 25, 2011 3:50 PM

164
- Regulatory Information
Regulatory Information
Notice
Changes or modifications not expressly approved by Fujitsu could void this user’s authority to operate the
equipment.
FCC NOTICES
Notice to Users of Radios and Television
This equipment has been tested and found to comply with the limit for class B digital devices, pursuant to parts 15
of the FCC Rules.
These limits are designed to provide reasonable protection against harmful interference in a residential installation.
This equipment generates, uses, and can radiate radio frequency energy and, if not installed and used in accordance
with the instructions, may cause harmful interference to radio communications. However, there is no guarantee that
interference will not occur in a particular installation. If this equipment does cause harmful interference to radio or
television reception, which can be determined by turning the equipment off and on, the user is encouraged to try to
correct the interference by one or more of the following measures:
•Reorient or relocate the receiving antenna.
•Increase the separation between the equipment and receiver.
•Connect the equipment into an outlet that is on a different circuit than the receiver.
•Consult the dealer or an experienced radio/TV technician for help.
Shielded interconnect cables must be employed with this equipment to ensure compliance with the pertinent RF
emission limits governing this device.
DOC (INDUSTRY CANADA) NOTICES
Notice to Users of Radios and Television
This Class B digital apparatus complies with Canadian ICES-003.
Cet appareil numérique de classe B respecte la norme canadienne ICES-003
Claw T731 UG.book Page 164 Wednesday, May 25, 2011 3:50 PM

165
Appendix A: WLAN User’s Guide
FCC Regulatory Information
Please note the following regulatory information related to the optional wireless LAN device.
Regulatory Notes and Statements
Wireless LAN, Health and Authorization for use
Radio frequency electromagnetic energy is emitted from Wireless LAN devices. The energy levels of these emissions, however,
are far much less than the electromagnetic energy emissions from wireless devices such as mobile phones. Wireless LAN
devices are safe for use by consumers because they operate within the guidelines found in radio frequency safety standards and
recommendations. The use of Wireless LAN devices may be restricted in some situations or environments, such as:
•On board an airplane, or
•In an explosive environment, or
•In situations where the interference risk to other devices or services is perceived or identified as harmful.
In cases in which the policy regarding use of Wireless LAN devices in specific environments is not clear (e.g., airports,
hospitals, chemical/oil/gas industrial plants, private buildings), obtain authorization to use these devices prior to operating the
equipment.
Claw T731 UG.book Page 165 Wednesday, May 25, 2011 3:50 PM

166
Regulatory Information/Disclaimers
Installation and use of this Wireless LAN device must be in strict accordance with the instructions included in the user
documentation provided with the product. Any changes or modifications made to this device that are not expressly approved
by the manufacturer may void the user’s authority to operate the equipment. The manufacturer is not responsible for any radio
or television interference caused by unauthorized modification of this device, or the substitution or attachment of connecting
cables and equipment other than those specified by the manufacturer. It is the responsibility of the user to correct any
interference caused by such unauthorized modification, substitution or attachment. The manufacturer and its authorized
resellers or distributors will assume no liability for any damage or violation of government regulations arising from failure to
comply with these guidelines.
This device must not be co-located or operated in conjunction with any other antenna or transmitter.
For IEEE 802.11a Wireless LAN: For operation within 5.15~5.25 GHz frequency range, it is restricted to indoor
environments, and the antenna of this device must be integral.
Federal Communications Commission statement
This device complies with Part 15 of FCC Rules.
Operation is subject to the following two conditions: (1) This device may not cause interference, and, (2) This device must
accept any interference, including interference that may cause undesired operation of this device.
FCC Interference Statement
This equipment has been tested and found to comply with the limits for a Class B digital device, pursuant to Part 15 of the FCC
Rules. These limits are designed to provide reasonable protection against harmful interference in a residential installation. This
equipment generates, uses, and can radiate radio frequency energy. If not installed and used in accordance with the instructions,
it may cause harmful interference to radio communications. However, there is no guarantee that interference will not occur in
a particular installation.
If this equipment does cause harmful interference to radio or television reception, which can be determined by turning the
equipment off and on, the user is encouraged to try and correct the interference by one or more of the following measures:
1Reorient or relocate the receiving antenna.
2Increase the distance between the equipment and the receiver.
3Connect the equipment to an outlet on a circuit different from the one the receiver is connected to.
4Consult the dealer or an experienced radio/TV technician for help.
Figure A-1. Ad Hoc Mode Network
Claw T731 UG.book Page 166 Wednesday, May 25, 2011 3:50 PM

167
FCC Radio Frequency Exposure statement
The available scientific evidence does not show that any health problems are associated with using low power wireless devices. There is no
proof, however, that these low power wireless devices are absolutely safe. Low power wireless devices emit low levels of radio frequency
energy (RF) in the microwave range while being used. Whereas high levels of RF can produce health effects (by heating tissue), exposure to
low-level RF that does not produce heating effects causes no known adverse health effects. Many studies of low-level RF exposure have not
found any biological effects. Some studies have suggested that some biological effects might occur, but such findings have not been
confirmed by additional research.
The wireless LAN radio device has been tested and found to comply with FCC radiation exposure limits set forth for an uncontrolled
equipment and meets the FCC radio frequency (RF) Exposure Guidelines in Supplement C to OET65.
Export restrictions
This product or software contains encryption code which may not be exported or transferred from the US or Canada without
an approved US Department of Commerce export license. This device complies with Part 15 of FCC Rules., as well as ICES
003 B / NMB 003 B. Operation is subject to the following two conditions: (1) this device may not cause harmful interference,
and (2) this device must accept any interference received, including interference that may cause undesirable operation.
Modifications not expressly authorized by Fujitsu America, Inc. may invalidate the user's right to operate this equipment.
Canadian Notice
The device for the 5150 - 5250 MHz band is only for indoor usage to reduce the potential for harmful interference to co-channel
mobile satellite systems.
The maximum antenna gain of 6 dBi permitted (for devices in the 5250 - 5350 MHz, 5470 - 5725 MHz and 5725 - 5825 MHz
bands) to comply with the e.i.r.p. limit as stated in A9.2 of RSS210.
In addition, users are cautioned to take note that high power radars are allocated as primary users (meaning they have priority)
of 5250 - 5350 MHz and 5650 - 5850 MHz and these radars could cause interference and/or damage to LE-LAN devices.
Claw T731 UG.book Page 167 Wednesday, May 25, 2011 3:50 PM

168
Before Using the Optional Wireless LAN
Before Using the Optional Wireless LAN
This manual describes the procedures required to properly set up and configure the optional integrated
Wireless LAN Mini-PCI device (referred to as "WLAN device" in the rest of the manual). Before using
the WLAN device, read this manual carefully to ensure its correct operation. Keep this manual in a safe
place for future reference.
Wireless LAN Device Covered by this Document
This document is applicable to systems containing one of the following optional devices:
•Optional integrated Intel® Centrino® Advanced-N 6205 (a/b/g/n, 2 x 2)
•Optional integrated Atheros® XSPAN 802.11abgn
Characteristics of the WLAN Device
•The WLAN device is a Mini-PCI card attached to the main board of the mobile computer.
•The WLAN device operates in license-free RF bands, eliminating the need to procure an FCC operating
license. The WLAN operates in the 2.4GHz Industrial, Scientific, and Medical (ISM) RF band and the lower,
middle, and upper bands of the 5GHz Unlicensed National Information Infrastructure (UNII) bands.
•The WLAN devices are capable of four operating modes, IEEE802.11a, IEEE802.11b, IEEE802.11g, and
IEEE802.11n.
•The WLAN devices are Wi-Fi certified and operate (as applicable) at a the maximum data rate of 540 Mbps
(theoretical) in IEEE802.11n mode; 54 Mbps in IEEE802.11a or IEEE802.11g mode; and 11 Mbps in
IEEE802.11b mode.
•The WLAN devices support the following encryption methods - WEP, TKIP, CKIP, and AES encryption.
•The Wireless LAN devices are compliant with the following standards: WPA, WPA2, CCX1.0, CCX2.0,
CCX3.0, and CCX4.0.
Claw T731 UG.book Page 168 Wednesday, May 25, 2011 3:50 PM
169
Before Using the Optional Wireless LAN
Wireless LAN Modes Using this Device
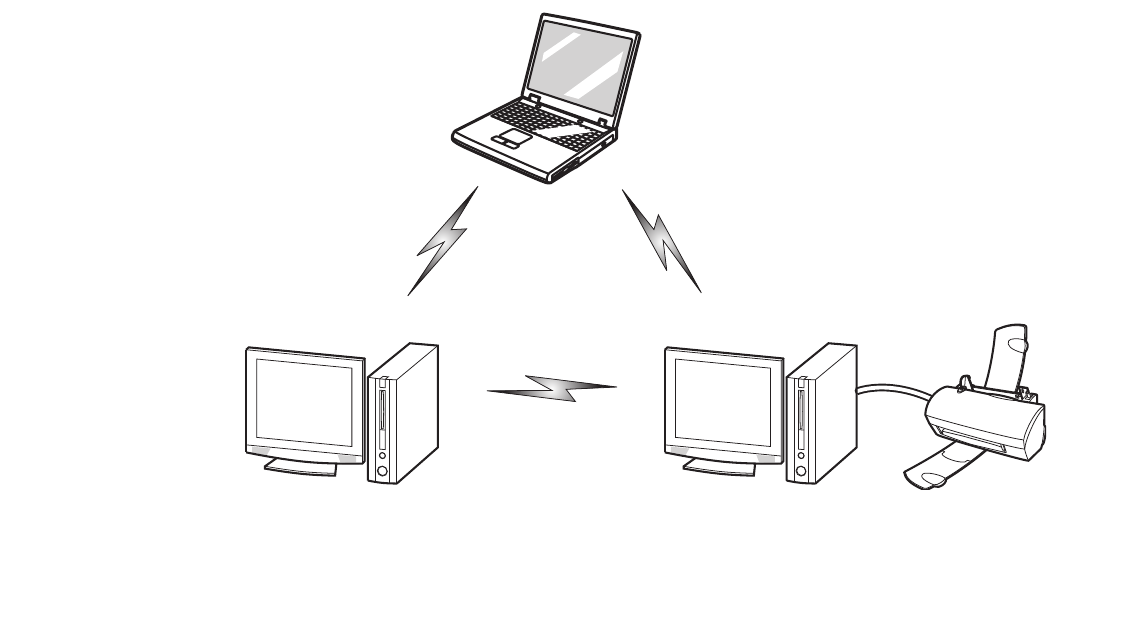
Ad Hoc Mode
"Ad Hoc Mode" refers to a wireless network architecture where wireless network connectivity between
multiple computers is established without a central wireless network device, typically known as Access
Point(s). Connectivity is accomplished using only client devices in a peer-to-peer fashion. That is why Ad
Hoc networks are also known as peer-to-peer networks. Ad Hoc networks are an easy and inexpensive
method for establishing network connectivity between multiple computers. Ad Hoc mode requires that the
SSID, network authentication, and encryption key settings are identically configured on all computers in
the Ad Hoc network.
Figure 49. Ad Hoc Mode Network
Claw T731 UG.book Page 169 Wednesday, May 25, 2011 3:50 PM
170
Before Using the Optional Wireless LAN
Access Point (Infrastructure) Mode
Infrastructure mode refers to a wireless network architecture in which devices communicate with wireless
or wired network devices by communicating through an Access Point. In infrastructure mode, wireless
devices can communicate with each other or with a wired network. Corporate wireless networks operate
in infrastructure mode because they require access to the WLAN in order to access services, devices, and
computers (e.g., file servers, printers, databases).
Figure 50. Access Point (Infrastructure) Mode Network
ADSL modem,
cable modem,
or similar
Internet Wired LAN
Access Point*
Wireless LAN *An optional hub for a wired
LAN may be required depending
upon the type of access point used.
Claw T731 UG.book Page 170 Wednesday, May 25, 2011 3:50 PM

171
Before Using the Optional Wireless LAN
How to Handle This Device
The WLAN device is an optional device that may come pre-installed in your mobile computer. Under
normal circumstances, it should not be necessary for you to remove or re-install it. The operating system
that your mobile computer comes with has been pre-configured to support the WLAN device.
•The Wireless LAN devices support IEEE802.11a, IEEE802.11b, IEEE802.11g, and IEEE802.11n.
•The WLAN devices operate in the 2.4 GHz ISM band and the 5 GHz lower, middle, and upper UNII bands.
•Microwave ovens may interfere with the operation of WLAN devices since they operate in the same 2.4 GHz
frequency range as IEEE802.11b/g/n devices. Interference by microwaves does not occur with IEEE802.11a
radio which operates in the 5 GHz RF band.
•Wireless devices that transmit in the 2.4 GHz range may interfere with operation of WLAN devices in
IEEE802.11b/g/n modes. Symptoms of interference include reduced throughput, intermittent disconnects,
and many frame errors. It is HIGHLY recommended that these interfering devices be powered off to ensure
proper operation of the WLAN device.
Deactivating/Disconnecting the WLAN Device
Disconnecting the WLAN device may be desired in certain circumstances (to extend battery life) or where
certain environments require it (i.e. hospitals, clinics, airplanes, etc.). The WLAN device can be
deactivated by using the Wireless On/Off Switch, and it can be disconnected in Windows using the WLAN
icon in the system tray (Note that disconnecting via the icon in the system tray does not turn off the radio;
it continues to transmit and receive even though it’s not connected.).
BEFORE USING THE WIRELESS LAN DEVICE, YOU MUST FIRST INSTALL CLICKME! TO ENSURE THAT THE
CORRECT SOFTWARE FOR YOUR DEVICE IS INSTALLED. SEE “INSTALLING CLICKME!” ON PAGE 76.
Claw T731 UG.book Page 171 Wednesday, May 25, 2011 3:50 PM
172
Before Using the Optional Wireless LAN
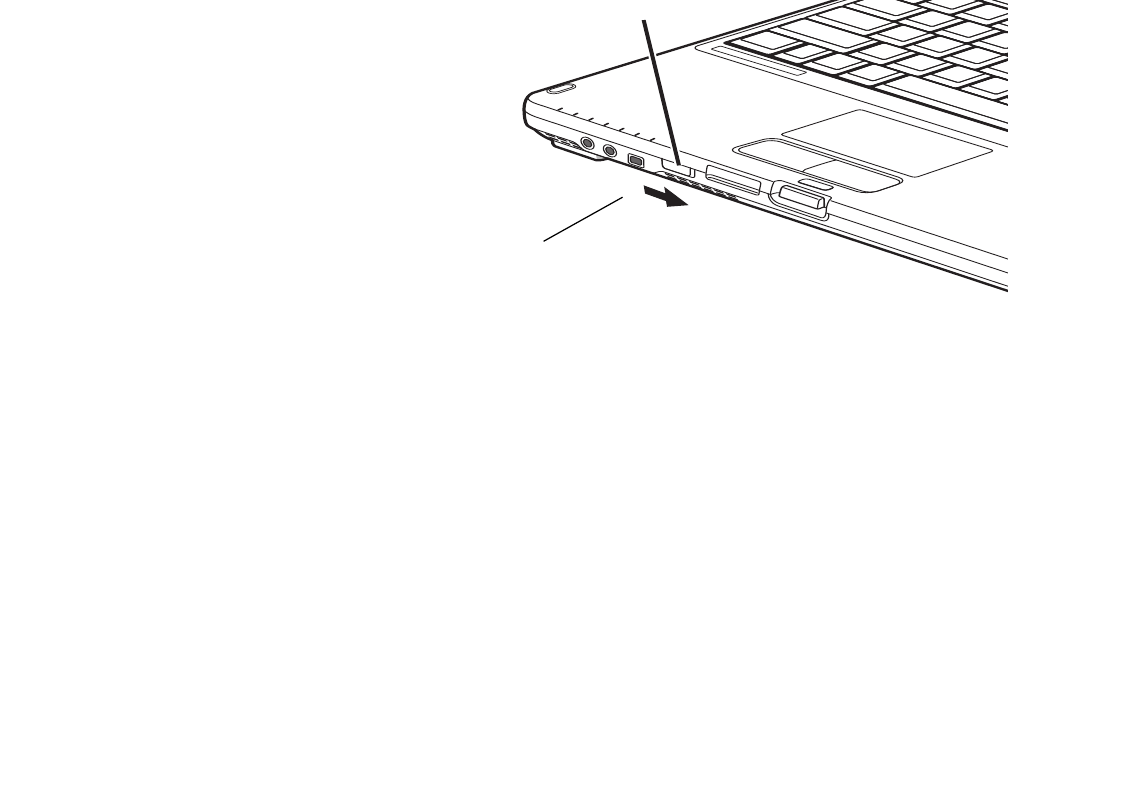
Deactivation Using the Wireless On/Off Switch
The WLAN device can be deactivated quickly and efficiently by toggling the Wireless LAN/Bluetooth
On/Off Switch to the Off position. The switch has no effect on non-Wireless LAN models.
Figure 51. Wireless LAN/Bluetooth On/Off Switch Location
Disconnection Using the Icon in the Taskbar
Note that disconnecting via the icon in the system tray does not turn off the radio; it continues to transmit
and receive even though it’s not connected.
1Right-click the WLAN icon in the taskbar at the bottom right of your screen.
2Choose Disconnect from a network.
Activating the WLAN Device
Activation of the WLAN device can be accomplished using the same methods as the deactivation process
•Using the Wireless On/Off Switch
•In Windows, by right-clicking the WLAN icon then clicking “Connect to a network”
WLAN/Bluetooth Switch
Claw T731 UG.book Page 172 Wednesday, May 25, 2011 3:50 PM

173
Configuring the Wireless LAN
Configuring the Wireless LAN
The WLAN device can be configured to establish wireless network connectivity using the software that
is built into Windows. Support for most industry standard security solutions is contained in this software.
Pre-defined parameters will be required for this procedure. Please consult with your network
administrator for these parameters:
Configuring the WLAN
1Click the Start button, then select Control Panel.
2If the Control Panel is not in Classic View, select Classic View from the left panel. Double-click the Network
Connections icon.
3Double-click on the Wireless Network Connection icon.
4Click on [View Wireless Networks]
5Choose a wireless network.
6Click [Connect].
7Enter the Network Key, if required.
8Enter any required information. It may be necessary to consult with your network administrator for some of the
information.
9If you require assistance, go to [Start] -> Help and Support -> Networking and the Web. Select the main topic
in which you are interested, then type in relevant keywords in the Search box.
Connection to the network
After you have configured your computer, you can connect to an active network by performing the
following steps:
1Click on the WLAN icon in the system tray.
2Select “Connect to a network”.
3Select a network from the list that appears, and click the [Connect] button.
After you have configured your computer, you can connect to an active network by clicking on the
Wireless Network icon in the system tray:
Claw T731 UG.book Page 173 Wednesday, May 25, 2011 3:50 PM

174
Troubleshooting the WLAN
Troubleshooting the WLAN
Troubleshooting
Causes and countermeasures for troubles you may encounter while using your wireless LAN are described
in the following table. If you are unfamiliar with the steps required, consult your System Administrator or
go to [Start] -> Help and Support -> Networking and the Web
Problem Possible Cause Possible Solution
Unavailable
network
connection
Incorrect network
name (SSID) or
network key
Ad hoc connection: verify that the network names (SSID’s) and network keys
(WEP) of all computers to be connected have been configured correctly. SSID’s
and WEP key values must be identical on each machine.
Access Point (Infrastructure) connection: set network name (SSID) and
network key to the same values as those of the access point.
Set the Network Authentication value identically to that of the Access Point.
Please consult your network administrator for this value, if necessary.
Weak received
signal strength
and/or link quality
Ad hoc connection: Retry connection after shortening the distance to the
destination computer or removing any obstacles for better sight.
Access Point (Infrastructure) connection: Retry connection after shortening the
distance to the access point or removing any obstacles for better transmission.
The WLAN device
has been
deactivated or
disabled
Check if the wireless switch is turned On. Go to Start -> Control Panel, and
double-click on Windows Mobility Center. If the wireless network is off, click the
[Turn wireless on] button.
The computer to be
connected is turned
off
Check if the computer to be connected is turned ON.
Claw T731 UG.book Page 174 Wednesday, May 25, 2011 3:50 PM

175
Troubleshooting the WLAN
Unavailable
network
connection
(continued)
RF interference from
Access Points or
other wireless
networks
The use of identical or overlapping RF channels can cause interference with the
operation of the WLAN device. Change the channel of your Access Point to a
channel that does not overlap with the interfering device.
Wireless network
authentication has
failed
Re-check your Network Authentication, Encryption, and Security settings.
Incorrectly configured security settings such as an incorrectly typed WEP key,
a misconfigured LEAP username, or an incorrectly chosen authentication
method will cause the LAN device to associate but not authenticate to the
wireless network.
Incorrectly
configured network
settings
Recheck the configuration of your network settings.
Incorrect IP address
configuration This only applies to networks using static IP addresses. Please contact your
network administrator for the correct settings.
Problem Possible Cause Possible Solution
Claw T731 UG.book Page 175 Wednesday, May 25, 2011 3:50 PM

176
WLAN Specifications
WLAN Specifications
Specifications
Item Specification
Type of network The optional integrated Intel Centrino Advanced-N 6205 (a/b/g/n, 2 x 2) and Atheros
XSPAN 802.11abgn) WLAN devices conform to IEEE 802.11a, 802.11b/g, and
802.11n, Wi-Fi based*.
Transfer rate (Automatic switching) 54 Mbps maximum data rate (IEEE802.11n to be determined)
Active frequency •802.11n: 2.4 GHz or 5 GHz
•802.11b/g: 2400~2473 MHz
•802.11a: 4900 ~ 5850 MHz
Typical operating distances** •802.11a: 40 ft. (12 m) @ 54 Mbps; 300 ft. (91 m) @ 6 Mbps
•802.11b: 100 ft. (30 m) @ 11 Mbps; 300 ft. (91 m) @ 1 Mbps
•802.11g: 100 ft. (30 m) @ 54 Mbps; 300 ft. (91 m) @ 1 Mbps
•802.11n: Estimated double the operating distance of 802.11g and 802.11a in
their respective frequencies.
Number of channels •802.11a: 8 independent channels
•802.11b/g: 11 channels, 3 non-overlapping channels
•802.11n: 2.4 GHz - 3 non-overlapping channels when Channel Bonding is not
used; 2 non-overlapping channels when Channel Bonding is used.
5 GHz - 12 non-overlapping UNII channels with or without Channel Bonding
Security Encryption Types - WEP, TKIP, AES***, WPA 1.0 compliant
Encryption Key lengths Supported: 64 bits and 128 bits 802.1x/EAP
Maximum recommended number
of computers to be connected
over wireless LAN (during ad hoc
connection)
10 units or less ****
Claw T731 UG.book Page 176 Wednesday, May 25, 2011 3:50 PM

177
WLAN Specifications
* “Wi-Fi based” indicates that the interconnectivity test of the organization which guarantees the interconnectivity of
wireless LAN (Wi-Fi Alliance) has been passed.
** The communication ranges shown above will increase or decrease depending on factors such as number of walls, reflective
material, or interference from external RF sources.
*** Encryption with network key (WEP) is performed using the above number of bits, however, users can set 40 bits/ 104
bits after subtracting the fixed length of 24 bits.
**** Depending on practical environments, the allowable number of computers to be connected may be decreased.
Claw T731 UG.book Page 177 Wednesday, May 25, 2011 3:50 PM

178
Using the Bluetooth Device
Using the Bluetooth Device
The optional Integrated Bluetooth module is a wireless device installed in selected Fujitsu mobile
computers.
What is Bluetooth
Bluetooth technology is designed as a short-range wireless link between mobile devices, such as laptop
computers, phones, printers, and cameras. Bluetooth technology is used to create Personal Area Networks
(PANs) between devices in short-range of each other.
Where to Find Information About Bluetooth
To access help about you Bluetooth module, go to the Bluetooth Help site at:
http://www.broadcom.com/support/bluetooth/
A large amount of helpful information is located at the site.
For additional information about Bluetooth Technology, visit the Bluetooth Web site at:
www.bluetooth.com.
THE WIRELESS LAN/BLUETOOTH ON/OFF SWITCH WILL POWER OFF BOTH THE OPTIONAL WIRELESS
LAN AND BLUETOOTH DEVICES AT THE SAME TIME. TO ENABLE OR DISABLE EITHER ONE OF THE
DEVICES INDIVIDUALLY, PERFORM THE FOLLOWING STEPS:
1Right-click on the Bluetooth icon in the task bar at the bottom right of your screen.
2Select the action you wish to perform from the window that appears.
Claw T731 UG.book Page 178 Wednesday, May 25, 2011 3:50 PM

179
Using the Bluetooth Device
FCC Radiation Exposure Statement
This equipment complies with FCC radiation exposure limits set forth for an uncontrolled environment.
The Bluetooth antenna is located on the front edge of the right palm rest and is exempt from minimum
distance criteria due to its low power.
The transmitters in this device must not be co-located or operated in conjunction with any other antenna
or transmitter.
Canadian Notice
To prevent radio interference to the licensed service, this device is intended to be operated indoors and
away from windows to provide maximum shielding. Equipment (or its transmit antenna) that is installed
outdoors is subject to licensing.
Warranty
Users are not authorized to modify this product. Any modifications invalidate the warranty.
This equipment may not be modified, altered, or changed in any way without signed written permission
from Fujitsu. Unauthorized modification will void the equipment authorization from the FCC and
Industry Canada and the warranty.
Claw T731 UG.book Page 179 Wednesday, May 25, 2011 3:50 PM
180
Appendix B: Fingerprint Sensor Device
Introducing the Fingerprint Sensor Device
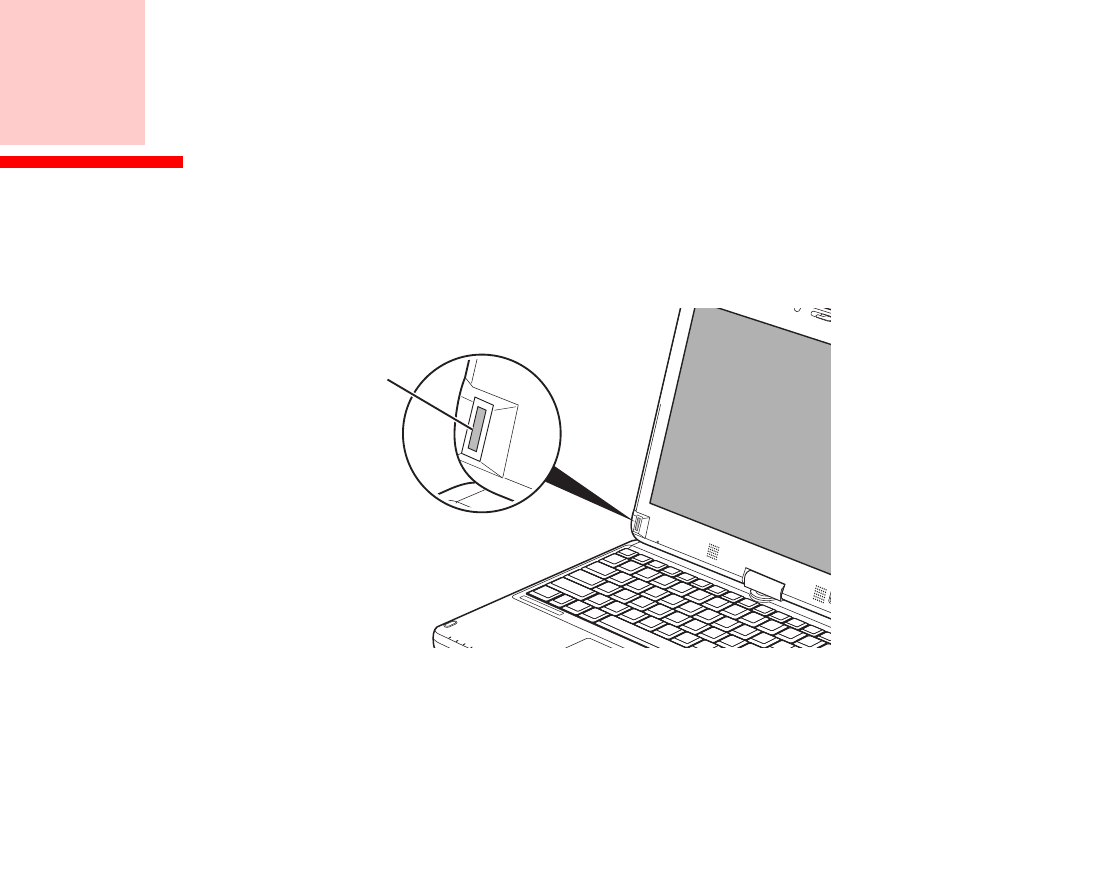
Your system has a fingerprint sensor device at the bottom left below the display screen.
Figure 52. Fingerprint sensor
With a fingerprint sensor, you can avoid having to enter a username and password every time you want to:
•Log onto Windows
•Resume from sleep mode
•Cancel a password-protected screen saver
Fingerprint
Sensor Device
Claw T731 UG.book Page 180 Wednesday, May 25, 2011 3:50 PM

181
- Introducing the Fingerprint Sensor Device
•Log into homepages that require a username and password
After you have “enrolled” - or registered - your fingerprint, you can simply swipe your fingertip over the
sensor for the system recognize you.
The fingerprint sensor uses Softex OmniPass which provides password management capabilities to
Microsoft Windows operating systems. OmniPass enables you to use a "master password" for all
Windows, applications, and on-line passwords.
OmniPass requires users to authenticate themselves using the fingerprint sensor before granting access to
the Windows desktop. This device results in a secure authentication system for restricting access to your
computer, applications, web sites, and other password-protected resources.
OmniPass presents a convenient graphical user interface, through which you can securely manage
passwords, users, and multiple identities for each user.
Getting Started
This section guides you through the preparation of your system for the OmniPass fingerprint recognition
application. You will be led through the OmniPass installation process. You will also be led through the
procedure of enrolling your first user into OmniPass.
Installing OmniPass
If OmniPass has already been installed on your system, skip this section and go directly to “User
Enrollment” on page 184. You can determine whether OmniPass has already been installed by checking
to see if the following are present:
•The gold key-shaped OmniPass icon in the system tray at the bottom right of the screen.
•The Softex program group in the Programs group of the Start menu
Claw T731 UG.book Page 181 Wednesday, May 25, 2011 3:50 PM

182
- Introducing the Fingerprint Sensor Device
System Requirements
The OmniPass application requires space on your hard drive; it also requires specific Operating Systems
(OS’s). The minimum requirements are as follows:
•Windows XP Professional operating system
•At least 35 MB available hard disk space
Installing the OmniPass Application
If OmniPass is already installed on your system, go to “User Enrollment” on page 184. Otherwise
continue with this section on software installation.
To install OmniPass on your system you must:
1Insert the installation media for the OmniPass application into the appropriate drive. If you are installing from
CD-ROM or DVD-ROM, you must find and launch the OmniPass installation program (setup.exe) from the
media.
2Follow the directions provided in the OmniPass installation program. Specify a location to which you would like
OmniPass installed. It is recommended that you NOT install OmniPass in the root directory (e.g. C:\).
3Once OmniPass has completed installation you will be prompted to restart you system. Once your system has
rebooted you will be able to use OmniPass. If you choose not to restart immediately after installation, OmniPass
will not be available for use until the next reboot.
4The installation program automatically places an icon (Softex OmniPass) in the Windows Control Panel as well
as a golden key shaped icon in the taskbar.
•INSTALLATION OF THE APPLICATION REQUIRES THAT YOU HAVE AN EXTERNAL OPTICAL DRIVE ATTACHED TO
YOUR SYSTEM.
•FOR INSTALLATION, OMNIPASS REQUIRES THAT THE USER INSTALLING OMNIPASS HAVE ADMINISTRATIVE
PRIVILEGES TO THE SYSTEM. IF YOUR CURRENT USER DOES NOT HAVE ADMINISTRATIVE PRIVILEGES, LOG OUT
AND THEN LOG IN WITH AN ADMINISTRATOR USER BEFORE PROCEEDING WITH OMNIPASS INSTALLATION.
Claw T731 UG.book Page 182 Wednesday, May 25, 2011 3:50 PM

183
- Introducing the Fingerprint Sensor Device
Verifying Information about OmniPass
After you have completed installing OmniPass and restarted your system, you may wish to check the
version of OmniPass on your system.
To check the version information of OmniPass:
1From the Windows Desktop, double-click the key-shaped OmniPass icon in the taskbar (usually located in the
lower right corner of the screen),
or,
Click the Start button, select Settings, and click Control Panel. Double-click Softex OmniPass in the Control
Panel, and the OmniPass Control Center will appear. If it does not appear, then the program is not properly
installed,
or,
Click the Start button, select Programs, and from the submenu select the Softex program group, from that
submenu click OmniPass Control Center.
2Select the About tab at the top of the OmniPass Control Center. The About tab window appears with version
information about OmniPass.
Uninstalling OmniPass
To remove the OmniPass application from your system:
1Click Start on the Windows taskbar. Select Settings, and then Control Panel.
2Double-click Add/Remove Programs.
3Select OmniPass, and then click Change/Remove.
4Follow the directions to uninstall the OmniPass application.
5Once OmniPass has finished uninstalling, reboot your system when prompted.
FOR UNINSTALLATION, OMNIPASS REQUIRES THAT THE USER UNINSTALLING OMNIPASS HAVE
ADMINISTRATIVE PRIVILEGES TO THE SYSTEM. IF YOUR CURRENT USER DOES NOT HAVE
ADMINISTRATIVE PRIVILEGES, LOG OUT AND THEN LOG IN WITH AN ADMINISTRATOR USER BEFORE
PROCEEDING WITH OMNIPASS UNINSTALLATION.
Claw T731 UG.book Page 183 Wednesday, May 25, 2011 3:50 PM

184
- Introducing the Fingerprint Sensor Device
User Enrollment
Before you can use any OmniPass features you must first enroll a user into OmniPass.
Master Password Concept
Computer resources are often protected with passwords. Whether you are logging into your computer,
accessing your email, e-banking, paying bills online, or accessing network resources, you often have to
supply credentials to gain access. This can result in dozens of sets of credentials that you have to
remember.
During user enrollment a "master password” is created for the enrolled user. This master password
“replaces” all other passwords for sites you register with OmniPass.
Example: A user, John, installs OmniPass on his system (his home computer) and enrolls an OmniPass
user with username “John_01” and password “freq14”. He then goes to his webmail site to log onto his
account. He inputs his webmail credentials as usual (username “John_02” and password “lifebook”), but
instead of clicking [Submit], he directs OmniPass to Remember Password. Now whenever he returns to
that site, OmniPass will prompt him to supply access credentials.
John enters his OmniPass user credentials (“John_01” and “freq14”) in the OmniPass authentication
prompt, and he is allowed into his webmail account. He can do this with as many web sites or password
protected resources he likes, and he will gain access to all those sites with his OmniPass user credentials
(“John_01” and “freq14”). This is assuming he is accessing those sites with the system onto which he
enrolled his OmniPass user. OmniPass does not actually change the credentials of the password protected
resource. If John goes to another computer without he OmniPass account to access his webmail, he would
need to enter his original webmail credentials (“John_02” and “lifebook”) to gain access. If he attempts
his OmniPass user credentials on a system other than a system he’s enrolled on, he will not gain access.
THE ENROLLMENT PROCEDURE ASSUMES YOU HAVE NO HARDWARE AUTHENTICATION DEVICES OR
ALTERNATE STORAGE LOCATIONS THAT YOU WISH TO INTEGRATE WITH OMNIPASS. IF YOU DESIRE
SUCH FUNCTIONALITY, CONSULT THE APPROPRIATE SECTIONS OF THIS DOCUMENT.
Claw T731 UG.book Page 184 Wednesday, May 25, 2011 3:50 PM

185
- Introducing the Fingerprint Sensor Device
Basic Enrollment
The Enrollment Wizard will guide you through the process of enrolling a user. Unless you specified
otherwise, after OmniPass installation the Enrollment Wizard will launch on Windows login. If you do
not see the Enrollment Wizard, you can bring it up by clicking Start on the Windows taskbar; select
Programs; select Softex; click OmniPass Enrollment Wizard.
1Click Enroll to proceed to username and password verification. By default, the OmniPass Enrollment Wizard
enters the credentials of the currently logged in Windows user.
2Enter the password you use to log in to Windows. This will become the “master password” for this OmniPass
user. In most cases, the Domain: value will be your Windows computer name. In a corporate environment, or
when accessing corporate resources, the Domain: may not be your Windows computer name. Click [Next] to
continue.
3In this step OmniPass captures your fingerprint. Refer to “Enrolling a Fingerprint” on page 185 for additional
information.
4Next, choose how OmniPass notifies you of various events. We recommend you keep Taskbar Tips on
Beginner mode taskbar tips and Audio Tips on at least Prompt with system beeps only until you get
accustomed to how OmniPass operates. Click [Next] to proceed with user enrollment. You will then see a
Congratulations screen indicating your completion of user enrollment.
5Click [Done] to exit the OmniPass Enrollment Wizard. You will be asked if you’d like to log in to OmniPass with
your newly enrolled user; click [Yes].
Enrolling a Fingerprint
Enrolling a fingerprint will increase the security of your system and streamline the authentication
procedure.
You enroll fingerprints in the OmniPass Control Center. With an OmniPass user logged in, double-click
the system tray OmniPass icon. Select the User Settings tab and click Enrollment under the User
Settings area. Click Enroll Authentication Device and authenticate at the authentication prompt to start
device enrollment.
Claw T731 UG.book Page 185 Wednesday, May 25, 2011 3:50 PM

186
- Introducing the Fingerprint Sensor Device
1During initial user enrollment, you will be prompted to select the finger you wish to enroll. Fingers that have
already been enrolled will be marked by a green check. The finger you select to enroll at this time will be marked
by a red arrow. OmniPass will allow you re-enroll a finger. If you choose a finger that has already been enrolled
and continue enrollment, OmniPass will enroll the fingerprint, overwriting the old fingerprint. Select a finger to
enroll and click [Next].
2It is now time for OmniPass to capture your selected fingerprint. It may take a several capture attempts before
OmniPass acquires your fingerprint. Should OmniPass fail to acquire your fingerprint, or if the capture screen
times out, click [Back] to restart the fingerprint enrollment process.
Your system has a “swipe” fingerprint sensor. A swipe sensor is small and resembles a skinny elongated
rectangle. To capture a fingerprint, gently swipe or pull your fingertip over the sensor (starting at the second
knuckle) towards yourself. Swiping too fast or too slow will result in a failed capture. The Choose Finger
screen has a [Practice] button; click it to practice capturing your fingerprint. When you are comfortable with how
your fingerprint is captured, proceed to enroll a finger.
3Once OmniPass has successfully acquired the fingerprint, the Verify Fingerprint screen will automatically
appear. To verify your enrolled fingerprint, place your fingertip on the sensor and hold it there as if you were
having a fingerprint captured. Successful fingerprint verification will show a green fingerprint in the capture
window and the text Verification Successful under the capture window.
Using OmniPass
You are now ready to begin using OmniPass. Used regularly, OmniPass will streamline your
authentications.
Password Replacement
You will often use the password replacement function. When you go to a restricted access website (e.g.,
your bank, your web-based email, online auction or payment sites), you are always prompted to enter your
login credentials. OmniPass can detect these prompts and you can teach OmniPass your login credentials.
The next time you go to that website, you can authenticate with your fingerprint to gain access.
Claw T731 UG.book Page 186 Wednesday, May 25, 2011 3:50 PM

187
- Introducing the Fingerprint Sensor Device
OmniPass Authentication Toolbar
After installing OmniPass and restarting, you will notice a dialog you have not seen before at Windows
Logon. This is the OmniPass Authentication Toolbar, and it is displayed whenever the OmniPass
authentication system is invoked. The OmniPass authentication system may be invoked frequently: during
Windows Logon, during OmniPass Logon, when unlocking your workstation, when resuming from sleep
or hibernate, when unlocking a password-enabled screensaver, during password replacement for
remembered site or application logins, and more. When you see this toolbar, OmniPass is prompting you
to authenticate.
The Logon Authentication window indicates what OmniPass-restricted function you are attempting. The
icons in the lower left (fingerprint and key) show what authentication methods are available to you.
Selected authentication methods are highlighted while unselected methods are not. When you click the
icon for an unselected authentication method, the authentication prompt associated with that method is
displayed.
When prompted to authenticate, you must supply the appropriate credentials: an enrolled finger for the
fingerprint capture window or your master password for the master password prompt (the key icon).
Remembering a Password
OmniPass can remember any application, GUI, or password protected resource that has a password
prompt.
Using the following procedure, you can store a set of credentials into OmniPass. These credentials will
then be linked to your “master password” or fingerprint.
Go to a site that requires a login (username and password), but do not log in yet. At the site login prompt,
enter your username and password in the prompted fields, but do not enter the site (do not hit [Enter],
[Submit], [OK], or Login). Right-click the OmniPass system tray icon and select Remember Password
from the submenu. The Windows arrow cursor will change to a golden key OmniPass cursor. Click the
OmniPass cursor in the login prompt area, but don’t click [Login] or [Submit].
Claw T731 UG.book Page 187 Wednesday, May 25, 2011 3:50 PM

188
- Introducing the Fingerprint Sensor Device
Associating a Friendly Name
After clicking the OmniPass key cursor near the login prompt, OmniPass will prompt you to enter a
“friendly name” for this site. You should enter something that reminds you of the website, the company,
or the service you are logging into. In its secure database, OmniPass associates this friendly name with
this website.
Additional Settings for Remembering a Site
When OmniPass prompts you to enter a “friendly name” you also have the opportunity to set how
OmniPass authenticates you to this site. There are three effective settings for how OmniPass handles a
remembered site.
The default setting is Automatically click the “OK” or “Submit” button for this password protected
site once the user is authenticated. With this setting, each time you navigate to this site OmniPass will
prompt you for your master password or fingerprint authentication device. Once you have authenticated
with OmniPass, you will automatically be logged into the site.
Less secure is the option to Automatically enter this password protected site when it is activated. Do
not prompt for authentication. Check the upper box to get this setting, and each time you navigate to
this site OmniPass will log you into the site without prompting you to authenticate.
If you uncheck both boxes in Settings for this Password Site, OmniPass will prompt you for your master
password or fingerprint authentication device. Once you have authenticated with OmniPass your
credentials will be filled in to the site login prompt, but you will have to click the website [OK], [Submit],
or [Login] button to gain access to the site.
THIS SETTING IS MORE CONVENIENT IN THAT WHENEVER YOU GO TO A SITE REMEMBERED WITH THIS
SETTING, YOU WILL BYPASS ANY AUTHENTICATION PROCEDURE AND GAIN INSTANT ACCESS TO THE
SITE. BUT SHOULD YOU LEAVE YOUR SYSTEM UNATTENDED WITH YOUR OMNIPASS USER LOGGED IN,
ANYONE USING YOUR SYSTEM CAN BROWSE TO YOUR PASSWORD PROTECTED SITES AND GAIN
AUTOMATIC ACCESS.
Claw T731 UG.book Page 188 Wednesday, May 25, 2011 3:50 PM

189
- Introducing the Fingerprint Sensor Device
Click Finish to complete the remember password procedure. The site location, the credentials to access
the site, and the OmniPass authentication settings for the site are now stored in the OmniPass secure
database. The OmniPass authentication settings (Settings for this Password Site) can always be changed
in Vault Management.
Logging in to a Remembered Site
Whether or not OmniPass prompts you to authenticate when you return to a remembered site is determined
by Settings for this Password Site and can be changed in Vault Management.
The following cases are applicable to using OmniPass to login to: Windows, remembered web sites, and
all other password protected resources.
With Master Password
Once you return to a site you have remembered with OmniPass, you may be presented with a master
password prompt. Enter your master password and you will be allowed into the site.
Logging into Windows with a Fingerprint Device
When logging into Windows with a fingerprint device, the fingerprint capture window will now appear
next to the Windows Login screen. Place your enrolled fingertip on the sensor to authenticate. You will
be simultaneously logged into Windows and OmniPass. The capture window will also appear if you have
used Ctrl-Alt-Del to lock a system, and the fingerprint device can be used to log back in as stated above.
IF A MACHINE IS LOCKED AND OMNIPASS DETECTS A DIFFERENT USER LOGGING BACK IN WITH A
FINGERPRINT, THE FIRST USER WILL BE LOGGED OUT AND THE SECOND USER LOGGED IN.
Claw T731 UG.book Page 189 Wednesday, May 25, 2011 3:50 PM

190
- Introducing the Fingerprint Sensor Device
Password Management
OmniPass provides an interface that lets you manage your passwords. To access this GUI, double-click
the OmniPass key in the system tray. Click Vault Management; you will be prompted to authenticate.
Once you gain access to Vault Management, click Manage Passwords under Vault Settings. You will
see the Manage Passwords interface, with a list of friendly names.
You can view the credentials stored for any remembered website by highlighting the desired resource
under Password Protected Dialog and clicking Unmask Values. Should a password be reset, or an
account expire, you can remove stored credentials from OmniPass. Highlight the desired resource under
Password Protected Dialog and click Delete Page. You will be prompted to confirm the password
deletion.
The two check boxes in Manage Passwords govern whether OmniPass prompts you to authenticate or
directly logs you into the remembered site.
OmniPass will overwrite an old set of credentials for a website if you attempt to use Remember
Password on an already remembered site.
The exception to the above rule is when resetting the Windows password. If your password is reset in
Windows, the next time you login to Windows, OmniPass will detect the password change and prompt
you to “Update” or “Reconfirm” the password with OmniPass. Enter your new Windows password in the
prompt and click OK. Your OmniPass "master password" will still be your Windows password.
OmniPass User Identities
Identities allow OmniPass users to have multiple accounts to the same site (e.g., bob@biblomail.com and
boballen@biblomail.com). If OmniPass did not provide you identities, you would be limited to
remembering one account per site.
To create and manage identities, double-click the OmniPass key in the system tray. Click Vault
Management; OmniPass will prompt you to authenticate. Once you gain access to Vault Management,
click Manage Identities under Vault Settings. You can only manage the identities of the currently logged
in OmniPass user
Claw T731 UG.book Page 190 Wednesday, May 25, 2011 3:50 PM

191
- Introducing the Fingerprint Sensor Device
To add a new identity, click New Identity or double-click Click here to add a new identity. Name the
new identity and click [OK], then click [Apply]. You can now switch to the new identity and start
remembering passwords.
To delete an identity, highlight the identity you want to delete and click [Delete Identity], then [Apply].
To set the default identity, highlight the identity you want as default and click [Set as Default]; click
[Apply] to ensure the settings are saved. If you log in to OmniPass with a fingerprint device, you will
automatically be logged in to the default identity for that OmniPass user. You can choose the identity with
which you are logging in if you login using "master password".
Choosing User Identity during Login
To choose your identity during login, type your username in the User Name: field. Press [Tab] and see
that the Domain: field self-populates. Click the Password: field to bring the cursor to it, and you will see
the pull-down menu in the Identity: field. Select the identity to login as, then click OK.
Switch User Identity
To switch identities at any time, right-click the OmniPass system tray icon and click Switch User Identity
from the submenu. The Switch Identity dialog will appear. Select the desired identity and then click OK.
Identities and Password Management
On the Manage Passwords interface of the Vault Management tab of the OmniPass Control Center,
there is a pull-down selection box labeled, Identity. This field lets you choose which identity you are
managing passwords for. When you select an identity here, only those password protected dialogs that are
associated with that identity are shown. You can perform all the functions explained in “Password
Management” on page 190.
WHEN YOU DELETE AN IDENTITY, ALL OF ITS ASSOCIATED REMEMBERED SITES AND PASSWORD
PROTECTED DIALOGS ARE LOST.
Claw T731 UG.book Page 191 Wednesday, May 25, 2011 3:50 PM

192
- Introducing the Fingerprint Sensor Device
Configuring OmniPass
This section gives an overview of both the Export/Import function and the OmniPass Control Center.
Exporting and Importing Users
Using OmniPass Control Center, you can export and import users in and out of OmniPass. The export
process backs up all remembered sites, credentials, and enrolled fingerprints for an OmniPass user. All
OmniPass data for a user is backed up to a single encrypted database file. During the import process, the
Windows login of the exported user is required. If the proper credentials cannot be supplied, the user
profile will not be imported.
Exporting an OmniPass User Profile
To export a user, open the OmniPass Control Center, and click Import/Export User under Manage
Users.
Click Exports an OmniPass user profile. OmniPass will prompt you to authenticate. Upon successfully
authentication, you must name the OmniPass user profile and decide where to save it. An .opi file is
generated, and you should store a copy of it in a safe place.
YOU CANNOT IMPORT A USER INTO OMNIPASS IF THERE ALREADY IS A USER WITH THE SAME NAME
ENROLLED IN OMNIPASS.
•YOU SHOULD PERIODICALLY EXPORT YOUR USER PROFILE AND STORE IT IN A SAFE PLACE. IF
ANYTHING HAPPENS TO YOUR SYSTEM, YOU CAN IMPORT YOUR OMNIPASS PROFILE TO A NEW
SYSTEM AND HAVE ALL YOUR REMEMBERED SETTINGS AND FINGERPRINTS INSTANTLY.
•YOU DON'T FORGET THE WINDOWS LOGIN CREDENTIALS WHEN EXPORTING. WHEN YOU EXAMINE
THE IMPORTATION, YOU ARE PROMPTED FOR AUTHENTICATION. THE CREDENTIALS THAT WILL
ALLOW A USER PROFILE TO BE IMPORTED ARE THE WINDOWS LOGIN CREDENTIALS OF THE
EXPORTED USER. THEY ARE THE CREDENTIALS THAT HAD TO BE SUBMITTED WHEN THE USER
PROFILE WAS EXPORTED. YOU WILL NEED USER NAME, PASSWORD, AND DOMAIN.
Claw T731 UG.book Page 192 Wednesday, May 25, 2011 3:50 PM

193
- Introducing the Fingerprint Sensor Device
This .opi file contains all your user specific OmniPass data, and it is both encrypted and password
protected. This user profile does NOT contain any of your encrypted data files.
Importing an OmniPass User Profile
To import an OmniPass user open the OmniPass Control Center, and click Import/Export User under
Manage Users. Click Imports a new user into OmniPass and then select OmniPass Import/Export File
(*.opi) and click Next. OmniPass will then prompt you to browse for the file you had previously exported
(.opi file). When you select the .opi file for importation, OmniPass will prompt you for authentication.
The credentials that will allow a user profile to be imported are the Windows login credentials of the
exported user. They are the credentials that had to be submitted when the user profile was exported. You
will need User Name, Password, and Domain. If you don’t remember the value for Domain, in a PC or
SOHO environment Domain should be your computer name.
OmniPass will notify you if the user was successfully imported.
Things to Know Regarding Import/Export
•Assume you export a local Windows User profile from OmniPass. You want to import that profile
to another machine that has OmniPass. Before you can import the profile, a Windows user with the
same login credentials must be created on the machine importing the profile.
Example: I have a Windows user with the username “Tom” and the password “Sunshine” on my
system. I have enrolled Tom into OmniPass and remembered passwords. I want to take all my
passwords to new system. I export Tom’s OmniPass user profile. I go to my new system and using
the Control Panel I create a user with the username "Tom" and the password "Sunshine". I can now
successfully import the OmniPass user data to the new system.
•If you export an OmniPass-only user, you can import that user to any computer running OmniPass,
provided that a user with that name is not already enrolled in OmniPass.
•If you attempt to import a user profile who has the same name as a user already enrolled in
OmniPass, the OmniPass import function will fail.
Claw T731 UG.book Page 193 Wednesday, May 25, 2011 3:50 PM

194
- Introducing the Fingerprint Sensor Device
OmniPass Control Center
This section will serve to explain functions within the OmniPass Control Center that weren’t explained
earlier.
You can access the OmniPass Control Center any of three ways:
•Double-click the golden OmniPass key shaped icon in the Windows taskbar (typically in the lower-
right corner of the desktop)
•Click the Start button; select the Programs group; select the Softex program group; and click the
OmniPass Control Center selection.
•Open the Windows Control Panel (accessible via Start button --> Settings --> Control Panel) and
double-click the Softex OmniPass icon.
User Management
The User Management tab has two major interfaces: Add/Remove User and Import/Export User.
Import/Export User functionality is documented in “Exporting and Importing Users” on page 192.
Add/Remove User functionality is straightforward.
If you click Adds a new user to OmniPass you will start the OmniPass Enrollment Wizard. The
Enrollment Wizard is documented in “User Enrollment” on page 184.
If you click Removes a user from OmniPass, OmniPass will prompt you to authenticate. Authenticate
with the credentials (or enrolled fingerprint) of the user you wish to remove. OmniPass will prompt you
to confirm user removal. Click OK to complete user removal.
REMOVING A USER WILL AUTOMATICALLY DESTROY ALL OMNIPASS DATA ASSOCIATED WITH THAT USER.
ALL IDENTITIES AND CREDENTIALS ASSOCIATED WITH THE USER WILL BE LOST.
IF YOU’RE SURE YOU WANT TO REMOVE THE USER, WE RECOMMEND YOU EXPORT THE USER PROFILE.
Claw T731 UG.book Page 194 Wednesday, May 25, 2011 3:50 PM

195
- Introducing the Fingerprint Sensor Device
User Settings
The User Settings tab has four interfaces: Audio Settings, Taskbar Tips, and Enrollment. User settings
allow users to customize OmniPass to suit their individual preferences. Under User Settings (Audio
Settings and Taskbar Tips) you can set how OmniPass notifies the user of OmniPass events (e.g.,
successful login, access denied, etc.). The details of each setting under the Audio Settings and Taskbar
Tips interfaces are self-explanatory.
The Enrollment interface allows you to enroll fingerprints. For the procedure to enroll and authentication
device refer to Chapter 2.3. To enroll additional fingerprints, click Enroll Authentication Device, and
authenticate with OmniPass. Select the fingerprint recognition device in the Select Authentication
Device screen (it should already be marked by a green check if you have a finger enrolled) and click Next.
System Settings
The OmniPass Startup Options interface can be found in the System Settings tab. With these options you
can specify how your OmniPass Logon is tied to your Windows Logon.
The first option, Automatically log on to OmniPass as the current user, will do just as it says; during
Windows login, you will be logged on to OmniPass using your Windows login credentials. If the user
logging into Windows was never enrolled into OmniPass, upon login no one will be logged on to
OmniPass. This setting is appropriate for an office setting or any setting where users must enter a
username and password to log into a computer. This is the default setting.
With the second option, Manually log on to OmniPass at startup, OmniPass will prompt you to login
once you have logged on to Windows.
With the third option, Do not log on to OmniPass at startup, OmniPass will not prompt for a user to be
logged on.
You can manually log on to OmniPass by right-clicking the OmniPass taskbar icon and clicking Log in
User from the right-click menu.
Claw T731 UG.book Page 195 Wednesday, May 25, 2011 3:50 PM

196
- Introducing the Fingerprint Sensor Device
Troubleshooting
You cannot use OmniPass to create Windows users. You must first create the Windows user, and you will
need administrative privileges to do that. Once the Windows user is created, you can add that user to
OmniPass using the same username and password
Cannot add Windows users to OmniPass
If you experience difficulties adding a Windows user to OmniPass, you may need to adjust your local
security settings. You can do this by going to Start, Control Panel, Administrative Tools, and Local
Security Settings. Expand Local Policies, expand Security Options, and double-click Network
Access: Sharing and Security Model for Local Accounts. The correct setting should be Classic -
Local Users Authenticate as Themselves.
Cannot add a User with a Blank Password to OmniPass
If you experience difficulties adding a user with a blank password to OmniPass, you may need to adjust
your local security settings. First attempt the procedure explained in the Cannot add Windows user to
OmniPass section. If the difficulties persist, then try the following procedure.
Click Start, Control Panel, Administrative Tools, and Local Security Settings. Expand Local
Policies, expand Security Options, and double-click Accounts: Limit local account use of blank
passwords to console login only. This setting should be set to Disabled.
Dialog appears after OmniPass authentication during Windows Logon
After installing OmniPass on your system, you can choose to logon to Windows using OmniPass. You
authenticate with OmniPass (via master password, or an enrolled security device) and OmniPass logs
you into Windows. You may, during this OmniPass authentication, see a Login Error dialog box.
This dialog box occurs when OmniPass was unable to log you into Windows with the credentials
supplied (username and password). This could happen for any of the following reasons:
•Your Windows password has changed
•Your Windows account has been disabled
Claw T731 UG.book Page 196 Wednesday, May 25, 2011 3:50 PM

197
- Introducing the Fingerprint Sensor Device
If you are having difficulties due to the first reason, you will need to update OmniPass with your
changed Windows account password. Click Update Password and you will be prompted with a dialog
to reconfirm your password.
Enter the new password to your Windows user account and click OK. If the error persists, then it is
unlikely the problem is due to your Windows user account password changing.
Claw T731 UG.book Page 197 Wednesday, May 25, 2011 3:50 PM

198
Index
A
About This Guide 13
AC adapter 69
indicator 31
plug adapters 134
Active Digitizer 47
Air Vents 27, 29
Anti-theft lock slot 26
Anytime USB Charge 17
Auto/Airline Adapter 69, 70
B
Battery 82
care 134
cold-swapping 85
conserving power 77
dead 113
faulty 114
hot-swapping 85
increasing life 135
level indicator 31
lithium ion battery 82
problems 113, 114
recharging 83
replacing 85
shorted 85
Standby mode 84
Battery Latches 29
BIOS 73
Bluetooth178
Boot Sequence 72
Booting the System 74
Built-in Speakers 109
Button Icons 58, 61
C
CapsLock 32
Click Me! 76
Cold-swapping 56
Configuration Label 137
Contact Information 14
Controls and Connectors 17
Conventions Used in the Guide 13
Cursor Keys 40
D
DC in connector 17
DC Output Cable 69
DC Power Jack 69
Device Ports 100
DIMM 91
Display Panel 20, 33
brightness 36
opening 33
problems 115, 116
Dock port 18,100
Double-Clicking 43
Claw T731 UG.book Page 198 Wednesday, May 25, 2011 3:50 PM

199
Dragging 43, 45
Dual Built-in Microphones 22
DVD drive problems 109, 110
E
Error Messages 118
ExpressCard Eject Button 24
ExpressCard Slot 24
ExpressCards 89, 112
External Monitor Port 104
External Video Port 18, 28
F
FDU 76, 128, 146
Fingerprint Sensor Device22, 180
enrolling a fingerprint 185
getting started 181
installing OmniPass 181
logging into a remembered site 189
OmniPass authentication toolbar 187
password replacement 186
remembering a password 187
uninstalling OmniPass 183
user enrollment 184
using OmniPass 186
Fujitsu Contact Information 14
Fujitsu Driver Update utility 76, 128, 146
Function Key
F10 41
F3 41
F4 41
F6 41
F7 41
F8 41, 53
F9 41, 53
FN 41
G
Gigabit LAN (RJ-45) Jack 27
Glossary 148
H
Hard Disk Drive
access indicator 31
problems 110, 111
Hard Disk Drive Passwords 73
Headphone Jack 17, 103
Hibernation Feature 79
I
IEEE 1394 (4-pin) Jack 21, 102
Internal LAN Jack 100
K
Keyboard 21, 39
cursor keys 40
function keys 40
numeric keypad 40
problems 111
windows keys 40
L
LifeBook Security Panel 20, 57
operating 65
passwords 63
setting up 63
uninstalling 66
LifeBook Security/Tablet PC Buttons
Lithium ion Battery Bay 29
Local Area Network (LAN) 18
Claw T731 UG.book Page 199 Wednesday, May 25, 2011 3:50 PM

200
M
Media Player
battery power 99
care 136
Control Panel 98
loading 95
removing 97
Software 95, 97
using 99
Memory
capacity 93
checking capacity 93
compartment 28, 91
installing 91
problems 111
upgrade module 91
Memory Stick
installing 88
removing 88
Memory Stick/Secure Digital Cards 87
Microphone Jack 17, 23, 103
Modular Bay 54
cold-swapping 56
devices 54
installing 55
removing 55
Modular Devices 55
installing 55
removing 55
Mouse
problems 111
N
NumLk 32
O
Optical Drive 94
Modular Multi-Format DVD Writer 94
tray release 97
P
Pen tether 52
Pen tether attachment point 25
Port Replicator
connector 29
problems 110
Post-logon button functions 60
Power
AC adapter 69
Auto/Airline adapter 69
failure 112, 113
indicator 30
management 77
off 80
on 71
problems 114
sources 69
Power Management 77
Power On Self Test 72, 118
Power/Suspend/Resume Switch 20, 77
Pre-Installed Software 144
Adobe Acrobat Reader 145
Google Toolbar 146
manuals 145
Pre-logon button functions 58
Claw T731 UG.book Page 200 Wednesday, May 25, 2011 3:50 PM

201
R
Registration 76
Regulatory Information 164
Restarting 79
Restoring Your Pre-installed Software 119
RJ-45 100
S
ScrLk 32
Scrolling 46
SD Card
installing 88
removing 88
SD/Memory Stick Slot 18
SDRAM 28, 91
Secure Digital Card
removing 88
Security Buttons
Functions 57
Security lock slot 17
Specifications 137
Audio 139
Chipset 138
Device Ports 141
Dimensions and Weight 143
Environmental Requirements 143
Keyboard 142
mass storage device options 139
Memory 138
Microprocessor 138
Power 142
Video 138
Status Indicator Panel 20, 30
Suspend/ Resume button 18
T
Tablet Configuration 34
Touch Screen
calibrating 50
clicking 48
dragging 49
Touchpad
pointing device 22
scroll button 22
Touchpad Control Adjustment 46
Troubleshooting 106
U
USB Ports 17, 26, 27,101, 111
V
Volume control 53
W
Warranty 15
Windows keys 40
Application key 40
Start keys 40
Windows Power Management 79
Wireless LAN
Before Using the Wireless LAN 168
configuring 168
connection to the network 173
deactivating/disconnecting 171
modes 169
Specifications 176
Troubleshooting 174
Wireless LAN On-Off Switch 18
Claw T731 UG.book Page 201 Wednesday, May 25, 2011 3:50 PM
Guide
d’utilisation
Découvrez comment
utiliser votre PC
Tablette LIFEBOOK
Fujitsu T731

Informations sur les droits d’auteurs
et les marques commerciales
La société Fujitsu America, Inc. a fait tous les efforts possibles pour vérifier l’exactitude des informations figurant dans ce document et s’assurer
qu’il n’y manque rien. Cependant, puisque nos produits font continuellement l’objet d’améliorations, nous ne pouvons garantir l’exactitude
de tout le contenu de ce document. Nous réfutons toute responsabilité relative à des erreurs, des omissions ou des modifications futures.
Fujitsu, le logo Fujitsu et LIFEBOOK sont des marques déposées de Fujitsu Limited.
Intel, Intel Core, Centrino et Intel Centrino Pro sont des marques de commerce ou des marques déposées de la société Intel ou des ses filiales
aux États-Unis et dans d’autres pays.
Microsoft et Windows sont des marques de commerce ou des marques déposées de la société Microsoft aux États-Unis et/ou dans d’autres pays.
Bluetooth est une marque de commerce de Bluetooth SIG, Inc., USA.
PowerDirector, MakeDisc, PowerDVD et YouCam sont des marques de commerce de la société CyberLink.
OmniPass est une marque de commerce de Softex, Inc.
Google et Picasa sont des marques de commerce ou des marques déposées de Google Incorporated.
Roxio est une marque de commerce de Sonic Solutions.
Le nom et le logo Energy Star sont des marques déposées aux États-Unis.
Wacom est une marque déposée de la société Wacom Company Limited.
Adobe, Acrobat et Acrobat Reader sont des marques de commerce ou des marques déposées de la société Adobe Systems Incorporated
aux États-Unis et/ou dans d’autres pays.
Norton et Norton Internet Security sont des marques de commerce ou des marques déposées de la société Symantec aux États-Unis
et dans d’autres pays.
Toutes les autres marques de commerce mentionnées dans le présent document sont la propriété de leur détenteur respectif.
© Copyright 2011 Fujitsu America, Inc. Tous droits réservés.
Aucune partie de cette publication ne peut être copiée, reproduite ou traduite sans le consentement préalable de Fujitsu. Aucune partie de cette
publication ne peut être enregistrée ou transmise électroniquement sans le consentement écrit de Fujitsu. B6FJ-7081-02ENZ0-00

AVERTISSEMENT
LA MANIPULATION DU CORDON DE CE PRODUIT VOUS EXPOSE AU PLOMB, UNE SUBSTANCE CHIMIQUE QUI,
SELON L’ÉTAT DE CALIFORNIE, PEUT CAUSER DES ANOMALIES CONGÉNITALES OU D’AUTRES PROBLÈMES
DE REPRODUCTION.
LAVEZ-VOUS LES MAINS APRÈS CHAQUE MANIPULATION.
GUIDE D’UTILISATION POUR LA CONNEXION SANS FIL EN LARGE BANDE
SI UN PÉRIPHÉRIQUE GRAND RÉSEAU SANS FIL (WWAN) OPTIONNEL EST INSTALLÉ SUR VOTRE ORDINATEUR, LE GUIDE
D’UTILISATION DU WWAN EST DISPONIBLE SUR :
HTTP://SOLUTIONS.US.FUJITSU.COM/WWW/CONTENT/SUPPORT/MOBILE/SUPPORT_NOTICES LA VERSION COMPLÈTE DU
GUIDE D’UTILISATION CONTIENT DES AVERTISSEMENTS ET DES MISES EN GARDE SUR LA SÉCURITÉ DES RADIOFRÉQUENCES
LORSQU’ON UTILISE UN DISPOSITIF DE RÉSEAU ÉTENDU SANS FIL, POUR LES CONSULTER, CLIQUEZ SUR « 3G MINI-CARD
GOBI3000 REGULATORY AND SAFETY INFORMATION ».
DÉCLARATION DE CONFORMITÉ
selon la partie 15 des règles de la FCC
Nom de la partie responsable : Fujitsu America, Inc.
Adresse : 1250 E. Arques Avenue,
Sunnyvale, CA 94085
Téléphone : (408) 746-6000
Déclare que le produit : Configuration du modèle de base :
PC Tablette LIFEBOOK T731
est conforme aux règles établies dans la Partie 15 des règles de la FCC.
Cet appareil est conforme aux exigences de la partie 15 des règles de la FCC. L’utilisation est soumise aux deux
conditions suivantes : (1) cet appareil ne doit pas causer d’interférence nuisible ; (2) cet appareil doit accepter toutes
les interférences reçues, y compris celles pouvant causer un mauvais fonctionnement de l’appareil.
CONSIGNES DE SÉCURITÉ IMPORTANTES
Pour fonctionner, cet appareil nécessite un adaptateur secteur. Utilisez uniquement un adaptateur de classe 2 pour équipement informatique,
homologué UL, avec une sortie nominale de 19 V c.c. et un courant de 4,22 A (80 W).
Lorsque vous utilisez votre PC Tablette, vous devez toujours prendre certaines précautions de base pour éviter les risques d'incendie, de choc
électrique et de blessure, notamment :
•ATTENTION - SURFACE CHAUDE : Le dessous de ce PC Tablette peut chauffer lorsque l’appareil est utilisé pendant une longue
période. Lorsque vous utilisez ce PC Tablette et qu'il repose à même la peau (sur les jambes nues), prenez garde à ne pas l’utiliser pendant
trop longtemps ou de manière continue.
•ATTENTION - BATTERIES RECHARGEABLES : Il y a un risque d'explosion si la batterie n'est pas remplacée par une batterie
appropriée. Jetez les batteries usées conformément aux instructions du fabricant.
•N’utilisez pas ce produit à proximité d’un point d’eau (baignoire, lavabo, évier de cuisine, évier de buanderie) ni dans un sous-sol humide
ou à côté d’une piscine.
•Utilisez uniquement le cordon d’alimentation et les piles recommandés dans ce manuel. Ne jetez pas les piles ou les batteries dans un feu.
Elles risquent d’exploser. Vérifiez si la réglementation locale comporte des instructions spéciales d’élimination.
CONSERVEZ CES INSTRUCTIONS
Avis réservé à des réparateurs qualifiés
DANGER D’EXPLOSION SI LA BATTERIE AU LITHIUM (HORLOGE) EST INCORRECTEMENT REMPLACÉE. LA PILE
DOIT ÊTRE REMPLACÉE UNIQUEMENT PAR UNE PILE IDENTIQUE OU D’UN TYPE ÉQUIVALENT RECOMMANDÉ
PAR LE FABRICANT. JETEZ LES BATTERIES USÉES CONFORMÉMENT AUX INSTRUCTIONS DU FABRICANT.
POUR BÉNÉFICIER D’UNE PROTECTION CONTINUE CONTRE LES RISQUES D’INCENDIE, LE FUSIBLE NE
DOIT ÊTRE REMPLACÉ QUE PAR UN AUTRE FUSIBLE DE MÊME TYPE ET DE MÊME CAPACITÉ.
Polarité de sortie de l’adaptateur secteur :
+

Recyclage de la batterie
Avec le temps, l’autonomie des batteries qui alimentent votre ordinateur portable finira par diminuer ; c’est un phénomène naturel pour toutes
les batteries. Lorsque vous remarquerez cela, songez à installer une batterie neuve*. Si vous remplacez votre ancienne batterie, il est important
que vous la jetiez comme il convient car, dans le cas contraire, les matériaux qu’elle contient risquent de nuire à l’environnement.
Chez Fujitsu, nous portons une attention particulière à la protection de l’environnement et nous collaborons donc avec la
Rechargeable Battery Recycle Corporation (RBRC)**, une organisation de service publique à but non lucratif qui
s’engage dans la protection de l’environnement en recyclant les batteries et piles usagées sans aucun frais pour vous.
La RBRC dispose de dizaines de milliers de points de collecte aux États-Unis et au Canada. Pour trouver le lieu de collecte
le plus proche de chez vous, visitez www.RBRC.org ou appelez au 1-800-822-8837.
Si aucun des lieux proposés par la RBRC ne vous convient, vous pouvez en chercher un autre en visitant le site Internet de la Consumer
Education Initiative (Initiative pour l’éducation des consommateurs) de l’EIA (Electronic Industries Alliance) à http://EIAE.org.
Rappelez-vous que la protection de l’environnement est l’affaire de tous, vous devriez donc faire tout votre possible afin d’y contribuer,
pour la génération actuelle et les générations suivantes.
* Pour commander une nouvelle batterie compatible avec votre ordinateur portable Fujitsu, visitez le site www.shopfujitsu.com si
vous résidez aux États-Unis ou www.fujitsu.ca/products/notebooks si vous résidez au Canada.
** La RBRC est une organisation indépendante dont Fujitsu finance une partie des activités de recyclage ; la RBRC n’est en aucune
façon affiliée à Fujitsu.

Table des matières
Préface
À propos de ce guide. . . . . . . . . . . . . . . . . . . . . . . . . . . . . . . . . . . . . . . . . . . 13
Conventions utilisées dans ce guide. . . . . . . . . . . . . . . . . . . . . . . . . . . . . . 13
Coordonnées pour contacter Fujitsu. . . . . . . . . . . . . . . . . . . . . . . . . . . . . . 14
Chapitre 1 Présentation de votre ordinateur LIFEBOOK
Aperçu général . . . . . . . . . . . . . . . . . . . . . . . . . . . . . . . . . . . . . . . . . . . . . . . 16
Emplacement des commandes et des connecteurs . . . . . . . . . . . . . . . . . . . 17
Composants supérieurs. . . . . . . . . . . . . . . . . . . . . . . . . . . . . . . . . . . . . . . . 21
Composants sur le côté gauche de l’ordinateur . . . . . . . . . . . . . . . . . . . . . 24
Composants sur le côté droit de l’ordinateur . . . . . . . . . . . . . . . . . . . . . . . 26
Composants de la face arrière. . . . . . . . . . . . . . . . . . . . . . . . . . . . . . . . . . . 27
Composants sous l’ordinateur . . . . . . . . . . . . . . . . . . . . . . . . . . . . . . . . . . 29
Tableau de voyants d’état . . . . . . . . . . . . . . . . . . . . . . . . . . . . . . . . . . . . . . 31
Voyant d’alimentation . . . . . . . . . . . . . . . . . . . . . . . . . . . . . . . . . . . . . . . . 31
Indicateur de source d’alimentation . . . . . . . . . . . . . . . . . . . . . . . . . . . . . . 32
Voyants de charge en cours . . . . . . . . . . . . . . . . . . . . . . . . . . . . . . . . . . . . 32
Voyant de niveau de charge . . . . . . . . . . . . . . . . . . . . . . . . . . . . . . . . . . . . 33

7
Écran . . . . . . . . . . . . . . . . . . . . . . . . . . . . . . . . . . . . . . . . . . . . . . . . . . . . . . . 35
Ouverture de l’écran . . . . . . . . . . . . . . . . . . . . . . . . . . . . . . . . . . . . . . . . . . 35
Utilisation du système comme une tablette . . . . . . . . . . . . . . . . . . . . . . . . 36
Réglage de la luminosité de l’écran . . . . . . . . . . . . . . . . . . . . . . . . . . . . . . 38
Activation/Désactivation du capteur de lumière ambiante
(Windows 7 seulement) . . . . . . . . . . . . . . . . . . . . . . . . . . . . . . . . . . . . . . . 39
Clavier . . . . . . . . . . . . . . . . . . . . . . . . . . . . . . . . . . . . . . . . . . . . . . . . . . . . . . 41
Utilisation du clavier. . . . . . . . . . . . . . . . . . . . . . . . . . . . . . . . . . . . . . . . . . 41
TouchPad/Numériseur actif/Écran tactile . . . . . . . . . . . . . . . . . . . . . . . . . 45
Utilisation du pavé Touchpad. . . . . . . . . . . . . . . . . . . . . . . . . . . . . . . . . . . 45
Écran numériseur actif . . . . . . . . . . . . . . . . . . . . . . . . . . . . . . . . . . . . . . . . 51
Utilisation de l’écran tactile capacitif optionnel. . . . . . . . . . . . . . . . . . . . . 55
Installation du cordon . . . . . . . . . . . . . . . . . . . . . . . . . . . . . . . . . . . . . . . . . 56
Réglage du volume . . . . . . . . . . . . . . . . . . . . . . . . . . . . . . . . . . . . . . . . . . . . 57
Réglage du volume . . . . . . . . . . . . . . . . . . . . . . . . . . . . . . . . . . . . . . . . . . . 57
Périphériques de baie modulaire . . . . . . . . . . . . . . . . . . . . . . . . . . . . . . . . . 58
Retirer et installer des périphériques modulaires . . . . . . . . . . . . . . . . . . . . 59
Boutons Sécurité/PC Tablette du LIFEBOOK . . . . . . . . . . . . . . . . . . . . . 61
Fonctions des boutons Sécurité . . . . . . . . . . . . . . . . . . . . . . . . . . . . . . . . . 61
Fonctions des boutons de pré-identification. . . . . . . . . . . . . . . . . . . . . . . . 62
Fonctions des boutons de post-identification . . . . . . . . . . . . . . . . . . . . . . . 64
Modification des fonctions des boutons PC Tablette . . . . . . . . . . . . . . . . . 67
Configuration du tableau de sécurité LIFEBOOK . . . . . . . . . . . . . . . . . . . 67
Mots de passe . . . . . . . . . . . . . . . . . . . . . . . . . . . . . . . . . . . . . . . . . . . . . . . 68
Utilisation de votre tableau de sécurité LIFEBOOK . . . . . . . . . . . . . . . . . 69
Mises en garde . . . . . . . . . . . . . . . . . . . . . . . . . . . . . . . . . . . . . . . . . . . . . . 71
Désinstallation/réinstallation de l’application de sécurité . . . . . . . . . . . . . 71

8
Chapitre 2 Première mise en marche de votre ordinateur portable LIFEBOOK
Sources d’alimentation . . . . . . . . . . . . . . . . . . . . . . . . . . . . . . . . . . . . . . . . . 74
Connexion des adaptateurs d’alimentation. . . . . . . . . . . . . . . . . . . . . . . . . 74
Démarrage de votre PC Tablette LIFEBOOK. . . . . . . . . . . . . . . . . . . . . . 76
Mise sous tension . . . . . . . . . . . . . . . . . . . . . . . . . . . . . . . . . . . . . . . . . . . . 76
Procédure d’amorçage . . . . . . . . . . . . . . . . . . . . . . . . . . . . . . . . . . . . . . . . 77
Mots de passe d’accès au disque dur . . . . . . . . . . . . . . . . . . . . . . . . . . . . . 78
Utilitaire de configuration du BIOS . . . . . . . . . . . . . . . . . . . . . . . . . . . . . . 78
Démarrage du système . . . . . . . . . . . . . . . . . . . . . . . . . . . . . . . . . . . . . . . . 80
Premier démarrage de Windows. . . . . . . . . . . . . . . . . . . . . . . . . . . . . . . . . 80
Enregistrement de votre PC Tablette LIFEBOOK chez Fujitsu. . . . . . . . . 81
Installation de ClickMe! . . . . . . . . . . . . . . . . . . . . . . . . . . . . . . . . . . . . . . . 82
Utilitaire de mise à jour des pilotes Fujitsu Driver Update . . . . . . . . . . . . 82
Gestion de l’alimentation . . . . . . . . . . . . . . . . . . . . . . . . . . . . . . . . . . . . . . . 83
Commutateur d’alimentation/veille/reprise . . . . . . . . . . . . . . . . . . . . . . . . 83
Mode sommeil . . . . . . . . . . . . . . . . . . . . . . . . . . . . . . . . . . . . . . . . . . . . . . 83
Mode veille prolongée (enregistrement sur le disque) . . . . . . . . . . . . . . . . 85
Gestion de l’alimentation dans Windows. . . . . . . . . . . . . . . . . . . . . . . . . . 85
Redémarrage du système . . . . . . . . . . . . . . . . . . . . . . . . . . . . . . . . . . . . . . 85
Mise hors tension . . . . . . . . . . . . . . . . . . . . . . . . . . . . . . . . . . . . . . . . . . . . 86
Conformité ENERGY STAR® . . . . . . . . . . . . . . . . . . . . . . . . . . . . . . . . . 86
Chapitre 3 Options installables par l’utilisateur
Batterie au lithium . . . . . . . . . . . . . . . . . . . . . . . . . . . . . . . . . . . . . . . . . . . . 88
Procédure de recharge des batteries . . . . . . . . . . . . . . . . . . . . . . . . . . . . . . 89
Remplacement de la batterie. . . . . . . . . . . . . . . . . . . . . . . . . . . . . . . . . . . . 91

9
Cartes mémoire Memory Stick/SD . . . . . . . . . . . . . . . . . . . . . . . . . . . . . . . 93
Installation d’une carte Memory Stick ou SD . . . . . . . . . . . . . . . . . . . . . . 94
Retrait d’une carte Memory Stick/SD . . . . . . . . . . . . . . . . . . . . . . . . . . . . 94
Cartes ExpressCard . . . . . . . . . . . . . . . . . . . . . . . . . . . . . . . . . . . . . . . . . . . 95
Installation d’une carte ExpressCard . . . . . . . . . . . . . . . . . . . . . . . . . . . . . 96
Retrait d’une carte ExpressCard . . . . . . . . . . . . . . . . . . . . . . . . . . . . . . . . . 97
Module de mémoire additionnelle . . . . . . . . . . . . . . . . . . . . . . . . . . . . . . . . 98
Installation des modules de mémoire additionnelle . . . . . . . . . . . . . . . . . . 98
Retrait d’un module de mémoire additionnelle . . . . . . . . . . . . . . . . . . . . . 100
Vérification de la capacité de mémoire . . . . . . . . . . . . . . . . . . . . . . . . . . . 100
Lecteur optique . . . . . . . . . . . . . . . . . . . . . . . . . . . . . . . . . . . . . . . . . . . . . . . 101
Logiciels du lecteur multimédia . . . . . . . . . . . . . . . . . . . . . . . . . . . . . . . . . 101
Installation d’un disque dans votre lecteur . . . . . . . . . . . . . . . . . . . . . . . . . 102
Retrait d’un disque . . . . . . . . . . . . . . . . . . . . . . . . . . . . . . . . . . . . . . . . . . . 103
Ouverture d’urgence du plateau de chargement du lecteur optique . . . . . . 104
Utilisation des logiciels du lecteur multimédia . . . . . . . . . . . . . . . . . . . . . 104
Utilisation du lecteur multimédia avec alimentation par batterie. . . . . . . . 106
Ports de périphériques . . . . . . . . . . . . . . . . . . . . . . . . . . . . . . . . . . . . . . . . . 107
Prise de réseau local (RJ-45) interne . . . . . . . . . . . . . . . . . . . . . . . . . . . . . 107
Connecteur pour duplicateur de ports. . . . . . . . . . . . . . . . . . . . . . . . . . . . . 107
Ports USB . . . . . . . . . . . . . . . . . . . . . . . . . . . . . . . . . . . . . . . . . . . . . . . . . . 108
Port IEEE 1394. . . . . . . . . . . . . . . . . . . . . . . . . . . . . . . . . . . . . . . . . . . . . . 109
Prise d’écouteurs. . . . . . . . . . . . . . . . . . . . . . . . . . . . . . . . . . . . . . . . . . . . . 109
Prise de micro . . . . . . . . . . . . . . . . . . . . . . . . . . . . . . . . . . . . . . . . . . . . . . . 110
Port HDMI . . . . . . . . . . . . . . . . . . . . . . . . . . . . . . . . . . . . . . . . . . . . . . . . . 110
Port vidéo externe. . . . . . . . . . . . . . . . . . . . . . . . . . . . . . . . . . . . . . . . . . . . 111

10
Chapitre 4 Dépannage de votre LIFEBOOK
Dépannage . . . . . . . . . . . . . . . . . . . . . . . . . . . . . . . . . . . . . . . . . . . . . . . . . . . 113
Identification du problème . . . . . . . . . . . . . . . . . . . . . . . . . . . . . . . . . . . . . 113
Problèmes spécifiques . . . . . . . . . . . . . . . . . . . . . . . . . . . . . . . . . . . . . . . . 115
Messages de l’auto-diagnostic de mise sous tension . . . . . . . . . . . . . . . . . 128
Restaurer vos logiciels pré-installés. . . . . . . . . . . . . . . . . . . . . . . . . . . . . . . 133
Enregistrement de votre image d’origine . . . . . . . . . . . . . . . . . . . . . . . . . . 133
Création d’images de sauvegarde de l’image d’origine, du disque
PRA et d’autres disques . . . . . . . . . . . . . . . . . . . . . . . . . . . . . . . . . . . . . . . 134
Restauration de votre image d’origine . . . . . . . . . . . . . . . . . . . . . . . . . . . . 135
Création d’une image de système . . . . . . . . . . . . . . . . . . . . . . . . . . . . . . . 135
Gestion de vos images de sauvegarde . . . . . . . . . . . . . . . . . . . . . . . . . . . . 137
Utilisation des outiles Restauration et Utilitaires . . . . . . . . . . . . . . . . . . . . 137
Récupération de l’image d’origine avec Restauration et utilitaires . . . . . . 140
Téléchargement automatique des mises à jour de pilotes. . . . . . . . . . . . . . 141
Chapitre 5 Entretien
Entretien de votre PC Tablette LIFEBOOK . . . . . . . . . . . . . . . . . . . . . . . 144
Nettoyage de votre PC Tablette LIFEBOOK . . . . . . . . . . . . . . . . . . . . . . . 146
Nettoyage du filtre anti-poussière. . . . . . . . . . . . . . . . . . . . . . . . . . . . . . . . 147
Entreposage de votre PC Tablette LIFEBOOK . . . . . . . . . . . . . . . . . . . . . 148
Voyager avec votre PC Tablette LIFEBOOK . . . . . . . . . . . . . . . . . . . . . . 148
Batteries . . . . . . . . . . . . . . . . . . . . . . . . . . . . . . . . . . . . . . . . . . . . . . . . . . . 149
Entretien de votre lecteur multimédia. . . . . . . . . . . . . . . . . . . . . . . . . . . . . 150
Cartes ExpressCard. . . . . . . . . . . . . . . . . . . . . . . . . . . . . . . . . . . . . . . . . . . 152

11
Chapitre 6 Spécifications techniques
Spécifications techniques du système . . . . . . . . . . . . . . . . . . . . . . . . . . . . . 153
Étiquette de configuration. . . . . . . . . . . . . . . . . . . . . . . . . . . . . . . . . . . . . . 153
Microprocesseur . . . . . . . . . . . . . . . . . . . . . . . . . . . . . . . . . . . . . . . . . . . . . 154
Puce. . . . . . . . . . . . . . . . . . . . . . . . . . . . . . . . . . . . . . . . . . . . . . . . . . . . . . . 154
Mémoire . . . . . . . . . . . . . . . . . . . . . . . . . . . . . . . . . . . . . . . . . . . . . . . . . . . 154
Vidéo. . . . . . . . . . . . . . . . . . . . . . . . . . . . . . . . . . . . . . . . . . . . . . . . . . . . . . 154
Numériseur . . . . . . . . . . . . . . . . . . . . . . . . . . . . . . . . . . . . . . . . . . . . . . . . . 155
Audio . . . . . . . . . . . . . . . . . . . . . . . . . . . . . . . . . . . . . . . . . . . . . . . . . . . . . 155
Options de mémoire de masse . . . . . . . . . . . . . . . . . . . . . . . . . . . . . . . . . . 155
Périphériques de baie modulaire. . . . . . . . . . . . . . . . . . . . . . . . . . . . . . . . . 155
Caractéristiques techniques . . . . . . . . . . . . . . . . . . . . . . . . . . . . . . . . . . . . 156
Ports de périphériques. . . . . . . . . . . . . . . . . . . . . . . . . . . . . . . . . . . . . . . . . 157
Clavier. . . . . . . . . . . . . . . . . . . . . . . . . . . . . . . . . . . . . . . . . . . . . . . . . . . . . 157
Alimentation . . . . . . . . . . . . . . . . . . . . . . . . . . . . . . . . . . . . . . . . . . . . . . . . 158
Dimensions et poids . . . . . . . . . . . . . . . . . . . . . . . . . . . . . . . . . . . . . . . . . . 158
Environnement d’exploitation . . . . . . . . . . . . . . . . . . . . . . . . . . . . . . . . . . 159
Accessoires préférés des utilisateurs . . . . . . . . . . . . . . . . . . . . . . . . . . . . . 159
Logiciels pré-installés. . . . . . . . . . . . . . . . . . . . . . . . . . . . . . . . . . . . . . . . . 159
Apprendre à utiliser vos logiciels . . . . . . . . . . . . . . . . . . . . . . . . . . . . . . . . 160

12
Glossaire/Réglementation
Glossaire. . . . . . . . . . . . . . . . . . . . . . . . . . . . . . . . . . . . . . . . . . . . . . . . . . . . . 164
Renseignements sur la réglementation . . . . . . . . . . . . . . . . . . . . . . . . . . . . 178
Annexe A : Guide d’utilisation de la carte de réseau local sans fil
Avant d’utiliser la carte réseau sans fil en option . . . . . . . . . . . . . . . . . . . 182
Cartes réseau sans fil présentées dans ce document . . . . . . . . . . . . . . . . . . 182
Caractéristiques de la carte réseau sans fil . . . . . . . . . . . . . . . . . . . . . . . . . 182
Modes de réseau sans fil compatibles avec cette carte. . . . . . . . . . . . . . . . 183
Désactivation/déconnexion de la carte réseau sans fil . . . . . . . . . . . . . . . . 185
Désactivation avec le commutateur de la carte réseau sans fil. . . . . . . . . . 186
Désactivation par l’icône dans la zone de notification . . . . . . . . . . . . . . . . 186
Activation de la carte réseau sans fil . . . . . . . . . . . . . . . . . . . . . . . . . . . . . 186
Configuration de la carte réseau sans fil. . . . . . . . . . . . . . . . . . . . . . . . . . . 187
Configuration de la carte réseau sans fil. . . . . . . . . . . . . . . . . . . . . . . . . . . 187
Connexion au réseau. . . . . . . . . . . . . . . . . . . . . . . . . . . . . . . . . . . . . . . . . . 187
Dépannage de la carte réseau sans fil . . . . . . . . . . . . . . . . . . . . . . . . . . . . . 188
Dépannage . . . . . . . . . . . . . . . . . . . . . . . . . . . . . . . . . . . . . . . . . . . . . . . . . 188
Spécifications de la carte réseau sans fil . . . . . . . . . . . . . . . . . . . . . . . . . . . 190
Spécifications . . . . . . . . . . . . . . . . . . . . . . . . . . . . . . . . . . . . . . . . . . . . . . . 190
Utilisation de Bluetooth . . . . . . . . . . . . . . . . . . . . . . . . . . . . . . . . . . . . . . . . 192
Présentation de Bluetooth. . . . . . . . . . . . . . . . . . . . . . . . . . . . . . . . . . . . . . 192
Sources d’informations supplémentaires sur Bluetooth . . . . . . . . . . . . . . . 192

13
Annexe B : Capteur d’empreintes digitales
Présentation du capteur d’empreintes digitales. . . . . . . . . . . . . . . . . . . . . 194
Première mise en marche . . . . . . . . . . . . . . . . . . . . . . . . . . . . . . . . . . . . . . 195
Installation d’OmniPass . . . . . . . . . . . . . . . . . . . . . . . . . . . . . . . . . . . . . . . 195
Enregistrement des utilisateurs. . . . . . . . . . . . . . . . . . . . . . . . . . . . . . . . . . 198
Utilisation d’OmniPass. . . . . . . . . . . . . . . . . . . . . . . . . . . . . . . . . . . . . . . . 201
Configuration d’OmniPass . . . . . . . . . . . . . . . . . . . . . . . . . . . . . . . . . . . . . 206
Centre de contrôle OmniPass . . . . . . . . . . . . . . . . . . . . . . . . . . . . . . . . . . . 209
Dépannage . . . . . . . . . . . . . . . . . . . . . . . . . . . . . . . . . . . . . . . . . . . . . . . . . 211
Index. . . . . . . . . . . . . . . . . . . . . . . . . . . . . . . . . . . . . . . . . . . . . . . . . . . . . . . . 213

13
- À propos de ce guide
Préface
À propos de ce guide
Le PC Tablette LIFEBOOK Série T731 de la société Fujitsu America est un ordinateur compact,
mais puissant. Il peut être utilisé en configuration d’ordinateur portable classique, avec un clavier,
ou en configuration tablette, avec un stylet. Son fonctionnement est assuré par un nouveau processeur
Intel® Core™ de deuxième génération et son écran intégré en couleurs est doté d'un numériseur actif
ou d’un numériseur double disponible en option, vous permettant d’avoir la puissance d’un ordinateur
de bureau dans un système portatif et polyvalent.
Ce manuel présente le mode d’emploi du PC Tablette LIFEBOOK T731 et de ses logiciels intégrés.
Conventions utilisées dans ce guide
Les touches du clavier et à l’écran apparaissent entre crochets. Exemple : [Fn], [F1], [Échap],
[Entrée] et [Ctrl].
Le texte contient plusieurs renvois vers des pages contenant des informations supplémentaires sur un
sujet quelconque. (« Voir Procédure d’installation en page 43 »). Remarque : tous les renvois sont reliés
aux éléments concernés, il vous suffit donc de cliquer sur le lien et vous serez automatiquement redirigé(e)
vers l’élément ou la page en question.
Les éléments des menus à l’écran sont indiqués en caractères gras. Exemple : « Cliquez sur Menu Fujitsu,
puis faites votre sélection. »

14
- À propos de ce guide
Coordonnées pour contacter Fujitsu
Service et assistance
Plusieurs façons s’offrent à vous pour contacter l’équipe de service et assistance de Fujitsu :
•Appel sans frais : 1-800-8Fujitsu (1-800-838-5487)
•Site Internet : http://www.computers.us.fujitsu.com/support
Avant de nous contacter, veuillez avoir les informations suivantes à portée de main pour que notre
préposé du service à la clientèle puisse vous venir en aide le plus rapidement possible :
•Nom du produit
•Numéro de configuration du produit
•Numéro de série du produit
•Date d’achat
L’ICÔNE D’INFORMATIONS MET EN ÉVIDENCE DES RENSEIGNEMENTS QUI VOUS AIDERONT À MIEUX
COMPRENDRE LE SUJET TRAITÉ.
L’ICÔNE DE MISE EN GARDE MET EN ÉVIDENCE DES INFORMATIONS IMPORTANTES POUR L’UTILISATION
SÉCURITAIRE DE VOTRE ORDINATEUR OU POUR L’INTÉGRITÉ DE VOS FICHIERS. VEUILLEZ LIRE
ATTENTIVEMENT TOUTES LES MISES EN GARDE.
L’ICÔNE D’AVERTISSEMENT MET EN ÉVIDENCE DES INFORMATIONS SUR DES DANGERS POUR VOUS,
VOTRE PC TABLETTE LIFEBOOK OU VOS FICHIERS. VEUILLEZ LIRE ATTENTIVEMENT TOUS LES
AVERTISSEMENTS.

15
- À propos de ce guide
•Conditions dans lesquelles le problème est survenu
•Texte des messages d’erreur reçus
•Types de périphériques connectés, si applicable
Site de vente par internet de Fujitsu
Vous pouvez vous rendre sur ce site directement à : www.shopfujitsu.com.
Garantie limitée
Votre PC Tablette LIFEBOOK T731 est accompagné d’une garantie limitée internationale de Fujitsu.
Pour connaître les conditions générales et la durée de votre garantie limitée, consultez la pochette de
service livrée avec votre ordinateur.
POUR UTILISER LES HYPERLIENS, VOUS DEVEZ AVOIR UNE CONNEXION INTERNET ACTIVE.
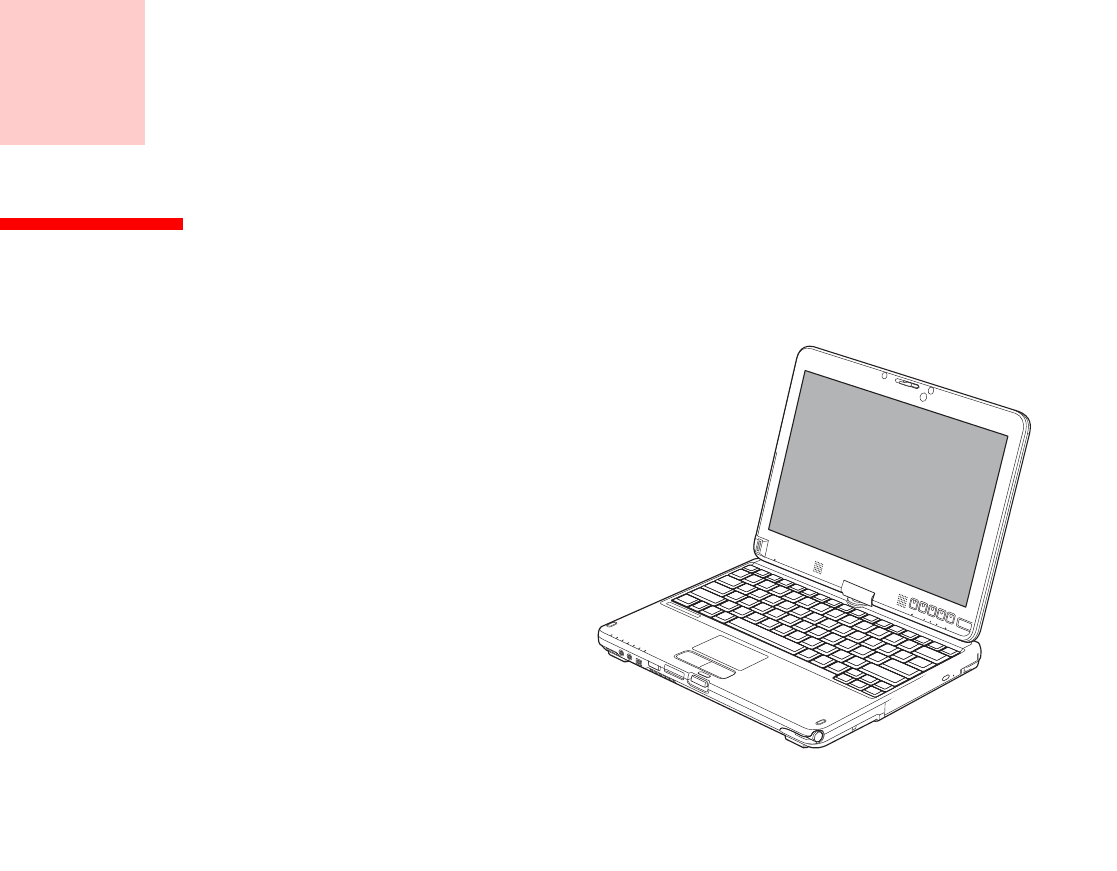
16
- Aperçu général
Chapitre 1
Présentation de votre ordinateur LIFEBOOK
Cette section décrit les composants
de votre PC Tablette Fujitsu
LIFEBOOK T731. Nous vous
suggérons fortement de la lire
avant de commencer à utiliser
votre PC Tablette, même si vous
avez déjà utilisé des ordinateurs
de ce type.
Aperçu général
Figure 1. PC Tablette LIFEBOOK T731
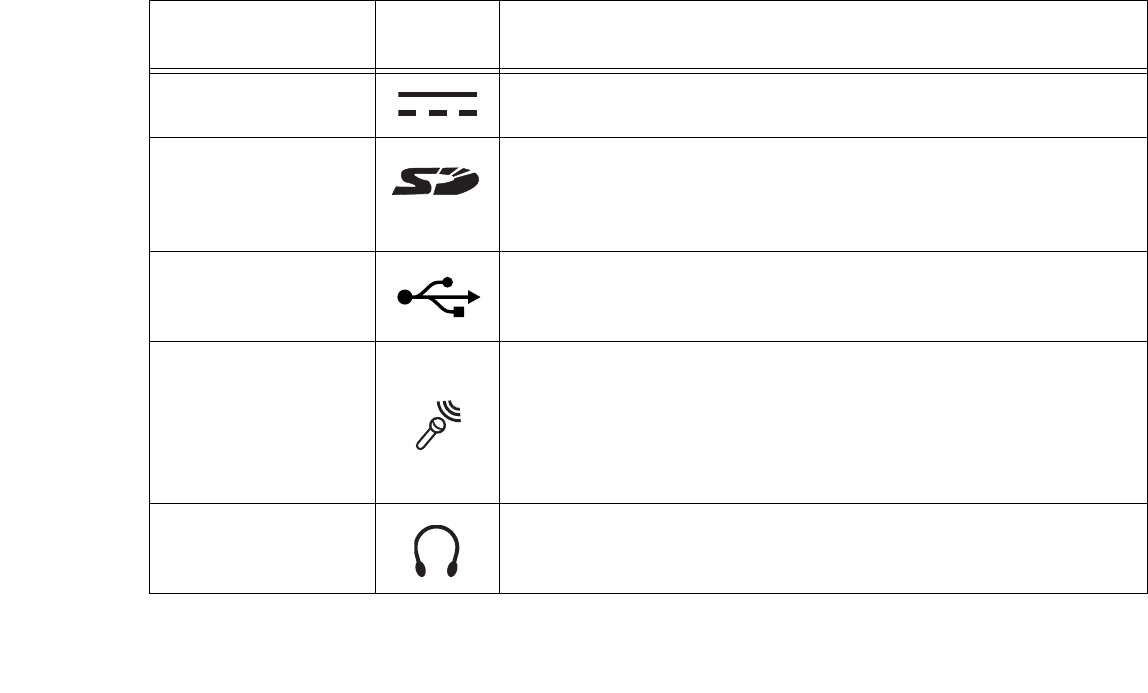
17
- Emplacement des commandes et des connecteurs
Emplacement des commandes et des connecteurs
Les interfaces de connecteurs et de périphériques sur le PC Tablette LIFEBOOK T731 et sur le duplicateur
de ports optionnel vous permettent de connecter divers périphériques. Les emplacements spécifiques sont
illustrés dans les figures 2 à 6. Le tableau ci-dessous fournit une brève description de chacune des icônes
figurant sur l’ordinateur et/ou le duplicateur de ports en option. Chacune des icônes est soit moulée, soit
imprimée sur le châssis du système.
Connexion Icône PC
Tablette Objectif
Connecteur entrée c. c. Connecter une source d’alimentation externe telle qu’un adaptateur
secteur ou un adaptateur auto/avion.
Fente pour carte
Memory Stick/SD La fente de carte Secure Digital (SD)/Memory Stick permet d’insérer une
carte mémoire pour la conservation des données. Cette carte mémoire
vous permet de transférer des données à partir de et vers une variété de
périphériques numériques.
Ports USB 2.0 Connecter des périphériques compatibles USB 2.0 et 1.1 aux ports USB
2.0. Pour connaître l’emplacement des ports, consultez les illustrations
sur le côté gauche et sur le panneau arrière, plus loin dans ce chapitre.
Port USB 3.0 avec
charge USB en tout
temps
N’hésitez pas à connecter des périphériques compatibles USB 3.0, 2.0
et 1.1 au port USB 3.0. Le port USB 3.0 situé sur le côté gauche offre
une fonction de charge USB en tout temps, ce qui signifie que même si
votre système est éteint, ce port peut être utilisé pour alimenter des
périphériques externes. Notez que le port USB 3.0 se reconnaît
également par la petite « languette » bleue dans le port.
Prise d’écouteurs/sortie
de ligne Connecter des écouteurs stéréos ou des haut-parleurs externes avec
amplificateur. Le haut-parleur interne est désactivé lorsque vous branchez
des écouteurs externes ou des haut-parleurs avec amplificateur.
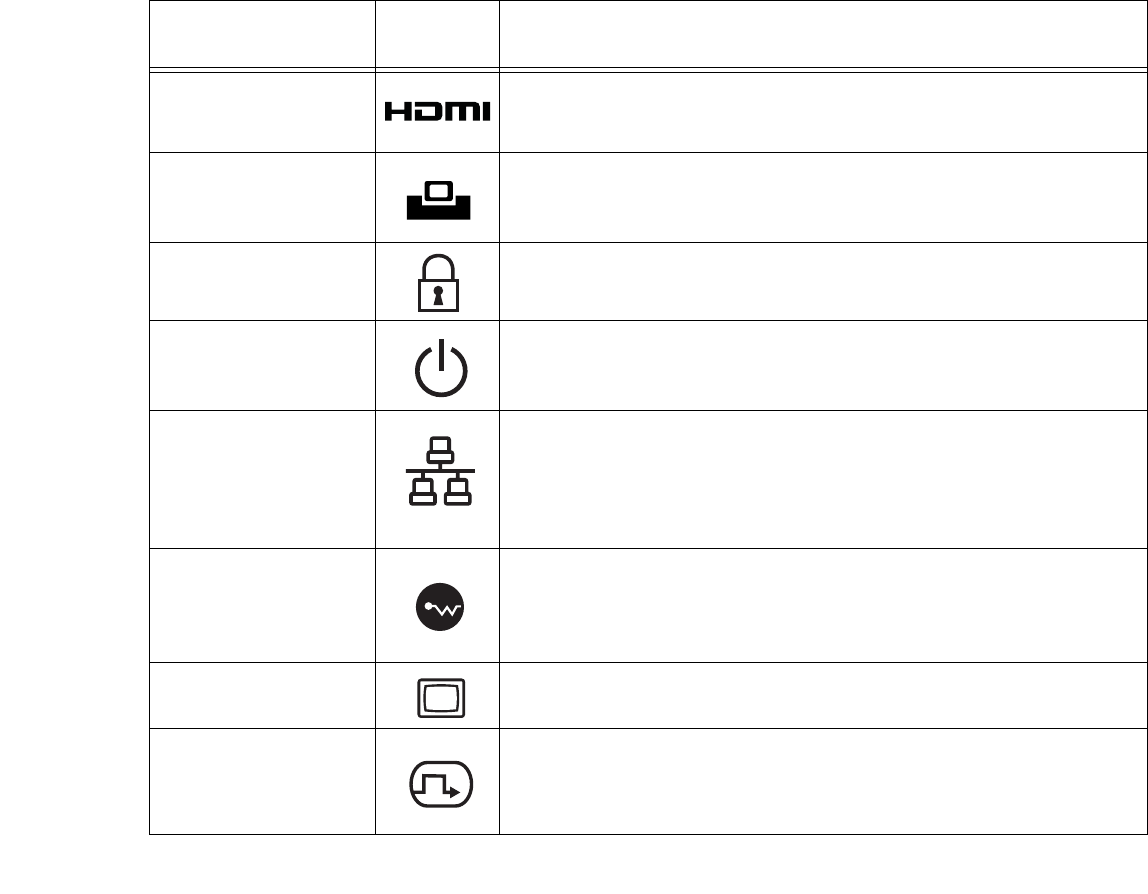
18
- Emplacement des commandes et des connecteurs
HDMI Le port HDMI vous permet d’utiliser des périphériques numériques
compatibles avec votre ordinateur, tels qu’une télévision haute définition
ou un récepteur AV (audio-vidéo).
Port de connexion Branchez le duplicateur de port ou un autre dispositif d’arrimage
adapté au PC Tablette. Pour plus d’informations, reportez-vous
à la documentation fournie avec l’appareil.
Fente d’antivol La fente d’antivol vous permet de sécuriser le PC Tablette
en y branchant un dispositif antivol compatible.
Commutateur de
veille/reprise Le commutateur de veille/reprise vous permet de mettre votre système
en veille sans l’éteindre, de reprendre l’utilisation du système lorsqu’il a
été mis en veille et de le faire démarrer s’il est éteint.
Réseau local La prise de réseau local (RJ-45) est utilisée pour connecter la carte
Ethernet Base-T/Tx 10/100/1000* interne à un réseau local de votre
bureau (ou domicile) ou à des périphériques tels que câble modem,
DSL ou Internet par satellite. *1000 Mbit/s, également connue sous le
nom de Gigabit Ethernet.
Commutateur marche/
arrêt pour réseau local
sans fil/Bluetooth/
réseau étendu
Le commutateur de carte réseau local sans fil/Bluetooth/réseau étendu
vous permet de mettre sous tension ou hors tension ces dispositifs sans
fil (disponibles en option).
Port vidéo externe Le port vidéo externe permet de connecter un moniteur externe
ou un projecteur ACL.
Interface vidéo
numérique (DVI)
Le port DVI-D situé sur le duplicateur de ports (en option) vous permet
de raccorder un moniteur ACL plat ou un poste de télévision équipé d’un
port DVI-D ; vous obtenez des graphismes et images d’une très grande
netteté.
Connexion Icône PC
Tablette Objectif

19
- Emplacement des commandes et des connecteurs
Port IEEE 1394 Le port IEEE 1394 vous permet de connecter des périphériques
IEEE 1394 (Firewire) sur votre PC Tablette, tels que caméra
numérique ou disques durs externes.
Connexion Icône PC
Tablette Objectif
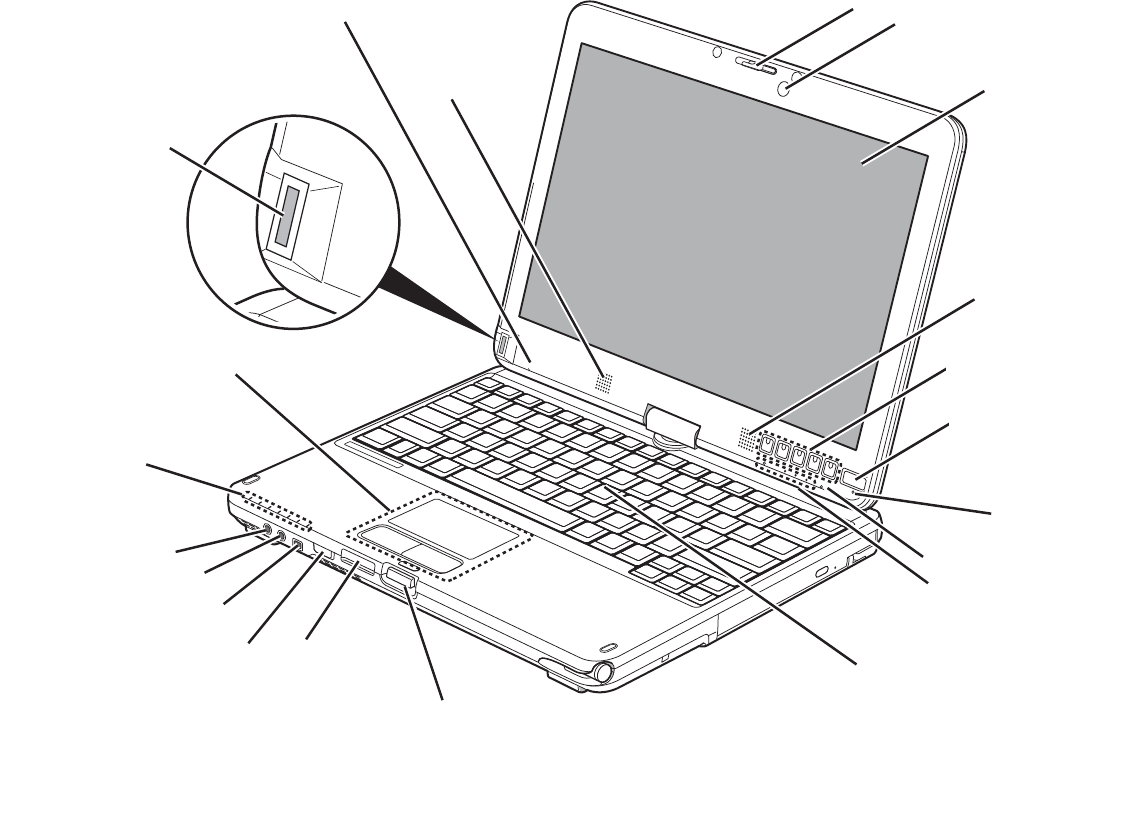
Écran
Caméra web en option
Loquet de l’écran
Haut-parleur stéréo
Tableau de sécurité/
Boutons de tablette PC
Commutateur
d'alimentation/reprise
Capteur de
lumière ambiante
Microphone intégré
Tableau de voyants d’état
Clavier
Loquet de l’écran
Cartes Memory
Stick/Fente pour
carte SD
Commutateur pour réseau
local/Bluetooth/réseau
local sans fil étendu
Prise IEEE 1394
Prise de micro
Prise d’écouteurs
État de voyants d’état
Pavé tactile TouchPad
Commande du curseur
Capteur d’empreintes
digitales
Microphone intégré
Haut-parleur stéréo
20
- Emplacement des commandes et des connecteurs
Figure 2. PC Tablette LIFEBOOK avec écran ouvert

21
- Emplacement des commandes et des connecteurs
Composants supérieurs
Voici une courte description des composants se trouvant sur le dessus de votre PC Tablette LIFEBOOK.
Loquet de l’écran
Ce loquet sert à maintenir l’écran du PC Tablette en bonne position lorsqu’il est rabattu.
Caméra Web
La caméra web 2.0 mégapixels en option vous permet de prendre des photos de vous-même et de les
envoyer par Internet.
Écran
L’ordinateur est équipé d’un écran couleur à diodes électroluminescentes avec rétro-éclairage, permettant
d’afficher des textes et des images. Deux types d’écran sont disponibles : un numériseur actif pouvant être
utilisé avec un stylet et un numériseur double pouvant être utilisé avec un stylet ou avec les doigts.
Deux haut-parleurs stéréo
Les deux haut-parleurs intégrés permettent une écoute en stéréophonie.
Boutons Sécurité/PC Tablette du LIFEBOOK
Les boutons de sécurité/PC Tablettepermettent de sécuriser votre système grâce à un mot de passe et de
lancer des applications au simple toucher d’un bouton. Voir « Boutons Sécurité/PC Tablette du
LIFEBOOK » en page 61.
Commutateur d’alimentation/veille/reprise
Le commutateur d’alimentation/veille/reprise vous permet de mettre votre ordinateur en veille sans
l’éteindre, de reprendre l’utilisation de l’ordinateur lorsqu’il a été mis en sommeil et de le faire démarrer
s’il est éteint. Voir « Commutateur d’alimentation/veille/reprise » en page 83.

22
- Emplacement des commandes et des connecteurs
Capteur de lumière ambiante
Lorsque l’ordinateur est en cours d’utilisation, ce capteur évalue la lumière ambiante et ajuste automatiquement
la luminosité de l’écran en conséquence. Voir « Activation/Désactivation du capteur de lumière ambiante
(Windows 7 seulement) » en page 39.
Tableau de voyants d’état
Les tableaux de voyants d’état affichent des symboles qui correspondent à des composants spécifiques du
PC Tablette. Les voyants d’état sont situés à deux endroits différents : sur le devant de l’ordinateur, côté
gauche (voyants d’état relatifs au système) et sous les boutons d’applications (voyants d’état relatifs aux
boutons). Voir « Tableau de voyants d’état » en page 31.
Clavier
Clavier complet avec plusieurs touches spéciales Windows. Voir « Clavier » en page 41.
Loquet de l’écran
Le loquet vous permet de libérer l’avant de l’écran du boîtier.
Fente pour carte MemoryStick/SD
La fente pour cartes mémoire MemoryStick/SD permet de connecter une carte MemoryStick/SD pour
stocker des données. Cette architecture vous permet de transférer des données à partir d’une grande variété
de périphériques numériques. Voi r « Installation d’une carte Memory Stick ou SD » en page 94.
Commutateur marche/arrêt pour réseau local sans fil/Bluetooth/réseau étendu
Ce commutateur permet de mettre sous et hors tension les dispositifs réseau local sans fil, réseau étendu
sans fil et Bluetooth en option. Pour prolonger la longévité de la batterie, éteignez ces périphériques entre
les utilisations. Voir « Activation de la carte réseau sans fil » en page 186.
Prise IEEE 1394 (4 broches)
La prise 1394 à 4 broches permet de relier votre ordinateur portable à un périphérique IEEE 1394,
notamment un caméscope numérique. Voi r « Port IEEE 1394 » en page 109.

23
- Emplacement des commandes et des connecteurs
Prise de micro
La prise de micro permet de connecter un microphone mono externe. Voir « Prise de micro » en page 110.
Prise d’écouteurs
La prise d’écouteurs vous permet de connecter des écouteurs. Voir « Prise d’écouteurs » en page 109.
Pavé tactile TouchPad
Le pavé tactile Touchpad est une commande semblable à une souris, avec bouton droit et bouton gauche.
Voir « TouchPad/Numériseur actif/Écran tactile » en page 45.
Capteur d’empreintes digitales
Le capteur d’empreintes digitales vous permet de vous connecter à votre système ainsi qu’à des sites
Internets et d’autres applications protégés par mot de passe : il suffit de glisser votre doigt sur le capteur.
Voir « Présentation du capteur d’empreintes digitales » en page 194.
Microphones intégrés doubles
Le microphone intégré vous permet d’enregistrer de la voix et des annotations.

Bouton d’éjection de carte ExpressCard
Fente pour carte ExpressCardGrilles de ventilation
Prise d’alimentation c.c. Port USB 3.0 (avec fonction de charge USB en tout temps)
24
- Emplacement des commandes et des connecteurs
Figure 3. Côté gauche du PC Tablette LIFEBOOK
Composants sur le côté gauche de l’ordinateur
Voici une courte description des composants se trouvant sur le côté gauche de votre PC Tablette LIFEBOOK.
Prise d’alimentation c.c.
La prise d’alimentation c.c. sert à brancher l’adaptateur secteur, lequel permet d’alimenter le PC Tablette
LIFEBOOK et de charger la batterie interne au lithium.
Ports USB 3.0
Le port USB 3.0 (sur le côté gauche du système) permet de brancher des périphériques USB (Universal
Serial Bus) 3.0. Chaque port USB 3.0 permet de transférer des données à une vitesse atteignant 5 Gbit/s.
Il est également rétrocompatible avec les périphériques USB 1.1 et 2.0, lesquels permettent de transférer
des données à des vitesses atteignant respectivement 12 Mbit/s et 480 Mbit/s. Veuillez prendre note que
le port USB 3.0 possède une fonction de charge USB en tout temps, ce qui signifie que vous pouvez
charger un périphérique externe à partir de ce port, même lorsque le système est éteint. Voir « Ports USB »
en page 108.

25
- Emplacement des commandes et des connecteurs
Grilles de ventilation
Les grilles de ventilation aident à refroidir votre système et à éviter qu’il ne surchauffe.
Fente ExpressCard
Permet de brancher une carte ExpressCard. Voi r « Cartes ExpressCard » en page 95.
Bouton d’éjection de carte ExpressCard
Le bouton d’éjection de carte ExpressCard permet de retirer une carte ExpressCard de la fente correspondante.
POUR PROTÉGER VOTRE ORDINATEUR DES DOMMAGES ET OPTIMISER SES PERFORMANCES, GARDEZ
TOUJOURS TOUTES LES GRILLES DE VENTILATION DÉGAGÉES, PROPRES ET SANS DÉBRIS. IL EST POSSIBLE
QUE VOUS DEVIEZ LES NETTOYER PÉRIODIQUEMENT, SELON L’ENVIRONNEMENT DANS LEQUEL VOUS
UTILISEZ L’ORDINATEUR.
NE PLACEZ PAS L’ORDINATEUR DANS UN ENDROIT OÙ LES GRILLES DE VENTILATION POURRAIENT ÊTRE
OBSTRUÉES, NOTAMMENT DANS UN PETIT ESPACE FERMÉ OU SUR UNE SURFACE MOLLE COMME UN LIT
OU UN COUSSIN.
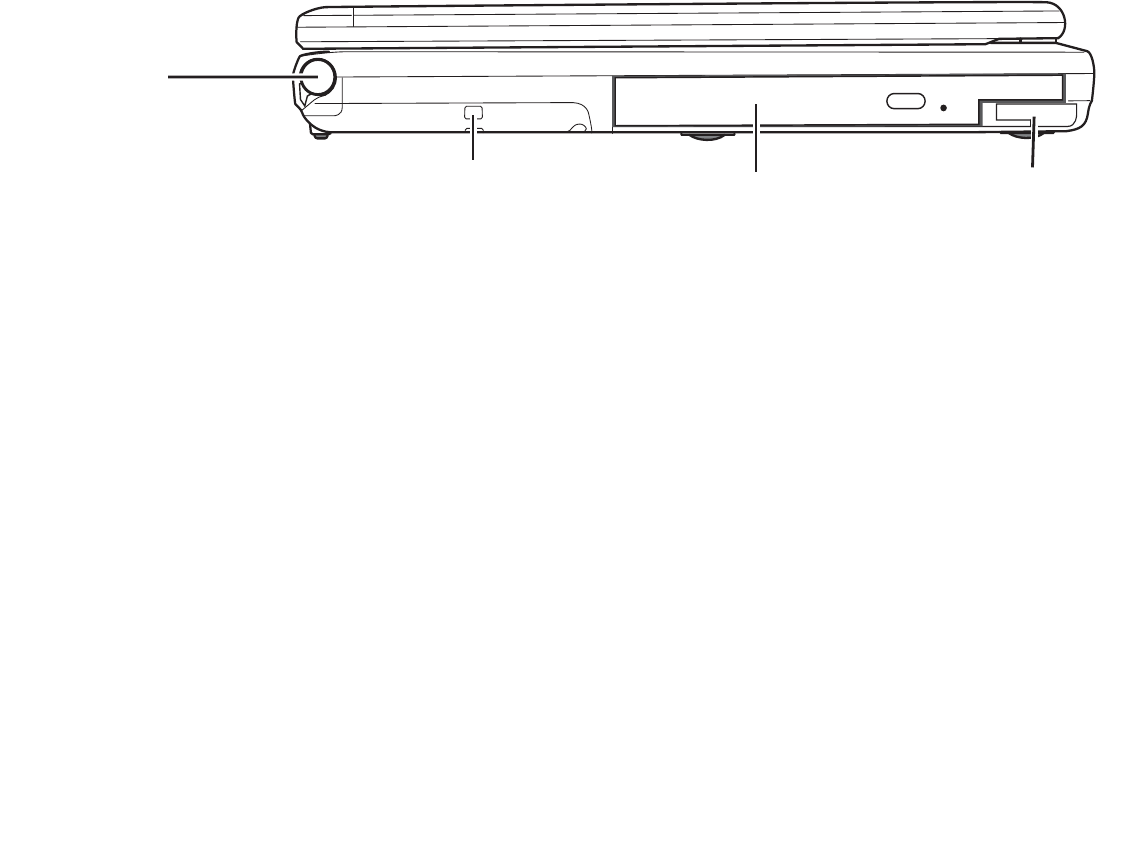
Support de stylo
Point d’attache du cordon du stylo Baie modulaire Bouton d’ouverture de la baie modulaire
26
- Emplacement des commandes et des connecteurs
Figure 4. Côté droit de l’ordinateur LIFEBOOK
Composants sur le côté droit de l’ordinateur
Voici une courte description des composants se trouvant sur le côté droit de votre PC Tablette LIFEBOOK.
Support de stylo
Le support sert à tenir le stylo (ou « stylet ») lorsque ce dernier n’est pas utilisé. Le stylo sert d’interface
avec l’écran numériseur actif.
Baie modulaire
La baie modulaire permet d’installer l’un des périphériques suivants. Voir « Périphériques de baie modulaire »
en page 58.
•Graveur de DVD multiformat double couche
•Batterie de baie modulaire
•Disque dur secondaire modulaire
•Volet réducteur de poids
Bouton d’ouverture de la baie modulaire
Le loquet d’ouverture du compartiment multifonctions sert à libérer le dispositif modulaire du
compartiment multifonctions.
Point d’attache du cordon du stylo
Le point d’attache du cordon permet de relier votre stylo à l’ordinateur pour éviter de le perdre.
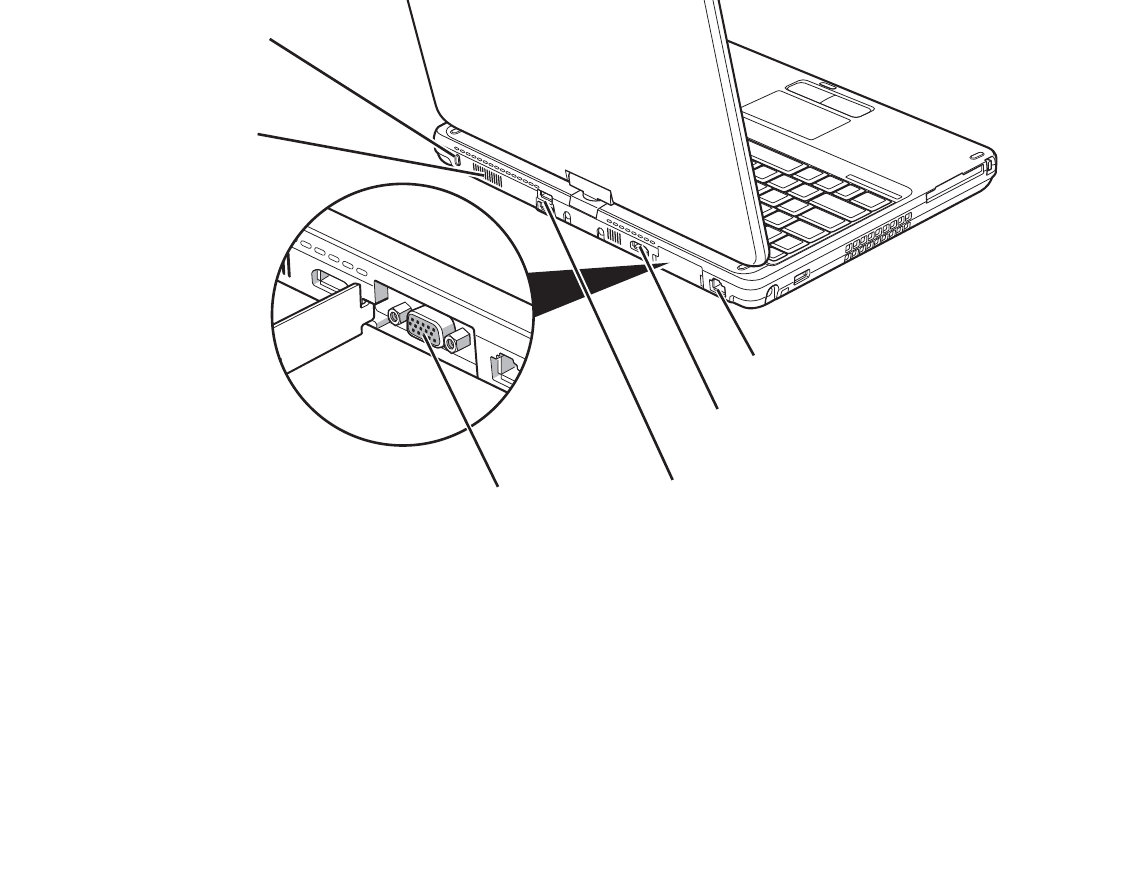
Fente pour dispositif antivol
Grilles de ventilation
Externe Ports USB 2.0
Port HDMI
Port Prise de réseau sans fil Gigabit (RJ-45)
27
- Emplacement des commandes et des connecteurs
Figure 5. Face arrière du PC Tablette LIFEBOOK
Composants de la face arrière
Voici une courte description des composants se trouvant à l’arrière de votre PC Tablette LIFEBOOK.
Fente pour dispositif antivol
La fente de dispositif antivol vous permet d’installer un dispositif antivol disponible en option.
Grilles de ventilation
Les grilles permettent à l’air de circuler dans le système afin de refroidir les composants.

28
- Emplacement des commandes et des connecteurs
Port vidéo externe
Le port vidéo externe permet de connecter un moniteur externe ou un projecteur ACL. Voir « Port vidéo
externe » en page 111.
Ports USB 2.0
Les ports USB 2.0 vous permettent de connecter des périphériques USB. Chaque port USB 2.0 permet
de transférer des données à une vitesse atteignant 480 Mbit/s. Il est également rétrocompatible avec les
périphériques USB 1.1, lesquels permettent des transferts de données à des vitesses atteignant 12 Mbit/s.
Voir « Ports USB » en page 108.
Port HDMI
Le port HDMI est conçu pour être utilisé avec des périphériques numériques compatibles avec votre
ordinateur, tels qu’une télévision haute définition ou un récepteur AV (audio-vidéo). Voir « Port HDMI »
en page 110.
Prise de réseau local Gigabit (RJ-45)
Cette prise est utilisée pour une connexion Gigabit Ethernet (10Base-T/100Base-Tx/1000Base-T) interne.
Voir « Prise de réseau local (RJ-45) interne » en page 107.
POUR PROTÉGER VOTRE ORDINATEUR DES DOMMAGES ET OPTIMISER SES PERFORMANCES, GARDEZ
TOUJOURS LES GRILLES DE VENTILATION DÉGAGÉES, PROPRES ET SANS DÉBRIS. IL EST POSSIBLE
QUE VOUS DEVIEZ LES NETTOYER PÉRIODIQUEMENT, SELON L’ENVIRONNEMENT DANS LEQUEL VOUS
UTILISEZ L’ORDINATEUR.
NE PLACEZ PAS L’ORDINATEUR DANS UN ENDROIT OÙ LES GRILLES DE VENTILATION POURRAIENT ÊTRE
OBSTRUÉES, NOTAMMENT DANS UN PETIT ESPACE FERMÉ OU SUR UNE SURFACE MOLLE COMME UN LIT
OU UN COUSSIN.
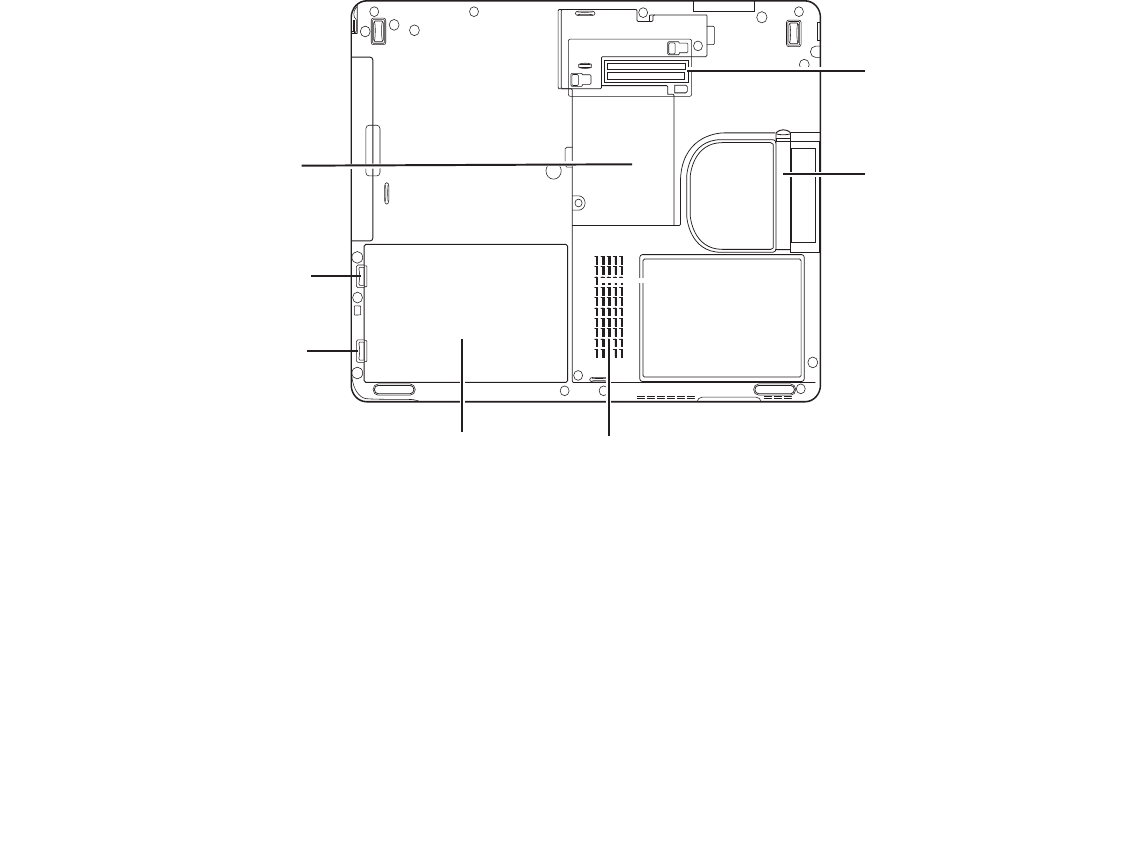
29
- Emplacement des commandes et des connecteurs
Filtre anti-poussière
Connecteur pour
duplicateur de ports
Compartiment de
mémoire supplémentaire
Loquet de la batterie
Loquet de la batterie
Compartiment de batterie au lithium Grilles de ventilation
Figure 6. Dessous du PC Tablette LIFEBOOK
Composants sous l’ordinateur
Voici une courte description des composants se trouvant sous votre PC Tablette LIFEBOOK.
Compartiment de mémoire supplémentaire
Votre ordinateur est équipé en usine d’une mémoire vive synchrone dynamique à double débit et à haute
vitesse (SDRAM DDR3 1333 MHz). Le compartiment de mémoire permet d’augmenter la capacité de
mémoire système de votre ordinateur pour en améliorer les performances globales. Voir « Module de
mémoire additionnelle » en page 98. Normalement, vous ne devriez pas avoir à ouvrir ce compartiment.
Connecteur pour duplicateur de ports
Ce connecteur permet de brancher le duplicateur de ports en option sur votre ordinateur portable.

30
- Emplacement des commandes et des connecteurs
Filtre anti-poussière
Le filtre anti-poussière aide à éviter que la poussière et la saleté s’infiltrent dans votre ordinateur.
Voir « Nettoyage du filtre anti-poussière » en page 147.
Grilles de ventilation
Les grilles permettent à l’air de circuler dans le système afin de refroidir les composants.
Compartiment de batterie au lithium
Le compartiment de batterie contient la batterie interne au lithium. Le couvercle de cette baie peut être
ouvert pour enlever la batterie lorsque l’ordinateur doit être entreposé pendant une longue période ou pour
remplacer une batterie à plat par une autre batterie chargée. Voir « Batterie au lithium » en page 88.
Loquets de la batterie
Les loquets servent à maintenir la batterie à l’intérieur de son compartiment.
POUR PROTÉGER VOTRE ORDINATEUR DES DOMMAGES ET OPTIMISER SES PERFORMANCES, GARDEZ
TOUJOURS LES GRILLES DE VENTILATION DÉGAGÉES, PROPRES ET SANS DÉBRIS. IL EST POSSIBLE QUE
VOUS DEVIEZ LES NETTOYER PÉRIODIQUEMENT, SELON L’ENVIRONNEMENT DANS LEQUEL VOUS
UTILISEZ L’ORDINATEUR.
NE PLACEZ PAS L’ORDINATEUR DANS UN ENDROIT OÙ LES GRILLES DE VENTILATION POURRAIENT ÊTRE
OBSTRUÉES, NOTAMMENT DANS UN PETIT ESPACE FERMÉ OU SUR UNE SURFACE MOLLE COMME UN LIT
OU UN COUSSIN.
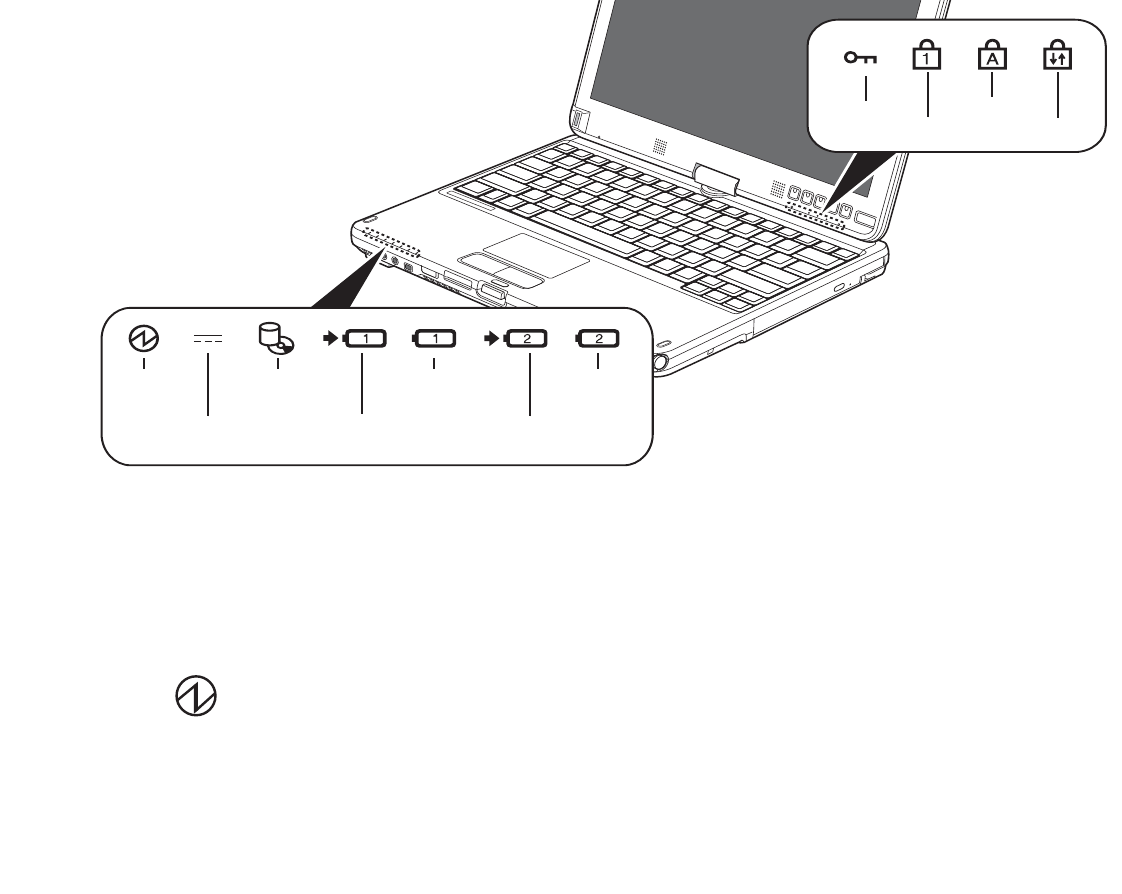
31
- Tableau de voyants d’état
Figure 7. Tableau de voyants d’état
Sécurité
Verr num
Verr maj
Verr défil
Batt. 1 niveau
de charge
Alimentation Batt. 2 niveau
de charge
Accès au lecteur
optique/disque dur
Alimentation
externe Batt. 1 charge
en cours Batt. 2 charge
en cours
Tableau de voyants d’état
Le tableau de voyants d’état contient des symboles et DEL associées correspondant à des composants
spécifiques de votre PC Tablette. Ces symboles vous renseignent sur le fonctionnement des composants
correspondants. (Figure 7).
Voyant d’alimentation
•Le voyant d’alimentation indique si le système est opérationnel. Il présente différents états, chacun
d’entre eux indiquant le mode d’alimentation de votre PC Tablette au moment donné.
•Allumé en continu : le PC Tablette est sous tension et prêt à être utilisé.
•Clignotant : le PC Tablette est en mode Sommeil.

32
- Tableau de voyants d’état
•Éteint : votre système est en veille prolongée ou carrément éteint.
Si la batterie est en cours de charge, le voyant d’alimentation demeure allumé même si l’ordinateur est
éteint. Et même si le système a été éteint avec Windows, le voyant d’alimentation restera allumé si un
adaptateur est branché à l’ordinateur.
Indicateur de source d’alimentation
L’indicateur de source d’alimentation indique si l’ordinateur portable est alimenté par l’adaptateur secteur,
par un adaptateur auto/avion ou par la batterie. Cette icône peut être affichée de deux manières pour
indiquer la source d’alimentation de votre ordinateur portable.
•Allumé : l’un des adaptateurs est en cours d’utilisation.
•Éteint : l’alimentation provient uniquement des batteries ; aucun adaptateur n’est connecté. Et
même si le système a été éteint avec Windows, le voyant d’alimentation externe restera allumé si
un adaptateur est branché à l’ordinateur.
Voyant d’accès au disque dur/lecteur optique
Ce voyant d’accès indique si le disque dur interne ou le lecteur optique est en cours d’utilisation.
1
Voyants de charge en cours
Les voyants « Chargement de la batterie » et « Niveau de charge » indiquent laquelle des batteries est en
cours de chargement (Batterie 1 : batterie au lithium principale ; Batterie 2 : batterie au lithium modulaire
optionnelle).
1
33
- Tableau de voyants d’état
Voyant de niveau de charge
Le voyant de niveau de charge de la batterie affiche le niveau de charge de la batterie comme suit :
•Vert continu : Batterie chargée entre 50% et 100% de sa capacité maximale.
•Orange continu : Batterie chargée entre 13% et 49% de sa capacité maximale.
•Rouge continu : Batterie chargée entre 0% et 12% de sa capacité maximale.
•Orange clignotant : Le clignotement indique qu’une mesure de chargement est en cours
(quatre secondes après l’installation de la batterie).
•Rouge clignotant : Problème de batterie.
•Éteint : Aucune batterie n’est installée.
Voyant de sécurité
Si un mot de passe a été défini, ce voyant clignote lorsque le système est réactivé à partir de l’état Hors
tension ou du mode Sommeil. Vous devez entrer le mot de passe défini dans le « Tableau de sécurité »
pour que le système redevienne opérationnel.
Voyant Verr num
Le voyant Verr num vire au vert si le clavier intégré est en mode de pavé numérique à dix touches.
•Lorsque la batterie est installée et que l’ordinateur n’est pas sous tension, le voyant de charge
de la pile s’affichera cinq secondes après le clignotement orange.
•Lorsque l’adaptateur secteur n’est pas branché ou que la batterie n’est pas complètement
chargée et que l’ordinateur se trouve en mode sommeil, le voyant clignote. Il clignote en
s’allumant une seconde toutes les cinq secondes.
•Les batteries soumises aux chocs, aux vibrations ou aux températures extrêmes risquent
de subir des dégâts permanents.
•Si une batterie est court-circuitée, elle est forcément abîmée et doit être remplacée.

34
- Tableau de voyants d’état
Voyant Verr maj
Le voyant Verr maj vire au vert si le clavier inscrira les lettres en majuscules.
Voyant Verr défil
Le voyant Verr défil vire au vert si le verrouillage du défilement est actif.
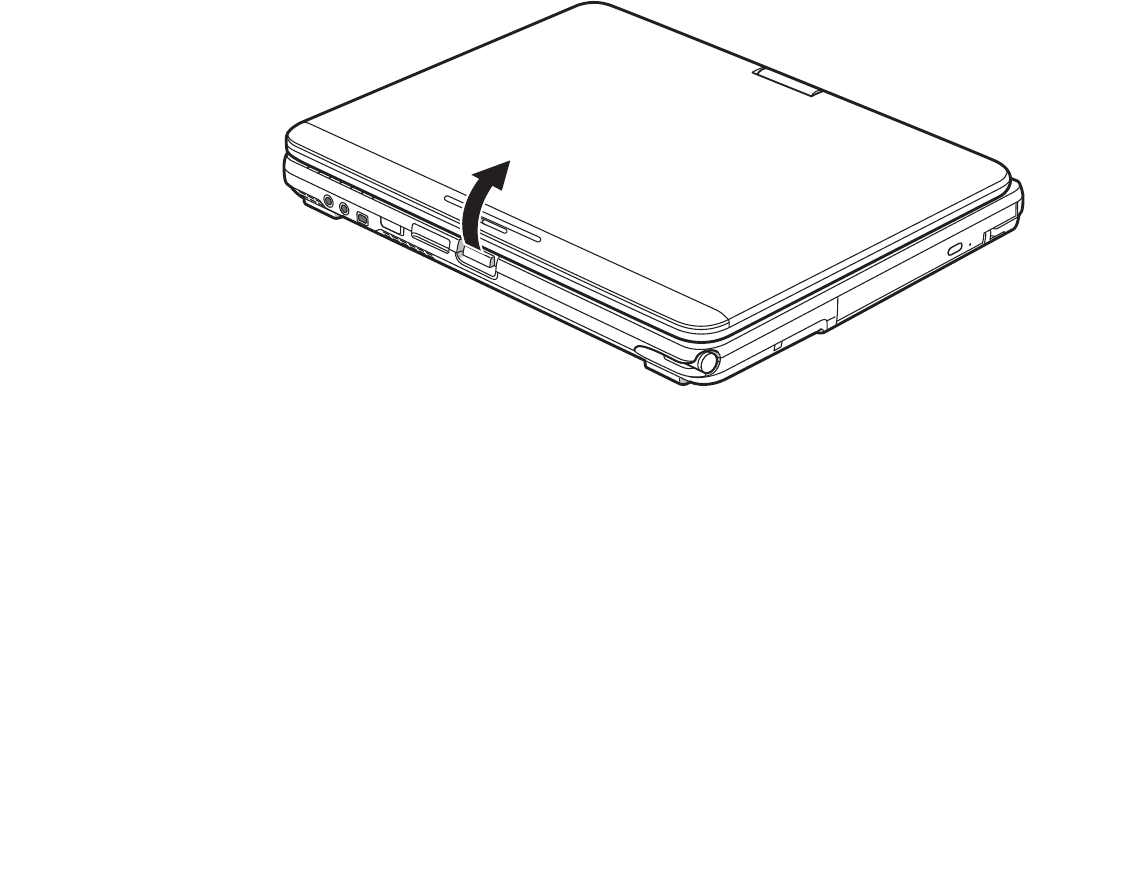
35
- Écran
Figure 8. Ouverture de l’écran
Écran
Votre PC Tablette LIFEBOOK T731 est doté d’un écran d’affichage à DEL rétroéclairé vous permettant
de mieux voir son contenu lorsque la lumière environnante est intense. La conception convertible de votre
PC Tablette vous permet d’ouvrir complètement l’écran, de le tourner à 180 degrés dans les deux sens et
le placer face vers le haut sur le clavier. Cela vous permet d’utiliser le système comme une tablette, de la
même manière qu’avec un bloc-note en papier.
Ouverture de l’écran
Appuyez sur le bouton du loquet pour soulever l'écran et inclinez ce dernier légèrement vers l'arrière
jusqu'à une position confortable, en faisant attention de ne pas toucher à la surface d'affichage. (Figure 8).
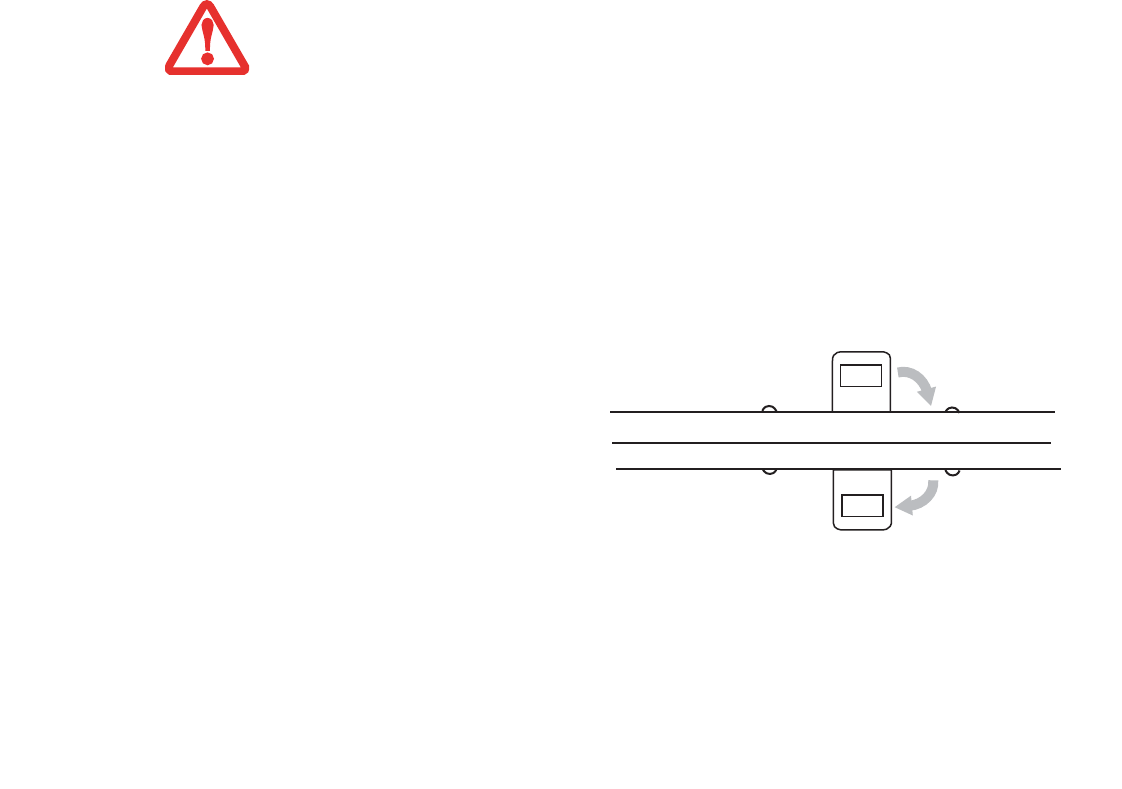
36
- Écran
Utilisation du système comme une tablette
Si vous souhaitez utiliser le système comme une tablette, effectuez les étapes suivantes.
1Appuyez sur le bouton du loquet et soulevez l’écran jusqu’à ce qu’il soit perpendiculaire au clavier. (Figure 10).
2Lorsque l’écran est perpendiculaire au clavier, tournez de 180 degrés dans l’une ou l’autre direction (Figure 11) afin
qu’il soit face vers l’arrière.
3
En tenant l’extrémité supérieure de l’écran, tirez vers l’avant jusqu’à ce qu’il repose pratiquement au dessus du clavier.
4Poussez le loquet vers l’écran (voir « A »
dans la figure 9). Le loquet pivotera, faisant
disparaître le loquet supérieur et apparaître
le loquet inférieur (voir « B » dans la figure 9).
Maintenez le loquet enfoncé et appliquez
l’écran à plat contre la base afin que le loquet
s’enclenche. Vous pouvez maintenant utiliser
le système comme une tablette. (Figure 12).
Loquet supérieur
Loquet inférieur
A
B
Glissement
vers l'écran
Figure 9. Verrouillage/Déverrouillage
Pour remettre l’ordinateur en configuration normale :
1Appuyez sur le bouton du loquet et soulevez l’écran jusqu’à ce qu’il soit perpendiculaire au clavier.
2En tenant l’extrémité supérieure de l’écran, tirez vers l’avant jusqu’à ce qu’il repose juste au-dessus du clavier.
•L’écran peut pivoter dans un sens comme dans l’autre ; mais lorsque vous souhaitez revenir à
la configuration portable, prenez garde à le faire pivoter dans le sens inverse à celui dans lequel
vous l’avez ouvert. Si vous tournez l’écran dans le mauvais sens, vous risquez d’endommager
la charnière. L'écran doit pouvoir tourner facilement, si ce n'est pas le cas, il se peut que vous
le fassiez tourner dans le mauvais sens.
•À l’étape suivante, assurez-vous de placer l’écran perpendiculairement au clavier, sinon le
clavier et le couvercle de l’écran pourraient s’égratigner.
•Il est important de se rappeler que le loquet doit toujours être enclenché afin d’éviter de
l’endommager, et ce quelle que soit la disposition de votre ordinateur.
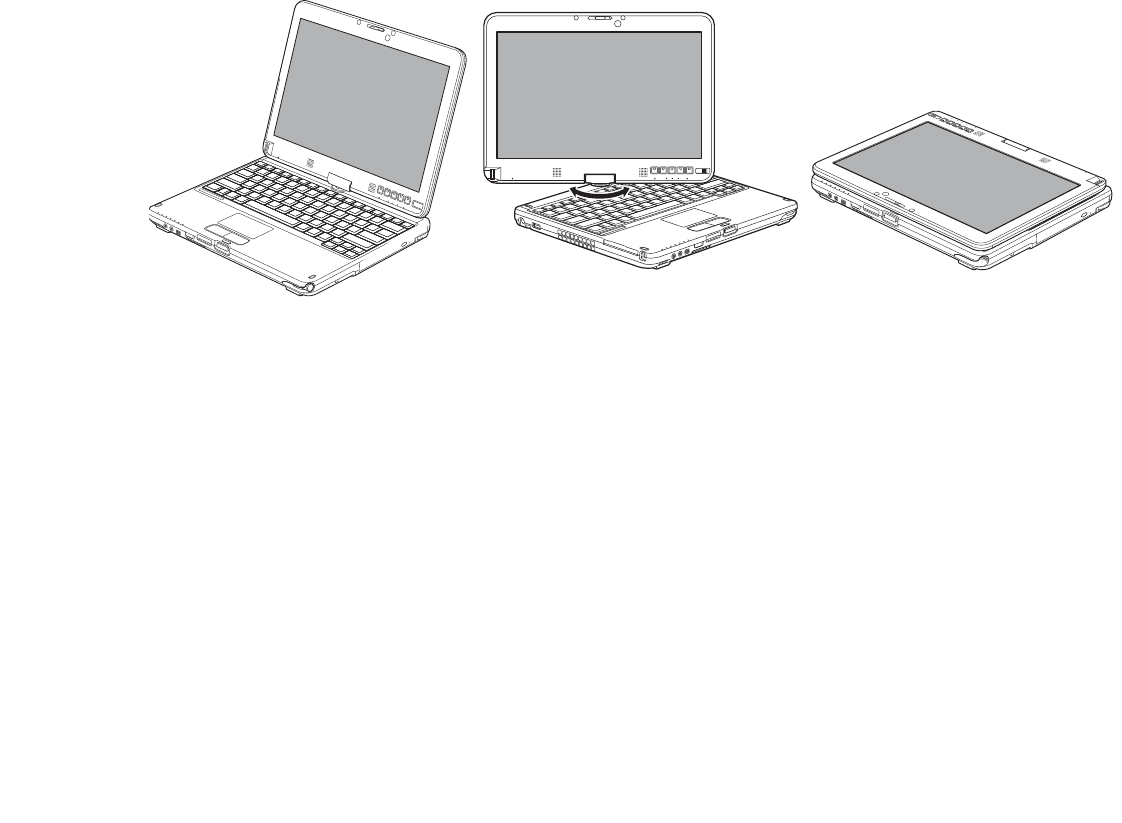
Figure 10. Écran
complètement ouvert
Figure 11. Pivoter l’écran Figure 12. Mode tablette
37
- Écran
Comment tenir le PC Tablette
Le PC Tablette LIFEBOOK T731 peut être tenu de quatre façons différentes, que vous pouvez choisir
selon vos besoins du moment. Vous pouvez donc choisir l’orientation horizontale primaire ou secondaire,
ou encore l’orientation verticale primaire ou secondaire. L’illustration ci-dessous indique l’ordre des
rotations lorsque vous faites pivoter le système avec le bouton de rotation.

38
- Écran
.
Orientation horizontale
primaire
Figure 13. Orientations du PC Tablette en mode tablette
Réglage de la luminosité de l’écran
Lorsque vous avez allumé votre PC Tablette, vous pouvez régler la luminosité de l’écran à un niveau
de visionnement plus confortable. Vous pouvez ajuster la luminosité de trois façons : avec le clavier,
avec l’utilitaire de gestion de l’alimentation, avec le menu Fujitsu.
Utilisation du clavier
Si vous réglez la luminosité en vous servant du clavier, vous modifiez les paramètres du système
(c.-à-d., le paramétrage réalisé avec les touches de fonction modifient automatiquement les paramètres
de luminosité dans les paramètres de la tablette et du stylo).
•[Fn+F6] : Appuyez plusieurs fois sur cette combinaison de touches pour diminuer la luminosité
de votre écran.
•[Fn+F7] : Appuyez plusieurs fois sur cette combinaison de touches pour augmenter la luminosité
de votre écran.
Orientation verticale
primaire Orientation horizontale
secondaire Orientation verticale
secondaire

39
- Écran
Remarque : le changement de luminosité avec la touche [Fn] est temporaire. Lors d’une reprise ou d’un
redémarrage, il faudra les réinitialiser si cette méthode a été utilisée.
Utilisation de la Gestion de l'alimentation pour contrôler la luminosité de l'écran (Windows 7)
Dans Windows 7 : Pour régler la luminosité avec l'utilitaire de gestion de l'alimentation sous
Windows 7 :
Cliquez sur Démarrer - Panneau de configuration. Dans Affichage par :, sélectionnez un des affichages
par icônes. Sélectionnez Écran puis cliquez sur Régler la luminosité dans le panneau de gauche. Sous
Sélectionner un régime d'alimentation, choisissez le régime que vous souhaitez. Faites glisser la barre
Luminosité de l’écran : vers la gauche ou la droite selon votre préférence.
Utilisation du menu Fujitsu pour régler la luminosité
Pour régler la luminosité en vous servant du menu Fujitsu, cliquez sur l’icône Menu Fujitsu de la barre de
tâches dans le coin inférieur droit de l’écran. Double-cliquez sur l’icône Centre de mobilité Windows, puis
double-cliquez sur l’icône située à côté de Luminosité de l’écran. Réglez la luminosité en faisant glisser
le bouton sur la position On battery (Alimentation batterie) ou Plugged in (Alimentation secteur).
Activation/Désactivation du capteur de lumière ambiante (Windows 7 seulement)
Les ordinateurs fonctionnant avec le système d’exploitation Windows 7 sont dotés d’un capteur de
lumière ambiante (juste en dessous du commutateur d’alimentation/veille/reprise) qui mesure
automatiquement l’environnement lumineux. Si l’environnement est très éclairé, la luminosité de l’écran
ACL augmentera pour faciliter la lecture. Au contraire, dans la pénombre, la luminosité de l’écran diminuera
automatiquement.
Le capteur de lumière peut être activé ou désactivé à partir du Panneau de configuration, comme suit :
LORSQUE VOUS EMPLOYEZ UNE ALIMENTATION SECTEUR, L’ÉCRAN UTILISE PAR DÉFAUT LE NIVEAU DE
LUMINOSITÉ LE PLUS ÉLEVÉ. LORSQUE VOUS EMPLOYEZ UNE ALIMENTATION SUR BATTERIE, L’ÉCRAN
UTILISE PAR DÉFAUT UN NIVEAU DE LUMINOSITÉ MOYEN.
PLUS LA LUMINOSITÉ EST ÉLEVÉE, PLUS L’ORDINATEUR CONSOMME D’ÉNERGIE ET PLUS LA LONGÉVITÉ
DE VOTRE BATTERIE SERA RÉDUITE. SI VOUS DÉSIREZ MAXIMISER LA LONGÉVITÉ DE LA BATTERIE,
RÉGLEZ LA LUMINOSITÉ AU PLUS BAS NIVEAU POSSIBLE.

40
- Écran
1Ouvrez le Panneau de configuration et cliquez sur Affichage par : puis sélectionner la taille des icônes souhaitée.
2Cliquez sur l’icone Capteurs d’emplacement et autres.
3Pour activer ou désactiver le capteur de lumière, cochez ou décochez la case située dans la colonne « Activé ».
4Pour de plus amples informations sur le capteur de lumière, cliquez sur l'icône du Capteur de lumière présente
dans la colonne des Capteurs à droite de l'icône pour ouvrir la fenêtre des Propriétés.
5Dans la fenêtre « Propriétés du capteur », vous pouvez modifier la description du capteur, désinstaller le capteur
ou encore activer ou désactiver les utilisateurs sélectionnés.
•Pour modifier la description du capteur, cliquez sur le bouton [Modifier la description], saisissez les nouveaux
éléments, puis cliquez sur le bouton [OK].
•Pour limiter le nombre d’utilisateurs ayant accès aux capteurs, cliquez sur Modifier les accès aux capteurs,
puis cochez ou libérez la case située à côté de l’utilisateur auquel vous souhaitez autoriser ou refuser l’accès.
•Pour désinstaller le capteur, cliquez sur Désinstaller ce capteur.
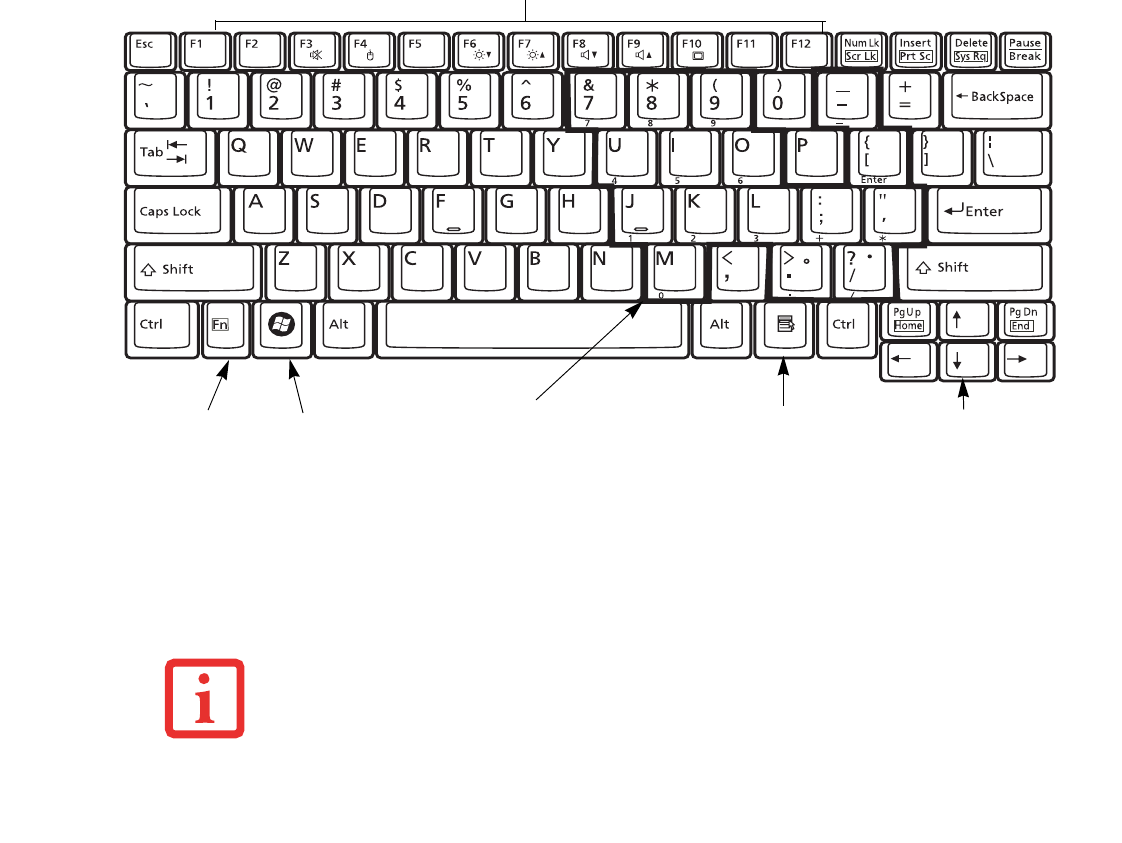
41
- Clavier
Clavier
Touche Fn Touche
Touches de fonction
Pavé numérique Touche Touches
(délimité par la ligne noire)
Démarrer d’application de curseur
Figure 14. Clavier
Utilisation du clavier
Votre PC Tablette Fujitsu LIFEBOOK est doté d'un clavier antimicrobien de 84 touches. Ce clavier
exécute toutes les fonctions d’un clavier à 101 touches, y compris les touches Windows et diverses touches
de fonction spéciales. Cette section décrit les touches suivantes (Figure 14).
LE CLAVIER ANTIMICROBIEN FOURNI AVEC CERTAINS MODÈLES D’ORDINATEURS LIFEBOOK FUJITSU
CONTIENT UN AGENT À BASE D’IONS ARGENT INORGANIQUES TRÈS EFFICACE POUR ATTAQUER LES
MICROBES ET LES BACTÉRIES, AINSI QUE POUR EN EMPÊCHER LA CROISSANCE. CET AGENT A
DÉMONTRÉ SA HAUTE EFFICACITÉ ANTIMICROBIENNE CONTRE UNE GRANDE VARIÉTÉ DE MICROBES, DE
BACTÉRIES ET DE CHAMPIGNONS NOCIFS POUR LA SANTÉ.

42
- Clavier
•Pavé numérique : Certaines touches de votre ordinateur portable remplissent une double fonction,
servant à la fois de caractère standard et de touche numérique ou mathématique. Pour passer du
caractère standard à la fonction numérique, utilisez la touche [Verr num].
•Touches de curseur : Votre clavier contient quatre touches fléchées permettant de déplacer le
curseur ou le point d’insertion vers la droite, vers la gauche, vers le haut ou vers le bas, dans les
fenêtres, dans les applications et dans les documents.
•Touches de fonction : Les touches [F1] à [F12] s’utilisent avec la touche [Fn] pour exécuter
des actions spéciales, selon le programme en cours d’utilisation.
•Touches Windows : Ces touches fonctionnent de concert avec votre système d’exploitation
Windows et produisent le même résultat que si vous cliquiez sur le menu Démarrer à l’écran
ou avec le bouton droit de votre pointeur.
Pavé numérique
Certaines touches du clavier remplissent une double fonction en servant de touche standard et de touche
numérique. Pour utiliser la fonction numérique de ces touches, appuyez sur [Verr num]. Pour désactiver
la fonction numérique, appuyez de nouveau sur la même touche. Lorsque cette fonction est activée, vous
pouvez saisir des chiffres de 0 à 9, exécuter des additions ( + ), des soustractions ( - ), des multiplications
( * ) et des divisions ( / ), ainsi que saisir des décimales ( , ) en vous servant des touches de fonction
désignées du pavé numérique. Les fonctions secondaires des touches du pavé numérique sont indiquées
sur leur face avant.
Touches Windows
Votre PC Tablette LIFEBOOK comporte deux touches Windows, soit une touche [Démarrer] et une
touche [Application]. La touche [Démarrer] affiche le menu Démarrer. Ce bouton fonctionne un peu
comme le bouton de menu Démarrer de votre écran La touche [Application] fonctionne comme le bouton
droit de votre souris et affiche un menu de raccourcis s’appliquant à l’élément sélectionné. (Pour plus
d’informations sur les touches Windows, veuillez consulter l’Aide Windows et la documentation de
soutien disponible dans le menu Démarrer.)

43
- Clavier
Touches de curseur
Les touches de curseur sont les quatre touches fléchées qui permettent de déplacer le curseur vers le haut,
vers le bas, vers la gauche et vers la droite dans les applications. Dans les programmes tels que l’Explorateur
Windows, elles servent à déplacer la « mise en évidence » (sélectionne l’élément suivant en haut, en bas,
à gauche ou à droite).
Touches de fonction
Votre PC Tablette LIFEBOOK comporte 12 touches de fonction, F1 à F12. Les fonctions affectées à ces
touches varient selon l’application. Pour les connaître, consultez la documentation du logiciel utilisé.
•La touche [Fn] permet d’accéder à des fonctions supplémentaires de votre PC Tablette. Elle est
toujours utilisée conjointement avec une autre touche.
•[Fn+F3] : Maintenez [Fn] enfoncée et appuyez sur [F3] pour activer ou désactiver la fonction Silence.
•[Fn+F4] : Maintenez la touche [Fn] enfoncée et appuyez sur [F4] pour activer ou désactiver la
fonction Quick Point. Veuillez prendre note que la combinaison de touches [Fn+F4] fonctionne
uniquement lorsque le paramètre Manual Setting (Configuration manuelle) est sélectionné dans
le BIOS. (Voir « Utilitaire de configuration du BIOS » en page 78.)
•[Fn+F6] : Gardez la touche [Fn] enfoncée et appuyez plusieurs fois sur [F6] pour diminuer
la luminosité de l’écran.
•[Fn+F7] : Gardez la touche [Fn] enfoncée et appuyez plusieurs fois sur [F7] pour augmenter
la luminosité de l’écran.
•[Fn+F8] : Si vous appuyez plusieurs fois sur [F8] tout en maintenant la touche [Fn] enfoncée,
vous réduirez le volume sonore de votre système.
•[Fn+F9] : Si vous appuyez plusieurs fois sur [F9] tout en maintenant la touche [Fn] enfoncée,
vous augmenterez le volume sonore de votre système.
•[Fn+F10] : Gardez la touche [Fn] enfoncée et appuyez sur [F10] pour changer l’emplacement de
l’affichage vidéo. L’ordre des emplacements dépend du type de périphérique(s) vidéo connecté(s)
au système. Chaque fois que vous appuyez sur ces touches, vous passez au choix suivant.
•Si vous avez un écran à tube cathodique externe, l’ordre sera le suivant : écran interne -> écran
cathodique externe -> affichage simultané -> écran interne.

44
- Clavier
•S’il y a seulement un périphérique HDMI connecté à votre système, l’ordre sera le suivant :
écran interne -> écran HDMI -> affichage simultané -> écran interne.
•Si vous avez un écran à tube cathodique externe et un périphérique HDMI, l’ordre sera le
suivant : écran interne -> écran cathodique externe -> affichage simultané écran interne et
écran cathodique externe -> écran HDMI -> affichage simultané écran interne et écran HDMI ->
écran interne.
•Si un écran à tube cathodique et un périphérique DVI sont connectés au duplicateur de ports,
l’ordre sera le suivant : écran interne -> écran cathodique externe -> affichage simultané écran
interne et écran cathodique externe -> écran DVI -> affichage simultané écran interne et écran
DVI -> écran interne.
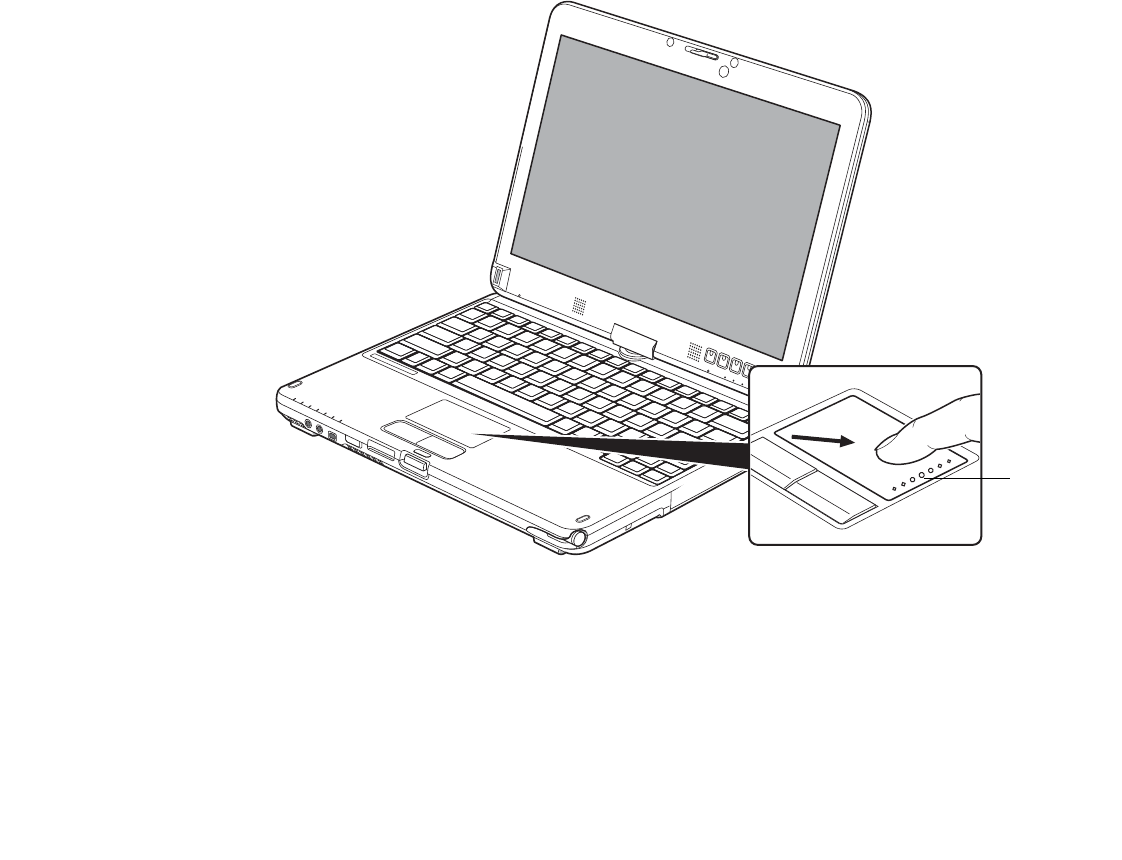
45
- TouchPad/Numériseur actif/Écran tactile
TouchPad/Numériseur actif
de défilement
Capteur
/Écran tactile
Figure 15. Pavé tactile TouchPad
Utilisation du pavé Touchpad
Le pavé tactile TouchPad est intégré à votre PC Tablette LIFEBOOK. Ce dispositif permet de commander
le déplacement du curseur et de sélectionner des éléments affichés à l’écran. Le pavé tactile se compose d’une
commande de curseur en bas du clavier, au centre, de deux boutons en bas de celle-ci, et d’un capteur de
défilement sur la partie droite de celle-ci. Le bouton gauche fonctionne de la même manière qu’un bouton
gauche de souris tandis que le bouton droit a la même fonction que le bouton droit d’une souris. Utilisé
conjointement avec la commande de curseur, le bouton central du pavé tactile permet de faire défiler l’écran
vers le haut ou le bas. La fonction exacte des boutons peut varier selon l’application utilisée.
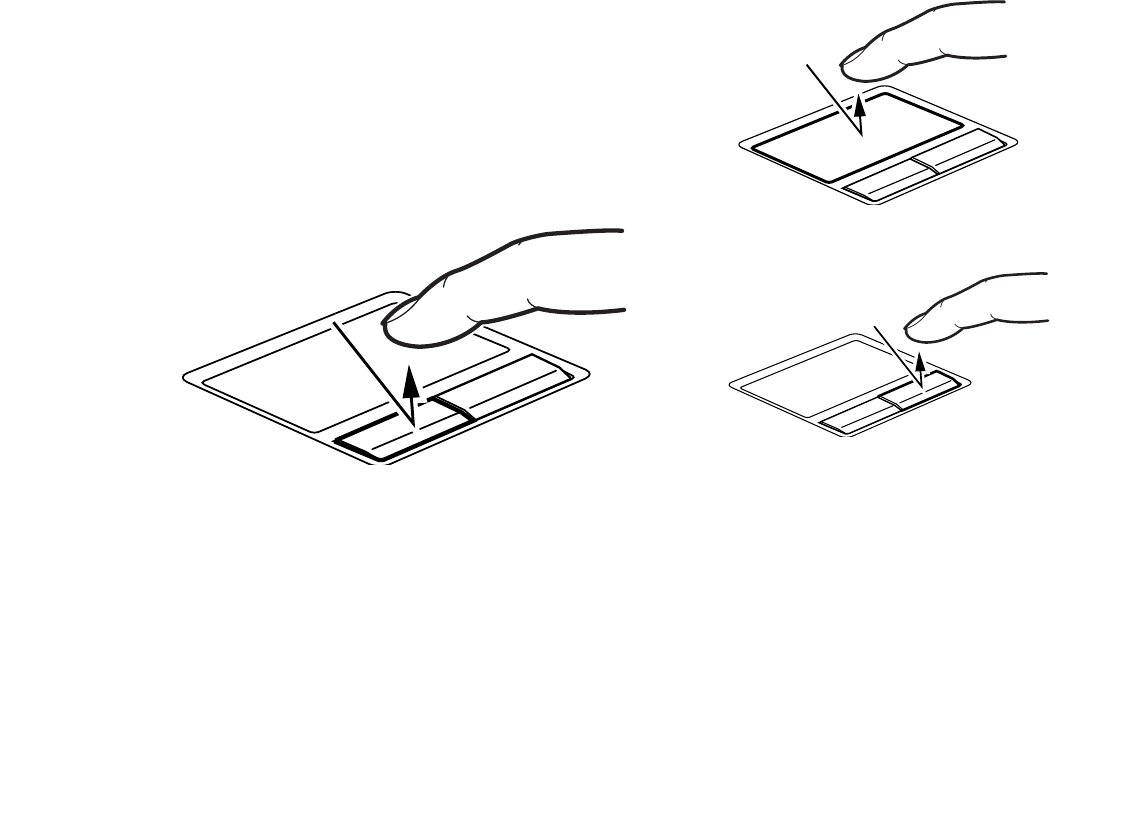
46
- TouchPad/Numériseur actif/Écran tactile
Cliquer
Cliquer signifie enfoncer et relâcher un bouton.
Pour cliquer à gauche, placez le curseur sur l’élément
que vous désirez sélectionner, puis enfoncez et
relâchez immédiatement le bouton gauche. Pour
cliquer à droite, placez le curseur sur l’élément que
vous désirez sélectionner, puis enfoncez et relâchez
immédiatement le bouton droit. Vous pouvez
également cliquer en frappant une fois le pavé
TouchPad avec délicatesse.
Figure 16. Cliquer à l’aide du bouton
Figure 17. Cliquer à l’aide du pavé TouchPad
Figure 18. Faire un clic droit avec le bouton
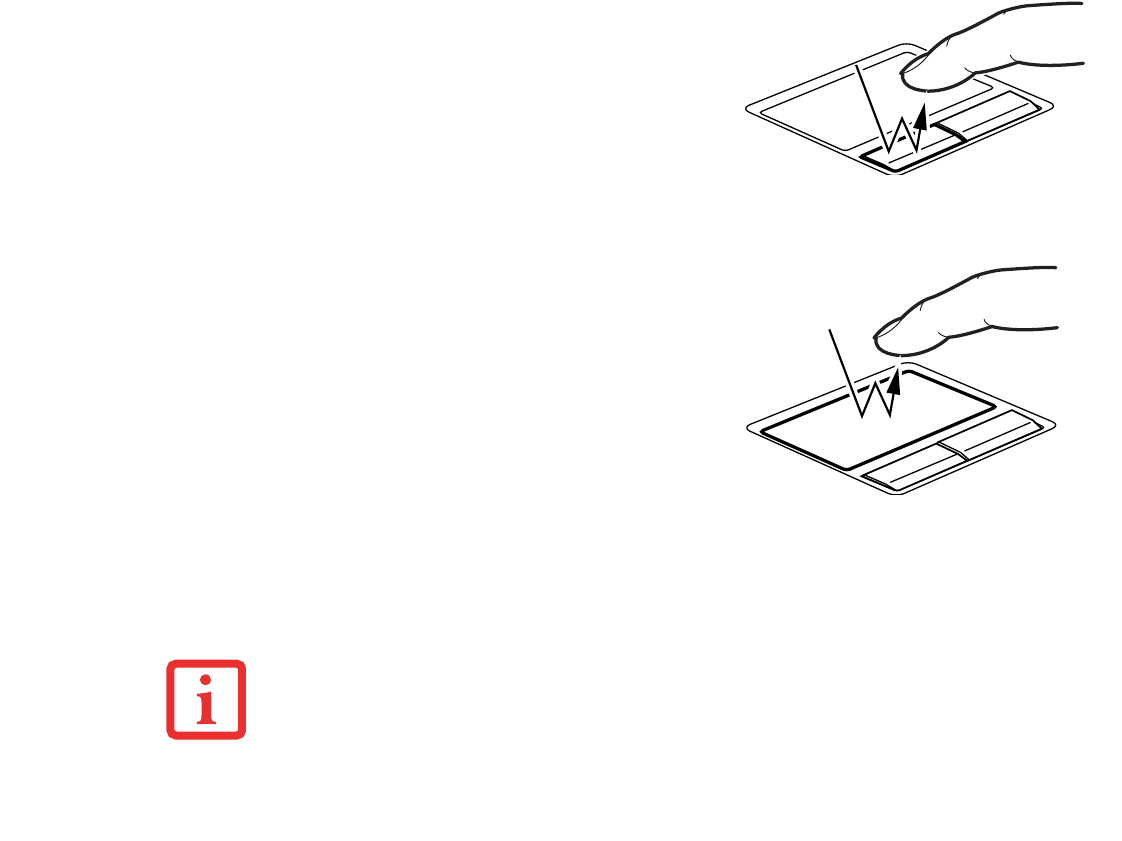
Double-cliquer
Double-cliquer signifie cliquer rapidement, deux fois de
suite, avec le bouton gauche. Cette procédure ne fonctionne
pas avec le bouton droit. Pour effectuer un double-clic,
placez le pointeur sur l’objet voulu et appuyez rapidement
deux fois sur le bouton gauche. Vous pouvez également
effectuer un double-clic en tapant deux fois légèrement
sur le TouchPad.
Figure 19. Double-cliquer
à l’aide du bouton
Figure 20. Double-cliquer à l’aide
du pavé TouchPad
47
- TouchPad/Numériseur actif/Écran tactile
•SI L’INTERVALLE ENTRE LES DEUX CLICS EST TROP LONG, LE DOUBLE-CLIC NE SERA PAS EXÉCUTÉ.
•LES PARAMÈTRES DU PAVÉ TACTILE TOUCHPAD PEUVENT ÊTRE RÉGLÉS DANS LA BOÎTE DE DIALOGUE
« PROPRIÉTÉS DE LA SOURIS » DU PANNEAU DE CONFIGURATION WINDOWS.
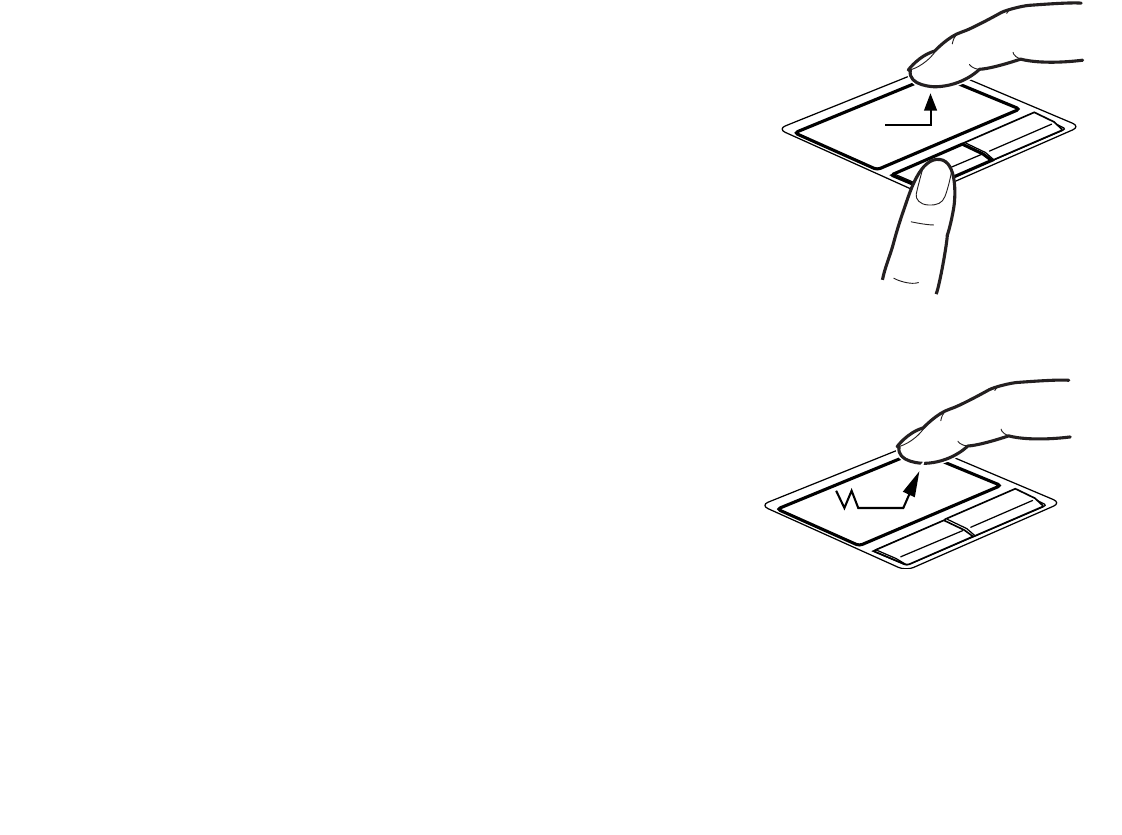
48
- TouchPad/Numériseur actif/Écran tactile
Glisser
Glisser signifie enfoncer le bouton gauche, sans le
relâcher, en déplaçant le curseur. Pour faire glisser
un élément, placez d’abord le curseur sur cet élément.
Ensuite, enfoncez et tenez le bouton gauche tout en
déplaçant l’élément à son nouvel emplacement, puis
relâchez. Vous pouvez également glisser un élément
avec le pavé tactile TouchPad. Premièrement, placez
le curseur sur l’élément que vous désirez déplacer et
frappez légèrement le pavé tactile TouchPad à deux
reprises en faisant attention de laisser le doigt sur le
pavé après la dernière frappe. Ensuite, glissez votre
doigt sur le pavé tactile jusqu’à ce que l’élément soit
à l’emplacement désiré et retirez votre doigt. Figure 21. Glisser à l’aide du bouton
Figure 22. Glisser à l’aide
du pavé TouchPad
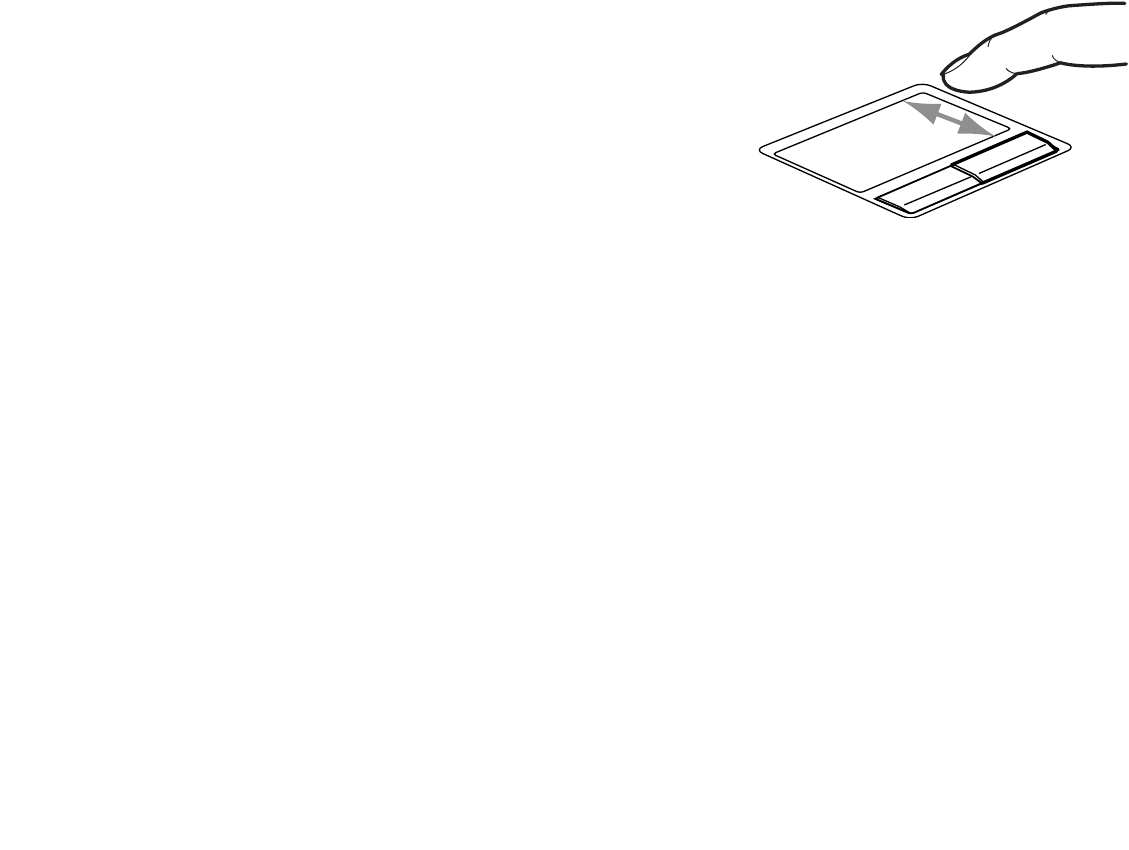
Défiler
Le capteur (bande) de défilement permet de faire défiler
rapidement les pages d’un document sans se servir de
la barre de défilement d’une fenêtre. Cette fonction est
particulièrement utile lorsque vous naviguez sur des sites
Internet. Pour faire défiler les pages, faites glisser votre
doigt en haut et en bas le long de la zone de défilement,
située sur la droite du pavé de commande.
Figure 23. Défiler à l’aide
de la zone de défilement
49
- TouchPad/Numériseur actif/Écran tactile
Réglage des commandes du pavé tactile TouchPad
Le panneau de configuration Windows vous permet de personnaliser votre pavé tactile Touchpad avec
divers paramètres disponibles dans la boîte de dialogue « Propriétés de la souris ». Il y a trois aspects
du fonctionnement du pavé tactile que vous pouvez régler :
•Boutons : Cet onglet vous permet de configurer les boutons pour une utilisation gaucher ou droitier,
ainsi que de configurer l’intervalle de temps permis entre deux clics lors des double-clics.
•Pointeurs : Cet onglet vous permet de paramétrer le régime du curseur selon sa fonctionnalité.
•Options de Pointeur : Cet onglet vous permet de configurer une relation entre la vitesse de mouvement
de votre doigt et la vitesse du curseur. Il vous permet aussi d’activer un sillage de pointeur pour la
flèche du curseur.

REMARQUE : Selon la configuration de votre
système, outre le numériseur actif, il est possible
que vous ayez un pavé tactile capacitif répondant
aux mouvements et aux pressions du doigt (cette
configuration est appelée « numériseur double »).
Pour de plus amples informations à propos de
l’écran tactile, allez à « Utilisation de l’écran
tactile capacitif optionnel » en page 54.
Le numériseur intégré vous permet d’utiliser le stylo
comme un pointeur. Vous pouvez utiliser le stylet
pour cliquer, double-cliquer, glisser des éléments ou
icônes ou pour dessiner comme avec un stylo ou un
crayon dans des applications qui fonctionnent avec
cette caractéristique, notamment des programmes
de dessin et de peinture. Pour de plus amples
informations, consultez la documentation
accompagnant votre application.
Figure 24. Utilisation de l’écran numériseur
50
- TouchPad/Numériseur actif/Écran tactile
Écran numériseur actif
•LORSQUE VOUS TOUCHEZ L’ÉCRAN AVEC LE DOIGT ET LORSQUE VOUS ÉCRIVEZ AVEC LE STYLET,
N’UTILISEZ PAS DE FORCE EXCESSIVE. SI VOUS UTILISEZ UNE FORCE EXCESSIVE, VOUS RISQUEZ
D’ENDOMMAGER L’ÉCRAN À DEL ET/OU L’ÉCRAN TACTILE.
•POUR ACHETER DES STYLETS ADDITIONNELS OU DE REMPLACEMENT, VISITEZ LE SITE INTERNET
DES ACCESSOIRES DE FUJITSU À : WWW.SHOPFUJITSU.COM.
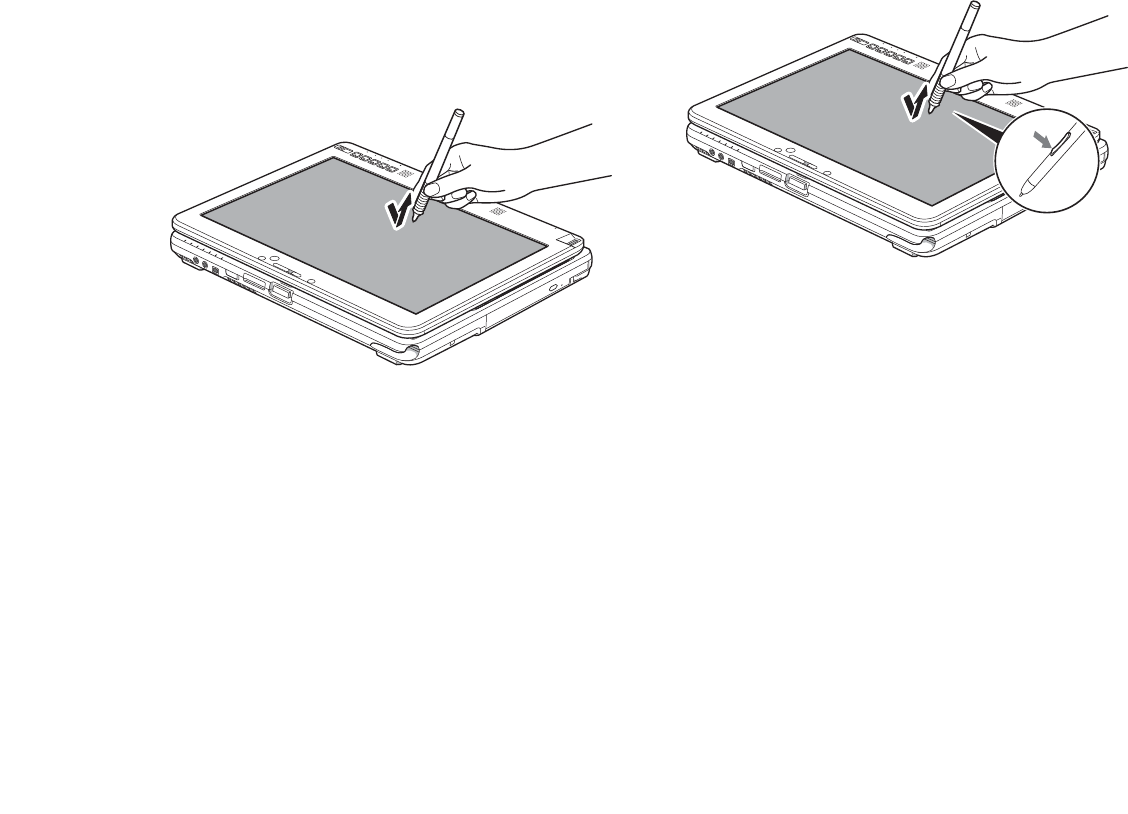
Cliquer sur l’écran numériseur actif
Pour cliquer du gauche, touchez l’objet que vous
voulez sélectionner, puis soulevez immédiatement
le bout du stylet.
Figure 25. Cliquer sur l’écran numériseur actif
Figure 26. Faire un clic droit sur
l’écran numériseur
Faire un clic droit sur l’écran numériseur
Pour faire un clic droit, maintenez le devant du
bouton du stylet enfoncé en tapotant sur l’écran.
Pour changer les paramètres pour la fonction de
clic à droite, allez à Démarrer -> Panneau de
configuration -> Paramètres d’entrée et du
stylet. Dans l’onglet des Options de stylet,
sélectionnez « Appuyer et maintenir »,
puis cliquez sur le bouton [Paramètres].
51
- TouchPad/Numériseur actif/Écran tactile
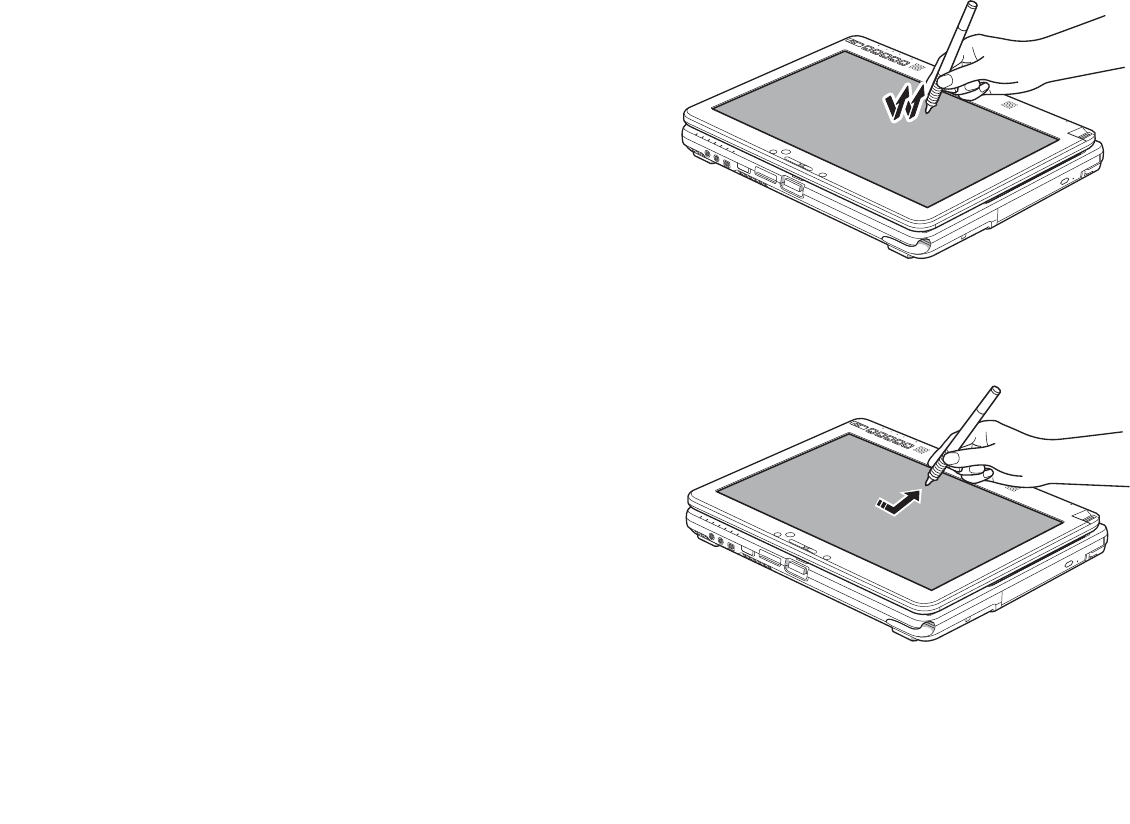
Double-cliquer
Pour double-cliquer, toucher l’élément deux fois,
puis retirez immédiatement le bout du stylet.
Figure 27. Faire un double clic sur l’écran
Glisser
Glisser signifie déplacer un élément avec le stylet en
touchant l’écran, puis en déplaçant et en soulevant le
stylet. Pour Glisser, touchez l’écran tactile avec votre
stylet sur l’élément que vous souhaitez déplacer. Tout
en continuant de toucher l’écran avec le stylet, glissez
l’élément vers son nouvel emplacement en déplaçant
le stylet à travers l’écran, puis en soulevant le stylet
pour le relâcher.
Figure 28. Faire glisser un objet sur l’écran
52
- TouchPad/Numériseur actif/Écran tactile

53
- TouchPad/Numériseur actif/Écran tactile
Étalonner l’écran numériseur
Pour assurer une correspondance précise entre le curseur et le stylet, vous devez exécuter l’Utilitaire
d’étalonnage de l’écran tactile avant d’utiliser l’écran tactile pour la première fois. Faites de même
si vous avez modifié la résolution de l’écran et/ou l’orientation.
Pour exécuter l’utilitaire d’étalonnage sous Windows 7 :
1Cliquez sur Démarrer -> Panneau de configuration.
2Double-cliquez sur l’icône Paramètres PC Tablette, puis sélectionnez l’onglet Écran.
3Cliquez sur le bouton [Étalonner].
4Réglez l’écran de votre portable à un angle confortable, puis repérez le symbole (+) dans le coin supérieur
gauche de l’écran.
5En vous servant du stylet, touchez fermement l’écran directement sur le symbole (+). Soulevez le stylet de
l’écran et la cible se déplacera vers une position différente sur l’écran.
6Répétez l’étape 5 jusqu’à ce que vous ayez sélectionné tous les symboles (+).
7Une fois cette opération terminée, appuyez sur le bouton [OK].
8Touchez le stylet sur plusieurs points de l’écran pour vérifier qu’il est bien étalonné. Si vous n’êtes pas satisfait
de l’étalonnage de l’écran, appuyez sur le bouton [Étalonner] pour recommencer.
LORSQUE VOUS TAPOTEZ SUR L’ÉCRAN PENDANT L’ÉTALONNAGE, N’UTILISEZ PAS DE FORCE EXCESSIVE.
SI VOUS UTILISEZ UNE FORCE EXCESSIVE, VOUS RISQUEZ D’ENDOMMAGER L’ÉCRAN DEL ET/OU
L’ÉCRAN TACTILE.

54
- TouchPad/Numériseur actif/Écran tactile
Utilisation de l’écran tactile capacitif optionnel
Certaines configurations de ce PC Tablette comportent un numériseur double optionnel permettant
d’utiliser le stylet ou un doigt comme pointeur. Ce type d’écran permet également d’utiliser des
« mouvements » pour exécuter diverses opérations, notamment pour défiler, zoomer et pivoter.
Faire un clic droit sur l’écran tactile
Pour exécuter un clic droit avec deux doigts, placez un doigt à l’endroit où vous désirez exécuter le clic
droit, puis tapotez rapidement une fois sur l’écran.
Mode mouvements
Pour activer le mode mouvements, deux doigts doivent toucher l’écran avec un intervalle de moins d’un
dixième de seconde. Si le deuxième doigt touche l’écran plus d’un dixième de seconde après le premier
doigt, le deuxième doigt est ignoré. Le mode mouvements est désactivé lorsque les deux doigts quittent
l’écran tactile. Si le système ne reconnaît pas un mouvement, aucune opération n’est exécutée. Dans ce
cas, retirez les deux doigts de l’écran et essayez de nouveau.
Mouvement de défilement
Si vous désirez faire défiler un document très long ou une grande page Web, placez vos deux doigts sur
l’écran tactile et déplacez-les parallèlement dans la même direction. Si un seul doigt est déplacé, l’écran
ne défile pas. Vous pouvez défiler horizontalement ou verticalement, selon la direction du mouvement.
Mouvement de zoom
Le mouvement de zoom est particulièrement utile pour voir des images. Pour faire un zoom avant, placez
deux doigts sur l’élément que vous désirez agrandir, puis écartez-les l’un de l’autre. Pour faire un zoom
arrière, placez deux doigts écartés sur l’élément que vous désirez réduire, puis rapprochez-les.
•LA RECONNAISSANCE DES MOUVEMENTS EST ACTIVÉE SUIVANT L’APPLICATION UTILISÉE.
•LE STYLET EST PRIORITAIRE PAR RAPPORT À LA COMMUNICATION TACTILE. SI LE STYLET SE TROUVE
DANS LE RAYON D’ACTION DE L’ÉCRAN, LA COMMUNICATION TACTILE EST DÉSACTIVÉE.
•LORSQUE L’UTILISATEUR POSE UN DOIGT SUR L’ÉCRAN TACTILE, CE DERNIER RÉAGIT COMME SI LE STYLET
ÉTAIT UTILISÉ.
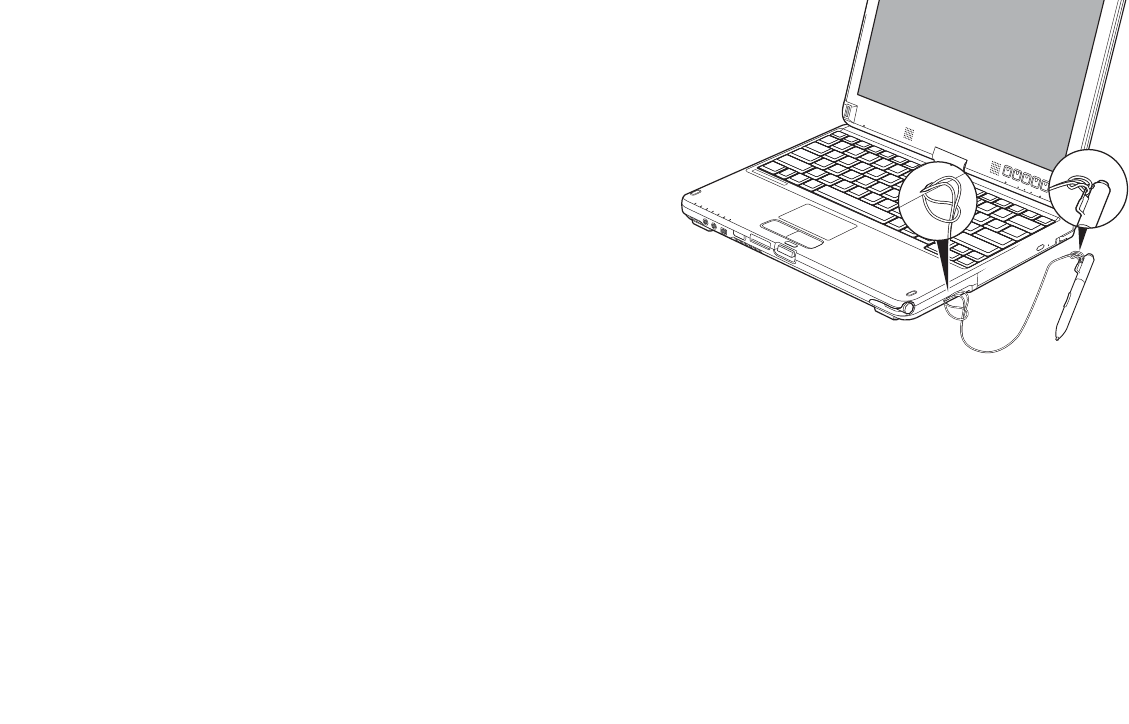
55
- TouchPad/Numériseur actif/Écran tactile
Mouvement de rotation
Si vous désirez faire pivoter un objet sur l’écran, placez deux doigts sur l’image que vous désirez faire
pivoter, puis déplacez-les en sens contraire, comme pour tourner une poignée. La direction du pivotement
de l’objet dépend de la direction du mouvement des doigts.
Installation du cordon
Pour éviter d’échapper ou de perdre votre stylo,
attachez-le à votre ordinateur à l’aide du cordon
fourni.
Pour attacher le cordon à votre PC Tablette, suivez
les étapes suivantes :
2Attachez la grande boucle du cordon au point
d’attache de votre ordinateur. Pour ce faire, enfilez
le bout du cordon (grande boucle) à travers le point
d’attache, puis faites passer le stylo à travers la
grande boucle. Figure 29. Installation du cordon
1Attachez l’extrémité du cordon (petite boucle) à votre
stylet. Pour ce faire, enfilez la petite boucle à travers
le trou du stylo, puis faites passer l’autre extrémité du
cordon à travers la boucle.

57
- Réglage du volume
Réglage du volume
Votre PC Tablette Fujitsu LIFEBOOK est doté de plusieurs commandes de volume fonctionnant en
interaction.
Réglage du volume
Le volume peut être réglé de plusieurs manières :
•Vous pouvez aussi ajuster et couper/remettre le volume avec l’icône de volume dans la zone
de notification.
•Le volume peut également être réglé avec les touches de fonction [F8] et [F9]. Si vous appuyez
plusieurs fois sur [F8] tout en maintenant la touche [Fn] enfoncée, vous réduirez le volume sonore
de votre système. Si vous appuyez plusieurs fois sur [F9] tout en maintenant la touche [Fn] enfoncée,
vous augmenterez le volume sonore de votre PC Tablette.
•Gardez la touche [Fn] enfoncée et appuyez sur la touche [F3] pour couper le son. Pour rétablir
le son, appuyez de nouveau sur [Fn+F3].
•Le volume peut aussi être réglé avec les commandes de volume proposées par diverses applications.
•Certains périphériques audio pouvant être connectés à votre système sont dotés de commandes
de volume.
Chaque commande de volume ci-dessus impose une limite supérieure s’appliquant aux autres commandes.
Nous vous recommandons d’essayer les différentes commandes pour découvrir le réglage vous convenant
le mieux.
LES APPLICATIONS POUVANT REPRODUIRE DES FICHIERS AUDIO PROPOSENT ÉGALEMENT LEUR
PROPRE COMMANDE DE VOLUME (COMMANDE LOGICIELLE). SI VOUS INSTALLEZ UN PÉRIPHÉRIQUE
AUDIO EXTERNE DOTÉ D’UNE COMMANDE DE VOLUME INDÉPENDANTE, LA COMMANDE DE VOLUME
DE L’APPAREIL ET LA COMMANDE DE VOLUME LOGICIELLE FONCTIONNERONT EN INTERACTION.
VOUS DEVEZ TOUTEFOIS SAVOIR QUE SI VOUS COUPEZ LE VOLUME AVEC LA COMMANDE
LOGICIELLE, LA COMMANDE DE VOLUME EXTERNE SERA ÉGALEMENT DÉSACTIVÉE.

Baie modulaire
Bouton d’ouverture de la baie modulaire
58
- Périphériques de baie modulaire
Figure 30. Baie modulaire
Périphériques de baie modulaire
Votre PC Tablette Fujitsu LIFEBOOK est doté d’une baie modulaire. Cette baie modulaire peut recevoir
un lecteur optique, une batterie au lithium, un disque dur secondaire modulaire ainsi qu’un réducteur de
poids.
L'un des périphériques suivants peut avoir été installé dans votre baie modulaire.
•Graveur de DVD multiformat double couche : Ce lecteur vous permet de lire des films, des logiciels
et des DVD/CD audio, ainsi que d’enregistrer des DVD, des CD et des DVD-RAM.
•Graveur triple Blu-ray : Le graveur triple Blu-ray permet de lire et d’écrire sur des CD, des DVD
et des disques Blu-ray™. Le graveur triple peut enregistrer jusqu’à 25 Go de données sur un disque
Blu-ray à une couche, ce qui correspond à 2,5 heures de vidéo haute définition ou 12 heures de
vidéo à définition standard.
•Batterie au lithium modulaire : cette batterie rechargeable peut être utilisée pour alimenter votre
PC Tablette LIFEBOOK lorsque aucun adaptateur n’y est connecté.
•Disque dur modulaire : ce disque vous permet d’augmenter la capacité de stockage de votre PC Tablette.

59
- Périphériques de baie modulaire
•Volet réducteur de poids : ce volet permet de remplir la baie lorsque vous n’y insérez aucun
périphérique.
Retirer et installer des périphériques modulaires
La baie modulaire permet d’installer des périphériques de deux façons :
•Remplacement à froid (hors tension) : installation ou remplacement d’un périphérique lorsque votre
PC Tablette est éteint.
•Remplacement à chaud (sous tension) : installation ou remplacement d’un périphérique lorsque le
système fonctionne, grâce à l’icône « Déconnecter/Éjecter en toute sécurité » de votre zone de
otification.
LA BAIE MODULAIRE NE DOIT JAMAIS ÊTRE VIDE LORSQUE L’ORDINATEUR EST EN MARCHE. SI VOUS LA
LAISSEZ VIDE, DE LA POUSSIÈRE ET DES CORPS ÉTRANGERS PEUVENT S’INFILTRER DANS L’ORDINATEUR.
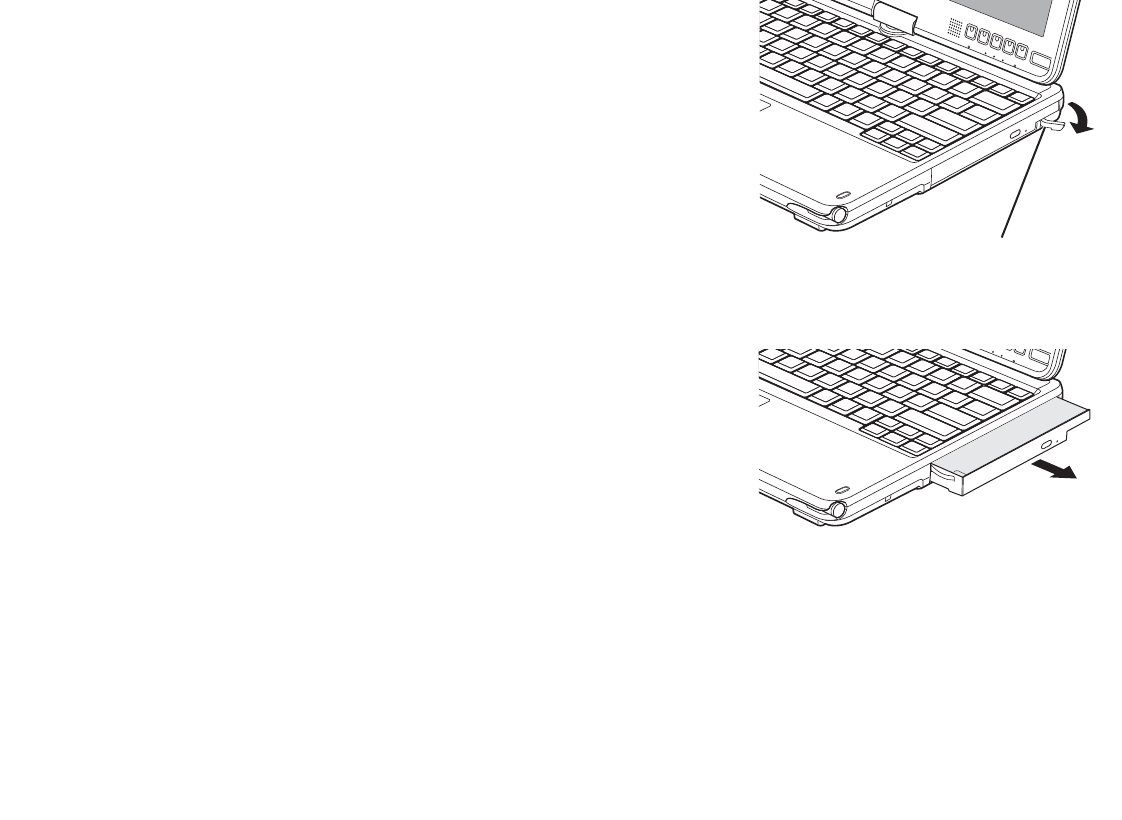
Remplacement hors tension
Pour installer un périphérique modulaire avec le système hors
tension, exécutez les opérations suivantes :
1Fermez tous les fichiers ouverts.
2Éteignez votre PC Tablette LIFEBOOK.
3Appuyez sur le loquet d’ouverture de la baie modulaire
conformément à la Figure 31.
4Tout en tenant le loquet, retirez complètement le périphérique
de la baie. Vous devrez utiliser une force légère.
5Insérez le périphérique que vous désirez installer
dans l’ordinateur jusqu’à ce qu’il s’enclenche.
6Vous pouvez maintenant rallumer votre ordinateur
en toute sécurité.
7Vous pourrez ensuite accéder au périphérique
et l’utiliser normalement.
Votre PC Tablette détectera automatiquement le nouveau
périphérique et l’activera lors du démarrage de votre système.
Une lettre de désignation du périphérique sera attribuée et
visible dans le Poste de travail et l’Explorateur Windows.
Bouton d’ouverture de la baie modulaire
Figure 31. Retrait/installation d’un
périphérique de baie modulaire
60
- Périphériques de baie modulaire
Remplacement sous tension
Pour remplacer un périphérique à chaud, employez l’utilitaire « Déconnecter ou éjecter un périphérique
en toute sécurité ». L’icône de cet utilitaire est disponible dans la zone de notification. Cliquez sur l’icône
et suivez les instructions s’affichant à l’écran.
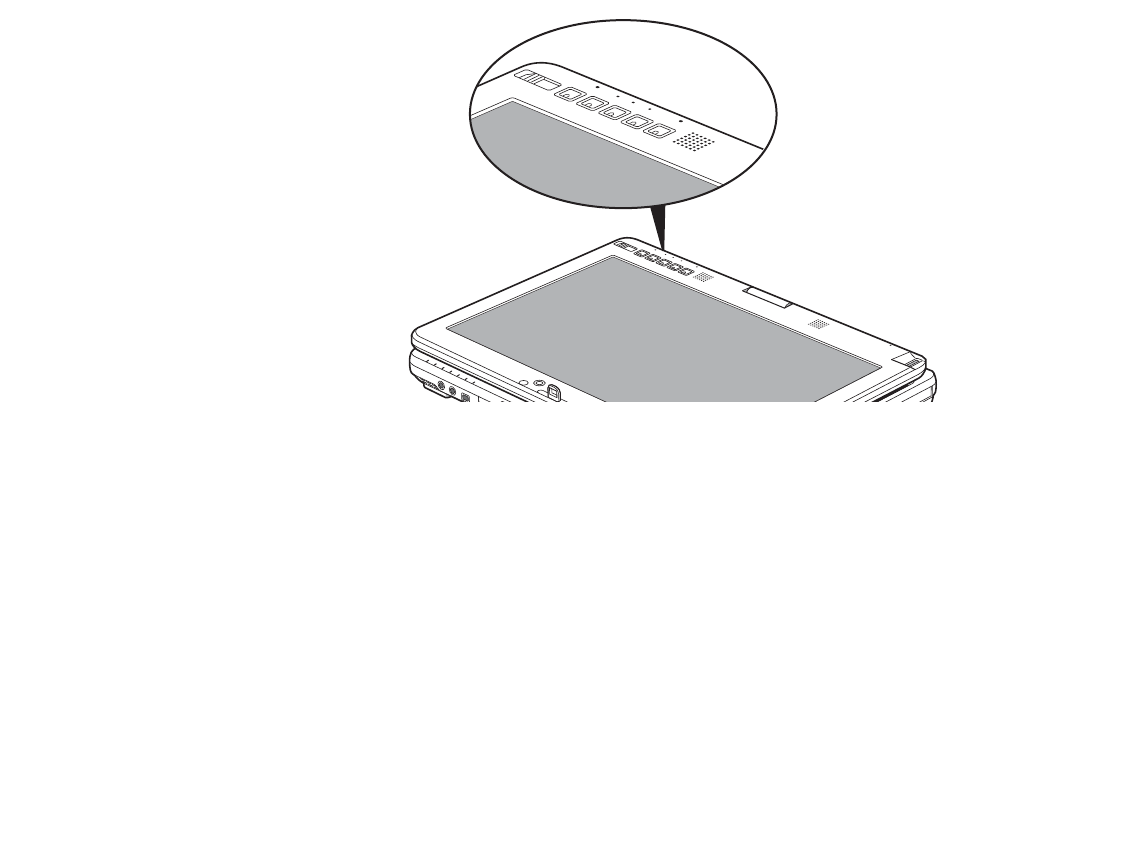
61
- Boutons Sécurité/PC Tablette du LIFEBOOK
Figure 32. Boutons Sécurité/PC Tablette du PC Tablette LIFEBOOK Série T731
Boutons Sécurité/PC Tablette du LIFEBOOK
Votre PC Tablette LIFEBOOK Série T731 présente l’avantage unique d’avoir de nombreux boutons
Sécurité et PC Tablette. Ces boutons vous permettent de protéger votre ordinateur contre toute utilisation
non autorisée et de lancer des applications et actions spécifique au simple toucher d’un bouton.
Fonctions des boutons Sécurité
Si le système de sécurité est activé au démarrage de votre PC Tablette ou à partir du mode Sommeil, Veille
prolongée ou Hors tension, vous devrez entrer un mot de passe à l’aide des boutons de sécurité. Une fois
le mot de passe valide entré, le système reprend son fonctionnement.
Cinq boutons de sécurité/application tablette sont situés sur le côté inférieur droit de l’écran lorsqu’il est
configuré pour une utilisation en ordinateur portable classique.
62
- Boutons Sécurité/PC Tablette du LIFEBOOK
Les cinq boutons sont utilisés pour l’activation des fonctions de sécurité. Quatre des boutons sont utilisés
pour entrer un mot de passe et le cinquième l’est en tant que bouton d’Entrée. Pour plus d’informations
sur chacun des boutons Sécurité, consultez Tableau 1.
Icône du bouton État du système Fonction du tableau de sécurité
Pré-démarrage ou reprise à partir
du mode Veille
Bouton de sécurité 1
Bouton de sécurité 2
Bouton de sécurité 3
Bouton de sécurité 4
Bouton de sécurité [Entrée]
Tableau 1. Fonctions des boutons du tableau de sécurité
Fonctions des boutons de pré-identification
Les cinq boutons peuvent tous être utilisés pour la phase d’identification préalable à l’ouverture d’une
session Windows (càd avant que l’écran d’identification Windows ne s’affiche). Quatre de ces boutons
ont une fonction secondaire. Pour plus d’informations sur les fonctions de pré-identification, consultez
Tableau 2.
<Tab>/<Shift><Tab>
Lorsque le système est en phase de pré-identification, la touche [Page suivante] agit comme la touche
de tabulation [Tab].
Si vous appuyez sur le bouton [Fn] tout en appuyant sur la touche [Page suivante] et en relâchant,
vous exécuterez la même action qu’avec la combinaison [Shift]+[Tab].
63
- Boutons Sécurité/PC Tablette du LIFEBOOK
<Entrée>/<Échap>
Lorsque le système est en phase de pré-identification, la touche [Page précédente] agit comme
la touche [Entrée].
Icône de
bouton État du système Fonctions PC Tablette Fonctions secondaires
(Fn + Bouton)
Pré-démarrage
(écran d’identification
Windows affiché)
<[Tab]> <Shift><Tab>
<[Entrée]> <[Échap]>
Faire tourner l’écran Aucune
Sert à appeler la fonction
secondaire Aucune
Combinaison
[Ctrl+Alt+Suppr] Aucune
Tableau 2. Fonctions des boutons PC Tablette pendant la pré-identification
Si vous appuyez sur le bouton [Fn] tout en appuyant sur la touche [Page précédente] et en la relâchant,
vous exécuterez la même action qu’avec la combinaison [Échap].
Rotation d’écran
La fonction de rotation d’écran devrait normalement être utilisée seulement lorsque le système est
configuré en tablette. Lorsque vous souhaitez utiliser la tablette comme livre électronique, par exemple,
vous pourriez utiliser l’orientation verticale ; lorsque vous accédez aux feuilles de calculs ou quand vous
utilisez le système comme un portable, vous utiliseriez normalement l’orientation horizontale.
Lorsque le système est placé en configuration tablette, l’orientation change automatiquement au mode
vertical par défaut.

64
- Boutons Sécurité/PC Tablette du LIFEBOOK
Si vous appuyez sur la touche [Rotation d’écran] lorsque le système est en pré-démarrage, l’orientation
de l’écran change de Verticale à Horizontale ou d’Horizontale à Verticale.
Bouton Fonction / Utilitaire du Menu Fujitsu
Le bouton [Fonction] s’utilise en conjonction avec les autres boutons d’application pour fournir des
fonctionnalités additionnelles. Référez-vous aux détails spécifiques plus haut.
Fonctions des boutons de post-identification
Les cinq boutons peuvent tous être utilisés une fois l’identification Windows effectuée. Quatre de ces
boutons ont une fonction secondaire. Pour plus d’informations sur les fonctions de post-identification,
consultez le Tableau 3.
Bouton [Page suivante / Application A]
Lorsque vous appuyez sur la touche [Page suivante] pendant que le système fonctionne, chaque pression
de la touche défilera l’écran vers le bas d’un écran. Cela vous permet de naviguer rapidement à travers de
larges documents.
Lorsque vous appuyez sur la touche [Fn] tout en appuyant et relâchant la touche [Page suivante/Application A],
vous démarrez automatiquement tout programme attibué à cette touche. L’application par défaut de ce
bouton est la Calculatrice. Si vous désirez sélectionner une application différente pour cette touche,
reportez-vous à « Modification des fonctions des boutons PC Tablette » en page 67.
L'ORIENTATION PAR DÉFAUT DE L'ÉCRAN PEUT ÊTRE CHANGÉE EN OUVRANT LE PANNEAU DE
CONFIGURATION, EN DOUBLE-CLIQUANT SUR L'ICÔNE COMMANDS DU PC TABLETTE FUJITSU, PUIS EN
SÉLECTIONNANT LES PARAMÈTRES VOULUS DANS LES PROPRIÉTÉS D'AFFICHAGE. APRÈS AVOIR
MODIFIÉ LES PARAMÈTRES, SAUVEGARDEZ-LES.
65
- Boutons Sécurité/PC Tablette du LIFEBOOK
Bouton [Page précédente / Application B]
Lorsque vous appuyez sur le bouton [Page précédente] pendant que le système fonctionne, chaque
pression du bouton fait défiler l’écran vers le haut d’un écran à la fois. Cela vous permet de naviguer
rapidement à travers de larges documents.
Lorsque vous appuyez sur la touche [Fn] tout en appuyant et relâchant la touche [Page précédente/
Application B], vous démarrez automatiquement tout programme attibué à cette touche. L’application
par défaut pour ce bouton est Journal MS. Reportez-vous à Voir « Modification des fonctions des boutons
PC Tablette » en page 67 pour attribuer une application différente à cette touche.
Icône du
bouton État du système Fonctions PC
Tablette principales Fonctions secondaires
(Fn + Bouton)
Post-démarrage
(bureau Windows
affiché)
Page suivante Application A définie
par l’utilisateur
(Par défaut = calculatrice)
Page précédente Application B définie
par l’utilisateur
(Par défaut = Journal MS)
Rotation d’écran Changement d’affichage :
1. Écran interne uniquement
2. CRT (rayons cathodiques)
uniquement
3. Affichage mixte
Utilisation de la fonction
secondaire Utilitaire de menu Fujitsu
Combinaison
[Ctrl+Alt+Suppr] Aucune
Tableau 3. Fonctions des boutons PC Tablette pendant la post-identification

66
- Boutons Sécurité/PC Tablette du LIFEBOOK
Bouton Rotation de l’écran/Changement d’affichage
La fonction de rotation d'écran devrait normalement être utilisée seulement lorsque le système est
configuré en tablette. Lorsque vous souhaitez utiliser la tablette comme livre électronique, par exemple,
vous pourriez utiliser l'orientation verticale; lorsque vous accédez aux feuilles de calculs ou quand vous
utilisez le système comme un portable, vous utiliseriez normalement l'orientation horizontale.
Lorsque le système est placé en configuration tablette, l'orientation change automatiquement au mode
vertical par défaut. Pour désactiver ou réactiver la fonction de rotation automatique, sélectionnez
Démarrer > Tous les programmes > Utilitaire de pivotement automatique, puis choisissez la fonction
désirée.
Lorsque vous appuyez sur la touche [Rotation d’écran / Changement d’affichage], l’orientation de l’écran
du système change de Verticale à Horizontale ou d’Horizontale à Verticale.
Le fait d’appuyer sur la touche [Fn] puis d’appuyer sur le bouton [Rotation de l’écran] en gardant la
première enfoncée fera alterner l’affichage d’un mode à l’autre, comme suit : écran intégré seulement,
écran externe seulement, les deux.
Bouton Fonction / Utilitaire du Menu Fujitsu
Le bouton [Fonction] s’utilise en conjonction avec les autres boutons d’application pour fournir des
fonctionnalités additionnelles. Référez-vous aux détails spécifiques plus haut.
Appuyez deux fois sur le bouton [Fn] et vous verrez apparaître l’utilitaire de menus Fujitsu sur votre écran,
vous permettant de modifier certains paramètres du système.
L'ORIENTATION PAR DÉFAUT DE L'ÉCRAN PEUT ÊTRE CHANGÉE EN OUVRANT LE PANNEAU DE
CONFIGURATION, EN DOUBLE-CLIQUANT SUR L'ICÔNE COMMANDS DU PC TABLETTE FUJITSU, PUIS EN
SÉLECTIONNANT LES PARAMÈTRES VOULUS DANS LES PROPRIÉTÉS D'AFFICHAGE. APRÈS AVOIR
MODIFIÉ LES PARAMÈTRES, SAUVEGARDEZ-LES.

67
- Boutons Sécurité/PC Tablette du LIFEBOOK
Combinaison [Ctrl+Alt+Suppr]
Si vous appuyez sur le bouton [Ctrl-Alt-Del] pendant au moins 8 millisecondes, l’écran d’identification
ou le gestionnaire des tâches Windows apparaîtra.
Modification des fonctions des boutons PC Tablette
Les boutons Applications A et B peuvent être changés pour lancer un programme ou effectuer une tâche
que vous choisissez. Par défaut, le bouton Application A lance la Calculatrice et le bouton Application B,
le Journal MS.
Pour lancer différentes applications ou amener les boutons Applications A et B à effectuer une tâche
spécifique :
1Dans le Panneau de configuration, cliquez sur l’icône « Paramètres des boutons tablette ».
2Sélectionnez l’onglet Boutons tablette et, dans la liste, cliquez sur le bouton que vous souhaitez modifier.
3Cliquez sur [Changer] et ouvrez la liste déroulante dans le champ Press :.
4Sélectionnez l’action que vous voulez voir le bouton effectuer. Si vous voulez lancer un programme, cliquez sur
[Lancer une Application] puis naviguez vers l’emplacement du programme.
5Cliquez sur [OK], puis cliquez à nouveau sur [OK]. Les boutons effectueront maintenant les actions que vous
leur avez assignées.
Configuration du tableau de sécurité LIFEBOOK
Lorsque vous recevez votre PC Tablette LIFEBOOK, l’application du tableau de sécurité est préinstallée,
mais sans aucun mot de passe défini. Les rubriques suivantes décrivent en détail le tableau de sécurité
et la façon de configurer, de changer ou de supprimer des mots de passe.
Boutons numérotés
Utilisez ces boutons pour entrer votre mot de passe.
Bouton Entrée
Après avoir entré les codes numérotés, appuyez sur ce bouton pour enregistrer le mot de passe dans
le PC Tablette.

68
- Boutons Sécurité/PC Tablette du LIFEBOOK
Mots de passe
Des mots de passe d’utilisateur et de superviseur peuvent être définis sur l’ordinateur. Afin de faciliter la
gestion des systèmes, le mot de passe de superviseur est habituellement le même sur tous les PC Tablette
d’un groupe de travail, d’un bureau ou d’une entreprise. Toutefois, les ordinateurs individuels utilisés dans
un environnement de groupe ne devraient pas utiliser un mot de passe commun. Un mot de passe se compose
de une à cinq frappes de bouton, suivies du bouton Entrer. Une frappe valide peut faire intervenir un seul
bouton ou jusqu’à quatre boutons simultanément.
Voici des exemples de frappes valides :
•Bouton [4] enfoncé seul
•Boutons [2] et [3] enfoncés en même temps
•Boutons [1], [2] et [4] enfoncés en même temps
•Boutons [1], [2], [3] et [4] enfoncés en même temps
Voici maintenant des mots de passe valides. Les codes entre accolades ({ }) font intervenir plus d’un bouton.
•{[2]+[3]}, [1], [Entrée]
•[4], [Entrée]
•{[1]+[3]}, {[2]+[3]+[4]}, [1], [4], [2], [Entrée]
Définition des mots de passe
Lorsque le portable est expédié de l’usine, aucun mot de passe n’est défini. Vous avez le choix de le laisser
tel quel ou de définir un mot de passe de superviseur et d’utilisateur. Vous devez définir le mot de passe
de superviseur avant celui de l’utilisateur.
•LE MOT DE PASSE DU SUPERVISEUR PERMET DE CONTOURNER LE MOT DE PASSE D’UTILISATEUR AU CAS OÙ
CE DERNIER SERAIT OUBLIÉ. UTILISÉ SEUL, LE MOT DE PASSE DE SUPERVISEUR NE VERROUILLE PAS LE SYSTÈME.
•LES DEUX MOTS DE PASSE (SUPERVISEUR ET UTILISATEUR) DOIVENT ÊTRE DÉFINIS POUR QUE LE TABLEAU
DE SÉCURITÉ FONCTIONNE.