Fujitsu Isotec 001M33331A Dot Matrix Printer User Manual 2 of 3
Fujitsu Isotec Limited Dot Matrix Printer 2 of 3
Contents
- 1. User Manual 1
- 2. User Manual 2
- 3. User Manual 1 of 3
- 4. User Manual 2 of 3
- 5. User Manual 3 of 3
User Manual 2 of 3

PRINTING
PRINTING
User's Manual 4-1
Quick
Reference Introduction Setting Up Paper
Handling Printing Setup Mode
CHAPTER 4
PRINTING
This chapter describes the following everyday
printing operations:
• Selecting print features
• Starting, stopping, or resuming printing
• Removing printed pages
• Clearing the print buffer
Instructions for loading paper are given in Chapter 3.
The print features you select determine how your printed pages will look.
Print features include the following:
• Print quality
• Fonts
• Pitch (characters per horizontal inch)
• Page length and width
• Line spacing (lines per vertical inch)
To select print features, you can use either commercial software or the printer
control panel. The method you use depends on the capabilities of your
software. If your software has most of the features you require, you may
rarely – if ever – have to use the control panel. In fact, your software often
overrides the printer settings.
If your software has limited options, you can use the printer control panel to
select print features. Sometimes, the control panel enables you to select
features not available through your software. For example, you can select
downloaded fonts not supported by your software.
SELECTING PRINT
FEATURES
PRINTING
4-2 User's Manual
Using Commercial Software
Many commercial software packages offer a wide variety of print features,
including some features that are not supported by this printer. For example,
software often provides a wider range of font sizes than the printer can
accommodate. Software also allows you to specify multiple fonts on a page.
To determine which features your software supports and how to select them,
refer to your software documentation.
Using the Control Panel
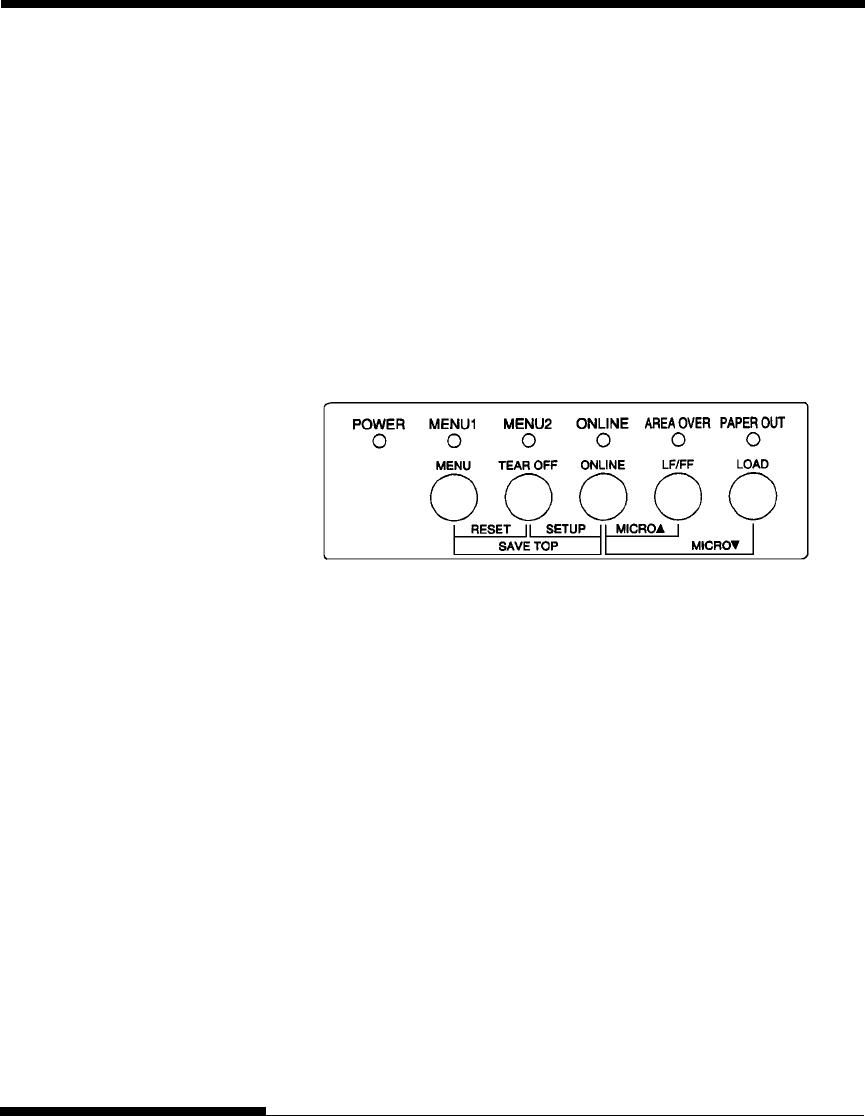
Use the MENU button to directly select one of the two menus.
Printer control panel
The MENU button specifies MENU1 or MENU2, either of which allows you
to specify different sets of options in advance. Some of the print features
include emulation, print quality, character pitch, and line spacing.
When you first turn the printer on, the MENU 1 indicator is lit; that is, all of
the print features assigned to MENU1 are enabled. However, you can easily
switch to MENU2 before printing. You can also select a resident font other
than the fonts assigned to MENU1 and MENU2.
NOTE
For easy reference, keep a list of your current MENU 1 and MENU 2
settings near the printer. To print a list of current settings, see the section
Printing a List of Selected Options in Chapter 5. You may also want to
use the space provided in Table 4.1 to record your settings.
PRINTING
PRINTING
User's Manual 4-3
Quick
Reference Introduction Setting Up Paper
Handling Printing Setup Mode
Selecting MENU1 or MENU2
When you first turn the printer on, MENU1 is selected. To change to MENU2
or back to MENU1, proceed as follows:
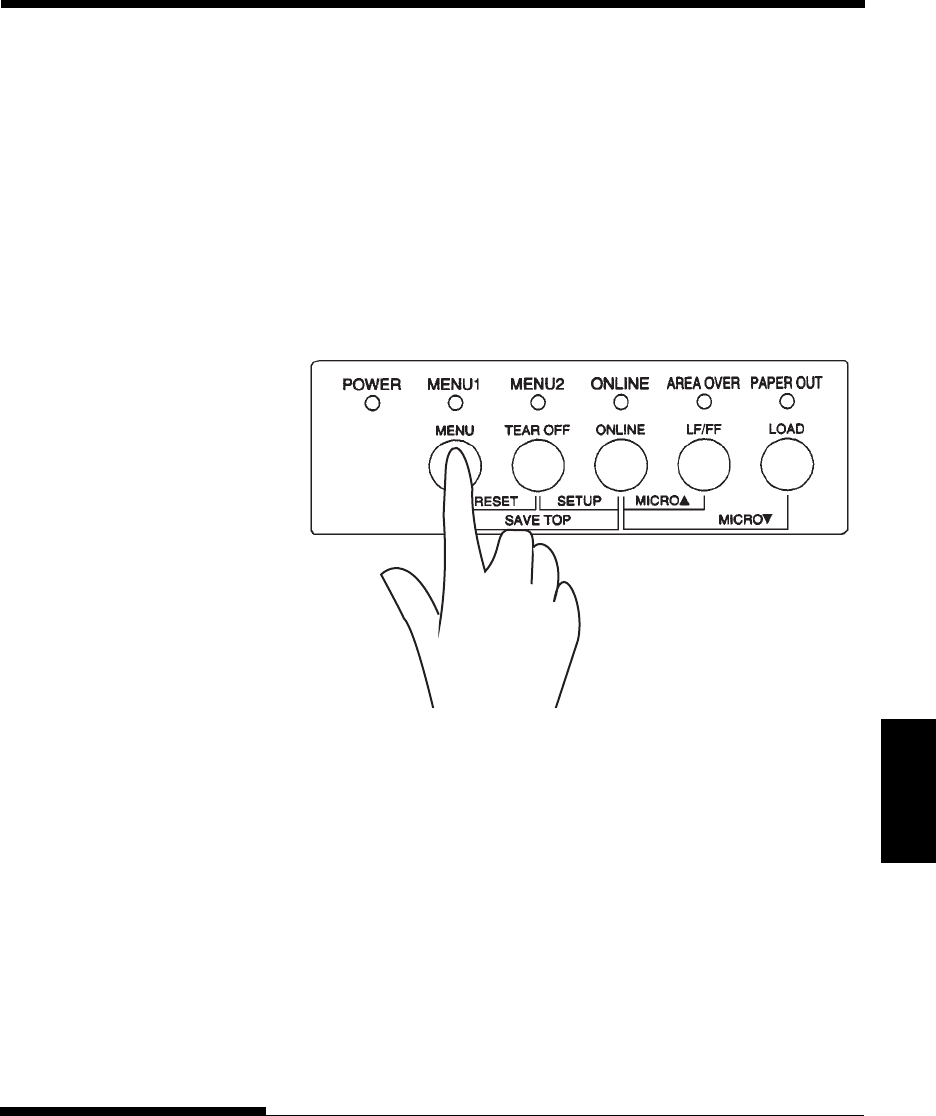
1. Press the ONLINE button to place the printer offline.
2. Repeatedly press the MENU button. The lighted indicator (1 or 2)
shows the menu selected. When the menu selection is changed, the
font (font, pitch, and quality) assigned in the selected menu becomes
valid.
PRINTING
4-4 User's Manual
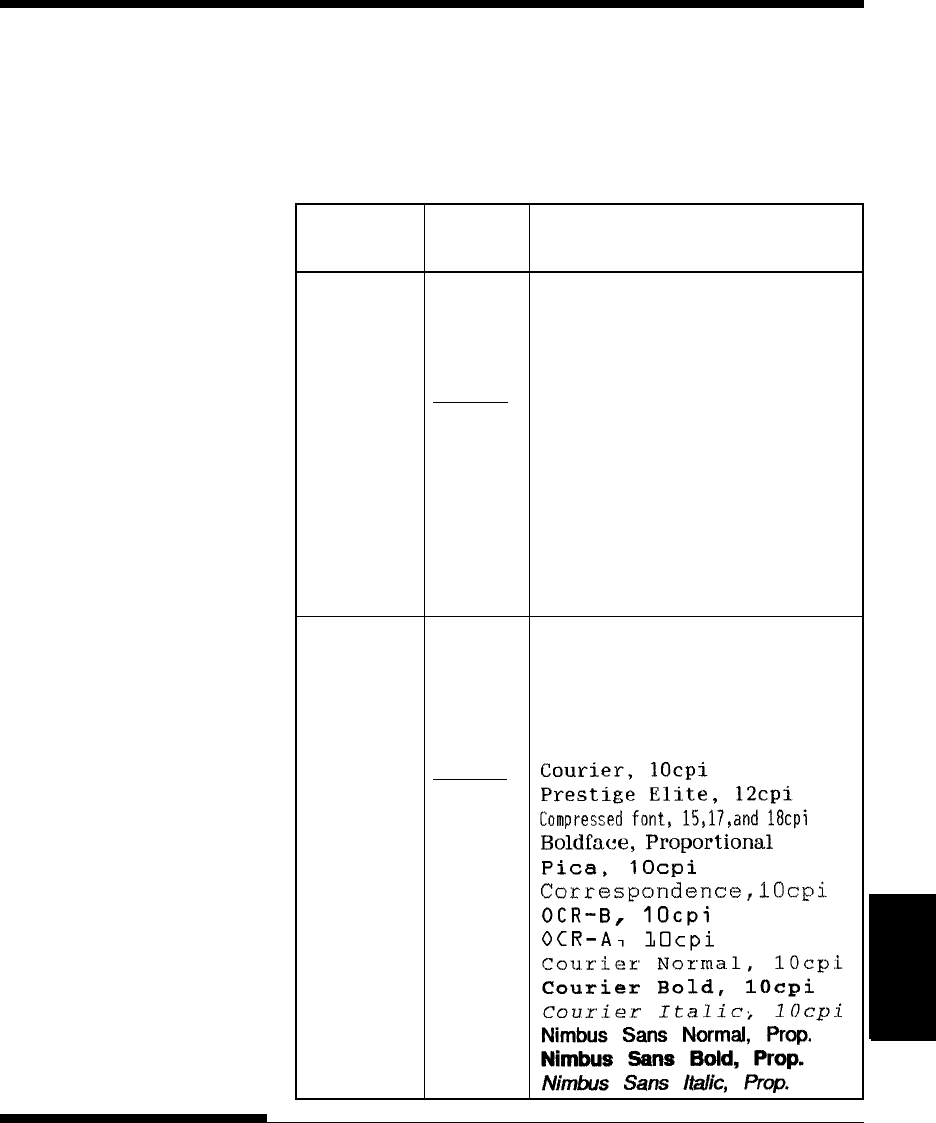
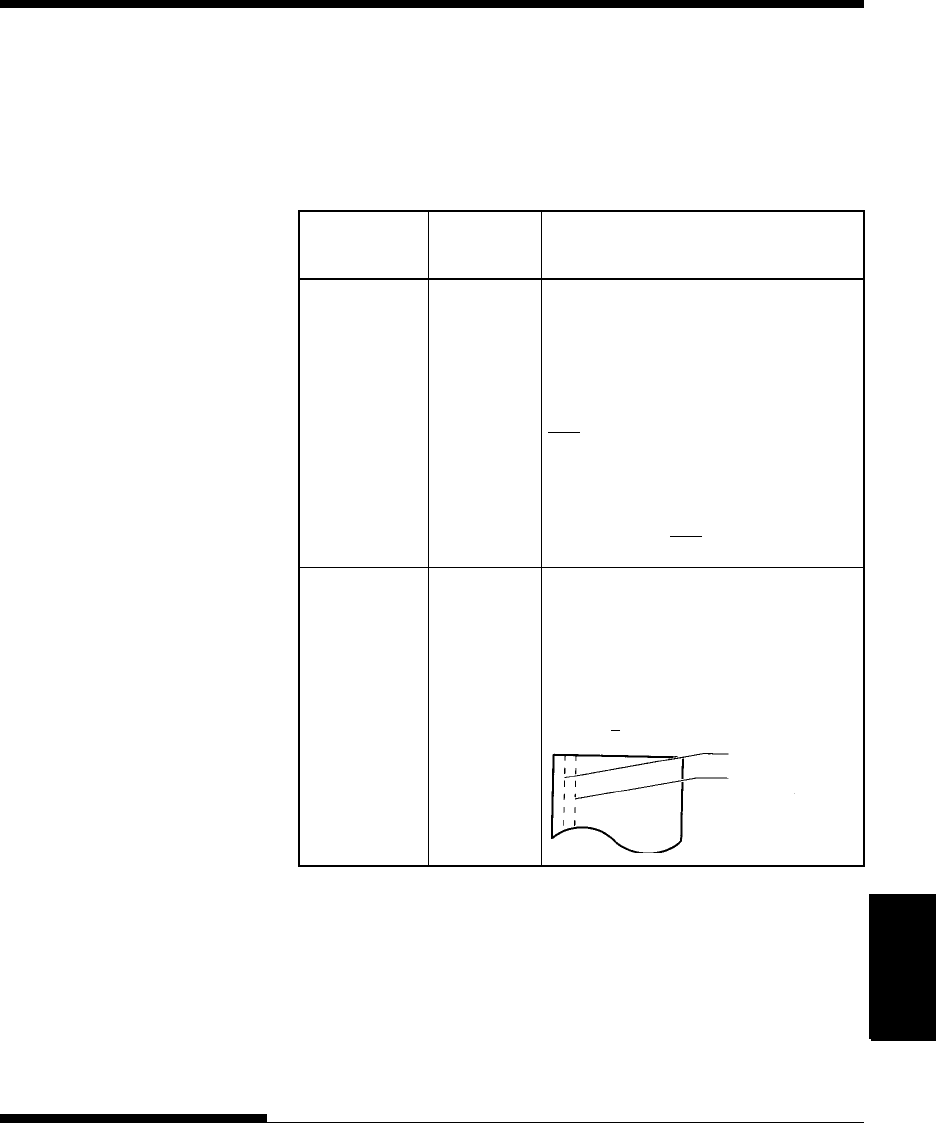
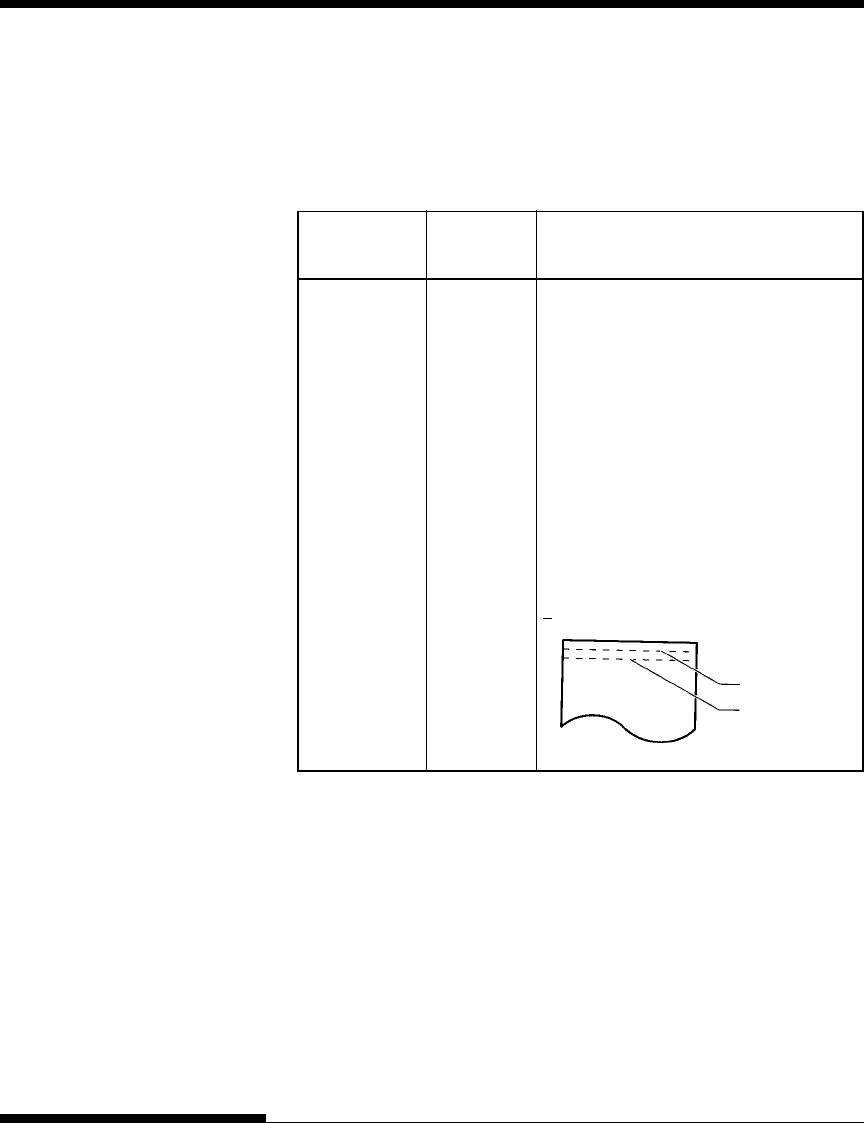
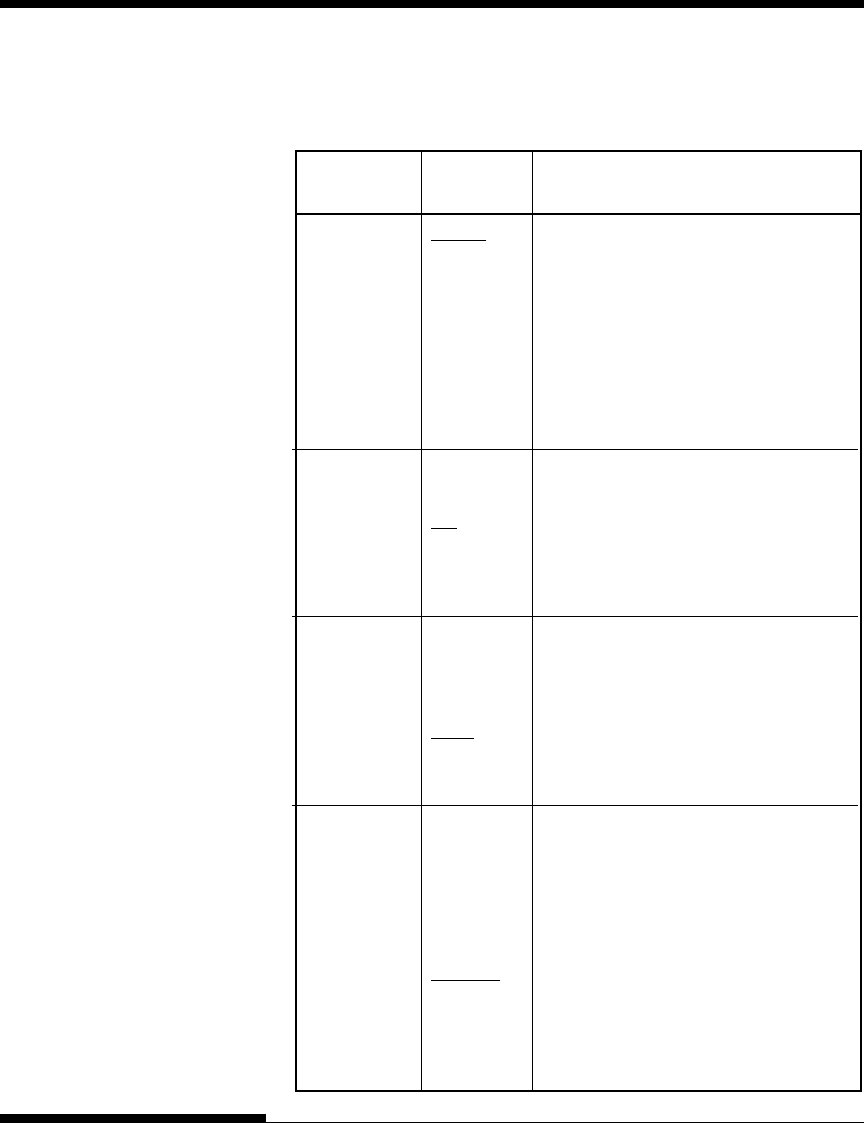
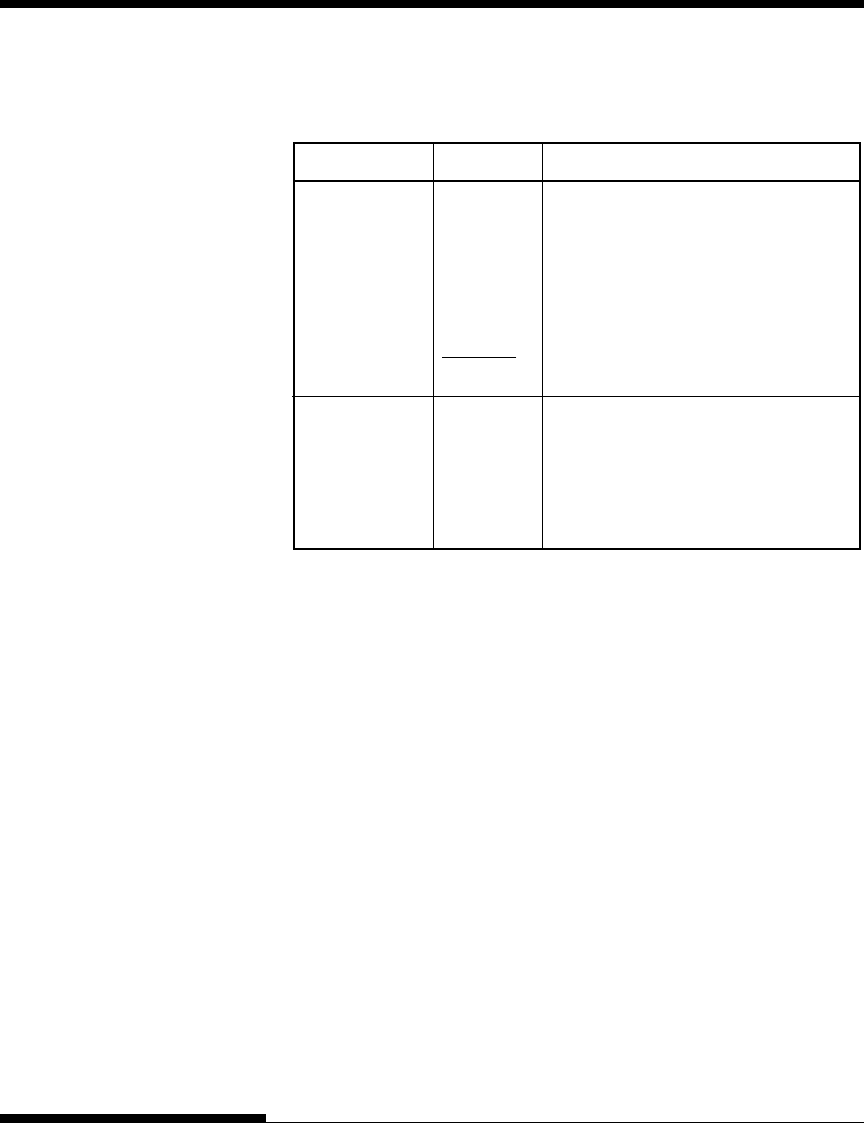
Table 4.1 MENU1 and MENU2 Settings
Default Settings
For easy reference, check (√) or record
your default settings in the space below.
Setting
Print Feature MENU1 MENU2
Emulation
Fujitsu DPL24C PLUS
IBM Proprinter XL24E
Epson ESC/P2
Font
Courier 10
Prestige Elite 12
Compressed 17
Boldface PS
Pica 10
Correspondence
OCR-B 10
OCR-A 10
Courier Normal 10 (outline)
Courier Bold 10 (outline)
Courier Italic 10 (outline)
Nimbus Sans Normal PS (outline)
Nimbus Sans Bold PS (outline)
Nimbus Sans Italic PS (outline)
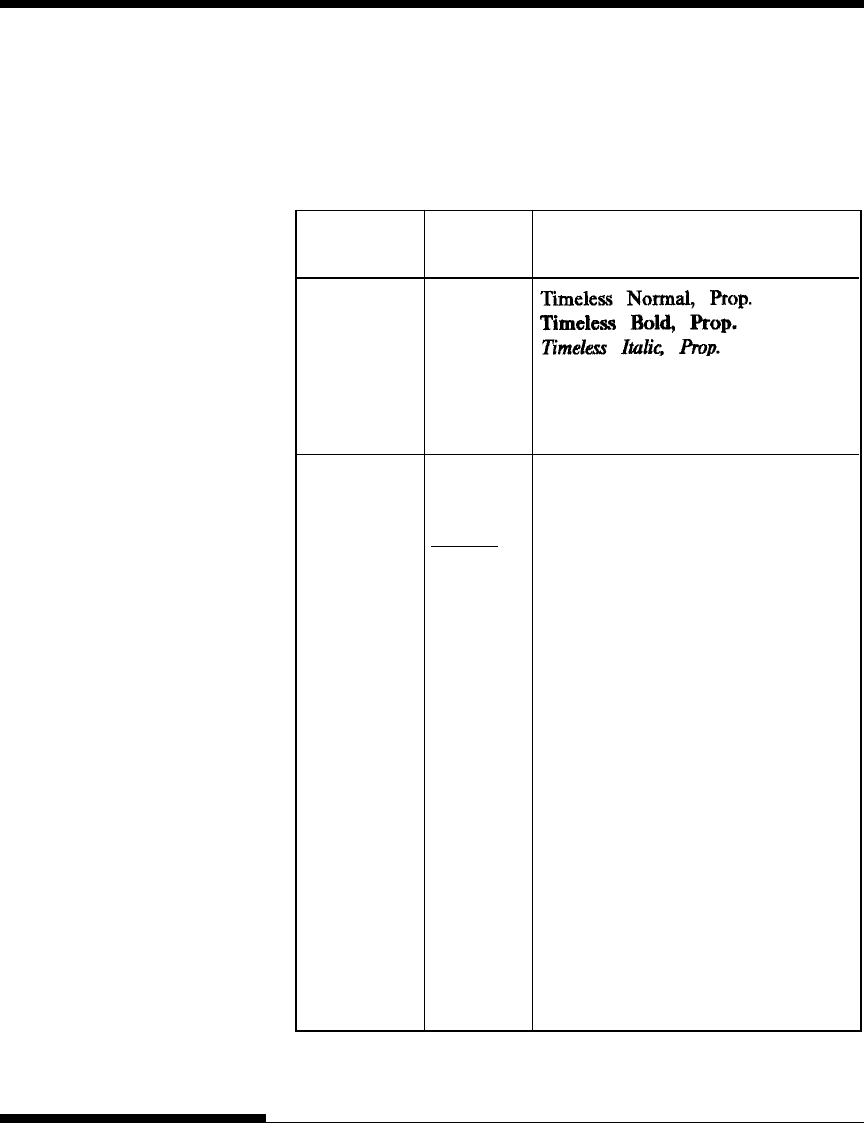
Timeless Normal PS (outline)
Timeless Bold PS (outline)
Timeless Italic PS (outline)
Downloaded font 0
Downloaded font 1
Print quality
Letter
Report
Draft
High-speed draft
Pitch
2.5, 3, 5, 6, 10, 12
15, 17, 18 or 20 cpi
Proportional spacing
Other features:

PRINTING
PRINTING
User's Manual 4-5
Quick
Reference Introduction Setting Up Paper
Handling Printing Setup Mode
3. Press the ONLINE button to return online. You are ready to print
using the selected menu.
Starting Printing
Before you start to print, make sure that paper is loaded. Also, verify that the
paper thickness lever is set to the appropriate position (1 to D).
To start printing, press the ONLINE button to place the printer online. Then
start your software.
Stopping Printing
To stop printing immediately, press the ONLINE button to place the printer
offline. You can also use your software to stop printing, but there will be a
slight delay before printing stops. Any data sent to the print buffer but not yet
printed is stored until you resume printing. Data in the print buffer is lost if
you turn the printer off.
To resume printing, press the ONLINE button again. To cancel printing, use
the cancel commands provided by your software or computer. To clear the
print buffer, place the printer offline and press the MENU and TEAR OFF
buttons. Any data sent to the print buffer before you canceled printing will be
lost.
Resuming from a Paper-Out
The printer can “sense” when paper runs out. Depending upon how PPR-
OUT (paper-out) is set in setup mode, the printer either:
• Stops printing and lights the red PAPER OUT indicator, or
• Continues printing until no more data remains in the printer.
See Chapter 5 for details on setting PPR-OUT. The factory default is to stop
printing if continuous forms paper runs out and to continue printing if single
sheet paper runs out.
To resume printing when paper runs out, use either of the methods described
below:
STARTING OR STOPPING
PRINTING

PRINTING
4-6 User's Manual
Printing the remaining lines on a page
This method is convenient to continue printing under the paper-out condition.
1. Press the ONLINE button. The printer returns to online mode, prints
or feeds one line, and the PAPER OUT indicator lights up again.
2. Repeat this procedure until the full page is printed. Line spacings,
however, may be uneven.
CAUTION
When using the cut sheet stand or when printing remaining lines, be careful
not to print on the platen. Printing on the platen may damage both the
platen and the print head.
Continuing printing after supplying paper
1. Install paper on the forms tractors or on the cut sheet stand.
2. To load the first sheet of paper, press the LOAD button. The PAPER
OUT indicator will turn off.
3. Press the ONLINE button to place the printer online. The printer
resumes printing.
NOTE
For continuous forms paper, the page where printing stopped and
the page where printing resumes may be incorrectly printed. In
this case, wait for the entire job to finish printing. Then reprint
the incorrect pages.

PRINTING
PRINTING
User's Manual 4-7
Quick
Reference Introduction Setting Up Paper
Handling Printing Setup Mode
Resuming after an Area Over warning
The printer senses the left and right edges of paper and stores their positions
when the paper is loaded. If your software will print data past either edge, the
printer ignores that data but does not stop printing. Rather, the AREA OVER
indicator lights to call your attention to the loss of data.
The AREA OVER indicator functions when AREACNT (area control) is set
to ENABLE in setup mode. See Chapter 5 for information on setting
AREACNT. The factory default is not to sense the edges. If paper is dark-
colored or preprinted, the printer may not be able to sense the edges correctly.
In this case, disable the sensor.
To resume printing when the AREA OVER indicator is on:
1. Stop your software and press the ONLINE button to place the printer
offline.
2. Adjust the horizontal position of the paper or change the margin
settings in the printer setup menu or your software.
3. Press the ONLINE button to place the printer online. Restart the
software from the page that includes the lost data.

PRINTING
4-8 User's Manual
CLEARING THE PRINT
BUFFER
This section describes the best methods for removing single sheets or
continuous forms paper after printing.
Removing Single Sheets
When you print using software, the printer automatically ejects each sheet of
paper when the end of the printed page is reached. To eject sheets manually,
use one of the following methods:
• Press and hold down the LF/FF button to execute a form feed,
or
• Turn the platen knob clockwise.
Removing Continuous Forms
To avoid wasting paper, use the printer tear-off function to remove continuous
forms paper. Press the TEAR OFF button to advance the perforation to the
tear-off edge. Tear the paper off, and then press any button to retract the paper
back to the top-of-form position. See Chapter 3 for more detailed instructions.
Place the printer offline. Press the MENU and TEAR OFF buttons simultane-
ously to clear all data from the print buffer. This method is useful when you
cancel a print operation and do not want to continue printing data already sent
to the printer.
This method does not change or clear MENU1 and MENU2 settings, paper
loading position settings, and downloaded fonts.
REMOVING PRINTED
PAGES

Setup Mode
USING SETUP MODE
User's Manual 5-1
Quick
Reference Introduc-
tion
Setting Up Paper
Handling Printing Setup Mode
5
USING SETUP MODE
Your printer has two modes: normal and setup.
Normal mode is used for everyday printer opera-
tions and is explained in Chapters 3 and 4.
Setup mode serves two purposes. It enables you to:
• Select the printer’s optional settings
• Help diagnose printer problems
These setup mode functions can be done either offline, using the printer
control panel (offline setup), or remotely, using a setup program in your
computer system or software (online setup). Primarily, this chapter explains
how to use the offline setup mode. The online setup mode, which is reviewed
briefly at the end of this chapter, is valid in all emulations. For details, refer to
the programmer's manuals.
Optional settings on the printer include the emulation, fonts, pitch, page length
and page width, serial interface options, and the top-of-form setting. When
you save your settings in the printer’s permanent memory, they become the
new settings or defaults. These defaults are invoked whenever you turn on the
printer. For example, if you save DPL24C PLUS as the default emulation,
DPL24C PLUS is invoked when you turn on the printer.
The printer diagnostic functions are SELF-TST, HEX-DUMP, and
V-ALMNT. These functions are helpful for printer trouble-shooting, as
described in Chapter 7.
The sections in this chapter are presented in logical sequence. If you are a
first-time user, be sure to read the following sections first:
• Entering Setup Mode
• Overview of Setup Mode
HOW TO USE THIS CHAPTER

USING SETUP MODE
User's Manual5-2
These sections will familiarize you with how setup mode works. Once you
understand the basics, use the following sections to select printer options that
are compatible with your computer system’s hardware and software setup:
• Printing a List of Selected Options
• Deciding Which Options to Change
• Changing MENU1 and MENU2 Options
• Changing Hardware Options
• Changing Print Position Adjustment Options
• Changing Configuration Options
• Exiting and Saving
To restore the printer default settings (factory defaults or power-on defaults),
see the section Resetting Defaults later in this chapter.
For information on using the SELF-TST, HEX-DUMP, and V-ALMNT
functions, see the section Using the Diagnostic Functions later in this
chapter.
For Experienced Users:
Once you are familiar with setup mode, you may want to use the flowchart at
the end of this chapter for quick reference. The flowchart lists all printer
setup functions, items, and options.
Before entering setup mode, load continuous forms paper into the printer as
described in Chapter 3. Several sheets of paper may be required to make all of
your setup mode selections.
To enter setup mode, follow these steps:
1. Make sure that continuous forms paper is loaded and that the paper
select lever is set backward.
2. Press the ONLINE button to place the printer offline.
ENTERING SETUP MODE
Setup Mode
USING SETUP MODE
User's Manual 5-3
Quick
Reference Introduc-
tion
Setting Up Paper
Handling Printing Setup Mode
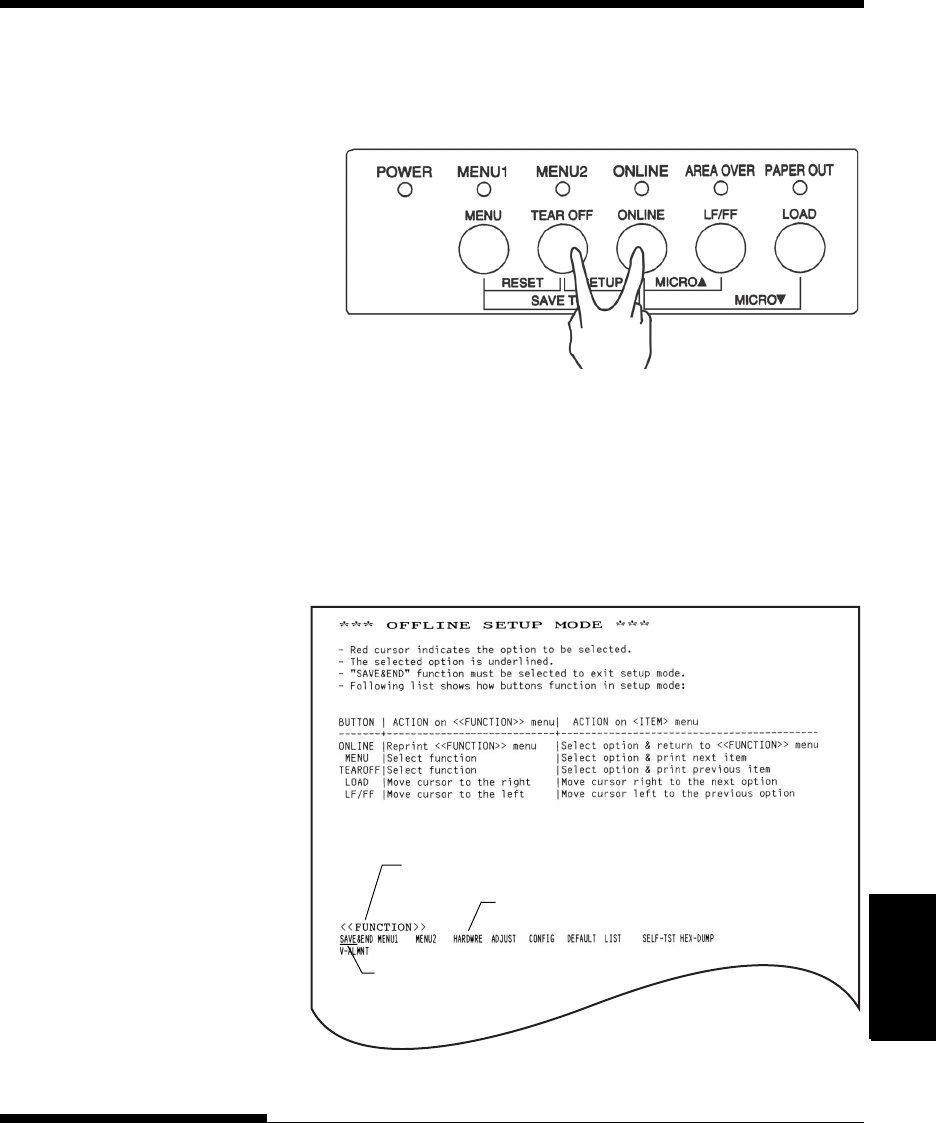
3. Press the TEAR OFF and ONLINE buttons simultaneously until the
printer beeps.
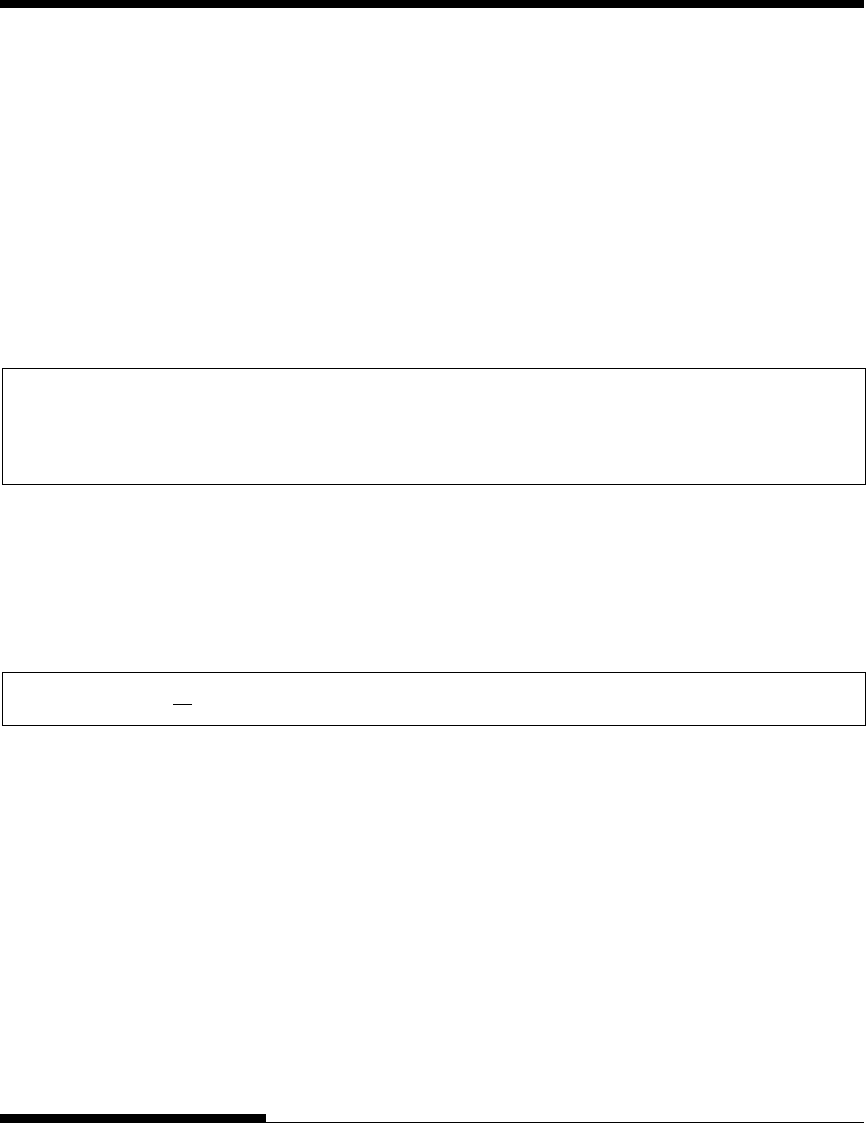
Initial printout in setup mode
Entering setup mode
If you do not hear a beep or hear an alarm beep (beeps four times), you
are not in setup mode. Place the printer offline and try again.
4. When the printer enters offline setup mode, it prints the following
information.
<<FUNCTION>> menu
Function
Red cursor on print guide
USING SETUP MODE
User's Manual5-4
Select Function SAVE & END Exits setup mode and saves any changes made
while in setup mode.
MENU1 and Assigns print features to MENU1 and
MENU2 MENU2 on the printer control panel.
HARDWRE Changes the printer hardware options.
ADJUST Changes the print position adjustment options.
CONFIG Changes the configuration options.
The initial printout contains a header, help menu, and <<FUNCTION>>
menu. The header tells you that the printer is offline and in setup mode. The
help menu provides a quick summary of how to use setup mode. The
<<FUNCTION>> menu lists all of the functions available to you in setup
mode. Note that the red cursor on the plastic print guide is initially positioned
below the SAVE & END function.
Setup mode can also be entered by turning off the printer, then turning the
printer back on while pressing the TEAR OFF and ONLINE buttons simulta-
neously until the printer beeps.
When you enter setup mode, the following <<FUNCTION>> menu is printed:
OVERVIEW OF SETUP
MODE
<<FUNCTION>>
SAVE&END MENU1 MENU2 HARDWRE ADJUST CONFIG DEFAULT LIST SELF-TST HEX-DUMP
V-ALMNT
Table 5.1 summarizes the purpose of each function.
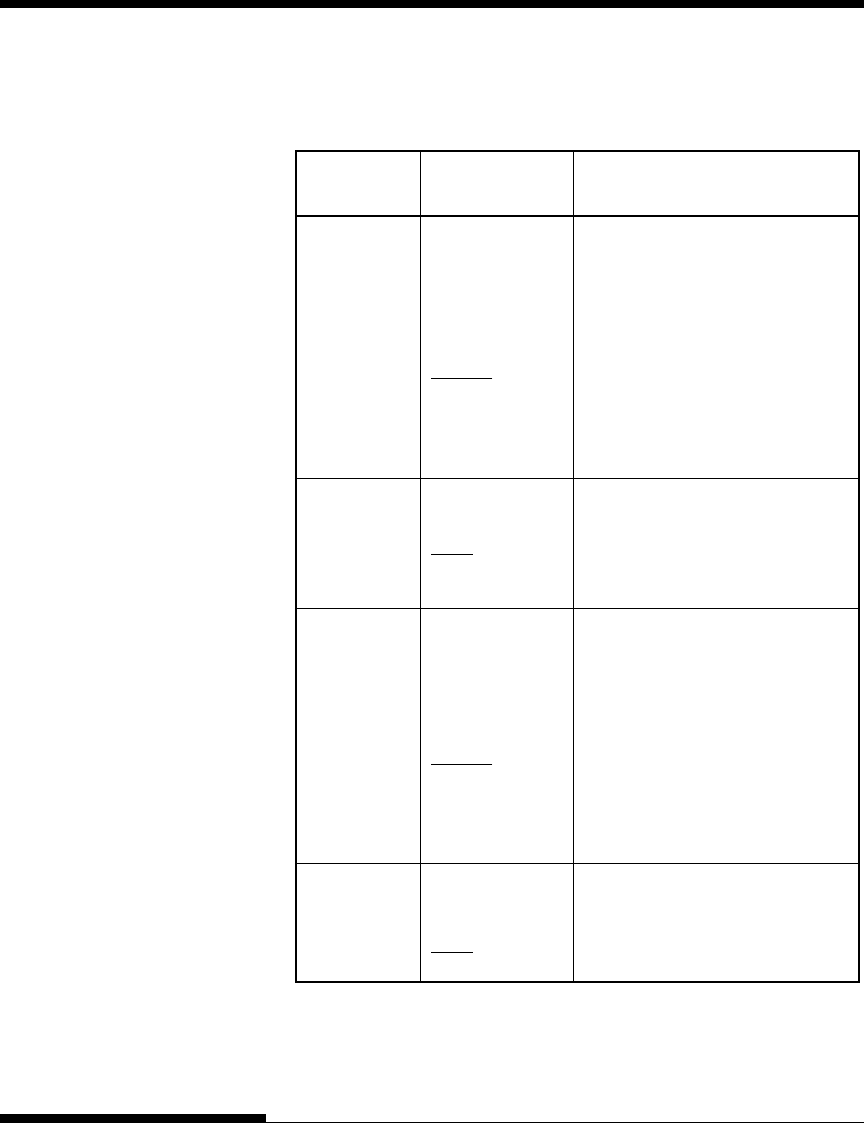
Table 5.1 Setup Mode Functions
Type Function Purpose

Setup Mode
USING SETUP MODE
User's Manual 5-5
Quick
Reference Introduc-
tion
Setting Up Paper
Handling Printing Setup Mode
Select DEFAULT
Resets factory defaults in MENU1 and MENU2.
Sub Function LIST Prints a list of all currently selected options.
SELF-TST Runs the self-test.
HEX-DUMP Prints hex dumps.
V-ALMNT Checks and corrects vertical print alignment.
Table 5.1 Setup Mode Functions (Cont.)
To select a function from the <<FUNCTION>> menu:
1. Repeatedly press the LOAD button or the LF/FF button to position the
red cursor on the plastic print guide under the function you require.
The LOAD button moves the cursor to the next option and the LF/FF
button moves the cursor to the previous option.
2. Press the TEAR OFF button or the MENU button to select the
function. If the function has items and options, the printer prints the
first item and its options. The MENU1, MENU2, HARDWRE,
ADJUST, and CONFIG functions contain items that have selectable
options. The other functions have neither items nor options.
The first three MENU1 items and their options are shown below.
Items are enclosed in single brackets < >.
Type Function Purpose
<EMULATE> DPL24C+ XL24E ESC/P2
<FONT>
COUR 10 PRSTG12 COMPRSD BOLDFCE PICA 10 CORRESP OCR-B OCR-A COUR-N COUR-B
COUR-I N.SAN-N N.SAN-B N.SAN-I TIMLS-N TIMLS-B TIMLS-I DOWNLD0 DOWNLD1
<QUALITY> LETTER REPORT DRAFT HI-DRAFT
Self Diagnostic
Function

USING SETUP MODE
User's Manual5-6
To select an option from the <item> menu:
1. Repeatedly press the LOAD button or the LF/FF button to position the
red cursor on the plastic print guide under the option you require.
2. Press the MENU button to select the option. The printer prints the
next item and its options. You can press MENU to select the option.
Then, the printer prints the previous item and its options.
3. After selecting the desired options, press the ONLINE button to
reprint the <<FUNCTION>> menu.
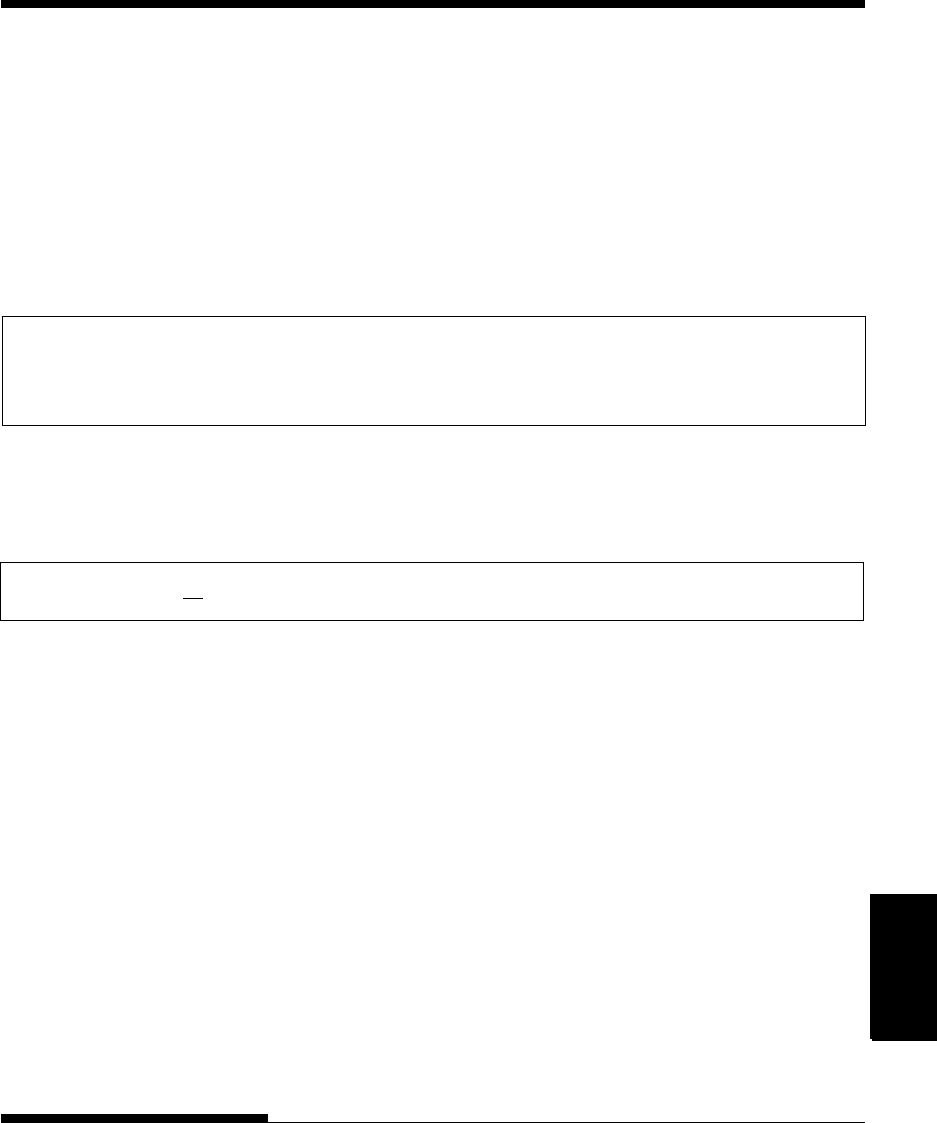
For each item, the short-underlined option is the current default option
(the option currently saved in the printer’s permanent memory). In the
previous example, the default options are Fujitsu DPL24C PLUS
emulation, Courier 10 font, and letter print quality.
The chart on the next page summarizes how to select options such as
emulation, font, and print quality and how to use functions that do not
have options.
Setup Mode Example
To become familiar with setup mode, try the following example. This
example shows how to change the font and pitch in MENU2 to Prestige Elite
12 and 12 cpi.
1. Load continuous forms paper.
2. Enter setup mode.
Press the TEAR OFF and ONLINE buttons simultaneously until the
printer beeps.
3. Select the MENU2 function.
Wait for the printer to stop printing and press the LOAD button or the
LF/FF button twice to position the red cursor on the print guide under
MENU2. Press the TEAR OFF button or the MENU button to select
the MENU2 function and print the <EMULATE> item and its options.

Setup Mode
USING SETUP MODE
User's Manual 5-7
Quick
Reference Introduc-
tion
Setting Up Paper
Handling Printing Setup Mode
Summary of setup mode

USING SETUP MODE
User's Manual5-8
4. Select the current emulation.
Since you do not want to change the emulation, press the MENU
button to select the current emulation and print the next item,
<FONT> and its options.
5. Change the font to Prestige Elite 12.
Press the LOAD button or the LF/FF button once to position the
cursor beneath PRSTG12. Press the MENU button to select
PRSTG12 and print the next item, <QUALITY>, and its options.
6. Select the current print quality.
Since you do not want to change the print quality, press the MENU
button to select the current print quality and print the next item,
<PITCH>, and its options.
7. Change the pitch to 12 cpi and exit the MENU2 function.
Press the LOAD button or the LF/FF button once to position the
cursor under 12 CPI. Since you do not want to make any other
changes in MENU2, press the ONLINE button to select 12 CPI and
exit MENU2. The <<FUNCTION>> menu is then reprinted.
8. Exit setup mode, saving the new font and pitch.
Since the cursor is under SAVE & END, press the MENU button or
the TEAR OFF button to select SAVE & END. The printer saves
Prestige Elite 12 and 12 cpi as the new power-on defaults in MENU2.
The printer then exits setup mode and returns online. These settings
remain in effect until changed.

Setup Mode
USING SETUP MODE
User's Manual 5-9
Quick
Reference Introduc-
tion
Setting Up Paper
Handling Printing Setup Mode
Points to Remember
• Load continuous forms paper before entering setup mode. In setup
mode, the LF/FF button cannot be used to feed paper. To adjust the
line position of paper in setup mode, use the platen knob.
• Whenever you enter setup mode, short help menus are printed
at the top of the page. Help menus are also printed when you select
the SELF-TST, HEX-DUMP, or V-ALMNT functions. Use help
menus for quick reference while in setup mode.
• When printing the items and options for each function, you can only
print one item at a time. However, you can move either forward or
backward in the item list. To move forward (print the next item), press
the MENU button. To move backward (print the previous item), press
the TEAR OFF button.
• While in the <<FUNCTION>> menu or when selecting a function that
contains items and selectable options, press the ONLINE button to
reprint the <<FUNCTION>> menu.
• A short underline under the first two letters of an option indicates that
it is the current default setting. For example, 12 CPI indicates that 12
characters per inch is the default pitch.
To change the default, select and save a new pitch setting.
• While in setup mode, you can use the LIST function to print out a list
of the currently selected options (see the next section for details).
• To exit setup mode and permanently save your changes, select either
the SAVE & END function. For details, see the section Exiting and
Saving later in this chapter. To exit setup mode without saving your
changes, turn the printer off. Your previous power-on defaults are
active when you turn the printer on again.
USING SETUP MODE
User's Manual5-10
PRINTING A LIST OF
SELECTED OPTIONS
The LIST function prints a list of all the printer’s currently selected options.
This function is useful for checking the printer settings when you first enter
setup mode or just before you exit. To print a list of options, load continuous
forms paper and then proceed as follows:
1. Enter setup mode.
Place the printer offline. Press the TEAR OFF button and the
ONLINE button simultaneously until the printer beeps. Wait for the
printer to stop printing and check that the following <<FUNCTION>>
menu is printed:
2. Select the LIST function.
Repeatedly press the LOAD button or the LF/FF button to position the
red cursor under LIST. Next press the TEAR OFF button or the
MENU button to select the LIST function. The printer starts to print a
list of the currently selected options. The preselected factory settings,
also called factory defaults, are shown on the opposite page.
When the printer finishes printing the list of options, it reprints the
<<FUNCTION>> menu.
NOTE
To remove the printout, turn the platen knob until the paper can
be torn off at the perforation. In setup mode, you cannot use the
printer tear-off feature (TEAR OFF button).
3. Do either of the following:
• Select another function, or
• Exit setup mode, saving any changes you made.
For details about other functions, see the other sections in this chapter.
To exit setup mode and save your changes, make sure that the red
cursor is positioned beneath SAVE & END, then press the MENU
button or the TEAR OFF button.
<<FUNCTION>>
SAVE&END MENU1 MENU2 HARDWRE ADJUST CONFIG DEFAULT LIST SELF-TST HEX-DUMP
V-ALMNT
Setup Mode
USING SETUP MODE
User's Manual 5-11
Quick
Reference Introduc-
tion
Setting Up Paper
Handling Printing Setup Mode
*1 LOADTIM is printed after this line when AUTO option is selected for
CUTLOAD.
Printout of factory defaults using LIST
(*1)

USING SETUP MODE
User's Manual5-12
MENU1 EMULATE The emulation selected on the printer
must be the same as the emulation
selected in your software. If you selected
an emulation when you set up the
printer (Chapter 2), you do not need to
change the EMULATE option unless you
want to change to a different emulation.
The emulation assigned to MENU1 is the
default when you turn the printer on.
See the section Changing MENU1 and
MENU2 Options later in this chapter.
MENU2 None If you use MENU2, the emulation selected
for MENU 2 must be the same as the
emulation selected in your software.
See the section Changing MENU1 and
MENU2 Options later in this chapter.
DECIDING WHICH
OPTIONS TO CHANGE
The previous page shows a printout of the printer’s factory default settings. In
this printout, options are listed by functional group:
• Menu 1 settings (MENU1 function)
• Menu 2 settings (MENU2 function)
• Hardware settings (HARDWRE function)
• Print position adjustment settings (ADJUST function)
• Configuration settings (CONFIG function)
Most selectable options only alter print features, such as the typestyle,
page format. However, some options must be selected correctly for the
printer to work properly with your hardware and software. For each
function, Table 5.2 lists items whose options must be selected correctly for
system and printer accessory compatibility.
Table 5.2 Required Options
Function Item Option
Setup Mode
USING SETUP MODE
User's Manual 5-13
Quick
Reference Introduc-
tion
Setting Up Paper
Handling Printing Setup Mode
Table 5.2 Required Options (Cont.)
HARDWRE FORMAT If you have a serial interface, the serial
BAUD-RT interface options selected on the printer
PROTOCL must be the same as the settings you
DSR selected using your software or your
DUPLEX computer operating system. If the settings
CTS are not the same, the printer will not
CD print or will print garbage.
See the section Changing Hardware
Options later in this chapter.
ADJUST None If you are not using software to specify
the top margin of the page, use the
printer’s default top-of-form setting,
1 inch (25.4 mm) from the top of the
paper. If you are using software to
specify the top margin of the page,
change the default setting to 1/6 inch
(4.2 mm).
See the section Changing Print Position
Adjustment Options later in this
chapter.
CONFIG None If you are using paper that is dark-
colored or preprinted with dark colors,
you may need to disable the AREA
OVER detection function.
See the section Changing Configuration
Options later in this chapter.
Function Item Option

USING SETUP MODE
User's Manual5-14
CHANGING MENU1 AND
MENU2 OPTIONS
The MENU1 and MENU2 functions allow you to change the print options
assigned to MENU1 and MENU2 on the printer control panel. In normal
(nonsetup) mode, you can easily switch between the menus for printing, as
described in Chapter 4.
MENU1 is invoked when you first turn the printer on.
Select the same emulation on the printer as is selected in your software. If the
emulations are not the same, the printer will not work correctly with your
software. If you plan to use two different emulations on a regular basis, assign
the most frequently used emulation to MENU1. Assign the second emulation
to MENU2. All of the other settings available for MENU1 and MENU2 are
optional. Some of the items and options will vary with the emulation.
To determine which features your software supports, refer to your software
documentation.
Table 5.3 describes the MENU1 and MENU2 items and options. Both
functions offer the same items and options. The items in Table 5.3 are listed
in the order in which they are printed. Not all items are defined for all
emulations and some options vary with the emulation.
The procedure for changing the MENU1 and MENU2 options is described
after Table 5.3.
Setup Mode
USING SETUP MODE
User's Manual 5-15
Quick
Reference Introduc-
tion
Setting Up Paper
Handling Printing Setup Mode
Table 5.3 MENU1 and MENU2 Items and Options
NOTES:
• Underlined options are the factory defaults.
• Asterisks identify items and options that differ for the IBM XL24E and Epson
ESC/P2 emulations. The notes are defined at the end of the table.
MENU1 and
MENU2 Items
<EMULATE>
Select the same emulation as is selected in
your software. See the section Selecting an
Emulation in Chapter 2 for information on
selecting an emulation.
DPL24C+ Fujitsu DL-series printers
(DPL24C PLUS command set)
XL24E IBM Proprinter XL24E printers
ESC/P2 Epson printers using the ESC/P2
command set
NOTE: When you change the
emulation, all MENU1 or MENU2
options are reset to the factory
defaults for that emulation.
<FONT> For each of the following fonts, the
recommended pitch settings are given
after the font name. When you change the
font, be sure to also change the pitch, if
required.
COUR 10
PRSTG12
COMPRSD
BOLDFCE
PICA 10
CORRESP
OCR-B
OCR-A
COUR-N
COUR-B
COUR-I
N.SAN-N
N.SAN-B
N.SAN-I
Options Description
USING SETUP MODE
User's Manual5-16
Table 5.3 MENU1 and MENU2 Items and Options (Cont.)
NOTES:
• Underlined options are the factory defaults.
• Asterisks identify items and options that differ for the IBM XL24E and Epson
ESC/P2 emulations. The notes are defined at the end of the table.
<FONT> TIMLS-N
(continued) TIMLS-B
TIMLS-I
DOWNLD# Font 0 or font 1 in the printer’s download
RAM
See Appendix F for font examples.
<QUALITY> Select the print quality that most often
meets your needs.
LETTER Letter print quality. This option provides
the highest resolution but the slowest
print speed. It cannot be used with the
compressed font.
REPORT Report print quality. This option provides
lower resolution than letter quality, but at
twice the speed. If you want only the
double speed, regardless of fonts, use the
correspondence font. The quality of the
correspondence font is higher than that of
report.
DRAFT Regular draft print quality. This option
provides lower resolution than report
quality, but at 3.2 times letter speed.
HI-DRFT High-speed draft print quality. This
option provides lower resolution than
draft quality, but at 3.5 times letter speed.
MENU1 and
MENU2 Items Options Description
Setup Mode
USING SETUP MODE
User's Manual 5-17
Quick
Reference Introduc-
tion
Setting Up Paper
Handling Printing Setup Mode
Table 5.3 MENU1 and MENU2 Items and Options (Cont.)
NOTES:
• Underlined options are the factory defaults.
• Asterisks identify items and options that differ for the IBM XL24E and Epson
ESC/P2 emulations. The notes are defined at the end of the table.
MENU1 and
MENU2 Items
<PITCH> ## CPI 2.5, 3, 5, 6, 10, 12, 15, 17, 18, or 20 cpi
(characters per horizontal inch)
PROP SP Proportional spacing (1/12 inch per
character space)
<LINE SP> ## LPI 1, 2, 3, 4, 5, 6, 7, or 8 lpi
(lines per vertical inch)
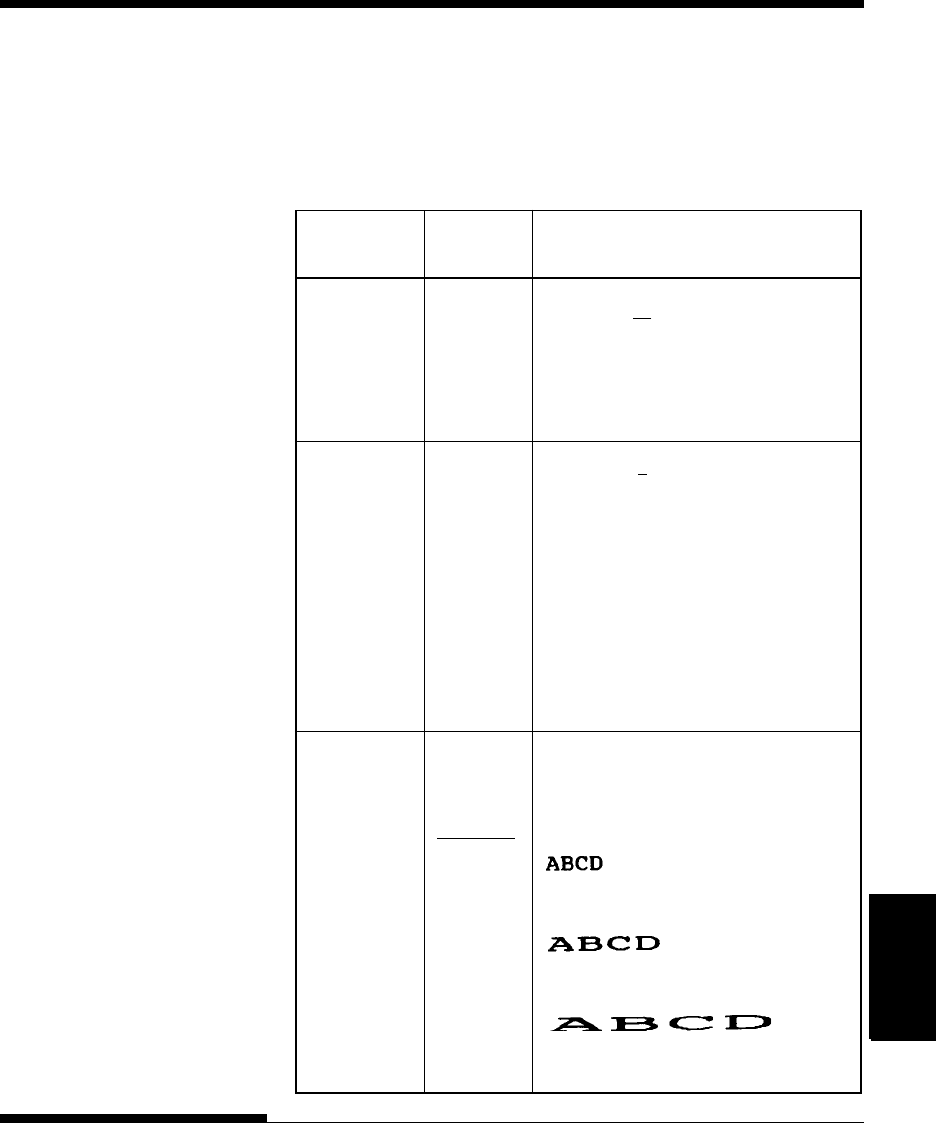
6 lpi 3 lpi (double spacing)
ABCD ABCD
ABCD
ABCD ABCD
ABCD
ABCD ABCD
ABCD
<CHAR-W> Change also the pitch 2 TIMES or 4
TIMES is selected.
NORMAL Standard character width
2 TIMES Double character width
4 TIMES Quadruple character width
(*1)
Options Description
USING SETUP MODE
User's Manual5-18
MENU1 and
MENU2 Items
<CHAR-H> Change also the line spacing if 2 TIMES
or 4 TIMES is selected.
NORMAL Standard character height
2 TIMES Double character height
4 TIMES Quadruple character height
(*1)
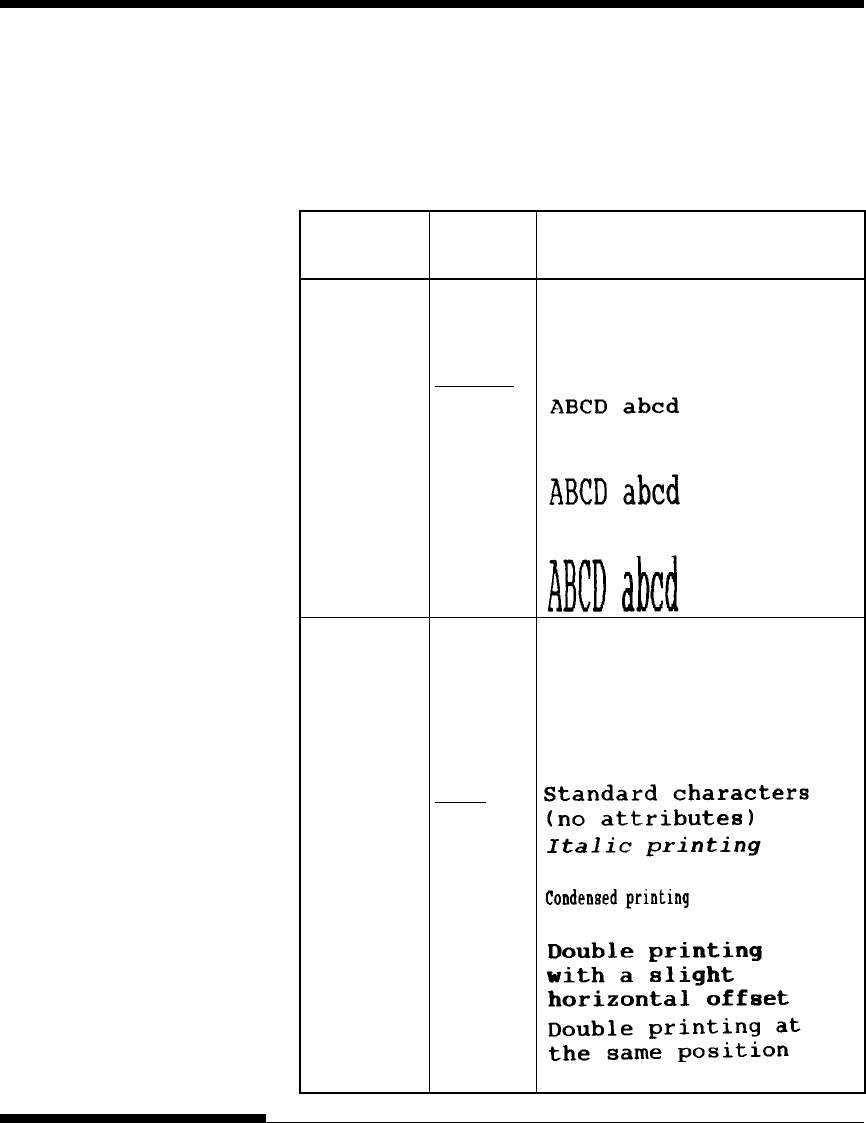
<ATTRIB> Selects an attribute to add emphasis to
your documents.
Only one attribute may be selected at
a time.
NONE
ITALICS
CONDNSD
(*1)
SHADOW
BOLD
Table 5.3 MENU1 and MENU2 Items and Options (Cont.)
NOTES:
• Underlined options are the factory defaults.
• Asterisks identify items and options that differ for the IBM XL24E and Epson
ESC/P2 emulations. The notes are defined at the end of the table.
Options Description
Setup Mode
USING SETUP MODE
User's Manual 5-19
Quick
Reference Introduc-
tion
Setting Up Paper
Handling Printing Setup Mode
MENU1 and
MENU2 Items
<PAGE LG> Specifies the length of the page in
inches.
## IN For DPL24C PLUS and IBM XL24E
emulations:
3.0, 3.5, 4.0, 5.0, 5.5, 6.0, 7.0, 8.0, 8.5,
11.0 (letter size), 11.6 (A4 size), 12.0,
14.0, or 18.0 inches
For Epson ESC/P2 emulation:
4.0, 4.5, 5.0, ..., 11.0, 11.5, ...,
22.0 inches
<LFT-END> Specifies the print start column for
changing the left margin. Printing
starts at the position given by this
column plus your software-specified left
margin.
## COLM Column 1, 2, 3, ..., 41
Table 5.3 MENU1 and MENU2 Items and Options (Cont.)
NOTES:
• Underlined options are the factory defaults.
• Asterisks identify items and options that differ for the IBM XL24E and Epson
ESC/P2 emulations. The notes are defined at the end of the table.
Options Description
LET-END
Software-
specified
margin
USING SETUP MODE
User's Manual5-20
MENU1 and
MENU2 Items
<TOP-MRG> Specifies the number of space lines for
the top margin. The resultant blank
space is the <TOP-MRG> setting minus
1 line.
The total size of your top margin is the
above resultant value plus the following
two settings: top-of-form (default = 1
inch) and the software-specified top
margin. If you are using software to
specify the top margin, use the default
(1 line) for <TOP-MRG>.
## LINE 1, 2, 3,4, 5, 6, 7, 8, 9, or 10 lines
Table 5.3 MENU1 and MENU2 Items and Options (Cont.)
NOTES:
• Underlined options are the factory defaults.
• Asterisks identify items and options that differ for the IBM XL24E and Epson
ESC/P2 emulations. The notes are defined at the end of the table.
Options Description
Top-of-form
Top margin
setting
Setup Mode
USING SETUP MODE
User's Manual 5-21
Quick
Reference Introduc-
tion
Setting Up Paper
Handling Printing Setup Mode
MENU1 and
MENU2 Items
<LANGUGE> Selects a language. Appendix E shows
the character sets for each language.
Two-pass means that diacritical marks
are printed separately from their letters
and that letters are printed without any
reduction.
The first listing is common to all
emulations. Options specific to each
emulation are skipped. See the
subsequent listings (*2) and(*3).
USA American English
(Same as code page 437)
UK British English
GERMAN German
SWEDISH Swedish
PAGE437 Code page 437
PAGE850 Code page 850
PAGE860 Code page 860
PAGE863 Code page 863
PAGE865 Code page 865
ECMA94 ECMA 94
ISO8859 ISO 8859-1
PG852 Code page 852
PG852-T Code page 852 two-pass
PG855 Code page 855
PG866 Code page 866
HUNGARY Hungarian
HUNG-T Hungarian two-pass
Table 5.3 MENU1 and MENU2 Items and Options (Cont.)
NOTES:
• Underlined options are the factory defaults.
• Asterisks identify items and options that differ for the IBM XL24E and Epson
ESC/P2 emulations. The notes are defined at the end of the table.
Options Description
USING SETUP MODE
User's Manual5-22
MENU1 and
MENU2 Items
<LANGUGE> SLOV Slovenian
(continued) SLOV-T Slovenian two-pass
POLISH Polish
POLSH-T Polish two-pass
MAZOWIA Mazowian
MAZOW-T Mazowian two-pass
LATIN2 Latin 2
LATIN2-T Latin 2 two-pass
KAMENIC Kamenicky
KAMEN-T Kamenicky two-pass
TURKY Turkish
TURKY-T Turkish two-pass
CYRILIC Cyrillic
IBM437 IBM 437
IBM851 IBM 851
ELOT928 ELOT 928
PG-DHN Code page DHN
LATIN-P Latin Polish
ISO-LTN ISO Latin
LITHUA1 Lithuanian1
LITHUA2 Lithuanian2
MIK
MACEDON Macedonian
PG-MAC
ELOT927
ABG
ABY
DEC GR
HBR-OLD
PG862
HBR-DEC
GREEK 11
ISO-TUK ISO Turkish
RUSCII
LATIN-9
Table 5.3 MENU1 and MENU2 Items and Options (Cont.)
NOTES:
• Underlined options are the factory defaults.
• Asterisks identify items and options that differ for the IBM XL24E and Epson
ESC/P2 emulations. The notes are defined at the end of the table.
Options Description

Setup Mode
USING SETUP MODE
User's Manual 5-23
Quick
Reference Introduc-
tion
Setting Up Paper
Handling Printing Setup Mode
MENU1 and
MENU2 Items
<LANGUGE> (*2)
(continued) FRENCH French
ITALIAN Italian
SPANISH Spanish
DANISH1 Danish I
DANISH2 Danish II
FINNISH Finnish
NORWEGN Norwegian
(*3)
DANISH1 Danish I
ITALIAN Italian
SPANSH1 Spanish I
SPANSH2 Spanish II
JAPAN Japanese
NORWEGN Norwegian
LATIN A Latin American
FRENCH French
DANISH2 Danish II
KOREA Korea
LEGAL Legal
Table 5.3 MENU1 and MENU2 Items and Options (Cont.)
NOTES:
• Underlined options are the factory defaults.
• Asterisks identify items and options that differ for the IBM XL24E and Epson
ESC/P2 emulations. The notes are defined at the end of the table.
Options Description
USING SETUP MODE
User's Manual5-24
MENU1 and
MENU2 Items
Table 5.3 MENU1 and MENU2 Items and Options (Cont.)
NOTES:
• Underlined options are the factory defaults.
• Asterisks identify items and options that differ for the IBM XL24E and Epson
ESC/P2 emulations. The notes are defined at the end of the table.
<CHR-SET> SET 1 IBM character set 1
SET 2 IBM character set 2
If a downloaded (soft) font is used, the
character set for that font overrides the
<CHR-SET> setting.
(*3)
ITALIC Italic characters are available.
GRAPHIC Graphics characters (ruled lines) are
available.
<PRF-SKP> For continuous forms, this option
specifies whether an inch is skipped
around the perforation. If you are not
using software to specify a bottom
margin, select SKIP when using thicker,
multipart forms.
SKIP One inch is skipped around the perfora-
tion.
NO-SKIP The perforation is not skipped. Printing
continues in the bottom margin of the
page.
<WIDTH> 13.6 IN 13.6-inch page width
(*5) 11.4 IN 11.4-inch page width
11.0 IN 11-inch page width
8.0 IN 8-inch page width
<ZEROFNT> Specifies whether to print the number
(*2) zero with a slash. This is useful to
distinguish the capital letter “O”
from the number “0”.
Invalid for some soft fonts.
NO-SLSH 0
SLASH 0/
Options Description
Setup Mode
USING SETUP MODE
User's Manual 5-25
Quick
Reference Introduc-
tion
Setting Up Paper
Handling Printing Setup Mode
MENU1 and
MENU2 Items
Table 5.3 MENU1 and MENU2 Items and Options (Cont.)
NOTES:
• Underlined options are the factory defaults.
• Asterisks identify items and options that differ for the IBM XL24E and Epson
ESC/P2 emulations. The notes are defined at the end of the table.
Options Description
<DC3-CDE> ENABLE Enables the DC1 and DC3 codes.
(*4) Any data received between DC3 and
the next DC1 is ignored.
DISABLE Disables the DC1 and DC3 codes. These
codes are then ignored.
<CR-CODE> CR ONLY No line feed is added to a carriage
return.
CR & LF A line feed is added to each carriage
return.
<LF-CODE> LF ONLY No carriage return is added to a line
(*3) feed.
LF & CR A carriage return is added to each line
feed.
USING SETUP MODE
User's Manual5-26
MENU1 and
MENU2 Items
Table 5.3 MENU1 and MENU2 Items and Options (Cont.)
NOTES:
• Underlined options are the factory defaults.
• Asterisks identify items and options that differ for the IBM XL24E and Epson
ESC/P2 emulations. The notes are defined at the end of the table.
Options Description
<RGHTEND> WRAP End-of-line wrap. Causes a carriage
return plus a line feed.
OVR-PRT Characters are overprinted at the end of a
line.
<==END==> Indicates the end of MENU1 items. Press
the MENU button to print the first item,
<EMULATE>. Press the TEAR OFF
button to print the previous item,
<RGHTEND>. Press the ONLINE button
to reprint the <<FUNCTION>> menu.
*1 Unavailable in the IBM XL24E emulation
*2 Unavailable in the Epson ESC/P2 emulations
*3 Available only in the Epson ESC/P2 emulations
*4 Available only in the DPL24C+ emulation
*5 Available only for 136-column printers
Setup Mode
USING SETUP MODE
User's Manual 5-27
Quick
Reference Introduc-
tion
Setting Up Paper
Handling Printing Setup Mode
3. Select an emulation.
Repeatedly press the LOAD button or the LF/FF button to position
the cursor under the emulation you require. Then do either of the
following:
• Press the MENU button to select the emulation and print the next
MENU1 or MENU2 item. (As shown in Table 5.3, this is the
<FONT> item).
• Press the TEAR OFF button to select the emulation and print
<==END==>. Press the TEAR OFF button again to print the last
MENU1 or MENU2 item. (As shown in Table 5.3, this is the
<RGHTEND> item). The TEAR OFF button is convenient when
the options you need to change are near the end of the list of
items.
Procedure
To change the options assigned to MENU1 or MENU2, make sure that
continuous forms paper is loaded and then proceed as follows:
1. Enter setup mode.
Place the printer offline. Press the TEAR OFF button and the
ONLINE button simultaneously until the printer beeps. Wait for the
printer to stop printing. The following <<FUNCTION>> menu is
printed:
<<FUNCTION>>
SAVE&END MENU1 MENU2 HARDWRE ADJUST CONFIG DEFAULT LIST SELF-TST HEX-DUMP
V-ALMNT
2. Select the MENU1 or MENU2 function.
Repeatedly press the LOAD button or the LF/FF button to position
the red cursor under either the MENU1 or MENU2 function. Press
the TEAR OFF button or the MENU button to select the function and
print the following <EMULATE> options:
<EMULATE> DPL24C+ XL24E ESC/P2

USING SETUP MODE
User's Manual5-28
NOTE
Whenever you select a new emulation, all MENU1 or MENU2
options are reset to the factory defaults for that emulation.
4. If necessary, change the other MENU1 or MENU2 options.
Press the LOAD button or the LF/FF button to move the cursor to the
option you want to select. Press the MENU button to select the
option and print the next item listed in Table 5.3. Press the TEAR
OFF button to select the option and print the previous item.
5. Exit MENU1 or MENU2.
Press the ONLINE button to exit the selected function and reprint the
<<FUNCTION>> menu.
6. Do either of the following:
• Select another function, or
• Exit setup mode, saving your changes.
For details about other functions, see the other sections in this
chapter. To exit setup mode and save your changes, make sure the
red cursor is positioned beneath SAVE & END, and then press the
TEAR OFF button or the MENU button.
Resetting MENU1 and MENU2
To reset the factory defaults for both MENU1 and MENU2, select the
DEFAULT function. For more information, see the section Resetting
Defaults later in this chapter. The DEFAULT function cannot reset those
options which are handled by the HARDWRE, ADJUST, and CONFIG
functions.

Setup Mode
USING SETUP MODE
User's Manual 5-29
Quick
Reference Introduc-
tion
Setting Up Paper
Handling Printing Setup Mode
CHANGING HARDWARE
OPTIONS
The HARDWRE function defines the printer’s hardware operating condi-
tions. If you are using the optional RS-232C serial interface, the serial
interface options must be set properly for the printer to function correctly
with your system hardware.
Table 5.4 describes the HARDWRE items and options . Items are listed in
the order in which they are printed. The procedure for changing the
hardware options is described after Table 5.4.
Table 5.4 HARDWRE Items and Options
NOTE: Underlined options are the factory defaults.
<PPR-OUT> Specifies how the printer responds
when you run out of paper.
CNTONLY The printer detects paper-out only
for continuous forms. Printing stops
and the PAPER OUT indicator lights
red.
DETECT The printer detects paper-out for
both continuous forms and single
sheets. Printing stops and the
PAPER OUT indicator lights red.
IGNORE The printer ignores paper-out for
both continuous forms and single
sheets. Printing continues until no
more data remains. No PAPER
OUT warning is displayed.
HARDWRE
Items Options Description
USING SETUP MODE
User's Manual5-30
Table 5.4 HARDWRE Items and Options (Cont.)
NOTE: Underlined options are the factory defaults.
HARDWRE
Items
<PRT-DIR> BI-DIR Bidirectional printing. The printer prints
in either direction while seeking the next
print direction for a shorter print time.
UNI-DIR Unidirectional printing. Unidirectional
printing is used for printing vertical lines
in tables even if vertical alignment is not
adjusted. Unidirectional printing is
slower than bidirectional printing.
<BUZZER> Enables or disables the printer status
buzzer.
ON Buzzer on (recommended).
The printer beeps to indicate paper-
out or other conditions.
OFF Buzzer off under any conditions.
<WORD-LG> To determine the required word
length, refer to your computer
documentation. Select 8-BIT to print bit
image graphics.
8 BIT 8-bit word length (used by most
computers)
7 BIT 7-bit word length (MSB = 0)
<BUFFER> Assigns buffer memory to input data and
downloaded font data.
Print buffer Download buffer
NONE 0 byte 128K bytes
256BYTE 256 bytes 127.75K bytes
2KBYTE 2K bytes 126K bytes
8KBYTE 8K bytes 120K bytes
24KBYTE 24K bytes 104K bytes
32KBYTE 32K bytes 96K bytes
96KBYTE 96K bytes 32K bytes
128KBYT 128K bytes 0K bytes
Options Description

Setup Mode
USING SETUP MODE
User's Manual 5-31
Quick
Reference Introduc-
tion
Setting Up Paper
Handling Printing Setup Mode
Table 5.4 HARDWRE Items and Options (Cont.)
NOTE: Underlined options are the factory defaults.
HARDWRE
Items Options Description
<BUFFER> NOTE:
(continued) • 0BYTE option is recommended
only for graphics application.
• With 128KB selected, the printer
cannot accept any download font
data.
<INTRFCE> Selects the type of the interface to the
computer.
PARALEL Centronics parallel interface
SERIAL RS-232C serial interface
USB USB interface
AUTO-2S Auto interface selection mode
AUTO-4S • Both interfaces are ready for
AUTO-6S communication.
AUTO10S • Specify the timing regarding the
AUTO15S selected interface as being inactive.
AUTO20S To switch the interface to the optional
LAN interface, mount the LAN card with
the setup mode set to "AUTO-XS" or
"AUTOXXS" under "INTERFCE," which
in turn is under "HARDWRE" The
interface will automatically switch to the
optional LAN interface.
To switch the interface to something other
than the optional LAN interface, do either
of the following:
• To return the setup mode to
"INTERFCE" under "HARDWRE,"
remove the LAN card.
• To switch the interface to a fixed
interface, set PARALEL,USB with the
LAN card mounted, and the setup mode
set to "INTERFCE" under
"HARDWRE."
Serial Interface or USB interface Items.
The following <FORMAT> to
<DUPLEX> items are not printed when you select the PARALEL option for the
<INTRFCE> item. Be sure that the options selected on the printer are the same as
the options selected using your computer operating system or your software.
Refer to the documentation provided for your computer and software.
USING SETUP MODE
User's Manual5-32
<FORMAT> Number of Number of
data bits Parity bit stop bits
8NONE 1 8 None 1
8NONE 2 8 None 2
8EVEN 1 8 Even 1
8ODD 1 8 Odd 1
7EVEN 1 7 Even 1
7ODD 1 7 Odd 1
7MARK 1 7 Mark 1
7SPACE 1 7 Space 1
7EVEN 2 7 Even 2
7ODD 2 7 Odd 2
The data format also includes a start
bit. The mark is logical 1. The space
is logical 0.
HARDWRE
Items Options Description
Table 5.4 HARDWRE Items and Options (Cont.)
NOTE: Underlined options are the factory defaults.

Setup Mode
USING SETUP MODE
User's Manual 5-33
Quick
Reference Introduc-
tion
Setting Up Paper
Handling Printing Setup Mode
Table 5.4 HARDWRE Items and Options (Cont.)
NOTE: Underlined options are the factory defaults.
HARDWRE Options Description
Items
<BAUD-RT> 150 The baud rate is in bps (bits per
300 second). Select the same baud rate as
600 used by your computer or modem.
1200
2400
4800
9600
19200
<PROTOCL> Indicates data transmission protocol.
XON/XOF The DC1 and DC3 codes are used.
DTR
The Data Terminal Ready signal is used.
REV-CHL The Reverse Channel signal is used.
<DSR> IGNORE DSR is ignored by the printer.
DETECT DSR is detected by the printer.
<DUPLEX> FULL Simultaneous data transmission occurs in
opposite directions.
HALF Data transmission occurs in either
direction, but not simultaneously.
<CTS> IGNORE CTS is ignored by the printer.
DETECT CTS is detected by the printer.
<CD> IGNORE CD is ignored by the printer.
DETECT CD is detected by the printer.
<==END==>
Indicates the end of the HARDWRE
item list. Press the MENU button to print the
first item, which is <PPR-OUT>. Press the
TEAR OFF button to print the previous item.
Press the ONLINE button to reprint the
<<FUNCTION>> menu.
USING SETUP MODE
User's Manual5-34
Procedure
To change the printer’s hardware options, make sure that continuous forms
are loaded and then proceed as follows:
1. Enter setup mode.
Press the TEAR OFF button and the ONLINE button simultaneously
until the printer beeps. Wait for the printer to stop printing and
check that the following <<FUNCTION>> menu is printed:
2. Select the HARDWRE function.
Repeatedly press the LOAD button or the LF/FF button to position
the red cursor under HARDWRE. Press the MENU button to select
the HARDWRE function and print the first item and its options, as
shown below:
3. Select an option for the selected item.
Press the LOAD button or the LF/FF button to move the cursor to the
option you require. Press the MENU button to select the option and
print the next item.
NOTE
To print the previous item, press the TEAR OFF button.
4. Repeat step 3 until all required options are changed.
5. Exit the HARDWRE function.
Press the ONLINE button to exit the HARDWRE function and
reprint the <<FUNCTION>> menu.
<<FUNCTION>>
SAVE&END MENU1 MENU2 HARDWRE ADJUST CONFIG DEFAULT LIST SELF-TST HEX-DUMP
V-ALMNT
<PPR-OUT> CNTONLY DETECT IGNORE

Setup Mode
USING SETUP MODE
User's Manual 5-35
Quick
Reference Introduc-
tion
Setting Up Paper
Handling Printing Setup Mode
6. Do either of the following:
• Select another function, or
• Exit setup mode, saving your changes.
For details on other functions, see the other sections in this chapter.
To exit setup mode and save your changes, make sure that the red
cursor is positioned under SAVE & END, then press the MENU
button or the TEAR OFF button.
When you print using ruled paper, you often want to adjust the print position
so that the print sits properly on the ruled lines. The ADJUST function
allows you to:
• Set top-of-form position
• Fine-tune top-of-form position
• Fine-tune left print start column (left margin)
• Adjust for accumlative line spacing error in a page
The first three items are provided separately for cut single sheets and
continuous forms. The last item is available for single sheets only.
The top edge of your paper is the physical top of the page. The logical top
of the page, as “understood” by the printer when loading paper, is called the
top-of-form. Printing starts at this position. Note that printing actually starts
at the position obtained by adding the following:
• Top-of-form, default = 1.8/6 inch (7.6mm)
• Top margin specified by your software
• Printer TOP-MRG (top margin setting), default = 1 line
Table 5.5 describes the ADJUT items and options. Items are listed in the
order they are printed. The procedure for changing top-of-form is described
after Table 5.5.
CHANGING PRINT
POSITION ADJUSTMENT
OPTIONS
USING SETUP MODE
User's Manual5-36
Table 5.5 ADJUST Items and Options
NOTE: Underlined options are the factory defaults.
<CNT-ORG> Sets the top-of-form for continuous
forms in increments of 1/6 inch
(4.2 mm) from the physical top of
the page.
1/6 IN The default is recommended if
1.8/6 IN your top margin is not software-
: specified. A setting of 1/6 inch
6/6 IN is preferable when your top
: margin is software-specified.
66/6 IN
<CNTFINE> Fine-tunes the top-of-form position
for continuous forms.
0/180, ..., 29/180 Increases top-of-form in increments
of 1/180 inch
(0.14 mm).
<CNT-ORG> Sets the top-of-form for single
sheets in increments of 1/6 inch
(4.2 mm) from the physical top of
the page.
1/6 IN The default is recommended if
1.8/6 IN your top margin is not software-
: specified. A setting of 1/6 inch
6/6 IN is preferable when your top
: margin is software-specified.
66/6 IN
<CUTFINE> Fine-tunes the top-of-form
position for single sheets.
0/180, ..., 29/180 Increases top-of-form in increments
of 1/180 inch (0.14 mm).
ADJUST
Items Options Description

Setup Mode
USING SETUP MODE
User's Manual 5-37
Quick
Reference Introduc-
tion
Setting Up Paper
Handling Printing Setup Mode
Table 5.5 ADJUST Items and Options (Cont.)
NOTE: Underlined options are the factory defaults.
ADJUST
Items
<CNT-LFT> Fine-tunes the left print start
position for continuous forms.
–10/90, ..., 0/90, Moves the position left or
..., 10/90 right in increments of 1/90
inch (0.28 mm).
<CUT-LFT> Fine-tunes the left print start
position for single sheets.
–10/90, ..., 0/90, Moves the position left or
..., 10/90 right in increments of
1/90 inch (0.28 mm).
<CUT-ADJ> Compensates the line spacing
pitch on the basis of the
spacing error accumulated for
feeding single sheets by10
inches.
Decreases or increases in
increments of 1/360 inch in
total.
<CNT-ADJ> Compensates for the forms
feed error accumulated
through feeding of continuous
forms.
<CNTADJL> Compensates for the forms
feed error accumulated
through feeding of continuous
forms. (Last page)
*1:When printing graphics, selecting "GRAPHIC" may result in the
printing of clearer graphics.
Options Description
–21/360, –14/360,
–7/360, 0/360,
7/360, 14/360, 21/360,
GRAPHIC (*1)
–28/360, –21/360,
–14/360, –7/360, 0/360,
7/360, 14/360, 21/360,
28/360, GRAPHIC (*1)
–21/360, –14/360,
–7/360, 0/360,
7/360, 14/360, 21/360,
GRAPHIC (*1)
USING SETUP MODE
User's Manual5-38
Table 5.5 ADJUST Items and Options (Cont.)
ADJUST
Items
<==END==> Indicates the end of the
ADJUST item list. Press
MENU to print the first item,
which is <CNT-ORG>. Press
TEAR OFF to print the last
item, which is <CUTADJL>.
Press ONLINE to reprint the
<<FUNCTION>> menu.
Options Description

Setup Mode
USING SETUP MODE
User's Manual 5-39
Quick
Reference Introduc-
tion
Setting Up Paper
Handling Printing Setup Mode
Procedure
Before adjusting a print position, you should carefully measure the amount
of adjustment required for any paper that demands precise print registration.
To adjust a print position, make sure that continuous forms paper is loaded.
The following example shows how to adjust the top-of-form setting for
continuous forms.
1. Enter setup mode.
Press the TEAR OFF button and the ONLINE button simultaneously
until the printer beeps. Wait for the printer to stop printing and
check that the following <<FUNCTION>> menu is printed:
<<FUNCTION>>
SAVE&END MENU1 MENU2 HARDWRE ADJUST CONFIG DEFAULT LIST SELF-TST HEX-DUMP
V-ALMNT
2. Select the ADJUST function.
Repeatedly press the LOAD button or the LF/FF button to position
the red cursor under ADJUST. Press the MENU button or the TEAR
OFF button to select the ADJUST function and print the following
<CNT-ORG> options:
<CNT-ORG>
1/6IN 1.8/6IN 2/6IN 3/6IN 4/6IN 5/6IN 6/6IN 7/6IN 8/6IN 9/6IN
10/6IN 11/6IN ....
3. Select an option from 1/6IN to 66/6IN.
Press the LOAD button or the LF/FF button to move the cursor to the
required option. Press the MENU button to select the option and
print the <CNTFINE> item. If necessary, fine-tune the top-of-form
position now. Otherwise, go to step 4.
4. Exit the ADJUST function.
Press the ONLINE button to exit the ADJUST function and reprint
the <<FUNCTION>> menu.
USING SETUP MODE
User's Manual5-40
CHANGING
CONFIGURATION OPTIONS
5. Exit setup mode, saving the top-of-form setting.
Make sure that the red cursor is positioned beneath SAVE & END,
then press the MENU button or the TEAR OFF button.
6. Check the top-of-form setting.
Load your paper and check the adjustment by printing a sample page
using your software. If necessary, reenter setup mode and fine-tune
the top-of-form position by changing the <CNTFINE> option.
The CONFIG function defines the printer’s primary configuration. You can
set the following options to ensure that the printer meets your requirements:
• Tear off for continuous forms
• Autoloading of single sheets
• Direct decoding of certain commands
• Enabling of the AREA OVER indicator
Table 5.6 describes the CONFIG items and options. Items are listed in the
order they are printed. The procedure for changing the configuration options
is described after Table 5.6.
Table 5.6 CONFIG Items and Options
NOTE: Underlined options are the factory defaults.
CONFIG Items Options Description
<TEAROFF> Auto or manual tearoff feed.
MANUAL Automatic tearoff feed is invalid,
and tearoff feed must be done using the
TEAR OFF button.
AUTO Automatic tearoff feed is valid but only
for continuous forms. Tearoff feed can
also be done using the TEAR OFF
button.

Setup Mode
USING SETUP MODE
User's Manual 5-41
Quick
Reference Introduc-
tion
Setting Up Paper
Handling Printing Setup Mode
Table 5.6 CONFIG Items and Options (Cont.)
NOTE: Underlined options are the factory defaults.
<TEARPOS> Tearoff position.
VISIBLE Select this option when your software
positions forms to the next top-of-form
after printing the last data. The printer
performs tearoff feed without adding a
form feed when data transfer has
stopped.
ALWAYS Select this option when your software
stops after printing the last data. The
printer performs tearoff feed after
adding a form feed when data transfer
has stopped.
Note: For both settings, tearoff
positioning will fail if the page length
setting does not match the actual
perforation spacing.
The following <TEAR-EN> item is printed when TEAROFF:AUTO is
specified for the <TEAROFF> item.
<TEAR-EN> Tearoff enabled time (offset time).
0 SEC The offset time is from when data
1 SEC transfer stops to when the printer
2 SEC performs automatic tearoff feed.
4 SEC If the printer receives data again
6 SEC within the offset time, the printer does
not perform automatic tearoff feed.
CONFIG Items Options Description
USING SETUP MODE
User's Manual5-42
Table 5.6 CONFIG Items and Options (Cont.)
NOTE: Underlined options are the factory defaults.
CONFIG Items Options Description
<TEAR-EN> In some application programs, data
(continued) transfer may stop temporarily due
to internal processing. This setting can
avoid an undesired tearoff feed by
waiting for up to six seconds each time
data transfer stops.
<CUTLOAD> Single sheet autoloading.
AUTO Single sheet paper is automatically
loaded a certain time after you set
the paper.
BUTTON Single sheet paper can be loaded by
pressing the LOAD button.
The following <LOADTIM> item is printed when CUTLOAD:AUTO is
specified for the <CUTLOAD> item.
<LOADTIM> Autoload start time.
0.5, 1.0, Autoloading starts when this
1.5, 2.0 amount of time passes after you set
2.5, 3.0SEC single sheet paper.
<DECODE> Command decode timing.
DIRECT The printer decodes certain commands
immediately after receiving data.
Example:
ESC SUB I, ESC CR P (DPL24C+)
ESC Q # (IBM XL24E)
QUEUED
The printer decodes commands after
storing all data (including commands)
in the input buffer. This speeds data
reception because the printer does not
require decoding time during data
reception.

Setup Mode
USING SETUP MODE
User's Manual 5-43
Quick
Reference Introduc-
tion
Setting Up Paper
Handling Printing Setup Mode
Table 5.6 CONFIG Items and Options (Cont.)
NOTE: Underlined options are the factory defaults.
CONFIG Items Options Description
<AREACNT> Area-over detection control.
ENABLE Detects the left and right edges of
paper when loading the paper.
The printer does not print data beyond
the edges, but turns on the AREA
OVER indicator.
DISABLE Does not detect the edges. Select this
option when you are using colored or
preprinted paper.
<ON-LOAD> Printer status after loading paper in
offline mode.
OFFLINE Remains offline after paper loading.
ONLINE
Goes into online after paper loading.
<LOCK>
Lock function of setup mode.
NONE Enables all buttons on the control panel.
SETUP Disables the setup-related buttons to keep
the printer from entering setup mode during
the offline state.
ALL Disables the setup-related buttons and the
MENU button.
Once this setting has been selected, setup
mode cannot be entered from the control
panel. To cancel this setting, turn the
power on while simultaneously pressing the
MENU, TEAROFF, and LF/FF buttons.
<//S//> Effectiveness of the Cut Sheet Selection
command (//S//).
DISABLE Makes the command ineffective.
ENABLE Makes the command effective.
Note: The Cut Sheet Selection command
(//S//) changes the paper source to
the paper table and waits for
manual insertion of a cut sheet.
USING SETUP MODE
User's Manual5-44
Table 5.6 CONFIG Items and Options (Cont.)
NOTE: Underlined options are the factory defaults.
CONFIG Items Options Description
<CONT-PE> Detection of end of continuous forms.
TRACTOR Paper end is detected by the sensor on
the tractor unit.
Paper-end unprinted area:
Continuous forms: About 80 mm
EDGE Regardless of paper end, printing
continues near to the edge of paper.
Paper-end unprinted area:
About 4.7 mm for both continu-
ous forms
GATHER Setting of ribbon protective control
at a line feed on continuous forms
ENABLE The protective control is executed.
DISABLE The protective control is not
executed.
CUT-CTL Setting of retracting control at
canceling TEAR OFF of continuous
forms.
PRCISIN The precision-prioritized retracting
control is executed.
It retracts a certain amount of paper
(the top part of the paper which
hangs out from the TOFS), and then
moves back to the position before
TEAR OFF. If TOFS detects paper
end when a certain amount of paper
is retracted, it executes the continu-
ous forms save operation and then
executes the paper loading opera-
tion.
SPEED The speed-prioritized retracting
control is executed.
It retracts the paper by the amount
the paper was advanced.

Setup Mode
USING SETUP MODE
User's Manual 5-45
Quick
Reference Introduc-
tion
Setting Up Paper
Handling Printing Setup Mode
Table 5.6 CONFIG Items and Options (Cont.)
NOTE: Underlined options are the factory defaults.
CONFIG Items Options Description
SKIP-PR Setting of printing speed change
processing (skip)
ENABLE The skip processing is executed.
When a certain amount of blank
spaces are found in a line, it changes
the printing speed for the blank
spaces.
DISABLE The skip processing is not executed.
It does not change the printing speed
for the blank spaces.
- If the printing speed of the printing
data varies before and after the
blank spaces (such as LQ
characters + blank space + CQ
characters), it changes printing
speeds regardless of this setting.
STATUS Setting of the asynchronous status
function
ENABLE The status information is stored in the
send buffer by a nibble mode request.
DISABLE The status information is not stored in
the send buffer by a nibble mode
request.
BANDCTL Setting of reducing backward line
feeds as much as possible. Backward
line feeds occur when printing vertical
enlargement characters or multi-path
characters which involve several
printing paths for a print activation.
ENABLE Reduce control is performed.
DISABLE Reduce control is not performed.
USING SETUP MODE
User's Manual5-46
Table 5.6 CONFIG Items and Options (Cont.)
NOTE: Underlined options are the factory defaults.
CONFIG Items Options Description
TOF-CTL Setting of priority on TOF control to
a printer driver specification or a
setup specification. TOF control
determines the amout of the top
margin when paper is fed to the home
position.
DRIVER Driver specification is given priority.
SETUP Setup specification is given priority.
<==END==> Indicates the end of the CONFIG
item list. Press the MENU button to print
the first item, which is <TEAROFF>.
Press the TEAR OFF button to print the
previous item. Press the ONLINE button
to reprint the <<FUNCTION>> menu.
Setup Mode
USING SETUP MODE
User's Manual 5-47
Quick
Reference Introduc-
tion
Setting Up Paper
Handling Printing Setup Mode
2. Select the CONFIG function.
Repeatedly press the LOAD button or the LF/FF button to position
the red cursor under CONFIG. Press the MENU button to select the
CONFIG function and print the following <TEAROFF> options:
<TEAROFF> MANUAL AUTO
3. Select an option.
Press the LOAD button or the LF/FF button to move the cursor to
either MANUAL or AUTO. Press the MENU button to select the
option and print the <TEARPOS> item. If other items must be
specified, do so now. Otherwise, go to step 4.
4. Exit the CONFIG function.
Press the ONLINE button to exit the CONFIG function and reprint
the <<FUNCTION>> menu.
5. Do either of the following:
• Select another function, or
• Exit setup mode, saving your changes.
For details on other functions, see the other sections in this chapter.
To exit setup mode and save your changes, make sure that the red
cursor is positioned under SAVE & END, then press the MENU
button or the TEAR OFF button.
.
Procedure
To change the printer configuration options, make sure that continuous
forms paper is loaded and then proceed as follows:
1. Enter setup mode.
Press the TEAR OFF button and the ONLINE button simultaneously
until the printer beeps. Wait for the printer to stop printing and
check that the following <<FUNCTION>> menu is printed:
<<FUNCTION>>
SAVE&END MENU1 MENU2 HARDWRE ADJUST CONFIG DEFAULT LIST SELF-TST HEX-DUMP
V-ALMNT

USING SETUP MODE
User's Manual5-48
<<FUNCTION>>
SAVE&END MENU1 MENU2 HARDWRE ADJUST CONFIG DEFAULT LIST SELF-TST HEX-DUMP
V-ALMNT
2. Select the SAVE & END function.
Make sure that the red cursor is positioned under SAVE & END.
Press the MENU button or the TEAR OFF button to select SAVE &
END. The printer exits setup mode and returns online (the ONLINE
indicator lights green). Any changes you made while in setup mode
are saved.
This section describes how to exit the setup mode save any changes you
made:
To exit setup mode immediately, select the SAVE & END function.
Any settings changed while in setup mode are saved as the new power-on
defaults for the printer. The new defaults remain active until you change them
again.
NOTE
The only way to exit setup mode without saving your changes is to turn off
the printer. When you turn the printer back on, the previous default
settings are used.
Procedure
To exit setup mode and save your changes using SAVE & END, proceed as
follows:
1. Print the <<FUNCTION>> menu.
The <<FUNCTION>> menu should be the last printed line on the
page. If the menu is not printed, press the ONLINE button to print the
menu. If you are using the SELF-TST or HEX-DUMP function, press
the LF/FF button instead of the ONLINE button to print the menu.
The <<FUNCTION>> menu is shown below.
EXITING AND SAVING

Setup Mode
USING SETUP MODE
User's Manual 5-49
Quick
Reference Introduc-
tion
Setting Up Paper
Handling Printing Setup Mode
RESETTING DEFAULTS This section describes how to reset the printer’s power-on defaults, all of the
factory defaults, or the factory defaults only for MENU1 and MENU2.
Resetting Power-On Defaults
Power-on defaults are the settings saved in the printer’s permanent memory.
The defaults are enabled whenever you turn the printer on. The easiest way
to reset the power-on defaults is to turn the printer off and then on again.
This method is useful if you have made changes in setup mode that you do
not want to save.
Resetting Factory Defaults
Factory defaults are those settings preselected at the factory. For a list of the
printer’s factory defaults, see the section Printing a List of Selected
Options earlier in this chapter. To reset the factory defaults for all functions,
proceed as follows:
1. Turn off the printer.
2. While pressing the MENU, TEAR OFF, and ONLINE buttons, turn
on the printer. Continue to press all three buttons until the printer
beeps.
The factory defaults are now reset.
Resetting Factory Defaults in MENU1 and MENU2
This method resets factory defaults for MENU1 and MENU2 options, listed
in Table 5.3, but does not reset the printer hardware, print position adjust-
ment, and configuration options. To reset the factory defaults in MENU1
and MENU2, proceed as follows:

USING SETUP MODE
User's Manual5-50
<<FUNCTION>>
SAVE&END MENU1 MENU2 HARDWRE ADJUST CONFIG DEFAULT LIST SELF-TST HEX-DUMP
V-ALMNT
1. Enter setup mode.
Press the TEAR OFF button and the ONLINE button simultaneously
until the printer beeps. Wait for the printer to stop printing and
check that the following <<FUNCTION>> menu is printed:
2. Select the DEFAULT function.
Repeatedly press the LOAD button or the LF/FF button to position
the red cursor under DEFAULT. Press the TEAR OFF button or the
MENU button to select the DEFAULT function. The printer reprints
the <<FUNCTION>> menu. The default values in MENU1 and
MENU2 are now reset.
3. Do either of the following:
• Select new options for MENU1 or MENU2.
• Exit setup mode, saving the factory defaults.
See the section Changing MENU1 and MENU2 Options. To exit
setup mode and save the new defaults, make sure that the red cursor
is positioned under SAVE & END, then press the TEAR OFF button
or the MENU button.
This section describes how to use the following diagnostic functions:
• SELF-TST
• HEX-DUMP
• V-ALMNT
These functions are used for checking print quality and diagnosing printer
problems. HEX-DUMP also provides useful information for programmers.
USING THE DIAGNOSTIC
FUNCTIONS

Setup Mode
USING SETUP MODE
User's Manual 5-51
Quick
Reference Introduc-
tion
Setting Up Paper
Handling Printing Setup Mode
Printing the Self-Test
The SELF-TST function prints test pages to check how the printer operates
independently of your computer. The self-test does not check the interface
between the computer and the printer.
The self-test prints the printer’s firmware version, its resident emulations,
and all of the characters available in the currently selected character set. If
the DPL24C PLUS emulation is selected for MENU1, the self-test is printed
using the settings currently assigned to MENU1.
Procedure
This procedure assumes that you are in setup mode. To print the self-test,
make sure that continuous forms paper is loaded into the printer. Then
proceed as follows:
1. Print the <<FUNCTION>> menu.
The <<FUNCTION>> menu should be the last printed line on the
page. If the menu is not printed, press the ONLINE button to print
the menu. If you are using the HEX-DUMP function, press the LF/
FF button instead of the ONLINE button to print the menu. The
following <<FUNCTION>> menu is printed:
<<FUNCTION>>
SAVE&END MENU1 MENU2 HARDWRE ADJUST CONFIG DEFAULT LIST SELF-TST HEX-DUMP
V-ALMNT

USING SETUP MODE
User's Manual5-52
2. Select the SELF-TST function.
Repeatedly press the LOAD button or the LF/FF button to position
the red cursor under SELF-TST, and then press the MENU button or
the TEAR OFF button. The printer selects SELF-TST and starts
printing. A short help menu is printed at the top of the page,
followed by the self-test. Note that the printer is not online during
self-test printing.
3. Examine the self-test page.
A sample self-test page is shown in Chapter 2. To pause during self-
test printing, press the MENU button or the TEAR OFF button. To
resume self-test printing, press the FONT button or the MENU
button again.
4. Exit the SELF-TST function.
Exit the SELF-TST function in either of the following ways:
• To exit SELF-TST and remain in setup mode, press the LF/FF
button. The <<FUNCTION>> menu is then reprinted.
• To exit SELF-TST and return online, press the ONLINE button.
The printer permanently saves any changes made while in setup
mode and returns online.
The self-test can also be started by turning off the printer, and then pressing
the LF/FF button while turning the printer back on. As described in Chapter
2, this method is useful when you first set up the printer.
Printing Hex Dumps
The HEX-DUMP function prints data and commands in hexadecimal
characters and abbreviated control codes. The IBM character set 2 is used
for printing (see Appendix E). The HEX-DUMP function is useful for
checking whether your computer is sending the correct commands to the
printer and whether the printer is executing the commands correctly. It is
also useful for debugging software programs.

Setup Mode
USING SETUP MODE
User's Manual 5-53
Quick
Reference Introduc-
tion
Setting Up Paper
Handling Printing Setup Mode
Procedure
To print hex dumps, make sure that continuous forms paper is loaded into
the printer. Then proceed as follows:
1. Enter setup mode.
Press the TEAR OFF button and the ONLINE button simultaneously
until the printer beeps. Wait for the printer to stop printing and
check that the following <<FUNCTION>> menu is printed:
<<FUNCTION>>
SAVE&END MENU1 MENU2 HARDWRE ADJUST CONFIG DEFAULT LIST SELF-TST HEX-DUMP
V-ALMNT
2. Select the HEX-DUMP function.
Repeatedly press the LOAD button or the LF/FF button to position
the red cursor under HEX-DUMP, then press the TEAR OFF button
or the MENU button to select the HEX-DUMP function. The printer
goes online and prints a header and a short help menu.
3. Print the hex dump.
To start hex dump printing, send your file or program to the printer.
The printer goes online and prints the hex dump.
Press the MENU button or the TEAR OFF button to pause during
hex dump printing. To resume hex dump printing, press the button
again.
NOTE
When hex dump printing stops, the printer remains online in
setup mode (the ONLINE indicator is green). To print another
hex dump, send another file to the printer.
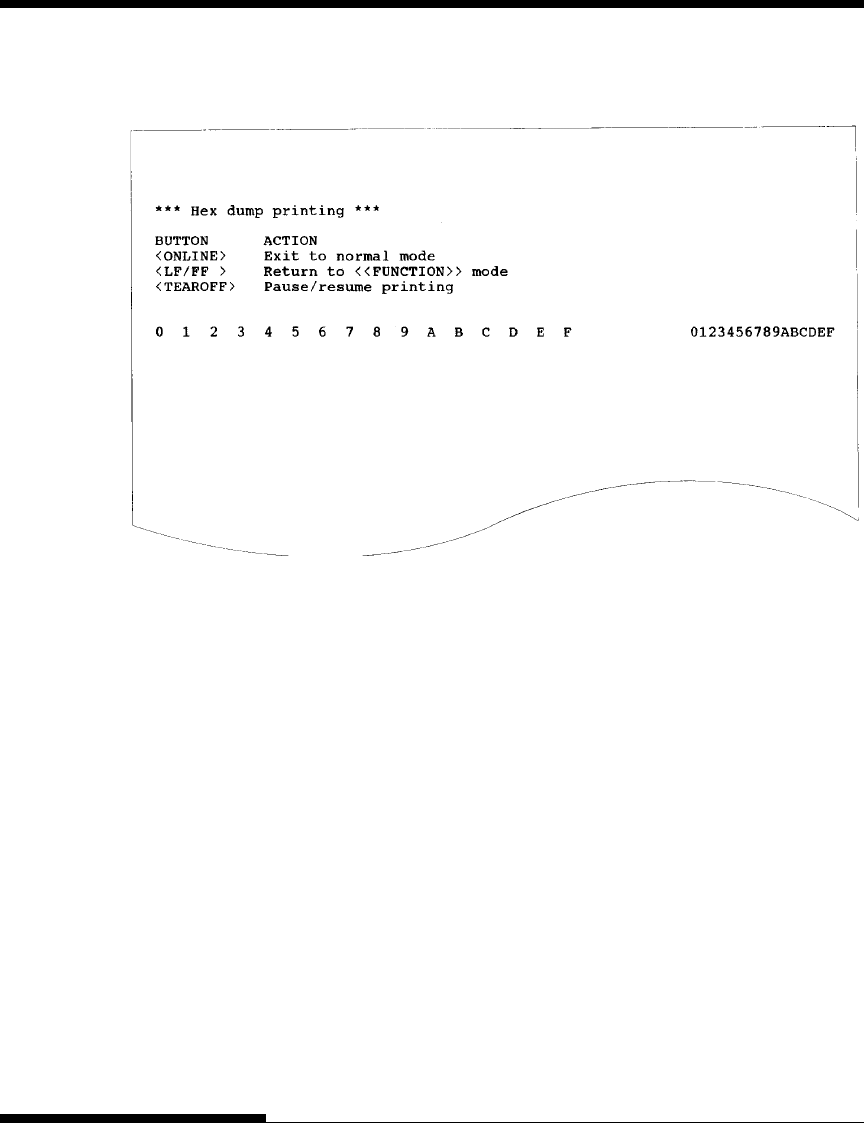
USING SETUP MODE
User's Manual5-54
Sample hex dump
4. Exit the HEX-DUMP function.
Exit the HEX-DUMP function in either of the following ways:
• To remain in setup mode, press the LF/FF button. The <<FUNC-
TION>> menu is then reprinted. For details on other functions,
see other sections in this chapter.
• To return to online normal mode, press the ONLINE button. If
you press the ONLINE button while the hex dump is printing, The
printer immediately switches to normal online mode. Any data
that was sent to the printer but not printed is discarded (cleared).
You can also enter hex dump mode, by turning off the printer, and then
turning the printer back on while simultaneously pressing the ONLINE
button and the LF/FF button until the printer beeps.

Setup Mode
USING SETUP MODE
User's Manual 5-55
Quick
Reference Introduc-
tion
Setting Up Paper
Handling Printing Setup Mode
Checking Vertical Print Alignment (V-ALMNT)
The V-ALMNT function corrects the vertical character displacement that
sometimes occurs with bidirectional printing. Characters printed from left to
right are not aligned with characters printed from right to left as shown
below:
This example shows how printing looks
when characters are vertically
misaligned. Note that the left
margin is not straight.
If you notice misaligned printing, use the following procedure to check and
correct the vertical print alignment.
Procedure
Make sure that continuous forms paper is loaded in the printer. If possible,
use forms at least 216 mm (8.5 inches) wide for 80 column printers or
356mm (14inches) wide for 136 colmun prnters to avoid printing on the
platen.
However, you can also use letter or A4 size forms if you set the WIDTH
option in MENU1 to 8 inches.
See the section Changing MENU1 and MENU2 Options for details. Then
proceed as follows to check and correct vertical print alignment:
1. Enter setup mode.
Press the MENU button and the TEAR OFF button simultaneously
until the printer beeps. Wait for the printer to stop printing and
check that the following <<FUNCTION>> menu is printed:
<<FUNCTION>>
SAVE&END MENU1 MENU2 HARDWRE ADJUST CONFIG DEFAULT LIST SELF-TST HEX-DUMP
V-ALMNT
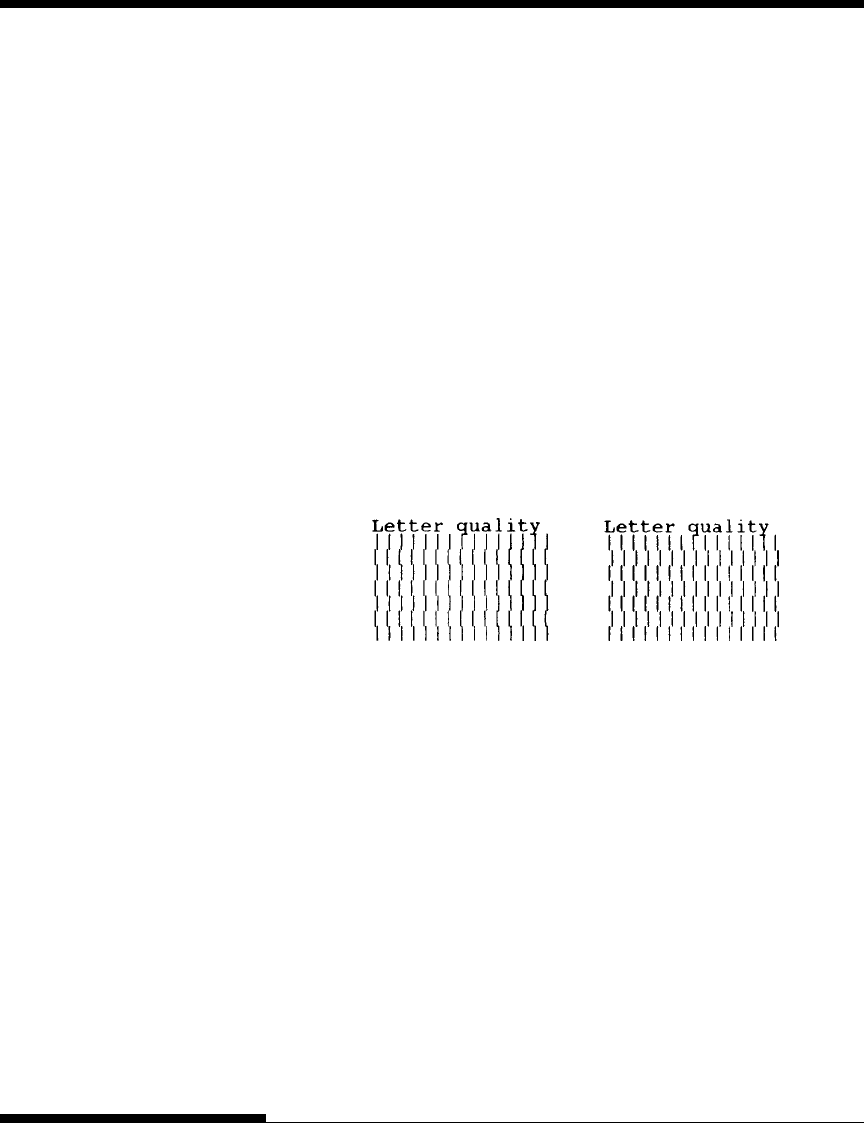
USING SETUP MODE
User's Manual5-56
2. Select the V-ALMNT function.
Repeatedly press the LOAD button or the LF/FF button to position
the red cursor under V-ALMNT, then press the MENU button or the
TEAR OFF button to select the V-ALMNT function. The printer
prints the help menu then starts printing rows of parallel bars using
letter quality speed.
3. Adjust the vertical print alignment at letter quality speed.
Examine the parallel bars. If the bars are aligned (not jagged), go to
step 4. If the bars are offset to the left, repeatedly press the LOAD
button until the bars are aligned. If the bars are offset to the right,
repeatedly press the LF/FF button until the bars are aligned. (In the
following figure, the first line is assumed to be printed from left to
right.)
Bars offset to the left Bars offset to the right
4. Adjust the vertical print alignment at correspondence speed.
Press the TEAR OFF button to switch from letter speed to corre-
spondence speed.
Examine the parallel bars and adjust the vertical print alignment as
described step 3.
5. Adjust the vertical print alignment at draft speed.
Press the TEAR OFF button to switch from correspondence speed to
draft speed.
Examine the parallel bars and adjust the vertical print alignment as
described step 3.
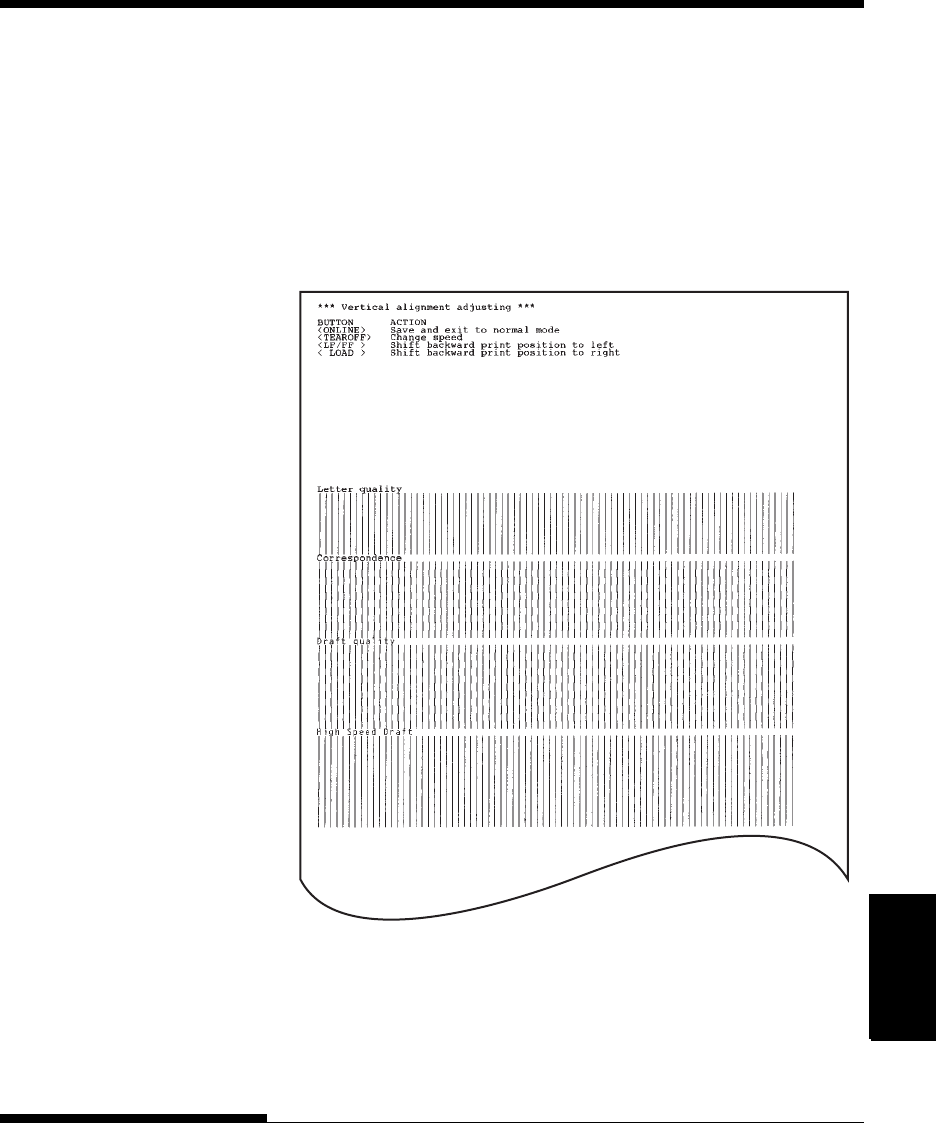
Setup Mode
USING SETUP MODE
User's Manual 5-57
Quick
Reference Introduc-
tion
Setting Up Paper
Handling Printing Setup Mode
Correct vertical print alignment
The following flowchart shows how setup mode is organized for the Fujitsu
DPL24C PLUS emulation. Differences in the IBM Proprinter XL24E and
Epson ESC/P2 emulations are summarized after the flowchart.
SETUP MODE REFERENCE
6. Exit the V-ALMNT function.
Press the ONLINE button to exit the V-ALMNT function and save
the new vertical alignment settings. The printer exits setup mode and
returns online.
NOTE
To exit the V-ALMNT function, you must exit setup mode.
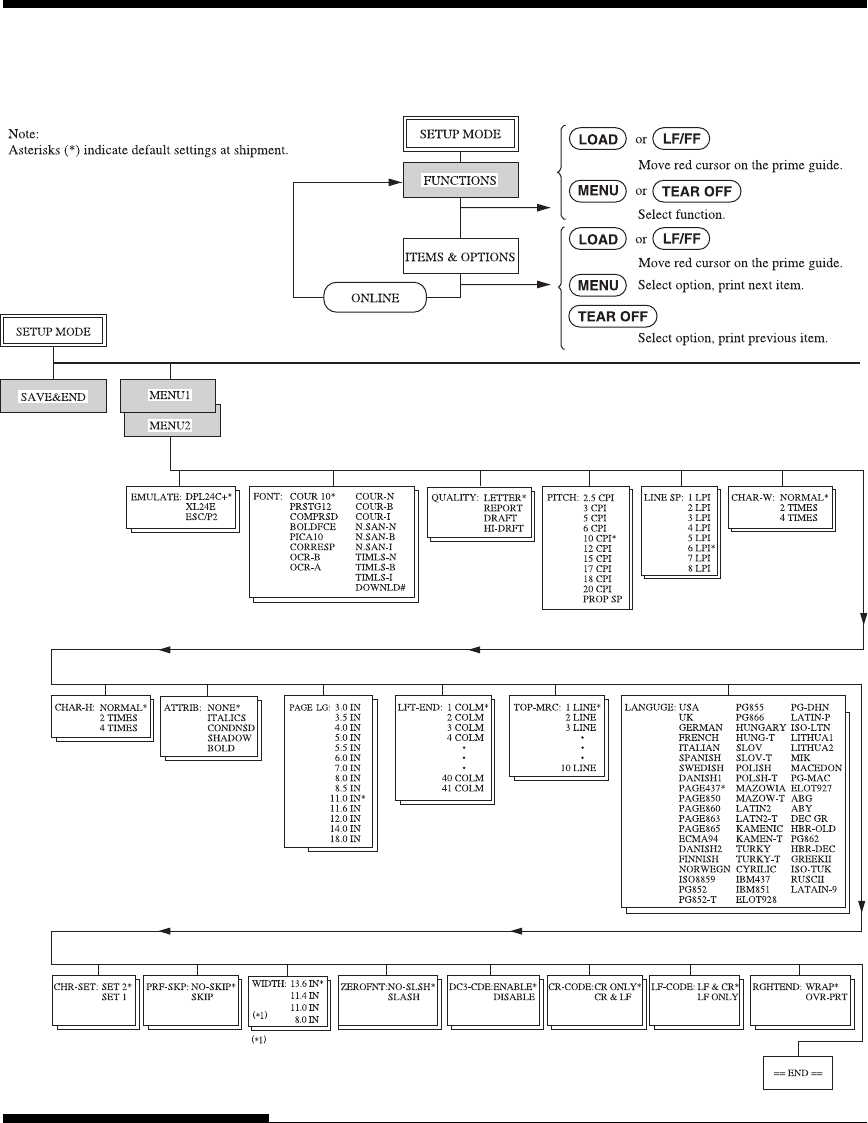
USING SETUP MODE
User's Manual5-58
DPL24C PLUS ORGANIZATION
This menu is not displayed on the DL3750+ printer.
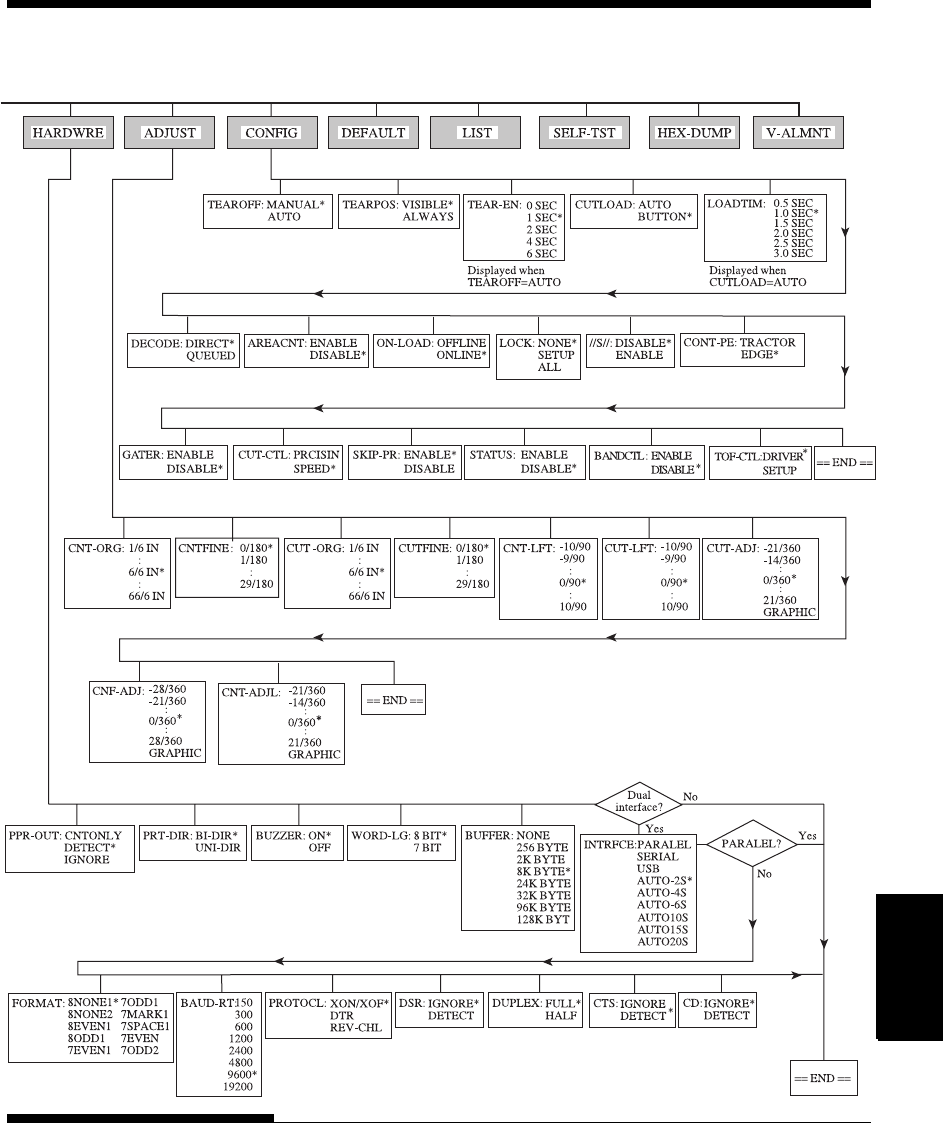
Setup Mode
USING SETUP MODE
User's Manual 5-59
Quick
Reference Introduc-
tion
Setting Up Paper
Handling Printing Setup Mode
USING SETUP MODE
User's Manual5-60
Differences in IBM Proprinter XL24E Emulation
In the IBM Proprinter XL24E emulation, MENU1 and MENU2 differ from
the DPL24C PLUS emulation in the following ways:
• The following options are different:
CHAR-W: NORMAL *
2 TIMES CHAR-H: NORMAL *
2 TIMES ATTRIB: NONE *
ITALIC
SHADOW
BOLD
• The AGM item is provided:
CHR-SET: SET 2 *
SET 1 AGM: OFF *
ON PRF-SKIP: NO-SKIP *
SKIP
• The LF-CODE item’s default is set to the other option:
LF-CODE: LF & CR
LF ONLY *

Setup Mode
USING SETUP MODE
User's Manual 5-61
Quick
Reference Introduc-
tion
Setting Up Paper
Handling Printing Setup Mode
Differences in Epson ESC/P2 Emulation
In the Epson ESC/P2 emulation, MENU1 and MENU2 differ from the
DPL24C PLUS emulation in the following ways:
• The ZEROFNT and LF-CODE items are not defined.
• The following options are different:
PAGE LG: 4.0 IN
4.5 IN
5.0 IN
5.5 IN
11.0 IN
11.5 IN *
22.0 IN
LANGUGE: USA
UK
GERMAN
SWEDISH
DANISH1
ITALIAN
SPANSH1
SPANSH2
JAPAN
NORWEGN
LATIN A
FRENCH
PAGE437*
PAGE850
PAGE860
PAGE863
PAGE865
ECMA94
DANISH2
ISO8859
PG852
PG852-T
PG855
PG866
HUNGARY
HUNG-T
SLOV
SLOV-T
POLISH
POLSH-T
MAZOWIA
MAZOW-T
LATIN2
LATN2-T
KAMENIC
KAMEN-T
TURKY
TURKY-T
CYRILIC
IBM437
IBM851
ELOT928
PG-DHN
LATIN-P
ISO-LTN
LITHUA1
LITHUA2
MIK
MACEDON
PG-MAC
ELOT927
ABG
ABY
DEC GR
HBR-OLD
PG862
HBR-DEC
GREEKII
ISO-TUK
KOREA
LEGAL
RUSCII
LATIN-9
CHR-SET: ITALIC *
GRAPHIC

USING SETUP MODE
User's Manual5-62
The preceding sections describe offline setup mode. This section introduces
online setup mode. The tedious task of setting up printer features one-by-one
from the control panel and printing and checking the desired options on paper can
be avoided by using online setup mode. In online setup mode, printer features are
set via the computer rather than the printer control panel.
Put the printer in online setup mode, in either of the following two ways:
• Turn the printer off and then turn the printer back on while pressing
the MENU button. Hold down the button until the printer beeps.
• Issue the printer command ESC e ONLINE. This command is valid
in any emulation.
Send setup data from the computer in any of the following three ways:
• Enter setup data directly from the computer keyboard before starting
your job. With MS-DOS, hold down the Ctrl key and type P. Data
entered from the keyboard is sent directly to the printer. When data
entry is complete, hold down the Ctrl key again and type P. This
method is useful when just a few settings need to be changed.
• Use an editor program to prepare a setup data file and then send the
file to the printer using a command before starting your job. With
MS-DOS, use the COPY command. This method is useful when
settings are used repeatedly.
• Write a program that enables interactive entry of setup data on the
CRT screen. This method is the most useful of the three. Check with
your dealer for currently available programs.
To exit from online setup mode, send EXIT as the last setup data.
For details of setup data and its format, refer to the programmer's manual for
each emulation.
ONLINE SETUP MODE

Maintenance
User's Manual 6-1
MAINTENANCE
MAINTENANCE
Your printer requires very little care. Occasional
cleaning and replacement of the ribbon cartridge
are all that is required.
Lubrication of the printer is not usually necessary.
If the print head carriage does not move smoothly back and forth, clean the
printer as described in this chapter. If the problem continues, contact your
dealer to determine whether lubrication might be needed.
The front and back covers, the ejection cover, and the acoustic cover of the
printer help protect against dust, dirt, and other contaminants. However,
paper produces small particles that accumulate inside the printer. This
section explains how to clean and vacuum the printer and how to clean the
platen and paper bail rollers.
It is easier to clean the printer when the front cover, the ejection cover, and
the cut sheet stand and back cover are removed.
Cleaning and Vacuuming the Printer
WARNING
To avoid any possibility of injury, before cleaning the printer, turn off the
power to both the printer and the computer, and unplug the printer.
Use the following procedure to clean and vacuum the printer as required:
1. Remove any paper from the printer. Make sure that the power is off,
and then disconnect the printer power cord.
2. Using a soft vacuum brush, vacuum the exterior of the printer. Be
sure to vacuum the air vents at the front, left sides, and bottom of the
printer. Also vacuum the cut sheet stand.
CLEANING
6
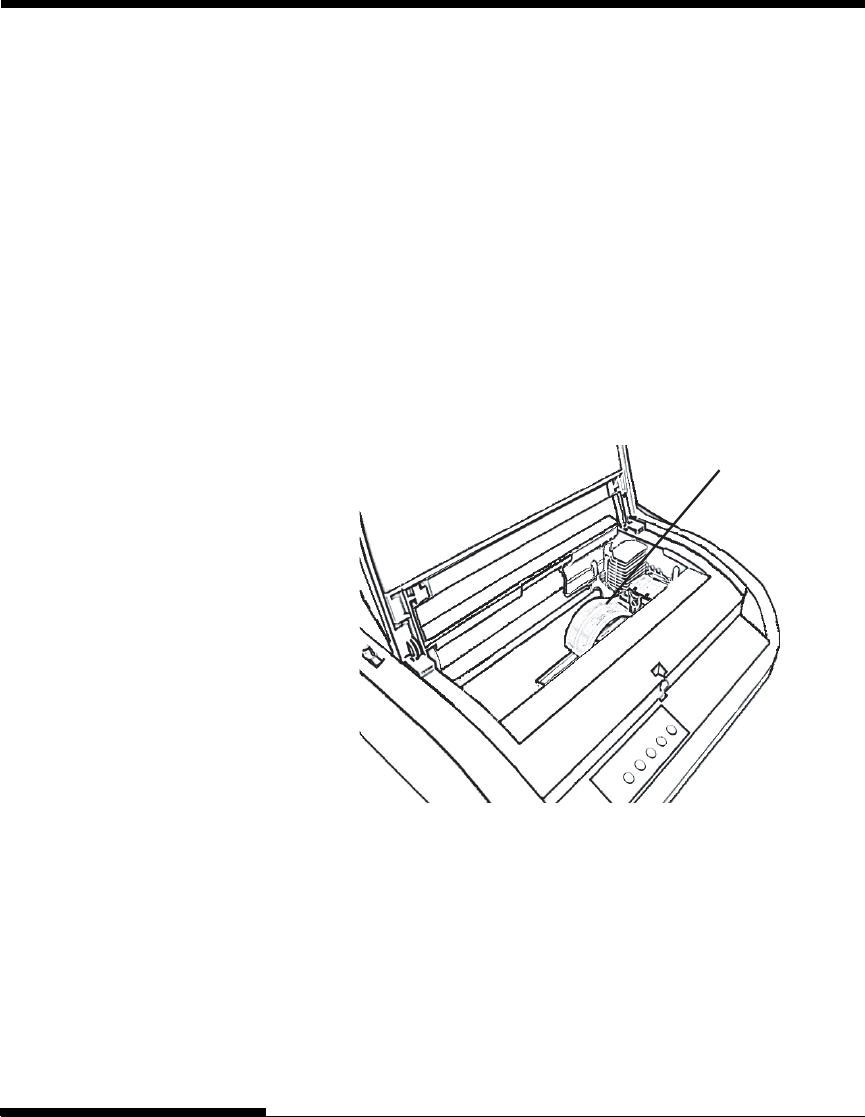
User's Manual6-2
MAINTENANCE
3. Use a soft, damp cloth to wipe the exterior of the printer, including
the covers and separator. A mild detergent may be used.
CAUTION
Do not use solvents, kerosene, or abrasive cleaning materials that
may damage the printer.
4. Open the front cover of the printer and remove the ribbon cartridge.
Using a soft vacuum brush, gently vacuum the platen, print head
carriage, and surrounding areas. You can easily slide the print head to
the left or right when the power is off. Be careful not to press too hard
on the flat ribbon cable that extends from the print head carriage.
Flat cable
Printer interior
5. Re-install the ribbon cartridge. Close the front cover.
6. Open the ejection cover. Vacuum the rollers, paper entry slot, and
surrounding areas.
7. Raise the cut sheet stand and the back cover. Vacuum the forms
tractors and surrounding areas.

Maintenance
User's Manual 6-3
MAINTENANCE
Cleaning the Platen and Exit Rollers
Clean the platen and rollers about once a month to remove excess ink. Use
the platen cleaner recommended by your supplier and proceed as follows:
1. Apply a small amount of platen cleaner to a soft cloth. Avoid
spilling platen cleaner inside the printer.
CAUTION
Do not use alcohol to clean the platen. Alcohol may cause the
rubber to harden.
2. Place the cloth against the platen and manually rotate the platen
knob.
3. To dry the platen, place a dry cloth against the platen and manually
rotate the platen knob.
4. Gently wipe the rollers using the cloth moistened with the platen
cleaner. Dry the rollers using a dry cloth.
There are two ways of replacing the ribbon. You can install a new ribbon
cartridge in the printer or refill the old ribbon cartridge with new ribbon from
a ribbon subcassette. Appendix A lists order numbers for ribbon cartridges
and ribbon subcassettes. The following procedure is for ribbon cartridges.
For ribbon subcassettes, refer to the instructions shipped with the
subcassette.
To replace the ribbon cartridge:
1. Turn off the printer.
2. Open the front cover of the printer. For easy installation, slide the
print head carriage to a position where it does not face a roller.
CAUTION
The print head may be hot if you have been printing recently.
REPLACING THE RIBBON
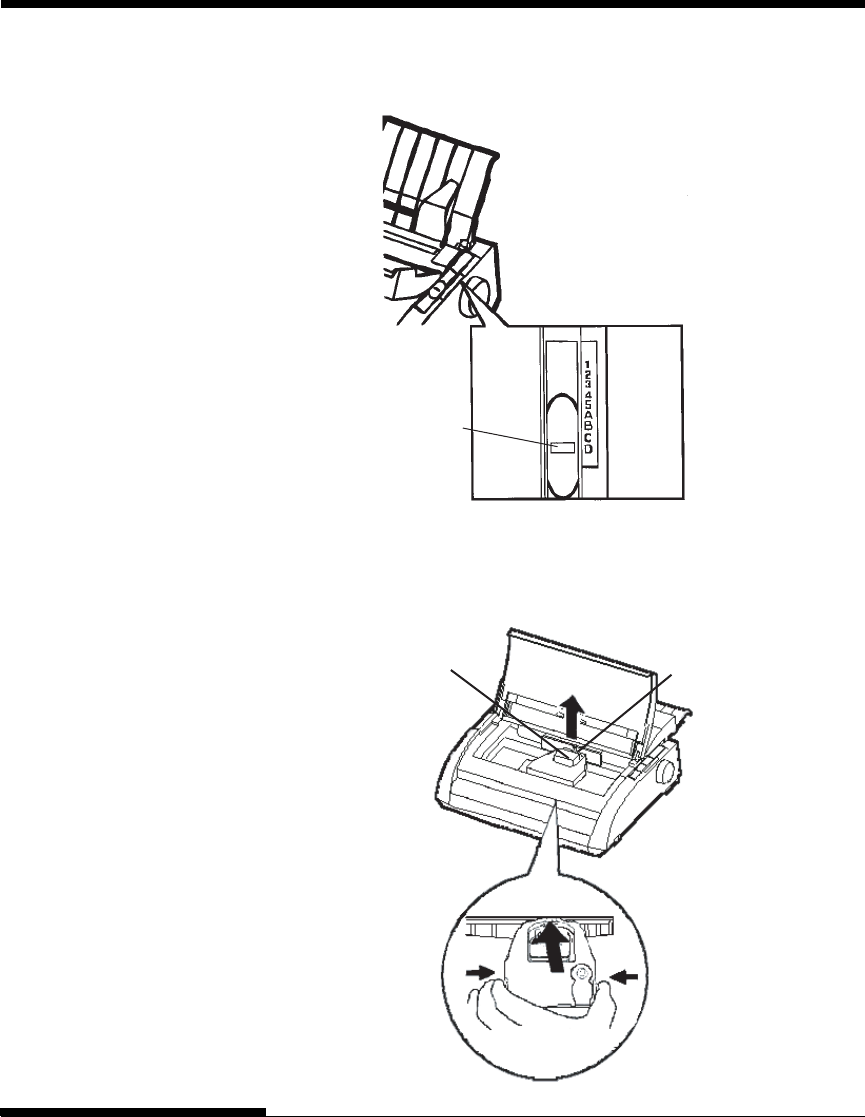
User's Manual6-4
MAINTENANCE
Removing the ribbon cartridge
Print guide
Print head
3. Move the paper thickness lever to position D.
Paper thickness lever
4. To remove the ribbon cartridge, press the ribbon release levers located
on either side of the cartridge and carefully lift the cartridge out of the
printer.
Paper thickness leve
r
Move to D.
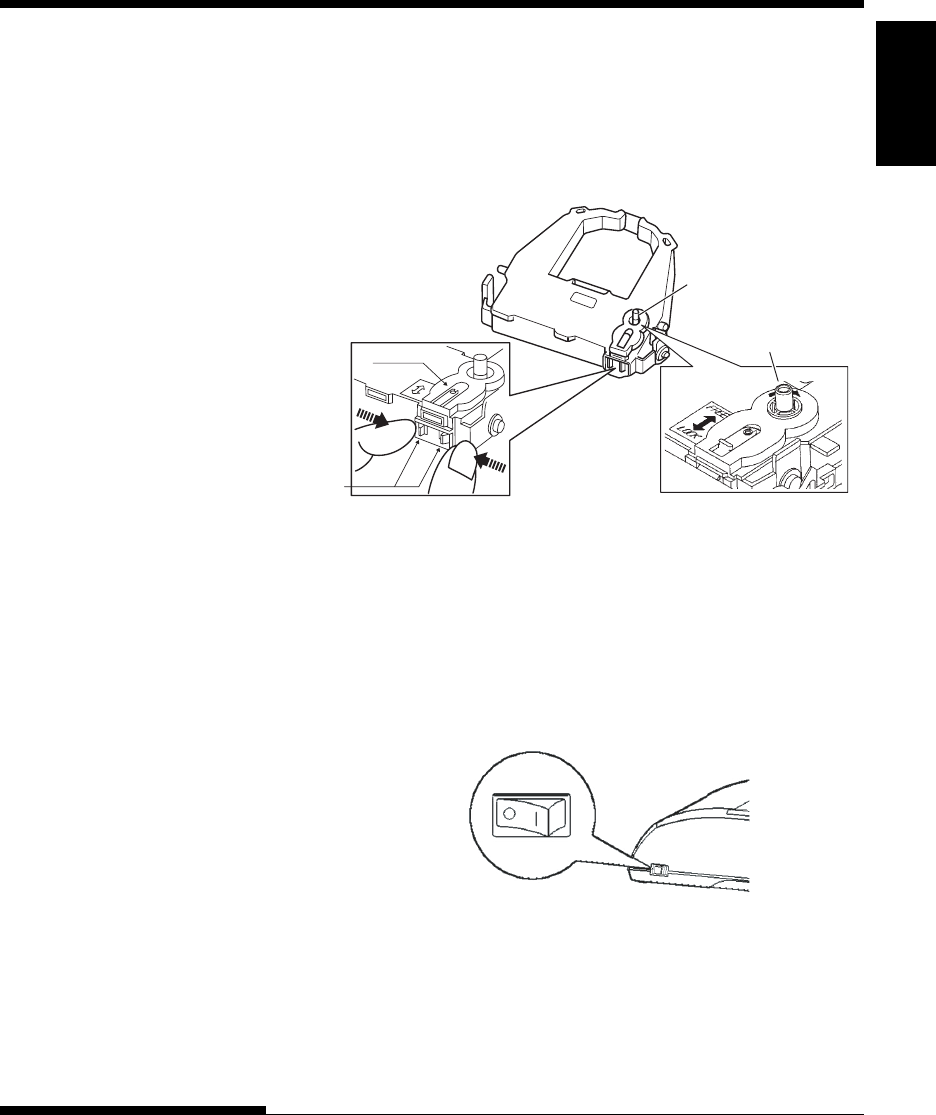
Maintenance
User's Manual 6-5
MAINTENANCE
CAUTION
Do not turn the ribbon feed knob in counterclockwise direction..
6. Verify that the power to the printer is off.
(Make sure that the circle mark on the power switch is pressed.).
Installing the ribbon cartridge
7. Move the paper thickness lever to the D position.
8. Open the front cover.
Turn the knob
clockwise.
5. Using the procedure below, release the roller from the LOCK position
and turn the ribbon feed knob clockwise to take up any ribbon slack.
Push in the gray ribbon release tabs on the side of the ribbon cartridge
to release them, and slide the roller from the LOCK position to the
FREE position.
Ribbon feed knob
Preparing the ribbon cartridge
Roller
Release
tabs
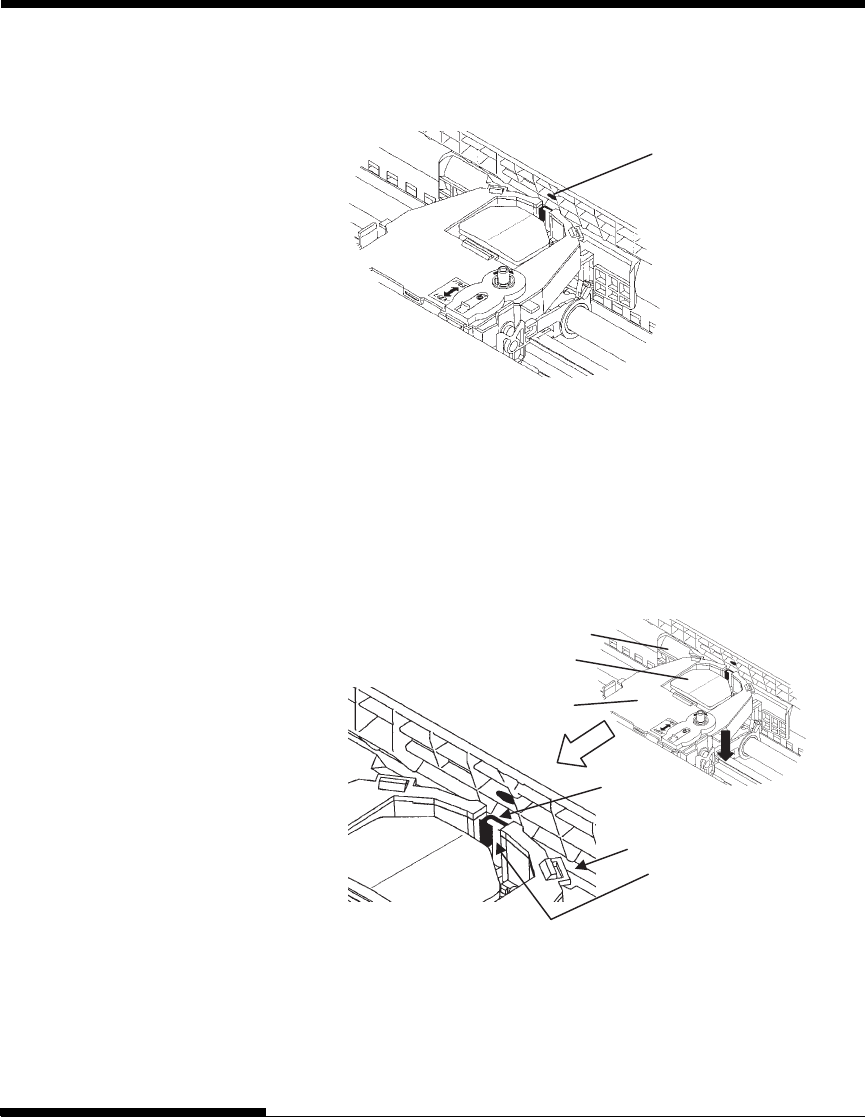
User's Manual6-6
MAINTENANCE
9. Align the print head position with the dot mark (green) on the printer
ejection cover.
Dot mark (green)
WARNING
Avoid touching the print head while using or immediately after using the
printer, as doing so may lead to burns. Wait until the print head cools
down before touching it.
10. Thread the ribbon between the print head and the print guide, then
gently press down on the ribbon cartridge against the printer until it
clicks into place.
(Make sure that the ribbon feed knob is facing upward.)
11. Turn the ribbon feed knob clockwise to take up any ribbon slack.
12. Move the paper thickness lever back to its original position. For
single sheet printing, the correct position is 1. Table 3.2 in Chapter 3
gives other paper thickness lever settings.
13. Close the front cover of the printer.
Print guide
Print head
Ribbon
Print guide
Tip of print head
Ribbon cartridge
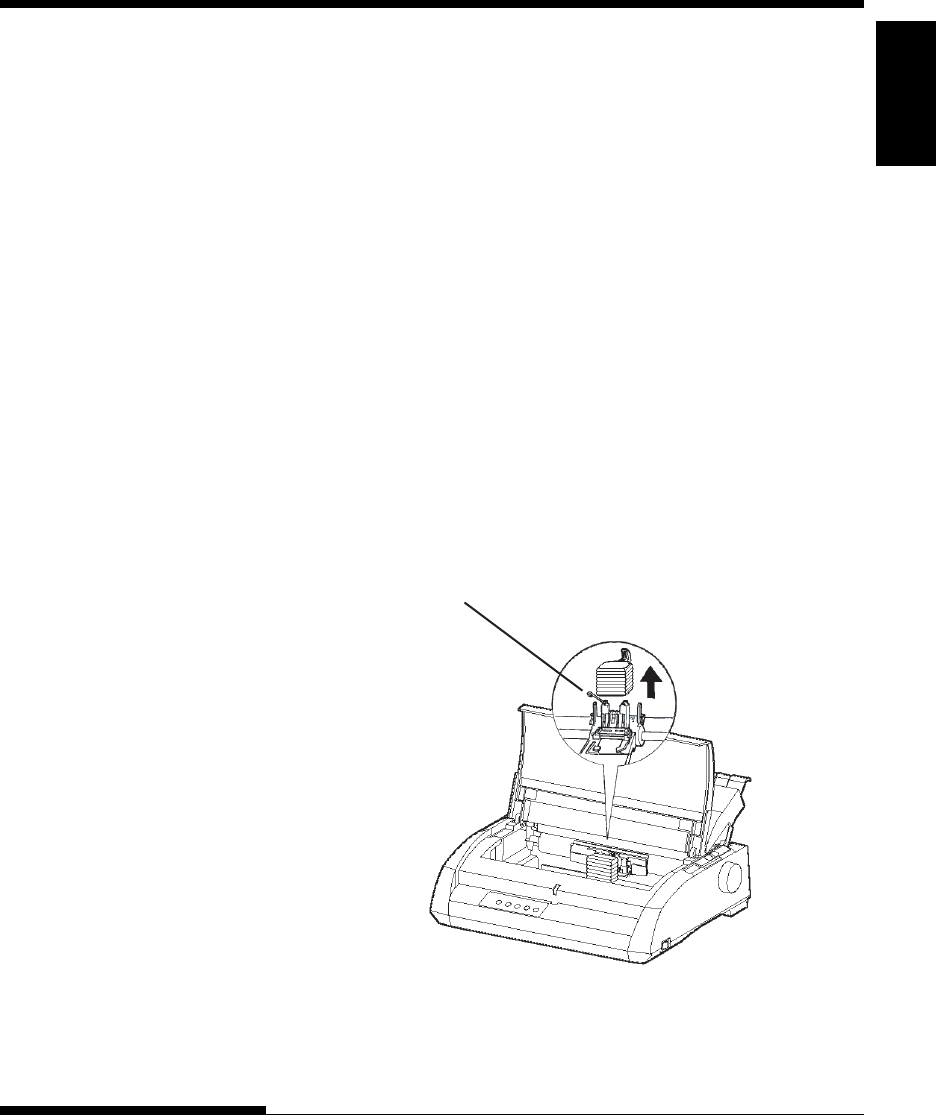
Maintenance
User's Manual 6-7
MAINTENANCE
Head lock wire
REPLACING THE PRINT
HEAD
The print head is easy to replace.
CAUTION
The print head may be hot if you have been printing recently.
To remove the print head:
1. Turn off the printer.
2. Open the front cover of the printer and remove the ribbon cartridge.
3. Pull the right end of the head lock wire forward to release it from the
hook at the right of the print head carriage. Then release the wire
from the center hook.
4. Remove the print head from the connector on the carriage, as shown
in the figure below.
Replacing the print head

User's Manual6-8
MAINTENANCE
To install the print head:
1. Carefully fit the mounting guide grooves of the print head on the
locating studs on the carriage.
2. Push the print head into the connector and hook the wire into place in
the reverse order of removal.

User's Manual 7-1
Trouble-
shooting
TROUBLE-SHOOTING
TROUBLE-SHOOTING
Your printer is extremely reliable, but occasional
problems may occur. You can solve many of
these problems yourself, using this chapter.
If you encounter problems that you cannot resolve,
contact your dealer for assistance.
This chapter is organized as follows:
• Solving problems
• Diagnostic functions
• Getting help
The tables in this section describe common printer problems and their
solutions. The following types of problems are considered:
• Print quality problems
• Paper handling problems
• Operating problems
• Printer failures
Print Quality Problems
Poor print quality or other printing problems are often caused by incorrect
printer setup or incorrect software settings. A gradual decrease in print
quality usually indicates a worn ribbon. Table 7.1 identifies common print
quality problems and suggests solutions.
SOLVING PROBLEMS
7
TROUBLE-SHOOTING
7-2 User's Manual
Table 7.1 Print Quality Problems and Solutions
Problem Solution
Printing is too Make sure that the ribbon cartridge is
light or too dark. properly installed and that the ribbon feeds smoothly.
Make sure that the paper thickness lever is set for the
thickness of your paper. See Table 3.2 in Chapter 3.
Check ribbon wear. Replace the ribbon if necessary.
Stains or smudges Make sure that the paper thickness lever is set
appear on the for the thickness of your paper. See Table 3.2 in
page. Chapter 3.
Check ribbon wear. Replace the ribbon if necessary.
Check whether the tip of the print head is dirty.
Clean the head with a soft cloth if necessary.
The page is blank. Make sure that the ribbon cartridge is properly
installed.
Printing is erratic Make sure that the interface cable is securely
or the wrong connected to both the printer and computer.
characters are
printed. Many Make sure that the printer emulation selected in
"?" characters are your software is the same as the emulation
printed. selected on the printer. See the section Selecting an
Emulation in Chapter 2.
If you are using an RS-232C serial interface, make
sure that the serial settings required by your software
or computer are the same as the settings on the
printer. See the section Changing Hardware
Options in Chapter 5.
User's Manual 7-3
Trouble-
shooting
TROUBLE-SHOOTING
Table 7.1 Print Quality Problems and Solutions (Cont.)
Problem Solution
Printing is Use the printer’s V-ALMNT function to
vertically check the vertical print alignment. If necessary,
misaligned adjust the print alignment. See the section
(jagged). Using the Diagnostic Functions in Chapter 5.
The top margin is The top margin is the sum of the top-of-form
wrong. setting, the software-specified top margin, and the
printer’s TOP-MRG setting. Proceed as follows:
• Make sure that the top-of-form setting is
correct. The factory default is 25.4 mm (1
inch). See the section Changing Top-of
Form in Chapter 5.
• Check the software-specified top margin.
Refer to your software documentation.
• Check the printer’s TOP-MRG setting. See
the section Changing MENU1 and MENU2
Options in Chapter 5.
Lines are double Check the line spacing setting in your software.
spaced instead of
single spaced. Change the CR-CODE setting in the printer setup
mode to CR ONLY. See the section Changing
MENU1 and MENU2 Options in Chapter 5.
The printer Change the CR-CODE setting in the printer
overprints on the setup mode to CR & LF. See the section
same line. Changing MENU1 and MENU2 Options in
Chapter 5.
The next print line Change the LF-CODE setting in the printer
starts where the setup mode to LF & CR. See the section
previous line Changing MENU1 and MENU2 Options in
ended instead of Chapter 5.
at the left margin.
TROUBLE-SHOOTING
7-4 User's Manual
Paper Handling Problems
Table 7.2 describes common paper handling problems and suggests solutions.
See Chapter 3 for detailed procedures on loading and using paper.
Table 7.2 Paper Handling Problems and Solutions
Problem Solution
Paper cannot be Make sure that the paper select lever is set
loaded or fed. correctly. Move the lever backward for continuous
forms and forward for single sheets.
Make sure that the paper covers the paper-out sensor,
i.e., the left paper edge is within 52 mm for single
sheets or 41 mm for continuous forms from the left
edge of the platen. (This problem cannot occur if you
use the forms tractor unit or insert a single sheet with
its left edge in contact with the left paper guide.)
Make sure that the paper holder is closed and forms
tractors are positioned correctly to match the width of
your paper.
Make sure that the printer does not detect the paper
after you have ejected the loaded paper manually.
If the printer detects paper even though it has already
been ejected, press the LOAD button and have the
printer perform the paper ejection operation, then load
the paper again.
Table 7.1 Print Quality Problems and Solutions (Cont.)
Problem Solution
If an error occurs If an error occurs during printing with Windows,
during printing with execute reset from the control panel or turn off the
Windows, simply printer, then print the page again.
printing the page
again will cause the
printed characters
to be garbled.
User's Manual 7-5
Trouble-
shooting
TROUBLE-SHOOTING
Table 7.2 Paper Handling Problems and Solutions (Cont.)
Problem Solution
Paper jams while Move the paper thickness lever to position D.
loading. Turn off the printer and remove the jammed
paper. Remove any obstructions from the paper
path.
Make sure that the paper thickness lever is set for the
thickness of your paper. See Table 3.2 in Chapter 3.
Make sure that the paper is not folded, creased, or
torn.
Reload the paper.
Paper jams while Move the paper thickness lever to position D.
printing. Turn off the printer and remove the jammed
paper. Remove any obstructions from the paper
path.
Make sure that the paper thickness lever is set for the
thickness of your paper. See Table 3.2 in Chapter 3.
For continuous forms, make sure that the incoming
and outgoing paper stacks are correctly placed.
Paper should feed straight.
Paper slips off the Make sure that the forms tractors are positioned
forms tractors or correctly for the width of your paper and that
the perforated the perforated holes of the paper fit directly over
holes of the paper the tractor sprockets.
tear during
printing.
TROUBLE-SHOOTING
7-6 User's Manual
Tips for clearing a jammed sheet from the printer
If a sheet of paper is jammed between the print head and the platen and
cannot be removed, clear it as follows:
1. Turn off the printer and disconnect the power cord from the recepta-
cle.
2. Push up the locking levers to release the forms tractors and open the
paper holders.
3. Move the paper thickness lever to position D.
4. Move the print head so that you can remove the jammed sheet easily
and clear the sheet.
NOTE
The print head is hot immediately after printing. Move it after making
sure that it gets cool.
• If you cannot clear the
jammed sheet by the
above procedure, set
fourfold continuous
forms paper on the
forms tractors and turn
the platen knob to feed
the paper forward. The
jammed paper is pushed
out. Before operation, be sure to position the print head at the
center of the jammed paper.
User's Manual 7-7
Trouble-
shooting
TROUBLE-SHOOTING
Operating Problems
If any of the errors listed in Table 7.3 occurs, the PAPER OUT LED lights
up, and an alarm beeps, and the printer goes offline.
In such cases, the buttons on the control panel can be used in the same
manner as those when the printer is in the offline state.
Table 7.3 Operating Problems and Solutions
Paper end (PE) error Paper end is detected. (*1) - Insert and load the
paper in the paper tray.
Eject jam error Paper end is not detected - Eject forms or sheets.
even after a large amount - Press the online button
of continuous forms or cut to turn the printer
sheets were ejected. online.
Continuous form/ In continuous form loading - Switch the continuous
cut sheet switch status, the continuous form/ form/cut sheet switch
lever error cut sheet switch lever is lever back to its
switched to cut sheet mode. original position.
In cut sheet loading status, - Remove the loaded
the continuous form/cut paper.
sheet switch lever is
switched to continuous form
mode.
If the error occurs, all
buttons are disabled.
Error name Error description Recovery method
TROUBLE-SHOOTING
7-8 User's Manual
Error name Blink Light
ONLINE AREA OVER PAPER OUT
Paper end *
Eject jam error * *
Continuous form/
cut sheet switch * *
lever error
Load jam error *
*1 If the setup item PPR-OUT:IGNORE is specified, paper end is not
detected.
LED status
LEDs light up depending on the following error types.
Table 7.3 Operating Problems and Solutions (Cont.)
Load jam error After the tractor PE sensor - Execute the loading
detected the form at operation.
continuous form loading, - Press the online button
the TOF sensor does not to turn the printer
detect the top of the form online.
even after line feed is - When the cut sheets
executed a certain number are loaded, remove the
of times. sheets once, and
After the set sensor detects then insert them again.
the sheet at cut sheet They are then loaded
loading, the TOF sensor automatically.
does not detect he top of
the sheet even after line
feed is executed a certain
number of times.
Error name Error description Recovery method
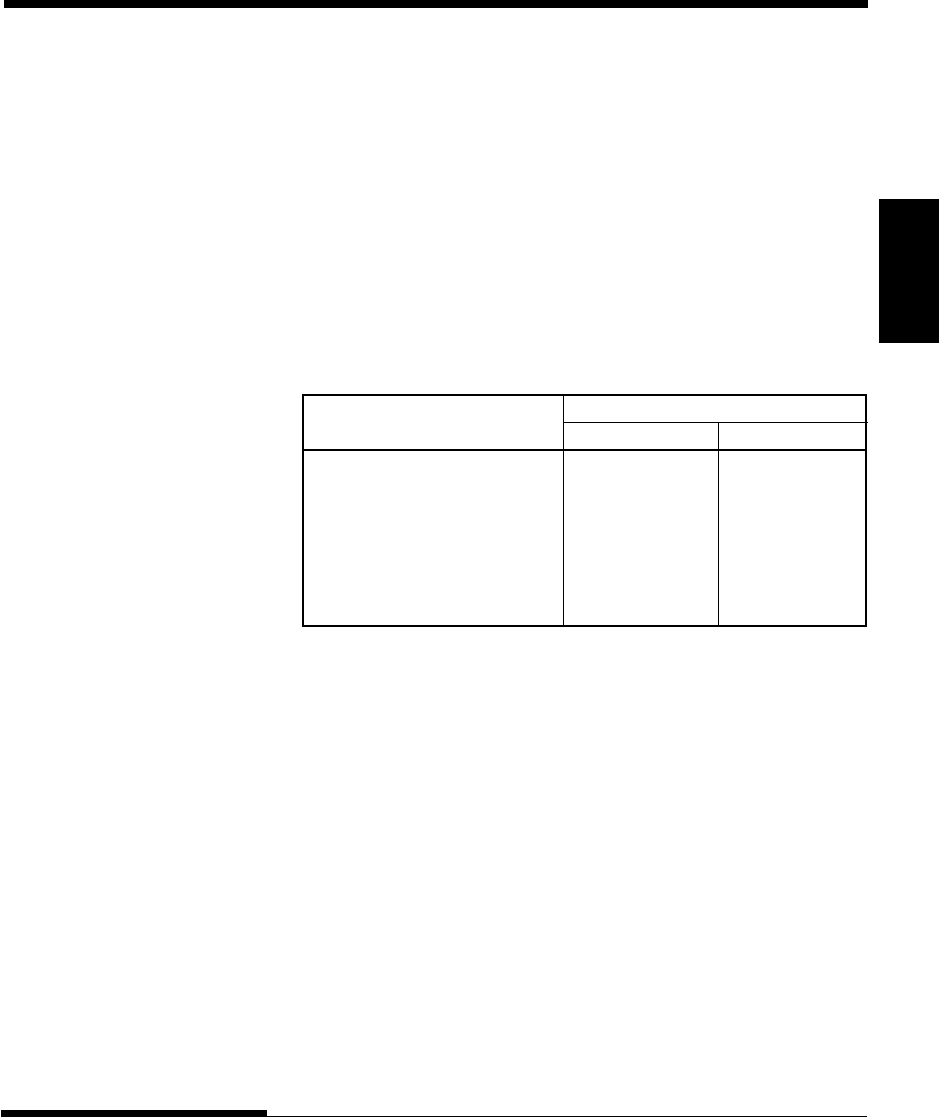
User's Manual 7-9
Trouble-
shooting
TROUBLE-SHOOTING
Printer Failures
A user cannot generally resolve a problem involving defective printer
hardware. On detecting a fatal error, the printer will:
• Stop printing
• Beep four times
• Turn the ONLINE indicator off
• Blink the PAPER OUT indicator (see Table 7.4 for the error type).
Table 7.4 Printer Failures
Error LED states
<Light> <Blink>
+34 V undervoltage error ONLINE PAPER OUT
Left end sensor error MENU1 PAPER OUT
Overload error MENU2 PAPER OUT
RAM error AREA OVER PAPER OUT
Hight voltage error - PAPER OUT
and
AREA OVER
The following errors cause the printer to turn off the power:
• Print head error
• Space motor error
• Line feed motor error
• +34 V overvoltage error
No error condition is displayed if any of these errors occurs.
Turn the printer off and back on, then rerun the same job to check if the error
was transient. If the error recurs, contact your dealer.

TROUBLE-SHOOTING
7-10 User's Manual
The printer diagnostic functions are SELF-TST, HEX-DUMP, and
V-ALMNT.
• SELF-TST tells you whether the printer hardware is functioning
correctly. If the printer hardware is functional, any problems you are
having are probably caused by incorrect printer settings, incorrect
software settings, the interface, or the computer.
• HEX-DUMP allows you to determine whether the computer is
sending the correct commands to the printer, and whether the printer
is executing the commands correctly. This function is useful to
programmers or others who understand how to interpret hex dumps.
• V-ALMNT allows you to check and, if necessary, correct the printer’s
vertical print alignment.
For details on using these functions, all of which are available in the printer
setup mode, see the section Using the Diagnostic Functions in Chapter 5.
If you are not able to correct a problem using this chapter, contact your dealer
for assistance. Be prepared to provide the following information:
• The printer number is on the rating label on the right side of the
printer. The serial number and date of manufacture are on the label
on the rear of the printer.
• Description of the problem
• Type of interface you are using
• Names of your software packages
• List of the printer default settings. To print the default settings, see
the section Printing a List of Selected Options in Chapter 5.
DIAGNOSTIC
FUNCTIONS
GETTING HELP

User's Manual 8-1
INSTALLING OPTIONS
Options
INSTALLING OPTIONS
The installaion of options allows you to expand
the capabilities of your printer. Options available
for the printer include:
• LAN card
• RS-232C serial interface board
The LAN card is a uset installable option, but can be installed only on a
printer model with the parallel and USB interfaces. For information on the
installation procedure, refer to the manual that comes with the LAN card.
Note that the RS-232C serial interface is a factory or dealer installable option.
Options can be purchased from your dealer. Order numbers for options are
given in Appendix A.
8

INSTALLING OPTIONS
8-2 User's Manual
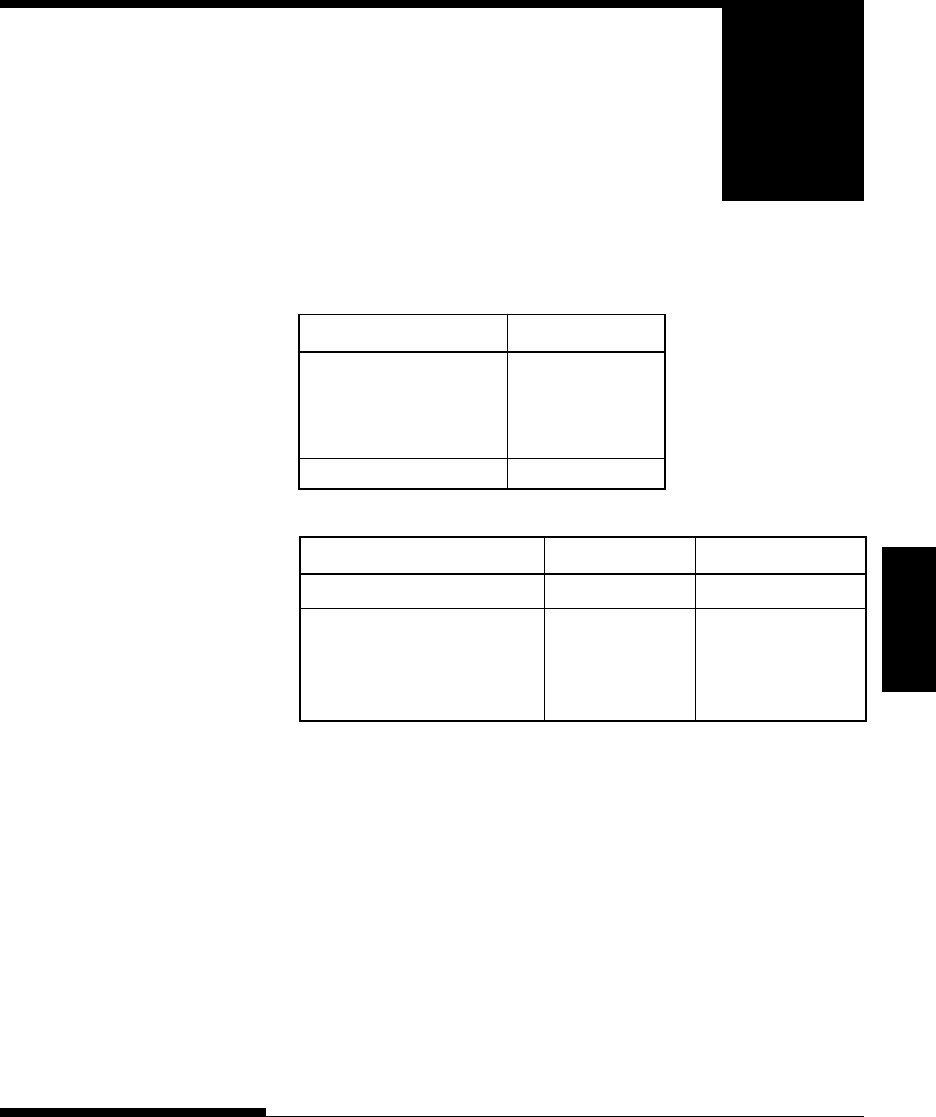
User's Manual A-1
Supplies
SUPPLIES AND OPTIONS
This appendix lists the supplies and options available
for the printer.
Contact your dealer for information on ordering
any of these items.
Supplies Order Number
Ribbon cartridges
Black ribbon CA02374-C104
Ribbon subcassette
Black ribbon CA02374-C204
Print head CA02281-E718
Option Order Number Description
RS-232C serial interface board. CA02374-C992
LAN card KA02004-C990 Installable only on a
printer model with the
parallel and USB
interfaces.
SUPPLIES
A
OPTION

SUPPLIES AND OPTIONS
A-2 User's Manual