Fujitsu FOMA-F906I Part 15 Low Power Communication Device Transmitter User Manual F906i
Fujitsu Limited Part 15 Low Power Communication Device Transmitter F906i
UserManual.wiki
>
Fujitsu
>
FOMA-F906I User Manual
>
manual 5
Contents
1.
manual 1
2.
manual 2
3.
manual 3
4.
manual 4
5.
manual 5
6.
manual 6
7.
manual 7
8.
manual 8
9.
manual 9
10.
manual 10
manual 5
Navigation menu
Upload a User Manual
Namespaces
Wiki Guide
HTML
PDF
Info
Views
User Manual
Discussion / Help
Navigation
![124 Security SettingsF906i_E1kouPrivacy modeSetting operations for using or displaying personal informationSet operations for using or displaying personal information and reflect secret attributes.◆Flow of Privacy mode operation setting・Set the operation in the order below.aOperation setting of Privacy mode→P124・You can set so that authentication is required each time you use personal information, select the data to hide, or select the reception operation to the call from a party that secret attribute is set.bSetting secret attribute・Reflecting the setting contents of each item of Privacy mode, "Hide set contact", "Hide secrecy fldrs", "Hide secrecy album", "Hide set schedule" to each data requires the setting of secret attribute.Phonebook→P90, Bookmark→P163, Mail→P199, My Picture, i-motion, My Document, Other→P317, Schedule→P361cActivating Privacy mode→P126■When there is an incoming call.・You can select various incoming methods such as hiding the name saved in phonebook or answering by recorded messages or voice mail without performing incoming operations.■Operation in Privacy modeTemporary cancellation of Privacy mode→P128Contact setting→P128✔INFORMATION・To enable Privacy mode settings, you need to start Privacy mode. You can also set automatic activation.・If Contact setting is not performed after changing secret attribute of phonebook entry or editing the phonebook entry, activating Privacy mode does not hide mail or SMS of the changed/edited phonebook entry. To hide them, perform Contact setting.→P128◆Setting Privacy mode operation・If selecting "Authorized access", authentication is performed when using a set function.・If selecting "Hide set contact", "Hide secrecy fldrs", "Hide secrecy albums", "Hide set schedule", data or folder that secret attribute is set is not displayed. And, also when setting Shortcut icons on stand-by display, data or folders with secret attribute are hidden.❖Setting operation of phonebook or mail1m [Settings & NW services] 421eAuthenticateeSet the required itemseCegCall & Logs : ・If setting to "Authorized access", authentication is performed when using phonebook, PushTalk phonebook, Redial, Received calls, Recorded messages, Voice memos or quick search to search mail.・With "Hide set contact" set, phonebook entries or groups (including phonebook entries in those groups) with secret attribute, redial, received calls, mail or SMS for parties with secret attribute is not displayed. And the reception operation depends on the setting of Private call act.Mail & Logs : ・If setting to "Authorized access", authentication is required when using mail or mail logs.・With "Hide secrecy fldrs" set, folders with secret attribute are not displayed. The reception operation when a mail is received from a party to be sorted to a folder with secret attribute depends on the setting of Private mail act.Private call act. : Set the incoming operation when there is an incoming call from a party of phonebook entry with secret attribute in Privacy mode (when Phonebook & Logs is "Hide set contact").・If setting to "Alert+Show No.", it is treated as a call from a party not registered in phonebook.・If setting to "Silent receive", it is not notified by ring alert, vibrate alert, light alert or sub-display. And, the display operates according to the setting of the Silent receive act.・If setting to "Alert+Show name.", it is treated as a call from a party that secret attribute is not set.F906i.book Page 124 Monday, April 21, 2008 10:59 PM](https://usermanual.wiki/Fujitsu/FOMA-F906I.manual-5/User-Guide-946661-Page-1.png)
![125Security SettingsF906i_E1kouSilent receive act. : Set the incoming operation when setting Private call act. to "Silent receive". And, even if each function is set, it is not notified by ring alert, vibrate alert, light alert or sub-display.・If setting to "Keep receiving", when there is an incoming call, only the phone number is displayed on the incoming call screen.・If setting to "Start Ans. Machine", when there is an incoming call, answer machine is activated. Only the phone number is displayed on the incoming call screen.・If setting to "Fwd to Voice Mail", the received call is connected to voice mail. Note that the incoming screen is not displayed.Private mail act. : Set the display or notification when a mail comes from a party that secret attribute is set or from a party whose mail is set to be sorted to folders that secret attribute is set in Privacy mode (when Call & Logs is "Hide set contact" or when Mail & Logs is "Hide secrecy fldrs").・If setting to "No alert/name/no.", mails are received but the receiving operation is not performed.・If setting to "Alert+Show name", even if receiving a mail from a party that secret attribute is set, ticker, name or subject is displayed and the receiving operation is performed.Incoming: privacy mode : Set if you notify the presence of newly arrived information by changing the battery icon type when there is an incoming call or mail from a party of a phonebook entry with secret attribute or when a mail is received from a party to be sorted to a folder with secret attribute. Select a battery icon to appear or select "OFF".❖Setting operations for Other item privacy1m [Settings & NW services] 422eAuthenticateeSet the required itemseCegMy Picture : Set if you require authentication before using My Picture.・With "Hide secrecy album" set, albums with secret attribute are not displayed.i-motion : Set if you require authentication before using i-motion.・With "Hide secrecy album" set, albums with secrecy are not displayed. When a movie/i-motion in an album with secret attribute is saved to playlist, the title in the playlist is not displayed either.My Document : Set if you require authentication before using My Document.・With "Hide secrecy fldrs" set, folders with secret attribute are not displayed.Other : Set if you perform authentication when using other (Word, Excel, PowerPoint).・With "Hide secrecy fldrs" set, folders with secret attribute are not displayed.Schedule : Set if you perform authentication when using Scheduler or watching/recording reservation of 1Seg.・With "Hide set schedule" set, schedules with secret attribute are not displayed.Notepad : Set if you perform authentication when using Notepad.i-αppli : Set if you require authentication before using i-αppli.Loc. history (GPS) : Set if you require authentication before using Loc. history of GPS.Bookmark : Set if you perform authentication when using Bookmark.・With "Hide secrecy fldrs" set, folders with secret attribute are not displayed.Screen memo : Set if you require authentication before using Screen memo.◆Setting activation/cancellation method of Privacy mode1m [Settings & NW services] 423eAuthenticateeSet the required itemseCActivate/Deactivate : Set the activation/cancellation method of Privacy mode.・When setting to "No activation", Privacy mode is activated only when Auto start is set.・When setting to "Key+Authorize", the operation of authentication screen for activation/cancellation is not displayed. When selecting this item, press C to display the detailed explanation screen of this operation.Auto start : Set the time period till Privacy mode automatically starts when doing nothing on stand-by display.F906i.book Page 125 Monday, April 21, 2008 10:59 PM](https://usermanual.wiki/Fujitsu/FOMA-F906I.manual-5/User-Guide-946661-Page-2.png)
![128 Security SettingsF906i_E1kou✔INFORMATION・Browser history of i-mode and full browser do not display other browser histories than those in Privacy mode.・If all items except Incoming: privacy mode and Auto start are "Show all", Privacy mode is not activated. If Privacy mode is already activated, it is canceled.・Deleting all data or perform "Delete all items" with the functions below also deletes the data hidden in Privacy mode.- Redial/Received calls- Recorded messages- Phonebook entry-Mail*- Mail logs-Schedule- Voice memos*Also when performing an operation except "Delete one item" or "Delete selected item", hidden mails are deleted.・When Call & Logs of Privacy mode setting is changed from "Show all" or "Authorized access" to "Hide set contact" in Privacy mode, a massage appears indicating that Contact setting is to be made to reflect the privacy to mail.・Depending on the settings of Privacy mode, when using mail or schedule (including 1Seg watching/recording reservation) from i-αppli in Privacy mode or save data in My Picture, a message may appear indicating that the specified function cannot be performed.・Once authentication is performed to use the function set to "Authorized access" in Privacy mode, no more authentication is required before returning to the stand-by display. The same situation occurs when using multiple functions set to "Authorized access".<Example> When sending an image saved in My Picture by mail in Privacy mode (when Call & Logs and My Picture is "Authorized access"), authentication is not required to display phonebook on a mail creation screen because it is carried out when displaying My Picture.◆Canceling Privacy mode temporarilyOn a list screen containing hidden data etc., you can temporarily cancel the privacy state to display hidden data.・The temporary cancellation is active until the stand-by display reappears. You may not be able to perform temporary cancellation depending on the screen.1On the screen to be temporarily cancelled, c (1 sec. or more)eAuthenticate◆Hiding mails from/to senders/receivers with secret attribute in the phonebook <Contact setting>When performing Contact setting after secret attribute of a phonebook entry is changed or a mail received via data communications is saved to FOMA terminal, secret attribute can be set to sent or received mail and SMS in correspondence with phone numbers or mail addresses in the phonebook entry with secret attribute.・In Privacy mode (when Call & Logs is "Hide set contact"), mail or SMS with secret attribute does not appear.1m [Settings & NW services] 424eAuthenticatee"Yes"✔INFORMATION・If Contact setting is not performed after changing phonebook entry secret attribute or editing the phonebook entry, activating Privacy mode does not hide mail or SMS of the changed/edited phonebook entry.・Mail and SMS to have secret attribute are as follows.- Sent/Unsent mails or SMS with secret attribute in phonebook entries saved in destination address (TO, CC, BCC)- Received mails or SMS sent from phonebook entries with secret attribute・ appears at the top of the display and the terminal is in the data transfer mode (same condition as out of service area) during Contact setting, the terminal is not available for phone calls, i-mode operation or data communication. Also, you cannot switch to other functions by pressing s.・When returning to the stand-by display after receiving an external phonebook entry with secret attribute or setting secret attribute for a phonebook entry, a confirmation screen appears asking if you reflect the secret attribute of the phonebook entry to mail. Select "Yes" to apply secret attribute. When Privacy mode is not activated, a message for confirming Activation option appears.・With 2in1 ON, secret attribute is set regardless of the 2in1 mode and Ph.book 2in1 setting.・Performing Contact setting in the cases below causes cancellation of secret attribute for the related mail and/or SMS.- When secret attribute of a phonebook entry is canceled- When a phonebook entry with secret attribute is changed (targeted at a previous phone number or mail address)- When a phonebook entry with secret attribute is deleted (including deletion of the phone number or mail address of the phonebook entry)F906i.book Page 128 Monday, April 21, 2008 10:59 PM](https://usermanual.wiki/Fujitsu/FOMA-F906I.manual-5/User-Guide-946661-Page-5.png)
![129Security SettingsF906i_E1kouReceive display optionSetting contents displayed when receiving call or mailYou can set the displaying contents (name, phone number, etc.) on the display or sub-display when receiving a call or mail from a party saved in phonebook.・For the displaying contents when receiving a call or mail in Privacy mode, the setting of Privacy mode takes precedence over this setting.1m [Settings & NW services] 44eAuthenticateeSet the required itemseCMain display info (At call received) : Set the display of the screen when receiving a voice/videophone call or PushTalk call (including during communications).・If setting to "Name+Phone No.", when receiving a voice call or videophone call, the name and phone number are displayed. When receiving a PushTalk call (including during communication), only the name is displayed.Main display info (Ticker at mail rcvd) : Set the display of reception result ticker.・If setting to "Name+Subject", when receiving a mail, the name and subject are displayed on the reception result ticker.・If setting to "Incoming notice", only the message indicating the mail reception is displayed on the reception result ticker.・If setting to "No ticker", reception result ticker is not displayed.Sub-display info (At call received) : Set the display of sub-display when receiving a voice/videophone call or PushTalk call (including during communications).・If setting to "Incoming notice", only the incoming notice is displayed.Sub-display info (At mail received) : Set the display of sub-display when receiving a mail.・If setting to "Incoming notice", only the message is received indicating that a mail is received.✔INFORMATION・Even if setting the name to be displayed in All lock, Omakase Lock or Personal data lock, only the phone number is displayed on the stand-by display or sub-display. And, even if setting the reception result ticker to be displayed in All lock, Omakase Lock, Personal data lock or Lock on close, the reception result ticker is not displayed.Side key holdPreventing inadvertent operation of side keysThis function disables P, M and side keys [▲▼] while FOMA terminal is folded, thus avoiding accidental operations of the terminal (e.g. when carrying in a bag).1m (1 sec. or more) appears on the stand-by display.Canceling : m (1 sec. or more)✔INFORMATION・Even in Side key hold, you can activate sub-display/the Quick answer machine or stop ring alert/the vibrator during reception.Lock on closeLocking key each time FOMA terminal is foldedWhen setting Lock on close to "ON", all keys except P, M and side keys [▲▼] are locked whenever FOMA terminal is folded. Even when Lock on close is canceled, the authentication screen appears every time FOMA terminal is opened to prevent unauthorized use by others.To make an emergency call (110, 119 or 118) in Lock on close, enter the emergency call number from a terminal security code entry screen, stand-by display or Lock on close ON screen and press n.*The emergency call number entered on the terminal security code entry screen is masked with " ".■For Verify fingerprintOn the fingerprint authentication screen, enter the emergency call number and press n. When a stand-by display or Lock on close ON screen appears, press m or s to make an emergency call.F906i.book Page 129 Monday, April 21, 2008 10:59 PM](https://usermanual.wiki/Fujitsu/FOMA-F906I.manual-5/User-Guide-946661-Page-6.png)
![130 Security SettingsF906i_E1kou■When Fingerprint access is "ON"Press n on the fingerprint authentication screen, enter the emergency call number and press n. When a stand-by display or Lock on close ON screen appears, press mn or sn to make an emergency call.・Lock on close is not activated when FOMA terminal is as below.- While dialing, talking, disconnecting, on hold, during a PushTalk session*- While receiving Area Mail (including while displaying the contents)*- While playing melody*- While sending location by GPS*- Receiving by infrared communication (including when displaying INBOX)/iC transmission (including when displaying INBOX)- While sounding of schedule reminder, alarm clock or countdown timer (including while snoozing, counting down or in stop state), receiving Fake call (including while counting down)- Software update (including while updating software)- During 1Seg watching, 1Seg recording (only while watching), Notify start of 1Seg, playing video from 1Seg folder list or recorded by 1Seg, displaying still image, displaying data list, when activating Music&Video Channel (except program downloading) or Music player*- During 64K data communications, data transfer- Repeat playing movie saved in microSD card*When the operation completes with FOMA terminal folded, Lock on close is activated.・The functions below are available.- Turning power ON/OFF- Operation of receiving voice/videophone/PushTalk call, making an emergency call (110, 119, 118)- Recording of recorded messages, voice memos or movie memo- Automatic update of Data Center- Switching displaying/hiding calendar layout- Receiving i-mode mail, MessageR/F, SMS*- Receiving Area Mail- Starting Omakase Lock- Obtaining ToruCa from IC card reader- Activating recording by 1Seg recording reservation- Headset quick dial by Headset key control- Reactions to Location request of GPS- Software update- Auto-update of pattern definitions*When receiving with FOMA terminal open, none of receiving actions such as displaying the receiving or reception result screen, emitting ring alert are not taken.◆Setting Lock on close "ON"1m [Settings & NW services] 411eAuthenticateeSet the required itemseCLock on close : Set if you activate Lock on close.Lock after phone close : Lock on close is activated when the specified time elapses after FOMA terminal is folded.❖When Lock on close is startedEach time FOMA terminal is folded, Lock on close is activated according to the time set in Lock after phone close and all keys except P, M and side keys [▲▼] are locked. Note that, even if pressing side key [▲] (1 second or more), voice memo/movie memo list screen is not displayed.・To cancel Lock on close, open FOMA terminal and perform authentication. When the next screen appears, directly enter terminal security code or perform authentication by pressing m or s.✔INFORMATION・When Lock on close is "ON", it is activated by turning the power OFF and ON. Lock on close is activated after Omakase Lock, if active, is canceled.Stand-by display when Lock on close is activated from stand-by displayStand-by display when Lock on close is activated from a screen except stand-by displayF906i.book Page 130 Monday, April 21, 2008 10:59 PM](https://usermanual.wiki/Fujitsu/FOMA-F906I.manual-5/User-Guide-946661-Page-7.png)
![131Security SettingsF906i_E1kou◆Indicating activation of Lock on close with a light <Security indicator>You can set if you indicate state of Lock on close with a light.1m [Settings & NW services] 43eAuthenticatee1 or 2❖When Security indicator is setIf FOMA terminal is closed and Lock on close is activated, the light blinks in blue for approximately 2 seconds. When set to other than "Right after", if the set time elapses, the light blinks in blue for approximately 2 seconds to indicate that Lock on close is activated. Note that, when the light blinks in red for approximately 2 seconds, it indicates that Lock on close is not activated.Restricting calls /mail/data tra nsferAccepting/Rejecting calls from specified phone numbersAccepting/Rejecting incoming call can be set for each phone number saved in FOMA terminal phonebook.・To use this function, specifying Accept/Reject call for each phone number and Specified caller setting are required. The settings and the operations of Accept/Reject call are as listed below.*The call or PushTalk call from a specified phone number is disconnected without activating ring alert and the caller hears a busy tone.・This function is activated only when the other party sends caller ID.・Rejected calls are recorded as missed calls.・If Ring time is set to "0 Sec." for Voice Mail or Call forwarding, Voice Mail or Call forwarding is activated and the call is not stored as a received call.・Combination of Caller ID request service and Anonymous caller is recommended when used.◆Specifying phone numbers to accept/reject calls <Accept/Reject call>Accepting/Rejecting incoming call is set for phone numbers saved in FOMA terminal phonebook.1deSearch the phonebookePlace the cursor on a phonebook entry to set and m353eAuthenticateeSelect a phone numbere1-3・To accept/reject calls from specified phone numbers, activate settings of Specified caller in succession to the above step.✔INFORMATION・When changing or deleting the phone number with Accept/Reject call is set, this setting is canceled. Set Accept/Reject call again for the new number.◆Enabling Accept/Reject call from specified numbers <Specified caller>・This setting applies to all phone numbers with Accept/Reject call set.・Reject call and Accept call are not enabled simultaneously.1m [Settings & NW services] 551eAuthenticatee1-3✔INFORMATION・If a call without caller ID is received from a party you set Reject call, the FOMA terminals response is according to the setting in Anonymous caller regardless of this setting.・When Accept call is selected with no phonebook data set for Accept call, a message appears indicating to reject all incoming calls. Select "Yes" to reject all incoming calls.・Regardless of this setting, i-mode mail and SMS are received.Setting Accept/Reject call for each phone numberAccept call Reject call No settingSpecified caller Cancel settingsAccepted Accepted AcceptedReject callAccepted Rejected*AcceptedAccept callAccepted Rejected*Rejected*F906i.book Page 131 Monday, April 21, 2008 10:59 PM](https://usermanual.wiki/Fujitsu/FOMA-F906I.manual-5/User-Guide-946661-Page-8.png)
![132 Security SettingsF906i_E1kouAnonymous callerSetting operations for incoming calls not to notify caller IDFor each reason for hiding caller ID, you can set a receiving operation for incoming calls notifying no caller ID.・For the ring alert and incoming call image for an incoming voice call that does not notify the caller ID, this setting takes precedence over the settings of Call alert (Incoming call).1m [Settings & NW services] 52eAuthenticatee1-3eSet the required itemseC(Incoming operation) : Set operations for incoming calls or PushTalk calls that do not notify caller ID.・When setting to "Disable settings", the ring tone set in each ring alert setting sounds.・When setting to "Call Rejection", incomings calls from other parties are rejected.・When setting to "Ring alert off", ring alert does not sound. Set an image in "Show image".・When setting to "Melody", select a melody and set an image in "Show image".・When setting to "Movie ringtone", select a movie/i-motion.・When setting to "Music", select a music data and set an image in "Show image".Setting Music→P95Show image : Set an image for incoming calls that do not notify caller ID.・When "i-motion" is selected, select a movie/i-motion from the movie list.List images : When "Select image" is selected in Show image, select the List images field and set an image.✔INFORMATION・When "Call Rejection" is set, the rejected calls are recorded as missed call.・When there is an incoming videophone/PushTalk call without caller ID notification, the operations are performed only when "Call Rejection" is set. For other settings, the ring alert and incoming image depend on each ring alert or incoming call image setting.・If movie/i-motion containing only sound (i-motion without image such as the one containing only singing voice of a singer) is set in "Movie ringtone" for the incoming settings, "Standard image" is set, but the image (except Flash graphics) can be changed by selecting "Select image" from Show image.Ring alert delaySetting not to answer calls from the party not saved in phonebook・Effective to "One-ring phone scam".・This function cannot be set when Unregistered caller is "ON".1m [Settings & NW services] 15eSet the required itemseCDelayed ring alert : Set if you enable Delayed ring alert.Delay time (sec) : Set the time between the arrival of calls and the start of ringing. (1-99 seconds)Missed call : Set whether to display a missed call which ends in less than the time set in Delay time in Received calls.❖When Delayed ring alert is setWhen an incoming voice, videophone or PushTalk call is received from a party not saved in phonebook or such call is received without caller ID notification, the reception is notified only with screen display for the specified period of time. After the set time has elapsed, normal ring alert action starts.・Before the specified time elapses, ordinary call receiving operation such as answering an incoming call or replying it with Answer machine can be performed.・In Personal data lock, this function operates even for an incoming call from a party saved in the phonebook.・This function operates also when there is an incoming call from a party that secret attribute is set with Private call act. set to "Alert+Show No." in Privacy mode (when Call & Logs is "Hide set contact").F906i.book Page 132 Monday, April 21, 2008 10:59 PM](https://usermanual.wiki/Fujitsu/FOMA-F906I.manual-5/User-Guide-946661-Page-9.png)
![133Security SettingsF906i_E1kou✔INFORMATION・Regardless of this function, when the functions or services below are set, they take precedence.- Public mode-Answer machine- Voice Mail service- Call forwarding service・When there is an incoming call or PushTalk call from a party to be rejected because of settings from Specified caller or Anonymous caller, rejective operation takes priority over the settings from this function.・When Delay time has been set to the same seconds as that for Voice Mail service or Call forwarding service, the ring alert may sound.Unregistered callerRejecting calls from phone numbers not saved in phonebook・Combination of Caller ID request service is recommended when used.・This function cannot be set in Personal data lock or when Delayed ring alert of Ring alert delay is "ON".1m [Settings & NW services] 552eAuthenticatee1 or 2❖When Unregistered caller is setThe voice/videophone/PushTalk call from a caller who is not saved in phonebook is disconnected without activating ring alert and the caller hears a busy tone.・Rejected calls are recorded as missed calls.・This function operates also when there is an incoming call from a party that secret attribute is set with Private call act. set to "Alert+Show No." in Privacy mode (when Call & Logs is "Hide set contact").・Regardless of this setting, i-mode mail and SMS are received.Other "Securi ty Settings"Data Security ServicePhonebook can be backed up by automatic update. This service allows you to store phonebook, images and mails saved in FOMA terminal to Data Center, and in case of misplacement, changing model, etc. of FOMA terminal, restore the data to FOMA terminal. And, you can send broadcast notice when you changed your mail address. A packet communication fee for sending a mail is not charged. With a PC (My DoCoMo), more convenient usages are available.・For details on Data Security Service, refer to "Mobile Phone User's Guide [i-mode] FOMA version".*Data Security Service is a charged service requiring subscription (i-mode subscription is required for the service).・For procedures for saving or restoring phonebook, mail and images to/from Data Center, see the related pages.Phonebook→P91, Mail→P199, Image→P298PC etc.Data CenterFOMA terminalPhonebook/Mail/Images are saved/downloaded Data edited using a PC is reflected Viewing/Editing saved dataData is restored easily when lost/wet/changed modelInternetF906i.book Page 133 Monday, April 21, 2008 10:59 PM](https://usermanual.wiki/Fujitsu/FOMA-F906I.manual-5/User-Guide-946661-Page-10.png)
![134 Security SettingsF906i_E1kouOther "Security Settings"In addition to those introduced in this chapter, you can use the functions below and services related to Security settings.Purpose Function/Service PageTo disable the IC card function IC card lock P249To reject "Nuisance calls" including malicious calls and repeating misdialed callsNuisance Call Blocking ServiceP391To reject calls with no caller ID Caller ID request service P391To perform safe and reliable data communications by using the electronic authentication service (FirstPass-compatible sites only)FirstPass P159P173To update the software if necessary Software update P463Protecting FOMA terminal from hazardous data Scanning function P467To receive only necessary mail messages selected from mass messages deliveredReceive option P207To register/check the safety of relatives by using i-mode when a disaster occurs"i-mode Disaster Message Board" serviceRefer to "Mobile Phone User's Guide [i-mode] FOMA version"To change mail address Change Mail AddressTo reject mail containing URL Spam Mail Prevention (Reject Mail with URL)To receive/reject only mails from the specified domainSpam Mail Prevention (Reject/Receive Mail Settings)To receive/reject mail messages only between i-mode terminalsTo receive/reject mails from the specified addressTo set recommended settings for Spam Mail Prevention easilySpam Mail Prevention (かんたん 設定 (Simple mail setting))To reject the 500th and later i-mode mails sent from one i-mode terminal in one daySpam Mail Prevention (Reject Mass i-mode Mail Senders)To reject receiving SMS Spam Mail Prevention (SMS Rejection Settings)To reject unsolicited Ad mails Other Settings (Reject Unsolicited Ad Mail)To restrict the size of received mail Limit Mail SizeTo confirm mail settings Confirm SettingsTo stop mail function temporarily Suspend MailTo check approximate location of misplaced FOMA terminalケータイお探しサービス (Keitai-Osagashi Service)Purpose Function/Service PageF906i.book Page 134 Monday, April 21, 2008 10:59 PM](https://usermanual.wiki/Fujitsu/FOMA-F906I.manual-5/User-Guide-946661-Page-11.png)
![136 CameraF906i_E1kouBefore using camera◆Using camera・Though the camera is manufactured using extremely accurate technology, some pixels and lines may always be displayed to be lighter or darker than you expect. Images shot under very low light intensity contain increased noise such as white lines, but it is not a malfunction.・If FOMA terminal is left in a warm place or exposed to direct sunlight for a long time, images to be shot may be deteriorated.・When attempting to take a photo of a strong light source such as the sun or a lamp, images may become dark or degraded.・For some characteristics of the lens, distorted images are displayed.・Shooting images under illumination flickering at high frequency such as fluorescent lamp, mercury vapor lamp or sodium vapor lamp may cause the screen to flicker or stripe patterns to appear on the screen, which is called flicker phenomena, giving different coloring for some shooting timings. Flickers or stripes may be reduced by adjusting the brightness for shooting.・Images shot with the camera may differ from actual subjects in color and brightness.◆Precautions for shooting image・If the lens is contaminated with fingerprints or skin oil, you cannot shoot clean images. Use a soft cloth to remove any such contaminants before taking photos.・Be careful not to cover the lens with fingers when shooting images.・Be careful of hand movement. Though FOMA terminal provides shake reduce function, it may become less effective for some shooting environment and/or object. Hold FOMA terminal firmly so that it does not move; or use of Auto timer function with FOMA terminal placed in a stable location is recommended. Auto timer is only available when shooting still images.・There is a small time lag from pressing g or side key [▲] until the photo is actually taken. Do not move FOMA terminal for a while after pressing g or side key [▲]. If you take a fast moving subject, the image taken may slightly differ from the subject displayed in the screen when pressing g or side key [▲].・If you shoot the quickly moving subjects when recording a movie, the image may be blurred.・When directing the in-camera toward yourself, the screen displays a mirror image. The shot still images and movies are saved as normal images. When Auto save is set to "No", the still images can also be saved as mirror images.・Images shot with the camera with i-αppli are saved in the i-αppli ("i-mode" folder or "Deco-mail picture" folder for some i-αppli). In some cases, automatically sent to the server.・When microSD card is the destination, do not remove the microSD card while using the camera. It may damage FOMA terminal.・If battery power goes out before saving shot image, the shot image is discarded.・As the camera consumes the battery power very quickly, do not leave the camera activated for a long time or do not leave shot images unsaved for a long time.・Some settings may require extra time for an image to be displayed on the shooting screen when starting the camera.・There are some unavailable functions or settings when Camera is activated from phonebook, mail or i-αppli.◆Shooting procedureWhen shooting, hold FOMA terminal firmly so that it does not move.・Image shooting without blurring→P151・When using Movie camera and Sound recorder, the sound is recorded from the microphone.・For some Image size, rotating the display while shooting switches horizontal/vertical mode of shot images.→P150・If no operations are performed for approximately 3 minutes during shooting stand-by, camera ends.F906i.book Page 136 Monday, April 21, 2008 10:59 PM](https://usermanual.wiki/Fujitsu/FOMA-F906I.manual-5/User-Guide-946661-Page-13.png)
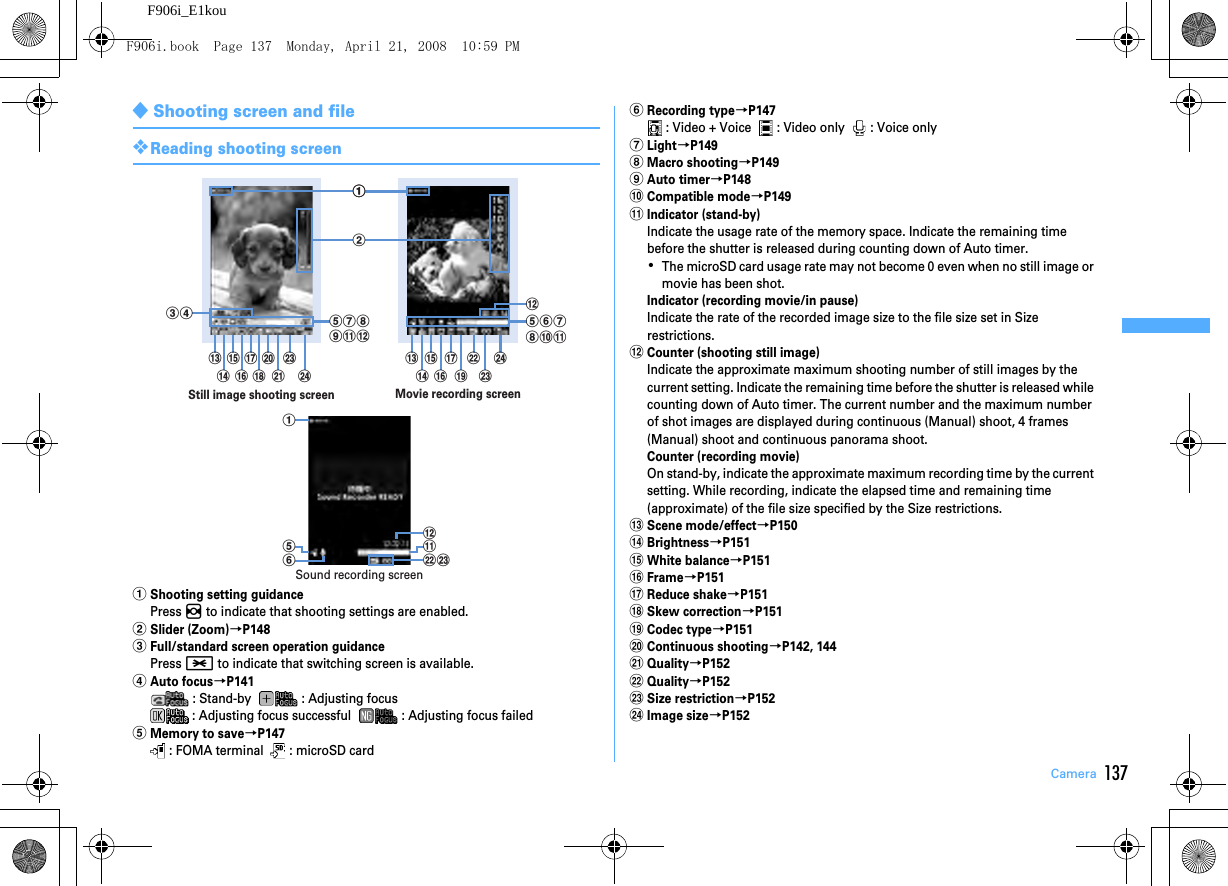
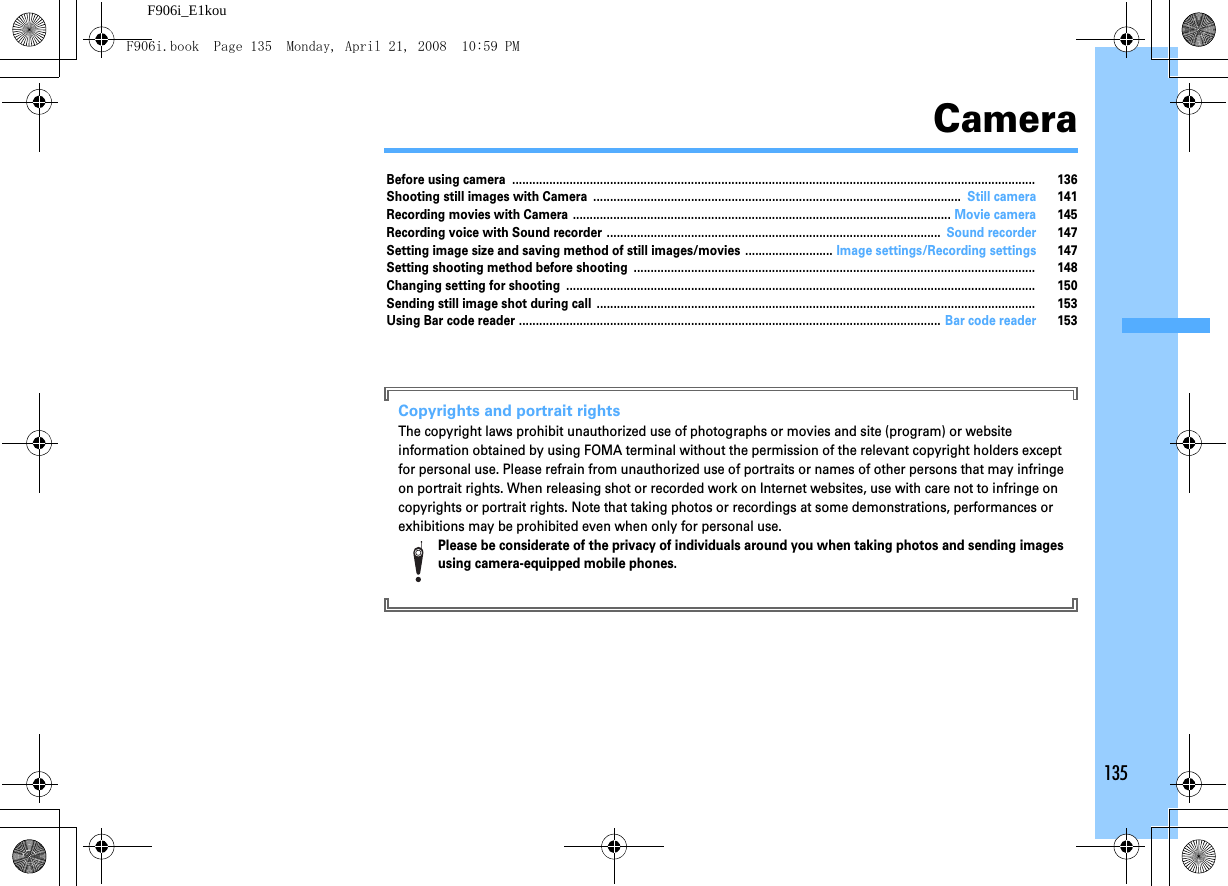
![141CameraF906i_E1kouStill cameraShooting still images with CameraVarious ways of shooting such as Auto focus, Continuous shooting or frame shooting are available.・Shooting method can be set before shooting.→P148・The settings for shooting can be changed.→P150・Shutter sound is emitted even when "Silent" is set for volume settings or in Silent mode or Public mode.・Savable number→P4711CEnters shooting stand-by state, and the light blinks in blue.2g or side key [▲]After focus frame is displayed and auto focus is activated, the shutter sound is emitted, the light turns on in red and a still image is shot.・Auto focus is not activated when using In-camera or when setting Scene mode/effect to "Night scene".Switching in-camera/out-camera : IThe camera is switched and turns to the shooting stand-by state.・The sizes that can be shot using in-camera are Ph.Book (96×72), Sub-QCIF (128×96), QCIF (176×144) or H-VGA (640×480).・When key assign (→P147) is set to "Movie camera", press I for 1 second or more to switch.・Even when the camera is switched, settings of shooting mode etc. are retained.Checking the saved still image : CeSelect a still imageThe still images in the saving destination set by Image settings can be checked.Procedure for displaying images→P294 Step 2 and the following steps in "Displaying image", P313 Step 2 and the following steps in "Displaying multimedia data"・Press c on the list screen of still image or folder to return to the shooting stand-by state.Recording by activating auto focus manually : aAdjust the object to focus on to the center and nOrange focus frame is displayed. When the camera is brought into focus, a confirmation sound is emitted and the focus frame changes to green "+".・Press n again to cancel.・When the camera is not brought into focus, the focus frame may change to red "+".・Depending on the states, the auto focus icon changes.→P137bg or side key [▲]The shutter sound is emitted, the light turns on in red and a still image is shot.・This function is unavailable when using In-camera or when setting Scene mode/effect to "Night scene".3Check the shot still image・Still images of H-QVGA/V-QVGA (320×240, 240×320) or smaller are displayed being scaled up. Press d to display in actual size, and press u to return to Zoom.Saving immediately : Go to Step 4Recording again without saving : cSwitching view to actual size : I・Press k to scroll the screen.・Press * to switch displaying/hiding the guide area.・Press any of c, m, I, C or a to cancel.・Only images of H-WXGA/V-WXGA (1280×768, 768×1280) or larger can be displayed in actual size display.Attaching to mail : aA confirmation screen for saving appears.・Saved to FOMA terminal even when the saving destination is microSD.・For some image size, a confirmation screen for conversion to H-QVGA/V-QVGA (320×240, 240×320) appears.・For some Image size and Size restrictions, a confirmation screen for file size adjustment appears. Selecting "No limit" causes the image to be saved without size adjustment, and selecting "Msg attach:Small" causes the image to be reduced to 90 Kbytes or less in size and saved.・When the file size is 90 Kbytes or less, a confirmation screen for pasting it to the message text appears.F906i.book Page 141 Monday, April 21, 2008 10:59 PM](https://usermanual.wiki/Fujitsu/FOMA-F906I.manual-5/User-Guide-946661-Page-18.png)
![142 CameraF906i_E1kouSetting to the stand-by display : m31e"Vertical view" or "Horizontal view"e"Yes"The still image is saved to FOMA terminal and set to the stand-by display.・When image size is smaller than H-QVGA/V-QVGA (320×240, 240×320), select "Yes (Same size)" or "Yes (Large size)".・If i-αppli stand-by display is set, a cancellation confirmation screen of the i-αppli stand-by display appears.・When the memory to save is microSD card, the image cannot be set for the stand-by display.Adding location information : m2The next procedure→P253 "■Paste/Attach/Send location menu"・When Location info is added, appears on the upper left of the display.Saving to phonebook entry (only for when the size is for Ph.Book (96×72)) : m3e2 or 3e"Yes"The still image is saved to FOMA terminal and phonebook data entry screen appears.・To update phonebook, select the party to save.・When the memory to save is microSD card, the image cannot be saved to phonebook.Changing the title : m41eChange the title and C・Up to 31 characters can be entered (up to 30 characters for continuously shot images).・Display name is changed. The display name can be changed after saving.→319Adjusting brightness and color balance : CThe edit screen appears.→P296・Images cannot be adjusted in the cases below.- When the image size is H-VGA/V-VGA (640×480, 480×640) or larger- When the frame is set for 4-frame shooting- For continuous Panorama- When Scene mode/effect is "Monochrome sketch" or "Colored sketch"Switching the normal display/mirror display (only while shooting with the in-camera) : m52Saving as mirror image (only while shooting with the in-camera) : m63・When setting frame, the still image cannot be saved as mirror image.Switching the saving destination between FOMA terminal and microSD card : m9Displaying the list of saved images : m0e1 or 24g or side key [▲]The shot still image is saved in "Camera" folder of My Picture.・When microSD card is the saving destination, the image is saved in "My Picture" folder.✔INFORMATION・The distance that you can focus on the object by auto focus is 30 cm or longer. Note that when simultaneously using Macro shooting mode, the distance is 8 to 40 cm.・In the cases below, Auto focus may be disabled.- When shooting an object with no shading in color- When shooting a moving object- When shooting in a dark place- When shooting while moving FOMA terminal- When there is light in the shooting area・When activating Auto focus, shooting function settings cannot be changed.・Saving shot still images takes time for some image sizes, quality or the destinations to save.・When an image that Image size is larger than H/V-VGA (640×480, 480×640) is shot with Reduce shake:Auto or Skew correction other than OFF, extra time is required before the operations can be performed by pressing m, I, a.・Shooting still image during a voice call may interrupt the call.・When there is an incoming call during still image shooting stand-by, the display switches to a reception screen. When there is an incoming PushTalk call, the camera ends.・If the screen is switched by an incoming call or alarm immediately after shooting, the image may be destroyed.・When a microSD card is not installed, is used for other functions or is in microSD mode, some functions are unavailable on the saving confirmation screen.◆Shooting continuously <Continuous shooting>Still images can be shot continuously. There are 4 types of continuous shooting.Continuous (Auto) : Shoot automatically and continuously the specified number of images (up to 9 still images).Continuous (Manual) : Shoot manually and continuously the specified number of images (up to 9 still images).F906i.book Page 142 Monday, April 21, 2008 10:59 PM](https://usermanual.wiki/Fujitsu/FOMA-F906I.manual-5/User-Guide-946661-Page-19.png)
![143CameraF906i_E1kou4 frames (Auto) : Shoot automatically 4 frames and makes 1 still image.4 frames (Manual) : Shoot manually 4 frames and makes 1 still image.・Still images can be shot at interval of approximately 0.4 seconds in Continuous (Auto) or 4 frames (Auto).・The number of images to be continuously shot can be set in Continuous shot photos for Image settings.・Continuous (Auto) and Continuous (Manual) are available for Image sizes listed below.- Sub-QCIF (128×96)-QCIF (176×144)- H-QVGA/V-QVGA(320×240, 240×320)・4 frames (Auto) is available when the Image size is H-QVGA/V-QVGA (320×240, 240×320).・4 frames (Manual) is available when the Image size is any one listed below.- H-QVGA/V-QVGA(320×240, 240×320)- H-VGA/V-VGA (640×480, 480×640)- H/V-Stand-by (864×480, 480×864)1CePlace the cursor on the icon of continuous shooting with heSwitch the type of continuous shooting withj and gThe position of continuous shooting icon→P137 : Continuous (Auto) : Continuous (Manual) : 4 frames (Auto) : 4 frames (Manual) : OFF (Shoot 1 image)2g or side key [▲]・For Continuous (Manual) or 4 frames (Manual), each time you press g or side key [▲], a still image is shot.・Each time an image is shot, shutter sound is emitted and the light turns on repeatedly in red, yellow, green, blue, purple and orange in order.・After starting Continuous (Auto) or 4 frames (Auto), shooting continues even if FOMA terminal is folded.・While shooting in Continuous (Manual) or 4 frames (Manual), folding FOMA terminal or pressing C stops the shooting. When in Continuous (Manual), go to Step 3. For 4 frames (Manual), the screen returns to the shooting stand-by state and still images already shot are discarded.3Check the continuously shot still imagesOperations available on the confirmation screen for saving still image or operations for saving still images→P141 Step 3 in "Shooting still images with Camera"For Continuous (Auto) or Continuous (Manual)・Each time you press I, individual display and thumbnail display switch.・During an individual display, pressing h switches to previous or next still image.・Only one image shot with Continuous (Manual) is not displayed in thumbnails.4g or side key [▲]The continuously shot images or images shot with 4 frames are saved as a single image data in "Camera" folder of My Picture. Continuously shot images are saved in the created animation format.・When microSD card is the memory to save, the image is saved in "My Picture" folder, and continuously shot still images are saved not as created animation, but as individual still image.Saving only the displayed still image (while shooting with the out-camera in Continuous (Auto) or Continuous (Manual)) : g (1 sec. or more)e"Yes"・A still image at cursor position is saved for thumbnail display.Saving only the displayed still image after switching normal/mirror (while shooting with the in-camera in Continuous (Auto) or Continuous (Manual)) : g (1 sec. or more)e"Save normal" or "Save mirror"・A still image at cursor position is saved for thumbnail display.Selecting selected still images to be saved from still images shot continuously (for thumbnail display in Continuous (Auto) or Continuous (Manual)) : am62eSelect the still images to save・All the still images are displayed in selected status. Press g to cancel the selection of the still images you do not save.・Press a to zoom in the still image at the cursor position. Press g or c to return to thumbnail display.bCe"Yes"The selected still images are saved.・When shooting with the in-camera, a confirmation screen appears asking if you save the image as normal or mirror.F906i.book Page 143 Monday, April 21, 2008 10:59 PM](https://usermanual.wiki/Fujitsu/FOMA-F906I.manual-5/User-Guide-946661-Page-20.png)
![145CameraF906i_E1kou1Cem65The continuous shooting icon changes from to .・In the lower left of the guide area, when is displayed, the image is connected horizontally, and when is displayed, the image is connected vertically.Switching the direction of panorama shooting : ICanceling : m662g or side key [▲]Shutter sound is emitted and still images are shot. Successively, shift FOMA terminal rightward or downward and perform shooting. Each time you press g or side key [▲], the light turns on in red, yellow, green, blue, purple and orange in order.If you press c, shooting is terminated and the shot images are discarded.・During continuous panorama shooting, approximately one fifth area of the previously shot still image is transparently displayed on the connection side. Shoot the next image overlaying the transparent part.・With guide line activated, the transparent part for the next shooting can be confirmed.Displaying guide line→P150Stitching : Shoot 2 or more images and C・If the maximum number images are shot, they are automatically stitched.・If you shoot 1 image and press C, shooting is terminated and the shot image is discarded.・The same operation is performed also by rotating the display.3Check the still image of continuous panorama shootingOperations available on the confirmation screen for saving or operations for saving still images→P141 Step 3 in "Shooting still images with Camera"Scrolling automatically : C4g or side key [▲]A single image is composed from shot still images and saved in "Camera" folder of My Picture.・When microSD card is the memory to save, the image is saved in "My Picture" folder.✔INFORMATION・If there is an incoming call or PushTalk call, or if the time specified in countdown timer, alarm clock or schedule comes during continuous panorama shooting, the shooting stops and the shot still images up to that point are discarded.Movie cameraRecording movies with Camera・Shooting method can be set before shooting.→P148・The settings for shooting can be changed.→P150・A shutter sound is emitted even when volume setting is "Silent" or in Silent mode or Public mode.・Savable number→P471・If setting Recording Type to "Voice only" from Recording settings, starts as Sound recorder, and operates recording only.1C (1 sec. or more)Enters shooting/recording stand-by state, and the light blinks in blue.2g or side key [▲]Shutter sound is emitted, appears on the display and recording starts. The light blinks in red.・When Recording Type is "Voice only" (Sound recorder), indicators appear also on the sub-display.Pausing/Resuming : g while shooting/recordingWhen paused, the light turns on in green and switches to .・When paused or resumed, the shutter sound is emitted.・Resuming is available also by pressing side key [▲].Switching in-camera and out-camera : IThe camera is switched and turns to the shooting stand-by state.・The available size for shooting by in- camera is QCIF (176×144) only.・When key assign (→P147) is set to "Still camera", press I for 1 second or more to switch.・Even when the camera is switched, settings of Scene mode/effect etc. are retained.・Even when shooting is in pause, switching in- and out-cameras is enabled if their Image sizes are the same.・When Recording Type is "Voice only", switching is unavailable.F906i.book Page 145 Monday, April 21, 2008 10:59 PM](https://usermanual.wiki/Fujitsu/FOMA-F906I.manual-5/User-Guide-946661-Page-22.png)
![146 CameraF906i_E1kouChecking the saved movie : CeSelect the movie to checkThe movie in the saving destination set by Recording settings can be checked.Procedure for displaying movie→P299 Step 2 and the following steps in "Displaying movie/i-motion", P313 Step 2 and the following steps in "Displaying multimedia data"・Press c on the list screen of movie or folder to return to the recording stand-by state.3C or side key [▲]Shutter sound is emitted and recording ends.・When file size reaches the limit value, recording ends.4Check the recorded movie・The recorded movie can be played by pressing C.Saving immediately : Go to Step 5Recording again without saving : cAttaching to mail : aA saving confirmation screen appears.・Even when the memory to save is microSD card, the shot still image is saved to FOMA terminal.・Recorded movies cannot be attached to mail in the cases below.- If the file size is 2 Mbytes or more- When Codec type is "STD (MPEG4)", and Quality is "XQ (Extra high)"Setting as the stand-by display (stand-by i-motion) : m21e"Yes"The movie is saved to FOMA terminal and set to the stand-by display.・When the movie can be enlarged, you can select "Yes (Same size)" to display without changing the size and select "Yes (Large size)" to fit the screen size on the stand-by display.・If i-αppli stand-by display is set, a cancellation confirmation screen of the i-αppli stand-by display appears.・When the memory to save is microSD card, the image cannot be set for the stand-by display.・When Recording type is "Voice only", the image cannot be set for the stand-by display.Saving to phonebook entry : m2e2 or 3e"Yes"The movie is saved to FOMA terminal and phonebook data entry screen appears.・The movie can be saved to phonebook data, only when the Recording Type is "Video only".・To update phonebook, select the party to save.・Saving as phonebook images is disabled in the cases below.- When the memory to save is microSD card- When Codec type is "STD (MPEG4)", and Quality is "XQ (Extra high)"- When the image size is "VGA (640×480)"Changing the title : m3eChange the title and C・Up to 31 characters can be entered・Display name and title are changed. The display name can be changed after saving.→319・When Codec type is "STD (MPEG4)", and Quality is "XQ (Extra high)", the title cannot be changed.Switching the saving destination between FOMA terminal and microSD card : m5・The saving destination cannot be switched in the cases below.- If the file size is 2 Mbytes or more- When Codec type is "STD (MPEG4)", and Quality is "XQ (Extra high)"Displaying the list of saved movie : m6e1 or 25g or side key [▲]The recorded movie is saved in "Camera" folder of i-motion.・When the memory to save is microSD card, the image is saved in "Movie" folder of the microSD card. The recorded sound is saved in "Other movie" folder.✔INFORMATION・When FOMA terminal is folded while recording, the recording is stopped. The confirmation screen for saving appears when FOMA terminal is opened again.・For some data you record, recording may be stopped before the file size reaches the limit set for Size restrictions.・Data may not be saved when battery runs out while shooting or recording data.・When anything shown below happens while shooting/recording, the shooting/recording is terminated immediately and a confirmation screen for saving appears.- When there is an incoming call or PushTalk call- When the time specified in countdown timer, alarm clock or schedule comes- When the display is rotated (only when recording a movie)・When the battery is almost exhausted during shooting or recording, shooting or recording is interrupted.F906i.book Page 146 Monday, April 21, 2008 10:59 PM](https://usermanual.wiki/Fujitsu/FOMA-F906I.manual-5/User-Guide-946661-Page-23.png)
![147CameraF906i_E1kou・If an alarm or battery alarm sounds while shooting/recording and shooting/recording is interrupted, the alarm or battery alarm may be recorded at the end of the saved movie.・When a microSD card is not installed, is used for other functions or is in microSD mode, some functions are unavailable on the saving confirmation screen.Sound recorderRecording voice with Sound recorder・Settings for recording can be changed using icons on display→P150・A shutter sound is emitted even when volume setting is "Silent" or in Silent mode or Public mode.・Savable number→P471・If setting Recording Type to "Voice only" from Recording settings when recording a movie, Sound recorder starts.1m [LifeKit] 5Enters recording stand-by state, and the light blinks in blue.The next procedure→P145 Step 2 and the following steps in "Recording movies with Camera"Switching to Still camera : ISwitching to Movie camera : a✔INFORMATION・Precautions on using →P146 INFORMATION in "Recording movies with Camera"Image settings/Recording settingsSetting image size and saving method of still images/movies・The functions that can be set differ between still image and movie.・Default settingsImage size : "Stand-by (480×864)" (out-camera), "QCIF (176×144)" (in-camera) for shooting still images, "QCIF (176×144)" for recording movies Size restrictions : "None" Quality : "Fine" Quality : "HQ(High quality)"Codec type : "STD (MPEG4)" Recording Type : "Video + Voice" Continuous shot photos : "9" Auto save : "No" Save to: : "Phone"Shutter sound : "Standard" key assign : "Camera switch"Set lighting : "Always on"<Example> Changing Image settings1On the still image shooting screen, m9Changing Recording settings : On the movie recording screen, m8・When Recording Type is "Voice only", press m1 on the recording screen.2Set the required itemseCImage size : For still image shooting, a setting screen appears and available functions can be checked (→P152) Settings differ between in-camera and out-camera, but in-camera of Movie camera is fixed to QCIF (176×144).Size restrictions : Set the size limitation of the file to save (→P152). For still image, the settings are separate for the in-/out-cameras.Quality : Setting is available only with Still camera.→P152Quality: Movie camera/Sound recorder : Setting is unavailable with Still camera. The settings are made separately between movie and sound recorder.→P152Codec type : Setting is available only with Movie camera.→P151Recording Type : Setting is unavailable with Still camera.Continuous shot photos : Setting is available only with Still camera. Set the number to shoot in Continuous (Auto) or Continuous (Manual).→P142Auto save : When setting to "Yes", saving is performed without displaying the confirmation screen for shooting or recording.Save to: : Set the saving destination of shot image or recorded voice.F906i.book Page 147 Monday, April 21, 2008 10:59 PM](https://usermanual.wiki/Fujitsu/FOMA-F906I.manual-5/User-Guide-946661-Page-24.png)
![149CameraF906i_E1kou1On the still image shooting screen, m5e1-4- appears indicating the number of seconds before the shutter is released.Canceling : m552g or side key [▲]Orange focus frame is displayed and auto focus starts. When the camera is brought into focus, the focus frame changes to green "+", and when it is not, the focus frame changes to red "+", and countdown starts. Synchronized with the countdown sound, the light blinks in green. An approximate remaining time before shooting and the remaining number of seconds are displayed on the indicator and counter. Frequencies of the countdown sound and light blinking go faster when the remaining time is reduced to a few seconds.When the countdown finishes, the shutter sound is emitted, the light turns on in red and a still image is shot.・Auto focus is not activated when using In-camera or when setting Scene mode/effect to "Night scene".・When is displayed, auto focus is activated and countdown starts also by pressing n.・Depending on the states, the auto focus icon changes as shown below.→P137Interrupting : C✔INFORMATION・The countdown is interrupted in the cases below.- When FOMA terminal is folded- When there is an incoming call or PushTalk call- When the date and time specified in countdown timer, alarm clock or schedule come- When s is pressed- When the display is turned・Auto timer is unavailable in the cases below.- In Continuous (Manual) shooting- In 4 frames (Manual) shooting- In Panorama shooting◆Turning on/off the light・You cannot turn light on with the In-camera.・You can turn on/off the light while recording a movie.1On the shooting/recording screen, aThe light turns on, and appears.◆Shooting nearby object <Macro shooting>You can focus on the subject approximately 8-40 cm away from the camera.・When setting Scene mode/effect to "Night scene", you can focus on the subject approximately 7-10 cm away.・Macro shooting is unavailable for shooting with the in-camera.1On the shooting/recording screen, #Camera switches to Macro shooting and appears.Canceling : #◆Switching to Compatible modeYou can record a movie that can be played regardless of the model of FOMA terminal.・Size restrictions, Quality, Image size and Codec type are changed respectively to "Msg attachment:Small", "HQ(high quality)", "QCIF(176×144)" and "STD (MPEG4)".1On the movie recording screen, m7The camera is switched to Compatible mode and appears.Canceling : On the movie recording screen m7◆Switching Full screen mode and Standard screen modeThe Full screen displays no icons or guide area and is convenient for checking the object.1On the shooting/recording screen, *✔INFORMATION・During portrait recording of a movie, switching display between Full screen and Standard screen is disabled.F906i.book Page 149 Monday, April 21, 2008 10:59 PM](https://usermanual.wiki/Fujitsu/FOMA-F906I.manual-5/User-Guide-946661-Page-26.png)
![150 CameraF906i_E1kou◆Switching portrait/landscape recording・Switching is enabled only in shooting stand-by state.1Rotate display・An image of sizes shown below shot with the out-camera for still image shooting put in horizontal (or vertical) position is in landscape (or portrait) mode regardless of the position before rotation.- QVGA (320×240, 240×320)- VGA (640×480, 480×640)- Stand-by (864×480, 480×864)- WXGA (1280×768, 768×1280)- 1M wide (1500×832, 832×1500)◆Switching still image shooting and movie recording1On the shooting/recording screen, I (1 sec. or more)✔INFORMATION・When key assign (→P147) is set to "Movie camera" or "Still camera", press I to switch.◆Displaying guide lineDisplay the straight line for a measure of recording. The guide line is not displayed in the screen actually recorded.1Side key [▼] on the still image shooting screenGuide line appears.・Pressing side key [▼] switches Guide line ON/OFF.・Guide line cannot be displayed when a frame is set for the image.Changing setting for shooting・When "Voice only" is set in Recording Type for recording movies, the settings except Quality and Size restrictions cannot be changed.◆Setting using icons on displayYou can change settings for shooting by placing the cursor on an icon at the bottom of the shooting screen.<Example> Setting Frames1On the shooting/recording screen, hePlace the cursor on the frame icon・During shooting stand-by, you can also press 4 to select the frame icon.2g❖Setting shooting modesShooting modes can be applied to still images/movies being shot according to the shooting state or your preference. : Auto : Portrait *1 : Landscape : Night scene*1 : Backlight : Sport : Texts*1 : Monotone : Sepia : Monochrome sketch*1, 2, 3 : Colored sketch*1, 2, 4*1Cannot be set for movie recording.*2Disabled when Camera is activated from i-αppli.*3Make the still image look as if it is sketched with pencil. Effect can be checked after shooting.*4Make an image like a pencil sketch with watercolors. Effect can be checked after shooting.✔INFORMATION・On the shooting screen, press m1 to enable selecting a shooting mode from a list. Below the shooting mode list, description of the shooting mode at the cursor position appears.・During Continuous(Auto) or 4 frames (Auto) for still image shooting, "Night scene" cannot be set.・Only images of H-/V-Stand-by (864×480, 480×864) or smaller can be set to "Monochrome sketch" or "Colored sketch" for Still camera.・During Continuous/4 frames/Panorama shooting for still image shooting, "Monochrome sketch" or "Colored sketch" cannot be set.Frame icon・Switching frame by jFrame nameF906i.book Page 150 Monday, April 21, 2008 10:59 PM](https://usermanual.wiki/Fujitsu/FOMA-F906I.manual-5/User-Guide-946661-Page-27.png)
![154 CameraF906i_E1kou■JAN codeJAN code is a bar code representing a number with vertical lines (bars) of different widths. The bar code of 8 digits (JAN8) or 13 (JAN13) can be read.■QR codeQR code is the 2-dimensional codes representing a string of alphanumeric, kanji, hiragana, katakana, pictograms or data such as melody and image with the vertical and horizontal patterns.■NW7 codeA bar code representing alphanumeric characters with vertical lines (bars) of different widths. Bar code with up to 20 characters, a 2-character start symbol and a 2-character end symbol can be read.■CODE39 codeA bar code representing alphanumeric characters and symbols with vertical lines (bars) of different widths. Bar code with up to 20 characters, a 2-character start symbol and a 2-character end symbol can be read.◆Scanning code1m [LifeKit] 1After Bar code reader starts, camera automatically switches to Macro shooting. Zoom is automatically set to ON and appears indicating that the code is being read.Place the out-camera approximately 7-10 cm away from the code to scan.・During Bar code reader stand-by, the operations below are available.u : Zoom ON d : Zoom OFFa : Switching of Light ON ( ) and Light OFF (no icon)# : Switch Macro OFF (no icon) and Macro ON ( ).n : Switching Auto focus・Depending on the states, the auto focus icon changes as shown below.No icon : Auto focus OFF (black) : Adjusting focus (green) : Focused (red) : Unfocused・Switch to Macro OFF before scanning large size codes. The readability of code may be raised by setting zoom OFF.Adjusting flicker : m2e1-3Select the power supply frequency of your area. When selecting "Auto", the power supply frequency is adjusted automatically.・The setting is retained even when Bar code reader is ended.・Reflected to the flicker adjustment settings of Videophone and Camera.Switching to normal still image shooting or movie recording : m4e1 or 2・When Bar code reader has not been started from Camera or the stand-by display, the switching is unavailable.Example of JAN codeInformation to be scanned"4942857315721"Example of NW7 codeInformation to be scanned"A123456789012A"Example of CODE39 codeInformation to be scanned"*123456ABC*"Example of QR codeInformation to be scanned"NTT DoCoMo, Inc."F906i.book Page 154 Monday, April 21, 2008 10:59 PM](https://usermanual.wiki/Fujitsu/FOMA-F906I.manual-5/User-Guide-946661-Page-31.png)
![155CameraF906i_E1kou2Adjust the out-camera to the codeScan the code automatically. A confirmation sound is played when scanning is complete and the scanned data appears.・If scanned data exceeds 11,000 one-byte characters or 5,500 two-byte characters, exceeded characters do not appear, but can be saved.Scanning divided QR codesWhen one data item is divided into multiple (up to 16) QR codes, scan them one by one following the instructions on the display.・In the display field for scanned data, the grids for the total number of QR codes appear. The grids already scanned appear in blue, those that not scanned yet appear in gray and the one scanned the last appears in green.・Press c and select "Yes" to cancel scanning.3m4The scanned data is saved.・When 5 data items have already been saved or the memory space for data is not enough, a confirmation screen of deleting saved data appears.Copying text information in scanned data : m1eSelect a copying areaCopy/Paste information→P383Rescanning code : C✔INFORMATION・During code scanning stand-by, the icon changes to .・If the code is hard to read, it may be read by adjusting the distance between the code and out-camera, the angle or direction of the out-camera, etc.・In the cases below, the confirmation sound is not emitted when the code is read.- In Silent mode or Public mode (Drive mode)- When Keypad sound is set to "OFF" (including the setting of Personalized silent mode)- When "Operation sound" of Adjust volume is set to "Silent"◆Using scanned data after saving<Example> Saving data to FOMA terminal phonebook or UIM phonebook1m [LifeKit] 1eC2Selecting the scanned dataDeleting scanned data : Place the cursor on the scanned data m3e1 or 2e"Yes"・When "All codes" is selected, perform authentication.3Place the cursor on the data to save to phonebook and m3e1 or 2e1 or 2The phonebook data entry screen appears with the selected data entered.・To update phonebook, select the party to save.Saving all data to phonebook at a time : "Add to phonebook"e1 or 2The phonebook data entry screen appears with name, reading, phone number, mail address, birthday, note, postal code/address and URL entered.Sending i-mode mail : Select a mail address or "Compose message"The mail creation screen with the mail address entered appears.・Mail address, subject and text are already entered when "Compose message" is selected.Connecting site or Internet website : Select a URLe"Yes"・Select a URL and press I to make connection using Full Browser.Registering URL as bookmark : aPlace the cursor on the URL and m33・Select "Add bookmark" to save.bSelect a folder where the bookmark is added.The next procedure →P163 Step 2 in "Registering in Bookmark"・When "Add bookmark" is selected, the site name is entered for the title.Starting i-αppli : "Start i-αppli"Making a voice, videophone, PushTalk call : Select a phone numbereSet a condition for dialingemMaking a call under set conditions→P59Sending SMS : Select a phone numbereSelect Call type fielde4eme"Yes"SMS can be created and sent to the selected phone number.Creating and sending SMS→P218Display scanning*The remaining number to be scanned/Total number** Displayed when scanning divided QR codes.F906i.book Page 155 Monday, April 21, 2008 10:59 PM](https://usermanual.wiki/Fujitsu/FOMA-F906I.manual-5/User-Guide-946661-Page-32.png)
![158 i-mode/i-motion/i-ChannelF906i_E1koui-modeWith i-mode, you can use online services such as site (program), Internet or i-mode mail by way of the display of i-mode compatible FOMA terminal (hereinafter called as i-mode terminal).・i-mode is a charged service requiring subscription.・For details of i-mode, refer to "Mobile Phone User's Guide [i-mode] FOMA version".Before using i-mode・The contents of sites (programs) and Internet websites are usually protected by copyright laws. All or any portion of text, image or other data imported to your i-mode terminal from a site (program) or website cannot be altered except for personal use, and cannot be sold or redistributed in any form without the express permission of the copyright holder.・When installing a UIM except yours or you turn ON FOMA terminal without UIM, still images/i-motion/melodies downloaded from sites, attached files sent/received by mail (still image, movie, melody, etc.), screen memos and MessageR/F for some models cannot be displayed or played.・When data with UIM operation restriction is set for the stand-by display or ring alert, replacing UIM with another one or turning the power ON with no UIM installed changes the settings back to the default.Displaying s itesDisplaying sitesYou can connect to i-mode to view various sites.1I1・On the connecting screen, g : Canceling saving・C while downloading a page : Stopping downloading a page.・Items with numbers such as a or b may be selected by pressing the keypads corresponding to the item (direct key function).2"English"e"Menu List"・You can set if you display the scroll bar.→P1613Select an item to viewDisplay the desired pages using the same procedure.4When quitting viewing a site, fe"Yes"Blinking while using i-modeScroll bar・The current position relative to the whole display appears temporarily by pressing j for 1 second or more when reading a page is completed or all lines are not displayed during a page appearing.F906i.book Page 158 Monday, April 21, 2008 10:59 PM](https://usermanual.wiki/Fujitsu/FOMA-F906I.manual-5/User-Guide-946661-Page-35.png)
![175i-mode/i-motion/i-ChannelF906i_E1kou◆Changing certificate host <Certificate host>If you use services except the FirstPass, set the host for certificate. If you change this setting, you cannot connect to the FirstPass center.Usually, you do not need to change this setting.1I8532Select the Host fielde2・Press 1 and C to restore the settings for connecting to FirstPass.3Set the required itemseCUser host : Enter up to 99 one-byte alphanumeric characters for the host.User host URL : Enter up to 100 one-byte alphanumeric characters for URL.Using i-motioni-motionMovie and sound can be downloaded from sites or websites and played/saved. Saved movie and sound can be played as i-motion and be set for Movie ringtone. The vocals of singers can be used for a ring alert as well as melodies (Some i-motion may not be set for Movie ringtone).・i-motion items can be categorized to 2 types listed below. The data types cannot be changed or selected when downloading.*Some i-motion may not allow saving.Downloading i-motion from sites・Savable number→P4711Display a siteeSelect an i-motionDownloading starts, and when completed, completion screen appears.・During downloading, press C and select "Yes" to stop downloading.For i-motion with file size larger than 500 Kbytes to 10 Mbytes that can be partially saved, the confirmation for restarting appears. If you select "Yes", downloading is restarted, and if you select "No", a partial saving confirmation screen appears. The rest of the partially saved i-motion can be downloaded→P300 INFORMATION in "Playing movie/i-motion"・When a streaming type i-motion is selected, playing confirmation screen appears.・The operations below can be performed when playing i-motion that can be played while being downloaded. After completion of playing, the i-motion can be operated in the same way as i-motions to be played after downloading all data.g : Pause/Play (normal type)j/Side keys [▲▼] : Adjust volumeC : Streaming type is interrupted by selecting "Yes" on the confirmation screen, and Normal type is stopped (Pressing g while stopped plays the i-motion from the beginning)m : Display detail informationDetail information→P319*Even when pausing or stopping the play, the data download continues.・Key operations (except c) for playing i-motion to be played after downloading the data→P300 Step 3 in "Playing movie/i-motion"Type Playing actionNormal type (can be saved*)Play while downloading i-motion data (up to 10 Mbytes). After completion of receiving, the i-motion can be operated in the same way as i-motion to be played after downloading all data.Play after downloading all i-motion data (up to 10 Mbytes).Streaming type (cannot be saved)Play while downloading i-motion data (up to 10 Mbytes). Deleting i-motion data after playing.The amount of data received/Total amount of dataF906i.book Page 175 Monday, April 21, 2008 10:59 PM](https://usermanual.wiki/Fujitsu/FOMA-F906I.manual-5/User-Guide-946661-Page-52.png)
![177i-mode/i-motion/i-ChannelF906i_E1kouUsing i-Channeli-Channel(In Japanese only)This is a service that news or weather information is distributed as graphical information to terminals compatible with i-Channel. It can periodically receive information and show the latest information as a ticker on the stand-by display or display the channel list by pressing c (displaying the channel list→P177).i-Channel is a charged service requiring subscription (i-mode subscription is required for the service).There are 2 types of i-Channels. They are "Basic Channel" provided by DoCoMo and " and "Okonomi (Favorite) channel" provided by IPs (Information Providers). For "Basic Channel", the packet communication fee for updating the distributed information is not charged. For "Okonomi (Favorite) channel" that you can use by registering your favorite channels, the packet communication fee for updating information is charged. Note that, when viewing detail information, packet communication fee is charged separately. When using international roaming service, packet communication fee is charged for both automatic update and viewing detail information.・For details of i-Channel, refer to "Mobile Phone User's Guide [i-mode] FOMA version".Displaying i-ChannelBy displaying i-Channel, you can view details of information of the current ticker display.1On stand-by display, c・When setting movie/i-motion, Chara-den or i-αppli on the stand-by display, press I71.2Select a channelThe site is connected and the detail information appears.✔INFORMATION・While receiving information, keeps blinking.・When information is received, none of the ring alert, vibrator, light operates.・In the cases below, when the i-Channel list appears by pressing c on the stand-by display, the latest information is received and a ticker appears.- When the information cannot be received as FOMA terminal is turned OFF or out of service area- When moving UIM to another i-Channel compatible terminal- When changing the host→P171- When initializing i-Channel→P178・When the i-Channel or i-mode service is canceled, no ticker appears; pressing c displays a screen for non-subscribers. However, before the procedure for cancellation is completed, a ticker may appear and pressing c may display the last information received in the i-Channel list.・Operating Flash graphics again while displaying i-channel list : m1・Under some usage conditions, information may be received when displaying the i-Channel list.i-Channel tickerSetting i-Channel ticker1I72eSet the required itemseC✔INFORMATION・When movie/i-motion, Chara-den or i-αppli is set for the stand-by display, if you try to set Show ticker of this function to "Yes", a confirmation screen for clearing the stand-by display settings appears.・When the i-mode service is canceled before canceling the i-Channel service, Show ticker of this function remains set to "Yes".・With 2in1 ON, a ticker can be set for each mode.F906i.book Page 177 Monday, April 21, 2008 10:59 PM](https://usermanual.wiki/Fujitsu/FOMA-F906I.manual-5/User-Guide-946661-Page-54.png)
![180 MailF906i_E1koui-mode mailOnly by subscribing to i-mode, i-mode mails can be exchanged not only with i-mode terminals but also via Internet.In addition to message text, you can attach up to 10 files (images, movie file, etc.) of up to 2 Mbytes in total to a mail. Moreover, as Deco-mail is available, a font color, size and background color of message text can be changed and Deco-mail pictogram is also available allowing you to easily create and send expressive mails.・For details of i-mode mail, refer to "Mobile Phone User's Guide [i-mode] FOMA version".Creating i-mode mail/Deco-mailCompose messageCreating and sending i-mode mail1a(1 sec. or more)2Select the receiver field3Select entry methodeEnter the addressEntering mail address from mail logs : Select "Sent msg log" or "Received msg log"eSelect mail logs to send mailEntering by searching phonebook : "View phonebook"eSearch the phonebookeSelect a phonebook entry to send mailEntering mail address from mail group : "Mail group"eSelect a mail group・If the total of already entered address and mail group address exceeds 5 addresses, the mail group cannot be added.Entering directly : "Direct input"eEnter the address (up to 50 one-byte characters)・When sending mail to another i-mode terminal, "@docomo.ne.jp" of the mail address can be omitted.4Select the subject fieldeEnter the subject (up to 100 two-byte (200 one-byte) characters)・The whole title may not be received depending on the receiving terminal.5Select the message text fieldeEnter the message text (up to 5,000 two-byte (10,000 one-byte) characters)Pasting URL of location information : m56The next procedure→P253 "■Paste/Attach/Send location menu"・When location information is pasted, and location information URL are entered to the text. Entered URL and icons are counted as text characters.・Location information is available only when the receiving device is an i-mode terminal.Inserting signature : m576C・To stop transmission, press g on the connecting screen or press C on the sending screen. Note that the i-mode mail may be sent depending on the operation timing. The sent mail is saved in "Unsent" folder of Unsent messages.Total bytes of characters and decoration input to textReceiver fieldMail creation screenSubject fieldAttachment fieldMessage text fieldThe remaining number of bytes that can be entered in the textF906i.book Page 180 Monday, April 21, 2008 10:59 PM](https://usermanual.wiki/Fujitsu/FOMA-F906I.manual-5/User-Guide-946661-Page-57.png)