Fujitsu FOMA-F906I Part 15 Low Power Communication Device Transmitter User Manual F906i
Fujitsu Limited Part 15 Low Power Communication Device Transmitter F906i
UserManual.wiki
>
Fujitsu
>
FOMA-F906I User Manual
>
manual 6
Contents
1.
manual 1
2.
manual 2
3.
manual 3
4.
manual 4
5.
manual 5
6.
manual 6
7.
manual 7
8.
manual 8
9.
manual 9
10.
manual 10
manual 6
Navigation menu
Upload a User Manual
Namespaces
Wiki Guide
HTML
PDF
Info
Views
User Manual
Discussion / Help
Navigation


![190 MailF906i_E1koucNumber of received i-mode mails・If you do not press any key for about 15 seconds after the reception result screen appears, the previous screen automatically reappears.When reception has failed"×" appears on the right side of "Mail" on the reception result screen. To receive again, perform i-mode inquiry.✔INFORMATION・When multiple mail and/or MessageR/F are received at the same time, the terminal operates depending on the conditions set for the mail or MessageR/F received last.・An i-mode mail of up to 100 Kbytes including attachment files can be automatically received. Attachment files exceeding 100 Kbytes can be manually downloaded from i-mode Center.→P193・Extremely large i-mode mail may be returned with an error message to the sender without being accepted in the i-mode Center.・When the memory space is not enough or when exceeding the savable number, the unread or unprotected received mails are overwritten chronologically. A large number of existing mails may be deleted depending on the size of the received mail.・In the cases below, received i-mode mail is stored in the i-mode Center.- When the power is OFF- During a videophone call- Accessing Data Center- During a PushTalk session- In Self mode- In Omakase Lock- During FirstPass center connection- When reception has failed- Out of i-mode service area- When receiving SMS- When Receive option setting is "ON"- During infrared communication/iC transmission- When storage area is filled with mail unread or protected・If there is not enough memory space available because memory is filled with unread and protected mails, reception of i-mode mail is stopped, and appear on the screen. To receive, changing unread mail to read mail (→P201), displaying the contents of unread mails (→P195), deleting unnecessary mails (→P201) or unprotecting (→P201) is required.・If there are remaining i-mode mail in the i-mode Center, or appears. It may not appear even when there is i-mode mail. When exceeding the savable number in the i-mode Center, the icon changes to or .・You may not automatically receive i-mode mail soon after sent. Perform i-mode inquiry.◆Displaying newly-received i-mode mail1On the reception result screen, 1・MessageR/F can be displayed by pressing 2 or 3.2Select a foldereSelect a mailPlaying Flash graphics with a melody or sound effect→P209Reading received mail details screen→P197◆Operating WEBmailTo send mails from/receive mails to address B with 2in1 ON, you need to connect to WEBmail site. Only when 2in1 ON in B or Dual mode, you can connect to the WEBmail site.・2in1 is a charged service requiring subscription.1a7eSelect i-mode password entry fieldeEnter i-mode passworde"決定 (Yes)"You are connected to WEBmail site.・For operations in WEBmail site, refer to "Mobile Phone User's Guide [2in1]".Receive optionReceiving i-mode mail to selectYou can check the subject of i-mode mail stored in the i-mode Center to select if you receive or delete i-mode mail without receiving it.・To use Receive option, Receive option setting must be set to "ON" in advance.F906i.book Page 190 Monday, April 21, 2008 10:59 PM](https://usermanual.wiki/Fujitsu/FOMA-F906I.manual-6/User-Guide-946662-Page-4.png)
![191MailF906i_E1kou❖When mail arrives at i-mode Center"You have mail at i-mode center." appears on the display.・Even when i-mode mail is stored in i-mode Center, ring alert, vibrator, etc. do not operate.・By pressing keys except T, U or s, "You have mail at i-mode center" disappears.✔INFORMATION・In All lock, Omakase Lock, Personal data lock or Lock on close, no messages appear.・If you perform Check new message, all the messages are received. To inhibit reception of mails, deselect "Mail" from the inquiry items for Check msg option.・Area Mail, SMS and MessageR/F are received automatically even when Receive option setting set to "ON".◆Selecting mail to receive1a*You are connected to the i-mode Center and can view the list of i-mode mail stored.・Icons displayed at the end of the mail are defined as follows. : Image is attached : Melody is attached : i-motion is attached : ToruCa is attached : File other than the above is attached2"保留 (Hold)"eSelect from "受信 (Receive)", "削除 (Delete)" or "保留 (Hold)" for each mail・When "保留 (Hold)" is selected, the mails are stored at the i-mode Center as they are.・To delete all mails stored at the i-mode Center, select "削除 (Delete)" of "iモードセンターから全てのメールを (All mails from i-mode Center)".・For more than one page, select "前ページ (Previous page)" or "次ページ (Next page)" at the end of the mail list to view the previous or next page.3"受信/削除 (Receive/Delete)"e"決定 (Select)"i-mode messageChecking for i-mode mailYou can make inquiry for any i-mode mail delivered while you were out of service area or the power was turned OFF.MessageR/F can also be checked at the same time if it is set in Check msg option.・Under some radio wave conditions, you cannot perform i-mode message.1Side key [▼] (1 sec. or more)・During i-mode message, the light blinks in rainbow. When there are no newly received i-mode mail after i-mode message, the light blinks in red. When i-mode message failed, the light blinks in yellow.✔INFORMATION・You can also press aa to check new message.・By default, Check new message is available by pressing side key [▼] for 1 second or more with FOMA terminal folded.・You can also use a menu on the sub-display to perform Check new message.→P35F906i.book Page 191 Monday, April 21, 2008 10:59 PM](https://usermanual.wiki/Fujitsu/FOMA-F906I.manual-6/User-Guide-946662-Page-5.png)

![198 MailF906i_E1kou / : Data error/Data exceeded : Receive option attachment file not yet downloaded : Receive option attachment file being downloaded : Downloading of the receive option attachment file unavailableSMS icon : SMSArea Mail icon : Area Mail : Area Mail to be used in Message i-αpplidMail number/number of itemseReception date and timefAddress type of sender's/broadcast address : Sender : Sender (unable to reply) : Receiver (only for i-mode mail) : Receiver (unable to reply) (only for i-mode mail)gSubject・For i-mode mail or SMS received while staying overseas (except GMT+09:00), may appear succeeding the receiving date and time.・When 2in1 is ON in Dual mode, appears at the end of the reception date and time for i-mode mail or SMS for Address B or Number B.Viewing Decome-AnimeIf selecting Decome-Anime from received mail list, Flash graphics of Decome-Anime text are played.・For Decome-Anime with sound effect, the sound effect is played at the volume set by Melody volume of Adjust volume.Operations while displaying Decome-Anime are as shown below.m : Play from the beginningg, 0-9, *, #: PlaySide keys [▲▼] : Adjust volumeI : Stop playinga : Return to received mail details screen/Display Decome-Anime❖Zooming in/out display of received mails <Quick zoom>In received message list screen and received message details screen, message can be zoomed up/down at 15 levels.・The operations below can be performed.1 / 3 : Zoom in/out2 : Initial screen reappears* / # : Scroll (only for list screens)・When displaying key operation list, press m on each screen, and select "Display" → "Key function help".・Zoom out/in operation of Decome-Anime is unavailable.❖Sent message details screenaStatus iconNo icon : Unprotected : ProtectedbAttachment files/SMS icon→P197 "Received message details screen"cMail number/number of itemsdSent date and timeeAddress type icon : Receiver ( and only for i-mode mail)fSubject・When i-mode mail or SMS is sent while staying overseas (except GMT+09:00), may appear succeeding the sending date and time.Viewing Decome-AnimeOperations while displaying Decome-Anime are the same as those of received mails.✔INFORMATION・Replying to "Welcome F906i " mail saved by default is unavailable.Note that communication fee for receiving "Welcome F906i " mail is not charged.・Characters that cannot be displayed are replaced with spaces or other characters.・When the subject exceeds the maximum number of characters that can be received, the excessive characters are deleted.・When the message exceeds the number of characters that can be received, "/" or "//" is inserted at the end and the remainder of the message is deleted automatically.edfabcF906i.book Page 198 Monday, April 21, 2008 10:59 PM](https://usermanual.wiki/Fujitsu/FOMA-F906I.manual-6/User-Guide-946662-Page-12.png)
![199MailF906i_E1kou・When receiving a mail decorated on a PC, operations by i-mode terminals may not be the same as those on a PC.・When the file attached to the received mail is larger than the data size that can be received (the data size that can be attached→P187) or for some files, it is deleted at the i-mode Center and [添付ファイル削除 (attachment files deleted)] is displayed below the subject.・Only one melody or link item to start i-αppli attached in the text of message, is valid. If multiple melodies or link items are attached, those attached data become invalid and or is displayed on the received mail list screen or details screen.・The subject and sender of received SMS, SMS report request, missed call notification and Notify recorded message are displayed as follows.For SMS sent, "Sent SMS" appears as a subject.*When the phone number is added to the phonebook, the name is displayed on the sender's terminal.*When the caller ID is not notified, the characters below are displayed in the sender field."User unset" (Message was sent with setting not to notify the caller ID)"Payphone" (Message was sent from a payphone)"Not support" (Message was sent using a procedure that does not provide caller ID information)◆Storing mail in Data Center <Data Security Service>By using Data Security Service, i-mode mail and SMS can be stored in Data Center on the network.・Data Security Service→P133・This is a charged service requiring subscription. When having not subscribed to this service, attempting to connect to Data Center displays the screen indicating that.・Up to 10 mails can be stored by one operation.・If the files are attached to i-mode mail, when saving they are deleted. Note that, images or melodies in the message or Flash graphics in Decome-Anime message text (except those whose mail attachment or output from FOMA terminal is prohibited) are not deleted.・SMS report request cannot be stored.・For details of restoration, refer to "Mobile Phone User's Guide [i-mode] FOMA version". Restored mails are protected except for the cases below.- When received mail or SMS saved in Data Center is unread- When the number of protected mail saved has reached the limit・Logs saved in Data Center can be checked.→P911ae1 or 4-5eSelect a folder2m45eSelect a mailSaving an unsent mail : m43eSelect a mail3Ce"Yes"eAuthenticate・g : Canceling saving4Check the communication result・The communication result display disappears after about 5 seconds.◆Creating/Deleting folders・You can set secret attribute to a created folder. In Privacy mode (when Mail & Logs is "Hide secrecy fldrs"), folders with Secret attribute "ON" are not displayed.・Setting Privacy mode→P124❖Creating folders・In Inbox, up to 40 folders in addition to "Inbox", "MessageR" and "MessageF" folder and folder for Message i-αppli can be created.・In Outbox or Unsent messages, up to 20 folders in addition to "Outbox", "Unsent" folder and the folder for Message i-αppli can be created respectively.・Folder settings for "Inbox", "MessageR", "MessageF", "Outbox" or "Unsent" folders and the folder for Message i-αppli cannot be changed.1ae1 or 4-52m1Changing folder setting : Place the cursor on the folder and m3Changing the order of the folder : Place the cursor on the folder and me7 or 8Item Subject SenderSMSReceived SMS Phone numbersSMS report requestSMS report request SMS CenterNotify missed callNotify missed call DoCoMo SMSNotify recorded messageAnswer videophone DoCoMo MSGF906i.book Page 199 Monday, April 21, 2008 10:59 PM](https://usermanual.wiki/Fujitsu/FOMA-F906I.manual-6/User-Guide-946662-Page-13.png)


![219MailF906i_E1kou・To save SMS without sending it, if pressing m2, it is saved in "Unsent" folder of Unsent messages, and the confirmation screen for pasting Shortcut icon appears.✔INFORMATION・When sending is completed correctly, the SMS is saved in a folder of Outbox. When the memory space is not enough or when exceeding the savable number, the unprotected sent mails are overwritten chronologically.・Depending on the radio wave conditions, font type or the terminal of the other party, characters may not be displayed correctly at the receiver side.・The type of font and whether to receive SMS report request are set in SMS settings beforehand. You can also change the settings of SMS report request and Keep in SMS center after starting creation of SMS.・You can insert a line feed by pressing * while entering the message text (except number entry mode), but the line feed is replaced with a blank for some terminals of the other party.・When Font type is Japanese, if you use one-byte katakana, the receiver may not be able to display them correctly. If you use pictograms, is replaced with , and each of pictograms except is replaced with a space.・When Font type is English and symbols (|^{ } [ ] ∼ ¥) are entered, the number of characters that can be sent is reduced. Moreover, symbol (`) can be entered and sent, but it is replaced with a space on the receiver's terminal.・When Font type is set to "Japanese", if you enter only one-byte alphanumerics or one-byte symbols and send, the Font type is changed to "English" before sending.・Saved in "Unsent" folder of Unsent messages when sending failed.・If setting SMS report request to "Request" and send SMS, you receive SMS report that notifies you that the other FOMA terminal received the SMS. SMS report request is saved in the folder of Inbox.・Even if Activate/Deactivate of caller ID notification is "Not notify", caller ID is sent to the receiver when SMS is sent.・When the memory space of Unsent messages is not enough or when exceeding the savable number, SMS cannot be created. Delete unnecessary i-mode mail and/or SMS from the folder of Unsent messages.・With the 2in1 service activated, you cannot send SMS for Number B.❖Editing/Sending sent or saved SMSSent SMS and SMS saved before sending or failed to send can be edited or sent.→P189Receive SMSWhen SMS is received・Savable number→P4711Receive SMS blinks and "Receiving message..." appears.Mail ring alert sounds, the light turns on or blinks, and the reception result screen appears.The received SMS is saved in a folder of Inbox.・While receiving SMS, f : Cancel receivingMay be received depending on the reception conditions.aIcon : Unread SMS exist : Unread i-mode mail and SMS existbReception result tickercNumber of received SMS・If you do not press any key for about 15 seconds after the reception result screen appears, the previous screen automatically reappears.Reading received SMS immediately : On the reception result screen, 1eSelect a foldereSelect SMS・You can reply to and/or forward received SMS.→P192When reception has failed"×" appears on the right side of "Messages" on the reception result screen. To receive again, perform check new SMS.Receiving screen Reception result screenBlinkingacbF906i.book Page 219 Monday, April 21, 2008 10:59 PM](https://usermanual.wiki/Fujitsu/FOMA-F906I.manual-6/User-Guide-946662-Page-33.png)
![224 i-αppliF906i_E1koui-αppliBy downloading i-αppli from sites, FOMA terminal can be used more conveniently. Direct registration to phonebook and schedule is available from some i-αppli, or Data Box including saving and obtaining image can be operated with some i-αppli.And, since this FOMA terminal is compatible with large-capacity Mega i-αppli, you can play high-resolution 3D and long role-playing games.・For details of i-mode, refer to "Mobile Phone User's Guide [i-mode] FOMA version".✔INFORMATION・Any image or movie saved by i-αppli or i-αppliDX is saved in "i-mode", "Deco-mail picture" or "Deco-mail pict" folder of My Picture, "i-mode" folder of i-motion or added album respectively, or in the i-αppli. Any ToruCa saved by i-αppli is saved in "ToruCa" of ToruCa content.・When ring tone is saved by i-αppliDX, it is saved in "i-mode" folder of Melody or in the i-αppli.Downloading i-αppliYou can download i-αppli from sites and store it in FOMA terminal.・The maximum size of i-αppli that can be saved is 1 Mbyte.・Savable number→P4711Displaying a siteeSelect an i-αppliThe selected i-αppli is downloaded.・While downloading, press g and select "Yes" to stop downloading.・When downloading is terminated or communication is interrupted, a confirmation screen for resuming may appear. If selecting "Yes", downloading is resumed, and if selecting "No", a confirmation screen for partial saving appears when it is available. When partial saving is unavailable, the downloaded part is deleted. The rest of the i-αppli partially saved can be downloaded→P225 Step 3 in "Starting i-αppli"When Software info disp. is "ON"A confirmation screen of i-αppli information and downloading appears.・The detail information of the i-αppli to be downloaded can be displayed by pressing C.Downloading i-αppli that uses the saved data, the serial number of your mobile phone/UIM/IC card or microSD cardDownloading confirmation screen appears.・With "Guide" displayed on the guide area, press C to check details of the data used by the i-αppli.When the selected i-αppli is already downloaded.A screen indicating that the data is already downloaded appears. When the new version of the i-αppli is released, upgrading confirmation screen appears. When already downloaded with another UIM, a confirmation screen for overwriting appears.2Select a destination to save・Some i-αppli shows setting screens for Set stand-by disp. (i-αppli stand-by), Use network, Use location info. (Location usage setting), and/or Program guide key setting.Setting items→P227 Step 1 in "Setting operating condition of i-αppli"3"Yes" or "No"・When setting Set stand-by disp. to "Yes", setting confirmation screen appears. If you select "Yes", i-αppli is set for stand-by display and if Show ticker of i-Channel ticker is "Yes", the ticker is canceled.・When downloading i-αppli to use mail function with 2in1 ON in B mode, the site screen reappears after selecting the saving destination. When the setting screen is displayed, press C to return to the site screen.✔INFORMATION・When exceeding the savable number/area→P322・Checking memory space→P321・Downloading of i-αppli may be unavailable if memory space in the IC card is not sufficient (regardless of memory space in the i-αppli storage area) or the i-αppli to be downloaded is Osaifu-Keitai compatible i-αppli that uses the same services as those used by another Osaifu-Keitai compatible i-αppli already saved. Delete the i-αppli following instructions displayed on the screen. Note that, some types of i-αppli may not be displayed as ones to be deleted or may require to be started or downloaded again and the data in the IC card to be deleted.F906i.book Page 224 Monday, April 21, 2008 10:59 PM](https://usermanual.wiki/Fujitsu/FOMA-F906I.manual-6/User-Guide-946662-Page-38.png)
![225i-αppliF906i_E1kou◆Downloading Message i-αppliWhen Message i-αppli is downloaded, the folders for Message i-αppli are automatically created in the folder list of Inbox, Outbox and Unsent messages. The automatically created folder name is set to the name of the Message i-αppli downloaded, which cannot be changed.・Up to 5 items of Message i-αppli can be saved (included in the savable number, 300 of i-αppli). When exceeding the savable number, follow the instructions on the screen and delete stored folder for Message i-αppli.・If Message i-αppli that uses the same mail folder has already been saved in FOMA terminal, it cannot be downloaded.・If a Message i-αppli is tried to be downloaded again while only the relevant Message i-αppli folder remains, a confirmation screen for using mail folder appears. If you do not use, download after deleting the mail folder.・If a mail that supports Message i-αppli to be downloaded has already been saved in FOMA terminal, a confirmation screen for moving to the folder created automatically when downloading appears.◆Setting whether to display i-αppli information when downloading <Software info disp.>1m [i-αppli] 23e1 or 2Starting i-αppli1I (1 sec. or more)Displaying only Osaifu-Keitai compatible i-αppli : m [Osaifu-Keitai] 1eGo to Step 3Displaying only GPS compatible i-αppli : →P2542Select a folder・Icon definitions / : Stored folder by default with/without i-αppli / : Created folder with/without i-αppli3Select i-αppli to start・Icon definitions (Only marks with * are displayed in IC card content.) : Osaifu-Keitai compatible i-αppli : IC card data transferred by iCお引っこしサービス (iC transfer service) : Message i-αppli : i-αppliDX(orange) : i-αppli / : i-αppli setting available/currently set for i-αppli stand-by display : Auto start set(upper half in gray, lower half in orange)* : i-αppli partially saved* : i-αppli unavailable due to UIM operation restriction.* : i-αppli of stopped condition by IP (Information Provider) : i-αppli downloaded from SSL page* : Unable to start when 2in1 is ON in B modeGraphical display<Software list> <IC card content>F906i.book Page 225 Monday, April 21, 2008 10:59 PM](https://usermanual.wiki/Fujitsu/FOMA-F906I.manual-6/User-Guide-946662-Page-39.png)
![226 i-αppliF906i_E1kou : i-αppli registered as one-key shortcut - : i-αppli registered as two-key shortcut* : i-αppli set with Individual IC card lock : GPS compatible i-αppli / : Program guide key setting available/set to ON / / : Search by i-mode (displayed in stored folder and IC card content)→P298・Each time you press I, display view switches in the order of graphical display→list display→thumbnail display.・When "Confirm every session" is Set NW transmission of the i-αppli to be started, connection confirmation screen appears.・When partially saved i-αppli is selected, downloading confirmation screen of the rest appears. The i-αppli can be started after the rest is downloaded; when download is disabled, the i-αppli partially saved may be deleted.・When IC card data transferred by iCお引っこしサービス (iC transfer service) is selected, downloading confirmation screen or connection confirmation screen to the site appears . The related Osaifu-Keitai compatible i-αppli can be started after it is downloaded.・To quit i-αppli, operate in the procedure specified for each i-αppli. You can also quit i-αppli by pressing f and then selecting "Yes".✔INFORMATION・Some i-αppli may have different display area, screen mode may not be changed by rotating the display.・i-αppli that vertical and horizontal (or vice versa) size is less than 432×240 dots are displayed with horizontal and vertical size doubled.・On a full-screen or wide display giving 864 vertical or horizontal dots, each time you press side key [▲], you can switch displaying and hiding of the battery icon.・The volume of sound emitted during i-αppli operation can be adjusted. Note that some i-αppli have no sound.→P96, 228・Some i-αppli can start specified i-αppli (when not specified, select an i-αppli). Note that, if the specified i-αppli in not on the Software list, it must be downloaded.・Images used on i-αppli (shot using the camera from i-αppli, obtained using the i-αppli infrared communication/iC transmission function) or the data you entered may be sent to the server via Internet.・Partially saved i-αppli is allowed displaying software description, deletion and folder change.・IC card data transferred by iCお引っこしサービス (iC transfer service) allows only deletion.・i-αppli that uses microSD card can save data in it. Data saved in microSD card may not be available for other models. i-αppli that uses microSD card can be viewed with "i-αppli data".→P315・i-αppli may be interrupted when any of the conditions below occur. When the operating function ends, i-αppli restarts , but some i-αppli does not return to the state of the time of interruption.- When there is an incoming call or PushTalk call- When Lock on close is activated- When the date and time specified in watching reservation/recording reservation of 1Seg, countdown timer, alarm clock or schedule come- When the function is switched over to another function・When you are out of service area or the saved data cannot be used, i-αppli may not start or not operate correctly.・For certain i-αppli, the IP (Information Provider) may access i-αppli saved in the mobile phone and directly set operation disabled state. In such a case, i-αppli startup, stand-by display settings, upgrading, etc. are disabled, enabling only deletion and software description display. To resume using i-αppli, notification of i-αppli enabled must be received; contact the IP (Information Provider).・For certain i-αppli, the IP (Information Provider) may send data to i-αppli saved in the mobile phone.・When the IP (Information Provider) requests i-αppli for stopping or restarting or sends data to i-αppli, FOMA terminal makes communications and blinks. In this case, no communication fee is charged.・For i-αppli buildersIf i-αppli does not operate normally while building, trace information may help. Press m [i-αppli] 34on the stand-by display to display Trace information. Note that Trace information cannot be displayed if i-αppli that records Trace information is not in the software list.To delete Trace information, press C and select "Yes".◆Displaying Security error historyWhen i-αppli ended with an error because i-αppli cannot use the saved data, the name of the i-αppli, date and time, and cause of security error are recorded.・Up to 20 items can be recorded. When exceeding the limit, record is overwritten chronologically.1m [i-αppli] 33・To delete histories, press C and select "Yes".F906i.book Page 226 Monday, April 21, 2008 10:59 PM](https://usermanual.wiki/Fujitsu/FOMA-F906I.manual-6/User-Guide-946662-Page-40.png)
![227i-αppliF906i_E1kou◆Displaying i-αppli description <Software description>1I(1 sec. or more)eSelect a folderePlace the cursor on the i-αppli and C・Displayed items differ by i-αppli.・To check the site certificate of the i-αppli downloaded from SSL page, press C on the Software description screen.◆Setting operating condition of i-αppli <Software settings>・You cannot select the item not supported by the i-αppli.・When 2in1 is ON in Dual mode or B mode, "Set i-αppli display" and "Set NW transmission during i-αppli display" cannot be selected.1I(1 sec. or more)eSelect a folderePlace the cursor on the i-αppli and m6eSet the required itemseCSet i-αppli display : Set if you set i-αppli as stand-by display. Only one i-αppli can be set.Set NW transmission during i-αppli display : Set if you allow automatic communication while the i-αppli stand-by display is running.Set NW transmission : Set if you allow automatic communication while the i-αppli is running.Use icons : Set if you enable icons for mail, MessageR/F, battery, Silent mode and signal level for i-αppli.Start from browser : Set if you allow starting the i-αppli from site (i-αppli To).Start from ToruCa : Set if you allow starting the i-αppli from ToruCa (i-αppli To).Start from mailer : Set if you allow starting the i-αppli from mail (i-αppli To).Start from Location Service menu : Set if you allow starting the i-αppli from link item of location information in site, MessageR/F or ToruCa (i-αppli To).Start from external : Set if you allow starting the i-αppli from external device (i-αppli To).Start from data broadcasting site : Set if you permit activation from 1Seg data broadcasting site.Allow ring tone/image changes by software* : Set if you allow i-αppli to automatically change the settings of a ring alert, stand-by display image, etc.Confirm all changes* : Set if you display a confirmation screen each time the settings of ring alert or images are changed.Allow access to phone book/call records by software* : Set if you allow i-αppli to refer to phonebook, redial or received call logs automatically. This setting applies to ToruCa saved in FOMA terminal.Location usage setting* : Set if you enable GPS compatible i-αppli to use location information automatically.Program guide key setting* : Set if you set i-αppli in program guide i-αppli activated from 1Seg. Only one i-αppli can be set.*Available only for i-αppliDX.✔INFORMATION・When setting Set i-αppli display to "Yes", setting confirmation screen appears (except when the i-αppli is already set to the stand-by display). If you select "Yes", stand-by screen is set and if Show ticker of i-Channel ticker is "Yes", the ticker is canceled.・If you set "No" for Set NW transmission, the i-αppli may not be started and timely information such as stock prices or weather information may not be provided by i-αppli.・If you set "Yes" for Use icons, since icons for unread messages, unread MessageR/F, remaining battery level, Silent mode, and antenna icon may be sent to IPs (Information Providers) through the Internet, it may give the information to a third party. Some i-αppli requiring icons may not operate when "No" is set.・When "No" is selected in Program guide key setting, cancellation confirmation screen appears.◆Setting operations while i-αppli is active❖Setting Display light1m [i-αppli] 24e1 or 2・When setting to "Terminal settings", it depends on Display light time (Normal use) of settings of Display & Key light.✔INFORMATION・i-αppli stand-by display light depends on the setting of Display & Key light.・Even if "Software" is set, the light turns off in Public mode when the time specified in Display light time (Normal use) of Display & Key light has elapsed.・This setting is also reflected to Display light time (i-αppli) of Display & Key light.F906i.book Page 227 Monday, April 21, 2008 10:59 PM](https://usermanual.wiki/Fujitsu/FOMA-F906I.manual-6/User-Guide-946662-Page-41.png)
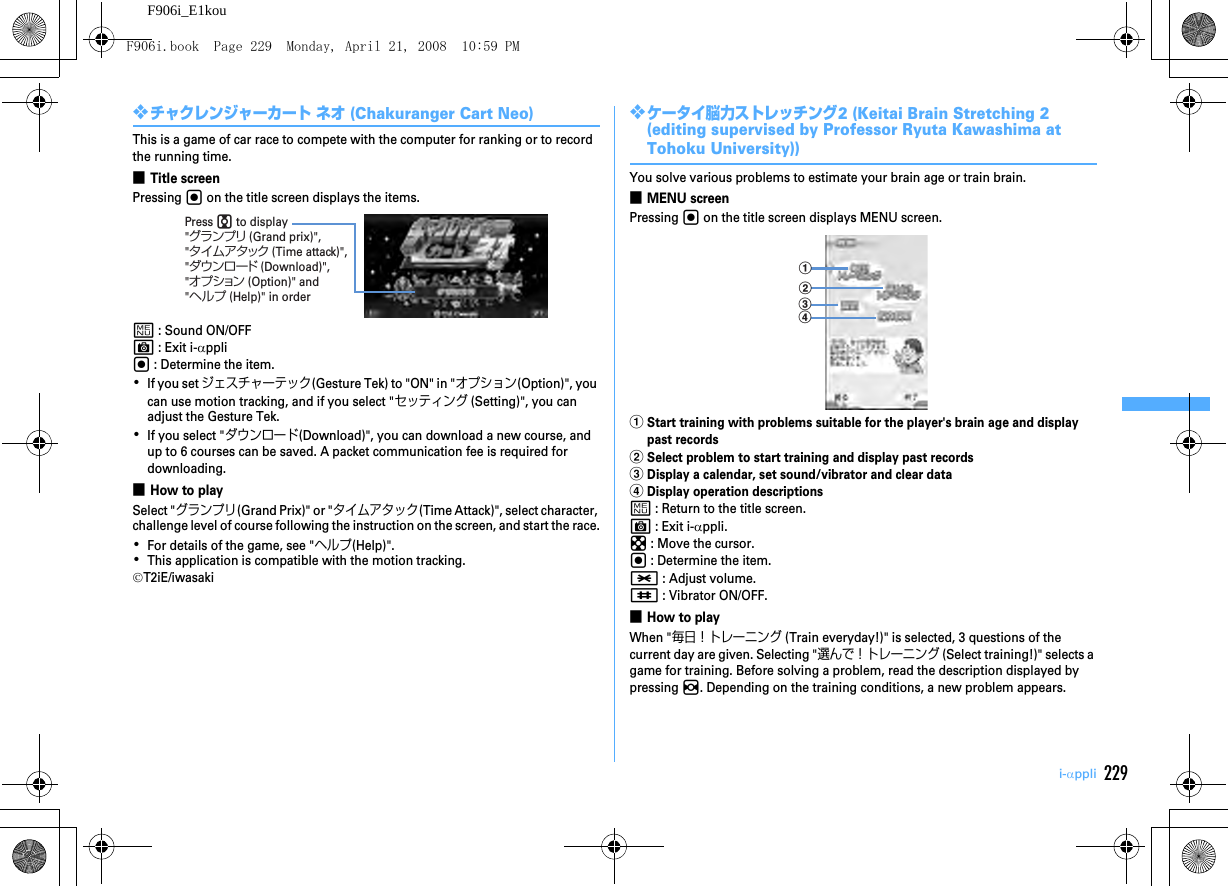
![228 i-αppliF906i_E1kou❖Setting vibratorSet if you allow the vibrator operation by i-αppli.1m [i-αppli] 25e1 or 2✔INFORMATION・This setting is also reflected to Vibrate alert/effect (i-αppli effect) of Alerts & Sounds.❖Setting power savingSet brightness of the display, key lighting and volume.<Example> Presetting1m [i-αppli] 2721e1 or 2・"Power saved mode" sets Brightness to "Brightness 1", Key lighting to "OFF" and Sound effect volume to "Level 1" (not changed if set to "Silent"). For "Default mode", this function resets each setting to default state.Changing brightness : 2e1-6Changing key lighting : 3e1 or 2Changing volume : 4eSide key [▲▼] or keg◆Motion trackingThis FOMA terminal is compatible with motion tracking of operating i-αppli (tilting or shaking FOMA terminal) using recognition technology of In-camera.・May unavailable in the cases below.- When the lens of In-camera is soiled- When your clothing looks similar to the background- When the background is not fixed like when moving- When in a dark place or where back ground is too brightWARNINGMotion tracking compatible i-αppli is a game to operate by tilting or shaking FOMA terminal. There is a risk that FOMA terminal hits people or objects around you by shaking it too much, causing an accident or damage. When you play, grip FOMA terminal firmly, do not shake it too much and confirm the safety around you while playing.◆Using preinstalled i-αppli・The i-αppli below are stored by default.-チャクレンジャーカート ネオ (Chakuranger Cart Neo)-ケータイ脳力ストレッチング2 (Keitai Brain Stretching 2)-太鼓の達人 4 F (Master of Drums 4 F)-ウォーキングチェッカー (Walking checker)-日英版しゃべって翻訳 for F (J-E Speech Translation for F)-日中版しゃべって翻訳 for F (J-C Speech Translation for F)-アバターメーカー for F (Avatar maker for F)-地図アプリ (Map application)-モバイルGoogleマップ (Mobile Google map)-Gガイド番組表リモコン (G-GUIDE TV Remote Controller)-iアプリバンキング (i-αppli banking)-楽オク出品アプリ2 (Rakuoku auctioning application 2)-iD 設定アプリ (iD setting application)-DCMXクレジットアプリ (Credit service application)-FOMA通信環境確認アプリ (FOMA communication environment check application)・If you delete stored i-αppli, you can download the software from "@Fケータイ応援団 (@ F mobile phone supporters)" site.→P321F906i.book Page 228 Monday, April 21, 2008 10:59 PM](https://usermanual.wiki/Fujitsu/FOMA-F906I.manual-6/User-Guide-946662-Page-42.png)
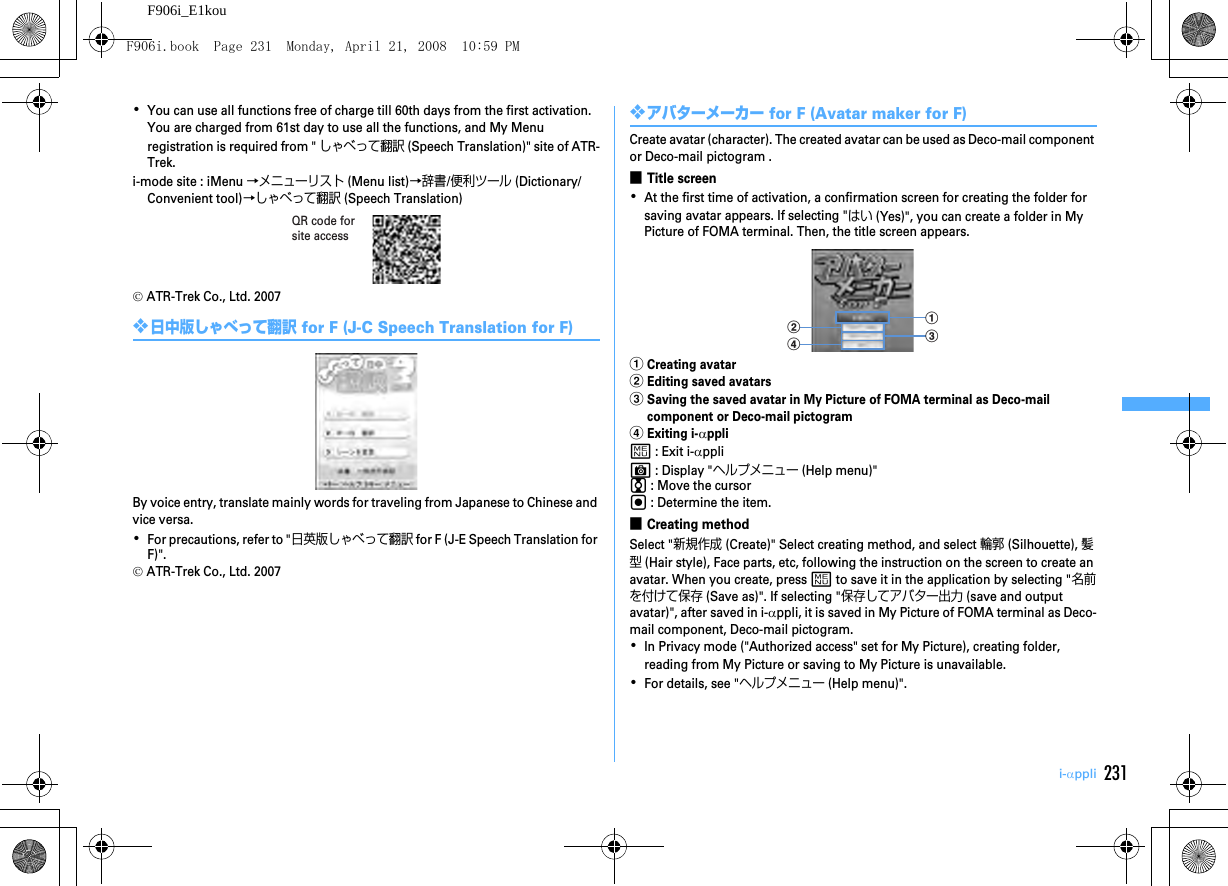
![232 i-αppliF906i_E1kou❖地図アプリ (Map application)A useful application that allows you to search the destination or display means of transportation by using GPS function equipped with FOMA terminal.Operating procedure of "地図アプリ (Map application)"→P254❖モバイルGoogleマップ (Mobile Google map)You can search for area information or shop information by displaying the map. And, you can switch to aerial photograph mode which is visually easy to see, and you can obtain the information of the town.■Map screen・You are required to agree to the Terms of Service at the first time you use this application.m : Display "メニュー (menu)"C : Search (Search shop or service information or location of the area and display it on the map)k : Moving of the cursor1 : Zoom out2 : Switch map/aerial photo3 : Zoom in0 : Display current location* : Saving to/displaying お気に入り (your favorite)・A packet communication fee is charged separately.・For details, see "ヘルプ (Help)" of メニュー (Menu).©2008 Google – Map data ©2008 Geocentre Consulting, NFGIS, Zenrin, Europa Technologies❖Gガイド番組表リモコン (G-GUIDE TV Remote Controller)This is a convenient application containing a TV program table and AV remote controller function with no monthly fee.You can easily obtain the TV program information of terrestrial digital, terrestrial analog or BS digital of your preferred time any time and anywhere. You can know the title, contents, start/end time, etc. of TV programs. And, you can activate 1Seg from Program guide, and Program guide from 1Seg. If there is any program you are interested in, you can make a watching reservation of the program to DVD recorder etc. via Internet (DVD recorder etc. compatible with remote watching reservation function is required. When using, the initial setting of this application is required). Moreover, you can search program information by keyword of TV category or favorite personalities, or pickup keyword at the top of the main display, etc. And, you can perform remote controlling operation of TV, video or DVD player (→P325) (some models are not applicable).・The first time you use this i-αppli, initial setup and agreement to the Terms of Service are required.・A packet communication fee is required separately.・With 2in1 ON in B mode, this function is unavailable.・When using overseas, set Date & time of FOMA terminal to Japan time.・For details of G-GUIDE TV Remote Controller, refer to "Mobile Phone User's Guide [i-mode] FOMA version".* The display is an example.It may differ from actual display.・Program guide available in the area you live is displayed.F906i.book Page 232 Monday, April 21, 2008 10:59 PM](https://usermanual.wiki/Fujitsu/FOMA-F906I.manual-6/User-Guide-946662-Page-46.png)
![233i-αppliF906i_E1kou■Watching reservation functionYou can select a program from Program guide of this i-αppli and reserve 1Seg watching.Watching reservation : Activate this i-αppli, select a program to reserve, select "視聴予約 (Reserve)" from menu "予約実行 (Reserved program)" and, when the reservation scheduler is activated, reserve the program according to the instruction given on the screen.■Recording reservation functionYou can select a program to record from Program guide of this i-αppli and make a recording reservation of 1Seg.Recording reservation : Activate this i-αppli, select a program to make a recording reservation, select "予約実行 (Reserved program)" from メニュー (Menu) "#ワンセグ録画予約 (1Seg Recording reservation)" and, when the reservation scheduler is activated, reserve the program according to the instruction given on the screen. (Recording reservation can be made also by selecting a program to make a recording reservation and pressing #.)■Remote recording reservation functionIf a DVD recorder etc. applicable with remote recording reservation is available, you can make recording reservation from a program table of this application even while going out.For remote recording reservation, initialization in this application is necessary.Initialization procedure : aSet DVD recorder etc. for Internet connection (See the operation manual of the DVD recorder etc.).bStart this application, select "リモート録画予約 (Remote recording reservation)" from メニュー (Menu) and perform initialization according to the prompt displayed.Reserving program : After initialization has completed, specify your favorite program and select "リモート録画予約 (Remote recording reservation)" from メニュー (Menu). Thus, you are connected with the DVD recorder etc. set in this application via Internet and can make recording reservation.❖iアプリバンキング (i-αppli banking)This is i-αppli for conveniently using mobile banking. Mobile banking is a service that allows you to use your FOMA terminal for inquiring for the balance, checking details of deposits and withdrawals, transferring and other operations on your own account anywhere at any time. When activating i-αppli, you are only required to enter a password set by yourself; after that, you can use mobile banking for up to 2 financial institutions.・Before using mobile banking, you are required to have an account of and make a subscription to one of financial institutions applicable to the mobile banking service.・A packet communication fee is required separately.・For details of i-αppli banking, refer to "Mobile Phone User's Guide [i-mode] FOMA version".・For information about i-αppli banking, visit i-mode site.i-mode site : iMenu→メニューリスト (Menu list)→モバイルバンキング (Mobile banking)→iアプリバンキング (i-αppli banking)* The display is an example.It may differ from actual display.QR code for site accessF906i.book Page 233 Monday, April 21, 2008 10:59 PM](https://usermanual.wiki/Fujitsu/FOMA-F906I.manual-6/User-Guide-946662-Page-47.png)
![234 i-αppliF906i_E1kou❖楽オク出品アプリ2 (Rakuoku auctioning application 2)"楽オク出品アプリ2 (Rakuoku auctioning application 2)" is a convenient application for easily auctioning in Rakuoku from any place, at any time.With guide display, it is available even to beginners of auctioning. And, using convenient functions for image shooting, editing, log saving, etc., you can make auctioning from a site in a shorter period of time.・Before using for the first time, you have to agree with "Terms of Service".・A packet communication fee is required separately.・For details of Rakuoku, refer to "Mobile Phone User's Guide [i-mode] FOMA version".・Auctioning in Rakuoku requires your subscription for a membership of and auctioning in Rakuten.・For information about Rakuoku, see i-mode site.i-mode site : iMenu →オークション (Auction)❖iD 設定アプリ (iD setting application)Charge-free Electronic money "iD" is a service that enables shopping only by holding up an Osaifu-Keitai or credit card loaded with "iD". You can enjoy shopping simply and conveniently without signing your name unlike in a conventional way. It also supports cashing, depending on the card issuer.・To use "iD", you need to own an Osaifu-Keitai with the necessary settings done with iD-αppli and the card i-αppli provided by a card issuer, in addition to subscribing to an iD-compatible card issuer.・When using "iD" with an Osaifu-Keitai, you need to take preparatory actions for usage at iD i-αppli, download or activate the card i-αppli provided by the card issuer and take preparatory actions for usage at card i-αppli side. Note that, some card can be used only by preparatory actions for usage at card i-αppli side without preparatory actions for usage at iD i-αppli.・The charges required for iD-compatible service (including the annual charge) vary by card issuer.・For information regarding "iD", refer to the "iD" i-mode site.i-mode site : iMenu→メニューリスト (Menu list)→「iD」* The display is an example.It may differ from actual display.QR code for site access* The display is an example.It may differ from actual display.QR code for site accessF906i.book Page 234 Monday, April 21, 2008 10:59 PM](https://usermanual.wiki/Fujitsu/FOMA-F906I.manual-6/User-Guide-946662-Page-48.png)
![236 i-αppliF906i_E1kou❖FOMA通信環境確認アプリ (FOMA communication environment check application)FOMA communication environment check application is an application to check if FOMA terminal can use FOMA high-speed area.・When using FOMA communication environment check application, agreement with "ご利用上の注意 (Precautions on Usage)" is necessary.・Depending on the communication condition (weather, radio wave conditions or congestion of the network) at the time of communication confirmation, different communication results or the result of out of service area may be displayed even if the place or the time zone is the same.・If you activate another function while using this application, you may not confirm correctly.Starting i-αppli quicklyi-αppli can be started by a simple operation from the stand-by display.◆Registering i-αppli as one-key/two-key shortcut・You can register one item of one-key shortcut.・You can register one item of two-key shortcut for each key of keypad, up to 10 items in total.<Example> Registering two-key shortcut1I (1 sec. or more)eSelect a folder2Place the cursor on the i-αppli and m82Registering i-αppli shortcut : Place the cursor on the i-αppli to set and m81・Same operations are required also for canceling.3Select a destination to register・Icon numbers ( - ) correspond to keypads (0-9) used to activate two-key shortcut.・When a destination already registered is selected, overwriting confirmation screen appears.✔INFORMATION・The i-αppli registered to the one-key shortcut can be checked by Software information.・Press m [i-αppli] 26 on the stand-by display to display the Shortcut list. Detail info can be displayed and perform Cancel two-key s.cut from the submenu of the list screen.◆Starting i-αppli using one-key/two-key shortcut<Example> Starting i-αppli using two-key shortcut10-9eI (1 sec. or more)Starting i-αppli using one-key shortcut : g (1 sec. or more)Automatically starting i-αppli◆Setting whether to start automatically <Auto start>Set all i-αppli, which are set to "ON" for User in Set auto start info., at once to start automatically.1m [i-αppli] 22e1 or 2* The display is an example.It may differ from actual display.F906i.book Page 236 Monday, April 21, 2008 10:59 PM](https://usermanual.wiki/Fujitsu/FOMA-F906I.manual-6/User-Guide-946662-Page-50.png)
![237i-αppliF906i_E1kou◆Setting date and time of auto start <Set auto start info.>Set the conditions such as ON/OFF of automatic start or start time for each i-αppli and display the preset details.・The conditions that can be set depend on the i-αppli.・Some i-αppli may not be able to start automatically.・When Auto start is "OFF", Auto start information cannot be registered.1I(1 sec. or more)eSelect a folderePlace the cursor on the i-αppli to set and m5eSet the required itemseCUser : Select if you perform auto start with the conditions below.Time : Enter the time for auto start of the i-αppli.Repeat : Set the condition for repetitive auto start of the i-αppli.Weekly : Set the day of the week for auto start when "Weekly" is set for Repeat.Date : Set the date for auto start when "Onetime" is set for Repeat.Software : Set if you automatically start at the intervals preset for the i-αppli.i-αppli 1-4 : For some i-αppliDX, up to 4 conditions of auto start can be set while it is running. Set if you enable those settings.✔INFORMATION・Even with auto start set, automatic activation does not occur in the cases below, causing to appear on the stand-by display and to be recorded in Start failure hist.- When the screen except the stand-by display appears- When unavailable due to UIM operation restriction (except for preinstalled i-αppli)- When UIM cannot be detected- When the interval of auto start is too short- When All lock, Omakase Lock, Personal data lock or Privacy mode is ON (when i-αppli is "Authorized access")- When 2in1 is ON in B mode (only for i-αppli to use mail function)- When the i-αppli usage is stopped by IP (Information Provider)・Even if you change "Repeat" of multiple i-αppli to set them start automatically at the same time, only one of them can be activated at one time. The information of the i-αppli that failed to be activated is recorded in Start failure hist., however, does not appear on the stand-by display.◆Displaying the start failure historyWhen auto start of the i-αppli fails, appears on the stand-by display and the name of the i-αppli, date and time, and causes are recorded.・Up to 20 items can be recorded. When exceeding the limit, record is overwritten chronologically.・When displaying Start failure hist. or when the next auto start is successful, on the stand-by display disappears.1m [i-αppli] 31・To delete histories, press C and select "Yes".i-αppli ToStarting i-αppli from site, mail or ToruCa1Select a link item enabling to start i-αppli of the site, i-mode mail or ToruCae"Yes"✔INFORMATION・i-αppli not saved in FOMA terminal cannot be started with i-αppli To. Some i-αppli can be started immediately after being downloaded from a site, without saving.・Partially saved i-αppli cannot be started from mail with i-αppli To.・For i-αppli starting just after downloading from sites, communication confirmation screen while they are activated may appear.・Some i-αppli program may not be saved in FOMA terminal.・If the i-αppli is set not to start with i-αppli To, the i-αppli cannot be started.→P227F906i.book Page 237 Monday, April 21, 2008 10:59 PM](https://usermanual.wiki/Fujitsu/FOMA-F906I.manual-6/User-Guide-946662-Page-51.png)
![238 i-αppliF906i_E1koui-αppli stand-by displayOperating i-αppli stand-by displayWhen the i-αppli is set for the stand-by display, you can start the i-αppli from the stand-by display to operate.・While displaying i-αppli stand-by display, or appears on the top of the display in gray.・Setting i-αppli stand-by display→P103, 227◆Starting i-αppli of i-αppli stand-by display1On the i-αppli stand-by display, ceOperate the i-αppli or on the top of the display flash in orange.✔INFORMATION・When FOMA terminal is turned ON while setting the i-αppli stand-by display, activating confirmation screen of the i-αppli stand-by display appears. The display starts when selecting "Yes" or performing no operations for approximately 5 seconds. Selecting "No" cancels i-αppli stand-by display. Note that when the power is turned ON by Auto power ON, the i-αppli stand-by display automatically appears, without displaying the confirmation screen.・When setting i-αppli that performs communication to i-αppli stand-by display, it may not operate correctly depending on radio wave conditions etc.・With 2in1 ON in Dual mode or B mode in All lock, Omakase Lock, Personal data lock or Privacy mode (when i-αppli is "Authorized access"), the i-αppli stand-by display is temporarily canceled and the default image is displayed.・When an error that cancels the i-αppli stand-by display occurs, canceling confirmation screen for the i-αppli stand-by display appears. If you select "Yes", it is canceled and recorded in Abnormal exit hist.◆Quitting i-αppli and returning to the i-αppli stand-by display1While running i-αppli, fe"End" or on the top of the display changes from orange to gray.The procedure to exit i-αppli and return to the i-αppli stand-by display depends on the i-αppli.・When selecting "Cancel", the i-αppli stand-by display is canceled. or on the top of display disappears.✔INFORMATION・Canceling operation from Software list : m→"i-αppli display"→"Cancel"◆Displaying the abnormal exit historyWhen an error that cancels i-αppli stand-by display occurs, the name of the i-αppli, date and time can be recorded.・Up to 20 items can be recorded. When exceeding the limit, record is overwritten chronologically.1m [i-αppli] 32・To delete histories, press C and select "Yes".Managing i-αppli◆Upgrading i-αppli <Upgrade>When the i-αppli is updated, upgrade is available.1I(1 sec. or more)eSelect a folderePlace the cursor on the i-αppli and m4e"Yes"✔INFORMATION・When upgrading i-αppli, data such as game scores stored in i-αppli may be erased.・Some i-αppli may inquire the DoCoMo server about the availability depending on the length of time of use and number of times of use. If the server gives a notice of the i-αppli having been updated, it can be upgraded after confirming if you upgrade it.・Some i-αppli is automatically upgraded.F906i.book Page 238 Monday, April 21, 2008 10:59 PM](https://usermanual.wiki/Fujitsu/FOMA-F906I.manual-6/User-Guide-946662-Page-52.png)
![240 i-αppliF906i_E1kou◆Sorting i-αppli <Sort software>1m [i-αppli] 21e1-5✔INFORMATION・Operations from the Software list : m9・For download time and access time, the time set for Date & time is recorded.・If one- and two-byte characters/alphanumeric are included in the name of i-αppli, the result of sort "By name" may not match the order of the Japanese syllabary.・The access frequency is carried over when upgrading the i-αppli version.・The access frequency does not include the number of starts as i-αppli stand-by display.・Selecting "By software size" sorts the i-αppli from large to small.◆Checking number of i-αppli in folder <Software in folder>1I(1 sec. or more)ePlace the cursor on the folder and CIcon definitions→P225 Step 3 in "Starting i-αppli"◆Checking current settings of i-αppli <Software information>The settings such as the saved number of i-αppli, i-αppli stand-by display, one-key shortcut or auto start can be checked.1I (1 sec. or more)eaUsing various functions from i-αppli・i-αppli applicable to each function is required.・Some i-αppli may need different operation or be unavailable.◆Making a call from i-αppli1Select a phone numbereSet a condition for dialingemMaking a call under set conditions→P59◆Using camera function from i-αppli1Operate i-αppli to use camera function✔INFORMATION・When activating Camera from i-αppli, the still image/movie is saved in i-αppli (in "i-mode" or "Deco-mail picture" folder of My Picture, "i-mode" folder of i-motion or added album). In some cases, automatically sent to the server.◆Using Bar code reader from i-αppli1Operate i-αppli to read a code・The scanned data is used by i-αppli and saved.◆Using infrared communication from i-αppli・Infrared communication may not be made depending on the other party's device even if it has infrared communication function.1"Yes" on the confirmation screen of infrared communication・i-αppli can also be executed by receiving i-αppli starting data via infrared communication.◆Using ToruCa from i-αppliFrom i-αppli, you can save ToruCa or select ToruCa in the folder for using or searching.<Example> Saving1Select "Yes (NewEntry)" on the confirmation screen of saving the ToruCaThe ToruCa is saved to "ToruCa" of ToruCa content.Overwriting ToruCa : "Yes (OverWrite)"eSelect a foldereSelect ToruCa to be overwrittenDisplaying : "Preview"F906i.book Page 240 Monday, April 21, 2008 10:59 PM](https://usermanual.wiki/Fujitsu/FOMA-F906I.manual-6/User-Guide-946662-Page-54.png)
![242 Osaifu-Keitai/ToruCaF906i_E1kouOsaifu-KeitaiOsaifu-Keitai allows you not only to pay money only by holding FOMA terminal over the IC card reader in stores etc., but also to use it as a point card or a coupon ticket.Moreover, by using communication, you can conveniently use Osaifu-Keitai to credit electronic money in a bank account, to check the balance or usage history, etc. And, for your safe usage, various security systems are equipped. For details, refer to "Mobile Phone User's Guide [i-mode] FOMA version".・To use Osaifu-Keitai compatible service, you are required to download Osaifu-Keitai compatible i-αppli from Osaifu-Keitai compatible site*, and make settings*iモードサイト(i-mode site) : iMenu→メニューリスト (Menu list)→"おサイフケータイ (Osaifu-Keitai)"・The data (including electronic money, points, etc.) in the IC card may be lost or modified because of the malfunction of FOMA terminal (When we take your Osaifu-Keitai for repair etc., as we cannot take it with data remained, you are required to erase the data by yourself). For support such as reissuance, restoration, temporary preservation or transfer of data except transfer by iCお引っこしサービス (iC transfer service), confirm with Osaifu-Keitai compatible service provider. For important data, be sure to use a service with backup service.・If the data in the IC card is lost, modified or damaged by any means related to Osaifu-Keitai compatible service such as malfunction or model change, DoCoMo assumes no responsibility for the loss of data.・If FOMA terminal is stolen or misplaced, immediately contact your subscribed IP (Information Provider) etc. for Osaifu-Keitai compatible service. This FOMA terminal allows you to use Omakase Lock or IC card lock.→P121, 249◆Using Osaifu-KeitaiDownloading Osaifu-Keitai compatible i-αppli→P224iD 設定アプリ (iD setting application) and DCMX クレジットアプリ (DCMX Credit service application) are stored by default. Press m [Osaifu-Keitai] 8 to connect to the site for downloading Osaifu-Keitai compatible i-αppli.Make initial settings of the service by starting Osaifu-Keitai compatible i-αppli→P243After starting Osaifu-Keitai compatible i-αppli and make settings following the instruction on the screen, you can charge (credit) money or check the balance or the usage history using the mobile phone.Holding FeliCa mark over IC card readerYou can use the i-mode terminal as electronic money to purchase, or use as a passenger ticket by placing the FeliCa mark of Osaifu-Keitai over the IC card reader. This function can be used without starting the Osaifu-Keitai compatible i-αppli.*No communication fee is charged.Step 1Step 2Step 3IC card readerFeliCa markF906i.book Page 242 Monday, April 21, 2008 10:59 PM](https://usermanual.wiki/Fujitsu/FOMA-F906I.manual-6/User-Guide-946662-Page-56.png)
![243Osaifu-Keitai/ToruCaF906i_E1kou✔INFORMATION・With IC card light "ON", when holding the FeliCa mark over the IC card reader scanning area, the light blinks.・If the recognition is not performed successfully by scanning the FeliCa mark of FOMA terminal with the IC card reader, shift the mark back and forth or right and left when scanning.・Even when Osaifu-Keitai is being turned OFF or after it is turned OFF, you can use the functions of Osaifu-Keitai by holding the FeliCa mark over the IC card reader. Note that, when the battery pack is not installed, or even when the battery pack is installed, if it has not been used for a long time or if it was left alone after battery alarm sounded without charging, Osaifu-Keitai may not be used.・You cannot start the Osaifu-Keitai compatible i-αppli to read/write data in the IC card or download ToruCa with the power OFF.・i-αppli may be started when holding the FeliCa mark over the IC card reader.・When scanning the FeliCa mark with the IC card reader, take care not to give a strong shock to FOMA terminal.iCお引っこしサービス (iC transfer service)iCお引っこしサービス (iC transfer service)*1 is a service that, when replacing Osaifu-Keitai in such cases as model change or repair, transfers data in an IC card collectively*2 to a new Osaifu-Keitai *3.After data in IC card is transferred, Osaifu-Keitai compatible services can be used easily by only downloading*4 Osaifu-Keitai compatible iC i-αppli. iCお引っこしサービス is available at a sales outlet such as DoCoMo Shop near you.For details, refer to "Mobile Phone User's Guide [i-mode] FOMA version".*1Both the source and the destination of the data need to be iCお引っこしサービス compatible FOMA terminal. For using iCお引っこしサービス, visit available sales outlet such as DoCoMo Shop near you.*2Some Osaifu-Keitai compatible services are not covered by iCお引っこしサービス, so only the Osaifu-Keitai compatible data saved in IC card covered by iCお引っこしサービス can be transferred.*3As this service "transfer", not "copy", data, the data saved in IC card does not remain in the original FOMA terminal. There may be a case that you cannot use iCお引っこしサービス, use the backup service for Osaifu-Keitai compatible service compatible with each Osaifu-Keitai.*4i-αppli downloading and settings require packet communication fee.Starting Osaifu-Keitai compatible i-αppli・When first starting or downloading Osaifu-Keitai compatible i-αppli, UIM in use is registered as the owner (IC owner) of the IC card in the Osaifu-Keitai. After that, IC card function cannot be used unless the UIM registered as the IC owner is installed. Note that, when replacing UIM with another one, IC card function cannot be used unless the IC owner is changed.→P2441m [Osaifu-Keitai] 1The next procedure→P225 Step 3 in "Starting i-αppli"✔INFORMATION・When Osaifu-Keitai compatible i-αppli starts, Osaifu-Keitai may be unavailable by placing the FeliCa mark over the IC card reader.・Active Osaifu-Keitai compatible i-αppli may be interrupted in the cases below. In that case, the data being read/written may be discarded.- When there is an incoming call or PushTalk call- When Lock on close is activated- When the date and time specified in the watching reservation/recording reservation of 1Seg, countdown timer, alarm clock or schedule come.- When the function is switched over to another function・When you are out of service area or the saved data cannot be used, some Osaifu-Keitai compatible i-αppli may not start or not operate correctly.・Press m [Osaifu-Keitai] 2 to activate DCMXクレジットアプリ (Credit service application).F906i.book Page 243 Monday, April 21, 2008 10:59 PM](https://usermanual.wiki/Fujitsu/FOMA-F906I.manual-6/User-Guide-946662-Page-57.png)
![244 Osaifu-Keitai/ToruCaF906i_E1kouCheck IC ownerChecking IC owner informationYou can check if the UIM in use is registered as the owner (IC owner) of the IC card in the Osaifu-Keitai.1m [Osaifu-Keitai] 6・If not registered as IC owner, install a UIM registered as IC owner, or select "How to reset IC owner" and change IC owner. Step 2 in "Changing IC owner" →P244 Step 2 in "Changing IC owner"❖Changing IC ownerTo change IC owner, you need to reset IC owner. By resetting, Osaifu-Keitai compatible i-αppli other than iD 設定アプリ (iD setting application) are deleted. Note that, for Osaifu-Keitai compatible i-αppli that the data in IC card is saved, the data in IC card needs to be deleted by activating or redownloading i-αppli before being reset. After reset, if starting or downloading Osaifu-Keitai compatible i-αppli, it is registered as IC owner.1m [Osaifu-Keitai] 72"Reset IC owner"e"Yes"eAuthenticatee"Yes"ToruCaToruCaToruCa is an electronic card that can be obtained using Osaifu-Keitai; it can be used conveniently as a flier, restaurant card, coupon ticket, etc.ToruCa can be downloaded from the IC card reader, site, etc. and can be easily exchanged using mail, infrared communication/iC transmission or microSD card.・Compatible models : ToruCa can be used on the models supporting ToruCa.For details, refer to "Mobile Phone User's Guide [i-mode] FOMA version".❖Flow of using ToruCaObtain ToruCa by holding Osaifu-Keitai over the IC card readerSelect ToruCa from ToruCa listDownload detail information by pressing the "詳細 (Details)" buttonToruCa (Details)F906i.book Page 244 Monday, April 21, 2008 10:59 PM](https://usermanual.wiki/Fujitsu/FOMA-F906I.manual-6/User-Guide-946662-Page-58.png)
![245Osaifu-Keitai/ToruCaF906i_E1kouToruCa downloadDownloading ToruCa・The savable size of each ToruCa is 1 Kbyte. The maximum size of each ToruCa (Details) is 100 Kbytes.・Savable number→P471❖ToruCa download method・The procedure for obtaining from IC card reader is the same as Step 3 in "Using Osaifu-Keitai".→P242・Reading QR code→P153・Downloading from a site→P168・Attaching to i-mode mail/saving→P187, 194・Saving from i-αppli→P240・Exchanging data between FOMA terminal and microSD card→P310・Infrared communication/iC transmission→P323, 324✔INFORMATION・When obtaining ToruCa with an IC card reader, operations are performed according to the settings from ToruCa preference, ToruCa alert, ToruCa auto-read, ToruCa receive of Light alert and ToruCa receive alert of Adjust volume.・The obtained/downloaded ToruCa is saved in "ToruCa". However, if ToruCa is obtained from IC card reader, it is saved according to ToruCa sort rule.・When Auto-display of ToruCa preference is "ON", if ToruCa is obtained from IC card reader , connecting confirmation screen to the site for downloading details may appear. If no key operations are made during automatic display, ToruCa is saved under unread state.・ToruCa downloaded in the methods below is saved as read ToruCa.- Reading QR code- Downloading from a site- Receiving by i-mode mail- Receiving read ToruCa through infrared communication/iC transmission・When attaching ToruCa (Details) to mail, sent via infrared communication/iC transmission or moved/copied to microSD card, a message may appear indicating that the detail information is not contained or saved.・For some ToruCa, updating, moving/copying, transmission through mail attachment or infrared communication may be disabled.・Checking memory space→P321・When exceeding the savable number/area→P322ToruCa listDisplaying ToruCa1m [Osaifu-Keitai] 3eSelect a folder(gray) : No ToruCa (blue) : No unread ToruCa : Unread ToruCa exists (gray) : No used ToruCa(blue) : Used ToruCa existsi-αppliQR codeIC card reader microSD cardExchange ToruCa among ToruCa compatible i-mode terminalsi-mode mailSiteInfrared communication/iC transmissionF906i.book Page 245 Monday, April 21, 2008 10:59 PM](https://usermanual.wiki/Fujitsu/FOMA-F906I.manual-6/User-Guide-946662-Page-59.png)
![246 Osaifu-Keitai/ToruCaF906i_E1kou2Select ToruCaaStatus icon : Unread : ReadbCategory iconcDownload datedIndexeTitlef"詳細 (Details)" buttonDisplayed when there is detail information. Detail information can be downloaded from a site.Attaching to mail : Place the cursor on the ToruCa and a・When ToruCa (Details) can be attached, a confirmation screen for attaching including details appears. When ToruCa (Details) cannot be attached, a confirmation screen for attaching excluding details appears.・Press m2 to attach the displayed ToruCa to the mail.❖Operations while displaying ToruCa (Details)Updating the display : m1e"Yes"Adding phone number and mail address into phonebook : aPlace the cursor on the phone number or mail address and m4e1 or 2b1 or 2・When adding data to existing phonebook entry, select the phonebook entry.cAdd the phone number or mail address.Phonebook new entry→P83Registering URL in bookmark : Place the cursor on the URL and m43eSelect a folder to add toThe next procedure →P163 Step 2 in "Registering in Bookmark"Saving image : m44eSelect the image・Press m45 to save a background image.The next procedure→P166 Step 2 and the following steps in "Downloading images"Using location information : Select location information.The next procedure→P170 Step 2 in "Using location information"Replaying Flash graphics or GIF animation : m7Uploading image or movie/i-motion : "View"The next procedure→P169 Step 2 in "Uploading image or movie/i-motion to sites"✔INFORMATION・For some ToruCa, an expiration date is set. After expiration, the background of the ToruCa list is displayed in different color.・If ToruCa includes phone numbers, mail addresses or URL, Phone To (AV Phone To), Mail To, SMS To and Web To functions can be used.・Category marks specific to ToruCa issuers may appear on the ToruCa list and ToruCa (Details) (they are not included in category marks in "Category", searching and/or ToruCa sorting method).・When Flash graphics are not in place within ToruCa (Details), the operation starts when they are in place within the display by scrolling.・ToruCa in "Used ToruCa" folder cannot be displayed.・A packet communication fee is required for downloading detail information.・ToruCa (Details) may not be received even if the receiver's device is compatible with ToruCa.◆Searching ToruCa<Example> Searching by category1m [Osaifu-Keitai] 3em1eSelect Search method field21eSelect Category fielde1-5deabcbcfCategory selection screenCategory icon included in the category at the cursor positionCategoryF906i.book Page 246 Monday, April 21, 2008 10:59 PM](https://usermanual.wiki/Fujitsu/FOMA-F906I.manual-6/User-Guide-946662-Page-60.png)
![247Osaifu-Keitai/ToruCaF906i_E1kouSearching by title : 2eEnter a part of the title in the entry filed for Search text (up to 10 two-byte (21 one-byte) characters)Searching by index : 3eEnter a part of the index in the entry filed for Search text (up to 7 two-byte (15 one-byte) characters)3C✔INFORMATION・Searching ToruCa in the folder : m2・ToruCa in "Used ToruCa" folder cannot be searched for.◆Creating/Deleting folders・Up to 20 folders can be created in addition to "ToruCa" and "Used ToruCa" folders.<Example> Creating folders1m [Osaifu-Keitai] 32m2Changing folder name : Place the cursor on the folder and m4eGo to Step 3Changing the order : Place the cursor on the folder and me9 or 0Deleting : Place the cursor on the folder and m3eAuthenticatee"Yes"3Enter the folder name (up to 8 two-byte (16 one-byte) characters)eC✔INFORMATION・"ToruCa" and "Used ToruCa" folders cannot be renamed, sorted or deleted.◆Deleting ToruCa<Example> Deleting 1 item1m [Osaifu-Keitai] 3eSelect a folder2Place the cursor on ToruCa and m31Deleting selected items : m32eSelect ToruCaeCDeleting all items in a folder : m33eAuthenticate3"Yes"✔INFORMATION・Deleting displayed ToruCa : m8・Deleting ToruCa in "Used ToruCa" folder : Place the cursor on the ToruCa and g→"Yes".◆Moving ToruCa to another folder・ToruCa also can be moved/copied to microSD card.→P310<Example> Moving 1 item1m [Osaifu-Keitai] 3eSelect a folder2Place the cursor on the ToruCa and m411Moving selected items : m412eSelect ToruCaeCMoving all items in the folder : m4133Select a folder to move toe"Yes"✔INFORMATION・Deleting displayed ToruCa : m31・ToruCa cannot be moved to "Used ToruCa" folder.◆Sorting ToruCa <Sort>The ToruCa list can be sorted temporarily.1m [Osaifu-Keitai] 3eSelect a folderem52e1-5✔INFORMATION・When the one- and two-byte characters are mixed in the titles of ToruCa, the sort result by "By title" and "By index" may not match the order of the Japanese syllabary.・When selecting "By name", the ToruCa list is sorted in the order of ID included as data in ToruCa (ID cannot be displayed).◆Checking the number of ToruCa <Check No. of items>1m [Osaifu-Keitai] 3em6✔INFORMATION・Checking the number of items saved in the folder : m51・ToruCa in "Used ToruCa" folder are not included in the number of saved items.F906i.book Page 247 Monday, April 21, 2008 10:59 PM](https://usermanual.wiki/Fujitsu/FOMA-F906I.manual-6/User-Guide-946662-Page-61.png)
![248 Osaifu-Keitai/ToruCaF906i_E1kouSetting ToruCa functions◆Setting the operation of ToruCa downloading <ToruCa preference>You can set if you obtain ToruCa from IC card reader and the operations for obtaining from IC card reader.1m [Osaifu-Keitai] 52eSet the required itemseCToruCa receive : When setting to "ON", ToruCa is obtained from IC card reader.Duplication check : When setting to "ON", a new ToruCa is not downloaded if it is duplicated with the existing one.Auto-sort : When setting to "ON", sort ToruCa according to ToruCa sort rule.Auto-display : When setting to "ON", downloaded ToruCa is automatically displayed for 15 seconds only when the stand-by display is active.◆Setting operations for checking completion of ToruCa download <ToruCa alert>You can set lighting and/or sound volume for notifying completion of ToruCa obtaining from the IC card reader.1m [Osaifu-Keitai] 51eSet the required itemseCLight alert : Set if you make the light blink when obtaining is completed.Light color : Set the lighting color of the light.Receive alert volume : Set the volume of the alert activated when obtaining ToruCa has completed.◆Using ToruCa auto-read <ToruCa auto-read>You can set if you automatically read enabled ToruCa when using it by placing FOMA terminal over an IC card reader. When set to "ON", enabled ToruCa is automatically recognized and moved to "Used ToruCa" folder. If not setting this function to "ON", some ToruCa may not be able to use.・Up to 20 ToruCa can be stored into "Used ToruCa" folder. When exceeding the limit, record is overwritten chronologically.1m [Osaifu-Keitai] 53e1 or 2✔INFORMATION・When this function is "OFF", if you hold FOMA terminal over an IC card reader, a confirmation screen for using ToruCa auto-read or a screen indicating that ToruCa auto-read is disabled may appear. When using ToruCa, set to "ON".◆Setting sort method of ToruCa <ToruCa sort rule>You can set sort method of ToruCa obtained with an IC card reader to specified folders.・Up to 20 items can be registered.・To enable execution of sort method, Auto-sort of ToruCa preference should be "ON".<Example> Sorting by category1m [Osaifu-Keitai] 54 : Category : Title : IndexNo icon : No method2CeSelect Sort by: field31eSelect Category fielde1-5Category selection screen→P246Sorting by title : 2eEnter a part of the title in the field for Enter text (up to 10 two-byte (21 one-byte) characters)Sorting by index : 3eEnter a part of the index in the field for Enter text (up to 7 two-byte (15 one-byte) characters)Sorting by no method : 44Selecting Location: filedeSelect a foldereC5Select a prioritySort method is added above the selected row.・When registering the first sort method, select "Add to last" (When changing a registered method, "Move to last" is displayed).Registered sort methods (in the order of priority)F906i.book Page 248 Monday, April 21, 2008 10:59 PM](https://usermanual.wiki/Fujitsu/FOMA-F906I.manual-6/User-Guide-946662-Page-62.png)
![249Osaifu-Keitai/ToruCaF906i_E1kou✔INFORMATION・"Used ToruCa" folder cannot be specified to the folder to sort.❖Checking, changing or deleting sorting methods<Example> Checking sorting methods1m [Osaifu-Keitai] 542Selecting sorting methodsA sort method details screen appears.Changing : Place the cursor on the sort method and m2eSelect the Sort by: field・When operating from the sort method details screen, press m1 and select the Sort by: field.The next procedure →P248 Step 3 and the following steps in "Setting sort method of ToruCa"Changing sort priority : Place the cursor on the sort method to change and m5The next procedure →P248 Step 5 in "Setting sort method of ToruCa"Deleting : Place the cursor on the sort method and me3 or 4e"Yes"・When selecting "All items", perform authentication.・When operating from the sort method details screen, press m2.IC card lockPreventing use of IC card functionWith IC card lock set, the functions below become unavailable.- Use of IC card- ToruCa obtained from IC card reader- Download or use of Osaifu-Keitai compatible i-αppli- Initializing IC owner- iC transmission・To activate both IC card lock and All lock, first start IC card lock and then start All lock.1r (1 sec. or more)e"Yes"When activating IC card lock, or (for individual IC card lock) appears on the stand-by display.Canceling : r (1 sec. or more)eAuthenticate❖Activating/Canceling with FOMA terminal folded.・When canceling, use Fingerprint authentication.1During the clock display on sub-display, PePlace the cursor on "Lock IC card" using side keys [▲▼] and MThe light turns on in blue for approximately 3 seconds when activating IC card lock.Canceling : During the clock display on sub-display, PePlace the cursor on "Unlock IC card" using side keys [▲▼] and MeAuthenticateThe light blinks in blue for about 3 seconds when canceling IC card lock.・In a state waiting for authentication, the light remains flashing in red. If pressing side keys [▲▼], P or M, IC card lock cancellation is stopped and the light turns off.・The light blinks in red for about 1.5 seconds after failing in authentication.✔INFORMATION・When removing the battery pack or activating Omakase Lock, IC card functions are unavailable regardless of the IC card lock settings.・During IC card lock, deletion of some Osaifu-Keitai compatible i-αppli may be disabled.F906i.book Page 249 Monday, April 21, 2008 10:59 PM](https://usermanual.wiki/Fujitsu/FOMA-F906I.manual-6/User-Guide-946662-Page-63.png)