Furuno USA 9ZWDSC60 Maritime DSC controller With MF/HF Watchkeeping Receiver User Manual dsc60 Part 1 of 2
Furuno USA Inc Maritime DSC controller With MF/HF Watchkeeping Receiver dsc60 Part 1 of 2
Contents
- 1. DSC60
- 2. dsc60 - Part 1 of 2
- 3. dsc60 Part 2 of 2
dsc60 - Part 1 of 2
i
DISTRESS Call Procedure
Do the following when a life endangering situation arises on your vessel:
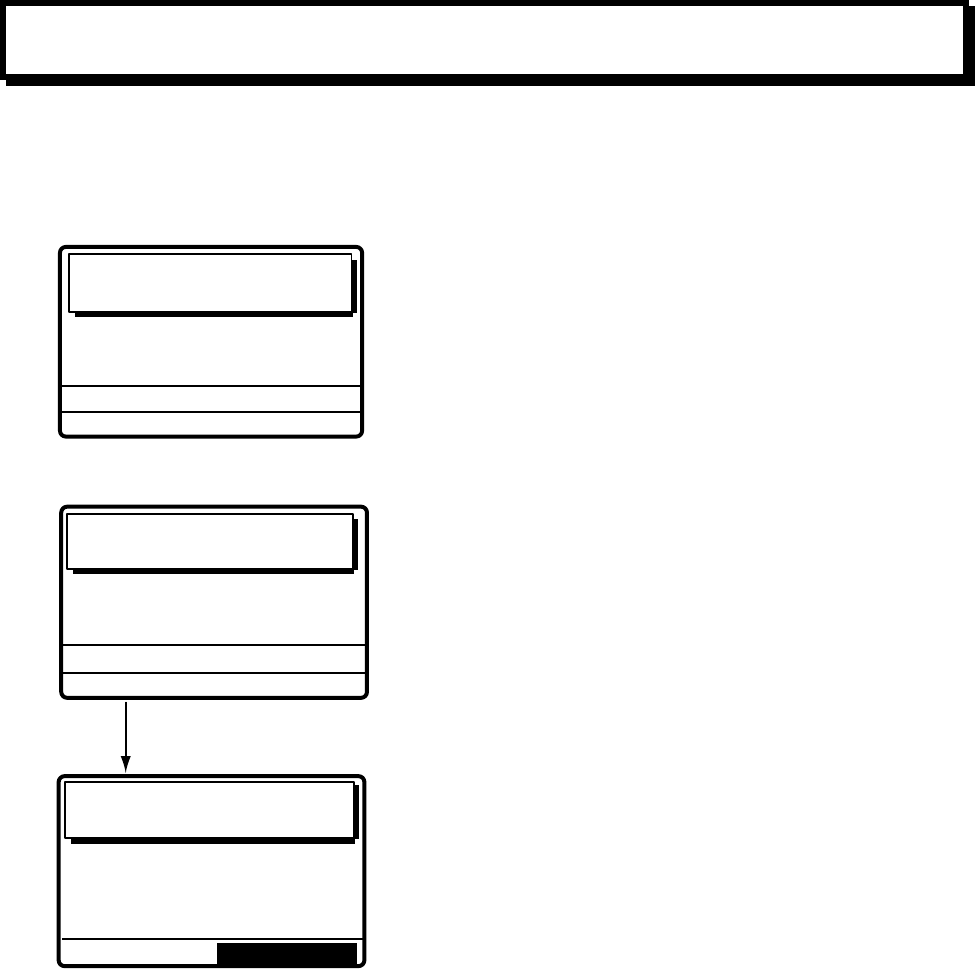
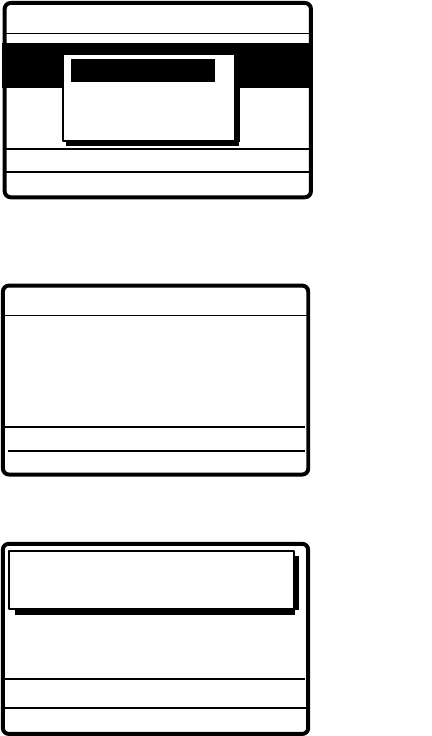
1. Open the DISTRESS button cover and press the [DISTRESS] button more than three
seconds to show the following display, then release the [DISTRESS] button.
Distress
call in progress!
TIME TO GO : 38S
NATURE: UNDESIGNATED
POS:
12˚34N 123˚45E AT 12:34
TELEPHONE
2182.0 KHZ
DSC FREQ
:
2187.5 KHZ
2. After the distress call is transmitted the following displays appear in order.
Waiting for distress
acknowledgement.
TIME TO GO: 3M10S
NATURE: UNDESIGNATED
POS :
12˚34N 123˚45E AT 12:34
TELEPHONE
2182.0 KHZ
DSC FREQ :
2187.5 KHZ
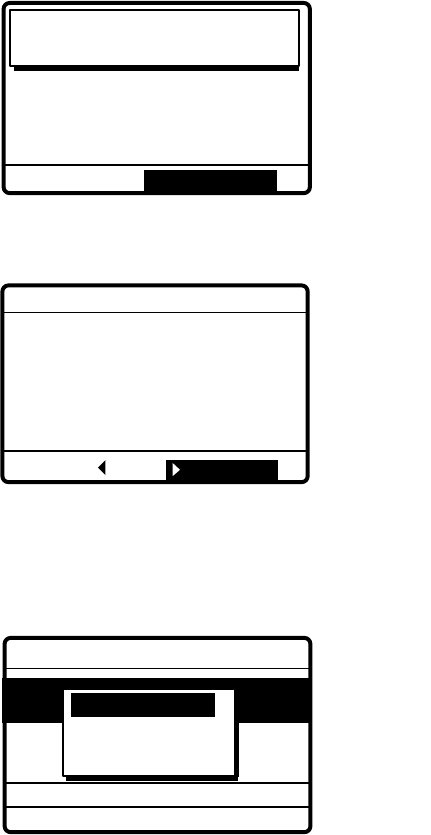
SHIP IN DIST:
123456789
POS:
12˚34N 123˚45E AT 12:34
TELEPHONE
2182.0 KHZ
FROM COAST:
001234567
NATURE: UNDESIGNATED
Distress acknowledge
call received.
STOP ALARM
When distress call is acknowledged
by coast station (within1 min to 2 min.
45 sec).
3. The audio alarm sounds; press the [CANCEL] key to silence the alarm
4. Communicate with the coast station via radiotelephone as follows:
a) Say MAYDAY three times.
b) Say “This is … “ name of your vessel and your call sign three times.
c) Give nature of distress and assistance needed.
d) Give description of your vessel (type, color, number of persons onboard, etc.) and any other
information which may aid in rescue.
For detailed information see page 3-1.
ii
SAFETY INSTRUCTIONS
WARNING
Immediately turn off the power at the
switchboard if water leaks into the
equipment or something is dropped in
the equipment.
Continued use of the equipment can cause
fire or electrical shock. Contact a FURUNO
agent for service.
Do not disassemble or modify the
equipment.
Fire, electrical shock or serious injury can
result.
Do not place liquid-filled containers on
the top of the equipment.
Fire or electrical shock can result if a liquid
spills into the equipment.
Immediately turn off the power at the
switchboard if the equipment is emitting
smoke or fire.
Continued use of the equipment can cause
fire or electrical shock. Contact a FURUNO
agent for service.
Make sure no rain or water splash leaks
into the equipment.
Fire or electrical shock can result if water
leaks in the equipment.
ELECTRICAL SHOCK HAZARD
Do not open the equipment.
Only qualified personnel
should work inside the
equipment.
WARNING
Keep heater away from equipment.
A heater can melt the equipment's power
cord, which can cause fire or electrical
shock.
Do not operate the equipment with wet
hands.
Electrical shock can result.
CAUTION
Do not use the equipment for other than
its intended purpose.
Use of the equipment as a stepping stool,
for example, can result in personal injury
or equipment damage.
A warning label is attached to the
equipment. Do not remove the label.
If the label is missing or illegible,
contact a FURUNO agent or dealer.
WARNING
To avoid electrical shock, do not
remove cover. No user-serviceable
parts inside.
Name: Warning Label (1)
Type: 86-003-1011-0
Code No.: 100-236-230

iii
TABLE OF CONTENTS
FOREWORD..................................................................................................................vi
SYSTEM CONFIGURATION .......................................................................................viii
1. DSC SYSTEM OVERVIEW.................................................................................. 1-1
1.1 What is DSC?..............................................................................................................................1-1
1.2 DSC Call .....................................................................................................................................1-1
1.2.1 Distress alert call and reply................................................................................................1-3
1.2.2 Individual call......................................................................................................................1-4
1.3 Audio Alarms...............................................................................................................................1-4
1.4 Remote Control and Automatic Acknowledge ............................................................................1-5
1.4.1 Remote control...................................................................................................................1-5
1.4.2 Automatic acknowledge .....................................................................................................1-5
1.4.3 Both remote control and automatic acknowledge ON .......................................................1-5
1.5 Interpreting Call Displays ............................................................................................................1-6
1.5.1 Receive calls ......................................................................................................................1-6
1.5.2 Send calls...........................................................................................................................1-8
1.6 Remote Control of SSB Radiotelephone ....................................................................................1-9
2. OPERATIONAL OVERVIEW ............................................................................... 2-1
2.1 Controls, LED Description...........................................................................................................2-1
2.2 Turning the Power On/Off ...........................................................................................................2-3
2.3 DSC Standby Screen, Radiotelephone Setting Screen and Their Indications ...........................2-3
2.3.1 DSC standby screen ..........................................................................................................2-3
2.3.2 Radiotelephone setting screen ..........................................................................................2-3
2.4 Panel Backlighting and LCD Contrast.........................................................................................2-4
2.5 Loudspeaker, Buzzer On/Off.......................................................................................................2-5
2.6 Starting, Stopping Scanning DSC Routine Frequencies ............................................................2-6
2.7 Automatic Acknowledge On/Off ..................................................................................................2-7
2.8 Intercom On/Off...........................................................................................................................2-8
2.9 Selection of On-screen Items......................................................................................................2-9
2.10 Manual Entry of Position and Time..........................................................................................2-10
2.11 Remote Control of FURUNO SSB Radiotelephone ................................................................2-12
3. DISTRESS OPERATIONS ................................................................................... 3-1
3.1 Sending Distress Alert.................................................................................................................3-1
3.1.1 Sending distress alert by DISTRESS button .....................................................................3-1
3.1.2 Sending distress alert with nature of distress specified.....................................................3-3
3.2 Sending Distress Relay to All Ships............................................................................................3-7
3.2.1 Distress alert received on MF band ...................................................................................3-7
3.2.2 Distress alert received on HF band..................................................................................3-13
3.3 Sending Distress Relay on Behalf of a Ship in Distress ...........................................................3-15
3.3.1 Sending distress relay to coast station ............................................................................3-15
3.3.2 Sending distress relay to all ships....................................................................................3-18
3.4 Receiving Distress Relay All Ships ...........................................................................................3-21
iv
4. CALLING ............................................................................................................. 4-1
4.1 All Ships Call ...............................................................................................................................4-1
4.1.1 Sending all ships call .........................................................................................................4-1
4.1.2 Receiving all ships call.......................................................................................................4-3
4.2 Individual Call..............................................................................................................................4-4
4.2.1 Sending individual call........................................................................................................4-4
How to set working frequency............................................................................................4-6
How to set DSC frequency.................................................................................................4-8
4.2.2 Receiving individual call...................................................................................................4-13
4.3 Group Call .................................................................................................................................4-18
4.3.1 Sending a group call ........................................................................................................4-18
4.3.2 Receiving a group call......................................................................................................4-20
4.4 Geographic Area Call................................................................................................................4-21
4.4.1 Sending a geographic area call .......................................................................................4-21
4.4.2 Receiving a geographic area call.....................................................................................4-24
4.5 Neutral Craft Call.......................................................................................................................4-25
4.5.1 Sending a neutral craft call ..............................................................................................4-25
4.5.2 Receiving a neutral craft call............................................................................................4-26
4.6 Medical Transport Call ..............................................................................................................4-27
4.6.1 Sending a medical transport call......................................................................................4-27
4.6.2 Receiving a medical transport call ...................................................................................4-28
4.7 Polling Call ................................................................................................................................4-29
4.7.1 Sending a polling call .......................................................................................................4-29
4.7.2 Receiving a polling call ....................................................................................................4-32
4.8 Position Call ..............................................................................................................................4-34
4.8.1 Position call: requesting other ship’s position ..................................................................4-35
4.8.2 Position call: other ship requests your position................................................................4-37
4.9 PSTN Call .................................................................................................................................4-40
4.9.1 Sending PSTN call, receiving acknowledge back (ACK BQ) ..............................................4-40
4.9.2 Sending PSTN call, receiving acknowledge back (QUEUE indication),
ring back...........................................................................................................................4-43
4.9.3 Receiving PSTN call, sending acknowledge back (ACK BQ)..........................................4-47
4.9.4 PSTN call disconnection, receiving charge information (ship disconnects line)..............4-48
4.9.5 PSTN call disconnection, receiving charge information
(coast station disconnects line)........................................................................................4-50
5. LOG FILE............................................................................................................. 5-1
5.1 Log File Description ....................................................................................................................5-1
5.2 Opening a Log File......................................................................................................................5-1
5.2.1 Distress log ........................................................................................................................5-1
5.2.2 Ordinary log........................................................................................................................5-3
5.2.3 Transmitted log ..................................................................................................................5-4
6. PREPARING SEND MESSAGES ........................................................................ 6-1
6.1 Preparing Individual Call Messages............................................................................................6-1
6.2 Preparing Group Call Messages.................................................................................................6-4
6.3 Preparing Geographic Area Call Messages................................................................................6-5
6.4 Preparing PSTN Call Messages .................................................................................................6-6
6.5 Sending Prepared Messages......................................................................................................6-8
v
7. SETUP MENU...................................................................................................... 7-1
7.1 Setup Menu Overview.................................................................................................................7-1
7.2 Alarm Menu.................................................................................................................................7-2
7.3 Auto Ack Menu............................................................................................................................7-3
7.4 Erase File Menu ..........................................................................................................................7-5
7.5 Message Menu............................................................................................................................7-5
7.6 Position Menu .............................................................................................................................7-6
7.7 Print Out Menu ............................................................................................................................7-6
7.7.1 Sample printouts ................................................................................................................7-7
7.8 Scan Freq Menu..........................................................................................................................7-8
7.8.1 Distress frequencies ..........................................................................................................7-8
7.8.2 Routine frequencies ...........................................................................................................7-9
7.9 User CH Menu ..........................................................................................................................7-10
7.10 Volume Menu...........................................................................................................................7-12
7.11 Test Menu ................................................................................................................................7-13
7.12 System Menu...........................................................................................................................7-13
8. CHECKING, MAINTENANCE.............................................................................. 8-1
8.1 Daily Test.....................................................................................................................................8-1
8.2 Maintenance................................................................................................................................8-2
8.2.1 Preventive maintenance ....................................................................................................8-2
8.2.2 Cleaning .............................................................................................................................8-2
8.3 Simple Troubleshooting ..............................................................................................................8-3
8.4 Error Messages...........................................................................................................................8-3
8.5 Test Call ......................................................................................................................................8-4
APPENDIX.................................................................................................................. A-1
Menu Tree ........................................................................................................................................ A-1
DSC Frequency Table ...................................................................................................................... A-2
SPECIFICATIONS ....................................................................................................SP-1
Declaration of conformity to type
INDEX

vi
FOREWORD
Thank you for purchasing this DSC/Watch Receiver. We are confident you will discover why
FURUNO has become synonymous with quality and reliability.
Dedicated in the design and manufacture of marine electronics equipment for half a century,
FURUNO Electric Company has gained an unrivaled reputation as a world leader in the industry.
This is the result of our technical excellence as well as our worldwide distribution and service
network.
Please carefully read and follow the safety information and operating and maintenance
instructions set forth in this manual before attempting to operate the equipment and conduct any
maintenance. Your DSC/Watch Receiver will perform to the utmost of its ability only if it is
operated and maintained in accordance with the correct procedures.
Features
Connected to an SSB radiotelephone, the DSC-60 generates and receives digital selective calls
for quick and efficient establishment of distress, urgency, safety and routine communications
with other ships and coast stations that install any MF/HF DSC facilities. Data is displayed on a
large, easy-to-read backlit LCD. Operation is simplified by the use of few keys and easy-to-follow
menus.
The main features are
• DSC Terminal, DSC Watch Receiver, DSC General Watch Receiver (option) and MF/HF
Radiotelephone Remote Station all contained in a compact and light-weight cabinet.
• Fully meets GMDSS carriage requirements. Large LCD meets requirements of 160-character
indication required by IMO MSC.68(68).
• Conforms to the following regulations:
IEC-61097-3/8/9
IEC-60945 (3rd edition protected from weather, former Class B)
IEC-61162-1
ETS-300/338
ITU-R M.493-9, M.541-8, M.1082-1
• Scan watch feature scans operator-programmed DSC frequencies.
• Remote operation optionally available.
• Automatic position and time input and update with connection of EPFS (Electronic Position-
Fixing Equipment).
• Optional printer can automatically print out received messages and test results.
• Log stores 50 each of latest ordinary, distress and transmitted messages, in separate
memory blocks.
vii
• Built-in intercom function provides voice communications between the DSC-60 and SSB
radiotelephone.
• Optional built-in receiver board for DSC ship's business/routine frequencies.
• One-touch testing facility.
viii
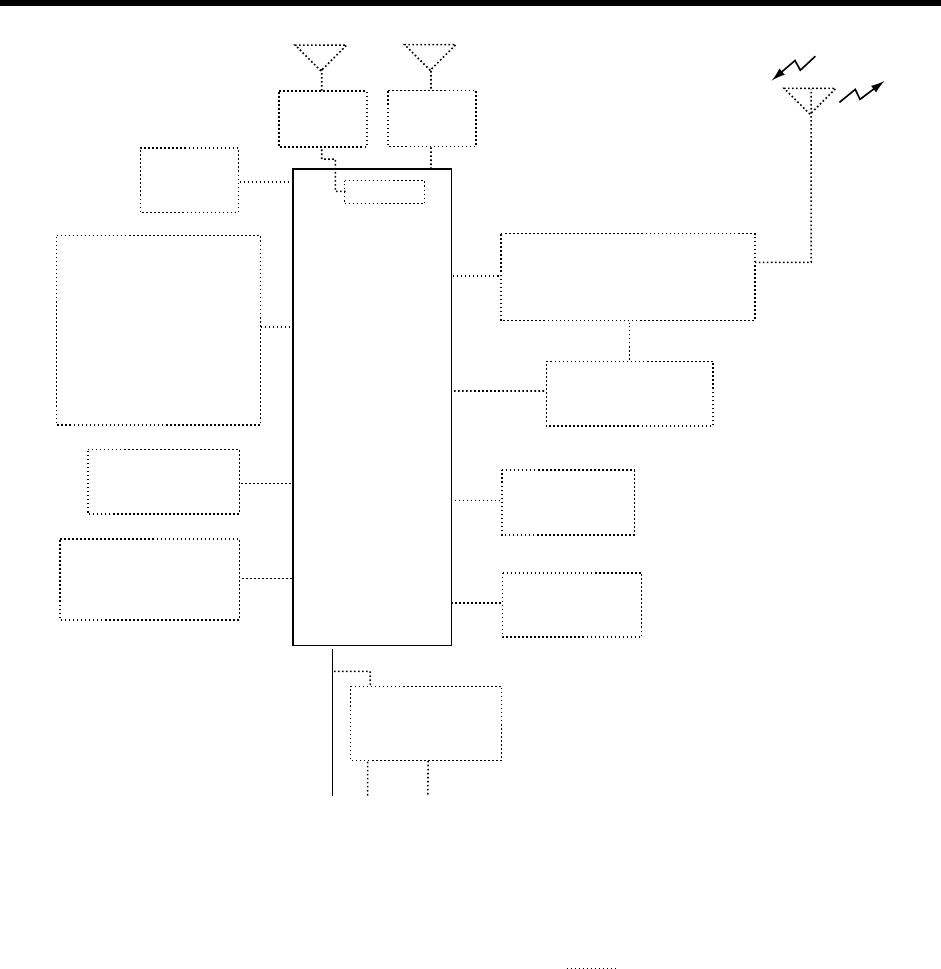
SYSTEM CONFIGURATION
PRINTER
PP-510
DSC/WATCH
RECEIVER
DSC-60
SSB RADIOTELEPHONE
FS-1562,
FS-5000/8000
RX Board
NBDP TERMINAL
or PC
DISTRESS MESSAGE
CONTROLLER
DMC-5
or
TELEX DISTRESS
ALERT BUTTON
IC-302
INCOMING
INDICATOR
IC-303
NAVIGATOR
: Optional equipment
HANDSET
HSC701K-B20
LOUDSPEAKER
MX910-X01
PREAMP
FAX-5
PREAMP
FAX-5
SHIP'S MAINS
24 VDC
100-115/200-220 VAC
1φ, 50/60 Hz
AC/DC POWER
SUPPLY UNIT
PR-300
1-1
1. DSC SYSTEM OVERVIEW
1.1 What is DSC?
DSC is an acronym meaning Digital Selective Calling. It is a digital distress and general calling
system in the MF, HF and VHF bands used by ships for transmitting distress alerts and general
calls and by coast stations for transmitting the associated acknowledgements.
For DSC distress and safety calling in the MF and HF bands the frequencies are (kHz) 2187.5,
4207.5, 6312.0, 8414.5, 12577.0, and 16804.5.
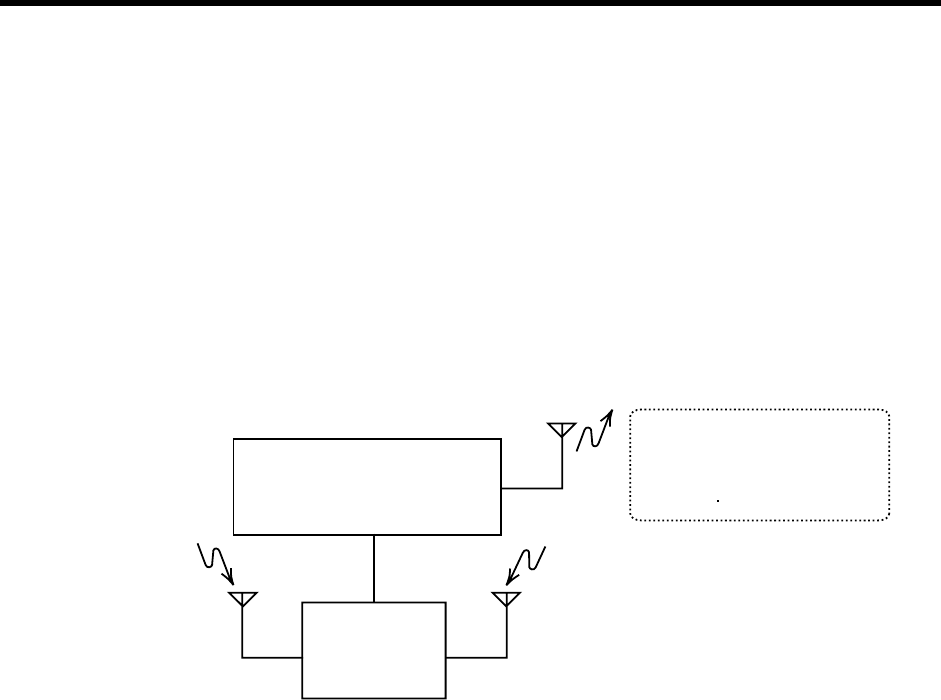
The DSC-60 is a combination MF/HF DSC Terminal and Watch Receiver. Connected to an SSB
radiotelephone, the DSC-60 sends and receives calls via the SSB radiotelephone. The built-in
remote control permits control of a FURUNO radiotelephone from the DSC-60.
SSB RADIOTELEPHONE
FS-1562/5000/8000
DSC-60
DSC message, which contains
calling category, working fre-
quency, etc, is sent on DSC
frequency
General DSC Call Distress and Safety DSC Calls
Option
1.2 DSC Call
DSC calls are roughly divided in two categories: distress and safety calls, and routine calls.
Below are the types of DSC calls and the pages on which their descriptions and procedures
appear.
• All Ships (page 4-1)
• Distress (page 3-1)
• Distress Relay (page 3-7 - 3-20)
• Geographic Area (page 4-21)
• Group (page 4-18)
• Individual (page 4-4)
• Medical Transport (page 4-27)
• Neutral Craft (4-25)
• Polling (page 4-29)
• Position (page 4-34)
• PSTN (page 4-40)
• Test (page 8-4)
1-2
Contents of a DSC call
Calling category
Call category Call
Individual Individual, PSTN, Test, Position, Polling, Relay Sel (specific coast station)
All Ships All Ships, Neutral, Medical, Relay All
Group Group
Geographic Area Area
Station ID
Own ship ID and sending station ID. Coast station ID begins with 00; Group ID begins with
0.
Priority
Routine: General calling
Business: For passing important alert such as navigation and weather.
Safety: For reporting emergency situation on board a ship.
Urgency: For reporting grave danger on board a ship.
Communication type
Telephone: telephone (J3E) by SSB
NBDP-ARQ: Telex (J2B) mode ARQ via NBDP Terminal
NBDP-FEC: Telex (J2B) mode FEC via NBDP Terminal
Communication frequency
Working frequency used to call. The sending station may have the receiving station (ship or
coast station) assign the frequency to use.
Position
Position can be automatically or manually input.
DSC frequency
DSC frequency to use. If the order of communications priority is SAFETY, URGENCY and
DISTRESS, select a DSC distress frequency.
End code
The end of a DSC message is denoted by ACK RQ (Acknowledge Request), ACK BQ
(Acknowledge Back) or EOS (End of Sequence).
1-3
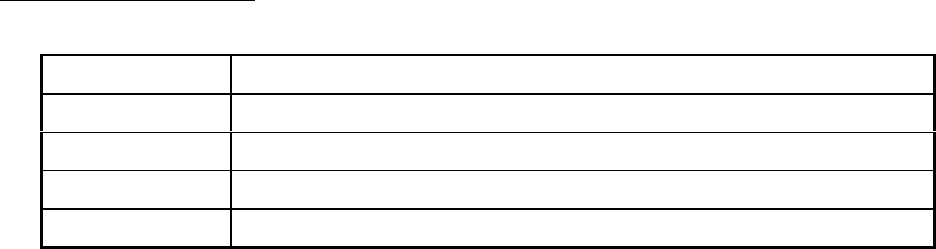
1.2.1 Distress alert call and reply
This type of call is sent by own ship in the event of distress, by pressing the [DISTRESS] button
more than three seconds as follows:
1. The LED in the button initially flashes, and lights when the button is pressed more than three
seconds. (If the button is pressed less than three seconds the distress alert is not sent. Once
the alert is sent it cannot be cancelled.)
2. The DSC-60 sets the DSC distress frequency on the SSB radiotelephone and it transmits the
distress alert.
3. After the distress alert is transmitted (about 40 seconds) the DSC-60 waits for the DIST ACK
call from a coast station. This usually takes less than 3 minutes and is accompanied with an
audio alarm. (If it is not received within 4.5 minutes the distress alert is re-transmitted.)
4. The SSB sets the DSC distress frequency to use to communicate with the coast station. With
the optional handset you can communicate through the DSC-60.
Coast
Station
Own Ship
Ship in
Distress
(Own Ship)
Ship in distress sends Distress Alert
Coast station sends distress acknowledgement (DIST ACK).
Voice or telex communications between ship in distress and coast station
1-4
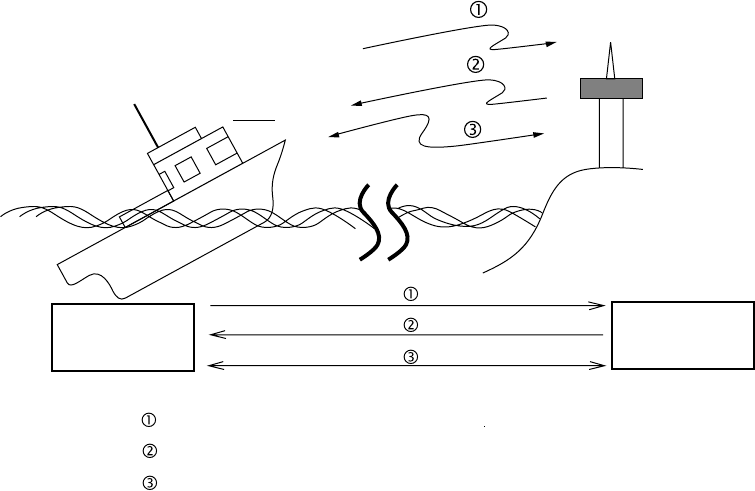
1.2.2 Individual call
The individual call is for sending a call to a specific station.
Coast
Station
Own Ship
DSC Message [Called Acknowledge
Request (ACK RQ) Signal]
Acknowledge Back (ACK BQ) Signal
Voice or telex communication
3
2
1
1
2
3
Basic procedure
1. Prepare message and transmit it by pressing the [CALL] key. The DSC-60 then awaits
acknowledgement of the call.
2. Receive acknowledge back (ACK BQ) signal from receiving station (coast station or ship
station) within about five minutes. The audio alarm sounds at this time; press the [CANCEL]
key to silence it.
3. After receiving ACK BQ signal, communicate with coast station; the FURUNO SSB
radiotelephone sets the working frequency and class of emission specified by your ship.
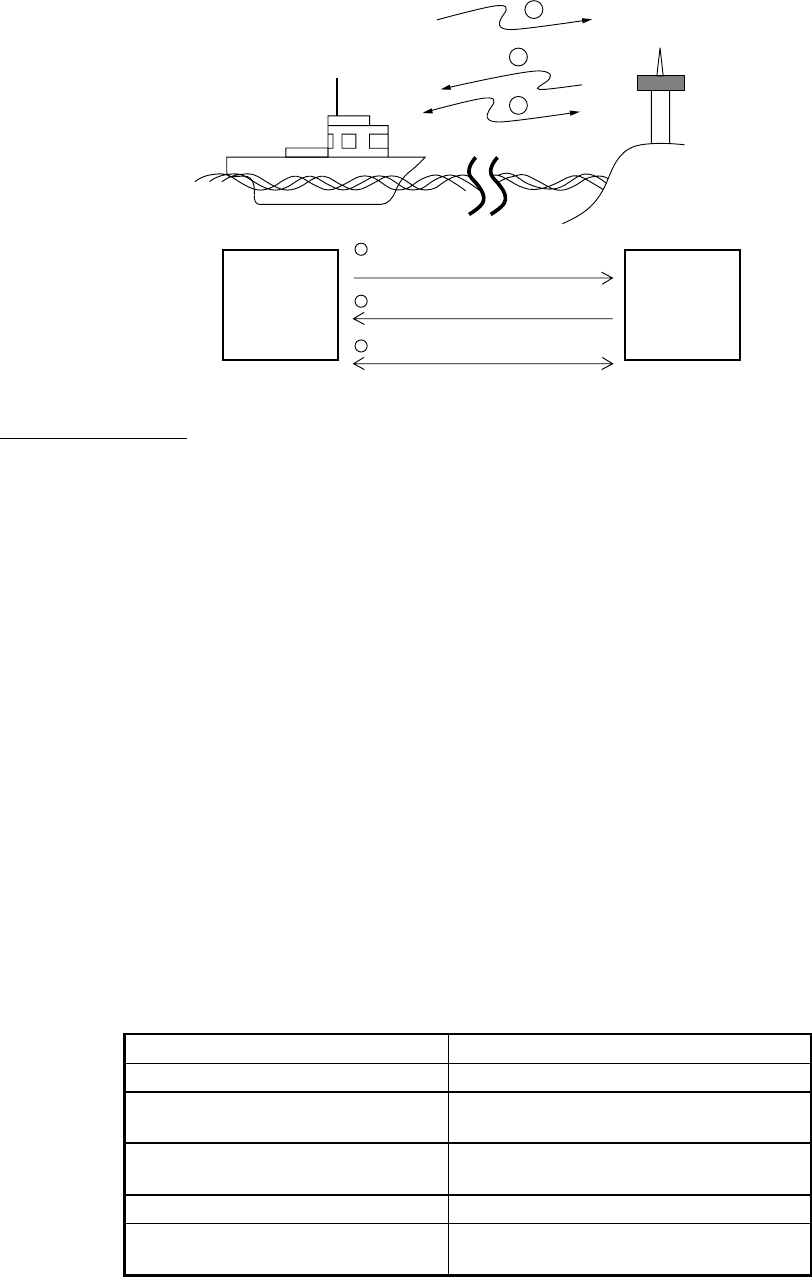
1.3 Audio Alarms
When you receive a distress alert or routine call addressed to your ship the audio and visual
alarms are released. For the distress or urgent call, the audio alarm sounds until the [CANCEL]
key is pressed. For other calls, the audio alarm sounds for one second and then automatically
goes off.
The tone of the alarm depends on the call received. By becoming accustomed to the tone you
can know which type of call you have received.
Alarm Frequency (interval)
Safety message received 1300 Hz and 0 Hz (250 ms)
Routine, Ship's Business
message received
880 Hz and 440 Hz (500 ms)
While DISTRESS button is
pressed for three seconds
2200 Hz and 0 Hz (125 ms)
Distress alert is being sent 2200 Hz, continuous
Own ship position not updated 2200 Hz (50 ms), three beeps every
two seconds

1-5
1.4 Remote Control and Automatic Acknowledge
1.4.1 Remote control
The DSC-60 and a FURUNO SSB radiotelephone communicate with each other by means of the
MIF (FURUNO Radio Interface) data format, a unique handshaking type signal exchange system
developed by FURUNO. The DSC-60 can also communicate with other makes of
radiotelephones which incorporate data format IEC-61162-1. The remote control feature allows
the DSC-60 to automatically set the DSC and working frequencies and class of emission on a
FURUNO SSB radiotelephone.
1.4.2 Automatic acknowledge
The automatic acknowledge feature, when turned on, automatically transmits the acknowledge
back signal to the sender when an individual, PSTN, position or polling call is received. With the
automatic acknowledge feature turned on the remote control is also turned on.
Automatic acknowledge is alternately enabled or disabled with the [5/ACK] key.
1.4.3 Both remote control and automatic acknowledge ON
The illustration and table below outline the sequence of events in an individual call when both
remote control and automatic acknowledge are turned on.
FS-1562*
DSC-60
FS-1562*
DSC-60
TX
ACK BQ
AUTO ACK (own ship) AUTO ACK (other station)
* FURUNO SSB radiotelphone
DSC operation Radiotelephone frequency c
cc
cRadiotelephone frequencyd
dd
d
1. DSC-60c [CALL] key
pressed.
DSC frequency changed; call
sent.
Scans DSC frequencies.
2. DSC-60d receives via
radiotelephone.
Sets DSC frequency received.
3. DSC-60d automatically
sends acknowledge back
(ACK BQ) signal.
DSC frequency set; ACK BQ sent.
Then, working frequency and
class of emission specified at
DSC-60c are set.
4. DSC-60c receives
acknowledge back signal
via radiotelephone.
Working frequency and class of
emission specified at DSC-60c
are set.
Both communication frequency and class of emission are already set on the FS-1562 c and
FS-1562d, so you may begin communications.
1-6
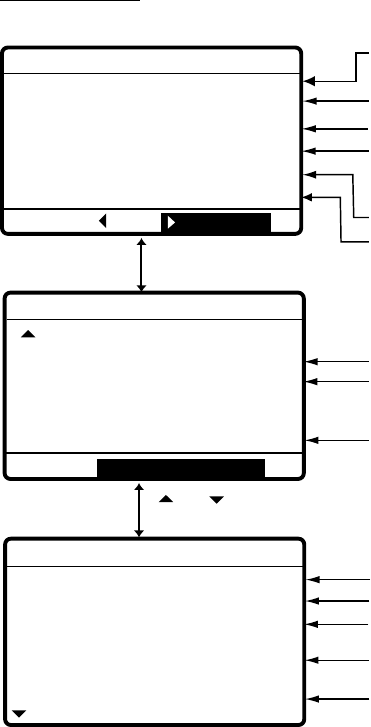
1.5 Interpreting Call Displays
This paragraph provides the information necessary for interpreting receive and send calls.
1.5.1 Receive calls
Below are sample distress and individual receive calls. Content of other receive calls is similar to
that of the individual call.
Distress call
* Received message *
JUL-23-1999-23:59 ECC: OK
DISTRESS CALL
ANSWER
SHIP IN DIST: 123456789
NATURE: UNDESIGNATED
POS: 12˚34N 123˚45E AT 12:34
TELEPHONE 2182.0 KHZ
ALL VIEW
END OF SEQUENCE: EOS
ERROR-CHECK: OK
DSC FREQUENCY : 2187.5 KHZ
* Received message *
GO TO EASY VIEW
[ENT] to
switch.
or to
switch.
FORMAT : DISTRESS
SELF-IDENTITY : 123456789
NATURE OF DISTRESS:
UNDESIGNATED DISTRESS
DISTRESS COORDINATES:
12˚34N 123˚45E AT 12:34
TELECOMMAND: J3E TELEPHONE
* Received message *
Date and time of message
ECC (Error Check Character): OK or NG (No Good)
Category (Distress call)
Ship in Distress (ID No. of ship in distress)
Nature of Distress (Undesignated, Fire, Flooding,
Collision, Grounding, Listing, Sinking, Disable,
Abandoning, Piracy, Man Overboard, EPIRB emission)
Position of ship in distress
Working frequency to use
End of sequence (EOS for distress)
Error check (OK or NG)
DSC frequency used to transmit distress call
Format (distress)
ID no. of ship in distress
Nature of distress (problem with ship in distress, see above)
Distress coordinates (position of ship in distress)
Telecommand (class of emission)
1-7
Individual call
FORMAT : INDIVIDUAL
ADDRESS : 987654321
CATEGORY : ROUTINE
SELF-IDENTITY : 123456789
1ST TELECOMMAND: J3E TELEPHONE
2ND TELECOMMAND : NO INFORMATION
*
Received message
*
*
Received message
*
JUL-23-1999-23:59 ECC: OK
INDIVIDUAL REQUEST
FROM SHIP:
123456789
ROUTINE
TELEPHONE 2182.0 KHZ
*
Received message
*
[ENT]
to switch.
or
to switch.
WORKING FREQ. : 2182 KHZ
END OF SEQUENCE: ACK. RQ
ERROR-CHECK: OK
DSC FREQUENCY TX: 2189.5 KHZ
RX: 2177.0 KHZ
GO TO EASY VIEW
Date and time of message
ECC (Error Check Character): OK or NG (No Good)
Able acknowledge ("Unable acknowledge" and reason if unable)
ID No. of sending station
Category (Routine, Business, Safety, Urgency)
Working frequency to use
End of sequence (ACK. BQ or ACK. RQ)
Error check (OK or NG)
DSC frequency used
Format (individual)
ID of your station
Category (Routine, Business, Safety, Urgency)
1st Telecommand (class of emission)
Working frequency to use
2nd Telecommand (class of emission)
ID of sending station
ANSWER Note: ANSWER is for replying to message.
ALL VIEW
1-8
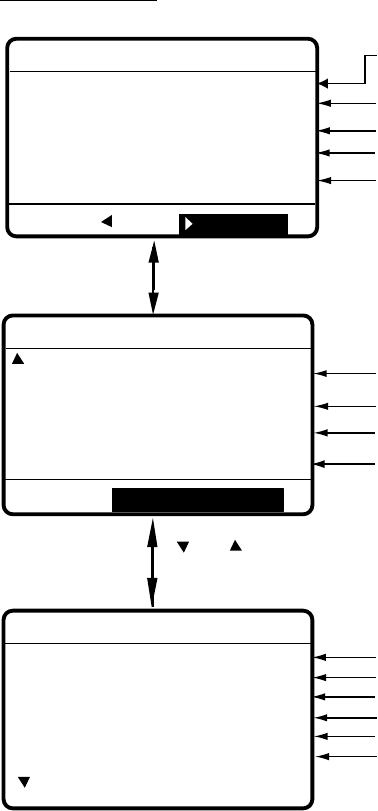
1.5.2 Send calls
Below are sample distress and individual send calls. Content of other send calls is similar to that
of the individual call.
Distress call
Distress
call in progress!
TIME TO GO : 38S
NATURE: UNDESIGNATED
POS:
12˚34N 123˚45E AT 12:34
TELEPHONE
2182.0 KHZ
DSC FREQ
:
2187.5 KHZ
Time remaining until transmission of distress call
is completed
Nature of Distress (Undesignated, Fire, Flooding,
Collision, Grounding, Listing, Sinking, Disable,
Abandoning, Piracy, Man Overboard)
Position of ship in distress (your ship)
DSC frequency used to send distress call
Individual call
*** Send message ***
COM. FREQ : CH 12034
PRIORITY : ROUTINE
COM. TYPE : TELEPHONE
CALL TYPE: INDIVIDUAL
STATION ID: 123456789
GO TO ALL VIEW
DSC FREQ : 2M-INTL
Press to select GO TO ALL VIEW
and press [ENT] key to view.
*** Send message ***
GO TO EASY VIEW
DSC FREQ TX: 2189.5 KHZ
RX: 2177.0 KHZ
WORKING FREQ. : CH 12034
END OF SEQUENCE: ACK. RQ
ID of station where message is to be sent
Mode of communication (Telephone)
Working frequency
Call type (Individual)
Working frequency
Priority (Routine, Safety, Urgency, Business)
DSC frequency
End of sequence (Acknowledge request)
DSC frequency used

1-9
1.6 Remote Control of SSB Radiotelephone
SSB output power at transmission of distress alert
When the [DISTRESS] button is pressed, the output power of the FURUNO SSB radiotelephone
is automatically set to maximum, even if it is set for minimum.
Keyboard lock at the SSB radiotelephone
The keyboard of the FURUNO SSB radiotelephone is automatically locked while a DSC
message is being transmitted.
• Distress alert or distress relay transmitted (transmission time about 40 seconds)
The keyboard is locked until the transmission of the distress alert or distress relay is
completed.
• Call other than distress is transmitted (transmission time about 8 seconds)
Press the [CANCEL] key to unlock the keyboard.
2-1
2. OPERATIONAL OVERVIEW
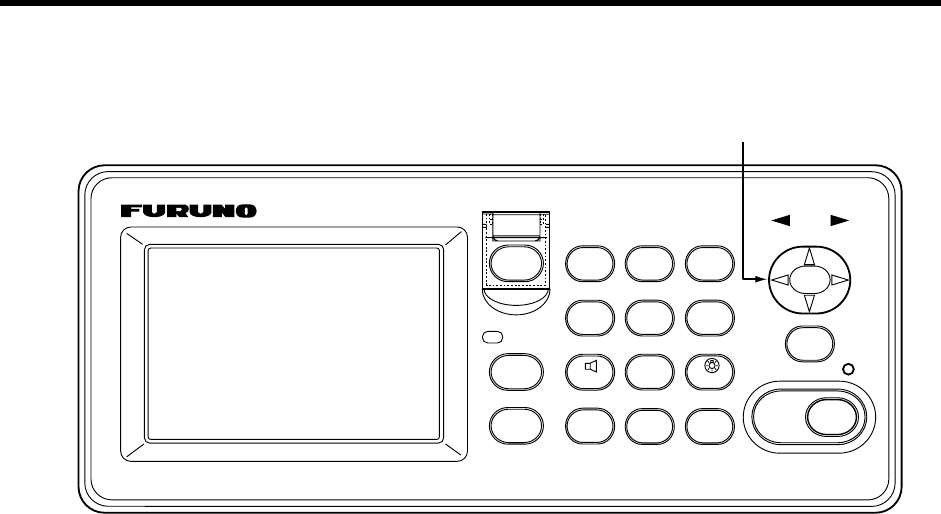
2.1 Controls, LED Description
DISTRESS
CANCEL
CALL
ALARM
RT
2182
1
DSC
ABC
2
ACK
JKL
5
LOG
0
TEST
DEF
3
ENT
SCAN
MNO
6
PRINT
TUV
8
SETUP
#
FILE
*
IntCom
GHI
4
PQRS
7
WXYZ
9
VOLUME
OVEN
POWER
LCD
DSC/WATCH RECEIVER DSC-60
Cursor Pad
2-2
Control, LED description
Control Function
POWER switch Turns the power on/off.
DISTRESS button Press and hold down the button more than three seconds to transmit the distress
alert. When pressed it initially flashes, and lights up if the button is pressed more
than three seconds. It stays lit until your ship receives the distress acknowledge
message. The distress alert will not be transmitted if the button is pressed less
than three seconds.
CALL key Transmits calls other than distress.
Cursor Pad Selects items on menus; adjusts loudspeaker volume (64 levels) on the DSC
standby screen. (The distress and urgency alarms are received at maximum
volume regardless of current loudspeaker volume setting.)
ENT key Registers key input.
CANCEL key • Cancels wrong data.
• Restores previous menu.
• Returns to DSC standby screen from other screen.
• Silences audio alarm (distress or routine).
• Cancels transmission, printing.
• Erases error message.
1/ RT/2182 key • Switches from the DSC standby screen to the radiotelephone setting screen.
• Switches between J3E and 2182.0 kHz on radiotelephone setting screen.
2/DSC key Switches from the radiotelephone setting screen to the DSC standby screen.
3/TEST key Executes daily test.
4/IntCom key Turns intercom with radiotelephone on/off, from the radiotelephone setting screen.
5/ACK key Switches automatic and manual acknowledge alternately at the DSC standby
screen.
6/SCAN key Starts/stops scanning of DSC routine frequencies at the DSC standby screen.
7/ key • Turns loudspeaker on/off.
• Silences buzzer.
Note that this key does not silence the distress or urgency alarm.
8/PRINT key Prints current screen and test results.
9/ key Adjusts keyboard backlighting and LCD contrast.
*/FILE key Opens the send message file from the DSC standby screen, to send stored
message.
0/LOG key Opens the Tx/Rx log file from the DSC standby screen.
#/SETUP key Opens the Setup menu from the DSC standby screen.
ALARM lamp • Flashes in red for distress or urgency call.
• Flashes in green (more rapidly) for safety or routine call.
OVEN lamp Lights (in green) when oven power is on.
2-3
2.2 Turning the Power On/Off
Press the [POWER] switch at the right-hand side of the equipment to turn the power on or off.
Whenever the power is applied the DSC standby screen appears.
2.3 DSC Standby Screen, Radiotelephone Setting
Screen and Their Indications
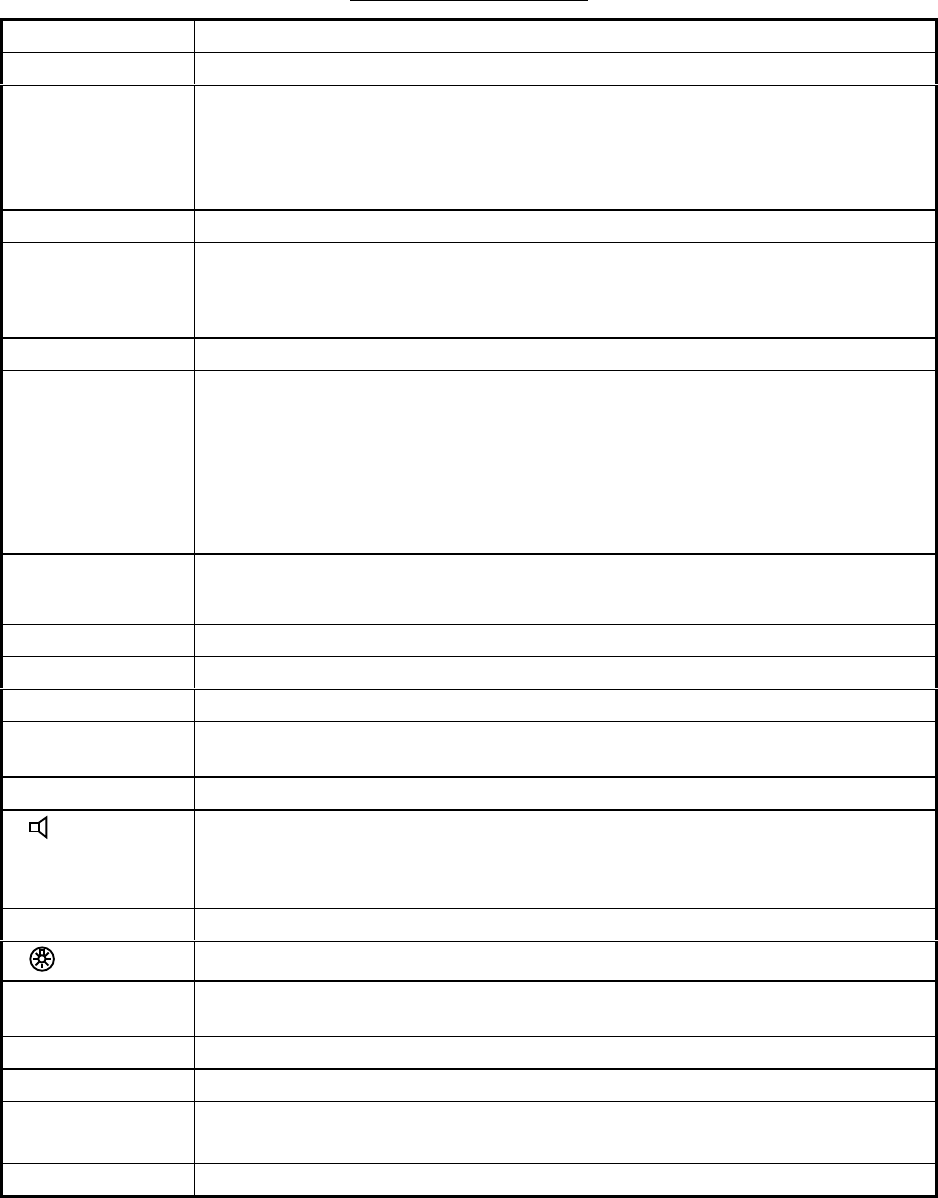
2.3.1 DSC standby screen
The DSC standby screen appears by pressing the [2/DSC] key. This is where you begin all
calling operations.
35˚00.000N 135˚00.000E 23:59
WATCH KEEPING
2187.5 4207.5 6312.0
16804.5 12577.0
DISTRESS
ROUTINE
2177.0 4219.5 6331.0
16903.0 12657.0
VOLUME 32
AUTO ACK
AUTO ACK (Automatic Acknowledge) or
MAN ACK (Manual Acknowledge)
DSC Distress/Safety Frequencies
(Frequency currently being
scanned is highlighted.)
Current Position, Time
Loudspeaker Volume Setting
(By graphic and figure)
DSC Routine Frequencies
(Frequency currently being
scanned is highlighted.)
8414.5
8436.5
DSC standby screen
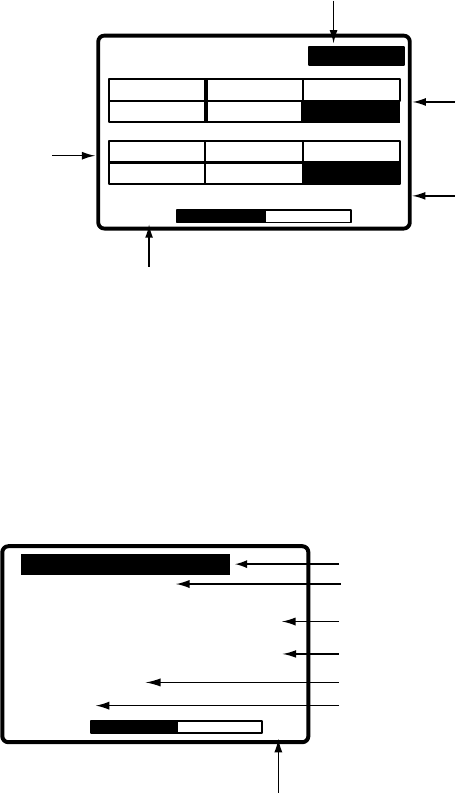
2.3.2 Radiotelephone setting screen
The radiotelephone setting screen appears by pressing the [1/ RT/2182] key. This is where you
set up the radiotelephone.
MODE: TELEPHONE
CH: 12034
VOLUME 32
Tx: 12329.0
KHZ
Rx: 13176.00
KHZ
POWER: HIGH
TUNE
Communications Mode
Channel in Use
Tx Frequency
Rx Frequency
Tx Power
Tuning Status (OK or NG
(No Good) appears
after tuning)
Loudspeaker Volume
Setting
MODE: TELEPHONE
Radiotelephone setting screen

2-4
2.4 Panel Backlighting and LCD Contrast
1. At the DSC standby screen or radiotelephone setting screen, press the [9/ ] key. The
following display appears.
EXIT:[ENT]
8
29
DIMMER (1~8)
CONTRAST (0~63)
2. Use
to increase the backlighting; to lower it. Current backlighting setting is shown in
both digital and analog indications below DIMMER.
3. Use
to lower the contrast; to raise it. Current contrast setting is shown in both digital
and analog indications below CONTRAST.
4. Press the [ENT] key to finish and return to the screen previously in use.
2-5
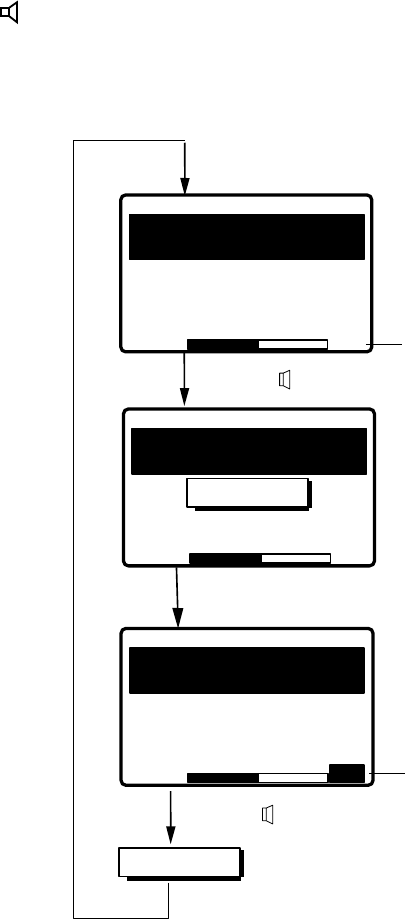
2.5 Loudspeaker, Buzzer On/Off
1. Display the DSC standby screen or radiotelephone setting screen.
2. Press the [7/ ] key to turn the loudspeaker, buzzer on or off. The message SOUND: ON or
SOUND: OFF appears with each pressing of the key. The indication OFF appears at the
lower-right side of the DSC standby and radiotelephone setting screens when the
loudspeaker is turned off.
WATCH KEEPING
VOLUME 32
CH:12034
MODE : TELEPHONE
TX
TUNE
POWER
RX
: 12 329.0
kHZ
: 13 176.00
kHZ
: NO TUNE
: HIGH
SOUND : OFF
SOUND : ON
WATCH KEEPING
VOLUME
CH:12034
MODE : TELEPHONE
TX
TUNE
POWER
RX
: 12 329.0
kHZ
: 13 176.00
kHZ
: NO TUNE
: HIGH
OFF
Speaker OFF
WATCH KEEPING
VOLUME 32
CH:12034
MODE : TELEPHONE
TX
TUNE
POWER
RX
: 12 329.0
kHZ
: 13 176.00
kHZ
: NO TUNE
: HIGH
About two seconds later
Press [7/ ]
About two seconds later
Press [7/ ]
Speaker ON
3. When the loudspeaker is on, press to lower the volume; to raise it. The setting range is
0 to 63. Current volume setting is shown by both bar graph and numeric at the bottom of the
display.
2-6
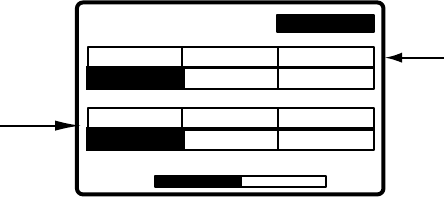
2.6 Starting, Stopping Scanning DSC Routine
Frequencies
Press the [6/SCAN] key at the DSC standby screen to start or stop scanning DSC routine
frequencies. The DSC routine frequencies to scan can be selected through the menu. Note that
scanning of DSC distress frequencies cannot be stopped.
35˚00.000N 135˚00.000E 23:59
WATCH KEEPING
2187.5 4207.5 6312.0
8414.512577.0
DISTRESS
ROUTINE
2177.0 4219.5 6331.0
8436.512657.0
VOLUME 32
AUTO ACK
DSC routine frequency
currently being
scanned is highlighted.
16804.5
16903.0
DSC distress frequency
currently being
scanned is highlighted.
2-7
2.7 Automatic Acknowledge On/Off
The automatic acknowledge feature, when turned on, automatically transmits the acknowledge
back (ACK BQ) signal to the sender when an individual, position, PSTN or polling call is received.
It can be turned on or off at the DSC standby screen by pressing the [5/ACK] key. The message
ACK: AUTO or ACK: MANUAL appears at the top-right corner of the DSC standby screen with
each press of the key.
ACK : AUTO
35 00.000N 135 00.000E 23:59
WATCH KEEPING
2187.5 4207.5 6312.0
8414.516804.5 12577.0
DISTRESS
ROUTINE
2177.0 4219.5 6331.0
8436.516903.0 12657.0
VOLUME 32
MANUAL ACK
Press [ACK].
About two seconds later
35 00.000N 135 00.000E 23:59
WATCH KEEPING
2187.5 4207.5 6312.0
14.516804
DISTRESS
ROUTIN
2177.0 4219.5 6331.0
8436.516903.0 12657.0
VOLUME 32
AUTO ACK
ACK : MANUAL
35 00.000N 135 00.000E 23:59
WATCH KEEPING
2187.5 4207.5 6312.0
8414.512577.0
DISTRESS
ROUTINE
2177.0 4219.5 6331.0
8436.512657.0
VOLUME 32
AUTO ACK
16804.5
16903.0
Automatic
Acknowledge
Manual
Acknowledge
Press [ACK].
About two seconds later

2-8
2.8 Intercom On/Off
The built-in intercom permits voice communications between the DSC-60 and the SSB
radiotelephone to which it is connected.
1. Display the radiotelephone setting screen.
2. Off hook the handset.
3. Press the [4/IntCom] key. You can begin communications with the SSB radiotelephone.
MODE: TELEPHONE
CH: 12034
VOLUME 32
Tx: 12329.0 KHZ
Rx: 13176.00 KHZ
POWER: HIGH
TUNE
MODE: TELEPHONE
CH: 12034
VOLUME 32
Tx: 12329.0 KHZ
Rx: 13176.00 KHZ
POWER: HIGH
TUNE
INTERCOM Off INTERCOM On
MODE: TELEPHONE MODE: TELEPHONE
INTERCOM
Press [4] key.
4. Hang up the handset when finished with communications to turn the intercom off. The
indication INTERCOM disappears from the radiotelephone setting screen when the intercom
is turned off.
Note: If you are called from other onboard SSB radiotelephone, three beeps sound. Off the
handset and begin communications.
2-9
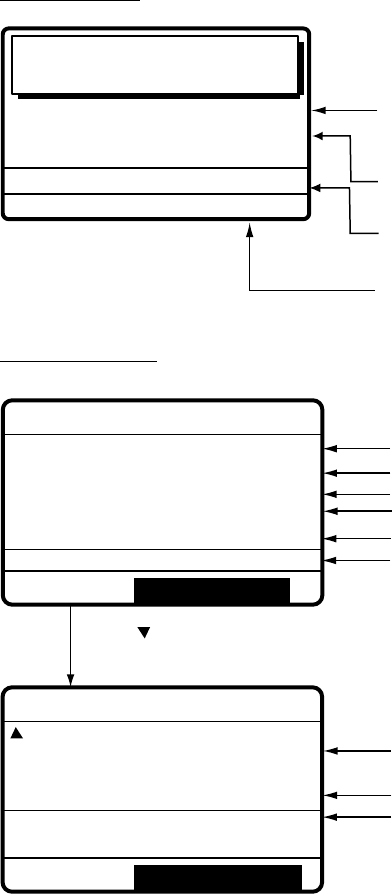
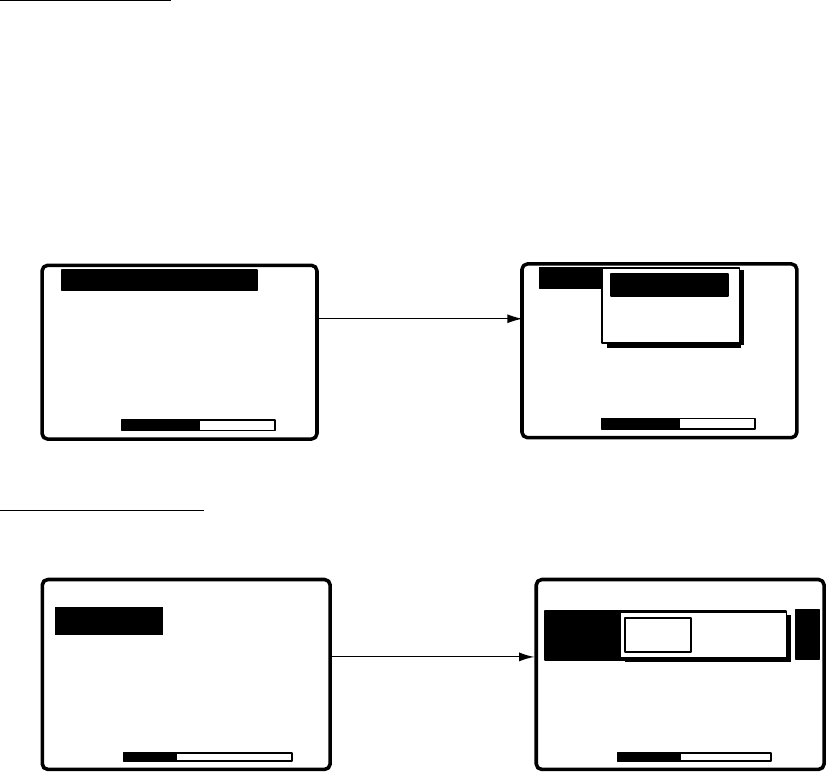
2.9 Selection of On-screen Items
Menu and calling operations are executed by selecting on-screen items. The example below
shows how to select items and options from the Alarm setup menu.
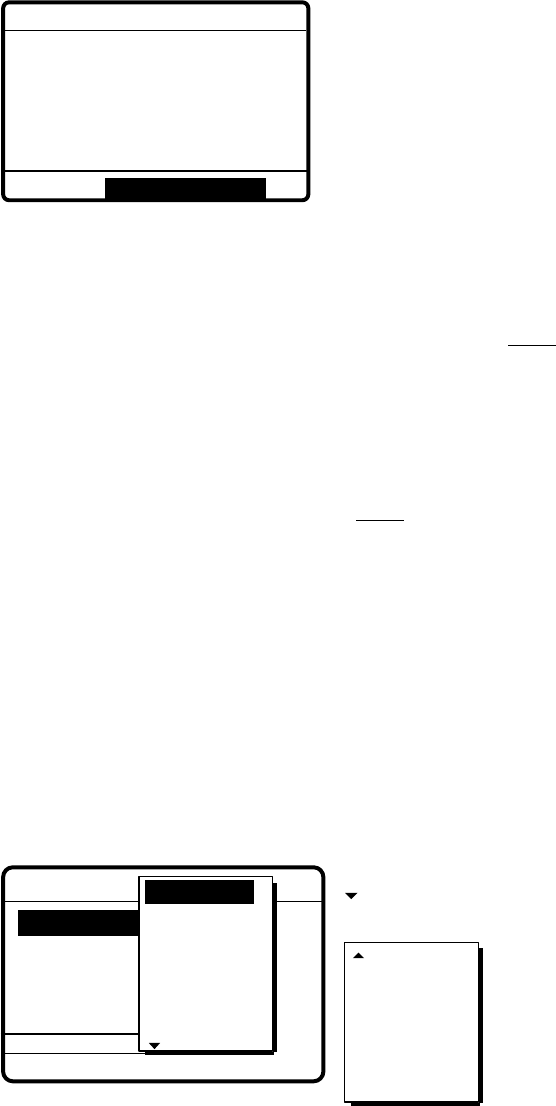
1. Press the [#/SETUP] key to display the Setup menu.
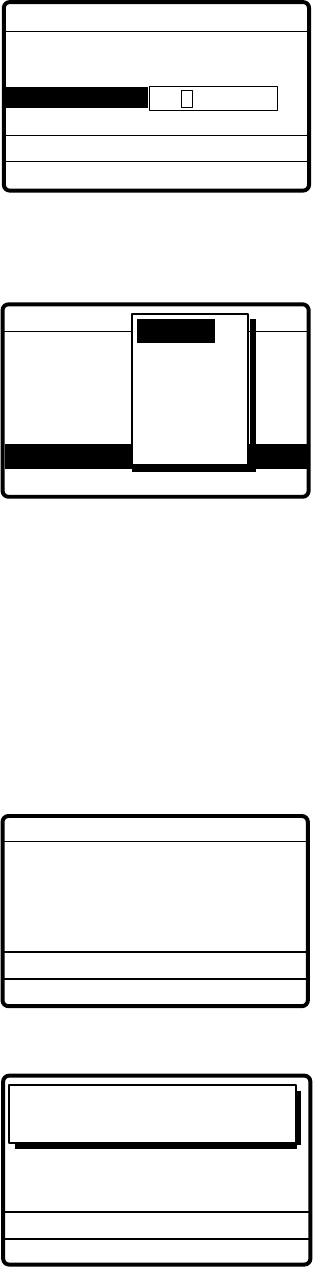
**** Setup menu ****
SCAN FREQ
USER CH
VOLUME
TEST
SYSTEM
ALARM
AUTO ACK
ERASE
MESSAGE
POSITION
PRINT OUT
2. Use the Cursor Pad to select a menu and then press the [ENT] key. For example, select the
ALARM menu.
**** Alarm setup ***
RCVD CALL
OLD POSITION
POSITION OLDER
EXT ALARM: DSTRS/URG
: ON
: ON
: 4.0 H
INTERNAL AUDIO ALARM
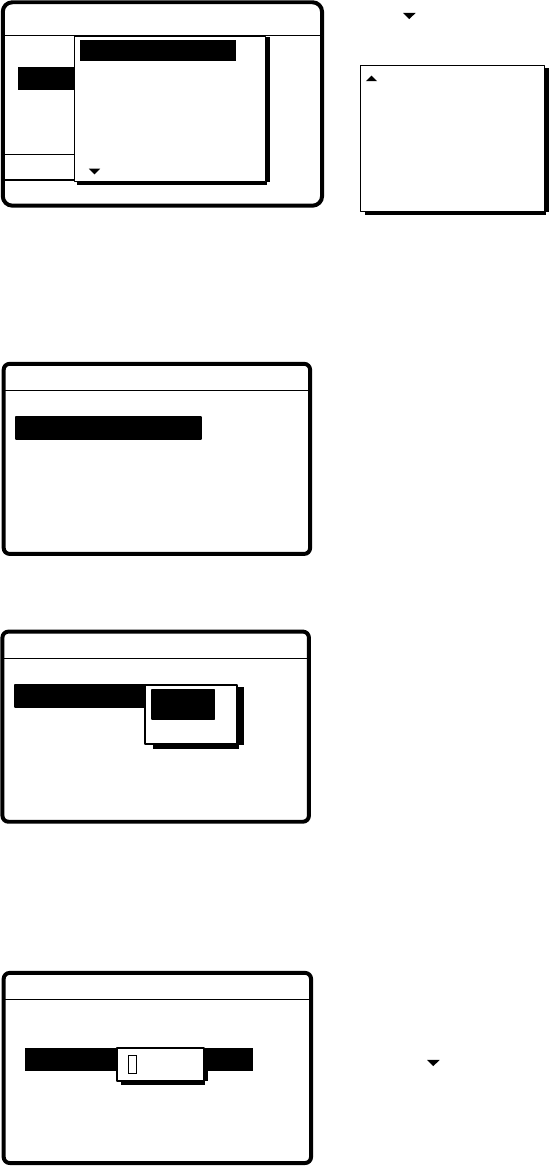
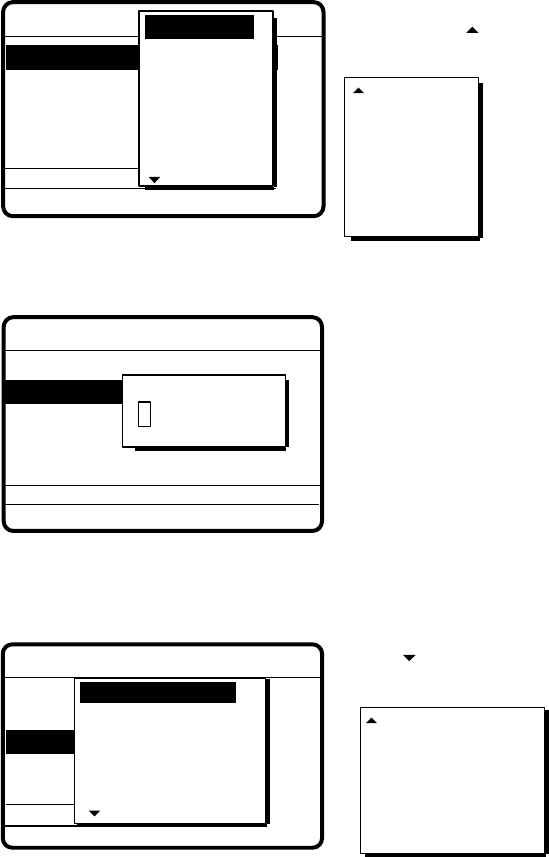
3. Use or to select menu item desired and press the [ENT] key. For example, select
RCVD CALL. The following window appears, superimposed on the main window.
**** Alarm setup ***
RCVD CALL
OLD POSITION
POSITION OLDER
EXT ALARM : DSTRS/URG
: ON
: ON
: 4.0 H
INTERNAL AUDIO ALARM
ON
N
OFF
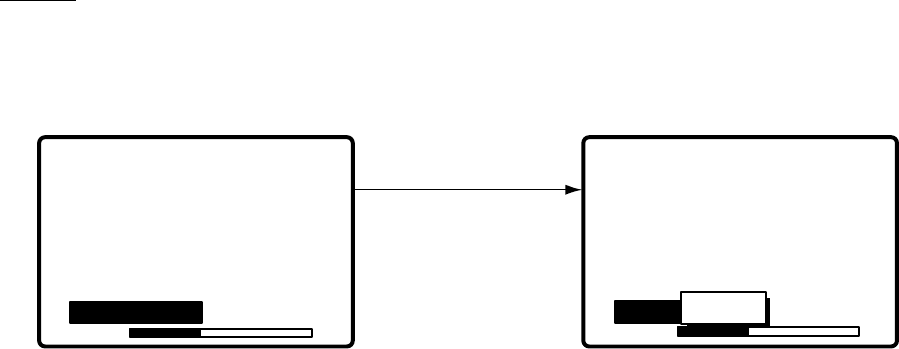
4. Use or to select option.
5. Press the [ENT] key to register your selection and the [CANCEL] key twice to return to the
DSC standby screen.
2-10
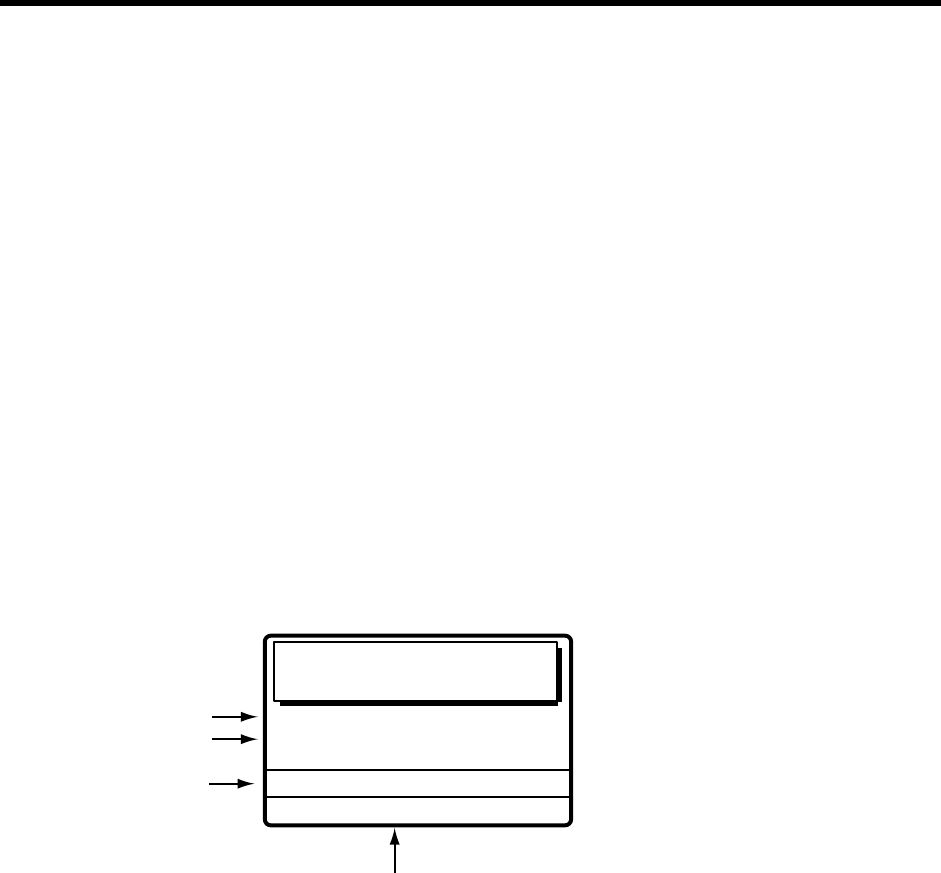
2.10 Manual Entry of Position and Time
If there is no EPFS (Electronic Position-Fixing System) connected to the DSC-60 or the EPFS
connected is inoperative, manually enter position and time as follows:
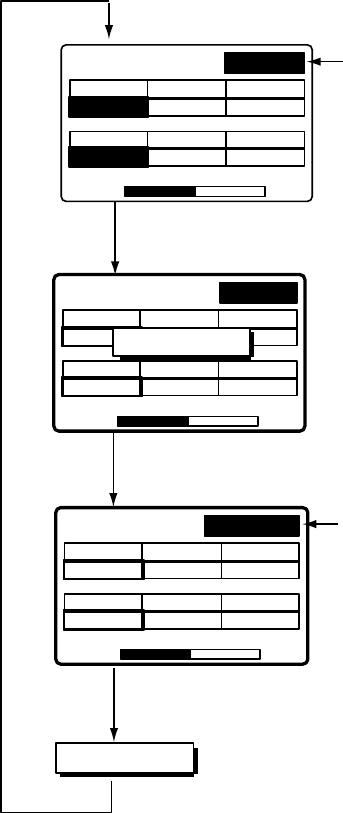
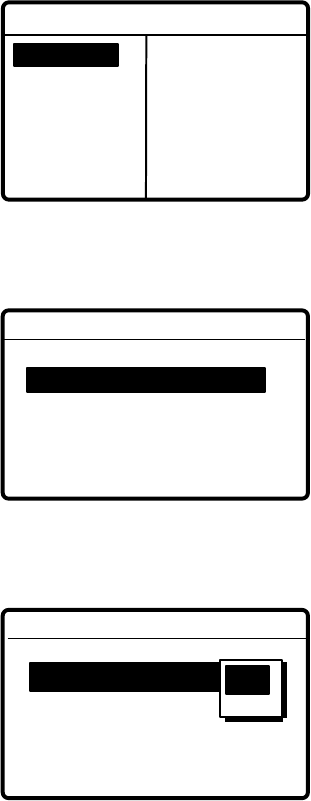
1. At the DSC standby screen, press the [#/SETUP] key to display the Setup menu.
**** Setup menu ****
SCAN FREQ
USER CH
VOLUME
TEST
SYSTEM
ALARM
AUTO ACK
ERASE
MESSAGE
POSITION
PRINT OUT
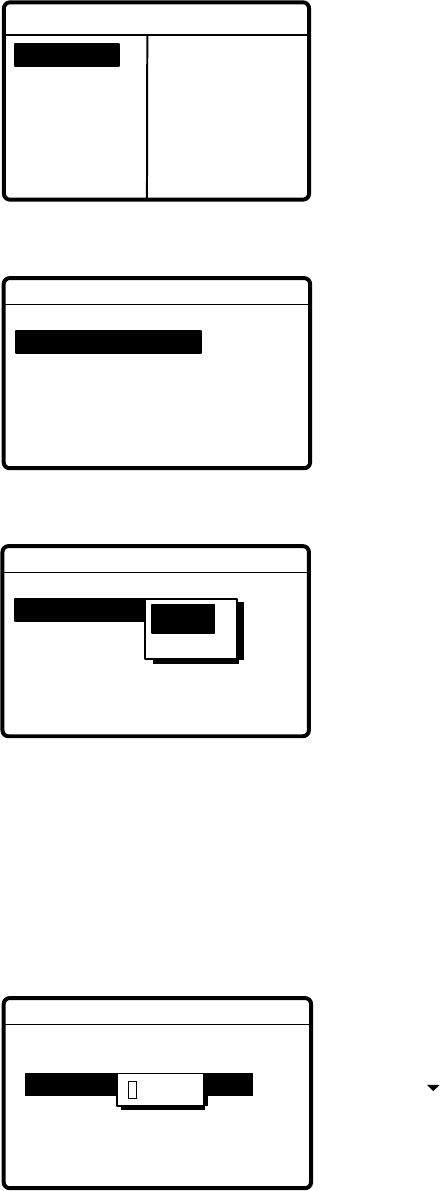
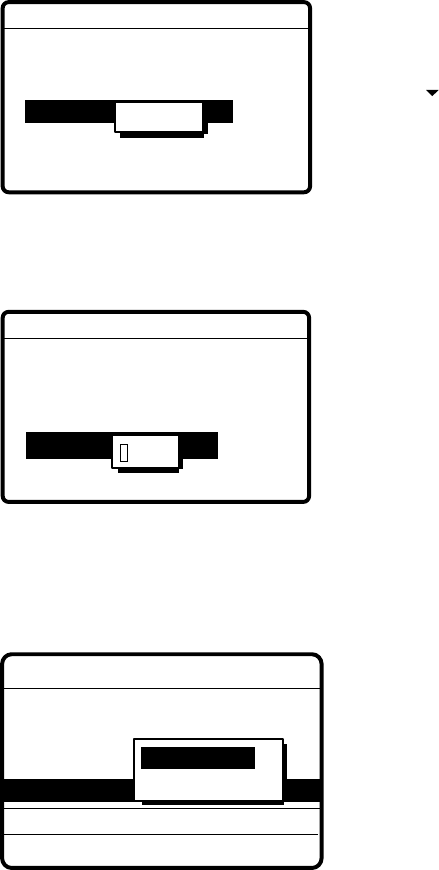
2. Select POSITION and press the [ENT] key to display the Position setup menu.
** Position setup **
INPUT TYPE: AUTO
LAT : 34˚ 41 NORTH
LON : 135˚ 30 EAST
TIME: 09: 00 UTC
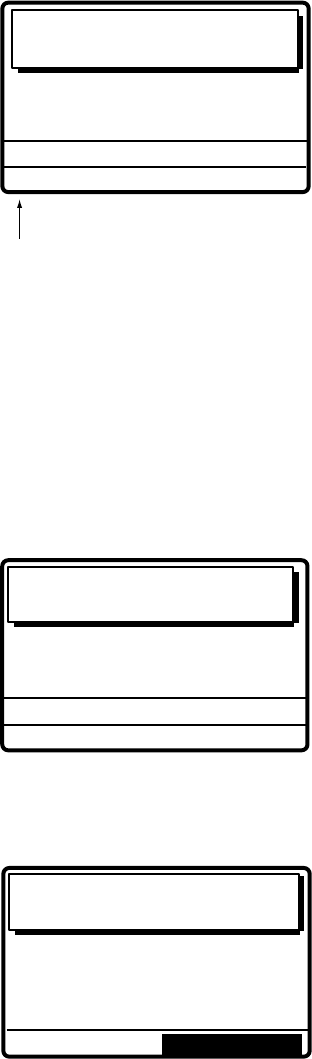
3. Press the [ENT] key to open the INPUT TYPE menu.
** Position setup **
INPUT TYPE: AUTO
LAT : 34˚ 41 NORTH
LON : 135˚ 30 EAST
TIME: 09: 00 UTC
AUTO
N
MANUAL
Note 1: If, when AUTO is selected, input from the navigator is interrupted the message
“EPFS error!” appears. If this occurs check the navigator.
Note 2: If, when MANUAL is selected, the message “Warning: Update position” appears at
set intervals to ask you to update position. For further details see page 7-2.
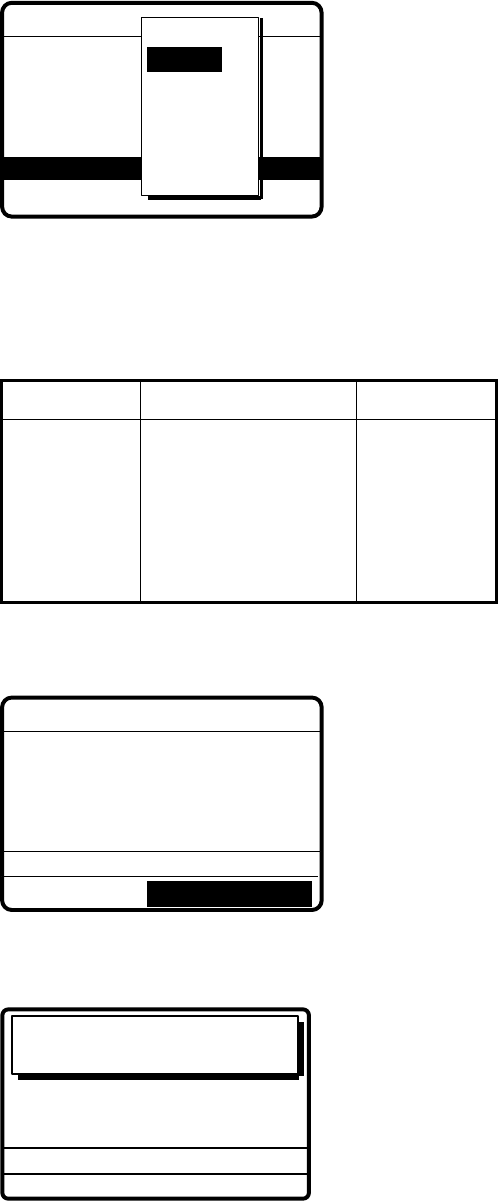
4. Press to select MANUAL and press the [ENT] key.
5. Press the [ENT] key to open the latitude entry window.
** Position setup **
INPUT TYPE: MANUAL
34˚ 41
LON : 135˚ 30 EAST
TIME: 09: 00 UTC
Note: Use to switch from
North to South and vice versa.
LAT : 34˚ 41 NORTH
12
34 ˚ 41
N
2-11
6. Enter latitude in four digits and press the [ENT] key.
7. Press the [ENT] key to open the longitude entry window.
** Position setup **
INPUT TYPE: MANUAL
LAT: 34˚ 41 NORTH
LON : 135˚ 30 EAST
TIME: 09: 00 UTC
Note: Use to switch from
East to West and vice versa.
LAT : 34˚ 41 NORTH
LON : 135˚ 30 EAST
135
˚
00 E
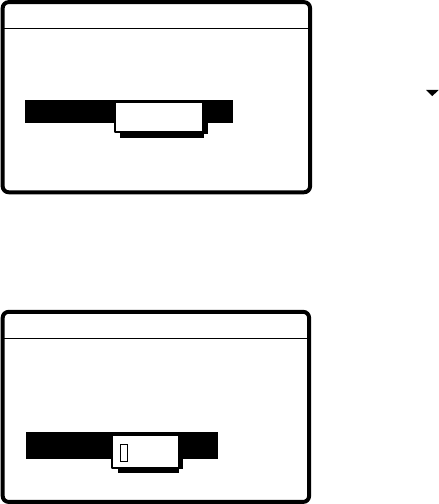
8. Enter longitude in five digits and press the [ENT] key.
9. Press the [ENT] key to open the time entry window.
** Position setup **
INPUT TYPE: MANUAL
LAT : 34˚ 41 NORTH
LON : 135˚ 30 EAST
TIME : 09: 00 UTC
LAT : 34˚ 41 NORTH
LON : 135˚ 30 EAST
TIME: 09: 00 UTC
12 : 34
10. Enter UTC time and press the [ENT] key. The Setup menu appears.
2-12
2.11 Remote Control of FURUNO SSB
Radiotelephone
A FURUNO SSB radiotelephone can be controlled from the radiotelephone setting screen, which
may be displayed by pressing the [1/ RT/2182] key. You can enter desired frequency by
designating channel as below or entering Tx and Rx frequencies as on the next page. The
handset must be off hook to set the radiotelephone.
Note: To set the SSB radiotelephone to 2182 kHz/J3E, press the [1/ RT/2182] key more than 2
sec.
Mode selection
1. Press the [1/ RT/2182] key to display the radiotelephone setting screen.
2. Select the MODE field with the Cursor Pad and press the [ENT] key.
3. Select mode desired and press the [ENT] key.
TELEPHONE: Telephone
NBDP/DSC: NBDP Terminal, DSC Terminal
FAX: Facsimile
With MODE selected
press [ENT].
MODE: TELEPHONE
CH: 12034
VOLUME 32
Tx: 12329.0 KHZ
Rx: 13176.00 KHZ
POWER: HIGH
TUNE
MODE: TELEPHONE
CH: 12034
VOLUME 32
Tx: 12329.0 KHZ
Rx: 13176.00 KHZ
POWER: HIGH
TUNE
MODE: TELEPHONE MODE: TELEPHONE
TELEPHONE
NBDP / DSC
FAX
Channel selection
1. Select the CH field and press the [ENT] key.
Select CH and
press [ENT].
TX:
-------
KHZ
RX:
---------
KHZ
POWER: HIGH
CH:12O34
MODE : TELEPHONE
VOLUME 24
TUNE
-----
-
T
x:
-------
KHZ
R
x:
---------
KHZ
POWER: HIGH
MODE : TELEPHONE
VOLUME 24
TUNE
CH: -----
2. Enter channel with Cursor Pad as follows:
a) Use
or to set band (MHz) 2, 4, 6, 8, 12, 16, 18, 24, 25. Note the band and channel may
also be entered directly from the keyboard.
b) Press.
c) Use
or to set channel.
d) Press the [ENT] key. The Tx and Rx frequencies of the channel entered appear.

2-13
12001
12001
Setting Range
ITU Band: 2/4/6/8/12/16/18/24/25
User Band: 01-029
ITU Channel: XX001 - XX193
User Channel: XXX01 - XXX99
Select digit (band, channel) with or .
Set with or .
Tx/Rx frequency selection
Select the Tx or Rx field and press the [ENT] key. Enter desired frequency with the numeric keys.
Press the [ENT] key to finish.
Note: If you enter the Tx frequency, the same frequency is entered to the Rx frequency.
Select Tx (or Rx)
and press [ENT].
POWER: HIGH
VOLUME 24
TUNE
Tx
:
12 329.0
KHZ
KHZ
POWER: HIGH
VOLUME 24
TUNE
Tx
Rx
:
12 329.0
KHZ
:
13 176.00
0. 00
KHZ
MODE: TELEPHONE
CH: 12034
MODE: TELEPHONE
CH: 12034
Rx
:
13 176.00
Power selection
Select the POWER field with the Cursor Pad and press the [ENT] key. Select power desired
among HIGH, MID and LOW with the Cursor Pad and press the [ENT] key.
Select POWER
and press [ENT].
POWER: HIGH
VOLUME 24
TUNE
: HIGH
POWER:
VOLUME 24
TUNE
: OK
:
Tx: 12329.0
KHZ
Rx: 13176.00
KHZ
Tx: 12329.0
KHZ
Rx: 13176.00
KHZ
MODE: TELEPHONE
CH: 12034
HIGH
MID
LOW
MODE: TELEPHONE
CH: 12034
Note: Some FURUNO SSB radiotelephones do not provide the power selection HIGH, MID
or LOW.
2-14
Tuning
Select the TUNE field with the Cursor Pad and press the [ENT] key. Tuning is automatically
executed, showing TUNING while tuning. The results are shown as TUNE: OK or TUNE: NG (No
Good).
Select TUNE field
and press [ENT].
POWER: HIGH
VOLUME 24
TUNE
Tx: 12 329.0 KHZ
Rx: 13 176.00 KHZ
: NO TUN
POWER: HIGH
VOLUME 24
TUNE
TUNING
MODE: TELEPHONE
CH: 12304
Tx: 12 329.0 KHZ
Rx: 13 176.00 KHZ
MODE: TELEPHONE
CH: 12034
3-1
3. DISTRESS OPERATIONS
3.1 Sending Distress Alert
3.1.1 Sending distress alert by DISTRESS button
GMDSS ships carry a DSC terminal with which to transmit the distress alert in the event of a life
endangering situation onboard ship. A coast station receives the distress alert and sends the
distress alert acknowledge message to the ship in distress. Then, voice communications
between the ship in distress and coast station begins, via the radiotelephone.
Transmission of the distress alert and receiving of distress alert acknowledgement are
completely automatic - simply press the [DISTRESS] button to initiate the sequence.
1. Open the DISTRESS button cover and press and hold down the [DISTRESS] button more
than three seconds. The button flashes in red and the buzzer sounds rapidly. The display
shows the contents of the distress alert call: your ship’s nature of distress and position, time,
and DSC frequency used to transmit the alert.
The number of seconds to continue pressing the [DISTRESS] button appear at the bottom of
the display. The buzzer sounds continuously when the button has been pressed three
seconds. You can release the button at that time.
KEEP PRESSED FOR 3 S
NATURE: UNDESIGNATED
POS:
12˚34N 123˚45E AT 12:34
TELEPHONE
2182.0 KHZ
Distress button
pressed!
Displays number of seconds to continue
pressing the DISTRESS button to
transmit the distress alert.
DSC FREQ :
2187.5 KHZ
Nature of Distress
Position, Time
DSC Distress
Frequency
2. The [DISTRESS] button lights and the display changes as at the top of the next page. It
takes about 35-40 seconds to complete transmission of the distress alert, and the number of
seconds until transmission is completed is shown at the bottom of the display.
At this time the output power of the radiotelephone is automatically set to maximum.
3-2
Distress
call in progress!
TIME TO GO : 38S
NATURE: UNDESIGNATED
POS:
12˚34N 123˚45E AT 12:34
TELEPHONE
2182.0 KHZ
DSC FREQ
:
2187.5 KHZ
Time to go until distress
alert transmission is completed.
The equipment sets up as follows:
a) Equipment goes into Alert condition.
b) Distress message contains current position and time.
c) Scanning is stopped and Distress watch receiver sets
distress frequency.
d) RT/NBDP remote function activated.
e) Timer countdowns time remaining until distress alert
transmission is completed.
f) The only keys operative are [7/SP] and [9/DIMMER].
3. After the distress alert has been sent the display changes as below. This is where the
equipment waits to receive the distress acknowledge message from a coast station. It takes
about one minute to three minutes. (The [DISTRESS] button remains lit until the DSC-60
receives the distress acknowledge message from a coast station.) The timer counts down
the number of minutes to wait, from 3.5 to 4.5 minutes, randomly set.
At this time the DSC-60 cannot receive any messages except the distress alert acknowledge
message. Distress message is recorded in the Tx log.
Waiting for distress
acknowledgement.
TIME TO GO: 3M 10S
NATURE: UNDESIGNATED
POS : 12˚34N 123˚45E AT 12:34
TELEPHONE 2182.0 KHZ
DSC FREQ : 2187.5 KHZ
4. When the distress acknowledge call is received the audio alarm sounds and the display
changes as below.
SHIP IN DIST:
123456789
POS:
12˚34N 123˚45E AT 12:34
TELEPHONE
2182.0 KHZ
FROM COAST:
001234567
NATURE: UNDESIGNATED
Distress acknowledge
call received.
STOP ALARM
Note: If you do not receive the distress alert acknowledge call, the DSC-60 re-transmits the
distress alert and then awaits the distress alert acknowledge call. This is repeated until the
distress alert is acknowledged.
3-3
5. Silence the alarm with the [CANCEL] or [ENT] key. The receive message appears as in the
figure below.
JUL-23-1999-23:59 ECC: OK
DISTRESS ACKNOWLEDGE
SHIP IN DIST: 123456789
POS: 12˚34N 123˚45E AT 12:34
TELEPHONE 2182.0 KHZ
FROM COAST: 001234567
NATURE: UNDESIGNATED
* Received message *
GO TO ALL VIEW
6. Communicate with the coast station via radiotelephone, which is automatically set to working
frequency and class of emission (telephone) specified in the distress acknowledge message.
a) Say MAYDAY three times.
b) Say “This is … “ name of your vessel and call sign three times.
c) Give nature of distress and assistance needed.
d) Give description of your vessel (type, color, number of persons onboard, etc.).
7. The coast station replies as follows:
a) MAYDAY.
b) Name of your vessel and call sign three times.
c) This is “ … “ coast station name.
d) RECEIVED
e) MAYDAY
3.1.2 Sending distress alert with nature of distress specified
If you have the time to designate the nature of distress, send the distress alert as follows:
1. At the DSC standby screen, press the [CALL] key.
2. Press the [ENT] key and the display changes as below.
*** Send MESSAGE ***
STATION ID
PRIORITY
COM. TYPE
COM. FREQ
DSC FREQ
: All ships
: Safety
: Telephone
: 2187.5 kHz
RELAY SEL
POLLING
NEUTRAL
MEDICAL
RELAY ALL
DISTRESS
CALL TYPE
Scroll the menu with
to show this part
of the menu.
PSTN CALL
TEST CALL
ALL SHIPS
GROUP CALL
AREA CALL
POSITION
INDIVIDUAL
3. Select DISTRESS from the menu and press the [ENT] key.
3-4
4. Press the [ENT] key to open the NATURE menu.
*** Send message ***
CALL TYPE
:Undesignated
POS.
COM.TYPE
DSC FREQ
: All ships
: 987654321
:
:
SINKING
DISABLE
ABANDONING
PIRACY
MAN OVERBOARD
NATURE
Use to scroll
menu.
FIRE
FLOODING
COLLISION
GROUNDING
LISTING
UNDESIGNATED
5. Select nature of distress and press the [ENT] key.
6. Press the [ENT] key to open the POS menu. This is where you enter your position,
automatically or manually.
** Position setup **
INPUT TYPE: AUTO
LAT : 34˚ 41 NORTH
LON : 135˚ 30 EAST
TIME: 09: 00 UTC
7. Press the [ENT] key to open the INPUT TYPE menu.
** Position setup **
INPUT TYPE: AUTO
LAT : 34˚ 41 NORTH
LON : 135˚ 30 EAST
TIME: 09: 00 UTC
AUTO
N
MANUAL
8. Press
to select AUTO or to select MANUAL and press the [ENT] key. If you selected
AUTO go to step 15. For manual go to step 9.
9. Press the [ENT] key to open the latitude entry window.
** Position setup **
INPUT TYPE: MANUAL
34˚ 41
LON : 135˚ 30 EAST
TIME: 09: 00 UTC
Note: Use to switch from
North to South and vice versa.
LAT : 34˚ 41 NORTH
12
34 ˚ 41
N
3-5
10. Key in latitude in four digits and press the [ENT] key.
11. Press the [ENT] key to open the longitude entry window.
** Position setup **
INPUT TYPE: MANUAL
LAT: 34˚ 41 NORTH
LON : 135˚ 30 EAST
TIME: 09: 00 UTC
Note: Use to switch from
East to West and vice versa.
LAT : 34˚ 41 NORTH
LON : 135˚ 30 EAST
135
˚
00 E
12. Key in longitude in five digits and press the [ENT] key.
13. Press the [ENT] key to open the time entry window.
** Position setup **
INPUT TYPE: MANUAL
LAT : 34˚ 41 NORTH
LON : 135˚ 30 EAST
TIME : 09: 00 UTC
LAT : 34˚ 41 NORTH
LON : 135˚ 30 EAST
TIME: 09: 00 UTC
12 : 34
14. Key in UTC time and press the [ENT] key.
15. The SEND MESSAGE screen is redisplayed. Press the [ENT] key to open the COM. TYPE
menu.
*** Send message ***
NATURE: UNDESIGNATED
POS: 35˚N 135˚00E AT 23:25
DISTRESS
CALL TYPE:
GO TO ALL VIEW
DSC FREQ : 2187.5 KHZ
COM. TYPE: TELEPHONE
NBDP-FEC
TELEPHONE
16. Select TELEPHONE and press the [ENT] key. (Telephone is the usual mode, however NBDP
may also be used.)
3-6
17. Press the [ENT] key to open the DSC FREQ menu.
*** Send message ***
NATURE: UNDESIGNATED
POS: 35˚N 135˚00E AT 23:25
DISTRESS
CALL TYPE:
GO TO ALL VIEW
COM. TYPE: TELEPHONE
DSC FREQ : 2187.5 KHZ
4207.5
6312.0
8414.5
12577.0
16804.5
MANUAL
2187.5
AUTO
18. Select a DSC frequency and press the [ENT] key. (AUTO retransmits the distress alert on 2
MHz, 8 MHz, 16 MHz, 4 MHz, 6 MHz and 2 MHz in sequence if the distress alert is not
acknowledged and MANUAL is for manual selection of frequency at the radiotelephone
when there is “remote error.”)
DSC SSB radiotelephone NBDP-FEC
2187.5 kHz
4207.5 kHz
6312.0 kHz
8414.5 kHz
12577.0 kHz
16804.5 kHz
2182.0 kHz
4125.0 kHz
6215.0 kHz
8291.0 kHz
12290.0 kHz
16420.0 kHz
2174.5 kHz
4177.5 kHz
6268.0 kHz
8376.5 kHz
12520.0 kHz
16695.0 kHz
19. The display changes as below. You can see the contents of the distress message by
pressing the [ENT] key.
*** Send message ***
NATURE: UNDESIGNATED
POS: 35˚N 135˚00E AT 23:25
DISTRESS
CALL TYPE:
COM. TYPE : TELEPHONE
DSC FREQ : 2187.5 KHZ
GO TO ALL VIEW
20. Press the [DISTRESS] button to send the distress alert.
Distress
call in progress!
TIME TO GO : 38S
NATURE: UNDESIGNATED
POS:
12˚34N 123˚45E AT 12:34
TELEPHONE 2182.0 KHZ
DSC FREQ
: 2187.5 KHZ
21. Follow steps 3-7 on page 3-2 and 3-3.
3-7
3.2 Sending Distress Relay to All Ships
When you receive a distress call from another ship, the audio alarm sounds and the message
"Distress call received." appears on the display. Press the [CANCEL] key to silence the audio
alarm. Monitor the distress frequency. The procedure for relaying the distress alert depends on if
the alert was received on MF or HF band.
3.2.1 Distress alert received on MF band
Do the following:
• Continue watching on 2182 kHz. Wait for coast station to acknowledge the distress call.
Distress communications continues until “SEELONCE FINI” is announced.
• After distress communications are completed, relay the distress alert. You do not have to
receive distress acknowledge from coast station; you can relay the distress call when you are
near the ship in distress.
• Receive distress acknowledge signal for ship in distress. You do not have to wait for
acknowledgement from coast station; you may only send the relay the distress call when you
are near the ship in distress.
If you do not receive the distress acknowledge within three minutes follow the flow chart on the
next page to determine if you should send the distress.
3-8
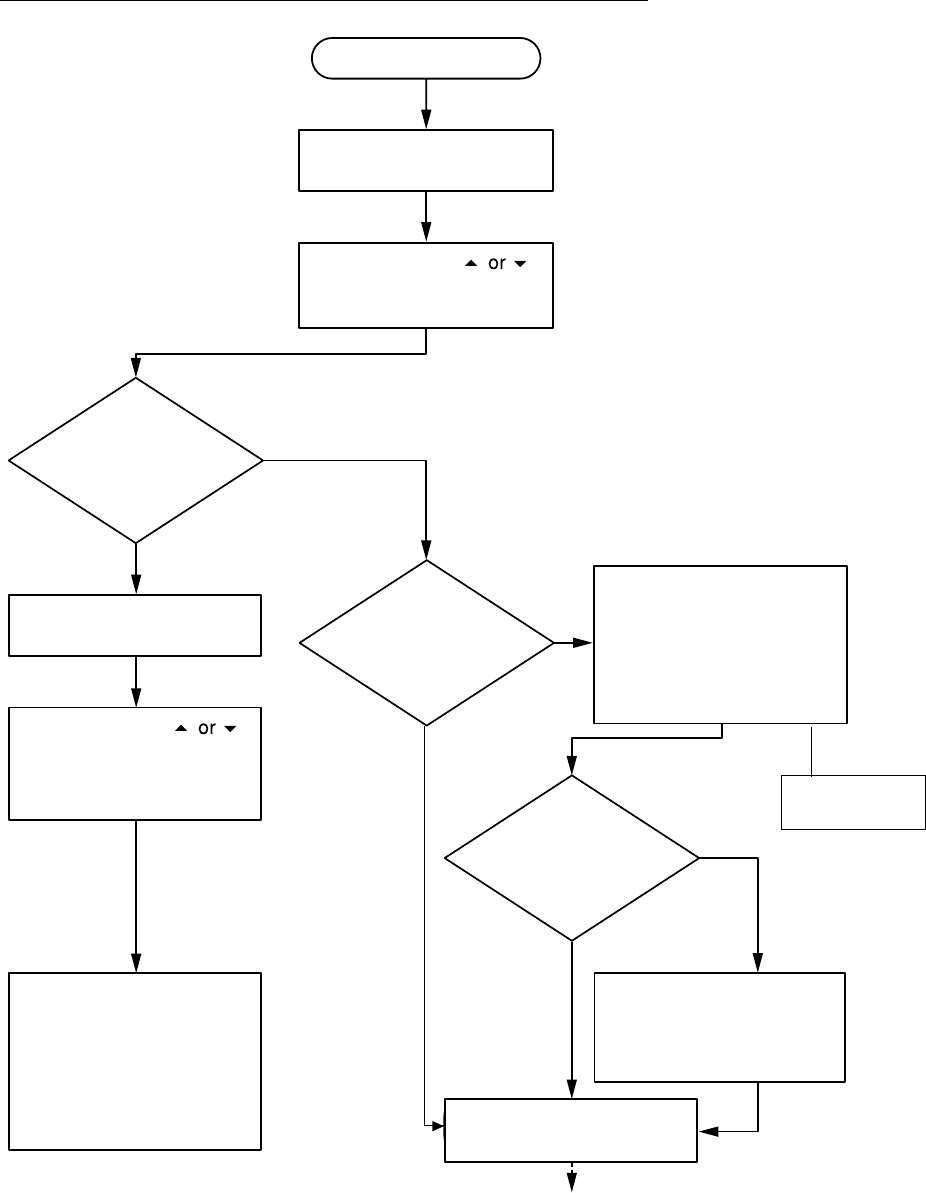
Flow chart for determining whether to relay distress alert
No
No
No
Yes
Yes
Yes
Distress alert received.
Press [ENT] and
to view contents of
received message.
Press [CANCEL] to si-
lence alarm.
Continue watch on 2182
kHz until you hear [SEE-
LONCE FINI]. (That
means completion of dis-
tress communication.)
Follow instructions of
coast station.
Press [CANCEL] to si-
lence alarm.
Did you receive
acknowledge from coast
station within 1 min. to
2 min. 45 sec?
Reply
received from vessel in
distress?
Did alarm
sound again?
Press [ENT] and
to view contents of re-
ceive contents of mes-
sage from coast station.
Transmit acknowledge
signal to vessel in dis-
tress over DSC 2187.5
kHz. (Press [CALL] key.)
If you can search and
rescue the vessel in dis-
tress, transmit acknowl-
edge signal to vessel in
distress on 2182 kHz
(voice.)
Relay DSC distress alert
to coast station by DSC.
Relay DSC distress alert to coast station over
HF band (8414.5 kHz). After relaying distress,
wait for acknowledge from coast station. (For
All Ship call: wait over radiotelephone, For indi-
vidual call: wait over DSC.)
Go to ship
in in distress
3-9
Sending the distress relay on MF band
First confirm whether your vessel should send the distress acknowledge signal, by following the
flow chart on page 3-8. If your ship meets those requirements do the following:
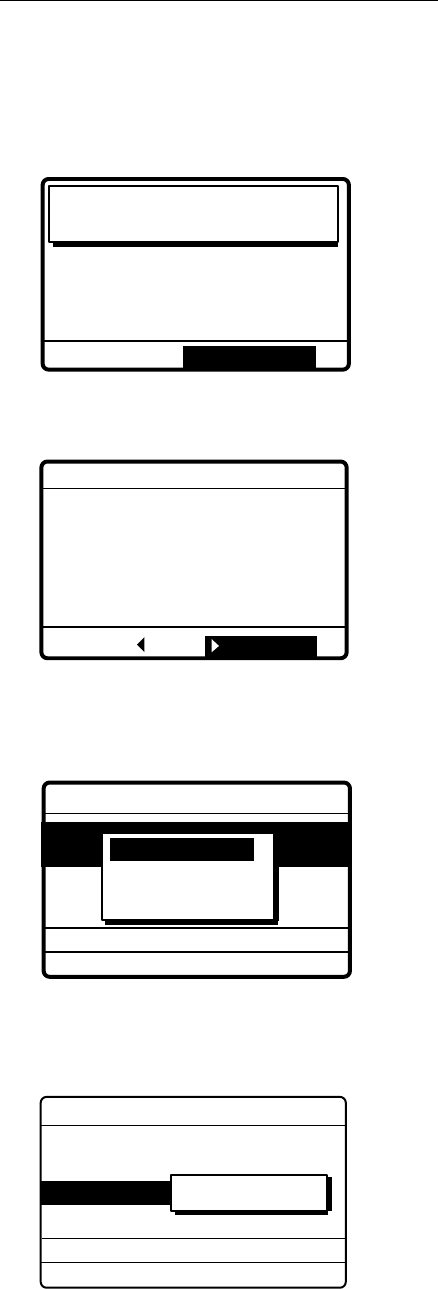
1. The audio alarm sounds and the display shows the message "Distress call received." when
your ship receives a distress call.
DISTRESS CALL
SHIP IN DIST:
123456789
NATURE: UNDESIGNATED
POS:
12˚34N 123˚45E at 12:34
TELEPHONE
2182.0 KHZ
Distress
call received.
STOP ALARM
2. Press the [CANCEL] key to silence the audio alarm, and the display changes as below.
*
Received message
*
JUL-23-1999-23:59 ECC: OK
DISTRESS CALL
ANSWER
SHIP IN DIST: 123456789
NATURE: UNDESIGNATED
POS: 12˚34N 123˚45E at 12:34
TELEPHONE 8414.5 KHZ
ALL VIEW
3. Press
to choose ANSWER and press the [ENT] key.
4. Press the [ENT] key to open the CALL TYPE menu.
***
Send message
***
GO TO ALL VIEW
DSC FREQ : 2187.5 KHZ
COAST
SHIP IN DIST: 987654321
CALL TYPE: INDIVIDUAL
DISTRESS RELAY
RELAY COAST
ACKNOWLEDGE
RELAY ALL
COAS
5. Select RELAY COAST (or RELAY ALL if you don’t know the coast where to send the distress
relay) and press the [ENT] key. Press the [ENT] key to open the COAST ID entry window.
CALL TYPE : INDIVIDUAL
DISTRESS RELAY
SHIP IN DIST :
987654321
00 - 0000000
GO TO ALL VIEW
DSC FREQ :
2187.5 KHZ
*** Send message ***
COAST ID :
6. Key in coast ID where to send the distress alert and press the [ENT] key.
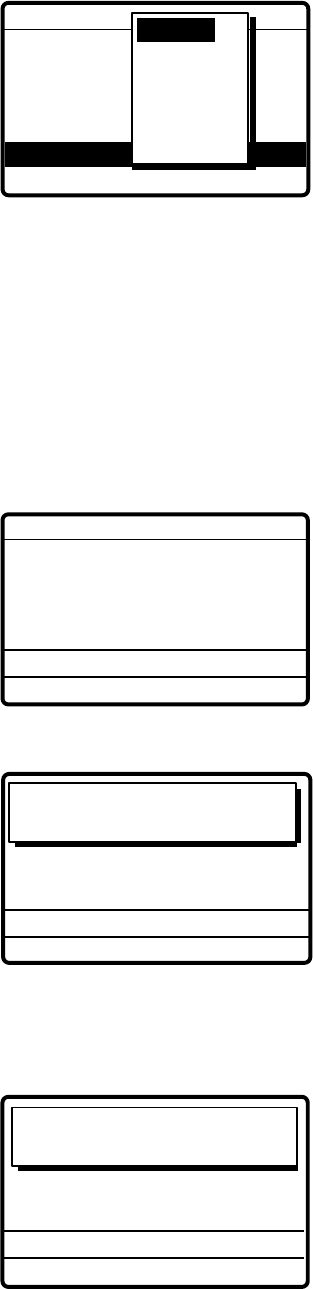
3-10
7. Press the [ENT] key to open the DSC FREQ. menu.
GO TO EASY VIEW
CALL TYPE : ALL SHIPS
DISTRESS RELAY
SHIP IN DIST :
***
Send message
***
DSC FREQ KHZ
GO TO ALL VIEW
4207.5
6312.0
8414.5
12577.0
16804.5
MANUAL
2187.5
COAST ID:
8. Select appropriate frequency and press the [ENT] key.
Note: Selection of frequency not necessary if frequency shown in step 7 is appropriate.
9. Press the [CALL] key to relay the distress call.
Note: If a coast station acknowledges the distress alert call before the timer counts to zero,
press the [CANCEL] key to cancel your call. Further, If the call key is pressed before five
minutes has elapsed the time to wait until the distress relay is sent is shown at the bottom of
the display.
DSC FREQ : 2187.5 KHZ
CALL TYPE : INDIVIDUAL
DISTRESS RELAY
SHIP IN DIST: 123456789
*** Send message ***
GO TO ALL VIEW
COAST ID: 001234567
10. While the distress relay all call is being sent the display shows the following.
SHIP IN DIST: 123456789
Distress relay coast
call in progress!
DSC FREQ : 8414.5 KHZ
TIME TO GO : 25S
COAST ID: 001234567
11. The equipment then waits for acknowledgement of the distress relay, showing the following.
If the distress relay is not acknowledged within five minutes the message “No response. Try
relay again.” appears. If this occurs send the relay again.
Waiting for distress
relay acknowledge.
COAST ID : 001234567
SHIP IN DIST : 123456789
TIME TO GO : 4M59S
DSC FREQ : 8414.5 KHZ
3-11
12. When the distress relay is acknowledged the audio alarm sounds and the display changes
as below.
Distress relay ack
call received.
SHIP IN DIST : 123456789
POS : 12°34N 123°45E AT 12:34
TELEPHONE 8414.5 KHZ
FROM COAST : 001234567
NATURE : UNDESIGNATED
STOP ALARM
13. Press the [CANCEL] key to silence the audio alarm, and the display below appears.
JUL-23-1999-23:59
GO TO ALL VIEW
SHIP IN DIST :
123456789
12°34N 123°45E AT 12:34
TELEPHONE
8414.5KHZ
FROM COAST :
001234567
NATURE : UNDESIGNATED
DISTRESS RELAY ACK
* Received message *
ECC:OK
Sending distress acknowledge
Send the distress acknowledge to the ship in distress when the coast station does not
acknowledge the distress call and you are able to assist the ship in distress.
1. The audio alarm sounds and the display shows the message "Distress call received." when
your ship receives a distress call.
DISTRESS CALL
SHIP IN DIST:
123456789
NATURE: UNDESIGNATED
POS:
12˚34N 123˚45E AT 12:34
TELEPHONE
2182.0 KHZ
Distress
call received.
STOP ALARM
2. Press the [CANCEL] key to silence the audio alarm, and the display changes as below.
*
Received message
*
JUL-23-1999-23:59 ECC: OK
DISTRESS CALL
ANSWER
SHIP IN DIST: 123456789
NATURE: UNDESIGNATED
POS: 12˚34N 123˚45E AT 12:34
TELEPHONE 8414.5 KHZ
ALL VIEW
3. Press
to choose ANSWER and press the [ENT] key.
3-12
4. Press the [ENT] key to open the CALL TYPE menu.
The option ACKNOWLEDGE
does not appear in the following cases:
a) Distress alert received on HF band.
b) If, on MF band, more than 2 min. 45 sec.
elapses after the distress alert is received.
***
Send message
***
GO TO ALL VIEW
DSC FREQ : 2187.5 KHZ
SHIP IN DIST: 987654321
CALL TYPE: ALL SHIPS
DISTRESS RELAY
RELAY COAST
ACKNOWLEDGE
RELAY ALL
5. Select ACKNOWLEDGE and press the [ENT] key. The following display appears.
CALL TYPE : ALL SHIPS
DISTRESS ACKNOWLEDGE
SHIP IN DIST :
987654321
GO TO ALL VIEW
DSC FREQ :
2187.5 KHZ
*** Send message ***
6. Press the [CALL] key to send the distress acknowledge call to the ship in distress.
SHIP IN DIST : 123456789
Distress acknowledge
call in progress!
DSC FREQ : 2187.5 KHZ
GO TO ALL VIEW
3-13
3.2.2 Distress alert received on HF band
If you receive a distress signal on HF band, the ALARM lamp lights and the audio alarm sounds.
Press the [CANCEL] key to silence the audio alarm. Wait for the distress acknowledge from a
coast station. If you do not receive it within three minutes do one of the following:
• Watch on the distress frequency.
• Relay the distress alert in the following cases.
• You do not receive distress acknowledge call from coast station within three minutes
after receiving distress call.
• You have not received distress relay from other ship.
• You cannot receive distress communications from other ship over radiotelephone.
1. The audio alarm sounds and the display changes as below when a distress call is received.
DISTRESS CALL
SHIP IN DIST:
123456789
NATURE: UNDESIGNATED
POS:
12˚34N 123˚45E AT 12:34
TELEPHONE
2182.0 KHZ
Distress
call received.
STOP ALARM
2. Press the [CANCEL] key to silence the audio alarm, and the display changes as below.
*
Received message
*
JUL-23-1999-23:59 ECC: OK
DISTRESS CALL
ANSWER
SHIP IN DIST: 123456789
NATURE: UNDESIGNATED
POS: 12˚34N 123˚45E AT 12:34
TELEPHONE 8414.5 KHZ
ALL VIEW
3. Select the display which shows GO TO ALL VIEW, press to choose ANSWER and press
the [ENT] key.
4. Press the [ENT] key to open the CALL TYPE menu.
***
Send message
***
GO TO ALL VIEW
DSC FREQ : 2187.5 KHZ
SHIP IN DIST: 987654321
CALL TYPE* INDVIDUAL
DISTRESS RELAY
RELAY COAST
RELAY ALL
5. Select RELAY COAST (if you know the ID of the nearest coast station) and press the [ENT]
key.
3-14
GO TO EASY VIEW
CALL TYPE : INDIVIDUAL
DISTRESS RELAY
DSC FREQ :
GO TO ALL VIEW
*** Send message
***
8414.5 KHZ
SHIP IN DIST:
0 0 0 0 0 0 0 0 0
COAST ID:
6. Key in ID of coast station where to send the call and press the [ENT] key.
7. Press the [ENT] key to open the DSC FREQ. menu.
GO TO EASY VIEW
CALL TYPE : ALL SHIPS
DISTRESS RELAY
SHIP IN DIST :
*** Send message ***
DSC FREQ KHZ
GO TO ALL VIEW
4207.5
6312.0
8414.5
12577.0
16804.5
MANUAL
2187.5
8. Select appropriate frequency and press the [ENT] key.
Note: Selection of frequency not necessary if frequency shown in step 7 is appropriate.
9. The display changes as below. Press the [CALL] key to relay the distress call.
Note: If a coast station acknowledges the distress alert call before the timer counts to zero,
press the [CANCEL] key to cancel your call. Further, If the call key is pressed before five
minutes has elapsed the time to wait until the distress relay is sent is shown at the bottom of
the display.
DSC FREQ : 2187.5 KHZ
CALL TYPE : INDIVIDUAL
DISTRESS RELAY
SHIP IN DIST: 123456789
*** Send message ***
GO TO ALL VIEW
COAST ID: 001234567
10. While the distress relay all call is being sent the display shows the following.
SHIP IN DIST: 123456789
Distress relay coast
call in progress!
DSC FREQ : 2 187.5 KHZ
TIME TO GO : 25S
11. After the call is transmitted the message “Waiting for distress relay acknowledge!” appears.
When you receive acknowledgement from the coast station communicate with the coast
station.
3-15
3.3 Sending Distress Relay on Behalf of a Ship in
Distress
3.3.1 Sending distress relay to coast station
You may send the distress relay to a coast station on behalf of a ship in distress in the following
cases:
• You are near the ship in distress and the ship in distress cannot transmit the distress alert.
• Another vessel requests you to transmit the distress relay.
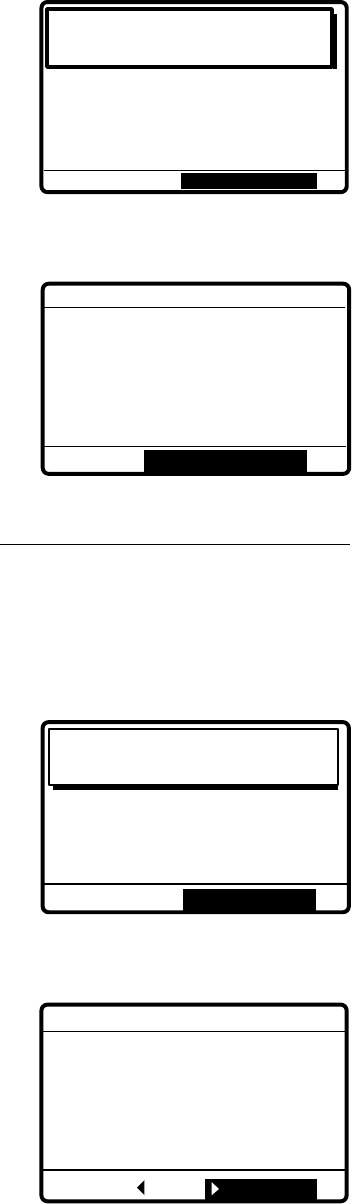
1. Press the [CALL] key and press the [ENT] key.
***
Send MESSAGE
***
STATION ID
PRIORITY
COM. TYPE
COM. FREQ
DSC FREQ
: All ships
: Safety
: Telephone
: 2187.5 kHz
RELAY SEL
POLLING
NEUTRAL
MEDICAL
RELAY ALL
DISTRESS
CALL TYPE
If this part of the menu
appears, use to scroll
the menu.
PSTN CALL
TEST CALL
ALL SHIPS
GROUP CALL
AREA CALL
POSITION
INDIVIDUAL
2. Select RELAY SEL and press the [ENT] key.
*** Send message ***
CALL TYPE: RELAY ALL
NATURE: UNDESIGNATED
POS: 34˚45N 13
COM. TYPE : TELEPHONE
DSC FREQ. : 2187.5 KHZ
ID IN DIST
000000000
GO TO ALL VIEW
3. Key in ID of ship in distress and press the [ENT] key. If you do not know the ID leave the ID
menu as it is (all 0s showing).
*** Send message ***
CALL TYPE
ID IN DIST
:Undesignated
POS: ION.
COM.TYPE
DSC FREQ
: All ships
: 987654321
:
:
SINKING
DISABLE
ABANDONING
PIRACY
MAN OVERBOARD
EPIRB EMISSION
NATURE
Use to scroll
menu.
FIRE
FLOODING
COLLISION
GROUNDING
LISTING
UNDESIGNATED
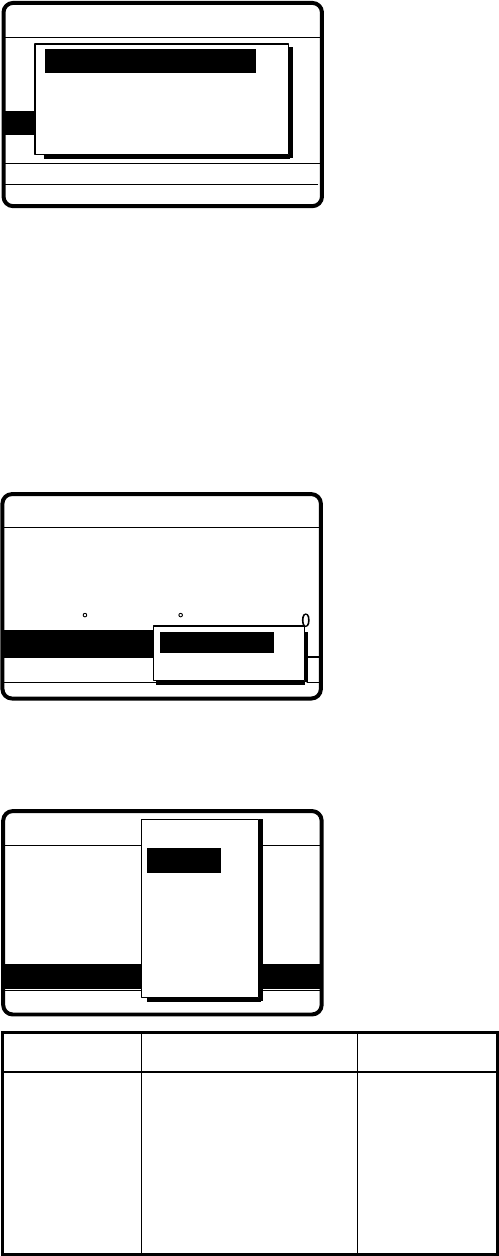
3-16
4. Select nature of distress and press the [ENT] key. (If you do not know the nature of distress,
select UNDESIGNATED.) Press the [ENT] key to open the POS menu.
***
Send message
***
CALL TYPE
DISTRESS RELAY
ID IN DIST
NATURE : UNDESIGNATE
COM. TYPE
DSC FREQ : 2187.5 KHZ
: ALL SHIPS
: 987654321
:
POS:
LAT : 34°45 NORTH
LON : 135°22 EAST
TIME: 10:00 UTC
INPUT TYPE: AUTO
GO TO ALL VIEW
5. Enter position. For automatic input, press the [ENT] key twice. For manual, press the [ENT]
key to select MANUAL and press the [ENT] key. Enter latitude, longitude of ship in distress
and time as follows:
a) Press to select LAT and press the [ENT] key. Enter latitude and press the [ENT] key.
b) Press to select LONG and press the [ENT] key. Enter longitude and press the [ENT] key.
c) Press to select TIME and press the [ENT] key. Enter UTC time and press the [ENT] key.
6. Press the [ENT] key to open the COM. TYPE menu.
TELEPHONE
*** Send message ***
NATURE : UNDESIGNATED
POS:
35 00N 135 00E AT 14:0
DSC FREQ
: 2187.5 kHz
TELEPHONE
NBDP-FEC
COM. TYPE
GO TO ALL VIEW
CALL TYPE : RELAY ALL
ID IN DIST : 123456789
7. Select TELEPHONE and press the [ENT] key. (NBDP may also be used.) Press the [ENT]
key to open the DSC menu.
:
3 45E
:
: Telephone
:2187.5 kHz
*** Send mESSAGE ***
GO TO ALL VIEW
DSC FREQ : 2187.5 KHZ
CALL TYPE
ID IN DIST:
NATURE: UN
COM. TYPE
POS: 34˚45N
4207.5
6312.0
8414.5
12577.0
16804.5
MANUAL
2187.5
AUTO
DSC SSB radiotelephone NBDP-FEC
2187.5 kHz
4207.5 kHz
6312.0 kHz
8414.5 kHz
12577.0 kHz
16804.5 kHz
2182.0 kHz
4125.0 kHz
6215.0 kHz
8291.0 kHz
12290.0 kHz
16420.0 kHz
2174.5 kHz
4177.5 kHz
6268.0 kHz
8376.5 kHz
12520.0 kHz
16695.0 kHz
8. Select appropriate DSC frequency and press the [ENT] key. The display now looks
something like the one at the top of the next page.
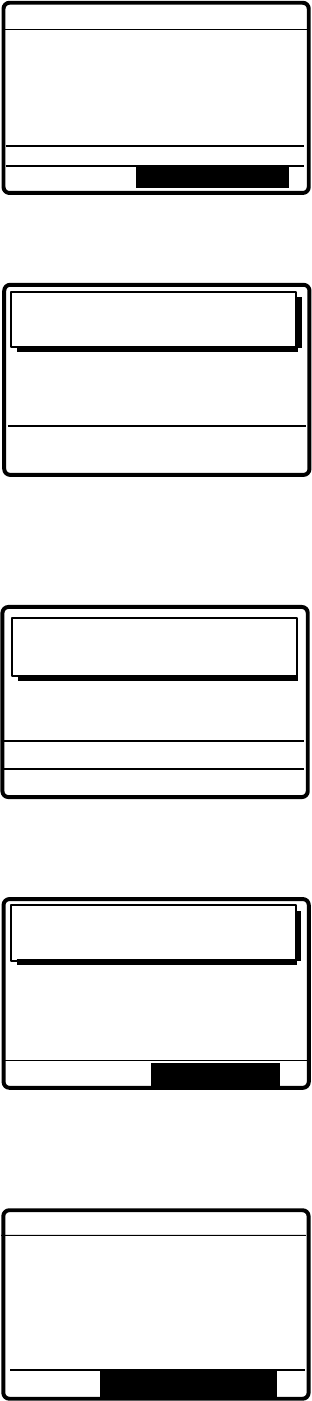
3-17
CALL TYPE : RELAY SEL
COAST ID :
001234567
ID IN DIST : NO INFO
NATURE : SINKING
POS
:
12˚34N 123˚45
*** Send message
***
DSC FREQ :
8414.5 KHZ
GO TO ALL VIEW
COM. TYPE : TELEPHONE
9. Press the [CALL] key to send the call. The equipment then waits for acknowledgement of the
distress relay.
Distress relay coast
call in progress!
DSC FREQ : 8414.0 KHZ
TO COAST : 001234567
SHIP IN DIST : NO INFO
POS : 12°34N 123°45 AT 12:34
TELEPHONE 12290.0 KHZ
10. The equipment then waits for acknowledgement of the distress relay, showing the following.
Message. If the distress relay is not acknowledged within five minutes the message “No
response. Try relay again.” appears. If this occurs send the relay again.
Waiting for distress
relay acknowledge.
COAST ID : 001234567
SHIP IN DIST : 123456789
TIME TO GO : 4M59S
DSC FREQ : 8414.5 KHZ
11. The display shows the following message when the distress relay acknowledge call is
received.
Distress relay ack
call received.
SHIP IN DIST : NO INFO
POS : 12°34N 123°45 AT 12:34
TELEPHONE 8414.5 KHZ
FROM COAST : 001234567
NATURE : SINKING
STOP ALARM
12. The audio alarm sounds; press the [CANCEL] key to silence the alarm. The following display
appears.
JUL-23-1999-23:59
GO TO ALL VIEW
SHIP IN DIST : NO INFO
POS :
12°34N 123°45 AT 12:34
TELEPHONE
8414.5 KHZ
FROM COAST :
001234567
NATURE : SINKING
DISTRESS RELAY ACK
* Received message *
ECC:OK
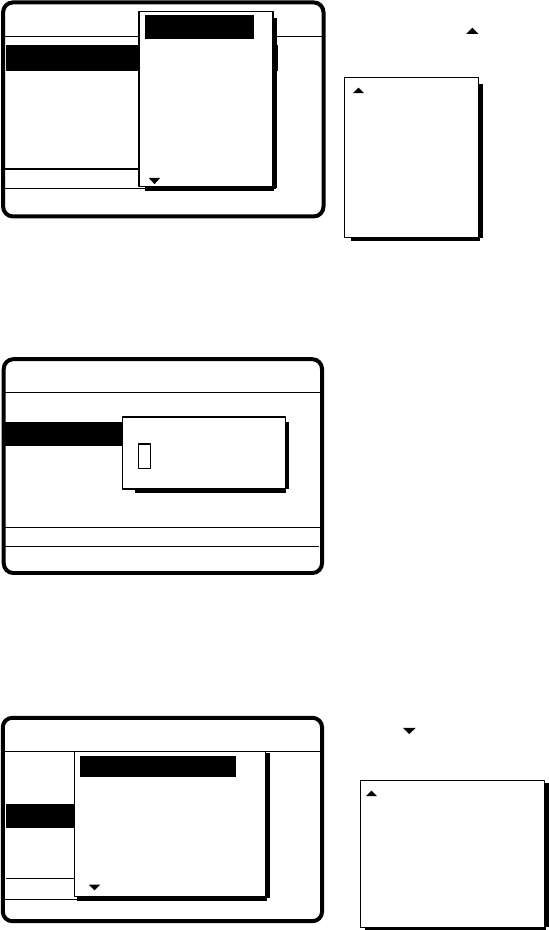
3-18
3.3.2 Sending distress relay to all ships
This procedure sends the distress relay to all ships.
1. Press the [CALL] key.
***
Send MESSAGE
***
STATION ID
PRIORITY
COM. TYPE
COM. FREQ
DSC FREQ
: All ships
: Safety
: Telephone
: 2187.5 kHz
RELAY SEL
POLLING
NEUTRAL
MEDICAL
RELAY ALL
DISTRESS
CALL TYPE
If this part of the menu
appears, use to scroll
the menu.
PSTN CALL
TEST CALL
ALL SHIPS
GROUP CALL
AREA CALL
POSITION
INDIVIDUAL
2. Select RELAY ALL and press the [ENT] key.
3. Press the [ENT] key to open the ID IN DIST menu.
*** Send message ***
CALL TYPE: RELAY ALL
NATURE: UNDESIGNATED
POSiTION: 34˚45N 13
COM. TYPE : TELEPHONE
DSC FREQ. : 2187.5 KHZ
ID IN DIST
000000000
GO TO ALL VIEW
4. Key in ID of ship in distress (if known) and press the [ENT] key. (If you do not know the ID
enter leave the ID menu as it is.
5. Press the [ENT] key to open the NATURE menu.
*** Send message ***
CALL TYPE
ID IN DIST
:Undesignated
POSITION.
COM.TYPE
DSC FREQ
: All ships
: 987654321
:
:
SINKING
DISABLE
ABANDONING
PIRACY
MAN OVERBOARD
EPIRB EMISSION
NATURE
Use to scroll
menu.
FIRE
FLOODING
COLLISION
GROUNDING
LISTING
UNDESIGNATED
6. Select nature of distress (if known) and press the [ENT] key. (If you do no the nature of
distress, select UNDESIGNATED.)

3-19
7. Press the [ENT] key to open the POS menu, where you enter the position of the ship in
distress and time, manually or automatically.
***
Send message
***
CALL TYPE
DISTRESS RELAY
ID IN DIST
NATURE : UNDESIGNATE
COM. TYPE
DSC FREQ : 2187.5 KHZ
: ALL SHIPS
: 987654321
:
POS:
LAT : 34°45 NORTH
LON : 135°22 EAST
TIME: 10:00 UTC
INPUT TYPE: AUTO
GO TO ALL VIEW
8. To enter position and time automatically, when you are near the ship in distress, press the
[ENT] key, select AUTO, press the [ENT] key again and then go to step 9. For manual input,
press the [ENT] key, select MANUAL and press the [ENT] key again. Enter position and time
as follows:
a) Press to select LAT and press the [ENT] key. Enter latitude and press the [ENT] key.
b) Press to select LONG and press the [ENT] key. Enter longitude and press the [ENT] key.
c) Press to select TIME and press the [ENT] key. Enter UTC time and press the [ENT] key.
9. Press the [ENT] key to open the COM. TYPE menu.
CALL TYPE: RELAY ALL
ID IN DIST:
NATURE : NDESIGNATED
DSC FREQ : 2187.5 KHZ
POS: 34˚45N
COM. TYPE
GO TO ALL VIEW
***
Send message
***
: TELEPHONE
TELEPHONE
NBDP-FEC
10. Select TELEPHONE and press the [ENT] key.
11. Press the [ENT] key to open the DSC FREQ menu.
:
3 45E
:
: Telephone
:2187.5 kHz
*** Send mESSAGE ***
GO TO ALL VIEW
DSC FREQ : 2187.5 KHZ
CALL TYPE
ID IN DIST:
NATURE: UN
COM. TYPE
POS: 34˚45N
4207.5
6312.0
8414.5
12577.0
16804.5
MANUAL
2187.5
AUTO
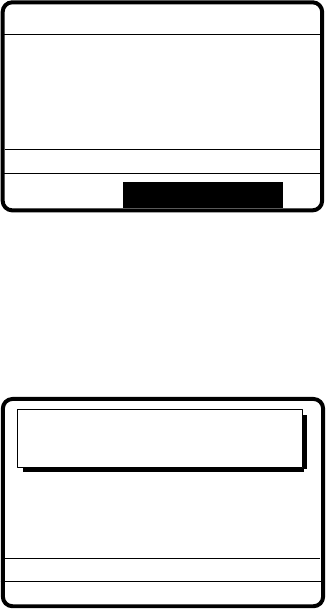
3-20
12. Select appropriate frequency and press the [ENT] key. The display now looks something like
the one below.
***
Send message
***
CALL TYPE: RELAY ALL
ID IN DIST: 123456789
NATURE: UNDESIGNATED
POS: 34˚50N 135˚45E AT 09:30
COM TYPE : TELEPHONE
DSC FREQ : 2187.5 KHZ
GO TO ALL VIEW
13. Press the [CALL] key to send the distress relay call (transmission time: about 43 sec.). The
display shows the message "Distress relay all call in progress!".
Note: If a coast station acknowledges the distress alert call before the timer counts to zero,
press the [CANCEL] key to cancel your call.
*** SEND MESSAGE ***
CALL TYPE : ALL SHIPS
SHIP IN DIST: 123456789
POS: 34˚50N 135˚45E AT 09:30
TELEPHONE 2182.0 KHZ
DSC FREQ
: 2187.5 KHZ
TIME TO GO: 29S
Distress relay all
call in progress!
14. After the call is sent the DSC standby screen automatically appears.

3-21
3.4 Receiving Distress Relay All Ships
When you receive a distress relay confirm that you are not near the ship in distress and continue
monitoring distress and safety frequencies over the SSB radiotelephone.
1. The audio alarm sounds and the display looks like the one below when a distress relay all
ships call is received.
Distress relay all
call received.
SHIP IN DIST:
123456789
POS:
12 34N 123 45E AT 12:34
TELEPHONE
NO INFO
FROM SHIP:
234567890
NATURE: UNDESIGNATED
STOP ALARM
2. Press the [CANCEL] key to silence the alarm, and the display changes as below.
JUL-23-1999-23:59 ECC: OK
SHIP IN DIST:
123456789
POS:
12 34N 123 45E AT 12:34
TELEPHONE
NO INFO
FROM SHIP:
234567890
NATURE: UNDESIGNATED
DISTRESS RELAY ALL
* Received message *
GO TO ALL VIEW
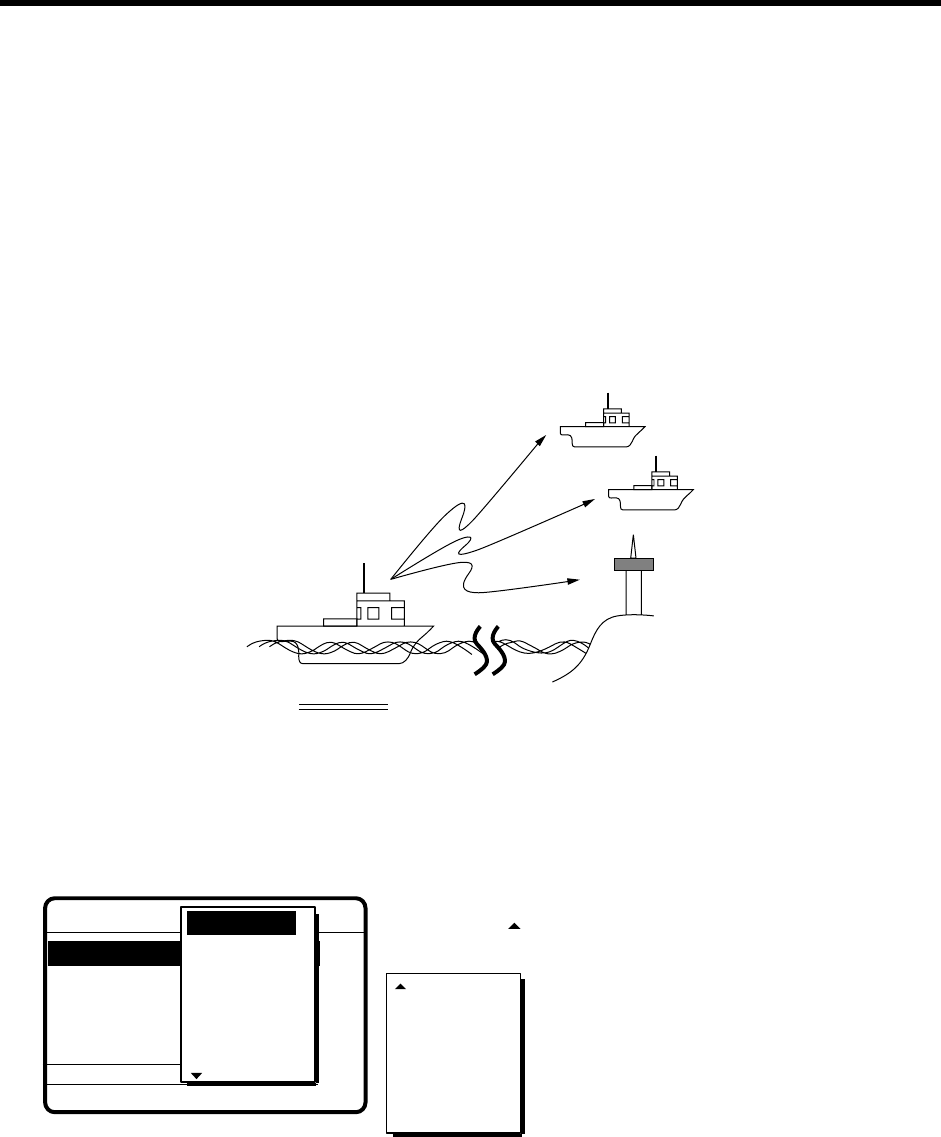
4-1
4. CALLING
This chapter provides the information necessary for general calling.
4.1 All Ships Call
When an urgent but not life endangering situation arises on your ship, for example, engine
trouble, send an all ships call to request assistance.
After sending the message, you can communicate by voice over the radiotelephone. Do the
following before beginning actual communications:
URGENCY priority: Say PAN three times followed by your call sign
SAFETY priority: Say SECURITE three times followed by your call sign.
Own Ship
Coast
Station
4.1.1 Sending all ships call
1. At the DSC standby screen, press the [CALL] key followed by the [ENT] key to display the
CALL TYPE menu.
***
Send MESSAGE
***
STATION ID
PRIORITY
COM. TYPE
COM. FREQ
DSC FREQ
: All ships
: Safety
: Telephone
: 2187.5 kHz
RELAY SEL
POLLING
NEUTRAL
MEDICAL
RELAY ALL
DISTRESS
CALL TYPE
If this part of the menu
appears, use to scroll
the menu.
PSTN CALL
TEST CALL
ALL SHIPS
GROUP CALL
AREA CALL
POSITION
INDIVIDUAL
2. Use
or to select ALL SHIPS and press the [ENT] key.
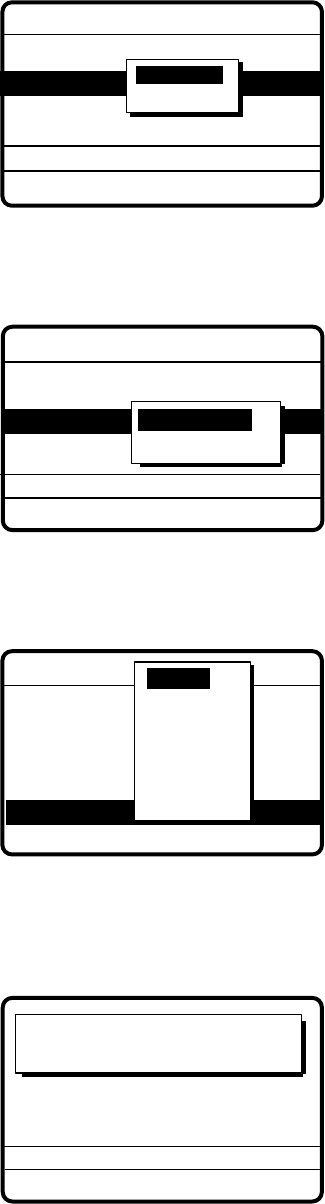
4-2
3. Press the [ENT] key to display the PRIORITY menu.
***
Send message
***
CALL TYPE: ALL SHIPS
COM. TYPE : TELEPHONE
DSC FREQ : 2187.5 KHZ
GO TO ALL VIEW
PRIORITY SAFETY
URGENCY
4. Select SAFETY or URGENCY as appropriate and press the [ENT] key.
5. Press the [ENT] key to open the COM. TYPE menu.
***
Send message
***
CALL TYPE: ALL SHIPS
PRIORITY : SAFETY
COM TYPE
DSC FREQ : 2187.5 KHZ
GO TO ALL VIEW
COM. TYPE
NBDP-FEC
TELEPHONE
6. Select communication type desired and press the [ENT] key.
7. Press the [ENT] key to open the DSC FREQ menu.
***
Send message
***
GO TO ALL VIEW
DSC FREQ
CALL TYPE : ALL SHIPS
PRIORITY : SAFETY
COM TYPE : TELEPHONE
2187.5KHZ
4207.5
6312.0
8414.5
12577.0
16804.5
MANUAL
2187.5
8. Select frequency and press the [ENT] key.
9. Press the [CALL] key to send the call (transmission time: 6-8 sec.). The display shows "All
ships call in progress!" while the call is being sent.
SAFETY
TELEPHONE 2182.0 KHZ
All ships
call in progress!
DSC FREQ : 2187.5 KHZ
TIME TO GO: 5S
10. The DSC standby screen automatically appears after the call is sent (timer counts down to
zero).
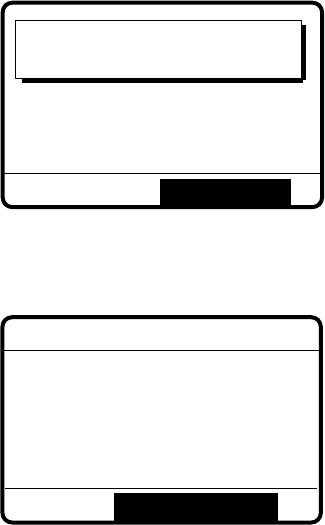
4-3
4.1.2 Receiving all ships call
1. When an all ships call is received the audio alarm sounds and the display looks like
something like the one shown below.
FROM SHIP:
123456789
SAFETY
TELEPHONE
2182.0 KHZ
All ships
call received.
STOP ALARM
2. Press the [CANCEL] key to silence the alarm. The display shows partial contents of the all
ships call as below.
* Received message *
JUL-23-1999-23:59 ECC: OK
ALL SHIPS CALL
FROM SHIP:
123456789
SAFETY
TELEPHONE
2182.0 KHZ
GO TO ALL VIEW
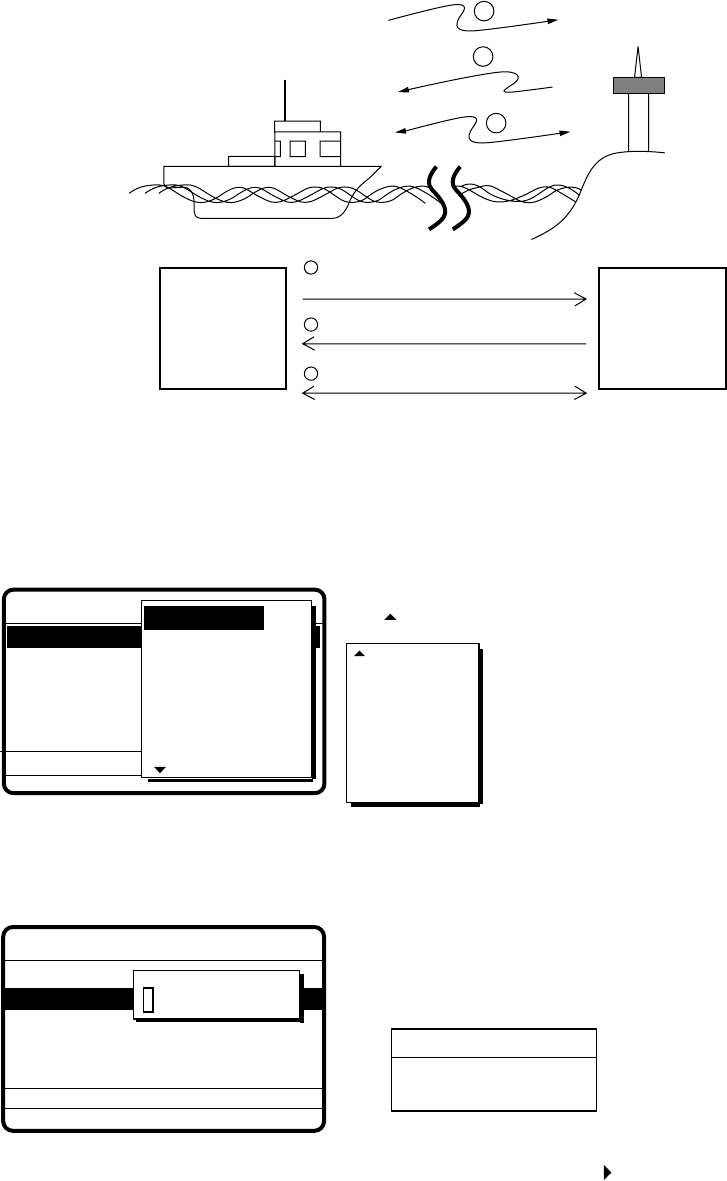
4-4
4.2 Individual Call
The individual call is for sending a message to a specific station. After sending an individual
message, called ACK RQ transmission, wait to receive the acknowledge back (ACK BQ) signal
from the receiving station. You should receive it within five minutes.
Coast
Station
Own Ship
DSC Message [Called Acknowledge
Request (ACK RQ) Signal]
Acknowledge Back (ACK BQ) Signal
Voice Communication
3
2
1
2
1
3
4.2.1 Sending individual call
1. At the DSC standby screen, press the [CALL] key followed by the [ENT] key to open the
CALL TYPE menu.
POLLING
NEUTRAL
MEDICAL
RELAY ALL
RELAY SEL
DISTRESS
STATION ID
PRIORITY
COM. TYPE
COM. FREQ
DSC FREQ
: INDIVIDUAL
: ---------
: ROUTINE
: TELEPHONE
: NO INFOR
: 2M-INTL
GO TO ALL VIEW
***
Send message
***
CALL TYPE
If this part of the menu appears
use to scroll menu.
INDIVIDUAL
PSTN CALL
TEST CALL
ALL SHIPS
GROUP CALL
AREA CALL
POSITION
2. Use
or to select INDIVIDUAL and press the [ENT] key.
3. Press the [ENT] key to open the STATION ID menu.
CALL TYPE
PRIORITY
COM. TYPE
COM. FREQ : NO INFO
DSC FREQ
: INDIVIDUAL
: ROUTINE
: TELEPHONE
: 2M-INTL
GO TO ALL VIEW
***
Send message
***
:
STATION ID
:
000000000
Select ID file
COAST STATION
SHIP STATION
If you have registred some station IDs (see page 6-1),
you can insert them into your message as follows:
1. Press the [FILE] key to show the following display.
2. Select COAST STATION or SHIP STATION and
press the [ENT] key.
3. Select ID to use Press to show ID number.
4. Press the [ENT] key to insert number.
4. Key in ID of station where to send the message and then press the [ENT] key.
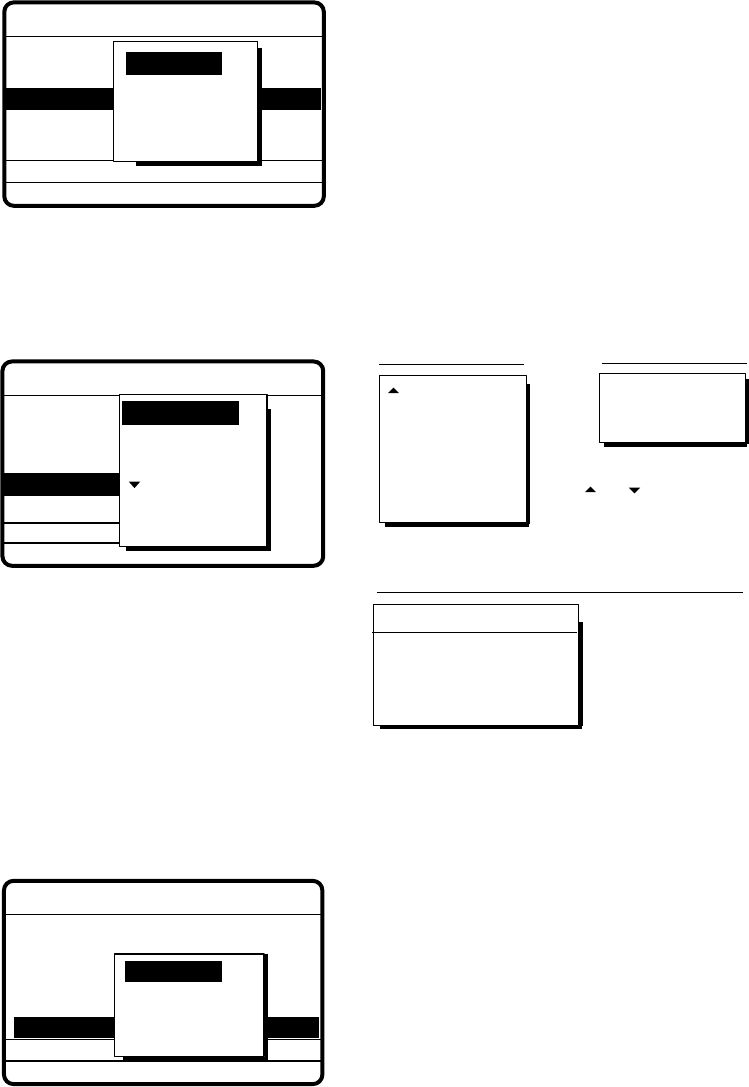
4-5
5. Press the [ENT] key to open the PRIORITY menu.
CALL TYPE
STATION ID
COM. TYPE
COM. FREQ
DSC FREQ
: INDIVIDUAL
: ---------
: TELEPHONE
: NO INFOR
: 2M-INTL
GO TO ALL VIEW
***
Send message
***
PRIORITY :
BUSINESS
SAFETY
URGENCY
ROUTINE
6. Select appropriate priority (normally ROUTINE) and press the [ENT] key.
7. Press the [ENT] key to open the COM. TYPE menu.
CALL TYPE
STATION ID
PRIORITY
COM. FREQ
DSC FREQ
: INDIVIDUAL
: ---------
: ROUTINE
: NO INFOR
: 2M-INTL
*** Send message *** TELEPHONE
NBDP-FEC
For Routine or
Business Priority For Safety or
Urgency Priority
COM. TYPE :
TTY RECEIVE
TTY
MORSE KEY
MORSE TAPE
FACSIMILE
DATA
MAIN
V32
* MODEM TYPE *
V21 V26 BIS
V22 V26 TER
V22 BIS V27 TER
V23
For DATA (Select DATA and press [ENT]).
Use or to
scroll menu.
TELEPHONE
NBDP-ARQ
NBDP-FEC
SPECIAL
8. Select communications type desired and press the [ENT] key.
9. Press the [ENT] key to open the COM. FREQ menu.
***
Send message
***
CALL TYPE
STATION ID : 123456789
PRIORITY
COM. TYPE
DSC FREQ
: INDIVIDUAL
: 12M-INTL
COM. FREQ
FREQUENCY
CHANNEL
POSITION
NO INFO
GO TO ALL VIEW
10. Select item desired and press the [ENT] key. For FREQUENCY and CHANNEL see “How to
Set Working Frequency” on the next page. NO INFO lets the receiving station set the
working frequency; POSITION inputs yours position.
Continued on page 4-11.
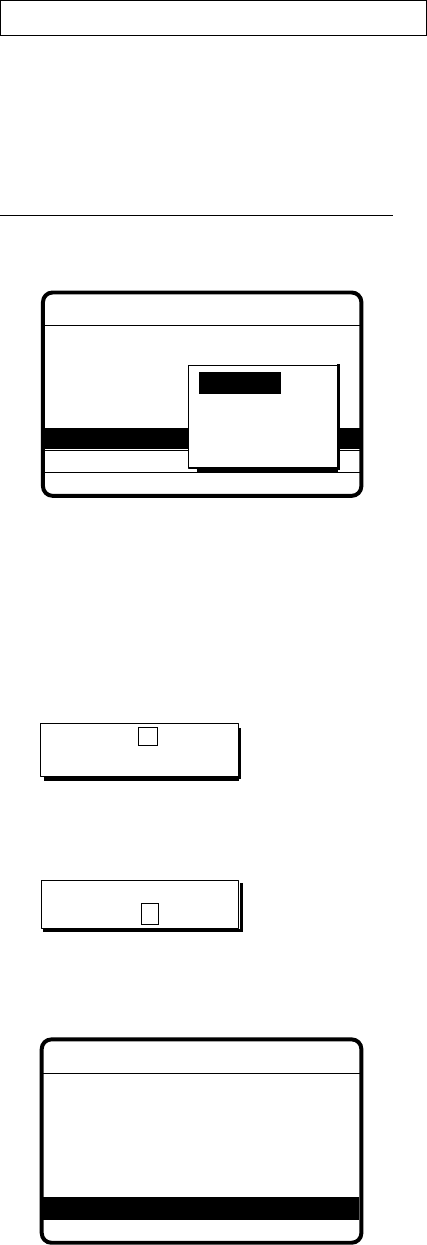
4-6
How to set working frequency
When you send a call set the working frequency as below to communicate with the receiver of
the message. The working frequency can be entered by Tx and Rx and frequencies as below or
channel no. as in “Channel” on the next page.
Routine or ship's business priority
1. Press the [CALL] key, select the COM. FREQ field and press the [ENT] key.
001234567
GO TO ALL VIEW
CALL TYPE:
STATION ID
PRIORITY
COM. TYPE
DSC FREQ
INDIVIDUAL
: 12M-INTL
COM. FREQ
FREQUENCY
CHANNEL
POSITION
NO INFO
***
Send message
***
2. Select NO INFO (frequency to be designated by sender), FREQUENCY, CHANNEL or
POSITION (your position is input automatically) as appropriate.
3. For FREQUENCY or CHANNEL follow one of the sections below.
Frequency
1. Select FREQUENCY and press the [ENT] key.
KHZ
KHZ
RX: 0. 0
TX: 0. 0
2. Key in Tx frequency in five or six digits with the numeric keys and press the [ENT] key. For
example, enter 12329.0 kHz.
TX: 12329.0 KHZ
KHZ
RX: 0.0
3. Enter Rx frequency and press the [ENT] key. The Tx frequency entered appears in the COM.
FREQ field.
*** Send message ***
GO TO ALL VIEW
CALL TYPE:
STATION ID:
PRIORITY
COM. TYPE
COM. FREQ
DSC FREQ
INDIVIDUAL
123456789
: ROUTINE
: TELEPHONE
TX:12329.0 KHZ
: 12M-INTL
DSC FREQ : 12M-INTL
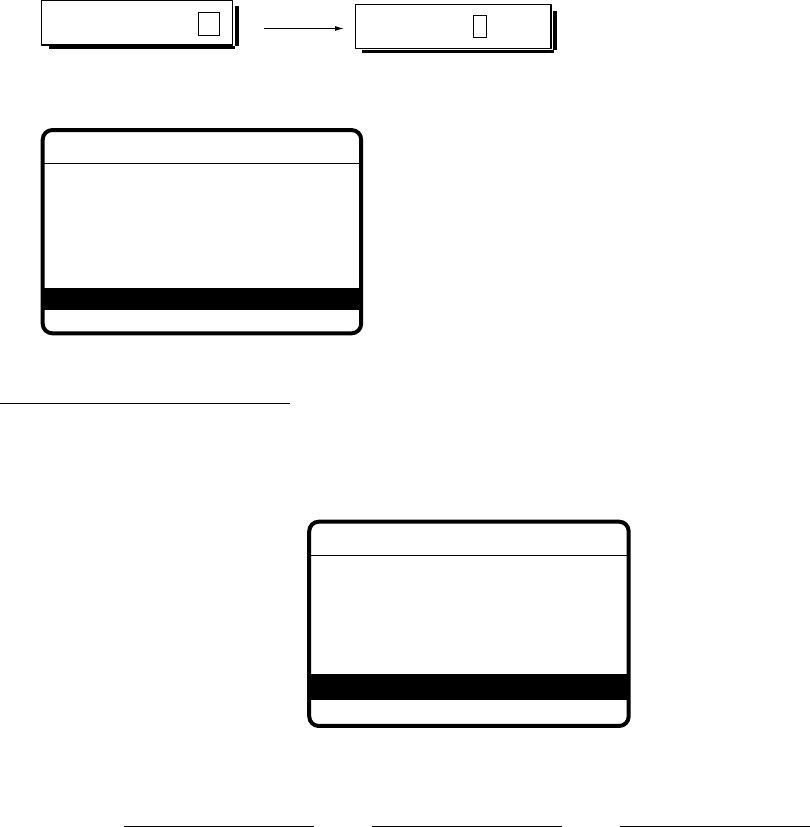
4-7
Channel
1. Select CHANNEL and press the [ENT] key.
2. Key in channel no. in four or five digits and press the [ENT] key. For example, enter CH
12034.
CH: 0CH: 12034
3. The channel entered appears in the COM. FREQ field.
GO TO ALL VIEW
***
Send message
***
CALL TYPE:
STATION ID:
PRIORITY
COM. TYPE
COM. FREQ
DSC FREQ
INDIVIDUAL
001234567
: ROUTINE
: TELEPHONE
: CH 12034
: 12M-INTL
DSC FREQ : 12M-INTL
Safety or urgency priority
For safety or urgency priority the communication frequency cannot be selected; it is
automatically set to the same band as set for the DSC frequency.
GO TO ALL VIEW
CALL TYPE: INDIVIDUAL
STATION ID: 123456789
PRIORITY : SAFETY
COM. TYPE : TELEPHONE
COM. FREQ : 2182.0 KHZ
: 2187.5 KHZ
DSC Frequency (kHz)
2187.5
4207.5
6312.0
8414.5
12577.0
16804.5
Com. type: Telephone
Com. Frequency
2182.0
4125.0
6215.0
8291.0
12290.0
16420.0
Com. type: NBDP-FEC
Com. Frequency
2174.5
4177.5
6268.0
8376.5
12520.0
16695.0
*** Send message ***
DSC FREQ : 2187.5 KHZ
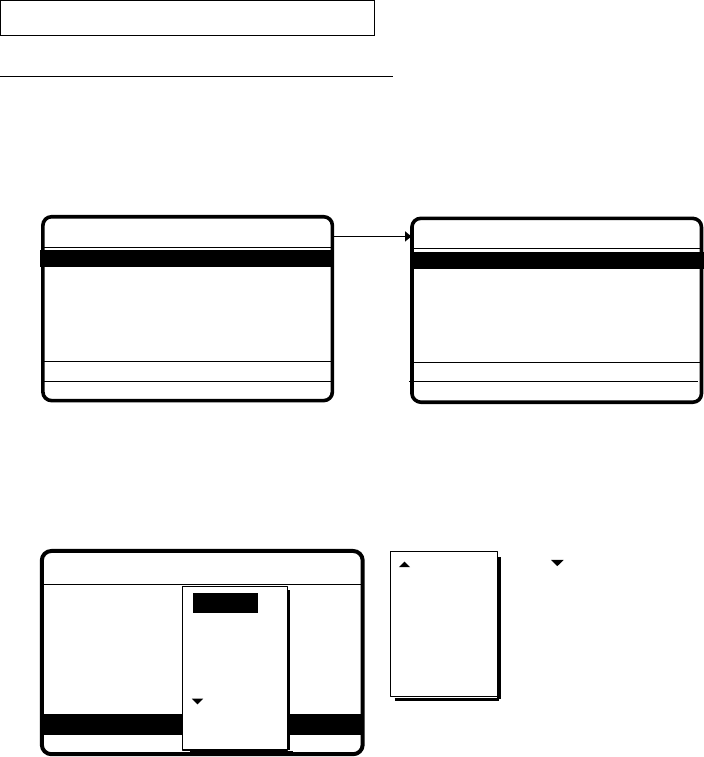
4-8
How to set DSC frequency
Routine or ship's business priority
1. Press the [CALL] key. (If PRIORITY is selected to other than ROUTINE or SHIP’S
BUSINESS, press to select PRIORITY, press the [ENT] key, select ROUTINE or SHIP’S
BUSINESS and then press the [ENT] key.)
If system setting "RT" is
OFF, DSC FREQ. field
displays MANUAL.
GO TO ALL VIEW
***
Send message
***
STATION ID: 123456789
PRIORITY
COM. TYPE
COM. FREQ
: ROUTINE
: TELEPHONE
: NO INFO
GO TO ALL VIEW
***
Send message
***
STATION ID: 123456789
PRIORITY
COM. TYPE
COM. FREQ
DSC FREQ
: ROUTINE
: TELEPHONE
: NO INFO
: MANUAL
OR
DSC FREQ : 12M-INTL
CALL TYPE: INDIVIDUAL CALL TYPE: INDIVIDUAL
2. Select DSC FREQ and press the [ENT] key.
GO TO ALL VIEW
*** Send message ***
CALL TYPE INDIVIDUAL
STATION ID 123456789
PRIORITY ROUTINE
COM. TYPE TELEPHONE
COM. FREQ NO INFO
: Individual
: 001234567
: Routine
: Telephone
: No infor
DSC FREQ TL
: 12M-INTL
16 MHZ
18 MHZ
22 MHZ
25 MHZ
OTHER
MANUAL
Use to scroll
menu.
OTHER: Special, private channel
MANUAL: Manual tuning of radiotelphone
6 MHZ
8 MHZ
12 MHZ
4 MHZ
2 MHZ
3. Select appropriate DSC frequency and press the [ENT] key. One of the menus shown on the
next page appears depending on the DSC frequency selected here.
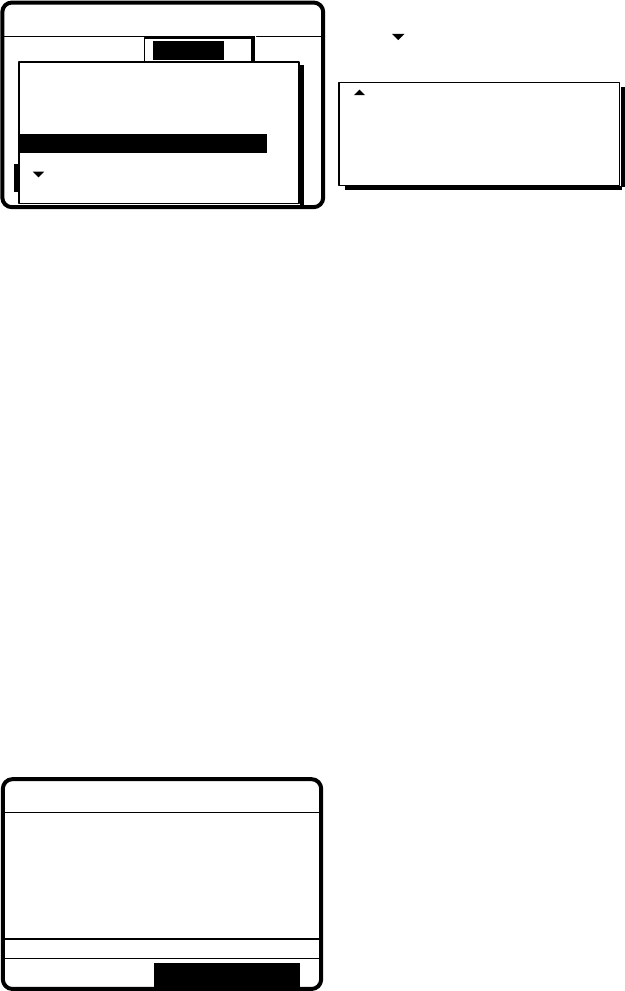
4-9
GO TO ALL VIEW
CALL TYPE
Station ID
Priority
Com. type
COM. FREQ
: Individual
: 001234567
: Routine
: Telephone
: No infor
: 12M-INTL
6 MHz
8 MHz
12 MHz
4 MHz
USER CH1 :T12345.0/R12345.0
USER CH2 :T12345.5/R12345.5
USER CH3 :T12346.0/R12346.0
USER CH4 :T12346.5/R12346.5
Use to scroll
menu.
12MHz menu
INTL :T12577.5/R12657.0
LOCAL1 :T12578.0/R12657.5
LOCAL2 :T12578.5/R12658.0
16MHz menu
INTL :T16805.0/R16903.0
LOCAL1 :T16805.5/R16903.5
LOCAL2 :T16806.0/R16904.0
2MHz menu
INTL :T 2189.5/R 2177.0
4MHz menu
INTL :T 4208.0/R 4219.5
LOCAL1 :T 4208.5/R 4220.0
LOCAL2 :T 4209.0/R 4220.5
6MHz menu
INTL :T 6312.5/R 6331.0
LOCAL1 :T 6313.0/R 6331.5
LOCAL2 :T 6313.5/R 6332.0
8MHz menu
INTL :T 8415.0/R 8436.5
18MHz menu
INTL :T18898.5/R19703.5
LOCAL1 :T18899.0/R19704.0
LOCAL2 :T18899.5/R19704.5
22MHz menu
INTL :T22374.5/R22444.0
LOCAL1 :T22375.0/R22444.5
LOCAL2 :T22375.5/R22445.0
25MHz menu
INTL :T25208.5/R26121.0
LOCAL1 :T25209.0/R26121.5
LOCAL2 :T25209.5/R26122.0
Other menu
INTL :T 458.5/R 458.5
2 MHz
DSC FREQ
INTL : T12577.5/R12657.0
LOCAL1 : T12578.0/R12657.5
LOCAL2 : T12578.5/R12658.0
USER CH1 : 12345.0/R12345.0
*** Send message ***
4. Select channel with or and press the [ENT] key. The display shows the DSC frequency
band selected.
***
Send message
***
CALL TYPE:
STATION ID:
PRIORITY
COM. TYPE
COM. FREQ
DSC FREQ
INDIVIDUAL
123456789
: ROUTINE
: TELEPHONE
: NO INFO
: 2M-INTL
GO TO ALL VIEW

4-10
Safety or urgency priority
For safety or urgency priority the field COM. FREQ is automatically set to the same band as the
DSC frequency.
1. Press the [CALL] key, select PRIORITY to SAFETY or URGENCY, and then select DSC
FREQ and press the [ENT] key.
GO TO ALL VIEW
***
Send message
***
CALL TYPE:
STATION ID:
PRIORITY
COM. TYPE
INDIVIDUAL
001234567
: SAFETY
: TELEPHONE
DSC FREQ : 2187.5 KHZ
COM. FREQ : 2182.0KHZ
4207.5
6312.0
8414.5
12577.0
16804.5
MANUAL
2187.5
2. Select appropriate frequency with or and press the [ENT] key.
DSC frequency
2187.5 kHz
4207.5 kHz
6312.0 kHz
8414.5 kHz
12577.0 kHz
16804.5 kHz
Com. type: Telephone
Com. frequency
2182.0 kHz
4125.0 kHz
6215.0 kHz
8291.0 kHz
12290.0 kHz
16420.0 kHz
Com. type: NBDP-FEC
Com. frequency
2174.5 kHz
4177.5 kHz
6268.0 kHz
8376.5 kHz
12520.0 kHz
16695.0 kHz
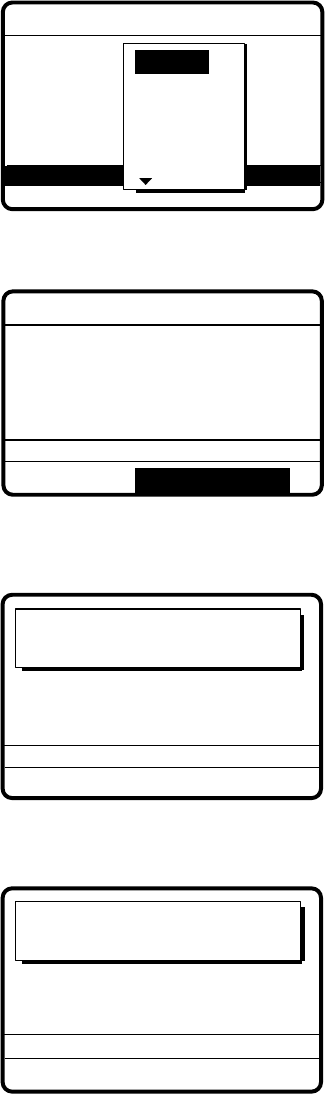
4-11
11. Press the [ENT] key to open the DSC FREQ menu.
GO TO ALL VIEW
***
Send message
***
CALL TYPE
GROUP ID
PRIORITY
COM. TYPE
COM. FREQ
: Individual
: 001234567
: Routine
: Telephone
: No infor
CALL
000
E
ONE
O
DSC FREQ : 12M-INTL
6 MHZ
8 MHZ
12 MHZ
4 MHZ
2 MHZ
12. Select DSC frequency. The display should now look something like the one below.
***
Send message
***
COM. FREQ : CH 12034
PRIORITY
: ROUTINE
COM. TYPE : TELEPHONE
CALL TYPE: INDIVIDUAL
STATION ID: 123456789
GO TO ALL VIEW
DSC FREQ : 2M-INTL
13. Press the [CALL] key to send the message (transmission time: 6-8 sec.). The display shows
the message "Individual request call in progress!" while the message is being sent.
Individual request
call in progress!
TIME TO GO: 8S
TO SHIP:
123456789
DSC FREQ :
2187.5 KHZ
ROUTINE
TELEPHONE CH 12034
14. After the message is sent, the equipment waits for acknowledgement of the message,
showing the display below.
Waiting for
acknowledgement.
TIME TO GO: 4M30S
FROM SHIP:
123456789
DSC FREQ :
2187.5 KHZ
ROUTINE
TELEPHONE CH 12034
15. The timer starts counting down the maximum time to wait for acknowledgement, 3.5-4.5
minutes, randomly set. One of the following three messages appears. (“No response! Try
calling again.” appears after the timer counts down to zero. It means the station called did not
respond.)
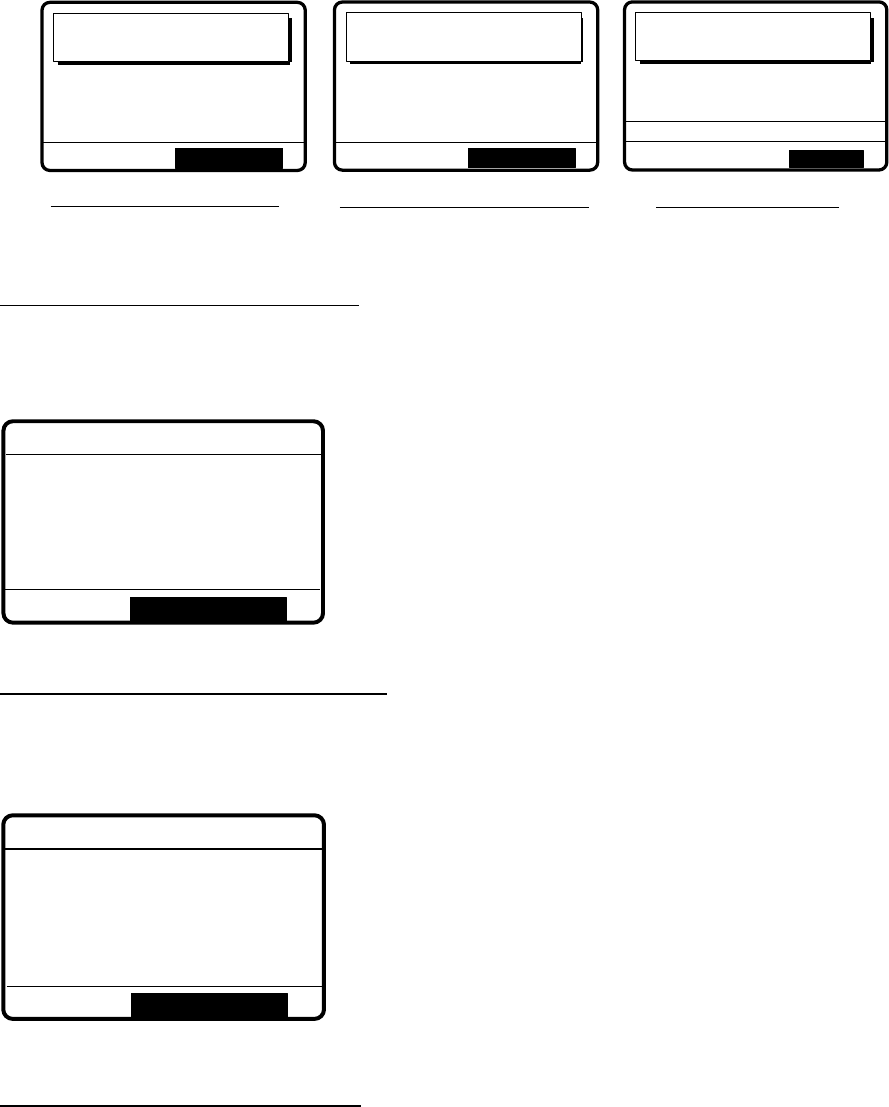
4-12
No response!
Try calling again?
FROM SHIP:
123456789
ROUTINE
TELEPHONE NO INFO
DSC FREQ :
2187.5 KHZ
RE-SEND
Able acknowledge
call received.
FROM SHIP:
123456789
ROUTINE
TELEPHONE NO INFO
STOP ALARM
Unable acknowledge
call received.
STOP ALARM
FROM SHIP:
123456789
ROUTINE
NO REASON GIVEN
Able acknowledge call received Unable acknowledge call received No response from station
16. Do one of the following depending on the message shown in step 15.
Able acknowledge call received
The audio alarm sounds; press the [CANCEL] key to silence it. The display changes as below.
Press the [CANCEL] key to return to the DSC standby screen.
JUL-23-1999-23:59 ECC: OK
ABLE ACKNOWLEDGE
FROM SHIP:
123456789
ROUTINE
TELEPHONE NO INFO
*
Received message
*
GO TO ALL VIEW
Unable acknowledge call received
The alarm sounds; press the [CANCEL] key to silence the alarm, and the display looks
something like the one below. Send the call again later.
JUL-23-1999-23:59 ECC: OK
NO REASON GIVEN
* Received message *
GO TO ALL VIEW
FROM SHIP:
123456789
ROUTINE
Reason for unable to acknowledge:
NO REASON GIVEN
CONGESTION AT SWITCHING CENTRE
BUSY
QUEUE INDICATION
STATION BARRED
NO OPERATOR AVAILABLE
OPERATOR TEMPORARILY UNAVAILABLE
EQUIPMENT DISABLED
MODE NOT USABLE
CHANNEL NOT USABLE
No response! Try calling again?
Press the [ENT] key (the display shown in step 12 appears) followed by the [CALL] key to re-
send the call, or press the [CANCEL] key to return to the DSC standby screen.
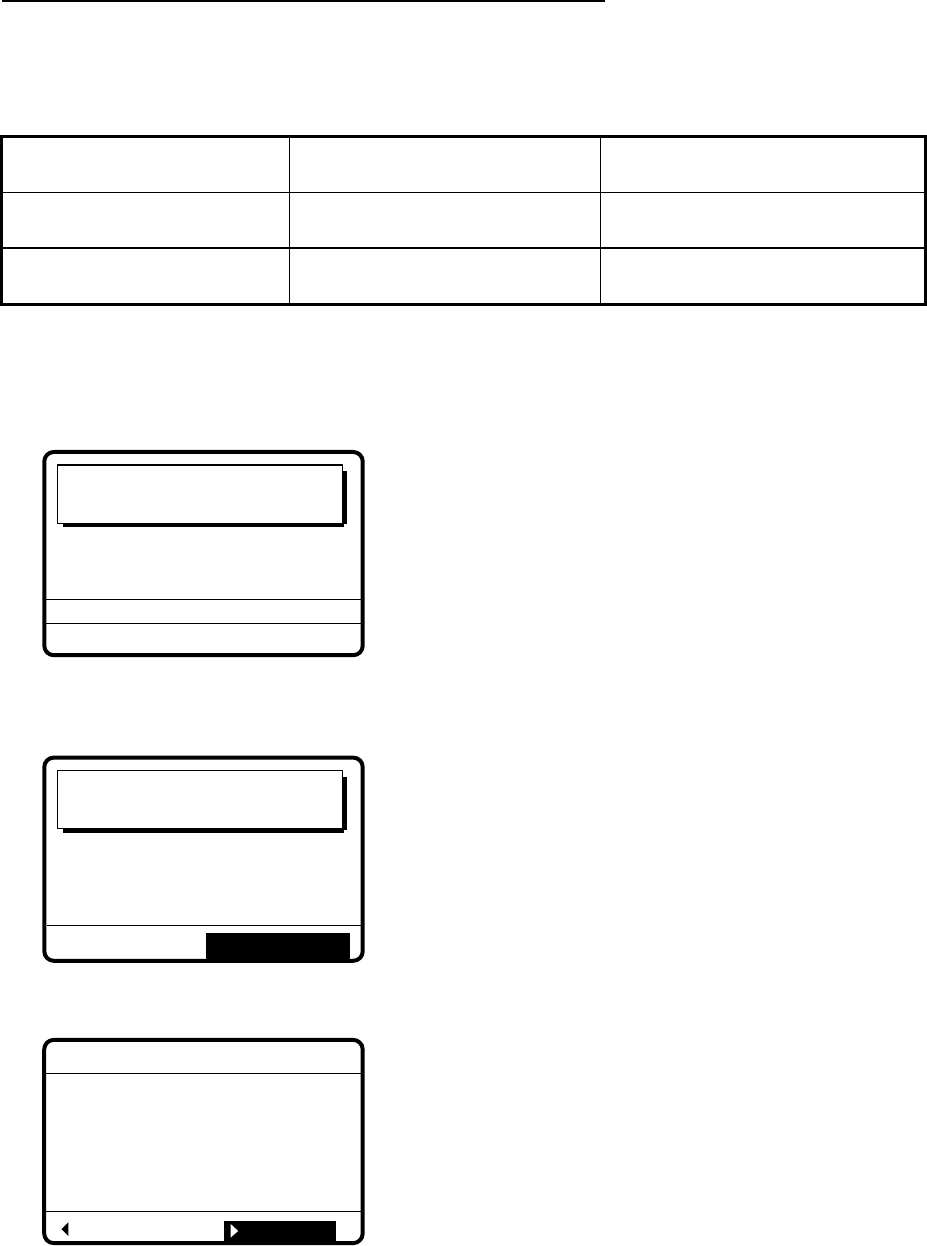
4-13
4.2.2 Receiving individual call
Sending automatic acknowledge (ACK BQ) to sender
When own ship receives an individual call you may or may not be able to receive the call
depending on the comply type setting as below. The relationship between comply type and
automatic/manual acknowledge is as below.
Comply type, automatic
acknowledge
ABLE UNABLE
AUTO ACK Can send acknowledge
automatically
Cannot send automatic
acknowledge
MANUAL ACK Can send acknowledge
manually
Cannot send manual acknowledge
1. When an individual call is received and the automatic acknowledge feature is active, the
display shown below appears, indicating the auto acknowledge call (ACK BQ) call is being
sent.
Able acknowledge
call in progress!
TIME TO GO: 8S
DSC FREQ :
2177.0 KHZ
TO SHIP:
123456789
ROUTINE
TELEPHONE NO INFO
2. It takes about 6-8 sec. to transmit the call, after which the audio alarm sounds and the
following message appears.
Able acknowledge
call transmitted.
TO SHIP:
123456789
ROUTINE
TELEPHONE NO INFO
STOP ALARM
3. Press the [CANCEL] key to silence the alarm and the following display appears.
*
Xmitted message
*
JUL-23-1999-23:01
ABLE ACKNOWLEDGE
TO SHIP:
123456789
ROUTINE
TELEPHONE NO INFO
RE-SEND ALL VIEW
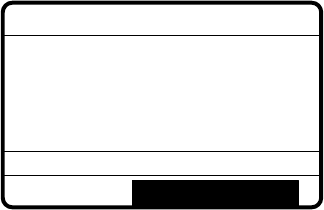
4-14
4. To re-send the message select RE-SEND and press the [ENT] key.
***
Send message
***
COM. FREQ : NO INFO
DSC FREQ : 2M-INTL
SHIP ID :
123456789
PRIORITY : ROUTINE
COM. TYPE : TELEPHONE
CALL TYPE : INDIVIDUAL
GO TO ALL VIEW
5. Press the [CALL] key to send the call.
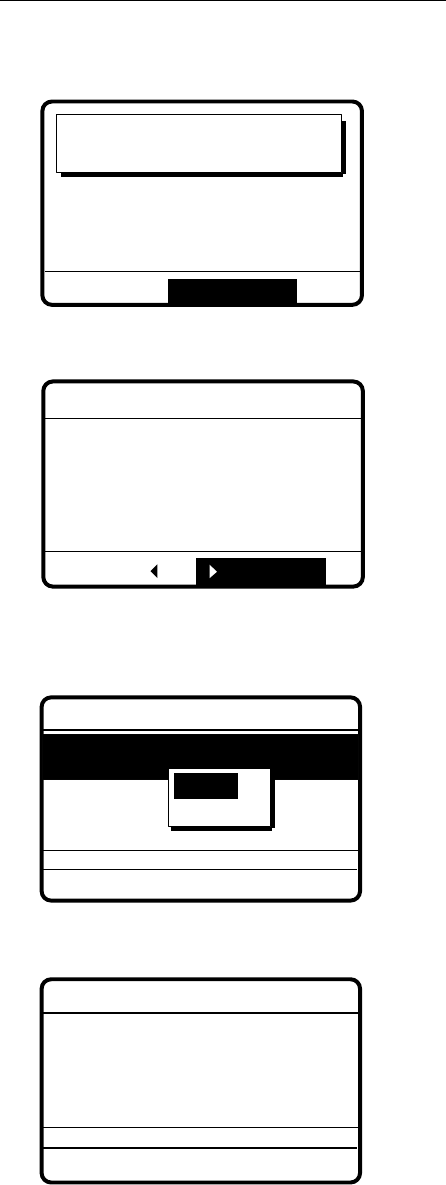
4-15
Manually acknowledging individual call
1. When an individual call is received, the alarm sounds and the display looks like the one
below.
Individual request
call received.
FROM SHIP:
123456789
ROUTINE
TELEPHONE NO INFO
STOP ALARM
2. Press the [CANCEL] key to silence the alarm, and the display changes as shown below.
JUL-23-1999-23:00:00 ECC: OK
INDIVIDUAL REQUEST
FROM SHIP:
123456789
ROUTINE
TELEPHONE NO INFO
*
Received message
*
ANSWER G ALL VIEW
3. Press
at the display which shows GO TO ALL VIEW to select "ANSWER" and then press
the [ENT] key.
***
Send message
***
TO COAST :
001234567
COM. TYPE : TELEPHONE
COM. FREQ : NO INFO
CALL TYPE : ABLE
ACKNOWLEDGEMENT
DSC FREQ : 2M-INTL
GO TO ALL VIEW
ABLE
UNABLE
4. Select ABLE and press the [ENT] key. The display changes as below.
***
Send message
***
DSC FREQ:
2M-INTL
GO TO ALL VIEW
TO SHIP:
123456789
COM. TYPE: TELEPHONE
COM. FREQ: NO INFO
CALL TYPE: ABLE
ACKNOWLEDGEMENT
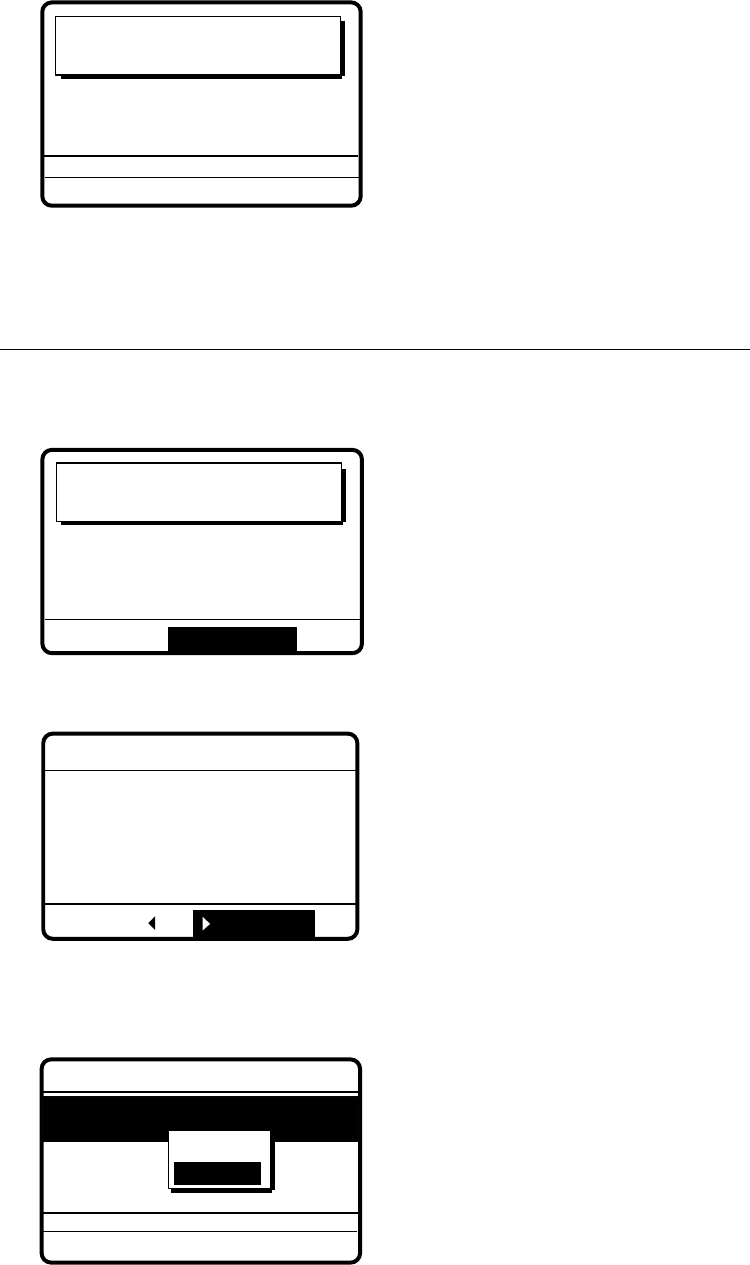
4-16
5. Press the [CALL] key to send the call, and the display changes as below.
Able acknowledge
call in progress!
TIME TO GO: 8S
DSC FREQ : 2177.0
KHZ
TO SHIP :
123456789
ROUTINE
TELEPHONE NO INFO
6. After the call is sent (transmission time: 6-8 sec.), press the [CANCEL] key to return to the
DSC standby screen.
Manually acknowledging individual call with unable acknowledge
1. When an individual call is received the alarm sounds and the display shows the message
"Individual request call received."
Individual request
call received.
FROM SHIP:
123456789
ROUTINE
TELEPHONE NO INFO
STOP ALARM
2. Press the [CANCEL] key to silence the alarm, and the display changes as below.
JUL-23-1999-23:00:00 ECC: OK
INDIVIDUAL REQUEST
FROM SHIP:
123456789
ROUTINE
TELEPHONE NO INFO
* Received message *
ANSWER ALL VIEW
3. Press
to select ANSWER and press the [ENT] key.
4. Press the [ENT] key to open the CALL TYPE menu.
***
Send message
***
TO SHIP :
001234567
COM. TYPE : TELEPHONE
COM. FREQ : NO INFO
CALL TYPE : ABLE
ACKNOWLEDGEMENT
DSC FREQ :
4M-INTL
GO TO ALL VIEW
ABLE
UNABLE
5. Select UNABLE and press the [ENT] key.
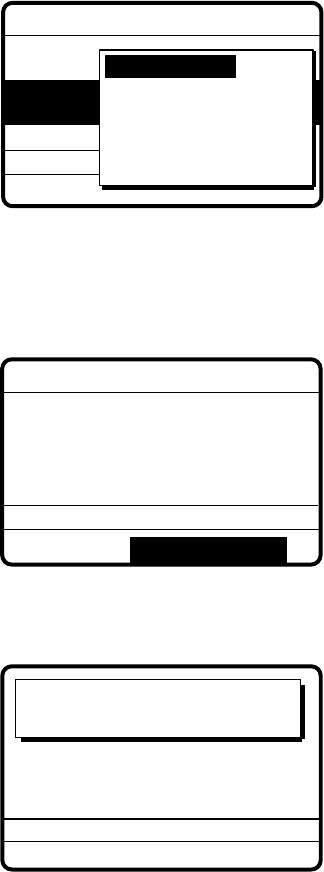
4-17
6. Press the [ENT] key. The display then prompts you for the reason you are unable to
acknowledge.
***
Send message
***
DSC FREQ :
12,577.5 KHZ
CALL TYPE : UNABLE
REASON : NO REASON
TO SHIP :
001234567
ACKNOWLEDGEMENT
GIVEN
NO REASON
BUSY
EQUIP DISABLED
MODE NOT USABLE
CH NOT USABLE
7. Select suitable reason and press the [ENT] key.
8. Press the [ENT] key to open the DSC FREQ menu. Select appropriate frequency and press
the [ENT] key. The display changes as below.
*** Send message ***
DSC FREQ :
4M-INTL
GO TO ALL VIEW
CALL TYPE : UNABLE
REASON : CHANNEL
TO SHIP : 123456789
ACKNOWLEDGEMENT
NOT USABLE
9. Press the [CALL] key to send the call. The display shows "Unable acknowledge call in
progress!" while the call is being sent.
Unable acknowledge
call in progress!
TIME TO GO: 8S
DSC FREQ :
4219.5 KHZ
ROUTINE
TO SHIP :
123456789
CHANNEL NOT USABLE
10. The timer counts down the time remaining until the message is sent (transmission time: 6-8
sec.). The DSC standby screen automatically appears upon completion of transmission.
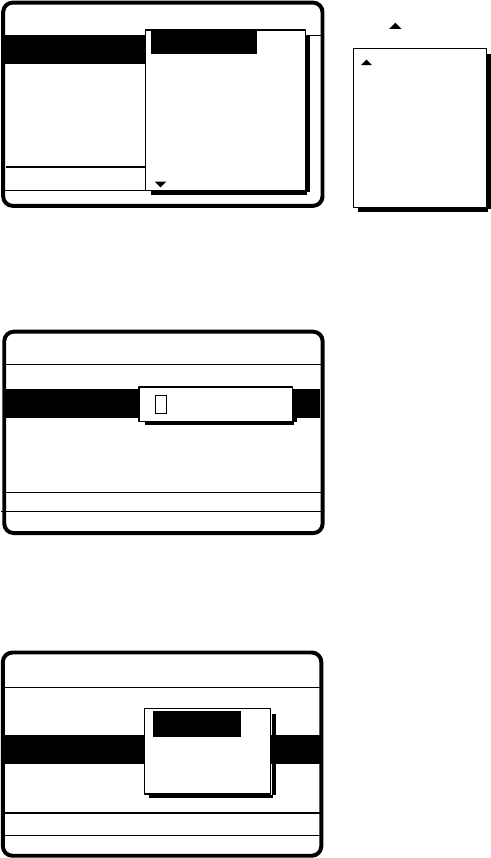
4-18
4.3 Group Call
A group call is for calling a specific group by entering its group ID.
4.3.1 Sending a group call
1. Press the [CALL] key at the DSC standby screen, and press the [ENT] key to open the CALL
TYPE menu.
***
Send message
***
RELAY SEL
POLLING
NEUTRAL
MEDICAL
RELAY ALL
DISTRESS
GROUP ID
PRIORITY
COM. TYPE
COM. FREQ
DSC FREQ
: Individual
PSTN CALL
TEST CALL
ALL SHIPS
GROUP CALL
AREA CALL
POSITION
INDIVIDUAL
CALL TYPE
If this part of the menu appears
use to scroll the menu.
2. Use
or to select GROUP CALL and press the [ENT] key.
3. Press the [ENT] key to open the GROUP ID menu.
GO TO ALL VIEW
***
Send message
***
CALL TYPE
PRIORITY
COM. TYPE
COM. FREQ
DSC FREQ
: GROUP CALL
: ROUTINE
: TELEPHONE
: NO INFO
: 2M-INTL
GROUP ID 000000000
4. Key in group ID (nine digits) where to send the message and press the [ENT] key.
5. Press the [ENT] key to open the PRIORITY menu.
GO TO ALL VIEW
***
Send message
***
CALL TYPE
GROUP ID
COM. TYPE
COM. FREQ NO INFO
DSC FREQ
: GROUP CALL
: 012345678
: 2M-INTL
PRIORITY SAFETY
URGENCY
ROUTINE
6. Select priority desired and press the [ENT] key.
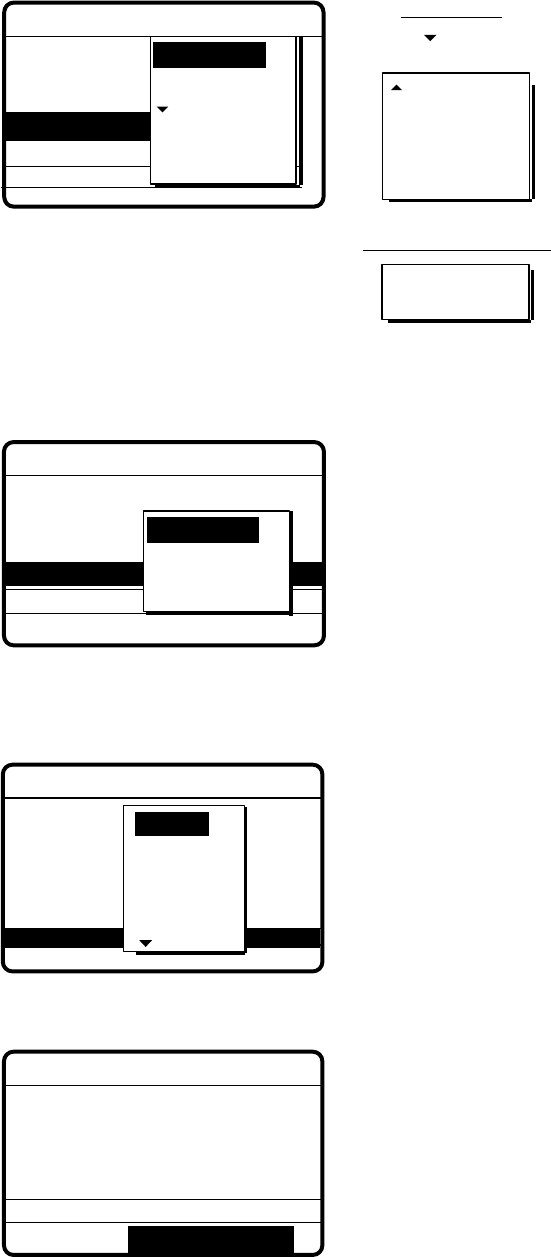
4-19
7. Press the [ENT] key to open the COM. TYPE menu.
GO TO ALL VIEW
***
Send message
***
CALL TYPE
GROUP ID
PRIORITY
COM. FREQ
DSC FREQ
: GROUP CALL
: 012345678
: Routine
: Telephone
: No infor
: 2M-INTL
NBDP-FEC
SPECIAL
TELEPHONE
COM. TYPE TTYRECEIVE
TTY
MORSE KEY
MORSE TAPE
FACSIMILE
MAIN
For Routine
Use to
scroll menu.
TELEPHONE
NBDP-FEC
For Safety or Urgency
8. Select communication type desired and press the [ENT] key.
9. Press the [ENT] key to open the COM. FREQ menu.
*** Send message ***
CALL TYPE : GROUP
COM. FREQ : 2164.0 kHz
COM. TYPE : TELEPHONE
PRIORITY : ROUTINE
GROUP ID : 012345678
DSC FREQ : 2M-INTL
GO TO ALL VIEW
FREQUENCY
CHANNEL
NO INFO
GO TO ALL VIEW
10. Select communication frequency desired and press the [ENT] key.
11. Press the [ENT] key to open the DSC FREQ menu.
GO TO ALL VIEW
***
Send message
***
CALL TYPE
GROUP ID
PRIORITY
COM. TYPE
COM. FREQ
: Individual
: 001234567
: Routine
: Telephone
: No infor
CALL
000
E
ONE
O
DSC FREQ : 12M-INTL
6 MHZ
8 MHZ
12 MHZ
4 MHZ
2 MHZ
12. Select DSC frequency and press the [ENT] key.
***
Send message
***
CALL TYPE : GROUP
COM. FREQ :
NO INFO
COM. TYPE : TELEPHONE
PRIORITY : ROUTINE
GROUP ID :
012345678
DSC FREQ : 2M-INTL
GO TO ALL VIEW
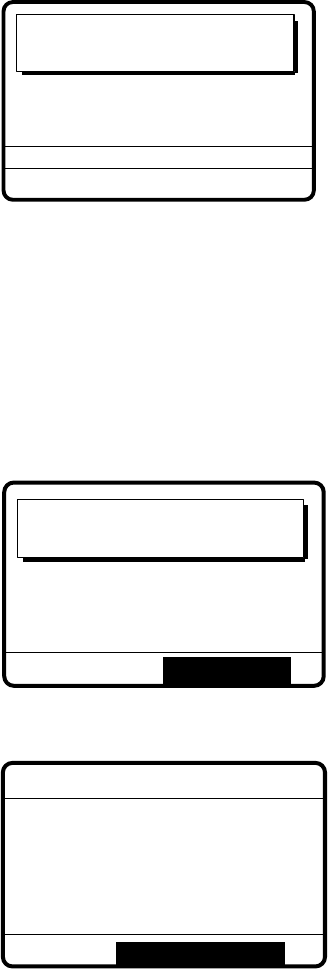
4-20
13. Press the [CALL] key to send the group call (transmission time: 6-8 sec.). The display shows
"Group call in progress" while the call is being sent.
GROUP ID : 012345678
Group
call in progress!
TIME TO GO : 8S
DSC FREQ : 2177.0 KHZ
TELEPHONE NO INFO
ROUTINE
14. The DSC standby screen automatically appears after the message is sent.
4.3.2 Receiving a group call
Group ID must be registered in order to receive a group call. See note on page 6-5.
1. The audio alarm sounds and the display shows "Group call received" when a group call is
received.
FROM SHIP:
123456789
ROUTINE
TELEPHONE
NO INFO
Group
call received.
STOP ALARM
2. Press the [CANCEL] key to silence the alarm, and the display changes as below.
* Received message *
JUL-23-1999-23:59 ECC: OK
GROUP CALL
FROM SHIP :
123456789
ROUTINE
TELEPHONE
NO INFO
GO TO ALL VIEW
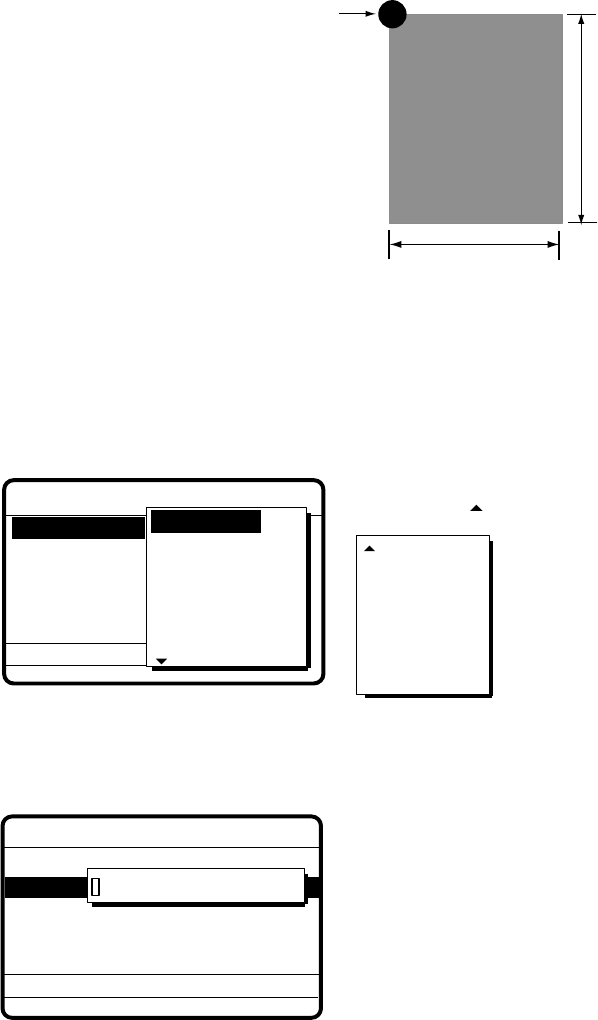
4-21
4.4 Geographic Area Call
The geographic area call sends a call to all ships within a specific area you designated in your
geographic area call message. In the figure below, for example, the call will be sent to all ships
within 10°N and 5°W of 34°N, 135°W.
Reference point
(For example,
34˚N 135˚W)
5˚ = do
135 W 140 W
10˚ = do
34 N
24 N
4.4.1 Sending a geographic area call
1. Press the [CALL] key at the DSC standby screen, and press the [ENT] key to open the CALL
TYPE menu.
RELAY SEL
POLLING
NEUTRAL
MEDICAL
RELAY ALL
DISTRESS
*** Send message ***
STATION ID
PRIORITY
COM. TYPE
COM. FREQ
DSC FREQ
: Individual
: 001234567
: Routine
: Telephone
: No inform
: 12M-INTEL
PSTN CALL
TEST CALL
ALL SHIPS
GROUP CALL
AREA CALL
POSITION
INDIVIDUAL
CALL TYPE
If this part of the menu
appears use to scroll.
2. Use
or to select AREA CALL and press the [ENT] key.
3. Press the [ENT] key to open the AREA menu.
GO TO ALL VIEW
***
Send message
***
CALL TYPE
PRIORITY
COM. TYPE
COM. FREQ
DSC FREQ
: AREA CALL
: ROUTINE
: TELEPHONE
: NO INFO
: 2M-INTL
00˚N 000˚W ↓ 00˚ → 00˚
AREA
4. Enter latitude, longitude and length and width of area (in degrees) and press the [ENT] key.
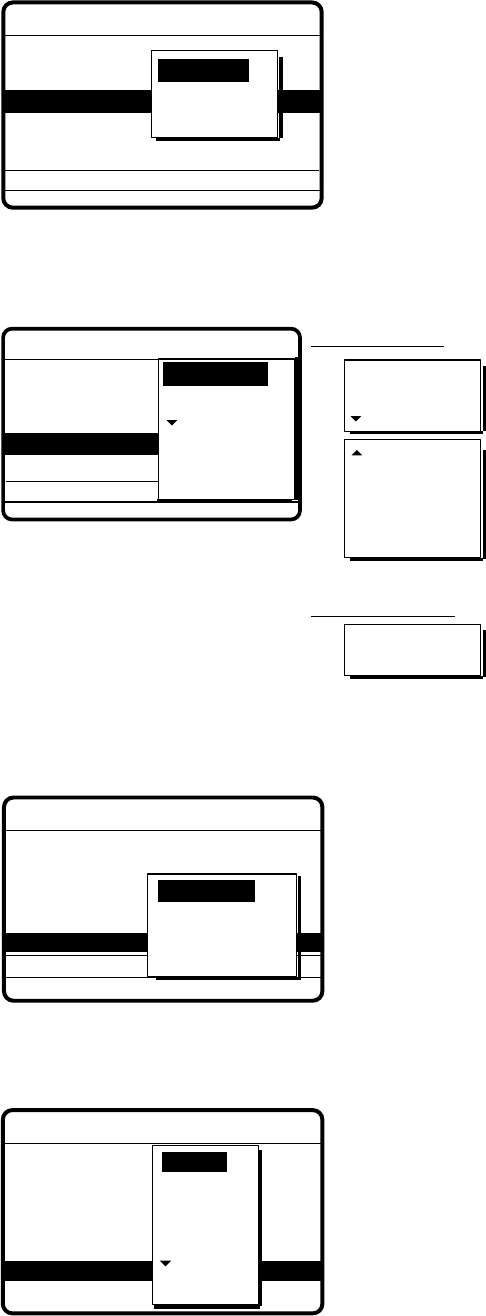
4-22
5. Press the [ENT] key to open the PRIORITY menu.
GO TO ALL VIEW
***
Send message ***
CALL TYPE
AREA :
12˚N 123˚W ↓12˚ → 12˚
COM. TYPE
COM. FREQ
DSC FREQ
: AREA CALL
: Routine
: Telephone
: NO INFO
: 2M-INTL
SAFETY
URGENCY
ROUTINE
PRIORITY
6. Select priority desired and press the [ENT] key.
7. Press the [ENT] key to open the COM. TYPE menu.
TELEPHONE
NBDP-FEC
SPECIAL
TTYRECEIVE
TTY
MORSE KEY
MORSE TAPE
FACSIMILE
MAIN
For ROUTINE
TELEPHONE
NBDP-FEC
For SAFETY or
URGENCY
GO TO ALL VIEW
*** Send message ***
CALL TYPE
AREA : 12˚N 123˚W ↓12˚ → 12˚
PRIORITY
COM. FREQ
DSC FREQ
: AREA CALL
: Routine
: Telephone
: No infor
: 2M-INTL
NBDP-FEC
SPECIAL
TELEPHONE
COM. TYPE
8. Select communication type desired and press the [ENT] key.
9. Press the [ENT] key to open the COM. FREQ menu.
GO TO ALL VIEW
***
Send message
***
CALL TYPE
AREA:
12˚N 123˚W ↓12˚ → 12˚
PRIORITY
COM. TYPE
DSC FREQ
: AREA CALL
: 2M-INTL
COM. FREQ
FREQUENCY
CHANNEL
NO INFO
10. Select communication frequency desired and press the [ENT] key.
11. Press the [ENT] key to open the DSC FREQ menu.
12M-INTL
GO TO ALL VIEW
***
Send message
***
CALL TYPE:
AREA:
PRIORITY
COM. TYPE
COM. FREQ
Individual
001234567
: Routine
: Telephone
: No infor
6 MHZ
8 MHZ
12 MHZ
4 MHZ
2 MHZ
DSC FREQ : TL
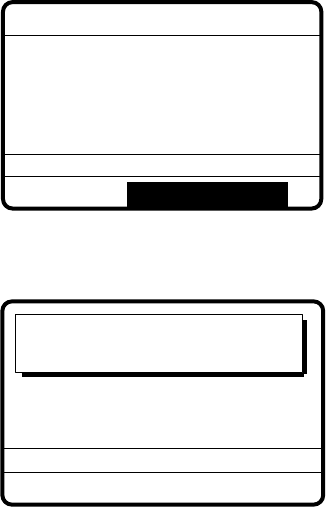
4-23
12. Select DSC frequency and press the [ENT] key. Your display should now look something like
one below.
*** Send message ***
CALL TYPE : AREA CALL
AREA :
12˚N 123˚W ↓12˚ → 12˚
PRIORITY : ROUTINE
COM. TYPE : TELEPHONE
COM. FREQ :
2164.0 KHZ
DSC FREQ : 2M-INTL
GO TO ALL VIEW
13. Press the [CALL] key to send the geographic area call (transmission time: 6-8 sec.). The
display shows "Geographic area call in progress!" while the call is being sent.
AREA:
12˚N 123˚W ↓12˚ → 12˚
Geographical area
call in progress!
TIME TO GO : 8S
DSC FREQ :
2177.0 KHZ
TELEPHONE
2164.0 KHZ
ROUTINE
O
14. After the call is sent (timer counts down to zero), the DSC standby screen automatically
appears.
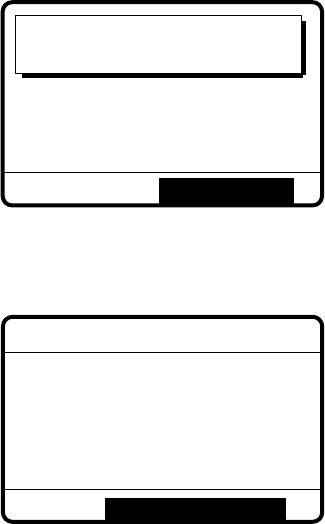
4-24
4.4.2 Receiving a geographic area call
1. The alarm sounds and the display shows "Geographic area call received" when a
geographic area call is received.
Geographic area
call received.
FROM SHIP: 123456789
ROUTINE
TELEPHONE NO INFO
STOP ALARM
2. The audio alarm sounds; press the [CANCEL] key to silence the alarm. The display changes
as below.
* Received message *
JUL-23-1999-23:59 ECC: OK
GEOGRAPHICAL AREA
FROM SHIP : 123456789
ROUTINE
TELEPHONE NO INFO
GO TO ALL VIEW
3. Press the [CANCEL] key at any time to return to the DSC standby screen.
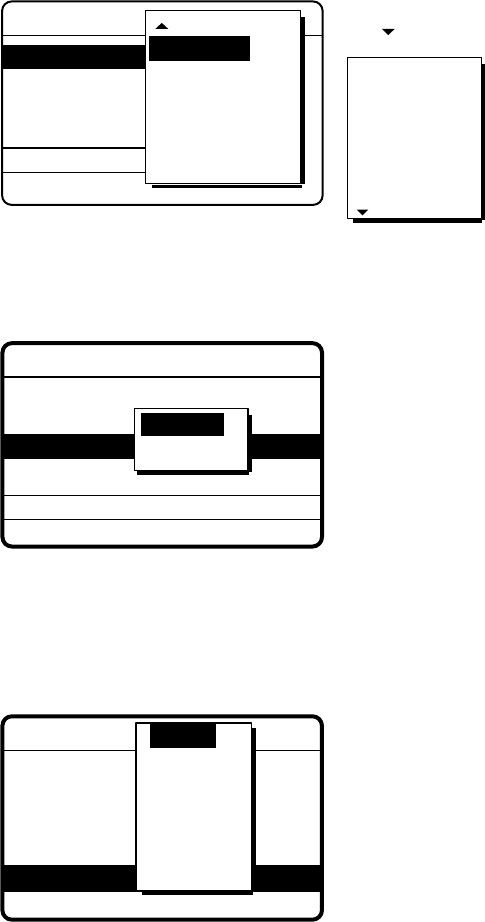
4-25
4.5 Neutral Craft Call
This type of call informs all ships that your ship is not a participant in armed conflict.
4.5.1 Sending a neutral craft call
1. Press the [CALL] key followed by the [ENT] key to display the CALL TYPE menu.
*** Send mESSAGE ***
STATION ID
PRIORITY
DSC FREQ
: Neutral
craft
: Safety
: 2187.5 kHz
INDIVIDUAL
PSTN CALL
TEST CALL
ALL SHIPS
GROUP CALL
AREA CALL
POSITION
RELAY SEL
NEUTRAL
MEDICAL
RELAY ALL
DISTRESS
POLLING
CALL TYPE
If this part of the menu appears
use to scroll the menu.
2. Use
or to select NEUTRAL and press the [ENT] key.
3. Press the [ENT] key to open the PRIORITY menu.
***
Send message
***
CALL TYPE
COM. TYPE
DSC FREQ
: NEUTRAL
craft
: Safety
: TELEPHONE
: 2187.5 KHZ
GO TO ALL VIEW
URGENCY
SAFETY
PRIORITY
4. Select appropriate priority and press the [ENT] key.
5. Press the [ENT] key to open the DSC FREQ menu.
Note: COM. TYPE is fixed at TELEPHONE.
***
Send MESSAGE
***
CALL TYPE
PRIORITY
COM. TYPE
VIEW
: Neutral
craft
: Safety
: Telephone
:2187.5 kHz
4207.5
6312.0
8414.5
12577.0
16804.5
MANUAL
2187.5
DSC FREQ KHZ
GO TO ALL VIEW
6. Select appropriate frequency and press the [ENT] key.
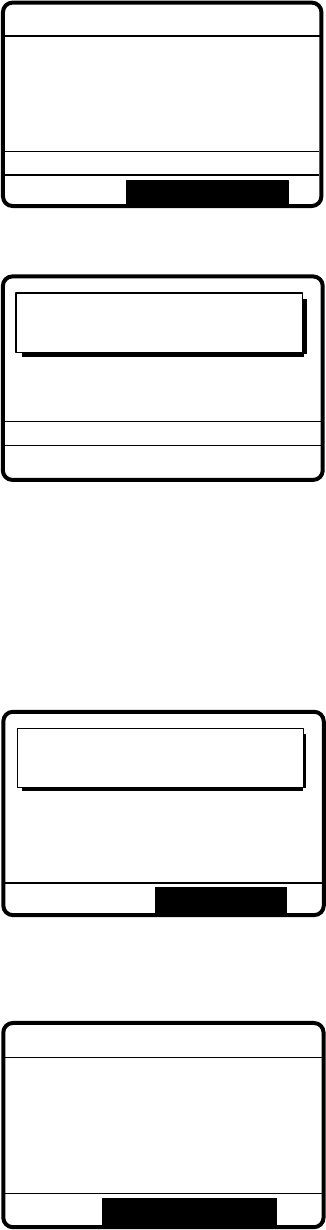
4-26
7. The display changes as below. You are now ready to send the neutral craft call.
***
Send message
***
CALL TYPE : NEUTRAL
CRAFT
PRIORITY : SAFETY
COM. TYPE : TELEPHONE
GO TO ALL VIEW
DSC FREQ :
2187.5 KHZ
8. Press the [CALL] key to send the neutral craft call (transmission time: 6-8 sec.).
Neutral craft
call in progress!
SAFETY
TELEPHONE
2182.0 KHZ
TIME TO GO: 8S
DSC FREQ :
2187.5 KHZ
O
9. After the call is sent (timer counts down to zero), the DSC standby screen automatically
appears.
4.5.2 Receiving a neutral craft call
1. When a neutral craft call is received the alarm sounds and the display changes as below.
Neutral craft
call received.
FROM SHIP:
123456789
SAFETY
TELEPHONE
2182.0 KHZ
STOP ALARM
2. The audio alarm sounds; press the [CANCEL] key to silence the alarm. The display changes
as below.
*
Received message *
JUL-23-1999-23:59 ECC: OK
NEUTRAL CRAFT
FROM SHIP: 123456789
SAFETY
TELEPHONE 2182.0 KHZ
GO TO ALL VIEW
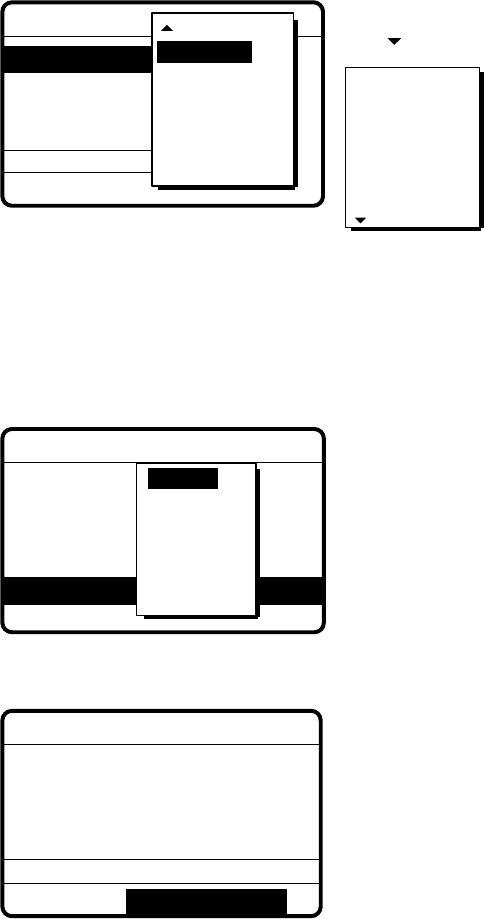
4-27
4.6 Medical Transport Call
The medical transport call informs all ships, by using the "urgent" category, that own ship carries
medical supplies.
4.6.1 Sending a medical transport call
1. Press the [CALL] key followed by the [ENT] key to open the CALL TYPE menu.
*** Send message ***
STATION ID
PRIORITY
DSC FREQ
: Medical
transport
: Urgency
: Telephone
: 2187.5 kHz
INDIVIDUAL
PSTN CALL
TEST CALL
ALL SHIPS
GROUP CALL
AREA CALL
POSITION
RELAY SEL
NEUTRAL
MEDICAL
RELAY ALL
DISTRESS
POLLING
CALL TYPE
If the part of the menu appears,
use to scroll menu.
2. Use
or to select MEDICAL and press the [ENT] key.
Note: PRIORITY and COM. TYPE are automatically selected to URGENCY and
TELEPHONE, respectively.
3. Press the [ENT] key to open the DSC FREQ menu.
*** Send message ***
CALL TYPE
PRIORITY
COM. TYPE
VIEW
: Medical
transport
: Urgency
: Telephone
:2187.5 KHZ
4207.5
6312.0
8414.5
12577.0
16804.5
MANUAL
2187.5
DSC FREQ
GO TO ALL VIEW
4. Select appropriate frequency and press the [ENT] key. The display changes as below.
CALL TYPE : MEDICAL
TRANSPORT
PRIORITY : URGENCY
COM. TYPE : TELEPHONE
GO TO ALL VIEW
*** Send message ***
DSC FREQ :
2187.5 KHZ

4-28
5. Press the [CALL] key to send the call (transmission time: 6-8 sec.). The display shows
“Medical transport call in progress!” while the message is being sent.
URGENCY
TELEPHONE
2182.0 KHZ
Medical transport
call in progress!
TIME TO GO : 8S
DSC FREQ :
2187.5 KHZ
6. After the message is sent (timer counts down to zero) the DSC standby screen automatically
appears.
4.6.2 Receiving a medical transport call
1. When a medical transport call is received, the alarm sounds and the display looks as below.
Medical transport
call received.
FROM SHIP:
123456789
URGENCY
TELEPHONE
2182.0 KHZ
STOP ALARM
2. Press the [CANCEL] key to silence the alarm. The display changes as below.
GO TO ALL VIEW
* Received message *
JUL-23-1999-23:59 ECC: OK
MEDICAL TRANSPORT
FROM SHIP:
123456789
URGENCY
TELEPHONE
2182.0 KHZ
GO TO ALL VIEW
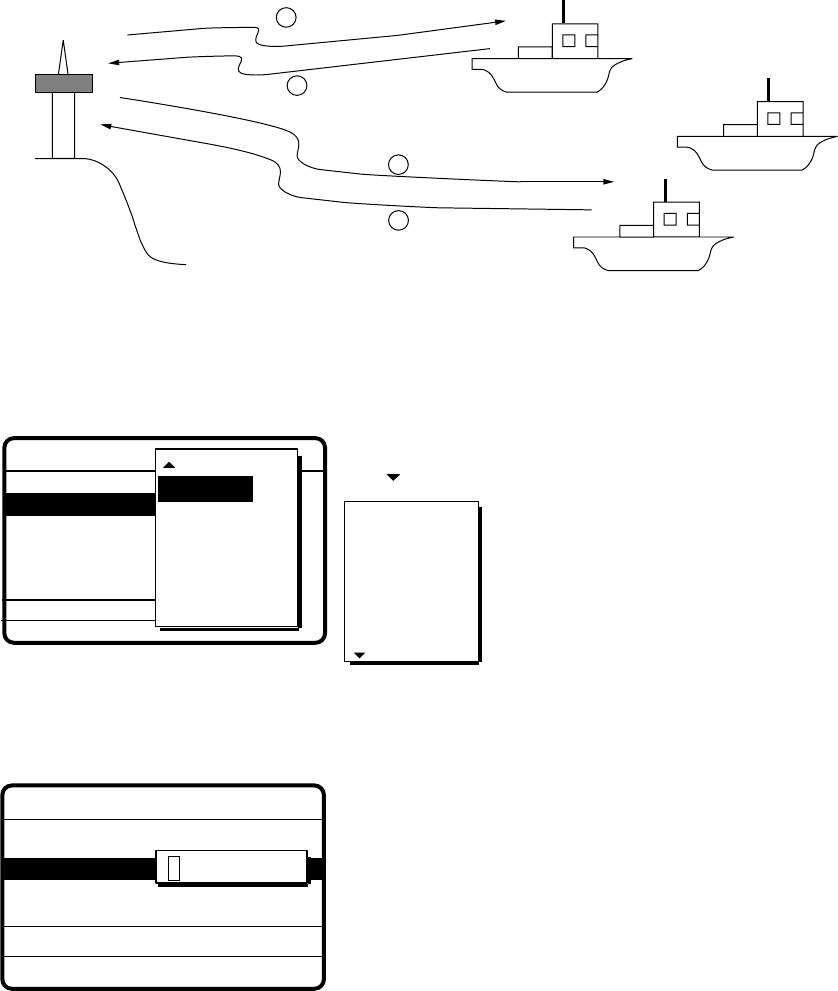
4-29
4.7 Polling Call
Polling means confirming if own station is within communicating range with other station. This
function only provides affirmative or negative response; it does not provide position information.
Note that simultaneous polling to more than one station is not possible.
1Polling
2Acknowledge
3Polling
4Acknowledge
Own Station
4.7.1 Sending a polling call
1. Press the [CALL] key followed by the [ENT] key to open the CALL TYPE menu.
*** Send message ***
STATION ID
PRIORITY
DSC FREQ
: Polling
: 987654321
: Routine
INDIVIDUAL
PSTN CALL
TEST CALL
ALL SHIPS
GROUP CALL
AREA CALL
POSITION
CALL TYPE
If the part of the menu appears,
use to scroll menu.
RELAY SEL
NEUTRAL
MEDICAL
RELAY ALL
DISTRESS
POLLING
2. Use
or to select POLLING and press the [ENT] key.
3. Press the [ENT] key to open the STATION ID menu.
CALL TYPE
PRIORITY
DSC FREQ
: POLLING
: ---------
: ROUTINE
: 2M-INTL
GO TO ALL VIEW
*** Send message ***
000000000
STATION ID
4. Key in ID of station where to send call and press the [ENT] key.
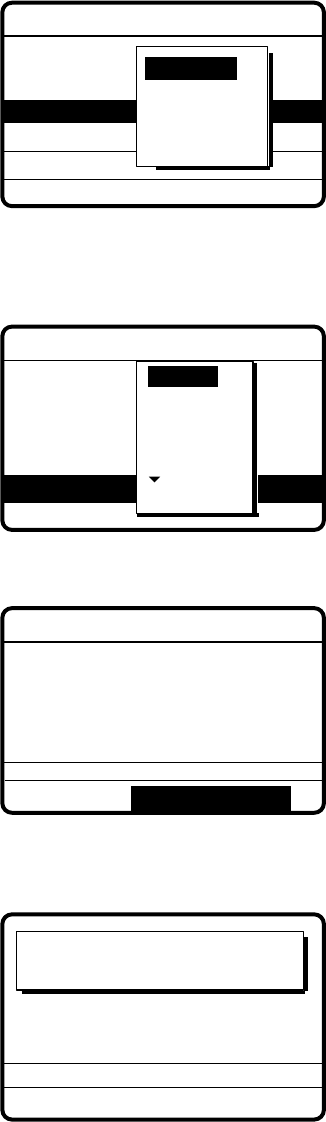
4-30
5. Press the [ENT] key to open the PRIORITY menu.
CALL TYPE
STATION ID
DSC FREQ
: Polling
: 987654321
: Routine
: 12M-INTL
GO TO ALL VIEW
*** Send message ***
BUSINESS
SAFETY
URGENCY
ROUTINE
PRIORITY
6. Select priority desired (usually ROUTINE) and press the [ENT] key.
7. Press the [ENT] key to open the DSC FREQ menu.
*** Send message ***
CALL TYPE
STATION ID
PRIORITY
VIEW
: Medical
transport
: Urgency
: Telephone
:267.5 kHz
4 MHZ
6 MHZ
8 MHZ
12 MHZ
2 MHZ
DSC FREQ TL
8. Select appropriate frequency and press the [ENT] key. The display changes as below.
CALL TYPE : POLLING
STATION ID :
123456789
PRIORITY
: ROUTINE
*** Send message ***
DSC FREQ : 2M-INTL
GO TO ALL VIEW
9. Press the [CALL] key to send the call (transmission time: 6-8 sec.), and the display changes
as below.
Polling request
call in progress!
TIME TO GO: 8S
DSC FREQ : 2177.0 KHZ
TO SHIP: 123456789
ROUTINE
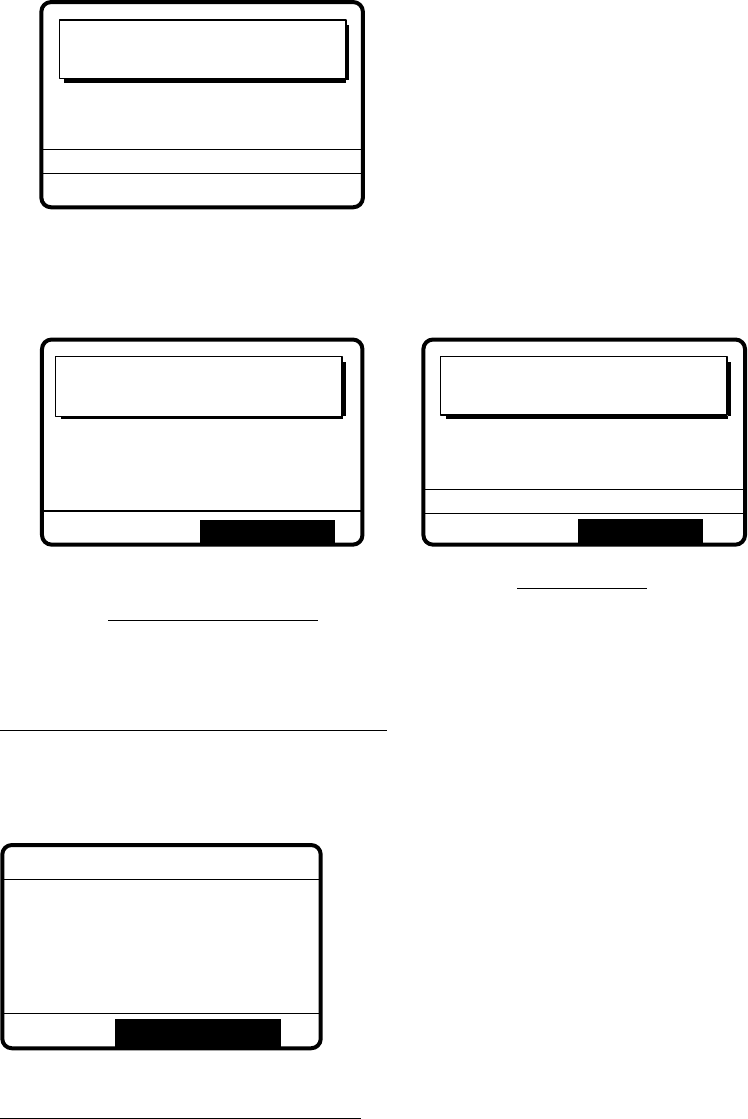
4-31
10. After the call is sent (timer counts down to zero) the following display appears.
Waiting for polling
acknowledgement.
DSC FREQ : 2177.0 KHZ
TIME TO GO: 4M59S
FROM SHIP: 123456789
ROUTINE
11. The timer counts down the time remaining to wait for acknowledgment of the call. One of the
following displays appears. (“No response! Try calling again?” appears when there is no
response from receiving station; timer counts down to zero.)
No response!
Try calling again?
DSC FREQ :
2177.0 KHZ
FROM SHIP:
123456789
ROUTINE
Polling acknowledge
call received.
FROM SHIP :
123456789
ROUTINE
NO INFORMATION
STOP ALARM CALL AGAIN
Polling acknowledge
call received
No response
12. Do one of the following depending on the message shown in step 11.
Polling acknowledge call received
The audio alarm sounds; press the [CANCEL] key to silence the alarm, and the display changes
as below.
JUL-23-1999-23:59 ECC: OK
POLLING ACKNOWLEDGE
FROM SHIP:
123456789
ROUTINE
NO INFORMATION
*
Received message
*
GO TO ALL VIEW
No response! Try calling again?
Press the [ENT] key (the display shown in step 8 appears), followed by the [CALL] key to re-send
the call, or press the [CANCEL] key to return to the DSC standby screen.
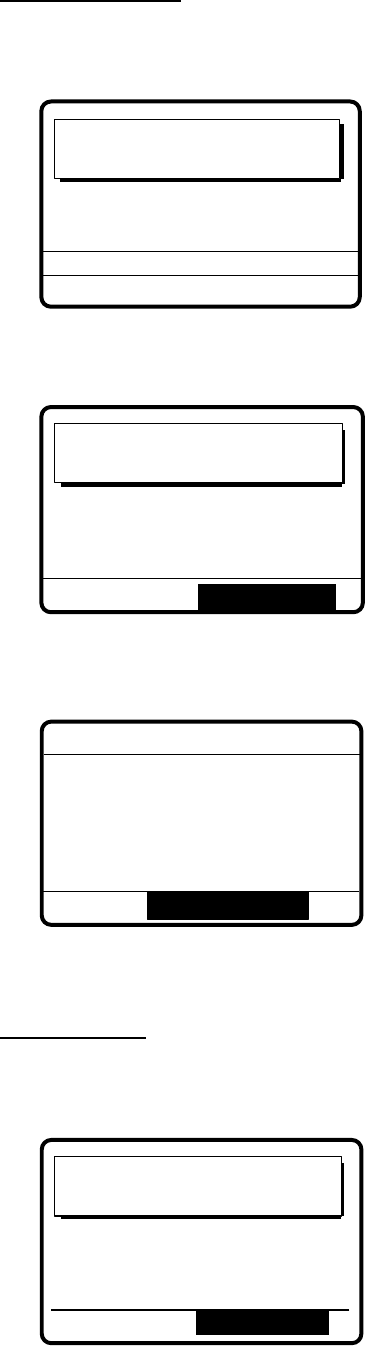
4-32
4.7.2 Receiving a polling call
Automatic reply
1. The display changes as follows and the audio alarm sounds when a polling request call is
received and the status of the [5/ACK] key is AUTO ACK.
Polling auto ack
call in progress!
TIME TO GO : 8S
DSC FREQ :
2177.0 KHZ
TO SHIP :
123456789
ROUTINE
2. After the call is transmitted the audio alarm sounds; press the [CANCEL] or [ENT] key to
silence the alarm.
Polling auto ack
call transmitted.
TO SHIP : 123456789
ROUTINE
STOP ALARM
3. The alarm sounds; press the [CANCEL] key to silence the alarm. The display changes as
below.
JUL-23-1999-23:00:09
POLLING ACKNOWLEDGE
TO SHIP :
987654321
ROUTINE
**
Xmitted message
**
GO TO ALL VIEW
4. Press the [CANCEL] key to return to the DSC standby screen.
Manual reply
1. It takes seven seconds to complete transmission of acknowledgement. Then the display
changes as below.
Polling request
call received.
STOP ALARM
FROM SHIP :
987654321
ROUTINE
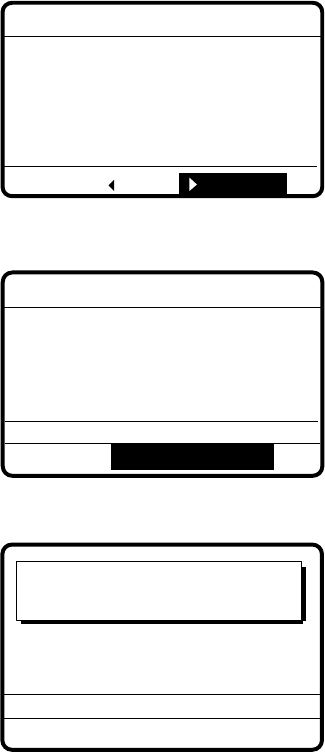
4-33
2. The alarm sounds; press the [CANCEL] to key to silence the alarm. The display changes as
below.
JUL-23-1999-23:01
POLLING REQUEST CALL
FROM SHIP : 987654321
ROUTINE
*
Received message
*
ALL VIEW
ANSWER
3. Press
to select ANSWER and press the [ENT] key. The display changes as below.
CALL TYPE : POLLING
ACKNOWLEDGE
SHIP ID : 987654321
PRIORITY : ROUTINE
*** Send message ***
DSC FREQ : 2M-INT
GO TO ALL VIEW
4. Press the [CALL] key to send the call. The display changes as below.
Polling acknowledge
call in progress!
TIME TO GO: 8S
DSC FREQ :
2177.0 KHZ
TO SHIP :
123456789
ROUTINE
After the call is sent the DSC standby screen appears.
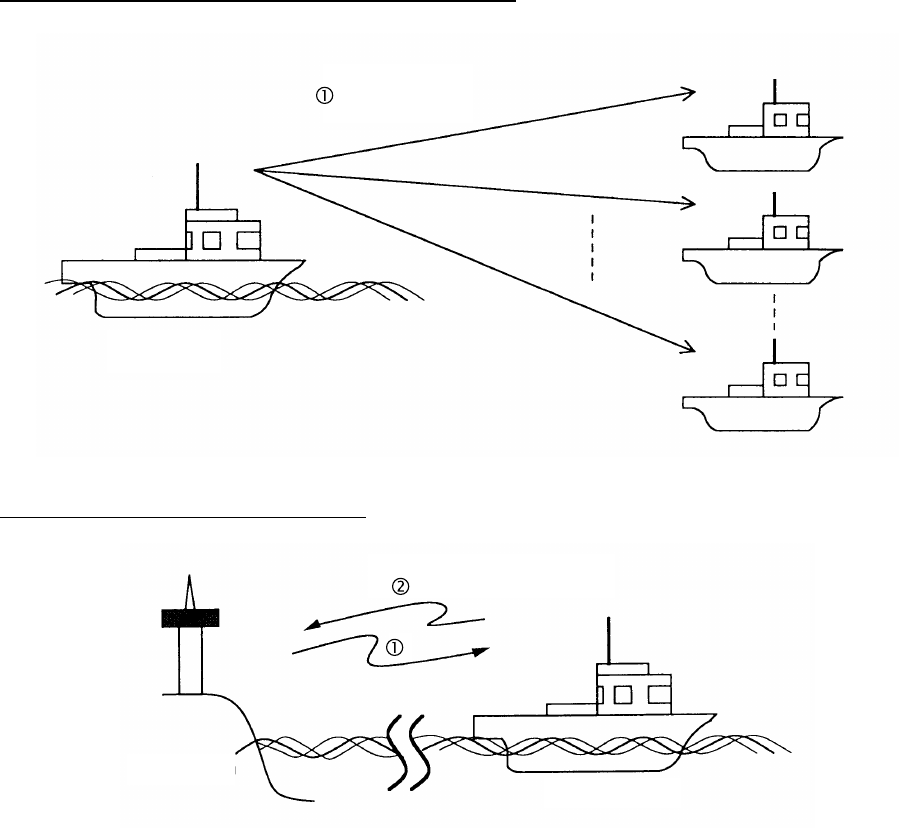
4-34
4.8 Position Call
There are two types of position calls: you send your position to other stations and your ship
requests position of another ship.
Sending own ship's position to other stations
Position Information
Own Ship
Finding position of other station
Position Information
Own Station Other Station
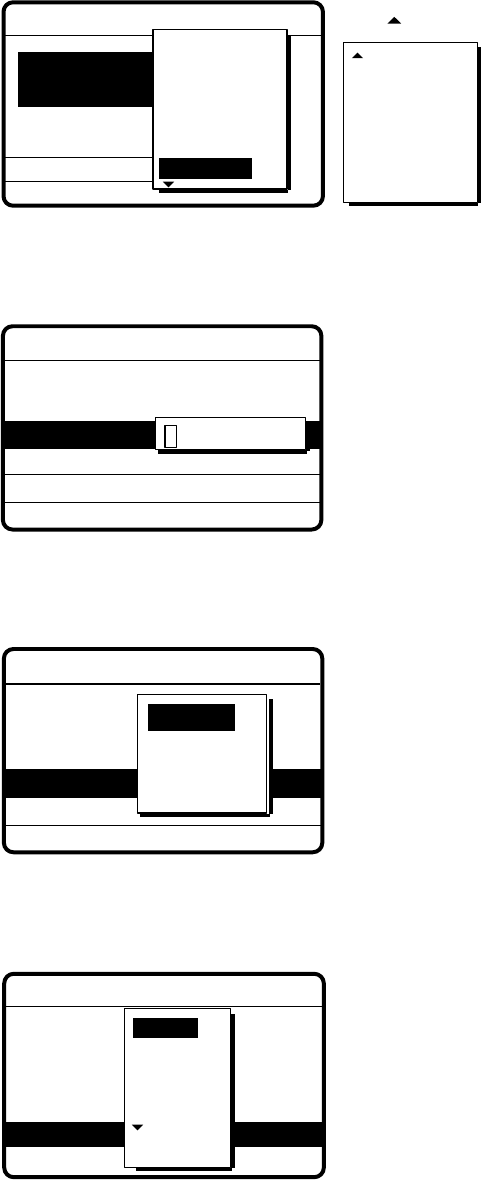
4-35
4.8.1 Position call: requesting other ship’s position
1. Press the [CALL] key, and press the [ENT] key to open the CALL TYPE menu.
If this part of menu appears,
use to scroll menu.
*** Send message ***
STATION ID
PRIORITY
DSC FREQ
INDIVIDUAL
PSTN CALL
TEST CALL
ALL SHIPS
GROUP CALL
AREA CALL RELAY SEL
POLLING
NEUTRAL
MEDICAL
RELAY ALL
DISTRESS
POSITION
CALL TYPE
2. Use
or to select POSITION and press the [ENT] key.
3. Press the [ENT] key to open the STATION ID menu.
CALL TYPE:
PRIORITY
DSC FREQ
POSITION
REQUEST
: ROUTINE
:2M-INTL
GO TO ALL VIEW
***
Send message
***
000000000
STATION ID
4. Key in ID of station (nine digits) of which you want their position and press the [ENT] key.
5. Press the [ENT] key to open the PRIORITY menu.
CALL TYPE
STATION ID
DSC FREQ
: Position
request
: 987654321
: Routine
:12M-INTL
GO TO ALL VIEW
***
Send message
***
BUSINESS
SAFETY
URGENCY
ROUTINE
PRIORITY
6. Select priority desired (usually ROUTINE) and press the [ENT] key.
7. Press the [ENT] key to open the DSC FREQ menu.
CALL TYPE : POSITION
REQUEST
STATION ID :
987654321
PRIORITY : ROUTINE
***
Send message
***
GO TO ALL VIEW
DSC FREQ : 2M-INTL
6 MHZ
8 MHZ
12 MHZ
4 MHZ
2 MHZ
8. Select appropriate frequency and press the [ENT] key.

4-36
9. The display now looks something like the following.
CALL TYPE: POSITION
REQUEST
STATION ID :
123456789
PRIORITY : ROUTINE
***
Send message
***
DSC FREQ : 2M-INTL
GO TO ALL VIEW
10. Press the [CALL] key to send the call (transmission time: 6-8 sec.). The following display
appears.
Position request
call in progress!
TIME TO GO: 8S
DSC FREQ :
2177.0 KHZ
TO SHIP :
123456789
ROUTINE
11. After the call has been sent (the timer counts down to zero) the following display appears.
Waiting for pos
acknowledgment.
TIME TO GO: 4M30S
DSC FREQ :
2177.0 KHZ
FROM SHIP :
123456789
ROUTINE
12. One of the following messages appears. (“No response! Try calling again?” appears after the
time has counted down to zero, meaning there is no response from the receiving station.)
No response!
Try calling again?
DSC FREQ :
2177.0 KHZ
STATION ID :
123456789
ROUTINE
Pos acknowledge
call received.
FROM SHIP :
123456789
ROUTINE
POS :
12˚34N 123˚45E AT 12:34
Position acknowledge call received No response
STOP ALARM
CALL AGAIN
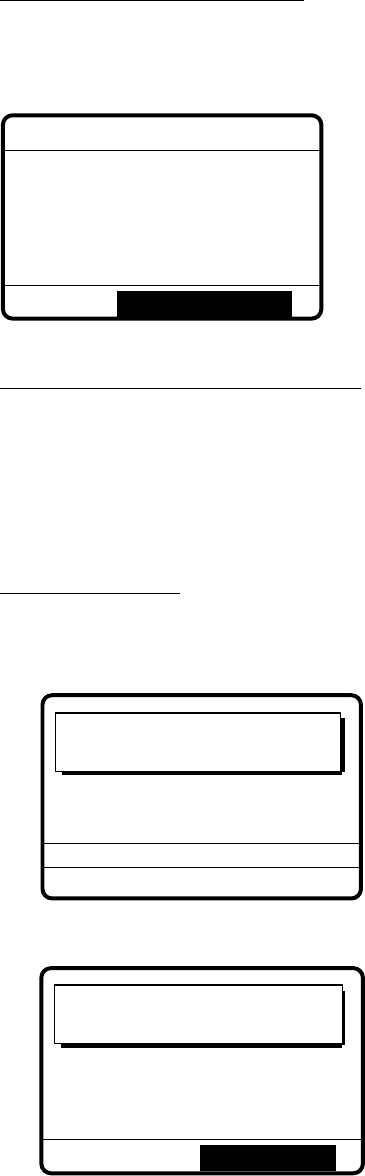
4-37
13. Do one of the following depending on the message displayed at step 12.
Acknowledge call received
The audio alarm sounds; press the [CANCEL] or [ENT] key to silence the alarm. The display
looks as below.
JUL-23-1999-23:59 ECC: OK
POSITION ACKNOWLEDGE
FROM SHIP :
123456789
ROUTINE
POS :
12˚34N 123˚45E AT 12:34
*
Received message
*
GO TO ALL VIEW
No response! Try calling again?
Press the [ENT] key (the display shown in step 9 appears) followed by the [CALL] key to re-send
the call, or press the [CANCEL] key to return to the DSC standby screen.
4.8.2 Position call: other ship requests your position
Automatic reply
1. When another ship requests your position and the [5/ACK] key is set for automatic
acknowledge the display changes as below.
Position auto ack
call in progress!
TIME TO GO : 8S
DSC FREQ :
2177.0 KHZ
TO SHIP :
123456789
ROUTINE
2. After the call is sent (transmission time: 6-8 sec.) the display below appears.
Position auto ack
call transmitted.
TO SHIP: 123456789
ROUTINE
STOP ALARM
POS: 35˚00N 135˚00E AT 23:59
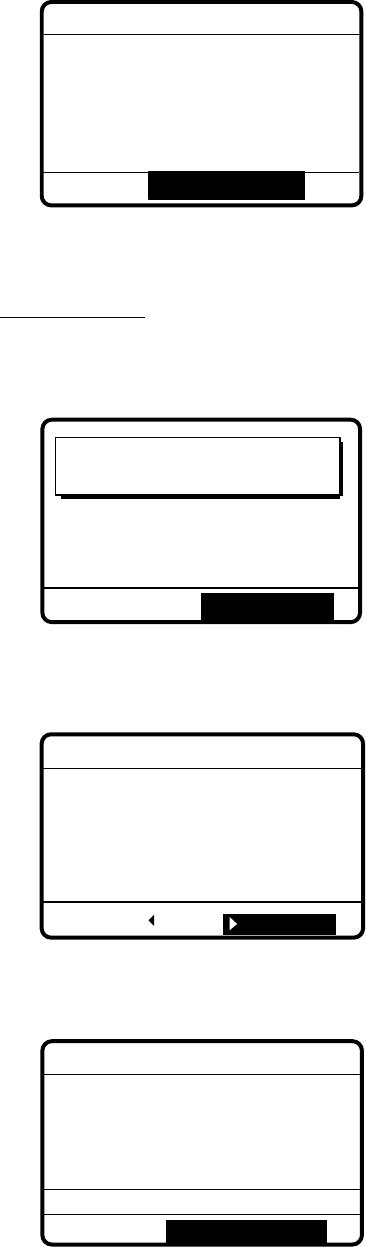
4-38
3. Press the [CANCEL] key to silence the alarm, and the display changes as below.
JUL-23-1999-23:59:09
POSITION ACKNOWLEDGE
TO SHIP :
987654321
ROUTINE
POS :
35°00N 135°00E AT 23:59
** Xmitted message **
GO TO ALL VIEW
4. Press the [CANCEL] key to return to the DSC standby screen.
Manual reply
1. When another ship requests your position and the [5/ACK] key is set for manual
acknowledge the display changes as below.
Position request
call received.
FROM SHIP:
123456789
ROUTINE
STOP ALARM
2. The audio alarm sounds; press the [CANCEL] key to silence the alarm. The display changes
as below.
JUL-23-1999-23:00:01 ECC: OK
POSITION REQUEST
FROM SHIP :
123456789
ROUTINE
* Received message *
ANSWER ALL VIEW
3. Press
to select ANSWER and press the [ENT] key. Your display should now look
something like the one below.
***
Send message
***
CALL TYPE: POSITION
ACKNOWLEDGE
POSTION :
35˚00N 135˚00E
UTC TIME :
23:01
DSC FREQ :
2177.0 KHZ
GO TO ALL VIEW
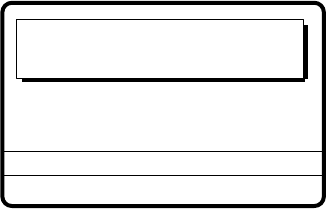
4-39
4. Press the [CALL] to send the call (transmission time: 6-8 sec.). The display changes as
below.
Position acknowledge
call in progress!
TIME TO GO: 8S
DSC FREQ :
2177.0 KHZ
TO SHIP :
123456789
POS:
35˚00N 135˚00E AT 23:01
ROUTINE
5. The DSC standby screen automatically appears after the call is sent.
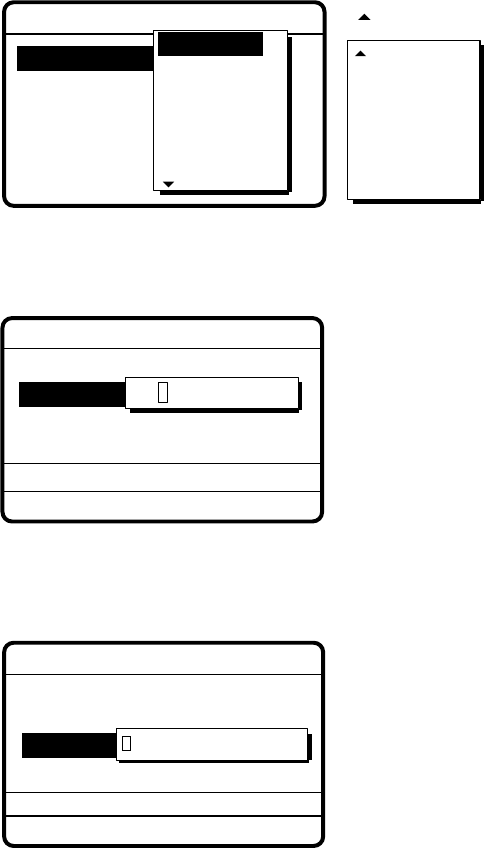
4-40
4.9 PSTN Call
The PSTN call allows the making and receiving of telephone calls over public switched telephone
networks.
4.9.1 Sending PSTN call, receiving acknowledge back (ACK BQ)
1. Press the [CALL] key followed by the [ENT] key to open the CALL TYPE menu.
RELAY SEL
POLLING
NEUTRAL
MEDICAL
RELAY ALL
DISTRESS
*** Send message ***
COAST ID
TEL NO. :
DSC FREQ
PSTN CALL
TEST CALL
ALL SHIPS
GROUP CALL
AREA CALL
POSITION
INDIVIDUAL
CALL TYPE
If this part of the
menu appears use
to scroll menu.
2. Select PSTN CALL and press the [ENT] key.
3. Press the [ENT] key to open the COAST ID menu.
GO TO ALL VIEW
***
Send message
***
CALL TYPE:
TEL NO. :
0000000000000000
DSC FREQ
PSTN CALL
:12M-INTL
000000000
COAST ID
4. Key in ID of coast station (nine digits) to where to send the call and press the [ENT] key.
5. Press the [ENT] key to open the TEL NO menu.
GO TO ALL VIEW
***
Send message
***
CALL TYPE:
COAST ID
DSC FREQ
PSTN CALL
: 001234567
:12M-INTL
0000000000000000
TEL NO.
16 digit max.
6. Enter telephone no. and press the [ENT] key.
7. Press the [ENT] key to open the DSC FREQ menu.
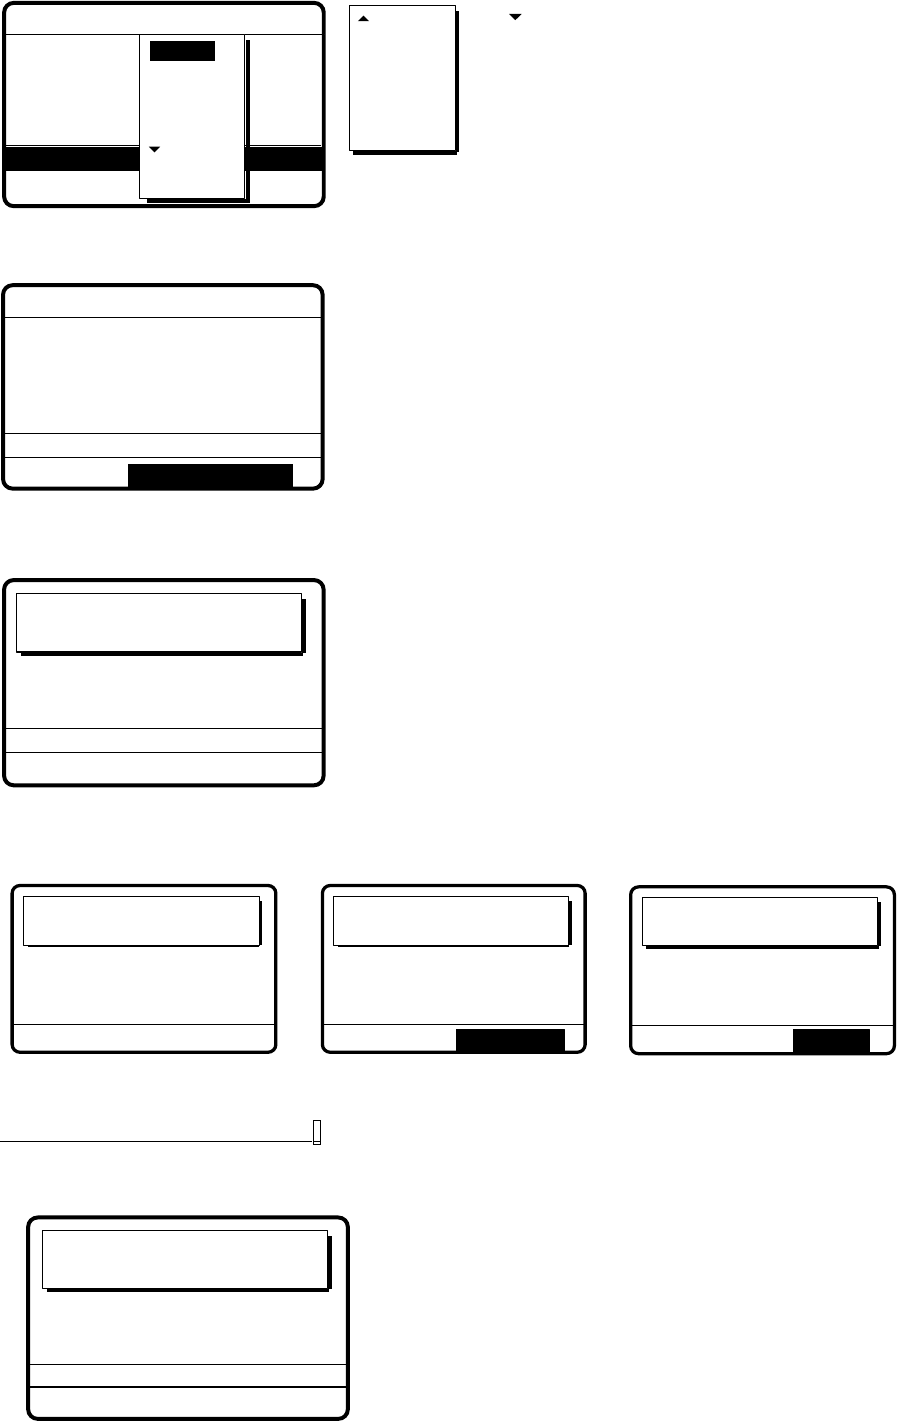
4-41
GO TO ALL VIEW
*** Send message ***
CALL TYPE
COAST ID
: PSTN CALL
: 123456789
TEL NO. : 123456789012345
DSC FREQ :12M-INTL
6 MHz
8 MHz
12 MHz
4 MHz
2 MHz 16 MHz
18 MHz
22 MHz
25 MHz
OTHER
MANUAL
Use to scroll
menu.
OTHER: Special, private channel
MANUAL: Manual tuning of
radiotelphone
8. Select DSC frequency and press the [ENT] key. The display changes as below.
***
Send message
***
DSC FREQ : 12M-INTL
GO TO ALL VIEW
CALL TYPE : PSTN CALL
COAST ID :
001234567
TEL NO. :
1234567890123456
9. Press the [CALL] key to send the PSTN call (transmission time: 6-8 sec.). The display shows
the following message.
PSTN request
call in progress!
TIME TO GO: 8S
TO COAST :
001234567
TEL NO. :
1234567890123456
DSC FREQ :
12577.5 KHZ
10. One of the following three displays appears. (“No response. Try calling again.” appears if
there is no response from the receiving station - the timer counts down to zero.)
Waiting for
acknowledgement.
TIME TO GO: 25S
DSC FREQ :
12577.5 KHZ
FROM COAST :
001234567
TEL NO. :
1234567890123456
No response!
Try calling again?
DSC FREQ :
12577.5 KHZ
RE-SEND
FROM COAST :
001234567
TEL NO. :
1234567890123456
Unable acknowledge
call received.
STOP ALARM
FROM COAST :
001234567
TEL NO. :
1234567890123456
BUSY
11. Do one of the following depending on the message shown at step 10.
Waiting for acknowledgement
1) The call is sent (transmission time: 6-8 sec.), showing the display below.
PSTN connection
call in progress!
TIME TO GO: 8S
TO COAST : 001234567
TEL NO. : 1234567890123456
TELEPHONE CH 12001
DSC FREQ : 12230.0 KHZ
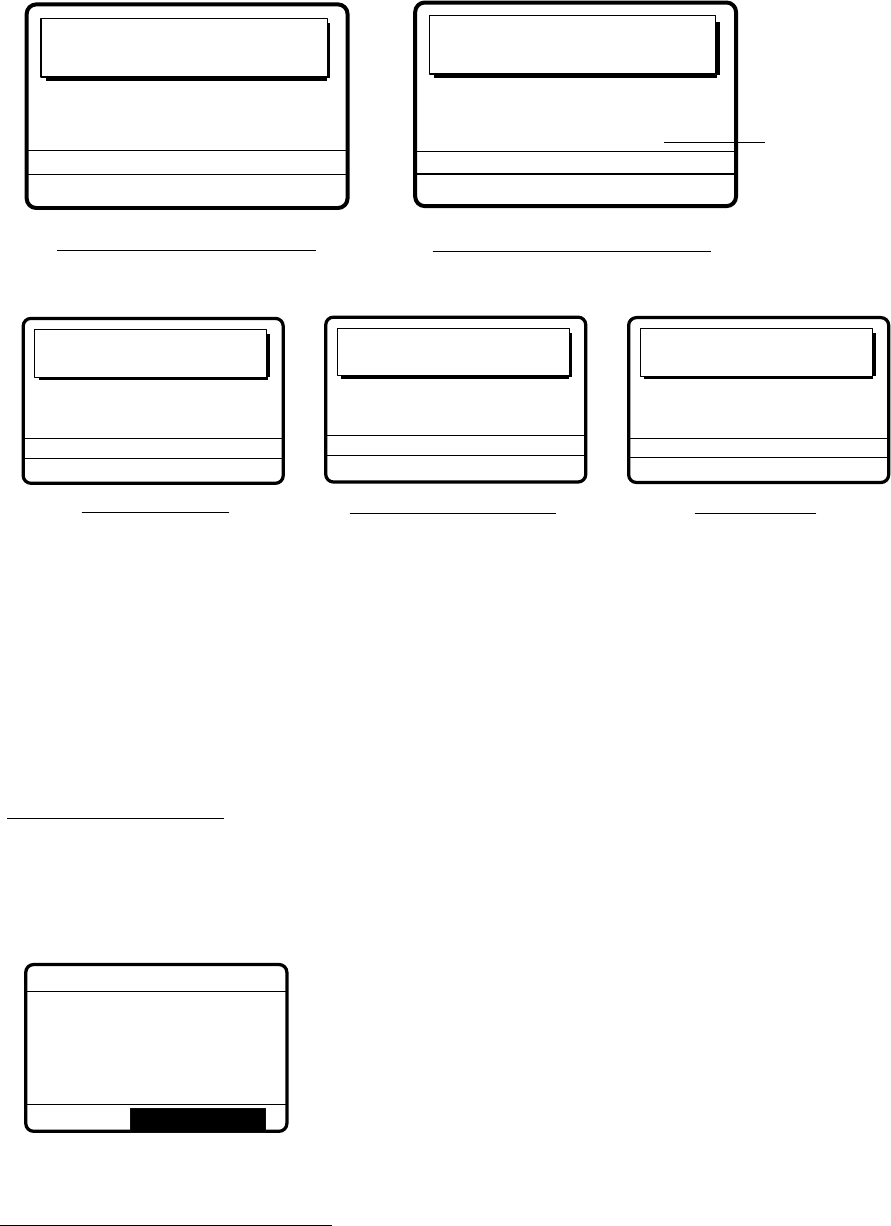
4-42
2) After the call is sent (timer counts down to zero) one of the following message appears.
Waiting for
acknowledgement.
TIME TO GO: 25S
DSC FREQ : 12230.0 KHZ
FROM COAST : 001234567
TEL NO. : 1234567890123456
TELEPHONE CH 12001
PSTN connection
call in progress!
TIME TO GO: 8S
TO COAST : 001234567
TEL NO. : 1234567890123456
TELEPHONE CH 16001
DSC FREQ : 16360.0 KHZ
Waiting for acknowledgement Request for new Tx assignment
New channel
3) One of the follow displays appears.
PSTN call connected.
DSC FREQ :
12230.0 KHZ
TO COAST :
001234567
TEL NO. :
1234567890123456
TELEPHONE CH 12001
PSTN end of call
in progress!
TIME TO GO: 8S
TO COAST :
001234567
TEL NO. :
1234567890123456
DSC FREQ :
12230.0 KHZ
PSTN call connected Waiting for acknowledgement PSTN end of call
Waiting for
acknowledgement.
TIME TO GO: 25S
DSC FREQ :
12230.0 KHZ
FROM COAST :
001234567
TEL NO. :
1234567890123456
TELEPHONE CH 12001
4) Follow the instructions below depending on the message shown in 3) above.
PSTN call connected: Your phone rings; pick up the handset and communicate with
called party.
Waiting for acknowledgement: If the call is acknowledged the message “PSTN call
connected.” appears. Follow “PSTN call connected” above.
PSTN end of call in progress: This means channel could not be used. After the timer
counts down to zero repeat this procedure to re-send the call.
Unable acknowledge
1) The audio alarm sounds; press the [CANCEL] or [ENT] key to silence the alarm. The
display shown at left in the figure below appears. Use the [ENT] key, and to view the
reason for unable to acknowledge.
*
Received message
*
JUL-23-1999-23:01 ECC: OK
UNABLE ACKNOWLEDGE
FROM COAST :
001234567
TEL NO. :
1234567890123456
BUSY
GO TO ALL VIEW
2) Press the [CANCEL] key to return to the DSC standby screen.
No response! Try calling again?
Press the [ENT] key (the display shown in step 7 appears) followed by the [CALL] key to re-
send the message, or press the [CANCEL] key to return to the DSC standby screen.

4-43
4.9.2 Sending PSTN call, receiving acknowledge back (QUEUE
indication), ring back
1. Press the [CALL] key followed by the [ENT] key to open the CALL TYPE menu.
RELAY SEL
POLLING
NEUTRAL
MEDICAL
RELAY ALL
DISTRESS
*** Send message ***
COAST ID
TEL NO. :
DSC FREQ
PSTN CALL
TEST CALL
ALL SHIPS
GROUP CALL
AREA CALL
POSITION
INDIVIDUAL
CALL TYPE
If this part of the
menu appears use
to scroll menu.
2. Select PSTN CALL and press the [ENT] key.
3. Press the [ENT] key to open the COAST ID menu.
GO TO ALL VIEW
***
Send message
***
CALL TYPE:
TEL NO. :
0000000000000000
DSC FREQ
PSTN CALL
:12M-INTL
000000000
COAST ID
4. Key in ID of coast station (nine digits) to where to send the call and press the [ENT] key.
5. Press the [ENT] key to open the TEL NO. menu.
GO TO ALL VIEW
***
Send message
***
CALL TYPE:
COAST ID
DSC FREQ
PSTN CALL
: 001234567
:12M-INTL
0000000000000000
TEL NO.
16 digit max.
6. Enter telephone no. and press the [ENT] key.
7. Press the [ENT] key to open the DSC FREQ menu.
GO TO ALL VIEW
*** Send message ***
CALL TYPE
COAST ID
: PSTN CALL
: 123456789
TEL NO. : 123456789012345
DSC FREQ :12M-INTL
6 MHz
8 MHz
12 MHz
4 MHz
2 MHz 16 MHz
18 MHz
22 MHz
25 MHz
OTHER
MANUAL
Use to scroll
menu.
OTHER: Special, private channel
MANUAL: Manual tuning of
radiotelphone
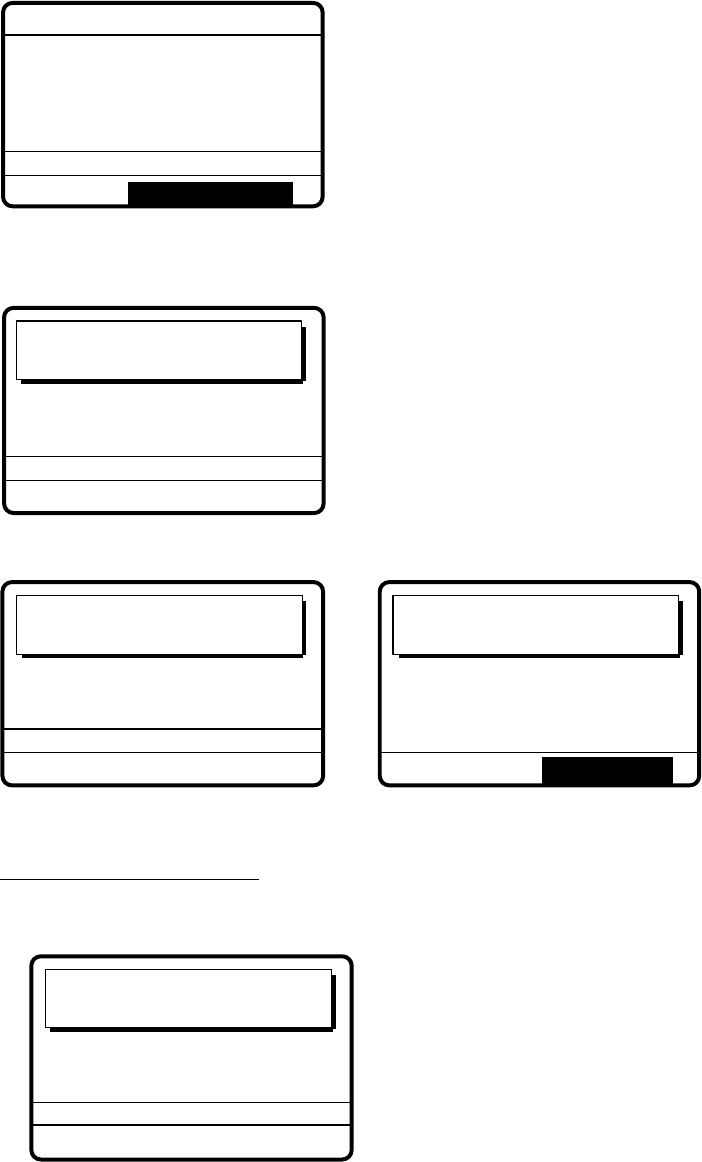
4-44
8. Select DSC frequency and press the [ENT] key. The display changes as below.
***
Send message
***
DSC FREQ : 12M-INTL
GO TO ALL VIEW
CALL TYPE : PSTN CALL
COAST ID :
001234567
TEL NO.
: 1234567890123456
9. Press the [CALL] key to send the PSTN call (transmission time: 6-8 sec.). The display shows
the following message.
PSTN request
call in progress!
TIME TO GO: 8S
TO COAST :
001234567
TEL NO. :
1234567890123456
DSC FREQ :
12577.5 KHZ
10. After the call is sent one of the following messages appears.
Waiting for
acknowledgement.
TIME TO GO: 25S
DSC FREQ :
12577.5 KHZ
FROM COAST :
001234567
TEL NO. :
1234567890123456
Unable acknowledge
call received.
STOP ALARM
FROM COAST :
001234567
TEL NO. :
1234567890123456
QUEUE INDICATION
11. Do one of the following depending on the message shown at step 10.
Waiting for acknowledge
1) After the timer counts down to zero the following message appears.
PSTN connection
call in progress!
TIME TO GO: 25S
DSC FREQ :
2230.0 KHZ
FROM COAST :
001234567
TEL No. :
1234567890123456
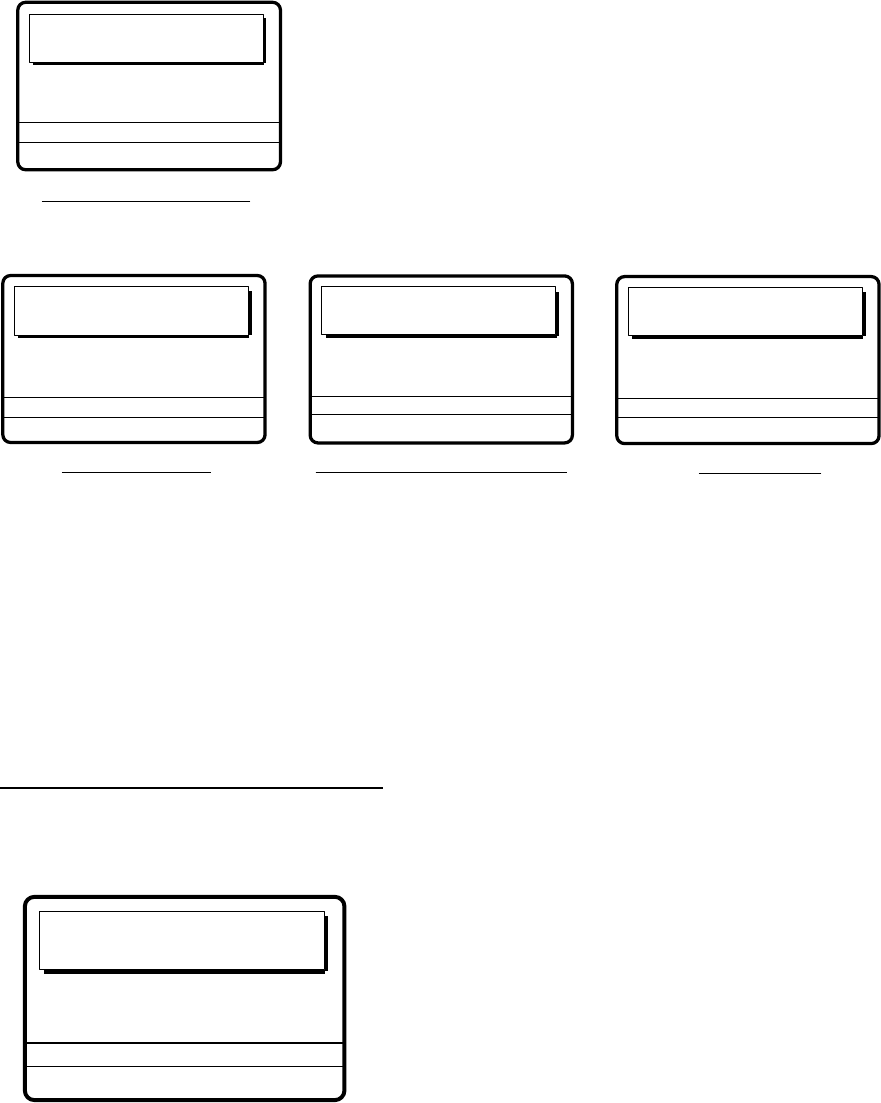
4-45
2) After the connection call is sent the following message appears.
Waiting for acknowledgement
Waiting for
acknowledgement.
TIME TO GO: 25S
DSC FREQ :
12230.0 KHZ
FROM COAST :
001234567
TEL NO. :
1234567890123456
TELEPHONE CH 12001
3) After the timer counts down to zero one of the following messages appears.
PSTN call connected.
DSC FREQ : 12230.0 KHZ
TO COAST : 001234567
TEL NO. : 1234567890123456
TELEPHONE CH 12001
PSTN call connected PSTN connection call in progress PSTN end of call
PSTN connection
call in progress!
TIME TO GO: 25S
DSC FREQ : 12230.0 KHZ
FROM COAST : 001234567
TEL NO. : 1234567890123456
PSTN end of call
in progress!
TIME TO GO: 8S
TO COAST : 001234567
TEL NO. : 1234567890123456
TELEPHONE CH 12001
DSC FREQ : 12230.0 KHZ
PSTN call connected: Your phone rings; pick up the handset and communication with
receiving station.
PSTN connection call in progress!: This means coast station has switched DSC
frequency. (If the channel cannot be used the message “PSTN end of call in progress!”
appears. In this case, start this procedure again.) If the channel assigned is OK the
message “Waiting for acknowledgment.” appears.
PSTN end of call in progress!: The channel could not be used. Press the [CANCEL]
key to return to the DSC standby screen. Repeat this procedure to send the call again.
Unable to acknowledge call received
1) The alarm sounds; press the [CANCEL] or [ENT] key to silence the alarm. The display
changes as below, waiting for the ring back call.
Waiting for
ring-back call.
TIME TO GO: 15M00S
DSC FREQ :
12577.5 KHZ
FROM COAST :
001234567
TEL NO. :
1234567890123456
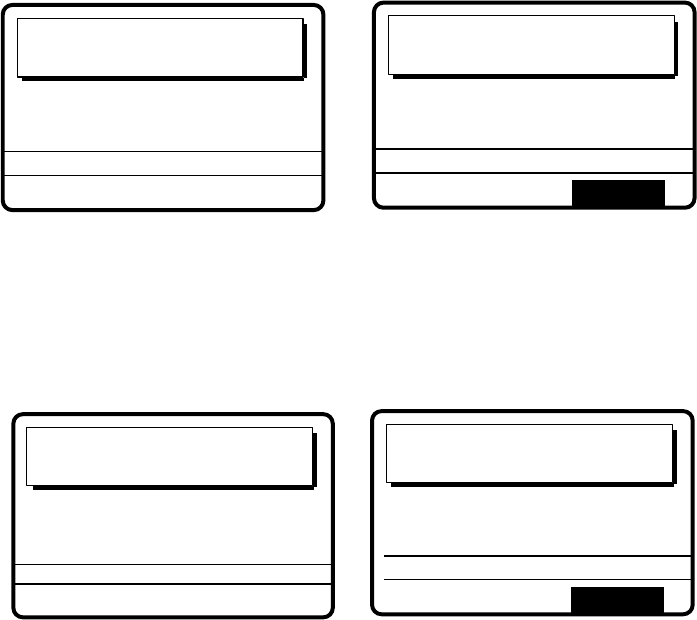
4-46
2) One of the following displays appears. (For “No response. Try calling again?”, press the
[ENT] key to re-send the call, or press the [CANCEL] key to cancel the call and return to
the DSC standby screen.)
No response!
Try calling again.
DSC FREQ :
12577.5 KHZ
RE-SEND
FROM COAST : 001234567
TEL NO. : 1234567890123456
Able acknowledge
call in progress!
DSC FREQ :
12577.5 KHZ
TO COAST : 001234567
TEL NO. : 1234567890123456
TELEPHONE CH121001
TIME TO GO: 8S
3) After the acknowledge able call is sent the display changes as below. Pick up the
handset or press the [CALL] key within one minute from the time this message appears.
(If the handset is not picked up or the [CALL] key is not pressed within one minute the
message “PSTN call canceled. Try calling again?” appears. In this case, press the
[ENT] key to re-send the call.)
No response!
Try calling again?
DSC FREQ :
12577.5 KHZ
RE-SEND
FROM COAST :
001234567
TEL NO. :
1234567890123456
Pick up the handset
or press CALL key!
TIME TO GO: 60S
FROM COAST :
001234567
TEL NO. :
1234567890123456
TELEPHONE CH 12001
DSC FREQ :
12577.5 KHZ
4) The message “PSTN call in progress!” appears. Follow from 2) above.
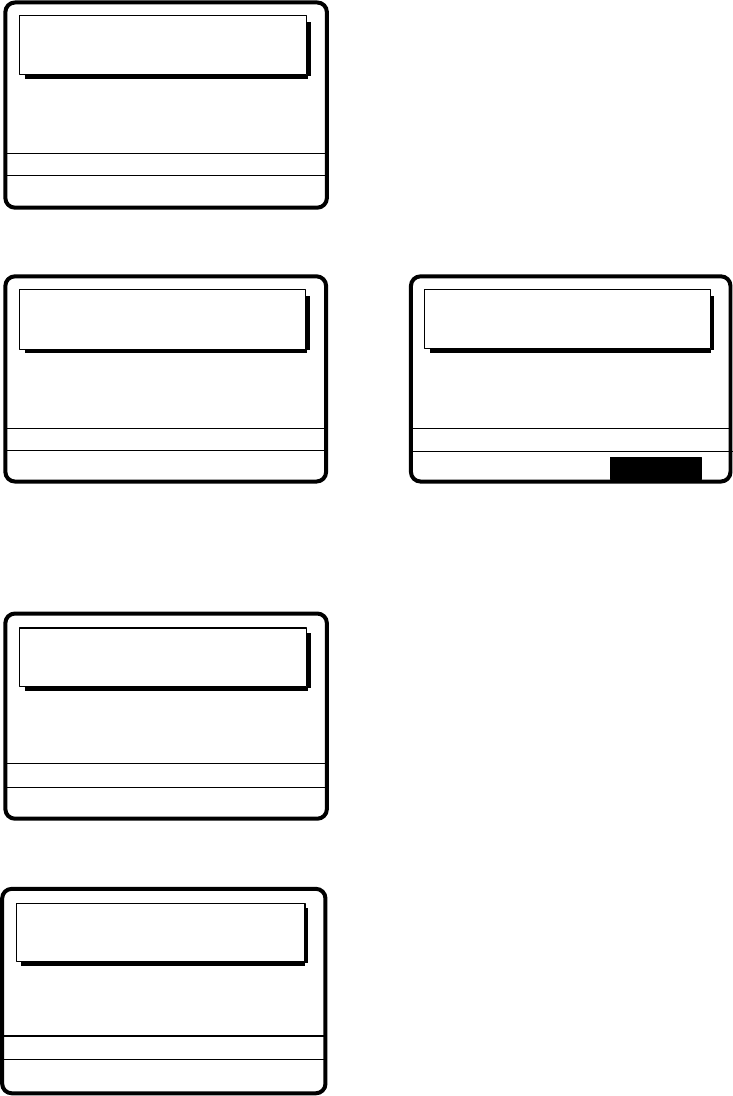
4-47
4.9.3 Receiving PSTN call, sending acknowledge back
(ACK BQ)
1. The following display appears when a PSTN call is received.
Able acknowledge
call in progress!
TIME TO GO: 8S
TO COAST : 001234567
TEL NO. : 1234567890123456
TELEPHONE CH 12001
DSC FREQ : 12577.5 KHZ
2. The timer counts down to zero and the following display appears.
Pick up the handset
or press CALL key.
TIME TO GO: 60S
FROM COAST :
001234567
TEL NO. :
1234567890123456
TELEPHONE CH 12001
DSC FREQ :
12577.5 KHZ
PSTN call canceled.
Try calling again.
FROM COAST :
001234567
TEL NO. :
1234567890123456
TELEPHONE CH 12001
DSC FREQ :
12577.5 KHZ
RE-SEND
3. Pick up the handset or press the [CALL] key within one minute. (If this not done within one
minute the call is canceled, displaying the message “PSTN call canceled. Try calling again?”.
Press the [ENT] key to call.)
PSTN connection
call in progress!
TIME TO GO: 8S
TO COAST : 001234567
TEL NO. : 1234567890123456
TELEPHONE CH 12001
DSC FREQ : 12230.0 KHZ
4. When the timer counts down to zero the following message appears.
Waiting for
acknowledgement.
TIME TO GO: 25S
DSC FREQ :
12230.0 KHZ
FROM COAST :
001234567
TEL NO. :
1234567890123456
TELEPHONE CH 12001
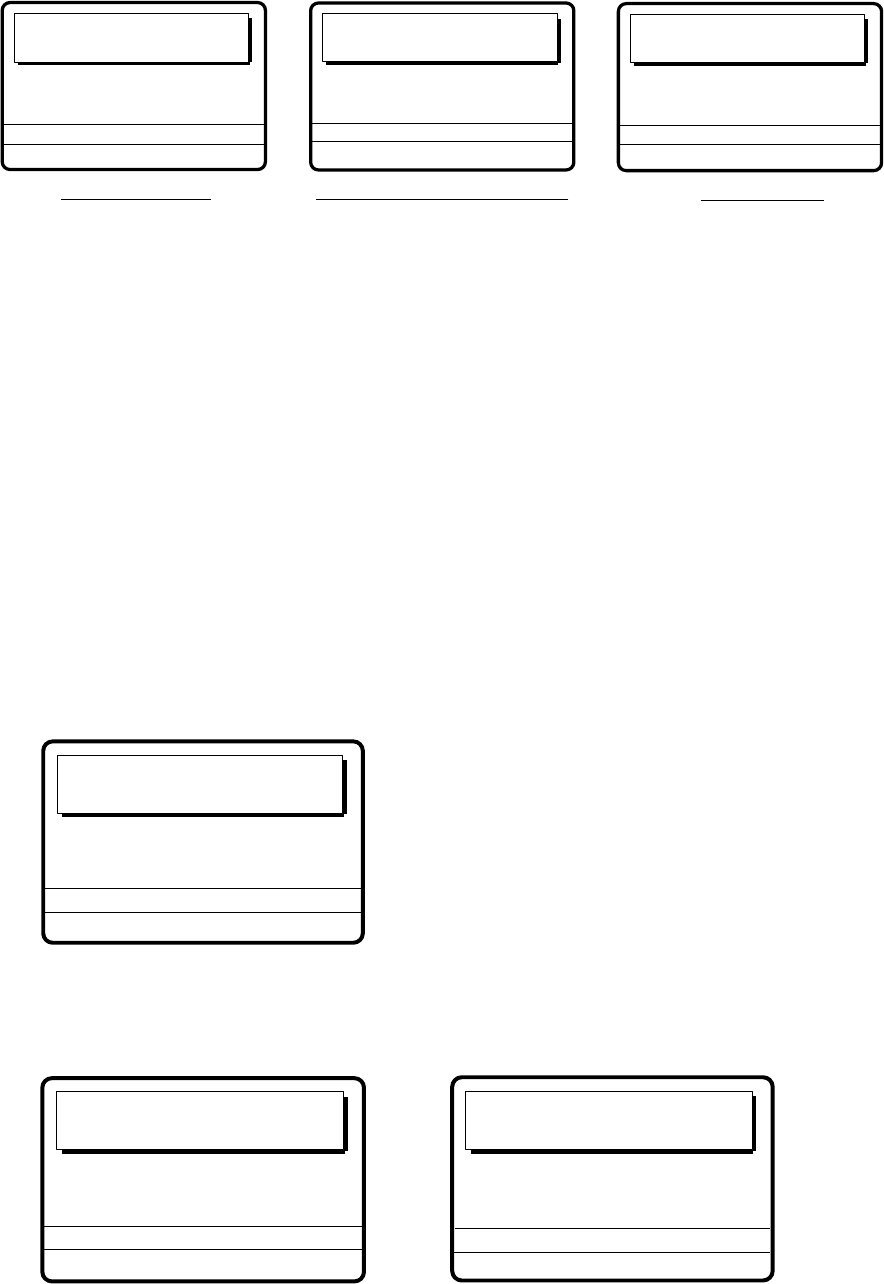
4-48
5. One of the following messages appears.
PSTN call connected.
DSC FREQ :
12230.0 KHZ
TO COAST :
001234567
TEL NO. :
1234567890123456
TELEPHONE CH 12001
PSTN call connected PSTN connection call in progress PSTN end of call
PSTN connection
call in progress!
TIME TO GO: 25S
DSC FREQ :
12230.0 KHZ
FROM COAST :
001234567
TEL NO. :
1234567890123456
PSTN end of call
in progress!
TIME TO GO: 8S
TO COAST :
001234567
TEL NO. :
1234567890123456
TELEPHONE CH 12001
DSC FREQ :
12230.0 KHZ
6. Do one of the following depending on the message shown at step 5.
PSTN call connected: Your phone rings; pick up the handset and communication with
receiving station.
PSTN connection call in progress!: This means coast station has switched DSC
frequency. (If the channel cannot be used the message “PSTN end of call in progress!”
appears. In this case, start this procedure again.) If the channel assigned is OK the
message Waiting for acknowledgment.” appears.
PSTN end of call in progress!: The channel could not be used. Press the [CANCEL]
key to return to the DSC standby screen. Repeat this procedure to send the call again.
4.9.4 PSTN call disconnection, receiving charge information
(ship disconnects line)
1. After hanging up the handset or pressing the [CANCEL] key to complete your call the display
shows the following message.
PSTN end of call
in progress!
TIME TO GO: 8S
TO COAST : 001234567
TEL NO. : 1234567890123456
DSC FREQ : 12230.0 KHZ
2. After the call is sent one of the following messages appears. (For time out the message
“PSTN end of call in progress!” appears. After the timer counts down to zero “Waiting for
charge information.” appears.)
Waiting for
charge information.
TIME TO GO: 20S
FROM COAST :
001234567
TEL NO. :
1234567890123456
DSC FREQ :
12230.0 KHZ
PSTN end of call
in progress!
TIME TO GO : 8S
TO COAST :
001234567
TEL NO. :
1234567890123456
DSC FREQ :
12230.0 KHZ
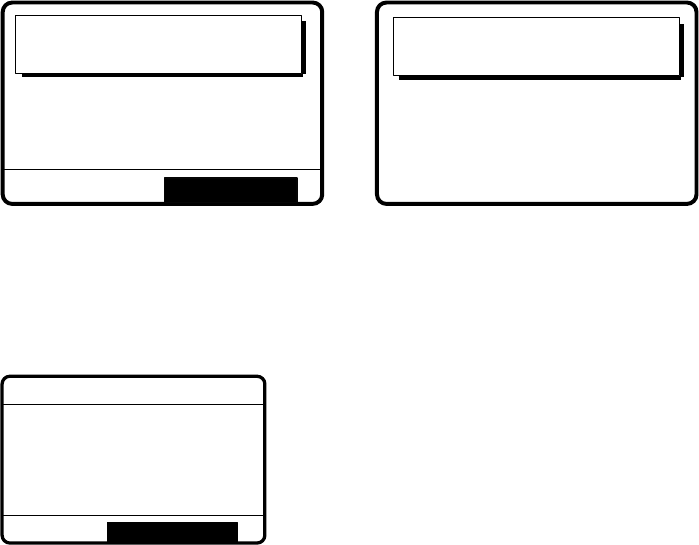
4-49
3. When the timer counts down to zero one of the following displays appear.
Charge information
call received.
CHARGE TIME :
00H 12M 34S
FROM COAST :
001234567
TEL NO. :
1234567890123456
STOP ALARM
No response!
charge information.
FROM COAST :
001234567
TEL NO. :
1234567890123456
4. For “No response! charge information.”, the equipment reverts to step 2 in this procedure
to await charge information. For “Charge information call received.” the audio alarm
sounds; press the [CANCEL] key or [ENT] key to silence the audio alarm. The display shown
below appears.
JUL-23-1999-23:59 ECC: OK
CHARGE INFORMATION
CHARGE TIME :
00H 12M 34S
FROM COAST :
001234567
TEL NO. :
1234567890123456
* Received message *
GO TO ALL VIEW
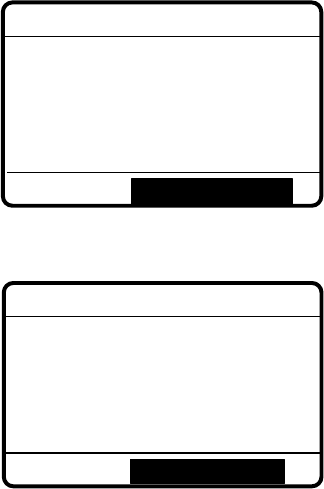
4-50
4.9.5 PSTN call disconnection, receiving charge information
(coast station disconnects line)
1. The PSTN line is disconnected by the coast station when it finds no evidence of
communications or the land subscriber hangs up. The coast station then sends charge
information as below.
JUL-23-1999-23:59 ECC: OK
CHARGE INFORMATION
CHARGE TIME : 00H 12M 34S
FROM COAST : 001234567
TEL NO. : 1234567890123456
* Received message *
GO TO ALL VIEW
2. For no charge information the left-hand figure below appears.
JUL-23-1999-23:59 ECC: OK
CHARGE INFORMATION
CHARGE TIME : NO INFO
FROM COAST : 001234567
TEL NO. 1234567890123456
* Received message *
GO TO ALL VIEW