Furuno USA 9ZWFM8900S GMDSS VHF User Manual
Furuno USA Inc GMDSS VHF
UserManual.wiki
>
Furuno USA
>
9ZWFM8900S User Manual
>
users manaul part 2
Contents
1.
users manual part 1
2.
users manaul part 2
3.
usermanual part 3
users manaul part 2
Navigation menu
Upload a User Manual
Namespaces
Wiki Guide
HTML
PDF
Info
Views
User Manual
Discussion / Help
Navigation
![3. DSC DISTRESS OPERATIONS3-133.4 How to Receive a Distress RelayThere are three types of distress relay messages: distress relay for all ships, distress relay area and distress relay from coast station. When you receive a distress relay message, continue monitoring CH16. The audio alarm sounds and the LED flashes in red. The icon ( ) appears in the tab area and the applicable pop-up message ap-pears on the screen.1. Press the CANCEL key to silence the audio alarm, stop the flashing of the LED and erase the pop-up message.2. Watch CH16.3.5 How to Cancel the Distress AlertYou can cancel the distress alert while it is being sent or while waiting for its acknowl-edgement as follows.1. Rotate the CHANNEL/ENTER knob to select [CANCEL] in the user options area then push the knob.The following message appears on the screen.Distress relay for all ships Distress relay areaDistress relay from coast station](https://usermanual.wiki/Furuno-USA/9ZWFM8900S.users-manaul-part-2/User-Guide-1778062-Page-1.png)
![3. DSC DISTRESS OPERATIONS3-142. Rotate the CHANNEL/ENTER knob to select [Yes] then push the knob to cancel the distress alert over CH70. After transmitting the distress cancel call, the follow-ing message appears on the screen.3. Push the CHANNEL/ENTER knob to erase the message. The following message appears on the screen.4. Communicate with all ships via radiotelephone referring to the message shown at step 3.5. Push the CHANNEL/ENTER knob. The following message appears on the screen.6. With [Finish] selected, push the CHANNEL/ENTER knob.7. Rotate the CHANNEL/ENTER knob to select [QUIT] in the user options area then push the knob. The RT screen appears.](https://usermanual.wiki/Furuno-USA/9ZWFM8900S.users-manaul-part-2/User-Guide-1778062-Page-2.png)
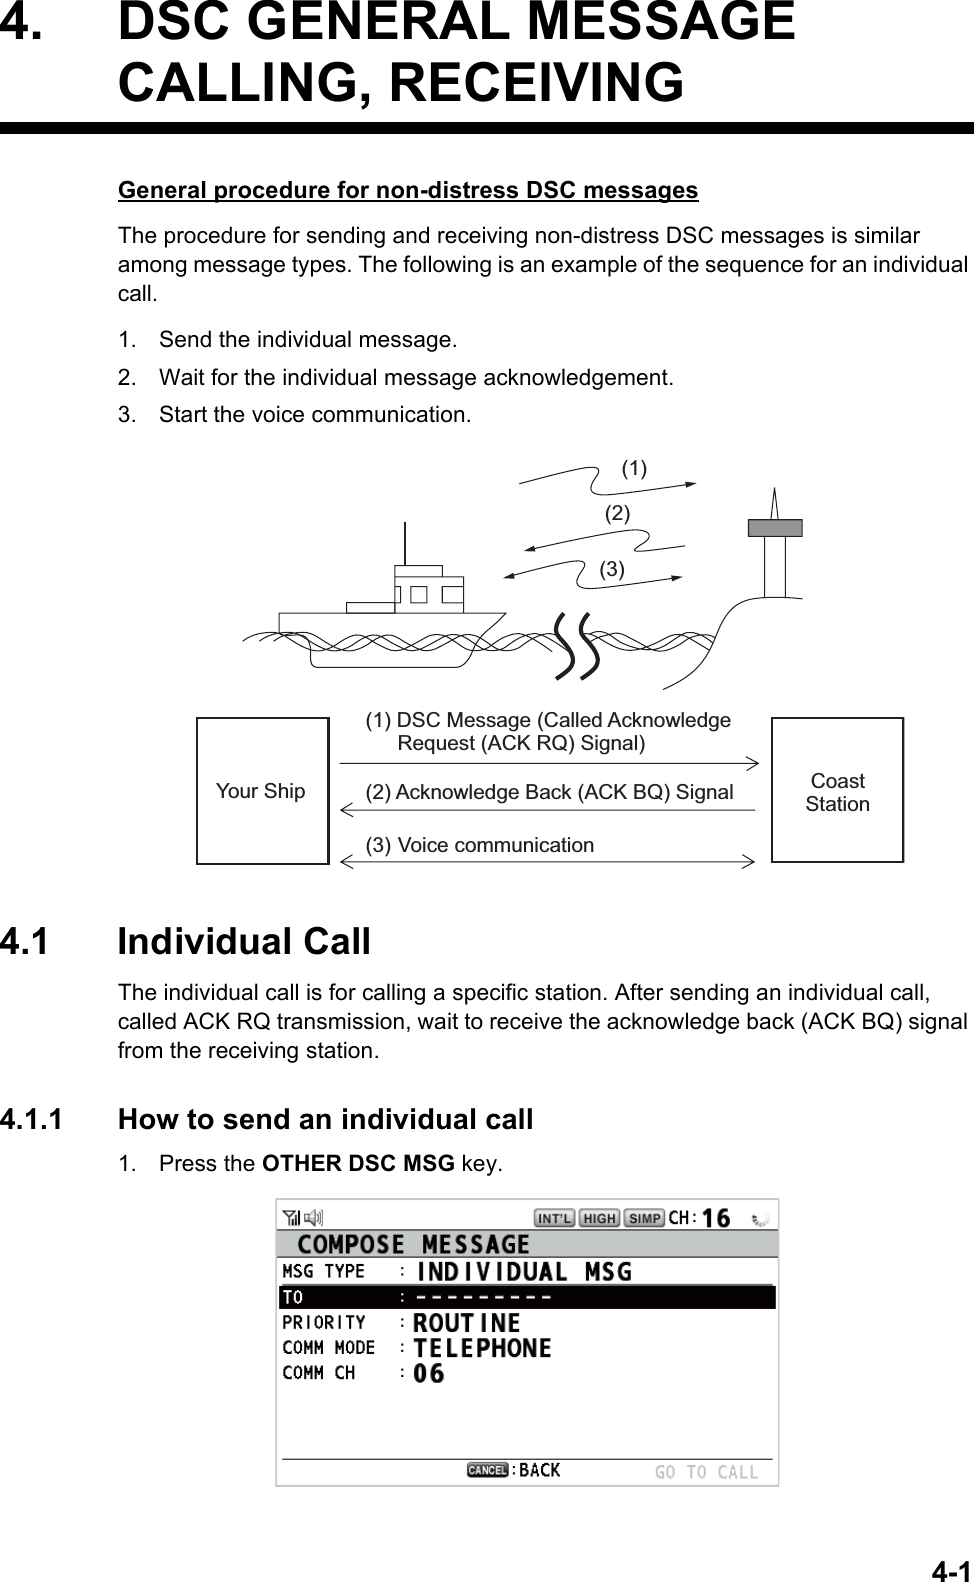
![4. DSC GENERAL MESSAGE CALLING, RECEIVING4-22. Rotate the CHANNEL/ENTER knob to select [MSG TYPE] then push the knob.3. Rotate the CHANNEL/ENTER knob to select [INDIVIDUAL MSG] then push the knob.4. With [TO] selected, push the CHANNEL/ENTER knob.5. Rotate the CHANNEL/ENTER knob to select [DIRECT INPUT], [ADDRESS BOOK DATA] or [AIS TARGET DATA] then push the knob.[DIRECT INPUT]: Enter the MMSI of the station where to send the call then push the CHANNEL/ENTER knob.[ADDRESS BOOK DATA]: Select an MMSI from the [ADDRESS BOOK] (see section 5.13) then push the CHANNEL/ENTER knob.[AIS TARGET DATA]: Select an MMSI from the [AIS TARGET LIST] then push the CHANNEL/ENTER knob.AIS target listIf an AIS transponder is connected to the radiotelephone, you can select an MMSI from the [AIS TARGET LIST].6. Rotate the CHANNEL/ENTER knob to select [PRIORITY] then push the knob.7. Rotate the CHANNEL/ENTER knob to select [ROUTINE], [SAFETY] or [URGEN-CY] then push the knob.8. With [COMM CH] selected, push the CHANNEL/ENTER knob.9. Rotate the CHANNEL/ENTER knob to select [SELECT] or [MANUAL] then push the knob.[SELECT]: The options window as shown in the right figure appears. Rotate the CHANNEL/ENTER knob to select the channel then push the knob.[MANUAL]: Enter the channel then push the CHANNEL/ENTER knob.10. With [GO TO CALL] selected, push the CHANNEL/ENTER knob to send the indi-vidual call. The screen changes as shown below.TX](https://usermanual.wiki/Furuno-USA/9ZWFM8900S.users-manaul-part-2/User-Guide-1778062-Page-4.png)
![4. DSC GENERAL MESSAGE CALLING, RECEIVING4-3The timer starts counting up the time since the call was sent. After the call is sent, the equipment waits for acknowledgement of the call, showing the WAIT FOR ACK screen as below.When the ACK is received, the audio alarm sounds and the pop-up message "ROUTINE (or SAFETY, URGENCY) INDIVIDUAL ACK received! [CANCEL]: Stop alarm" appears on the screen as below. The timer starts counting up the time since the ACK was received.There are three types of ACK messages; [ABLE ACK], [UNABLE ACK] or [ABLE CHANGE CHANNEL ACK].11. Do one of the following depending on the message type shown at step 10.Able acknowledge call received1) Press the CANCEL key to silence the audio alarm and erase the pop-up mes-sage.2) Communicate by radiotelephone.3) After you have completed communications, rotate the CHANNEL/ENTER knob to select [QUIT] in the user options area then push the knob.Able to change channel acknowledge call receivedThis call means that the station you sent the individual call to accepts your call with the channel specified.1) Press the CANCEL key to silence the audio alarm and erase the pop-up mes-sage. The following message appears on the screen.2) Press the CANCEL key to erase the message. The working channel is changed to one that the station specified. You can now communicate by ra-diotelephone.3) After you have completed communications, rotate the CHANNEL/ENTER knob to select [QUIT] in the user options area then push the knob.REGIST](https://usermanual.wiki/Furuno-USA/9ZWFM8900S.users-manaul-part-2/User-Guide-1778062-Page-5.png)
![4. DSC GENERAL MESSAGE CALLING, RECEIVING4-4Unable acknowledge call received1) Press the CANCEL key to silence the audio alarm and erase the pop-up mes-sage. The reason for [UNABLE ACK] is displayed on the screen.Reason for unable to acknowledge2) Rotate the CHANNEL/ENTER knob to select [QUIT] in the user options area then push the knob.Note: If the coast station sends the message "QUEUE INDICATION", wait un-til your turn comes.If there is no response from the station, do one of the following procedures:• Resend call: Rotate the CHANNEL/ENTER knob to select [RESEND] in the user options area then push the knob.• Cancel call: Rotate the CHANNEL/EN-TER knob to select [QUIT] in the user op-tions area then push the knob. The message as shown in the right figure ap-pears.Rotate the CHANNEL/ENTER knob to select [Yes] then push the knob.4.1.2 How to receive an individual callUnable acknowledge is sent automatically or manually depending on the acknowl-edgement method setting (see section 5.16). Able acknowledge is sent only manually.Note: All sessions must be quit or put on hold to enable automatic acknowledge.Send unable acknowledge automaticallyIf the channel specified by the sending station is one that you cannot use, an unable acknowledge [CAN’T USE CH] is sent automatically. The [ACK SETTINGS] menu is set to [AUTO (UNABLE)]. It takes a few seconds to transmit the call.• NO REASON• BUSY• EQUIP ERROR• CAN’T USE CH• CAN’T USE MODE• QUEUE INDICATION• STATION BARRED• OPERATOR ABSENT• TEMP. UNAVAILABLE: No reason given: Busy: Equipment disabled: Unable to use proposed channel: Unable to use proposed mode: Queue indication: Station barred: No operator available: Operator temporarily unavailableREGIST](https://usermanual.wiki/Furuno-USA/9ZWFM8900S.users-manaul-part-2/User-Guide-1778062-Page-6.png)
![4. DSC GENERAL MESSAGE CALLING, RECEIVING4-5Send able/unable acknowledge manuallyWhen an individual call is received with the setting [MANUAL] on the [ACK SET-TINGS] menu, the audio alarm sounds and the pop-up message "ROUTINE (SAFE-TY, URGENCY) INDIVIDUAL message received! [CANCEL]: Stop alarm" appears on the screen as below.Press the CANCEL key to silence the audio alarm and erase the pop-up message. There are three types of ACK transmission; able acknowledge, able to change chan-nel and unable acknowledge. Follow the appropriate procedure below.• How to send able acknowledge call1. With [ACCEPT] selected, push the CHANNEL/ENTER knob to send the able acknowledge call.2. Communicate by radiotelephone.3. After you have completed communications, rotate the CHANNEL/ENTER knob to select [QUIT] in the user options area then push the knob.• How to send unable acknowledge call1. Rotate the CHANNEL/ENTER knob to select [UNABLE] in the user options area then push the knob.2. With [REASON] selected, push the CHANNEL/ENTER knob.UNABLEACCEPT PROPOSE[ SELECT AN ACK ]INDIVIDUAL MSGELAPSED T I ME : 00H01M15SMSG TYPE : INDIVIDUAL ACKTO : 123456789PRIORITY : ROUTINECOMM MODE : UNABLE TO COMPLYREASON : NO REASONCOMM CH : 06NO REASONBUSYEQUIP ERRORCAN’T USE CHCAN’T USE MODEQUEUE INDICATIONSTATION BARREDOPERATOR ABSENTTEMP. UNAVAILABLE](https://usermanual.wiki/Furuno-USA/9ZWFM8900S.users-manaul-part-2/User-Guide-1778062-Page-7.png)
![4. DSC GENERAL MESSAGE CALLING, RECEIVING4-63. Rotate the CHANNEL/ENTER knob to select the reason for unable then push the knob.4. With [GO TO CALL] selected, push the CHANNEL/ENTER knob to send un-able acknowledge call.• How to send able acknowledge call and change channel1. Rotate the CHANNEL/ENTER knob to select [PROPOSE] in the user options area then push the knob.2. With [COMM CH] selected, push the CHANNEL/ENTER knob.3. Rotate the CHANNEL/ENTER knob to select [SELECT] or [MANUAL] then push the knob.[SELECT]: The options window appears. Rotate the CHANNEL/ENTER knob to select a channel then push the knob.[MANUAL]: Enter a channel then push the CHANNEL/ENTER knob.4. With [GO TO CALL] selected, push the CHANNEL/ENTER knob to send the able to change channel acknowledge call.5. Communicate by radiotelephone.6. After you have completed communications, rotate the CHANNEL/ENTER knob to select [QUIT] in the user options area then push the knob.4.2 Group CallA group call is for calling a specific group by specifying its group MMSI. When you set the group call in the address book, the group MMSI is automatically stored as your ship’s group MMSI.4.2.1 How to send a group call1. Press the OTHER DSC MSG key.[ SELECT AN ACK ]INDIVIDUAL MSGELAPSED T I ME : 00H01M15SMSG TYPE : INDIVIDUAL ACKTO : 123456789PRIORITY : ROUTINECOMM MODE : TELEPHONECOMM CH : 01](https://usermanual.wiki/Furuno-USA/9ZWFM8900S.users-manaul-part-2/User-Guide-1778062-Page-8.png)
![4. DSC GENERAL MESSAGE CALLING, RECEIVING4-72. Rotate the CHANNEL/ENTER knob to select [MSG TYPE] then push the knob.3. Rotate the CHANNEL/ENTER knob to select [GROUP MSG] then push the knob.4. With [TO] selected, push the CHANNEL/ENTER knob.5. Rotate the CHANNEL/ENTER knob to select [DIRECT INPUT] or [ADDRESS BOOK DATA] then push the knob.[DIRECT INPUT]: Enter group MMSI (eight digits) with the numeric keys then push the CHANNEL/ENTER knob.[ADDRESS BOOK DATA]: Select an MMSI from the [ADDRESS BOOK] (see section 5.13) then push the CHANNEL/ENTER knob.6. With [COMM CH] selected, push the CHANNEL/ENTER knob.7. Rotate the CHANNEL/ENTER knob to select [SELECT] or [MANUAL] then push the knob.[SELECT]: The options window appears. Rotate the CHANNEL/ENTER knob to select the channel then push the knob.[MANUAL]: Enter the channel then push the CHANNEL/ENTER knob.8. With [GO TO CALL] selected, push the CHANNEL/ENTER knob to send the group call. The screen changes as below.9. Communicate by radiotelephone.10. After you have completed communications, rotate the CHANNEL/ENTER knob to select [QUIT] in the user options area then push the knob.4.2.2 How to receive a group callGroup MMSI must be registered in order to receive a group call (see paragraph 5.13.2).When a group call is received, the audio alarm sounds. The icon ( ) appears in the tab area, and the pop-up message "GROUP message received! [CANCEL]: Stop alarm" appears.TX](https://usermanual.wiki/Furuno-USA/9ZWFM8900S.users-manaul-part-2/User-Guide-1778062-Page-9.png)
![4. DSC GENERAL MESSAGE CALLING, RECEIVING4-81. Press the CANCEL key to silence the audio alarm and erase the pop-up mes-sage. The channel is automatically tuned to the received channel.2. Watch on the working channel. Communicate by radiotelephone.3. After you have completed communications, rotate the CHANNEL/ENTER knob to select [QUIT] in the user options area then push the knob.4.3 PSTN CallThe PSTN call allows the making and receiving of telephone calls over public switched telephone networks. To use the PSTN call feature, use a handset which has a HOOK ON/OFF function. The standard supply handset has this feature.4.3.1 How to send a PSTN call1. Press the OTHER DSC MSG key.2. Rotate the CHANNEL/ENTER knob to select [MSG TYPE] then push the knob.3. Rotate the CHANNEL/ENTER knob to select [PSTN MSG] then push the knob.4. With [TO] selected, push the CHANNEL/ENTER knob.5. Rotate the CHANNEL/ENTER knob to select [DIRECT INPUT], [ADDRESS BOOK DATA] or [AIS TARGET DATA] then push the knob.[DIRECT INPUT]: Enter the MMSI of coast station (seven digits) with the numeric keys then push the CHANNEL/ENTER knob.[ADDRESS BOOK DATA]: Select an MMSI from the [ADDRESS BOOK] (see section 5.13) then push the CHANNEL/ENTER knob.[AIS TARGET DATA]: Select an MMSI from the [AIS TARGET LIST] then push the CHANNEL/ENTER knob.6. With [TEL NO.] selected, push the CHANNEL/ENTER knob.7. Enter telephone no. (up to 16 digits) with the numeric keys then push the CHAN-NEL/ENTER knob.](https://usermanual.wiki/Furuno-USA/9ZWFM8900S.users-manaul-part-2/User-Guide-1778062-Page-10.png)
![4. DSC GENERAL MESSAGE CALLING, RECEIVING4-98. With [GO TO CALL] selected, push the CHANNEL/ENTER knob to send the PSTN call. After the call has been sent, the WAIT FOR ACK screen appears. The elapsed time since sending the call and the countdown for resending are dis-played.When you receive an acknowledge message, a pop-up message appears.Note: The time period of countdown for resending is five seconds. After five sec-onds have passed, the call is resent. After five seconds have passed since re-sending the call, the pop-up message for time out or no response appears.9. Do one of the following depending on ACK message.Able acknowledge message receivedIf the PSTN call is accepted, the PSTN connection call is sent. When you receive the PSTN ACK message, the pop-up message "PSTN connected. Pick up HANDSET" ap-pears and the audio alarm sounds. The communication channel changes.Note: If you have already picked up the handset before the pop-up message appears, a pop-up message which suggests you to push the CHANNEL/ENTER knob appears. Push the CHANNEL/ENTER knob to accept.1. Pick up the handset and communicate with the party you called. The elapsed time since starting communication is displayed.2. To quit the communications, do one of the following.• On hook the handset. END OF CALL is sent automatically. The waiting ACK for END OF CALL screen appears. When you receive the ACK, rotate the CHAN-NEL/ENTER knob to select [QUIT] then push the knob.Note: Be sure to on hook the handset to quit the communication so as not to incur further charges.• When the PSTN line is disconnected by the coast station, you receive the END OF CALL ACK message. Rotate the CHANNEL/ENTER knob to select [QUIT] then push the knob.Unable acknowledge message receivedWhen you receive an unable acknowledge message, the audio alarm sounds and a pop-up message appears. Rotate the CHANNEL/ENTER knob to select [QUIT] then push the knob.TX](https://usermanual.wiki/Furuno-USA/9ZWFM8900S.users-manaul-part-2/User-Guide-1778062-Page-11.png)
![4. DSC GENERAL MESSAGE CALLING, RECEIVING4-104.3.2 How to receive a PSTN callWhen a PSTN call is received, the icon appears in the tab area. An able/unable acknowledge is sent automatically according to the setting of [PSTN] on the [ACK SETTINGS].• [AUTO (ABLE)]: The automatic able acknowledge (which means you can commu-nicate with party) is sent.• [AUTO (UNABLE)]: The automatic unable acknowledge (which means you cannot communicate with party) is sent.Able acknowledgementThe automatic able acknowledge is sent and the pop-up message "PSTN connected pick up HANDSET!" appears.Note: If you have already picked up the handset before the pop-up message appears, a pop-up message which suggests you to push the CHANNEL/ENTER knob appears. Push the CHANNEL/ENTER knob to accept.1. Pick up the handset. When you receive the PSTN ACK message, the screen for telephone calling appears. Communicate with the party. The elapsed time since starting communication is displayed.2. To quit the communication, do one of the following.• On hook the handset. END OF CALL is sent automatically. The waiting ACK for END OF CALL screen appears. When you receive the ACK, rotate the CHAN-NEL/ENTER knob to select [QUIT] then push the knob.Note: Be sure to on hook the handset to quit the communication so as not to incur further charges.• When the PSTN line is disconnected by the coast station, you receive the END OF CALL ACK message. Rotate the CHANNEL/ENTER knob to select [QUIT] then push the knob.After disconnection of the PSTN line, the END OF CALL ACK is sent.Unable acknowledgementThe automatic unable acknowledge is sent. The audio alarm sounds and the LED flashes in green. Press the CANCEL key.4.3.3 Caution for a PSTN callAfter you send a PSTN call and receive an ACK (regardless of on hook or off hook condition), the following pop-up message appears.If you do not push the CHANNEL/ENTER knob or pick up the handset within 60 sec-onds, the PSTN call is disconnected because of timeout.On hook Off hook](https://usermanual.wiki/Furuno-USA/9ZWFM8900S.users-manaul-part-2/User-Guide-1778062-Page-12.png)
![4. DSC GENERAL MESSAGE CALLING, RECEIVING4-114.4 All Ships CallWhen an urgent but not life-endangering situation arises on your ship, for example, engine trouble, send an all ships call to request assistance. After sending the call, you can communicate by radiotelephone. Do the following before beginning actual com-munications:URGENCY priority: Say "PAN" three times followed by your call sign.SAFETY priority: Say "SECURITE" three times followed by your call sign.4.4.1 How to send an all ships call1. Press the OTHER DSC MSG key.2. Rotate the CHANNEL/ENTER knob to select [MSG TYPE] then push the knob.3. Rotate the CHANNEL/ENTER knob to select [ALL SHIPS MSG] then push the knob.4. With [PRIORITY] selected, push the CHANNEL/ENTER knob.5. Rotate the CHANNEL/ENTER knob to select [SAFETY] or [URGENCY] then push the knob.6. With [COMM CH] selected, push the CHANNEL/ENTER knob.Coast stationYour ship](https://usermanual.wiki/Furuno-USA/9ZWFM8900S.users-manaul-part-2/User-Guide-1778062-Page-13.png)
![4. DSC GENERAL MESSAGE CALLING, RECEIVING4-127. Rotate the CHANNEL/ENTER knob to select [SELECT] or [MANUAL] then push the knob.[SELECT]: The options window appears. Rotate the CHANNEL/ENTER knob to select the channel then push the knob.[MANUAL]: Enter the channel then push the CHANNEL/ENTER knob.8. With [GO TO CALL] selected, push the CHANNEL/ENTER knob to send the call. The screen changes as below.9. Communicate by radiotelephone.10. After you have completed communications, rotate the CHANNEL/ENTER knob to select [QUIT] in the user options area then push the knob.4.4.2 How to receive an all ships callWhen you receive an all ships call, the audio alarm sounds. The icon ( ) appears in the tab area, and the pop-up message "SAFETY (URGENCY) ALL message received! [CANCEL]: Stop alarm" appears.1. Press the CANCEL key to silence the audio alarm and erase the pop-up mes-sage. The channel is automatically tuned to the received channel.2. Watch on the working channel. Communicate by radiotelephone.3. After you have completed communications, rotate the CHANNEL/ENTER knob to select [QUIT] in the user options area then push the knob.TXREGIST](https://usermanual.wiki/Furuno-USA/9ZWFM8900S.users-manaul-part-2/User-Guide-1778062-Page-14.png)
![4. DSC GENERAL MESSAGE CALLING, RECEIVING4-134.5 Position CallThere are two types of position calls: your ship requests the position of another ship and other station requires your ship's position.Find position of other stationSend your ship's position to other station4.5.1 How to request other ship's position1. Press the OTHER DSC MSG key.2. Rotate the CHANNEL/ENTER knob to select [MSG TYPE] then push the knob.3. Rotate the CHANNEL/ENTER knob to select [POSITION MSG] then push the knob. [PRIORITY] is automatically selected to [SAFETY].4. With [TO] selected, push the CHANNEL/ENTER knob.(1) Position request call(2) Position InformationYour Station Other StationYour Station(1) Request ship's position(2) Send position InformationOther Station](https://usermanual.wiki/Furuno-USA/9ZWFM8900S.users-manaul-part-2/User-Guide-1778062-Page-15.png)
![4. DSC GENERAL MESSAGE CALLING, RECEIVING4-145. Rotate the CHANNEL/ENTER knob to select [DIRECT INPUT], [ADDRESS BOOK DATA] or [AIS TARGET DATA] then push the knob.[DIRECT INPUT]: Enter the MMSI of station, which you want to know its position, with the numeric keys then push the CHANNEL/ENTER knob.[ADDRESS BOOK DATA]: Select an MMSI from the [ADDRESS BOOK] (see section 5.13) then push the CHANNEL/ENTER knob.[AIS TARGET DATA]: Select an MMSI from the [AIS TARGET LIST] then push the CHANNEL/ENTER knob.6. With [GO TO CALL] selected, push the CHANNEL/ENTER knob to send the po-sition call. After the call has been sent, the WAIT FOR ACK screen appears. The elapsed time since sending the call is displayed.When you receive an acknowledge message, the audio alarm sounds and the pop-up message "POSITION ACK received! [CANCEL]: Stop alarm" appears.7. Press the CANCEL key to silence the audio alarm and erase the pop-up mes-sage. There are two types of ACK screens, one with position information and one with no position information.TXPosition information included No position information](https://usermanual.wiki/Furuno-USA/9ZWFM8900S.users-manaul-part-2/User-Guide-1778062-Page-16.png)
![4. DSC GENERAL MESSAGE CALLING, RECEIVING4-154.5.2 Other ship requests your positionYou can turn automatic acknowledge of position request on with [POSITION MSG] on the [ACK SETTINGS] menu (see section 5.16).Automatic replyWhen another ship requests your position and the setting of [POSITION MSG] on the [ACK SETTINGS] menu is [AUTO], the equipment automatically transmits a reply. There are two types of automatic replies, one with position information (the setting is [AUTO (ABLE)]) and the other with no position information (the setting is [AUTO (UN-ABLE)]).Manual replyWhen a position request message is received and the setting of [POSITION MSG] on the [ACK SETTINGS] menu is [MANUAL], send the reply manually.To silence the audio alarm, press the CANCEL key.• Send the ACK with position information: With [ACCEPT] selected, push the CHANNEL/ENTER knob. The message with position information is sent.• Send the ACK with no position information: Rotate the CHANNEL/ENTER knob to select [UNABLE] in the user options area then push the knob. The message with no position information is sent.4.6 How to Receive a Polling RequestPolling means a coast station wants to confirm if it is within communicating range of your ship.4.6.1 Automatic replyWhen a polling request message is received with [AUTO] setting on [POLLING MSG] of the [ACK SETTINGS] menu, an acknowledge is sent automatically. See section 5.16.UNABLEACCEPT(1) Polling(2) Acknowledge Your ShipCoast station](https://usermanual.wiki/Furuno-USA/9ZWFM8900S.users-manaul-part-2/User-Guide-1778062-Page-17.png)
![4. DSC GENERAL MESSAGE CALLING, RECEIVING4-164.6.2 Manual replyWhen you receive a polling request message, the audio alarm sounds. The icon ( ) appears in the tab area, and the pop-up message shown below appears. The equip-ment is set up for manual acknowledge: [POLLING MSG] on the [ACK SETTINGS] menu is [MANUAL].1. Press the CANCEL key to silence the audio alarm and erase the pop-up mes-sage.2. Rotate the CHANNEL/ENTER knob to select [ACK] then push the knob to send the polling acknowledge message.3. Rotate the CHANNEL/ENTER knob to select [QUIT] then push the knob.4.7 Neutral Craft CallThe neutral craft call, which contains your MMSI, informs all ships that your ship is not a participant in an armed conflict. The neutral craft call must be enabled on the [SPE-CIAL MSG] menu. See section 5.17.4.7.1 How to send a neutral craft call1. Press the OTHER DSC MSG key.2. Rotate the CHANNEL/ENTER knob to select [MSG TYPE] then push the knob.3. Rotate the CHANNEL/ENTER knob to select [SPECIAL MSG] then push the knob.](https://usermanual.wiki/Furuno-USA/9ZWFM8900S.users-manaul-part-2/User-Guide-1778062-Page-18.png)
![4. DSC GENERAL MESSAGE CALLING, RECEIVING4-174. Rotate the CHANNEL/ENTER knob to select [NEUTRAL MSG] then push the knob. [PRIORITY] is automatically selected to [URGENCY].5. With [COMM CH] selected, push the CHANNEL/ENTER knob.6. Rotate the CHANNEL/ENTER knob to select [SELECT] or [MANUAL] then push the knob.[SELECT]: The options window appears. Rotate the CHANNEL/ENTER knob to select the channel then push the knob.[MANUAL]: Enter the channel then push the CHANNEL/ENTER knob.7. With [GO TO CALL] selected, push the CHANNEL/ENTER knob to send the neu-tral craft call.8. Inform all ships by radiotelephone that your ship is not a participant in armed con-flict.9. After you have completed communications, rotate the CHANNEL/ENTER knob to select [QUIT] in the user options area then push the knob.4.7.2 How to receive a neutral craft callWhen you receive a neutral craft call, the audio alarm sounds. The icon ( ) appears in the tab area, and the following pop-up message appears.TX](https://usermanual.wiki/Furuno-USA/9ZWFM8900S.users-manaul-part-2/User-Guide-1778062-Page-19.png)
![4. DSC GENERAL MESSAGE CALLING, RECEIVING4-181. Press the CANCEL key to silence the audio alarm and erase the pop-up mes-sage.2. Watch on the working channel. Communicate by radiotelephone.3. After you have completed communications, rotate the CHANNEL/ENTER knob to select [QUIT] in the user options area then push the knob.4.8 Medical Transport CallThe medical transport call informs all ships, by urgency priority, that your ship carries medical supplies. The medical transport call must be enabled on the [SPECIAL MSG] menu. See section 5.17.4.8.1 How to send a medical transport call1. Press the OTHER DSC MSG key.2. Rotate the CHANNEL/ENTER knob to select [MSG TYPE] then push the knob.3. Rotate the CHANNEL/ENTER knob to select [SPECIAL MSG] then push the knob.](https://usermanual.wiki/Furuno-USA/9ZWFM8900S.users-manaul-part-2/User-Guide-1778062-Page-20.png)
![4. DSC GENERAL MESSAGE CALLING, RECEIVING4-194. Rotate the CHANNEL/ENTER knob to select [MEDICAL MSG] then push the knob. [PRIORITY] is automatically selected to [URGENCY].5. With [COMM CH] selected, push the CHANNEL/ENTER knob.6. Rotate the CHANNEL/ENTER knob to select [SELECT] or [MANUAL] then push the knob.[SELECT]: The options window appears. Rotate the CHANNEL/ENTER knob to select the channel then push the knob.[MANUAL]: Enter the channel then push the CHANNEL/ENTER knob.7. With [GO TO CALL] selected, push the CHANNEL/ENTER knob to send the med-ical transport call.8. Inform all ships by radiotelephone that your ship is transporting medical supplies.9. After you have completed communications, rotate the CHANNEL/ENTER knob to select [QUIT] in the user options area then push the knob.4.8.2 How to receive a medical transport callWhen you receive a medical transport call, the audio alarm sounds. The icon ( ) ap-pears in the tab area, and the following pop-up message appears.TX](https://usermanual.wiki/Furuno-USA/9ZWFM8900S.users-manaul-part-2/User-Guide-1778062-Page-21.png)
![4. DSC GENERAL MESSAGE CALLING, RECEIVING4-201. Press the CANCEL key to silence the audio alarm and erase the pop-up mes-sage.2. Watch on the working channel. Communicate by radiotelephone.3. After you have completed communications, rotate the CHANNEL/ENTER knob to select [QUIT] in the user options area then push the knob.](https://usermanual.wiki/Furuno-USA/9ZWFM8900S.users-manaul-part-2/User-Guide-1778062-Page-22.png)
![5-15. MENU OPERATIONThe menu can be accessed from both the RT and DSC screens.Note: The menu can not be opened when awaiting acknowledgement of a distress alert.5.1 How to Open/Close the MENU Screen1. Press the MENU key to open the [MENU] screen.2. Rotate the CHANNEL/ENTER knob to select a desired menu item then push the knob. You can also select the desired menu item by pressing the 1 to 9 keys. The menu items that have a X indicate additional menus.3. To close the menu screen, press the MENU key.Note: The RT/REGION key cancels menu operation and returns control to the RT screen.These marks indicate additional menus.Menu items in next layerSecond layerThird layer](https://usermanual.wiki/Furuno-USA/9ZWFM8900S.users-manaul-part-2/User-Guide-1778062-Page-23.png)
![5. MENU OPERATION5-25.2 Handset Volume SettingYou can adjust the volume of the loudspeaker for the handset.1. Rotate the CHANNEL/ENTER knob to select [HS VOL] on the [MENU] screen then push the knob.2. Rotate the CHANNEL/ENTER knob to set the volume level then push the knob.5.3 Channel Setting5.3.1 Channel regionYou can change the channel region (see section 1.5).1. Rotate the CHANNEL/ENTER knob to select [CH MODE] on the [MENU] screen then push the knob.2. With [REGION] selected, push the CHANNEL/ENTER knob.3. Rotate the CHANNEL/ENTER knob to select the channel region then push the knob.5.3.2 MemoryYou can easily call up the channel which you registered in the [MEMORY CONFIG] menu (see section 5.4).1. Rotate the CHANNEL/ENTER knob to select [CH MODE] on the [MENU] screen then push the knob.2. Rotate the CHANNEL/ENTER knob to select [MEMORY] then push the knob.3. Rotate the CHANNEL/ENTER knob to select [ON] or [OFF] then push the knob. When you select [ON], appears on the screen. On the RT screen, you can se-lect the memory channel by rotating the CHANNEL/ENTER knob. The following figure shows the example for CH 10.Only permitted channel modes are displayed, which are set by the installer of the equipment.Channel number“5” means that you turned 5 channels of the selected channel region to [ON] in the [MEMORY CONFIG] menu. Channel status for CH 10](https://usermanual.wiki/Furuno-USA/9ZWFM8900S.users-manaul-part-2/User-Guide-1778062-Page-24.png)
![5. MENU OPERATION5-35.4 Memory ConfigurationYou can turn on or off memory channels on the [MEMORY CONFIG] screen. You can not turn off CH 16.1. Rotate the CHANNEL/ENTER knob to select [CH MODE] on the [MENU] screen then push the knob.2. Rotate the CHANNEL/ENTER knob to select [MEMORY CONFIG] then push the knob. The list for memory config appears.3. Press the 4 or 6 key to switch the channel region.4. When there are multiple pages, press the 1 key for the previous page and the 3 key for the next page.5. Rotate the CHANNEL/ENTER knob to select the channel number then push the knob or the 8 key. Below is the example screen for the channel number 01 select-ed. The exclamation mark (!) and [ON] are displayed at each side of the selected channel number.To erase a channel, select a channel to erase then push the CHANNEL/ENTER knob or the 8 key. The exclamation mark (!) and [ON] at each side of the selected channel number disappear.6. Press the MENU key to save the setting.7. Rotate the CHANNEL/ENTER knob to select [Yes] then push the knob.To cancel the setting, press the CANCEL key instead of the MENU key at step 6. The message as shown in the right figure appears.8. Rotate the CHANNEL/ENTER knob to select [Yes] then push the knob.Channel region](https://usermanual.wiki/Furuno-USA/9ZWFM8900S.users-manaul-part-2/User-Guide-1778062-Page-25.png)
![5. MENU OPERATION5-45.5 How to Print MessagesThe [PRINT] menu enables/disables automatic printing of all transmitted and received calls and the results of the daily test.1. Rotate the CHANNEL/ENTER knob to select [SYSTEM] on the [MENU] screen then push the knob.2. Rotate the CHANNEL/ENTER knob to select [PRINT] then push the knob.3. With [TX MSG] selected, push the CHANNEL/ENTER knob.4. Rotate the CHANNEL/ENTER knob to select [AUTO] or [MANUAL] then push the knob.5. Set [RX MSG] and [DAILY TEST] similarly.5.6 Position SettingDo the following to set your position:1. Rotate the CHANNEL/ENTER knob to select [SYSTEM] on the [MENU] screen then push the knob.2. Rotate the CHANNEL/ENTER knob to select [POSI-TION] then push the knob.3. With [INPUT TYPE] selected, push the CHANNEL/ENTER knob.4. Rotate the CHANNEL/ENTER knob to select [EPFS], [MANUAL] or [NO INFO] then push the knob.[EPFS]: The position data from EPFS[MANUAL]: Set the position data manually[NO INFO]: No position dataFor [MANUAL], go to the next step.5. For manual input, use the numeric keys to enter current latitude/longitude posi-tion, and UTC. To change coordinate, select it and press the 1 key for North or East; the 2 key for South or West. Push the CHANNEL/ENTER knob after enter-ing a line of data.Latitude setting windowLongitude setting windowPush the CHANNEL/ ENTER knob.UTC setting windowPush the CHANNEL/ ENTER knob.Push the CHANNEL/ ENTER knob.](https://usermanual.wiki/Furuno-USA/9ZWFM8900S.users-manaul-part-2/User-Guide-1778062-Page-26.png)
![5. MENU OPERATION5-5Note: When the setting of [INPUT TYPE] is [MANUAL], the following message ap-pears to ask you to update position, when position data is more than four hours old.5.7 Date and Time SettingSet the date and time for the system.1. Rotate the CHANNEL/ENTER knob to select [SYSTEM] on the [MENU] screen then push the knob.2. Rotate the CHANNEL/ENTER knob to select [DATE/TIME] then push the knob.• The date or time cannot be adjusted when they are in-put from an EPFS navigator.• If date or time is not input from an EPFS navigator, en-ter the date and time with the numeric keys.Note: When manually entering date and time, use UTC (Universal Time Coor-dinated). Do not use local time.5.8 Timeout SettingThe menu screen and/or the inactive sessions (icons) can be closed automatically when there is no menu operation within the time specified. You can set the time inter-val for auto closing of the menu and inactive session.1. Rotate the CHANNEL/ENTER knob to select [SYSTEM] on the [MENU] screen then push the knob.2. Rotate the CHANNEL/ENTER knob to select [TIMEOUT] then push the knob.3. Rotate the CHANNEL/ENTER knob to select the item desired then push the knob.Select [DATE] or [TIME] then push the CHANNEL/ENTER knob.Setting window for [DATE]Enter time then push the CHANNEL/ENTER knob.Setting window for [TIME]Enter date then push the CHANNEL/ENTER knob. For example, 10/APR/2012 is entered as 100412 (20 of 2012 is fixed).10042012Day Month Year](https://usermanual.wiki/Furuno-USA/9ZWFM8900S.users-manaul-part-2/User-Guide-1778062-Page-27.png)
![5. MENU OPERATION5-64. Rotate the CHANNEL/ENTER knob to select a time interval then push the knob. [NO TIMEOUT] leaves the menu screen and/or the inactive sessions open until you close them manually.5.9 How to Name the Terminal for IntercomYou can change the name of the terminal for intercom.1. Rotate the CHANNEL/ENTER knob to select [SYSTEM] on the [MENU] screen then push the knob.2. Rotate the CHANNEL/ENTER knob to select [INTERCOM NAME] then push the knob.3. Rotate the CHANNEL/ENTER knob to select the terminal then push the knob.Item Description Option[MENU END] Close the menu screen automatically. [10MIN], [NO TIMEOUT][DSCGENERAL]Close the inactive sessions except the distress alert.[15MIN], [NO TIMEOUT][RXDISTRESS]Close the inactive sessions for the re-ceiving distress alert.[TELEPHONE] Close the inactive sessions for RT. [10SEC], [30SEC], [10MIN]Connection status](https://usermanual.wiki/Furuno-USA/9ZWFM8900S.users-manaul-part-2/User-Guide-1778062-Page-28.png)
![5. MENU OPERATION5-74. Rotate the CHANNEL/ENTER knob to select the character to edit then press the appropriate numeric key. To delete a character, rotate the CHANNEL/ENTER knob to select the character to delete then press the CANCEL key.5. Push the CHANNEL/ENTER knob.6. Repeat steps 3 to 5 to name another terminal.5.10 Automatic Switch to CH16The channel can be automatically set to CH16 when the handset is on hooked.1. Rotate the CHANNEL/ENTER knob to select [SYSTEM] on the [MENU] screen then push the knob.2. Rotate the CHANNEL/ENTER knob to se-lect [AUTO REVERT] then push the knob.3. Rotate the CHANNEL/ENTER knob to select [MAIN] (for the main unit) or [RE-MOTE] (for the remote handset) then push the knob.4. For [MAIN], rotate the CHANNEL/ENTER knob to select [RT+DSC], [RT] or [OFF] then push the knob.[RT+DSC]: Automatic switching to CH16 for all sessions[RT]: Automatic switching to CH16 for the stand-by mode, the RT screen and the active RT session[OFF]: No automatic switchingFor [REMOTE], rotate the CHANNEL/ENTER knob to select [ON] or [OFF] then push the knob.[ON]: Automatic switching to CH16 for the RT session[OFF]: No automatic switchingNote: This function is not available during DW, scanning or PSTN.5.11 External Alarm SettingThe [EXTERNAL ALARM] menu enables/disables output of the contact signal for ur-gency, safety and routine messages to an external alarm system.1. Rotate the CHANNEL/ENTER knob to select [SYSTEM] on the [MENU] screen then push the knob.2. Rotate the CHANNEL/ENTER knob to se-lect [EXTERNAL ALARM] then push the knob.3. Rotate the CHANNEL/ENTER knob to select [URGENCY], [SAFETY] or [ROU-TINE] then push the knob.4. Rotate the CHANNEL/ENTER knob to select [ON] or [OFF] then push the knob.1. Rotate the CHANNEL/ENTER knob to select “F”. 2. Press the appropriate numeric key (in this case, the 2 key) to change “F” to “A”.Note: Each time you press the 2 key, the character changes in the sequence of “A” “B” “C” “2” “A” ...](https://usermanual.wiki/Furuno-USA/9ZWFM8900S.users-manaul-part-2/User-Guide-1778062-Page-29.png)
![5. MENU OPERATION5-8• When receiving urgency, safety or routine messages, the contact signal for the cat-egory selected to ON is output to an external alarm system.• When receiving distress alert or distress messages, the contact signal is output to an external alarm system regardless of the external alarm setting.• When an alarm acknowledgement from an external alarm system is received by the transceiver unit or an alarm pop-up message closes (with pressing the CANCEL key, etc.), output of the contact signal to an external alarm system is stopped.Note: An alarm pop-up message or audio alarm for the transceiver unit are not af-fected by this condition.5.12 RT Application SettingYou can display the guide for operations, the handset state or the squelch values at the bottom left corner of the RT screen.1. Rotate the CHANNEL/ENTER knob to select [SYSTEM] on the [MENU] screen then push the knob.2. Rotate the CHANNEL/ENTER knob to select [RT APPLICATION] then push the knob.3. Rotate the CHANNEL/ENTER knob to select [GUIDE], [HS STATE] or [SQ METER] then push the knob.[GUIDE]: The guide for operations.[HS STATE]: The remote handset state.[SQ METER]: The squelch values for the transceiver unit and the remote handset.5.13 Address BookYou can register a maximum of 50 MMSIs and address names (max. 20 letters) in the memory.5.13.1 List for address data1. Rotate the CHANNEL/ENTER knob to select [DSC] on the [MENU] screen then push the knob.[GUIDE] [HS STATE][SQ METER]Upper: Transceiver unitLower: Remote handset (The one which is available is highlighted.)2](https://usermanual.wiki/Furuno-USA/9ZWFM8900S.users-manaul-part-2/User-Guide-1778062-Page-30.png)
![5. MENU OPERATION5-92. Rotate the CHANNEL/ENTER knob to select [ADDRESS BOOK] then push the knob.5.13.2 How to register addresses1. Open the [ADDRESS BOOK] screen.2. Press the 5 key to open the [ADDRESS DATA ENTRY] screen.3. With [NAME] selected, push the CHANNEL/ENTER knob.4. Enter the address name (max. 20 letters) with the numeric keys then push the CHAN-NEL/ENTER knob.Key/knob FunctionCHANNEL/ENTER• Move the cursor by rotating the CHANNEL/ENTER knob.• Open the [ADDRESS DATA EDIT] screen by pushing the CHANNEL/ENTER knob (see paragraph 5.13.3).CANCEL Return to the [MENU] screen.OTHER DSC MSGOpen the [COMPOSE MESSAGE] screen to create a DSC message with registered address (see paragraph 5.13.5).1Go to the previous page.3Go to the next page.4Delete address (see paragraph 5.13.4).5Open the [ADDRESS DATA ENTRY] screen (see paragraph 5.13.2).6Switch the address type. Each press changes the type continuously ([SHIP] → [COAST] → [GROUP] → [SHIP] → ...).When 50 addresses have been registered, this is grayed out.](https://usermanual.wiki/Furuno-USA/9ZWFM8900S.users-manaul-part-2/User-Guide-1778062-Page-31.png)
![5. MENU OPERATION5-105. With [MMSI] selected, push the CHANNEL/ENTER knob.6. Enter the MMSI with the numeric keys then push the CHANNEL/ENTER knob.7. With [REGISTER] selected, push the CHANNEL/ENTER knob.5.13.3 How to edit addresses1. Open the [ADDRESS BOOK] screen.2. Rotate the CHANNEL/ENTER knob to select the address to edit then push the knob.3. Rotate the CHANNEL/ENTER knob to select [NAME] or [MMSI] as appropriate then push the knob.4. Enter the address name or MMSI with the numeric keys then push the CHANNEL/ENTER knob.5. Rotate the CHANNEL/ENTER knob to select [REGISTER] then push the knob.Note: If the MMSI is already registered to an-other address, the error alarm sounds and a warning pop-up message appears when se-lecting [REGISTER].6. Rotate the CHANNEL/ENTER knob to select [Yes] then push the knob.Push the CHANNEL/ENTER knob.](https://usermanual.wiki/Furuno-USA/9ZWFM8900S.users-manaul-part-2/User-Guide-1778062-Page-32.png)
![5. MENU OPERATION5-115.13.4 How to delete addressesOpen the [ADDRESS BOOK] screen then follow the applicable procedure below.Individual address1. Rotate the CHANNEL/ENTER knob to select the address to delete then press the 4 key.2. Rotate the CHANNEL/ENTER knob to select [DELETE SE-LECTION] then push the knob.3. Rotate the CHANNEL/ENTER knob to select [Yes] then push the knob.Address by type1. Press the 6 key several times to select desired type.2. Press the 4 key.3. Rotate the CHANNEL/ENTER knob to select [DELETE LIST] then push the knob.4. Rotate the CHANNEL/ENTER knob to select [Yes] then push the knob.All addresses1. Press the 4 key.2. Rotate the CHANNEL/ENTER knob to select [DELETE ALL LISTS] then push the knob.3. Rotate the CHANNEL/ENTER knob to select [Yes] then push the knob.5.13.5 How to create a DSC message with registered address1. Open the [ADDRESS BOOK] screen.2. Rotate the CHANNEL/ENTER knob to select the address to use.3. Press the OTHER DSC MSG key to open the [COMPOSE MESSAGE] screen. For the address type [SHIP] or [COAST], [MSG TYPE] is [INDIVIDUAL MSG]. For [GROUP], [MSG TYPE] is [GROUP MSG].Press the OTHER DSC MSG key.](https://usermanual.wiki/Furuno-USA/9ZWFM8900S.users-manaul-part-2/User-Guide-1778062-Page-33.png)
![5. MENU OPERATION5-125.14 TX Message PreparationFor the individual, PSTN, group and test messages, you can create messages and store them in the memory for future use. You can edit, send or delete these messages. A maximum of 100 messages can be stored in the memory.5.14.1 List for message files1. Rotate the CHANNEL/ENTER knob to select [DSC] on the [MENU] screen then push the knob.2. Rotate the CHANNEL/ENTER knob to select [MSG FILE] then push the knob.Detailed information screen for message filesRotate the CHANNEL/ENTER knob to select the message file desired on the [MESSAGE FILE] list then push the knob. The detailed information screen for the selected message file appears. The right figure shows the screen for an individual message.Key/knob FunctionCHANNEL/ENTER• Move the cursor by rotating the CHANNEL/ENTER knob.• Open the detailed information screen for the selected message file by pushing the CHANNEL/ENTER knob (see the following "Detailed in-formation screen for message files").CANCEL Return to the [MENU] screen.OTHER DSC MSGOpen the [COMPOSE MESSAGE] screen to create a DSC message with registered message (see paragraph 5.13.5).1Go to the previous page.3Go to the next page.4Delete messages (see paragraph 5.14.8).5Open the [MESSAGE FILE ENTRY] screen.6Switch the message type. Each press changes the type continuously ([INDIVIDUAL] → [GROUP] → [PSTN] → [TEST] → [INDIVIDUAL] → ...).When 100 messages have been registered, this is grayed out.](https://usermanual.wiki/Furuno-USA/9ZWFM8900S.users-manaul-part-2/User-Guide-1778062-Page-34.png)
![5. MENU OPERATION5-13Several functions can be done from this screen.• Rotating the CHANNEL/ENTER knob: Go to the detailed information screen for the previous or next message file.• Pushing the CHANNEL/ENTER knob: Open the [MESSAGE FILE EDIT] screen (see paragraph 5.14.6).• OTHER DSC MSG key: Open the [COMPOSE MESSAGE] screen (see paragraph 5.14.7).• 4 key: Delete the selected message file. The confirmation message appears on the screen. Rotate the CHANNEL/ENTER knob to select [Yes] then push the knob.5.14.2 Individual calls1. Open the [MESSAGE FILE] list.2. Press the 6 key several times to select the [INDIVIDUAL] type.3. Press the 5 key to open the [MESSAGE FILE ENTRY] screen.4. With [TO] selected, push the CHANNEL/ENTER knob.5. Rotate the CHANNEL/ENTER knob to select [DIRECT INPUT], [ADDRESS BOOK DATA] or [AIS TARGET DATA] then push the knob.[DIRECT INPUT]: Enter the MMSI of the station where to send the call then push the CHANNEL/ENTER knob.[ADDRESS BOOK DATA]: Select an MMSI from the [ADDRESS BOOK] (see section 5.13) then push the CHANNEL/ENTER knob.[AIS TARGET DATA]: Select an MMSI from the [AIS TARGET LIST] then push the CHANNEL/ENTER knob.6. With [COMM CH] selected, push the CHANNEL/ENTER knob.7. Rotate the CHANNEL/ENTER knob to select [SELECT] or [MANUAL] then push the knob.[SELECT]: The options window appears. Rotate the CHANNEL/ENTER knob to select the channel then push the knob.[MANUAL]: Enter the channel then push the CHANNEL/ENTER knob.8. With [FILE NAME] selected, push the CHANNEL/ENTER knob.](https://usermanual.wiki/Furuno-USA/9ZWFM8900S.users-manaul-part-2/User-Guide-1778062-Page-35.png)
![5. MENU OPERATION5-149. Enter the file name (max. 20 letters) with the numeric keys then push the CHAN-NEL/ENTER knob.10. With [REGISTER] selected, push the CHANNEL/ENTER knob.5.14.3 Group callsTo receive group calls, register the group MMSI in [ADDRESS BOOK].1. Open the [MESSAGE FILE] list.2. Press the 6 key several times to select the [GROUP] type.3. Press the 5 key to open the [MESSAGE FILE ENTRY] screen.4. With [TO] selected, push the CHANNEL/ENTER knob.5. Rotate the CHANNEL/ENTER knob to select [DIRECT INPUT] or [ADDRESS BOOK DATA] then push the knob.[DIRECT INPUT]: Enter the group MMSI (eight digits) with the numeric keys then push the CHANNEL/ENTER knob.[ADDRESS BOOK DATA]: Select an MMSI from the [ADDRESS BOOK] (see section 5.13) then push the CHANNEL/ENTER knob.6. With [COMM CH] selected, push the CHANNEL/ENTER knob.7. Rotate the CHANNEL/ENTER knob to select [SELECT] or [MANUAL] then push the knob.[SELECT]: The options window appears. Rotate the CHANNEL/ENTER knob to select the channel then push the knob.[MANUAL]: Enter the channel then push the CHANNEL/ENTER knob.8. With [FILE NAME] selected, push the CHANNEL/ENTER knob.9. Enter the file name (max. 20 letters) with the numeric keys then push the CHAN-NEL/ENTER knob.10. With [REGISTER] selected, push the CHANNEL/ENTER knob.](https://usermanual.wiki/Furuno-USA/9ZWFM8900S.users-manaul-part-2/User-Guide-1778062-Page-36.png)
![5. MENU OPERATION5-155.14.4 PSTN calls1. Open the [MESSAGE FILE] list.2. Press the 6 key several times to select the [PSTN] type.3. Press the 5 key to open the [MESSAGE FILE ENTRY] screen.4. With [TO] selected, push the CHANNEL/ENTER knob.5. Rotate the CHANNEL/ENTER knob to select [DIRECT INPUT], [ADDRESS BOOK DATA] or [AIS TARGET DATA] then push the knob.[DIRECT INPUT]: Enter the MMSI of coast station (seven digits) with the numeric keys then push the CHANNEL/ENTER knob.[ADDRESS BOOK DATA]: Select an MMSI from the [ADDRESS BOOK] (see section 5.13) then push the CHANNEL/ENTER knob.[AIS TARGET DATA]: Select an MMSI from the [AIS TARGET LIST] then push the CHANNEL/ENTER knob.6. With [TEL NO.] selected, push the CHANNEL/ENTER knob.7. Enter the telephone no. (up to 16 digits) with the numeric keys then push the CHANNEL/ENTER knob.8. With [FILE NAME] selected, push the CHANNEL/ENTER knob.9. Enter the file name (max. 20 letters) with the numeric keys then push the CHAN-NEL/ENTER knob.10. With [REGISTER] selected, push the CHANNEL/ENTER knob.5.14.5 Test calls1. Open the [MESSAGE FILE] list.2. Press the 6 key several times to select the [TEST] type.3. Press the 5 key to open the [MESSAGE FILE ENTRY] screen.4. With [TO] selected, push the CHANNEL/ENTER knob.](https://usermanual.wiki/Furuno-USA/9ZWFM8900S.users-manaul-part-2/User-Guide-1778062-Page-37.png)
![5. MENU OPERATION5-165. Rotate the CHANNEL/ENTER knob to select [DIRECT INPUT], [ADDRESS BOOK DATA] or [AIS TARGET DATA] then push the knob.[DIRECT INPUT]: Enter the MMSI where to send the test message with the nu-meric keys then push the CHANNEL/ENTER knob.[ADDRESS BOOK DATA]: Select an MMSI from the [ADDRESS BOOK] (see section 5.13) then push the CHANNEL/ENTER knob.[AIS TARGET DATA]: Select an MMSI from the [AIS TARGET LIST] then push the CHANNEL/ENTER knob.6. With [FILE NAME] selected, push the CHANNEL/ENTER knob.7. Enter the file name (max. 20 letters) with the numeric keys then push the CHAN-NEL/ENTER knob.8. With [REGISTER] selected, push the CHANNEL/ENTER knob.5.14.6 How to edit prepared messages1. Open the [MESSAGE FILE] list.2. Rotate the CHANNEL/ENTER knob to select the message file to edit then push the knob.3. Push the CHANNEL/ENTER knob to open the [MESSAGE FILE EDIT] screen.4. Rotate the CHANNEL/ENTER knob to select the item to edit then push the knob.5. Change the setting accordingly.6. Rotate the CHANNEL/ENTER knob to select [REGIS-TER] then push the knob.7. Rotate the CHANNEL/ENTER knob to select [Yes] then push the knob.5.14.7 How to send prepared messagesHow to send without modification1. Open the [MESSAGE FILE] list.2. Rotate the CHANNEL/ENTER knob to select the message file desired then press the OTHER DSC MSG key.3. Rotate the CHANNEL/ENTER knob to select [GO TO CALL] then push the knob.Edit before sendingFollow the procedure in paragraph 5.14.6 and do the above procedure "How to send without modification".](https://usermanual.wiki/Furuno-USA/9ZWFM8900S.users-manaul-part-2/User-Guide-1778062-Page-38.png)
![5. MENU OPERATION5-175.14.8 How to delete prepared messagesOpen the [MESSAGE FILE] list then follow the applicable procedure below.Individual prepared message1. Rotate the CHANNEL/ENTER knob to select the file to de-lete then press the 4 key.2. Rotate the CHANNEL/ENTER knob to select [DELETE SE-LECTION] then push the knob.3. Rotate the CHANNEL/ENTER knob to select [Yes] then push the knob.Prepared messages by type1. Press the 6 key several times to select the desired type.2. Press the 4 key.3. Rotate the CHANNEL/ENTER knob to select [DELETE LIST] then push the knob.4. Rotate the CHANNEL/ENTER knob to select [Yes] then push the knob.All prepared messages1. Press the 4 key.2. Rotate the CHANNEL/ENTER knob to select [DELETE ALL LISTS] then push the knob.3. Rotate the CHANNEL/ENTER knob to select [Yes] then push the knob.5.15 Log FileThree logs are provided for storage of calls:• [RX DISTRESS] (received distress log)• [RX GENERAL] (received ordinary log)• [TX] (transmitted log)Each mode stores 50 calls. The latest call is saved as log no.1 and the log no. of all previous calls in that log increments by one. When the storage capacity is exceeded, the oldest call is deleted to make a room for the latest. The icon ( ) indicates unread calls. Received distress calls are automatically deleted after 48 hours.5.15.1 How to open a log fileThe procedure to open a log is common to all logs.1. Rotate the CHANNEL/ENTER knob to select [DSC] on the [MENU] screen then push the knob.](https://usermanual.wiki/Furuno-USA/9ZWFM8900S.users-manaul-part-2/User-Guide-1778062-Page-39.png)
![5. MENU OPERATION5-182. Rotate the CHANNEL/ENTER knob to select [LOG] then push the knob.3. Press the 6 key to switch the log file mode in the sequence of [RX DISTRESS] → [RX GENERAL] → [TX] → [RX DISTRESS] → ...4. When there are multiple pages, press the 1 key for the previous page and the 3 key for the next page. Rotate the CHANNEL/ENTER knob to select a desired log then push the knob. The contents of the selected log file are displayed. To return to the [MENU] screen, press the CANCEL key.5. Press the 1 key for the previous page and the 3 key for the next page. Rotate the CHANNEL/ENTER knob to change the log file (clockwise rotation: to the next log file, counterclockwise rotation: to the previous log file).6. To print the selected log, press the 5 key.7. To return to the log list, press the CANCEL key.5.15.2 How to delete log filesYou can delete the log files except RX DISTRESS. Open the log file list then follow the applicable procedure below.Individual log file1. Rotate the CHANNEL/ENTER knob to select the log file to delete then press the 4 key.2. Rotate the CHANNEL/ENTER knob to select [DELETE SE-LECTION] then push the knob.3. Rotate the CHANNEL/ENTER knob to select [Yes] then push the knob.You can delete a log file by pressing the 4 key on the screen shown at step 4 in paragraph 5.15.1.Mode 8 : 15/APR/2012 23:09 INDIVIDUAL MSG 9 : 14/APR/2012 23:05 GROUP MSG10 : 10/APR/2012 21:15 ALL SHIP MSG11 : 09/APR/2012 10:32 INDIVIDUAL MSG12 : 05/APR/2012 09:40 GROUP MSG13 : 04/APR/2012 14:58 INDIVIDUAL MSG14 : 01/APR/2012 17:21 INDIVIDUAL MSGRX GENERAL LOG](https://usermanual.wiki/Furuno-USA/9ZWFM8900S.users-manaul-part-2/User-Guide-1778062-Page-40.png)
![5. MENU OPERATION5-19Specify log files by mode1. Press the 6 key several times to select [RX GENERAL] or [TX].2. Press the 4 key.3. Rotate the CHANNEL/ENTER knob to select [DELETE LIST] then push the knob.4. Rotate the CHANNEL/ENTER knob to select [Yes] then push the knob.All log files1. Press the 4 key.2. Rotate the CHANNEL/ENTER knob to select [DELETE ALL LISTS] then push the knob.3. Rotate the CHANNEL/ENTER knob to select [Yes] then push the knob.The log files are renumbered to reflect the deletion.5.16 How to Set the AUTO ACK DetailsThe acknowledgement message can be sent automatically when you receive an indi-vidual message or a PSTN message. You can also enable or disable it for position, polling and test messages. For PSTN, position and polling messages, automatic ac-knowledge is disabled when there is an active DSC session.Note 1: For individual message, the automatic acknowledgement is automatically dis-abled, as required by law, when an RX call contains errors.1. Rotate the CHANNEL/ENTER knob to select [DSC] on the [MENU] screen then push the knob.2. Rotate the CHANNEL/ENTER knob to select [ACK SETTINGS] then push the knob.Default:[AUTO (UNABLE)][AUTO (ABLE)]: Send ABLE acknowledgement automatically.[AUTO (UNABLE)]: Send UNABLE acknowledgement automatically.Sets reason for UNABLE. This menu item is only for use with PSTN. Default: [MANUAL][AUTO (ABLE)]: When the position information is set, send automatic acknowledgement of position request. When the position information is not set, send automatic acknowledgement of no position information (ALL 9). [AUTO (UNABLE)]: Send automatic acknowledgement of no position information (symbol No.126).[MANUAL]: Send manual acknowledgement.Default: [AUTO][AUTO]: Send automatic acknowledgement of polling request.[MANUAL]: Send manual acknowledgement of polling request.Default: [AUTO][AUTO]: Send automatic acknowledgement of test call.[MANUAL]: Send manual acknowledgement of test call.Default: [CAN’T USE CH]Default:[AUTO (ABLE)]If you cannot use the channel or mode specified by a sending station, [CAN'T USE CH] is automatically sent.](https://usermanual.wiki/Furuno-USA/9ZWFM8900S.users-manaul-part-2/User-Guide-1778062-Page-41.png)