GN Audio USA GN9120 Cordless Phone User Manual users manual
GN Netcom Inc Cordless Phone users manual
Contents
users manual

GN 9120
User Guide
GN Netcom
GN9120 BETA User Guide 11/20/02 5:12 PM Page 1
GN 9120 User Guide
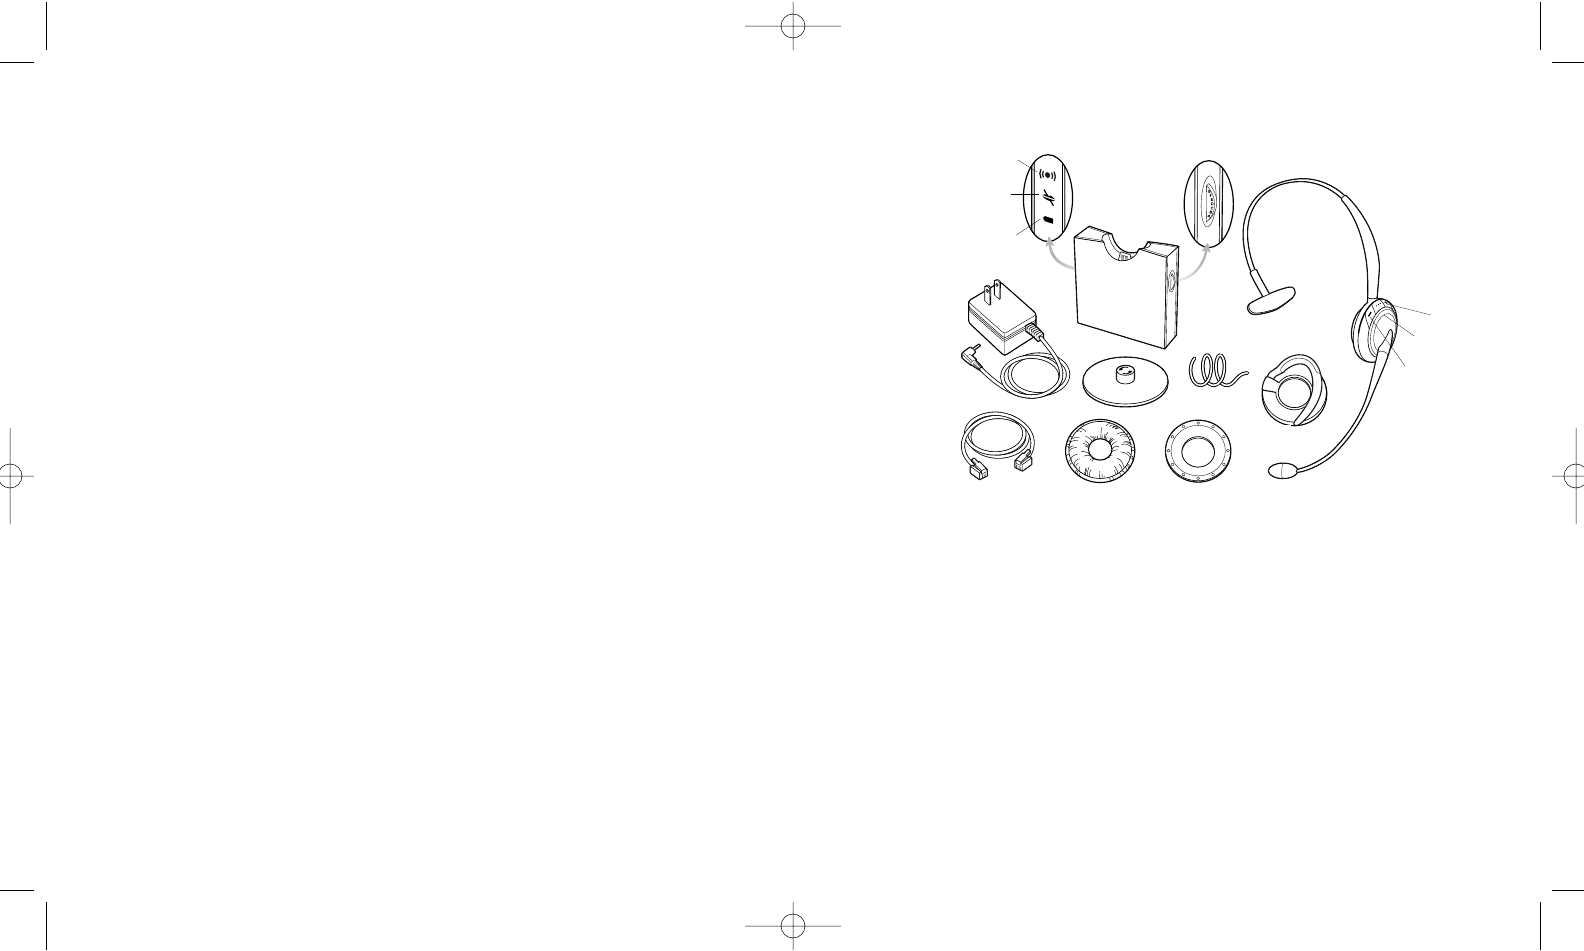
Components
1. Base Unit
a) On-Line Indicator
b) Mute Indicator
c) Battery Re-Charge Indicator
d) Link Indicator
e) Telephone Termination Switch
2. Headset
a) Multifunction Button
b) Volume Up
c) Volume Down
3. Headband
4. Earhook
5. Earplate
6. Ear cushion
7. Base Stand
8. Connection Cord
9. Cord Manager
10. Power Cord
3
(1a)
(1)
(1d)
(1b)
(2)
(3)
(1e)
(5)
(2b)
(4)
(8)
(9) (6)
(7.)
(10)
(2c)
(2a)
(1c)
GN9120 BETA User Guide 11/20/02 5:12 PM Page 2
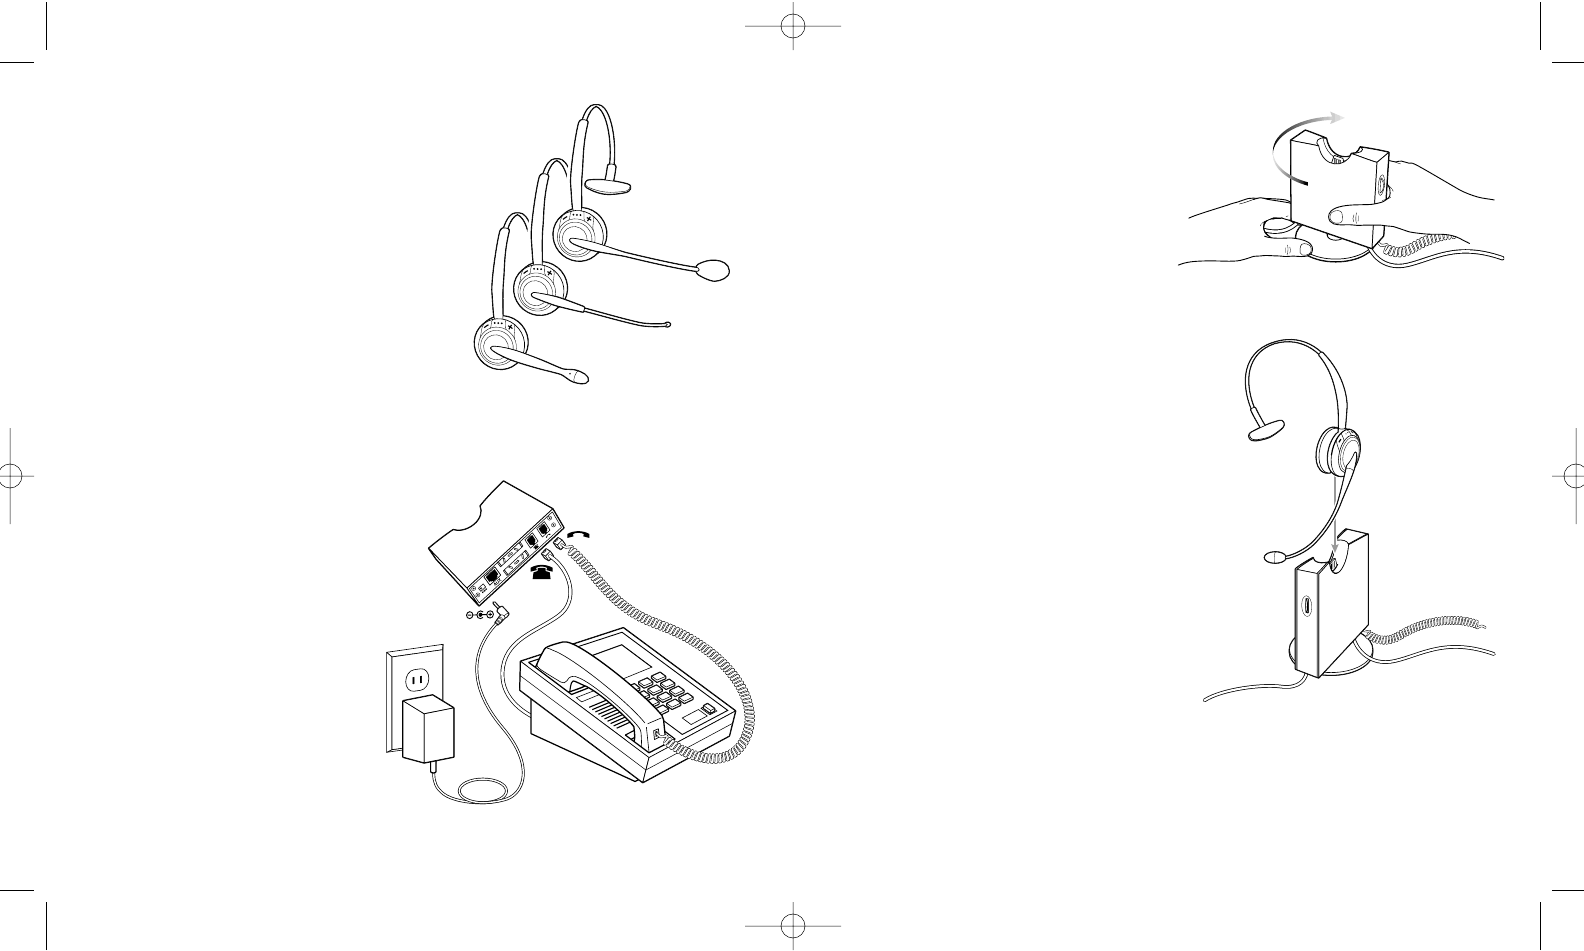
4) Insert the Base Unit into the Base Stand
and twist until secure.
Note: Use the Cord Manager to organize all
cords attached to the Base Unit.
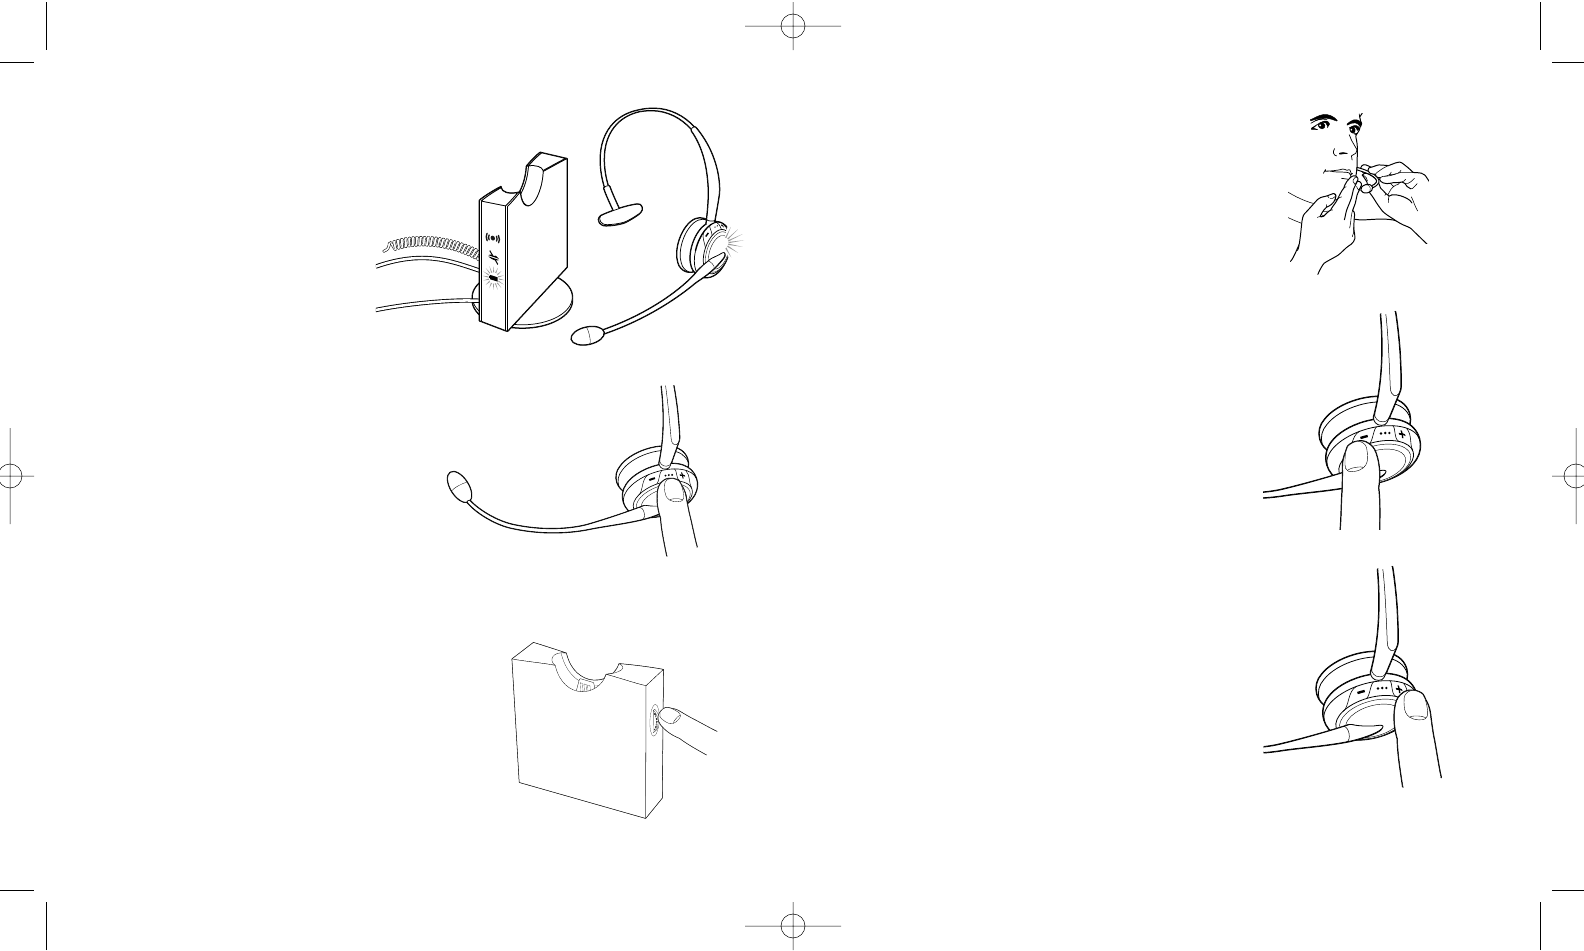
Charging the Battery
Fully charge the headset for 1.5 hours prior to
initial use. To charge, place the headset in the
base. The Battery-Charging Indicator on the
Base Unit will flash while charging and will stop
flashing, but remain lit when the battery is fully
charged.
A completely charged battery provides up to 8
hours of talk time. If the battery needs to be
recharged, a beep will sound in the headset every
20 seconds.
*** REMEMBER ***
CHARGE THE BATTERY FOR 1.5 HOURS
PRIOR TO INITIAL USE
5
4
Your headset will have one of the following
Boom styles:
a) Headset with NC (noise canceling microphone)
b) Headset with SoundTubeTM
c) Headset with MidiBoomTM
These instructions apply to all 3 Headsets.
Installation
1) Disconnect the handset cord
from the telephone's handset
port and connect it to the port
marked handset on the Base Unit.
2) Insert the Connection Cord
into the telephone's handset port
marked handset. Then insert
the other end of the Connection
Cord into the port on the Base
Unit marked telephone.
3) Plug the Power Adapter into the
port marked power icon at the
bottom of the Base Unit.
Connect to a power outlet.
(a.)
(b.)
(c.)
GN9120 BETA User Guide 11/20/02 5:12 PM Page 4
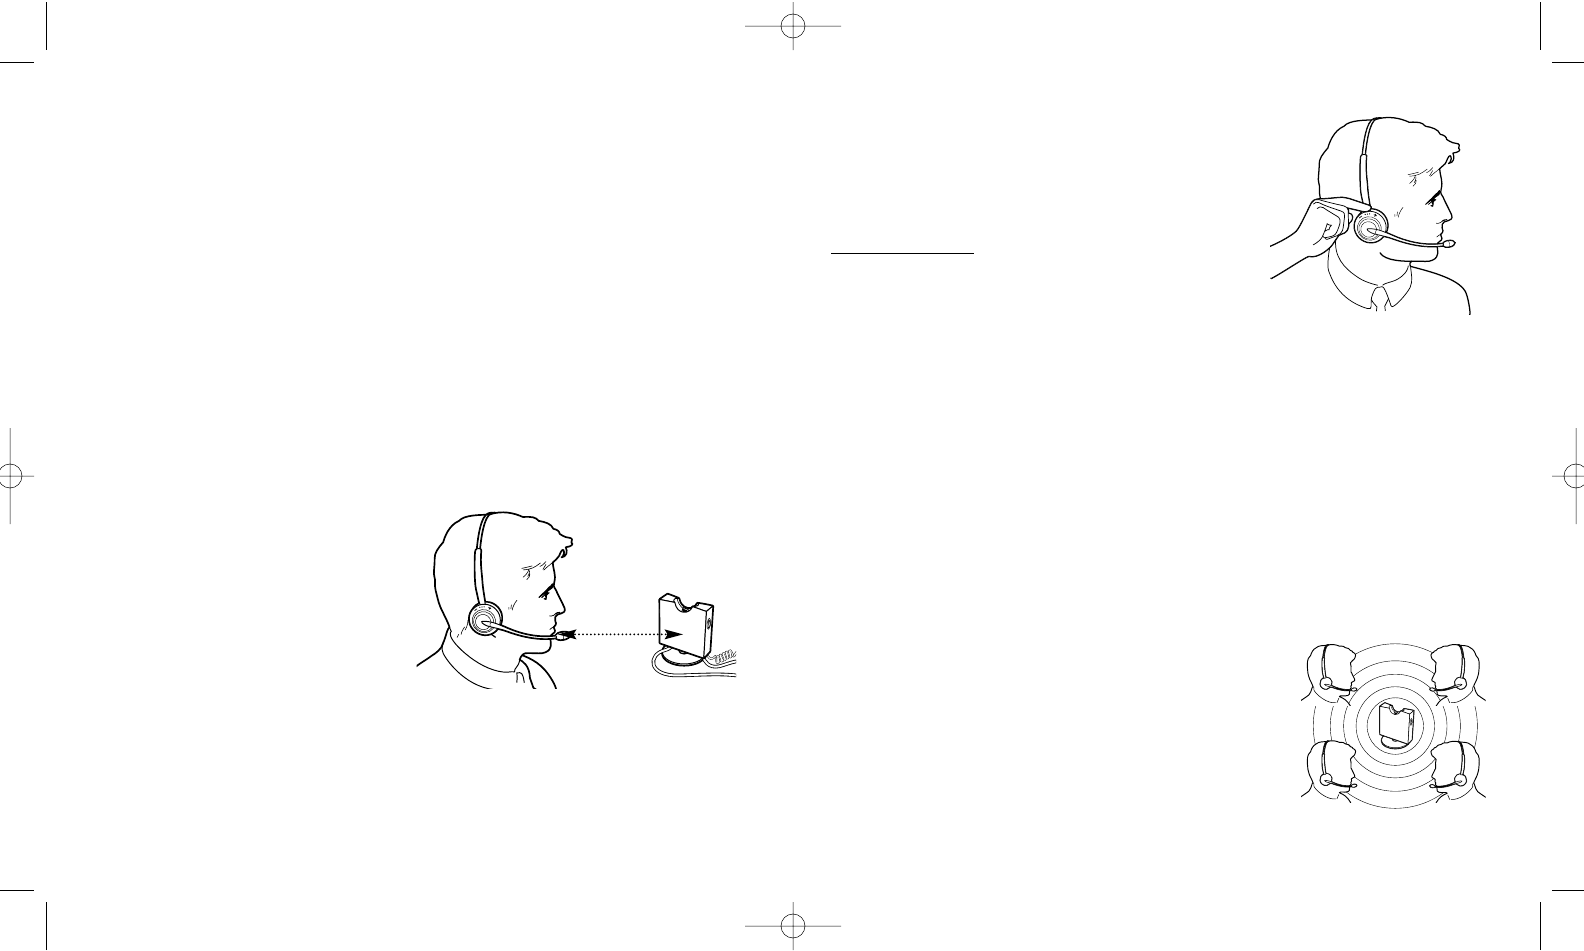
Checking Your System
To check that your system is set up cor-
rectly, first remove the headset from the
Base Unit. The green, Link Indicator on
the front of the Base Unit will light up and
the red, On-Line Indicator on the headset
will flash.
Adjusting to Your Telephone
1) First, make sure the Mute function is off.
If the Mute function is activated, you will
hear a beep in your headset every 15
seconds. Turn off the Mute function by
pressing the Multifunction Button
once quickly.
2) Put on the headset.
3) Lift the telephone's handset and listen for a
dial tone in your headset.
4) If there is little or no dial tone, move the
Telephone Termination Switch on the back
of the Base Unit, from A through G until the
dial tone is clearly heard.
7
6
Adjusting Transmit and Receive Volume
1) Put on the headset.
2) Lift the handset.
3) Call someone and ask them to help you evaluate
the headset's transmit volume.
4) Make sure that the boom arm/microphone is
positioned closely to your mouth.
5) Press the +/- buttons on the headset simultaneously
until you hear a beep. Adjust the Transmit Volume
by pressing the + or - Button. + raises transmit
and - lowers transmit.
When the person you are speaking with finds the
volume of your voice appropriate, press the +/-
Buttons simultaneously for 2 seconds. This setting is
now stored in the headset.
6) Now, adjust the Receive Volume by pressing the + or -
Button, until you reach the sound level you desire. This
setting is now stored in the headset.
Note: When the maximum or minimum volume is reached,
you will hear a beep in your headset.
GN9120 BETA User Guide 11/20/02 5:12 PM Page 6
Answering telephone calls using the GN 1000 RHL
(Remote Handset Lifter):
You may purchase a GN 1000 RHL as an accessory, which
lets you answer and end telephone calls while away from your
desk. Please contact your preferred reseller or visit
www.gnnetcom.com for further information.
To use the GN 1000 RHL accessory with your
GN 9120 telephone:
1) Install a Remote Handset Lifter using the directions
provided with that product.
2) To make a call, lift the handset out of the Base Unit. The Remote Handset Lifter
will immediately lift up and you will hear a dial tone. To terminate the call, press
the Multifunction Button for 2 seconds or put the headset back in its base.
3) To answer a call while wearing the headset, press the Multifunction Button quickly
to establish a link. To end the call, press the Multifunction Button on your headset
for 6 seconds. The call will be terminated.
Conference Mode
Using the Conference Mode, additional headsets may be joined
to a telephone conference via the base station. The headset
used with your Base Unit is the Master headset.
1) Lift your Master headset out of the Base Unit.
2) Initiate or answer a call.
Adjusting Receive Tone Control
Select the tone (Normal, Bass Lift or Treble Lift) according to personal preference:
1) Press the Multifunction Button for 6 seconds. A beep will indicate when 6 seconds
has passed.
2) Press the volume +or - button to toggle between the 3 sound modes.
When the desired sound mode is reached, press the Multifunction Button to
exit the sound mode feature.
Muting the Microphone
To mute the microphone, press the Multifunction Button on the headset once quickly. When the
microphone is muted, you will hear a beep every 15 seconds in your headset and the red Mute
Indicator on the Base Unit will light. You will still hear the other party.
Placing and Answering Telephone Call
1) Remove the headset from the Base
Unit. The Link Indicator will light.
2) Put on the headset.
3) Lift the handset from the phone.
Answer or place the call.
4) You can now move freely away from
the Base Station. If you move out of
trans mission range, you will hear a beep
in the headset every 10 seconds.
Once back in range, the beeping will stop.
To end the call, replace the handset.
9
8
GN9120 BETA User Guide 11/20/02 5:12 PM Page 8
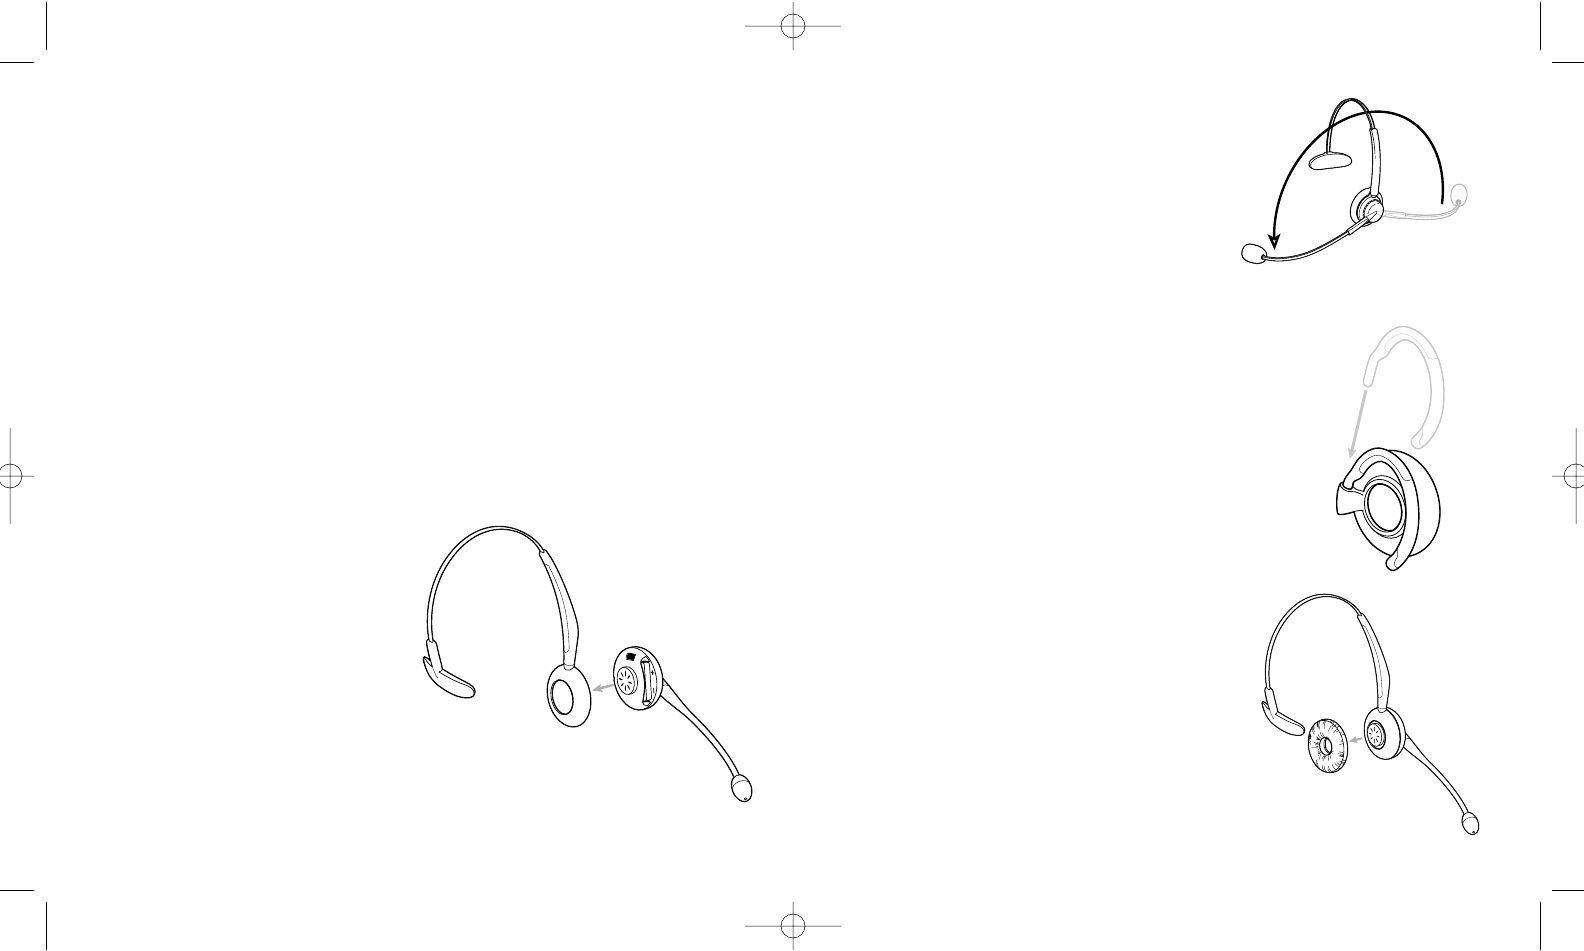
Your headband allows you to wear your headset on your
right or left ear. Rotate the Boom Arm (x) 180 degrees for
left ear or right ear wearing. The Stay-Put TM click-stop
headband lengthens and shortens to the desired length for
a custom fit over your head. Pull to lengthen.
Push to shorten.
Note: The Boom Arm cannot be rotated a full 360
degrees.Do not force it if you cannot rotate it any further.
To Attach the Earhook for Over-the-Ear Wearing:
1) Gently press the Earhook Ring into the Headset
Receiver. The square knob on the Earhook Ring
will match the square hole in the Headset Receiver.
2) Attach the Earhook to the Earhook Ring.
After attaching the Earhook, you may now
adjust the headset to be worn on your right
or left ear, depending on personal preference.
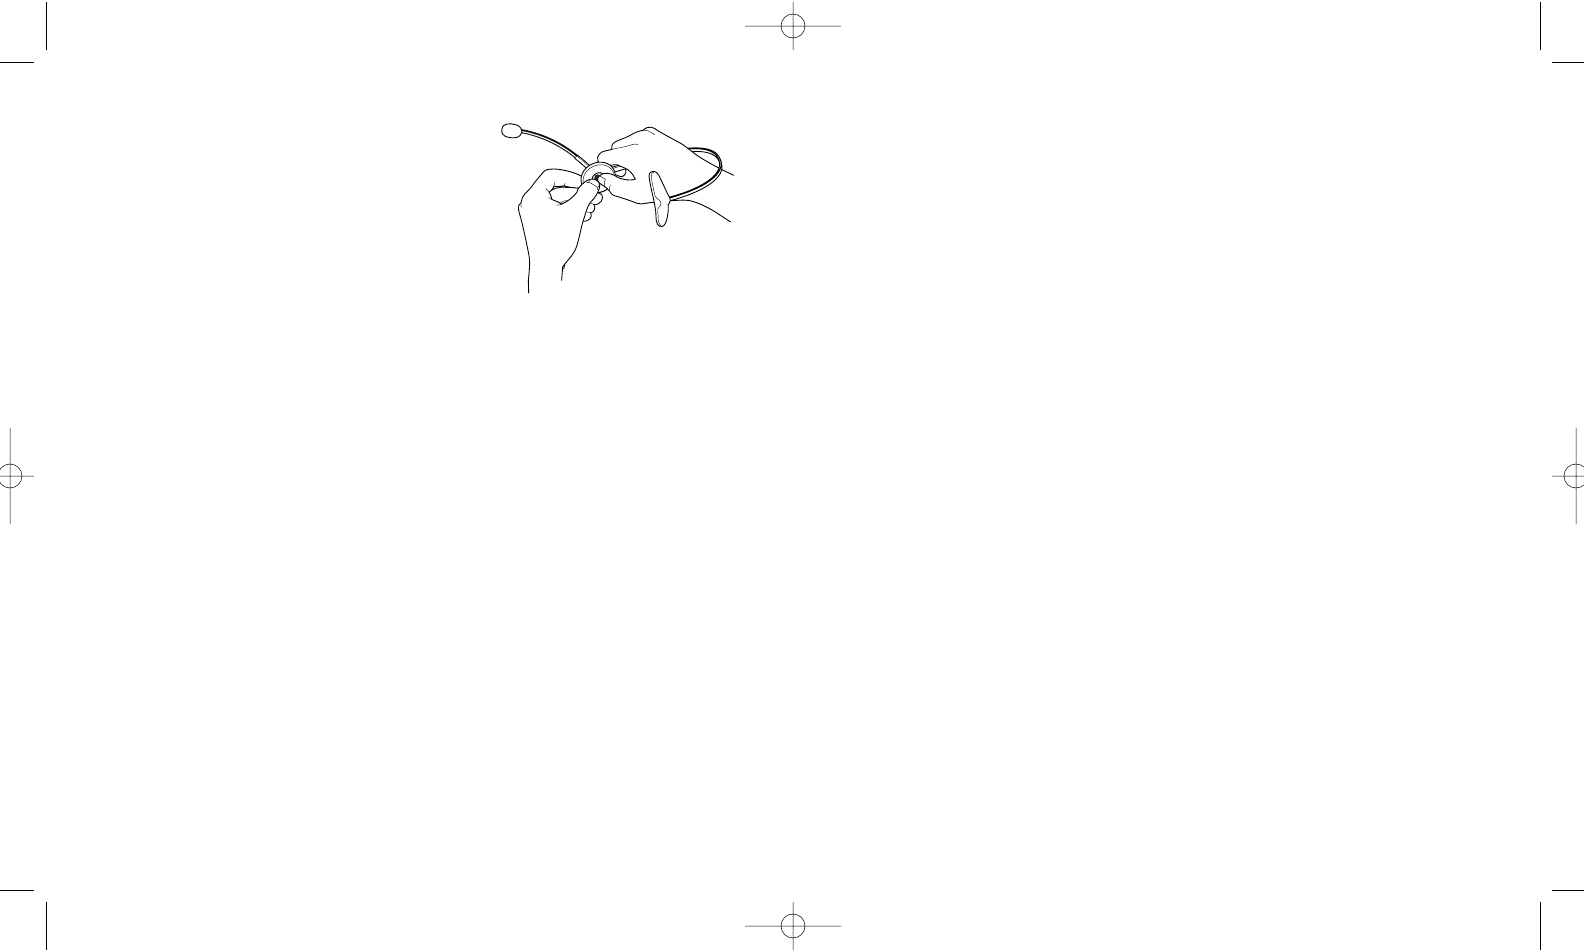
Changing the Headset's Wearing Style:
1) Remove the Ear Cushion from the Headset
Receiver (headband version only).
11
10
3) During the telephone call, place an additional headset into the Master's Base Unit.
4) Listen for a beep in the master headset. You will have 15 seconds after the beep to
accept the additional headset for conference. Accept the additional headset by simultane-
ously pressing the +/- Buttons briefly. The additional headset can exit the conference call
by pressing the Multifunction Button for 2 seconds.
5) The conference mode is terminated when:
the Master headset is placed in the Base Unit or; the Master headset's Multifunction
Button is pressed for 2 seconds (this will end the call)
Note: Repeat steps 3-5 to add more headsets to the conference mode. Up to 4 headsets
may participate in the conference mode.
Comfort Adjustments
The GN 9120 has 2 different wearing styles:
Headband or Over-the-Ear.
To attach the headband:
1) Align the Headset Receiver with the
Headband Ring.
2) Gently press the Headband Ring to
the Headset Receiver until it clicks.
The square knob on the Headband
Ring will match the square hole in
the Headset Receiver.
3) Press the Ear Cushion onto the
Headset Receiver until it clicks.
Align Heaband Ring with
Headset Receiver
GN9120 BETA User Guide 11/20/02 5:12 PM Page 10
- Check the position of the Boom Arm and make sure that the microphone is
positioned close to your mouth.
- You may be out of range. Move closer to the Base Unit.
Why do I hear a buzz or humming noise in my headset?
- Static sometimes results when your Base Unit is placed too close to your telephone
or other electronic devices. Try moving the base station further away from other devices.
Operational and Safety Information
Replacing the battery
If you need to replace the battery, you must use GN Netcom-approved batteries.
No other parts can be replaced by the user.
Inside the Headset Receiver is where the battery is located, press down on the
plastic tab securing the battery and pull the battery out. Insert the new battery into
the battery compartment.
Note: Make sure that the battery is placed correctly in the headset with the + of the
battery corresponding to the + indicated in the battery slot of the headset.
Memory Reset
When the battery is removed or the power adapter is unplugged (for at least a few seconds), all
customized headset settings (clear dial tone, transmit volume, received sound volume and tone
control) are returned to factory-set default settings.
Cleaning and Replacing Parts
The Ear Cushion and Earplate may be cleaned or replaced. When cleaning, use only water and a
small amount of dishwashing liquid if needed.
For the Earplate , remove the Earplate from the Headset Receiver.
For the Headset's Ear Cushion, gently peel it off the Earplate
2) While carefully handling the headset, gently
press the Headset Receiver's speaker with
your thumb and pull the Headband/Earhook
Ring away.
Frequently Asked Questions
Why can't I hear a dial tone?
- Check that all the cords are connected correctly.
- Be sure that the AC power adapter is plugged in and has power.
- Check that the On-Line Indicator is lit. If not, place the headset in the Base Unit
and take it out again.
- Check that the battery is fully charged. If the battery is fully charged, the
Battery-Charging Indicator on the Base Unit will light up.
If the green, On-Line Indicator does not light up, check the wiring connections on the
Base Unit and be sure that the AC power adapter is connected. If the On-Line Indicator
on the headset does not flash continuously put the headset back in the Base Unit and
remove it again.
Why do I hear beeping in my headset?
- A beep every 10 seconds indicates that you are out of range. Move closer to the Base Unit.
- A beep every 15 seconds indicates that the Mute function is active.
- A beep every 20 seconds indicates that the battery is too low and needs recharging.
Why can't the caller hear me speaking?
- Check that the Mute function is off.
- Readjust the microphone volume.
13
12
GN9120 BETA User Guide 11/20/02 5:12 PM Page 12

Cautionary Notes to Computer Users
When using any headset with a computer, care should be taken in dry or low humidity environments
to protect the user from electrostatic discharge from the monitor (CRT). Computer monitors can
induce a substantial electrostatic charge when turned on or off, or when there is a power failure, and
the resulting electrostatic discharge can be passed through the headset to ground.
A user in close proximity to or touching the computer may feel a common “shock” sensation, similar
to touching a doorknob after walking across a carpet, causing no harm to the user. This discharge is
entirely due to the computer monitor; the headset is merely the shortest path to ground.
To minimize the possibility of electrostatic discharge through the headset, you can:
• Use a grounded screen in front of the monitor.
• Use static dissipative wrist straps.
• Increase the relative humidity in the room to 60% or more.
• Install static dissipative carpets or floor coverings (anti-static sprays can be helpful).
• Remove the headset before turning the computer on or off.
GN Netcom, Inc. headsets meet all OSHA, UL, FCC and CS standards.
Safety Instructions
• Never try to dismantle the product yourself. None of the internal components can be
repaired by users.
• Do not expose the headset to rain or other liquids.
• The headset is equipped with a rechargeable NiMH battery (nickel-metal-hydride). For
battery replacement, please contact your distributor or reseller.
FCC Notice to Users
Upon request only, you must notify your telephone utility company (telco) of your intention to install or
permanently remove an FCC Part 68 registered device or system. Include the FCC Registration
Number and the Ringer Equivalence Number (REN) located on the amplifier label.
The telco has the right to make changes to their network, which may affect the operation of your
equipment, provided you are given adequate advance written notice to permit correct operation.
This device complies with part 15 of the FCC Rules and ICES-003 Operation is subject to the follow-
15
Registering a New Master Headset
A new master headset may be registered to the product in case of loss
or damage to the original headset. To register a new master headset:
1) Unplug the power adapter for a couple of seconds.
2) Plug the power adapter back to the power outlet.
3) Secure the new master headset into the Base Unit.
14
GN9120 BETA User Guide 11/20/02 5:12 PM Page 14

IC Notice to Users
The Industry Canada label identifies certified equipment. This certification means that the equipment
meets telecommunications network protective, operational and safety requirement as prescribed in
the appropriate Terminal Equipment Technical Resource Document(s). The department does not
guarantee the equipment will operate to the user’s satisfaction.
Before installing this equipment, users should ensure that it is permissible to be connected to the
facilities of the local
telecommunications company. The equipment must also be installed using an acceptable method of
connection. The customer should be aware that compliance with the above conditions may not pre-
vent degradation of service in some situations.
Repairs to certified equipment should be coordinated by a representative designated by the supplier.
Any repairs or alterations made by the user to this equipment, or equipment malfunctions, may give
the telecommunications company cause to request the user to disconnect the equipment.
Users should ensure for their own protection that the electrical ground connections of the power utili-
ty, telephone lines and
internal metallic water pipe system, if present, are connected together. This precaution may be partic-
ularly important in rural areas. Caution: Users should not attempt to make such connections them-
selves, but should contact the appropriate electric inspection authority, or electrician, as appropriate.
NOTICE: The Ringer Equivalence Number (REN) assigned to each terminal device provides an indica-
tion of the maximum number of terminals allowed to be connected to a telephone interface. The ter-
mination of an interface may consist of any combination of devices subject only to the requirement
that the sum of the ringer equivalence Numbers of all the devices does not exceed 5.
17
ing two conditions:
1. This device may not cause harmful interference.
2. This device must accept any interference received, including interference that may cause
undesired operation.
Note: This equipment has been tested and found to comply with the limits for a Class B digital device,
pursuant to part 15 of the FCC Rules. These limits are designed to provide reasonable protec
tion against harmful interference in a residential installation.
This equipment generates uses and can radiate radio frequency energy and, if not installed and used
in accordance with the instructions, may cause harmful interference to radio communications.
However, there is no guarantee that interference will not occur in a particular installation. If this equip-
ment does cause harmful interference to radio or television reception, which can be determined by
turning the equipment off and on, the user is encouraged to try to correct the interference by one or
more of the following measures:
1) Reorient or relocate the receiving antenna.
2) Increase the separation between the equipment and receiver.
3) Connect the equipment into an outlet on a circuit different from that to which the receiver
is connected.
4) Consult the dealer or an experienced radio/TV technician for help.
Complies with part 15 & 68, FCC Rules
Operation is subject to the following two rules:
1) This device may not cause harmful interference and
2) This device must accept any interference received, including interference that may
cause undesired operation.Industry Canada requires Indoor Use Only
16
GN9120 BETA User Guide 11/20/02 5:12 PM Page 16

Warranty
GN Netcom, Inc. warrants this product against all defects in material and workmanship for a period of
one year from the date of original purchase. The conditions of this warranty and our responsibilities
under this warranty are as follows:
• The warranty is limited to the original purchaser.
• The warranty is void if the serial number, date code label or product label is removed, or if the
product has been subject to physical abuse, improper installation, modification, or repair by
unauthorized third parties.
• The responsibility of GN Netcom, Inc. under this warranty shall be limited to the repair or
replacement of the product at the sole discretion of GN Netcom, Inc.
• Any implied warranty on GN Netcom, Inc. products is limited to one year from the date of pur-
chase on all parts, including the cords and connectors. Specifically exempt from warranty are
limited-life consumable components subject to normal wear and tear, such as microphone
windscreens, ear cushions, ear tips, decorative finishes, batteries, and other accessories. GN
Netcom, Inc. is not liable for any incidental or consequential damages arising from the use or
misuse of any GN Netcom, Inc. product.
• A copy of your receipt or other proof of purchase is required. Without proof of purchase, your
warranty is defined as beginning on the date of manufacture as labeled on the product.
• This warranty gives you specific legal rights and you may have other rights which vary from
state to state.
Unless otherwise instructed in the User Guide, the user may not, under any circumstances, attempt
any service, adjustments or repairs on this unit, whether in or out of warranty. FCC Part 68.216 man-
dates that “Repair of registered terminal equipment and registered protective circuitry shall be
accomplished only by the manufacturer or assembler thereof or by their authorized agent.”Contact
GN Netcom, Inc. at (800) 826-4656 for authorized service locations.
19
To Obtain Service
For customer service and technical support, call GN Netcom, Inc. at 1-800-826-4656.
If it becomes necessary to send a unit in for repair, it is not necessary to call for a Return Material
Authorization (RMA) number, as one will be assigned upon receipt of the package at the factory.
Ship the product in a suitable shipping container, fully insured and with the shipping charges prepaid.
Include the following with the product:
• Your name, company name, address and telephone number.
• A description of the problem.
• A copy of the receipt or other proof of purchase (without proof of purchase, your warranty will
be defined as beginning on the date of manufacture as labeled on the product).
Or, for out of warranty products:
• A purchase order which authorizes repair.
In warranty products are warranted for one year from the repair date or for the remainder of the origi-
nal warranty period, whichever is longer. Out of warranty products will be repaired or replaced at the
prevailing charge and carry a one year warranty from repair date.
GN Netcom, Inc. will not assume any responsibility for any loss or damage incurred in shipping. Any
repair work on GN Netcom, Inc. products by unauthorized third parties voids any existing GN
Netcom, Inc. warranty.
Ship To:
GN Netcom, Inc. • 77 Northeastern Boulevard • Nashua, NH 03062 • 1-800-826-4656
18
GN9120 BETA User Guide 11/20/02 5:12 PM Page 18

20
GN9120 BETA User Guide 11/20/02 5:12 PM Page 20