GUANGZHOU TAIMA TI4520 Wireless 2D Barcode Scanner User Manual
GUANGZHOU TAIMA(TICODE) ELECTRONICS TECHNOLOGY LTD. Wireless 2D Barcode Scanner
User Manual
2D Wireless Barcode Scanner
Quick Guide
Reset to Default
Remark
:
This pamphlet is for quick guidance only. Please refer to
the Uses’ Manual for more detail instructions.
VER: TI4520_QG_EN_V1.00
Handset & Cradle
① Power Indicator
② Data Indicator
③ Trigger
④ View window of capture
① Pairing
② Channel Up
③ Channel Down
④ Power Indicator
⑤ Data Indicator
⑥
Reserved
⑦
Power Interface
⑧
Data Interface to PC
⑨
Wall-mounted Adjusting
⑩
Antenna
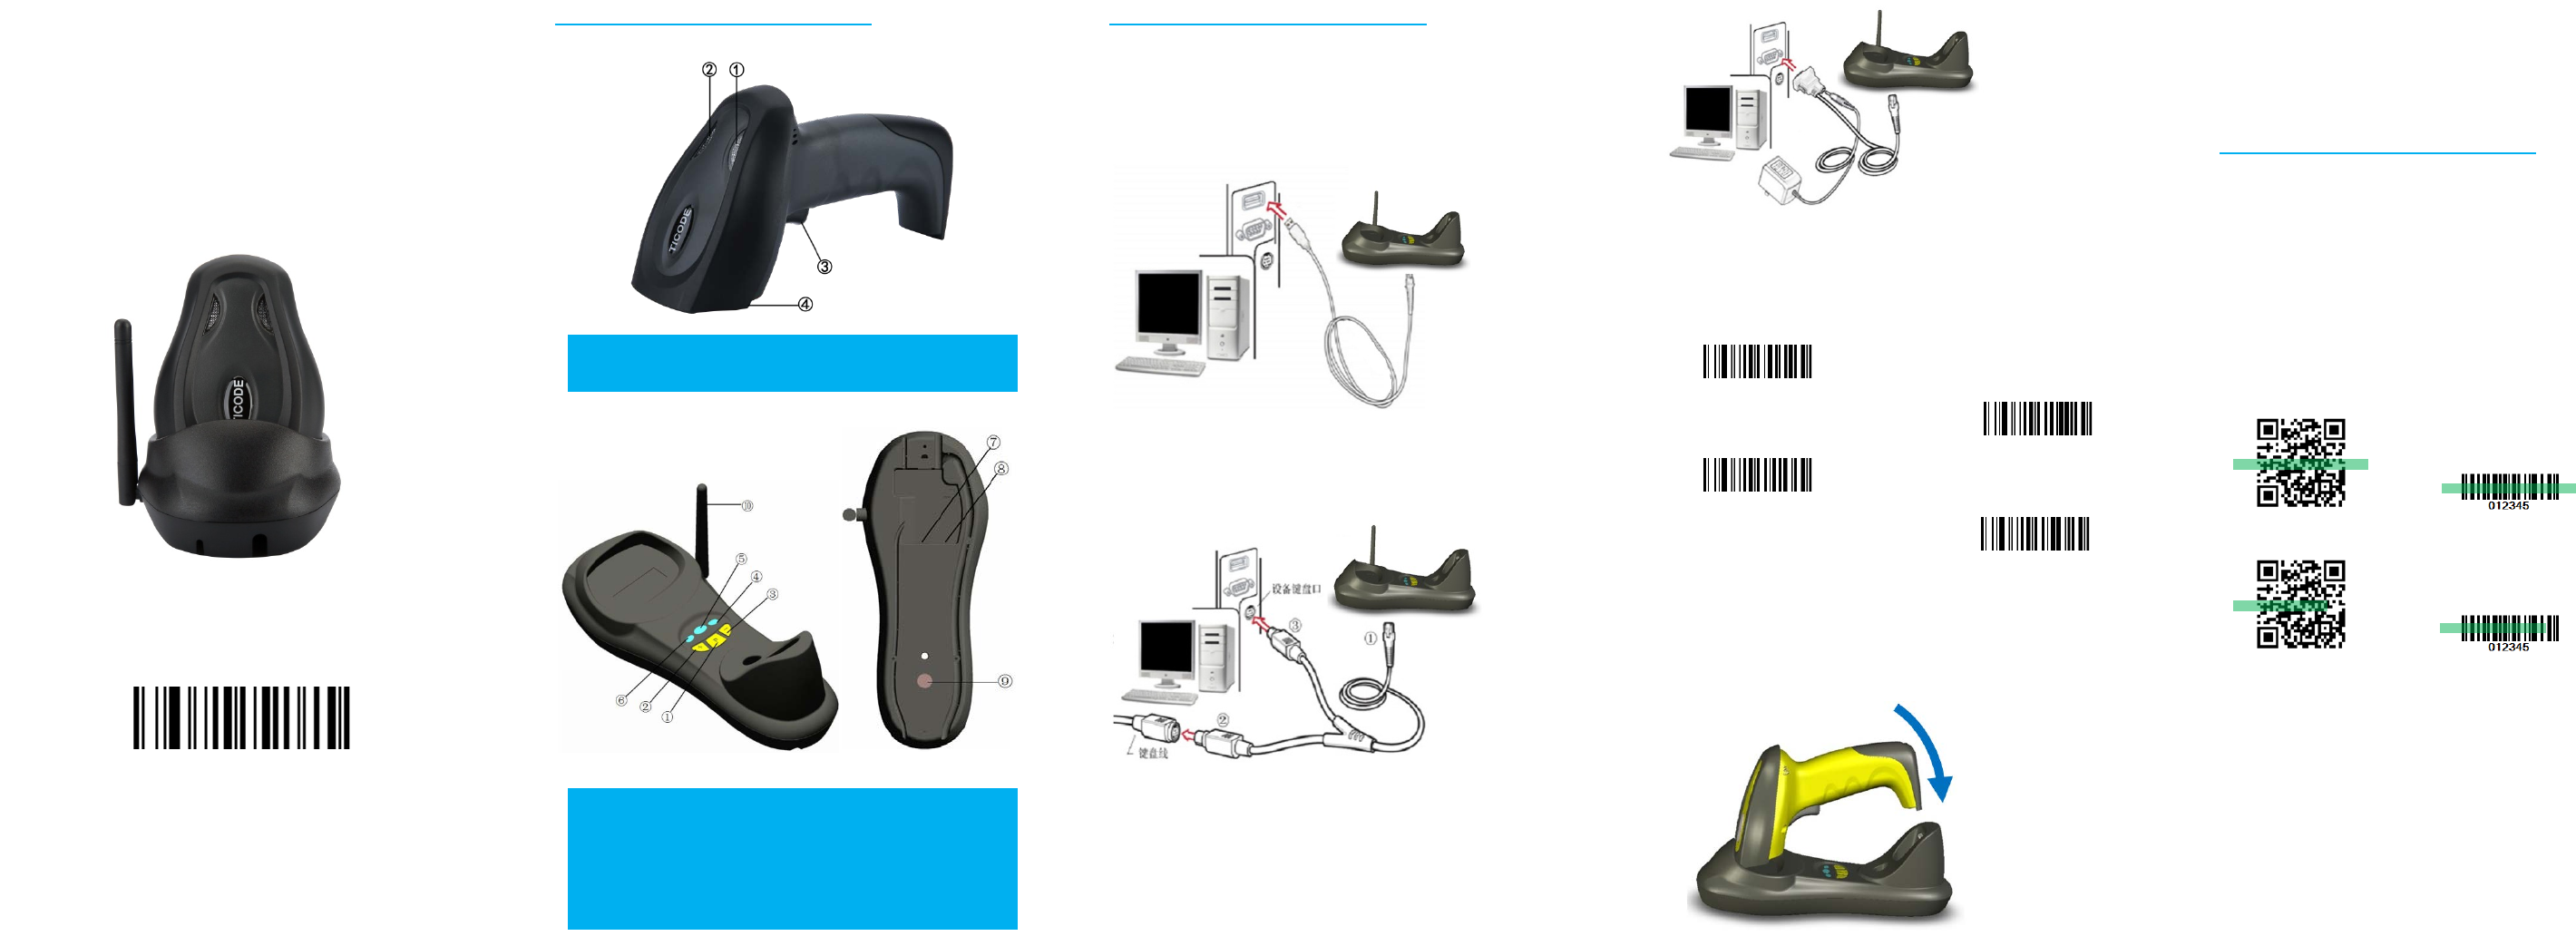
Installation
Connection and Pairing
Step 1. Refer to the below pictures, firstly connect the cradle⑧ to host
(e.g. PC or POS) with cables of different interface:
USB: Plug the RJ45 in cradle⑧, and plug the USB end into the host.
USB Cable
Keyboard PS/2
:
Plug the RJ45 to cradle⑧, and connect the male PS/2
end to host port and the female end with keyboard wire.
Keyboard P/S 2
RS232
:
Plug the RJ45 into the cradle⑧, and plug the RS232 into the PC
port. The DC power should be plugged into the RS232 connector.
RS232 Cable
Typically the cradle will auto identify the interface type (COM) and
cradle⑤ gets green on. In extreme case the cradle fails to identify
(green flash of cradle⑤), please scan the barcode to set it manually.
Auto identifying (Default)
USB Mode
Keyboard (PS/2) Mode
RS232 Mode
Note: The auto setting of interface type will only be activated when
the pairing is well done. Please refer to the Step2 and Step3 for pairing.
Step 2. Place the handset onto the cradle. As in the picture below, firstly
place the head of handset onto the wider end of cradle. Then press the
other end onto the cradle till a “Pa” sound is out. It means well locked.
Handset onto Cradle
Step 3. Press the cradle①(P button) and hold till the Dee-Doo-Doo
sound is out. Then the handset and cradle are well paired.
Remark: 1 cradle can support maximum 100 handsets. The handset
cannot upload data if the handset and cradle were not well paired.
Usage of Scanner
Power On / Off
When trigger (handset①) is pulled and a Beep-Deep sound comes
out, the handset is power on. If handset is not used for 60sec (default),
the handset will auto turn off. The timing can be reset to your need.
Code capture
In the standby mode, pull the trigger to capture code. Make sure the
green aiming line is covering the full code, as in picture below
Correct way
Wrong way
Remark: 1.Once the code is well captured, the handset② will turn red
and up for 1sec, and a “Dee” sound will come out.
2. To capture codes of different density, please move the handset
forward and backward to gain a proper position.
Recharging
Place the handset back to cradle as Step2 to start recharging.
Remark: 1. Green flash of handset① means low power.
2. Red flash means recharging and it turns to yellow on once finished.

Built-in Data Memory
If the handset is out of limit to wireless contact radius, or it works in
the Manual Upload Mode, the captured code data will be stored in the
handset memory. The Data Indicator (handset②) will be red on if data
stored. It will turn green on once the data is well uploaded.
Multi-Cradles Working
In case two or more cradles working in the same room, please set
them to different channels to ensure high upload efficiency as follow.
1.Press the “+” or “-” buttons (Cradle②, ③) on the cradle. (The No. of
the channel will be displayed on the PC.)
2.Redo the pairing of handset and cradle to reset it to new channel.
Remark: If two or more cradles working in the same signal channel, it
will slow down upload speed. However, they won’t jam with each other.
Common Settings
Information Check
Firmware Version
Handset Serial No.
Cradle Serial No.
Battery Power
Channel and Handset ID
Suffix Quick Setup
CR (Default)
LF
CR+LF
No Suffix
Setting the Torch
Torch on when scanning*
Torch off
Common Symbol Setting
Start QR
Stop QR
Start Data Matrix
Stop Data Matrix
Start PDF417
Stop PDF417
Setting the Data Upload Mode
Multiple upload modes are available for different usages:
No Storing Mode: Every code data will be uploaded instantly to the
cradle once they are well captured. In case of unsuccessful upload, the
code data will be ignored and alarm of “Dee-Dee-Dee” will come out.
Auto Storage Mode (Default): The data will be stored in the handset
memory in case of upload failure to cradle. And the data will be
uploaded to cradle once the contact connection come back normal. It’s
the default working mode.
Manual Mode: The code data will firstly be stored in the built-in
handset memory once well captured. It can store up to 10,000pcs code
data. The data would be uploaded to cradle in one time once the
Upload Start Code is manually triggered.
During the process of uploading or after upload well finished, if the
Upload Start code is triggered, all code data stored in handset will be
uploaded again.
Auto Storing (Default)
No Storing
Manual Mode
Upload Start (in Manual Mode)
Remark: In the Manual Mode, all stored code data will be kept until
manually erased. Every time the Upload Start code is triggered, all code
data stored in handset will be uploaded again. To avoid duplicating
upload data, please trigger Erase Storage code to clear handset data.
Erase Storage
Setting Power of Wireless Communication
Power-High (Default 14dBm)
Power-Mid (7dBm)
Power-Low(0dBm)
Caution: Please check with your local authority and set the power of
wireless communication according to local rules and regulations.
Setting the Volume of the Beeper
Loud (default)
Mid
Low
Mute
Setting the Scanning Mode
Manual Scanning*
Auto Scanning Mode
Power Off
Power off at once
Indicators and Buttons
Handset Indicators
Indicators Status Meanings
Power
(handset
①
)
Green Started normally
Green flash Power low, need to recharge
Red flash Recharging
Yellow Recharge finished
Data
(handset
②
)
Green
All data uploaded
Red
Stored data pending to upload
Red flash
Data storage is full
Yellow flash
Data is uploading
Possibility of upload failures: Cradle disconnected to PC; Exceeding
distance limit; Handset working in Manual Mode (e.g. checking stock).
Cradle Indicators
Indicators Status Meanings
Power -Cradle④
(Right, Green)
Flashing Identifying interface
Green on Started normally
Data -Cradle⑤
(Middle, Red)
Red flash Receiving data
Red on Stored data pending to upload
Rev -Cradle⑥
(Left, Green)
Reserved
Cradle Button
Button Position(Button) Function
Channel
Down
Cradle③
Right (-)
For channel setting. One press to
turn down one channel
Pairing Cradle①
Mid (P)
Press and hold 4secs to pair the
handset
and cradle. Once it’s
done, “Dee-Doo-Dee” alarm will
Channel
Up
Cradle②
Left (+)
For channel setting. One press to
turn up one channel
FCC Statement
This equipment has been tested and found to comply with the limits for a Class B
digital device, pursuant to part 15 of the FCC rules. These limits are designed to
provide reasonable protection against harmful interference in a residential installation.
This equipment generates, uses and can radiate radio frequency energy and, if not
installed and used in accordance with the instructions, may cause harmful interference
to radio communications. However, there is no guarantee that interference will not
occur in a particular installation. If this equipment does cause harmful interference to
radio or television reception, which can be determined by turning the equipment off
and on, the user is encouraged to try to correct the interference by one or more of the
following measures:
-Reorient or relocate the receiving antenna.
-Increase the separation between the equipment and receiver.
-Connect the equipment into an outlet on a circuit different from that to which the
receiver is connected.
-Consult the dealer or an experienced radio/TV technician for help.
To assure continued compliance, any changes or modifications not expressly
approved by the party.
Responsible for compliance could void the user’s authority to operate this
equipment. (Example- use only shielded interface cables when connecting to
computer or peripheral devices).
This equipment complies with Part 15 of the FCC Rules. Operation is subject to
the following two conditions:
(1) This device may not cause harmful interference, and
(2) This device must accept any interference received, including interference that
may cause undesired operation.