Garmin Canada SMW-A Sports Monitoring Watch User Manual Manual
DynaStream Innovations Inc. Sports Monitoring Watch Manual
UserManual.wiki
>
Garmin Canada
>
SMW A User Manual
Manual
Navigation menu
Upload a User Manual
Namespaces
Wiki Guide
HTML
PDF
Info
Views
User Manual
Discussion / Help
Navigation
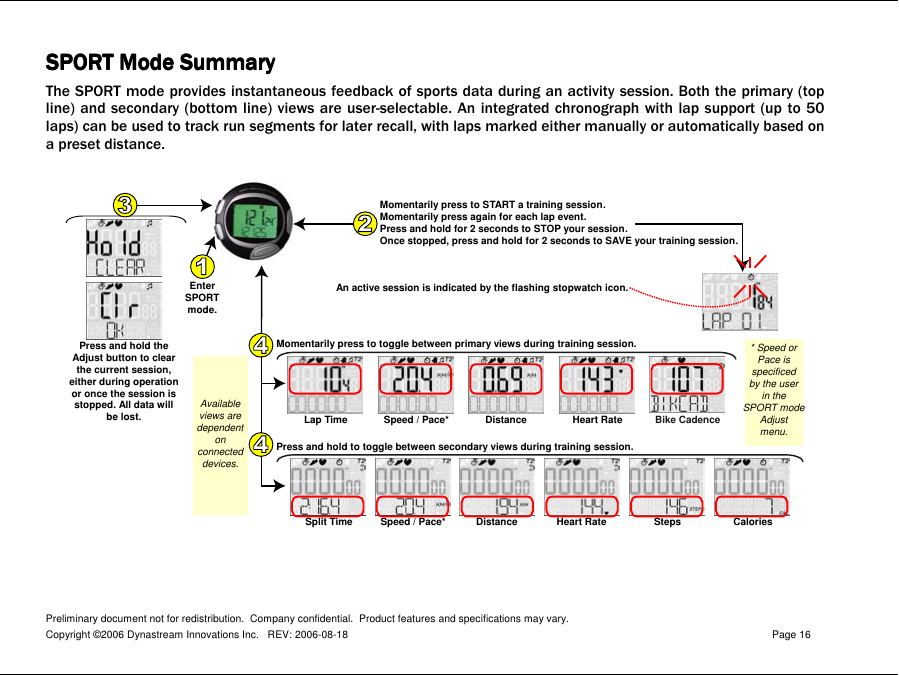
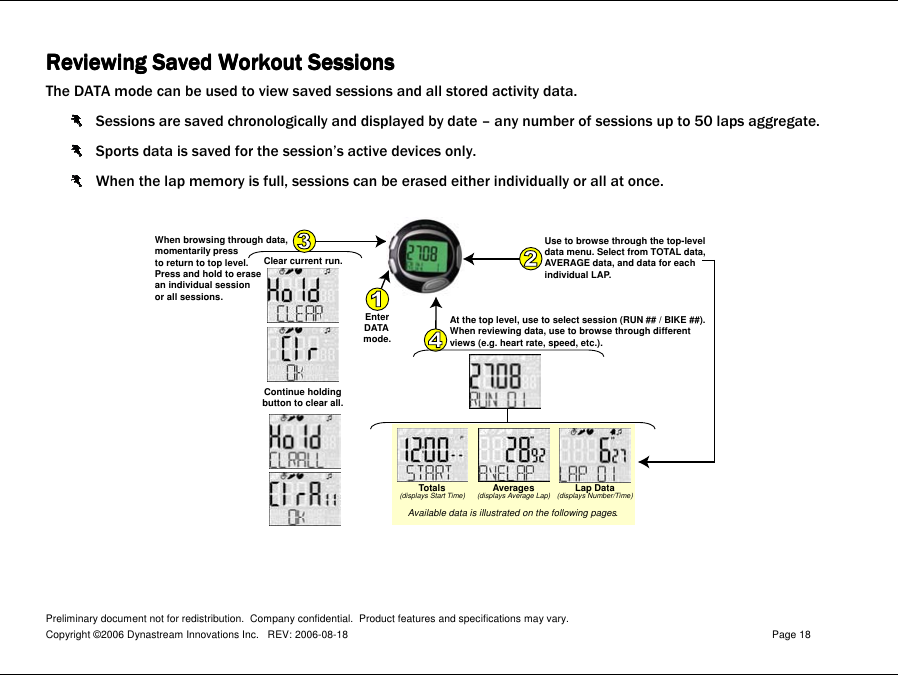
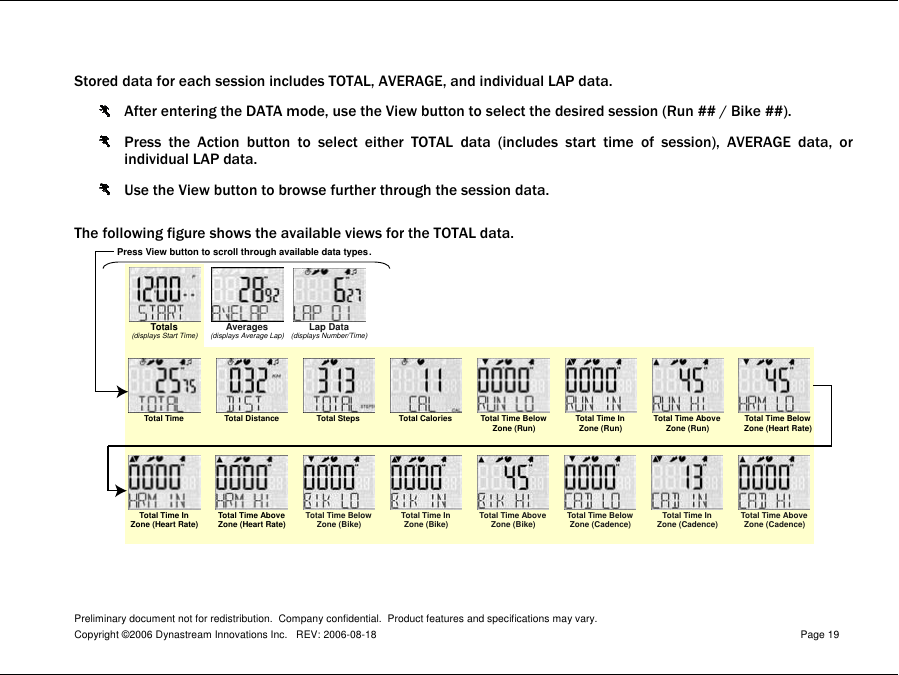
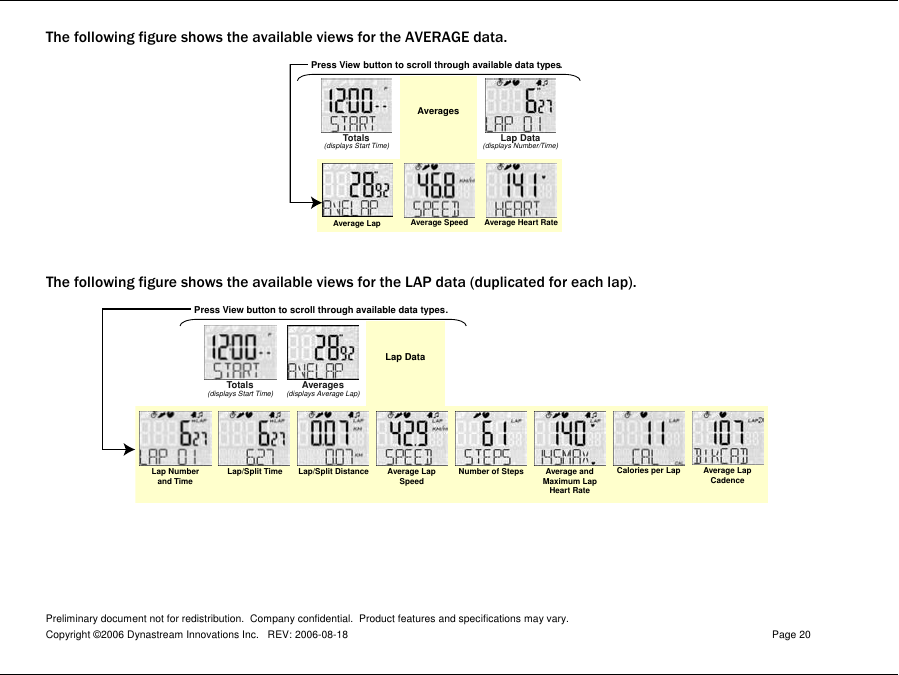
![Preliminary document not for redistribution. Company confidential. Product features and specifications may vary. Copyright ©2006 Dynastream Innovations Inc. REV: 2006-08-18 Page 8 SWM1 Wristwatch Quick Start Turn on the footpod, heart rate monitor, and/or bike monitor and bring the device[s] within range of the watch (<2 meters). The watch will search and connect to all ‘paired’ devices when placed into SPORT mode. • If your products came packaged together (watch, footpod, heart rate monitor, bike monitor), pairing will have already been performed and you do not need to perform additional steps. • To pair devices to the watch (i.e., to add a new device or to re-pair a heart rate monitor after battery replacement), refer to page 21, Device Pairing. Momentarily press to START a training session. Momentarily press again for each Lap event.Press and hold for 2 seconds to STOP your session.Once stopped, press and hold for 2 seconds to SAVE your training session data.From TIME mode, press onceto move to SPORT mode.Momentarily press to toggle between primary views.Distance Heart Rate Steps CaloriesSplit TimeAvailableviews aredependentonconnecteddevices.Press and hold to toggle between secondary views.Speed / PaceThe display will indicatewhen devices are found.SEARCHING FOUNDLap Time Speed / Pace* Distance Heart Rate Bike Cadence* Speed orPace isspecificedby the userin theSPORT modeAdjustmenu.](https://usermanual.wiki/Garmin-Canada/SMW-A/User-Guide-703724-Page-8.png)

![Preliminary document not for redistribution. Company confidential. Product features and specifications may vary. Copyright ©2006 Dynastream Innovations Inc. REV: 2006-08-18 Page 13 SPORTSPORTSPORTSPORT Mode Adjustment Settings Mode Adjustment Settings Mode Adjustment Settings Mode Adjustment Settings The SPORT Adjust menu is used to select display defaults, set user data, and access sports settings. Use to start/lap/stop/save session.Enter SPORT mode.Cycle throughadjustment settings.Adjust up or down.Execute (Pair/Calibration).UPDOWNToggle between views during session.Select km (metric)or miles (imperial) Enable / disablefootpod autolapfeatureSet bicyclewheel diameter[4]Set genderof userAdjust userbody weightSelect speed (kph/mph)or pace (min/km / min/mi)as default footpod viewPair with newdevice [2]Use targettraining zones[3]Press and hold to enter the Adjust menu. Momentarily press to exit the Adjust menu.Adjust footpodcalibrationoffset [1]Initiate footpodauto-calibrationmode [1]Set autolapdistance [1] For further detail on calibration of a running footpod, see page 22, Footpod Calibration. [2] For further detail, see page 21, Device Pairing. [3] For further detail, see page 17, Using Training Zones. [4] Sample Tire Sizes and Corresponding Wheel Diameters Mountain Bike 26 x 1.75 2030 mm Road & Touring 700 x 23C 2096 mm](https://usermanual.wiki/Garmin-Canada/SMW-A/User-Guide-703724-Page-13.png)
![Preliminary document not for redistribution. Company confidential. Product features and specifications may vary. Copyright ©2006 Dynastream Innovations Inc. REV: 2006-08-18 Page 17 Using Using Using Using TrainingTrainingTrainingTraining Zones Zones Zones Zones Training zones can be used to help an athlete maintain speed, heart rate, or cadence within a target range. Visual and audible alerts are activated when outside of this range. In addition, time spent within, above, and below zones is tracked for later recall in DATA mode. Perform the following steps to enable and adjust training zones: In the SPORT Adjust menu, cycle to the zones selection using the Mode button. Press Action to enable. Enable or disable the zone alarm. If enabled, you will receive an audible beep when above or below zones. Enable the RUN, HRM, bike speed, and/or bike cadence zones for run speed/pace, heart rate, bike speed/pace, and/or bike cadence readings, respectively. Adjust the HI and LO values to set a desired target training zone. Zone audible alerts and arrows [][] will be activated under the following conditions: o Chronograph is active. o Speed/pace, heart rate, or cadence is present in the primary display. SPORTAdjust menuAvailable target zoneswill depend onconnected devices.During a session, the arrowswill flash to indicateout-of-zone training.Enable/disableaudible zonealarm.](https://usermanual.wiki/Garmin-Canada/SMW-A/User-Guide-703724-Page-17.png)
![Preliminary document not for redistribution. Company confidential. Product features and specifications may vary. Copyright ©2006 Dynastream Innovations Inc. REV: 2006-08-18 Page 23 Calibration MCalibration MCalibration MCalibration Menuenuenuenu Both manual and auto-calibration settings are found in the SPORT Adjust menu. Manual calibration is performedby adjusting the nominal valueof 1.000 up or down using theAction (+) or View (-) buttons.Alternatively, begin the auto-calibrationprocess by pressing the Action button. [1]SPORTAdjust menu. . .Begin your run of aknown distance(e.g. 400-meter track).Press Action whencomplete.Adjust the measureddistance with the actualdistance you ran usingthe Action (+) andView (-) buttons.Hold the Adjustbutton to save. Watch confirmscalibration.Auto-Calibration Process [1] The auto-calibration setting is not available until the watch is paired with a footpod.](https://usermanual.wiki/Garmin-Canada/SMW-A/User-Guide-703724-Page-23.png)