Garmin Canada SMW2A Sports Monitoring Watch User Manual Manual 7
DynaStream Innovations Inc. Sports Monitoring Watch Manual 7
Contents
Manual 7
Forerunner 50 Owner’s Manual 7
GettinG Started
Using the Foot Pod
The foot pod is on standby and
ready to send data (like the heart rate
monitor). As soon as you install the
foot pod and start moving, the foot
pod sends data to the Forerunner.
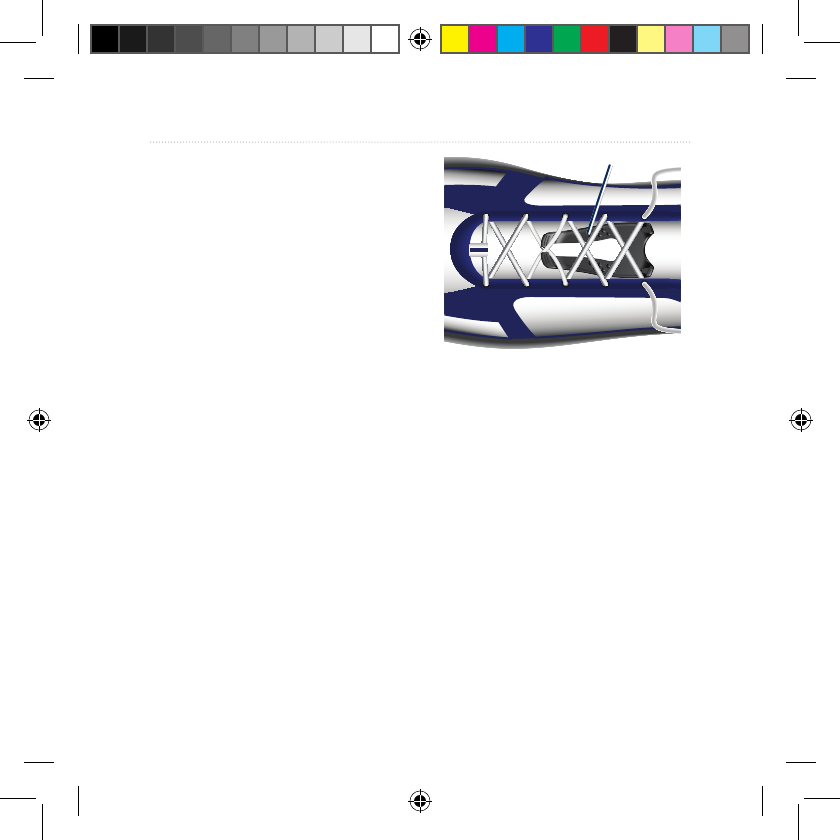
1. Press the tabs on the lace
clip. Lift and separate the foot
pod from the lace clip.
2. Loosen your shoe laces
slightly.
3. Thread the lace clip through
2–3 secure sections of your
shoelaces, allowing enough
room at the top to tie the
shoelaces as usual.
Lace clip
4. Tie your shoelaces securely
to keep the foot pod in place
during your workout.
5. Snap the foot pod into the
lace clip. The foot pod must
be pointed toward the front of
your shoe.
190-00839-00_0D.indd 7 7/31/2007 1:48:32 PM

8 Forerunner 50 Owner’s Manual
GettinG Started
6. Take a few steps to activate
the foot pod. The LED blinks
three times. (This may occur
during installation.)
7. Bring the Forerunner within
range (3 m) of the foot pod.
8. Press mode to access Train
mode. The foot pod icon
appears on the Train page.
9. Press view to access the
DIST, LAP, or SPEED/PACE
data pages.
10. If or foot pod data does
not appear, you may have
to pair the foot pod and the
Forerunner. See page 25.
Calibrating the Foot Pod
Calibrating your foot pod is optional
and can improve accuracy. There are
two ways to adjust the calibration:
auto and manual.
Auto Calibration
The minimum calibration distance is
400 m. For best results, calibrate the
foot pod using the longest distance
possible at your typical pace. A
regulation track (one lap = 400 m) is
more accurate than a treadmill.
1. On the Train page, press and
hold start/stop.
2. Press view to advance to the
PUSH CALIB setting.
190-00839-00_0D.indd 8 7/31/2007 1:48:32 PM

Forerunner 50 Owner’s Manual 9
GettinG Started
3. Press start to begin recording.
4. Run or walk the known
distance.
5. Press stop.
6. Use + and - to adjust the
distance to the ACTUAL
distance.
7. Press view to save the
calibrated distance.
Manual Calibration
If your foot pod distance seems
slightly high or low each time you
run, you can manually adjust the
calibration factor.
1. On the Train page, press and
hold start/stop.
2. Press view to advance to the
CALIB setting.
3. Use + and - to adjust the
calibration factor.
4. Press view to save the
calibration factor.
Removing the Foot Pod
Press the tabs on the front of the lace
clip to remove the foot pod.
Turning Off the Foot Pod
After 30 minutes of inactivity, the
foot pod automatically powers off
to conserve the battery (LED blinks
twice).
Using the GSC10™
Your Forerunner is compatible
with the GSC10 speed and cadence
sensor for bikes. The GSC10 is an
optional accessory that is available
at http://shop.garmin.com. For more
information, see page 25.
190-00839-00_0D.indd 9 7/31/2007 1:48:32 PM

10 Forerunner 50 Owner’s Manual
time mode
time mode
Time mode is the default view of
the Forerunner. After 30 minutes
of inactivity, the Forerunner
automatically jumps back to the Time
page. Otherwise, press mode until the
Time page appears.
Chimes
On the Time page, press and hold
view to toggle Chime mode.
Set the Time
See page 3.
Set the Alarm
1. On the Time page, press
start/stop. The Alarm page
appears.
2. Press and hold start/stop until
the hour setting blinks.
3. Use + and - to adjust the hour.
TIP: Press and hold + or
- to scroll quickly through
the hours, minutes, and
other Time mode settings.
4. Press view to advance to the
minutes setting.
190-00839-00_0D.indd 10 7/31/2007 1:48:35 PM
Forerunner 50 Owner’s Manual 11
time mode
5. Use + and - to adjust the
minutes.
6. Whennished,pressmode to
resume Alarm mode.
7. Press lap/reset to activate (or
deactivate) the alarm. The
icon appears on the Time and
Alarm pages.
Set a Second Time
Zone
You can set the Forerunner time for
two time zones.
1. On the Time page, press and
hold lap/reset to switch to
the second time zone. The
icon appears on the Time
page.
2. Follow the instructions on
page 3 to set the time.
3. Press and hold lap/reset to
switchbacktothersttime
zone.
More Time Options
Press lap/reset to switch the view
between day and month.
Press and hold lap/reset to
switch time zones.
•
•
190-00839-00_0D.indd 11 7/31/2007 1:48:36 PM

12 Forerunner 50 Owner’s Manual
train mode
train mode
Train mode displays your current
workout settings and data. Press
mode until the Train page appears.
Timed Workout
1. Press start to begin an active
session.
Press lap to mark a known
position or distance during
your workout.
Press view to scroll
through data pages.
Press and hold view
to view secondary data
pages.
•
•
•
2. Whennished,pressstop.
3. To save the workout, press
and hold lap/reset. Use + and
- to toggle YES or NO. Press
viewtoconrm.
Training Settings
NOTE: Training settings
cannot be modied during
an active session in Train
mode.
1. On the Train page, press and
hold start/stop.
2. Press view to advance to the
next setting. The following
settingscanbemodied:
UNITS–change units to
miles or kilometers.
•
190-00839-00_0D.indd 12 7/31/2007 1:48:37 PM
Forerunner 50 Owner’s Manual 13
train mode
PACE SHOW–display
pace in minutes per mile/
kilometer.
OR
SPEED SHOW–display
speed in miles/kilometers
per hour.
AUTO–turn Auto Lap
®
feature on or off. Laps
are triggered by distance.
If set to ON, press
view again to enter the
distance. When AUTO
lap is ON, you cannot use
the lap button to manually
mark laps.
ZONES–turn training
zones feature on or off.
See Training Zones.
PUSH CALIB–calibrate
foot pod by running a
known distance, see
page 8.
TxPAIR–see page 17.
•
•
•
•
•
CALIB–enter calibration
factor to adjust foot pod
calibration to a known
value. See page 8.
WHEEL–enter wheel
circumference in mm
(GSC10 required).
WGT LB–enter your
weight (pounds or
kilograms determined by
UNITS setting)
GENDER
PUSH PAIR–see page 25.
3. Use + and - to toggle or
change numeric settings.
4. Press mode at any time to
return to the Train page.
Training Zones
1. On the Train page, press and
hold start/stop.
2. Press view to advance to the
ZONES setting.
•
•
•
•
•
190-00839-00_0D.indd 13 7/31/2007 1:48:37 PM
14 Forerunner 50 Owner’s Manual
train mode
3. Press + to set ZONES to ON.
4. Press view to advance to the
next training zone setting.
Use + and - to toggle or adjust
numeric values for each zone
limit. The following training
zonesettingscanbemodied:
Audible zone alarms
Pace and speed zones
(foot pod required)
Heart rate zone (heart rate
monitor required)
Bike speed and cadence
zones (GSC10 required)
NOTE: During a workout
with training zones, the
and icons ash if
you are above or below
the specied range.
•
•
•
•
Running Zones
Use the foot pod to track speed,
distance, steps, and pace during a
workout on the Forerunner indoors
or outdoors.
You can set the low and high zone
limits based on either speed or pace.
The ZONES must be set to ON.
1. On the Train page, press and
hold start/stop.
2. Press view, and then select
PACE SHOW or SPEED
SHOW.
3. Press view to advance to
ZONES.
4. Press + to set ZONES to ON.
5. Press view to advance to ZO
RUN.
190-00839-00_0D.indd 14 7/31/2007 1:48:37 PM

Forerunner 50 Owner’s Manual 15
train mode
6. Press + to set ZO RUN to ON.
7. Press view to advance to the
RUN LO and RUN HI settings.
Use + and - to toggle or adjust
numeric values for each zone
limit.
Heart Rate Zones
Setting heart rate zone is very similar
to setting speed or pace zones, see
page 14.
Many runners and other athletes are
using heart rate zones to measure and
increase their cardiovascular strength
and improve their level of tness.
A heart rate zone is a set range of
heartbeats per minute. The ve
commonly accepted heart rate zones
are numbered from 1–5 according to
increasing intensity. Generally, heart
rate zones are calculated based on
percentages of your maximum heart
rate.
How Do Heart Rate Zones
Affect Your Fitness Goals?
Knowing your heart rate zones can
help you measure and improve
your tness by understanding and
applying these principles:
Your heart rate is a good measure
of exercise intensity.
Training in certain heart rate
zones can help you improve
cardiovascular capacity and
strength.
Knowing your heart rate
zones can prevent you from
overtraining and decrease your
risk of injury.
•
•
•
190-00839-00_0D.indd 15 7/31/2007 1:48:37 PM