Garmin 02670 Wireless Dog Trainer User Manual
Garmin International Inc Wireless Dog Trainer
Garmin >
Manual
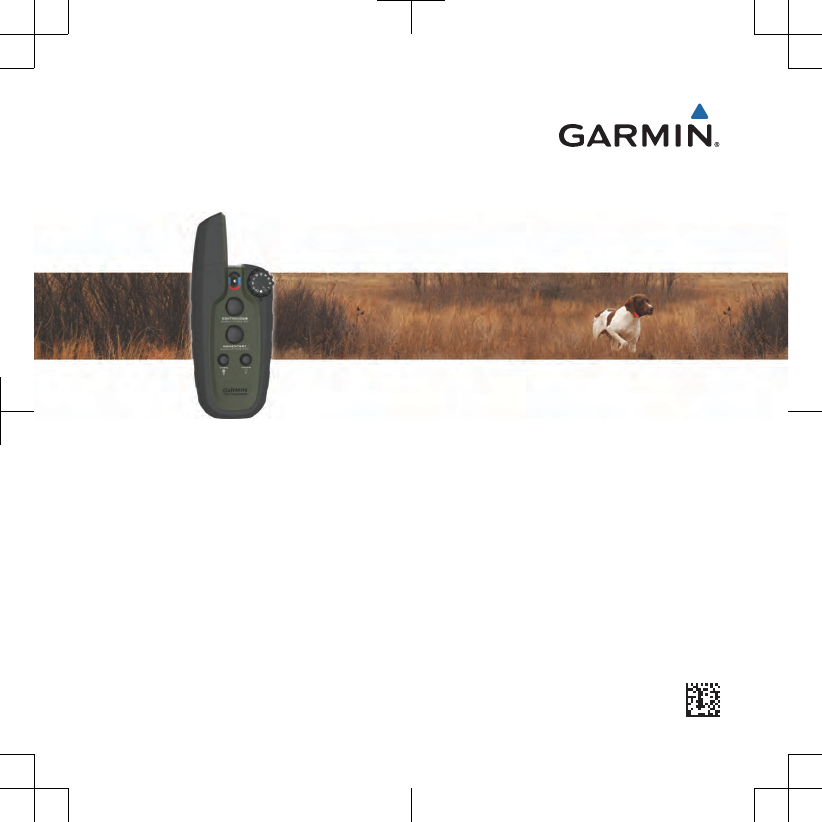
Sport PRO™
Quick Start Manual
April 2015 Printed in Taiwan 190-01893-01_0A
DRAFT
Getting Started
WARNING
See the Important Safety and Product
Information guide in the product box for
product warnings and other important
information.
Setting Up the Sport PRO System
Before you can use the Sport PRO
system, you must set up the devices.
1Attach the dog collar device to the
collar strap (page 3).
2Charge the handheld device
(page 3).
3Charge the dog collar device
(page 4).
4Turn on the devices (page 5).
5If necessary, pair the dog collar device
with the handheld device (page 5).
Device Overviews
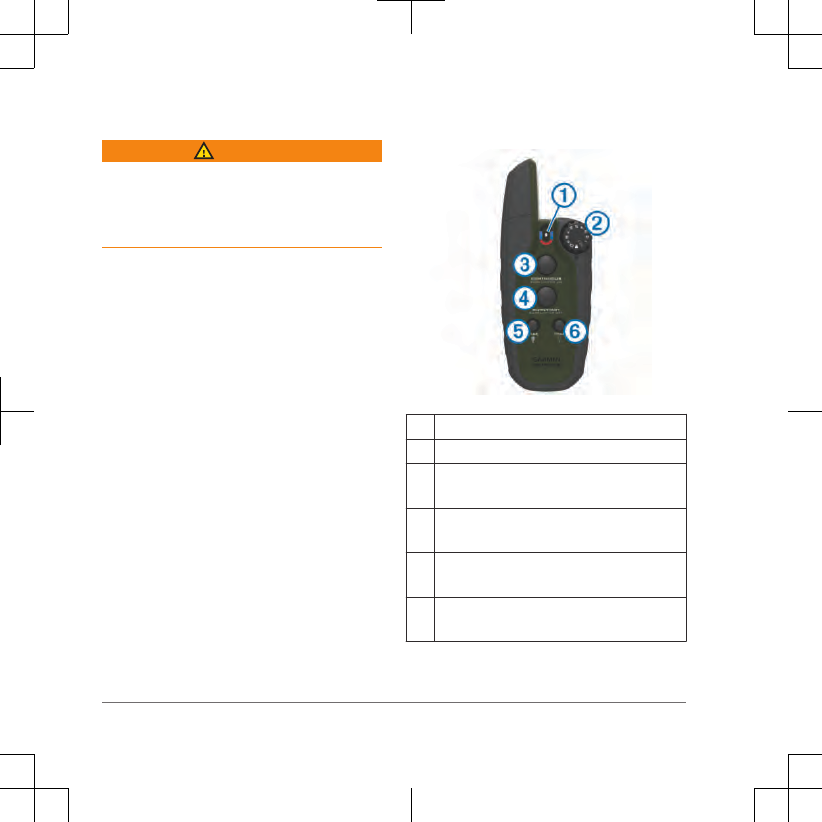
Sport PRO Handheld Device
ÀDog collar device toggle switch
ÁIntensity level and training mode dial
ÂContinuous stimulation key
BarkLimiter™
on key (AUX mode)
ÃMomentary stimulation key
BarkLimiter off key (AUX mode)
ÄVibration key
Light on key (AUX mode)
ÅTone key
Light off key (AUX mode)
2 Getting Started
DRAFT
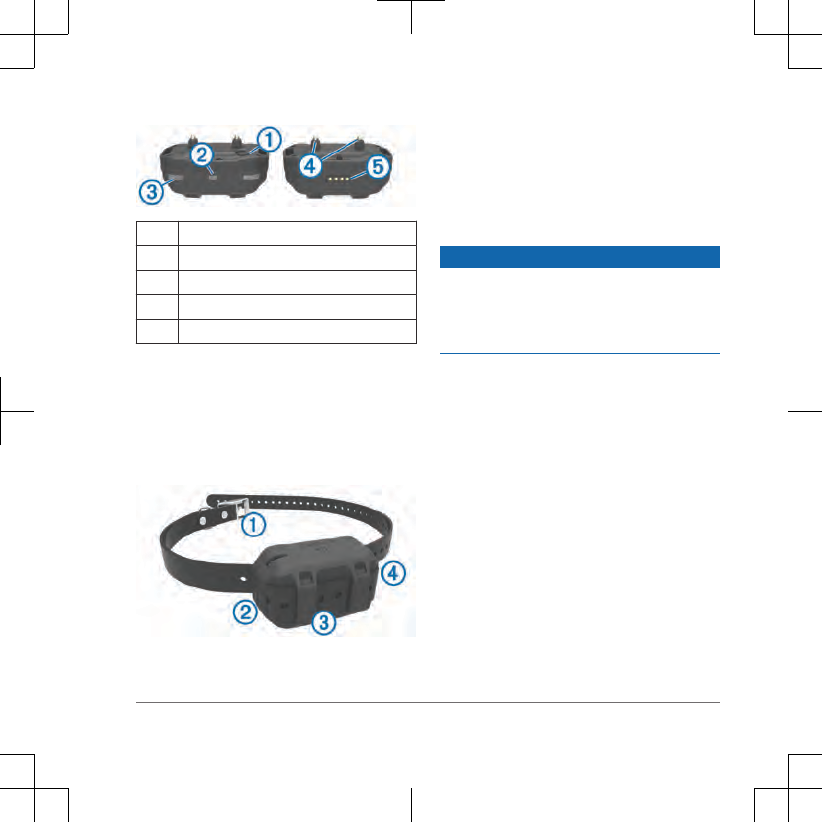
Sport PRO Dog Device
ÀPower key
ÁStatus LED
ÂLights
ÃContact points
ÄCharging clip contacts
Attaching the Dog Collar Device to
the Collar Strap
1With the buckle À facing outward,
insert the end of the collar strap
through the slot Á on the collar
device.
2Pull most of the collar strap through
the two slots  on the dog device.
3Insert the end of the collar strap
through the slot à on the opposite
side of the device.
4Pull the strap until it is tight across the
front of the device.
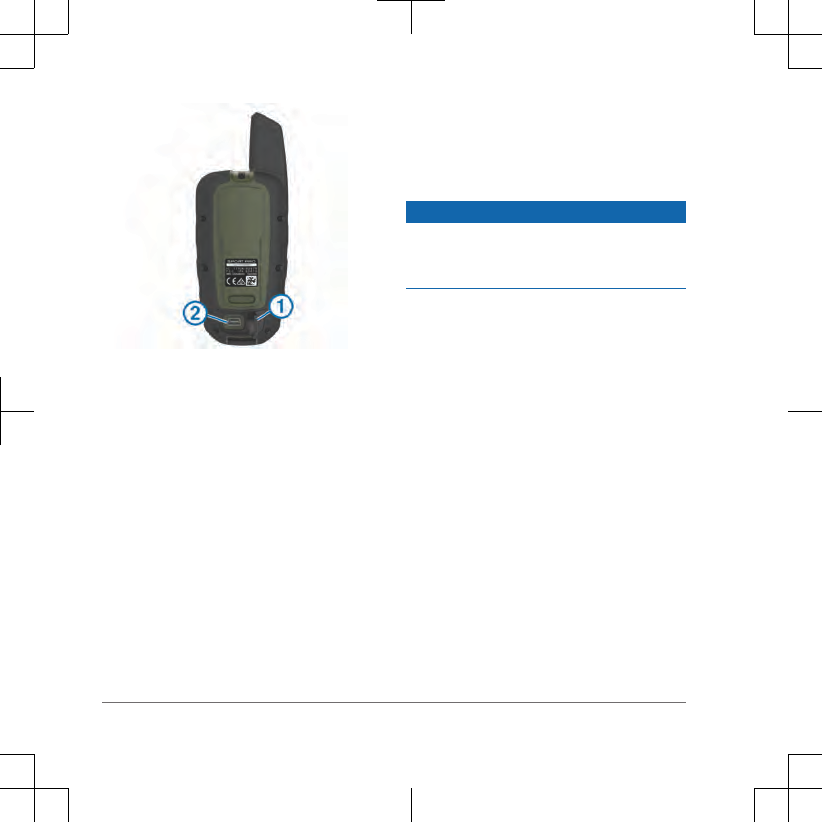
Charging the Handheld Device
NOTICE
To prevent corrosion, thoroughly dry the
USB port, the weather cap, and the
surrounding area before charging or
connecting to a computer.
You should fully charge the battery before
you use the device for the first time or
whenever the battery is low. It is normal
for the battery to discharge in
approximately 7 to 10 weeks when the
device is not in use. Charging a fully
depleted battery takes about 2 hours.
NOTE: The device will not charge when it
is outside the temperature range of 32° to
104°F (0° to 40°C).
1Lift the weather cap À.
Getting Started 3
DRAFT
You should fully charge the battery
before you use the device for the first
time or whenever the battery is low. It
is normal for the battery to discharge in
approximately 7 to 10 weeks when the
device is not in use. Charging a fully
depleted battery takes about 2 hours.
2Plug the small end of the power cable
into the mini-USB port Á on the
device.
3Plug the other end of the power cable
into an appropriate power source.
The status LED is solid red when the
device is charging.
4After the status LED turns solid green,
unplug the power cable from the
device.
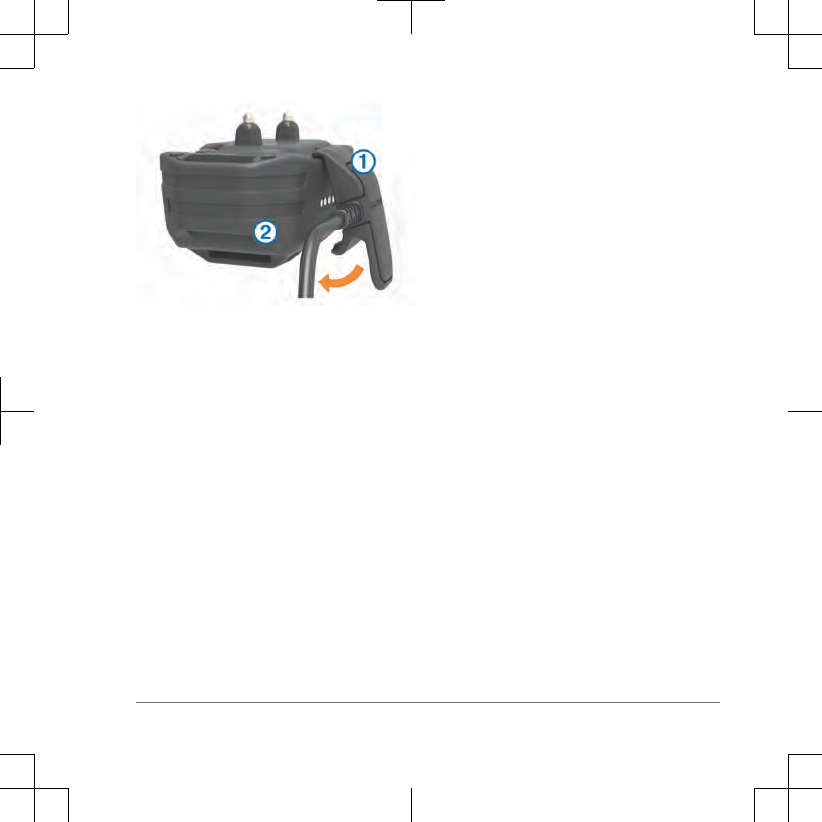
Charging the Dog Collar Device
NOTICE
To prevent corrosion, thoroughly dry the
contacts on the collar and the surrounding
area before connecting the charging clip.
You should fully charge the battery before
you use the device for the first time or
whenever the battery is low. It is normal
for the battery to discharge in
approximately 7 to 10 weeks when the
device is not in use. Charging a fully
depleted battery takes about 2 hours.
NOTE: The device will not charge when
outside the temperature range of 32° to
104°F (0° to 40°C).
1Snap the charging clip À onto the
device Á.
4 Getting Started
DRAFT
2Plug the power cable into a power
source.
The status LED is solid red when the
collar is charging.
3After the status LED turns solid green,
remove the charging clip from the
collar.
Turning On the Dog Collar Device
• On the dog collar device, hold the
power key until the status LED turns
green and the collar beeps to turn it on
in training mode.
•On the dog collar device, hold the
power key until the status LED turns
blue to turn on the BarkLimiter feature.
• On the dog collar device, hold the
power key until the status LED turns
yellow to enter pairing mode
(page 5).
Turning Off the Device
1On the dog collar device, hold the
power key until the red LED appears.
2Release the power key.
The dog collar device beeps to confirm
powering off.
NOTE: If the device is powered off in
BarkLimiter mode, the LED flashes the
number of corrected barks before
powering off .
Dog Collar Device
You can use up to 3 dog collar devices
with a single handheld device.
Each dog collar device must be paired
with the handheld device before it can be
used. During the pairing process, each
dog collar device is associated with a
different color on the handheld device.
Pairing a Dog Collar Device with the
Handheld Device
NOTE: If your handheld device and dog
collar device were included in the same
package, the devices are paired from the
factory.
Getting Started 5
DRAFT

1On the handheld device, move the
toggle switch and select a key to
choose the color associated with the
dog collar device.
2On the handheld device, set the
intensity level to a numbered position.
3On the dog collar device, hold the
power key for about 5 seconds until
the status LED changes to yellow.
4On the handheld device, select a
training key.
The dog collar device beeps when the
devices have paired successfully. If the
device does not beep, pairing has not
been successful.
TIP: If the devices did not pair
successfully, you should verify the
batteries in both devices are fully charged
and the intensity level is set to a numbered
position.
Selecting a Dog Collar Device
Before you can select and control a dog
collar device, you must pair the dog collar
device with the handheld device (page 5).
Move the dog collar device toggle
switch to select the color associated
with a dog collar device.
The training keys control the dog collar
device associated with the selected color.
Dog Training
You should research and investigate the
training methods best suited for you, your
dog, and your needs.
When used properly, the Sport PRO
training system is an effective training tool
to aid your dog in reaching its full potential.
The use of the training system should be
part of an overall training program.
Fitting the Collar on Your Dog
CAUTION
To prevent irritation from the contact
points, remove the collar for at least eight
hours out of every 24-hour period.
This device is not intended for human use.
Do not attempt to use on any person.
Do not spray the device or collar with
harsh chemicals including but not limited
to flea or tick spray. Always ensure that
any flea or tick spray that is applied to the
dog is completely dry before placing the
collar on the dog. Small amounts of harsh
chemicals can damage the plastic
components and collar laminate.
6 Dog Training
DRAFT
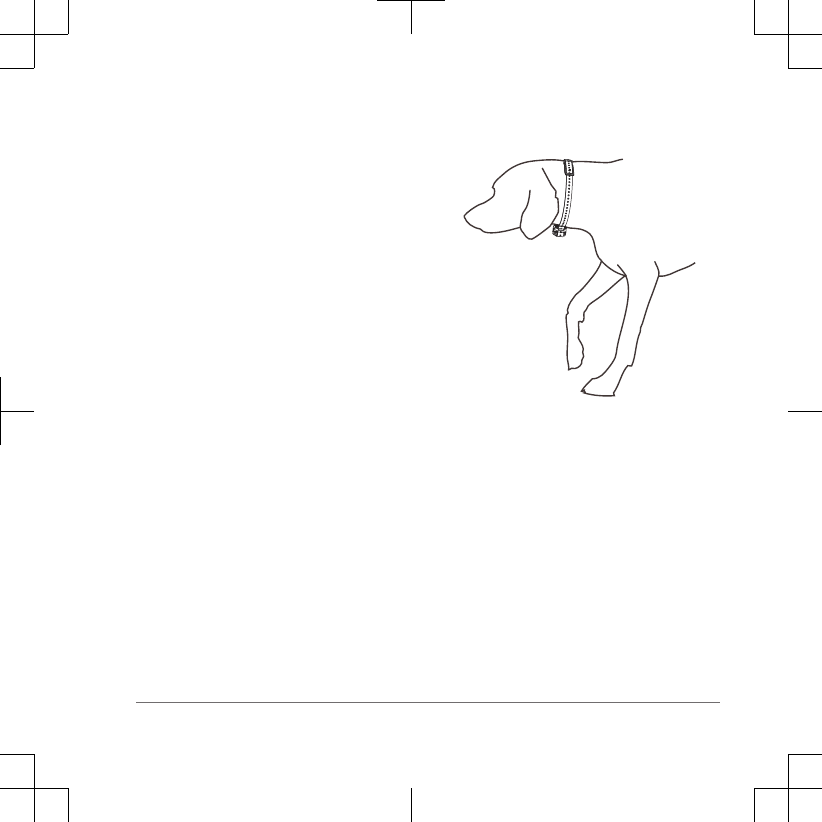
In order to properly correct the dog, the
collar and device must fit the dog properly.
If the collar is too loose or positioned
incorrectly, corrections may be
inconsistent. This can delay or prevent
successful training.
1Position the device at the front of the
dog's neck, with the status LED facing
toward the dog's chin and the contact
points against the throat.
TIP: For bark correction, the device
contact points should be positioned
near the dog's vocal cords. This
location varies based on the breed of
dog. If the device does not seem to
detect the dog's barks, you should
move the device closer to or farther
from the dog's body to find the ideal
location.
2Tighten the strap so that it is very snug
around the dog's neck, and fasten the
buckle.
NOTE: The collar should fit tightly and
should not be able to rotate or slide on
the dog's neck. The dog must be able
to swallow food and water normally.
You should observe your dog's
behavior to verify that the collar is not
too tight.
3Wiggle the device to work the contact
points through the dog's coat.
NOTE: The contact points must have
contact with the dog's skin to be
effective.
4If the strap is too long, cut off the
excess, leaving at least 3 in. (8 cm) to
spare.
TIP: You can mark the hole used to
fasten the buckle for future reference.
Dog Training 7
DRAFT
Selecting and Installing the Contact
Points
For best results, select the correct contact
points based on your dog's coat.
1Select the correct contact point length
for your dog's coat type:
•For dogs with thicker coats, use
the longer contact points.
•For dogs with shorter coats, use
the shorter contact points.
2If necessary, use the included wrench
to remove the contact points.
3Twist the contact points into the collar.
4Tighten with the included wrench, but
do not overtighten.
When you put the collar on the dog, make
sure the contact points are tight against
the neck.
Training Methods
NOTE: Training features are not available
in all areas for tracking collars.
Momentary stimulation: Applies a brief
stimulation when you press the training
key, regardless of how long the key is
depressed.
Continuous stimulation: Applies
stimulation to the dog the entire time
you press the training key, for a
maximum of 8 seconds. Your
stimulations should typically be much
shorter than 8 seconds.
Tone: Activates an audible tone instead of
stimulation. A tone can be used as
either a positive or negative training
cue, depending on your training
program.
Vibration: Applies vibration instead of
stimulation to the dog the entire time
you press the training key, for a
maximum of 8 seconds. The
effectiveness of vibration may vary
based on the dog's temperament and
experience.
Device Information
Handheld Device Specifications
Battery type Rechargeable lithium-ion
Battery life 60 hr. typical use
Operating
temperature range
From -20° to 60°C (from
-4° to 140°F)
Charging
temperature range
From 0° to 40°C (from
32° to 104°F)
8 Device Information
DRAFT

Storage
temperature range
(up to 1 month)
From -20° to 50°C (from
-4° to 122°F)
Storage
temperature range
(up to 3 months)
From -20° to 35°C (from
-4° to 95°F)
Water rating IEC 60529 IPX7*
*The device withstands incidental
exposure to water of up to 1 m for up to
30 min. For more information, go to
www.garmin.com/waterrating.
Dog Collar Device Specifications
Battery type Rechargeable,
replaceable lithium-ion
Battery life 60 hr. typical use
Operating
temperature range
From -20° to 60°C (from
-4° to 140°F)
Charging
temperature range
From 0° to 40°C (from
32° to 104°F)
Storage
temperature range
(up to 1 month)
From -20° to 50°C (from
-4° to 122°F)
Storage
temperature range
(up to 3 months)
From -20° to 35°C (from
-4° to 95°F)
Water rating 1 ATM*
*The device withstands pressure
equivalent to a depth of 10 m. For more
information, go to www.garmin.com
/waterrating.
Registering Your Device
Help us better support you by completing
our online registration today.
• Go to http://my.garmin.com.
• Keep the original sales receipt, or a
photocopy, in a safe place.
Getting More Information
You can find more information about this
product on the Garmin® website.
• Go to www.garmin.com/outdoor.
• Go to http://buy.garmin.com, or contact
your Garmin dealer for information
about optional accessories and
replacement parts.
Device Information 9
DRAFT

DRAFT

DRAFT
www.garmin.com/support
+43 (0) 820 220230 + 32 2 672 52 54
0800 770 4960 1-866-429-9296
+385 1 5508 272
+385 1 5508 271
+420 221 985466
+420 221 985465
+ 45 4810 5050 + 358 9 6937 9758
+ 331 55 69 33 99 + 39 02 36 699699
(+52) 001-855-792-7671 0800 0233937
+47 815 69 555 00800 4412 454
+44 2380 662 915
(+35) 1214 447 460 +386 4 27 92 500
0861 GARMIN (427 646)
+27 (0)11 251 9999 +34 93 275 44 97
+ 46 7744 52020 +886 2 2642-9199 ext 2
0808 238 0000
+44 (0) 870 8501242
+49 (0)180 6 427646
20 ct./Anruf. a. d.
deutschen Festnetz,
Mobilfunk max. 60 ct./Anruf
913-397-8200
1-800-800-1020
Garmin® and the Garmin logo are trademarks of Garmin Ltd. or its
subsidiaries, registered in the USA and other countries. Sport PRO™
is a trademark of Garmin Ltd. or its subsidiaries. These trademarks
may not be used without the express permission of Garmin.
CAN ICES-3(B)/NMB-3(B)
© 2015 Garmin Ltd. or its subsidiaries
DRAFT