General Dynamics Itronix IX-512AN IX-512AN User Manual Contents
General Dynamics Itronix Corporation IX-512AN Contents
Contents
User Manual 1 INtel

Intel(R) PROSet/Wireless WiFi Connection Utility
User's Guide
Supported wireless adapters:
●Intel(R) WiMAX/WiFi Link 5350
●Intel(R) WiMAX/WiFi Link 5150
●Intel(R) WiFi Link 5300
●Intel(R) WiFi Link 5100
●Intel(R) Wireless WiFi Link 4965AGN
●Intel(R) Wireless WiFi Link 4965AG_
●Intel(R) PRO/Wireless 3945ABG Network Connection
●Intel(R) PRO/Wireless 2915ABG Network Connection
●Intel(R) PRO/Wireless 2200BG Network Connection
With your wireless network card, you can access wireless networks, share files or printers,
or even share your Internet connection. All of these features can be explored using a
wireless network in your home or office. This wireless network solution is designed for both
home and business use. Additional users and features can be added as your networking
needs grow and change.
Depending on the model of your Intel wireless adapter, your adapter is compatible with
802.11a, 802.11b, 802.11g, and 802.11n wireless standards. Operating at 5 GHz or 2.4 GHz
frequency at data rates of up to 300 Mbps, you can now connect your computer to existing
high-speed networks that use multiple access points within large or small environments.
Your wireless adapter maintains automatic data rate control according to the access point
location and signal strength to achieve the fastest possible connection. All of your wireless
network connections are easily managed by the WiFi connection utility. Profiles that are set
up through the WiFi connection utility provide enhanced security measures with 802.1X
network authentication.
Table of Contents
●Use the Intel(R) PROSet/Wireless WiFi Connection Utility
●Connect to a Network
●Use Wi-Fi Protected Setup*
●Use Profiles
●Set up Security

●Wireless Network Overview
●Administrator Tool
●Create Administrator Packages
●Create Profiles for Windows XP*
●Security Overview
●Safety and Regulatory Information
●Specifications
●Troubleshooting
●Glossary
●Customer Support
●Warranty
Information in this document is subject to change without notice.
© 2004–2008 Intel Corporation. All rights reserved. Intel Corporation, 5200 N.E.
Elam Young Parkway, Hillsboro, OR 97124-6497 USA
The copying or reproducing of any material in this document in any manner whatsoever
without the written permission of Intel Corporation is strictly forbidden. Intel(R) is a
trademark or registered trademark of Intel Corporation or its subsidiaries in the United
States and other countries. Other trademarks and trade names may be used in this
document to refer to either the entities claiming the marks and names or their products.
Intel disclaims any proprietary interest in trademarks and trade names other than its own.
Microsoft and Windows are registered trademarks of Microsoft Corporation. Windows Vista is
either a registered trademark or trademark of Microsoft Corporation in the United States and/
or other countries.
*Other names and brands may be claimed as the property of others.
Intel Corporation assumes no responsibility for errors or omissions in this document. Nor
does Intel make any commitment to update the information contained herein.
"IMPORTANT NOTICE FOR ALL USERS OR DISTRIBUTORS:
Intel wireless LAN adapters are engineered, manufactured, tested, and quality checked to
ensure that they meet all necessary local and governmental regulatory agency requirements
for the regions that they are designated and/or marked to ship into. Because wireless LANs
are generally unlicensed devices that share spectrum with radars, satellites, and other
licensed and unlicensed devices, it is sometimes necessary to dynamically detect, avoid, and
limit usage to avoid interference with these devices. In many instances Intel is required to
provide test data to prove regional and local compliance to regional and governmental
regulations before certification or approval to use the product is granted. Intel's wireless
LAN's EEPROM, firmware, and software driver are designed to carefully control parameters

that affect radio operation and to ensure electromagnetic compliance (EMC). These
parameters include, without limitation, RF power, spectrum usage, channel scanning, and
human exposure.
For these reasons Intel cannot permit any manipulation by third parties of the software
provided in binary format with the wireless LAN adapters (e.g., the EEPROM and firmware).
Furthermore, if you use any patches, utilities, or code with the Intel wireless LAN adapters
that have been manipulated by an unauthorized party (i.e., patches, utilities, or code
(including open source code modifications) which have not been validated by Intel), (i) you
will be solely responsible for ensuring the regulatory compliance of the products, (ii) Intel
will bear no liability, under any theory of liability for any issues associated with the modified
products, including without limitation, claims under the warranty and/or issues arising from
regulatory non-compliance, and (iii) Intel will not provide or be required to assist in
providing support to any third parties for such modified products.
Note: Many regulatory agencies consider Wireless LAN adapters to be "modules", and
accordingly, condition system-level regulatory approval upon receipt and review of test data
documenting that the antennas and system configuration do not cause the EMC and radio
operation to be non-compliant."
April 2008

Back to Contents
Use the Intel(R) PROSet/Wireless WiFi Connection
Utility Software
Use Intel(R) PROSet/Wireless WiFi Connection Utility as your Wireless Manager
Start Intel(R) PROSet/Wireless WiFi Connection Utility
Start Intel(R) PROSet/Wireless WiFi Connection Utility from the Taskbar
●Taskbar Icons
●Tool Tips and Desktop Alerts
Intel(R) PROSet/Wireless WiFi Connection Utility Main Window
●First Time Connection
●WiFi Networks list
●Connection Status Icons
●Network Properties
●Connection Details
Intel(R) PROSet/Wireless WiFi Menus
●Tools Menu
❍Application Settings
❍Intel Wireless Troubleshooter
❍Manual Diagnostics Tool
❍Administrator Tool
●Advanced Menu
❍Adapter Settings
❍Advanced Statistics
❍Use Windows to Manage WiFi
●Profiles Menu
❍Manage Profiles
❍Manage Exclusions
Use Intel(R) PROSet/Wireless WiFi Connection Utility Profile Features
Turn Wireless Radio On or Off
Installing Intel(R) PROSet/Wireless WiFi Connection Utility
Install Additional Software Features
Remove Intel(R) PROSet/Wireless WiFi Connection Utility

Use Intel(R) PROSet/Wireless WiFi Connection Utility as Your
Wireless Manager
Intel(R) PROSet/Wireless WiFi software is used to set up, edit, and manage network profiles to
connect to a network. It also includes advanced settings such as power management and channel
selection for setting up ad-hoc networks.
If you use Microsoft* Windows XP* Wireless Zero Configuration as your wireless manager, you
can disable it from the Microsoft Windows Wireless Network tab.
To disable Microsoft Windows XP Wireless Zero Configuration as your wireless manager:
1. Click Start > Control Panel.
2. Double-click Network Connections.
3. Right-click Wireless Network Connection.
4. Click Properties.
5. Click Wireless Networks.
6. Verify that the Use Windows to configure my wireless network settings is not
selected. If it is, clear it.
7. Click OK. This confirms that the Intel(R) PROSet/Wireless utility is configured to manage
your network profiles.
NOTE: Verify that the Application Settings option Notify when another application
uses the wireless adapter is selected. This option prompts you when Microsoft
Windows XP Wireless Zero Configuration starts to manage your network profiles.
Start Intel(R) PROSet/Wireless WiFi Connection Utility
To start the WiFi connection utility, use one of the following methods:
●Click Start > Programs > Intel PROSet Wireless > WiFi Connection Utility .
●Right-click the Taskbar icon located in the lower right corner of your Windows Desktop to
open the Taskbar menu. Click Configure WiFi .
●Double-click the Taskbar icon.
To close the WiFi connection utility from the main window, use one of the following:
●Select File > Exit from the main window.
●Click Close.
●Click the Close button (X) at the top right corner of the window.
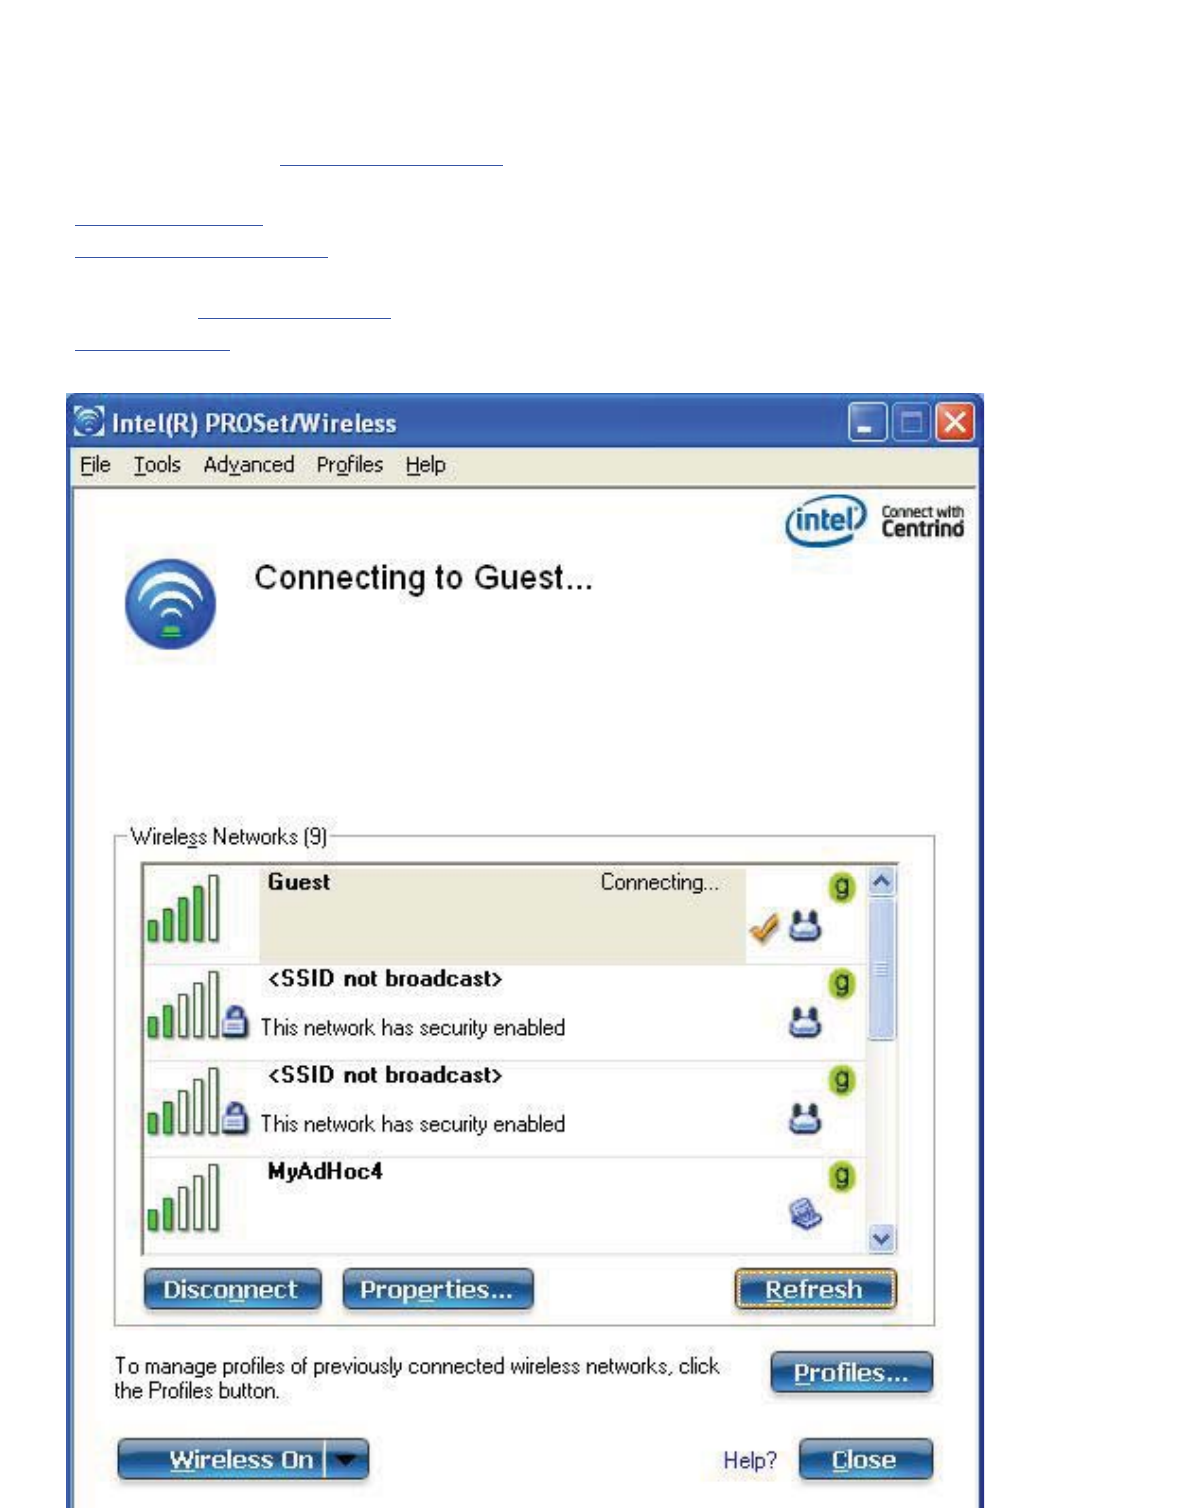
Intel(R) PROSet/Wireless WiFi Connection Utility Main Window
the WiFi connection utility Main Window lets you:
●View the current connection details (signal quality, speed and current network name).
●Scan for available wireless networks.
●Manage profiles.
●Auto-connect profiles to available networks in a specific order defined in the Profile list.
●Connect to Infrastructure and Device to Device (ad hoc) networks.
●Configure adapter settings.
●Troubleshoot wireless connection problems.

Connection Details
On the main window, click Details to view detailed parameters of the access point and network
adapter. The Connection Details window displays the current network connection information.
See Connection Details for a complete description.
The Taskbar icon also indicates the current connection status. See Taskbar Icons.
Main Window Connection Status Icons
The connection status icons indicate the current connection status of your wireless adapter. The
connection status icon displays in the WiFi connection utility main window See Connection Status
Icons.
Profile Management
On the WiFi connection utility main window, click Connect on a wireless network. Once
connected, a profile is created in the Profiles list. The Profiles List displays the current user profiles
in the order that they are to be applied. Use the up and down arrows to arrange profiles in a
specific order to automatically connect to a wireless network.
You can also add, edit, and remove profiles from the Profiles list. Click Profiles on the WiFi
connection utility main window.
Different profiles can be configured for each wireless network. Profile settings can include, the
network name (SSID), operating mode, and security settings. See Profile Management for more
information.
Menus
Use the File,Tools,Advanced,Profiles and Help menus to configure your network settings.

Name Description
File Exit: Closes the WiFi connection utility main window.
Tools Application Settings: Use to set system wide connection preferences. See
Application Settings for information.
Intel Wireless Troubleshooter: Use to resolve wireless network connection
problems. See Intel Wireless Troubleshooter for more information.
Manual Diagnostics Tool: The Manual Diagnostics Tool lets you run a set of
diagnostics tests that verify the functionality of your wireless adapter. See Manual
Diagnostics Tool for more information.
Administrator Tool: Used by administrators or the person who has administrator
privileges on this computer to configure shared profiles (Pre-logon/Common,
Persistent, and Voice over IP [VoIP]). The Administrator Tool can also be used by an
Information Technology department to configure user settings within the WiFi
connection utility and to create custom install packages to export to other systems.
See Administrator Tool for more information.
NOTE: The Administrator Tool is available only if it installed during a custom
installation of the Intel(R) PROSet/Wireless WiFi software. See Install Additional
Software Featuresfor more information on custom installation.
Advanced Adapter Settings: Displays Adapter Settings that are equivalent to the settings in
the Microsoft Windows Advanced settings. See Adapter Settings for information.
To access Adapter Settings from Microsoft Windows:
●Double-click Network Connections from the Windows Control Panel.
●Right-click the Wireless Network Connection.
●Select Properties from the menu.
●Click Configure to display the Advanced settings for the adapter.
Advanced Statistics: Select to view detailed information about the wireless
adapter and connection. See Advanced Statistics for more information.
Use Windows to manage Wi-Fi: Select to enable Microsoft Windows XP as the
wireless manager. See Microsoft Windows XP Wireless Zero Configuration for more
information.

Profiles Manage Profiles: Select to create or edit profiles.
Manage Exclusions: Select to exclude networks from automatic connection. See
Manage Exclusions for more information.
Help Intel PROSet/Wireless WiFi Help: Starts the online help.
About: Displays version information for the currently installed application
components.
Administrator Tool (Tools menu)
The Administrator tool is for administrators or the person who has administrator privileges on this
computer. This tool allows the administrator to restrict what level of control the users of this
computer have over their wireless connections. This tool is used also to configure common
(shared) profiles.
Users cannot modify Administrator settings or profiles unless they have the password for this tool.
A password should be chosen that is secure and not easily guessed.
You can export these settings and profiles as one package to other computers on your network.
For more information, See the Administrator Tool section.
Name Description
Administrator Packages The Administrator Packages are used to save administrative profiles
and other settings. For Windows XP*, you can copy or send this self-
extracting executable to clients on your network. When it is run, the
contents are installed and configured on the destination computer.
See Administrator Tool Packages.
Application Settings An administrator can configure the WiFi connection utility Application
Settings to control how the application behaves on the user's
computer, and to select what level of control users have over
various aspects of their wireless connections. See Administrator Tool
Application Settings.
Administrator Profiles Enable or disable Persistent or Pre-logon/Common profiles and
configure Voice over IP (VoIP) settings on the computer. See
Administrator Tool Profiles.
Adapter Settings An administrator can select which level of control that users have
over their wireless network connections. See Administrator Tool
Adapter Settings.

EAP-FAST A-ID Groups An administrator can select which Authority Identifier (A-ID) RADIUS
server to provision Protected Access Credentials (PACs) for profiles
that use EAP-FAST authentication. A-ID groups are shared by all
users of the computer and allow EAP-FAST profiles to support
multiple PACs from multiple A-IDs. See Administrator Tool EAP-FAST
A-ID Groups.
Change Password Change the password for the Administrator Tool. See Change
Password for more information.
Close Closes the page.
Help? Provides help information for this page.
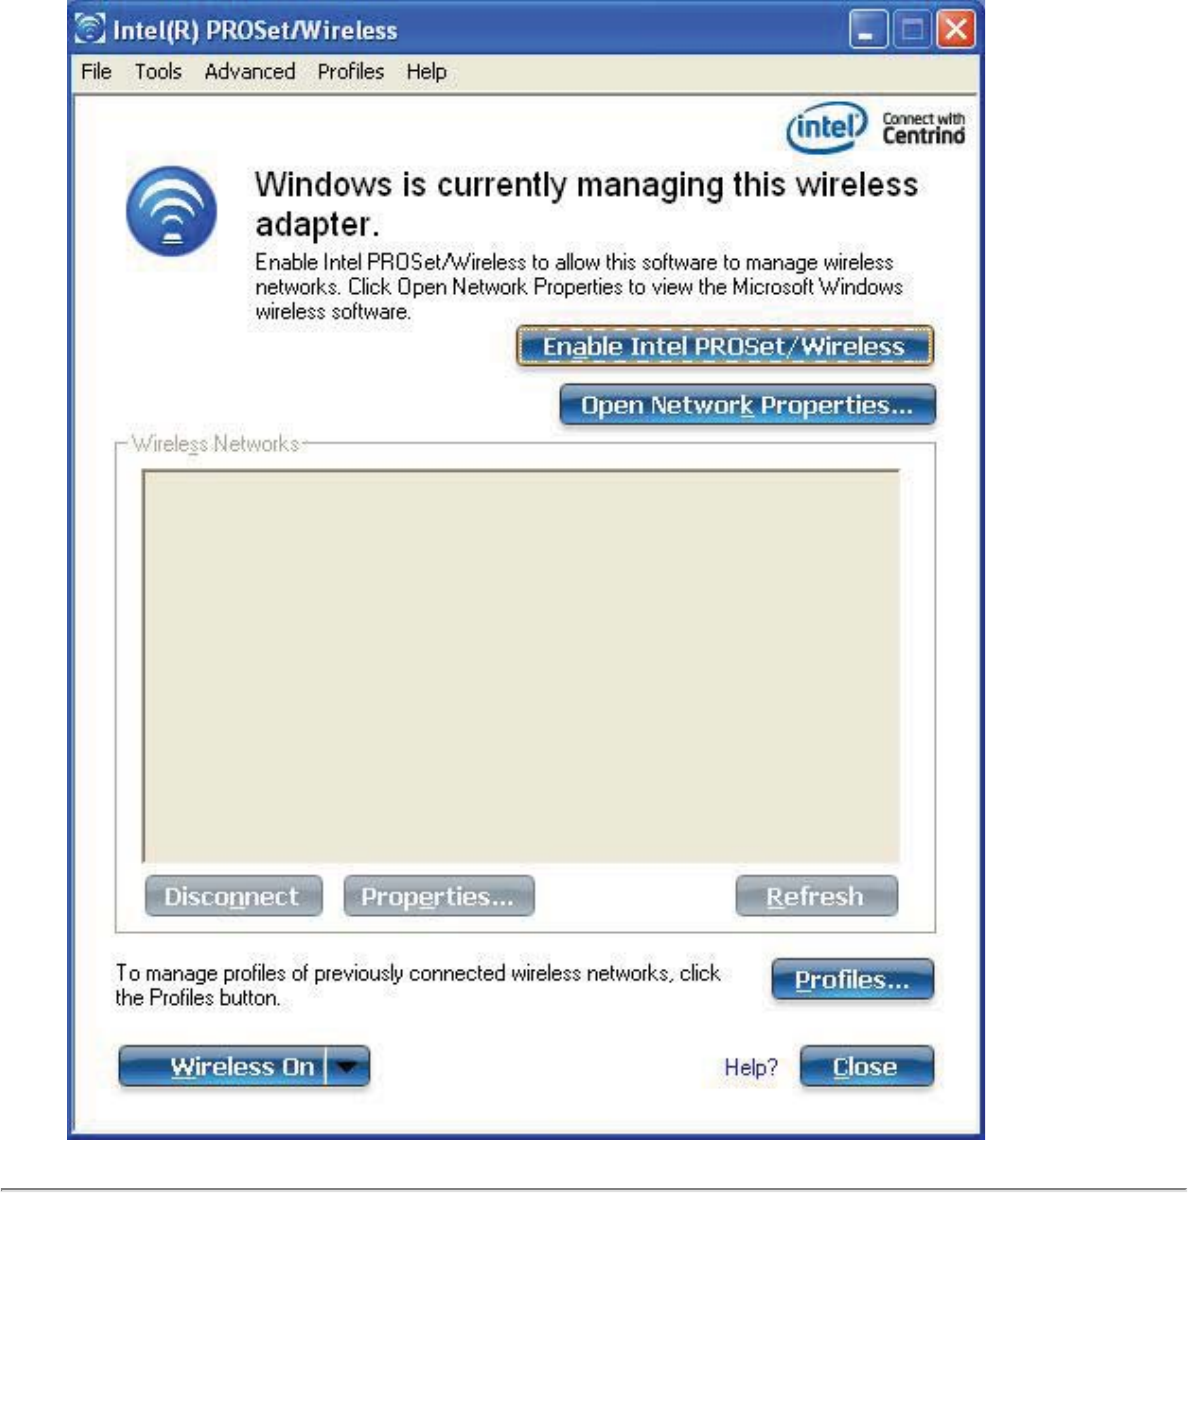
Use Windows to Manage WiFi (Advanced menu)
The Microsoft Windows XP Wireless Zero Configuration feature provides a built-in wireless
configuration utility. This feature can be enabled and disabled within the WiFi connection utility.
Click Use Windows to manage Wi-Fi on the Advanced menu. If Windows XP Wireless Zero
Configuration is enabled, the features in the WiFi connection utility are disabled. To let the WiFi
connection utility manage your WiFi connections, click Enable WiFi Control on the main window.
Installing Intel(R) PROSet/Wireless WiFi Connection Utility
Typical Installation
The following components are installed in a Typical installation.

●The WiFi connection utility driver. You can choose to install the driver only if desired. This is
the minimal installation.
●The WiFi connection utility. For a Typical installation, this includes the following:
❍Wi-Fi Protected Setup*
❍Intel Wireless Troubleshooter
NOTE: If you plan to use Novell Client* for Windows, it should be installed prior to
installation of the WiFi connection utility. If the WiFi connection utility is already
installed, you should remove it prior to installation of Novell Client for Windows.
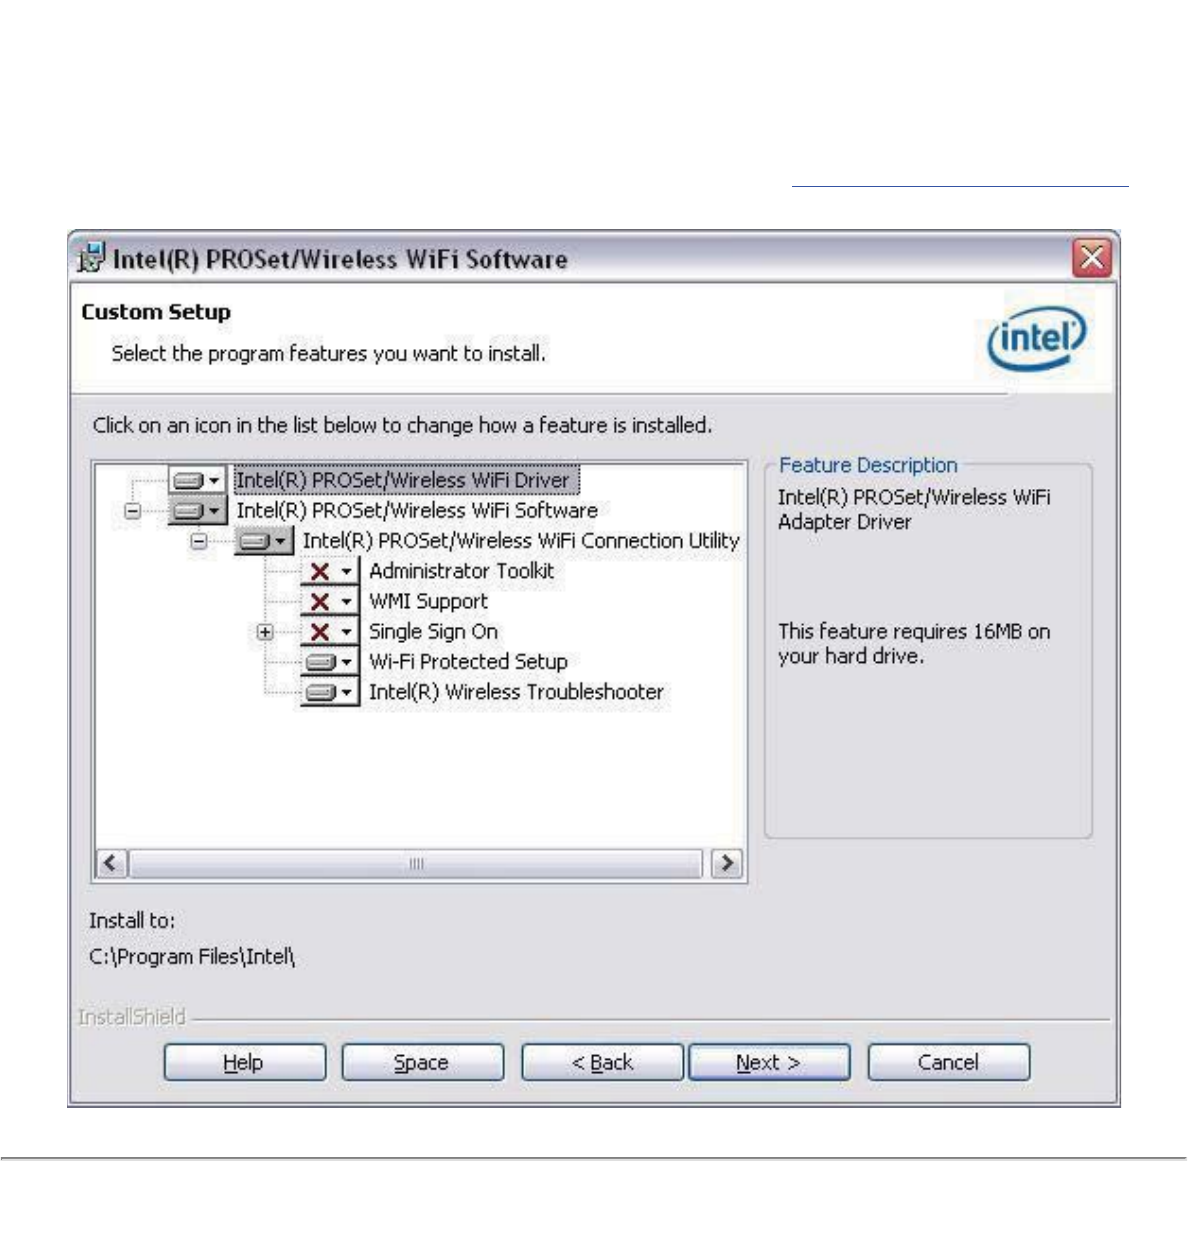
Custom Installation
The following features are available to install during a Custom installation. Of these, Wi-Fi
Protected Setup* and Intel Wireless Troubleshooter are also installed in a typical installation.
●Administrator Tool
●WMI Support
●Single Sign On
❍Pre-logon Connect
●WiFi Protected Setup
●Intel Wireless Troubleshooter
Administrator Tool: Installs the Administrator Tool to the Tools menu. This tool is used to
configure common (shared) profiles. The Administrator Tool is also used by an Information
Technology department to enable or disable features within the WiFi connection utility.
WMI Support: Windows Management Instrumentation functionality allows administrators who do
not have the WiFi connection utility installed to manage remotely clients that do have the WiFi
connection utility installed.
Single Sign On: Installs the Single Sign On Pre-Login Connect feature. This tool is used to
configure common (shared) profiles with the Administrator Tool. Single Sign On is targeted to the
enterprise environment where users log on to their computer with a user name, password, and
typically a domain. Fast User Switching does not support domain log on. The Fast User Switching
and the Windows XP Welcome Screen are disabled when Single Sign On support is installed.
NOTE: Windows Fast User Switching is enabled by default if you use Windows XP
Home Edition. It is targeted for the home user. Fast User Switching is also available
on Windows XP Professional if you install it on a stand-alone or workgroup-connected
computer. If a computer running Windows XP Professional is added to a domain, then
Fast User Switching option is not available.
Pre-logon Connect: A Pre-logon/Common profile is active once a user logs onto the computer.
Pre-logon Connect establishes a wireless connection prior to user logon to Windows. This feature
is installed with Single Sign On.
WiFi Protected Setup: Installed as part of a Typical installation, this feature detects when a
compatible wireless router is present and provides easy connection to it.
Intel(R) Wireless Troubleshooter: Provides valuable assistance in resolving wireless WiFi
connection problems.
To install these features, select Custom during installation. Follow the instructions below to install
features. If the WiFi connection utility is already installed, see the post-installation instructions.
Install Intel(R) PROSet/Wireless WiFi Connection Utility
1. Insert the Installation CD in your CD drive.
2. The installer presents the message:
Welcome to the Intel(R) Wireless Installer Prerequisite Wizard. Click Next.
3. The next message displays:
Welcome to the InstallShield Wizard to Intel(R) PROSet/Wireless WiFi Software.
Click Next.

4. Read the license agreement.
5. Click I accept the terms in the license agreement. You can click Print if you want a
printed copy of the agreement. Then click Next.
6. Click Next to accept the default install destination folder. Otherwise, click Change to
specify a different location. Then click OK and Next.
7. Click Typical or Custom. If you click Typical, proceed to step 9.
8. If performing a Custom installation, select from the list of features to install. See Custom
Installation for an explanation of the available features. For each feature, you can select:
❍This feature will be installed on the local hard drive.
❍This feature, and all subfeatures, will be installed on the local hard drive.
❍The feature will not be available.
9. Click Next.
10. The installation may take several minutes. When the installation completes, the message
InstallShield Wizard Completed! displays. Click Finish.
11. You may be asked to reboot the computer. If so, you should reboot you computer now.
Click Yes to do so, or No to reboot later.
Install Additional Software Features
If the WiFi connection utility is already installed, follow the instructions below to add the
Administrator Tool and Pre-logon Connect:
1. Click Start > Control > Panel > Add or Remove Programs > Intel PROSet/Wireless
WiFi Software.
2. Click Change.
3. The next message displays:
Welcome to the InstallShield Wizard to Intel(R) PROSet/Wireless WiFi Software.
Click Next.
4. Click Modify. Then click Next.
5. Click the red X next to any of the features not currently installed that you want to install.
6. For each feature you want to install, click one of the following choices, as appropriate:
❍This feature will be installed on the local hard drive.
❍This feature, and all subfeatures, will be installed on the local hard drive.
7. Click Next.
8. The installation may take several minutes. When the installation completes, the message
InstallShield Wizard Completed! displays. Click Finish.
9. You may be asked to reboot the computer. If so, you should reboot you computer now.
Click Yes to do so, or No to reboot later.
Remove Intel(R) PROSet/Wireless WiFi Connection Utility
To uninstall the WiFi connection utility:
1. Click Start > Control Panel > Add or Remove Programs.

2. Click Intel PROSet/Wireless WiFi Software.
3. Click Change.
4. The next message displays:
Welcome to the InstallShield Wizard to Intel(R) PROSet/Wireless WiFi Software.
Click Next.
5. Click Remove.
6. Click Next.
7. The next message appears. Make your selection from the list and click Next.
Save User Defined Settings. Choose what to do with your current application:
❍Save. Save settings and files applicable to the current version of the application.
❍Convert and Save. Save settings and files in the format compatible with PROSet/
Wireless WiFi version 10.
❍Remove. Do not save application settings.
8. The removal may take several minutes. After the software is removed, the message
InstallShield Wizard Completed! displays. Click Finish.
9. A message requests that you restart your computer. Click Yes to restart the computer.
Back to Top
Back to Contents
Trademarks and Disclaimers

Back to Contents
Get Connected
Connect to a Wireless Network
First Time Connection
Using Wi-Fi Protected Setup*
Configure an Access Point and set up a Network
Connect an Enrollee to a Network or Access Point
Add an Enrollee to a Network at the Registrar
Other Wireless Managers
Connect to a Wireless Network
You can connect to a wireless network with one of the following methods.
●Automatic connection: If an existing profile matches an available network, you are
automatically connected to that wireless network.
●Configure a new profile: Select a wireless network from the list of wireless networks in the
Intel(R) PROSet/Wireless WiFi Connection Utility main window. Click Connect. If you
successfully connect, a profile is created in the Profiles list for future use.
●Connect to a profile in the Profiles list: You can select a profile from the Profiles list. To
activate it, click Connect. This lets you connect to a network that is lower in the list (if it is
available).
●Right-click the Taskbar icon located in the lower right corner of your Windows desktop. Right-
click Connect to Profile. A list of previously configured profiles is listed. Select a profile.
First Time Connection
The WiFi connection utility automatically detects wireless networks that are within range of your
wireless adapter. When a network is found, a desktop alert notification displays: Wireless networks
found. See Taskbar Icons for more information.
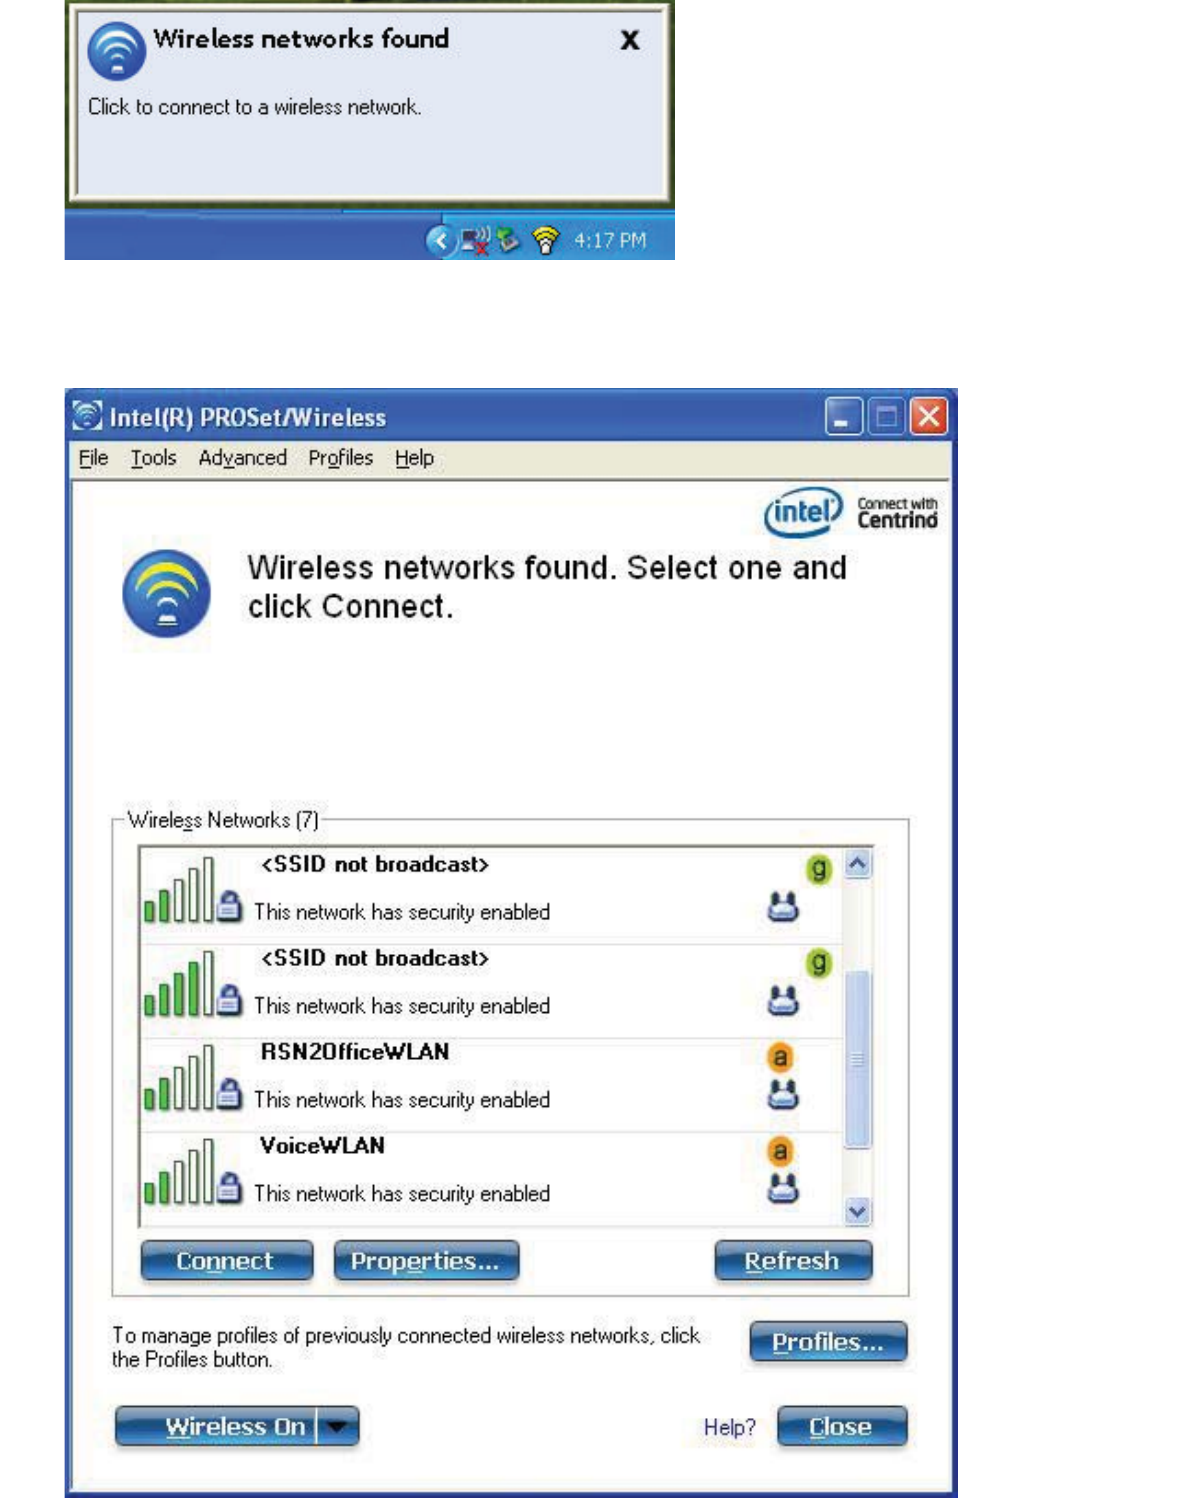
1. Double-click the desktop alert to open the WiFi connection utility main window.
2. Select a network from the WiFi Networks list.

3. Click Connect. If the network does not require security authentication, a desktop alert notifies
you that you are connected to the network. See Main Window and Taskbar for more
information about the taskbar menu and icons.
If you need to add security authentication:
1. The Create Wireless Profile manager opens and guides you through the configuration
process.
2. Specify a Profile Name. The Profile Name is your name for this network. It can be anything
that helps you identify this network. For example, My Home Network, Coffee Shop on A Street.
3. Wireless Network Name (SSID): Contains the network identifier name.
4. Click Next. The Profile Wizard then attempts to detect the network settings of this network.
❍If a pre-shared key (PSK) or WEP password are required, you are prompted to enter this
information prior to connection. Click Advanced to change or edit the PSK or other
security settings. For information on key and passwords, see Network Keys.
❍If you need to add security settings, click Profiles to access the Profiles list and the
Profile Features. Use the Profile Wizard Security page to add the required security
settings. See Security Settings for more information.
5. Click OK to connect to the wireless network.
See Main Window for more information.
Using Wi-Fi Protected Setup* to Configure or Join a Network
●Configure an access point and set up a network
●Connect an enrollee (computer) to a network or access point
●Add an enrollee to a network at the registrar
Intel(R) PROSet/Wireless WiFi implements Wi-Fi Protected Setup* to permit easy and secure set up
and management of a wireless network. You can use this capability to initially set up a wireless
network and to introduce new devices to the network. Wi-Fi Protected Setup simplifies the set up
process and at same time helps ensure that the network is configured securely. The following terms
are used in this discussion.
●Access Point: A device that connects wireless devices to a network. The access point is
configured with the necessary network name (SSID) and security credentials.
●Enrollee: A device that seeks to join an access point or wireless network, but does not have
the password or key for the access point or network. Once the computer obtains the valid
password or key, it becomes a member of the wireless network. The WiFi connection utility can
be configured to operate as an enrollee for a supported access point.
●Registrar: A registrar is a logical entity (usually a computer) that allows other devices
(usually computers) to join the wireless network. The WiFi connection utility can be configured
to operate as a registrar for a supported access point(s). The registrar securely transfers the
access point key or password automatically.
A new wireless network is established by configuring the access point, connecting the desired
computers equipped with wireless adapters, and optionally attaching external network connectivity (i.
e. the Internet, typically by connecting the access point to a DSL or cable modem, or equivalent).
Configure an Access Point and Set up a Network
The following steps will configure this computer as a registrar for a secure network or access point.
1. Locate the device ownership password for the access point. This is set by the manufacturer of
the access point. The password is often located on a label on the bottom of the device.
2. Turn on the network access point.
3. At the computer that you want to establish as the registrar, turn on the WiFi connection utility.
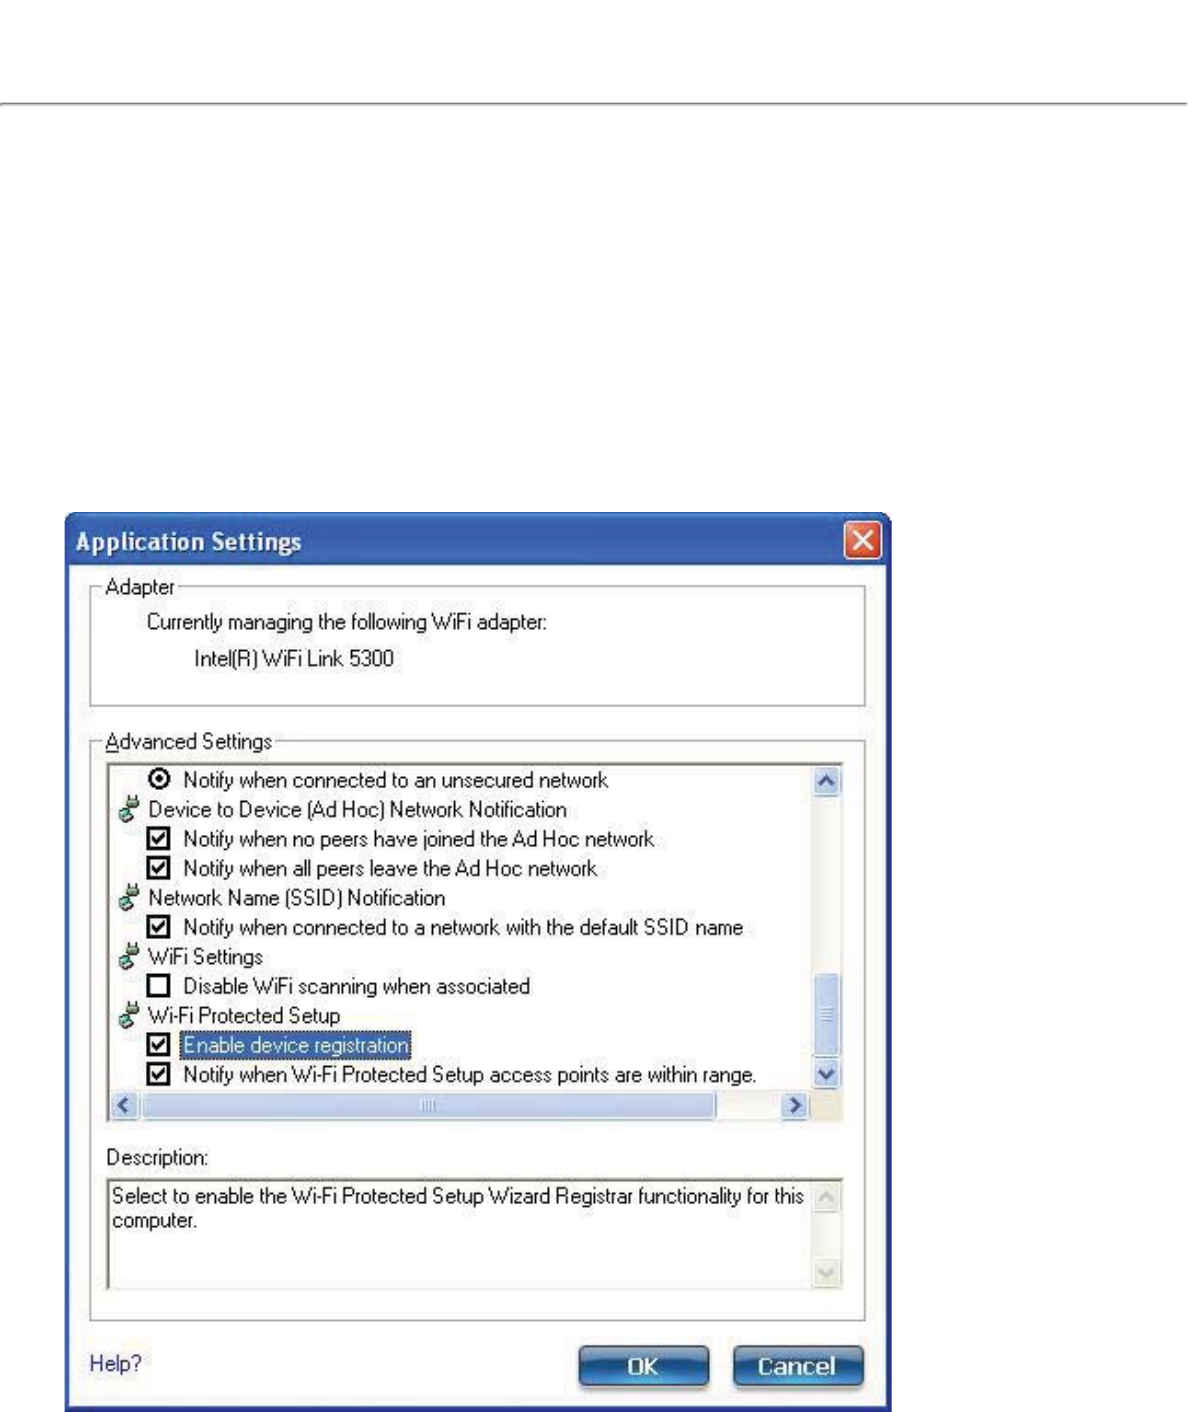
4. In the WiFi connection utility, click Tools > Application Settings.
5. In the Advanced Settings area under Wi-Fi Protected Setup, turn on Enable device
registration.
6. The next message tells you that one or more compatible devices are within range of your
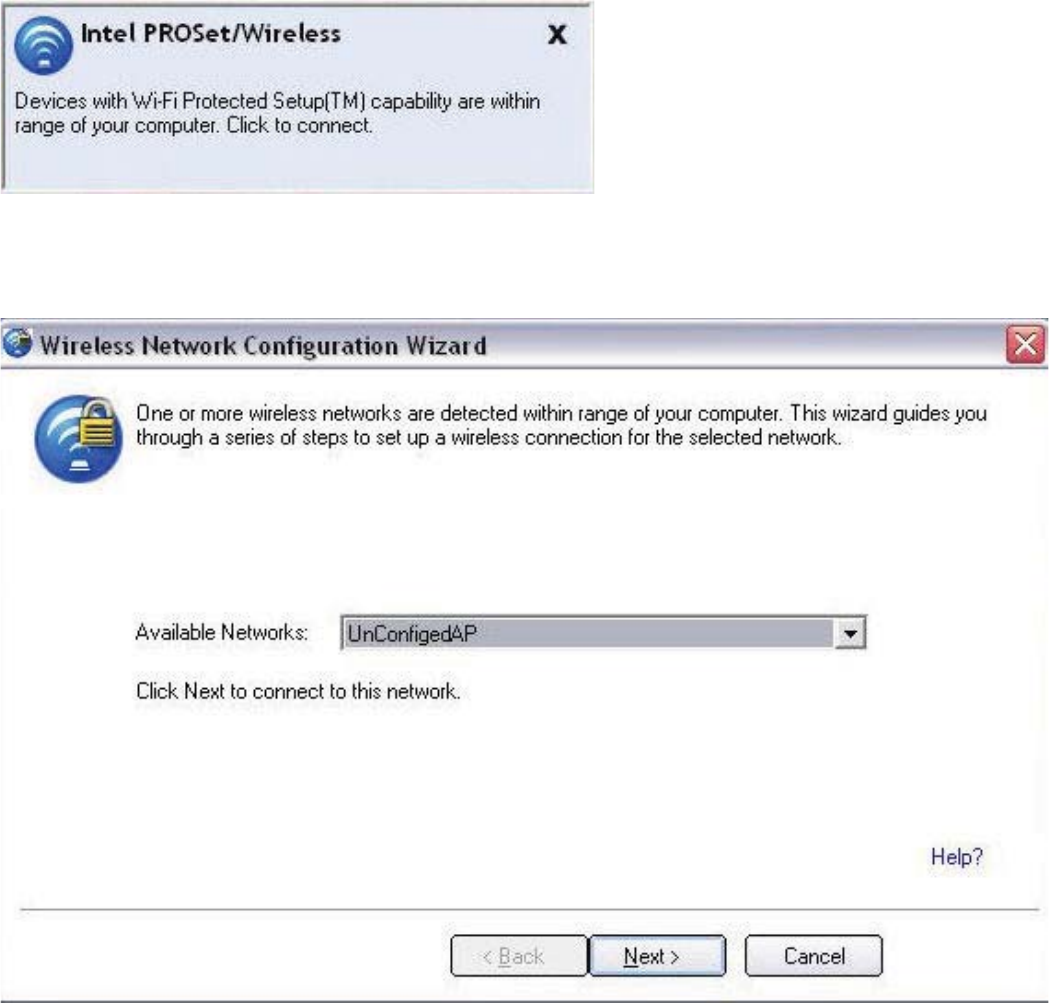
computer. Click this message. (Or, you can select the network from the WiFi Networks list in
the WiFi connection utility main window.)
7. At the next window, on the Available Networks list, select the network that you want to
connect to. The listed network depends on what is detected. Click Next.
8. At the next window, enter the Device Ownership Password that you retrieved from the access
point in step 1. Click Next to continue.
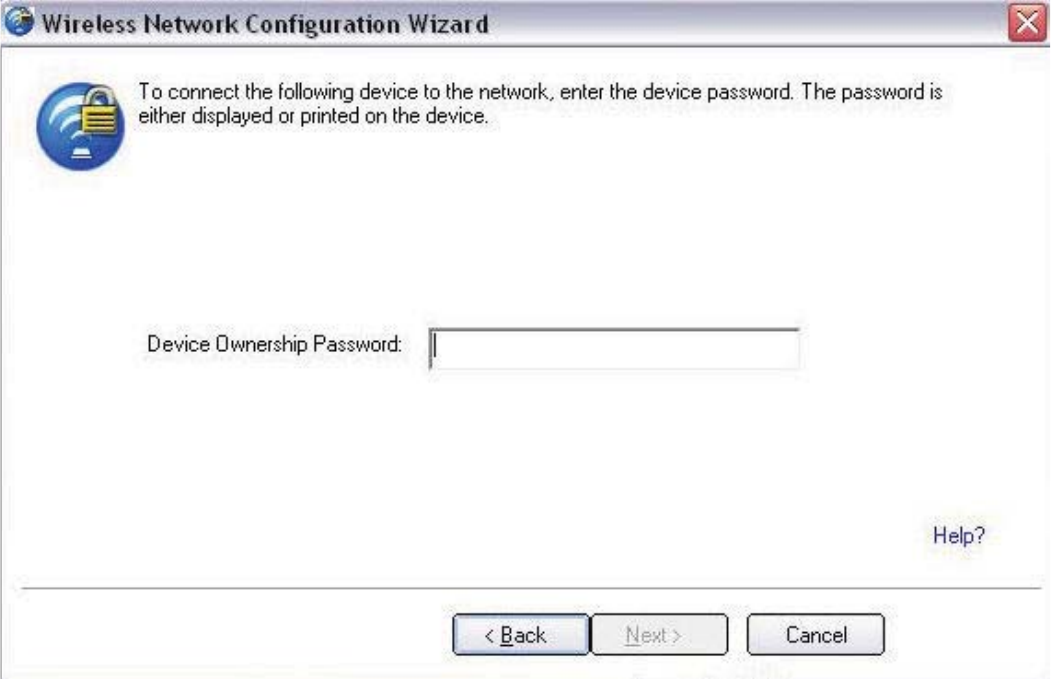
9. The next window shown displays the Network Name,Security Type, and Password. If the
access point is already configured, it is grayed out; proceed to step 10. If the access point is
not configured (fields are not grayed out), proceed to step 11.
10. After a few seconds the following message is displayed:
The access point is already configured. Do you want to reconfigure it?
If you do not want to reconfigure the access point, select No. The software joins the network,
makes the connection, and creates a profile. It then exits and this procedure is completed. If
you want to reconfigure the access point, select Yes.
11. The next window is displayed. The first field shows the name of the access point. This is by
default the Network Name (SSID). In this example we have reset it to MyWPS. You can
name it whatever you want.
12. In the Security Type field, select the security type you want.
❍WPA* Personal requires manual configuration of a pre-shared key (PSK) on the access
point and clients. This PSK authenticates a password or identifying code, on both the
client station and the access point. An authentication server is not needed.
❍WPA2* is the second generation of WPA security that provides enterprise and consumer
wireless users with a high level of assurance that only authorized users can access their
wireless networks. Here we have selected WPA2 Personal security. You can use Intel
PROSet/Wireless WiFi profiles to obtain the wireless network name (SSID) and WPA2-
Personal pass phrase to use for a legacy device.
13. The third field is the Password (Key). The password shown is randomly generated or pre-
configured, you can change it to whatever password you want. However you should use a
robust key for improved security. It must have between 8 and 63 characters. When you have
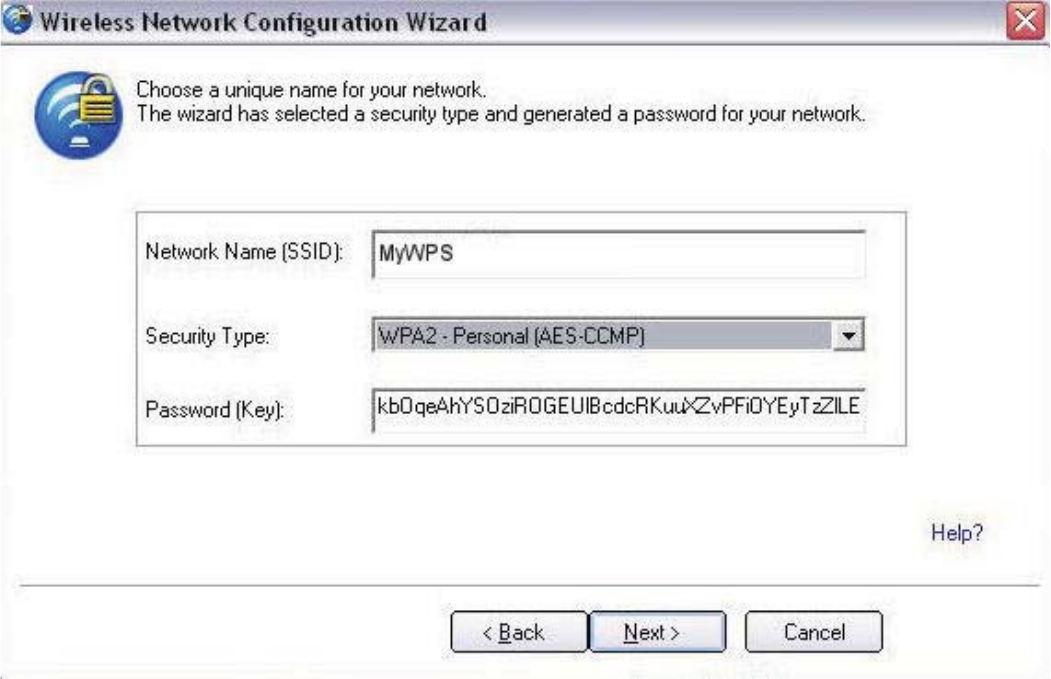
completed this step, click Next.
The following windows show the configuration of the access point and the registrar.
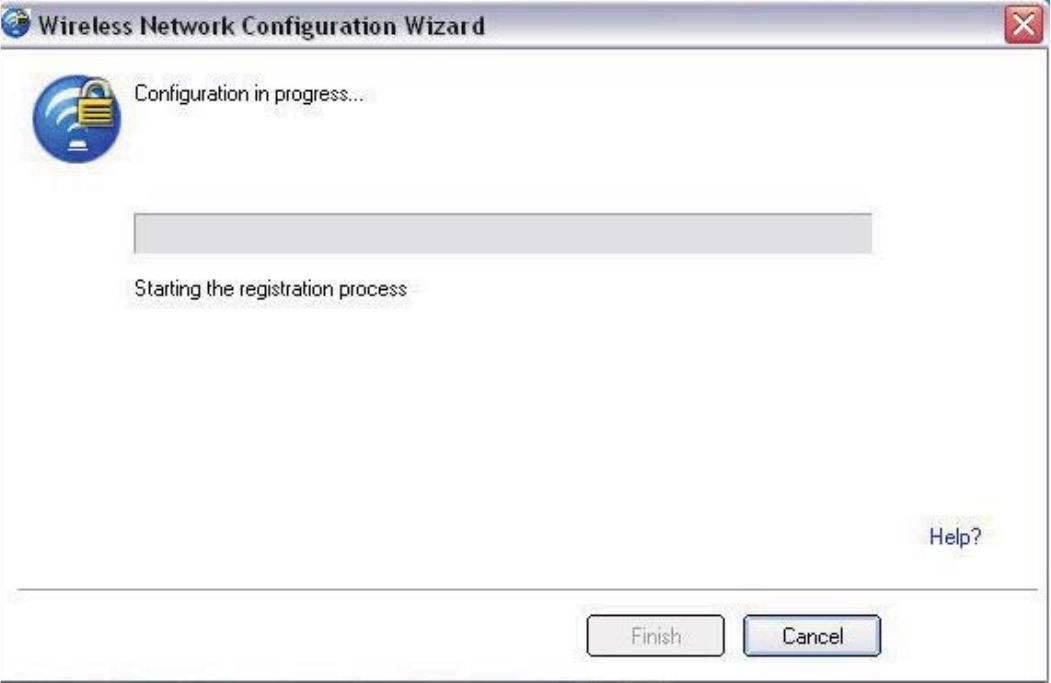
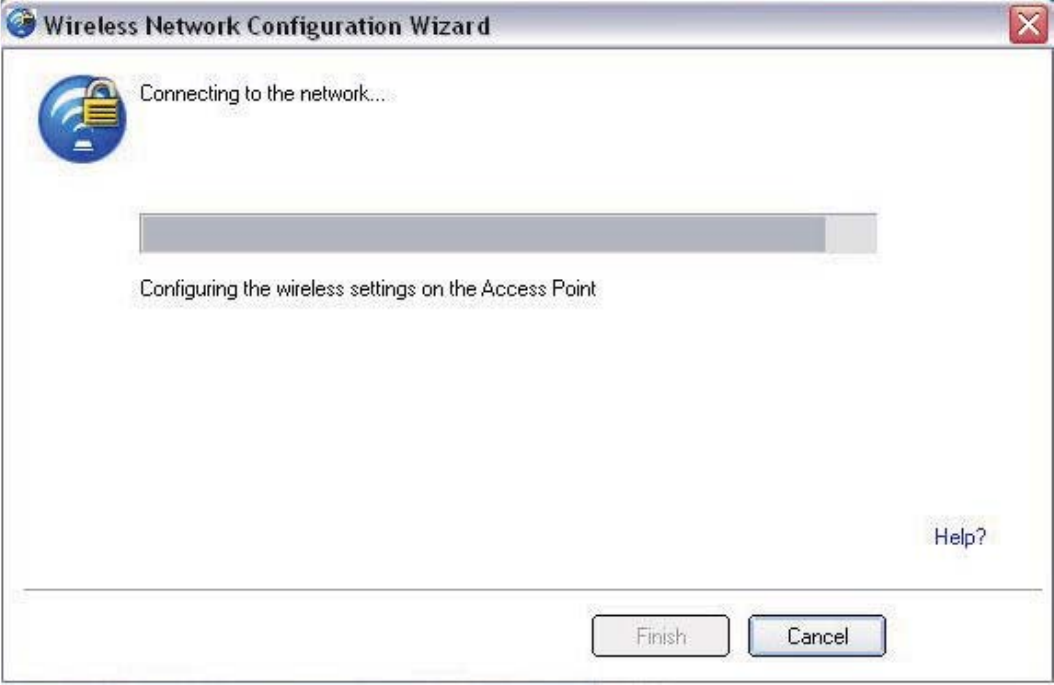
The following window appears briefly and shows the configuration of wireless settings for the access
point.
14. After the network receives the Ownership Password, you are notified that you have
Successfully connected to <name of wireless network>. Click Finish. This process
completes configuration of the access point and the registrar.
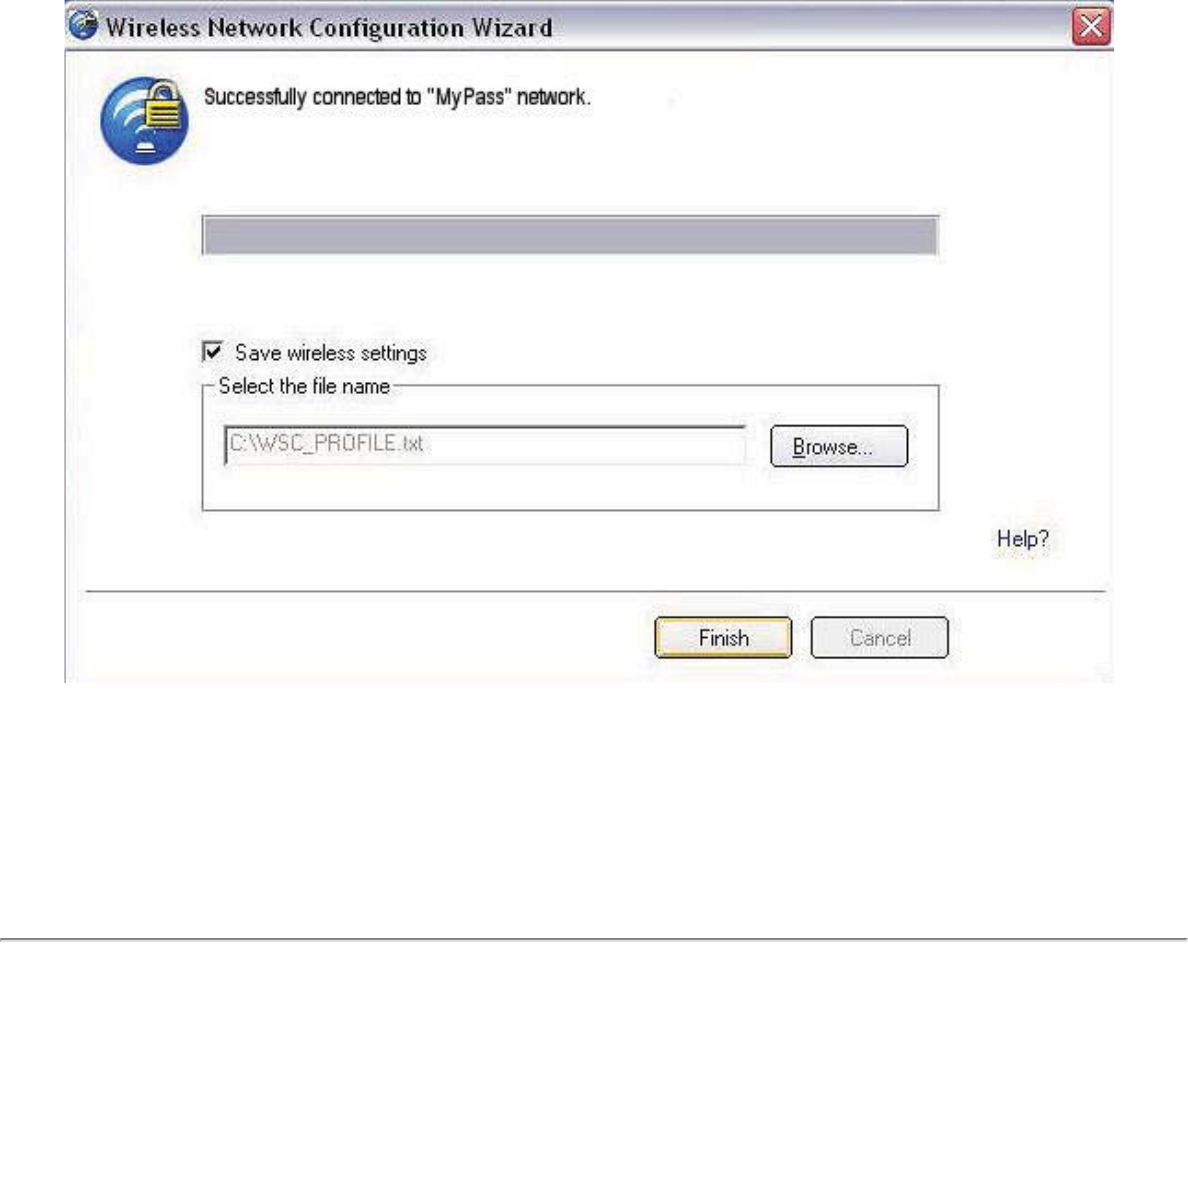
15. If you want to save these settings to a profile for future use by a legacy client, click Save
wireless settings. The profile settings are saved to a text file (txt) on your local hard drive.
The file is saved to your local C:\ drive by default. Accept the default save location or click
Browse to choose another location on your computer.
Next, you can connect an enrollee (computer) to the network using the registrar.
Connect an Enrollee to a Network or Access Point
Perform these steps to connect an enrollee to the network you just created. This assumes that the
registrar computer is running the WiFi connection utility.
NOTE: To achieve transfer rates greater than 54 Mbps on 802.11n connections, WPA2-AES security
must be selected. No security (None) can be selected to enable network setup and troubleshooting.
1. At the enrollee you want to connect the network, a message tells you that one or more access
points with Wi-Fi Protected Setup capability is within range of your wireless computer. Click on
this message. (Or, you can select the network from the WiFi Networks list in the WiFi
connection utility main window.)
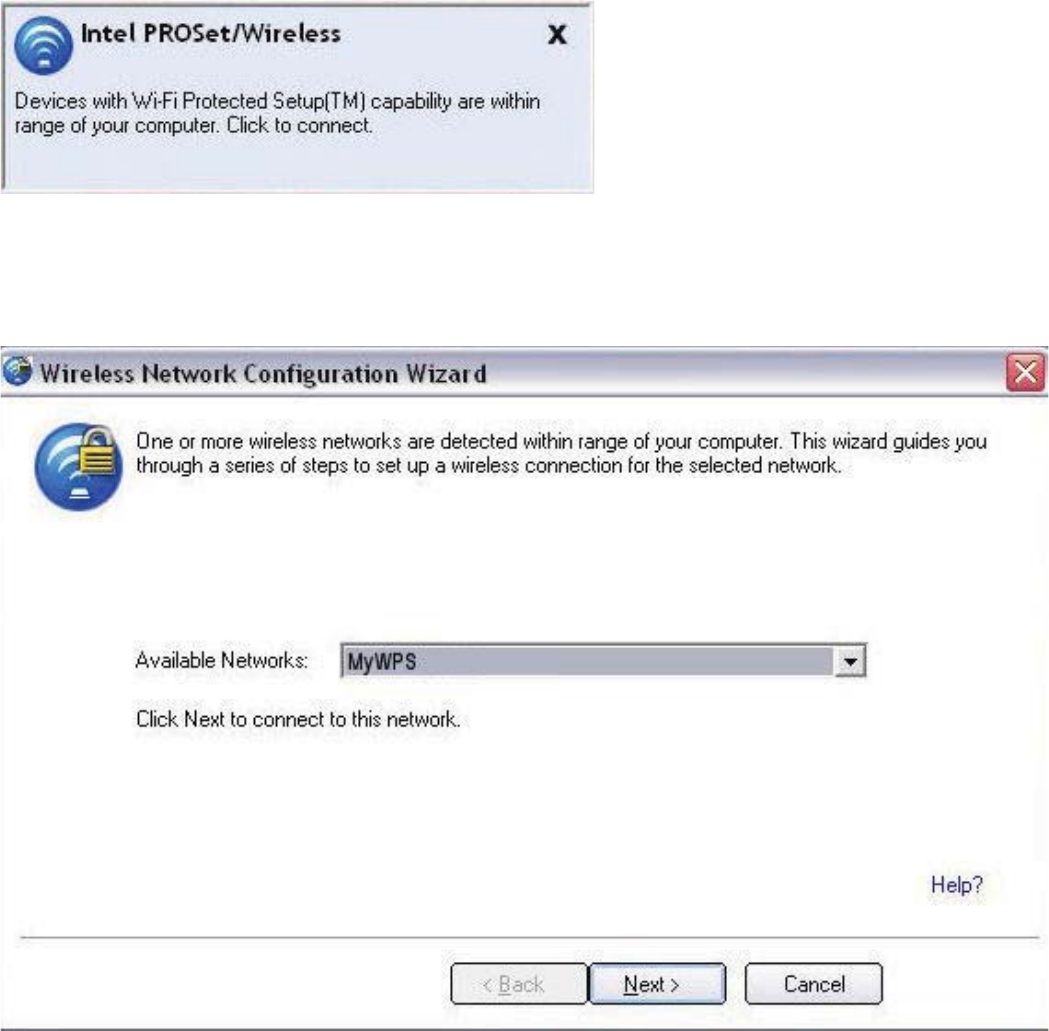
2. The Wireless Network Configuration start up page opens. Use the Available Networks list
to select the network that you want to connect to (in this example it is MyWPS). Then click
Next.
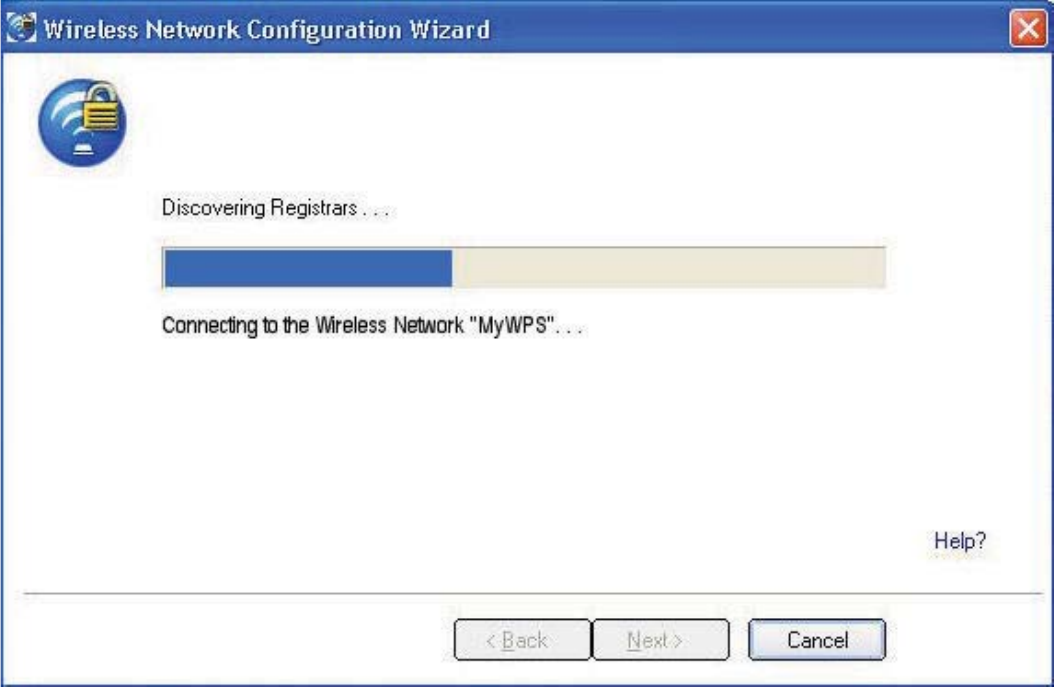
3. The Discovery window opens. The enrollee that you want to connect to the network discovers
the registrar for the network. Assuming that the Discovery process succeeds, the name of the
registrar or access point is displayed.
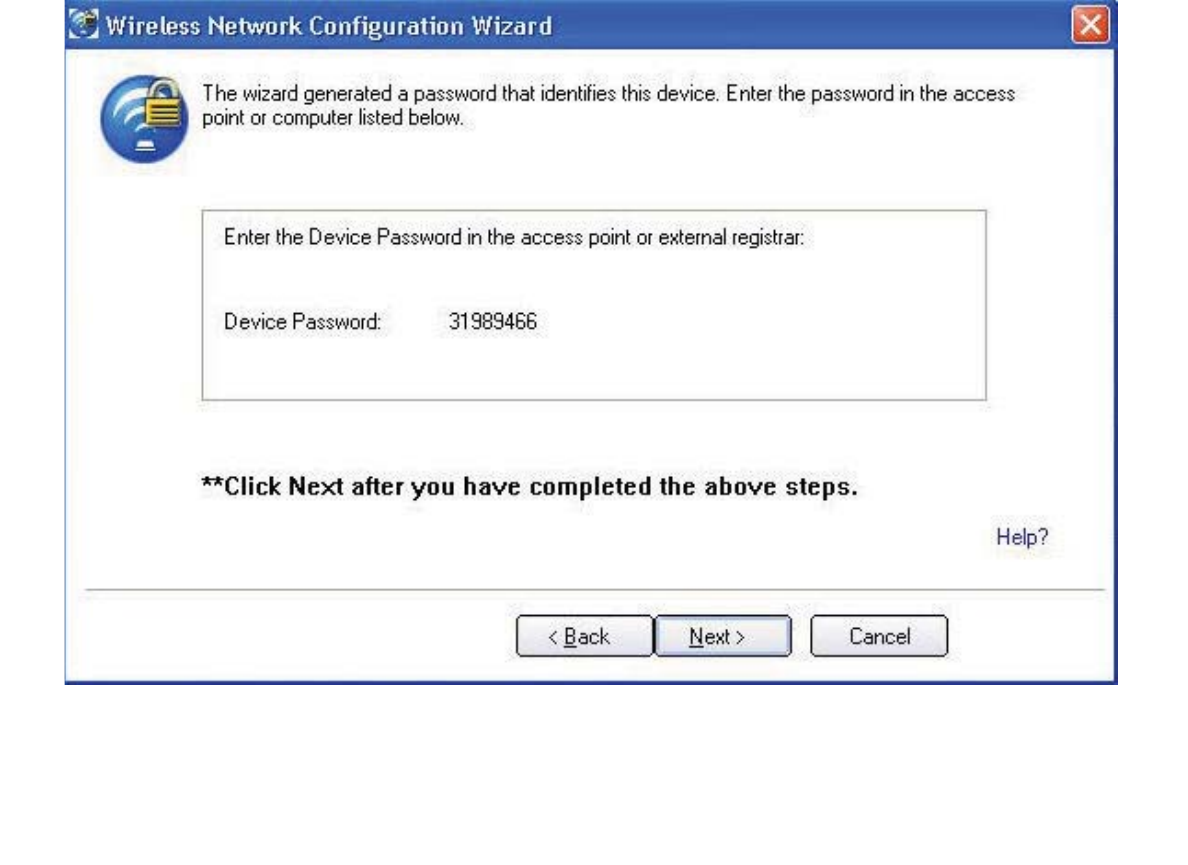
4. The next window appears, displaying the Device Password (enrollee password). The password
displayed at the enrollee is a unique, randomly generated temporary password for the
enrollee. This password is used to ask permission to connect to the network access point. (The
password shown below is an example only).
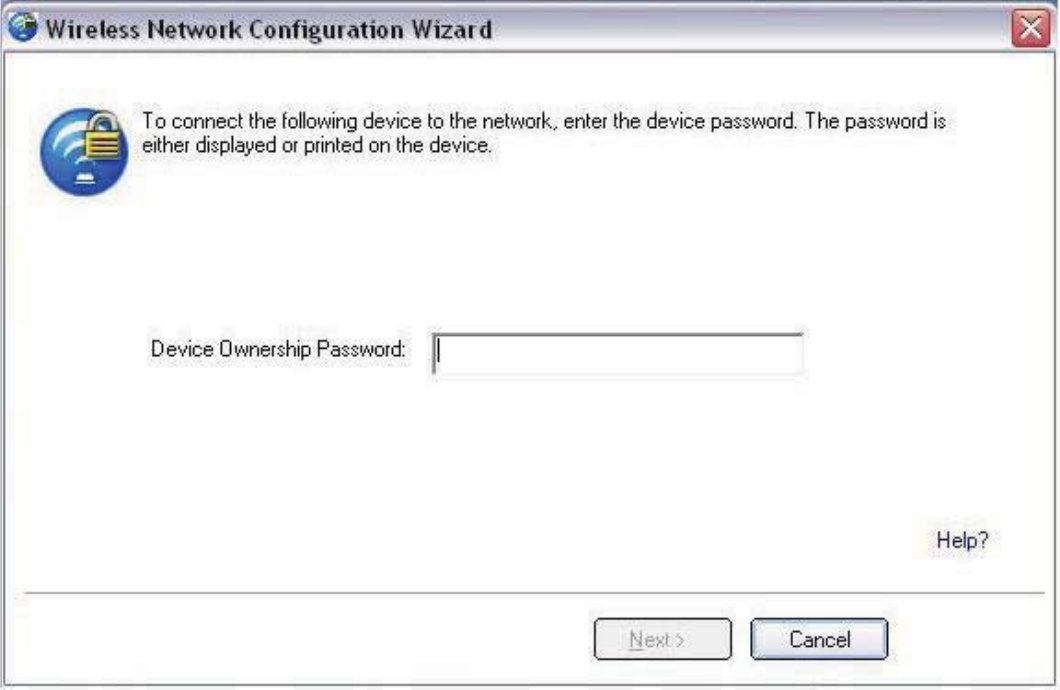
5. At the registrar, enter the password provided by the enrollee. Then click Next.
NOTE: This process assumes that the registrar is running the WiFi connection utility; the process
and windows displayed at the registrar may be different for software from other vendors. Some
access points may have a built in registrar.
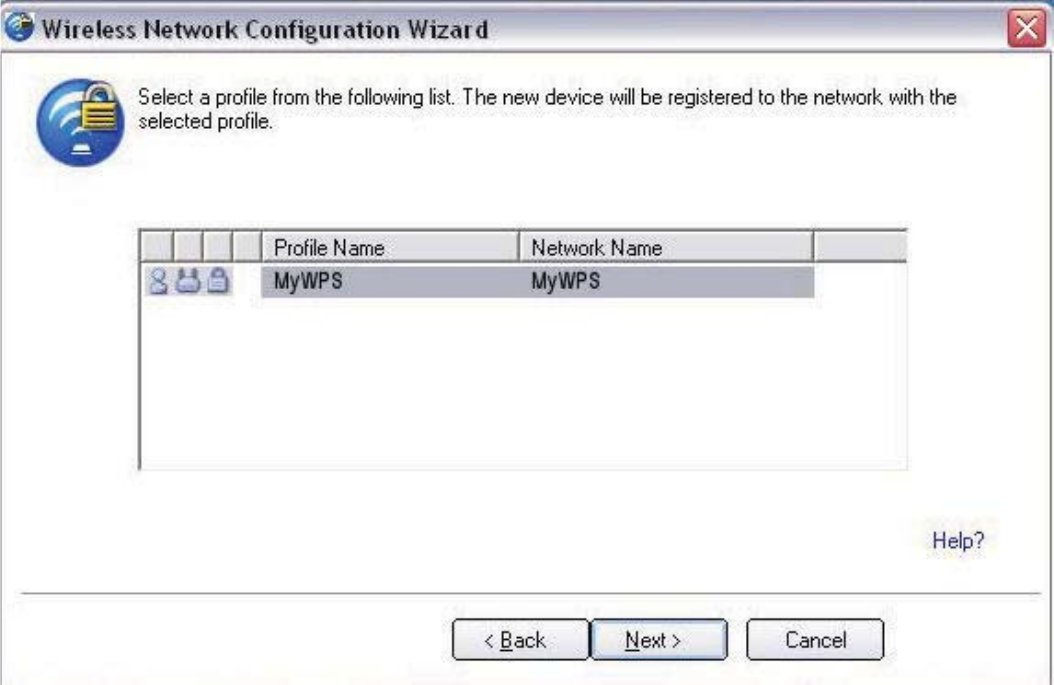
6. The next window lists the profile for this network. The selected profile will be sent to the
enrollee, granting it access to the network. Only supported profiles are displayed. Supported
profiles are those based on WPA-PSK, WPA2-PSK, and Open (None) security. Select the profile
and click Next to finalize the enrollment process.
7. The last window shows that the enrollee registration with the registrar is complete. Click
Finish.

8. At the enrollee, click Next. At the enrollee, you are notified when you have Successfully
connected to <name of wireless network>. Click Finish.
Add an Enrollee to an Existing Network at the Registrar
This following procedure lets you add an enrollee to an existing network, where the access point is
already configured and the registrar has already joined the AP.
NOTE: This process assumes that the registrar is running the WiFi connection utility; the process
and windows displayed at the registrar may be different for software from other vendors.
1. Get the Device Password for the enrollee computer that you want to add to the network.
2. At the task tray icon for the WiFi connection utility, right-click and select Add New Device.
3. Perform steps 5 through 8 of the procedure Connect an Enrollee to a Network or Access Point.
Other Wireless Managers
If the WiFi connection utility detects another software application trying to communicate with the
wireless device, you are notified of this behavior.

Microsoft Windows XP* Wireless Zero Configuration
To switch from the Intel(R) PROSet/Wireless WiFi Connection Utility to the Microsoft Windows XP
Wireless Zero Configuration, perform these steps:
1. At the Intel(R) PROSet/Wireless WiFi Connection Utility main window, under the Advanced
menu, select Use Windows to manage WiFi. Then click Close.
2. Right-click on the tasktray icon and select Open Wireless Zero Configuration.
NOTE: Any wireless profiles created in the WiFi connection utility are not visible in
Microsoft Windows XP Wireless Zero Configuration. If you want to use your Intel wireless
profiles, click Enable Intel PROSet/Wireless WiFi on the main window.
When you are finished using the Microsoft Windows XP Wireless Zero Configuration, you can switch
back to the WiFi connection utility To do this, click Enable Intel PROSet/Wireless WiFi on the
WiFi connection utility main window.
Third-Party Wireless Software
If you use software provided by a hotspot location (coffee shop, airport terminal), the WiFi
connection utility notifies you and then disables itself. It cannot manage the wireless device when
another wireless manager communicates with the wireless device. To take advantage of the WiFi
connection utility features, you want to disable or remove this software when you leave the hotspot.
Back to Top
Back to Contents
Trademarks and Disclaimers

Back to Contents
Profile Management
●What is a Profile?
●Profiles Types
●Profiles List
●Profile Icons
●Connect to a Profile
●Create a New Profile
●Edit an Existing Profile
●Remove a Profile
●Set a Profile Password
●Export or Import Profiles
What is a Profile?
A profile is a saved group of network settings. Profiles are displayed in the Profiles List. Profiles are useful
when moving from one wireless network to another. Different profiles can be configured for each wireless
network. Profile settings include the network name (SSID), operating mode, and security settings.
A profile is created when you connect to a wireless network.
1. Select a network from the Wireless Networks list.
2. Click Connect.
3. If the wireless network requires a WEP password or encryption key, you are prompted to enter this
information prior to connection. To change the security options, click Advanced to open the Create
Wireless Profile Security Settings.
4. Click OK to connect. A profile is created and added to the Profiles list.
The Create Wireless Profile Wizard guides you through the settings required to connect with the wireless
network. At completion, the profile is saved and added to the Profiles list. Since these wireless settings are
saved, the next time you are in range of this wireless network you are automatically connected.
Profile Types
There are two basic types of profiles that can be used to connect to a wireless network. The profile types
are:
●User Profiles: These profiles are created by individual users. If there is more than one user on a
computer, each user needs to create their own set of user profiles. User-created wireless profiles are
not accessible by other users of a computer.
●Administrator Profiles: If one or more profiles need to be shared among users on a computer, the
Administrator Tool must be installed to create Administrator profiles. For more information, see
Administrator Profiles .
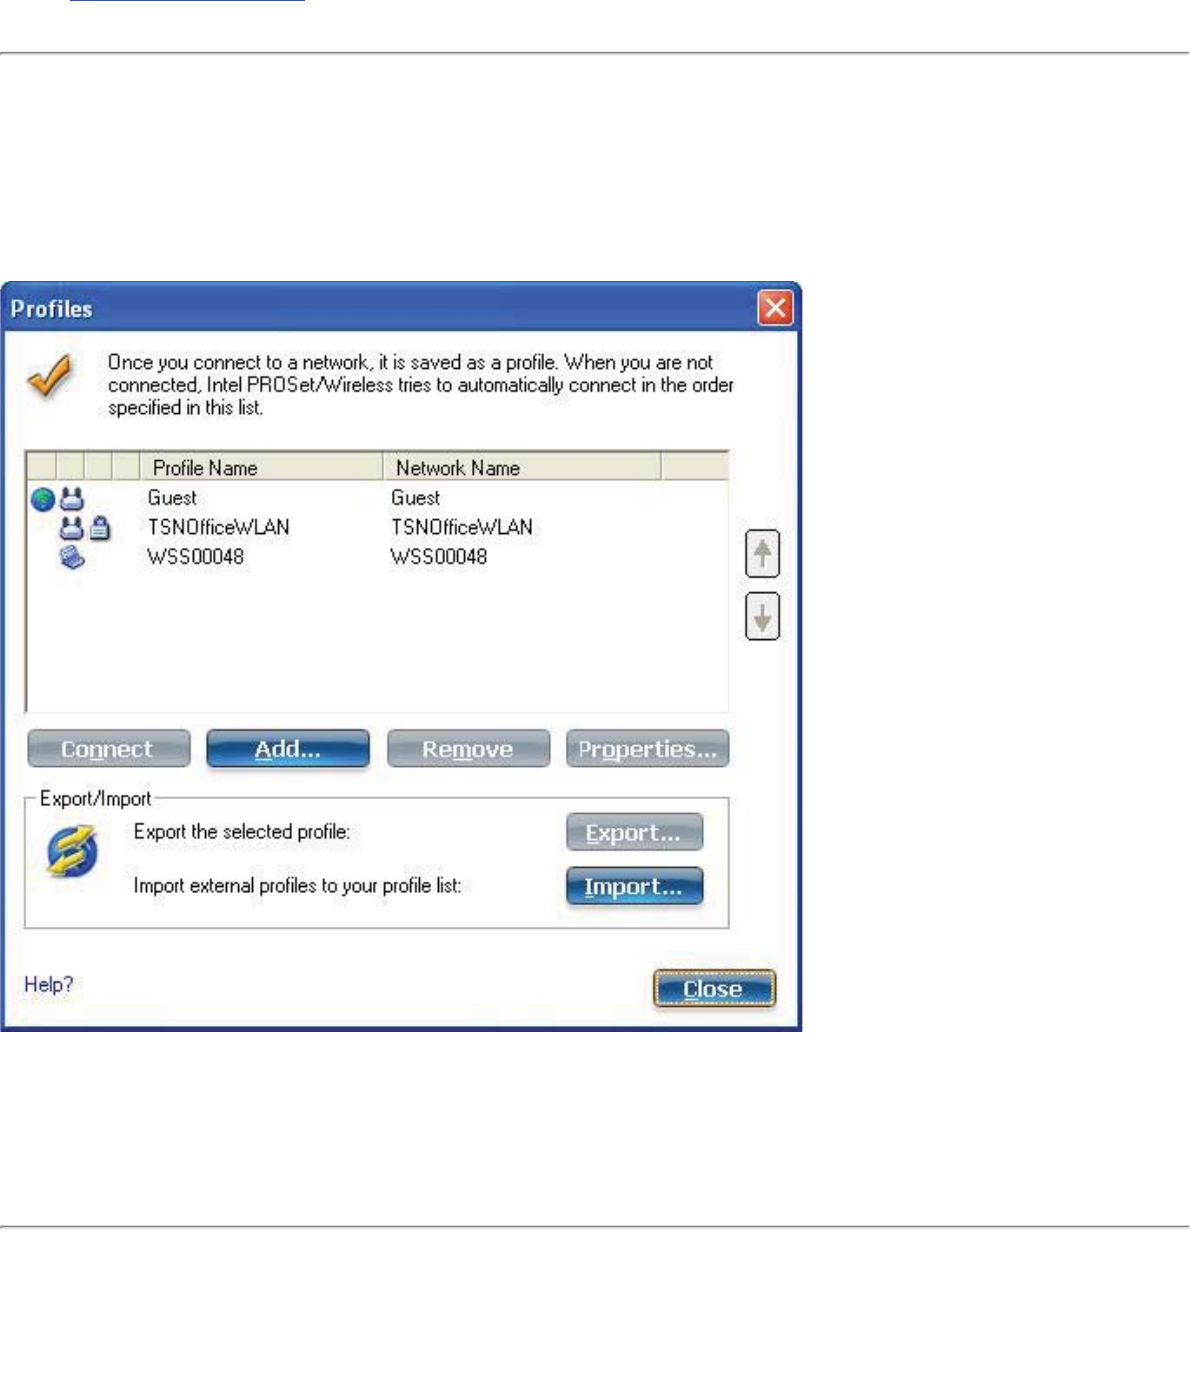
Profiles List
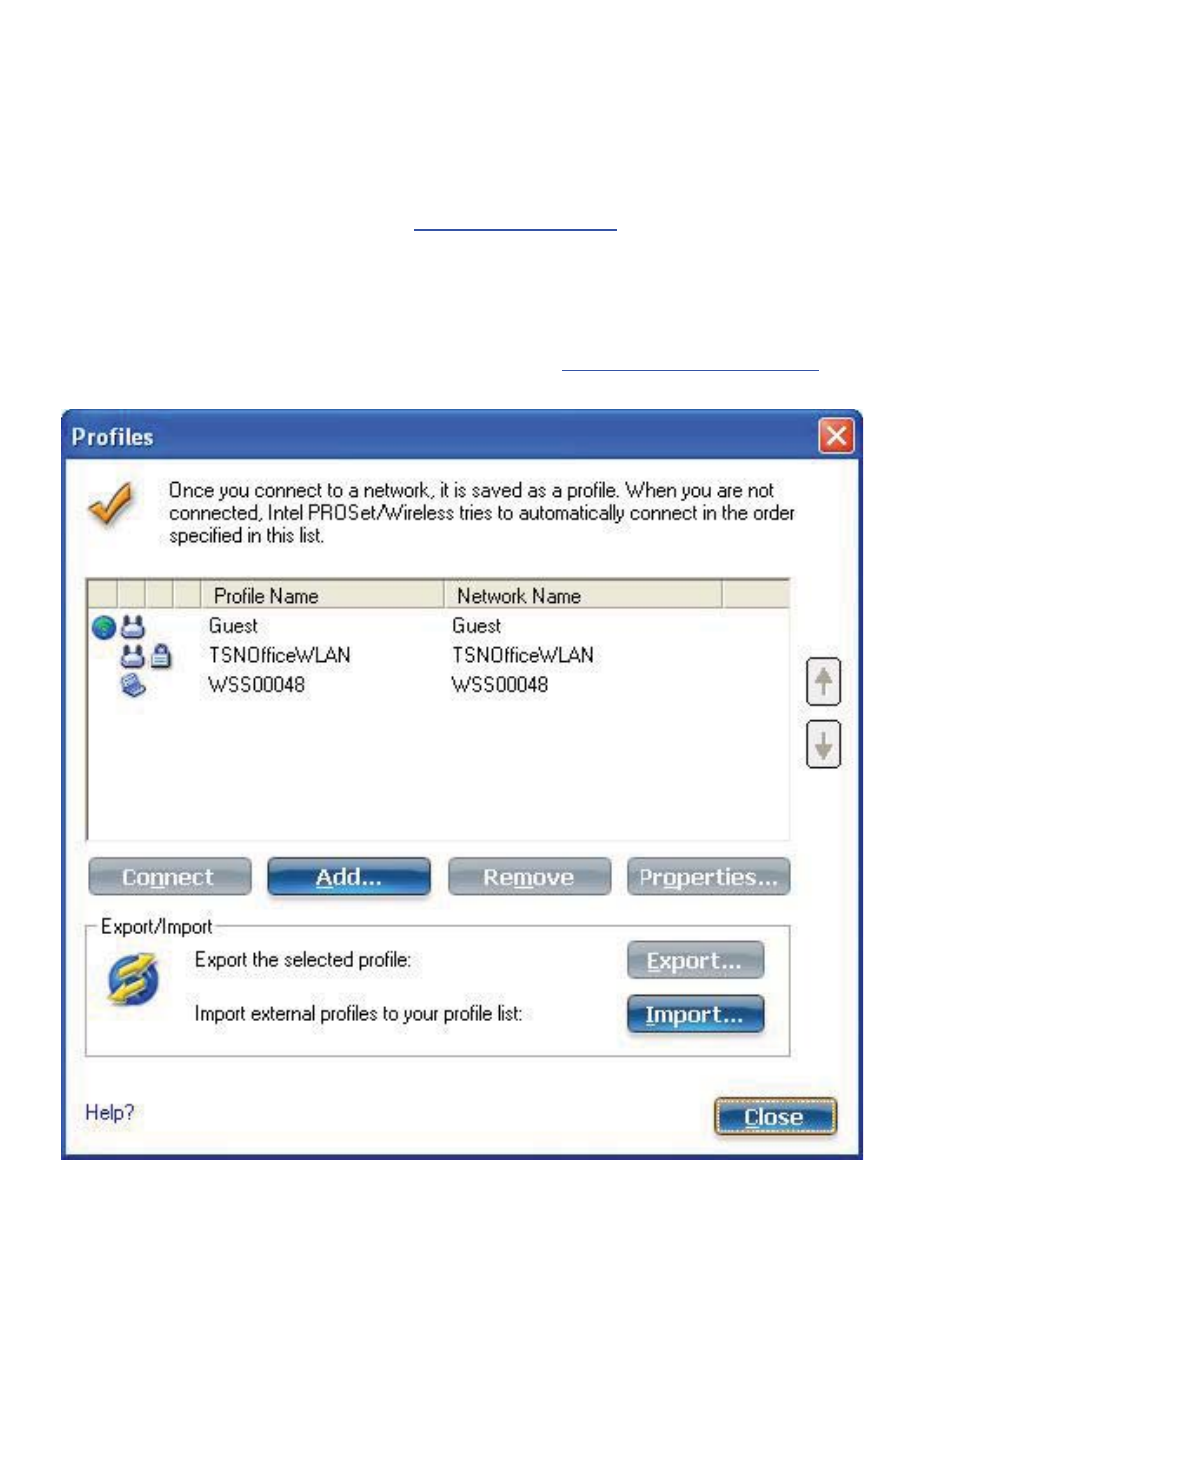
The Profiles list displays a list of existing profiles. When you come in range of a wireless network, the WiFi
connection utility software scans the Profiles list to see if there is a match. If a match is found, you are
automatically connected to the network.
Profiles List Priority Arrows
●Use the up-arrow to move the position of a selected profile up in the profiles list.
●Use the down-arrow to move the position of a selected profile down in the profiles list.
Profile Icons
The network profile status icons indicate whether the adapter is associated with a network, the type of

operating mode being used, and whether security encryption is enabled. These icons display next to the
profile name in the Profiles list.
Name Description
Profile Name The Profile Name is your name for this network. It can be anything that helps you
identify this network. For example, My Home Network, Coffee Shop on A Street.
Network Name Name of the wireless network (SSID) or computer.
Connection Icons: The network profile status icons indicate the different connection states of the
adapter with a wireless network, the type of operating mode being used, and whether network security is
being used.
Blue circle: The wireless adapter is associated with an access point or computer
(Device to Device [ad hoc] mode). If a profile has 802.1X security enabled, this
indicates that the wireless adapter is associated and authenticated.
Indicates Network (infrastructure) mode.
Indicates Device to Device (ad hoc) mode.
Indicates an Administrator profile.
The wireless network uses Security encryption.
Indicates that this network is on the Exclude list, e.g. is set for manual rather than
automatic connection. When on the Exclude list, to connect the user must connect
manually.
Arrows Use the arrows to position profiles in a preferred order for auto-connection.
●Up-arrow: Move the position of a selected profile up in the Profiles list.
●Down-arrow: Move the position of a selected profile down in the Profiles list.
Connect Connect the selected profile for the wireless network.
Add Opens the Create Wireless Profile General Settings, which are used to create a
new profile. See Create a New Profile for more information.
Remove Removes a selected profile from the Profiles list. See Remove a Profile for more
information.
Properties Used to edit the contents of an existing profile. You can also double-click a profile in the
Profiles list to edit the profile. See Edit an Existing Profile for more information.
Export/Import: Imports and exports user-based profiles to and from the Profiles list.
Wireless profiles can be automatically imported into the Profiles list. See Export or
Import Profiles for more information.
Close Closes the profile management window.
Help? Provides help information for this page.
Connect to a Profile
When you are in range of a wireless network that has a matching profile you are automatically connected
to that network. If a network with a lower priority profile is also in range you can force the connection to

that lower profile. This is achieved the from the WiFi connection utility or from the Taskbar icon.
Manually connect to a profile from the Intel PROSet/Wireless WiFi software:
1. Double-click the Taskbar icon to open the Intel PROSet/Wireless WiFi main window.
2. Click Profiles to open the Profiles list.
3. Select the profile from the Profiles list.
4. Click Connect. Remember that the connection is only made if the wireless network is in range.
Manually connect to a profile from the Taskbar:
1. Right-click the Intel PROSet/Wireless WiFi Taskbar icon.
2. Click Connect to Profile.
3. Select a profile.
4. Click to start the connection.
Create a New Wireless Profile
Select a network from the Wireless Networks list. Click Connect. The Create Wireless Profile manager
guides you through the necessary steps to create a profile and connect to the network. During this process,
the Create Wireless Profile Security Settings attempts to detect the appropriate security settings for
you.
To create a new profile and connect to a wireless network:
1. From the Intel PROSet/Wireless WiFi main window, click Profiles.
2. On the Profiles page, click Add to open the Create Wireless Profile General Settings. (See
General Settings for more information.)
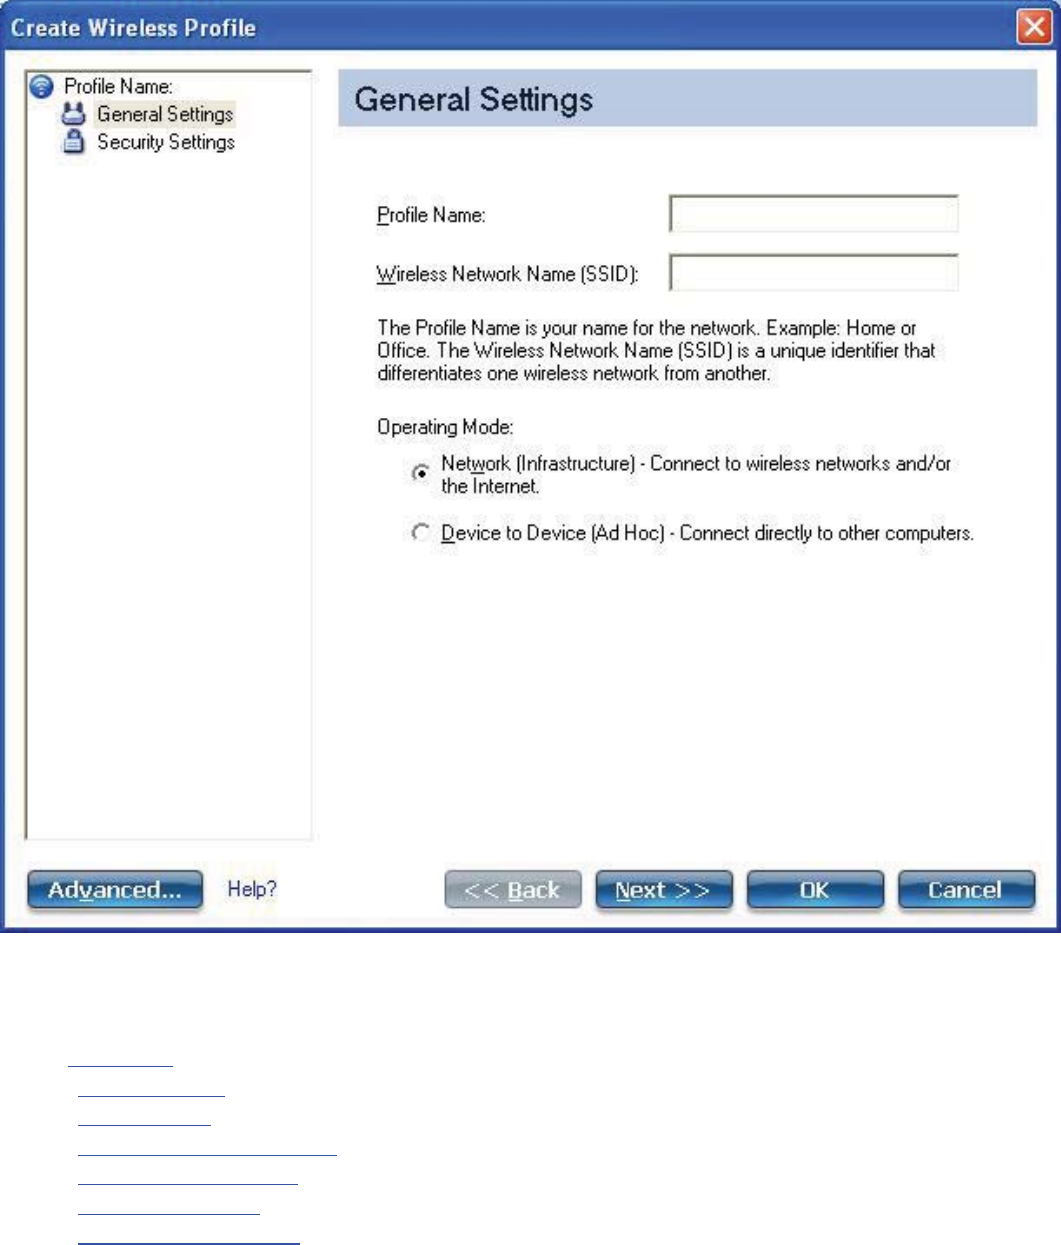
3. Profile Name: Enter a descriptive profile name.
4. Wireless Network Name (SSID): Enter the wireless network name.
5. Select the Operating Mode: Network (Infrastructure) or Device to Device (ad hoc).
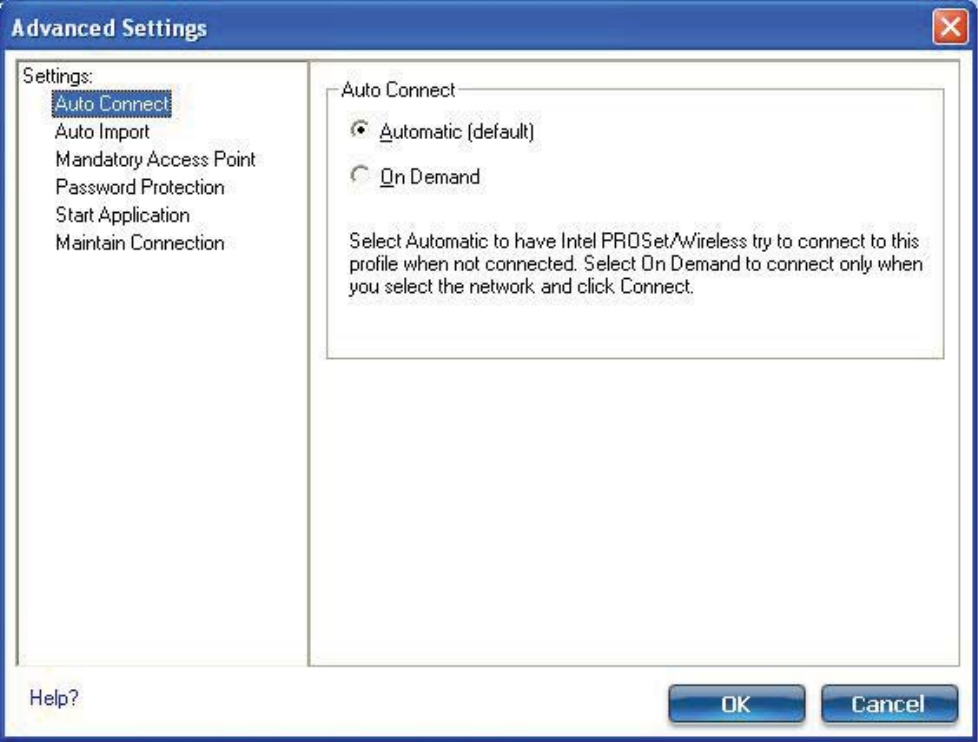
6. Click Advanced for the following options:
❍Auto Connect: Select to automatically or manually connect to a profile.
❍Auto Import: Network administrator can export a profile on another computer.
❍Mandatory Access Point: Select to associate the wireless adapter with a specific access point.
❍Password Protection: Select to password protect a profile.
❍Start Application: Specify a program to be started when a wireless connection is made.
❍Maintain Connection: Select to remain connected to a user profile after log off.
7. From the General Settings, click Next to open the Security Settings.
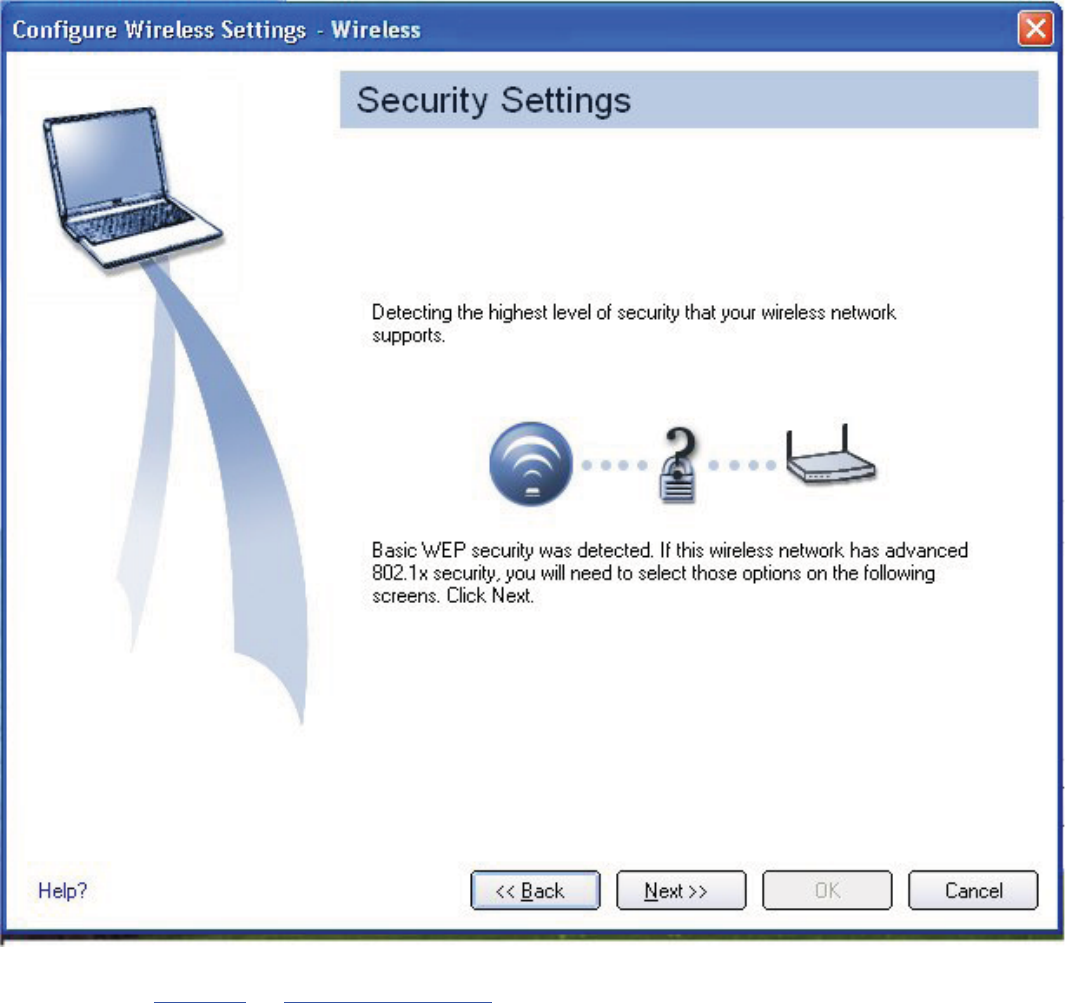
8. Select either Personal or Enterprise Security to select the Network Authentication and Data
Encryption options. Enter the encryption key settings and configure the 802.1X settings as
required.
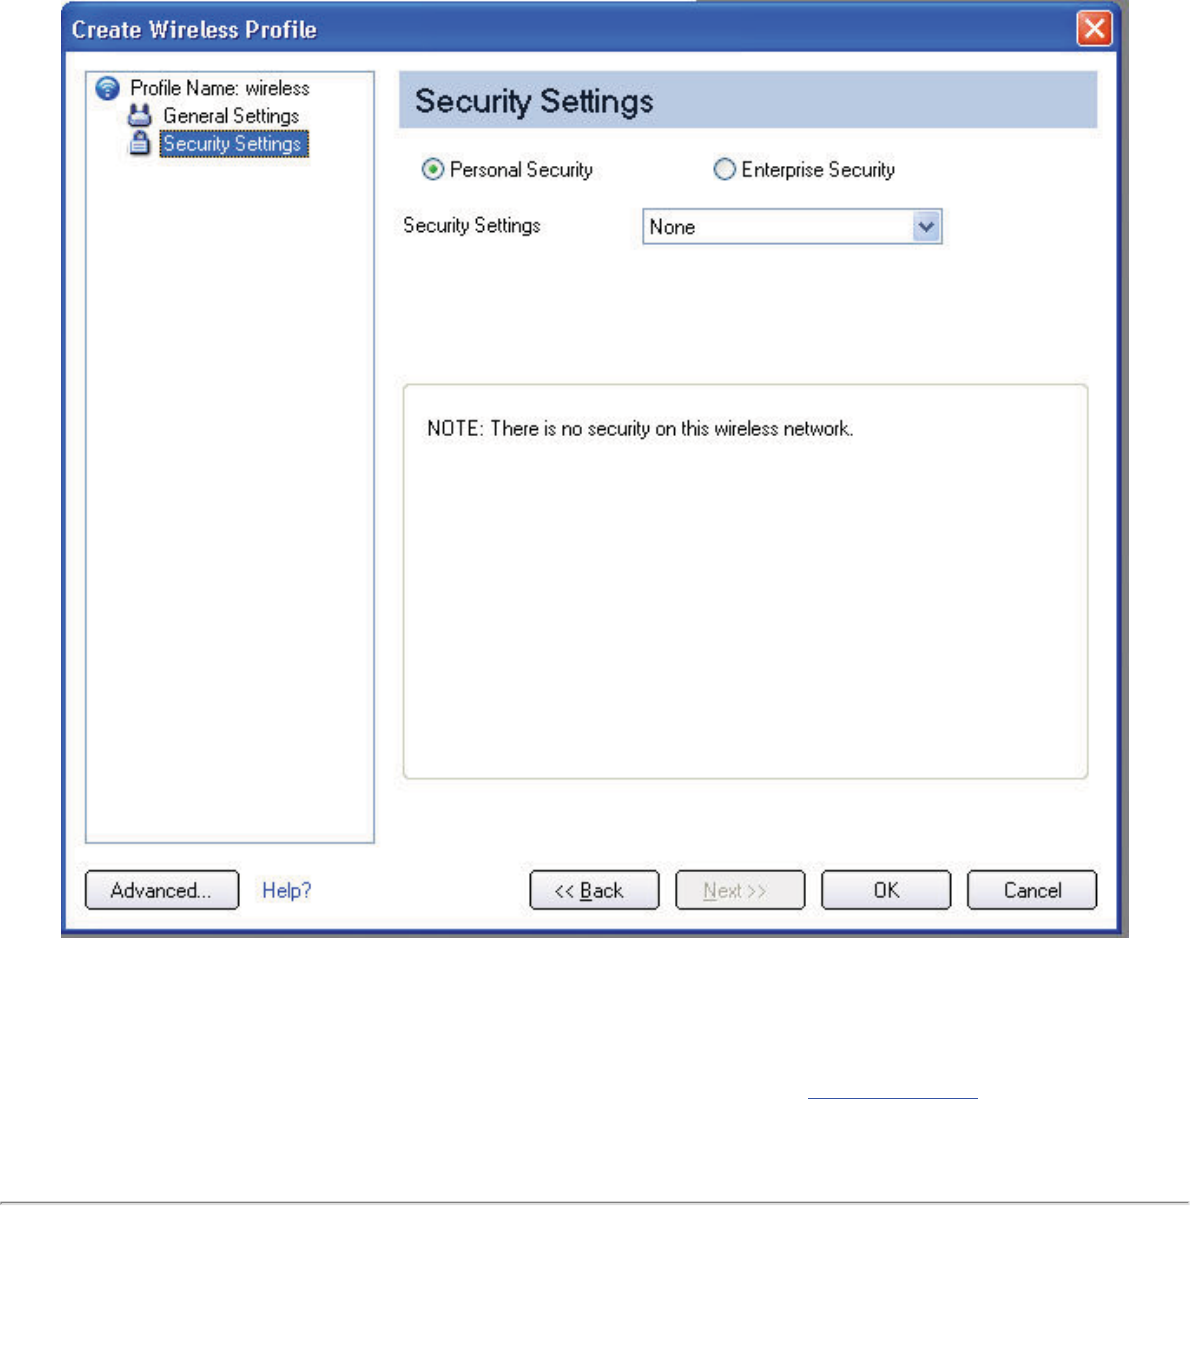
9. Click OK when you have completed the profile settings. To change or verify the profile settings, click
Back.
10. If you are not currently connected to a network, Intel PROSet/Wireless WiFi detects that a new
profile has been added and automatically attempts to connect to this new profile.
11. If you want to manually connect to this profile, click Connect. The connection icon displays the
current connection status. The network name, transmit and receive speeds, and signal quality are
also displayed.
Edit an Existing Profile
To edit an existing profile:
1. Click Profiles on the Intel PROSet/Wireless WiFi main window.
2. Select the profile to edit from the Profiles List.
3. Click Properties to open the Wireless Profile Properties General Settings.

4. Click Next and Back to navigate through the Wireless Profile Properties' General and Security
Settings:
❍General Settings: See General Settings for more information.
❍Security Settings: See Security Settings for more information.
5. Click OK to save the current settings and exit. Click Cancel to exit without saving changes.
Remove a Profile
To remove a profile:
1. Click Profiles on the Intel PROSet/Wireless WiFi main window.
2. Select the profile from the list.
3. Click Remove. You are notified that Selected profiles will be permanently removed. Do you
want to continue?
4. Click Yes. The profile is removed from the Profiles list.
If you are still connected to the network:
1. Click Profiles on the Intel PROSet/Wireless WiFi main window.
2. Select the profile from the list.
3. Click Remove. You are notified that Selected profiles will be permanently removed. Do you
want to continue?
4. Click Yes. You are notified that <profile name> is active and will be permanently removed.
Do you want to continue?
5. Click Yes. The profile is removed from the Profiles list.
NOTE: If the profile is protected by a password, you cannot remove or edit the profile settings without
entering the password. If the administrator or you do not know the password, there is no process available
to reset the password.
Set a Profile Password
To password protect an existing profile:
1. Click Profiles on the Intel PROSet/Wireless WiFi main window.
2. Select the profile from the list.
3. Click Properties to open the Wireless Profile Properties' General Settings.
4. Click Advanced to open the Advanced Settings.
5. Click Password Protection to open the Password Protection settings.
6. Click Password protect this profile (maximum 10 characters)
7. Password: Enter the password.
8. Confirm Password: Reenter the password.
9. Click OK to save the setting and return to the General Settings page.
10. Click OK to return to the Intel PROSet/Wireless WiFi main window.
Import or Export Profiles
This feature lets you import and export user-based profiles to and from the Profiles list. Wireless profiles
can be automatically imported into the Profiles list.
An administrator can set profiles to be imported automatically into the Profiles list. Intel PROSet/Wireless
WiFi monitors the import folder on your hard disk for new profile files. Only profiles that have been enabled
through Enable Auto-Import in the Advanced Settings are automatically imported. If a profile of the
same name already exists in the Profiles list, you are notified to either reject the imported profile or accept
it. If accepted, the existing profile is replaced. All imported user-based profiles are placed at the bottom of
the Profiles List.
NOTE: To export Administrator profiles, see Administrator Packages.
Import Profiles into the Profiles List
To import profiles manually:
1. Click Import on the Profiles page.
2. Select the profile files to import.
3. Click Import.
4. You are notified that the profile has been successfully imported.

Export Profiles from the Profiles List
1. Select individual or multiple profiles from the list.
2. Select Export to export one or more profiles from the Profiles list.
3. Select the destination folder. Click Browse to search your hard disk for the destination directory.
The C:\ drive is the default directory.
4. Click OK to export the selected profile. You are notified: Successfully exported selected profiles
to the destination folder: C:\.
To select multiple profiles:
1. Use your mouse to highlight a profile.
2. Press Ctrl.
3. Click each profile that you want selected. Follow the instructions from Step 2 above to export
multiple profiles.
Password Protected Profiles
Import and export password-protected user-based profiles automatically to remote systems. If a profile is
password protected, the assigned password must be entered before it can be edited. See Set a Profile
Password for more information.
Back to Top
Back to Contents
Trademarks and Disclaimers

Back to Content
Set Up Profile Security
Use the Intel(R) PROSet/Wireless WiFi Connection Utility
Personal Security
Personal Security Settings
Set up Data Encryption and Authentication
●Set up a Client with No Authentication and No Data Encryption
●Set up a Client with WEP 64-bit or WEP 128-bit Data Encryption
●Set up a Client with WPA*-Personal (TKIP) or WPA2*-Personal (TKIP) Security Settings
●Set up a Client with WPA*-Personal (AES-CCMP) or WPA2*-Personal (AES-CCMP)
Security Settings
Enterprise Security
Enterprise Security Settings
Network Authentication
●Configure Profiles for Infrastructure Networks
●Set up a Client with Shared Network Authentication
●Set up a Client with WPA-Enterprise or WPA2-Enterprise Network Authentication
802.1X Authentication Types
●Set up a Client with EAP-SIM Network Authentication
●Set up a Client with EAP-AKA Network Authentication
●Set up a Client with TLS Network Authentication
●Set up a Client with TTLS Network Authentication
●Set up a Client with PEAP Network Authentication
●Set up a Client with LEAP Network Authentication
●Set up a Client with EAP-FAST Network Authentication
Use the Intel(R) PROSet/Wireless WiFi Connection Utility

The following sections describe how to use the WiFi connection utility to set up the required
security settings for your wireless adapter. See Personal Security.
It also provides information about how to configure advanced security settings for your
wireless adapter. This requires information from a systems administrator (corporate
environment) or advanced security settings on your access point (for home users). See
Enterprise Security.
For general information about security settings, See Security Overview.
Set up Data Encryption and Authentication
In a home wireless network you can use a variety of simple security procedures to protect
your wireless connection. These include:
●Enable Wi-Fi Protected Access* (WPA).
●Change your password.
●Change the network name (SSID).
Wi-Fi Protected Access (WPA) encryption provides protection for your data on the network.
WPA uses an encryption key called a pre-shared key (PSK) to encrypt data before
transmission. Enter the same password in all of the computers and access point in your
home or small business network. Only devices that use the same encryption key can access
the network or decrypt the encrypted data transmitted by other computers. The password
automatically initiates the Temporal Key Integrity Protocol (TKIP) or AES-CCMP protocol for
the data encryption process.
Network Keys
WEP encryption provides two levels of security:
●64-bit key (sometimes referred to as 40-bit)
●128-bit key (also known as 104-bit)
For improved security, use a 128-bit key. If you use encryption, all wireless devices on your
wireless network must use the same encryption keys.
You can create the key yourself and specify the key length (64-bit or 128-bit) and key index
(the location that a specific key is stored). The greater the key length, the more secure the
key.
Key Length: 64-bit

Pass phrase (64-bit): Enter five (5) alphanumeric characters, 0-9, a-z or A-Z.
Hex key (64-bit): Enter 10 hexadecimal characters, 0-9, A-F.
Key Length: 128-bit
Pass phrase (128-bit): Enter 13 alphanumeric characters, 0-9, a-z or A-Z.
Hex key (128-bit): Enter 26 hexadecimal characters, 0-9, A-F.
With WEP data encryption, wireless station can be configured with up to four keys (the key
index values are 1, 2, 3, and 4). When an access point or a wireless station transmits an
encrypted message that uses a key stored in a specific key index, the transmitted message
indicates the key index that was used to encrypt the message body. The receiving access
point or wireless station can then retrieve the key that is stored at the key index and use it
to decode the encrypted message body.
Set up a Client with No Authentication and No Data Encryption
CAUTION: Networks using no authentication or encryption are highly vulnerable to access
by unauthorized users.
On the WiFi connection utility main page, select one of the following methods to connect to
an infrastructure network:
●Double-click an infrastructure network in the WiFi Networks list.
●Select an infrastructure network in the WiFi Networks list. Click Connect. The WiFi
connection utility automatically detects the security settings for the wireless adapter.
If there is no authentication required, the network connects without a prompt to enter any
log-on credentials. Any wireless device with the correct network name (SSID) is able to
associate with other devices in the network.
To create a profile for a wireless network connection with no encryption:
1. Click Profiles on the WiFi connection utility main window.
2. On the Profiles list, click Add to open the wireless profile General Settings.
3. Profile Name: Enter a descriptive profile name.
4. Wireless Network Name (SSID): Enter the name of your wireless network.
5. Operating Mode: Click Device to Device (ad hoc).
6. Click Next to open the Security Settings.
7. Personal Security is selected by default.
8. Security Settings: The default setting is None, which indicates that there is no
security on this wireless network.

9. Click OK. The profile is added to the Profiles list and connects to the wireless network.
Set up a Client with WEP 64-bit or WEP 128-bit Data Encryption
When WEP data encryption is enabled, a network key or password is used for encryption.
A network key is provided for you automatically (for example, it might be provided by your
wireless network adapter manufacturer), or you can enter it yourself and specify the key
length (64-bit or 128-bit), key format (ASCII characters or hexadecimal digits), and key
index (the location where a specific key is stored). The greater the key length, the more
secure the key.
To add a network key for a Device to Device (ad hoc) network connection:
1. On the WiFi connection utility main window, double-click a Device to Device (ad hoc)
network in the WiFi Networks list or select the network and click Connect.
2. Click Profiles to access the Profiles list.
3. Click Properties to open the wireless profile General Settings. The Profile name and
Wireless Network Name (SSID) display. Device to Device (ad hoc) should be
selected as the Operating Mode.
4. Click Next to open the Security Settings.
5. Personal Security is selected by default.
6. Security Settings: The default setting is None, which indicates that there is no
security on this wireless network.
To add a password or network key:
1. Security Settings: Select either WEP 64-bit or WEP 128-bit to configure WEP data
encryption with a 64-bit or 128-bit key.
When WEP encryption is enabled on an access point, the WEP key is used to verify
access to the network. If the wireless device does not have the correct WEP key, even
though authentication is successful, the device is unable to transmit data through the
access point or decrypt data received from the access point.
Name Description
Password Enter the Wireless Security Password (Pass phrase)
or Encryption Key (WEP key).

Pass phrase (64-bit ) Enter five (5) alphanumeric characters, 0-9, a-z or
A-Z.
WEP key (64-bit) Enter 10 hexadecimal characters, 0-9, A-F.
Pass phrase (128-bit) Enter 13 alphanumeric characters, 0-9, a-z or A-Z.
WEP key (128-bit) Enter 26 hexadecimal characters, 0-9, A-F.
2. Key Index: Change the Key Index to set up to four passwords.
3. Click OK to return to the Profiles list.
To add more than one password:
1. Select the Key Index number: 1, 2, 3, or 4.
2. Enter the Wireless Security Password.
3. Select another Key Index number.
4. Enter another Wireless Security Password.
Set up a Client with WPA*-Personal (TKIP) or WPA2*-Personal
(TKIP) Security Settings
WPA* Personal Mode requires manual configuration of a pre-shared key (PSK) on the access
point and clients. This PSK authenticates a user's password or identifying code, on both the
client station and the access point. An authentication server is not needed. WPA Personal
Mode is targeted to home and small business environments.
WPA2* is the second generation of WPA security that provides enterprise and consumer
wireless users with a high level of assurance that only authorized users can access their
wireless networks. WPA2 provides a stronger encryption mechanism through Advanced
Encryption Standard (AES), which is a requirement for some corporate and government
users.
NOTE: To achieve transfer rates greater than 54 Mbps on 802.11n connections, WPA2-AES
security must be selected. No security (None) can be selected to enable network setup and
troubleshooting.
To configure a profile with WPA-Personal network authentication and TKIP data encryption:

1. On the WiFi connection utility main window, double-click an infrastructure network in
the WiFi Networks list or select the network and click Connect.
2. Click Profiles to access the Profiles list.
3. Click Properties to open the wireless profile General Settings. The Profile name and
Wireless Network Name (SSID) display. Network (Infrastructure) should be
selected as the Operating Mode.
4. Click Next to open the Security Settings.
5. Select Personal Security.
6. Security Settings: Select WPA-Personal (TKIP) to provide security to a small
business network or home environment. A password, called a pre-shared key (PSK), is
used. The longer the password, the stronger the security of the wireless network.
If your wireless access point or router supports WPA2-Personal, then you should
enable it on the access point and provide a long, strong password. The longer
the password, the stronger the security of the wireless network. The same
password entered in the access point needs to be used on this computer and all
other wireless devices that access the wireless network.
NOTE: WPA-Personal and WPA2-Personal are interoperable.
7. Wireless Security Password (Encryption Key): Enter a text phrase with eight to
63 characters. Verify that the network key matches the password in the wireless
access point.
8. Click OK to return to the Profiles list.
Set up a Client with WPA*-Personal (AES-CCMP) or WPA2*-Personal
(AES-CCMP) Security Settings
Wi-Fi Protected Access (WPA*) is a security enhancement that strongly increases the level of
data protection and access control to a wireless network. WPA enforces 802.1X
authentication and key-exchange and only works with dynamic encryption keys. For a home
user or small business, WPA-Personal uses either Advanced Encryption Standard - Counter
CBC-MAC Protocol (AES-CCMP) or Temporal Key Integrity Protocol (TKIP).
NOTE: For the Intel(R) Wireless WiFi Link 4965AGN adapter, to achieve transfer rates
greater than 54 Mbps on 802.11n connections, WPA2-AES security must be selected. No
security (None) can be selected to enable network setup and troubleshooting.
To create a profile with WPA2*-Personal network authentication and AES-CCMP data
encryption:
1. On the WiFi connection utility main window, double-click an infrastructure network
from the WiFi Networks list or select the network and click Connect.

2. If these are being transmitted, the Profile name and Wireless Network Name (SSID)
should display on the General Settings screen. Network (Infrastructure) should
be selected as the Operating Mode. Click Next to open the Security Settings.
3. Select Personal Security.
4. Security Settings: Select WPA2-Personal (AES-CCMP) to provide this level of
security in the small network or home environment. It uses a password, also called a
pre-shared key (PSK). The longer the password, the stronger the security of the
wireless network.
AES-CCMP (Advanced Encryption Standard - Counter CBC-MAC Protocol) is a
newer method for privacy protection of wireless transmissions specified in the
IEEE 802.11i standard. AES-CCMP provides a stronger encryption method than
TKIP. Choose AES-CCMP as the data encryption method whenever strong data
protection is important.
If your Wireless access point or router supports WPA2-Personal, then you
should enable it on the access point and provide a long, strong password. The
same password entered into the access point needs to be used on this
computer and all other wireless devices that access the wireless network.
NOTE: WPA-Personal and WPA2-Personal are interoperable.
Some security solutions may not be supported by your computer's operating
system. You may require additional software or hardware as well as wireless
LAN infrastructure support. Contact your computer manufacturer for details.
5. Password: Wireless Security Password (Encryption Key): Enter a text phrase
(length is between eight and 63 characters). Verify that the network key used
matches the wireless access point key.
6. Click OK to return to the Profiles list.
Back to Top
Back to Contents
Trademarks and Disclaimers

Back to Contents
Wireless Network Overview
About Wireless Networks
What do I Need to Set up a Wireless Network?
Wireless Networking Basics
●What is a Wireless Network Management Utility?
●Network Name
●Profiles
●Security
●Identify a Wireless Network
●Select a Wireless Network Mode
How do I Turn My Radio On and Off?
About Wireless Networks
A Wireless Local Area Network (WLAN) connects computers without network cables. Instead,
computers use radio communications to send data between each other. In a WLAN, a radio
communications device called an access point or wireless router connects network
computers and provides Internet or network access. You can communicate directly with
other wireless computers, or connect to an existing network through a wireless access point.
When you set up your wireless adapter, you select the operating mode for the kind of
wireless network you want. You can use your Intel(R) PRO/Wireless Network Connection
adapter to connect to other similar wireless devices that comply with the 802.11 standard
for wireless networking.
What do I Need to Set up a Wireless Network?
The most common type of wireless network is an infrastructure network. To set up an
infrastructure network, you need the following:
●A wireless router.
●A wireless network adapter for each computer that you want to connect to the

wireless network.
●If you want internet access for your WLAN, you also need broadband internet service
such as cable or DSL. This includes a broadband modem.
Wireless Networking Basics
What is a Wireless Network Management Utility?
The WiFi connection utility is a wireless network management utility. It helps you manage
your wireless connections. It can help you initially set up your wireless connections and then
easily manager those connections, opening and closing connections and managing security
as required. Some computers also ship with Microsoft Windows Zero Configuration, which is
another wireless network management utility, and you should not use both of these tools.
This is because network settings you create with one utility are not applied if the other utility
is managing wireless connections. We recommend that you pick one tool to manage wireless
connections, and stay with that.
See Use Microsoft Windows* to Manage WiFi* and also see Get Connected.
Network Name (SSID)
Every wireless local area network (WLAN) uses a unique network name to identify the
network. This name is also called the Service Set Identifier (SSID). When you set up your
wireless adapter, you specify the SSID. If you want to connect to an existing WLAN, you
must use the name for that network. If you set up your own WLAN, you can make up your
own name and use it on each computer. The name can be up to 32 characters long and
contain letters and numbers. The SSID or network name is assigned at the access point or
wireless router.
Profiles
A profile is used to manage your computer's connection to a WLAN. A profile is a collection
of settings that determines how your computer connects to the WLAN. These settings (the
profile) are saved on your computer and are used each time you connect to that WLAN. The
profile includes all of the network information and security settings. Different profiles are
created for different WLANs. For your computer, each WLAN will have its own profile to
manage connection to that WLAN. Using the WiFi connection utility, the profiles for your
computer are displayed in the Profiles list. From the WiFi connection utility main window you
can create, edit, and remove profiles.
Security
Some WLANs are open or unsecure networks, and some are secure networks. A secure
WLAN limits who can access the network. There are different levels methods of security. The

WiFi connection utility can easily help you set up a security method for your WLAN.
Common security methods for WLANs use keys or passwords, where the computer
requesting access must provide the key or password to get access. WLANs can also use
encryption to encode the data. With encryption, before a computer transmits data it uses a
secret encryption key to scramble the data. The receiving computer uses this same key to
unscramble the data. If you connect to an existing network, use the encryption key provided
by the administrator of the wireless network. If you set up your own network, you can make
up your own key and use it on each computer. The WiFi connection utility can help you do
this. The security method used by your computer to get WLAN access is stored in the profile.
See Security for more helpful information.
Identify a Wireless Network
Depending on the size and components of a wireless network, there are different ways to
identify a wireless network:
●The Network Name or Service Set Identifier (SSID): Identifies a wireless
network. All wireless devices on the network must use the same SSID. This is
probably the most common method.
●Basic Service Set (BSS): Consists of two or more wireless nodes, or stations, which
have recognized each other and have established communications.
●Broadcast SSID: An access point can respond to computers sending probe packets
with the broadcast SSID. If this feature is enabled on the access point, any wireless
user can associate with the access point by using a blank (null) SSID.
●Basic Service Set Identifier (BSSID): A unique identifier for each wireless device.
The BSSID is the Ethernet MAC address of the device.
●Extended Service Set Identifier (ESSID): A special case of SSID used to identify a
wireless network that includes access points.
●Independent Basic Service Set (IBSS): A mode of operation in an 802.11 system
that allows direct communication between 802.11 devices without the need to set up
a communication session with an access point.
●Independent Basic Service Set Identifier (IBSSID): A special case of SSID used
to identify a network of wireless computers configured to communicate directly with
one another without using an access point.
Select a Wireless Network Mode
Wireless networks can operate with or without access points, depending on the number of
users in the network. Infrastructure mode uses access points to allow wireless computers to
send and receive information. Wireless computers transmit to the access point, the access
point receives the information and rebroadcasts it to other computers. The access point can
also connect to a wired network or to the Internet. Multiple access points can work together
to provide coverage over a wide area.
Device-to-Device mode, also called ad hoc mode, works without access points and allows

wireless computers to send information directly to other wireless computers. You can use
Device-to-Device mode to network computers in a home or small office or to set up a
temporary wireless network for a meeting.
How do I turn my Radio on and off?
You will need to turn the wireless adapter radio off (and on) on different occasions. For
example, you may be required to turn the radio off when boarding an airplane. You can also
turn it off to conserve battery power.
There are three methods to turn the radio on and off:
●Using the wireless radio hardware switch (may not be present on all computers).
●Using the WiFi On /WiFi Off button in the WiFi connection utility.
●Using Windows.
Remember that to connect to wireless networks, the wireless radio needs to be turned back
on. If you are unable to connect to a wireless network, verify that your radio is turned on at
both the hardware switch and the WiFi On /WiFi Off button in the WiFi connection utility.
See Turn the Radio on or off for more information.
Back to Top
Back to Contents
Trademarks and Disclaimers

Back to Contents
Administrator Tool
Set Administrator Password
Administrator Tool Settings
Administrator Packages for Windows XP*
Administrator Profiles
●Persistent Profiles
●Pre-logon/Common Connection
●Exclude Networks
●Voice over IP (VoIP) Connection
Application Settings
Adapter Settings
EAP-FAST A-ID Groups
Administrator Tasks
The Administrator Tool is used by the person who has administrator privileges on this computer.
This tool is used to configure Pre-logon/Common profiles, and Persistent Connection profiles.
The Administrator Tool can be used by an Information Technology department to configure user
settings and to create custom install packages to export to other systems.
The Administrator Tool is located on the Tools menu. The Administrator Tool must be selected
during a Custom installation of the Intel(R) PROSet/Wireless WiFi Connection Utility or the
feature is not displayed.
Administrator Packages for Windows XP*
An Administrator Package is a self-extracting executable file that generally contains the WiFi
connection utility, administrative profiles, and other settings. You can copy or send an
administrative package to clients on your network. When the executable runs, the contents are
installed and configured on the destination computer. If a profile is part of the package, the
profile governs how the destination computer connects to a specific wireless network.
NOTE: To create and export a package for a computer running on Microsoft Windows Vista*,

you need to create the package on a computer running Windows Vista. You cannot create a
package for Windows Vista on a computer running Microsoft Windows XP*.
Create a New Package
1. At the Tools menu, click Administrator Tool.
2. Enter the Administrator Tool password.
3. Open Administrator Package: Click Create a Windows XP package, or Open an
existing package.
Name Description
Create a Windows XP package Create a package that can be exported to a
user's computer running Microsoft Windows
XP* operating system. This package allows
export of all 802.1X authentication EAP-type
Pre-logon/Common and Persistent profiles.
Create a Windows Vista
package
Not Available. To create and export a package
for a computer running on Microsoft Windows
Vista*, you need to create the package on a
computer running Windows Vista. You cannot
create a package for Windows Vista on a
computer running Microsoft Windows XP*.

Open an existing package Select to browse for and open an existing
package.
4. Click OK.
5. Configure the following options to be included in the package:
Name Description
Profiles Click Include Profiles in this package. Profiles can be
shared with other users.
Application Settings Click Include Application Settings in this package.
Specify application settings to be enabled.
Adapter Settings Click Include Adapter Settings in this package.
Specify initial values for adapter settings used on this
computer.
EAP-FAST A-ID Groups Click Include A-ID Groups. Add A-ID Group to support
multiple PACs from multiple A-IDs.
6. Click Close.
7. You are notified: The current package is changed. Would you like to save the
changes?
8. Click Yes. Save the executable file to a directory on the local disk drive.
9. Click Save. The file is created. This may take several minutes.
10. Click Finished to view the package contents.
❍Click Apply this package to this computer if you want to use the package
configuration on the Administrator's computer.
❍Copy the executable file to any user's computer to install the configuration that has
been saved in the package. When you execute the package file, it is a silent install.
11. Click OK.
NOTE: You can also select Save Package on the File menu to save the package.
Edit a Package
1. Access the Administrator Tool.
2. On the Open Administrator Package page, click Open an existing package to edit an
existing package.
3. Click Browse. Locate the package's executable file.
4. Click Open. Make your updates to the package settings.
5. Click Close.
6. You are notified: The current package is changed. Would you like to save the
changes?
7. Click Yes. Save the executable file to a directory on the local disk drive.
NOTE: You can also select Open Package on the File menu to edit an
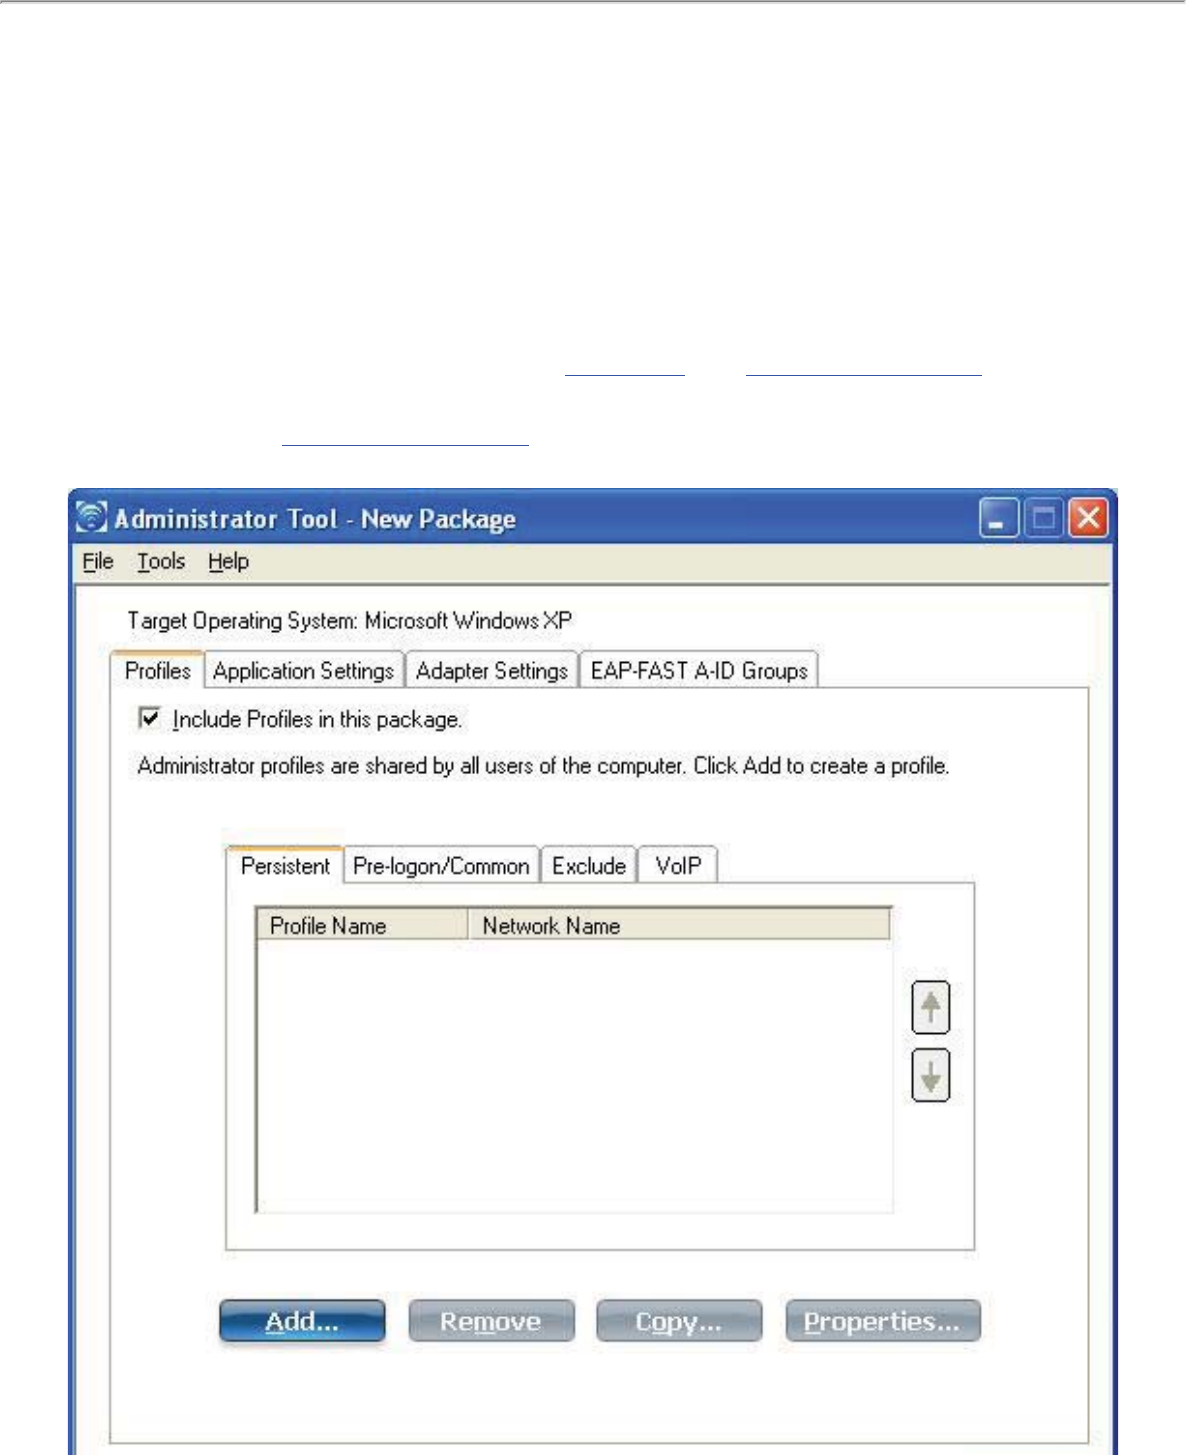
Administrator Package.
Administrator Profiles
Administrator Profiles are managed by the network administrator. These profiles can be
exported to other computers.
These profiles are common or shared by all users on this computer. However, end users cannot
modify these profiles. They can only be modified from the Administrator Tool, which is password
protected.
There are two types of Administrator Profiles: Persistent and Pre-logon/Common.
You can also configure Voice over IP (VoIP) settings for export to a soft-phone application.

Persistent Profiles
Persistent profiles are applied at boot time or whenever no one is logged on the computer. After
a user logs off, a Persistent profile maintains a wireless connection either until the computer is
turned off or a different user logs on.
Persistent profile key points:
●The following types of profiles can be created as Persistent profiles:
❍All profiles that do not require 802.1X authentication (for example, Open
authentication with WEP encryption, Open authentication with no encryption).
❍All profiles with 802.1X authentication that have the credentials saved: LEAP or
EAP-FAST.
❍Profiles with security settings that include the "Use the following user name and
password" option.
❍Profiles that use the machine certificate to authenticate.
❍WPA*-Enterprise profiles that do not use a user certificate.
❍WPA-Personal profiles.
●Persistent profiles are applied at system power up and after a user logs off.
NOTE: The WiFi connection utility supports machine certificates. However, they are
not displayed in the certificate listings.
To create a Persistent profile:
1. Click Include Profiles in this package.
2. Click Persistent.
3. Click Add to open the General Settings.
4. Profile Name: Enter a descriptive profile name.
5. Wireless Network Name (SSID): Enter the name of your wireless network.
6. Operating Mode: Network (Infrastructure) is selected by default.
7. Administrator Profile Type:Persistent: Active when no users are logged on is
selected.
8. Click Next.
9. Click Enterprise Security to open the Security Settings. See TLS,TTLS,PEAP,LEAP,
or EAP-FAST for 802.1X security configuration information.
10. Click OK.
Pre-logon/Common

Pre-logon/Common profiles are applied prior to a user log on. If Single Sign On support is
installed, the connection is made prior to the Windows log-on sequence (Pre-logon/Common).
If Single Sign On support is not installed, the profile is applied once the user session is active.
Pre-logon/Common profiles always appear at the top of the Profiles list. Users can still prioritize
profiles that they have created but they cannot reprioritize Pre-logon/Common profiles. Because
these profiles appear at the top of the Profiles list, the WiFi connection utility automatically
attempts to connect to the Administrator profiles first before any user-created profiles.
NOTE: Only administrators can create or export Pre-logon/Common profiles.
Pre-logon Connect key points are:
●Pre-logon Connect is active only at the Windows log on.
●The following types of profiles can be created as Pre-logon/Common profiles:
❍802.1X PEAP,TTLS or EAP-FAST profiles that use either the "Use Windows Logon
user name and password" or "Use the following user name and password"
credentials when configuring the profile's security settings.
❍LEAP profiles that use the "Prompt for the user name and password." credentials
when configuring the profile's security settings.
❍802.1X PEAP or TTLS profiles with user or machine certificates (the user must have
administrative rights to use machine certificates).
❍TLS profiles that use digital certificates to verify the identity of a client and a server.
❍EAP-SIM profiles that use a Subscriber Identity Module (SIM) card to validate your
credentials with the network.
❍All non-802.1X (Open and WEP) Common or User Based profiles.
●A Pre-logon/Common profile is applied at Windows user log-on time.
Pre-logon/Common Connection Status
Pre-logon/Common profiles support is installed during a Custom install of the WiFi connection
utility. See Install or Uninstall the Single Sign On Feature for more information.
NOTE: If the Single Sign On or Pre-logon Connect features are not installed, an
administrator is still able to create Pre-logon/Common profiles for export to a
user's computer.
The following describes how the Pre-logon Connect feature functions from system power-up.
The assumption is that a saved profile exists. This saved profile has valid security settings
marked with "Use Windows Logon user name and password" that are applied at the time of
Windows log on.
1. After a system power-up, enter your Windows log on domain, user name, and password.
2. Click OK. The Pre-logon/Common profile status page displays the progress of the network
connection. After the wireless adapter is connected to the network access point, the
Status page closes and the Windows user logs on.
❍If the corresponding access point rejects your credentials during the Pre-logon/

Common connection, you will be prompted for your user credentials.
❍Enter your credentials.
❍Click OK. The profile is applied and the Status page displays the progress of the
connection status until you are logged onto Windows.
❍Click Cancel on the Credentials page to select another profile.
NOTE: A user certificate can only be accessed by a user that has been
authenticated on the computer. Therefore, a user should log onto the computer
once (using either a wired connection, alternate profile or local log in) before using
a Pre-logon/Common profile that authenticates with a user certificate.
When you log off, any wireless connection is disconnected and a persistent profile (if one is
available) is applied. Under certain circumstances, it is desirable to maintain the current
connection (for example, if user-specific data needs to be uploaded to the server post-log off or
when roaming profiles are used).
Create a profile that is marked as both Pre-logon/Common and persistent to achieve this
functionality. If such a profile is active when the user logs off, the connection is maintained.
To create a Pre-logon/Common Profile:
1. Click Include Profiles in this package.
2. Click Pre-logon/Common.
3. Click Add to open the General Settings.
4. Profile Name: Enter a descriptive profile name.
5. Wireless Network Name (SSID): Enter the network identifier.
6. Operating Mode: Network (Infrastructure) is selected by default.
7. Administrator Profile Type:Pre-logon/Common: Active when a user is logged
on. This profile is shared by all users. This profile type is already selected.
8. Click Next.
9. Click Advanced to open and configure the Advanced Settings. See Advanced Settings.
10. Click OK to close the Advanced Settings.
11. Click Enterprise Security to open the Security Settings. See EAP-SIM,TLS,TTLS,
PEAP,LEAP, or EAP-FAST for 802.1X security configuration information.
12. Click OK to save the profile and add it to the Administrator profiles list.
NOTE: If a Persistent connection was already established, a Pre-logon/Common
profile is ignored unless the profile is configured with both Pre-logon/Common and
Persistent connection options.
Exclude Networks
Administrators can designate networks to be excluded from connection. Once a network is
excluded, only an administrator can remove the network from the Exclude list. The excluded
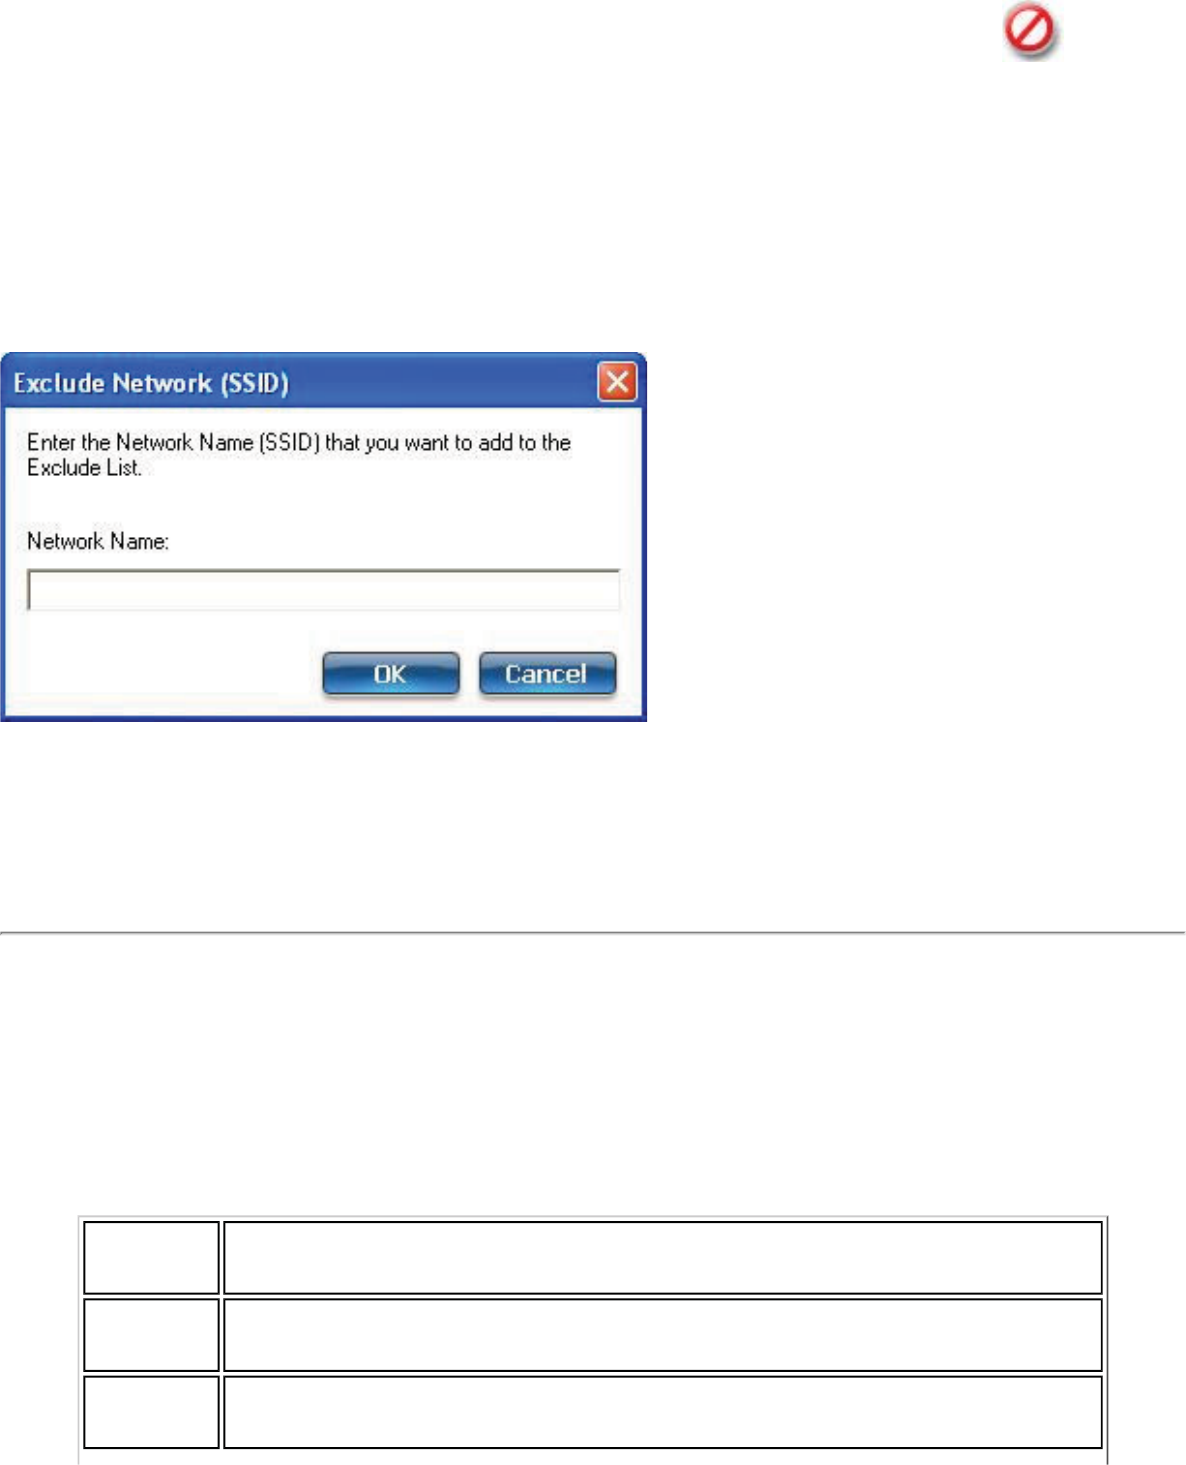
network is displayed in the Exclude List Management and is indicated by this icon:
To exclude a network:
1. Click Include Profiles in this package.
2. Click Exclude.
3. Click Add to open the Exclude Network (SSID).
4. Network Name: Enter the network name of the network that you want to exclude.
5. Click OK to add the network name to the list.
To remove a network from exclusion:
1. Select the network name in the Exclude list.
2. Click Remove. The network is deleted from the list.
Voice over IP (VoIP) Connection
The WiFi connection utility supports VoIP third-party soft-phone applications. Third-party VoIP
applications support voice codecs. Codecs generally provide a compression capability to save
network bandwidth. The WiFi connection utility supports the following International
Telecommunications Union (ITU) codec standards:
Codec Algorithm
ITU G.711 PCM (Pulse Code Modulation)
ITU G.722 SBADPCM (Sub-Band Adaptive Differential Pulse Code Modulation)

ITU G.723 Multi-rate Coder
ITU G.726 ADPCM (Adaptive Differential Pulse Code Modulation)
ITU G.727 Variable-Rate ADPCM
ITU G.728 LD-CELP (Low-Delay Code Excited Linear Prediction)
ITU G.729 CS-ACELP (Conjugate Structure Algebraic-Code Excited Linear
Prediction)
An administrator can export VoIP settings to configure various codec data rates and frame rates
to improve voice quality in VoIP transmissions.
To configure VoIP settings:
NOTE: Ensure Voice over IP is not disabled in the Administrator Tool Application
Settings. It is enabled by default.
1. Click Include Profiles in this package.
2. Click VoIP.
3. Click Add to open the Create VoIP Profiles page.
4. Select the Codec bandwidth, application usage, and frame rate. For Voice Data:
G711 has 10ms frame rate with 64kbps bit rate
G722 has 10ms frame rate with 64kbps bit rate
G723 has 30ms frame rate with either 5.3kbps or 6.4kbps bit rate
G726-32 has 10ms frame rate with 32kbps bit rate
G728 has 2.5ms frame rate with 16kbps bit rate
G729 has 10ms frame rate with 10kbps bit rate
Select parameters from the drop down menus.
Codec Usage Frame Rate

●G711_64kbps
●G722_64kbps
●G722_56kbps
●G722_48kbps
●G722_1_32kbps
●G722_1_24kbps
●G722_1_16kbps
●G726_16kbps
●G726_24kbps
●G726_32kbps
●G726_40kbps
●G728_16kbps
●G729a_8kbps
●G729e_11_8kbps
●GIPS_iPCM_VARIABLE
●G722_2_VARIABLE
●Interactive Voice
●Audio Conference
●Voice Data
●Video
●Streaming Audio
●20
●30
5. Click OK to return to the Profiles list.
6. Click Close to save the profile settings to a package.
EAP-FAST A-ID Groups
NOTE: This feature is unavailable if CCXv4 is not selected in the Administrator
Tool Application Settings
An Authority Identifier (A-ID) is the RADIUS server that provisions Protected Access Credential
(PACs) A-ID groups. A-ID groups are shared by all users of the computer and allow EAP-FAST
profiles to support multiple PACs from multiple A-IDs.
The A-ID groups can be pre-configured by the administrator and set up through an
Administrator Package on a user's computer. When a wireless network profile encounters a
server with an A-ID within the same group of the A-ID specified in the wireless network profile,
it uses this PAC without a prompt to the user.
To add an A-ID Group:
1. Select Include A-ID Groups.
2. Click Add.
3. Enter a new A-ID group name.
4. Click OK. The A-ID group is added to the A-ID Group list.
If the A-ID group is locked, then additional A-IDs cannot be added to the group.

To add an A-ID to an A-ID group:
1. Select a group from the A-ID Groups list.
2. Click Add in the A-IDs section.
3. Select an A-ID.
4. Click OK. The A-ID is added to the list.
Once an A-ID group has been selected, the A-IDs are extracted from the PACs on the A-ID
group server. The list of A-IDs is automatically populated.
Administrator Tasks
How to Obtain a Client Certificate
If you do not have any certificates for EAP-TLS (TLS) or EAP-TTLS (TTLS) you must obtain a
client certificate to allow authentication.
Certificates are managed from either Internet Explorer or the Microsoft Windows Control Panel.
Windows XP: When a client certificate is obtained, do not enable strong private key protection.
If you enable strong private key protection for a certificate, you need to enter an access
password for the certificate every time this certificate is used. You must disable strong private
key protection for the certificate if you configure the service for TLS or TTLS authentication.
Otherwise, the 802.1X service fails authentication because there is no logged in user to provide
the required password.
Notes about Smart Cards
After a Smart Card is installed, the certificate is automatically installed on your computer and is
chosen from the personal certificate store and root certificate store.
Set up a Client with TLS Network Authentication
Step 1: Obtain a certificate
To allow TLS authentication, you need a valid client certificate in the local repository for the
logged-in user's account. You also need a trusted CA certificate in the root store.
The following information provides two methods for obtaining a certificate:
●From a corporate certification authority (CA) implemented on a Windows 2000 server.
●Import a certificate from a file with Internet Explorer's certificate import wizard.
If you do not know how to obtain a user certificate from the CA, consult your administrator for
the procedure.
To install the CA on the local machine:
1. Obtain the CA and store it on your local drive.
2. Click Import. The Certificate Import Wizard opens.
3. Click Next.
4. Click Browse to locate the certificate on your local drive.
5. Click the exported certificate.
6. Click Open.
7. Click Next.
8. Click Place all certificates in the following store.
9. Click Browse to open the Select Certificate Store.
10. Click Show physical stores.
11. Click OK.
12. From the list of stores, scroll up and expand Trusted Root Certificate Authorities.
13. Click Local Computer.
14. Click OK.
15. Click Next.
16. Click Finish to complete the process.
17. Reboot after a certificate is installed.
Use Microsoft Management Console (MMC) to verify that the CA is installed in the machine store.
1. In the Start menu, click Run.
2. Enter MMC.
3. Click OK to open The Microsoft Management Console.
4. Click File.
5. Click Add/Remove Snap-in.
6. Click Add to open the Add Standalone Snap-in page.
7. Click Certificates.
8. Click Add.
9. Click Computer account.
10. Click Next.
11. Click Finish.
12. Click Close.
13. Click OK.
14. In the console, click Certificates (Local Computer).
15. Click Trusted Root Certificate Authorities.
16. Click Certificates.
17. Verify that the CA you just installed is listed.
18. Click File.
19. Click Exit to close the console.
Obtain a certificate from a Microsoft Windows 2000* CA:
1. Start Internet Explorer and browse to the Certificate Authority HTTP Service (use an URL,
for example, http://yourdomainserver.yourdomain/certsrv with certsrv being the
command that brings you to the certificate authority. You can also use the IP address of
the server machine. For example, "192.0.2.12/certsrv."
2. Logon to the CA with the name and password of the user account you created on the
authentication server. The name and password do not have to be the same as the
Windows log on name and password of the current user.
3. On the Welcome page of the CA, select Request a certificate task and submit the
form.
4. Choose Request Type: Select Advanced request.
5. Click Next.
6. Advanced Certificate Requests: Select Submit a certificate request to this CA
using a form.
7. Click Submit.
8. Advanced Certificate Request: Select User certificate template.
9. Click Mark keys as exportable.
10. Click Next. Use the provided defaults.
11. Certificate Issued: Click Install this certificate.
NOTE: If this is the first certificate you have obtained, the CA first asks you if it
should install a trusted CA certificate in the root store. This is not a trusted CA
certificate. The name on the certificate is that of the host of the CA. Click Yes. You
need this certificate for both TLS and TTLS.
12. If your certificate was successfully installed, you see the message, "Your new certificate
has been successfully installed."
13. To verify the installation, click Internet Explorer > Tools > Internet Options >
Content > Certificates. The new certificate should be installed in the Personal folder.
Import a Certificate from a File
1. Open Internet Properties (right-click on the Internet Explorer icon on the desktop.
2. Select Properties.
3. Content: Click Certificates. The list of installed certificates appears.
4. Click Import to open the Certificate Import Wizard.
5. Select the file.
6. Specify your access password for the file. Clear Enable strong private key protection.
7. Certificate store: Click Automatically select certificate store based on the type of
certificate (the certificate must be in the user accounts personal store to be accessible).
8. Proceed to Completing the Certificate Import and click Finish.
To configure a profile with WPA authentication with WEP or TKIP encryption that uses TLS
authentication:
NOTE: Obtain and install a client certificate, See Step 1 or consult your
administrator.
Specify the certificate used by the WiFi connection utility.
1. On the Profile page, click Add to open General Settings.

2. Profile Name: Enter a profile name.
3. Wireless Network Name (SSID): Enter the network identifier.
4. Operating Mode: Network (Infrastructure) is selected by default.
5. Click Next to open the Security Settings.
6. Click Enterprise Security.
7. Network Authentication: Select Open (Recommended).
8. Data Encryption: Select WEP.
9. 802.1X Enabled: Selected.
10. Authentication Type: Select TLS.
Step 1 of 2: TLS User
1. Obtain and install a client certificate.
2. Select one of the following to obtain a certificate:
Name Description
Static Password On connection, enter the user credentials.
One-time password (OTP) Obtain the password from a hardware token device.
PIN (Soft Token) Obtain the password from a soft token program.
3. Click Next.
Step 2 of 2: TLS Server
1. Select one of the following credential retrieval methods: Validate Server Certificate or
Specify Server or Certificate Name.
2. Click OK. The profile is added to the Profiles list.
3. Click the new profile at the end of the Profiles list. Use the up and down arrows to change
the priority of the new profile.
4. Click Connect to connect to the selected wireless network.
5. Click OK to close the application.
Back to Top
Back to Contents

Back to Contents
Configure Profiles for Network (Infrastructure) Operating
Mode
A Network (Infrastructure) network consists of one or more access points and one or more computers with
wireless adapters installed. Each access point must have a wired connection to a wireless network. This
section describes how to create various profiles.
●Create a Windows XP* Profile with No Authentication or Data Encryption
●Create a Windows XP* Profile with Shared Network Authentication
●Create a Windows XP* Profile with WPA-Personal or WPA2-Personal Network Authentication
●Create a Windows XP* Profile with WPA-Enterprise or WPA2-Enterprise Network Authentication
●Create a Windows XP* Profile with WEP Data Encryption and EAP-SIM Network Authentication
●Create a Windows XP* Profile with TLS Network Authentication
●Create a Windows XP* Profile with TTLS Network Authentication
●Create a Windows XP* Profile with PEAP Network Authentication
●Create a Windows XP* Profile with LEAP Network Authentication
●Create a Windows XP* Profile with EAP-AKA Network Authentication
●Create a Windows XP* Profile with EAP-FAST Network Authentication
Create a Windows XP* Profile with No Authentication or Data
Encryption (None)
CAUTION: Networks using no authentication or encryption are highly vulnerable to access by
unauthorized users.
To create a profile for a wireless network connection with no encryption:
1. Click Profiles on the Intel(R) PROSet/Wireless WiFi Connection Utility main window. Or if you are
acting as the administrator, open the Administrator Tool.
2. On the Profiles list/tab, click Add to open the Create Wireless Profile General Settings.
3. Profile Name: Enter a descriptive profile name.
4. Wireless Network Name (SSID): Enter the network identifier.
5. Operating Mode: Click Network (Infrastructure). (This parameter is set to Infrastructure if you
are using the Administrator Tool.)
6. Administrator Profile Type: Select Persistent or Pre-logon/Common. (This step applies only if you
are using the Administrator Tool.)
7. Click Next to open the Security Settings.
8. Click Enterprise Security to open the Security Settings.
9. Network Authentication: Open (Selected).
Open authentication allows a wireless device access to the network without 802.11
authentication. If no encryption is enabled on the network, any wireless device with the

correct network name (SSID) can associate with an access point and gain access to the
network.
10. Data Encryption:None is the default.
11. Click OK. The profile is added to the Profiles list and connects to the wireless network.
Create a Windows XP* Profile with Shared Network Authentication
When shared key authentication is used, each wireless station is assumed to have received a secret
shared key over a secure channel that is independent from the 802.11 wireless network communications
channel. Shared key authentication requires that the client configure a static WEP or CKIP key. The client
access is granted only if it passes a challenge-based authentication. CKIP provides stronger data
encryption than WEP, but not all operating systems and access points support it.
NOTE: While shared key would appear to be the better option for a higher level of security, a
known weakness is created by the clear text transmission of the challenge string to the client.
Once an invader sniffs for the challenge string, the shared authentication key can be easily
reverse engineered. Therefore, open authentication (with data encryption) is actually, and
counter intuitively, more secure.
To create a profile with shared authentication:
1. Click Profiles on the WiFi connection utility main window. Or if you are acting as the administrator,
open the Administrator Tool.
2. On the Profiles list/tab, click Add to open the Create Wireless Profile General Settings.
3. Profile Name: Enter a descriptive profile name.
4. Wireless Network Name (SSID): Enter the network identifier.
5. Operating Mode: Click Network (Infrastructure). (This parameter is set to Infrastructure if you
are using the Administrator Tool.)
6. Administrator Profile Type: Select Persistent or Pre-logon/Common.(This step applies only if you
are using the Administrator Tool.)
7. Click Next to open the Security Settings.
8. Click Enterprise Security.
9. Network Authentication: Select Shared. Shared authentication is accomplished with a pre-
configured WEP key.
10. Data Encryption: Select None, WEP (64-bit or 128-bit), or CKIP (64-bit or 128-bit).
11. Enable 802.1X: Disabled.
12. Encryption Level:64-bit or 128-bit: When switching between 64-bit and 128-bit encryption, the
previous settings are erased and a new key must be entered.
13. Key Index: Select 1, 2,3, or 4. Change the Key Index to specify up to four passwords.
14. Wireless Security Password (Encryption Key): Enter the wireless network password
(Encryption Key). This password is the same value used by the wireless access point or router.
Contact your administrator for this password.
❍Pass phrase (64-bit): Enter five (5) alphanumeric characters, 0-9, a-z or A-Z.
❍Hex key (64-bit): Enter 10 hexadecimal characters, 0-9, A-F.
❍Pass phrase (128-bit): Enter 13 alphanumeric characters, 0-9, a-z or A-Z.
❍Hex key (128-bit): Enter 26 hexadecimal characters, 0-9, A-F.

Create a Windows XP* Profile with WPA-Personal or WPA2-Personal
Network Authentication
Wi-Fi Protected Access (WPA) is a security enhancement that strongly increases the level of data
protection and access control to a wireless network. WPA-Personal enforces key-exchange and only works
with dynamic encryption keys. If your wireless access point or router supports WPA-Personal or WPA2-
Personal, then you should enable it on the access point and provide a long, strong password. For personal
or home networks without a RADIUS or AAA server, use Wi-Fi Protected Access Personal.
●WPA-Personal: A wireless security method that provides strong data protection and prevents
unauthorized network access for small networks. It uses Temporal Key Integrity Protocol (TKIP) or
AES-CCMP encryption and protects against unauthorized network access through the use of a pre-
shared key (PSK).
●WPA2-Personal: A follow-on wireless security method to WPA that provides stronger data
protection and prevents unauthorized network access for small networks.
NOTE: WPA-Personal and WPA2-Personal are interoperable.
Some security solutions may not be supported by your computer's operating system and may
require additional software or certain hardware as well as wireless LAN infrastructure support.
Check with your computer manufacturer for details.
To add a profile with WPA-Personal or WPA2-Personal network authentication:
1. Click Profiles on the WiFi connection utility main window. Or if you are acting as the administrator,
open the Administrator Tool.
2. On the Profiles list/tab, click Add to open the Create Wireless Profile General Settings.
3. Profile Name: Enter a descriptive profile name.
4. Wireless Network Name (SSID): Enter the network identifier.
5. Operating Mode: Click Network (Infrastructure). (This parameter is set to Infrastructure if you
are using the Administrator Tool.)
6. Administrator Profile Type: Select Persistent or Pre-logon/Common. (This step applies only if you
are using the Administrator Tool.)
7. Click Next to open the Security Settings.
8. Click Enterprise Security.
9. Network Authentication: Select WPA-Personal or WPA2-Personal. See Security Overview.
10. Data Encryption: Select either TKIP or AES_CCMP.
11. Password: Enter a text phrase from 8 to 63 characters. The longer the password, the stronger the
security of the wireless network. The same password entered into an access points needs to be used
on this computer and all other wireless devices that access the wireless network.
Create a Windows XP* Profile with WPA-Enterprise or WPA2-
Enterprise Network Authentication
WPA2-Enterprise requires an authentication server.
●WPA-Enterprise: A wireless security method that provides strong data protection for multiple
users and large managed networks. It uses the 802.1X authentication framework with TKIP or AES-
CCMP encryption and prevents unauthorized network access by verifying network users through an

authentication server.
●WPA2-Enterprise: The follow-on wireless security method to WPA that provides stronger data
protection for multiple users and large managed networks. It prevents unauthorized network access
by verifying network users through an authentication server.
NOTE: WPA-Enterprise and WPA2-Enterprise are interoperable.
To add a profile that uses WPA-Enterprise or WPA2-Enterprise authentication:
1. Obtain a user name and password on the RADIUS server from your administrator.
2. Certain Authentication Types require that you obtain and install a client certificate. See Create a
Profile with TLS authentication or consult your administrator.
3. Click Profiles on the WiFi connection utility main window. Or if you are acting as the administrator,
open the Administrator Tool.
4. On the Profiles list, click Add to open the Create Wireless Profile General Settings.
5. Profile Name: Enter a descriptive profile name.
6. Wireless Network Name (SSID): Enter the network identifier.
7. Operating Mode: Click Network (Infrastructure). (This parameter is set to Infrastructure if you
are using the Administrator Tool.)
8. Administrator Profile Type: Select Persistent or Pre-logon/Common. (This step applies only if you
are using the Administrator Tool.)
9. Click Next to open the Security Settings.
10. Click Enterprise Security.
11. Network Authentication: Select WPA-Enterprise or WPA2-Enterprise.
12. Data Encryption: Select either TKIP or AES_CCMP.
13. Enable 802.1X: Selected by default.
14. Authentication Type: Select one of the following: EAP-SIM,LEAP,TLS,TTLS,PEAP, or EAP-FAST.
Configure a Network Profile with 802.1X Authentication
Types
Create a Windows XP* Profile with WEP Data Encryption and EAP-
SIM Network Authentication
EAP-SIM uses a dynamic session-based WEP key, which is derived from the client adapter and RADIUS
server, to encrypt data. EAP-SIM requires you to enter a user verification code, or PIN, for communication
with the Subscriber Identity Module (SIM) card. A SIM card is a special smart card that is used by Global
System for Mobile Communications (GSM) based digital cellular networks.
To add a profile with EAP-SIM authentication:
1. Click Profiles on the WiFi connection utility main window. Or if you are acting as the administrator,
open the Administrator Tool.
2. On the Profiles list, click Add to open the Create Wireless Profile General Settings.
3. Profile Name: Enter a profile name.
4. Wireless Network Name (SSID): Enter the network identifier.
5. Operating Mode: Click Network (Infrastructure). (This parameter is set to Infrastructure if you
are using the Administrator Tool.)

6. Administrator Profile Type: Select Pre-logon/Common. (This step applies only if you are using
the Administrator Tool. EAP-SIM cannot be used for Persistent profiles.)
7. Click Next to open the Security Settings.
8. Click Enterprise Security.
9. Network Authentication: Select Open (Recommended).
10. Data Encryption: Select WEP.
11. Click Enable 802.1X.
12. Authentication Type: Select EAP-SIM.
EAP-SIM authentication can be used with:
●Network Authentication types: Open, Shared, WPA-Enterprise and WPA2-Enterprise
●Data Encryption types: None, WEP, TKIP, AES-CCMP and CKIP
EAP-SIM User (optional)
1. Click Specify user name (identity):
2. At User Name: Enter the user name assigned to the SIM card.
3. Click OK.
Create a Windows XP* Profile with EAP-AKA Network Authentication
EAP-AKA (Extensible Authentication Protocol Method for UMTS Authentication and Key Agreement) is an
EAP mechanism for authentication and session key distribution, using the Universal Mobile
Telecommunications System (UMTS) Subscriber Identity Module (USIM). The USIM card is a special smart
card used with cellular networks to validate a given user with the network.
EAP-AKA authentication can be used with:
●Network Authentication types: Open, WPA-Enterprise and WPA2-Enterprise
●Data Encryption types: WEP or CKIP for Open authentication, TKIP or AES-CCMP for Enterprise
authentication.
EAP-AKA uses Enterprise Security and for network authentication, can use Open, WPA Enterprise, or WPA2
Enterprise.
To add a profile with EAP-AKA authentication:
1. Click Profiles on the WiFi connection utility main window. Or if you are acting as the administrator,
open the Administrator Tool.
2. On the Profiles list, click Add to open the Create Wireless Profile General Settings.
3. Profile Name: Enter a profile name.
4. Wireless Network Name (SSID): Enter the network identifier.
5. Operating Mode: Click Network (Infrastructure). (This parameter is set to Infrastructure if you
are using the Administrator Tool.)
6. Administrator Profile Type: Select Pre-logon/Common. (This step applies only if you are using
the Administrator Tool. EAP-SIM cannot be used for Persistent profiles.)
7. Click Next to open the Security Settings.
8. Click Enterprise Security.
9. Network Authentication: Select Open,WPA-Enterprise, or WPA2-Enterprise.

10. Data Encryption: Select WEP or CKIP for Open authentication, TKIP or AES-CCMP for
Enterprise authentication.
11. Click Enable 802.1X if it is not already selected.
12. Authentication Type: Select EAP-AKA.
EAP-AKA User (optional)
1. Click Specify user name (identity):
2. At User Name: Enter the user name assigned to the USIM card.
3. Click OK.
Create a Windows XP* Profile with TLS Network Authentication
These settings define the protocol and the credentials used to authenticate a user. Transport Layer
Security (TLS) authentication is a two-way authentication method that exclusively uses digital certificates
to verify the identity of a client and a server.
To add a profile with TLS authentication:
1. Click Profiles on the WiFi connection utility main window. Or if you are acting as the administrator,
open the Administrator Tool.
2. On the Profiles list, click Add to open the Create Wireless Profile General Settings.
3. Profile Name: Enter a descriptive profile name.
4. Wireless Network Name (SSID): Enter the network identifier.
5. Operating Mode: Click Network (Infrastructure). (This parameter is set to Infrastructure if you
are using the Administrator Tool.)
6. Administrator Profile Type: Select Persistent or Pre-logon/Common. (This step applies only if you
are using the Administrator Tool.)
7. Click Next to open the Security Settings.
8. Click Enterprise Security.
9. Network Authentication: Select WPA-Enterprise or WPA2-Enterprise (Recommended).
10. Data Encryption: Select AES-CCMP (Recommended).
11. Enable 802.1X: Selected by default.
12. Authentication Type: Select TLS to be used with this connection.
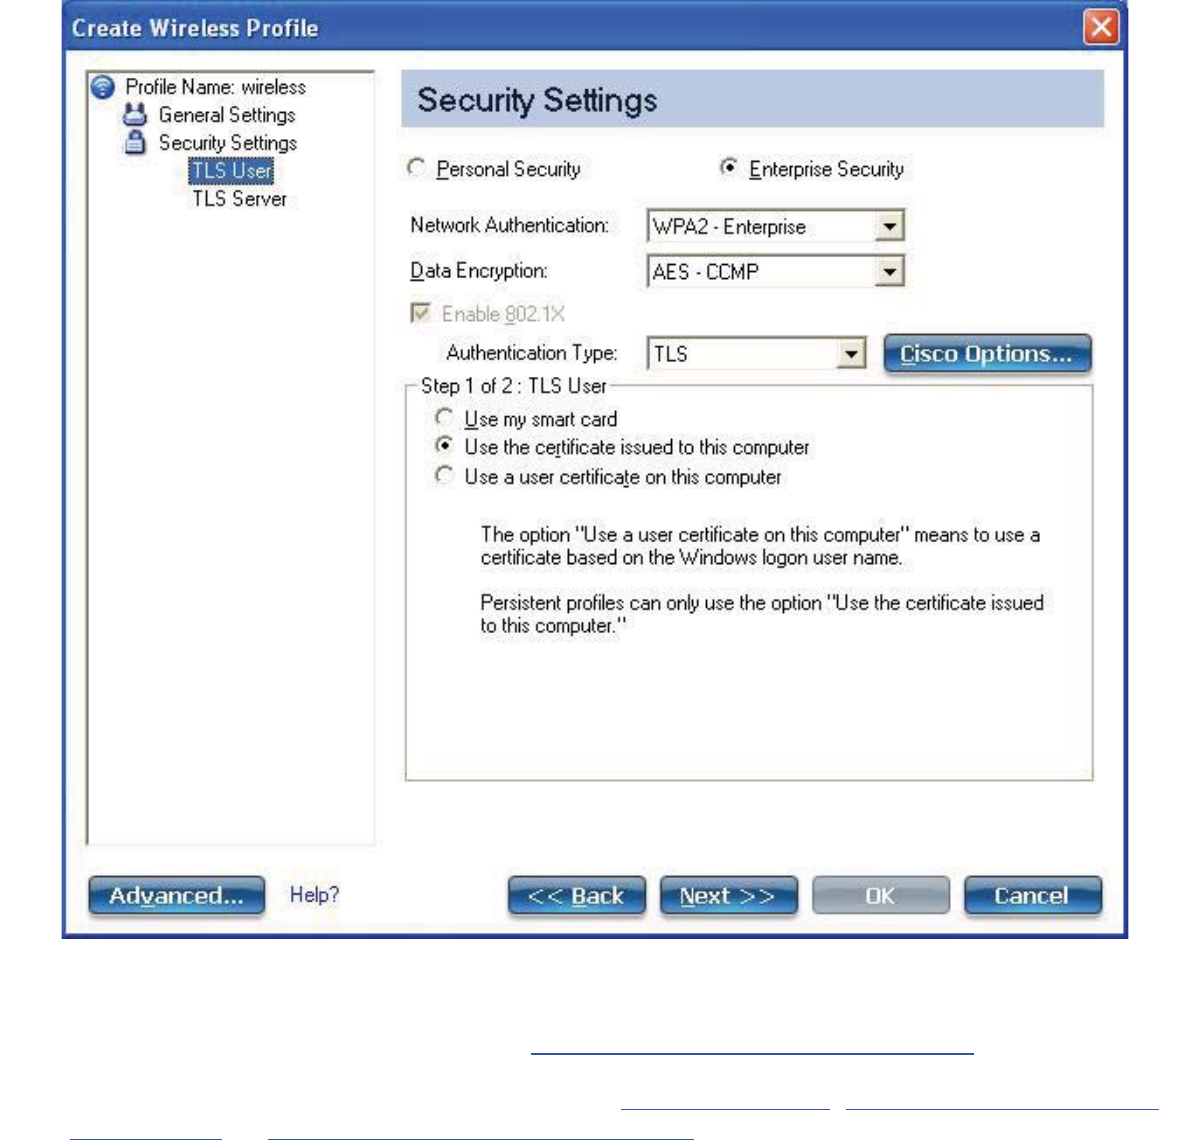
Step 1 of 2: TLS User
1. Obtain and install a client certificate. See Create a Profile with TLS authentication or consult your
system administrator.
2. Select one of the following to obtain a certificate: Use my smart card,Use the certificate issued to
this computer, or Use a user certificate on this computer.
3. Click Next to open the TLS Server settings.
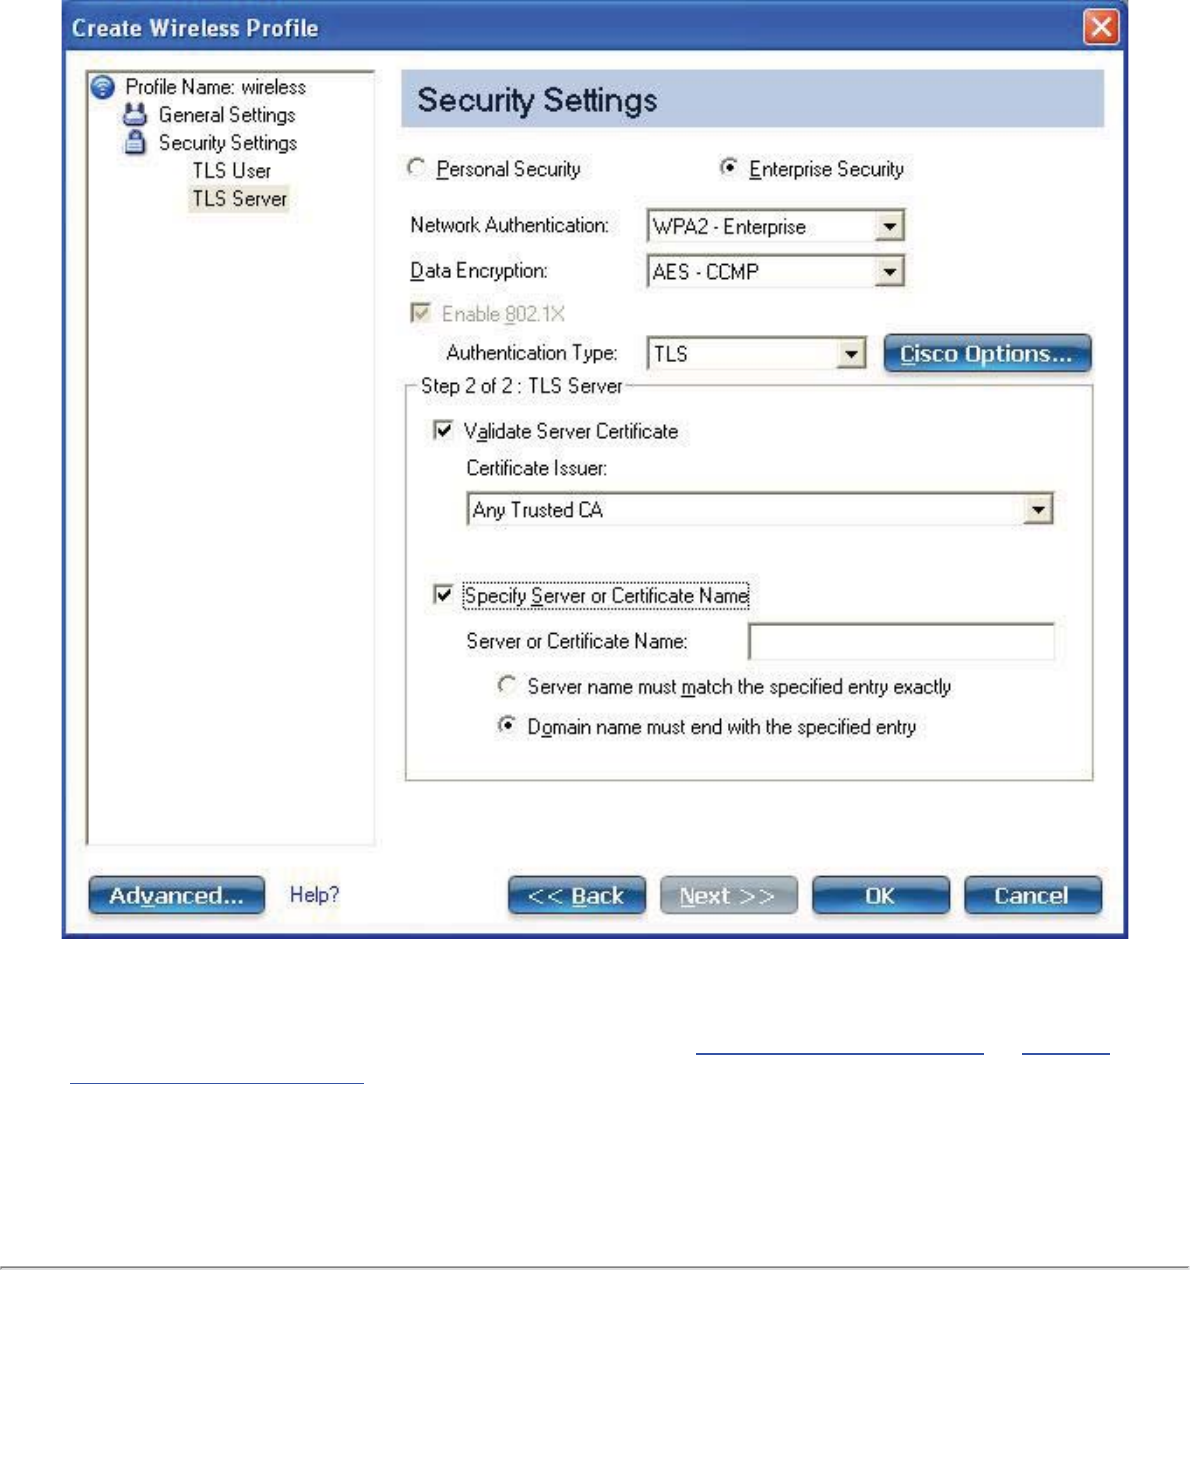
Step 2 of 2: TLS Server
1. Select one of the following credential retrieval methods: Validate Server Certificate or Specify
Server or Certificate Name.
2. Click OK. The profile is added to the Profiles list.
3. Click the new profile at the end of the Profiles list. Use the up and down arrows to change the
priority of the new profile.
4. Click Connect to connect to the selected wireless network.
5. Click OK to close Intel PROSet/Wireless WiFi.
Create a Windows XP* Profile with TTLS Network Authentication
TTLS authentication: These settings define the protocol and credentials used to authenticate a user. The
client uses EAP-TLS to validate the server and create a TLS-encrypted channel between the client and
server. The client can use another authentication protocol. Typically password-based protocols challenge
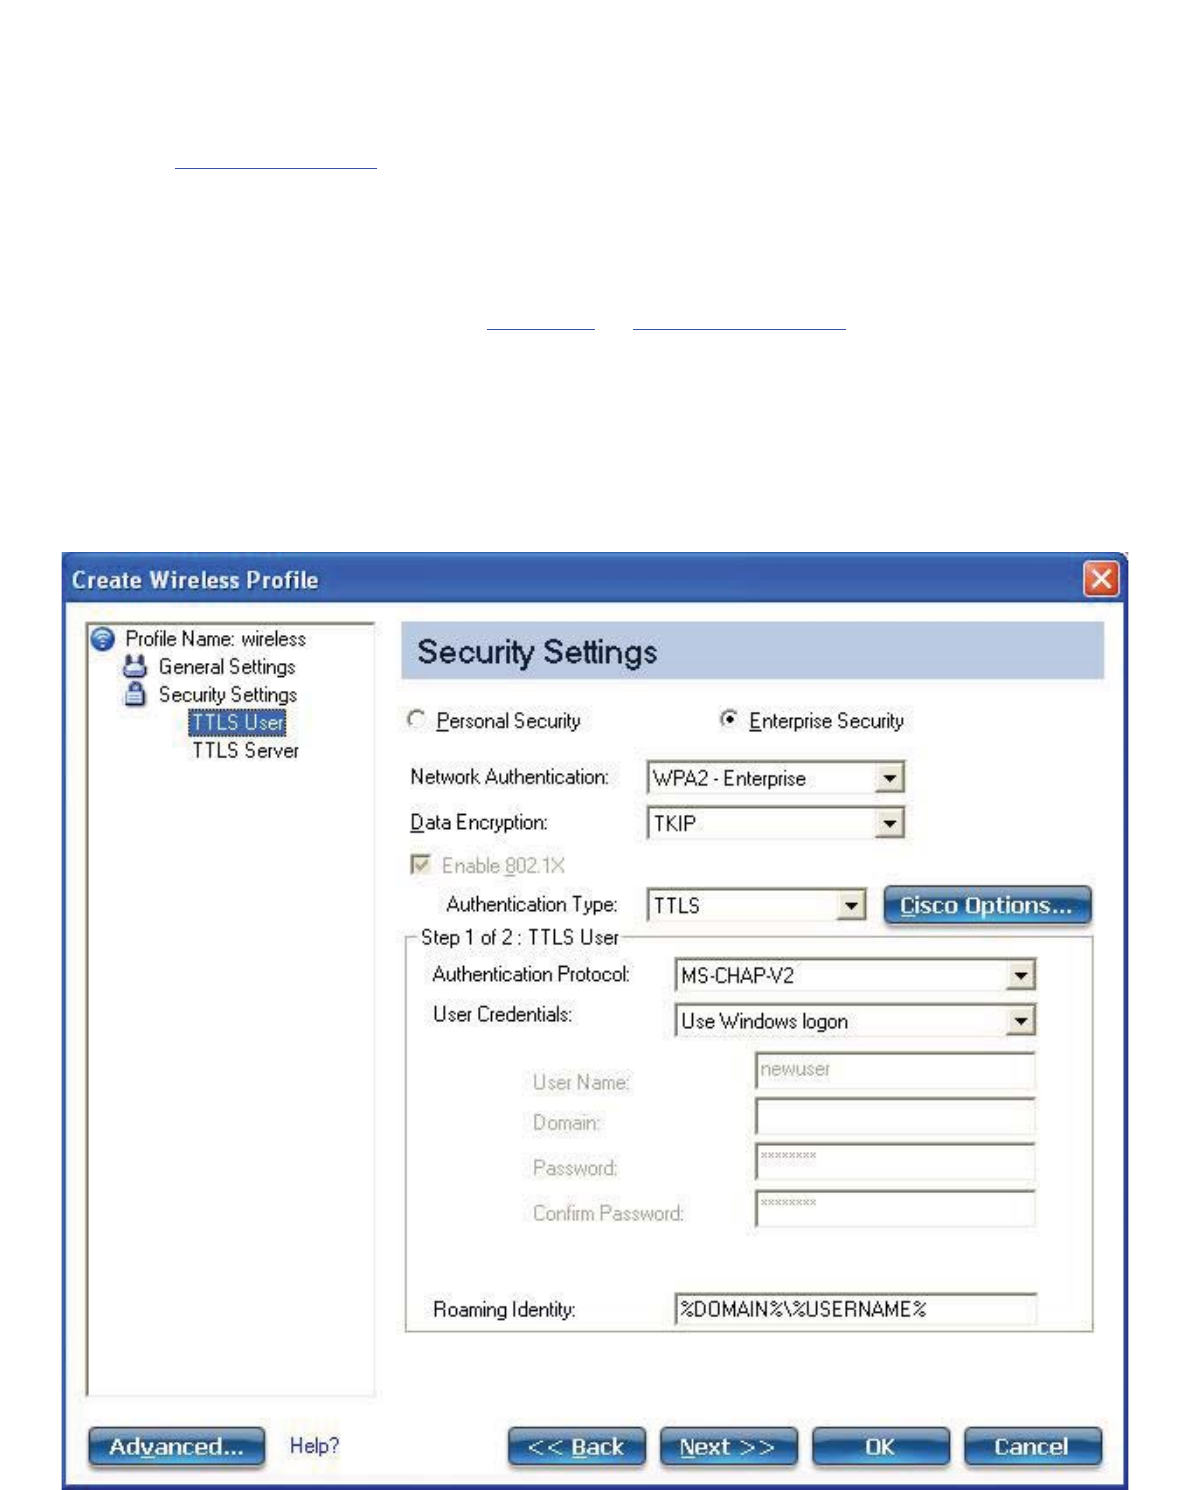
over a non-exposed TLS encrypted channel.
To set up a client with TTLS Authentication:
1. Click Profiles on the WiFi connection utility main window. Or if you are acting as the administrator,
open the Administrator Tool.
2. On the Profiles list, click Add to open the Create Wireless Profile General Settings.
3. Profile Name: Enter a descriptive profile name.
4. Wireless Network Name (SSID): Enter the network identifier.
5. Operating Mode: Click Network (Infrastructure). (This parameter is set to Infrastructure if you
are using the Administrator Tool.)
6. Administrator Profile Type: Select Persistent or Pre-logon/Common. (This step applies only if you
are using the Administrator Tool.)
7. Click Next to open the Security Settings.
8. Click Enterprise Security.
9. Network Authentication: Select WPA-Enterprise or WPA2-Enterprise (Recommended)
10. Data Encryption: Select TKIP or AES-CCMP (Recommended).
11. Enable 802.1X: Selected by default.
12. Authentication Type: Select TTLS to be used with this connection.
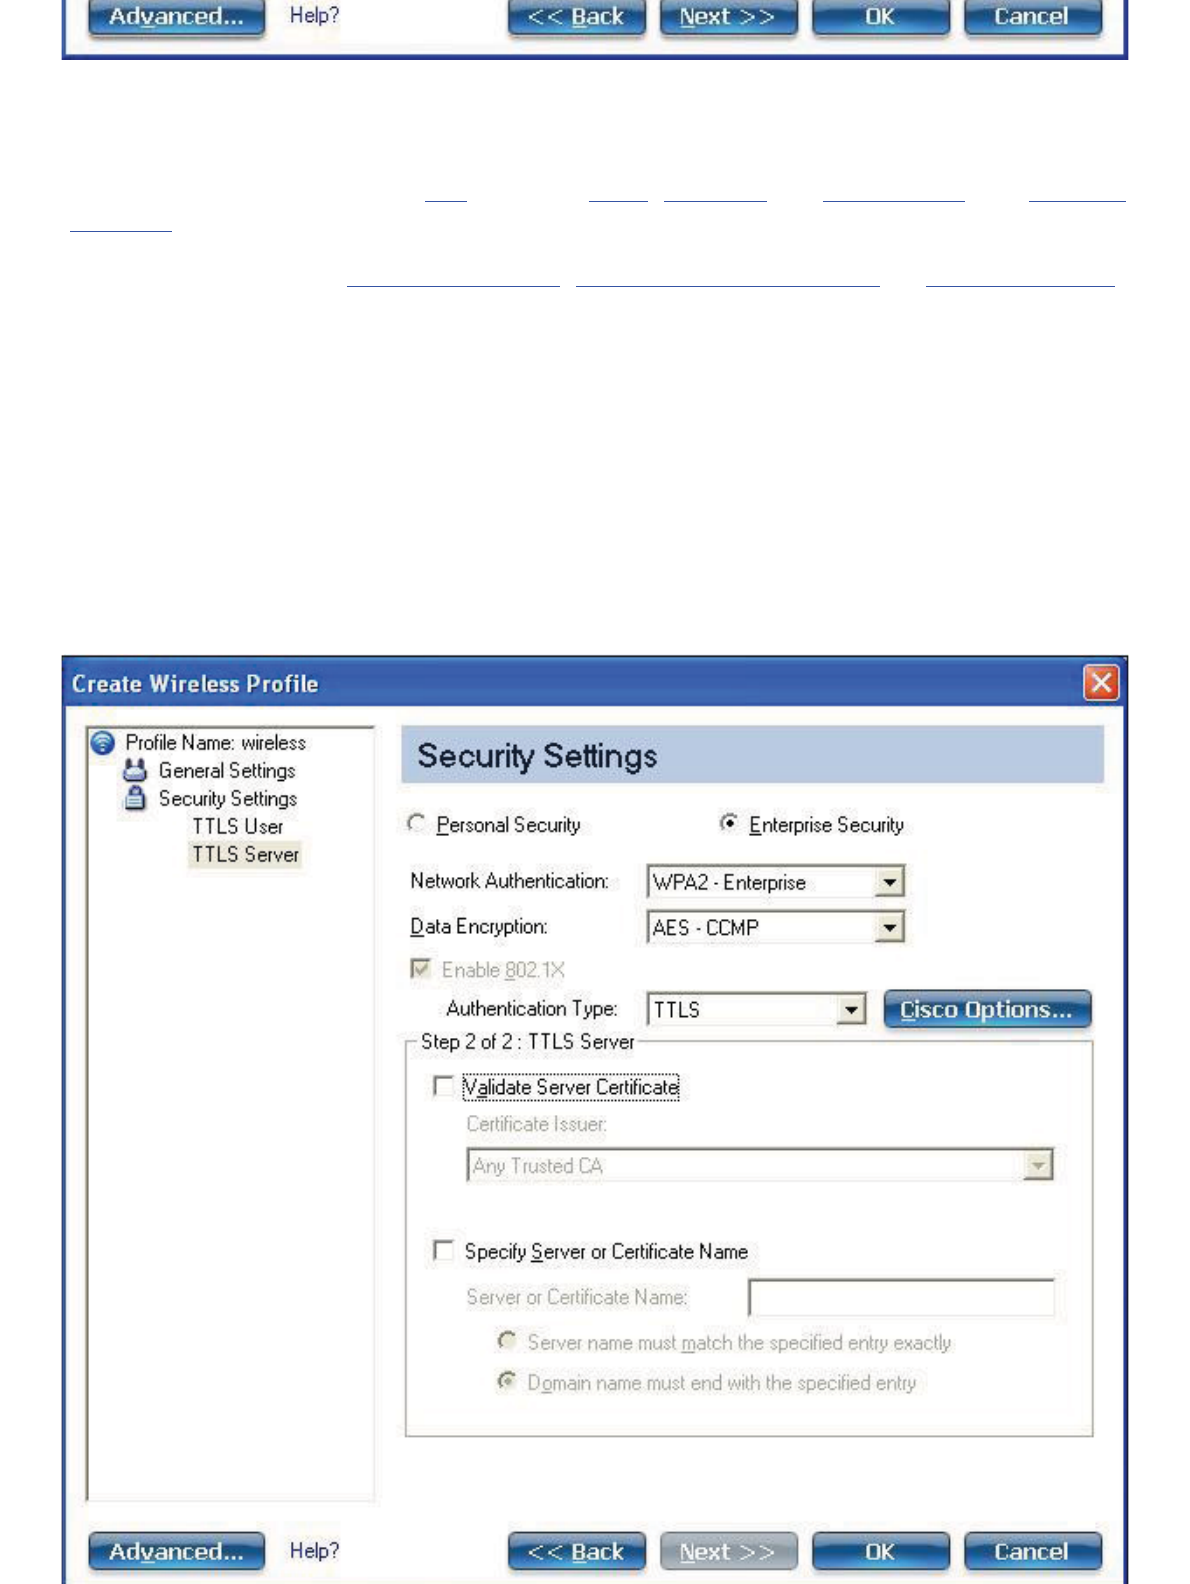
Step 1 of 2: TTLS User
1. Authentication Protocol: This parameter specifies the authentication protocol operating over the
TTLS tunnel. The protocols are: PAP (Default), CHAP,MS-CHAP and MS-CHAP-V2. See Security
Overview for more information.
2. User Credentials: For PAP, CHAP, MS-CHAP, and MS-CHAP-V2 protocols, select one of these
authentication methods: Use Windows logon,Prompt each time I connect, or Use the following.
3. Roaming Identity: A Roaming Identity may be populated in this field or you can use %domain%\%
username% as the default format for entering a roaming identity.
When 802.1X Microsoft IAS RADIUS is used as an authentication server, the server
authenticates the device using the Roaming Identity from Intel PROSet/Wireless WiFi
software, and ignores the Authentication Protocol MS-CHAP-V2 user name. Microsoft IAS
RADIUS accepts only a valid user name (dotNet user) for the Roaming Identity. For all other
authentication servers, the Roaming Identity is optional. Therefore, it is recommended to use
the desired realm (for example, anonymous@myrealm) for the Roaming Identity rather than
a true identity.
4. Click Next to access the TTLS Server settings.

Step 2 of 2: TTLS Server
1. Select one of the following credential retrieval methods: Validate Server Certificate or Specify
Server or Certificate Name.
2. Click OK to save the setting and close the page.
Create a Windows XP* Profile with PEAP Network Authentication
PEAP authentication: PEAP settings are required for the authentication of the client to the authentication
server. The client uses EAP-TLS to validate the server and create a TLS-encrypted channel between client
and server. The client can use another EAP mechanism, such as Microsoft Challenge Authentication
Protocol (MS-CHAP) Version 2, over this encrypted channel to enable server validation. The challenge and
response packets are sent over a non-exposed TLS encrypted channel. The following example describes
how to use WPA with AES-CCMP or TKIP encryption with PEAP authentication.
To set up a client with PEAP Authentication: Obtain and install a client certificate. See Create a Windows
XP* Profile for TLS authentication or consult your administrator.
1. Click Profiles on the WiFi connection utility main window. Or if you are acting as the administrator,
open the Administrator Tool.
2. On the Profiles list, click Add to open the Create Wireless Profile General Settings.
3. Profile Name: Enter a descriptive profile name.
4. Wireless Network Name (SSID): Enter the network identifier.
5. Operating Mode: Click Network (Infrastructure). (This parameter is set to Infrastructure if you
are using the Administrator Tool.)
6. Administrator Profile Type: Select Persistent or Pre-logon/Common. (This step applies only if you
are using the Administrator Tool.)
7. Click Next to open the Security Settings.
8. Click Enterprise Security.
9. Network Authentication: Select WPA-Enterprise or WPA2-Enterprise (Recommended).
10. Data Encryption: Select one of the following: AES-CCMP is recommended.
11. Enable 802.1X: Selected by default.
12. Authentication Type: Select PEAP to be used with this connection.
Step 1 of 2: PEAP User
PEAP relies on Transport Layer Security (TLS) to allow unencrypted authentication types such as EAP-
Generic Token Card (GTC) and One-Time Password (OTP) support.
1. Authentication Protocol: Select either GTC,MS-CHAP-V2 (Default), or TLS. See Authentication
Protocols.
2. User Credentials: Select one of the following: Use Windows logon,Prompt each time I connect, or
Use the following.
3. Roaming Identity: A Roaming Identity may be populated in this field or you can use %domain%\%
username% as the default format for entering a roaming identity.

When 802.1X Microsoft IAS RADIUS is used as an authentication server, the server
authenticates the device using the Roaming Identity from Intel PROSet/Wireless WiFi
software, and ignores the Authentication Protocol MS-CHAP-V2 user name. Microsoft IAS
RADIUS accepts only a valid user name (dotNet user) for the Roaming Identity. For all other
authentication servers, the Roaming Identity is optional. Therefore, it is recommended to use
the desired realm (for example, anonymous@myrealm) for the Roaming Identity rather than
a true identity.
Configure Roaming Identity to Support Multiple Users:
If you use a Pre-logon/Common profile that requires the roaming identity to be based on the
Windows logon credentials, the creator of the profile can add a roaming identity that uses %
username% and %domain%. The roaming identity is parsed and the appropriate log on
information is substituted for the keywords. This allows maximum flexibility in configuring the
roaming identity while allowing multiple users to share the profile.
Please see your authentication server user guide for directions about how to format a suitable
roaming identity. Possible formats are:
%domain%\%user_name%
%user_name%@%domain%
%user_name%@%domain%.com
%user_name%@mynetwork.com
If Roaming Identity is blank, %domain%\%username% is the default.
Notes about the credentials: This user name and domain must match the user name that
is set in the authentication server by the administrator prior to client authentication. The user
name is case-sensitive. This name specifies the identity supplied to the authenticator by the
authentication protocol operating over the TLS tunnel. This user identity is securely
transmitted to the server only after an encrypted channel has been verified and established.
Authentication Protocols
This parameter specifies the authentication protocols that can operate over the TTLS tunnel. Next are
instructions on how to configure a profile that uses PEAP authentication with GTC,MS-CHAP-V2 (Default),
or TLS authentication protocols.
Generic Token Card (GTC)
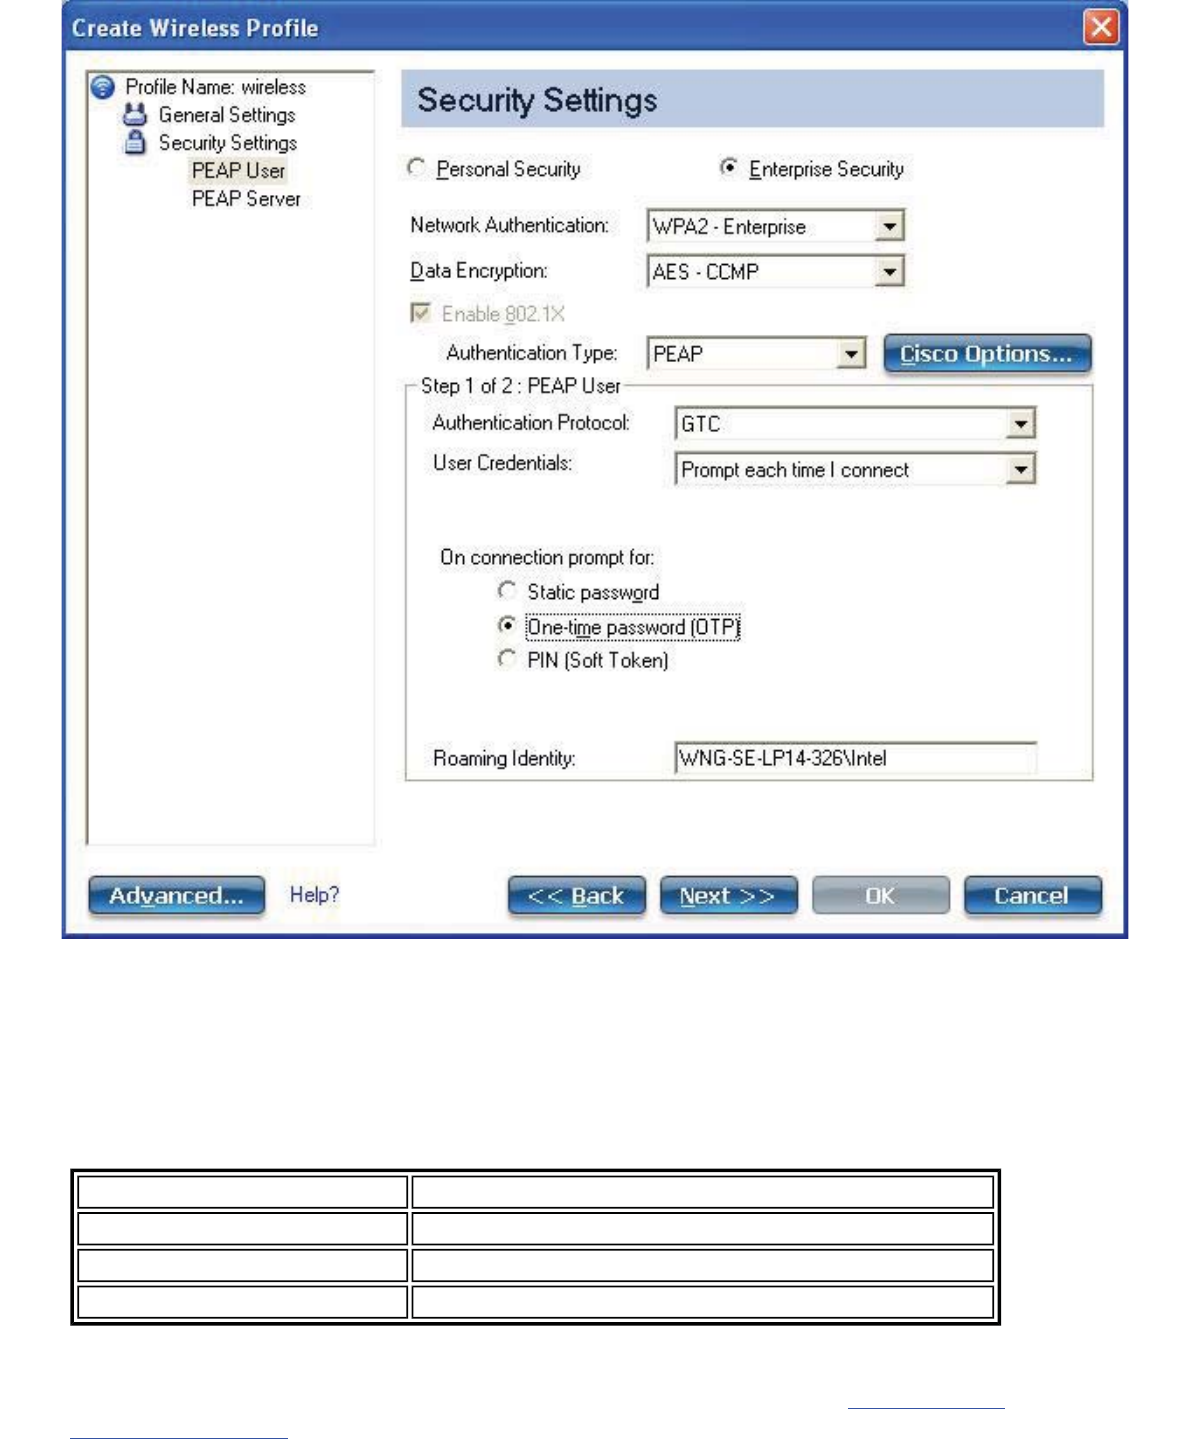
To configure a one-time password:
1. Authentication Protocol: Select GTC (Generic Token Card).
2. User Credentials: Select Prompt each time I connect. (This is only available if you are creating
a personal profile. Not available for IT profiles.)
3. On connection prompt for: Select one of the following:
Name Description
Static Password On connection, enter the user credentials.
One-time password (OTP) Obtain the password from a hardware token device.
PIN (Soft Token) Obtain the password from a soft token program.
NOTE: The Prompt each time I connect option is unavailable if an Administrator has
cleared the Cache Credentials setting in the Administrator Tool. See Administrator
Application Settings for more information.
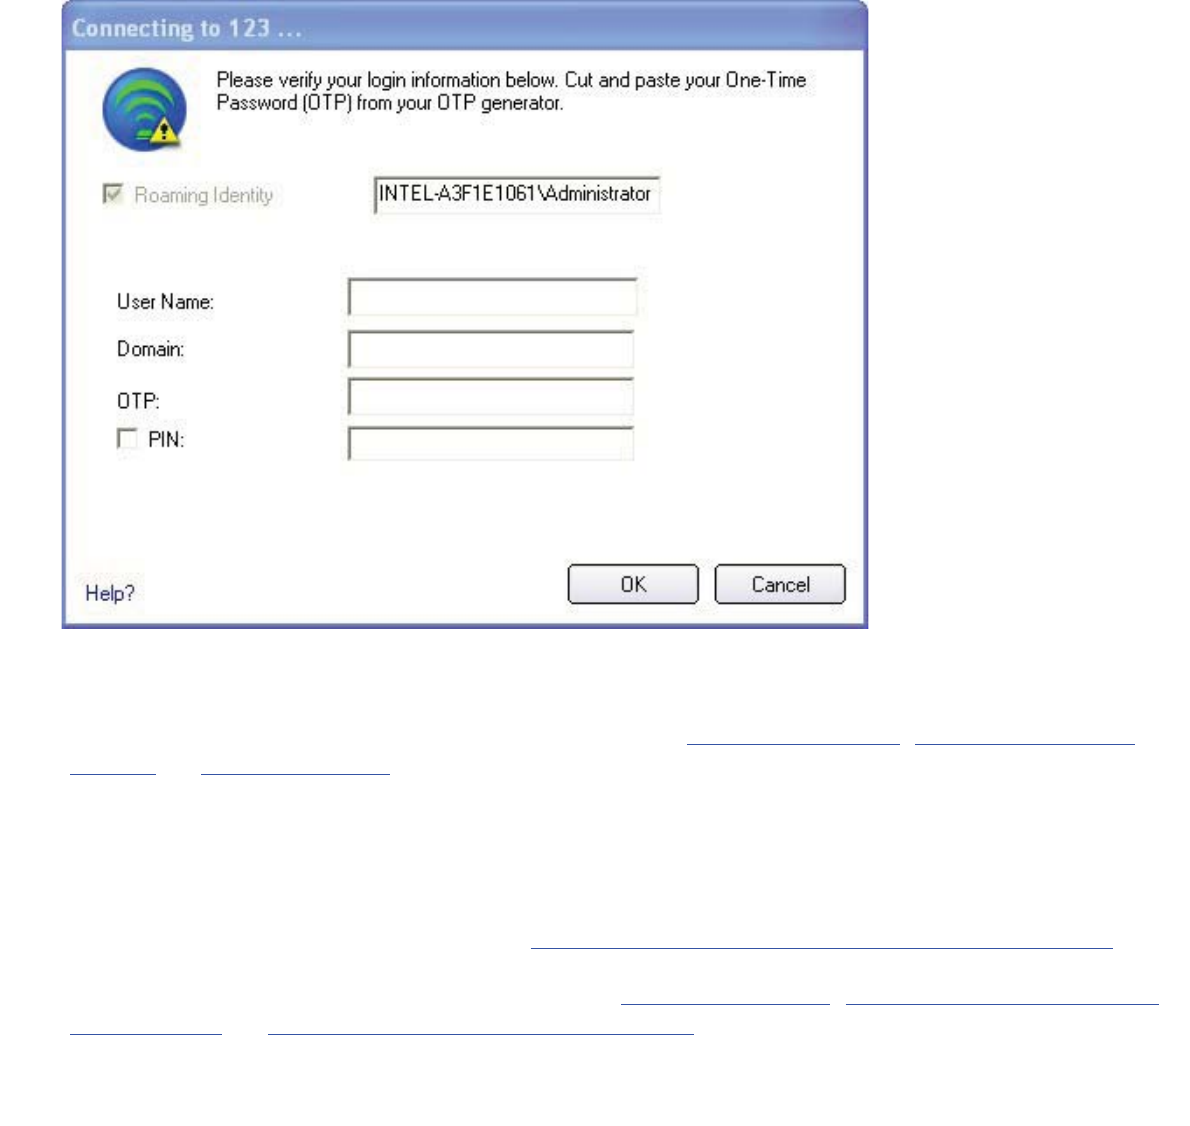
4. Click OK.
5. If you are acting as the user, perform the following three steps.
6. Select the profile on the WiFi Networks list.
7. Click Connect. When prompted, enter the user name, domain and OTP.
8. Click OK. You are asked to verify your log in information.
MS-CHAP-V2: This parameter specifies the authentication protocol operating over the PEAP tunnel.
1. User Credentials: Select one of the following options: Use Windows logon,Prompt each time I
connect, or Use the following.
2. Click Next to open the PEAP Server settings.
TLS: Transport Layer Security authentication is a two-way authentication method that exclusively uses
digital certificates to verify the identity of a client and a server.
1. Obtain and install a client certificate. See Create a Windows XP* Profile for TLS authentication or
consult your system administrator.
2. Select one of the following to obtain a certificate: Use my smart card,Use the certificate issued to
this computer, or Use a user certificate on this computer.
3. Click Next to open the PEAP Server settings.
Step 2 of 2: PEAP Server
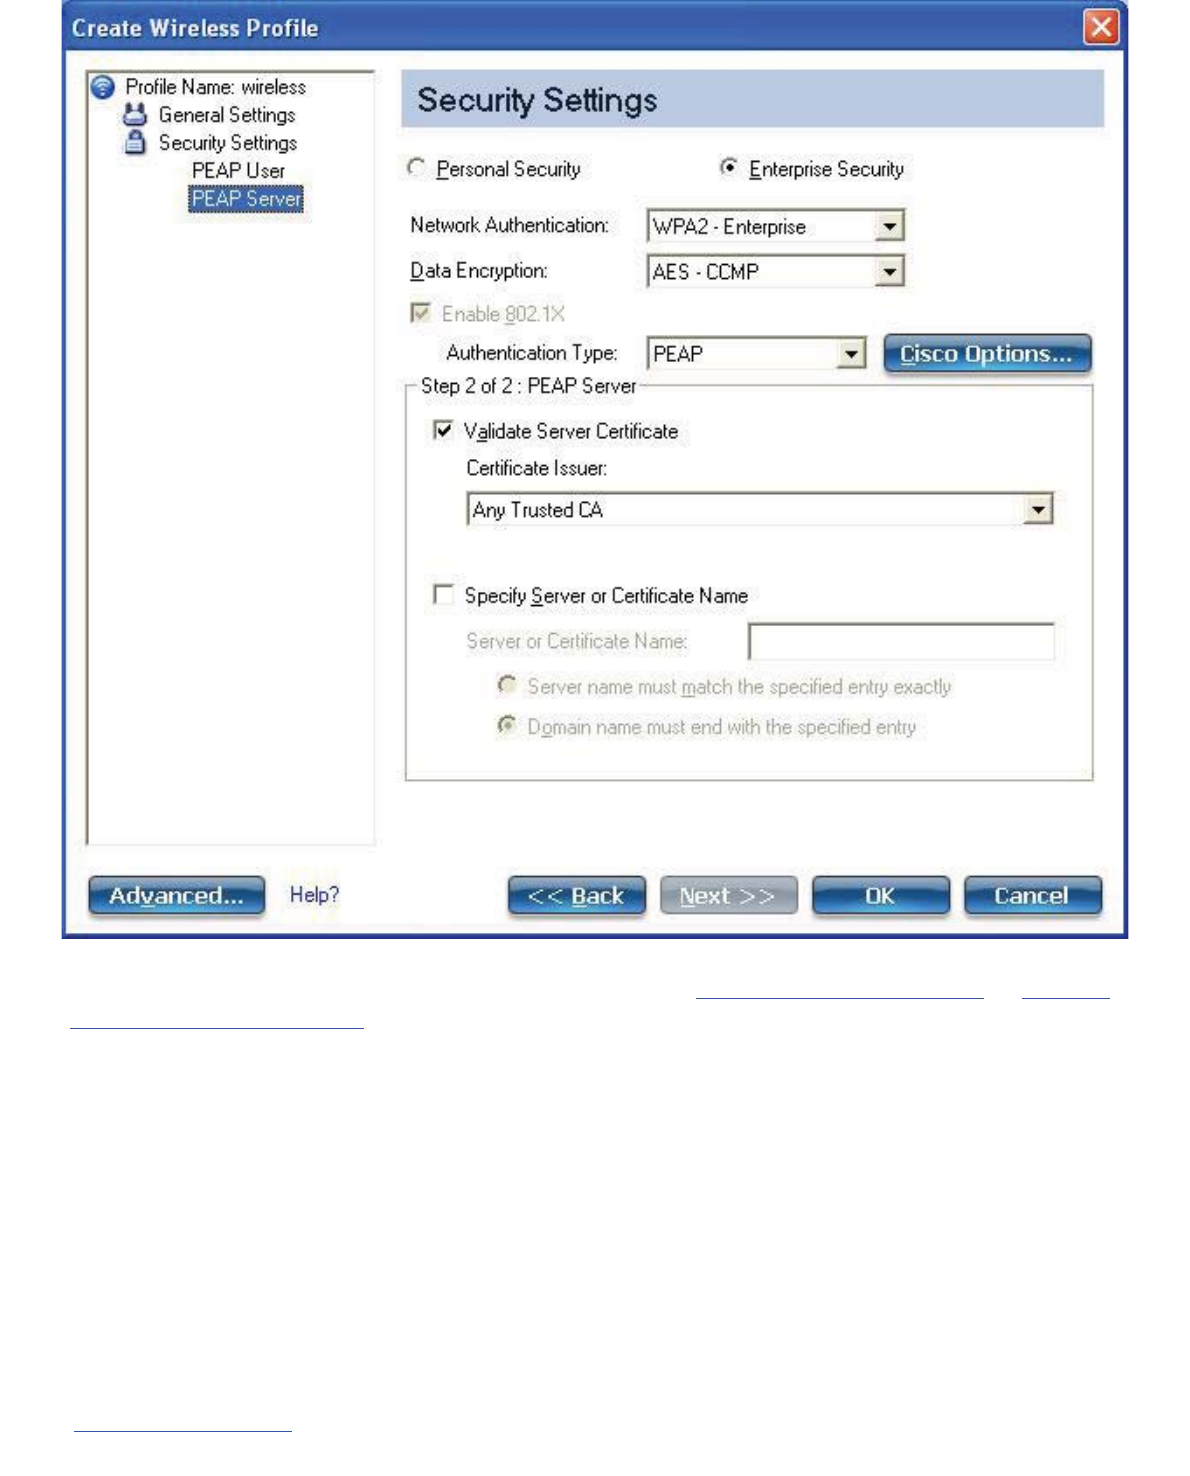
1. Select one of the following credential retrieval methods: Validate Server Certificate or Specify
Server or Certificate Name.
2. Click OK. The profile is added to the Profiles list.
3. Click the new profile at the end of the Profiles list. Use the up and down arrows to change the
priority of the new profile.
4. Click Connect to connect to the selected wireless network.
If you did not select Use Windows logon on the Security Settings page and also did not
configure user credentials, no credentials are saved for this profile. Please enter your
credentials to authenticate to the network.
5. Click OK to close Intel PROSet/Wireless WiFi.
PEAP-TLS Certificate Auto Enrollment
In the Application Settings, select Enable TLS rejected certificates notification, if you want a warning
issued when a PEAP-TLS certificate is rejected.When a certificate has an invalid field expiration date, you

are notified that you must take one of the following actions:
A potential authentication problem for profile has been detected. The expiration
date in the associated certificate may be invalid. Choose one of the following
options:
Control Description
Continue with current parameters. Continue with the current certificate.
Update certificate manually. The Select Certificate page opens for you to choose
another certificate.
Update certificate automatically based on the
certificates in the local store.
This option is enabled only when the local store holds
one or more certificates for which the "issued to" and
"issued by" fields match the current certificate and for
which the "expiration date" has not expired. If you
choose this option, the application selects the first valid
certificate.
Log off to obtain certificate during logon
process (this does not update the profile and
only applies to certificates configured for auto
enrollment).
Logs off the user, who must obtain a proper certificate
during the next logon process. The profile must be
updated to select the new certificate.
Auto enrollment You are notified to: Please wait while the system is
trying to obtain the certificate automatically. Click
Cancel to end the certificate retrieval.
Do not show this message again. A user is able to avoid this step in subsequent sessions.
The choice selected is remembered for future sessions.
Create a Windows XP* Profile with LEAP Network Authentication
Cisco LEAP (Light Extensible Authentication Protocol) is an 802.1X authentication type that supports strong
mutual authentication between the client and a RADIUS server. The LEAP profiles settings include LEAP,
CKIP with Rogue access point detection integration. To set up a client with LEAP authentication:
1. Click Profiles on the WiFi connection utility main window. Or if you are acting as the administrator,
open the Administrator Tool.
2. On the Profiles list, click Add. The Create Wireless Profile General Settings opens.
3. Profile Name: Enter a descriptive profile name.
4. Wireless Network Name (SSID): Enter the network identifier.
5. Operating Mode: Click Network (Infrastructure). (This parameter is set to Infrastructure if you
are using the Administrator Tool.)
6. Administrator Profile Type: Select Persistent or Pre-logon/Common. (This step applies only if you
are using the Administrator Tool.)
7. Click Next to open the Security Settings.
8. Click Enterprise Security.
9. Network Authentication: Select WPA-Enterprise or WPA2-Enterprise (Recommended).
10. Data Encryption:AES-CCMP is recommended.
11. Enable 802.1X: Selected by default.
12. Authentication Type: Select LEAP to be used with this connection.
13. Click Cisco Options.
14. Click Enable Cisco Compatible Extensions to enable Cisco Compatible Extensions (CCX) security
(Allow Fast Roaming (CCKM), Enable Radio Management Support, and Enable Mixed Cells Mode).
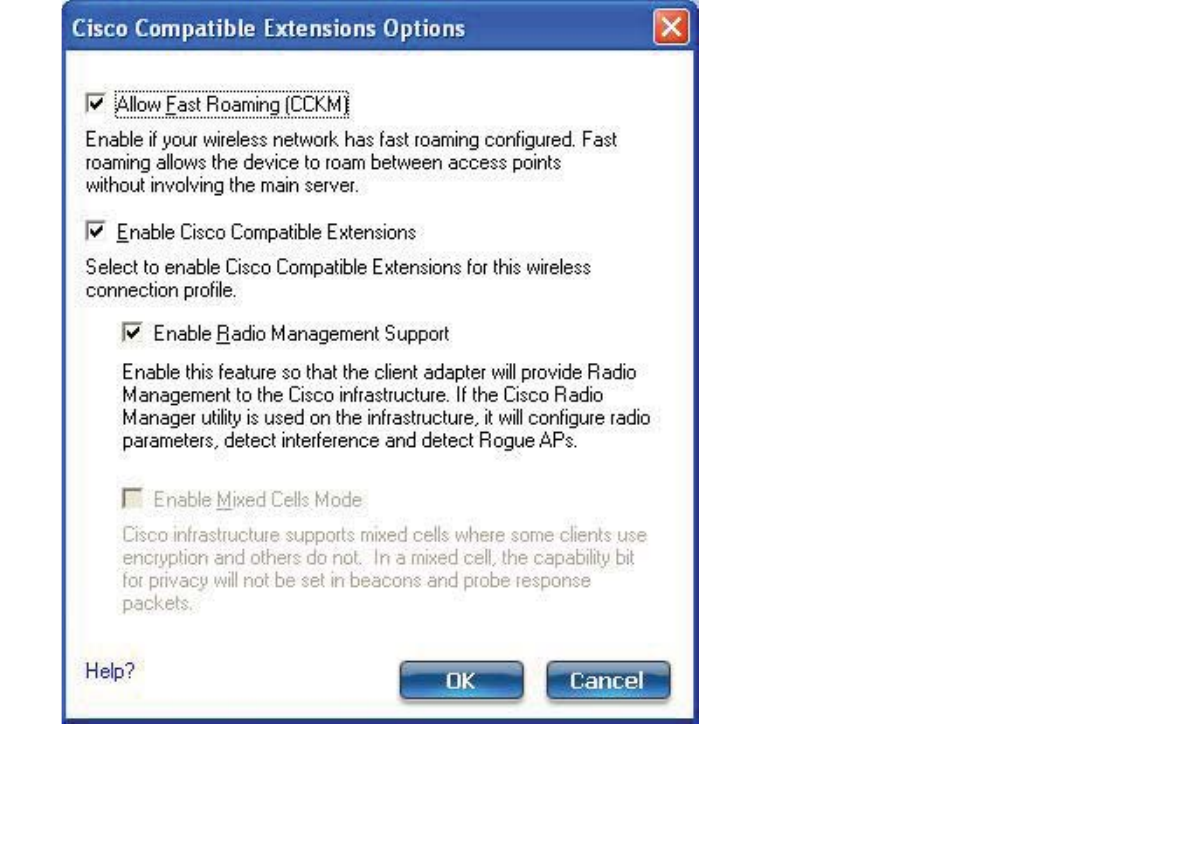
15. Click Enable Radio Management Support to detect rogue access points.
16. Click OK to return to the Security Settings.
LEAP User:
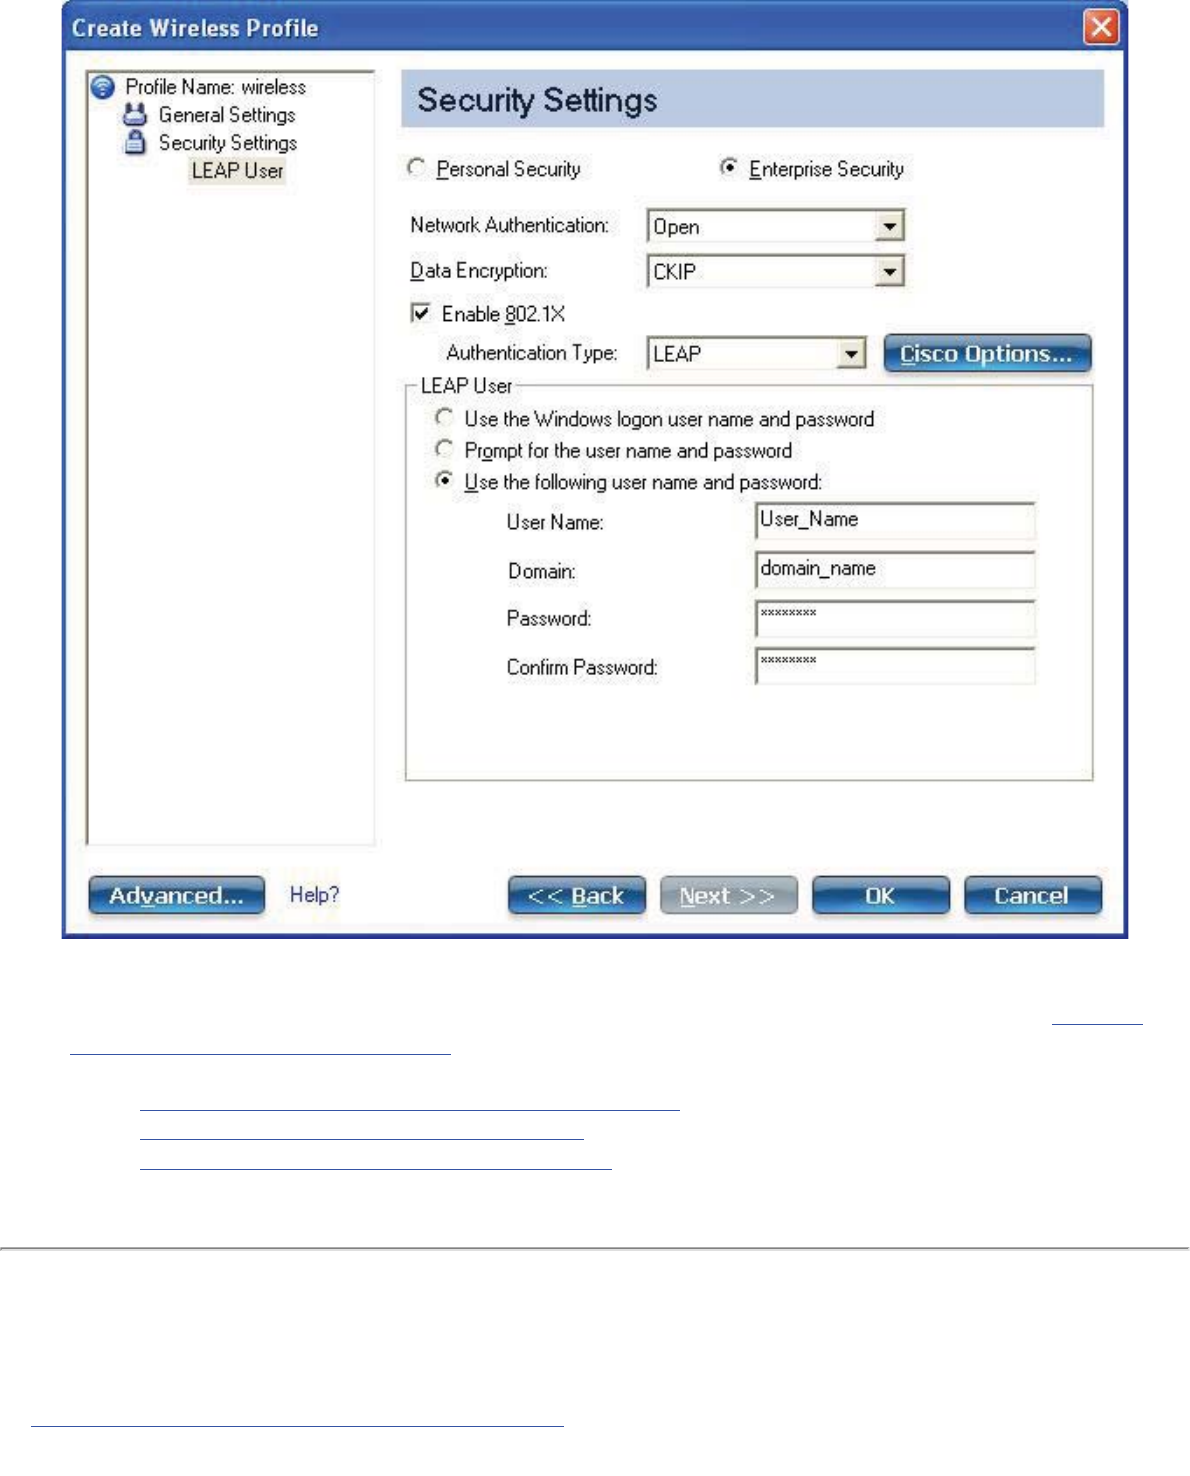
1. Select one of the following authentication methods listed next. If under Administrator Profile
Type you selected Persistent (with or without selecting Pre-logon/Common), then only Use the
following user name and password is available. If you only selected Pre-logon/Common, then the
following three authentication methods are available.
❍Use the Windows logon user name and password
❍Prompt for the user name and password
❍Use the following user name and password
2. Click OK to save the setting and close the page.
Create a Windows XP* Profile with EAP-FAST Network
Authentication
In Cisco Compatible Extensions, Version 3 (CCXv3), Cisco added support for EAP-FAST (Extensible
Authentication Protocol-Flexible Authentication via Secure Tunneling), which uses protected access

credentials (PACs) to establish an authenticated tunnel between a client and a server.
Cisco Compatible Extensions, Version 4 (CCXv4) improves the provisioning methods for enhanced security
and provides innovations for enhanced security, mobility, quality of service, and network management.
Cisco Compatible Extensions, Version 3 (CCXv3)
To set up a client with EAP-FAST authentication with Cisco Compatible Extensions, version 3 (CCXv3):
1. Click Profiles on the WiFi connection utility main window. Or if you are acting as the administrator,
open the Administrator Tool.
2. On the Profiles list, click Add to open the Create Wireless Profile General Settings.
3. Wireless Network Name (SSID): Enter the network identifier.
4. Profile Name: Enter a descriptive profile name.
5. Operating Mode: Click Network (Infrastructure). (This parameter is set to Infrastructure if you
are using the Administrator Tool.)
6. Administrator Profile Type: Select Persistent or Pre-logon/Common. (This step applies only if you
are using the Administrator Tool.)
7. Click Next to open the Security Settings.
8. Click Enterprise Security.
9. Network Authentication: Select WPA-Enterprise or WPA2-Enterprise (Recommended).
10. Data Encryption:AES-CCMP is recommended.
11. Enable 802.1X: Selected by default.
12. Authentication Type: Select EAP-FAST to be used with this connection.
NOTE: If CCXv4 Application Setting was not installed through an Administrator Package, only
EAP-FAST User Settings are available for configuration. See EAP-FAST User Settings.
Step 1 of 2: EAP-FAST Provisioning
1. Click Disable EAP-FAST Enhancements (CCXv4) to allow provisioning inside a server-
unauthenticated TLS tunnel (Unauthenticated-TLS-Server Provisioning Mode).
2. Click Select server to view any unauthenticated PACs that have already been provisioned and
reside on this computer.
NOTE: If the provisioned PAC is valid, the WiFi connection utility does not prompt the user for
acceptance of the PAC. If the PAC is invalid, WiFi connection utility fails the provisioning
automatically. A status message is displayed in the Wireless Event Viewer that an
administrator can review on the user's computer.
To import a PAC:

●Click Select server to open the Protected Access Credentials (PAC) list.
●Click Import to import a PAC that resides on this computer or a server.
●Select the PAC and click Open.
●Enter the PAC password (optional).
●Click OK to close this page. The selected PAC is added to PAC list.
3. Click Next to select the credential retrieval method or click OK to save the EAP-FAST settings and
return to the Profiles list. The PAC is used for this wireless profile.
Step 2 of 2: EAP-FAST Additional Information
To perform client authentication in the established tunnel, a client sends a user name and password to
authenticate and establish client authorization policy.
1. Click User Credentials to select one of the following credentials retrieval method: Use Windows
logon,Prompt each time I connect, or Use the following.
2. Click OK to save the settings and close the page. Server verification is not required.
Cisco Compatible Extensions, Version 4 (CCXv4)
To set up a client with EAP-FAST authentication with Cisco Compatible Extensions, version 4 (CCXv4):
1. Click Profiles on the WiFi connection utility main window. Or if you are acting as the administrator,
open the Administrator Tool.
2. On the Profiles list, click Add to open the Create Wireless Profile General Settings.
3. Wireless Network Name (SSID): Enter the network identifier.
4. Profile Name: Enter a descriptive profile name.
5. Operating Mode: Click Network (Infrastructure). (This parameter is set to Infrastructure if you
are using the Administrator Tool.)
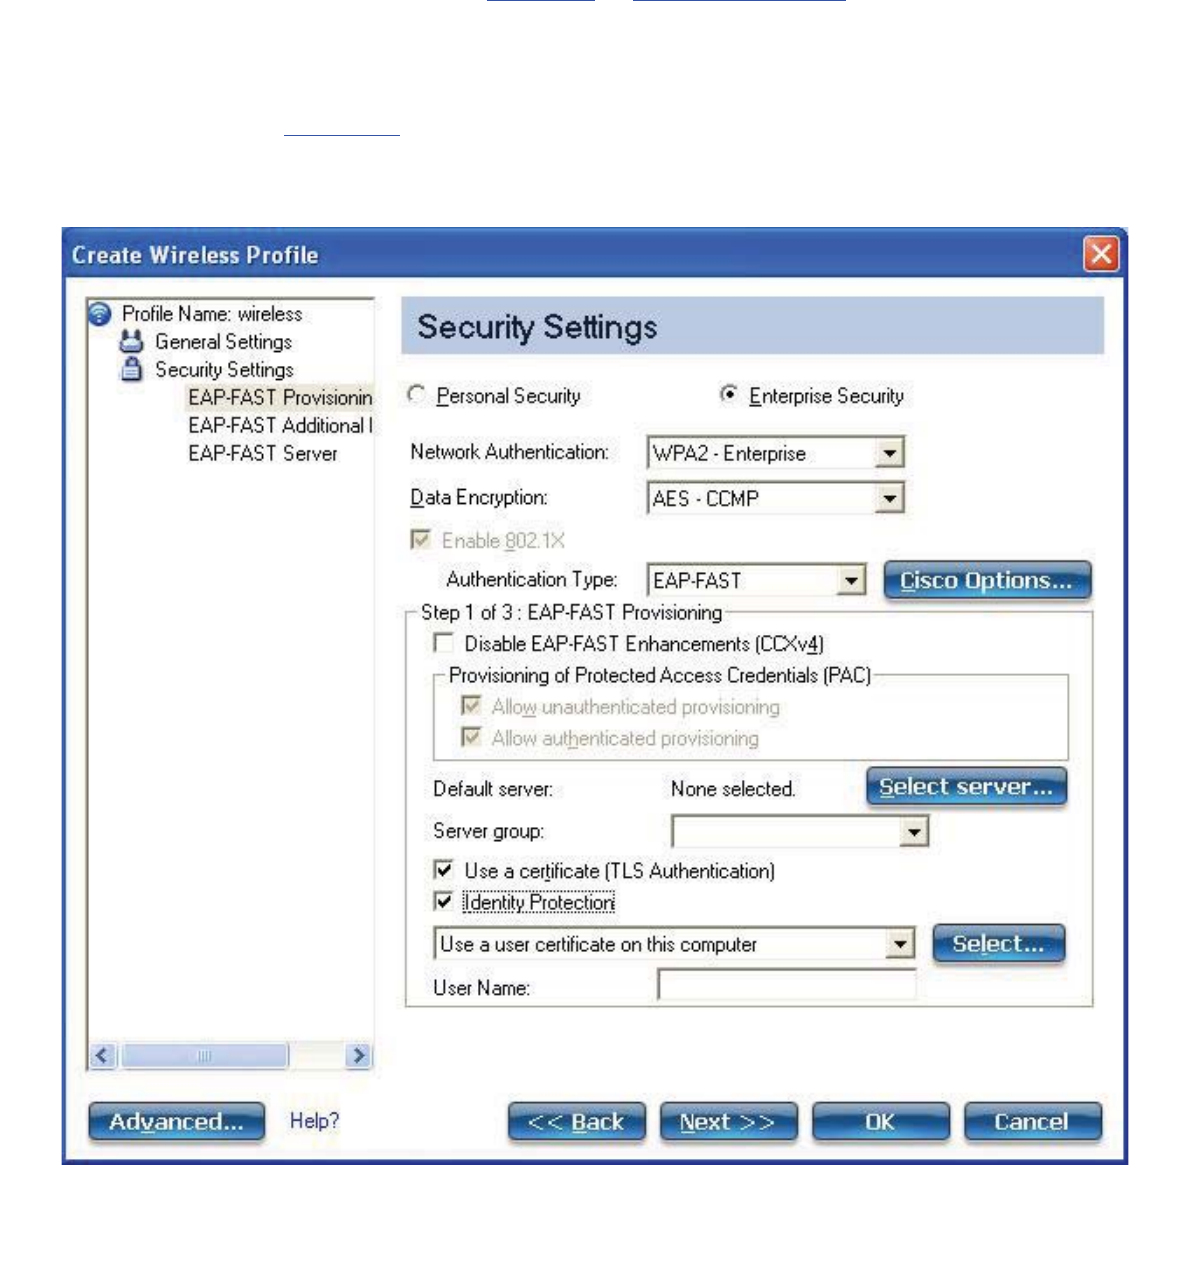
6. Administrator Profile Type: Select Persistent or Pre-logon/Common. (This step applies only if you
are using the Administrator Tool.)
7. Click Next to open the Security Settings.
8. Click Enterprise Security.
9. Network Authentication: Select WPA-Enterprise or WPA2-Enterprise (Recommended).
10. Data Encryption:AES-CCMP is recommended.
11. Enable 802.1X: Selected.
12. Authentication Type: Select EAP-FAST to be used with this connection.
Step 1 of 3: EAP-FAST Provisioning
With CCXv4, EAP-FAST supports two modes for provisioning:
●Server-Authenticated Mode: Provisioning inside a server authenticated TLS tunnel.
●Server-Unauthenticated Mode: Provisioning inside an unauthenticated TLS tunnel.
NOTE: Server-Authenticated Mode provides significant security advantages over Server-
Unauthenticated Mode even when EAP-MS-CHAP-V2 is being used as an inner method. This

mode protects the EAP-MS-CHAP-V2 exchanges from potential Man-in-the-Middle attacks by
verifying the server’s authenticity before exchanging MS-CHAP-V2. Therefore, Server-
Authenticated Mode is preferred whenever it is possible. EAP-FAST peer must use Server-
Authenticated Mode whenever a certificate or public key is available to authenticate the server
and ensure the best security practices.
Provisioning of Protected Access Credentials (PAC):
EAP-FAST uses a PAC key to protect the user credentials that are exchanged. All EAP-FAST authenticators
are identified by an authority identity (A-ID). The local authenticator sends its A-ID to an authenticating
client, and the client checks its database for a matching A-ID. If the client does not recognize the A-ID, it
requests a new PAC.
NOTE: If the provisioned Protected Access Credential (PAC) is valid, the WiFi connection
utility does not prompt the user for acceptance of the PAC. If the PAC is invalid, the WiFi
connection utility fails the provisioning automatically. A status message is displayed in the
Wireless Event Viewer that an administrator can review on the user's computer.
1. Verify that Disable EAP-FAST Enhancements (CCXv4) is not selected. Allow unauthenticated
provisioning and Allow authenticated provisioning are selected by default. Once a PAC is
selected from the Default Server, you can deselect any of these provisioning methods.
2. Default Server:None is selected as the default. Click Select Server to select a PAC from the
default PAC authority server or select a server from the Server group list. The EAP-FAST Default
Server (PAC Authority) selection page opens.
NOTE: Server groups are only listed if you have installed an Administrator Packagethat
contains EAP-FAST Authority ID (A-ID) Group settings.
PAC distribution can also be completed manually (out-of-band). Manual provisioning enables you to create
a PAC for a user on an ACS server and then import it into a user's computer. A PAC file can be protected
with a password, which the user needs to enter during a PAC import.
To import a PAC:
1. Click Import to import a PAC from the PAC server.
2. Click Open.
3. Enter the PAC password (optional).
4. Click OK closes this page. The selected PAC is used for this wireless profile.
EAP-FAST CCXv4 enables support for the provisioning of other credentials beyond the PAC currently
provisioned for tunnel establishment. The credential types supported include trusted CA certificate,
machine credentials for machine authentication, and temporary user credentials used to bypass user
authentication.
Use a certificate (TLS Authentication)
1. Click Use a certificate (TLS Authentication)
2. Click Identity Protection when the tunnel is protected.
3. Select one of the following to obtain a certificate: Use my smart card,Use the certificate issued to
this computer, or Use a user certificate on this computer.
4. User Name: Enter the user name assigned to the user certificate.
5. Click Next.

Step 2 of 3: EAP-FAST Additional Information
If you selected Use a certificate (TLS Authentication) and Use a user certificate on this computer,
click Next (no roaming identity is required) and proceed to Step 3 to configure EAP-FAST Server
certificate settings. If you do not need to configure EAP-FAST server settings, click OK to save your
settings and return to the Profiles page.
If you selected to Use my smart card, add the roaming identity, if required. Click OK to save your
settings and return to the Profiles page.
If you did not select Use a certificate (TLS Authentication), click Next to select an Authentication
Protocol. CCXv4 permits additional credentials or TLS cipher suites to establish the tunnel.
Authentication Protocol: Select either GTC, or MS-CHAP-V2 (Default).
Generic Token Card (GTC)
GTC may be used with Server-Authenticated Mode. This enable peers using other user databases as
Lightweight Directory Access Protocol (LDAP) and one-time password (OTP) technology to be provisioned
in-band. However, the replacement may only be achieved when used with the TLS cipher suites that
ensure server authentication.
To configure a one-time password:
1. Authentication Protocol: Select GTC (Generic Token Card).
2. User Credentials: Select Prompt each time I connect.
3. On connection prompt for: Select one of the following:
Name Description
Static Password On connection, enter the user credentials.
One-time password (OTP) Obtain the password from a hardware token device.
PIN (Soft Token) Obtain the password from a soft token program.
4. Click OK.
5. Select the profile on the WiFi Networks list.
6. Click Connect. When prompted, enter the user name, domain and one-time password (OTP).
7. Click OK.
MS-CHAP-V2. This parameter specifies the authentication protocol operating over the PEAP tunnel.
1. Authentication Protocol: Select MS-CHAP-2.
2. Select the user credentials: Use Windows logon,Prompt each time I connect, or Use the following.
3. Roaming Identity: A Roaming Identity may be populated in this field or you can use %domain%\%
username% as the default format for entering a roaming identity.
When 802.1X Microsoft IAS RADIUS is used as an authentication server, the server
authenticates the device using the Roaming Identity from Intel PROSet/Wireless WiFi
software, and ignores the Authentication Protocol MS-CHAP-V2 user name. Microsoft IAS
RADIUS accepts only a valid user name (dotNet user) for the Roaming Identity. For all other
authentication servers, the Roaming Identity is optional. Therefore, it is recommended to use

the desired realm (for example, anonymous@myrealm) for the Roaming Identity rather than
a true identity.
Step 3 of 3: EAP-FAST Server
Authenticated-TLS-Server Provisioning Mode is supported using a trusted CA certificate, a self-signed
server certificate, or server public keys and GTC as the inner EAP method.
1. Select one of the following credential retrieval methods: Validate Server Certificate or Specify
Server or Certificate Name.
2. Click OK to close the security settings.
EAP-FAST User Settings
NOTE: If an Administrator Package to be exported to a user's computer does not include the
Enable CCXv4 Administrator Tool Application Setting, only EAP-FAST User Settings will be
available for configuration.
To set up a client with EAP-FAST authentication:
1. Click Profiles on the WiFi connection utility main window. Or if you are acting as the administrator,
open the Administrator Tool.
2. On the Profile page, click Add to open the Create Wireless Profile General Settings.
3. Wireless Network Name (SSID): Enter the network identifier.
4. Profile Name: Enter a descriptive profile name.
5. Operating Mode: Click Network (Infrastructure). (This parameter is set to Infrastructure if you
are using the Administrator Tool.)
6. Administrator Profile Type: Select Persistent or Pre-logon/Common. (This step applies only if you
are using the Administrator Tool.)
7. Click Next to open the Security Settings.
8. Click Enterprise Security.
9. Network Authentication: Select WPA-Enterprise or WPA2-Enterprise.
10. Data Encryption: Select one of the following:
❍TKIP provides per-packet key mixing, a message integrity check and a rekeying mechanism.
❍AES-CCMP (Advanced Encryption Standard - Counter CBC-MAC Protocol) is used as the data
encryption method whenever strong data protection is important. AES-CCMP is recommended.
11. Enable 802.1X: Selected.
12. Authentication Type: Select EAP-FAST to be used with this connection.
13. Click Cisco Options to select Allow Fast Roaming (CCKM), which enables the client wireless
adapter for fast secure roaming.
Step 1 of 3 EAP-FAST Provisioning (User Settings)
EAP-FAST uses a PAC key to protect the user credentials that are exchanged. All EAP-FAST authenticators
are identified by an authority identity (A-ID). The local authenticator sends its A-ID to an authenticating
client, and the client checks its database for a matching A-ID. If the client does not recognize the A-ID, it
requests a new PAC.
NOTE: If the provisioned Protected Access Credential (PAC) is valid, the WiFi connection utility does not
prompt the user for acceptance of the PAC. If the PAC is invalid, the WiFi connection utility fails the

provisioning automatically. A status message is displayed in the Wireless Event Viewer that an
administrator can review on the user's computer.
1. Leave unchecked Disable EAP-FAST Enhancements (CCXv4).
2. Allow authenticated provisioning and Allow unauthenticated provisioning are both checked.
3. Default Server: None selected is the default. Click Select Server to select a PAC from the default
PAC authority server. The Protected Access Credentials selection page opens.
NOTE: Server groups are only listed if you have installed an Administrator Package that
contains EAP-FAST Authority ID (A-ID) Group settings.
PAC distribution can also be completed manually (out-of-band). Manual provisioning lets you
create a PAC for a user on an ACS server and then import it into a user's computer. A PAC file
can be protected with a password, which the user needs to enter during a PAC import.
4. To import a PAC:
1. Click Import to import a PAC from the PAC server.
2. Click Open.
3. Enter the PAC password (optional).
4. Click OK to close this page. The selected PAC is used for this wireless profile.
5. Click Next.
6. If this is not a Pre-logon/Common profile, then click Next and jump to Step 3 of 3: EAP-FAST
Server.
7. If this is a Pre-logon/Common profile, or if you are not using the Administrator Tool to create this
profile, proceed to the next step.
Step 2 of 3: EAP-FAST Additional Information
1. Authentication Protocol: Select MS-CHAP-V2 or GTC
2. User Credentials: Select Use Windows Logon or Use the following.
3. If you selected Use the following, then enter the User Name, Domain, Password, and Confirm
Password.
4. Enter the Roaming Identity: %DOMAIN%\%USERNAME
5. Click Next.
Step 3 of 3: EAP-FAST Server
1. Click Validate Certificate if desired and select the Certificate Issuer from the drop down menu.
The default selection is Any Trusted CA.
2. If desired, click Specify Server or Certificate Name and enter the name. Then click Server
Name must match the specified entry exactly or Domain name must end with the specified
entry.
3. Click OK.
Back to Top
Back to Contents
Trademarks and Disclaimers

Back to Contents
Security Overview
This section describes the various security methods used to help protect wireless networks.
Protecting Your Wireless Network
●Authentication
●Encryption
●SSID Broadcasting
Personal Security Methods
●Open and Shared Key authentication
●WEP Encryption
●WPA-Personal
●WPA2-Personal
802.1X Authentication (Enterprise Security)
●Overview
●What is RADIUS?
●How 802.1X Authentication Works
●802.1X Features
Network Authentication Types
●Open
●Shared
●WPA-Personal
●WPA2-Personal
●WPA-Enterprise
●WPA2-Enterprise
Data Encryption Types
●AES-CCMP

●TKIP
●CKIP
Authentication Types
●TLS
●TTLS
●PEAP
●LEAP
●EAP-SIM
●EAP-FAST
●EAP-AKA
Authentication Protocols
●PAP
●CHAP
●MS-CHAP
●MS-CHAP-V2
●GTC
●TLS
Cisco Features
●Cisco LEAP
●Cisco Rogue Access Point Security Feature
●802.11b and 802.11g Mixed Environment Protection Protocol
●CKIP
●Fast Roaming (CCKM)
●Mixed Cell Mode
●Radio Management
Protecting Your Wireless Network
Your wireless network, if left unprotected, is vulnerable to access from other computers. You
can easily protect your home and small business network from nearly all forms of
unauthorized access with the security methods described in this section.
Authentication

Authentication is the process of identifying and approving a request from a client (usually a
laptop) to access a network at a network access point. Once authentication is completed and
access is granted, the client has access to the network.
Encryption
You can select encryption algorithms to encrypt the information and data that is sent across
your wireless network. Only computers equipped with pre-shared keys can encrypt and
decrypt the data being transmitted. Encryption keys are available with two levels of security,
64-bit and 128-bit. Use 128-bit keys for greater security.
SSID Broadcasting
A simple way to improve network security is to set your network access point to not
broadcast the Service Set Identifier (SSID). The SSID is needed to gain access. Only those
computers with knowledge of the SSID can access the network. (This is not set at the
adapter using the Intel(R) PROSet/Wireless WiFi Connection Utility, it is set at the access
point.)
Personal Security Methods
Open and Shared Network Authentication
IEEE 802.11 supports two types of network authentication methods: Open System and
Shared Key.
●When open authentication is used, any wireless station can request authentication.
The station that needs to authenticate with another wireless station sends an
authentication management request that contains the identity of the sending station.
The receiving station or access point grants any request for authentication. Open
authentication allows any device to gain network access. If no encryption is enabled
on the network, any device that knows the Service Set Identifier (SSID) of the access
point can gain access to the network.
●When shared key authentication is used, each wireless station is assumed to have
received a secret shared key over a secure channel that is independent from the
802.11 wireless network communications channel. You can share this secret key via a
wired Ethernet connection, or by physically using a USB memory stick or CD. Shared
key authentication requires that the client configure a static WEP key. The client
access is granted only if it passes a challenge-based authentication.
WEP

Wired Equivalent Privacy (WEP) uses encryption to help prevent unauthorized reception of
wireless data. WEP uses an encryption key to encrypt data before transmitting it. Only
computers that use the same encryption key can access the network and decrypt the data
transmitted by other computers. WEP encryption provides for two levels of security, using a
64-bit key (sometimes referred to as 40-bit) or a 128-bit key (also known as 104-bit). For
stronger security, you should use a 128-bit key. If you use encryption, all wireless devices
on your wireless network must use the same encryption keys.
With WEP data encryption, a wireless station can be configured with up to four keys (the key
index values are 1, 2, 3, and 4). When an access point (AP) or a wireless station transmits
an encrypted message that uses a key stored in a specific key index, the transmitted
message indicates the key index that was used to encrypt the message body. The receiving
AP or wireless station can then retrieve the key that is stored at the key index and use it to
decode the encrypted message body
Because the WEP encryption algorithm is vulnerable to network attacks, you should consider
using WPA-Personal or WPA2-Personal security.
WPA-Personal
WPA-Personal Mode is targeted to home and small business environments. WPA Personal
requires manual configuration of a pre-shared key (PSK) on the access point and clients. No
authentication server is needed. The same password entered at the access point needs to be
used on this computer and all other wireless devices that access the wireless network.
Security depends on the strength and secrecy of the password. The longer the password,
the stronger the security of the wireless network. If your wireless access point or router
supports WPA-Personal and WPA2-Personal then you should enable it on the access point
and provide a long, strong password. WPA-Personal makes available the TKIP and AES-
CCMP data encryption algorithms.
WPA2-Personal
WPA2-Personal requires manual configuration of a pre-shared key (PSK) on the access point
and clients. No authentication server is needed. The same password entered at the access
point needs to be used on this computer and all other wireless devices that access the
wireless network. Security depends on the strength and secrecy of the password. The longer
the password, the stronger the security of the wireless network. WPA2 is an improvement
over WPA and implements the full IEEE 802.11i standard. WPA2 is backward compatible with
WPA. WPA2-Personal makes available the TKIP and AES-CCMP data encryption algorithms.
NOTE: WPA-Personal and WPA2-Personal are interoperable.
802.1X Authentication (Enterprise Security)

This section describes security common used by larger companies.
Overview
What is Radius?
How 802.1X Authentication Works
802.1X Features
Overview
The 802.1X authentication is independent of the 802.11 authentication process. The 802.11
standard provides a framework for various authentication and key-management protocols.
There are different 802.1X authentication types and each provides a different approach to
authentication, but all employ the same 802.11 protocol and framework for communication
between a client and an access point. In most protocols, after completion of the 802.1X
authentication process, the client receives a key that it uses for data encryption. See How
802.1X authentication works for more information. With 802.1X authentication, an
authentication method is used between the client and a server (for example a Remote
Authentication Dial-In User Service (RADIUS) server) connected to the access point. The
authentication process uses credentials, such as a user's password, that are not transmitted
over the wireless network. Most 802.1X types support dynamic per-user, per-session keys to
strengthen the key security. The 802.1X authentication benefits from the use of an existing
authentication protocol known as the Extensible Authentication Protocol (EAP).
The 802.1X authentication for wireless networks has three main components:
●The authenticator (the access point)
●The supplicant (the client software)
●The authentication server
The 802.1X authentication security initiates an authorization request from the wireless client
to the access point, which authenticates the client to an Extensible Authentication Protocol
(EAP) compliant RADIUS server. This RADIUS server may authenticate either the user (via
passwords or certificates) or the system (by MAC address). In theory, the wireless client is
not allowed to join the networks until the transaction is complete. (Not all authentication
methods use a RADIUS server. WPA-Personal and WPA2-Personal use a common password
that must be entered at the access point and at all devices requesting access to the
network.)
There are several authentication algorithms used with 802.1X. Some examples are: EAP-
TLS,EAP-TTLS, Protected EAP (PEAP), and EAP Cisco Wireless Light Extensible
Authentication Protocol (LEAP). These are all methods for the wireless client to identify itself
to the RADIUS server. With RADIUS authentication, user identities are checked against
databases. RADIUS constitutes a set of standards that addresses Authentication,
Authorization, and Accounting (AAA). RADIUS includes a proxy process to validate clients in
a multi-server environment. The IEEE 802.1X standard provides a mechanism for controlling

and authenticating access to port-based 802.11 wireless and wired Ethernet networks. Port-
based network access control is similar to a switched local area network (LAN) infrastructure
that authenticates devices attached to a LAN port and prevents access to that port if the
authentication process fails.
What is RADIUS?
RADIUS is the Remote Authentication Dial-In User Service, an Authorization, Authentication,
and Accounting (AAA) client-server protocol that is used when a AAA dial-up client logs in or
out of a Network Access Server. Typically, a RADIUS server is used by Internet Service
Providers (ISP) to perform AAA tasks. AAA phases are described as follows:
●Authentication phase: Verifies a user name and password against a local database.
After credentials are verified, the authorization process begins.
●Authorization phase: Determines whether a request is allowed access to a resource.
An IP address is assigned for the dial-up client.
●Accounting phase: Collects information on resource usage for the purpose of trend
analysis, auditing, session-time billing, or cost allocation.
How 802.1X Authentication Works
Following is a simplified description of how 802.1X authentication works.
1. A client sends a "request to access" message to an access point. The access point
requests the identity of the client.
2. The client replies with its identity packet, which is passed along to the authentication
server.
3. The authentication server sends an "accept" packet to the access point.
4. The access point places the client port in the authorized state and data traffic is
allowed to proceed.
802.1X Features
The following authentication methods are supported on Windows XP:
●802.1X supplicant protocol support
●Support for the Extensible Authentication Protocol (EAP) - RFC 2284
●Supported Authentication Methods on Windows XP:
❍EAP TLS Authentication Protocol - RFC 2716 and RFC 2246
❍EAP Tunneled TLS (TTLS)
❍Cisco LEAP

❍PEAP
❍EAP-SIM
❍EAP-FAST
❍EAP-AKA
Network Authentication
Open
See Open Authentication.
Shared
See Shared Authentication.
WPA-Personal
See WPA-Personal.
WPA2-Personal
See WPA2-Personal.
WPA Enterprise
Enterprise Mode authentication is targeted to corporate or government environments. WPA
Enterprise verifies network users through a RADIUS or other authentication server. WPA
uses 128-bit encryption keys and dynamic session keys to ensure your wireless network's
privacy and enterprise security. An authentication type is selected to match the
authentication protocol of the 802.1X server.
WPA2 Enterprise
WPA Enterprise authentication is targeted to corporate or government environments. WPA2
Enterprise verifies network users through a RADIUS or other authentication server. WPA2
uses 128-bit encryption keys and dynamic session keys to ensure your wireless network's
privacy and enterprise security. An authentication type is selected to match the
authentication protocol of the 802.1X server. Enterprise Mode is targeted to corporate or
government environments. WPA2 is an improvement over WPA and implements the full IEEE
802.11i standard.