General Dynamics Itronix IX-512AN IX-512AN User Manual Contents
General Dynamics Itronix Corporation IX-512AN Contents
Contents
User Manual 3 INtel

Shared Folder Notification File and printer sharing enables other computers on a
network to access resources on your computer. You
should be cautious when you use your wireless
notebook computer with file and printer sharing
enabled.
Use this feature to receive notifications when you
connect to a wireless network with shared folders that
meet one of the following conditions:
●The Microsoft Windows firewall is disabled
●File and Printer Sharing are enabled as an
exception to the Microsoft Windows firewall
settings.
Unshare shared folders automatically when
connected to an unsecured network.
Select to unshare shared folders automatically, each
time you connect to an unsecured network. This feature
provides some additionally security.
Disable this notification
Select to maintain your current shared folder settings
each time you connect to an open, unsecured network.
Notify when connected to an unsecured network.
Select to receive notification each time you are
connected to an open, unsecured network.
Device to Device (ad hoc)
Network Notification
Receive alerts dependent on the following settings
when connected to an ad hoc network. You are alerted
every two minutes, with a maximum of five alerts.
Notify when no peers have joined the ad hoc
network
Select to receive notification if no peers join the ad hoc
network.
Notify when all peers leave the ad hoc network
Select to receive an alert when all the peers leave the
ad hoc network.

Network Name (SSID)
Notification
Notifies you when the default network name (SSID) is
used to connect to a network. Common examples of
pre-defined, default network names are: wireless,
WLAN, linksys, default.
Connecting to an access point that has the default
network name (SSID) can be a security problem. This
access point usually uses all the default security and,
management settings (for example, Open
authentication; default IP address, user name, or
password). If this is a personal network, change the
network name and security settings to improve the
security of the network.
Notify when connected to a network with the
default SSID name
Select to receive an alert when connected to a network
with the default network name.
WiFi Settings Disable WiFi scanning when associated: This
setting disables scanning for additional WiFi access
points after the adapter connects to an access point
(network). Disabling scanning when already connected
can improve the connection performance.
Wi-Fi Protected Setup* Enable device registration
Turn this on to let the computer act as an external
registrar. In this capacity, the computer can set up an
unconfigured access point or join a configured access
point. After the access point has been configured, the
computer, as an external registrar, can add new
computers (enrollees) to the network. Default state is
OFF.
Turn Enable device registration off to let the
computer detect and connect to a network as an
enrollee.
Notify when Wi-Fi Protected Setup access points
are within range of your computer
Turn to on to let you know when an access point
equipped with Wi-Fi Protected Setup* is within range of
your computer. This is necessary if you want to enroll
(connect) this computer to the access point. Default
state is On.
OK Saves settings and return to the previous page.
Cancel Closes and cancels changes.

Help? Provides help information for this page.
Back to Top
Back to Contents
Trademarks and Disclaimers

Back to Contents
Intel(R) Wireless Troubleshooter (Tools menu)
Intel(R) Wireless Troubleshooter Window
Open Intel(R) Wireless Troubleshooter
Resolve Errors
The Intel Wireless Troubleshooter is an application that can help you resolve wireless
network connection issues. When a connection issue is detected, a desktop alert notification
appears at the bottom right corner of your desktop. Once you click the desktop alert, a
diagnostic message displays the recommended steps to resolve the connection problem. For
example, if a connection problem occurred because of an invalid password, the Profile
Manager application is launched when you click a displayed hyperlink, letting you enter the
correct password.
From the Intel Wireless Troubleshooter you can enable or disable the alert notifications. The
Intel Wireless Troubleshooter is only supported under Microsoft Windows XP*.
Intel(R) Wireless Troubleshooter Window
The Intel Wireless Troubleshooter contains two panes. The left pane displays a list of
available tools. The right pane displays the current connection issue and is divided into two
sections: the error message and the recommended action. The recommended action
contains descriptions about available utilities and helps to resolve the associated connection
issue. If you click on a help link, the help text is displayed in a window. If you click on the
associated issue resolution link, a program is launched to resolve the connection issue.
Name Description
Menu Options File Wireless Event Viewer: Launches Wireless Event Viewer. Also
selectable in the left pane.
Disable Notification/Enable Notification: Select to disable or
enable alert notifications. Also selectable in the left pane.
Exit: Click to exit the Intel Wireless Troubleshooter application.

View History: Displays or removes the History data on the right panel
of the Intel Wireless Troubleshooter.
Tools Manual Diagnostics Tool: Run diagnostic test to verify the
functionality of your wireless adapter. See Manual Diagnostics
Tool for more information.
Help Intel(R) Wireless Troubleshooter Help: Displays online help
for the Intel Wireless Troubleshooter.
About: Displays version information for the Intel Wireless
Troubleshooter.
Available Help The date, time and error message:
●Description of error.
●Link to resolve error (if available). See Resolve Errors next.
●Link to recommended steps to resolve error.
History Maintains a list of the last five alerts. The alerts are listed chronologically,
with the most recent alert at the top of the list.
How to Open Use Intel(R) Wireless Troubleshooter
Open the Intel(R) PROSet/Wireless WiFi Connection Utility. At the Tools menu, click Intel
(R) Wireless WiFi Troubleshooter.
Resolve Errors
Use the following recommendations to resolve detected network connection issues.
Did not receive an IP address
The ad hoc network is idle and no peers have joined the network
The ad hoc network is idle and all peers have left the network
You are connected to a network with default network name (SSID). The network or the
access point may not be configured with security
You are connected to a network that is not configured with security and there are shared
folders detected in your system
The wireless network adapter in the system is disabled
No wireless network adapter was detected in the system
No wireless network adapter driver was installed
Corrupted wireless network adapter driver

Adapter Driver is not loaded
Disconnection from an access point
If you are an advanced user or administrator, use these error messages to diagnose
problems within your wireless network profiles.
The application failed to start
No certificate found
Authentication failed due to invalid user name
Authentication failed due to invalid user credentials
Authentication failed due to an invalid user certificate
Your certificate will expire soon
Authentication failed due to invalid server identity
Authentication failed due to invalid server credentials
Authentication failed due to an invalid server certificate
Authentication failed because the AAA server is unavailable
The AAA server rejected the EAP method
Incorrect PIN for retrieving certificate
Error occurred because the GSM adapter was unexpectedly removed
Smart Card was unexpectedly removed
Authentication failed because timer expired
An administrator profile failed to authenticate
Administrator profile did not receive an IP address
Did not receive an IP address
The wireless adapter failed to get a valid IP address. The wireless security password or
encryption key does not match the one used by the access point. Other causes are: the
wireless network requires a static IP address; there is a problem with the DHCP server; or, a
general network problem.
To clear this message:
●Reenter the wireless security password in the network security settings. See Personal
Security.
●Restart the access point, router, computer, and DSL/cable modem.
●Verify the security configuration on the access point or wireless router. For assistance,
contact your access point or router manufacturer.
●Contact your network administrator for help to set up your wireless connection.

The ad hoc network is idle and no peers have joined the network
If you create an ad hoc network and no peers join that ad hoc network for two minutes, this
alert notifies you that the ad hoc network is idle.
This alert notification is enabled or disabled in the Application Settings.
To clear this message:
1. From the Tools menu, click Application Settings.
2. Scroll down to locate Device to Device (ad hoc) Network Notification.
3. Clear Notify when no peers have joined the ad hoc network.
4. Click OK to save your settings and return to the WiFi connection utility main window.
The ad hoc network is idle and all peers have left the network
If you create or join an ad hoc network with other participants, this alert notifies you when
any or all participants have left the ad hoc network.
This alert notification is set in the Application Settings.
To clear this message:
1. From the Tools menu, click Application Settings.
2. Scroll down to locate Device to Device (ad hoc) Network Notification.
3. Clear Notify when all peers leave the ad hoc network.
4. Click OK to save your settings and return to the WiFi connection utility main window.
You are connected to a network with default network name (SSID).
The network or the access point may not be configured with security
Connecting to an access point that uses a default network name (SSID) can be a security
problem. This access point usually uses all the default security and management settings
(for example, Open authentication, default IP address, user name, or password.) If this is a
personal network, change the network name and security settings to improve the security of
the network.
This alert notification is enabled or disabled in the Application Settings.

To clear this message:
1. From the Tools menu, click Application Settings.
2. Scroll down to locate SSID Notification.
3. Clear Notify when connected to a network with the default SSID name.
4. Click OK to save your settings and return to the WiFi connection utility main window.
You are connected to a network that is not configured with security
and there are shared folders detected in your system
File and printer sharing enables other computers on a network to access resources on your
computer. You should be cautious when you use your wireless portable computer with file
and printer sharing enabled.
If you are alerted when connecting to a wireless LAN with shared folders, you can disable
this notification. See Application Settings.
To clear this message and restore the network shared folders on disconnection:
1. From the Tools menu, click Application Settings.
2. Scroll down to locate Shared Folder Notification.
3. Select Disable this notification to maintain your current shared folder settings each
time that you connect to an open, unsecured network.
4. Click OK to save your settings and return to the WiFi connection utility main window.
The wireless network adapter in the system is disabled
Enable the wireless adapter.
1. Right-click My Computer.
2. Select Properties.
3. Click Hardware.
4. Click Device Manager.
5. Double-click Network Adapters.
6. Right-click the Intel(R) PRO/Wireless adapter that is listed.
7. Click Enable.
8. Click File > Exit to close the Device Manager.
9. Click OK to close System Properties.

No wireless network adapter was detected in the system
The system could not detect an Intel wireless adapter in the system. The adapter may be
removed or not installed.
First verify if there is a wireless adapter listed in the Device Manager:
1. Right-click My Computer.
2. Select Properties.
3. Click Hardware.
4. Click Device Manager.
5. Double-click Network Adapters.
If an Intel(R) PRO/Wireless adapter is listed, update the driver from the Intel Corporation
Support Web site at www.intel.com/support/. If an Intel(R) PRO/Wireless adapter is not
listed, contact your computer manufacturer.
No wireless network adapter driver was detected in the system
The system could not detect an Intel wireless adapter in the system. You may need to
update the wireless adapter driver.
First verify if there is a wireless adapter listed in the Device Manager:
1. Right-click My Computer.
2. Select Properties.
3. Click Hardware.
4. Click Device Manager.
5. Double-click Network Adapters.
If the wireless adapter is listed:
1. Go to Start > Control Panel >Add or Remove Programs.
2. Select Intel(R) PROSet/Wireless WiFi Software.
3. Click Change/Remove.
4. Select repair.
5. Click Next.
If these steps do not resolve the problem, download and install the latest software for the
Intel wireless adapter from the Intel Corporation Support Web site at www.intel.com/
support/. If an Intel(R) PRO/Wireless adapter is not listed, contact your computer

manufacturer.
Corrupted wireless network adapter driver
The system detected that the network driver is corrupted. You need to update the wireless
adapter driver.
1. Right click the Intel(R) PRO/Wireless network card that is installed in your computer.
2. Click Update Driver. The Windows Welcome to the Hardware Update Wizard is
displayed.
3. At the Hardware Update Wizard screen, click Yes, this time only.
4. Click Next.
5. Click Install the software automatically. Or if you know where the driver is
located, click Install from a list or specified location.
If an Intel(R) PRO/Wireless adapter is listed, update the driver from the Intel Corporation
Support Web site at www.intel.com/support/. If an Intel(R) PRO/Wireless adapter is not
listed, contact your computer manufacturer.
If you receive the message Cannot Continue the Hardware Update Wizard, contact the
Intel Corporation Support Web site at www.intel.com/support/.
Adapter Driver is not loaded
The system detected that the wireless adapter driver is not loaded. You need to install/
update the wireless adapter driver.
1. Right click the Intel(R) PRO/Wireless network card that is installed in your computer.
2. Click Update Driver. The Windows Welcome to the Hardware Update Wizard is
displayed.
3. At the Hardware Update Wizard screen, click Yes, this time only.
4. Click Next.
5. Click Install the software automatically. Or if you know where the driver is
located, click Install from a list or specified location.
If an Intel(R) PRO/Wireless adapter is listed, update the driver from the Intel Corporation
Support Web site at www.intel.com/support/. If an Intel(R) PRO/Wireless adapter is not
listed, contact your computer manufacturer.
If you receive the message Cannot Continue the Hardware Update Wizard, contact the

Intel Corporation Support Web site at www.intel.com/support/.
Disconnection from an access point
The following error messages are displayed when the wireless adapter is disconnected from
the network access point.
Disconnect from access point due to failed association.
Disconnect from access point due to authentication failures.
Disconnect from access point due to TKIP Michael Integrity Check failure.
Disconnect from access point due to Class 2 frame non-authentication failure.
Disconnect from access point due to Class 3 frame non-association failure.
Disconnect from access point due to re-association failure.
Disconnect from access point due to Information Element failure.
Disconnect from access point due to EAPOL-Key protocol 4-way handshake failure.
Disconnect from access point due to 802.1X authentication failure.
Recommended action:
Manually reconnect or verify network settings stored in profile then remove the access point
from the Exclude list. For example, on the WiFi connection utility main window, click
Profiles to open the Profiles list. Select the profile and click Connect.
The application failed to start
The application that you specified to start when this profile connected, could not be found.
Verify the path and file name in the Profile Wizard Advanced Settings.
To verify the path and file name:
1. From the WiFi connection utility main window, click Profiles.
2. Select the Profile.
3. Click Properties.
4. Click Advanced.
5. Click Start Application.
6. Click Enable Auto Launch. Verify that the file name and file location path are correct.
7. Click OK to close the Advanced Settings.
8. Click OK to close the General Settings and return to the Profiles list.

No certificate found
This error may occur if a machine certificate or a user certificate was not found in the
relevant certificate store. To resolve, perform the following steps:
1. Verify that a valid machine or user certificate is present in the machine or user
certificate store, depending on the type of profile you are using.
2. If a valid certificate is not present in the store, request a valid machine or user
certificate from the domain's Certificate Authority. Note that the computer needs to be
joined to a domain in order to be eligible to get a machine certificate from the
domain's Certificate Authority.
3. Contact your Administrator for assistance.
Authentication failed due to invalid user name: Reenter user name
This authentication error can be caused by an invalid user name when using either TTLS,
PEAP, LEAP, or EAP-SIM profiles.
Use the following steps to resolve this error:
1. Select the appropriate profile from the Profiles list.
2. Click Properties.
3. Click Next.
4. Select the appropriate 802.1X Authentication Type.
●For TTLS, PEAP and EAP-FAST profiles: Select Use the following for User
Credentials.
❍Verify the User Name information.
❍If Use Windows logon or Prompt each time I connect is selected,
verify that the correct user credentials information is used when you
connect to the wireless network. NOTE: This option is only available if
you have the Single Sign On Pre-logon Connect component installed.
●For LEAP profiles: Select Use the following user name and password and
verify the user name information. If Use Windows logon user name and
password or Prompt for user name and password is selected, make sure
that the correct user credentials information is used when you connect to the
wireless network.
●For EAP-SIM authentication type: Verify that the correct user name is being
used under Specify user name (identity).
5. To save the settings, click OK.

Authentication failed due to invalid user credentials: Reenter
credentials
This authentication error can be caused by invalid user credentials when using either TTLS,
PEAP, LEAP or EAP-FAST profiles.
Use the following steps to resolve this error:
1. Select the appropriate profile from the Profiles list.
2. Click Properties to open the General Settings.
3. Click Next to open the Security Settings.Enterprise Security is selected.
4. The 802.1X Authentication Type should be selected.
5. Select Use the following for User Credentials.
6. Verify the User Name, Domain, and password information.
❍If Use Windows logon or Prompt each time I connect is selected, verify
that the correct user credentials information is used when you connect to the
wireless network.
7. Click OK to save the settings.
Authentication failed due to an invalid user certificate: Select
another certificate
This authentication error can be caused by an invalid user certificate.
Use the following steps to resolve this error:
1. Select the appropriate profile from the Profiles list.
2. Click Properties to open the General Settings.
3. Click Next to open the Security Settings.Enterprise Security is selected.
4. Select the appropriate Authentication Type.
5. For TLS User: You can select to Use the certificate issued to this computer. Or
you can click Use a user certificate on this computer. Then click Select and
choose another user certificate from the list of installed certificates.
6. Click OK.
7. Click OK to save the settings.
Notes about Certificates: The specified identity should match who the certificate is issued
to and should be registered on the authentication server (for example, RADIUS server) that
is used by the authenticator. Your certificate must be valid with respect to the authentication
server. This requirement depends on the authentication server and generally means that the
authentication server must know the issuer of your certificate as a Certificate Authority. You
should be logged in with the same user name you used when the certificate was installed.

Your certificate will expire soon
This message applies to Windows XP* users only. This certificate you are using in your
profile will expire soon. This message does not imply connection failure, but is instead a
warning intended to help you avoid connection failure in the future. The time left from when
this message is first displayed, until the certificate expires, is set by the Administrator. Use
the following steps to resolve this error:
1. In the Intel® Wireless Troubleshooter window, click on the link to update your
certificate.
If you are not able to obtain a new certificate, contact your Administrator.
Authentication failed due to invalid server identity: Reenter server
name
This authentication error can be caused by invalid server identity information.
Use the following steps to resolve this error:
1. Select the appropriate profile from the Profiles list.
2. Click Properties to open the General Settings.
3. Click Next to open the Security Settings.Enterprise Security is selected.
4. Click Next.
5. On this screen, if you have selected Validate Server Certificate, then under the
Certificate Issuer drop down menu, be sure you have selected the correct issuer. Or if
you have selected to Specify Server or Certificate Name, be sure that a valid server of
certificate name is entered. Or if you have selected Any trusted CA, be sure that the
CA certificate is installed in the Trusted Root CA store.
6. Click OK to save the settings.
Authentication failed due to invalid server credentials: Reenter
server credentials
This authentication error can be caused by an invalid server (domain) credential.
Use the following steps to resolve this error:

1. Select the appropriate profile from the Profiles list.
2. Click Properties to open the General Settings.
3. Click Next to open the Security Settings.Enterprise Security is selected.
4. Select the appropriate 802.1X Authentication Type.
●For TTLS, PEAP and EAP-FAST profiles: Select Use the following for User
Credentials.
●Verify the Domain information.
●If Use Windows logon user name or password or Prompt for the
user name and password is selected, verify that the correct domain
credentials information is used when you connect to the wireless
network. NOTE: This option is only available if you have the Single Sign
On Pre-logon Connect component installed.
●For LEAP profiles: Select Use the following user name and password and
verify the domain is correct. If Prompt for the user name and password is
selected, verify that the correct domain and password information is entered
when you connect to the wireless network. (Must match what appears on the
Security settings window.)
5. To save the settings, click OK.
Authentication failed due to an invalid server certificate: Select
another certificate
This authentication error can be caused by an invalid server certificate.
Use the following steps to resolve this error:
1. Select the appropriate profile from the profiles list.
2. Click Properties.
3. Click Next to open the Security Settings.Enterprise Security is selected.
4. Select the appropriate 802.1X Authentication Type.
●For TTLS and PEAP profiles: Verify that the correct Authentication Type is
selected from the list. Click Next to select another certificate from the list of
installed certificates or specify another server or certificate name. Click OK.
●For TLS profiles: Click Select and choose another certificate from the list of
installed certificates and click OK.
6. To save the settings, click OK.
Notes about certificates: The specified identity should match who the certificate is issued
to and should be registered on the authentication server (for example, RADIUS server) that
is used by the authenticator. Your certificate must be valid with respect to the authentication
server. This requirement depends on the authentication server and generally means that the
authentication server must know the issuer of your certificate as a Certificate Authority. You
should be logged in with the same user name you used when the certificate was installed.

Authentication failed because the AAA server is unavailable
The wireless adapter is associated to the access point, but the 802.1X authentication cannot
be completed because of a response from the authentication server.
Use the following steps to resolve this error:
1. Select the profile
2. Click Connect and attempt to associate with the network and authenticate with the
server.
The AAA Server rejected the EAP method
This error occurs when the AAA Server does not accept the configured authentication.
Use the following steps to resolve this error:
1. Double-click the Taskbar icon to open the WiFi connection utility.
2. Click Profiles on the WiFi connection utility main window.
3. Select the associated or last-used profile from the Profiles list.
4. Click Properties to open the General Settings.
5. Click Next to open the Security Settings.
6. Verify that Enable 802.1X is selected.
7. Verify that the correct authentication type is selected.
8. Enter the required security information.
9. Click OK. The profile is now reapplied. The WiFi connection utility attempts to connect
to the wireless network.
Incorrect PIN for retrieving certificate: Reenter PIN
The certificate retrieval failed because of an incorrect PIN.
Recommended action: Enter the correct PIN.

Error occurred because the GSM adapter was unexpectedly removed
This error occurs when the GSM adapter is not fully inserted or is unexpectedly removed
from the mobile station.
Use the following steps to resolve this error:
1. Reinsert the GSM adapter.
2. Double-click the Intel PROSet/Wireless WiFi Software icon at the bottom right of
the screen.
3. Select the associated or last-used profile from the profiles list.
4. Click Connect. The profile is now re-applied. The WiFi connection utility attempts to
connect to the wireless network.
Smart Card was unexpectedly removed
This error occurred because the Smart Card was unexpectedly removed.
Use the following steps to resolve this error:
1. Insert the Smart Card.
2. Select the 802.1X EAP-SIM authentication profile.
3. Click Connect to try to associate with the network.
Authentication failed because timer expired
Authentication failed because the authentication timer expired while this mobile station was
authenticating. A Rogue access point or a problem with the RADIUS server could have been
the reason for the problem.
Recommended action:
●If a rogue access point is suspected, consider adding this access point to the excluded
access point list to prevent the wireless adapter from connecting to this access point
in the future.
●If a rogue access point is not suspected, click the profile in the Profiles list. Click
Connect to associate with the network and attempt to authenticate with the server.

An administrator profile failed to authenticate
This error occurs when the credentials in the profile are not accepted by the authenticator
(for example, an access point or AAA server). Please contact your Administrator to resolve
this problem.
Administrator profile did not receive an IP address
The wireless adapter failed to get a valid IP address. The wireless security password or
encryption key does not match the one used by the access point. Other causes are: the
wireless network requires a static IP address; there is a problem with the DHCP server; or, a
general network problem.
To clear this message, contact your network administrator to help set up your wireless
connection.
Back to Top
Back to Contents
Trademarks and Disclaimers
Back to Contents
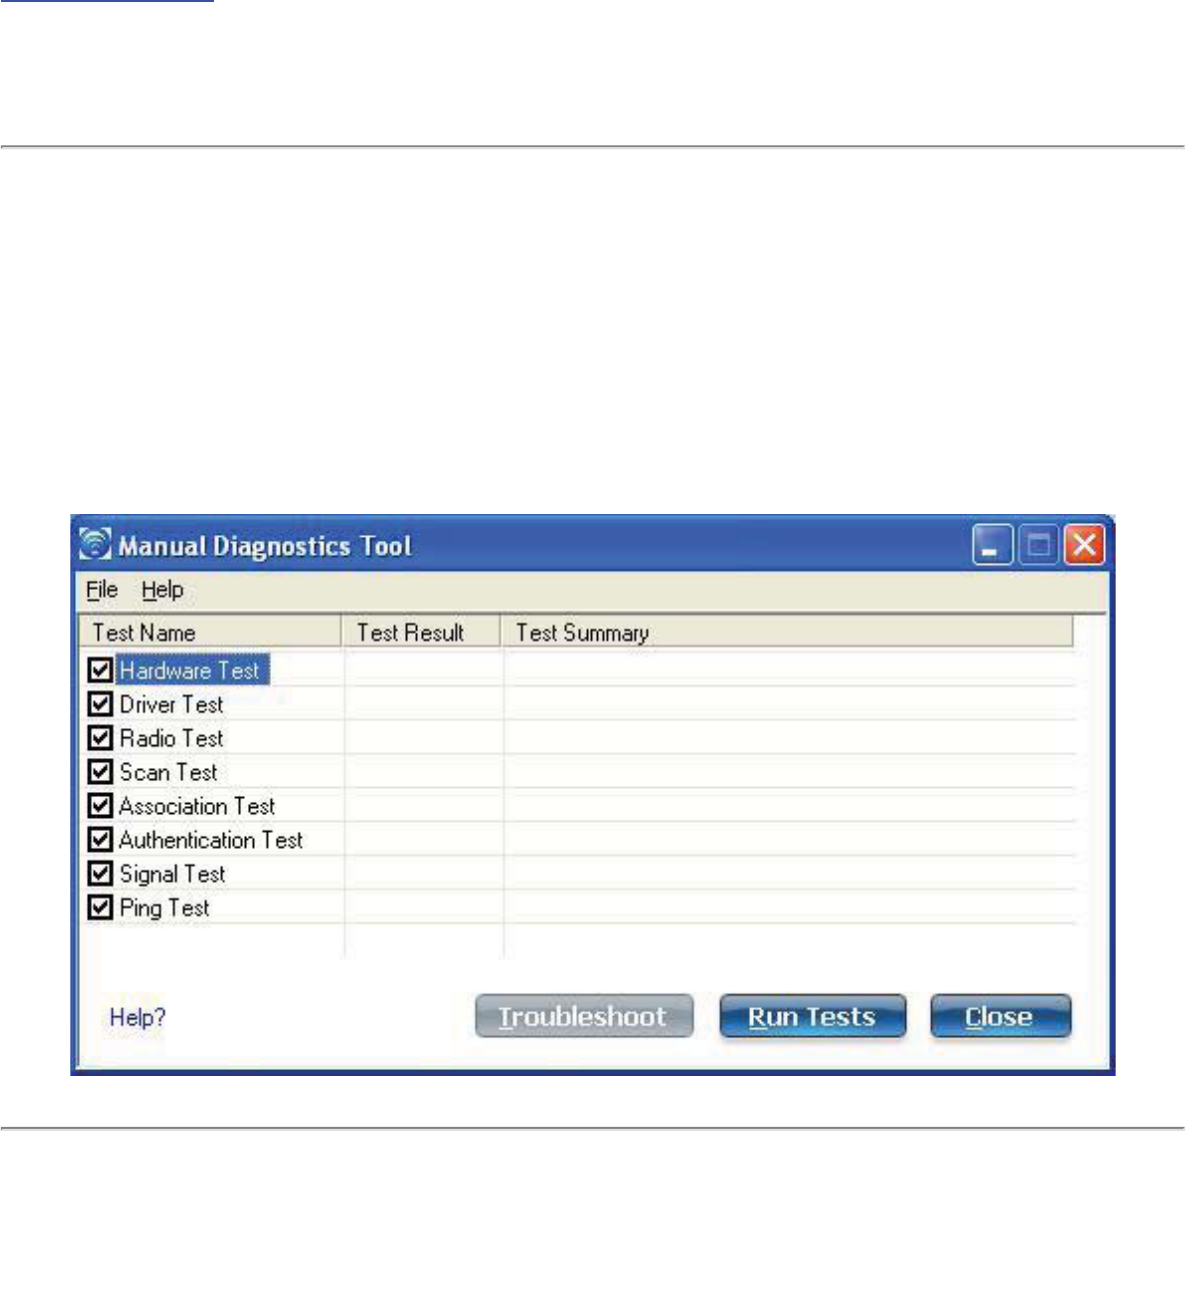
Manual Diagnostics Tool
The Manual Diagnostics Tool lets you run a set of diagnostics tests that verify the
functionality of your wireless adapter. There are two levels of diagnostics details represented
in this tool: user level and technical support level. At the user level, the tool only shows a
short description of the different diagnostics steps that are being taken and only shows a
pass or fail indication for each step.
The technical support level includes the creation of a log file which contains detailed
information on all the executed tests. This log file can be saved to a text file and emailed to a
technical support department to troubleshoot connection problems.
Using the Manual Diagnostics Tool
To open the Manual Diagnostics tool:
●For computers running Windows XP*, first open the Intel(R) PROSet/Wireless WiFi
Connection Utility. Then under the Tools menu, click Manual Diagnostics tool.

●For computers running Windows Vista*, click Start > All Programs > Intel PROSet
Wireless > WiFi Manual Diagnostics.
To set the log file location:
1. Inside the Manual Diagnostics tool, click File.
2. Click Settings. The log file named WirelessDiagLog.csv contains the results of the
tests. It is saved as a text file and can be used to troubleshoot network connectivity
issues.
3. Click Browse to specify where you want the log file to be saved.
4. Click OK to apply your changes and return to the Manual Diagnostics Tool. The next
time you run the tests, the log file will be save to your specified location.
To run the tests:
1. Click the check box next to each test to select the test to run.
2. Click Run Tests to run the selected tests. The test results will be saved to a file
named WirelessDiagLog.csv.
3. Click Close to close the Manual Diagnostics Tool.
Available Tests
Name Description
Hardware Test The test passes if the wireless adapter is present and accessible.
The test fails if the adapter is not present or present but disabled.
The test summary displays whether the wireless hardware is
enabled or disabled.
Troubleshooting
●Verify that your adapter is listed under Network adapters in
the Device Manager.
●If the adapter is not listed, right-click Network adapters and
select Scan for hardware changes. You can also reboot
your system.
●Verify that your adapter is enabled in the Device Manager.
When the adapter is disabled, a red Xis displayed on the
device. Right-click the adapter and select Enable from the
menu.
●When the adapter displays a yellow exclamation point, right-
click the adapter and reinstall the driver.
●Contact your computer manufacturer for other
troubleshooting options.

Driver Test The test summary displays the Intel(R) PRO/Wireless Network
Connection driver supported by the wireless adapter. The test
verifies if the driver binary version is compatible with the installed
version of the WiFi connection utility. The test fails if the driver
binary is not found or if the driver version does not match the WiFi
connection utility software version (for example, version 11.1.x.x
and driver version 9.0.x.x, 9.1.x.x, or 11.1.x.x).
Troubleshooting
●Reinstall the drivers using the WiFi connection utility.
Radio Test The test summary displays Radio On or Radio Off. The test queries
the current radio state. If the radio is switched on, the test passes.
If the radio is off, the test fails.
Troubleshooting
Verify that your wireless adapter's radio is on. There are two
methods to turn the radio on and off:
●The hardware switch
●The WiFi On/WiFi Off button in the WiFi connection utility
main window. See Turn On or Off the Wireless Radio for more
information.
Scan Test The test queries the wireless networks within range of your wireless
adapter. The test passes if networks can be seen in the scan list.
The Test Summary displays the number of networks available to
connect to.
Troubleshooting
●Verify that you are within range of an access point.
●Switch the wireless radio to off and back to on.
●Verify that the wireless band setting matches the access point
band setting.
●Switch the access point to off and back to on.

Association Test The test summary displays Associated or Not Associated.
Association is the establishment and maintenance of the wireless
link between devices. When security is enabled, the devices only
exchange security credentials. The test checks for wireless
connectivity. The test passes if the client is associated successfully.
Troubleshooting
●When the access point signal strength is low, use the signal
test listed below.
●Verify that a profile has been created. If created:
❍Verify that the profile SSID matches the access point
Network Name (SSID).
❍Remove the profile and create a new profile.
●Verify that your wireless network is not included in the
Exclude (profiles) List.
●Verify that the MAC address has not been excluded in the
access point.
Authentication Test Describes the process after association, during which the identity of
the wireless device or end-user is verified and then allowed network
access. The test queries for authentication state information,
including all Cisco Compatible Extensions and security-related
information. The test passes if the client is authenticated
successfully. The test fails if the WEP key or other credentials are
not authenticated. The Test Summary displays whether
authentication is required for the network connection.
Troubleshooting
●Edit your profile to ensure the correct credentials have been
used for the WEP key, PSK, password or certificates.
●Remove the existing profile and create a new profile.

Signal Test The test summary displays the signal quality. If the signal quality is
low, use the Troubleshoot button to diagnose and fix the problem.
Troubleshooting
●Move your computer 10 to 20 feet from the wireless access
point or router.
●Reduce interference by moving away from appliances
(microwaves, cell phones or 2.4 GHz phones) or access points
using the same channel.
●Try increasing the transmission power of the access point.
Ping Test The test verifies whether the wireless adapter successfully sent
messages to and received replies from the access point IP address,
default gateway, DHCP server (if enabled) and DNS servers. The
test summary displays whether replies from these entities were
received.
Example: Response: AP, default gateway. No Response: DHCP
server
NOTE: If the ping tests to this access point and default gateway are
successful but the ping test to the DNS server fails this is not a
wireless network issue but a general network issue.
Troubleshooting
●Disable the security firewall and try the ping test again.
●Contact the access point manufacturer to troubleshoot your
home network.
●Enterprise users should contact their network administrator.
Troubleshoot Diagnose and fix problems displayed by each of the tests. The
Troubleshoot button becomes active if the test fails.
Run Tests Executes the tests that you have selected.
Close Closes the page.
Help? Provides help information for this page.
Back to Top
Back to Contents

Trademarks and Disclaimers
Back to Contents
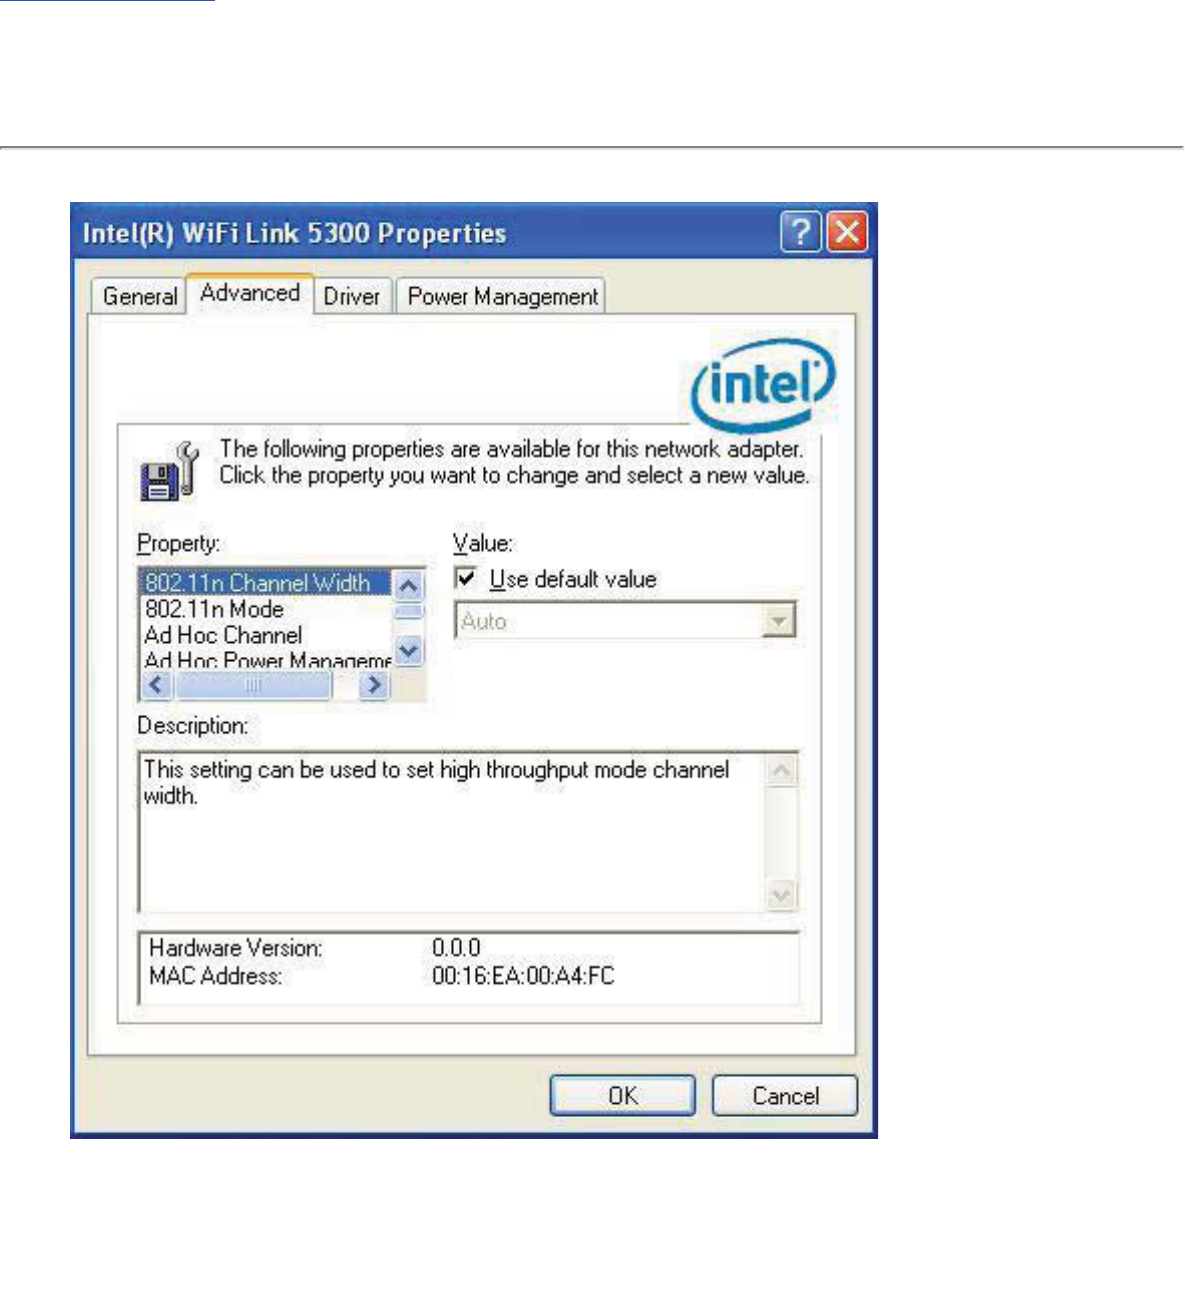
Adapter Settings (Advanced tab)
The Adapter Settings, advanced tab, displays the device properties for the wireless adapter
installed on your computer.
It may be one of the following network connection adapters:
●Intel(R) WiMAX/WiFi Link 5350

●Intel(R) WiMAX/WiFi Link 5150
●Intel(R) WiFi Link 5300
●Intel(R) WiFi Link 5100
●Intel(R) Wireless WiFi Link 4965AGN
●Intel(R) Wireless WiFi Link 4965AG_
●Intel(R) PRO/Wireless 3945ABG Network Connection
●Intel(R) PRO/Wireless 2915ABG Network Connection
●Intel(R) PRO/Wireless 2200BG Network Connection.
For Windows XP* users, to see the adapter settings, on the Advanced Menu click Adapter
Settings. Select the Advanced tab.
Adapter Settings Description
Name Description
802.11n Channel Width (2.4
GHz)
Set high throughput channel width to maximize
performance. Set the channel width to Auto or
20Mhz.Auto is the default setting. Use 20MHz if
802.11n channels are restricted.
NOTE: This setting is available only if the wireless
adapter is one of the following:
●Intel(R) WiMAX/WiFi Link 5350
●Intel(R) WiMAX/WiFi Link 5150
●Intel(R) WiFi Link 5300
●Intel(R) WiFi Link 5100
●Intel(R) Wireless WiFi Link 4965AGN
802.11n Channel Width (5.2
GHz)
Set high throughput channel width to maximize
performance. Set the channel width to Auto or
20Mhz.Auto is the default setting. Use 20MHz if
802.11n channels are restricted.
NOTE: This setting is available only if the wireless
adapter is one of the following:
●Intel(R) WiMAX/WiFi Link 5350
●Intel(R) WiMAX/WiFi Link 5150
●Intel(R) WiFi Link 5300
●Intel(R) WiFi Link 5100
●Intel(R) Wireless WiFi Link 4965AGN

802.11n Mode The 802.11n standard builds on previous 802.11
standards by adding multiple-input multiple-output
(MIMO). MIMO increases data throughput to
improve transfer rate. Select Enabled or Disabled
to set the 802.11n mode of the adapter. Enabled is
the default setting.
An administrator can enable or disable support for
high throughput mode to reduce power-
consumption or conflicts with other bands or
compatibility issues.
NOTE: This setting is available only if the adapter is
one of the following:
●Intel(R) WiMAX/WiFi Link 5350
●Intel(R) WiMAX/WiFi Link 5150
●Intel(R) WiFi Link 5300
●Intel(R) WiFi Link 5100
●Intel(R) Wireless WiFi Link 4965AGN
NOTE: To achieve transfer rates greater than 54
Mbps on 802.11n connections, WPA2-AES security
must be selected. No security (None) can be
selected to enable network setup and
troubleshooting.
Ad Hoc Channel Unless the other computers in the ad hoc network
use a different channel from the default channel,
there is no need to change the channel.
Value: Select the permitted operating channel from
the list.
●802.11b/g: Select this option when 802.11b
and 802.11g (2.4 GHz) ad hoc band
frequency is used.
●802.11a: Select this option when 802.11a (5
GHz) ad hoc band frequency is used.
NOTE: When an 802.11a channel is not displayed,
initiating ad hoc networks is not supported for
802.11a channels.

Ad Hoc Power Management Set power saving features for device to device (ad
hoc) networks.
●Disable: Select when connecting to ad hoc
networks that contain stations that do not
support ad hoc power management
●Maximum Power Savings: Select to
optimize battery life.
●Noisy Environment: Select to optimize
performance or connecting with multiple
clients.
NOTE: This setting is only available if the wireless
adapter is one of the following:
●Intel(R) WiMAX/WiFi Link 5350
●Intel(R) WiMAX/WiFi Link 5150
●Intel(R) WiFi Link 5300
●Intel(R) WiFi Link 5100
●Intel(R) Wireless WiFi Link 4965AGN
●Intel(R) PRO/Wireless 3945ABG
Ad Hoc QoS Mode Quality of Service (QoS) control in ad hoc networks.
QoS provides prioritization of traffic from the access
point over a wireless LAN based on traffic
classification. WMM (Wi-Fi Multimedia) is the QoS
certification of the Wi-Fi Alliance (WFA). When WMM
is enabled, the adapter uses WMM to support
priority tagging and queuing capabilities for Wi-Fi
networks.
●WMM Enabled (Default)
●WMM Disabled
NOTE: This setting is only available if the wireless
adapter is one of the following:
●Intel(R) WiMAX/WiFi Link 5350
●Intel(R) WiMAX/WiFi Link 5150
●Intel(R) WiFi Link 5300
●Intel(R) WiFi Link 5100
●Intel(R) Wireless WiFi Link 4965AGN
●Intel(R) PRO/Wireless 3945ABG

Fat Channel Intolerant This setting communicates to surrounding networks
that this wireless adapter is not tolerant of 40MHz
channels in the 2.4GHz band. The default setting is
for this to be turned off (disabled), so that the
adapter does not send this notification.
NOTE: This setting is available only if the adapter is
one of the following:
●Intel(R) WiMAX/WiFi Link 5350
●Intel(R) WiMAX/WiFi Link 5150
●Intel(R) WiFi Link 5300
●Intel(R) WiFi Link 5100
●Intel(R) Wireless WiFi Link 4965AGN
NOTE: This setting is only available to the user and
is not available for export in an administrator
package.
HD Mode In a wireless network environment where several
access points are nearby, this feature will reduce
interference and improve your wireless connection.
The default setting is for this to be turned off
(disabled).
NOTE: This setting is available only if the adapter is
one of the following:
●Intel(R) WiMAX/WiFi Link 5350
●Intel(R) WiMAX/WiFi Link 5150
●Intel(R) WiFi Link 5300
●Intel(R) WiFi Link 5100
●Intel(R) Wireless WiFi Link 4965AGN
Mixed mode protection Use to avoid data collisions in a mixed 802.11b and
802.11g environment. Request to Send/Clear to
Send (RTS/CTS) should be used in an environment
where clients may not hear each other. CTS-to-self
can be used to gain more throughput in an
environment where clients are in close proximity
and can hear each other.

Power Management Lets you select a balance between power
consumption and adapter performance. The wireless
adapter power settings slider sets a balance
between the computer's power source and the
battery.
●Use default value: (Default) Power settings
are based on the computer's power source.
●Manual: Adjust the slider for the desired
setting. Use the lowest setting for maximum
battery life. Use the highest setting for
maximum performance.
NOTE: Power consumption savings vary based on
Network (Infrastructure) settings.
Preamble Mode Changes the preamble length setting received by
the access point during an initial connection. Always
use Auto Tx Preamble to provide optimal network
throughput. Auto Tx Preamble allows automatic
preamble detection. If supported, short preamble
should be used. If not, use Long Tx Preamble.
NOTE: This setting is only available if the adapter is
an Intel(R) PRO/Wireless 2915ABG Network
Connection or an Intel(R) PRO/Wireless 2200BG
Network Connection.
Roaming Aggressiveness This setting lets you define how aggressively your
wireless client roams to improve connection to an
access point.
●Default: Balanced setting between not
roaming and performance.
●Lowest: Your wireless client will not roam.
Only significant link quality degradation
causes it to roam to another access point.
●Highest: Your wireless client continuously
tracks the link quality. If any degradation
occurs, it tries to find and roam to a better
access point.

Throughput Enhancement Changes the value of the Packet Burst Control.
●Enable: Select to enable throughput
enhancement.
●Disable: (Default) Select to disable
throughput enhancement.
Transmit Power Default Setting: Highest power setting.
Lowest: Minimum Coverage.: Set the adapter to
the lowest transmit power. Enables you to expand
the number of coverage areas or confine a coverage
area. Reduces the coverage area in high traffic
areas to improve overall transmission quality and
avoids congestion and interference with other
devices.
Highest: Maximum Coverage.: Set the adapter to
a maximum transmit power level. Select for
maximum performance and range in environments
with limited additional WiFi radio devices.
NOTE: The optimal setting is for a user to always
set the transmit power at the lowest possible level
that is still compatible with the quality of their
communication. This allows the maximum number
of wireless devices to operate in dense areas and
reduce interference with other devices that it shares
the same radio spectrum with.
NOTE: This setting takes effect when either
Network (Infrastructure) or Device to Device (ad
hoc) mode is used.

Wireless Mode Select which mode to use for connection to a
wireless network:
●802.11a only: Connect the wireless adapter
to 802.11a networks only.
●802.11b only: Connect the wireless adapter
to 802.11b networks only.
●802.11g only: Connect the wireless adapter
to 802.11g networks only.
●802.11a and 802.11g: Connect the wireless
adapter to 802.11a and 802.11g networks
only.
●802.11b and 802.11g: Connect the wireless
adapter to 802.11b and 802.11g networks
only.
●802.11a, 802.11b, and 802.11g: (Default)
- Connect to either 802.11a, 802.11b or
802.11g wireless networks.
NOTE: These wireless modes (Modulation type)
determine the discovered access points displayed in
the WiFi Networks list
OK Saves settings and returns to the previous page.
Cancel Closes and cancels any changes.
Microsoft Windows* Advanced Options (Adapter Settings)
To access the Windows XP* Advanced options:
1. Start Windows and log on with administrative privileges.
2. From your desktop, right-click My Computer and click Properties.
3. Click the Hardware tab.
4. Click Device Manager.
5. Double-click Network adapters.
6. Right-click the name of the installed wireless adapter that is in use.
7. Click Properties.
8. Select the Advanced tab.
9. Select the Property you want (for example, Mixed Mode Protection, Power
Management).
10. To select a new value or setting, click Use default value to clear the checkbox. Then
select a new value or setting. To return to the default value, click the Use default
value checkbox. (The Use default value box is not present for all properties, for
example, Ad Hoc Channel. In this case, simply select the setting you want.)
11. To save your settings and exit the window, click OK.

Back to Top
Back to Contents
Trademarks and Disclaimers

Back to Contents
Advanced Statistics (Advanced menu)
The Advanced Statistics provides current adapter connection information. This information
defines how the adapter communicates with an access point. At the Advanced menu, click
Advanced Statistics to access.
Advanced Statistics Description
Name Description
Statistics Advanced Statistics: This information pertains to how the
adapter communicates with an access point.
Association: If the adapter finds an access point to
communicate with, the value is in range. Otherwise, the value is
out of range.
●AP MAC Address: The twelve-digit MAC address
(00:40:96:31:1C:05) of the access point.
●Number of associations: The number of times the
access point has found the adapter.
●AP count: The number of available access points within
range of the wireless adapter.
●Number of full scans: The number of times the adapter
has scanned all channels for receiving information.
●Number of partial scans: The number of scans that
have been terminated.
Roaming: This information contains counters that are related to
reasons for the adapter roaming. Roaming occurs when an
adapter communicates with one access point and then
communicates with another for better signal strength.
●Roaming count: The number of times that roaming
occurred.
●AP did not transmit: The adapter did not receive radio
transmission from the access point. You may need to reset
the access point.
●Poor beacon quality: The signal quality is too low to
sustain communication with the access point. Either you

have moved the adapter outside the coverage area of the
access point or the access point's device address
information has been changed.
●AP load balancing: The access point ended its
association with the adapter based on the access point's
inability to maintain communication with all its associated
adapters. Too many adapters are trying to communicate
with one access point.
●AP RSSI too low: The Receive Signal Strength Indicator
(RSSI) is too low to maintain an association with the
adapter. You may have moved outside the coverage area
of the access point or the access point could have
increased its data rate.
●Poor channel quality: The quality of the channel is low
and caused the adapter to look for another access point.
●AP dropped mobile unit: The access point dropped a
computer from the list of recognizable mobile devices. The
computer must re-associate with an access point.
Miscellaneous: Use this information to determine if an
association with a different access point increases performance
and helps maintain the highest possible data rate.
●Received beacons: Number of beacons received by the
adapter.
●Percent missed beacons: Percent value for missed
beacons.
●Percent transmit errors: The percentage of data
transmissions that had errors.
●Signal Strength: Signal strength of the access point that
the adapter communicates with displayed in decibels
(dBm).
Transmit/Receive
(Tx/Rx) Statistics
Displays percent values for non-directed and directed packets.
Total host packets: The total number of directed and non-
directed packets counts.
●Transmit - (Mbps)
●Receive - (Mbps)
●Non-directed packets: The number of received packets
broadcast to the wireless network.
●Directed packets: The number of received packets sent
specifically to the wireless adapter.
●Total Bytes: The total number of bytes for packets

received and sent by the wireless adapter.
Logging Set the duration that you want to record statistical data for your
wireless adapter.
Configure logging settings: Click Settings to set how
frequently you want to log the statistics. You can set the number
of seconds and how many hours you want the statistics to be
logged.
To change the storage location of the log file.
1. Click Browse to specify a new log file location. The
current path is displayed. The default location is in the
Intel PROSet/Wireless WiFi program files directory.
2. Click Open to close and apply the new file path.
3. Click Close to exit Advanced Statistics.
Start/Stop Logging: Click this button to start and stop logging.
When you click Start logging, statistical information (described
above) is accumulated. When you click Stop Logging, the
accumulation ends and this information is saved to a file that
you can open and view.
View Log File...: Click this button to open the Wireless folder
under Program Files/Intel (this is the default location). Log files
are named using the month, day, and year, plus the number of
the log created on that day. For example: 03122007_001.htm.
The log file provides:
●Date and Time
●Adapter Information
●Connection Information
●Transmit/Receive Statistics
NOTE: An administrator can disable this feature.
Reset Stats Resets the adapter statistical counters back to zero and begins
making new data measurements.
Close Closes and returns to the main window.
Help? Provides help information for this page.
For information about importing/exporting user-created profiles, see Import or Export
Profiles.

Back to Top
Back to Contents
Trademarks and Disclaimers

Back to Contents
Exclude List Management
The Exclude list is a list of networks that you will not automatically be connected to. This
feature lets you restrict automatic access to a listed network or access point, even if you
have created a profile for that network. Use Exclude List Management to exclude entire
wireless networks (SSID).
There are two ways to access the Exclude List Management screen:
●Click Manage Exclusions at the Profiles menu, or
●At the main window, select a network and click the Properties button. Then click
Manage Exclusions.
NOTE: If an administrator has designated a network for exclusion, only an administrator
using the Administrator Tool may remove the network from the Exclude List.
NOTE: Administrators can exclude profiles from the Administrator Tool. See Administrator
Tool.
This icon following icon on the WiFi Networks list indicates that a network has been excluded.
Name Description
Network Name Name (SSID) of the wireless network.
Radio Displays the band if there is a DHCP error.
MAC Address The MAC address of the access point, or all access points or stations in
the network.
Reason The source of the exclusion, the User.

Details Click Details to learn specific information on how the access point was
excluded and how to remove it from exclusion. Following is an example:
This network has been excluded from automatic connection for the
following reasons.
●User has excluded this network manually.
To make this network (or access points) eligible for automatic connection
again, select it and click the Remove button.
NOTES:
●The Reset list button removes all entries except rogue and
administrator excluded access points from the list.
●Rogue access points are removed from the list when a connection
is made to this access point using valid credentials.
●All excluded access points in a network (other than rogue and
administrator excluded) are removed from the list when a profile
for that network is applied manually.
Entries that are dimmed are excluded rogue or administrator excluded
access points. Rogue or administrator excluded access points cannot be
removed from the list manually.
Add Click the Add button to enter the network name (SSID) that you want to
add to the Exclude List.
1. Network Name: Enter the network name.
2. Click OK.
Remove Remove an entry from the list.
1. Select the entry from the list.
2. Click Remove.
3. You are asked: Do you want to remove the selected item
from the Exclude List?
4. Click Yes to remove the profile from the list.
Reset list Removes all of the networks and access points from the Exclude List.
Close Closes and saves settings.
Help? Provides help information for this page.

Back to Top
Back to Contents
Trademarks and Disclaimers

Back to Contents
Turn WiFi Radio On or Off
To switch the wireless radio on or off, use one of the following methods:
●The optional hardware radio switch on your computer
●Intel(R) PROSet/Wireless WiFi Connection Utility
●Microsoft Windows
NOTE: When your computer is switched on, the radio is constantly transmitting
signals. In certain situations, as in an airplane, signals from the radio may
cause interference. Use the following methods if you need to turn off the radio
and use your notebook without emitting radio signals.
Use the Optional Computer Radio on or off Switch
If your computer has an external switch installed, use it to switch the radio on or off. See
the computer manufacturer's documentation for more information about this switch. If you
have Intel PROSet/Wireless WiFi software installed, the current state of the radio displays in
the WiFi connection utility main window and on the Taskbar.
Use Intel PROSet/Wireless WiFi to Switch the Radio on or off
From Intel PROSet/Wireless WiFi software, the radio can be switched on or off. The status
icon on Intel PROSet/Wireless WiFi displays the current state of the radio.
From the Intel PROSet/Wireless WiFi main Window, click WiFi On /WiFi Off to toggle the
radio on or off.
Switch the radio on or off from the Taskbar Icon
To switch the radio on or off, click the Taskbar icon and select WiFi On /WiFi Off.
Use Windows to turn on or off the Radio
The radio can be turned off using Windows.

NOTE: If you turned off the radio from Microsoft Windows, then you must use
Microsoft Windows to turn the radio on. You cannot use a hardware switch or
the WiFi connection utility to enable the radio if the radio has been turned off
using Windows.
Windows XP
1. At the Start Menu, click Connect to. Right click Wireless Network Connection and
select Disable.
2. Or if you have more than one wireless adapter, at the Start Menu, click Connect to >
Show all connections. Right click the desired adapter and select Disable.
You can use the same method to turn the radio back on.
Back to Top
Back to Contents
Trademarks and Disclaimers

Back to Contents
Application Settings (Administrator Tool)
An administrator can configure the Intel(R) PROSet/Wireless WiFi Connection Utility software
application settings to control how the application behaves on the user's computer, and to
select what level of control users have over various aspects of their wireless connections.
These settings are configured using the Administrator Tool, and are not the same as those
listed under the Tools Menu.
To configure Application Settings:
1. Click Include Application Settings in this package.
2. Select the settings that you want. Some settings require more information. Each
setting is listed in the next table.
Name Description
802.1X Authentication Enable a user to create or connect to profiles that
support different 802.1X authentication EAP types.
Select which 802.1X authentication EAP types you
want enabled on a user’s computer: EAP LEAP,EAP
PEAP,EAP TLS,EAP SIM,EAP TTLS,EAP FAST,EAP
AKA.
AAA In Control Notify when another application uses the wireless
adapter.
Adapter Switching If enabled, then whenever a valid wired Ethernet
connection is detected, the WiFi connection utility
will automatically close any wireless network
connections and turn off the wireless radio. If the
system looses its wired Ethernet connection, the
WiFi connection utility will automatically turn on the
wireless adapter radio and attempt to connect to the
last connected profile. If the last connected network
is not available, the WiFi connection utility will
attempt to connect to the first available wireless
network based on the preferred Profile List.
NOTE: This behavior is for the system as a whole
and is not specific to any user.

NOTE: If the user has manually turned off the
wireless radio, the radio will not turn on again when
an wired Ethernet connection is lost. The user must
turn the radio back on for wireless connections to be
established.
Administrator Tool Disable access to the Administrator Tool on a user’s
computer.
Application Auto Launch Select to start a batch file, executable file, or script
automatically when a specific profile connects to the
network. For example, start a Virtual Private
Network (VPN) session automatically whenever a
user connects to a wireless network.
Application On Radio Toggle Enables a third-party application to disable the Intel
(R) PROSet/Wireless WiFi Connection Utility, WiFi
On / WiFi Off button.
CCXv4 Select Enable CCXv4 to Enable Cisco Compatible
Extensions, version 4 (CCXv4) features for EAP-
FAST profiles.
NOTE: The EAP-FAST Authority Identifier (A-ID)
Groups feature in the Administrator Tool is
unavailable if CCXv4 is not enabled.
Select which of the following prompts to enable or
disable on a user's computer for EAP-FAST PAC
provisioning:
Turn off prompts and warnings for
unauthenticated provisioning: Option to turn off
prompts and warnings for PAC auto-provisioning if
there is no PAC or there is no PAC that matches the
A-ID sent by the server that it is connected to.
Turn off prompts when switching default
server (A-ID): Option to turn off prompts when a
client encounters a server that has provisioned a
PAC before but is not currently selected as the
default server.
Turn off unauthenticated provisioning after
PAC is provisioned: Option to turn off auto-
provisioning automatically after a PAC for that A-ID
has been provisioned.

NOTE: This feature is installed through an
Administrator Package when a user's computer has
one of the following adapters:
●Intel(R) WiMAX/WiFi Link 5350
●Intel(R) WiMAX/WiFi Link 5150
●Intel(R) WiFi Link 5300
●Intel(R) WiFi Link 5100
●Intel(R) Wireless WiFi Link 4965AGN
●Intel(R) Wireless WiFi Link 4965AG_
●Intel(R) PRO/Wireless 3945ABG Network
Connection
Cache Credentials Select to save credentials after a user logs on. If the
wireless connection temporarily disconnects, the
saved credentials are used upon reconnection. The
credentials are cleared when the user logs off.
NOTE: if cleared, the Prompt each time I connect
option is unavailable when creating profiles
Certificate Expiry Warning If specified, the WiFi connection utility will warn
users when the certificates are going to expire. The
provided URL will allow them to update their
certificates from a certificate server.
Device to Device
(ad hoc)
Enable or disable whether a user is able to either
create Device to Device (ad hoc) profiles or join
Device to Device (ad hoc) networks.
Select one of the following to enable or disable
whether the user can connect to device to device
networks:
●Enable device to device networking
●Enable only secure device to device networking
●Disable device to device networking
Select to either allow a user to configure profiles
with device to device (ad hoc) settings or prevent
configuration of Device to Device (ad hoc) profiles.
●Show device to device application settings

●Hide device to device application settings
To remove the Device to Device (ad hoc) operating
mode from the Create Wireless Profile General
Settings, select both Disable device to device
networking and Hide device to device
application settings. This prevents a user from
creating profiles that support Device to Device (ad
hoc) network.
Import and Export Select to import to or export profiles from a user’s
computer. Enable permits auto import of user
profiles when copied to an auto import folder.
Maintain Connection Select to hide the Maintain Connection option in the
Create Wireless Profile Advanced Settings. This
Maintain Connection option maintains the wireless
connection with a user profile after log off.
NOTE: The Maintain Connection option may be used
with Nortel VPN client when it is configured to
Logoff on Connect.
Maintain SmartCard Connection Select to maintain the connection if the smart card is
removed while the wireless device is connected to a
network that uses smart card credentials. The
default behavior for the WiFi connection utility is to
close the connection that uses smart card
credentials if the smart card is removed. Turning
this feature On will cause the connection to remain
connected (unless re-authentication is required for
another reason). Select to maintain a connection if
the smart card is removed while the wireless device
is connected to a network using smart card/SIM
credentials.
NOTE: This setting is not available for Windows
Vista* client profiles.
Message On Radio Toggle Enables a third-party application to notify a user
that the WiFi connection utility radio is either on or
off.

Microsoft Windows XP
Coexistence
Select Enable Microsoft Wireless Zero
Configuration and Intel PROSet/Wireless WiFi
to coexist on this system.
Enable this option to allow Microsoft Wireless Zero
Configuration and the WiFi connection utility to exist
together on this system. When you select this
option, you prevent Microsoft Windows XP Wireless
Zero Configuration Service from being disabled when
the WiFi connection utility is enabled.
Persistent Connection Select Ensure that persistent connection and
computer policies are updated prior to user log
on.
NOTE: Updating policies may delay the log on
screen for up to two minutes.
Pre-logon Cisco Mode Enable Cisco Mode during a Pre-logon connection.
Cisco access points have the capability to support
multiple wireless network names (SSIDs) but only
broadcast one. In order to connect to such an access
point, an attempt is made to connect with each
profile. This is referred to as Cisco Mode.
NOTE: The Pre-logon connection may increase the
connection time.
Profile Connectivity Control profile connection by the user.
Disable user-profile switching. Leaving this
setting Off lets the user connect to both user and
administrator profiles. By turning this setting On, the
user can only connect to administrator profiles. The
administrator also chooses which administrator
profiles are available to the user, as follows:
●Allow the user to connect to All administrator
profiles.
●Allow the user to only connect to the First
administrator profile.

Security Level Select the security level on a user's computer.
Users are able to connect to profiles only with
this security level.
●Allow the user to connect to networks with
Personal Security only.
Shared Folder Notification Select the shared folder notification setting on a
user's computer.
●Unshare shared folders automatically when
connected to an unsecured network.
●Disable this notification.
●Notify when connected to an unsecured
network (default).
Single Sign On Select which Administrator Profile types are enabled
on a user computer.
●Persistent Connection : Profiles are active
during start up and when no user is logged
onto the computer.
●Pre-logon or Common Connection: Profiles
are active immediately once a user logs onto
the computer.
Common profiles are enabled if Pre-logon or
Common features are not installed on a user’s
computer. Common profiles are active after a user
has logged on and the session becomes active.
Persistent and Pre-logon or Common profiles are
placed at the top of the user’s profiles list. They
cannot be changed or deleted by a user.

Support Information Specify the support information displayed in the
About box of the WiFi connection utility.
●Support URL: Enter the support center web
site that you want your customers to access
for technical support.
●Support Phone Number: Enter the
telephone number that you want your
customers to call for technical support.
Voice over IP Enables third-party software to use the VoIP
application on a user's computer. The default setting
enables this feature.
NOTE: This feature is installed through an
Administrator Package when a user's computer has
one of the following adapters:
●Intel(R) WiMAX/WiFi Link 5350
●Intel(R) WiMAX/WiFi Link 5150
●Intel(R) WiFi Link 5300
●Intel(R) WiFi Link 5100
●Intel(R) Wireless WiFi Link 4965AGN
●Intel(R) Wireless WiFi Link 4965AG_
●Intel(R) PRO/Wireless 3945ABG Network
Connection
Wi-Fi Manager Select which Wi-Fi manager controls a user's
wireless connections. Use either the previous logged
on user's Wi-Fi manager or allow each user to select
their preferred Wi-Fi manager.
●Allow all users to switch between the WiFi
connection utility and Microsoft Windows XP
Wireless Zero Configuration after log on.
●The Wi-Fi manager at log on is determined by
the active Wi-Fi manager when the last user
logged off.

Wi-Fi Protected Setup* The WiFi connection utility can be configured to
operate as a registrar for a Wi-Fi Protected Setup
supported access points. The registrar securely
transfers the access point key or password
automatically or manually with a USB flash drive or
other external device.
●Enable registering other devices (default).
●Hide Enable Device Registration application
setting.
Select to enable the WiFi connection utility to
register other devices. Also select to hide the Enable
Device Registration setting in the WiFi connection
utility application settings to block user to change
the settings.
NOTE: This feature is installed through an
Administrator Package when a user's computer has
one of the following adapters:
●Intel(R) WiMAX/WiFi Link 5350
●Intel(R) WiMAX/WiFi Link 5150
●Intel(R) WiFi Link 5300
●Intel(R) WiFi Link 5100
●Intel(R) Wireless WiFi Link 4965AGN
●Intel(R) Wireless WiFi Link 4965AG_
●Intel(R) PRO/Wireless 3945ABG Network
Connection
WiFi On/Off Control the wireless radio.
●No change: The radio is not turned on or off.
●Turn WiFi Off: The profile turns the radio off.
●Turn WiFi On: The profile turns the radio on.
●Turn off 802.11a radio only: This becomes
selectable if Turn WiFi On is enabled.
●Disable WiFi On/Off selection: Select to
prevent a user from accessing the WiFi On/
Off control on the WiFi connection utility main
window or Taskbar menu. A user is notified
that The feature is disabled by the
administrator if they attempt to turn on or
off the radio control.
●Add 802.11a Radio On/Off selection:

Select to allow the user to turn on/off the
802.11a radio separately from the 802.11b/g
radio. If you select this, the Disable 802.11a
Radio On/Off selection becomes available.
Select this to show the 802.11a radio On/Off
control, but disable it. This lets you give the
user individual control over the radios.
Once this feature is installed on a user's computer,
follow the instructions below to turn on or off the
802.11a radio control.
To turn off the 802.11a radio:
1. On the WiFi connection utility main window,
click the WiFi On button. The list of radio
options is displayed.
2. Select 802.11a Radio Off. The 802.11a radio
is now inactive.
To turn on the 802.11a radio:
1. On the WiFi connection utility main window,
click the 802.11a Radio Off button. The list
of radio options is displayed.
2. Select WiFi On. The 802.11a radio is now
active.
NOTE: The option Add 802.11a Radio On/Off
selection is available only for wireless adapters that
support 802.11a, 802.11b and 802.11g. This feature
is not installed through an Administrator Package
when a user's computer has an Intel(R) PRO/
Wireless 2200BG Network Connection.
Close Closes the Administrator Tool.
Help? Provides help information for this page.
Back to Top
Back to Contents
Trademarks and Disclaimers

Back to Contents
Advanced Settings
Use the Advanced Settings to password protect a profile, select a specific access point on
a network to connect to, start an application or auto import a profile. Click the Advanced
button on the Create Wireless Profile General Settings to access.
Name Description
Auto Connect Automatic (Default): Select to have the Intel(R) PROSet/
Wireless WiFi Connection Utility connect automatically to this
profile when it is in range.
On Demand: Select to prevent automatic connection of a
profile when the network is in range. For example, if there is a
cost for a wireless connection and you did not want to connect
automatically when in range. In the WiFi Networks list and in
the Profiles list, the network will be noted with this icon,
indicating On Demand connection (also called manual
connection).
To connect to the network:
1. Select the network from the WiFi Networks list.
2. Click Connect.
Auto Import Allows a network administrator to easily move the selected
profile to other computers. When the exported file is placed in
the Wireless\AutoImport directory on another computer, the
WiFi connection utility automatically imports the profile.
NOTE: This feature is only available when configuring a user
profile. It is not available when configuring Administrator
Profiles.

Band Selection Here you can select the band to use for this connection profile:
●Mixed Band: Select this to the have WiFi connection
utility attempt to connect this profile to an available
network with either of the two bands.
●2.4 GHz band: Select this to have the WiFi connection
utility attempt to connect this profile to an available
network using only the 2.4 GHz band.
●5.2 GHz band: Select this to have the WiFi connection
utility attempt to connect this profile to an available
network using only the 5.2 GHz band.
Mandatory Access
Point
Forces the wireless adapter to connect to an access point that
uses a specific MAC address. Enter the MAC address of the
access point (BSSID); 48-bit, 12 hexadecimal digits. For
example, 00:06:25:0E:9D:84.
Clear: Clear current address.
NOTE: This feature is not available when ad hoc operating
mode is used.
Password Protection 1. Password protect this profile (maximum 10
characters): Select to enable a password for the profile.
The default setting is cleared for no profile password.
2. Password: Enter a password. The entered password
characters display as asterisks.
3. Confirm Password: Reenter the password.
NOTE: Be sure to keep this password written down. If it is
forgotten, it cannot be reset.
Start Application Automatically starts a batch file, executable file, or script
whenever you connect to the profile. For example, start a
Virtual Private Network (VPN) session automatically whenever
you connect to a wireless network.
1. Click Enable Application Auto Launch.
2. Enter the name of the program that you want to start or
click Browse to locate the file on your hard disk.
3. Click OK to close the Advanced Settings.

Maintain Connection The Maintain Connection option maintains the wireless
connection with a user profile after log off.
If the Maintain Connection option is selected and a Persistent
profile exists, the Persistent profile will not be applied at logoff.
It will be applied only if the connection with this profile is lost.
NOTE: This option may be used with Nortel VPN client when it
is configured to Logoff on Connect.
NOTE: This feature is only available when configuring a user
profile. It is not available when configuring Administrator
Profiles.
User Name Format User Name Format: An administrator can select the user
name format for the authentication server.
The choices are:
●user (default)
●user@domain
●user@domain.com
●DOMAIN\user
NOTE: This feature is available only when configuring
Administrator Profiles. It is not available when creating a profile
from the Create Wireless Profile page.
PLC Domain Check Pre-logon Domain Check: This setting is visible only when
using the Administrator Tool, and only if you select to create a
Pre-logon/Common profile. The choices are:
●Check for Domain Server Presence: When using a Pre-
logon Connect profile while joined to a domain, this
setting will verify the domain server's presence before
the user login process is finished. If the server is not
found, login may be delayed for a minute or more.
●Just continue with login: Login proceeds normally.
Server presence is not checked.
NOTE: This feature is available only when configuring
Administrator Profiles. It is not available when creating a profile
from the Create Wireless Profile page.
OK Close and save the settings.
Cancel Close and cancel any changes.
Help? Help information for this page.

Back to Top
Back to Contents
Trademarks and Disclaimers

Back to Contents
Adapter Settings (Administrator)
The Adapter Settings screen controls and displays the device properties for the wireless
adapter installed on a computer. The adapter may be any one of the following:
●Intel(R) WiMAX/WiFi Link 5350
●Intel(R) WiMAX/WiFi Link 5150
●Intel(R) WiFi Link 5300
●Intel(R) WiFi Link 5100
●Intel(R) Wireless WiFi Link 4965AGN
●Intel(R) Wireless WiFi Link 4965AG_
●Intel(R) PRO/Wireless 3945ABG Network Connection
●Intel(R) PRO/Wireless 2915ABG Network Connection
●Intel(R) PRO/Wireless 2200BG Network Connection.
To configure Adapter Settings:
1. From within the Administrator tool, click Include Adapter Settings in this package.
2. For each setting listed in the table below, select one of the following options:
❍Use default value: Resets the setting on the user machine to the default value.
❍No change: (For Windows XP* users only.) Maintains the user selected value.
The administrator decides not to enforce all the settings on a user's computer.
The user can change the adapter setting values from the WiFi connection utility
Advanced menu.
❍No change: (For Windows Vista* users only.) Maintains the user selected
value. The administrator decides not to enforce all the settings on a user's
computer. The user can change the adapter setting values at the Device
Manager .
❍Select the value: The administrator selects the value that is to be used on the
user's computer.
Adapter Settings Description
Following are descriptions of the adapter settings.
Name Description

802.11n Channel Width (2.4
GHz)
Set high throughput channel width to maximize
performance. Set the channel width to Auto or
20Mhz.Auto is the default setting. Use 20MHz if
802.11n channels are restricted.
NOTE: This setting is available only if the wireless
adapter is one of the following:
●Intel(R) WiMAX/WiFi Link 5350
●Intel(R) WiMAX/WiFi Link 5150
●Intel(R) WiFi Link 5300
●Intel(R) WiFi Link 5100
802.11n Channel Width (5.2
GHz)
Set high throughput channel width to maximize
performance. Set the channel width to Auto or
20Mhz.Auto is the default setting. Use 20MHz if
802.11n channels are restricted.
NOTE: This setting is available only if the wireless
adapter is one of the following:
●Intel(R) WiMAX/WiFi Link 5350
●Intel(R) WiMAX/WiFi Link 5150
●Intel(R) WiFi Link 5300
●Intel(R) WiFi Link 5100
●Intel(R) Wireless WiFi Link 4965AGN
802.11n Mode The 802.11n standard builds upon previous 802.11
standards by adding multiple-input multiple-output
(MIMO). MIMO increases data throughput to improve
transfer rate. Select Enabled or Disabled to set the
802.11n mode of the adapter. Enabled is the default
setting.
NOTE: This setting is available only if the adapter is
one of the following:
●Intel(R) WiMAX/WiFi Link 5350
●Intel(R) WiMAX/WiFi Link 5150
●Intel(R) WiFi Link 5300
●Intel(R) WiFi Link 5100
●Intel(R) Wireless WiFi Link 4965AGN
NOTE: To achieve transfer rates greater than 54
Mbps on 802.11n connections, WPA2*-AES security

must be selected. No security (None) can be selected
to enable network setup and troubleshooting.
An administrator can enable or disable support for
high throughput mode to reduce power-consumption
or conflicts with other bands or compatibility issues.
Ad Hoc Channel Unless the other computers in the ad hoc network
use a different channel from the default channel,
there is no need to change the channel.
Value: Select the allowed operating channel from the
list.
●802.11b/g: Select this option when 802.11b
and 802.11g (2.4 GHz) ad hoc band frequency
is used. For this band, the default channel is 11.
●802.11a: Select this option when 802.11a (5
GHz) ad hoc band frequency is used. For this
band, the default channel is 36.
NOTE: When an 802.11a channel is not displayed,
initiating ad hoc networks is not supported for
802.11a channels.
Ad Hoc Power Management Set power saving features for Device to Device (ad
hoc) networks.
●Disable: Select when connecting to ad hoc
networks that contain stations that do not
support ad hoc power management.
●Maximum Power Savings: Select to optimize
battery life.
●Noisy Environment: Select to optimize
performance or connecting with multiple clients.
NOTE: This feature is only installed through an
Administrator Package when a user's computer has
one of the following adapters:
●Intel(R) WiMAX/WiFi Link 5350
●Intel(R) WiMAX/WiFi Link 5150
●Intel(R) WiFi Link 5300
●Intel(R) WiFi Link 5100
●Intel(R) Wireless WiFi Link 4965AGN
●Intel(R) PRO/Wireless 3945ABG

Ad Hoc QoS Mode Quality of Service (QoS) control in ad hoc networks.
QoS provides prioritization of traffic from the access
point over a wireless network based on traffic
classification. WMM* (Wi-Fi Multimedia*) is the QoS
certification of the Wi-Fi Alliance* (WFA). When
WMM* is enabled, the adapter uses WMM to support
priority tagging and queuing capabilities for Wi-Fi*
networks.
●WMM Enabled (Default)
●WMM Disabled
NOTE: This feature is only installed through an
Administrator Package when a user's computer has
one of the following adapters:
●Intel(R) WiMAX/WiFi Link 5350
●Intel(R) WiMAX/WiFi Link 5150
●Intel(R) WiFi Link 5300
●Intel(R) WiFi Link 5100
●Intel(R) Wireless WiFi Link 4965AGN
●Intel(R) PRO/Wireless 3945ABG
HD Mode In a wireless network environment where several
access points are nearby, this feature will reduce
interference and improve your wireless connection.
The default setting is for this to be turned off
(disabled).
NOTE: This setting is available only if the adapter is
one of the following:
●Intel(R) WiMAX/WiFi Link 5350
●Intel(R) WiMAX/WiFi Link 5150
●Intel(R) WiFi Link 5300
●Intel(R) WiFi Link 5100
●Intel(R) Wireless WiFi Link 4965AGN

Mixed Mode Protection Use to avoid data collisions in a mixed
802.11b/11g/11a/11n environment. Request to Send/
Clear to Send (RTS/CTS) should be used in an
environment where clients may not hear each other.
CTS-to-self can be used to gain more throughput in
an environment where clients are in close proximity
and can hear each other. (CTS-to-self is not
supported for 802.11n.)
Power Management
(Administrator View)
When creating an administrator package, Power
Management lets you select a balance between power
consumption and adapter performance.
PSP - Power Saving Mode
CAM - Constantly Awake Mode
Select one of the Power Saving Mode levels:
PSP CAM: The client adapter is powered
up continuously.
PSP Level 1: PSP set at maximum
power.
PSP Levels 2-4: PSP set to maximize
power.
PSP Level 5: PSP set to maximize
battery life.
PSP Auto: Default in PSP Level 6:
Balances between power consumption
and battery life.
NOTE: Power consumption savings vary based on
infrastructure settings.
Preamble Mode Changes the preamble length setting received by the
access point during an initial connection. Always use
Auto Tx Preamble to provide optimal network
throughput. Auto Tx Preamble allows automatic
preamble detection. If supported, short preamble
should be used. If not, use Long Tx Preamble.
NOTE: This setting is only available if the client
adapter is an Intel(R) PRO/Wireless 2915ABG
Network Connection or an Intel(R) PRO/Wireless
2200BG Network Connection.

Roaming Aggressiveness This setting lets you define how aggressively a
wireless client roams to improve connection to an
access point.
Click Use default value to balance between not
roaming and performance or select a value from the
list.
Values:
0: No Roaming: Your wireless client does
not roam. Only significant link quality
degradation causes it to roam to another
access point.
1-3: Allow Roaming
2: Default: Balances between not
roaming and performance.
4: Maximum Roaming
Throughput Enhancement Changes the value of the Packet Burst Control.
●Enable: Select to enable throughput
enhancement.
●Disable: (Default) Select to disable throughput
enhancement.
Transmit Power If you decrease the transmit power, you reduce the
WiFi radio coverage.
Default Setting: Highest power setting
Values:
Tx Minimum:Lowest Minimum
Coverage: Set the adapter to the lowest
transmit power. Enables you to expand
the number of coverage areas or confine
a coverage area. Reduce the coverage
area in high traffic areas to improve
overall transmission quality and avoid
congestion and interference with other
devices.
Tx Level 1, Tx Level 2, Tx Level 3:
Set by country requirements.
Tx Maximum:Highest Maximum

Coverage: Set the adapter to the
maximum transmit power level. Select
for maximum performance and range in
environments with limited additional
radio devices.
If you select No change, then this setting will not be
changed at the user's computer.
NOTE: The optimal setting is for a user to always set
the transmit power at the lowest possible level still
compatible with the quality of their communication.
This allows the maximum number of wireless devices
to operate in dense areas and reduce interference
with other devices that this radio shares radio
spectrum with.
NOTE: This setting takes effect when either Network
(Infrastructure) or Device to Device (ad hoc) mode is
used.
Wireless Mode Select which mode to use for connection to a wireless
network:
●802.11a (only): Connect the wireless adapter
to 802.11a networks only.
●802.11b (only): Connect the wireless adapter
to 802.11b networks only.
●802.11g (only): Connect the wireless adapter
to 802.11g networks only.
●802.11a and 802.11g: Connect the wireless
adapter to 802.11a and 802.11g networks only.
●802.11b and 802.11g: Connect the wireless
adapter to 802.11b and 802.11g networks only.
●802.11a, 802.11b, and 802.11g: (Default) -
Connect to either 802.11a, 802.11b or 802.11g
wireless networks.
NOTE: These wireless modes (Modulation types)
determine the discovered access points displayed in
the WiFi Networks list.
Back to Top
Back to Contents

Trademarks and Disclaimers

Back to Contents
Set Administrator Password
A user cannot modify Administrator settings or profiles unless they have the password for
this tool. When you first access the Administrator Tool, you are required to enter a
password. The password must not exceed 100 characters (although the field will only display
up to 56 characters). Null passwords are not allowed.
1. Password: Create a password (maximum 100 characters).
2. Confirm Password: Reenter the password.
3. Click OK. The Open Administrator Package displays.
To change or unlock the existing password:
1. On the Tools menu, click Administrator Tool.
2. Click Change Password on the password entry form.
3. Old Password: Enter the existing password.
4. New Password: Enter the new password.
5. Confirm Password: Reenter the new password again.
6. Click OK to save the new password and enter the Administrator Tool.
Back to Top
Back to Contents
Trademarks and Disclaimers

Back to Contents
Enterprise Security
From the Security Settings page you can enter the required security settings for the selected
wireless network. See Personal Security to set basic WEP or WPA security in a non-
enterprise environment (home, small business). See Enterprise Security Settings to set up
802.1X security authentication options.
●Use Enterprise Security if your network environment requires 802.1X authentication.
●802.1X authentication methods include passwords, certificates and smart cards.
●802.1X authentication types are: EAP-SIM,EAP-AKA,LEAP,TLS,TTLS,PEAP,EAP-
FAST.
●See Profile Management for a description of when the Profile Wizard is launched.
●See Security Overview for more information about the different security options for
wireless networks.
Enterprise Security Settings
Enterprise Security Settings Description
Name Setting
Enterprise Security Select to open the Enterprise Security settings. The security
settings that are available are dependent on the Operating
Mode selected: Device to Device (ad hoc) or Network
(Infrastructure).

Network Authentication If you configure a profile for Device to Device (ad hoc)
networking, the default setting is Open authentication.
If you configure a profile for an infrastructure network, select:
●Open: Any wireless station can request authentication.
●Shared: Uses an encryption key known only to the
receiver and sender of data.
●WPA-Personal or WPA2-Personal: Uses a password also
called a pre-shared key (PSK).
●WPA-Enterprise or WPA2-Enterprise: Use on enterprise
networks with an 802.1X RADIUS server.
NOTE: WPA-Enterprise and WPA2-Enterprise are
interoperable.
Data Encryption Click to open the following data encryption types:
●None: No encryption.
●WEP: WEP encryption provides two levels of security
that use a 64-bit key (sometimes referred to as 40-bit)
or a 128-bit key (also known as 104-bit). If you use
encryption, all wireless devices on your wireless
network must use the same encryption keys.
●CKIP: Cisco Key Integrity Protocol is a Cisco proprietary
security protocol for encryption in 802.11 media. CKIP
uses Key Permutation (KP) and Message Sequence
Number to improve 802.11 security in infrastructure
mode.
●TKIP: Provides per-packet key mixing, a message
integrity check and a rekeying mechanism.
●AES-CCMP: (Advanced Encryption Standard - Counter
CBC-MAC Protocol) Used as the data encryption method
whenever strong data protection is important.

Enable 802.1X
(Authentication Type)
Click to open the following 802.1X authentication types:
●TLS
●TTLS
●PEAP
●LEAP
●EAP-FAST
●EAP-SIM: If in administrator mode, this only available
for Pre-logon/Common profiles, not Persistent.
●EAP-AKA: If in administrator mode, this only available
for Pre-logo/Common profiles, not Persistent.
Certain Authentication Types require that you obtain and
install a client certificate. See Set up a Client with TLS
authentication or consult your administrator.
Authentication
Protocols
Authentication Protocols apply only when Network
Authentication is set to WPA-Enterprise or WPA2-Enterprise
and Authentication Type is set to TTLS or PEAP.
●PAP
●CHAP
●MS-CHAP
●MS-CHAP-V2
●GTC
●TLS
Cisco Options Click to view the Cisco Compatible Extensions Options.
NOTE: Cisco Compatible Extensions are automatically enabled
for CKIP and LEAP profiles.
Advanced Click to access the Advanced Settings and configure the
following options listed.
●Auto Connect: Select to automatically or manually
connect to a profile.
●Auto Import: Allows a network administrator to move
this profile to other computers. (Visible on user profiles
only.)
●Band Selection: Select the band to use for this
connection profile.
●Mandatory Access Point: Select to associate the wireless
adapter with a specific access point.

●Password Protection: Select to password protect a
profile.
●Start Application: Specify a program to be started when
a wireless connection is made.
●Maintain Connection: Select to remain connected to a
user profile after log off. (Visible on user profiles only.)
●User Name Format: Select the user name format for the
authentication server. (Visible on administrator profiles
only.)
●PLC Domain Check: Select to verify the domain server's
presence before the user login process is finished.
(Visible on administrator profiles only.)
User Credentials A profile configured for TTLS, PEAP, or EAP-FAST
authentication requires one of the following log on
authentication methods:
●Use Windows logon: The 802.1X credentials match
your Windows user name and password. Before
connection, you are prompted for your Windows logon
credentials.
NOTE: For LEAP profiles, this option is listed as Use
Windows logon user name and password.
●Prompt each time I connect: Prompt for your user
name and password every time you log onto the
wireless network.
NOTE: For LEAP profiles, this option is listed as Prompt for
the user name and password.
●Use the following: Use your saved credentials to log
onto the network.
❍User Name: This user name must match the
user name that is set in the authentication server
by the administrator prior to client
authentication. The user name is case-sensitive.
This name specifies the identity supplied to the
authenticator by the authentication protocol
operating over the TLS tunnel. This identity is
securely transmitted to the server only after an
encrypted channel has been established.
❍Domain: Name of the domain on the
authentication server. The server name identifies
a domain or one of its sub-domains (for example,

zeelans.com, where the server is blueberry.
zeelans.com).
❍Password: Specifies the user password. The
password characters appear as asterisks. This
password must match the password that is set in
the authentication server.
❍Confirm Password: Reenter the user password.
❍Roaming Identity: A Roaming Identity may be
populated in this field or you can use %domain%\
%username% as the default format for entering
a roaming identity. When 802.1X Microsoft IAS
RADIUS is used as an authentication server, the
server authenticates the device using the
Roaming Identity from Intel PROSet/Wireless
WiFi software, and ignores the Authentication
Protocol MS-CHAP-V2 user name. Microsoft
IAS RADIUS accepts only a valid user name
(dotNet user) for the Roaming Identity. For all
other authentication servers, the Roaming
Identity is optional. Therefore, it is recommended
to use the desired realm (for example,
anonymous@myrealm) for the Roaming Identity
rather than a true identity.
NOTE: Contact your administrator to obtain the domain name.
NOTE: For LEAP profiles, this option is listed as Use the
following user name and password.
Server Options Select one of the following credential retrieval methods:
●Validate Server Certificate: Select to verify the
server certificate.
Certificate Issuer: The server certificate received during TLS
message exchange must be issued by this certificate authority
(CA). Trusted intermediate certificate authorities and root
authorities whose certificates exist in the system store are
available for selection. If Any Trusted CA is selected, any CA
in the list is acceptable. Click Any Trusted CA as the default
or select a certificate issuer from the list.
●Specify Server or Certificate Name: Enter the server
name.
The server name or domain to which the server belongs,
depends on which of the following options has been selected.

●Server name must match the specified entry
exactly: When selected, the server name must match
exactly the server name found on the certificate. The
server name should include the complete domain name
(for example, Servername.Domain name).
●Domain name must end with the specified entry:
When selected, the server name identifies a domain,
and the certificate must have a server name that
belongs to this domain or to one of its subdomains (for
example, zeelans.com, where the server is blueberry.
zeelans.com).
NOTE: These parameters should be obtained from the
administrator.
Certificate Options To obtain a certificate for TLS authentication, select one of the
following:
●Use my smart card: Select if the certificate resides on
a smart card.
●Use the certificate issued to this computer: Selects
a certificate that resides in the machine store.
●Use a user certificate on this computer: Click
Select to choose a certificate that resides on this
computer.
NOTE: The Intel(R) PROSet/Wireless WiFi Connection Utility
supports machine certificates. However, they are not
displayed in the certificate listings.
Notes about Certificates: The specified identity should
match the Issued to identity in the certificate and should be
registered on the authentication server (for example, RADIUS
server) that is used by the authenticator. Your certificate must
be valid with respect to the authentication server. This
requirement depends on the authentication server and
generally means that the authentication server must know the
issuer of your certificate as a Certificate Authority. Use the
same user name you used to log in when the certificate was
installed.
Back View the prior page in the Profile Wizard.
Next View the next page in the Profile Wizard. If more security
information is required then the next step of the Security
Settings is displayed.
OK Closes the Profile Wizard and saves the profile.

Cancel Closes the Profile Wizard and cancels any changes made.
Help? Provides the help information for the current page.
Back to Top
Back to Contents
Trademarks and Disclaimers

Back to Contents
Profile Wizard General Settings
The General Settings page is the first page in the Create Wireless Profile Wizard. From this
page you can specify the profile name, the wireless network name (SSID), and choose the
operating mode.
See Profile Management for a description of when the Create Wireless Profile General
Settings is launched.
While you configure a profile, you can use the left pane to navigate to the General and
Security Settings pages. The Back and Next buttons located at the bottom of the Profile
Wizard can also be used for the same functions.
General Settings Page Description
Name Description
Profile Name Name of the wireless network profile. When you
configure a wireless network that was selected from
the WiFi Networks list, the profile name is the same as
the Wireless Network Name SSID). This name can be
changed to be more descriptive or customized for
your personal use.
Examples: My Office Network, Bob's Home Network,
ABC Company Network
Wireless Network Name (SSID) Name of the wireless network access point used by
the wireless adapter for connection. The network
name must match exactly the name of the wireless
access point. It is case sensitive.
When you configure a wireless network that was
selected from the WiFi Networks list, the network
name is taken from the wireless network list. You
cannot and should not change it.
<SSID not broadcast>: If an access point does not
broadcast its network name (SSID) or the wireless
adapter receives a hidden network name from a

stealth access point, it is displayed in the WiFi
Networks list. To associate with an <SSID not
broadcast> network entry, a new profile must be
created before connection. Provide the actual SSID for
the access point. After connection, the <SSID not
broadcast> is still displayed in the WiFi Networks list.
The associated SSID profile is viewed in the Profiles
list.
Operating Mode Network (Infrastructure): Connect to an access
point. A Network (Infrastructure) network consists of
one or more access points and one or more computers
with wireless adapters. This connection is the type
used in home networks, corporate networks, hotels,
and other areas that provide access to the network
and/or the internet.
NOTE: Only Network (Infrastructure) is available
for administrator profiles (Pre-logon/Common and
Persistent profiles). See the Administrator Tool for
more information.
Device to Device (ad hoc): Connect directly to
other computers in an ad hoc wireless network. This
type of connection is useful for connections between
two or more computers only. It does not provide
access to network resources or the internet.
Administrator Profile Type
(Visible only in Administrator Tool)
Persistent: Persistent profiles are applied at boot
time or whenever no one is logged on the computer.
After a user logs off, a Persistent profile maintains a
wireless connection either until the computer is turned
off, or a different user logs on.
Pre-logon/Common: These profiles are only
available using the Administrator Tool. Pre-logon/
Common profiles are applied once a user logs on. The
connection is made as part of the Windows log-on
sequence (Pre-logon/Common). This profile is shared
by all users.
Advanced Click Advanced to access the Advanced Settings. Use
the Advanced Settings to set Maintain Connection,
User Name Format, Auto Connect or Auto Import
options, launch an application (Start Application), set
a profile password (Password Protection), specify a
certain access point address for adapter connection
(Mandatory Access Point), and set Pre-logon Connect
options.

Next Proceeds to the Security Settings page.
OK Finishes creation of the new profile with the current
settings.
Cancel Closes the Create Wireless Profile Wizard and cancel
any changes.
Help? Provides help information for this page.
Back to Top
Back to Contents
Trademarks and Disclaimers

Back to Contents
Personal Security
Use Personal Security if you are a home or small business user who can use a variety of
simple security procedures to protect your wireless connection. You may want to select from
the list of security settings that are easy to configure, for your wireless network. See
Personal Security Settings for a description of each of the options. A RADIUS or AAA server
is not required.
●Review the Set up Data Encryption and Authentication information to learn about the
different security types.
●To add or change the required security settings, click Security Settings for information
to set security for the selected wireless network.
●See Profile Management for a description of when to use the Profile Wizard.
●See Security Overview for more information about the different security options for
wireless networks.
●If you want to verify the security settings, select a wireless network in the WiFi
Networks list. See Network Properties to review the operating mode, authentication
level, and data encryption.
●See Enterprise Security to set 802.1X authentication security.
Personal Security Settings
Personal Security Settings Description
Name Setting

General Settings Select to open the Personal Security Settings. The security settings
that are available are dependent on the Operating Mode selected in
the Create Wireless Profile Security Settings.
Device to Device (ad hoc): In device to device mode, also called ad
hoc mode, wireless computers send information directly to other
wireless computers. You can use ad hoc mode to network multiple
computers in a home or small office, or to set up a temporary wireless
network for a meeting.
NOTE: Device to Device (ad hoc) networks are identified
with a notebook image ( ) in the Wireless Networks
and Profiles list.
Network (Infrastructure): An infrastructure network consists of
one or more access points and one or more computers with wireless
adapters installed. At least one access point should also have a wired
connection. For home users, this is usually a broadband or cable
network.
NOTE: Infrastructure networks are identified with an
access point image ( ) in the Wireless Networks and
Profiles list.
Security
Settings
If you are configuring a Device to Device (ad hoc) profile, select one of
the following data encryption settings:
●None: No authentication required.
●WEP-64 bit or WEP-128 bit: A network key or password is used
for encryption.
If you are configuring a Network (Infrastructure) profile, select:
●WPA*-Personal (TKIP) or WPA2*-Personal (TKIP): WPA-Personal
uses the Temporal Key Integrity Protocol (TKIP) for data
encryption.
●WPA-Personal (AES-CCMP) or WPA2-Personal (AES-CCMP):
WPA-Personal uses a new method for privacy protection of
wireless transmissions specified in the IEEE 802.11i standard.

Advanced button Click to access the Advanced Settings and configure the following
options:
●Auto Connect: Select to automatically or manually connect to a
profile.
●Auto Import: Network administrator can export a profile on
another computer.
●Band Selection: Select the band to use for this connection
profile.
●Mandatory Access Point: Select to associate the wireless
adapter with a specific access point.
●Password Protection: Select to password protect a profile.
●Start Application: Specify a program to be started when a
wireless connection is made.
●Maintain Connection: Select to remain connected to a user
profile after log off.
Back View the prior page in the Profile Wizard.
OK Closes the Profile Wizard and saves the profile.
Cancel Closes the Profile Wizard and cancels any changes made.
Help? Provides the help information for the current page.
Set up Data Encryption and Authentication
In a home wireless network you can use a variety of simple security procedures to protect
your wireless connection. These include:
●Enable Wi-Fi Protected Access (WPA*).
●Change your password.
●Change the network name (SSID).
Wi-Fi Protected Access (WPA) encryption provides protection for your data on the network.
WPA uses an encryption key called a Pre-Shared Key (PSK) to encrypt data before
transmission. Enter the same password in all of the computers and access point in your
home or small business network. Only devices that use the same encryption key can access
the network or decrypt the encrypted data transmitted by other computers. The password
automatically initiates the Temporal Key Integrity Protocol (TKIP) or AES-CCMP protocol for
the data encryption process.
Network Keys

WEP encryption provides two levels of security:
●64-bit key (sometimes referred to as 40-bit)
●128-bit key (also known as 104-bit)
For improved security, use a 128-bit key. If you use encryption, all wireless devices on your
wireless network must use the same encryption keys.
You can create the key yourself and specify the key length (64-bit or 128-bit) and key index
(the location that a specific key is stored). The greater the key length, the more secure the
key. When the length of a key is increased by one character, the number of possible keys
doubles.
Key Length: 64-bit
Pass phrase (64-bit): Enter five (5) alphanumeric characters, 0-9, a-z or A-Z.
Hex key (64-bit): Enter 10 hexadecimal characters, 0-9, A-F.
Key Length: 128-bit
Pass phrase (128-bit): Enter 13 alphanumeric characters, 0-9, a-z or A-Z.
Hex key (128-bit): Enter 26 hexadecimal characters, 0-9, A-F.
With WEP data encryption, wireless station can be configured with up to four keys (the key
index values are 1, 2, 3, and 4). When an access point or a wireless station transmits an
encrypted message that uses a key stored in a specific key index, the transmitted message
indicates the key index that was used to encrypt the message body. The receiving access
point or wireless station can then retrieve the key that is stored at the key index and use it
to decode the encrypted message body.
Set up a Client with Open Authentication and No Data Encryption
(None)
CAUTION: Networks using no authentication or encryption are highly vulnerable to access
by unauthorized users.
On the Intel(R) PROSet/Wireless WiFi main window, use one of the following methods to
connect to a device to device network:
●Double-click a Device to Device (ad hoc) network in the WiFi Networks list.
●Select a Device to Device (ad hoc) network in the WiFi Networks list. Click Connect.
The Intel(R) PROSet/Wireless WiFi Connection Utility automatically detects the

security settings for the wireless adapter.
To create a profile for a wireless network connection with no encryption perform these steps:
1. Click Profiles on the WiFi connection utility main window.
2. On the Profiles list, click Add to open the Create Wireless Profile General Settings.
3. Profile Name: Enter a descriptive profile name.
4. Wireless Network Name (SSID): Enter the name of your wireless network.
5. Operating Mode: Click Device to Device (ad hoc).
6. Click Next to open the Security Settings.Personal Security is selected by default.
7. Security Settings: The default setting is None, which indicates that there is no
security on this wireless network.
8. Click OK. The profile is added to the Profiles list and connects to the wireless network.
Set up a Client with WEP 64-bit or WEP 128-bit Data Encryption
When WEP data encryption is enabled, a network key or password is used for encryption.
A network key is provided for you automatically (for example, it might be provided by your
wireless network adapter manufacturer), or you can enter it yourself and specify the key
length (64-bit or 128-bit), key format (ASCII characters or hexadecimal digits), and key
index (the location where a specific key is stored). The greater the key length, the more
secure the key.
To add a network key for an infrastructure network connection:
1. On the WiFi connection utility main window, double-click an infrastructure network in
the WiFi Networks list or select the network and click Connect.
2. Click Profiles to access the Profiles list.
3. Click Properties to open the Create Wireless Profile General Settings. The Profile
name and Wireless Network Name (SSID) display. Network (Infrastructure) should be
selected as the Operating Mode.
4. Click Next to open the Security Settings.Personal Security is selected by default.
5. Security Settings: The default data encryption setting is None, which indicates that
there is no security on this wireless network.
To add a password or network key:
1. Security Settings: Select either WEP 64-bit or WEP 128-bit to configure WEP data
encryption with a 64-bit or 128-bit key.
When WEP encryption is enabled on an access point, the WEP key is used to
verify access to the network. If the wireless device does not have the correct

WEP key, even though authentication is successful, the device is unable to
transmit data through the access point or decrypt data received from the access
point.
Name Description
Password Enter the Wireless Security Password (Pass phrase)
or Encryption Key (WEP key).
Pass phrase (64-bit ) Enter five (5) alphanumeric characters, 0-9, a-z or
A-Z.
WEP key (64-bit) Enter 10 hexadecimal characters, 0-9, A-F.
Pass phrase (128-bit) Enter 13 alphanumeric characters, 0-9, a-z or A-Z.
WEP key (128-bit) Enter 26 hexadecimal characters, 0-9, A-F.
2. Key Index: Change the Key Index to set up to four passwords.
3. Click OK to return to the Profiles list.
To add more than one password:
1. Select the Key Index number: 1, 2, 3, or 4.
2. Enter the Wireless Security Password.
3. Select another Key Index number.
4. Enter another Wireless Security Password.
5. Click OK to return to the Profiles list.
Set up a Client with WPA*-Personal (TKIP) or WPA2*-Personal
(TKIP) Security Settings
WPA* Personal Mode requires manual configuration of a pre-shared key (PSK) on the access
point and clients. This PSK authenticates a user's password or identifying code, on both the
client station and the access point. The access point performs the authentication. WPA
Personal Mode is targeted to home and small business environments.
WPA2* is the second generation of WPA security that provides enterprise and consumer
wireless users with a high level of assurance that only authorized users can access their
wireless networks. WPA2 provides a stronger encryption mechanism through Advanced
Encryption Standard (AES), which is a requirement for some corporate and government
users.
NOTE: To achieve transfer rates greater than 54 Mbps on 802.11n connections, WPA2-AES
security must be selected. No security (None) can be selected to enable network setup and
troubleshooting.

To configure a profile with WPA-Personal network authentication and TKIP data encryption:
1. On the WiFi connection utility main window, double-click an infrastructure network in
the WiFi Networks list or select the network and click Connect.
2. Click Profiles to access the Profiles list.
3. Click Properties to open the Wireless Profile Properties General Settings. The
Profile name and Wireless Network Name (SSID) display. Network (Infrastructure)
should be selected as the Operating Mode.
4. Click Next to open the Security Settings.
5. Select Personal Security.
6. Security Settings: Select WPA-Personal (TKIP) to provide security to a small
business network or home environment. A password, called a pre-shared key (PSK), is
used. The longer the password, the stronger the security of the wireless network.
If your wireless access point or router supports WPA2-Personal, then you should
enable it on the access point and provide a long, strong password. The longer
the password, the stronger the security of the wireless network. The same
password entered in the access point needs to be used on this computer and all
other wireless devices that access the wireless network.
NOTE: WPA-Personal and WPA2-Personal are interoperable.
7. Wireless Security Password (Encryption Key): Enter a text phrase with eight to
63 characters. Verify that the network key matches the password in the wireless
access point.
8. Click OK to return to the Profiles list.
Set up a Client with WPA*-Personal (AES-CCMP) or WPA2*-Personal
(AES-CCMP) Security Settings
Wi-Fi Protected Access (WPA*) is a security enhancement that strongly increases the level of
data protection and access control to a wireless network. WPA enforces 802.1X
authentication and key-exchange and only works with dynamic encryption keys. For a home
user or small business, WPA-Personal uses either Advanced Encryption Standard - Counter
CBC-MAC Protocol (AES-CCMP) or Temporal Key Integrity Protocol (TKIP).
NOTE: To achieve transfer rates greater than 54 Mbps on 802.11n connections, WPA2-AES
security must be selected. No security (None) can be selected to enable network setup and
troubleshooting.
To create a profile with WPA2*-Personal network authentication and AES-CCMP data
encryption:

1. On the WiFi connection utility main window, double-click an infrastructure network
from the WiFi Networks list or select the network and click Connect.
2. If these are being transmitted, the Profile name and Wireless Network Name (SSID)
should display on the General Settings screen. Network (Infrastructure) should
be selected as the Operating Mode. Click Next to open the Security Settings.
3. Select Personal Security.
4. Security Settings: Select WPA2-Personal (AES-CCMP) to provide this level of
security in the small network or home environment. It uses a password, also called a
pre-shared key (PSK). The longer the password, the stronger the security of the
wireless network.
AES-CCMP (Advanced Encryption Standard - Counter CBC-MAC Protocol) is a
newer method for privacy protection of wireless transmissions specified in the
IEEE 802.11i standard. AES-CCMP provides a stronger encryption method than
TKIP. Choose AES-CCMP as the data encryption method whenever strong data
protection is important.
If your Wireless access point or router supports WPA2-Personal, then you
should enable it on the access point and provide a long, strong password. The
same password entered into the access point needs to be used on this
computer and all other wireless devices that access the wireless network.
NOTE: WPA-Personal and WPA2-Personal are interoperable.
Some security solutions may not be supported by your computer's operating
system. You may require additional software or hardware as well as wireless
LAN infrastructure support. Contact your computer manufacturer for details.
5. Password: Wireless Security Password (Encryption Key): Enter a text phrase
(length is between eight and 63 characters). Verify that the network key used
matches the wireless access point key.
6. Click OK to return to the Profiles list.
Back to Top
Back to Contents
Trademarks and Disclaimers

Back to Contents
Administrator Tool Settings
These settings allow the administrator to control where profiles are placed in the
Administrator's Profiles list.
Name Description
Profile Insertion: Select one of
the following to place
Administrator profiles within a
Administrator's Profiles list.
Insert on top Select to place Administrator
profiles at the top of the
Administrator's Profiles list
(Persistent, Pre-logon/Common or
Voice over IP profiles)

Insert on
bottom
Select to place Administrator
profiles at the end of the
Administrator's Profiles list.
(Persistent, Pre-logon/Common or
Voice over IP profiles)
OK Save settings and close the page.
Cancel Cancel settings and close the page.
Help? Provides help information for this page.
How to Use
1. Open the Administrator Tool.
2. Click Tools > Settings to open the Administrator Tool Settings.
❍Select Insert on top to always place Administrator profiles at the top of the
Administrator Tool's Profiles list.
❍Select Insert on bottom to always place Administrator profiles at the bottom
the Administrator Tool's Profiles list.
3. Click OK to close and return to the Administrator Tool.
Back to Top
Back to Contents
Trademarks and Disclaimers
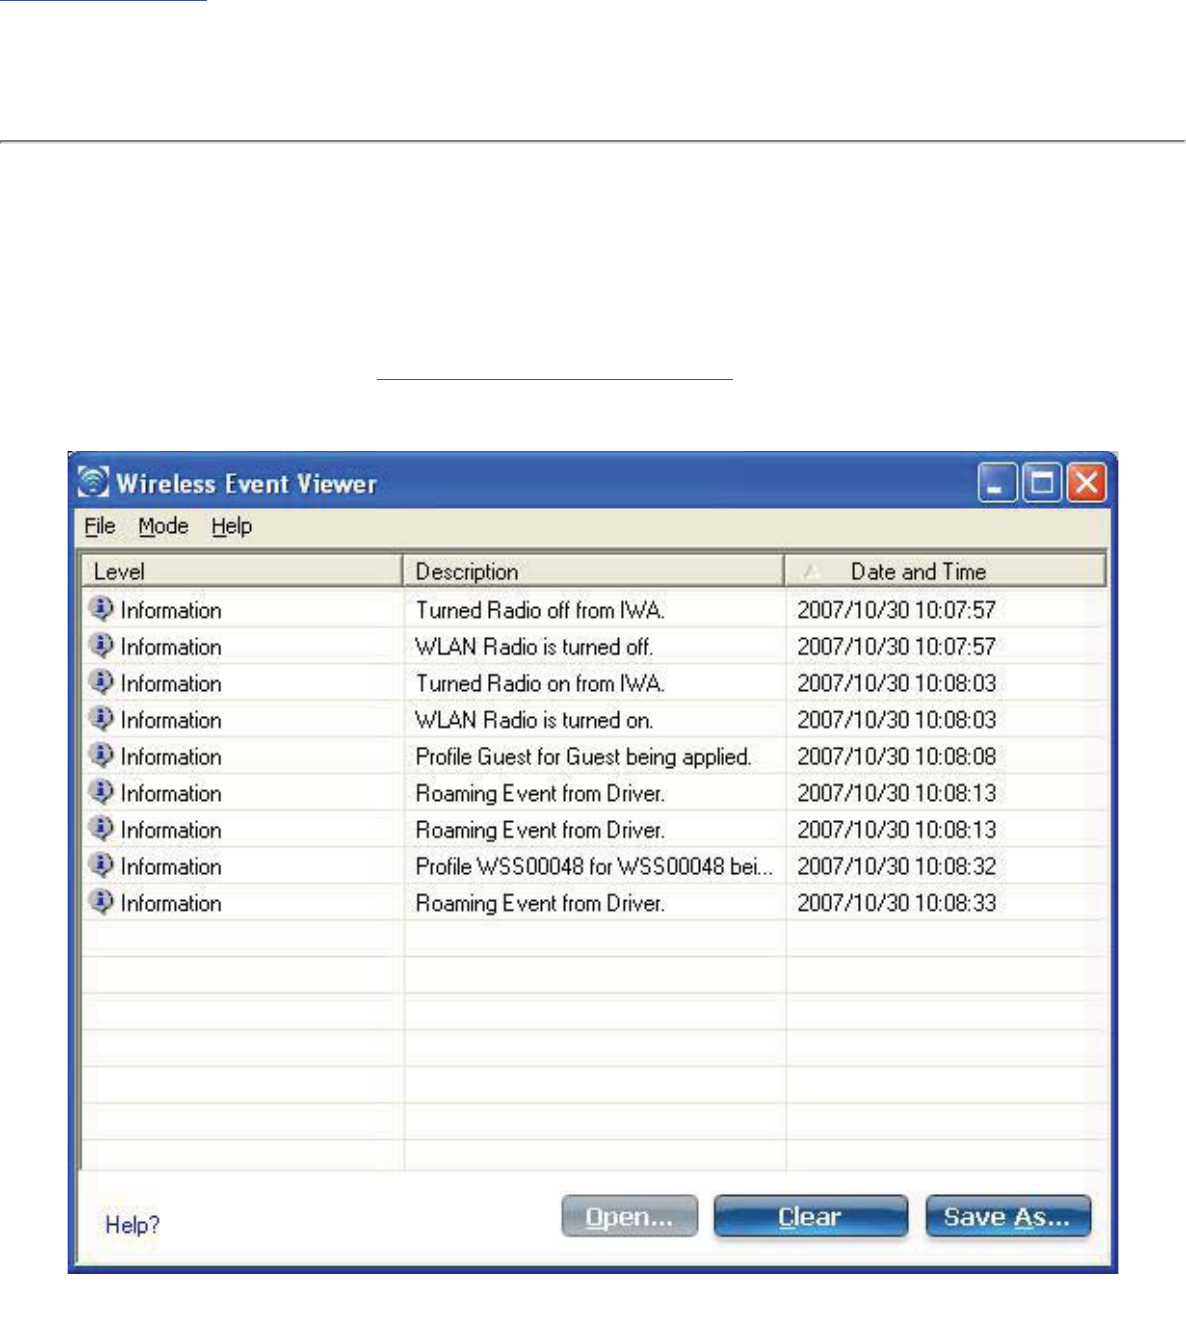
Back to Contents
Wireless Event Viewer
The Wireless Event Viewer program displays a list of error log records. You can save all available
log records to a binary format file for sending to customer support.
To launch Wireless Event Viewer:
1. At the Tools menu, click Intel Wireless Troubleshooter.
2. Click Wireless Event Viewer.
Wireless Event Viewer Description

Name Description
File Settings:
To change the storage location of the log file.
1. Click File > Settings to open the Wireless Event
Viewer Settings.
2. Specify the default folder for saved log files:
The default location is My Documents. Click
Browse to locate a new folder location.
3. File Name: The file name is the default machine
name.
4. Maximum file size (KB): Enter the size of the file
in kilobytes (KB).
5. Click OK to close and apply the new changes. Click
Cancel to close without applying any changes.
If you want the log file copied to an archive site after a
specific number of days:
1. Click Copy the log file to another location.
2. Destination Folder: Enter where to store the files
or click Browse to select a folder location.
3. Frequency (days): Select how often you want the
files moved to the destination folder.
4. Click OK to close and apply the new changes. Click
Cancel to close without applying any changes.
Exit: Click to exit Wireless Event Viewer and return to the
Intel Wireless Troubleshooter.
NOTE: An administrator can use the Administrator Tool
Application Settings, Wireless Event Viewer Settings to set
the default log file location.
Mode Select to view current or previously saved event records:
●Real time Event Viewing: Select this to view
error events as they occur in real time.
●Log File Viewing: Select this to open an error log
file that has been previously saved, or to save the
current error event log to a file.
Help? Provides help information for this page.
About: Displays version information for the Intel Wireless
Troubleshooter.

Wireless Event Viewer
Information
Level: The severity level of the connection issue is
indicated by an icon.
The severity levels are:
●Information
●Error
●Warning
Description: Brief description of the connection issue.
Date and Time: Date and time of the detected
connection issue. This column can be sorted in ascending
or descending order. Click the column header to sort the
displayed events.
Open Opens log files archived from previous sessions with Intel
(R) Wireless Troubleshooter.
Clear Removes the information in the Wireless Event Viewer.
Save As Saves the available log. Use the suggested name or
change it.
Back to Top
Back to Contents
Trademarks and Disclaimers
●
●
■Intel.com
■Worldwide
■About Intel
■Press Room
■Contact Us
❍ ❍ ❍ ❍ ❍
Support & Downloads
Browse By Product
●Intel® Wireless WiFi Link
4965AGN Home
●Software & Drivers
●Installation & Use
●Product Documentation
●Email Support
Search
Support & Downloads
All of Support
This Category
This Product
Intel® Wireless WiFi Link 4965AGN
● ● ● ●
●
●Identify your
adapter
●
Intel® PRO/Wireless Network connection ID tool
Other methods to identify your adapter
●Known issues
& solutions
●back to top
Security information
IMPORTANT NOTICE: Ensure the wireless capability of your system functions
in accordance with Intel's product specification
Wireless connection may drop with Microsoft* games for Windows LIVE™
Reduced battery run time when using wireless on Windows Vista*
Interference from 2.4 GHz cordless telephones
Wireless client adapter connection and roaming behavior
Wireless radio remains inactive and cannot be enabled from software
More ›
●Software &
drivers
●back to top
Intel® Wireless LAN software support for Windows Vista* OS
Download center
●Installation &
use
●back to top
View available wireless networks on Windows Vista
Connect to secure wireless networks on Windows Vista
Create a secure wireless network profile on Windows Vista
Create a secure ad hoc wireless network on Windows Vista
Set up a secure wireless connection to the internet on Windows Vista
More ›
●Frequently
asked questions
●back to top
What do I need in order to connect to a wireless network?
Could you briefly define the various wireless protocols (802.11a,b,g,n)?
Why am I not able to connect, or stay connected, to my wireless network?
Wireless Security - 802.1x and EAP Types
What is MIMO?
Identify your adapter
❍
Need to know what adapter
you have?
❍
Intel® PRO/Wireless
network connection ID tool
Download adapter
software
❍
Download center
Other resources
❍
Product change
notifications?
❍
Windows Vista information
❍
Hotspot information
❍
Intel® Centrino® mobile
technology
❍
Other methods to identify
your adapter

More ›
●Product
documentation
●back to top
User guide
Supported 802.11n APs
Product brief [PDF]
Currently supported 802.11 wireless LAN products
More ›
●❍Site Map ❍RSS Feeds ❍Jobs at Intel ❍Investor Relations
●❍*Legal Information ❍Privacy Policy ❍©Intel Corporation