General Dynamics Itronix IX-NW620 IX-NW620 CDMA/EV-DO User Manual
General Dynamics Itronix Corporation IX-NW620 CDMA/EV-DO Users Manual
Contents
- 1. USERS MANUAL
- 2. RADIO SPECIFIC SAFETY INFORMATION
- 3. USERS MANUAL 2
USERS MANUAL

Getting Started
Congratulations on your purchase of the Itronix GoBook PRO II computer! Your new GoBook PRO II
features the most innovative advances in portable computing technology. It combines state-of-the-art
ergonomics with sophisticated architecture to provide you with a personal computer that is compact,
p
owerful, and easy to use.
Designed for a wide range of general, business, and personal productivity applications, the semi-rugged,
wireless ready GoBook PRO II is an ideal choice wherever you need a computer; in the office, at home,
and on the road.
Your GoBook II is both expandable and portable, supporting the features you expect in a desktop
computer but with the mobility of a laptop.
This online document, GoBook PRO II Help, contains all the information
you need to set up and use your new GoBook PRO II. For information on
printing, navigating or otherwise using GoBook PRO II Help see the How to
Use This Help System topics.
Unpacking Your System
Inside
y
our
p
acka
g
in
g
y
ou will find:
GoBook® PRO II Help
Pa
g
e 1 of 100GoBook PRO II Hel
p
5/16/2005file://C:\Documents%20and%20Settin
g
s\barvill
j
.ITRXNT1\Local%20Settin
g
s\Tem
p
\~hh7...

Standard
Options
Where to Look For Information
Features
This computer was designed with the user in mind. Here are just a few of its many features:
Performance
Multimedia
Connectivity
Human-centric design and ergonomics
Expansion
See Specifications for more information.
The First Time. . .
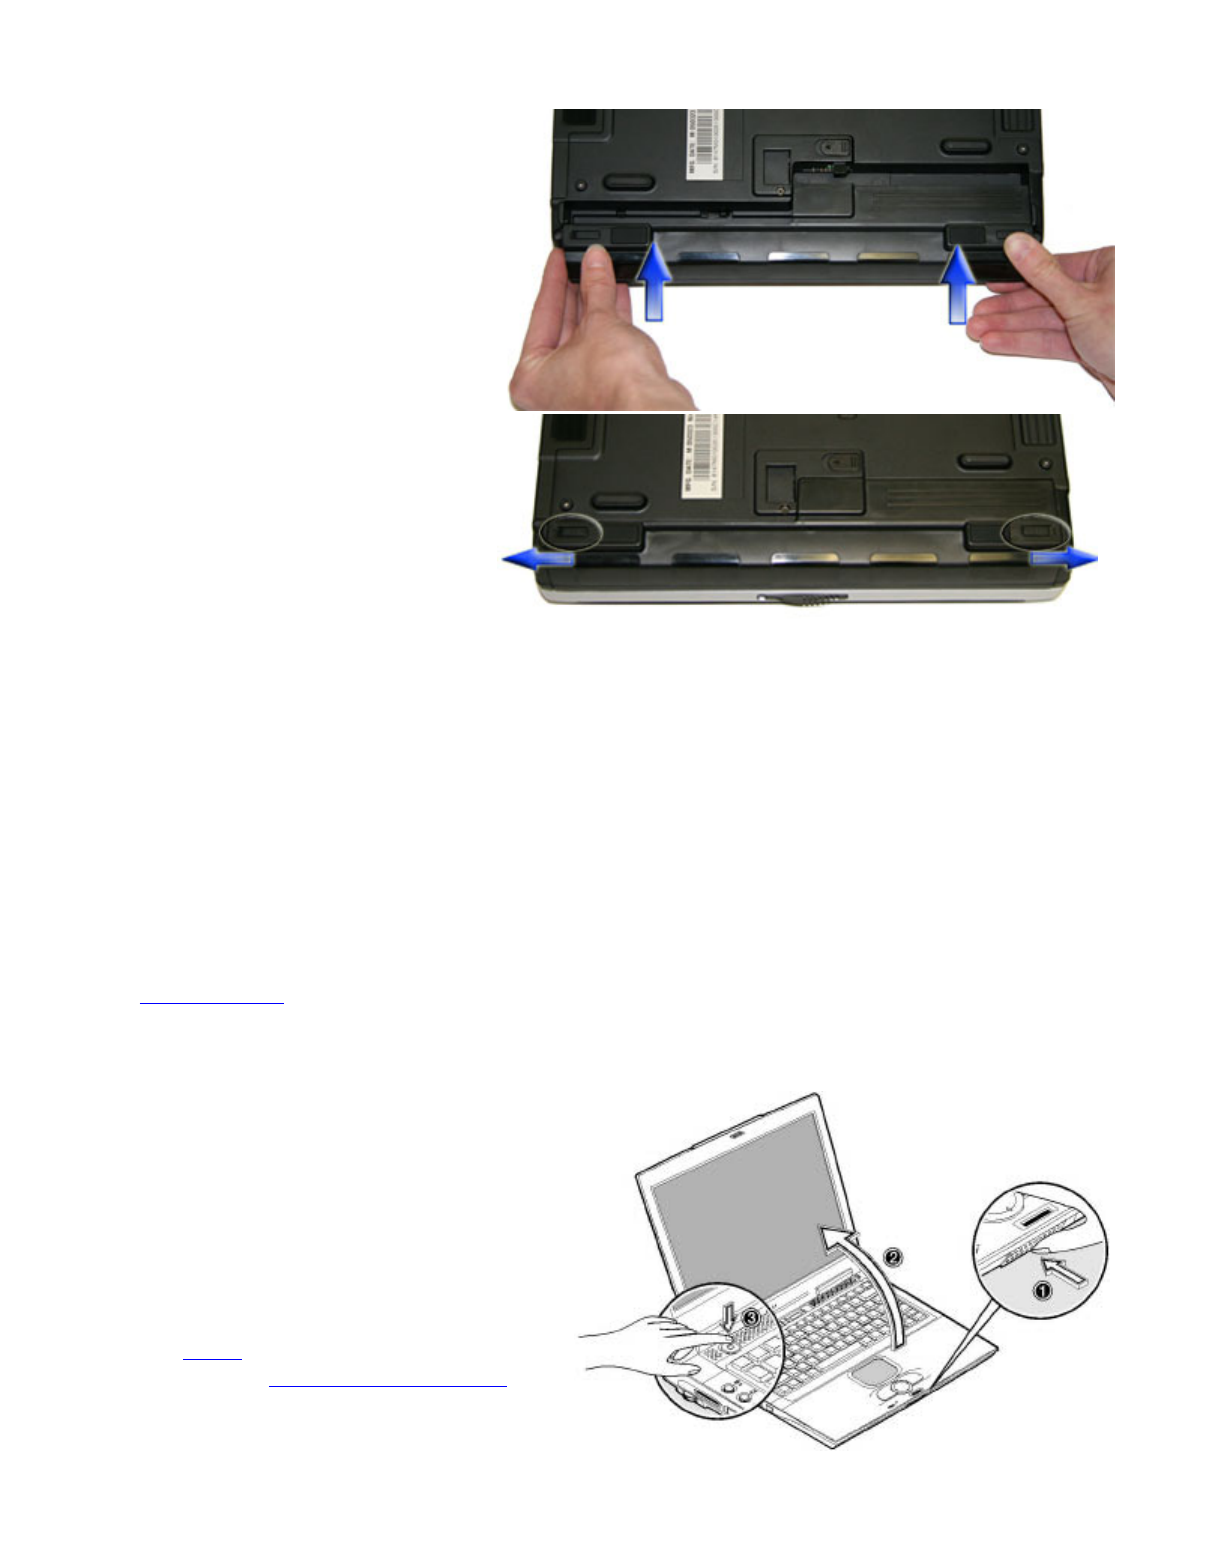
Before using your computer, install the battery and then attach the computer to AC power.
Installing the battery:
72_0128_001
16 May 2005
© 2005 Itronix Cor
p
oration. All ri
g
hts reserved.
GoBook® PRO II Help
72_0128_001
16 May 2005
© 2005 Itronix Cor
p
oration. All ri
g
hts reserved.
GoBook® PRO II Help
1
. Line up the battery connectors.
2
. Press gently on the battery until it
clicks into place.
Pa
g
e 2 of 100GoBook PRO II Hel
p
5/16/2005file://C:\Documents%20and%20Settin
g
s\barvill
j
.ITRXNT1\Local%20Settin
g
s\Tem
p
\~hh7...
Attaching AC Power:
Begin Using the Computer
3. Slide the battery locks
toward the outside of the
computer to lock the battery.
1
. Connect the AC adapter power cord to the AC
adapter.
2
. Connect the AC adapter to the DC power port
on the rear panel of your computer.
3
. Connect the AC adapter power cord to a
properly grounded AC outlet.
NOTE It is recommended you use a quality
surge protector.
insert picture
1
. Slide the display cover release latch to the
right.
2
. Open the display to a comfortable viewing
angle.
3
. Press the power switch to turn on the power.
The POST (power-on self-test) routine
executes and Windows begins loading.
NOTE When using a battery pack for the
first time, fully charge the battery, then
Pa
g
e 3 of 100GoBook PRO II Hel
p
5/16/2005file://C:\Documents%20and%20Settin
g
s\barvill
j
.ITRXNT1\Local%20Settin
g
s\Tem
p
\~hh7...
Turning off Your Computer
Turning off the computer properly is important to maintaining your computer. Select Start, Shut Down
and follow the instructions on the screen.
If you are going to be away from the computer for a short period, there are ways to conserve power
without shutting down the system. See Power Saving Modes for details.
NOTE If you are unable to shut down your computer normally, press and hold the power button more
than four seconds to turn off the computer. If you turn off the computer and want to turn it on again,
wait at least two seconds before powering up.
CAUTION Shutting off the computer improperly may result in data loss.
Loading Windows
This section is for installing the Windows operating system only. If you are installing a different
operating system, please check with your vendor for installation details.
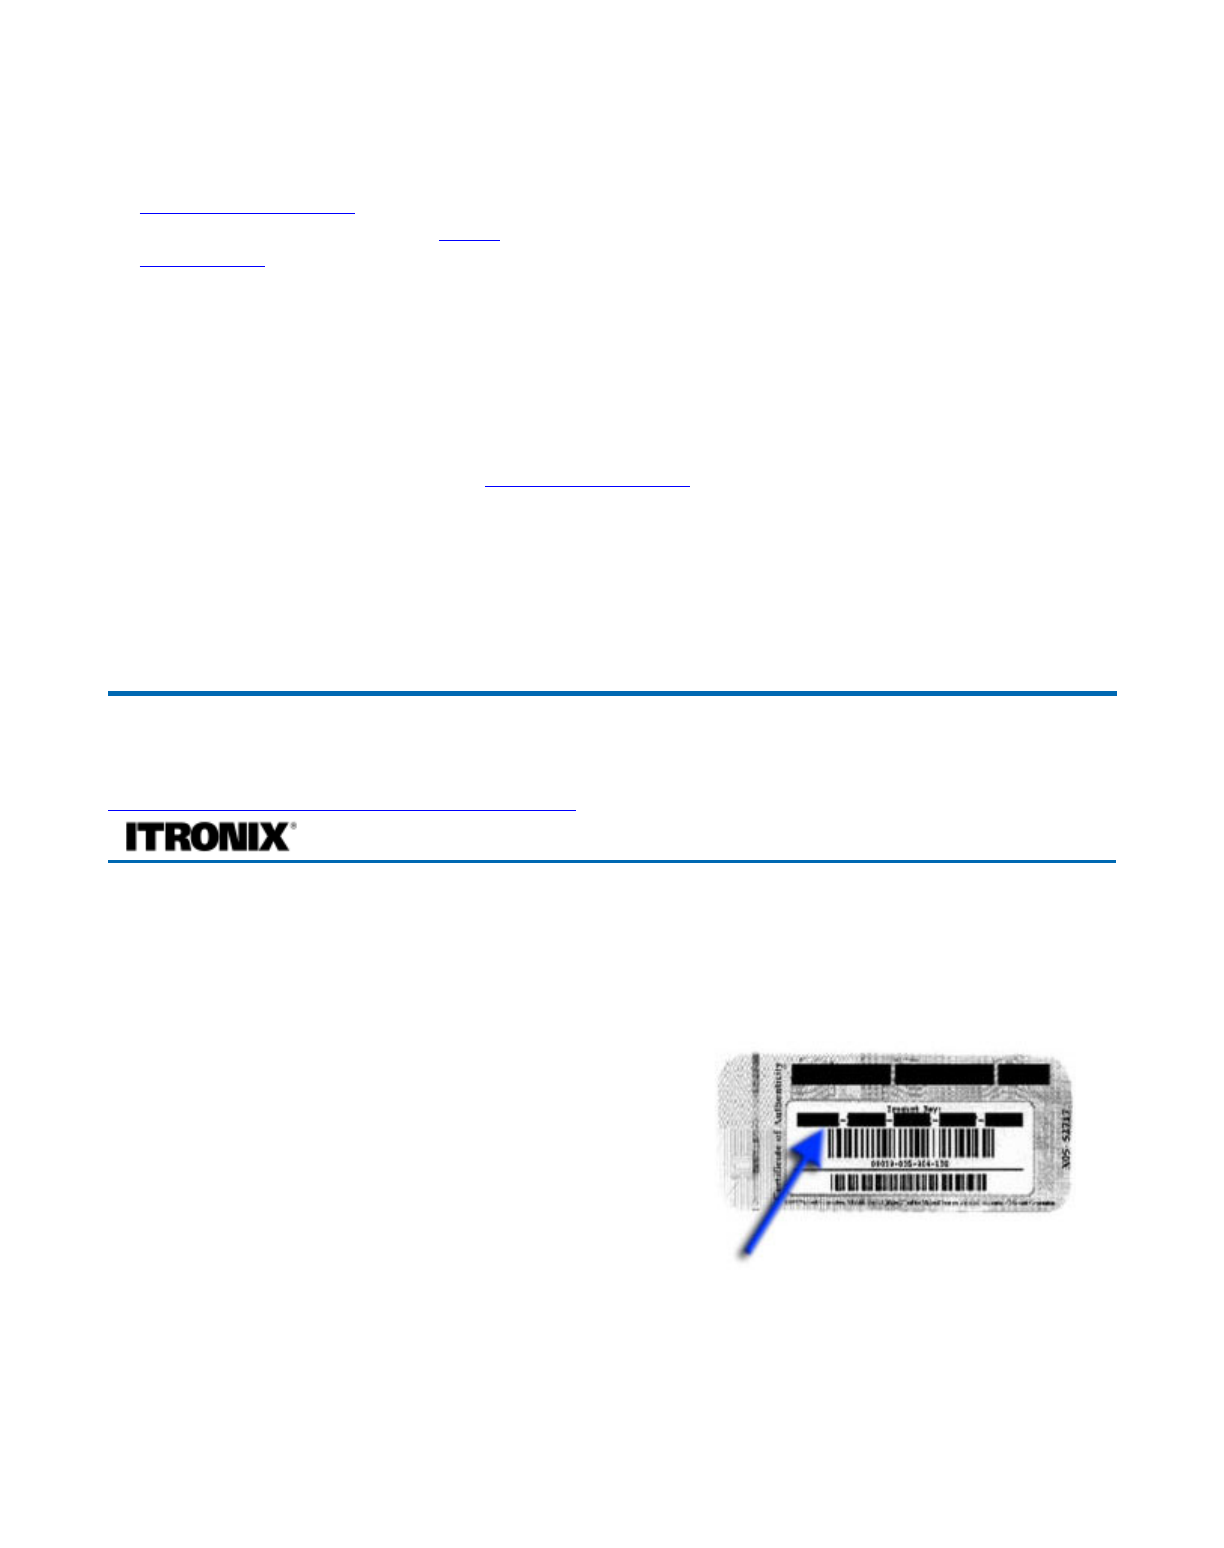
Your computer will begin loading Windows once you turn
on the power. Wait a few seconds for Windows setup to
load. The Windows setup will prompt you for the product
key number. You can find the product key number on a
sticker attached to the bottom of the computer.
1. Type your name, and, if applicable, the name of
your company.
2. Read the End User's License Agreement. Click Next to accept it.
3. Enter the product key number. You can find this on the Certificate of Authenticity on a sticker
attached to the computer. Click Finish.
4. The Start Wizar
d
will
p
rom
p
t
y
ou to set the date, and
y
our local time.
disconnect the adapter to use up the battery
b
efore recharging again. Perform this action
twice to condition the battery pack.
Calibrating the battery before use is also
highly recommended. Refer to Power
Management, for more information.
72_0128_001
16 May 2005
© 2005 Itronix Cor
p
oration. All ri
g
hts reserved.
GoBook® PRO II Help
Pa
g
e 4 of 100GoBook PRO II Hel
p
5/16/2005file://C:\Documents%20and%20Settin
g
s\barvill
j
.ITRXNT1\Local%20Settin
g
s\Tem
p
\~hh7...

Some software comes pre-loaded with Windows. New users can familiarize themselves with this
software by selecting All Programs from the start menu, then clicking on programs to run them.
CAUTION When you are installing the Windows operating system and enter the product key number,
we strongly recommend connecting the AC adapter - DO NOT use battery alone to avoid warning
messages.
Startup Problems?
If your computer does not operate, try these solutions.
zConnect the AC adapter to charge the battery if it is not charged.
NOTE The Power LED on the AC adapter should be lit as well as the External Power Indicator on
the GoBook PRO II if the AC adapter is connected and functioning properly. Additionally, one of
the power icons should appear in the task tray.
zIf the AC adapter is connected but the unit will still not turn on, make sure the electrical outlet you
are using works.
zCheck to make sure the battery is installed and charged properly.
zIf the battery does not begin charging, remove the battery, connect the AC adapter, and turn on the
computer by pressing the Power Button. Reinstall the battery. The Battery Indicator is solid
orange while the battery is charging.
The Troubleshooting section lists additional solutions you can try.
Safety and Ergonomics
Important safety instructions
1. Read these instructions carefull
y
. Save these instructions for future reference.
72_0128_001
16 May 2005
© 2005 Itronix Cor
p
oration. All ri
g
hts reserved.
GoBook® PRO II Help
72_0128_001
16 May 2005
© 2005 Itronix Cor
p
oration. All ri
g
hts reserved.
GoBook® PRO II Help
Pa
g
e 5 of 100GoBook PRO II Hel
p
5/16/2005file://C:\Documents%20and%20Settin
g
s\barvill
j
.ITRXNT1\Local%20Settin
g
s\Tem
p
\~hh7...

2. Follow all warnings and instructions marked on the product.
3. Unplug this product from the wall outlet before cleaning. Do not use liquid cleaners or aerosol
cleaners. Use a damp cloth for cleaning.
4. Do not use this product near water.
5. Do not place this product on an unstable cart, stand, or table. The product may fall, causing
serious damage to the product.
6. Slots and openings in the cabinet and the back or bottom are provided for ventilation; to ensure
reliable operation of the product and to protect it from overheating, these openings must not be
blocked or covered. The openings should never be blocked by placing the product on a bed, sofa,
rug, or other similar surface. This product should never be placed near or over a radiator or heat
register, or in a built-in installation unless proper ventilation is provided.
7. This product should be operated from the type of power indicated on the marking label. If you are
not sure of the type of power available, consult your dealer or local power company.
8. Do not allow anything to rest on the power cord. Do not locate this product where persons will
walk on the cord.
9. If an extension cord is used with this product, make sure that the total ampere rating of the
equipment plugged into the extension cord does not exceed the extension cord ampere rating.
Also, make sure that the total rating of all products plugged into the wall outlet does not exceed
the fuse rating.
10. Never push objects of any kind into this product through cabinet slots as they may touch
dangerous voltage points or short out parts that could result in a fire or electric shock. Never spill
liquid of any kind on the product.
11. Do not attempt to service this product yourself, as opening or removing covers may expose you to
dangerous voltage points or other risks. Refer all servicing to qualified service personnel.
12. Unplug this product from the wall outlet and refer servicing to qualified service personnel under
the following conditions:
1. When the power cord or plug is damaged or frayed
2. If liquid has been spilled into the product
3. If the product has been exposed to rain or water
4. If the product does not operate normally when the operating instructions are followed. Adjust
only those controls that are covered by the operating instructions since improper adjustment of
other controls may result in damage and will often require extensive work by a qualified
technician to restore the product to normal condition.
5. If the
p
roduct has been dro
pp
ed or the cabinet has been dama
g
e
d
Pa
g
e 6 of 100GoBook PRO II Hel
p
5/16/2005file://C:\Documents%20and%20Settin
g
s\barvill
j
.ITRXNT1\Local%20Settin
g
s\Tem
p
\~hh7...

6. If the product exhibits a distinct change in performance, indicating a need for service.
13. Replace the battery with the same type as the product's battery we recommend. Use of another
battery may present a risk of fire or explosion. Refer battery replacement to a qualified
serviceman.
14. WARNING! Batteries may explode if not handled properly. Do not disassemble or dispose of
them in fire. Keep them away from children and dispose of used batteries promptly.
15. Use only the proper type of power supply cord set (provided in your accessories box) for this unit.
It should be a detachable type: UL listed/CSA certified, type SPT-2, rated 7A 125V minimum,
VDE approved or its equivalent. Maximum length is 15 feet (4.6 meters).
Ergonomics
Tips for New Owners
zTake responsibility for backup
Back up files often. Users who need to manage large amounts of data may wish to use backup
devices such as a ZIP drive.
zDon't leave passwords anywhere on your notebook or carrying case
zBe careful when placing your notebook on an airport security conveyor belt
In most airports, security conveyor belts are safe for computers. If you are not sure, ask the
security staff. You should keep a close eye on your computer.
zTape your business card to the notebook and accessories
In the workplace, notebooks and accessories may often look exactly alike, leading to equipment
mix-ups. Prevent such mix-ups by placing your name on your equipment.
zDevelop ergonomic work habits
The science of ergonomics studies the relationship between health and a suitable work
environment. For more information on ergonomics, contact your nearest computer bookstore, or
local librar
y
. See Safet
y
and Er
g
onomics.
72_0128_001
16 May 2005
© 2005 Itronix Cor
p
oration. All ri
g
hts reserved.
GoBook® PRO II Help
Pa
g
e 7 of 100GoBook PRO II Hel
p
5/16/2005file://C:\Documents%20and%20Settin
g
s\barvill
j
.ITRXNT1\Local%20Settin
g
s\Tem
p
\~hh7...

zConsider using a lock
For added security, consider purchasing a Kensington lock to put into the Security Slot on the
right side of your computer. Use the Kensington lock to secure the computer to a desk or table.
NOTE Using a computer for extended periods of time with a poor workstation setup and incorrect work
habits can cause health problems.
Getting Familiar with Your Computer
This chapter introduces the different components and controls of your notebook computer, including the
hardware components, the software, and the audio and video systems.
Before you begin using your GoBook PRO II, read this chapter to familiarize yourself with the main
components installed in the system.
This computer combines high-performance, versatility, power management features and multimedia
capabilities with a unique style and ergonomic design. Work with unmatched productivity and reliability
with your new power computing partner.
This chapter gives an in-depth "tour" of the computer's many features.
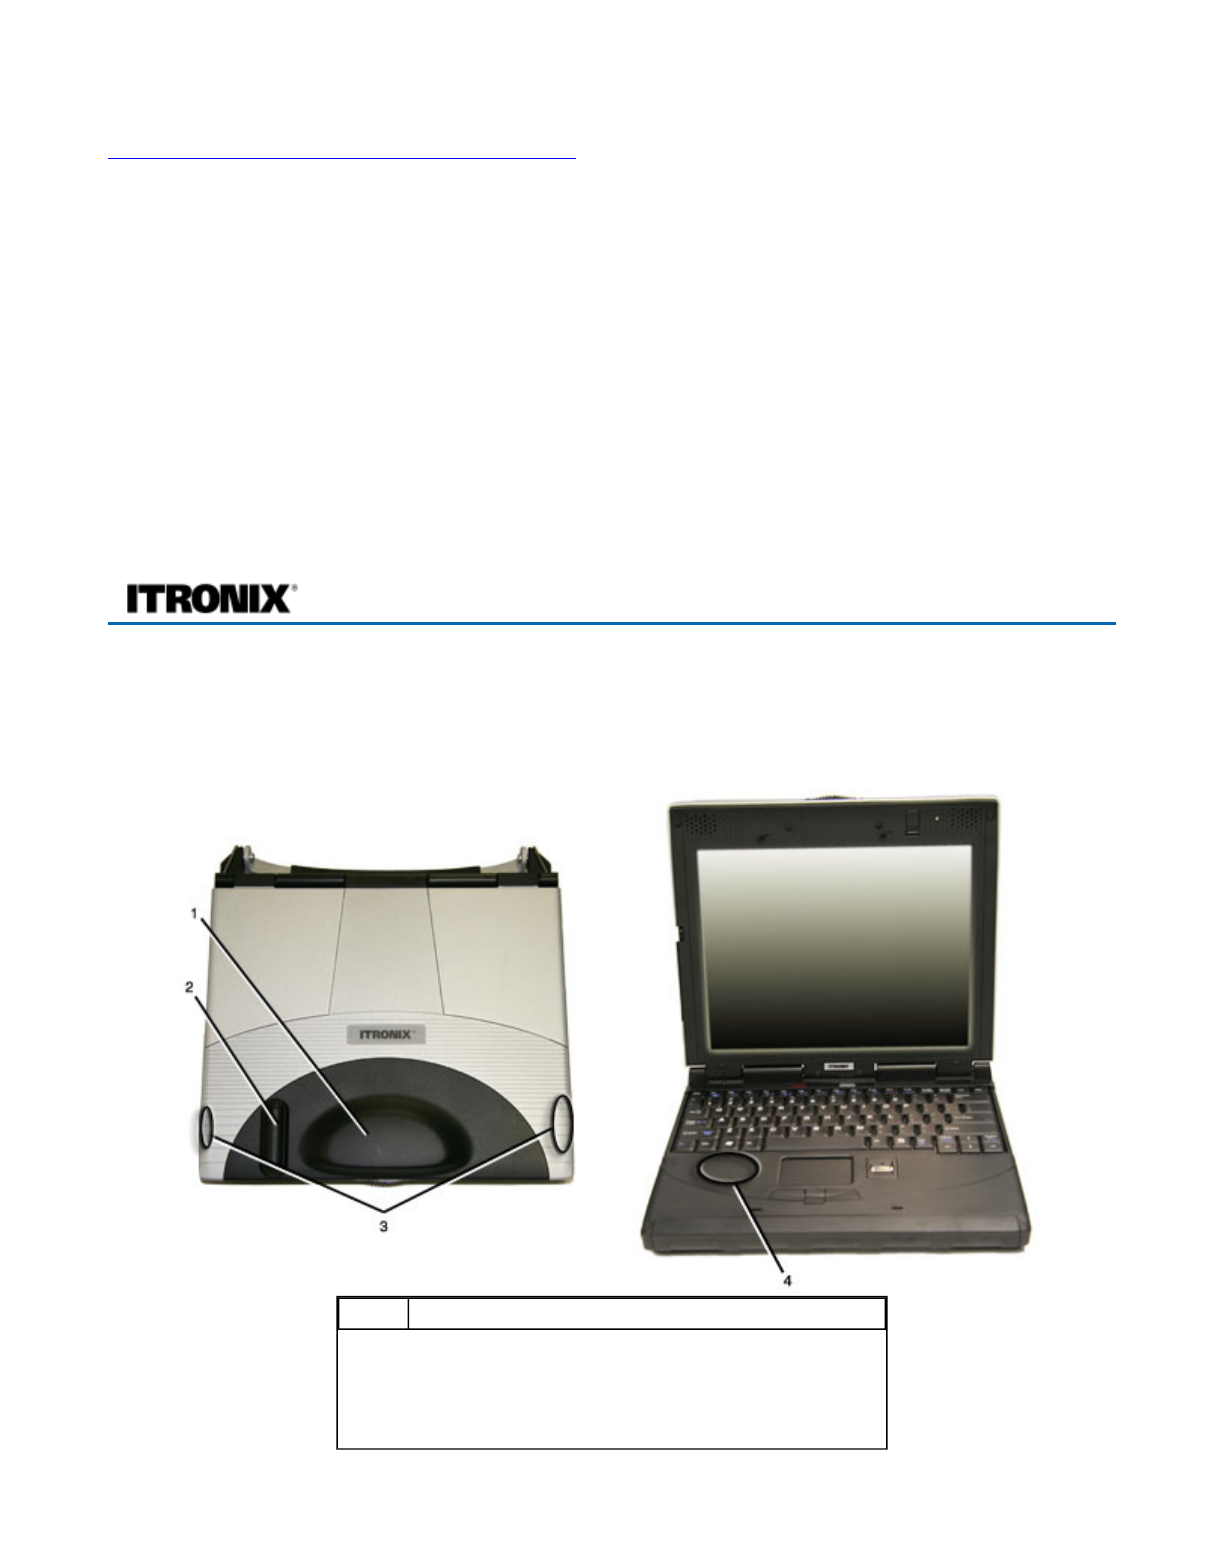
Front View
Hover the mouse over each number on the
p
icture to see a descri
p
tion
72_0128_001
16 May 2005
© 2005 Itronix Cor
p
oration. All ri
g
hts reserved.
GoBook® PRO II Help
Pa
g
e 8 of 100GoBook PRO II Hel
p
5/16/2005file://C:\Documents%20and%20Settin
g
s\barvill
j
.ITRXNT1\Local%20Settin
g
s\Tem
p
\~hh7...
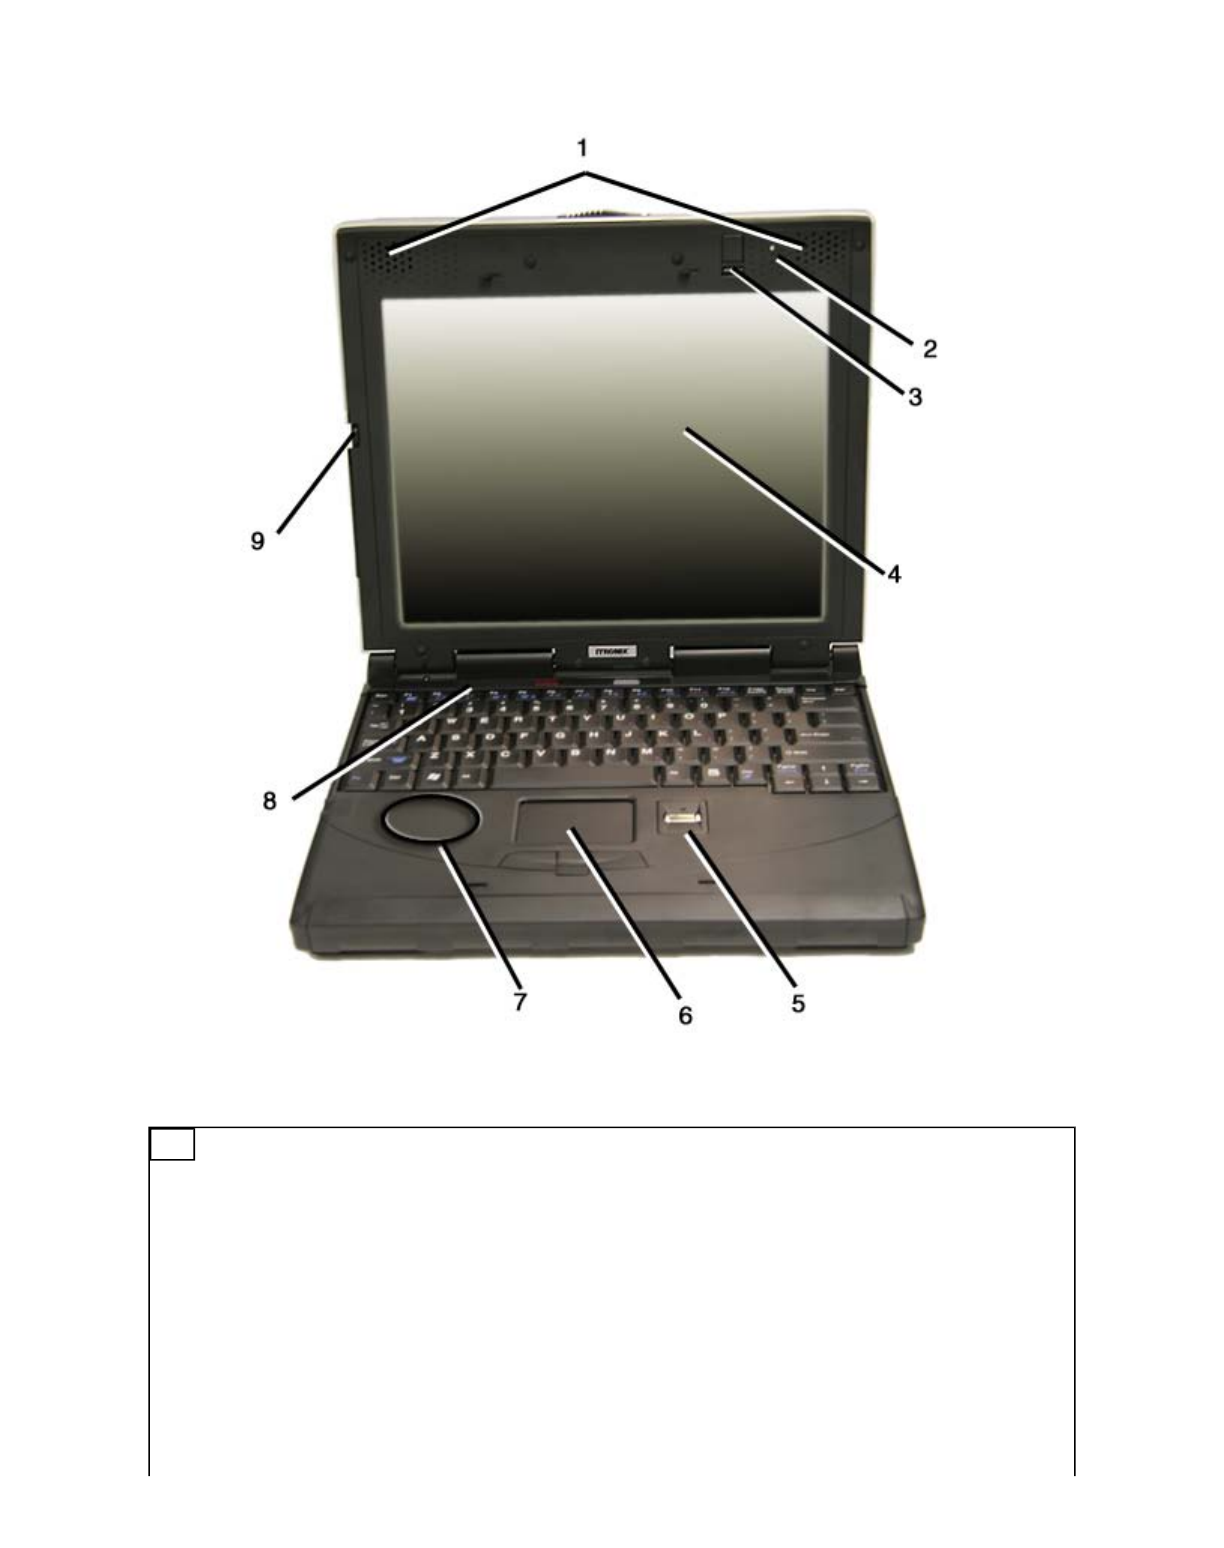
# Feature Description
1 Speakers
2 Photo Sensor
3 Keyboard Light
4 Touch Screen
Display
5 Fingerprint
Scanner Optional feature
6 Touchpad
7 Bluetooth /
Diversity for
EVDO Antenna
Pa
g
e 9 of 100GoBook PRO II Hel
p
5/16/2005file://C:\Documents%20and%20Settin
g
s\barvill
j
.ITRXNT1\Local%20Settin
g
s\Tem
p
\~hh7...
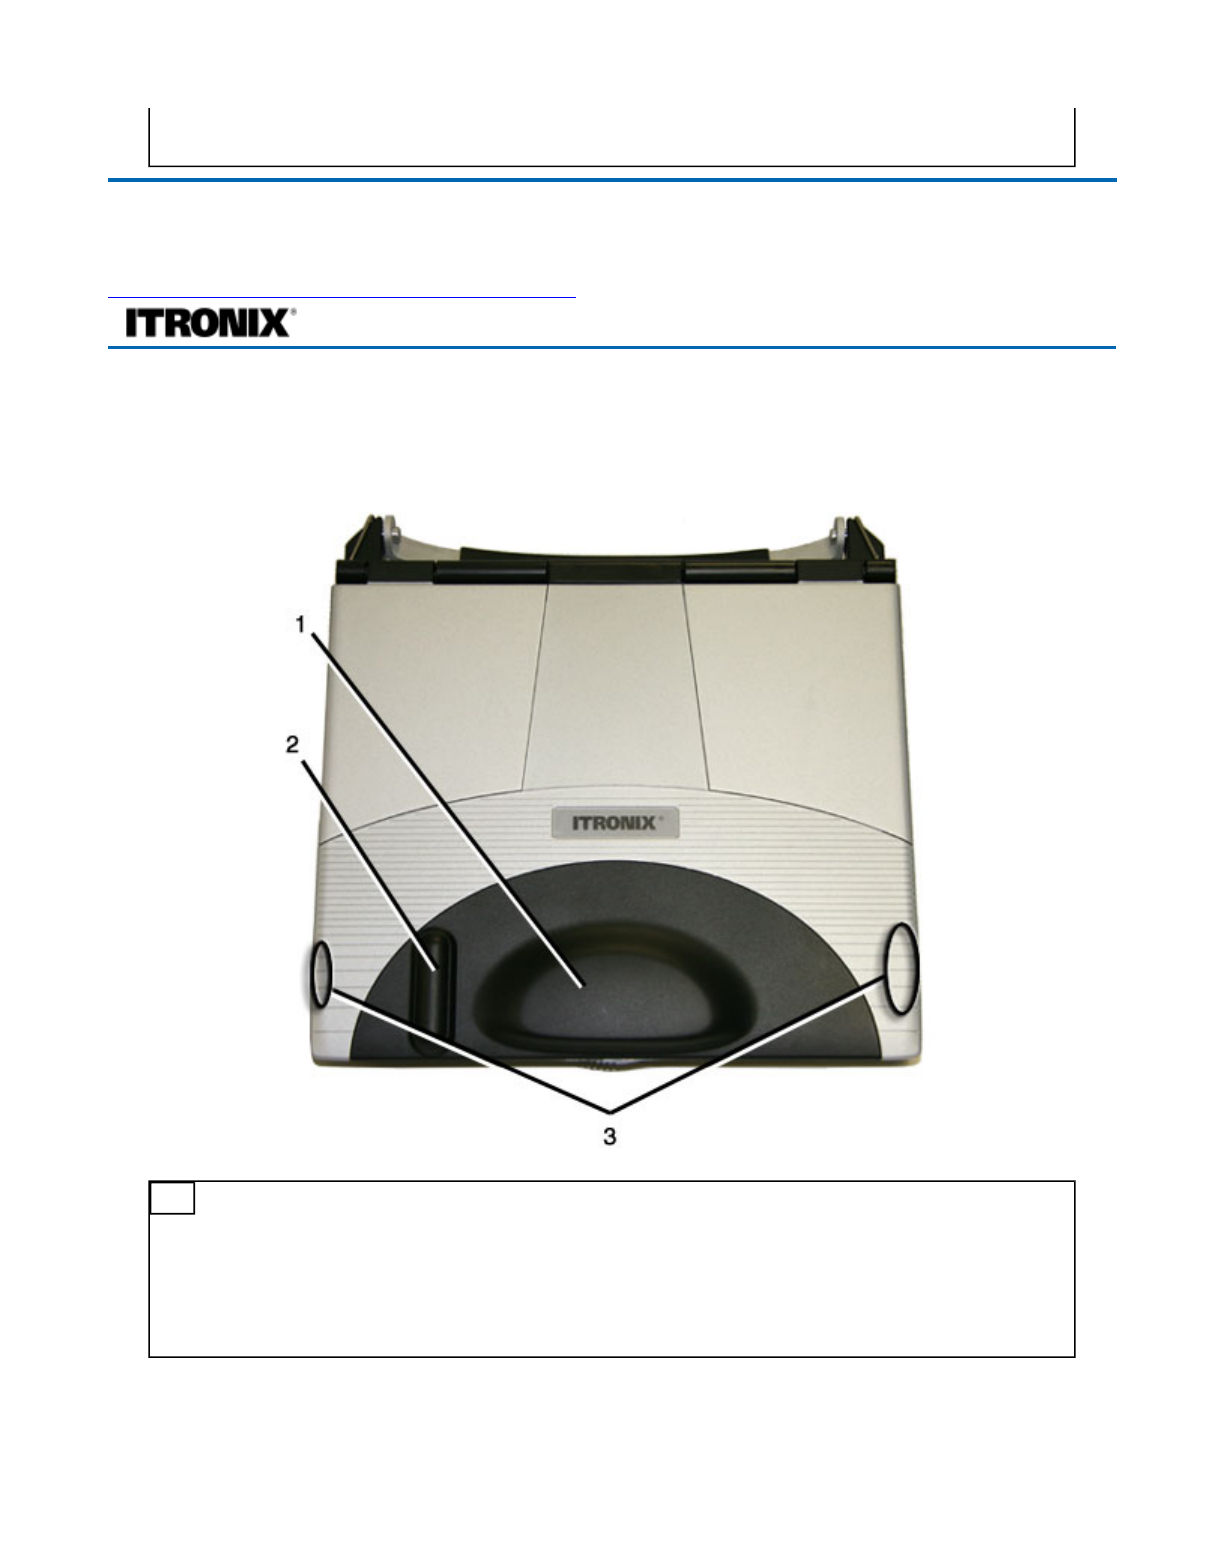
Top View
Hover the mouse over each number on the picture to see a description
CAUTION Please avoid hitting wireless communication antennas as this may adversely affect
communications quality.
8 LEDs Lights that turn on, of or blink to show the status of the computer and its
functions
72_0128_001
16 May 2005
© 2005 Itronix Cor
p
oration. All ri
g
hts reserved.
GoBook® PRO II Help
# Feature Description
1 CRMA Express
Antenna Antenna for WAN Communications
2 GPS Antenna Antenna for GPS Communications
3 WLAN
Antennas Antenna for WLAN Communications
Pa
g
e 10 of 100GoBook PRO II Hel
p
5/16/2005file://C:\Documents%20and%20Settin
g
s\barvill
j
.ITRXNT1\Local%20Settin
g
s\Tem
p
\~hh7...

Left Side View
Hover the mouse over each number on the picture to see a description
** insert picture**
Right Side View
Hover the mouse over each number on the picture to see a description
**insert picture**
72_0128_001
16 May 2005
© 2005 Itronix Cor
p
oration. All ri
g
hts reserved.
GoBook® PRO II Help
# Feature Description
1 Volume Control Knob Use to adjust the volume
2 Memory Stick / Secure
Digital Card Slot (optional) Use with a Memory Stick, Secure Digital (SD) or MultiMediaCard
(MMC) memory card.
3 PC Card Slot
4 Infrared Port (optional)
5
6
72_0128_001
16 May 2005
© 2005 Itronix Cor
p
oration. All ri
g
hts reserved.
GoBook® PRO II Help
# Feature Description
1
2
3
4
5
6
7
8
9
10
Pa
g
e 11 of 100GoBook PRO II Hel
p
5/16/2005file://C:\Documents%20and%20Settin
g
s\barvill
j
.ITRXNT1\Local%20Settin
g
s\Tem
p
\~hh7...

Back Edge View
Hover the mouse over each number on the picture to see a description
**insert picture**
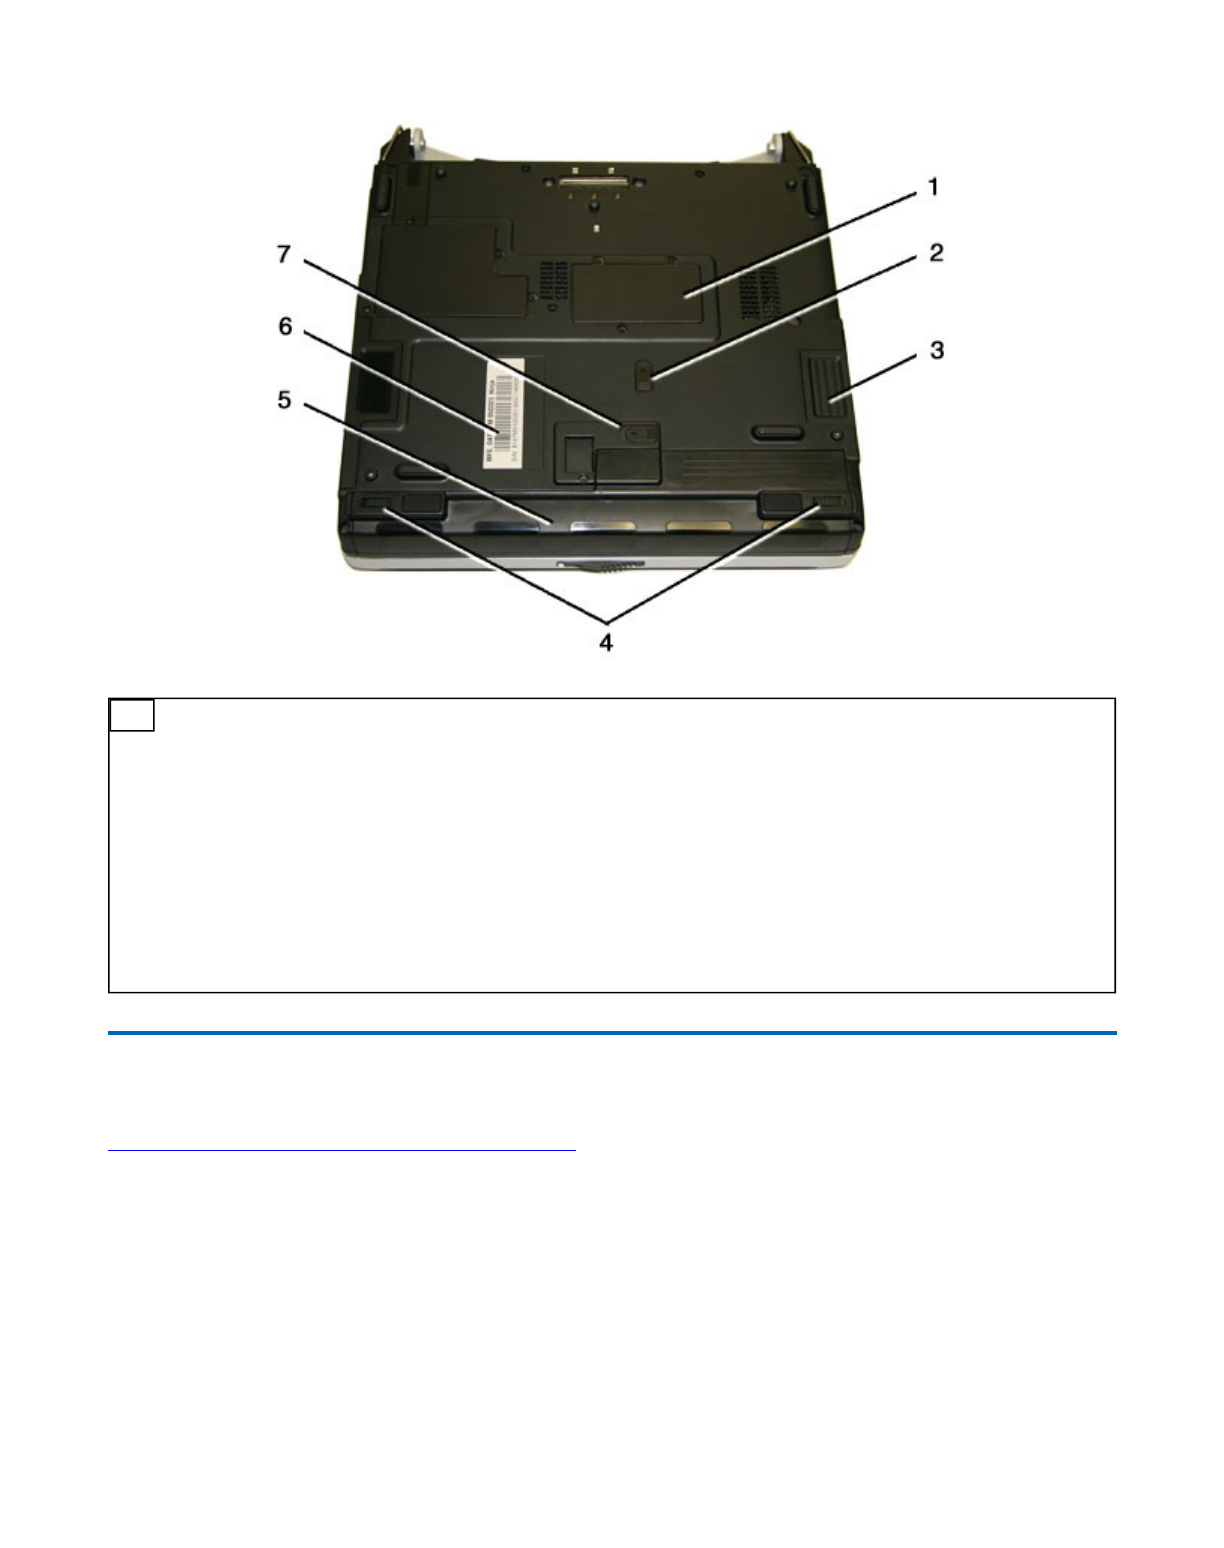
Bottom View
Hover the mouse over each number on the picture to see a description
1. USB ports
2. S-Video port
3. DVD-ROM drive
4. DVD-ROM drive lock
5. DVD-ROM drive eject button
6. GPRS Headset Jack
7. Shoulder strap hole
72_0128_001
16 May 2005
© 2005 Itronix Cor
p
oration. All ri
g
hts reserved.
GoBook® PRO II Help
# Feature Description
1 DC-in jack Connects to an AC adapter.
2 S-video out port Connects to a television or display device with S-video input.
3 External monitor port Connects to a display monitor (up to 2048x1536 resolution).
4 Parallel port Connects to a parallel device (e.g., parallel printer).
5 Modem jack Connects a phone line (only for models with an internal fax/data
modem).
6 Network jack Connects to an Ethernet-based network.
7 IEEE 1394 port (firewire) Connects to a IEEE 1394-compatible (4-pin) device (e.g., digital
video camera).
8 USB ports Connect to USB devices (e.g., USB digital camera).
9 Line-in jack Accepts audio line-in devices (e.g., audio CD player, stereo
walkman).
10 S/PDIF line-out jack Connects to audio line-out devices (e.g., speakers, headphones);
supports S/PDIF connections.
72_0128_001
16 May 2005
© 2005 Itronix Cor
p
oration. All ri
g
hts reserved.
GoBook® PRO II Help
Pa
g
e 12 of 100GoBook PRO II Hel
p
5/16/2005file://C:\Documents%20and%20Settin
g
s\barvill
j
.ITRXNT1\Local%20Settin
g
s\Tem
p
\~hh7...
Keyboard Basics
The GoBook PRO II computer features:
zFull size keys 85-key US keyboard; 87-key international keyboard
zTwelve function keys
zEmbedded numeric ke
yp
a
d
# Feature Description
1 Memory compartment User expandable memory slot
2 Hard Disk Lock Slide this to lock or unlock the hard disk drive
3 Hard Disk Drive Removable hard disk drive for data storage
4 Battery Locks Slide these locks toward the outer edges of the computer to lock the
battery.
5 Battery
6 Serial Number Label
7 Battery Release Latch Slide this latch to the left to remove the battery. NOTE You must
first unlock the battery.
72_0128_001
16 May 2005
© 2005 Itronix Cor
p
oration. All ri
g
hts reserved.
Pa
g
e 13 of 100GoBook PRO II Hel
p
5/16/2005file://C:\Documents%20and%20Settin
g
s\barvill
j
.ITRXNT1\Local%20Settin
g
s\Tem
p
\~hh7...

zMouse keys and cursor control keys
zUSB port that enables you to connect an external keyboard
Keyboard ergonomics
Located below the keyboard, the wide and curved palm rest is ergonomically designed to provide you
with a very comfortable place to rest your hands while you type.
Primary Keys
GoBook® PRO II Help
Key Description
ALTThe ALT (alternate) key is used with other keys to perform special tasks. On
some operating systems pressing CTRL+ALT+DEL twice soft reboots the
computer .
ALT GRThe ALT GR key, a special function key found on the 87-key international
keyboard, when pressed and held, allows you to use characters in the bottom
right of a three character key.
BACKSPACEThe BACKSPACE key, sometimes represented on the keyboard as a left
arrow, moves the cursor one position to the left. The character to the left of
the cursor is erased.
CAPS LOC
K
Pressing the caps lock key one time locks keys A through Z in the UPPER
CASE position. Pressing the caps lock key again returns the letters to lower
case. While in the upper case mode, pressing the shift key results in lowercase
characters when entered. You still have to use the shift key to display
characters located on the upper portion of the keyboard. For example, press
shift+8 to type an asterisk (*), even when the caps lock key is activated.
The CAPS LOCK activity indicator is on when the keyboard is in CAPS
LOCK mode.
CTRLThe ctrl (control) key works with other keys to perform a variety of functions.
ENTERThe enter key signals the computer that you have completed your entry. This
is your way of telling the computer to process the information that you have
entered.
ESCThe esc (escape) key allows you to exit a pop-up window or message box.
PRTSCIn Windows, pressing the prtsc (print screen) key or ALT+PRTSC key copies
the current screen or window to the clipboard so you can paste it into
documents.
SHIFTThe shift key changes the keys A through Z to the UPPER CASE position.
When you press an alphabetic key, the character appears as a capital letter.
When you press shift with other keys, the characters on the upper part of the
keys appear. For example, pressing shift+7 displays an ampersand (&).
FnSome special Fn (function) keys have been established to perform important
tasks when pressed and held with the Fn key. These keys are described later in
this document. The Fn key legend is color keyed to other special keys on the
Pa
g
e 14 of 100GoBook PRO II Hel
p
5/16/2005file://C:\Documents%20and%20Settin
g
s\barvill
j
.ITRXNT1\Local%20Settin
g
s\Tem
p
\~hh7...

Arrow Keys
The arrow keys are defined by the software application.
The up arrow key usually moves the cursor up one line. In some cases, you can use the up arrow to
make selections from menus and scrollable list boxes.
The down arrow key usually moves the cursor down one line. In Windows, you can use the down arrow
to make selections from menus and scrollable list boxes.
The right arrow key usually moves the cursor one character position to the right.
The Left arrow key usually moves the cursor one character position to the left.
Function Keys and Key Combinations
When using function keys, press and hold the Fn key before pressing the other key in the key
combination.
keyboard
spacebar
Use the spacebar to enter a space and move the cursor one character to the
right.
TABThe tab key moves the cursor to the next tab stop or field. Tab stops are
defined by your operating system or application program. Press the tab key to
move from one field or text box to another.
72_0128_001
16 May 2005
© 2005 Itronix Cor
p
oration. All ri
g
hts reserved.
GoBook® PRO II Help
72_0128_001
16 May 2005
© 2005 Itronix Cor
p
oration. All ri
g
hts reserved.
GoBook® PRO II Help
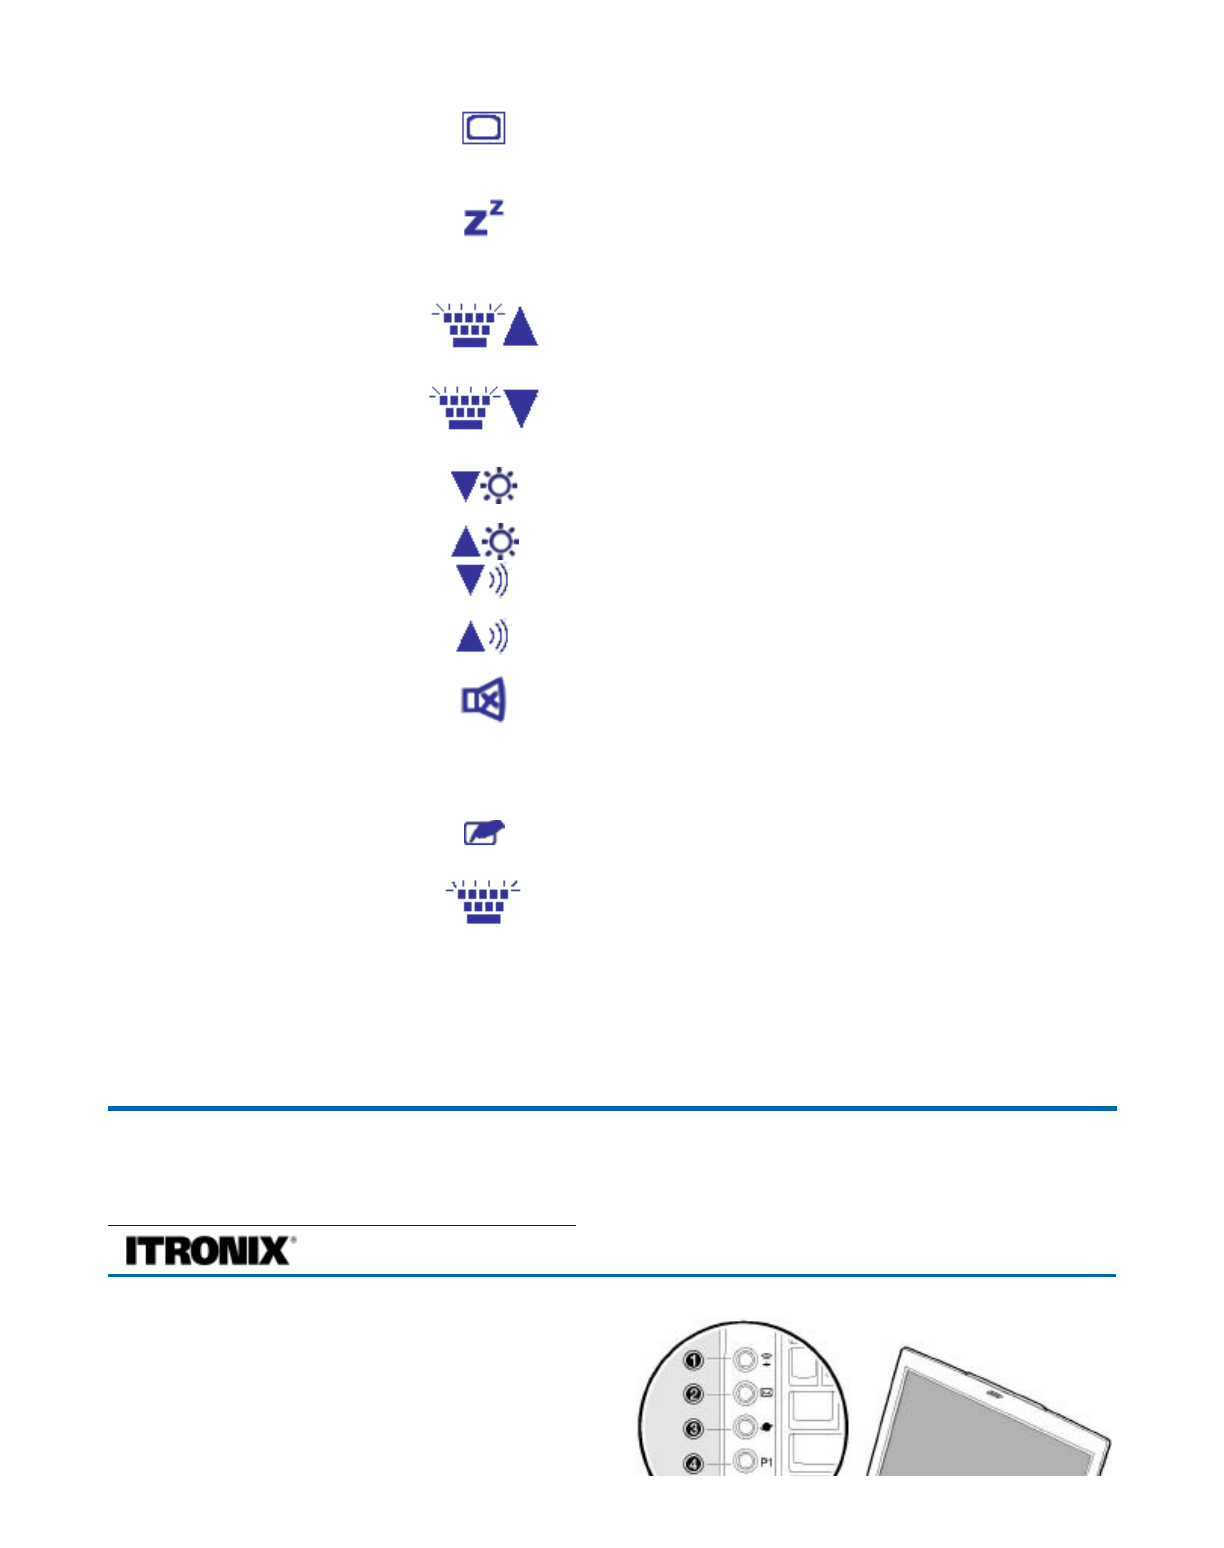
Function
Key Function Icon Description
Fn+F1 Display
toggle Switches the display output between the display
screen, external monitor (if connected) and both the
display screen and external monitor
NOTE When a DVD or VCD is playing, this
hotkey is disabled.
Pa
g
e 15 of 100GoBook PRO II Hel
p
5/16/2005file://C:\Documents%20and%20Settin
g
s\barvill
j
.ITRXNT1\Local%20Settin
g
s\Tem
p
\~hh7...
Quick Launch Buttons
Five Quick Launch Buttons, located at the top of the
keyboard, launch frequently used applications. The
Quick Launch Buttons automatically lock when the
Fn+F2 Screen
blank Turns off the display screen backlight and turns off
the external monitor, if attached. Press any key to
turn it back on.
Fn+F3 Standby Puts the computer in standby mode, which can be
defined via the advanced section of the Power
Management Properties in the Windows Control
Panel
Fn+F4 Tasklight
Brightness
Down
Dims the keyboard tasklight. NOTE You must first
turn on the tasklight by pressing Fn+Shift
Fn+F5 Tasklight
Brightness Up Increases the brightness of the keyboard tasklight.
NOTE You must first turn on the tasklight by
pressing Fn+Shift
Fn+F6 Brightness
Down Decreases the screen brightness
Fn+F7 Brightness Up Increases the screen brightness
Fn+F8 Speaker
Volume Down Decreases the speaker volume
Fn+F9 Speaker
Volume Up Increases the speaker volume
Fn+F10 Speaker
on/off Turns the speakers on and off; mutes the sound
Fn+F12 Scr Lk Scroll Lock
Fn+PgUp Home Home Functions as the “Home” key
Fn+PgDn End End Functions as the “End” key
Fn+ Right
Ctrl Touchpad
on/off Toggles the touchpad on and off
Fn+ Left
Shift Keyboard Task
Light Toggles the keyboard tasklight on and off
Fn+Caps
Lock Wireless Toggles the power on and off to all radio devices.
The radio devices include GPS, Bluetooth,
WLAN,and WWAN radios.
NOTE If radio wakeup is enabled, radio power will
turn back on before the system suspends.
72_0128_001
16 May 2005
© 2005 Itronix Cor
p
oration. All ri
g
hts reserved.
GoBook® PRO II Help
Pa
g
e 16 of 100GoBook PRO II Hel
p
5/16/2005file://C:\Documents%20and%20Settin
g
s\barvill
j
.ITRXNT1\Local%20Settin
g
s\Tem
p
\~hh7...
cover is closed so you don't have to worry about the
GoBook PRO II getting turned on accidentally.
For more information, see Launch Manager.
Numeric Keypad
The embedded numeric keypad consists of ten keys that make number intensive input more convenient.
It is indicated by small characters located on the upper right corner of the keycaps. To simplify the
keyboard legend, cursor-control key symbols are not printed on the keys. Press FN+NumLock to enable
or disable the numeric keypad.
**insert picture**
Lock Keys
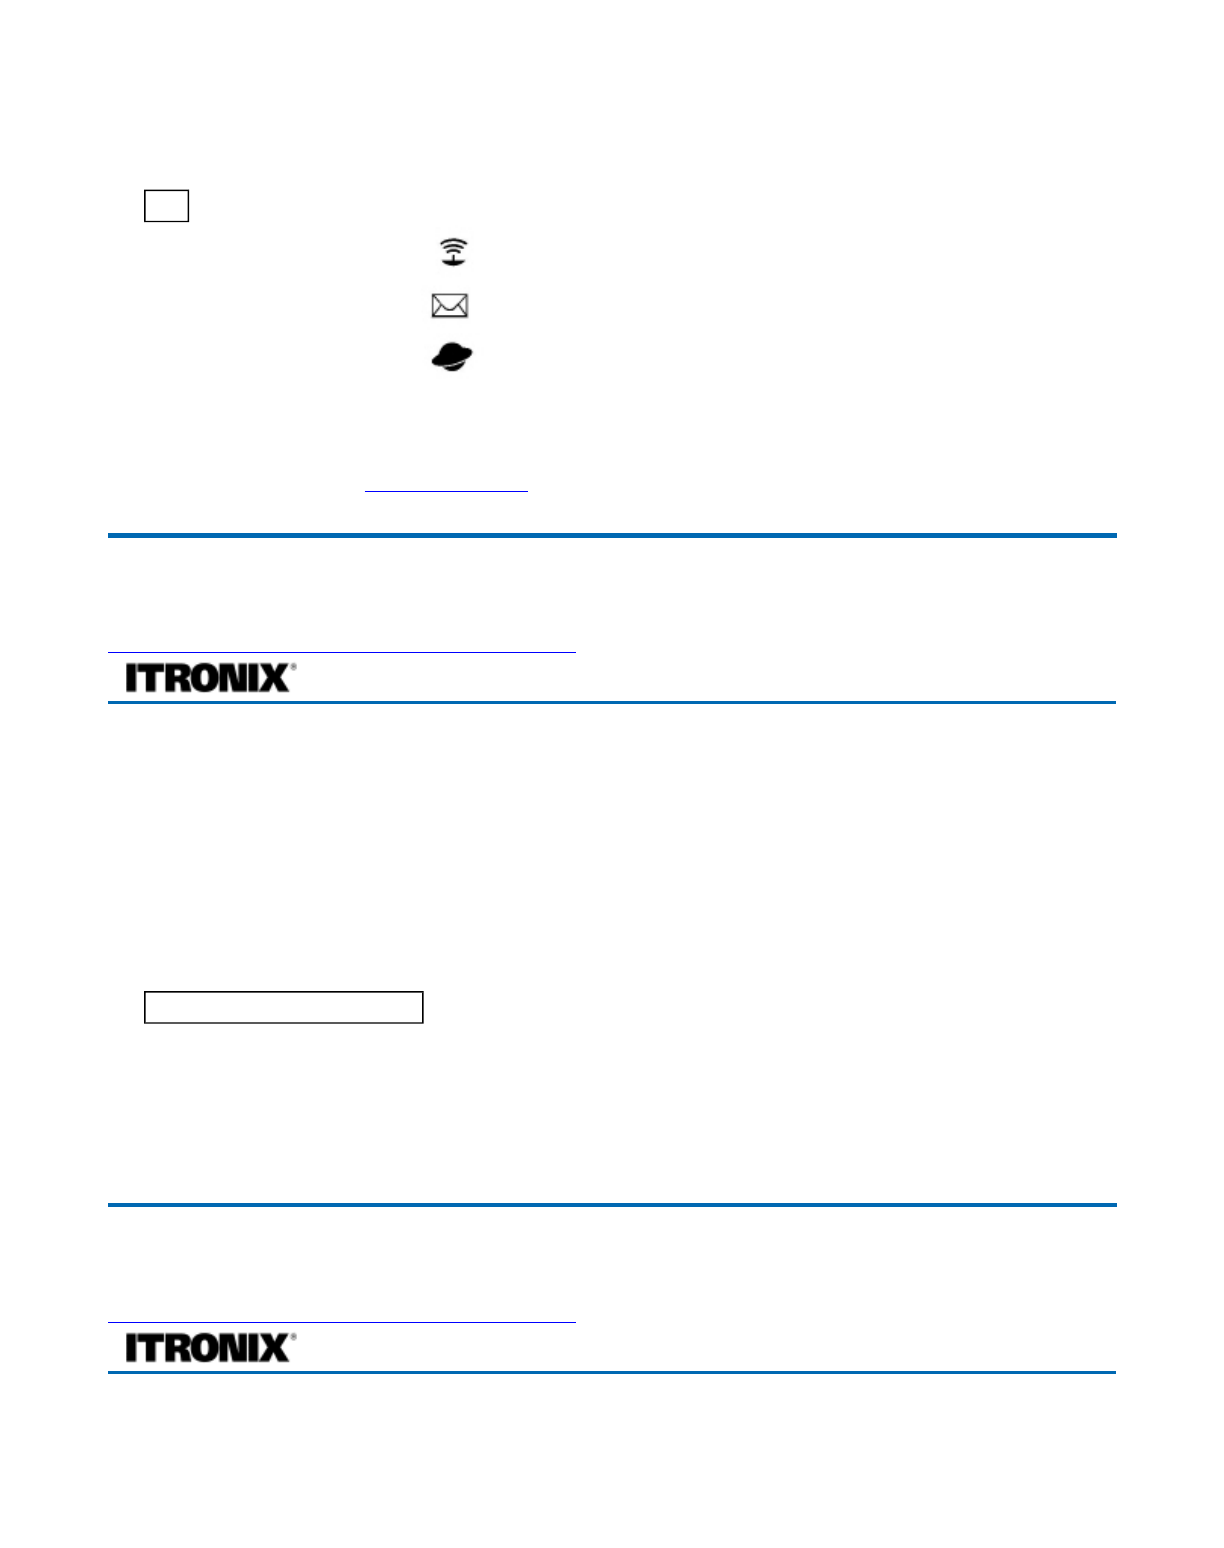
# Item Icon Description
1 Wireless
Communication
This button is used to enable or disable the wireless LAN
(optional) function.
2 Email The mail button is used to launch the email application.
3 Internet browser By default, is used to launch your internet browser.
4 P1 This button is user-programmable
5 P2 This button is user-programmable
72_0128_001
16 May 2005
© 2005 Itronix Cor
p
oration. All ri
g
hts reserved.
GoBook® PRO II Help
Desired Access Num Lock On Num Lock Off
Number keys on
embedded keypad Type numbers in a normal
manner.
Cursor-control keys on
embedded keypad Hold Shift while using cursor-
control keys. Hold Fn while using
cursor-control keys.
Main keyboard keys Hold Fn while typing letters on
embedded keypad. Type the letters in a
normal manner.
72_0128_001
16 May 2005
© 2005 Itronix Cor
p
oration. All ri
g
hts reserved.
GoBook® PRO II Help
Pa
g
e 17 of 100GoBook PRO II Hel
p
5/16/2005file://C:\Documents%20and%20Settin
g
s\barvill
j
.ITRXNT1\Local%20Settin
g
s\Tem
p
\~hh7...
The keyboard has three lock keys which you can toggle on and off.
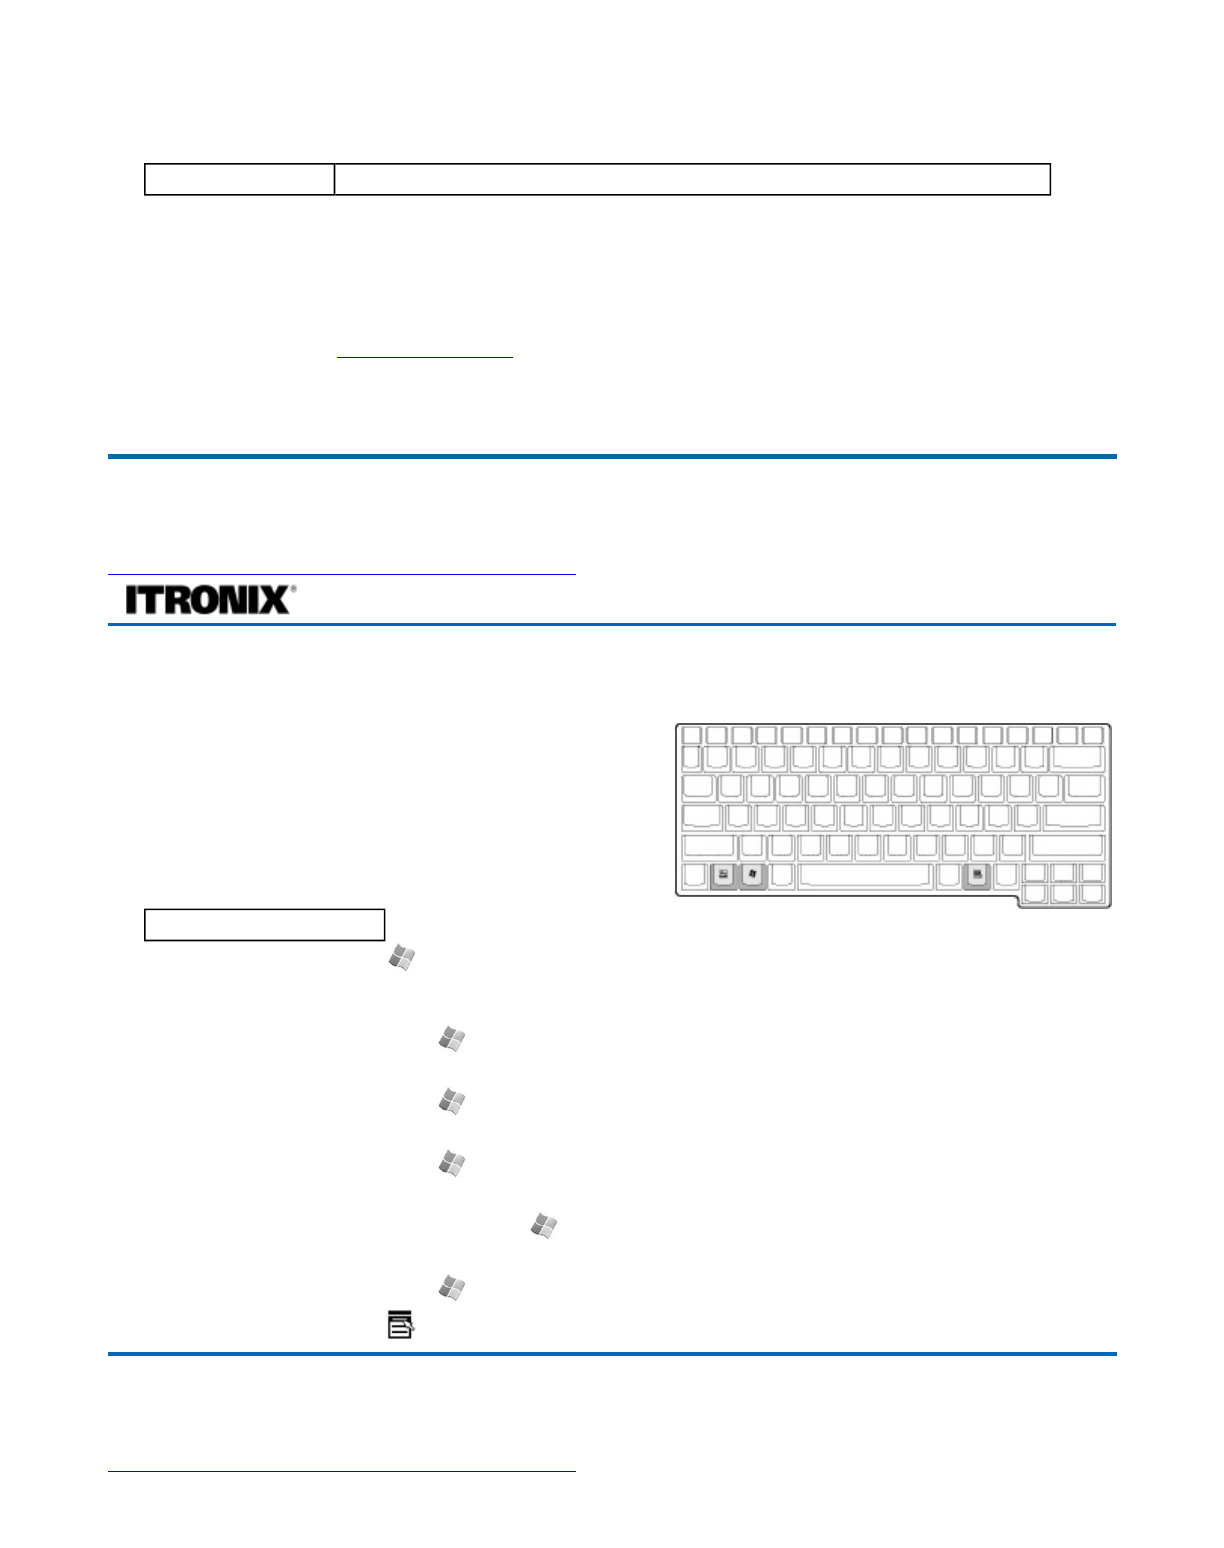
Windows Keys
The keyboard has two keys that perform Windows-
specific functions.
Lock Key Description
CAPS LOCK When Caps Lock is on, all alphabetic characters typed are in uppercase.
NUM LOCK
(Fn-F11) When Num Lock is on, the embedded keypad is in numeric mode. The
keys function as a calculator (complete with the arithmetic operators +, -,
*, and /). Use this mode when you need to do a lot of numeric data
entry. A better solution would be to connect an external keypad. See
External keyboard
SCROLL
LOCK
(Fn-F12)
When Scroll Lock is on, the screen moves one line up or down when you
press Ł or ¯ respectively. Scroll Lock does not work with some
applications.
72_0128_001
16 May 2005
© 2005 Itronix Cor
p
oration. All ri
g
hts reserved.
GoBook® PRO II Help
Key Icon Description
Windows Logo Key Start button. Combinations with this key perform special
functions. Below are a few examples:
+ TAB (Activates next Taskbar button)
+ E (Explores My Computer)
+ M (Undoes Minimize All)
SHIFT + + M (Undoes Minimize All)
+ R (Displays Run dialog box)
Application Key Opens the application's context menu (same as right-click).
72_0128_001
16 May 2005
© 2005 Itronix Cor
p
oration. All ri
g
hts reserved.
Pa
g
e 18 of 100GoBook PRO II Hel
p
5/16/2005file://C:\Documents%20and%20Settin
g
s\barvill
j
.ITRXNT1\Local%20Settin
g
s\Tem
p
\~hh7...
Keyboard Light
Restarting the Computer
Restarting the Computer
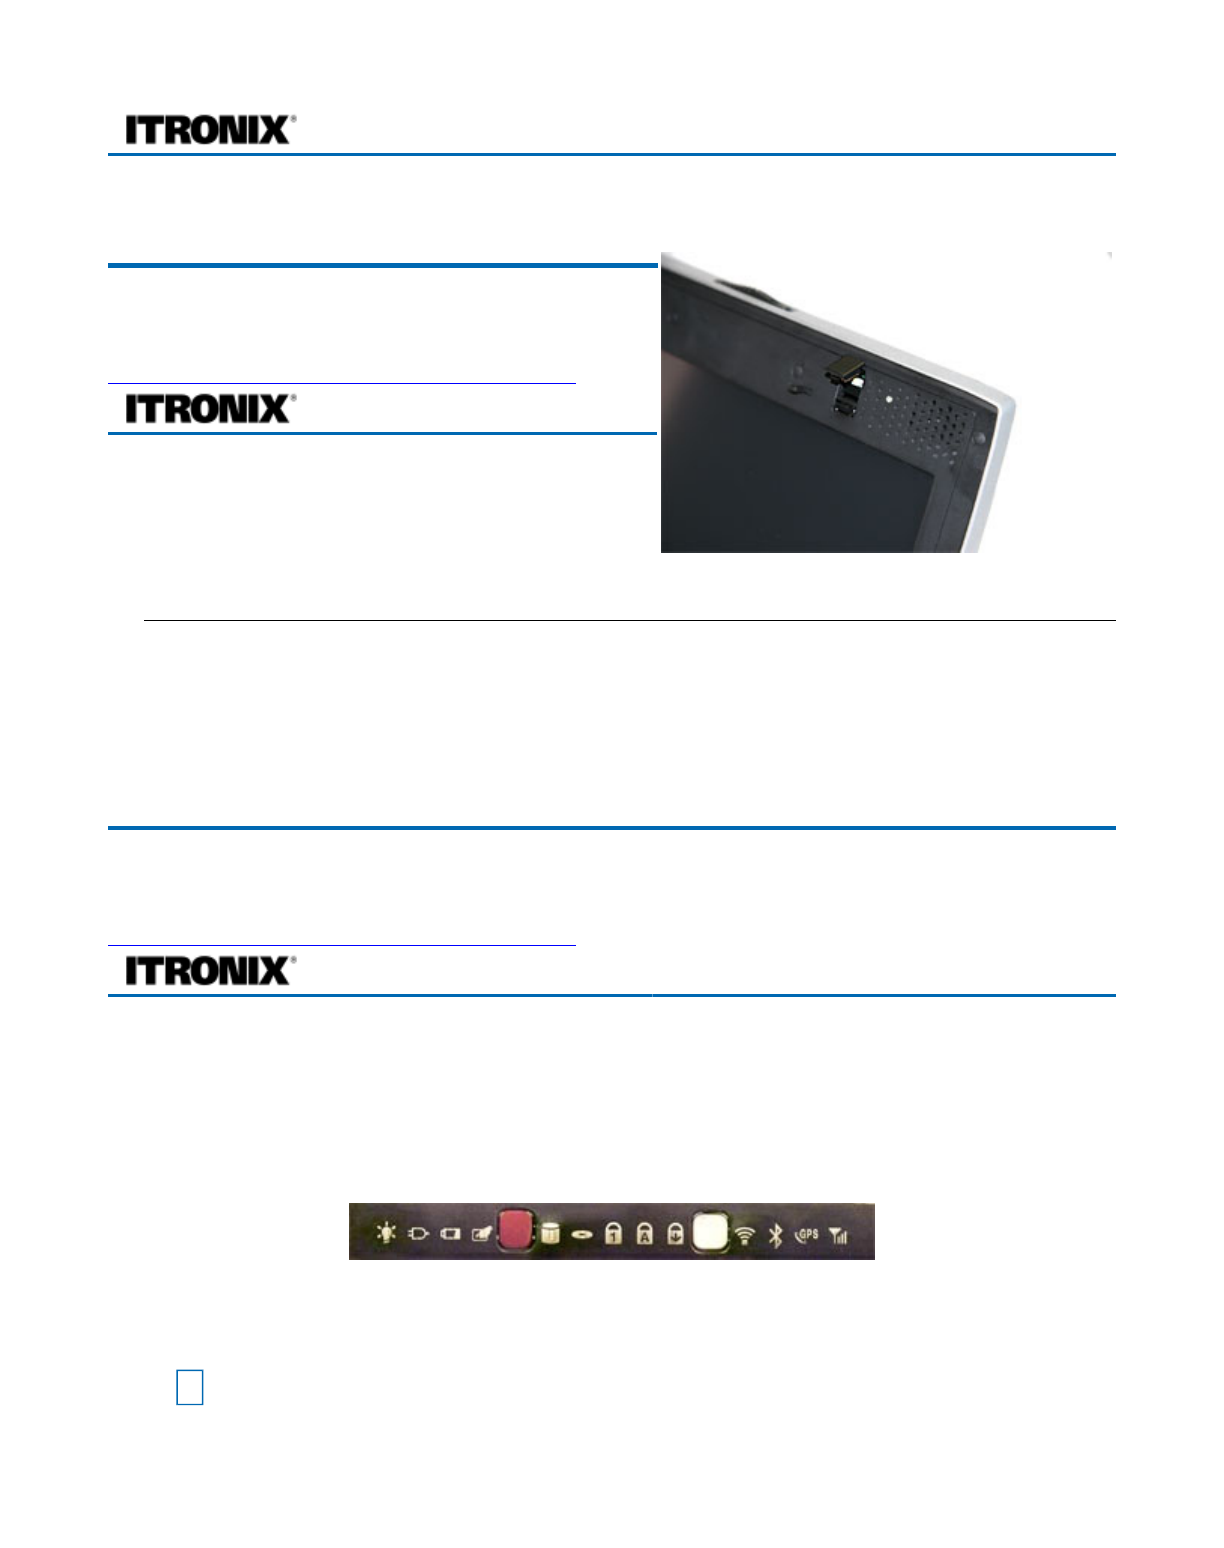
Activity Status LEDs
Thirteen easy-to-read LEDs under the display screen indicate activity status for common functions.
***insert picture with callout of LEDs
The Power indicators are visible even when you close the display cover so you can see the status of the
computer while the cover is closed.
GoBook® PRO II Help
72_0128_001
16 May 2005
© 2005 Itronix Cor
p
oration. All ri
g
hts reserved.
GoBook® PRO II Help
Press… To do this
CTRL+ALT+DEL twice Soft reboot the computer.
CAUTION All open and unsaved data will be lost.
Press and hold the Power
Button for approximately ten
seconds and then release it.
Reset the computer
CAUTION All open and unsaved data will be lost.
72_0128_001
16 May 2005
© 2005 Itronix Cor
p
oration. All ri
g
hts reserved.
GoBook® PRO II Help
# Icon Function LED Description
Power Steady
Green Computer is on and operating
Pa
g
e 19 of 100GoBook PRO II Hel
p
5/16/2005file://C:\Documents%20and%20Settin
g
s\barvill
j
.ITRXNT1\Local%20Settin
g
s\Tem
p
\~hh7...
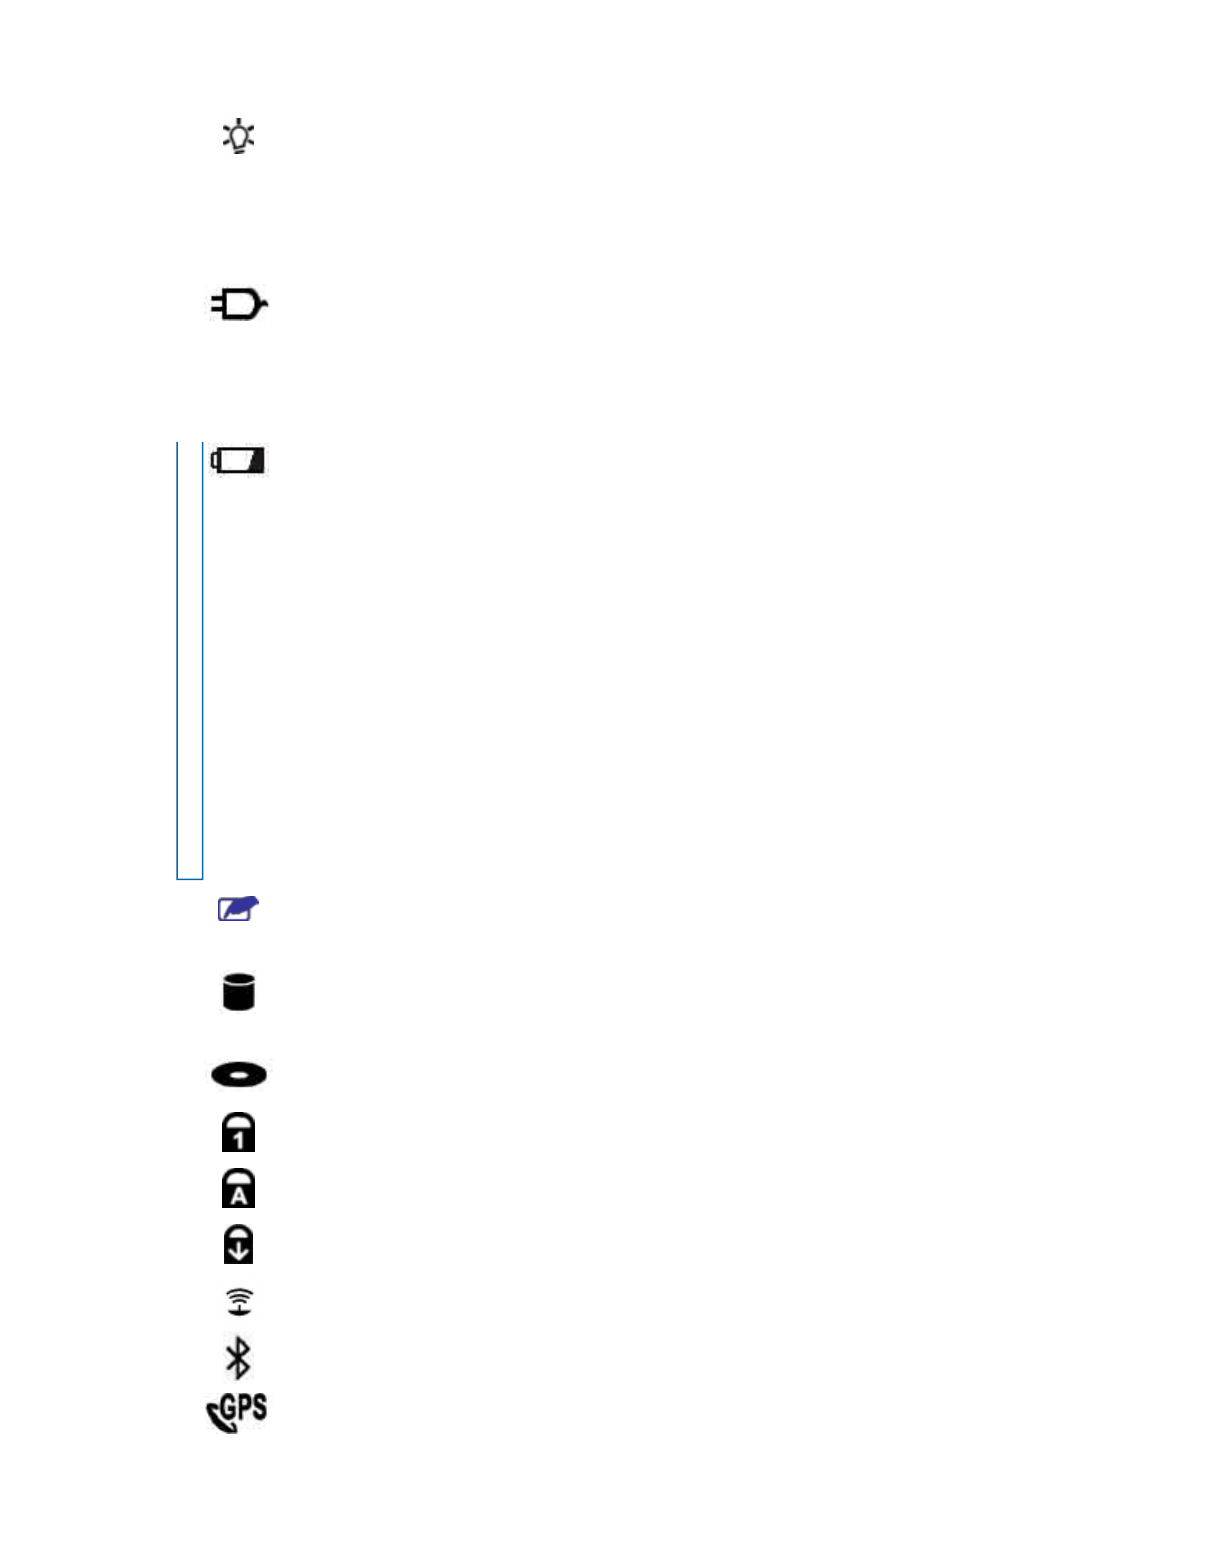
1 Blinking
Green Computer has suspended to RAM
2
External
Power Steady
Green Power is on and external power is applied from one o
f
the following:
1. The AC Adapter connected to a wall outlet, or
2. A vehicle-mounted cradle, or
3. A vehicle power adapter.
Blinking
Green AC adapter is in use and computer is in suspend mode
3 Battery
Power Steady
Green Battery is charging
Blinking
Green Battery is low
NOTES
If the computer is not plugged into external power
within a few minutes, it will go into a Suspend Power
Mode.
If the computer is radio-equipped and is in the middle
of communication, it will suspend power to the radio
when the battery is low. The computer must then be
plugged into external power to continue radio
communication.
No Light The battery is fully charged or a main battery pack is
not fitted.
4 Touch
Pad Steady
Green
5
Hard
Disk
Drive
Blinking
Green Computer is reading from, or writing to the built-in
hard disk
6 Media
Bay Blinking
Green Computer is reading information from the DVD ROM
or Combo DVD/CD-RW drive in the Media Bay.
7 Num
Lock Steady
Green Keyboard is in Num Lock mode
8 Caps
Lock Steady
Green Keyboard is in Caps Lock mode
9 Scroll
Lock Steady
Green Keyboard is in Scroll Lock mode
10
WLAN
Communication Steady
Green Wireless LAN radio is on
11
Bluetooth
Communication Steady
Green Bluetooth radio is on
12 GPS
Communication Steady
Green GPS radio is on
WWAN Steady WWAN radio is on
Pa
g
e 20 of 100GoBook PRO II Hel
p
5/16/2005file://C:\Documents%20and%20Settin
g
s\barvill
j
.ITRXNT1\Local%20Settin
g
s\Tem
p
\~hh7...
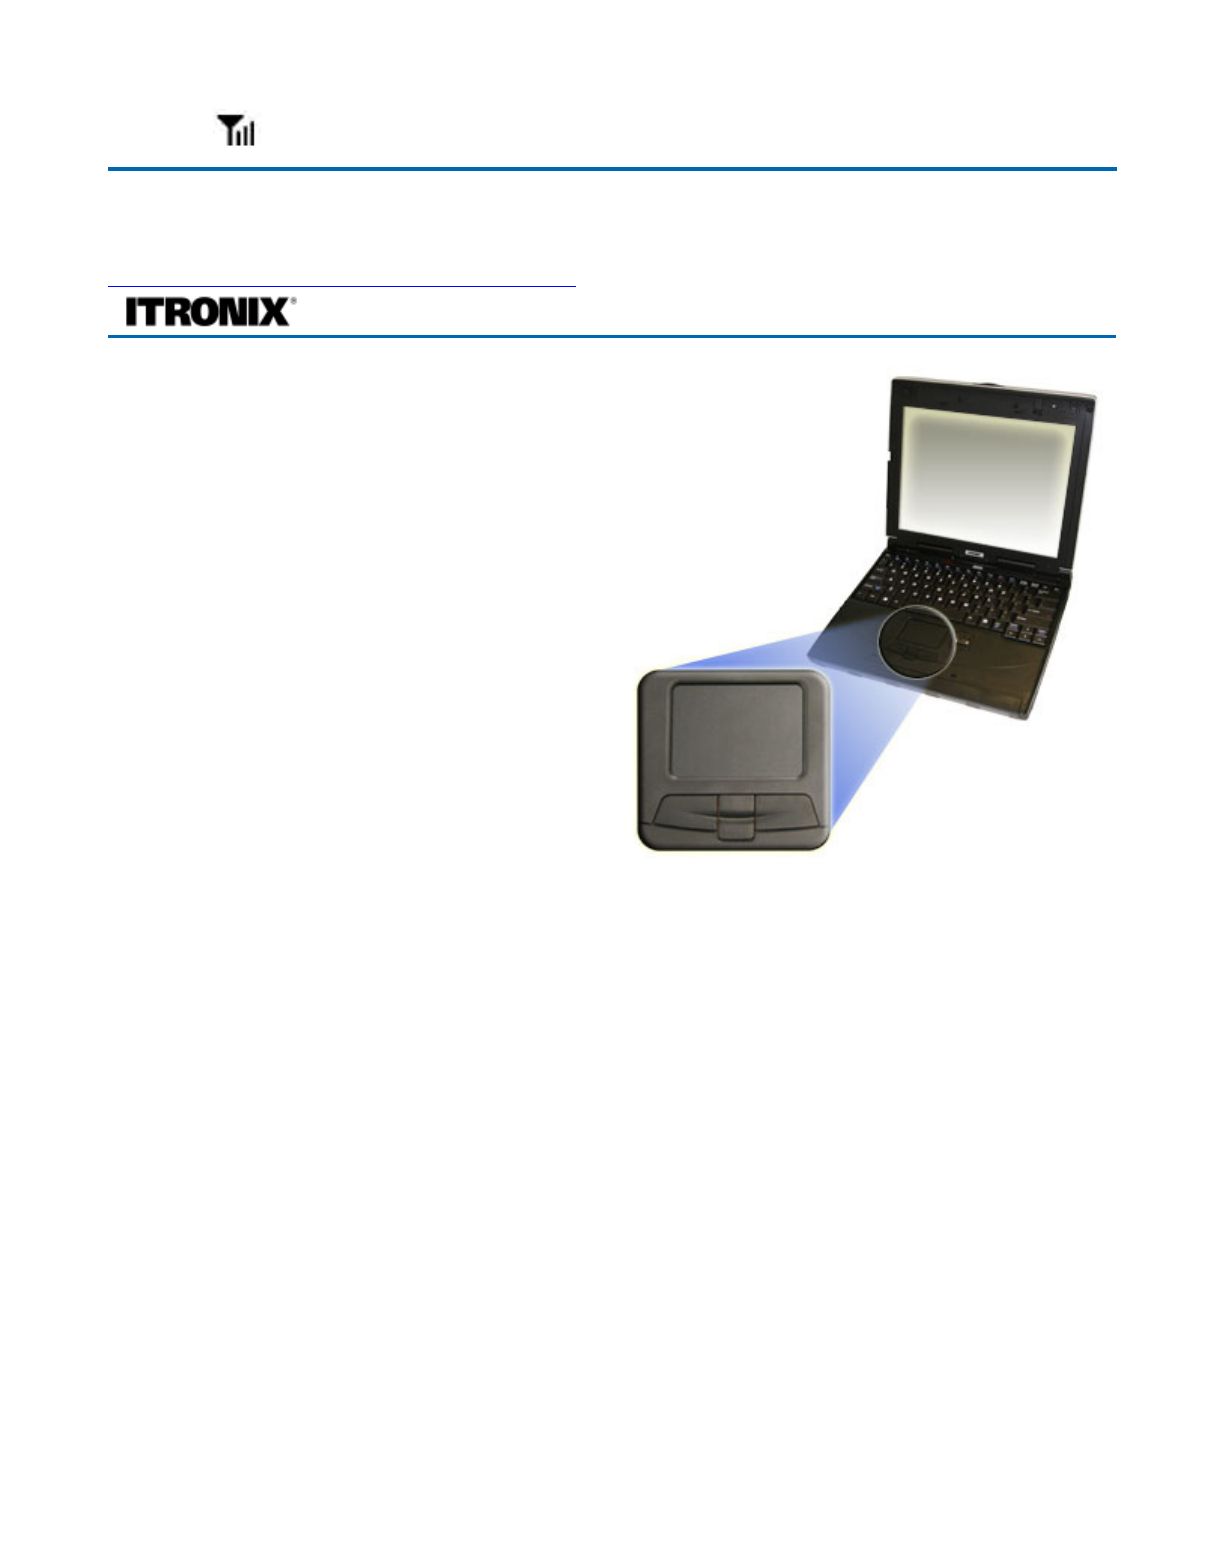
Touchpad
The built-in touchpad is a pointing device that
senses movement on its surface. This means the
cursor responds as you move your finger over of the
touchpad. It also provides all the features of a two-
button mouse.
How to Use the Touchpad
1. First, place your fingers on the keyboard in
the normal typing position. The touchpad is
easily accessible by moving either your left or
right thumb off the space bar and onto the
touchpad.
2. Gently move your thumb across the pressure-
sensitive touchpad in the direction you want
the cursor to move. The pad detects the change in pressure and moves the cursor in the
corresponding direction.
3. You can also make selections by double-tapping. This function corresponds to double-clicking
with a mouse. Once the cursor has been moved to the object you want to select, lightly double-tap
the pressure sensitive touchpad. This double-tapping on the touchpad will select the desired item
and prompt the software to perform the related operation.
4. The buttons located directly below the touchpad are the same in function as those on a two-
buttoned mouse. Clicking these buttons makes selections, drags objects, or performs a variety of
other functions depending on the software. To select an object, first move the pointer over the
object you want to select, and then press the left button one time. The functions of these buttons
are software specific.
5. Double-clicking is a common technique for selecting objects or launching programs from icons.
Once you have moved the pointer over the object you wish to select, rapidly press the left button
two times. This action is commonly referred to as "double-clicking" an object.
Dragging
zMove the pointer to the desired location then press down the left button. While still holding down
the left button, move the
p
ointer to the desired location. Release the button.
13 Communication Green
72_0128_001
16 May 2005
© 2005 Itronix Cor
p
oration. All ri
g
hts reserved.
GoBook® PRO II Help
Pa
g
e 21 of 100GoBook PRO II Hel
p
5/16/2005file://C:\Documents%20and%20Settin
g
s\barvill
j
.ITRXNT1\Local%20Settin
g
s\Tem
p
\~hh7...
zMove the pointer to the desired location. Tap the touchpad twice quickly as if you were double-
clicking, however do not remove your finger after the second tap. Move the cursor to the desired
location. Lift your finger to finish dragging.
Adjust the touchpad settings by selecting Settings/Control Panel/Mouse/Buttons. These settings allow
you to change the orientation of the joystick from right-handed to left-handed, and fine-tune the pointer
movement and timing of clicks.
Touchpad Precautions
The touchpad is a pressure-sensitive device. If not properly cared for, it can be easily damaged. Please
take note of the following precautions:
zMake sure the touchpad does not into come into contact with dirt, liquids or grease.
zDo not touch the touchpad if your fingers are dirty.
zDo not rest heavy objects on the touchpad or the touchpad buttons.
Scrolling buttons
If you are scrolling through a document, you may find that using the scrolling button is more restful to
your hand than holding down a mouse button. The scrolling button is located between the touchpad
buttons. Push the top of the button to scroll up in a document or Web page; press the bottom of the
button to scroll down in a document or web page.
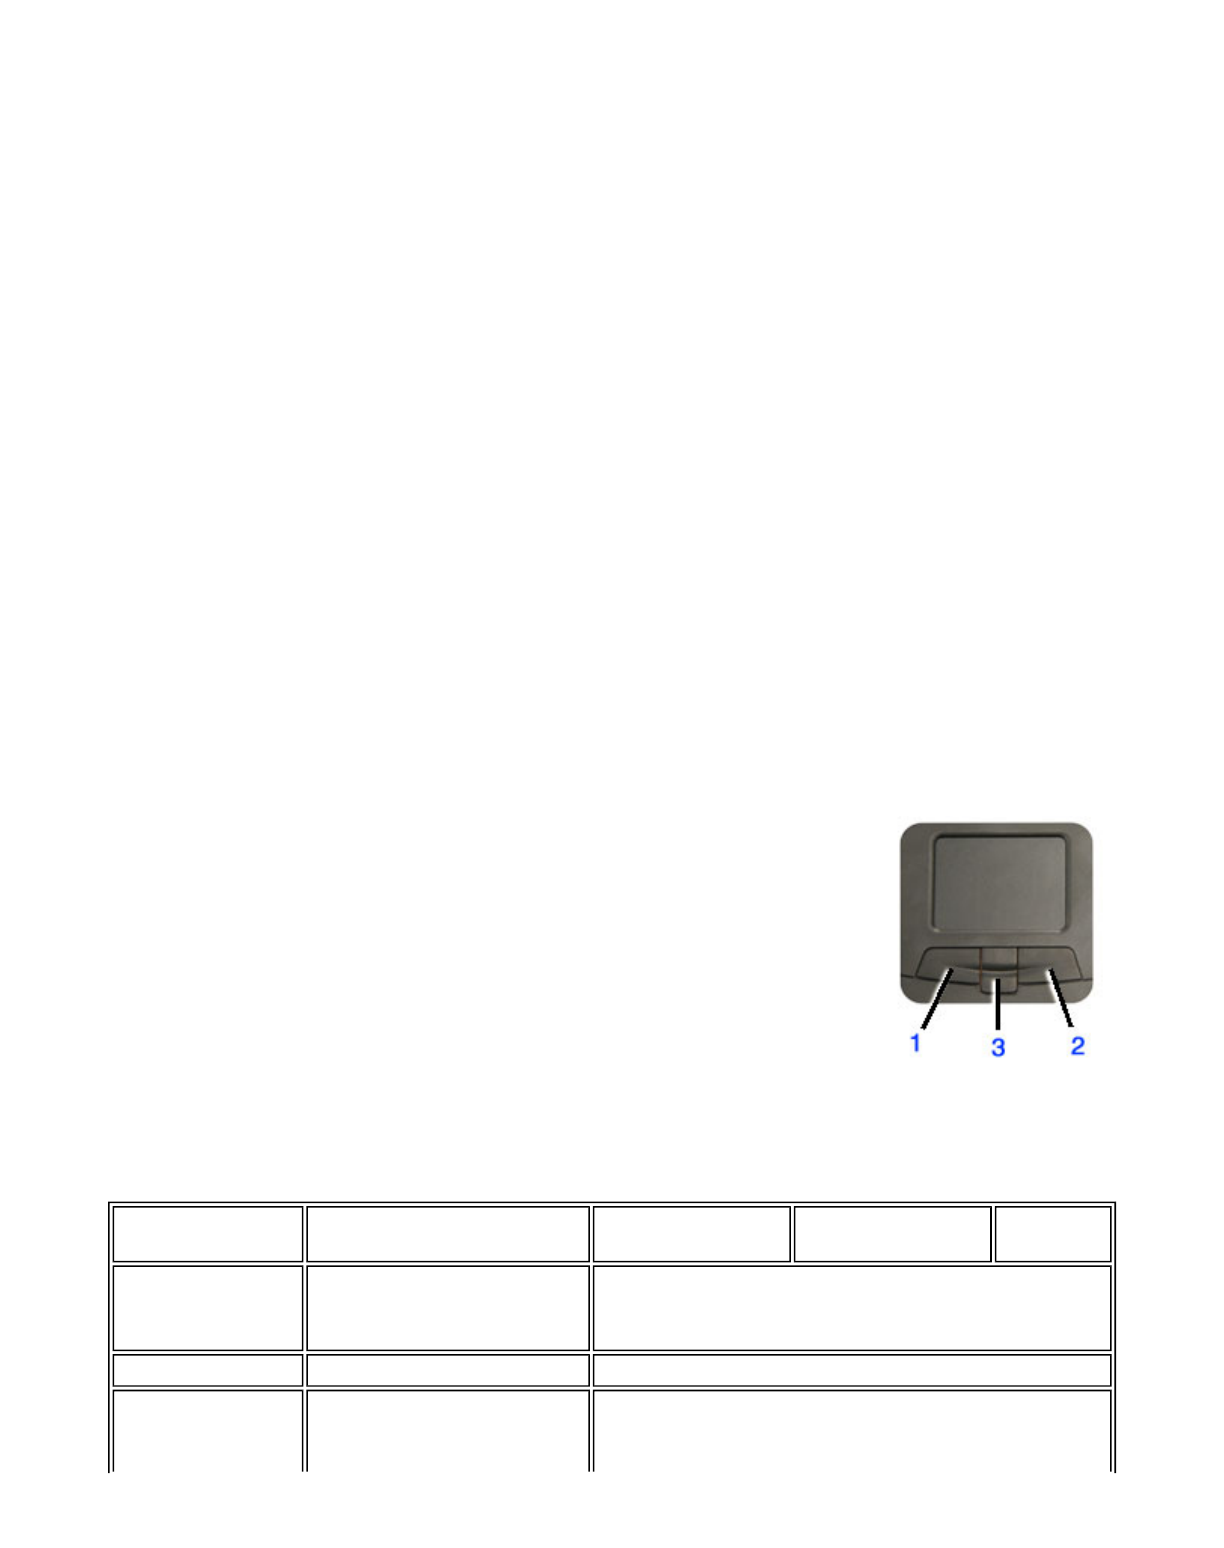
Touchpad basics
The following teaches you how to use the touchpad:
zMove your finger across the touchpad to move the cursor.
zPress the left (1) and right (3) buttons located below the touchpad to do
selection and execution functions. These buttons are similar to the left and
right buttons on a mouse. Tapping on the touchpad produces similar
results.
zPress the center 4-way scroll button (2) to scroll up, down, left, and right on a page. This button
mimics the cursor pressing the right and bottom scroll bars of your Windows applications.
Function Left Button Right
Button Cente
r
Button Tap
Execute Click twice
quickly. Tap twice (at the same
speed as double-clicking
the mouse button).
Select Click once. Tap once.
Drag Click and
hold, then Tap twice (at the same
speed as double-clicking
Pa
g
e 22 of 100GoBook PRO II Hel
p
5/16/2005file://C:\Documents%20and%20Settin
g
s\barvill
j
.ITRXNT1\Local%20Settin
g
s\Tem
p
\~hh7...

NOTES
Keep your fingers dry and clean when using the touchpad and keep the touchpad dry and clean.
The touchpad is sensitive to finger movements. It responds best to light touches. Tapping too hard will
not increase the touchpad's responsiveness.
The Graphics System
Your computer has a high-performance graphics system that can easily handle the demands of today's
multimedia computing. The display offers excellent viewing, display quality and desktop-performance
graphics. The computer supports a large Thin-Film Transistor (TFT) liquid crystal display (LCD)
displaying up to 16.7 million colors at 1024x768 XGA or 1400x1050 SXGA+ resolution, depending on
the LCD display model.
Screen Controls
Adjusting Display Brightness
Function keys can increase or decrease the display brightness.
zFN + F6 decreases the LCD panel brightness
zFN + F7 increases the LCD panel brightness
Ad
j
ustin
g
Dis
p
la
y
Resolution
use finger to
drag the
cursor on the
touchpad.
the mouse button) and
hold finger to the
touchpad on the second
tap to drag the cursor.
Access
context
menu
Click once.
Scroll Click and hold
the button in
the desired
direction (up/
down/left/
right).
72_0128_001
16 May 2005
© 2005 Itronix Cor
p
oration. All ri
g
hts reserved.
GoBook® PRO II Help
Pa
g
e 23 of 100GoBook PRO II Hel
p
5/16/2005file://C:\Documents%20and%20Settin
g
s\barvill
j
.ITRXNT1\Local%20Settin
g
s\Tem
p
\~hh7...

1. Select My Computer, Control Panel, Display, Settings. Select the Settings tab. The dialog box
indicates the monitor resolution.
2. Use the slide bar to adjust the resolution. Normally, you should use the resolution suggested for
the LCD or monitor.
N
OTE Using a lower resolution than the screen was designed for will reduce the area of the display.
You can stretch low resolution displays to full screen size by selecting either the Expanded Display or
Display Expansion Mode features in the BIOS utility. However, the stretching may cause distortion,
especially to fonts.
Higher resolution modes may be used, as long as the monitor supports them.
Photo Sensor
The built in photo sensor automatically adjusts the display brightness unless you use the function keys to
manually adjust display brightness.
N
OTE Fn+F6 and Fn+F7 override the photo sensor. Once they have been used, the photo sensor is
disabled until the next resume or reboot.
The sensitivity of photo sensor is adjustable in BIOS Setup Utility. The photo sensor does not have a
time out setting.
Auto Dim Feature
To save the battery power, your GoBook PRO II automatically dims the display when the computer is
not attached to external power.
N
OTE You may still use the display brightness function keys (Fn+F6 and Fn+F7) to adjust display
brightness.
See Power management for more information on power management features.
Simultaneous display
The computer's crisp display and multimedia capabilities are great for viewing movies or giving
p
resentations. If you prefer, you can also connect an external monitor when giving presentations. This
computer supports simultaneous LCD and external display output via the external display port or the S-
video output port. Simultaneous display allows you to control the presentation from your computer and
at the same time face your audience. You can also connect other output display devices such as LCD
p
rojection panels for large-audience presentations.
Opening and closing the display
To open the display, press the display cover latch and lift up the cover, then tilt it to a comfortable
viewing position. See Connecting your computer. The computer employs a microswitch that turns off
the display (e.g., enters standby mode) to conserve power when you close the display cover, and turns it
b
ack on when
y
ou o
p
en the dis
p
la
y
cover.
Pa
g
e 24 of 100GoBook PRO II Hel
p
5/16/2005file://C:\Documents%20and%20Settin
g
s\barvill
j
.ITRXNT1\Local%20Settin
g
s\Tem
p
\~hh7...

To close the display cover, fold it down gently until the display cover latch clicks into place.
CAUTION To avoid damaging the display, do not slam it when you close it. Also, do not place any
object on top of the computer when the display is closed.
Cursor Visibility
The mobile computer uses a Liquid Crystal Display (LCD), a type of screen used on many notebook and
sub-notebook computers. One problem experienced on computers with an LCD display, especially in
cold environments, is that the cursor seems to “disappear” whenever the mouse is moved quickly. To
improve the visibility of the mouse cursor, you should:
zEnable the “Pointer Trails” feature to add trailing cursors.
zUse a slow or medium speed/sensitivity level.
You can combine a higher level of acceleration with a slow or medium speed/sensitivity level. This
allows you to move the mouse cursor quickly by increasing your finger pressure, while still providing a
finer degree of control when you apply minimum pressure.
N
OTE To change the speed of the mouse, from the Start Menu select Settings, Control Panel, and then
choose Mouse to make adjustments.
Memory
Adding memory allows the computer to operate faster, handle more tasks simultaneously, and work
more smoothly with large files. Users who increase memory demands - by adding additional programs,
for example - may notice a slowdown in operating speed, and wish to increase memory. The notebook
includes a memory card slot for adding additional memory.
Calculate memory size by adding the size of the memory module to the existing built-in memory. For
example: 128 MB (module) + 128 MB (built-in memory) = 256 MB Total
Replacing a Memory Card
CAUTION Memory modules can be easily damaged by static electricity. Leave the module inside its
static-proof bag until it is ready for installation.
Removing a Memory Card
1. Turn off the com
p
uter and disconnect the AC ada
p
ter.
72_0128_001
16 May 2005
© 2005 Itronix Cor
p
oration. All ri
g
hts reserved.
GoBook® PRO II Help
Pa
g
e 25 of 100GoBook PRO II Hel
p
5/16/2005file://C:\Documents%20and%20Settin
g
s\barvill
j
.ITRXNT1\Local%20Settin
g
s\Tem
p
\~hh7...

Turn the computer upside down and lay it on a flat surface.
2. Carefully remove the two RAM compartment cover screws and remove the RAM compartment
cover.
3. Gently pull tabbed latched in the direction of the arrows (1). The card will pop up slightly.
4. Pull upwards on the card and then slide the card out (2).
Inserting a Memory Card
1. Hold the memory card by its edges with the edge-connector side towards the slot.
2. Hold the card at a shallow angle (about 25 degrees) and insert the edge connector into the
connector slot. The "gold teeth" of the edge connector should no longer be visible when the card is
fully inserted.
3. Press the card downwards so that it is flat inside the compartment. You may hear an audible click
as the latches of the connector lock the card in place.
4. Replace the RAM compartment cover and secure it with the two screws.
Your notebook computer will automatically detect the change in RAM capacity when it restarts. You
can verify RAM capacity has changed in the Setup Utility or in Windows:
1. Setup: Press DEL during boot-up when you see the "Hit DEL if you want to run Setup" prompt.
Then select Standard CMOS Setup. This screen shows the base memory and the extended memory.
2. Windows: Right click on my computer and select properties. The bottom of the system Properties
General tab lists the memory detected by Windows.
Audio
Your com
p
uter includes 16-
b
it hi
g
h-fidelit
y
stereo audio. The s
p
eaker is located above the dis
p
la
y
.
72_0128_001
16 May 2005
© 2005 Itronix Cor
p
oration. All ri
g
hts reserved.
GoBook® PRO II Help
Pa
g
e 26 of 100GoBook PRO II Hel
p
5/16/2005file://C:\Documents%20and%20Settin
g
s\barvill
j
.ITRXNT1\Local%20Settin
g
s\Tem
p
\~hh7...
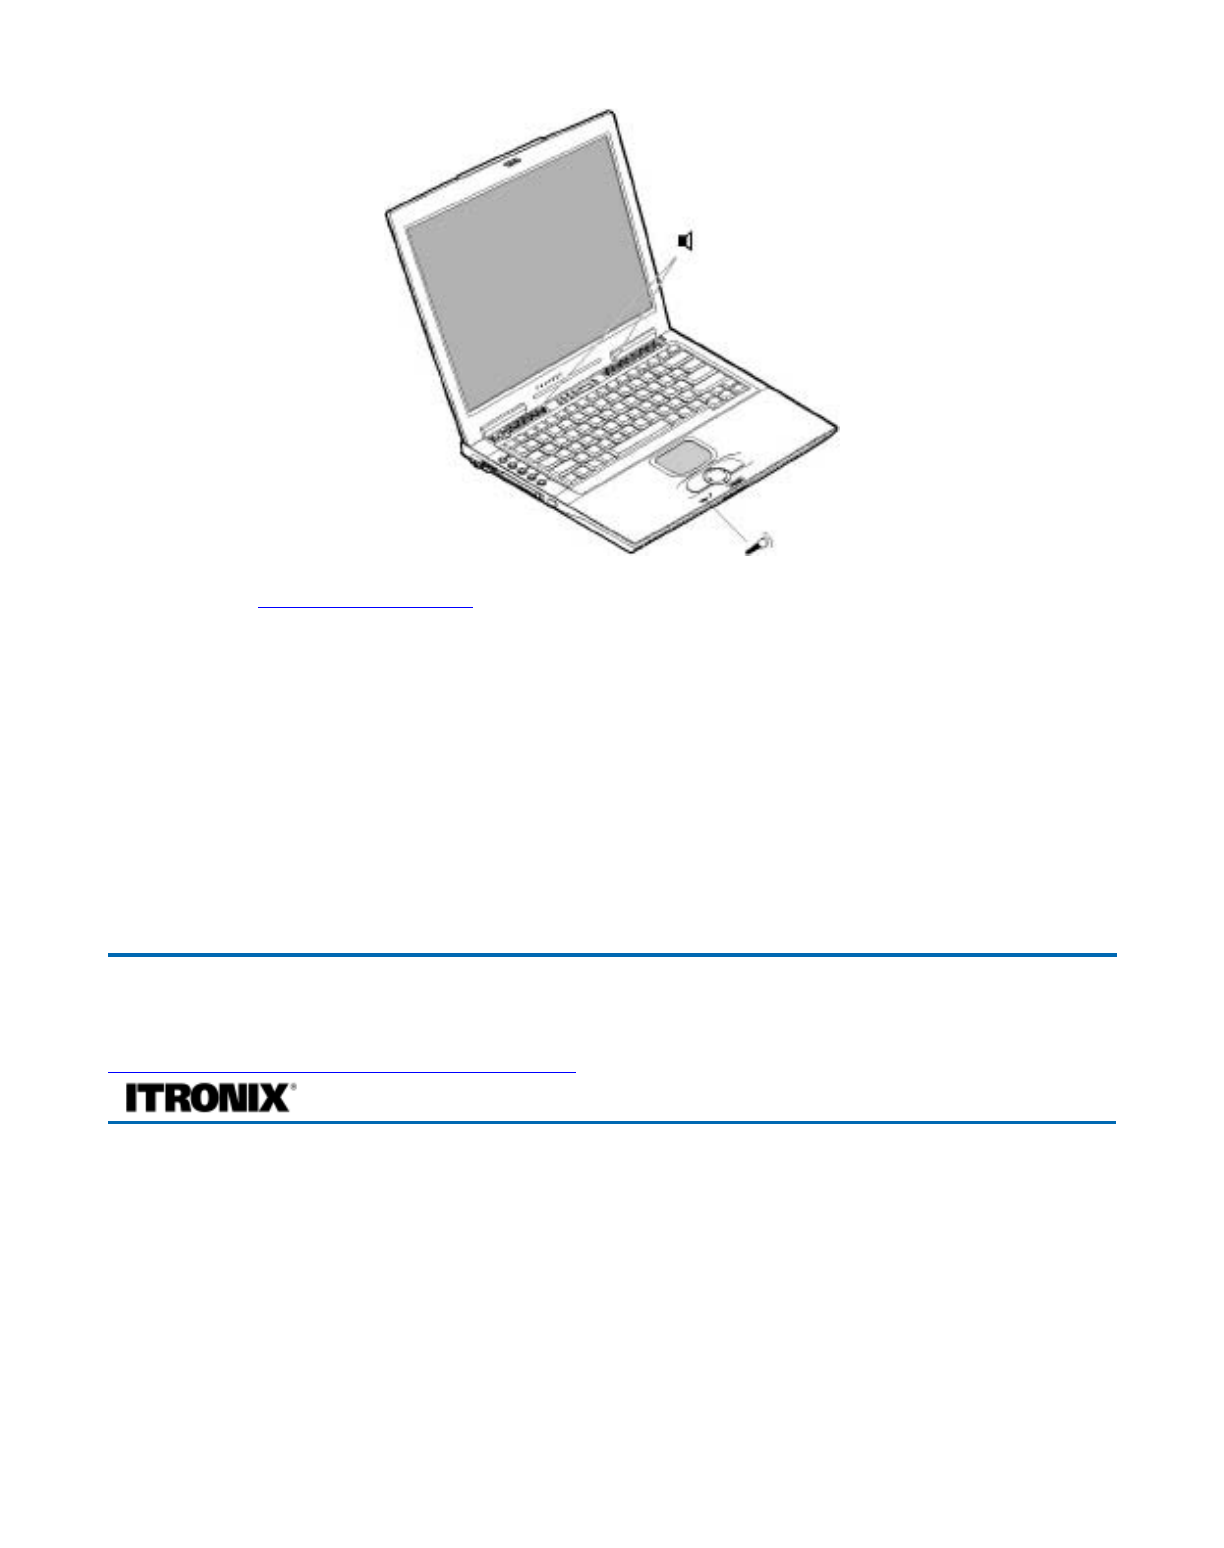
You can attach external audio devices via the audio ports on the left side of the computer.
Adjusting the Volume
zTo increase volume, press FN+F9
zTo decrease volume, press FN+F8
You can also adjust the volume with the Windows volume control applet located on the taskbar.
However, the volume control function keys override the Windows volume control applet. If your
volume is too low or too high after setting the volume in the applet, adjust the volume with the function
keys.
The PC Card Slot
The computer has a built-in CardBus PC Card slot on the left panel of the computer that can
accommodate one Type II PC Card. It accepts credit-card sized cards that enhance the usability and
expandability of the computer. The PC card slot can be used as an interface between your computer and
a variety of communications devices, such as network adapters, SCSI adapters, or fax/modems. They
can also be used to provide additional data storage capacity. Please consult your dealer for PC Card
options available that you can purchase for your computer.
PC Cards (formerly PCMCIA) are add-on cards for portable computers, giving you expansion
p
ossibilities lon
g
afforded b
y
deskto
p
PCs. Po
p
ular t
yp
e II cards include flash memor
y
, SRAM, fax/data
72_0128_001
16 May 2005
© 2005 Itronix Cor
p
oration. All ri
g
hts reserved.
GoBook® PRO II Help
Pa
g
e 27 of 100GoBook PRO II Hel
p
5/16/2005file://C:\Documents%20and%20Settin
g
s\barvill
j
.ITRXNT1\Local%20Settin
g
s\Tem
p
\~hh7...
modem, LAN and SCSI cards. CardBus improves on the 16-bit PC card technology by expanding the
data path to 32 bits.
NOTE Refer to your card's manual for details on how to install and use the card and its functions.
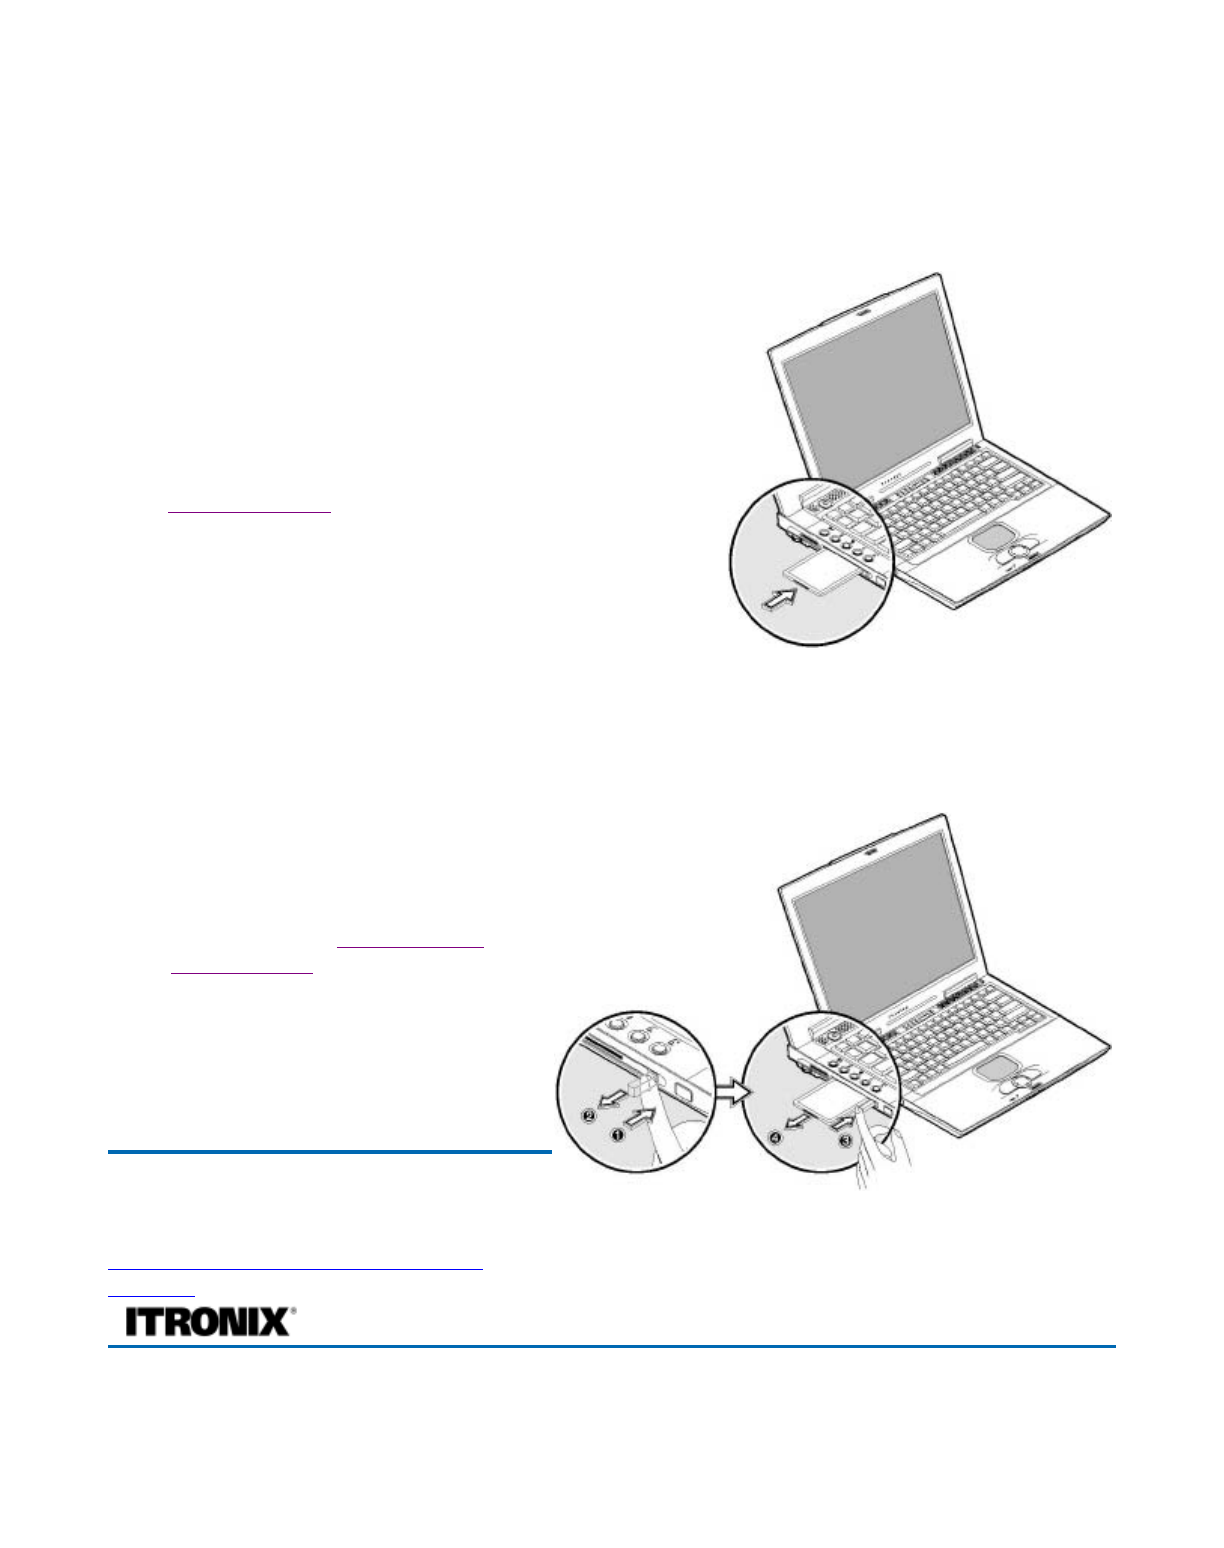
Inserting a Card
1. The top side of a PC Card is usually identified with a
label. Insert the card into the slot with the top up and the
edge with pinhole contacts going in first. You will feel
some resistance as the card slides into the back of the
slot.
2. PC Cards require drivers, or a program that allows the
operating system to use a specific device. Many drivers
are included with Windows, but if not, you will be
prompted to install the driver included with your card.
3. The computer will beep twice to indicate successful
installation. A single beep means that there was a
problem recognizing the card.
NOTE Please read the instructions included with individual PC Cards. Some cards may be inserted
with power on, while others require that the computer be turned off.
Ejecting a Card
1. First, exit the application using the
card.
2. Left-click on the Safely Remove
Hardware icon on the taskbar and stop
the card operation.
3. Press the slot eject button once (1) to
pop it out (2); then press it again (3) to
eject the PC Card.
Memory Stick/SD combo slot (option)
Your com
p
uter comes with a Memor
y
Stic
k
/Secure Di
g
ital
(
SD
)
combo slot
(
o
p
tion
)
. This slot is useful
72_0128_001
16 May 2005
© 2005 Itronix Corporation. All rights
reserved.
GoBook® PRO II Help
Pa
g
e 28 of 100GoBook PRO II Hel
p
5/16/2005file://C:\Documents%20and%20Settin
g
s\barvill
j
.ITRXNT1\Local%20Settin
g
s\Tem
p
\~hh7...
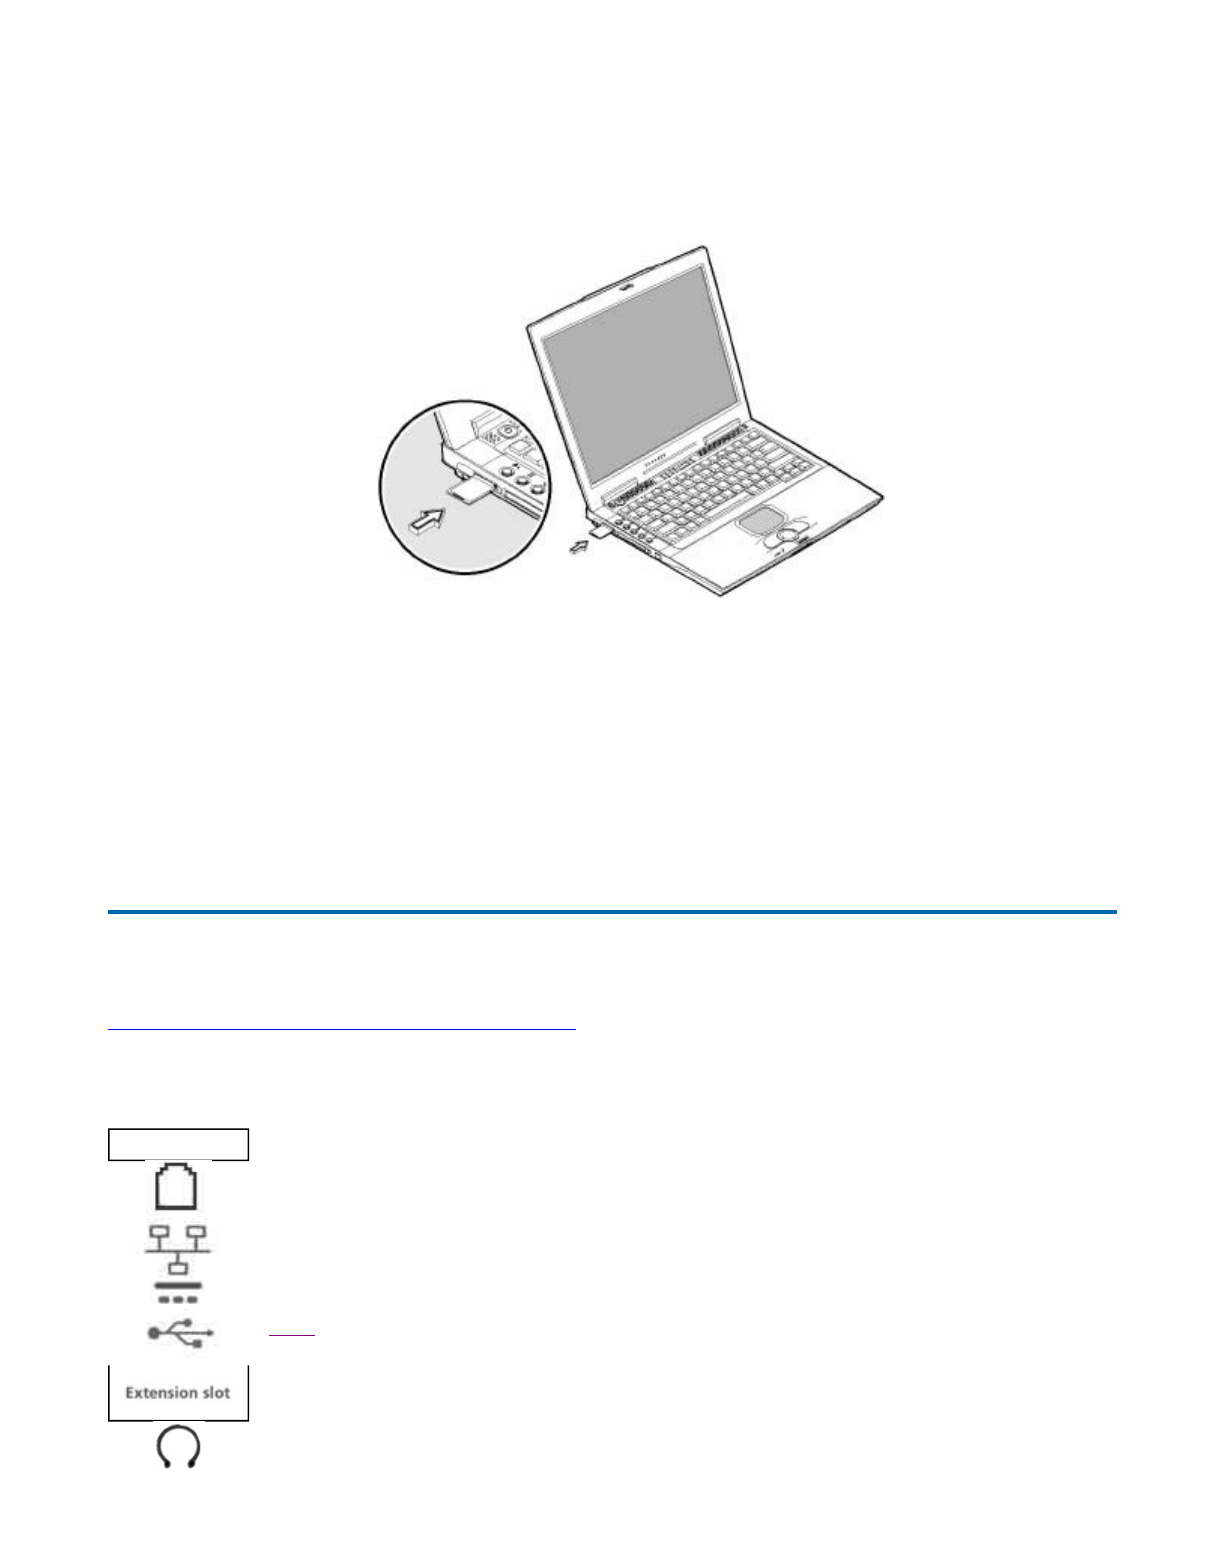
for transferring data to and from a Memory Stick, SD or MultiMediaCard (MMC). Memory cards are
used in a variety of digital devices such as digital cameras, digital camcorders and mobile phones.
Insert a card (label side up) into the slot until it clicks into place.
The card now appears on My Computer as a removable storage device that you can copy files to and
from.
To remove the card from the slot, do the following:
1. Make sure no operation (e.g., file copying or deletion) is using the card.
2. Press the card further into the slot to release the card (you hear a click); then pull out and remove
the card.
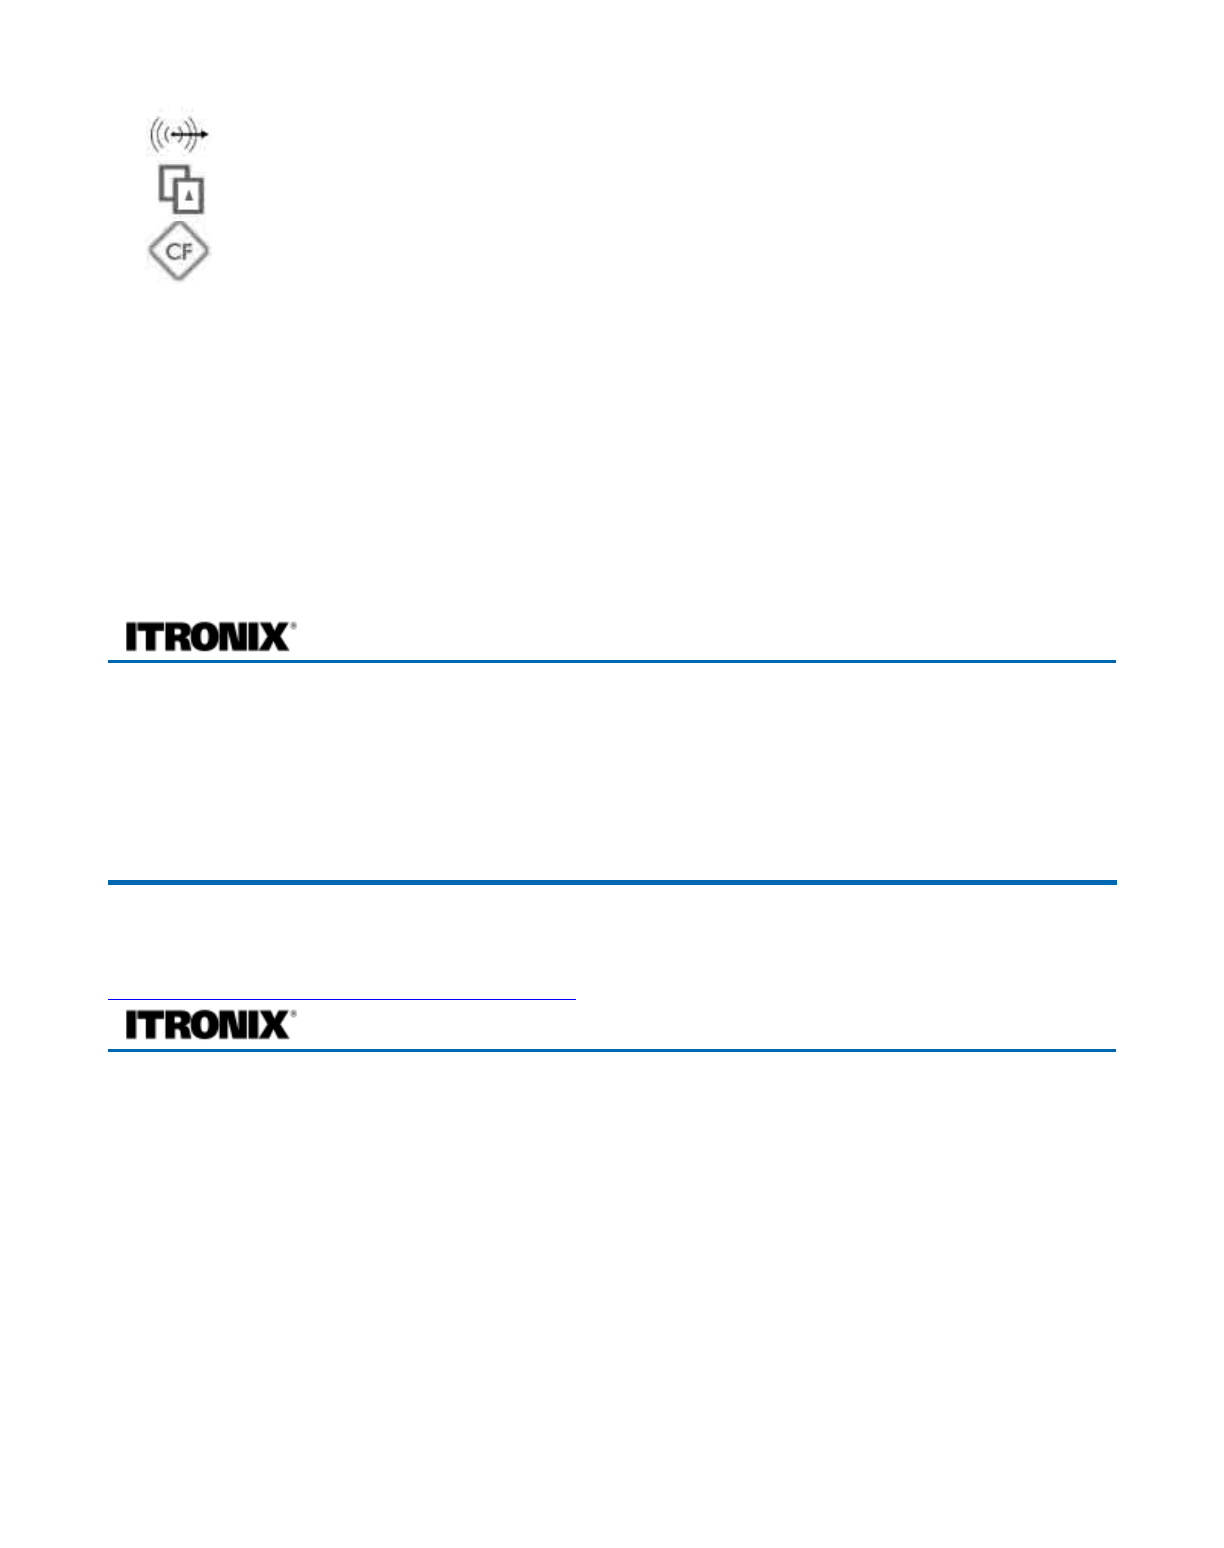
Ports and Connectors
72_0128_001
16 May 2005
© 2005 Itronix Cor
p
oration. All ri
g
hts reserved.
Icon Ports and Connectors Connection Location
RJ-11 Phone line/modem (internet and fax)
RJ-45 Ethernet
DC-in AC Adapter (power)
2 USB 2.0 USB Peripherals such as a mouse or
printer
Multi-I/O Extension
Slot Vehicle Dock, Desk Mount
Audio In Microphone
Pa
g
e 29 of 100GoBook PRO II Hel
p
5/16/2005file://C:\Documents%20and%20Settin
g
s\barvill
j
.ITRXNT1\Local%20Settin
g
s\Tem
p
\~hh7...
Making Connections
Your computer is equipped with a full array of ports and connectors, including standard input/output
(I/O) ports for quickly and easily adding peripheral devices such as printers, keyboards, and mice. Refer
to documentation included with individual devices for details on connecting these devices to your
computer. Your computer also includes IEEE 1394 ports, modem and LAN ports, offering advanced
communications technology.
Attaching Power
insert picture with callout of port
Connect the DC power cable from the AC adapter or the vehicle adapter to this jack.
Attaching an External Monitor or Video Device
Audio Out Speakers or headphones
PC Card Slot Type II PC Cards
CompactFlash Slot CompactFlash Cards
no icon Security Slot Computer lock such as a Kensington lock
GoBook® PRO II Help
72_0128_001
16 May 2005
© 2005 Itronix Cor
p
oration. All ri
g
hts reserved.
GoBook® PRO II Help
Pa
g
e 30 of 100GoBook PRO II Hel
p
5/16/2005file://C:\Documents%20and%20Settin
g
s\barvill
j
.ITRXNT1\Local%20Settin
g
s\Tem
p
\~hh7...
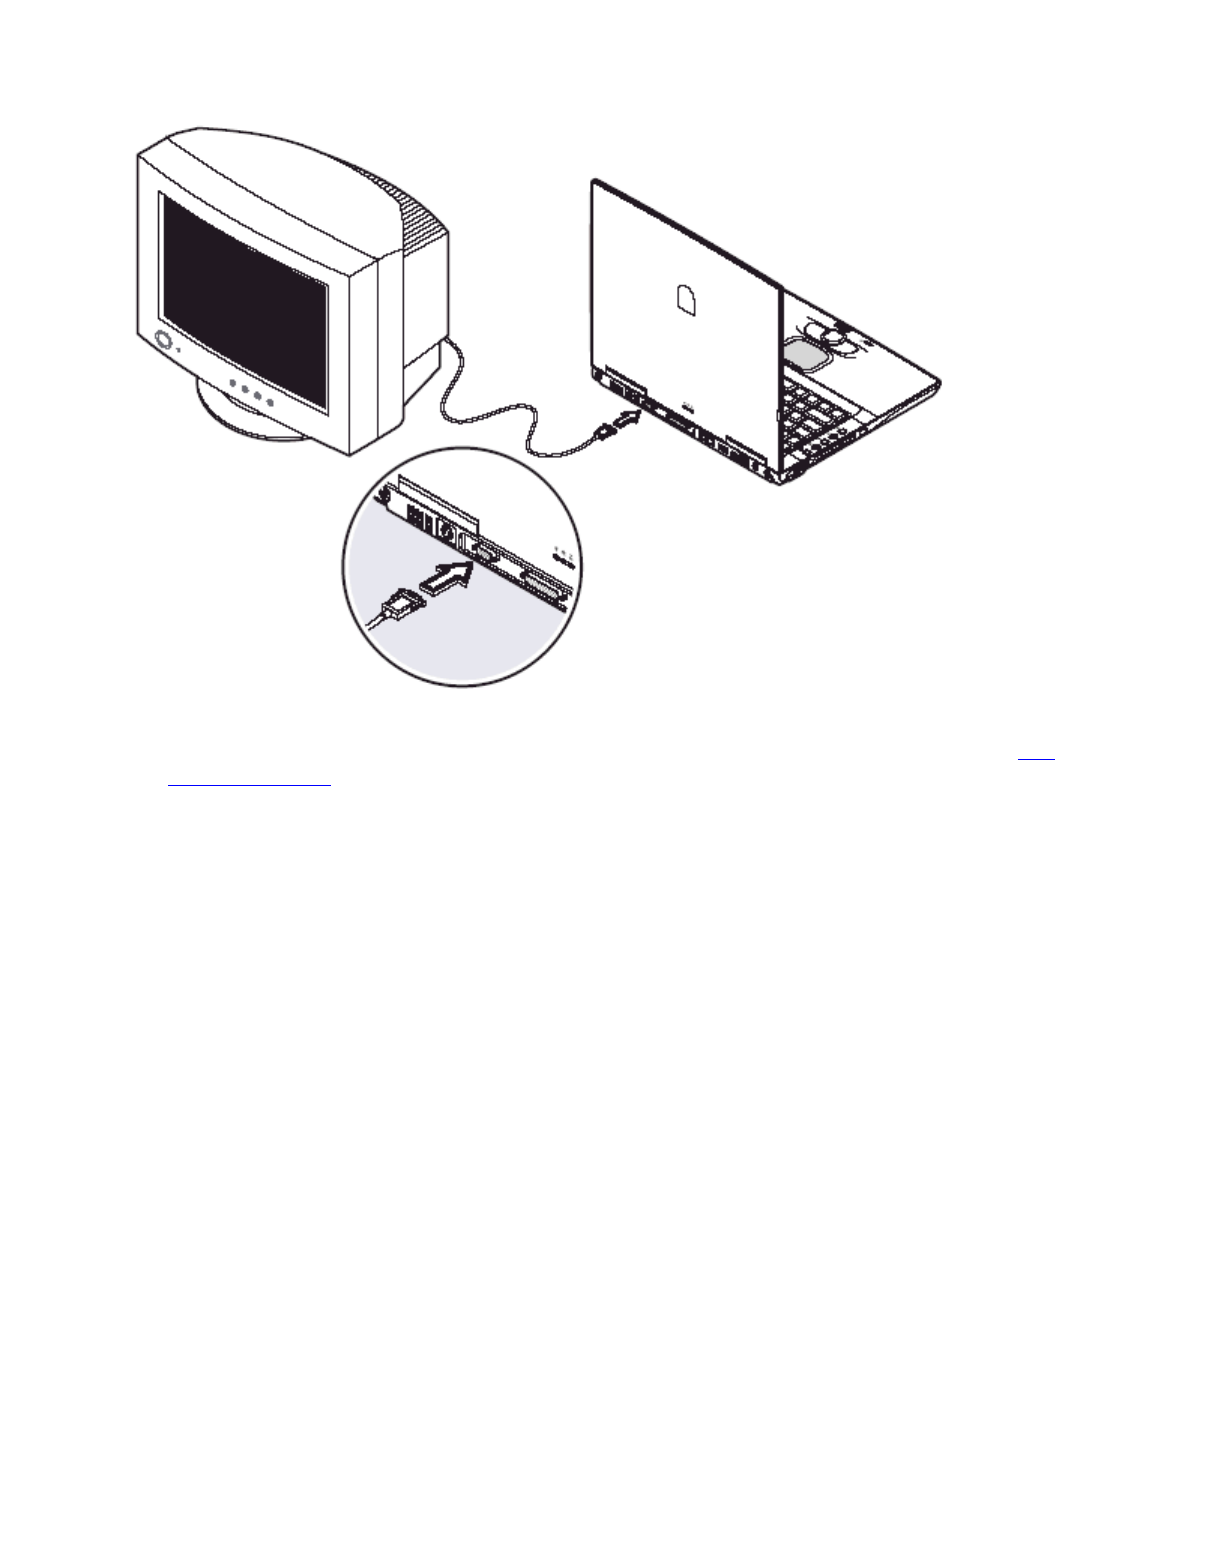
1. The 15-pin VGA port can be used to connect your computer to an external monitor. See The
Graphics System for more information.
2. S-Video technology provides sharper video image on a video or television device than traditional
TV-out connections, provided your video display device supports S-Video input.
You can connect an external monitor to the external monitor port on the rear panel. Read the monitor
manual for additional instructions.
N
OTE If an external monitor is not connected, closing the display cover puts the computer into Standby
mode.
Using simultaneous display
Your computer takes advantage of Windows multi-display capability, allowing you to use your
computer for presentation purposes. So whatever is displayed in your computer will likewise be
displayed on the other external display.
To use simultaneous display, connect an external display device to the external monitor port or S-video
output jack. You can then toggle the display output location by pressing Fn-F3 to make the image
appear on both the computer LCD and external display device.
Connecting to an External Monitor
The notebook has a VGA monitor
p
ort to connect
y
our com
p
uter to an external monitor.
Pa
g
e 31 of 100GoBook PRO II Hel
p
5/16/2005file://C:\Documents%20and%20Settin
g
s\barvill
j
.ITRXNT1\Local%20Settin
g
s\Tem
p
\~hh7...

Using the VGA monitor port.
1. Locate the 15-pin VGA monitor port on the left side of your notebook and connect the video
signal cable from the external monitor (or the VGA adapter) to the monitor port.
2. Connect the power cable from the external monitor to a power outlet and turn on the monitor.
3. On your notebook, click the right touchpad button on the Windows desktop to open the desktop
menu. Click Properties to open the Display Properties window.
4. In the Display Properties window, click Advanced in the Settings tab. Click the Display Modes
tab.
5. Under Driver mode, you can select the appropriate options to change the display to an external
monitor or FN+F2.
Adjustments to screen resolution and color depth can also be made in this dialog box.
Dual Displays
With a Windows system, you may use an external monitor simultaneously with your notebook's LCD.
You may also use the external monitor only and disable the LCD or only use the LCD. To do this you
may first need to enable the multiple display settings in Windows.
1. Open the Control Panel and double-click Display. The Display Properties window will open
2. Click the Settings tab, then click the Advanced button
3. Select the S3 Display tab.
There are two display mode options: Single and Mirror.
Single: In Display Combination, there are two options available: VGA1 or LCD2. You can choose
which device to apply as the Primary display. VGA1 is the default value for Primary if an external CRT
is available. If an external CRT is not connected to the notebook, only LCD2 is available. In Single
mode, the video display hot key combination is available-you can cycle the video output by pressing the
FN + F2 keys.
Mirror: In Display Combination, there is no Primary display option available. Only LCD2 is available
as Secondary display even when an external CRT is connected. In Mirror mode, the video display hot
key combination is available-you can cycle the video output by pressing the FN + F2 keys. If the
external CRT is connected, the display on the LCD and the CRT is the same.
TIP To ensure trouble-free video output, the first time you use an external monitor, change the output in
the Display Properties dialog box. After successfully switching modes, you may use the video function
keys.
N
OTE Light or dark dots may appear on the LCD due to technical limitations of LCD manufacturing.
This will not effect normal operation of the LCD.
Pa
g
e 32 of 100GoBook PRO II Hel
p
5/16/2005file://C:\Documents%20and%20Settin
g
s\barvill
j
.ITRXNT1\Local%20Settin
g
s\Tem
p
\~hh7...
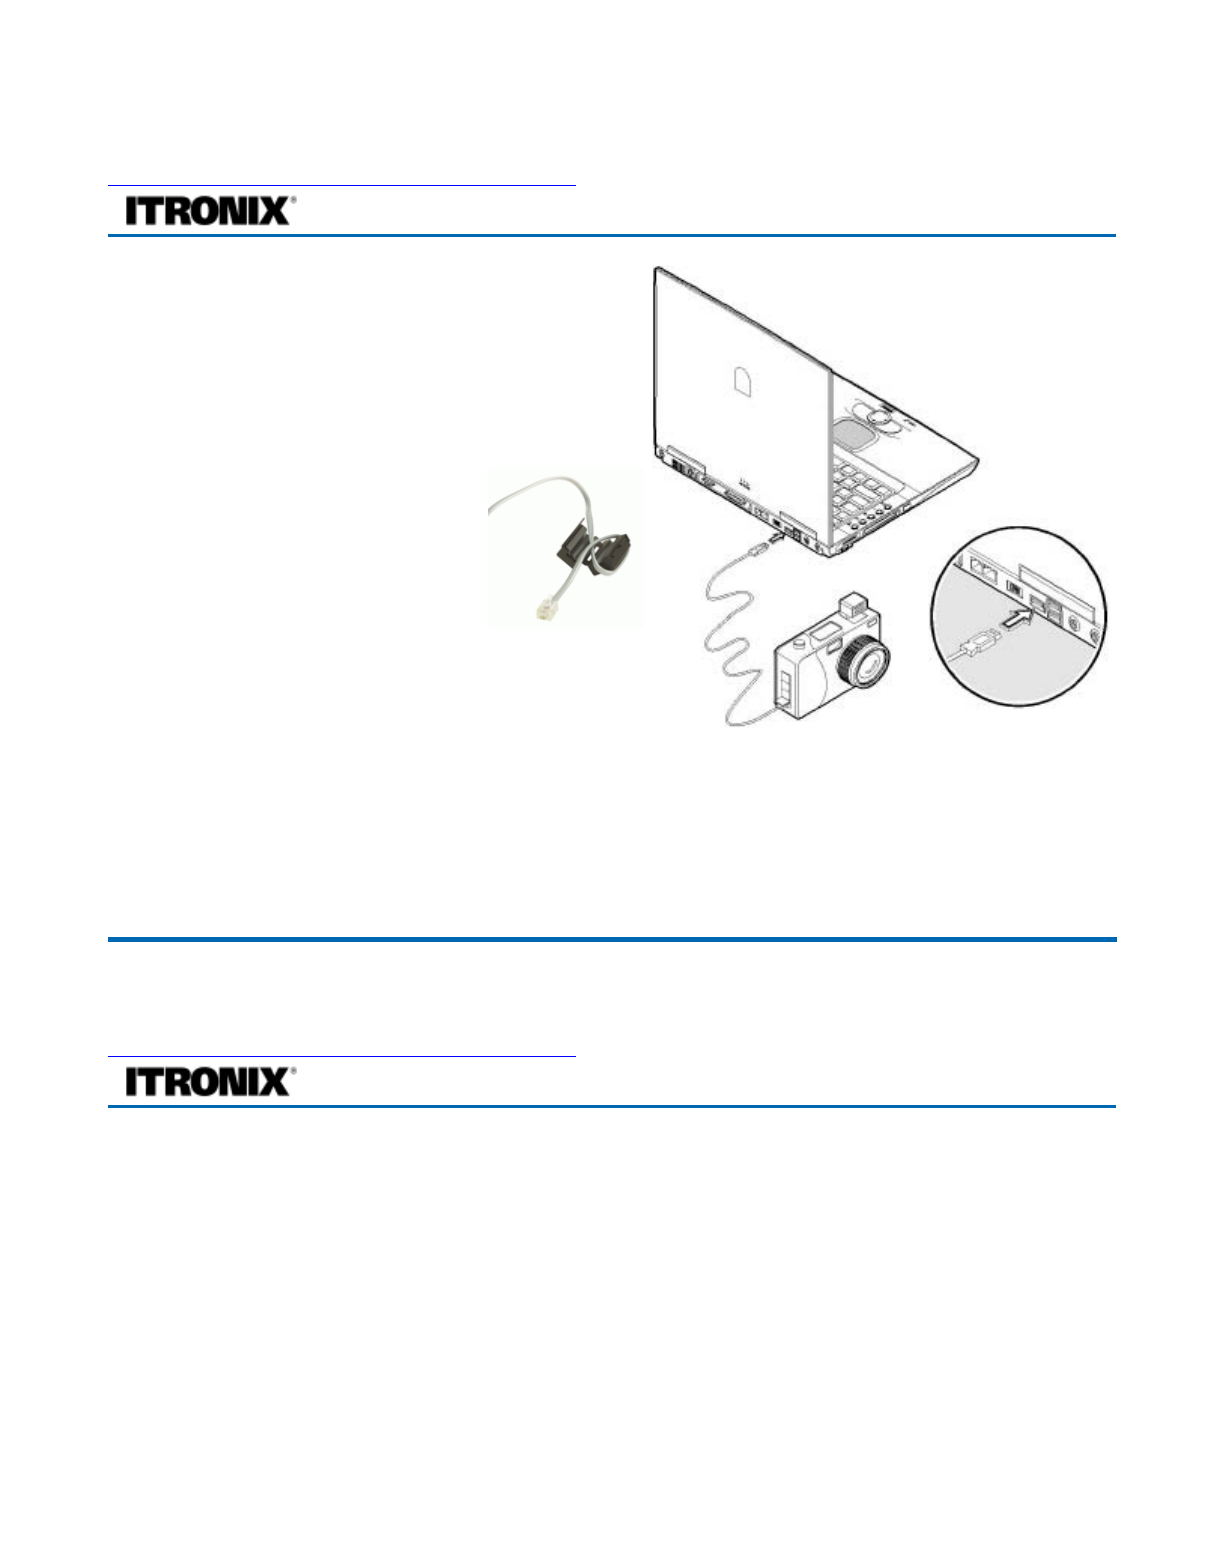
Attaching USB Devices
The Universal Serial Bus (USB) is the latest standard
for attaching keyboards, mice, scanners, and other
devices to a PC. USB devices can be chained together
on a single cable.
CAUTION To eliminate
electromagnetic waves, it is strongly
recommended that you thread the USB
cable or phone cord through the clip
p
rovided when using USB
p
eripherals, audio-out jack or
connecting to a phone line.
The computer has three USB (Universal Serial Bus) 2.0
p
orts on the rear of the computer, that allow you to
connect peripherals without occupying too many resources. Common USB devices include a mouse,
keyboard, and digital camera.
Before disconnecting a USB device from your computer, click on the Safely Remove Hardware icon on
the taskbar and click on the device. When the device can be safely removed, disconnect the device from
the computer. See your peripheral's documentation for details.
Ethernet (LAN)
72_0128_001
16 May 2005
© 2005 Itronix Cor
p
oration. All ri
g
hts reserved.
GoBook® PRO II Help
72_0128_001
16 May 2005
© 2005 Itronix Cor
p
oration. All ri
g
hts reserved.
GoBook® PRO II Help
Pa
g
e 33 of 100GoBook PRO II Hel
p
5/16/2005file://C:\Documents%20and%20Settin
g
s\barvill
j
.ITRXNT1\Local%20Settin
g
s\Tem
p
\~hh7...
With the built-in Ethernet LAN combo, you can make LAN connections without installing PC cards.
Connection speed is 10/100 Mbps standard; 10/100/1000 Mbps optional. When using the LAN function,
wrap your LAN cable around the EMI ferrite suppression box to inhibit electromagnetic interference.
To use the network feature, connect an Ethernet cable from the network jack on the rear of the computer
to a network jack or hub on your network.
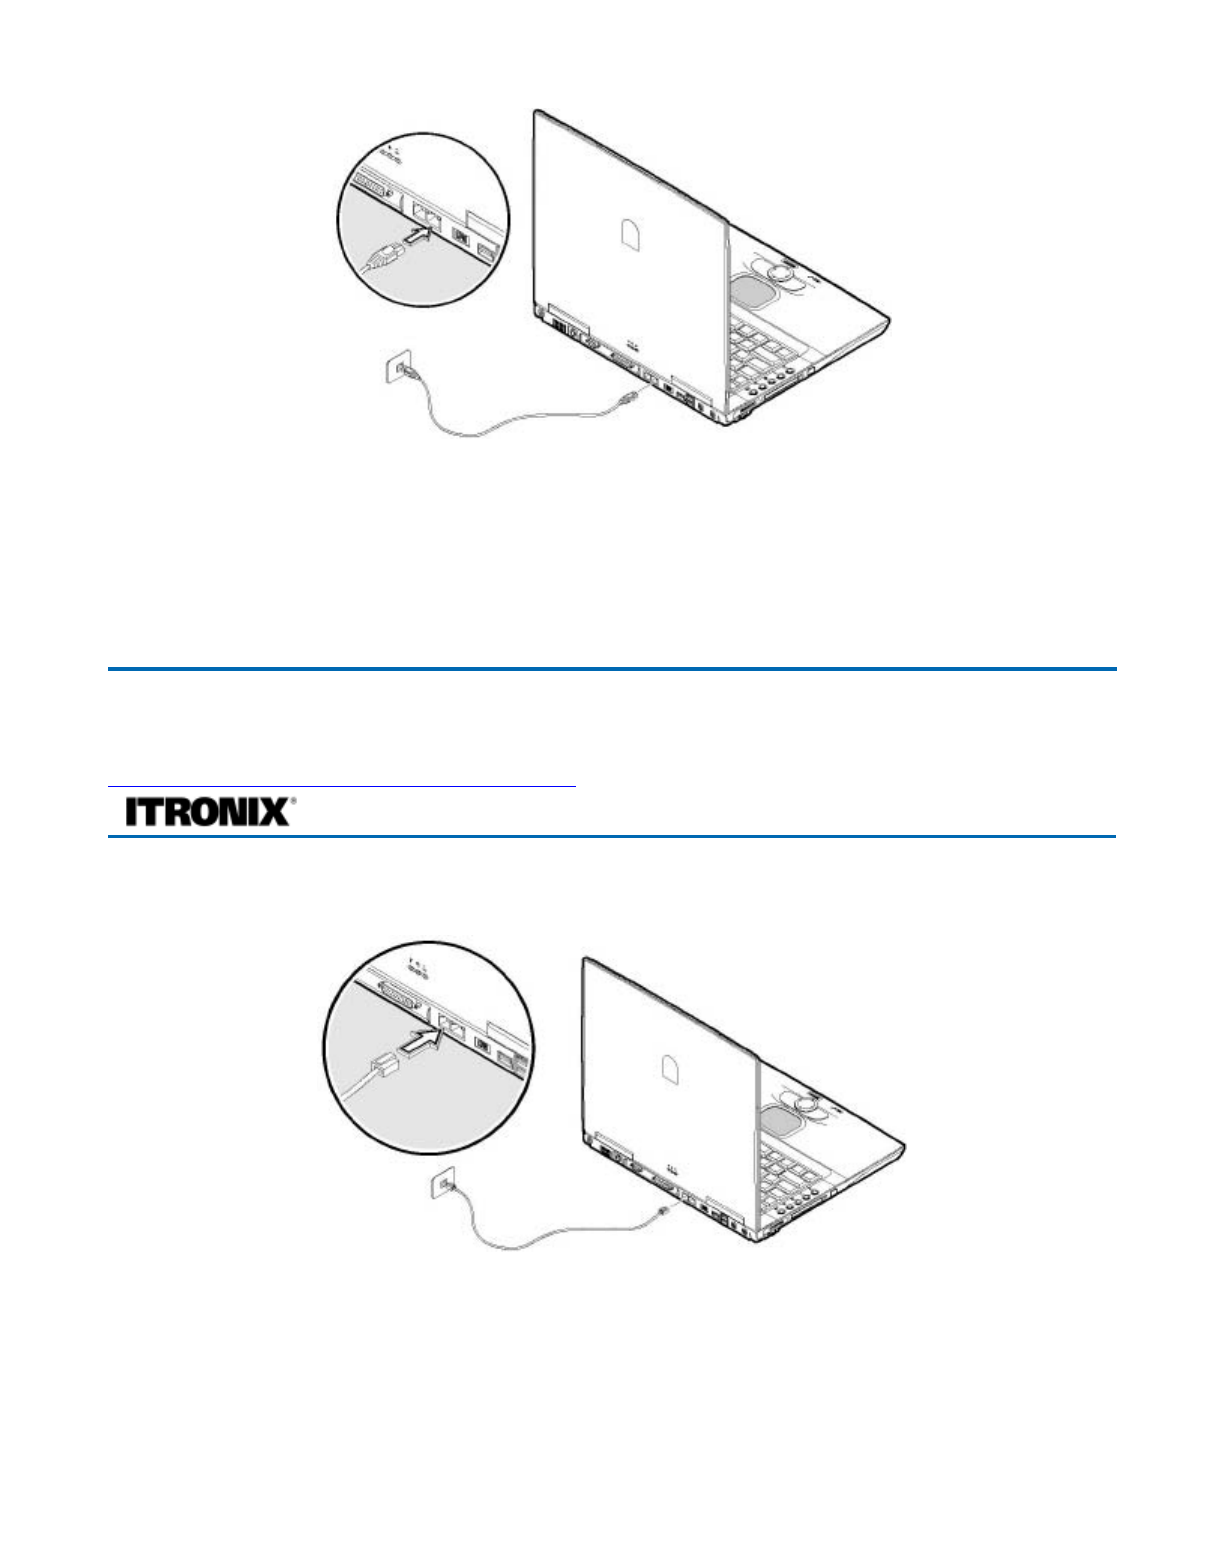
Fax/data modem
You can use the fax/modem to connect to the Internet to send and receive data using the 56 Kbps V.90
p
rotocol. When used with fax software, it can be used as a fax at 14.4 Kbps. In some countries, local
regulations may not permit the use of the fax/modem designed for this system. In this case, you may use
a PCMCIA modem. To use the fax/data modem port, connect a phone cable from the modem port to a
tele
p
hone
j
ack.
72_0128_001
16 May 2005
© 2005 Itronix Cor
p
oration. All ri
g
hts reserved.
GoBook® PRO II Help
Pa
g
e 34 of 100GoBook PRO II Hel
p
5/16/2005file://C:\Documents%20and%20Settin
g
s\barvill
j
.ITRXNT1\Local%20Settin
g
s\Tem
p
\~hh7...

CAUTION Plug your modem into an analog telephone jack only. Most homes use analog lines. Do not
use digital lines, such as the PBX and ISDN systems found in many offices. Digital lines may damage
your modem.
CAUTION To eliminate electromagnetic waves, it is strongly recommended that you thread the USB
cable or phone cord through the clip provided when using USB peripherals, audio-out jack or
connecting to a phone line.
Attaching Audio Devices
1. Connect a stereo headset or external speakers
to this jack to listen to multimedia.
2. Connect a microphone this jack to record
audio.
Audio devices are easy to connect with the audio
p
orts accessible from the rear of the computer. You
can plug an external microphone (or an audio line-
in device) into the line-in jack. Amplified speakers
or headphones connect to the line-out jack. The
line-out jack also supports digital audio output
(S/PDIF).
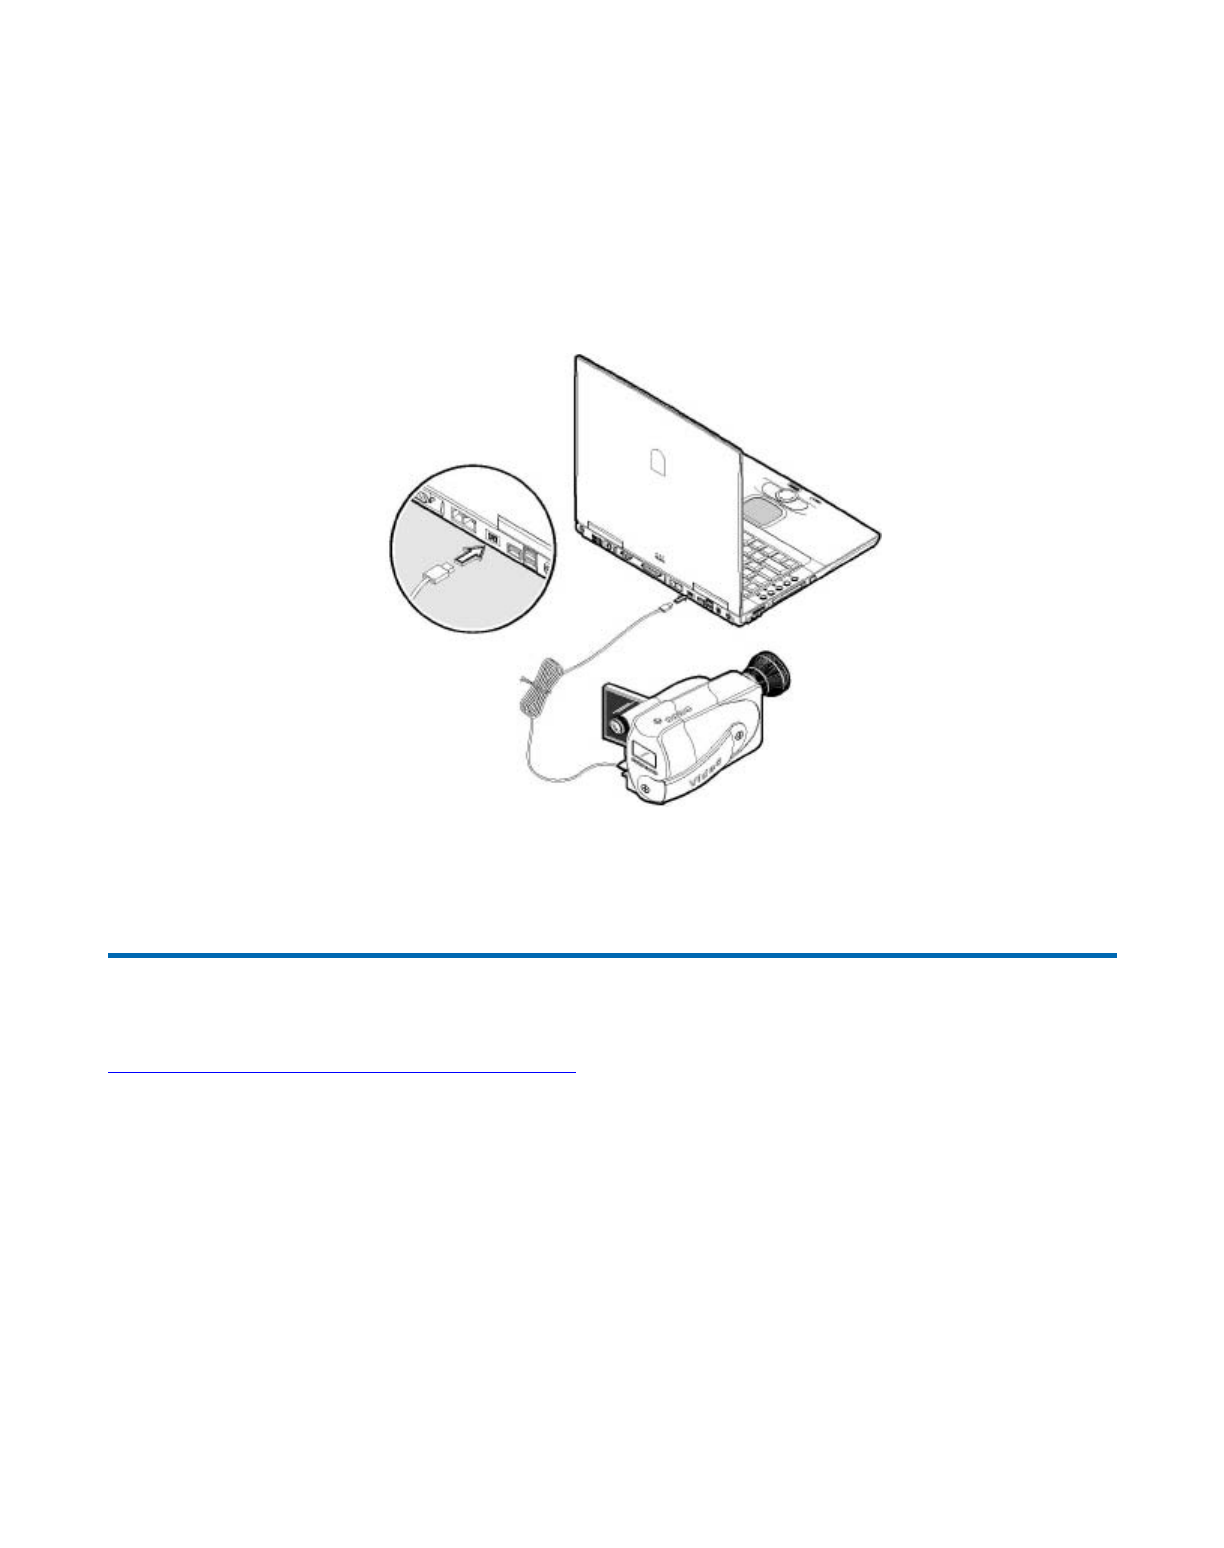
IEEE 1394 Port (4-pin)
72_0128_001
16 May 2005
© 2005 Itronix Cor
p
oration. All ri
g
hts reserved.
GoBook® PRO II Help
72_0128_001
16 May 2005
© 2005 Itronix Cor
p
oration. All ri
g
hts reserved.
GoBook® PRO II Help
Pa
g
e 35 of 100GoBook PRO II Hel
p
5/16/2005file://C:\Documents%20and%20Settin
g
s\barvill
j
.ITRXNT1\Local%20Settin
g
s\Tem
p
\~hh7...
insert picture with callout of port
The IEEE 1394 port is able to transfer large amounts of data at high speed. Because of this ability, the
IEEE 1394 port is often used with multimedia devices, such as video cameras. However, a variety of
devices that support the IEEE 1394 standard can be connected to this port.
The computer's fast IEEE 1394 ports allow you to connect IEEE 1394 supported devices like a digital
video camera or external storage devices.
Before disconnecting an IEEE 1394 device from your computer, click on the Safely Remove Hardware
icon on the taskbar and click on the device. When the device can be safely removed, disconnect the
device from the computer. See your peripheral's documentation for details.
External keyboard
This computer has a keyboard with full-sized keys and an embedded keypad. If you feel more
comfortable using a desktop keyboard, you can connect a USB external keyboard to an available USB
p
ort.
72_0128_001
16 May 2005
© 2005 Itronix Cor
p
oration. All ri
g
hts reserved.
Pa
g
e 36 of 100GoBook PRO II Hel
p
5/16/2005file://C:\Documents%20and%20Settin
g
s\barvill
j
.ITRXNT1\Local%20Settin
g
s\Tem
p
\~hh7...
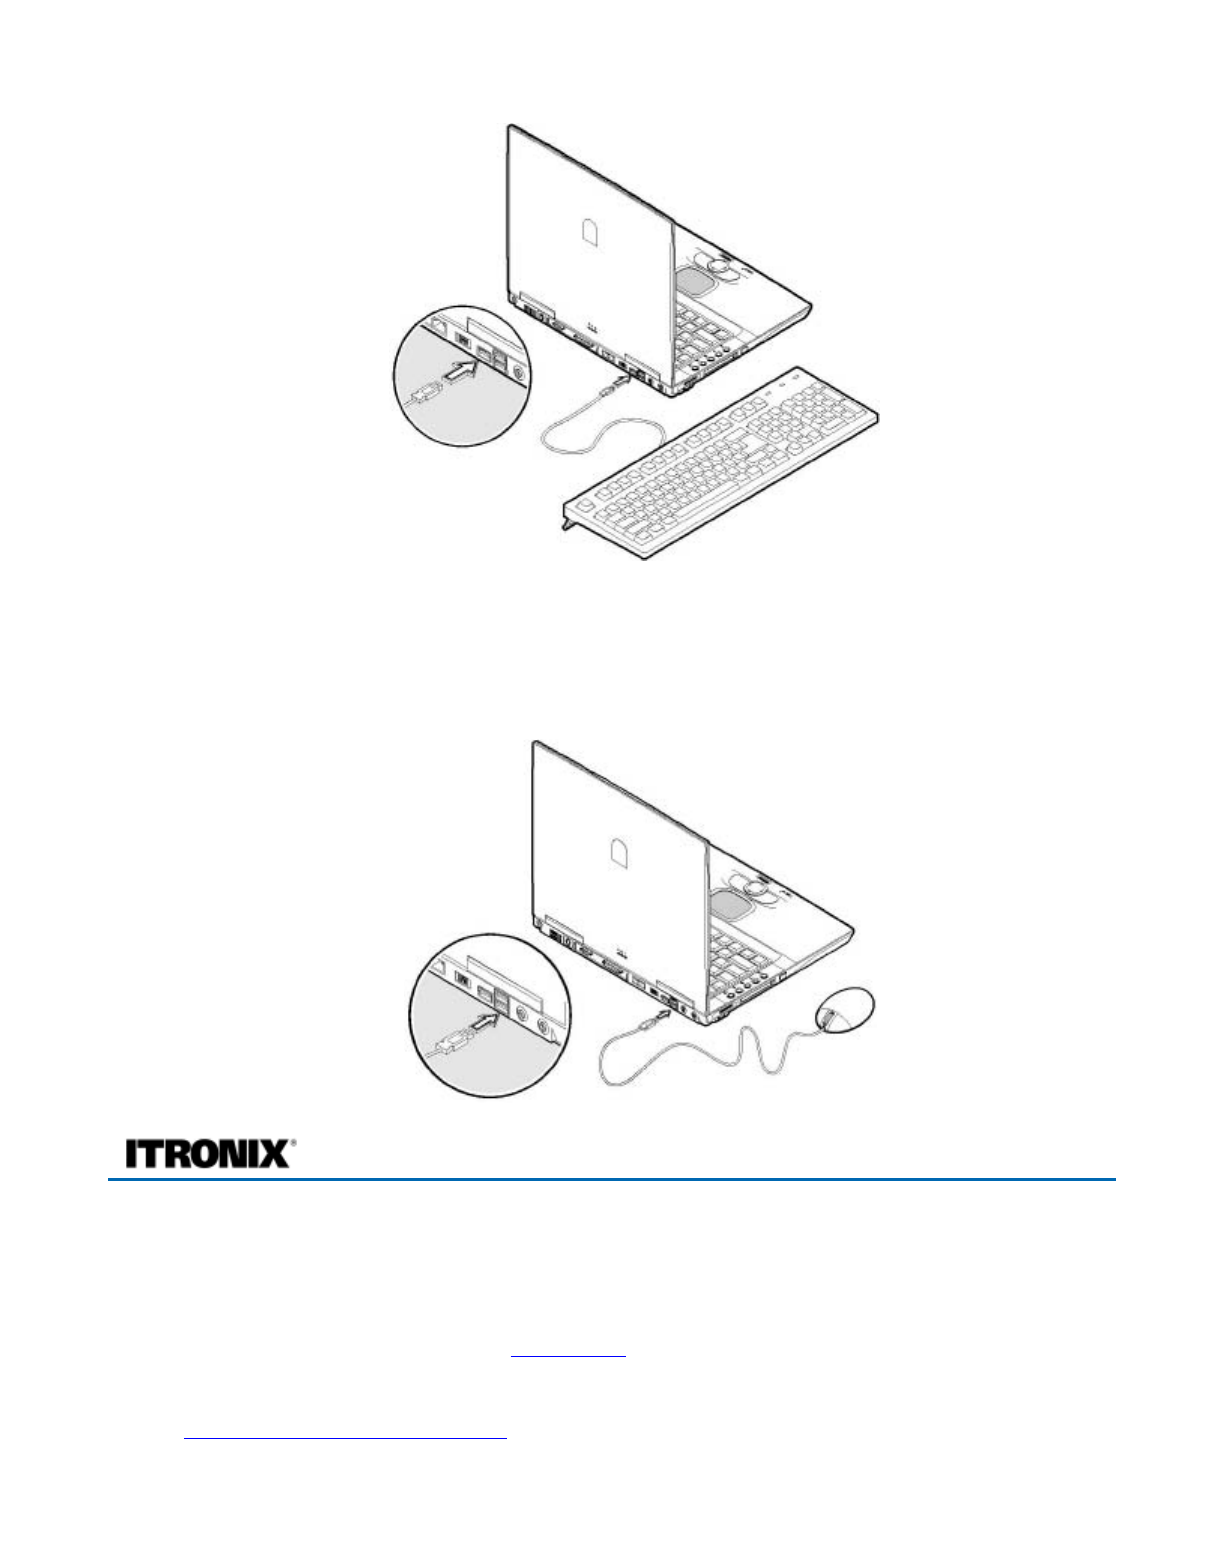
External pointing device
This computer accepts a USB mouse or a similar pointing device. Simply plug it into an available USB
p
ort.
Attaching Mobile Phone Earphones
insert picture with callout of port
If your GoBook PRO II has an integrated GPRS radio, you can plug in mobile phone three-pin
earphones to the GPRS-in jack to receive phone calls.
See the Wireless Communication Section for more information.
GoBook® PRO II Help
Pa
g
e 37 of 100GoBook PRO II Hel
p
5/16/2005file://C:\Documents%20and%20Settin
g
s\barvill
j
.ITRXNT1\Local%20Settin
g
s\Tem
p
\~hh7...
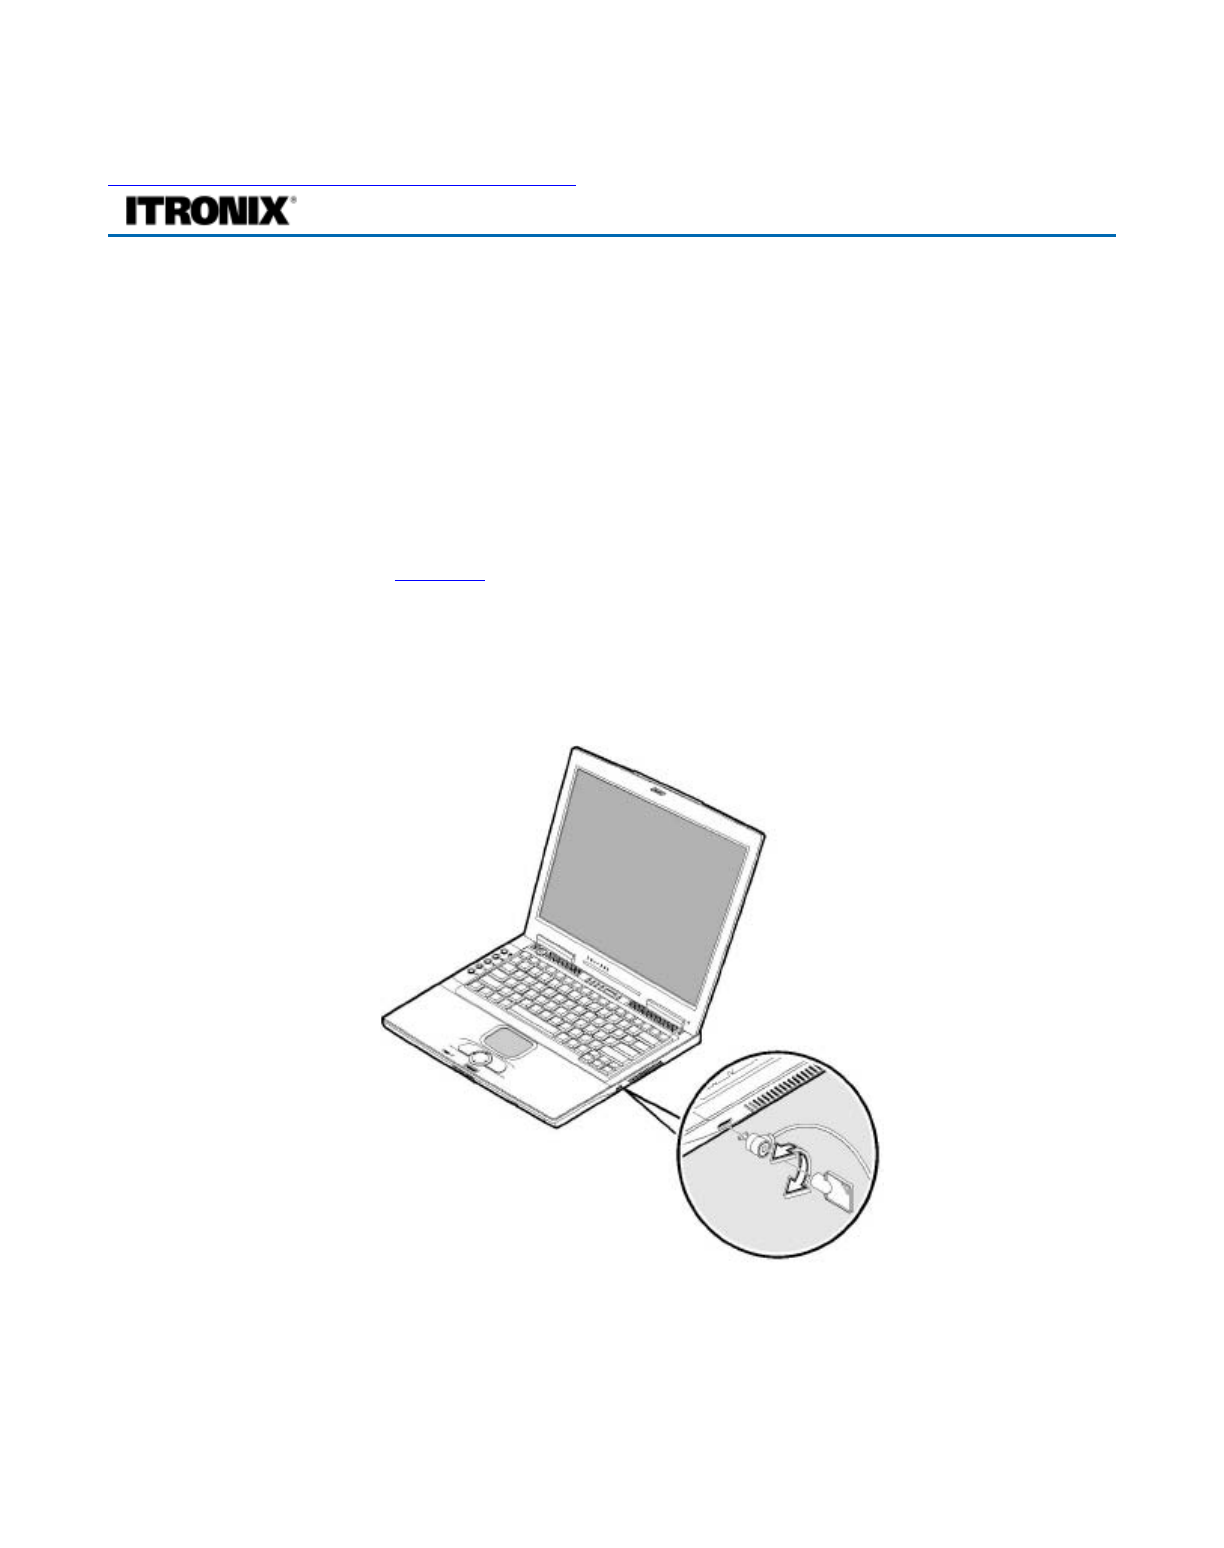
Securing Your Computer
Your computer includes a Kensington lock hole to be used with a standard Kensington lock. You can
connect the notebook to a large object with the Kensington lock to prevent theft of your notebook. See
the documentation that comes with your Kensington lock for more information.
Security features include hardware and software locks — a security slot and password.
Security slot
A security slot located on the right side of the computer lets you connect a Kensington compatible
computer security lock.
Wrap a computer security lock cable around an immovable object such as a table or locked drawer
handle. Insert the lock into the notch and turn the key to secure the lock. Some keyless models are also
available.
Passwords
Passwords protect your computer from unauthorized access. When set, no one can access the computer
without entering the correct password.
There are three t
yp
es of
p
asswords
y
ou can set:
72_0128_001
16 May 2005
© 2005 Itronix Cor
p
oration. All ri
g
hts reserved.
GoBook® PRO II Help
Pa
g
e 38 of 100GoBook PRO II Hel
p
5/16/2005file://C:\Documents%20and%20Settin
g
s\barvill
j
.ITRXNT1\Local%20Settin
g
s\Tem
p
\~hh7...

zSupervisor Password secures your computer against unauthorized entry to critical parameters in
the BIOS Utility.
zUser Password secures your computer against unauthorized use, and allows limited access to the
BIOS Utility.
zHard Disk Password protects your data by preventing unauthorized access to your hard disk, even
if the hard disk is physically removed from the computer and installed in another computer.
NOTE Do not forget your Setup and Hard Disk password! If you forget your password, please get in
touch with your dealer or an authorized service center.
Fingerprint Scanner (Option)
I/O Security
In a high security environment, sensitive and classified data stored in the computer is restricted to
authorized users. Other users cannot communicate with the outside world when using the computer. All
the communication IO interfaces (listed below) are selectively enabled/disabled by the supervisor.
zAll USB ports (USB1.1 and USB 2.0).
zAudio
zModem
zLAN (the on-board Ethernet controller)
zWLAN
z1394 ( TI7611 CardBus Controller)
zExpress card
zSerial port
zParallel port
When the device has been disabled, it is completely non-accessible.
Smart Card Security
72
_
0128
_
001
Pa
g
e 39 of 100GoBook PRO II Hel
p
5/16/2005file://C:\Documents%20and%20Settin
g
s\barvill
j
.ITRXNT1\Local%20Settin
g
s\Tem
p
\~hh7...
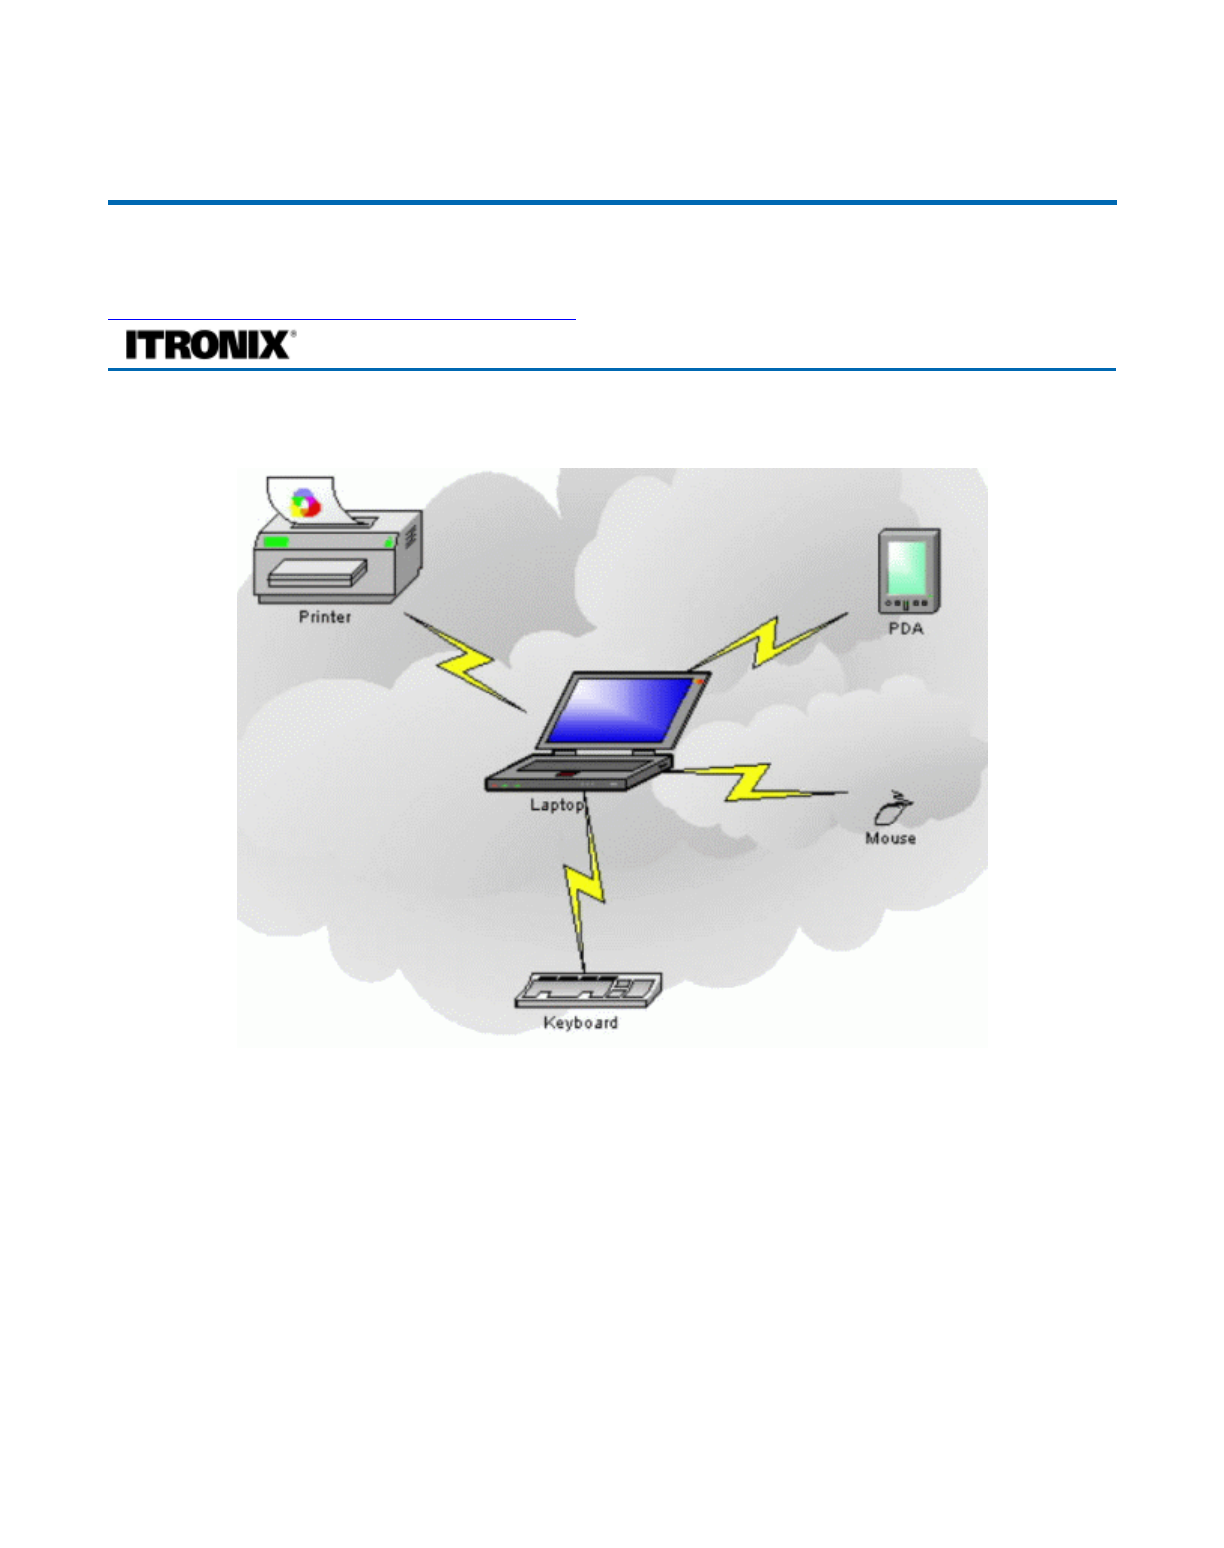
Wireless Communication
Your GoBook PRO supports up to four integrated radios for superior wireless communication.
zWAN
zLAN
zPAN
zGPS
NOTE The radios do NOT function in suspend mode.
Antennas
The GoBook PRO II may contain several embedded antenna options to support wireless communications.
16 May 2005
© 2005 Itronix Cor
p
oration. All ri
g
hts reserved.
GoBook® PRO II Help
# Antenna
1 CRMA Express Antenna
2 GPS Antenna
3 WLAN Antennas
4 Bluetooth / Diversity for EVDO
Pa
g
e 40 of 100GoBook PRO II Hel
p
5/16/2005file://C:\Documents%20and%20Settin
g
s\barvill
j
.ITRXNT1\Local%20Settin
g
s\Tem
p
\~hh7...
CAUTION Please avoid hitting wireless communication antennas as this may adversely affect
communications quality.
Bluetooth
Bluetooth systems create a personal-area network (PAN), or piconet, that may fill a room or may
encompass no more distance than that between the cell phone on a belt-clip and the headset on your
head.
When Bluetooth-capable devices come within range of one another, an electronic conversation takes
p
lace to determine whether they have data to share or whether one needs to control the other. The user
doesn't have to press a button or give a command -- the electronic conversation happens automatically.
Once the conversation has occurred, the devices -- whether they're part of a computer system or a stereo
-- form a network.
Once a piconet is established, the members randomly hop frequencies in unison so they stay in touch
with one another and avoid other piconets that may be operating in the same room.
One of the wa
y
s Bluetooth devices avoid interferin
g
with other s
y
stems is b
y
sendin
g
out ver
y
weak
72_0128_001
16 May 2005
© 2005 Itronix Cor
p
oration. All ri
g
hts reserved.
GoBook® PRO II Help
Pa
g
e 41 of 100GoBook PRO II Hel
p
5/16/2005file://C:\Documents%20and%20Settin
g
s\barvill
j
.ITRXNT1\Local%20Settin
g
s\Tem
p
\~hh7...
signals of 1 milliwatt. By comparison, the most powerful cell phones can transmit a signal of 3 watts.
The low power limits the range of a Bluetooth device to about 10 meters, cutting the chances of
interference between your computer system and your portable telephone or television. Even with the low
p
ower, the walls in your house won't stop a Bluetooth signal, making the standard useful for controlling
several devices in different rooms.
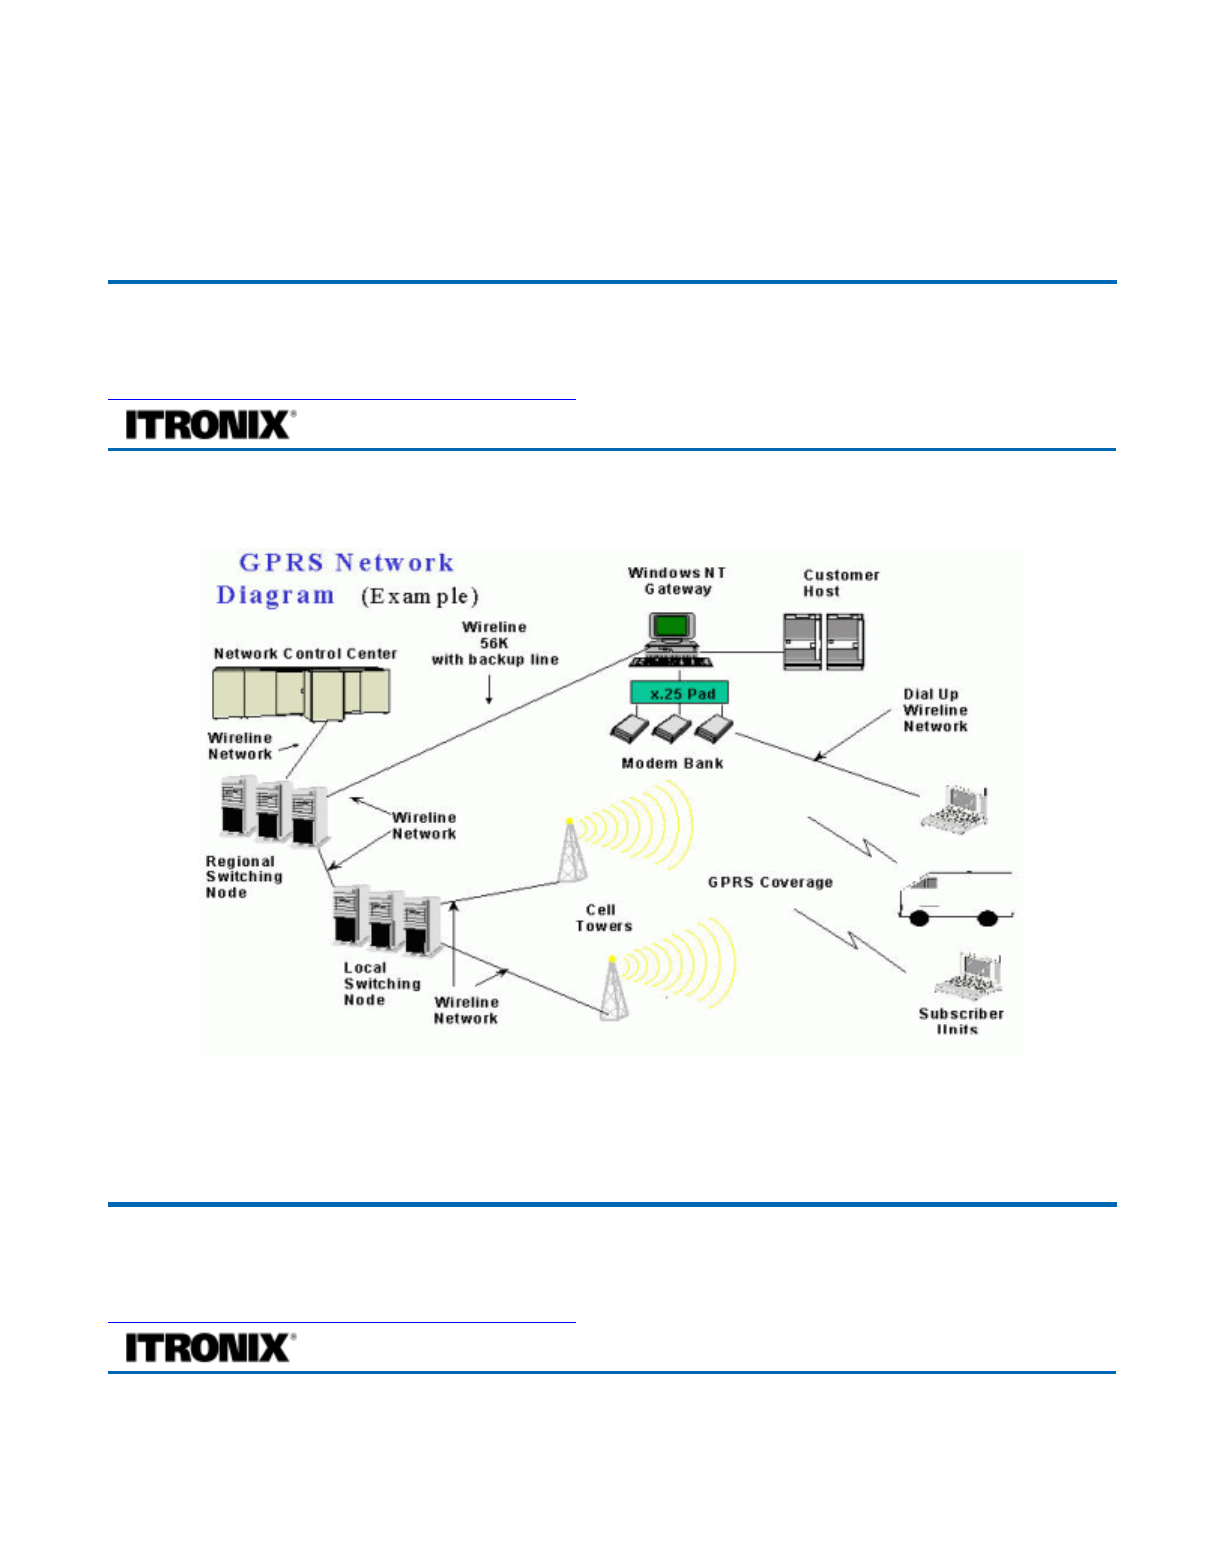
GPRS Network
A radio system must be able to generate a radio frequency signal that contains information and then
transmit that signal through the atmosphere with enough strength to be received at the appropriate
location.
Improving Radio Coverage
72_0128_001
16 May 2005
© 2005 Itronix Cor
p
oration. All ri
g
hts reserved.
GoBook® PRO II Help
72_0128_001
16 May 2005
© 2005 Itronix Cor
p
oration. All ri
g
hts reserved.
GoBook® PRO II Help
Pa
g
e 42 of 100GoBook PRO II Hel
p
5/16/2005file://C:\Documents%20and%20Settin
g
s\barvill
j
.ITRXNT1\Local%20Settin
g
s\Tem
p
\~hh7...

Wireless connectivity between radio-equipped portable terminals and host computers is unique and
maintaining this wireless connectivity over a wide area is fundamental to the usefulness of the network.
As such, the scope and reliability of radio coverage is a primary concern. Therefore, one of the most
important features of the wireless network is the degree of radio coverage provided. Coverage is
influenced by terrain, buildings or a crowded room. There are many things that can be done to improve
coverage depending on location.
In any location
1. Performance can vary significantly at different times of the day.
2. Weather can affect performance.
On the street
1. Try all sides of a building to see which side provides the strongest radio signal.
2. Move from under trees. Pine needles absorb radio signals more than leaves.
3. Move away from overhead electrical wires.
4. Radio signals reflect off other buildings. Even in the signal shadow, the signal could be reflected
back by another building.
5. Try not to hold the unit. If possible, place it in vehicle, on a cabinet or desk.
6. If holding the unit, turn the unit in 90-degree increments to avoid shielding it with your body.
7. The signal is 1 - 2 feet across; therefore, moving several feet in any direction may give different
results.
Inside a Building
1. Move toward windows.
2. Signals do not penetrate ground, therefore, there will probably be no signal in basements.
3. Reflective coatings on windows reflect radio signals. Try the side of the building, the least likely
to have coated windows.
4. Closed metal blinds can reflect radio signals.
5. Dropped ceilings sometimes hide an accumulation of electrical cable.
Electromagnetic Interference (EMI)
1. Electromagnetic Interference (EMI) is generated by switching circuitry closets or Un-interruptable
Power Source
(
UPS
)
s
y
stems found near com
p
uter rooms and can block the radio si
g
nal.
Pa
g
e 43 of 100GoBook PRO II Hel
p
5/16/2005file://C:\Documents%20and%20Settin
g
s\barvill
j
.ITRXNT1\Local%20Settin
g
s\Tem
p
\~hh7...
2. Look for significant sources of electromagnetic radiation. The problem may emanate from a
source between location and the radio base station.
When to use landline communication
If these tips do not improve radio signal strength, switch to landline communication. Switching to
landline communication is faster than searching for and trying to improve the radio signal.
WLAN
In the simplest of terms, a wireless local-area network (WLAN) does exactly what the name implies: it
p
rovides all the features and benefits of traditional LAN technologies, such as Ethernet and Token Ring,
without the limitations of wires or cables. But to view a WLAN just in terms of the cables it does not
have is to miss the point: WLANs redefine the way we view LANs. Connectivity no longer implies
attachment. An infrastructure need not be buried in the ground or hidden behind the walls—an
"infrastructure" can move and change at the speed of the organization. This technology has several
immediate applications, including:
zIT professionals or business executives who want mobility within the enterprise, perhaps in
addition to a traditional wired network
zBusiness owners or IT directors who need flexibility for frequent LAN wiring changes, either
throughout the site or in selected areas
zAn
y
com
p
an
y
whose site is not conducive to LAN wirin
g
because of buildin
g
or bud
g
et
72_0128_001
16 May 2005
© 2005 Itronix Cor
p
oration. All ri
g
hts reserved.
GoBook® PRO II Help
Pa
g
e 44 of 100GoBook PRO II Hel
p
5/16/2005file://C:\Documents%20and%20Settin
g
s\barvill
j
.ITRXNT1\Local%20Settin
g
s\Tem
p
\~hh7...

limitations, such as older buildings, leased space, or temporary sites
zAny company that needs the flexibility and cost savings offered by wireless, building-to-building
bridge to avoid expensive trenches, leased lines, or right-of-way issues
WLANs use a transmission medium, just like wired LANs. Instead of using twisted-pair or fiber-optic
cable, WLANs use either infrared light (IR) or radio frequencies (RF). Of the two, RF is far more
p
opular for its longe
r
-range, higher- bandwidth, and wider coverage. Most wireless LANs today use the
2.4-gigahertz (GHz) frequency band, the only portion of the RF spectrum reserved around the world for
unlicensed devices. The freedom and flexibility of wireless networking can be applied both within
buildings and between buildings.
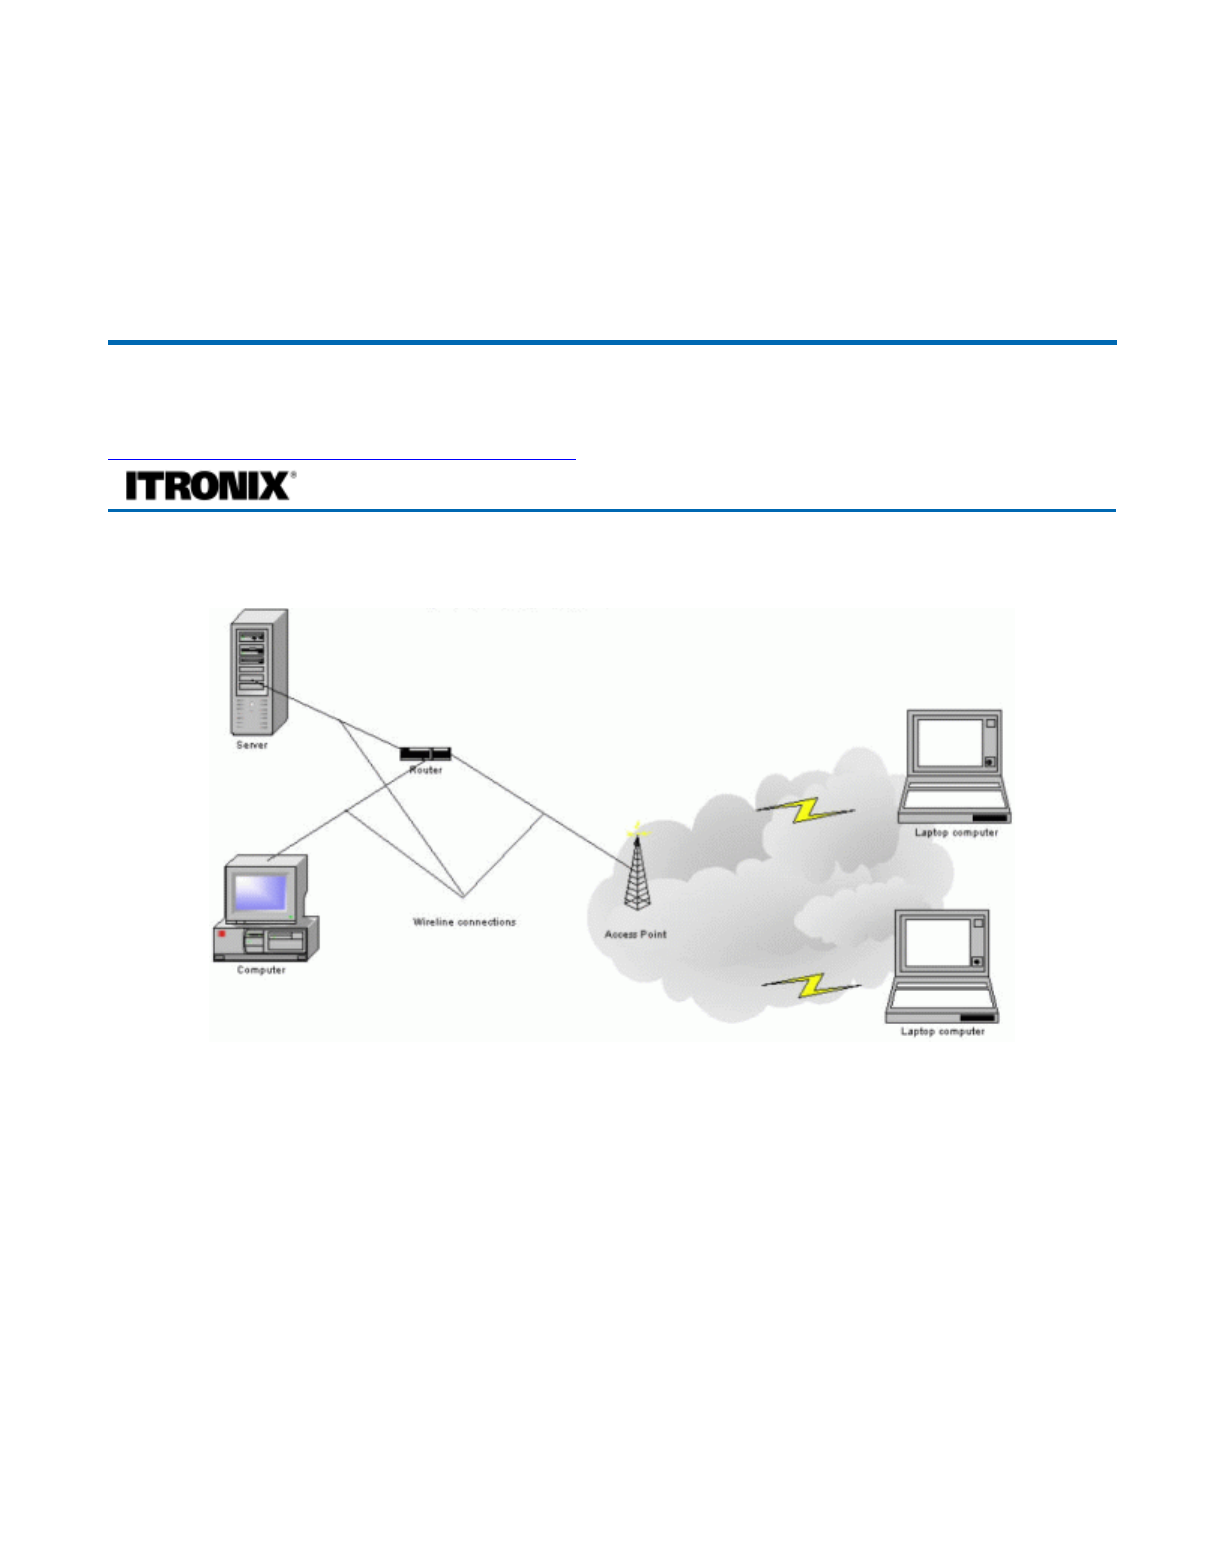
In-Building WLANs
WLAN technology can take the place of a traditional wired network or extend its reach and capabilities.
Much like their wired counterparts, in-building WLAN equipment consists of USB, Personal Computer
Interface (PCI), and Industry-Standard Architecture (ISA) client adapters, as well as access points,
which perform functions similar to wired networking hubs. Similar to wired LANs for small or
temporary installations, a WLAN can be arranged in a peer-to-peer or ad hoc topology using only client
adapters. For added functionality and range, access points can be incorporated to act as the center of a
star topology and function as a bridge to an Ethernet network as well.
Within a building, wireless enables computing that is both mobile and connected. With a PC Card client
adapter installed in a notebook or hand-held PC, users can move freely within a facility while
maintaining access to the network.
Applying wireless LAN technology to desktop systems provides an organization with flexibility
impossible with a traditional LAN. Desktop client systems can be located in places where running cable
is impractical or impossible. Desktop PCs can be redeployed anywhere within a facility as frequently as
needed, making wireless ideal for temporary workgroups and fast-growing organizations.
Building-to-Building WLANs
In much the same way that a commercial radio signal can be picked up in all sorts of weather miles from
its transmitter, WLAN technology applies the power of radio waves to truly redefine the "local" in LAN.
With a wireless bridge, networks located in different buildings can be integrated into a single local-area
network. When bridging between buildings with traditional copper or fiber-optic cable, freeways, lakes,
and even local governments can be impassible obstacles. A wireless bridge makes them irrelevant,
transmitting data through the air and requiring no license or right of way.
Without a wireless alternative, organizations frequently resort to wide area networking (WAN)
technologies to link together separate LANs. Contracting with a local telephone provider for a leased
line presents a variety of drawbacks. Installation is typically expensive and rarely immediate. Monthly
fees are often quite high for bandwidth that by LAN standards is very low. A wireless bridge can be
p
urchased and then installed in an afternoon for a cost that is often comparable to a T1 installation
charge alone. Once the investment is made, there are no recurring charges. In addition, today's wireless
bridges provide the bandwidth one would expect from a technology rooted in data, rather than voice,
communications.
Combination WLANs
Pa
g
e 45 of 100GoBook PRO II Hel
p
5/16/2005file://C:\Documents%20and%20Settin
g
s\barvill
j
.ITRXNT1\Local%20Settin
g
s\Tem
p
\~hh7...
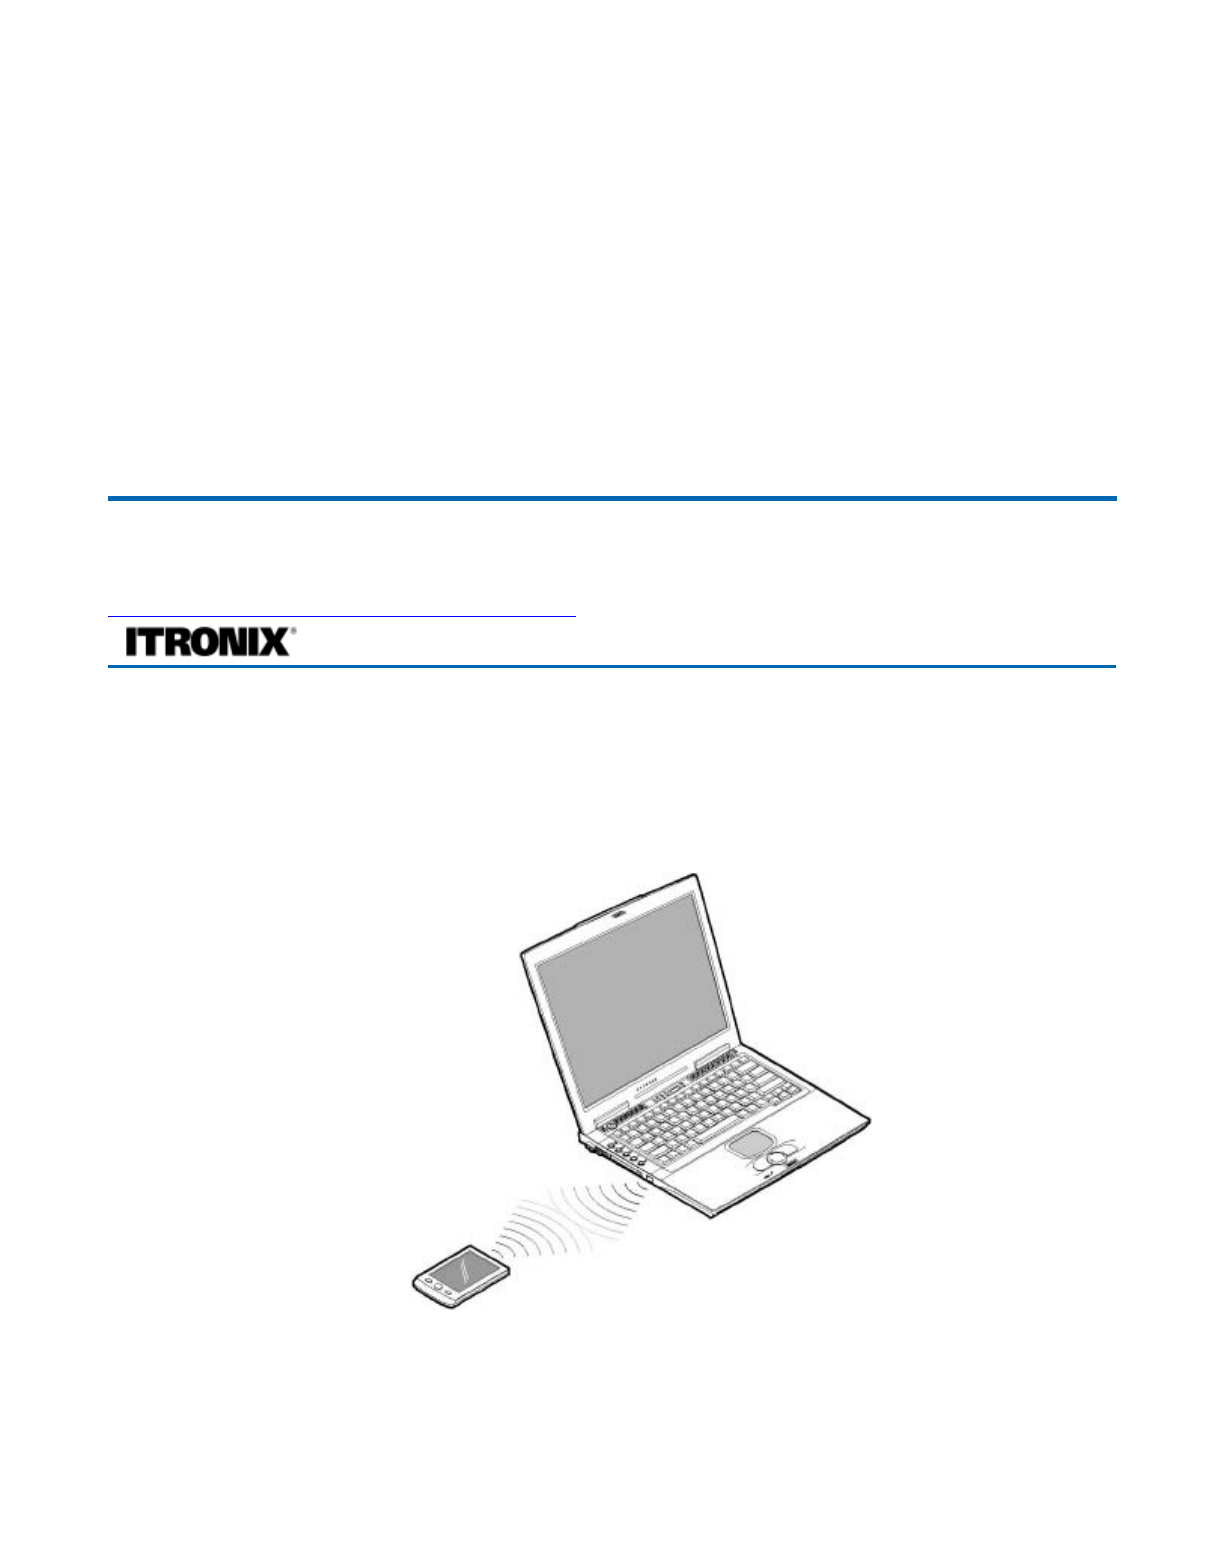
Recently a combination of the in building and building to building WLAN has been developed. Two
examples are parking lots that are equipped with outdoor access points and vehicles that are equipped
with access points.
In the first example, a user is connected and disconnected with the company LAN as they approach or
leave the parking area. This allows the user full fast access while in the vehicle. In most cases, the user
will still be able to gain access to a portion of the company LAN through a slower and more expensive
RF or landline WAN while they are outside of the WLAN area.
In the second example, a user connects to the company WAN with an RF modem located inside the
vehicle. When the user leaves the vehicle, the computer is connected to the vehicle using a WLAN
connection. The vehicle can either contain a store of information or simply be a pass through to the
WAN.
Fast Infrared
The computer's fast infrared (FIR) port (option) allows you to do wireless data transfer with other IR-
aware computers and peripherals such as PDAs (personal digital assistants), mobile phones, and infrared
p
rinters. The infrared port can transfer data at speeds of up to 4 Mb/s at a distance of up to one meter.
To use FIR, position two IR-aware devices such that their IR ports are no more than one meter apart and
offset no more the 15 degrees.
When the two computers are in position, simply begin the data transfer as you normally would. See your
file transfer software for details.
72_0128_001
16 May 2005
© 2005 Itronix Cor
p
oration. All ri
g
hts reserved.
GoBook® PRO II Help
Pa
g
e 46 of 100GoBook PRO II Hel
p
5/16/2005file://C:\Documents%20and%20Settin
g
s\barvill
j
.ITRXNT1\Local%20Settin
g
s\Tem
p
\~hh7...

--------------------
IrDA Communications is used to carry information between components via beams of light in the
infrared spectrum. Infrared refers to light waves of a lower frequency than human eyes can receive and
interpret. Infrared is used in most television remote control systems, and with a standard called IrDA
(Infrared Data Association) it's used to connect some computers with peripheral devices. With IrDA
communications there are a couple of drawbacks. First, infrared is a "line of sight" technology. For
example, you have to point the remote control at the television or DVD player to make things happen.
NOTE In practice, the components should be no closer than 12 inches and no further apart then three
feet.
The second drawback is that infrared is almost always a "one to one" technology. You can send data
between your desktop computer and your laptop computer, but not your laptop computer and your PDA
at the same time.
These two qualities of infrared are actually advantageous in some regards. Because infrared transmitters
and receivers have to be lined up with each other, interference between devices is uncommon. The one-
to-one nature of infrared communications is useful in that you can make sure a message goes only to the
intended recipient, even in a room full of infrared receivers.
Operating with Battery Power
The computer operates on AC or battery power. This chapter contains the information you need to know
to operate the computer on battery power. It also includes information on how your computer manages
and saves power.
Battery pack
The computer uses a battery pack that gives you long use between charges.
Battery pack characteristics
The battery pack has the following characteristics:
z Employs current battery technology standards
The computer uses a Lithium-Ion battery pack which does not have the memory effect problem of
Nickel Cadmium (NiCd) batteries. Li-Ion batteries consistently provide the longest battery life,
b
est-suited for road warriors.
72_0128_001
16 May 2005
© 2005 Itronix Cor
p
oration. All ri
g
hts reserved.
GoBook® PRO II Help
Pa
g
e 47 of 100GoBook PRO II Hel
p
5/16/2005file://C:\Documents%20and%20Settin
g
s\barvill
j
.ITRXNT1\Local%20Settin
g
s\Tem
p
\~hh7...

z Battery-low warning
When the battery charge level becomes low, the status indicator of the computer flashes at regular
intervals. This tells you that the battery power is critically low (and you should save your work).
You can correct this situation by recharging the battery pack.
Whenever possible, use the AC adapter. The battery will come in handy when you travel or during a
p
ower failure. It is advisable to have an extra fully-charged battery pack available as backup.
Using a battery pack for the first time
When using a battery pack for the first time, follow these steps:
1. Connect the AC adapter to a power source and to the computer and fully recharge the battery.
2. Disconnect the adapter to use up the battery before recharging again.
You only need to do this once or twice with a new battery or with a battery that's been stored without
being used for a long time. If the computer is to be stored for more than two weeks, we suggest you
remove the battery pack. Battery power from a fully charged battery pack depletes in roughly a day with
the computer in Standby mode, a month in Hibernation mode or when power is off.
WARNING Do not expose battery packs to temperatures below 0ºC (32ºF) or above 60ºC (140ºF).
This may adversely affect the battery pack.
Installing and removing the battery pack
Important! Before removing the battery pack, make sure that you have an AC adapter connected to the
computer; otherwise, turn off the computer.
To install a battery pack:
1. Line up battery connectors.
2. Press gently on the battery until it clicks into place.
3. Then slide the battery lock to the lock position.
To remove the battery pack:
1. Slide the batter
y
lock to the unlock
p
osition
72_0128_001
16 May 2005
© 2005 Itronix Cor
p
oration. All ri
g
hts reserved.
GoBook® PRO II Help
Pa
g
e 48 of 100GoBook PRO II Hel
p
5/16/2005file://C:\Documents%20and%20Settin
g
s\barvill
j
.ITRXNT1\Local%20Settin
g
s\Tem
p
\~hh7...
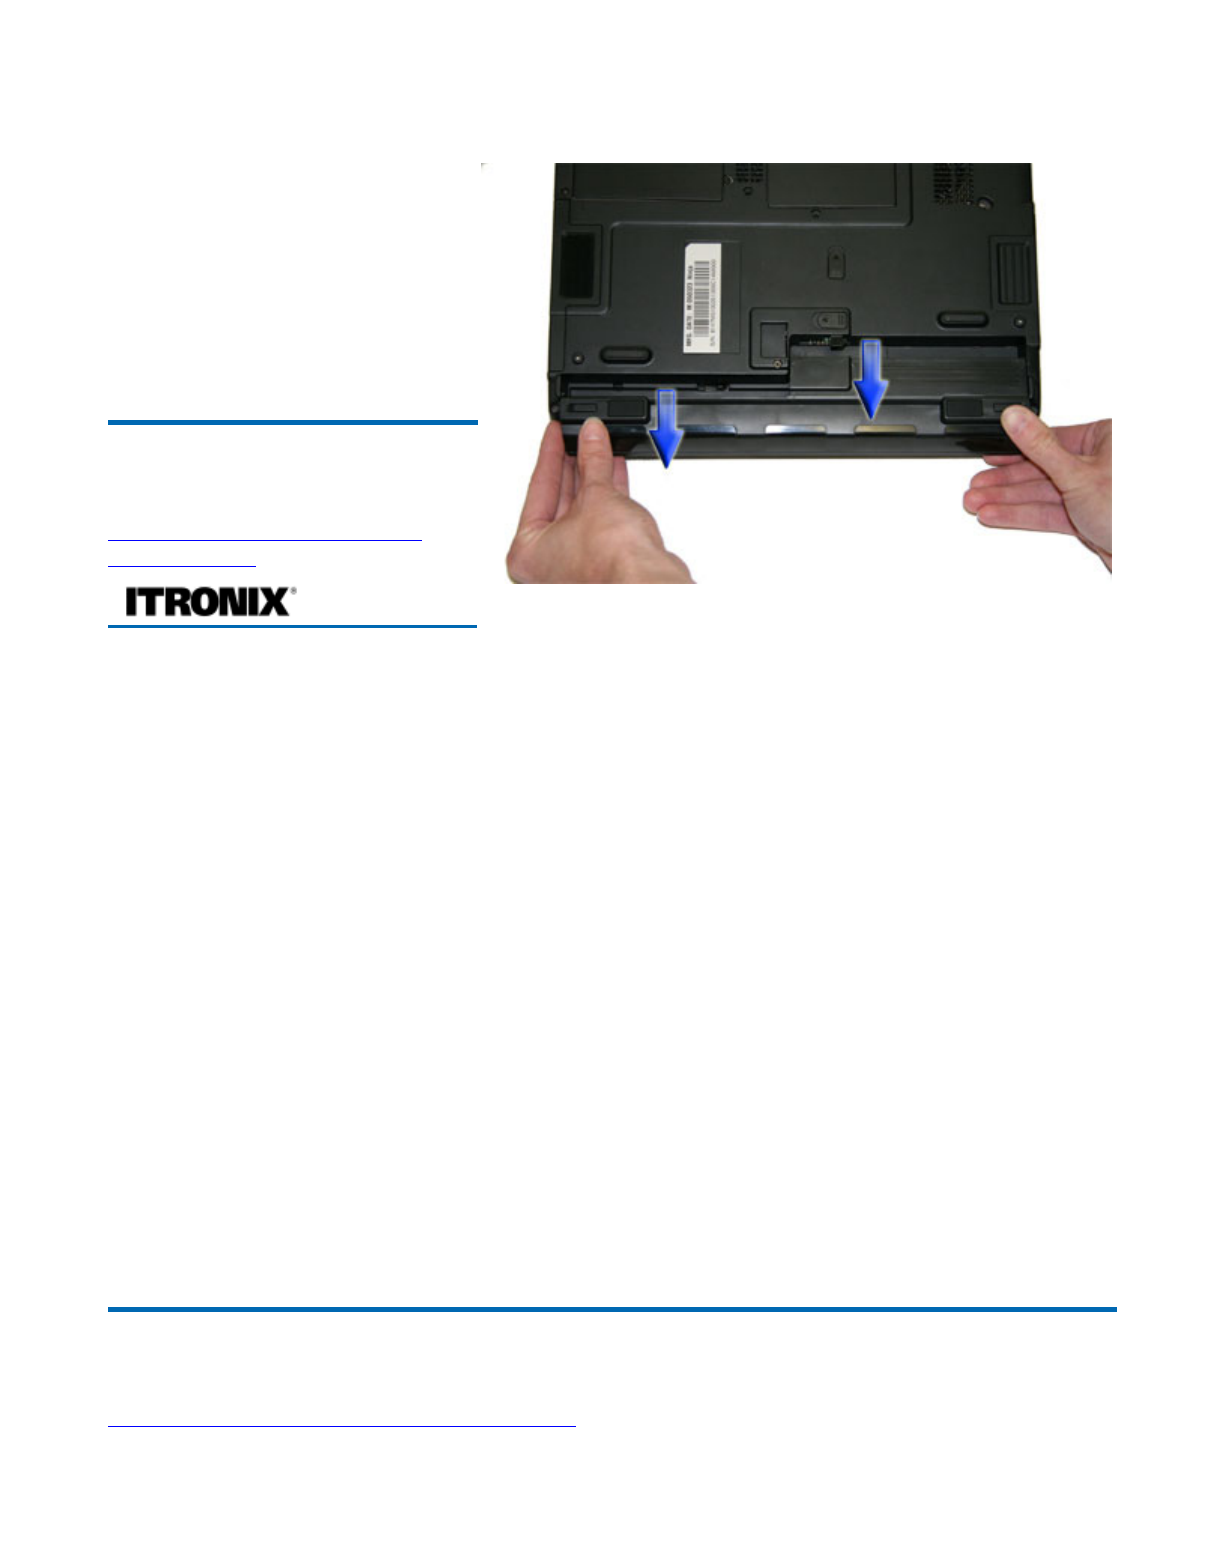
2. Slide and hold the two battery release latches
3. Gently slide the battery out of
the computer.
Battery Calibration
The first time you use a battery, you should calibrate it. The calibration process empties and charges the
battery one time. This allows the Windows battery gauge to accurately monitor battery status. To
calibrate a battery, follow these steps:
1. Plug in the AC adapter.
2. Restart the computer and when the startup screen appears, press DEL key to enter the Setup
Utility.
3. In the Setup Utility, select Power Management Setup , choose Battery Auto Calibration, then
press PgDn.
4. You will be prompted to make sure the AC adapter and Battery are present. Do this and then
Select Yes to begin "battery auto-learning". Please press Space Bar to select option, and Enter to
continue.
Battery Calibration will take from 10 to 16 hours, depending on how much power the battery may
already contain.
N
OTE For optimum performance, we recommend calibrating the battery every three months.
72_0128_001
16 May 2005
© 2005 Itronix Corporation. All
ri
g
hts reserved.
GoBook®
PRO II Help
72_0128_001
16 May 2005
© 2005 Itronix Cor
p
oration. All ri
g
hts reserved.
Pa
g
e 49 of 100GoBook PRO II Hel
p
5/16/2005file://C:\Documents%20and%20Settin
g
s\barvill
j
.ITRXNT1\Local%20Settin
g
s\Tem
p
\~hh7...

Battery Charging
To charge the battery, install the battery pack and plug the AC adapter into the computer and an
electrical outlet.
Charging modes
The adapter has two charging modes:
zRapid mode
The computer uses rapid charging when power is turned off and a powered AC adapter is
connected to it. In rapid mode, a fully depleted battery gets 95% charged in approximately 2
hours.
z Charge-in-use mode
When the computer is in use with the AC adapter plugged in, the computer also charges the
battery pack if installed. This mode will take longer to fully charge a battery than rapid mode. In
charge-in-use mode, a fully depleted battery gets 95% charged in approximately 4 hours.
NOTE We suggest that you charge the battery pack before retiring for the day, letting it charge
overnight before traveling. This ensures a fully charged battery for use the next day.
When you use the AC adapter to connect your GoBook PRO II to a power outlet, the internal battery
will automatically begin to recharge. While the battery is charging, the Battery Power Indicator will
be active after 6-12 seconds and will stay solid orange. When the battery is fully charged, the Battery
Power Indicator will turn green.
If your computer is turned off, a fully discharged battery will take about 3 hours to recharge. If your
computer is turned on and is not in suspend mode, it will take about 6-13 hours to recharge the battery.
Refer to the following table:
NOTE A fully charged Li-Ion battery can run the Notebook for approximately 2.5 hours of normal use.
(
Accordin
g
to Batter
y
Mark benchmark tests
)
. Use of external devices, the media ba
y
and wireless radio
GoBook® PRO II Help
Charging Discharging
System On 6-13 hours 2.5 hours
System Off (Suspend to
RAM and Suspend to Disk) 3 hours —
Pa
g
e 50 of 100GoBook PRO II Hel
p
5/16/2005file://C:\Documents%20and%20Settin
g
s\barvill
j
.ITRXNT1\Local%20Settin
g
s\Tem
p
\~hh7...
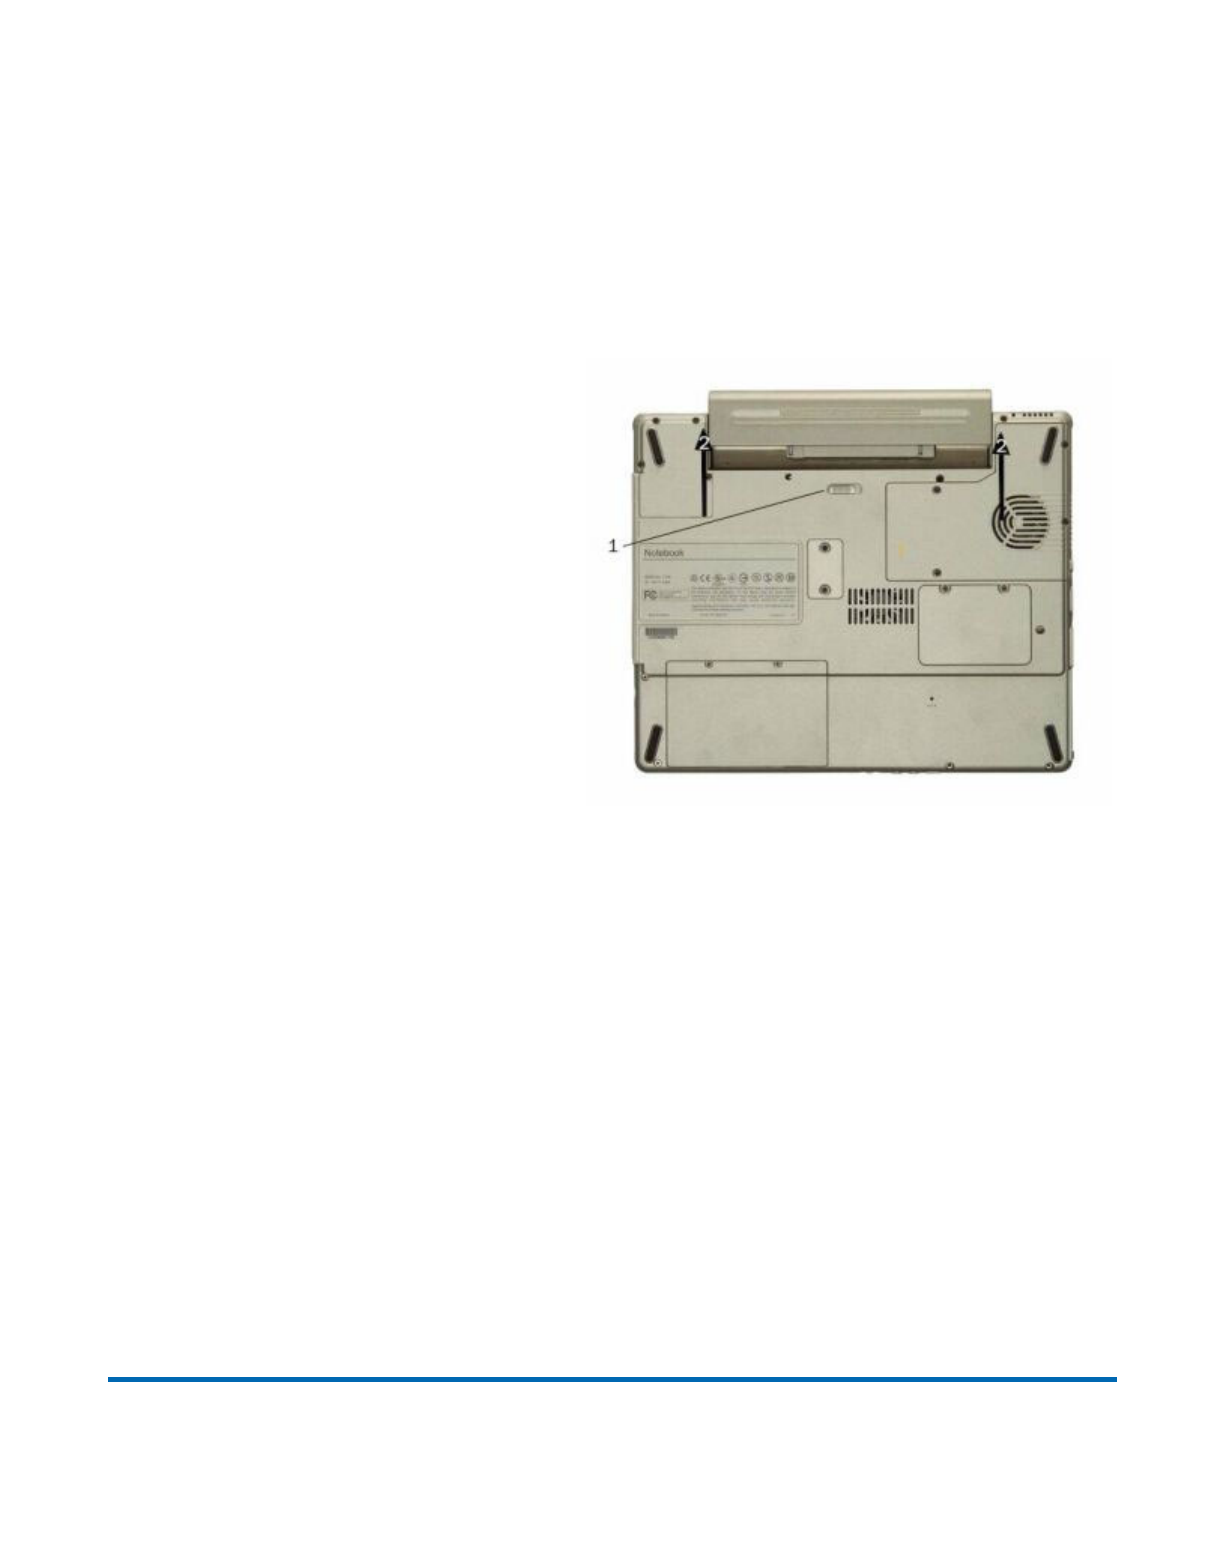
causes increased battery consumption.
When to Replace the Battery
Over time, the battery’s capacity gradually decreases. We recommend that you replace your battery
when you notice that it begins to store significantly less charge.
Changing the Battery
Change the main battery pack as follows:
1. Turn off the computer.
2. Close the screen and turn the computer
over.
3. Slide the side battery latch (1) away from
the battery. Continue to hold it until the
battery is removed.
4. Gently lift the battery out of the
compartment (2).
5. Make sure the replacement battery is
properly orientated. Slide back the battery
latch (1) then insert the battery into the
battery compartment. Check that the latch locks back into position.
Heat Considerations
The computer’s processor has been specially designed to consume as little power as possible, and
generates very little heat. However, working in a hot environment, or working for long periods may
raise the temperature. The GoBook PRO II takes the following steps to lower temperature:
1. The cooling fan turns on automatically. You may feel air coming from a vent at the left side of the
computer when this happens.
2. If the temperature continues to rise, processor activity will be reduced. You may notice a slight
loss of performance when this happens.
WARNING If the operating temperature exceeds 40°C (104°F) the system will slowdown to prevent
the heat from damaging the computer's infrastructure. If you continue to operate the computer at these
high temperatures it will eventually shutdown. When the computer cools to a normal temperature you
can restart the system. The higher the temperature, the longer the period the computer will need to cool
down.
72_0128_001
16 Ma
y
2005
Pa
g
e 51 of 100GoBook PRO II Hel
p
5/16/2005file://C:\Documents%20and%20Settin
g
s\barvill
j
.ITRXNT1\Local%20Settin
g
s\Tem
p
\~hh7...

Monitoring Battery Power
There are two ways to monitor how much power the battery has left:
1. Select Start, Settings, Control Panel, Power Options; then select the Power Meter.
2. Moving the cursor to the battery icon on the taskbar is the simplest way to check on battery power
status. The status will show as a pop-up when you mouse-over the icon.
N
OTE If you do not see the battery icon on the taskbar, enable it in Start, Settings, Control Panel,
Power Options. Choose the Advanced tab and select "Always show icon on the taskbar."
Low Battery Alarms
How your computer responds to a low battery condition can be set by going to Start, Settings, Control
Panel, Power Options, Alarms.
Two different power alarms can be enabled or disabled: the Low Battery Alarm, and the Critical Battery
Alarm. Use the slide bar to set the power level at which the alarms are activated. Click on the Action
button to choose whether the alarm sounds, displays a message, or both.
CAUTION When battery power is low, the Battery Power Indicator flashes red and the alarm
b
eeps or displays a warning on your screen. Take immediate action, such as saving files or connecting to
the AC adapter , or data may be lost.
When the computer alerts you that the battery is low, immediately do one of the following:
zConnect the AC power adapter
zSave your work and then select Shut Down from the Start menu
zTurn off the computer and replace the discharged battery with a charged battery (See Battery
Charging).
N
OTE Do not restart the computer until you have connected to an AC adapter or replaced the
discharged battery with a charged battery.
Checking the battery level
The Windows battery meter indicates the present battery level. Simply rest your cursor on the battery
meter (or AC plug) icon on the taskbar to see the present charge level of your battery.
Optimizing battery life
This section hel
p
s
y
ou
g
et the most out of batter
y
o
p
eration. O
p
timizin
g
batter
y
life
p
rolon
g
s the
© 2005 Itronix Cor
p
oration. All ri
g
hts reserved.
GoBook® PRO II Help
Pa
g
e 52 of 100GoBook PRO II Hel
p
5/16/2005file://C:\Documents%20and%20Settin
g
s\barvill
j
.ITRXNT1\Local%20Settin
g
s\Tem
p
\~hh7...

charge/recharge cycle and improves recharge efficiency. Follow these suggestions to optimize and
maximize battery power:
Battery-low warning
You never have to worry about battery power as long as you are using the AC adapter. However, when
you operate the computer on battery power, pay extra attention to the power indicator on the display
p
anel.
During a battery-low condition, the power indicator flashes at regular intervals until battery power is
depleted.
WARNING Connect the AC adapter to the computer as soon as possible. Data is lost when computer
p
ower is cut off during Standby mode.
The following table shows the recommended course of action to take when you encounter a battery-low
condition.
z Purchase an extra battery pack.
z Use the AC adapter whenever possible so that the battery is reserved for on-
the-go computing.
z Keep the battery pack in the computer powered by the AC adapter. The
constant trickle charge maintains the battery level to eliminate the battery
self-discharge effect. The charge-in-use function also charges the battery
pack.
z Eject the PC card from the card slot when it is not in use, since the PC card
draws extra power. See Ejecting a card.
Store the battery pack in a cool, dry place. The recommended storage
temperature for battery packs ranges from 10 to 30 degrees Celsius. The
higher the storage temperature, the faster the battery pack self-discharges.
z
z
z
The batteries can be recharged about 400 times when used as directed.
Excessive recharging decreases battery life.
Take care of your battery pack and AC adapter. See Safety and maintenance.
Situation Recommended Action
AC adapter and
power outlet
available
1. Connect the AC adapter to the computer.
2. Save all necessary files.
3. Resume work.
Power off the computer if you wish to recharge the battery rapidly.
An extra fully-
charged battery
pack available
1. Save all necessary files.
2. Exit the application.
3. Power off the computer.
4. Replace the battery pack.
5. Power on the computer and resume work.
Pa
g
e 53 of 100GoBook PRO II Hel
p
5/16/2005file://C:\Documents%20and%20Settin
g
s\barvill
j
.ITRXNT1\Local%20Settin
g
s\Tem
p
\~hh7...

Power management
The GoBook PRO II has power management capability so you can reduce the amount of energy used,
especially during periods of inactivity. Effective use of power management options can greatly
conserve and extend your battery life.
This computer has a built-in power management unit that monitors system activity. System activity
refers to any activity involving one or more of the following devices: keyboard, mouse, floppy drive,
hard disk, peripherals connected to the serial and parallel ports, and video memory. If no activity is
detected for a period of time (called an inactivity timeout), the computer stops some or all of these
devices in order to conserve energy.
This computer employs a power management scheme that supports ACPI (Advanced Configuration and
Power Interface) which allows for maximum power conservation and maximum performance at the
same time. Windows handles all power-saving chores for your computer.
Advanced Configuration and Power Interface
Advanced Configuration and Power Interface (ACPI) is a power management specification jointly
developed by Compaq, Intel, Microsoft, Phoenix and Toshiba. ACPI enables Windows to control the
amount of power given to each device attached to the computer. With ACPI, Windows can turn off
p
eripheral devices when they are not in use, thereby saving power.
NOTE We recommend you enable power management to prolong your battery life.
Refer to Windows help for more details.
Power Management
Power Saving Modes
Adjust the default power management settings in the Power Options / Advanced dialog box in the
Control panel. The Power Options Properties dialog box allows you to set different actions to take when
the computer is left idle for a certain amount of time.
Sus
p
end Mode
AC adapter or
power outlet not
available
1. Save all necessary files.
2. Exit the application.
3. Power off the computer.
72_0128_001
16 May 2005
© 2005 Itronix Cor
p
oration. All ri
g
hts reserved.
GoBook® PRO II Help
Pa
g
e 54 of 100GoBook PRO II Hel
p
5/16/2005file://C:\Documents%20and%20Settin
g
s\barvill
j
.ITRXNT1\Local%20Settin
g
s\Tem
p
\~hh7...

There are several possible settings for suspend mode, which can be selected in the Power Management
dialog box: You may have the notebook standby, hibernate, or you can power off the computer
altogether.
Standby
Hibernate
Power Off
Initiating Suspend Mode
There are five ways to initiate suspend mode. The settings can be adjusted in the Power Management
p
rofile dialog box:
1. The computer will automatically enter suspend mode when not used for a set period of time
2. Selecting the Standby button in the Shut Down Windows dialog box
3. Closing the screen cover (assuming no external monitor has been connected)
4. Pressing the Power Button (if enabled in Power Settings)
5. Pressing the suspend function key FN+F3
Using the Setup Utility for Power Management
With Windows running in ACPI mode, power can be controlled through the Power Management dialog
box only. With operating systems that use ACPI power management, Setup power settings have no
effect.
Power Button Settings
The function of the Power Button can be set to Shutdown, Hibernate, or Standby in the Power
Management Properties dialog box in the Control Panel. However, holding the Power Button down for
more than four seconds will force a power off while operating under any situation, resulting in the loss
of any unsaved information.
Battery Tips
72_0128_001
16 May 2005
© 2005 Itronix Cor
p
oration. All ri
g
hts reserved.
GoBook® PRO II Help
Pa
g
e 55 of 100GoBook PRO II Hel
p
5/16/2005file://C:\Documents%20and%20Settin
g
s\barvill
j
.ITRXNT1\Local%20Settin
g
s\Tem
p
\~hh7...

Tip 1. Avoid excessive heat and cold
zYour battery will last longer during the day if it is used, charged and stored between 50°F and 86°
F (10°C and 30°C).
zCharge the battery nightly where the temperature will remain around 68°F (20°C). Your battery
may not last as long through the day if you charge it at higher or lower temperatures.
zAllow unrestricted airflow while the computer is connected to external power. Make sure that the
fan inlet and outlet are unobstructed.
zAvoid exposing batteries to hot or cold temperatures for long periods.
How your battery behaves in warm conditions
How your battery behaves in cold conditions
Tip 2. Prevent wasted power
zManually turn off or suspend your computer whenever you are not using it.
zReduce the screen brightness. Decrease brightness by pressing FN+F6. Increase it by pressing
FN+F7.
zUse the AC adapter or vehicle adapter whenever possible.
zSelect either the Portable/Laptop or Max Battery power scheme. Both of these power schemes
help to conserve battery power. Max Battery provides the most battery conservation by always
keeping the processing speed lower. However, this may affect your application performance.
Portable/Laptop automatically adjusts the processing speed as required by your applications.
zWhen running on battery power, make sure your system suspends automatically after a few
minutes of inactivity. PC Cards, radios, custom applications, or modified system settings may
affect this.
zRemove PC Cards and unplug peripherals when you are not using them. They may draw power
from the system even when not in use.
zAvoid operating the fax/modem, or audio and video applications when using battery power.
Operating a fax/modem, video, or audio equipment increases the computer’s power requirements.
zDon't use screen savers as they draw excessive current, especially “3D” screen savers.
zAvoid or minimize using applications that keep the CPU busy a large percentage of the time. The
following will help you determine if your system is running such applications:
zTurn off the Wireless LAN when not using it. Turning on the Wireless LAN increases the
com
p
uter's
p
ower re
q
uirements.
Pa
g
e 56 of 100GoBook PRO II Hel
p
5/16/2005file://C:\Documents%20and%20Settin
g
s\barvill
j
.ITRXNT1\Local%20Settin
g
s\Tem
p
\~hh7...

Identifying power wasting programs
What to do if applications are keeping the CPU busy
Tip 3. Calibrate your battery
zOver time, the accuracy of the Windows battery gas gauge may be affected by repeated charging
and discharging of the battery. Calibrating the battery every three or four months helps to keep the
gas gauge accurate. For information on calibrating the battery, refer to Battery Calibration.
Tip 4. Get a good charge
zYour computer will charge more quickly if it is turned off or suspended.
zIn warmer or cooler temperatures, your battery can take much longer to fully charge.
zIf your battery is charged in a cold (less than 41°F/5°C) or very warm (greater than 122°F/50°C)
environment, it is possible that the Battery Charge LED will indicate that the charge has stopped;
however, this does not necessarily mean that your battery is fully charged.
Tip 5. Prevent data loss
Follow these guidelines to prevent data loss when removing your battery or storing your computer:
zYou will lose data if you remove the battery while the computer is operating or suspended. To
prevent this, shutdown your computer or put it into hibernate (suspend-to-disk) mode before
removing your battery.
zIf you plan to store your computer for more than a few days, shutdown your computer or put it
into hibernate mode. Remove the battery before storing the computer.
Tip 6. Clean terminals
zDirty terminals can be a cause of charging problems. Clean battery terminals with a cotton swab
dipped in isopropyl alcohol. Make sure that the alcohol has evaporated before reinstalling the
battery.
Tip 7. Storing batteries
zStore the battery within the recommended temperature range: 10°C to 30°C (50°F to 86°F).
zUnused or stored batteries can lose power over time. When you install a battery that has not been
used for awhile, connect external power to the computer and fully charge your battery.
zBattery calibration may increase the capacity of a battery stored for a period of time. For
information on calibrating the battery, refer to Battery Calibration.
zIt is recommended that the battery is recharged every six months while in storage.
Pa
g
e 57 of 100GoBook PRO II Hel
p
5/16/2005file://C:\Documents%20and%20Settin
g
s\barvill
j
.ITRXNT1\Local%20Settin
g
s\Tem
p
\~hh7...
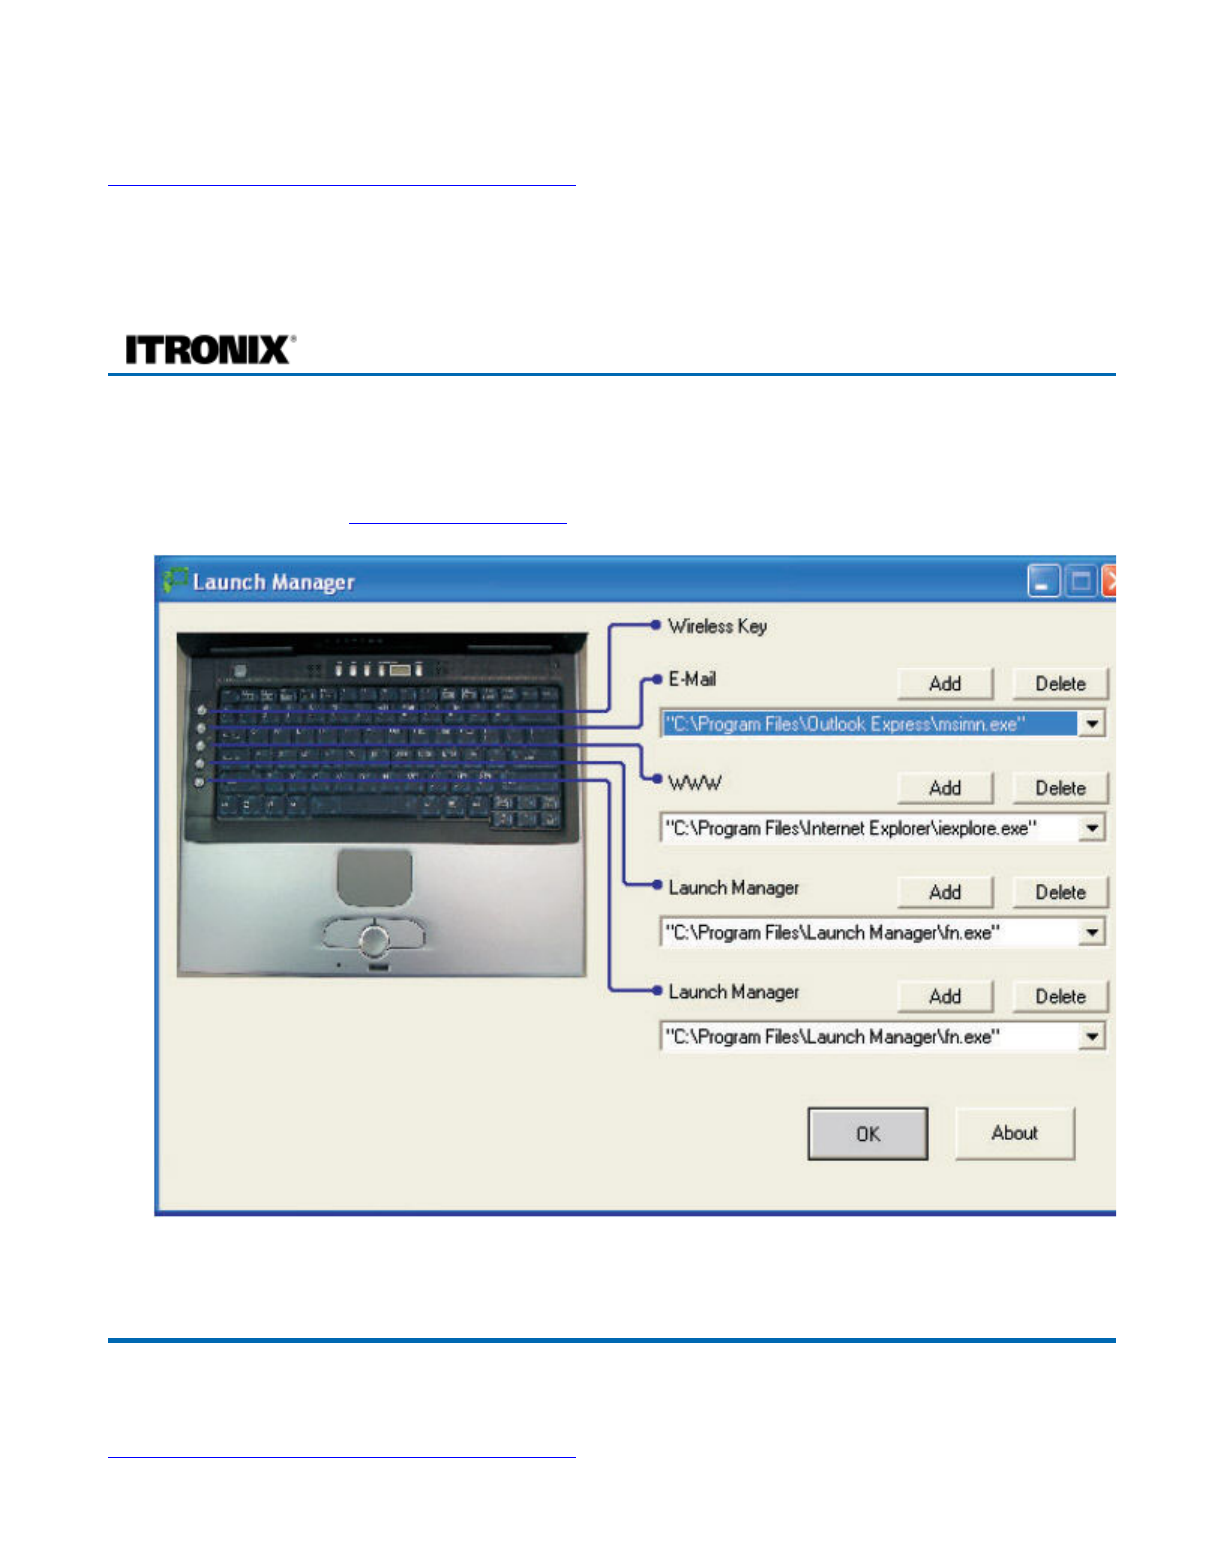
System Software
This chapter discusses the important system utilities bundled with your computer.
Launch Manager
Launch Manager allows you to set the launch keys (excluding the wireless LAN button) located to the
left of the keyboard. See Quick Launch Buttons for the location of these keys.
You can access the Launch Manager by selecting Start, All Programs, and then Launch Manager.
Pressing an unassigned launch key also brings up the Launch Manager.
72_0128_001
16 May 2005
© 2005 Itronix Cor
p
oration. All ri
g
hts reserved.
GoBook® PRO II Help
72_0128_001
16 May 2005
© 2005 Itronix Cor
p
oration. All ri
g
hts reserved.
Pa
g
e 58 of 100GoBook PRO II Hel
p
5/16/2005file://C:\Documents%20and%20Settin
g
s\barvill
j
.ITRXNT1\Local%20Settin
g
s\Tem
p
\~hh7...

Customizing Your BIOS Settings
The BIOS Utility is a hardware configuration program built into your computer's BIOS (Basic
Input/Output System).
Your computer is already properly configured and optimized, and you do not need to run this utility.
However, if you encounter configuration problems, you may need to run it. Please also refer to
Troubleshooting if a problem arises.
This chapter explains how to use the Setup Utility to modify the BIOS settings. The Setup Utility
displays and allows modification of the GoBook PRO II components and the configuration of devices
that are connected to it. This information is used to test and initialize components at start-up time and to
make sure everything runs properly when the system is operating.
The GoBook PRO II is configured with a set of default values. You may be able to increase system
p
erformance by changing some of the timing values in the Setup Utility, but this can be limited by the
kind of hardware you are using. In certain circumstances, the system may generate an error message that
asks you to make changes to the BIOS settings using the Setup Utility. This happens when the system
finds an error during the POST (Power On Self Test) that it carries out at startup.
CAUTION It is not recommended that you change any settings since this may cause the unit to not
function properly.
If you are not sure how to configure the BIOS settings we suggest that you select "Auto configuration
with Optimal Settings" on the Main Menu screen, then exit saving changes. This loads optimized
default settings for normal use.
Using the Setup Utility
The Setup Utility allows you to configure your computer’s basic settings. When you turn your computer
on, the system reads this information to initialize the hardware so that it can operate correctly. You can
use the Setup Utility to change your computer’s start-up configuration. For example, you can change
your system's security routine.
Starting the Setup Utility
You can only start the Setup Utility shortly after the computer has been turned on or rebooted. To
execute a controlled reboot select Start, Shutdown, Restart. To activate the BIOS Setup Utility, press F2
during POST.
N
OTE The BIOS password settings affect this option. If a user or supervisor password has been
p
reviously entered, you will be asked for a password.
The Setup Utility has the following menu options:
GoBook® PRO II Help
Field Description
Pa
g
e 59 of 100GoBook PRO II Hel
p
5/16/2005file://C:\Documents%20and%20Settin
g
s\barvill
j
.ITRXNT1\Local%20Settin
g
s\Tem
p
\~hh7...

NOTE Certain parameters are highly technical. Do not make changes to parameters if you do not
understand the function of the particular parameter.
Navigating and Entering Information in the BIOS
To enter a menu, highlight the item using the keys. Use the following keys to move between fields
and to enter information.
NOTE You can change the value of a parameter if it is enclosed in square
b
rackets. Navigation keys for
a menu are shown at the bottom of the screen. Please refer to the help information that displays on the
Item Specific Help pane of the BIOS Setup Utility as you select a parameter.
For optimum settings, press F9 to load setup defaults; then press F10 to save the changes and exit the
BIOS Setup Utility.
NOTE Don't forget your password. If you forget your password, you may have to return your notebook
computer to your dealer to reset it.
Information displays a summary of the computer's hardware information
Main contains basic settings about your computer such as date, time, and boot options
Advanced allows you to view and configure your drives, and I/O (input/ output) ports
Security lets you set passwords for protecting your computer
Boot allows you to set the order in which the system boots up
Exit includes options to save or discard your changes, and to exit the BIOS Utility
Key Function
Del Starts the Setup utility after turning on the computer
Esc Exits any submenu. If you wish to exit the Setup utility without
saving changes, go to the main menu, then press Esc
Up,
down
arrow
keys /
Tab
Moves among selections
cursor
up/down
keys
Selects an item
Enter Makes a selection or go into a sub-menu
F5 or
F6 Change the value of a parameter
F10 Saves changes, then exits
72_0128_001
16 May 2005
© 2005 Itronix Cor
p
oration. All ri
g
hts reserved.
Pa
g
e 60 of 100GoBook PRO II Hel
p
5/16/2005file://C:\Documents%20and%20Settin
g
s\barvill
j
.ITRXNT1\Local%20Settin
g
s\Tem
p
\~hh7...
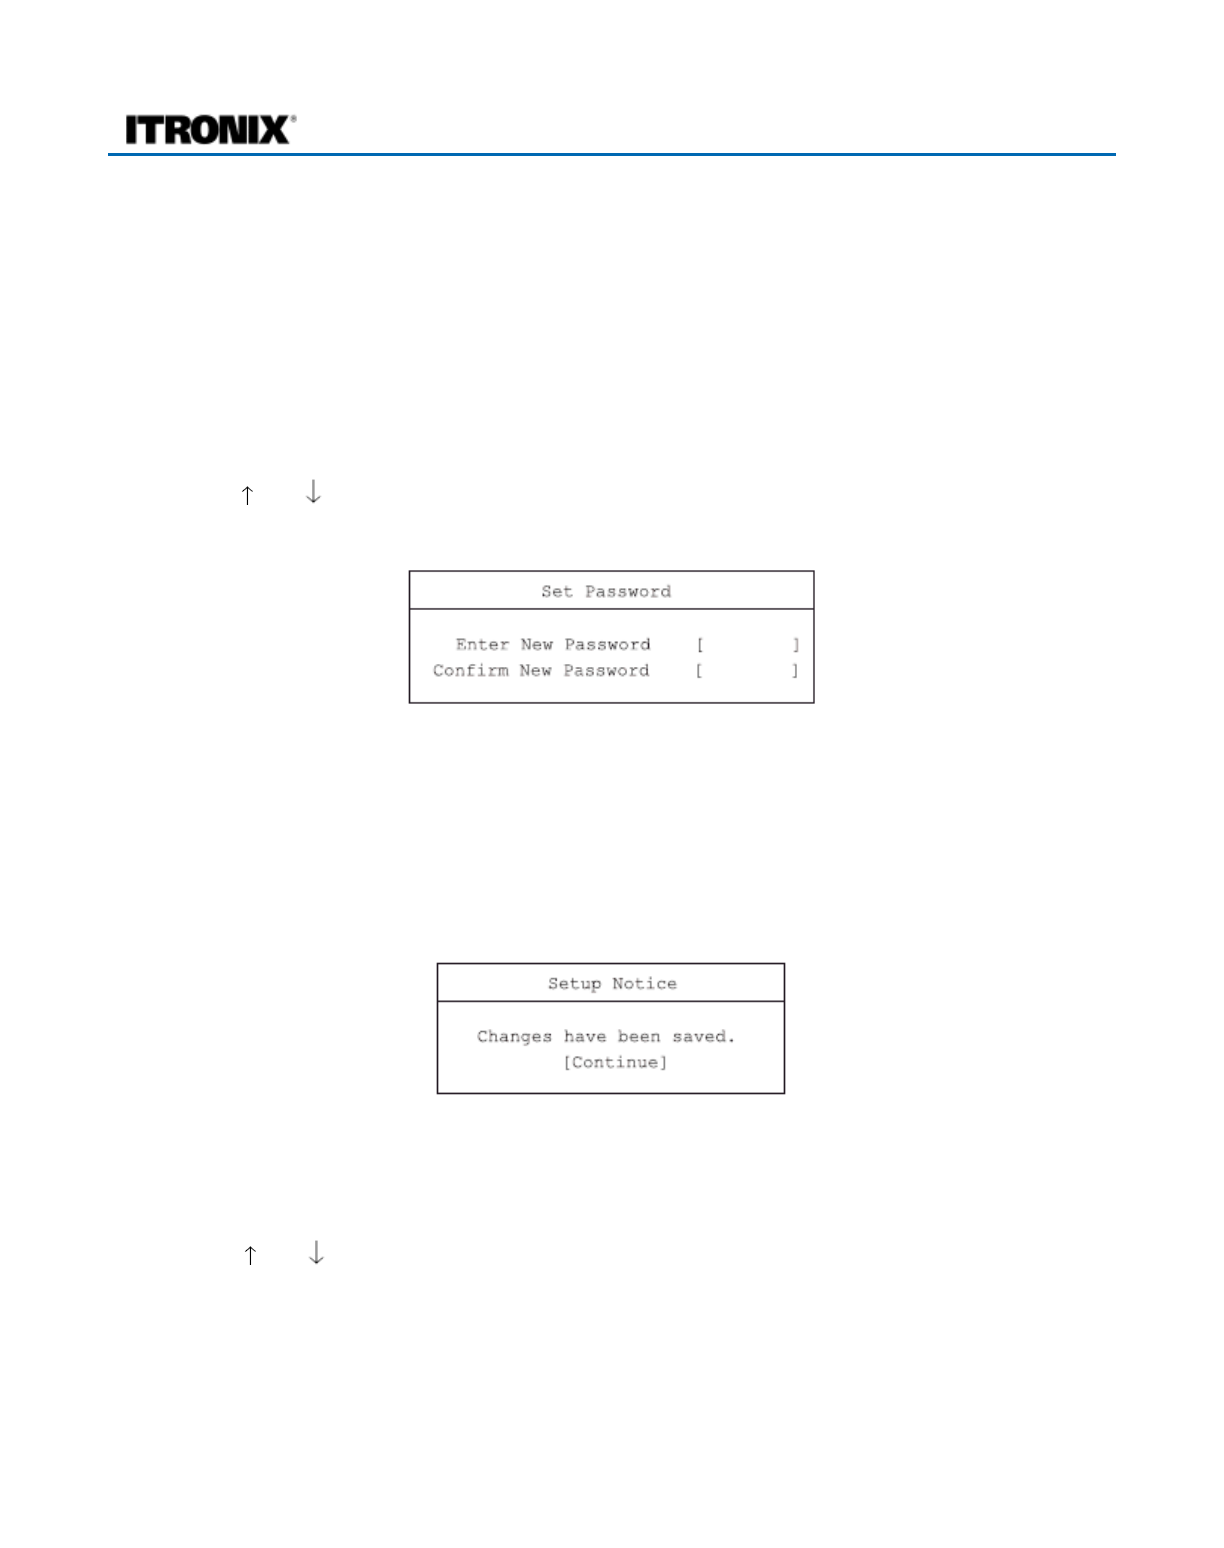
Most Used Setup Options
The following are the most frequently used options in the BIOS Setup Utility.
Setting passwords
You can set, change or remove passwords in the Security menu.
To set a password:
1. Use the and keys to highlight a password parameter (Supervisor, User or Primary Hard Disk)
and press the Enter key. The password box appears:
2. Type a password in the Enter New Password field. The password may consist of up to eight
alphanumeric characters (A-Z, a-z, 0-9).
NOTE Be very careful when typing your password because the characters do not appear on the
screen.
3. Press Enter. Then re-enter the password in the Confirm New Password field, and press Enter.
4. Press Enter to accept the changes and save the password.
To change or remove a password:
1. Use the and keys to highlight a password parameter and press Enter. The following box
a
pp
ears.
GoBook® PRO II Help
Pa
g
e 61 of 100GoBook PRO II Hel
p
5/16/2005file://C:\Documents%20and%20Settin
g
s\barvill
j
.ITRXNT1\Local%20Settin
g
s\Tem
p
\~hh7...

2. Enter the current password, then press Enter.
{To change the password, type in a new password in the Enter New Password field and press
Enter. Then re-enter the password in the Confirm New Password field and press Enter.
{To remove the password, press Enter twice (once each in the Enter New Password and
Confirm New Password fields) without typing anything in the fields.
3. Press Enter to accept the changes.
About the boot drive sequence
In the Boot menu, use the cursor up/down keys to select a boot device, then press F5 or F6 to change
its order. Items with a “+” sign can be further expanded.
The Main Menu
72_0128_001
16 May 2005
© 2005 Itronix Cor
p
oration. All ri
g
hts reserved.
GoBook® PRO II Help
Pa
g
e 62 of 100GoBook PRO II Hel
p
5/16/2005file://C:\Documents%20and%20Settin
g
s\barvill
j
.ITRXNT1\Local%20Settin
g
s\Tem
p
\~hh7...
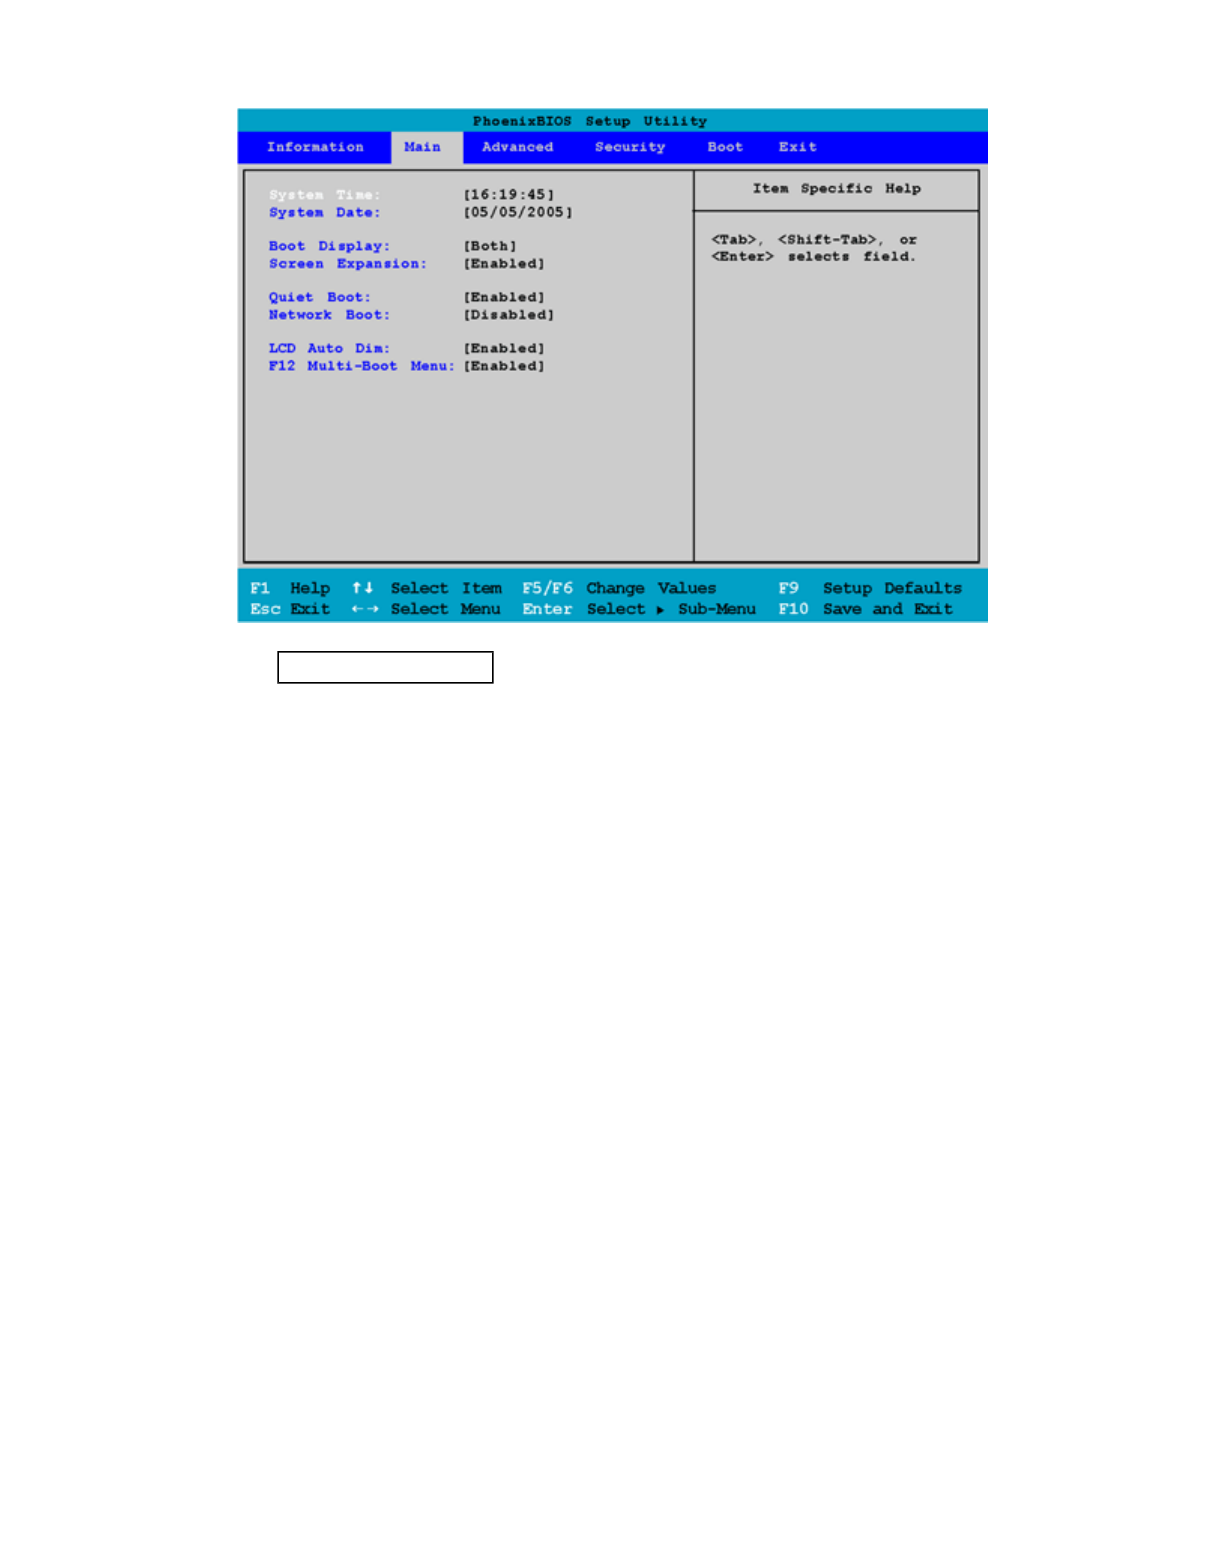
Field Setting Function
System Time Sets the system time.
Format: HH:MM:SS ( Hour :
Minute : Second )
System Date Sets the system date.
Format: MM/DD/YYYY
( Month/Day/Year )
Boot Display Auto
Both Sets the display output device on
boot up.
Both: the computer turns on both
the LCD and external monitor if an
external monitor is attached and
operational.
Auto: the computer automatically
determines the display device. If an
external display device (monitor) is
connected, it becomes the boot
display.
Screen Expansion Enabled
Disabled
Quiet Boot Enabled
Disabled When set to enabled, the system will
show the graphic picture screen on
boot up.
When Quiet Boot option is set to
[Enabled] in BIOS Setup, right after
we turn on or reset the computer,
system displays a graphic
illustration created by the computer
Pa
g
e 63 of 100GoBook PRO II Hel
p
5/16/2005file://C:\Documents%20and%20Settin
g
s\barvill
j
.ITRXNT1\Local%20Settin
g
s\Tem
p
\~hh7...
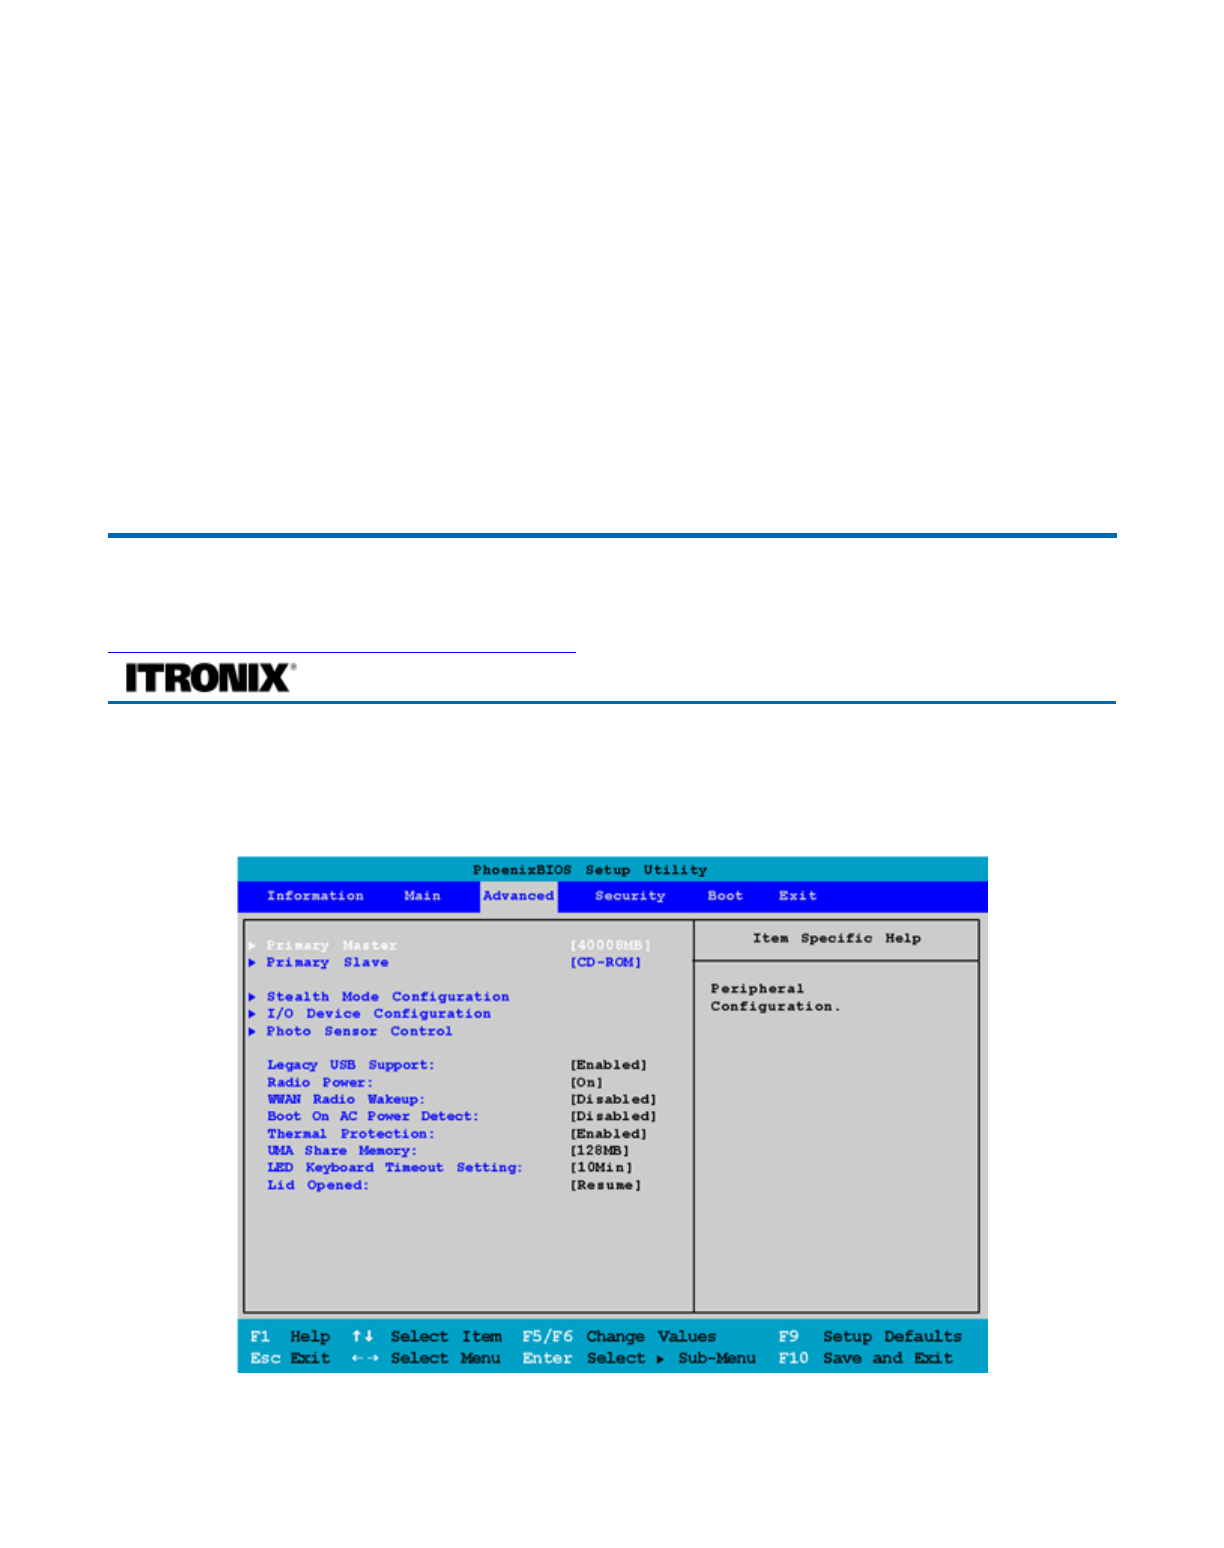
The Advanced Menu
manufacturer instead of the text-
based POST screen, which display a
number of PC diagnostic messages.
Network Boot Enabled
Disabled When set to enabled, system will
Network Boot.
LCD Auto Dim Enabled
Disabled The system will support Auto-Dim
of the LCD backlight when the AC
power source is NOT available
(running on battery power).
F12 Multi-Boot MenuEnabled
Disabled Users could choose if they want to
display the "F12 to enter Multi Boot
Menu" message during post.
72_0128_001
16 May 2005
© 2005 Itronix Cor
p
oration. All ri
g
hts reserved.
GoBook® PRO II Help
Field Setting Function
Primary Master sub- Configure Peripherals
Pa
g
e 64 of 100GoBook PRO II Hel
p
5/16/2005file://C:\Documents%20and%20Settin
g
s\barvill
j
.ITRXNT1\Local%20Settin
g
s\Tem
p
\~hh7...

menu
Primary Slave sub-
menu Configure Peripherals
Stealth Mode Configuration sub-
menu Configure Stealth Mode
I/O Device Configuration sub-
menu Configure I/O Devices
Photo Sensor Control sub-
menu Set photo sensor settings
Legacy USB Support Disabled
Enabled When set to enable, system can
support legacy USB devices
Radio Power Off
On When this option is set to "on", all
wireless devices are powered on
when the system reboots
WWAN Radio Wakeup Disabled
Enabled This option determines the WWAN
radio power when the system is
suspended.
When set to "Disabled" the radio
power is turned off before system
enters standby state (S3)
When set to "Enabled" the radio
power it turned on before the system
enters S3
Boot On AC Power Detect Disabled
Enabled Once the user plugs in AC Power,
the system will boot up or resume
automatically if this option is set to
enable
Thermal Protection Disabled
Enabled If enabled, the system can NOT boot
up in temperatures between 0 and -
20 C. If disabled, the system can
boot up in these temperatures
UMA Share Memory 64MB
128MB The size of the main memory that is
allocated to support the Internal
Graphics device in VGA
LED Keyboard Timeout Setting5Min
10Min
15Min
20Min
30Min
40Min
50Min
60Min
80Min
100Min
120Min
240Min
Choose the interval at which the
timeout counter is reset for PS2 key
and/or mouse activities
Lid Opened Nothing
Resume If set to "Nothing" there is no action
taken when the Lid is opened.
If set to "Resume", the system will
Pa
g
e 65 of 100GoBook PRO II Hel
p
5/16/2005file://C:\Documents%20and%20Settin
g
s\barvill
j
.ITRXNT1\Local%20Settin
g
s\Tem
p
\~hh7...
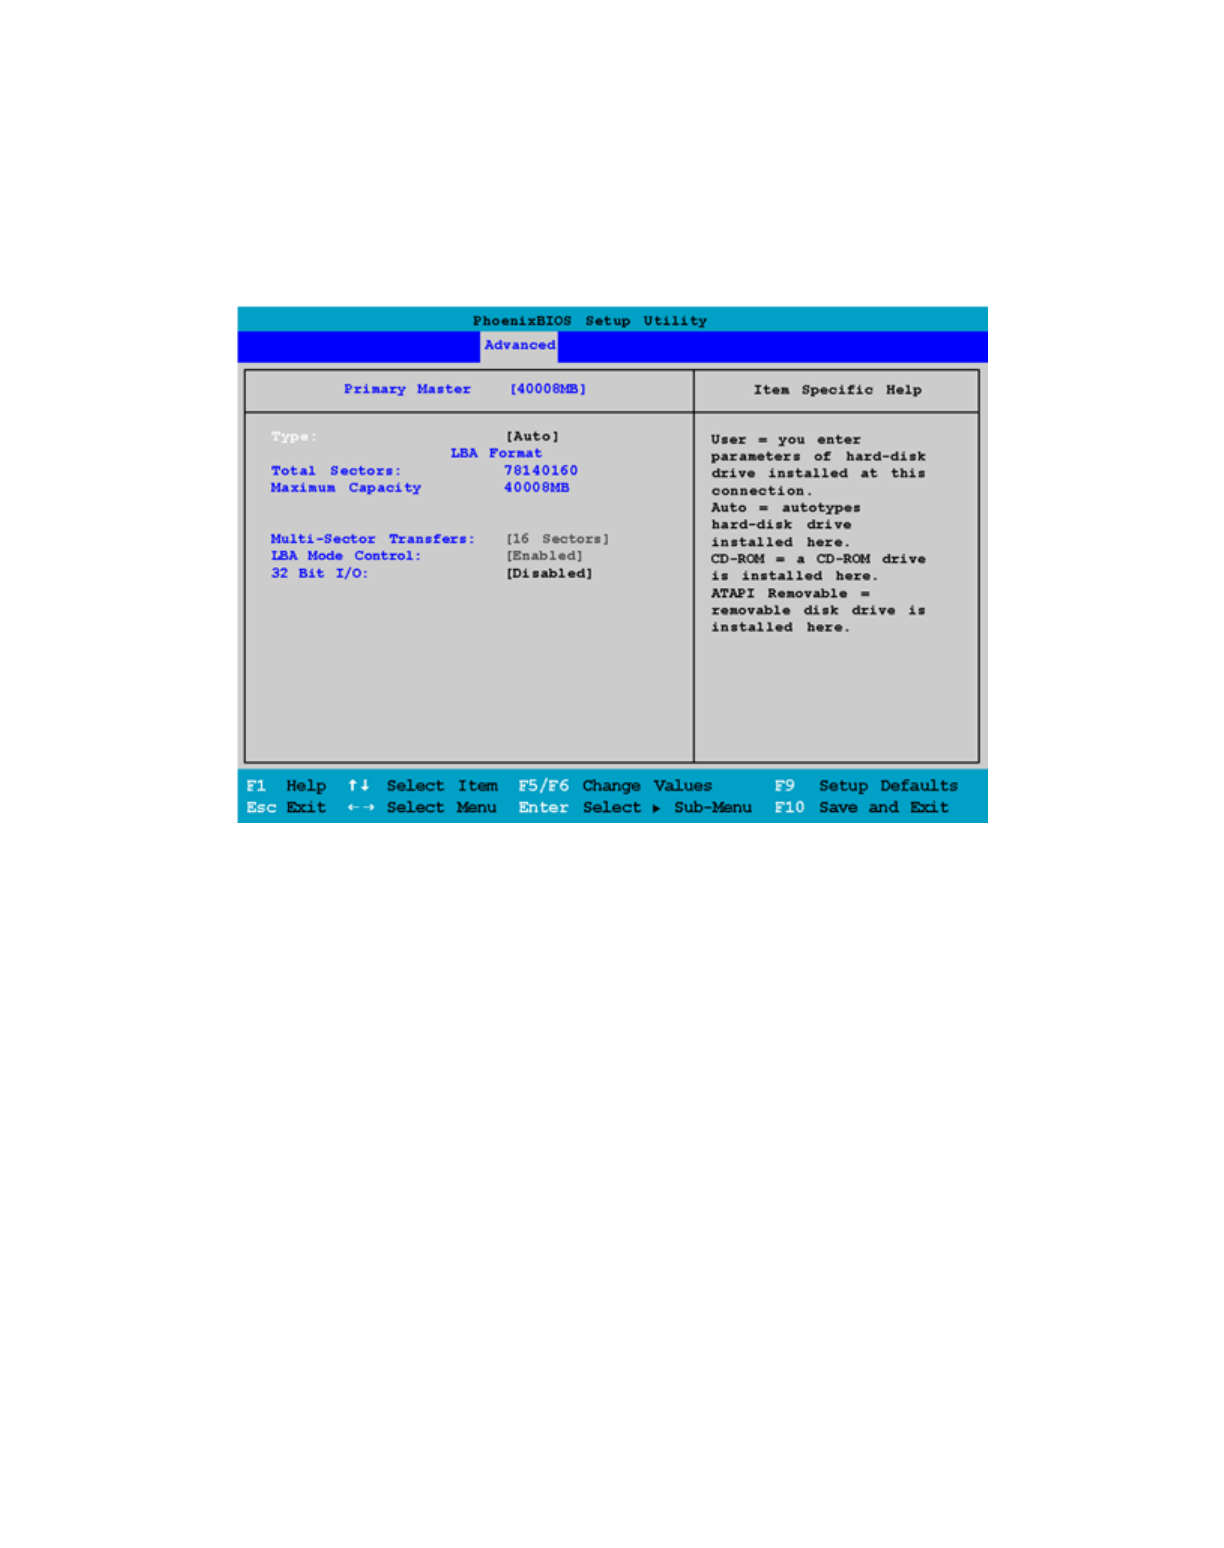
Primary Master
Primary Slave
resume from a suspended state when
the lid is opened.
Pa
g
e 66 of 100GoBook PRO II Hel
p
5/16/2005file://C:\Documents%20and%20Settin
g
s\barvill
j
.ITRXNT1\Local%20Settin
g
s\Tem
p
\~hh7...
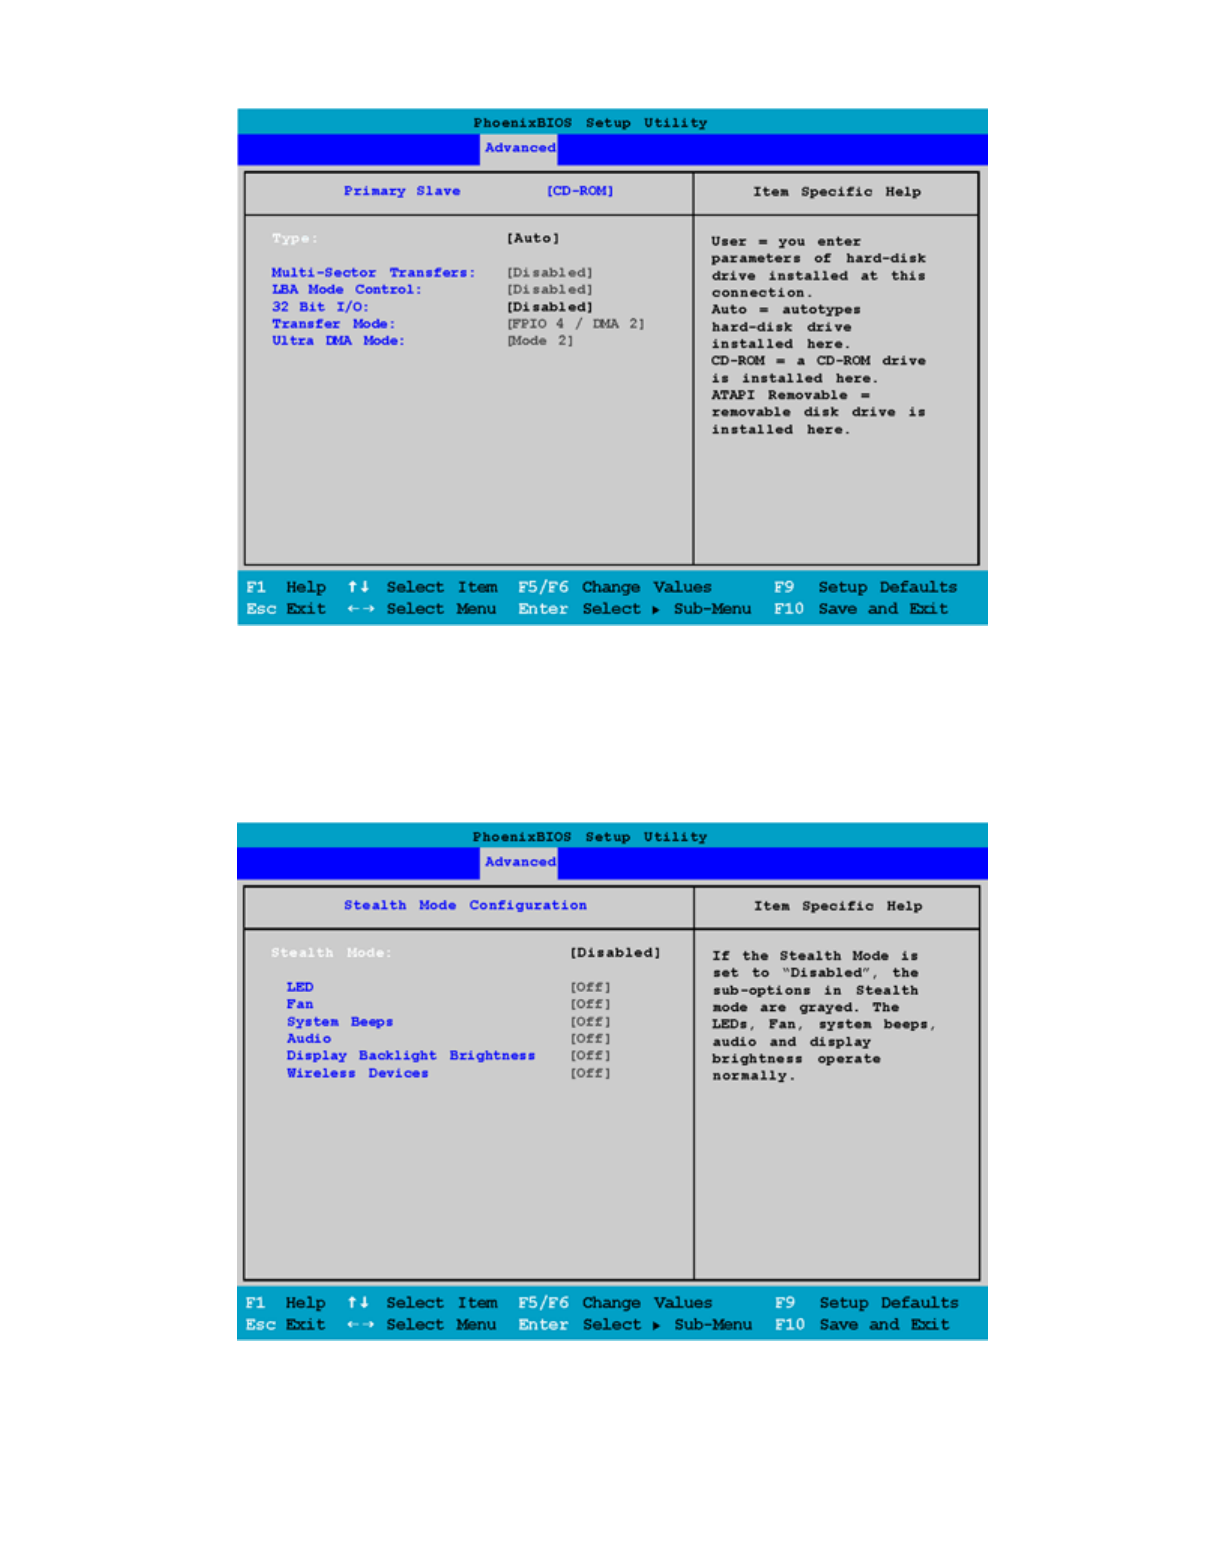
Stealth Mode Configuration
Field Setting Function
Stealth Mode Disabled
Enabled
Pa
g
e 67 of 100GoBook PRO II Hel
p
5/16/2005file://C:\Documents%20and%20Settin
g
s\barvill
j
.ITRXNT1\Local%20Settin
g
s\Tem
p
\~hh7...
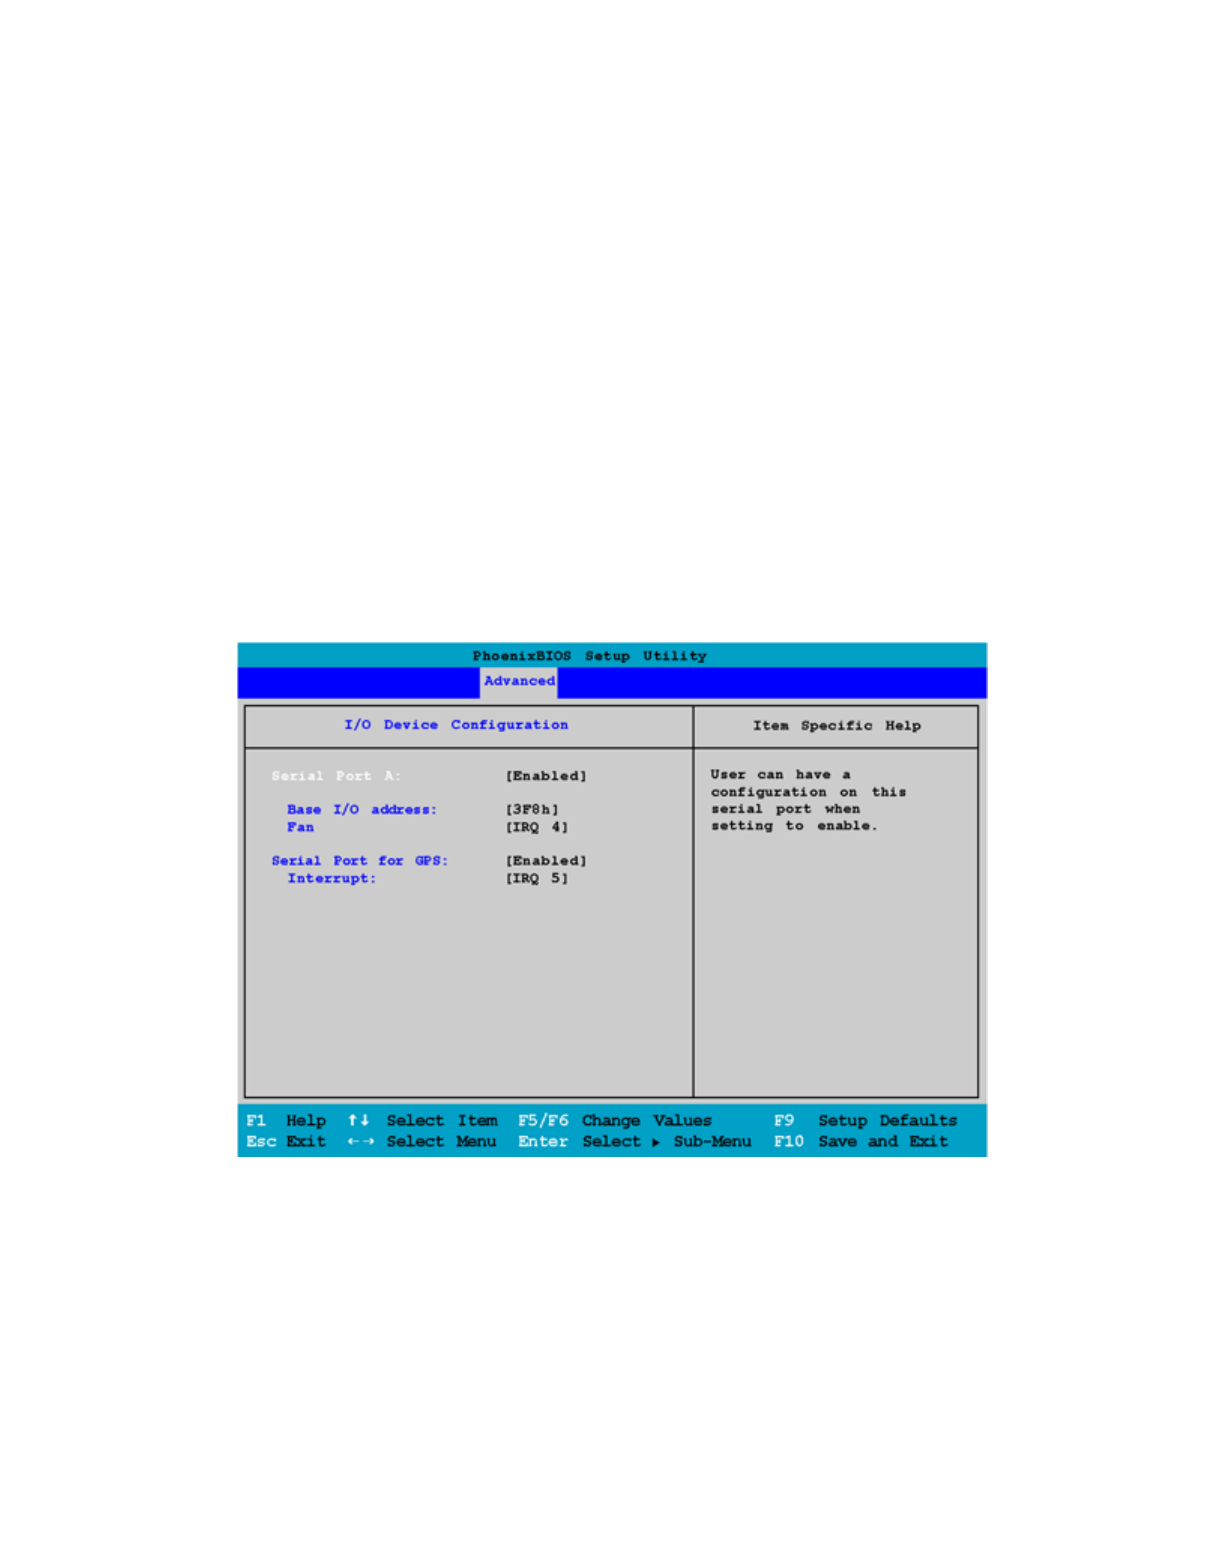
I/O Device Configuration
LED Off
On
Fan Off
On
System Beeps Off
On
Audio Off
On
Display Backlight BrightnessOff
On
Wireless Devices Off
On
Field Setting Function
Pa
g
e 68 of 100GoBook PRO II Hel
p
5/16/2005file://C:\Documents%20and%20Settin
g
s\barvill
j
.ITRXNT1\Local%20Settin
g
s\Tem
p
\~hh7...
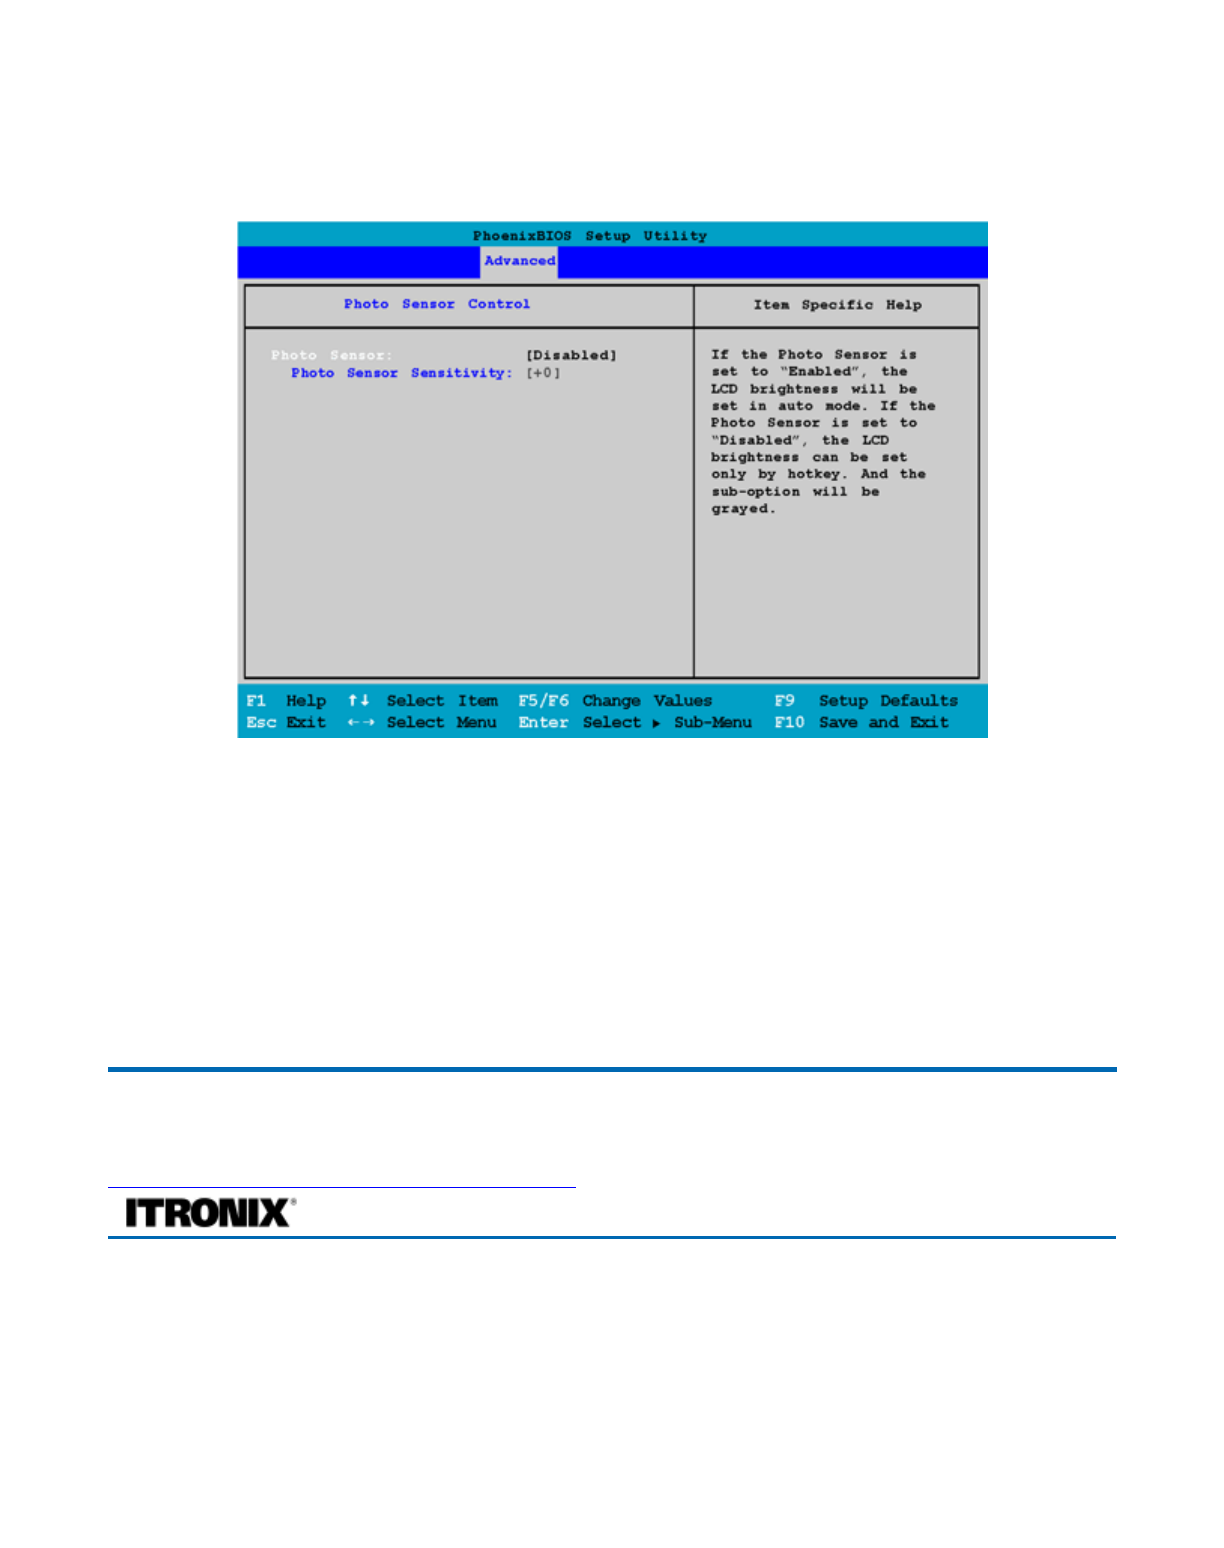
Photo Sensor Control
The Information Page
This page displays information about your computer from what kind of CPU and how much memory the
com
p
uter has, to
p
ertinent numbers such as the
p
roduct number and serial number:
Field Setting Function
72_0128_001
16 May 2005
© 2005 Itronix Cor
p
oration. All ri
g
hts reserved.
GoBook® PRO II Help
Pa
g
e 69 of 100GoBook PRO II Hel
p
5/16/2005file://C:\Documents%20and%20Settin
g
s\barvill
j
.ITRXNT1\Local%20Settin
g
s\Tem
p
\~hh7...
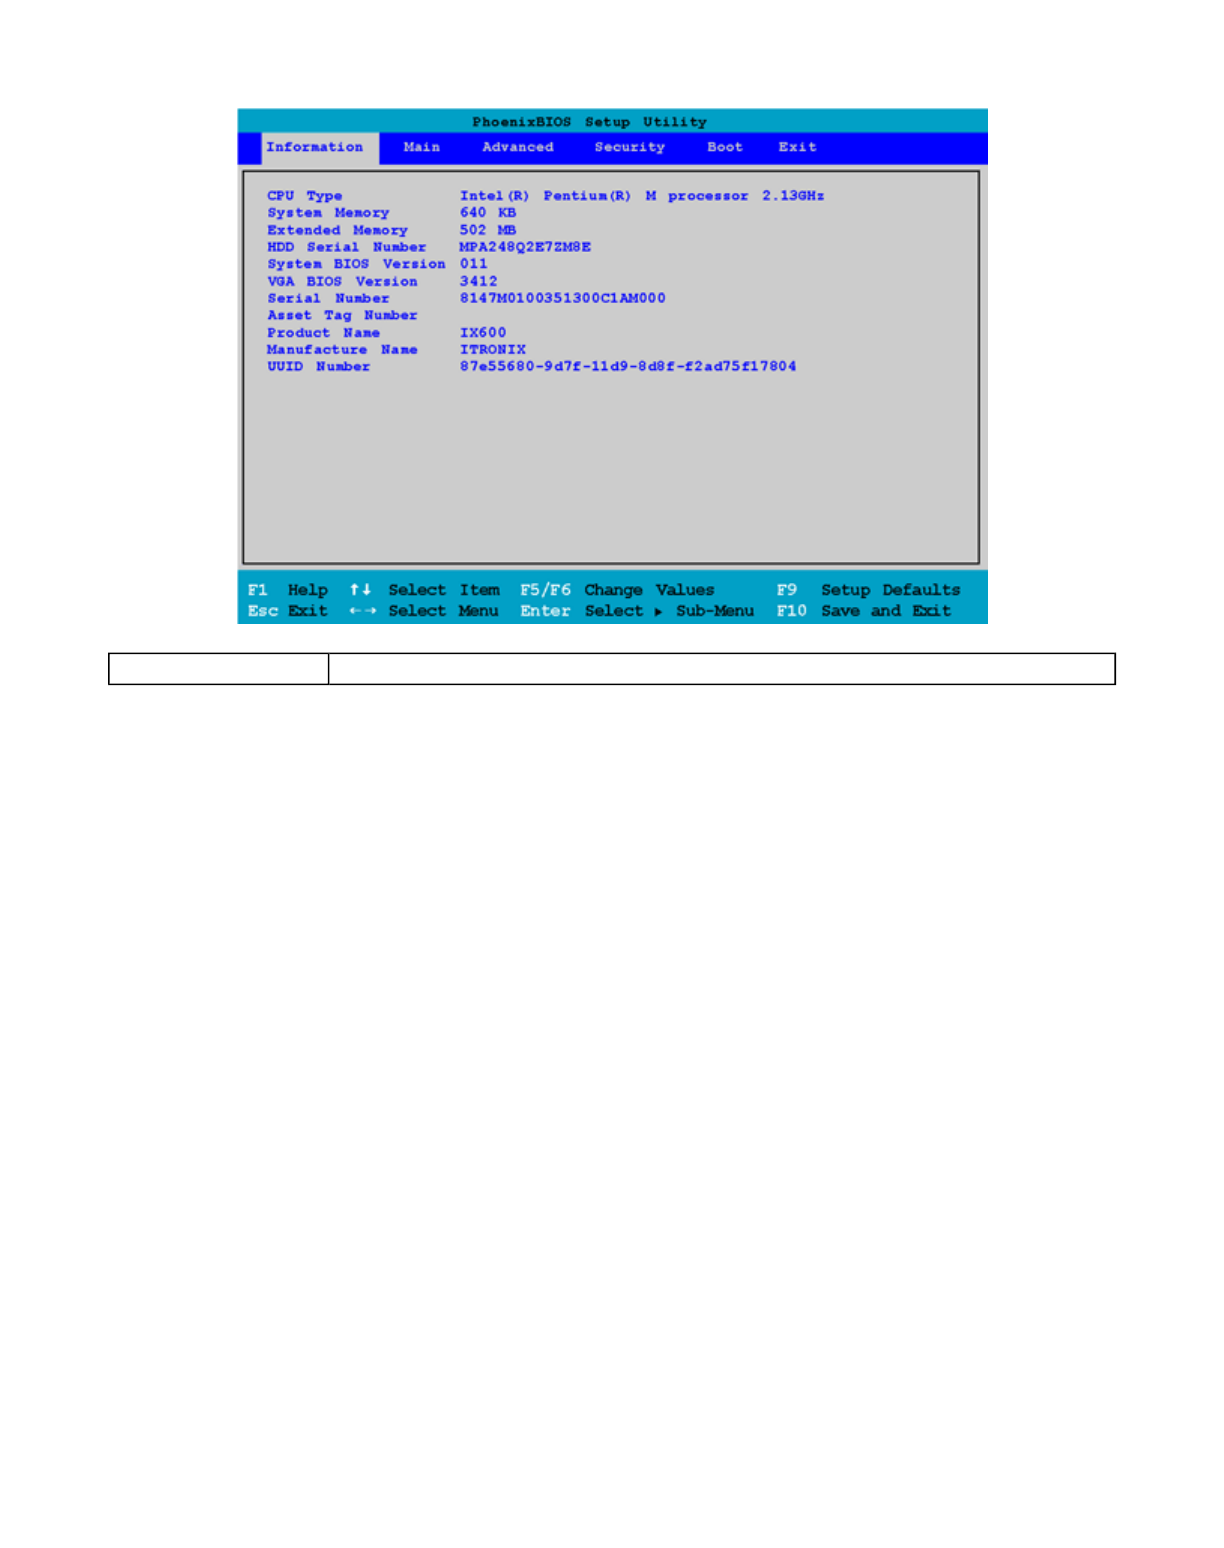
Field Description
CPU Type
Displays the CPU information
System Memory
Displays the current system memory
Extended Memory
Displays the current extended memory
HDD Serial
Number
Displays the primary master HDD serial number
If there is no primary master HDD, it displays ‘None’
System BIOS
Version
Displays the current system BIOS version
VGA BIOS
Version
Displays the current VGA BIOS version
Serial Number
Displays the System Serial Number (30 characters)
Asset Tag Number Displays the Asset Tag Number (32 characters)
Pa
g
e 70 of 100GoBook PRO II Hel
p
5/16/2005file://C:\Documents%20and%20Settin
g
s\barvill
j
.ITRXNT1\Local%20Settin
g
s\Tem
p
\~hh7...
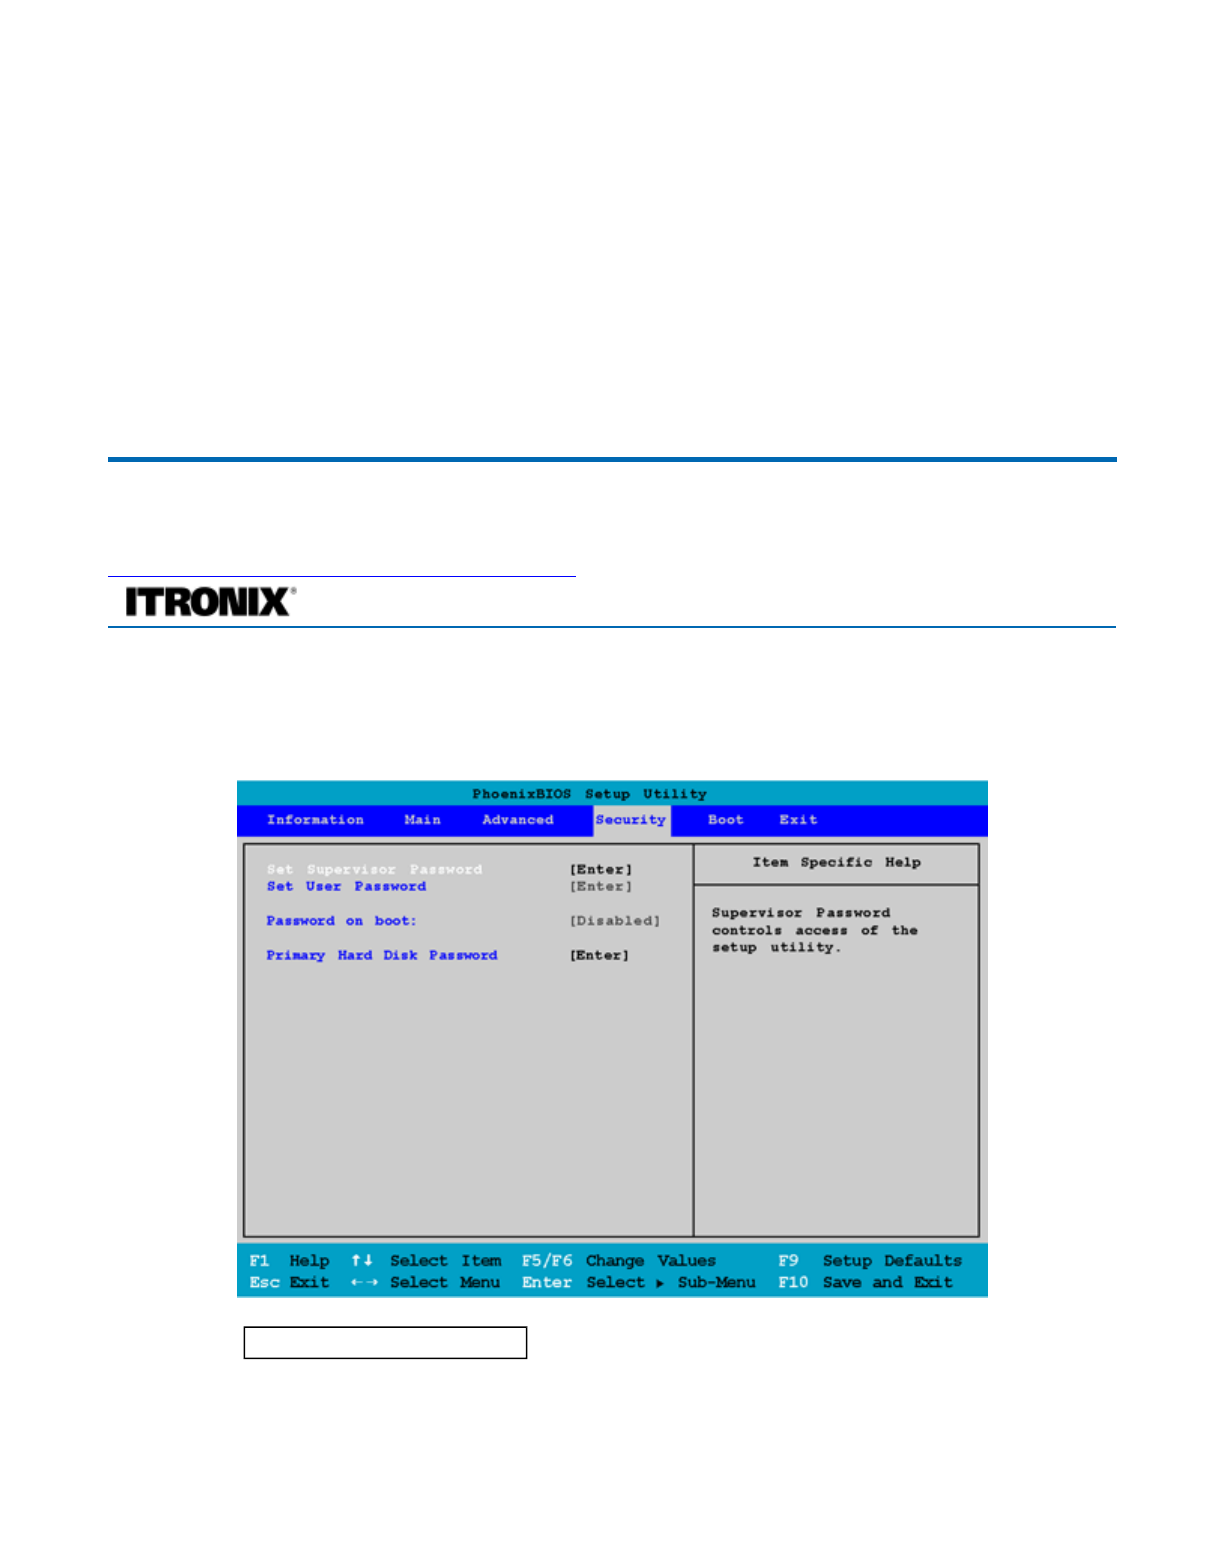
The Security Menu
The
Product Name
Displays the Product Name (up to 15 characters). This is "IX625"
Manufacturer
Name
Displays the Manufacturer Name (up to 15 characters). This is Itronix
UUID Display the UUID (16 Byte Hex-Digital)
72_0128_001
16 May 2005
© 2005 Itronix Cor
p
oration. All ri
g
hts reserved.
GoBook® PRO II Help
Field Setting Function
Set Supervisor Password Supervisor Password controls access
to the Setup Utility.
Set User Password User Password controls access to the
system
Pa
g
e 71 of 100GoBook PRO II Hel
p
5/16/2005file://C:\Documents%20and%20Settin
g
s\barvill
j
.ITRXNT1\Local%20Settin
g
s\Tem
p
\~hh7...

Optional Equipment and Accessories
Your computer offers excellent expansion capabilities with its built-in ports, connectors and bays. This
chapter describes how to connect peripherals and hardware options that help you use your computer
with ease. When connecting peripherals, read the manual included with the peripheral for operating
instructions. You can purchase most of these and other options directly from authorized dealers.
This chapter also includes information on upgrading key components to keep your computer in step
with the latest technology.
The GoBook PRO II computer has several equipment and accessory options to further enhance your
mobile computing experience. Go to the accessory section of the Itronix website for a list of available
accessories.
CAUTION When purchasing any additional accessories, purchase only those accessories that are
approved for use with your computer. Some accessories are proprietary items and can be obtained
through your system vendor. If you use items that are not approved for use with this computer, you may
cause your computer to malfunction, or to emit or receive electromagnetic radiation in excess of local
regulations. For non-proprietary accessories such as PC Cards or printers, ensure that the accessory
functions properly with your computer before making the purchase. Your system vendor may be able to
recommend reliable brands and models.
External monitor
You can connect an external monitor to the external monitor port on the rear panel. Read the monitor
manual for additional instructions.
N
OTE If an external monitor is not connected, closing the display cover puts the computer into Standby
mode.
Using simultaneous display
Your computer takes advantage of Windows multi-display capability, allowing you to use your
com
p
uter for
p
resentation
p
ur
p
oses. So whatever is dis
p
la
y
ed in
y
our com
p
uter will likewise be
Password on boot Enables password entry on boot.
Primary Hard Disk Password Use the hard disk drive password to
prevent unauthorized access to the
hard disk.
72_0128_001
16 May 2005
© 2005 Itronix Cor
p
oration. All ri
g
hts reserved.
GoBook® PRO II Help
Pa
g
e 72 of 100GoBook PRO II Hel
p
5/16/2005file://C:\Documents%20and%20Settin
g
s\barvill
j
.ITRXNT1\Local%20Settin
g
s\Tem
p
\~hh7...

displayed on the other external display.
To use simultaneous display, connect an external display device to the external monitor port or S-video
output jack. You can then toggle the display output location by pressing Fn-F3 to make the image
appear on both the computer LCD and external display device.
Connecting to an External Monitor
The notebook has a VGA monitor port to connect your computer to an external monitor.
Using the VGA monitor port.
1. Locate the 15-pin VGA monitor port on the left side of your notebook and connect the video
signal cable from the external monitor (or the VGA adapter) to the monitor port.
2. Connect the power cable from the external monitor to a power outlet and turn on the monitor.
3. On your notebook, click the right touchpad button on the Windows desktop to open the desktop
menu. Click Properties to open the Display Properties window.
4. In the Display Properties window, click Advanced in the Settings tab. Click the Display Modes
tab.
5. Under Driver mode, you can select the appropriate options to change the display to an external
monitor or FN+F2.
Adjustments to screen resolution and color depth can also be made in this dialog box.
Dual Displays
With a Windows system, you may use an external monitor simultaneously with your notebook's LCD.
You may also use the external monitor only and disable the LCD or only use the LCD. To do this you
may first need to enable the multiple display settings in Windows.
1. Open the Control Panel and double-click Display. The Display Properties window will open
2. Click the Settings tab, then click the Advanced button
3. Select the S3 Display tab.
There are two display mode options: Single and Mirror.
Single: In Display Combination, there are two options available: VGA1 or LCD2. You can choose
which device to apply as the Primary display. VGA1 is the default value for Primary if an external CRT
is available. If an external CRT is not connected to the notebook, only LCD2 is available. In Single
mode, the video display hot key combination is available-you can cycle the video output by pressing the
FN + F2 keys.
Mirror: In Display Combination, there is no Primary display option available. Only LCD2 is available
as Secondar
y
dis
p
la
y
even when an external CRT is connected. In Mirror mode, the video dis
p
la
y
hot
Pa
g
e 73 of 100GoBook PRO II Hel
p
5/16/2005file://C:\Documents%20and%20Settin
g
s\barvill
j
.ITRXNT1\Local%20Settin
g
s\Tem
p
\~hh7...
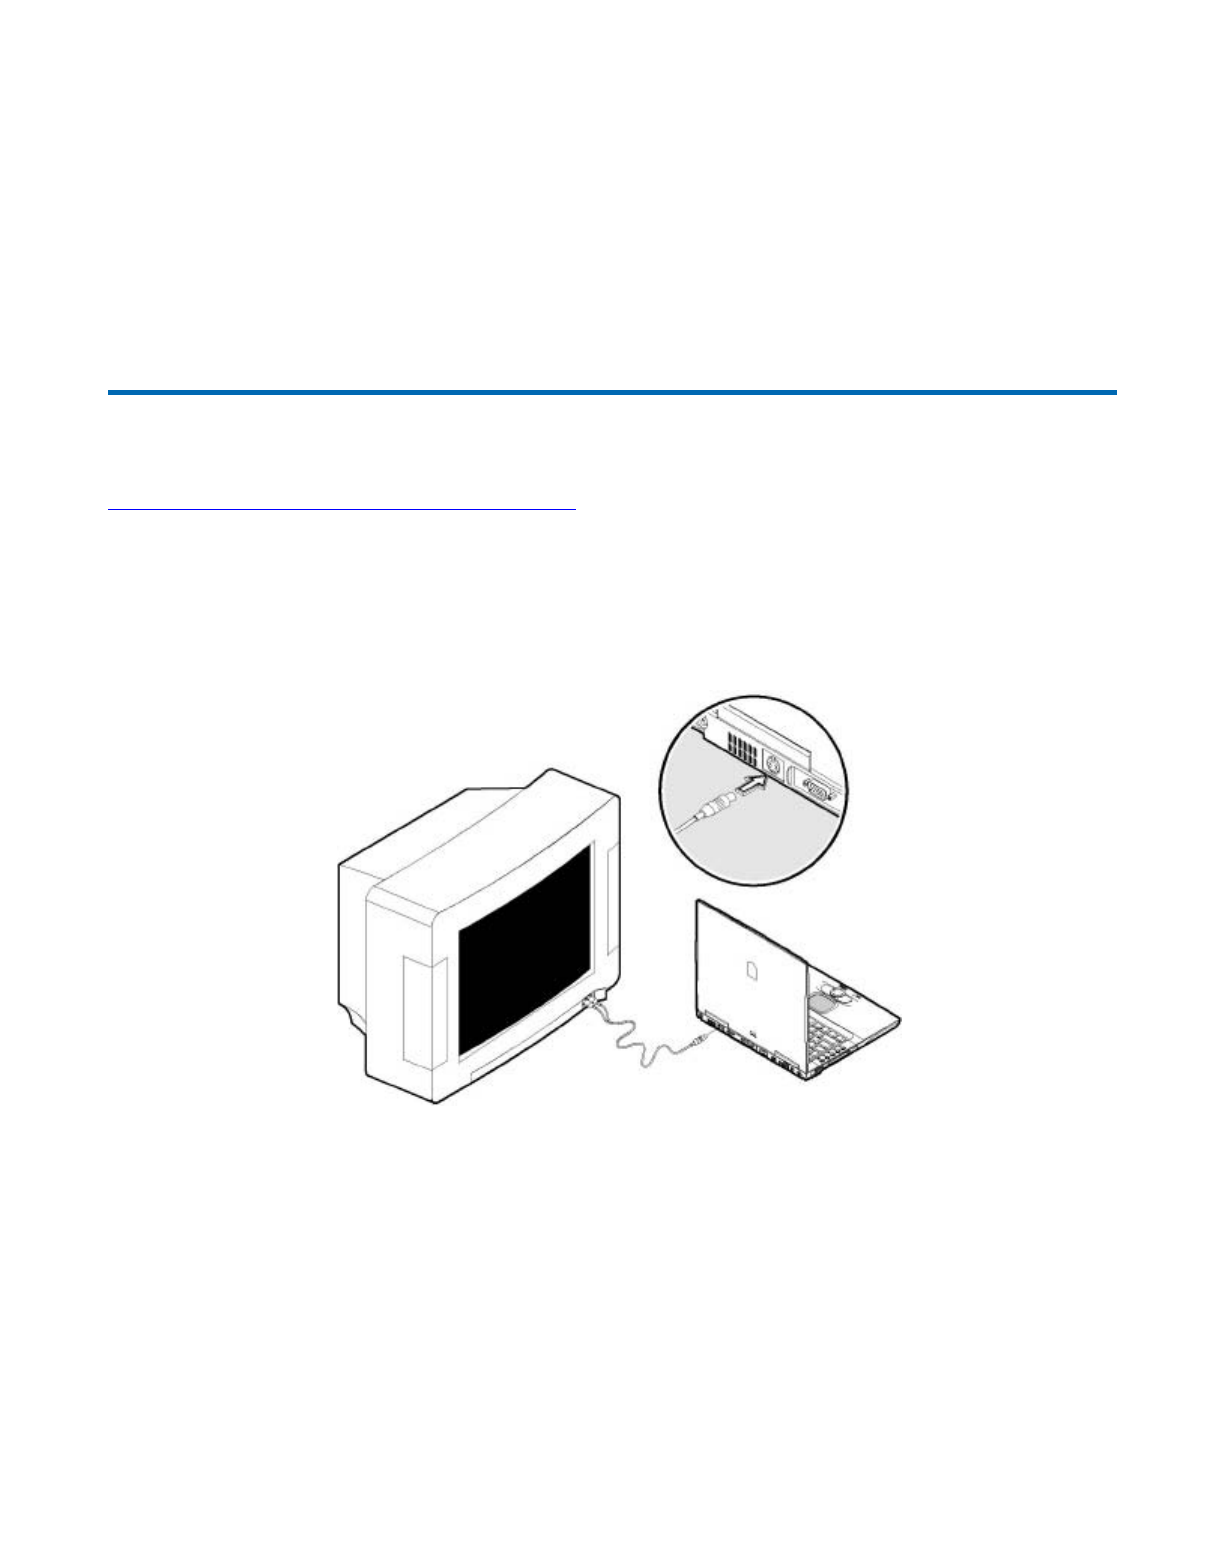
key combination is available-you can cycle the video output by pressing the FN + F2 keys. If the
external CRT is connected, the display on the LCD and the CRT is the same.
TIP To ensure trouble-free video output, the first time you use an external monitor, change the output in
the Display Properties dialog box. After successfully switching modes, you may use the video function
keys.
N
OTE Light or dark dots may appear on the LCD due to technical limitations of LCD manufacturing.
This will not effect normal operation of the LCD.
S-video
The S-video port allows you to output to a television or display devices that support S-video input. This
is useful if you want to do some presentations or watch movies on a bigger screen.
Printer
You can connect a printer to your computer's parallel port. You can also connect a USB printer to an
available USB
p
ort. See
y
our
p
rinter manual for o
p
eratin
g
instructions.
72_0128_001
16 May 2005
© 2005 Itronix Cor
p
oration. All ri
g
hts reserved.
Pa
g
e 74 of 100GoBook PRO II Hel
p
5/16/2005file://C:\Documents%20and%20Settin
g
s\barvill
j
.ITRXNT1\Local%20Settin
g
s\Tem
p
\~hh7...
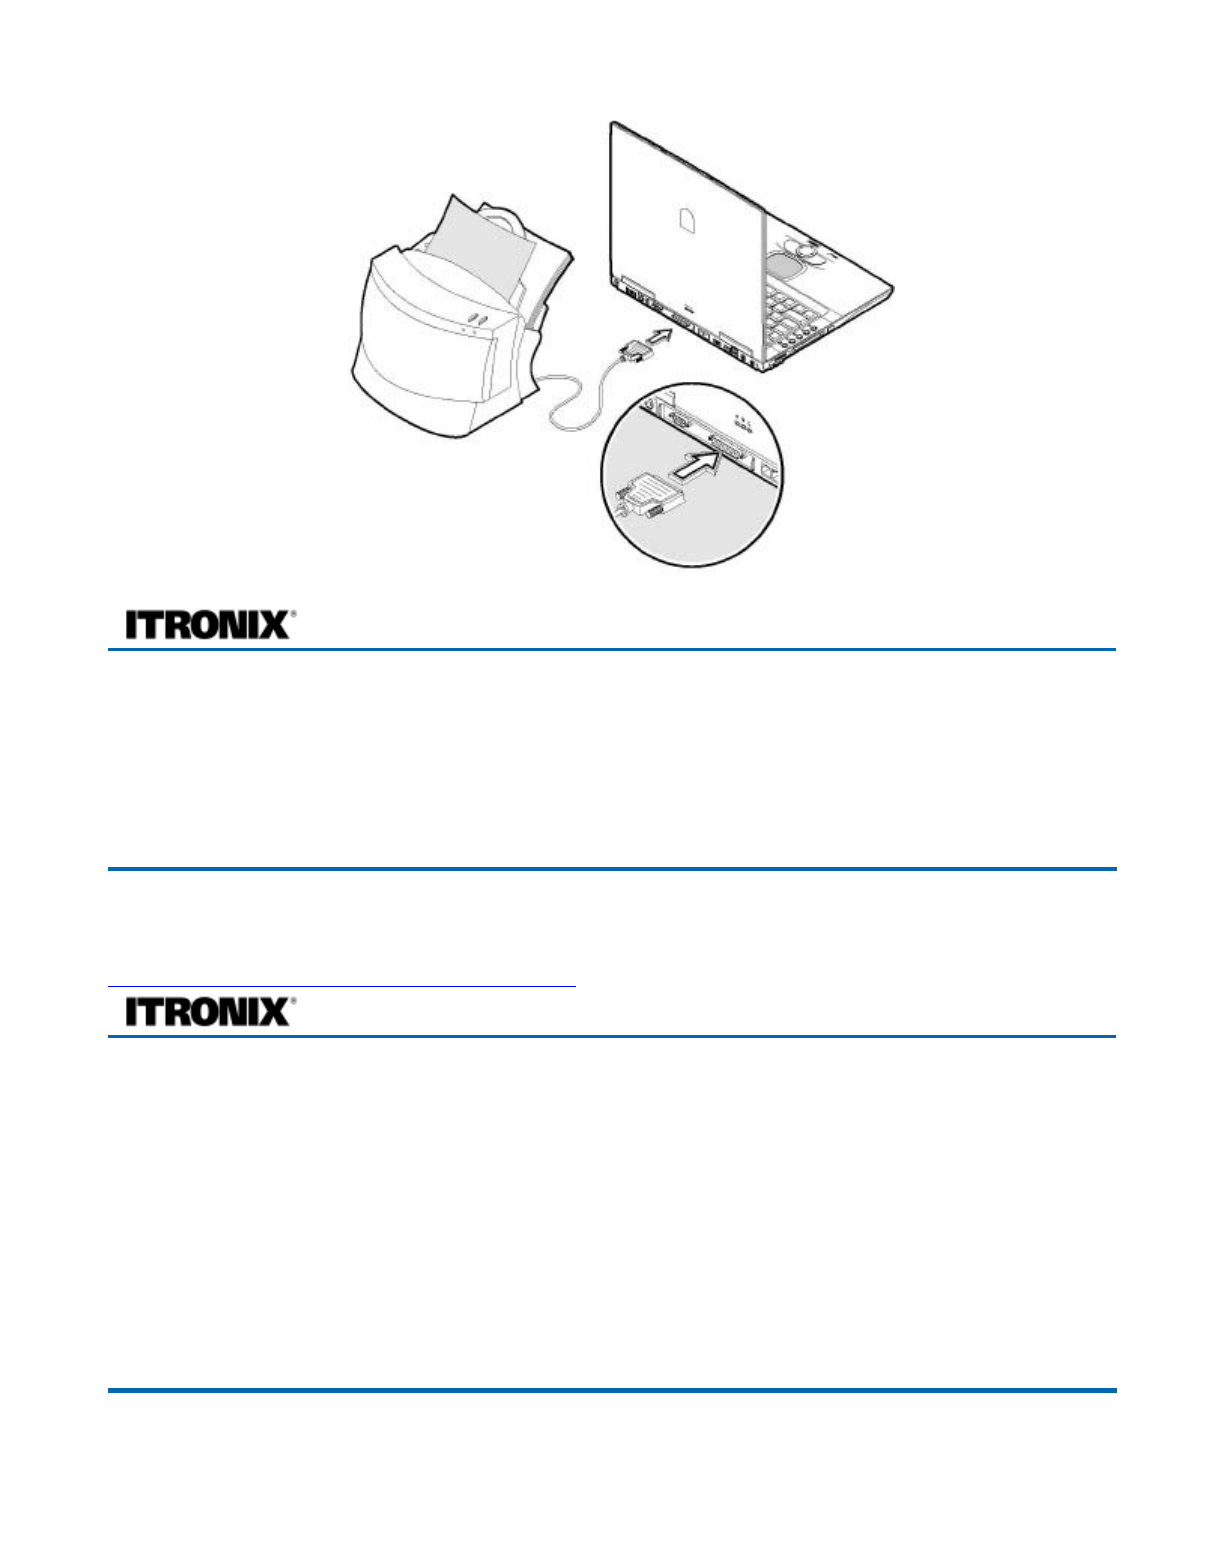
Audio devices
Audio devices are easy to connect with the audio ports accessible from the rear of the computer. You
can plug an external microphone (or an audio line-in device) into the line-in jack. Amplified speakers or
headphones connect to the line-out jack. The line-out jack also supports digital audio output (S/PDIF).
USB devices
The computer has three USB (Universal Serial Bus) 2.0 ports on the rear of the computer, that allow you
to connect peripherals without occupying too many resources. USB 2.0 is the second generation USB
standard that allows faster transfer rates and is also backward-compatible with USB 1.1 devices.
Common USB devices include a mouse, keyboard, and digital camera.
Before disconnecting a USB device from your computer, click on the Safely Remove Hardware icon on
the taskbar and click on the device. When the device can be safely removed, disconnect the device from
the computer. See your peripheral's documentation for details.
GoBook® PRO II Help
72_0128_001
16 May 2005
© 2005 Itronix Cor
p
oration. All ri
g
hts reserved.
GoBook® PRO II Help
72
_
0128
_
001
Pa
g
e 75 of 100GoBook PRO II Hel
p
5/16/2005file://C:\Documents%20and%20Settin
g
s\barvill
j
.ITRXNT1\Local%20Settin
g
s\Tem
p
\~hh7...
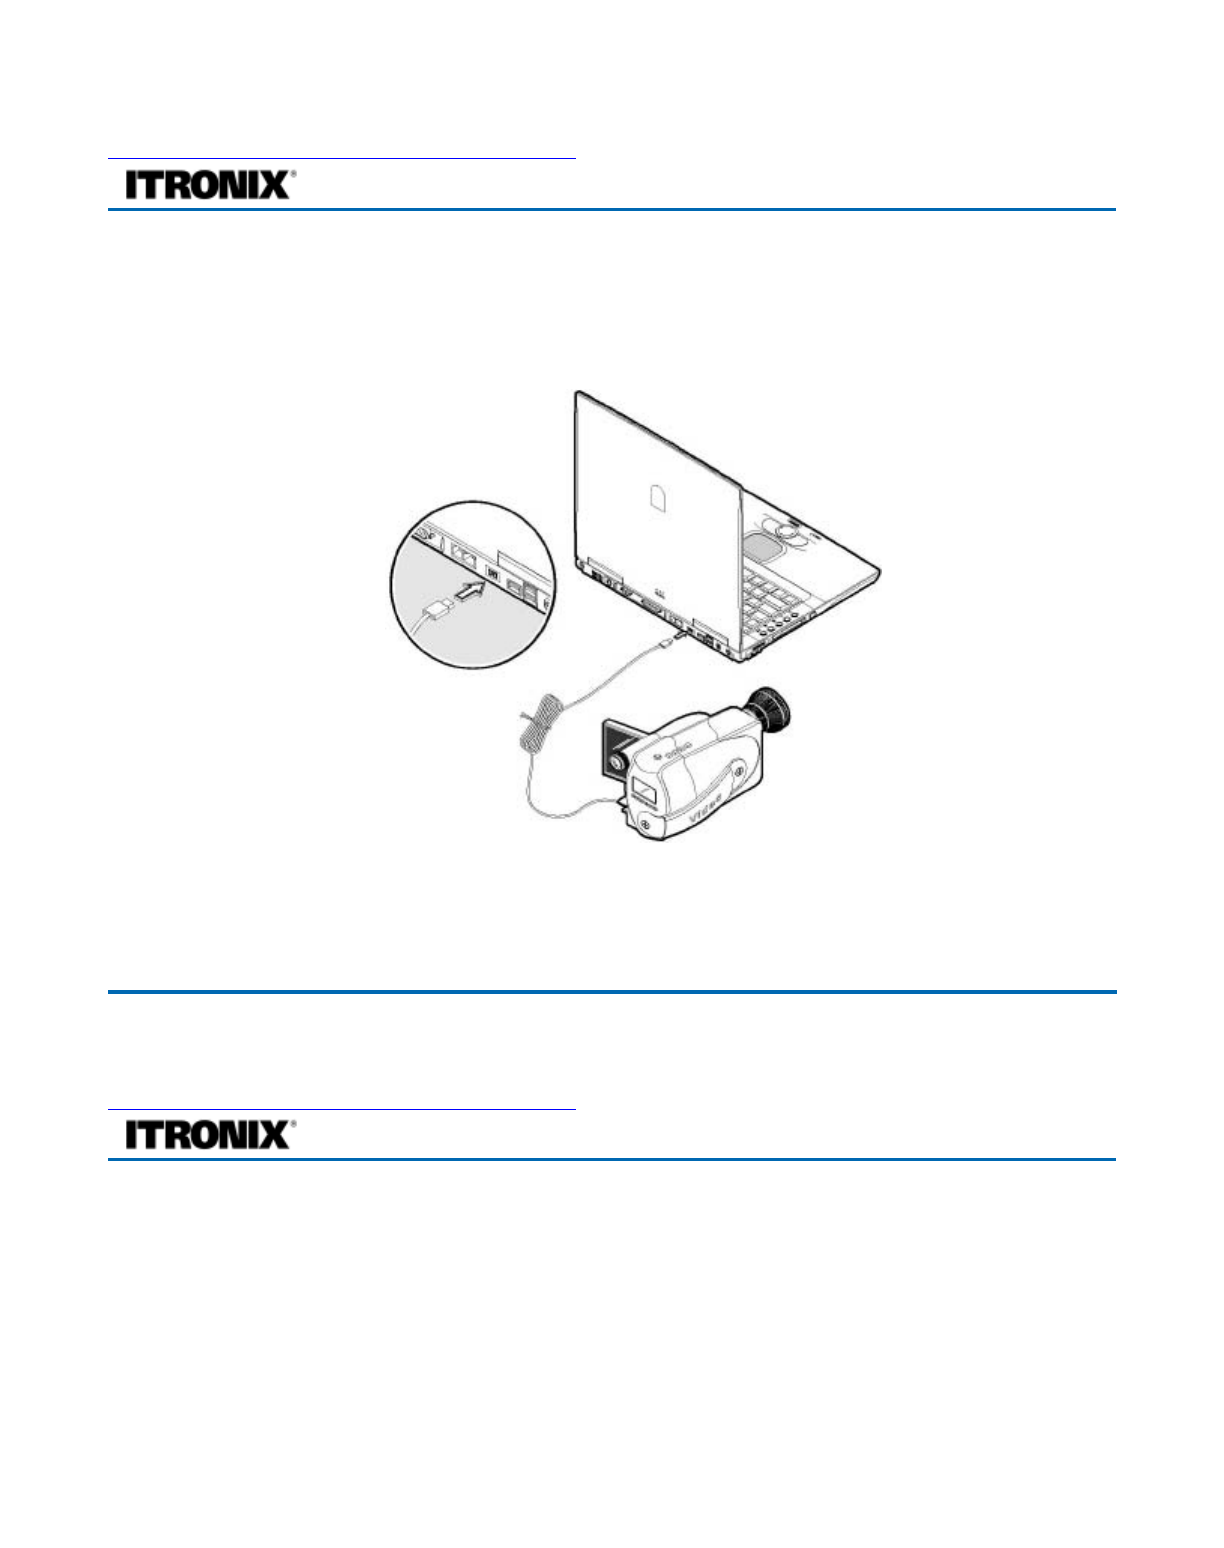
IEEE 1394 devices
The computer's fast IEEE 1394 ports allow you to connect IEEE 1394 supported devices like a digital
video camera or external storage devices.
Before disconnecting an IEEE 1394 device from your computer, click on the Safely Remove Hardware
icon on the taskbar and click on the device. When the device can be safely removed, disconnect the
device from the computer. See your peripheral's documentation for details.
Miscellaneous options
Additional power packs
You can order an AC adapter and spare batteries.
Battery pack
It is a
g
ood
p
ractice to have a s
p
are batter
y
around, es
p
eciall
y
when
y
ou travel. The Li-ion batter
y
,
16 May 2005
© 2005 Itronix Cor
p
oration. All ri
g
hts reserved.
GoBook® PRO II Help
72_0128_001
16 May 2005
© 2005 Itronix Cor
p
oration. All ri
g
hts reserved.
GoBook® PRO II Help
Pa
g
e 76 of 100GoBook PRO II Hel
p
5/16/2005file://C:\Documents%20and%20Settin
g
s\barvill
j
.ITRXNT1\Local%20Settin
g
s\Tem
p
\~hh7...

coupled with the power management features of your computer, supplies you with more power on-the-
go.
AC adapter
The compact AC adapter charges your battery pack and supplies power to your computer. You can order
a spare AC adapter so you do not need to carry it from the office to your home or destination.
Surge Protection
A large number of computer and high technology equipment damage is directly related to AC power and
telephone line problems. These problems can include surges, spikes, noise, interference, and weather-
related problems, which in turn can cause glitches, hang-ups, crashes, performance slow downs, and
down time with computer equipment. The market is flooded with hundreds of AC power line surge
suppressors advertising high performance surge protection; only a few of them actually provide
adequate protection.
This section provides guidelines for selecting a quality surge suppressor to be used with your GoBook
PRO II, and it helps identify a few sources for products with acceptable performance.
Selecting the Right Surge Protection
Consider the level of quality you need when selecting a surge suppressor. This depends on factors such
as surge environment, the type of equipment to be protected, and the quality of the electrical wiring and
service.
Surge Environment
Surge environment refers to the damage potential from electrical surges in a particular geographical
area. A high quality suppressor should be used if there is frequent lightning activity in the area and the
location service is fed by overhead utility poles.
Type of Equipment to be Protected
If the computer is equipped with a modem, the modem should also be surge protected. Protecting the
p
ower line without protecting the modem line provides only partial protection.
Quality of Electrical Wiring and Service
Wiring should be up to current NEC standards and have verified good AC grounds. It is important that
y
our com
p
uter s
y
stem be
p
lu
gg
ed into a
g
rounded AC outlet when char
g
in
g
and that all
p
eri
p
herals
72_0128_001
16 May 2005
© 2005 Itronix Cor
p
oration. All ri
g
hts reserved.
GoBook® PRO II Help
Pa
g
e 77 of 100GoBook PRO II Hel
p
5/16/2005file://C:\Documents%20and%20Settin
g
s\barvill
j
.ITRXNT1\Local%20Settin
g
s\Tem
p
\~hh7...

connected to your system reference the same AC ground.
Selecting the Right Equipment
There are a number of companies that sell quality surge suppressors. When looking for a surge
suppressor, consider these things.
zExpect to pay more for a good quality surge suppressor
zThe surge suppressor should be a UL 1449, 497, and 1283 listed for surge suppression, modem
surge protection, and RFI/EMI noise filtering respectively
zThe surge suppressor should have diagnostic LEDs that verify good AC ground, proper wiring,
and proper surge operation. On/off switches that light are not recommended since they can
produce electrical noise
zThe Joule ratings should be a minimum of 480 Joules for the AC surge circuit
zThe Joule ratings should be a minimum of 240 Joules for the modem
zThe modem surge circuit should present low capacitance to the modem line or it will slow the
transmission rate. Capacitance should be specified at less than 50 picofarads
zQuality surge suppressor manufacturers generally offer a lifetime warranty
zConsider obtaining a protected equipment coverage policy which insures the equipment in the
event of surge damage
zThe devices that will be attached to the computer also need to be surge protected
Key component upgrades
Your computer delivers superior power and performance. However, some users and the applications
they use may demand more. This computer allows you to upgrade key components when you need
increased performance.
NOTE Contact your authorized dealer if you decide to perform a key component upgrade.
Memory upgrade
This notebook com
p
uter comes with two PC2100/PC2700
(
266MHz/333MHz DDR
)
soDIMM
(
Small
72_0128_001
16 May 2005
© 2005 Itronix Cor
p
oration. All ri
g
hts reserved.
GoBook® PRO II Help
Pa
g
e 78 of 100GoBook PRO II Hel
p
5/16/2005file://C:\Documents%20and%20Settin
g
s\barvill
j
.ITRXNT1\Local%20Settin
g
s\Tem
p
\~hh7...
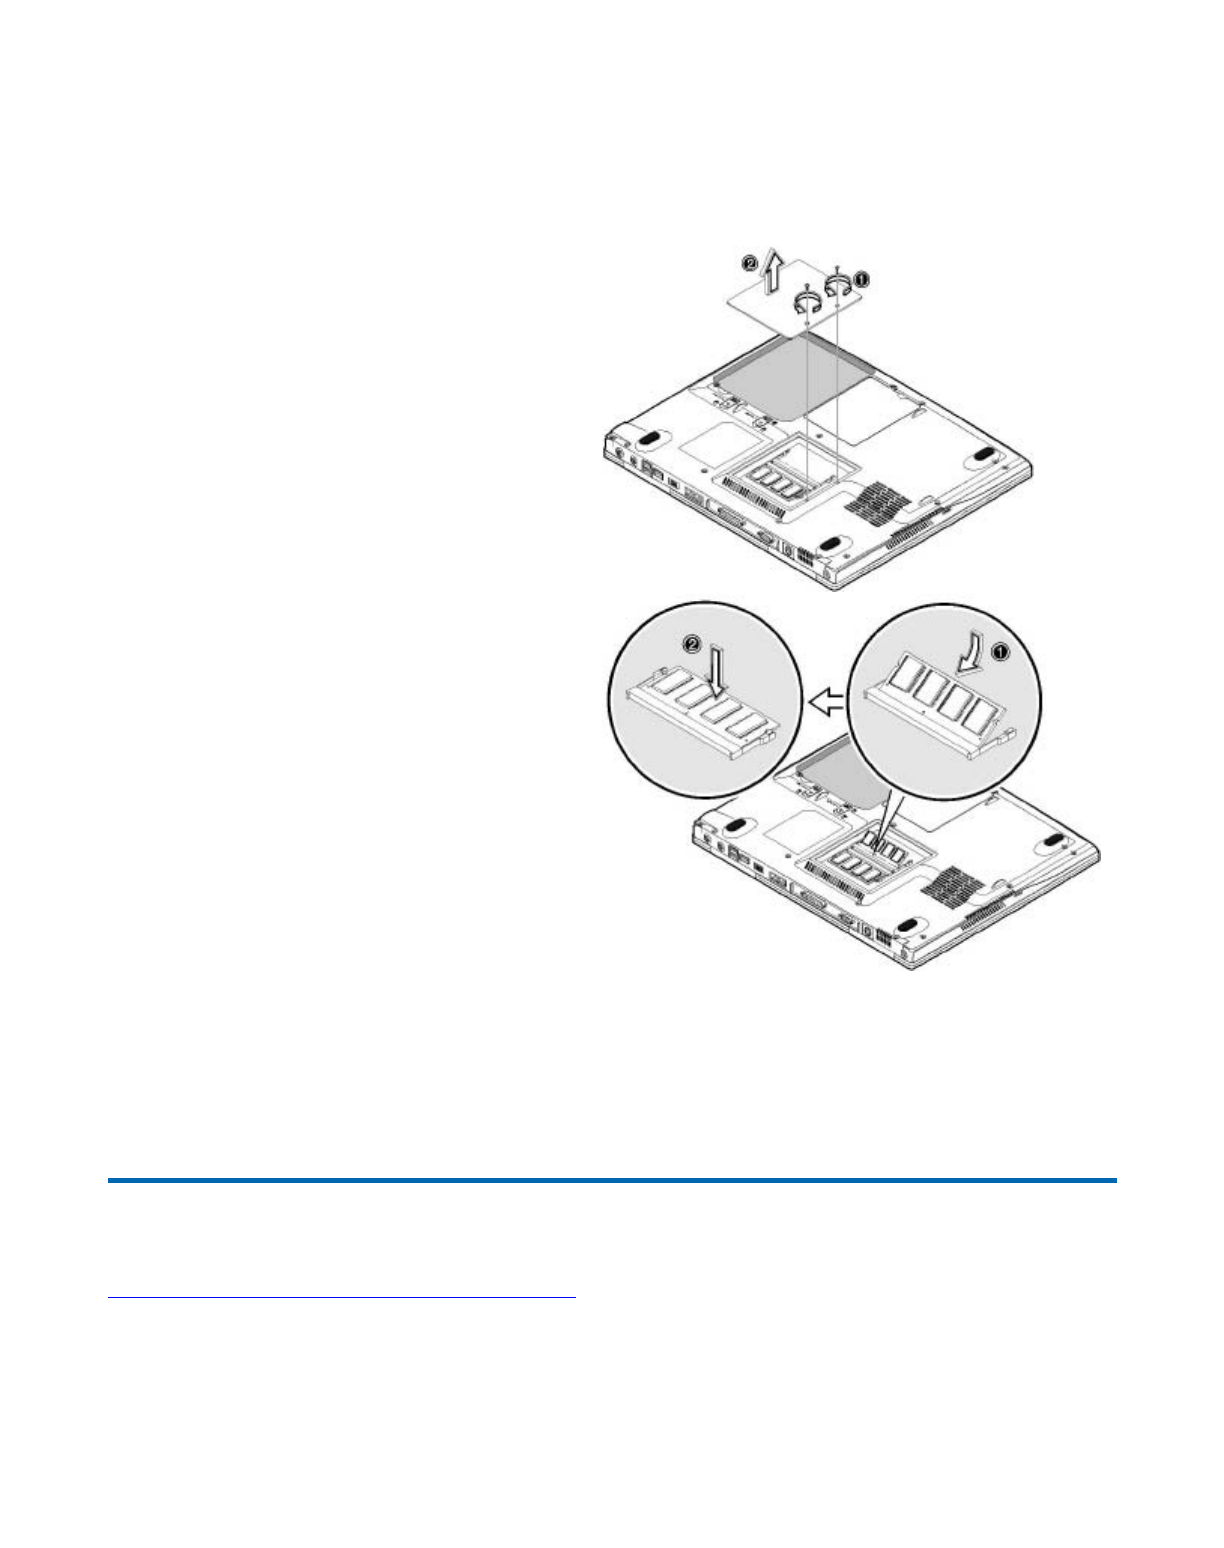
Outline Dual Inline Memory Module) sockets that accept 128/256/512 MB modules. Please consult your
dealer if you need to add more memory.
To install memory, do the following:
Hard disk upgrade
It is possible to upgrade your hard disk with a higher capacity drive when you need more storage space.
The computer uses a 9.5mm 2.5-inch Enhanced-IDE hard disk. Please consult your dealer if you need to
upgrade your hard disk.
Moving with your computer
This chapter gives you tips and hints on things to consider when moving around or traveling with your
com
p
uter.
1. Shutdown the computer, disconnect the
AC adapter from the computer, and
remove the battery pack.
2. Remove the two screws that secure the
memory door and remove the memory
door.
3. Insert a memory module at an angle
firmly into a memory socket (1); then
gently press down until the memory
module locks and clicks into place (2).
72_0128_001
16 May 2005
© 2005 Itronix Cor
p
oration. All ri
g
hts reserved.
Pa
g
e 79 of 100GoBook PRO II Hel
p
5/16/2005file://C:\Documents%20and%20Settin
g
s\barvill
j
.ITRXNT1\Local%20Settin
g
s\Tem
p
\~hh7...

Disconnecting from the desktop
Follow these steps to disconnect your computer from external accessories:
1. Save your work in progress.
2. Shut down the operating system.
3. Turn off the computer.
4. Disconnect the cord from the AC adapter.
5. Disconnect the keyboard, pointing device, printer, external monitor, and other external devices.
6. Disconnect the Kensington lock if you are using one to secure the computer.
Moving around
When you are just moving within short distances, for example, from your office desk to a meeting room
Preparing the computer
Before moving the computer, close and latch the display cover to place it in Standby mode. You can
now safely take the computer anywhere you go within the building.
To bring the computer out of Standby mode, open the display and press the power button.
What to bring to short meetings
A fully charged battery runs the computer for 4 hours under most circumstances. If your meeting is
shorter than that, you probably do not need to bring anything with you other than the computer.
What to bring to long meetings
If your meeting will last longer than 4 hours or if your battery is not fully charged, you may want to
bring the AC adapter with you to plug in your computer in the meeting room.
If the meeting room does not have an electrical outlet, reduce the drain on the battery by putting the
computer in sleep mode. Press Fn-F2 or close the display cover whenever you are not actively using the
computer. Then press the power button to resume (open the display if necessary).
Taking the computer home
When
y
ou are movin
g
from
y
our office to
y
our home or vice versa
Pa
g
e 80 of 100GoBook PRO II Hel
p
5/16/2005file://C:\Documents%20and%20Settin
g
s\barvill
j
.ITRXNT1\Local%20Settin
g
s\Tem
p
\~hh7...

Preparing the computer
After disconnecting the computer from your desktop, follow these steps to prepare the computer for the
trip home:
1. Remove all media from the drives. Failure to remove the media can damage the drive head.
2. Pack the computer in a protective case that can prevent the computer from sliding around and
cushion it if it should fall.
CAUTION Avoid packing items next to the top cover of the computer. Pressure against the top
cover could damage the screen.
What to bring with you
Unless you already have some items at home, bring the following items with you:
z AC adapter and power cord
z The printed user's manual
Special considerations
Follow these guidelines to protect your computer while traveling to and from work:
z Minimize the effect of temperature changes by keeping the computer with you.
z If you need to stop for an extended period of time and cannot bring the computer with you, leave
the computer in the trunk of the car to avoid exposing the computer to excessive heat.
z Changes in temperature and humidity can cause condensation. Allow the computer to return to
room temperature, and inspect the screen for condensation before turning on the computer. If the
temperature change is greater than 18°F (10°C), allow the computer to come to room temperature
slowly. If possible, leave the computer for 30 minutes in an environment with a temperature
between outside and room temperature.
Setting up a home office
If you frequently work on your computer at home, it may be worthwhile to purchase a second AC
adapter for use at home. With a second AC adapter, you can avoid transporting the extra weight to and
from home.
If you use your computer at home for significant periods of time, you might also want to add an external
keyboard, monitor, or mouse.
Traveling with the computer
When you are moving within a larger distance, for instance, from your office building to a client's office
b
uildin
g
or travelin
g
locall
y
Pa
g
e 81 of 100GoBook PRO II Hel
p
5/16/2005file://C:\Documents%20and%20Settin
g
s\barvill
j
.ITRXNT1\Local%20Settin
g
s\Tem
p
\~hh7...

Preparing the computer
Prepare the computer as if you were taking it home. Be sure the battery in the computer is charged.
Airport security may require you to turn on your computer when bringing it into the gate area.
What to bring with you
Bring the following items with you:
z AC adapter
z Spare, fully charged battery packs
z Additional printer driver files if you plan to use another printer
Special considerations
In addition to the guidelines for taking the computer home, follow these guidelines to protect your
computer while traveling:
z Always take the computer as carry-on luggage.
z If possible, have the computer inspected by hand. The computer can safely pass through security
X-ray machines, but never expose the computer to a metal detector.
z Avoid exposing floppy disks to hand-held metal detectors.
Traveling internationally with the computer
When you are moving from country to country
Preparing the computer
Prepare the computer as you would normally prepare it for traveling.
What to bring with you
Bring the following items with you.
z AC adapter
z Power cords that are appropriate to the country to which you are traveling
z Spare, fully charged battery packs
z Additional printer driver files if you plan to use another printer
S
p
ecial considerations
Pa
g
e 82 of 100GoBook PRO II Hel
p
5/16/2005file://C:\Documents%20and%20Settin
g
s\barvill
j
.ITRXNT1\Local%20Settin
g
s\Tem
p
\~hh7...

Follow the same special considerations as when traveling with the computer. In addition, these tips are
useful when traveling internationally.
z When traveling in another country, check that the local AC voltage and the AC adapter power
cord specifications are compatible. If not, purchase a power cord that is compatible with the local
AC voltage (e.g., power rating). Do not use converter kits sold for appliances to power the
computer.
z If you are using the modem, check if the modem and connector is compatible with the
telecommunication system of the country you are traveling in.
Error Messages
The following are possible error and warning messages you may encounter while operating the GoBook
PRO II computer. The messages described in this section are listed below.
Error and warning messages are generated by several different sources including:
zPower On Self Test (POST)
zWindows
zApplications
POST Messages
When the GoBook PRO II computer restarts, it tests its hardware components. This test is called the
Power On Self Test (POST) . If the system finds an error during this test, it displays an error message.
Some POST errors can occur before anything can be displayed on the screen. In this case, the computer
issues a series of beeps, then stops working. This type of error indicates a serious hardware problem, and
you should contact your supervisor or your organization’s help desk.
The most common POST error messages are listed next. Select the error message to view solutions you
can try.
Failure Fixed Dis
k
Stuck ke
y
Ke
y
board erro
r
Ke
y
board Controller Faile
d
Monitor t
yp
e does not match CMOS - Run SETUP
Shadow Ram Failed at offset: nnnn
S
y
stem RAM Failed at offset: nnnn
Pa
g
e 83 of 100GoBook PRO II Hel
p
5/16/2005file://C:\Documents%20and%20Settin
g
s\barvill
j
.ITRXNT1\Local%20Settin
g
s\Tem
p
\~hh7...

Extended RAM Failed at offset: nnnn
S
y
stem batter
y
is dead - Re
p
lace and run SETUP
S
y
stem CMOS checksum bad - Default confi
g
uration use
d
S
y
stem timer erro
r
Real time clock erro
r
Check date and time settin
g
s
Previous boot incom
p
lete -Default confi
g
uration use
d
Memor
y
Size found b
y
POST differed from CMOS
Diskette drive A error
Diskette drive B erro
r
Incorrect Drive A t
yp
e - run SETUP
Incorrect Drive B t
yp
e - run SETUP
S
y
stem cache error - Cache disable
d
CPU ID:
EISA CMOS not writeable
DMA Test Faile
d
Software NMI Faile
d
Fail-Safe Timer NMI Faile
d
device Address Conflict
Allocation Error for: device
CD ROM Drive
Enterin
g
SETUP ...
Failin
g
Bits: nnnn
Fixed Disk n
Invalid S
y
stem Confi
g
uration Dat
a
Pa
g
e 84 of 100GoBook PRO II Hel
p
5/16/2005file://C:\Documents%20and%20Settin
g
s\barvill
j
.ITRXNT1\Local%20Settin
g
s\Tem
p
\~hh7...

Windows Messages
Windows messages are typically self-explanatory. (See Troubleshooting, for more information).
Application Messages
Windows applications may display messages if a warning or error condition occurs. Refer to the Online
Help or other documentation for the application that generated the message.
Troubleshooting
This section is designed to help you determine and fix problems you might encounter while operating
the GoBook PRO II computer. Try the following things in order:
zFirst look through the categories in this section for a solution.
zIf you don’t find a solution for your situation here, try one of the resources listed below.
zIf you are having a problem with a computer application , use the online Help that comes with the
a
pp
lication to find a solution.
I/O device IRQ conflict
PS/2 Mouse Boot Summar
y
Screen:
nnnn kB Extended RAM Passe
d
nnnn Cache SRAM Passe
d
nnnn kB Shadow RAM Passe
d
nnnn kB S
y
stem RAM Passe
d
One or more I2O Block Stora
g
e Devices were excluded from the Setu
p
Boot Menu
O
p
eratin
g
s
y
stem not foun
d
PS/2 Mouse:
Run the I2O Confi
g
uration Utilit
y
S
y
stem BIOS shadowe
d
UMB u
pp
er limit se
g
ment address: nnnn
Video BIOS shadowe
d
Pa
g
e 85 of 100GoBook PRO II Hel
p
5/16/2005file://C:\Documents%20and%20Settin
g
s\barvill
j
.ITRXNT1\Local%20Settin
g
s\Tem
p
\~hh7...

zIf you still cannot resolve your problem, contact the help desk at your organization.
WARNING Do not attempt to open and service the computer by yourself. Contact your dealer or an
authorized service center for assistance.
Applications
My application locks up, acts strangely, or produces a General Protection Fault (GPF) error
zIf you’ve tried to resolve the problem and your application still doesn’t respond, you may need to
restart your computer as described below.
To reboot your computer, select Start, Shut Down, Restart. If that does not work, try pressing
ctrl+alt+del twice.
If the computer does not restart, the keyboard may be locked up. Hold the Power Button or use the
reset on the bottom of the unit.
NOTE This will result in a loss of all unsaved data.
zThe data on the hard disk could be corrupted. Run SCANDISK.
zWindows is out of memory/resources. Exit Windows and restart Windows.
Communications programs such as HyperTerminal, or Procomm Plus don’t seem to work or they lock
Windows
zWhen you first try to use HyperTerminal or similar application, the system responds with a
message asking if you want to install the modem. Answer “Yes” to this question and follow the
instructions on the screen to install it.
zVerify with your company that your computer has an internal modem installed.
Batteries
The battery does not charge
zTo prevent possible damage to the battery, the system will not allow a charge if the battery
temperature is extremely hot or cold (such as in a closed, unattended vehicle). If possible, charge
the battery in a location with a moderate temperature of around 20°C (68°F).
zIf possible, turn off the computer while the battery is charging.
zIf the battery is new or has been stored for a week or more, follow this procedure:
1. Make sure the computer is turned off.
2. Remove the batter
y
.
Pa
g
e 86 of 100GoBook PRO II Hel
p
5/16/2005file://C:\Documents%20and%20Settin
g
s\barvill
j
.ITRXNT1\Local%20Settin
g
s\Tem
p
\~hh7...

3. Connect the AC adapter to the computer and an AC wall outlet, and then turn on the
computer by pressing the Power Button.
4. Reinstall the battery.
5. Allow the system to remain idle for one hour with the AC adapter connected to the
computer.
The Battery Power Indicator is solid orange while the battery charges.
6. If the battery still fails to charge after an hour, remove the battery, wait several seconds, and
then install it again.
If the battery does not begin charging within several minutes, return the unit for service.
The batteries take much longer than seven hours to charge
zUnder moderate temperatures, about 21°C (70ºF), the computer’s battery takes approximately 2 to
3 hours to completely charge if the unit is off and 6 to 13 hours if it is running. Under extremely
cold or hot temperatures, however, the battery can take up to 16 hours to fully charge.
The batteries don’t last very long
zAs your battery ages, the maximum capacity that it can hold naturally decreases, and even the best
maintained batteries eventually need to be retired. Consider replacing the battery if you are not
getting the usage you need from it.
The gas gauge isn’t full after charging the battery
zThis may indicate that the charging process terminated prematurely.
The gas gauge reads “full,” but the indicator light is still blinking
zIf you charge your battery daily, rely on the gas gauge reading to determine battery capacity. The
charging process may continue even if the gas gauge reads full. External power can be removed
because the battery is virtually full.
My battery seems to have less and less capacity
zAs your battery ages, the maximum capacity that it can hold naturally decreases, and even the best
maintained batteries eventually need to be retired. Consider replacing the battery if you are not
getting the usage you need from it.
Display
The dis
p
la
y
p
erformance is slow
I can’t read the dis
p
la
y
Pa
g
e 87 of 100GoBook PRO II Hel
p
5/16/2005file://C:\Documents%20and%20Settin
g
s\barvill
j
.ITRXNT1\Local%20Settin
g
s\Tem
p
\~hh7...

Frequently Asked Questions
This is a list of possible situations that may arise during the use of your computer, and it gives easy
answers and solutions to these questions.
1. My screen seems to time out too quickly. I have to constantly hit a key or move the mouse in
order to bring it back. How can I adjust the screen time-out?
2. I've heard that cleaning up and rearranging files on the hard drive will improve the startup speed
of my programs. How do I do this?
3. The internal fax/modem dial tone sound is too low. How can I increase the volume?
4. What kind of external microphone can I use with my notebook computer?
5. There is feedback noise coming from my speakers. What can I do?
6. Because of a software problem, I was unable to shut down power normally. I pressed the power
button to force a power off, but it didn't work. How can I force a power off?
7. Why can't I charge the battery of my portable computer after it was out of use for some time?
8. My computer alerts "CMOS Battery Low", what can I do?
9. I press the power switch, but the computer does not start or boot-up.
10. Nothing appears on the screen.
11. Image is not full-screen.
12. No audio from the computer.
13. The keyboard does not respond.
14. The printer does not work.
15. I want to set up my location to use the internal modem.
16. Why can't I charge my battery to 100% charged when it is 99-95% charged?
Hard Disk
The hard disk will not spin up so the computer can’t boot up
zThis occurs if the unit is exposed to extreme low temperatures. This is not a hardware failure
associated with the hard dis
k
. Allow the com
p
uter to warm to room tem
p
erature.
The underlined, inverse, and h
yp
ertext characters are difficult to read on the screen
The dis
p
la
y
a
pp
ears to have random
p
ixels darkened after scrollin
g
I chan
g
ed m
y
dis
p
la
y
resolution, but I see no difference on the screen
Pa
g
e 88 of 100GoBook PRO II Hel
p
5/16/2005file://C:\Documents%20and%20Settin
g
s\barvill
j
.ITRXNT1\Local%20Settin
g
s\Tem
p
\~hh7...

I can’t save files because the disk is full
zReport this situation to your supervisor or your organization’s help desk.
Keyboard
Something unexpected happens when I press a key
zYou may have pressed a key combination that performs a Windows function. Make sure you are
pressing the correct keys for the application you are running.
Incorrect characters appear on the screen when I press certain keys
zYou may be in NUM LOCK mode. Press FN+NUM LOCK to toggle NUM LOCK mode off.
Landline Modems
The modem doesn’t work
zWhen you first try to use HyperTerminal or similar application , the system responds with a
message asking if you want to install the modem. Answer “Yes” to this question and follow the
instructions on the screen to install it.
zMake sure the communication settings are correct in your application. Refer to the online Help for
your application.
The modem doesn’t dial a number
Check these things:
zIf you are using an external modem, make sure the cables are attached correctly.
zMake sure your communications parameters are correct in your application. Refer to the online
Help for your application.
The modem dials and receives an answer but does not establish a connection
zYou may have incorrect parameters selected for your application to talk with the remote modem.
Refer to the online Help for your application.
zYou may need to adjust your modem’s baud rate or protocol selection.
Communications programs such as HyperTerminal or Procomm Plus don’t seem to work or they lock
Windows
zIf you are using the internal modem, be sure to specify the proper communications port .
zWhen you first try to use HyperTerminal or similar application, the system responds with a
messa
g
e askin
g
if
y
ou want to install the modem. Answer “Yes” to this
q
uestion and follow the
Pa
g
e 89 of 100GoBook PRO II Hel
p
5/16/2005file://C:\Documents%20and%20Settin
g
s\barvill
j
.ITRXNT1\Local%20Settin
g
s\Tem
p
\~hh7...

instructions on the screen to install it.
Miscellaneous
The computer shuts off unexpectedly
zThe computer has entered suspend mode . Press any key to resume from the standby state. Press
the Power Button to resume from the hibernate state.
zThe battery capacity may be low. Connect external power to charge the battery, or replace the
battery with a fully charged one.
The speaker volume is too high or too low
zIncrease the volume by using the volume control knob on the front of the unit.
The computer won’t turn on
zThe battery may not be installed properly, or it may not be fully charged. Make sure a fully
charged battery is properly installed.
zConnect external power to charge the battery if it is not charged.
zIf you are using the AC adapter , check the electrical outlet you are using to make sure it is
working properly.
zIf the GoBook PRO II computer does not turn on, restart the computer by holding down the Power
Button for at least 4 seconds and then release it.
The computer won’t turn off
zPress and release the Power Button.
The computer enters suspend mode too quickly
zWhen there is no activity for a period of time, the computer turns off or enters suspend mode. To
extend this time, use the Power Management program (Start, Settings, Control Panel, Power
Management) and increase the non-activity time to enter suspend.
The computer doesn’t automatically suspend
zCheck to make sure the COM ports are off. For example, exit any application that uses COM
ports.
zMake sure external power is not connected. Depending on power settings, some systems will not
suspend automatically when they are connected to external power.
The s
y
stem date and time are incorrect
Pa
g
e 90 of 100GoBook PRO II Hel
p
5/16/2005file://C:\Documents%20and%20Settin
g
s\barvill
j
.ITRXNT1\Local%20Settin
g
s\Tem
p
\~hh7...

zReset the correct date and time by choosing the Date/Time icon from Control Panel and making
the appropriate changes.
I receive an “out of memory” error message
zToo many applications may be running at the same time. Close applications you don’t need.
zIf you’re using desktop wallpaper, set wallpaper to None. To do this, choose Display from Control
Panel and make the appropriate change.
zMake sure you have enough space on your hard disk . Contact your supervisor or your
organization’s help desk for assistance.
zSet up a permanent swap file. Contact your supervisor or your organization’s help desk for
assistance.
Mouse
I have difficulty double-clicking the mouse fast enough
zFrom the Start Menu, select Settings, Control Panel, and then choose Mouse. The Response tab
contains the setting for the double-click speed.
PC Cards
I can’t remove the PC card
zPress the ejector button located inside the PC card door on the side of the computer. The button
will pop out. Press the ejector button again to eject the PC card. Slide the card out.
zIf the ejector button malfunctions when you press it, release the button and then press it again.
Diskette Read Error
zAny card in the PC Card socket except for a properly formatted memory card will cause this error
since it is trying to read the PC Card.
The system does not recognize the PC Card CD-ROM when it is inserted into the PC Card socket
zThere is a delay of 10 to 15 seconds before the CD-ROM drive is recognized.
zDrivers may not be installed. Contact your organization’s help desk for assistance.
The computer locks up when I remove the PC card
zBefore you remove the card, select the PC card icon in the system “tray” area of the screen (near
the clock in the lower right corner), and choose “Stop [card name] card.”
Pa
g
e 91 of 100GoBook PRO II Hel
p
5/16/2005file://C:\Documents%20and%20Settin
g
s\barvill
j
.ITRXNT1\Local%20Settin
g
s\Tem
p
\~hh7...

Care and Maintenance
You can use your computer under a wide range of environmental conditions. However, to ensure long
use and continued high performance, consider the following factors when setting up your computer:
Taking Care of Your Computer
zFollow all warnings and instructions noted in this documentation and in the Windows Help
program.
zThe first time you use your computer, we recommend that you carefully read the Making
Connections section and initialize the battery to ensure optimum battery performance.
zUnplug the computer from the power outlet before cleaning. Use a damp cloth for cleaning. Do
not use aerosols, solvents, or strong detergents.
zSlots and openings in the system cabinet are for ventilation purposes. Do not block or cover these
openings or the system could overheat. Do not use or store the computer near a source of heat or
dust.
zOn the base or rear panel of this notebook, there is a label with information on the power
requirements of this system. These requirements must be followed. If you are unsure of your local
power supply, consult your dealer or local Power Company.
zIf you use the computer with an extension cord, ensure that the total ampere ratings of all the
devices sharing the extension do not exceed the rating of the extension cord or the rating of the
wall outlet.
zNever push foreign objects into the computer through any of the slots or openings. Dangerous
voltages are present, which could cause electric shock or fire, or damage sensitive components.
zFor best results, use a power strip with a built-in surge protector. Do not use inferior extension
cords as this may result in damage to your computer.
zSet the computer on a flat, stable surface. To prevent damage to the computer’s hard disk drive,
avoid using the computer where it will be exposed to strong vibration.
zDo not expose the computer to direct sunlight. Do not place it near sources of heat, such as a
radiator.
zDo not expose the computer to temperatures below 0ºC (32ºF) or above 50ºC (122ºF).
zDo not subject the computer to magnetic fields.
zDo not ex
p
ose the com
p
uter to rain or moisture.
GoBook® PRO II Help
Pa
g
e 92 of 100GoBook PRO II Hel
p
5/16/2005file://C:\Documents%20and%20Settin
g
s\barvill
j
.ITRXNT1\Local%20Settin
g
s\Tem
p
\~hh7...

zDo not spill water or any liquid on the computer.
zDo not subject the computer to heavy shock and vibration.
zDo not expose the computer to dust and dirt.
zDo not place objects on top of the computer.
zDo not place the computer on uneven surfaces.
Taking care of your AC adapter
zDo not connect the adapter to any other device.
zDo not step on the power cord or place anything on top of it. Carefully route the power cord and
any cables away from all potential traffic.
zWhen unplugging the power cord, do not pull on the cord itself but pull on the plug.
zThe total ampere ratings of the equipment plugged in should not exceed the ampere rating of the
cord if you are using an extension cord. Also, the total current rating of all equipment plugged into
a single wall outlet should not exceed the fuse rating.
Taking care of your battery pack
zUse only batteries of the same kind as replacements. Turn the power off before removing or
replacing batteries.
zDo not tamper with batteries. Keep them away from children.
zDispose of used batteries according to local regulations. Recycle if at all possible.
Cleaning
To clean the computer:
1. Power off the computer and remove the battery pack.
2. Disconnect the AC adapter.
3. Use a soft cloth moistened with water. Do not use liquid or aerosol cleaners.
Servicing
Contact your dealer or see your service technician if any of the following occurs:
z The computer has been dropped or the body has been damaged.
z Li
q
uid has been s
p
illed into the
p
roduct.
Pa
g
e 93 of 100GoBook PRO II Hel
p
5/16/2005file://C:\Documents%20and%20Settin
g
s\barvill
j
.ITRXNT1\Local%20Settin
g
s\Tem
p
\~hh7...

z The computer does not operate normally.
Service and Support
Our commitment at Itronix is to provide you, our client, with both the products and support services
necessary for success in your enterprise.
Client Care Center
The Itronix Client Care Center strives to consistently provide world-class service and continually make
improvements thanks to valuable input and ideas from our customer base.
Product Support - Downloads
Get the software updates you need to keep your configuration current.
Client Care Center (CCC)
THE ITRONIX “ONE CALL” CLIENT CARE CENTER
1-800-638-9270
The convenient "One Call" Client Care Center number, 800-638-9270, allows a single entry point of
access to meet all your needs (or our web portal at www.itronix.com/CCC), including:
zTroubleshooting and/or RMA Origination
zTrial/Demo/Pilot Unit Orders and Status Updates
zPlacing and Checking Status on Unit and/or Parts Orders
zRMA Status check on Service Unit and Warranty/Service Parts Orders
zNew Accessory, Peripheral and Service Parts Orders
zProof of Delivery Status Updates for Service and New Unit Orders
zInternational New Unit & Accessory, Peripheral and Service Parts Orders
zCentralized access for all Invoicin
g
and Finance related issues
72_0128_001
16 May 2005
© 2005 Itronix Cor
p
oration. All ri
g
hts reserved.
GoBook® PRO II Help
Pa
g
e 94 of 100GoBook PRO II Hel
p
5/16/2005file://C:\Documents%20and%20Settin
g
s\barvill
j
.ITRXNT1\Local%20Settin
g
s\Tem
p
\~hh7...

The Itronix "One Call" Client Care Center access number in the America's is 800-638-9270. Please
listen to the recording closely and choose from the following options:
You can also e-mail us at ccc@itronix.com
NOTE For support and queries in Europe, Middle East and Africa, please Click Here or call +44 (0)24
7671 4800
Services Expertise: Itronix provides in-field support provided by a network of Field Service Managers
whose expertise focuses on specific vertical applications and industries. Strategically located to provide
nationwide support, they can provide both first level and escalated customer support. In addition, the
Field Managers perform regular site visits to receive feedback on customer satisfaction, training or
individualized support needs, product performance and future value-add post-installation support needed
for anticipated changes in the customer environment and user community or profile, as well as to garner
input on future product designs. For more information on our comprehensive services offering, please
Click Here.
Product Support - Downloads
Itronix Corporation makes it easy to get the software updates you need to keep your configuration
current and get the most from your Itronix product. Simply go to the Notebooks section of the Product
Support downloads page on the Itronix website. Downloads are listed by model (GoBook PRO II) and
p
roduct number (IX600).
1 New to Itronix and would like to purchase products for the first time or
interested in becoming an Itronix Business Partner
2 Technical Assistance Center for Troubleshooting, Unit Exchange Information,
Warranty Unit and Service Parts Orders
3 Speak with your assigned point of contact
4 New Orders for Accessories, Peripherals and Service Parts Ordering (such as
batteries or chargers)
5 Finance, Invoicing or Credit Related Issues and Proof of Delivery
8 Non-urgent message with reply within 48 hours
72_0128_001
16 May 2005
© 2005 Itronix Cor
p
oration. All ri
g
hts reserved.
GoBook® PRO II Help
72_0128_001
16 May 2005
© 2005 Itronix Cor
p
oration. All ri
g
hts reserved.
GoBook® PRO II Help
Pa
g
e 95 of 100GoBook PRO II Hel
p
5/16/2005file://C:\Documents%20and%20Settin
g
s\barvill
j
.ITRXNT1\Local%20Settin
g
s\Tem
p
\~hh7...

Identification
GoBook PRO II (IX600) Help
May 2005 · Revision 001
Copyright Notice
© Copyright 2005 Itronix Corporation. All rights reserved. No part of this document may be reproduced, transmitted,
transcribed, stored in a retrieval system, or translated into any other language or computer language in whole or in part, in
any form or by any means, whether it be electronic, mechanical, magnetic, optical, manual, or otherwise, without the prior
written consent of Itronix Corporation, South 801 Stevens Street, Spokane, Washington 99204.
Disclaimer
This document is printed in the U.S.A. Itronix Corporation reserves the right to revise the manual and make periodic changes
to the content without a direct or inferred obligation to Itronix to notify any person of such revision or changes. Itronix
Corporation does not assume responsibility for the use of this help manual, nor for any patent infringements or other rights or
third parties who may use the manual.
This document contains valuable trade secrets and proprietary information of Itronix Corporation.
This product is available for purchase under the terms of the Itronix Hardware Purchase and Software License Agreement.
Itronix hardware products may be reconditioned, or be manufactured from parts and components that may be new, used,
rebuilt, or recycled and in some cases, the hardware product may not be new and may have been previously installed. In any
event, Itronix warranty terms apply.
Trademark and Patent Notice
Itronix is a registered trademark of Itronix Corporation.
GoBook PRO II is a registered trademark of Itronix Corporation
Microsoft, MS, Windows, and MS-DOS are registered trademarks of Microsoft Corporation.
IBM is a trademark of International Business Machines Corporation.
The following United States Patent Numbers apply to any unit which incorporates a DVD drive -
5,434,678; 5,589,945; 5,913,013; 6,151,444; and 6,208,805.
Compliance Statements
Federal Communication Commission Interference Statement
This equipment has been tested and found to comply with the limits for a Class B digital device,
p
ursuant to Part 15 of the FCC Rules. These limits are designed to provide reasonable protection against
harmful interference in a residential installation. This equipment generates, uses and can radiate radio
frequency energy and, if not installed and used in accordance with the instructions, may cause harmful
interference to radio communications. However, there is no guarantee that interference will not occur in
a particular installation. If this equipment does cause harmful interference to radio or television
reception, which can be determined by turning the equipment off and on, the user is encouraged to try to
correct the interference by one of the following measures:
zReorient or relocate the receiving antenna.
zIncrease the se
p
aration between the e
q
ui
p
ment and receiver.
Pa
g
e 96 of 100GoBook PRO II Hel
p
5/16/2005file://C:\Documents%20and%20Settin
g
s\barvill
j
.ITRXNT1\Local%20Settin
g
s\Tem
p
\~hh7...

zConnect the equipment into an outlet on a circuit different from that to which the receiver is
connected.
zConsult the dealer or an experienced radio/TV technician for help.
FCC CAUTION
To assure continued compliance, (example - use only shielded interface cables when connecting to
computer or peripheral devices) any changes or modifications not expressly approved by the party
responsible for compliance could void the user's authority to operate this equipment.
This device complies with Part 15 of the FCC Rules. Operation is subject to the following two
conditions:
(1) This device may not cause harmful interference, and
(2) This device must accept any interference received, including interference that may cause undesired
operation.
IMPORTANT NOTE
FCC Radiation Exposure Statement
This equipment complies with FCC radiation exposure limits set forth for an uncontrolled environment.
This equipment should be installed and operated with minimum distance 20cm between the radiator and
your body.
This transmitter must not be co-located or operating in conjunction with any other antenna or
transmitter.
REN
The GoBook PRO II (IX600) computer complies with Part 68 of the FCC Rules. On the bottom of this
equipment is a label that contains, among other information, the FCC registration number and ringer
equivalence number (REN) for this equipment. If requested, this information must be provided to the
telephone company.
The REN is used to determine the quantity of devices which may be connected to the telephone line. Excessive RENs on the
telephone line may result in the devices not ringing in response to an incoming call. In most, but not all areas, the sum of the
RENs should not exceed five (5.0). To be certain of the number of devices that may be connected to the line, as determined
by the total RENs, contact the telephone company to determine the maximum REN for the calling area.
The GoBook PRO II (IX600) computer may be connected to the telephone network using the RJ-11 jack
p
rovided.
If this equipment causes harm to the telephone network, the telephone company will notify you in advance that temporary
discontinuance of service may be required. If advance notice isn’t practical, the telephone company will notify the customer
as soon as possible. Also, you will be advised of your right to file a complaint with the FCC if you believe it is necessary.
The telephone company may make changes in its facilities, equipment, operations, or procedures that could affect the
operation of the equipment. If this happens, the telephone company will provide advance notice in order for you to make the
Pa
g
e 97 of 100GoBook PRO II Hel
p
5/16/2005file://C:\Documents%20and%20Settin
g
s\barvill
j
.ITRXNT1\Local%20Settin
g
s\Tem
p
\~hh7...

necessary modifications in order to maintain uninterrupted service.
If trouble is experienced with this equipment, please contact the equipment manufacturer for repair and/or warranty
information. Do not attempt repairs of this equipment yourself without obtaining manufacturer authorized parts and
documentation. If the trouble is causing harm to the telephone network, the telephone company may request you remove the
equipment from the network until the problem is resolved.
Compliance Statement for Canada
NOTICE The Industry Canada label identifies certified equipment. This certification means that the equipment meets certain
telecommunications network protective, operational and safety requirements as prescribed in the appropriate Terminal
Equipment Technical Requirements document(s). The Department does not guarantee the equipment will operate to the
user’s satisfaction.
Before installing this equipment, users should ensure that it is permissible to be connected to the facilities of the local
telecommunications company. The equipment must also be installed using an acceptable method of connection. The
customer should be aware that compliance with the above conditions may not prevent degradation of service in some
situations.
Repairs to certified equipment should be made by a representative designated by the supplier. Any repairs or alterations made
by the user to this equipment, or equipment malfunctions, may give the telecommunications company cause to request the
user to disconnect the equipment.
Users should ensure for their own protection that the electrical ground connections of the power utility , telephone lines, and
internal metallic water pipe system, if present, are connected together. This precaution may be particularly important in rural
areas.
CAUTION! Users should not attempt to make such connections themselves, but should contact the appropriate electric
inspection authority, or electrician, as appropriate.
The Ringer Equivalence Numbers (REN) are:
GoBook PRO II (IX600) non-radio: 0.5B
GoBook PRO II (IX600) Motient: 0.5B
GoBook PRO II (IX600) Cingular: 0.5B
NOTICE The Ringer Equivalence Number (REN) assigned to each terminal device provides an indication of the maximum
number of terminals allowed to be connected to a telephone interface. The termination on an interface may consist of any
combination of devices subject only to the requirement that the sum of the Ringer Equivalence Numbers of all the devices
does not exceed 5.
The GoBook PRO II (IX600) computer may be connected to the telephone network using the RJ-11 jack
p
rovided.
Fax Branding
The Telephone Consumer Protection Act of 1991 makes it unlawful for any person to use a computer or other electronic
device to send any message via a telephone fax machine unless such message clearly contains in a margin at the top or
bottom of each transmitted page or on the first page of the transmission, the date and time it is sent and an identification of
the business or other entity, or other individual sending the message and the telephone number of the sending machine or
such business, other entity, or individual.
In order to program this information into your fax machine, you should complete the following:
Pa
g
e 98 of 100GoBook PRO II Hel
p
5/16/2005file://C:\Documents%20and%20Settin
g
s\barvill
j
.ITRXNT1\Local%20Settin
g
s\Tem
p
\~hh7...

This information is entered through the FAX application software you have installed. Consult your FAX software
documentation for instructions about entering this information.
Warnings and Cautions
WARNING It is important that only authorized Itronix personnel attempt repairs on Itronix equipment as this might void any
maintenance contract with your company. Unauthorized service personnel might be subject to shock hazard on some Itronix
equipment if removal of protective covers is attempted.
The product you have purchased is powered by a rechargeable battery. The battery is recyclable and, under various state and
local laws, it may be illegal to dispose of this battery into the municipal waste stream. Do not crush the battery or place it in a
fire. Check with your local solid-waste officials for details on recycling options or proper disposal.
CAUTION Internal components of the GoBook PRO II (IX600) computer will be damaged if exposed
to contaminants. When dust covers, the PC card door, or the bottom access panel are open on the
computer, shield the unit from all contaminants such as liquids, rain, snow, and dust.
Internal radio(s) may display an individual FCC Identifier which are not applicable to this configuration. Only the FCC ID(s)
shown on the label located on the bottom of the IX600 Laptop PC is/are applicable. The IX600 Laptop PC Radio(s) must not
be co-located or operating in conjunction with any other antenna or transmitter than specified within the FCC ID certification.
This device may contain a WWAN radio transmitter, and/or WLAN radio transmitter and/or a PAN radio
transmitter. To comply with FCC/IC RF exposure requirements when using the WWAN radio transmitter,
a minimum separation distance of 20 cm must be maintained between the back of the display screen and
all users/bystanders. When using the WLAN transmitter, a minimum separation distance of 20 cm must
be maintained between the back of the display screen and all users/bystanders. The WWAN and WLAN
radio transmitters should be turned off before carrying the Laptop PC in order to comply with FCC/IC
RF exposure requirements.
"The equipment has been approved to [Commission Decision "CTR21"] for pan-European single terminal connection to the
Public Switched Telephone Network (PSTN). However, due to differences between individual PSTNs provided in different
countries the approval does not, of itself, give an unconditional assurance of successful operation on every PSTN network
termination point.
I
n the event of problems, you should contact your equipment supplier in the first instance.
This product is intended to be supplied by a Listed Power Unit and output rated 20 V dc, 3.25 A.
CAUTION Always disconnect all telephone lines from the wall outlet before servicing or disassembling
this equipment.
CAUTION To reduce the risk of fire use only a No. 26 AWG or larger telecommunication line cord.
Safety Information
Enclosed with each IX600 Laptop PC is the radio specific safety information. Do not proceed without
reviewing the information provided in that document.
Do not proceed beyond a WARNING or CAUTION until the indicated conditions are fully understood
and met.
Pa
g
e 99 of 100GoBook PRO II Hel
p
5/16/2005file://C:\Documents%20and%20Settin
g
s\barvill
j
.ITRXNT1\Local%20Settin
g
s\Tem
p
\~hh7...