GoPro HWHL1 Camera User Manual
GoPro, Inc. Camera
UserManual.wiki
>
GoPro
>
HWHL1 User Manual
User Manual
Navigation menu
Upload a User Manual
Namespaces
Wiki Guide
HTML
PDF
Info
Views
User Manual
Discussion / Help
Navigation
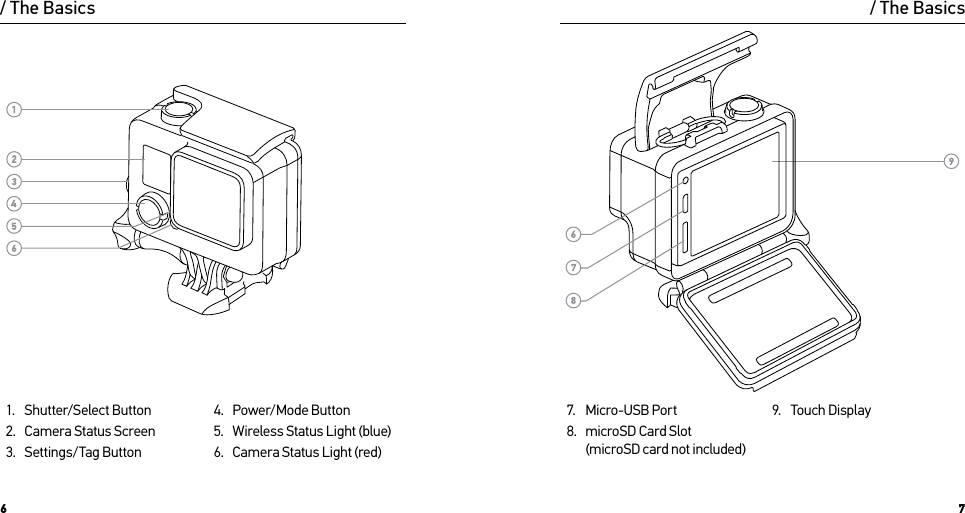
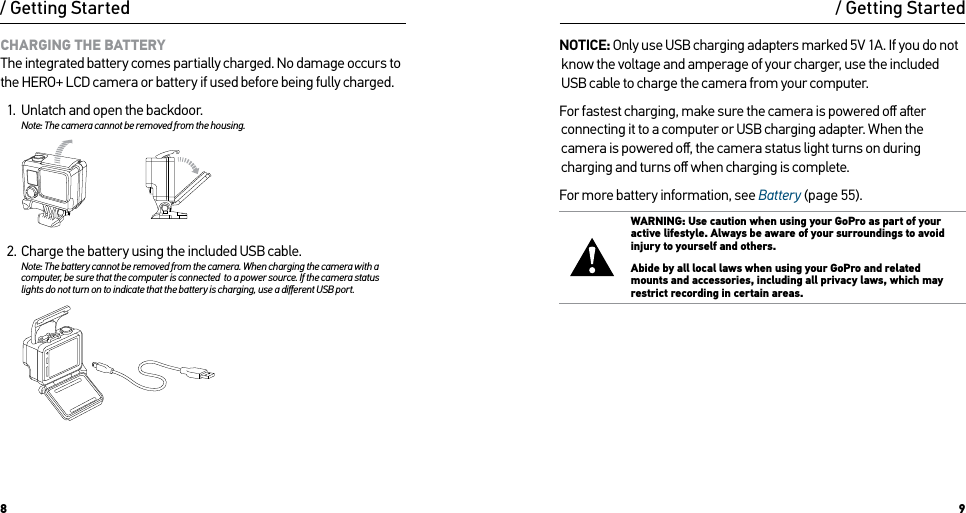
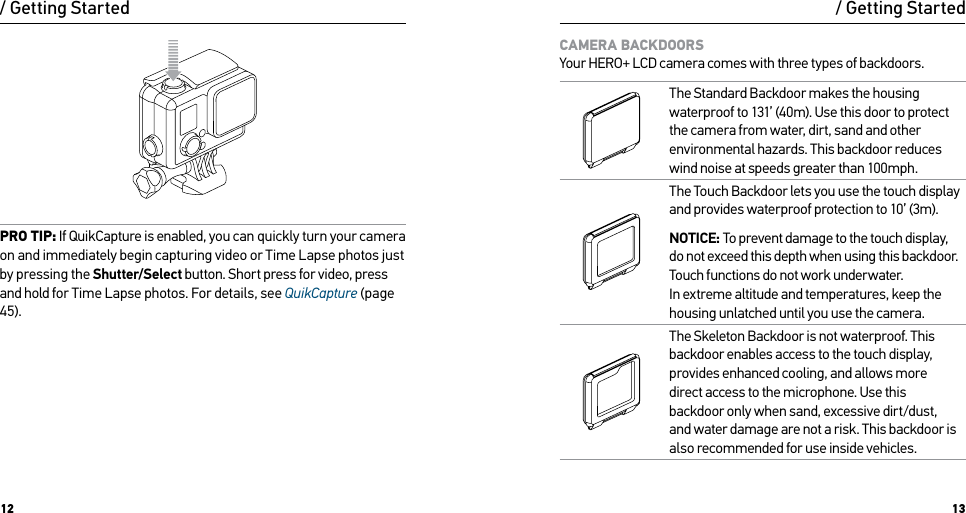
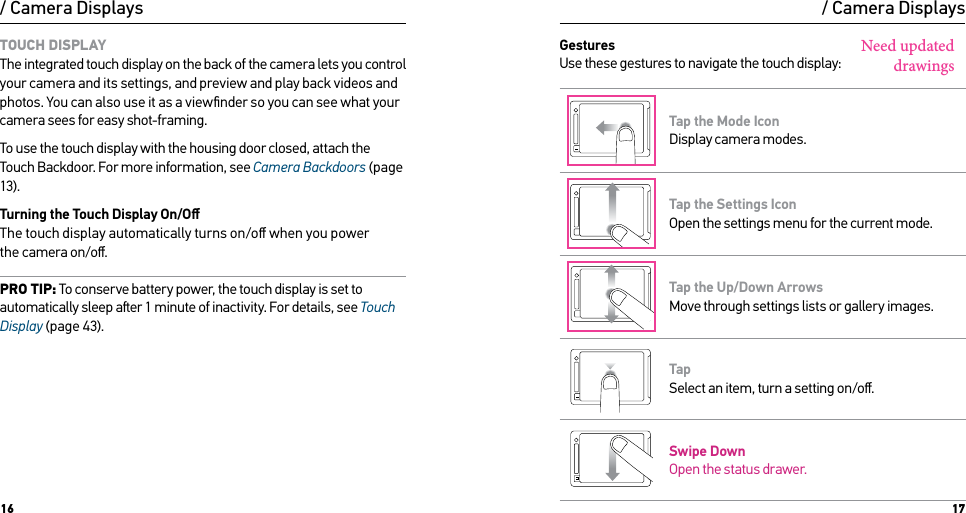
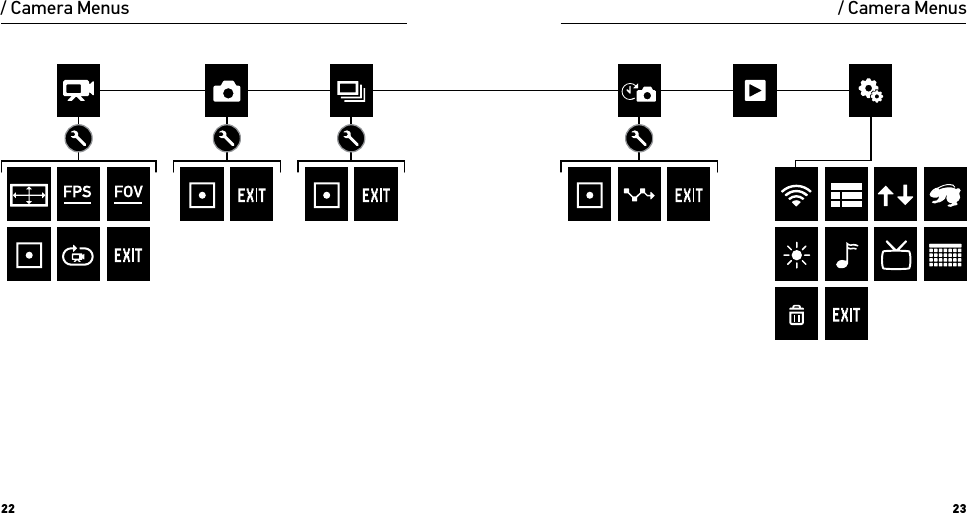
![14 15/ Camera DisplaysHERO+ LCD features a status screen on the front of the camera and a larger touch display on the back.CAMERA STATUS SCREEN The camera status screen on the front of the camera displays the following information about modes and settings:CAMERA SOFTWARE UPDATES To get the latest features and best performance from your HERO+ LCD camera, make sure you are using the most current camera soware. You can update your camera soware via the GoPro App or GoPro Studio soware. For more information, visit gopro.com/getstarted.CAMERA DEFAULT SETTINGS The HERO+ LCD camera powers up with the following default settings:Video 720p60 SuperView, Auto Low LightPhoto 7MP, Wide Field of View (FOV)Burst 10 photos in 2 seconds (5 fps)Time Lapse 0.5 secondsQuikCapture OffWireless OffPRO TIP: To open the settings menu for the current mode, tap the Settings icon [ ] or press the Settings/Tag button. To change general camera settings that apply to all modes, navigate to Setup mode./ Getting Started1. Camera Mode/FOV (field of view)2. Resolution/fps (frames per second)3. Number of Files Captured4. Remaining Time/Files on microSD CardNote: The icons that appear on the camera status screen vary by mode.5. Spot Meter (when feature is enabled)6. Time Lapse Interval/Burst Rate (not shown)7. Wireless8. Battery Life](https://usermanual.wiki/GoPro/HWHL1/User-Guide-2605203-Page-8.png)
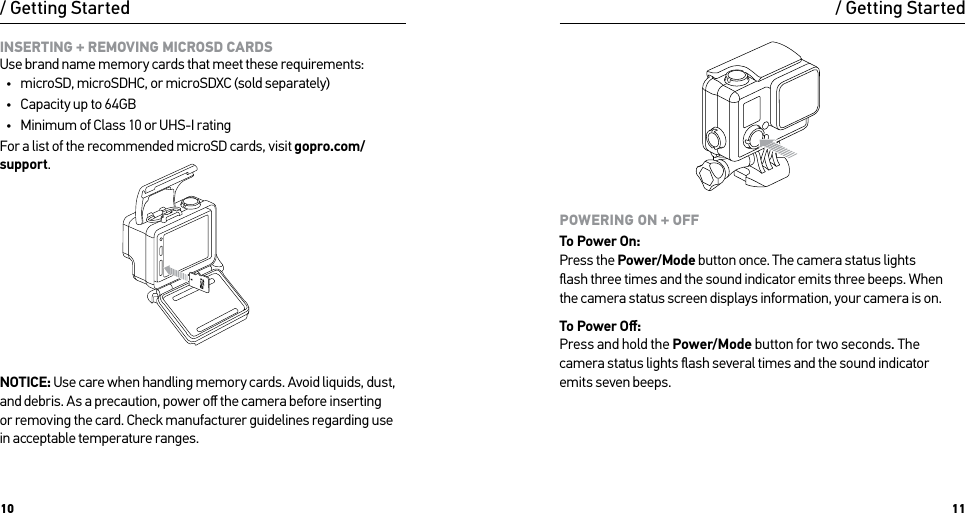
![18 19HERO+ LCD features several camera modes. Tap the mode icon on the touch display, or press the Power/Mode button repeatedly to cycle through the modes. These modes appear:Video Record videoPhoto Capture a single photoBurst Capture 10 photos in 2 seconds (5 fps)Time Lapse Capture a series of photos at specified intervalsPlayback Play back videos and photosSetup Adjust general camera settingsPRO TIP: To change settings for the current mode, press the Settings/Tag button. To change general camera settings that apply to all modes, navigate to Setup mode./ Camera ModesWith the HERO+ LCD camera, you can navigate the settings menus using the touch display or the buttons on the camera. Each camera mode has its own settings menu.To Navigate with the Touch Display:1. Verify that the camera is in the desired camera mode. To select a different mode, tap the mode icon, and then tap the desired mode.2. Tap the Settings icon [ ] to open the settings menu for that mode.Arrows indicate additional options, if available.3. Tap the down arrow to scroll through the settings for that mode.4. Tap a setting repeatedly to cycle through the options for that setting.5. To exit the settings menu, tap Exit./ Navigating Settings Menus](https://usermanual.wiki/GoPro/HWHL1/User-Guide-2605203-Page-10.png)
![28 29Time Lapse mode captures a series photos at set intervals. You can use Time Lapse to capture photos of any activity, so you can choose the best ones later. You can also stitch the photos together in editing to create a time lapse video. The resolution for these photos is 7MP with Ultra Wide FOV.CAPTURING TIME LAPSE PHOTOS1. Tap the mode icon to display the camera modes, and then tap Time Lapse [ ].2. Press the Shutter/Select button. The camera initiates countdown and the camera status lights flash each time a photo is captured.3. To stop capturing, press Shutter/Select button. The camera status lights flash three times and the camera beeps three times.PRO TIP: When QuikCapture is enabled, you can turn the camera on and immediately begin capturing Time Lapse photos just by pressing and holding the Shutter/Select button for two seconds. For details, see QuikCapture (page 45)./ Capturing Time Lapse Photos / Connecting to the GoPro AppThe free GoPro App lets you control your camera remotely using a smartphone or tablet. Features include full camera control, live preview, playback and sharing of content, and camera soware updates.TO CONNECT YOUR CAMERA TO THE GOPRO APP:1. Download the GoPro App to your smartphone or tablet from the Apple® App Store, Google Play, or Windows® Phone store.2. Open the app.3. Follow the app’s on-screen instructions to connect your camera. Note: If needed, the default password for your camera is goprohero.PRO TIP: If the camera is powered on and ready to capture videos or photos, you can press and hold the Settings/Tag button for two seconds to turn wireless on/off. You can also do this when the camera is powered off.](https://usermanual.wiki/GoPro/HWHL1/User-Guide-2605203-Page-15.png)
![30 31To play back your video and photos on a computer, you must first transfer these files to a computer. Transferring frees up space on your microSD card for new content. You can also transfer files to a computer using a card reader (sold separately).TO TRANSFER YOUR FILES TO A COMPUTER:1. Download and install GoPro Studio from gopro.com/getstarted. The HERO+ LCD camera was designed to communicate with GoPro Studio to help you easily locate and transfer your files.2. Connect the camera to your computer using the included USB cable.3. Short press the Shutter/Select button to power on the camera and open GoPro Studio Importer. 4. Follow the on-screen instructions.PRO TIP: Video files are written to your memory card in segments. When viewing this content on a computer, you might see separate files for each segment. Use GoPro Studio soware to combine the files into a longer video./ Transferring Files to a Computer / Playing Back Video and PhotosYou can play back your content on the camera’s touch display, your computer, or smartphone/tablet (using the GoPro App). You can also play back content by inserting the microSD card directly into a device, such as a computer or compatible TV.PLAYING BACK VIDEOS AND PHOTOS ON YOUR CAMERA With the HERO+ LCD touch display, you can play back your videos and photos directly on your camera.To Play Back Content Using the Touch Display:1. Tap the mode icon, and then tap Playback.2. Tap the up and down arrows to scroll through the thumbnails. Note: For Burst and Time Lapse photos, the thumbnail displays the first photo in the series.3. Tap a video or photo to open it in full-screen view.4. For video, tap [ ].5. To return to the thumbnails screen, tap [ ], and then tap [ ].6. To exit Playback mode, tap Exit.](https://usermanual.wiki/GoPro/HWHL1/User-Guide-2605203-Page-16.png)
![32 33/ Playing Back Video and PhotosTRIMMING A VIDEO With HERO+ LCD, you can save a clip from a video as a separate file. Then use the GoPro App on your smartphone/tablet to share that clip on social media sites.To Trim a Video:1. In Playback mode, tap the video that contains the clip that you want to save.2. Tap [ ], and then tap [ ]. By default, the duration of the clip is 5 seconds.3. If needed, select one of these options:• To save a longer clip, tap the 5 sec icon repeatedly to cycle through the options. You can save a clip. with a duration of 5, 15, or 30 seconds. • To save a photo of the frame in view, tap Still.4. Tap [ ] to review the clip before saving it.5. If needed, adjust the starting point of the clip by tapping the le arrow at the top of the progress bar. To adjust the ending point, tap the right arrow.Note: If you adjust the starting or ending points, the duration of the clip remains the same.6. Tap Save. The clip is saved as a separate video file. Still photos are saved as photo files. Your original video remains intact. PRO TIP: Once you trim the best moments from a video, you can delete the original file to save space on your microSD card./ Playing Back Video and PhotosTo Play Back Content Using the Camera Buttons:1. Power on the camera.2. Press the Power/Mode button repeatedly to cycle to Playback mode, then press the Shutter/Select button to select it.3. In thumbnail preview, press the Power/Mode button to cycle through the thumbnails. 4. Press the Shutter/Select button to view a thumbnail.5. To play a video, press the Power/Mode button to select [ ].6. To return to the thumbnails:a. Press the Power/Mode button to cycle to [ ], and then press the Shutter/Select button to select it.b. Press the Power/Mode button to cycle to the thumbnail icon [ ], and then press the Shutter/Select button to select it.7. To exit Playback mode, press the Power/Mode button repeatedly to cycle to Exit, then press the Shutter/Select button to select it.](https://usermanual.wiki/GoPro/HWHL1/User-Guide-2605203-Page-17.png)
![36 37VIDEO SETTINGS For instructions on changing settings, see Navigating Settings Menus (page 19).Resolution, FPS, and FOV HERO+ LCD includes the video resolutions listed below. All resolutions include Auto Low Light at the 60 fps setting. Auto Low Light automatically optimizes fps according to lighting conditions.Video ResolutionNTSC/PAL FOV Screen Resolution1080p 60/50 Ultra Wide 1920x1080, 16:91080p 30/25 Ultra Wide 1920x1080, 16:9720p SuperView 60/50 Ultra Wide 1280x720, 16:9PRO TIP: To open the settings menu for the current mode, tap the Settings icon [ ] on the touch display or press the Settings/Tag button. To change general camera settings that apply to all modes, navigate to Setup mode./ SettingsVideo Resolution Best Use1080p60 Great for capturing fast action at the highest resolution.1080p30 Good for capturing content in low-light conditions. 720p SuperViewSuperView delivers the world’s most immersive field of view. Great for point-of-view shots or when you want to capture more vertical content, such as the sky or land.PRO TIP: Easily create epic GoPro-style videos using free GoPro Studio soware. Learn more and download this soware at gopro.com/getstarted./ Settings](https://usermanual.wiki/GoPro/HWHL1/User-Guide-2605203-Page-19.png)
![38 39/ SettingsSPOT METERSpot Meter is good for filming into a setting where the lighting is different from where you are, such as filming the outdoors from within a car or filming a shaded environment while standing in the sun. Spot Meter automatically sets the exposure based on a single spot in the middle of the image. When Spot Meter is turned on, [ ] appears on the camera displays. The options for this setting are Off (default) and On.Note: Changes that you make to the Spot Meter setting in Video mode apply only to video capture. To adjust this setting for another mode (Photo, Burst, or Time Lapse), adjust the setting within that mode.LOOPINGLooping lets you continuously record and save only the best moments, which helps to conserve space on your microSD card. Available intervals for looping are 5, 20, 60, and 120 minutes. For example, if you select a 5-minute interval, the previous 5 minutes is saved when you stop recording.You can also select Max as the interval for Looping. With this option, the camera records until the memory card is full, then overwrites the content. The default option for Looping is Off.Note: To use Looping, be sure that your microSD card has sufficient space to create the loop segment based on the interval that you select. If the microSD card becomes full, Looping does not overwrite the content.PRO TIP: Files are written to your memory card in segments. When viewing this content on a computer, you might see separate files for each time segment. Use GoPro Studio soware to combine the files into a longer video./ Settings](https://usermanual.wiki/GoPro/HWHL1/User-Guide-2605203-Page-20.png)
![40 41PHOTO SETTINGS For instructions on changing settings, see Navigating Settings Menus (page 19).INTERVALThis setting applies only to Time Lapse mode. Interval determines the amount of time that passes between each captured frame. Available intervals for Time Lapse range from 0.5 seconds (default) to 60 seconds.Interval Examples0.5-2 seconds Surfing, biking, or other sport2 seconds Busy street corner5-10 seconds Sunset10-60 seconds Lengthy activities, such as construction projects/ SettingsSPOT METERThis setting applies to all photo capture modes: Photo, Burst, and Time Lapse. Spot Meter is good for capturing photos where the lighting is different from where you are, such as capturing the outdoors from within a car or capturing a shaded environment while standing in the sun. Spot Meter automatically sets the exposure based on a single spot in the middle of the image. When Spot Meter is turned on, [ ] appears on the camera displays. The options for this setting are Off (default) and On.Note: Changes that you make to the Spot Meter setting in one mode (Photo, Burst, or Time Lapse) apply only to that mode. To adjust this setting for another mode, adjust the setting within that mode./ Settings](https://usermanual.wiki/GoPro/HWHL1/User-Guide-2605203-Page-21.png)
![44 45/ Setup ModeORIENTATIONThis setting eliminates the need to flip your video during editing when the camera is mounted upside down. Setting DescriptionUp (default) Camera is used right-side up.Down Camera is used upside down./ Setup ModeQUIKCAPTUREWith QuikCapture, you can quickly turn your camera on and begin capturing video or Time Lapse photos. The options for this setting are On and Off (default).Note: You cannot start QuikCapture with the GoPro remote or the GoPro App.To Capture Video with QuikCapture: With the camera powered off, press and release the Shutter/Select button. Your camera automatically powers on and begins capturing video.To Capture Time Lapse Photos with QuikCapture: With the camera powered off, press and hold the Shutter/Select button until you see the Time Lapse icon [ ]. Your camera automatically powers on and begins capturing Time Lapse photos.To Stop Recording: Press and release the Shutter/Select button to stop recording and power off the camera.](https://usermanual.wiki/GoPro/HWHL1/User-Guide-2605203-Page-23.png)