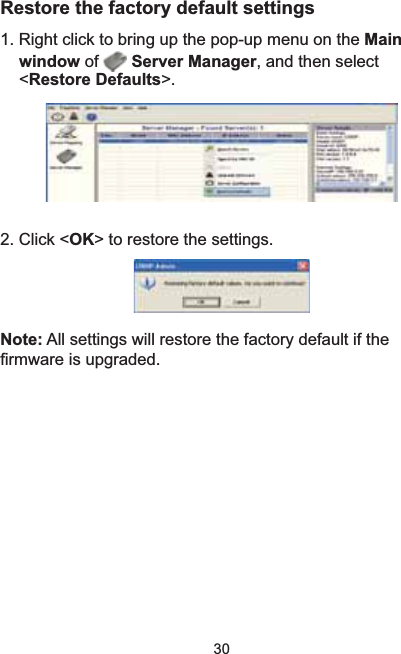
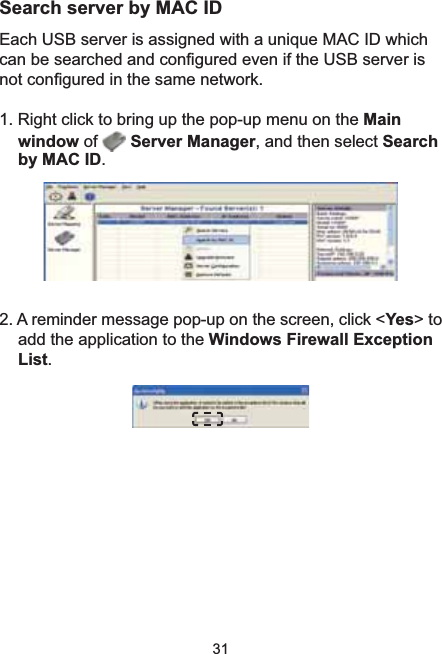
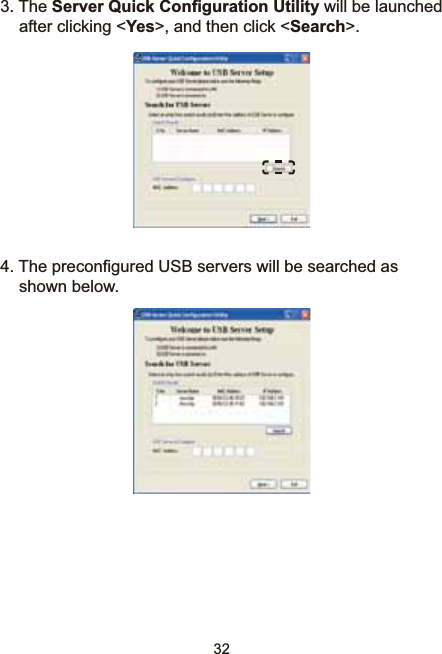
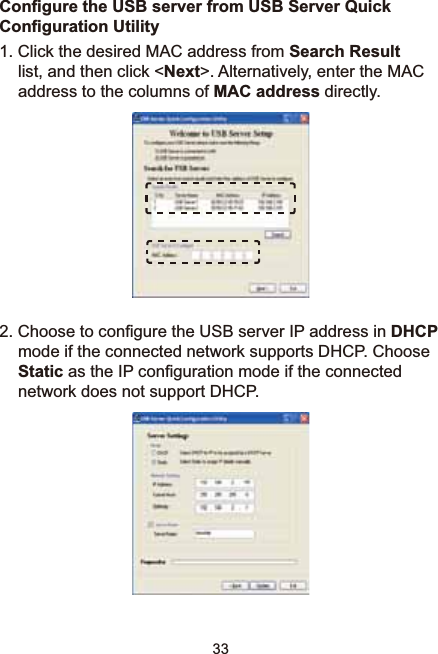
Good Way Technology FW2140 4 Port Wireless USB Server User Manual
Good Way Technology Co., Ltd. 4 Port Wireless USB Server
UserManual.wiki
>
Good Way Technology
>
FW2140 User Manual
Manual r1
Navigation menu
Upload a User Manual
Namespaces
Wiki Guide
HTML
PDF
Info
Views
User Manual
Discussion / Help
Navigation

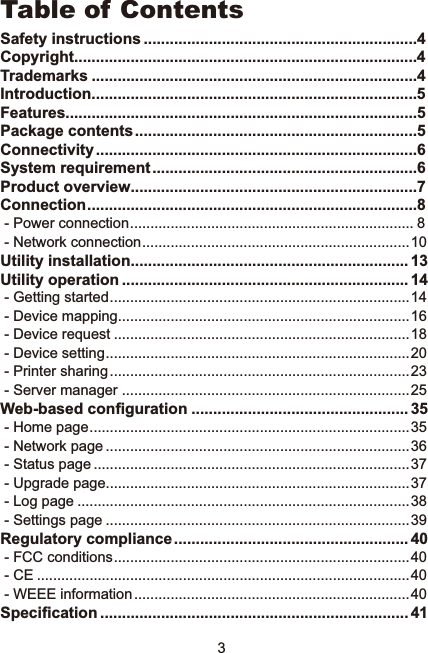

![5IntroductionThis server allows you to control the USB devices (such as multi-function printer, scanner, keyboard and etc.) using a computer through a network. it provides USB2.0 full-speed data transmission rate up to 480Mbps, and 4 USB device connections are supported. Except the Ethernet connection, the built-in WiFi connection allows you to access these USB devices without 5 meters limitation of USB cable.FeaturesŶ&RPSOLDQWZLWK86%YHUVLRQVSHFL¿FDWLRQŶ+LJKVSHHG86%GDWDWUDQVPLVVLRQUDWHXSWR0ESVŶ0ESV(WKHUQHWSRUWIRU/$1ŶEJQ:L)LIRUZLUHOHVV/$1Ŷ&HQWUDOL]HGUHPRWH86%VHUYHUPDQDJHPHQWŶ&HQWUDOL]HGUHPRYHGHYLFHVWDWXVPRQLWRULQJŶ.9'&(6'LPPXQLW\WR86%SRUWŶ',1UDLOPRXQWDEOHPackage contentsŶWireless USB server x1Ŷ&''ULYHU8VHU¶V0DQXDO[Ŷ3RZHUDGDSWHU$8(88.86DGDSWHUFRQYHUWHUincluded)](https://usermanual.wiki/Good-Way-Technology/FW2140/User-Guide-1560090-Page-5.png)
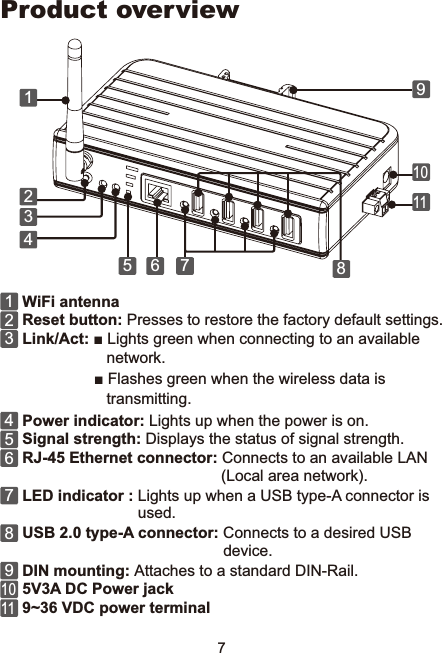
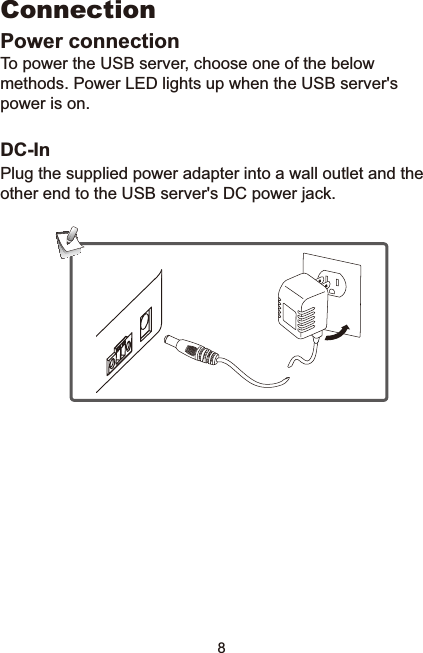
![6Connectivity- The USB server provides the following connections to your USB devicesŶ86%+LJKVSHHGSRUWVŶ)XOOP$SRZHUSURYLGHGWRHDFKSRUW- The USB Server provides the following connections to your NetworkŶ5-(WKHUQHWFRQQHFWRUŶ0ESVDXWRVHQVLQJ$XWR0',;FDSDEOHŶ,3DGGUHVVLQJ6WDWLF'+&3System requirementŶ,%0FRPSDWLEOHFRPSXWHURU0DFŶ:LQGRZV®:LQGRZV9LVWD®:LQGRZV;3®ELWWindows 2000 ® and Mac OS®;Ŷ%XLOWLQ86%SRUWFRPSXWHUŶ0%5$0RUKLJKHUŶ3HQWLXP®0+]RUKLJKHUŶ0DFLQWRVK0DF26;RUODWHUŶ/LQX[RU/DWHU](https://usermanual.wiki/Good-Way-Technology/FW2140/User-Guide-1560090-Page-6.png)
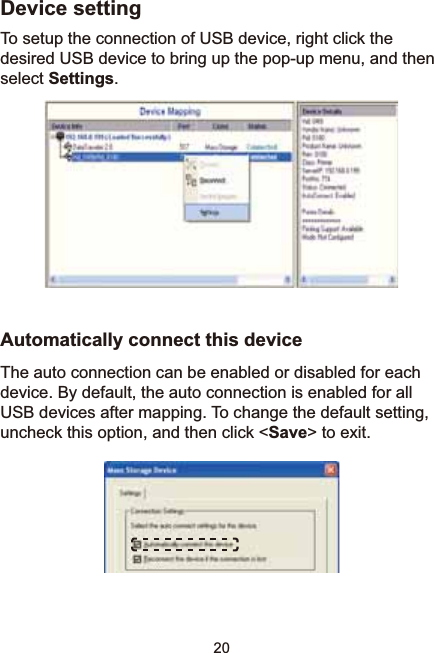
![13Utility installationNote that the following descriptions of software installation and operations are on the Windows Operation System platform. Although the screen shots shown on this XVHU¶VPDQXDOPD\QRWPDWFK\RXURSHUDWLRQV\VWHPWKHGH¿QLWLRQVRIEXWWRQVWDEVDQGPHQXVDUHWKHVDPH,QVHUWWKHVXSSOLHGGULYHU&'LQWR\RXUFRPSXWHUV&''9'520'RXEOHFOLFNWKHLQVWDOODWLRQ¿OHWRVWDUWWKHLQVWDOODWLRQZL]DUGDQGWKHQIROORZWKHRQVFUHHQLQVWUXFWLRQVWRcomplete the installation procedure. 3. Click <Yes!WRDGGWKHXWLOLW\WRWKH¿UHZDOOH[FHSWLRQOLVWwhen the utility dialog window pop-up on the screen.4. The utility's shortcut will appear on the system tray when the installation is complete. Note: Please install the utility before connecting the USB server to a computer.](https://usermanual.wiki/Good-Way-Technology/FW2140/User-Guide-1560090-Page-13.png)


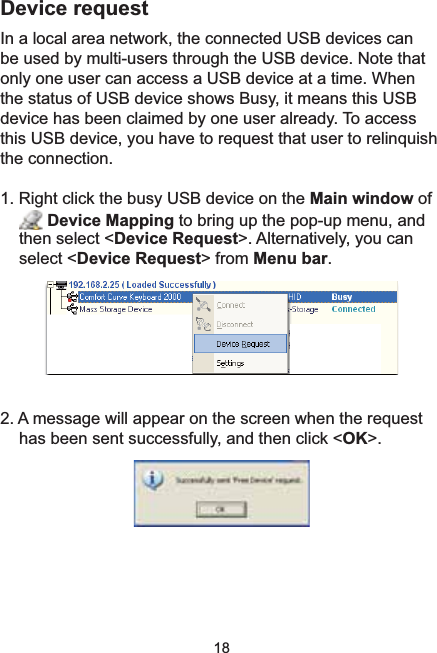
![174. By default, all the detected USB devices will be connected automatically when mapping procedure is ¿QLVKHG,IWKHVWDWXVRI86%GHYLFHVKRZVDisconnect,right click on the main window of Device Mapping tobring up the pop-up menu and then select < Connect!WRYLUWXDOL]HVWKH86%GHYLFHRQWR\RXUFRPSXWHU5. To disable the connection, right click the desired USB device on the Main window of Device Mapping, and then select < Disconnect >.](https://usermanual.wiki/Good-Way-Technology/FW2140/User-Guide-1560090-Page-17.png)