Good Way Technology FW2140 4 Port Wireless USB Server User Manual
Good Way Technology Co., Ltd. 4 Port Wireless USB Server
Manual r1

4-Port Wireless
USB Server
User's Manual
3
Table of Contents
Safety instructions ...............................................................4
Copyright...............................................................................4
Trademarks ...........................................................................4
Introduction...........................................................................5
Features.................................................................................5
Package contents.................................................................5
Connectivity..........................................................................6
System requirement.............................................................6
Product overview..................................................................7
Connection............................................................................8
- Power connection...................................................................... 8
- Network connection..................................................................10
Utility installation................................................................ 13
Utility operation .................................................................. 14
- Getting started..........................................................................14
- Device mapping........................................................................16
- Device request .........................................................................18
- Device setting...........................................................................20
- Printer sharing..........................................................................23
- Server manager .......................................................................25
:HEEDVHGFRQ¿JXUDWLRQ .................................................. 35
- Home page...............................................................................35
- Network page ...........................................................................36
- Status page ..............................................................................37
- Upgrade page...........................................................................37
- Log page ..................................................................................38
- Settings page ...........................................................................39
Regulatory compliance...................................................... 40
- FCC conditions.........................................................................40
- CE ............................................................................................40
- WEEE information....................................................................40
6SHFL¿FDWLRQ ....................................................................... 41
4
Before attempting to connect, operate or adjust this product, please
save and read the User's Manual completely. The style of the
product shown in this User's Manual may be different from the actual
unit due to various models.
Safety instructions
Always read the safety instructions carefully:
Ŷ.HHSWKLV8VHU¶V0DQXDOIRUIXWXUHUHIHUHQFH
Ŷ.HHSWKLVHTXLSPHQWDZD\IURPKXPLGLW\
Ŷ,IDQ\RIWKHIROORZLQJVLWXDWLRQDULVHVJHWWKHHTXLSPHQW
checked by a service technician:
• The equipment has been exposed to moisture.
• The equipment has been dropped and damaged.
• The equipment has obvious sign of breakage.
• The equipment has not been working well or cannot get
LWWRZRUNDFFRUGLQJWRWKH8VHU¶V0DQXDO
Copyright
This document contains proprietary information protected
by copyright. All right are reserved. No part of this manual
may be reproduced by any mechanical, electronic or other
means, in any form, without prior written permission of the
manufacturer.
Trademarks
All trademarks and registered trademarks are the property
of their respective owners or companies.
5
Introduction
This server allows you to control the USB devices (such as
multi-function printer, scanner, keyboard and etc.) using a
computer through a network. it provides USB2.0 full-speed
data transmission rate up to 480Mbps, and 4 USB device
connections are supported. Except the Ethernet connection,
the built-in WiFi connection allows you to access these USB
devices without 5 meters limitation of USB cable.
Features
Ŷ&RPSOLDQWZLWK86%YHUVLRQVSHFL¿FDWLRQ
Ŷ+LJKVSHHG86%GDWDWUDQVPLVVLRQUDWHXSWR0ESV
Ŷ0ESV(WKHUQHWSRUWIRU/$1
ŶEJQ:L)LIRUZLUHOHVV/$1
Ŷ&HQWUDOL]HGUHPRWH86%VHUYHUPDQDJHPHQW
Ŷ&HQWUDOL]HGUHPRYHGHYLFHVWDWXVPRQLWRULQJ
Ŷ.9'&(6'LPPXQLW\WR86%SRUW
Ŷ',1UDLOPRXQWDEOH
Package contents
Ŷ
Wireless USB server
x1
Ŷ&''ULYHU8VHU¶V0DQXDO[
Ŷ3RZHUDGDSWHU$8(88.86DGDSWHUFRQYHUWHU
included)
6
Connectivity
- The USB server provides the following connections to your
USB devices
Ŷ86%+LJKVSHHGSRUWV
Ŷ)XOOP$SRZHUSURYLGHGWRHDFKSRUW
- The USB Server provides the following connections to
your Network
Ŷ5-(WKHUQHWFRQQHFWRU
Ŷ0ESVDXWRVHQVLQJ$XWR0',;FDSDEOH
Ŷ,3DGGUHVVLQJ6WDWLF'+&3
System requirement
Ŷ,%0FRPSDWLEOHFRPSXWHURU0DF
Ŷ:LQGRZV®:LQGRZV9LVWD®:LQGRZV;3®ELW
Windows 2000 ® and Mac OS®;
Ŷ%XLOWLQ86%SRUWFRPSXWHU
Ŷ0%5$0RUKLJKHU
Ŷ3HQWLXP®0+]RUKLJKHU
Ŷ0DFLQWRVK0DF26;RUODWHU
Ŷ/LQX[RU/DWHU
7
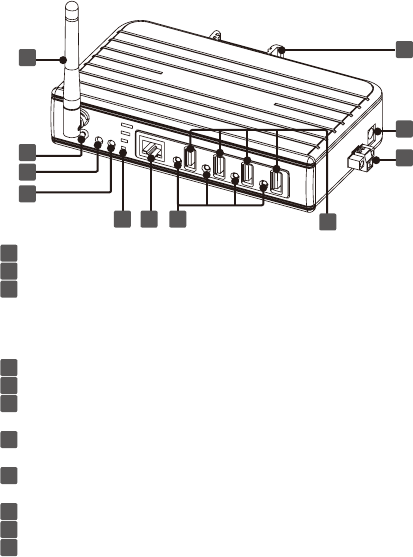
Product overview
8
9
10
11
765
4
3
2
1
1 WiFi antenna
2 Reset button: Presses to restore the factory default settings.
3 Link/Act: ŶLights green when connecting to an available
network.
ŶFlashes green when the wireless data is
transmitting.
4 Power indicator: Lights up when the power is on.
5 Signal strength: Displays the status of signal strength.
6 RJ-45 Ethernet connector: Connects to an available LAN
(Local area network).
7 LED indicator : Lights up when a USB type-A connector is
used.
8 USB 2.0 type-A connector: Connects to a desired USB
device.
9 DIN mounting: $WWDFKHVWRDVWDQGDUG',15DLO
10 5V3A DC Power jack
11 9~36 VDC power terminal

8
Connection
Power connection
To power the USB server, choose one of the below
methods. Power LED lights up when the USB server's
power is on.
DC-In
Plug the supplied power adapter into a wall outlet and the
other end to the USB server's DC power jack.
9
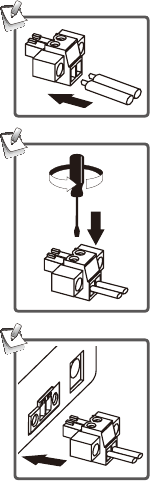
Power cable
,QVHUWWKHFDEOHLQWRWKHSRZHU
terminal block.
2. Tighten the screw using
screwdriver.
3. Plug the power terminal block into
the USB server according to the
connector's orientation.
10
Network connection
This USB server can connect to an available LAN (Local
Area Network) using wire or wireless. Select one of the
following methods to connect the USB server. Note that the
connection diagrams shown below are examples only. The
real applications may be different from the actual conditions.
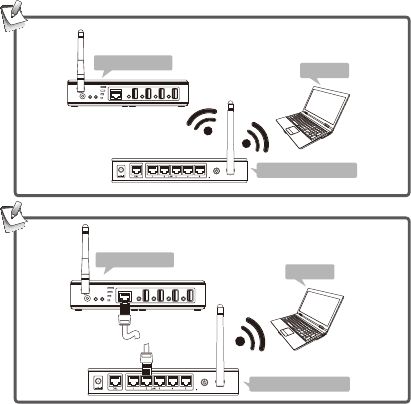
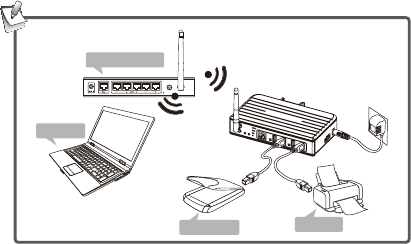
Wireless connection
Wireless
Wireless
USB server Laptop
Wireless router
Cable
Wireless
USB server
Wireless router
Laptop
7KHGHYLFHRIURXWHUFDQEHD'6/URXWHU(WKHUQHW+XE6ZLWFK
RU[URXWHUEDVHVWDWLRQ
11
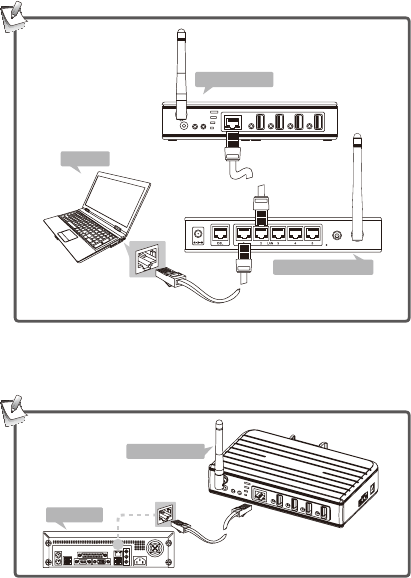
Wire connection
Cable
Cable
USB server
Laptop
Wireless router
PC connection
Connect the USB server to a computer using Ethernet cable
directly if you do not have a network.
Cable
USB server
Desktop
12
USB devices connection
Connect USB device(s) to the USB server when the USB
server has been connected to a LAN. The supported USB
devices of this USB server are USB printers, USB multi-
function printers, USB scanners, USB hard drives, USB
+,'GHYLFHVLHNH\ERDUGVDQGPLFH86%FDPHUDV86%
$XGLR9LGHRSURGXFWVDQGHWF
Note:,QVWDOOWKH86%GHYLFHVGULYHUVEHIRUHFRQQHFWLQJWR
the USB server is recommended.
USB server
Laptop
Scanner Printer
Wireless
Wireless
USB
cable
USB
cable
13
Utility installation
Note that the following descriptions of software installation
and operations are on the Windows Operation System
platform. Although the screen shots shown on this
XVHU¶VPDQXDOPD\QRWPDWFK\RXURSHUDWLRQV\VWHPWKH
GH¿QLWLRQVRIEXWWRQVWDEVDQGPHQXVDUHWKHVDPH
,QVHUWWKHVXSSOLHGGULYHU&'LQWR\RXUFRPSXWHUV&'
'9'520
'RXEOHFOLFNWKHLQVWDOODWLRQ¿OHWRVWDUWWKHLQVWDOODWLRQ
ZL]DUGDQGWKHQIROORZWKHRQVFUHHQLQVWUXFWLRQVWR
complete the installation procedure.
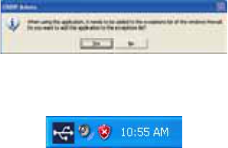
3. Click <Yes!WRDGGWKHXWLOLW\WRWKH¿UHZDOOH[FHSWLRQOLVW
when the utility dialog window pop-up on the screen.
4. The utility's shortcut will appear on the system tray when
the installation is complete.
Note: Please install the utility before connecting the USB
server to a computer.
14
Utility operation
7KH86%,3$GPLQ8WLOLW\FDQGHWHFWWKH86%GHYLFHV
which are connected to the USB server. With the utility, the
connected USB devices can be used by different users
as long as the users are connecting to the same LAN and
XQGHUWKHVDPH,3VXEQHW
The USB server is designed for monopoly type connection
which means the USB device can be used by one user at
DWLPH7RDFFHVVWKHRFFXSLHG86%GHYLFHWKH¿UVWXVHU
has to
relinquish
the connection to other user.
,QFDVHRI
printers, the USB server utility can be shared with different
XVHUVVLPXOWDQHRXVO\5HIHUWRPrinter sharing chapter for
more details.
Getting started
,QVWDOOWKHXWLOLW\RI86%VHUYHUUHIHUWR
Utility installation
chapter
) and USB device drivers (refer to the USB device
user's manual) to the computer you wish to connect.
2. Power on the USB device, refer to the Connection >
Power connection chapter.
3. Connect the USB server to a computer, refer to the
Connection > Wireless connection or Wire connection
chapter.
4. Launch the utility.
15
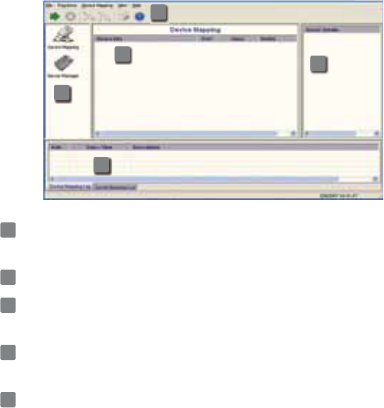
5. Utility's main menu.
2
34
5
1
1Menu bar: Presents the command list and graphic user
interfaces.
2Function Panel: Lists the function of USB server utility.
3Main window: Lists the connected device server and
USB devices.
4Server/Device Details Panel: Displays the detailed
information which are selected on the main window.
5Log panel: List the log of the USB server. Shows useful
PHVVDJHVRIWKHXVHU¶VSURFHVVLQJKLVWRU\
16
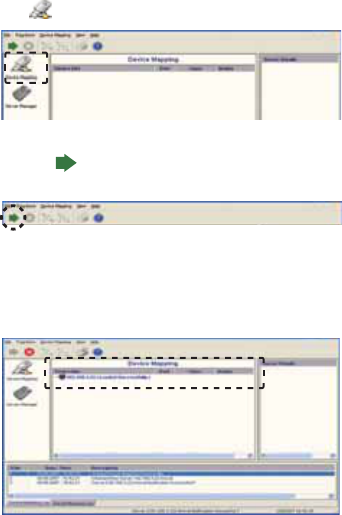
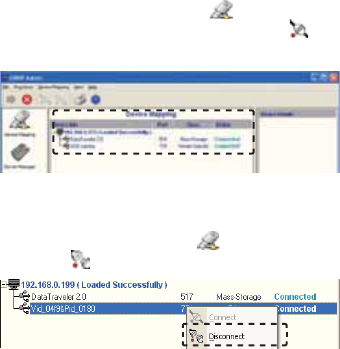
Device mapping
1. Click < Device Mapping > on the function panel.
2. Click the < > on the toolbar to start the device
mapping after connecting USB devices.
3. All the connected USB devices will be listed as a tree
hierarchy under the USB server on the main window after
a while.
17
4. By default, all the detected USB devices will be
connected automatically when mapping procedure is
¿QLVKHG,IWKHVWDWXVRI86%GHYLFHVKRZVDisconnect,
right click on the main window of Device Mapping to
bring up the pop-up menu and then select < Connect
!WRYLUWXDOL]HVWKH86%GHYLFHRQWR\RXUFRPSXWHU
5. To disable the connection, right click the desired USB
device on the Main window of Device Mapping, and
then select < Disconnect >.
18
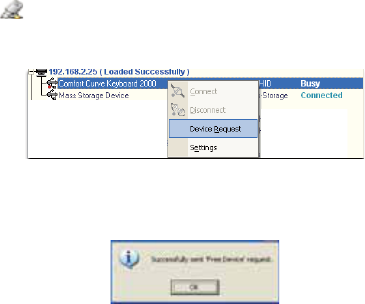
Device request
,QDORFDODUHDQHWZRUNWKHFRQQHFWHG86%GHYLFHVFDQ
be used by multi-users through the USB device. Note that
only one user can access a USB device at a time. When
the status of USB device shows Busy, it means this USB
device has been claimed by one user already. To access
this USB device, you have to request that user to relinquish
the connection.
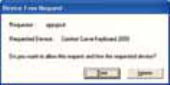
5LJKWFOLFNWKHEXV\86%GHYLFHRQWKHMain window of
Device Mapping to bring up the pop-up menu, and
then select <Device Request>. Alternatively, you can
select <Device Request> from Menu bar.
2. A message will appear on the screen when the request
has been sent successfully, and then click <OK>.
19
3. The current user which is accessing the USB device
will receive a Device Free Request message as shown
below.
4. The current user can either click <Free> to release the
USB device or click <Ignore> the reject the request.
20
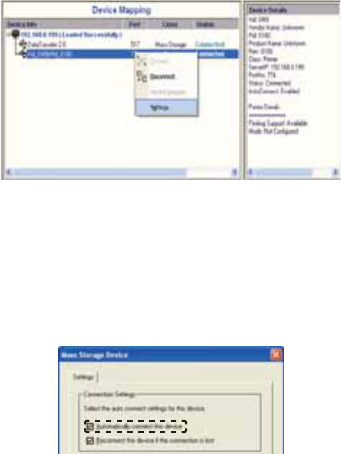
Device setting
To setup the connection of USB device, right click the
desired USB device to bring up the pop-up menu, and then
select Settings.
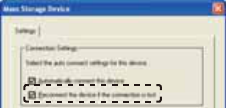
Automatically connect this device
The auto connection can be enabled or disabled for each
device. By default, the auto connection is enabled for all
USB devices after mapping. To change the default setting,
uncheck this option, and then click <Save> to exit.
21
Reconnect the device if the connection is loss
You may re-establish the connection back with the device
if disconnecting. To enable the auto re-connect back to the
network as your default setting, tick this option, otherwise
re-connect the network manually. To exit the setting window,
click <Save>.
Note: The reasons for disconnection may include the
following: USB server is power cycled, USB device is
XQSOXJJHGQHWZRUN¶VFDEOHLVXQSOXJJHGDQGHWF
22
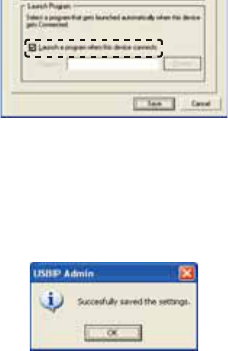
Auto launch the program
$XWRODXQFKHVDVSHFL¿FDSSOLFDWLRQZKHQWKHVSHFL¿F86%
device is connected.
1. Tick Launch a program when this device connects
option.
2. Click <Browse> to set the path of the application which
needs to be launched, then click <Save> to exit the
dialog window.
3. A message as shown below will appear on the screen if
the setting is successful, and then click <OK!WRFRQ¿UP
Note:7KHVSHFL¿FDSSOLFDWLRQZLOOEHODXQFKHGRQO\ZKHQ
WKHVSHFL¿F86%GHYLFHLVFRQQHFWHG
23
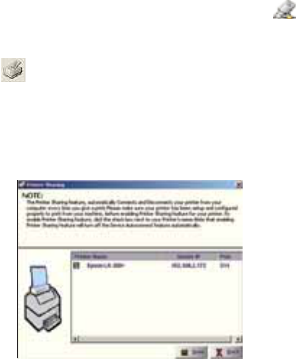
Printer sharing
This application enables the connected printer as a printer
server. To share the printer among multiple users, follow the
steps below.
,QVWDOOWKHSULQWHUGULYHUWRDFOLHQW3&DWOHDVW
2. Connect the printer to the USB server.
3. Disconnect the printer from the main window of
Device Mapping.
4. Click the Printer Sharing button on the Menu bar to
open the Printer Sharing window.
5. When the Printer Sharing window is opened, the
connected printers will be scanned, saved and listed.
24
6. Tick the printer which is connected, and then click
<Save> button to close the window.
7. Once the printer is set to a printer server, it remains free
except the printer is accessed and becomes Busy when
a user prints to the printer. The printing jobs from multiple
user will be executed on a time sharing basis.
Remove the obsolete printer
To remove the obsolete printer, right click the selected
printer, and then select <Remove> option on the Printer
Sharing window. The obsolete printer means the driver
KDVEHHQXQLQVWDOOHGIURPDFOLHQWXVHU5HPRYHWKHSULQWHU
which is not an obsolete printer is banned. The user will
receive the message as Printer XXX: Is not an obsolete
Printer!!.
Note:
,IDSULQWHUKDVEHHQVHWLQSULQWHUVKDULQJPRGHWKHAuto
Connect will be turned off.
,IWU\WRHQDEOHWKHAuto Connect function for a printer
which is in the printer sharing mode through device
setting, a message will pop-up and show that it cannot be
FRQ¿JXUHGWRAuto Connect mode as its Printer Sharing
mode is already enabled.
25
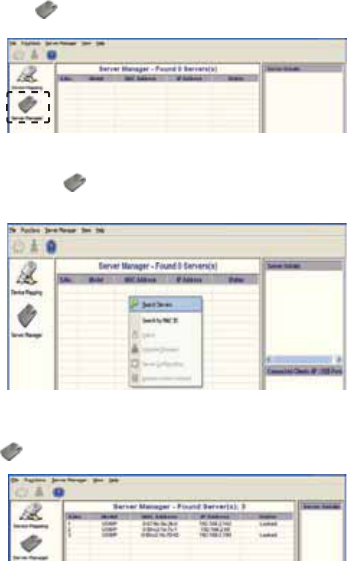
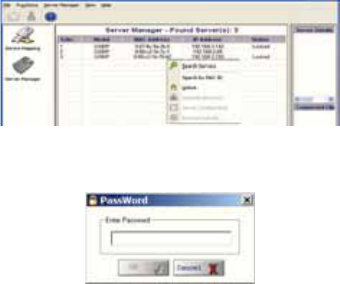
Server manager
1. Click < Server Manager > from function panel.
5LJKWFOLFNWREULQJXSDSRSXSPHQXRQWKHMain
window of Server Manager, and then select
<Search Servers>.
3. All the searched server will be listed on the Main window
of Server Manager as shown below.
26
4. By default, the USB server is protected by a password.
7RFRQ¿JXUHWKH86%VHUYHUWKHXQORFNSURFHGXUHLV
necessary.
5LJKWFOLFNDQGVHOHFWUnlock> to bring up the password
dialog window.
.H\LQWKHSDVVZRUG7KHGHIDXOWSDVVZRUGIRUWKH86%
server is "usbip".
7. The message of Unlock OK appears on the screen when
the authentication is successful. Now the USB server can
EHFRQ¿JXUHG
27
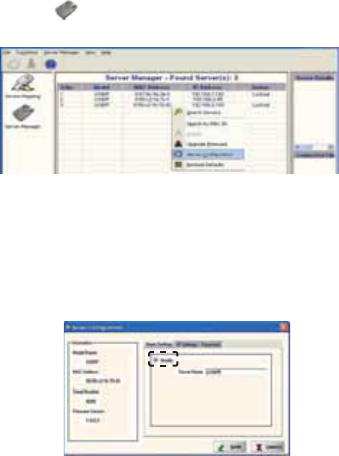
6HUYHUFRQ¿JXUDWLRQ
5LJKWFOLFNWREULQJXSWKHSRSXSPHQXRQWKHMain
window of Server Manager, and then select <Server
&RQ¿JXUDWLRQ>.
2. The 6HUYHU&RQ¿JXUDWLRQ window will appear on the
screen.
2-1 Rename the server
1. Click <Basic Settings> tab, and then tick checkbox of
<Modify>.
2. Enter a desired name to the column of Server Name.
3. Click <Save!WRFRQ¿UP
28
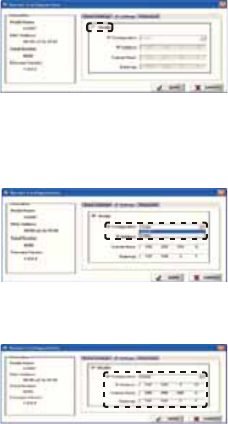
2-2 Change the IP address
1. Click <IP Setting> tab, and then tick the checkbox of
<Modify>.
Note:%\GHIDXOWWKH,3DGGUHVVRIWKLVVHUYHULV
192.168.3.22.
6HOHFWDSUHIHUUHG,3FRQ¿JXUDWLRQ
3. Enter the desired IP address,Subnet Mask and Gate
Way, and then click <Save!WRFRQ¿UP
29
4. A successful message appears on the screen after
click <Save>.
Note:(DFKGHYLFHLVLGHQWL¿HGE\LWVXQLTXH,3DGGUHVVLQ
WKHQHWZRUN'RQRWXVHWKH,3DGGUHVVZKLFKKDVEHHQ
assigned to other device already.
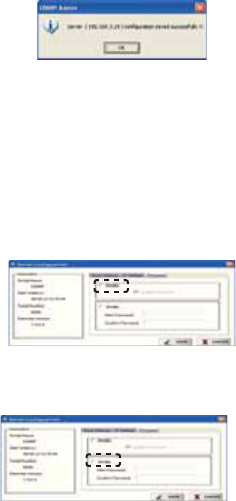
2-3 Enable, disable or change the password
1. Click the <Password> tab.
2. Tick the checkbox of upper <Modify> to enable or
disable the password option.
3. Tick the checkbox of lower <Modify> to change your
password.
30
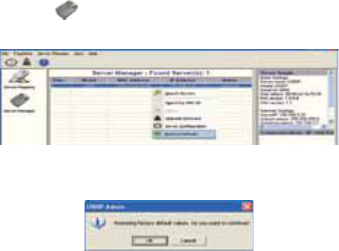
Restore the factory default settings
5LJKWFOLFNWREULQJXSWKHSRSXSPHQXRQWKHMain
window of Server Manager, and then select
<Restore Defaults>.
2. Click <OK> to restore the settings.
Note: All settings will restore the factory default if the
¿UPZDUHLVXSJUDGHG
31
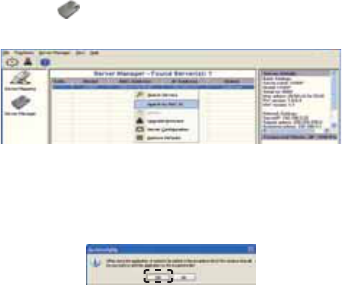
Search server by MAC ID
(DFK86%VHUYHULVDVVLJQHGZLWKDXQLTXH0$&,'ZKLFK
FDQEHVHDUFKHGDQGFRQ¿JXUHGHYHQLIWKH86%VHUYHULV
QRWFRQ¿JXUHGLQWKHVDPHQHWZRUN
5LJKWFOLFNWREULQJXSWKHSRSXSPHQXRQthe Main
window of Server Manager, and then select Search
by MAC ID.
2. A reminder message pop-up on the screen, click <Yes> to
add the application to the Windows Firewall Exception
List.
32
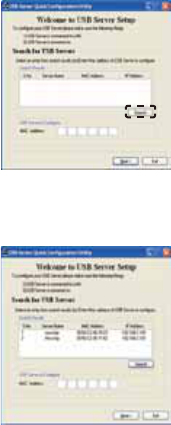
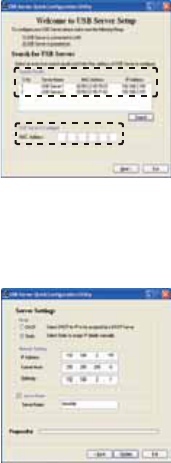
3. The 6HUYHU4XLFN&RQ¿JXUDWLRQ8WLOLW\ will be launched
after clicking <Yes>, and then click <Search>.
7KHSUHFRQ¿JXUHG86%VHUYHUVZLOOEHVHDUFKHGDV
shown below.
33
&RQ¿JXUHWKH86%VHUYHUIURP86%6HUYHU4XLFN
&RQ¿JXUDWLRQ8WLOLW\
1. Click the desired MAC address from Search Result
list, and then click <Next>. Alternatively, enter the MAC
address to the columns of MAC address directly.
&KRRVHWRFRQ¿JXUHWKH86%VHUYHU,3DGGUHVVLQDHCP
mode if the connected network supports DHCP. Choose
StaticDVWKH,3FRQ¿JXUDWLRQPRGHLIWKHFRQQHFWHG
network does not support DHCP.
34
3. Tick checkbox of Server Name to assign a desired user
QDPHIRULGHQWL¿FDWLRQ2QFHWKHVHWWLQJVKDYHEHHQ
completed, click <Update> to apply.
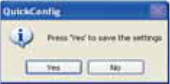
4. Click <Yes!WRVDYHWKHVHWWLQJVLIWKHHQWHUHG,3VHWWLQJV
are correct.
35
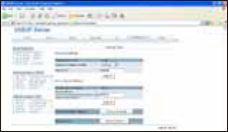
:HEEDVHGFRQÀJXUDWLRQ
7RFRQ¿JXUHWKH86%VHUYHUXVLQJZHEEURZVHUODXQFKD
ZHEEURZVHUDQGHQWHUWKH,3DGGUHVVRIWKH86%VHUYHU
%\GHIDXOWWKH86%VHUYHUV,3DGGUHVVLV
2. Enter the user name and password, and then click
<Submit> to enter. The default user name is "admin"
and the password is "usbip".
6HYHUDOFRQ¿JXUDWLRQSDJHVDUHFRQWDLQHGZKHQWKH
ZHEFRQ¿JXUDWLRQLVRSHQHG&OLFNRQHRIWKHSDJHVWR
FRQ¿JXUHWKH86%VHUYHU
Home page
Displays the information of USB server, such as Server
QDPHQHWZRUNVHWWLQJV¿UPZDUHYHUVLRQDQGHWF
36
Network page
The contents of network page will be changed depending
on the type of connection you selected.
Wire connection
Click the wire option when connecting to a router through
DQ(WKHUQHWFDEOH&RQ¿JXUHWKHStatic IP,Subnet Mask,
and GatewayPDQXDOO\RUHQDEOHWKH'+&3WRREWDLQDQ,3
address.
Wireless connection
1. Click the wireless option when using a wireless
connection to a router.
2. Click <SCAN ROUTERS> to search the available
wireless LAN(s), and then select a desired wireless LAN
to join.
3. Enable the Encryption option and then enter the
password if the network is secured.

37
(QDEOHWKH'+&3WRJHWDQ,3DGGUHVVIURPWKHZLUHOHVV
router or disable to change the IP address,Subnet
mask and Default Gateway.
Status page
The status page shows the current status of the connected
USB devices, and update the information automatically
every 10 seconds.
Upgrade page
7RXSGDWHWKH¿UPZDUHRIWKH86%VHUYHUFOLFNWRHQDEOH
Complete Firmware Upgrade option.
2. Enter TFTP Sever IP address and Upgrade File Name,
then click <Upgrade!1RWHWKDWWKH¿OHQDPH\RX
HQWHUHGPXVWPDWFKWRWKH¿UPZDUH¿OHQDPHRQWKH
TFTP server.
38
Log page
The Log page allows you to view the USB server's log and
send the log events to a desired FTP.
1. To setup the FTP address, enable the <Advanced
Settings>, and then click <Submit>.
2. Enable the FTP Transfer.
3. Enter the FTP address that you wish to receive the log
¿OHWRWKHFTP-IP Address.
4. Enter the user name and password that you have set in
WKHVSHFL¿FIWSWRWKHFTP-USER and FTP-Password
address respectively.
39
Settings page
Change the password
1. To protect the USB server using a password, click to
select <ENABLE> in the Password Enable/Disable
option.
2. Enter the password, and then click <Submit>.
Change the Server Name
Enter a desired name to the Server Name option.
Restore the settings
Ŷ7RUHVWRUHWKHIDFWRU\GHIDXOWVHWWLQJVFOLFNRestore
Defaults>. Once the restore function has been operated,
all the settings will be erased and return to the factory
default.
Reset the Server
Ŷ7R reset the USB server, click <Reboot Server>.

40
Regulatory compliance
FCC conditions
This equipment has been tested and found to comply with
3DUW&ODVV%RIWKH)&&5XOHV2SHUDWLRQLVVXEMHFWWR
the following two conditions:
(1) This device may not cause harmful interference
(2) This device must accept any interference
received and include interference that may
cause undesired operation.
CE
This equipment is in compliance with the
requirements of the following regulations:
EN 55 022: CLASS B
WEEE information
For EU (European Union) member users: According to
the WEEE (Waste electrical and electronic equipment)
Directive, do not dispose of this product as household
waste or commercial waste. Waste electrical and electronic
equipment should be appropriately collected
and recycled as required by practices
established for your country. For information on
recycling of this product, please contact your
local authorities, your household waste disposal
service or the shop where you purchased the
product.
Regulatory compliance
FCC conditions
Caution: changes or modifications not expressly approved by the party
responsible for compliance could void the user's authority to operate
the equipment.
This equipment has been tested and found to comply with the limits for
a Class B digital device, pursuant to Part 15 of the FCC Rules. These
limits are designed to provide reasonable protection against harmful
interference in a residential installation. This equipment generates,
uses and can radiate radio frequency energy and, if not installed and
used in accordance with the instructions, may cause harmful
interference to radio communications. However, there is no guarantee
that interference will not occur in a particular installation.
If this equipment does cause harmful interference to radio or television
reception, which can be determined by turning the equipment off and
on, the user is encouraged to try to correct the interference by one or
more of the following measures:
‐‐ Reorient or relocate the receiving antenna.
‐‐ Increase the separation between the equipment and receiver.
‐‐ Connect the equipment into an outlet on a circuit different
from that to which the receiver is connected.
‐‐ Consult the dealer or an experienced radio/TV technician for help.
RF exposure: The device has been evaluated for RF exposure at a
distance of 20cm in mobile conditions. Keep the antennas of the
device away at least 20cm from persons.

41
6SHFLÀFDWLRQ
,WHP Description
Ports 4xUSB2.0
Connector USB-A female
ESD protect .9(6'
Transmission Speed 12M~480Mbps
Interface *LJD/$1:L)L
Interface connector 5-$QWHQQD
Power requirements 9$'&a9'&
Operating
temperature
0 ~ 55°C
Operating humidity a5+
Regulatory approvals )&&&(

4-Port Wireless USB Server
User's Manual
0614v1