Gospell Smarthome Electronic T5886HCA HD WiFi Camera User Manual
Shenzhen Gospell Smarthome Electronic Co., Ltd. HD WiFi Camera
User Manual
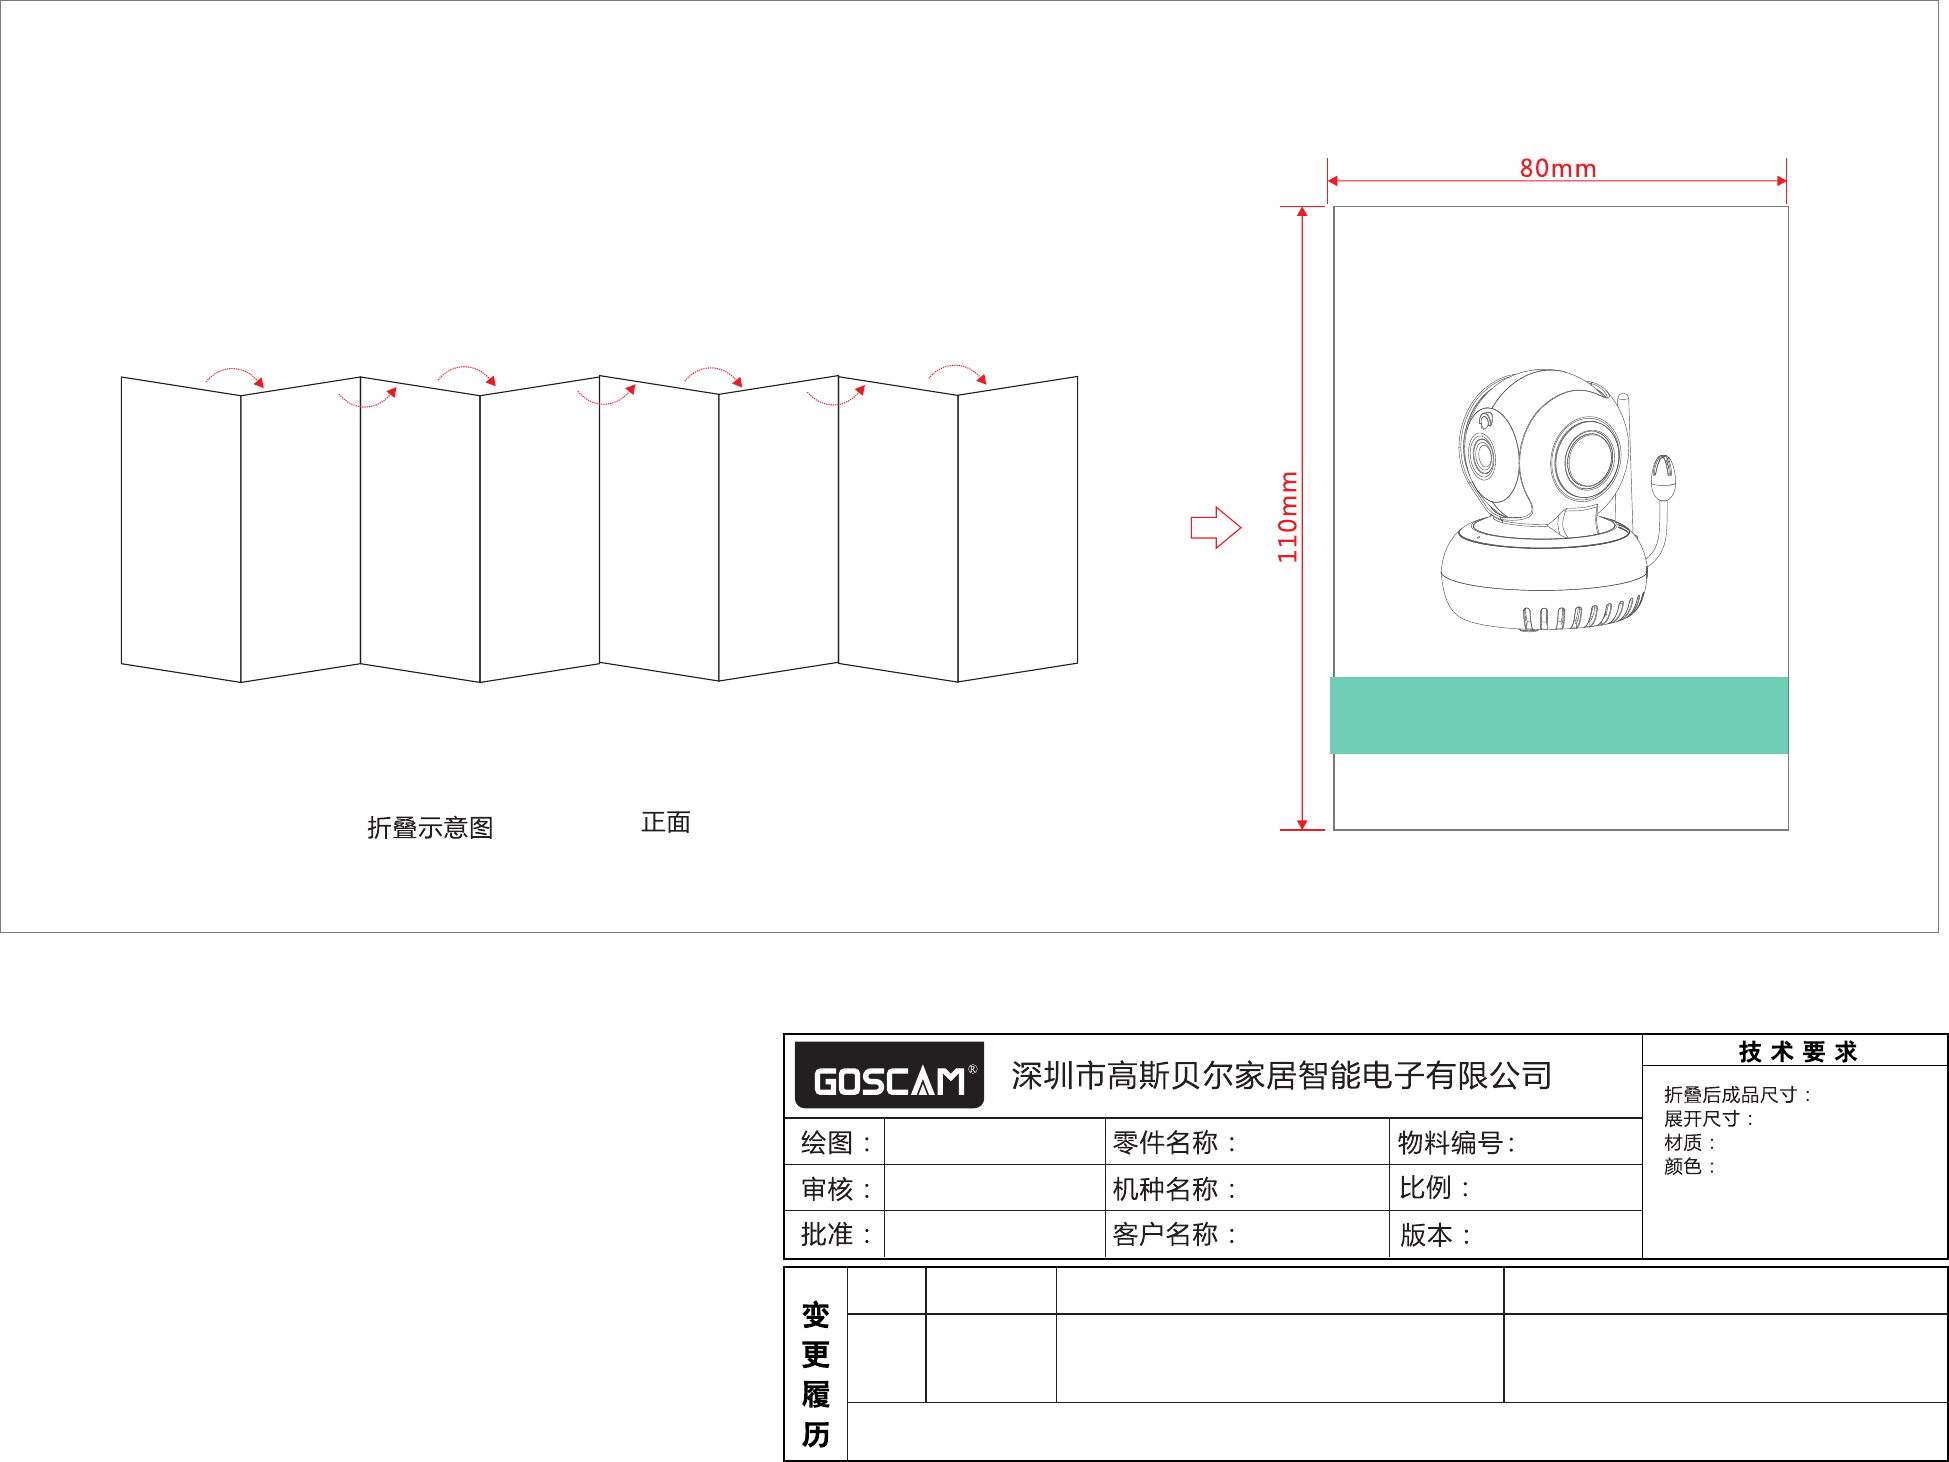
Folding Schematic Front side
Model: T5886HCA
Before using the product, please read the guide carefully to avoid
any damages to the product in virtue of faulty operation or misuse.
HD WiFi Camera
Quick Start Guide
80x110mm
105g铜版纸
双面四色印刷
640x110mm
汪敏 2017.06.02
电子档1:1
中文说明书
新版本
变更时间 变更前
1.1
变更后
说明:
工艺:风琴折,封面在外
其他:16P
T5886HCA
中性
B2017.06.02 技术规格部份有更改
内存改为64GB
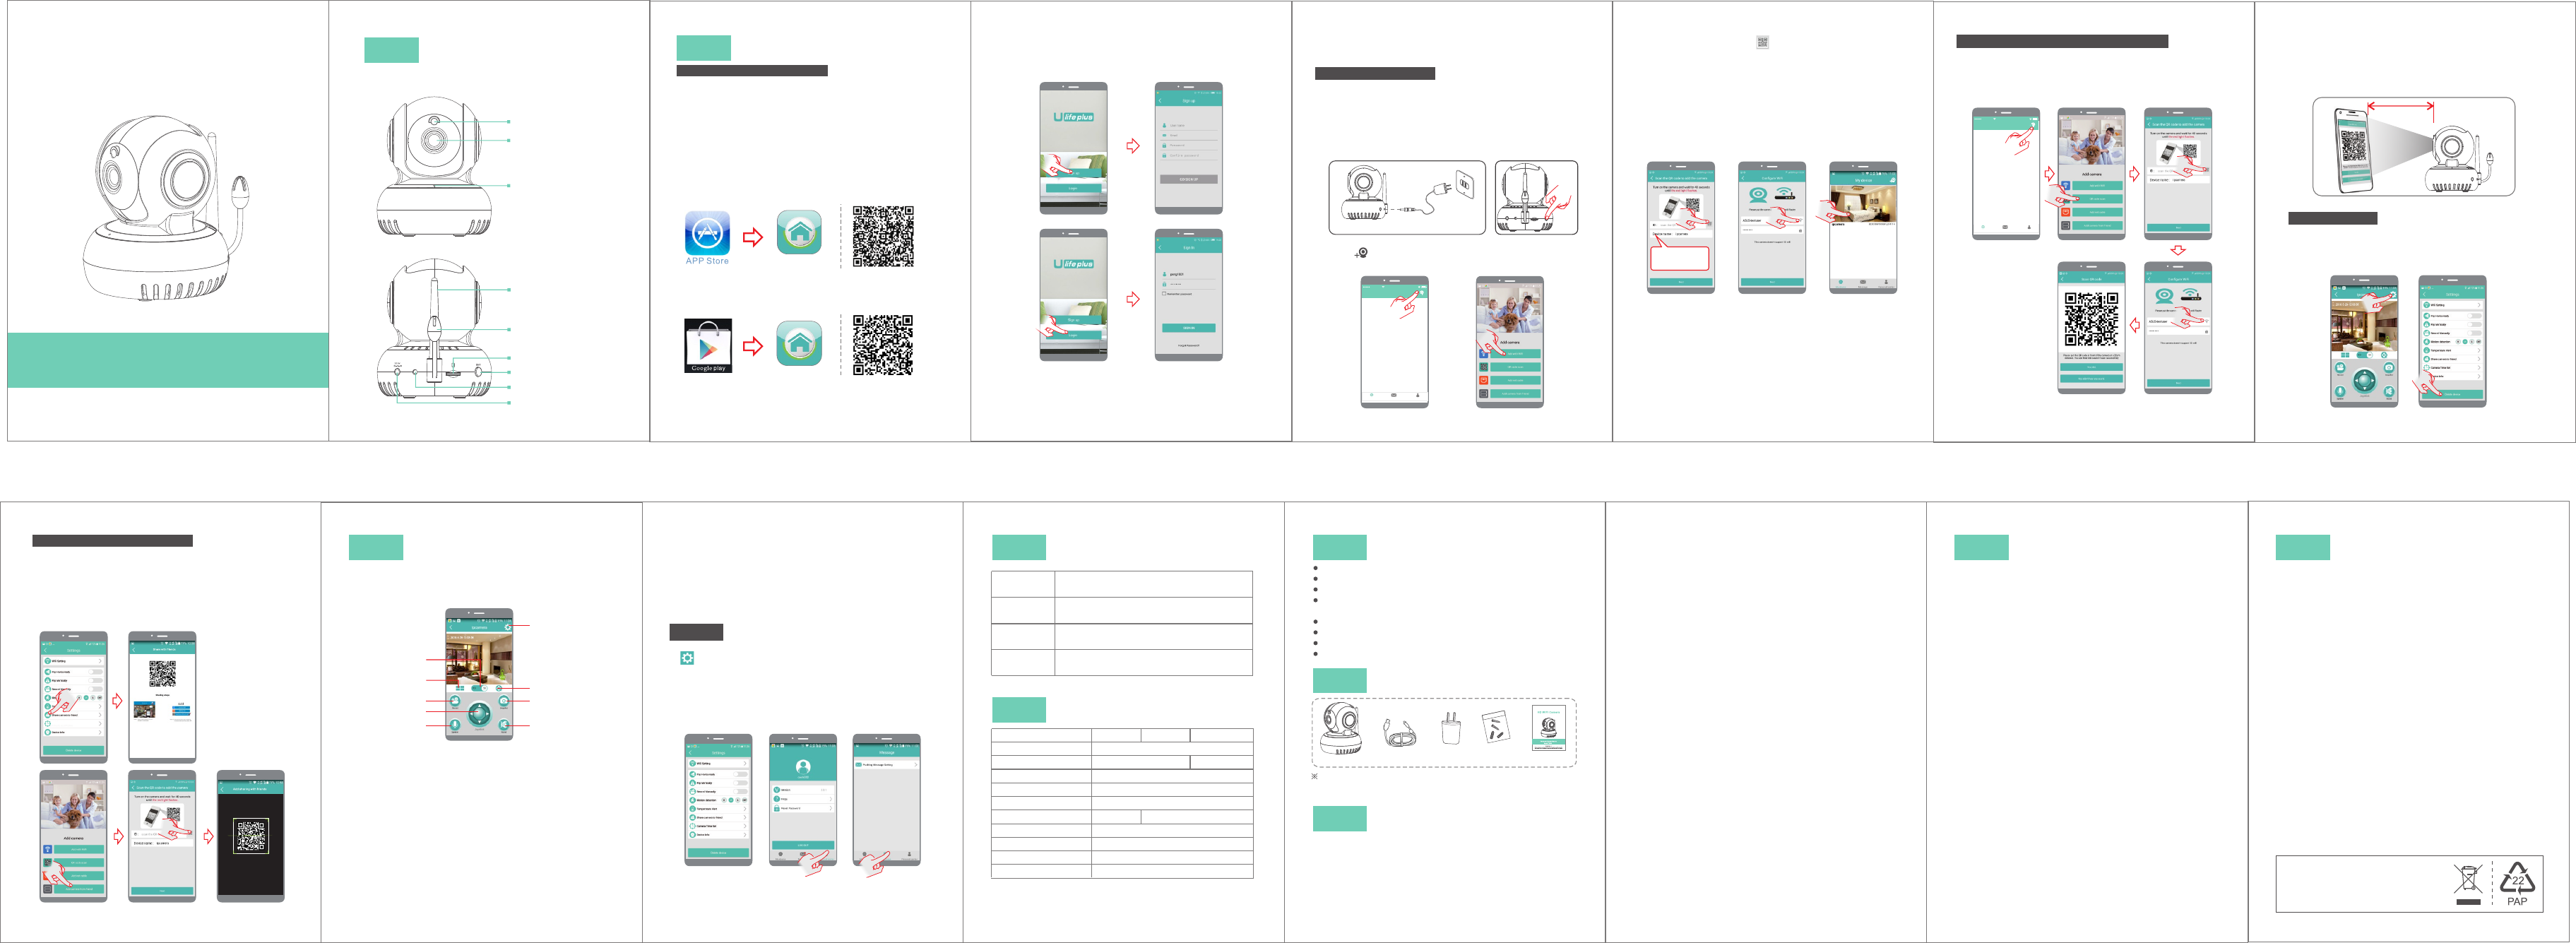
Antenna
Thermo sensitive
induction
Micro SD card slot
SET key
Indicator light
Power adapter port
-1-
Model: T5886HCA
Quick Start Guide
Before using the product, please read the guide carefully to avoid
any damages to the product in virtue of faulty operation or misuse.
Appearance
Microphone
I
HD WiFi Camera
Light sensor
Camera Lens
-2--3--4--5-
-8-
Installation
II
※Take the operation of Android client-end as example,
and refer to Android client-end for IOS client-end.
(Fig. 2)
1.Requirements of version: Android 4.4, iOS 8.0, and
later versions.
2. 2.4G wireless router should connect to the Internet;
smartphone should connect the Wi-Fi of the router.
When connecting to the camera, both the smartphone
and camera should be within the range of this
wireless router.
3.Download and install client-end APP
3. Click to add equipment; (Fig. 3)
Prompt: please use a valid and useable mailbox during
user registration, for recovering the password.
(Fig. 1)
1. Please connect the camera to power and switch it on;
after switching on, its indicator light will be turned on
and the camera will start auto-check. After finishing the
auto-check, there will be “ding-dong” sound ringing.
(Fig. 1)
2.
machine will enter configuration mode.(Fig. 2)
Press SET for 1 second, and after a “beep” sound, the
6.Select your WiFi, and input your WiFi password, and
then click "Next" (Fig.6)
7.After two beeps, camera starts to configure the Wi-Fi
connection. When the light turns green, it indicates the
connection is established. After successful connection,
the app will pop up list of connected camera (Fig. 7).
Choose the item to enter real-time monitor.
U-life Plus
A.Open the App Store on iPhone/iPad, search for
"U-life Plus" and install.Or scan the QR code to install
it directly.
U-life Plus
B.Enter the "Google Play" store on Android smartphone.
Search for "U-life Plus" and install.Or scan the QR
code to install it directly.
Camera
Power
adapter Power
source
5.Click the QR code icon and scan the QR code of the
camera ID on the camera. After getting the device's ID,
pls press "Next" (Fig. 5)
4.Click “Add with WiFi". (Fig. 4)
(Fig. 3) (Fig. 4)
(Fig. 5) (Fig. 6) (Fig. 7)
Pre-Installation Preparation
Add camera for multi-users
1.If your cell phone APP has added camera and
connected successfully, next time when others adds,
You click "Share your camera to friends".and then there
will be a QR code in your APP.You share this QR code to
your friends. And he/she click "Add camera from friend"
to scan the QR code you provided.(Fig.11 series)
4.Open APP, register an ID first, then please login.
(special characters (such as "%","\","<>" etc...)
are not allowed.) Adding mode by WiFi
1.Power camera on > Press SET for 1 second > Click Add
by scanning the QR code to add the camera > Scan
device ID > Enter the name and password for access to
WiFi. Perform operations as instructed. (Figure 8 series)
2.When the mobile phone shows the QR code ,please
place your phone in font of the camera (as shown in
Figure 9). If it beeps, scanning succeeds, and then
click on "Yes, I did".When the light turns green, it
indicates the bonding is successful.
(Fig.8 series)
(Fig. 9)
-6-
-10--11- - 12--13-
-9--14--15-
Function Features
Product Specifications
Image sensor CMOS
Camera resolution
Camera rotation range 270°horizontal, 120°vertical
Night vision range ≤5m
Audio sensitivity ≤-47dB
Operation voltage
※
Packing List
III
V
VII
FCC/CE Certification Information
Camera Power
adapter Quick Guide
USB cable
Troubleshooting
The picture is only for reference and the real object shall prevail
X
No additional notice will be made in case of any
minor change. Our company reserves the right of
final interpretation.
Operation humidity 15% ~ 85% RH
Size (LxWxH) 85 x88.5 x103.5mm
Net weight 224g
Operation temperature -10℃ ~ + 50℃
IV V I
VII I
IX
With a successful connection, monitor view supports
real-time monitoring, taking photos, recording videos,
intercommunication, modifying setting and other
operations.
Monitor View and Operations Notes:
1.Photos and videos taken in the app will be saved in
smartphone.
2.Automatic photos and videos of movement detection
will be saved in micro-SD card of camera.
2.Open the APP, enter “User center” page to check
APP version info etc. (Fig .14)
3.Open the APP, enter “message” page to set message
pushing. (Fig .15)
Indicates that power failure or network not
connected.
Red indicator
remains
Red indicator
flashes
Indicates that camera is connecting to
network.
Green
indicator
flashes
Indicates the router connected
successfully (no Internet).
Green
indicator
remains
Indicates the camera is connected to server
and working well.
Camera Indicator Instruction
i ) Ensure that there is no MAC filter on router or add MAC
address to router whitelist
j)
We suggest rebooting the router, and the "security
settings, encryption method" of WiFi password should
never choose "auto-select".
k )
Reset the camera to set up connection again. Press
and hold SET key for 5 seconds.
※ This camera is compatible with universal APP, actual
function is subject to camera.
(Fig. 13)
Settings
Screws
(Fig. 14) (Fig. 15)
24/7 live video streaming
HD provides excellent video quality
Smart motion detection and notification
Advanced video recording on micro-SD card (Maximally
support the cyclic recording of 64GB micro SD card.)
Motorized Pan/Tilt
Night vision (5m visibility)
Two-way voice transmit
Quick & easy to set up
2. Red indicator remains, network connection is failed.
a) Ensure that the password of Wi-Fi is correct.
b) Ensure that the network connects to Internet freely.
c) Ensure that the camera is in range of Wi-Fi hotspot.
5.Push message: when movement is detected, alarm
message can be sent to server and pushed to your
phone.
6.Remote monitoring: after the camera is connected to
Internet successfully, app can view the monitor via
Internet, anytime, anywhere.
7.Temperature alarm: In case that the temperature
detected by the device is higher than the set value,
audible alarm will be activated on cell phone (once
every 2 minutes).
3. Green indicator flashes, connection to server failed.
a) Ensure that Wi-Fi signal is strong enough and
bandwidth is enough for connection. Move near to
Wi-Fi hotspot or increase the bandwidth.
b) Ensure that camera is not under interferon of other
2.4GHz signal.
Tips
1.Suggest using qualified micro-SD card to avoid
incompatibility. Format micro-SD card before using.
2.Movement detection: when movement is detected
within the scope of camera, the camera will record video
and take photos automatically. Videos and photos will
be saved in micro-SD card.
1. Wi-Fi cannot be connected
a) Ensure that the antenna of camera is fixed well.
b) Ensure that camera is in range of router. Keep the
distance less than 40fts between router and indoor
camera, less than 65fts for outdoor camera.
c) Ensure that SSID and password of Wi-Fi contains no
special characters. Modify the SSID and password of
Wi-Fi with only English characters, no special characters.
d) Ensure that SSID and password are no longer than 16
characters
Model No.
(Fig. 12)
1.Click to switch between standard definition and high
definition of real-time video.
2.Click to enter multi-video view, monitor at most 4 real-
time video.
3.Click to start recording video, click again to stop
recording. Video will be saved in smartphone.
4.Drag to adjust camera view angle.
5.Click and hold the button to transmit voice to camera.
While holding the button, the audio from camera will be
mute.
6.Click to enter setting
7.Click to view and download photos & videos saved in
camera micro-SD card.
8.Click to take a photo. Photo will be saved in smartphone.
9.Click to mute the audio from camera. Click again to
cancel.
1.On the real-time monitoring interface, click the setting
icon for entering into the camera setting menu. The
user can set up the relevant functions for the “Camera
time check’ and others. (Fig. 13)
5
1
3
4
7
8
6
2
9
9.When this machine has a crash fault or other abnormal
conditions influencing the usage, it is recommended to
cut out the power and restart; or press SET key for 10
seconds, which can restore factory settings, and then
please reconnect the router.
g) Ensure that Wi-Fi encryption method is WPA2-PSK/
WPA-PSK or AES.
h) Ensure that Wi-Fi signal is 2.4GHz.
-7-
中国移 动 上午11:50
My Ce nter
Decice List Message
My de vice
中国移 动 上午11:50
My Center
Decice List Message
My de vice
The default
ipcamera can
be modified.
e) Ensure that SSID is broadcasted.
f ) Ensure that the DHCP is enabled on router.
Adding mode by scanning the QR code
8.Only support the special characters in English mode,
such as: " @, #, &, *, ~, {, }, -, =, +, /, ?, (, )",
Dont support the special characters, such as:"%", "\",
"<>".
There are two ways to add the camera function in
Mobile APP, namely, "adding mode by WiFi " and
"adding mode by scanning the QR code ".
(Fig.11 series)
(Fig.10)
1.In setting page of app (Fig. 10), click “Delete device”
to remove the connected camera, can remove the
bonding with the account. then others can add the
camera freely.
Delete device
10~15cm
3.Share your camera to friends: Share QR code of the
device with your friends.
4.Cancel "Share your camera to friends": Delete the
camera and cancel "Sharing your camera to friends".
(You have to re-add the camera to use it again)
1080P:1920x1080 720P:1280x720
T5886HCA T5886HAA/GAA
T5886GCA
DC+5V/2A DC+5V/1A
Share your camera to friends
The Maximum Permissible Exposure (MPE) level has been calculated based
on a distance of d=20 cm between the device and the human body. To maintain
compliance with RF exposure requirement, use product that maintain a 20cm
distance between the device and human body. Hereby, we declares that this
device is in compliance with the essential requirements and other relevant
provisions of Directive 2014/53/EN.
Notice: Observe the national local regulations in the location where the device I
s to be used. This device may be restricted for use in some or all member states
of the European Union (EU)
NOTE: This equipment has been tested and found to comply with the limits for a
Class B digital device, pursuant to part 15 of the FCC Rules.
These limits are designed to provide reasonable protection against harmful
interference in a residential installation. This equipment generates uses and can
radiate radio frequency energy and, if not installed and used in accordance with
the instructions, may cause harmful interference to radio communications. However,
there is no guarantee that interference will not occur in a particular installation.
If this equipment does cause harmful interference to radio or television reception,
which can be determined by turning the equipment off and on, the user is
encouraged to try to correct the interference by one or more of the following
measures:
EU Environmental Provisions
E-waste cannot be mixed with household
garbage; corresponding local government
sector or recycling stations shall be
responsible for circular process.
- Reorient or relocate the receiving antenna.
- Increase the separation between the equipment and receiver.
- Connect the equipment into an outlet on a circuit different from that to which the
receiver is connected.
- Consult the dealer or an experienced radio/TV technician for help
Changes or modifications not expressly approved by the party responsible for
compliance could void the user's authority to operate the equipment.
This device complies with Part 15 of the FCC Rules. Operation is subject to the
following two conditions:
(1) this device may not cause harmful interference, and
(2) this device must accept any interference received, including interference that
may cause undesired operation.
NOTE: This equipment has been tested and found to comply with the limits for a
Class B digital device, pursuant to part 15 of the FCC Rules. These limits are
designed to provide reasonable protection against harmful interference in a
residential installation. This equipment generates uses and can radiate radio
frequency energy and, if not installed and used in accordance with the instructions,
may cause harmful interference to radio communications. However, there is no
guarantee that interference will not occur in a particular installation. If this
equipment does cause harmful interference to radio or television reception, which
can be determined by turning the equipment off and on, the user is encouraged to
try to correct the interference by one or more of the following measures:
- Reorient or relocate the receiving antenna.
- Increase the separation between the equipment and receiver.
-Connect the equipment into an outlet on a circuit different from that to which the
receiver is connected.
-Consult the dealer or an experienced radio/TV technician for help
Changes or modifications not expressly approved by the party responsible for compliance
could void the user's authority to operate the equipment.
This device complies with Part 15 of the FCC Rules. Operation is subject to the following two
conditions:
(1) this device may not cause harmful interference, and
(2) this device must accept any interference received, including interference that may
cause undesired operation.
This device is acting as slave and operating in the 2.4 GHz (2412 ~2462 MHz) band.
FCC Radio Frequency Exposure Statement
The device has been evaluated to meet general RF exposure requirements. The device can be used in
fixed exposure conditions. The min separation distance is 20cm.