Grandstream Networks GVC3200 Full HD Video Conferencing System User Manual x0001
Grandstream Networks, Inc. Full HD Video Conferencing System x0001
Contents
- 1. Users Manual
- 2. User manual part 1
- 3. User manual part 2
User manual part 2

Firmware Version 1.0.0.X
GVC3202 User Guide
Page 60 of 117
Figure 25: GVC3202 Call Details Screen
ENABLING DND DURING CONFERENCE
When DND is enabled during conference, the new incoming calls will be blocked. On the conference
screen, use GVC3202 remote control to click on MORE button and select "DND".
The icon will be displayed on conference screen if the device is set to DND mode. To
disable DND, select DND mode again and press "OK" key to cancel it.
--------------------------------------------------------------------------------------------------------------------------------------------
Note:
After enabling DND mode during a conference, the DND mode will remain effective after the conference
is over. To disable DND, please press on GVC3202 remote control when there is no active call.
--------------------------------------------------------------------------------------------------------------------------------------------
Firmware Version 1.0.0.X
GVC3202 User Guide
Page 61 of 117
CONFERENCE LOCK
Users could lock/unlock the scheduled conference. Once it is locked, the other incoming calls will not be
able to join the conference.
The locked scheduled conference will display icon on the screen.
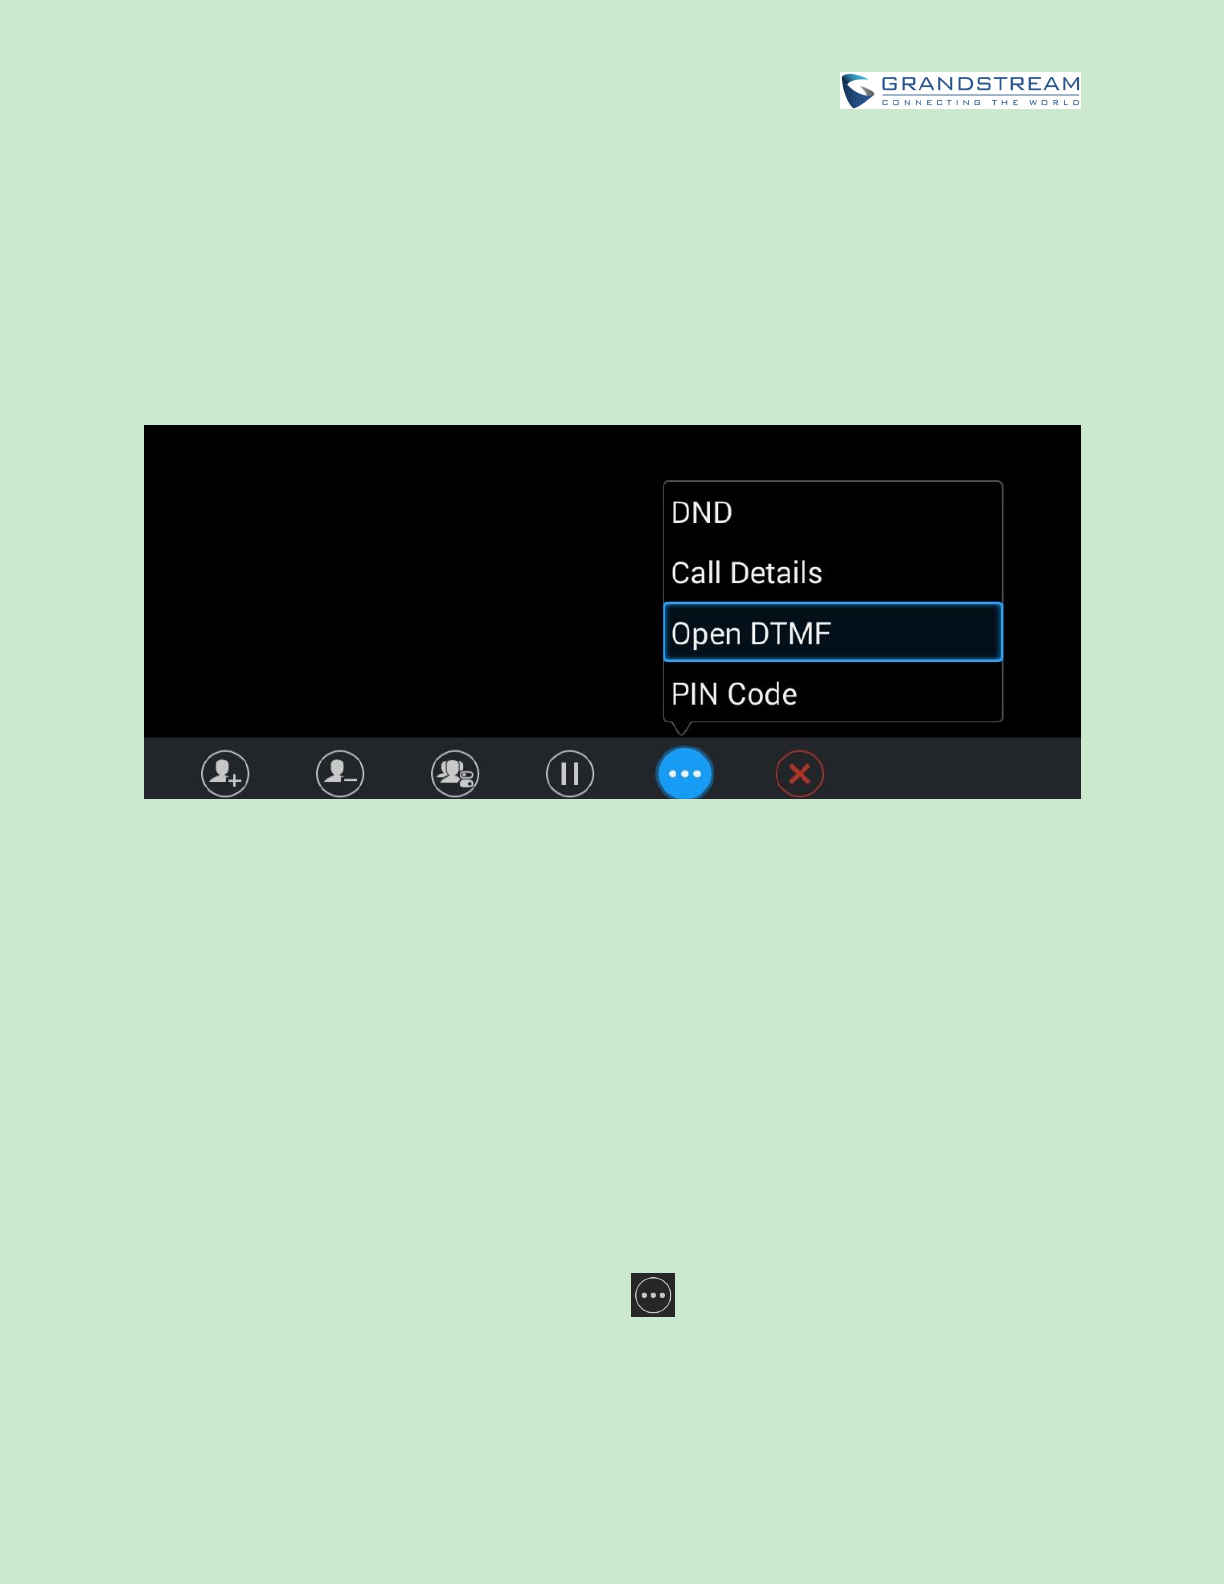
OPEN DTMF
Users can dial DTMF during a conference.
1. On GVC3202 remote control, press the red shortcut key, or click on MORE button ->select
"Open DTMF" on the conference screen to bring up the DTMF input screen.
2. Press the digital keys on the remote control to input DTMF. Press to cancel the operation if
needed.
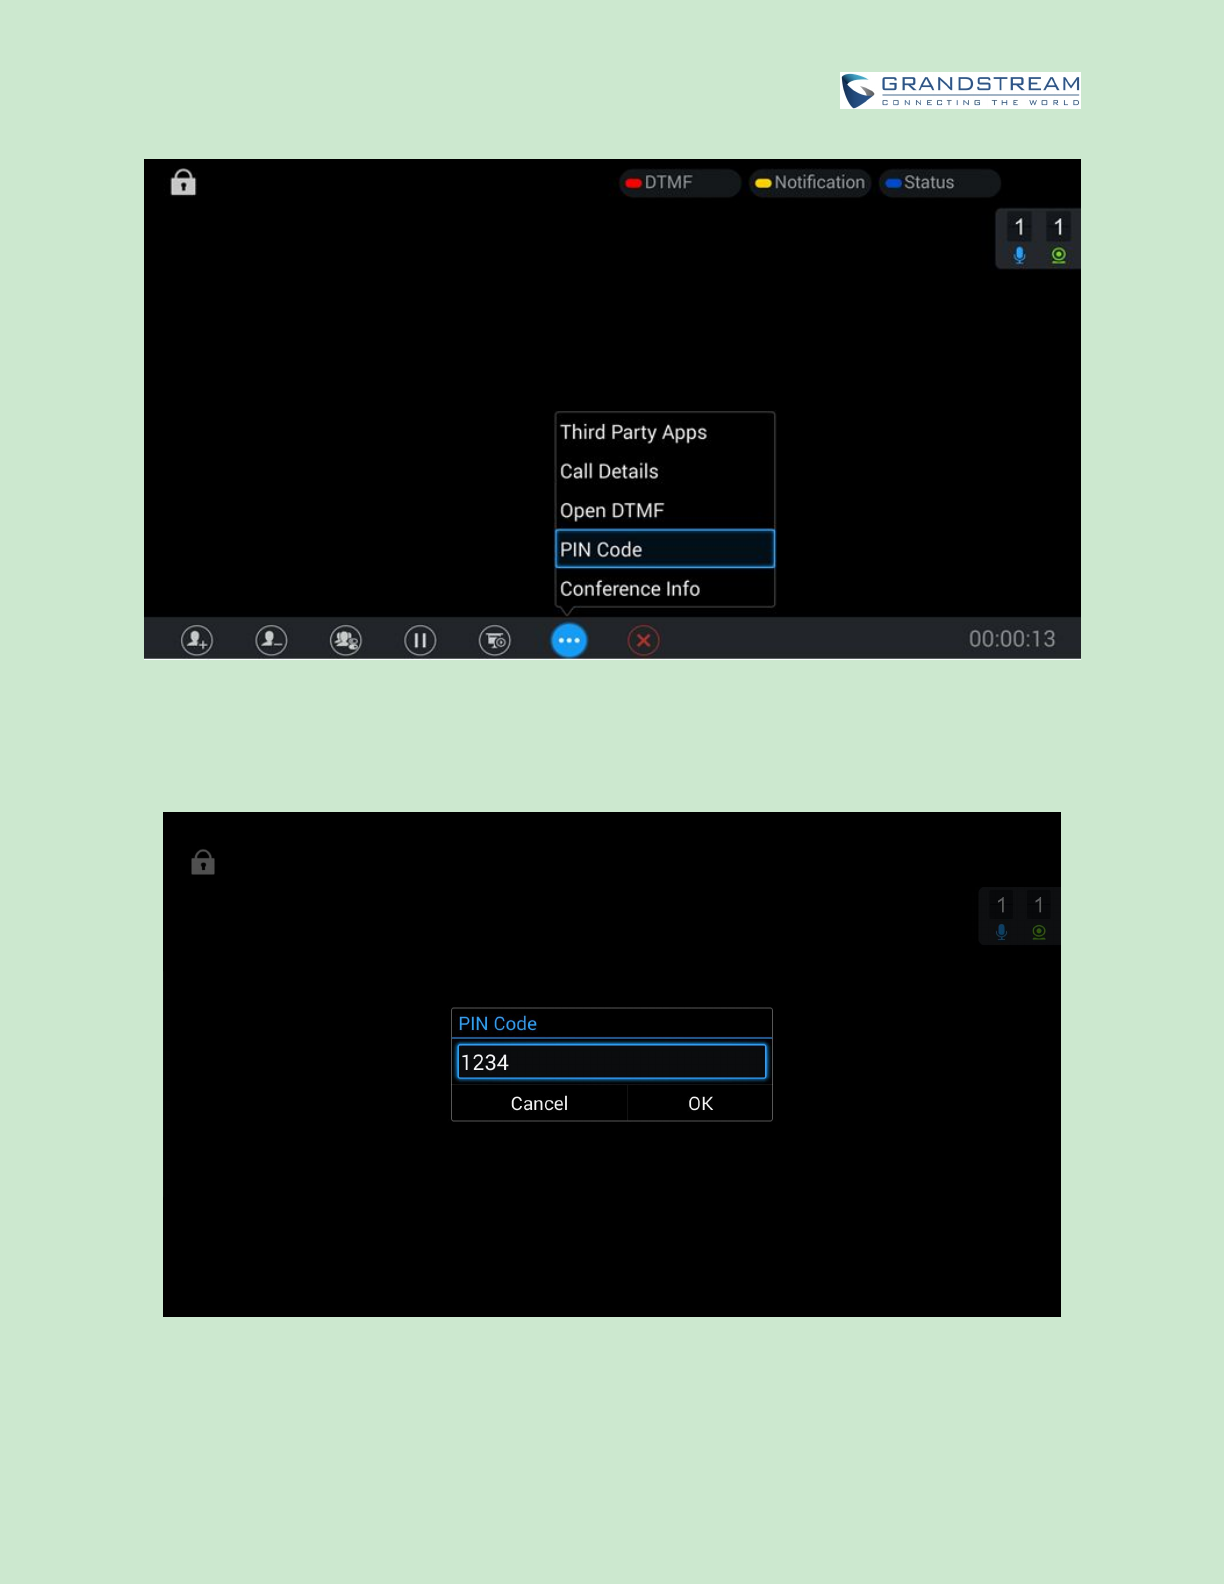
PIN CODE
During the conference call, the conference host can set a PIN code to lock the call. Once the conference
call is locked, the caller who wants to join this conference by calling the conference host must enter the
PIN code.
Here is how to use PIN code to lock the conference call:
1. During the call, in the GVC3202 display LCD call screen bottom menu, select MORE->PIN Code.
Firmware Version 1.0.0.X
GVC3202 User Guide
Page 62 of 117
Figure 26: GVC3202 Call Screen->More->PIN Code
2. Enter the PIN Code to lock the conference call. If it’s empty, the conference call is not locked. Click on
OK to confirm.
Figure 27: Enter PIN Code to Lock Conference
3. Now the conference call is locked. If someone wants to join the conference call by calling this
Firmware Version 1.0.0.X
GVC3202 User Guide
Page 63 of 117
GVC3202, the same PIN code will be required to be entered before the call goes through.
Here is an example on how to use PIN code to enter the locked conference call:
1. Make a video call to the GVC3202 that has locks the conference call from another GVC3202.
2. The GVC3202 caller will show a video windows with voice prompt asking for PIN code.
3. On the GVC3202 caller’s call screen bottom menu, select MORE->Open DTMF. Then input the DTMF
with PIN code followed by #.
Figure 28: Input PIN Code from DTMF to Join Conference
4. The GVC3202 caller joins the conference call after entering correct PIN code in DTMF.
THIRD PARTY APPLICATIONS
GVC3202 runs Android Operating System and offers full access to the thousands of Android apps in
Google Play Store, including Skype for Business, Google Hangouts and etc. The calls using certain apps
can be mixed with the SIP call so that they can be brought into the same conference on GVC3202.
For example, to use third party app Skype during a conference:
1. Install Skype and sign in.
2. Establish a conference call on GVC3202.
3. On the conference screen, click on MORE button and select "Third party applications".
4. Press "OK" key, and select “Skype” in the pop out menu.
5. Search contacts in Skype and dial out.
6. The new call will be added to conference.
Firmware Version 1.0.0.X
GVC3202 User Guide
Page 64 of 117
--------------------------------------------------------------------------------------------------------------------------------------------
Note:
When the call is mixed, GVC3202 and the remote party using the app can see video from all parties. The
remote SIP party can only see video from GVC3202. All parties can hear each other.
--------------------------------------------------------------------------------------------------------------------------------------------
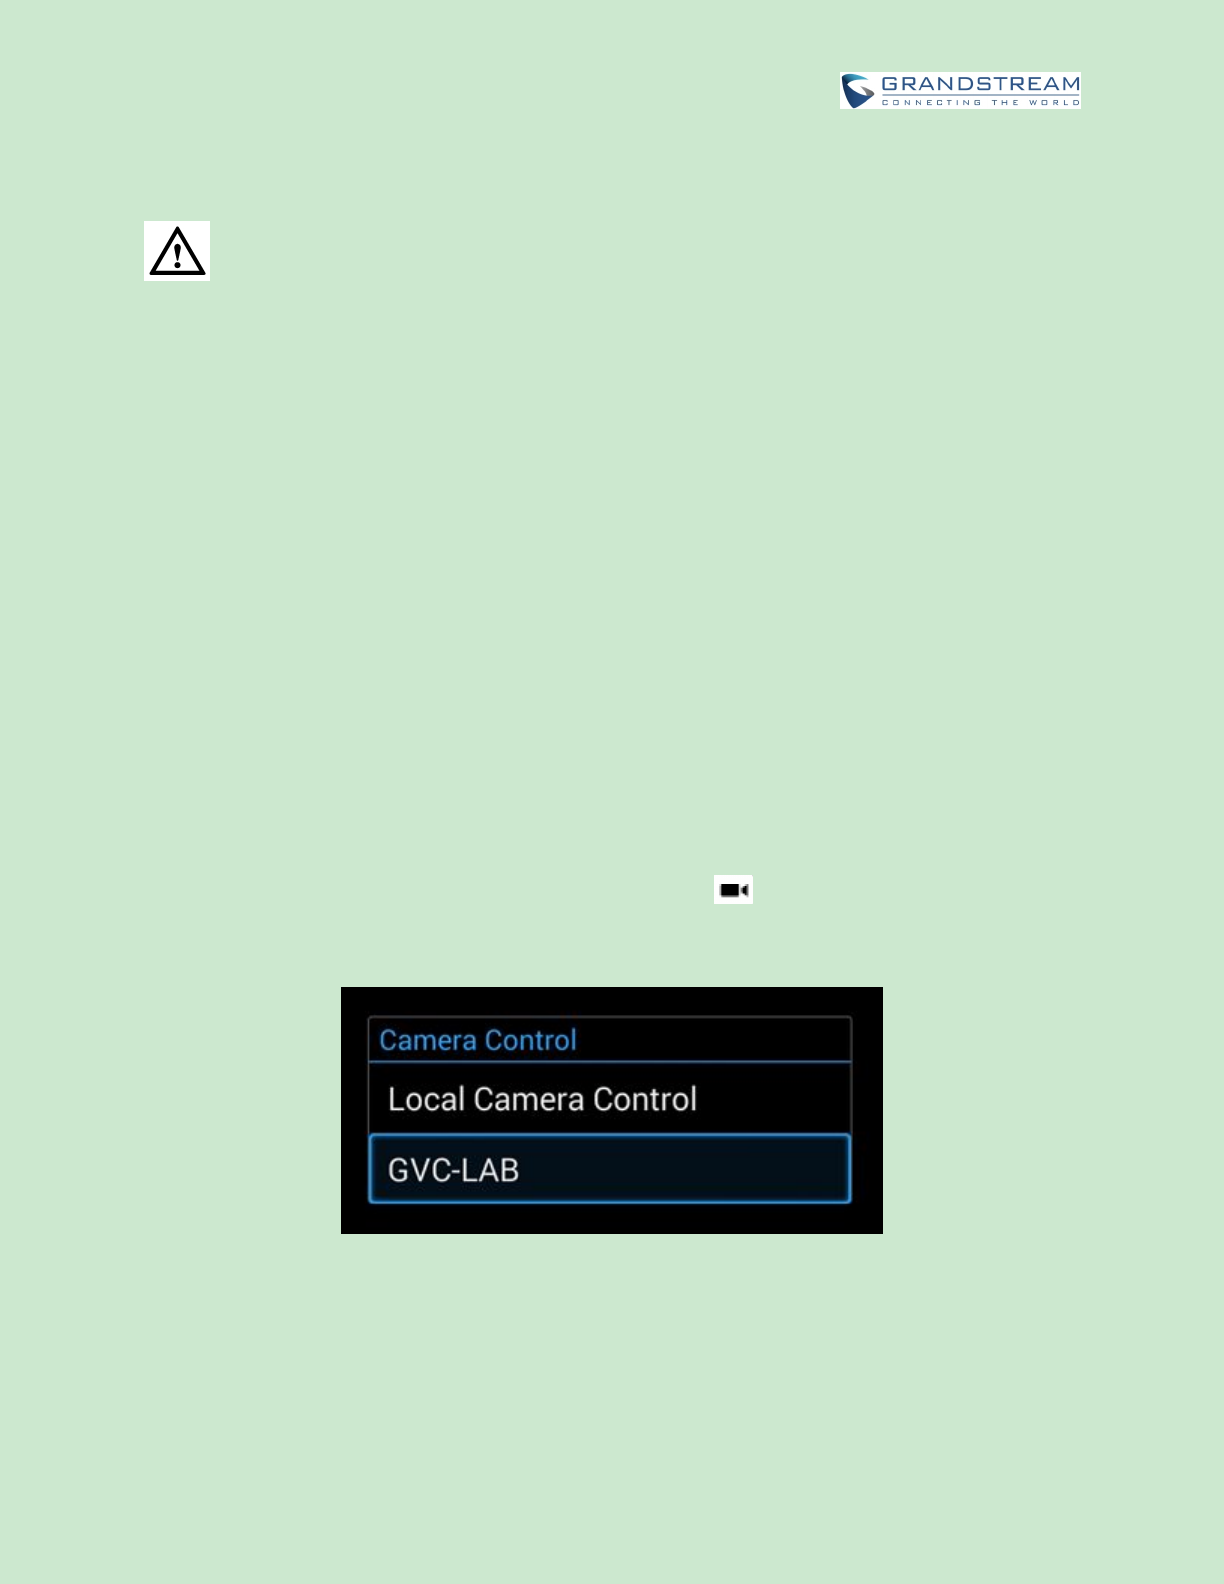
FECC - CAMERA CONTROL IN CONFERENCE
During the video call, if the local party (GVC3202) and remote party support FECC, the remote camera
can be controlled on the GVC3202.
Here is how to use FECC on the GVC3202 to control remote party’s camera:
1. Make sure the GVC3202 and the remote party support FECC and it’s enabled on both parties. For
GVC3202, FECC setting is under web UI->Settings->Account Settings->Codec: “Enable FECC”. If the
remote party is another vendor’s video device, please check the documentation from the vendor to
enable FECC.
2. Establish video call between GVC3202 and the remote party.
3. On the GVC3202 remote control, press the camera button and the following prompt pops up on
GVC3202 display device.
Figure 29: FECC – Remote Camera Control
4. Use UP/DOWN/OK navigation keys on the GVC3202 remote control to select the remote party, e.g.,
GVC-LAB in the above figure. This will bring up camera control interface.
5. On the GVC3202 remote control, press the navigation keys and zoom in/zoom out buttons on
trackpad to adjust remote camera.
Firmware Version 1.0.0.X
GVC3202 User Guide
Page 65 of 117
END CONFERENCE
To end the conference, tap on END button or press key on GVC3202 remote control to
disconnect from the conference. If GVC3202 is the conference host, ending the conference will
disconnect all the members from the conference. If the conference member hangs up the call, it will be
disconnected from the conference, but other parties in the conference will stay in the conference.
SCHEDULE
SCHEDULE feature allows users to set a specific time to host a conference in advance, with conference
reminder and members.
Figure 30: GVC3202 Schedule Screen
Follow one of the ways below to access schedule conference screen:
On the home screen, click on CONFERENCE button .
On the home screen, click on APPLICATION button and select .
Users will see the scheduled conferences (after the current time) in the schedule screen. Select one
conference entry to view details.
Firmware Version 1.0.0.X
GVC3202 User Guide
Page 66 of 117
-------------------------------------------------------------------------------------------------------------------------------
Note:
Conferences that have been held in the past will not be displayed in the schedule screen.
--------------------------------------------------------------------------------------------------------------------------------------------
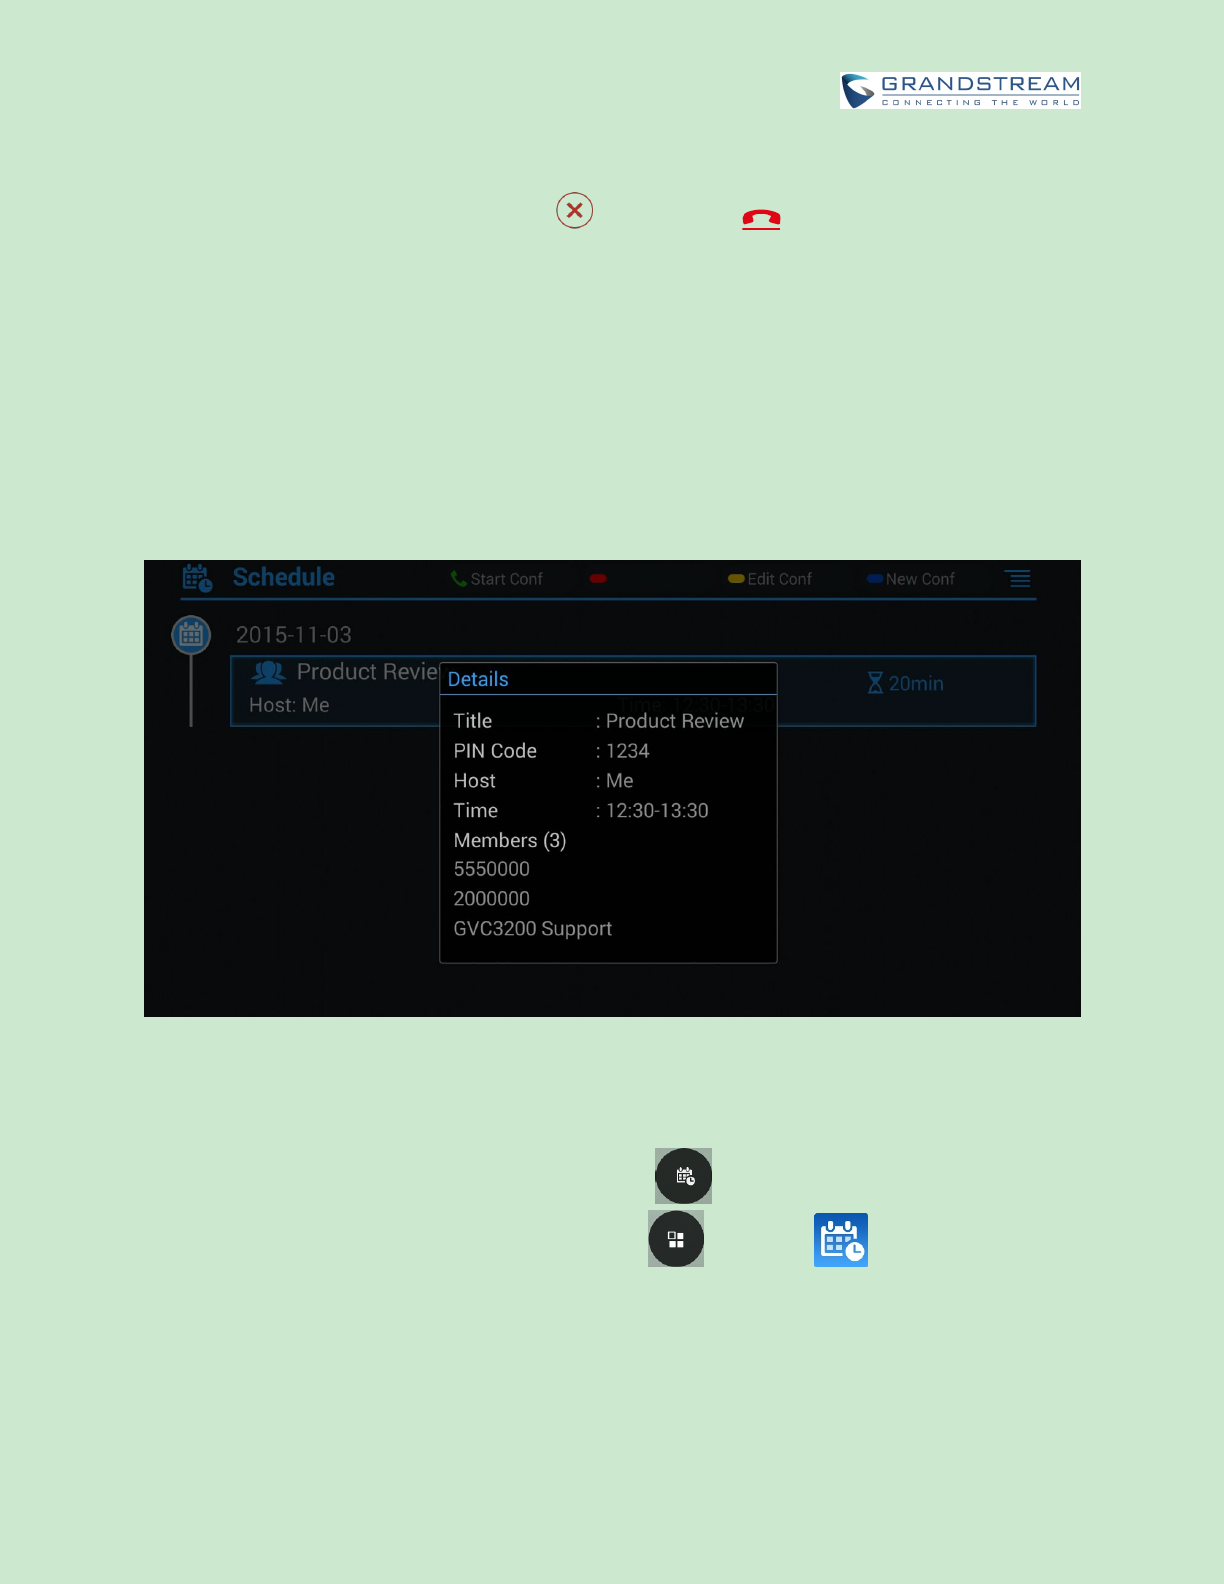
VIEW CONFERENCE DETAILS
Users could view scheduled conference details after the current time. Select one conference and press
"OK" key on GVC3202 remote control to view conference details.
Figure 31: GVC3202 Conference Details Screen
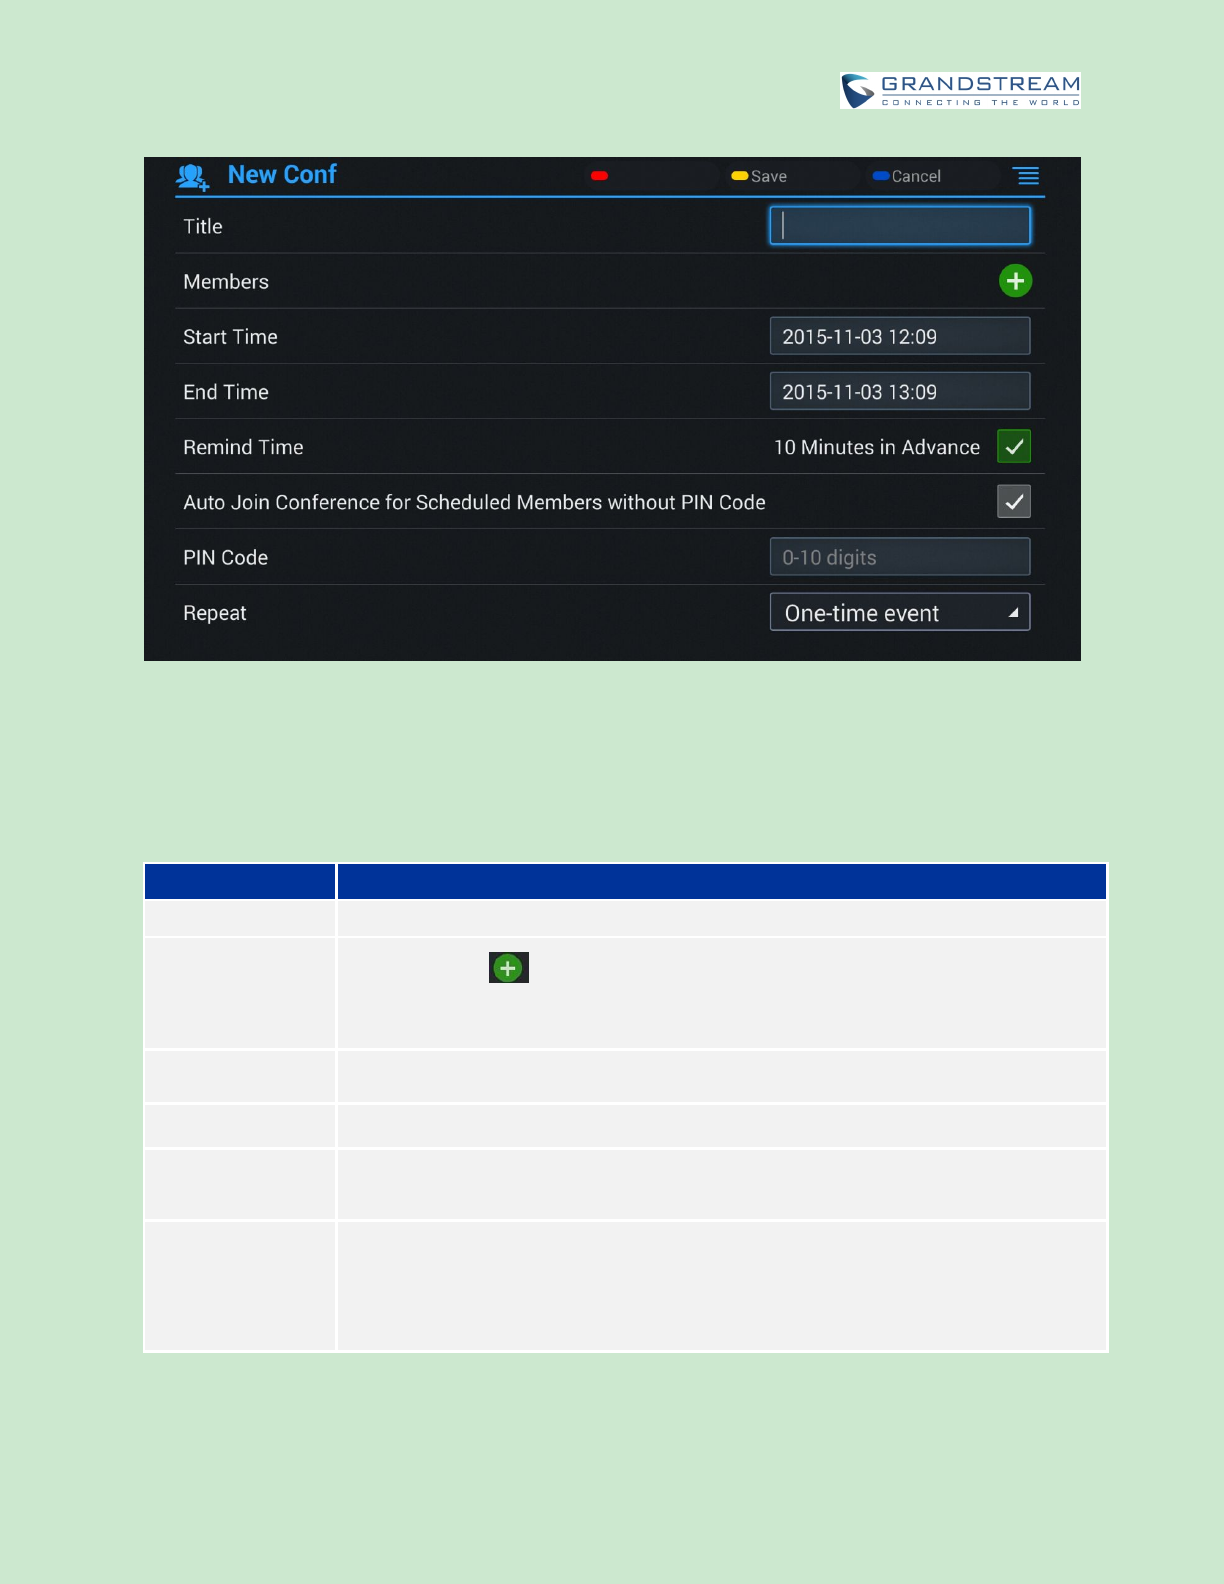
ADD SCHEDULED CONFERENCE
Follow the steps below to add a scheduled conference:
1. On the home screen, select to access schedule screen.
2. On GVC3202 remote control, press the yellow shortcut key to create a new conference.
Firmware Version 1.0.0.X
GVC3202 User Guide
Page 67 of 117
Figure 32: GVC3202 Add Conference Screen
3. Fill in conference name, members, start time, conference duration and etc.
4. Press the yellow shortcut key on the remote control to save the scheduled conference.
Table 16: GVC3202 Add Conference Parameters
Parameters
Descriptions
Title
It is used to set the conference name to identify this conference.
Members
Click on button to access the Add Member screen. Users can add one
member or a group of members. Press the yellow key on the remote control to save
and go back to schedule screen. Up to 8 members can be added.
Start Time
It is used to configure the start time of the conference.
End Time
It is used to configure the end time of the conference.
Reminder Time
It is used to configure whether to remind users in advanced. A prompt dialog box will
pop up on GVC3202 screen 10 minutes before the conference starts.
Auto Join
Conference for
Scheduled
Members without
PIN Code
It is used to configure whether PIN code is required when the scheduled members
join the conference. If enabled and the scheduled conference has PIN code
configured, the scheduled members will automatically answer the call without PIN
code required.
Firmware Version 1.0.0.X
GVC3202 User Guide
Page 68 of 117
PIN Code
Configure PIN code for the conference. It can be number 0 – 9 and up to 10 digits
can be configured as PIN code.
Repeat
Users could select repeat conditions for the scheduled conference. The repeat
condition options are:
One-time event
Daily
Every Weekday (Mon-Fri)
Weekly
Monthly (by week)
Monthly (by day)
Yearly
Custom
EDIT SCHEDULED CONFERENCE
Follow the steps below to edit scheduled conference:
1. Access conference schedule screen and select the conference entry users would like to edit.
2. Press the blue shortcut key on GVC3202 remote control to access edit screen.
3. Press the yellow shortcut key on the remote control to save changes, and go back to schedule
screen.
RESCHEDULE CONFERENCE
1. Access schedule screen and select the conference entry users would like to edit.
2. Press the MENU key on GVC3202 remote control, and select "Reschedule" option.
3. Set new conference start time in the pop out dialog box.
4. Click on SAVE button to save changes. If users would like to cancel the changes, users could press
on the remote control, or click on CANCEL button on the screen.
DELETE SCHEDULED CONFERENCE
Follow the steps below to delete the existing scheduled conference:
1. Access schedule screen and select the conference entry users would like to delete.
2. Press the MENU key on the remote control, and select "Delete".
Firmware Version 1.0.0.X
GVC3202 User Guide
Page 69 of 117
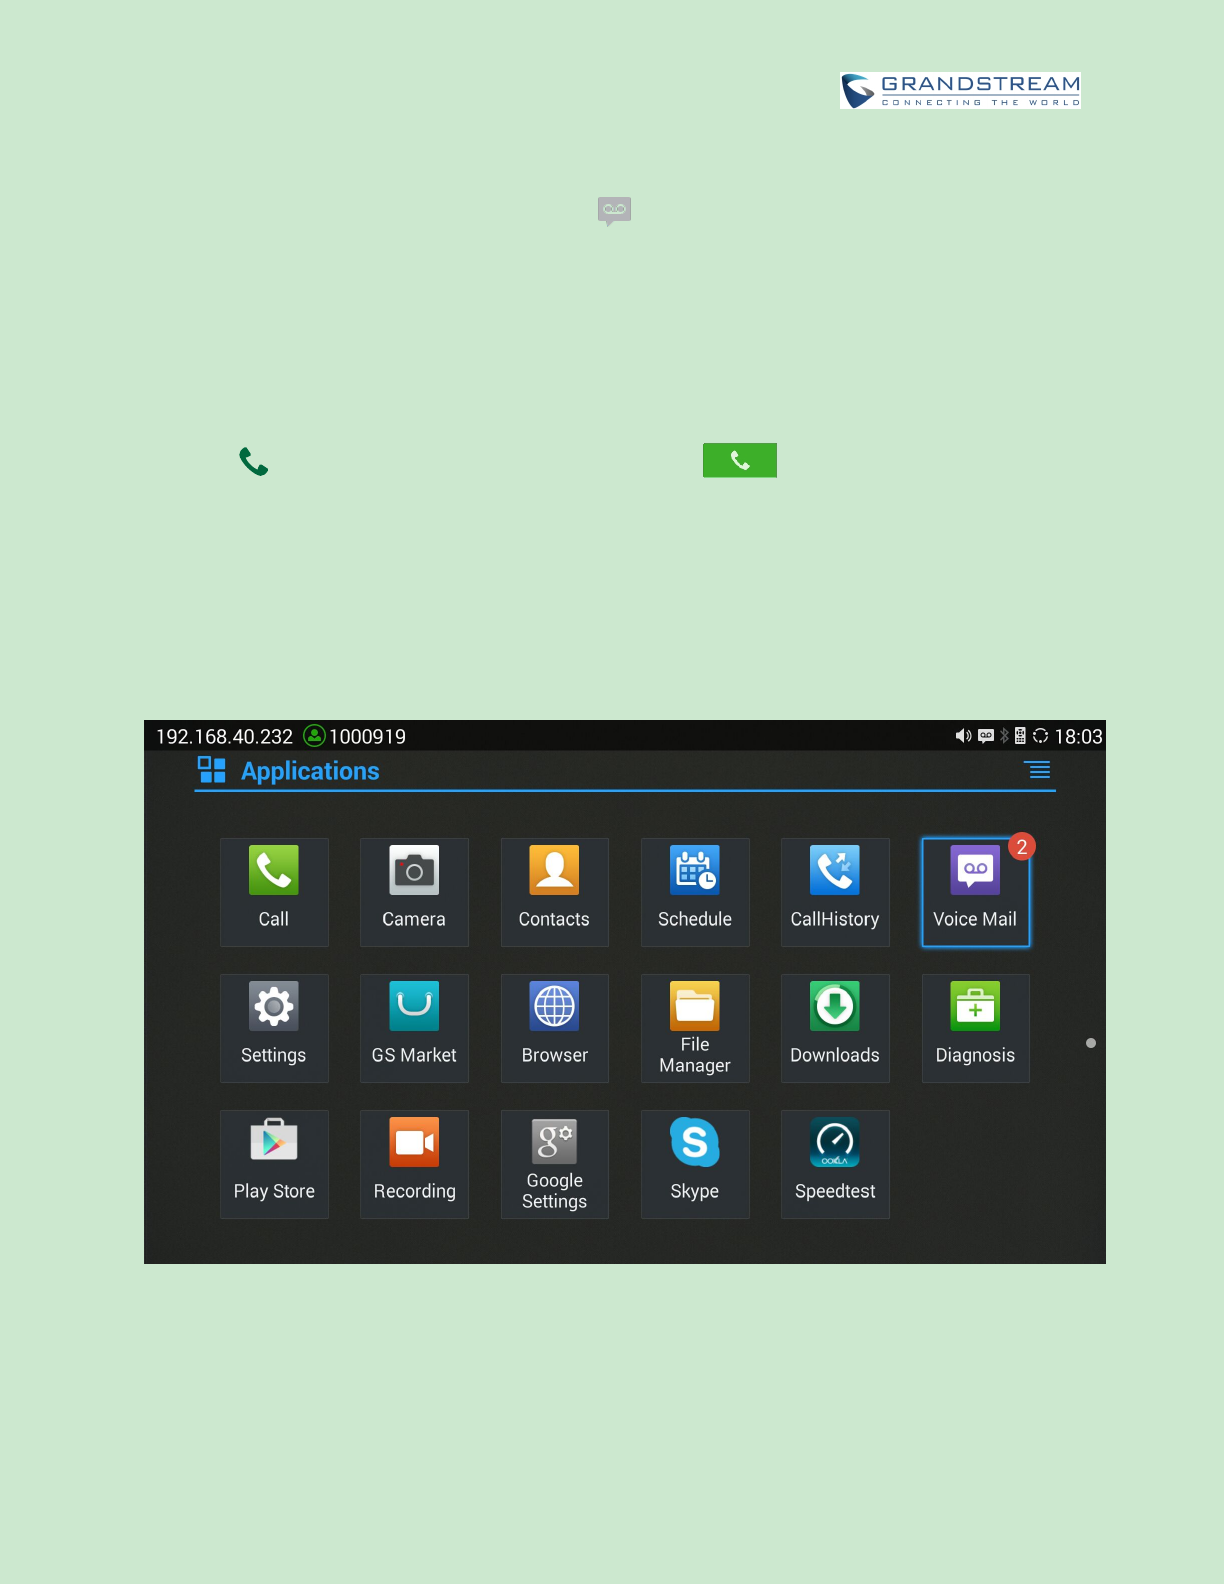
VOICEMAIL
When there is a new voicemail, voice mail icon will show up as a notification in the status bar.
Users could login the web UI->Settings->Account->General Settings to configure the access number for
the voicemail.
Follow the steps below to access voicemail:
1. Access the dial screen and input voicemail access number.
2. Press on GVC3202 remote control, or click on button on the call screen to dial into the
voicemail box.
3. Follow the Interactive Voice Response (IVR) for the message retrieval process.
Users could also go to Home screen->Applications and click on "Voice Mail" to access the voicemail box.
The number of new voicemail messages will be shown on the voice mail app icon as well. See figure
below:
Figure 33: GVC3202 Voice Mail Application
Firmware Version 1.0.0.X
GVC3202 User Guide
Page 70 of 117
ADDITIONAL FUNCTIONS
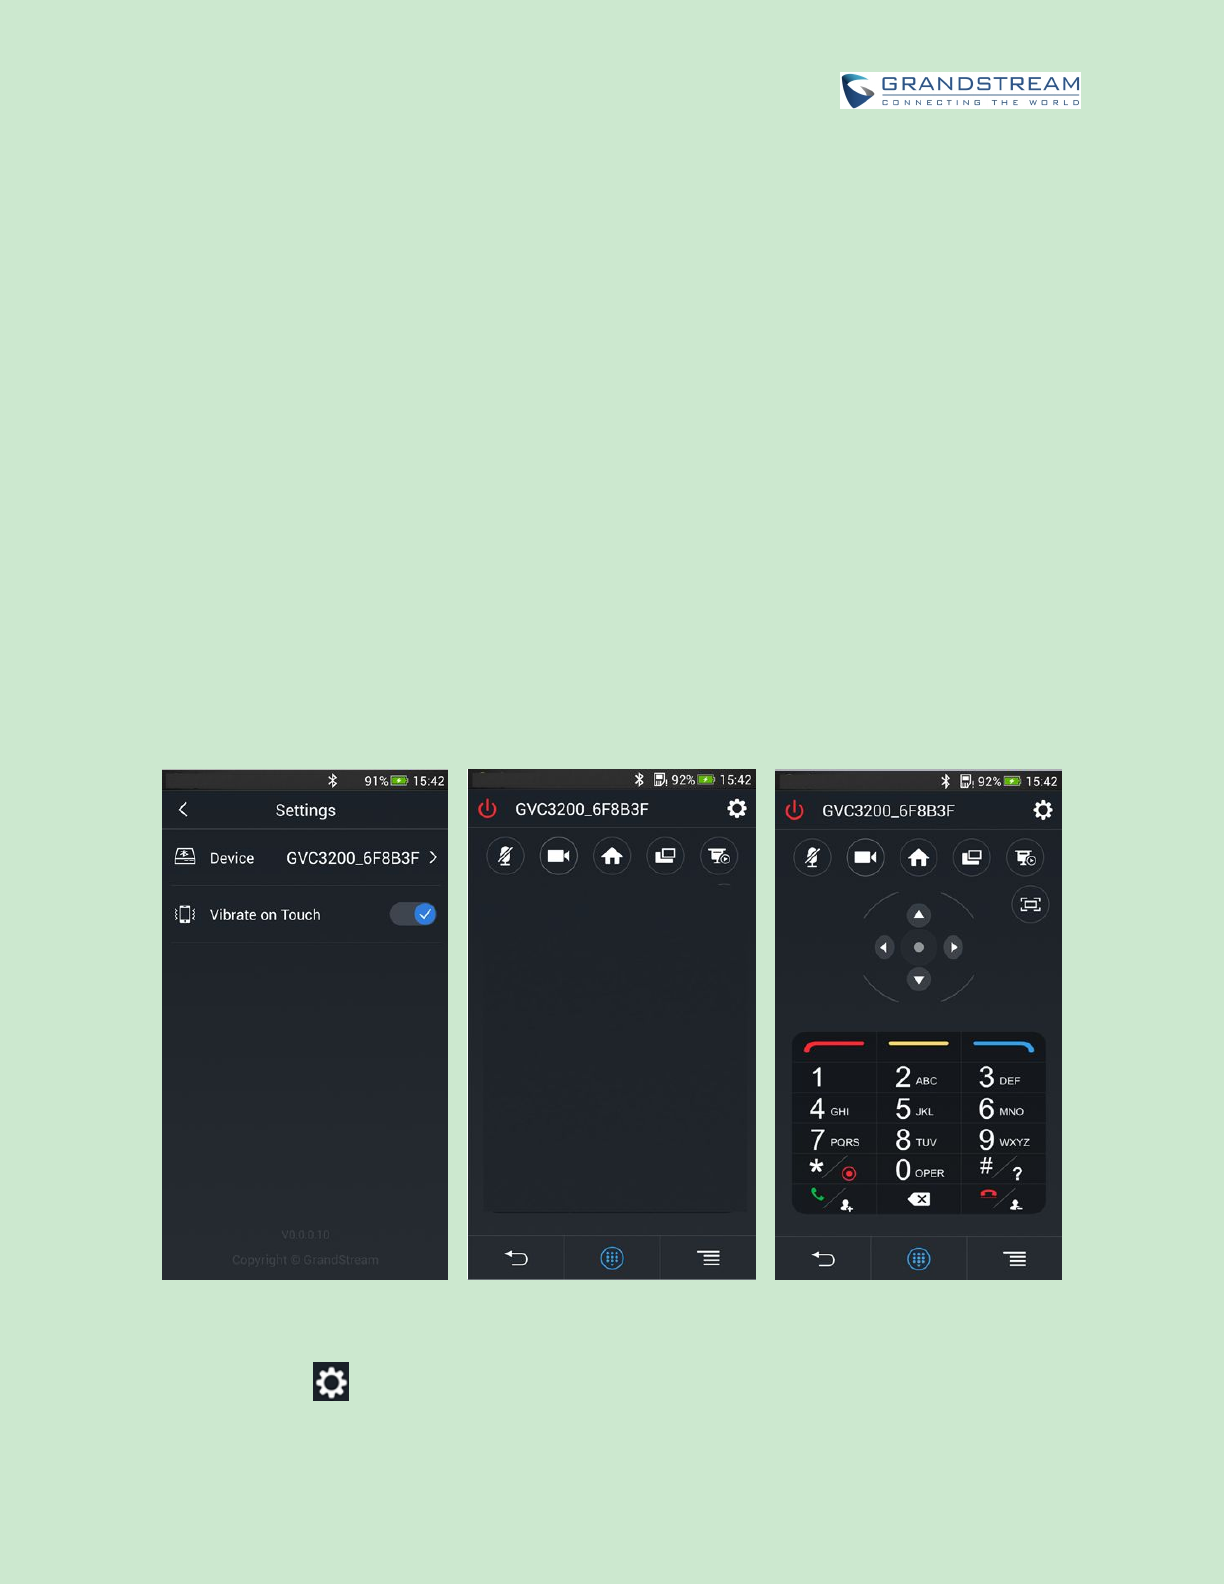
GVC REMOTE CLIENT APPLICATION
Besides using GVC3202 Bluetooth remote control in the package, users could also download the
Grandstream GVC Remote Client application, and install it on an Android device. GVC3202 remote
control application is used via Bluetooth protocol. Follow the steps below to install the remote control
application:
1. Download the GVC Remote app for GVC3202 from GS Market, and install it on your Android device.
2. Open GVC Remote app on the Android device, and access settings screen.
3. Select the GVC3202 device that users would like to connect to. Each discovered GVC3202 could be
distinguished by the last 6 digits of its MAC address.
4. Pair GVC Remote app with GVC3202 via Bluetooth. Users might see prompt on GVC3202, and
Android device to confirm the passcode during pairing and connection process.
5. After pairing and connecting the remote control application, users can use the keys and options on
the Android device touch screen to control GVC3202.
Figure 34: GVC3202 Remote Control Application on Android Device
Tap on button at the upper right corner to access settings screen as the left figure shows above.

Firmware Version 1.0.0.X
GVC3202 User Guide
Page 71 of 117
Tap on button to go back to home screen as the figure in the middle shows above.
Tap on button to bring up navigation panel and digital keyboard as the right figure shows above,
tap on again to hide the keyboard.
BLUE JEANS
GVC3202 has built-in Blue Jeans access for users to dial Blue Jeans calls. Follow the steps below:
1. On the LCD dial screen, press the blue shortcut key on GVC3202 remote control to switch call mode
from SIP Call to Blue Jeans Call.
2. When the call mode shows Blue Jeans, input Blue Jeans conference ID and conference password.
3. Press on the remote control or click on button on the screen to dial out.
For more information about how to use Blue Jeans on GVC3202, please refer to the link below:
http://www.grandstream.com/products/gvc/documents/GVC3202_BlueJeans_application_note.pdf
Firmware Version 1.0.0.X
GVC3202 User Guide
Page 72 of 117
APPLICATIONS
GVC3202 provides built-in applications such as Contacts, Call History, File Manager, Browser and etc.
Users could also download the apps from GS market or Google Play Store to install on GVC3202.
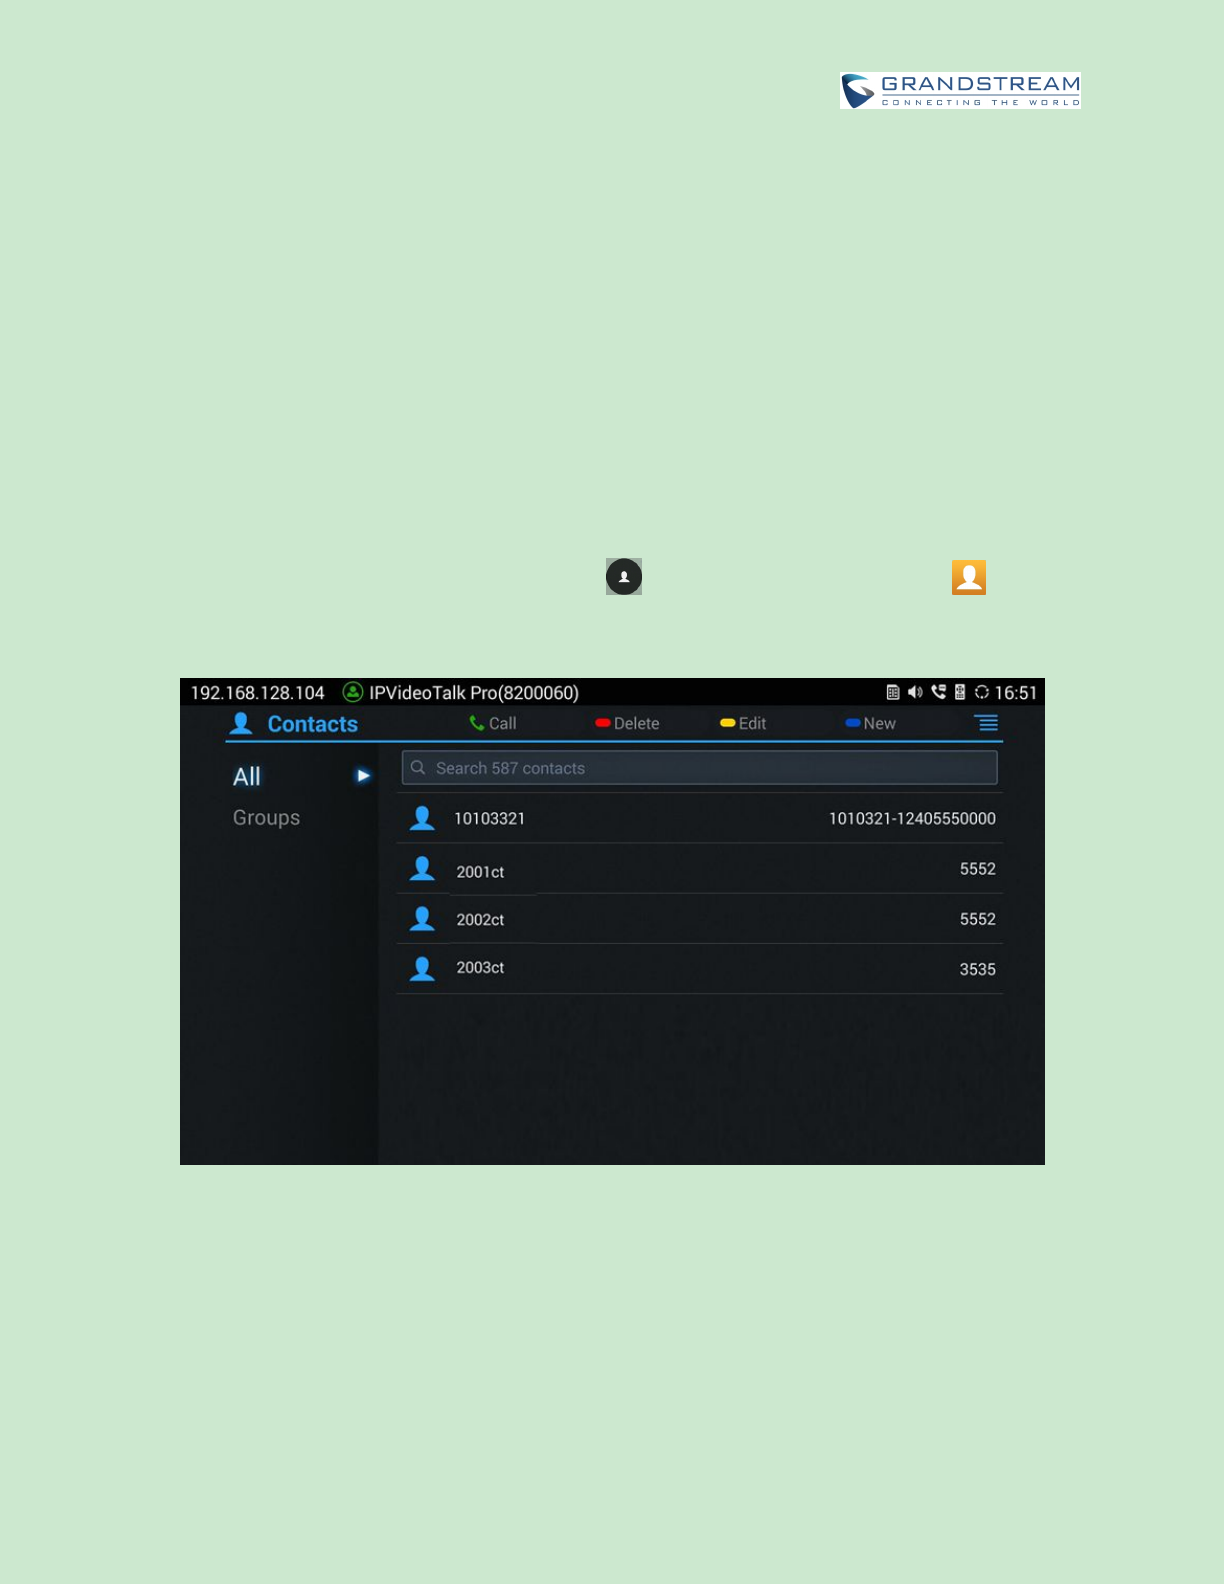
CONTACTS
GVC3202 Contacts app helps users to easily store and manage phone numbers and contacts information.
Users can add contacts on GVC3202 or import contacts from external devices as well as download from
a server.
On GVC3202 home screen, click on Contacts icon , or go to Applications, and select to access
contacts app.
Figure 35: GVC3202 Contacts Screen
All
It is used to display all contacts.
Groups
It is used to view groups. Select one group to view group details.
Call

Firmware Version 1.0.0.X
GVC3202 User Guide
Page 73 of 117
Select the contact, and press on GVC3202 remote control or click on button to dial
the contact users would like to call.
Delete
Press the red shortcut key on the remote control to delete contacts.
Edit
Press the yellow shortcut key on the remote control to edit contacts.
Add
Press the blue shortcut key on the remote control to access New Contact screen, fill in contact
information and press the yellow shortcut key on the remote control to save it.
Menu
Press on the remote control to access menu to edit/add/delete/export/import/download contacts.
Contact Details
Select one contact and press "OK" key on the remote control to view contact details.
ADD CONTACT
ADD SINGLE CONTACT
Follow the steps below to add one single contact:
1. Press the blue shortcut key on GVC3202 remote control to access New Contact screen.
Figure 36: GVC3202 Add New Contact Screen
2. Enter the contact information.
3. Press the red shortcut key to add more fields.
4. Press the yellow shortcut key to save the contact information.
Users could press the red shortcut key to add more contact information.
Firmware Version 1.0.0.X
GVC3202 User Guide
Page 74 of 117
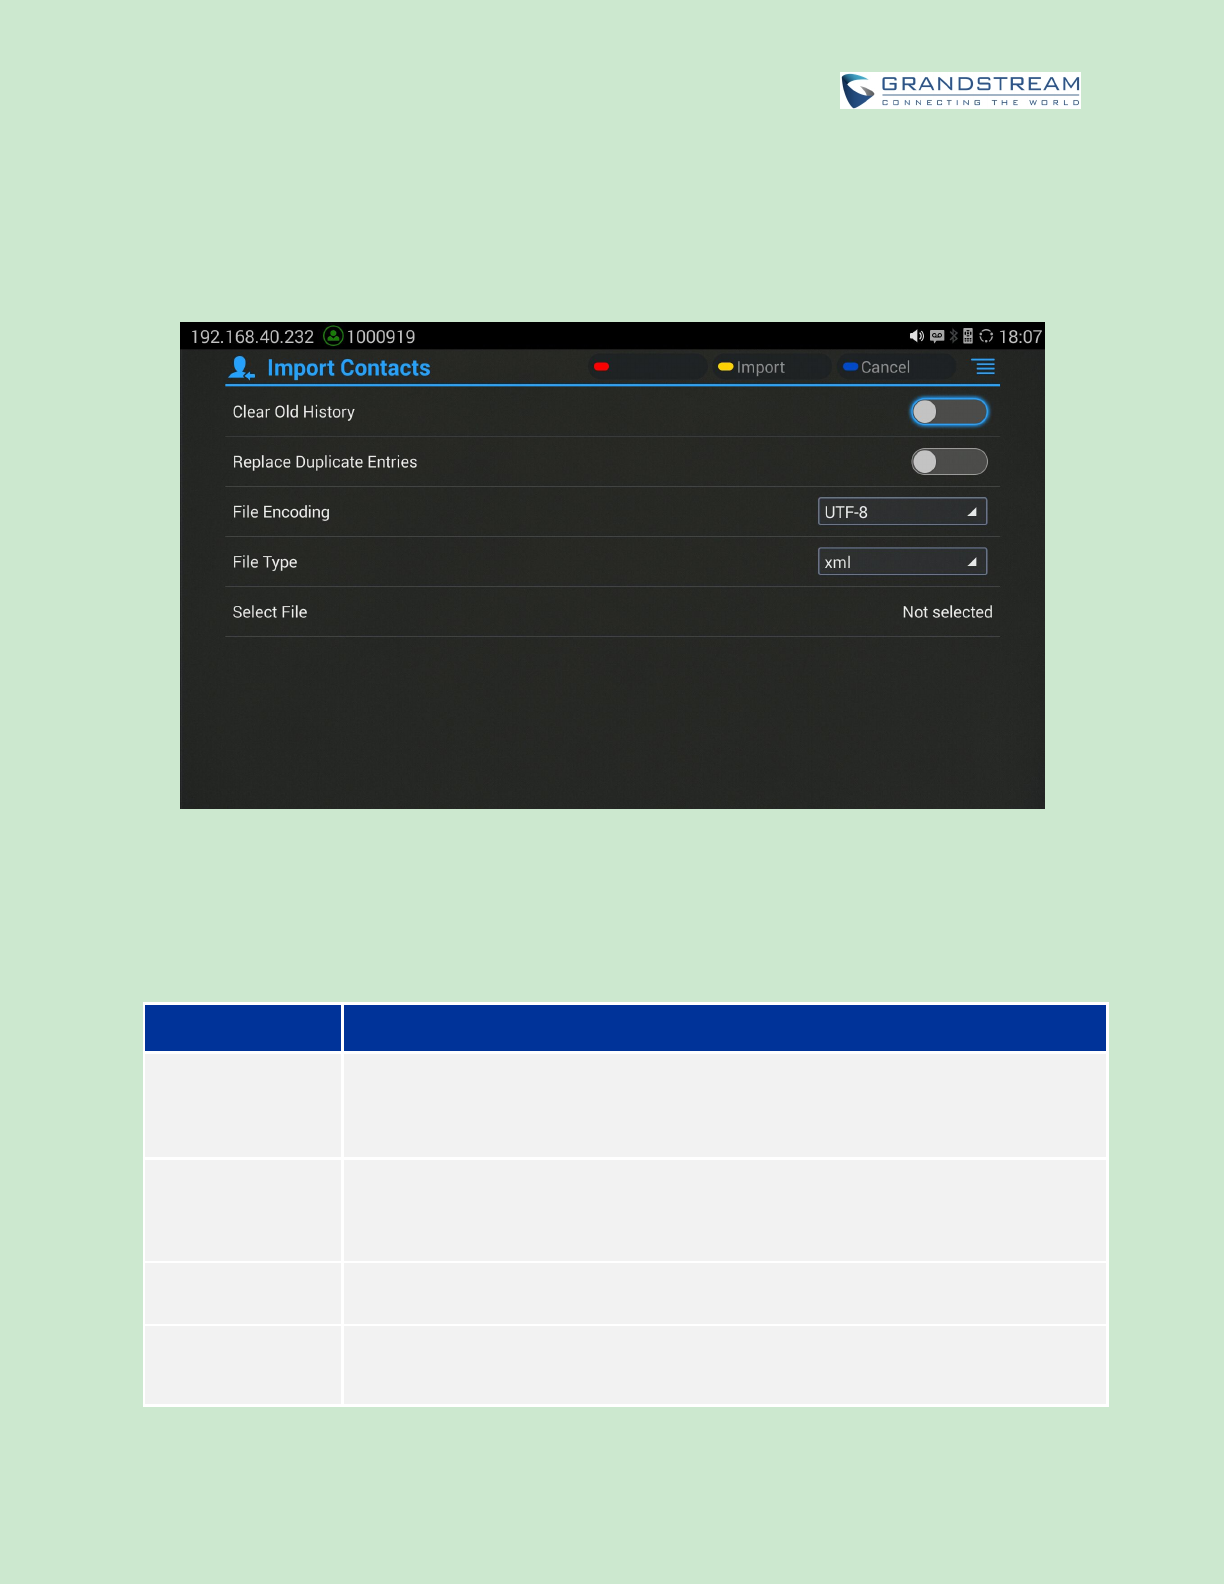
BATCH IMPORT CONTACTS
Import function allows users to batch import contacts. The phonebook with compatible format needs to be
saved to the storage devices like SD card/USB flash drive and plugged into GVC3202.
1. Press the MENU key on Contacts screen, and select "Import" to access Import Contacts screen.
Figure 37: GVC3202 Import Contacts Screen
2. Configure parameters and select the path to save the imported file.
3. Press the yellow shortcut key to save the contact information.
Table 17: GVC3202 Import Contacts Parameters
Parameters
Descriptions
Clear The Old List
If it is enabled, the previous contact records will be deleted when a new phonebook
file is loaded into the device. If it is disabled, both the old contacts and new contacts
will be kept in GVC3202.
Replace Duplicate
Entries
If it is enabled, when the phonebook file is imported to the device, the duplicated
entries will be removed. If it is disabled, both the old contacts and new contacts will
be kept in GVC3202.
File Encoding
Select the encoding format for XML contact file.
File Type
Select the file format for phonebook file import. The device supports xml, csv and
vcard format.
Firmware Version 1.0.0.X
GVC3202 User Guide
Page 75 of 117
Select The File
Select file from storage device plugged into GVC3202.
DOWNLOAD CONTACT
GVC3202 supports downloading phonebook from the file server to batch add contacts. The default file
name that GVC3202 looks for is "phonebook.xml". The phonebook XML file should be placed under the
file server directory for GVC3202 to retrieve. GVC3202 supports vcard/xml/csv file format.
1. On the Contacts screen, tap on the MENU key and select "Download" to bring up the Download
Contacts screen.
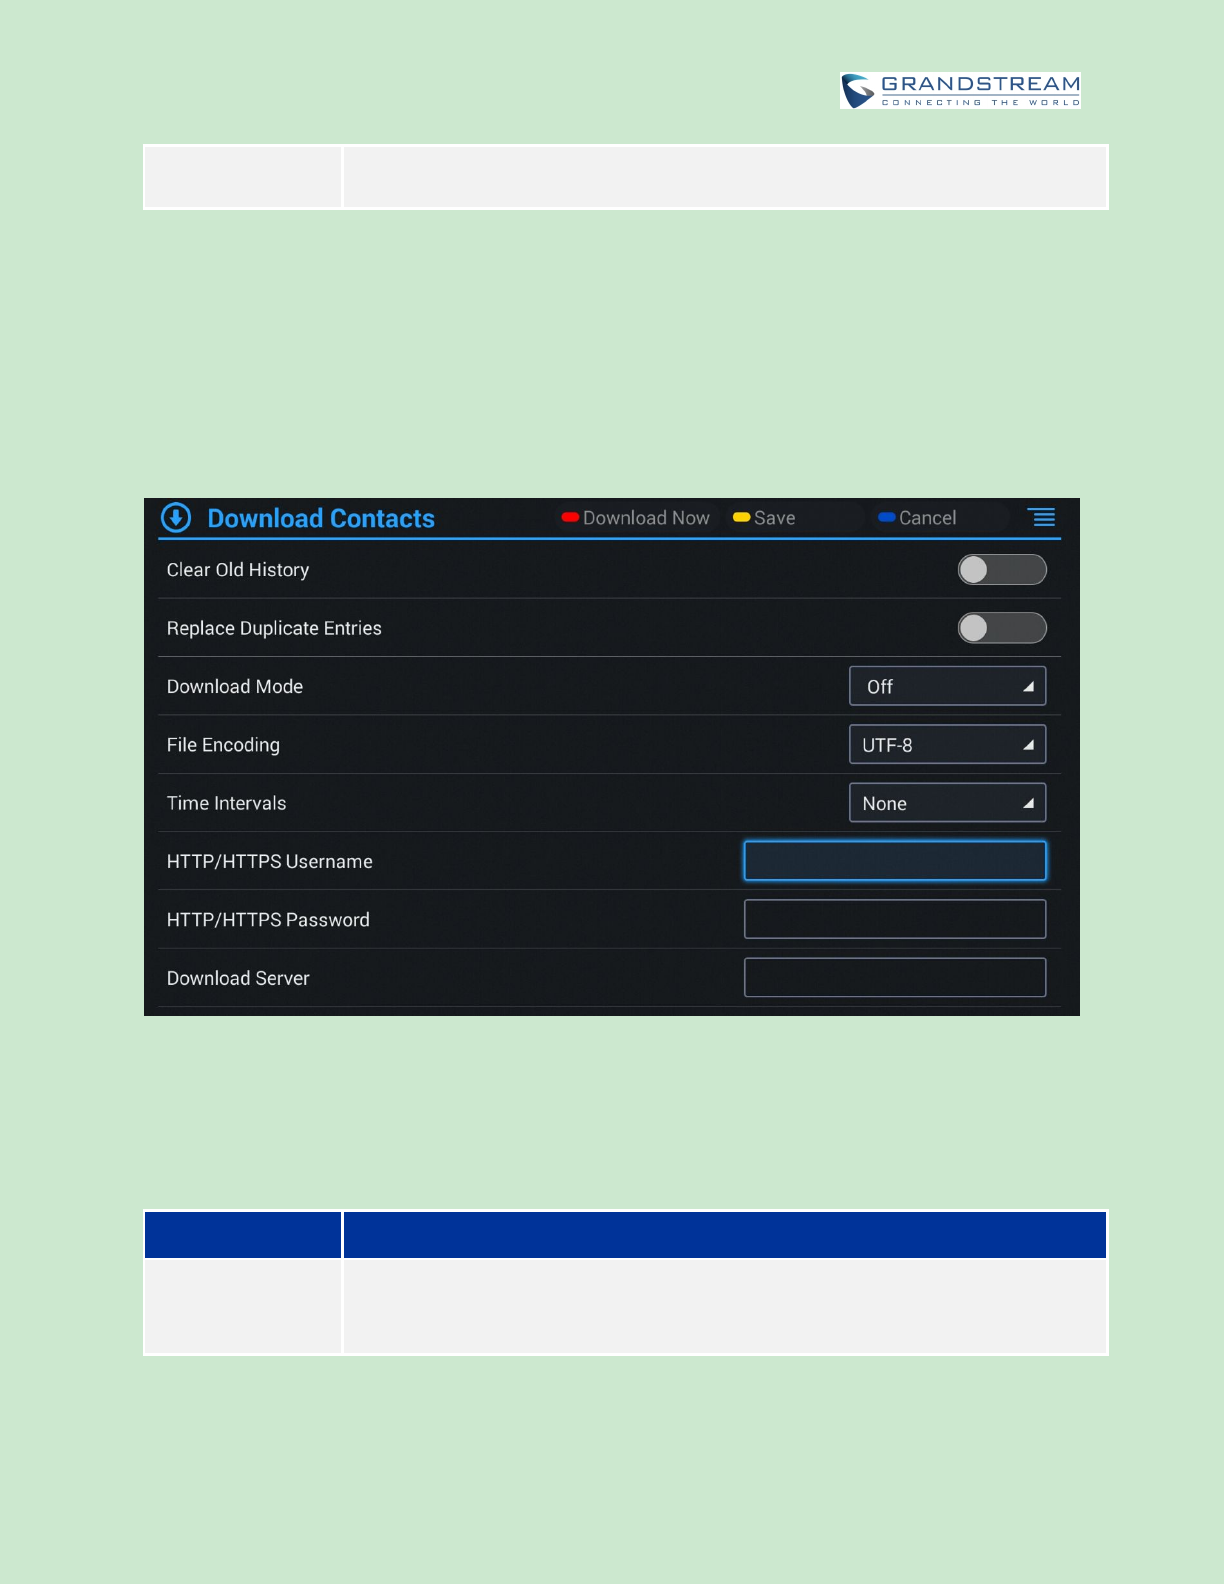
Figure 38: GVC3202 Download Contacts Screen
2. Configure parameters and select the path to save the file.
3. Press the red shortcut key to download the file.
Table 18: GVC3202 Download Contacts Parameters
Parameters
Descriptions
Clear The Old List
If it is enabled, the previous contact records will be deleted when a new phonebook
file is loaded into the device. If it is disabled, both the old contacts and new contacts
will be kept in GVC3202.
Firmware Version 1.0.0.X
GVC3202 User Guide
Page 76 of 117
Replace Duplicate
Entries
If it is enabled, when the phonebook file is imported to GVC3202, the duplicated
entries will be removed. If it is disabled, both the old contacts and new contacts will
be kept in GVC3202.
Download Mode
Select the phonebook download mode from TFTP, HTTP or HTTPS.
File Encoding
Select the encoding format for the XML contact file.
Time Intervals
Configure the time interval to download XML contact file.
HTTP/HTTPS
Username
Configure the HTTP/HTTPS username for phone book downloading if it’s required
by the server.
HTTP/HTTPS
Password
Configure the HTTP/HTTPS password for phone book downloading if it’s required
by the server.
Download Server
Fill in the server URL or IP address to download the XML contact file to the device.
SEARCH CONTACTS
In the Contacts app, users could input keyword to search in the dialog. GVC3202 will display contacts
automatically which is related to the search keyword. Fuzzy search and precise search are both
supported.
MANAGE CONTACTS
DELETE CONTACT
1. Access Contacts screen and select the contact users would like to delete.
2. Tap on and select "Delete" option to delete contact.
BATCH REMOVE CONTACTS
To delete more than one contacts,
1. Select "Batch Remove" option.
2. Select the checkbox for the contacts to be deleted, and press the red shortcut key on GVC3202
remote control to delete them. Users could also press the yellow shortcut key on the remote control to
select all contacts at once.
Firmware Version 1.0.0.X
GVC3202 User Guide
Page 77 of 117
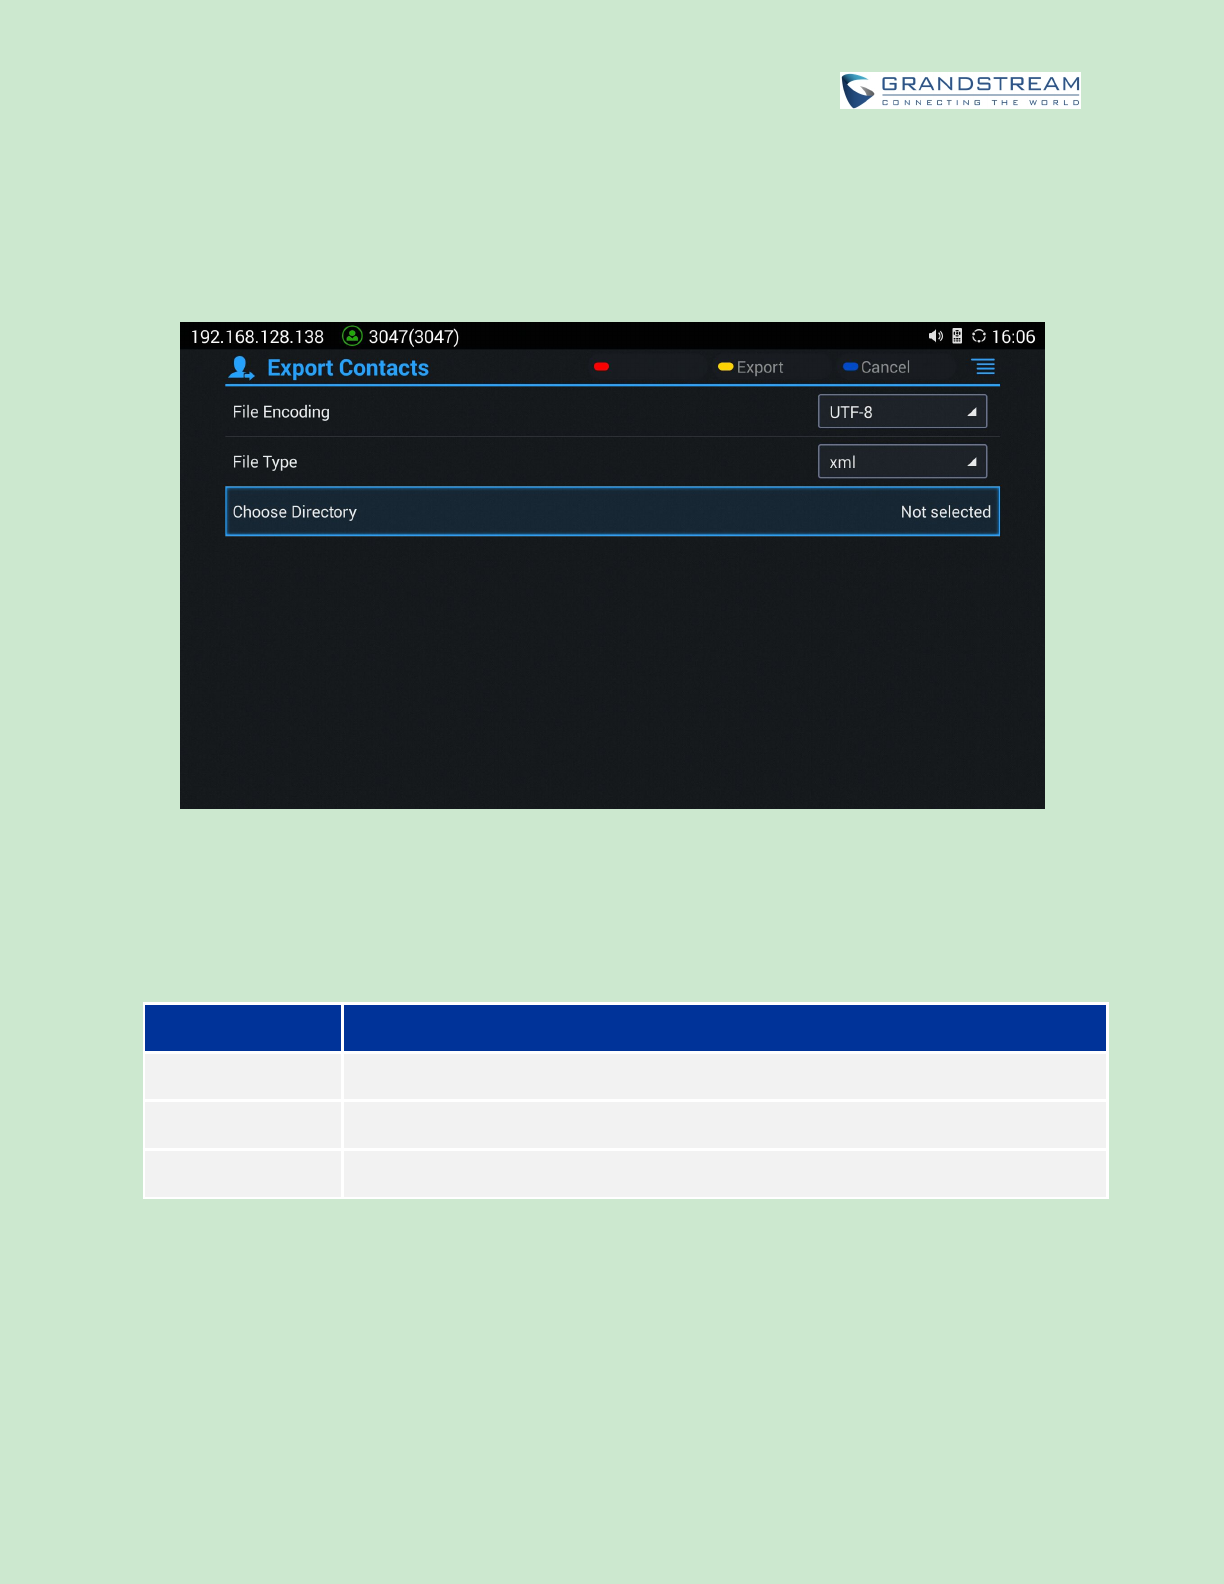
EXPORT CONTACTS
GVC3202 supports exporting phonebook as vcard/xml/csv files, and save the files to other external
storage devices.
1. Press the MENU key on Contacts screen to bring up the Export Contacts screen.
Figure 39: GVC3202 Export Contacts Screen
2. Configure parameters as shown in table below and select the directory to save the exported file.
3. Press the yellow shortcut key to export the file.
Table 19: GVC3202 Export Contacts Parameters
Parameters
Descriptions
File Encoding
Select the encoding format for XML contact file.
File Type
Select the file format for phonebook file export. The device supports xml, csv, and
vcard.
Choose Directory
Select directory to save file.
GROUPS
Users could divide contacts into different groups with specific names. Select one group entry and press
"OK" key to view group details.

Firmware Version 1.0.0.X
GVC3202 User Guide
Page 78 of 117
Figure 40: GVC3202 Groups Screen
Call
Press on GVC3202 remote control to call the first 8 members in a group to initiate a conference.
Rename (red shortcut key)
It is used to rename a group.
Delete (yellow shortcut key)
It is used to delete a group.
Add (blue shortcut key)
It is used to add a group.
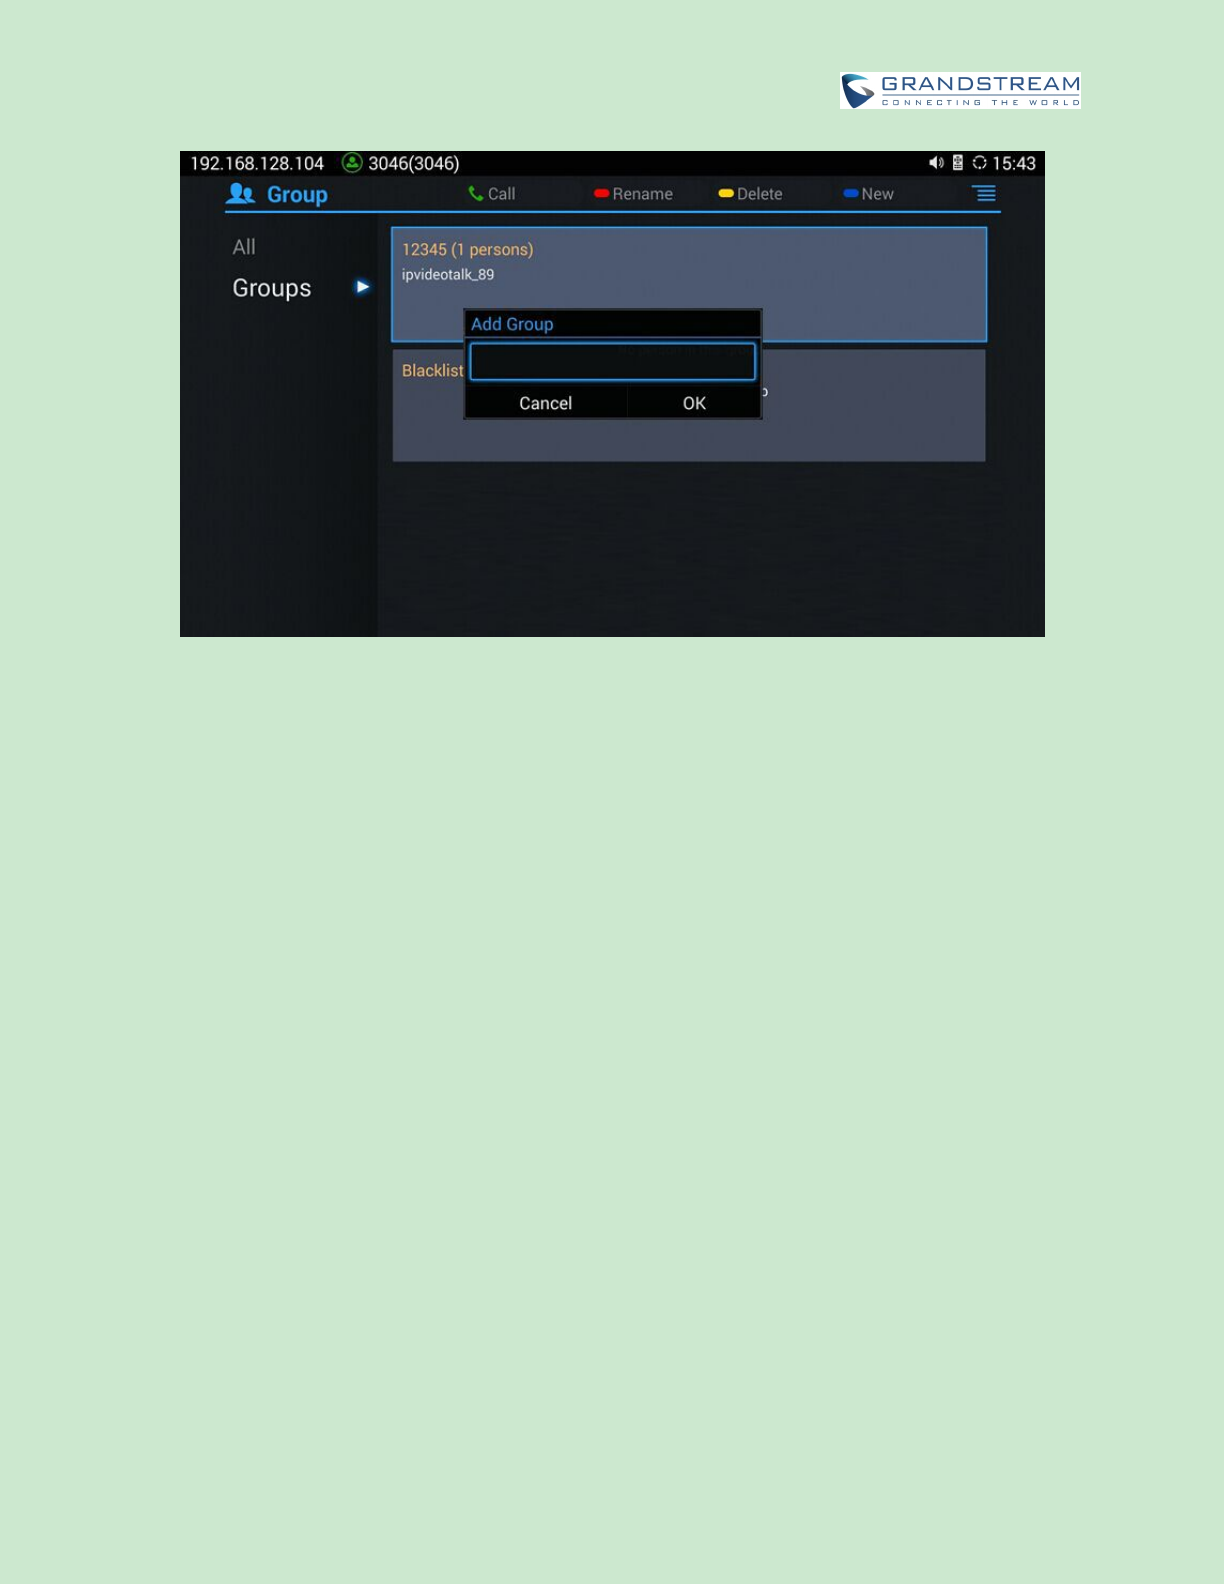
ADD NEW GROUP
1. Select Groups tab in Contacts screen.
2. Press the blue shortcut key on GVC3202 remote control to bring up the screen below:
Firmware Version 1.0.0.X
GVC3202 User Guide
Page 79 of 117
Figure 41: GVC3202 Add Group Screen
3. Input a group name and tap on "OK" to add a new group.
4. Go to Contacts Screen to find the group you just added and access it.
5. Press the red shortcut key on the remote control to access Groups editing screen.
6. Select the contacts users would to add to this group.
7. Press the blue shortcut key on GVC3202 remote control to save the operations.
DELETE GROUP
Follow the steps below to delete groups.
1. Select Groups on Contacts screen.
2. Select the group users would like to delete.
3. Press the yellow shortcut key to bring up the dialog box.
4. Press "OK" key to delete.
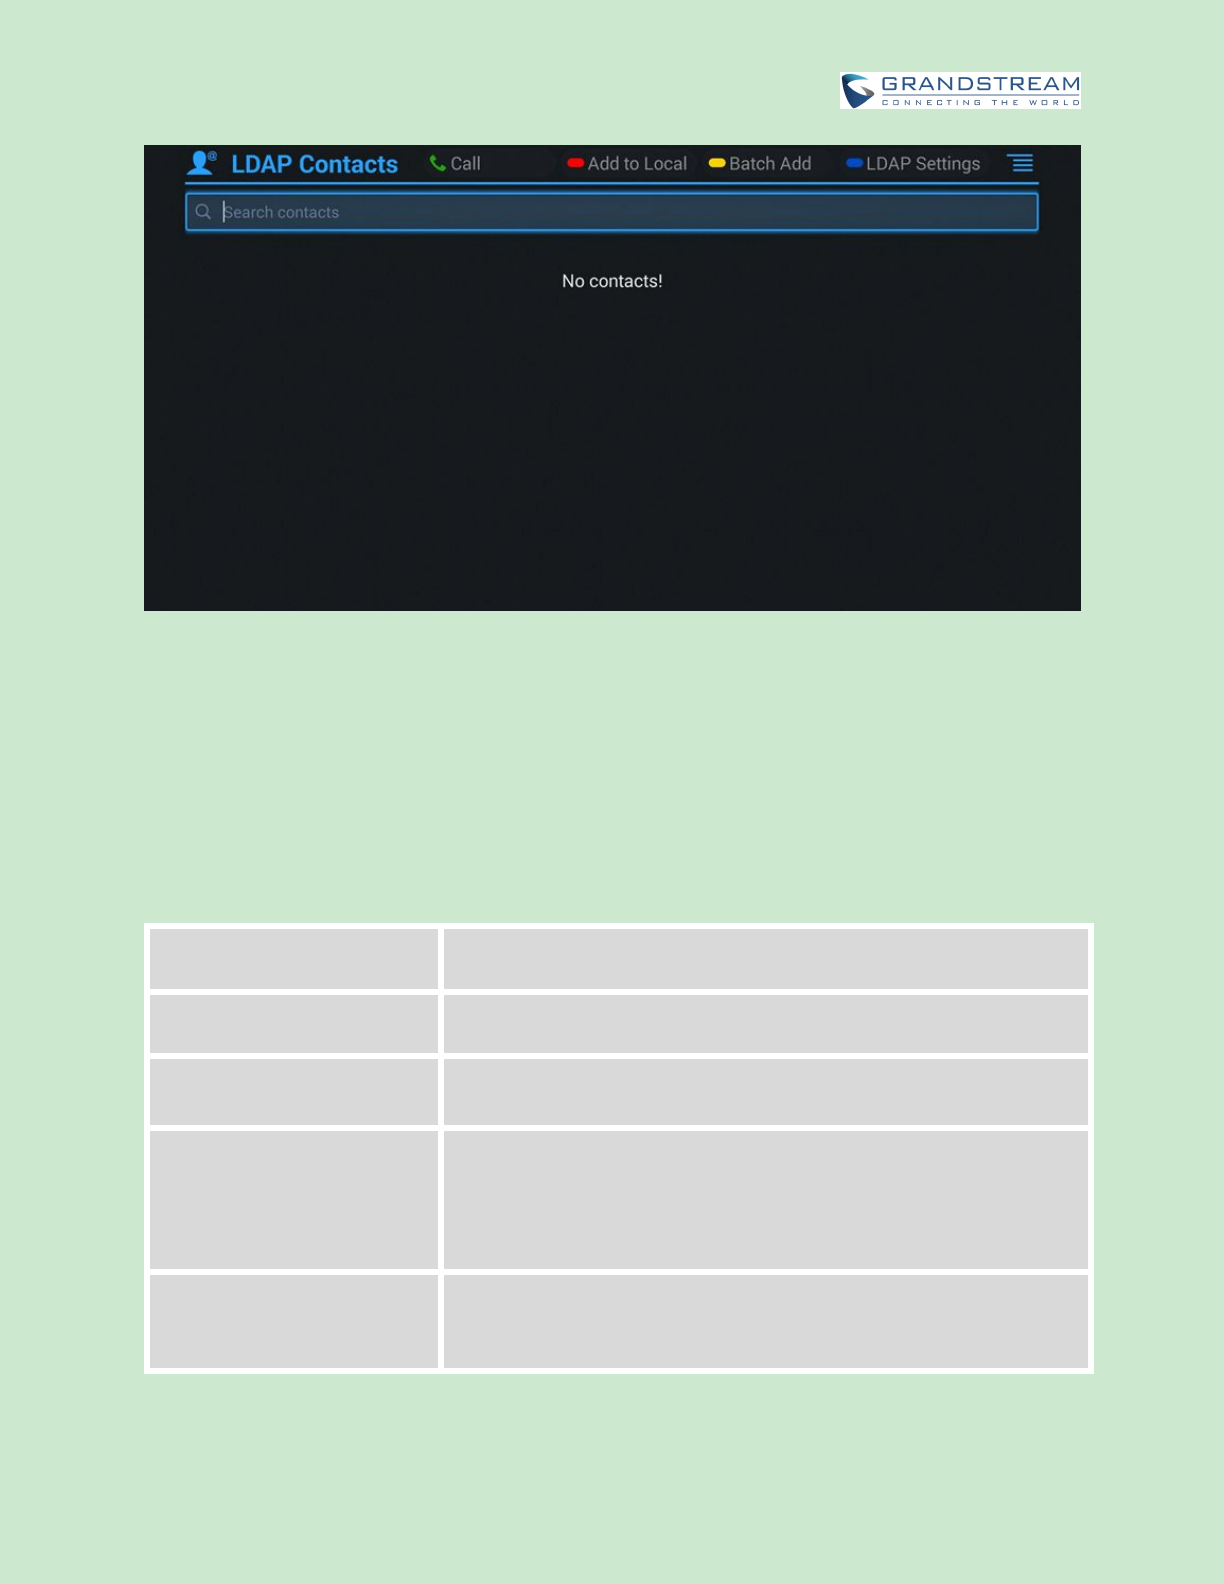
LDAP CONTACTS
LDAP contacts application can be accessed in GVC3202 display device LCD->Applications->LDAP
Contacts. It helps users access and manage the contacts at ease.
Here is the main interface of LDAP contacts.
Firmware Version 1.0.0.X
GVC3202 User Guide
Page 80 of 117
Figure 42: LDAP Contacts Interface
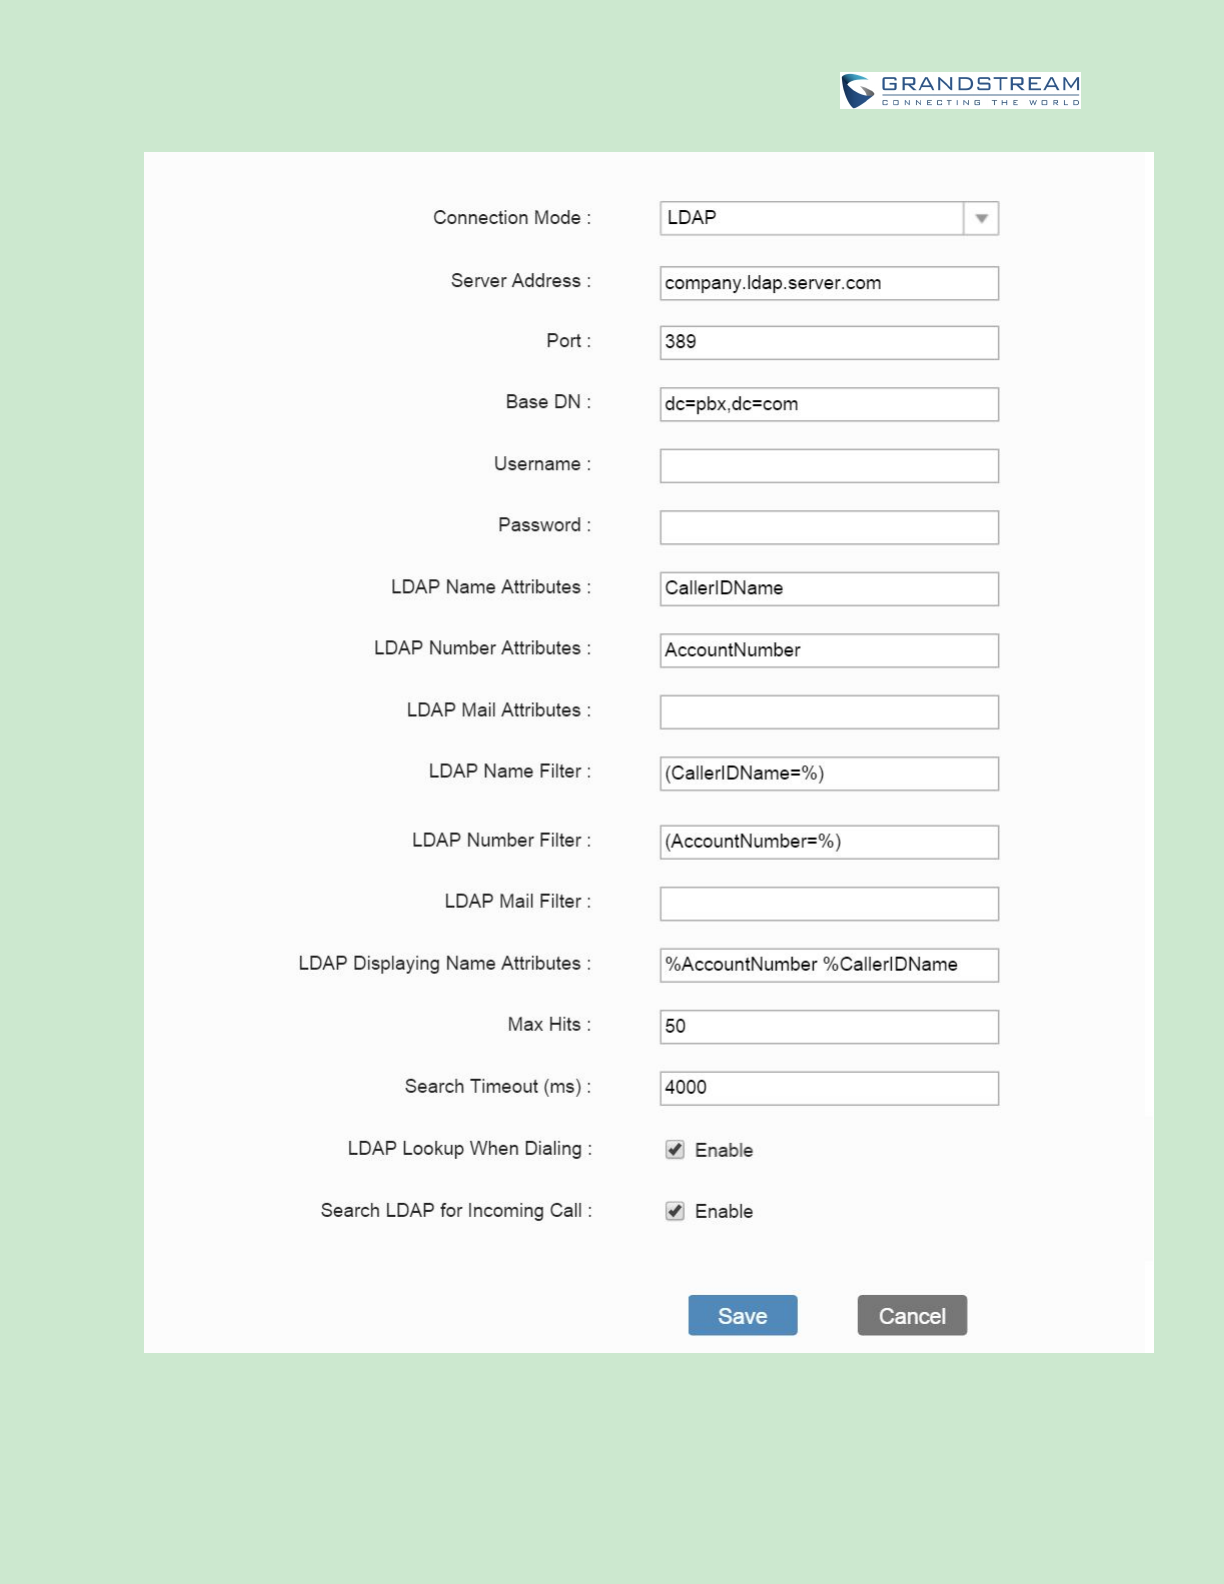
LDAP SETTINGS
Before starting using LDAP on GVC3202, the users must configure the LDAP settings first. Press the
Blue shortcut key on the GVC3202 remote control to access LDAP settings, or the users can configure it
under GVC3202 web UI->Contacts->LDAP page.
Table 20: GVC3202 LDAP Settings Parameters
Connection Mode
It is used to select which protocol will be used for LDAP searching,
LDAP or LDAPS.
Server Address
It is used to configure the URI of the LDAP (Lightweight Directory
Access Protocol) server.
Port
It is used to configure the LDAP server port. The default LDAP port
number is 389.
Base DN
It is used to configure the LDAP search base. This is the location in the
directory where the search is requested to begin.
Example:
dc=grandstream, dc=com
ou=Boston, dc=grandstream, dc=com
User Name
It is used to configure the bind "Username" for querying LDAP servers.
Some LDAP servers allow anonymous binds in which case the setting
can be left blank.
Firmware Version 1.0.0.X
GVC3202 User Guide
Page 81 of 117
Password
It is used to configure the bind "Password" for querying LDAP servers.
The field can be left blank if the LDAP server allows anonymous binds.
LDAP Name Attributes
It is used to configure the "name" attributes of each record which are
returned in the LDAP search result. This field allows the users to
configure multiple space separated name attributes.
Example:
gn
cn sn description
LDAP Number Attributes
It is used to configure the "number" attributes of each record which are
returned in the LDAP search result. This field allows the users to
configure multiple space separated number attributes.
Example:
telephoneNumber
telephoneNumber Mobile
LDAP Mail Attributes
It is used to configure the "mail" attributes of the each record which are
returned in the LDAP search result.
Example:
mail
LDAP Name Filter
It is used to configure the filter used for name lookups.
Examples:
(|(cn=%)(sn=%)) returns all records which has the "cn" or "sn" field
starting with the entered prefix;
(!(sn=%)) returns all the records which do not have the "sn" field
starting
with the entered prefix;
(&(cn=%) (telephoneNumber=*)) returns all the records with the "cn"
field starting with the entered prefix and "telephoneNumber" field set.
LDAP Number Filter
It is used to configure the filter used for number lookups.
Examples:
(|(telephoneNumber=%)(Mobile=%) returns all records which has the
"telephoneNumber" or "Mobile" field starting with the entered prefix;
(&(telephoneNumber=%) (cn=*)) returns all the records with the
"telephoneNumber" field starting with the entered prefix and "cn" field
set.
LDAP Mail Filter
It is used to configure the filter used for mail lookups.
Example:
(mail=%)
LDAP Displaying Name
Attributes
It is used to configure the entry information to be shown on phone's
LCD. Up to 3 fields can be displayed.
Example:
%cn %sn %telephoneNumber

Firmware Version 1.0.0.X
GVC3202 User Guide
Page 82 of 117
Max Hits
It is used to configure the maximum number of results to be returned
by the LDAP server. If set to 0, server will return all search results. The
default setting is 50.
Search Timeout (ms)
It is used to configure the interval (in seconds) for the server to
process the request and client waits for server to return. The default
setting is 4000 seconds.
LDAP Lookup When Dialing
It is used to set if allow the phone system to do the LDAP number
searching when making outgoing calls. The default setting is "No".
Search LDAP For Incoming
Call
It is used to set if allow the phone system to do LDAP number
searching for incoming calls. The default setting is "No".
Here is an example configuration on GVC3202 LDAP settings in web UI. The LDAP server is the built-in
LDAP server in Grandstream UCM61xx.
Firmware Version 1.0.0.X
GVC3202 User Guide
Page 83 of 117
Figure 43: LDAP Settings Example in Web UI

Firmware Version 1.0.0.X
GVC3202 User Guide
Page 84 of 117
SEARCH LDAP CONTACTS
After configuring LDAP settings, the users could search contacts in LDAP Contacts main interface. In the
following example, the users could enter number or name in the Search field. The LDAP result will be
displayed dynamically when the key word is entered.
Figure 44: Search LDAP Contacts
If the user presses the Green Call button on the GVC3202 remote control, the GVC3202 will initiate a
call to this contact.
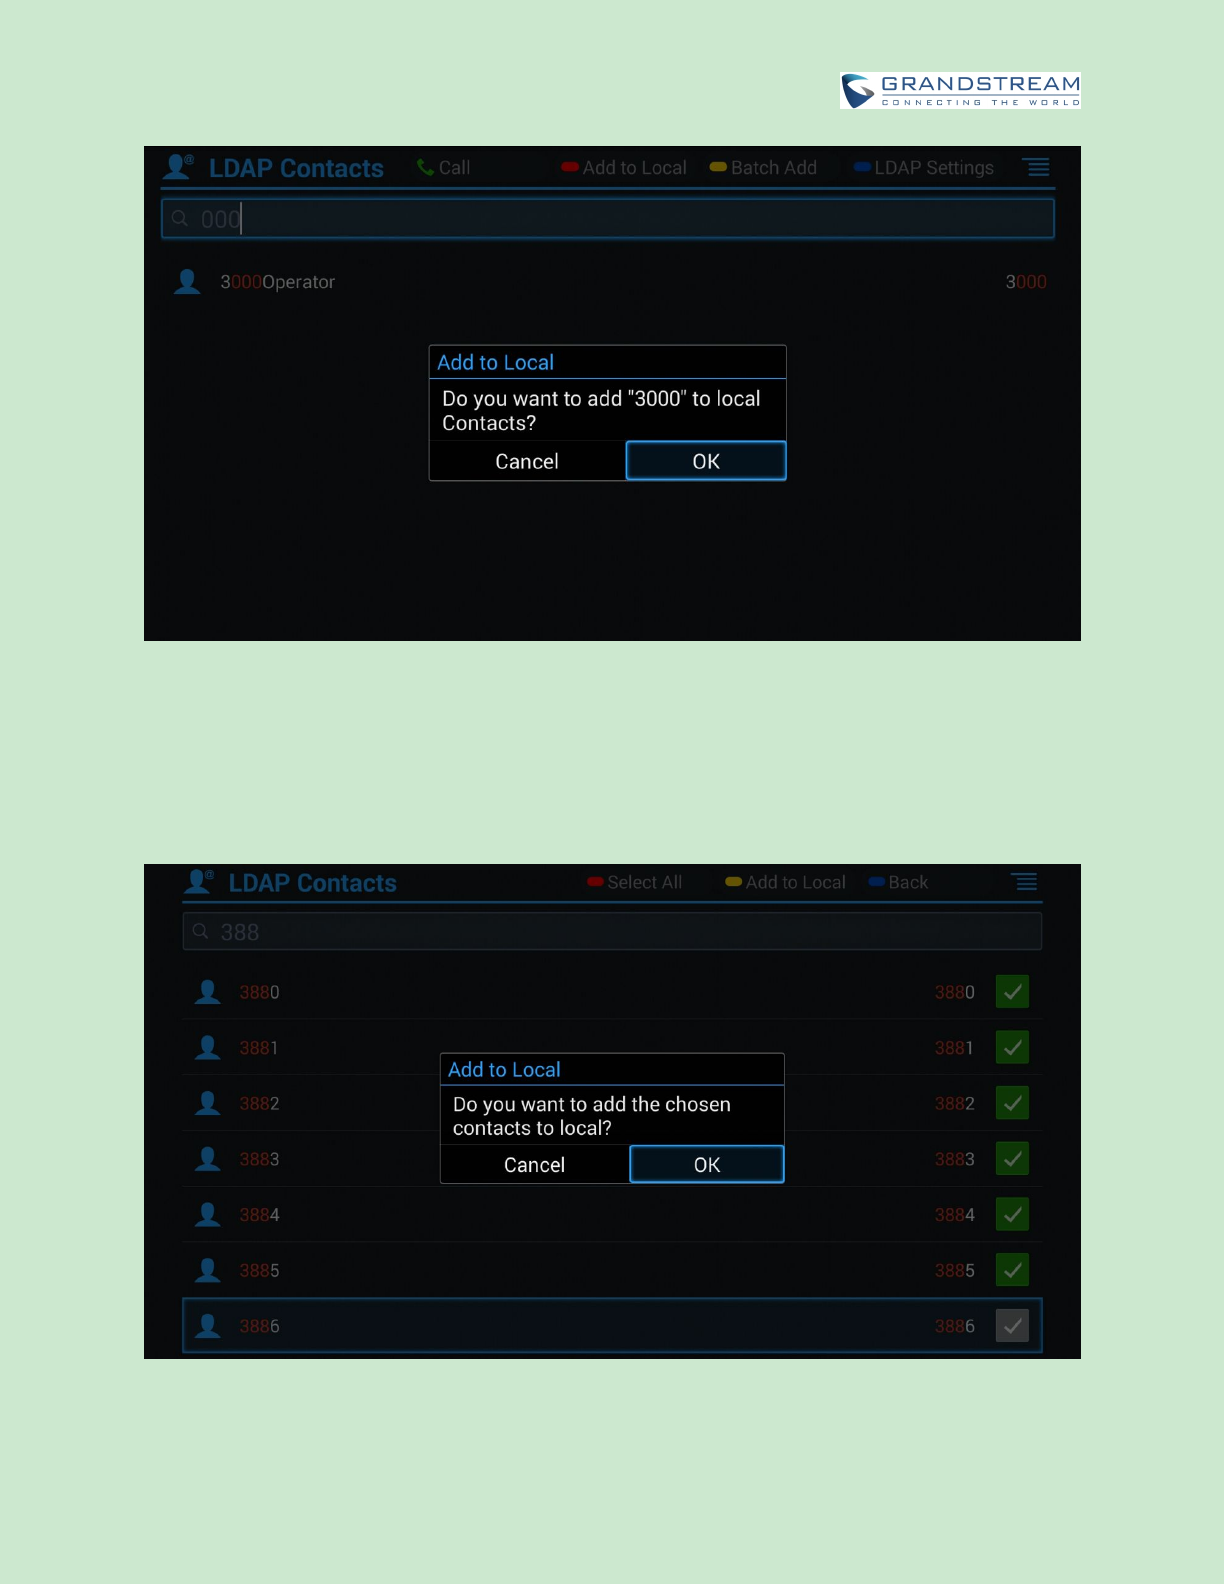
ADD SEARCH RESULT INTO LOCAL CONTACTS
After performing LDAP search, the users could select to add the result into GVC3202 local contacts.
Add to Local
On the search result screen, move the selection to the contact, then press the red shortcut key on the
GVC3202 remote control to add single search result to local contacts. Click on OK to confirm Add to
Local.
Firmware Version 1.0.0.X
GVC3202 User Guide
Page 85 of 117
Figure 45: Add LDAP Search Result to Local Contacts
Batch Add
Press the yellow shortcut key on the GVC3202 remote control, then select the checkbox for multiple
search results to be added into local contacts. Press the yellow shortcut key again and the following
prompt will pop up. Click on OK to confirm Batch Add.
Figure 46: Batch Add LDAP Search Results to Local Contacts
Firmware Version 1.0.0.X
GVC3202 User Guide
Page 86 of 117
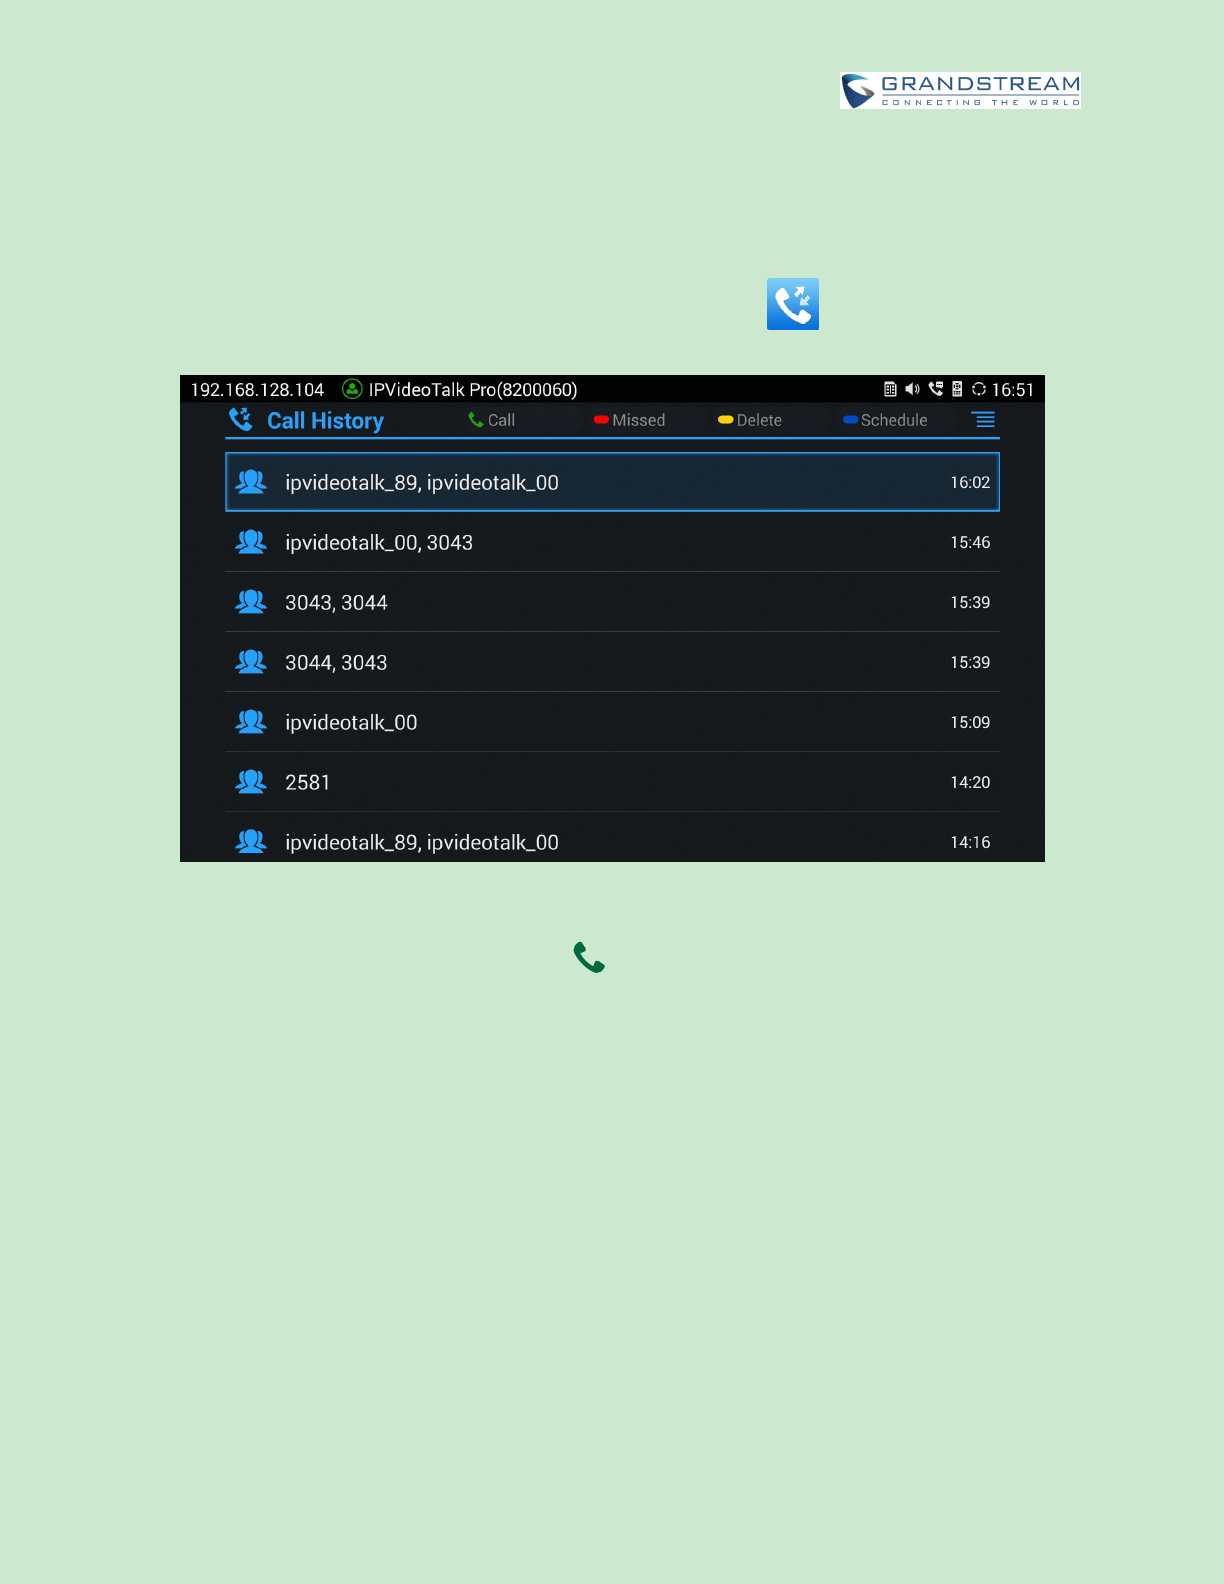
CALL HISTORY
Call History provides users access to phone's recent call records. Users can view all records, or select
different categories for incoming calls, outgoing calls, missed call and conference.
To access Call History, go to Home screen->APPLICATIONS->select .
Figure 47: GVC3202 Call History Screen
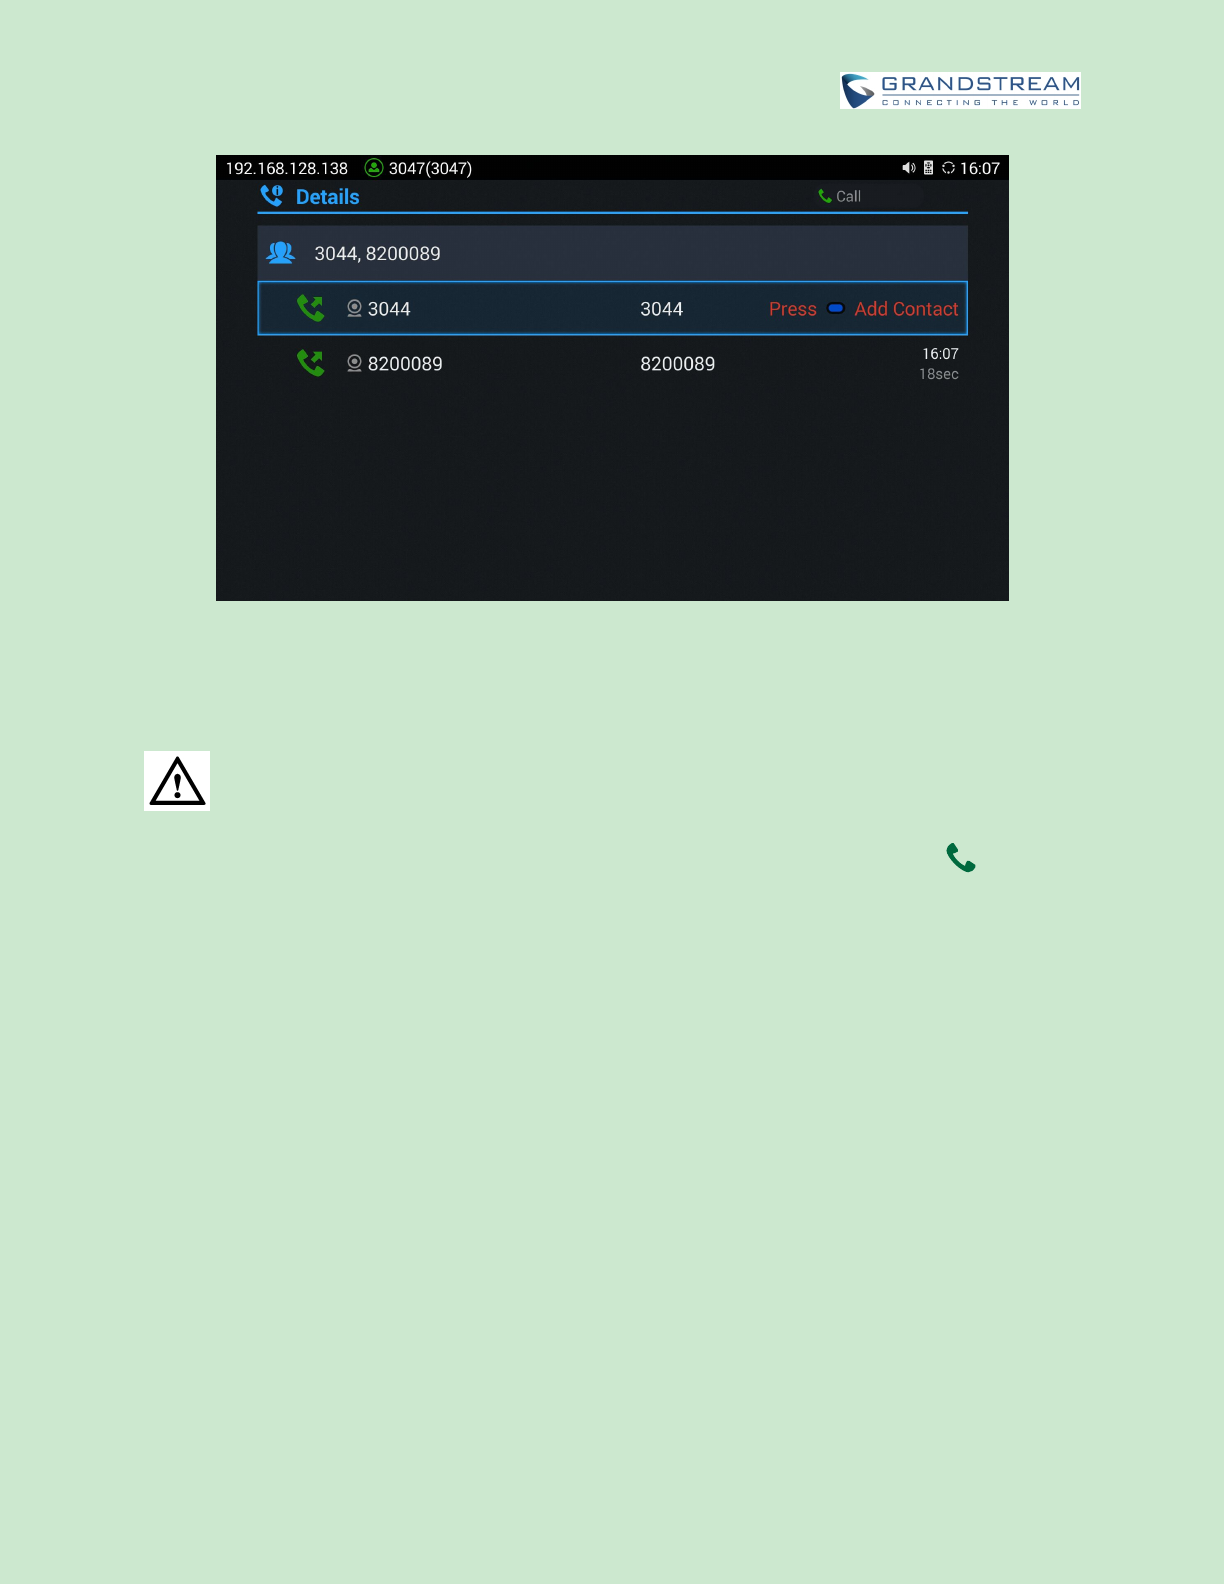
Click on a record in the call history and press to dial out this number directly. Press "OK" key on
GVC3202 remote control to view call details for this number.
Firmware Version 1.0.0.X
GVC3202 User Guide
Page 87 of 117
Figure 48: GVC3202 Call History Details
--------------------------------------------------------------------------------------------------------------------------------------------
Note:
Call history displays all Blue Jeans conference call histories as well. Press "OK" key or to dial out
directly, and there is no need to input the password again. However, if the conference does not exist or
the password has been changed, the re-dial will fail.
--------------------------------------------------------------------------------------------------------------------------------------------
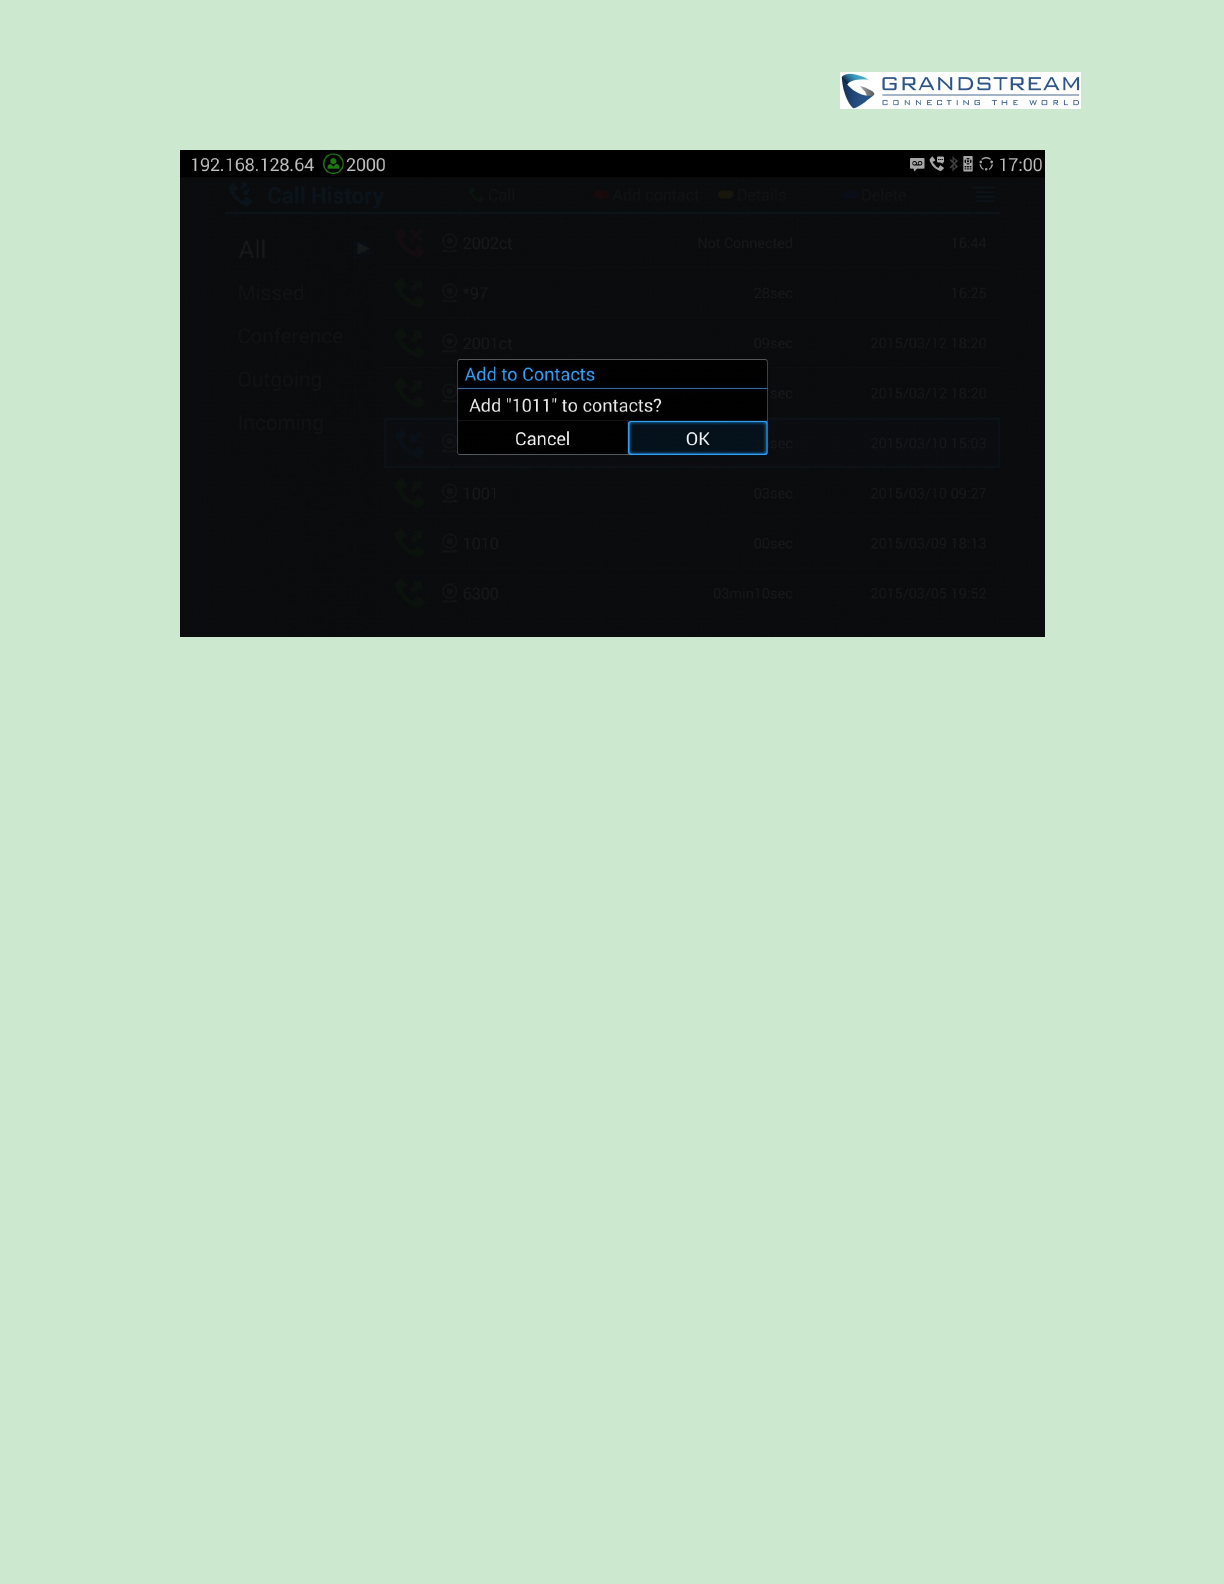
ADD CONTACT FROM CALL HISTORY
1. Access Call History screen.
2. Select one call history entry.
3. Press the blue shortcut key to bring up the dialog box.
4. Confirm to add the contacts.
Firmware Version 1.0.0.X
GVC3202 User Guide
Page 88 of 117
Figure 49: GVC3202 Add Contact Screen
5. Select existing contact or press the blue shortcut key on GVC3202 remote control to access edit
screen.
6. Fill in contact information and press the yellow shortcut key on the remote control to save the contact.
DELETE CALL HISTORY
1. Select the call history entry.
2. Press the yellow shortcut key on GVC3202 remote control to bring up the dialog box.
3. Confirm to delete.
CONFERENCE SCHEDULE VIA CALL HISTORY
1. Select one call history entry users would like to add to scheduled conference.
2. Press the blue shortcut key on GVC3202 remote control to access schedule screen.
3. Fill in information and press the yellow shortcut to save.
FILE MANAGER
File Manager allows users to delete, move, copy, paste, send, rename files (including files on storage
device such as USB flash drive and SD card), and query file properties on GVC3202.

Firmware Version 1.0.0.X
GVC3202 User Guide
Page 89 of 117
COPY FILE
To copy the file from GVC3202 to USB/SD storage device:
1. Insert USB/SD storage device into USB port on GVC3202. It will take a few seconds for GVC3202 to
prepare the connection.
2. The USB storage icon will show up on the status bar.
3. Go to Home screen->Applications->File Manager.
4. Open the target folder.
5. Press the yellow shortcut key and select the file.
6. Press the blue shortcut key to copy file and press to go back to the upper level directory.
7. Select target storage device and go to the directory where the file will be pasted to.
8. Press the yellow shortcut key to paste the file.
Users can also select file and press the blue shortcut key to copy one single file or folder.
SEND FILE
1. Go to Home screen->Applications->File Manager.
2. Open the target folder.
3. Press the yellow shortcut key and select the file.
4. Press MENU key on GVC3202 remote control and select "Send" option.
5. Select target location and press "OK" key on GVC3202 remote control to send file. If users need to
send the file via Bluetooth, enable and connect Bluetooth device first. Otherwise, the interface will be
redirected to the corresponding setting page to configure.
Users can also select file and press the MENU key to send one single file or folder.
DELETE FILE
1. Go to Home screen->Applications->File Manager.
2. Open the target folder.
3. Press the yellow shortcut key and select the file.
4. Press the red shortcut key.
5. A dialog will pop out for users to confirm whether to delete the file or not.
6. Press "OK" key to delete the file successfully.
Users can also select file and press the red shortcut key to delete one single file or folder.
Firmware Version 1.0.0.X
GVC3202 User Guide
Page 90 of 117
RENAME FILE
1. Go to Home screen->Applications->File Manager.
2. Open the target folder.
3. Press the yellow shortcut key and select the file.
4. Press MENU key on GVC3202 remote control and select "Rename".
5. Input the new file name in the pop out dialog and press "OK" key to save.
Press on GVC3202 remote control to cancel the operation.
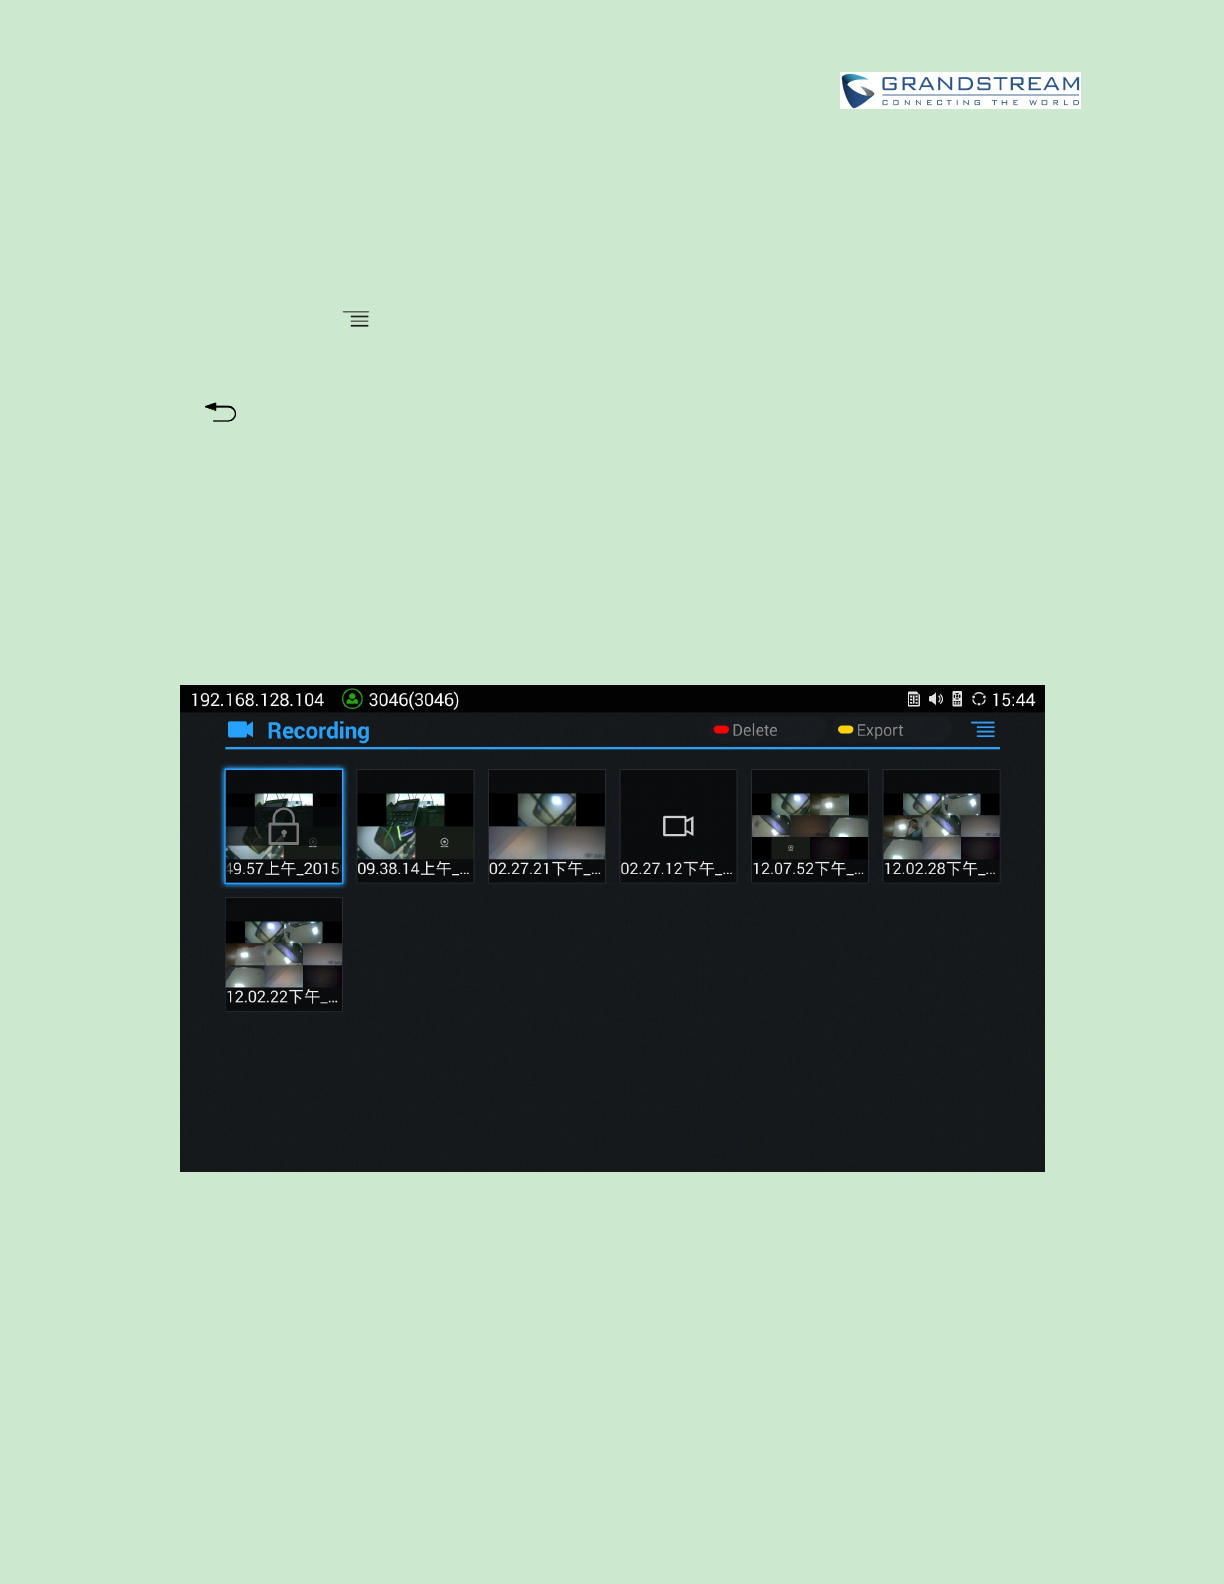
RECORDING
GVC3202 recording application is used for the storage of call recording files in video conferencing. Users
can play, export, lock/unlock, send, rename or delete these recordings and etc. The recording screen is
as shown below:
Figure 50: GVC3202 Recording Screen
Press "OK" key to play recording.
Press the red shortcut key to delete the chosen recording file.
Press the yellow shortcut key to export the recording files to the external storage device.
Press the MENU key to make other operations to recording files like export, rename, and lock/unlock.
Firmware Version 1.0.0.X
GVC3202 User Guide
Page 91 of 117
--------------------------------------------------------------------------------------------------------------------------------------------
Note:
The locked files can't be deleted or overwritten, and cannot be shown in the third party application, but
can be viewed in GVC3202 video application.
--------------------------------------------------------------------------------------------------------------------------------------------
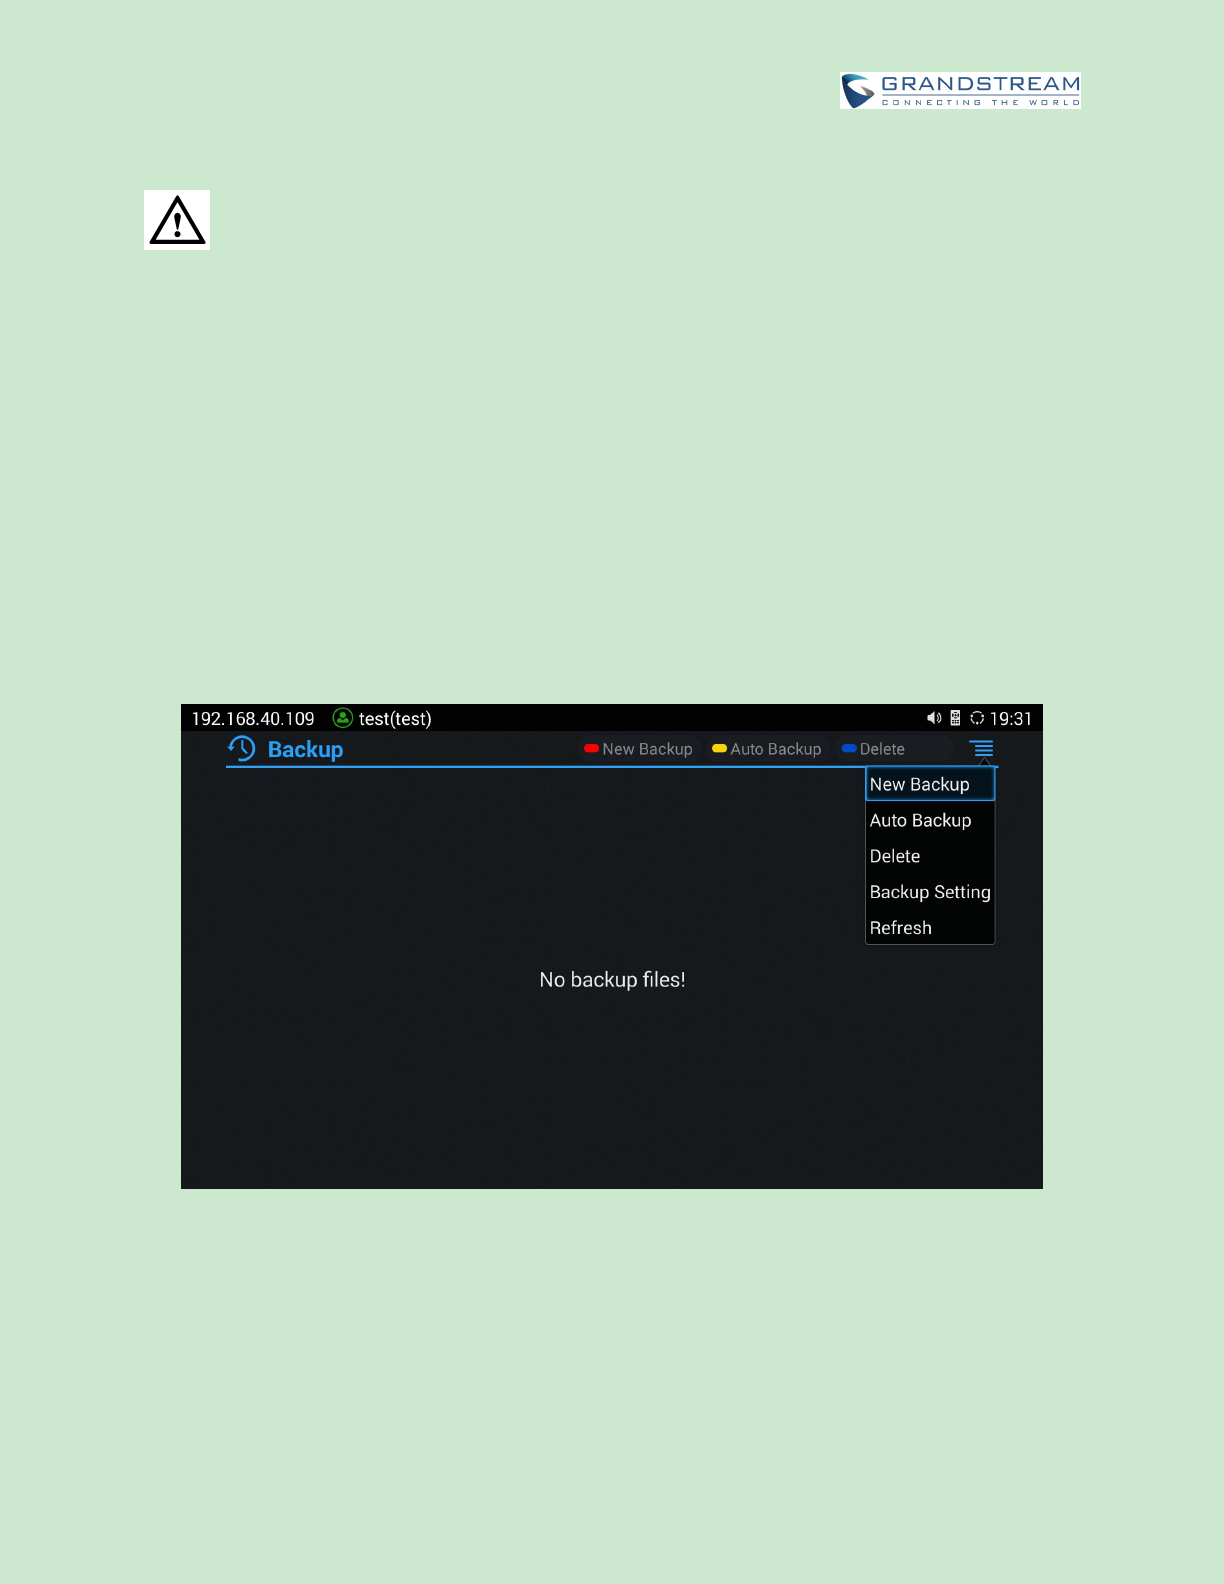
BACKUP
BACKUP DATA
GVC3202 BACKUP application is used to back up data or import backup files to restore data. It can be
accessed from Home screen->Applications->Backup. The default screen will list available backup files (if
any) and backup options.
Figure 51: GVC3202 Backup App
GVC3202 supports manual backup and automatic backup:
Press the red shortcut key on the remote control to create new backup manually. The user will
select data and press the blue shortcut key to start backup.
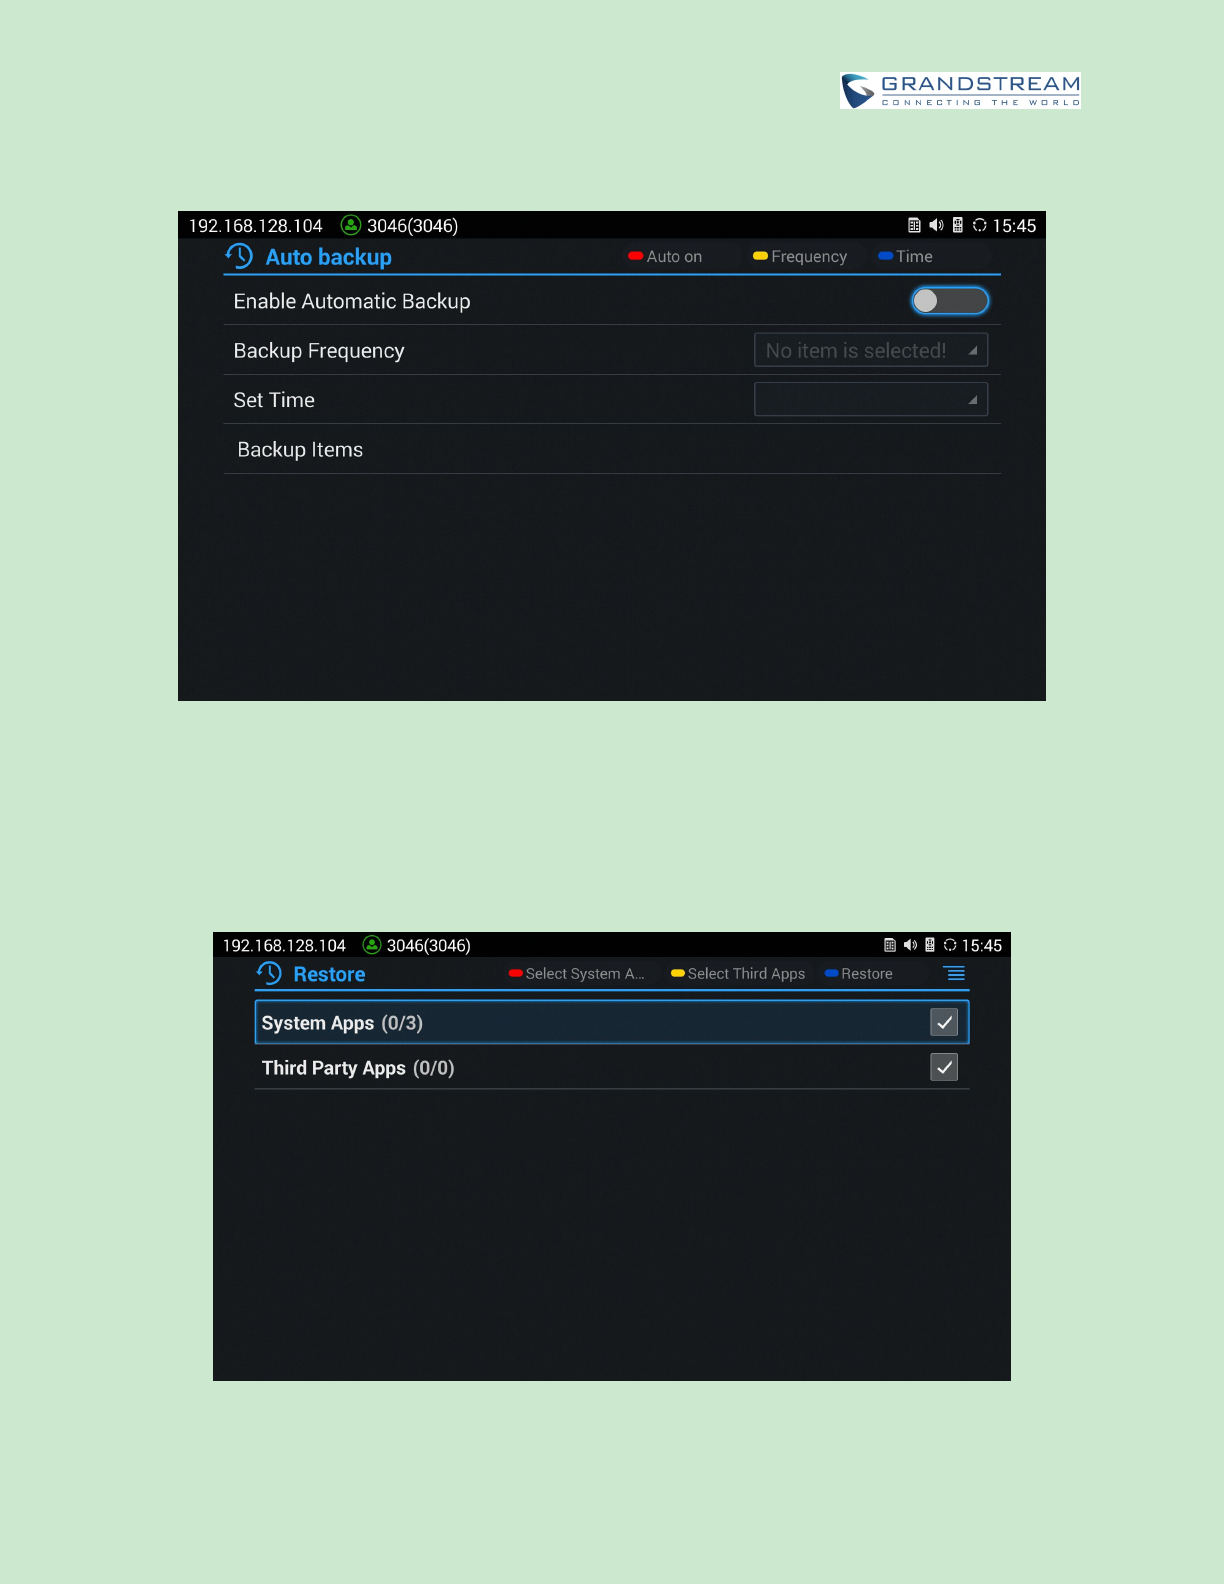
Press the yellow shortcut key on the remote control to access automatic backup. Then configure
Firmware Version 1.0.0.X
GVC3202 User Guide
Page 92 of 117
each parameter for automatic backup.
Figure 52: GVC3202 Automatic Backup Screen
RESTORE BACKUP DATA
Select one backup data and press "OK" key to access restore screen, select data and press the blue
shortcut key to restore the backup data.
Figure 53: GVC3202 Restore Backup Data Screen
Firmware Version 1.0.0.X
GVC3202 User Guide
Page 93 of 117
SET BACKUP PATH
Press the MENU key and select "Settings" on backup screen to access settings screen, set backup path
and go back to save automatically.
--------------------------------------------------------------------------------------------------------------------------------------------
Note:
Insert SD card or USB flash drive to the GVC3202 before configuring backup path.
--------------------------------------------------------------------------------------------------------------------------------------------
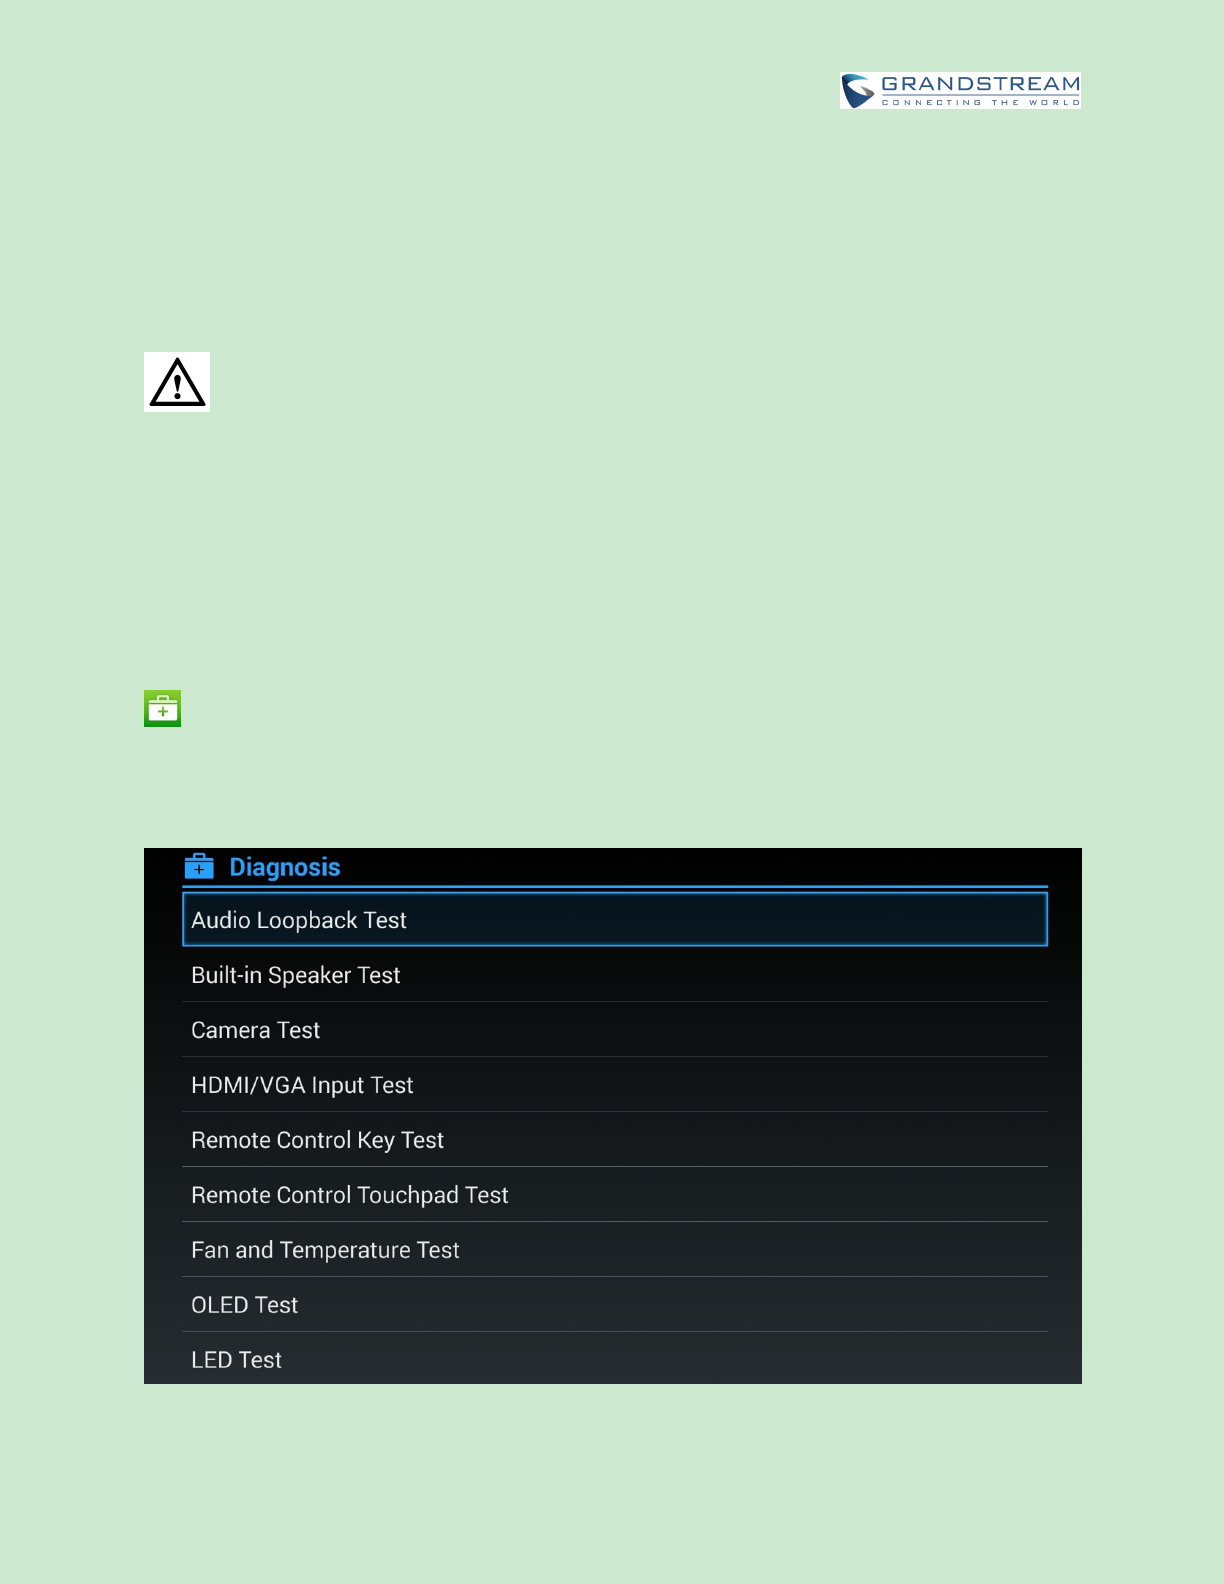
DIAGNOSIS
When troubleshooting GVC3202, users could go to GVC3202 home screen->Applications->Diagnosis
. Tap on the option and follow the instructions on each function to perform Camera Test, Remote
Control Key Test, Bulid-in Speaker Test and etc. During the test, users could press the BACK key or
follow the prompt to exit the test.
Figure 54: GVC3202 Diagnosis Screen
Firmware Version 1.0.0.X
GVC3202 User Guide
Page 94 of 117
BROWSER
Users could browse web page, view news and watch video via the built-in GVC3202 Browser. On home
screen, select Application->Browser .
Slide up or down with slide gesture to scroll the screen.
Zoom in/out the page via zoom gesture.
Press the MENU key to open the menu bar for more operations.
CUSTOM APP ON HOME SCREEN
Users could add one app to the home screen for easy access. GVC3202 only supports custom one app
on home screen. The new app will overwrite the older one.
On the Home screen, click on "Custom Home App" and select one app. Press "OK" key to confirm. The
system will go back to Home screen automatically and users could find the app has already been added.
To remove or change the Custom Home App, go to LCD Home screen->Applications. Click on and
select the option to modify custom app. Users could de-select the existing custom app, or change to a
different app.
UNINSTALL APPLICATION
The applications (except the system applications) on GVC3202 can be uninstalled. Go to LCD Home
screen->Applications, click on and select "Uninstall Mode". Users will see the apps that can be
deleted shown with icon. Select and confirm the uninstallation.
Once done, Press on the remote control, or press to go back to normal mode.
Firmware Version 1.0.0.X
GVC3202 User Guide
Page 95 of 117
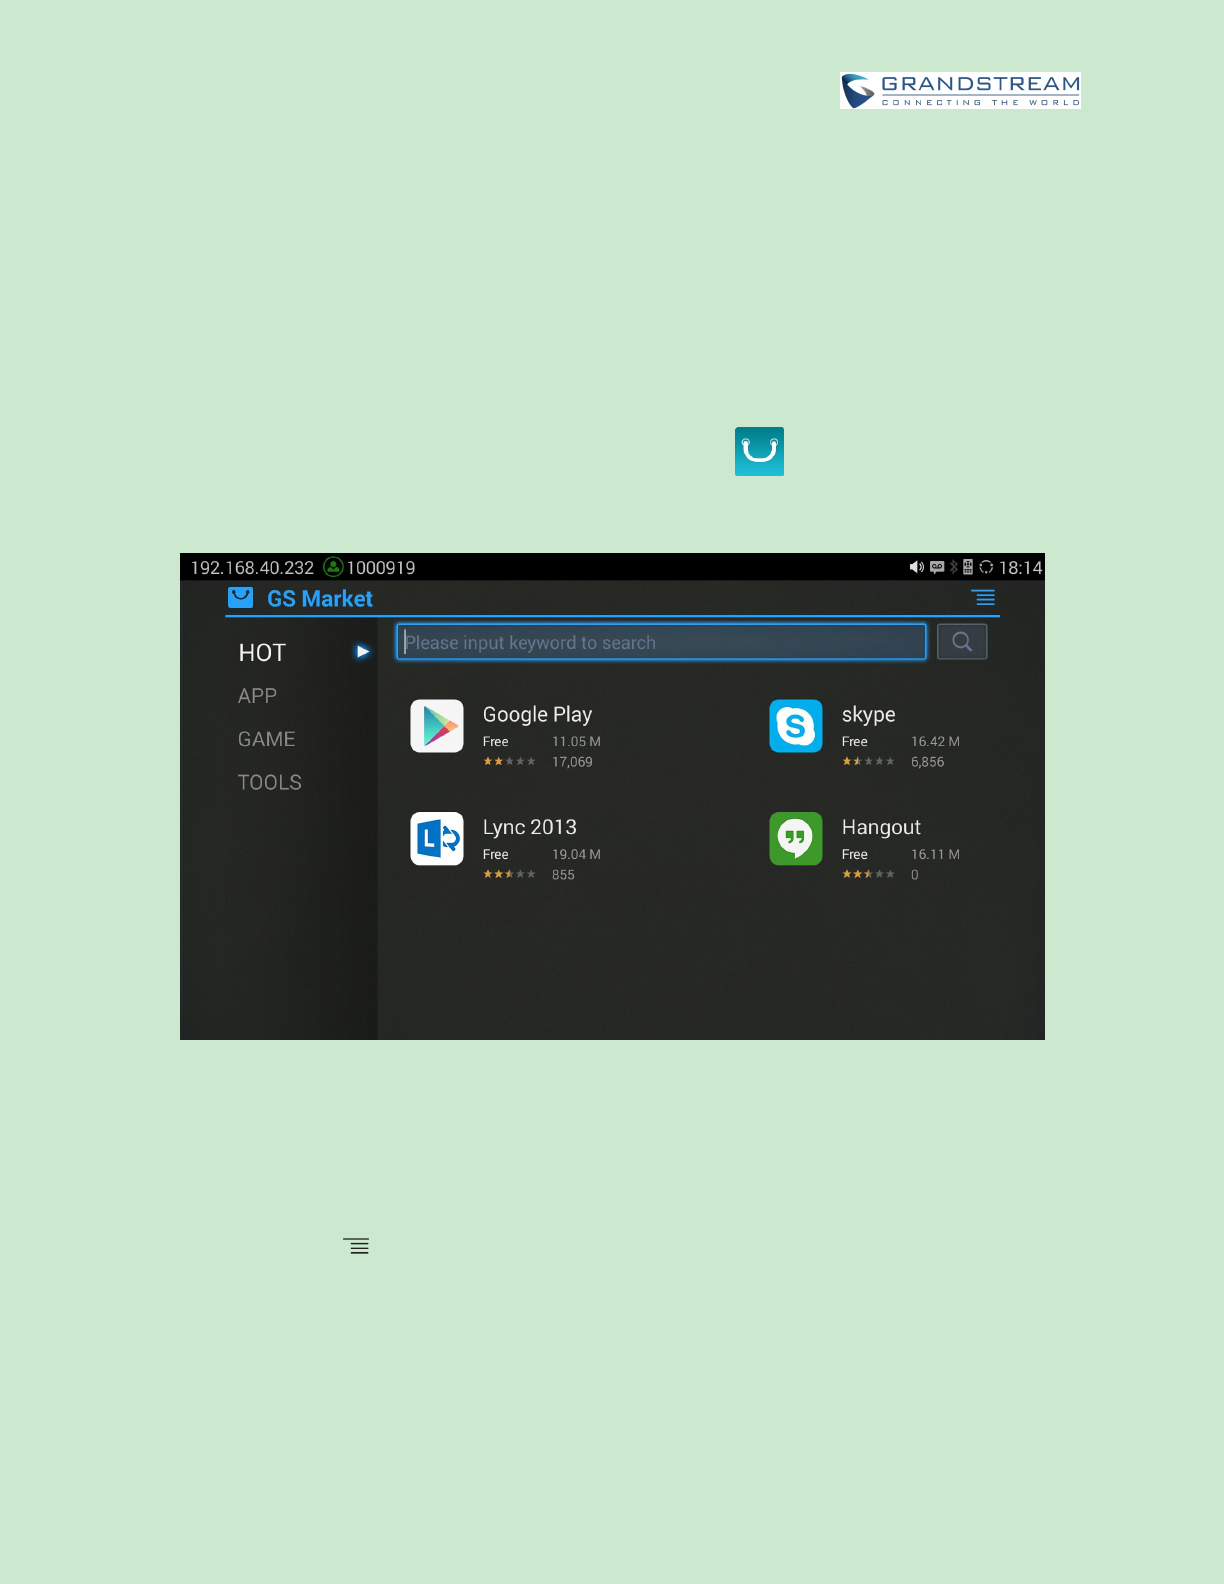
GS MARKET
GVC3202 provides access to apps directly via built-in GS market. Users could download the apps from
the market and install to GVC3202.
SEARCH APPS
On GVC3202 Home screen, click on Applications->GS Market . Users could view the apps by
category, or input key words and click on SEARCH icon to search the app.
Figure 55: GVC3202 GS Market
DOWNLOAD AND INSTALL APPS
Users could see that if the app has been installed or downloaded by pressing the blue shortcut key.
Press MENU key to view the downloaded apps and installed apps.
Users could press the blue shortcut key on GVC3202 remote control to cancel download in process.
The installing process will be started automatically after downloading the app.
Go to Installed screen to view the installed apps, or press the blue shortcut key on the remote control
to uninstall the downloaded apps.

Firmware Version 1.0.0.X
GVC3202 User Guide
Page 96 of 117
UPDATE APPS
GVC3202 will detect to update automatically if there is new version available for the installed apps when
the network connection is normal. Users can view the relevant information, and update apps on the
Installed screen.
Firmware Version 1.0.0.X
GVC3202 User Guide
Page 97 of 117
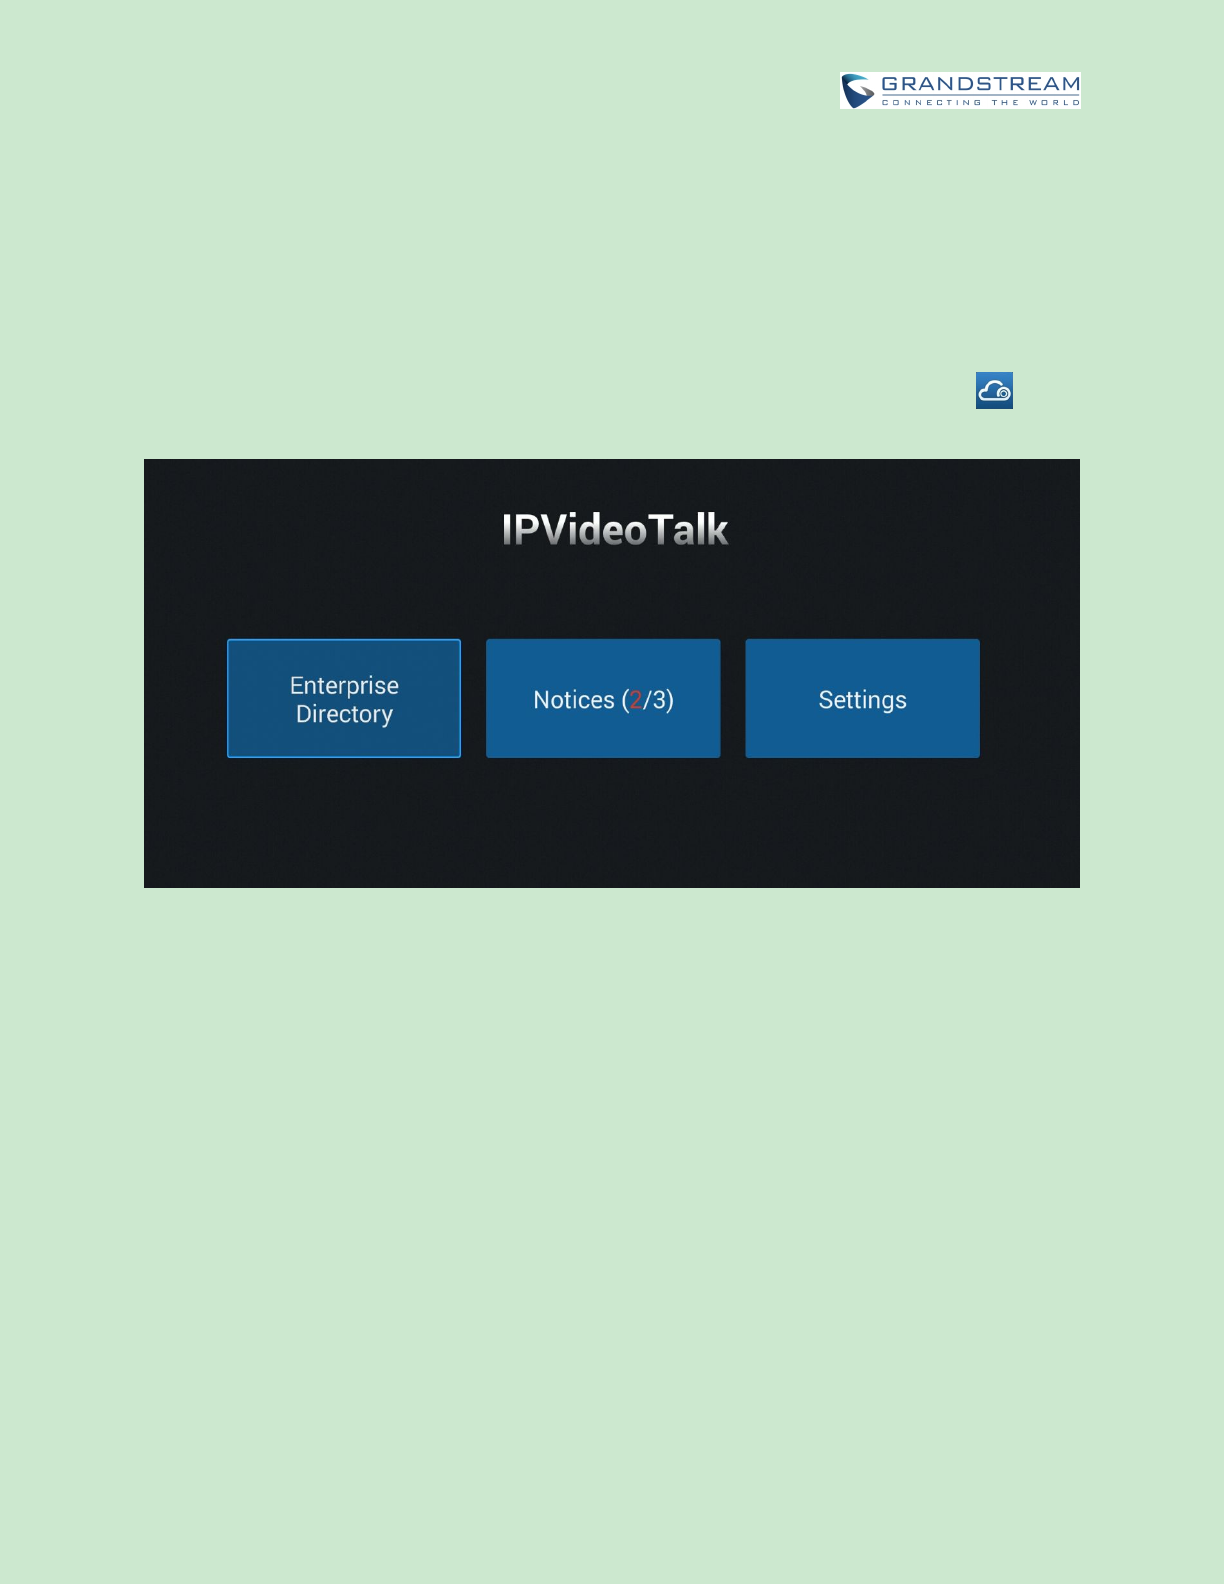
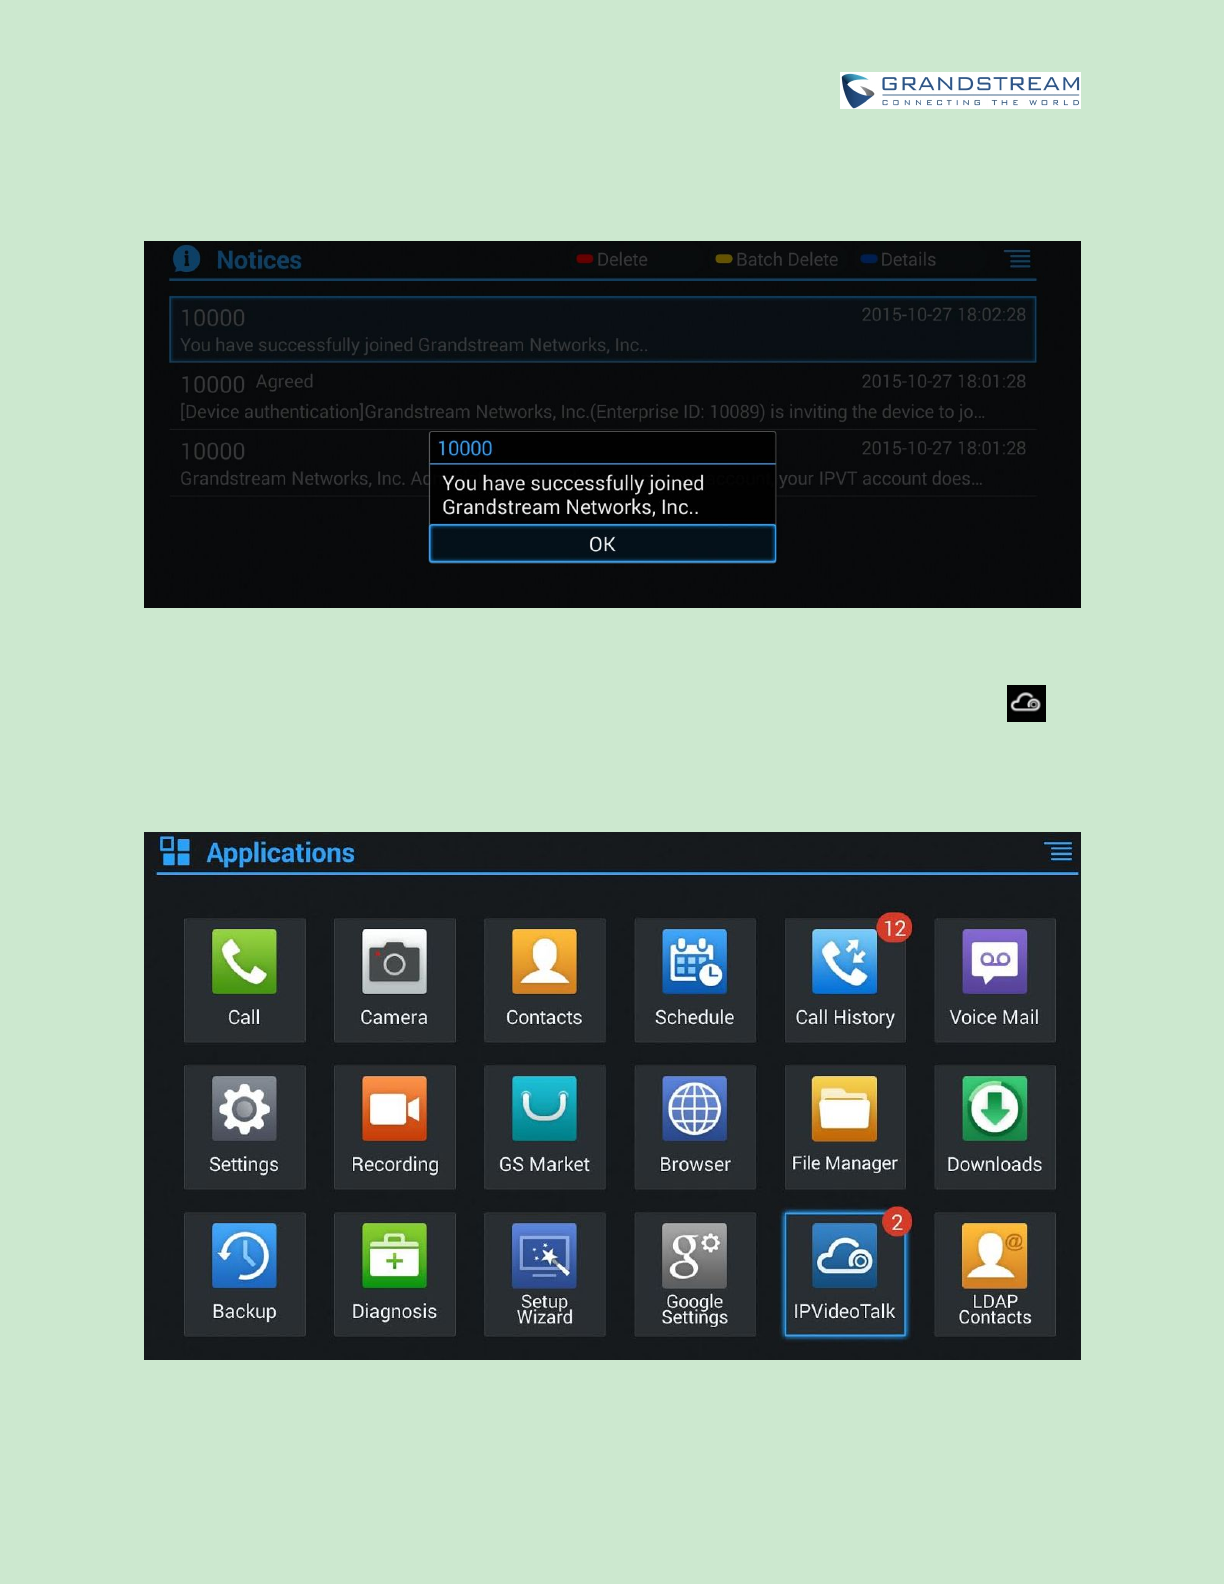
IPVIDEOTALK
The GVC3202 has a built-in IPVideoTalk account that requires the user to activate it before using it. The
IPVideoTalk application provides an interface for the user to manage this service on the GVC3202, e.g.,
view enterprise directory, check and reply notices from IPVideoTalk server as well as change IPVideoTalk
settings. The user can access IPVideoTalk application from LCD->Applications->IPVideoTalk .
Figure 56: GVC3202 IPVideoTalk Application
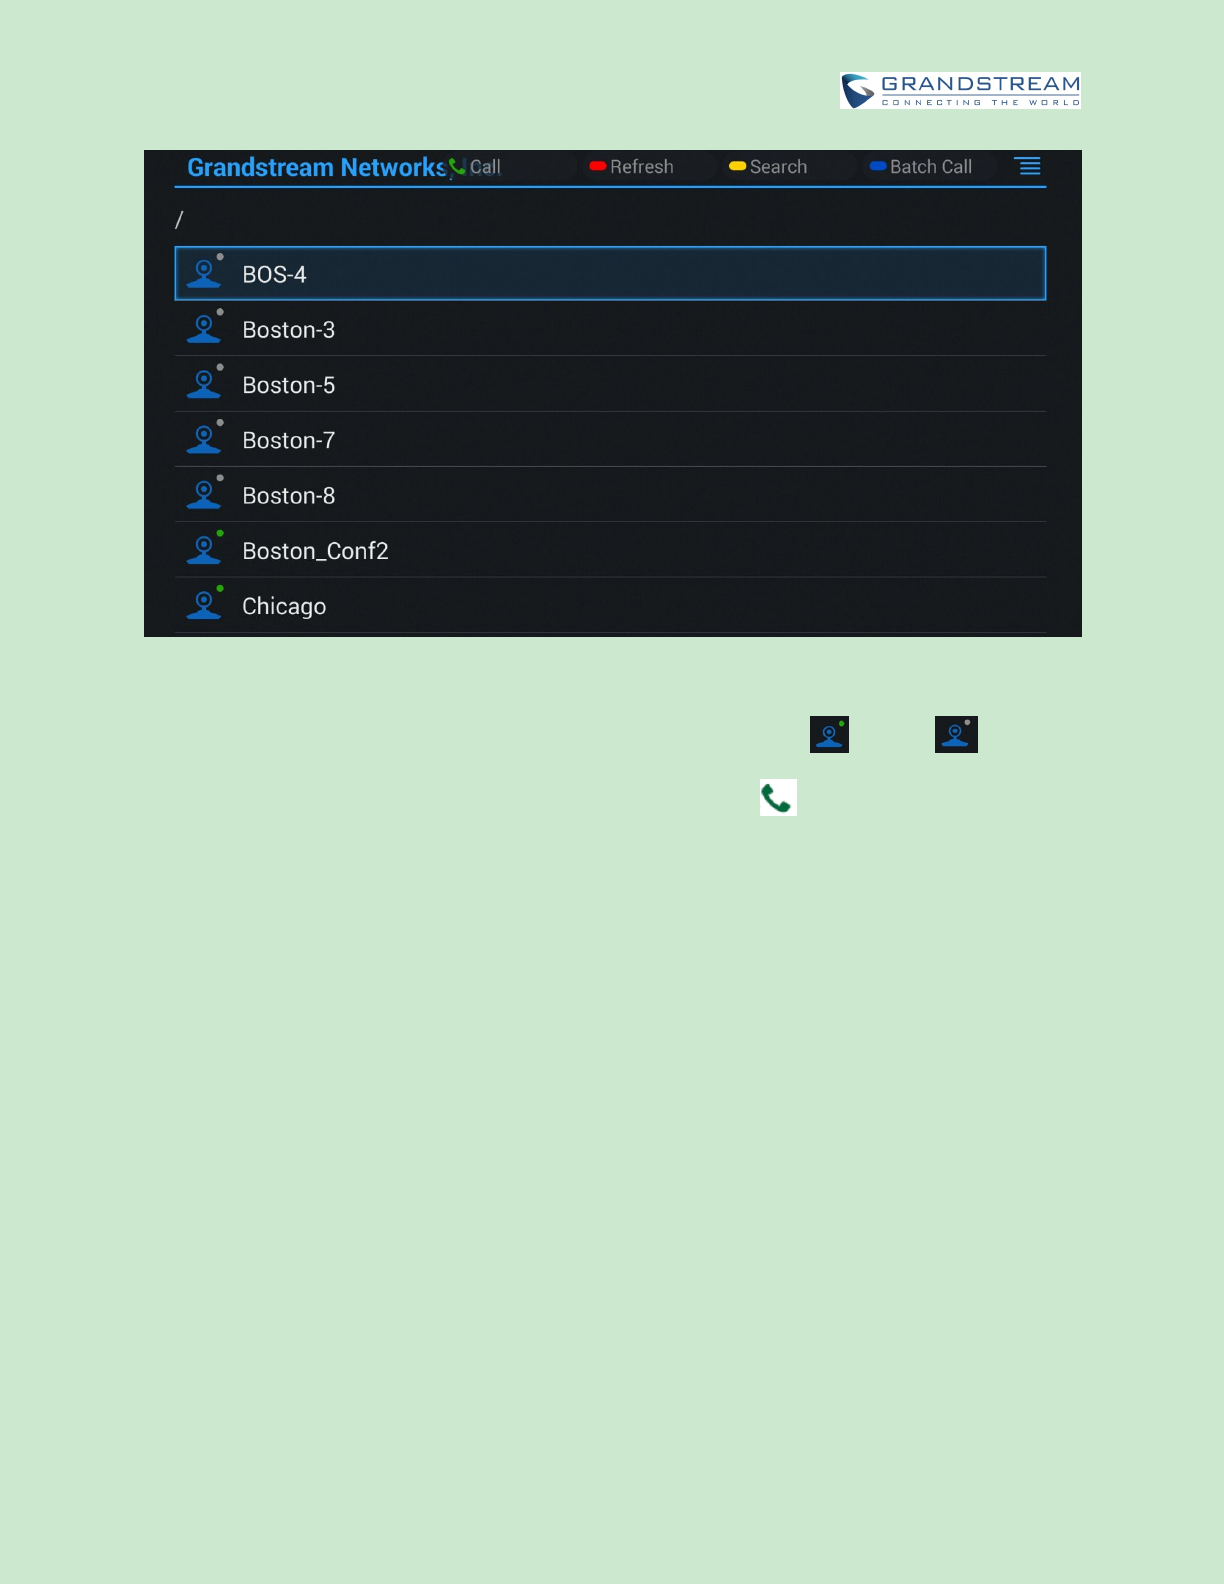
ENTERPRISE DIRECTORY
The Enterprise Directory is managed centrally in the server side. Users can access it by selecting
“Enterprise Directory”.
Firmware Version 1.0.0.X
GVC3202 User Guide
Page 98 of 117
Figure 57: IPVideoTalk Application->Enterprise Directory
In the Enterprise Directory, the users can view account status: online - , offline - .
Select an entry in the directory and press the Green Call button on the GVC3202 remote control
to call this contact.
Press the red shortcut key on the GVC3202 remote control to refresh the directory.
Press the yellow shortcut key on the GVC3202 remote control to search contacts in the directory.
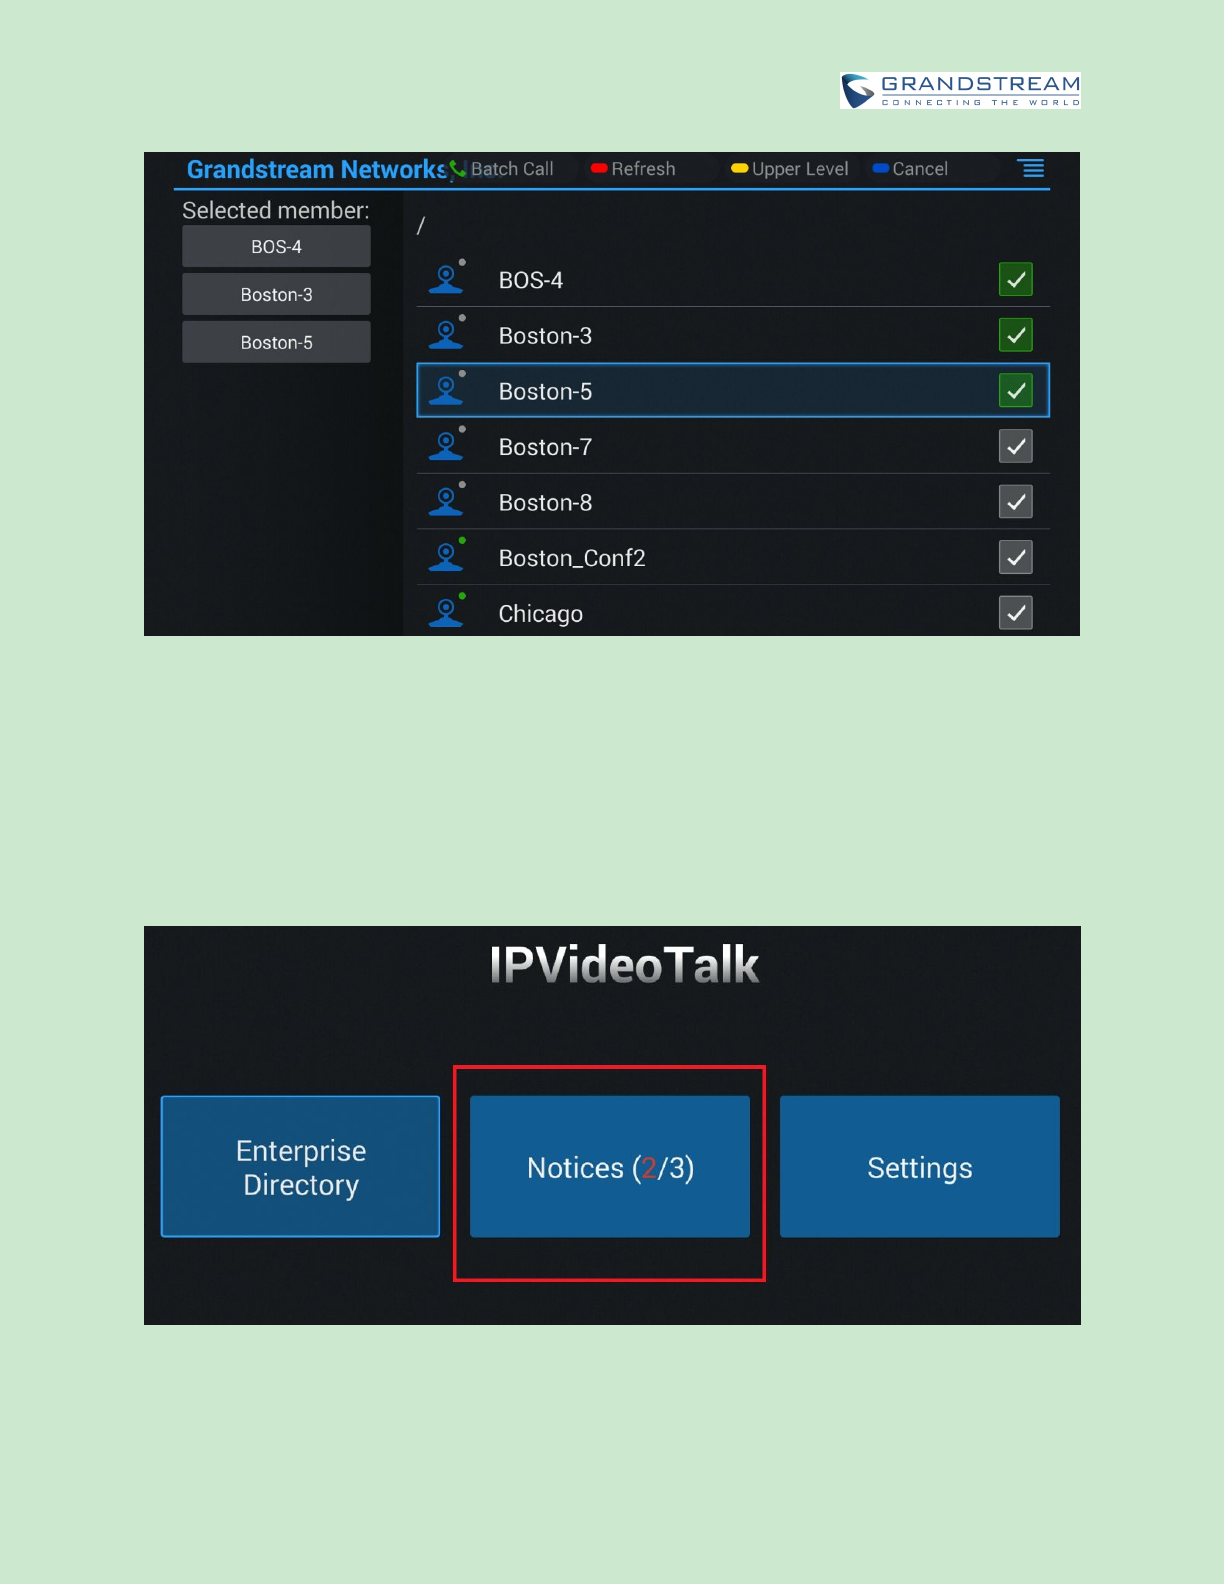
Press the blue shortcut key on the GVC3202 remote control to select entries and make a batch call to
multiple contacts in the directory.
Firmware Version 1.0.0.X
GVC3202 User Guide
Page 99 of 117
Figure 58: IPVideoTalk Application->Enterprise Directory: Batch Call
NOTICES
In the IPVideoTalk application, any incoming messages from the server side will be displayed in “Notices”.
In the following figure, “2” indicates the number of new message and “3” indicates the number of total
messages.
Figure 59: IPVideoTalk Application->Notices
Click on “Notices” to access the messages. Use the navigations keys/OK keys on the GVC3202 remote
Firmware Version 1.0.0.X
GVC3202 User Guide
Page 100 of 117
control to select and read the messages. For the messages that requires user’s reply, a prompt will pop
up for the users to make a selection.
Figure 60: IPVideoTalk Application->Notices: Message Prompt
If there are new incoming messages for the IPVideoTalk account, users will see indicator icon on
the top status bar. Also on the upper right corner of the IPVideoTalk application icon in Application menu,
users will see the number of new messages displayed.
Figure 61: Message Indicator for IPVideoTalk Application

Firmware Version 1.0.0.X
GVC3202 User Guide
Page 101 of 117
SETTINGS
In the IPVideoTalk application, click on “Settings” to configure “Account Active” and “Display Name” for
the IPVideoTalk account on GVC3202.
Figure 62: IPVideoTalk Account Settings
Firmware Version 1.0.0.X
GVC3202 User Guide
Page 102 of 117
GVC3202 WEB UI FEATURES
GVC3202 embedded Web server responds to HTTP/HTTPS GET/POST requests. Embedded HTML
pages allow users to configure the application device through a Web browser such as Mozilla Firefox,
Google Chrome and etc.
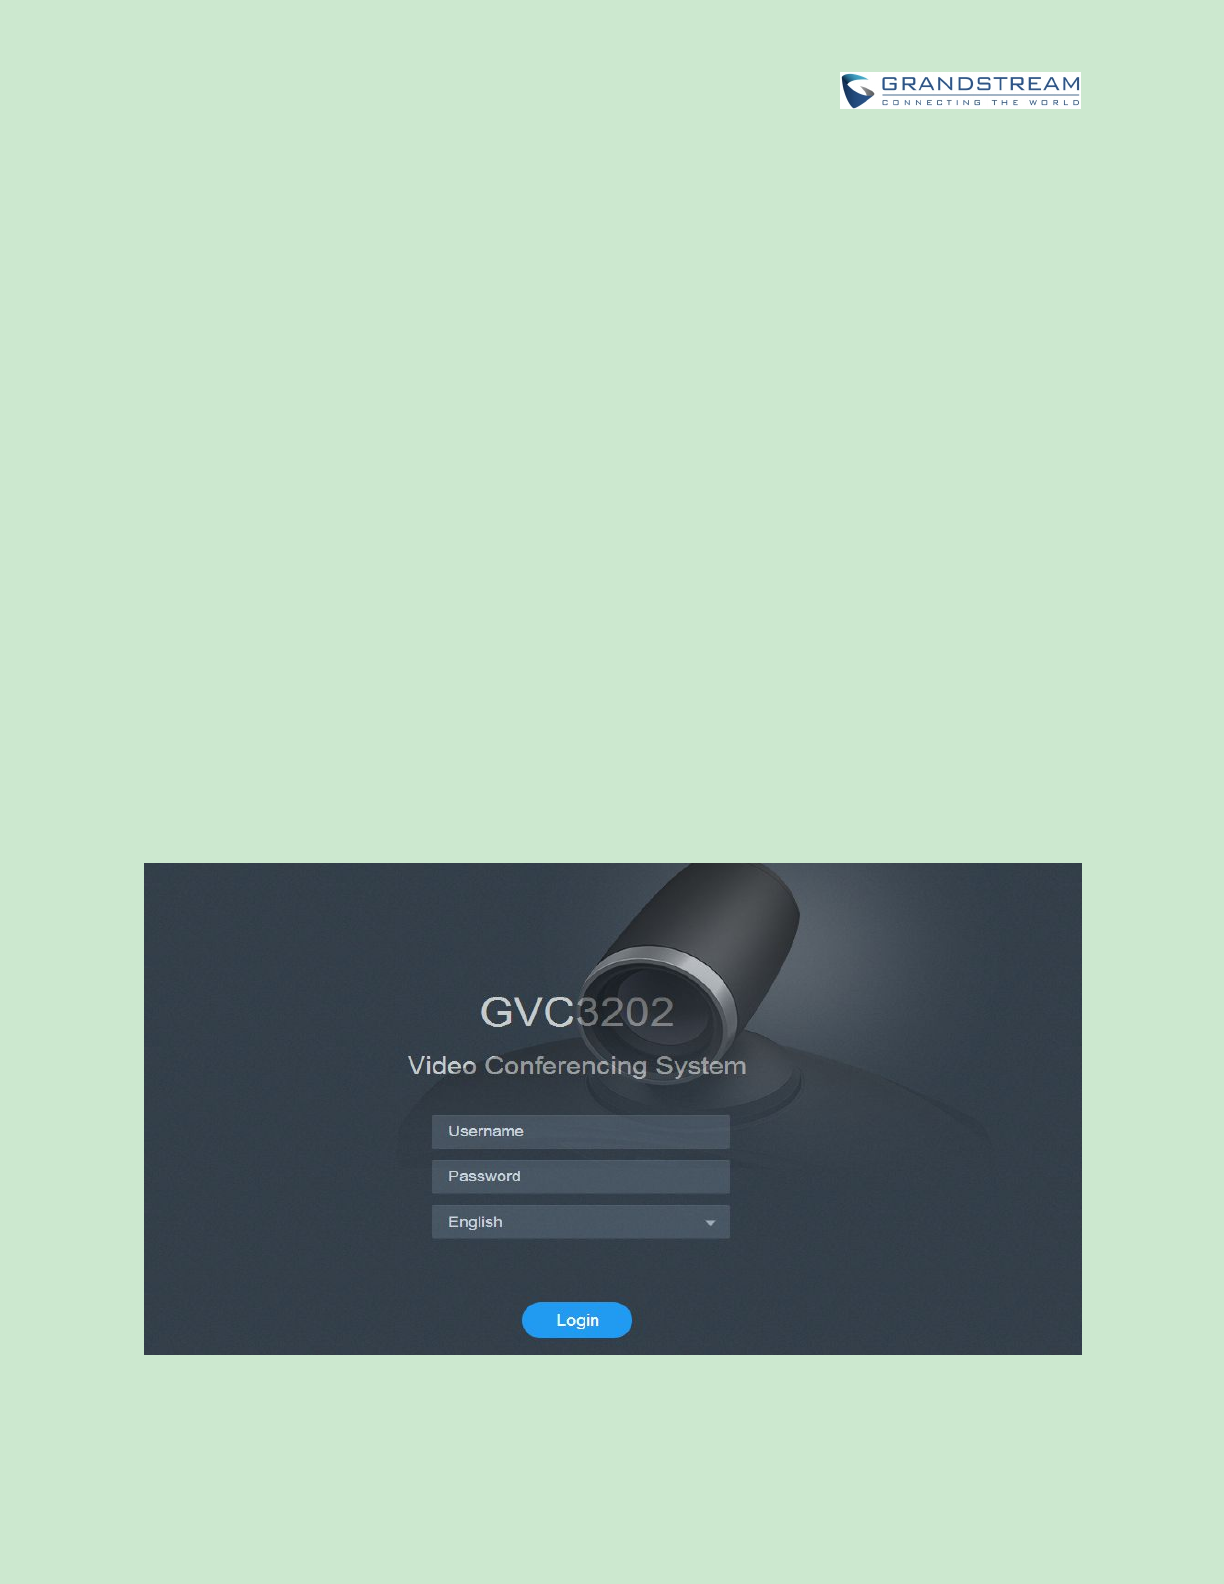
ACCESSING GVC3202 WEB GUI
The IP addressof GVC3202 displays on OLED display screen on the front panel.
To access GVC3202 Web GUI:
1. Connect the computer to the same network as GVC3202.
2. Make sure GVC3202 is turned on and shows its IP address on OLED display screen.
3. Open a Web browser on your computer.
4. Enter GVC3202’s IP address in the address bar of the browser, e.g.: http://192.168.124.111.
5. Enter the administrator’s login and password to access the Web Configuration Menu. The default
username and password are: admin, admin; you can set language to English or Chinese in the drop-
down menu of language.
Figure 63: GVC3202 Web GUI - Login
Firmware Version 1.0.0.X
GVC3202 User Guide
Page 103 of 117
6. Click "Login" to access the configurations on web UI.
SAVING CHANGES
When changing any setting on GVC3202 web UI, users need to submit them by pressing the SAVE
button on the bottom of the page, and then, click the Apply button on the top of the page to apply the
configuration changes. For those options with next to it on the Web page, users have to reboot
GVC3202 to take effect.
DEFINITIONS
This section describes the 6 options on GVC3202 Web GUI. Please view Settings, Maintenance and
Status specifications in Administration Guide.
Call
Users could start video conference and control conference from Web GUI.
Contacts
Contacts, Schedule, Call History
Device Control
Video Control, Audio Control
Settings
SIP Account, IPVideoTalk account, Blue Jeans account, Network Settings, Peripheral, Call Features,
General Settings, and Security Settings
Maintenance
Upgrade, Recording, Time & Language, Troubleshooting, Reboot
Status
Account Status, Peripheral Status, Network Status, System Info and Remote Control
Users can log in as an administrator or a normal user. The following table shows the web pages
accessible by normal user and administrator. It is recommended to change the default password for user
and administrator after login for the first time.

Firmware Version 1.0.0.X
GVC3202 User Guide
Page 104 of 117
Table 21: GVC3202 Web Access
User Type
Username
Default Password
Accessible Web Pages
Normal User
user
123
Call
Contacts
Device Control
Status
Settings: Network Settings, Peripheral, Security
Settings
Maintenance: Recording, Time & Language,
Troubleshooting
Administrator
admin
admin
All pages
TOOLBAR
The web UI tool bar is on the upper right corner of the web UI page.
Figure 64: GVC3202 Web UI Tool Bar
DND
It is used to turn on/off DND mode. Once it is enabled, the DND text will turn into red and all incoming
calls will be rejected.
Remote Control
Click to bring up virtual remote control panel.
English
Select the display language for the web UI.
Logout
Log out from the web UI.
CALL PAGE
GVC3202 Web UI call page is shown below. Users could make calls and initiate conference from Web UI.

Firmware Version 1.0.0.X
GVC3202 User Guide
Page 105 of 117
Figure 65: GVC3202 Web UI - Call
MAKING A CALL
Enter phone number in input box, and select call mode, tap on button to dial out; or, select one
call history entry in the list below and click on to dial out.
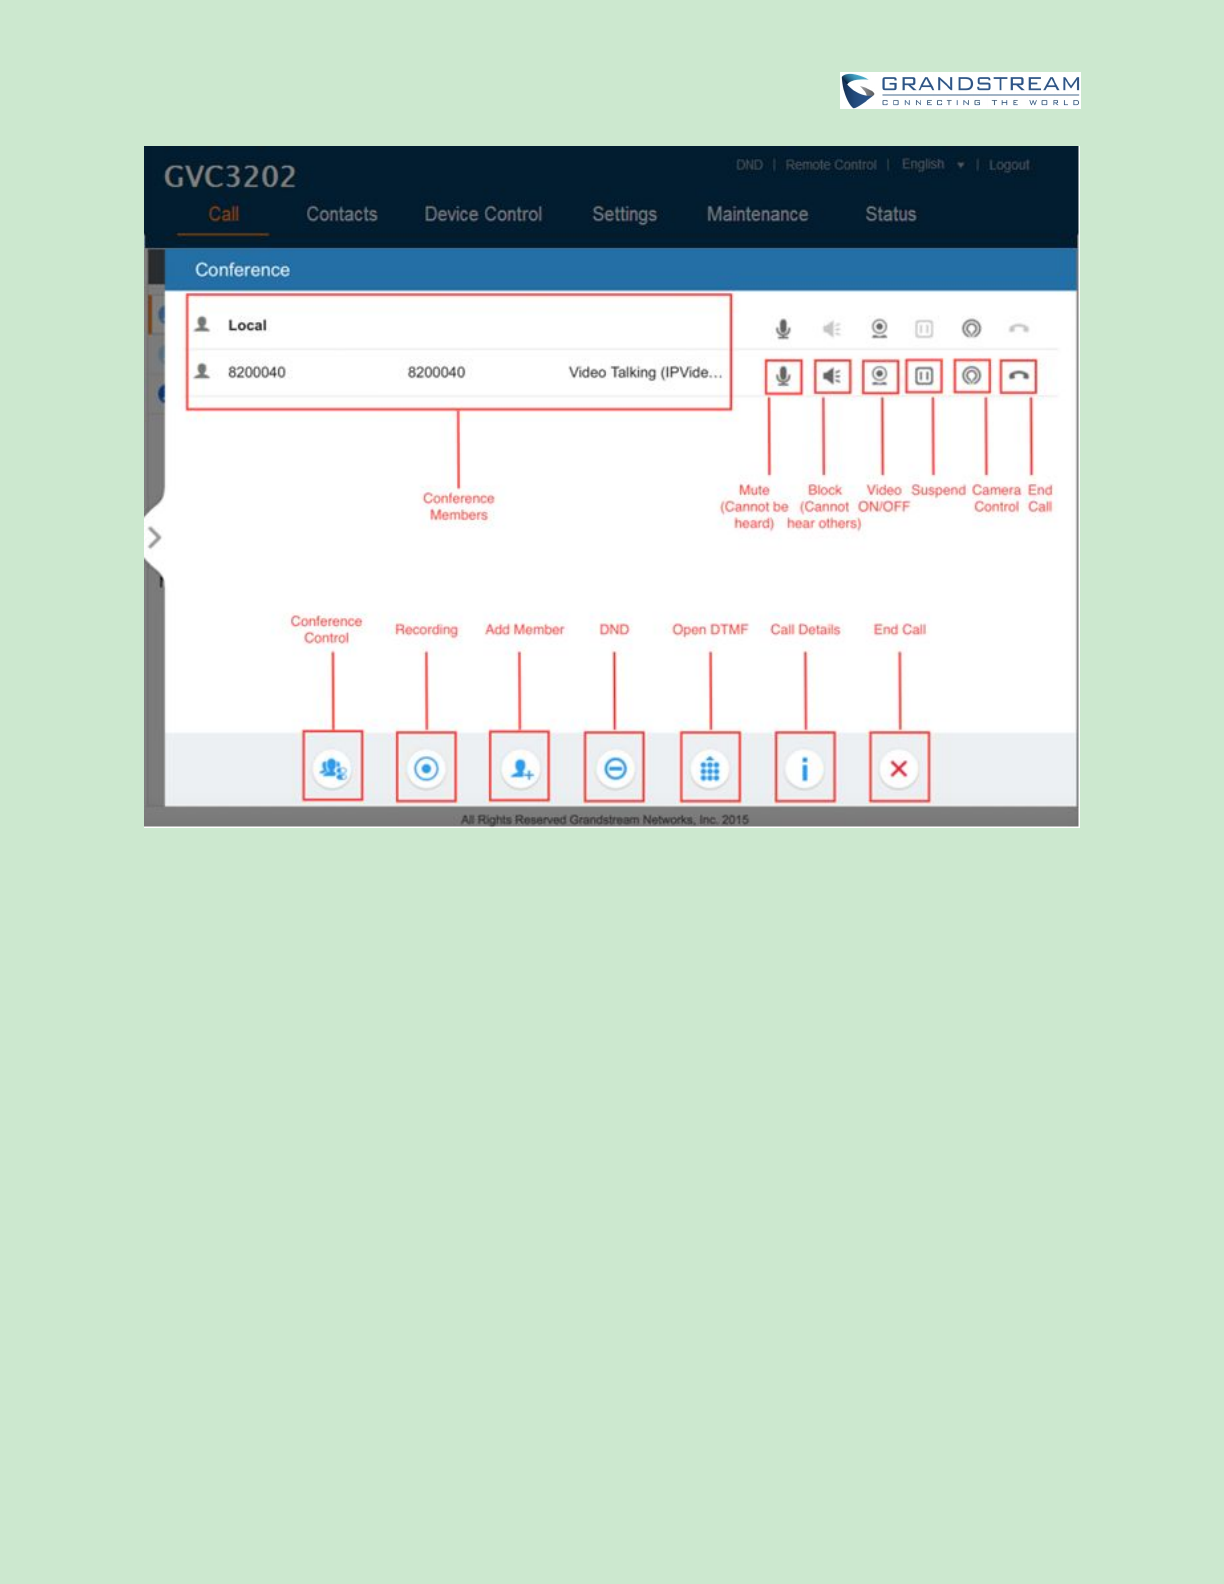
CONFERENCE CONTROL
When making a new call, initiating a conference or receiving an incoming call, the conference screen will
pop up as shown below.
Firmware Version 1.0.0.X
GVC3202 User Guide
Page 106 of 117
Figure 66: GVC3202 Web UI - Conference Status
Click on the icon for “Conference Control”, users will see a list of control icons on the bottom which are
also available in LCD call screen.
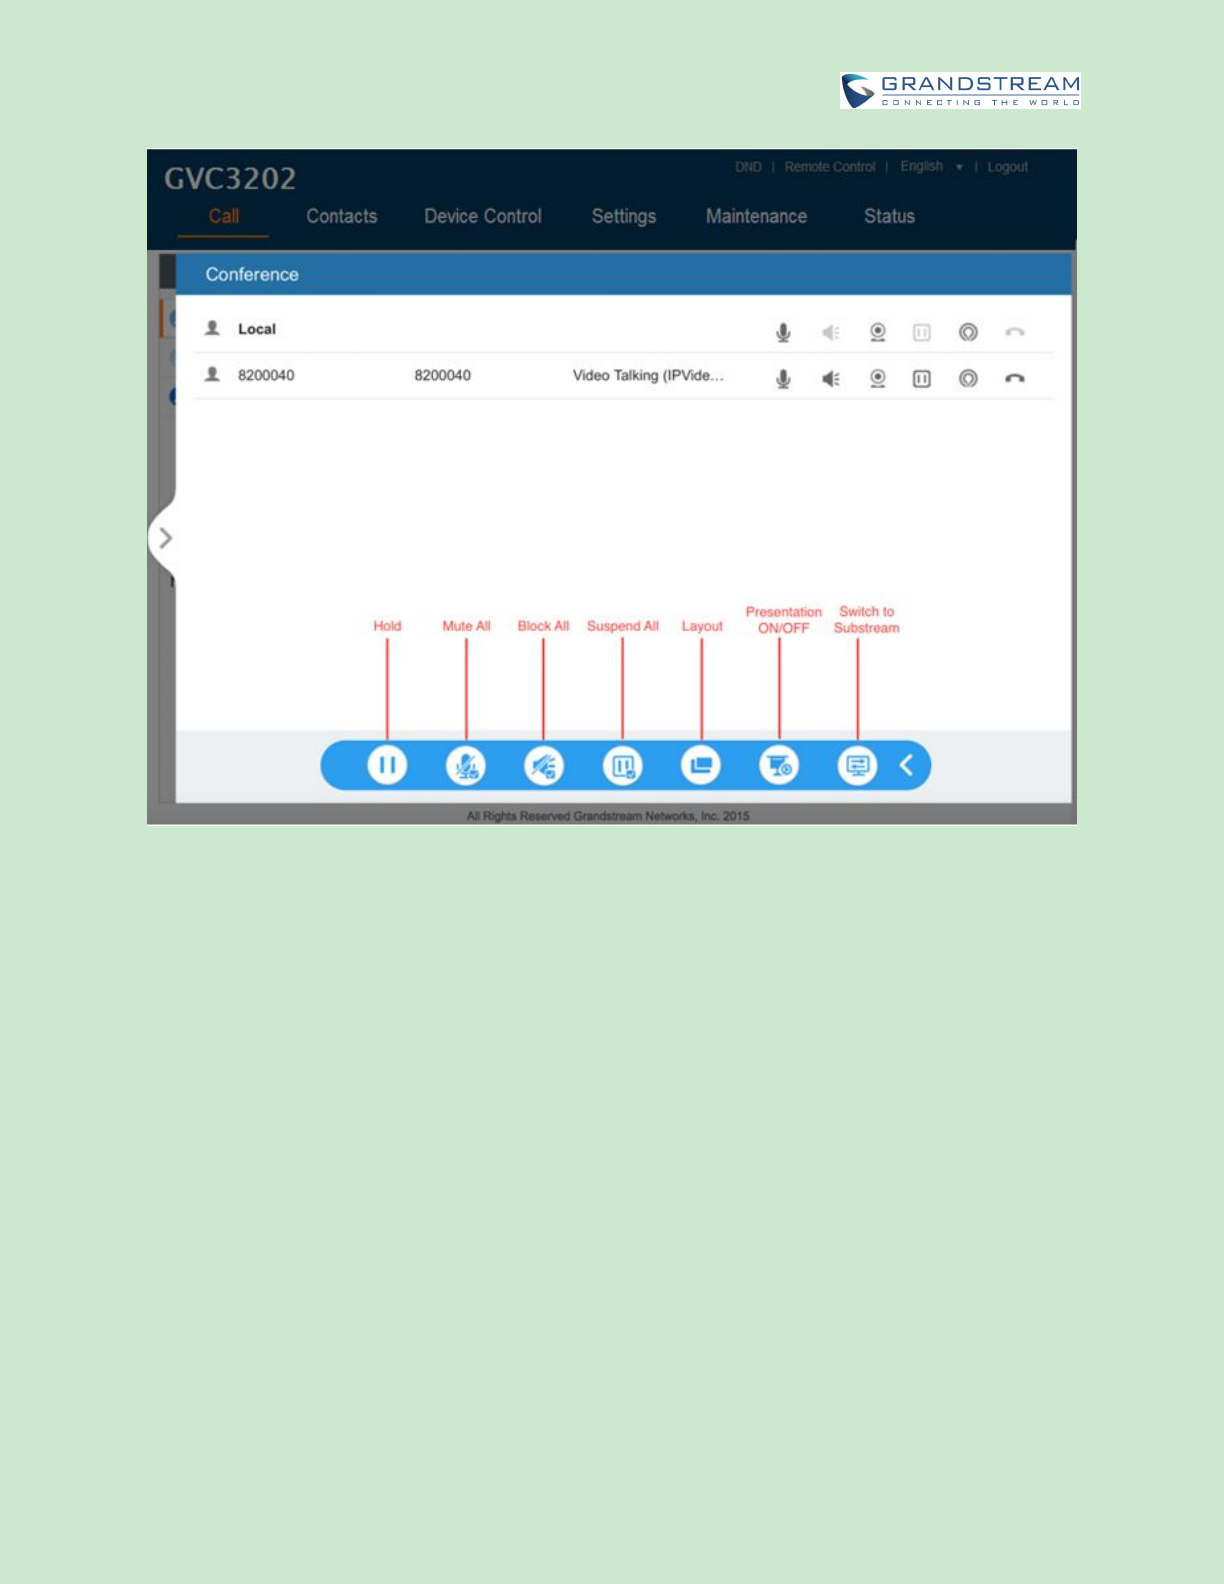
Firmware Version 1.0.0.X
GVC3202 User Guide
Page 107 of 117
Figure 67: GVC3202 Web UI - Conference Control
CONTACTS PAGE
This page lists Contacts, Schedule and Call History.
CONTACTS
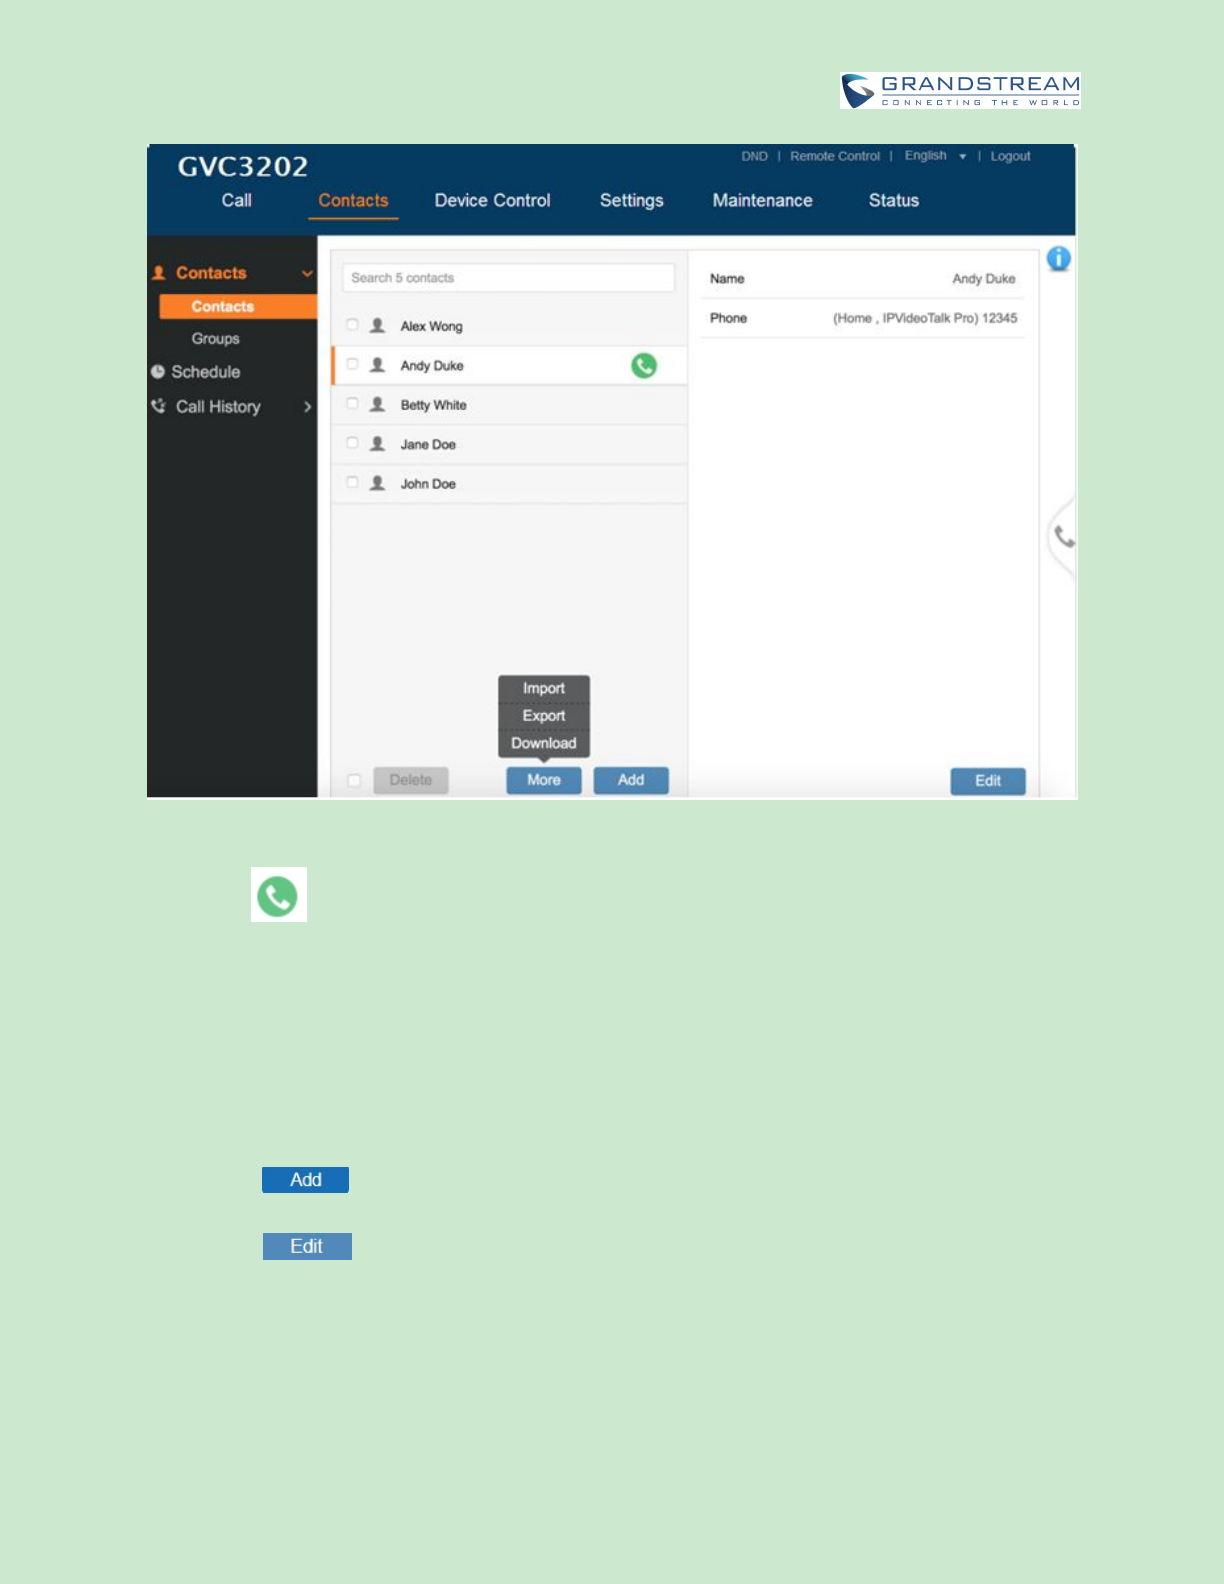
Users could search/add/delete/edit contacts on web page. The operations will be synchronized and can
be viewed from LCD as well. The web UI contacts page is as shown below.
Firmware Version 1.0.0.X
GVC3202 User Guide
Page 108 of 117
Figure 68: GVC3202 Web UI - Contacts
Click on next to the contact to dial the contact.
Click on “More” to open more options such as export, import and download contact.
Select "Import" option and users will find import screen on the right. Refer to chapter BATCH
IMPORT CONTACTS for more details.
Select "Export" option and users will find export screen on the right. Refer to chapter EXPORT
CONTACTS for more details.
Select "Download" option and users will find download screen on the right. Refer to chapter
DOWNLOAD CONTACT for more details.
Click on and users will find Add Contact screen on the right. Fill in contact information and
save.
Click on and users will find Edit Contact screen on the right. Edit contact information and
save.
Click on the checkbox for “Delete” and users can select the contacts to delete from GVC3202.
Firmware Version 1.0.0.X
GVC3202 User Guide
Page 109 of 117
GROUPS
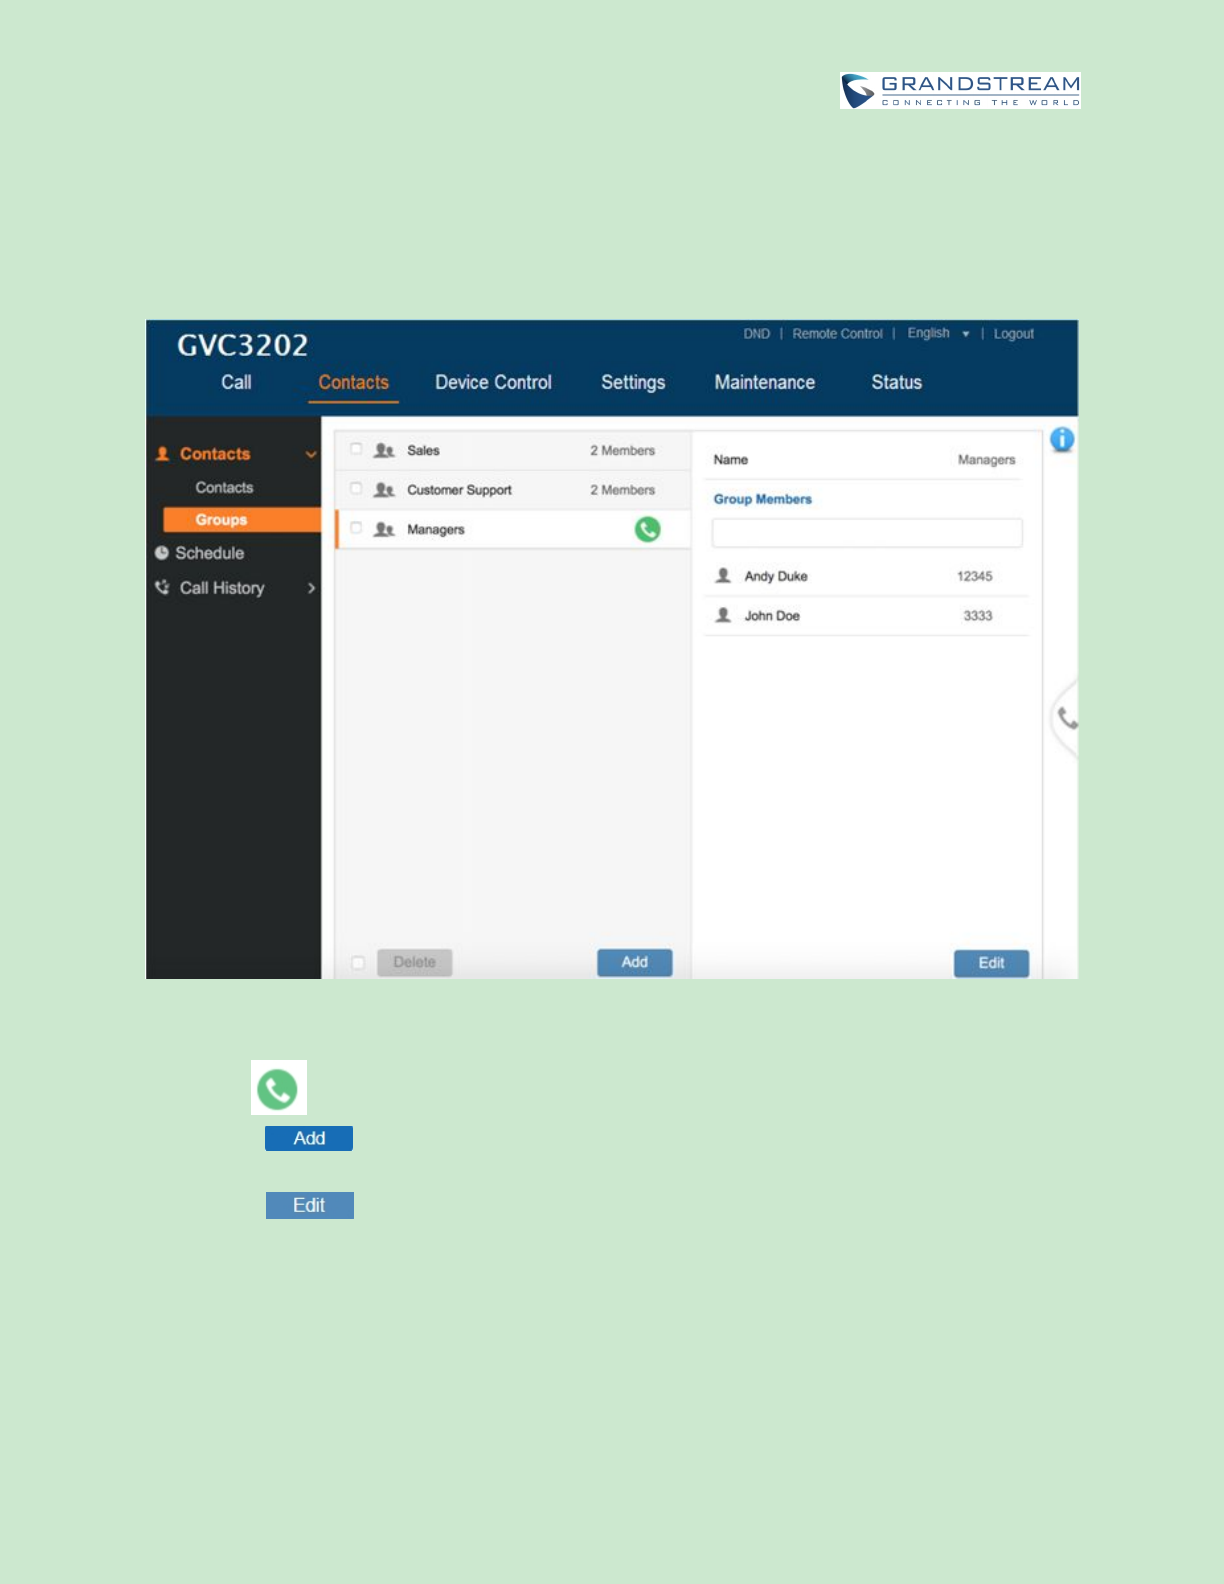
GVC3202 supports up 9-way video conference, including the GVC3202 itself. If there are more than 8
conference members, only the first 8 members in the group will be dialed.
Figure 69: GVC3202 Web UI - Groups
Click on next to the group to call the contacts in the group.
Click on and users will find Add Group screen on the right. Select group members from
existing contacts and save.
Click on and users will find Edit Group screen on the right. Edit Group information and
save.
Click on the checkbox for “Delete” and users can select the groups to delete from GVC3202.
Firmware Version 1.0.0.X
GVC3202 User Guide
Page 110 of 117
SCHEDULE
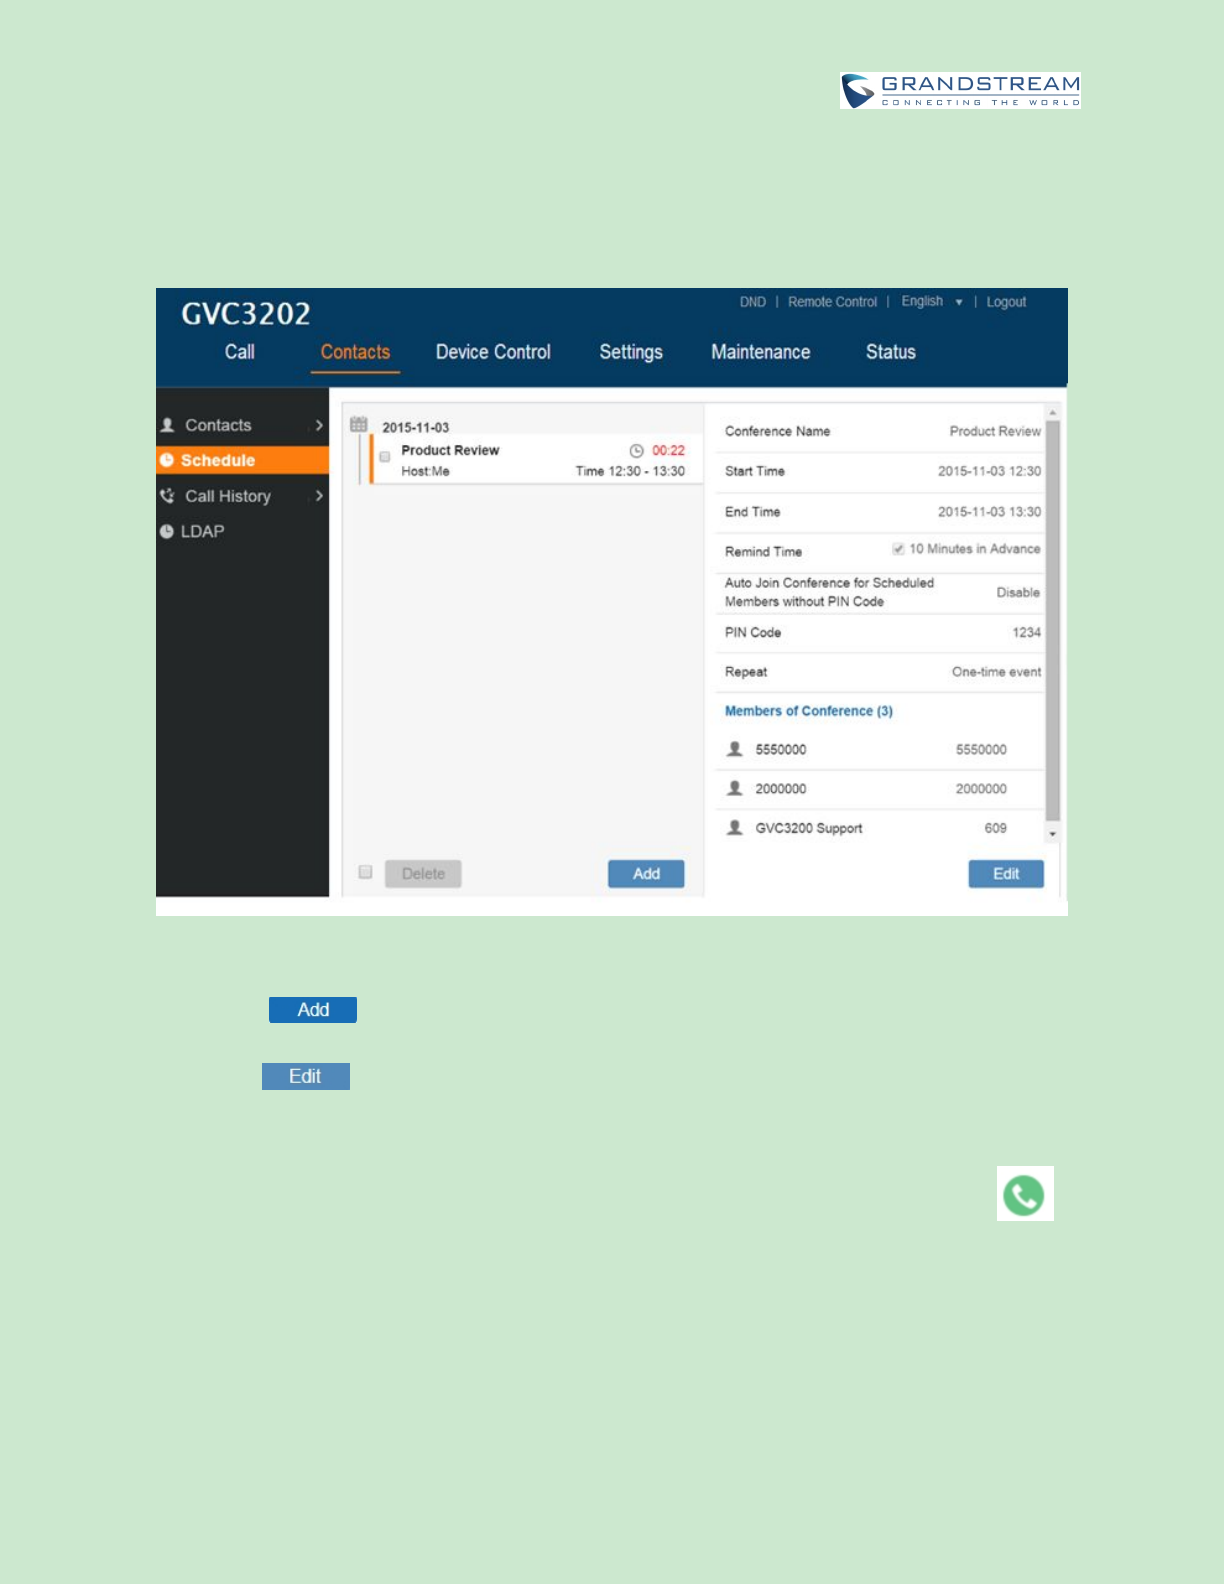
Conference can be scheduled, edited and deleted from web UI. See figure below. Please refer to chapter
SCHEDULE for more details for each option.
Figure 70: GVC3202 Web Page - Schedule
Click on and users will find Add Schedule screen on the right. Click on “Save” after
configuring the schedule.
Click on and users will find Edit Schedule screen on the right. Click on “Save” after editing
the schedule.
Click on the checkbox for “Delete” and users can select the schedules to delete from GVC3202.
Move the cursor to the scheduled conference where the scheduled time is displayed, icon will
appear for the user to dial out immediately.
CALL HISTORY
From web UI, users could also access Call history, which is synchronized with the call history from LCD.
Firmware Version 1.0.0.X
GVC3202 User Guide
Page 111 of 117
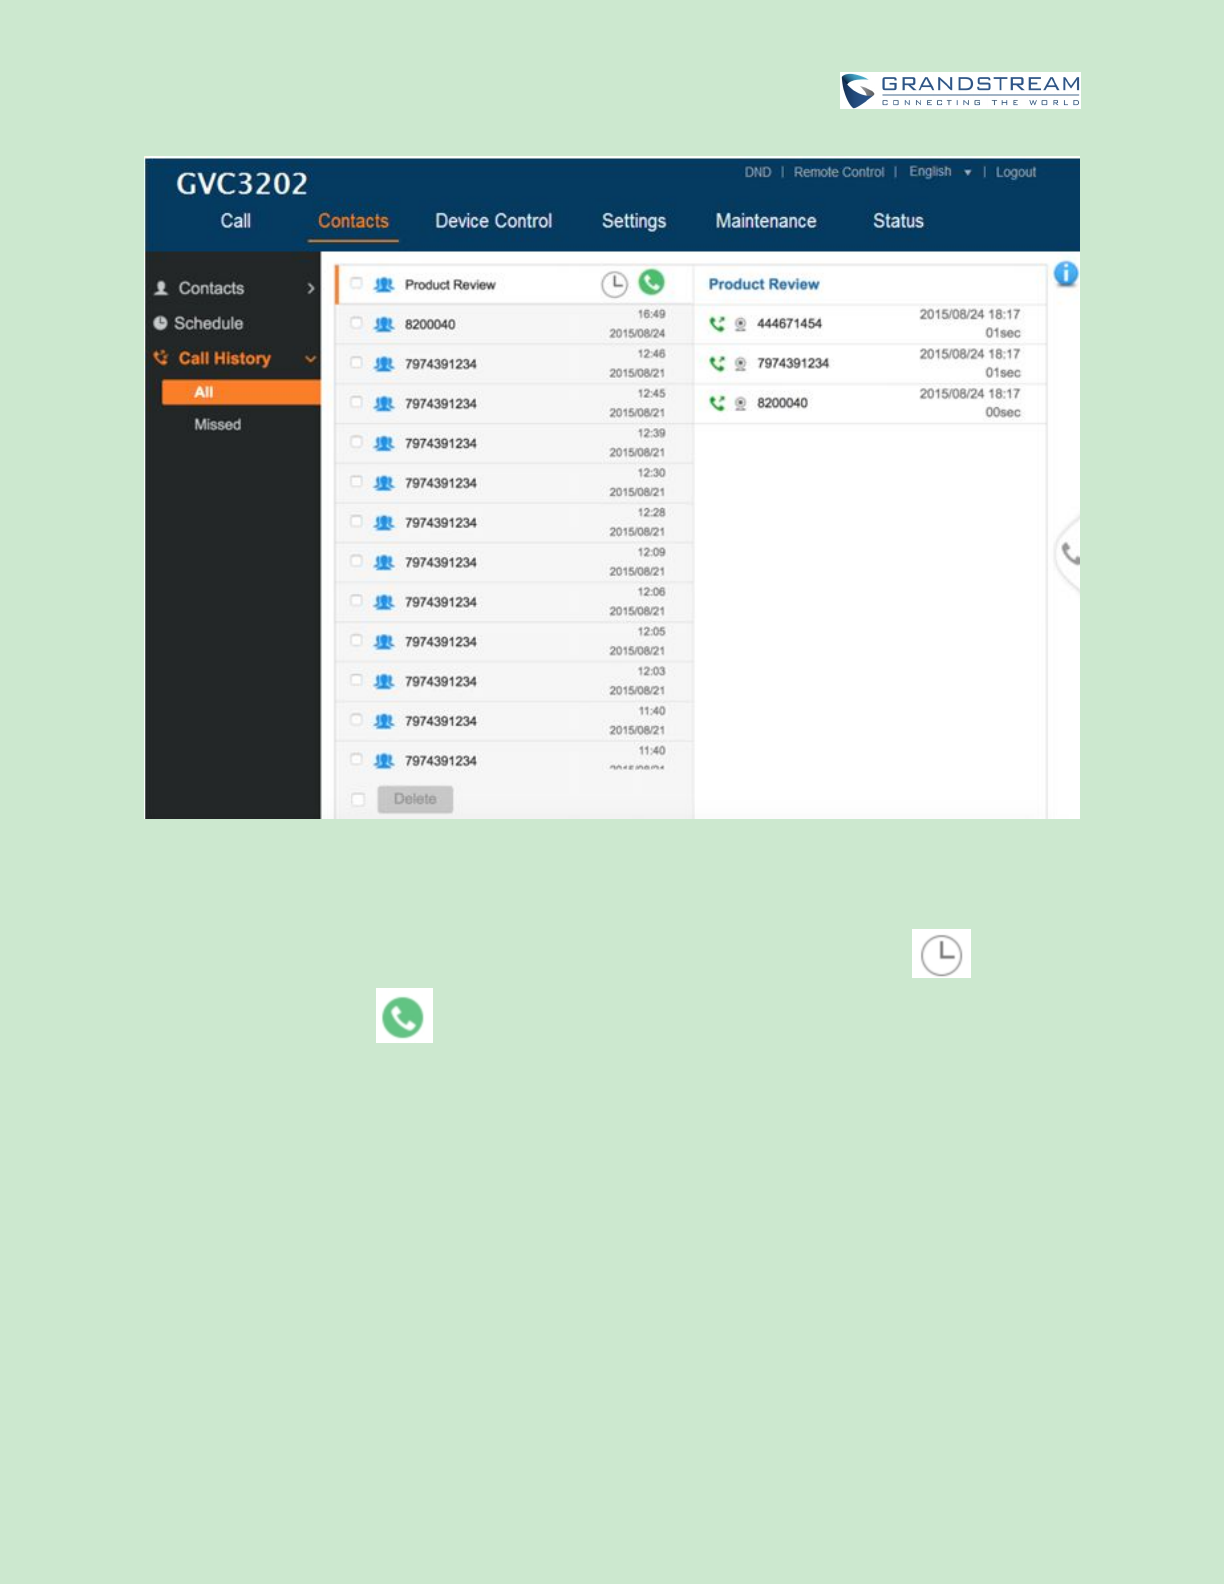
Figure 71: GVC3202 Web UI - Call History
The call history details will be displayed on the right side when there is one entry selected. Users can also
move the cursor to the call history time to add this call to schedule by clicking on , or dial out
immediately by clicking on .
DEVICE CONTROL PAGE
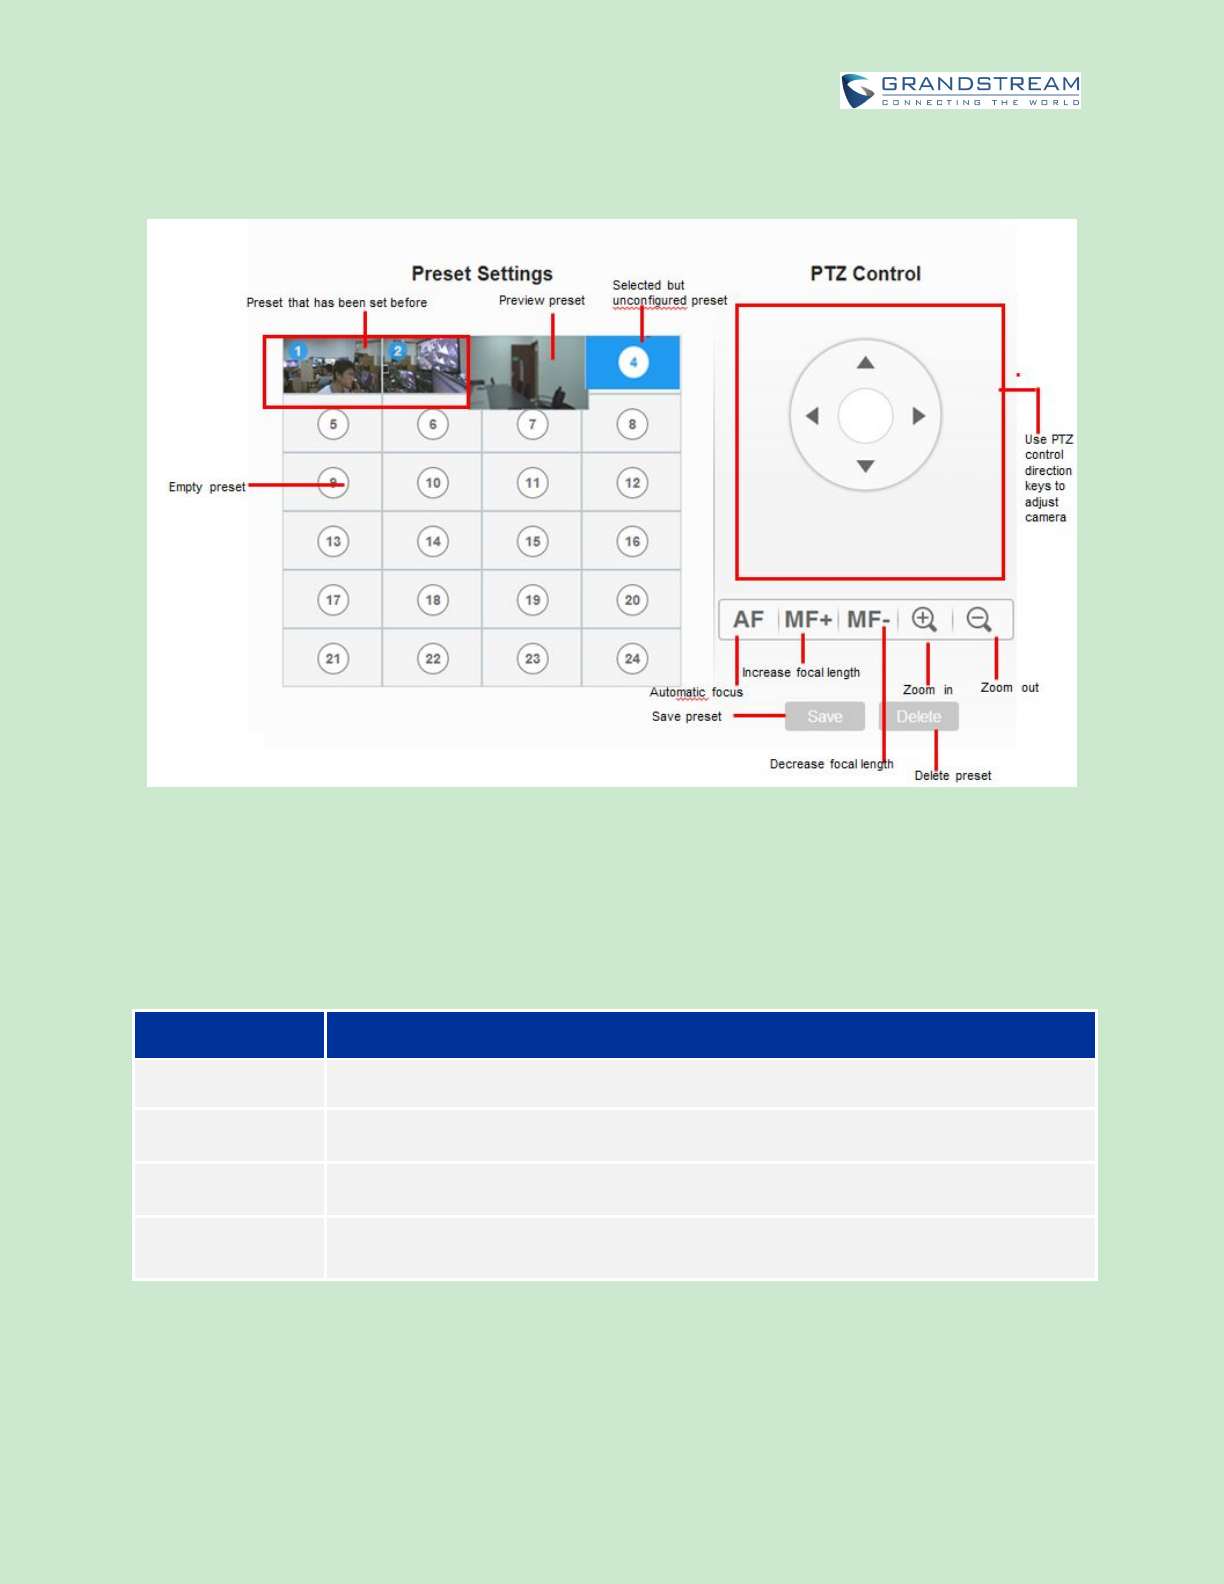
VIDEO CONTROL
Users could add preset and manipulate PTZ control on this page.
Move the cursor to one configured preset to preview preset.
Click one preset to apply the preset.
Click the un-configured preset, and adjust via the PTZ control panel on the right, then save the
Firmware Version 1.0.0.X
GVC3202 User Guide
Page 112 of 117
configurations.
Figure 72: GVC3202 Web UI - Video Control
AUDIO CONTROL
Table 22: GVC3202 Web UI - Audio Control Parameters
Parameters
Descriptions
Ringtone Volume
Users can slide left or right to adjust ringtone volume.
Media Volume
Users can slide left or right to adjust media volume.
Device Ringtone
Select device ringtone from the dropdown list.
Notification
Ringtone
Select device notification ringtone from the dropdown list.

Firmware Version 1.0.0.X
GVC3202 User Guide
Page 113 of 117
Audio Device
Select the audio device that the GVC3202 will use for audio input and output during
call or playing media. The options are “Auto”, “Bluetooth”, “USB” and “HDMI”.
Auto
GVC3202 will automatically detect whether any USB, Bluetooth or HDMI
devices are connected. If only one of them is connected, it will be used as the
audio device. If two or three are connected, the priority is
“Bluetooth”>”USB”>”HDMI”.
Bluetooth
The Bluetooth audio device will be used for audio input and output.
USB
The USB audio device will be used for audio input and output.
HDMI
The audio input comes from the built-in MIC in GVC3202 and the audio output
comes from HDMI.
The default settings is "Auto".
Call Progress
Tones:
Ring Back Tone
Busy Tone
Reorder Tone
Confirmation Tone
Call-waiting Tone
Using these settings, users can configure ring or tone frequencies based on
parameters from the local telecom provider. By default, they are set to the North
American standard.
Frequencies should be configured with known values to avoid uncomfortable high
pitch sounds.
Syntax: f1=val, f2=val [,c=on1/off1[-on2/off2[-on3/off3]]];
(Frequencies are in Hz and cadence on and off are in 10ms)
ON is the period of ringing ("On time" in ‘ms’) while OFF is the period of silence. In
order to set a continuous ring, OFF should be zero. Otherwise, it will ring ON ms and
a pause of OFF ms and then repeat the pattern. Up to three cadences are
supported.
Ring Back Tone:
Users can configure ring back tone which is the tone the caller will hear before the
callee answers the call. The default value: f1=440@-19,f2=480@-19,c=2000/4000;
Busy Tone:
Users can configure busy tone which will be heard if the callee is busy or on DND.
The default value: f1=480@-24,f2=620@-24,c=500/500;
Reorder Tone:
Users can configure reorder tone which will be heard when the call fails to be
established such as wrong account number is dialed, or the call is timed out. The
default value: f1=480@-24,f2=620@-24,c=250/250;
Firmware Version 1.0.0.X
GVC3202 User Guide
Page 114 of 117
Confirmation Tone:
Users can configure confirmation tone which will be heard when the callee enables
call recording function or when the SIP account fails to register. The default value:
f1=350@-11,f2=440@-11,c=100/100-100/100-100/100.
Call Waiting Tone:
Users can configure call waiting tone when there is another incoming call during the
call. The default value: f1=440@-13,c=300/2000-300/2000-0/0.
Call-Waiting Tone
Gain
This configures the call-waiting tone gain. By default, they are set to the North
American standard. Users could select "Low", "Medium" or "High". The default
setting is "Low".
Ring Cadence
Configure the default ring cadence for the ring back tone. The default setting is
c=2000/4000;
Firmware Version 1.0.0.X
GVC3202 User Guide
Page 115 of 117
FACTORY RESET
Users could reset GVC3202 to factory settings via the following ways: Reset via local GUI, via Web page,
via the reset hole on the back panel of GVC3202. Factory reset will delete configuration info and syslog
info.
--------------------------------------------------------------------------------------------------------------------------------------------
Warning:
1. Factory reset will erase all GVC3202 configuration information. Please back up all settings or print
useful information before making the following operations. If users lose all parameters or records,
Grandstream will not take responsibility for the damage or loss.
2. After factory reset, the remote control will not be paired to GVC3202 anymore. Please go to
GVC3202 LCD settings->Network->Bluetooth, select the menu buttons on the upper right and click
"Search New Devices". GVC3202 remote control “GS-RCU” with last 4 digits of the remote control
MAC address will show in the available device list. Select it to start pairing process on GVC3202,
immediately followed by pressing OK+5 keys on the remote control at the same time. The remote
control will be paired and connected to GVC3202 again.
--------------------------------------------------------------------------------------------------------------------------------------------
RESET VIA LCD
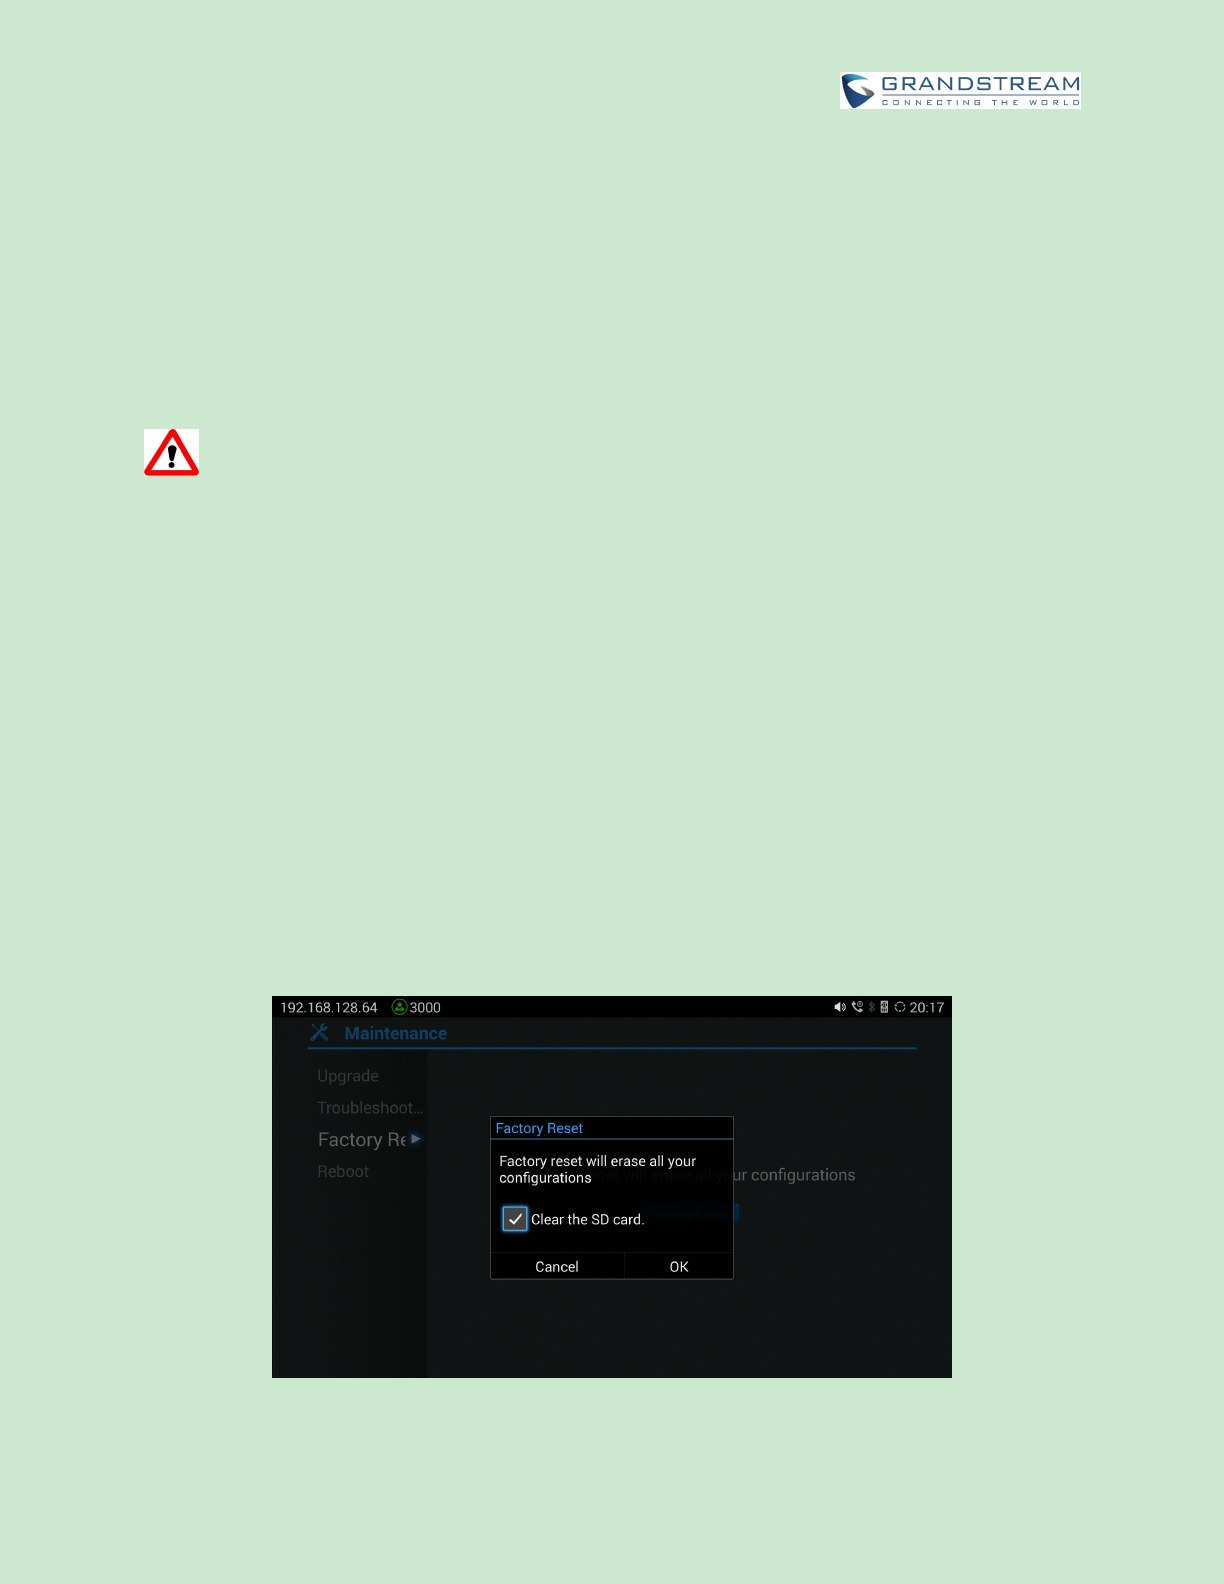
Go to GVC3202 LCD idle screen->Settings->Maintenance->Factory Reset, click on the "Reset" button to
bring up the prompt box as shown below. Click "OK" to reboot the device and restore factory settings.
Figure 73: Factory Reset via LCD
Firmware Version 1.0.0.X
GVC3202 User Guide
Page 116 of 117
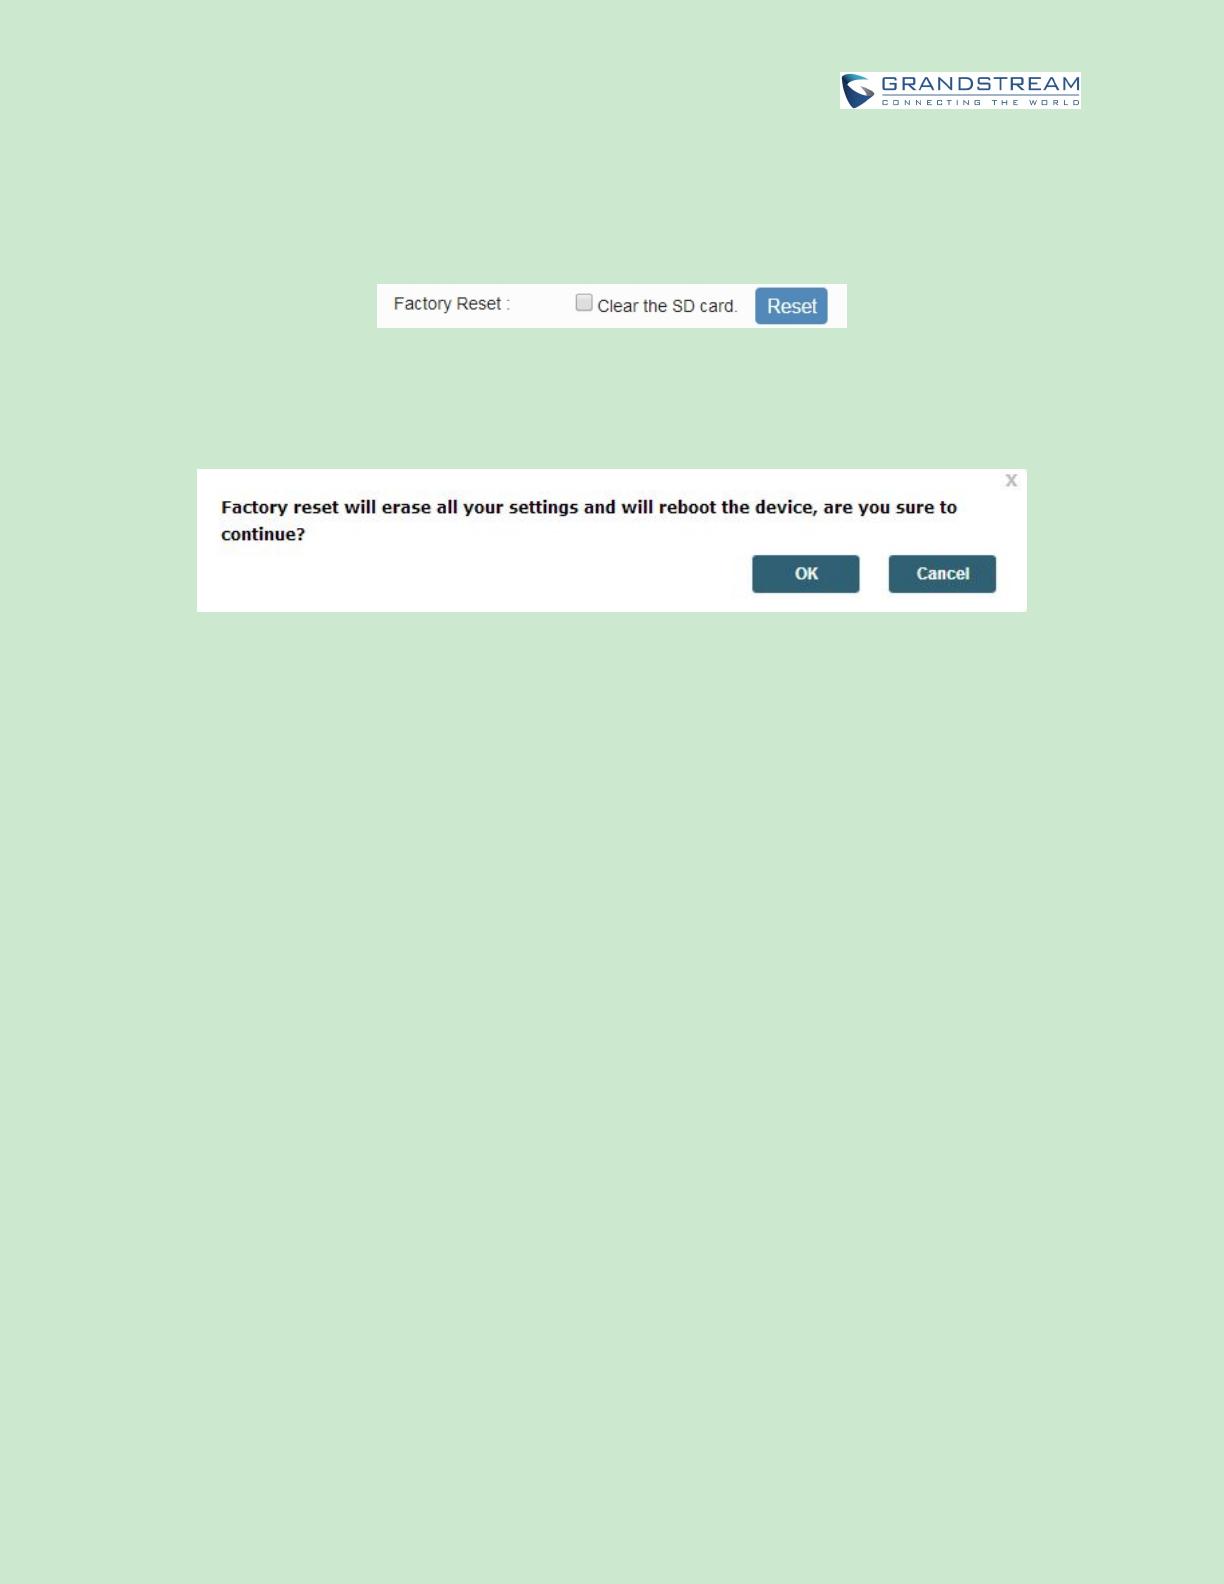
RESET VIA WEB UI
1. Log in GVC3202 Web UI->Maintenance->Upgrade, the "Factory Reset" option is on the bottom of
the page.
Figure 74: GVC3202 Web UI - Factory Reset
2. Click the "Reset" button to bring up the prompt box as shown below. Click "OK" to reboot the device,
and restore factory settings.
Figure 75: GVC3202 Web UI - Factory Reset Confirmation
RESET VIA RESET HOLE
There is a Reset hole on the back panel of GVC3202, use a small pin to hold against the Reset hole for
more than 10 seconds to restore factory settings.

Firmware Version 1.0.0.X
GVC3202 User Guide
Page 117 of 117
EXPERIENCING GVC3202
Please visit our website: http://www.grandstream.com to receive the most up-to-date updates on firmware
releases, additional features, FAQs, documentation and news on new products.
We encourage you to browse our product related documentation, FAQs and User and Developer Forum
for answers to your general questions. If you have purchased our products through a Grandstream
Certified Partner or Reseller, please contact them directly for immediate support.
Our technical support staff is trained and ready to answer all of your questions. Contact a technical
support member or submit a trouble ticket online to receive in-depth support.
Thank you again for purchasing Grandstream Video Conferencing System, it will be sure to bring
convenience and color to both your business and personal life.
--------------------------------------------------------------------------------------------------------------------------------------------
* Android is a trademark of Google Inc.
* Skype and Skype for Business are Registered Trademarks of Microsoft Corporation.
HDMI, the HDMI Logo, and High-Definition Multimedia Interface are trademarks or
registered trademarks of HDMI Licensing LLC in the United States and other countries.
--------------------------------------------------------------------------------------------------------------------------------------------

FCC&EU Compliance:
The device complies with EU EMF Directive 1999/519/EC can be used in the European
Community.
“ Hereby, (Grandstream Networks, Inc.), declares that this device (Model:GVC3202 ) is in
compliance with the essential requirements and other relevant provisions of Directive
1999/5/EC.”
This device complies with part 15 of the FCC Rules. Operation is subject to the following
two conditions:(1)This device may not cause harmful interference, and (2) this device
must accept any interference received, including interference that may cause undesired
operation.
Note :This equipment has been tested and found to comply with the limits for a Class B
digital device, pursuant to part 15 of the FCC Rules.
These limits are designed to provide reasonable protection against harmful interference in
a residential installation. This equipment generates, uses and can radiate radio frequency
energy and, if not installed and used in accordance with the instructions, may cause
harmful interference to radio communications. However, there is no guarantee that
interference will not occur in a particular installation.
If this equipment does cause harmful interference to radio or television reception, which
can be determined by turning the equipment off and on, the user is encouraged to try to
correct the interference by one or more of the following measures:
-Reorient or relocate the receiving antenna.
-Increase the separation between the equipment and receiver.
-Connect the equipment into an outlet on a circuit different from that to which the receiver
is connected.
-Consult the dealer or an experienced radio/TV technician for help.
Any Changes or modifications not expressly approved by the party responsible for
compliance could void the user's authority to operate the equipment.
For operation within 5.15 ~ 5.25GHz frequency range, it is restricted to indoor
environment. This device meets all the other requirements specified in Part 15E, Section
15.407 of the FCC Rules
Radiation Exposure Statement:
The transmitter must not be co-located or operated in conjunction with any other antenna
or transmitter. This equipment complies with the FCC&CE RF radiation exposure limits
set forth for an uncontrolled environment. This equipment should be installed and
operated with a minimum distance of 20cm between the radiator and any part of your
body.
※※※
END of User’s Manual
※※※